

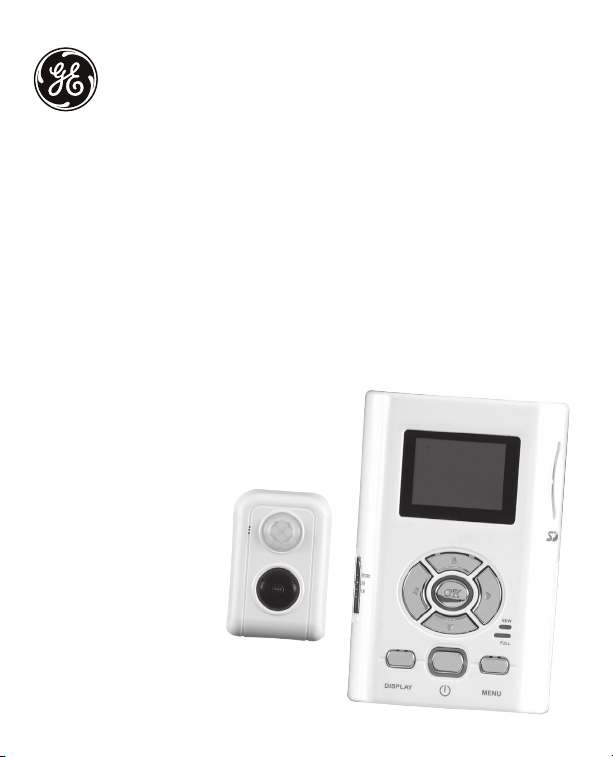
GE SmartHome
™
IntelliCorder Camera System
User’s Guide
45227-1 07/17/06

3
Before attempting to connect or operate this product,
please read these instructions carefully and save this
manual for future reference.
Congratulations
With the GE branded IntelliCorder, you can monitor the entrance
of any home or business and safely answer your door before
opening. The internal Digital Video Recorder (DVR), can capture
the video/audio of any visitor even when you are not present.
The IntelliCorder is a high-quality, battery-operated security
monitoring device. It uses a passive infrared (PIR) motion sensor
to detect guests/intruders at your front or back door and projects
an on-screen image onto the internal monitor screen. If set into
record mode, it will activate a video recording, storing it in the
internal memory or onto a SD memory card.
This instruction manual explains in simple steps how to install,
use and care for your new IntelliCorder in your
home, office or business.
2
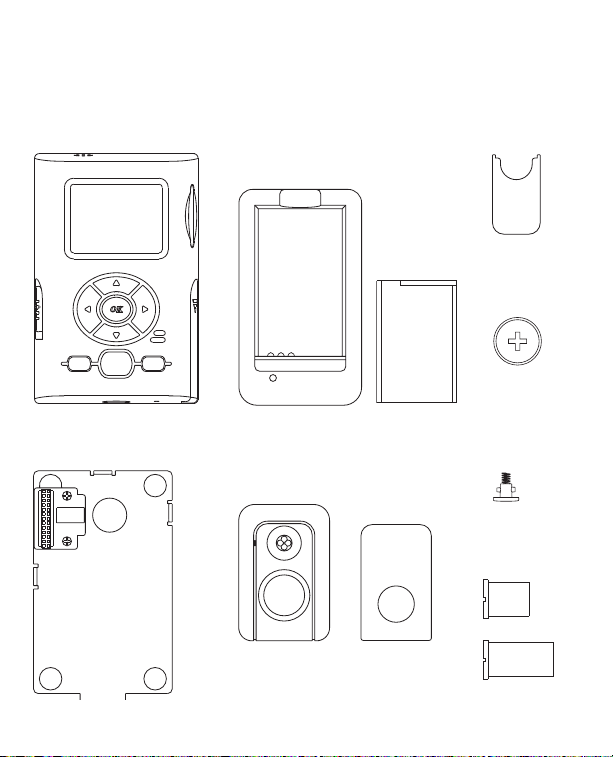
Parts Checklist
Identify all parts before proceeding with installation
IntelliCorder
Battery Charger
Rechargeable
Battery
Adjustment
Tool
Clock Battery
(installed in
IntelliCorder)
T-Shaped
Lock-Screw
Mounting Bracket
Camera with PIR sensor and
double-side tape
3
Support
tubes (2 sizes)

5
Things You Should Know
FCC Warning
Any unauthorized changes or modifications to the equipment
would void the users authority to operate. This IntelliCorder
complies with part 15 of the FCC rules. Operation is subject
to the following two conditions:
1. The IntelliCorder may not cause harmful interference
2. The IntelliCorder may accept any interference received,
including interference that may cause undesired operation.
Important Safeguards
1. Cleaning – Turn off this video unit before cleaning. Do not
use strong or abrasive detergents. Use a dry cloth to clean the
camera body when dirty. In case the dirt is hard to remove, use a
damp (not wet) cloth for cleaning.
2. Water and Moisture – Do not use any component
of this system in an exposed outdoor area, unless the instructions
clearly state that it is safe. Do not operate this system in the
presence of explosive or flammable fumes.
Precautions
1. Do not attempt to disassemble the camera. There are no
user-serviceable parts inside.
2. Handle the IntelliCorder with care – Avoid striking or shaking.
Improper use or storage could damage the IntelliCorder.
Modifying or tampering with the device or its internal components
can cause a malfunction and void the IntelliCorder’s warranty. If
4

you feel the IntelliCorder may not be performing correctly, contact
customer service for assistance.
3. Motion Detection – The PIR motion sensor will NOT detect
motion through glass storm doors, screen doors or metal gates.
4. Camera faceplate care – Do not clean the lens with strong or
abrasive detergents. Use lens tissue or a cotton tipped applicator
and ethanol alcohol.
5. Light Source – The Cameras viewing area must be illuminated
with a suitable light source during evening and nighttime hours.
6. Door Mounting – The product should be mounted to a door,
only as recommended by the instructions. Contact customer
service for any questions.
7. Stand-by MODE - When not using your IntelliCorder set mode
switch to Play and Press Power. This will power off IntelliCorder.
8. Do not touch the LCD screen with a sharp-pointed object.
9. If your IntelliCorder is used in a cold environment, a residual
image may appear on the LCD screen. This is not a malfunction.
Contact customer service for any questions. Call 1-800-654-8483
5
7
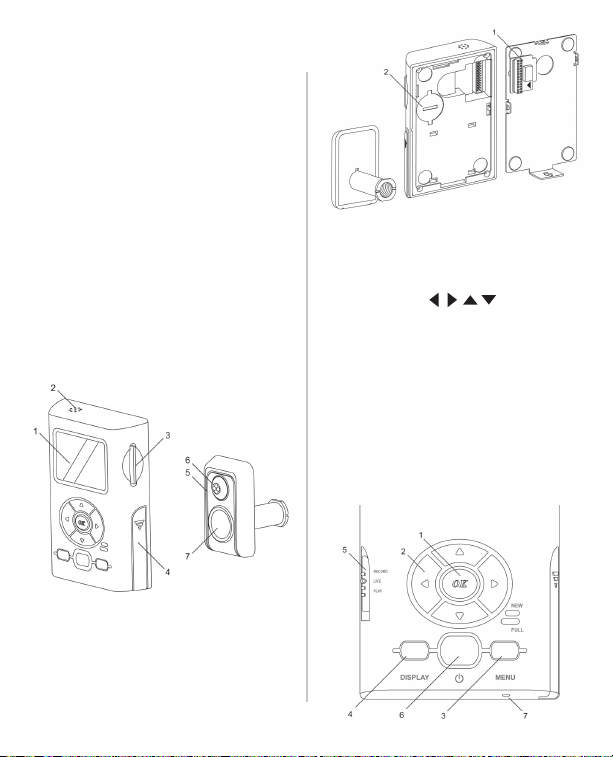
Features
Monitor and Sensor Front
1. LCD Screen - 1.5” LTPS LCD
2. Speaker - play back the audio
sound of recorded file in PLAY mode
3. SD Card Insert Slot
4. Battery Cover
5. Microphone
6. Motion-activated Sensor – detects
motion up to 6.5 feet (2 meters)
away and from a horizontal angle of
up to 125 degrees (Motion cannot be
detected through glass storm doors,
screen doors or metal gates).
7. Lens
Control Panel
1. OK – confirm setting
2. CURSOR –
3. MENU – enter Menu screen
4. DISPLAY – press this button to toggle
between Full Display On, Text Off and
Display Off
5. MODE switch – go to RECORD, LIVE,
or PLAY
6. POWER – activates and deactivates
the device in play mode
7. RESET – use a pointer or alike to press
this button to reset the unit
Monitor and Sensor Back
1. Terminal
2. Clock Battery Cover
6
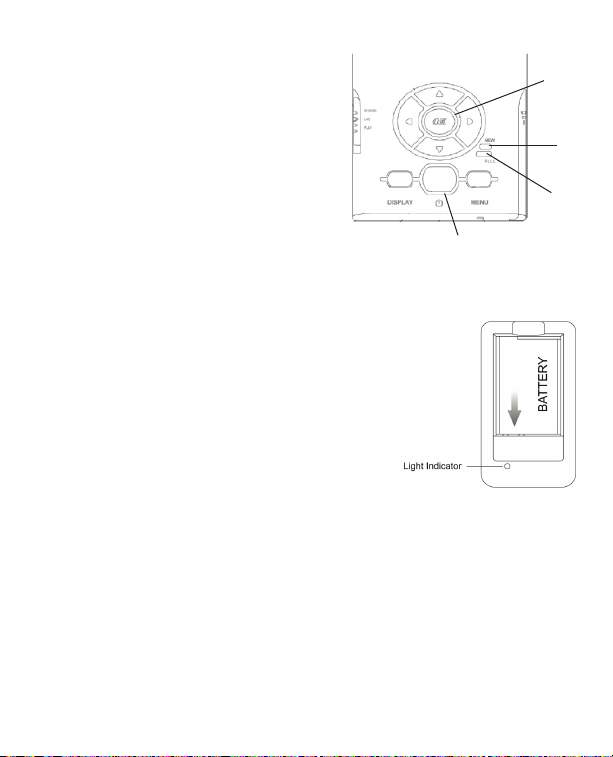
Operation Indicators
1. New Message Light Indicator
(Green)
2. Full Memory Light Indicator (Red)
3. Key Light Guide (Blue) – illuminates
when user presses any button
4. Low Battery Light Indicator (Red)
3
1
2
Preparation
Charging CAMERA Battery
Charge Battery fully before use
1. Plug in Charger.
2. Insert Battery onto the Charger, observing
proper +/- polarities as indicated. The red light
will turn on.
3. When charging is complete, the light
changes to Green.
4. Remove Battery from the Charger.
4
Notes:
• Charging takes approximately 2 hours.
• An amber light will indicate abnormal use or defective battery.
• Prevent metallic objects from coming into contact with the metal parts
of the Charger’s terminal. This may cause a short circuit, damaging
the Charger.
• Keep the battery dry.
• Battery life gradually decreases after repeated use and recharging
7
9
The rechargeable battery can last
up to two years. If operation time
becomes very short even after a
sufficient charge, discard Battery
properly and contact Customer
Service to purchase a replacement
battery.
• If the battery will not be used
for a long period of time, it will
need to be fully charged, then fully
discharged for storage.
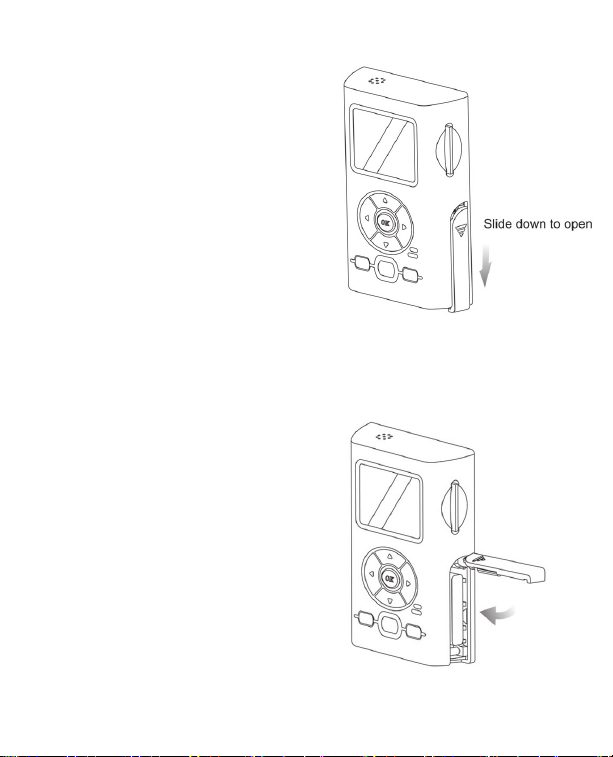
Install Battery
1. Press and slide the battery
cover downward. The cover is
spring-loaded and will open up
horizontally.
2. Install a fully charged Battery
into the battery compartment,
observing proper +/- polarities
as indicated. Press battery into
compartment until lower tab locks
battery into position.
3. Once the battery is locked, press
the cover down and slide up to
lock the battery cover.
8
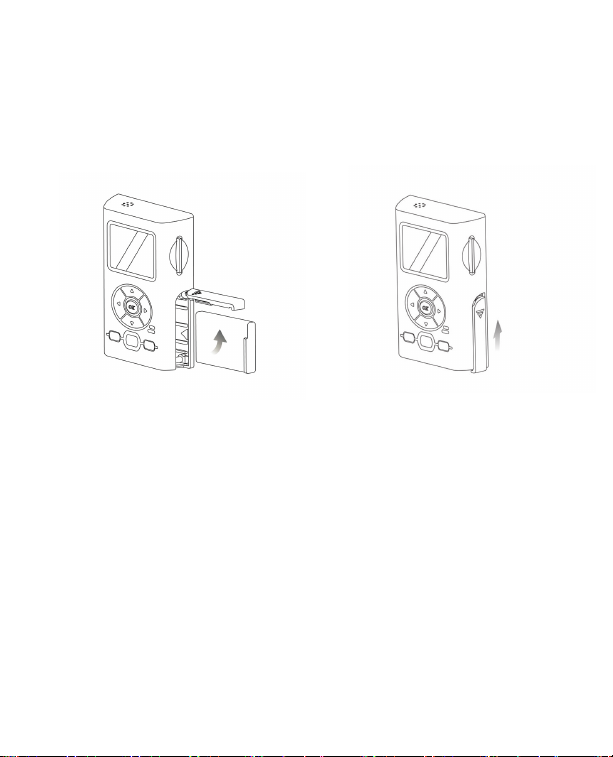
To Remove Battery
1. Press and slide the battery
cover downward. The cover is
spring-loaded and will open up
horizontally.
2. Press Orange BATTERY RELEASE
Battery Care
Caution:
• Charge only with specified
charger and AC adapter
• Battery can be charged within a
temperature range of 10C (50F)
and 35C (95F)
• Battery is normally warm after
charging or just after use.
• Do not use an insufficiently
tab down to unlock battery. The
battery is spring-loaded and will
eject out.
3. Once the battery has been
removed, press the cover down
and slide up to lock the battery
cover.
charged or worn-out Battery
Safety precautions:
• Do not place Battery near, or
dispose of in fire
• Do not directly connect (short
circuit) the positive (+) and
negative (-) terminals
• Never attempt to disassemble or
reassemble Battery
9

11
To avoid Battery damage:
• Do not drop or jar Battery
• Use Battery with the IntelliCorder only
• If Battery is used in extremely high
temperatures, an internal safety
circuit will automatically stop the
IntelliCorder’s operation to prolong
Battery life.
• While not in use, remove Battery from
the IntelliCorder and Charger, and store
in a cool, dark, dry place.
• Keep Battery terminals clean
Charger Caution:
• The battery charging unit operates
on AC 100-240 V 50/60Hz.
• Power-Cord Protection – The Power
supply cord should be routed so that
it will not be stepped on, pinched or
punctured by items placed upon or
against it.
• Overloading – Do not overload wall
outlets and extension cords as this can
result in a risk of fire or electric shock.
• During charging operation, the
battery should be kept away from
high temperature, high pressure and
heat sources. Also it should be kept
away from children. Do not charge the
battery for over 24 hours.
CLOCK Battery Installation
The IntelliCorder’s internal clock
operates on a CR2032 lithium flat cell
battery (included). To replace battery
when expired:
1. Remove the cover on the back of
the unit by rotating tabs into unlock
position.
2. Install a new CR2032 battery into the
clock battery compartment, observing
proper + / - polarities as indicated.
3. Replace the battery cover, rotate
tabs into lock position.
Warning:
• Dispose of old battery promptly and
properly.
Do not burn or bury.
• Replace battery with CR2032 only.
Use of another battery may present a
risk of damage to the IntelliCorder.
• Keep away from children. Do not
recharge, disassemble or dispose of
in fire.
Note:
• Keep battery out of children’s reach.
Swallowing it may be harmful.
• Battery life is approximately two years.
10

Installation
Choose a Mounting Location
The IntelliCorder is designed to mount
on a smooth, flat door surface. Select
a door/entrance you wish to monitor.
The recommended mounting height is
approximately 5 - 6 feet. At this height,
the PIR sensor detects motion up to 6.5
feet (2 meters) away, with a viewing
angle up to 125 degrees.
To help avoid false activation, mount your camera:
• Away from direct sunlight
• Away from heat sources, such as space heaters, radiators, and exposed light bulbs
• Away from strong drafts, like those caused by central heating vents
1. Prepare the mounting space by first removing the original door peep hole
viewer. If there is no peep hole, then you will need to drill a hole of at least 9/16”
(14mm) diameter at desired location.
2. Clean the surface where the PIR camera sensor is to be mounted.
3. Carefully pull out the ribbon cable from the camera tube.
4. Remove the backing of the double sided adhesive tape on the back of the PIR.
Carefully feed the ribbon cable and tube through the peep hole, to the other side
of the door; Be careful not to stick the camera to the door. Once you have the
camera aligned properly, press the camera to the door allowing the adhesive tape
to hold the camera in place. As illustrated below, keep the PIR sensor on the top.
11
PIR sensor
Camera lens

13
3. Feed the ribbon cable through the mounting hole of the mounting bracket.
Position the Mounting Bracket over the peep hole opening on the inside of
your door.
4. Feed the ribbon cable through the support tube. Place the Support tube through
the Mounting Bracket into the peep hole and screw onto the PIR tube . Use the
Adjustment Tool to turn the Support tube clockwise until the mounting plate is
secured to the door. Take care not to overtighten the Support Tube.
5. Connect the ribbon cable plug to the INPUT Connector by matching the arrow
symbols on the plug and the terminal.
Caution
Do not rotate the camera or
recorder without disconnecting
the ribbon cable first. Damage to
the ribbon cable will occur and
void the warranty.
12

6. To activate clock battery, pull the insulator tab from the back side of Monitor.
7. Position the slot located at the top edge of the IntelliCorder onto the top tab
of the Mounting Bracket. Next, fit the slot located at the bottom edge of the
IntelliCorder onto the lower tab of the mounting bracket. Press the IntelliCorder
firmly into position.
8. Insert the T-shaped lock-screw into hole located at bottom of the IntelliCorder
and turn it clockwise until it locks into position. Take care not to over tighten.
9. If using an SD memory card (not supplied) insert into the slot at the right side of Monitor.
10. Insert the Battery into the compartment, as indicated by polarity symbols
(+ and -) marked inside. See Battery Installation (Page 8).
Operation
For First Use, set MODE switch to RECORD. The camera will undergo selfcalibration within several seconds. IntelliCorder has different languages available.
Select your desired language (see page 27) Set the Time / Date (see page 26).
To save battery power, the IntelliCorder will enter into sleep mode at a selectable
time (5 or 10 seconds) when not in use or no motion is detected
(see page 22 for setting).
13

15
SD Card (not included)
For increased recording time, data (Video files) can be stored onto standard
SD memory cards. Data from the IntelliCorder’s internal memory can also be
downloaded to an SD card. The IntelliCorder accepts SD memory cards up to 1GB.
SD Card Insertion/Removal
1. Insert SD card with the logo facing outward toward the LCD screen. Press the
SD memory card inward until it ‘clicks’ into position.
2. To remove the SD memory card, press in on it to release.
It will click and eject out.
Record/Playback Time
Use one of the following SD card sizes in the chart below.
The resolution setting determines the recording length.
Resolution 128MB 256MB 512MB 1GB
Fine 15 min 30 min 60 min 120 min
SP (Standard Play) 30 min 60 min 120 min 240 min
LP (Long Play)* 40 min 80 min 160 min 320 min
* LP playback may contain more picture noise
14

Operating Modes
1:20
FINE
A
01/01/2 005 12:00
The system can be set to operate in
one of three modes: RECORD, LIVE or
PLAY. The desired operating mode can
be selected using the MODE switch on
the left side of the IntelliCorder.
Motion-Activation in RECORD Mode
In this mode setting, the IntelliCorder
can record high-resolution video with
sound of visitors/intruders at your front
or back door, even when you are not
home.
Before you begin
• Check the Battery Indicator
• If using an SD memory card, Ensure
SD memory card is properly installed.
Your IntelliCorder will automatically
record to the SD memory card when
activated.
1. Set MODE to RECORD.
2. A camera icon indicates that
the camera is on.
3. When motion is detected, the
IntelliCorder begins recording
shortly after the PIR detects motion. It
continues recording until motion has
ceased for 5 or 10 seconds (selectable,
see Page 20)
4. The IntelliCorder is equipped with
internal memory for immediate
recording storage. Video files are
stored as standard AVI computer files
in MPEG4 format. If no SD memory
card is detected, files will be stored to
internal memory. Internal memory can
store up to four minutes of Video in LP
mode. For longer recording time you
can use SD memory cards up to 1GB
(see page 26). If a SD memory card is
detected, video files will store to the
memory card. When the memory is
full, (either internal or on SD memory
card) recording will stop and the Full
(Red) indicator light will turn on. This
indicates you should replace the
memory card or clear the memory. The
IntelliCorder can also be set to autoerase, In this setting it will erase the
three oldest files each time.
(See page 22)
5. Use the DISPLAY button to switch
between LCD ON/TEXT OFF/LCD OFF.
LCD ON allows you to view a scene
while in live or record mode. TEXT OFF
allows you to view scene in live or
revord mode without text appearing
on the screen. LCD OFF allows a scene
to be recorded without viewing. You
can use this position to conserve
battery power, but still record a scene
for viewing at a later time. Date, time,
length of recording, and file number
are always recorded and will be
displayed on the screen
during playback.
15

17
PIR Sensor activation may not occur when:
Sensor Trigger Capture Auto Delete Enable
White Balance
Auto
Sunny
Fluorescent
Tungsten
Cloudy
Battery Status
Full Power Level
66% Power Level
33% Power Level
Empty
SD card Status
Present and Valid
Present but Locked
Video Quality
640x480 @ 15fps
320x240 @ 30fps
320x240 @ 15fps
Record Status
Capturing Triggered
by PIR sensor
EV Enabled
Set Clock
The clock time is lost
in last power off
Clock Info/Stamp Mode
Clock Record Elapsed Time/
Remain Time/ Stamp Mode
01/01/2005
12:00 AM
1:20
FINE
SP
LP
+
-
+
-
A
• Motion is very slow or very fast.
• Moving object is very small.
• Motion occurs only in 1 corner of viewing area.
Note: The PIR sensor will not detect motion through a glass storm door, screen
door or metal gate.
16
Motion-Activation in LIVE mode setting
In this mode setting, the IntelliCorder can monitor video and audio of visitors/
intruders at your front or back door.

1. Set MODE switch to LIVE.
2. A sensor capture icon will appear.
3. When activated, the PIR system
will monitor the surrounding area in
front of the door for motion. It will go
to standby mode when no motion is
detected or motion has ceased for 5 or
10 seconds (selectable, see Page 22)
4. You can view outside scene on the
LCD (Liquid Crystal Display) monitor.
Use DISPLAY button to switch between
LCD ON/TEXTS OFF/LCD OFF. LCD ON
allows you to view a scene while in
live or record mode. TEXT OFF allows
you to view scene in live or record
mode without text appearing on the
screen. LCD OFF allows a scene to be
recorded without viewing. You can use
this position to conserve battery power,
but still record a scene for viewing
at a later time. Date, time, length of
recording, and file number are always
recorded and will be displayed on the
screen during playback.
5. When in live mode, press to
change the Movie Quality (Fine/SP/LP).
6. Press OK to manually start
recording. Press OK again to stop
recording. Video files are stored as
standard AVI computer files in MPEG4
format. If no SD card is detected, files
will be stored to internal memory.
If an SD card is detected, video files
will store to the memory card . When
the memory is full, recording will stop
and the Full indicator (Red) light will
blink on/off. This indicates you should
replace the memory card or clear the
memory. The IntelliCorder can also be
set to auto-erase. In this setting the
oldest three files will be erased each
time. (See page 22)
PLAY Back Video Files using Monitor
A flashing Green light indicates new
files have been recorded. You can
monitor the playback picture on the
LCD screen using the IntelliCorder’s
DVR features.
1. Set MODE switch to Play and
press Thumbnail file(s) will appear
on the screen.
3. Use to select the desired
file to preview.
4. Press OK to open it.
5. Uses OK to play/pause/replay the
video.
6. Use DISPLAY button to change
between LCD ON/TEXTS OFF/LCD OFF.
After 1 minute the IntelliCorder will go
into sleep mode.
When a video is playing:
- To Fast Forward or Rewind,
Press to or
- To Zoom in or out, Press to zoom in
or to zoom out.
Note: Zoom is performed digitally; as
the zoom is increased, more video
noise (static) will appear in the picture.
17

19
• To Pan (in Zoom mode only) Hold
20 05/ 01/0 3
12 :00 :00
20 05/ 01/1 0
12 :00 :00
20 05/ 01/0 9
12 :00 :00
20 05/ 01/0 6
12 :00 :00
20 05/ 01/0 1
12 :00 :00
20 05/ 01/0 1
12 :00 :00
to pan to desired position
When the video is paused/stopped
• Press to skip to previous/next
video
• Press to increase volume or to
decrease it
Notes:
• The IntelliCorder saves video files
with date and time information In
Thumbnail mode
• New message light will turn off when
the video is played
• Recordings will stop when starting
the Play Back Mode (Video)
• The file Order depends on DCF Index:
CLIP00001 to CLIP09999
18

Video File Auto Delete Enable
Playback status
Video stop
Video Playing
Video Pause
Battery Status
Full Power Level
66% Power Level
33% Power Level
Empty
SD card Status
Present and Valid
Present but Locked
Current File / Total File
Movie Date and Time
Zoom position
White region – Whole
Green region - Zoomed
Playback Zoom Ratio
Set Clock
The clock time is lost in
last power off
x1
21/28
2005/01/01
12:00:00
Using Menu Mode
1. Press MENU button for Menu mode. The Menu screen with thumbnail
selections will appear.
2. Press to highlight the desired item
3. Press OK to select an option.
4. When finished, press MENU button to exit
Note:
• The menu mode will cancel if a selection is not made within 1 minute.
The IntelliCorder will enter into stand-by mode.
19

21
RECORD/ LIVE Mode Menu Screen
Select Movie (Resolution) Quality
Select White balance
EV Set Up - Select Exposure Compensation
Choose Auto Off in 5 seconds or 10 seconds
Enable/Disable Auto Delete Function
Enter Setup Mode
Movie Quality
You can select the Movie quality mode in video recording.
The default setting is Standard Play.
Fine (640x480 15fps)
Standard Play (320x240 30fps)
Long Play (320x240 15fps)
1. Set MODE switch to LIVE.
2. Press MENU button to enter Menu mode
3. Use to select your desired Movie Quality
4. Press OK to enter the setting mode
5. Press OK to confirm the selected quality and go back to the previous menu.
Press menu to return to live mode.
6. Note: You can press the MENU button anytime during setting to cancel the
selection and go back to the previous menu
20

Adjust White Balance
Adjust E V
-2.0
2.0
0.0
White balance adjustment can make subjects look washed out or it can allow
more natural color balance for video recording. Normally, white balance is
automatically adjusted. You can obtain different results by adjusting the white
balance manually to fit your actual living environment.
Auto
Sunlight
Cloudy
Fluorescent
Tungsten
1. Set MODE switch to LIVE while the LCD is on.
2. Press MENU button to enter Menu mode
3. Use to move to White Balance (AWB)
4. Press OK to enter the setting mode
5. Use to move to your desired effect (Auto, Sunlight, Cloudy,
Fluorescent or Tungsten)
6. Press OK to confirm the selected quality and go back to the previous menu.
Press menu to return to live mode.
7. Note: You can press the MENU button anytime during setting to cancel the
selection and go back to the previous menu
Exposure Valve Setup
>0 Brighter/ Exposure longer
=0 Standard/ Exposure normal
<0 Dimmer/ Exposure shorter
1. Set MODE switch to LIVE with the LCD is on.
2. Press MENU button to enter Menu mode
3. Use to move to EV Setup
4. Press OK to enter the setting mode
5. Use to increase or to decrease EV value
21

23
6. Press OK to confirm the selected quality and go back to the previous menu.
Press menu to return to live mode.
7. Note: You can press the MENU button anytime during setting to cancel the
selection and go back to the previous menu
Choose Auto Off
5 seconds
10 seconds
To conserve power, the IntelliCorder will
automatically go to stand-by mode
whenever it detects no motion in RECORD or LIVE
mode, or remains idle in PLAY mode.
1. Set MODE switch to LIVE while the LCD is ON
2. Press MENU button to enter Menu mode
3. Use to move to Setup
4. Press OK to enter the setting mode
5. Use to select 5 seconds or 10 seconds
6. Press OK to confirm the selected quality and go back to the previous menu.
Press menu to return to live mode.
7. Note: You can press the MENU button anytime during setting to cancel the
selection and go back to the previous menu
Enable/Disable Auto Delete
Auto Delete means that the three oldest index files are deleted when memory is full
Enable Auto Delete
Disable Auto Delete
22

PLAY Mode Menu Screen
DELET E S ING LE
AR E Y OU SUR E ?
Ok
C a ncel
E ra se T hi s
DELE TE ALL
ARE YOU SURE ?
O k
C a ncel
Erase a Single Video File.
Erase All Video Files
Adjust Volume Level
Enter Setup Mode
Go back to Thumbnail Mode
Erase This
1. Set MODE switch to PLAY and ensure the LCD is on
2. Use to select to the desired file
to erase in thumbnail mode
3. Press MENU button to enter Menu mode
4. Press OK to enter the setting mode
5. Use to select “Cancel” or “OK”.
Press OK to confirm the selected command.
6. Press OK to confirm the selected quality and g
o back to the previous menu. Press menu to return to live mode.
7. Note: You can press the MENU button anytime during setting to cancel the
selection and go back to the previous menu
Erase All
1. Set MODE switch to PLAY and ensure the LCD is on
2. Press MENU button to enter Menu mode
3. Use to move to Erase All
4. Press OK to enter the setting mode
5. Use to select “Cancel” or “OK”. Press OK to confirm your selection.
6. Press OK to confirm the selected quality and go back to the previous menu.
Press menu to return to live mode.
7. Note: You can press the MENU button anytime during setting to cancel the
selection and go back to the previous menu
23

25
Adjust Volume
7
LCD
Default
Default
1. Set MODE switch to PLAY and ensure the
LCD is on
2. Press MENU button to enter Menu mode
3. Use to move to Volume setting
4. Press OK to enter the setting mode
5. Use to adjust your desired
sound level
6. Press OK to confirm the selected quality
and go back to the previous menu. Press
menu to return to live mode.
7. Note: You can press the MENU button anytime during setting to cancel the
selection and go back to the previous menu
SETUP Screen
Choose LCD Brightness
Choose Flicker Option (depending
on lighting - See page 25)
Go to Format Menu
Go to Copy All to SD Card
Go to Date/Time Menu
Choose Language Option
Go to Reset All Settings Menu
Go to Firmware Version Info. Menu
Choose LCD Brightness
1. Press MENU to enter Menu mode
2. Use to move to Setup
3. Press OK to enter the setting mode
24

4. Use to move to LCD Brightness.
Adjust LCD
Brightness
0
-2.0
2.0
0.0
Flic ker
50H z Light
F or m at will era se
A ll da ta
O k
C a ncel
Press OK to enter
5. Use to reduce the brightness value
or to increase it
6. Press OK to confirm the selected quality
and go back to the previous menu. Press
menu to return to live mode.
7. Note: You can press the MENU button
anytime during setting to cancel the selection
and go back to the previous menu
Choose Flicker Option
This setting is for 50Hz/60Hz lighting.
E.g. US: 60Hz
EU: 50Hz
HK: 50Hz
50Hz Flicker
60Hz Flicker
1. Press MENU buttons to enter Menu mode
2. Use to move to Setup
3. Press OK to enter the setting mode
4. Use to move to Flicker option.
Press OK to enter
5. Use to select 50Hz or 60Hz depending on your country standards - see above.
6. Press OK to proceed the selection and go back to previous menu
7. Press MENU during setting to cancel the selection and go back to the last menu
Format Memory Card
1. Press MENU to enter Menu mode
2. Use to move to Setup
3. Press OK to enter the setting mode
4. Use to move to Format. Press OK to enter
5. Use to select Cancel or OK. Press OK
to confirm the selected command
6. Press OK to confirm the selected quality and go
back to the previous menu. Press menu to return to
live mode.
25

27
7. Note: You can press the MENU button anytime during setting to cancel the
St ar t C o py ing Files
fr o m inte r na l M em ory
to SD C ar d?
O k
C a ncel
YYYY -MM -DD
2005 – 05 – 13
00 : 00 A M
12 -HOUR
Date / Time
selection and go back to the previous menu
Copy Files to SD Card
The Copy Files function can be used to copy
all video files at once from internal memory
to SD card.
Note: IntelliCorder will automatically detect an
SD memory card after insertion. Record, Play
and other file management tasks will be routed
from internal memory to SD card.
1. Press MENU switch to enter Menu mode
2. Use to move to Setup
3. Press OK to enter the setting mode
4. Use to move to Copy File to SD. Press OK to enter
5. Use to select Cancel or OK
6. Press OK to start copying.
7. Press MENU during setting to cancel the selection
and go back to the last menu
Note:
• Files copied from the internal memory
will be stored in a new folder \DCIM\xxxFLASH\. xxx
• The original files in the internal memory will not be erased - They must be erased manually.
Set Date / Time
1. Date
2. Time
3. Date Format
YYYY-MM-DD
MM-DD-YYYY
DD-MM-YYYY
4. Time Format
12 - HOUR
24 - HOUR
26

1. Press MENU switch to enter Menu mode
L a ngu age
English
RES T ORE
DEF A UL T
O k
C a ncel
2. Use to move to Setup
3. Press OK to enter the setting mode
4. Use to move to Date/Time. Press OK to enter
5. Use to move to desired item. The selected item is always blinking
6. Press to increase the current item’s value or to decrease it
7. After setting, press OK to save changes and go back to previous menu
8. During setting, press MENU button to cancel selection and go back to previous menu
Choose Language
1. Press MENU button to enter Menu mode
2. Use to move to Setup
3. Press OK to enter the setting mode
4. Use to move to Language. Press OK
to enter
5. Use to select your desired language.
The flag of the country will change according to the selection
6. Press OK to proceed the selection and go back
to previous menu
Default Setup
Should it become necessary, you have the
option of setting the IntelliCorder back to the
original factory default settings.
1. Press MENU button to enter Menu mode
2. Use to move to Setup
3. Press OK to enter the setting mode
4. Use to move to Default Setup. Press OK to enter
5. Use to select “Cancel” or “OK”. Press OK to confirm the selected command
6. If “OK” is selected, the default settings will be restored and return to the screen
at RECORD/LIVE mode, or go to thumbnail at PLAY mode; Select “Cancel” to go
back to previous menu
7. Press MENU button during setting to cancel the selection and go back to the
previous menu
27

29
Firmware Version
V er si on
v601010
Occasionally, software updates/improvements may become available. The
IntelliCorder has the ability to load new software. Check the website periodically
to find out if new software versions are available. Instructions to download from
the web site and upload to the IntelliCorder can also be found on the web site. You
can also contact Customer Service for any questions at 1-800- 654-8483
1. Press MENU button to enter Menu mode
2. Use to move to Setup
3. Press OK to enter the setting mode
4. Use to move to Version. Press
OK to enter
5. Press OK or MENU button to go back to
previous menu
Use “SD Memory Card”
You can record and play back videos on the SD memory
card (purchase separately). Exchange video data with other equipment such as
a personal computer etc., using the Memory Card Reader/Writer or a PC card
adaptor (not supplied).
Note:
• We recommend backing up important data
• IntelliCorder supports up to 1 GHz SD card.
• Video data may be damaged in the following cases:
- If you remove the SD memory card before you turn off power
- If you remove battery while reading or recording data to the SD memory card
- If the SD memory card is placed near magnetic or static electricity fields
• Do not bend, drop or apply strong shock to a SD card.
• Do not disassemble or modify a SD card.
• Do not let the SD card get wet
• Do not use or keep a SD card in locations that are:
- Extremely hot
- Under direct sunlight
- Very humid or subject to corrosive gases
• When you carry or store a SD card, put it in its case.
• A SD memory card formatted by the Windows OS or Macintosh computer does not have a
guaranteed compatibility with this IntelliCorder.
28

Download Video
To download video images directly from a SD memory card to your PC, a
Multimedia or SD card reader compatible with your computer is required. Your
IntelliCorder compresses video data into AVI format.
Typical video data file name
Root: folder <DCIM> <100 CODER> CLIP0001~2,3,…. : As displayed on your PC
screen
Software Requirements
An XviD code is required to view recorded movies on your computer’s media
viewer. A free XviD code is available for download from http://www.koepi.org/xvid.
shtml and you can download the current stable binary XviD-1.0.3-20122004.exe.
Once you install the software, you may need to reboot your computer.
Alternatively, DivX code software is available at the DivX website: www.divx.com.
Trouble Shooting
If you are having trouble in operating this product, please consult the guide as
below:
SYMPTOM
No picture in LCD monitor
LCD displays “SENSOR ERROR”
REMEDIES
Set MODE to RECORD or LIVE
• Use fully charged Battery
• Firmly connect all needed cables
Ensure the plug of the ribbon cable is
properly attached into the terminal
(see page 13).
• Make sure monitor is switched ON.
• Make sure camera is not covered
Audio problems
Ensure the volume is turned up sufficiently
on the monitor
29

31
Trouble Shooting Cont.
SYMPTOM
The power goes off
The AUTO RECORD function
does not work
REMEDIES
The Battery is dead or nearly dead
• Recharge battery
There is no AUTO RECORD in the
LIVE, PLAY or menu settings.
• Set MODE to RECORD
The battery remaining indicator
does not indicate the correct time
Cannot record files to SD
memory card
NO SD memory card
SD card cannot be inserted
LCD displays
You have used the Battery in an extremely
hot or cold environment for a long time.
The Battery is completely dead, and can not
be recharged
• Replace with a new Battery
The SD memory card has already been
recorded to its full capacity
• Erase unnecessary videos and record again
SD card is formatted incorrectly.
• Format the SD card or use another
SD memory card
• Check Battery Indicator
No SD card or unreadable SD card is inserted
• The SD card is broken or the file format
is incorrect. Eject the SD card, check it for
damage and insert it again. If the same
indicator appears, use another SD card.
Insert SD card, label side facing out
Set the time and date
Replace with a new CR2032 battery for clock
30

Specifications
Input Power: Charger 100-240V AC, 50/60Hz
Battery Rechargeable Lithium Polymer Type DC 3.7V
Video Recording Camera 1/5” CMOS, Approx. 300,000 pixels
LCD: 1.5 inch Color S/D LPTS (557 x 324)
File Type: AVI
Video Format: MPEG 4
Operating Temperature: 32F ~ 122F (0C ~ 50C)
Operating Humidity: 10% ~ 85 %
Weight: IntelliCorder 231g (including batteries)
Charger 74 g
Dimensions: IntelliCorder - Color 110 x 72 x 24mm
(excluding Mounting Bracket)
IntelliCorder - Sensor 60 x 40 x 13mm
(excluding Supporter)
Charger 22 x 49 x 93mm
(excluding adaptor)
Weight and dimensions as shown above are approximation only. Design
and specifications are subject to change without prior notice.
31

1 YEAR LIMITED WARRANTY: Jasco Products Company warrants this product to be free from manufacturing
defects for a period of 1 year from the original date of consumer purchase. This warranty is limited to the
repair or replacement of this product only and does not extend to consequential or incidental damage to other
products that may be used with this unit. This warranty is in lieu of all other warranties express or implied.
Some states do not allow limitations on how long an implied warranty lasts or permit the exclusion or limitation
of incidental or consequential damages, so the above limitations may not apply to you. This warranty gives
you specific rights, and you may also have other rights which vary from state to state. If unit should prove
defective within the warranty period, return prepaid with dated proof of purchase to:
Jasco Products Company
311 N.W. 122nd
Oklahoma City, OK. 73114
1-800-
is a trademark of
General Electric Company
and is used under license to
Jasco Products Company LLC,
311 N.W. 122nd Street,
Oklahoma City, OK 73114
Or visit us at
www.jascoproducts.com
654-8483
All brand names shown are trademarks of their respective owners.
 Loading...