

Page 1
Gateway 205 ProjectorGateway 205 Projector
user'sguideuser'sguide
Setup Connecting
Page 2

www.gateway.com
Page 3

Contents
Using the Gateway 205 Projector. . . . . . . . . . . . . . . . . . . . . . . . . . . . . . . . . . . . 1
Features . . . . . . . . . . . . . . . . . . . . . . . . . . . . . . . . . . . . . . . . . . . . . . . . . . . . . . . . . . . 2
Projector front . . . . . . . . . . . . . . . . . . . . . . . . . . . . . . . . . . . . . . . . . . . . . . . . . . . . . . 3
Projector back . . . . . . . . . . . . . . . . . . . . . . . . . . . . . . . . . . . . . . . . . . . . . . . . . . . . . . 4
Projector top . . . . . . . . . . . . . . . . . . . . . . . . . . . . . . . . . . . . . . . . . . . . . . . . . . . . . . . 6
Projector bottom . . . . . . . . . . . . . . . . . . . . . . . . . . . . . . . . . . . . . . . . . . . . . . . . . . . . 8
Cables . . . . . . . . . . . . . . . . . . . . . . . . . . . . . . . . . . . . . . . . . . . . . . . . . . . . . . . . . . . . 9
Remote control . . . . . . . . . . . . . . . . . . . . . . . . . . . . . . . . . . . . . . . . . . . . . . . . . . . . 11
Remote front . . . . . . . . . . . . . . . . . . . . . . . . . . . . . . . . . . . . . . . . . . . . . . . . . . . 12
Remote back . . . . . . . . . . . . . . . . . . . . . . . . . . . . . . . . . . . . . . . . . . . . . . . . . . . 14
Setting up the projector . . . . . . . . . . . . . . . . . . . . . . . . . . . . . . . . . . . . . . . . . . . . . . 16
Connecting components . . . . . . . . . . . . . . . . . . . . . . . . . . . . . . . . . . . . . . . . . . . . . 17
Connecting to your computer . . . . . . . . . . . . . . . . . . . . . . . . . . . . . . . . . . . . . . 17
Connecting to a DVD player or VCR . . . . . . . . . . . . . . . . . . . . . . . . . . . . . . . . 19
Connecting to a satellite dish . . . . . . . . . . . . . . . . . . . . . . . . . . . . . . . . . . . . . . 21
Operating the projector . . . . . . . . . . . . . . . . . . . . . . . . . . . . . . . . . . . . . . . . . . . . . . 22
Starting the projector . . . . . . . . . . . . . . . . . . . . . . . . . . . . . . . . . . . . . . . . . . . . 22
OSD options . . . . . . . . . . . . . . . . . . . . . . . . . . . . . . . . . . . . . . . . . . . . . . . . . . . 23
Shutting down the projector . . . . . . . . . . . . . . . . . . . . . . . . . . . . . . . . . . . . . . . 26
Maintaining the projector . . . . . . . . . . . . . . . . . . . . . . . . . . . . . . . . . . . . . . . . . . . . . 27
Changing the lamp module . . . . . . . . . . . . . . . . . . . . . . . . . . . . . . . . . . . . . . . . 27
Cleaning the projector . . . . . . . . . . . . . . . . . . . . . . . . . . . . . . . . . . . . . . . . . . . . 30
Accessories . . . . . . . . . . . . . . . . . . . . . . . . . . . . . . . . . . . . . . . . . . . . . . . . . . . . . . . 31
Troubleshooting . . . . . . . . . . . . . . . . . . . . . . . . . . . . . . . . . . . . . . . . . . . . . . . . . . . . 32
First steps . . . . . . . . . . . . . . . . . . . . . . . . . . . . . . . . . . . . . . . . . . . . . . . . . . . . . 32
Common problems and solutions . . . . . . . . . . . . . . . . . . . . . . . . . . . . . . . . . . . 33
LED status . . . . . . . . . . . . . . . . . . . . . . . . . . . . . . . . . . . . . . . . . . . . . . . . . . . . . 35
On-screen status messages . . . . . . . . . . . . . . . . . . . . . . . . . . . . . . . . . . . . . . . 35
Specifications . . . . . . . . . . . . . . . . . . . . . . . . . . . . . . . . . . . . . . . . . . . . . . . . . . . . . . 36
Display size chart . . . . . . . . . . . . . . . . . . . . . . . . . . . . . . . . . . . . . . . . . . . . . . . 37
Timing chart . . . . . . . . . . . . . . . . . . . . . . . . . . . . . . . . . . . . . . . . . . . . . . . . . . . 38
Safety, Regulatory, and Legal Information . . . . . . . . . . . . . . . . . . . . . . . . . 39
i
Page 4

ii
Page 5

Using the
Gateway 205
Projector
Read this guide to find out how to:
■ Use the projector safely
■ Use the remote control
■ Set up and connect the projector
■ Start and turn off the projector
■ Use the On-screen display (OSD) menus
■ Replace the lamp module
■ Troubleshoot typical hardware problems
1
Page 6
Using the Gateway 205 Projector
Features
The Gateway 205 is a high-resolution projector with:
■ Compact, lightweight design
■ Full-function remote including laser pointer and mouse controls
■ 16 million-color display capability
■ Ultra-high brightness projection lamp
■ High-quality manual zoom lens
■ On-screen display (OSD) menus for easy adjustment
■ One-button AUTO adjust for best display image
■ Easy Keystone correction for distorted images
■ Component video compatibility
Before using your projector please read the following safety instructions:
Warning Do not cover the lens while the lamp is on.
Warning To project your eyes, do not look into the projector’s light
source.
Warning Make sure that you provide adequate ventilation for the
projector. Do not block the ventilation holes in the case.
Warning To prevent electrical shock, never open the projector case.
For a complete list of safety precautions, see “Important safety information”
on page 39.
2
www.gateway.com
Page 7
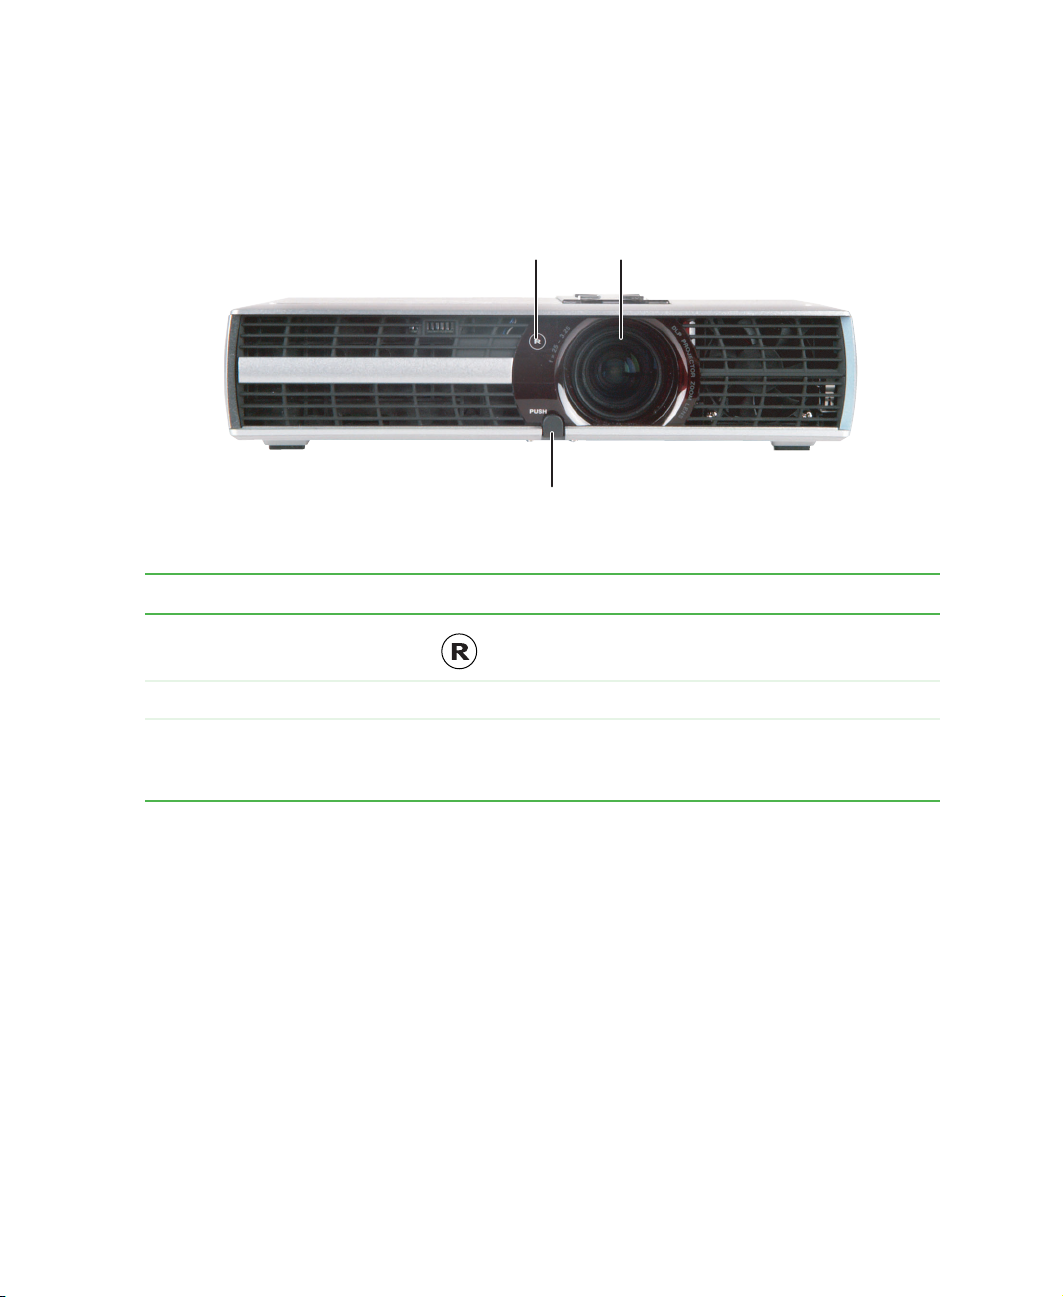
Projector front
Infrared
remote
sensor
Adjustor-foot
release button
Item Icon Description
Infrared remote sensor Picks up the signal from the remote control.
Projection
lens
Projector front
Projection lens Projects the image on the screen.
Adjustor-foot release button Press to release the adjustor-foot. For more
information, see “Setting up the projector” on
page 16.
www.gateway.com
3
Page 8
Using the Gateway 205 Projector
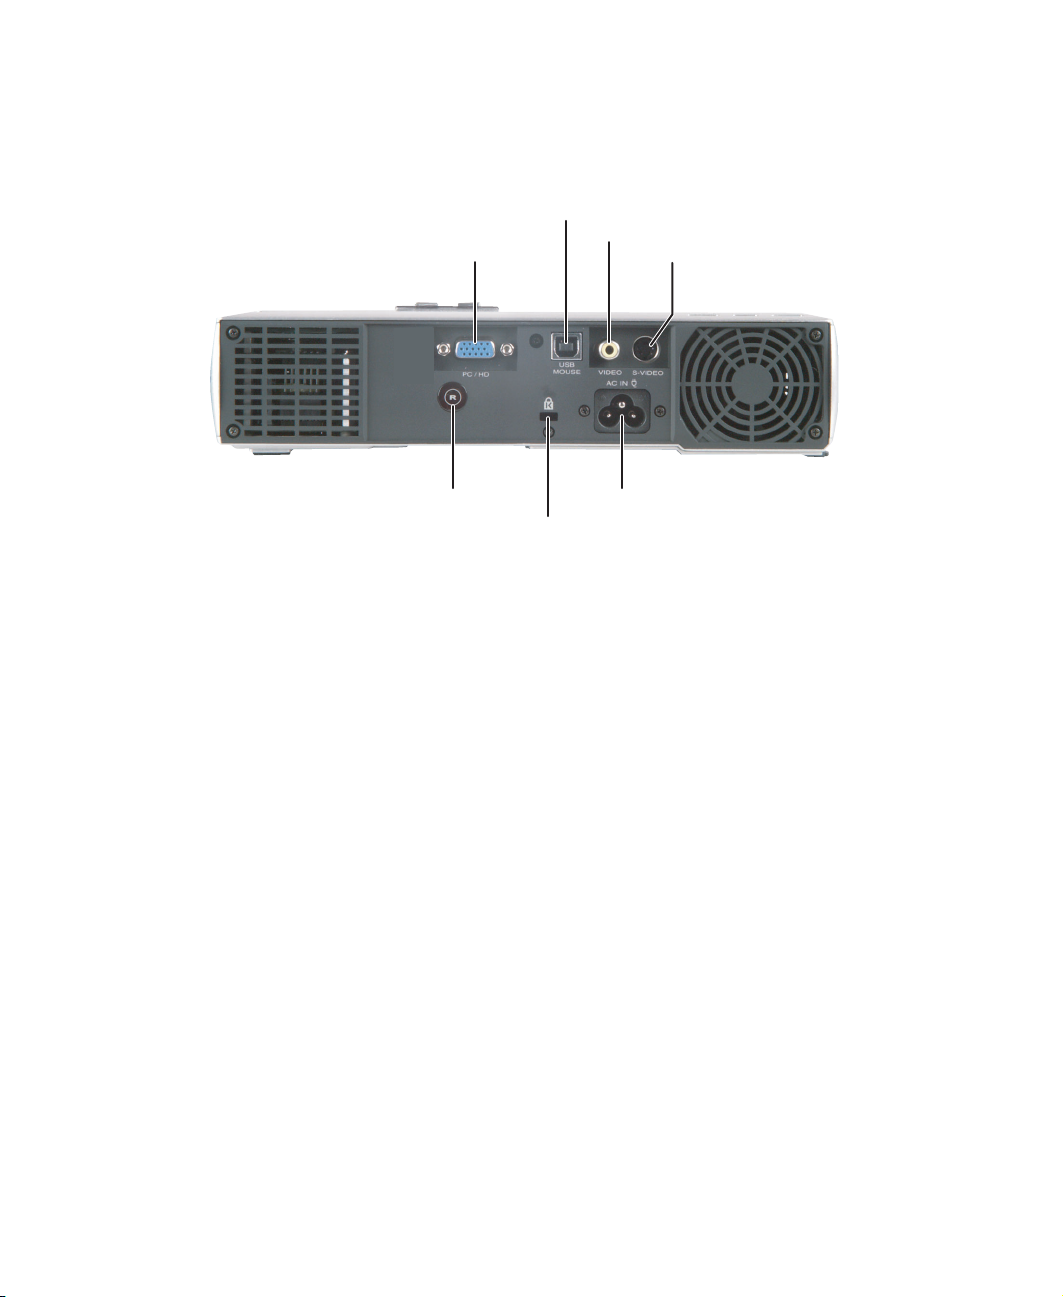
Projector back
USB port
PC/HD port
Video port
S-Video port
Infrared remote sensor
Kensington lock
AC Power connector
4
www.gateway.com
Page 9
Projector back
Item Icon Description
PC/HD port PC: Plug the video cable from your computer into
this port. See “Connecting to your computer” on
page 17.
HD: Plug a component video cable into this port. For
more information, see “Connecting to a satellite
dish” on page 21.
USB port Plug the USB cable into this port so you can use
the remote control as a mouse.
Video port Plug the video connector from a composite video
cable into this port. For more information, see “To
connect the projector to a DVD player or VCR using
composite video:” on page 19.
S-Video port Plug an S-Video cable into this port. For more
information, see “To connect the projector to a DVD
player or VCR using S-Video:” on page 20.
Infrared remote sensor Picks up the signal from the remote control.
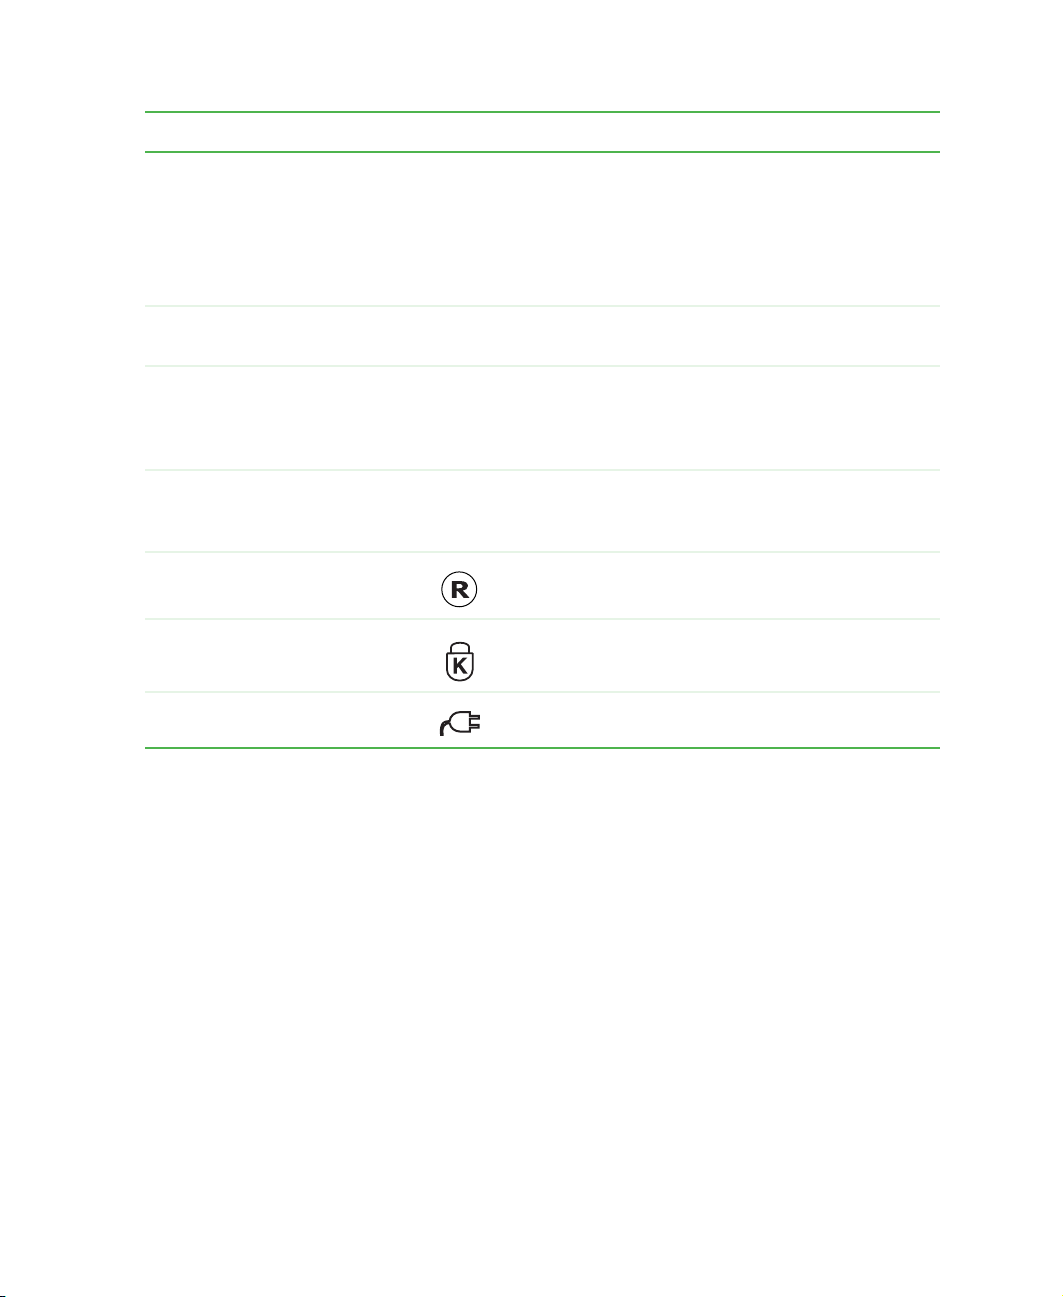
Kensington™ lock slot Connect a Kensington cable lock to this slot to
secure the projector to an object.
AC power connector Plug an AC power cable into this connector.
www.gateway.com
5
Page 10
Using the Gateway 205 Projector
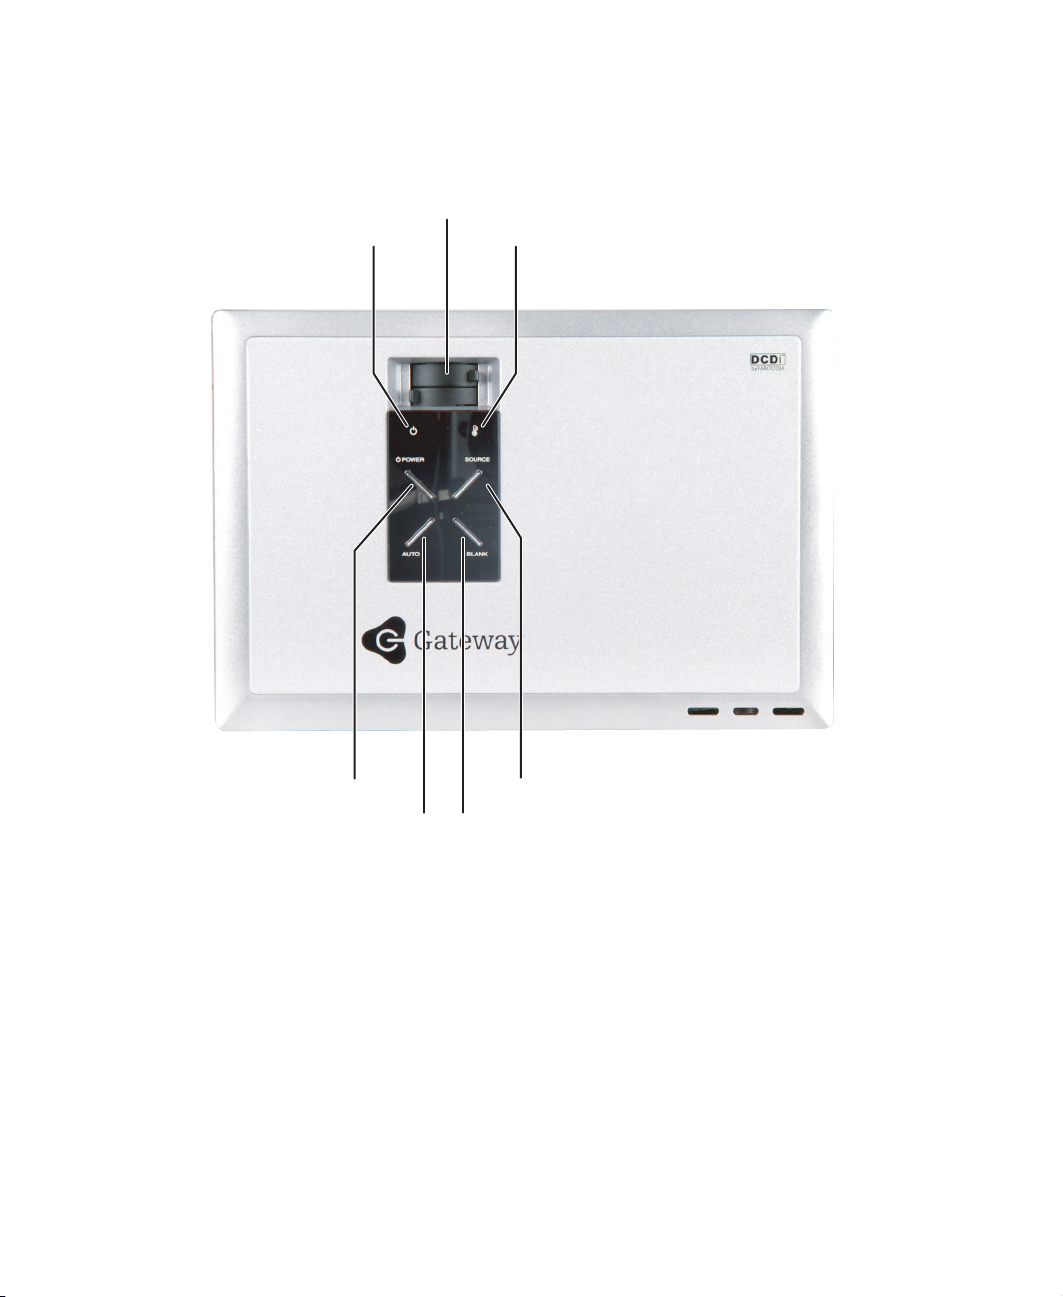
Projector top
Power indicator
Lens adjustment wheels
Lamp indicator
POWER button
AUTO button
6
SOURCE button
BLANK button
www.gateway.com
Page 11
Projector top
Item Icon Description
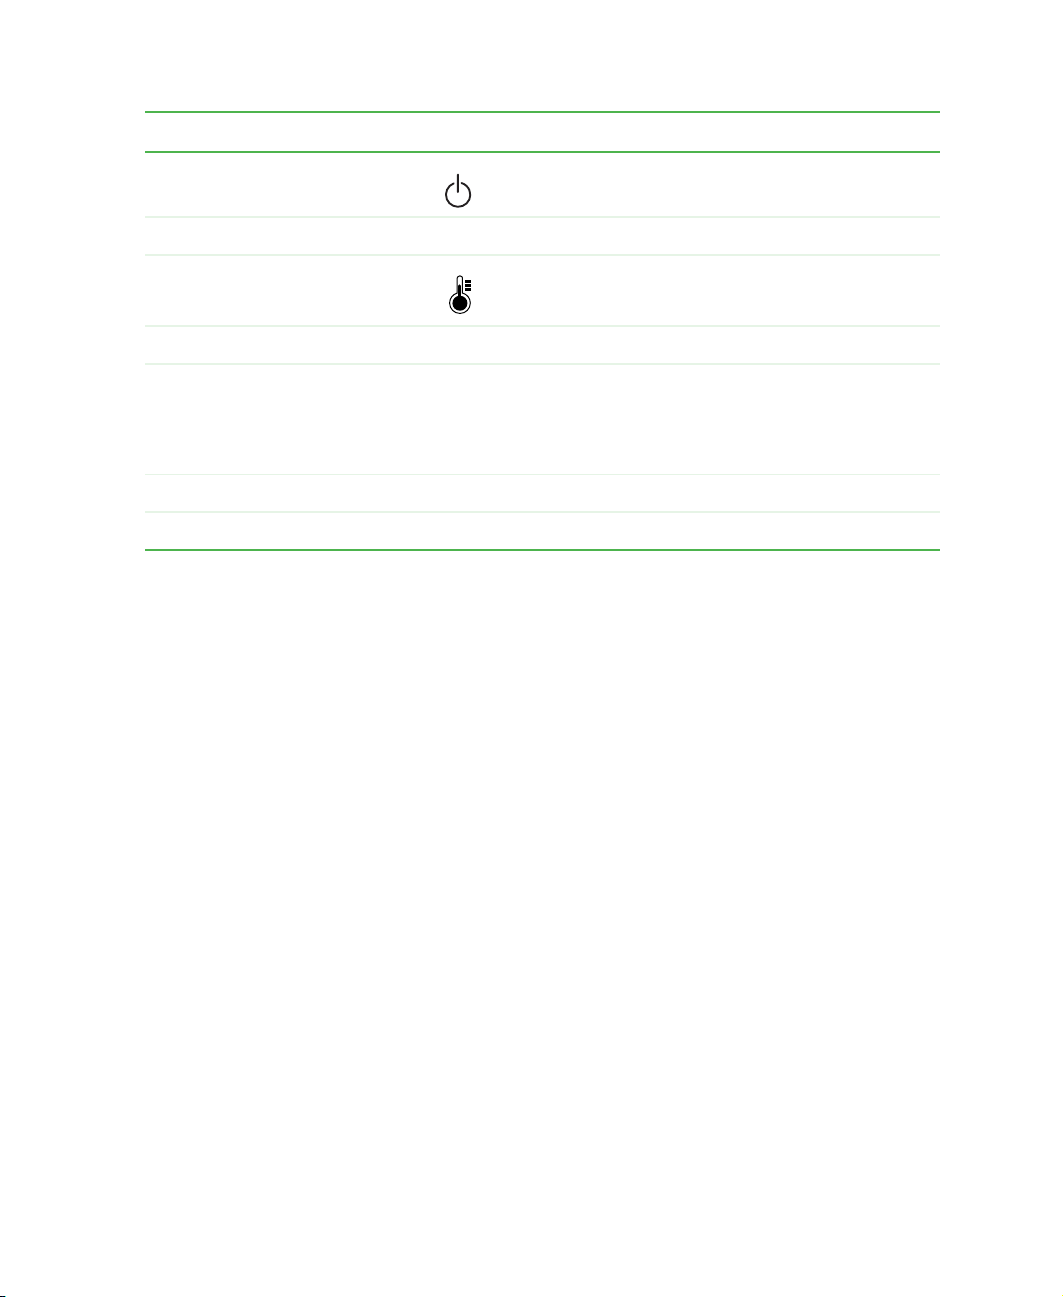
Power indicator Displays power status. For more information, see
“LED status” on page 35.
Lens adjustment wheels Manually focus or zoom the display image.
Lamp indicator Displays lamp status. For more information, see
“LED status” on page 35.
POWER button Press to turn the power off and on.
AUTO button Press to automatically adjust the display image to
the best settings for the video input source.
This function is only available when the projector is
connected to your computer.
BLANK button Press to select a blue display screen.
SOURCE button Press to select the video input source.
www.gateway.com
7
Page 12
Using the Gateway 205 Projector
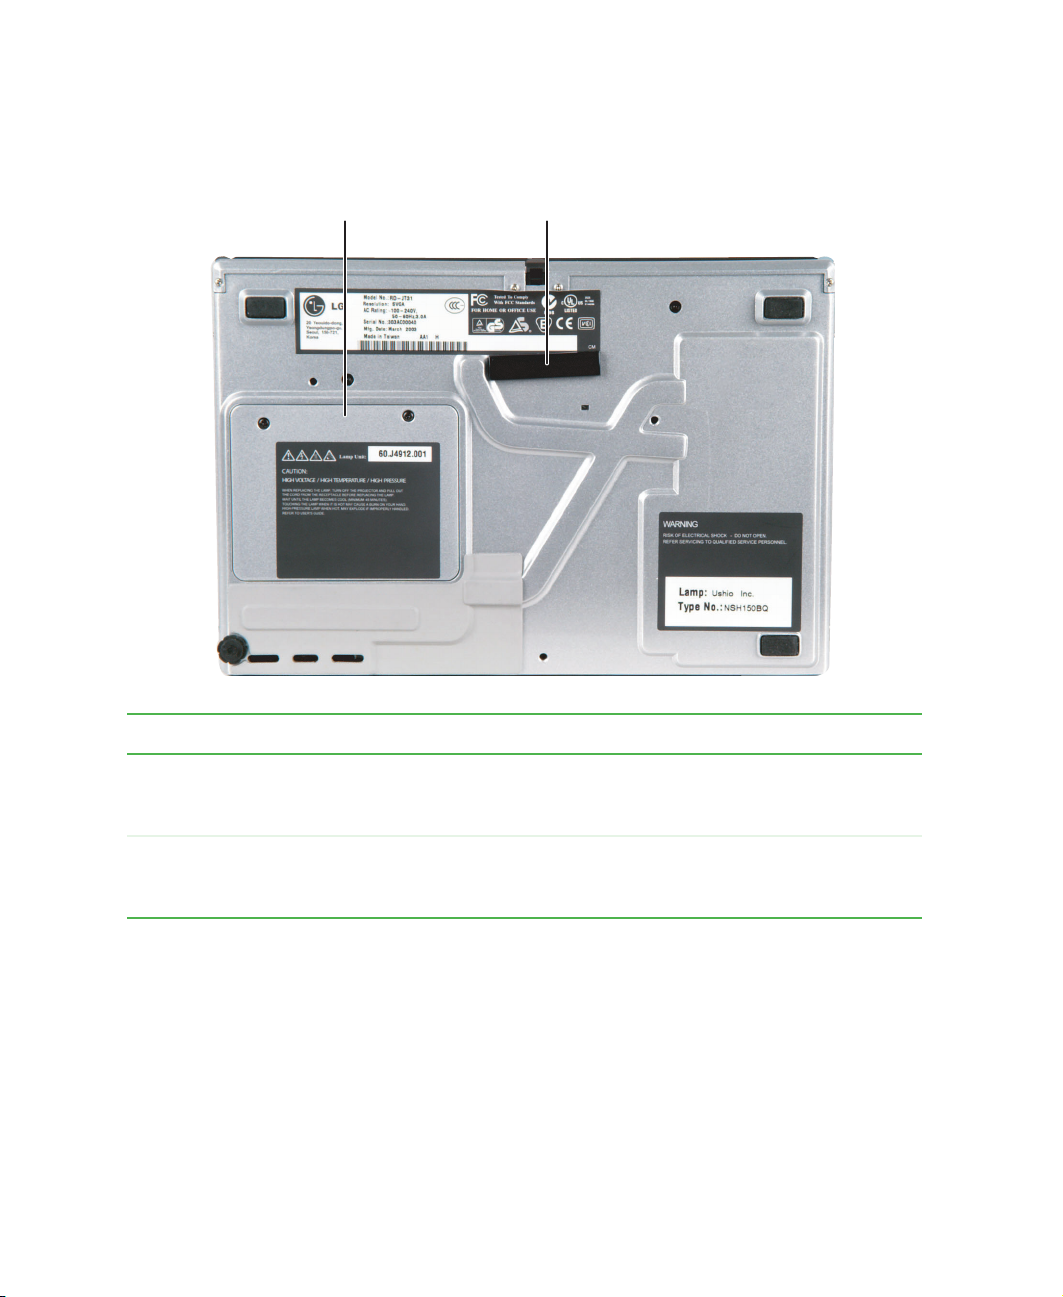
Projector bottom
Lamp access panel
Item Icon Description
Lamp access panel Remove the two screws to access the lamp bay. For
Adjustor-foot
more information, see “Changing the lamp module”
on page 27.
Adjustor-foot Press the button on the front of the projector to
release the adjustor-foot. For more information, see
“Setting up the projector” on page 16.
8
www.gateway.com
Page 13
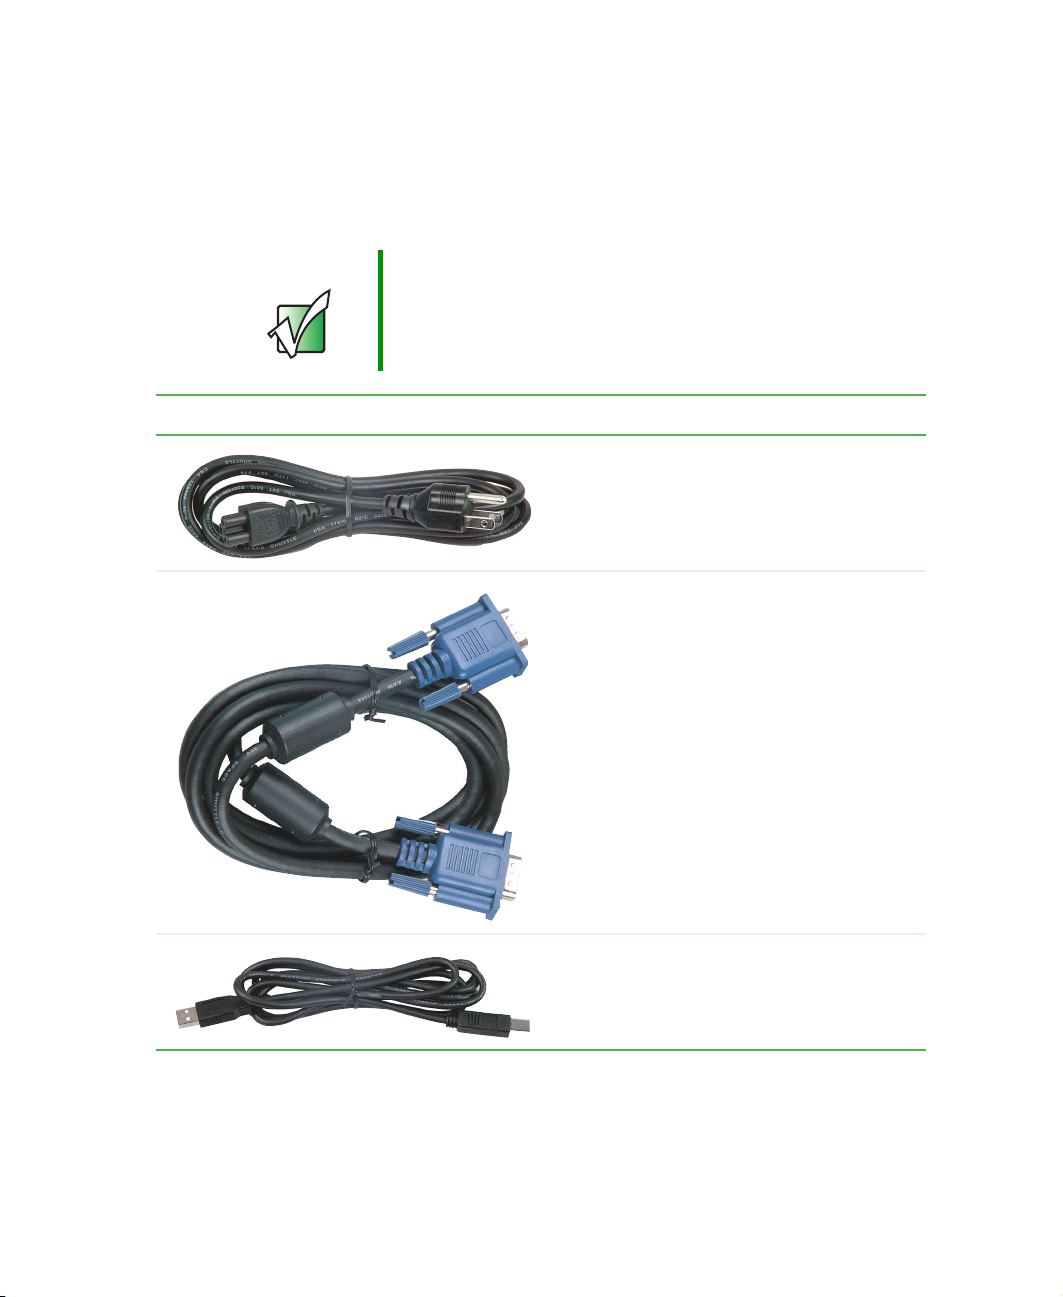
Cables
The projector comes with several cables so you can connect to your computer
or other video component. See “Connecting components” on page 17.
Important The Gateway 205 does not support internal audio. You
must use an external audio source, such as the speakers
with your computer, to receive an audio signal.
Cable Description
AC power cable. Use this cable to connect
the projector to a correctly grounded
electrical outlet or surge protector.
VGA cable. Connect this cable to send the
video signal from your computer to the
projector.
Cables
USB cable. Use this cable to connect your
computer to the projector so you can use the
remote control as a mouse.
www.gateway.com
9
Page 14
Using the Gateway 205 Projector
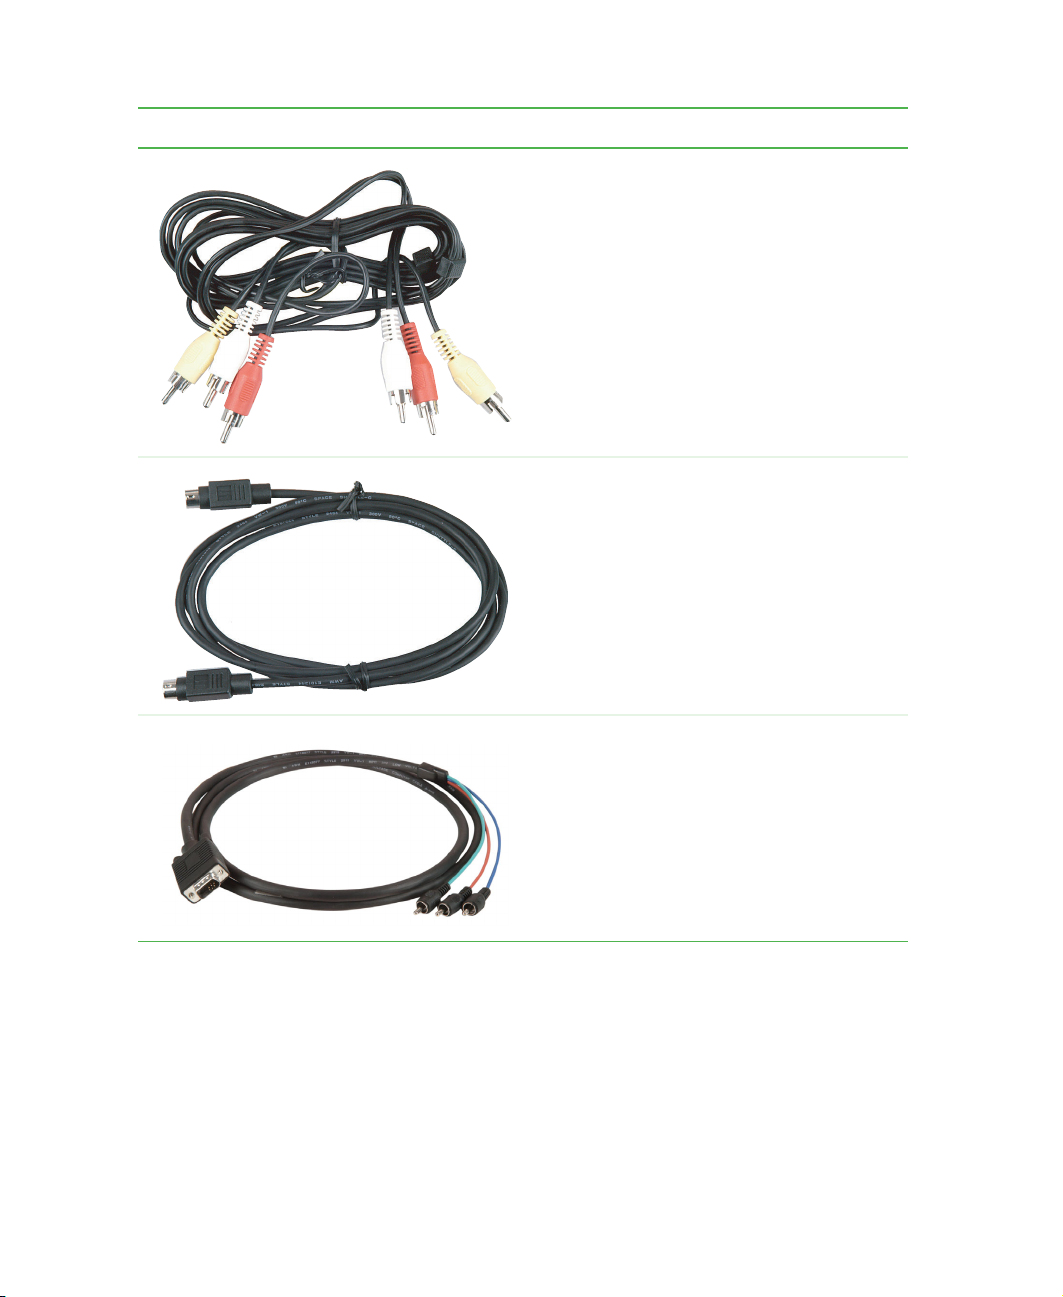
Cable Description
Composite video cable. Use this cable to
connect a video component, such as a DVD
player or VCR, to the projector.
The video signal is carried through a single
video (yellow) connection.
The two additional connectors carry the left
(white) and right (red) channel audio signals
to an audio receiver.
S-Video cable. Use this cable to connect a
video component, such as a DVD player or
VCR, to the projector.
The video signal is split into two signals,
black-and-white and color. This type of cable
produces a better picture than the
single-connector from the composite video
cable.
This cable provides no audio output.
10
Component video cable. Use this cable to
connect a video component, such as a
progressive-scan DVD player or satellite
dish, to the projector.
The video signal is split into three signals,
one black-and-white and two color. This type
cable provides the best possible picture.
This cable provides no audio output.
www.gateway.com
Page 15
Remote control
The infrared remote sensors are located on the front and back of the projector.
The distance between the sensors and remote control should not exceed
29.5 feet (9 meters) for the remote control to function correctly.
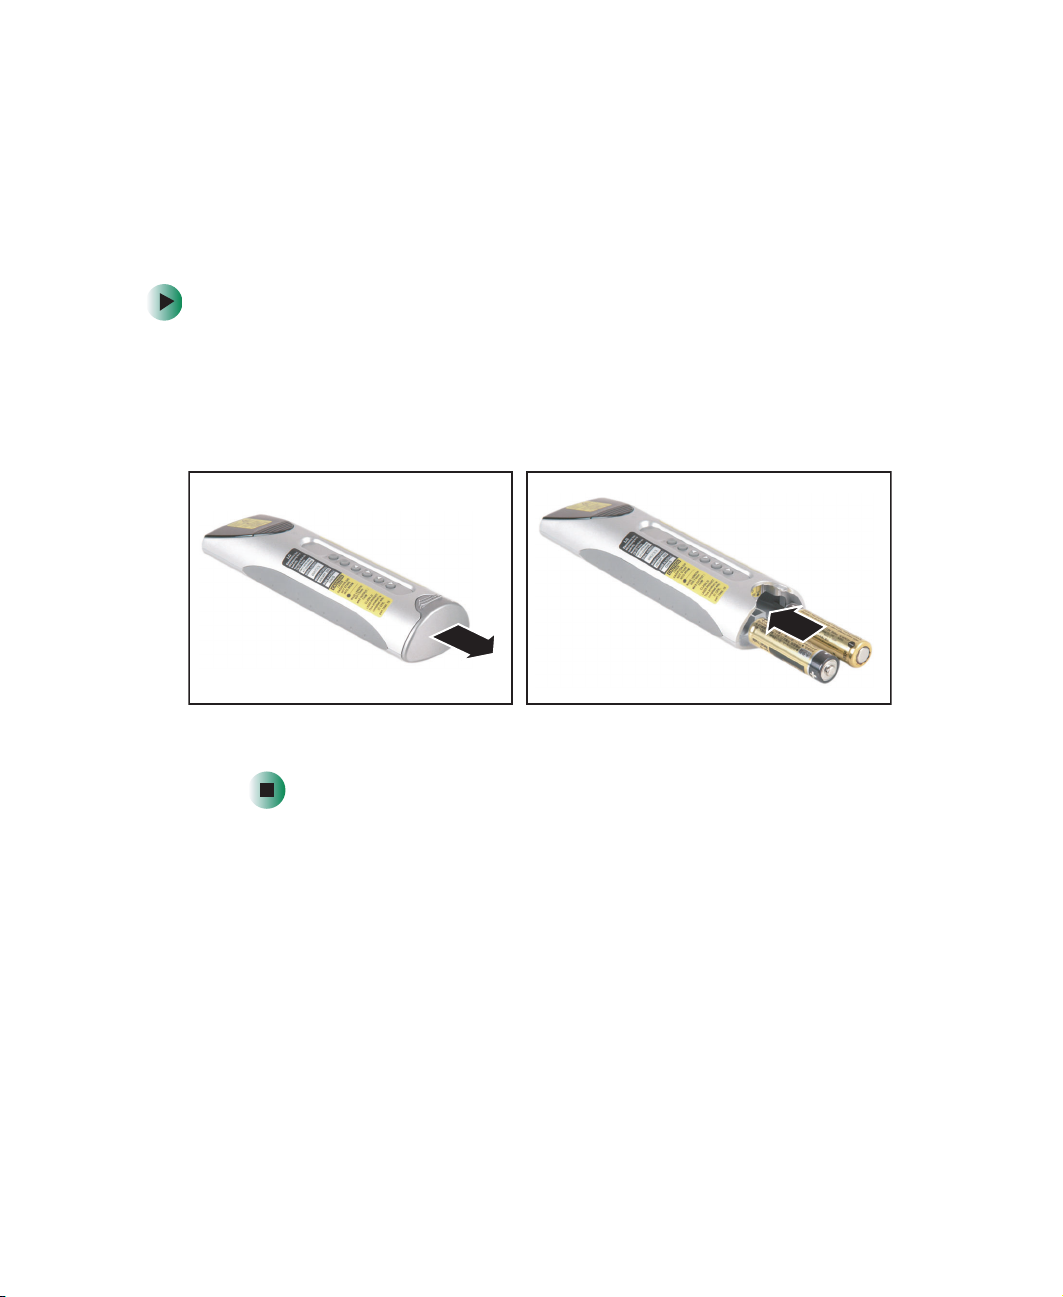
To insert batteries in the remote control:
1 Remove the battery compartment cover.
2 Insert two AA batteries into the battery compartment. Make sure that the
+ and – symbols match the + and – symbols inside the battery
compartment.
Remote control
3 Replace the battery compartment cover.
www.gateway.com
11
Page 16

Using the Gateway 205 Projector
Remote front
POWER
button
SOURCE
button
L-Mouse
button
Joystick
MENU
button
R-Mouse
button
Enter
button
BLANK
button
AUTO
button
LASER
button
12
www.gateway.com
Page 17

Remote control
Item Description
POWER Press to turn the projector on and off.
SOURCE Press to view the current video input source and switch between video input
sources.
L-Mouse Mouse active: Use as the left mouse button.
Zoom active: Increase the size of the display image.
Joystick OSD active: Move up and down to highlight OSD sub-menus and left and right
to adjust OSD options.
OSD inactive: Move the cursor within the display image.
Zoom active: Move within the zoomed display image.
For more information about the OSD options, see “OSD options” on page 23.
BLANK Press to view a blank screen. Choose between blue, black, green, and a
Gateway Logo screen.
MENU Press to view the OSD. Press again to exit. For more information about the OSD
options, see “OSD options” on page 23.
R-Mouse Mouse active: Use as the right mouse button.
Zoom active: Decrease the size of the display image.
Enter Press to select an OSD option. For more information about the OSD options,
see “OSD options” on page 23.
AUTO Press to automatically adjust the display image to the best settings for the video
input source.
This option is only available when connected to your computer.
LASER Press to activate the laser pointer.
www.gateway.com
13
Page 18

Using the Gateway 205 Projector
Remote back
STILL
button
RESIZE
button
MOUSE DRAG
button
KEYSTONE
buttons
14
ZOOM
buttons
www.gateway.com
Page 19

Remote control
Item Description
STILL Press to freeze the display image.
RESIZE Press to scale the display image up one size, or back down to the original
size.
MOUSE DRAG Press to activate mouse drag, click on the object that you want to move,
then use the joystick to move the object around in the display image.
KEYSTONE Press the button to correct a display image that is wider at the top, and
press the button to correct a display image that is wider at the bottom.
To eliminate text distortion, do not use when displaying text or spreadsheets.
ZOOM Press the and button to zoom the display image in and out. Use the
joystick to move within the zoomed display image.
www.gateway.com
15
Page 20

Using the Gateway 205 Projector
Setting up the projector
To set up the projector:
1 Place the projector on a sturdy cart or table close to other components you
plan to connect to the projector and an electrical outlet.
2 Point the projector lens towards a blank wall or projection screen.
3 Press the button on the front of the projector to release the adjustor-foot
so you can adjust the tilt angle of the projector.
Adjustor-foot
release button
16
Adjustor-foot
4 Plug the AC power cable into the AC power (AC IN) connector on the back
of the projector, then plug the other end into a correctly grounded
electrical outlet or surge protector.
www.gateway.com
Page 21

Connecting components
Connecting components
You can connect the projector to your computer, DVD player or VCR, and
satellite dish receiver.
To connect the projector to a DVD player or VCR, go to “Connecting to a DVD
player or VCR” on page 19.
To connect the projector to a satellite dish, go to “Connecting to a satellite dish”
on page 21.
Connecting to your computer
To connect the projector to your computer:
1 Plug the VGA cable into the blue PC/HD port on the back of the projector,
then plug the other end into the blue video port on the back of your
computer.
Tips & Tricks If you are connecting to a notebook, you may need to make
adjustments to the notebook’s display settings to view the
display image through the projector. See the
documentation that came with your notebook for
information about changing display settings.
www.gateway.com
17
Page 22

Using the Gateway 205 Projector
2 If you want to use the remote control as a mouse, plug the USB cable into
the USB port on the back of the projector, then plug the other end into
a USB port on the back of your computer.
18
www.gateway.com
Page 23

Connecting components
Connecting to a DVD player or VCR
If you are using composite video to connect the DVD player or VCR, follow
these instructions. If you are using S-Video to connect the DVD player or VCR,
go to “To connect the projector to a DVD player or VCR using S-Video:” on
page 20.
To connect the projector to a DVD player or VCR using composite video:
1 Plug the yellow composite video cable connector into the Video port on
the back of the projector, then plug the yellow, white, and red connectors
on the other end into the corresponding line out ports on the back of the
DVD player or VCR.
2 Plug the remaining red and white audio connectors from the composite
video cable into the corresponding ports on the back of an audio receiver.
www.gateway.com
19
Page 24

Using the Gateway 205 Projector
To connect the projector to a DVD player or VCR using S-Video:
1 Plug the S-Video cable connector into the S-Video port on the back of the
projector, then plug the other end into the S-Video port on the back of
the DVD player or VCR.
20
2 Plug the red and white connectors from a composite video cable into the
corresponding ports on the back of the DVD player or VCR, then plug the
red and white connectors on the other end to the corresponding ports on
an audio receiver.
www.gateway.com
Page 25

Connecting to a satellite dish
To connect the projector to a satellite dish:
1 Plug the component cable connector into the PC/HD port on the back of
the projector, then plug the green, blue, and red connectors on the other
end into the corresponding ports on the back of the satellite dish receiver.
Connecting components
2 Plug the red and white connectors from a composite video cable into the
corresponding ports on the back of the satellite dish receiver, then plug
the red and white connectors on the other end to the corresponding ports
on an audio receiver.
www.gateway.com
21
Page 26

Using the Gateway 205 Projector
Operating the projector
After you have connected all components to the projector, you are ready to
begin using the projector.
Starting the projector
To start the projector:
1 Press the POWER button. The power LED turns on.
22
2 Turn on the connected components.
After all components are running, allow about 30 seconds for the display
image to appear. If the power LED is not green or you do not see a display
image, check the connections. For more troubleshooting information, see
“Troubleshooting” on page 32.
3 Use the lens adjustment wheels to adjust the display image.
You can also use the on-screen display (OSD) to make additional display
setting adjustments if necessary. For more information, see “OSD options”
on page 23.
www.gateway.com
Page 27

Operating the projector
OSD options
This projector features an on-screen display (OSD) that lets you adjust and save
contrast, brightness, and other display settings.
Use the remote control to access all OSD functions.
■ SOURCE
Press to view the current video input source and switch between video
input sources.
■ MENU
Press to view the OSD. Press again to exit.
■ Joystick
Move the joystick up and down to highlight OSD options, or left and right
to adjust OSD options.
■ Enter
Press to select an OSD option.
Important If you are connected to your computer, always press the
AUTO button before entering the OSD. This automatically
adjusts the display image to the ideal settings for the video
input source.
The AUTO function is only available when the projector is
connected to your computer.
To adjust the OSD settings:
1 Press the MENU button. The OSD menu opens.
2 Move the joystick up or down to highlight a control, then press the
Enter button.
3 Move the joystick left or right to adjust the control to the desired level.
4 Press the MENU button to return to the main navigation bar on the left of
the OSD menu.
5 When you have finished making all adjustments, press the MENU button
to exit the OSD.
www.gateway.com
23
Page 28

Using the Gateway 205 Projector
OSD menus
OSD Menu Description
VIDEO
- OR -
POSITION
Contrast. Adjusts the contrast of the
display image.
Brightness. Adjusts the brightness of
the display image.
You may need to readjust brightness after
the projector has warmed up.
Color. Increases the color range of the
display image.
This option is not available when
connected to your computer.
Tint. Increases the red or blue tint of the
display image.
This option is not available when
connected to your computer.
Color (R,G, B). Customizes the red,
green, and blue color levels.
This option is only available when
connected to your computer.
Reset. Returns all settings to factory
defaults.
Vertical. Adjusts the display image up
and down.
Horizontal. Adjusts the display image left
and right.
Keystone. Corrects a display image that
is wider at the top or at the bottom.
To eliminate text distortion, do not use
when displaying text or spreadsheets.
Zoom. Activates the Zoom option.
Resize. Switches between a display
image mode of 4:3 or 16:9.
- OR -
Switches between an enlarged and
original display image mode when
connected to your computer.
24
www.gateway.com
Page 29

OSD Menu Description
Operating the projector
SPECIAL
TRACKING
Source. Shows the current video input
source and switches between available
video input sources.
Language. Changes the language of the
OSD menu. Choose between English,
French, German, Italian, Spanish,
Korean, Simplified Chinese, and
Traditional Chinese.
Flip Horizontal. Flips the display image
so it can be viewed correctly when the
projector is set up for rear screen
projection.
Flip Vertical. Flips the display image so
it can be viewed correctly when the
projector is ceiling-mounted.
Blank Image. Displays a blank screen.
Choose between blue, black, green, and
a Gateway Logo screen.
Lamp Time. Displays the hours that the
lamp has been in use and resets the
timer when the lamp module has been
replaced.
Auto Tracking. Automatically adjusts the
display image to the best settings for the
video input source.
This option is only available when
connected to your computer.
Clock. Minimizes any vertical bars or
stripes visible on the screen background.
The horizontal screen size also changes
to fit the image size.
Phase. Removes any horizontal
distortion and clears or sharpens the
displayed characters.
www.gateway.com
25
Page 30

Using the Gateway 205 Projector
Shutting down the projector
To shut down the projector:
1 Turn off all connected components.
2 Press the POWER button on the projector. A warning message appears.
26
3 Press the POWER button again to turn off the projector.
Warning The projector needs a 90-second cool-down period. Do not
disconnect the power cable until the fan stops, or you may
damage the projector.
4 Wait until the fan stops, then disconnect the power cable.
Important After the projector fan has been turned off and the fan
stops, you must wait for 90 seconds before you can start
the projector.
www.gateway.com
Page 31

Maintaining the projector
Maintaining the projector
The only user-replaceable part in the projector is the lamp module. Contact
Gateway Technical Support for any additional service or repair.
Warning To prevent electric shock, do not open the projector case.
There are no user-replaceable parts inside. Contact
Gateway Technical Support for service or repair.
Changing the lamp module
You should replace the lamp module and reset the lamp timer in the projector
every 1500 hours to maintain the best possible display image. Do not use a lamp
module past the rated lamp life.
Warning The high-pressure lamp module may explode if handled
incorrectly. Make sure that the projector is turned off, power
is disconnected, and the lamp is completely cool (minimum
of 45 minutes) before replacing the lamp module.
To replace the lamp module:
1 Turn off the projector and wait for the fan to stop.
2 Disconnect the power cord and all other external cables.
3 Let the projector lamp cool completely (approximately 45 minutes).
4 Turn the projector over so the bottom is facing up.
www.gateway.com
27
Page 32

Using the Gateway 205 Projector
5 Remove the two lamp access panel screws, then remove the lamp access
panel.
6 Remove the lamp module retaining screw.
Screws
Screw
28
www.gateway.com
Page 33

Maintaining the projector
7 Unsnap the lamp removal handle, then lift the lamp module straight up
out of the lamp bay.
8 Gently press the new lamp module into the lamp bay. The lamp module
is keyed so it can only be inserted in one direction. If the lamp module
does not fit, make sure that the cable connections line up with the
connectors in the lamp bay.
9 Replace the lamp module retaining screw.
10 Replace the lamp bay access panel, then replace the access panel screws.
www.gateway.com
29
Page 34

Using the Gateway 205 Projector
11 Turn the projector over.
12 Connect the power cable and all external cables.
To reset the lamp timer:
1 Press the POWER button on the top of the projector twice, a warning
message appears.
2 Press the AUTO and BLANK buttons at the same time. A lamp hour icon
will appear on the screen.
3 Press the AUTO button to reset the lamp timer.
Cleaning the projector
Keeping the projector clean and the vents free from dust helps keep it
performing at its best.
Warning Make sure that the projector is off, power is disconnected,
and the lamp is completely cool (minimum of 45 minutes)
before cleaning the projector.
Cleaning the exterior
Always turn off the projector and wait for it to cool before cleaning it.
Use a damp, lint-free cloth to clean the projector case. Do not use abrasive or
solvent cleaners because they can damage the finish.
The projector is cooled by air circulated through the vents on the case, so keep
the vents free of dust. With the projector turned off and unplugged, brush the
dust away from the vents with a damp cloth. Be careful not to drip any water
into the vents. Do not attempt to clean dust from the inside the projector.
Cleaning the projector lens
Always turn off the projector and wait for it to cool before cleaning the projector
lens.
Use a soft cloth and glass cleaner to clean the projector lens. Squirt a little
cleaner on the cloth (never directly on the lens), and wipe the lens with the
cloth.
30
www.gateway.com
Page 35

Accessories
Gateway offers accessories that can help you make the most of using the
projector. To order accessories, visit the Accessory Store at
accessories.gateway.com
Carrying cases
Gateway has large-capacity carrying cases if you need additional space for
accessories or supplies.
Ceiling mount kits
Gateway has ceiling mounting kits available that let you mount the projector
to the ceiling.
Portable projection screens
Gateway has portable projection screens available so you can get the best
display possible in any room.
Replacement lamps
Gateway has the correct replacement lamps for the projector. Lamps should be
replaced every 1500 hours of operation. See “Changing the lamp module” on
page 27 to learn how to replace the lamp module.
.
Accessories
www.gateway.com
31
Page 36

Using the Gateway 205 Projector
Troubleshooting
Warning To avoid bodily injury, do not attempt to troubleshoot the
projector problem if:
■
■
■
■
Instead, unplug the projector and contact a qualified
service technician.
First steps
Try these things first:
■ Make sure that the power cable is connected to the projector and an
AC outlet and that the AC outlet is supplying power.
■ If you use a power strip, make sure that it is turned on.
■ Make sure that all components are connected correctly and securely. For
more information, see “Connecting components” on page 17.
Power cable or plug are damaged
Liquid has been spilled into the projector
The projector was dropped
The projector case was damaged
■ If an error message appears on the screen, see “On-screen status messages”
on page 35.
If the suggestions in the Troubleshooting section of this guide does not correct
the problem, contact Gateway Technical Support at 800-846-2303.
Before calling Gateway Technical Support:
■ Have your customer ID, serial number, and order number available, along
with a detailed description of your problem, including the exact text of
any error messages, and the steps you have taken.
■ Make sure that the projector is nearby at the time of your call. The
technician may have you follow troubleshooting steps.
32
www.gateway.com
Page 37

Common problems and solutions
No power
■ Make sure that the power cable is connected to the projector and an
AC outlet and that the AC outlet is supplying power.
■ Wait 90 seconds after the projector fan stops before starting the projector
again.
No picture
■ Press the SOURCE button on the remote control to select the correct video
input source. For more information, see “Remote front” on page 12.
■ Make sure that all components are connected correctly and securely. For
more information, see “Connecting components” on page 17.
■ If you are connected to a notebook, make sure that the notebook’s display
settings were changed so the display image is viewed through the projector.
See the documentation that came with your notebook for information
about changing display settings.
■ Access the OSD menus to adjust the brightness and contrast. For more
information, see “OSD options” on page 23.
Troubleshooting
No sound
■ Make sure that all components are connected correctly and securely. For
more information, see “Connecting components” on page 17.
www.gateway.com
33
Page 38

Using the Gateway 205 Projector
Display image is wider on the top or bottom
■ Press the KEYSTONE buttons on the remote control to adjust the display
image. For more information, see “Remote back” on page 14.
■ Reposition the projector to get a better angle on the projection screen.
Display image is poor or blurred
■ If the projector is connected to your computer, press the AUTO button on
the remote control to automatically adjust the display image to the ideal
settings.
■ Use the lens adjustment wheel to manually focus the display image.
■ Use the OSD menus to adjust the brightness and contrast. For more
information, see “OSD options” on page 23.
■ Reposition the projector to get a better angle on the projection screen.
Remote control does not work
■ Make sure that you are less than 29.5 feet (9 meters) from the infrared
remote sensors on the front and back of the projector.
■ Make sure that nothing is blocking the infrared remote sensors on the front
and back of the projector.
34
■ Replace the batteries in the remote control. For information on replacing
the batteries, see “Remote control” on page 11.
www.gateway.com
Page 39

LED status
Power LED Lamp LED Problem Possible Cause
Flashing orange Red Fan On error The fan is not running.
Troubleshooting
Green Orange Lamp Case Open
error
Orange Orange Lamp On error The lamp is not on.
Orange Flashing orange Lamp Time Over
error
Red Orange Lamp Time Over
error
Orange Flashing red Temperature error The lamp temperature is
Red Red Temperature error The lamp temperature is over
The lamp access panel is
closed.
The lamp module has been in
operation between 1400 hours
and 1500 hours.
The Lamp module has been in
operation over 1500 hours.
Replace lamp module.
between 161.6°F (72°C) and
165.2°F (74°C).
165.2°F (74°C). Turn off the
projector immediately.
On-screen status messages
No signal
Projector is searching for a video input source.
Out of range
You are too far away from the projector for the remote to function correctly.
Replace the lamp!
The lamp module has been in operation for more than 1500 hours. For
information on replacing the lamp module, see “Changing the lamp module”
on page 27.
www.gateway.com
35
Page 40

Using the Gateway 205 Projector
Specifications
Specifications are subject to change without notice or obligation.
Model
Resolution
Display system
Lens F-number
Lamp
Power supply
Power consumption
Dimensions (W×H×D)
Weight
Operating temperature
Certifications
GW205
800 × 600 SVGA
1-chip DMD
F/2.4
150 W NSH lamp
AC 100 ~ 240 V, 3 A, 50/60 Hz (automatic)
250 W (max.)
9.76 × 2.32 × 6.69 inches (248 × 59 × 170 mm)
3lbs (1.7Kg)
41°F ~ 95°F (5°C ~ 35°C)
FCC Class B,
ICES-003 Class B, UL, cUL
36
www.gateway.com
Page 41

Display size chart
Specifications
Display Size (Maximum) L.
Display Size (Minimum)
Projection
Diagonal A. Width C. Height Diagonal B. Width D. Height
33.4 in.
(84.8 cm)
44.5 in.
(113.0 cm)
66.8 in.
(169.7 cm)
89.1 in
(226.3 cm)
111.3 in.
(282.7 cm)
133.6 in.
(339.3 cm)
155.9 in.
(396.0 cm)
178.1 in.
(452.4 cm)
26.7 in.
(67.9 cm)
35.6 in.
(90.5 cm)
53.4 in.
(135.7 cm)
71.3 in.
(181.0 cm)
89.1 in.
(226.2 cm)
106.9 in.
(271.5 cm)
124.7 in.
(316.7 cm)
142.5 in.
(362.0 cm)
20.1 in.
(50.9 cm)
26.7 in.
(67.9 cm)
40.1 in.
(101.8 cm)
53.4 in.
(135.7 cm)
66.8 in.
(169.7 cm)
80.2 in.
(203.6 cm)
93.5 in.
(237.5 cm)
106.9 in.
(271.5 cm)
Distance
4.92 ft.
(1.5 m)
6.56 ft.
(2 m)
9.84 ft.
(3 m)
13.12 ft.
(4 m)
16.40 ft.
(5 m)
19.69 ft.
(6 m)
22.97 ft.
(7 m)
26.25 ft.
(8 m)
25.7 in.
(65.28 cm)
34.3 in.
(87.12 cm)
51.4 in.
(130.6 cm)
68.5 in.
(174.0 cm)
85.6 in.
(217.4 cm)
102.8 in.
(261.1 cm)
119.9 in.
(304.5 cm)
137.0 in.
(348.0 cm)
20.6 in.
(52.2 cm)
27.4 in.
(69.6 cm)
41.1 in.
(104.4 cm)
54.8 in.
(139.2 cm)
68.5 in.
(174.0 cm)
82.2 in.
(208.8 cm)
95.9 in.
(243.6 cm)
109.6 in.
(278.4 cm)
15.4 in.
(39.2 cm)
20.6 in.
(52.2 cm)
30.8 in.
(78.3 cm)
41.1 in.
(104.4 cm)
51.4 in.
(130.5 cm)
61.7 in.
(156.6 cm)
71.9 in.
(182.7 cm)
82.2 in.
(208.8 cm)
www.gateway.com
37
Page 42

Using the Gateway 205 Projector
Timing chart
Resolution Horizontal Sync Vertical Sync Remark
640 × 350 31.5 kHz 70.1 Hz
640 × 400 37.9 kHz 85.1 Hz VESA
720 × 400 31.5 kHz 70.1 Hz
720 × 400 37.9 kHz 85.1 Hz VESA
640 × 480 31.5 kHz 60.0 Hz VESA
640 × 480 35.0 kHz 66.7 Hz Macintosh
640 × 480 37.9 kHz 72.8 Hz VESA
640 × 480 43.3 kHz 85.0 Hz VESA
800 × 600 35.2 kHz 56.3 Hz VESA
800 × 600 37.9 kHz 60.3 Hz VESA
800 × 600 48.1 kHz 72.2 Hz VESA
800 × 600 46.9 kHz 75.0 Hz VESA
800 × 600 53.7 kHz 85.1 Hz VESA
832 × 624 49.7 kHz 74.5 Hz Macintosh
1024 × 768 48.4 kHz 60.0 Hz VESA
1024 × 768 56.5 kHz 70.1 Hz VESA
1024 × 768 60.0 kHz 75.0 Hz VESA
1024 × 768 68.7 kHz 85.0 Hz VESA
1280 × 1024 64.0 kHz 60.0 Hz VESA
Many products for Gateway and its subsidiaries are custom engineered by our
suppliers to Gateway specifications and may vary from similarly marketed
products.
38
www.gateway.com
Page 43

Safety,
Regulatory, and
Legal Information
Important safety
information
The Gateway projector is designed and tested to meet the latest standards
for safety of information technology equipment. However, to ensure safe
use of this product, it is important that the safety instructions marked on
the product and in the documentation are followed.
Warning Always follow these instructions to help
guard against personal injury and damage
to the Gateway projector.
39
Page 44

Appendix A: Safety, Regulatory, and Legal Information
Setting up the projector
■
Read and follow all instructions marked on the product and in the documentation before you
operate the projector. Retain all safety and operating instructions for future use.
■
Do not use this product near water or a heat source such as a radiator.
■
Set up the projector on a stable work surface.
■
The product should be operated only from the type of power source indicated on the rating label.
■
If the projector is connected to a computer, make sure that the voltage selector switch is in the
proper position for your area. The voltage selector switch is set at the factory to the correct
voltage.
■
Openings in the projector case are provided for ventilation. Do not block or cover these
openings. Make sure you provide adequate space, at least 6 inches (15 cm), around the projector
for ve ntilati on wh en you set up y our wor k ar ea. Nev er i nsert object s of a ny k ind int o the
ventilation openings.
■
Some products are equipped with a three-wire power cord to make sure that the product is
properly grounded when in use. The plug on this cord will fit only into a grounding-type outlet.
This is a safety feature. If you are unable to insert the plug into an outlet, contact an electrician
to install the appropriate outlet.
■
If you use an extension cord with this projector, make sure that the total ampere rating on the
products plugged into the extension cord does not exceed the extension cord ampere rating.
■
If the projector is connected to a product fitted with a TV Tuner, cable, or satellite receiver card,
make sure that the antenna or cable system is electrically grounded to provide some protection
against voltage surges and buildup of static charges.
Care during use
■
Do not wal k on the p ower co rd o r allow a nythin g to r est on it .
■
Do not spill anything on the projector. The best way to avoid spills is to avoid eating and
drinking near the projector.
■
When the projector is turned off, a small amount of electrical current still flows through the
projector. To avoid electrical shock, always unplug all power cables from the wall outlets and any
other cable connections before cleaning the projector.
■
Unplug the projector from the wall outlet and refer servicing to qualified personnel if:
■
The power cord or plug is damaged.
■
Liquid has been spilled into the projector.
■
The projector does not operate properly when the operating instructions are followed.
■
The projector was dropped or the projector case is damaged.
■
The projector performance changes.
Replacement parts and accessories
Use only replacement parts and accessories recommended by Gateway.
40
Important Do not use Gateway products in areas classified as
hazardous locations. Such areas include patient care
areas of medical and dental facilities, oxygen-laden
environments, or industrial facilities.
www.gateway.com
Page 45

Regulatory compliance statements
Regulatory compliance
statements
United States of America
Federal Communications Commission (FCC)
Unintentional emitter per FCC Part 15
This device has been tested and found to comply with the limits for a Class B digital device,
pursuant to Part 15 of the FCC rules. These limits are designed to provide reasonable protection
against harmful interference in a residential installation. This equipment generates, uses, and can
radiate radio frequency energy and, if not installed and used in accordance with the instructions,
may cause harmful interference to radio or television reception. However, there is no guarantee
that interference will not occur in a particular installation. If this equipment does cause
interference to radio and television reception, which can be determined by turning the equipment
off and on, the user is encouraged to try to correct the interference by one or more of the following
measures:
■
Reorient or relocate the receiving antenna
■
Increase the separation between the equipment and receiver
■
Connect the equipment to an outlet on a different circuit from that to which the receiver is
connected
■
Consult the dealer or an experienced radio/TV technician for help.
Compliance Accessories: The accessories associated with this equipment are: shielded video cable
when an external monitor is connected. These accessories are required to be used in order to
ensure compliance with FCC rules.
FCC declaration of conformity
Responsible party:
Gateway Companies, Inc.
610 Gateway Drive, North Sioux City, SD 57049
(605) 232-2000 Fax: (605) 232-2023
Product:
■
Gateway 205 Projector
This device complies with Part 15 of the FCC Rules. Operation of this product is subject to the
following two conditions: (1) this device may not cause harmful interference, and (2) this device
must accept any interference received, including interference that may cause undesired operation.
Caution Changes or modifications not expressly approved by
Gateway could void the FCC compliance and negate your
authority to operate the product.
www.gateway.com
41
Page 46

Appendix A: Safety, Regulatory, and Legal Information
Canada
Industry Canada (IC)
Unintentional emitter per ICES-003
This digital apparatus does not exceed the Class B limits for radio noise emissions from digital
apparatus as set out in the radio interference regulations of Industry Canada.
Le présent appareil numérique n’émet pas de bruits radioélectriques dépassant les limites
applicables aux appareils numériques de Classe B prescrites dans le règlement sur le brouillage
radioélectrique édicté par Industrie Canada.
Laser Radiation
Warning Laser Radiation – Do not stare into the laser beam.
California Proposition 65 Warning
Warning This product contains chemicals, including lead, known to
the State of California to cause cancer and/or birth defects
or reproductive harm.
42
www.gateway.com
Page 47

Notices
Copyright © 2003 Gateway, Inc.
All Rights Reserved
14303 Gateway Place
Poway, CA 92064 USA
All Rights Reserved
This publication is protected by copyright and all rights are reserved. No part of it may be reproduced or
transmitted by any means or in any form, without prior consent in writing from Gateway.
The information in this manual has been carefully checked and is believed to be accurate. However, changes are
made periodically. These changes are incorporated in newer publication editions. Gateway may improve and/or
change products described in this publication at any time. Due to continuing system improvements, Gateway is
not responsible for inaccurate information which may appear in this manual. For the latest product updates,
consult the Gateway Web site at www.gateway.com
exemplary, incidental, or consequential damages resulting from any defect or omission in this manual, even if
advised of the possibility of such damages.
In the interest of continued product development, Gateway reserves the right to make improvements in this
manual and the products it describes at any time, without notices or obligation.
Trademark Acknowledgments
1-800-GATEWAY, ActiveCPR, ALR, AnyKey, black-and-white spot design, CrystalScan, Destination, DestiVu, EZ
Pad, EZ Point, Field Mouse, Gateway 2000, Gateway Country, gateway.net, Gateway stylized logo, Perfect
Scholar, Solo, TelePath, Vivitron, stylized “G” design, and “You’ve got a friend in the business” slogan are
registered trademarks and black-and-white spotted box logo, GATEWAY, Gateway Astro, Gateway@Work,
Gateway Connected touch pad, Gateway Connected music player, Gateway Cyber:)Ware, Gateway
Education:)Ware, Gateway Flex Case, Gateway Gaming:)Ware, Gateway GoBack, Gateway Gold, Gateway
Learning:)Ware, Gateway Magazine, Gateway Micro Server, Gateway Money:)Ware, Gateway Music:)Ware,
Gateway Networking Solutions, Gateway Online Network (O.N.) solution, Gateway Photo:)Ware, Gateway
Professional PCs, Gateway Profile, Gateway Solo, green stylized GATEWAY, green stylized Gateway logo,
Gateway Teacher:)Ware, Gateway Video:)Ware, HelpSpot, InforManager, Just click it!, Learn@Gateway, Kids
BackPack, SERVE-TO-ORDER, Server Watchdog, the Spotted G Gateway Logo and the Spotted G Logo,
SpotShop, Spotshop.com, and Your:)Ware are trademarks of Gateway, Inc. Intel, Intel Inside logo, and Pentium
are registered trademarks and MMX is a trademark of Intel Corporation. Microsoft, MS, MS-DOS, and Windows
are trademarks or registered trademarks of Microsoft Corporation. All other product names mentioned herein are
used for identification purposes only, and may be the trademarks or registered trademarks of their respective
companies.
. In no event will Gateway be liable for direct, indirect, special,
Notices
Macrovision statement
If the projector is connected to a computer that has a DVD drive and an analog TV Out port, the following
paragraph applies:
This product incorporates copyright protection technology that is protected by method claims of certain U.S.
patents and other intellectual property rights owned by Macrovision Corporation and other rights owners. Use of
this copyright protection technology must be authorized by Macrovision Corporation, and is intended for home
and other limited viewing uses only unless otherwise authorized by Macrovision Corporation. Reverse
engineering or disassembly is prohibited.
www.gateway.com
43
Page 48

Appendix A: Safety, Regulatory, and Legal Information
44
www.gateway.com
Page 49

www.gateway.com
Page 50

MAN 205 PROJECTOR USR GDE R0 3/03
 Loading...