


Contents
1 Checking Out Your Gateway Solo 1200 ..........................1
Front .............................................................2
Left...............................................................3
Right .............................................................4
Back..............................................................6
Bottom ............................................................7
Identifyingyourmodel ................................................8
Accessories ........................................................9
2GettingStarted..................................................11
ConnectingtheACadapter ...........................................12
Protectingfrompowersourceproblems..............................14
Startingyournotebook ..............................................15
Wakingupyournotebook.........................................16
Turningoffyournotebook ............................................17
Switchinguseraccounts .............................................18
Statusindicators ...................................................20
Usingthekeyboard .................................................22
Keys .........................................................23
Systemkeycombinations .........................................24
Multi-functionbuttons ............................................26
UsingtheEZPadtouchpad ..........................................28
Usingthetouchpad ..............................................29
Connectingthemodem ..............................................31
ConnectingtoanEthernetnetwork ....................................32
Broadband Internet connections . . . . . ...............................33
Aboutinstallingaprinter,scanner,orotherperipheraldevice................34
3GettingHelp....................................................35
HelpSpot .........................................................36
HelpSpotVideos ................................................38
Onlinehelp .......................................................39
GatewayWebsite ..................................................40
4 Windows Basics ................................................41
AbouttheWindowsenvironment ......................................42
Usingthedesktop ..................................................43
UsingtheStartmenu ............................................44
IdentifyingWindowitems.............................................45
i

Please check out our eBay auctions for more great
deals on Factory Service Manuals:

Workingwithfilesandfolders .........................................47
Viewingdrives ..................................................47
Creatingfolders .................................................48
Copyingandmovingfilesandfolders ................................49
Deletingfilesandfolders ..........................................51
Browsingforfilesandfolders ......................................53
Searchingforfiles ...................................................54
UsingtheSearchutility ...........................................55
Workingwithdocuments .............................................57
Creatinganewdocument .........................................57
Savingadocument ..............................................59
Openingadocument .............................................60
Printingadocument ..............................................61
Shortcuts..........................................................62
Transferringsoftwareandhardwarefromyouroldcomputer .................63
UsingtheFilesandSettingsTransferWizard..........................63
Transferringfiles.................................................63
TransferringInternetsettings .......................................65
Reinstallingyouroldprinterorscanner...............................66
Reinstallingyouroldprograms .....................................67
5 Using the Internet ...............................................69
LearningabouttheInternet ...........................................70
SettingupanInternetaccount .........................................71
AccessingyourInternetaccount ....................................72
UsingtheWorldWideWeb ...........................................73
ConnectingtoaWebsite..........................................74
Downloadingfiles ................................................75
Usinge-mail .......................................................76
Sendinge-mail ..................................................76
Checkingyoure-mail .............................................77
6 Using Multimedia ................................................79
Usingdiskettes .....................................................80
UsingtheCDdrive...............................................81
Adjustingthevolume ................................................83
Recordingandplayingaudio ..........................................87
Playing audio and video files with the Windows Media Player . . . . . . . . . . . . .89
UsingMusicMatch ..................................................90
PlayingCDs ....................................................90
Creatingmusicfiles ..............................................92
Editingtrackinformation...........................................93
Buildingamusiclibrary ...........................................94
ii

ListeningtoInternetradio .........................................96
Usingadvancedfeatures .........................................97
7 Sending and Receiving Faxes ..................................99
Settingupyourcoverpage ......................................100
Sendingafax .................................................102
Faxingfromprograms...........................................104
Receivingandviewingafax ......................................104
8 Managing Power ...............................................105
Monitoringthebatterycharge ........................................106
Rechargingthebattery .............................................106
Changingbatteries ................................................107
Extendingbatterylife...............................................109
Conservingbatterypower ........................................109
Usingalternatepowersources ....................................109
Changingpowermodes .........................................110
Changingautomaticpowersettings ................................111
9TravelTips.....................................................117
Modem..........................................................118
Radiofrequencywirelessconnections .................................118
Files ............................................................119
Security .........................................................119
Power...........................................................120
10 Customizing Your Notebook ...................................121
Adjustingthescreenanddesktopsettings ..............................122
Adjustingthecolordepth ........................................122
Adjustingthescreenresolution ...................................124
Applyingacolorscheme ........................................125
Changing the desktop background . . ..............................126
Selectingascreensaver ........................................128
Changingthetouchpadsettings ......................................130
Programmingthemulti-functionbuttons ................................131
Allocatingsystemmemory ..........................................131
11 Upgrading Your Notebook .....................................133
AddingaPCCard .................................................134
Preventingstaticelectricitydischarge ..................................136
Installingmemory .................................................137
Replacingtheharddrive ............................................141
iii

12 Networking Your Computer.....................................143
Usinganetwork ...................................................144
Sharing a single Internet connection . . . .............................144
Sharingdrives .................................................144
Sharingperipheraldevices........................................145
Streamingaudioandvideofiles ...................................145
Playingmulti-playergames .......................................145
Introducing the Gateway Connected Home . .............................146
ComponentsofaGatewayConnectedHome.........................147
Selectinganetworkconnection .......................................148
Wiredconnections ..............................................148
Wirelessconnections ............................................149
Assessingyourconnectionneeds ..................................150
Comparingdatatransferspeed ....................................152
Networkshoppinglist ...............................................154
HPNA ........................................................154
Ethernet ......................................................155
WirelessEthernet ...............................................156
Bluetooth .....................................................156
Formoreinformation ...............................................157
13 Maintaining Your Notebook.....................................159
Caringforyourcomputer ............................................159
Creatinganemergencystartupdiskette ................................161
Protectingyourcomputerfromviruses .................................163
Managingharddrivespace ..........................................165
Checkingharddrivespace .......................................165
UsingDiskCleanup .............................................166
Checkingtheharddriveforerrors..................................167
Defragmentingtheharddrive .....................................169
Backingupfiles ................................................171
Using the Scheduled Task Wizard . . . . .............................172
Recalibratingthebattery.............................................173
Cleaningyourcomputer .............................................174
Cleaningtheexterior ............................................174
Cleaningthekeyboard ...........................................175
Cleaningthescreen .............................................175
Cleaningthemouse .............................................175
14 Restoring Software .............................................177
Reinstallingdevicedrivers ...........................................177
Reinstallingdevicedrivers ........................................178
iv

Updatingdevicedrivers.............................................180
ReinstallingWindows ..............................................181
ReinstallingWindows ...........................................181
Reinstallingprograms ..............................................182
15 Troubleshooting ...............................................185
Safetyguidelines ..................................................186
Troubleshooting ...................................................187
Firststeps ....................................................187
Softwaresupporttools..............................................188
CDdrive .....................................................189
Deviceinstallation ..............................................191
Diskettedrive .................................................191
Filemanagement ..............................................192
Harddrive ....................................................193
Internet ......................................................194
Keyboard.....................................................195
LCDpanel ....................................................195
Memory ......................................................196
Modem ......................................................196
Mouse .......................................................200
Networks .....................................................200
Passwords....................................................200
PCCards.....................................................201
Power .......................................................201
Printer .......................................................202
Sound .......................................................203
Video ........................................................203
Telephonesupport.................................................205
BeforecallingGatewayTechnicalSupport ..........................205
Telephonenumbers ............................................206
Tutoringandtraining ...............................................207
Self-help .....................................................207
Tutoring ......................................................207
Training ......................................................208
A Safety, Regulatory, and Legal Information .....................209
Index..............................................................227
v

vi

Checking Out Your Gateway Solo 1200
Tips & Tricks Toaccessthecontentsofthis guide while you are traveling,
download an electronic copy from
www.gateway.com/support/manlib/.
1
www.gateway.com
1
Chapter 1: Checking Out Your Gateway Solo 1200
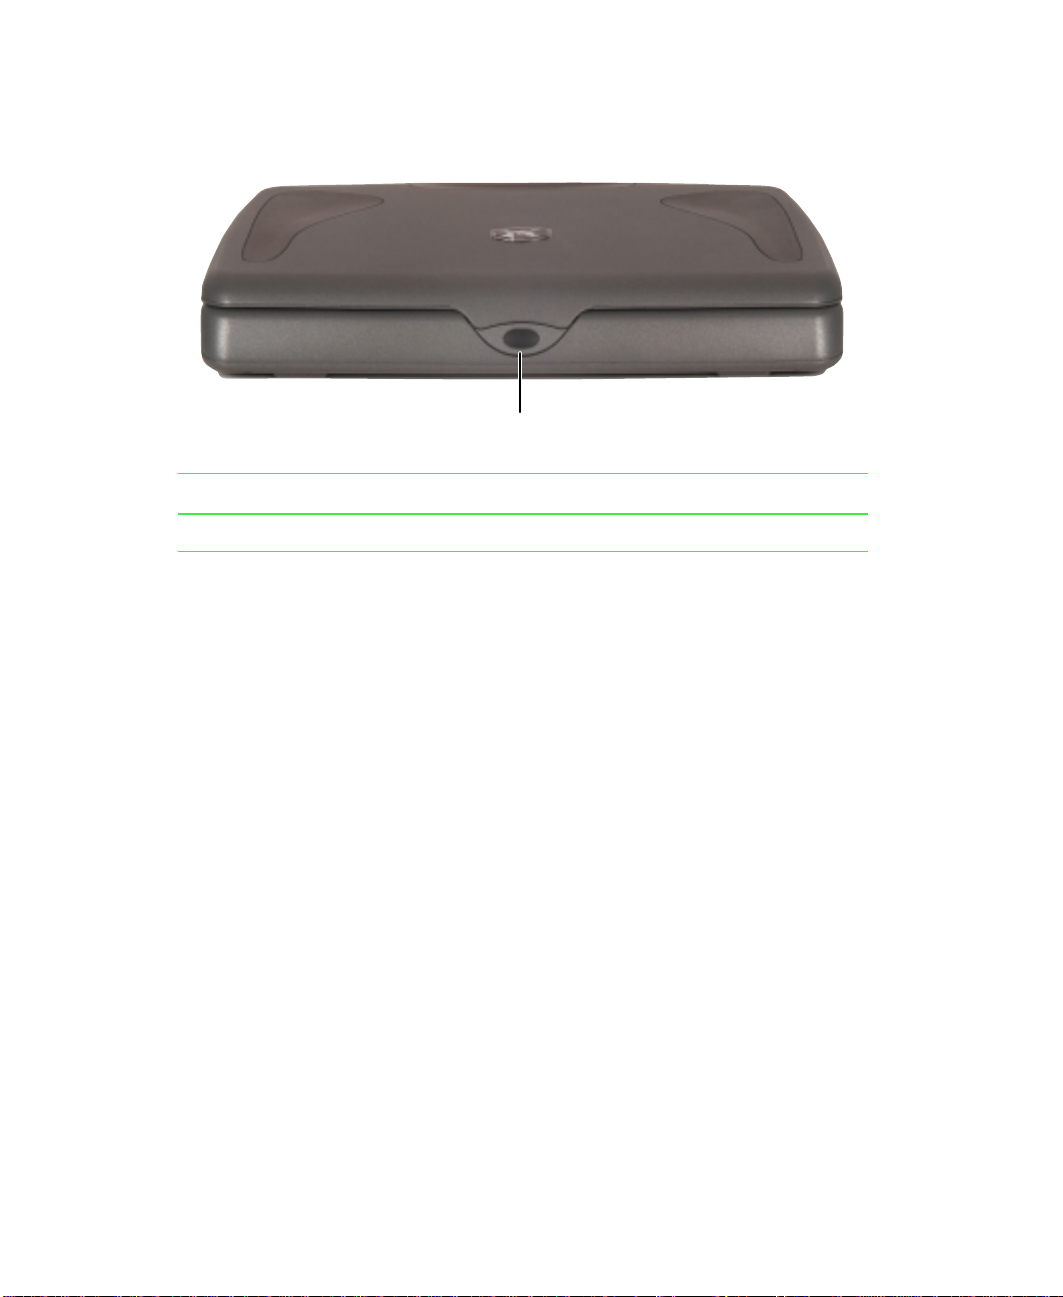
Front
Cover release latch
Component Description
Cover release latch Open the notebook cover by pressing the release latch.
2
www.gateway.com

Left
Left
PC Card
eject button
Component Icon Description
PC Card eject button Press the eject button to remove a PC Card from the
PC Card slot Insert one TypeI, II, or III PC Card into this slot. For
Diskette drive Insert a standard 3.5-inch diskette into this drive. For
Diskettedrive ejectbutton Press the eject button to remove a diskette from the
PC Card slot Diskette drive Diskette drive
eject button
PC Card slot.
more information, see “Addinga PC Card”on page 134.
more information, see “Using diskettes” on page 80.
drive.
www.gateway.com
3

Chapter 1: Checking Out Your Gateway Solo 1200
Right
CD drive
CD drive
indicator
Component Icon Description
CD drive Insert CDs into this drive. For more information, see
CD drive eject
button
“Using the CD drive” on page 81.
Headphone
jack
Power
indicator
Battery
charge
indicator
Modem jack
Microphone jack
CD drive indicator Lights up when the computer is accessingthe CD drive.
CD drive eject button Press the eject button to open the disc tray.
Microphone jack Plug a microphone into this jack.
Headphone jack Plug headphones or amplified speakers into this jack.
Modem jack Plug a modem cable into this jack.
4
www.gateway.com

Component Icon Description
Battery charge indicator The LED shows the battery activity and status.
■
Green – battery is fully charged.
■
Orange – battery is being charged.
■
Red – battery is low.
■
Blinking and red – battery is very low.
■
Blinking and orange – battery is malfunctioning.
Power indicator Lights up when the notebook is turned on and shows
notebook power status:
■
LED on – notebook is ON.
■
LED off – notebook is OFF or in Hibernate.
■
LED flashing – notebook is in Standby.
Right
www.gateway.com
5

Chapter 1: Checking Out Your Gateway Solo 1200
Back
USB ports Parallel port
Ventilation fan
Monitor port
Kensington
lock slot
Power
connector
Ethernet
jack
Component Icon Description
USB ports Plug USB (Universal Serial Bus) devices (such as a
USB Iomega™ Zip™drive,printer,scanner,or camera)
into these ports.
Parallel port Plug a parallel printer into this port.
Ventilation fan Helps cool internal components. Do not block or insert
objects into these slots.
Monitor port Plug an external (VGA) monitor into this port.
Kensington™ lock slot Secure your computer to an object by connecting a
Kensington cable lock to this slot.
Ethernet jack (optional) Plug a 10/100 Ethernet network cable into this jack. For
more information, see “Connecting to an Ethernet
network” on page 32 and “Networking Your Computer”
on page 143.
Power connector Plug the AC adapter cable into this connector.
6
www.gateway.com

Bottom
Hard drive
assembly
Certificate of
authenticity
label
Memory
bay
Battery
release
latch
Battery
Bottom
System
identification
label
Component Icon Description
Hard drive assembly Remove this assembly to replace the hard drive.
Certificate of Authenticity
label
Memory bay Install a memory module in this bay.
Battery release latch Slide to release the battery.
Battery Insert the battery into this bay.
System identification
label
Find the registration key for the operating system onthis
label.
Find the product model number and serial number on
this label.
www.gateway.com
7

Chapter 1: Checking Out Your Gateway Solo 1200
Identifying your model
The label on the bottom of your computer contains informa tion that
identifies your notebook model. Gateway Technical Support will need this
information if you call for assistance. Label information varies by model.
Gateway
model
number
Gateway
serial
number
Revision
code and
display
type/
processor
size
Internal
wireless
devices
Gateway part
number
8
www.gateway.com

Accessories
Gateway offers accessories that can help you make the most of using your
notebook.
Batteries and automobile/airplanepower adapters
If you run your notebook on battery power for extended periods, you may
want to buy an additional battery so that you can swap batteries when
necessary.
With an automobile/airplane power adapter, you can save battery power by
plugging your notebook into an automobile cigarette lighter or an airplane
in-flight power receptacle.
Carrying cases
Gateway has large-capacity carrying cases if you need additional space for
accessories or supplies.
External devices
Y ou can attach external devices suc h as a keyboard, mouse, printer, o r monitor
to your notebook.
Accessories
Memory
Large programs, such as multimedia games or graphics programs, use a lot of
memory. If your programs are running more slowly than you think they
should, try adding more memory.
Printers
You can attach many types of printer to your computer. The most common
types are inkjet and laser printers, which print in color or black and white.
Inkjet printers and cartridges are relatively inexpensive, but usually they are
slower than laser printers. Using an inkjet color printer, you ca n print pictures,
banners, and greeting cards, as well as documents.
Laser printers and cartridges are more expensive, but usually they print much
faster than inkjet printers. Laser printers are better than inkjet printers when
you are printing large documents.
www.gateway.com
9

Chapter 1: Checking Out Your Gateway Solo 1200
10
www.gateway.com

Getting Started
This chapter provides basic information about your Gateway notebook. Read
this chapter to find out:
■ How to connec t the AC a dapter
■ How to start and turn off your notebook
■ How to use the keyboard
■ How to use the E Z Pad™ to uchpad
■ How to connec t the mode m
■ How to connec t to a netw ork
■ How to ins tall periphera l devices
Warning Radio frequency wireless communication can interfere
with equipment on commercial aircraft. Current aviation
regulations require wireless devices to be turned off while
traveling in an airplane. IEEE 802.11b (also known as
wireless Ethernet or Wifi) and Bluetooth communication
devices are examples of devices that provide wireless
communication.
2
Important If your system came equipped with an internal radio
frequency wireless device, see “Safety, Regulatory, and
Legal Information” on page 209 for general wireless
regulatory andsafety guidelines. Tofind outif yoursystem
has an internal wireless device, check the label (see
“Identifying your model” on page 8.
www.gateway.com
11

Chapter 2: Getting Started
Connecting the AC adapter
Y ou can run y our notebook using an AC adapter or the notebook battery . The
battery was shipped to you partially charged. You should use the AC adapter
right away to fully charge the battery. Allow 24 hours for the battery to fully
charge.
Important If the battery is not fully charged before you use your
notebook on battery power for the first time, the battery life
may be much shorter than you expect. If the battery life
seems short even after being charged for 24 hours, the
battery may need to be recalibrated. For information on
recalibratingthe battery,see “Recalibrating the battery” on
page 173.
To connect the AC adapter:
1 Connect the power cord to the AC adapter.
12
Warning Replace the power cord if it becomes damaged. The
replacement cord must be of the same type and voltage
rating as the original cord or the notebook may damaged.
www.gateway.com

Connecting the ACadapter
2 Connect the AC adapter to your notebook’s power connector.
3 Plug the power cord into a wall outlet.
The battery charge indicator turns on. If the battery charge indicator does
not turn on, disconnect the adapter from your notebook and repeat
Step 2.
4 When you finish using your notebook for the first time, turn the
notebook off and leave the notebook connected to AC power for at least
24 hours.
5 If the battery does not show a full charge after 24 hours, contact Gateway
Technical Support at www.gateway.com/support/contact.
Warning Do not attempt to disassemble the AC adapter. The
AC adapter has no user-replaceable or user-serviceable
parts inside. The AC adapter has dangerous voltages that
can cause serious injury or death. ContactGatewayabout
returning defective AC adapters.
www.gateway.com
13

Chapter 2: Getting Started
Protectingfrom power source problems
During a power surge, the voltage level of electricity coming into your
computer can increase to far above normal levels and cause data loss or system
damage. Protect your computer and peripheral devices by connecting them
to a surge protector, which absorbs voltage surges and prevents them from
reaching your computer.
Warning High voltages can enter your computer through both the
power cord and the modem connection. Protect your
computer by using a surge protector. If you have a
telephone modem, use a surge protector that has a
modem jack. If you have a cable modem, use a surge
protector that has an antenna/cable TV jack. During an
electrical storm, unplug both the surge protector and the
modem.
14
www.gateway.com
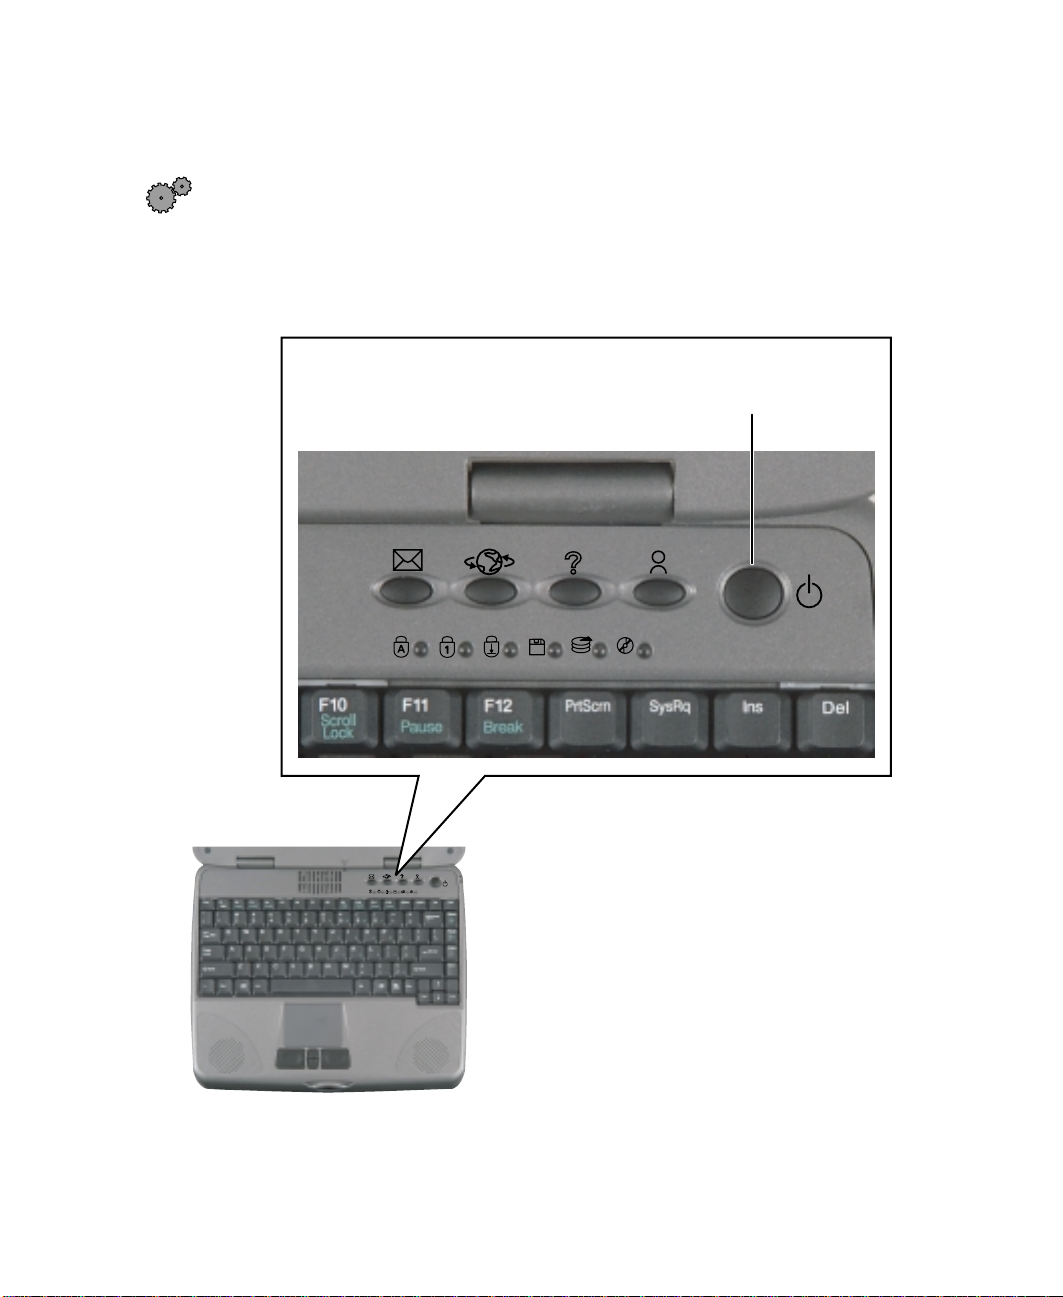
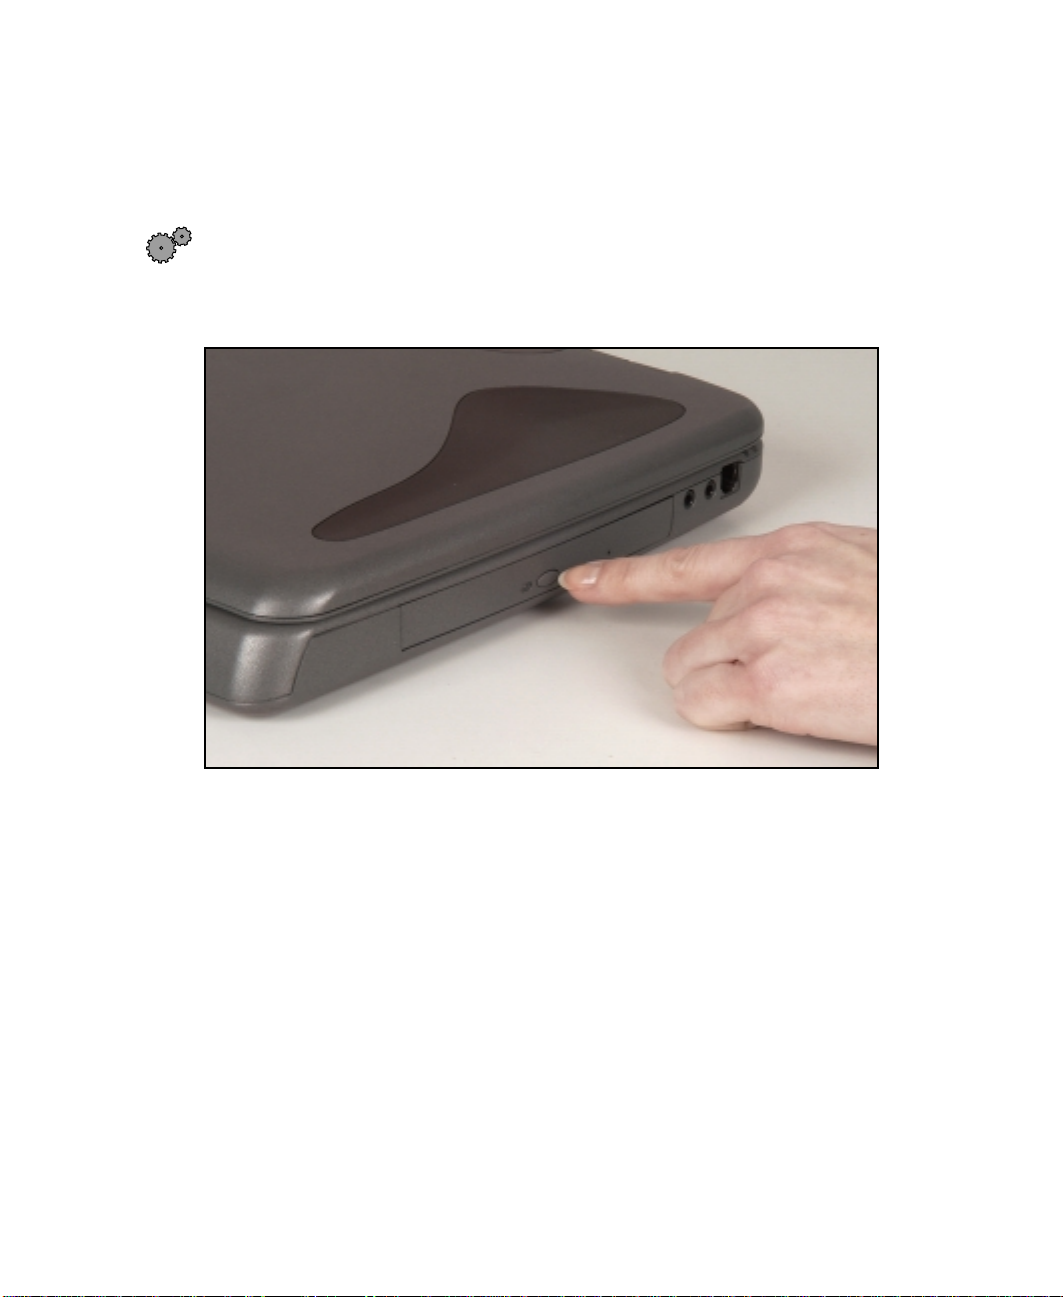
Starting your notebook
To start the notebook:
1 Open your notebook by pressing the latch on the front o f your notebook
and lifting the LCD panel.
2 Press the power button located above the keyboard.
Starting your notebook
Power button
www.gateway.com
15

Chapter 2: Getting Started
The power button is preset to On/Off mode. However, you can also set
it to function in Standby/Resume mode. For instructions on changing
the power button mode, see “Changing automatic power settings” on
page 111.
3 If you are starting your computer for the first time, follow the on-screen
instructions to set up your computer.
Waking up your notebook
When you have not used your notebook for several minutes, it enters a
power-saving mode called Standby. While in Standby, the power indicator
flashes.
If your notebook is in Standby mode, “wake” it up by pressing the power
button. For more information on changing power-saving settings, see
“Managing Power” on page 105.
16
www.gateway.com

Turning off your notebook
To turn off your notebook:
■ Click Start, then click Turn Off Computer, then click Turn Off. Windows
shuts down and turns off your computer.
Important If for some reason you cannot use the Turn Off Computer
option in Windows to turn off your notebook, press and
hold the power button for about five seconds.
Turning off your notebook
www.gateway.com
17
Chapter 2: Getting Started
Switching user accounts
When you first turn on your notebook, you have the option to add different
user accounts. These user accounts can be customized for each person that
uses the notebook. Y ou can add, delete, or modify existin g user accounts. You
can also switch (change) user accounts without turning off your notebook.
Help and
Support
For more information about adding, deleting, and
modifyingyouruser accounts, click Start, then select Help
and Support.
To add, delete, or modify user accounts:
1 Click Start, select Control Panel, th en double-click UserAccounts. The User
Accounts window opens.
2 Follow the on-screen prompts to add, delete, or m odify a user account.
18
www.gateway.com
Switching user accounts
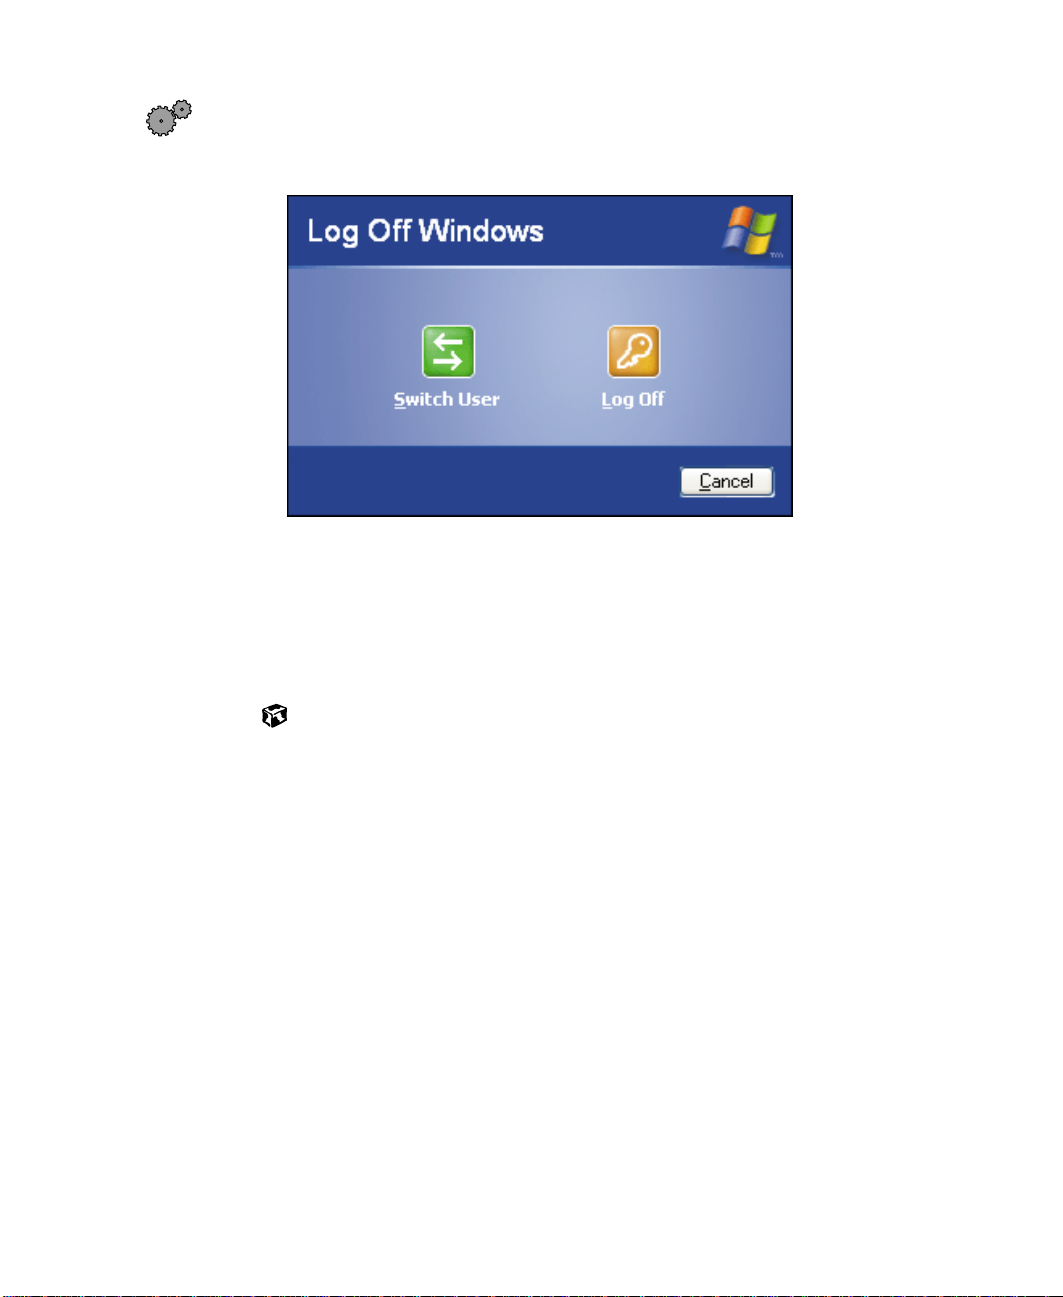
To switch user accounts:
1 Click Start, then Log Off. The Log Off Windows dialog box opens.
2 Click Switch User to switch between your user accounts. The Windows
logon screen opens.
3 Select the user account that you want to activate. When you switch
between users, any programs that were running for the previous user
continue to run.
www.gateway.com
19

Chapter 2: Getting Started
Status indicators
Caps lock
Pad lock
Diskette
drive
Scroll lock
Hard
drive
CD drive
20
www.gateway.com

Status indicators
This light turns
on...
1
When...
Caps Lock is turned on.
Pad Lock is turned on.
Scroll Lock is turned on.
The notebook is accessing the diskette drive.
The notebook is accessing the hard drive.
The notebook is accessing the CD drive.
www.gateway.com
21
Chapter 2: Getting Started
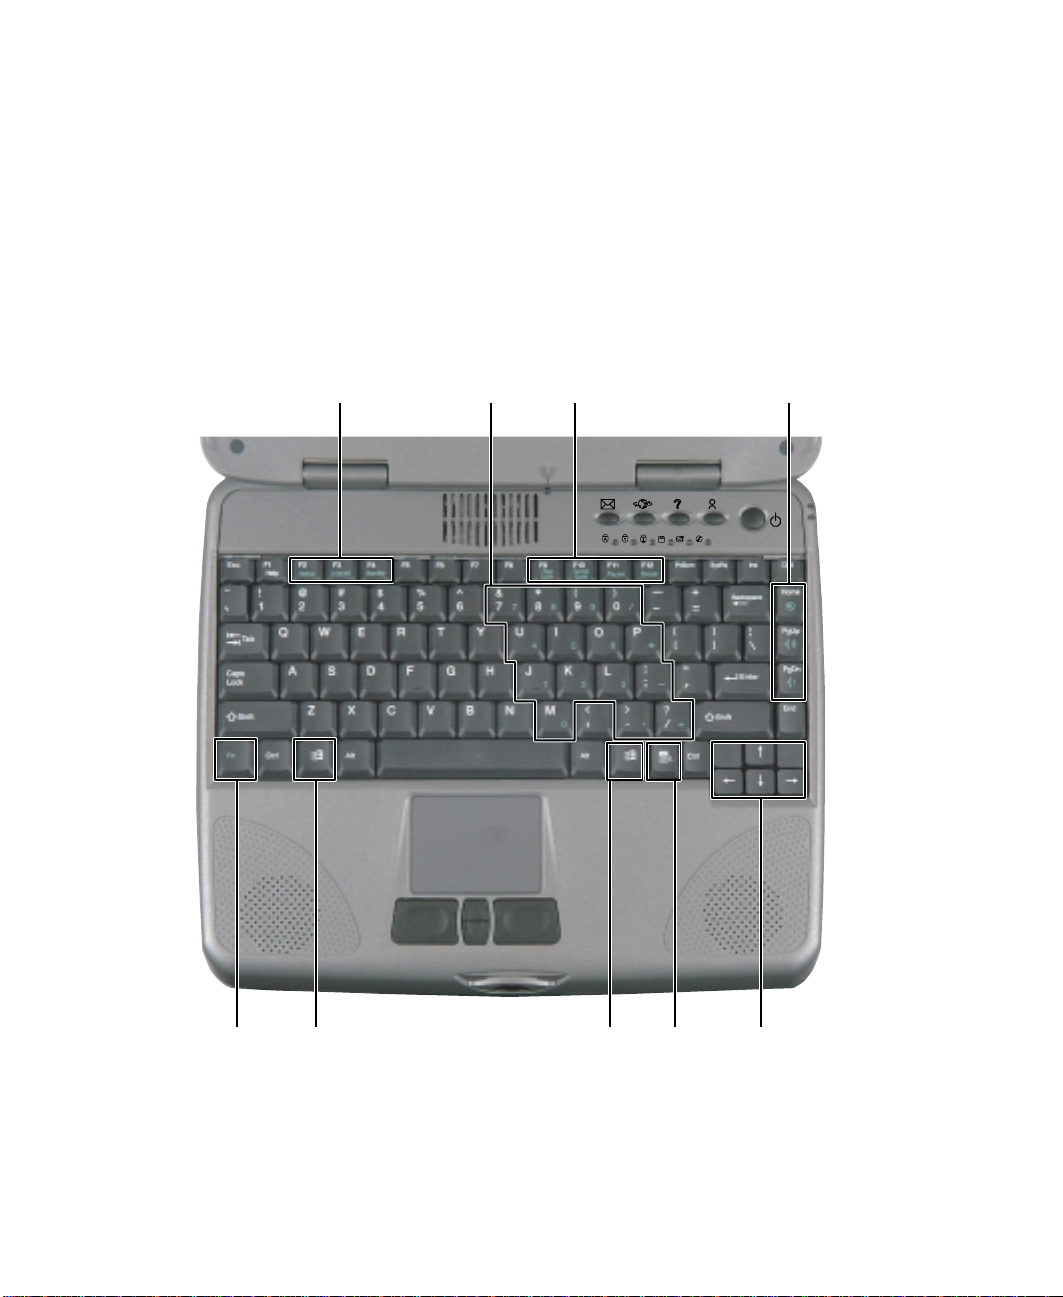
Using the keyboard
Your notebook features a full-size keyboard that has the full functionality of
a desktop computer keyboard. Many of the keys have been assigned alternate
functions, including shortcut keys for Windows, function keys for specific
system operations, and the Pad Lock keys for the numeric keypad.
You can attach an external keyboard to the notebook using a USB port. You
do not need to shut down the notebook to connect a USB keyboard.
System
keys
Numeric
keypad
System
keys
Navigation and
volume keys
22
N key Windows
F
key
Windows
key
www.gateway.com
Application
key
Arrow
keys
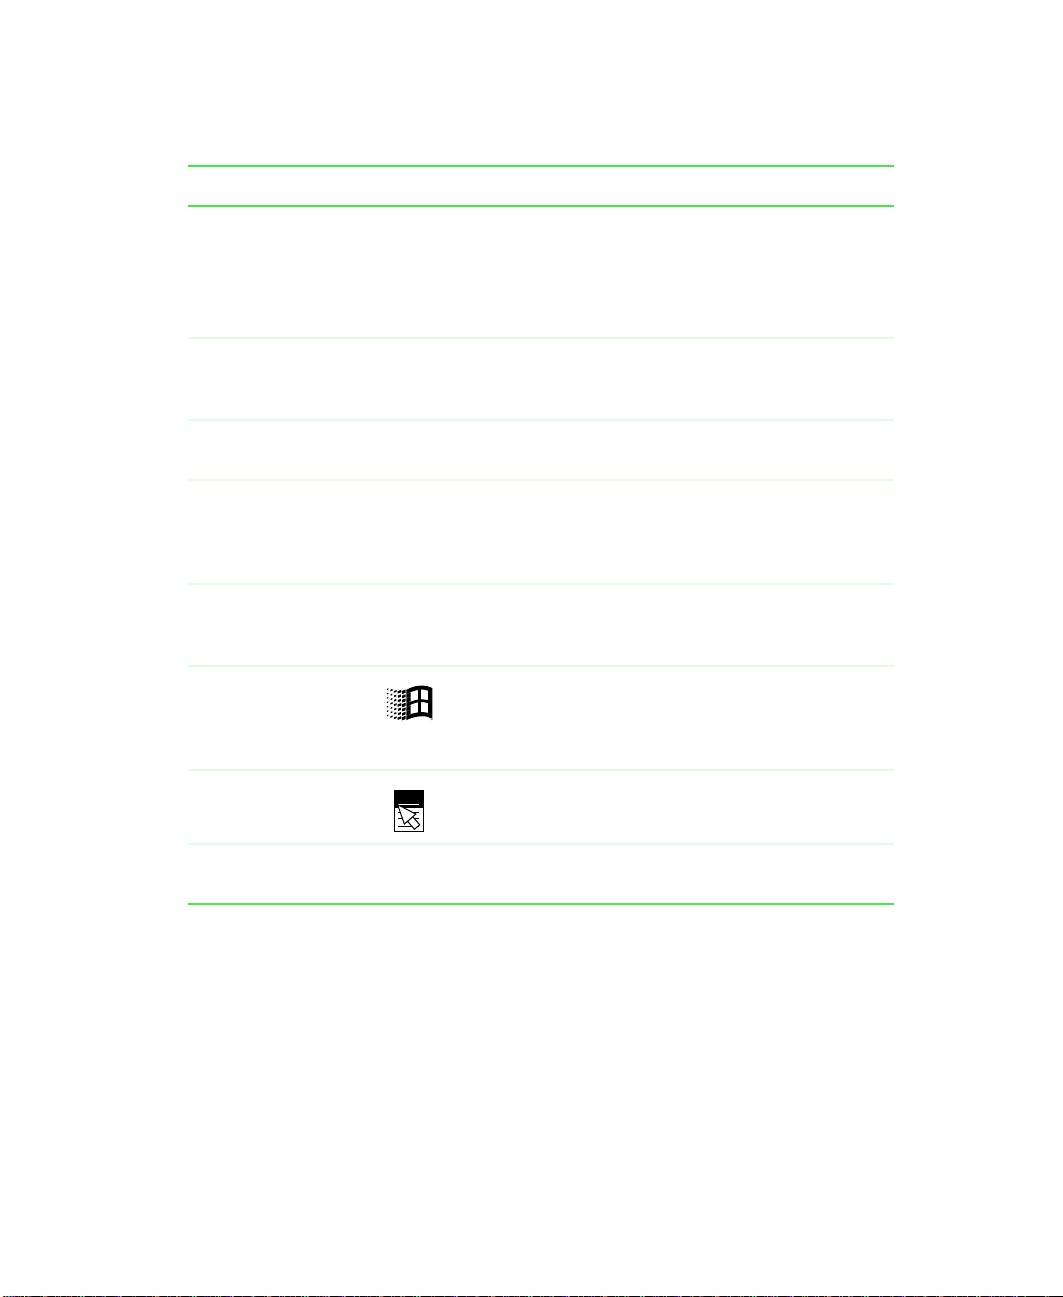
Keys
Component Icon Description
Function keys Press thesekeys labeledF1 to F12 to perform actions
in programs. For example, pressingF1 mayopen help.
Each program usesdifferentfunction keys for different
purposes. Refer to the program documentationto find
out more about the function key actions.
Numeric keypad Usethese keysto type numberswhen numeric keypad
is turned on. Press
numeric keypad.
System keys Press these green-colored keys in combination with
N key to perform a specific action.
the F
Navigation keys Press these keys to move the cursor to the beginning
of a line, to the end of a line, up the page, down the
page, to the beginning of a document, or to the end
of a document.
N key Press the FN key in combination with a green-colored
F
system key (such as S
specific action.
FN+PAD LOCK to turn on the
TANDBY or PAUSE)toperforma
Using the keyboard
Windows key Press to open the Windows Start menu. These keys
canalsobeusedincombinationwithotherkeysto
open utilities likeF (Search utility), R (Run utility), and
E (Explorer utility).
Application key Press for quick access to shortcut menus and help
assistants in Windows.
Arrow keys Press these keys to move the cursor up, down, right,
or left.
www.gateway.com
23
Chapter 2: Getting Started
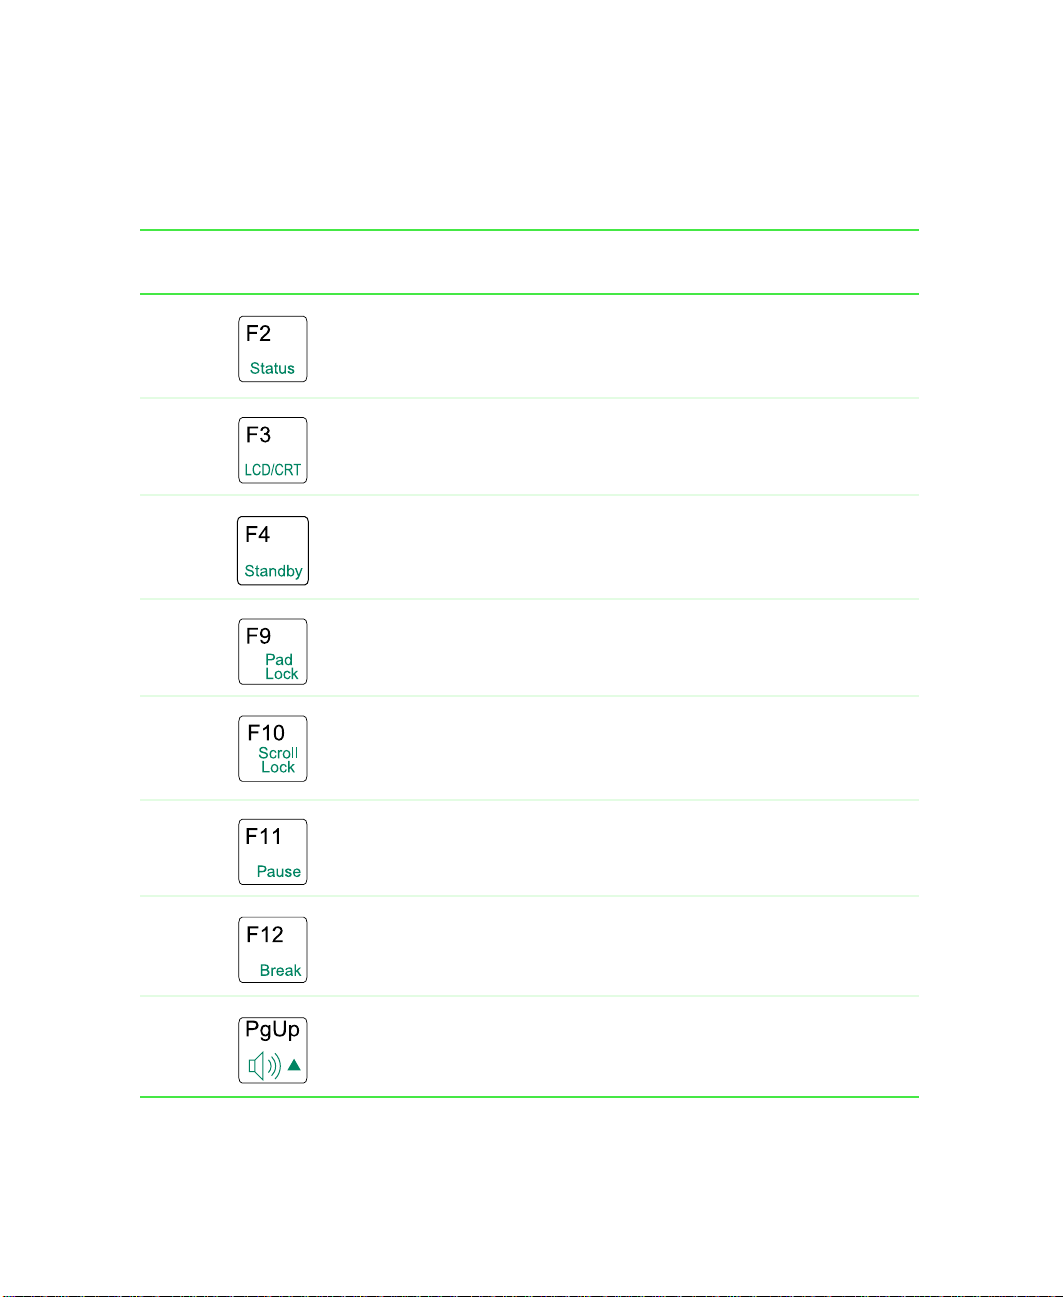
System key combinations
When you press the FN key and a system key at the same time, the notebook
performs an action identified by the green text on the key.
Press and hold F
N while
pressing this system key...
To...
Display the power status box in the upper left corner of your
screen. The menu shows the battery charge level, the BIOS
version,and whether the AC adapter is being used. Press the
key combination again to close this box.
Toggle the notebook screen between the LCD, an external
monitor, or both at the same time. A monitormust be plugged
into the monitor port on the notebook.
EnterStandbymode. Press the power button to leaveStandby
mode.
Turn on Pad Lock so you can use the numeric keypad. Press
this key combinationagain to turn off Pad Lock.The Pad Lock
status indicator lights up while this function is turned on.
Pause the text scrolling in a DOS screen. The Scroll Lock
statusindicator appears whenthis function isturned on.Press
the key combinationagain tocontinue scrolling.(This function
isonlyavailableinsomeprograms.)
Pause execution of a DOS program. (This function is only
available in some programs.)
24
Stop the currentlyrunningDOS program.(This functionisonly
available in some programs.)
Increase the volume.
www.gateway.com

Using the keyboard
Press and hold FN while
pressing this system key...
To...
Decrease the volume.
Mute the volume.
www.gateway.com
25

Chapter 2: Getting Started
Multi-function buttons
E-mail Internet Help
User-defined
shortcut
Button Icon Press to...
E-mail Open your e-mail program.
Internet Open your Web browser.
26
www.gateway.com

Button Icon Press to...
Help Open online help.
User-defined shortcut Open the program you assign to this key.
For more information, see “Programming the multi-function buttons” on
page 131.
Using the keyboard
www.gateway.com
27

Chapter 2: Getting Started
Using the EZ Pad touchpad
The EZ Pad™ consists of a touchpad, two buttons, and a rocker switch.
Touchpad
28
Left touchpad
button
Rocker
switch
www.gateway.com
Right touchpad
button

Using the EZ Pad touchpad
When you move your finger on the touchpad, the pointer (arrow) on the screen
moves in the sam e directi on.
You can use the EZ-Pad left and right buttons below the touchpad to select
objects. Y ou can scroll usi ng the rocker switch between the touchpad buttons.
Scrolling capabilities are available in some Windows applications, including
Microsoft Office.
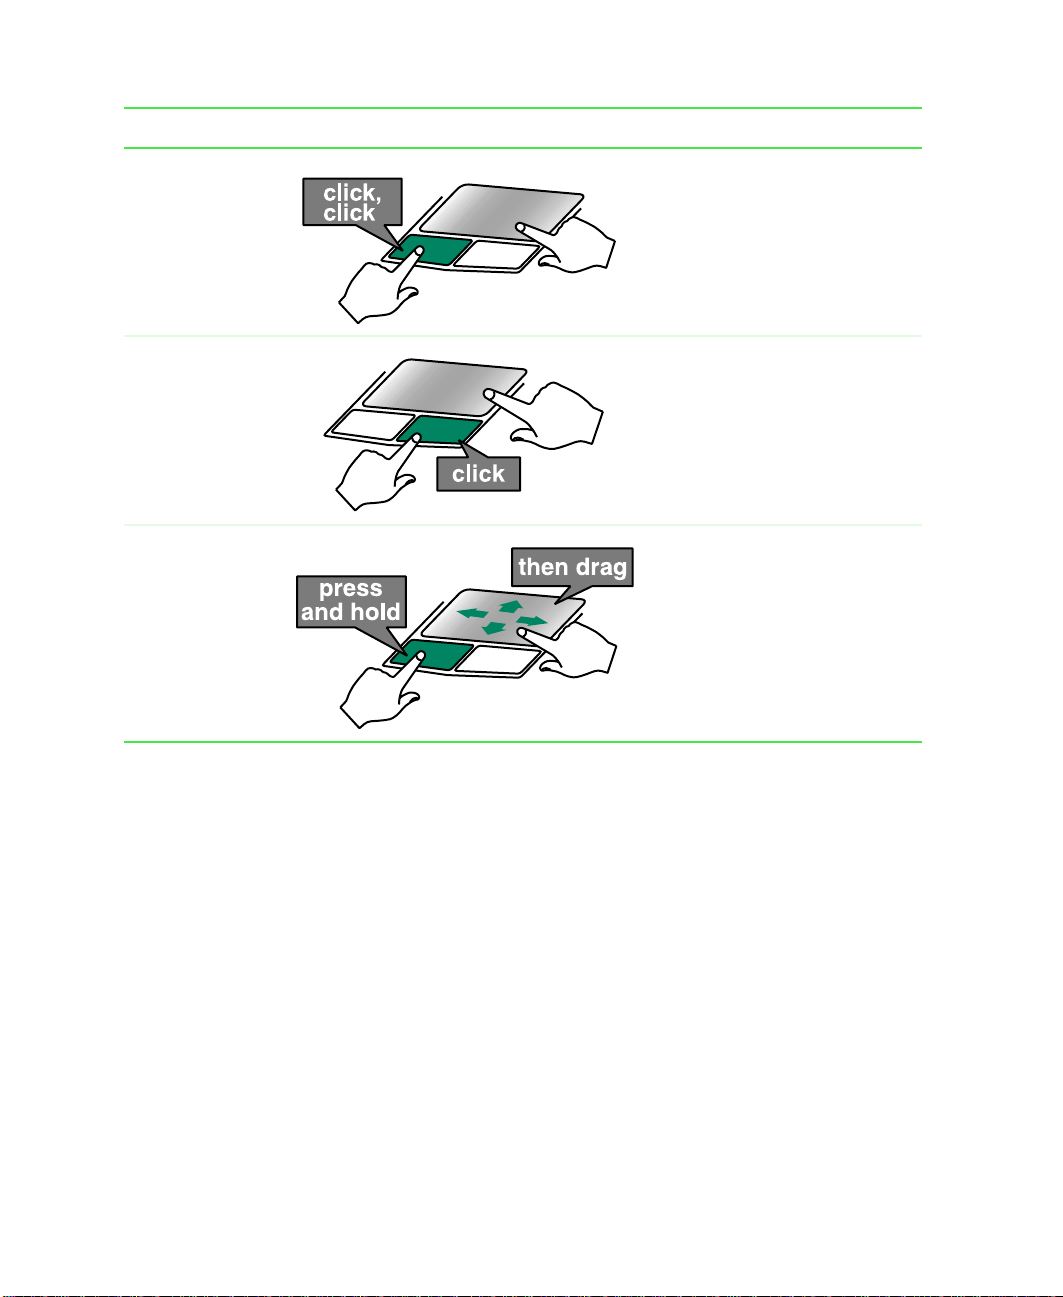
Using the touchpad
To... Do this...
Movethe pointer
on the screen.
Select an object
on the screen.
Move your finger around on the
touchpad.If yourun outofspace
and need to move the pointer
farther,lift yourfinger,move it to
the middle ofthe touchpad,then
continue moving your finger.
Position the pointer over the
object. Press the left button
below the touchpad once. This
clicking
action is called
.
www.gateway.com
29
Chapter 2: Getting Started
To... Do this...
Start a program
or open a file or
folder.
Access a
shortcut menu or
find more
information
about an object
on the screen.
Move an object
on the screen.
Position the pointer over the
object. Press the left button
below the touchpad twice in
rapid succession. This action is
called
double-clicking
Position the pointer over the
object. Quickly press and
release the right button once.
This action is called
right-clicking
Position the pointer over the
object. Press the left button and
hold it down, then use the
touchpad to move (drag) the
object to the appropriate part of
the screen. Release the button
to drop the object where you
want it.
.
.
30
www.gateway.com

Connecting the modem
If your notebook has a modem jack, the notebook has a built-in V.92 56K
modem.
Caution To reduce the risk of fire, use only a No. 26 AWG or larger
telecommunications line cord.
To connect the modem:
1 Insert one end of the modem cable into the modem jack on the right
side of the notebook.
Connecting the modem
2 Insert the other end of the modem cable into a telephon e wall jack. The
modem will not work with digital or PBX telephone lines.
3 Start your notebook, then start your communications software.
www.gateway.com
31

Chapter 2: Getting Started
Connecting to an Ethernet network
If your notebook has a network j ack, y ou c an conne c t it to a 10/100 Ethernet
network.
To connect to a network:
1 Insert one end of the network cable into the network jack on the
back of the notebook.
32
2 Insert the other end of the network cable into a network wall jack. Ask
your network administrator to help you select the correct network jack.
Y our notebook is now phy sically connected to the ne twork. Y our network
administrator can help you log onto your network.
www.gateway.com

BroadbandInternet connections
You can use your computer’s Ethernet jack for more than just networking.
Many broadband Internet connections, such as cable modems and DSL
modems, connect to your computer’s Ethernet jack. For more information,
see “Using the Internet” on page 69 and “Networking Your Computer” on
page 143.
Connecting to an Ethernet network
www.gateway.com
33

Chapter 2: Getting Started
About installing a printer, scanner, or other peripheral device
Your computer has two Universal Serial Bus (USB) ports and a parallel printer
port. These ports are used for connecting peripheral devices such as pr inters,
scanners, and digital cameras to your computer.
USB por ts support plug-and-play and hot swapping, which means that your
computer will usually recognize such a device whenever you plug it into the
appropriate port. When you use a USB device for the first time, your computer
will prompt you to install any software the device needs. After doing this,
you can disconnect and recon nect the device at any time.
Parallel devices are not plug-and-play. Refer to the device documentation for
detailed information and installation instructions.
34
www.gateway.com

Getting Help
This chapter tells you about additional information resources ava ilable to help
you use your computer, including:
■ HelpSpot
■
Online help
■ Gateway Web site
™
3
www.gateway.com
35

Chapter 3: Getting Help
HelpSpot
Your computer includes HelpSpot, an ea sily accessible collection of Help
information, troubleshooters, instructional videos, and automated support.
Use HelpSpot to answer questions about Windows and to help you quickly
discover and use the many features of your Gateway computer.
To start HelpSpot:
■ Click Start, then select Help and Support. HelpSpot opens.
36
If this is the first time you have started HelpSpot on your computer, you
may experience a brief wait while HelpSpot builds the help database, then
HelpSpot will display an introductory video.
www.gateway.com

You can find help information by clicking a link, performing a search, or
browsing the index. To learn about using your Gateway computer, your
mouse, and other topics, click the
Getting Started link on the HelpSpot main
page.
HelpSpot
www.gateway.com
37

Chapter 3: Getting Help
HelpSpot Videos
HelpSpot contains several short videos to help introduce you to new concepts
or show you how to perform various tasks.
To play a HelpSpot video:
■ To watch a video in HelpSpot, click VideoTutorials on the HelpSpot home
page, then click a video title. The video plays.
38
www.gateway.com

Online help
Many programs provide information online so you can research a topic or
learn how to perform a task while you are using the program. Most online
help information can be accessed by selecting a topic from a
by clicking a
You can search for information by viewing the help contents, checking the
index, searching for a topic or keyword, or browsing through the online help.
Help button.
Online help
Help menu or
www.gateway.com
39

Chapter 3: Getting Help
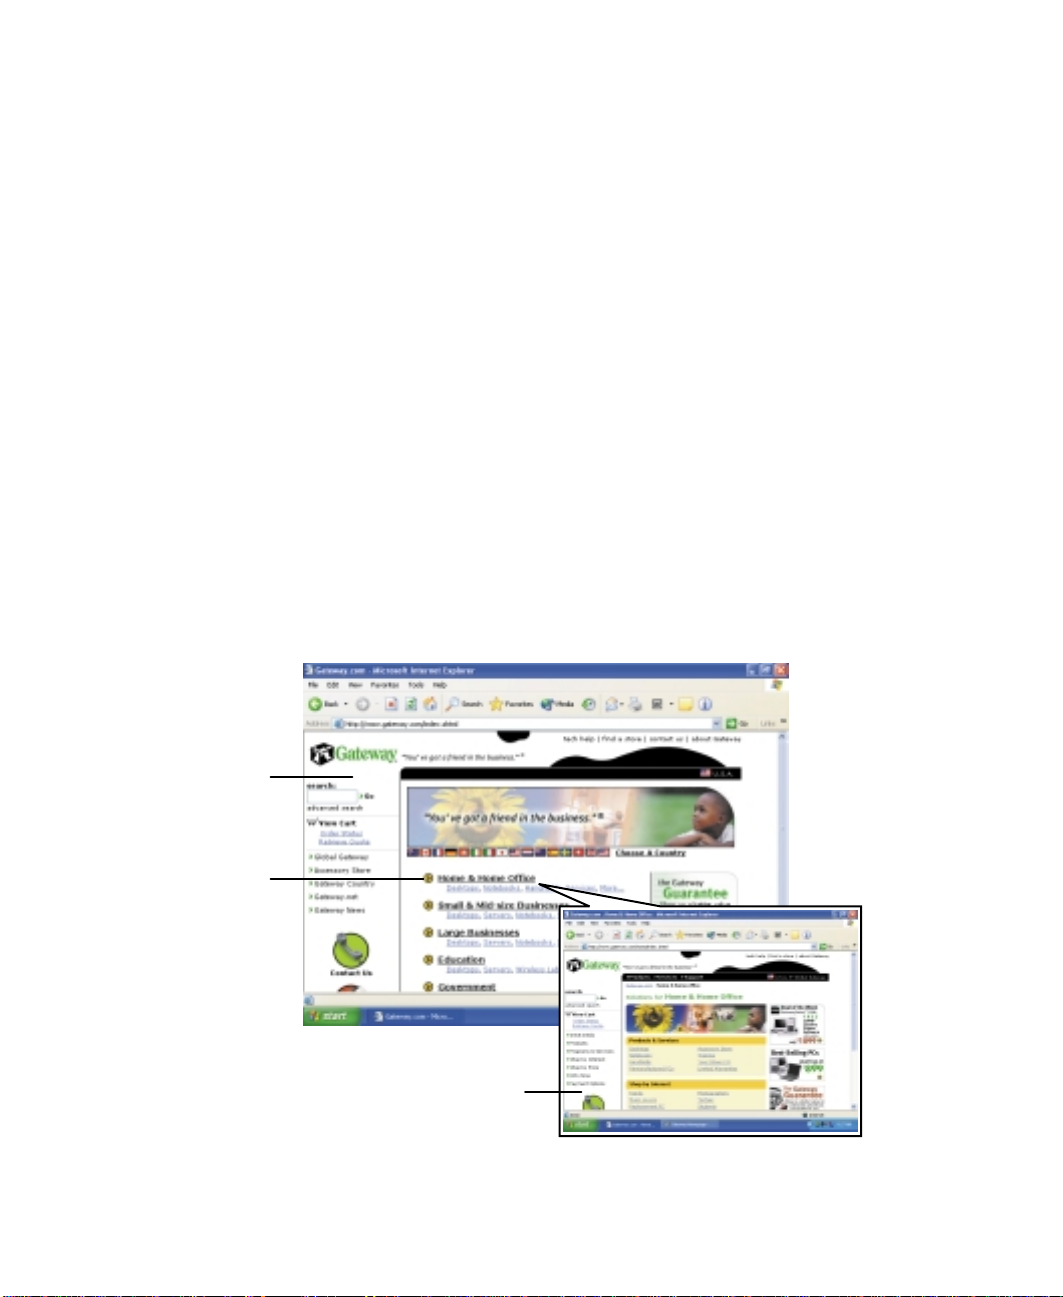
Gateway Website
Gateway provides a variety of information on its Web site to help you use
your computer.
40
Visit the Gateway Web site at www.gateway.com for:
■ Technical documentation and p roduct manuals
■ Technical tips and support, including online chat services
■ Hardware drivers
■ Order status
■ Frequently asked questions (FAQs)
For more information about connecting to the Internet, see “Learning about
the Internet” on page 70.
www.gateway.com

Windows Basics
Read this chapter to get basic information on how to:
■ Use the Windows desktop
■ Manage files and folders
■ Wo r k w it h d o c u m e n ts
■ Use shortcuts
4
Help and
Support
For more information on Windows,click Start, then select
Help and Support.
www.gateway.com
41

Chapter 4: WindowsBasics
About the Windows environment
After your computer starts, the first screen you see is the Windows desktop.
The desktop is like the top of a real desk. Think of the desktop as your
personalized work space where you open programs and perform other tasks.
Y our deskto p may be different from the example shown below , depending on
how your computer is set up.
42
www.gateway.com

Using the desktop
The desktop contains the taskbar, the Start button, and the Recycle Bin icon.
Desktop elements Description
The
taskbar
containingthe Start button onthe leftand aclock
on the right. Other buttons on the taskbar
represent programs that are running.
Click a program’s button on the taskbar to open
the program’s window.
Using the desktop
is the bar at the bottom of the screen
Start button
The
files, help for Windows and other programs, and
computer tools and utilities.
Clickthe Start button, then opena file orprogram
by clicking (
opens.
The
Recycle Bin
programsthatyoudiscardedarestored.Youmust
empty the Recycle Bin to permanently delete
themfromyourcomputer.Forinstructionsonhow
to use the Recycle Bin, see “Deleting files and
folders” on page 51.
provides access to programs,
selecting
)anitemonthemenuthat
is w here files, folders, and
www.gateway.com
43

Chapter 4: WindowsBasics
Using the Start menu
You can sta rt progr ams, ope n files, c ustomiz e your sys tem, get h elp, se arch
for files and folders, and more using the Start menu.
To use the Start menu:
1 Click the Start button on the lower left of the W indows desktop. Th e Start
menu opens showing you the first level of menu items.
2 To see all programs and files in the Start menu, click All Programs.
When you move the mouse pointer over any menu item that has an
arrow next to it, another menu, or submenu, opens and reveals related
files, programs, or commands.
3 Click a file or program to open it.
44
www.gateway.com

Identifying Window items
When you double-click the icon for a drive, folder, file, or program, a window
opens on the desktop. This example shows the Local Disk (C:) window, which
opens after double-clicking the
window.
Local Disk (C:) icon in the My Computer
Identifying Window items
Title bar
Menu bar
Close
Maximize
Minimize
www.gateway.com
45

Chapter 4: WindowsBasics
Every program window looks a little different because each has its own menus,
icons, and controls. Most windows include these items:
Window item Description
The
title bar
of a window that shows window title.
is thehorizontal barat the top
Clicking the
active window to a button on the taskbar.
Clicking the program button in the taskbar
opens the window again.
Clicking the
active window to fit the entire screen.
Clicking the maximize button again
restores the window to its former size.
Clicking the
window or program.
Selecting an item on the
an action such as Print or Save.
minimize button
maximize button
close button
reduces the
expands the
closes the active
menu bar
starts
46
www.gateway.com

Working with files and folders
Workingwith files a nd folders
You can organize your files and programs to suit your preferences much like
you would store information in a file cabinet. You can store these files in
folders and copy, move, or delete the information.
Viewing drives
Drives are like file cabinets because they hold files and folders. A computer
almost always has more than one drive. Each drive has a letter, usually Local
Disk (C:) for the hard d rive and 3½ Floppy (A:) for the diskette drive.
To view the drives on your computer:
■ Click Start, then select My Computer from the Start menu.
Drives
To see the files and folders on a drive:
■ Double-click the drive icon. If you do not see the contents of a drive after
you double-click its icon, click
www.gateway.com
Show the contents of this drive.
47

Chapter 4: WindowsBasics
Creating folders
Folders are much like the folders in a file cabinet. They can contain files and
other folders.
Files are much like paper documents—letters, spreadsheets, and pictures—that
you keep on your computer. In fact, all information on a computer is stored
in files.
Folders
Files
To create a folder:
1 Click Start, then select My Computer from the Start menu.
2 Double-click the drive or folder, for example theLocal Disk (C:), where you
48
want to put the new folder.
The drive or folder window opens. If you do not see the contents of the
drive or folder, click
Show the contents of this drive.
www.gateway.com

3 Select File, then New, then Folder. The new folder is created.
4 Type a name for the folder, then press ENTER. The new folder name
appears by the folder ico n.
Copyingand moving files and folders
The skills you need to copy and move files are called copying, cutting, and
pasting.
When you copy and paste a file or folder, you place a copy of the file o r folde r
on the Windows clipboard, which stores it. Then, when you decide what folder
you want the copy to go in (the destination folder), you paste it there.
When you cut and paste a file or folder, you remove the file or folder from
its location and place the file or folder on the Windows clipboard. When you
decide where you want the file or folder to go, you paste it there.
Important The clipboard stores whatever you cutor copyuntil youcut
or copy again. Then the clipboard contains the new
information only. Therefore, you can paste copies of a file
orfolderinto more thanone place, butas soonas youcopy
or cut a different file or folder, the original file or folder is
deleted from the clipboard.
Working with files and folders
To copy a file or folder to another folder:
1 Right-click (press the right mouse button) the file or folder that you want
to copy. A pop-up menu opens on th e desktop.
2 Select Copy from the pop-up menu.
3 Open the destination folder.
4 With the pointer inside the destination folder, right-click.
5 Select Paste. A copy of the file or folder appears in the new location.
www.gateway.com
49

Chapter 4: WindowsBasics
To move a file or folder to another folder:
1 Right-click (press the right mouse button) the file or folder that you want
to move. A pop-up menu opens on the desktop.
2 Select Cut from the pop-up menu.
3 Open the destination folder.
4 With the pointer inside the destination folder, right-click.
5 Select Paste. The file or folder you moved appears in its new location and
is removed from its old location.
50
www.gateway.com

Deleting files and folders
When you throw away paper files and folders, you take them from the file
cabinet and put them in a trash can. Eventually the trash can is emptied.
In Windows, you throw away files and folders by first moving them to
Windows trash can, called the Recycle Bin, where they remain until you decide
to empty the bin.
You can recover any file in the R ecycle Bin as long as the bin has not been
emptied.
To delete files or folders:
1 In My Computer or Windows Explorer , select the files or folders that you
want to delete. For instructions on how to select multiple files and folders,
see “Shortcuts” on page 62.
2 Select File, then Delete. Windows moves the files and folders to the
Recycle Bin.
Working with files and folders
To recover files or folders from the Recycle Bin:
1 Double-click the Recycle Bin icon. The Recycle Bin window opens and
lists the files and folders you have thrown away since you last emptied it.
2 Select the files or folders that you want to restore. For instructions on
how to select multiple files and folders, see “Shortcuts” on page 62.
3 Select File, then Restore. Windows returns the deleted files or folders to
their original locations.
www.gateway.com
51

Chapter 4: WindowsBasics
To empty the Recycle Bin:
Caution Emptying the RecycleBin permanently erases any files or
1 Double-click the RecycleBin icon on the desktop. The Recycle Bin window
opens.
2 Select File, then Empty Recycle Bin. Windows asks you if you are sure that
you want to empty the bin.
3 Click Yes. Windows permanently deletes all files in the Recycle Bin.
folders in the bin. These files cannot be restored.
52
www.gateway.com

Browsing for files and folders
A file or folder that you need is rarely right on top of your Windows desktop.
It is usually on a drive inside a folder that may be inside yet another folder,
and so on.
Windows drives, folders, and files are organized in the same way as a real file
cabinet in that they may have many levels (usually many more levels than
a file cabinet, in fact). So you usually will have to search through levels of
folders to find the file or folder that you need. This is called browsing.
To browse for a file:
1 Click Start, then select My Computer.
2 Double-click the drive or folder that you think contains the file or folder
that you want to find.
Working with files and folders
3 Continue double-clicking folders and their subfolders until you find the
file or folder you want. (If you do not see the contents of a folder, click
Show the contents of this folder.)
www.gateway.com
53

Chapter 4: WindowsBasics
Searching for files
If you are looking for a particular file or folder or a set of files or folders that
have characteristics in common, but you do not remember where they are
stored on your hard drive, you can use the Search utility to search by:
■ Name or part of a name
■ Creation date
■ Modification date
■ File type
■ Text contained in the file
■ Time period in which it was created or modified
You can also combine s earch criteria to refine searches.
Files and folders found using these utilities can be opened, copied, cut,
renamed, or deleted directly from the list in the results window.
54
www.gateway.com
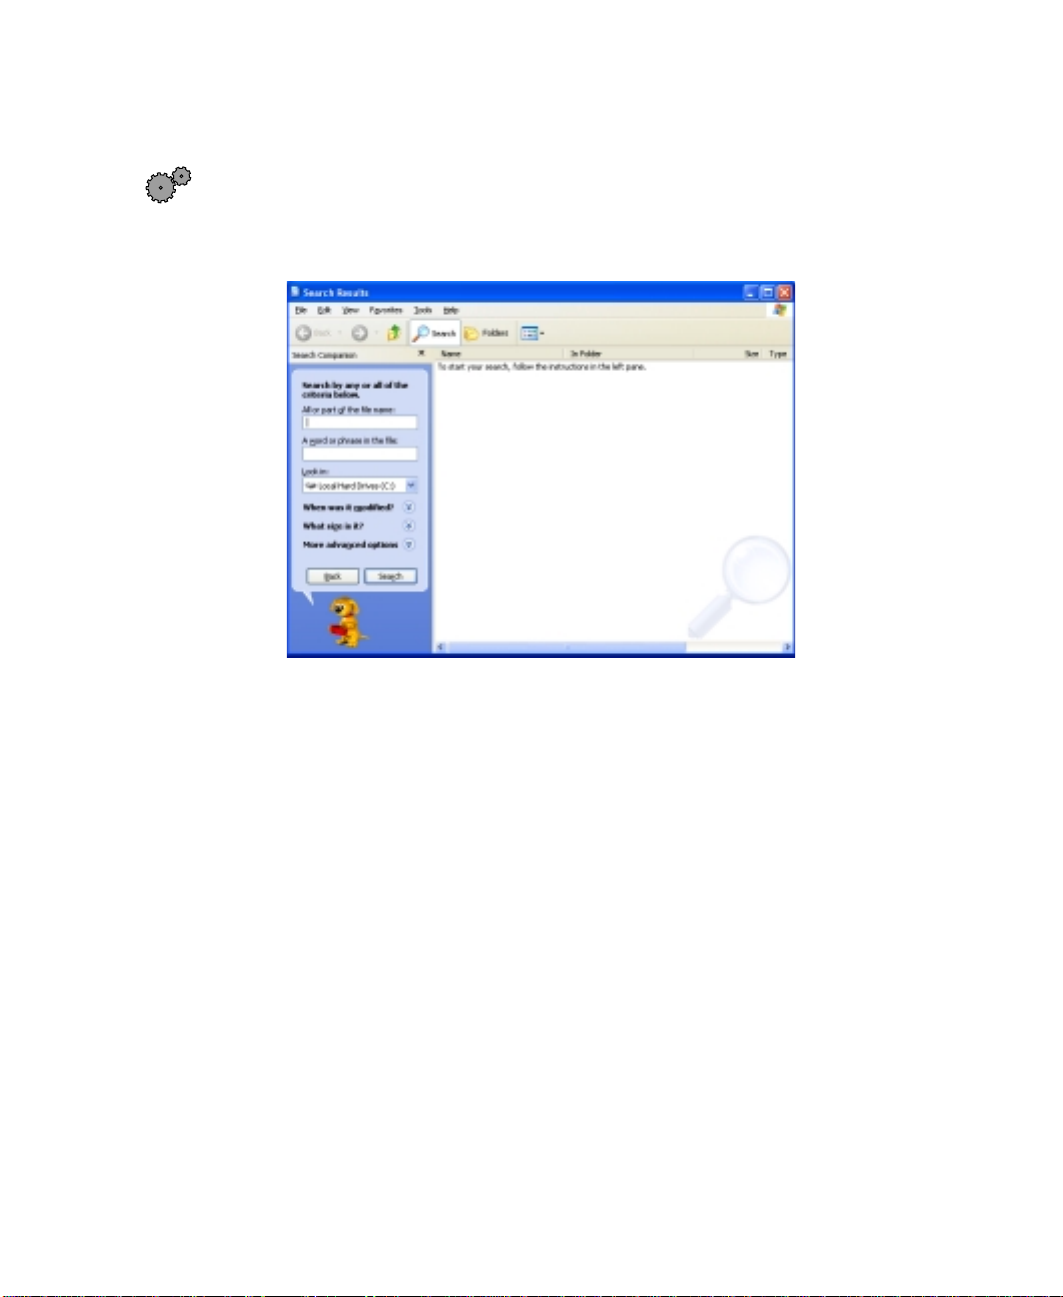
Using the Search utility
To find files and folders using the Search utility:
1 Click Start, then select Search. The search window opens. Click All files
and folders
.
Searching for files
2 If you want to search by file or folder name, type in all or part of the
file or folder name in the name box in the left pane of the window.
■ If you type all of the name, Search will list all files and folders of
that name.
■ If you type part of the name, Search will list all of the file and folder
names containing the letters you typed.
www.gateway.com
55
Chapter 4: WindowsBasics
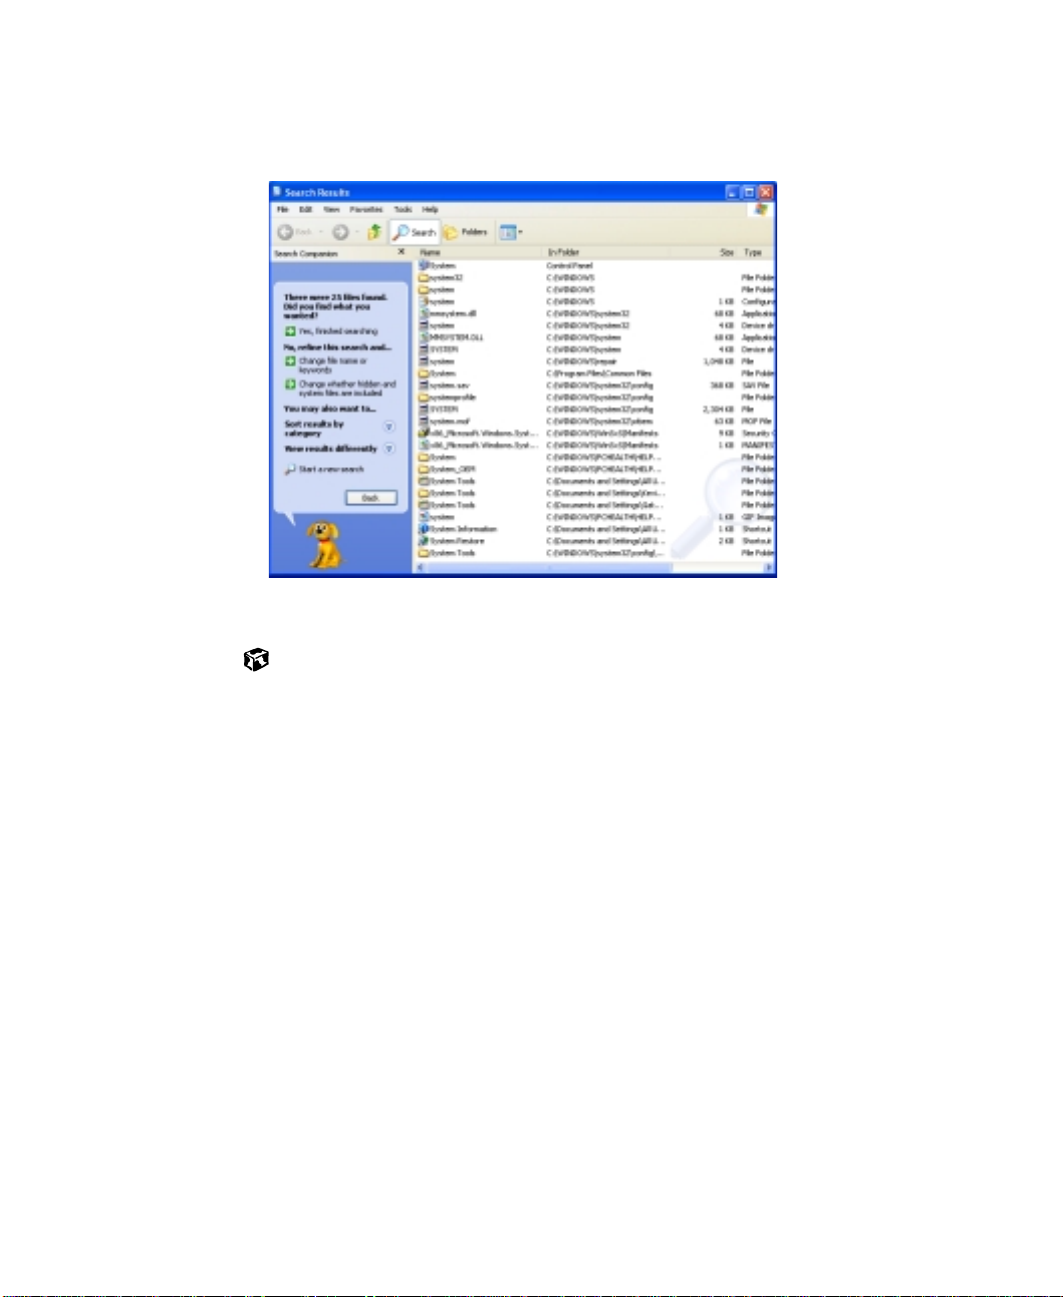
3 Click Search. When the search is completed, Windows lists the files and
folders whose names contain the text that you searched for.
4 Open a file, folder, or program by double-clicking the name in the list.
Using advancedsearch options
Search can find files meeting more criteria than file name. You can narrow
your search by selecting the search options that you want. You can search by
the:
■ Date the file was created or modified.
■ Size of the file.
■ Type of file, such as a program or a text document.
56
www.gateway.com

Workingwith documents
Documents are commonly word processing files, spreadsheet files, or other
similar files. The basic methods of creating, saving, opening, and printing a
document apply to most of these types of files.
Working with documents
The following examples illustrate the concepts for creating, saving, opening,
and printing a document in Microsoft
Microsoft W ord, similar procedures apply to other programs such as Microsoft
Excel, Microsoft Works, and Microsoft Publisher.
For more information about using a program, select
Creating a new document
Help and
Support
For more information on creating a document, click Start,
then select Help and Support.
®
Word. Though these examples use
Help on the menu bar.
www.gateway.com
57

Chapter 4: WindowsBasics
To create a new document:
1 Click Start, then select All Programs, then Microsoft Word. Microsoft Word
starts and a blank docu ment opens.
2 Select File, then select New. The New Document pane opens.
New
Document
pane
58
3 Click General Templates. The Templates dialog box opens.
www.gateway.com

4 Click a tab for the type of document you want to create, select a
documen t te mplat e sty le, then clic k
5 Begin composing your do cu ment. Use the menus and toolbar buttons a t
the top of the window to format the document.
Saving a document
After you create a document, you need to save it if you want to use it later.
Working with documents
OK. The document template opens.
Help and
Support
For more information on saving a document, click Start,
then select Help and Support.
To save a document in Microsoft Word:
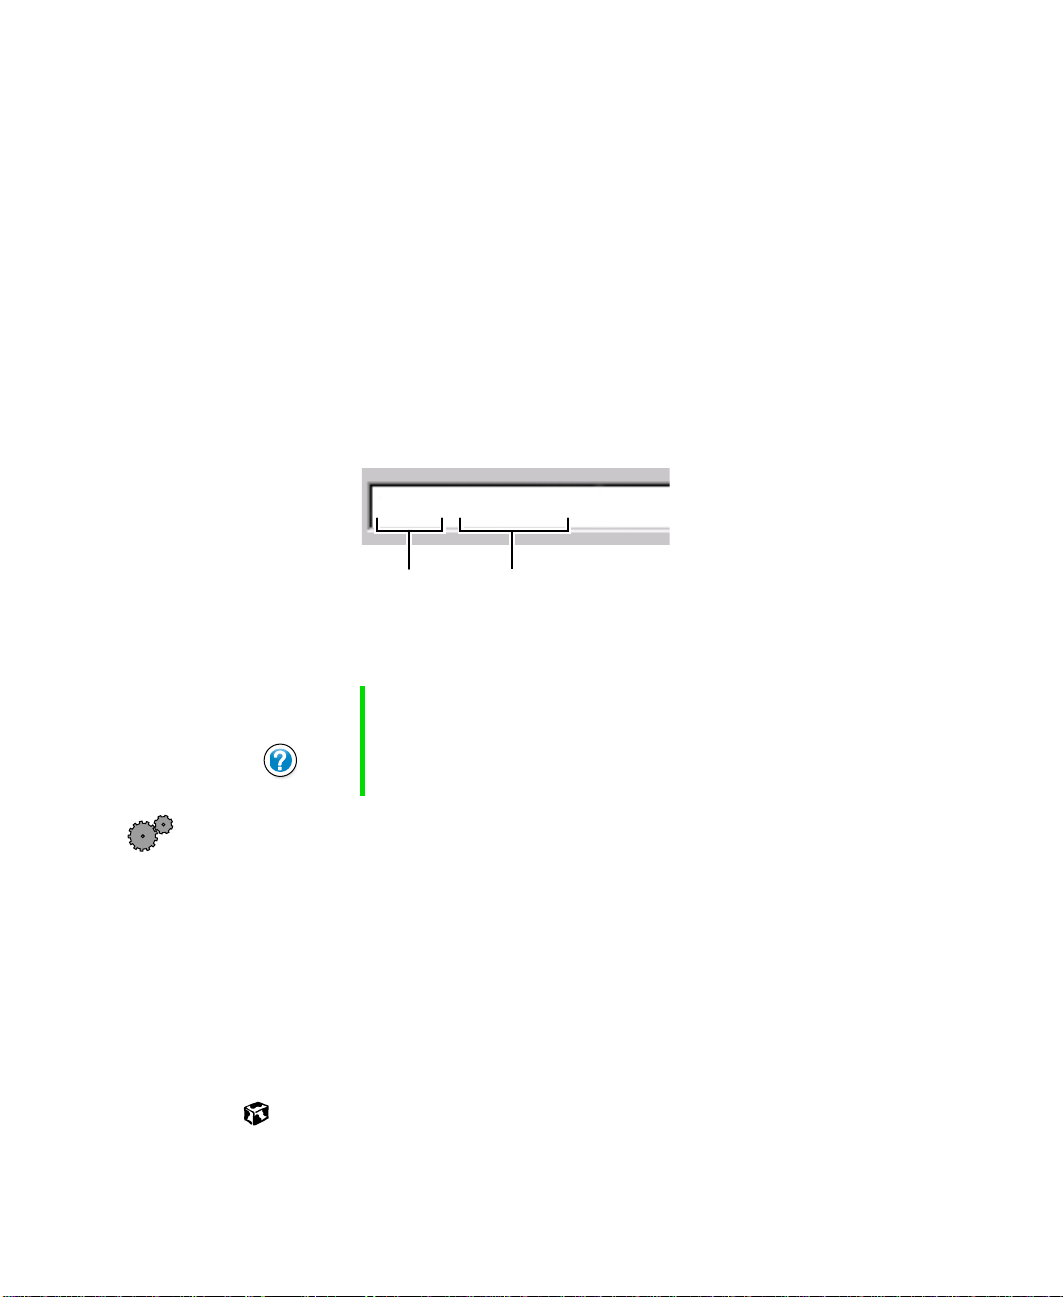
1 Select File, then Save. T he Save As dialog box opens.
2 Select the folder in which you plan to save the file from the Save in list.
3 Type the new file name.
File
folder
File
name
4 Click Save.
www.gateway.com
59

Chapter 4: WindowsBasics
Opening a document
To view, revise, or print an existing document, you need to open it. Open
the document in the program it was created in.
Help and
Support
For more information on opening a document, click Start,
then select Help and Support.
To open a document in Microsoft Word:
1 Click Start, then select All Programs, then Microsoft Word. Microsoft Word
starts and a blank docu ment opens.
2 Select File, then Open.
3 Find the folder you want to open in the Look in list.
File
folder
File
name
60
4 Double-click the document file name. The document opens.
www.gateway.com
Printing a document
To print a document, you must have a printer connected to your computer
or have access to a network printer. For more information about installing or
using you r printe r, refer to the printer documen tation.
Working with documents
Help and
Support
For more information on printing a document, click Start,
then select Help and Support.
To print a document in Microsoft Word:
1 Make sure that the printer is turned on and loaded with paper.
2 Start Microsoft Word and open a document.
3 Select File, then Print. The Print dialog box opens.
4 Select the print options, then click OK. The document prints.
www.gateway.com
61

Chapter 4: WindowsBasics
Shortcuts
The following table shows a fe w shortc uts tha t yo u ca n use in Windows and
almost all programs that run in W indows. For more information on W indows
shortcuts, see your Windows or program documentation.
To... Do this...
Copy a file, folder, text, or graphic Select the item, then press CTRL + C.
Cut a file, folder, text, or graphic Select the item, then press CTRL + X.
Paste a file, folder, text, or graphic Clickinside thefolder or window where you want topaste
the object, then press C
TRL + V.
Select multiple items in a list or in a
window
Select multipleadjacent items in a list
or window
Permanently delete a file or folder Click the fileorfolder,then pressS
Rename a file or folder Select the file or folder, press F2, type the new name,
Close the active window or program Press ALT + F4.
Switch to a different file, folder, or
running program
Click the first item, press and hold down the C
then click each of the remaining items.
Click the first item in the list, press and hold down the
HIFT key, then click the last item in the list.
S
HIFT + DELETE.Thefile
is permanently deleted. The file or folder is not stored
in the Recycle Bin.
then press E
Press A
NTER.
LT + TAB.
TRL key,
62
www.gateway.com

Transferring software and hardware from your old computer
Transferring software and hardware from your old computer
If your new computer is replacing an old computer, you may have personal
data files, Internet settings, a printer or other peripheral devices, and other
unique computer settings that you want to move from your old computer to
your new one.
Using the Files and Settings Transfer Wizard
You can move your data files and personal settings from your old computer
to your new one by using the Files and Settings Transfer W izard. You can take
your display, Internet, and e-mail settings from your old computer and
transfer them to the new one. The wizard also moves specific files or entire
folders, such as My Documents, My Pictures, and Favorites.
To Open the Files and Settings Transfer Wizard:
1 Click Start, selec t All Programs, Accessories, System Tools, then Files and
Settings Transfer Wizard
.
Transferring files
You can manually transfer your personal data files by
copying them to removable media, such as a diskette, CD,
or Zip disk, or by using a home network. For more
information on using your home network, see
“Networking Your Computer” on page 143.
Finding your files
Many programs automatically save your personal data files in the
My Documents folder. Look in your old computer’s My Documents folder for
personal data files. Use Windows Search to locate other personal data files.
www.gateway.com
63

Chapter 4: WindowsBasics
To find files in the My Documents folder:
1 Click Start, then select My Computer.
2 Double-click the C:\ drive icon. The C:\ window opens.
3 Double-click the My Documents folder . The My Documents window opens
and displays many of your saved personal da ta files.
Y ou can often identify different data file type s by looking at the file’ s extension
(the part of the file name following the last period). For example, a document
file might have a .DOC extension and a spreadsheet file might have an .XLS
extension.
File type File usually ends in...
Documents .DOC, .TXT, .RTF, .HTM, .HTML, .DOT
Spreadsheets .XLS, .XLT, .TXT
Pictures .JPG, .BMP, .GIF, .PDF, .PCT, .TIF, .PNG
Movies .MPEG, .MPG, .AVI, .GIF, .MOV
Sound and Music .WAV, .CDA, .MP3, .MID, .MIDI
To find files using Search:
1 Click Start, then select Search, then All Files or Folders. The Search Results
window opens.
2 Use Windows Search to locate data files by file name or file type. For help
on findin g files , click
64
Help, then select Help Topics.
www.gateway.com

Transferring software and hardware from your old computer
Transferring Internet settings
You can use different methods to transfer your Internet
account from your old comp uter to your new o ne.
Setting up your ISP
■ If your current Internet Service Provider (ISP) software came preinstalled
on your new computer, run that setup program. If it asks to set up a new
account or an existing one, choose to reconnect to an existing account.
■ If your current ISP software is not preinstalled on your new computer,
locate the original Internet setup program provided by your local ISP, or
contact your ISP to see if they have an updated version of their software,
and install it on your new computer.
■ If you use MSN as your ISP, or if you know your ISP settings, use the
Windows Internet Connection Wizard.
To use the Internet Connection Wizard:
1 Click Start, then select All Programs, Accessories, Communications, then
New Connection Wizard. The New Connection Wizard window opens.
2 Configure your Internet settings by following the on-screen instructions.
www.gateway.com
65

Chapter 4: WindowsBasics
Transferringyoure-mail and address book
Refer to your old e-mail program’s online help for information on exporting
and importing e-mail messages and the address book. You can often export all
of your old e-mail messages or address book to a disket te, then import them
from the diskette into your new computer’ s e-mail program. Alternatively , you
may want to consider simply printing the old information or e-mailing it to
yourself.
Transferring yourInternet shortcuts
You can export and import your old bookmarks (Netscape Navigator) or
favorites (Microsoft Internet Explorer). Fo r more information, refer to your
Internet browser program’s online help.
Reinstalling your old printer or scanner
Older printers, scanners, or other peripheral devices may
have Windows support integrated (built in), which means
you do not need any additional software. Newer devices,
however, usually require your original software
installation CDs or diskettes.
Reinstallinga USB printer or scanner
USB devices may have special installation instructions. Refer to your USB
device’s installation guide.
Reinstalling a parallel port printer
You can usually install parallel port printers by following these steps.
To reinstall your old printer:
1 Exit Windows and turn off your computer.
2 Connect your parallel port printer.
3 Turn on your printer, then your computer.
4 If Windows detects your printer, install your printer by following the
on-screen instructions. You are finished.
- OR If Windows does not detect the printer, go to the next step.
66
www.gateway.com

Transferring software and hardware from your old computer
5 Click Start, then select Control Panel. If you do not see the Printers and
Faxes icon, click
Switch to Classic View.
6 Click/double-click the Printers and Faxes icon, then click Add a printer. The
Add Printer Wizard window opens.
7 Install your printer by following the on-screen instructions.
Refer to your peripheral device’s user guide for installation information
and tips. Because most installation software is periodically updated, you
should also check the manufacturer’s Web site for driver updates.
Reinstalling your old programs
You probably use some programs that did not come
installed on your new computer, such as personal finance
software, graphics programs, or games.
Spend some time going through your old computer’s
menus, making note of any programs you want to install on your new
computer. Locate your original program installation CDs and installation
guides. Your original CDs and guides should contain any serial numbers or
product ID keys that may be requ ired for program installation and
registration. Remember to check the manufacturer’s Web site for important
program upda tes.
Tips & Tricks If your new computer comes with a newer version of a
program, it is usually best to use the newer version than
to reinstall the old one.
www.gateway.com
Start and Programs
67

Chapter 4: WindowsBasics
68
www.gateway.com

Using the Internet
5
This chapter provides information about the Internet and the World Wide
W eb, and tells you how to set up the America Online
you can send and receive e-mail and access other Internet resources.
®
Internet service so that
www.gateway.com
69
Chapter 5: Using the Internet
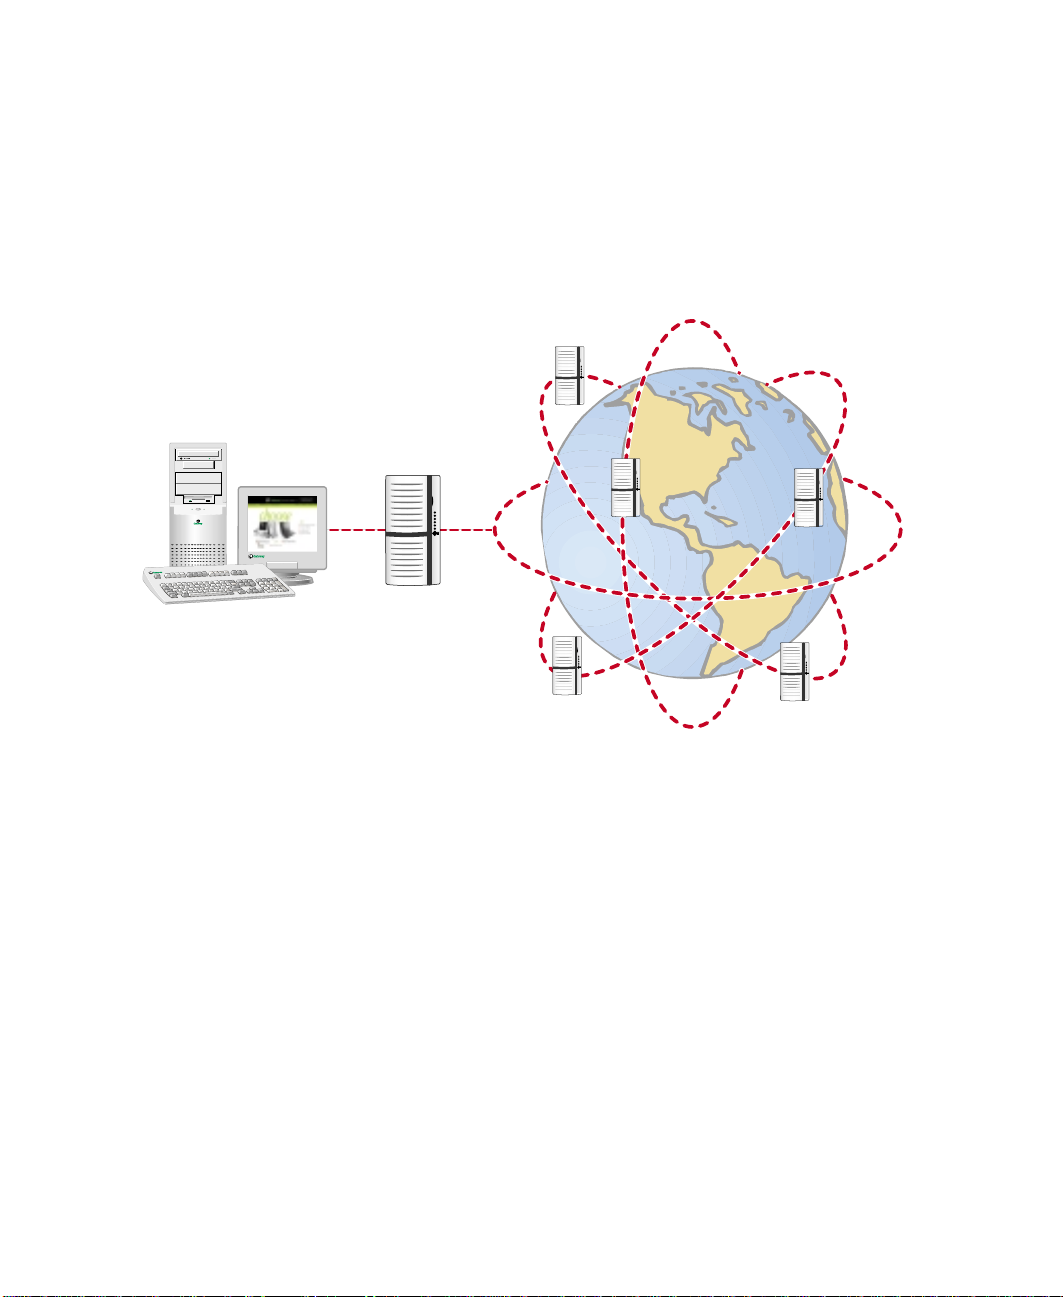
Learning about the Internet
The Internet is a worldwide network of computers linked together to provide
information to people everywhere. The two most popular services on the
Internet are e-mail and the World Wide Web. You can access this network by
connecting your computer to a telephone, DSL (Digital Subscriber Line), or
cable line and signing up with an Internet Service Provider (ISP).
Internet Servers
store information so other
computers can access it
from the Internet.
Your computer
connects to the
Internet through
an ISP.
ISP Servers
let you connect to
the Inter net and
accessyoure-mail
messages.
If you want to access the Internet you need:
■ A modem – a device that connects your computer, using a telephone,
DSL, or cable line, to other computers or servers.
■ An Internet Service Provider – a company that provides access to the
Internet through an ISP server. When you connect to an ISP, the ISP server
lets you access the Internet and yo ur e-mail messages.
■ A Web browser – a program that displays information from the World
Wide Web .
■ An e-mail program – a program that lets you create, send, and receive
e-mail messages over the Internet.
70
www.gateway.com
Setting up an Internet account
Setting up an Internet account
Before you can view the information on the World Wide Web, you need to
set up an Internet account with an Internet Service Provider (ISP). If you have
chosen America Online as an ISP, follow these instructions to set up and
connect to your account. To establish a different ISP service, or to transfer an
existing account to this computer, contact the ISP directly.
If you set up an account with America Online, an Internet e-mail address is
created for you. After completing the setup you are ready to access the
Internet.
Help and
Support
For more information on setting up an Internet account,
click Start, then select Help and Support.
To set up an Internet account with America Online:
1 Select Start, then select All Programs, then America Online.
2 Follow the on-screen instructions. After setting up your account, you can
connect to the Internet and access your e-mail services.
www.gateway.com
71
Chapter 5: Using the Internet
Accessing your Internet account
Help and
Support
For more information on accessing your Internet account,
click Start, then select Help and Support.
To connect to your America Online Internet account:
1 Select Start, then select All Programs, then America Online.
2 Complete the member name and password information, then click
Connect. The computer dials the Internet account telephone number.
If you are using a service other than America Online, check with your ISP for
the correct procedure for conn ecting.
After connecting, the W eb browser window opens. For information about the
Web and the Web browser, see “Using the World Wide Web” on page 73.
To disconnect from your America Online Internet account:
■ Click X in the top right corner of the America Online program. Your
computer disconnects from the Internet.
Important Make sure that your computer disconnects correctly from
your Internet account. If you do not have an “unlimited
hours” ISP account, you may haveto pay for the time that
you are connected, even if you are not at the computer.
72
If you are using a service other than America Online, check with your ISP for
the correct procedure for disconnecting.
www.gateway.com
Using the World Wide Web
The World Wide Web is a multimedia window to the Internet that gives you
access to millions of information sources.
Information on the Web comes to you on Web pa g e s , wh ich are electronic
documents that you view using a Web page display program called a browser.
You can use any of the commercially available Web browsers, like Microsoft
Internet Explorer, which comes installed on your new computer.
Web pages can contain text, animations, music, and other multimedia
features.
A group of related Web p age s is called a Web site. You can access Web sites to
shop, track investments, read the news, download programs, and much more.
You can explore a Web site or visit other Web sites by clicking areas on the
W eb page called links, or hyperlinks. A link may be colored or underlined text,
a picture, or an animated image. Y o u can identify a link by moving the mouse
pointer over it. If the pointer changes to a hand, the item is a link.
Using the WorldWide Web
To learn more about using the Web browser features, select
bar.
Web
page
Link
LinkedWeb page
Help in the menu
www.gateway.com
73

Chapter 5: Using the Internet
Connecting to a Web site
After you set up an account with an Internet Service Provider (ISP) such as
America Online, you can access the many information sources on the World
Wide Web .
Help and
Support
For more information on connecting to a Web site, click
Start, then select Help and Support.
To connect to a Web site:
1 Connect to your Internet account. After the computer connects, a default
opening page or welcome screen opens.
2 To go to a different Web site, type the address (called a URL for “Universal
Resource Locator”) in the browser address bar (for example
www.gateway.com) then click
- OR On the current Web page, click a link to a Web site.
The Web browser locates the server computer on the Internet, downloads
(transfers) data to your computer, and displays the page on the site that
you requested.
GO on the browser address bar.
74
Sometimes Web pages display slowly. The speed that a Web page displays on
your screen depends on the complexity of the Web page and other Internet
conditions. Additionally, the speed of your connection will determine how
fast Web pages display.
www.gateway.com

Downloadingfiles
Downloading is the process of transferring files from a computer on the
Internet to your computer.
To protect your computer against viruses, make sure that you scan the files
you download. For more information, see “Protecting your computer from
viruses” on page 163.
Using the WorldWide Web
Help and
Support
Formoreinformationon downloadingfiles,clickStart,then
select Help and Support.
To download files or programs from a Web site:
1 Connect to your Internet account.
2 In the address bar, type the address of the Web site that contains the file
or program you want to download, then click
bar.
- OR Click a link on a Web page to navigate to the Web site containing the
file that you want to download.
GO on the browser address
3 Create or locate the folder where you want to store the file on your
computer.
4 Click the link on the Web page for the file that you want to download.
5 Follow the on-screen instructions for saving the file in the folder that
you created.
A copy of the file is downloaded to your comp uter. The time that it ta kes
to transfer the file to your computer depends on file size and Internet
conditions.
6 Open the folder that you created.
7 Install or view the downloaded file by double-clicking it. If applicable,
follow the instructions provided on the Web site to run or install the
program.
www.gateway.com
75
Chapter 5: Using the Internet
Using e-mail
E-mail (electronic mail) lets you send messages to anyone who has an Internet
connection and e-mail address. E-mail is usually a free service of your Internet
account.
The Internet never closes, so you can send e-mail messages at any time. Your
e-mail messages arrive at most e-mail addresses in minutes.
An e-mail address consists of a user name, the @ symbol, and the Internet
domain name of the Internet Service Provider (ISP) or company that “hosts”
that user. Your e-mail address is assigned when you sign up for an account
with an ISP. For example, a person with an account with America Online
might have an e-mail address that is similar to this one:
jdoe@aol.com
User name Internet domain name
Sending e-mail
Help and
Support
To send e-mail using America Online:
1 Connect to your America Online account, then click Write.
2 Type the e-mail address of the recipient you want to send e-mail to in
the
Send To box.
3 Type the subject of your e-mail in the Subject box.
4 Type the e-mail message.
5 When finished, click Send Now. Your e-mail is sent over the Internet to
the e-mail address you specified.
76
For more information on sending e-mail, click Start,then
select Help and Support.
www.gateway.com

Checkingyoure-mail
Using e-mail
Help and
Support
For more information on checkingyour e-mail, clickStart,
then select Help and Support.
To check your e-mail using America Online:
1 Connect to your America Online account.
2 Click Read.
For more information about managing and organizing your e-mail messag es,
see the online help in your e-mail program.
www.gateway.com
77

Chapter 5: Using the Internet
78
www.gateway.com

Using Multimedia
This chapter provides information on using the multimedia capabilities of
your notebook. Read this chapter to learn how to:
■ Use the diskette drive
■ Use the CD drive
■ Play CDs
■ Record and pla y audio files
■ Use Windows Media Player
■ Use MusicMatch
6
www.gateway.com
79

Chapter 6: Using Multimedia
Using diskettes
The diskette drive uses 3.5-inch diskettes (sometimes called floppy disks).
Diskettes are useful for storing files or transferring files to another computer.
Warning Do not expose diskettes to water or magnetic fields.
To use a diskette:
1 Insert the diskette into the diskette drive with the label facing up.
Exposure could damage the data on the diskette.
80
2 To access a file on the diskette, click Start, then select My Computer, then
the drive letter (for example, the A: drive), then double-click the file.
3 T o remove the diskette, make sure the drive act ivity indicator is off, then
press the diskette eject button. For more information, see “Status
indicators” on page 20.
www.gateway.com
Using the CD drive
You can use your computer to enjoy a wide variety of multimedia features,
such as playing games and listening to audio CDs.
To insert a CD:
1 Press the eject button on the CD drive. After the tray opens slightly, pull
the disc tray completely open.
Using diskettes
www.gateway.com
81

Chapter 6: Using Multimedia
2 Place the disc in the tray with the label facing up, then press down
carefully on the disc until it snaps into place.
Important When you place a single-sided disc in the tray, make sure
that the label side is facing up.If the disc hastwo playable
sides, place the disc so that the name of the side you want
to play is facing up.
82
3 Push the tray in until it is closed.
www.gateway.com

Adjusting the volume
Y ou c an use the volume controls to a djust the overall volume and the vo lume
of specific sound devices in your computer.
Adjusting the volume
Help and
Support
Formoreinformationon adjusting volume,clickStart,then
select Help and Support.
To adjust the overall volume level using hardware controls:
■ On the keyboard, press the FN+PAGE UP or PAGE DOWN keys to change
the volume, or press the F
N+HOME key to turn off (mute) all sound.
www.gateway.com
83

Chapter 6: Using Multimedia
To adjust the overall volume level from Windows:
1 Click Start, then select Control Panel. The Control Panel window opens.
2 Select Sounds, Speech, and Audio Devices.
3 Select Adjust the system volume. The Sounds and Audio Devices Properties
dialog box opens.
84
4 On the Volume tab, drag the Device Volume slider to change the volume
or click to select the
Mute check box, then click OK.
www.gateway.com

Adjusting the volume
To adjust specific volume levels:
1 Click Start, then select Control Panel. The Control Panel window opens.
2 Select Sounds, Speech, and Audio Devices.
3 Select Adjust the system volume. The Sounds and Audio Devices Properties
dialog box opens.
4 On the V olume ta b, c lick Ad vanced in the Device volume area. The Master
Volume dialog box opens.
If the device you want to adjust does not appear in the Master Volume
dialog box, select
to adjust, then click
Options, Properties, select the audio device you want
OK.
www.gateway.com
85

Chapter 6: Using Multimedia
5 Drag the volume level and balance sliders for the device you want to
adjust, then close the window. For more information about the volume
controls, select
6 Click X in the top right corner of the Master Volume dialog box.
Help in the Master Volume dialog box.
86
www.gateway.com

Recording and playing audio
Use the instructions below to make an audio recording by speaking into the
microphone.
Recording and playing audio
Help and
Support
Formore informationon recording and playing audio, click
Start, then select Help and Support.
To make an audio recording:
1 Plug a microphone into the Microphone jack on your computer.
2 Click Start, then select All Programs, Accessories, Entertainment, then
Sound Recorder. The Sound Recorder opens.
Rewind Fast
Forward
Play Stop Record
3 Click (record), then speak into the microphone.
4 When you finish recording, click (stop ).
5 Select File, then Save As. The Save As dialog box opens.
6 Name the recording, specify the path, then click Save. The recording is
saved.
www.gateway.com
87

Chapter 6: Using Multimedia
To play an audio recording in Sound Recorder:
1 Open the Sound Recorder.
2 Select File, then Open. The Open dialog box opens.
3 Select the file you want to play back, then click Open.
4 Play the file by clicking (play), then stop playing the file by clicking
(stop).
88
www.gateway.com

Recording and playing audio
Playing audio and video files with the
Windows Media Player
The Windows Media Player can play several types of audio and vide o files,
including WAV, MIDI, MP3, AU, AVI, and MPEG formats. For more
information about the using the Windows Media Player, select
To play a file using the Windows Media Player:
1 Click Start, then select All Programs, then Windows Media Player. The
Windows Media Player opens.
Help.
Video file
information
Video
screen
Play
Stop
2 Select File, then Open. The Open dialog box opens.
3 Select the file you want to play, then click Open.
4 Play the file by clicking (play), then stop playing the file by
clicking (stop).
www.gateway.com
89

Chapter 6: Using Multimedia
Using MusicMatch
Using MusicMa tch™, you can:
■ Play music CDs
■ Create MP3 music files from your music CDs
■ Use your music files to build a music library
■ Enter music track information
■ Listen to Internet Radio
For more information on using MusicMatch, see its online Help.
Playing CDs
Use the MusicMatch program to play music CDs.
To play a music CD:
1 Insert the music CD into the CD drive on your computer. The first time
you insert a CD, the Audio CD dialog box opens.
90
www.gateway.com

Using MusicMatch
2 Click PlayAudio CD using mmjb, click to select Always do the selected action,
then click
of the music tracks appear in the playlist area.
The next time you insert an audio CD, MusicMatch plays the CD
automatically.
OK. MusicMatch opens, the CD begins playing, and the names
www.gateway.com
91
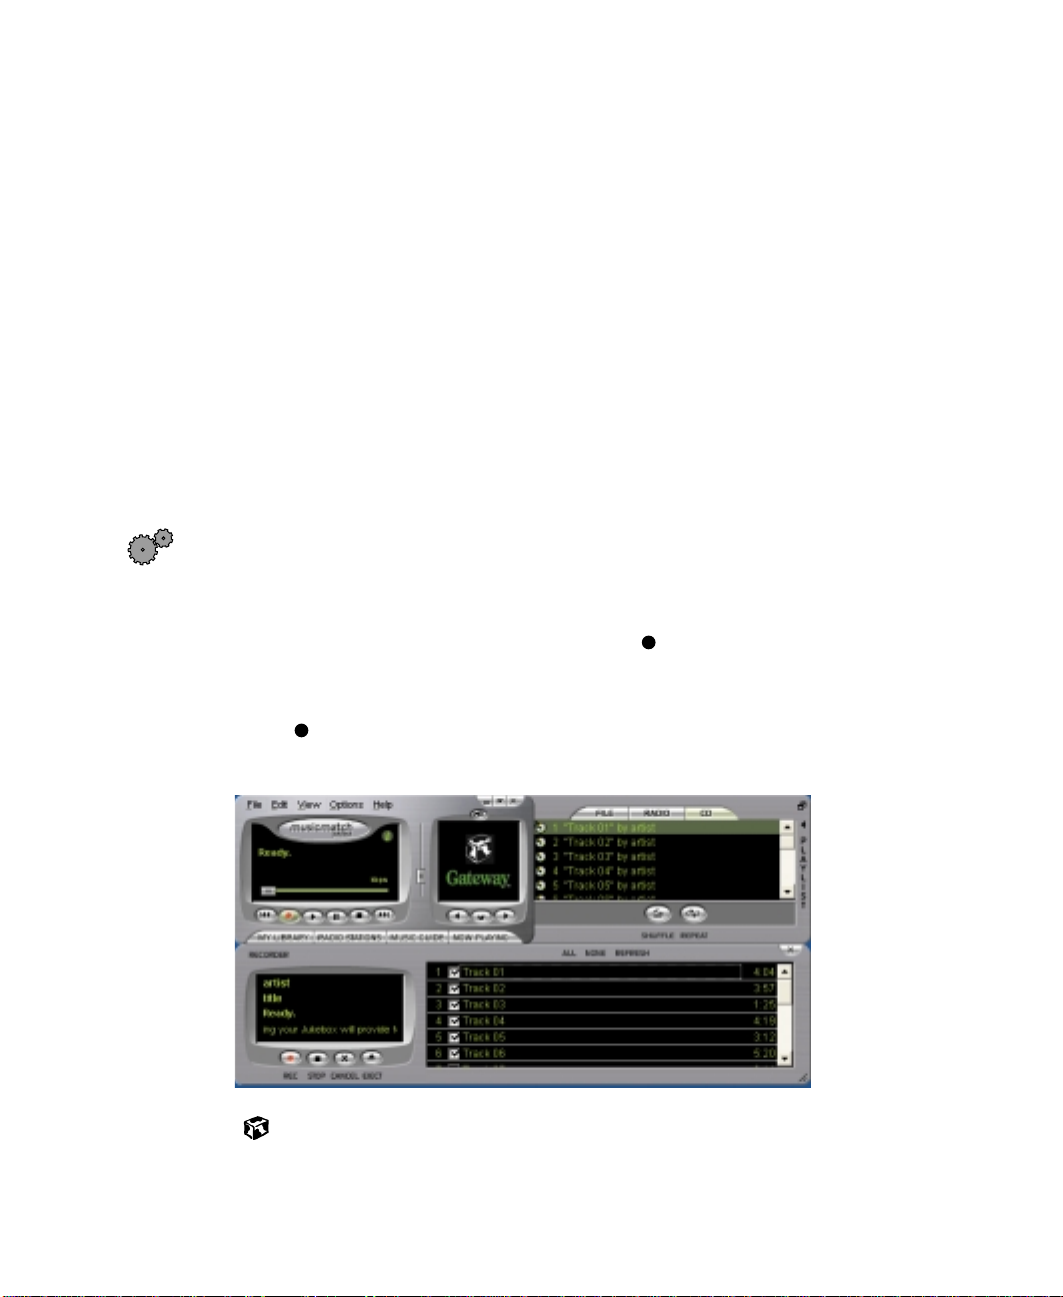
Chapter 6: Using Multimedia
Creating music files
Using MusicMatch, you can copy the tracks from a music CD to your
computer’s hard drive as MP3 files.
Here are some terms that you need to know before you get started:
■ Bit rate is the number of bits required to store one second of music.
CD quality is 128 kilobits per second. A high bit rate gives you better
sound quality but the file size is also larger. For information about
changing the sound quality settings, see the online help in MusicMatch.
■ MP3 (MPEG Layer 3) is a standard for digitally compressing high-fidelity
music into compact files without noticeably sacrif icing quality. MP3 files
end in the file extension .mp3.
■ Ripping is the process of copying a music track from a mu sic CD and
storing it on your computer’s hard drive.
To create (rip) MP3 files:
1 Open MusicMatch b y clicking Start, then selecting All Programs,
MusicMatch, then MusicMatch Jukebox.
92
2 Insert a CD into the CD drive, then click (record). The Rec order
window opens.
3 In the Rec order w indow, select the tracks yo u want to record, then
click (
computer’s hard drive.
REC). The tracks that you selected are copied as MP3 files to your
www.gateway.com

Editing track information
After you add a CD track as an MP3 file to your music library, you can edit
the track’s information.
To edit track information:
1 In MusicMatch, click My Library. The library window opens.
2 In the library window , right-click the file, then select EditTrackTag(s). The
Edit Track Tag dialog box opens.
Using MusicMatch
3 Enter information such as track title, lead artist, album, and genre.
4 Click OK. The new track information is displayed in the MusicMatch
playlist, music library, and recorder.
www.gateway.com
93
 Loading...