

Page 1
http://support.gateway.com/s/Mobile/Solo_Series/p1100/8505462/index.htm
Using Your
Solo 1100
Contents
Learning about
Your Notebook
Keyboard and
LCD
Right
side
Left
side
Back
Top
Bottom
Status
indicators
Accessories
Identifying your
model
For more
information...
·
Microsoft Windows®
manual
·
Welcome to Windows
·
Online help
·
Gateway Web site
Viewing
technical
specifications
Getting Started
Connecting your
AC power
adapter
Starting your
notebook
Windows98
basics
Learning about Your
Notebook
This chapter shows the features that are available on your notebook. It
also describes the various resources that you can access for more
information.
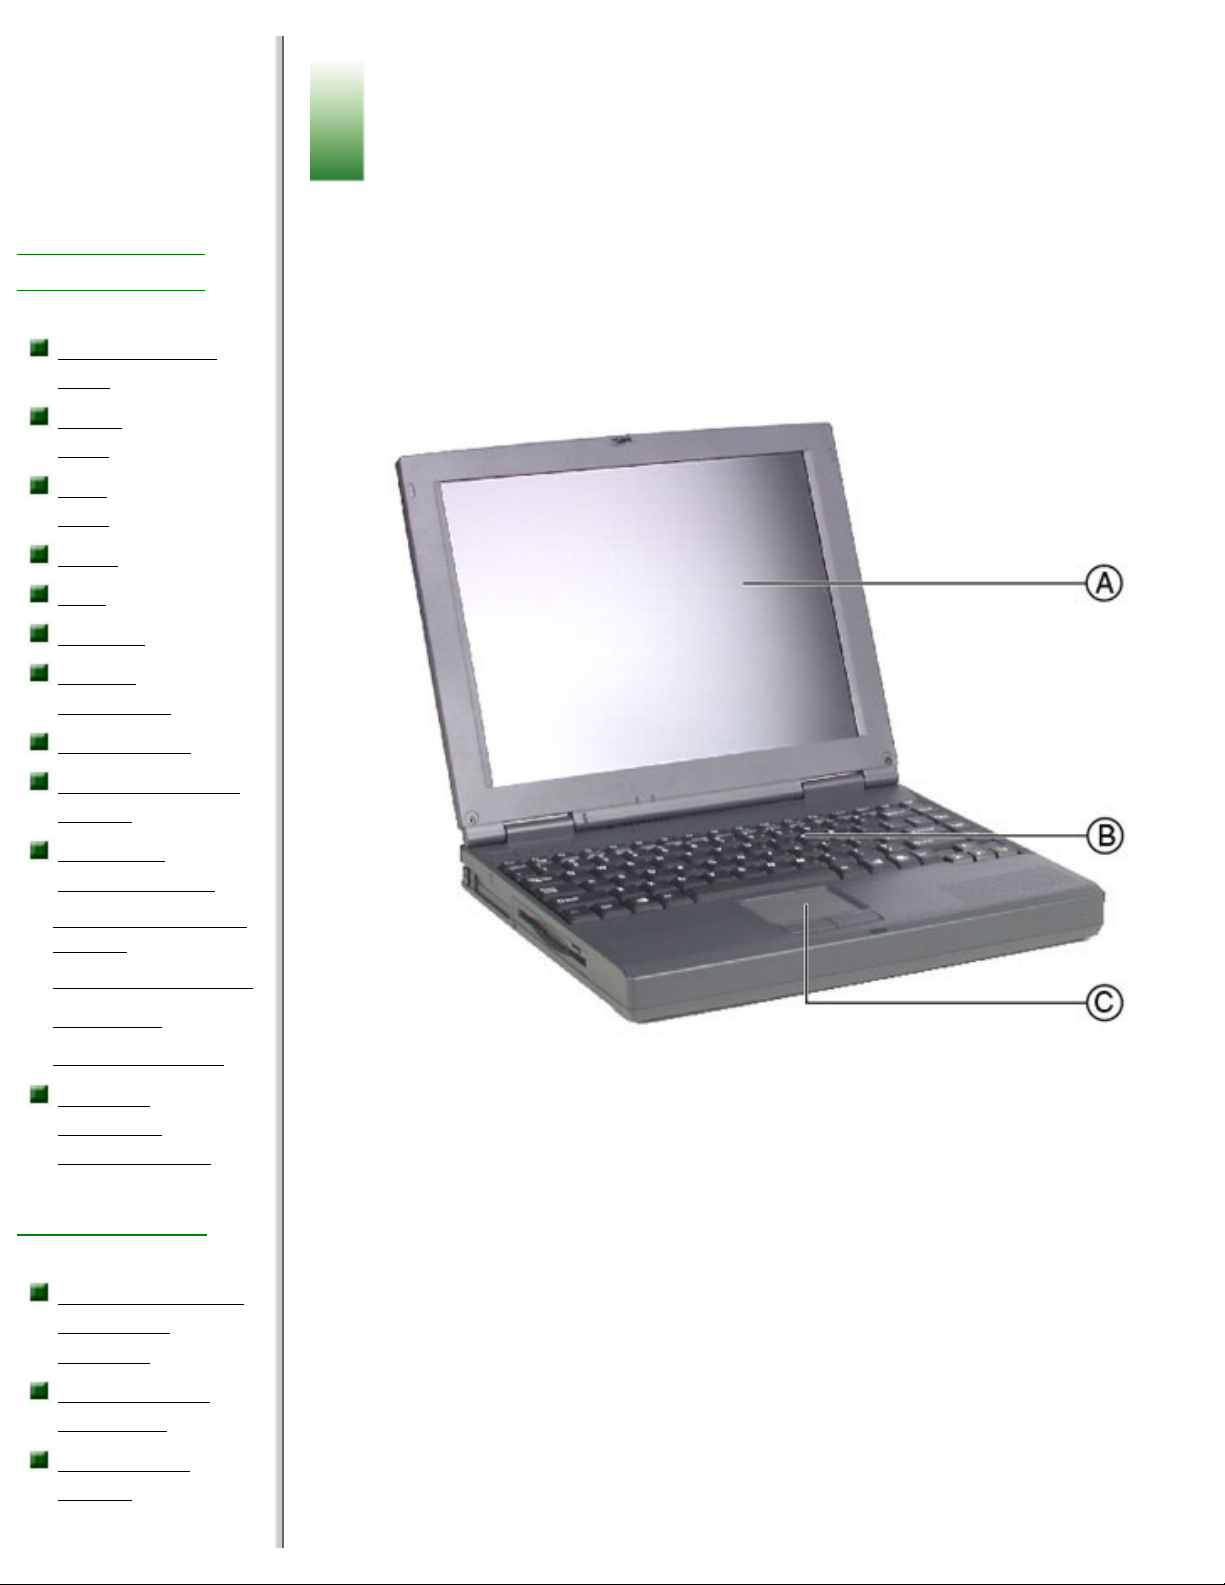
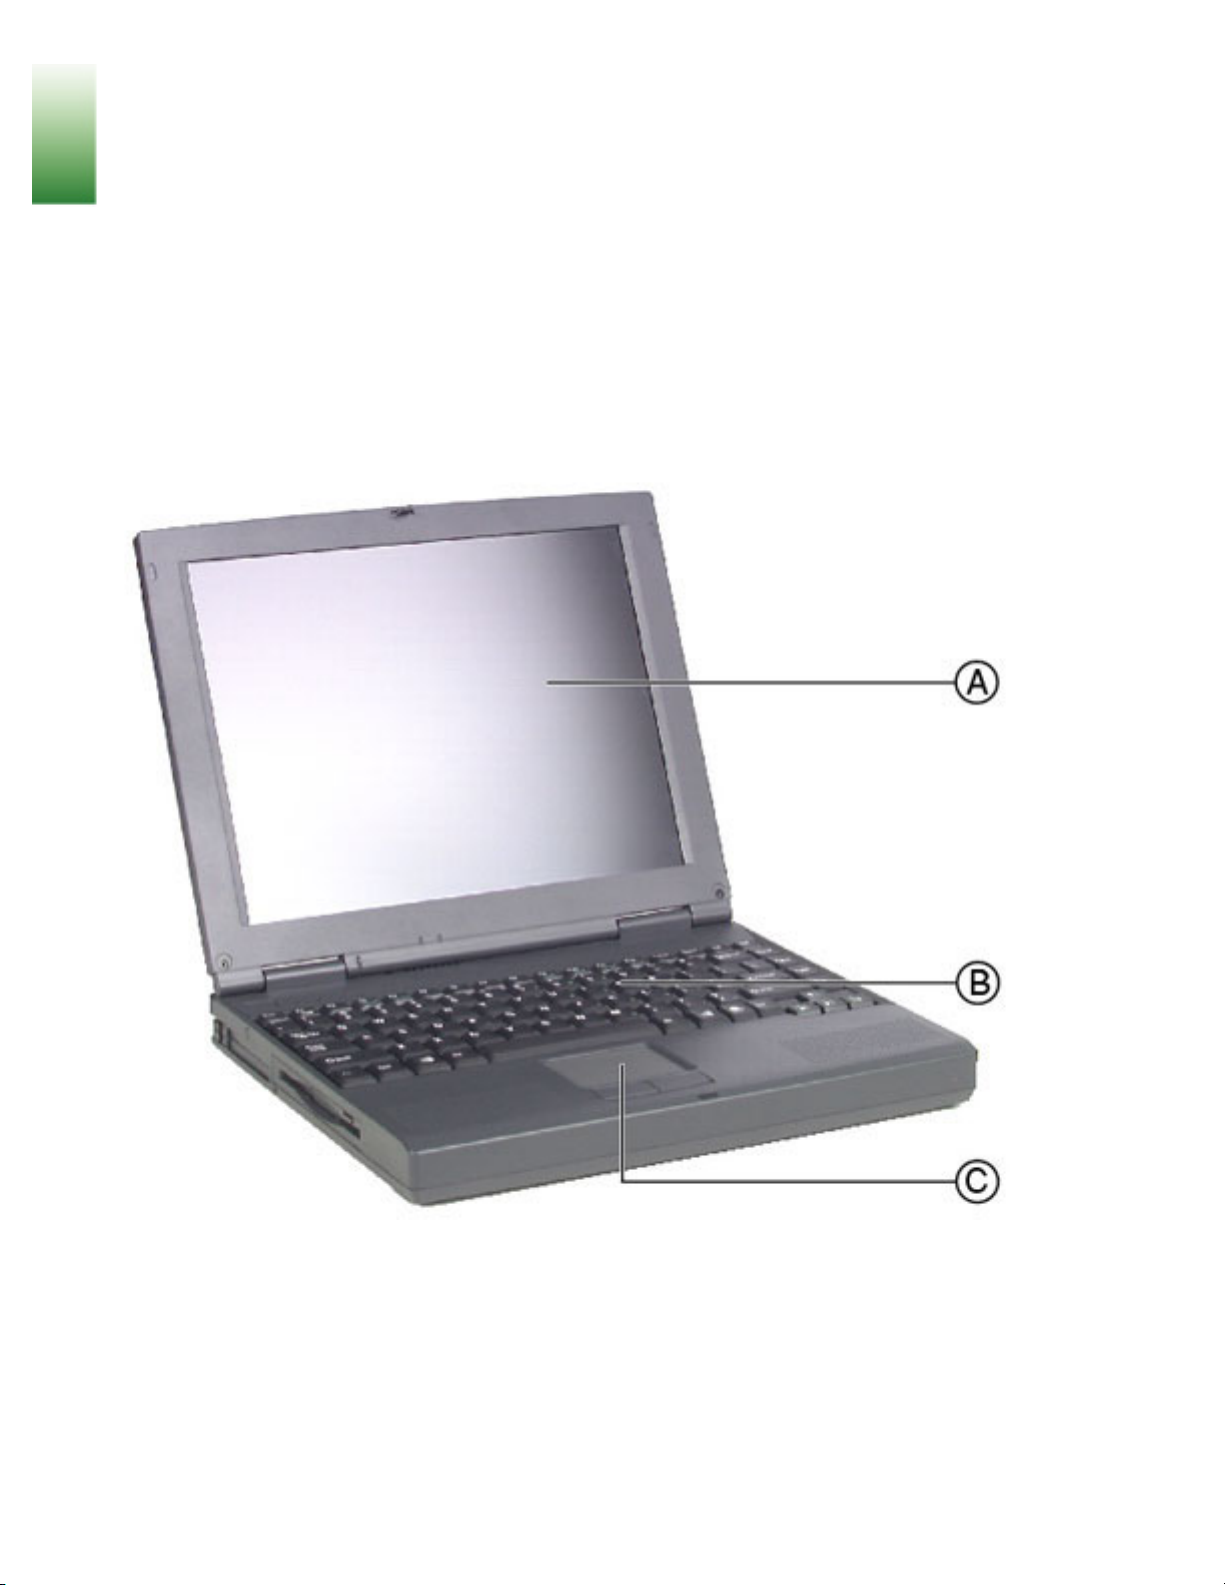
Keyboard and LCD
Component Description
A Color Liquid Crystal
Display (LCD)
Provides sharp resolution with
backlighting.
B
Keyboard
Provides the functionality of a
desktop keyboard.
C
EZ PadTM touchpad
Controls pointer movement.
Right side
http://support.gateway.com/s/Mobile/Solo_Series/p1100/8505462/index.htm (1 of 11)7/28/2004 8:18:35 AM
Page 2

Please check out our eBay auctions for more great
deals on Factory Service Manuals:
Page 3
http://support.gateway.com/s/Mobile/Solo_Series/p1100/8505462/index.htm
·
The Windows
desktop
·
Working with
windows
·
Starting a program
using the Start menu
·
Managing files and
folders
·
Browsing and
searching for files
Using the
Keyboard and
Touchpad
Using the
keyboard
·
Function
combination keys
·
Pad lock keys
Using your
EZPad touchpad
Using Multimedia
Installing
programs or
using multimedia
CDs
Listening to
music
Adjusting the
volume
Recording and
playing audio
Adjusting the
screen settings
Using the Internet
Learning about
the Internet
Using gateway.
net
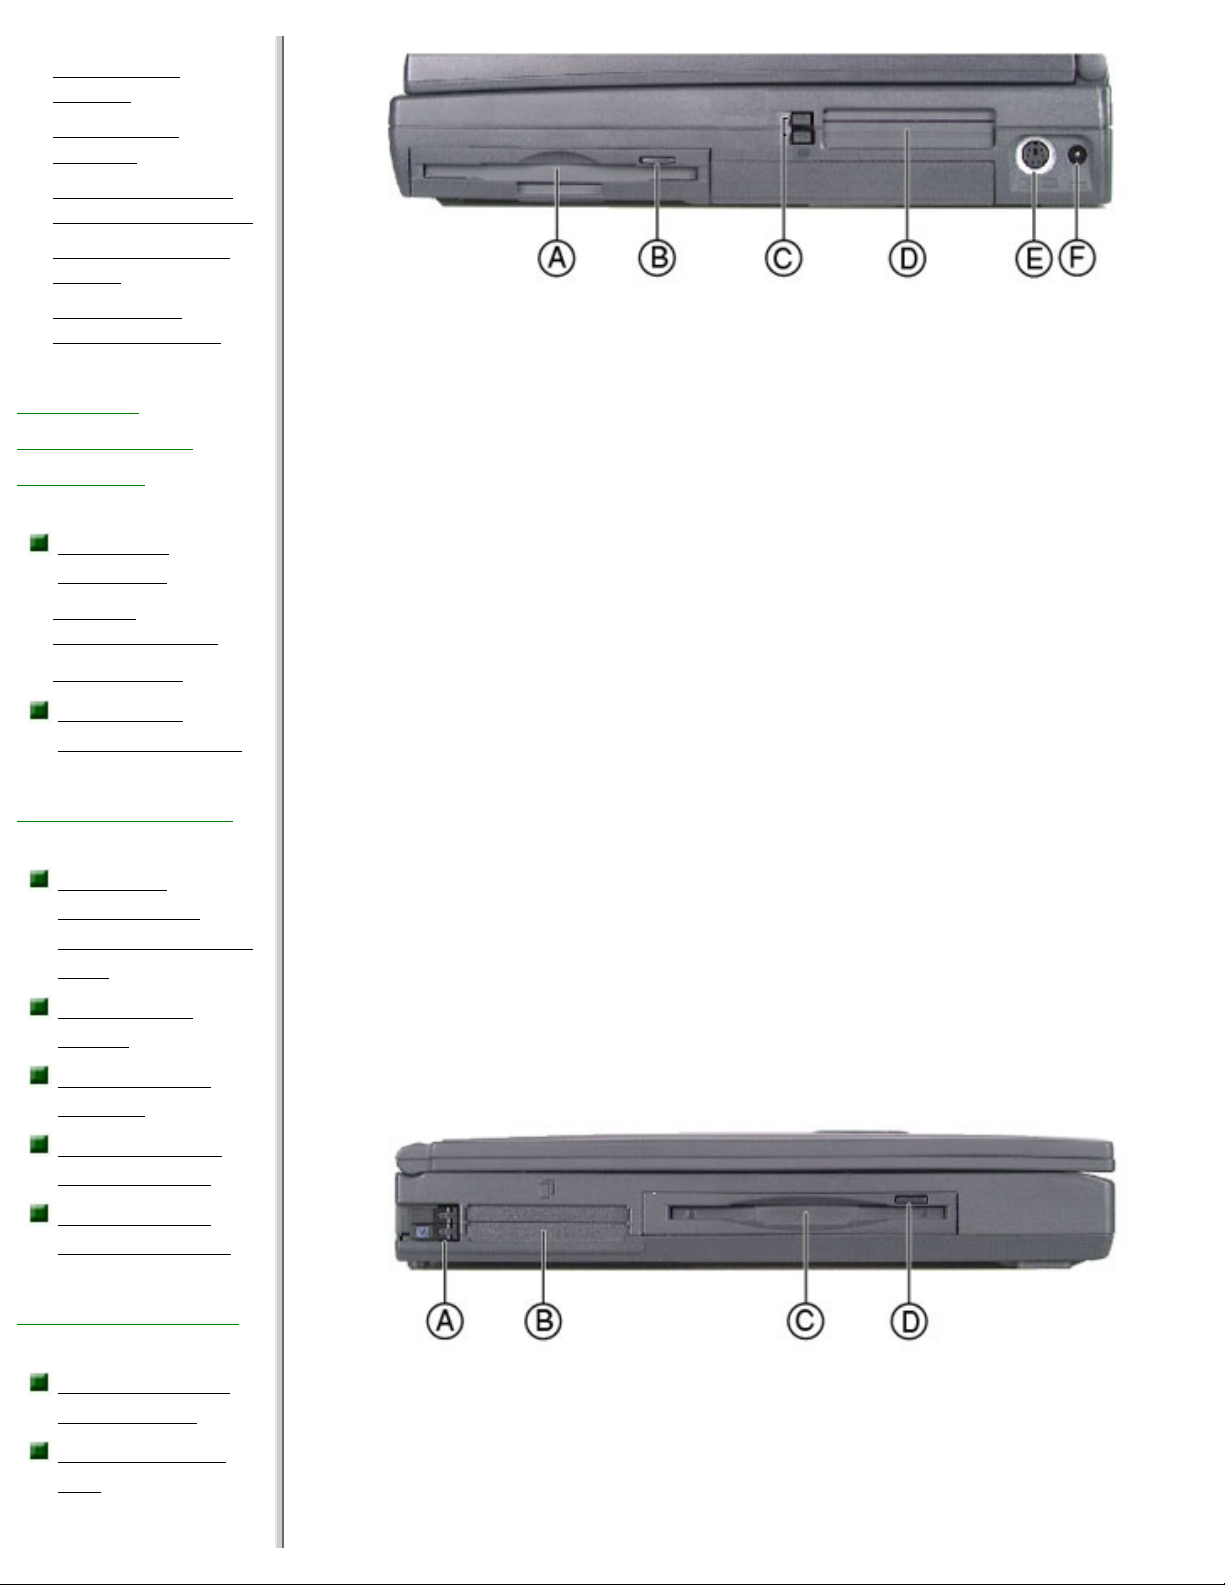
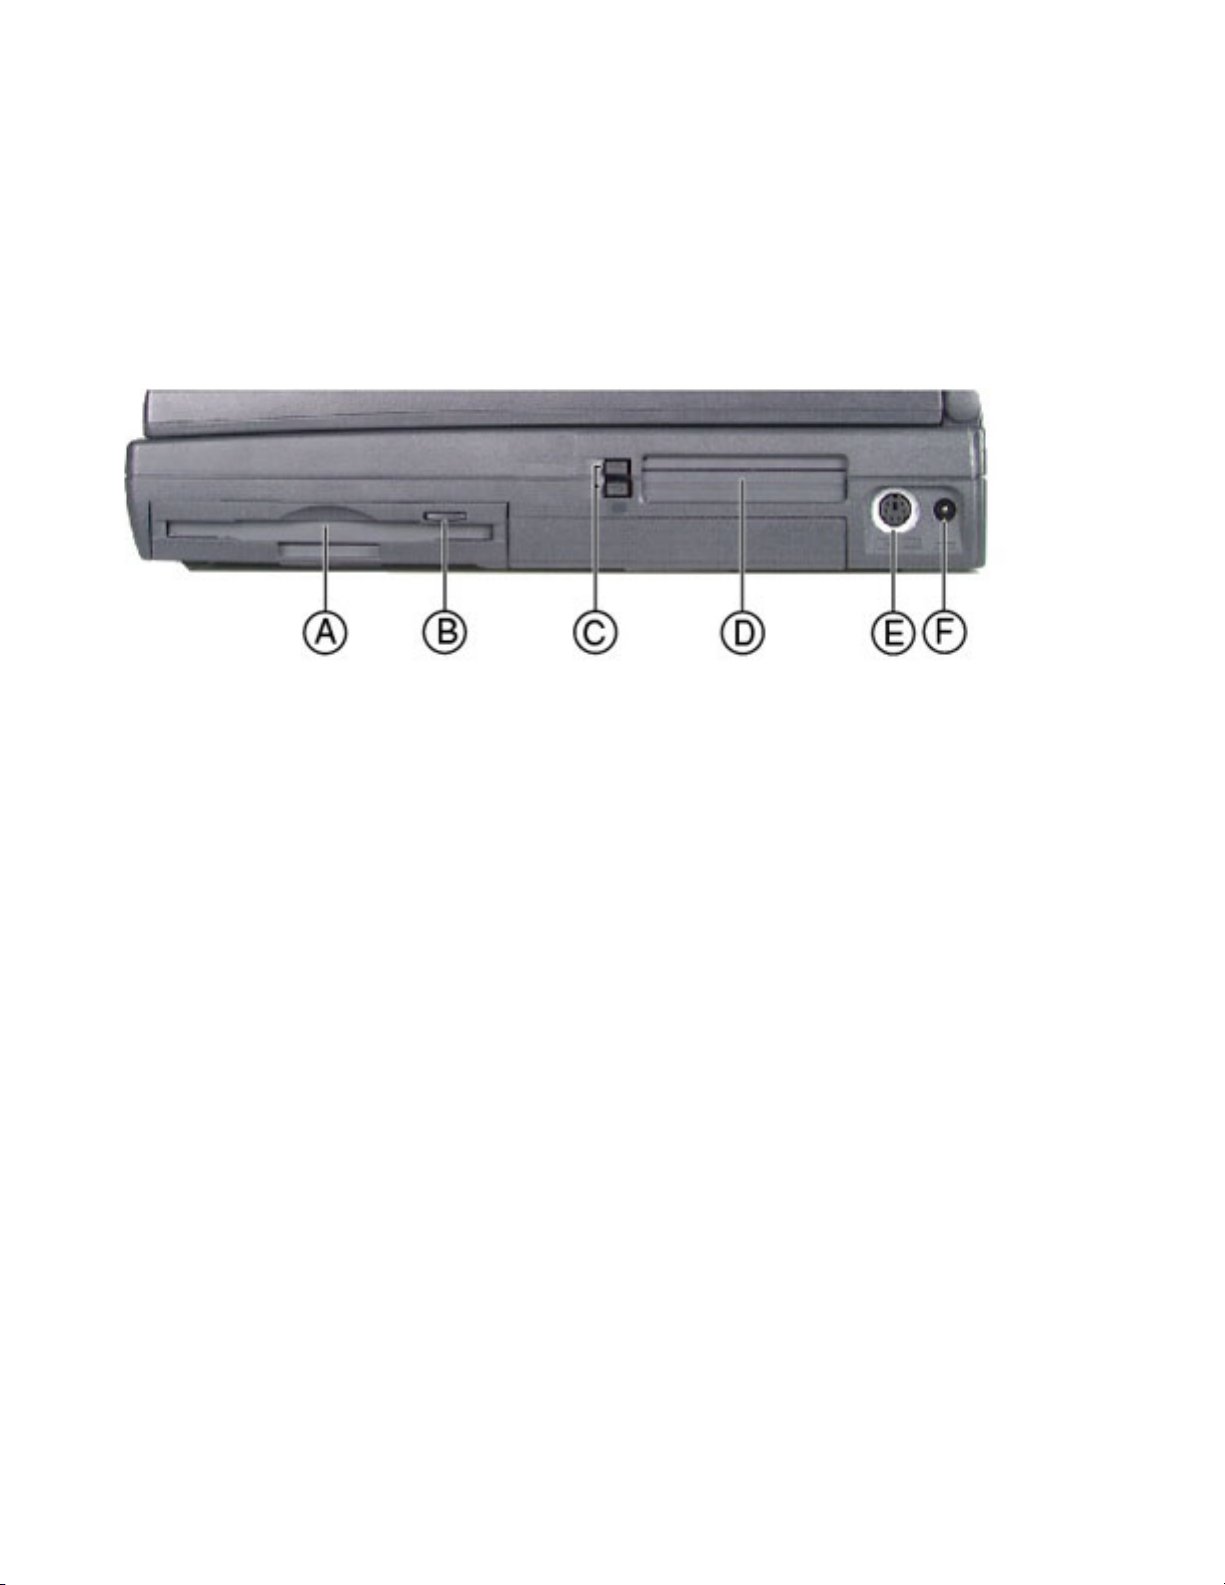
Component Icon Description
A
CD drive
Insert data or audio CD
discs into this drive.
B CD eject
button
Press to eject the CD
discs tray from the
drive.
C
Volume wheel
Use to adjust volume for
built-in speakers,
external speakers, and
headphones. Other port
volume levels are
controlled by multimedia
programs.
D
Modem port
Insert modem cable into
this port.
.
Left side
Component Icon Description
http://support.gateway.com/s/Mobile/Solo_Series/p1100/8505462/index.htm (2 of 11)7/28/2004 8:18:35 AM
Page 4

http://support.gateway.com/s/Mobile/Solo_Series/p1100/8505462/index.htm
·
Setting up an
account
·
Connecting to your
account
·
Disconnecting from
your account
Using the World
Wide Web
·
Visiting a Web site
·
Using links
·
Using the toolbar
buttons
Downloading
files
Using email
·
Sending e-mail
·
Checking your e-mail
Maintaining Your
Computer
Caring for your
computer
Protecting from
power source
problems
·
Surge suppressors
Creating an
emergency
startup diskette
Scanning the
hard drive for
errors
Defragmenting
the hard drive
Protecting your
computer from
viruses
Managing hard
drive space
·
Checking hard drive
space
·
Backing up files
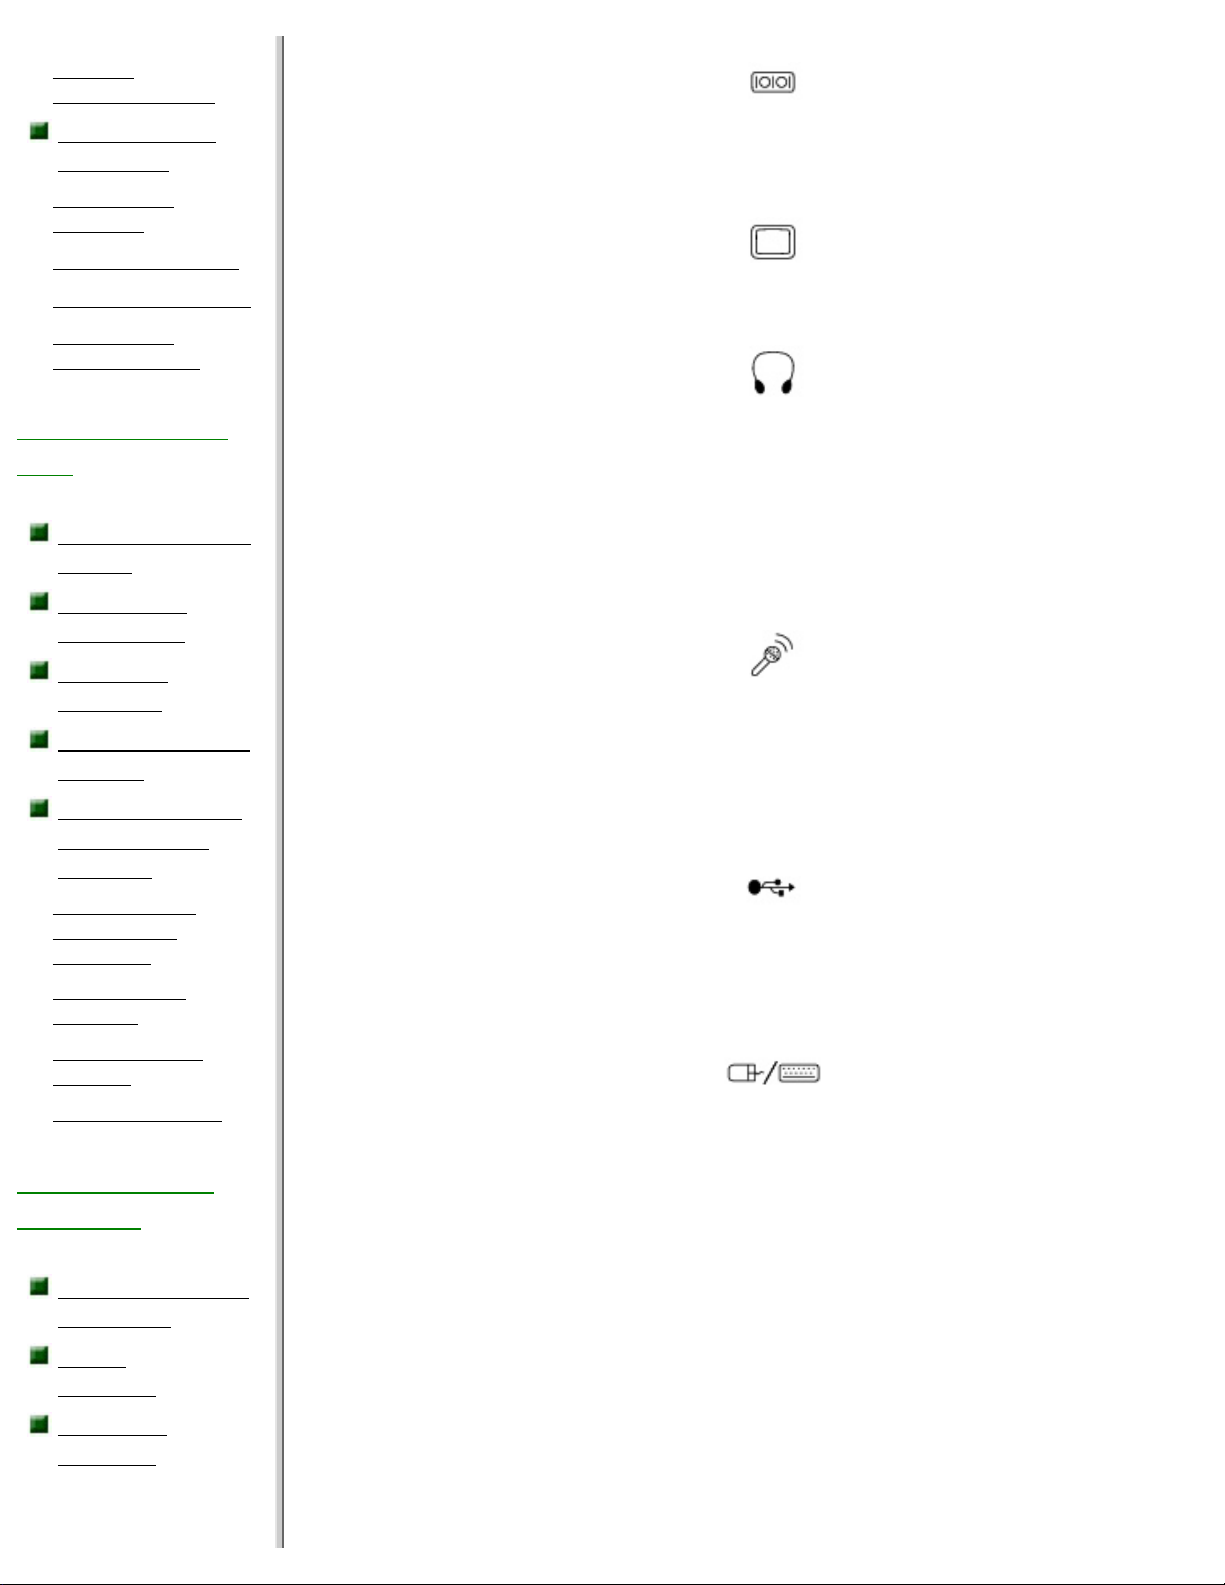
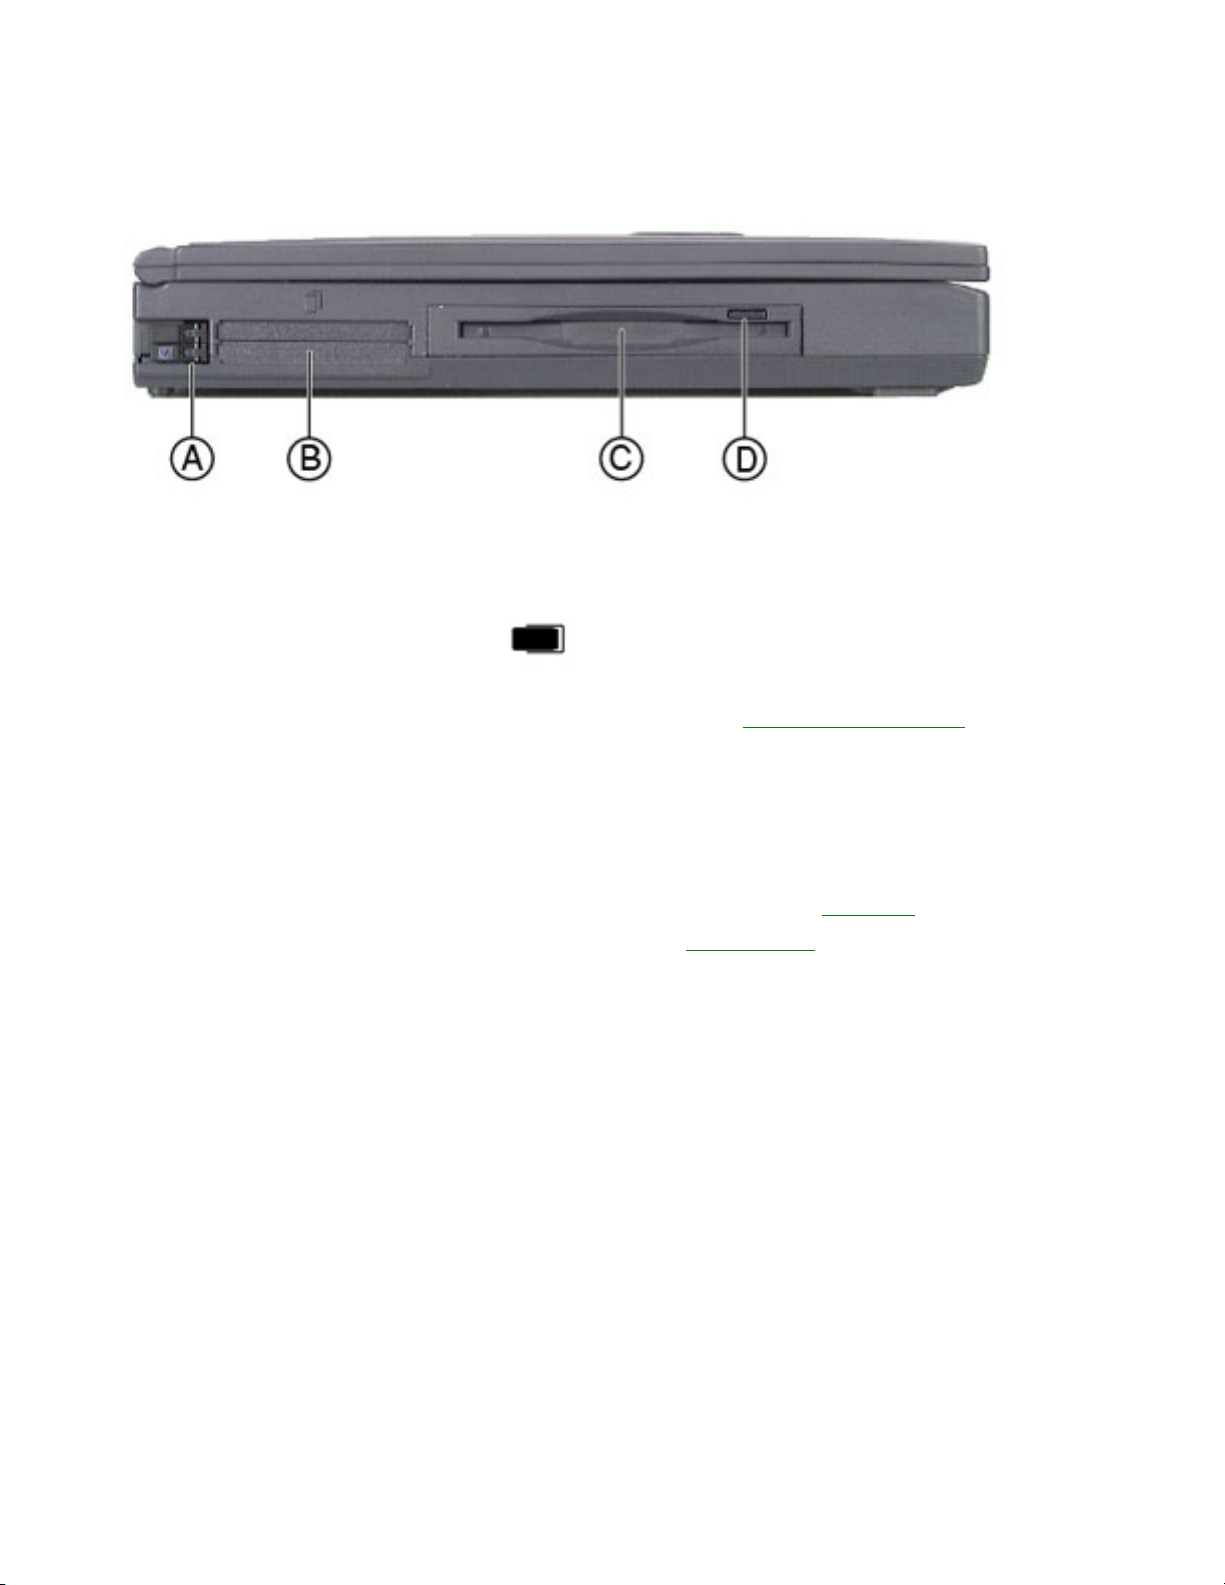
A PC Card eject
buttons
Press an eject button
to remove PC Cards
from PC Card slots.
See
"Using PC Cards"
for more information.
B
PC Card slots
Insert PC Cards Type I,
II, or III into these
slots. See
"Using
PC Cards" for more
information.
C
Diskette drive
Insert a standard 3.5inch diskette into this
drive.
D Diskette drive
eject button
Press the eject button
to remove a diskette
from the drive.
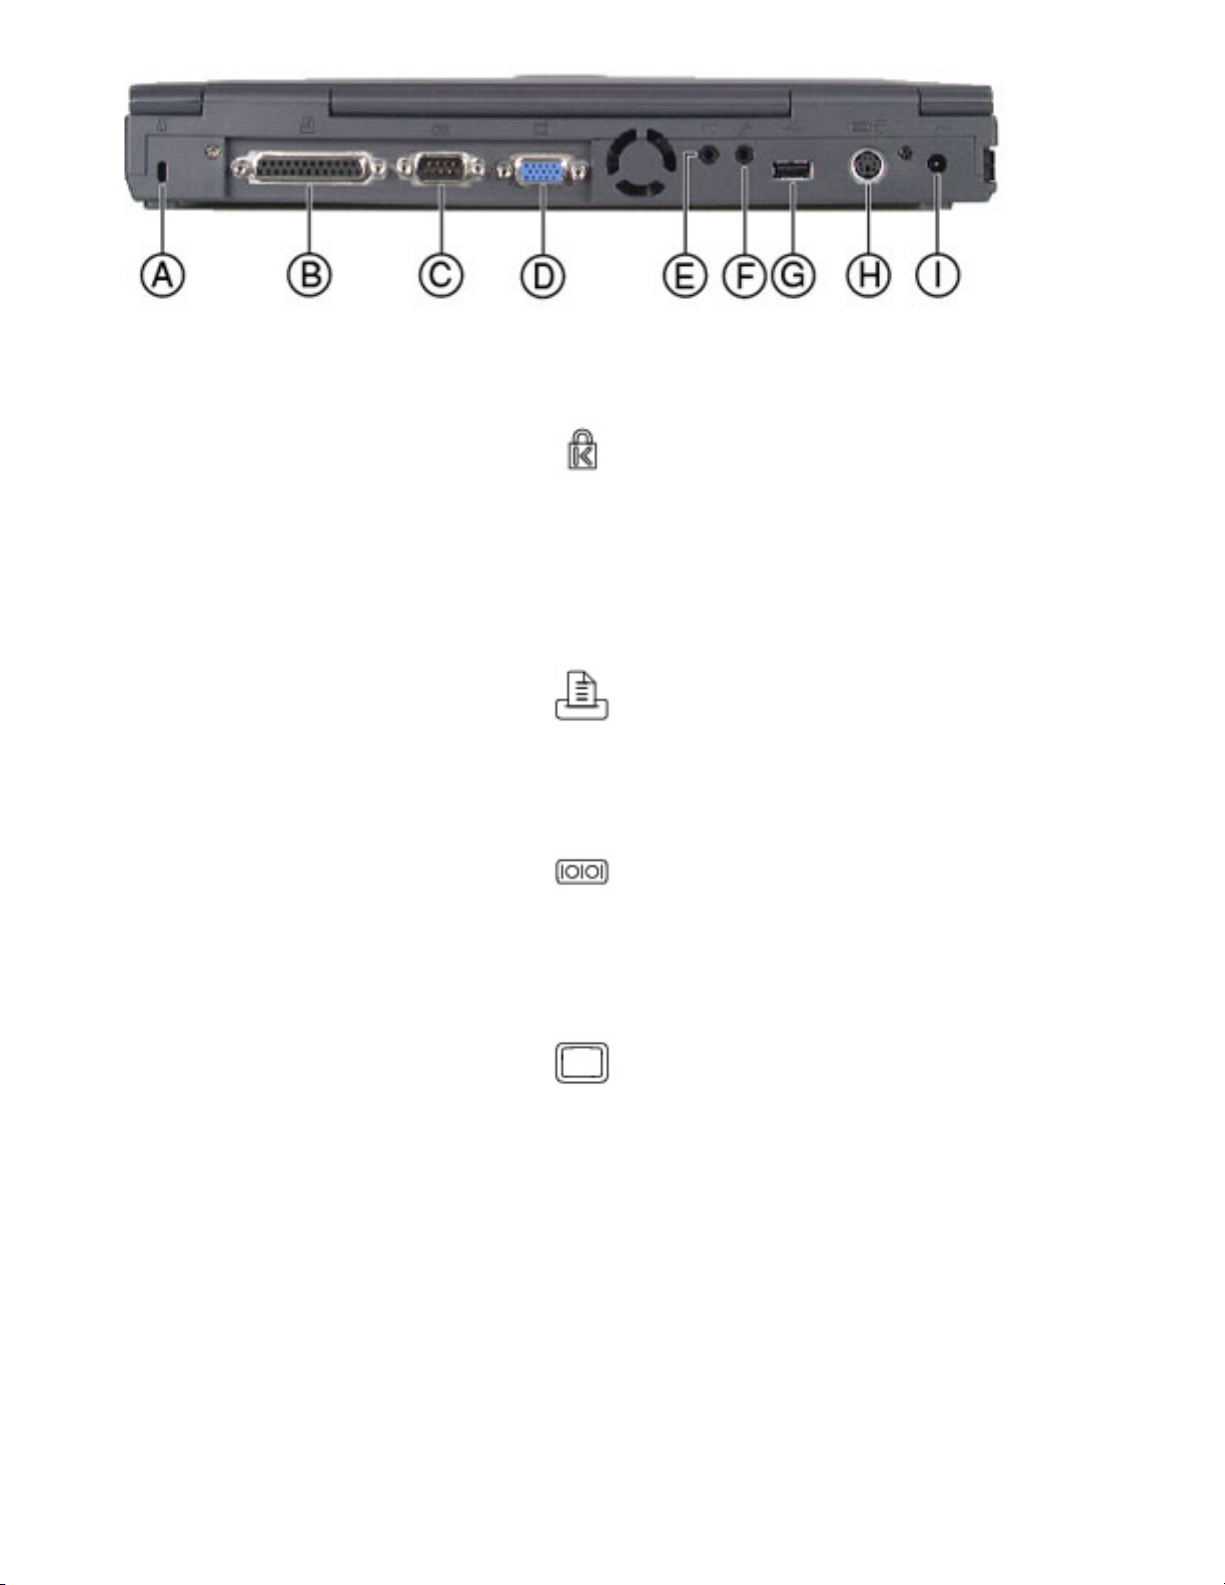
Back
Component Icon Description
A Kensington lock
slot
Secure your
notebook to an
immovable object
by connecting a
Kensington cable
lock to this slot.
B
Parallel port
Connect a parallel
device such as a
printer to this
port.
http://support.gateway.com/s/Mobile/Solo_Series/p1100/8505462/index.htm (3 of 11)7/28/2004 8:18:35 AM
Page 5
http://support.gateway.com/s/Mobile/Solo_Series/p1100/8505462/index.htm
·
Deleting
unnecessary files
Cleaning your
computer
·
Cleaning the
keyboard
·
Cleaning the screen
·
Cleaning the exterior
·
Cleaning the
external mouse
Managing Power
Use
Checking battery
status
Maximizing
battery life
Changing
batteries
Recalibrating the
battery
Changing power
management
settings
·
Opening Power
Management
Properties
·
Setting power
schemes
·
Changing alarm
settings
·
Hibernation mode
Upgrading Your
Notebook
Preventing static
electricity
Using
PCCards
Installing
memory
C
Serial port
Connect a serial
device to this
port such as a
digital camera.
D
VGA port
Connect a
monitor cable to
this port.
E Speaker out/
headphone port
Connect external
speakers or
headphones to
this port.
Supports small
unamplified
speakers. (1/8inch/3.5-mm
jack)
F External
microphone port
Connect an
external
microphone to
this port to
record audio.
(1/8-inch/3.5mm jack)
G USB (Universal
Serial Bus) port
Plug a USB serial
device into this
port such as a
USB Iomega
Zip
TM
drive.
H PS/2 port
Connect a PS/2
device to this
port such as a
keyboard or
mouse.
I
Power connector
Connect the AC
power adapter to
this port.
Top
http://support.gateway.com/s/Mobile/Solo_Series/p1100/8505462/index.htm (4 of 11)7/28/2004 8:18:35 AM
Page 6
http://support.gateway.com/s/Mobile/Solo_Series/p1100/8505462/index.htm
Replacing the
hard disk drive
Restoring Files and
Programs
Using Gateway
GoBack
·
Before you use
Gateway GoBack
·
Recovering a file
·
Reverting to a
previous hard drive
configuration
·
What to do when
your computer does
not start
·
Disabling Gateway
GoBack
·
Clearing Gateway
GoBack history
·
Starting your
computer using
adiskette
·
Reinstalling Gateway
GoBack
·
Updating your
Gateway GoBack
software
·
Getting help
·
Backing up your
computer
·
Using disk
compression utilities
·
Using Norton Speed
Disk
Reinstalling
Windows98
Reinstalling
device drivers
Reinstalling
programs
Troubleshooting
·
Safety guidelines
This light turns
on...
when...
A
Power
The notebook is powered by the AC adapter.
Check LED for notebook power status:
● LED on - power is ON.
● LED off - power is OFF or in suspend.
B Battery
charge
The battery is installed. The LED shows
battery activity and status.
● Green - battery fully charged.
● Orange - battery is being charged.
● Red - battery is low.
● Blinking and red - battery is very low.
● Blinking and orange - battery is
malfunctioning.
Bottom
http://support.gateway.com/s/Mobile/Solo_Series/p1100/8505462/index.htm (5 of 11)7/28/2004 8:18:35 AM
Page 7
http://support.gateway.com/s/Mobile/Solo_Series/p1100/8505462/index.htm
·
First steps
·
CD drive
·
Device conflicts
·
Diskette drive
·
File management
·
Hard disk drive
·
Internet
·
Keyboard
·
Memory
·
Modem
·
Passwords
·
PC Cards
·
Power
·
Printers
·
ScanDisk
·
Software
·
Sound
·
Video
Getting Help
Before calling for
technical support
Technical
support
resources
Safety and
Regulatory
Information
Index
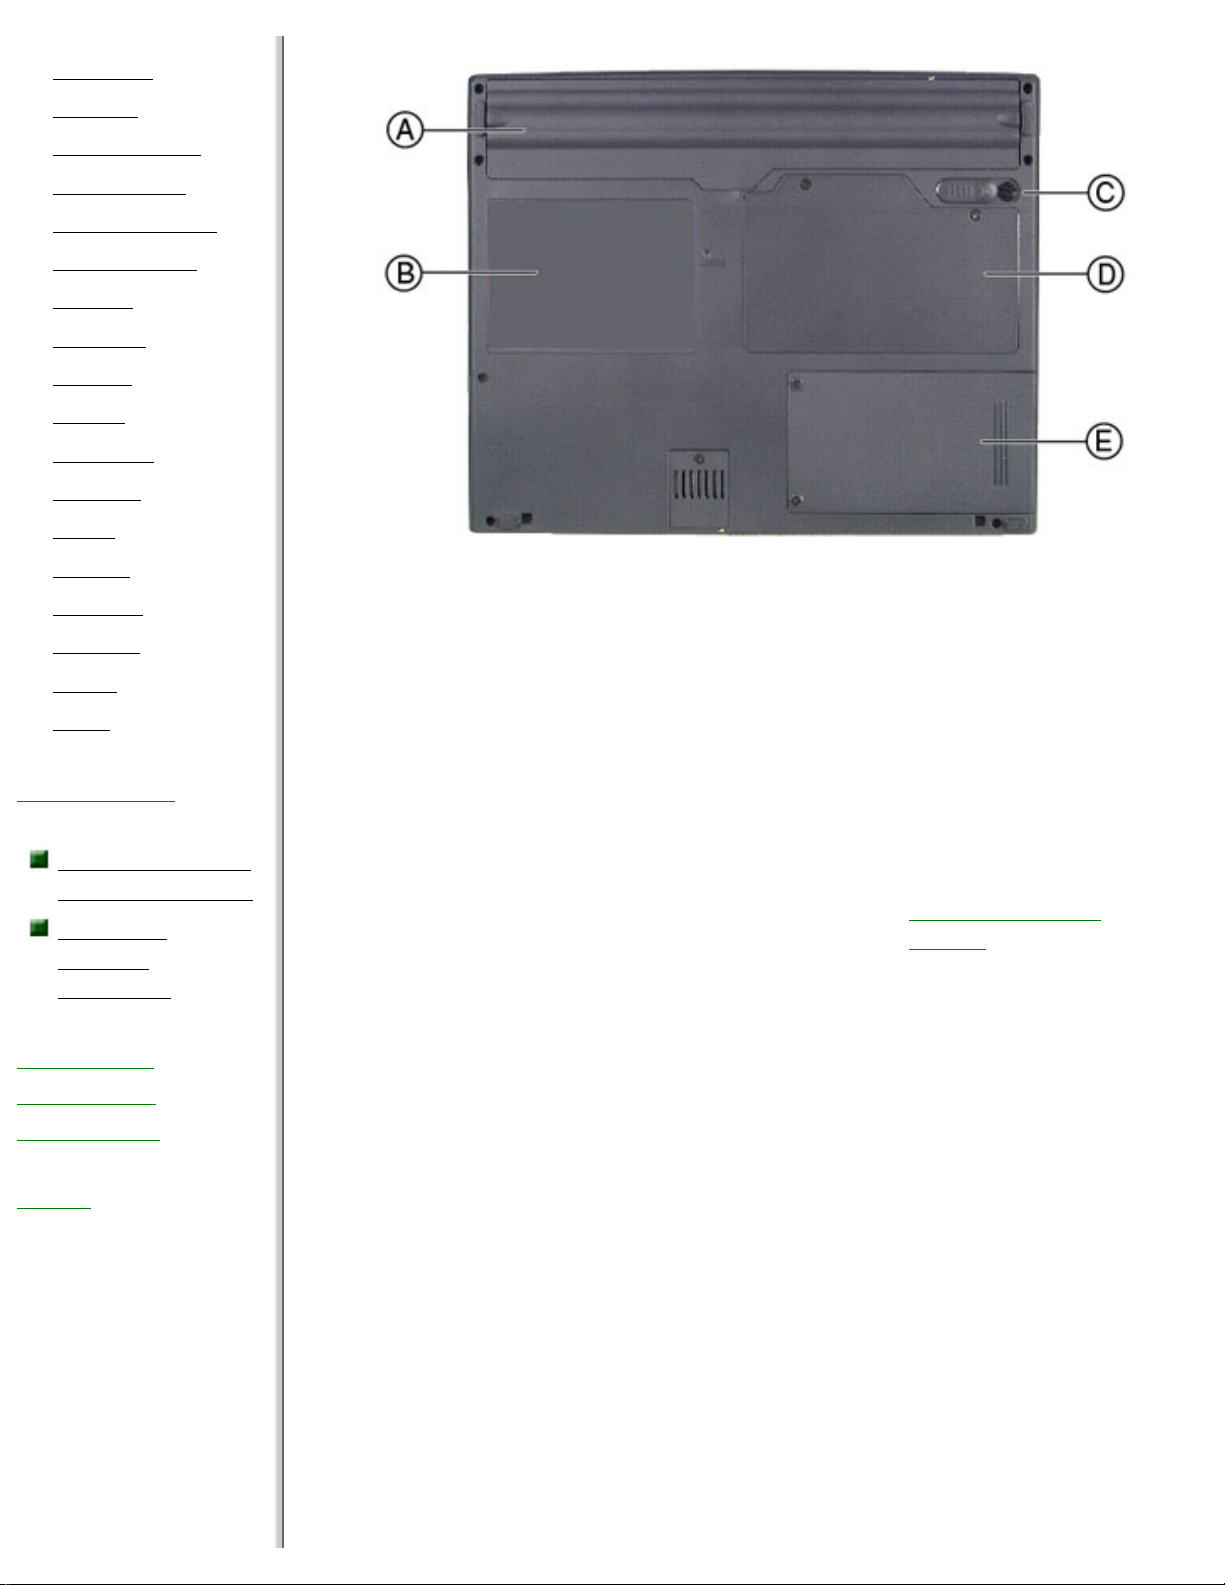
Component Icon Description
A
Battery bay
Insert battery into
this bay.
B System
identification label
Find the product
model number,
serial number,
display type, and
processor speed
on this label. See
"Identifying your
model" for more
information on
your label.
C
Battery release latch
Slide to release
battery pack.
D
Memory bay
Install or remove
SO-DIMM memory
modules in this
bay.
E
Hard disk drive bay
Open the cover to
replace hard disk
drive.
Status indicators
http://support.gateway.com/s/Mobile/Solo_Series/p1100/8505462/index.htm (6 of 11)7/28/2004 8:18:35 AM
Page 8
http://support.gateway.com/s/Mobile/Solo_Series/p1100/8505462/index.htm
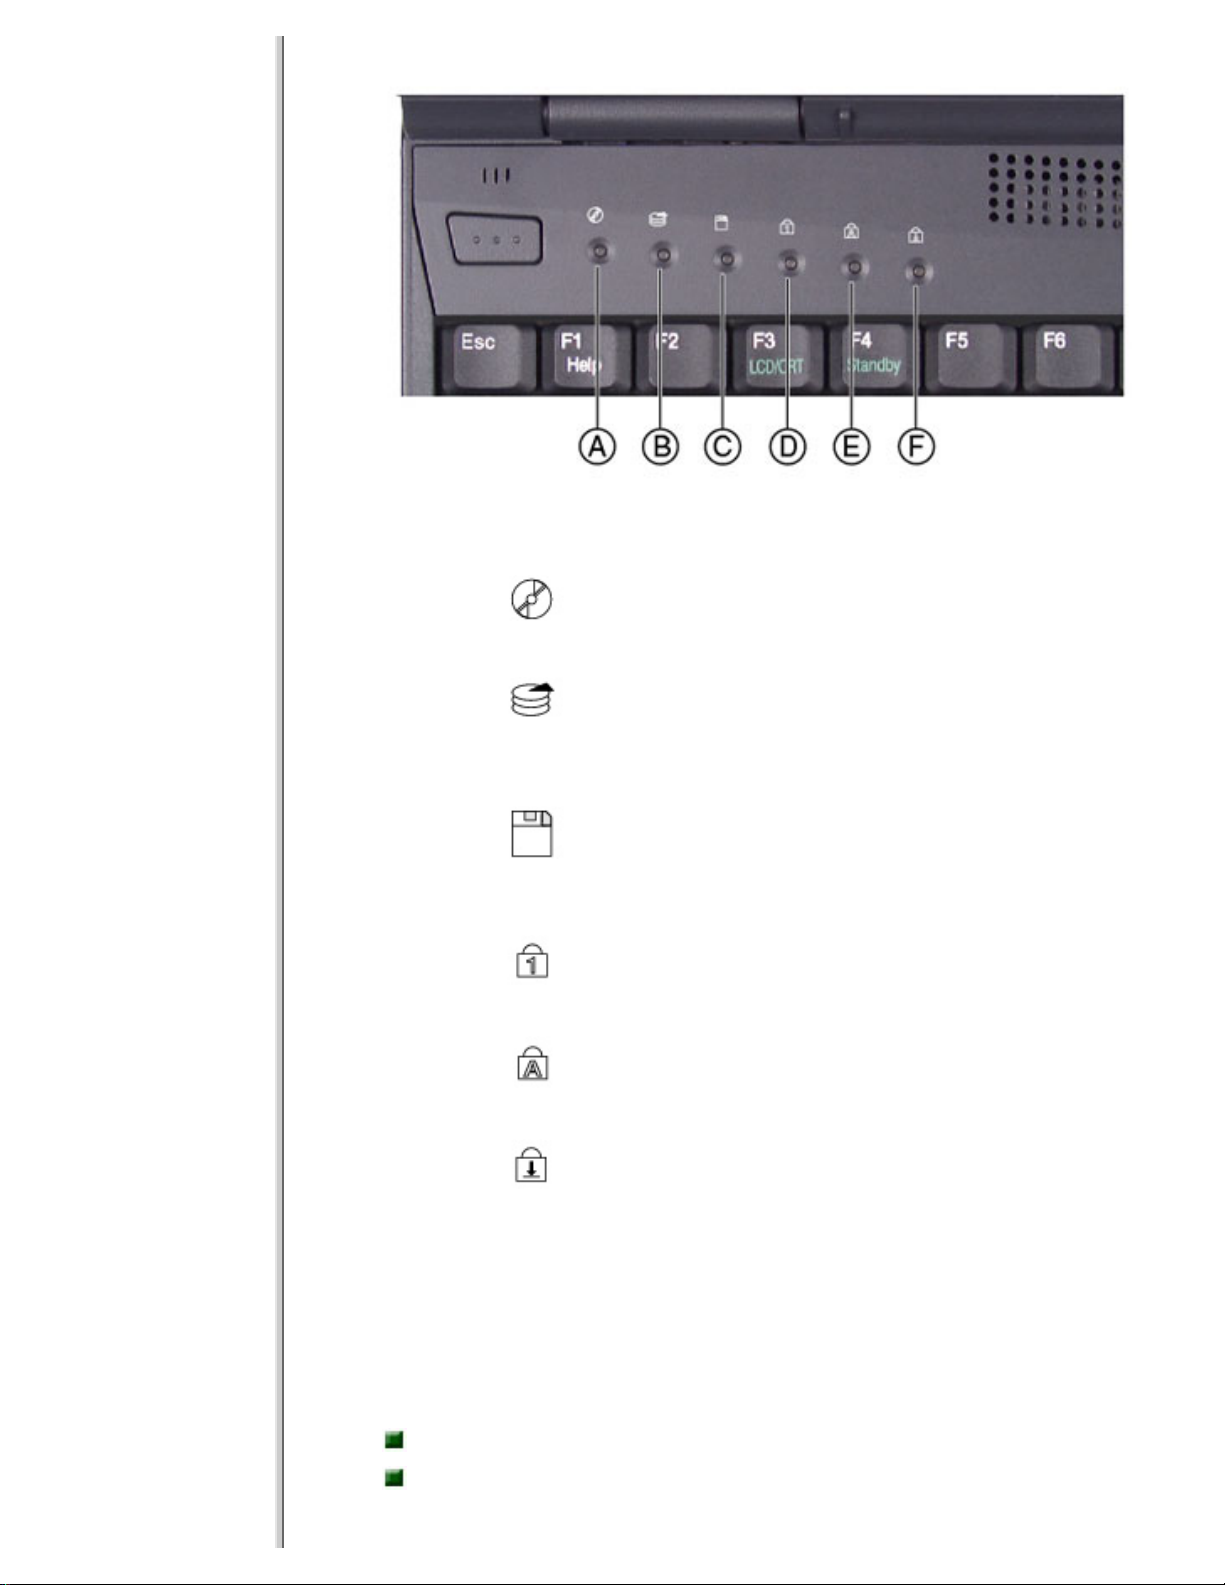
This light turns on... when...
A
CD drive
The notebook is
accessing the CD drive.
B
Hard disk
drive
The notebook is
accessing the hard disk
drive.
C
Diskette drive
The notebook is
accessing the diskette
drive.
D
Pad lock The Pad lock is enabled.
E
Caps lock The caps lock is enabled.
F
Scroll lock
The scroll lock is
enabled.
Accessories
Gateway offers various accessories that can help you make the most of
using your Solo notebook:
Batteries
Automobile/airplane
adapters
http://support.gateway.com/s/Mobile/Solo_Series/p1100/8505462/index.htm (7 of 11)7/28/2004 8:18:35 AM
Page 9
http://support.gateway.com/s/Mobile/Solo_Series/p1100/8505462/index.htm
Memory
modules
Hard disk
drives
External keyboards, monitors, and
speakers
Network
cards
Printers
Tape backup
units
Software
Carrying
cases
For more information on these or other Gateway accessories for your
notebook, visit our Web site at
www.gateway.com or call 1.800.846.2000.
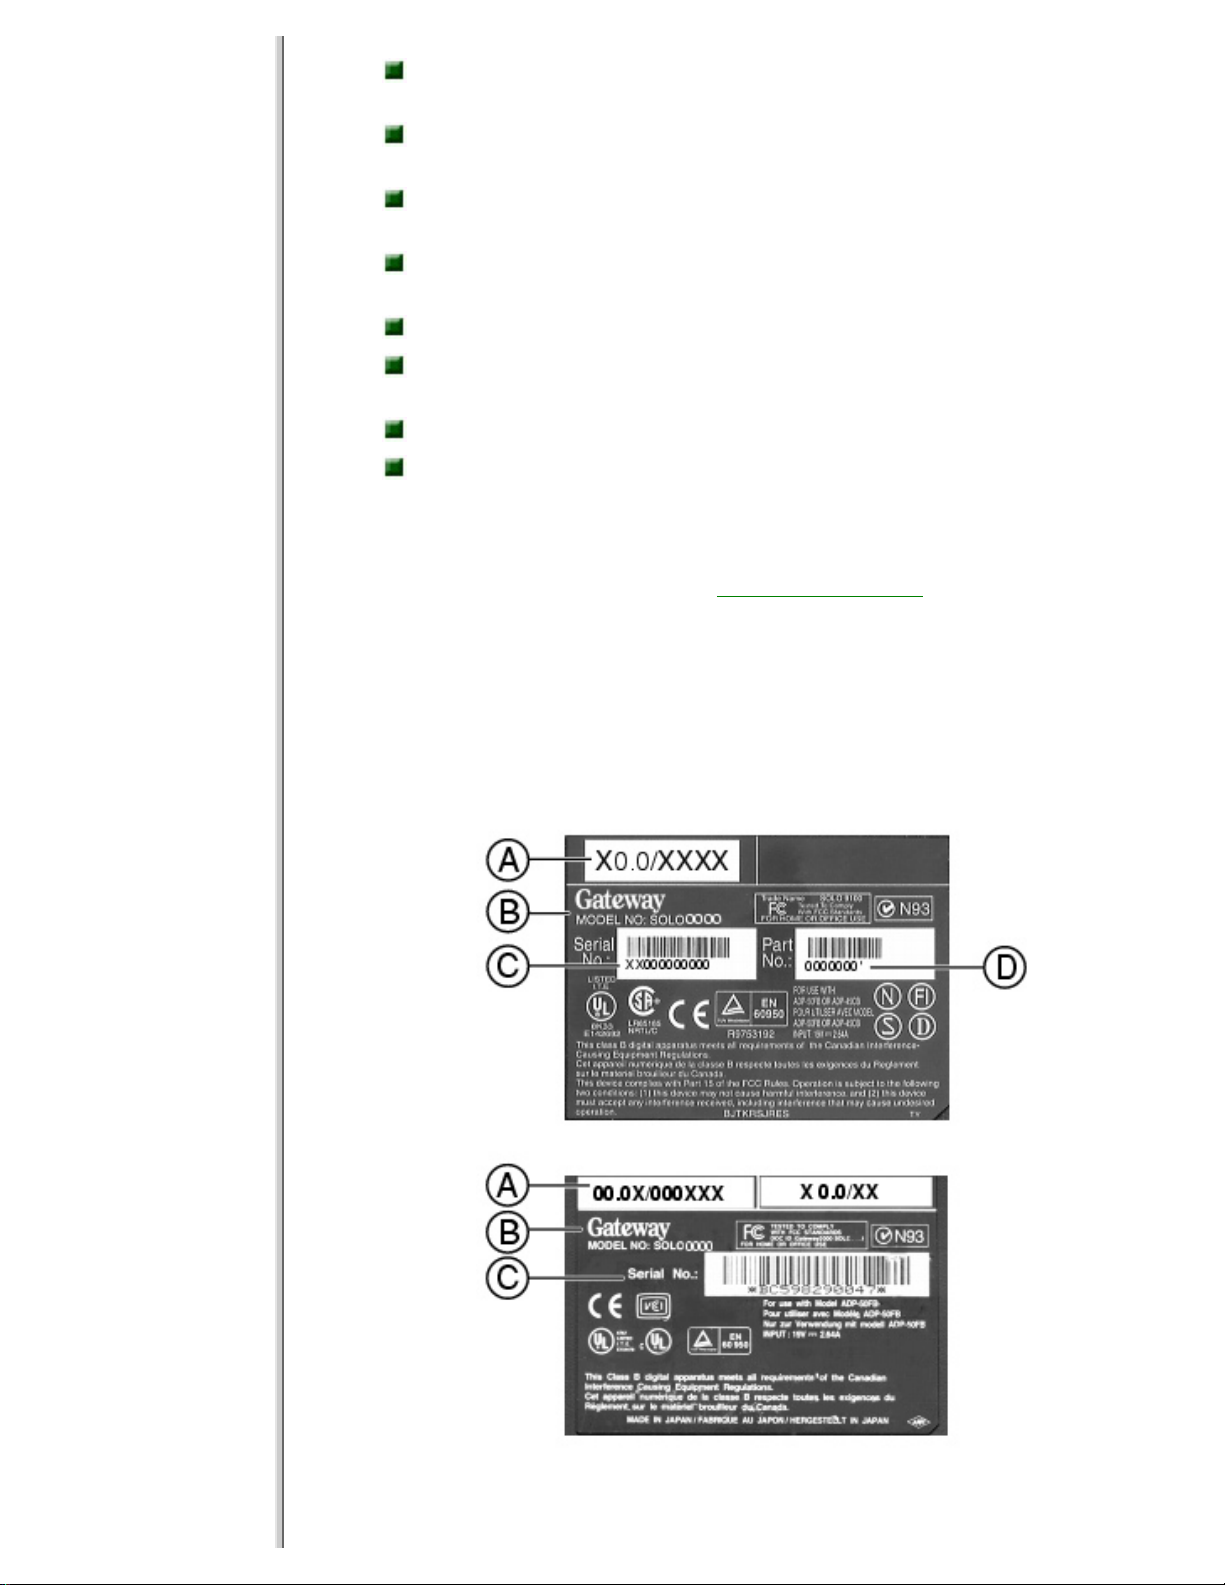
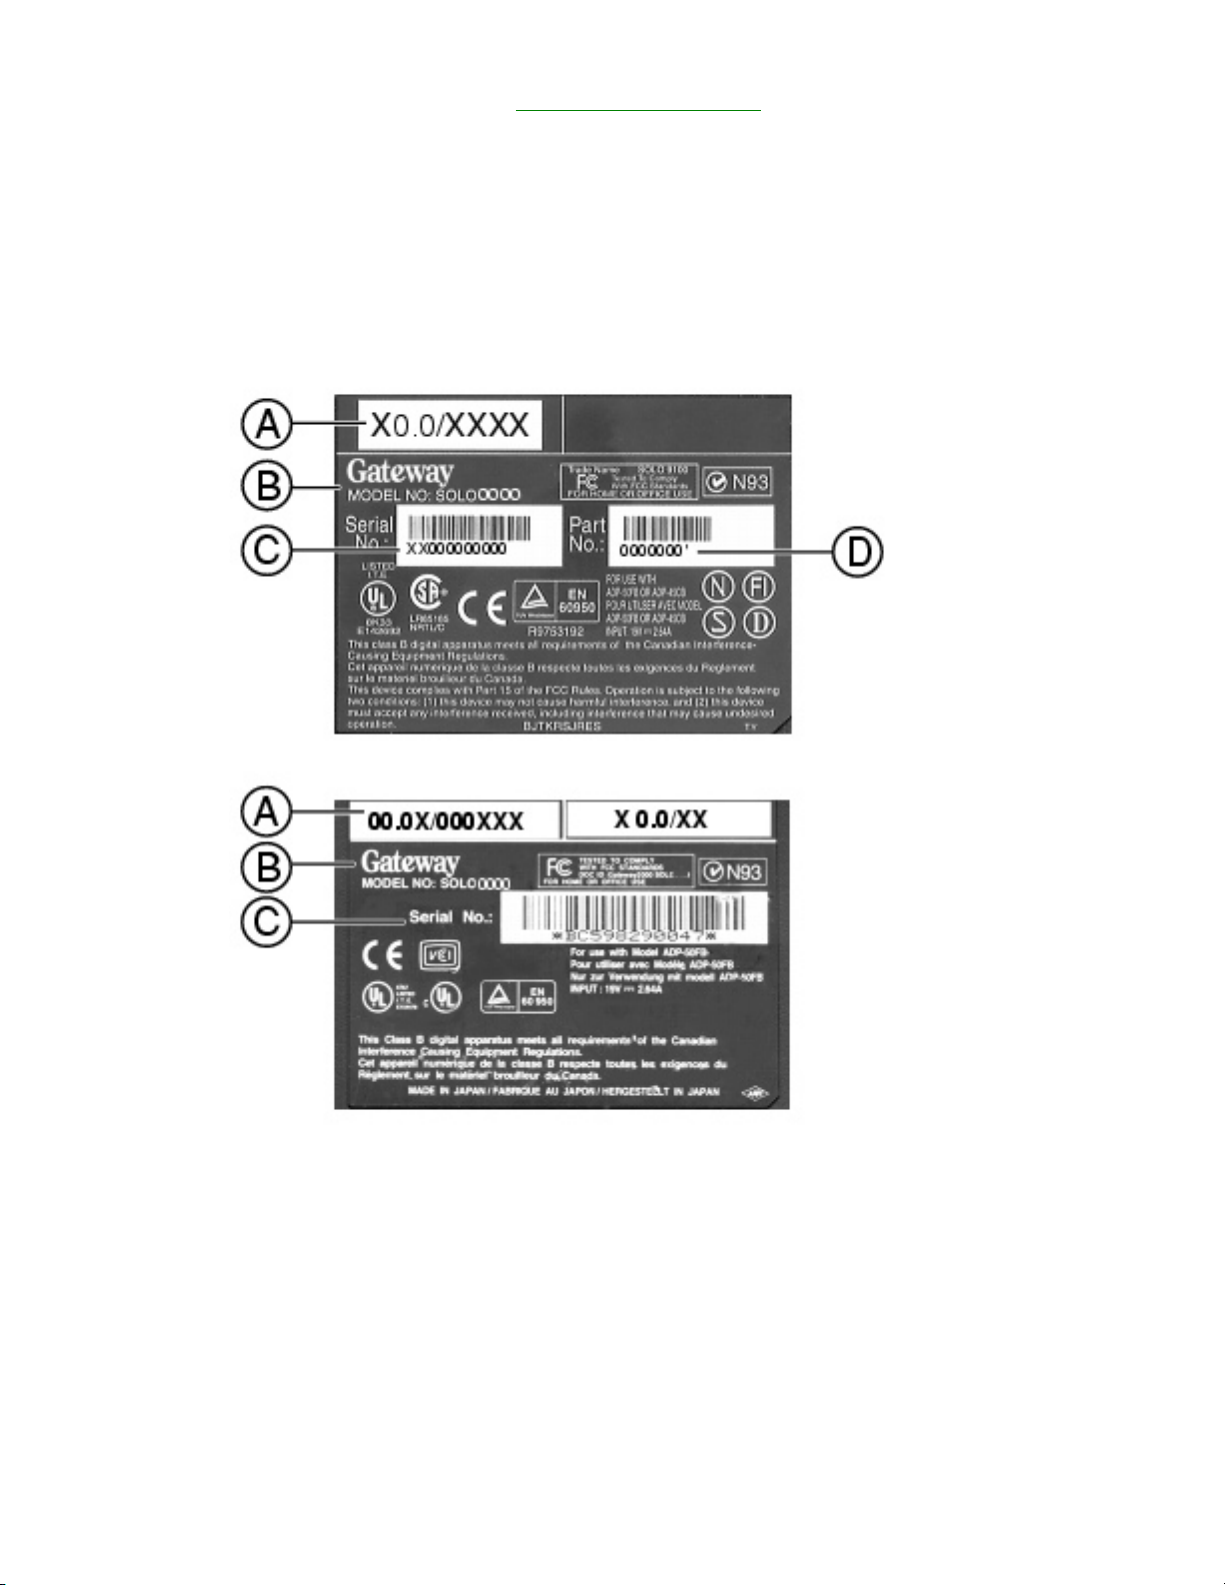
Identifying your model
The label on the bottom of your computer contains model information that
can help Client Care diagnose your problem if you call for assistance.
Label information varies by model. Two examples are shown here.
a. Revision code and display type/processor size
http://support.gateway.com/s/Mobile/Solo_Series/p1100/8505462/index.htm (8 of 11)7/28/2004 8:18:35 AM
Page 10
http://support.gateway.com/s/Mobile/Solo_Series/p1100/8505462/index.htm
b. Gateway model number
c. Gateway serial number
d. Gateway part number
For more information . . .
Gateway has provided these additional documentation resources to help
you get the most out of your Gateway PC.
Microsoft Windows® manual
Use this manual to find information about using the operating system,
getting help, organizing your files, using programs, troubleshooting, and
learning about other advanced features such as connecting to a network.
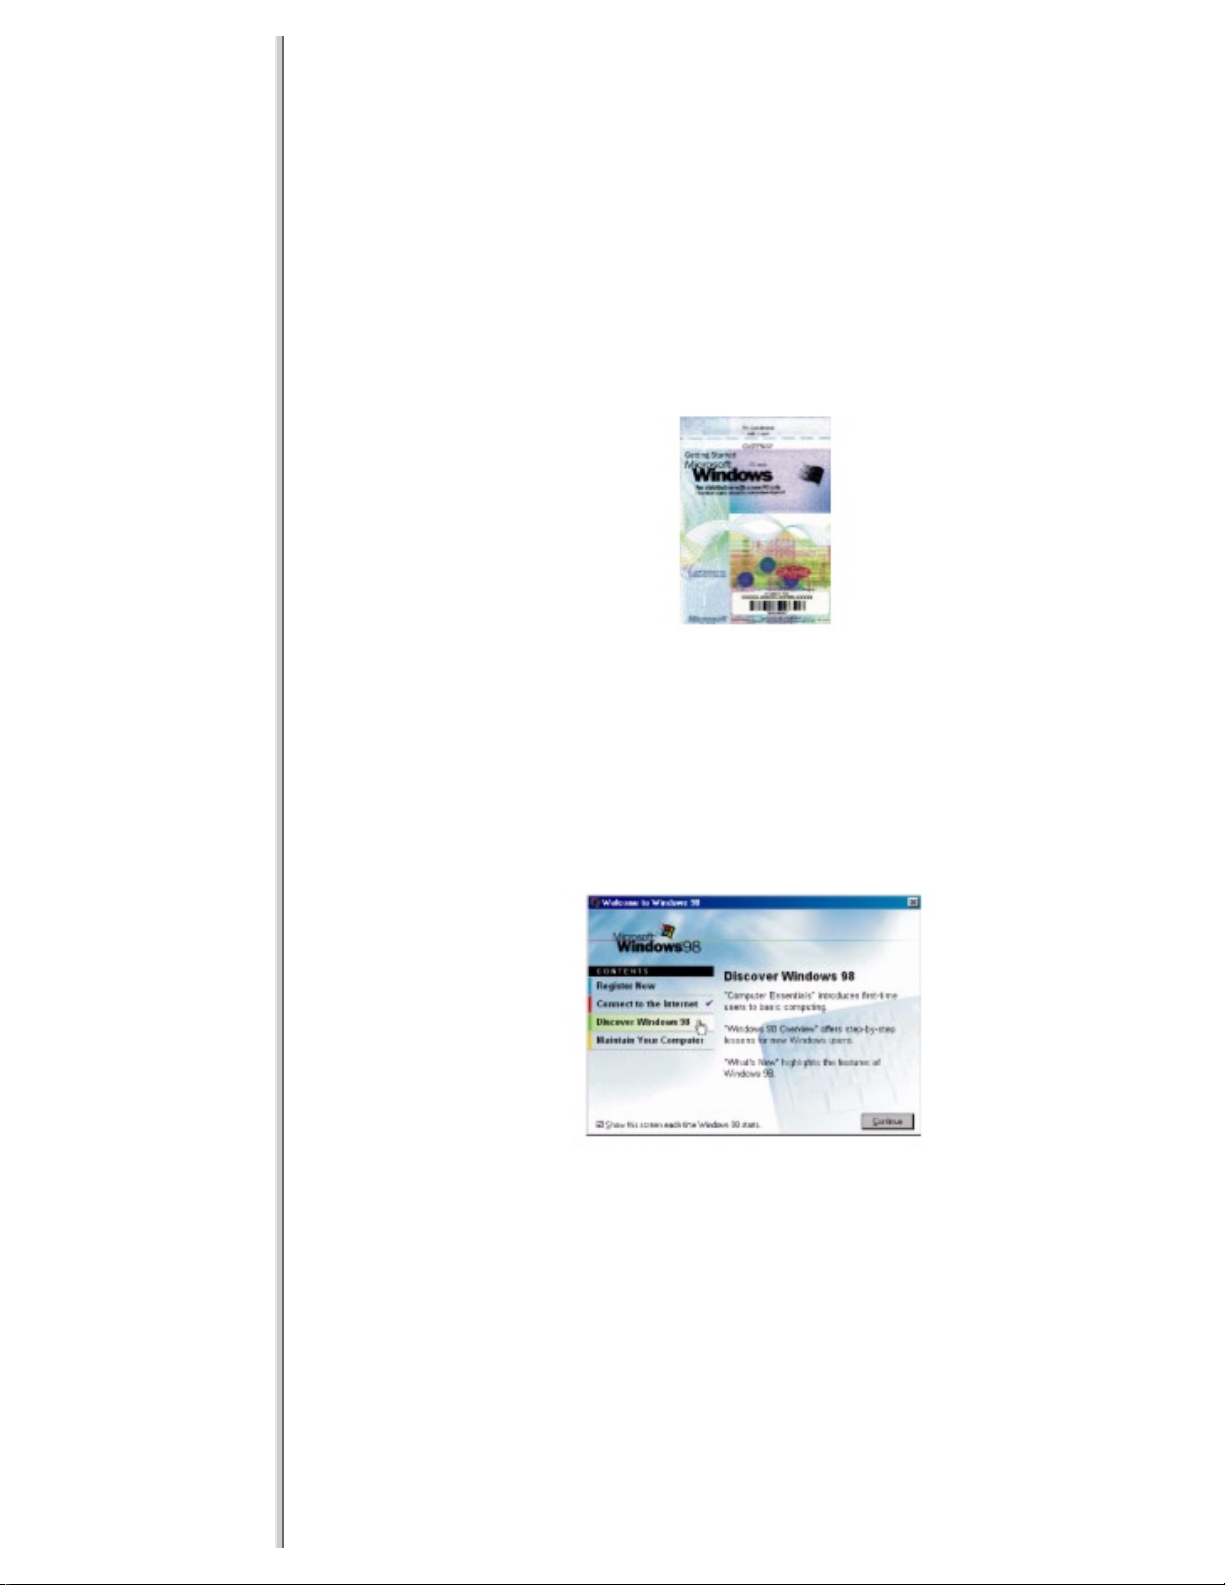
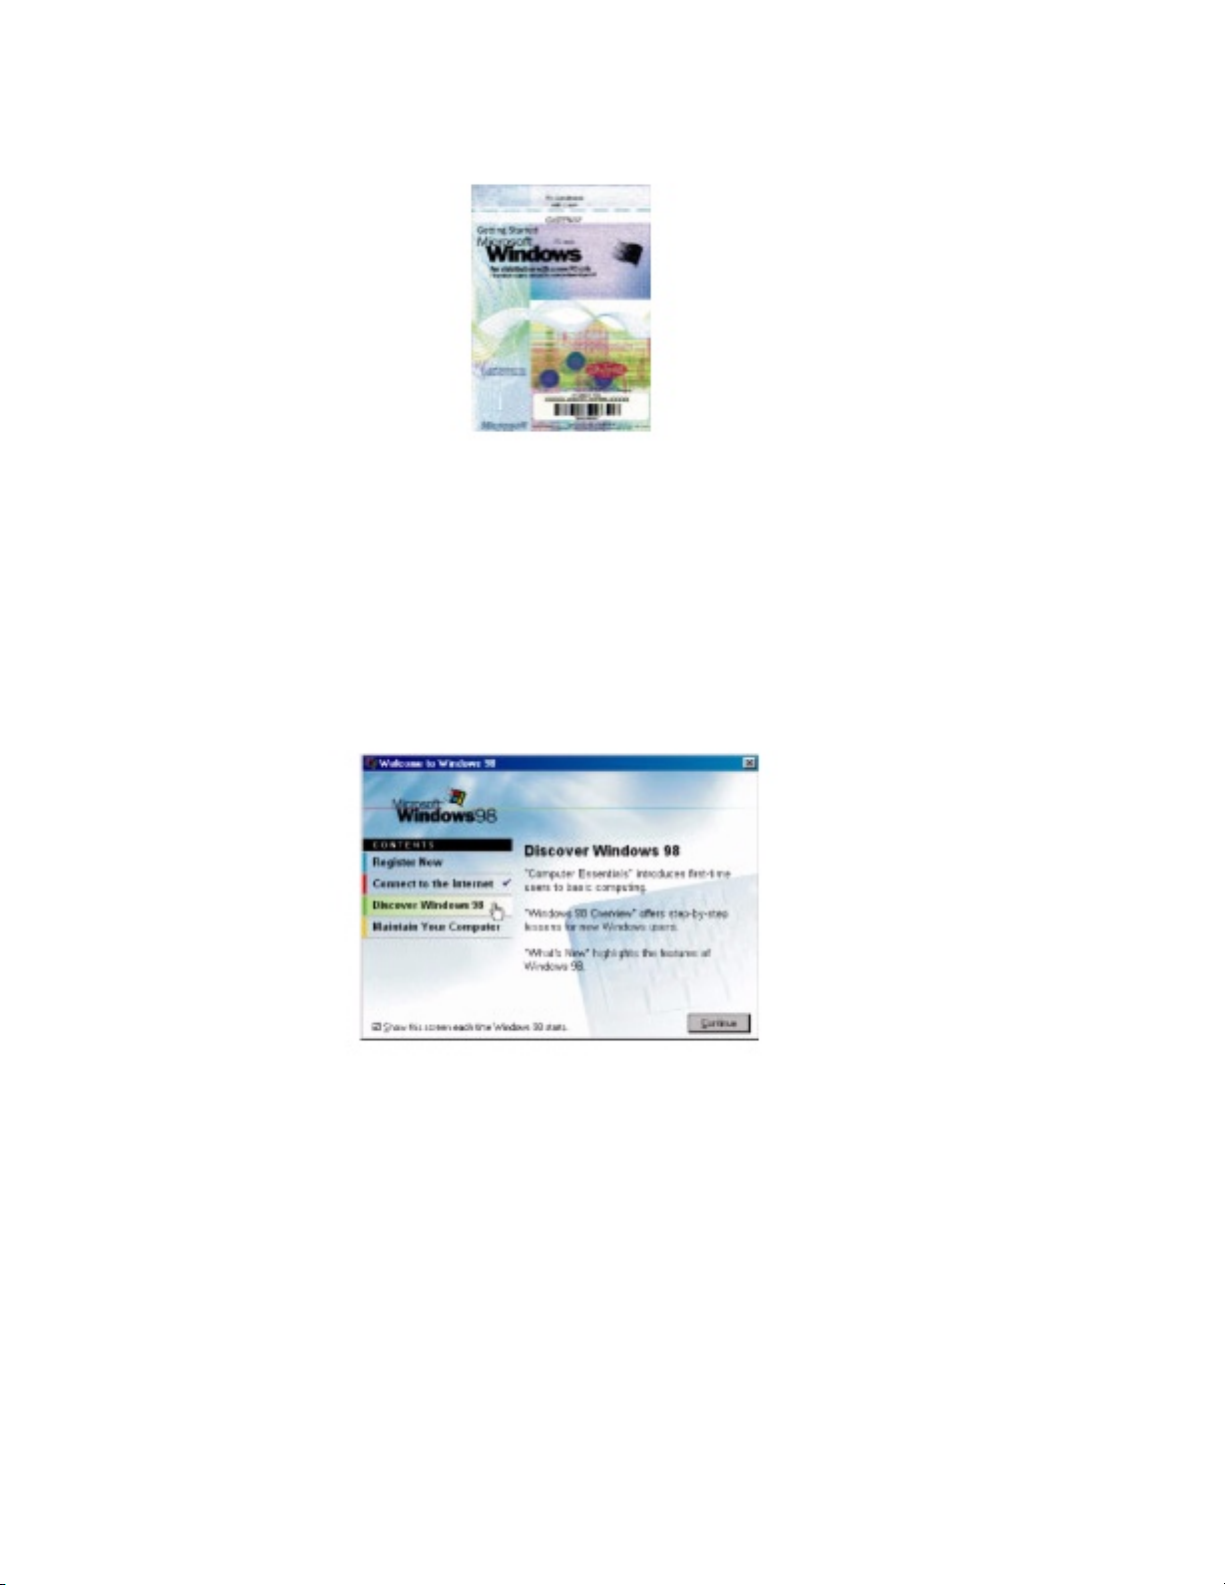
Welcome to Windows
Use the interactive Windows tutorial, "Discovering Windows 98", to
become more familiar with Windows features and learn more about using
and getting the most out of your computer.
Start the program by clicking Start, then selecting Programs, Accessories,
System Tools, then Welcome to Windows. The Windows tutorial starts.
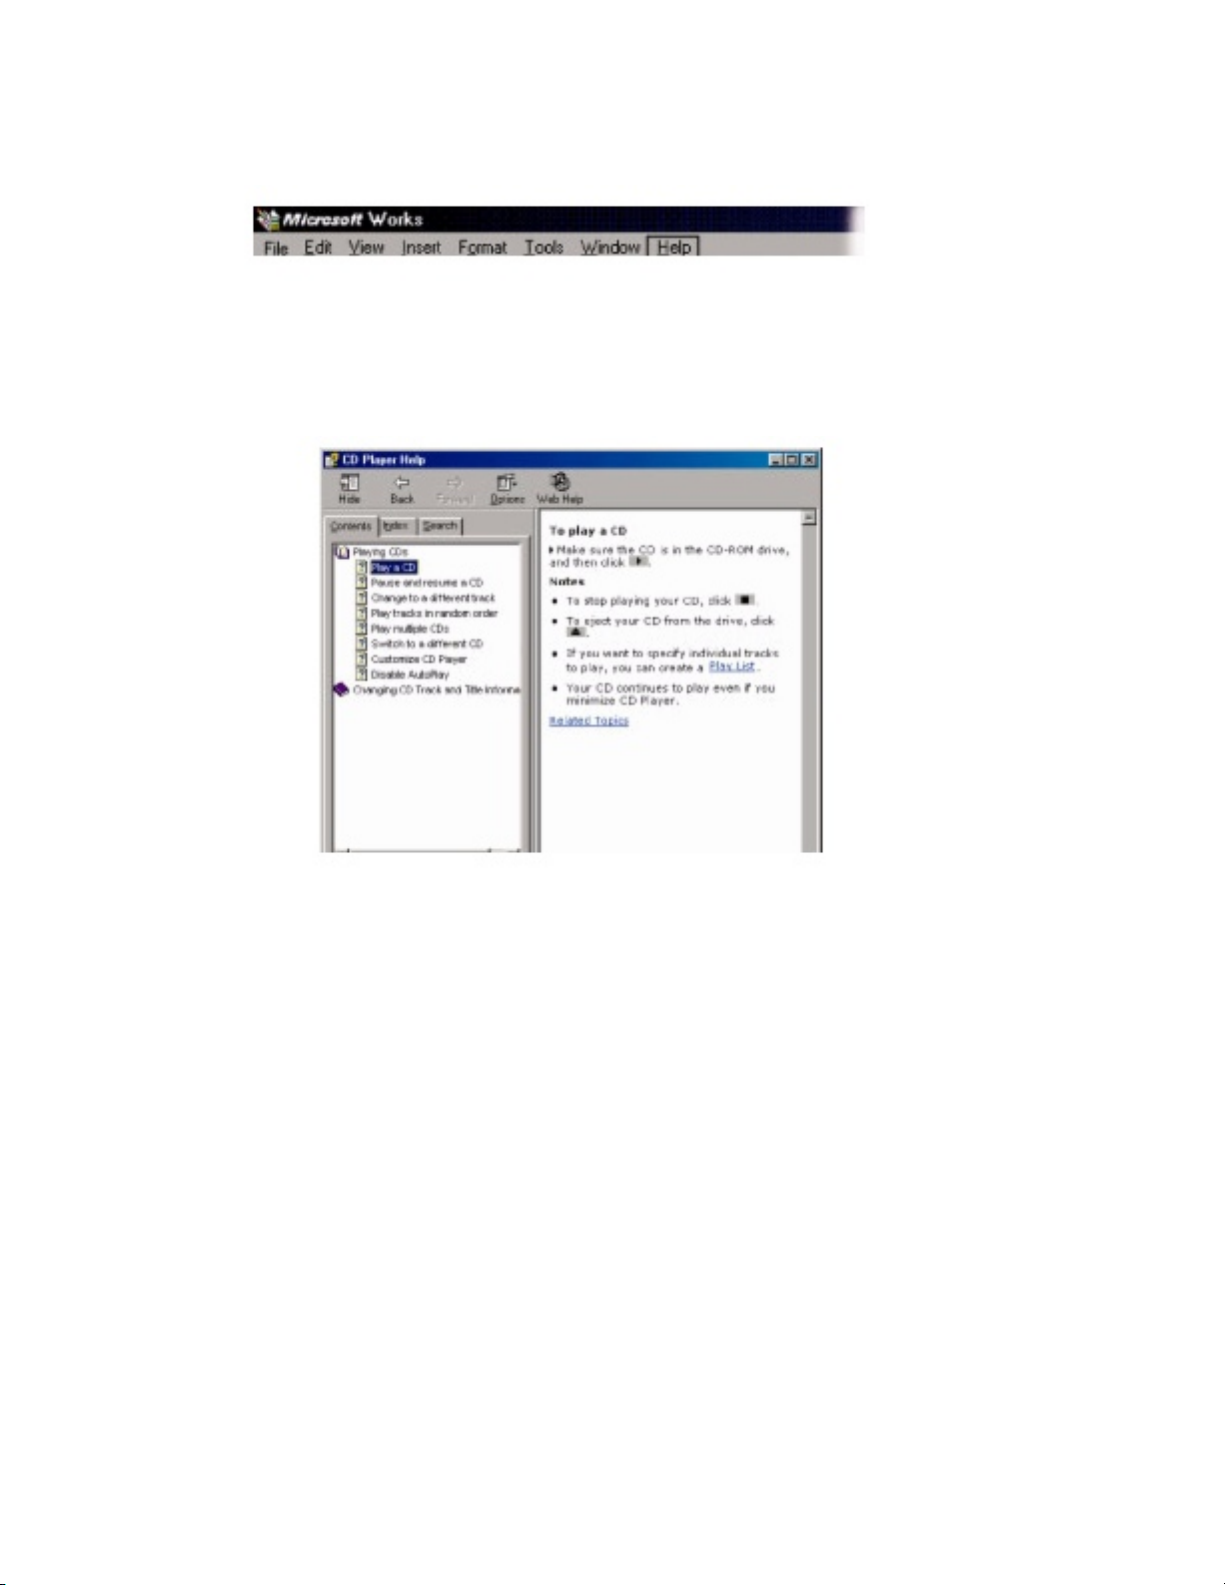
Online help
Many programs provide information online so you can research a topic or
learn how to perform a task while you are using the software. This online
http://support.gateway.com/s/Mobile/Solo_Series/p1100/8505462/index.htm (9 of 11)7/28/2004 8:18:35 AM
Page 11

http://support.gateway.com/s/Mobile/Solo_Series/p1100/8505462/index.htm
information is organized so that you can find the information you need
quickly. Most online help information can be accessed by selecting a topic
from a Help menu or by clicking a Help button.
Usually you can search for information by looking for a keyword, browsing
through the contents of the online help, or searching for a topic.
Gateway Web site
Gateway provides a variety of information on its Web site to help you use
your computer.
http://support.gateway.com/s/Mobile/Solo_Series/p1100/8505462/index.htm (10 of 11)7/28/2004 8:18:35 AM
Page 12

http://support.gateway.com/s/Mobile/Solo_Series/p1100/8505462/index.htm
Visit the Gateway Web site at www.gateway.com for:
Technical documentation and product
manuals
Technical tips and
support
Hardware
drivers
A glossary of computer
terms
Frequently asked questions
(FAQs)
For more information about connecting to the Internet, see "Using the
Internet".
Viewing technical specifications
If you want to knowing your computer processor type, total memory, hard
disk drive size, and other details, view the specifications on the Gateway
Web site.
To view the technical specifications for your computer:
1. Connect the www.gateway.com or other ISP account.
2. Open your Web browser.
3. Click the Tech Support, Technical Documents, then Documentation
Library.
4. Under Systems, click Portables.
5. Find your computer model, then click on the link for its
specifications document. The specifications document shows
technical details of your system.
http://support.gateway.com/s/Mobile/Solo_Series/p1100/8505462/index.htm (11 of 11)7/28/2004 8:18:35 AM
Page 13
Learning about Your Notebook
Learning about Your
Notebook
This chapter shows the features that are available on your notebook. It
also describes the various resources that you can access for more
information.
Keyboard and LCD
Component Description
A Color Liquid Crystal
Display (LCD)
Provides sharp resolution with
backlighting.
http://support.gateway.com/s/Mobile/Solo_Series/p1100/8505462/05462c01.htm (1 of 14)7/28/2004 8:18:38 AM
Page 14
Learning about Your Notebook
B
Keyboard
Provides the functionality of a
desktop keyboard.
C
EZ PadTM touchpad
Controls pointer movement.
Right side
Component Icon Description
A
CD drive
Insert data or audio CD
discs into this drive.
B CD eject
button
Press to eject the CD
discs tray from the
drive.
C
Volume wheel
Use to adjust volume for
built-in speakers,
external speakers, and
headphones. Other port
volume levels are
controlled by multimedia
programs.
D
Modem port
Insert modem cable into
this port.
http://support.gateway.com/s/Mobile/Solo_Series/p1100/8505462/05462c01.htm (2 of 14)7/28/2004 8:18:38 AM
Page 15
Learning about Your Notebook
.
Left side
Component Icon Description
A PC Card eject
buttons
Press an eject button
to remove PC Cards
from PC Card slots.
See
"Using PC Cards"
for more information.
B
PC Card slots
Insert PC Cards Type I,
II, or III into these
slots. See "Using
PC Cards" for more
information.
C
Diskette drive
Insert a standard 3.5inch diskette into this
drive.
D Diskette drive
eject button
Press the eject button
to remove a diskette
from the drive.
Back
http://support.gateway.com/s/Mobile/Solo_Series/p1100/8505462/05462c01.htm (3 of 14)7/28/2004 8:18:38 AM
Page 16
Learning about Your Notebook
Component Icon Description
A Kensington lock
slot
Secure your
notebook to an
immovable object
by connecting a
Kensington cable
lock to this slot.
B
Parallel port
Connect a parallel
device such as a
printer to this
port.
C
Serial port
Connect a serial
device to this
port such as a
digital camera.
D
VGA port
Connect a
monitor cable to
this port.
http://support.gateway.com/s/Mobile/Solo_Series/p1100/8505462/05462c01.htm (4 of 14)7/28/2004 8:18:38 AM
Page 17
Learning about Your Notebook
E Speaker out/
headphone port
Connect external
speakers or
headphones to
this port.
Supports small
unamplified
speakers. (1/8inch/3.5-mm
jack)
F External
microphone port
Connect an
external
microphone to
this port to
record audio.
(1/8-inch/3.5mm jack)
G USB (Universal
Serial Bus) port
Plug a USB serial
device into this
port such as a
USB Iomega
Zip
TM
drive.
H PS/2 port
Connect a PS/2
device to this
port such as a
keyboard or
mouse.
I
Power connector
Connect the AC
power adapter to
this port.
Top
http://support.gateway.com/s/Mobile/Solo_Series/p1100/8505462/05462c01.htm (5 of 14)7/28/2004 8:18:38 AM
Page 18
Learning about Your Notebook
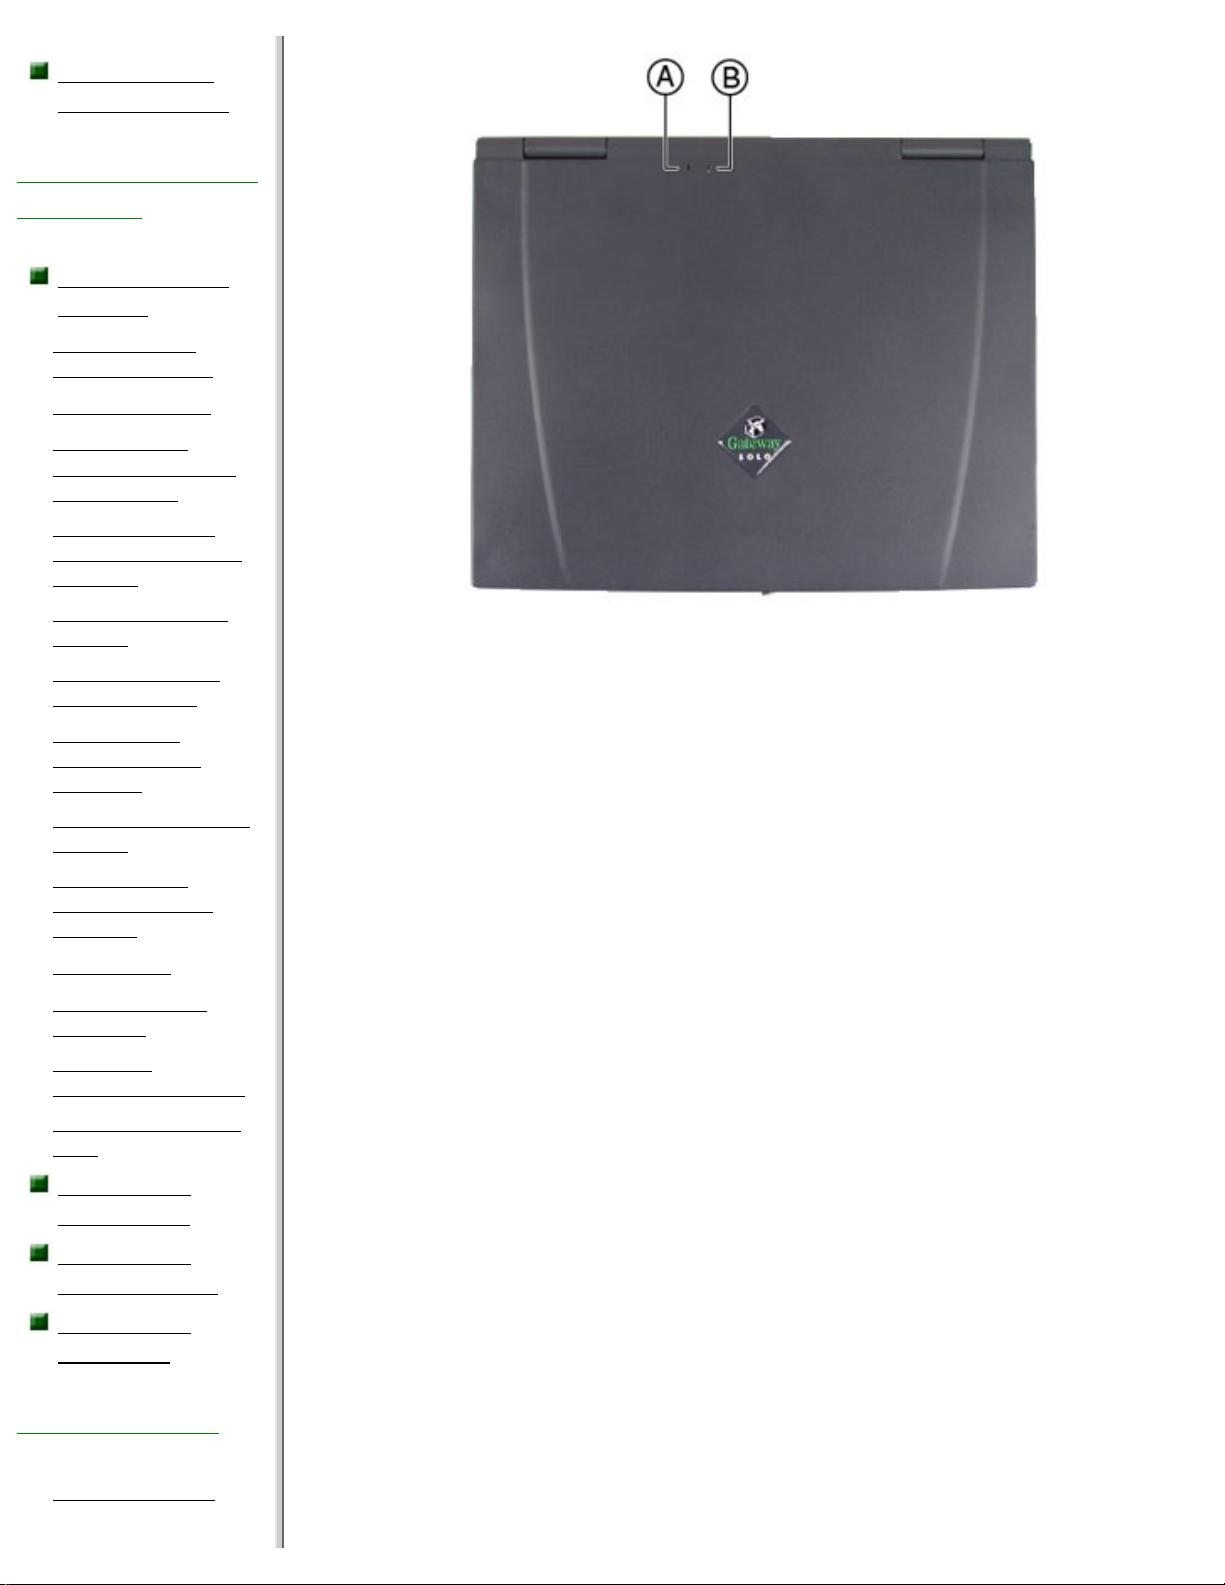
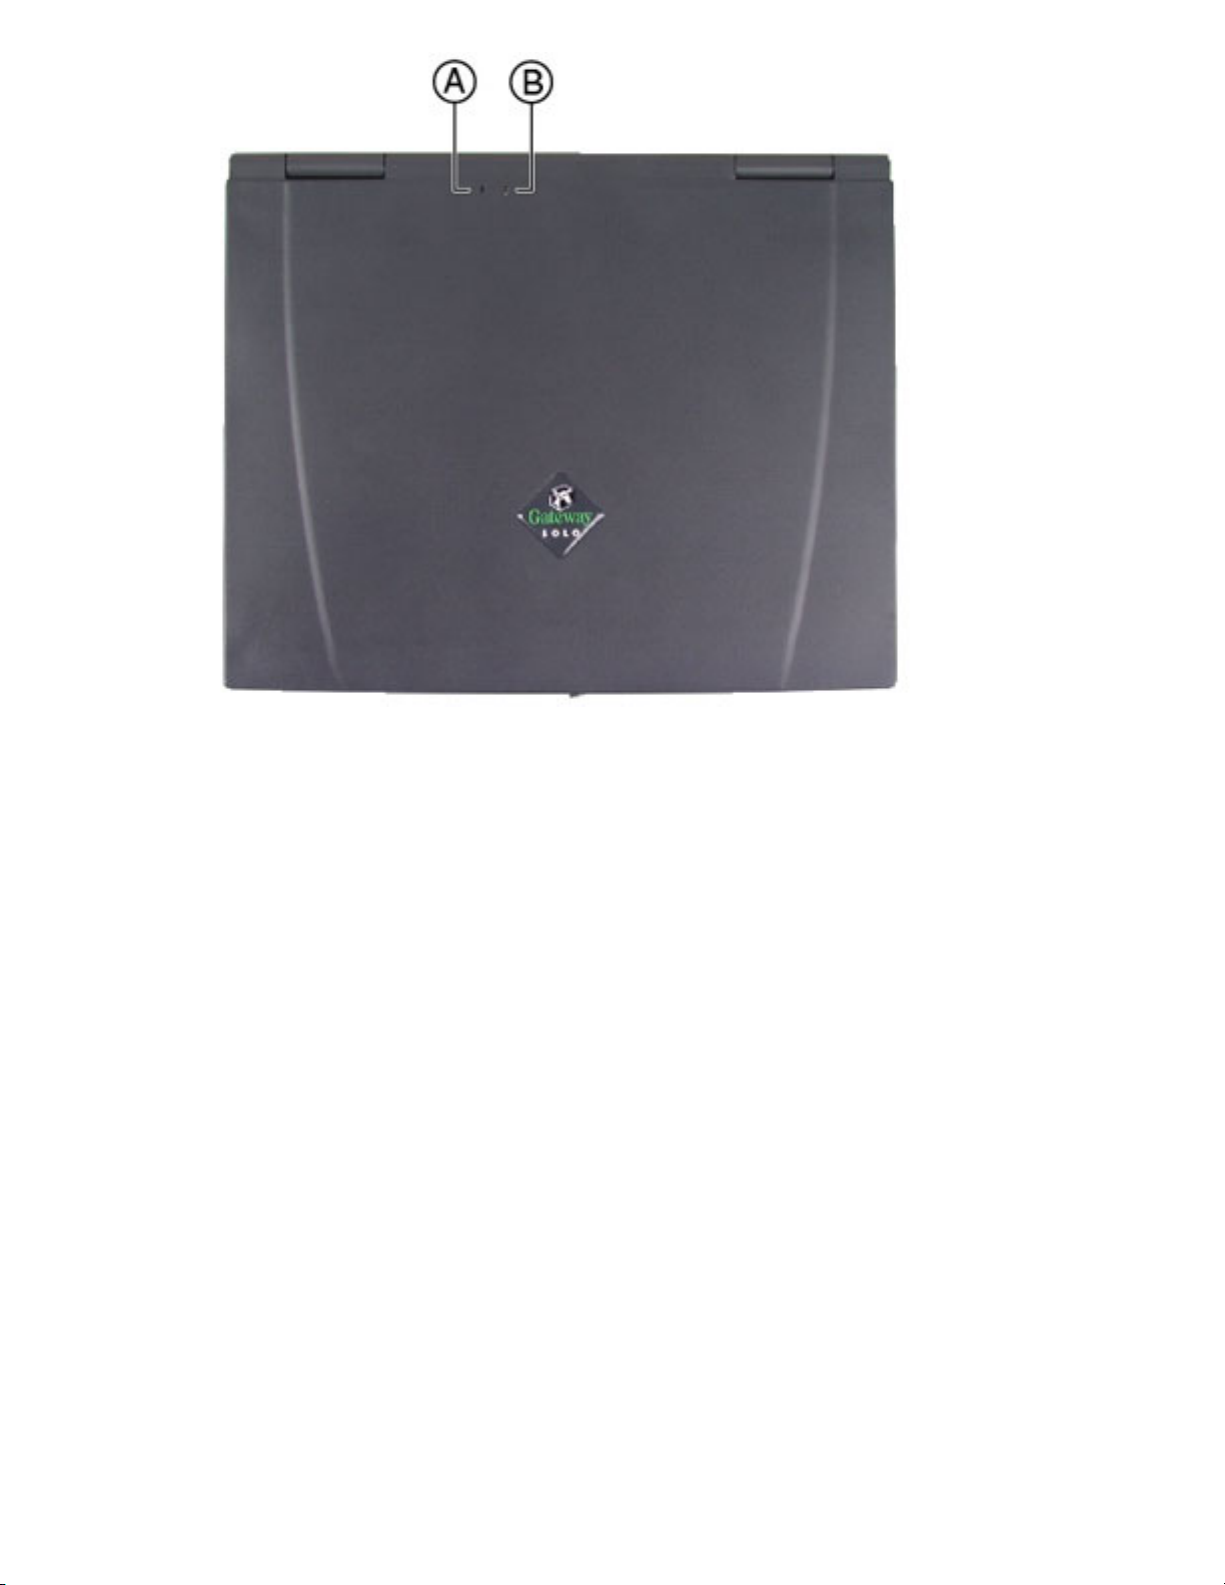
This light turns
on...
when...
A
Power
The notebook is powered by the AC adapter.
Check LED for notebook power status:
● LED on - power is ON.
● LED off - power is OFF or in suspend.
B Battery
charge
The battery is installed. The LED shows
battery activity and status.
● Green - battery fully charged.
● Orange - battery is being charged.
● Red - battery is low.
● Blinking and red - battery is very low.
● Blinking and orange - battery is
malfunctioning.
Bottom
http://support.gateway.com/s/Mobile/Solo_Series/p1100/8505462/05462c01.htm (6 of 14)7/28/2004 8:18:38 AM
Page 19
Learning about Your Notebook
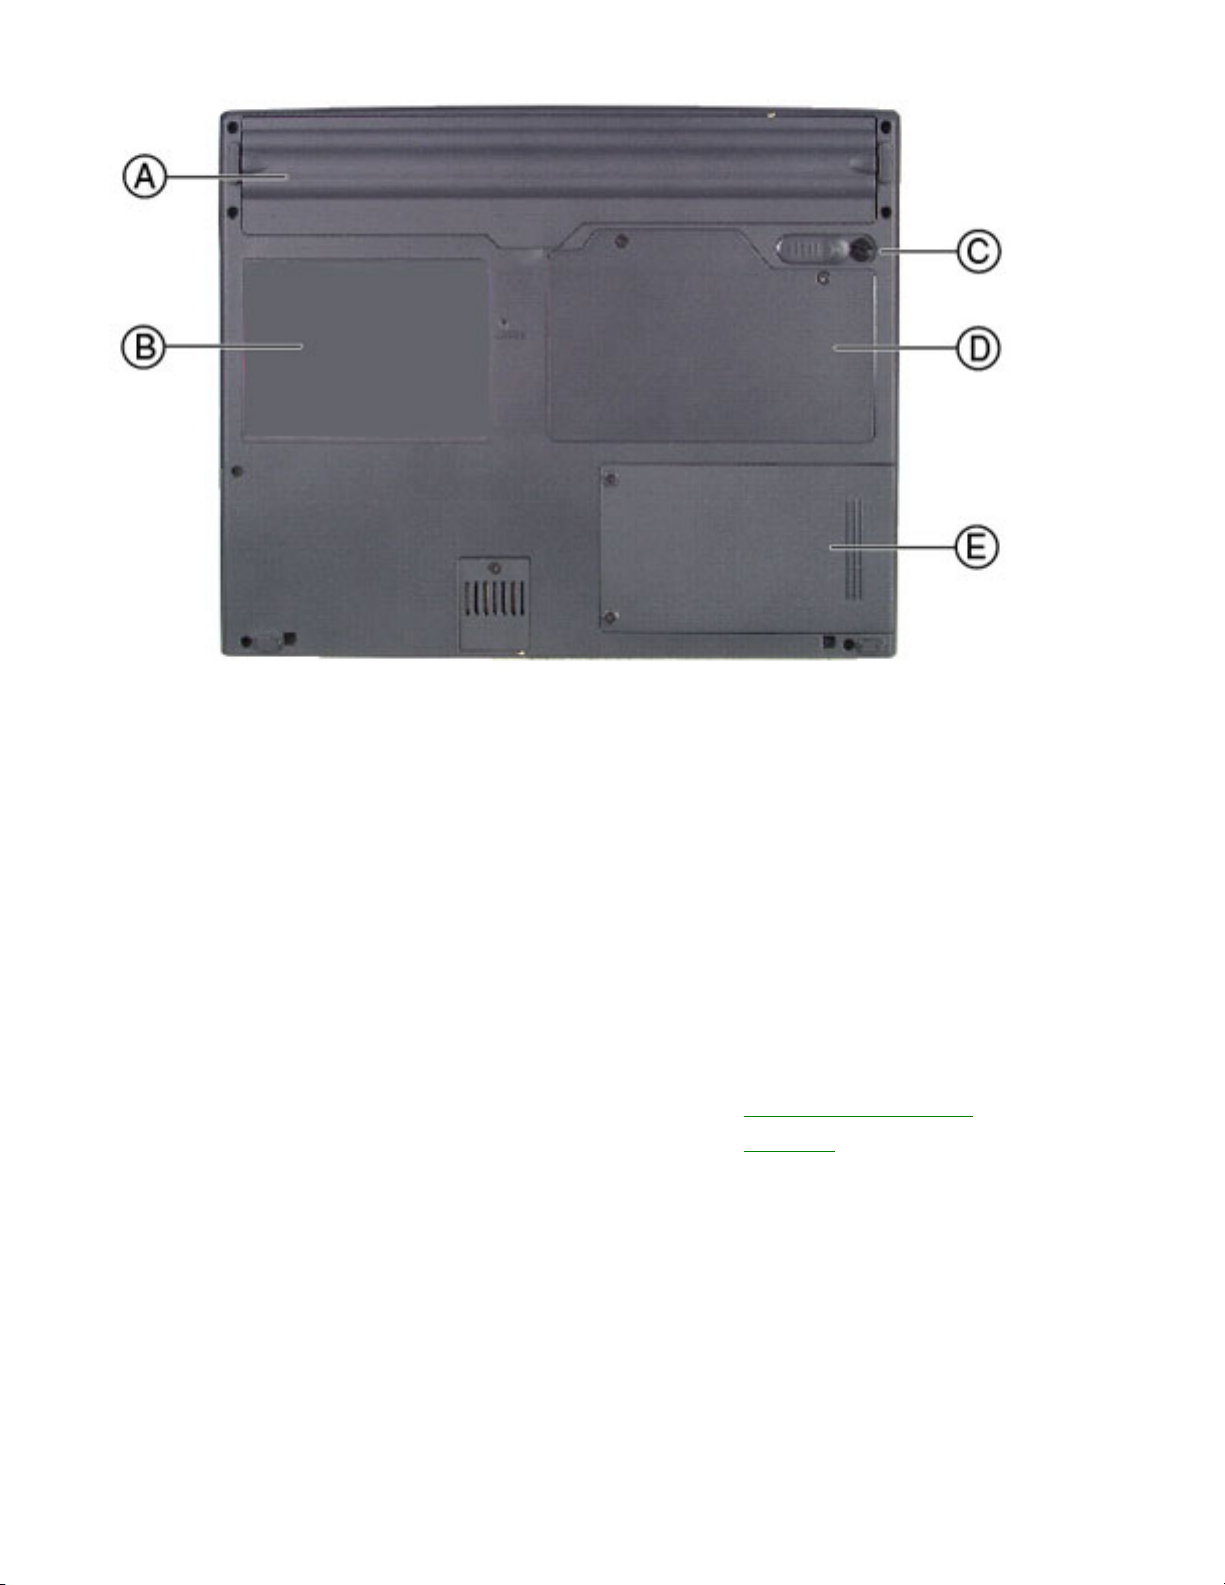
Component Icon Description
A
Battery bay
Insert battery into
this bay.
B System
identification label
Find the product
model number,
serial number,
display type, and
processor speed
on this label. See
"Identifying your
model" for more
information on
your label.
C
Battery release latch
Slide to release
battery pack.
http://support.gateway.com/s/Mobile/Solo_Series/p1100/8505462/05462c01.htm (7 of 14)7/28/2004 8:18:38 AM
Page 20
Learning about Your Notebook
D
Memory bay
Install or remove
SO-DIMM memory
modules in this
bay.
E
Hard disk drive bay
Open the cover to
replace hard disk
drive.
Status indicators
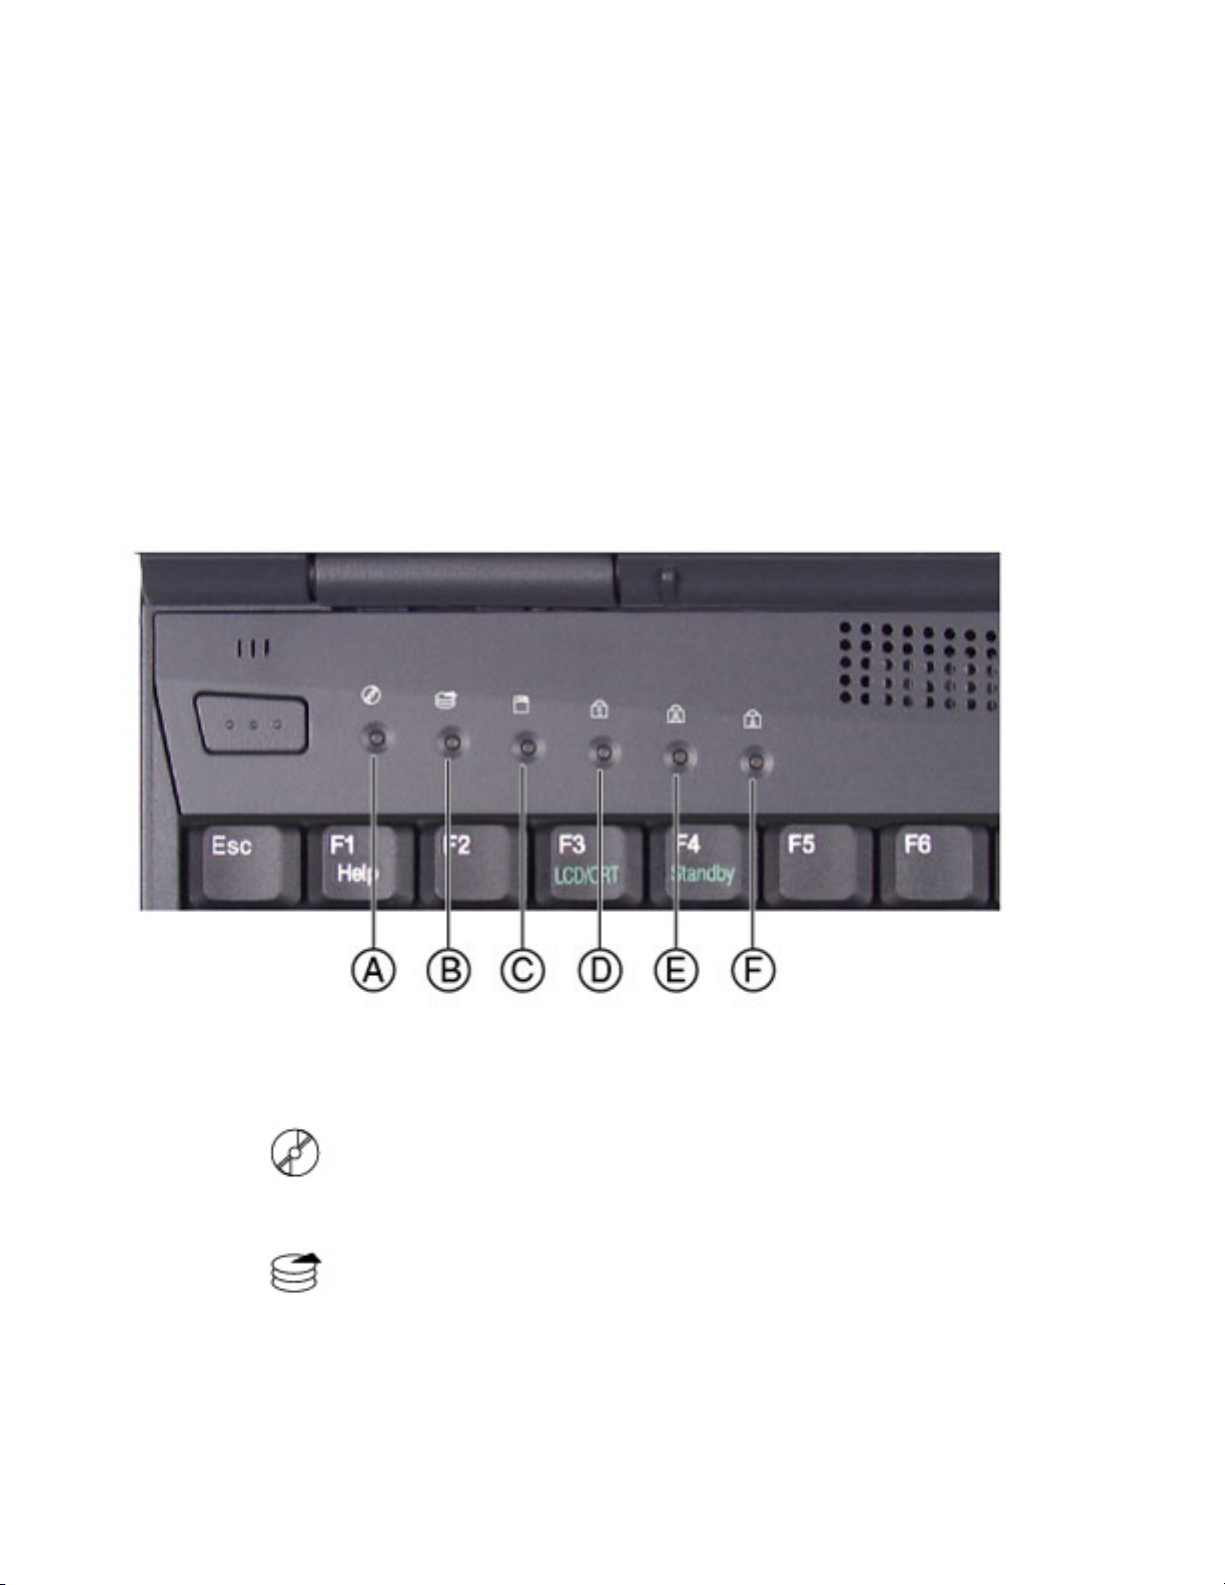
This light turns on... when...
A
CD drive
The notebook is
accessing the CD drive.
B
Hard disk
drive
The notebook is
accessing the hard disk
drive.
http://support.gateway.com/s/Mobile/Solo_Series/p1100/8505462/05462c01.htm (8 of 14)7/28/2004 8:18:38 AM
Page 21
Learning about Your Notebook
C
Diskette drive
The notebook is
accessing the diskette
drive.
D
Pad lock The Pad lock is enabled.
E
Caps lock The caps lock is enabled.
F
Scroll lock
The scroll lock is
enabled.
Accessories
Gateway offers various accessories that can help you make the most of
using your Solo notebook:
Batteries
Automobile/airplane
adapters
Memory
modules
Hard disk
drives
External keyboards, monitors, and
speakers
Network
cards
Printers
Tape backup
units
Software
Carrying
cases
http://support.gateway.com/s/Mobile/Solo_Series/p1100/8505462/05462c01.htm (9 of 14)7/28/2004 8:18:38 AM
Page 22
Learning about Your Notebook
For more information on these or other Gateway accessories for your
notebook, visit our Web site at www.gateway.com or call 1.800.846.2000.
Identifying your model
The label on the bottom of your computer contains model information that
can help Client Care diagnose your problem if you call for assistance.
Label information varies by model. Two examples are shown here.
a. Revision code and display type/processor size
b. Gateway model number
c. Gateway serial number
d. Gateway part number
For more information . . .
Gateway has provided these additional documentation resources to help
you get the most out of your Gateway PC.
http://support.gateway.com/s/Mobile/Solo_Series/p1100/8505462/05462c01.htm (10 of 14)7/28/2004 8:18:38 AM
Page 23
Learning about Your Notebook
Microsoft Windows® manual
Use this manual to find information about using the operating system,
getting help, organizing your files, using programs, troubleshooting, and
learning about other advanced features such as connecting to a network.
Welcome to Windows
Use the interactive Windows tutorial, "Discovering Windows 98", to
become more familiar with Windows features and learn more about using
and getting the most out of your computer.
Start the program by clicking Start, then selecting Programs, Accessories,
System Tools, then Welcome to Windows. The Windows tutorial starts.
Online help
Many programs provide information online so you can research a topic or
learn how to perform a task while you are using the software. This online
http://support.gateway.com/s/Mobile/Solo_Series/p1100/8505462/05462c01.htm (11 of 14)7/28/2004 8:18:38 AM
Page 24
Learning about Your Notebook
information is organized so that you can find the information you need
quickly. Most online help information can be accessed by selecting a topic
from a Help menu or by clicking a Help button.
Usually you can search for information by looking for a keyword, browsing
through the contents of the online help, or searching for a topic.
Gateway Web site
Gateway provides a variety of information on its Web site to help you use
your computer.
http://support.gateway.com/s/Mobile/Solo_Series/p1100/8505462/05462c01.htm (12 of 14)7/28/2004 8:18:38 AM
Page 25
Learning about Your Notebook
Visit the Gateway Web site at www.gateway.com for:
Technical documentation and product
manuals
Technical tips and
support
Hardware
drivers
A glossary of computer
terms
Frequently asked questions
(FAQs)
For more information about connecting to the Internet, see "Using the
Internet".
Viewing technical specifications
If you want to knowing your computer processor type, total memory, hard
http://support.gateway.com/s/Mobile/Solo_Series/p1100/8505462/05462c01.htm (13 of 14)7/28/2004 8:18:38 AM
Page 26

Learning about Your Notebook
disk drive size, and other details, view the specifications on the Gateway
Web site.
To view the technical specifications for your computer:
1. Connect the www.gateway.com or other ISP account.
2. Open your Web browser.
3. Click the Tech Support, Technical Documents, then Documentation
Library.
4. Under Systems, click Portables.
5. Find your computer model, then click on the link for its
specifications document. The specifications document shows
technical details of your system.
http://support.gateway.com/s/Mobile/Solo_Series/p1100/8505462/05462c01.htm (14 of 14)7/28/2004 8:18:38 AM
Page 27

Getting Started
Getting
Started
This chapter explains how to:
Connect your AC power
adapter
Start up your
computer
Use Windows desktop icons, buttons, and
taskbar
Control document and program
windows
Use the start
menu
Manage files and
folders
Browse or search for files and
folders
Connecting your AC power adapter
Your notebook battery was shipped to you partially charged and ready to
use. You may want to use the AC adapter right away to complete charging
the battery.
Warning
Replace the power cord if it becomes damaged. The
replacement cord must be of the same type and voltage rating
as the original cord or the notebook may damaged.
http://support.gateway.com/s/Mobile/Solo_Series/p1100/8505462/05462c02.htm (1 of 15)7/28/2004 8:18:45 AM
Page 28
Getting Started
Warning
Do not attempt to disassemble the AC adapter. The AC adapter
has no user-replaceable or user-serviceable parts inside. The AC
adapter has dangerous voltages that can cause serious personal
injury or death. Contact Gateway about returning defective AC
adapters.
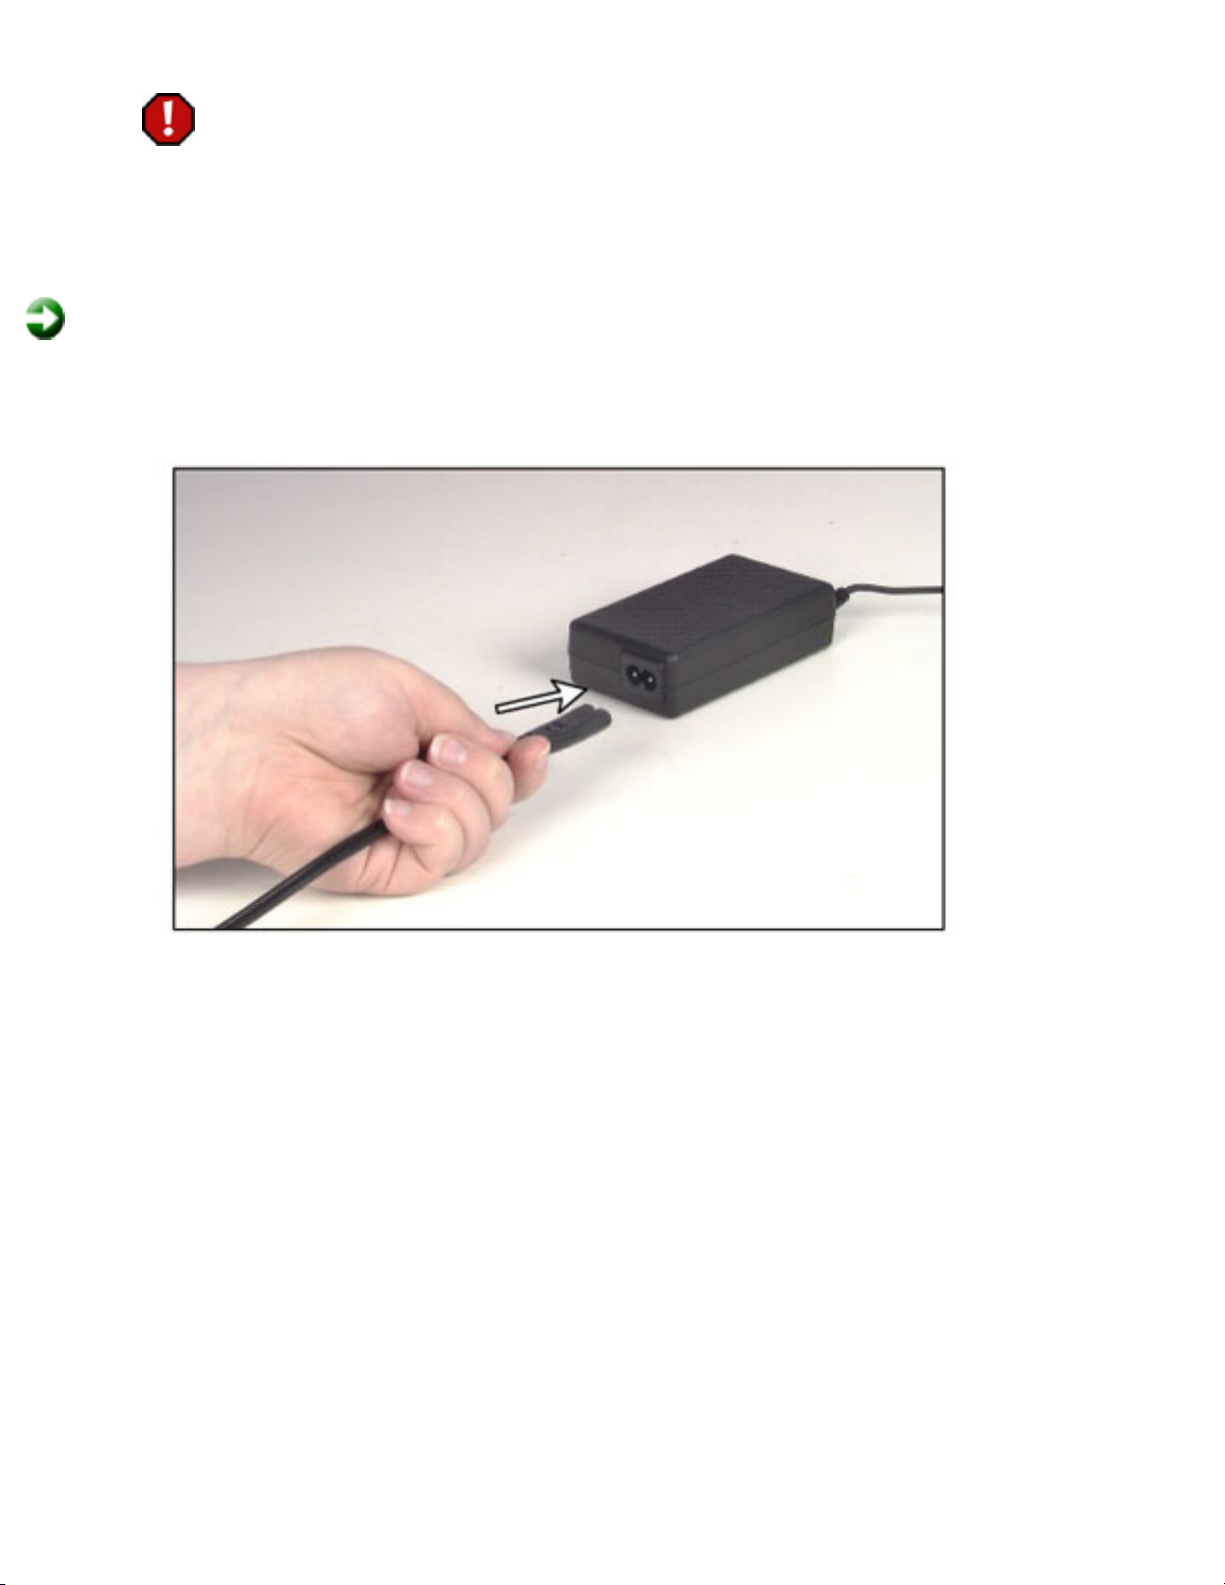
To connect the AC adapter:
1. Connect the power cord to the AC adapter.
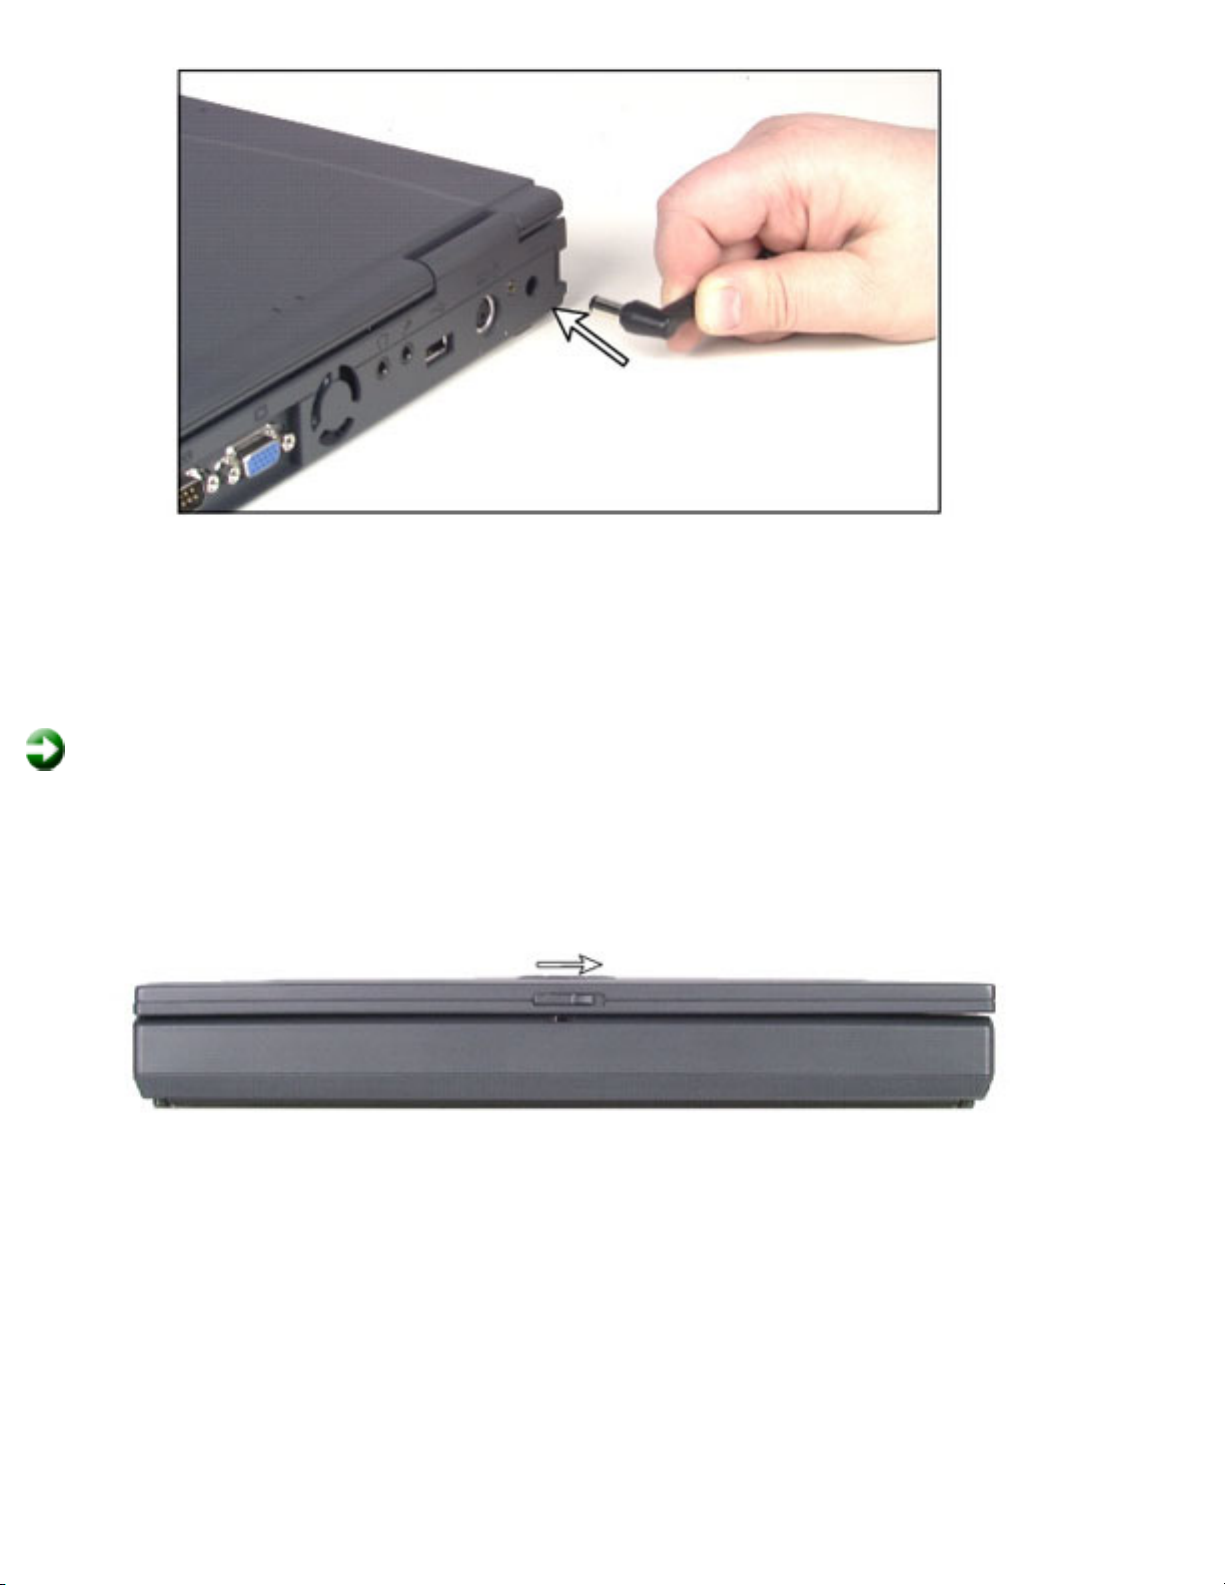
2. Plug the adapter into the notebook power connector.
http://support.gateway.com/s/Mobile/Solo_Series/p1100/8505462/05462c02.htm (2 of 15)7/28/2004 8:18:45 AM
Page 29
Getting Started
3. Plug the power cord into an electrical outlet.
Starting your notebook
To start the notebook:
1. Open your notebook by sliding the latch on the front face of your
notebook to the right and lifting the cover.
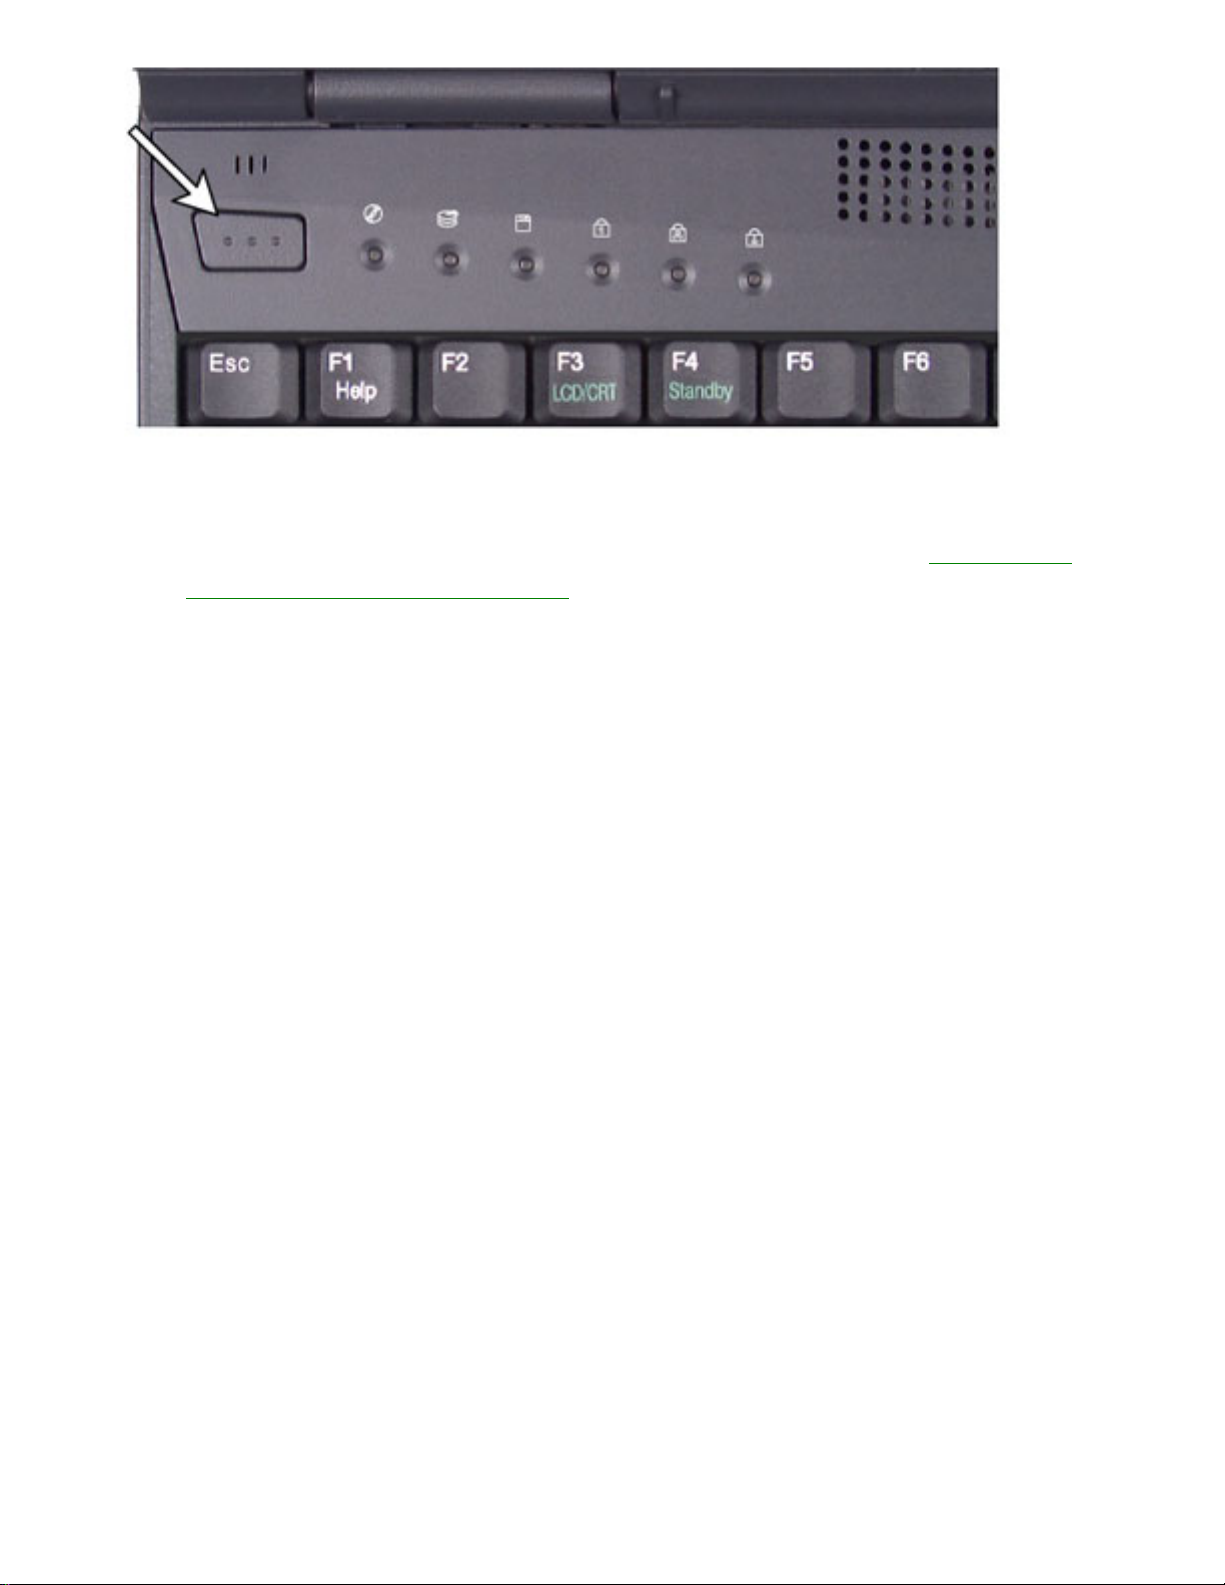
2. Press the power button.
http://support.gateway.com/s/Mobile/Solo_Series/p1100/8505462/05462c02.htm (3 of 15)7/28/2004 8:18:45 AM
Page 30
Getting Started
The power button is preset to On/Off mode. You can set it to
function either in On/Off or Standby/Resume mode. See "Changing
power management settings" for more information.
Windows 98 basics
This section discusses some basic Windows 98 concepts. To find out more
about Windows 98, see the "Getting Started Microsoft Windows 98" guide.
The Windows desktop
Once you have your computer running and have completed all the setup
screens, the first screen you see is the Windows desktop. The desktop is
the area on the screen where you work. Think of the desktop as your
personalized workspace where you open programs and perform other
tasks.
Your desktop may be different from the example shown below, depending
on how your computer is set up.
http://support.gateway.com/s/Mobile/Solo_Series/p1100/8505462/05462c02.htm (4 of 15)7/28/2004 8:18:45 AM
Page 31

Getting Started
The table below describes some of the icons, buttons, and other elements
on the desktop. Some common elements are:
Icons - graphic representations of objects that you select and open,
such as a drive, disk, folder, document, or program.
Buttons - graphic representations of controls that you use to change
the state of desktop elements such as the window size.
Desktop
element
Description
The My Computer icon provides access to
drives and other computer controls on your
computer. Double-click My Computer to view
the drives and folders on your computer.
http://support.gateway.com/s/Mobile/Solo_Series/p1100/8505462/05462c02.htm (5 of 15)7/28/2004 8:18:45 AM
Page 32

Getting Started
The My Documents icon is a folder that was
created for you to store your personal files.
You can create other folders to save files in,
but My Documents is a folder that is easy to
find and is accessible from the desktop.
Double-click My Documents to view your
files, folders, and drives.
The Recycle Bin is where files, folders, and
programs that you delete are stored until you
decide to permanently delete them. You must
empty the Recycle Bin to permanently delete
these items from your computer. Double-click
Recycle Bin and follow the instructions on
the left of the window to do various file
maintenance activities such as restoring
deleted files.
Microsoft Internet Explorer is a program that
lets you view Web sites and Web pages on the
Internet. Before viewing Web sites or pages
on the Internet, you need to connect to
gateway.net or another Internet Service
Provider (ISP). After you connect to your ISP,
double-click Internet Explorer to start the
Web browser. See
"Connecting to your
account" for more information about
connecting to gateway.net.
Gateway GoBack is a program that lets you
"go back" in time to resolve computer
problems. Double-click Gateway GoBack to
open the Main menu. See
"Using Gateway
GoBack" for more information.
The Gateway.net icon lets you connect to the
gateway.net ISP (Internet Service Provider).
Double-click Gateway.net to dial-up gateway.
net.
http://support.gateway.com/s/Mobile/Solo_Series/p1100/8505462/05462c02.htm (6 of 15)7/28/2004 8:18:45 AM
Page 33

Getting Started
The Start button provides access to programs
that let you open documents, get help, search
for files on your computer, and more. Click
Start to access the menu for starting
programs. Click on a file or program name to
open it.
The taskbar is the gray area at the bottom of the screen that contains
the Start button on the left and a clock on the right. You may also see
other buttons on the taskbar that represent programs that are running.
Single-click on a taskbar button to bring a program window onto the
desktop to use.
Working with windows
When you double-click on the icon for a drive, disk, folder, document, or
program a window opens. This example shows System (C:) in My Computer
after double-clicking the System (C:) icon.
Every program window looks a little different because each has its own
menus, icons, and controls.
http://support.gateway.com/s/Mobile/Solo_Series/p1100/8505462/05462c02.htm (7 of 15)7/28/2004 8:18:45 AM
Page 34

Getting Started
The table below describes how to control a window. To find out more
about controlling a window see the "Getting Started Microsoft
Windows 98" guide.
Window element Description
The title bar is the horizontal bar at the top of a
window that shows the name of the program and
document.
Click the Minimize button to reduce the active
window to a button on the taskbar. Click the
program button in the taskbar to open the
window again.
Click the Maximize button to expand the active
window to fit the full screen. Click the maximize
button again to restore the window to the smaller
size.
Click the Close button to close the active window
or program.
Click a menu bar item to perform a command in a
program.
http://support.gateway.com/s/Mobile/Solo_Series/p1100/8505462/05462c02.htm (8 of 15)7/28/2004 8:18:45 AM
Page 35

Getting Started
Starting a program using the Start menu
Using the Start button you can start programs, open documents,
customize your system, get help, search for items on your computer, and
more.
To open a Start menu item, first click Start. The start menu pops up
showing you the first level of the menu items. When you move the mouse
pointer over any menu item that has an arrow next to it, another menu,
or submenu, opens and reveals related files, programs, or commands.
Click on a file or program to open it.
Managing files and folders
In Windows, you can organize your online documents and programs like
you would organize print documents (letters, spread sheets, and
instructions) in a file cabinet. On your computer, you store documents and
programs called files, in folders. Folders can contain both files and other
folders.
http://support.gateway.com/s/Mobile/Solo_Series/p1100/8505462/05462c02.htm (9 of 15)7/28/2004 8:18:45 AM
Page 36

Getting Started
You can copy, move, delete, and organize files and folders on drives,
which are like filing cabinets because they can hold files and folders. Your
computer can have several different types of drives. For example, you
may have a diskette drive, a hard disk drive, and a CD-ROM drive. A
computer may have other types of drives, such as a Zip drive or a Tape
drive.
Creating folders
http://support.gateway.com/s/Mobile/Solo_Series/p1100/8505462/05462c02.htm (10 of 15)7/28/2004 8:18:45 AM
Page 37

Getting Started
To create a folder:
1. Double-click the My Computer icon. The My Computer window opens.
2. Double-click the drive or folder, for example System (C:), where you
want to put the new folder. The drive or folder dialog box opens.
3. Select File, then New, then Folder. The new folder is created.
4. Type a name for the folder, then press Enter. The new folder name
appears under the folder.
Copying, moving and deleting files
As you work with files and folders, you will need to copy them, move
them, and delete them. The basic skills you need to copy and move files
are called copying, cutting, and pasting.
When you copy and paste a selection, you place a copy of the file you
selected on the Windows clipboard, which stores it. Then, when you
decide what folder you want the copy to go in, you paste it there.
When you cut and paste a selection, you remove the file from its
folder and place the file on the Windows clipboard. When you decide
where you want the file to go, you paste it there.
Remember that the clipboard stores whatever you cut or copy until you
cut or copy again. Then the clipboard contains the new information only.
Therefore, you can paste copies of a file into more than one place, but as
soon as you copy or cut a file again, the old file is deleted from the
clipboard.
To copy a file to another folder:
1. Right-click the file you want to copy. A pop-up menu opens.
2. Select Copy.
3. Open the folder where you want to put a copy of the file.
4. With the pointer inside the folder, right-click the mouse button.
http://support.gateway.com/s/Mobile/Solo_Series/p1100/8505462/05462c02.htm (11 of 15)7/28/2004 8:18:45 AM
Page 38

Getting Started
5. Select Paste. A copy of the file appears in the new location.
To move a file to another folder:
1. Right-click the file you want to copy. A pop-up menu opens.
2. Select Cut.
3. Open the folder where you want to move the file to.
4. With the pointer inside the folder, right-click the mouse button.
5. Select Paste. The file appears in its new location and is removed
from its old folder.
Browsing and searching for files
Just as in a filing cabinet, a file that you might need is rarely right on top.
It is usually inside a folder and sometimes even inside a folder inside a
folder. Windows drives, folders, and files are organized in the same way-they may have many levels (usually many more levels than a filing
cabinet, in fact) so you usually will have to search through levels of folders
to find the file you need. This is called browsing.
To browse for a file:
1. Double-click the My Computer icon.
2. Double-click the drive or folder you want to open.
http://support.gateway.com/s/Mobile/Solo_Series/p1100/8505462/05462c02.htm (12 of 15)7/28/2004 8:18:45 AM
Page 39

Getting Started
3. Continue double-clicking folders stored in other folders until you find
the file or folder you want.
If you cannot remember where you put a file or folder, you can find it
using the Find program in Windows.
To find files and folders using the Find program:
1. Click Start, then select Find, then Files or Folders. The Find dialog
box opens.
http://support.gateway.com/s/Mobile/Solo_Series/p1100/8505462/05462c02.htm (13 of 15)7/28/2004 8:18:45 AM
Page 40

Getting Started
2. In the appropriate boxes, type in whatever you know about the file.
For example:
All or part of the file
name
Text that is inside the
file
The date it was created or
modified
A time period it was created or modified
in
3. Click Find Now. The computer begins the search.
When your system is finished searching, you see a list of the files
and folders containing the text that you searched for or satisfying
the criteria that you entered. For example, if you need to find a file
name that has the word "system" in it, but you do not know the
exact file name, you type in the word "system" and click Find Now.
http://support.gateway.com/s/Mobile/Solo_Series/p1100/8505462/05462c02.htm (14 of 15)7/28/2004 8:18:45 AM
Page 41

Getting Started
After the system searches, all the files and folders that contain the
word "system" appear in a list in the Find dialog box along with their
file locations and other details. You can open a file, folder, or
program by double-clicking the name in the list.
http://support.gateway.com/s/Mobile/Solo_Series/p1100/8505462/05462c02.htm (15 of 15)7/28/2004 8:18:45 AM
Page 42

Using the Keyboard and Touchpad
Using the Keyboard and
Touchpad
This chapter describes where various keys are located on the keyboard
and how to use Function combination keys, Pad lock keys, and the
touchpad. It also explains how to disable the touchpad to use an external
mouse.
Using the keyboard
http://support.gateway.com/s/Mobile/Solo_Series/p1100/8505462/05462c03.htm (1 of 7)7/28/2004 8:18:47 AM
Page 43

Using the Keyboard and Touchpad
Your notebook features a full-size keyboard that has the full functionality
of a desktop computer keyboard. Many of the keys have been assigned
alternate functions, including shortcut keys for Windows, function keys for
specific system operations, and Pad lock keys for the numeric keypad.
You can attach an external keyboard to the notebook using the PS/2, USB,
or serial port. You do not need to shut down the notebook before
connecting an external PS/2 keyboard.
Key Action
A Function combination
keys
Press one of the Function combination
keys (such as
F4, F10 etc.) with one the
two
Fn keys to perform a specific
function.
B
Fn (function) keys
Press one of the two Fn keys with one of
the Function combination keys (such as
F4, F10 etc.) to perform a specific
function.
C
Windows logo key
Press to activate the Windows Start button
menu. This key can be used with other
keys on the keyboard to open the
Windows Help (H), Find (F), Run (R) or
Explorer (E) programs.
D
Numeric keypad
Press Fn+F9 to activate the numeric
keypad.
E
Right-click key
Press for quick access to shortcut menus
and help assistants in Windows.
Function combination keys
By pressing one of the two Fn keys and one of the Function combination
keys, the notebook performs various functions such as displaying the
power status, enabling the scroll lock, and adjusting the brightness of the
LCD screen.
http://support.gateway.com/s/Mobile/Solo_Series/p1100/8505462/05462c03.htm (2 of 7)7/28/2004 8:18:47 AM
Page 44

Using the Keyboard and Touchpad
The following table lists the Function combination keys and a description
of the corresponding function:
Combination key Function
Toggles between the LCD display, external
monitor, both displays at the same time, or TV
display (NTSC or PAL format).
Enters Standby mode for Windows 98. Press the
power button to exit Standby mode.
Enables the Pad lock function so you can use
the numeric keypad.
The Pad lock status indicator appears while this
function is enabled. Press this key combination
again to disable the function.
Enables the Scroll lock function so that you can
scroll through large volumes of text. (This is
only available in some programs.)
The Scroll Lock status indicator appears while
this function is enabled. Press this key
combination again to disable the function.
http://support.gateway.com/s/Mobile/Solo_Series/p1100/8505462/05462c03.htm (3 of 7)7/28/2004 8:18:47 AM
Page 45

Using the Keyboard and Touchpad
Pauses the display when the text is scrolling
very quickly. (This is only available in some
programs.)
Press any key to continue the text flow.
Breaks the text scrolling in a DOS screen. (This
is only available in some programs.)
Increases LCD brightness.
Decreases LCD brightness.
Increases LCD contrast.
Decreases LCD contrast.
Pad lock keys
Activate Pad lock by pressing the Fn+F9 key combination. When Pad lock is
activated, you can use the embedded numeric keypad shown below. Press
the
Fn+F9 key combination again to disable the function.
http://support.gateway.com/s/Mobile/Solo_Series/p1100/8505462/05462c03.htm (4 of 7)7/28/2004 8:18:47 AM
Page 46

Using the Keyboard and Touchpad
Using your EZ Pad touchpad
Your notebook comes with the EZ Pad touchpad. Like a mouse, the
touchpad controls the pointer movements on the notebook display.
http://support.gateway.com/s/Mobile/Solo_Series/p1100/8505462/05462c03.htm (5 of 7)7/28/2004 8:18:47 AM
Page 47

Using the Keyboard and Touchpad
Touchpad actions
Use the touchpad to select, click, and drag items on your notebook
screen. The following table shows the various actions you can perform
with your touchpad:
To do this... Do this...
Move pointer Slide finger.
http://support.gateway.com/s/Mobile/Solo_Series/p1100/8505462/05462c03.htm (6 of 7)7/28/2004 8:18:47 AM
Page 48

Using the Keyboard and Touchpad
Left mouse button
click
Tap one
finger.
Right mouse button
click
Tap 2 fingers.
http://support.gateway.com/s/Mobile/Solo_Series/p1100/8505462/05462c03.htm (7 of 7)7/28/2004 8:18:47 AM
Page 49

Using Multimedia
Using
Multimedia
This chapter shows you how to:
Install programs or use multimedia
CDs
Listen to
music
Adjust
volume
Record and play an audio
file
Adjust the screen
settings
Installing programs or using multimedia CDs
To install programs or use other multimedia CDs (such as games and
education CDs), insert the program CD into the CD drive and wait for the
CD to autostart. Follow the on-screen instructions.
If the CD does not autostart, you can browse for setup files such as setup.
exe or install.exe using My Computer. For more information about
browsing for files, see "Browsing and searching for files".
If you do not hear the audio or you want to increase or decrease the
volume, see "Adjusting the volume".
Listening to music
Use the CD drive and the Windows CD Player to listen to music. When you
insert your music CD into the drive, the CD begins playing and the CD
Player displays on the screen. Use the CD Player to play, pause, fastforward, rewind, or go to the next or previous track.
If you do not hear the audio or you want to increase or decrease the
volume, see "Adjusting the volume". When you are through listening to
http://support.gateway.com/s/Mobile/Solo_Series/p1100/8505462/05462c04.htm (1 of 8)7/28/2004 8:18:50 AM
Page 50

Using Multimedia
the CD click Eject to open the CD drive tray.
If the CD Player does not open automatically when you insert your music
CD, you can open it from the Start menu. Click Start, then select
Programs, Accessories, Entertainment, then CD Player. When the CD Player
opens, click the play button.
Adjusting the volume
You can control volume by adjusting the volume with the volume control
wheel on the side of your notebook. You can also adjust the volume
settings in Windows. Even if you are adjusting the volume in Windows, the
volume control wheel must be turned on or you will not be able to hear
any sound.
To adjust the volume settings:
1. Double-click the speaker icon in the right corner of the task bar. The
Volume control dialog box opens.
http://support.gateway.com/s/Mobile/Solo_Series/p1100/8505462/05462c04.htm (2 of 8)7/28/2004 8:18:50 AM
Page 51

Using Multimedia
2. If the device you want to adjust appears in the Volume Control
dialog box, go to Step 5.
- OR -
If the device does not appear in the Volume Control dialog box, go
to Step 3.
3. Select Options, then Properties. The Audio Properties dialog box
opens.
http://support.gateway.com/s/Mobile/Solo_Series/p1100/8505462/05462c04.htm (3 of 8)7/28/2004 8:18:50 AM
Page 52

Using Multimedia
4. Select the audio device you want to appear in the Volume Control
dialog box, then click OK.
5. Move the slider up or down to change the volume level or move the
balance slider left or right to adjust the balance.
For more information about the volume controls, select Help in the
Volume Control dialog box.
6. When you finish adjusting the sound settings, click X to close the
volume control box.
Recording and playing audio
Use the instructions below to make an audio recording by talking into the
built-in microphone or an external microphone connected to the
microphone port. Connecting an external microphone disables the built-in
microphone.
http://support.gateway.com/s/Mobile/Solo_Series/p1100/8505462/05462c04.htm (4 of 8)7/28/2004 8:18:50 AM
Page 53

Using Multimedia
To make an audio recording:
1. Click Start, then select Programs, Accessories, Entertainment, then
Sound Recorder. The Sound Recorder opens.
2. Click (Record).
3. Speak into the microphone.
4. When you finish recording, click (Stop).
http://support.gateway.com/s/Mobile/Solo_Series/p1100/8505462/05462c04.htm (5 of 8)7/28/2004 8:18:50 AM
Page 54

Using Multimedia
5. Select File, then Save As. The Save As dialog box opens.
6. Name the recording, specify the path, then click Save. The recording
is saved.
To play back a recording in Sound Recorder:
1. Click Start, then select Programs, Accessories, Multimedia, then
Sound Recorder. The Sound Recorder window opens.
2. Click File, then Open. The Open dialog box opens.
3. Select the file to play back.
4. Click Open.
5. Click (Play). To stop playing the recording, click (Stop).
Adjusting the screen settings
You can change the display resolution in the Display Properties window.
To change the color depth and screen area resolution:
1. Click Start, then select Settings, then Control Panel. The Control
Panel window opens.
http://support.gateway.com/s/Mobile/Solo_Series/p1100/8505462/05462c04.htm (6 of 8)7/28/2004 8:18:50 AM
Page 55

Using Multimedia
2. Double-click the Display icon. The Display Properties window opens.
3. Click the Settings tab. The Settings tab opens.
http://support.gateway.com/s/Mobile/Solo_Series/p1100/8505462/05462c04.htm (7 of 8)7/28/2004 8:18:50 AM
Page 56

Using Multimedia
4. Select the color depth or number of colors used for the screen
display from the Colors drop-down list.
5. Drag the Screen area slider to select the screen area or number of
pixels used for the horizontal and vertical screen display.
6. Click OK.
http://support.gateway.com/s/Mobile/Solo_Series/p1100/8505462/05462c04.htm (8 of 8)7/28/2004 8:18:50 AM
Page 57

Using the Internet
Using the
Internet
This chapter provides information about the Internet and basic
instructions about setting up gateway.net Internet service to access the
World Wide Web (WWW), e-mail, and other Internet services.
Learning about the Internet
The Internet is a worldwide network of computers linked together to
provide information to users everywhere. You can access this global
network by connecting your computer to a phone line and signing up with
an Internet Service Provider (ISP). The two most popular services on the
Internet are e-mail and the World Wide Web (WWW).
If you want to access the Internet you need:
A modem - a device that is installed in your computer. When it is
connected to a phone line, it is able to connect with other computers
or servers. If you have a modem jack on your computer, you have a
modem.
http://support.gateway.com/s/Mobile/Solo_Series/p1100/8505462/05462c05.htm (1 of 9)7/28/2004 8:18:52 AM
Page 58

Using the Internet
An Internet Service Provider (ISP) account - a service purchased
from a company that provides access to the Internet through their
ISP server. When you connect to an ISP, such as gateway.net
SM
, the
ISP server lets you access the Internet and access your e-mail
messages.
An e-mail program - a program that lets you send and receive email messages over the Internet.
A Web browser - a program that displays information from the
World Wide Web on your computer.
Using gateway.net
Before you can view the information on the Web, you need to set up an
account with ISP. If you selected gateway.net as an ISP, follow these
instructions to set up and connect to your account.
Setting up an account
To set up an Internet account with gateway.net:
1. Double-click the Register with gateway.net icon.
2. Follow the on-screen instructions.
After setting up your gateway.net account, your e-mail and Web browser
programs are automatically set up. You can connect to the Internet
immediately and access your e-mail services after thirty minutes.
Connecting to your account
To connect to your gateway.net Internet account:
1. Double-click the Connect to gateway.net icon. The gateway.net Sign-
In dialog box opens.
2. If your user name is not entered, type it in the User Name text box.
3. If your password is not entered, type it in the Password text box.
Asterisks appear on the screen when you type in your password so
that onlookers cannot see your password.
http://support.gateway.com/s/Mobile/Solo_Series/p1100/8505462/05462c05.htm (2 of 9)7/28/2004 8:18:52 AM
Page 59

Using the Internet
4. If the dialer is not set to dial automatically, click Connect. The
computer dials a gateway.net access phone number.
After connecting, the Web browser opens and the default Web site
opens. For information about the Web and the Web browser, see
"Using the World Wide Web."
Disconnecting from your account
Caution
Make sure that your computer disconnects properly from your Internet
account. If you do not have a "unlimited hours" ISP account, you may
have to pay for the time that you are connected.
To disconnect from your gateway.net Internet account:
1. Close your e-mail application. If you have unsent e-mail in your out
box, you are asked to send it.
2. Close all Web browser windows.
3. On the taskbar, double-click the gateway.net icon. A dialog box
opens and tells you that you are connected to gateway.net.
4. Click Disconnect. Your modem disconnects from the Internet.
Using the World Wide Web
The World Wide Web (WWW) is a user-friendly multimedia window to the
Internet that gives you easy access to millions of sources of information
on Web pages and Web sites, which are collections of pages. On the Web
you can shop, track investments, read the news, download programs, visit
entertainment sites, and much more.
Visiting a Web site
After you have connected to the Internet with the help of your ISP, you
can visit Web sites by typing the Web address (for example, www.gateway.
com) in the address bar, then clicking Go or pressing Enter. The Web
http://support.gateway.com/s/Mobile/Solo_Series/p1100/8505462/05462c05.htm (3 of 9)7/28/2004 8:18:52 AM
Page 60

Using the Internet
browser locates the server computer on the Internet, transfers, or
downloads, data to your computer, and displays the page in the Web
browser window.
Sometimes Web pages load or display slowly. The speed that a Web page
displays on your screen depends on the complexity of the Web page and
other Internet conditions.
Using links
You can travel through a Web site or visit other Web sites by clicking
areas on the Web page called links, or hyperlinks. A link can be colored
text (sometimes underlined), a picture, or an animated image. If you
move your mouse over a link, your pointer will change to a "hand."
Using the toolbar buttons
In your Web browser, use toolbar buttons to:
Move backward and forward through the pages you have recently
visited.
Stop a Web page from
loading.
Refresh a Web page that is having difficulty loading or has updated
information on it.
Go to the default home page you have
marked.
Save or mark your favorite Web page
addresses.
View the history of recent Web page
visits.
http://support.gateway.com/s/Mobile/Solo_Series/p1100/8505462/05462c05.htm (4 of 9)7/28/2004 8:18:52 AM
Page 61

Using the Internet
See the online help in your Web browser for additional information on
using and setting up your Web browser.
Downloading files
Downloading is the process of transferring files or programs from an
Internet server to the hard disk drive on your computer.
To download files or programs from a Web site:
1. Connect to your gateway.net or other ISP account.
2. Open your Web browser.
http://support.gateway.com/s/Mobile/Solo_Series/p1100/8505462/05462c05.htm (5 of 9)7/28/2004 8:18:52 AM
Page 62

Using the Internet
3. Type in the address of the Web site that contains the file or program
that you are going to download.
4. On your computer, create a folder where you want to store the file
or program.
5. Click the link for the file that you want to download.
6. Follow the on-screen instructions to save the file in the folder that
you created. A copy of the file is transferred to your computer. The
time that it takes to transfer the file to your computer depends on
file size and other Internet conditions.
7. Make sure you scan the file for viruses. See "Protecting your
computer from viruses" for information on checking files for viruses.
8. Locate and open the folder that you created.
9. Install or view the file by double-clicking it. If applicable, follow the
instructions provided on the Web site to run or install the program.
10. After you have installed the downloaded program or finished using
the file, you can delete it from your computer.
Using e-mail
E-mail (electronic mail) programs let you send messages to anyone who
has an Internet connection and e-mail address. Sending e-mail requires
no additional fees because it is a free service of your Internet account.
The Internet never "closes," so you can send e-mail messages at any time
of the day or night. Your e-mail messages can arrive at most Internet email addresses in minutes.
An e-mail address consists of a user name, the @ symbol, and the
Internet domain name of the ISP or company that "hosts" that user. Your
e-mail address is assigned when you sign up for an account with an ISP.
For example, a person with an account with the gateway.net ISP might
have an e-mail address that is similar to this one:
http://support.gateway.com/s/Mobile/Solo_Series/p1100/8505462/05462c05.htm (6 of 9)7/28/2004 8:18:52 AM
Page 63

Using the Internet
Sending e-mail
To send e-mail:
1. Connect to your gateway.net or other ISP account.
2. Open your Web browser.
3. If you use the Microsoft Internet Explorer Web browser, click Mail,
then select New Message. The New Message window opens.
- OR -
If you use the Netscape Navigator Web browser, select
Communicator, then Messenger Mailbox. The Netscape Messenger e-
mail program opens. Click Message, then New Message.
4. In the new message window, type the e-mail address of the person
you want to send your message to in the To: field, then type the
subject and your message.
http://support.gateway.com/s/Mobile/Solo_Series/p1100/8505462/05462c05.htm (7 of 9)7/28/2004 8:18:52 AM
Page 64

Using the Internet
5. Click Send. Your e-mail is sent over the Internet to the e-mail
address you specified.
Checking your e-mail
To check your e-mail:
1. Connect to your gateway.net or other ISP account.
2. Open your Web browser.
3. If you use the Microsoft Internet Explorer Web browser, click Mail,
then select Read Mail. The Microsoft Outlook Express e-mail program
opens.
- OR -
http://support.gateway.com/s/Mobile/Solo_Series/p1100/8505462/05462c05.htm (8 of 9)7/28/2004 8:18:52 AM
Page 65

Using the Internet
If you use the Netscape Navigator Web browser, select
Communicator, then Messenger Mailbox. The Netscape Messenger e-
mail program opens.
4. If you use the Microsoft Outlook Express e-mail program, click Send/
Recv.
- OR -
If you use the Netscape Messenger e-mail program, click Get Msg.
If you have a new e-mail message, it is downloaded to your
computer and appears in your e-mail Inbox.
5. To read a message, double-click it. The message opens.
After you have received your e-mail messages, they remain on your
computer until you delete them. You do not need to be connected to the
Internet to read messages that you have already received.
For more information about managing and organizing your e-mail
messages, see the online help in your e-mail application.
http://support.gateway.com/s/Mobile/Solo_Series/p1100/8505462/05462c05.htm (9 of 9)7/28/2004 8:18:52 AM
Page 66

Maintaining Your Computer
Maintaining Your
Computer
This chapter provides basic information about maintaining your
computer hardware and programs. You should perform regular
maintenance to keep your computer running efficiently.
Check the following table to set up your best maintenance schedule.
Maintenance task
Immediately after
purchase
Monthly
When
needed
Create an
emergency disk
X X
Back up files X X
Scan hard drive X X
Defragment hard
drive
X X
Check for viruses X X
Manage hard drive
space
X
Clean computer case X
Clean keyboard X
Clean screen X
http://support.gateway.com/s/Mobile/Solo_Series/p1100/8505462/05462c06.htm (1 of 14)7/28/2004 8:18:56 AM
Page 67

Maintaining Your Computer
Clean mouse X
Caring for your computer
Your Gateway computer is a durable product; however, use a
carrying case when you are transporting it.
Here are more ways to extend the life of your computer:
Do not bump or drop your computer and do not put objects on
top of it. The case, although strong, is not made to support
extra weight.
Never turn off your computer when the hard drive light is on
because data on the hard drive could be lost or corrupted.
Avoid subjecting your computer to extreme temperature
changes. The case can become very brittle and easy to break in
cold temperatures and could melt or warp in high temperatures.
Damage due to either extreme is not covered by your warranty.
As a general rule, your computer is safest at temperatures that
are comfortable for yourself.
Keep all liquids away from your computer, especially drinks.
Exposure to almost any liquid can result in extremely expensive
repairs that are not covered under your warranty.
Avoid dusty or dirty work environments. Dust and dirt can clog
the internal mechanisms.
Keep port covers closed when you are not using the external
device ports so that the connectors remain clean and the pins
do not get bent or broken.
Keep diskettes and modular disk drives away from magnetic
fields. Magnetic fields can erase data on both diskettes and
hard drives.
Protecting from power source problems
Surge suppressors can help protect your computer from power
source problems.
Surge suppressors
http://support.gateway.com/s/Mobile/Solo_Series/p1100/8505462/05462c06.htm (2 of 14)7/28/2004 8:18:56 AM
Page 68

Maintaining Your Computer
During a power surge, the voltage level of electricity coming into
your computer can increase to far above normal levels and cause
data loss or system damage. Protect your computer and peripherals
by connecting them to a surge suppressor, which will absorb voltage
surges and prevent them from reaching your computer.
Warning
High voltages can enter your computer through the
phone line connected to the modem. To protect your
computer during electrical storms, unplug the telephone
line from the modem jack or use a telephone line surge
suppressor.
Creating an emergency startup diskette
An emergency startup diskette is a diskette that contains critical
information that you need to start your computer if Windows fails to
start. Using the startup diskette, you can restore the files that are
required to return your computer to normal operation.
You should create a startup diskette as soon as you get your
computer and when you make configuration changes to your
computer, such as adding new hardware or programs.
To create an emergency startup diskette:
1. Click Start, then select Settings, then Control Panel. The
Control Panel opens.
2. Double-click the Add/Remove Programs icon. The Add/Remove
Programs Properties window opens.
3. Click the Startup Disk tab. The Startup Disk tab opens.
http://support.gateway.com/s/Mobile/Solo_Series/p1100/8505462/05462c06.htm (3 of 14)7/28/2004 8:18:56 AM
Page 69

Maintaining Your Computer
4. Place a blank diskette into the diskette drive.
5. Click Create Disk. A message box appears telling you to insert
a new diskette.
6. Click OK. Files are copied to the emergency startup diskette.
When Windows finishes copying files, remove the diskette
from the diskette drive.
7. Label the diskette "Emergency startup diskette."
8. If you want to write-protect your diskette, which will prevent
the diskette from being erased or infected by viruses, slide the
tab that is at the top of the diskette to the up position.
http://support.gateway.com/s/Mobile/Solo_Series/p1100/8505462/05462c06.htm (4 of 14)7/28/2004 8:18:56 AM
Page 70

Maintaining Your Computer
9. Store your emergency startup diskette in a safe place and
away from magnetic fields.
Scanning the hard drive for errors
The ScanDisk utility examines the hard drive for surface errors, file
problems, and folder problems. ScanDisk corrects these problems so
that Windows and other programs run efficiently.
Use ScanDisk from once a week to once a month, depending on how
often you use your computer. Also use ScanDisk if you encounter
hard drive problems.
To run ScanDisk:
1. Double-click the My Computer icon. The My Computer window
opens.
2. Right-click the hard drive that you want to check for errors,
then select Properties. The System Properties window opens.
http://support.gateway.com/s/Mobile/Solo_Series/p1100/8505462/05462c06.htm (5 of 14)7/28/2004 8:18:56 AM
Page 71

Maintaining Your Computer
3. Click the Tools tab. The Tools tab opens.
4. Click Check Now. The ScanDisk dialog box opens.
http://support.gateway.com/s/Mobile/Solo_Series/p1100/8505462/05462c06.htm (6 of 14)7/28/2004 8:18:56 AM
Page 72

Maintaining Your Computer
5. Click Start. ScanDisk checks the drive for errors.
6. Correct any problems that are found by following the on-
screen instructions. After ScanDisk has finished checking the
drive for errors, it provides a summary of the problems that
were found.
7. Click Close.
Defragmenting the hard drive
When working with files, Windows may divide the file information
into pieces and store the pieces in different places on the hard drive.
This division of files, called fragmentation, is normal. However, to
access a file, the hard drive must search for the pieces of the file
and put the file back together, which can slow down your hard drive
performance.
The Disk Defragmenter utility rearranges the data on the drive so
that each file is stored as one unit rather than multiple pieces
scattered across different areas of the disk. Defragmenting the
information stored on the drive can improve hard drive
performance.
Caution
Do not use your keyboard or mouse when the computer
is running Disk Defragmenter because you may have
restart the process at the beginning. Also, if you are
connected to a network, log off any network connections
because network communication may restart the Disk
Defragmenter process.
To run Disk Defragmenter:
1. Double-click the My Computer icon. The My Computer window
opens.
2. Right-click the hard drive that you want to defragment, then
select Properties. The System Properties window opens.
3. Click the Tools tab. The Tools tab opens.
http://support.gateway.com/s/Mobile/Solo_Series/p1100/8505462/05462c06.htm (7 of 14)7/28/2004 8:18:56 AM
Page 73

Maintaining Your Computer
4. Click Defragment Now.
5. If Disk Defragmenter does start automatically, click Start.
Disk Defragmenter displays the progress on the screen. After
the process is over, you are asked if you want to defragment
another drive.
6. If you do not want to defragment another drive, click No.
Protecting your computer from viruses
A virus is a program that attaches itself to a program or data file on
a computer and then spreads from one computer to another.
Viruses can damage data, cause computers to malfunction, and can
display annoying or offensive messages. Some viruses can go
unnoticed for long periods of time because they are activated on a
certain date or time. Protect your computer from a virus by:
http://support.gateway.com/s/Mobile/Solo_Series/p1100/8505462/05462c06.htm (8 of 14)7/28/2004 8:18:56 AM
Page 74

Maintaining Your Computer
Using the Norton® AntiVirus to check files and programs that
are on diskettes, attached to e-mail messages, or downloaded
from the Internet. After you run Norton AntiVirus you can back
up your files to diskettes, a separate hard drive, or a highcapacity storage drive.
Updating Norton AntiVirus periodically to keep up with new
viruses.
Obtaining all programs from reputable sources and checking
programs for viruses before installing them.
Disabling macros on suspicious Microsoft Word and Excel files.
These programs will warn you if a document that you are
opening contains a macro that might have a virus.
The Norton AntiVirus scanning program is located in the Start menu.
If you need help using the program, select Help in the menu bar.
To remove a virus:
1. Find and remove the virus immediately using Norton
AntiVirus.
2. Turn off your computer and leave it off for at least 30
seconds.
3. Turn on the computer and rescan for the virus.
4. If the virus cannot be removed or has caused substantial
damage to your computer, use Gateway GoBack to return
your computer to its previously working condition. For more
information, see "Using Gateway GoBack".
Managing hard drive space
By deleting unnecessary files from your hard drive and managing
the space that is automatically allocated for saving certain files, you
can help maintain the performance of the hard drive.
Checking hard drive space
In Windows, you can see a chart of the available hard drive space.
http://support.gateway.com/s/Mobile/Solo_Series/p1100/8505462/05462c06.htm (9 of 14)7/28/2004 8:18:56 AM
Page 75

Maintaining Your Computer
To check hard drive space:
1. Double-click on the My Computer icon. The My Computer
window opens.
2. Right-click the hard drive that you want to check for available
file space, then select Properties. The System Properties
window opens and shows the free and used space on the
drive.
Backing up files
In order to retrieve files that may have been lost or damaged, you
should back up your files regularly to diskettes or other backup
media.
You can back up all of the files on your computer or you can select
specific files and folders. Use diskettes to do a partial backup of
selected files or folders. Use a backup device such as a Zip
®
drive,
tape drive, or other high capacity backup device to do a complete
hard drive backup.
Windows 98 includes a backup program to help manage backups.
The following instructions describe how to use the backup program.
Select Help for more information about using the backup program.
If you lose a file that was not backed up, you can restore the file
using Gateway GoBack. For more information about restoring files,
see "Using Gateway GoBack".
To run the Windows backup program:
1. Double-click the My Computer icon. The My Computer window
opens.
2. Right-click the hard drive you want to back up, then select
Properties. The System Properties window opens.
3. Click the Tools tab. The Tools tab opens.
http://support.gateway.com/s/Mobile/Solo_Series/p1100/8505462/05462c06.htm (10 of 14)7/28/2004 8:18:56 AM
Page 76

Maintaining Your Computer
4. Click Backup Now. The Backup program starts.
5. Follow the on-screen instructions.
Deleting unnecessary files
By deleting unnecessary files from the hard drive, you free up space
on the hard drive and help improve its performance. Use the
Windows Disk Cleanup utility to delete temporary Windows files,
delete temporary Internet files, empty the Recycle Bin, and delete
other files.
To use Windows Disk Cleanup:
1. Click Start, then select Programs, Accessories, System Tools,
then Disk Cleanup. The Select Drive window opens.
2. Select the drive you want to clean up and click OK. The Disk
Cleanup window opens.
3. Click the check box beside each file type you want to delete.
For more information about each file type you can delete,
read the descriptions in the Disk Cleanup window.
http://support.gateway.com/s/Mobile/Solo_Series/p1100/8505462/05462c06.htm (11 of 14)7/28/2004 8:18:56 AM
Page 77

Maintaining Your Computer
4. Click OK, then click Yes. The selected files are deleted.
Cleaning your computer
Keeping your computer clean and the vents free from dust helps
keep your system performing at its best. Use the instructions in this
section to clean your computer components.
Before you start, you may want to gather these items and put
together a computer cleaning kit:
A soft
cloth
An aerosol can of air that has a narrow, straw-like
extension
Isopropyl
alcohol
A cotton
swab
A CD drive cleaning
kit
Cleaning the keyboard
You should clean the keyboard occasionally to free it of dust and lint
particles trapped under the keys. The easiest way to do this is to
blow trapped dirt from under the keys using an aerosol can of air
with a narrow, straw-like extension.
If you spill liquid on the keyboard, turn off the computer and turn
the unit upside down to let the liquid drain. Let the keyboard dry
before trying to use the keyboard again. If the keyboard does not
work after it is dry, you may need to have it replaced.
Cleaning the screen
Use a soft cloth and water to clean the screen. Squirt a little water
on the cloth (never directly on the screen), and wipe the screen with
the cloth.
http://support.gateway.com/s/Mobile/Solo_Series/p1100/8505462/05462c06.htm (12 of 14)7/28/2004 8:18:56 AM
Page 78

Maintaining Your Computer
Caution
The LCD screen is made of specially coated glass and can
be scratched or damaged by abrasive or ammonia-based
window cleaners.
Cleaning the exterior
Always turn off the computer and other peripherals before cleaning
any components.
Caution
When you shut down your computer the power turns off,
but some electrical current still flows through the
computer. To completely disconnect power from the
computer, unplug the power cable and modem cable from
the wall outlets and disconnect the battery.
Use a damp, lint-free cloth to clean the computer, keyboard, and
other parts of your system. Do not use abrasive or solvent cleaners
because they can damage the finish on your components.
Your computer is cooled by air drawn in through the vents on the
chassis and blown out through the power supply exhaust fan. Keep
vents on the chassis free of dust. With the computer turned off and
unplugged, brush the dust away from the vents with a slightly damp
cloth. Be careful not to drip any water into the vents. Do not
attempt to clean dust from the inside of the computer.
Cleaning the external mouse
If you use an external mouse and the mouse pointer begins moving
erratically across the screen or becomes difficult to control precisely,
then cleaning the mouse will likely improve mouse accuracy.
To clean the external mouse:
1. Turn the mouse upside down.
2. Rotate the retaining ring on the bottom of the mouse counter-
clockwise.
http://support.gateway.com/s/Mobile/Solo_Series/p1100/8505462/05462c06.htm (13 of 14)7/28/2004 8:18:56 AM
Page 79

Maintaining Your Computer
3. Remove the retaining ring and mouse ball.
4. Remove any dust, lint, or dirt from the mouse ball with a soft
cloth.
5. Clean the mouse rollers with a cotton swab dipped in isopropyl
alcohol.
6. Replace the mouse ball and retaining ring.
7. Rotate the retaining ring on the bottom of the mouse
clockwise and lock it in place.
http://support.gateway.com/s/Mobile/Solo_Series/p1100/8505462/05462c06.htm (14 of 14)7/28/2004 8:18:56 AM
Page 80

Upgrading Your Notebook
Upgrading Your
Notebook
This chapter explains how to:
Prevent static
electricity
Install and remove
PC Cards
Replace a hard disk
drive
Connect a Mini PCI
device
Upgrade
memory
Preventing static electricity
To prevent static electricity:
Before opening the computer case, read and follow these precautions to
prevent damage from static electricity.
Caution
Static
electricity
can
permanently
damage
electronic
components
in the
computer.
Prevent
electrostatic
damage to
the system
by following
static
http://support.gateway.com/s/Mobile/Solo_Series/p1100/8505462/05462c08.htm (1 of 10)7/28/2004 8:18:58 AM
Page 81

Upgrading Your Notebook
electricity
precautions
every time
you open
the
computer
case.
1. Wear a grounding wrist strap (available at most electronic stores).
2. Turn off the computer power.
3. Remove the battery pack.
4. Remove all external cords and cables.
Also follow these static electricity precautions:
Avoid static-causing surfaces such as plastic and packing foam in your
work area.
Remove parts from their antistatic bags only when you are ready to
use them. Do not lay parts on the outside of antistatic bags because
only the inside provides antistatic protection.
Always hold expansion cards by their edges and their metal mounting
brackets. Avoid touching components on the cards and the edge
connectors that connect to expansion slots. Never slide cards or other
parts over any surface.
Using PC Cards
The PC Card slots (also known as PCMCIA card slots) are located on the
right side of your notebook. Install Types I or II PC Cards in the top slot.
Install Types I, II, or III PC Cards in the bottom slot.
These PC Cards can be used in your notebook:
PC Card 16
PC Card 32
(CardBus)
http://support.gateway.com/s/Mobile/Solo_Series/p1100/8505462/05462c08.htm (2 of 10)7/28/2004 8:18:58 AM
Page 82

Upgrading Your Notebook
Zoomed Video Cards (Place in bottom slot only. PC eject button for
this slot is labeled.)
You do not need to restart your notebook after changing most cards
because your notebook supports hot-swapping, or the ability to insert a
PC Card while your notebook is running. If your PC Card does not work
after hot-swapping, refer to the PC Card manufacturer's documentation for
further information.
To insert a PC Card:
1. Insert the PC Card with the label facing up.
2. Slide the card firmly into the PC Card slot until it is flush with the
notebook case.
3. Follow the Windows Setup Wizard installation steps the first time
you insert a PC Card. Operate the device as recommended in the
manual from the PC Card manufacturer.
To remove a PC Card:
1. Click the PC Card icon in the taskbar.
2. Click the card you want to remove, then click OK.
3. Swing out the eject button.
http://support.gateway.com/s/Mobile/Solo_Series/p1100/8505462/05462c08.htm (3 of 10)7/28/2004 8:18:58 AM
Page 83

Upgrading Your Notebook
4. Eject the PC Card by pressing the eject button.
5. Reset the eject button by pressing the eject button again.
Installing memory
Your portable computer uses memory modules called SO-DIMMs (Small
Outline Dual Inline Memory Modules). The modules are available in
various capacities and any module can be placed in any available slot. Use
the procedure in this chapter to add or replace memory modules.
Important
If you
change
the
memory
(RAM)
and your
notebook
uses
Hibernate
(Suspend
to Disk)
mode to
save
power,
you must
run a
utility for
http://support.gateway.com/s/Mobile/Solo_Series/p1100/8505462/05462c08.htm (4 of 10)7/28/2004 8:18:58 AM
Page 84

Upgrading Your Notebook
Hibernate
mode to
function
correctly.
Warning
Disconnect
all power
supply lines
before
removing
the memory
expansion
bay cover.
Replace the
memory
expansion
bay cover
before
reconnecting
power.
To add or replace memory modules:
1. Turn off your computer.
2. Remove the battery pack.
3. Remove the memory bay cover.
http://support.gateway.com/s/Mobile/Solo_Series/p1100/8505462/05462c08.htm (5 of 10)7/28/2004 8:18:58 AM
Page 85

Upgrading Your Notebook
4. If you are removing a module, gently press outward on both clips at
either end of the memory module at the same time until the module
tilts upward.
5. Pull the memory module out of the slot.
http://support.gateway.com/s/Mobile/Solo_Series/p1100/8505462/05462c08.htm (6 of 10)7/28/2004 8:18:58 AM
Page 86

Upgrading Your Notebook
6. Find the appropriate memory module slot. Your notebook can accept
one 1-inch wide, PC-66 SO-DIMM and one 1.25-inch wide, PC-66
SO-DIMM.
7. Hold the replacement module at a 30-degree angle and slide it into
the empty memory slot. Align the small notches on the ends of the
module with the matching bumps on the latches and gently push
the module down until it clicks in place.
http://support.gateway.com/s/Mobile/Solo_Series/p1100/8505462/05462c08.htm (7 of 10)7/28/2004 8:18:58 AM
Page 87

Upgrading Your Notebook
8. Replace the memory bay cover, insert the main battery, and restart
the computer.
9. If you do not have the hibernation mode option enabled, you have
finished installing the memory module.
- OR -
If you are using hibernation mode, press F8 while the system is
starting.
10. Select Command prompt only by pressing the down arrow key, then
press
Enter. The command prompt C: appears.
11. Type chks2d, then press Enter. The Hibernation mode memory file
is regenerated.
12. Restart the computer.
Replacing the hard disk drive
You can remove the hard disk drive from your notebook to swap to a
second hard disk drive.
If you decide to add a new hard disk drive, then use the documentation
that comes with the hard disk drive to prepare the drive for use.
Caution
Do not
expose the
hard drive to
liquid or
magnetic
fields.
Exposure
could damage
the data on
the hard
drive.
http://support.gateway.com/s/Mobile/Solo_Series/p1100/8505462/05462c08.htm (8 of 10)7/28/2004 8:18:58 AM
Page 88

Upgrading Your Notebook
To replace the hard disk drive:
1. Save all work.
2. Click Start, then select Shut Down, Shut down, then click OK.
3. Close the LCD lid.
4. Disconnect the AC power.
5. Remove the battery. See "Changing batteries" for instructions on
removing the battery.
6. Turn the notebook over.
7. Remove the two screws that hold the hard disk drive panel to the
notebook case.
8. Slide the hard disk drive kit out and lift it up.
http://support.gateway.com/s/Mobile/Solo_Series/p1100/8505462/05462c08.htm (9 of 10)7/28/2004 8:18:58 AM
Page 89

Upgrading Your Notebook
9. Place the new hard disk drive kit into the notebook case.
10. Secure the new hard disk drive kit with the screw.
11. Turn on the notebook when you are ready to use it.
12. If this is a first-time installation, then follow the instructions that
came with the hard disk drive to prepare the drive for use.
http://support.gateway.com/s/Mobile/Solo_Series/p1100/8505462/05462c08.htm (10 of 10)7/28/2004 8:18:58 AM
Page 90

Managing Power Use
Managing Power
Use
This chapter explains how to:
Check battery
status
Maximize battery
life
Change
batteries
Recalibrate a
battery
Change power management
settings
Change BIOS settings in the Power
menu
Checking battery status
The notebook can run on a fully charged battery for several hours of
normal use before the battery needs recharging. As long as the AC
adapter is properly connected, the battery will charge while your notebook
is operating.
Charge level
If you want to check the charge level of your battery, you can:
Look at the battery indicator
light:
Green - battery fully
charged.
Orange - battery is being
charged.
Red - battery is
low.
http://support.gateway.com/s/Mobile/Solo_Series/p1100/8505462/05462c07.htm (1 of 11)7/28/2004 8:19:01 AM
Page 91

Managing Power Use
Blinking and red - battery is very
low.
Position the cursor over the power cord or battery icon in the lower
right corner of the taskbar. A battery status pop-up window opens.
Low battery
When your battery is low:
The battery indicator light is red or blinking and
red.
The battery icon in the lower right corner of the taskbar has a red "X"
over it.
The Low Battery window appears, advising you to change your
battery or connect to AC power immediately to prevent losing your
work.
Battery malfunction
The battery is malfunctioning when the battery indicator light is blinking
and orange. If this occurs, see "Recalibrating the battery".
Maximizing battery life
If your notebook is relying only on the battery for power, try these tips to
conserve power:
Dim the display brightness as low as is
comfortable.
Remove PC Cards when they are not in use. Many PC Cards use a
small amount of battery power while they are installed, even if they
are not being used.
Close the display panel to turn off the display when the notebook is
not being used. The LCD display stays off until you open the lid.
Use the CD drive only when necessary. This drive uses a large
amount of battery power.
While traveling, use the optional automobile/aircraft power adapter to
connect your notebook to any available power receptacle. Also, take
your AC power adapter to recharge the battery when possible.
http://support.gateway.com/s/Mobile/Solo_Series/p1100/8505462/05462c07.htm (2 of 11)7/28/2004 8:19:01 AM
Page 92

Managing Power Use
Modify the Power Management settings for maximum power savings.
For more information on changing the power management settings in
Windows 98, see "Changing power management settings."
Enable Hibernation mode support and use Hibernation mode for
power savings while the notebook is not in use.
Changing batteries
Follow this procedure to change your notebook battery pack.
Important
Because notebooks operate in Standby mode for only a short
time without power, swap batteries quickly.
To change the battery pack:
1. Turn off the computer.
2. Close the cover.
3. Turn your notebook over.
4. Remove the screw from the battery release latch.
http://support.gateway.com/s/Mobile/Solo_Series/p1100/8505462/05462c07.htm (3 of 11)7/28/2004 8:19:01 AM
Page 93

Managing Power Use
5. Slide the battery release latch to release the battery pack.
6. Hold the latch forward and lift the battery pack straight out from the
notebook.
http://support.gateway.com/s/Mobile/Solo_Series/p1100/8505462/05462c07.htm (4 of 11)7/28/2004 8:19:01 AM
Page 94

Managing Power Use
7. Slide the recharged battery into the bay and snap it into place.
8. Open the cover.
9. Turn on the notebook.
Warning
Danger of explosion if battery is incorrectly replaced.
Replace only with the Gateway Solo 1100 NiMH battery
pack. Discard used batteries according to the
manufacturer's instructions.
The battery used in this device may present a fire or
chemical burn hazard if mistreated. Do not disassemble,
heat above 212°F (100°C), or incinerate. Dispose of used
battery promptly. Keep away from children.
Recalibrating the battery
Recalibrate the battery gauge every two months using the Battery
Learning program to increase the accuracy of the battery gauge, which
http://support.gateway.com/s/Mobile/Solo_Series/p1100/8505462/05462c07.htm (5 of 11)7/28/2004 8:19:01 AM
Page 95

Managing Power Use
loses its accuracy over time. The process of recalibrating the battery can
take 6-8 hours. You may want to let the Battery Learning program run
overnight.
Important
Removing the battery or disconnecting the AC power will
interrupt the process of recalibrating the battery. If the process
is interrupted, you must run the program from the beginning
to properly condition the battery.
To recalibrate the battery:
1. Connect the AC adapter to the notebook and to an AC outlet.
2. Insert the battery into the battery bay.
3. Start the notebook.
4. Place the Gateway Solo 1100 Recovery CD, Disk 2 into the CD drive.
The Gateway Solo 1100 Recovery CD, Disk 2 window opens.
5. Click the Recalibrate Battery tab.
6. Click Restart to run the Battery Learning program. The computer
shuts down and starts using the Gateway Solo 1100 Recovery CD,
Disk 2.
7. When prompted, select Recalibrate battery.
8. Press Enter. A screen with a description of the Battery Learning
program appears.
9. Press any key. A screen showing the progress of the Battery
Learning program appears. Recalibrating the battery takes
approximately 6-8 hours.
Important
If you need to exit the Battery Learning program, press
Esc.
http://support.gateway.com/s/Mobile/Solo_Series/p1100/8505462/05462c07.htm (6 of 11)7/28/2004 8:19:01 AM
Page 96

Managing Power Use
10. After the battery is recalibrated, follow the on-screen instructions to
exit the Battery Learning program and restart your computer. Make
sure that you remove the Gateway Solo 1100 Recovery CD, Disk 2
before you restart your computer.
Changing power management settings
You can change the behavior of the power button, the Standby button,
and the power-savings timers. To change these power management
settings, you need to go into the Windows Control Panel.
Opening Power Management Properties
To open Power Management Properties:
1. Click Start, then select Settings, then Control Panel. The Control
Panel opens.
2. Double-click the Power Management icon. The Power Management
Properties dialog box opens.
http://support.gateway.com/s/Mobile/Solo_Series/p1100/8505462/05462c07.htm (7 of 11)7/28/2004 8:19:01 AM
Page 97

Managing Power Use
3. Click the appropriate tab to view and modify settings.
Setting power schemes
Within the Power Management Properties window you can change power
saving settings, determining when the monitor or hard disk should be
turned off so that you can save power.
You can select one of the pre-defined power schemes from the Power
schemes drop-down list, or you can create your own power scheme. The
Portables/Laptop power scheme changes the settings to maximize the
battery life of your notebook.
To change your power saving options:
1. Open the Power Management Properties window.
http://support.gateway.com/s/Mobile/Solo_Series/p1100/8505462/05462c07.htm (8 of 11)7/28/2004 8:19:01 AM
Page 98

Managing Power Use
2. Click the Power Schemes tab.
3. Select a pre-defined power scheme from the drop-down list.
- OR -
Set your power saving options. Save the power scheme by clicking
Save As, typing in a name, then clicking OK.
4. Click OK.
Changing alarm settings
Your notebook is equipped with alarms that can alert you if your battery
power is running low.
To change your power saving options:
1. Open the Power Management Properties window.
2. Click the Alarms tab.
http://support.gateway.com/s/Mobile/Solo_Series/p1100/8505462/05462c07.htm (9 of 11)7/28/2004 8:19:01 AM
Page 99

Managing Power Use
3. Make your alarm settings. You can turn alarms On and Off, set the
level of battery power when the alarm rings, and select how you are
notified (sound or message).
4. Click OK.
Hibernation mode
When you activate the Hibernation power-saving mode (also called
suspend to disk), all the RAM information, or information about what
current files and programs you are working on at the time, is stored on
the hard disk drive when the computer is turned off. When the computer
is turned on again, the RAM information is read from the hard disk drive
and the files and programs are restored to the same condition that they
were in when you activated Hibernation mode.
You need to enable the Hibernation mode option before you can select it
http://support.gateway.com/s/Mobile/Solo_Series/p1100/8505462/05462c07.htm (10 of 11)7/28/2004 8:19:01 AM
Page 100

Managing Power Use
in the Advanced tab.
To enable Hibernation mode option:
1. Click Start, then select Settings, then Control Panel.
2. Double-click Power Management. The Power Management Properties
dialog box opens.
3. Click the Hibernate tab.
4. Select the Enable hibernate support check box, then click OK.
http://support.gateway.com/s/Mobile/Solo_Series/p1100/8505462/05462c07.htm (11 of 11)7/28/2004 8:19:01 AM
 Loading...