


Street Atlas USA User Guide

WARNING:
Always test your device before you go.
This manual is provided as a convenience.
GARMIN IS NOT RESPONSIBLE FOR THE ACCURACY OF THIS MANUAL AND DISCLAIMS ANY
LIABILITY ARISING FROM THE RELIANCE THEREON.
Messaging, tracking and SOS functions require an active Iridium satellite subscription.

Table of Contents
Getting Started ........................................................................................................ 1
Welcome to Street Atlas USA .................................................................................. 1
Frequently Asked Questions .................................................................................... 1
Helpful Tips .......................................................................................................... 8
Activating Advanced/Simplified File Management ..................................................... 11
Basic Functions ................................................................................................... 12
Zooming In and Out ............................................................................................ 12
Panning/Centering the Map ................................................................................... 13
Copying Your Map to the Clipboard ........................................................................ 14
Saving a Map as a Bitmap or JPEG Image ............................................................... 14
Measuring Distance and Area ................................................................................ 15
Chart of Supported Coordinate Formats .................................................................. 16
Searching Tips .................................................................................................... 18
About the Interface ............................................................................................. 18
Tab Area ............................................................................................................ 18
Control Panel ...................................................................................................... 19
Overview Map ..................................................................................................... 20
Toolbar .............................................................................................................. 21
Tutorials ............................................................................................................... 23
Tutorial: Use the E-Z Nav Route Wizard .................................................................. 23
Tutorial: Find Points of Interest on a Route ............................................................. 28
Tutorial: Plan a Long Distance Trip......................................................................... 30
Tutorial: Share Maps ........................................................................................... 33
Tutorial: Route with XData Points .......................................................................... 37
Map Legend .......................................................................................................... 41
Map Legend ........................................................................................................ 41
Using the Toolbar ................................................................................................... 45
Showing/Hiding Toolbar Options ............................................................................ 45
Reordering the Toolbar Options ............................................................................. 45
To Create a New Map File ..................................................................................... 45
To Open a Map File .............................................................................................. 45
To Save a Map File .............................................................................................. 46
To Share Maps .................................................................................................... 46
To Create a Route ............................................................................................... 46
To Start/Stop Your GPS Connection ....................................................................... 47
To Use GPS NavMode ........................................................................................... 47
To Open the Map Library ...................................................................................... 48
To View Imagery ................................................................................................. 48
To Get Information About a Location ...................................................................... 49
To Choose Options .............................................................................................. 50
iii

Street Atlas USA User Guide
To Add Images to a GPS Location .......................................................................... 51
To Grab and Pan the Map ..................................................................................... 51
To Measure Distance ............................................................................................ 51
To Print ............................................................................................................. 51
To Print the Map Screen ....................................................................................... 52
Customizing the Map and Tab Display ....................................................................... 53
Customizing the Interface ..................................................................................... 53
Displaying Basic Map Features .............................................................................. 53
Customizing the Map Feature Preferences ............................................................... 55
Changing the Map Colors ...................................................................................... 56
Changing the Map Magnification Level .................................................................... 57
Changing How POIs Display on the Map .................................................................. 57
Setting Units of Measure Preferences ..................................................................... 58
Resizing the Map and Tab Areas ............................................................................ 60
Showing or Hiding Tabs ........................................................................................ 61
Importing/Exporting Tab Manager Preferences ........................................................ 62
Reordering the Tabs ............................................................................................ 63
Using Keyboard Shortcuts ....................................................................................... 65
Selecting a Keyboard Shortcut Scheme .................................................................. 65
Creating a New Custom Scheme ............................................................................ 65
Assigning Keyboard Shortcuts in a Custom Scheme .................................................. 65
Customizing a DeLorme Scheme ........................................................................... 67
Renaming a Custom Scheme ................................................................................ 67
Deleting a Custom Scheme ................................................................................... 68
Importing a Custom Scheme ................................................................................. 68
Exporting a Custom Scheme ................................................................................. 68
Searching For Commands ..................................................................................... 69
Viewing All of the Shortcut Keys for a Scheme ......................................................... 69
Viewing Map Data .................................................................................................. 71
Saving Data to Your Hard Drive ............................................................................. 71
Connecting Data ................................................................................................. 71
Viewing Imagery ................................................................................................. 72
Showing Roads in Raster Data .............................................................................. 72
Using Map Files ...................................................................................................... 73
Map Files Overview .............................................................................................. 73
Creating and Deleting Map Files ............................................................................ 73
Opening an Existing Map File ................................................................................ 74
Setting which Map File Op e ns with Street Atlas USA ................................................. 75
Saving a Map File ................................................................................................ 76
Editing a Map File ................................................................................................ 76
Creating Transfer Files ......................................................................................... 77
Creating Transfer Files with Hyperlinked Files .......................................................... 78
iv

Table of Contents
Importing Transfer Files ....................................................................................... 80
E-mailing a Transfer File ....................................................................................... 81
Printing ................................................................................................................ 83
Printing a Map .................................................................................................... 83
Printing a Route and Directions ............................................................................. 84
Adding Text or Graphics to Your Map ..................................................................... 85
Aligning Text and Graphic Items on Your Map .......................................................... 87
Snapping Text and Graphic Items on Your Map ........................................................ 88
Layering Multiple Text and Graphic Items on a Printed Map ....................................... 89
Changing the Background Color of a Printed Map ..................................................... 90
Manually Assembling a Multi-page Map ................................................................... 90
Finding a Location on the Map .................................................................................. 95
Find Overview ..................................................................................................... 95
Find Options ....................................................................................................... 95
Performing a Basic Search .................................................................................... 96
Performing an Advanced Search ............................................................................ 97
Performing a POI Search ..................................................................................... 100
Finding Points Near Your Current Location.............................................................. 101
Finding a Symbol by its Name .............................................................................. 102
Tips on Viewing Search Results ............................................................................ 103
Keywords for Category Searches .......................................................................... 104
MapTags: Converting, Moving, Hiding, and Deleting ................................................ 106
Using Address Book Contacts .................................................................................. 109
Searching for Address Book Contacts .................................................................... 109
Importing Existing Address Book Information ......................................................... 109
Manually Entering Address Book Information .......................................................... 110
Centering the Map on an Address Book Contact ...................................................... 110
Editing a Contact In Your Address Book ................................................................. 111
Manually Moving a Contact on the Map .................................................................. 111
Relocating Address Book Contacts ........................................................................ 112
Deleting a Contact In Your Address Book ............................................................... 112
Showing/Hiding Address Book Contacts on the Map ................................................. 113
Deleting Your Entire Address Book ........................................................................ 113
Exporting Your Address Book ............................................................................... 114
Searching for Phone Book Listings ........................................................................... 115
Using Phone Data ............................................................................................... 115
Searching for a Phone Book Listing ....................................................................... 115
Finding Phone Book Listings for a Specific Road ...................................................... 118
Using XData ......................................................................................................... 121
XData Overview ................................................................................................. 121
Importing Data .................................................................................................. 121
Managing Datasets ............................................................................................. 123
v

Street Atlas USA User Guide
Viewing Dataset Records ..................................................................................... 124
Creating a Route with XData Records .................................................................... 125
Geocoding or Moving a Record's Location ............................................................... 125
Exporting Data ................................................................................................... 126
Printing XData Dataset Records ............................................................................ 127
Using the Draw Tools ............................................................................................. 129
Draw Overview .................................................................................................. 129
Viewing Hidden Draw Tools .................................................................................. 132
Draw File Management ........................................................................................ 132
Creating a New Draw File .................................................................................... 132
Saving a Draw File ............................................................................................. 133
Deleting a Draw File ........................................................................................... 134
Hiding Draw Files ............................................................................................... 135
Editing/Locking Draw Files ................................................................................... 135
Exporting Draw Files to Text Files ......................................................................... 136
Exporting Track or Waypoint Files to GPX Files ....................................................... 137
Importing Files to Draw Files ................................................................................ 138
Formatting a Text File to Import as a Draw File ...................................................... 140
Copying a Map Line to a Draw File ........................................................................ 141
Saving a Track as a GPS Log ................................................................................ 142
Viewing the Contents of a Draw File ...................................................................... 142
Copying a Draw File ............................................................................................ 144
Changing Draw Object Types ............................................................................... 144
Renaming a Draw File ......................................................................................... 146
Copying a Draw Object From One Draw File to Another ............................................ 146
Moving a Draw Object to a Different Draw File ........................................................ 147
Using Draw Objects ............................................................................................ 148
Copying and Placing Draw Objects ........................................................................ 148
Moving Draw Objects .......................................................................................... 149
Renaming a Draw Object ..................................................................................... 150
Deleting Draw Objects ........................................................................................ 150
Snapping Draw Objects ....................................................................................... 151
Adding Points to Draw Objects ............................................................................. 152
Deleting Points and Line Segments from Draw Objects ............................................ 153
Labeling a Draw Object ....................................................................................... 153
Routable Roads, Tracks, Lines, Arcs, and Splines .................................................... 154
Drawing Routable Roads on the Map ..................................................................... 154
Drawing a Line, Arc, or Spline on the Map .............................................................. 155
Drawing a Track on the Map ................................................................................ 156
Editing a Routable Road, Line, Arc, or Spline .......................................................... 157
Editing a Track ................................................................................................... 157
Placing a Routable Road, Line, Arc, or Spline at a Specific Location ............................ 158
vi

Table of Contents
Joining and Breaking Linear Objects ...................................................................... 159
Circles, Rectangles, and Polygons ......................................................................... 159
Drawing a Circle, Rectangle, or Polygon on the Map ................................................ 160
Editing a Circle, Rectangle, or Polygon ................................................................... 161
Placing a Circle, Rectangle, or Polygon on the Map .................................................. 161
Waypoints, Symbols, MapNotes, Text Labels, and Images ........................................ 162
Adding a Waypoint, Symbol, MapNote, Text Label, or Image to the Map ..................... 162
Editing a Waypoint, Symbol, MapNote, Text Label, or Image .................................... 165
Placing a Waypoint, Symbol, Text Label, or Image at a Specific Location .................... 165
Moving and Deleting Draw MapNotes .................................................................... 166
Custom Symbols ................................................................................................ 167
Custom Symbols Overview .................................................................................. 167
Creating a New Symbol ....................................................................................... 168
GPS Device Custom Symbols ............................................................................... 169
Editing a Symbol ................................................................................................ 170
Finding a Custom Symbol .................................................................................... 171
Importing a Bitmap ............................................................................................ 171
Copying and Pasting ........................................................................................... 172
Pasting a Bitmap into XSym ................................................................................. 173
Dragging a Bitmap into XSym .............................................................................. 174
Removing a Symbol ............................................................................................ 174
Draw Tool Box ................................................................................................... 175
Using the Transparency Option ............................................................................. 176
Anchor Position .................................................................................................. 176
Cursor Position .................................................................................................. 177
Creating a New Symbol Set ................................................................................. 177
Opening a Symbol Set ........................................................................................ 178
Routing ............................................................................................................... 179
Creating a Route ................................................................................................ 179
Adding and Inserting Stops and Vias ..................................................................... 180
Changing the Routing Method .............................................................................. 183
Changing the Properties of a Stop Along Your Route ................................................ 183
Viewing Route Directions ..................................................................................... 184
Avoiding a Specified Area When Routing ................................................................ 184
Saving Route Directions as Text ........................................................................... 185
Setting Your Routing Preferences .......................................................................... 185
Editing a Route .................................................................................................. 186
Editing Roads .................................................................................................... 187
Labeling a Route Point with a MapNote .................................................................. 188
Moving Route MapNotes ...................................................................................... 189
Displaying and Centering Routes on the Map .......................................................... 189
Saving a Route .................................................................................................. 190
vii

Street Atlas USA User Guide
Deleting a Route ................................................................................................ 190
Importing Routes ............................................................................................... 191
Setting Your End of Day and Fuel Break Preferences................................................ 191
Estimating the Fuel Cost of Your Route .................................................................. 192
Converting a Route to a GPS Log .......................................................................... 193
Using GPS ............................................................................................................ 195
GPS Overview .................................................................................................... 195
GPS Options/Initializing GPS ................................................................................ 195
Using NavMode or GPS Tab View .......................................................................... 198
Tracking a Route with GPS .................................................................................. 199
Getting Back on Track When Off Course ................................................................ 201
Using the E-Z Nav Route Wizard ........................................................................... 201
Panning the Map Automatically While GPS Tracking ................................................. 203
Playing Back a Log File ........................................................................................ 203
Previewing a GPS Log File .................................................................................... 204
Viewing File Details for a GPS Log ......................................................................... 205
Monitoring Your GPS Status ................................................................................. 205
Monitoring GPS Satellite Information ..................................................................... 207
Viewing Sun and Moon Information ....................................................................... 208
GPS Devices ...................................................................................................... 208
About GPS ........................................................................................................ 209
Using Small-screen Devices .................................................................................... 211
Using Small-screen Devices ................................................................................. 211
Using Voice Navigation and Speech Recognition ........................................................ 213
Voice Overview .................................................................................................. 213
Voice Options .................................................................................................... 213
Activating and Monitoring Speech Recognition ........................................................ 214
Training the Speech Recognition Engine ................................................................ 214
Voice Commands ............................................................................................... 216
Speech Recognition Tips ...................................................................................... 218
Changing Voice Output ....................................................................................... 220
Voice Preferences ............................................................................................... 220
Voice Prompts ................................................................................................... 221
Exchanging Information with A Third-party GPS Device .............................................. 223
Sending Route Information .................................................................................. 223
Sending Tracks .................................................................................................. 224
Sending Waypoints ............................................................................................. 224
Receiving a Route .............................................................................................. 225
Receiving a Track ............................................................................................... 226
Receiving Waypoints ........................................................................................... 226
Using NetLink ....................................................................................................... 229
NetLink ............................................................................................................. 229
viii

Table of Contents
Using GeoTagger .................................................................................................. 231
Getting Started with GeoTagger ........................................................................... 231
Tagging an Image .............................................................................................. 231
Calculate the Timestamp Offset ............................................................................ 232
Legal Information ................................................................................................. 233
Street Atlas USA® 2013 Plus Single-User License Agreement ................................... 233
Important Notices .............................................................................................. 237
Index .................................................................................................................. 243
ix


Getting Started
Welcome to Street Atlas USA
Tips
• Double-click a book in the Table of Contents to view all of its associated topics.
Click a topic to read its contents.
• Additional information is available online:
• support.delorme.com
• forum.delorme.com
Street Atlas USA Features
• GPS NavMode—a hands free full-screen view that you can view in 2-D or 3-D. GPS
Radar results display on the screen. Optimized for use on netbooks.
• Find a street address, city/town, ZIP/Postal Code, coordinate, point of interest, and
more. Use the advanced search function to locate the intersection of two streets, a
specific category of map items, such as landmarks along the current route, or an
area code and exchange.
• Connect your GPS device to the program and track your progress on a portable
computer as you travel. View your next turn as well as the turn after that—very
helpful when you need to make a turn directly after another turn. You can even use
automatic back-on-track feature to recalculate your route when detours v9er you
the
off course.
• Use MapShare to share your current map view and even route directions with
anyone.
• Use the NetLink tab to get free downloads of data and imagery from the Map Library
for your area of interest.
• Use Canadian data to create door-to-door routes in Canada.
• Import your personal address book information
map. You can even use them as a start, stop, or finish route point or search for them
using the Find tab.
• Create custom keyboard shortcuts to navigate the program more easily than ever.
• Combine digital photos with GPS locations using GeoTagger.
• Use the toolbar to create routes, share maps, open/create/save map files, and edit
your preferences.
• Print high quality, de tailed, single-page maps or mural maps as large as 3 x 3 pages.
• Print your route and/or route directions.
• Customize your map with routable roads, text, MapNotes, and more!
With the Phone tab in Street Atlas USA Plus, you can also:
• Search over 121 million r e sidential and business phone listings
• Find phone numbers for a specific road.
and visualize your contacts on the
, including Canada.
Frequently Asked Questions
1

Street Atlas USA User Guide
These questions are asked most frequently by our customers.
• Where do I find the map and other option s settings?
All options are located in the Options dialog box. To open it, click the Options button
on the toolbar. You can use it to modify GPS, voice, map feature,
display, and keyboard shortcut preferences. For more information, see the Toolbar
topic.
Notes
• Some tabs also have an Options button , which opens the same dialog
box.
• You can also click the arrow next to the Options toolbar button to open the
Options menu. Then, click Options to open the dialog box.
• How can I make the program open with my most recent map file instead of in Salt
Lake City?
Use the Welcome Screen to determine if you want to create a new map file project
each time you open Street Atlas USA or if you want to open a recent map file. When
you use the new map file option, the default location is Salt La ke Ci ty.
• Upgraders only: What happens to my map files when I upgrade?
Your map files, draw files, route files, and log files are stored in the DeLorme Docs
folder, usually found on the root of your computer's C: drive. They are not affected
by an install or removal of DeLorme software.
• Upgraders only: Why doesn't this version of Street Atlas USA overwrite the older
version?
This allows you to view both versions on the same computer.
• Upgraders only: Should I uninstall my previous version before installing this
version of Street Atlas USA?
Uninstalling is not necessary; however, you can uninstall the previous edition of the
software either before or after installing this version of Street Atlas USA.
• Can I see my imagery and data from Topo USA, Topo North America, and XMap on
the map?
Yes, as long as the DeLorme Docs\Downloads is located in the same location for
Street Atlas USA as it was in Topo USA, Topo North America, or XMap.
Note You cannot view 7.5-minute USGS Quad maps, NOAA charts, or DigitalGlobe®
maps in Street Atlas USA.
• How do I create a route?
2
You can create a route using the Route tab, right-click menu options, or the toolbar.
If you are using a GPS, you can use E-Z Nav to quickly create a route to a location.
See the following topics for more information about creating routes.
Creating a Route
Tutorial: Plan a Long Distance Trip

Getting Started
Tutorial: Use the E-Z Nav Route Wizard
• How do I import files from an earlier version of Street Atlas USA into this version?
You can import map files, routes, and draw files from many other DeLorme mapping
programs by using a drag-and-drop operation or by using the import function in
Street Atlas USA.
Note Information for Street Atlas USA 9.0 and earlier users.
The structure of map files has changed throughout the life of Street Atlas USA. Map
files in older products, such as Street Atlas USA 9.0 and earlier, are a single file that
contain route information, draw objects, and the current display settings. These map
files cannot be opened in this version of Street Atlas USA; however, you can view the
route and/or draw information that the map file contains using the import and dragand-drop functions within Street Atlas USA.
Map files do not contain the draw and route information but connect to separate
route and draw files. You can open these map files in Street Atlas USA to view their
contents. Or, you can import/drag-and-drop the draw/route information individually.
To Open A Map File
•
1. Click the Map Files tab.
2. Click File and then click Open.
3. Select the map file you want to view and then click Open.
Notes
Street Atlas USA can open only map files with an .saf extension.
Regular Street Atlas USA only: If you have simplified file management
activated and the map file you are opening contains more then one draw file
or route file, you will be prompted to select the file you want to open.
4. Click OK. The files are imported into one .saf file.
Note Once you save the map file in Street Atlas USA, you can no longer
open it in previous versions of Street Atlas USA. If you want to continue to
use the map file in a previous version, select Save As and rename the file.
To Import a Route
5. Using Windows® Explorer®, browse to the source folder of the route file. The
default directory is C:\DeLorme Docs\Navigation or C:\Program Files\Street
Atlas USA.
6. Locate the file you want to import.
7. While holding the left mouse button, drag the file to the Windows task bar
button for Street Atlas USA (Street Atlas USA opens) and then drag the file to
the map. Release the mouse button when finished.
8. Drag the file on top of the map and release the left mouse button. The file
imports and displays the route.
To Import a Draw File
9. Click the Draw tab, click File, and then click Import.
10. Browse to the path where your draw files are stored. The default directory is
C:\DeLorme Docs\Draw.
3

Street Atlas USA User Guide
11. Under Files of Type, select the file type from the list. If the type is not listed,
select All Files; for example, All Files (*.*).
12. Click the file to select it and then click Open. The imported draw layer
displays in Street Atlas USA. A copy of the draw layer is imported into the
current map file and the original file is not modified.
• What is the difference between NavMode and the GPS tab view when using GPS?
The default GPS view is NavMode—a hands free full-screen view that you can display
in 2-D or 3-D. By default, the Control Panel is hidden and the tabs are minimized;
however, you can customize your interface
. By default, NavMode uses the E-Z Nav
route wizard so you can quickly plan a trip.
The GPS tab view option allow s you to use the GPS tab to control navigating and
tracking. By default, the tabs and Control Panel are visible, but
you can opt to hide
them. It is available only in 2-D mode. For more information, see Using NavMode or
GPS Tab View.
To turn NavMode on or off, click the NavMode button on the toolbar. When the
button appears indented,
Note The button is grayed out
NavMode is on.
unless you have a GPS device plugged in or are
playing back a GPS log file
You can also change your GPS view in the Options dialog box:
1. Click the Options button
You can also click the Options button
on the toolbar and click the GPS tab.
on the GPS tab.
2. Clear the Use NavMode check box to turn it off, or select the check box to
turn it on.
3. Click OK.
• How do I find a specific location?
Street Atlas USA offers powerful search tools that enable you to locate any place in
the United States or Canada.
In addition, you can search for places along your route, within a certain radius of the
current map center, or within a particular region.
To access the search features in Street Atlas USA, click the Find tab. For more
information on searching for specific locations, see Performing a Basic Search
Performing a POI Search, Performing an Advanced Search, and Finding POIs Near
Your Current Location.
• How can I find all of the nearby points of interest?
,
Right-click your loca tion on the map, click Find Travel POIs, and then click the
distance you want to search within (1 mile, 5 miles, or 10 miles). The points of
interest display in Find tab results area.
OR
If you are tracking with a GPS device, do a radar search
to locate points of interest
within a designated distance of your current GPS position.
• How do I perform an Along the Way search in the Find tab and print my results?
4

Getting Started
You can search for names or categories along your current route by doing an
advanced search in the Find tab. You can then print your search results using the
Along the Way print option. Use the following steps to search for a name/category
along your current route and print the results:
1. Click the Find tab and then click Advanced. The Advanced dialog area
displays.
2. Select Category from the From drop-down list.
3. Select Current Route from the Within drop-down list.
4. Type the appropriate keyword in the Keywords text box.
5. Type the distance within which you want to search in the Distance text box.
6. Click Search. The search results display in the dialog area.
7. Click the Print tab and then click Route. The Route dialog area displays.
8. Select the Along the Way check box.
9. Click Print. The search results print.
• How do I turn on voice navigation?
Voice is used in the follow ing ways:
•
• Listen to your route directions
while tracking along a route using GPS.
• Use the speech recognition feature to issue commands or ask questions about
map panning and zooming, navigation, or GPS functions.
• Why can't I hear the voice during voice navigation?
The voice navigation system depends on your computer's sound system for volume
levels.
To Set the Volume Level
If your system is not playing the sound loud enough, use the following steps to verify
the Wave volume control is set to its highest levels.
•
1. From the Start menu, point to Programs, point to Accessories, point to
Multimedia (or Entertainment depending on your operating system) and
then click Volume Control.
OR
If available, click the audio control shortcut on your taskbar.
2. In the Wave column, move the Volume slider to the top.
3. Close the Volume Control dialog box.
If the voice commands are still not loud enough to hear, contact your sound card
manufacturer to download and install the latest driver for your specific model sound
card. The new driver may be able to provide louder output.
There are a variety of external speaker output options for your laptop. Some of them
are simply larger external speakers; others allow you to send the voice to your car
stereo speakers.
• Why doesn't Street Atlas USA recognize my voice?
To troubleshoot why Street Atlas USA may not recognize your voice, verify the
following:
5

Street Atlas USA User Guide
•
• Ensure Street Atlas USA is the active application.
• Ensure you are wearing your microphone correctly. See your microphone's
user guide for more information.
• Train your speech engine in the environment in which you are using the Voice
tab of Street Atlas USA. It is important to speak as naturally as you did during
the training.
Note You can also designate a phrase with which to prefix all of your commands
(similar to Simon Says) within the program or the Speech settings in your Windows
Control Panel to change your voice settings.
• How do I get data updates or fix the roads on my map?
The data in Street Atlas USA can be updated only by buying a more recent version of
the product when it is available.
However, if you find there is a local road that is missing, you can add it to the
current draw layer using the Routable Roads Draw tool. For more information, see
the topic Drawing Routable Roads on the Map
.
Note You can also report data corrections to DeLorme using the NetLink tab.
• What is a map file?
Street Atlas USA lets you save all of the work you have done in the mapping
application as a single workspace so you can open it later. These saved workspaces
are called map files.
A map file consists of the following items: coordinates of the map center, current
zoom level, current magnification, map display preferences, any added items: such
as draw layers, routes, and so forth. As you create new routes or draw layers,
change preferences or the map center, and so forth, they are added to the current
map file. Changes can be saved or discarded.
To learn how to create a map file in Street Atlas USA, see
Creating and Deleting Map
Files.
• What do the different colors and symbols on the map mean?
The different colors on the map represent different areas of land use and land cover
(parks, population centers, water, forests, and so on). The Map Legend provides
examples and descriptions of the map features.
Click the Help button
to display the Map Legend
on the Street Atlas USA toolbar and click Map Legend
Help topic.
• What's the difference between a stop and a via?
When routing in Street Atlas USA, you have the option of adding/inserting stops or
vias in the route. A stop is a location in the middle of a route where you want to stop
and then proceed from. A via is a road on the map that you want to specifically use
when routing.
• What's the difference between adding and inserting a stop or via?
The Insert Stop/Via function arranges stops/vias geographically in the route. The Add
Stop/Via function adds stops/vias in the order you add them to the route.
6

• Why does my route fail to calculate?
Your route will fail to calculate if you create a route:
• With a route start, stop, via, or finish point in an area that you have
designated as a Route Avoid
.
• That includes route points outside the United States, Mexico, or Canada.
• On an island without roads. In this case, Street Atlas USA will look for the
nearest road to that island to place the route point. If the nearest road is not
routable (for example, it is the only road on the island and/or the island does
not have ferry access), you will get an error message saying "Route failed to
calculate."
• Why do X marks display on the map when I calculate a route?
• When you place a route point in a location that isn't on a street, Street Atlas
USA finds the closest street to that location, marks the space bet ween the
point you clicked and the street with X marks, and starts the route at the
street.
• If you search for an address that is on a walkway and place a route point on
it, Street Atlas USA finds the closest street to that location, marks the space
between the point you clicked and the street with X marks, and starts the
route at the street.
Getting Started
• Why are the tab area and control panel so narrow?
Street Atlas USA was designed to accommodate resolutions of 800 x 600 or higher.
If you are using a very high resolution (such as 1920 x 1200), the tab area and
control panel in Street Atlas USA may appear to be very narrow.
Note Use the Windows Control Panel to adjust your display settings.
• Can I send maps to my GPS device?
You cannot export maps to a GPS device with Street Atlas USA. You can send routes,
draw files, waypoints, and tracks.
• Why can’t I see all the information about my route on the Route tab?
If your have your screen resolution set to 800 x 600, some information, such as the
route summary, may not display for a longer route. Increase your screen resolution
to view all details.
• Regular Street Atlas USA only: What's the difference between advanced and
simplified file management?
Simplified file management allows you to save one route or draw layer in a single
map file.
Advanced file management allows you to save multiple routes and draw layers in
a single map file.
During the product installation, you chose to use simplified or advanced file
management. Once the program is installed, you can verify the type of file
management you are using and change it. Click the arrow next to the Options
button
on the toolbar to open the menu, and then click Change File
7

Street Atlas USA User Guide
MapNote, insert it as a stop in your route, copy the
Management. Your current option displays in the dialog box. To change the option,
click the button for the file management option you want to use. For more
information, see Activating Advanc e d/Simplified File Mana gement
.
Helpful Tips
These tips may help you use the features in your DeLorme mapping program. The Did You
Know? pop-up tutorials provide hints while you are working in the application.
Tips
• To disable a specific pop-up tutorial, select the Don't Show Again check box before
you close it.
• To disable all pop-up tut o rials, click the Help button
Shut Off All Pop-up Tutorials.
• To enable all pop-tutorials after you have shut off one or more, click the Help button
on the toolbar and click Reset All Pop-up Tutorials.
on the toolbar and click
Control Panel
If you want to... Use this tip...
Zoom the map out/in
quickly
Pan the map quickly Position your cursor on the edge of the map; it becomes a
Update the coordinate
format that displays in the
Control Panel
View the last map center Press the middle button in the Compass Rose in the
Drag the map cursor in an up-left direction to zoom the
map out or drag it in a down-right direction to zoom the
map in.
white hand that you can use to drag the map to the new
location.
Update your measurement preferences at any time using
the Display tab in the Options dialog box.
Control Panel to center the map on the previous map view.
This button performs an undo function for the last pan or
zoom (up to 256 times).
Draw
If you want to... Use this tip...
Create a route using a
road you have added to
the map with the Draw tab
When drawing a routable road, click each existing road it
crosses to ensure that you can route on the new road.
When you open a track you've imported from your GPS
device, join the imported line with existing lines by rightclicking each inter section and selecting Manage
Draw/Join.
Find
If you want to... Use this tip...
Modify a Find search result Right-click a result item in the Find tab to add it as a
8
Getting Started
information to your clipboard, and so on.
Get all of the phone
You can right-click the map on a road to view phone
Find a custom point of
interest (such as a Chinese
restaurant) when
performing a GPS radar
search in Find
You can use the Custom option to find other categories
besides those listed, or to find multiple categories at once.
GPS
If you want to... Use this tip...
View a GPS log on the map Use the Draw tab to import a GPS log file and view it as a
line object on the map.
Info
If you want to... Use this tip...
Quickly view information
for a location on the map.
Hover your cursor over objects on the map to see
information (such as road names, city/town, details about
draw objects, etc.) in the status line that appears at the
bottom of the map, just above the tab area.
Map Files
If you want to... Use this tip...
Determine which map file
opens when you open
Street Atlas USA.
Learn how to add route
and/or draw layers to your
map file
Use the Welcome Screen to
Street Atlas USA.
Add existing route and/or draw files to your map file by
clicking the Add button and selecting the Draw File or
Route File option.
Note In Street Atlas USA, you must use Advanced File
Management to use this option. This does not apply to
Street Atlas USA Plus.
Measurement Tool
If you want to... Use this tip...
Measure the
area/perimeter of a
location on the map
Use the measure tool to draw a polygon on the map and
determine its area and perimeter. Just click point-by-point
to draw the polygon on the map and then double-click to
close the polygon. The area and perimeter display in the
center of the polygon.
Phone
If you want to... Use this tip...
set which map file opens with
9

Street Atlas USA User Guide
listings for a particular
listings for that road.
road.
Note The Phone tab is available only in Street Atlas USA Plus.
If you want to... Use this tip...
Stop a page in a multipage map from printing
If you do not want to print all the pages in a multi-page
map, on the Layout graphic, click each page you do not
want to print.
Route
If you want to... Use this tip...
Reorder inserted stops Reorder your inserted route stops using the Advanced
features in the Route tab.
Create a route quickly For quick route creation, right-click the map and select one
of the Create Route options or use the Route buttons on
the toolbar.
Reorder the columns in the
Route Directions list
Determine the difference
between adding and
inserting stops and vias
View information about
your second turn
Click the Directions list column headers to change the
column order.
Added stops/vias are placed in the order you add them to
the route. Inserted stops/vias are placed in the order you
would approach them between the Start and Finish points
of the route.
Click the Show Turns button when GPS tracking to view
information about the following turn.
Tab Area
If you want to... Use this tip...
Adjust the size of the tab
area
Show, hide, or reorder
tabs
Import or export a tab
configuration file
Adjust the size of the tab area by dragging the top or right
side of the tab area.
Use the Tab Manager option in the Help menu to show,
hide, or reorder tabs.
Use the Tab Manager option in the Help menu to import or
export a tab configuration file
Voice
If you want to... Use this tip...
Create new speech
recognition profiles
10
You can create a new speech recognition profile for each of
your working environments (noisy, quiet) and users (your
spouse or child) by clicking the Speech settings in the
Windows Control Panel.
Getting Started
Learn how to make the
microphone more sensitive
to your commands in noisy
environments
If there is background noise while you are speaking, it may
be helpful to precede all of your voice commands with a
special phrase (like Simon Says). See the Voice Settings
tab of the Options dialog box.
XData
If you want to... Use this tip...
Geoplace XData records
that do not have complete
You can drag a record from the Query list and place it at
the correct geo-location on the map.
address information or
were not correctly located
during the import process
Add a blank record to your
XData database
To add a blank record to an XData database, you must
select All Records as the Table Display type.
Note The XData tab is available only in Street Atlas Plus.
Activating Advanced/Simplified File Management
Note for regular Street Atlas USA only
Advanced file management allows you to save multiple routes and draw layers in
a single map file. With simplified file management, you can save only one route
and/or draw layer in a single map file. If you did not select to enable advanced
file management during the product installation, you can still change the settings
using the Change File Management option in the Options menu.
This note does not apply to Street Atlas USA Plus users.
When you installed Street Atlas USA, you were given the option to use simplified or
advanced file management. Simplified file management all ows you to have one route or
draw layer saved in a map file. If you want to save multiple route and/or draw layers in a
map file, you must activate advanced file management.
To Activate Advanced/Simplified File Management
Use the following steps to change your file management prefer ences.
1. Click the arrow next to the Options button
2. Click Change File Management.
The Change File Management dialog box opens, indicating if the program is set to
use advanced or simplified file management.
3. To use advanced file management, click Advanced.
OR
To use simplified file man a gement, click Simplified.
4. At the confirmation message, click OK.
5. You must restart Street Atlas USA to view the change in file management.
Note Some of the Help topics related to the Map Files tab, Route tab, and Draw tab include
instructions for both simplified and advanced file management. Be sure to follow the
on the toolbar.
11

Street Atlas USA User Guide
instructions for the file management system you have selected. A note appears at the end
of each related Help topic.
Basic Functions
Zooming In and Out
You can use the drag and zoom feature, zoom tools, or the data zoom level(Data zoom level
is the relationship between what you see in a map view and how it exists in reality. It is the
amount of geographic data displayed on a computer monitor. The data zoom level is similar
to the traditional fractional relationship expressed on paper maps. For example, 1:24,000,
1:100,000, 1:500,000, and so on.) to quickly change the zoom level of the map view.
Notes
• Increase the data zoom level number to show a smaller geographic area at greater
detail.
• Decrease the data zoom level number to show a larger geographic area at lesser
detail.
• If you view both the right (primary) and left (secondary) maps at different data
zoom levels, a box (or lines, depending on the current data zoom level) displays on
the map that is zoomed out the furthest. The box/lines indicate th e area that is in
view on the other map.
• If you view the right and left maps at the same data zoom level but they are not
equally represented on the screen (50/50), a box (or lines) displays on the map that
is covering the most screen area. The box/lines indicate the area that is in view on
the other map.
To Drag and Zoom In
Use the following steps to zoom in either the right or left map.
1. Click and hold down the left mouse button as you drag the mouse in a down-right
direction on the map to encompass the area you want to display. A view box displays
on the screen and changes dimension as you move the mouse. A label displays the
data zoom level at the current map center.
2. Once you reach the map area or data zoom level you want to display, release the
mouse button. The area you selected fills the map window, the map re-centers, and
the map view adjusts to show the appropriate level of detail.
Tip To move the view box to another location, press the SHIFT key at any time.
To Drag and Zoom Out
Use the following steps to zoom in either the right or left map.
1. Click and hold down the left mouse button as you drag the mouse in an up-left
direction on the map. A staircase with a small circle displays on the screen.
2. Continue dragging the mouse in an up-left direction. The small circle moves up the
steps, one step per data zoom level. A label displays the data zoom level to the
bottom-right of the staircase.
3. Once you reach the data zoom level you want to display, release the mouse button.
The map view adjusts to display the appropriate level of detail. The map center is
retained on your screen.
To Zoom In/Out Using the Zoom Tools
12
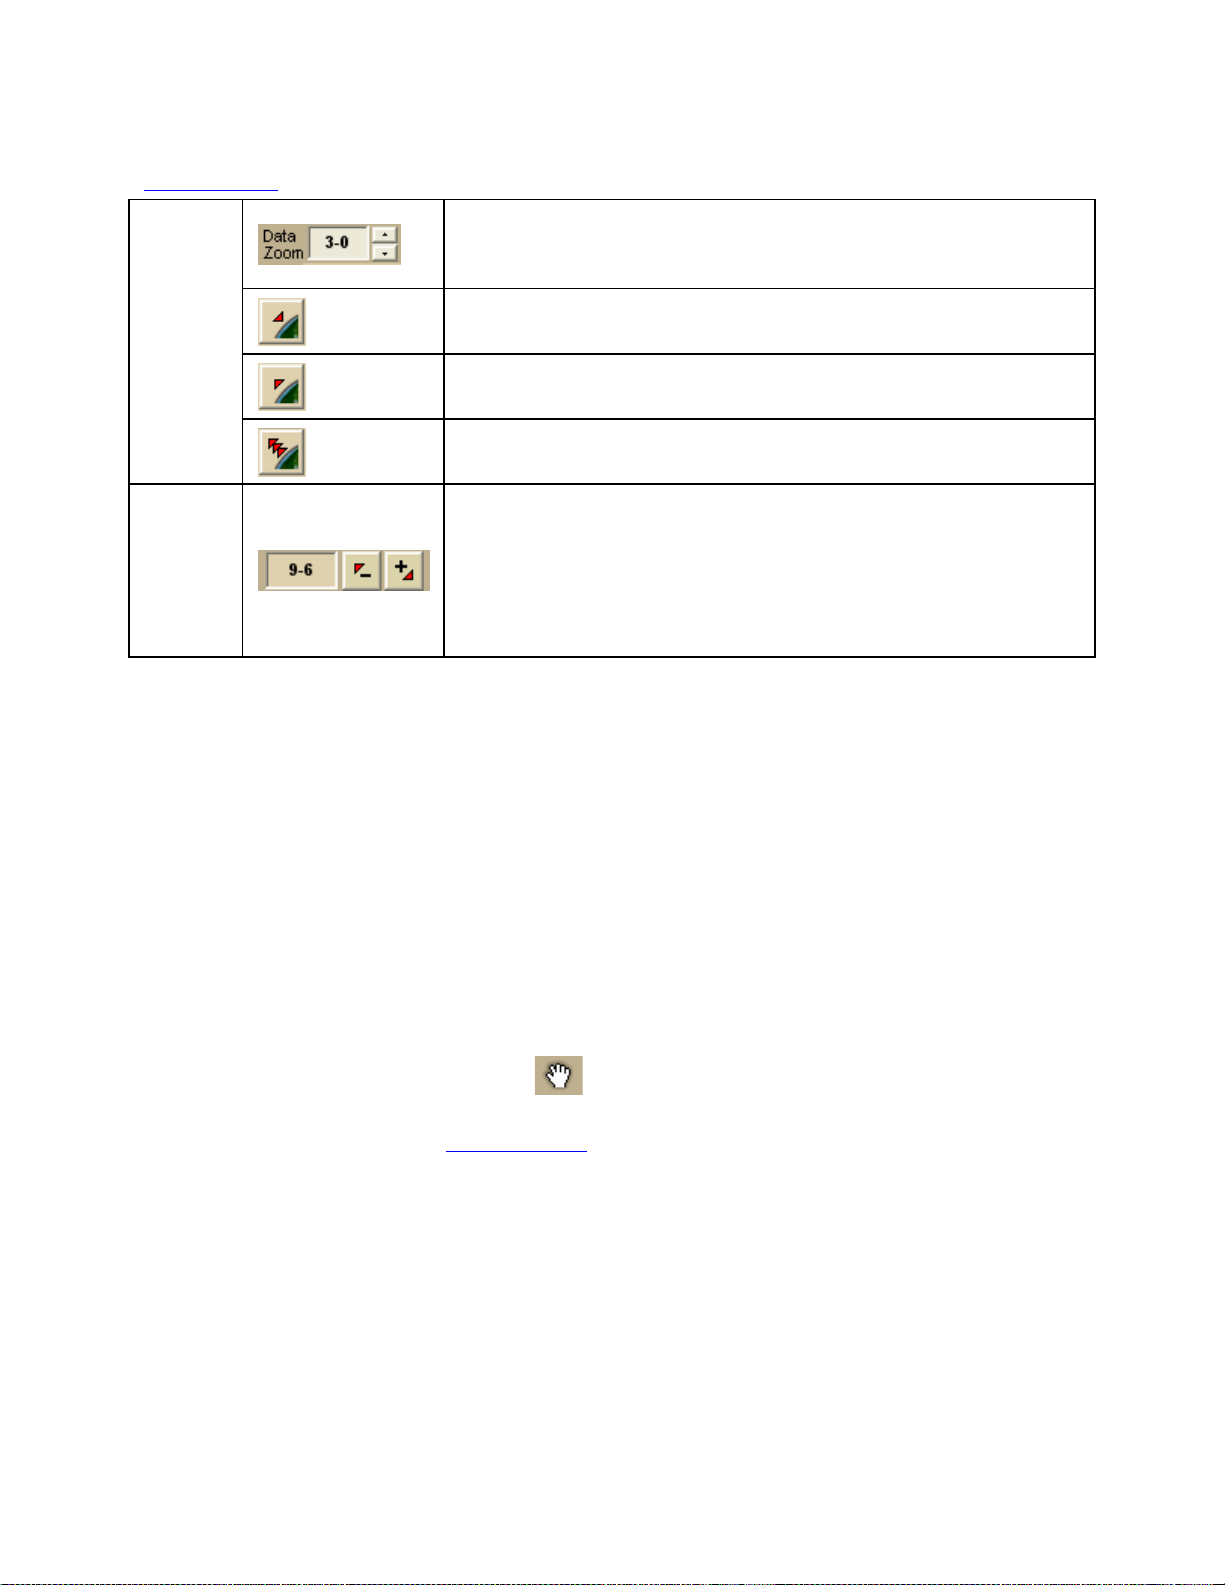
Getting Started
There are two sets of zoom tools. The zoom tools for the right map are located in the
Control Panel
. The zoom tools for the left map are located at the top of the left map view.
Click the up arrow to zoom out one minor data zoom level at
a time. Click the down arrow to zoom in one minor data
zoom level at a time.
Right
Map
Controls
Click the Zoom In 1 tool to increase the detail number to
the next full level.
Click the Zoom Out 1 tool to decrease the detail number to
the next full level.
Click the Zoom Out 3 tool to decrease the detail number by
three full levels.
Click the plus button to increase the detail number to the
next full level.
Left
Map
Controls
Click the minus button to decrease the detail number to the
next full level.
The data zoom level of the left map displays in the text area
to the left of the buttons.
Tips
• Press ALT+PAGE UP on your keyboard to zoom out to the next full data zoom level.
Press ALT+PAGE DOWN on your keyboard to zoom in to the next full data zoom
level.
• Use the mouse wheel to zoom the map in and out. Rotate the mouse wheel to zoom
in by individual data zoom level steps or hold th e SHIFT key while rotating the
mouse wheel to zoom to the next full data zoom level.
Panning/Centering the Map
Use any of the following methods to pan (move) or center the map.
• Click anywhere on the map. The point you click becomes the new map center.
• When you point near the map edge, a white hand displays. Drag the hand to move
the map in that direction.
• Click the Map Panning button
direction.
• Click anywhere on the over view map
center. This allows you to traverse greater distances with each mouse click than you
can within the main map.
on the toolbar to drag/pan the map in any
. The point you click becomes the new map
13

Street Atlas USA User Guide
• Point anywhere on the black view box in the overview map window. When the
pointer becomes a
• Use the search features on the Find tab to center the map on a particular location.
• Assign shortcut keys
, drag the view box to the new location.
to pan the map up, down, left, or right in small increments.
Copying Your Map to the Clipboard
Click the Copy to Clipboard button on the Print tab to copy your map to the clipboard.
You can then paste it into another program.
You can also right-click anywhere on the map and click Copy Map to Clipboard.
Saving a Map as a Bitmap or JPEG Image
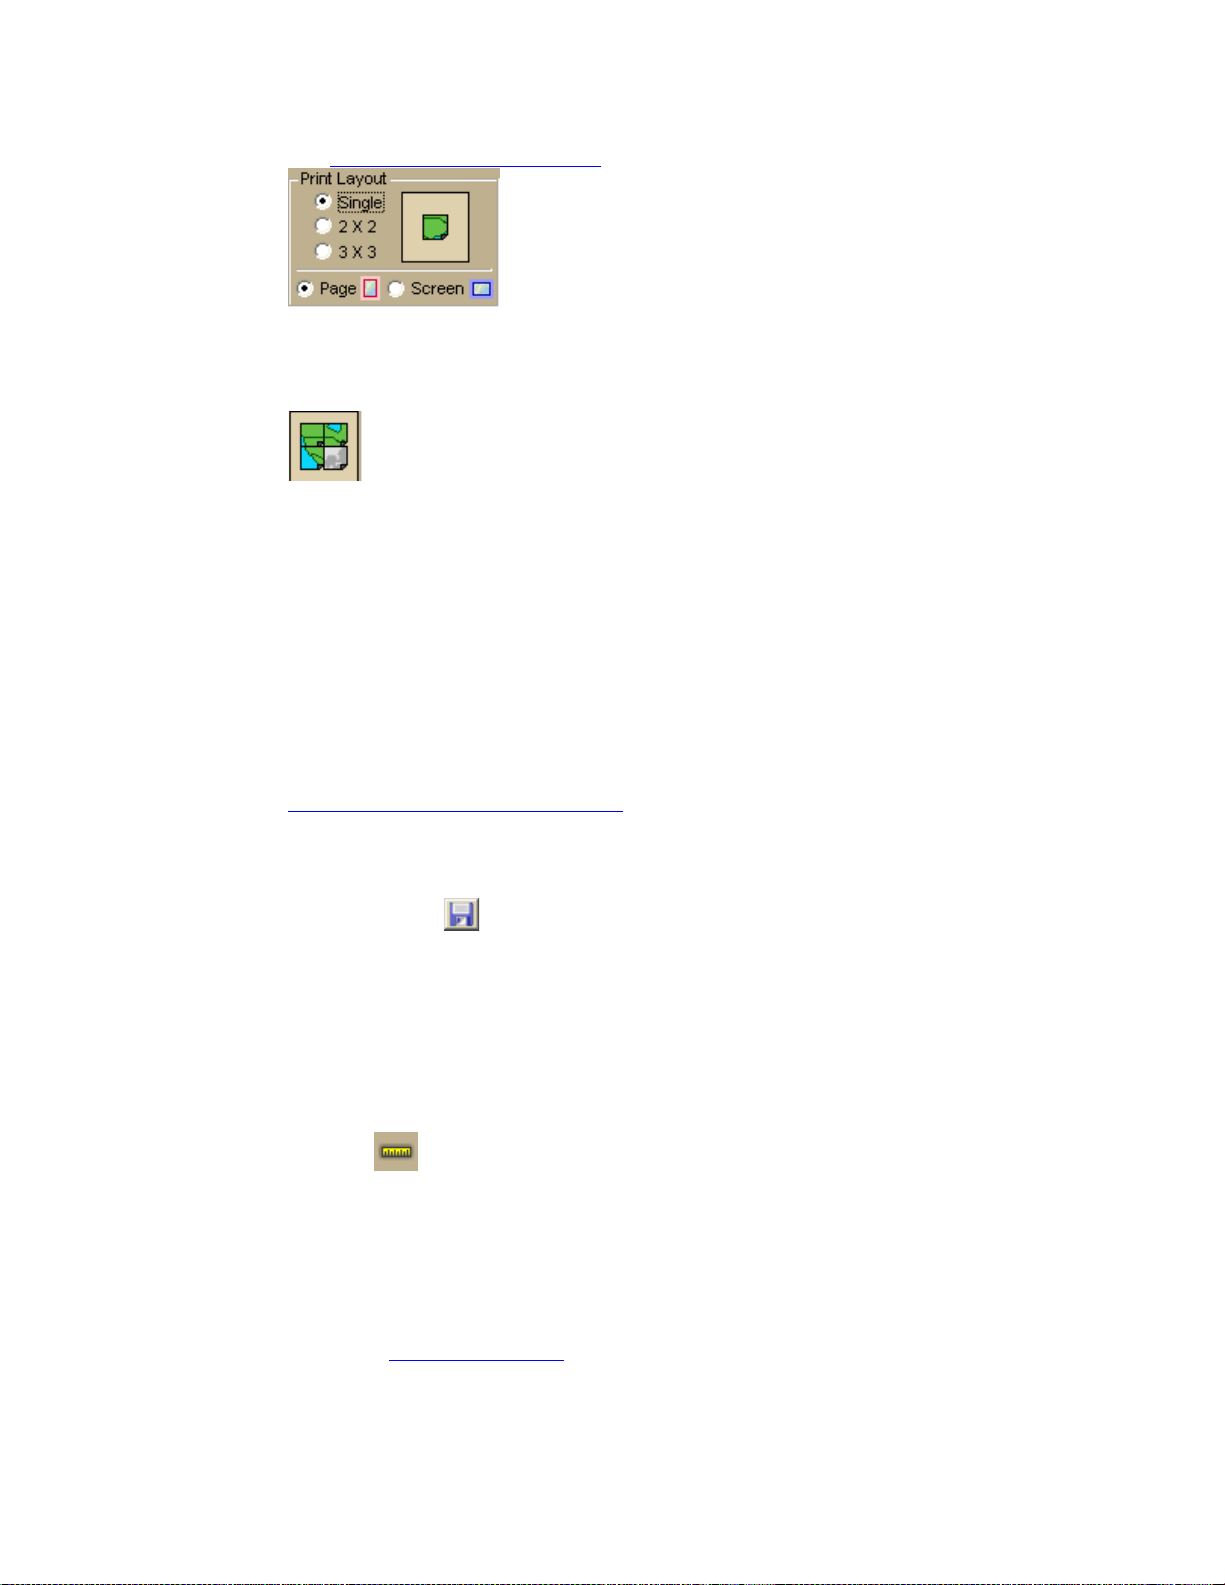
You can save the current map view as a bitmap (.bmp) or JPEG (.jpg) image in all page
layout formats: Single, 2 x 2, and 3 x 3. If you select a multi-page format, all the active
pages are saved as individual bitmaps or JPEGs. The file name is the specified file name
with an incremental page number at the end.
See Printing a Map
for information about printing a map without saving it as a file.
To Save a Map as a Bitmap or JPEG
Use the following steps to save a map as an image.
1. Locate the area on the map that you want to save as an image.
2. Click the Print tab and then click the Map subtab (if it is not already selected).
3. Under Print Layout, select Page(the map print area is based on the paper size
specified in the Setup options) or Screen(the map print area is based on the screen
size).
The print area for a Page map displays as a red box and the print area for a Screen
map displays as a blue box on the overview map.
4. If you selected Page in step 3, the follow ing options are available.
• Under Print Layout, select a layout option (Single, 2 x 2, or 3 x 3). The
print area displays on both the Map and the Overview Map. In the example
below, 2 x 2 is selected. This means the print area encompasses four
standard pages at whatever paper size you specified in the Setup options. You
14
Getting Started
can assemble a multipage map
• If you selected 2 x 2 or 3 x 3 and do not want to save all the pages in the
multipage map on the map layout graphic, click each page you do not want to
save. The page appears dimmed or gray. In the example below, page 4 will
not print.
• Verify this is the location and photo zoom you want to save. If not, pan the
map to the location and zoom to the level you want.
Note Changing the photo zoom enlarges/reduces the map features and
changes the map area that you save as an image. If you increase the photo
zoom level, map text, lines, symbols, etc. are larger and your map area is
reduced. If you decrease the photo zoom level, map text, lines, symb o ls, etc.
are smaller and your map area is enlarged. The reduction/enlargement
percentages for your photo zoom level display under the Photo Zoom dropdown list.
• If you want to use other tabs and functions but not lose your current print
area, print photo zoom, or other settings, select the Lock Print Center check
box. This locks the print area and changes the tab label to red.
• Add text or graphics to your map
• Select the Print Preview check box to zoom the map and view the entire
area that will be saved as a bitmap image. Clear the check box to return to
your previous data zoom level.
into a large map.
.
6. Click the Save button
The Save 2D Map Image dialog box opens.
7. Type the file name in the File Name text box, select to save the file as a .bmp or
.jpg from the Save as Type drop-down list, select the DPI (dots per inch) value
(optional), and click Save.
.
Measuring Distance and Area
Use the Measure tool on the toolbar to measure linear distance and area on the map
based on the units chosen in the Display tab of the Options dialog box.
The snap function snaps (attaches) the point of a measurement line to a point on a road or
another measurement object. This ensures a more accurate measurement of distance or
area. To measure area, you must completely enclose the area by snapping your finish point
to your starting point.
Notes
• The Measure tool is hidden by default
menu and click Measure Distance.
. To show it, right-click the toolbar to open the
15

Street Atlas USA User Guide
• The Measure tool is the best way to measure short distances on the map. If you want to
measure the distance of a road, try creating a route
area on the map, use the area object tools in the Draw tab.
• To disable the auto-snap function, hold down the ALT key on your keyboard while using
the Measure tool.
• Measure objects (lines and areas) are saved with the current map file. When you create
a new map file, the measure objects do not display. If you want the same measure
objects on your new map file, you must recreate them.
• To view information about a measurement line, right-click it and click Info. The
measurement information is automatically displayed in the Info tab.
. If you want to measure a large
To Measure Distance or Area
Use the following steps to measure linear distance or area on the map.
1. Verify you have the correct units of measure selected in the Display tab of the
Options dialog box. For more information, see Setting Units of Measure Preferences
2. On the toolbar, click the Measure tool . The pointer changes to .
3. Click point-by-point to draw a measurement line on the map. A text box displays
next to your pointer indicating the total distance of the measurement taken.
Note When you pass over a point in a road, measurement line, or measurement
area to which you can snap, a yellow circle
the point of the measure line to the road or measurement object's point coordinate.
4. To end a measurement line, double-click the last point of the measu rement line.
OR
Click the last point of your measure line or area and then click the Measure tool on
the toolbar.
The measure line is a two-pixel wide yellow line and the total length of the line is
displayed in a label at each endpoint of the line.
5. To end a measure area, hover over the starting point until the yellow snap circle
displays, and then double-click the last point to the starting point. The closure area
is transparently shaded, and the area and perimeter measurements display.
defines the snap point. Click to snap
.
Chart of Supported Coordinate Formats
These are the supported search formats. Sample coordinates are for Yarmouth, Maine.
Tip Examples of search formats are listed in the Advanced search drop-down text boxes
along with a history of your most current search criteria.
Coordinate
Format
Latitude/Longitude N 43 48 30, W70 9 52 N 43 48 30 W70 9 52
16
QuickSearch Advanced Search
N 43 48.4910, W 070
09.8440
N434829.4600,
W0700950.6400
N43-48-30, W70-9-52 N43-48-30 W70-9-52
N 43 48.4910 W 070 09.8440
N434829.4600 W0700950.6400

Getting Started
N 43:48:29.46, W
N 43:48:29.46 W 70:9:50.64
70:9:50.64
4348, -7009 4348 -7009
4348N, 7009W 4348N 7009W
N4348, W7009 N4348 W7009
4348n, 7009w 4348n 7009w
n4348, w7009 n4348 w7009
4348 N, 7009 W 4348 N 7009 W
N 4348, W 7009 N 4348 W 7009
4348 n, 7009 w 4348 n 7009 w
n 4348 w 7009 n 4348 w 7009
434829, -700950 434829 -700950
4348.491, -7009.844 4348.491 -7009.844
4348.491, -7009.844 4348.491 -7009.844
434829.46, -700950.64 434829.46 -700950.64
43.80818333, -
43.80818333 -70.16406667
70.16406667
43 48.4910 N, 70 09 50.64 W 43 48.4910 N 70 09 50.64 W
43 48.4910 n, 70 09 50.64
43 48.4910 n 70 09 50.64 w
w
N 43 48.4910, W 70 09
N 43 48.4910 70 09 50.64 W
50.64
434829.46 N, 700950.64 W 434829.46 N 700950.64 W
43, -70 43 -70
USNG
Street Atlas USA
Plus only
19TDJ 06354 51187
19TDJ0635451187
(NAD27)*
Same as QuickSearch
19TDJ06355109
19TDJ064511
19TDJ0651
UTM/UPS 19T 0406311E 4850964N Zone 19T
Easting 0406311E
Northing 4850964N
19T 0406311 4850964 Zone 19T
Easting 0406311
Northing 4850964
17

Street Atlas USA User Guide
19T / 0406311 / 4850964 Zone 19T
Easting 0406311
Northing 4850964
SPCS
* Use this example for USNG with non-standard datum.
ME-W 0500490 0355150 Zone ME-W
Easting 0500490
Northing 0355150
Searching Tips
When you use the Quick Search subtab on the Find tab or the Route tab to search for a
location, you must enter the information in a specific format.
Tips
• Use punctuation as in the e xamples in the table below .
• Do not use periods.
This table shows formats for search types.
For this type of search... Use this format... Example
Address Street address, City, State 100 Baxter Blvd, Portland,
ME
Street address, ZIP Code 100 Congress St, 04101
Street address, City, State,
ZIP Code
100 Congress St, Portland,
ME 04101
City City, State Atlanta, Georgia
ZIP/Postal Code Within the U.S.: ##### (5-
digit ZIP Codes only)
Within Canada: ### 6-digit
Postal Codes only)
Minor Point of Interest POI name, City, State Subway, Columbus, OH
Major Point of Interest or
Landmark
Latitude/Longitude See Chart of Supported of Supported Coordinate Formats
For more information about the Find tab, see the Help topics under Finding a Location on
the Map.
POI/landmark name Mount Rushmore
POI/landmark name, State Space Needle, WA
04096
J8E756
About the Interface
Tab Area
18

Getting Started
You can access most of the application's functions from the tab area at the bottom of the
screen. To access Help for a specific tab, click the Help button
reorder the tabs, show or hide individual tabs or show or hide the tab panel
• Map Files
• Find
• Phone Street Atlas Plus only
• XData Street Atlas Plus only
• Print
• Draw
• GPS
• Route
• Info
• NetLink
• Voice
on the tab. You can also
.
Control Panel
The Control Panel, located to the right of the map view, displays information pertinent to
the current map view and map cursor position. It also includes zoom and map pan buttons.
You can customize your interface to show or hide the Control Panel
.
19

Street Atlas USA User Guide
Data Zoom Level—The current data zoom level of the map view;
ranges between 2-0 (maximum zoom out) and 16-0 (regular Street
Atlas maximum zoom in) or 17-0 (Street Atlas Plus maximum zoom in).
Zoom Tools—Buttons that quickly zoom out three levels, out one level,
or in one level. For more information, see Zooming In and Out
Compass Rose—A group of nine buttons on a globe. The outer buttons
have yellow arrows; click one of the arrow buttons to pan the map in
that direction. Click the middle button to center the map on the
previous map view. This button performs an undo function for the last
pan or zoom (up to 256 times).
Map Rotation Tool—The arrow in the graphic indicates True North in
relation to the rotated map. Use the Map Rotation Tool to rotate the
map in any direction. You can rotate the map by clicking or dragging
the square map graphic in the direction you want or by selecting/typing
the degree of map rotation from the drop-down list.
Map Coordinates—Coordinates for the current map cursor position
display based on the units of measurement preferences
Display tab of the Options dialog box.
Scale Bar—Indicates the distance one scale bar unit equals in the
measurement chosen under in the Display tab of the Options dialog
box.
.
chosen in the
Overview Map
The overview map is a small map in the lower-right c orner of the screen that offers a wideangle view of your current map view area. It is approximately three data zoom-levels out
from the current map view.
Tips
• Click anywhere on the overview map and that point becomes the new map center.
This allows you to travel greater distances with each mouse click than you can within
the larger, current map view.
20
 Loading...