

Page 1

GPSMAP® 695/696
Portable Aviation Receiver
Quick Reference Guide
Page 2

Page 3
Overview
OVERVIEW
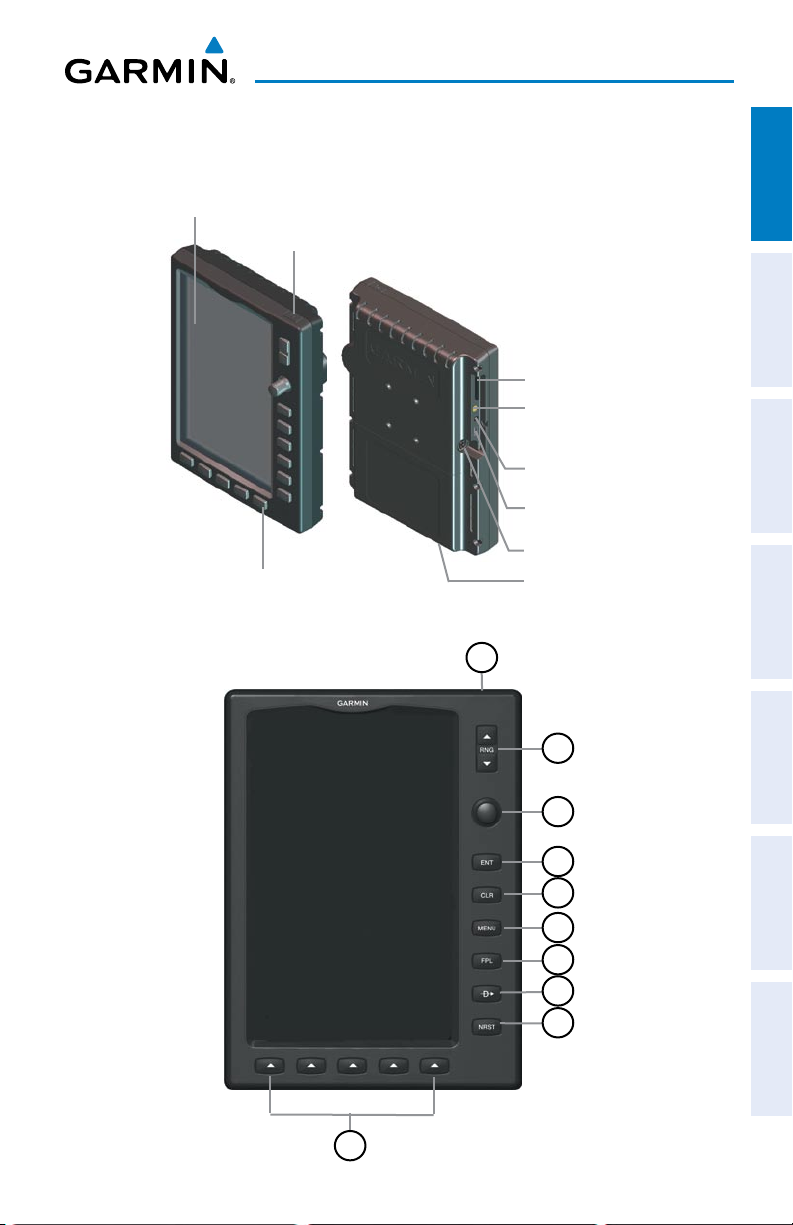
7” WVGA (800x480)
Color Display
Backlit Keypad
Overview GPS Navigation Flight Planning Hazard Avoidance Additional Features Messages & Alerts Utilities
Power Button
SD Card Slot
External GPS Antenna
Connector
Audio (Headphones/Line Out)
USB Connector
External Power/Serial Port
Connector
Battery Pack
Unit Overview
1
190-00959-00 Rev. C
2
3
4
5
6
7
8
9
10
Garmin GPSMAP 695/696 Quick Reference Guide
1
Page 4

Overview
1
2
OverviewGPS NavigationFlight PlanningHazard AvoidanceAdditional FeaturesMessages & AlertsUtilities
3
4
5
6
7
8
9
Power
Button
Press and hold to turn the unit on or off
With the unit on, press to adjust the backlight and volume
RNG Key Press to increase or decrease the viewing range of the map
FMS
Joystick
Press the FMS Joystick to toggle input focus between user
interaction with the current page and the page navigation bar
Turn the FMS Joystick clockwise to access a dropdown menu
Turn the FMS Joystick to change the selected value within the
highlighted field
Move the FMS Joystick to highlight fields or move the map pointer
when interacting with the page
ENT Key Press to confirm menu selection or data entry
Press to acknowledge messages
Press and hold to mark a waypoint
CLR Key Press to cancel an entry, revert to the previous value in a data entry
field or remove menus
Press and hold to return to the default page
MENU Key Press once to view the Page Menu
Press twice to view the Main Menu
Press a third time to clear the Main Menu
FPL Key Press to display the Flight Plan Page
Press a second time to remove the Flight Plan Page
Direct-To
Key
Press to activate the Direct-To function, enter a destination
waypoint and establish a direct course to the selected destination
NRST Key Press to display the Nearest Page for viewing the nearest airports,
intersections, NDBs, VORs, waypoints, frequencies, and airspaces
10
2
Softkey
Selection
Keys
Press to select the softkey shown above the bezel key on the unit
Garmin GPSMAP 695/696 Quick Reference Guide
190-00959-00 Rev. C
Page 5
Overview
MAP
TERRAIN
WEATHER
PANEL
MAP
VFR MAP
BACK
IFR MAP TOPO
BACK
Press the BACK Softkey to
return to the top-level softkeys.
SAT VIEW
HIGH AWYLOW AWYIFR MAPVFR MAP
SOFTKEYS
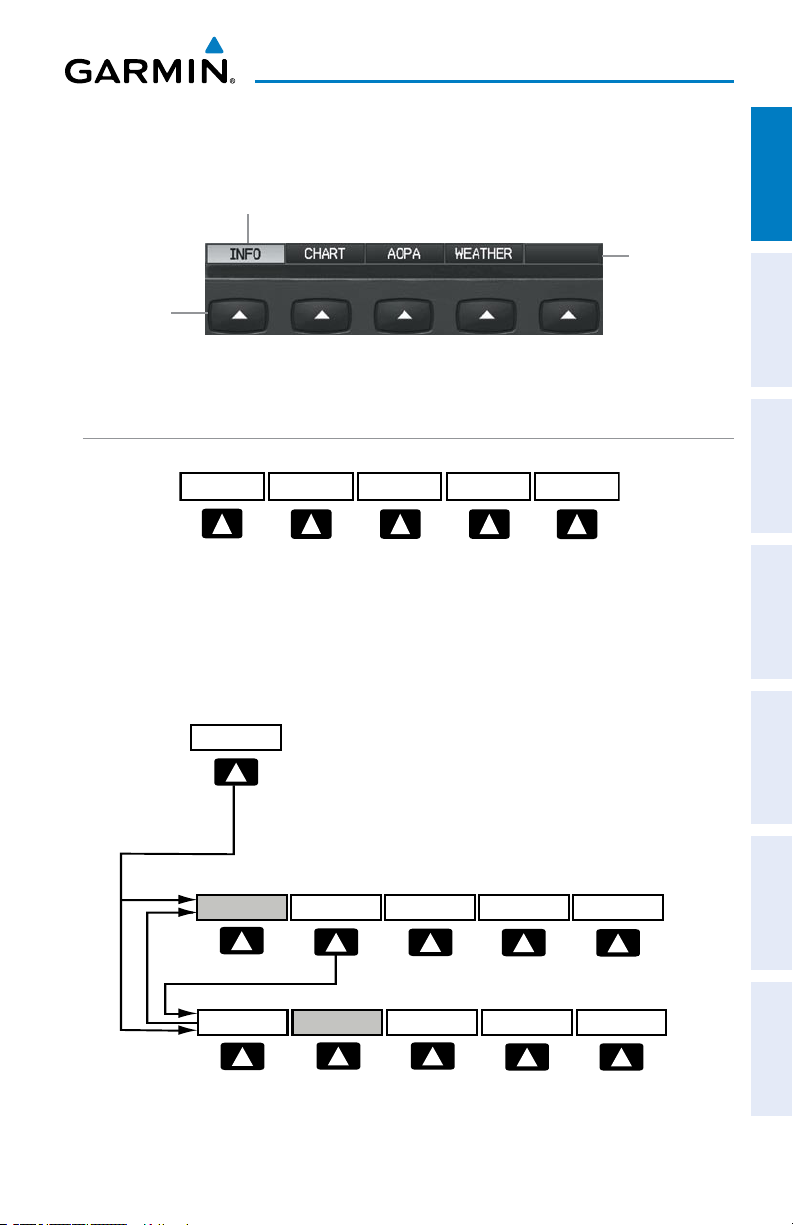
Softkey
On
Bezel Mounted
Softkeys (Press)
Softkeys (WPT Page)
MAP PAGE SOFTKEYS
• MAP Enables second-level Map Page softkeys
TERRAIN Displays/removes terrain awareness information
WEATHER Displays/removes weather information
PANEL Displays/removes the Panel
Overview GPS Navigation Flight Planning Hazard Avoidance Additional Features Messages & Alerts Utilities
Softkey Names
(Displayed)
190-00959-00 Rev. C
Garmin GPSMAP 695/696 Quick Reference Guide
3
Page 6
Overview
INFO
CHART
AOPA WEATHER
PAN MAP
ANIMATE
LEGEND
INFO
VFR MAP Softkey selected
IFR MAP Displays IFR map information and softkeys
TOPO Displays/removes topographical terrain shading
OverviewGPS NavigationFlight PlanningHazard AvoidanceAdditional FeaturesMessages & AlertsUtilities
SAT VIEW Displays/removes satellite imagery (above 20nm scale)
BACK Returns to top-level softkeys
IFR MAP Softkey selected
VFR MAP Displays VFR map information and softkeys
LOW AWY Low Altitude (Victor) Airways displayed
HIGH AWY High Altitude Airways (Jet Routes) displayed
BACK Returns to top-level softkeys
WAYPOINT PAGE SOFTKEYS
4
INFO Displays waypoint information
CHART Displays optional FliteCharts (Americas Unit Only)
AOPA Displays AOPA information (Americas Unit Only)
WEATHER Displays METAR and TAF text (GPSMAP 696® Only)
WEATHER PAGE SOFTKEYS (GPSMAP 696 ONLY)
PAN MAP Activates the map pointer for panning the map
ANIMATE Animates NEXRAD weather
INFO Displays XM® Information
LEGEND Displays weather legends
Garmin GPSMAP 695/696 Quick Reference Guide
190-00959-00 Rev. C
Page 7
Overview
INFO
CHANNEL
VOLUME
CATEGORY FAVORITE
VOL +
BACK VOL -
MUTE
VOLUME
Press the BACK Softkey to
return to the top-level softkeys.
XM AUDIO PAGE SOFTKEYS (GPSMAP 696 ONLY)
INFO Displays XM Information
CATEGORY Highlights the Category eld
CHANNEL Highlights the Channels eld
FAVORITE Displays a list of favorite channels
• VOLUME Enables second-level VOLUME softkeys.
Press and hold to toggle Mute on and off.
Overview GPS Navigation Flight Planning Hazard Avoidance Additional Features Messages & Alerts Utilities
190-00959-00 Rev. C
VOL - Decreases XM audio volume
VOL + Increases XM audio volume
MUTE Toggles XM audio on/off
BACK Returns to top-level softkeys
Garmin GPSMAP 695/696 Quick Reference Guide
5
Page 8

Overview
DATA ENTRY
Using the FMS Joystick to enter data:
OverviewGPS NavigationFlight PlanningHazard AvoidanceAdditional FeaturesMessages & AlertsUtilities
1)
Press the FMS Joystick to activate the cursor.
2)
Move the FMS Joystick to highlight the desired field.
3)
Begin entering data.
a)
To quickly enter a waypoint identifier, turn the FMS Joystick counter-
clockwise to display a list of recent waypoints (RECENT WPTS), nearest
airports (NRST APTS) or ight plan waypoints (FPL WPTS).
b)
Move the FMS Joystick to highlight the desired waypoint from the list
and press the ENT Key.
Or
:
a)
Turn the FMS Joystick to select a character for the first placeholder.
Turning the FMS Joystick clockwise scrolls through the alphabet (where
appropriate) toward the letter Z, starting in the middle at K (US only), and
the digits zero through nine. Turning the FMS Joystick counter-clockwise
scrolls in the opposite direction.
b)
Use the FMS Joystick to move the cursor to the next placeholder in the
field.
c)
Repeat, turning the FMS Joystick to select a character and using the
FMS Joystick to move the cursor, until the fields are complete.
d)
Press the ENT Key to conrm entry.
4)
Press the FMS Joystick or the CLR Key to cancel data entry (the eld reverts
back to its previous information).
MENUS
Navigating the Page Menu:
1)
Press the MENU Key once to display the Page Menu.
2)
Turn or move the FMS Joystick to scroll through a list of available options
(a scroll bar always appears to the right of the window/box when the
option list is longer than the window/box).
3)
Press the ENT Key to select the desired option.
6
Garmin GPSMAP 695/696 Quick Reference Guide
190-00959-00 Rev. C
Page 9
4)
Press the FMS Joystick, the CLR Key, the MENU Key twice to remove the
menu and cancel the operation.
Navigating the Main Menu:
1)
Press the MENU Key twice to display the Main Menu.
2)
Turn or move the FMS Joystick to scroll through a list of available options
(a scroll bar always appears to the right of the window/box when the
option list is longer than the window/box).
3)
Press the ENT Key to select the desired option.
4)
Press the FMS Joystick, the CLR Key, the EXIT Softkey, or the MENU Key to
remove the menu and cancel the operation.
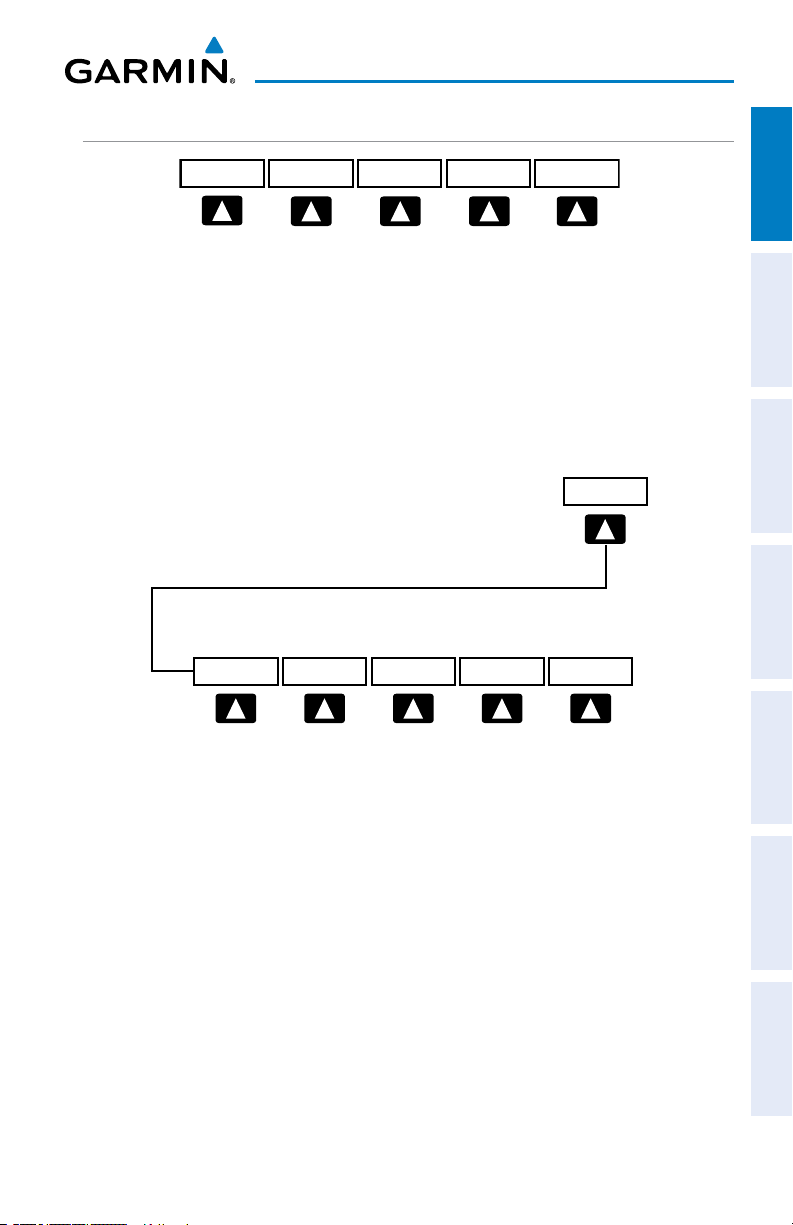
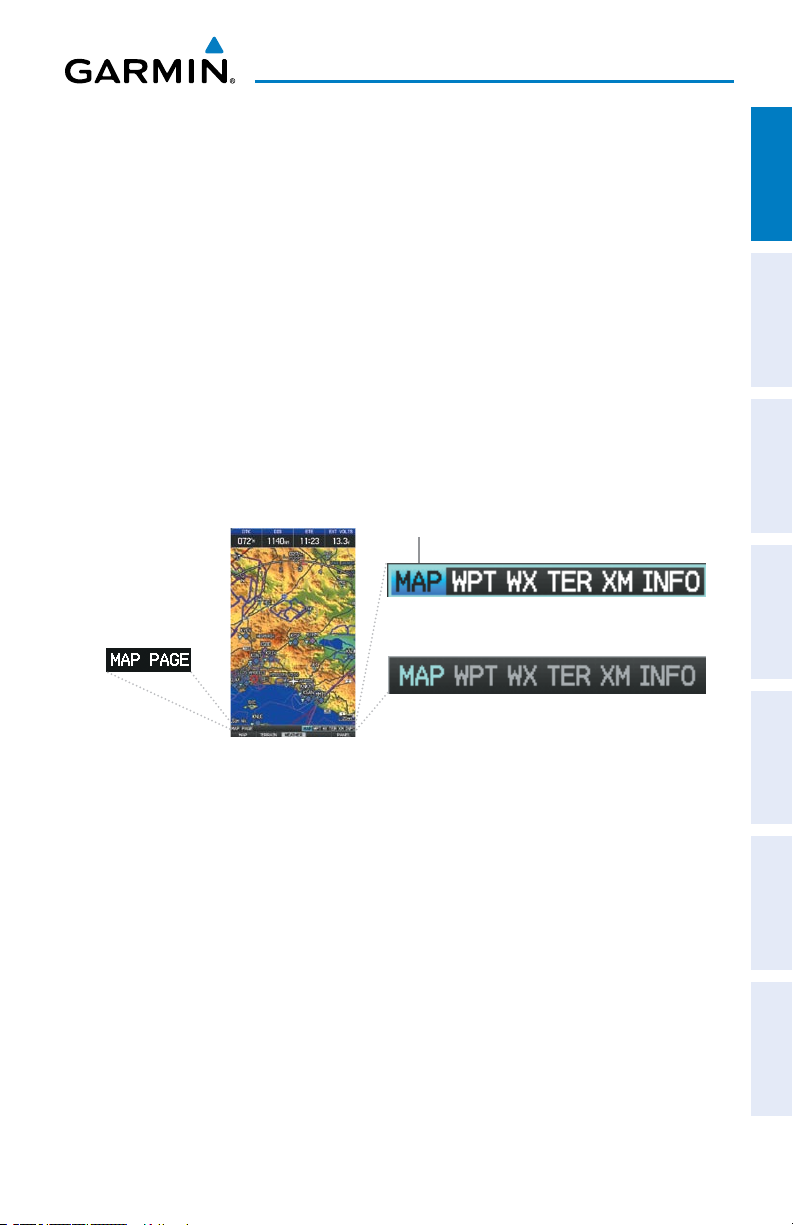
PAGES
Overview
Overview GPS Navigation Flight Planning Hazard Avoidance Additional Features Messages & Alerts Utilities
Selected Page
Active Page Title
Input Focus on Navigation Bar
Input Focus on Current Page
Selecting a Main Page using the FMS Joystick:
1)
If necessary press the FMS Joystick to begin interaction with the Navigation
Bar.
2)
Turn the
FMS Joystick
until the desired page is selected (MAP, WPT, WX,
TER, XM, INFO).
Selecting the FPL or NRST Pages:
1)
Press the FPL or the NRST Key.
2)
If necessary, press the FMS Joystick to begin interaction with the
Navigation Bar.
3)
Turn the FMS
190-00959-00 Rev. C
Joystick
until the desired page is selected.
Garmin GPSMAP 695/696 Quick Reference Guide
(Page Cursor Off)
(Page Cursor On)
7
Page 10

GPS Navigation
GPS NAVIGATION
OverviewGPS NavigationFlight PlanningHazard AvoidanceAdditional FeaturesMessages & AlertsUtilities
PANEL
HSI
Ground Speed
Turn Rate Indicator
Estimated Time Enroute
Setting the Bug Indicator:
1)
From the Map Page, press the MENU Key to display the Map Page Menu
2)
Turn or move the FMS Joystick to highlight ‘Set Bug Indicator’, and press
the ENT Key. The ‘Set Bug Indicator’ Menu appears.
3)
Turn or move the FMS Joystick to highlight the desired menu option, and
press the ENT Key. For the ‘User Selected’ option, turn the FMS Joystick to
select the desired heading reference, and press the ENT Key.
- Next Waypoint
-Distance
Altitude
Vertical Speed
CDI Scale
Panel (Map Page)
Manually setting a course to the destination waypoint:
1)
From the Map Page, press the MENU Key to display the Map Page Menu
2)
Turn or move the FMS Joystick to highlight ‘Set OBS and Hold’, and press
the ENT Key.
3)
Turn the FMS Joystick to select the desired course to the destination, and
press the ENT Key.
8
Garmin GPSMAP 695/696 Quick Reference Guide
190-00959-00 Rev. C
Page 11

GPS Navigation
WAYPOINT PAGE
Selecting an airport for review by identifier, facility name, or location:
1)
From the Waypoint (WPT) Page, press the INFO Softkey.
2)
Press the FMS Joystick to activate the cursor.
3)
Turn the FMS Joystick clockwise to begin entering a waypoint identifier
(turning it counter-clockwise brings up the waypoint selection submenu press the CLR Key to remove it), or move the FMS Joystick to select the
facility name, or city field.
4)
Press the ENT Key.
NEAREST PAGES
Viewing nearest information:
1)
Press the NRST Key.
2)
Turn the FMS Joystick to select the desired Nearest Page (APT, WX, VOR,
NDB, INT, USR, CTY, ATC, FSS, or ASPC. If none are not available, “None
Within 200 NM” is displayed.
3)
Press the NRST Key again to highlight the rst airport on the Nearest
Airports (APT) Page or press the FMS Joystick to highlight the first selection
in the list. Turn or move the FMS Joystick to highlight the desired nearest
option.
4)
Press the ENT Key to display the associated ‘Information Page’. From the
Airport Information Page and Weather Information Page, press the INFO,
CHART, AOPA, or WEATHER Softkeys for additional information. From
the User Waypoint Information Page, press the DELETE, or EDIT softkeys
to make changes to the selected user waypoint.
5)
To return to the Nearest Page, press the FMS Joystick, the ENT Key, or the
CLR Key.
Overview GPS Navigation Flight Planning Hazard Avoidance Additional Features Messages & Alerts Utilities
190-00959-00 Rev. C
Garmin GPSMAP 695/696 Quick Reference Guide
9
Page 12

GPS Navigation
USER WAYPOINTS
Creating user waypoints:
OverviewGPS NavigationFlight PlanningHazard AvoidanceAdditional FeaturesMessages & AlertsUtilities
1)
To create a user waypoint at the current location, using the Map Pointer, or
from the Main Menu:
a)
To create a user waypoint at the current location, press and hold the
ENT Key from any page.
b)
The ‘Mark a New User Waypoint? window appears.
Or
:
a)
Press the MENU Key twice to access the Main Menu.
b)
Move the FMS Joystick to highlight ‘User Waypoints’ and press the ENT
Key.
c)
Enter a user waypoint name (up to six characters).
d)
Press the NEW Softkey. The message “Create a New User Waypoint?”
is displayed. The current aircraft position is the default location of the new
waypoint.
Or
:
a)
From a map page, press the FMS Joystick to activate the Map Pointer
(on the WX Page, press the PAN MAP Softkey).
b)
Find an empty area without any map features and press the ENT Key.
The message “Create a New User Waypoint?” is displayed.
Or
:
a)
From a map page, press the FMS Joystick to activate the Map Pointer
(on the WX Page, press the PAN MAP Softkey).
b)
Select a map feature using the Map Pointer and press the MENU Key.
c)
With ‘Create User Waypoint’ highlighted, press the ENT Key. The
message “Create a New User Waypoint?” is displayed.
2)
With ‘Yes’ highlighted, press the ENT Key. The New Waypoint Window is
displayed.
3)
Move the FMS Joystick to the User Waypoint Name Field and enter the
waypoint name, if desired.
10
Garmin GPSMAP 695/696 Quick Reference Guide
190-00959-00 Rev. C
Page 13

GPS Navigation
4)
If desired, select the waypoint symbol:
a)
Move the FMS Joystick to highlight the Symbol.
b)
Turn the FMS Joystick to access the ‘Select Symbol’ Menu.
c)
Turn or move the FMS Joystick to highlight the desired symbol from the
menu, and press the ENT Key.
5)
If desired, press the POSITION Softkey and enter the latitude, longitude,
name, or altitude for the waypoint or press the REF WPTS Softkey to enter
a bearing and distance from another waypoint or the bearing from two
other waypoints to define the new waypoint location.
6)
With ‘Done’ highlighted, press the ENT Key.
DIRECT-TO
Entering a waypoint identifier, facility name, or city as a direct-to
destination:
1)
Press the Direct-to Key. The Direct-to Window is displayed (with the active
ight plan waypoint as the default selection or a blank waypoint eld if no
ight plan is active).
2)
Turn the FMS Joystick clockwise to begin entering a waypoint identifier
(turning it counter-clockwise brings up the waypoint selection submenu press the CLR Key to remove it), press the RECENT Softkey to display a list
of recent waypoints, or move the FMS Joystick to select the facility name,
or city field.
3)
Press the ENT Key.
4)
With ‘Activate’ highlighted, press the ENT Key.
Overview GPS Navigation Flight Planning Hazard Avoidance Additional Features Messages & Alerts Utilities
190-00959-00 Rev. C
Garmin GPSMAP 695/696 Quick Reference Guide
11
Page 14

Flight Planning
FLIGHT PLANNING
OverviewGPS NavigationFlight PlanningHazard AvoidanceAdditional FeaturesMessages & AlertsUtilities
FLIGHT PLAN CREATION
Creating an active flight plan:
1)
Press the FPL Key.
2)
Press the FMS Joystick to activate the cursor.
3)
Turn the FMS Joystick to display the Insert Waypoint window. (Turning
it clockwise displays a blank Insert Waypoint window, turning it counterclockwise displays a list of recent waypoints (RECENT WPTS), nearest
airports (NRST APTS), or ight plan waypoints (FPL WPTS)
4)
Enter the identifier, facility, or city name of the departure waypoint or select
a waypoint from the submenu of waypoints and press the ENT Key. The
active ight plan is modied as each waypoint is entered.
5)
Repeat step numbers 3 and 4 to enter each additional ight plan waypoint.
6)
When all waypoints have been entered, press the FMS Joystick to remove
the cursor.
FLIGHT PLAN STORAGE
Viewing information about a stored flight plan:
1)
Press the FPL Key.
2)
Turn the FMS Joystick to display the Flight Plan List Page.
3)
Press the FMS Joystick to activate the cursor and turn or move the FMS
Joystick to highlight the desired ight plan.
4)
Press the ENT Key. The Saved Flight Plan Page is displayed showing
departure, destination, total distance, and enroute safe altitude information
for the selected Flight Plan.
5)
Press the FMS Joystick or the DONE Softkey to exit the Saved Flight Plan
Page.
12
Garmin GPSMAP 695/696 Quick Reference Guide
190-00959-00 Rev. C
Page 15

Flight Planning
Storing an active flight plan from the Active Flight Plan Page:
1)
Press the FPL Key.
2)
Turn the FMS Joystick to select the Active Flight Plan Page.
3)
Press the MENU Key. The Active Flight Plan Page Menu is displayed.
4)
Turn or move the FMS Joystick to Highlight ‘Save Flight Plan’.
5)
Press the ENT Key.
6)
With ‘Yes’ highlighted, press the ENT Key. A copy of the ight plan is
stored in the next available position in the ight plan list on the Flight Plan
List Page.
FLIGHT PLAN ACTIVATION
Activating a stored flight plan:
1)
Press the FPL Key and turn the FMS Joystick to display the Flight Plan List
Page.
2)
Press the FMS Joystick to activate the cursor, and turn or move the FMS
Joystick to highlight the desired ight plan.
3)
Select the ACTIVATE Softkey; or press the MENU Key, highlight ‘Activate
Flight Plan’, and press the ENT Key.
4)
With ‘Yes’ highlighted, select the ENT Key. To cancel the request, press the
CLR Key, the FMS Joystick, or highlight ‘No’ and press the ENT Key.
Overview GPS Navigation Flight Planning Hazard Avoidance Additional Features Messages & Alerts Utilities
Activating a Flight Plan Leg:
1)
Press the FPL Key.
2)
Turn the FMS Joystick to display the Active Flight Plan Page.
3)
Press the FMS Joystick to activate the cursor and move the FMS Joystick to
highlight the waypoint leg to be activated.
4)
Press the Direct-to Key twice. The “Activate Leg XXXXX - XXXXX?”
window is displayed.
5)
With ‘Yes’ highlighted, press the ENT Key. To cancel the request, press the
CLR Key, the FMS Joystick, or highlight ‘No’ and press the ENT Key.
190-00959-00 Rev. C
Garmin GPSMAP 695/696 Quick Reference Guide
13
Page 16

Flight Planning
ADJUSTING FUEL FLOW
Adjusting the Active Flight Plan fuel flow:
OverviewGPS NavigationFlight PlanningHazard AvoidanceAdditional FeaturesMessages & AlertsUtilities
1)
Press the FPL Key and turn the FMS Joystick to display the Active Flight
Plan Page.
2)
Press the FMS Joystick to activate the cursor, and move the FMS Joystick to
highlight the ‘Fuel Flow’ eld.
3)
Using the FMS Joystick, enter the desired fuel ow, and press the ENT Key.
INVERTING A FLIGHT PLAN
Inverting the active flight plan:
1)
Press the FPL Key to display the Active Flight Plan Page.
2)
Press the MENU Key, turn or move the FMS Joystick to highlight ‘Invert
Flight Plan’, and press the ENT Key. An “Invert the Active Flight Plan?”
confirmation window is displayed.
3)
With ‘Yes’ highlighted, press the ENT Key to invert and activate the active
ight plan. To cancel, press the CLR Key, the FMS Joystick, or highlight
‘No’ and press the ENT Key.
SELECTING AN APPROACH
Whenever an approach is selected, the choice to either “Load Approach” or “Activate
Approach” is given. “Load Approach” adds the approach to the end of the ight plan
without immediately using it for navigation guidance. This allows continued navigation
via the intermediate waypoints in the original ight plan, but keeps the procedure
available on the Active Flight Plan Page for quick activation when needed. “Activate
Approach” also adds the procedure to the end of the ight plan but immediately
begins to provide guidance to the first waypoint in the approach.
Loading an approach from the active or saved flight plan page:
1)
Press the FPL Key.
2)
Turn the FMS Joystick to display the Active Flight Plan Page or Saved Flight
Plan Page.
14
Garmin GPSMAP 695/696 Quick Reference Guide
190-00959-00 Rev. C
Page 17

Flight Planning
3)
Press the SEL APPR Softkey; or press the MENU Key, highlight ‘Select
Approach’ by turning or moving the FMS Joystick, and press the ENT Key.
The Select Approach Window is displayed.
4)
Turn the FMS Joystick to access a list of available approaches. Turn or
move the FMS Joystick to highlight the desired approach and press the
ENT Key.
5)
With ‘Load Approach’ highlighted, press the ENT Key. To cancel the
request, press the CLR Key or the FMS Joystick.
Activating an approach on the Active Flight Plan Page:
1)
Press the FPL Key.
2)
Turn the FMS Joystick to display the Active Flight Plan Page (if necessary).
3)
Press the SEL APPR Softkey; or press the MENU Key, highlight ‘Select
Approach’ by turning or moving the FMS Joystick, and press the ENT Key.
The Select Approach Window is displayed.
4)
Turn the FMS Joystick to access a list of available approaches. Turn or
move the FMS Joystick to highlight the desired approach and press the
ENT Key.
5)
With ‘Activate Approach’ highlighted, press the ENT Key. To cancel the
request, press the CLR Key or the FMS Joystick.
Overview GPS Navigation Flight Planning Hazard Avoidance Additional Features Messages & Alerts Utilities
ACTIVATING VECTORS-TO-FINAL
After an approach has been activated, the VECTORS Softkey is used when being
vectored to the nal approach course by Air Trafc Control (ATC).
If the VECTORS Softkey is selected, the GPSMAP 695/696 creates an extension of
the final course, beyond the final approach waypoint in the database (final approach
x [FAF]). On the Active Flight Plan Page, a Vector to Final symbol appears beside the
first approach waypoint.
Cancelling Vectors-to-Final:
From the Active Flight Plan Page, press the VECTORS Softkey.
Or
:
1)
From the Active Flight Plan Page, press the MENU Key.
2)
Turn or move the FMS Joystick to highlight ‘Cancel Vectors-to-Final’ and
press the ENT Key.
190-00959-00 Rev. C
Garmin GPSMAP 695/696 Quick Reference Guide
15
Page 18

Hazard Avoidance
HAZARD AVOIDANCE
OverviewGPS NavigationFlight PlanningHazard AvoidanceAdditional FeaturesMessages & AlertsUtilities
XM® WEATHER (GPSMAP 696)
Viewing XM Weather products on the Map Page:
1)
Select the Map Page.
2)
Select the WEATHER Softkey to display the XM weather products.
Or
:
a)
Press the MENU Key.
b)
Select ‘Show Weather’ and press the ENT Key.
3)
Press the FMS Joystick to activate the Map Pointer.
4)
Use the FMS Joystick to highlight the desired weather product with the
Map pointer.
5)
With the desired weather product selected press the ENT Key to get
detailed information (if available).
Viewing XM Weather products on the Weather (WX) Page:
1)
From the WX Page press the FMS Joystick to highlight the weather product
field.
2)
Turn the FMS Joystick to select and automatically display the desired
weather product.
3)
If necessary, move the FMS Joystick to highlight the type field and turn the
FMS Joystick to scroll through a list of available options.
4)
Press the PAN MAP Softkey to get abbreviated information about the
selected weather product or map feature (if available).
5)
With the desired weather product selected press the ENT Key to get
detailed information (if available).
16
Garmin GPSMAP 695/696 Quick Reference Guide
190-00959-00 Rev. C
Page 19

Hazard Avoidance
TERRAIN
Enabling/Disabling Terrain Shading on the Map Page:
From the Map Page with the VFR Map displayed, press the TERRAIN
Softkey.
Or
1)
From the Map Page, press the MENU Key.
2)
Turn or move the FMS Joystick to highlight ‘Set Up Map’, and press the
ENT Key.
3)
Turn the FMS Joystick to highlight the ‘Map’ Category from the horizontal
list.
4)
Move the FMS Joystick to highlight the ‘Terrain Shading’ eld.
5)
Turn the FMS Joystick to select ‘On’ or ‘Off’, and press the ENT Key.
Enabling/Disabling terrain alerts:
1)
From the Terrain Page, press the MENU Key to access the Page Menu.
2)
Turn or move the FMS Joystick to highlight ‘Disable Alerts’ or ‘Enable
Alerts’ and press the ENT Key.
TRAFFIC INFORMATION SERVICE (TIS)
Overview GPS Navigation Flight Planning Hazard Avoidance Additional Features Messages & Alerts Utilities
Adjusting alert volume:
1)
Press the MENU Key twice to access the Main Menu.
2)
Turn or move the FMS Joystick to highlight ‘System Setup’, and press the
ENT Key.
3)
Turn or move the FMS Joystick to highlight ‘Sound’, and press the ENT Key.
4)
Move the FMS Joystick to highlight the ‘Alert Volume’ eld.
5)
Turn the FMS Joystick to select the desired volume (0-10), and press the
ENT Key.
190-00959-00 Rev. C
Garmin GPSMAP 695/696 Quick Reference Guide
17
Page 20

Additional Features
ADDITIONAL FEATURES
OverviewGPS NavigationFlight PlanningHazard AvoidanceAdditional FeaturesMessages & AlertsUtilities
SAFETAXI
Enabling/disabling SafeTaxi:
1)
With the Map Page displayed, press the MENU Key. The Map Page Menu
is displayed.
2)
Turn or move the FMS Joystick to highlight ‘Set Up Map’ and press the
ENT Key.
3)
Turn the FMS Joystick to highlight the ‘Airport’ Category from the
horizontal list.
4)
Move the FMS Joystick to highlight the ‘Safe Taxi’ Field.
5)
Turn the FMS Joystick to access the menu options.
6)
Turn or move the FMS Joystick to select ‘On’ or ‘Off’, and press the ENT
Key.
FLITECHARTS
Displaying FliteCharts:
1)
With the Waypoint (WPT) Page displayed, press the CHART Softkey.
2)
Press the FMS Joystick to activate the cursor.
3)
Move the FMS Joystick to highlight the Airport Identier Field and use the
FMS Joystick to begin entering the desired airport.
Or
:
a)
Move the FMS Joystick to highlight the Chart Field.
b)
Turn the FMS Joystick to access a drop-down menu of available charts.
c)
Turn or move the FMS Joystick to select the desired chart, and press
the ENT Key.
Or
:
18
Garmin GPSMAP 695/696 Quick Reference Guide
190-00959-00 Rev. C
Page 21

Additional Features
1)
From the Active Flight Plan Page or the Select Approach Window, press the
MENU Key.
2)
Turn or move the FMS Joystick to select ‘Show Chart’, and press the ENT
Key. The selected chart is displayed.
3)
Press the EXIT Softkey to return to the previous page.
Or
:
1)
From the Map Page or Active Flight Plan Page, use the Map Pointer
to highlight the desired airport and press the ENT Key. The Airport
Information Window is displayed.
2)
Press the CHART Softkey.
3)
With the ‘Chart’ Field highlighted, turn the FMS Joystick to access a drop-
down menu of available charts.
4)
Turn or move the FMS Joystick to select the desired chart, and press the
ENT Key.
AOPA DATA
Viewing AOPA Airport Directory information:
1)
From the Waypoint (WPT) Page, enter the desired airport with AOPA data.
2)
Press the AOPA Softkey.
Or
:
1)
From any map highlight an airport (with AOPA data) using the Map Pointer,
and press the ENT Key. The Airport Information Window is displayed.
2)
Press the AOPA Softkey.
3)
To return to the map, press the ENT Key, the CLR Key, or the FMS Joystick.
Overview GPS Navigation Flight Planning Hazard Avoidance Additional Features Messages & Alerts Utilities
190-00959-00 Rev. C
Garmin GPSMAP 695/696 Quick Reference Guide
19
Page 22

Messages & Alerts
MESSAGES & ALERTS
OverviewGPS NavigationFlight PlanningHazard AvoidanceAdditional FeaturesMessages & AlertsUtilities
SYSTEM MESSAGES
• Antenna Shorted to Ground—the external GPS antenna has an electrical
connection problem. Contact Garmin Product Support.
• Approaching Target Altitude—within 1,000 feet of nal VNAV target altitude.
• Approaching VNAV Prole—the aircraft is within one minute of reaching the
initial VNAV descent point.
• Arriving at XXX—the aircraft is nearing the destination.
• Battery Low—the battery needs to be recharged.
• Can’t Unlock Maps—no applicable unlock code for one or more maps was found.
All MapSource maps are not accessible.
• Check XM Antenna—internal problem with your GXM 40 antenna. Contact
Garmin Product Support.
• Database Error—internal problem with the unit. Contact your dealer or Garmin
Product Support to have the unit repaired.
• Switch Fuel Tanks—a reminder for switching fuel tanks. The reminder message
repeats at the specified interval after the beginning of each trip.
• Lost Satellite Reception—the unit is unable to receive satellite signals.
• Memory Full—unit memory is full, no further data can be saved.
• Near Proximity Point—the aircraft has reached the distance set for a proximity
waypoint.
• Next DTK XXX—the aircraft is nearing a turn in a route.
• No XM Signal—the GXM 40 antenna is not receiving an XM signal.
• Proximity Memory Full—no additional proximity waypoints can be saved.
• Proximity Radius Overlaps—the radius of two proximity waypoints overlap.
• Route Already Exists—a route name that already exists has been entered.
20
Garmin GPSMAP 695/696 Quick Reference Guide
190-00959-00 Rev. C
Page 23

Messages & Alerts
• Route Memory Full—no additional routes can be saved.
• Route Truncated—uploaded route from another device has more than 300
waypoints.
• Route Waypoint Memory Full—no additional route waypoints can be saved.
• Saving XM Program Information—an XM Radio channel lineup change has
occurred and the unit is saving the channel lineup to memory.
• Steep Turn—approaching a turn that requires a bank angle in excess of 25 degrees
to stay on course.
• Track Already Exists—a saved track with the same name already exists.
• Track Log Full—the track log is full and track recording was turned off. To record
more track points, you need to clear the track log and turn track recording on.
• Track Memory Full—no more track data can be stored. Delete the old track data
to store the new data.
• Track Truncated—a complete uploaded track will not t in memory. The oldest
track log points have been deleted.
• Transfer Complete—data transfer was completed.
• VNAV Cancelled—VNAV function has been cancelled due to a change in the
active route.
Overview GPS Navigation Flight Planning Hazard Avoidance Additional Features Messages & Alerts Utilities
• Waypoint Already Exists—a waypoint with the same name already exists.
• Waypoint Memory Full—the unit has stored the maximum number of waypoints.
• XM Antenna Not Responding—the unit is unable to communicate with the GXM
40.
AIRSPACE MESSAGES
• Inside Airspace—inside the boundaries of the airspace.
• Airspace Near and Ahead—within two nautical miles of an airspace and your
current course takes you inside the airspace.
190-00959-00 Rev. C
Garmin GPSMAP 695/696 Quick Reference Guide
21
Page 24

Messages & Alerts
• Airspace Ahead, Within 10 Minutes—the projected course takes you inside an
airspace within the next 10 minutes or less.
• Near Airspace, Within 2 nm—within two nautical miles of an airspace but not
OverviewGPS NavigationFlight PlanningHazard AvoidanceAdditional FeaturesMessages & AlertsUtilities
projected to enter it.
AURAL ALERTS
TRAFFIC
“Trafc”—TIS trafc alert received.•
“Trafc Not Available”—TIS service is not available or out of range.•
TERRAIN
“Five Hundred”—when the aircraft descends through 500 feet above the destina-•
tion airport.
The following aural terrain alerts are issued when ight conditions meet
parameters that are set within the software algorithms, and are dependant on
the sensitivity level set in the Terrain Setup Menu.
Alert
Severity
Caution
Warning
22
Terrain Obstacle Descent Rate
“caution, terrain”
“caution, terrain ahead”
“terrain ahead! pull up!”
“terrain! terrain! pull up!
pull up!”
Garmin GPSMAP 695/696 Quick Reference Guide
“caution, obstacle”
“caution, obstacle
“obstacle ahead! pull
“obstacle! obstacle!
pull up! pull up!”
Aural Alerts
ahead”
up!”
“caution, sink rate”
“sink rate, pull up!”
“pull up!”
190-00959-00 Rev. C
Page 25

Utilities
UTILITIES
FLIGHT LOG
Viewing details for a flight:
1)
Press the MENU Key twice to display the Main Menu.
2)
Turn or move the FMS Joystick to select ‘Flight Log’, and press the ENT
Key. (Hours and minutes can be displayed by pressing the MENU Key and
selecting ‘Show Hours and Minutes’).
3)
Turn or move the FMS Joystick to select the desired ight from the list, and
press the ENT Key. Route, date, hours, distance, and actual ight path is
displayed.
4)
With ‘Done’ selected, press the ENT Key to return to the previous page.
TRACK LOG
Displaying/removing the track log on the Map Page:
1)
From the Map Page, press the MENU Key. The Map Page Menu is
displayed.
2)
Turn or move the FMS Joystick to select ‘Set Up Map’ from the Map Page
Menu, and press the ENT Key.
3)
Turn the FMS Joystick to highlight the ‘Line’ options from the horizontal
list.
4)
Move the FMS Joystick to highlight the ‘Track Log’ eld.
5)
Turn the FMS Joystick to select ‘Yes’ or ‘No’, and press the ENT Key.
6)
Press the FMS Joystick, the CLR Key, or the EXIT Softkey to return to the
Map Page.
Overview GPS Navigation Flight Planning Hazard Avoidance Additional Features Messages & Alerts Utilities
190-00959-00 Rev. C
Garmin GPSMAP 695/696 Quick Reference Guide
23
Page 26

Utilities
E6B CALCULATOR
Calculating true airspeed and density altitude:
OverviewGPS NavigationFlight PlanningHazard AvoidanceAdditional FeaturesMessages & AlertsUtilities
1)
From the E6B Calculator Window, enter the altitude shown on the altimeter
into the ‘Indicated Altitude’ eld, and press the ENT Key.
2)
Repeat for ‘Calibrated Airspeed’, ‘Baro Pressure’, and ‘Total Air
Temperature’ elds. (For Calibrated Airspeed, use the speed shown on
the airspeed indicator. Use the current altimeter setting for Baro Pressure.
Total Air Temperature is the temperature of the outside air including the
heating effect caused by speed. For most aircraft, this is the temperature
reading on a standard outside air temperature gauge.) The calculated
gures for True Airspeed and Density Altitude are shown in the designated
fields.
Calculating winds aloft:
1)
Calculate or enter the true airspeed into the ‘True Airspeed’ eld, and press
the ENT Key.
2)
Enter the aircraft heading shown on the directional gyro or compass into
the ‘Heading’ eld, and press the ENT Key. Tail Wind, Wind From, and Wind
Speed are calculated.
AIRCRAFT PROFILE
Entering an aircraft profile:
1)
From the Aircraft Prole Page, press the NEW Softkey. The cursor is
activated in the ‘Current Aircraft’ eld.
2)
Enter the desired aircraft name, and press the ENT Key.
3)
Move the FMS Joystick to the ‘Cruise Speed’ eld, turn the FMS Joystick to
enter the appropriate cruise speed, and press the ENT Key. Repeat for the
‘Maximum Speed’ and ‘Fuel Flow’ elds.
4)
Move the FMS Joystick to highlight the ‘Map Symbol’ eld, and turn the
FMS Joystick to select the desired map symbol.
24
Garmin GPSMAP 695/696 Quick Reference Guide
190-00959-00 Rev. C
Page 27

Utilities
WEIGHT & BALANCE
Performing weight and balance calculations:
1)
Press the MENU Key twice to open the Main Menu.
2)
Turn or move the FMS Joystick to highlight ‘Weight & Balance’, and press
the ENT Key.
3)
Select the desired aircraft from the ‘Current Aircraft’ eld.
4)
Use the FMS Joystick to enter the desired weights and arms (or “stations”),
pressing the ENT Key after each entry. The calculated moment, weight,
and CG gures appear at the bottom of the page. Keep in mind that the
“Aircraft” (empty weight/arm) gures must be entered as a reference to
calculate a valid moment, weight, and CG.
5)
To empty the aircraft, press the Menu Key and select ‘Empty Aircraft’, or
press the EMPTY Softkey.
PROXIMITY WAYPOINTS
Defining proximity waypoints:
1)
Press the MENU Key twice to open the Main Menu.
2)
Turn or move the FMS Joystick to highlight ‘User Waypoints’, and press the
ENT Key.
3)
Press the PROXIMITY Softkey. The Proximity Waypoints Page is displayed.
4)
Press the NEW Softkey. The New Proximity Waypoint Window is displayed.
5)
Select ‘Use Map’ or ‘Use Identier’, and press the ENT Key.
6)
Select the desired waypoint using the Map or Select Waypoint Window, and
press the ENT Key. The ‘Distance’ eld is highlighted.
7)
Using the FMS Joystick, enter the desired distance and press the ENT Key.
Overview GPS Navigation Flight Planning Hazard Avoidance Additional Features Messages & Alerts Utilities
190-00959-00 Rev. C
Garmin GPSMAP 695/696 Quick Reference Guide
25
Page 28

Blank Page
Page 29

Page 30

Garmin International, Inc.
1200 East 151st Street
Olathe, KS 66062, U.S.A.
p: 913.397.8200
f: 913.397.8282
Garmin AT, Inc.
2345 Turner Road SE
Salem, OR 97302, U.S.A.
p: 503.391.3411
f: 503.364.2138
Garmin (Europe) Ltd
Liberty House, Bulls Copse Road
Hounsdown Business Park
Southampton, SO40 9RB, U.K.
p: 44/0870.8501241
f: 44/0870.8501251
Garmin Corporation
No. 68, Jangshu 2nd Road
Shijr, Taipei County, Taiwan
p: 886/2.2642.9199
f: 886/2.2642.9099
www.garmin.com
© 2009 Garmin Ltd. or its subsidiaries
Printed in Taiwan
190-00959-00 Rev. C
 Loading...