

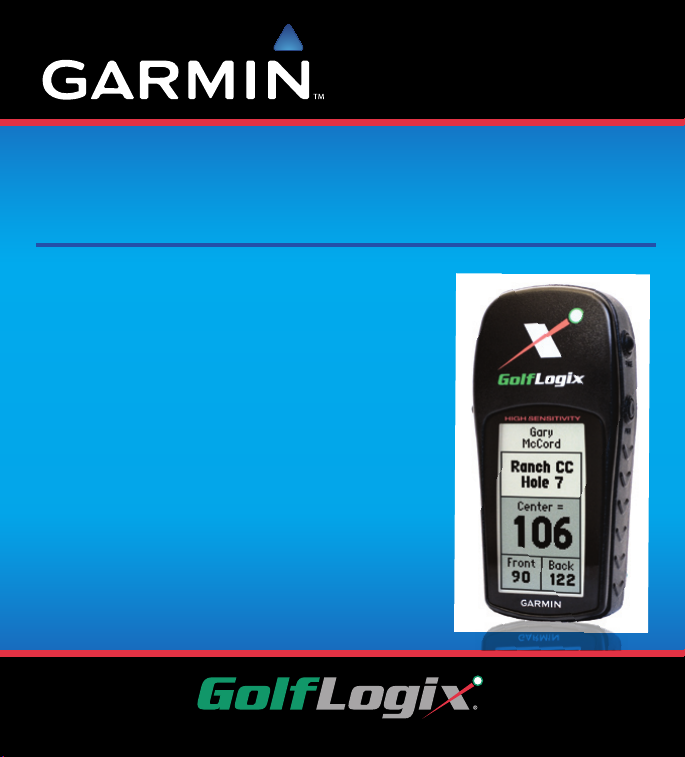
Page 1
GolfGPS
GolfGPS
GolfLogix GPS Powered by Garmin
The Best GPS for Golf
User Guide
User Guide
Page 2

GolfLogix. The Best GPS for Golf, Simple and Accurate.
Manufactured by GARMIN, the World Leader in GPS.
Patent Protected.
© 2001-2008 GolfLogix, Inc. All Rights Reserved.
GolfLogix User Guide. All content within is copyrighted by GolfLogix, Inc. and may not be
reprinted without permission.
Information in this document is subject to change without notice. GolfLogix reserves the
right to change or improve its product and to make changes in the content without obligation to notify any person or organization to such changes and improvements. The GolfLogix
User Guide is for informational purposes only and should not be construed as a commitment by GolfLogix, Inc.
GolfLogix is a registered trademark of GolfLogix, Inc.
GolfLogix, Inc.,
16055 N. Dial Blvd., Suite 5, Scottsdale, Arizona 85260 USA.
Please follow the instructions contained herein to register your GolfLogix GPS within 30
days of purchase to activate your Consumer Limited Warranty.
Visit us online at www.gologix.com.
Page 3

Table of Contents
Introduction . . . . . . . . . . . . . . . . . . . . . . . . . . . . . . . . . . . . . . . . . . . . . . . . .6
Chapter 1: Getting Started
Box Contents . . . . . . . . . . . . . . . . . . . . . . . . . . . . . . . . . . . . . . . . . 7
Button Descriptions . . . . . . . . . . . . . . . . . . . . . . . . . . . . . . . . . . . . . 8
Installing Batteries . . . . . . . . . . . . . . . . . . . . . . . . . . . . . . . . . . . . . . 9
Chapter 2: Installing the Course Manager Software
System Requirements . . . . . . . . . . . . . . . . . . . . . . . . . . . . . . . . . . . 11
Installing the USB-to-Serial Driver . . . . . . . . . . . . . . . . . . . . . . . . . . . 12
Installing the Course Manager Software . . . . . . . . . . . . . . . . . . . . . . . 13
Connecting GolfLogix GPS to Your Computer . . . . . . . . . . . . . . . . . . . . 14
Registering Your GolfLogix GPS . . . . . . . . . . . . . . . . . . . . . . . . . . . . . 15
Trouble Shooting the Connection Between Your Unit and Computer . . . . . 16
Activate Your GolfLogix Membership . . . . . . . . . . . . . . . . . . . . . . . . . 17
Upgrading Your GolfLogix Software . . . . . . . . . . . . . . . . . . . . . . . . . . 18
Chapter 3: Downloading Courses to GolfLogix GPS
Opening the Application . . . . . . . . . . . . . . . . . . . . . . . . . . . . . . . . . 19
Page 4

Search & Save Courses to Your Computer . . . . . . . . . . . . . . . . . . . . . . 20
Requesting Unavailable Golf Courses . . . . . . . . . . . . . . . . . . . . . . . . . 22
Receiving Course Map Updates . . . . . . . . . . . . . . . . . . . . . . . . . . . . . 23
Load Golf Courses to Your GolfLogix GPS. . . . . . . . . . . . . . . . . . . . . . . 24
Chapter 4: Playing Golf with Your GolfLogix GPS
Button Descriptions . . . . . . . . . . . . . . . . . . . . . . . . . . . . . . . . . . . . 26
Acquiring GPS Signals . . . . . . . . . . . . . . . . . . . . . . . . . . . . . . . . . . . 27
Distance of Last Shot . . . . . . . . . . . . . . . . . . . . . . . . . . . . . . . . . . . 27
Screen Descriptions . . . . . . . . . . . . . . . . . . . . . . . . . . . . . . . . . . . . 28
Tips During Your Round . . . . . . . . . . . . . . . . . . . . . . . . . . . . . . . . . 29
Checking Battery Power . . . . . . . . . . . . . . . . . . . . . . . . . . . . . . . . . 29
Adjusting Contrast . . . . . . . . . . . . . . . . . . . . . . . . . . . . . . . . . . . . . 30
Switching From Yards to Meters . . . . . . . . . . . . . . . . . . . . . . . . . . . . 30
Other Menu Items . . . . . . . . . . . . . . . . . . . . . . . . . . . . . . . . . . . . . 31
Purchase Accessories . . . . . . . . . . . . . . . . . . . . . . . . . . . . . . . . . . . 31
Customer Service and Support . . . . . . . . . . . . . . . . . . . . . . . . . . . . . 31
Chapter 5: Using the Help Section
Request a Course . . . . . . . . . . . . . . . . . . . . . . . . . . . . . . . . . . . . . . 33
Improve Course Accuracy . . . . . . . . . . . . . . . . . . . . . . . . . . . . . . . . 33
Page 5

Adjust Hole Order . . . . . . . . . . . . . . . . . . . . . . . . . . . . . . . . . . . . . 35
Change Course Name . . . . . . . . . . . . . . . . . . . . . . . . . . . . . . . . . . . 35
Chapter 6: License and Warranty Information
Product Use Agreement . . . . . . . . . . . . . . . . . . . . . . . . . . . . . . . . . 36
Software License Agreement . . . . . . . . . . . . . . . . . . . . . . . . . . . . . . 37
Consumer Limited Warranty . . . . . . . . . . . . . . . . . . . . . . . . . . . . . . . 38
Page 6

Introduction
Congratulations on your new GolfLogix GPS. GolfLogix is the best GPS for Golf, Simple, Fast
and Fun. GolfLogix is powered by Garmin, a world leader in GPS.
The Distances Golfers Need:
• Front, Center, and Back of Green
• Bunkers
• Water Hazards
• Lay-ups
• Carries
The Way GPS Was Meant to Be:
• Auto-recognizes course being played
• Auto-advances to next hole
• No-touch operation
• Large, easy-to-read screen
• Personalized name screen
• Constant display, no pointing or aiming
• Rugged construction
• 100% Waterproof casing
• Shock resistant
• Conforms to USGA and R&A Rulings
Know your distance and lower your score. Yes, it can be that simple! Accurate distance is
key for every golfer on every shot. GolfLogix takes the guesswork out of determining the
yardage.
Without ever having to push a button, GolfLogix continually displays the distance to every
target and hazard. All you do is check the distance, select your club, and take your shot.
GolfLogix even scrolls automatically to the next hole.
It’s that simple! Enjoy!
Page 7
Chapter 1: Getting Started
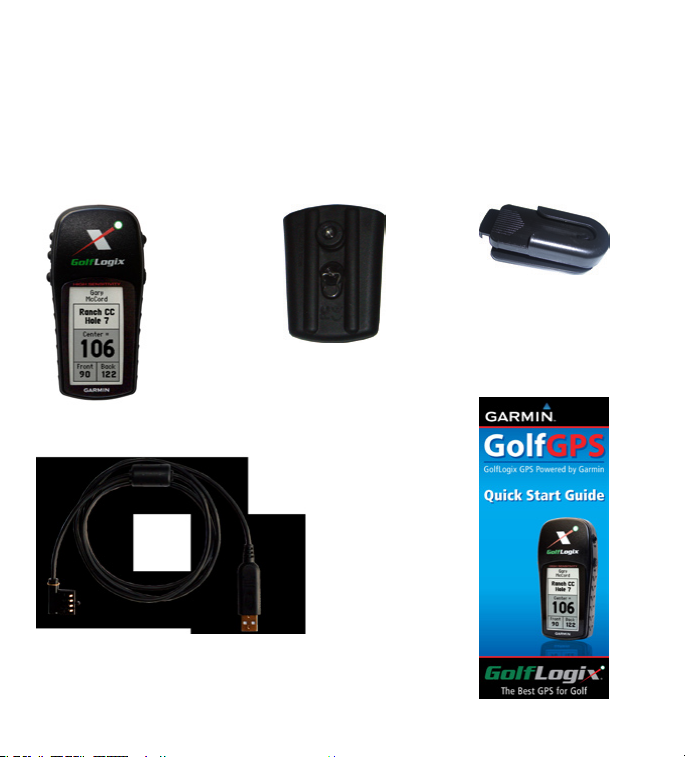
Box Contents
Before getting started, please check your box to familiarize yourself with the contents:
GolfLogix GPS Unit Battery Back Cover Belt-Clip
Quick Start Guide
Serial Adaptor to USB Connection
Page 8
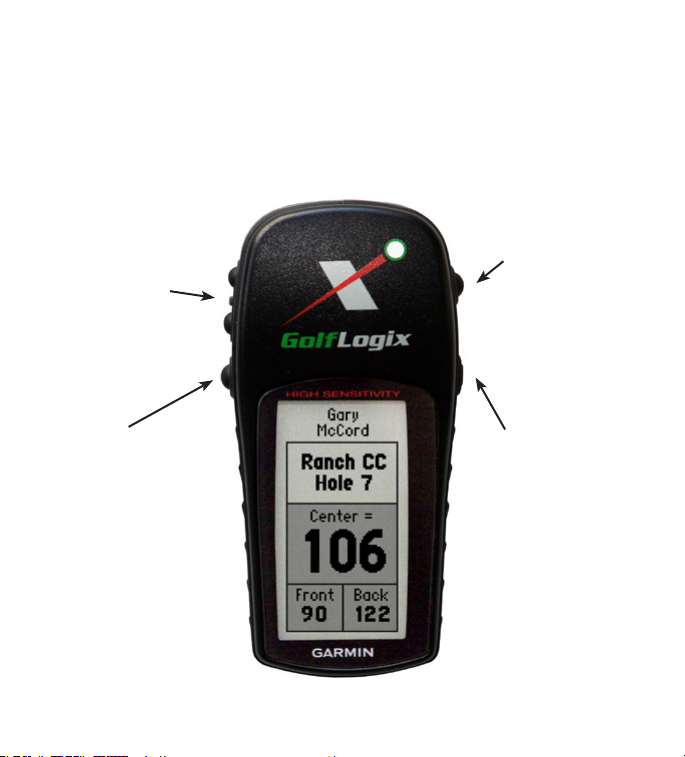
Chapter 1: Getting Started
GolfLogix GPS Button Description
Up/Down Buttons
Scroll to Next Hazard
or Hole. Press & Hold
to Quickly Scroll
Enter Button
Press to Measure
Distance of Last Shot
and Use to Select
Menu Items
Page Button
Press to select
between multiple
courses. Press and
Hold for 4 Seconds
to Check Battery
Signal and Adjust
Screen Contrast
Power Button
Press to Power Unit
On/O.
Page 9

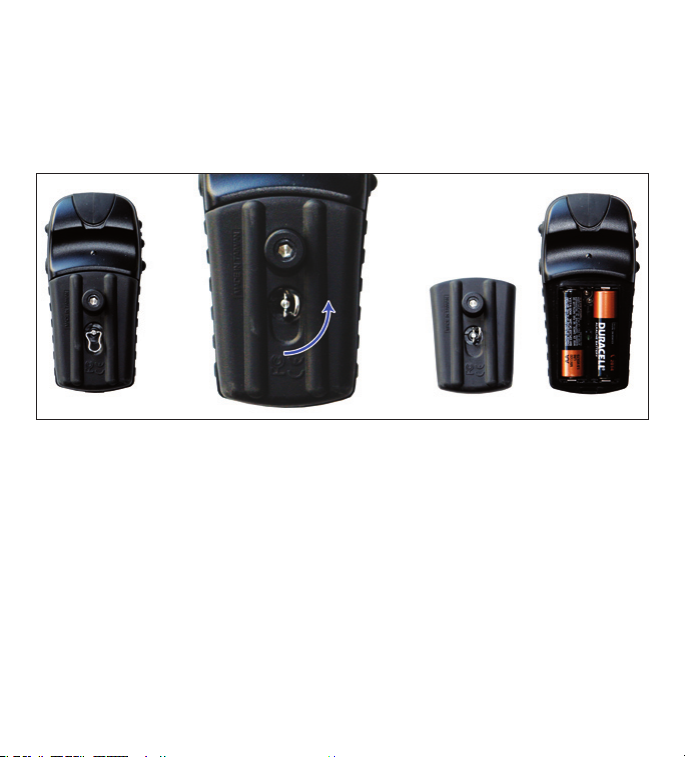
Chapter 1: Getting Started
Installing the Batteries
We highly recommend you use high quality AA batteries (Duracell, Energizer) which will
give you up to 22 hours (4-5 rounds of golf) of battery life. Always remember to turn o
the unit after each use to achieve the maximum battery life. Do not keep the unit on while
indoors as this will drain the battery life.
To install the batteries,
1. Remove the battery cover by turning the D-ring at the back of the unit ¼ turn counterclockwise to the vertical position then lift o the battery back cover.
2. Insert the batteries into position observing proper polarity.
3. To attach the battery cover, push down and turn the D-ring ¼ turn clockwise.
View diagram on page 10.
Power the GolfLogix GPS on by pressing and holding the Power button.
You will need to have your GolfLogix GPS powered ON and plugged into your computer to
complete the registration and activation process when using the device for the rst time.
Page 10
Page 11

Chapter 2: Installing the Course Manager Software
System Requirements
Windows
Operating Systems
Windows 2000
Windows XP
Windows Vista
Minimum Hardware
500 MHz Pentium class processor or better
256 MB RAM or greater
USB Connection
Internet Connection
Mac
Operating Systems
Mac OS X 10.4 (Tiger)
Mac OS X 10.5 (Leopard)
Minimum Hardware
Macintosh computer with an Intel x86 or PowerPC G3, G4, or G5 processor
256 MB RAM or greater
USB Connection
Internet Connection
Page 12
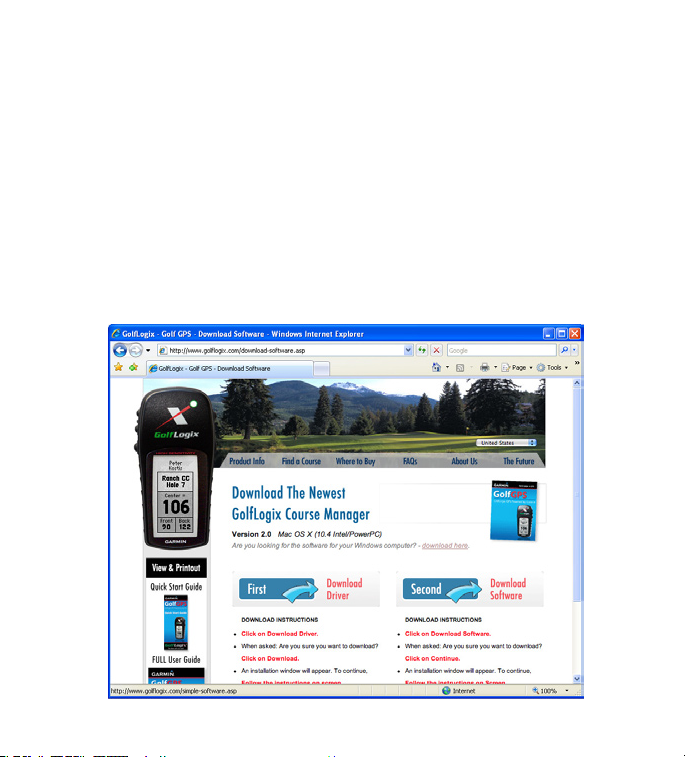
Installing the USB-to-Serial Driver
To get started,
• Make sure you are connected to the Internet.
• Open your Internet browser to download the latest GolfLogix software to your computer.
• Goto: http://www.gologix.com/download and click on the Download Software
link form the homepage.
• Click on Download Driver and follow steps on website.
When ask if you want to “Run” or “Save” this le Click Run
When ask “The publisher could not be veried, are you sure you want to run?” Click Run
An installation window will appear, to continue Click Next
To complete installation process Click Finish
Page 13

Installing the Course Manager Software
The GolfLogix Course Manager software is used to search, select and download golf course
maps to your computer and then load them onto your GolfLogix GPS unit. You can download your rst golf course for free or choose the $29.95 annual membership to download
unlimited worldwide golf course maps.
To get started,
• Once the driver is installed, click on Download Software and follow steps on website.
When ask if you want to “Run” or “Save” this le Click Run
When ask “The publisher could not be veried, are you sure you want to run?” Click Run
An installation window will appear, to continue Click OK
On Welcome to GolfLogix Course Manager install screen Click Next
On the Select Destination Location for install screen Click Next
On the Ready to Install Screen Click Install
To complete installation process Click Finish
Once Course Manager installation is complete,
• Open the GolfLogix Course Manager
Start Menu > Programs > GolfLogix > GolfLogix Course
• Read and scroll through the License and Warranty Agreement. Click on Accept at the
bottom to agree and continue.
IMPORTANT : TO CONTINUE TO THE REGISTRATION STEP YOU MUST CONNECT AND POWER
ON YOUR UNIT. PLEASE SEE PAGE 14 FOR INSTRUCTIONS ON CONNECTING YOUR UNIT.
Page 14

Connecting GolfLogix GPS to Your Computer
Follow the on-screen instructions to connect your GolfLogix GPS to your Computer with the
download cables included in the package.
• Ensure that there are batteries in your GolfLogix GPS unit. (See Page 10)
• Insert the end of the black serial cord into the back of your GolfLogix GPS unit. (The
connection is located by lifting the black rubber tab on the top-back of the GPS unit).
Make sure the grooves on the cord connector slide rmly into the connection on the
unit. When correctly installed this connection should feel very tight.
• Insert the end of the USB cord into your computer’s available USB port.
• Power your GolfLogix GPS on by pressing and holding the Power button.
Page 15

Registering Your GolfLogix GPS
• Double-click the GolfLogix icon on your desktop if the software is not already open.
• Read the License and Warranty information. Scroll to the bottom and click Accept.
• Ensure that GolfLogix GPS is powered on and it is plugged into the black serial cable
and the USB Port on your computer (See Page 14 for Help)
If the GolfLogix GPS is connected properly your screen should automatically
advance to the password selection screen below. If it does not advance please follow the instructions in the trouble-shooting video.
• You are asked to create a password to manage your account. Complete the password
screen and click Submit.
• Complete the registration form that appears on your computer screen and click Submit.
Page 16

Trouble Shooting the Connection Between Your Unit and Computer
If your GolfLogix Course Manager will not move to the Registration form when you
connect your GolfLogix GPS then use the following troubleshooting steps. The following steps are also outlined in the video available on the “Connect Your GPS” screen.
Step 1 : Double check all connections and make sure GolfLogix GPS is powered on.
Step 2 : Plug your unit into another available USB Port on your computer. After plugging
in to a new port wait for a few seconds to see if the Course Manager advances to the
Registration Screen. If still unsuccessful try Step 3
Step 3 : Re-install the USB to Serial Driver. Use link at http://www.gologix.com/download.
• Ensure GolfLogix GPS is unplugged from your computer.
• Click on Download Driver and follow steps on website.
When ask if you want to “Run” or “Save” this le Click Run
When ask “The publisher could not be veried, are you sure you want to run?” Click Run
You may be asked if you’d like to “Re-install”. Click Re-install
Note : After a re-install you will be ask to re-boot your computer.
An installation window will appear, to continue Click Next then Click Finish
• Open Course Manager and continue to USB Connection screen
• Securely plug in your GolfLogix GPS and power on. Wait for a few seconds to see if the
Course Manager advances the to the Registration Screen.
Step 4 : If you are still unsuccessful then try the new hardware found wizard.
• If Windows pops up the “New Hardware Found Wizard” when you connect your unit try
using the Wizard: 1) Select Auto-Detect driver, 2) If Prolic driver is found click Next,
3) When Wizard is nished try again to advance to the Registration screen.
Step 5 : If you are still unsuccessful then you may want to try the device on another
computer.
If you are still having trouble connecting your unit you may contact our Customer Service
department using www.gologix.com/support or calling 1-877-977-0162
Page 17

Activate your GolfLogix Membership
• To activate your GolfLogix membership, complete the Membership screen selecting
Option A or Option B.
Note: If your registration address is the same as your billing address, click on the box
that says same as registration data. If not please ll in your credit card billing address
for the annual membership.
• Click Submit to activate your GolfLogix membership.
Page 18

Upgrading Your GolfLogix Software
Occasionally GolfLogix will provide free upgrades for Course Manager software and for the
GolfLogix GPS unit. You will be notied when a new version of the software is available.
When you open the course manager software you will receive a message that says new
GolfLogix software is available and needs to be installed. If you receive this message simply
click OK and the new software will install automatically.
If the software update includes an update to the GPS unit itself you will be notied when
you attempt to load courses. Before your courses load the GPS Unit will automatically install
the newest update. This process will happen automatically and shouldn’t require any additional work on your part.
If you receive a software update make sure you check the User Guide for information about
new features included in the current software release.
Page 19

Chapter 3: Downloading Courses to GolfLogix GPS
Opening the Application
Double-click the GolfLogix desktop icon to start the GolfLogix Course Manager
software that has been loaded on your PC.
(Start Menu > Programs > GolfLogix > GolfLogix Course)
The main screen of the GolfLogix Course Manager always shows the easy steps to download
courses. Search, Load, Play…It’s that Easy!
Page 20

Search & Save Courses to Your Computer
• To Search for a golf course map rst ensure that you are connected to the Internet and
then click Search.
• Start by selecting a country and lter the list by selecting a state and a city. You can
also type in a golf course name.
• Your results will automatically appear as you select criteria.
• Click on the course name that you want to download. When the course name is se-
lected, it will be highlighted and have a check mark.
• Click Select to save the selected course on your personal computer.
Page 21

• Once the course has been saved you will see a pop-up box letting you know your
course is available for loading to your GolfLogix GPS.
• You may now search and save more courses if you have the unlimited membership or
you can load saved courses onto your GolfLogix GPS.
Note: If the course you selected appears in gray text then it is not currently available
in our database. If you select the course then you will be prompted to request that the
course be mapped using our Request a Course form. Continue to the next page of the
User Guide for more information on Requesting a Course
Page 22

Request Unavailable Golf Courses
To request that a course be mapped simply search for the course using our search form. If
the course name appears in gray then it is currently unmapped. Click the course name to
continue to the Course Request form.
If the golf course map you are looking for does not appear in the search results, press the
Request a Course Button from the search page and ll-out the golf course information. You
can also click on Help to access the Request a Course form.
We will email you as soon as the golf course map you have requested becomes available.
Typically, new golf course maps can be created within 14 business days.
Page 23

Receiving Course Map Updates
When a new version of a golf course map becomes available, the new version of the course
will be automatically downloaded to your computer.
If you have created any user modied courses these courses will not be over-written by
course updates.
You will receive any available course updates as soon as you open your Course Manager
software.
Page 24

Load Courses on Your GolfLogix GPS
• Ensure that the USB cord is plugged into your computer and also attached to your
GolfLogix GPS.
• Press and hold the Power button to turn on your GolfLogix GPS.
• Double-click on the GolfLogix icon to run the GolfLogix software, if it is not already
running.
• Click Load to see your list of saved courses. Click on courses you wish to load on your
GolfLogix GPS. You will see each selected course show up in your loading area on the
right side of the screen.
Page 25

GolfLogix GPS-8 (black unit) can hold up to 20 courses at a time.
GolfLogix GPS (green unit) can hold 10 courses.
• Once you are done selecting courses Click Load
Note: The selected courses will replace all courses currently loaded on your GolfLogix
GPS. If you want some of the same courses on the unit, you will have to reload them
• You will see a pop-up progress bar on the screen during the loading process.
• Do not press any buttons on your GolfLogix GPS while loading.
• A pop-up screen will notify you that the loading process is complete and the Course
Manager software will automatically turn o your GolfLogix GPS.
Helpful Tips
• Loading courses requires a fully charged battery. Please check batteries before loading.
See page 29 for checking battery power.
• If your download progress bar only makes it partially through the download and
seems to stop/disconnect then try applying pressure with your thumb to the black serial connection on your unit. Applying pressure for the duration of the load may x the
connection issues.
with the new batch of courses.
Page 26

Chapter 4: Playing Golf with your GolfLogix GPS
Button Descriptions
• Press the Power button to turn on your GolfLogix GPS 5-10 minutes prior to starting
your round so that the system can locate satellites. Note: GolfLogix GPS must have a
clear view of the sky at all times to obtain and sustain satellite connections.
• Use the Page button to move to the course you will be playing. Use the Up/Down Ar-
row buttons to advance to the hole that you will be playing rst.
• GolfLogix GPS-8 will automatically recognize the course you are on. If there are multiple courses at the location, you can manually search through the courses by pressing
the Page button.
• During your round, GolfLogix GPS will automatically advance to the next hazard
and hole. At any time you can use the Up/Down Arrow buttons to manually scroll to
another distance point if you desire.
• After you complete your round, remember to turn o the GolfLogix GPS to prolong the
battery life.
Up/Down Buttons
Enter Button
Page Button
Power Button
Page 27

Acquiring GPS Signals
Press the Power button to turn ON the GolfLogix GPS unit 5 - 10 minutes prior to starting
your round so that the system can locate satellites. This must be done outdoors with a clear
view of the sky.
Do not carry GolfLogix in your pocket or turn it on and o during your round. The GPS
antenna in the unit requires a clear view of the sky at all times to maintain satellite links.
If the unit screen locks up, simply turn it o and on again to correct the problem.
Distance of Last Shot (GolfLogix GPS-8 Only)
GolfLogix GPS-8 is equipped to capture the distance of your last shot. After viewing the
yardage screen, press the Enter button to go to the shot distance screen. Take your shot.
The distances on the screen will change as you approach the landing location of your golf
ball. Press Enter again to return to the yardage screen.
Page 28

Screen Descriptions: Green Screen
Personalized Name
Golf Course Name
Distance to the
Center of the Green
Distance to the Front
Edge of the Green
Screen Descriptions: Hazard Screen
Personalized Name
Name of the Closest
Hazard on the
current hole
Distance to the
Closest Hazard
on the Current Hole
Current Hole
Displayed
Distance to the Back
Edge of the Green
Name of the Second
Closest Hazard on the
Current Hole
Distance to the Second
Closest Hazard on the
Current Hole
Page 29

Tips During Your Round
GolfLogix will automatically advance to the next hole. However, you can manually
advance to any hole on the course by pressing the Up/Down Arrow buttons on the
top left of the unit.
Before using GolfLogix ensure that the AA batteries in the unit have adequate
power.
Do not store GolfLogix for more than 6 months with the alkaline batteries in the
battery compartment.
Press the Power button to turn ON the GolfLogix GPS unit 5 - 10 minutes prior to
starting your round so that the system can locate satellites.
Do not carry GolfLogix in your pocket or turn it on and o during your round. The
GPS antenna in the unit requires a clear view of the sky at all times to maintain
satellite links.
If the unit screen locks up, simply turn it o and on again to correct the problem.
Checking Battery Power
To check the battery power level,
1. Press and hold the Page button for 4-5 seconds. The Menu Screen will appear.
2. At the bottom left corner of the menu screen you will see the battery power level icon. If
the shaded area in the battery icon is low, replace both AA batteries before your next round.
3. Press the Page Button again to return to the main golf course screens to play golf.
Page 30

Adjusting Contrast
The contrast on your screen can be adjusted manually for your optimum viewing. To do so:
1. Press and hold the Page button for 4-5 seconds. The Menu Screen will appear.
2. Press the Down Arrow to highlight the Display screen and then press the Enter button. A
screen showing Contrast levels and Light Timeout will appear.
3. Press the Down Arrow to highlight the Contrast bar. Press the Up Arrow button to Darken
the screen contrast. Press the Down Arrow button to Lighten the screen contrast.
4. Press the Page Button again to save your screen contrast settings and return to the Menu
Screen.
5. Press the Page Button again to return to the main golf course screens to play golf.
Note: When new golf courses are loaded onto your GolfLogix GPS, the contrast may convert
to the factory default and need to be readjusted for your desired viewing.
Switching From Yards to Meters
To switch your distances from Yards to Meters,
Press and hold the Page button for 4-5 seconds. The Menu Screen will appear.
1. Press the Down Arrow button to highlight the Yards screen and then press the Enter but-
ton to switch back and forth from Yards to Meters.
2. Press the Page Button again to return to the main golf course screens to play golf.
Page 31

Other Menu Items
Press and hold the Page button for 4-5 seconds. The Menu Screen will appear.
The Time selection allows you to set the time format and zone for your unit. This is not
necessary for proper GPS operation.
Please do not chose the System Selection. The Battery Save and Demo modes under this
selection will turn o your GPS signal.
Purchase Accessories
Visit www.GolfLogix.com to view and order all of the accessories available for your
GolfLogix GPS.
Customer Service and Support
For technical support or the latest updates and accessories:
Email us at support@gologix.com
or visit www.gologix.com/support
or call 1-877-977-0162
Page 32

Chapter 5: Using the Help Section
To access GolfLogix Course Manager Help click the red Help button in the upper right hand
corner. The Help Sections contains three sub-sections: The User Guide, Course Help, and
GolfLogix Contact Information. The Help Section also contains a comprehensive list of Fre-
quently Asked Questions. If you don’t nd the answer you are looking for in this User Guide
make sure to view our list of FAQ’s.
Click Here to View all FAQ’s
Page 33

Request a Course
If the golf course map you are looking for is not available, press the Request a Course Button
and ll-out the golf course information. (See page 20)
We will email you as soon as the golf course map you have requested becomes available.
Typically, new golf course maps can be created within 5-7 business days.
Improve Course Accuracy
GolfLogix is committed to providing you with the most accurate golf course map available.
Course Markings you see on the golf course may dier from GolfLogix for many reasons.
For instance, because all greens are irregular shapes, the GolfLogix mapping professional
may have picked a dierent center of green point than the golf course chose when they
originally installed their course markings.
To learn more about GPS accuracy please click the Tips for Accurate GPS link on the Course
Accuracy screen in the Course Manager.
If you still nd that GPS positions on the course are inaccurate, we encourage you to participate in the GolfLogix community and submit a correction for your course.
The course adjustment process involves printing a form from the Course Adjustment Form
and lling it in as you play golf. The form contains instructions on what numbers are needed.
After the form is complete you can return to the Course Manager, select Improve Course
Accuracy, and select your course. When the following screen appears simply follow the
instructions to enter in the course data from your printed form.
Page 34

Improve Course Accuracy Cont.
Once the form is completed click the Submit button. An updated version of the course will
be stored on your computer and will be available on your courses list as a “User Modied”
course.
Page 35

Adjust Hole Order
On rare occasions a GolfLogix map will contain holes that are out of order. Sometimes these
discrepancies occur because golf courses change and consolidate holes.
Use this form to let us know if your course has the wrong hole order. After clicking on Adjust
Hole Order simply select the course from your list of loaded courses. A form will appear with
your course information pre-lled. Complete the form by giving us as much information
about the proper hole order as possible. When you are nished click the Submit button.
Typically we can make adjustments to the course in 5-7 business days. After the course is
adjusted a new version of the course will be automatically downloaded to your computer
the next time you open the GolfLogix Course Manager.
Change Course Name
If your course has recently changed names then you can use this form to provide an updated course name.
After clicking on Change Course Name simply select the course from your list of loaded
courses. A form will appear with your course information pre-lled. Complete the form by
giving us information about the new course name. When you are nished, click the Submit
button. Typically we can change the course name in 5-7 business days. After the course
name is changed a new version of the course will by automatically downloaded to your
computer the next time you open the GolfLogix Course Manager.
Page 36

Chapter 6: License and Warranty Information
Product Use Agreement
Please read carefully the License Agreement below before using this product.
This is a consumer, non-exclusive license for your use only with the GolfLogix software and
operating system software, intellectual properties, internet web site access and le downloads, and documentation and modications, updates, revisions or enhancements received
by you from Licensor or its authorized dealers, collectively know as the (“Products”).
WARNING! PROCEEDING WITH THE USE FOR THE INSTALLATION OF THE PRODUCTS INDICATES YOUR ACCEPTANCE OF THE LICENSING TERMS. IF YOU DO NOT AGREE WITH THESE
TERMS, YOU SHOULD CANCEL THE USE OF AND/OR THE INSTALLATIONS PROCESS AND
RETURN THE PACKAGE TO THE POINT OF PURCHASE WITH A DATED RECEIPT WITHIN THIRTY
(30) DAYS TO APPLY FOR A REFUND.
If you purchased the Products directly from GolfLogix, Inc. via the Licensor’s internet website, then you should contact the Customer Service department at support@gologix.com
to apply for and arrange for a refund of your purchase.
Page 37

Software License Agreement
IMPORTANT! BY USING GOLFLOGIX GPS, YOU AGREE TO BE BOUND BY THE TERMS AND
CONDITIONS OF THE FOLLOWING SOFTWARE LICENSE AGREEMENT. PLEASE READ THIS
AGREEMENT CAREFULLY.
GolfLogix grants you limited license to use the software embedded in the GPS device (the
“Product) and the software included in CD packaging (collectively the “Software”) in binary
executable form in the normal operation of the Product. Title, ownership rights and intellectual property rights in and to the Software remain in GolfLogix.
You acknowledge that the Software is the property of GolfLogix and is protected under the
United States of America copyright laws and international copyright treaties. You further
acknowledge that the structure, organization and code of the Software are valuable trade
secrets of GolfLogix and that the Software in source code form remains a valuable trade
secret of GolfLogix. You agree not to sublicense, rent or lease any portion of the Software;
decompile, disassemble, modify, reverse assemble, reverse engineer or reduce to human
readable form the Software of any country in violation of the export control laws of the
United States of America.
This license will automatically terminate if you fail to comply with any provision of this
Agreement. Upon termination the Product and Software must be returned to GolfLogix
at your expense, or destroyed, together with all copies and merged portions in any form,
including any original or copy of the computer memory, on a hard disk, or stored on any
other media.
Page 38

Consumer Limited Warranty for GolfLogix, Inc. Products and Components
The GolfLogix product is warranted to be free from defects in materials or workmanship for
one year from the date of purchase. Within this period, GolfLogix will at its sole option, repair or replace any components that fail in normal use. Such repairs or replacement will be
made at no charge to the customer for parts and labor. This warranty does not cover failures
due to abuse, misuse, accident or unauthorized alteration or repairs.
IN NO EVENT SHALL GOLFLOGIX BE LIABLE FOR ANY INCIDENTAL, SPECIAL, INDIRECT OR
CONSEQUENTIAL DAMAGES, WHETHER RESULTING FROM THE USE, MISUSE, OR INABILITY
TO USE THIS PRODUCT OR FROM DEFECTS IN THE PRODUCT. Some states do not allow the
exclusion of incidental or consequential damages, so the above limitations may not apply
to you.
GolfLogix retains the exclusive right to repair or replace the unit or software or oer a full
refund of the purchase price at its sole discretion. SUCH REMEDY SHALL BE YOUR SOLE AND
EXCLUSIVE REMEDY FOR ANY BREACH OF WARRANTY.
To obtain warranty service, call GolfLogix or visit the website at www.gologix.com for
warranty address and instructions. The unit should be securely packed and sent, freight
charges prepaid, to any GolfLogix warranty service station. A copy of the original receipt is
required as the proof of purchase for warranty repairs. Online auction conrmations are not
accepted for warranty verication. GolfLogix will not replace missing components from any
package purchased through an online auction. To obtain warranty service, an original or
copy of the sales receipt from the original retailer is required.
 Loading...