

Garmin fēnix User Manual
fēnix™ Quick Start Manual
WARNING
See the Important Safety and Product Information guide in the
product box for product warnings and other important
information.
WARNING
Always consult your physician before you begin or modify any
exercise program.
Getting Started
When using your device the first time, you should complete
these tasks to set up the device and get to know the basic
features.
Charge the device (page 1).
1
Register the device (page 4).
2
Learn about the sensor data and modes (page 1).
3
Acquire satellites (page 2).
4
Go for a hike (page 2).
5
Create a waypoint (page 2).
6
Get the owner's manual (page 3).
7
Charging the Device
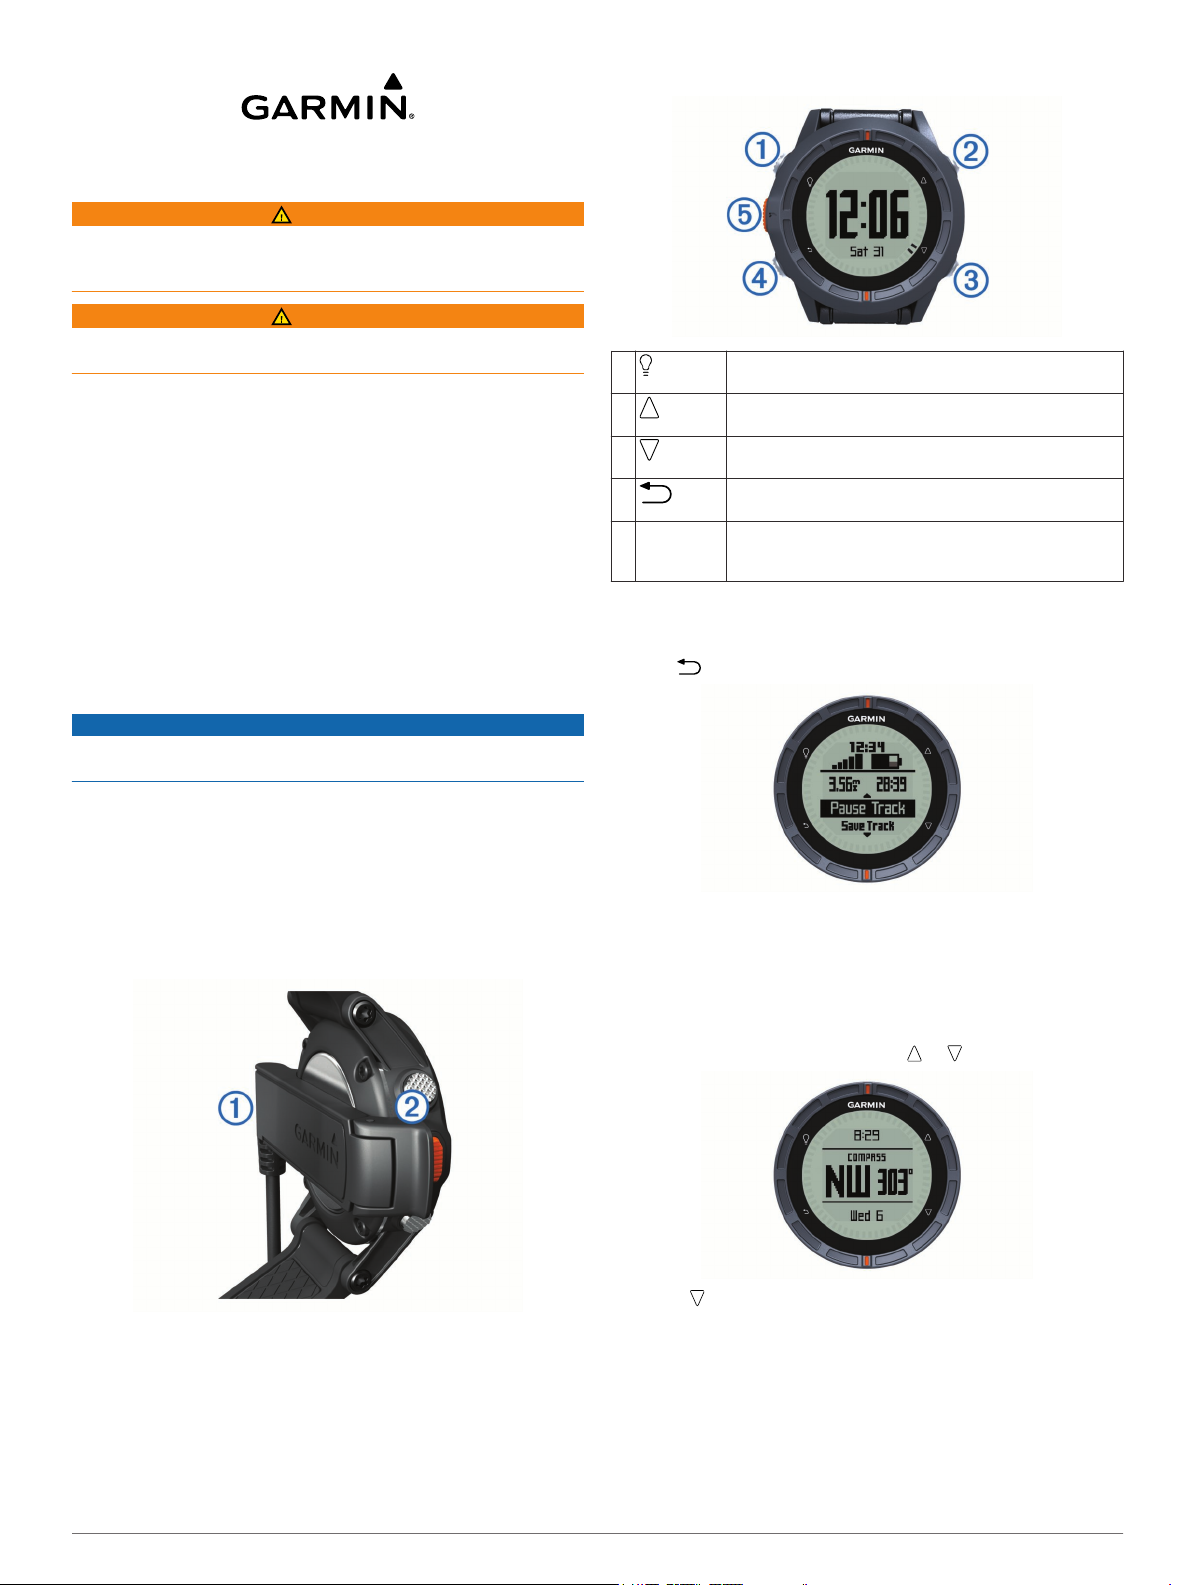
Keys
À
Á
Â
Ã
Orange key Select to open the menu for the current screen. Select
Ä
Viewing the Status Page
You can quickly switch to this page to view the time of day,
battery life, and GPS status information from any other page.
Hold .
Select to turn the backlight on and off. Hold to turn the
device on and off.
Select to scroll through the data pages, options, and
settings.
Select to scroll through the data pages, options, and
settings.
Select to return to the previous screen. Hold to view
the status page.
to choose an option and to acknowledge a message.
Hold to mark a waypoint.
NOTICE
To prevent corrosion, thoroughly dry the contacts and the
surrounding area before charging or connecting to a computer.
The device is powered by a built-in lithium-ion battery that you
can charge using a standard wall outlet or a USB port on your
computer.
Plug the USB end of the cable into the AC adapter or a
1
computer USB port.
Plug the AC adapter into a standard wall outlet.
2
Align the left side of the charging cradle À with the groove on
3
the left side of the device.
Align the hinged side of the charger Á with the contacts on
4
the back of the device.
When you connect the device to a power source, the device
turns on.
Charge the device completely.
5
Viewing the Sensor Data
You can quickly access real-time data for the compass,
altimeter, barometer, and temperature sensors.
NOTE: These data pages automatically time out to low-power
mode.
NOTE: This data is not recorded to the device (page 2).
From the time of day page, select or .
1
Select .
2
May 2013
190-01507-01_0D Printed in Taiwan

Select .
3
Select .
4
NOTE: Your body temperature affects the temperature
sensor. To get the most accurate temperature reading,
remove the device from your wrist and wait 20–30 minutes.
TIP: To purchase a tempe™ wireless temperature sensor, go
to www.garmin.com. See the owner's manual for more
information.
Turning on a Sensor Mode
The default sensor mode is on demand mode, which offers you
quick access to compass, altimeter, barometer, or temperature
data. You can also put the device in always on mode to display
continuous sensor data.
NOTE: If you have an optional heart rate monitor or speed and
cadence sensor paired with the device, your device can display
continuous heart rate or speed and cadence data.
Select the Orange key.
1
Select Setup > Sensors > Mode > Always On.
2
Acquiring Satellite Signals and Recording a Track
Before you can use the GPS navigation features, such as
recording a track, you must acquire satellite signals.
The device may need a clear view of the sky to acquire satellite
signals. The time and date are set automatically based on the
GPS position.
Hold to turn on the device.
1
Select your language (first time only).
2
Select the Orange key.
3
Select Start GPS.
4
Wait while the device locates satellites.
5
Walk around to record a track.
6
Your distance and time appear.
Select to view the loop of data pages including compass
7
data, altimeter data, ascent and speed, the map, and the
time of day page.
You can customize some data pages. See the owner's
manual (page 3).
Hold .
8
Select an option:
9
• Select Pause Track to pause tracking.
• Select Save Track to save your track.
• Select Clear Track to erase the track without saving.
• Select Stop GPS to turn off GPS without deleting your
track.
Stopping GPS
Select the Orange key.
1
Select Stop GPS.
2
Tracks
A track is a recording of your path. The track log contains
information about points along the recorded path, including
time, location, and elevation for each point.
Going for a Hike
Before you go for a hike, you should charge the device
completely (page 1).
NOTE: The device turns on automatically while charging. If you
do not charge the device before going for a hike, hold to turn
on the device.
Select the Orange key.
1
Select Start GPS.
2
Wait while the device locates satellites.
3
Start hiking.
4
When you want to take a break or pause the device from
5
tracking, hold > Pause Track.
Hold > Resume Track, and continue hiking.
6
When finished, hold > Save Track to save your hiking
7
data.
If necessary, select Yes to stop GPS.
8
Sending Your Hike to BaseCamp™
Before you can send data to BaseCamp, you must download
BaseCamp to your computer (www.garmin.com/basecamp).
You can view your hike, other tracks, and waypoints on your
computer.
Connect your device to your computer using the USB cable.
1
Your device appears as a removable drive in My Computer
on Windows® computers and as a mounted volume on Mac
computers.
Start BaseCamp.
2
Follow the on-screen instructions.
3
Waypoints
Waypoints are locations you record and store in the device.
Creating a Waypoint
You can save your current location as a waypoint.
Hold the Orange key.
1
Select an option:
2
• To save the waypoint without changes, select Save.
• To make changes to the waypoint, select Edit, make
changes to the waypoint, and select Save.
Navigating to a Waypoint
Select the Orange key.
1
®
2
 Loading...