

Page 1
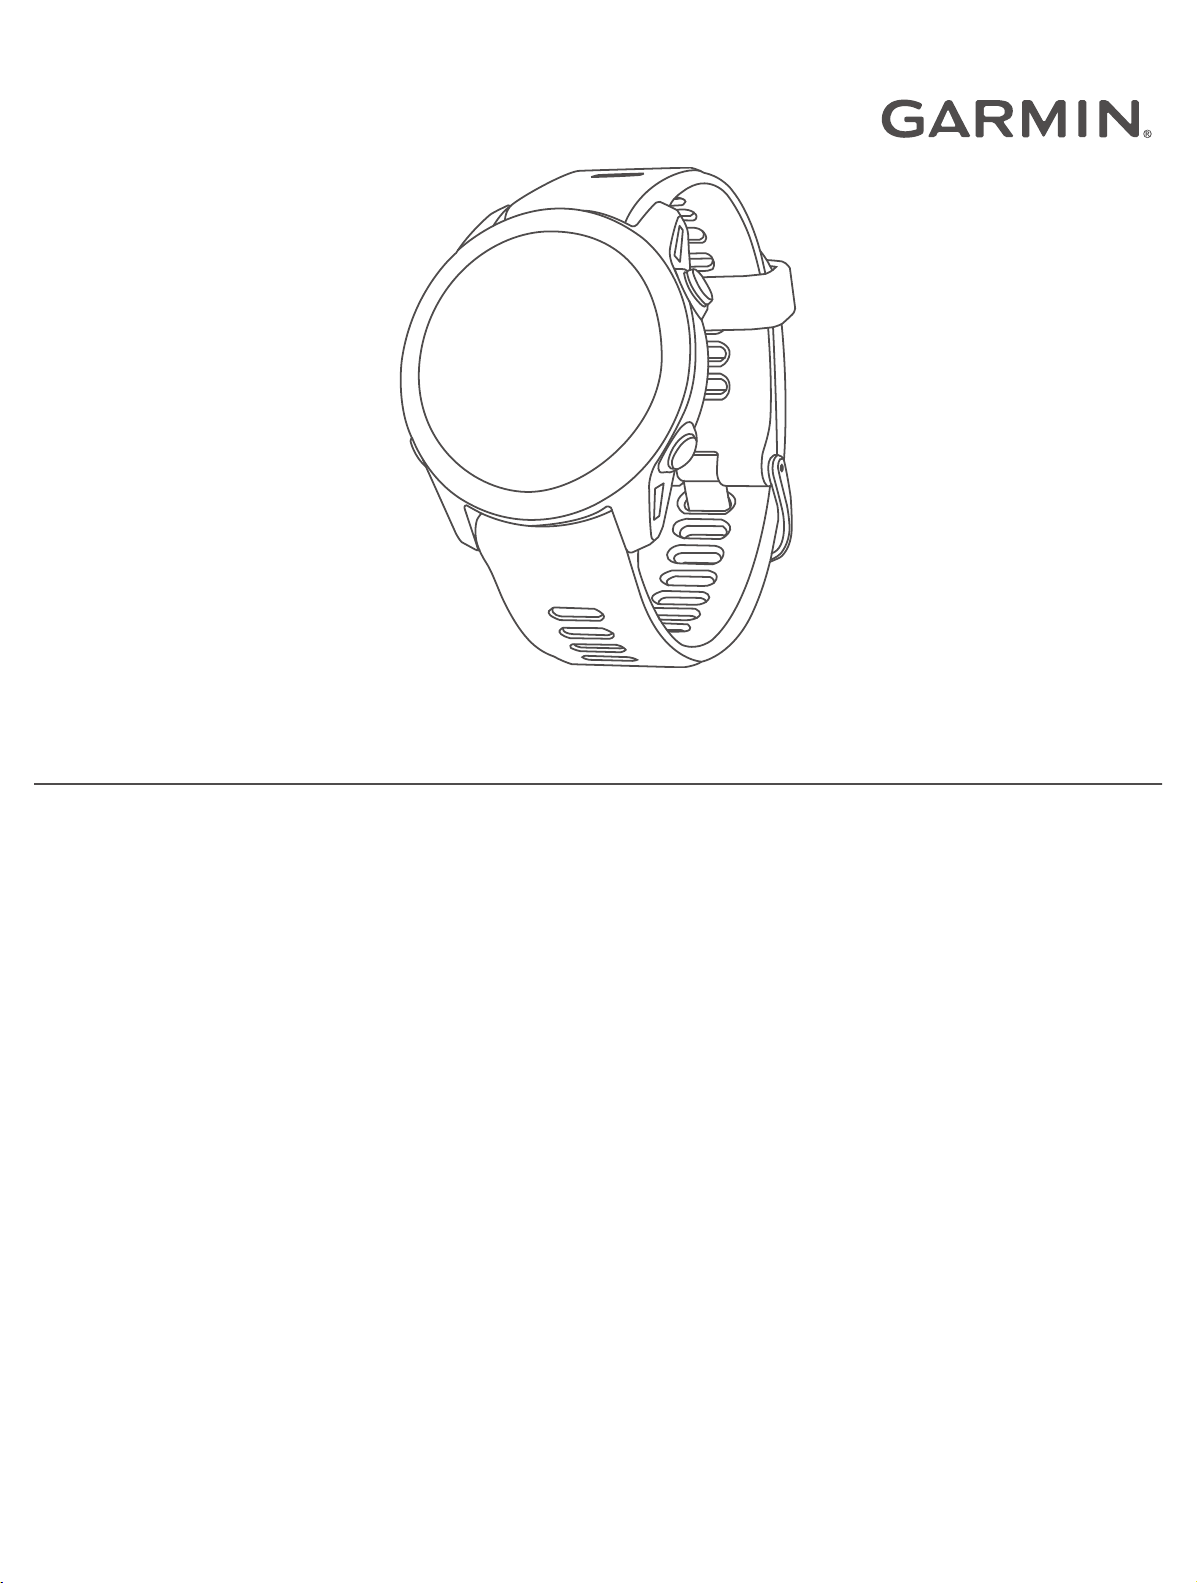
FORERUNNER® 955
Owner’s Manual
Page 2

© 2022 Garmin Ltd. or its subsidiaries
All rights reserved. Under the copyright laws, this manual may not be copied, in whole or in part, without the written consent of Garmin. Garmin reserves the right to change or
improve its products and to make changes in the content of this manual without obligation to notify any person or organization of such changes or improvements. Go to
www.garmin.com for current updates and supplemental information concerning the use of this product.
Garmin®, the Garmin logo, ANT+®, Approach®, Auto Lap®, Auto Pause®, Edge®, Forerunner®, inReach®, QuickFit®, TracBack®, VIRB®, and Virtual Partner® are trademarks of Garmin Ltd.
or its subsidiaries, registered in the USA and other countries. Body Battery™, Connect IQ™, Firstbeat Analytics™, Garmin Connect™, Garmin Express™, Garmin Golf™, Garmin Index™,
Garmin Move IQ™, Garmin Pay™, Health Snapshot™, HRM-Dual™, HRM-Run™, HRM-Pro™, HRM-Swim™, HRM-Tri™, Rally™, tempe™, TrueUp™, Varia™, and Vector™ are trademarks of
Garmin Ltd. or its subsidiaries. These trademarks may not be used without the express permission of Garmin.
Android™ is a trademark of Google Inc. Apple®, iPhone®, iTunes®, and Mac® are trademarks of Apple Inc., registered in the U.S. and other countries. The BLUETOOTH® word mark and
logos are owned by the Bluetooth SIG, Inc. and any use of such marks by Garmin is under license. The Cooper Institute®, as well as any related trademarks, are the property of The
Cooper Institute. Advance heartbeat analytics by Firstbeat. iOS® is a registered trademark of Cisco Systems, Inc. used under license by Apple Inc. Di2™ is a trademark of Shimano,
Inc. Shimano® is a registered trademark of Shimano, Inc. STRAVA and Strava™ are trademarks of Strava, Inc. Training Stress Score™ (TSS), Intensity Factor™ (IF), and Normalized
Power™ (NP) are trademarks of Peaksware, LLC.Wi‑Fi® is a registered mark of Wi-Fi Alliance Corporation. Windows® and Windows NT® are registered trademarks of Microsoft
Corporation in the United States and other countries. Zwift™ is a trademark of Zwift, Inc. Other trademarks and trade names are those of their respective owners.
This product is ANT+® certified. Visit www.thisisant.com/directory for a list of compatible products and apps.
M/N: A04244
Page 3
Table of Contents
Introduction......................................1
Setting Up Your Watch............................ 1
Overview.................................................. 1
GPS Status and Status Icons................. 2
Enabling and Disabling the
Touchscreen............................................ 2
Using the Watch...................................... 3
Activities and Apps...........................3
Starting an Activity.................................. 3
Tips for Recording Activities.............. 3
Stopping an Activity................................ 4
Evaluating an Activity.............................. 4
Outdoor Activities....................................4
Going for a Run.................................... 5
Going for a Track Run......................... 6
Tips for Recording a Track Run...... 6
Recording an Ultra Run Activity.......... 6
Triathlon Training................................ 7
Creating a Multisport Activity............. 7
Using an eBike..................................... 7
Viewing Your Ski Runs........................ 7
Recording a Backcountry Skiing
Activity..................................................8
Cross-Country Skiing Power Data...... 8
Recording a Bouldering Activity......... 8
Swimming................................................ 9
Swimming in Open Water................... 9
Going for a Pool Swim........................ 9
Tips for Swimming Activities.............. 9
Swim Terminology............................ 10
Stroke Types...................................... 10
Auto Rest and Manual Rest.............. 10
Training with the Drill Log................. 10
Indoor Activities.................................... 11
Going for a Virtual Run...................... 11
Calibrating the Treadmill Distance... 11
Health Snapshot™............................. 11
Recording a Strength Training
Activity............................................... 12
Tips for Recording Strength Training
Activities.........................................12
Recording a HIIT Activity.................. 13
HIIT Timers.................................... 13
Using an ANT+® Indoor Trainer....... 13
Recording an Indoor Climbing
Activity............................................... 14
Golfing................................................... 14
Playing Golf........................................14
Hole Information............................... 15
Moving the Flag................................. 15
Viewing Measured Shots.................. 16
Manually Measuring a Shot.......... 16
Viewing Layup and Dogleg
Distances........................................... 16
Club Sensors......................................16
Keeping Score................................... 16
Updating a Score........................... 17
Setting the Scoring Method.......... 17
Setting Your Handicap.................. 17
Enabling Statistics Tracking......... 17
Using the Golf Odometer.................. 18
Viewing the Direction to the Pin....... 18
Customizing Activities and Apps......... 18
Adding or Removing a Favorite
Activity............................................... 18
Changing the Order of an Activity in
the Apps List...................................... 18
Creating a Custom Activity............... 19
Appearance.................................... 19
Watch Face Settings............................. 19
Customizing the Watch Face............19
Glances.................................................. 20
Viewing the Glance Loop.................. 22
Customizing the Glance Loop.......... 22
Body Battery...................................... 22
Viewing the Body Battery
Glance............................................ 23
Tips for Improved Body Battery
Data................................................ 23
Viewing the Heart Rate Glance......... 24
Viewing the Weather Glance.............24
Menstrual Cycle Tracking................. 24
Using the Stress Level Glance.......... 24
Performance Measurements............25
About VO2 Max. Estimates........... 26
Viewing Your Predicted Race
Times..............................................27
Heart Rate Variability Status.........28
Performance Condition................. 28
Getting Your FTP Estimate........... 29
Table of Contents i
Page 4
Lactate Threshold......................... 30
Viewing Your Real-Time
Stamina.......................................... 32
Syncing Activities and Performance
Measurements...............................32
Turning Off Performance
Notifications.................................. 33
Training Status.................................. 33
Training Status Levels................... 34
Acute Load..................................... 34
Training Readiness........................ 37
Recovery Time............................... 37
Heat and Altitude Performance
Acclimation.................................... 38
Pausing and Resuming Your
Training Status.............................. 38
Controls................................................. 39
Viewing the Controls Menu.............. 40
Customizing the Controls Menu.......41
Garmin Pay........................................ 41
Setting Up Your Garmin Pay
Wallet............................................. 41
Paying for a Purchase Using Your
Watch............................................. 41
Adding a Card to Your Garmin Pay
Wallet............................................. 42
Changing Your Garmin Pay
Passcode....................................... 42
Morning Report..................................... 42
Customizing Your Morning Report... 42
Training..........................................43
Training for a Race Event..................... 43
Race Calendar and Primary Race..... 43
Activity Tracking....................................43
Auto Goal........................................... 44
Using the Move Alert......................... 44
Turning on the Move Alert............ 44
Sleep Tracking................................... 44
Using Automated Sleep
Tracking......................................... 44
Using Do Not Disturb Mode.......... 45
Intensity Minutes............................... 45
Earning Intensity Minutes............. 45
Garmin Move IQ™.............................. 45
Activity Tracking Settings................. 45
Turning Off Activity Tracking........ 45
Workouts............................................... 46
Following a Workout From Garmin
Connect.............................................. 46
Creating a Custom Workout on Garmin
Connect.............................................. 46
Sending a Custom Workout to Your
Watch............................................. 46
Starting a Workout............................ 47
Following a Daily Suggested
Workout..............................................47
Turning Daily Suggested Workout
Prompts On and Off...................... 47
Following a Pool Swim Workout...... 48
Recording a Critical Swim Speed
Test.................................................48
Editing Your Critical Swim Speed
Result............................................. 48
Workout Execution Score................. 48
About the Training Calendar............. 49
Using Garmin Connect Training
Plans...............................................49
Adaptive Training Plans................ 49
Interval Workouts.................................. 49
Customizing an Interval Workout..... 50
Starting an Interval Workout............. 50
Stopping an Interval Workout........... 50
PacePro Training...................................50
Downloading a PacePro Plan from
Garmin Connect.................................51
Starting a PacePro Plan.................... 52
Stopping a PacePro Plan.................. 52
Creating a PacePro Plan on Your
Watch................................................. 53
Segments...............................................53
Strava™ Segments............................. 53
Viewing Segment Details.................. 53
Racing a Segment............................. 54
Setting a Segment to Adjust
Automatically.....................................54
Using Virtual Partner®.......................... 54
Setting a Training Target...................... 55
Cancelling a Training Target.............55
Racing a Previous Activity.................... 55
Using the Metronome........................... 56
Enabling Self Evaluation....................... 56
Extended Display Mode........................ 56
History........................................... 56
Using History......................................... 57
ii Table of Contents
Page 5
Multisport History................................. 57
Personal Records.................................. 57
Viewing Your Personal Records....... 57
Restoring a Personal Record............ 58
Clearing Personal Records............... 58
Viewing Data Totals.............................. 58
Viewing Your Time in Each Heart Rate
Zone....................................................... 58
Deleting History..................................... 58
Data Management................................ 58
Deleting Files..................................... 59
Heart Rate Features........................59
Wrist-based Heart Rate.........................59
Tips for Erratic Heart Rate Data....... 59
Turning Off the Wrist-based Heart
Rate Monitor...................................... 60
Heart Rate While Swimming.................60
Setting an Abnormal Heart Rate
Alert........................................................ 60
Broadcasting Heart Rate Data..............60
Broadcasting Heart Rate Data During an
Activity................................................... 61
Pulse Oximeter...................................... 62
Getting Pulse Oximeter Readings.... 63
Turning On Pulse Oximeter Sleep
Tracking............................................. 63
Turning On All-Day Mode.................. 63
Tips for Erratic Pulse Oximeter
Data.................................................... 63
Navigation...................................... 64
Courses.................................................. 64
Following a Course on Your
Device.................................................64
Creating a Round-Trip Course.......... 65
Creating a Course on Garmin
Connect.............................................. 65
Sending a Course to Your
Device............................................. 65
Viewing or Editing Course Details.... 66
Saving Your Location............................ 66
Viewing and Editing Your Saved
Locations........................................... 66
Navigating to a Destination.................. 66
Navigating to a Point of Interest.......... 67
Points of Interest............................... 67
Using ClimbPro..................................... 67
Marking and Starting Navigation to a
Man Overboard Location...................... 68
Navigating with Sight 'N Go.................. 68
Navigating to Your Starting Point During
an Activity.............................................. 68
Viewing Route Directions..................69
Stopping Navigation............................. 69
Map........................................................ 69
Viewing the Map................................ 69
Saving or Navigating to a Location on
the Map.............................................. 70
Navigating with the Around Me
Feature............................................... 70
Changing the Map Theme................ 71
Compass................................................71
Setting the Compass Heading..........71
Altimeter and Barometer...................... 71
Sensors and Accessories............... 71
Wireless Sensors...................................72
Pairing Your Wireless Sensors............. 73
Running Power...................................... 73
Running Dynamics................................ 74
Training with Running Dynamics......74
Color Gauges and Running Dynamics
Data.................................................... 76
Ground Contact Time Balance
Data................................................ 76
Vertical Oscillation and Vertical
Ratio Data...................................... 77
Tips for Missing Running Dynamics
Data.................................................... 77
Chest Heart Rate While Swimming...... 77
Using an Optional Bike Speed or
Cadence Sensor.................................... 77
Training with Power Meters................. 78
Cycling Dynamics.............................. 78
Using Electronic Shifters...................... 78
Situational Awareness.......................... 78
Using the Varia Camera Controls..... 78
tempe..................................................... 78
inReach Remote.................................... 78
Using the inReach Remote............... 79
VIRB Remote......................................... 79
Controlling a VIRB Action Camera... 79
Controlling a VIRB Action Camera
During an Activity.............................. 80
Table of Contents iii
Page 6
User Profile.................................... 80
Setting Up Your User Profile................. 80
Viewing Your Fitness Age................. 80
About Heart Rate Zones....................... 80
Fitness Goals..................................... 81
Setting Your Heart Rate Zones......... 81
Letting the Watch Set Your Heart Rate
Zones................................................. 81
Heart Rate Zone Calculations...........82
Setting Your Power Zones.................... 82
Detecting Performance Measurements
Automatically........................................ 82
Garmin Connect.................................89
Using the Garmin Connect App.... 89
Using Garmin Connect on Your
Computer....................................... 90
Manually Syncing Data with Garmin
Connect.......................................... 90
Connect IQ Features......................... 90
Downloading Connect IQ
Features......................................... 90
Downloading Connect IQ Features
Using Your Computer.................... 91
Garmin Golf™ App..............................91
Music............................................. 83
Downloading Personal Audio
Content.................................................. 83
Connecting to a Third-Party Provider...83
Downloading Audio Content from a
Third-Party Provider.......................... 83
Disconnecting from a Third-Party
Provider.............................................. 84
Connecting Bluetooth Headphones..... 84
Listening to Music.................................84
Music Playback Controls.................. 85
Controlling Music Playback on a
Connected Phone.............................. 85
Changing the Audio Mode................ 85
Connectivity................................... 86
Phone Connectivity Features............... 86
Pairing Your Phone............................86
Enabling Bluetooth Notifications..... 86
Viewing Notifications.................... 86
Receiving an Incoming Phone
Call..................................................87
Replying to a Text Message..........87
Managing Notifications.................87
Turning Off the Bluetooth Phone
Connection.........................................87
Turning On and Off Smartphone
Connection Alerts.............................. 87
Playing Audio Prompts During an
Activity............................................... 88
Wi‑Fi Connectivity Features.................. 88
Connecting to a Wi‑Fi Network......... 88
Phone Apps and Computer
Applications...........................................88
Safety and Tracking Features......... 91
Adding Emergency Contacts................ 91
Adding Contacts....................................91
Turning Incident Detection On and
Off.......................................................... 92
Requesting Assistance......................... 92
Live Event Sharing................................. 92
Turning On Live Event Sharing......... 92
Spectator Messaging............................ 92
Blocking Spectator Messages..........93
Starting a GroupTrack Session............ 93
Tips for GroupTrack Sessions.......... 93
GroupTrack Settings......................... 93
Clocks............................................ 94
Setting an Alarm....................................94
Deleting an Alarm.................................. 94
Using the Stopwatch............................. 95
Starting the Countdown Timer............. 95
Syncing the Time with GPS.................. 96
Setting the Time Manually.................... 96
Customizing Your Device................96
Activities and App Settings.................. 96
Customizing the Data Screens......... 98
Adding a Map to an Activity..............98
Activity Alerts.....................................99
Setting an Alert............................ 100
Activity Map Settings...................... 100
Routing Settings.............................. 100
Using ClimbPro................................101
Enabling Auto Climb........................101
GPS Settings....................................102
Sensors Settings................................. 102
iv Table of Contents
Page 7
Compass Settings........................... 102
Calibrating the Compass
Manually.......................................102
Setting the North Reference....... 102
Altimeter Settings........................... 103
Calibrating the Barometric
Altimeter...................................... 103
Barometer Settings......................... 103
Calibrating the Barometer...........103
Map Settings....................................... 104
Map Themes....................................104
Marine Map Settings....................... 104
Showing and Hiding Map Data....... 104
Navigation Settings.............................105
Customizing Navigation Data
Screens............................................ 105
Setting Up a Heading Bug............... 105
Setting Navigation Alerts................ 105
Power Manager Settings.................... 105
Customizing the Battery Saver
Feature............................................. 106
System Settings.................................. 106
Time Settings.................................. 107
Setting Time Alerts...................... 107
Changing the Screen Settings........ 107
Customizing the Hot Keys.............. 107
Changing the Units of Measure......108
Device Information....................... 108
Viewing Device Information............... 108
Viewing E-label Regulatory and
Compliance Information................. 108
Charging the Watch............................ 109
Tips for Solar Charging................... 109
Tips for Charging the Watch...........109
Wearing the Watch..............................110
Device Care......................................... 110
Cleaning the Watch......................... 110
Changing the Bands............................111
Specifications......................................113
Battery Life Information.................. 114
My daily step count does not
appear.............................................. 115
My step count does not seem
accurate........................................... 115
The step counts on my device and my
Garmin Connect account don't
match............................................... 115
The floors climbed amount does not
seem accurate................................. 115
My intensity minutes are flashing.. 115
Acquiring Satellite Signals..................116
Improving GPS Satellite Reception 116
Restarting the Watch.......................... 116
Resetting All Default Settings............ 116
Maximizing Battery Life...................... 117
My Device is in the Wrong Language.117
Is my phone compatible with my
watch?................................................. 117
My phone will not connect to the
watch................................................... 117
The temperature reading is not
accurate............................................... 118
How can I manually pair ANT+
sensors?.............................................. 118
Can I use my Bluetooth sensor with my
watch?................................................. 118
My headphones will not connect to the
watch................................................... 118
My music cuts out or my headphones
won't stay connected.......................... 119
Appendix...................................... 119
Data Fields...........................................119
VO2 Max. Standard Ratings............... 131
FTP Ratings......................................... 132
Wheel Size and Circumference.......... 133
Troubleshooting........................... 114
Product Updates................................. 114
Setting Up Garmin Express............. 114
Getting More Information................... 115
Activity Tracking................................. 115
Table of Contents v
Page 8

Page 9
Introduction
WARNING
See the Important Safety and Product Information guide in the product box for product warnings and other
important information.
Always consult your physician before you begin or modify any exercise program.
Setting Up Your Watch
To take full advantage of the Forerunner features, complete these tasks.
• Pair the Forerunner watch with your phone using the Garmin Connect™ app (Pairing Your Phone, page 86).
• Set up Wi‑Fi® networks (Connecting to a Wi‑Fi Network, page 88).
• Set up safety features (Safety and Tracking Features, page 91).
• Set up music (Music, page 83).
• Set up your Garmin Pay™ wallet (Setting Up Your Garmin Pay Wallet, page 41).
Overview
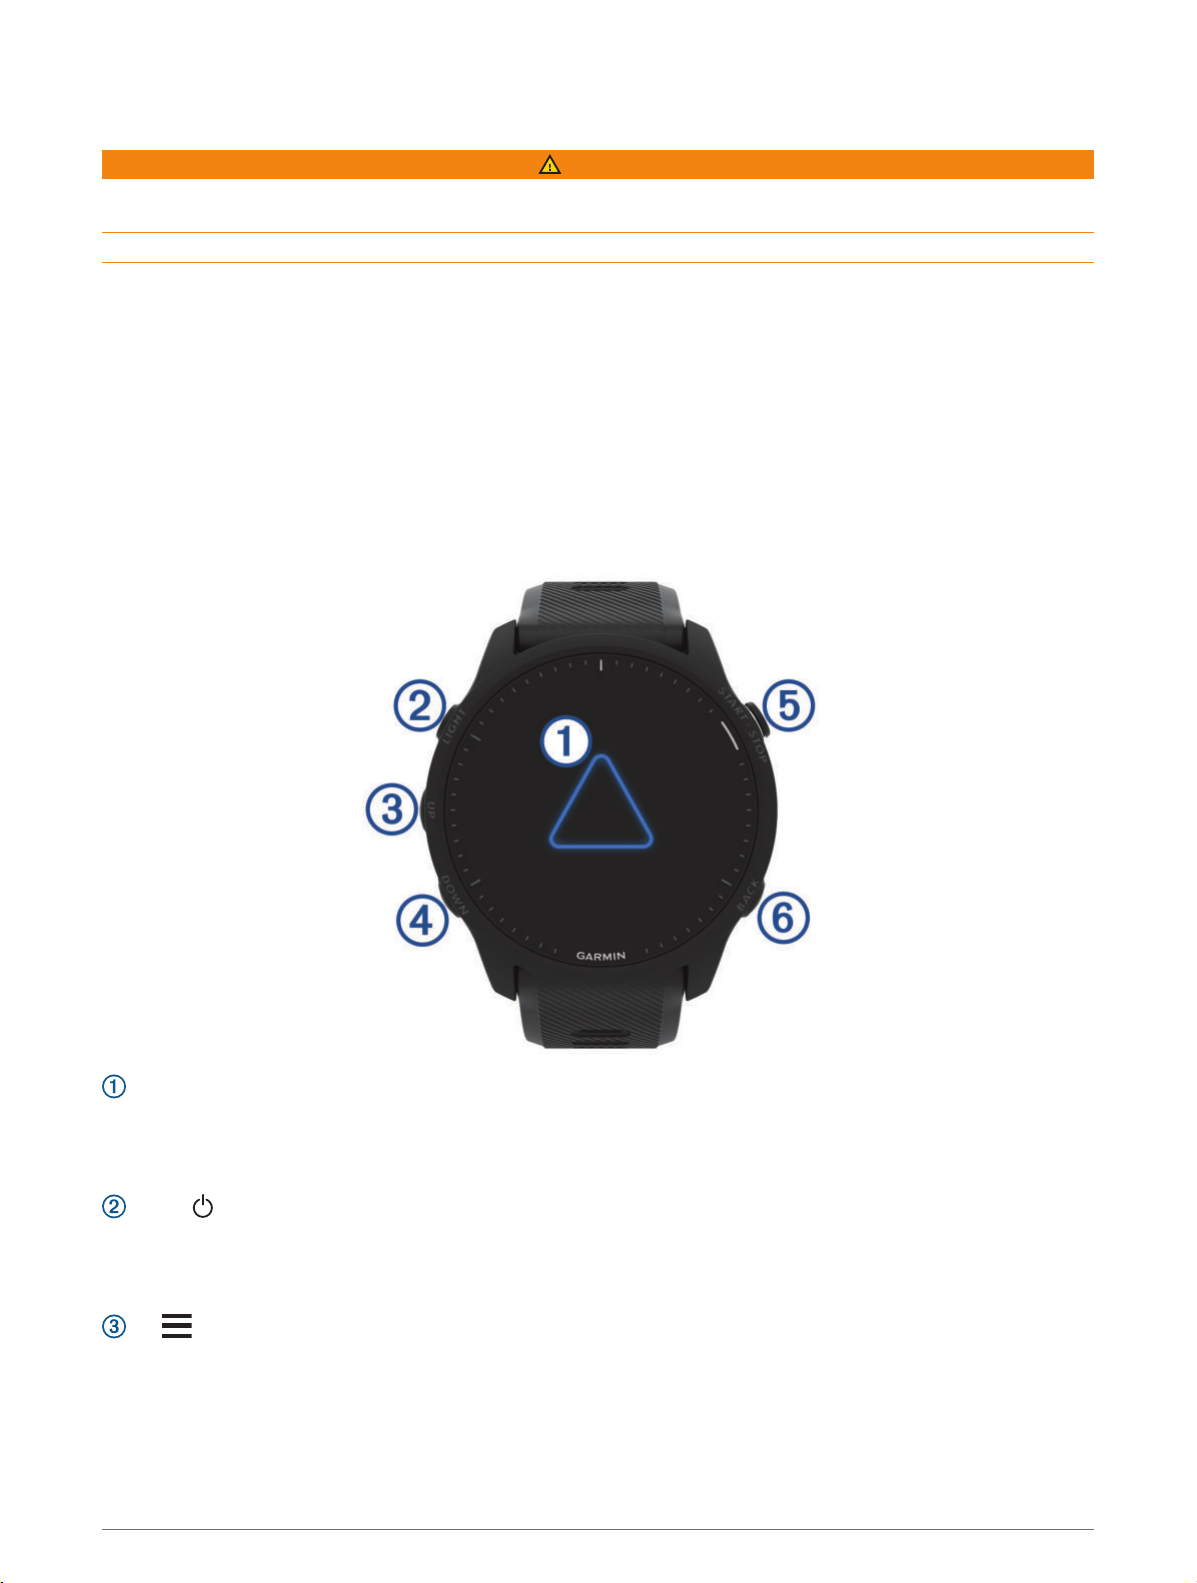
Touchscreen
• Tap to choose an option in a menu.
• Tap to open the glance to view more data.
• Swipe up or down to scroll through the glance loop and menus.
LIGHT
• Press to turn the watch on.
• Press to turn the backlight on and off.
• Hold to view the controls menu for quick access to frequently used functions.
UP
• Press to scroll through the glances, data screens, options, and settings.
• Hold to view the menu.
• Hold to manually change sports during an activity.
Introduction 1
Page 10
DOWN
• Press to scroll through the glances, data screens, options, and settings.
• Hold to open the music controls (Music, page 83).
START · STOP
• Press to start and stop the activity timer.
• Press to choose an option or to acknowledge a message.
BACK
• Press to return to the previous screen.
• Press to record a lap, rest, or transition during an activity.
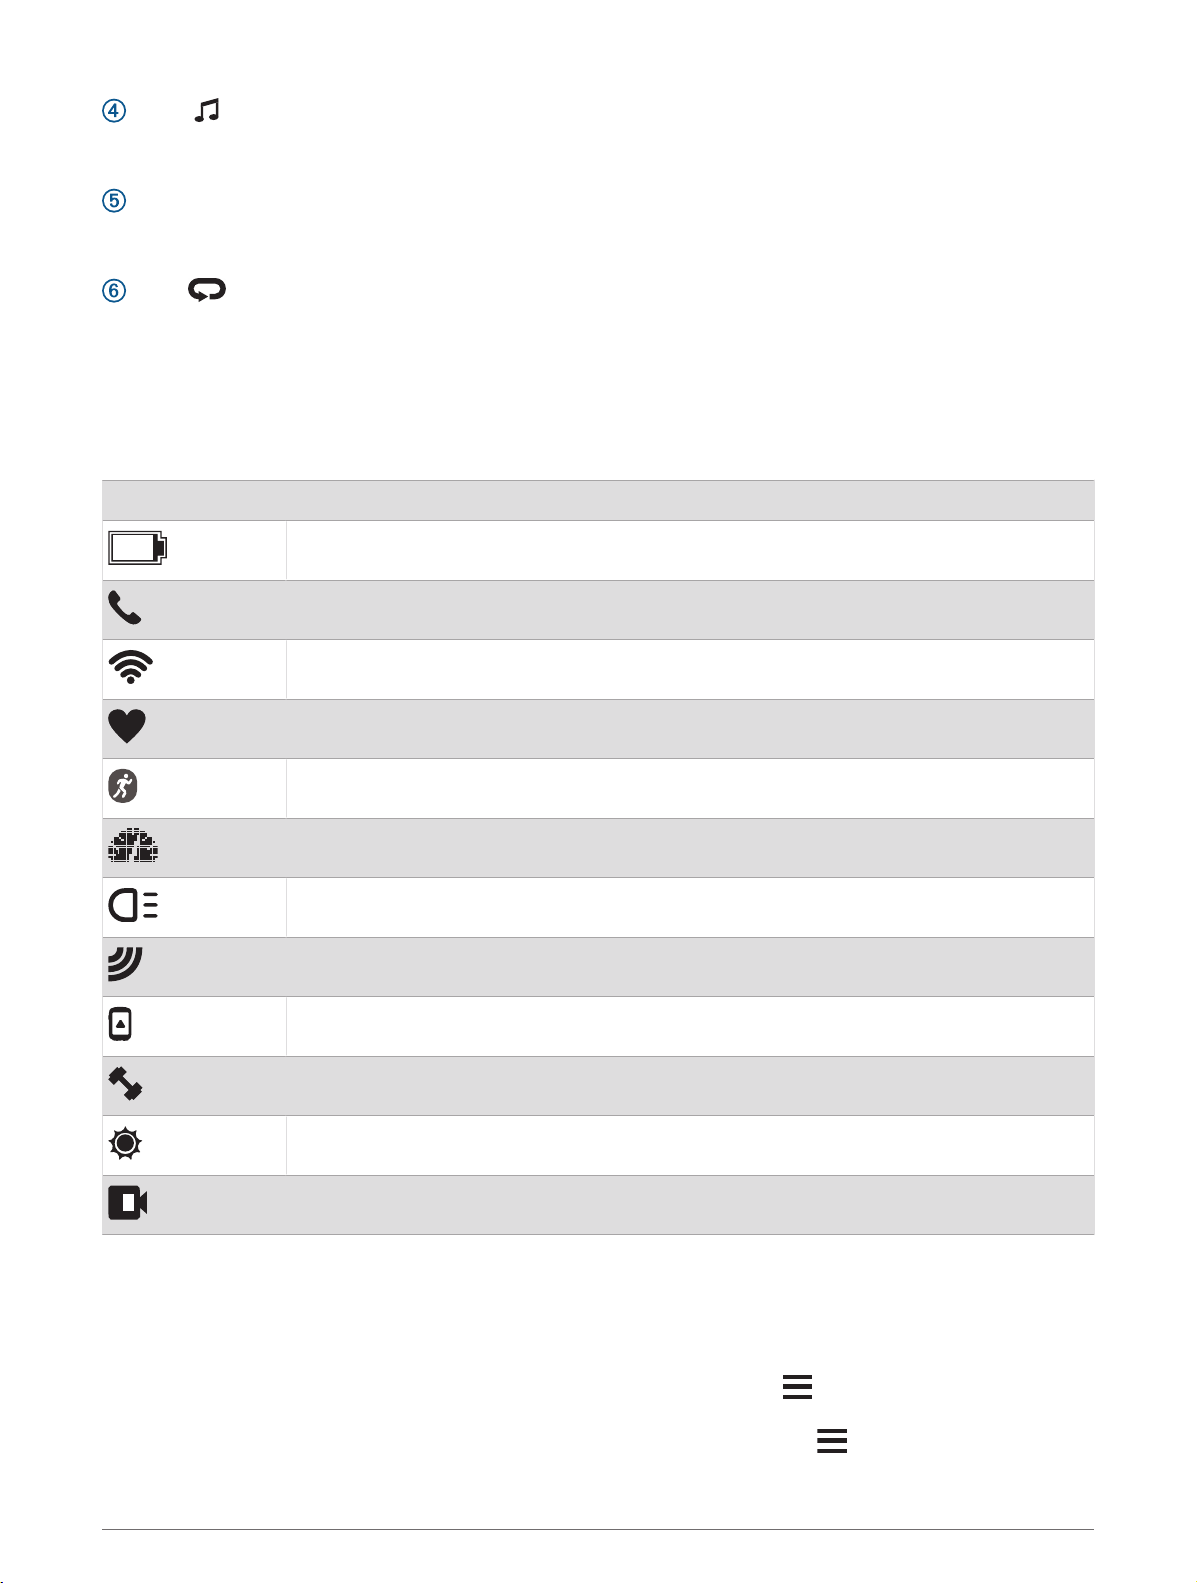
GPS Status and Status Icons
For outdoor activities, the status ring turns green when GPS is ready. A flashing icon means the watch is
searching for a signal. A solid icon means the signal was found or the sensor is connected.
GPS GPS status
Battery status
Phone connection status
Wi‑Fi technology status
Heart rate status
Running Dynamics Pod status
Speed and cadence sensor status
Bike lights status
Bike radar status
Extended display mode status
Power meter status
tempe™ sensor status
VIRB® camera status
Enabling and Disabling the Touchscreen
You can customize the touchscreen for general watch use and for each activity profile.
NOTE: The touchscreen is not available during swim activities. The touchscreen setting for each activity profile
(such as run or bike) applies to the corresponding leg of a multisport activity.
• To enable or disable the touchscreen during general use or activities, hold , select System > Touch, and
select an option.
• To customize a hot key to temporarily enable or disable the touchscreen, hold , select System > Hot Keys.
2 Introduction
Page 11
Using the Watch
• Hold LIGHT to view the controls menu (Controls, page 39).
The controls menu provides quick access to frequently used functions, such as turning on do not disturb
mode, saving a location, and turning the watch off.
• From the watch face, press UP or DOWN to scroll through the glance loop (Glances, page 20).
• From the watch face, press START to start an activity or open an app (Activities and Apps, page 3).
• Hold to customize the watch face (Customizing the Watch Face, page 19), adjust settings (System
Settings, page 106), pair wireless sensors (Pairing Your Wireless Sensors, page 73), and more.
Activities and Apps
Your watch can be used for indoor, outdoor, athletic, and fitness activities. When you start an activity, the watch
displays and records sensor data. You can create custom activities or new activities based on default activities
(Creating a Custom Activity, page 19). When you finish your activities, you can save and share them with the
Garmin Connect community.
You can also add Connect IQ™ activities and apps to your watch using the Connect IQ app (Connect IQ Features,
page 90).
For more information about activity tracking and fitness metric accuracy, go to garmin.com/ataccuracy.
Starting an Activity
When you start an activity, GPS turns on automatically (if required).
1 Press START.
2 If this is the first time you are starting an activity, select the checkbox next to each activity to add to your
favorites, and select .
3 Select an option:
• Select an activity from your favorites.
• Select , and select an activity from the extended activity list.
4 If the activity requires GPS signals, go outside to an area with a clear view of the sky, and wait until the watch
is ready.
The watch is ready after it establishes your heart rate, acquires GPS signals (if required), and connects to
your wireless sensors (if required).
5 Press START to start the activity timer.
The watch records activity data only while the activity timer is running.
Tips for Recording Activities
• Charge the watch before starting an activity (
• Press to record laps, start a new set or pose, or advance to the next workout step.
• Press UP or DOWN to view additional data screens.
• Swipe up or down to view additional data screens.
Activities and Apps 3
Charging the Watch, page 109).
Page 12
Stopping an Activity
1 Press STOP.
2 Select an option:
• To resume your activity, select Resume.
• To save the activity and view the details, select Save, press START, and select an option.
NOTE: After you save the activity, you can enter self-evaluation data (Evaluating an Activity, page 4).
• To suspend your activity and resume it at a later time, select Resume Later.
• To mark a lap, select Lap.
• To navigate back to the starting point of your activity along the path you traveled, select Back to Start >
TracBack.
NOTE: This feature is available only for activities that use GPS.
• To navigate back to the starting point of your activity by the most direct path, select Back to Start > Route.
NOTE: This feature is available only for activities that use GPS.
• To measure the difference between your heart rate at the end of the activity and your heart rate two
minutes later, select Recovery Heart Rate, and wait while the timer counts down.
• To discard the activity, select Discard.
NOTE: After stopping the activity, the watch saves it automatically after 30 minutes.
Evaluating an Activity
Before you can evaluate an activity, you must enable the self-evaluation setting on your Forerunner watch
(Enabling Self Evaluation, page 56).
NOTE: This feature is not available for all activities.
1 After you complete an activity, select Save (Stopping an Activity, page 4).
2 Select a number that corresponds with your perceived effort.
NOTE: You can select to skip the self evaluation.
3 Select how you felt during the activity.
You can view evaluations in the Garmin Connect app.
Outdoor Activities
The Forerunner device comes preloaded with outdoor activities, such as running and cycling. GPS is turned on
for outdoor activities. You can add new activities based on default activities, such as walking or rowing. You can
also add custom activities to your device (Creating a Custom Activity, page 19).
4 Activities and Apps
Page 13
Going for a Run
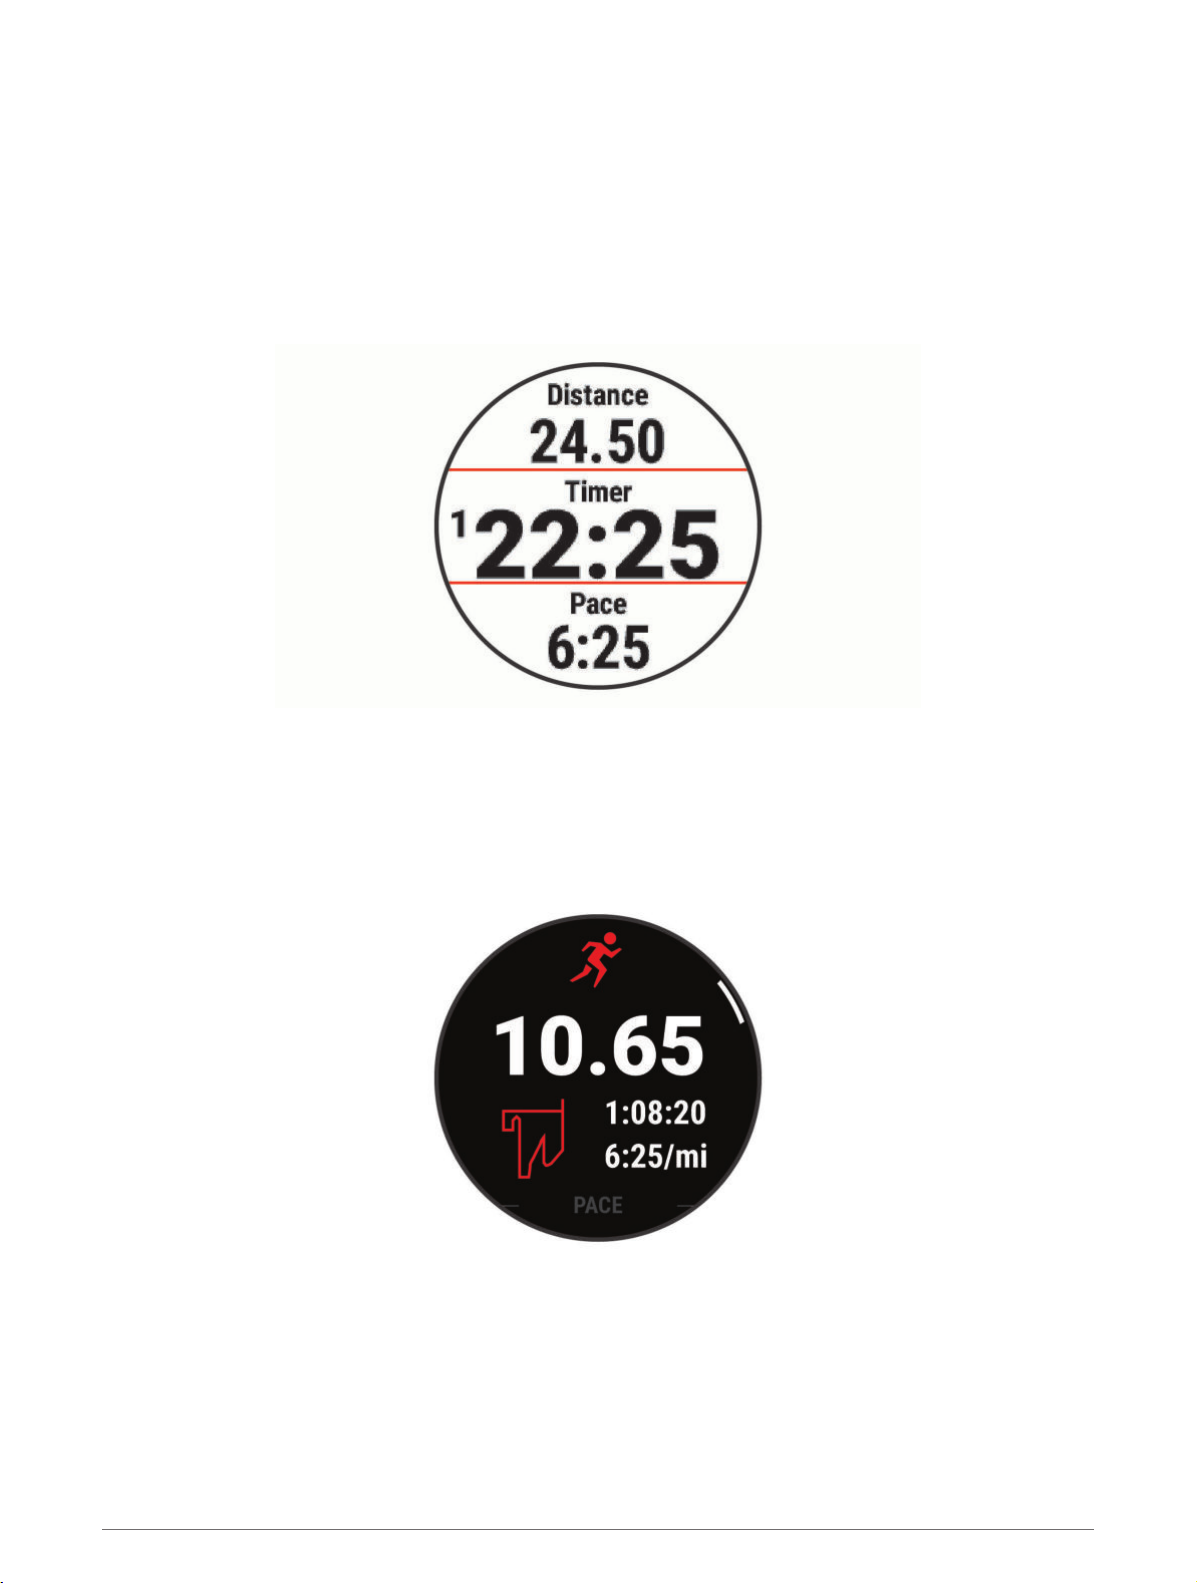
The first fitness activity you record on your watch can be a run, ride, or any outdoor activity. You may need to
charge the watch before starting the activity (
The device records activity data only while the activity timer is running.
1 Press START, and select an activity.
2 Go outside, and wait while the watch locates satellites.
3 Press START.
4 Go for a run.
Charging the Watch, page 109).
NOTE: On a Forerunner music watch, hold DOWN while in an activity to open the music controls (Music
Playback Controls, page 85).
5 After you complete your run, press STOP.
6 Select an option:
• Select Resume to restart the activity timer.
• Select Save to save the run and reset the activity timer. You can select the run to view a summary.
NOTE: For more run options, see Stopping an Activity, page 4.
Activities and Apps 5
Page 14
Going for a Track Run
Before you go for a track run, make sure you are running on a standard-shape, 400 m track.
You can use the track run activity to record your outdoor track data, including distance in meters and lap splits.
1 Stand on the outdoor track.
2 From the watch face, press START.
3 Select Track Run.
4 Wait while the watch locates satellites.
5 If you are running in lane 1, skip to step 11.
6 Press
7 Select the activity settings.
8 Select Lane Number.
9 Select a lane number.
10 Press BACK twice to return to the activity timer.
11 Press START.
12 Run around the track.
After you run 3 laps, your watch records the track dimensions and calibrates your track distance.
13 After you complete your activity, press STOP, and select Save.
Tips for Recording a Track Run
• Wait until the GPS status indicator turns green before starting a track run.
• During your first run on an unfamiliar track, run for a minimum of 3 laps to calibrate your track distance.
You should run slightly past your starting point to complete the lap.
• Run each lap in the same lane.
NOTE: The default Auto Lap® distance is 1600 m, or 4 laps around the track.
• If you are running in a lane other than lane 1, set the lane number in the activity settings.
.
Recording an Ultra Run Activity
1 Press START.
2 Select Ultra Run.
3 Press START to start the activity timer.
4 Start running.
5 Press
NOTE: You can configure the Lap Key setting to record a lap and start the rest timer, start the rest timer only,
or record a lap only (Activities and App Settings, page 96).
6 When you are done resting, press to resume running.
7 Press UP or DOWN to view additional data pages (optional).
8 After you complete your activity, press STOP, and select Save.
to record a lap and start the rest timer.
6 Activities and Apps
Page 15
Triathlon Training
When you participate in a triathlon, you can use the triathlon activity to quickly transition to each sport segment,
to time each segment, and to save the activity.
1 Press START.
2 Select Triathlon.
3 Press START to start the activity timer.
4 Press
The transition feature is on by default, and the transition time is recorded separately from the activity time.
The transition feature can be turned on or off in the triathlon activity settings. If transitions are turned off,
press to change sports.
5 After you complete your activity, press STOP, and select Save.
at the beginning and end of each transition.
Creating a Multisport Activity
1 Press START.
2 Select Add > Multisport.
3 Select a multisport activity type, or enter a custom name.
Duplicate activity names include a number. For example, Triathlon(2).
4 Select two or more activities.
5 Select an option:
• Select an option to customize specific activity settings. For example, you can select whether to include
transitions.
• Select Done to save and use the multisport activity.
6 Select Yes to add the activity to your list of favorites.
Using an eBike
Before you can use a compatible eBike, such as a Shimano STEPS™ eBike, you must pair it with your Forerunner
device (
Pairing Your Wireless Sensors, page 73).
Viewing Your Ski Runs
Your watch records the details of each downhill skiing or snowboarding run using the auto run feature. This
feature is turned on by default for downhill skiing and snowboarding. It automatically records new ski runs
based on your movement. The activity timer pauses when you stop moving downhill and when you are on a
chairlift. The activity timer remains paused during the chairlift ride. You can start moving downhill to restart the
activity timer. You can view run details from the paused screen or while the activity timer is running.
1 Start a skiing or snowboarding activity.
2 Hold
3 Select View Runs.
4 Press UP and DOWN to view details of your last run, your current run, and your total runs.
The run screens include time, distance traveled, maximum speed, average speed, and total descent.
.
Activities and Apps 7
Page 16
Recording a Backcountry Skiing Activity
The backcountry skiing activity lets you manually switch between climbing and descending tracking modes so
you can accurately track your statistics.
1 Press START.
2 Select Backcountry Ski.
3 Select an option:
• If you are starting your activity on a climb, select Climbing.
• If you are starting your activity moving downhill, select Descending.
4 Press START to start the activity timer.
5 Press
6 After you complete your activity, press STOP, and select Save.
to switch between climbing and descending tracking modes.
Cross-Country Skiing Power Data
You can use your compatible Forerunner device paired with the HRM-Pro™ accessory to provide real-time
feedback about your cross-country skiing performance.
NOTE: The HRM-Pro accessory must be paired to the Forerunner device using ANT® technology.
Power is the force you generate while skiing. The power output is measured in watts. Factors that affect power
include your speed, elevation changes, wind, and snow conditions. You can use power output to measure and
improve your skiing performance.
NOTE: Skiing power values are generally lower than cycling power values. This is normal and occurs because
humans are less efficient at skiing than they are at cycling. It is common for ski power values to be 30 to 40
percent lower than cycling power values at the same training intensity.
Recording a Bouldering Activity
You can record routes during a bouldering activity. A route is a climbing path along a boulder or small rock
formation.
1 Press START.
2 Select Bouldering.
3 Select a grading system.
NOTE: The next time you start a bouldering activity, the watch uses this grading system. You can hold
select the activity settings, and select Grading System to change the system.
4 Select the difficulty level for the route.
5 Press START to start the route timer.
6 Start your first route.
7 Press to finish the route.
8 Select an option:
• To save a successful route, select Completed.
• To save an unsuccessful route, select Attempted.
• To delete the route, select Discard.
9 When you are done resting, press to start your next route.
10 Repeat this process for each route until your activity is complete.
11 After your last route, press STOP to stop the route timer.
12 Select Save.
,
8 Activities and Apps
Page 17
Swimming
NOTICE
The device is intended for surface swimming. Scuba diving with the device may damage the product and will
void the warranty.
NOTE: The watch has wrist-based heart rate enabled for swim activities. The watch is also compatible with the
HRM-Pro, HRM-Swim™, and HRM-Tri™ accessories (Chest Heart Rate While Swimming, page 77). If both wristbased heart rate and chest heart rate data are available, your watch uses the chest heart rate data.
Swimming in Open Water
You can record swim data including distance, pace, and stroke rate. You can add data screens to the default
open water swimming activity (
1 Press START.
2 Select Open Water.
3 Go outside and wait while the device locates satellites.
4 Press START to start the activity timer.
5 Start swimming.
6 Press UP or DOWN to view additional data pages (optional).
7 After you complete your activity, press STOP, and select Save.
Going for a Pool Swim
1 Press START.
2 Select Pool Swim.
3 Select your pool size, or enter a custom size.
4 Press START.
The device records swim data only while the activity timer is running.
5 Start your activity.
The device automatically records swim intervals and lengths.
6 Press UP or DOWN to view additional data pages (optional).
7 When resting, press
8 Press to restart the activity timer.
9 After you complete your activity, press STOP, and select Save.
Customizing the Data Screens, page 98).
to pause the activity timer.
Tips for Swimming Activities
• Press
• Before starting a pool swimming activity, follow the on-screen instructions to select your pool size or enter a
custom size.
The watch measures and records distance by completed pool lengths. The pool size must be correct to
display accurate distance. The next time you start a pool swimming activity, the watch uses this pool size.
You can hold , select the activity settings, and select Pool Size to change the size.
• For accurate results, swim the entire pool length, and use one stroke type for the entire length. Pause the
activity timer when resting.
• Press to record a rest during pool swimming.
The device automatically records swim intervals and lengths for pool swimming.
• To help the device count your lengths, use a strong push off the wall and glide before your first stroke.
• When doing drills, you must either pause the activity timer or use the drill logging feature (
Drill Log, page 10).
Activities and Apps 9
to record an interval during open water swimming.
Training with the
Page 18
Swim Terminology
Length: One trip down the pool.
Interval: One or more consecutive lengths. A new interval starts after a rest.
Stroke: A stroke is counted every time your arm wearing the watch completes a full cycle.
Swolf: Your swolf score is the sum of the time for one pool length and the number of strokes for that length. For
example, 30 seconds plus 15 strokes equals a swolf score of 45. For open water swimming, swolf is
calculated over 25 meters. Swolf is a measurement of swimming efficiency and, like golf, a lower score is
better.
Critical swim speed (CSS): Your CSS is the theoretical speed that you can maintain continuously without
exhaustion. You can use your CSS to guide your training pace and monitor your improvement.
Stroke Types
Stroke type identification is available only for pool swimming. Your stroke type is identified at the end of a
length. Stroke types appear in your swimming history and in your Garmin Connect account. You can also select
stroke type as a custom data field (
Free Freestyle
Back Backstroke
Breast Breaststroke
Fly Butterfly
Mixed More than one stroke type in an interval
Customizing the Data Screens, page 98).
Drill Used with drill logging (Training with the Drill Log, page 10)
Auto Rest and Manual Rest
NOTE: Swim data is not recorded during a rest. To view other data screens, you can press UP or DOWN.
The auto rest feature is available only for pool swimming. Your watch automatically detects when you are
resting, and the rest screen appears. If you rest for more than 15 seconds, the watch automatically creates a
rest interval. When you resume swimming, the watch automatically starts a new swim interval. You can turn on
the auto rest feature in the activity options (
TIP: For best results using the auto rest feature, minimize your arm motions while resting.
During a pool or open water swim activity, you can manually mark a rest interval by pressing .
Adding or Removing a Favorite Activity, page 18).
Training with the Drill Log
The drill log feature is available only for pool swimming. You can use the drill log feature to manually record kick
sets, one-arm swimming, or any type of swimming that is not one of the four major strokes.
1 During your pool swim activity, press UP or DOWN to view the drill log screen.
2 Press
3 After you complete a drill interval, press .
The drill timer stops, but the activity timer continues to record the entire swim session.
4 Select a distance for the completed drill.
Distance increments are based on the pool size selected for the activity profile.
5 Select an option:
• To start another drill interval, press .
• To start a swim interval, press UP or DOWN to return to the swim training screens.
to start the drill timer.
10 Activities and Apps
Page 19
Indoor Activities
The watch can be used for training indoors, such as running on an indoor track or using a stationary bike or
indoor trainer. GPS is turned off for indoor activities (Activities and App Settings, page 96).
When running or walking with GPS turned off, speed and distance are calculated using the accelerometer in the
watch. The accelerometer is self-calibrating. The accuracy of the speed and distance data improves after a few
outdoor runs or walks using GPS.
TIP: Holding the handrails of the treadmill reduces accuracy.
Going for a Virtual Run
You can pair your watch with a compatible third-party app to transmit pace, heart rate, or cadence data.
1 Press START.
2 Select Virtual Run.
3 On your tablet, laptop, or phone, open the Zwift™ app or another virtual training app.
4 Follow the on-screen instructions to start a running activity and pair the devices.
5 Press START to start the activity timer.
6 After you complete your activity, press STOP, and select Save.
Calibrating the Treadmill Distance
To record more accurate distances for your treadmill runs, you can calibrate the treadmill distance after you run
at least 1.5 km (1 mi.) on a treadmill. If you use different treadmills, you can manually calibrate the treadmill
distance on each treadmill or after each run.
1 Start a treadmill activity (
2 Run on the treadmill until your watch records at least 1.5 km (1 mi.).
3 After you finish the activity, press STOP to stop the activity timer.
4 Select an option:
• To calibrate the treadmill distance the first time, select Save.
The device prompts you to complete the treadmill calibration.
• To manually calibrate the treadmill distance after the first-time calibration, select Calibrate & Save > Yes.
5 Check the treadmill display for the distance traveled, and enter the distance on your watch.
Starting an Activity, page 3).
Health Snapshot
The Health Snapshot feature is an activity on your watch that records several key health metrics while you hold
still for two minutes. It provides a glimpse of your overall cardiovascular status. The watch records metrics
such as your average heart rate, stress level, and respiration rate.
™
Activities and Apps 11
Page 20
Recording a Strength Training Activity
You can record sets during a strength training activity. A set is multiple repetitions (reps) of a single move. You
can create and find strength workouts using Garmin Connect and send them to your watch.
1 Press START.
2 Select Strength.
The first time you record a strength training activity, you must select which wrist your watch is on.
3 Select a workout.
NOTE: If you don't have any strength workouts downloaded to your watch, you can select Free > START, and
go to step 6.
4 Press DOWN to view a list of workout steps (optional).
TIP: While viewing workout steps, you can press START to view an animation of the selected exercise, if
available.
5 Press START > Do Workout > START to start the set timer.
6 Start your first set.
The device counts your reps. Your rep count appears when you complete at least four reps.
TIP: The device can only count reps of a single move for each set. When you want to change moves, you
should finish the set and start a new one.
7 Press
The watch displays the total reps for the set. After several seconds, the rest timer appears.
8 If necessary, edit the number of reps.
TIP: You can also add the weight used for the set.
9 When you are done resting, press to start your next set.
10 Repeat for each strength training set until your activity is complete.
11 After your last set, press STOP to stop the set timer.
12 Select Stop Workout > Save.
to finish the set.
Tips for Recording Strength Training Activities
• Do not look at the watch while performing reps.
You should interact with the watch at the beginning and end of each set, and during rests.
• Focus on your form while performing reps.
• Perform bodyweight or free weight exercises.
• Perform reps with a consistent, wide range of motion.
Each rep is counted when the arm wearing the watch returns to the starting position.
NOTE: Leg exercises may not be counted.
• Turn on automatic set detection to start and stop your sets.
• Save and send your strength training activity to your Garmin Connect account.
You can use the tools in your Garmin Connect account to view and edit activity details.
12 Activities and Apps
Page 21
Recording a HIIT Activity
You can use specialized timers to record a high-intensity interval training (HIIT) activity.
1 Press START.
2 Select HIIT.
3 Select an option:
• Select Free to record an open, unstructured HIIT activity.
• Select HIIT Timers (
• Select Workouts to follow a saved workout.
4 If necessary, follow the on-screen instructions.
5 Press START to start your first round.
The device displays a countdown timer and your current heart rate.
6 If necessary, press to manually move to the next round or rest.
7 After you complete your activity, press STOP, and select Save.
HIIT Timers
You can use specialized timers to record a high-intensity interval training (HIIT) activity.
AMRAP: The AMRAP timer records as many rounds as possible during a set time period.
EMOM: The EMOM timer records a set number of moves every minute on the minute.
Tabata: The Tabata timer alternates between 20-second intervals of maximum effort and 10 seconds of rest.
Custom: You can set your move time, rest time, number of moves, and number of rounds.
HIIT Timers, page 13).
Using an ANT+® Indoor Trainer
Before you can use a compatible ANT+ indoor trainer, you must pair the trainer with your watch (
Wireless Sensors, page 73).
You can use your watch with an indoor trainer to simulate resistance while following a course, ride, or workout.
While using an indoor trainer, GPS is turned off automatically.
1 Press START.
2 Select Bike Indoor.
3 Press .
4 Select Smart Trainer Options.
5 Select an option:
• Select Free Ride to go for a ride.
• Select Follow Course to follow a saved course (Courses, page 64).
• Select Follow Workout to follow a saved workout (Workouts, page 46).
• Select Set Power to set the target power value.
• Select Set Grade to set the simulated grade value.
• Select Set Resistance to set the resistance force applied by the trainer.
6 Press START to start the activity timer.
The trainer increases or decreases resistance based on the elevation information in the course or ride.
Pairing Your
Activities and Apps 13
Page 22
Recording an Indoor Climbing Activity
You can record routes during an indoor climbing activity. A route is a climbing path along an indoor rock wall.
1 Press START.
2 Select Climb Indoor.
The first time you start an activity, you can enable route statistics.
3 Select a grading system.
NOTE: The next time you start an indoor climbing activity, the watch uses these activity settings.
4 Select the difficulty level for the route.
5 Press START.
6 Start your first route.
7 When you finish the route, descend to the ground.
The rest timer starts automatically when you are on the ground.
NOTE: If necessary, you can press
8 Select an option:
• To save a successful route, select Completed.
• To save an unsuccessful route, select Attempted.
• To delete the route, select Discard.
9 Enter the number of falls for the route.
10 When you are done resting, press , and begin your next route.
11 Repeat this process for each route until your activity is complete.
12 After you complete your activity, press STOP, and select Save.
to finish the route.
Golfing
Playing Golf
Before you play golf, you should charge the device (
1 From the watch face, select START > Golf.
2 Go outside, and wait while the device locates satellites.
3 Select a course from the list of available courses.
4 If necessary, set your driver distance.
5 Select Yes to keep score.
6 Select UP or DOWN to scroll through the holes.
The device automatically transitions when you move to the next hole.
7 After you complete your activity, select START > End Round > Yes.
Charging the Watch, page 109).
14 Activities and Apps
Page 23
Hole Information
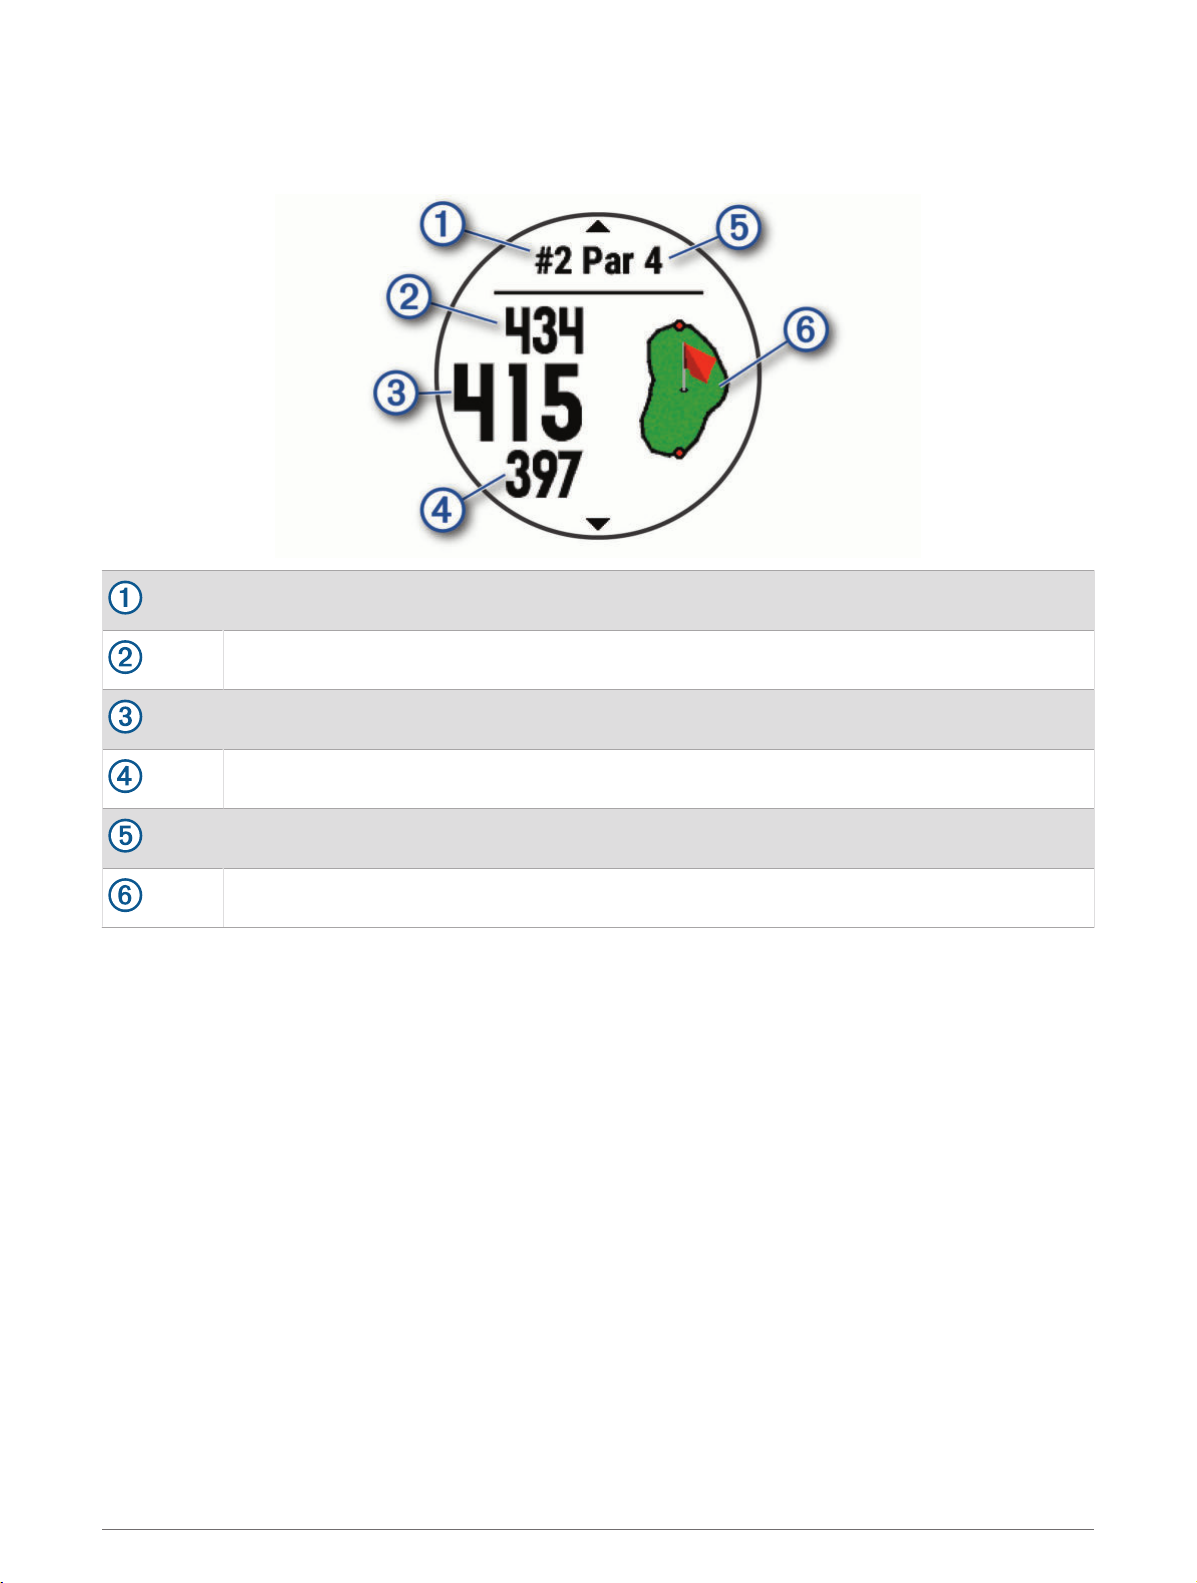
The watch calculates the distance to the front and back of the green, and to the selected pin location (
the Flag, page 15).
Current hole number
Distance to the back of the green
Moving
Distance to the selected pin location
Distance to the front of the green
Par for the hole
Map of the green
Moving the Flag
You can take a closer look at the green and move the pin location.
1 From the hole information screen, press START.
2 Select Move Flag.
3 Press UP or DOWN to move the pin position.
4 Press START.
The distances on the hole information screen are updated to show the new pin location. The pin location is
saved for only the current round.
Activities and Apps 15
Page 24
Viewing Measured Shots
Before the device can automatically detect and measure shots, you must enable scoring.
Your device features automatic shot detection and recording. Each time you take a shot along the fairway, the
device records your shot distance so you can view it later.
TIP: Automatic shot detection works best when you wear the device on your leading wrist and make good
contact with the ball. Putts are not detected.
1 While playing golf, select START > Measure Shot.
Your last shot distance appears.
NOTE: The distance automatically resets when you hit the ball again, putt on the green, or move to the next
hole.
2 Select DOWN to view previously recorded shot distances.
Manually Measuring a Shot
You can manually add a shot if the watch doesn't detect it. You must add the shot from the location of the
missed shot.
1 Take a shot and watch where your ball lands.
2 From the hole information screen, press START.
3 Select Measure Shot.
4 Press DOWN.
5 Select Add Shot >
6 If necessary, enter the club you used for the shot.
7 Walk or drive to your ball.
The next time you take a shot, the watch automatically records your last shot distance. If necessary, you can
manually add another shot.
.
Viewing Layup and Dogleg Distances
You can view a list of layup and dogleg distances for par 4 and 5 holes. Custom targets also appear in this list.
1 From the hole information screen, press START.
2 Select Layups.
Each layup and the distance until you reach each layup appear on the screen.
NOTE: Distances are removed from the list as you pass them.
Club Sensors
Your watch is compatible with Approach® CT10 golf club sensors. You can use paired club sensors to
automatically track your golf shots, including location, distance, and club type. See the owner's manual for your
club sensors for more information (
garmin.com/manuals/ApproachCT10).
Keeping Score
1 From the hole information screen, press START.
2 Select Scorecard.
The scorecard appears when you are on the green.
3 Press UP or DOWN to scroll through the holes.
4 Press START to select a hole.
5 Press UP or DOWN to set the score.
Your total score is updated.
16 Activities and Apps
Page 25
Updating a Score
1 From the hole information screen, press START.
2 Select Scorecard.
3 Press UP or DOWN to scroll through the holes.
4 Press START to select a hole.
5 Press UP or DOWN to change the score for that hole.
Your total score is updated.
Setting the Scoring Method
You can change the method the device uses to keep score.
1 From the hole information screen, hold
2 Select the activity settings.
3 Select Scoring Method.
4 Select a scoring method.
.
About Stableford Scoring
When you select the Stableford scoring method (
based on the number of strokes taken relative to par. At the end of a round, the highest score wins. The device
awards points as specified by the United States Golf Association.
The scorecard for a Stableford scored game shows points instead of strokes.
Points Strokes Taken Relative to Par
Setting the Scoring Method, page 17), points are awarded
0 2 or more over
1 1 over
2 Par
3 1 under
4 2 under
5 3 under
Setting Your Handicap
1 From the hole information screen, hold
2 Select the activity settings.
3 Select Handicap Scoring.
4 Select a handicap scoring option:
• To enter the number of strokes to be subtracted from your total score, select Local Handicap.
• To enter the player's handicap index and the course slope rating used to calculate your course handicap,
select Index/Slope.
5 Set your handicap.
.
Enabling Statistics Tracking
The Stat Tracking feature enables detailed statistics tracking while playing golf.
1 From the hole information screen, hold
2 Select the activity settings.
3 Select Stat Tracking.
.
Activities and Apps 17
Page 26
Recording Statistics
Before you can record statistics, you must enable statistics tracking (
1 From the scorecard, select a hole.
2 Enter the total number of strokes taken, including putts, and press START.
3 Set the number of putts taken, and press START.
NOTE: The number of putts taken is used for statistics tracking only and does not increase your score.
4 If necessary, select an option:
NOTE: If you are on a par 3 hole, fairway information does not appear.
• If your ball hit the fairway, select In Fairway.
• If your ball missed the fairway, select Missed Right or Missed Left.
5 If necessary, enter the number of penalty strokes.
Enabling Statistics Tracking, page 17).
Using the Golf Odometer
You can use the odometer to record the time, distance, and steps traveled. The odometer automatically starts
and stops when you start or end a round.
1 From the hole information screen, press START.
2 Select Odometer.
3 If necessary, select Reset to reset the odometer to zero.
Viewing the Direction to the Pin
The PinPointer feature is a compass that provides directional assistance when you are unable to see the green.
This feature can help you line up a shot even if you are in the woods or in a deep sand trap.
NOTE: Do not use the PinPointer feature while in a golf cart. Interference from the golf cart can affect the
accuracy of the compass.
1 From the hole information screen, press START.
2 Select PinPointer.
The arrow points to the pin location.
Customizing Activities and Apps
You can customize the activities and apps list, data screens, data fields, and other settings.
Adding or Removing a Favorite Activity
The list of your favorite activities appears when you press START from the watch face, and it provides quick
access to the activities you use most frequently. The first time you press START to start an activity, the watch
prompts you to select your favorite activities. You can add or remove favorite activities at any time.
1 Hold
2 Select Activities & Apps.
Your favorite activities appear at the top of the list.
3 Select an option:
• To add a favorite activity, select the activity, and select Set as Favorite.
• To remove a favorite activity, select the activity, and select Remove from Favorites.
Changing the Order of an Activity in the Apps List
1 Hold
2 Select Activities & Apps.
3 Select an activity.
4 Select Reorder.
5 Press UP or DOWN to adjust the position of the activity in the apps list.
.
.
18 Activities and Apps
Page 27
Creating a Custom Activity
1 Press START.
2 Select Add.
3 Select an option:
• Select Copy Activity to create your custom activity starting from one of your saved activities.
• Select Other to create a new custom activity.
4 If necessary, select an activity type.
5 Select a name or enter a custom name.
Duplicate activity names include a number, for example: Bike(2).
6 Select an option:
• Select an option to customize specific activity settings. For example, you can customize the data screens
or auto features.
• Select Done to save and use the custom activity.
7 Select Yes to add the activity to your list of favorites.
Appearance
You can customize the appearance of the watch face and the quick access features in the glance loop and
controls menu.
Watch Face Settings
You can customize the appearance of the watch face by selecting the layout, colors, and additional data. You
can also download custom watch faces from the Connect IQ store.
Customizing the Watch Face
Before you can activate a Connect IQ watch face, you must install a watch face from the Connect IQ store
Connect IQ Features, page 90).
(
You can customize the watch face information and appearance, or activate an installed Connect IQ watch face.
1 From the watch face, hold .
2 Select Watch Face.
3 Press UP or DOWN to preview the watch face options.
4 Select Add New to scroll through additional pre-loaded watch faces.
5 Select START > Apply to activate a pre-loaded watch face or an installed Connect IQ watch face.
6 If using a pre-loaded watch face, select START > Customize.
7 Select an option:
• To change the style of the numbers for the analog watch face, select Dial.
• To change the style of the hands for the analog watch face, select Hands.
• To change the style of the numbers for the digital watch face, select Layout.
• To change the style of the seconds for the digital watch face, select Seconds.
• To change the data that appears on the watch face, select Data.
• To add or change an accent color for the watch face, select Accent Color.
• To change the background color, select Bkgd. Color.
• To save the changes, select Done.
8 To save all changes, select Apply.
Appearance 19
Page 28
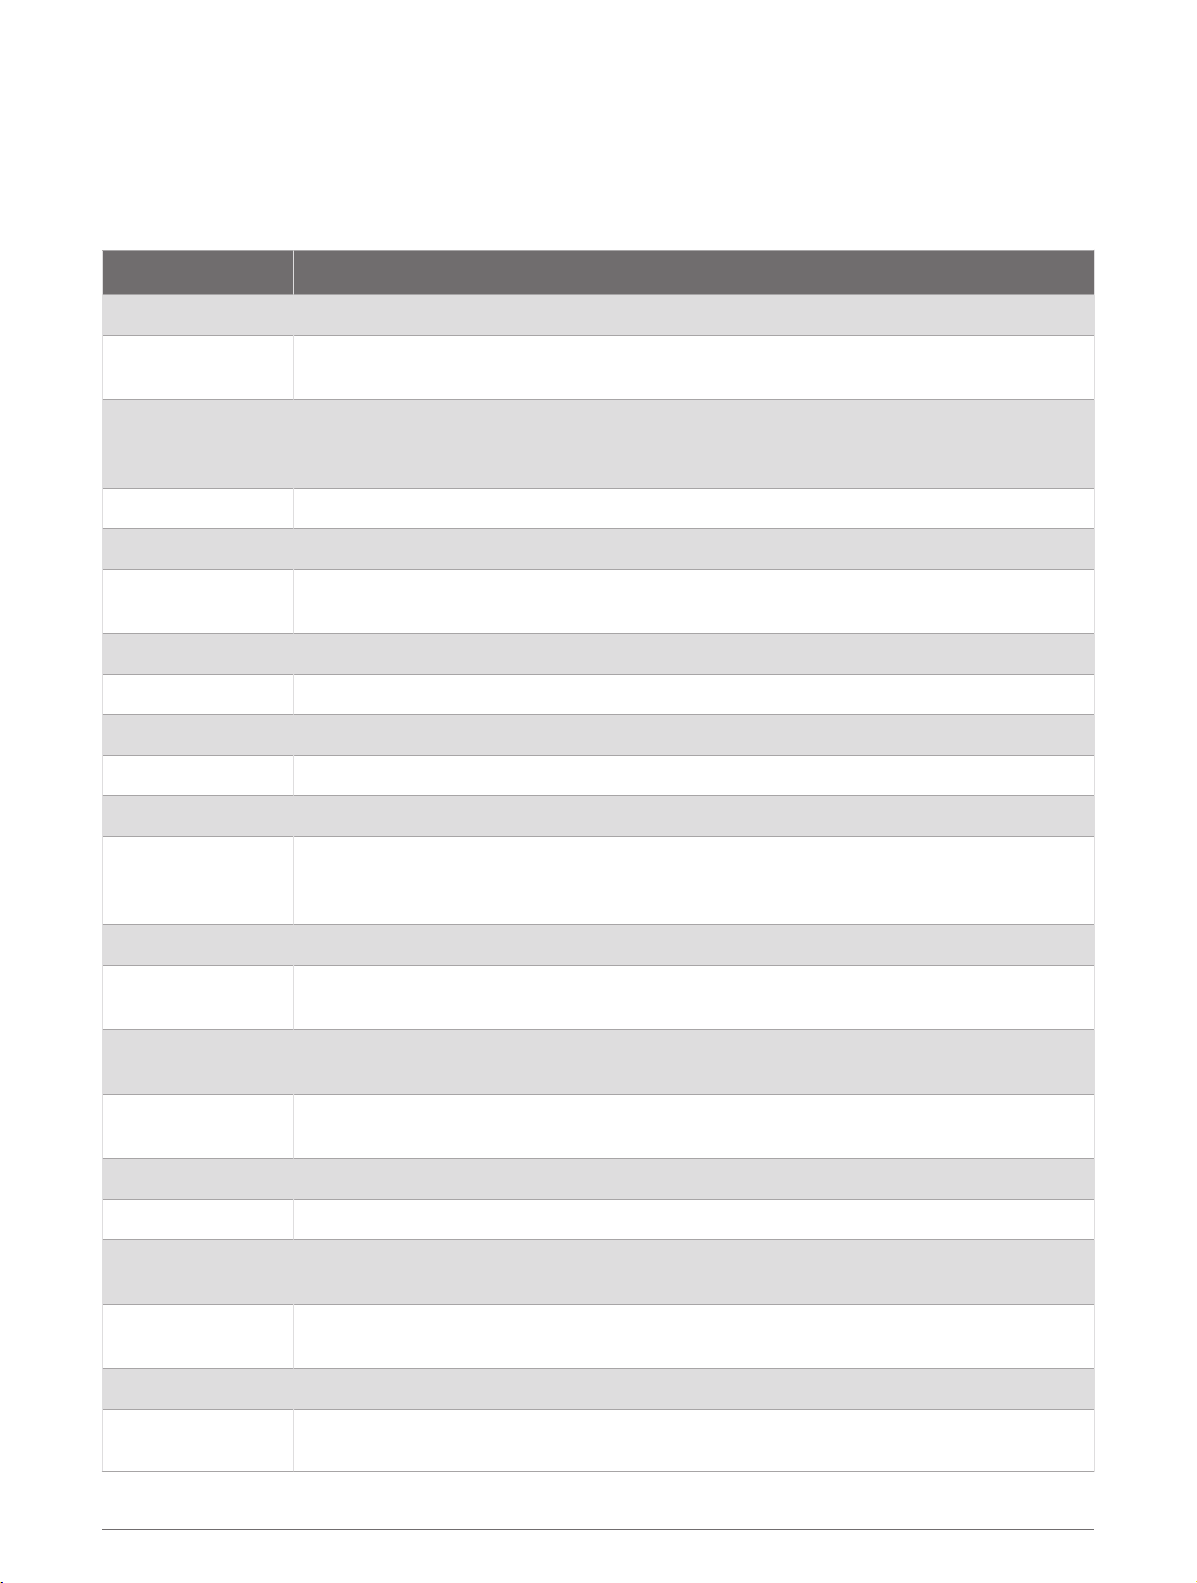
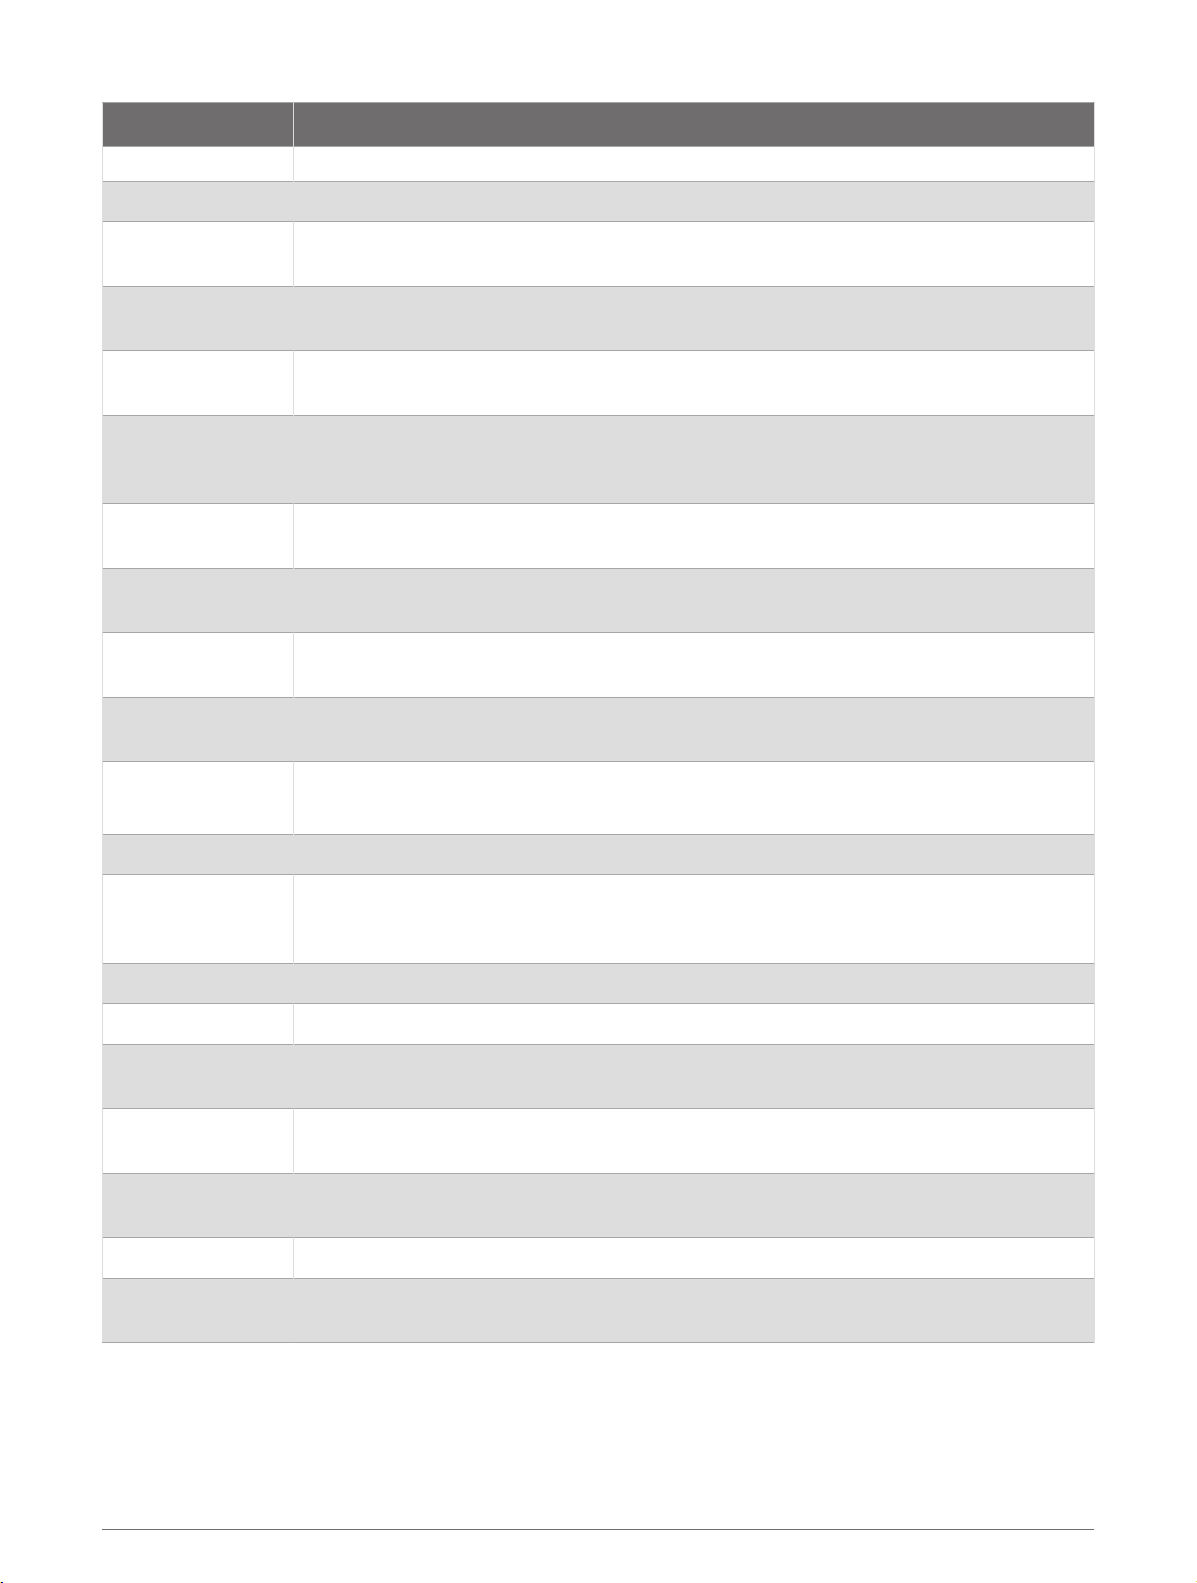
Glances
Your watch comes preloaded with glances that provide quick information (Viewing the Glance Loop, page 22).
Some glances require a Bluetooth® connection to a compatible phone.
Some glances are not visible by default. You can add them to the glance loop manually (Customizing the Glance
Loop, page 22).
Name Description
ABC Displays combined altimeter, barometer, and compass information.
Alternate time
zones
Displays the current time of day in additional time zones.
At altitudes above 800 m (2625 ft.), displays graphs showing altitude-corrected values
Altitude acclimation
for your average pulse oximeter reading, respiration rate, and resting heart rate for the
last seven days.
Altimeter Displays the approximate elevation based on pressure changes.
Barometer Displays the environmental pressure data based on elevation.
Body Battery
™
With all day wear, displays your current Body Battery level and a graph of your level for
the last several hours (Body Battery, page 22).
Calendar Displays upcoming meetings from your phone calendar.
Calories Displays your calorie information for the current day.
Compass Displays an electronic compass.
Device usage Displays the current software version and device usage statistics.
Floors climbed Tracks your floors climbed and progress toward your goal.
Displays scheduled workouts when you select a Garmin coach adaptive training plan in
Garmin® coach
your Garmin Connect account. The plan adjusts to your current level of fitness, coaching
and schedule preferences, and race date.
Golf Displays golf scores and statistics for your last round.
Health Snapshot
Health stats
Heart rate
Displays summaries of your saved Health Snapshot sessions (Health Snapshot™,
page 11).
Displays a dynamic summary of your current health statistics. The measurements
includes heart rate, Body Battery level, stress, and more.
Displays your current heart rate in beats per minute (bpm) and a graph of your average
resting heart rate (RHR).
History Displays your activity history and a graph of your recorded activities.
HRV Status Displays your seven-day average of your overnight heart rate variability.
Intensity minutes
inReach® controls
Tracks your time spent participating in moderate to vigorous activities, your weekly
intensity minutes goal, and progress toward your goal.
Allows you to send messages on your paired inReach device (Using the inReach Remote,
page 79).
Last activity Displays a brief summary of your last recorded activity.
Last ride
Last run
Displays a brief summary of your last recorded activity and history of the specified sport.
20 Appearance
Page 29
Name Description
Last swim
Music controls Provides music player controls for your phone or watch music.
Notifications
Performance
Primary race
Pulse oximeter
Race calendar
RCT camera
controls
Respiration
Sleep
Solar intensity
Alerts you to incoming calls, texts, social network updates, and more, based on your
phone notification settings (Enabling Bluetooth Notifications, page 86).
Displays performance measurements that help you track and understand your training
activities and race performances (Performance Measurements, page 25).
Displays the race event you designate as the primary race in your Garmin Connect
calendar (Race Calendar and Primary Race, page 43).
Allows you to take a manual pulse oximeter reading (Getting Pulse Oximeter Readings,
page 63). If you are too active for the watch to determine your pulse oximeter reading,
the measurements are not recorded.
Displays your upcoming race events set in your Garmin Connect calendar (Race Calendar
and Primary Race, page 43).
Allows you to manually take a photo, record a video clip, and customize settings (Using
the Varia Camera Controls, page 78).
Your current respiration rate in breaths per minute and seven-day average. You can do a
breathing activity to help you relax.
Displays total sleep time, a sleep score, and sleep stage information for the previous
night.
Displays a graph of the intensity of solar exposure for the last 3 hours.
NOTE: This feature is not available for all product models.
Steps Tracks your daily step count, step goal, and data for previous days.
Displays your current stress level and a graph of your stress level. You can do a
Stress
breathing activity to help you relax. If you are too active for the watch to determine your
stress level, stress measurements are not recorded.
Sunrise and sunset Displays sunrise, sunset, and civil twilight times.
Temperature Displays temperature data from the internal temperature sensor.
Training readiness
Training status
VIRB controls
Displays a score and a short message that helps you determine how ready you are for
training each day (Training Readiness, page 37).
Displays your current training status and training load, which shows you how your
training affects your fitness level and performance (Training Status, page 33).
Provides camera controls when you have a VIRB device paired with your Forerunner
watch (VIRB Remote, page 79).
Weather Displays the current temperature and weather forecast.
Women's health
Displays your current cycle or pregnancy tracking status. You can view and log your daily
symptoms.
Appearance 21
Page 30
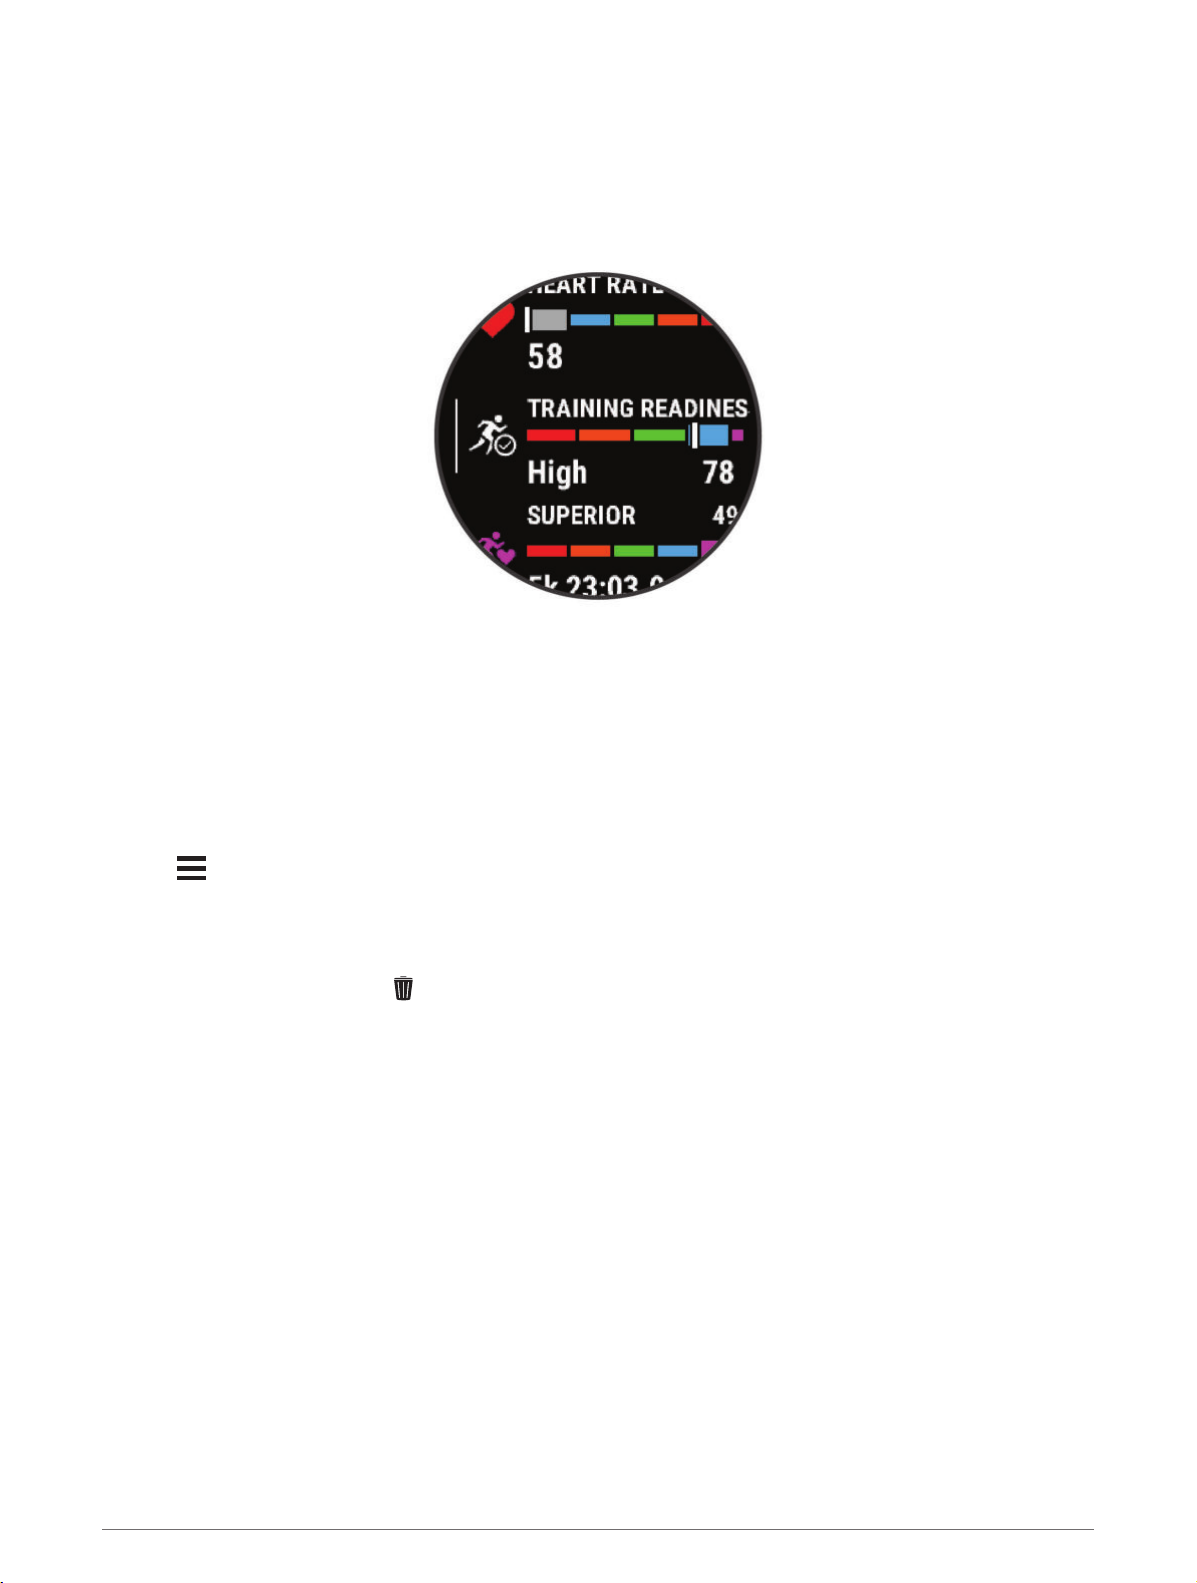
Viewing the Glance Loop
Glances provide quick access to health data, activity information, built-in sensors, and more. When you pair your
watch, you can view data from your phone, such as notifications, weather, and calendar events.
1 Press UP or DOWN.
The watch scrolls through the glance loop and displays summary data for each glance.
TIP: You can also swipe to scroll or tap to select options.
2 Press START to view more information.
3 Select an option:
• Press DOWN to view details about a glance.
• Press START to view additional options and functions for a glance.
Customizing the Glance Loop
You can change the order of the glances in the loop, remove glances, and add new glances.
1 Hold
2 Select Appearance > Glances.
3 Select an option:
• Select a glance, and press UP or DOWN to change the location of the glance in the loop.
• Select a glance, and select to remove the glance from the loop.
• Select Add, and select a glance to add it to the loop.
.
Body Battery
Your watch analyzes your heart rate variability, stress level, sleep quality, and activity data to determine your
overall Body Battery level. Like a gas gauge on a car, it indicates your amount of available reserve energy. The
Body Battery level range is from 0 to 100, where 0 to 25 is low reserve energy, 26 to 50 is medium reserve
energy, 51 to 75 is high reserve energy, and 76 to 100 is very high reserve energy.
You can sync your watch with your Garmin Connect account to view your most up-to-date Body Battery level,
long-term trends, and additional details (
Tips for Improved Body Battery Data, page 23).
22 Appearance
Page 31
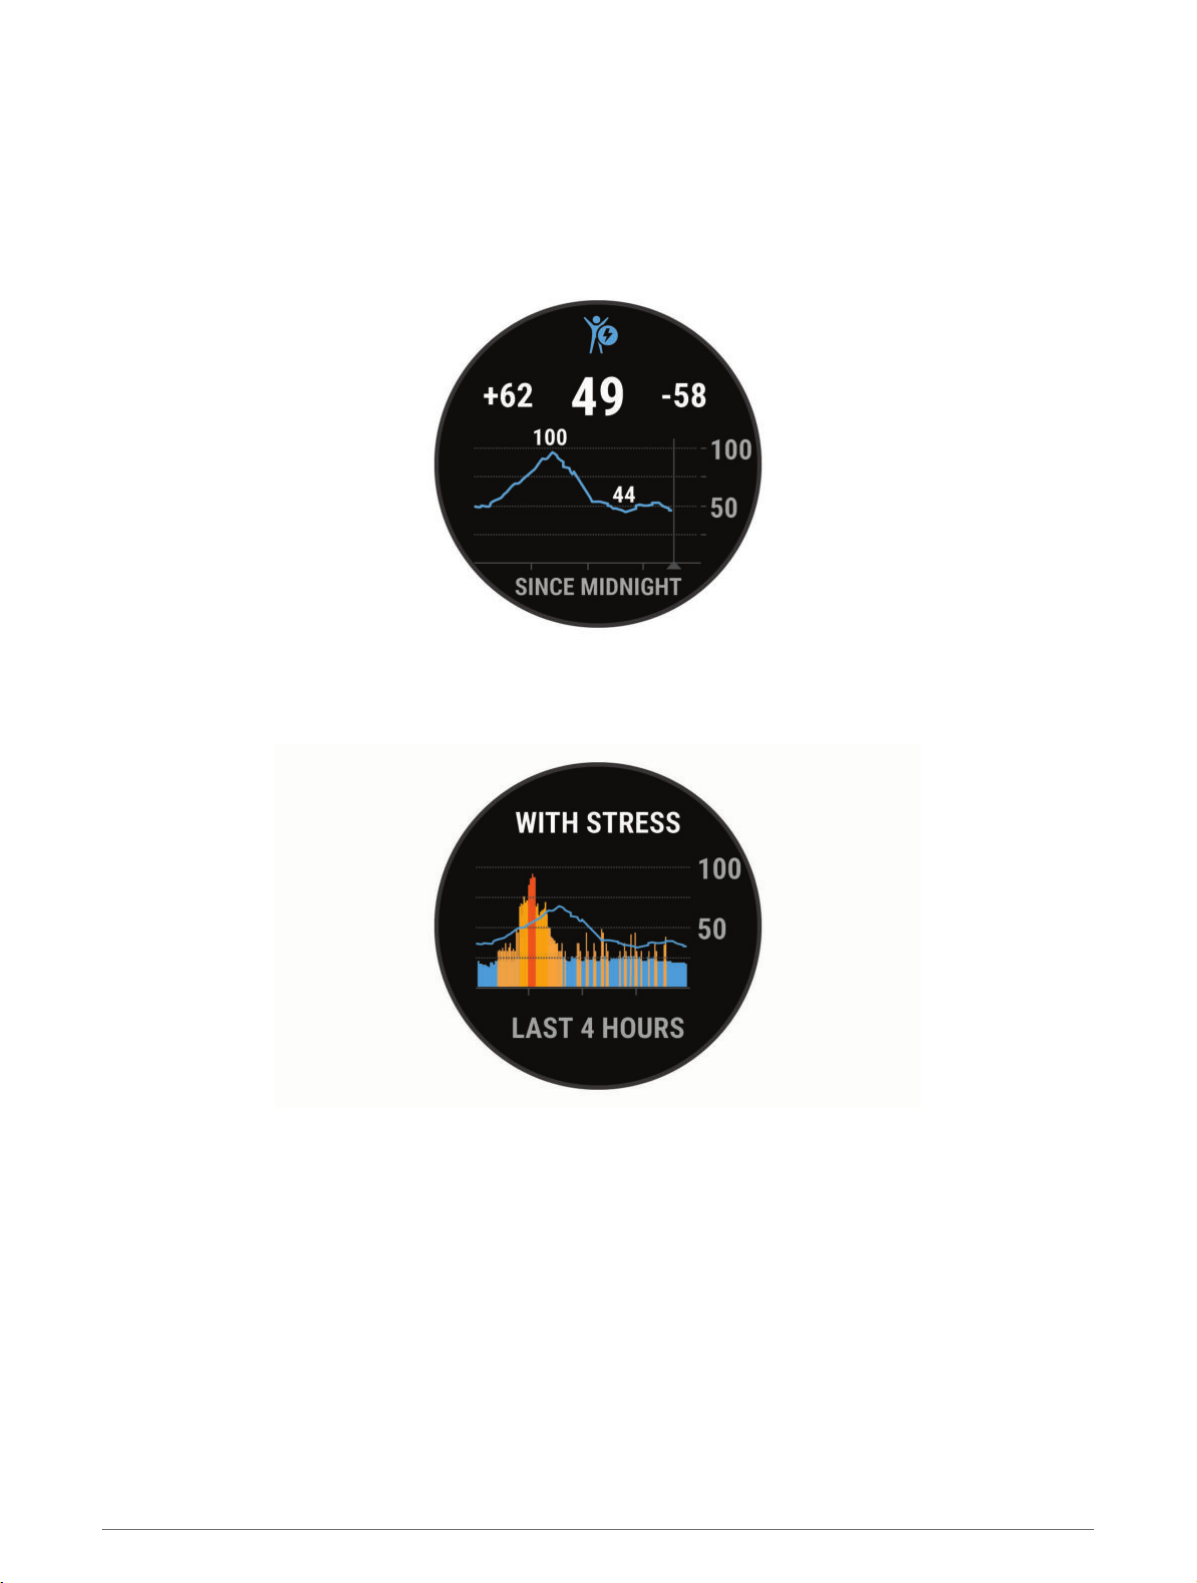
Viewing the Body Battery Glance
The Body Battery glance displays your current Body Battery level and a graph of your Body Battery level for the
last several hours.
1 Press UP or DOWN to view the Body Battery glance.
NOTE: You may need to add the glance to your glance loop (
2 Press START to view a graph of your body battery level since midnight.
3 Press DOWN to view a combined graph of your Body Battery and stress levels.
Blue bars indicate periods of rest. Orange bars indicate periods of stress. Gray bars indicate times when you
were too active to determine your stress level.
Customizing the Glance Loop, page 22).
Tips for Improved Body Battery Data
• For more accurate results, wear the watch while sleeping.
• Good sleep charges your Body Battery.
• Strenuous activity and high stress can cause your Body Battery to drain more quickly.
• Food intake, as well as stimulants like caffeine, has no impact on your Body Battery.
Appearance 23
Page 32
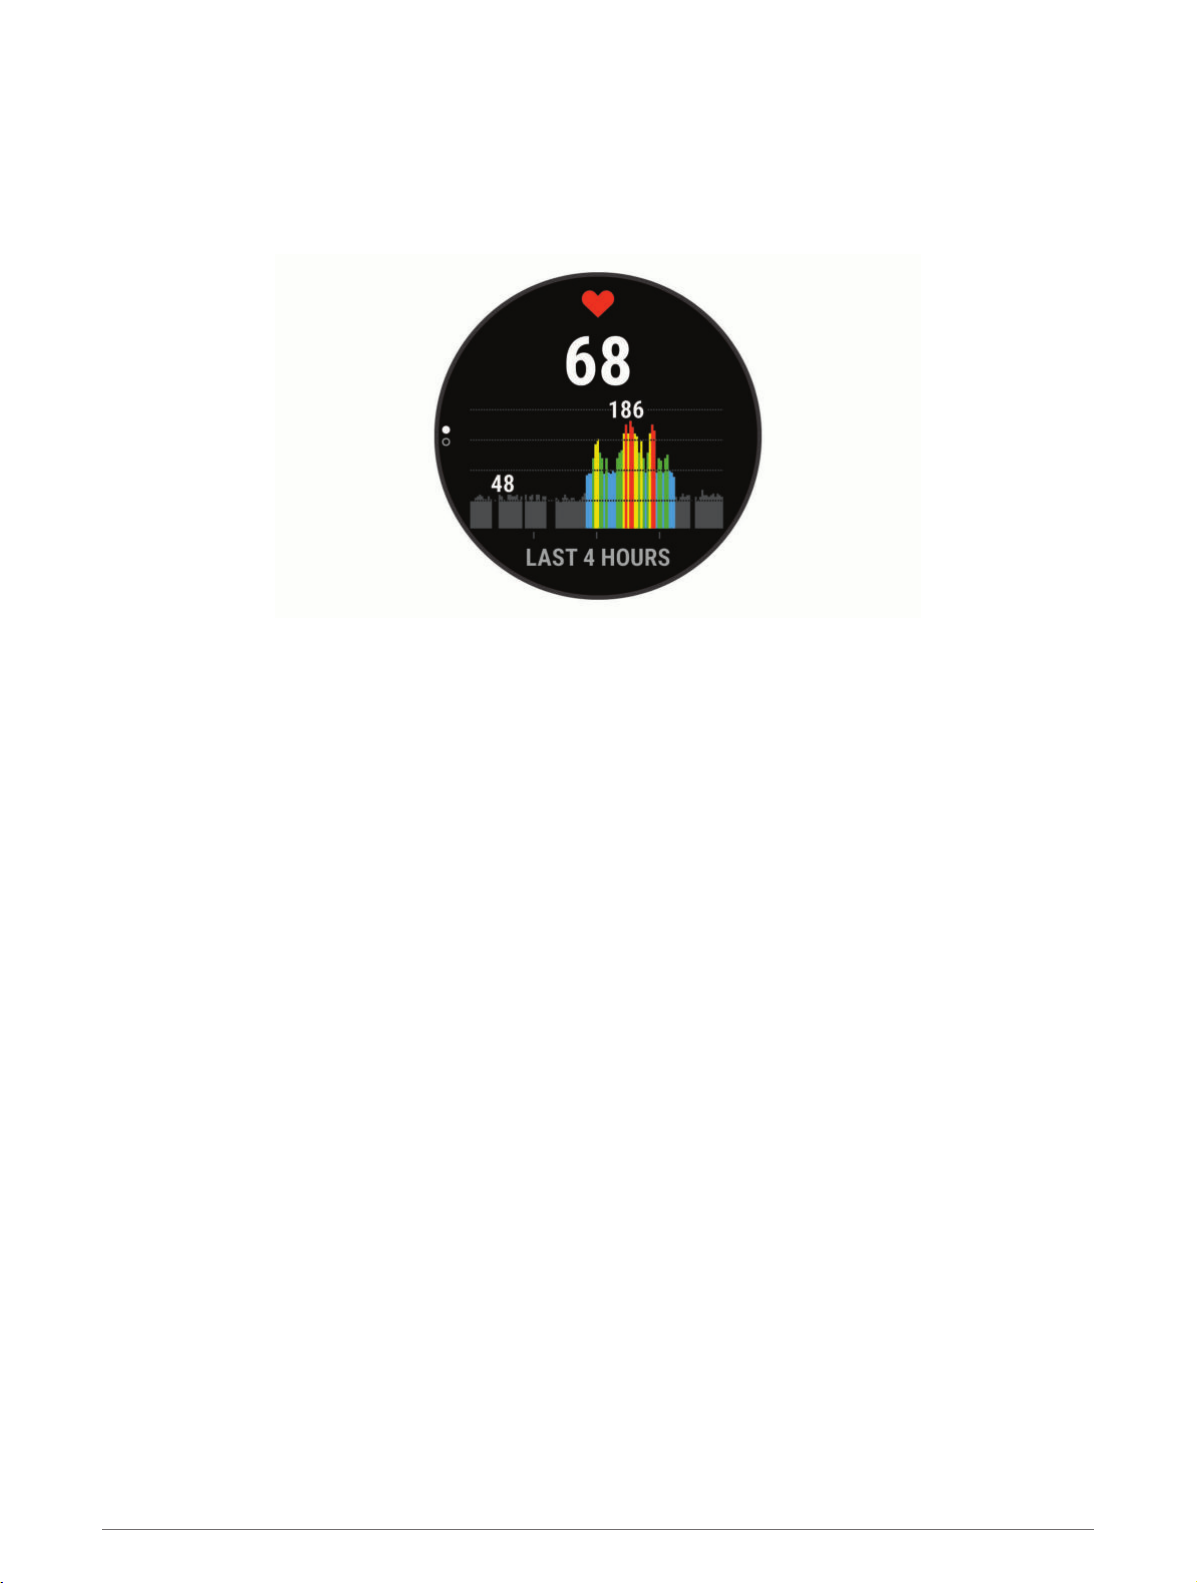
Viewing the Heart Rate Glance
1 From the watch face, press UP or DOWN to view the heart rate glance.
NOTE: You may need to add the glance to your glance loop (
2 Press START to view your current heart rate in beats per minute (bpm) and a graph of your heart rate for the
last 4 hours.
3 Press DOWN to view your average resting heart rate values for the last 7 days.
Customizing the Glance Loop, page 22).
Viewing the Weather Glance
Weather requires a Bluetooth connection to a compatible phone.
1 From the watch face, select UP or DOWN to view the weather glance.
2 Select START to view weather details.
3 Select UP or DOWN to view hourly, daily, and weather trend data.
Menstrual Cycle Tracking
Your menstrual cycle is an important part of your health. You can use your watch to log physical symptoms, sex
drive, sexual activity, ovulation days, and more. You can learn more and set up this feature in the Health Stats
settings of the Garmin Connect app.
• Menstrual cycle tracking and details
• Physical and emotional symptoms
• Period and fertility predictions
• Health and nutrition information
NOTE: You can use the Garmin Connect app to add and remove glances.
Using the Stress Level Glance
The stress level glance displays your current stress level and a graph of your stress level for the last several
hours. It can also guide you through a breathing activity to help you relax (
page 22).
1 While you are sitting or inactive, press UP or DOWN to view the stress level glance.
2 Press START.
3 Select an option:
• Press DOWN to view additional details.
TIP: Blue bars indicate periods of rest. Orange bars indicate periods of stress. Gray bars indicate times
when you were too active to determine your stress level.
• Press START to start a Breathwork activity.
Customizing the Glance Loop,
24 Appearance
Page 33
Performance Measurements
These performance measurements are estimates that can help you track and understand your training activities
and race performances. The measurements require a few activities using wrist-based heart rate or a compatible
chest heart rate monitor. Cycling performance measurements require a heart rate monitor and a power meter.
These estimates are provided and supported by Firstbeat Analytics™. For more information, go to
www.garmin.com/performance-data/running/.
NOTE: The estimates may seem inaccurate at first. The watch requires you to complete a few activities to learn
about your performance.
VO2 max.: VO2 max. is the maximum volume of oxygen (in milliliters) you can consume per minute per kilogram
of body weight at your maximum performance (About VO2 Max. Estimates, page 26).
Predicted race times: The watch uses the VO2 max. estimate and your training history to provide a target race
time based on your current state of fitness (Viewing Your Predicted Race Times, page 27).
HRV status: The watch analyzes your wrist heart rate readings while you are sleeping to determine your heart
rate variability (HRV) status based on your personal, long-term HRV averages (Heart Rate Variability Status,
page 28).
Performance condition: Your performance condition is a real-time assessment after 6 to 20 minutes of activity.
It can be added as a data field so you can view your performance condition during the rest of your activity. It
compares your real-time condition to your average fitness level (Performance Condition, page 28).
Functional threshold power (FTP): The watch uses your user profile information from the initial setup to
estimate your FTP. For a more accurate rating, you can conduct a guided test (Getting Your FTP Estimate,
page 29).
Lactate threshold: Lactate threshold requires a chest heart rate monitor. Lactate threshold is the point where
your muscles start to rapidly fatigue. Your watch measures your lactate threshold level using heart rate data
and pace (Lactate Threshold, page 30).
Stamina: The watch uses your VO2 max. estimate and heart rate data to provide real-time stamina estimates. It
can be added as a data screen so you can view your potential and current stamina during your activity
(Viewing Your Real-Time Stamina, page 32).
Appearance 25
Page 34
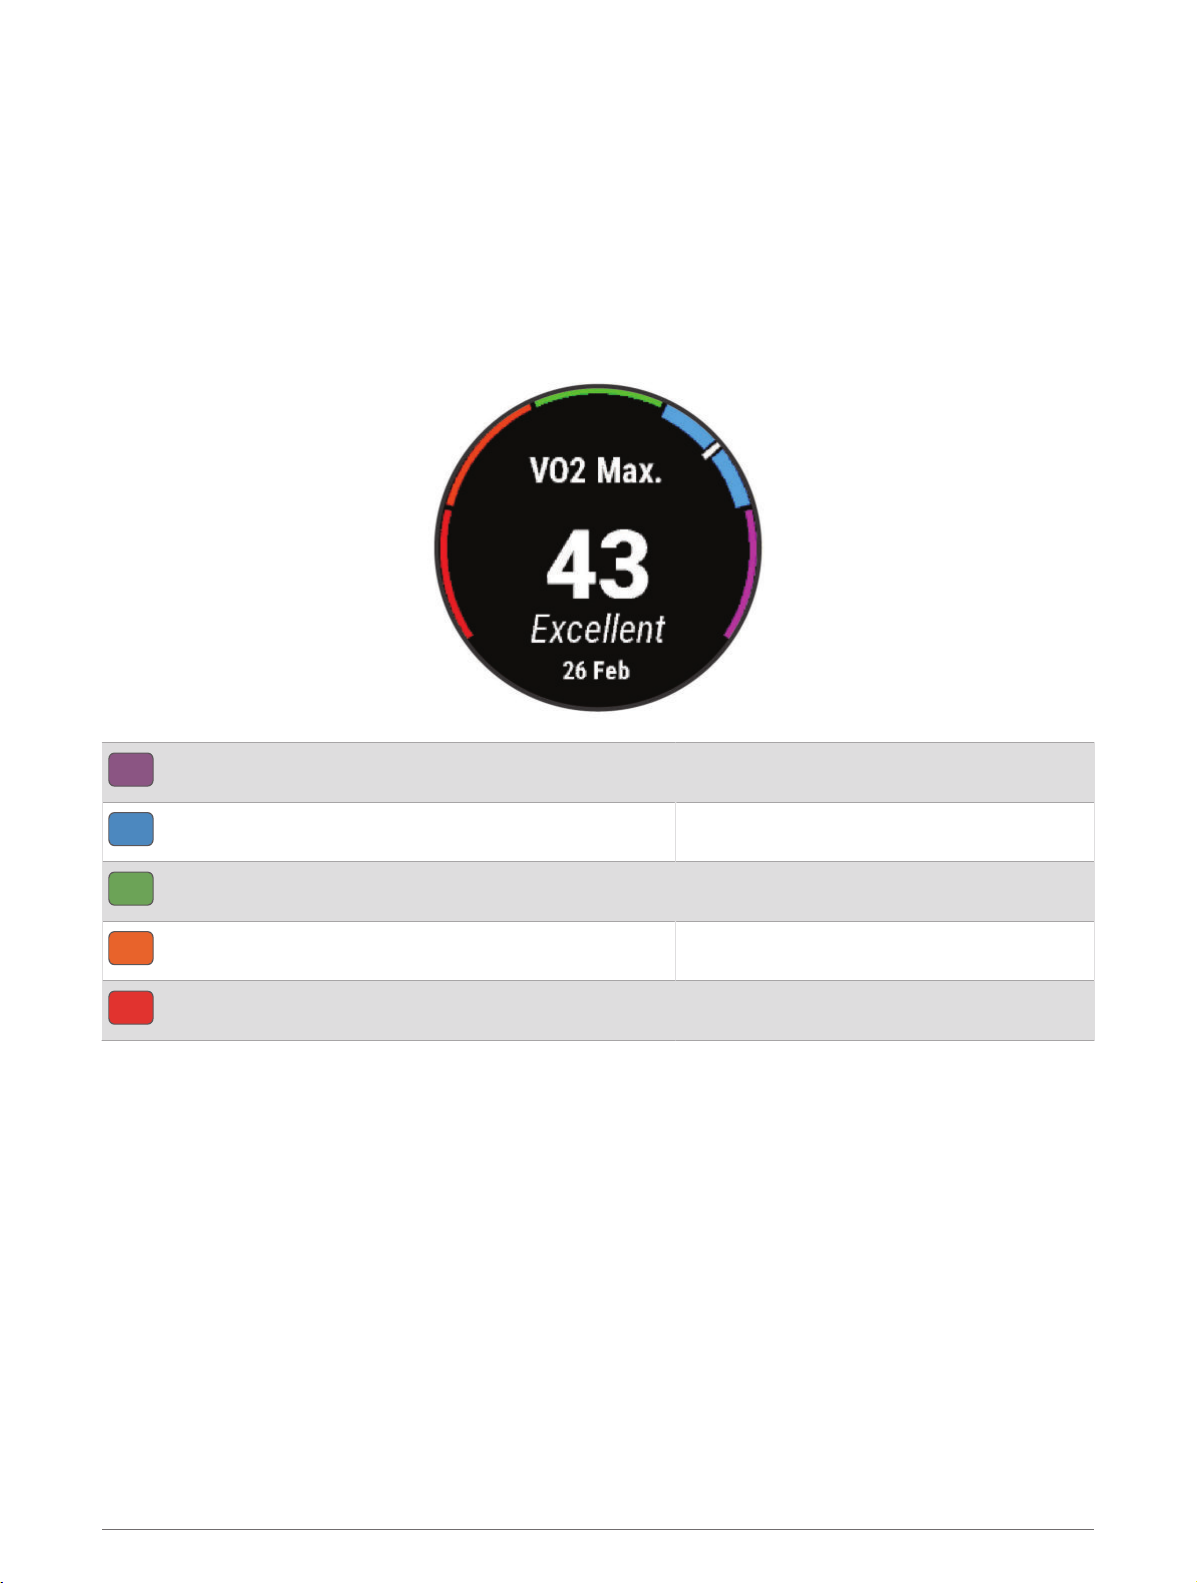
About VO2 Max. Estimates
VO2 max. is the maximum volume of oxygen (in milliliters) you can consume per minute per kilogram of body
weight at your maximum performance. In simple terms, VO2 max. is an indication of athletic performance and
should increase as your level of fitness improves. The Forerunner device requires wrist-based heart rate or a
compatible chest heart rate monitor to display your VO2 max. estimate. The device has separate VO2 max.
estimates for running and cycling. You must run either outside with GPS or ride with a compatible power meter
at a moderate level of intensity for several minutes to get an accurate VO2 max. estimate.
On the device, your VO2 max. estimate appears as a number, description, and position on the color gauge. On
your Garmin Connect account, you can view additional details about your VO2 max. estimate, such as where it
ranks for your age and gender.
Purple
Blue
Green
Orange
Red
VO2 max. data is provided by Firstbeat Analytics. VO2 max. analysis is provided with permission from The
Cooper Institute®. For more information, see the appendix (VO2 Max. Standard Ratings, page 131), and go to
www.CooperInstitute.org.
Superior
Excellent
Good
Fair
Poor
Getting Your VO2 Max. Estimate for Running
This feature requires wrist-based heart rate or a compatible chest heart rate monitor. If you are using a chest
heart rate monitor, you must put it on and pair it with your watch (
For the most accurate estimate, complete the user profile setup (Setting Up Your User Profile, page 80), and set
your maximum heart rate (Setting Your Heart Rate Zones, page 81). The estimate may seem inaccurate at first.
The watch requires a few runs to learn about your running performance. You can disable VO2 max. recording for
ultra run and trail run activities if you do not want those run types to affect your VO2 max. estimate (Turning Off
VO2 Max. Recording, page 27).
1 Start a running activity.
2 Run for at least 10 minutes outdoors.
3 After your run, select Save.
4 Press UP or DOWN to scroll through the performance measurements.
Pairing Your Wireless Sensors, page 73).
26 Appearance
Page 35
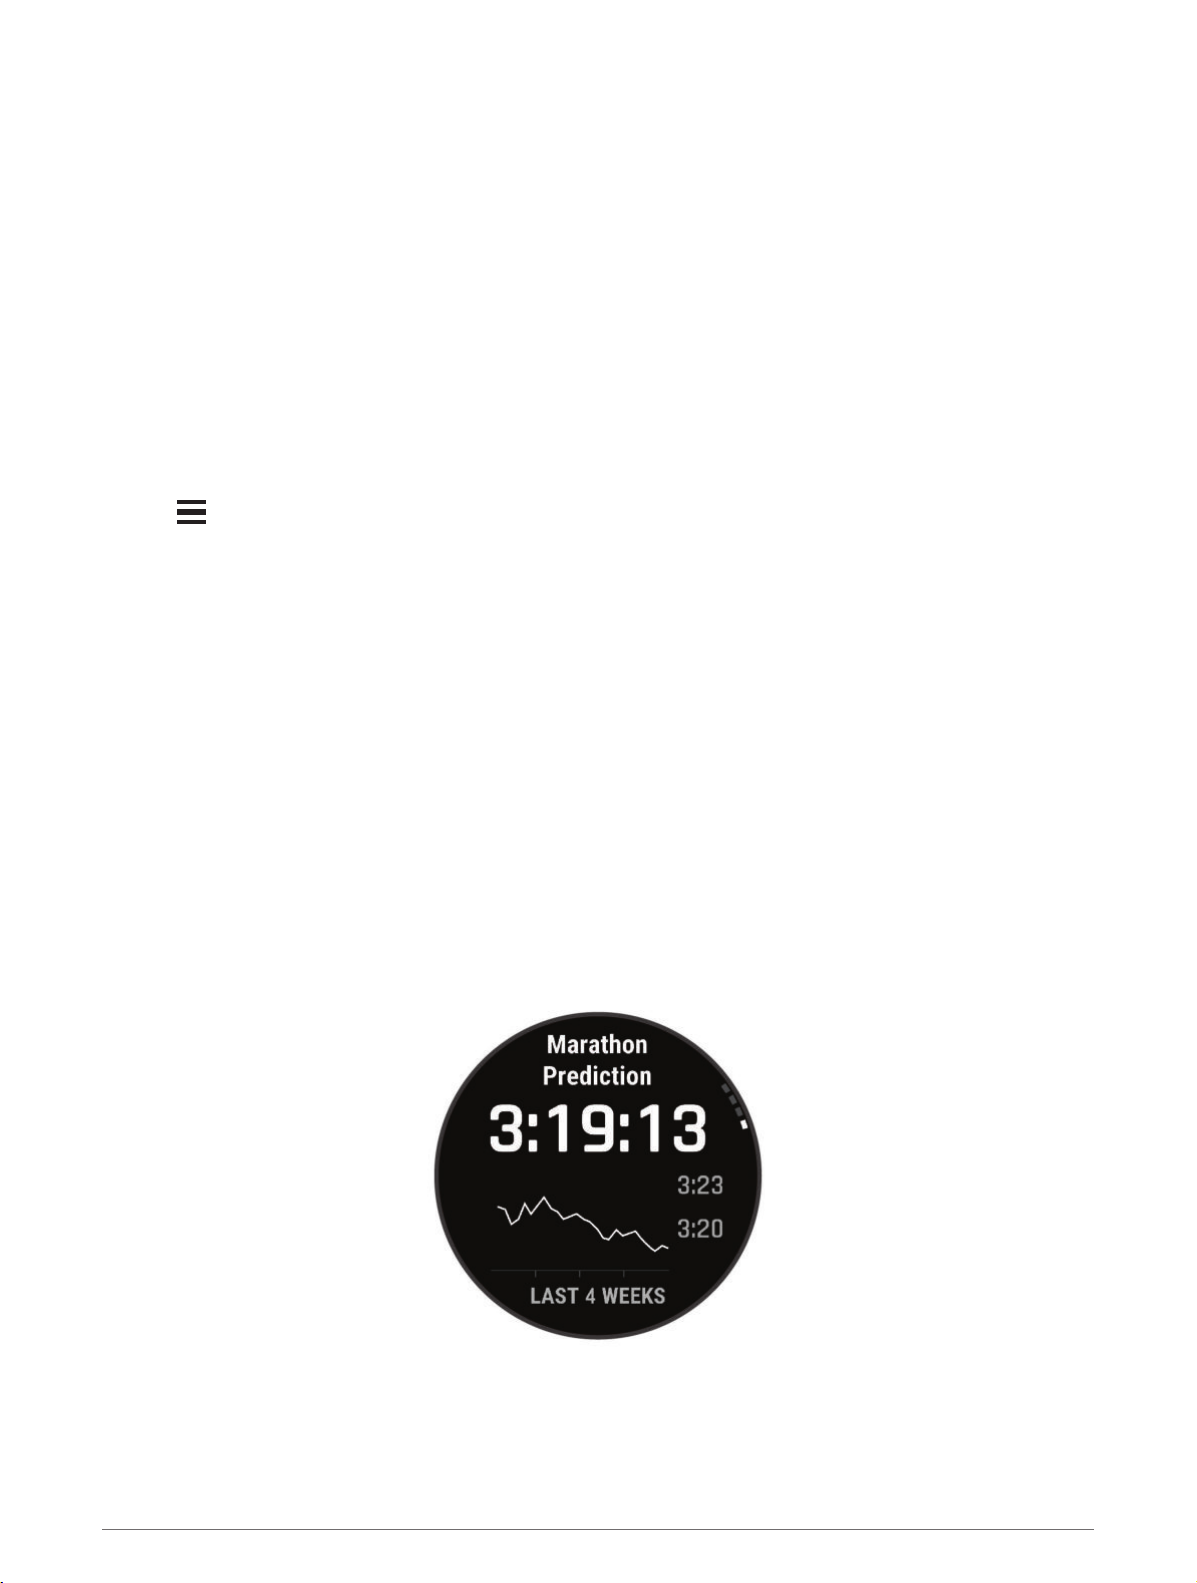
Getting Your VO2 Max. Estimate for Cycling
This feature requires a power meter and wrist-based heart rate or a compatible chest heart rate monitor. The
power meter must be paired with your watch (
heart rate monitor, you must put it on and pair it with your watch.
For the most accurate estimate, complete the user profile setup (Setting Up Your User Profile, page 80) and set
your maximum heart rate (Setting Your Heart Rate Zones, page 81). The estimate may seem inaccurate at first.
The watch requires a few rides to learn about your cycling performance.
1 Start a cycling activity.
2 Ride at a steady, high intensity for at least 20 minutes.
3 After your ride, select Save.
4 Press UP or DOWN to scroll through the performance measurements.
Pairing Your Wireless Sensors, page 73). If you are using a chest
Turning Off VO2 Max. Recording
You can disable VO2 max. recording for ultra run and trail run activities if you do not want these run types to
affect your VO2 max. estimate (
1 Hold .
2 Select Activities & Apps.
3 Select Trail Run or Ultra Run.
4 Select the activity settings.
5 Select Record VO2 Max. > Off.
About VO2 Max. Estimates, page 26).
Viewing Your Predicted Race Times
For the most accurate estimate, complete the user profile setup (
your maximum heart rate (Setting Your Heart Rate Zones, page 81).
Your watch uses the VO2 max. estimate (About VO2 Max. Estimates, page 26) and your training history to
provide a target race time. The watch analyzes several weeks of your training data to refine the race time
estimates.
TIP: If you have more than one Garmin device, you can enable the Physio TrueUp™ feature, which allows your
watch to sync activities, history, and data from other devices (Syncing Activities and Performance
Measurements, page 32).
1 From the watch face, press UP or DOWN to view the performance glance.
2 Press START to view glance details.
3 Press UP or DOWN to view a predicted race time.
Setting Up Your User Profile, page 80), and set
4 Press START to view predictions for other distances.
NOTE: The predictions may seem inaccurate at first. The watch requires a few runs to learn about your
running performance.
Appearance 27
Page 36
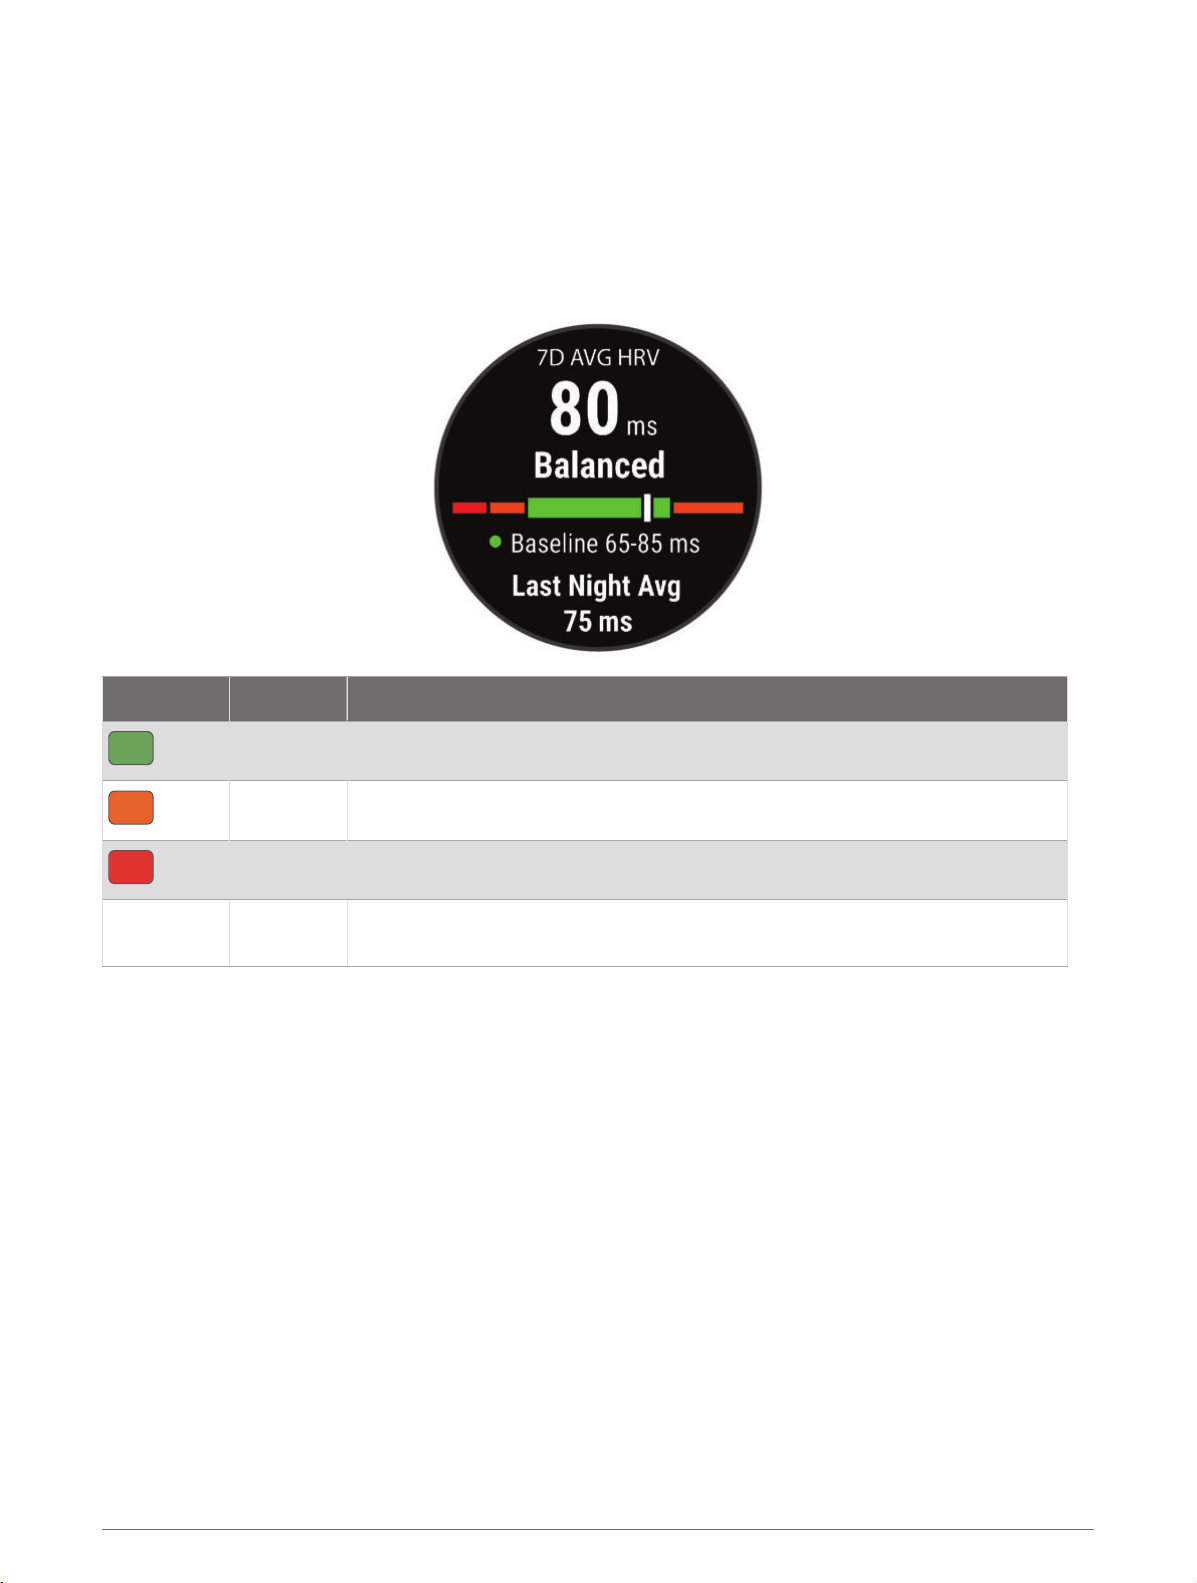
Heart Rate Variability Status
Your watch analyzes your wrist heart rate readings while you are sleeping to determine your heart rate variability
(HRV). Training, physical activity, sleep, nutrition, and healthy habits all impact your heart rate variability. HRV
values can vary widely based on gender, age, and fitness level. A balanced HRV status may indicate positive
signs of health such as good training and recovery balance, greater cardiovascular fitness, and resilience to
stress. An unbalanced or poor status may be a sign of fatigue, greater recovery needs, or increased stress. For
best results, you should wear the watch while sleeping. The watch requires three weeks of consistent sleep data
to display your heart rate variability status.
Color Zone Status Description
Green
Orange
Red
No color
You can sync your watch with your Garmin Connect account to view your current heart rate variability status,
trends, and educational feedback.
Balanced Your seven-day average HRV is within your baseline range.
Unbalanced Your seven-day average HRV is above or below your baseline range.
Low Your seven-day average HRV is well below your baseline range.
Poor
No status
Your HRV values are averaging well below the normal range for your age.
No status means that there is insufficient data to generate a seven-day average.
Performance Condition
As you complete your activity, such as running or cycling, the performance condition feature analyzes your pace,
heart rate, and heart rate variability to make a real-time assessment of your ability to perform compared to your
average fitness level. It is approximately your real-time percentage deviation from your baseline VO2 max.
estimate.
Performance condition values range from -20 to +20. After the first 6 to 20 minutes of your activity, the device
displays your performance condition score. For example, a score of +5 means that you are rested, fresh, and
capable of a good run or ride. You can add performance condition as a data field to one of your training screens
to monitor your ability throughout the activity. Performance condition can also be an indicator of fatigue level,
especially at the end of a long training run or ride.
NOTE: The device requires a few runs or rides with a heart rate monitor to get an accurate VO2 max. estimate
and learn about your running or riding ability (
About VO2 Max. Estimates, page 26).
28 Appearance
Page 37
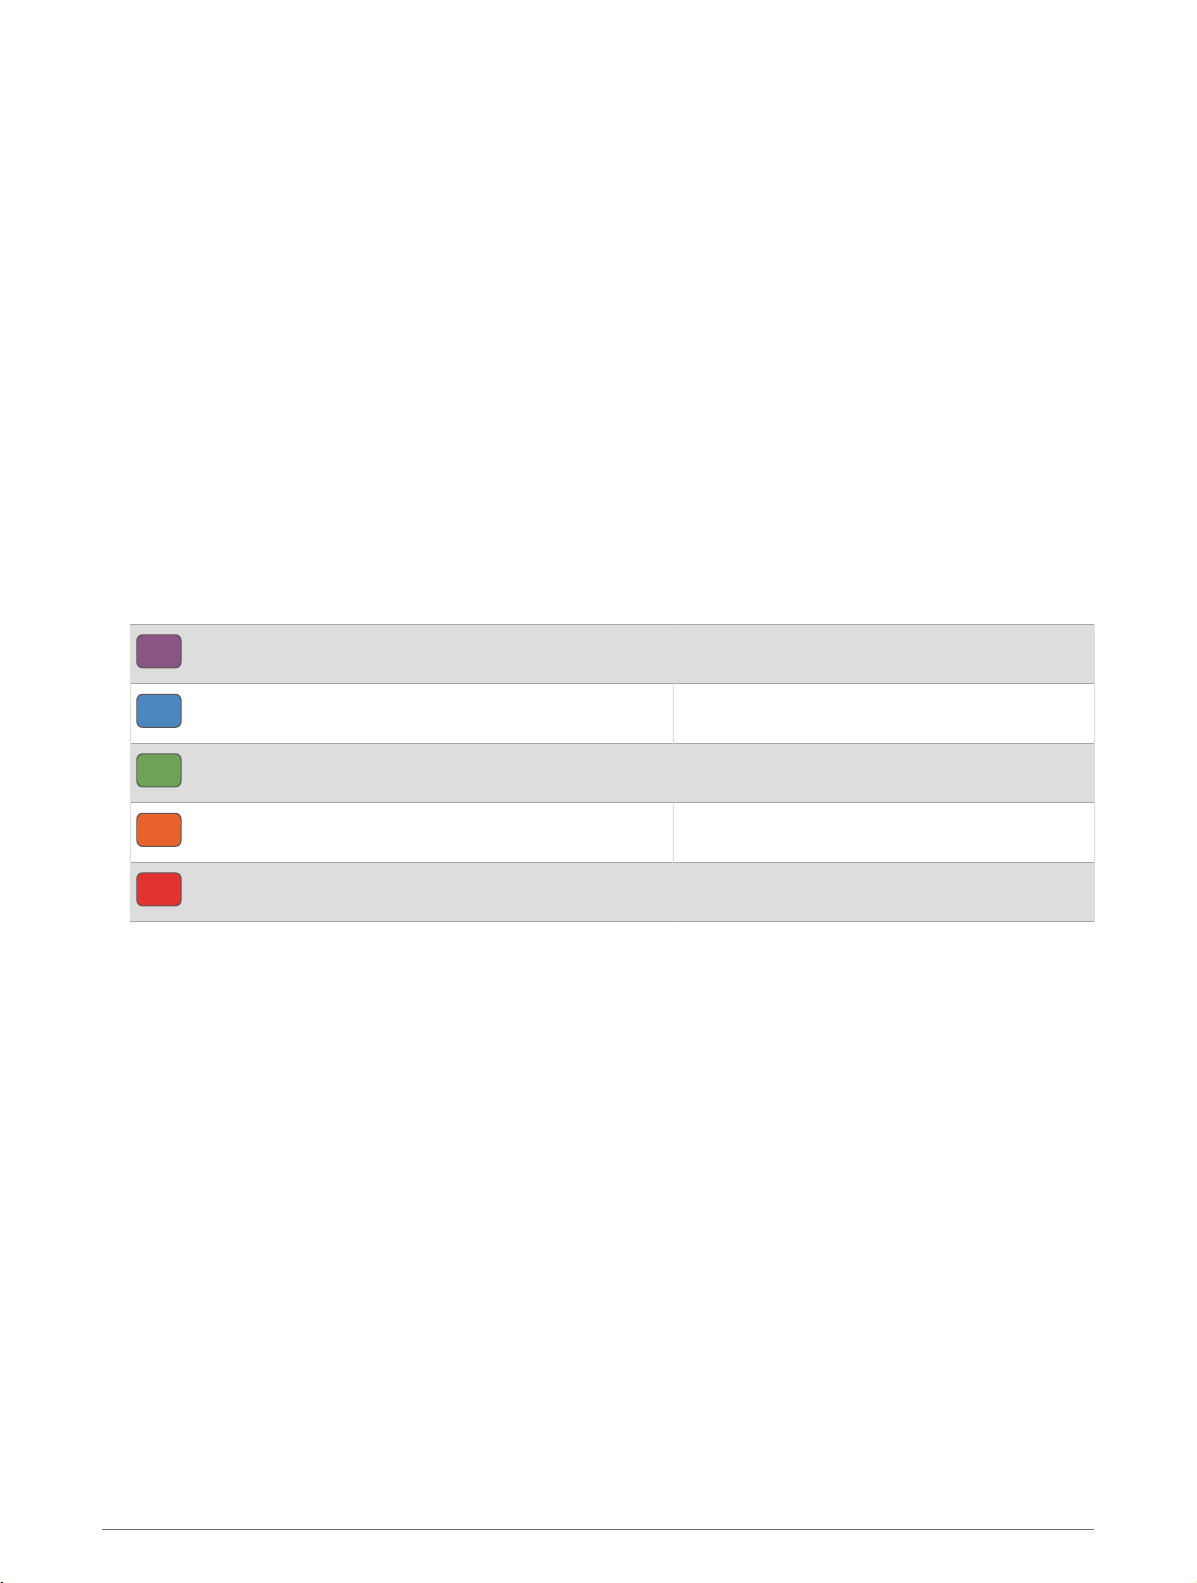
Viewing Your Performance Condition
This feature requires wrist-based heart rate or a compatible chest heart rate monitor.
1 Add Performance Condition to a data screen (
2 Go for a run or ride.
After 6 to 20 minutes, your performance condition appears.
3 Scroll to the data screen to view your performance condition throughout the run or ride.
Customizing the Data Screens, page 98).
Getting Your FTP Estimate
Before you can get your functional threshold power (FTP) estimate, you must pair a chest heart rate monitor
and power meter with your watch (
estimate (Getting Your VO2 Max. Estimate for Cycling, page 27).
The watch uses your user profile information from the initial setup and your VO2 max. estimate to estimate your
FTP. The watch will automatically detect your FTP during rides at a steady, high intensity with heart rate and
power.
1 Press UP or DOWN to view the performance glance.
2 Press START to view glance details.
3 Press UP or DOWN to view your FTP estimate.
Your FTP estimate appears as a value measured in watts per kilogram, your power output in watts, and a
position on the color gauge.
Pairing Your Wireless Sensors, page 73), and you must get your VO2 max.
Purple
Blue
Green
Orange
Red
For more information, see the appendix (FTP Ratings, page 132).
NOTE: When a performance notification alerts you to a new FTP, you can select Accept to save the new FTP,
or Decline to keep your current FTP.
Superior
Excellent
Good
Fair
Untrained
Appearance 29
Page 38
Conducting an FTP Test
Before you can conduct a test to determine your functional threshold power (FTP), you must pair a chest heart
rate monitor and a power meter with your device (
your VO2 max. estimate (Getting Your VO2 Max. Estimate for Cycling, page 27).
NOTE: The FTP test is a challenging workout that takes about 30 minutes to complete. Choose a practical and
mostly flat route that allows you to ride at a steadily increasing effort, similar to a time trial.
1 From the watch face, select START.
2 Select a cycling activity.
3 Hold .
4 Select Training > FTP Guided Test.
5 Follow the on-screen instructions.
After you begin your ride, the device displays each step duration, the target, and current power data. A
message appears when the test is complete.
6 After you complete the guided test, complete the cool down, stop the timer, and save the activity.
Your FTP appears as a value measured in watts per kilogram, your power output in watts, and a position on
the color gauge.
7 Select an option:
• Select Accept to save the new FTP.
• Select Decline to keep your current FTP.
Pairing Your Wireless Sensors, page 73), and you must get
Lactate Threshold
Lactate threshold is the exercise intensity at which lactate (lactic acid) starts to accumulate in the bloodstream.
In running, it is the estimated level of effort or pace. When a runner exceeds the threshold, fatigue starts to
increase at an accelerating rate. For experienced runners, the threshold occurs at approximately 90% of their
maximum heart rate and between 10k and half-marathon race pace. For average runners, the lactate threshold
often occurs well below 90% of maximum heart rate. Knowing your lactate threshold can help you determine
how hard to train or when to push yourself during a race.
If you already know your lactate threshold heart rate value, you can enter it in your user profile settings (
Your Heart Rate Zones, page 81). You can turn on the Auto Detection feature to automatically record your
lactate threshold during an activity.
Setting
30 Appearance
Page 39
Performing a Guided Test to Determine Your Lactate Threshold
This feature requires a Garmin chest heart rate monitor. Before you can perform the guided test, you must put
on a heart rate monitor and pair it with your device (
The device uses your user profile information from the initial setup and your VO2 max. estimate to estimate
your lactate threshold. The device will automatically detect your lactate threshold during runs at a steady, high
intensity with heart rate.
TIP: The device requires a few runs with a chest heart rate monitor to get an accurate maximum heart rate value
and VO2 max. estimate. If you are having trouble getting a lactate threshold estimate, try manually lowering
your maximum heart rate value.
1 From the watch face, select START.
2 Select an outdoor running activity.
GPS is required to complete the test.
3 Hold .
4 Select Training > Lactate Threshold Guided Test.
5 Start the timer, and follow the on-screen instructions.
After you begin your run, the device displays each step duration, the target, and current heart rate data. A
message appears when the test is complete.
6 After you complete the guided test, stop the timer and save the activity.
If this is your first lactate threshold estimate, the device prompts you to update your heart rate zones based
on your lactate threshold heart rate. For each additional lactate threshold estimate, the device prompts you
to accept or decline the estimate.
Pairing Your Wireless Sensors, page 73).
Appearance 31
Page 40
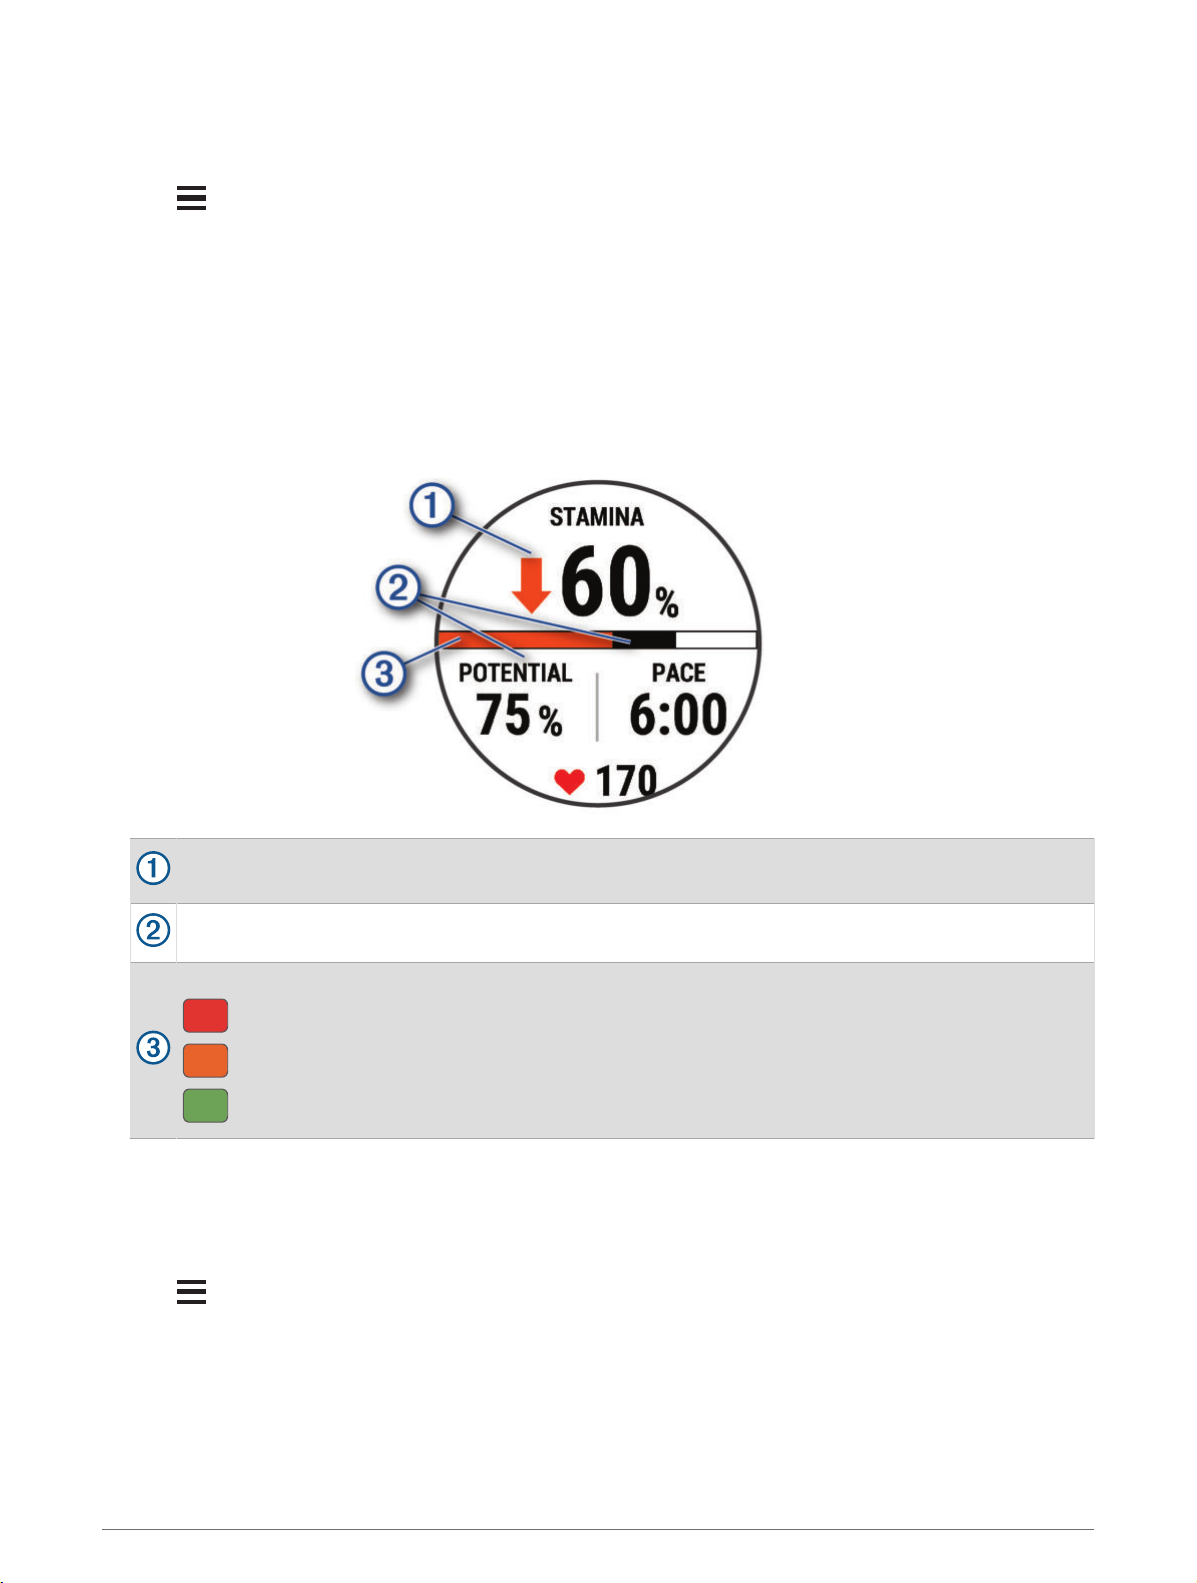
Viewing Your Real-Time Stamina
Your watch can provide real-time stamina estimates based on your heart rate data and VO2 max. estimate
About VO2 Max. Estimates, page 26).
(
1 Hold .
2 Select Activities & Apps.
3 Select a run or bike activity.
4 Select the activity settings.
5 Select Data Screens > Add New > Stamina.
6 Press UP or DOWN to change the location of the data screen (optional).
7 Press START to edit the primary stamina data field (optional).
8 Start your activity (Starting an Activity, page 3).
9 Press UP or DOWN to scroll to the data screen.
Primary stamina data field. Shows your current stamina percentage, distance remaining, or time
remaining.
Potential stamina.
Current stamina.
Red: Stamina is depleting.
Orange: Stamina is steady.
Green: Stamina is recharging.
Syncing Activities and Performance Measurements
You can sync activities and performance measurements from other Garmin devices to your Forerunner watch
using your Garmin Connect account. This allows your watch to more accurately reflect your training status and
fitness. For example, you can record a ride with an Edge® device, and view your activity details and overall
training load on your Forerunner watch.
1 Hold
2 Select System > Physio TrueUp.
When you sync your watch with your phone, recent activities and performance measurements from your other
Garmin devices appear on your Forerunner watch.
.
32 Appearance
Page 41
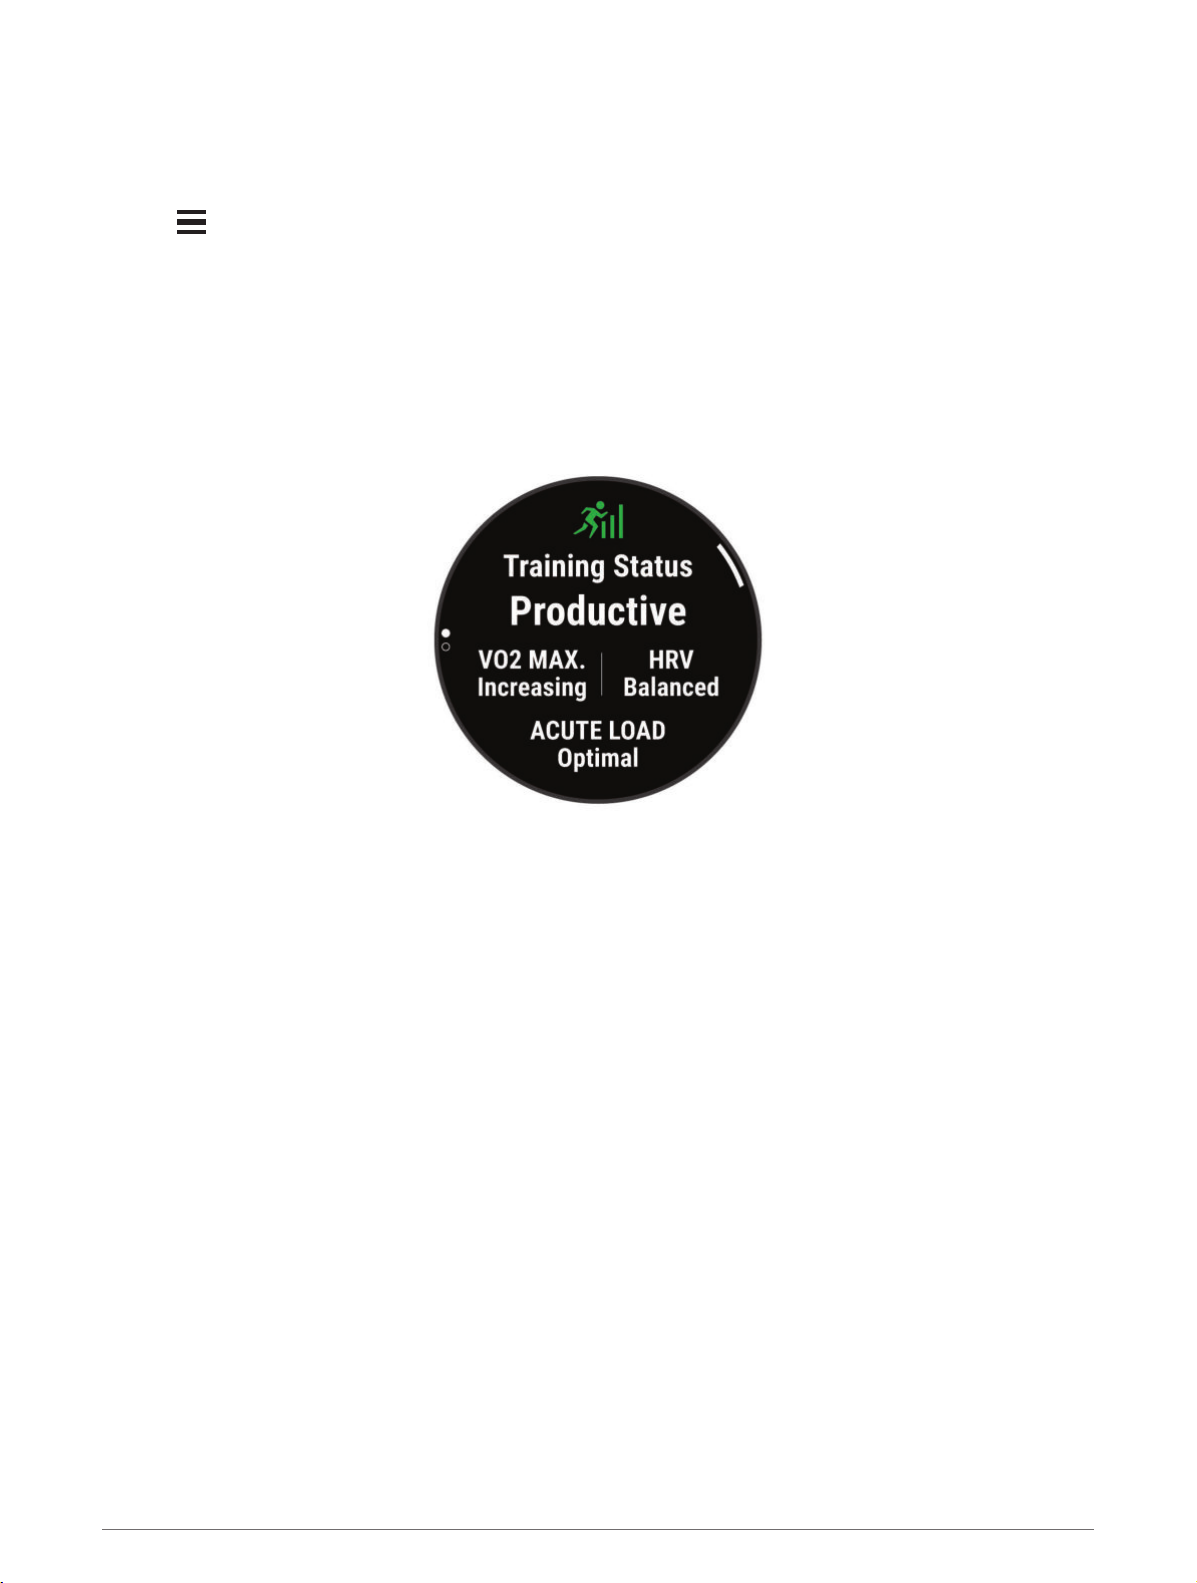
Turning Off Performance Notifications
Some performance notifications appear upon completion of your activity. Some performance notifications
appear during an activity or when you achieve a new performance measurement, such as a new VO2 max.
estimate. You can turn off the performance condition feature to avoid some of these notifications.
1 Hold
2 Select System > Performance Condition.
.
Training Status
These measurements are estimates that can help you track and understand your training activities. The
measurements require a few activities using wrist-based heart rate or a compatible chest heart rate monitor.
Cycling performance measurements require a heart rate monitor and a power meter.
These estimates are provided and supported by Firstbeat Analytics. For more information, go to
www.garmin.com/performance-data/running/.
NOTE: The estimates may seem inaccurate at first. The watch requires you to complete a few activities to learn
about your performance.
Training status: Training status shows you how your training affects your fitness and performance. Your
training status is based on changes to your VO2 max., acute load, and HRV status over an extended time
period.
VO2 max.: VO2 max. is the maximum volume of oxygen (in milliliters) you can consume per minute per kilogram
of body weight at your maximum performance (About VO2 Max. Estimates, page 26). Your watch displays
heat and altitude corrected VO2 max. values when you are acclimating to high heat environments or high
altitude (Heat and Altitude Performance Acclimation, page 38).
Acute load: Acute load is a weighted sum of your recent exercise load scores including exercise duration and
intensity. (Acute Load, page 34).
Training load focus: Your watch analyzes and distributes your training load into different categories based on
the intensity and structure of each activity recorded. Training load focus includes the total load accumulated
per category, and the focus of the training. Your watch displays your load distribution over the last 4 weeks
(Training Load Focus, page 35).
Training readiness: The watch uses various data, including training, recovery, and sleep, to provide a readiness
score so you can determine if this is the best time to do a hard workout or take it easy (Training Readiness,
page 37).
Recovery time: The recovery time displays how much time remains before you are fully recovered and ready for
the next hard workout (Recovery Time, page 37).
Appearance 33
Page 42
Training Status Levels
Training status shows you how your training affects your fitness level and performance. Your training status is
based on changes to your VO2 max., acute load, and HRV status over an extended time period. You can use
your training status to help plan future training and continue improving your fitness level.
No Status: The watch needs at least one activity per week, with VO2 max. results from running or cycling, to
determine your training status.
Detraining: You have a break in your training routine or you are training much less than usual for a week or
more. Detraining means that you are unable to maintain your fitness level. You can try increasing your
training load to see improvement.
Recovery: Your lighter training load is allowing your body to recover, which is essential during extended periods
of hard training. You can return to a higher training load when you feel ready.
Maintaining: Your current training load is enough to maintain your fitness level. To see improvement, try adding
more variety to your workouts or increasing your training volume.
Productive: Your current training load is moving your fitness level and performance in the right direction. You
should plan recovery periods into your training to maintain your fitness level.
Peaking: You are in ideal race condition. Your recently reduced training load is allowing your body to recover
and fully compensate for earlier training. You should plan ahead, since this peak state can only be maintained
for a short time.
Overreaching: Your training load is very high and counterproductive. Your body needs a rest. You should give
yourself time to recover by adding lighter training to your schedule.
Unproductive: Your training load is at a good level, but your fitness is decreasing. Try focusing on rest, nutrition,
and stress management.
Strained: There is imbalance between your recovery and training load. It is a normal result after a hard training
or major event. Your body may be struggling to recover, so you should pay attention to your overall health.
Tips for Getting Your Training Status
The training status feature depends on updated assessments of your fitness level, including at least one VO2
max. measurement per week. Your VO2 max. estimate is updated after outdoor runs or rides with power during
which your heart rate reached at least 70% of your maximum heart rate for several minutes. Indoor run activities
do not generate a VO2 max. estimate in order to preserve the accuracy of your fitness level trend. You can
disable VO2 max. recording for ultra run and trail run activities if you do not want those run types to affect your
VO2 max. estimate (
To get the most out of the training status feature, you can try these tips.
• At least one time per week, run or ride outdoors with a power meter, and reach a heart rate higher than 70% of
your maximum heart rate for at least 10 minutes.
After using the watch for one week, your training status should be available.
• Record all of your fitness activities on this watch, or enable the Physio TrueUp feature, allowing your watch to
learn about your performance (Syncing Activities and Performance Measurements, page 32).
• Wear the watch consistently while you sleep, to continue generating an up-to-date HRV status. Having a valid
HRV status can help maintain a valid training status when you do not have as many activities with VO2 max.
measurements.
Turning Off VO2 Max. Recording, page 27).
Acute Load
Acute load is a weighted sum of your excess post-exercise oxygen consumption (EPOC) for the last several
days. The gauge indicates whether your current load is low, optimal, high, or very high. The optimal range is
based on your individual fitness level and training history. The range adjusts as your training time and intensity
increase or decrease.
34 Appearance
Page 43
Training Load Focus
In order to maximize performance and fitness gains, training should be distributed across three categories: low
aerobic, high aerobic, and anaerobic. Training load focus shows you how much of your training is currently in
each category and provides training targets. Training load focus requires at least 7 days of training to determine
if your training load is low, optimal, or high. After 4 weeks of training history, your training load estimate will
have more detailed target information to help you balance your training activities.
Below targets: Your training load is lower than optimal in all intensity categories. Try increasing the duration or
frequency of your workouts.
Low aerobic shortage: Try adding more low aerobic activities to provide recovery and balance for your higher
intensity activities.
High aerobic shortage: Try adding more high aerobic activities to help improve your lactate threshold and VO2
max. over time.
Anaerobic shortage: Try adding a few more intense, anaerobic activities to improve your speed and anaerobic
capacity over time.
Balanced: Your training load is balanced and provides all-around fitness benefits as you continue training.
Low aerobic focus: Your training load is mostly low aerobic activity. This provides a solid foundation and
prepares you for adding more intense workouts.
High aerobic focus: Your training load is mostly high aerobic activity. These activities help to improve lactate
threshold, VO2 max., and endurance.
Anaerobic focus: Your training load is mostly intense activity. This leads to rapid fitness gains, but should be
balanced with low aerobic activities.
Above targets: Your training load is higher than optimal, and you should consider scaling back the duration and
frequency of your workouts.
Appearance 35
Page 44
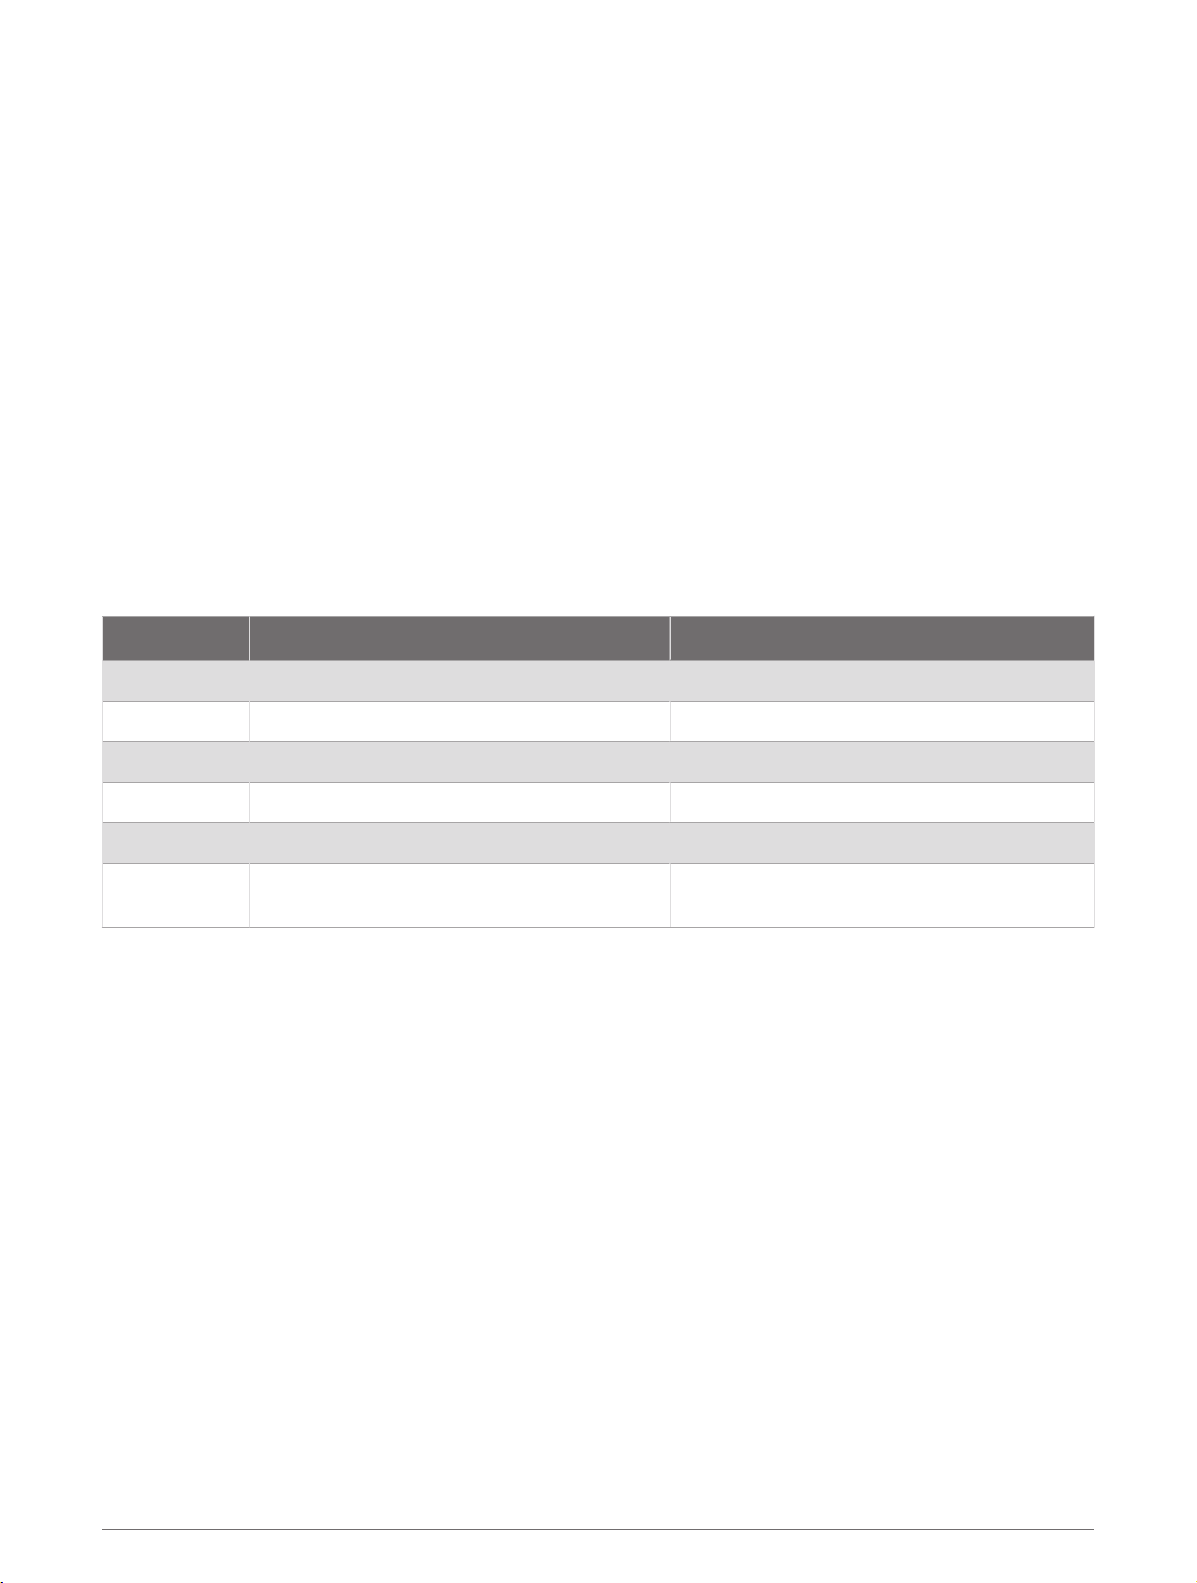
About Training Effect
Training Effect measures the impact of an activity on your aerobic and anaerobic fitness. Training Effect
accumulates during the activity. As the activity progresses, the Training Effect value increases. Training Effect
is determined by your user profile information and training history, and heart rate, duration, and intensity of your
activity. There are seven different Training Effect labels to describe the primary benefit of your activity. Each
label is color coded and corresponds to your training load focus (
phrase, for example, "Highly Impacting VO2 Max." has a corresponding description in your Garmin Connect
activity details.
Aerobic Training Effect uses your heart rate to measure how the accumulated intensity of an exercise affects
your aerobic fitness and indicates if the workout had a maintaining or improving effect on your fitness level.
Your excess post-exercise oxygen consumption (EPOC) accumulated during exercise is mapped to a range of
values that account for your fitness level and training habits. Steady workouts at moderate effort or workouts
involving longer intervals (>180 sec) have a positive impact on your aerobic metabolism and result in an
improved aerobic Training Effect.
Anaerobic Training Effect uses heart rate and speed (or power) to determine how a workout affects your ability
to perform at very high intensity. You receive a value based on the anaerobic contribution to EPOC and the type
of activity. Repeated high-intensity intervals of 10 to 120 seconds have a highly beneficial impact on your
anaerobic capability and result in an improved anaerobic Training Effect.
You can add Aerobic Training Effect and Anaerobic Training Effect as data fields to one of your training screens
to monitor your numbers throughout the activity.
Training Effect Aerobic Benefit Anaerobic Benefit
From 0.0 to 0.9 No benefit. No benefit.
Training Load Focus, page 35). Each feedback
From 1.0 to 1.9 Minor benefit. Minor benefit.
From 2.0 to 2.9 Maintains your aerobic fitness. Maintains your anaerobic fitness.
From 3.0 to 3.9 Impacts your aerobic fitness. Impacts your anaerobic fitness.
From 4.0 to 4.9 Highly impacts your aerobic fitness. Highly impacts your anaerobic fitness.
5.0
Training Effect technology is provided and supported by Firstbeat Technologies Ltd. For more information, go to
www.firstbeat.com.
Overreaching and potentially harmful without
enough recovery time.
Overreaching and potentially harmful without
enough recovery time.
36 Appearance
Page 45
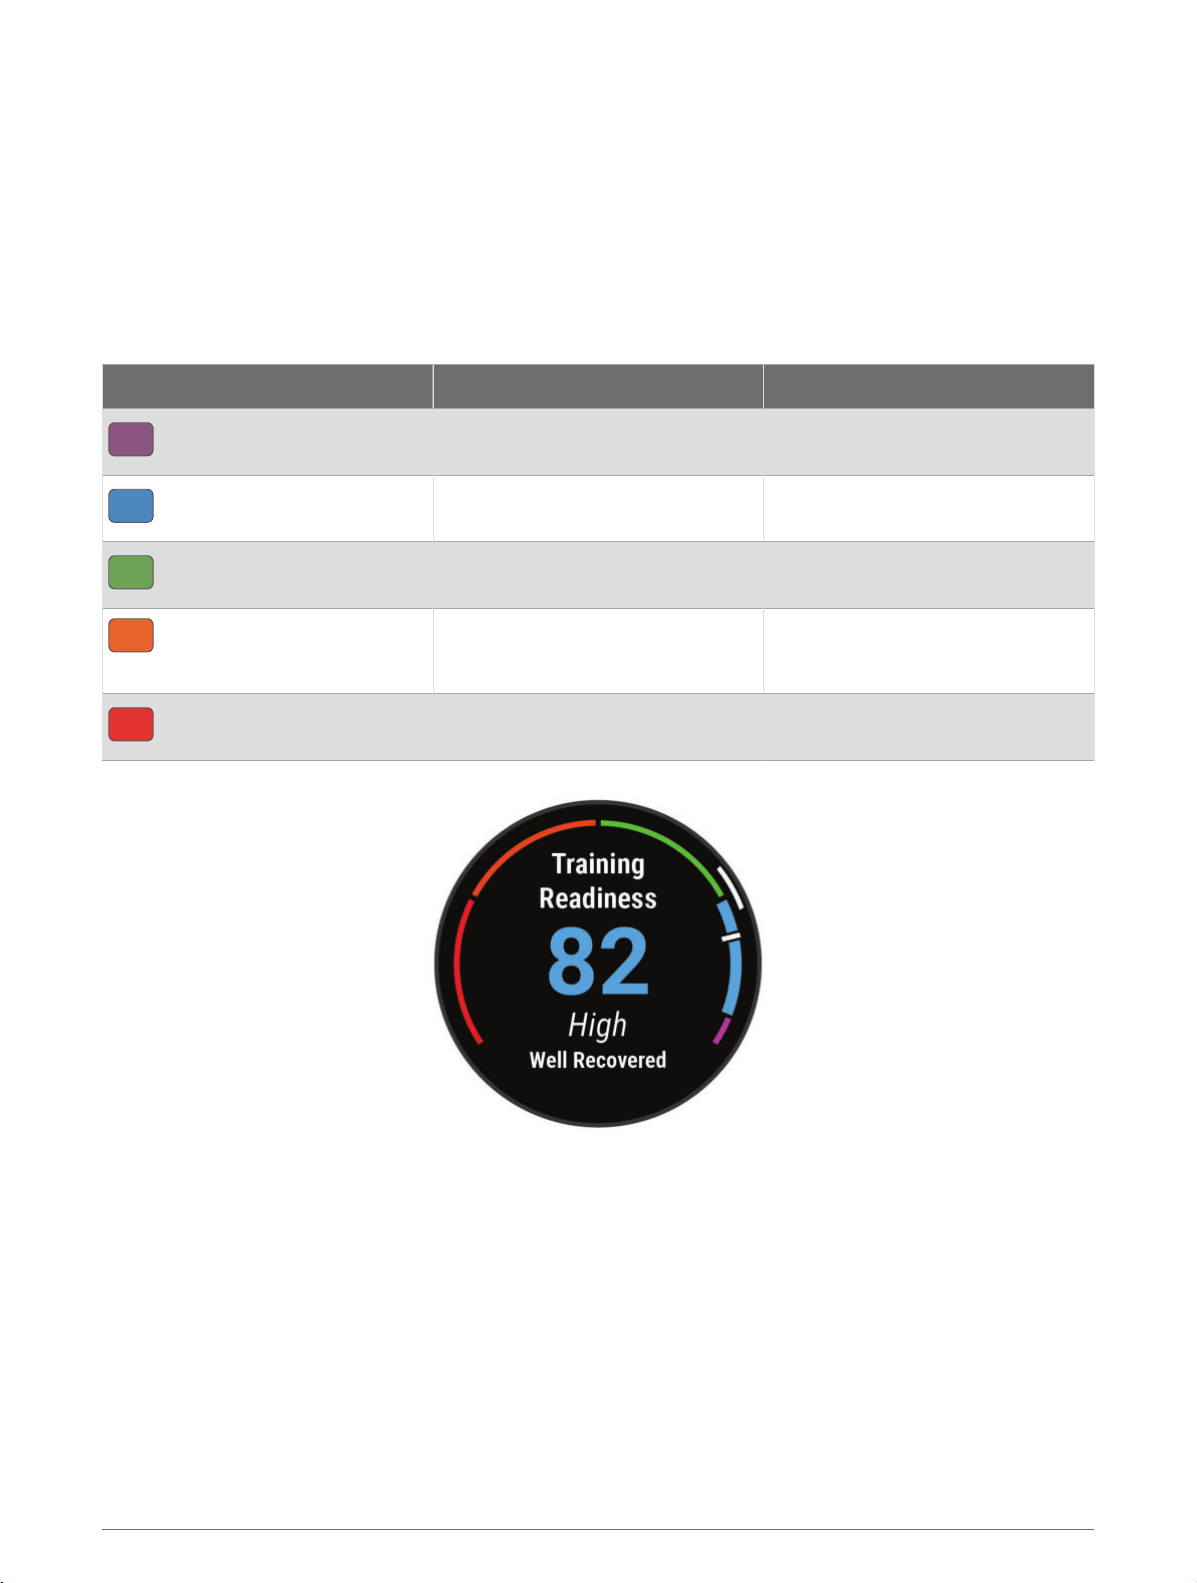
Training Readiness
Your training readiness is a score and a short message that helps you determine how ready you are for training
each day. The score is continuously calculated and updated throughout the day using these factors:
• Sleep score (last night)
• Recovery time
• HRV status
• Acute load
• Sleep history (last 3 nights)
• Stress history (last 3 days)
Color Zone Score Description
Purple
Blue
Green
Orange
Red
95 to 100
75 to 94
50 to 74
25 to 49
1 to 24
Prime
Best possible
High
Ready for challenges
Moderate
Good to go
Low
Time to slow down
Poor
Let your body recover
To see your training readiness trends over time, go to your Garmin Connect account.
Recovery Time
You can use your Garmin device with wrist-based heart rate or a compatible chest heart rate monitor to display
how much time remains before you are fully recovered and ready for the next hard workout.
NOTE: The recovery time recommendation uses your VO2 max. estimate and may seem inaccurate at first. The
device requires you to complete a few activities to learn about your performance.
The recovery time appears immediately following an activity. The time counts down until it is optimal for you to
attempt another hard workout. The device updates your recovery time throughout the day based on changes in
sleep, stress, relaxation, and physical activity.
Appearance 37
Page 46
Viewing Your Recovery Time
For the most accurate estimate, complete the user profile setup (
your maximum heart rate (Setting Your Heart Rate Zones, page 81).
1 Start a running activity.
2 After your run, select Save.
The recovery time appears. The maximum time is 4 days.
NOTE: From the watch face, you can press UP or DOWN to view the training status glance, and press START
to scroll through the metrics to view your recovery time.
Setting Up Your User Profile, page 80), and set
Recovery Heart Rate
If you are training with wrist-based heart rate or a compatible chest heart rate monitor, you can check your
recovery heart rate value after each activity. Recovery heart rate is the difference between your exercising heart
rate and your heart rate two minutes after the exercise has stopped. For example, after a typical training run, you
stop the timer. Your heart rate is 140 bpm. After two minutes of no activity or cool down, your heart rate is 90
bpm. Your recovery heart rate is 50 bpm (140 minus 90). Some studies have linked recovery heart rate to
cardiac health. Higher numbers generally indicate healthier hearts.
TIP: For best results, you should stop moving for two minutes while the device calculates your recovery heart
rate value.
Heat and Altitude Performance Acclimation
Environmental factors such as high temperature and altitude impact your training and performance. For
example, high altitude training can have a positive impact on your fitness, but you may notice a temporary VO2
max. decline while exposed to high altitudes. Your Forerunner watch provides acclimation notifications and
corrections to your VO2 max. estimate and training status when the temperature is above 22ºC (72ºF) and when
the altitude is above 800 m (2625 ft.). You can keep track of your heat and altitude acclimation in the training
status glance.
NOTE: The heat acclimation feature is available only for GPS activities and requires weather data from your
connected phone.
Pausing and Resuming Your Training Status
If you are injured or sick, you can pause your training status. You can continue to record fitness activities, but
your training status, training load focus, recovery feedback, and workout recommendations are temporarily
disabled.
You can resume your training status when you are ready to start training again. For best results, you need at
least one VO2 max. measurement each week (
1 When you want to pause your training status, select an option:
• From the training status glance, hold , and select Pause Training Status.
• From your Garmin Connect settings, select Performance Stats > Training Status > > Pause Training
Status.
2 Sync your watch with your Garmin Connect account.
3 When you want to resume your training status, select an option:
• From the training status glance, hold , and select Resume Training Status.
• From your Garmin Connect settings, select Performance Stats > Training Status > > Resume Training
Status.
4 Sync your watch with your Garmin Connect account.
About VO2 Max. Estimates, page 26).
38 Appearance
Page 47
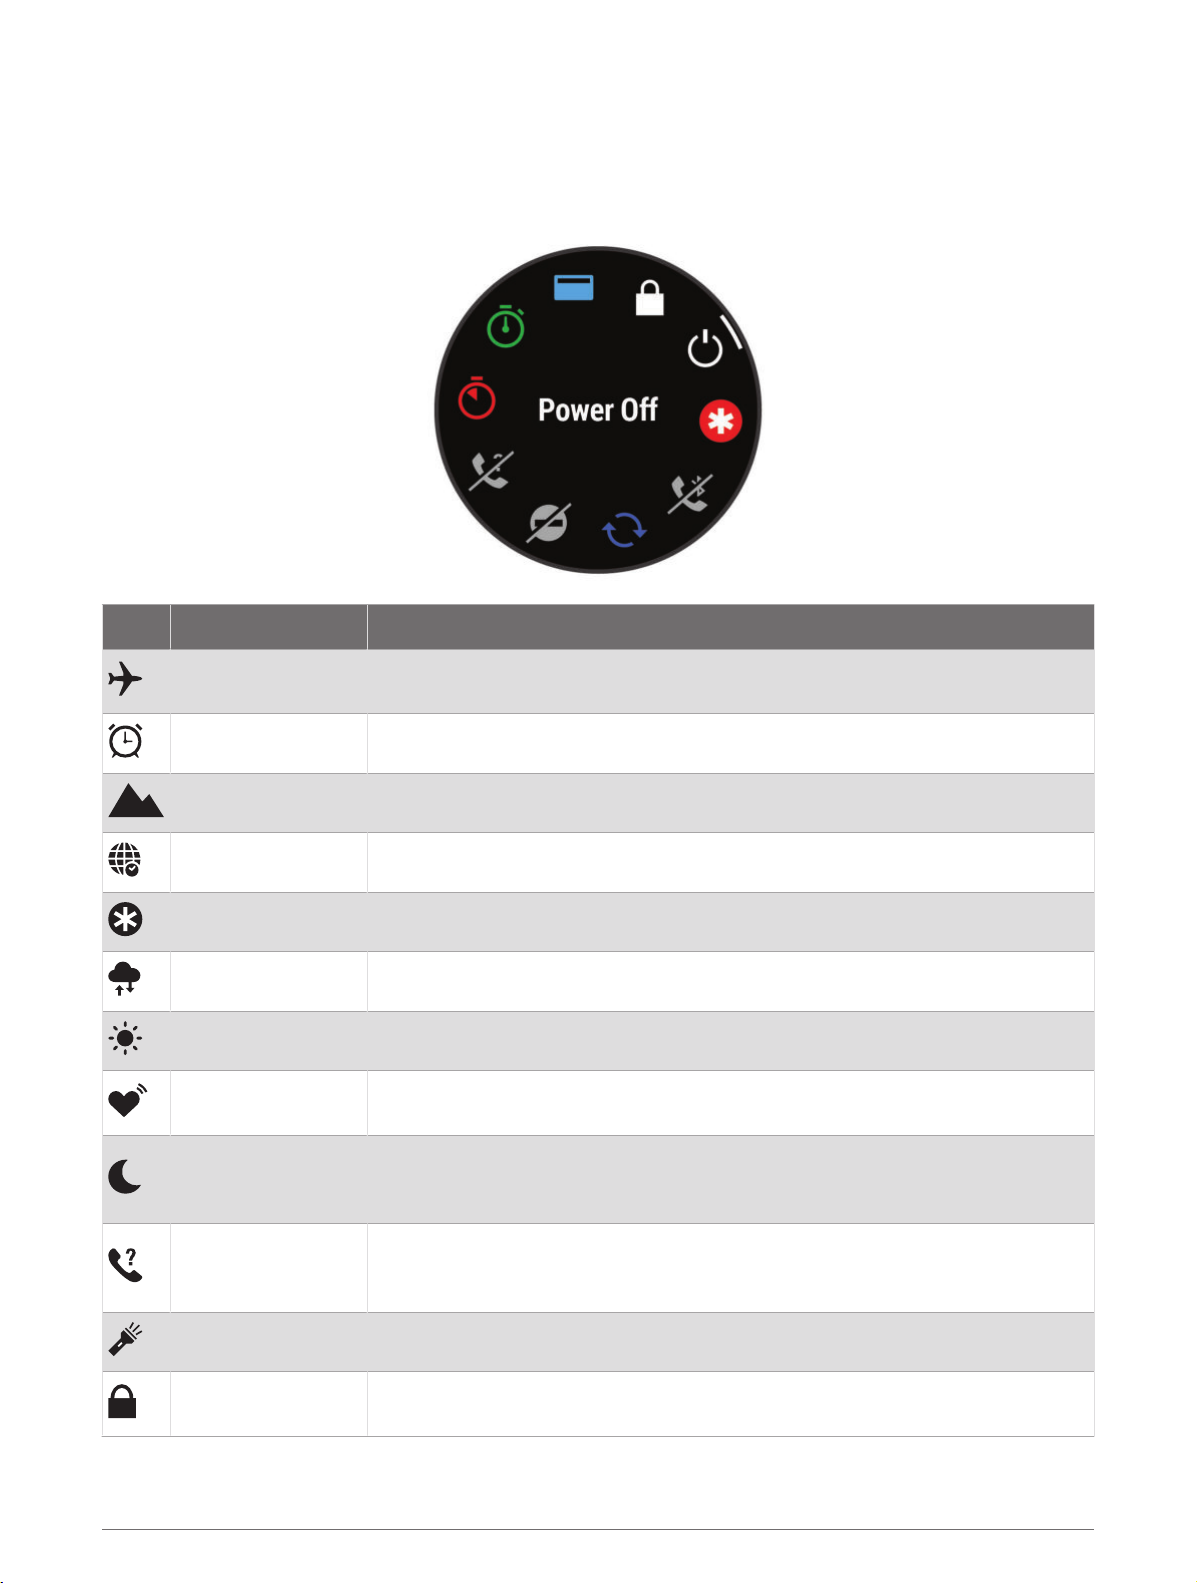
Controls
The controls menu lets you quickly access watch features and options. You can add, reorder, and remove the
options in the controls menu (Customizing the Controls Menu, page 41).
From any screen, hold LIGHT.
Icon Name Description
Airplane Mode
Alarm Clock Select to add or edit an alarm (Setting an Alarm, page 94).
Altimeter Select to open the altimeter screen.
Alt. Time Zones Select to view the current time of day in additional time zones.
Assistance Select to send an assistance request (Requesting Assistance, page 92).
Barometer Select to open the barometer screen.
Backlight Select to adjust the screen brightness (Changing the Screen Settings, page 107).
Broadcast Heart
Rate
Do Not Disturb
Find My Phone
Select to enable or disable airplane mode to turn off all wireless communica
tions.
Select to turn on heart rate broadcasting to a paired device (Broadcasting Heart
Rate Data, page 60).
Select to enable or disable do not disturb mode to dim the screen and disable
alerts and notifications. For example, you can use this mode while watching a
movie.
Select to play an audible alert on your paired phone, if it is within Bluetooth
range. The Bluetooth signal strength appears on the Forerunner watch screen,
and it increases as you move closer to your phone.
Flashlight Select to turn on the screen to use your watch as a flashlight.
Lock Device
Appearance 39
Select to lock the buttons and the touchscreen to prevent inadvertent presses
and swipes.
Page 48
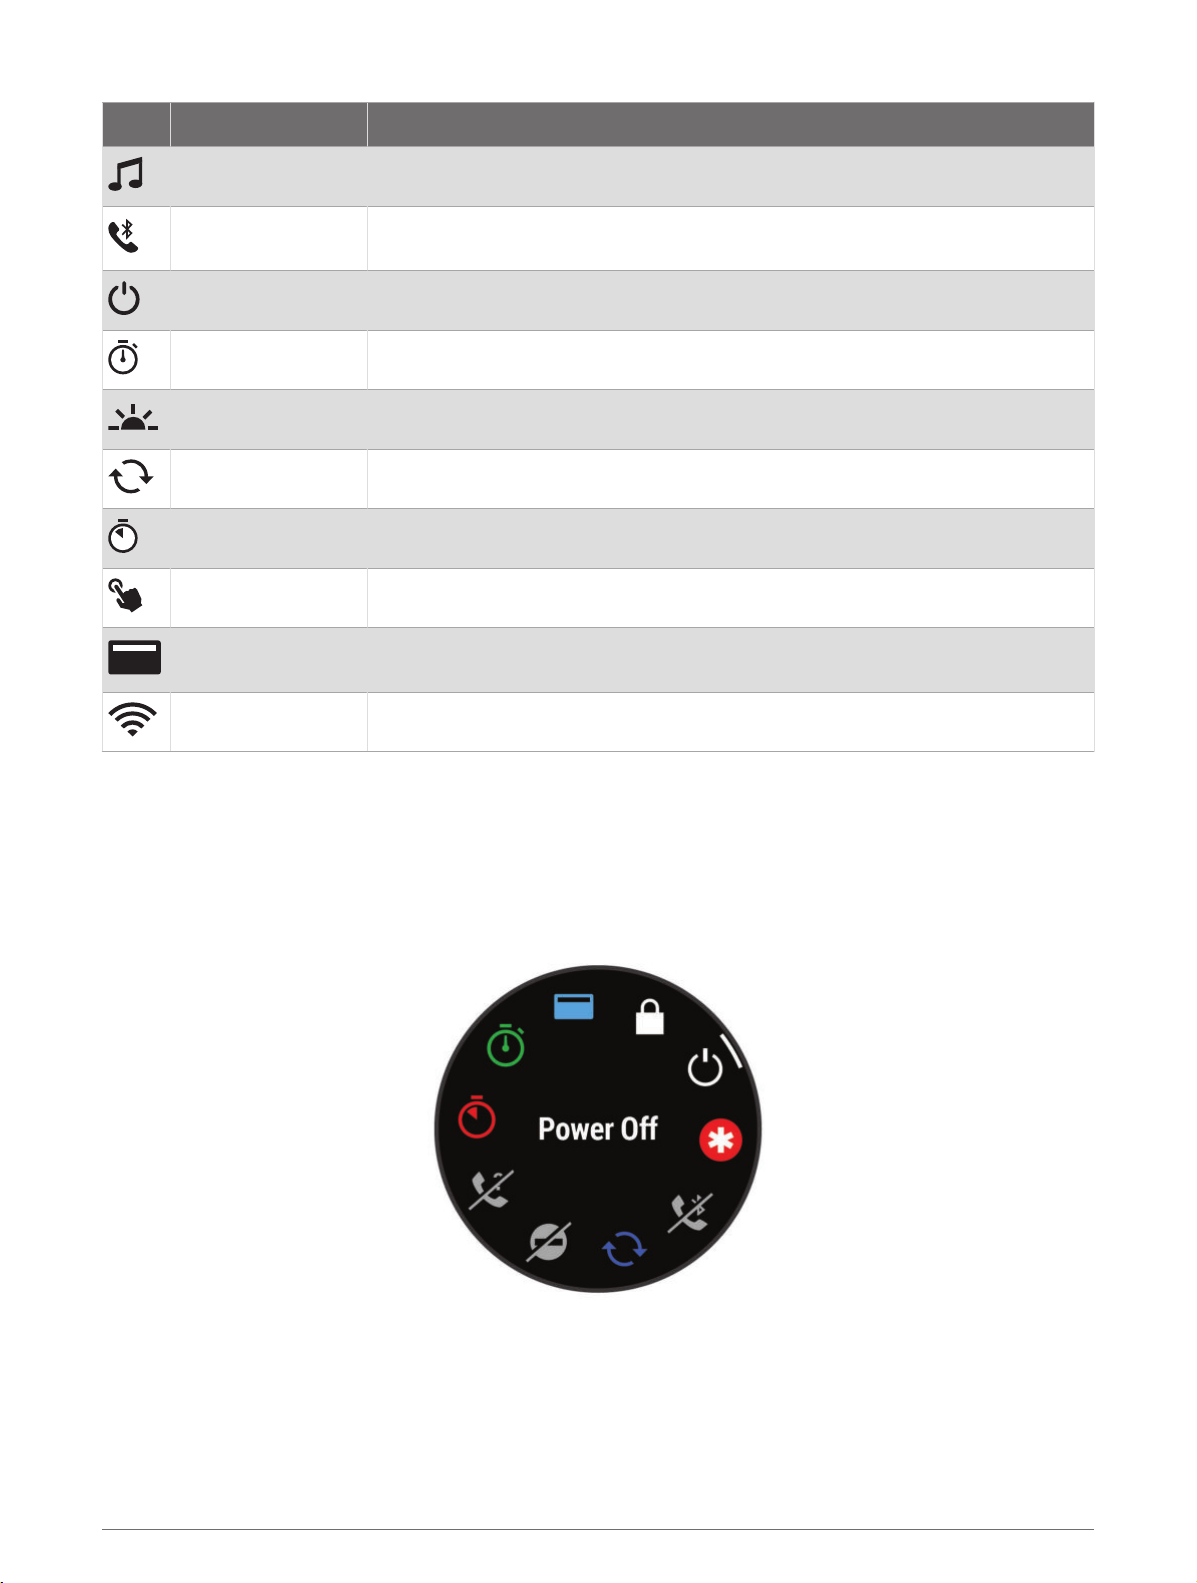
Icon Name Description
Music Controls Select to control music playback on your watch or phone.
Phone
Power Off Select to turn off the watch.
Stopwatch Select to start the stopwatch (Using the Stopwatch, page 95).
Sunrise & Sunset Select to view sunrise, sunset, and twilight times.
Sync Select to sync your watch with your paired phone.
Timers Select to set a countdown timer (Starting the Countdown Timer, page 95).
Touch Select to enable or disable touchscreen controls.
Wallet
Wi-Fi Select to enable or disable Wi‑Fi communications.
Select to enable or disable Bluetooth technology and your connection to your
paired phone.
Select to open your Garmin Pay wallet and pay for purchases with your watch
(Garmin Pay, page 41).
Viewing the Controls Menu
The controls menu contains options, such as the stopwatch, locating your connected phone, and turning the
watch off. You can also open the Garmin Pay wallet.
NOTE: You can add, reorder, and remove the options in the controls menu (
page 41).
1 From any screen, hold LIGHT.
Customizing the Controls Menu,
2 Press UP or DOWN to scroll through the options.
TIP: You can also drag the touchscreen to rotate the options.
40 Appearance
Page 49
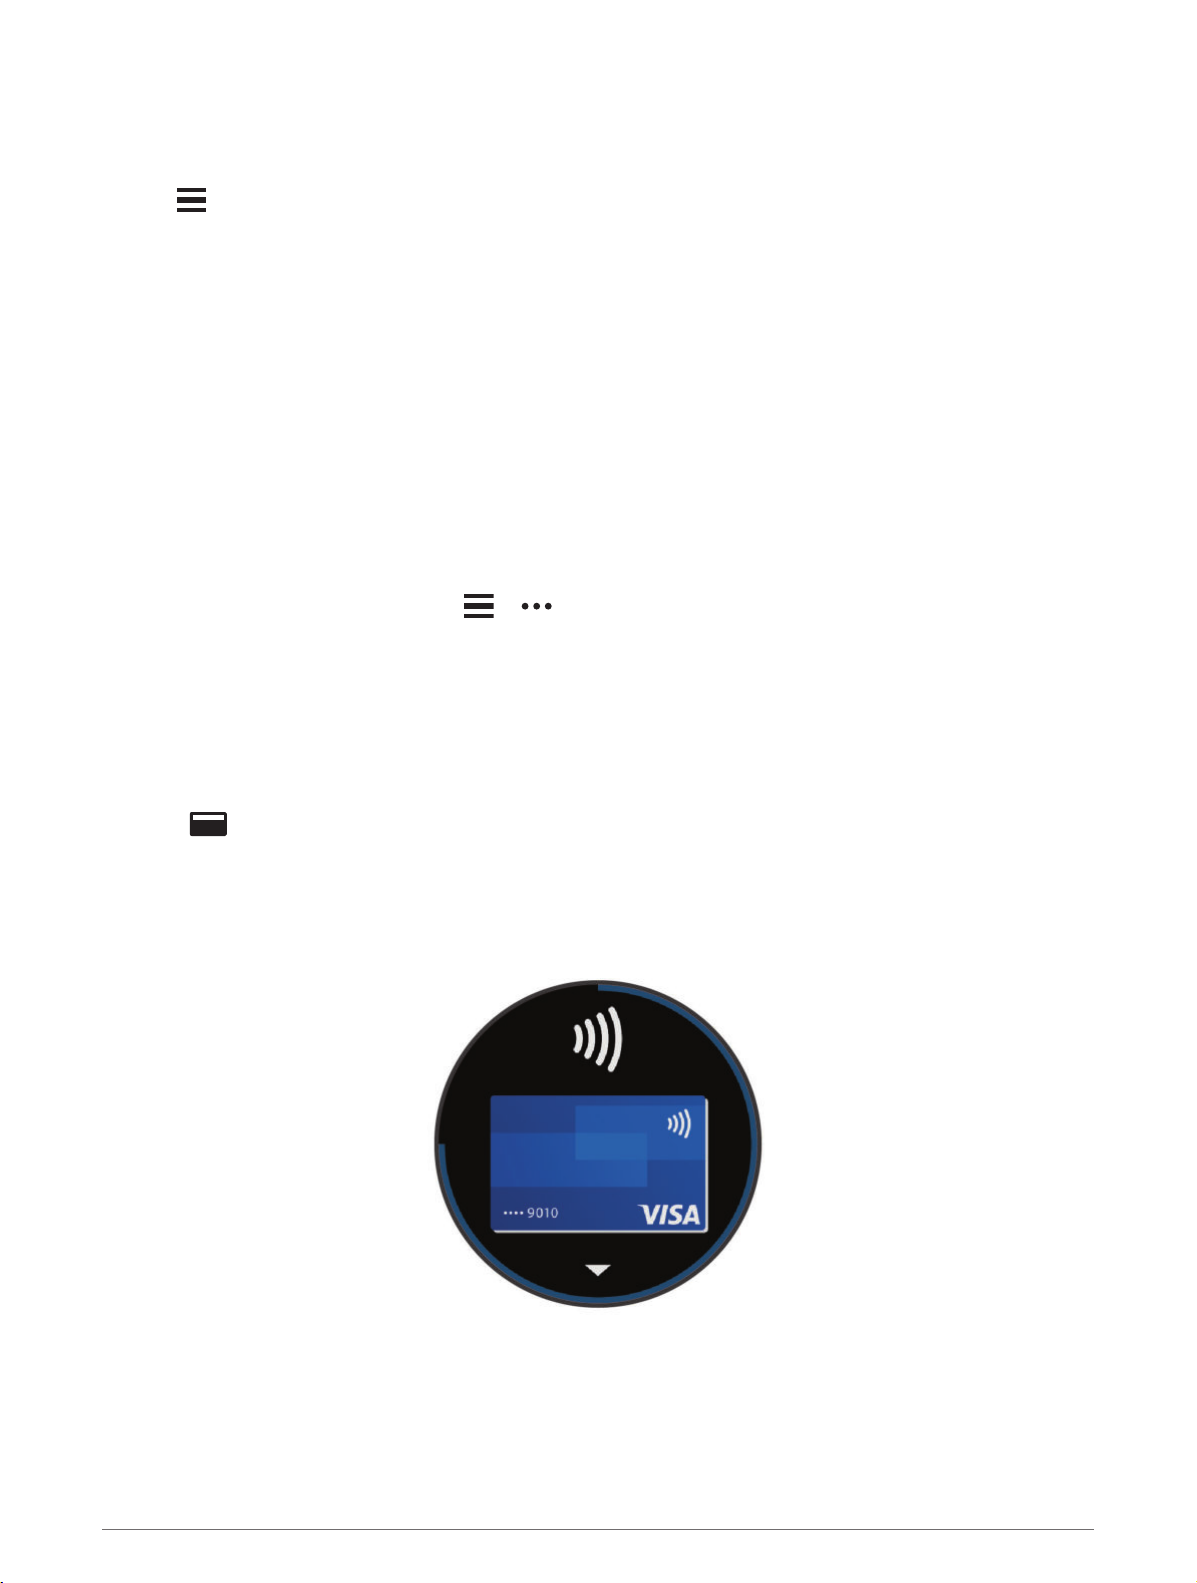
Customizing the Controls Menu
You can add, remove, and change the order of the shortcut menu options in the controls menu (
page 39).
1 Hold .
2 Select Appearance > Controls.
3 Select a shortcut to customize.
4 Select an option:
• Select Reorder to change the location of the shortcut in the controls menu.
• Select Remove to remove the shortcut from the controls menu.
5 If necessary, select Add New to add an additional shortcut to the controls menu.
Controls,
Garmin Pay
The Garmin Pay feature allows you to use your watch to pay for purchases in participating locations using credit
or debit cards from a participating financial institution.
Setting Up Your Garmin Pay Wallet
You can add one or more participating credit or debit cards to your Garmin Pay wallet. Go to
/garminpay/banks to find participating financial institutions.
1 From the Garmin Connect app, select or .
2 Select Garmin Pay > Get Started.
3 Follow the on-screen instructions.
garmin.com
Paying for a Purchase Using Your Watch
Before you can use your watch to pay for purchases, you must set up at least one payment card.
You can use your watch to pay for purchases in a participating location.
1 Hold LIGHT.
2 Select
3 Enter your four-digit passcode.
NOTE: If you enter your passcode incorrectly three times, your wallet locks, and you must reset your
passcode in the Garmin Connect app.
Your most recently used payment card appears.
.
4 If you have added multiple cards to your Garmin Pay wallet, swipe to change to another card (optional).
5 If you have added multiple cards to your Garmin Pay wallet, select DOWN to change to another card
(optional).
Appearance 41
Page 50
6 Within 60 seconds, hold your watch near the payment reader, with the watch facing the reader.
The watch vibrates and displays a check mark when it is finished communicating with the reader.
7 If necessary, follow the instructions on the card reader to complete the transaction.
TIP: After you successfully enter your passcode, you can make payments without a passcode for 24 hours while
you continue to wear your watch. If you remove the watch from your wrist or disable heart rate monitoring, you
must enter the passcode again before making a payment.
Adding a Card to Your Garmin Pay Wallet
You can add up to 10 credit or debit cards to your Garmin Pay wallet.
1 From the Garmin Connect app, select
2 Select Garmin Pay > > Add Card.
3 Follow the on-screen instructions.
After the card is added, you can select the card on your watch when you make a payment.
or .
Managing Your Garmin Pay Cards
You can temporarily suspend or delete a card.
NOTE: In some countries, participating financial institutions may restrict the Garmin Pay features.
1 From the Garmin Connect app, select
2 Select Garmin Pay.
3 Select a card.
4 Select an option:
• To temporarily suspend or unsuspend the card, select Suspend Card.
The card must be active to make purchases using your Forerunner watch.
• To delete the card, select .
or .
Changing Your Garmin Pay Passcode
You must know your current passcode to change it. If you forget your passcode, you must reset the Garmin Pay
feature for your Forerunner watch, create a new passcode, and reenter your card information.
1 From the Forerunner device page in the Garmin Connect app, select Garmin Pay > Change Passcode.
2 Follow the on-screen instructions.
The next time you pay using your Forerunner watch, you must enter the new passcode.
Morning Report
Your watch displays a morning report based on your normal wake time. Press DOWN, and select to view the
report, which includes weather, sleep, overnight heart rate variability status, and more (Customizing Your
Morning Report, page 42).
Customizing Your Morning Report
NOTE: You can customize these settings on you watch or in your Garmin Connect account.
1 Hold
2 Select Appearance > Morning Report.
3 Select an option:
• Select Show Report to enable or disable the morning report.
• Select Edit Report to customize the order and type of data that appears in your morning report.
• Select Your Name to customize your display name.
.
42 Appearance
Page 51
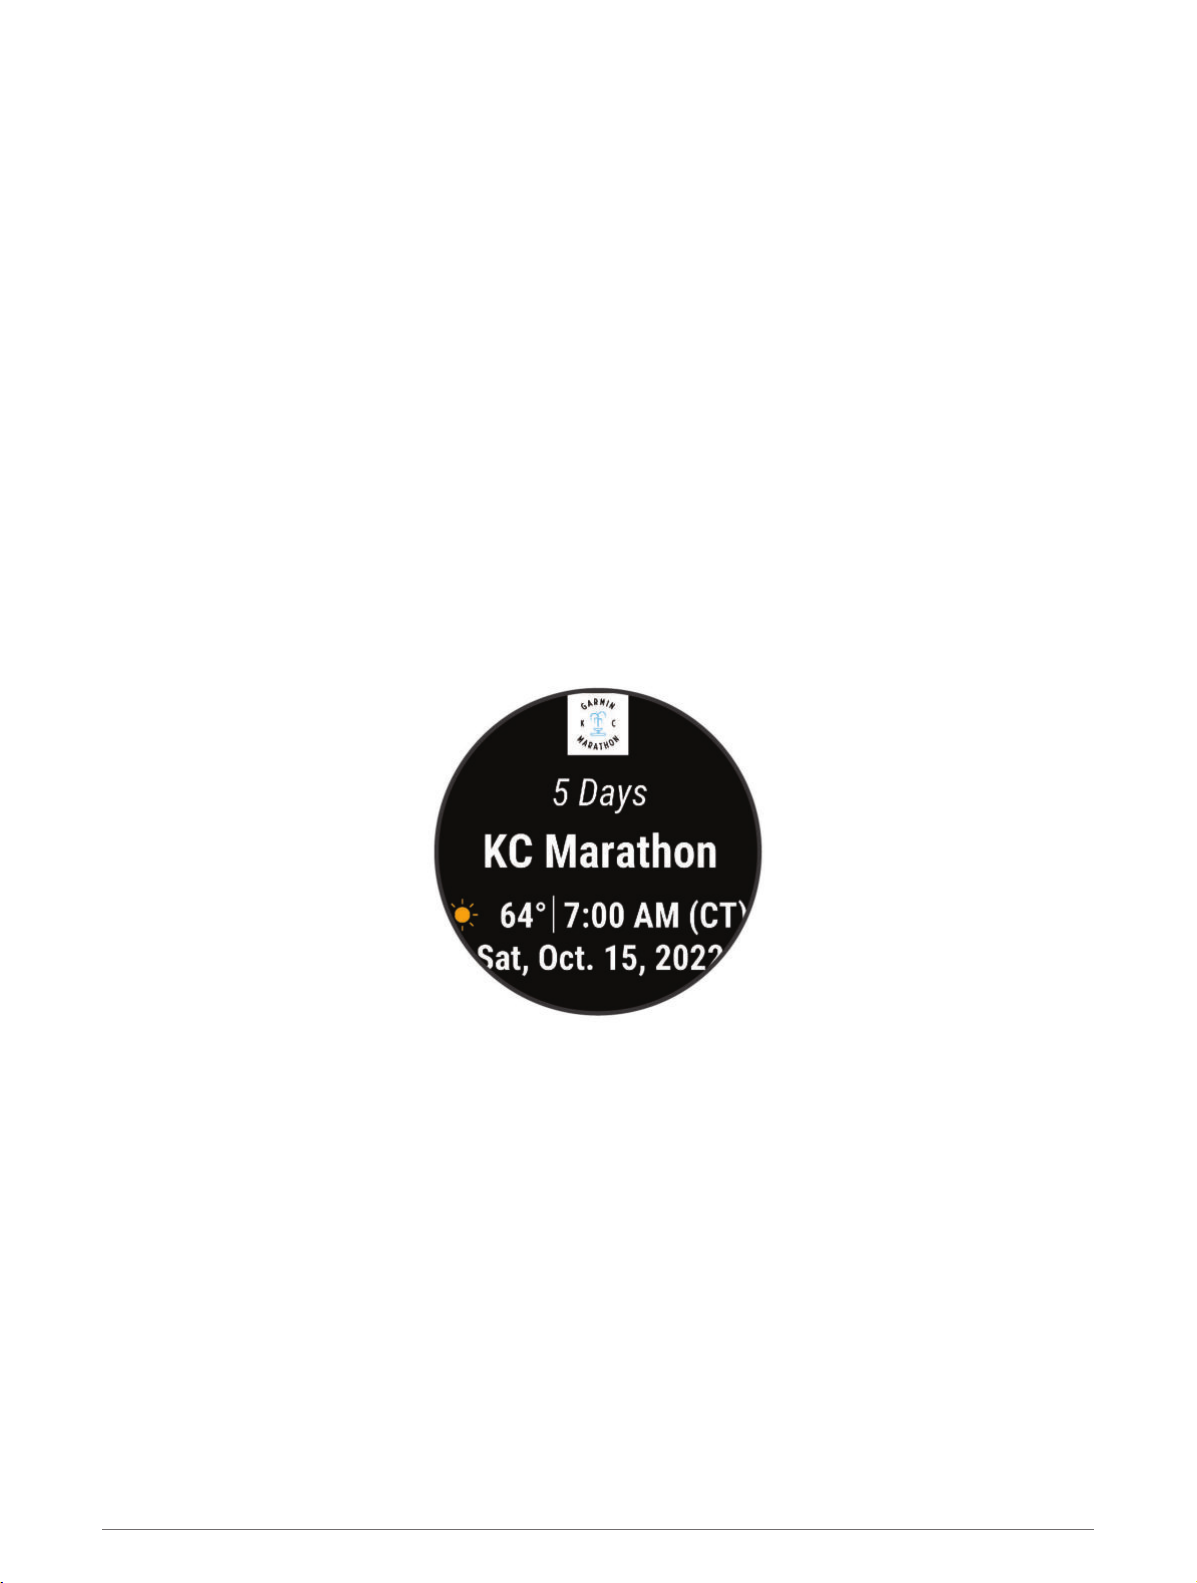
Training
Training for a Race Event
Your watch can suggest daily workouts to help you train for a running event, if you have a VO2 max. estimate
(About VO2 Max. Estimates, page 26).
1 On your phone or computer, go to your Garmin Connect calendar.
2 Select the day of the event, and add the race event.
You can search for an event in your area or create your own event.
NOTE: You can add and view cycling race events, but daily suggested workouts are not available.
3 Add details about the event, and add the course if it's available.
4 Sync your watch with your Garmin Connect account.
5 On your watch, scroll to the primary event glance to see a countdown to your primary race event.
6 From the watch face, press START, and select a running activity.
NOTE: If you have completed at least 1 outdoor run with heart rate data or 1 ride with heart rate and power
data, daily suggested workouts appear on your watch.
Race Calendar and Primary Race
When you add a race event to your Garmin Connect calendar, you can view the event on your watch by adding
the primary race glance (
countdown to the event, your goal time or predicted finish time (running events only), and weather information.
Glances, page 20). The event date must be in the next 365 days. The watch displays a
NOTE: Historical weather information for the location and date is available right away. Local forecast data
appears approximately 14 days before the event.
If you add more than one race event, you are prompted to choose a primary event.
Depending on the available course data for your event, you can view elevation data, the course map, and add a
PacePro plan (PacePro Training, page 50).
Activity Tracking
The activity tracking feature records your daily step count, distance traveled, intensity minutes, floors climbed,
calories burned, and sleep statistics for each recorded day. Your calories burned includes your base metabolism
plus activity calories.
The number of steps taken during the day appears on the steps glance. The step count is updated periodically.
For more information about activity tracking and fitness metric accuracy, go to garmin.com/ataccuracy.
Training 43
Page 52
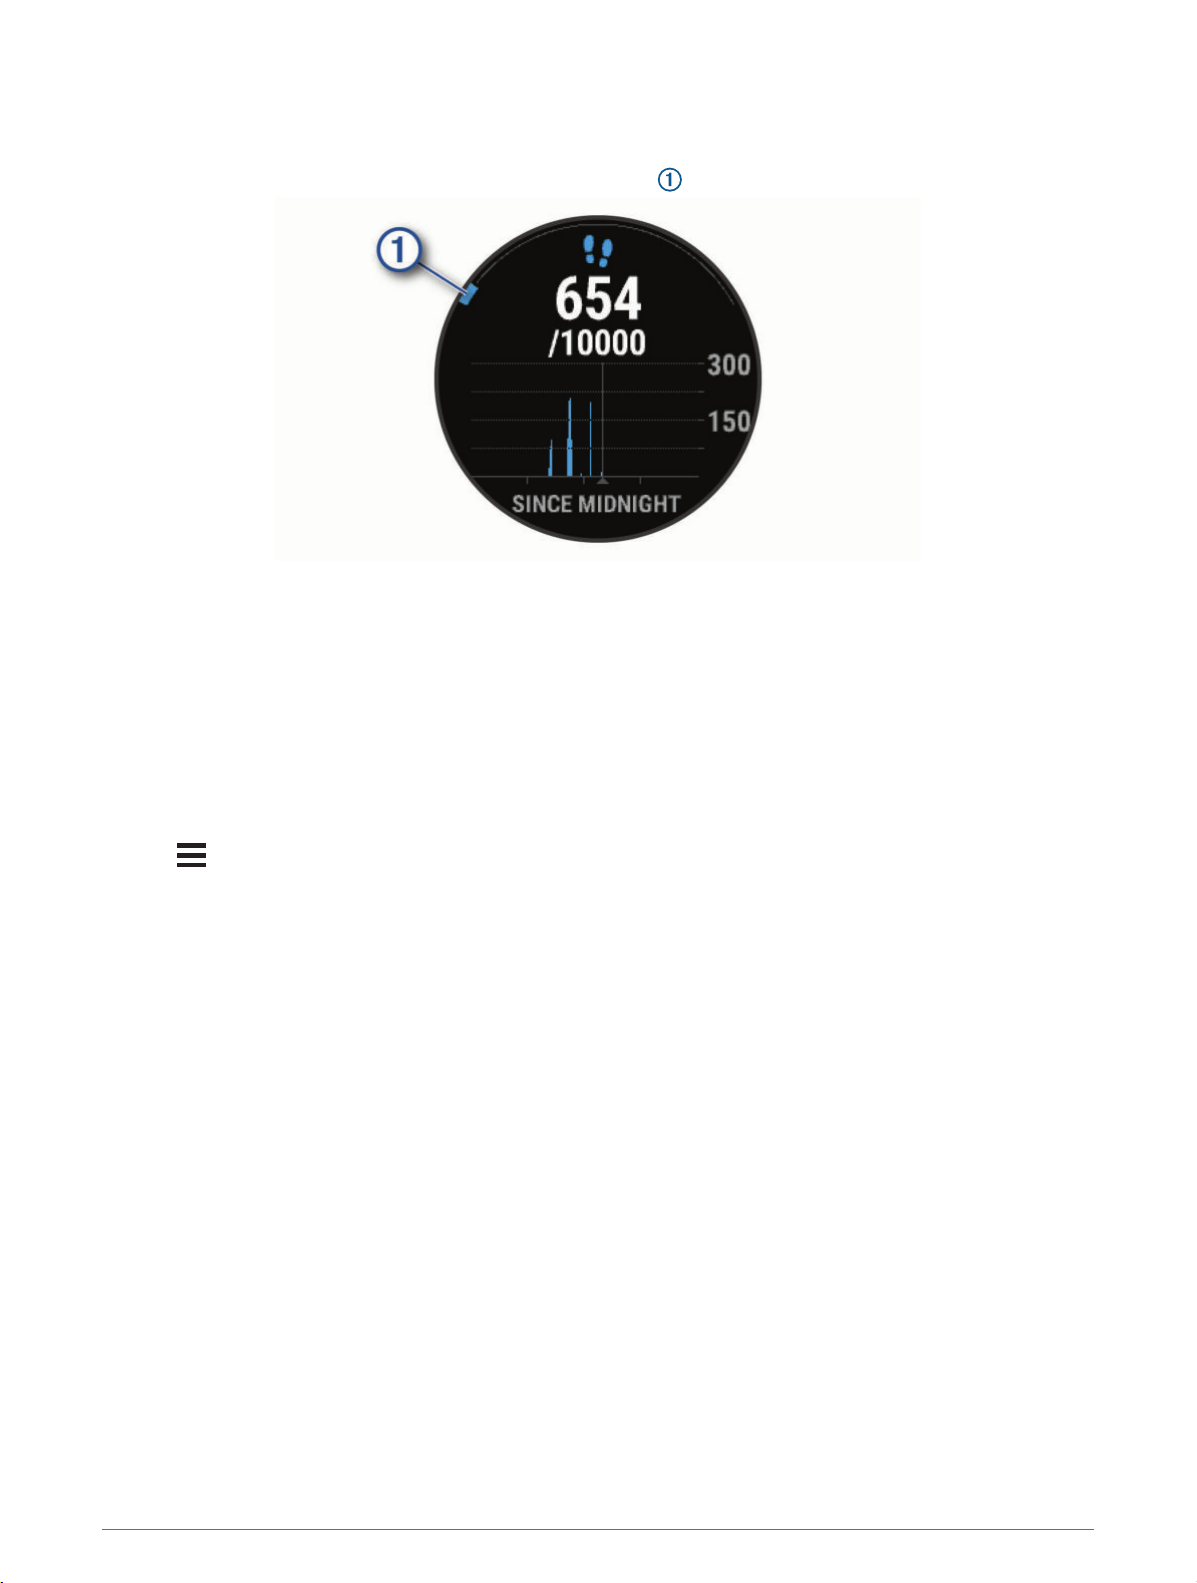
Auto Goal
Your watch creates a daily step goal automatically, based on your previous activity levels. As you move during
the day, the watch shows your progress toward your daily goal
If you choose not to use the auto goal feature, you can set a personalized step goal on your Garmin Connect
account.
.
Using the Move Alert
Sitting for prolonged periods of time can trigger undesirable metabolic state changes. The move alert reminds
you to keep moving. After one hour of inactivity, Move! and the red bar appear. Additional segments appear
after every 15 minutes of inactivity. The device also beeps or vibrates if audible tones are turned on (
Settings, page 106).
Go for a short walk (at least a couple of minutes) to reset the move alert.
System
Turning on the Move Alert
1 Hold
2 Select Notifications & Alerts > System Alerts > Activity Tracking > Move Alert > On.
.
Sleep Tracking
While you are sleeping, the watch automatically detects your sleep and monitors your movement during your
normal sleep hours. You can set your normal sleep hours in the user settings on your Garmin Connect account.
Sleep statistics include total hours of sleep, sleep stages, sleep movement, and sleep score. You can view your
sleep statistics on your Garmin Connect account.
NOTE: Naps are not added to your sleep statistics. You can use do not disturb mode to turn off notifications
and alerts, with the exception of alarms (
Using Automated Sleep Tracking
1 Wear your device while sleeping.
2 Upload your sleep tracking data to the Garmin Connect site (
page 90).
You can view your sleep statistics on your Garmin Connect account.
You can view sleep information from the previous night on your Forerunner device (Glances, page 20).
Using Do Not Disturb Mode, page 45).
Manually Syncing Data with Garmin Connect,
44 Training
Page 53
Using Do Not Disturb Mode
You can use do not disturb mode to turn off the backlight, tone alerts, and vibration alerts. For example, you can
use this mode while sleeping or watching a movie.
NOTE: You can set your normal sleep hours in the user settings on your Garmin Connect account. You can
enable the During Sleep option in the system settings to automatically enter do not disturb mode during your
normal sleep hours (
NOTE: You can add options to the controls menu (Customizing the Controls Menu, page 41).
1 Hold LIGHT.
2 Select Do Not Disturb.
System Settings, page 106).
Intensity Minutes
To improve your health, organizations such as the World Health Organization recommend at least 150 minutes
per week of moderate intensity activity, such as brisk walking, or 75 minutes per week of vigorous intensity
activity, such as running.
The watch monitors your activity intensity and tracks your time spent participating in moderate to vigorous
intensity activities (heart rate data is required to quantify vigorous intensity). The watch adds the amount of
moderate activity minutes with the amount of vigorous activity minutes. Your total vigorous intensity minutes
are doubled when added.
Earning Intensity Minutes
Your Forerunner watch calculates intensity minutes by comparing your heart rate data to your average resting
heart rate. If heart rate is turned off, the watch calculates moderate intensity minutes by analyzing your steps
per minute.
• Start a timed activity for the most accurate calculation of intensity minutes.
• Wear your watch all day and night for the most accurate resting heart rate.
Garmin Move IQ
When your movements match familiar exercise patterns, the Move IQ feature automatically detects the event
and displays it in your timeline. The Move IQ events show activity type and duration, but they do not appear in
your activities list or newsfeed. For more detail and accuracy, you can record a timed activity on your device.
™
Activity Tracking Settings
Hold
Status: Turns off the activity tracking features.
Move Alert: Displays a message and the move bar on the digital watch face and steps screen.
Goal Alerts: Allows you to turn on and off goal alerts, or turn them off only during activities. Goal alerts appear
Move IQ: Allows you to turn on and off Move IQ events.
Turning Off Activity Tracking
When you turn off activity tracking, your steps, floors climbed, intensity minutes, sleep tracking, and Move IQ
events are not recorded.
1 Hold
2 Select Activity Tracking > Status > Off.
, and select Activity Tracking.
for your daily steps goal, daily floors climbed goal, and weekly intensity minutes goal.
.
Training 45
Page 54
Workouts
You can create custom workouts that include goals for each workout step and for varied distances, times, and
calories. During your activity, you can view workout-specific data screens that contain workout step information,
such as the workout step distance or average step pace.
You can create and find more workouts using Garmin Connect, or select a training plan that has built-in
workouts and transfer them to your watch.
You can schedule workouts using Garmin Connect. You can plan workouts in advance and store them on your
watch.
Following a Workout From Garmin Connect
Before you can download a workout from Garmin Connect, you must have a Garmin Connect account (
Connect, page 89).
1 Select an option:
• Open the Garmin Connect app.
• Go to (Garmin Connect, page 89).
2 Select Training > Workouts.
3 Find a workout, or create and save a new workout.
4 Select or Send to Device.
5 Follow the on-screen instructions.
Creating a Custom Workout on Garmin Connect
Before you can create a workout on the Garmin Connect app, you must have a Garmin Connect account (
Connect, page 89).
1 From the Garmin Connect app, select or .
2 Select Training > Workouts > Create a Workout.
3 Select an activity.
4 Create your custom workout.
5 Select Save.
6 Enter a name for your workout, and select Save.
The new workout appears in your list of workouts.
NOTE: You can send this workout to your watch (Following a Workout From Garmin Connect, page 46).
Garmin
Garmin
Sending a Custom Workout to Your Watch
You can send a custom workout you created with the Garmin Connect app to your watch (
Workout on Garmin Connect, page 46).
1 From the Garmin Connect app, select or .
2 Select Training > Workouts.
3 Select a workout from the list.
4 Select .
5 Select your compatible watch.
6 Follow the on-screen instructions.
46 Training
Creating a Custom
Page 55
Starting a Workout
Your device can guide you through multiple steps in a workout.
1 Press START.
2 Select an activity.
3 Hold
4 Select Training > Workouts.
5 Select a workout.
NOTE: Only workouts that are compatible with the selected activity appear in the list.
6 Select View to view a list of workout steps (optional).
TIP: While viewing workout steps, you can press START to view an animation of the selected exercise, if
available.
7 Select Do Workout.
8 Press START to start the activity timer.
After you begin a workout, the device displays each step of the workout, step notes (optional), the target
(optional), and the current workout data. For strength, yoga, cardio, or Pilates activities, an instructional
animation appears.
.
Following a Daily Suggested Workout
Before the watch can suggest a daily workout, you must have a VO2 max. estimate (
page 26).
1 Press START.
2 Select Run or Bike.
The daily suggested workout appears.
3 Press DOWN to view details about the workout, such as steps and estimated benefit (optional).
4 Select START, and select an option:
• To do the workout, select Do Workout.
• To skip the workout, select Dismiss.
• To view workout suggestions for the upcoming week, select More Suggestions.
• To view the workout settings, such as Target Type, select Settings.
The suggested workout updates automatically to changes in training habits, recovery time, and VO2 max.
About VO2 Max. Estimates,
Turning Daily Suggested Workout Prompts On and Off
Daily suggested workouts are recommended based on your previous activities saved to your Garmin Connect
account.
1 Press START.
2 Select Run or Bike.
3 Hold
4 Select Training > Workouts > Suggested Workout > Settings > Workout Prompt.
5 Press START to disable or enable prompts.
Training 47
.
Page 56
Following a Pool Swim Workout
Your watch can guide you through multiple steps in a swim workout. Creating and sending a pool swim workout
is similar to
1 Press START.
2 Select Pool Swim.
3 Hold .
4 Select Training.
5 Select an option:
• Select Workouts to do workouts downloaded from Garmin Connect.
• Select Critical Swim Speed to record a Critical Swim Speed (CSS) test or enter a CSS value manually
• Select Training Calendar to do or view your scheduled workouts.
6 Follow the on-screen instructions.
Recording a Critical Swim Speed Test
Your Critical Swim Speed (CSS) value is the result of a time-trial-based test expressed as a pace per 100 meters.
Your CSS is the theoretical speed you can maintain continuously without exhaustion. You can use your CSS to
guide your training pace and monitor your improvement.
1 Press START.
2 Select Pool Swim.
3 Hold
4 Select Training > Critical Swim Speed > Do Critical Swim Speed Test.
5 Press DOWN to preview the workout steps (optional).
6 Press START.
7 Press START to start the activity timer..
8 Follow the on-screen instructions.
Workouts, page 46 and Following a Workout From Garmin Connect, page 46.
(Recording a Critical Swim Speed Test, page 48).
.
Editing Your Critical Swim Speed Result
You can manually edit or enter a new time for your CSS value.
1 From the watch face, select START > Pool Swim > Options > Critical Swim Speed > Critical Swim Speed.
2 Enter the minutes.
3 Enter the seconds.
Workout Execution Score
After you complete a workout, the watch displays your workout execution score based on how accurately you
completed the workout. For example, if your 60 minute workout has a target pace range, and you stay in that
range for 50 minutes, your workout execution score is 83%.
Good, 67 to 100%
Average, 34 to 66%
Low, 0 to 33%
48 Training
Page 57
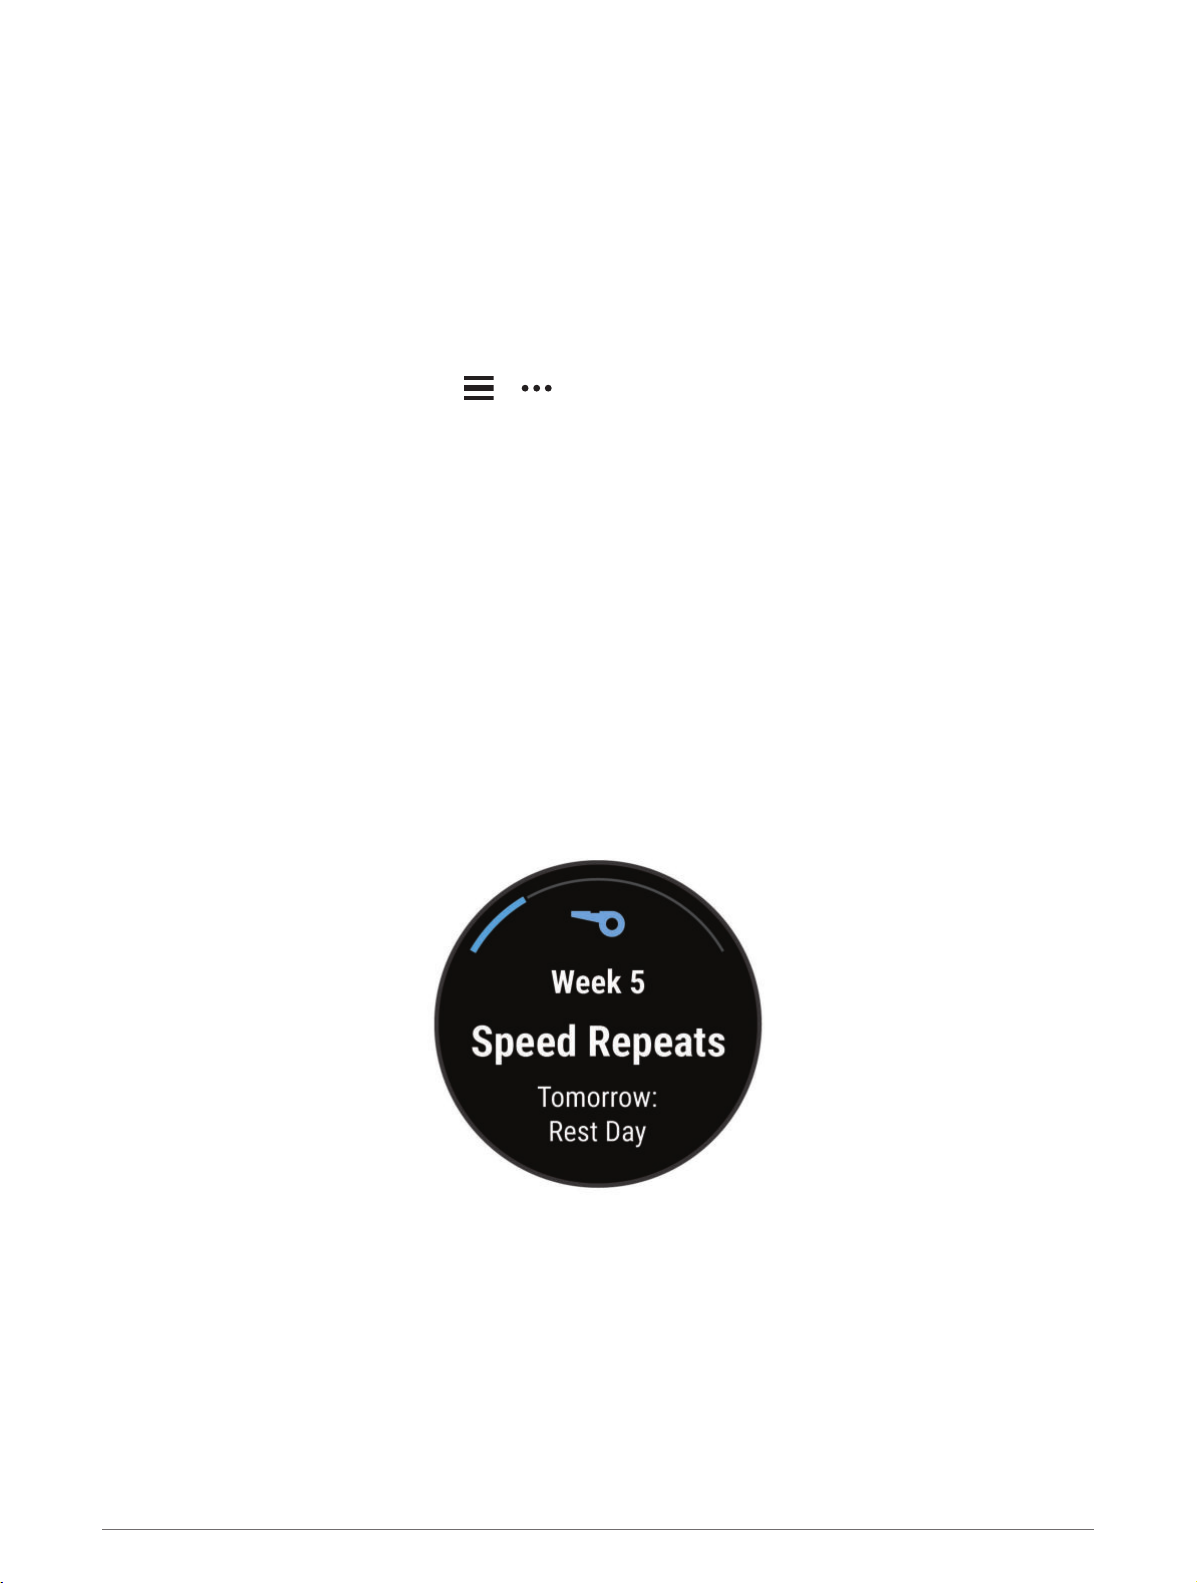
About the Training Calendar
The training calendar on your watch is an extension of the training calendar or schedule you set up in your
Garmin Connect account. After you have added a few workouts to the Garmin Connect calendar, you can send
them to your device. All scheduled workouts sent to the device appear in the calendar glance. When you select a
day in the calendar, you can view or do the workout. The scheduled workout stays on your watch whether you
complete it or skip it. When you send scheduled workouts from Garmin Connect, they overwrite the existing
training calendar.
Using Garmin Connect Training Plans
Before you can download and use a training plan, you must have a Garmin Connect account (
page 89), and you must pair the Forerunner watch with a compatible phone.
1 From the Garmin Connect app, select or .
2 Select Training > Training Plans.
3 Select and schedule a training plan.
4 Follow the on-screen instructions.
5 Review the training plan in your calendar.
Adaptive Training Plans
Your Garmin Connect account has an adaptive training plan and Garmin coach to fit your training goals. For
example, you can answer a few questions and find a plan to help you complete a 5 km race. The plan adjusts to
your current level of fitness, coaching and schedule preferences, and race date. When you start a plan, the
Garmin coach glance is added to the glance loop on your Forerunner watch.
Starting Today's Workout
After you send a Garmin Coach training plan to your watch, the Garmin Coach glance appears in your glance
Customizing the Glance Loop, page 22).
loop (
1 From the watch face, press UP or DOWN to view the Garmin Coach glance.
If a workout for this activity is scheduled for today, the watch shows the workout name and prompts you to
start it.
Garmin Connect,
2 Press START.
3 Press DOWN to view the workout steps (optional).
4 Press START, and select Do Workout.
5 Follow the on-screen instructions.
Interval Workouts
Interval workouts can be open or structured. Structured repeats can be based on distance or time. The device
saves your custom interval workout until you edit the workout again.
Training 49
Page 58
Customizing an Interval Workout
1 Press START.
2 Select an activity.
3 Press
4 Select Training > Intervals > Structured Repeats.
A workout appears.
5 Press START, and select Edit Workout.
6 Select one or more options:
• To set the interval duration and type, select Interval.
• To set the rest duration and type, select Rest.
• To set the number of repetitions, select Repeat.
• To add an open-ended warm up to your workout, select Warm Up > On.
• To add an open-ended cool down to your workout, select Cool Down > On.
7 Press BACK.
.
Starting an Interval Workout
1 Press START.
2 Select an activity.
3 Hold
4 Select Training > Intervals.
5 Select an option:
• Select Open Repeats to mark your intervals and rest periods manually by pressing .
• Select Structured Repeats > START > Do Workout to use an interval workout based on distance or time.
6 Press START to start the activity timer.
7 When your interval workout has a warm up, press to begin the first interval.
8 Follow the on-screen instructions.
After you complete all of the intervals, a message appears.
.
Stopping an Interval Workout
• At any time, select
period.
• After all intervals and rest periods are complete, select to end the interval workout and transition to a
timer that can be used for cool down.
• At any time, select STOP to stop the activity timer. You can resume the timer or end the interval workout.
to stop the current interval or rest period and transition to the next interval or rest
PacePro Training
Many runners like to wear a pace band during a race to help achieve their race goal. The PacePro feature allows
you to create a custom pace band based on distance and pace or distance and time. You can also create a pace
band for a known course to optimize your pace effort based on elevation changes.
You can create a PacePro plan using the Garmin Connect app. You can preview the splits and elevation plot
before you run the course.
50 Training
Page 59
Downloading a PacePro Plan from Garmin Connect
Before you can download a PacePro plan from Garmin Connect, you must have a Garmin Connect account
Garmin Connect, page 89).
(
1 Select an option:
• Open the Garmin Connect app, and select or .
• Go to (Garmin Connect, page 89).
2 Select Training > PacePro Pacing Strategies.
3 Follow the on-screen instructions to create and save a PacePro plan.
4 Select or Send to Device.
Training 51
Page 60
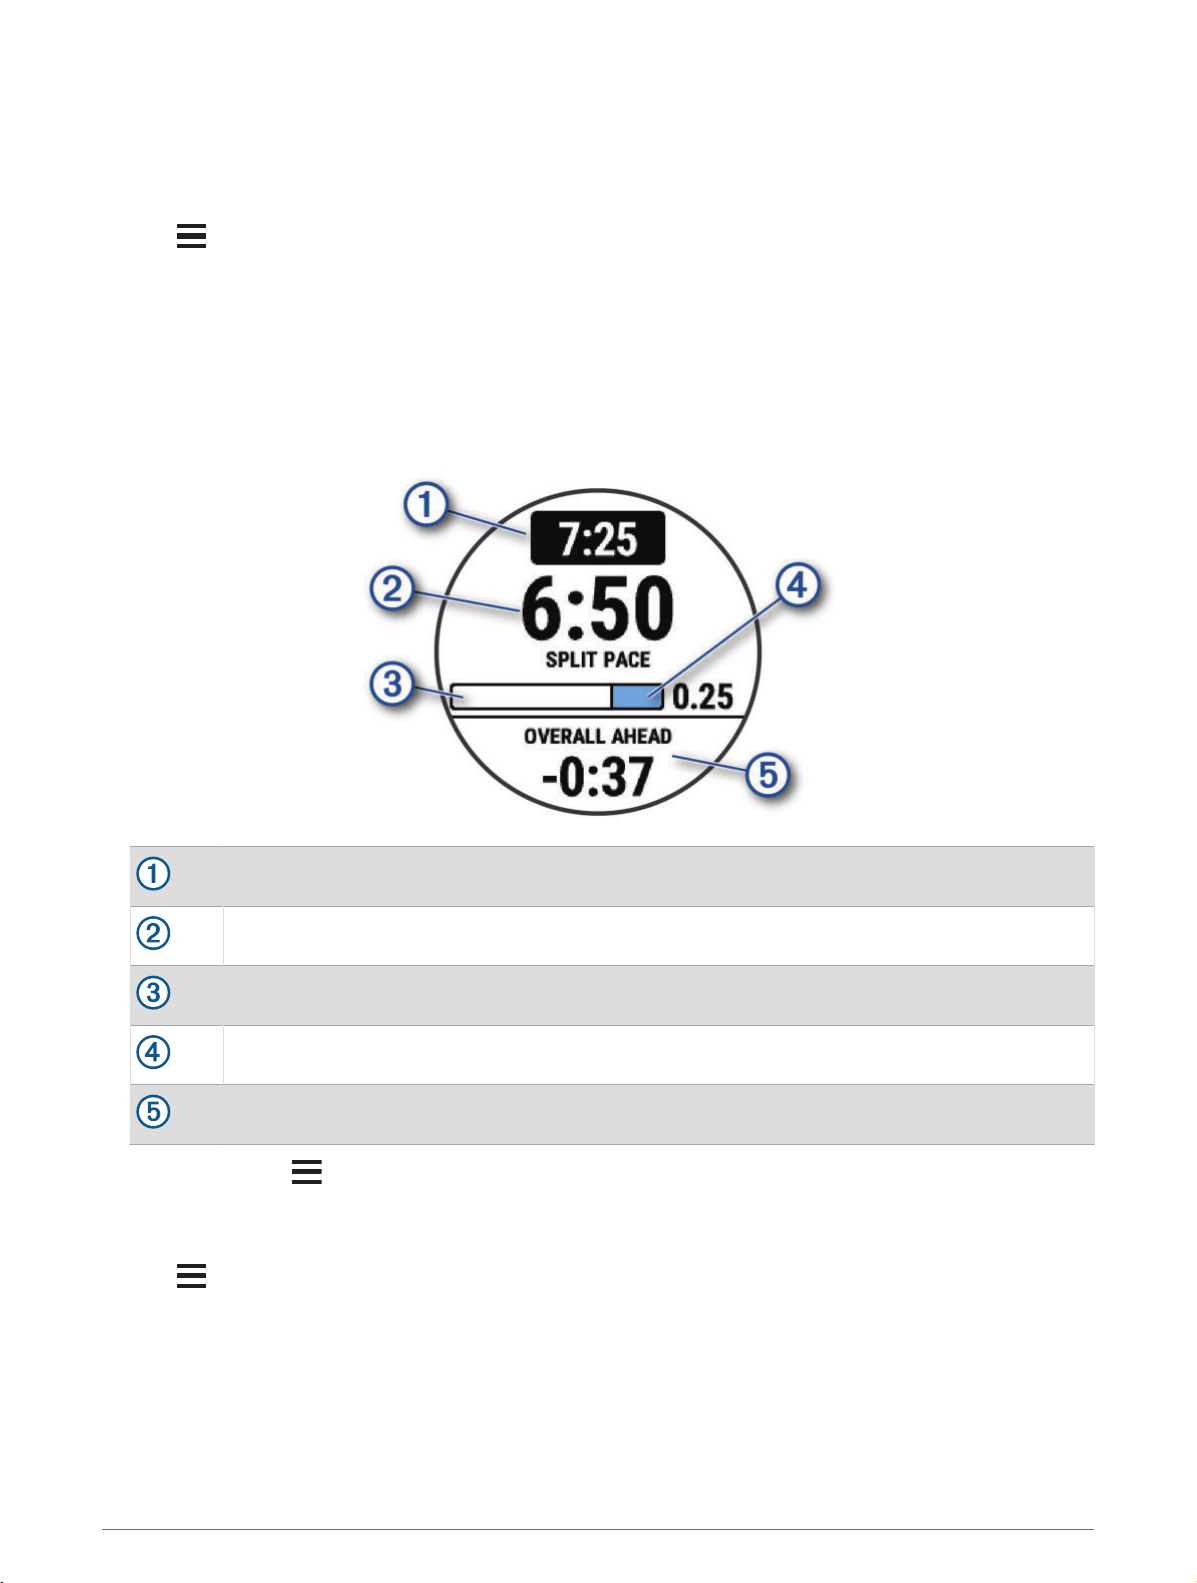
Starting a PacePro Plan
Before you can start a PacePro plan, you must download a plan from your Garmin Connect account.
1 Press START.
2 Select an outdoor running activity.
3 Hold
4 Select Training > PacePro Plans.
5 Select a plan.
6 Press START.
TIP: You can preview the splits, elevation plot, and the map before you accept the PacePro plan.
7 Select Accept Plan to start the plan.
8 If necessary, select Yes to enable course navigation.
9 Press START to start the activity timer.
.
Target split pace
Current split pace
Completion progress for the split
Distance remaining in the split
Overall time ahead of or behind your target time
TIP: You can hold , and select Stop PacePro > Yes to stop the PacePro plan. The activity timer continues
running.
Stopping a PacePro Plan
1 Hold
2 Select Stop PacePro > Yes.
The device stops the PacePro plan. The activity timer continues running.
.
52 Training
Page 61
Creating a PacePro Plan on Your Watch
Before you can create a PacePro plan on your watch, you must create a course (
Device, page 64).
1 From the watch face, press START.
2 Select an outdoor running activity.
3 Hold .
4 Select Navigation > Courses.
5 Select a course.
6 Select PacePro > Create New.
7 Select an option:
• Select Goal Pace, and enter your target pace.
• Select Goal Time, and enter your target time.
The watch displays your custom pace band.
8 Press START.
9 Select an option:
• Select Accept Plan to start the plan.
• Select View Splits to preview the splits.
• Select Elevation Plot to view an elevation plot of the course.
• Select Map to view the course on the map.
• Select Remove to discard the plan.
Following a Course on Your
Segments
You can send running or cycling segments from your Garmin Connect account to your device. After a segment
is saved to your device, you can race a segment, trying to match or exceed your personal record or other
participants who have raced the segment.
NOTE: When you download a course from your Garmin Connect account, you can download all of the available
segments in the course.
Strava™ Segments
You can download Strava segments to your Forerunner device. Follow Strava segments to compare your
performance with your past rides, friends, and pros who have ridden the same segment.
To sign up for a Strava membership, go to the segments menu in your Garmin Connect account. For more
information, go to
The information in this manual applies to both Garmin Connect segments and Strava segments.
Viewing Segment Details
1 Press START.
2 Select an activity.
3 Hold
4 Select Training > Segments.
5 Select a segment.
6 Select an option:
• Select Race Times to view the time and average speed or pace for the segment leader.
• Select Map to view the segment on the map.
• Select Elevation Plot to view an elevation plot of the segment.
www.strava.com.
.
Training 53
Page 62
Racing a Segment
Segments are virtual race courses. You can race a segment, and compare your performance to past activities,
others' performance, connections in your Garmin Connect account, or other members of the running or cycling
communities. You can upload your activity data to your Garmin Connect account to view your segment position.
NOTE: If your Garmin Connect account and Strava account are linked, your activity is automatically sent to your
Strava account so you can review the segment position.
1 Press START.
2 Select an activity.
3 Go for a run or ride.
When you approach a segment, a message appears, and you can race the segment.
4 Start racing the segment.
A message appears when the segment is complete.
Setting a Segment to Adjust Automatically
You can set your device to automatically adjust the target race time of a segment based on your performance
during the segment.
NOTE: This setting is enabled for all segments by default.
1 Press START.
2 Select an activity.
3 Hold
4 Select Training > Segments > Auto Effort.
.
Using Virtual Partner
Your Virtual Partner is a training tool designed to help you meet your goals. You can set a pace for the Virtual
Partner and race against it.
NOTE: This feature is not available for all activities.
1 Hold
2 Select Activities & Apps.
3 Select an activity.
4 Select the activity settings.
5 Select Data Screens > Add New > Virtual Partner.
6 Enter a pace or speed value.
7 Press UP or DOWN to change the location of the Virtual Partner screen (optional).
8 Start your activity (Starting an Activity, page 3).
9 Press UP or DOWN to scroll to the Virtual Partner screen and see who is leading.
.
®
54 Training
Page 63
Setting a Training Target
The training target feature works with the Virtual Partner feature so you can train toward a set distance,
distance and time, distance and pace, or distance and speed goal. During your training activity, the watch gives
you real-time feedback about how close you are to achieving your training target.
1 Press START.
2 Select an activity.
3 Hold .
4 Select Training > Set a Target.
5 Select an option:
• Select Distance Only to select a preset distance or enter a custom distance.
• Select Distance and Time to select a distance and time target.
• Select Distance and Pace or Distance and Speed to select a distance and pace or speed target.
The training target screen appears and displays your estimated finish time. The estimated finish time is
based on your current performance and the time remaining.
6 Press START to start the activity timer.
TIP: You can hold , and select Cancel Target > Yes to cancel the training target.
Cancelling a Training Target
1 During an activity, hold
2 Select Cancel Target > Yes.
.
Racing a Previous Activity
You can race a previously recorded or downloaded activity. This feature works with the Virtual Partner feature
so you can see how far ahead or behind you are during the activity.
NOTE: This feature is not available for all activities.
1 Press START.
2 Select an activity.
3 Hold .
4 Select Training > Race an Activity.
5 Select an option:
• Select From History to select a previously recorded activity from your device.
• Select Downloaded to select an activity you downloaded from your Garmin Connect account.
6 Select the activity.
The Virtual Partner screen appears indicating your estimated finish time.
7 Press START to start the activity timer.
8 After you complete your activity, press STOP, and select Save.
Training 55
Page 64
Using the Metronome
The metronome feature plays tones at a steady rhythm to help you improve your performance by training at a
faster, slower, or more consistent cadence.
NOTE: This feature is not available for all activities.
1 Press START.
2 Select an activity.
3 Hold .
4 Select the activity settings.
5 Select Metronome > Status > On.
6 Select an option:
• Select Beats / Minute to enter a value based on the cadence you want to maintain.
• Select Alert Frequency to customize the frequency of the beats.
• Select Sound and Vibe to customize the metronome tone and vibration.
7 If necessary, select Preview to listen to the metronome feature before you run.
8 Go for a run (Going for a Run, page 5).
The metronome starts automatically.
9 During your run, press UP or DOWN to view the metronome screen.
10 If necessary, hold to change the metronome settings.
Enabling Self Evaluation
When you save an activity, you can evaluate your perceived effort and how you felt during the activity. Your self
evaluation information can be viewed in your Garmin Connect account.
1 Hold .
2 Select Activities & Apps.
3 Select an activity.
4 Select the activity settings.
5 Select Self Evaluation.
6 Select an option:
• To complete self evaluation only after workouts, select Workouts Only.
• To complete self evaluation after every activity, select Always.
Extended Display Mode
You can use Extended Display mode to display data screens from your Forerunner device on a compatible Edge
device during a ride or triathlon. See your Edge owner's manual for more information.
History
History includes time, distance, calories, average pace or speed, lap data, and optional sensor information.
NOTE: When the device memory is full, your oldest data is overwritten.
56 History
Page 65
Using History
History contains previous activities you have saved on your watch.
The watch has a history glance for quick access to your activity data (Glances, page 20).
1 From the watch face, hold .
2 Select History.
3 Select an option:
• To view an activity from this week, select This Week.
• To view an older activity, select Previous Weeks, and select a week.
• To view your personal records by sport, select Records (Personal Records, page 57).
• To view your weekly or monthly totals, select Totals .
4 Select an activity.
5 Press START.
6 Select an option:
• To view additional information about the activity, select All Stats.
• To view the impact of the activity on your aerobic and anaerobic fitness, select Training Effect (About
Training Effect, page 36).
• To view your time in each heart rate zone, select Heart Rate (Viewing Your Time in Each Heart Rate Zone,
page 58).
• To select a lap and view additional information about each lap, select Laps.
• To select a ski or snowboard run and view additional information about each run, select Runs.
• To select an exercise set and view additional information about each set, select Sets.
• To view the activity on a map, select Map.
• To view an elevation plot for the activity, select Elevation Plot.
• To delete the selected activity, select Delete.
Multisport History
Your device stores the overall multisport summary of the activity, including overall distance, time, calories, and
optional accessory data. Your device also separates the activity data for each sport segment and transition so
you can compare similar training activities and track how quickly you move through the transitions. Transition
history includes distance, time, average speed, and calories.
Personal Records
When you complete an activity, the watch displays any new personal records you achieved during that activity.
Personal records include your fastest time over several typical race distances, highest strength activity weight
for major movements, and longest run, ride, or swim.
NOTE: For cycling, personal records also include most ascent and best power (power meter required).
Viewing Your Personal Records
1 From the watch face, hold
2 Select History > Records.
3 Select a sport.
4 Select a record.
5 Select View Record.
.
History 57
Page 66
Restoring a Personal Record
You can set each personal record back to the one previously recorded.
1 From the watch face, hold
2 Select History > Records.
3 Select a sport.
4 Select a record to restore.
5 Select Previous > Yes.
NOTE: This does not delete any saved activities.
.
Clearing Personal Records
1 From the watch face, hold
2 Select History > Records.
3 Select a sport.
4 Select an option:
• To delete one record, select a record, and select Clear Record > Yes.
• To delete all records for the sport, select Clear All Records > Yes.
NOTE: This does not delete any saved activities.
.
Viewing Data Totals
You can view the accumulated distance and time data saved to your watch.
1 From the watch face, hold .
2 Select History > Totals.
3 Select an activity.
4 Select an option to view weekly or monthly totals.
Viewing Your Time in Each Heart Rate Zone
Viewing your time in each heart rate zone can help you adjust your training intensity.
1 From the watch face, hold .
2 Select History.
3 Select This Week or Previous Weeks
4 Select an activity.
5 Press START, and select Heart Rate.
Deleting History
1 From the watch face, hold .
2 Select History > Options.
3 Select an option:
• Select Delete All Activities to delete all activities from the history.
• Select Reset Totals to reset all distance and time totals.
NOTE: This does not delete any saved activities.
Data Management
NOTE: The device is not compatible with Windows® 95, 98, Me, Windows NT®, and Mac® OS 10.3 and earlier.
58 History
Page 67
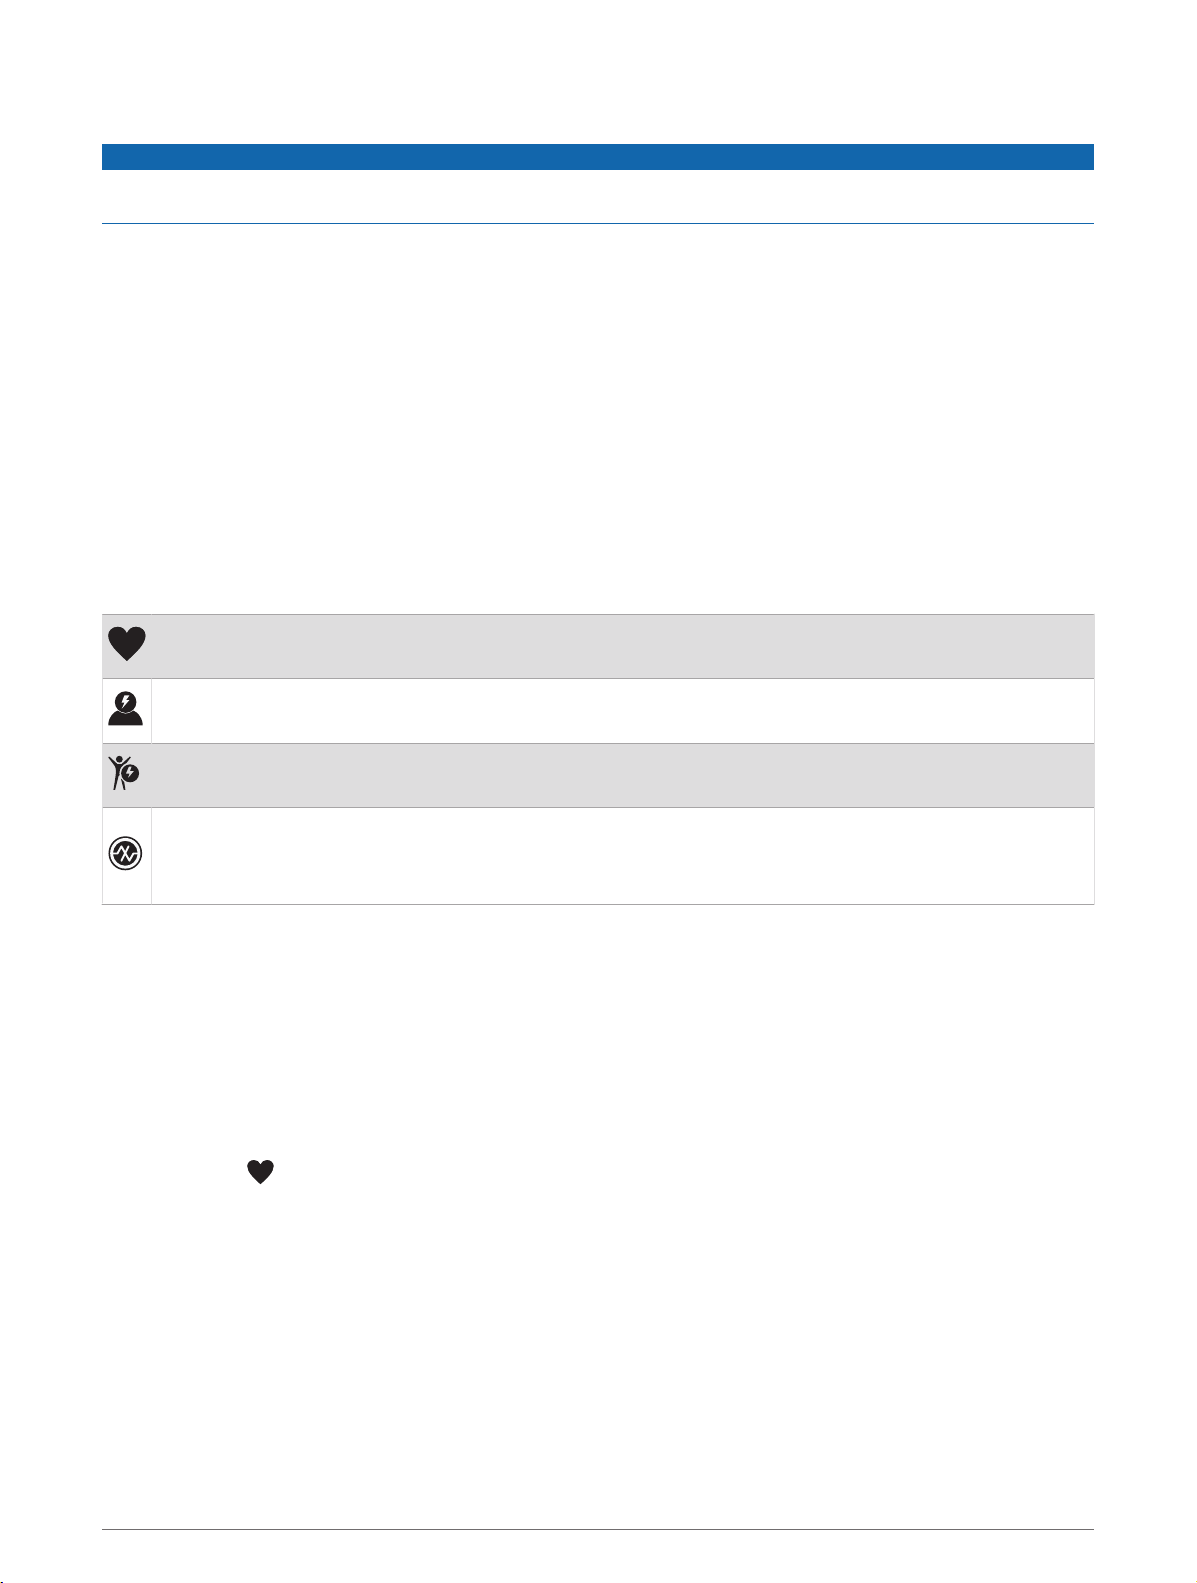
Deleting Files
NOTICE
If you do not know the purpose of a file, do not delete it. Your device memory contains important system files
that should not be deleted.
1 Open the Garmin drive or volume.
2 If necessary, open a folder or volume.
3 Select a file.
4 Press the Delete key on your keyboard.
NOTE: Mac operating systems provide limited support for MTP file transfer mode. You must open the
Garmin drive on a Windows operating system. You should use the Garmin Express™ application to remove
music files from your device.
Heart Rate Features
The watch has a wrist-based heart rate monitor and is also compatible with chest heart rate monitors. You can
view heart rate data on the heart rate glance. If both wrist-based heart rate and chest heart rate data are
available, your watch uses the chest heart rate data.
There are several heart rate-related features available in the default glance loop.
Your current heart rate in beats per minute (bpm). There is graph of your heart rate for the last four hours,
highlighting your highest and lowest heart rate.
Your current stress level. The watch measures your heart rate variability while you are inactive to
estimate your stress level. A lower number indicates a lower stress level.
Your current Body Battery energy level. The watch calculates your current energy reserves based on
sleep, stress, and activity data. A higher number indicates a higher energy reserve.
The current saturation of oxygen in your blood. Knowing your oxygen saturation can help you determine
how your body is adapting to exercise and stress.
NOTE: The pulse oximeter sensor is located on the back of the watch.
Wrist-based Heart Rate
Tips for Erratic Heart Rate Data
If the heart rate data is erratic or does not appear, you can try these tips.
• Clean and dry your arm before putting on the watch.
• Avoid wearing sunscreen, lotion, and insect repellent under the watch.
• Avoid scratching the heart rate sensor on the back of the watch.
• Wear the watch above your wrist bone. The watch should be snug but comfortable.
• Wait until the
• Warm up for 5 to 10 minutes and get a heart rate reading before starting your activity.
NOTE: In cold environments, warm up indoors.
• Rinse the watch with fresh water after each workout.
icon is solid before starting your activity.
Heart Rate Features 59
Page 68
Turning Off the Wrist-based Heart Rate Monitor
The default value for the Wrist Heart Rate setting is Auto. The device automatically uses the wrist-based heart
rate monitor unless you pair an ANT+ heart rate monitor to the device.
NOTE: Disabling the wrist-based heart rate monitor also disables the wrist-based pulse oximeter sensor. You
can perform a manual reading from the pulse oximeter widget.
1 From the heart rate widget, hold
2 Select Heart Rate Options > Status > Off.
.
Heart Rate While Swimming
NOTICE
The device is intended for surface swimming. Scuba diving with the device may damage the product and will
void the warranty.
The watch has wrist-based heart rate enabled for swim activities. The watch is also compatible with the HRMPro, HRM-Swim, and HRM-Tri accessories. If both wrist-based heart rate and chest heart rate data are available,
your watch uses the chest heart rate data (Chest Heart Rate While Swimming, page 77).
Setting an Abnormal Heart Rate Alert
CAUTION
This feature only alerts you when your heart rate exceeds or drops below a certain number of beats per minute,
as selected by the user, after a period of inactivity. This feature does not notify you of any potential heart
condition and is not intended to treat or diagnose any medical condition or disease. Always defer to your health
care provider for any heart-related issues.
You can set the heart rate threshold value.
1 From the heart rate glance, hold .
2 Select Heart Rate Options > Abnormal Heart Rate Alerts.
3 Select High Alert or Low Alert.
4 Set the heart rate threshold value.
Each time your heart rate exceeds or drops below the threshold value, a message appears and the watch
vibrates.
Broadcasting Heart Rate Data
You can broadcast your heart rate data from your watch and view it on paired devices. Broadcasting heart rate
data decreases battery life.
TIP: You can customize the activity settings to broadcast your heart rate data automatically when you begin an
activity (Activities and App Settings, page 96). For example, you can broadcast your heart rate data to an Edge
device while cycling.
1 Select an option:
• Hold , and select Wrist Heart Rate > Broadcast Heart Rate.
• Hold LIGHT to open the controls menu, and select .
NOTE: You can add options to the controls menu (Customizing the Controls Menu, page 41).
2 Press START.
The watch starts broadcasting your heart rate data.
3 Pair your watch with your compatible device.
NOTE: The pairing instructions differ for each Garmin compatible device. See your owner's manual.
4 Press STOP to stop broadcasting your heart rate data.
60 Heart Rate Features
Page 69
Broadcasting Heart Rate Data During an Activity
You can set up your Forerunner watch to broadcast your heart rate data automatically when you begin an
activity. For example, you can broadcast your heart rate data to an Edge device while cycling, or to a VIRB action
camera during an activity.
NOTE: Broadcasting heart rate data decreases battery life.
1 Press START.
2 Select an activity.
3 Press .
4 Select the activity settings.
5 Select Broadcast Heart Rate.
The Forerunner watch starts broadcasting your heart rate data in the background.
NOTE: There is no indication that the watch is broadcasting your heart rate data during an activity.
6 Begin the activity (Starting an Activity, page 3).
7 Pair your Forerunner watch with your Garmin ANT+ compatible device.
NOTE: The pairing instructions differ for each Garmin compatible device. See your owner's manual.
TIP: To stop broadcasting your heart rate data, stop the activity (Stopping an Activity, page 4).
Heart Rate Features 61
Page 70
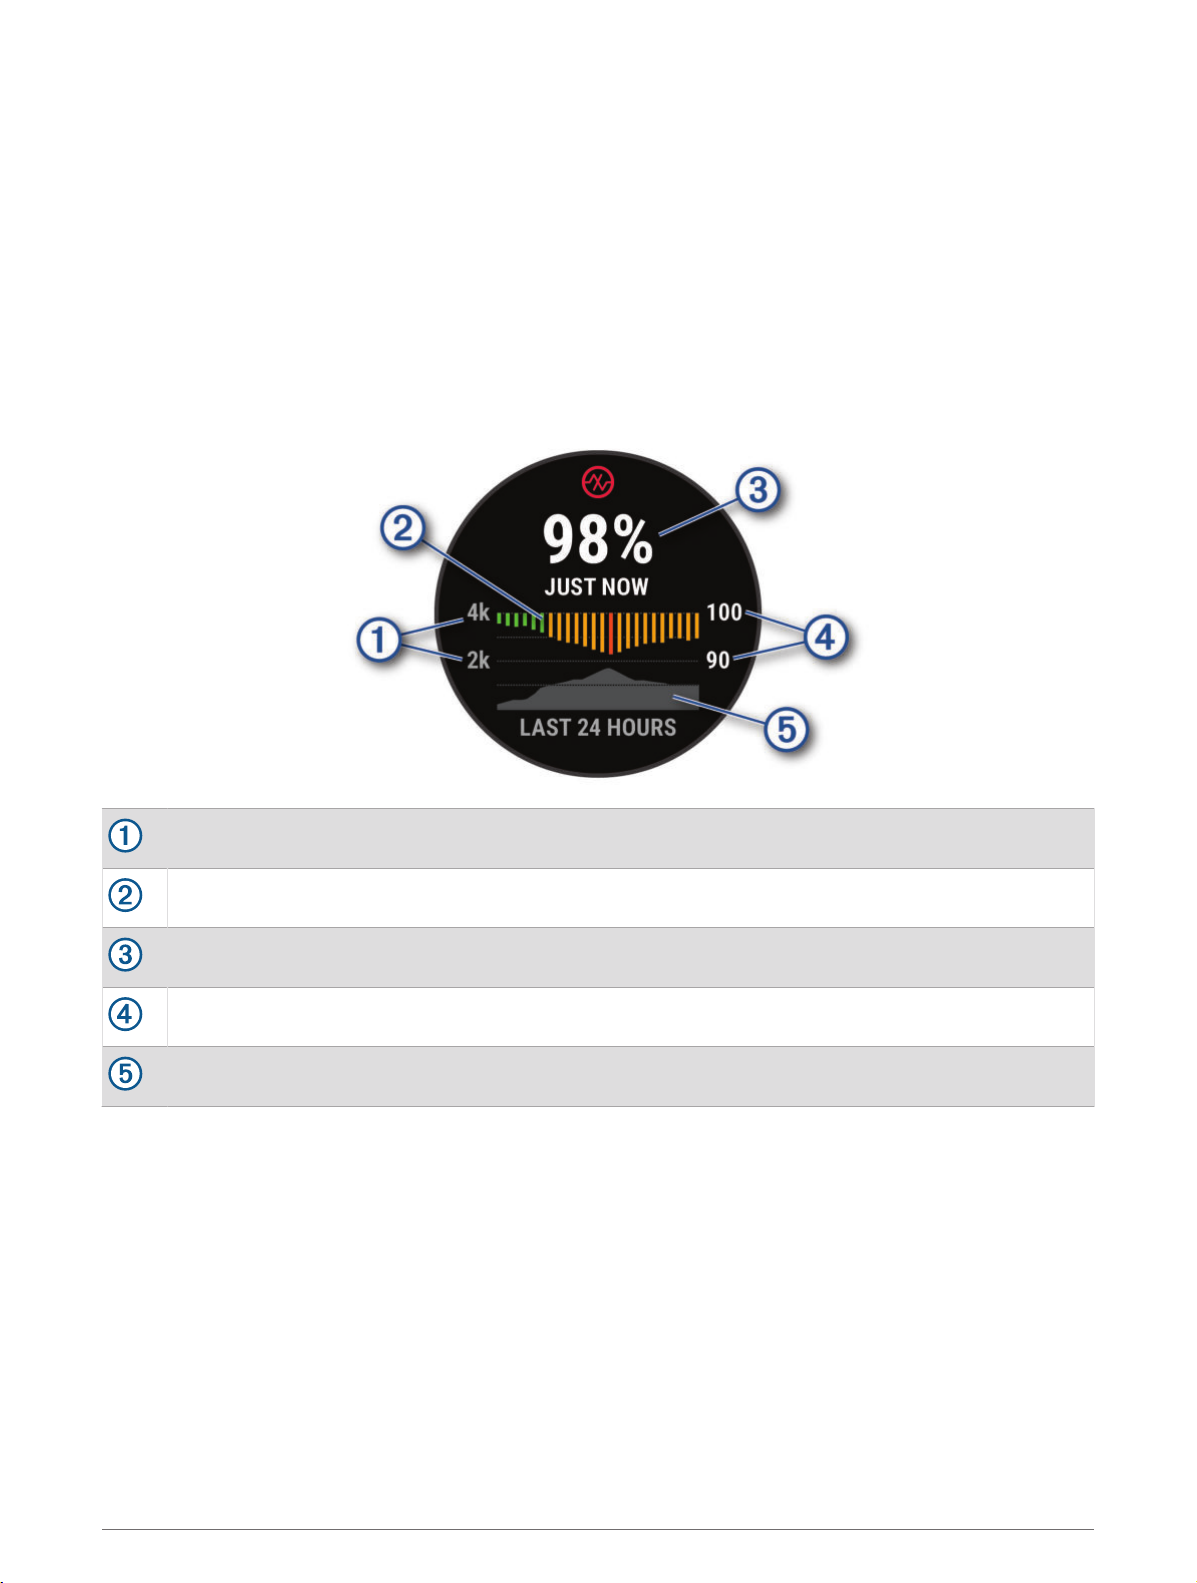
Pulse Oximeter
Your watch has a wrist-based pulse oximeter to gauge the peripheral saturation of oxygen in your blood (SpO2).
As your altitude increases, the level of oxygen in your blood can decrease.
You can manually begin a pulse oximeter reading by viewing the pulse oximeter glance (Getting Pulse Oximeter
Readings, page 63). You can also turn on all-day readings (Turning On All-Day Mode, page 63). When you view
the pulse oximeter glance while you are not moving, your watch analyzes your oxygen saturation and your
elevation. The elevation profile helps indicate how your pulse oximeter readings are changing, relative to your to
elevation.
On the watch, your pulse oximeter reading appears as an oxygen saturation percentage and color on the graph.
On your Garmin Connect account, you can view additional details about your pulse oximeter readings, including
trends over multiple days.
For more information about pulse oximeter accuracy, go to garmin.com/ataccuracy.
The elevation scale.
A graph of your average oxygen saturation readings for the last 24 hours.
Your most recent oxygen saturation reading.
The oxygen saturation percentage scale.
A graph of your elevation readings for the last 24 hours.
62 Heart Rate Features
Page 71
Getting Pulse Oximeter Readings
You can manually begin a pulse oximeter reading by viewing the pulse oximeter glance. The glance displays
your most recent blood oxygen saturation percentage, a graph of your hourly average readings for the last 24
hours, and a graph of your elevation for the last 24 hours.
NOTE: The first time you view the pulse oximeter glance, the watch must acquire satellite signals to determine
your elevation. You should go outside, and wait while the watch locates satellites.
1 While you are sitting or inactive, press UP or DOWN to view the pulse oximeter glance.
2 Press START to view glance details and begin a pulse oximeter reading.
3 Remain motionless for up to 30 seconds.
NOTE: If you are too active for the watch to get a pulse oximeter reading, a message appears instead of a
percentage. You can check again after several minutes of inactivity. For best results, hold the arm wearing
the watch at heart level while the watch reads your blood oxygen saturation.
4 Press DOWN to view a graph of your pulse oximeter readings for the last seven days.
Turning On Pulse Oximeter Sleep Tracking
You can set your device to continuously measure your blood oxygen saturation while you sleep.
NOTE: Unusual sleep positions can cause abnormally low sleep-time SpO2 readings.
1 From the pulse oximeter glance, hold
2 Select Pulse Ox Options > During Sleep.
.
Turning On All-Day Mode
1 From the pulse oximeter glance, hold
2 Select Pulse Ox Options > All Day.
The device automatically analyzes your oxygen saturation throughout the day, when you are not moving.
NOTE: Turning on all-day mode decreases battery life.
.
Tips for Erratic Pulse Oximeter Data
If the pulse oximeter data is erratic or does not appear, you can try these tips.
• Remain motionless while the watch reads your blood oxygen saturation.
• Wear the watch above your wrist bone. The watch should be snug but comfortable.
• Hold the arm wearing the watch at heart level while the watch reads your blood oxygen saturation.
• Use a silicone or nylon band.
• Clean and dry your arm before putting on the watch.
• Avoid wearing sunscreen, lotion, and insect repellent under the watch.
• Avoid scratching the optical sensor on the back of the watch.
• Rinse the watch with fresh water after each workout.
Heart Rate Features 63
Page 72
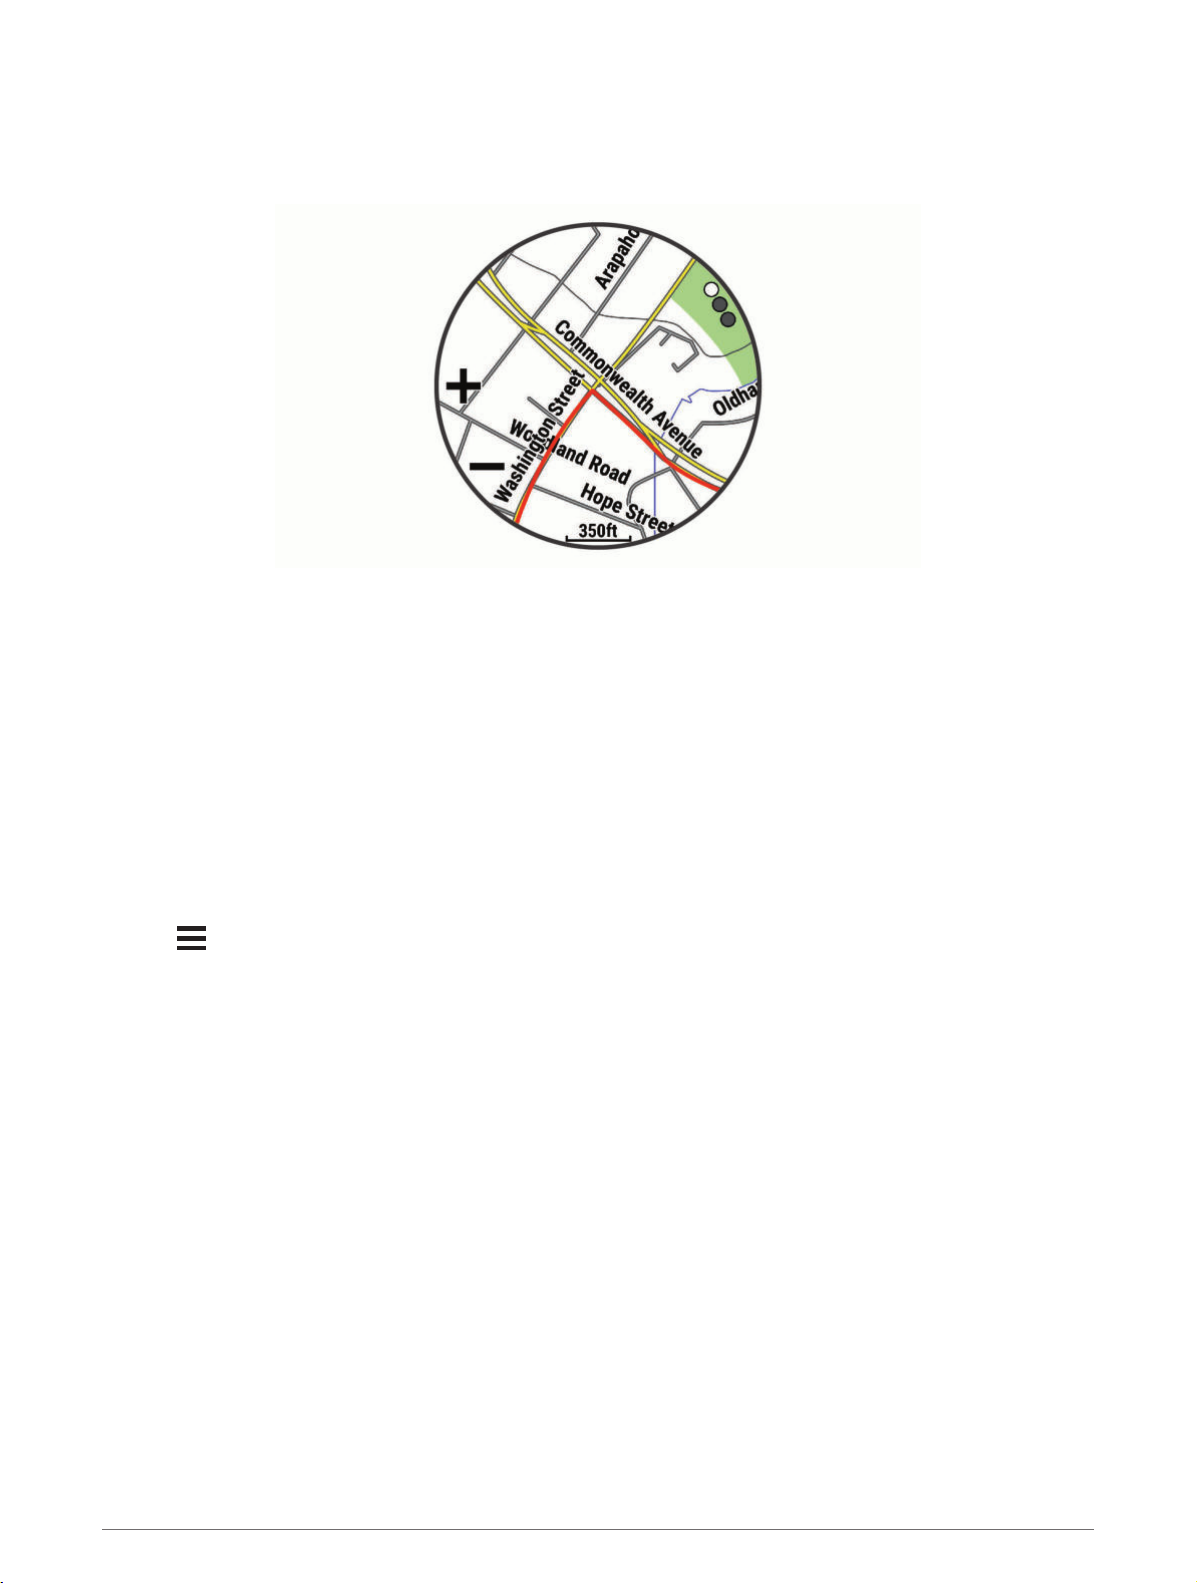
Navigation
You can use the GPS navigation features on your device to view your path on a map, save locations, and find
your way home.
Courses
You can send a course from your Garmin Connect account to your device. After it is saved to your device, you
can navigate the course on your device.
You can follow a saved course simply because it is a good route. For example, you can save and follow a bike
friendly commute to work.
You can also follow a saved course, trying to match or exceed previously set performance goals. For example, if
the original course was completed in 30 minutes, you can race against a Virtual Partner trying to complete the
course in under 30 minutes.
Following a Course on Your Device
1 From the watch face, select START.
2 Select an activity.
3 Hold
4 Select Navigate > Courses.
5 Select a course.
6 Select Do Course.
Navigation information appears.
7 Select START to begin navigation.
.
64 Navigation
Page 73
Creating a Round-Trip Course
The device can create a round-trip course based on a specified distance and direction of navigation.
1 Press START.
2 Select Run or Bike.
3 Hold
4 Select Navigation > Round-Trip Course.
5 Enter the total distance for the course.
6 Select a direction heading.
The device creates up to three courses. You can press DOWN to view the courses.
7 Press START to select a course.
8 Select an option:
• To begin navigation, select Go.
• To view the course on the map and pan or zoom the map, select Map.
• To view a list of turns in the course, select Turn By Turn.
• To view an elevation plot of the course, select Elevation Plot.
• To save the course, select Save.
• To view a list of ascents in the course, select View Climbs.
.
Creating a Course on Garmin Connect
Before you can create a course on the Garmin Connect app, you must have a Garmin Connect account (
Connect, page 89).
1 From the Garmin Connect app, select or .
2 Select Training > Courses > Create Course.
3 Select a course type.
4 Follow the on-screen instructions.
5 Select Done.
NOTE: You can send this course to your device (Sending a Course to Your Device, page 65).
Garmin
Sending a Course to Your Device
You can send a course you created using the Garmin Connect app to your device (
Connect, page 65).
1 From the Garmin Connect app, select or .
2 Select Training > Courses.
3 Select a course.
4 Select > Send to Device.
5 Select your compatible device.
6 Follow the on-screen instructions.
Creating a Course on Garmin
Navigation 65
Page 74
Viewing or Editing Course Details
You can view or edit course details before you navigate a course.
1 Press START.
2 Select an activity.
3 Hold
4 Select Navigation > Courses.
5 Press START to select a course.
6 Select an option:
• To begin navigation, select Do Course.
• To create a custom pace band, select PacePro.
• To view the course on the map and pan or zoom the map, select Map.
• To begin the course in reverse, select Do Course in Reverse.
• To view an elevation plot of the course, select Elevation Plot.
• To change the course name, select Name.
• To edit the course path, select Edit.
• To view a list of ascents in the course, select View Climbs.
• To delete the course, select Delete.
.
Saving Your Location
You can save your current location to navigate back to it later.
NOTE: You can add options to the controls menu (Customizing the Controls Menu, page 41).
1 Hold LIGHT.
2 Select Save Location.
3 Follow the on-screen instructions.
Viewing and Editing Your Saved Locations
TIP: You can save a location from the controls menu (
1 Press START.
2 Select Navigate > Saved Locations.
3 Select a saved location.
4 Select an option to view or edit the location details.
Controls, page 39).
Navigating to a Destination
You can use your device to navigate to a destination or follow a course.
1 Press START.
2 Select an activity.
3 Hold .
4 Select Navigation.
5 Select a category.
6 Respond to the on-screen prompts to choose a destination.
7 Select Go To.
Navigation information appears.
8 Press START to begin navigation.
66 Navigation
Page 75
Navigating to a Point of Interest
If the map data installed on your watch includes points of interest, you can navigate to them.
1 Press START.
2 Select an activity.
3 Hold .
4 Select Navigation > Points of Interest, and select a category.
A list of points of interest near your current location appears.
5 If necessary, select an option:
• To search near a different location, select Search Near, and select a location.
• To search for a point of interest by name, select Spell Search, and enter a name.
• To search for nearby points of interest, select Around Me (Navigating with the Around Me Feature,
page 70).
6 Select a point of interest from the search results.
7 Select Go.
Navigation information appears.
8 Press START to begin navigation.
Points of Interest
NOTICE
You are responsible for understanding and complying with any applicable rules, laws, or regulations associated
with points of interest.
A point of interest is a place that you may find useful or interesting. Points of interest are organized by category
and can include popular travel destinations such as gas stations, restaurants, hotels, and entertainment venues.
Using ClimbPro
The ClimbPro feature helps you manage your effort for the upcoming climbs on a course. You can view climb
details, including gradient, distance, and elevation gain, before or in real time while following a course. Cycling
climb categories, based on length and gradient, are indicated by color.
1 Hold .
2 Select Activities & Apps.
3 Select an activity.
4 Select the activity settings.
5 Select ClimbPro > Status > When Navigating.
6 Select an option:
• Select Data Field to customize the data field that appears on the ClimbPro screen.
• Select Alert to set alerts at the start of a climb or at a certain distance from the climb.
• Select Descents to turn descents on or off for running activities.
• Select Climb Detection to choose the types of climbs detected during cycling activities.
7 Review the climbs and course details for the course (Viewing or Editing Course Details, page 66).
8 Start following a saved course (Navigating to a Destination, page 66).
Navigation 67
Page 76
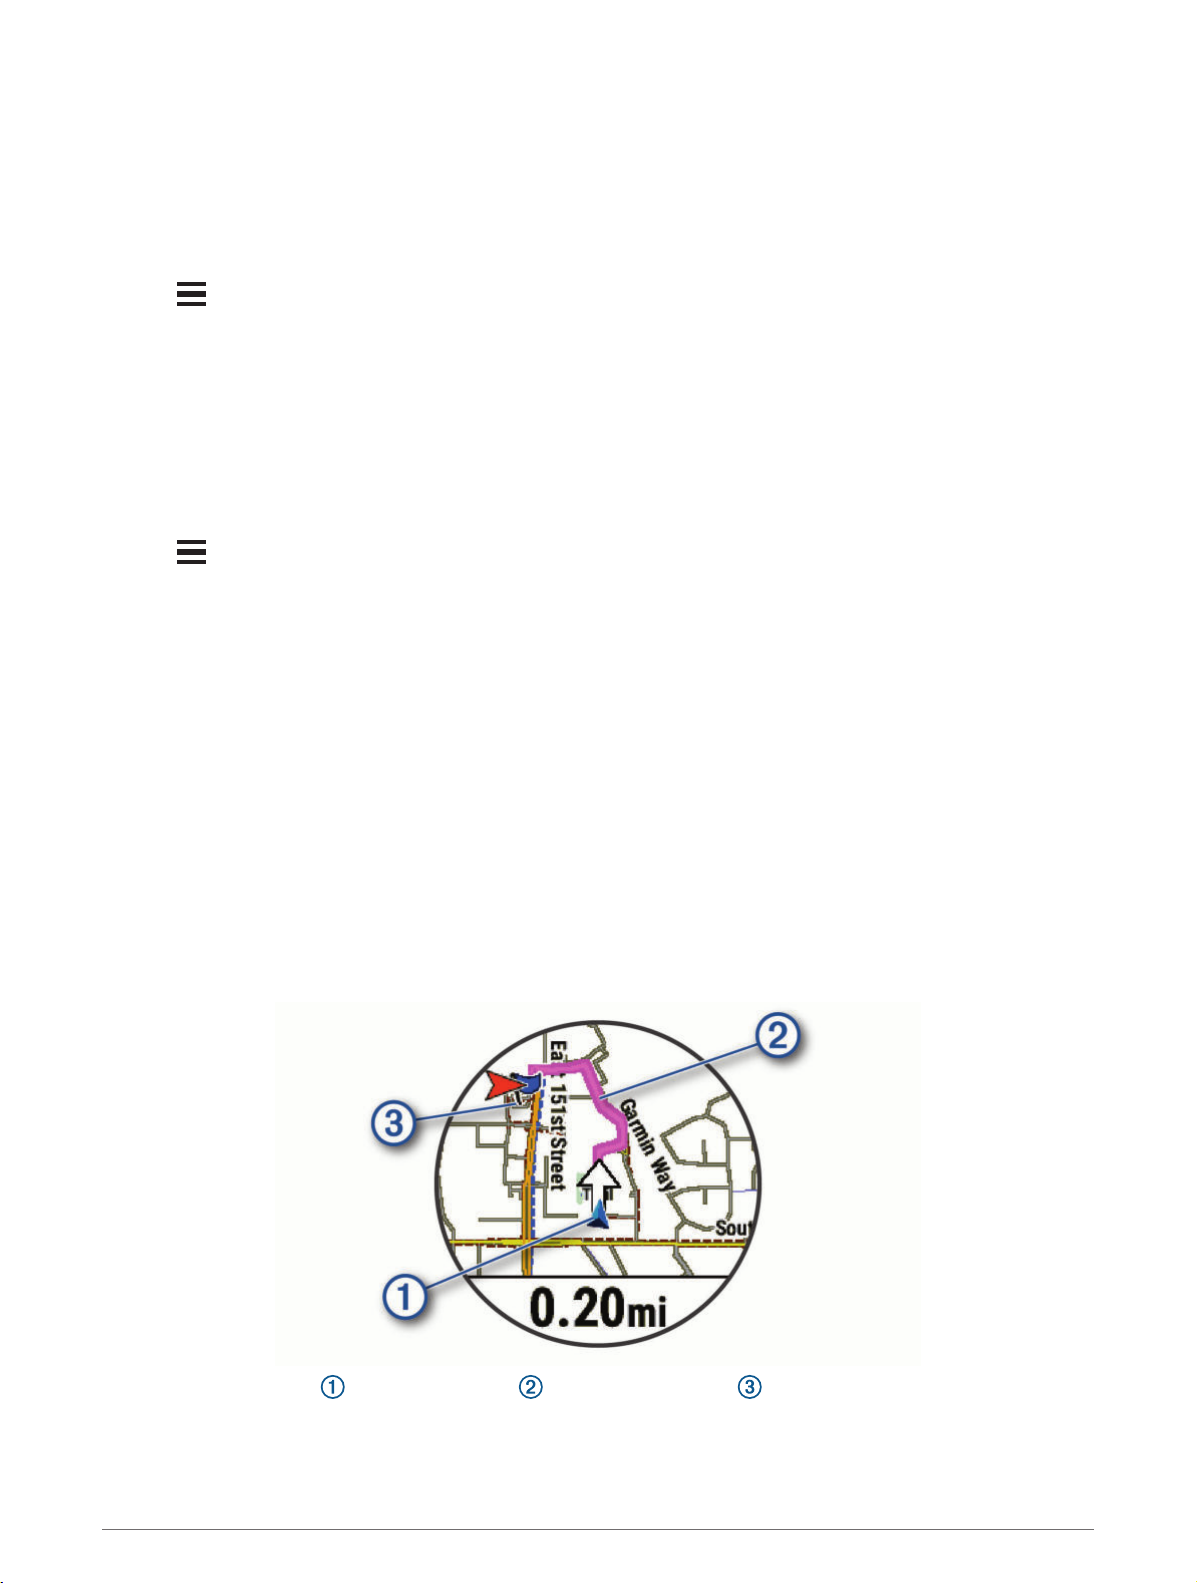
Marking and Starting Navigation to a Man Overboard Location
You can save a man overboard (MOB) location, and automatically start navigation back to it.
TIP: You can customize the hold function of the keys to access the MOB function (Customizing the Hot Keys,
page 107).
1 Press START.
2 Select an activity.
3 Hold .
4 Select Navigation > Last MOB.
Navigation information appears.
Navigating with Sight 'N Go
You can point the device at an object in the distance, such as a water tower, lock in the direction, and then
navigate to the object.
1 Press START.
2 Select an activity.
3 Hold .
4 Select Navigation > Sight 'N Go.
5 Point the top of the watch at an object, and press START.
Navigation information appears.
6 Press START to begin navigation.
Navigating to Your Starting Point During an Activity
You can navigate back to the starting point of your current activity in a straight line or along the path you
traveled. This feature is available only for activities that use GPS.
1 During an activity, press STOP.
2 Select Back to Start, and select an option:
• To navigate back to the starting point of your activity along the path you traveled, select TracBack.
• If you do not have a supported map or are using direct routing, select Route to navigate back to the
starting point of your activity in a straight line.
• If you are not using direct routing, select Route to navigate back to the starting point of your activity using
turn-by-turn directions.
Your current location , the track to follow , and your destination appear on the map.
68 Navigation
Page 77
Viewing Route Directions
You can view a list of turn-by-turn directions for your route.
1 While navigating a route, hold
2 Select Turn By Turn.
A list of turn-by-turn directions appears.
3 Press DOWN to view additional directions.
.
Stopping Navigation
• To stop navigation and continue your activity, hold , and select Stop Navigation or Stop Course.
• To stop navigation and save your activity, press STOP, and select Save.
Map
Your watch can display several types of Garmin map data, including topographical contours, nearby points of
interest, ski resort maps, and golf courses. You can use the Map Manager to download additional maps or
manage map storage.
To purchase additional map data and view compatibility information, go to garmin.com/maps.
represents your location on the map. When you are navigating to a destination, your route is marked with a
line on the map.
Viewing the Map
1 Select an option to open the map:
• Press START, and select Map to view the map without starting an activity.
• Go outside, start a GPS activity (
screen.
2 If necessary, wait while the watch locates satellites.
3 Select an option to pan and zoom the map:
• To use the touchscreen, tap the map, tap and drag to position the crosshairs, and press UP or DOWN to
zoom in or out.
• To use the buttons, hold , select Pan/Zoom, and press UP or DOWN to zoom in or out.
NOTE: You can press START to toggle between panning up and down, panning left and right, or zooming.
4 Hold START to select the point indicated by the crosshairs.
Starting an Activity, page 3), and press UP or DOWN to scroll to the map
Navigation 69
Page 78
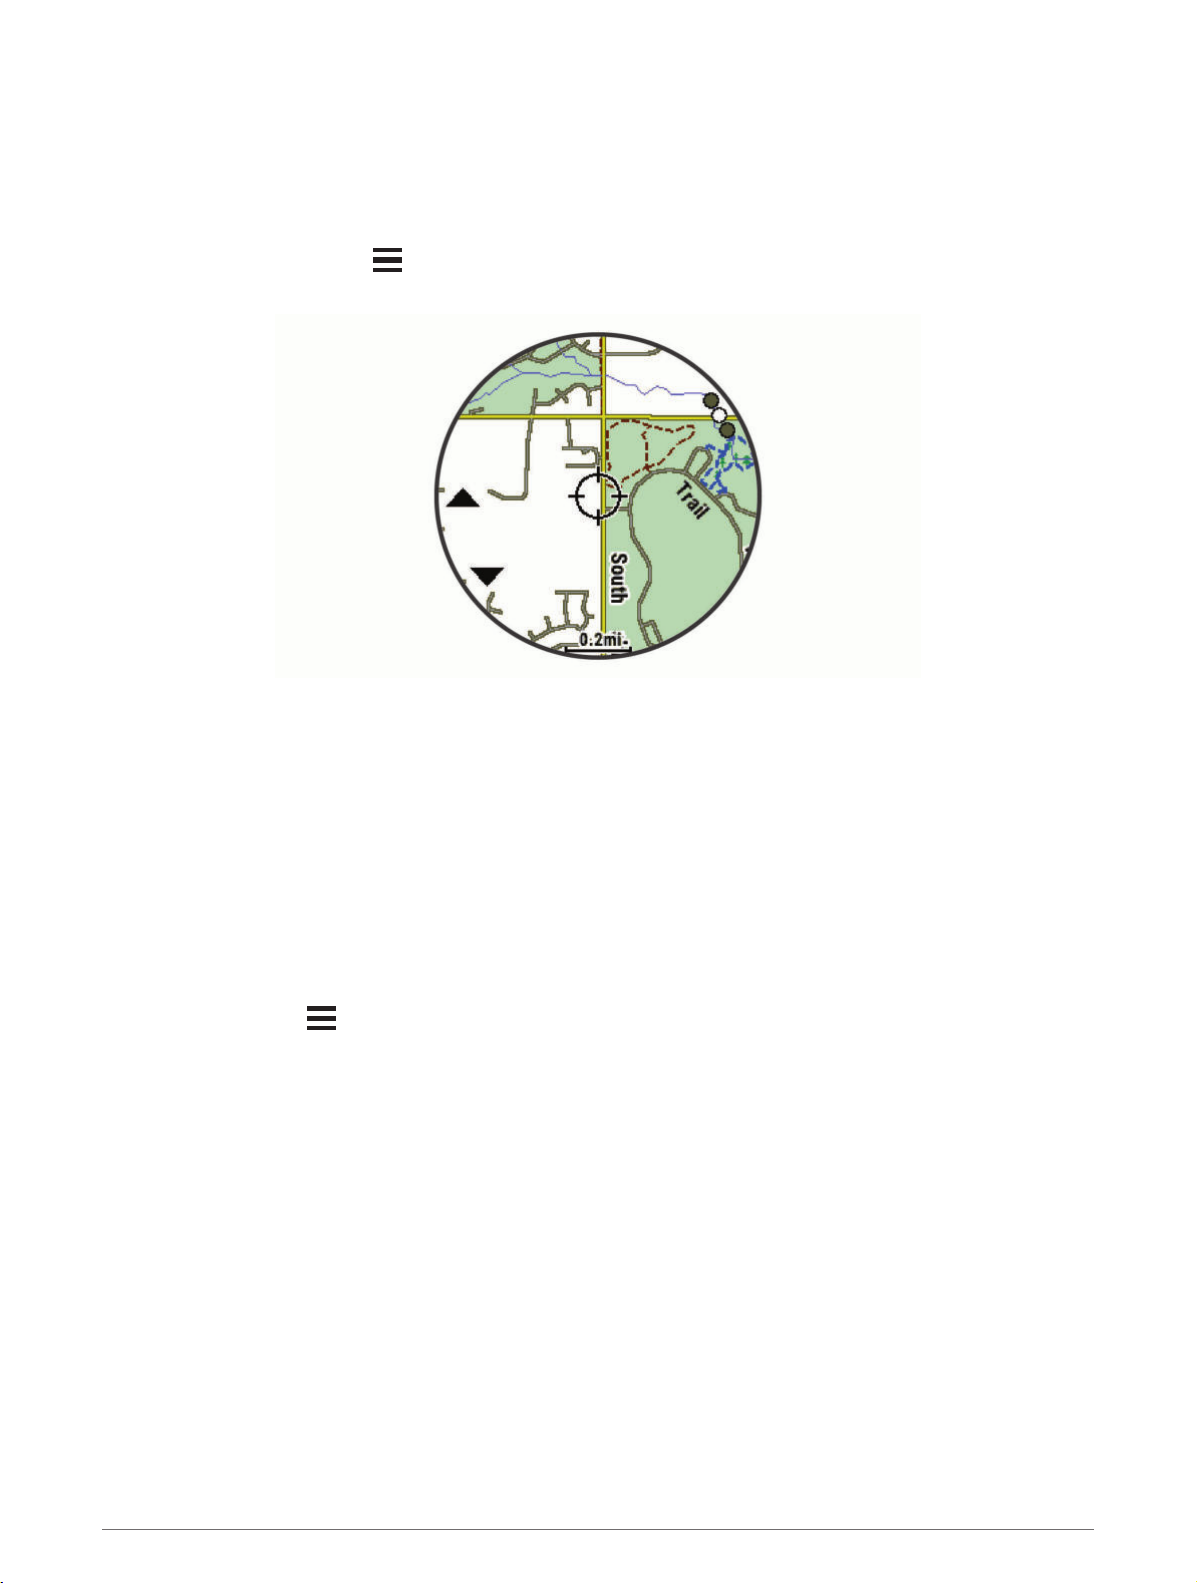
Saving or Navigating to a Location on the Map
You can select any location on the map. You can save the location or start navigating to it.
1 From the map, select an option:
• To use the touchscreen, tap the map, tap and drag to position the crosshairs, and press UP or DOWN to
zoom in or out.
• To use the buttons, hold
NOTE: You can press START to toggle between panning up and down, panning left and right, or zooming.
, select Pan/Zoom, and press UP or DOWN to zoom in or out.
2 Pan and zoom the map to center the location in the crosshairs.
3 Hold START to select the point indicated by the crosshairs.
4 If necessary, select a nearby point of interest.
5 Select an option:
• To start navigating to the location, select Go.
• To save the location, select Save Location.
• To view information about the location, select Review.
Navigating with the Around Me Feature
You can use the around me feature to navigate to nearby points of interest and waypoints.
NOTE: The map data installed on your watch must include points of interest to navigate to them.
1 From the map, hold
2 Select Around Me.
Icons indicating points of interest and waypoints appear on the map.
3 Press UP or DOWN to highlight a section of the map.
4 Press START.
A list of points of interest and waypoints in the highlighted map section appear.
5 Select a location.
6 Select an option:
• To start navigating to the location, select Go.
• To view the location on the map, select Map.
• To save the location, select Save Location.
• To view information about the location, select Review.
.
70 Navigation
Page 79
Changing the Map Theme
You can change the map theme to display map data optimized for your activity type. For example, high contrast
map themes provide better visibility in challenging environments, and activity-specific map themes display the
most important map data at-a-glance.
1 Start an outdoor activity.
2 Hold
3 Select the activity settings.
4 Select Map > Map Theme.
5 Select an option.
.
Compass
The watch has a 3-axis compass with automatic calibration. The compass features and appearance change
depending on your activity, whether GPS is enabled, and whether you are navigating to a destination. You can
change the compass settings manually (Compass Settings, page 102).
Setting the Compass Heading
1 From the compass glance, press START.
2 Select Lock Heading.
3 Point the top of the watch toward your heading, and press START.
When you deviate from the heading, the compass displays the direction from the heading and degree of
deviation.
Altimeter and Barometer
The watch contains an internal altimeter and barometer. The watch collects elevation and pressure data
continuously, even in low-power mode. The altimeter displays your approximate elevation based on pressure
changes. The barometer displays environmental pressure data based on the fixed elevation where the altimeter
was most recently calibrated (Altimeter Settings, page 103).
Sensors and Accessories
The Forerunner watch has several internal sensors, and you can pair additional wireless sensors for your
activities.
Sensors and Accessories 71
Page 80
Wireless Sensors
Your watch can be paired and used with wireless ANT+ or Bluetooth sensors (Pairing Your Wireless Sensors,
page 73). After the devices are paired, you can customize the optional data fields (Customizing the Data
Screens, page 98). If your watch was packaged with a sensor, they are already paired.
For information about specific Garmin sensor compatibility, purchasing, or to view the owner's manual, go to
buy.garmin.com for that sensor.
Sensor Type Description
Club Sensors
eBike
Extended
Display
External Heart
Rate
Foot Pod
Headphones
inReach
Lights You can use Varia™ smart bike lights to improve situational awareness.
Muscle O2
You can use Approach CT10 golf club sensors to automatically track your golf shots, including
location, distance, and club type.
You can use your watch with your eBike and view bike data, such as battery and shifting infor
mation, during your rides.
You can use the Extended Display mode to display data screens from your Forerunner watch
on a compatible Edge device during a ride or triathlon.
You can use an external heart rate monitor, such as the HRM-Pro or HRM-Dual™, and view heart
rate data during your activities. Some heart rate monitors can also store data or provide
running dynamics information (Running Dynamics, page 74).
You can use a foot pod to record pace and distance instead of using GPS when you are
training indoors or when your GPS signal is weak.
You can use Bluetooth headphones to listen to music loaded onto your Forerunner watch
(Connecting Bluetooth Headphones, page 84).
The inReach remote function allows you to control your inReach device using your Forerunner
watch (Using the inReach Remote, page 79).
You can use a muscle oxygen sensor to view hemoglobin and muscle oxygen saturation data
while you train.
Power
Radar
RD Pod
Shifting
Shimano Di2
Smart Trainer
Spd./Cad.
You can use a power meter, such as Rally™ and Vector™, to view your power data on your
watch. You can adjust your power zones to match your goals and abilities (Setting Your Power
Zones, page 82), or use range alerts to be notified when you reach a specified power zone
(Setting an Alert, page 100).
You can use a Varia rearview bike radar to improve situational awareness and send alerts
about approaching vehicles. With a Varia radar camera tail light, you can also take photos and
record video during a ride (Using the Varia Camera Controls, page 78).
You can use a Running Dynamics Pod to record running dynamics data and view it on your
watch (Running Dynamics, page 74).
You can use electronic shifters to display shifting information during a ride. The Forerunner
watch displays current adjustment values when the sensor is in adjustment mode.
You can use Shimano® Di2™ electronic shifters to display shifting information during a ride. The
Forerunner watch displays current adjustment values when the sensor is in adjustment mode.
You can use your watch with an indoor bike smart trainer to simulate resistance while
following a course, ride, or workout (Using an ANT+® Indoor Trainer, page 13).
You can attach speed or cadence sensors to your bike and view the data during your ride. If
necessary, you can manually enter your wheel circumference (
page 133).
Wheel Size and Circumference,
72 Sensors and Accessories
Page 81
Sensor Type Description
Tempe
VIRB
You can attach the tempe temperature sensor to a secure strap or loop where it is exposed to
ambient air, so it provides a consistent source of accurate temperature data.
The VIRB remote function allows you to control your VIRB action camera using your watch
(VIRB Remote, page 79).
Pairing Your Wireless Sensors
The first time you connect a wireless sensor to your watch using ANT+ or Bluetooth technology, you must pair
the watch and sensor. If the sensor has both ANT+ and Bluetooth technology, Garmin recommends that you
pair using ANT+ technology. After they are paired, the watch connects to the sensor automatically when you
start an activity and the sensor is active and within range.
1 If you are pairing a heart rate monitor, put on the heart rate monitor.
The heart rate monitor does not send or receive data until you put it on.
2 Bring the watch within 3 m (10 ft.) of the sensor.
NOTE: Stay 10 m (33 ft.) away from other wireless sensors while pairing.
3 Hold .
4 Select Sensors & Accessories > Add New.
5 Select an option:
• Select Search All.
• Select your sensor type.
After the sensor is paired with your watch, the sensor status changes from Searching to Connected. Sensor
data appears in the data screen loop or a custom data field. You can customize the optional data fields
(Customizing the Data Screens, page 98).
Running Power
Garmin running power is calculated using measured running dynamics information, user mass, environmental
data, and other sensor data. The power measurement estimates the amount of power a runner applies to the
road surface, and it is displayed in watts. Using running power as a gauge of effort may suit some runners
better than using either pace or heart rate. Running power can be more responsive than heart rate for indicating
the level of effort, and it can account for the uphills, downhills, and wind, which a pace measurement does not
do.
You can customize the running power data fields to view your power output and make adjustments to your
training (Data Fields, page 119). You can set up power alerts to be notified when you reach a specified power
zone (Activity Alerts, page 99).
Running power zones are similar to cycling power zones. The values for the zones are default values based on
gender, weight, and average ability, and may not match your personal abilities. You can manually adjust your
zones on the watch or using your Garmin Connect account (Setting Your Power Zones, page 82).
Sensors and Accessories 73
Page 82
Running Dynamics
You can use your compatible Forerunner device paired with the HRM-Pro accessory or other running dynamics
accessory to provide real-time feedback about your running form.
The running dynamics accessory has an accelerometer that measures torso movement in order to calculate six
running metrics.
Cadence: Cadence is the number of steps per minute. It displays the total steps (right and left combined).
Vertical oscillation: Vertical oscillation is your bounce while running. It displays the vertical motion of your
torso, measured in centimeters.
Ground contact time: Ground contact time is the amount of time in each step that you spend on the ground
while running. It is measured in milliseconds.
NOTE: Ground contact time and balance are not available while walking.
Ground contact time balance: Ground contact time balance displays the left/right balance of your ground
contact time while running. It displays a percentage. For example, 53.2 with an arrow pointing left or right.
Stride length: Stride length is the length of your stride from one footfall to the next. It is measured in meters.
Vertical ratio: Vertical ratio is the ratio of vertical oscillation to stride length. It displays a percentage. A lower
number typically indicates better running form.
Training with Running Dynamics
Before you can view running dynamics, you must put on a running dynamics accessory, such as the HRM-Pro,
and pair it with your watch (
1 Press START, and select a running activity.
2 Press START to start the activity timer.
3 Go for a run.
Pairing Your Wireless Sensors, page 73).
74 Sensors and Accessories
Page 83
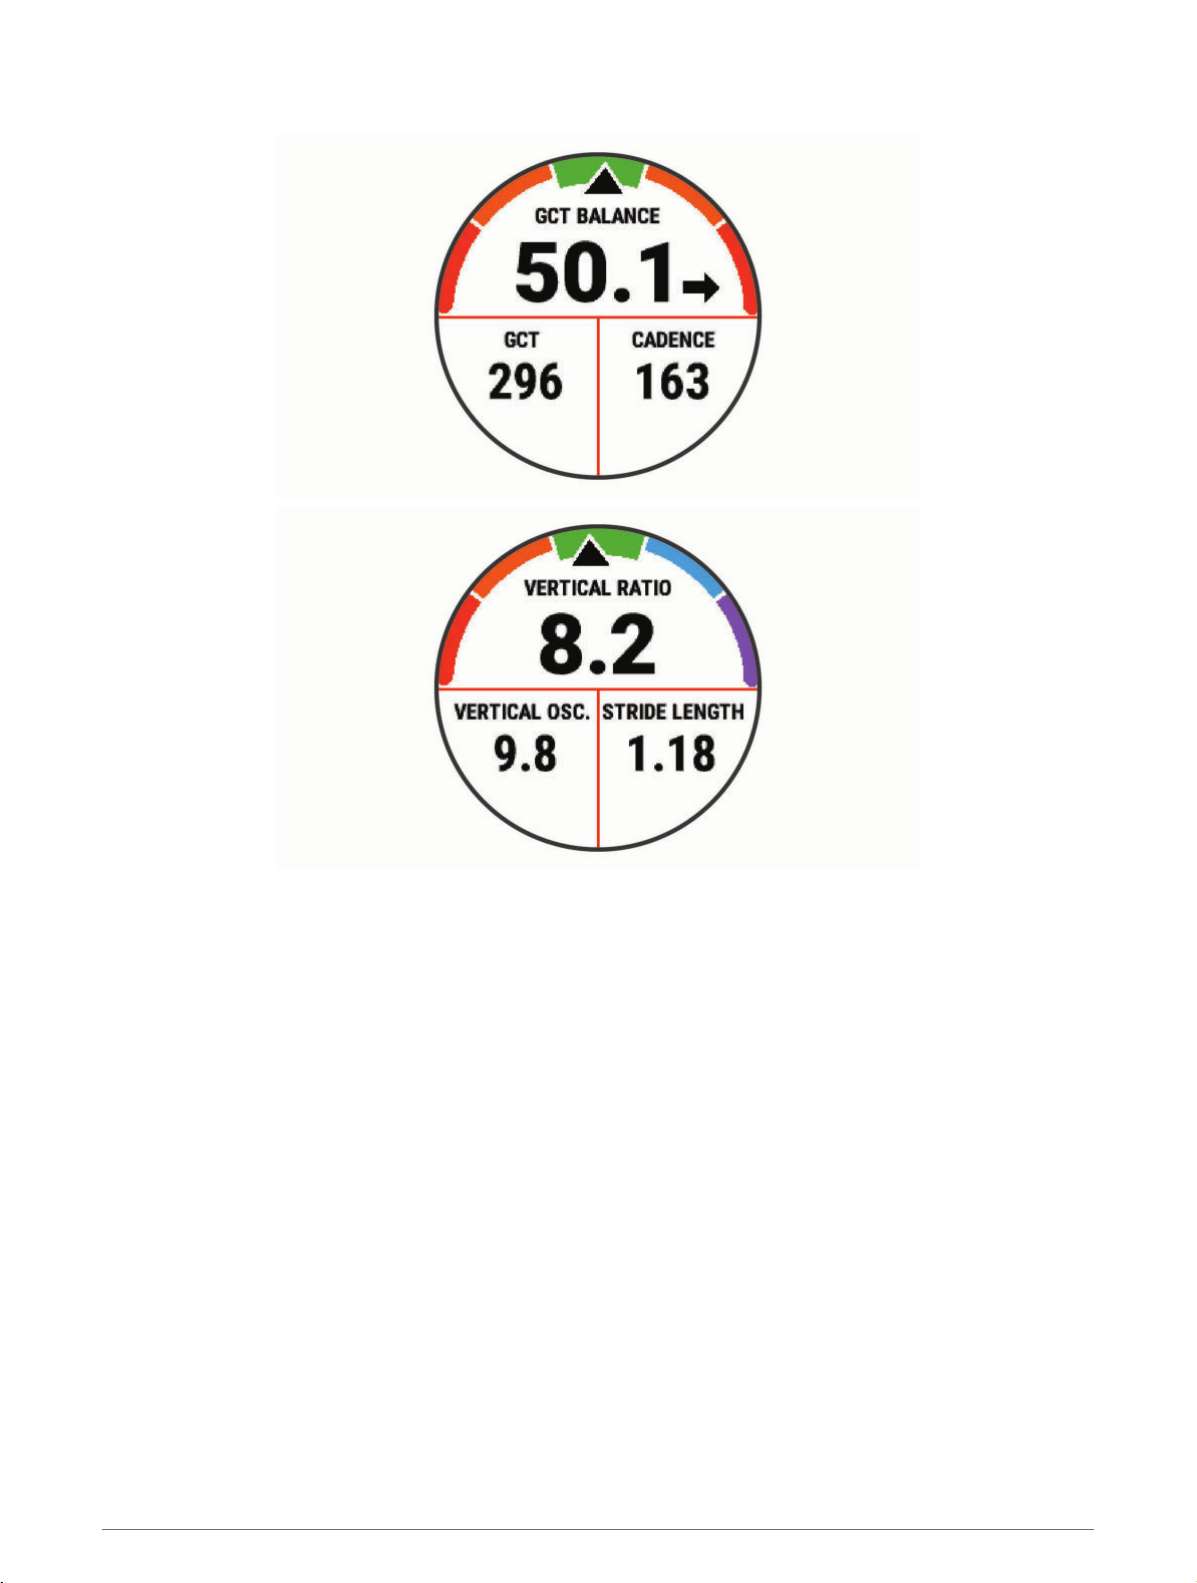
4 Scroll to the running dynamics screens to view your metrics.
5 If necessary, hold UP to edit how the running dynamics data appears.
Sensors and Accessories 75
Page 84
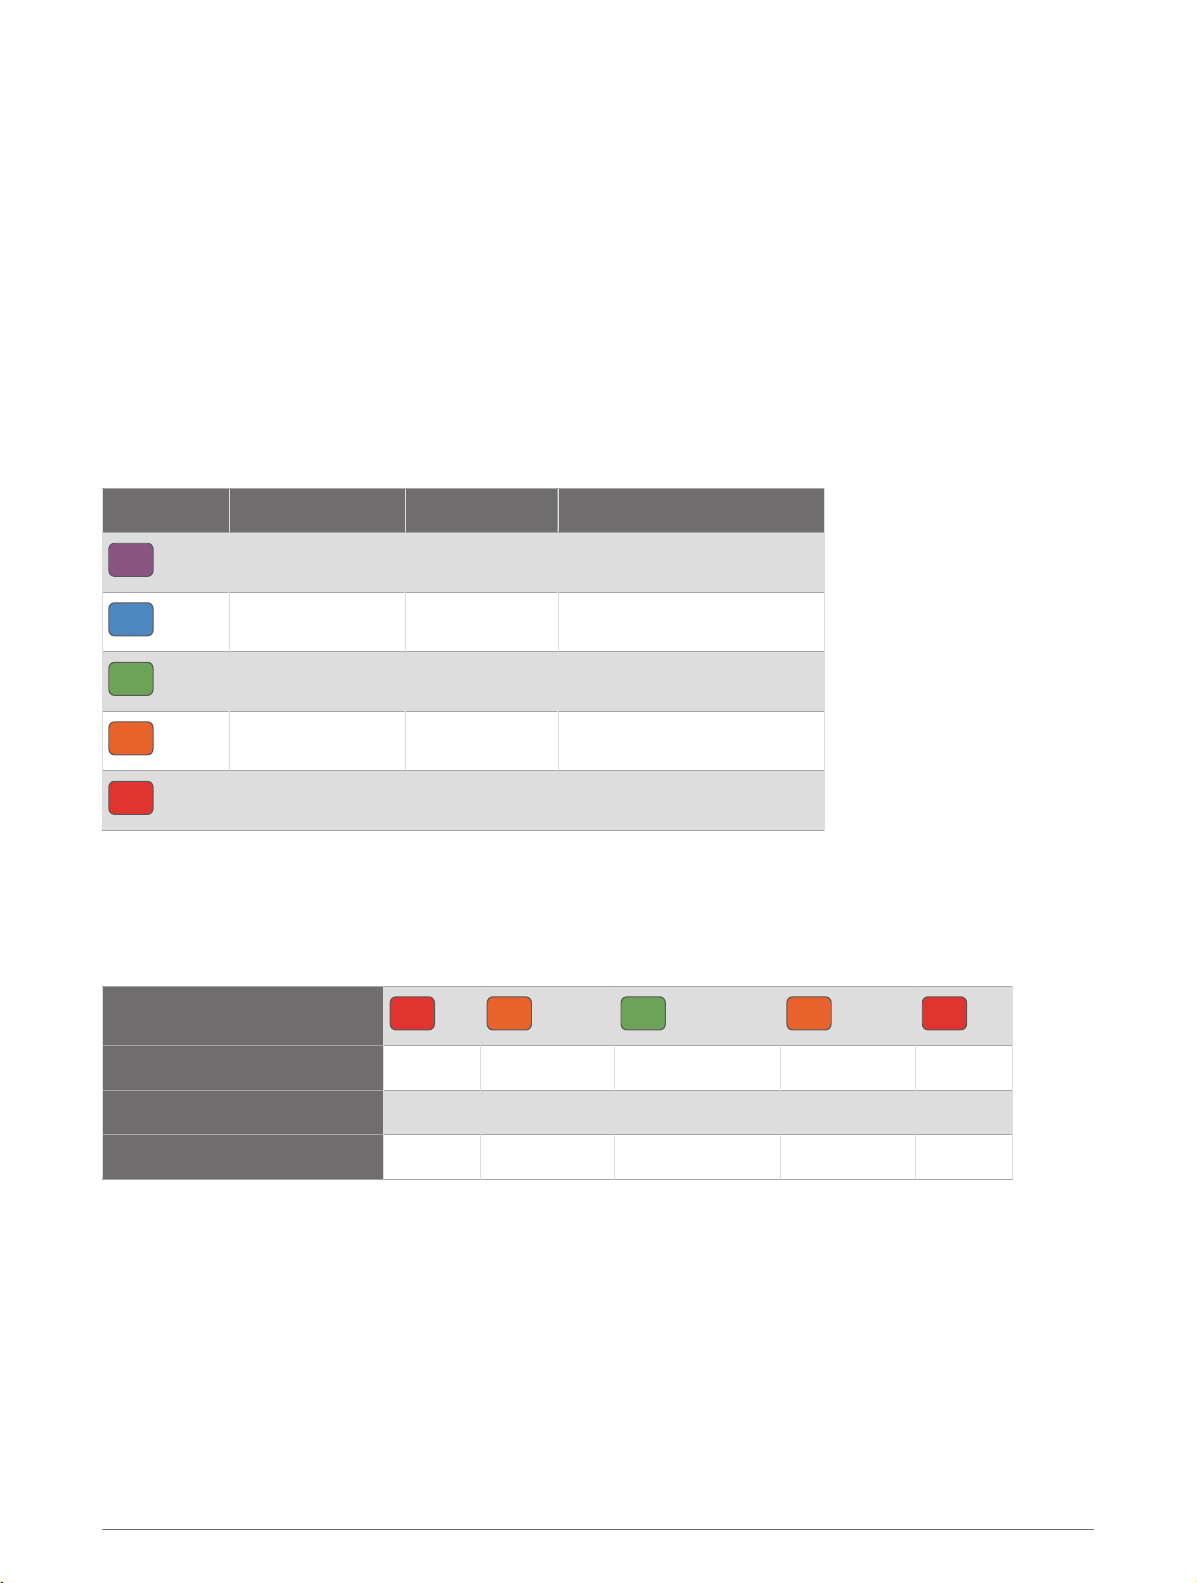
Color Gauges and Running Dynamics Data
The running dynamics screens display a color gauge for the primary metric. You can display cadence, vertical
oscillation, ground contact time, ground contact time balance, or vertical ratio as the primary metric. The color
gauge shows you how your running dynamics data compare to those of other runners. The color zones are
based on percentiles.
Garmin has researched many runners of all different levels. The data values in the red or orange zones are
typical for less experienced or slower runners. The data values in the green, blue, or purple zones are typical for
more experienced or faster runners. More experienced runners tend to exhibit shorter ground contact times,
lower vertical oscillation, lower vertical ratio, and higher cadence than less experienced runners. However, taller
runners typically have slightly slower cadences, longer strides, and slightly higher vertical oscillation. Vertical
ratio is your vertical oscillation divided by stride length. It is not correlated with height.
www.garmin.com/performance-data/running/ for more information on running dynamics. For additional
Go to
theories and interpretations of running dynamics data, you can search reputable running publications and
websites.
Color Zone Percentile in Zone Cadence Range Ground Contact Time Range
Purple
Blue
Green
Orange
Red
>95 >183 spm <218 ms
70–95 174–183 spm 218–248 ms
30–69 164–173 spm 249–277 ms
5–29 153–163 spm 278–308 ms
<5 <153 spm >308 ms
Ground Contact Time Balance Data
Ground contact time balance measures your running symmetry and appears as a percentage of your total
ground contact time. For example, 51.3% with an arrow pointing left indicates the runner is spending more time
on the ground when on the left foot. If your data screen displays both numbers, for example 48–52, 48% is the
left foot and 52% is the right foot.
Color Zone
Symmetry Poor Fair Good Fair Poor
Percent of Other Runners 5% 25% 40% 25% 5%
Red Orange Green Orange Red
Ground Contact Time Balance >52.2% L 50.8–52.2% L 50.7% L–50.7% R 50.8–52.2% R >52.2% R
While developing and testing running dynamics, the Garmin team found correlations between injuries and
greater imbalances with certain runners. For many runners, ground contact time balance tends to deviate
further from 50–50 when running up or down hills. Most running coaches agree that a symmetrical running
form is good. Elite runners tend to have quick and balanced strides.
You can watch the gauge or data field during your run or view the summary on your Garmin Connect account
after your run. As with the other running dynamics data, ground contact time balance is a quantitative
measurement to help you learn about your running form.
76 Sensors and Accessories
Page 85
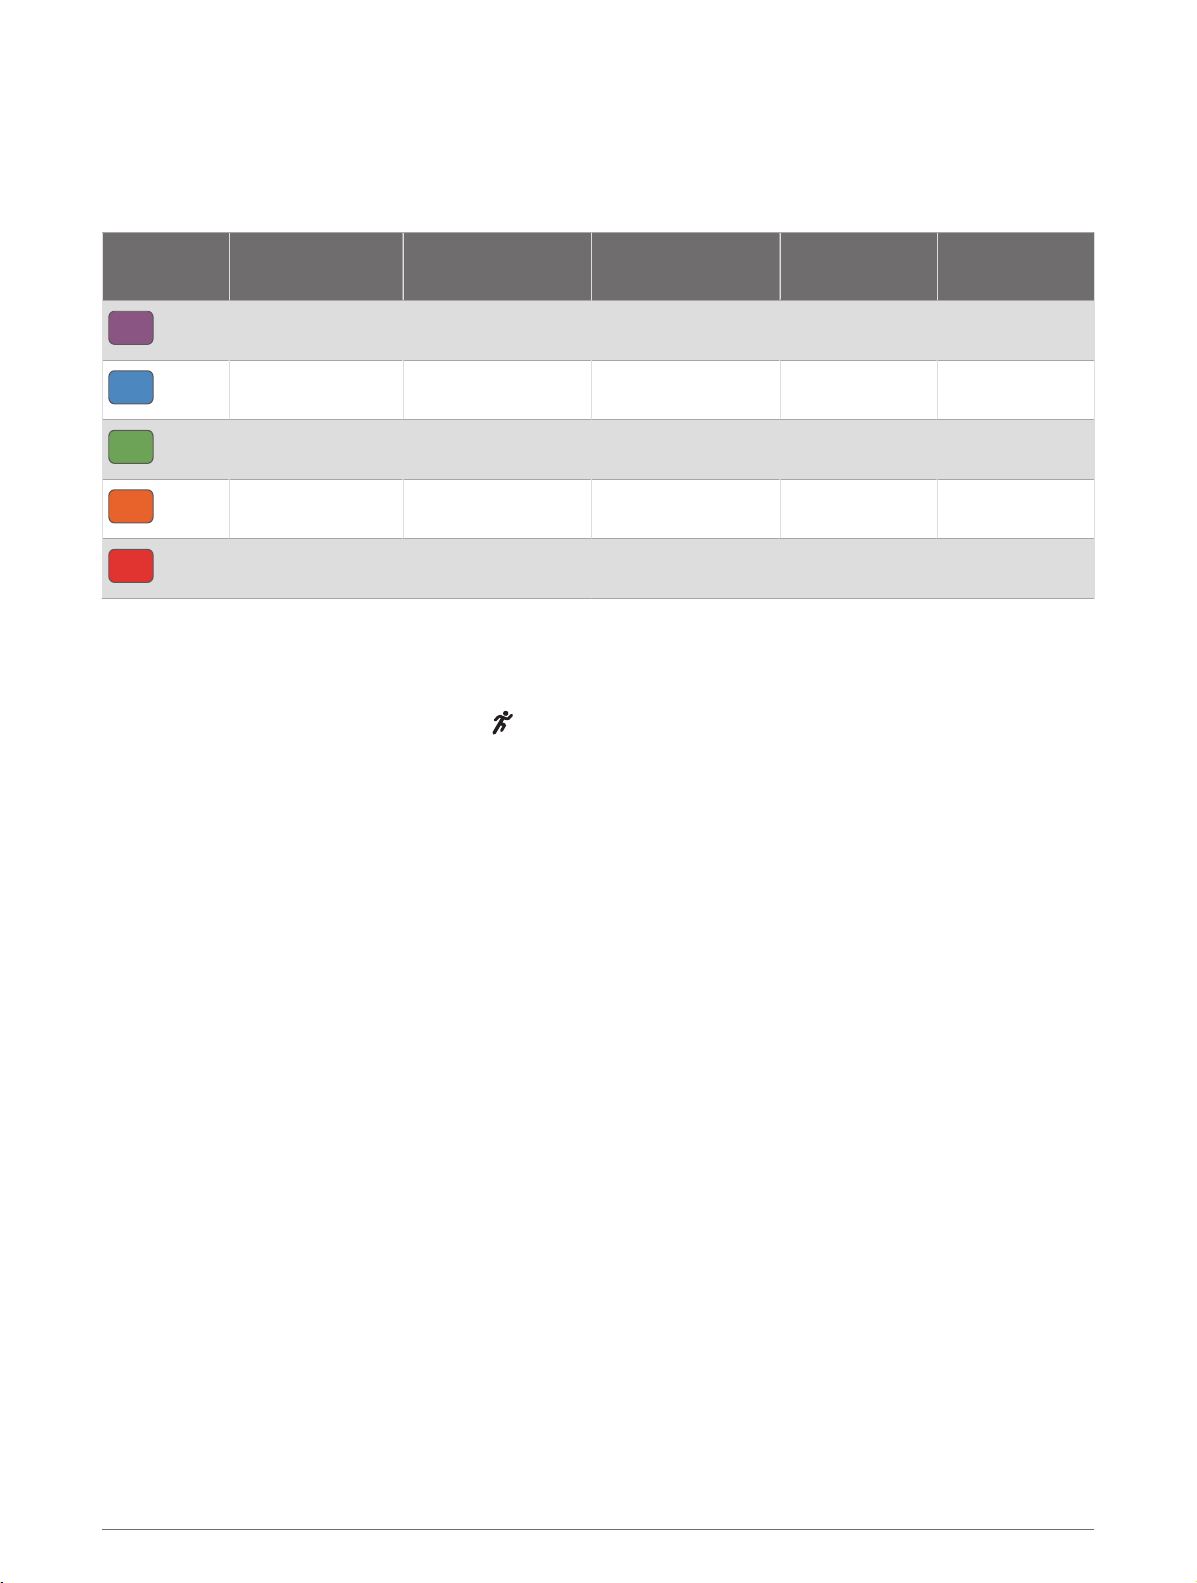
Vertical Oscillation and Vertical Ratio Data
The data ranges for vertical oscillation and vertical ratio are slightly different depending on the sensor and
whether it is positioned at the chest (HRM-Pro, HRM-Run™, or HRM-Tri accessories) or at the waist (Running
Dynamics Pod accessory).
Color Zone
Purple
Blue
Green
Orange
Red
Percentile in
Zone
>95 <6.4 cm <6.8 cm <6.1% <6.5%
70–95 6.4–8.1 cm 6.8–8.9 cm 6.1–7.4% 6.5–8.3%
30–69 8.2–9.7 cm 9.0–10.9 cm 7.5–8.6% 8.4–10.0%
5–29 9.8–11.5 cm 11.0–13.0 cm 8.7–10.1% 10.1–11.9%
<5 >11.5 cm >13.0 cm >10.1% >11.9%
Vertical Oscillation
Range at Chest
Vertical Oscillation
Range at Waist
Vertical Ratio at
Chest
Vertical Ratio at
Waist
Tips for Missing Running Dynamics Data
If running dynamics data does not appear, you can try these tips.
• Make sure you have a running dynamics accessory, such as the HRM-Pro accessory.
Accessories with running dynamics have
• Pair the running dynamics accessory with your watch again, according to the instructions.
• If you are using the HRM-Pro accessory, pair it with your watch using ANT+ technology, rather than Bluetooth
technology.
• If the running dynamics data display shows only zeros, make sure the accessory is worn right-side up.
NOTE: Ground contact time and balance appears only while running. It is not calculated while walking.
on the front of the module.
Chest Heart Rate While Swimming
The HRM-Pro, HRM-Swim, and HRM-Tri heart rate accessories record and store your heart rate data while you
are swimming. To view your heart rate data, you can add heart rate data fields (Customizing the Data Screens,
page 98).
NOTE: Chest heart rate data is not visible on compatible watches while the heart rate monitor is underwater.
You must start a timed activity on your paired watch to view stored heart rate data later. During rest intervals
when out of the water, the heart rate accessory sends your heart rate data to your watch. Your watch
automatically downloads stored heart rate data when you save your timed swim activity. Your heart rate
accessory must be out of the water, active, and within range of the watch (3 m) while data downloads. Your
heart rate data can be reviewed in the watch history and on your Garmin Connect account.
If both wrist-based heart rate and chest heart rate data are available, your watch uses the chest heart rate data.
Using an Optional Bike Speed or Cadence Sensor
You can use a compatible bike speed or cadence sensor to send data to your watch.
• Pair the sensor with your watch (Pairing Your Wireless Sensors, page 73).
• Set your wheel size (Wheel Size and Circumference, page 133).
• Go for a ride (Starting an Activity, page 3).
Sensors and Accessories 77
Page 86
Training with Power Meters
• Go to buy.garmin.com for a list of ANT+ sensors that are compatible with your Forerunner device (such as
Rally and Vector).
• For more information, see the owner's manual for your power meter.
• Adjust your power zones to match your goals and abilities (Setting Your Power Zones, page 82).
• Use range alerts to be notified when you reach a specified power zone (Setting an Alert, page 100).
• Customize the power data fields (Customizing the Data Screens, page 98).
Cycling Dynamics
Cycling dynamics metrics measure how you apply power throughout the pedal stroke, and where you apply
power on the pedal, allowing you to understand your particular way of riding. Understanding how and where you
produce power allows you to train more efficiently and evaluate your bike fit.
NOTE: You must have a compatible, dual sensing power meter connected using ANT+ technology to use cycling
dynamics metrics.
For more information, go to
www.garmin.com/performance-data.
Using Electronic Shifters
Before you can use compatible electronic shifters, such as Shimano Di2 shifters, you must pair them with your
Forerunner device (Pairing Your Wireless Sensors, page 73). You can customize the optional data fields
(Customizing the Data Screens, page 98). The Forerunner device displays current adjustment values when the
sensor is in adjustment mode.
Situational Awareness
Your Forerunner watch can be used with the Varia smart bike lights and rearview radar to improve situational
awareness. See the owner's manual for your Varia device for more information.
Using the Varia Camera Controls
NOTICE
Some jurisdictions may prohibit or regulate the recording of video, audio, or photographs, or may require that all
parties have knowledge of the recording and provide consent. It is your responsibility to know and follow all
laws, regulations, and any other restrictions in jurisdictions where you plan to use this device.
Before you can use the Varia camera controls, you must pair the accessory with your watch (Pairing Your
Wireless Sensors, page 73).
1 Add the RCT Camera glance to your watch (Glances, page 20).
2 From the RCT Camera glance, select an option:
• Select to view the camera settings.
• Select to take a photo.
• Select to save a clip.
tempe
Your device is compatible with the tempe temperature sensor. You can attach the sensor to a secure strap or
loop where it is exposed to ambient air, so it provides a consistent source of accurate temperature data. You
must pair the tempe sensor with your device to display temperature data. See the instructions for your tempe
sensor for more informationwww.garmin.com/manuals/tempe.
inReach Remote
The inReach remote function allows you to control your inReach device using your Forerunner device. Go to
buy.garmin.com to purchase a compatible inReach device.
78 Sensors and Accessories
Page 87
Using the inReach Remote
Before you can use the inReach remote function, you must add the inReach glance to the glance loop
Customizing the Glance Loop, page 22).
(
1 Turn on the inReach device.
2 On your Forerunner watch, press UP or DOWN from the watch face to view the inReach glance.
3 Press START to search for your inReach device.
4 Press START to pair your inReach device.
5 Press START, and select an option:
• To send an SOS message, select Initiate SOS.
NOTE: You should only use the SOS function in a real emergency situation.
• To send a text message, select Messages > New Message, select the message contacts, and enter the
message text or select a quick text option.
• To send a preset message, select Send Preset, and select a message from the list.
• To view the timer and distance traveled during an activity, select Tracking.
VIRB Remote
The VIRB remote function allows you to control your VIRB action camera using your device.
Controlling a VIRB Action Camera
Before you can use the VIRB remote function, you must enable the remote setting on your VIRB camera. See the
VIRB Series Owner's Manual for more information.
1 Turn on your VIRB camera.
2 Pair your VIRB camera with your Forerunner watch (
The VIRB glance is automatically added to the glance loop.
3 Press UP or DOWN from the watch face to view the VIRB glance.
4 If necessary, wait while your watch connects to your camera.
5 Select an option:
• To record video, select Start Recording.
The video counter appears on the Forerunner screen.
• To take a photo while recording video, press DOWN.
• To stop recording video, press STOP.
• To take a photo, select Take Photo.
• To take multiple photos in burst mode, select Take Burst.
• To send the camera to sleep mode, select Sleep Camera.
• To wake the camera from sleep mode, select Wake Camera.
• To change video and photo settings, select Settings.
Pairing Your Wireless Sensors, page 73).
Sensors and Accessories 79
Page 88
Controlling a VIRB Action Camera During an Activity
Before you can use the VIRB remote function, you must enable the remote setting on your VIRB camera. See the
VIRB Series Owner's Manual for more information.
1 Turn on your VIRB camera.
2 Pair your VIRB camera with your Forerunner watch (
When the camera is paired, a VIRB data screen is automatically added to activities.
3 During an activity, press UP or DOWN to view the VIRB data screen.
4 If necessary, wait while your watch connects to your camera.
5 Hold .
6 Select VIRB.
7 Select an option:
• To control the camera using the activity timer, select Settings > Recording Mode > Timer Start/Stop.
NOTE: Video recording automatically starts and stops when you start and stop an activity.
• To control the camera using the menu options, select Settings > Recording Mode > Manual.
• To manually record video, select Start Recording.
The video counter appears on the Forerunner screen.
• To take a photo while recording video, press DOWN.
• To manually stop recording video, press STOP.
• To take multiple photos in burst mode, select Take Burst.
• To send the camera to sleep mode, select Sleep Camera.
• To wake the camera from sleep mode, select Wake Camera.
Pairing Your Wireless Sensors, page 73).
User Profile
You can update your user profile on your watch or on the Garmin Connect app.
Setting Up Your User Profile
You can update your gender, date of birth, height, weight, wrist, heart rate zone, power zone, and Critical Swim
Speed (CSS) settings (Recording a Critical Swim Speed Test, page 48). The watch uses this information to
calculate accurate training data.
1 Hold .
2 Select User Profile.
3 Select an option.
Viewing Your Fitness Age
Your fitness age gives you an idea of how your fitness compares with a person of the same gender. Your watch
uses information, such as your age, body mass index (BMI), resting heart rate data, and vigorous activity history
to provide a fitness age. If you have a Garmin Index™ scale, your watch uses the body fat percentage metric
instead of BMI to determine your fitness age. Exercise and lifestyle changes can impact your fitness age.
NOTE: For the most accurate fitness age, complete the user profile setup (
1 Hold .
2 Select User Profile > Fitness Age.
About Heart Rate Zones
Many athletes use heart rate zones to measure and increase their cardiovascular strength and improve their
level of fitness. A heart rate zone is a set range of heartbeats per minute. The five commonly accepted heart
rate zones are numbered from 1 to 5 according to increasing intensity. Generally, heart rate zones are
calculated based on percentages of your maximum heart rate.
Setting Up Your User Profile, page 80).
80 User Profile
Page 89
Fitness Goals
Knowing your heart rate zones can help you measure and improve your fitness by understanding and applying
these principles.
• Your heart rate is a good measure of exercise intensity.
• Training in certain heart rate zones can help you improve cardiovascular capacity and strength.
If you know your maximum heart rate, you can use the table (
determine the best heart rate zone for your fitness objectives.
If you do not know your maximum heart rate, use one of the calculators available on the Internet. Some gyms
and health centers can provide a test that measures maximum heart rate. The default maximum heart rate is
220 minus your age.
Heart Rate Zone Calculations, page 82) to
Setting Your Heart Rate Zones
The watch uses your user profile information from the initial setup to determine your default heart rate zones.
You can set separate heart rate zones for sport profiles, such as running, cycling, and swimming. For the most
accurate calorie data during your activity, set your maximum heart rate. You can also set each heart rate zone
and enter your resting heart rate manually. You can manually adjust your zones on the watch or using your
Garmin Connect account.
1 Hold
2 Select User Profile > Heart Rate & Power Zones > Heart Rate.
3 Select Max. Heart Rate, and enter your maximum heart rate.
You can use the Auto Detection feature to automatically record your maximum heart rate during an activity
(Detecting Performance Measurements Automatically, page 82).
4 Select LTHR, and enter your lactate threshold heart rate.
You can perform a guided test to estimate your lactate threshold (Lactate Threshold, page 30). You can use
the Auto Detection feature to automatically record your lactate threshold during an activity (Detecting
Performance Measurements Automatically, page 82).
5 Select Resting HR > Set Custom, and enter your resting heart rate.
You can use the average resting heart rate measured by your watch, or you can set a custom resting heart
rate.
6 Select Zones > Based On.
7 Select an option:
• Select BPM to view and edit the zones in beats per minute.
• Select %Max. HR to view and edit the zones as a percentage of your maximum heart rate.
• Select %HRR to view and edit the zones as a percentage of your heart rate reserve (maximum heart rate
• Select %LTHR to view and edit the zones as a percentage of your lactate threshold heart rate.
8 Select a zone, and enter a value for each zone.
9 Select Sport Heart Rate, and select a sport profile to add separate heart rate zones (optional).
10 Repeat the steps to add sport heart rate zones (optional).
.
minus resting heart rate).
Letting the Watch Set Your Heart Rate Zones
The default settings allow the watch to detect your maximum heart rate and set your heart rate zones as a
percentage of your maximum heart rate.
• Verify that your user profile settings are accurate (
• Run often with the wrist or chest heart rate monitor.
• Try a few heart rate training plans, available from your Garmin Connect account.
• View your heart rate trends and time in zones using your Garmin Connect account.
User Profile 81
Setting Up Your User Profile, page 80).
Page 90
Heart Rate Zone Calculations
% of Maximum Heart
Zone
Rate
Perceived Exertion Benefits
1 50–60% Relaxed, easy pace, rhythmic breathing
2 60–70%
3 70–80%
4 80–90%
5 90–100%
Comfortable pace, slightly deeper
breathing, conversation possible
Moderate pace, more difficult to hold
conversation
Fast pace and a bit uncomfortable,
breathing forceful
Sprinting pace, unsustainable for long
period of time, labored breathing
Beginning-level aerobic training,
reduces stress
Basic cardiovascular training, good
recovery pace
Improved aerobic capacity, optimal
cardiovascular training
Improved anaerobic capacity and
threshold, improved speed
Anaerobic and muscular endurance,
increased power
Setting Your Power Zones
The power zones use default values based on gender, weight, and average ability, and may not match your
personal abilities. If you know your functional threshold power (FTP) or threshold power (TP) value, you can
enter it and allow the software to calculate your power zones automatically. You can manually adjust your
zones on the watch or using your Garmin Connect account.
1 Hold .
2 Select User Profile > Heart Rate & Power Zones > Power.
3 Select an activity.
4 Select Based On.
5 Select an option:
• Select Watts to view and edit the zones in watts.
• Select % FTP or %TP to view and edit the zones as a percentage of your threshold power.
6 Select FTP or Threshold Power, and enter your value.
You can use the Auto Detection feature to automatically record your threshold power during an activity
(Detecting Performance Measurements Automatically, page 82).
7 Select a zone, and enter a value for each zone.
8 If necessary, select Minimum, and enter a minimum power value.
Detecting Performance Measurements Automatically
The Auto Detection feature is turned on by default. The watch can automatically detect your maximum heart
rate and lactate threshold during an activity. When paired with a compatible power meter, the watch can
automatically detect your functional threshold power (FTP) during an activity.
NOTE: The watch detects a maximum heart rate only when your heart rate is higher than the value set in your
user profile (Setting Up Your User Profile, page 80).
1 Hold .
2 Select User Profile > Heart Rate & Power Zones > Auto Detection.
3 Select an option.
82 User Profile
Page 91
Music
NOTE: There are three different music playback options for your Forerunner 955 watch.
• Third-party provider music
• Personal audio content
• Music stored on your phone
On a Forerunner 955 watch, you can download audio content to your watch from your computer or from a third-
party provider, so you can listen when your phone is not nearby. To listen to audio content stored on your watch,
you can connect Bluetooth headphones.
Downloading Personal Audio Content
Before you can send your personal music to your watch, you must install the Garmin Express application on
your computer (www.garmin.com/express).
You can load your personal audio files, such as .mp3 and .m4a files, to a Forerunner 955 watch from your
computer. For more information, go to www.garmin.com/musicfiles.
1 Connect the watch to your computer using the included USB cable.
2 On your computer, open the Garmin Express application, select your watch, and select Music.
TIP: For Windows computers, you can select and browse to the folder with your audio files. For Apple
computers, the Garmin Express application uses your iTunes® library.
3 In the My Music or iTunes Library list, select an audio file category, such as songs or playlists.
4 Select the checkboxes for the audio files, and select Send to Device.
5 If necessary, in the Forerunner 955 list, select a category, select the checkboxes, and select Remove From
Device to remove audio files.
®
Connecting to a Third-Party Provider
Before you can download music or other audio files to your watch from a supported third-party provider, you
must connect the provider to your watch.
For more options, you can download the Connect IQ app on your phone (garmin.com/connectiqapp).
1 Press START.
2 Select Connect IQ Store.
3 Follow the on-screen instructions to install a third-party music provider.
4 Hold DOWN from any screen to open the music controls.
5 Select the music provider.
NOTE: If you want to select another provider, hold , select Music Providers, and follow the on-screen
instructions.
Downloading Audio Content from a Third-Party Provider
Before you can download audio content from a third-party provider, you must connect to a Wi‑Fi network
Connecting to a Wi‑Fi Network, page 88).
(
1 Hold DOWN from any screen to open the music controls.
2 Hold .
3 Select Music Providers.
4 Select a connected provider.
5 Select a playlist or other item to download to the watch.
6 If necessary, press BACK until you are prompted to sync with the service.
NOTE: Downloading audio content can drain the battery. You may be required to connect the watch to an
external power source if the battery is low.
Music 83
Page 92
Disconnecting from a Third-Party Provider
1 From the Garmin Connect app, select
2 Select Garmin Devices, and select your watch.
3 Select Music.
4 Select an installed third-party provider, and follow the on-screen instructions to disconnect the third-party
provider from your watch.
or .
Connecting Bluetooth Headphones
To listen to music loaded onto your Forerunner 955 watch, you must connect Bluetooth headphones.
1 Bring the headphones within 2 m (6.6 ft.) of your watch.
2 Enable pairing mode on the headphones.
3 Hold .
4 Select Music > Headphones > Add New.
5 Select your headphones to complete the pairing process.
Listening to Music
1 Hold DOWN from any screen to open the music controls.
2 If necessary, connect your Bluetooth headphones (Connecting Bluetooth Headphones, page 84).
3 Hold .
4 Select Music Providers, and select an option:
• To listen to music downloaded to the watch from your computer, select My Music (Downloading Personal
Audio Content, page 83).
• To control music playback on your phone, select Control Phone.
• To listen to music from a third-party provider, select the name of the provider, and select a playlist.
5 Select .
84 Music
Page 93
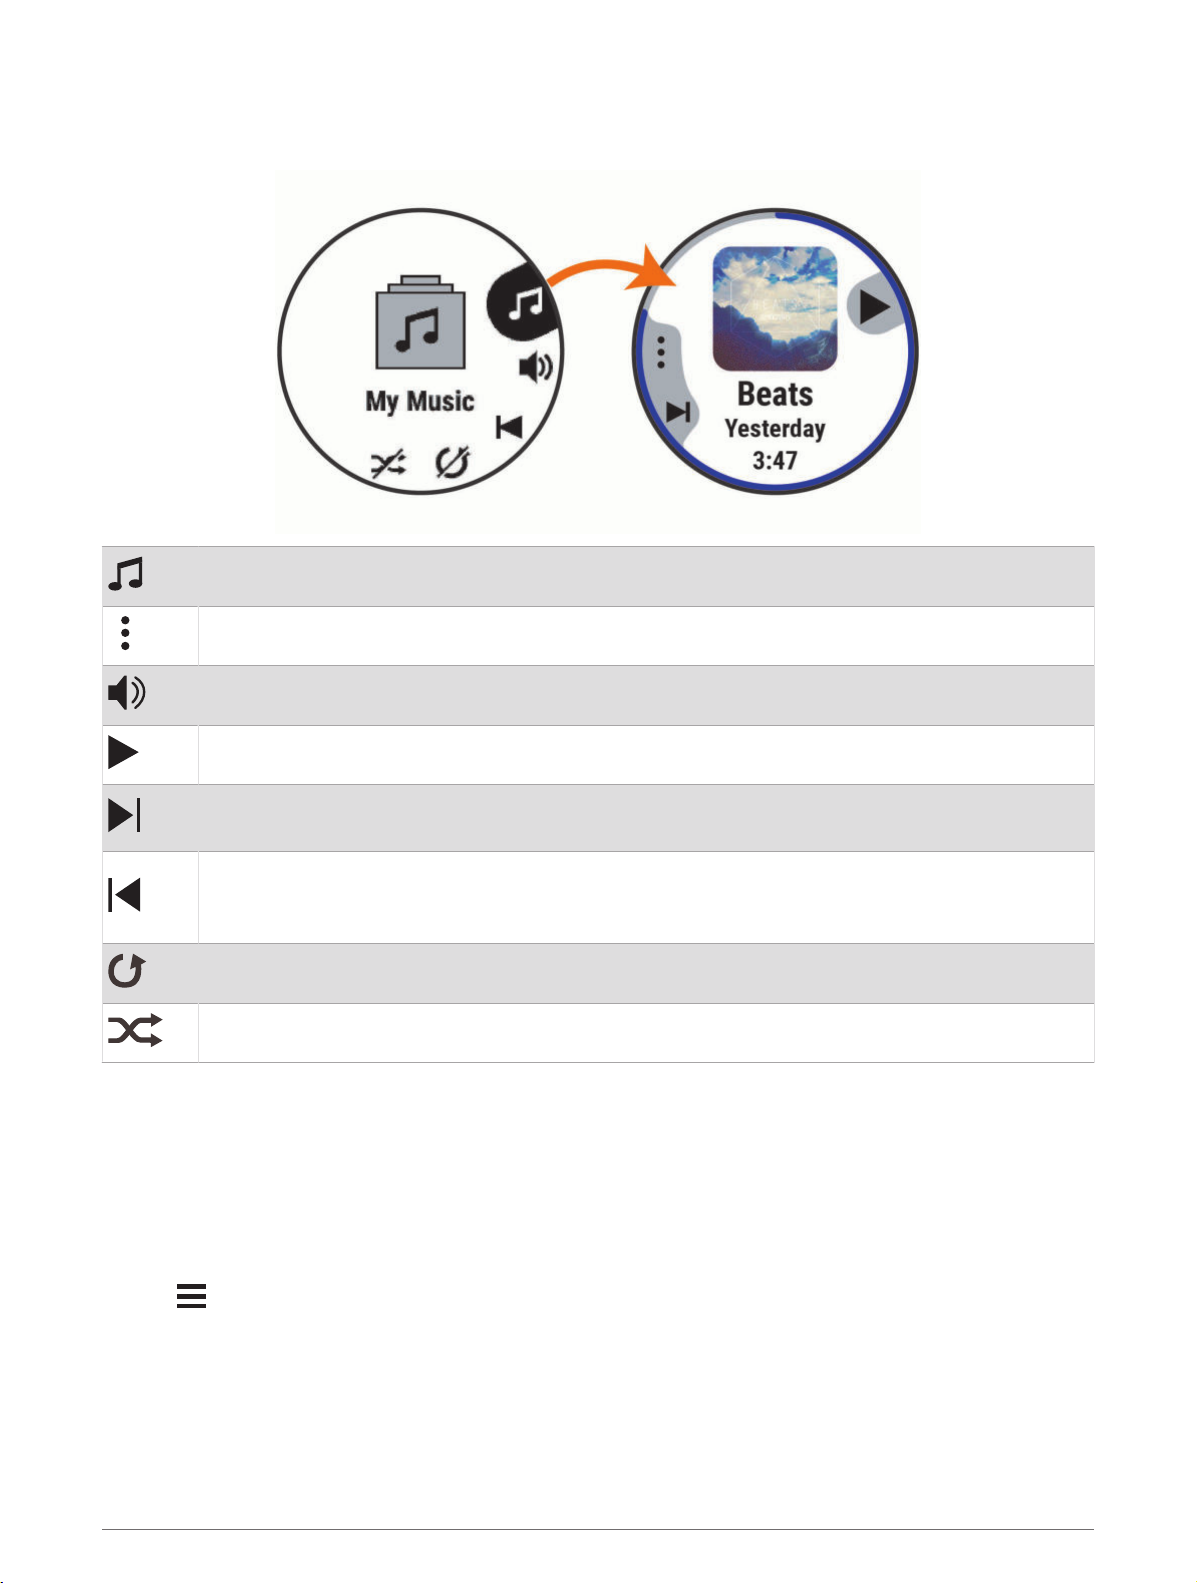
Music Playback Controls
NOTE: Music playback controls may look different, depending on the selected music source.
Select to view more music playback controls.
Select to browse the audio files and playlists for the selected source.
Select to adjust the volume.
Select to play and pause the current audio file.
Select to skip to the next audio file in the playlist.
Hold to fast forward through the current audio file.
Select to restart the current audio file.
Select twice to skip to the previous audio file in the playlist.
Hold to rewind through the current audio file.
Select to change the repeat mode.
Select to change the shuffle mode.
Controlling Music Playback on a Connected Phone
1 On your phone, start playing a song or playlist.
2 On your Forerunner 955 watch, hold DOWN from any screen to open the music controls.
3 Select Music Providers > Control Phone.
Changing the Audio Mode
You can change the music playback mode from stereo to mono.
1 Hold
2 Select Music > Audio.
3 Select an option.
.
Music 85
Page 94
Connectivity
Connectivity features are available for your watch when you pair with your compatible phone (Pairing Your
Phone, page 86). Additional features are available when you connect your watch to a Wi‑Fi network
(Connecting to a Wi‑Fi Network, page 88).
Phone Connectivity Features
Phone connectivity features are available for your Forerunner watch when you pair it using the Garmin Connect
app (Pairing Your Phone, page 86).
• App features from the Garmin Connect app, the Connect IQ app, and more (Phone Apps and Computer
Applications, page 88)
• Glances (Glances, page 20)
• Controls menu features (Controls, page 39)
• Safety and tracking features (Safety and Tracking Features, page 91)
• Phone interactions, such as notifications (Enabling Bluetooth Notifications, page 86)
Pairing Your Phone
To use the connected features on your watch, you must pair it directly through the Garmin Connect app, instead
of from the Bluetooth settings on your phone.
1 From the app store on your phone, install and open the Garmin Connect app.
2 Select an option to enable pairing mode on your watch:
• During the initial setup, select
• If you previously skipped the pairing process, hold , and select Connectivity > Pair Phone.
3 Select an option to add your watch to your account:
• If this is the first time you are pairing a device with the Garmin Connect app, follow the on-screen
instructions.
• If you already paired another device with the Garmin Connect app, from the or menu, select
Garmin Devices > Add Device, and follow the on-screen instructions.
when you are prompted to pair with your phone.
Enabling Bluetooth Notifications
Before you can enable notifications, you must pair the watch with a compatible phone (
page 86).
1 Hold .
2 Select Connectivity > Bluetooth > Smart Notifications > Status > On.
3 Select General Use or During Activity.
4 Select a notification type.
5 Select status, tone, and vibration preferences.
6 Press BACK.
7 Select privacy and timeout preferences.
8 Press BACK.
9 Select Signature to add a signature to your text message replies.
Viewing Notifications
1 From the watch face, press UP or DOWN to view the notifications glance.
2 Press START.
3 Select a notification.
4 Press START for more options.
5 Press BACK to return to the previous screen.
Pairing Your Phone,
86 Connectivity
Page 95
Receiving an Incoming Phone Call
When you receive a phone call on your connected phone, the Forerunner watch displays the name or phone
number of the caller.
• To accept the call, select
NOTE: To talk to the caller, you must use your connected phone.
• To decline the call, select .
• To decline the call and immediately send a text message reply, select Reply, and select a message from the
list.
NOTE: To send a text message reply, you must be connected to a compatible Android™ phone using
Bluetooth technology.
.
Replying to a Text Message
NOTE: This feature is available only for compatible Android phones.
When you receive a text message notification on your watch, you can send a quick reply by selecting from a list
of messages. You can customize messages in the Garmin Connect app.
NOTE: This feature sends text messages using your phone. Regular text message limits and charges from your
carrier and phone plan may apply. Contact your mobile carrier for more information about text message charges
or limits.
1 From the watch face, press UP or DOWN to view the notifications glance.
2 Press START, and select a text message notification.
3 Press START.
4 Select Reply.
5 Select a message from the list.
Your phone sends the selected message as an SMS text message.
Managing Notifications
You can use your compatible phone to manage notifications that appear on your Forerunner watch.
Select an option:
• If you are using an iPhone®, go to the iOS® notifications settings to select the items to show on the watch.
• If you are using an Android phone, from the Garmin Connect app, select Settings > Notifications.
Turning Off the Bluetooth Phone Connection
You can turn off the Bluetooth phone connection from the controls menu.
NOTE: You can add options to the controls menu (
1 Hold LIGHT to view the controls menu.
2 Select to turn off the Bluetooth phone connection on your Forerunner watch.
Refer to the owner's manual for your phone to turn off Bluetooth technology on your phone.
Customizing the Controls Menu, page 41).
Turning On and Off Smartphone Connection Alerts
You can set the Forerunner device to alert you when your paired smartphone connects and disconnects using
Bluetooth technology.
NOTE: Smartphone connection alerts are turned off by default.
1 Hold
2 Select Connectivity > Bluetooth > Connected Alerts.
.
Connectivity 87
Page 96
Playing Audio Prompts During an Activity
You can enable your Forerunner 955 watch to play motivational status announcements during a run or other
activity. Audio prompts play on your connected Bluetooth headphones, if available. Otherwise, audio prompts
play on your phone paired through the Garmin Connect app. During an audio prompt, the watch or phone mutes
the primary audio to play the announcement.
NOTE: This feature is not available for all activities.
1 Hold
2 Select Audio Prompts.
3 Select an option:
• To hear a prompt for each lap, select Lap Alert.
• To customize prompts with your pace and speed information, select Pace/Speed Alert.
• To customize prompts with your heart rate information, select Heart Rate Alert.
• To customize prompts with power data, select Power Alert.
• To hear prompts when you start and stop the activity timer, including the Auto Pause® feature, select
• To hear workout alerts play as an audio prompt, select Workout Alerts.
• To hear activity alerts play as an audio prompt, select Activity Alerts (Activity Alerts, page 99).
• To hear a sound play right before an audio alert or prompt, select Audio Tones.
• To change the language or the dialect of the voice prompts, select Dialect.
.
Timer Events.
Wi‑Fi Connectivity Features
Activity uploads to your Garmin Connect account: Automatically sends your activity to your Garmin Connect
account as soon as you finish recording the activity.
Audio content: Allows you to sync audio content from third-party providers.
Software updates: You can download and install the latest software.
Workouts and training plans: You can browse for and select workouts and training plans on the Garmin Connect
site. The next time your device has a Wi‑Fi connection, the files are sent to your device.
Connecting to a Wi‑Fi Network
You must connect your watch to the Garmin Connect app on your phone or to the Garmin Express application
on your computer before you can connect to a Wi‑Fi network.
1 Hold
2 Select Connectivity > Wi-Fi > My Networks > Add Network.
The watch displays a list of nearby Wi‑Fi networks.
3 Select a network.
4 If necessary, enter the password for the network.
The watch connects to the network, and the network is added to the list of saved networks. The watch
reconnects to this network automatically when it is within range.
.
Phone Apps and Computer Applications
You can connect your watch to multiple Garmin phone apps and computer applications using the same Garmin
account.
88 Connectivity
Page 97
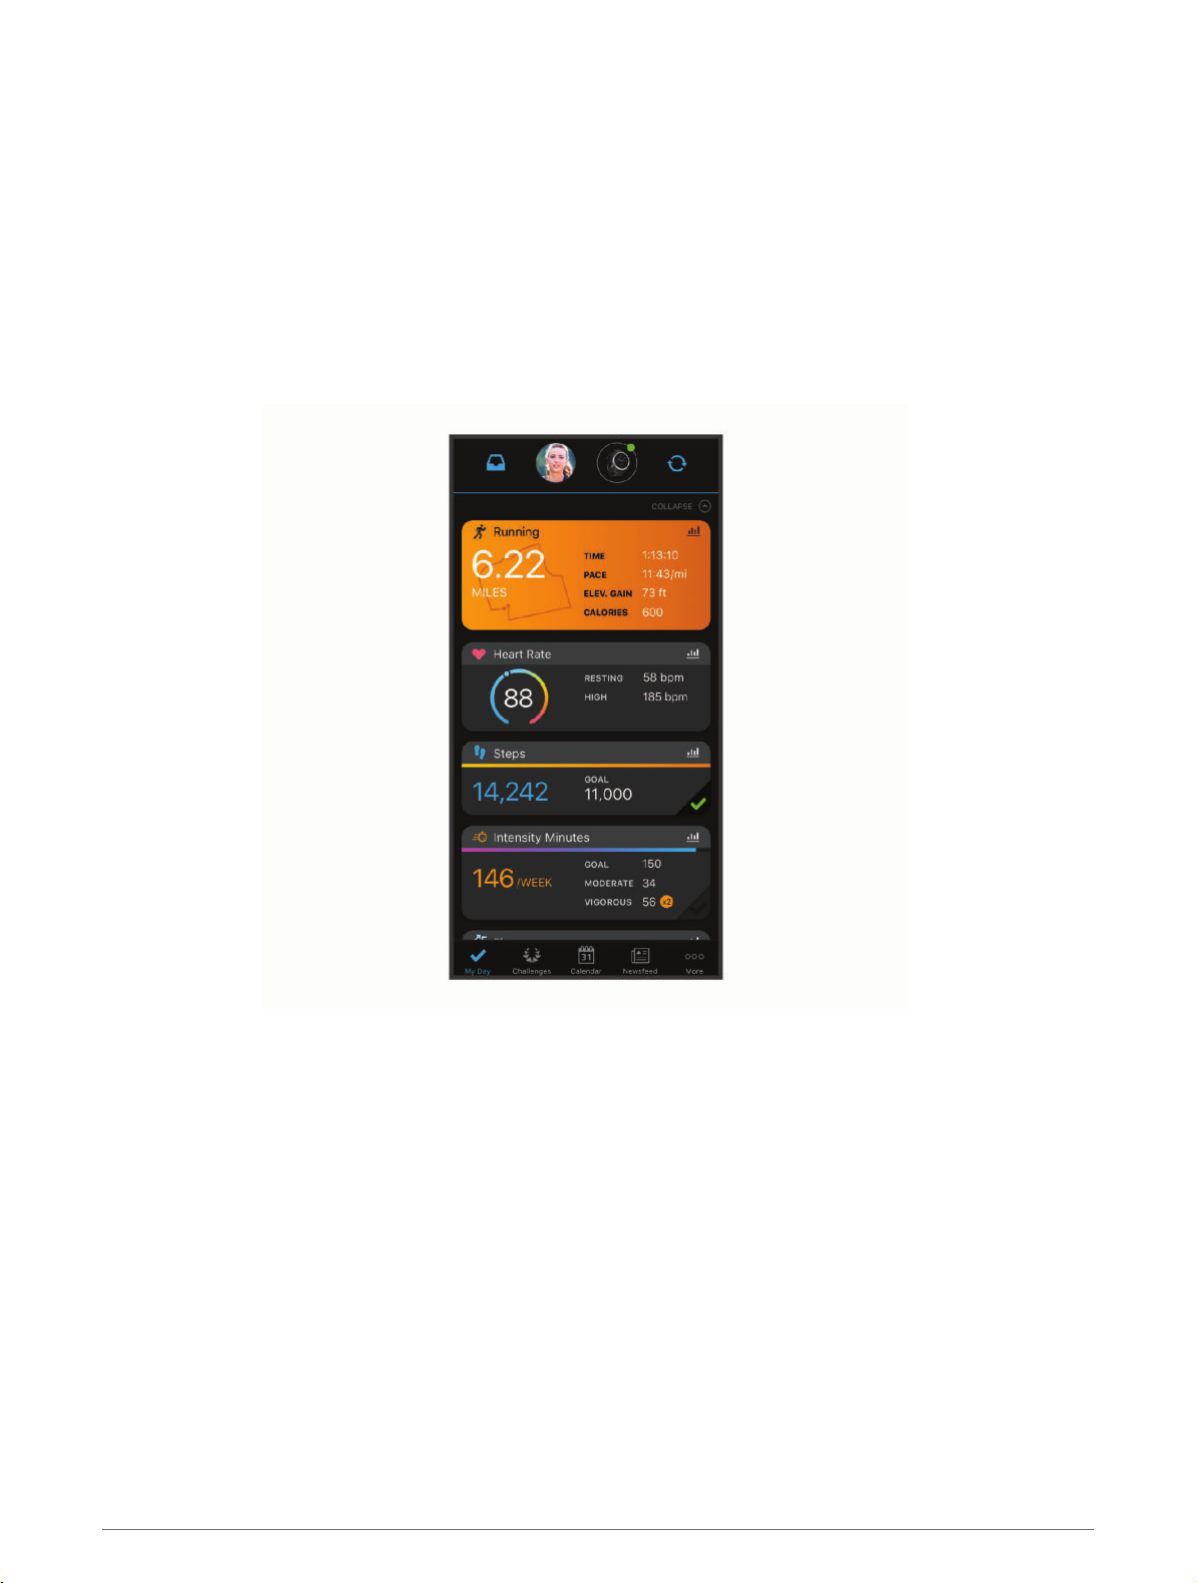
Garmin Connect
You can connect with your friends on Garmin Connect. Garmin Connect gives you the tools to track, analyze,
share, and encourage each other. Record the events of your active lifestyle including runs, walks, rides, swims,
hikes, triathlons, and more. To sign up for a free account, you can download the app from the app store on your
garmin.com/connectapp, or go to connect.garmin.com.
phone
Store your activities: After you complete and save an activity with your watch, you can upload that activity to
your Garmin Connect account and keep it as long as you want.
Analyze your data: You can view more detailed information about your activity, including time, distance,
elevation, heart rate, calories burned, cadence, running dynamics, an overhead map view, pace and speed
charts, and customizable reports.
NOTE: Some data requires an optional accessory such as a heart rate monitor.
Plan your training: You can choose a fitness goal and load one of the day-by-day training plans.
Track your progress: You can track your daily steps, join a friendly competition with your connections, and meet
your goals.
Share your activities: You can connect with friends to follow each other's activities or post links to your
activities on your favorite social networking sites.
Manage your settings: You can customize your watch and user settings on your Garmin Connect account.
Using the Garmin Connect App
After you pair your watch with your phone (
upload all of your activity data to your Garmin Connect account.
1 Verify the Garmin Connect app is running on your phone.
2 Bring your watch within 10 m (30 ft.) of your phone.
Your watch automatically syncs your data with the Garmin Connect app and your Garmin Connect account.
Connectivity 89
Pairing Your Phone, page 86), you can use the Garmin Connect app to
Page 98
Updating the Software Using the Garmin Connect App
Before you can update your watch software using the Garmin Connect app, you must have a Garmin Connect
account, and you must pair the watch with a compatible phone (
Sync your watch with the Garmin Connect app (Manually Syncing Data with Garmin Connect, page 90).
When new software is available, the Garmin Connect app automatically sends the update to your watch.
Pairing Your Phone, page 86).
Using Garmin Connect on Your Computer
The Garmin Express application connects your watch to your Garmin Connect account using a computer. You
can use the Garmin Express application to upload your activity data to your Garmin Connect account and to
send data, such as workouts or training plans, from the Garmin Connect website to your watch. You can also
add music to your watch (
and manage your Connect IQ apps.
1 Connect the watch to your computer using the USB cable.
2 Go to www.garmin.com/express.
3 Download and install the Garmin Express application.
4 Open the Garmin Express application, and select Add Device.
5 Follow the on-screen instructions.
Downloading Personal Audio Content, page 83). You can also install software updates
Updating the Software Using Garmin Express
Before you can update your device software, you must have a Garmin Connect account, and you must download
the Garmin Express application.
1 Connect the device to your computer using the USB cable.
When new software is available, Garmin Express sends it to your device.
2 Follow the on-screen instructions.
3 Do not disconnect your device from the computer during the update process.
NOTE: If you have already set up your device with Wi‑Fi connectivity, Garmin Connect can automatically
download available software updates to your device when it connects using Wi‑Fi.
Manually Syncing Data with Garmin Connect
NOTE: You can add options to the controls menu (
1 Hold LIGHT to view the controls menu.
2 Select Sync.
Customizing the Controls Menu, page 41).
Connect IQ Features
You can add Connect IQ features to your watch from Garmin and other providers using the Connect IQ app
garmin.com/connectiqapp). You can customize your watch with watch faces, device apps, data fields, and
(
music providers.
Watch Faces: Allow you to customize the appearance of the clock.
Device Apps: Add interactive features to your watch, such as glances and new outdoor and fitness activity
types.
Data Fields: Allow you to download new data fields that present sensor, activity, and history data in new ways.
You can add Connect IQ data fields to built-in features and pages.
Music: Add music providers to your watch.
Downloading Connect IQ Features
Before you can download features from the Connect IQ app, you must pair your Forerunner watch with your
phone (
1 From the app store on your phone, install and open the Connect IQ app.
2 If necessary, select your watch.
3 Select a Connect IQ feature.
4 Follow the on-screen instructions.
Pairing Your Phone, page 86).
90 Connectivity
Page 99
Downloading Connect IQ Features Using Your Computer
1 Connect the watch to your computer using a USB cable.
2 Go to
3 Select a Connect IQ feature, and download it.
4 Follow the on-screen instructions.
apps.garmin.com, and sign in.
Garmin Golf™ App
The Garmin Golf app allows you to upload scorecards from your compatible Garmin device to view detailed
statistics and shot analyses. Golfers can compete with each other at different courses using the Garmin Golf
app. More than 42,000 courses have leaderboards that anyone can join. You can set up a tournament event and
invite players to compete.
The Garmin Golf app syncs your data with your Garmin Connect account. You can download the Garmin Golf
app from the app store on your phone (
garmin.com/golfapp).
Safety and Tracking Features
CAUTION
The safety and tracking features are supplemental features and should not be relied on as a primary method to
obtain emergency assistance. The Garmin Connect app does not contact emergency services on your behalf.
NOTICE
To use the safety and tracking features, the Forerunner watch must be connected to the Garmin Connect app
using Bluetooth technology. Your paired phone must be equipped with a data plan and be in an area of network
coverage where data is available. You can enter emergency contacts in your Garmin Connect account.
For more information about safety and tracking features, go to www.garmin.com/safety.
Assistance: Allows you to send a message with your name, LiveTrack link, and GPS location (if available) to
your emergency contacts.
Incident detection: When the Forerunner watch detects an incident during certain outdoor activities, the watch
sends an automated message, LiveTrack link, and GPS location (if available) to your emergency contacts.
LiveTrack: Allows friends and family to follow your races and training activities in real time. You can invite
followers using email or social media, allowing them to view your live data on a web page.
Live Event Sharing: Allows you to send messages to friends and family during an event, providing real-time
updates.
NOTE: This feature is available only if your watch is connected to a compatible Android phone.
GroupTrack: Allows you to keep track of your connections using LiveTrack directly on screen and in real time.
Adding Emergency Contacts
Emergency contact phone numbers are used for the safety and tracking features.
1 From the Garmin Connect app, select or .
2 Select Safety & Tracking > Safety Features > Emergency Contacts > Add Emergency Contacts.
3 Follow the on-screen instructions.
Adding Contacts
You can add up to 50 contacts to the Garmin Connect app. Contact emails can be used with the LiveTrack
feature. Three of these contacts can be used as emergency contacts (Adding Emergency Contacts, page 91).
1 From the Garmin Connect app, select or .
2 Select Contacts.
3 Follow the on-screen instructions.
After you add contacts, you must sync your data to apply the changes to your Forerunner device (Manually
Syncing Data with Garmin Connect, page 90).
Safety and Tracking Features 91
Page 100
Turning Incident Detection On and Off
NOTE: Your paired phone must be equipped with a data plan and be in an area of network coverage where data
is available.
Before you can enable incident detection on your watch, you must set up emergency contacts in the Garmin
Connect app (Adding Emergency Contacts, page 91). Your emergency contacts must be able to receive emails
or text messages (standard text messaging rates may apply).
1 From the watch face, hold .
2 Select Safety & Tracking > Incident Detection.
3 Select a GPS activity.
NOTE: Incident detection is available only for certain outdoor activities.
When an incident is detected by your Forerunner watch and your phone is connected, the Garmin Connect app
can send an automated text message and email with your name and GPS location to your emergency contacts.
You have 15 seconds to cancel the message.
Requesting Assistance
NOTE: Your paired phone must be equipped with a data plan and be in an area of network coverage where data
is available.
Before you can request assistance, you must set up emergency contacts (Adding Emergency Contacts,
page 91). Your emergency contacts must be able to receive emails or text messages (standard text messaging
rates may apply).
1 Hold .
2 When you feel three vibrations, release the button to activate the assistance feature.
The countdown screen appears.
TIP: Before the countdown is complete, you can hold any button to cancel the message.
Live Event Sharing
Live event sharing allows you to send messages to friends and family during an event, providing real-time
updates including cumulative time and last lap time. Before the event, you can customize the list of recipients
and the message content in the Garmin Connect app.
Turning On Live Event Sharing
Before you can use live event sharing, you must set up the LiveTrack feature in the Garmin Connect app.
NOTE: LiveTrack features are available when your Forerunner watch is connected to the Garmin Connect app
using Bluetooth technology, with a compatible Android phone.
1 In the Garmin Connect app, from the settings menu, select Safety & Tracking > Live Event Sharing.
You can customize the message triggers and options.
2 Go outside, and select a GPS activity on your Forerunner watch.
NOTE: This feature is not available for all activities.
3 Select
Live event sharing is enabled for 24 hours.
4 Select Recipients to add people from your contacts.
> Live Event Sharing > Sharing.
Spectator Messaging
NOTE: Your paired phone must be equipped with a data plan and be in an area of network coverage where data
is available.
Spectator messaging is a feature that allows your LiveTrack followers to send you audio and text messages
during your run activity. You can set up this feature in the LiveTrack settings of the Garmin Connect app. To
receive audio messages, you must have Bluetooth headphones connected to your watch.
92 Safety and Tracking Features
 Loading...