

Garmin fenix 3 Owner's Manual
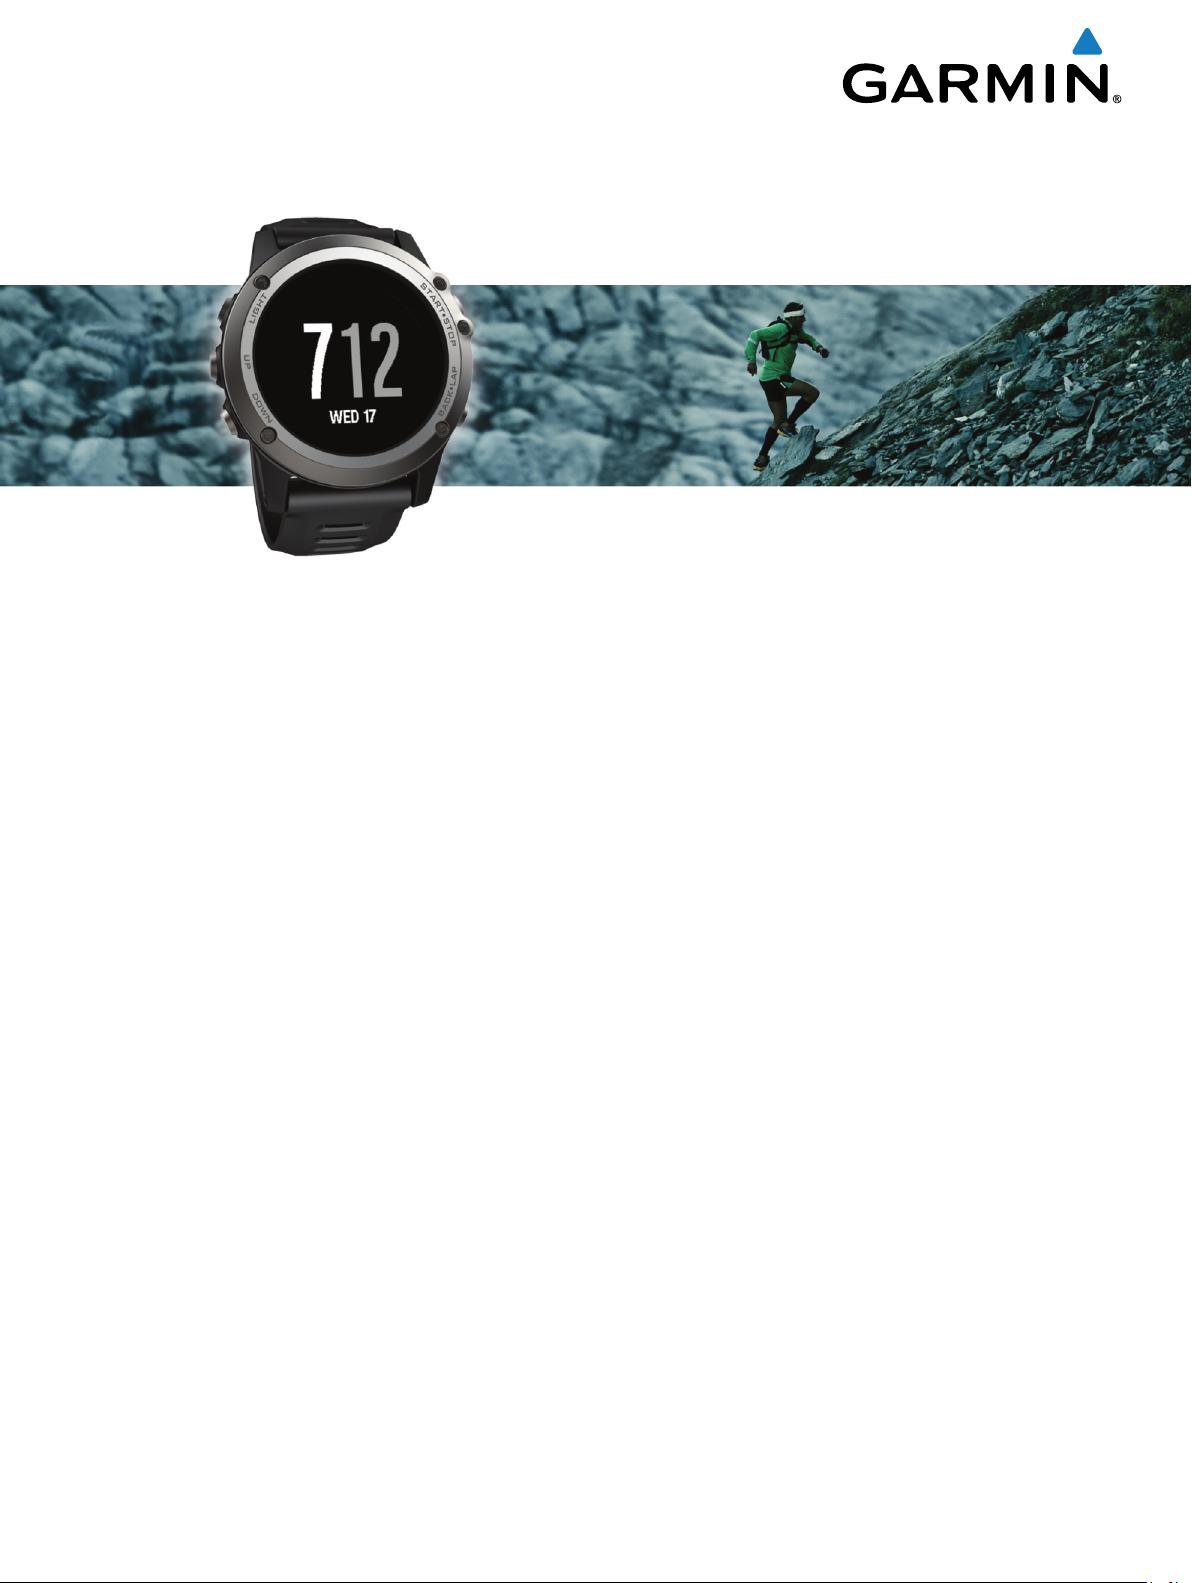
fēnix® 3
Owner’s Manual
February 2015
Printed in Taiwan 190-01840-00_0B


Table of Contents
Introduction.....................................................................1
Keys............................................................................................ 1
Charging the Device................................................................... 1
Pairing Your Smartphone with Your Device............................... 1
Support and Updates.................................................................. 1
Setting Up Garmin Express................................................... 1
Activities......................................................................... 1
Starting an Activity...................................................................... 2
Stopping an Activity.................................................................... 2
Skiing.......................................................................................... 2
Going Cross-Country Skiing.................................................. 2
Going Downhill Skiing or Snowboarding................................ 2
Viewing Your Ski Runs......................................................2
Hiking.......................................................................................... 2
Going for a Hike..................................................................... 2
Running...................................................................................... 2
Going for a Run......................................................................2
Running with the Metronome................................................. 2
Biking.......................................................................................... 3
Going for a Ride..................................................................... 3
Swimming................................................................................... 3
Going for a Pool Swim........................................................... 3
Swim Terminology.............................................................3
Stroke Types..................................................................... 3
Resting During Pool Swimming.........................................3
Training with the Drill Log..................................................3
Going for an Open Water Swim............................................. 3
Multisport.................................................................................... 4
Starting a Triathlon or Multisport Activity............................... 4
Creating a Multisport Activity................................................. 4
Indoor Activities.......................................................................... 4
Navigation....................................................................... 4
Saving Your Location................................................................. 4
Navigating to a Destination......................................................... 4
Navigating with Sight 'N Go........................................................ 4
Compass.....................................................................................4
Map............................................................................................. 4
Panning and Zooming the Map.............................................. 4
Navigating To Your Starting Point.............................................. 5
Altimeter and Barometer............................................................. 5
Training........................................................................... 5
Setting Up Your User Profile.......................................................5
Fitness Goals......................................................................... 5
About Heart Rate Zones........................................................ 5
Setting Your Heart Rate Zones......................................... 5
Heart Rate Zone Calculations........................................... 5
About Lifetime Athletes.......................................................... 5
Activity Tracking..........................................................................5
Turning On Activity Tracking.................................................. 5
Using the Move Alert..............................................................6
Auto Goal............................................................................... 6
Sleep Tracking....................................................................... 6
Using Sleep Mode............................................................. 6
Workouts.....................................................................................6
Following a Workout From the Web.......................................6
Starting a Workout................................................................. 6
About the Training Calendar.................................................. 6
Using Garmin Connect Training Plans.............................. 6
Interval Workouts........................................................................ 6
Creating an Interval Workout................................................. 6
Starting an Interval Workout.................................................. 6
Stopping an Interval Workout................................................ 7
Using Virtual Partner®................................................................ 7
Setting a Training Target
Cancelling a Training Target.................................................. 7
Racing a Previous Activity.......................................................... 7
Personal Records....................................................................... 7
Viewing Your Personal Records............................................ 7
Restoring a Personal Record................................................. 7
Clearing a Personal Record................................................... 7
Clearing All Personal Records............................................... 7
Running Dynamics......................................................................7
Training with Running Dynamics........................................... 8
Color Gauges and Running Dynamics Data.......................... 8
Tips for Missing Running Dynamics Data.............................. 8
About VO2 Max. Estimates.........................................................8
Getting Your VO2 Max. Estimate for Running....................... 8
Getting Your VO2 Max. Estimate for Cycling......................... 9
VO2 Max. Standard Ratings.................................................. 9
Viewing Your Predicted Race Times..................................... 9
Recovery Advisor........................................................................9
Turning On the Recovery Advisor.......................................... 9
Viewing Your Recovery Time.................................................9
About Training Effect.................................................................. 9
............................................................ 7
History........................................................................... 10
Using History............................................................................ 10
Multisport History................................................................. 10
Viewing Your Time in Each Heart Rate Zone...................... 10
Viewing Step Totals.................................................................. 10
Viewing Data Totals.................................................................. 10
Deleting History........................................................................ 10
Clock.............................................................................. 10
Setting the Alarm...................................................................... 10
Starting the Countdown Timer.................................................. 10
Using the Stopwatch................................................................. 10
Connected Features..................................................... 10
Enabling Bluetooth Notifications............................................... 11
Viewing Notifications............................................................ 11
Managing Notifications.........................................................11
Turning Off Bluetooth Technology....................................... 11
Garmin Connect........................................................................11
Using Garmin Connect Mobile............................................. 11
Using Garmin Connect on Your Computer.......................... 11
Wi‑Fi® Connected Features..................................................... 11
Setting Up Wi‑Fi Connectivity.............................................. 11
Connect IQ Features.................................................... 11
Downloading Connect IQ Features.......................................... 12
Downloading Connect IQ Features Using Your Computer....... 12
Widgets..................................................................................... 12
Viewing Widgets.................................................................. 12
VIRB™ Remote................................................................... 12
Controlling a VIRB Action Camera.................................. 12
Customizing Your Device............................................ 12
Activity App Settings................................................................. 12
Customizing the Data Screens............................................ 12
Adding a Map to an Activity................................................. 13
Alerts.................................................................................... 13
Setting an Alert................................................................13
Enabling Auto Pause®......................................................... 13
Auto Lap®............................................................................ 13
Marking Laps by Distance............................................... 13
3D Speed and Distance....................................................... 14
Using Auto Scroll................................................................. 14
UltraTrac.............................................................................. 14
Power Save Timeout Settings..............................................14
Watch Face Settings.................................................................14
Customizing the Watch Face............................................... 14
Table of Contents i

Customizing the Widget Loop................................................... 14
Sensors Settings.......................................................................14
Compass Settings................................................................ 14
Setting the North Reference........................................... 14
Calibrating the Compass................................................. 14
Altimeter Settings................................................................. 14
Calibrating the Barometric Altimeter............................... 14
Barometer Settings.............................................................. 14
System Settings........................................................................ 14
Time Settings....................................................................... 15
Backlight Settings................................................................ 15
Changing the Units of Measure........................................... 15
Navigation Settings................................................................... 15
Customizing Map Features.................................................. 15
ANT+ Sensors............................................................... 15
Pairing ANT+ Sensors.............................................................. 15
tempe........................................................................................ 15
Putting On the Heart Rate Monitor........................................... 15
Tips for Erratic Heart Rate Data...........................................16
Foot Pod................................................................................... 16
Foot Pod Calibration............................................................ 16
Calibrating Your Foot Pod Manually............................... 16
Using an Optional Bike Cadence Sensor................................. 16
Device Information....................................................... 16
Viewing Device Information...................................................... 16
Device Care.............................................................................. 16
Cleaning the Device............................................................. 16
Metal Watch Band Adjustment................................................. 16
Specifications............................................................................16
Battery Information...............................................................17
Caring for the Heart Rate Monitor.............................................17
HRM-Run Specifications...........................................................17
User Replaceable Batteries...................................................... 17
Replacing the Heart Rate Monitor Battery........................... 17
Data Management.................................................................... 17
Disconnecting the USB Cable............................................. 17
Deleting Files....................................................................... 17
Troubleshooting........................................................................ 17
My daily step count does not appear................................... 17
The temperature reading is not accurate............................. 17
Resetting Your Device......................................................... 17
Restoring All Default Settings.............................................. 18
Maximizing the Battery Life.................................................. 18
Getting More Information..................................................... 18
Appendix....................................................................... 18
Data Fields................................................................................18
Software License Agreement................................................... 20
Symbol Definitions.................................................................... 20
Index.............................................................................. 21
ii Table of Contents
Introduction
WARNING
See the Important Safety and Product Information guide in the
product box for product warnings and other important
information.
Always consult your physician before you begin or modify any
exercise program.
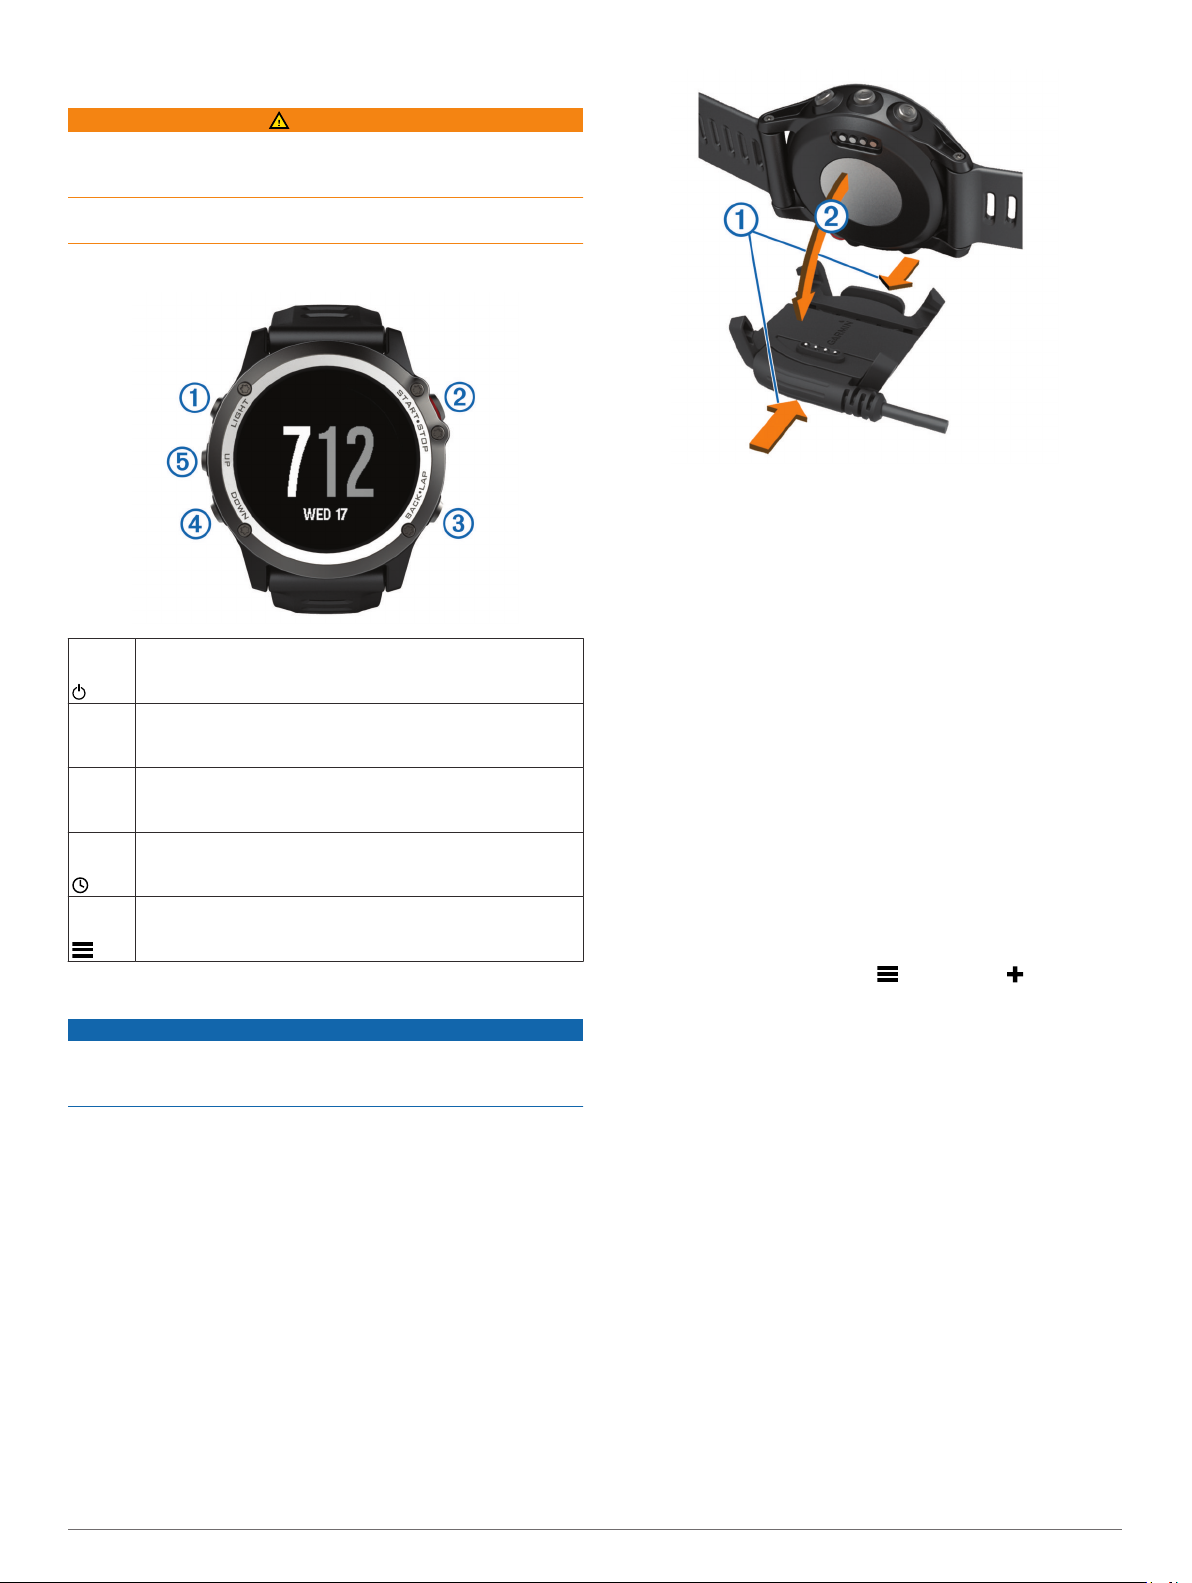
Keys
À
LIGHT
Á
START
STOP
Â
BACK
LAP
Ã
DOWN
Ä
UP
Charging the Device
Select to turn the backlight on and off.
Hold to turn the device on and off.
Select to start or stop an activity.
Select to choose an option in a menu.
Select to return to the previous page.
Select to record a lap or a rest during an activity.
Select to scroll through widgets, menus, and messages.
Hold to view the clock from any page.
Select to scroll through widgets, menus, and messages.
Select to dismiss a short message or notification.
Hold to view the main menu.
With the contacts aligned, place the device into the cradle
4
and release the arms to hold the device in place.
When you connect the device to a power source, the device
turns on, and the battery charge level appears on the screen.
Charge the device completely.
5
Pairing Your Smartphone with Your Device
You should connect your fēnix 3 device to a smartphone to
access the full features of the device.
Go to www.garmin.com/apps, and download the Garmin
1
Connect™ Mobile app to your smartphone.
Bring your smartphone within 10 m (33 ft.) of your device.
2
On the fēnix 3 device, hold UP.
3
Select Settings > Bluetooth > Pair Mobile Device.
4
On your smartphone, open the Garmin Connect Mobile app.
5
Select an option to add your device to your Garmin Connect
6
account:
• If this is the first device you have paired a device with the
Garmin Connect Mobile app, follow the on-screen
instructions.
• If you have already paired another device with the Garmin
Connect Mobile app, select > Devices > , and follow
the on-screen instructions.
Á
NOTICE
To prevent corrosion, thoroughly clean and dry the contacts and
the surrounding area before charging or connecting to a
computer. Refer to the cleaning instructions in the appendix.
The device is powered by a built-in lithium-ion battery that you
can charge using a standard wall outlet or a USB port on your
computer.
Plug the USB end of the cable into the AC adapter or a
1
computer USB port.
Plug the AC adapter into a standard wall outlet.
2
Pinch the sides of the charging cradle À to open the arms on
3
the cradle.
Support and Updates
Garmin Express™ provides easy access to these services for
Garmin® devices. Some services may not be available for your
device.
• Product registration
• Product manuals
• Software updates
• Map, chart, or course updates
• Vehicles, voices, and other extras
Setting Up Garmin Express
Connect the device to your computer using a USB cable.
1
Go to www.garmin.com/express.
2
Follow the on-screen instructions.
3
Activities
Your device can be used for indoor, outdoor, athletic, and fitness
activities. When you start an activity, the device displays and
records sensor data. You can save activities and share them
with the Garmin Connect community.
Introduction 1

You can also add Connect IQ™ activity apps to your device using
the Garmin Connect Mobile app (Connect IQ Features).
Starting an Activity
When you start an activity, GPS turns on automatically (if
required). When you stop the activity, the device returns to
watch mode.
From the clock, select START.
1
Select an activity.
2
If necessary, follow the on-screen instructions to enter
3
additional information.
If necessary, wait while the device connects to your ANT+
4
sensors.
If the activity requires GPS, go outside, and wait while the
5
device locates satellites.
Select START to start the timer.
6
NOTE: The device does not record your activity data until
you start the timer.
®
Stopping an Activity
NOTE: Some options are not available for some activities.
Select STOP.
1
Select an option:
2
• To follow your track back to the starting point of your
activity, select TracBack.
• To resume your activity, select Resume.
• To save the activity and return to watch mode, select
Save.
• To discard the activity and return to watch mode, select
Discard.
• To suspend your activity and resume it at a later time,
select Resume Later.
Skiing
Going Cross-Country Skiing
Before you go skiing, you should charge the device (Charging
the Device).
From the clock, select START.
1
Select XC Ski.
2
Wait while the device locates satellites.
3
Select START to start the timer.
4
History is recorded only while the timer is running.
Start your activity.
5
Select LAP to record laps (optional).
6
Select UP or DOWN to view additional data pages (optional).
7
After you complete your activity, select STOP > Save.
8
Going Downhill Skiing or Snowboarding
Before you go skiing or snowboarding, you should charge the
device (Charging the Device).
From the clock, select START.
1
Select Ski.
2
Go outside, and wait while the device locates satellites.
3
Select START to start the timer.
4
History is recorded only while the timer is running.
Start your activity.
5
The auto run feature is turned on by default. This feature
automatically records new ski runs based on your movement.
The timer pauses when you stop moving downhill and when
you are on a chairlift. The timer remains paused during the
chairlift ride.
If necessary, start moving downhill to restart the timer.
6
Select UP or DOWN to view additional data pages (optional).
7
After you complete your activity, select STOP > Save.
8
Viewing Your Ski Runs
Your device records the details of each skiing or snowboarding
run. You can view run details from the paused screen or while
the timer is running.
Start a skiing or snowboarding activity.
1
Hold UP.
2
Select View Runs.
3
Select UP and DOWN to view details of your last run, your
4
current run, and your total runs.
The run screens include time, distance traveled, maximum
speed, average speed, and total descent.
Hiking
Going for a Hike
Before you go for a hike, you should charge the device
(Charging the Device).
From the clock, select START.
1
Select Hike.
2
Go outside, and wait while the device locates satellites.
3
Select START to start the timer.
4
History is recorded only while the timer is running.
Start your activity.
5
The device records a track while you hike.
Select START > Resume to resume tracking.
6
When you want to take a break or pause the device from
7
tracking, select STOP > Resume Later.
The device saves the status of your hike and enters low
power mode.
Select UP or DOWN to view additional data pages (optional).
8
After you complete your activity, select STOP > Save.
9
Running
Going for a Run
Before you go for a run, you should charge the device (Charging
the Device). Before you can use an ANT+ sensor for your run,
you must pair the sensor with your device (Pairing ANT+
Sensors).
Put on your ANT+ sensors, such as a foot pod or heart rate
1
monitor (optional).
From the clock, select START.
2
Select Run.
3
When using optional ANT+ sensors, wait while the device
4
connects to the sensors.
Go outside, and wait while the device locates satellites.
5
Select START to start the timer.
6
History is recorded only while the timer is running.
Start your activity.
7
Select LAP to record laps (optional).
8
Select UP or DOWN to view additional data pages (optional).
9
After you complete your activity, select STOP > Save.
10
Running with the Metronome
The metronome feature plays tones at a steady rhythm to help
you improve your performance by training at a faster, slower, or
more consistent cadence.
Hold UP.
1
2 Activities

Select Settings > Apps.
2
Select an activity.
3
NOTE: This feature is not available for all activities.
Select an option:
4
• Select Beats / Minute to enter a value based on the
cadence you want to maintain.
• Select Alert Frequency to customize the frequency of the
beats.
• Select Sounds to customize the metronome sound.
If necessary, select Preview to listen to the metronome
5
feature before you run.
Go for a run (Going for a Run).
6
The metronome starts automatically.
During your run, select UP to view the metronome screen.
7
If necessary, hold UP to change the metronome settings.
8
Biking
Going for a Ride
Before you go for a ride, you should charge the device
(Charging the Device). Before you can use an ANT+ sensor for
your ride, you must pair the sensor with your device (Pairing
ANT+ Sensors).
Pair your ANT+ sensors, such as a heart rate monitor, speed
1
sensor, or cadence sensor (optional).
From the clock, select START.
2
Select Bike.
3
When using optional ANT+ sensors, wait while the device
4
connects to the sensors.
Go outside, and wait while the device locates satellites.
5
Select START to start the timer.
6
History is recorded only while the timer is running.
Start your activity.
7
Select UP or DOWN to view additional data pages (optional).
8
After you complete your activity, select STOP > Save.
9
Swimming
NOTICE
The device is intended for surface swimming. Scuba diving with
the device may damage the product and will void the warranty.
NOTE: The device cannot record heart rate data while
swimming.
Going for a Pool Swim
Before you go for a swim, you should charge the device
(Charging the Device).
From the clock, select START.
1
Select Pool Swim.
2
Select your pool size, or enter a custom size.
3
Select START to start the timer.
4
History is recorded only while the timer is running.
Start your activity.
5
The device automatically records swim intervals and lengths.
Select UP or DOWN to view additional data pages (optional).
6
When resting, select LAP to pause the timer.
7
Select LAP to restart the timer.
8
After you complete your activity, select STOP > Save.
9
Swim Terminology
Length: One trip down the pool.
Interval: One or more consecutive lengths. A new interval starts
after a rest.
Stroke: A stroke is counted every time your arm wearing the
device completes a full cycle.
Swolf: Your swolf score is the sum of the time for one pool
length and the number of strokes for that length. For
example, 30 seconds plus 15 strokes equals a swolf score of
45. For open water swimming, swolf is calculated over 25
meters. Swolf is a measurement of swimming efficiency and,
like golf, a lower score is better.
Stroke Types
Stroke type identification is available only for pool swimming.
Your stroke type is identified at the end of a length. Stroke types
appear when you are viewing interval history. You can also
select stroke type as a custom data field (Customizing the Data
Screens).
Free Freestyle
Back Backstroke
Breast Breaststroke
Fly Butterfly
Mixed More than one stroke type in an interval
Drill Used with drill logging (Training with the Drill Log)
Resting During Pool Swimming
The default rest screen displays two rest timers. It also displays
time and distance for the last completed interval.
NOTE: Swim data is not recorded during a rest.
During your swim activity, select LAP to start a rest.
1
The display reverses to white text on a black background,
and the rest screen appears.
During a rest, select DOWN to view other data screens
2
(optional).
Select LAP, and continue swimming.
3
Repeat for additional rest intervals.
4
Training with the Drill Log
The drill log feature is available only for pool swimming. You can
use the drill log feature to manually record kick sets, one-arm
swimming, or any type of swimming that is not one of the four
major strokes. The drill time is recorded, and you must enter the
distance.
TIP: You can customize the data screens and data fields for
your pool swim activity (Customizing the Data Screens).
From the clock, select START.
1
Select Pool Swim.
2
During your pool swim activity, select DOWN to view the drill
3
log screen.
Select LAP to start the drill timer.
4
After completing a drill interval, select LAP.
5
The drill timer stops, but the activity timer continues to record
the entire swim session.
Select a distance for the completed drill.
6
Distance increments are based on the pool size selected for
the activity profile.
Select an option:
7
• To start another drill interval, select LAP.
• To start a swim interval, select DOWN to return to the
swim training screens.
After you complete your activity, select STOP > Save.
8
Going for an Open Water Swim
Before you go for a swim, you should charge the device
(Charging the Device).
From the clock, select START.
1
Activities 3

Select Open Water.
2
Go outside, and wait while the device locates satellites.
3
Select START to start the timer.
4
History is recorded only while the timer is running.
Start your activity.
5
Select LAP to record an interval (optional).
6
Select UP or DOWN to view additional data pages (optional).
7
After you complete your activity, select STOP > Save.
8
Multisport
Triathletes, duathletes, and other multisport competitors can
take advantage of the multisport activity. During a multisport
activity, you can transition between activities and continue to
view your total time and distance. For example, you can switch
from biking to running and view your total time and distance for
biking and running throughout the multisport activity.
You can customize a multisport activity, or you can use the
default multisport activity set up for a standard triathlon.
Starting a Triathlon or Multisport Activity
Before you start an activity, you should charge the device
(Charging the Device). Before you can use an ANT+ sensor, you
must pair the sensor with your device (Pairing ANT+ Sensors).
Pair your ANT+ sensors, such as a foot pod or heart rate
1
monitor (optional).
From the clock, select START.
2
Select Triathlon or a custom multisport activity.
3
Go outside, and wait while the device locates satellites.
4
Select START to start the timer.
5
History is recorded only while the timer is running.
Start your first activity.
6
Select LAP to transition to the next activity.
7
If transitions are turned on, the transition time is recorded
separately from the activity times.
If necessary, select LAP to start the next activity.
8
Select UP or DOWN to view additional data pages (optional).
9
After you complete your activity, select STOP > Save.
10
Creating a Multisport Activity
Hold UP.
1
Select Settings > Apps > Add New > Multisport.
2
Select an option:
3
• Select an activity type.
• Select Custom, and enter a name.
Select an activity.
4
If necessary, repeat step 4 until the multisport activity is
5
complete.
Select Done.
6
Select Yes to turn transitions on or No to turn transitions off.
7
When transitions are turned on, the transition time is
recorded separately from the activity times.
Indoor Activities
The fēnix 3 device can be used for training indoors, such as
running on an indoor track or using a stationary bike.
GPS is turned off for indoor activities. When running with GPS
turned off, speed, distance, and cadence are calculated using
the accelerometer in the device. The accelerometer is selfcalibrating. The accuracy of the speed, distance, and cadence
data improves after a few outdoor runs using GPS.
Navigation
Saving Your Location
You can save your current location to navigate back to it later.
Hold UP.
1
Select Save Location.
2
Follow the on-screen instructions.
3
Navigating to a Destination
You can use your device to navigate to a destination or follow a
course. When you start navigating, you can choose the activity
to be used while traveling to your destination, such as hiking,
running, or biking. If you are already recording an activity when
you start navigation, the device continues to record the current
activity while navigating.
Hold UP.
1
Select Navigation.
2
Select a category.
3
Follow the on-screen instructions to select a destination, and
4
select Go To.
Select an activity.
5
Navigation information appears.
Select UP or DOWN to view additional data pages (optional).
6
Navigating with Sight 'N Go
You can point the device at an object in the distance, such as a
water tower, lock in the direction, and then navigate to the
object.
Hold UP.
1
Select Navigation > Sight 'N Go.
2
Point the top mark on the bezel at an object and select
3
START.
Select a category.
4
Select START to begin navigation.
5
Navigation information appears.
Select UP or DOWN to view additional data pages (optional).
6
Compass
The device has a 3-axis compass with automatic calibration.
The compass features and appearance change depending on
your activity, whether GPS is enabled, and whether you are
navigating to a destination. You can manually change the
compass settings (Compass Settings).
Map
represents your location on the map. Location names and
symbols appear on the map. When you are navigating to a
destination, your route is marked with a line on the map.
• Map navigation (Panning and Zooming the Map)
• Map settings (Customizing Map Features)
Panning and Zooming the Map
While navigating, select UP to view the map.
1
Hold UP.
2
Select Pan/Zoom.
3
Select an option:
4
• To toggle between panning up and down, panning left and
right, or zooming, select START.
• To pan or zoom the map, select UP and DOWN.
• To quit, select BACK.
4 Navigation
 Loading...