

Garmin eTrex Vista Cx User Manual

eTrex® Vista Cx
hiking companion
owner’s manual

© 2006 Garmin Ltd. or its subsidiaries
Garmin International, Inc.
1200 East 151st Street,
Olathe, Kansas 66062, U.S.A.
Tel. 913/397.8200 or 800/800.1020
Fax 913/397.8282
All rights reserved. Except as expressly provided herein, no part of this manual may be reproduced, copied, transmitted,
disseminated, downloaded or stored in any storage medium, for any purpose without the express prior written consent of Garmin.
Garmin hereby grants permission to download a single copy of this manual onto a hard drive or other electronic storage medium
to be viewed and to print one copy of this manual or of any revision hereto, provided that such electronic or printed copy of this
manual must contain the complete text of this copyright notice and provided further that any unauthorized commercial distribution
of this manual or any revision hereto is strictly prohibited.
Information in this document is subject to change without notice. Garmin reserves the right to change or improve its products and
to make changes in the content without obligation to notify any person or organization of such changes or improvements. Visit the
Garmin Web site (www.garmin.com) for current updates and supplemental information concerning the use and operation of this
and other Garmin products.
Garmin®, eTrex®, AutoLocate®, TracBack®, BlueChart®, and MapSource® are registered trademarks of Garmin Ltd. or its
subsidiaries and may not be used without the express permission of Garmin.
microSD™ is a trademark of The SD Card Association . TransFlash™ is a trademark of SanDisk Corporation.
Garmin (Europe) Ltd.
Unit 5, The Quadrangle, Abbey Park
Industrial Estate, Romsey, SO51 9DL,
U.K.
Tel. 44/0870.8501241
Fax 44/0870.8501251
Garmin Corporation
No. 68, Jangshu 2nd Road, Shijr, Taipei
County, Taiwan
Tel. 886/2.2642.9199
Fax 886/2.2642.9099
June 2006 Part Number 190-00514-00 Rev. B Printed in Taiwan

INTRODUCTION > ABOUT THIS MANUAL
INTRODUCTION
Thank you for choosing the Garmin® eTrex® Vista Cx.
The eTrex Vista Cx uses the proven performance of
Garmin GPS and full-featured mapping to create an
unsurpassed portable GPS receiver. Take a moment
now to compare the contents of this package with
the packing list on the box. If any pieces are missing,
contact your Garmin dealer immediately.
About This Manual
To get the most out of your new navigation system,
take time to read this manual and learn the operating
procedures for your unit in detail. This manual is
organized into the following sections.
The Introduction contains manual conventions, the
Table of Contents, the software license agreement,
product registration, and product care information.
The Getting Started section provides an overview of
the unit, how to turn the unit on, and acquiring satellites.
The Basic Operation section provides information
about setting up waypoints, routes, and tracks.
eTrex Vista Cx Owner’s Manual i
The Main Pages section contains an overview of
the Satellite, Trip Computer, Map, Compass, and
Altimeter Pages.
The Main Menu section describes features found on
the Main Menu, and information about how to change
settings.
The Appendix contains information, such as
specifications, optional accessories, and maintenance
information. You can also find warranty and FCC
information in the Appendix.
An Index is provided at the end of the manual for
reference.
Manual Conventions
This manual uses the term Warning to indicate a
potentially hazardous situation, which, if not avoided,
could result in death or serious injury.
This manual uses the term Caution to indicate a
potentially hazardous situation, which, if not avoided,
may result in minor injury or property damage. It may
also be used without the symbol to alert you to avoid
unsafe practices.

INTRODUCTION > ABOUT THIS MANUAL
Table of Contents
Introduction ....................................................... i
About This Manual .............................................. i
Manual Conventions ................................................ i
Software License Agreement ............................ v
Product Registration .......................................... v
Contact Garmin ........................................................v
Caring for the Vista Cx ...................................... vi
Cleaning the Case ................................................. vi
Cleaning the Screen ............................................... vi
Storage ................................................................... vi
Water Immersion ................................................... vi
Warning ............................................................. vii
Caution ............................................................. viii
Getting Started ................................................. 1
Unit Overview .....................................................1
Installing the Batteries .............................................2
Key Functions ...........................................................3
Turning on the Vista Cx .....................................4
Adjusting the Backlight ...........................................4
Initializing the GPS Receiver ............................. 5
Using the Vista Cx .............................................. 6
Understanding Terms ...............................................6
Selecting Options and Entering Data .......................7
The Status Bar and Date and Time ..........................7
On-Screen Messages ................................................8
Using the Mapping Databases .................................8
Transferring Data to a microSD™ Card ...................9
Basic Operation ............................................. 10
Creating and Using Waypoints ....................... 10
Marking Your Current Location ............................10
Creating Waypoints Using the Map .......................11
Creating a Waypoint Using Coordinates ...............11
Editing Waypoints .................................................12
Deleting Waypoints ...............................................12
Averaging the Waypoint’s Location ......................13
Projecting a Waypoint ............................................14
Proximity Waypoints .............................................15
Using the Find Menu ........................................ 16
Find By Name ........................................................17
Recent Finds ..........................................................18
Using the Find Item Information Page ..................18
Find Information Page Options Menu ...................18
Finding a Waypoint ................................................20
Finding a Geocache ...............................................20
Finding a City ........................................................22
Finding an Interstate Exit ......................................22
Finding an Address ................................................23
Finding an Intersection ..........................................24
ii eTrex Vista Cx Owner’s Manual

INTRODUCTION > ABOUT THIS MANUAL
Searching for a Point of Interest ............................25
Custom Points of Interest ......................................26
Using Tracks ..................................................... 26
Track Profiles .........................................................30
Navigating a Saved Track ......................................31
Creating and Using Routes ............................. 32
Creating a Route ....................................................32
Navigating a Route ................................................33
Editing a Route ......................................................35
Using the Route Page Options ...............................36
Main Pages ..................................................... 37
Satellite Page .................................................... 38
Using the Satellite Page Options Menu .................38
Map Page ........................................................... 39
Using Additional Map Data ...................................40
Changing the Zoom Range ....................................41
Map Orientation .....................................................41
Map Page Options .................................................41
Guidance Text ........................................................42
Setting up the Map Page ........................................43
Measuring Distance ...............................................46
Turning Declutter On or Off ..................................47
Restoring Defaults .................................................47
Compass Page .................................................. 48
Using the Electronic Compass ...............................49
Compass Page Options ..........................................51
Sight ‘N Go Navigation .........................................52
Using the Course Pointer or Bearing Pointer ........53
Data Fields .............................................................54
Altimeter Page .................................................. 55
Altimeter Page Options .........................................56
Plot Over Time or Distance ...................................57
View Pressure or Elevation Plots ..........................57
Zoom Ranges .........................................................58
View Points ............................................................59
View Points on Map ..............................................59
Resetting Data ........................................................60
Calibrating the Altimeter .......................................61
Change Data Fields ................................................62
Trip Computer Page ......................................... 63
Trip Computer Page Options Menu .......................63
Main Menu ...................................................... 64
Tracks ................................................................ 64
Track Page Options ................................................65
Routes Page ...................................................... 65
Highway Page ................................................... 65
Setup Menu ....................................................... 66
System Setup .........................................................67
System Setup Options ............................................67
Display Setup .........................................................68
eTrex Vista Cx Owner’s Manual iii

INTRODUCTION >ABOUT THIS MANUAL
Interface Setup .......................................................68
Tones Setup ............................................................69
Page Sequence Setup .............................................70
Map Page Setup .....................................................70
Routing Setup ........................................................70
Geocache Setup .....................................................72
Marine Setup ..........................................................72
Time Setup .............................................................72
Units Setup ............................................................73
Heading Setup ........................................................73
Calibration Setup ...................................................74
Altimeter Setup ......................................................74
Welcome Page Setup .............................................75
Jumpmaster Setup ..................................................75
Proximity Waypoints ........................................ 80
Calendar ............................................................ 80
Calculator .......................................................... 81
Stopwatch ......................................................... 81
Sun and Moon ................................................... 82
Hunt and Fish ................................................... 83
Games Menu ..................................................... 84
Memory Race ........................................................84
Virtua Maze ...........................................................85
GekoSmak .............................................................85
Nibbons ..................................................................86
Gekoids ..................................................................86
Beast Hunt .............................................................87
Appendix ........................................................ 88
Specifications ................................................... 88
Physical ..................................................................88
Performance ...........................................................88
Power .....................................................................88
Optional Accessories ....................................... 89
Connecting Your Vista Cx to a Computer ...... 92
What Is WAAS/EGNOS? ...................................93
Map Datums and Location Formats ............... 94
What Are Map Datums? ........................................94
What Is a Location Format? ..................................94
Loran TD Setup ................................................. 95
FCC Compliance ............................................... 96
Limited Warranty .............................................. 97
Index ............................................................... 99
iv eTrex Vista Cx Owner’s Manual

INTRODUCTION > ABOUT THIS MANUAL
Software License Agreement
BY USING THE eTrex Vista Cx, YOU AGREE
TO BE BOUND BY THE TERMS AND
CONDITIONS OF THE FOLLOWING SOFTWARE
LICENSE AGREEMENT. PLEASE READ THIS
AGREEMENT CAREFULLY.
Garmin grants you a limited license to use the
software embedded in this device (the “Software”)
in binary executable form in the normal operation of
the product. Title, ownership rights, and intellectual
property rights in and to the Software remain in
Garmin.
You acknowledge that the Software is the property of
Garmin and is protected under the United States of
America copyright laws and international copyright
treaties. You further acknowledge that the structure,
organization, and code of the Software are valuable
trade secrets of Garmin and that the Software in
source code form remains a valuable trade secret of
Garmin. You agree not to decompile, disassemble,
modify, reverse assemble, reverse engineer, or reduce
to human readable form the Software or any part
thereof or create any derivative works based on the
Software. You agree not to export or re-export the
Software to any country in violation of the export
control laws of the United States of America.
Product Registration
Help us better support you by completing our online
registration today! Have the serial number of your
eTrex Vista Cx handy and connect to our Web site
(http://www.garmin.com). Look for the Product
Registration link on our Home page.
Use this area to record the serial number in case your
eTrex Vista Cx is lost, stolen, or needs service. Be
sure to keep your original sales receipt in a safe place
or attach a photocopy inside this manual.
Serial Number: ___ ___ ___ ___ ___ ___ ___ ___
Contact Garmin
If you should encounter any difficulty while using
your eTrex Vista Cx, or if you have any questions, in
the U.S.A. contact Garmin Product Support by phone:
913/397.8200 or 800/800.1020, Monday–Friday,
8 AM–5 PM Central Time; or go to www.garmin.com/
support/ and select Technical Support.
In Europe, contact Garmin (Europe) Ltd. at
44/0870.8501241.
eTrex Vista Cx Owner’s Manual v

INTRODUCTION > ABOUT THIS MANUAL
Caring for the Vista Cx
The Vista Cx case is constructed of high-quality
materials and does not require user maintenance
except cleaning.
Cleaning the Case
Clean the unit’s outer casing (except for the screen)
using a cloth dampened with a mild detergent solution
and then wipe dry. Avoid chemical cleaners and
solvents that may damage plastic components.
Cleaning the Screen
Clean the Vista Cx screen using a soft, clean, lintfree cloth. Use water, isopropyl alcohol, or eyeglass
cleaner if needed. When using these agents, apply the
liquid to the cloth, and then gently wipe the screen
with the moistened cloth.
Storage
Do not store the Vista Cx where prolonged exposure
to temperature extremes may occur (such as in the
trunk of a car) as permanent damage may result.
User information, such as waypoints and routes, are
retained in the unit’s memory without the need for
external power. It is always a good practice to back
up important user data by manually recording it or
downloading it to a PC (transferring it to MapSource
software).
Water Immersion
The Vista Cx is waterproof to IEC Standard 60529
IPX7. It can withstand immersion in 1 meter of water
for 30 minutes. Prolonged submersion can cause
damage to the unit. After submersion, be certain to
wipe and air dry the unit before reuse or charging.
vi eTrex Vista Cx Owner’s Manual

Warning
INTRODUCTION > ABOUT THIS MANUAL
Failure to avoid the following potentially hazardous
situations could result in an accident or collision
resulting in death or serious injury.
When navigating, carefully compare information displayed
on the eTrex Vista Cx to all available navigation sources,
including information from visual sightings, and maps. For
safety, always resolve any discrepancies or questions before
continuing navigation.
WARNING: This product, its packaging, and its components contain chemicals known to the State of California to cause cancer,
birth defects, or reproductive harm. This Notice is being provided in accordance with California’s Proposition 65. If you have any
questions or would like additional information, please refer to our Web site at
eTrex Vista Cx Owner’s Manual vii
Use the electronic chart in the eTrex Vista Cx only to
facilitate, not to replace, the use of authorized government
charts. Official government charts and notices to mariners
contain all information needed to navigate safely.
http://www.garmin.com/prop65.

INTRODUCTION > ABOUT THIS MANUAL
Caution
Failure to avoid the following potentially hazardous
situations may result in injury or property damage.
Use the eTrex Vista Cx only as a navigational aid. Do not
attempt to use the eTrex Vista Cx for any purpose requiring
precise measurement of direction, distance, location, or
topography. This product should not be used to determine
ground proximity for aircraft navigation.
Map Data Information: One of the goals of Garmin is to provide customers with the most complete and accurate cartography
that is available to us at a reasonable cost. We use a combination of governmental and private data sources, which we identify in
product literature and copyright messages displayed to the consumer. Virtually all data sources contain inaccurate or incomplete
data to some extent. This is particularly true outside the United States, where complete and accurate digital data is either not
available or prohibitively expensive.
NOTICE TO DRIVERS IN CALIFORNIA AND MINNESOTA
using suction mounts on their windshields while operating motor vehicles. Other Garmin dashboard or friction mounting options
should be used. Garmin does not take any responsibility for any fines, penalties, or damages that may be incurred as a result of
disregarding this notice. (See California Vehicle Code Section 26708(a); Minnesota Statutes 2005, Section 169.71.)
The California Electronic Waste Recycling Act of 2003 requires recycling of electronic equipment. Refer to www.erecycle.org.
viii eTrex Vista Cx Owner’s Manual
The Global Positioning System (GPS) is operated by the
United States government, which is solely responsible for
its accuracy and maintenance. The government’s system
is subject to changes which could affect the accuracy and
performance of all GPS equipment, including the eTrex
Vista Cx. Although the eTrex Vista Cx is a precision
navigation device, any navigation device can be misused or
misinterpreted and, therefore, become unsafe.
: State law prohibits drivers in California and Minnesota from
GETTING STARTED
GETTING STARTED > UNIT OVERVIEW
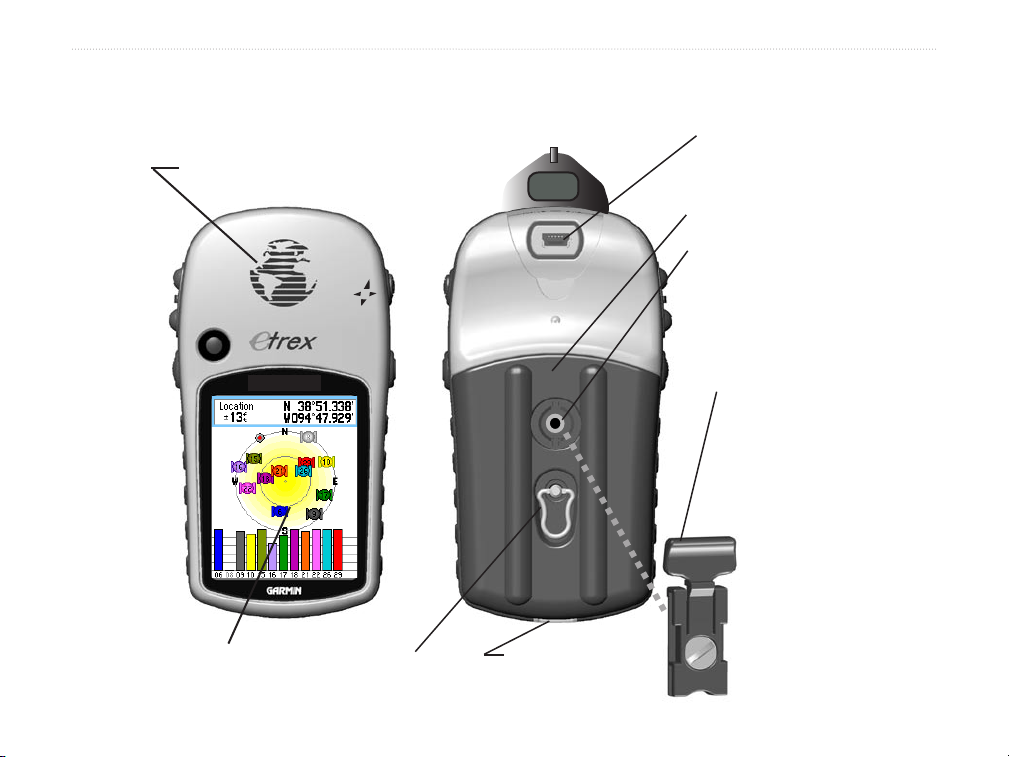
Unit Overview
GPS antenna
• Provides quick satellite acquisition
N
USB connector port
(under weather cap)
Battery
compartment cover
Belt Clip/Auxiliary Mount Adapter
attachment location
• Accepts a Belt Clip accessory
for convenient access when
walking.
Vista Cx
hiking or
• Accepts the Auxiliary Mount
Adapter accessory supplied
with the unit.
(Refer to page 89 for acces
-
sory listings.)
Color LCD display
eTrex Vista Cx Owner’s Manual 1
Battery compartment
locking D-Ring
Carry Lanyard
attachment slots

GETTING STARTED > UNIT OVERVIEW
Installing the Batteries
The Vista Cx operates on two AA batteries (not
included), which are installed in the back of the unit.
You can use Alkaline or NiMH batteries. See page 67
for information on setting the battery type.
To
install the lanyard:
1. Place the loop of the lanyard through the slot
at the upper-left side on the back of the unit.
2 Route the strap through the loop, and pull tight.
To install the batteries:
1. Remove the battery
cover by turning the D-Ring
Optional Belt Clip
(attaches to belt or
waistband)
1/4 turn counter-clockwise
and pulling the cover loose.
PUSH TO EJECT
2. Insert the batteries,
observing the proper
polarity. A polarity diagram
is molded into the battery
compartment.
3. Reinstall the battery
cover by aligning the back
Locking
pin slot
Battery
compartment
cover with the unit and
turning the D-Ring 1/4 turn
clockwise.
Remove the batteries from your Vista Cx when you do
not expect to use the unit for several months. Stored
data is not lost when batteries are removed.
2 eTrex Vista Cx Owner’s Manual
Belt Clip Knob
(attaches to back of
unit)
Lanyard installation
Auxiliary Mount Adapter
(Do not discard. This adapter
attaches to the unit for
connection to mounting kits.)

GETTING STARTED > KEY FUNCTIONS
Key Functions
“Thumb Stick” Enter/Rocker key
(Press down to Enter - move to the side or up or down to
scroll, highlight fields or pan the map)
• Rock up or down or right or left to
In/Out Zoom keys
• From the Map Page, press to zoom
the map in or out.
• From any other page, press to scroll
up or down a list or move a high lighted slider.
Menu/Find key
• Press and release to view the
Options Menu for a page.
• Press and hold to display the Find
Menu.
N
Vista Cx
move through lists; highlight fields, on screen buttons, or icons; enter data; or
move the map panning arrow.
• Press in and release to enter highlighted
options and data or confirm on-screen
messages.
• Press in and hold at any time to mark
your current location as a waypoint.
Quit/Compass key
• Press to cycle through the main pages.
• Press when using the on-screen
keyboard to close.
• Press and hold to turn the compass
on or off.
Power/Backlight key
• Press and hold to turn unit on or off.
• Press and release to adjust backlighting,
or to view time, date, and battery
capacity.
eTrex Vista Cx Owner’s Manual 3

GETTING STARTED > TURNING ON THE VISTA CX
Turning on the Vista Cx
When you turn on the Vista Cx, the Welcome Page
appears, followed by the Satellite Page. The unit must
Adjusting the Backlight
You may want to adjust the backlight to see the
display better.
collect satellite data and establish its current location.
To turn the Vista Cx on and off:
1. Press and hold the Power key. When the unit
turns on, a tone sounds, and the Introduction
Page appears, followed by the Satellite Page.
2. To turn off the Vista Cx, press and hold the
Power key again.
See page 68 for information about changing the
Welcome Page Satellite Page
display colors and backlight timeout and brightness
levels.
To adjust the backlight level:
1. Press and quickly release the Power key.
2. Press up on the Rocker to increase the
brightness, or press down to decrease.
3. Press Enter or the Quit key to close the
backlight adjustment window.
Backlight Adjustment Slider
4 eTrex Vista Cx Owner’s Manual

GETTING STARTED > INITIALIZING THE GPS RECEIVER
Initializing the GPS Receiver
The first time you turn on your Vista Cx, the GPS
receiver must collect satellite data and establish its
current location. To ensure proper initialization, the
Vista Cx is shipped from the factory in AutoLocate
mode, which allows the receiver to “find itself”
anywhere in the world. To receive satellite signals,
you must be outdoors and have a clear view of the
sky.
To initialize your Vista Cx:
1. Press and hold the Power key to turn on the
Vista Cx.
2. Hold the unit in front of you with the top tilted
upward. While the GPS receiver is searching
for the satellite signals, a “Locating Satellites”
message is replaced by an “Acquiring
Satellites” message until enough signals are
acquired to fix its location.
When the receiver has signals from at least
three satellites, the display at the top of the
page changes to indicate position accuracy
and location coordinates.
3. Press and release the
Page appears. You are now ready to begin
GPS-aided navigation.
Quit key until the Map
You can also observe a sky-view array of the satellites
overhead with your location centered in the array. The
outer circle represents the horizon and the inner circle
represents a position 45 degrees from the horizon. The
numbers shown indicate the number assigned to each
satellite. A bar graph at the bottom of the page shows
the strength of signals from each satellite.
The outer
circle
represents
the horizon.
The inner
circle is a
location 45
degrees from
the horizon.
The number of
each overhead
satellite is
displayed.
The strength of
each satellite
signal is shown.
If the unit cannot establish a satellite fix, a list of
solutions appears. Highlight the appropriate solution,
and press Enter.
eTrex Vista Cx Owner’s Manual 5
GETTING STARTED > USING THE VISTA CX
Using the Vista Cx
This section explains how to enter and select
information with the Vista Cx.
Understanding Terms
As you progress through this manual, you are directed
to press a specific key or highlight a field on the
screen. When you are directed to press a key, you
should press and quickly release the key. If the key
must be held down for a period of time to start a
secondary function, the instructions will tell you to
On-screen button
button, and press Enter to select the button.
Scroll bar
appear on the screen, a scroll bar appears along the
right side of the list. To scroll through a list, press up
or down on the Rocker.
Default—the factory setting saved in the unit’s
memory. You can change the settings, but you can
also revert to the factory (default) settings when you
select Restore Defaults.
—when viewing a list of items too long to
—use the Rocker to highlight a
do so. When a field is highlighted on the screen, it is
highlighted in yellow. The position of the highlight is
controlled by the Rocker.
Highlighted
The following terms are used throughout this manual:
Highlight—move the highlighted area on the screen
Field
field
up, down, left, or right with the Rocker to select
individual fields.
Field—the location on a page where data or an option
can be shown and entered. Select (highlight) a field
On-screen buttons
using the Rocker to begin entering data or selecting
options.
6 eTrex Vista Cx Owner’s Manual

GETTING STARTED > USING THE VISTA CX
Selecting Options and Entering Data
Use the Rocker to highlight, select, or choose an item
in a list or a field on the screen.
The Status Bar and Date and Time
The status bar and Date/Time Window appear below
the backlight adjustment slider when you press and
release the Power key.
To select and activate an option:
1. From any page, press the Menu key. An
Options Menu appears with a list of additional
options for that page.
2. Use the Rocker to move the highlight up,
down, right, or left on the menu to highlight the
option you want, and press Enter to select it.
To exit a menu or return to the previous
setting:
Press the Quit key. The Quit key moves
backward through your steps. Press the Quit
key repeatedly to return to the starting page.
Status Bar - Date/Time Window
• Power to the unit is provided by either batteries or
from an auxiliary source. Power status is shown
on the Main Menu and the Status Bar - Date
and Time Window. The Battery Power icon
( ) shows the remaining power as the battery
is depleted. The external power icon ( ) is
shown when the unit is powered from an external
source (PC/USB or 12 volt DC adapters).
• Satellite signal status is shown when searching for
or acquiring satellites ( ), when a 2D fix ( )
is attained, and when a 3D fix ( ) is attained.
• The Compass ( ) and Alarm ( ) icons
appear when these features are activated.
eTrex Vista Cx Owner’s Manual 7

GETTING STARTED > USING THE VISTA CX
On-Screen Messages
When a significant event in the operation of the
unit occurs, an on-screen message appears to advise
you of the occurrence. In each case, the condition is
described and often a remedy is provided. Press Enter
to acknowledge the message and close the window.
Using the Mapping Databases
Many of the Vista Cx features require detailed
mapping data to be fully operational, so you may want
to transfer maps before using the unit. The microSD™
card (interchangeable with TransFlash™ cards)
provided with your unit can be loaded with detailed
maps from optional MapSource disks for your PC.
This can enhance the versatility of your Vista Cx.
With selected MapSource detailed mapping data,
you can view listings of nearby restaurants, lodging,
shopping centers, attractions and entertainment, and
On-Screen Messages
even retrieve addresses and phone numbers for any
listed location. The amount of data transferred is
In some instances, the message may indicate a
temporary condition such as the “Calculating
Route” message and close as soon as calculation is
completed.
determined by the capacity printed on the microSD
card.
Use the USB Interface Cable provided with the unit
to transfer MapSource data from a PC to the microSD
card when installed in the Vista Cx. You can purchase
additional microSD cards at your local electronics
supplier. See the Garmin Web site
(http://www.garmin.com/cartography/) for compatible
Calculating Route
Message
MapSource products and pre-loaded microSD cards.
8 eTrex Vista Cx Owner’s Manual

GETTING STARTED > USING THE VISTA CX
Transferring Data to a microSD™ Card
The eTrex Vista Cx is equipped with a pre-installed
microSD card.
To install or remove the microSD card:
1. Remove the battery compartment cover from
microSD card
location
PUSH TO EJECT
Battery
compartment
with cover
removed
the back of the unit.
2. Locate the card slot at the upper-left edge of
USB port
weather cover
the battery tray, and check to be certain the
card is installed in the slot.
3.
Press down on the card and release quickly to
eject it from the slot if you plan to replace it with
a card with more memory or pre-loaded maps.
4. Replace the battery cover when finished.
To transfer map data to the microSD card:
Accessing the microSD
card slot
Contacts on card
must face away
from the batteries.
Taiwan
USB port
1. Lift the weather cover from the USB port on
the upper back of the unit.
PUSH TO EJECT
2. Connect the USB cable provided with the unit
to the USB port on your PC and to the miniUSB port on the back of the unit.
3. Follow instructions for selecting and
downloading maps provided with the
MapSource map data disk.
eTrex Vista Cx Owner’s Manual 9
microSD card
inserted in
card slot
Installing and removing
the microSD card
Accessing the USB port

BASIC OPERATION > CREATING AND USING WAYPOINTS
BASIC OPERATION
This section explains some of the more common
operations you can perform with your Vista Cx,
including creating and using waypoints, using the
Find Menu, and how to create and use tracks and
routes.
Creating and Using Waypoints
Waypoints are locations or landmarks you record and
store in your GPS. They are locations you might want
to return to later. You can add waypoints to routes and
even create a Go To directly to the selected waypoint.
You can create waypoints using three methods. You
can press the MARK key while at a location, create a
waypoint on the Map Page, or enter coordinates for a
waypoint manually.
Marking Your Current Location
Use the MARK key to quickly capture your current
location to create a new waypoint. You must have a
valid position (2D or 3D) fix to mark your current
location.
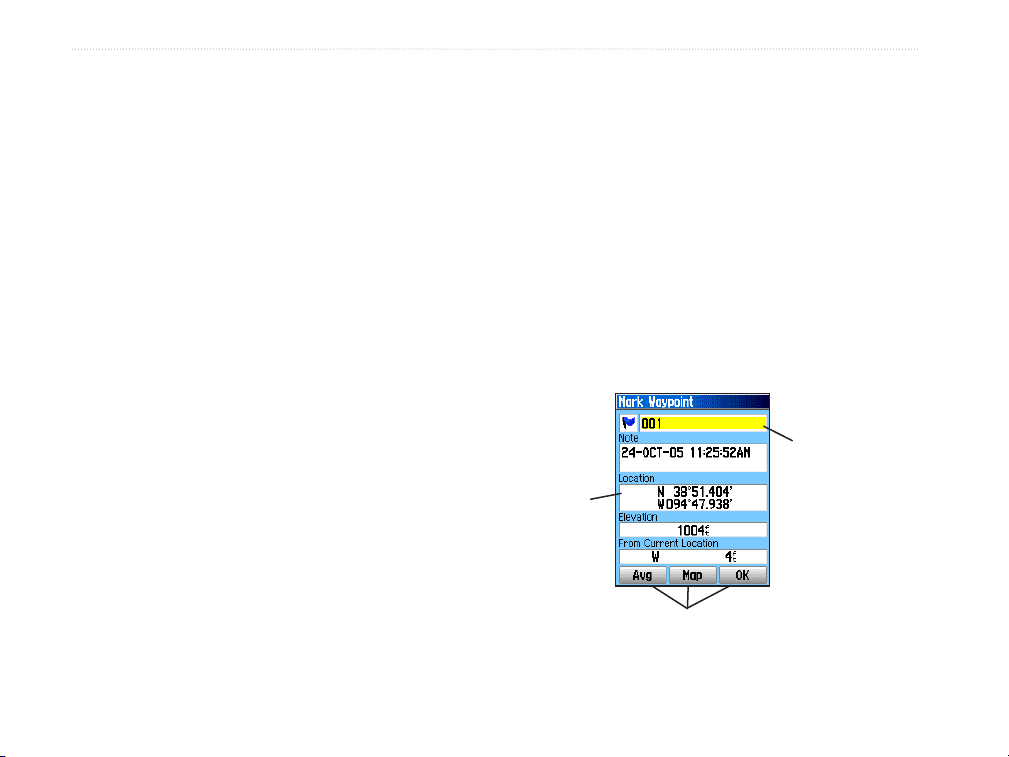
To mark your current location:
1. Press and hold the MARK key until the Mark
Waypoint Page appears. A default three-digit
name and symbol are assigned to the new
waypoint.
Waypoint
symbol
Mark Waypoint Page
2. To accept the waypoint with the default
information, highlight OK, and press Enter.
OR
To change any information on the Mark
Waypoint Page, highlight the appropriate
field, and press Enter to open the on-screen
keypad. After entering and confirming your
changes, highlight OK, and press Enter.
Waypoint
name
10 eTrex Vista Cx Owner’s Manual
BASIC OPERATION > CREATING AND USING WAYPOINTS
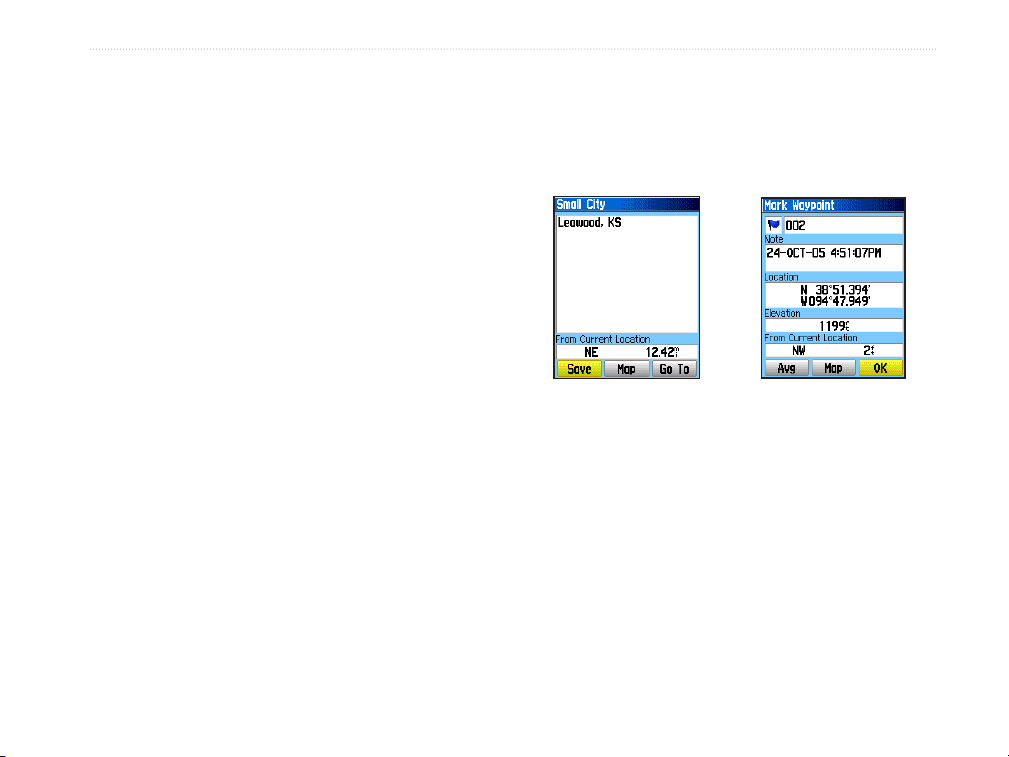
Creating Waypoints Using the Map
You can quickly create a waypoint using the Map
Page. When you pan the map and move the arrow
over a map item, you can see a highlighted description
of the item.
To create a waypoint using the Map Page:
1. On the Map Page, use the Rocker to move
the pointer to the map item you want to mark
as a waypoint.
2. Press and quickly release Enter to capture the
pointer location and open the information page
for the map item.
3. Highlight Save, and press Enter.
If the map item selected contains no
information, a “No map information at this
point. Do you want to create a user waypoint
here?” message appears. Highlight Yes, and
press Enter.
4. To change any information on the Waypoint
Page, highlight the appropriate field, and
press Enter to open the on-screen keypad.
After entering and confirming your changes,
highlight OK, and press Enter.
Creating a Waypoint Using Coordinates
You can manually enter location coordinates to create a
waypoint. This method is useful for creating a waypoint
at a specific latitude/longitude position from a chart.
Information page for a
map point with data
To create a new waypoint by entering
location coordinates:
1. Create a new waypoint.
2. On the Waypoint Page, highlight the Location
field, and press Enter to open the on-screen
keypad.
3. Use the Rocker to enter location coordinates.
Highlight OK, and press Enter when finished.
Information page for a
map point without data
eTrex Vista Cx Owner’s Manual 11

BASIC OPERATION > CREATING AND USING WAYPOINTS
Manually
enter waypoint
coordinates.
4. Press Quit to exit.
4. Make changes by highlighting each field,
and use the waypoint symbol chart and
alphanumeric keypad to enter new data.
5. Press Quit when finished.
Deleting Waypoints
You can delete waypoints from the Waypoint Page.
NOTE: When you delete a waypoint, you cannot
recover it from the unit.
Editing Waypoints
You can edit waypoints to change the symbol, name,
note, location, elevation, and depth.
To edit a waypoint:
1. Press and hold the Find key to open the Find
Menu.
2. Highlight the Waypoints icon, and press Enter
to open the Waypoints Page.
3. Select the waypoint you want to edit, and
press Enter. The Waypoint Page opens.
12 eTrex Vista Cx Owner’s Manual
To delete a waypoint:
1. Press and hold the Find key to open the Find
Menu.
2. Highlight the Waypoints icon, and press Enter
to open the Waypoints Page.
3. Select the waypoint you want to delete, and
press Enter. The Waypoint Page opens.
4. Highlight the Delete button, and press Enter. A
confirmation message appears.
5. Highlight Yes, and press Enter to delete the
waypoint.

BASIC OPERATION > CREATING AND USING WAYPOINTS
To move a waypoint on the Map Page:
1. On the Find Menu, highlight the Waypoints
icon, and press Enter to open the Waypoints
Page.
2. Select the waypoint you want to move, and
press Enter. The Waypoint Page opens.
3. Highlight the Map button, and press Enter to
show the waypoint on the map.
4. Press Enter again to place a MOVE marker
next to the waypoint.
5. Use the Rocker to move the waypoint to a
new location on the map, and press Enter.
Original
location
New location
Moving a waypoint
Averaging the Waypoint’s Location
You can average a new waypoint location over time to
produce a more accurate location.
NOTE: You must have a GPS satellite fix
before you can average a waypoint’s location.
You cannot average a waypoint after it has
been saved to the waypoints list and the Mark
Waypoint page is closed as there is no longer
satellite fix for that specific location.
To calculate the average location:
1. Press the Find key to open the Find Menu.
2. Highlight the Waypoints icon, and press Enter
to open the Mark Waypoints Page.
3. Select the waypoint for which you want to
calculate the average location, and press
Enter.
4.
Press the Menu key to open the Options Menu.
5. Highlight Average Location, and press Enter
to open the Average Location Page. The unit
begins calculating the average location of the
waypoint.
eTrex Vista Cx Owner’s Manual 13

BASIC OPERATION > CREATING AND USING WAYPOINTS
Mark Waypoint
Page
Average Location
Page
6. Press Enter to save the location.
Projecting a Waypoint
You can create a new waypoint by projecting the
distance and bearing from one location to a new
location.
To project a waypoint:
1. Press the Find key to open the Find Menu.
2. Highlight the Waypoints icon, and press Enter
to open the Waypoints Page.
3. Select the waypoint you want to project, and
press Enter. The Waypoint Information Page
opens.
4. Press the
Menu key to open the Options
Menu.
5. Select Project Waypoint, and press Enter to
open the Project Waypoint Page.
6. Enter the distance and bearing to the projected
waypoint in the appropriate fields at the bottom
of the page, and press the Quit key when
finished.
Project Waypoint
Page
Projected Waypoint on
the Map
14 eTrex Vista Cx Owner’s Manual

BASIC OPERATION > CREATING AND USING WAYPOINTS
Proximity Waypoints
Use the Proximity Waypoints Page to define an alarm
circle around a stored waypoint location.
5. With the
to add the point to the list on the Proximity
Waypoints Page.
Use button highlighted, press Enter
6. Use the Rocker to highlight the Radius field
if you want to enter a value different than the
default of 1 mile.
To turn proximity alarms on or off:
1. Press the Menu key twice to open the Main
Proximity
icon
Radius
field
New Entry
line
Menu.
Proximity
Alarms
check box
2. Highlight the Proximity icon, and press Enter
to open the Proximity Waypoints Page.
3. Highlight the Proximity Alarms check box,
and press Enter to initiate the alarm feature.
To add a proximity waypoint:
1. Press the Menu key twice to open the Main
Menu.
2. Highlight the Proximity icon, and press Enter
When you trigger an alarm, a tone sounds and
a “Near Proximity Point” message appears.
When you move outside the set radius, a
“Leaving Proximity Point” message is shown.
to open the Proximity Waypoints Page.
3. Highlight an empty line, and press Enter to
open the Find Menu.
4. Select a waypoint from the Waypoints List or
from any other group of map points, and press
Enter to open the information page for the
item.
eTrex Vista Cx Owner’s Manual 15
BASIC OPERATION > USING THE FIND MENU
To clear one or all proximity waypoints
from the list:
To remove or review a single entry, press
Enter.
OR
To remove all waypoints from the list, press the
Menu key, highlight Remove All, and press
Enter.
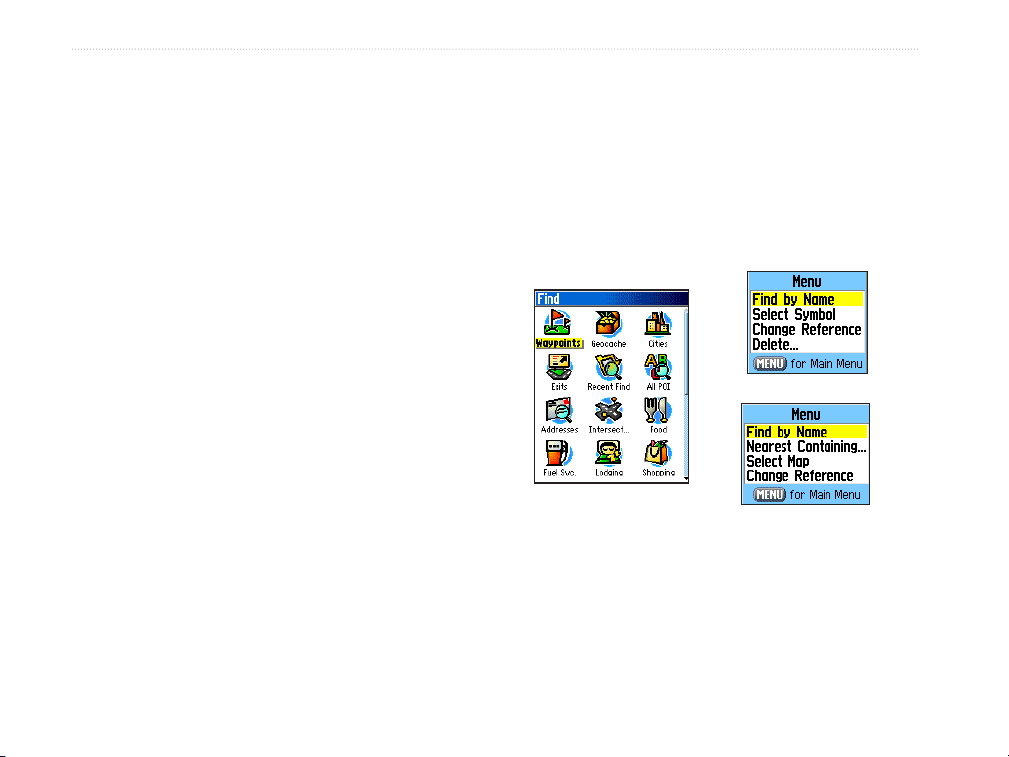
Using the Find Menu
Use the Find Menu to search for waypoints, cities,
and exits included in the Vista Cx basemap. You
can also find saved waypoint and geocache points.
Additional icons appear depending on the optional
MapSource data loaded to the unit. Press and hold the
Find key to open the Find Menu.
Waypoint Options Menu
Find Menu with optional
MapSource data
When you access a Find group list, it contains only
those items near your current location or the pointer
(if active).
Cities Options Menu
16 eTrex Vista Cx Owner’s Manual

BASIC OPERATION > USING THE FIND MENU
The options menu for each category contains a
submenu of search options, such as Find By Name,
Find Nearest, Select Symbol (for waypoints), Change
Reference (by moving the pointer to a new location),
Nearest Containing (a keyword you enter), Select
Category (for those groups, such as Food & Drink and
Lodging). Use these options to shorten your
search.
Find By Name
If you know the name of the location you want to find,
use the Find By Name option.
To find a location using Find By Name:
1. Press and hold the Find key to open the Find
Menu.
2. Use the Rocker to highlight the icon for the
type of item for which you want to search, and
press Enter.
OR
To search the entire database, select the All
Points of Interest icon, and press Enter.
3. Press the Menu key, highlight Find By Name,
and press Enter.
4. Use the
the on-screen keypad and enter the name of
the location you want to find. When the Find
list contains a match, highlight OK, and press
Enter.
5. Highlight the location in the Find list, and press
Enter. The item’s information page opens,
allowing you to save the item as a waypoint,
show the item on the map, or automatically
create a route to the item (Go To).
Rocker and Enter key to operate
Find By
Name
On-screen
keypad
eTrex Vista Cx Owner’s Manual 17

BASIC OPERATION > USING THE FIND MENU
Recent Finds
The Recent Finds Page shows a list of the last 50
items you have searched for or gone to recently.
To go to a recently found item:
1. Press and hold the Find key to open the Find
Menu.
2. Highlight the Recent Finds icon, and press
Enter to open the Recent Finds Page.
Recent
Finds
icon
3. Use the Rocker to select the item you want
to go to, and press Enter to open the item’s
information page.
4. Highlight Go To, and press Enter to begin
navigation.
List of
recently
found items
Using the Find Item Information Page
When you select an item from the Find item list and
press Enter, an information page shows detailed
information about the item. Each information page
contains three on-screen buttons. Different buttons
appear depending on whether you are selecting a Find
item to navigate to or adding a Find item to a route list
as a waypoint.
Find Information Page Options Menu
The Options Menu for each information page contains
options for using a Find item as a tool for navigation.
To use the Options Menu:
1. With an information page open for a Find
item, press the Menu key to open the Options
Menu.
2. Use the Rocker to select an option, and press
Enter:
• Average Location—sample a waypoint
location over time and average the result for a
more accurate location reference. See page 13
for more information.
18 eTrex Vista Cx Owner’s Manual

BASIC OPERATION > USING THE FIND MENU
• Project Waypoint—create a new waypoint
referencing another location by entering
bearing and distance from the referenced
location. See page 14 for more information.
• Find Near Here
—return to the Find Menu
where you can search for map items near the
item defined on the information page.
• Change Reference
—point to a new location on
the Map Page using the pointer.
• Set Proximity
—program an alarm to sound
when you are within a specified radius of an
item defined by the information page. See page
15 for more information.
• Add To Route
—include this item on a new
route or add it to an existing route. See “Using
Routes” on page 32 for more information.
• View Sun and Moon
—view Sun and Moon
tables for this item location. See page 82 for
more information.
• View Hunt and Fish
—view Hunt and Fish
tables for this item location. See page 83 for
more information.
eTrex Vista Cx Owner’s Manual 19
• Map Information
the map item originated. See page 92 for
information about downloading detailed maps.
To find an item near another item:
1. Press and hold the Find key to open the Find
Menu.
2. Select an icon on the Find Menu, and press
Enter.
3. Highlight an item in the Find list, and press
Enter to open the information page.
4. Press the Menu key to open the Options
Menu, highlight Find Near Here, and press
Enter. The Find Menu opens again with
each category containing items near the item
selected on the information page.
5. Select a category icon, and press Enter to
open a Find list of items near the item.
To find an item from another location on
the map:
1. Press and hold the Find key to open the Find
Menu.
2. Select an icon on the Find Menu, and press
Enter.
—show the map from which
BASIC OPERATION > USING THE FIND MENU
3. Press the Menu key to open the Options
Menu, highlight Change Reference, and press
Enter. The Map Page appears.
4. Use the Rocker to pan the arrow (pointer) to
the map location you want, and press Enter.
The Find list shows a list of items near the new
map location.
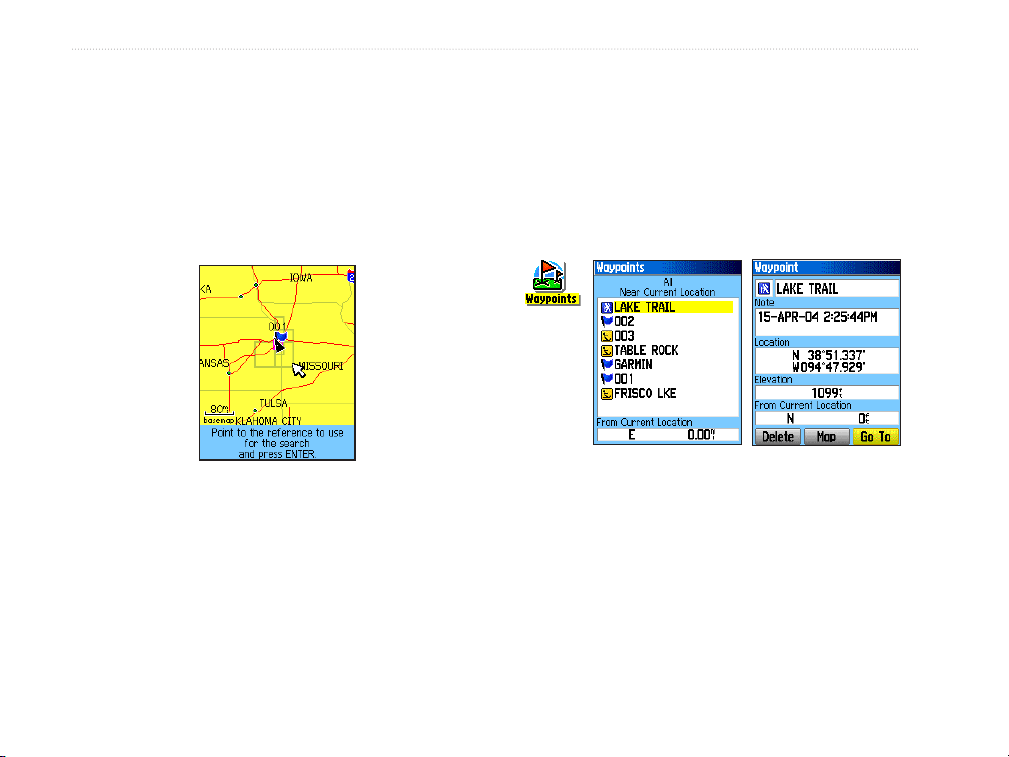
Finding a Waypoint
The Waypoints Page contains a list of all saved
waypoints. Waypoints are stored in alphanumeric
order and are also identified by a symbol assigned
from a list of symbol types.
To find a waypoint:
1. Press and hold the Find key to open the Find
Menu.
2. Highlight the Waypoints icon, and press Enter
to open the Waypoints Page.
3. Use the Rocker to select a waypoint, and
press Enter. The Waypoint Page opens.
Waypoints
icon
Finding a Geocache
Use the Geocache icon to view the list of geocache
locations created using your Vista Cx or downloaded
from your computer. A geocache location is a
waypoint with a special geocache symbol assigned
to give special significance and to allow it to be
separated from others on the waypoints list. For more
information about creating a geocache point, see
20 eTrex Vista Cx Owner’s Manual
 Loading...