

Garmin Edge 205, Edge 305 Owner Manual
Owner’s Manual
Edge™ 205/305
GPS-enabled computer for cyclists

© Copyright 2005–2006 Garmin Ltd. or its subsidiaries.
Garmin International, Inc.
1200 East 151st Street
Olathe, Kansas 66062, U.S.A.
Tel. 913/397.8200 or
800/800.1020
Fax 913/397.8282
All rights reserved. Except as expressly provided herein, no part of this manual may be reproduced,
copied, transmitted, disseminated, downloaded or stored in any storage medium, for any purpose
without the express prior written consent of Garmin. Garmin hereby grants permission to download a
single copy of this manual onto a hard drive or other electronic storage medium to be viewed and to
print one copy of this manual or of any revision hereto, provided that such electronic or printed copy
of this manual must contain the complete text of this copyright notice and provided further that any
unauthorized commercial distribution of this manual or any revision hereto is strictly prohibited.
Information in this document is subject to change without notice. Garmin reserves the right to change
or improve its products and to make changes in the content without obligation to notify any person
or organization of such changes or improvements. Visit the Garmin Web site (
current updates and supplemental information concerning the use and operation of this and other
Garmin products.
Garmin®, Auto Lap®, and Auto Pause® are registered trademarks and Edge™, GSC10™, Virtual
Partner™, and Garmin Training Center™ are trademarks of Garmin Ltd. or its subsidiaries and may not
be used without the express permission of Garmin.
May 2006 Part Number 190-00580-00 Rev. D Printed in Taiwan
Garmin (Europe) Ltd.
Unit 5, The Quadrangle
Abbey Park Industrial Estate
Romsey, SO51 9DL, U.K.
Tel. 44/0870.8501241
Fax 44/0870.8501251
Garmin Corporation
No. 68, Jangshu 2nd Road
Shijr, Taipei County, Taiwan
Tel. 886/2.2642.9199
Fax 886/2.2642.9099
www.garmin.com) for

TABLE OF CONTENTS
Introduction ......................... 5
About This Manual ............. 5
Getting Started .................... 6
Charge the Battery ............. 6
Position the Edge .............10
Configure the Edge .......... 12
Acquire Satellite
Signals .......................... 13
Position the Heart Rate
Monitor .........................14
Position the GSC10
Sensor ..........................16
Set Your User Profile ........19
Set Your Bike Profile ........ 20
Change the Backlight and
Contrast Settings ........21
Training ..............................22
Auto Pause® .....................22
Auto Lap® .........................22
Alerts ................................. 24
INTRODUCTION
Using Time and Distance
Alerts ..........................24
Using Speed Alerts .......... 25
Using Heart Rate Alerts ... 26
Using Cadence Alerts ...... 27
Virtual Partner™ ................ 28
Workouts: Quick, Interval,
and Advanced .............29
Using Workouts ............... 30
Quick Workouts ............... 30
Interval Workouts .............
Advanced Workouts .........
Courses .............................39
Creating Courses ............. 39
Using a Course ................ 40
32
33
History ............................... 43
Viewing History ................ 43
Deleting History ............... 46
Navigation ......................... 47
Navigating with the Map .. 47
Edge™ 205/305 Owner’s Manual 3

INTRODUCTION
Marking and Finding
Locations .....................48
Navigating with Routes .... 50
Viewing GPS
Information ................... 52
Customizing ...................... 54
Setting Up Custom Data
Fields ............................ 54
Changing System
Settings ........................56
Updating User Profile ....... 59
Changing Bike Profile ......59
Setting Zones .................... 60
Speed Zones ................... 60
Heart Rate Zones ........... 61
Data Recording .................62
Appendix ........................... 64
Edge Data Fields ..............64
Edge Accessories .............70
Viewing Heart Rate Data ..71
Training with Heart Rate
Zones ............................71
4 Edge™ 205/305 Owner’s Manual
Sensor Pairing ..................74
Training with Cadence ....76
Barometric Altimeter ........ 76
Tire Size and
Circumference .............77
Garmin Training Center ... 79
Caring for the Edge ..........80
Specifications ..................81
Product Registration ........ 84
Contact Garmin ................ 84
Warning .............................85
Caution ..............................86
Limited Warranty ..............87
FCC Compliance ............... 88
Software License
Agreement .................... 90
CE Compliance .................90
Index .................................. 91

INTRODUCTION
INTRODUCTION
Thank you for choosing the
Garmin® Edge™! Track your
cycling activities using this
advanced GPS-enabled
computer.
About This Manual
To get the most out of your Edge,
review this manual and the Edge
Quick Reference Guide.
Getting Started–charge your
Edge, position and use the heart
rate monitor and GSC10 speed
and cadence sensor, and set up
the Edge for your first ride.
Training–customize alerts and
create workouts and courses on
your Edge.
Edge™ 205/305 Owner’s Manual 5
History–view and manage your
Edge history data.
Navigation–learn about the
navigating features of your Edge,
including how to save and find
locations, create routes, and view
the satellite page.
Customizing–configure your
Edge settings to fit your training
needs.
Appendix–review specifications,
cleaning instructions, information
about Garmin Training Center™,
and optional accessories. Be sure
to read the safety information in
this section to learn how to use
your Edge safely and responsibly.
Index–contains a comprehensive
index by subject.
GETTING STARTED
GETTING STARTED
Follow the instructions in this
section to set up and begin using
your Edge.
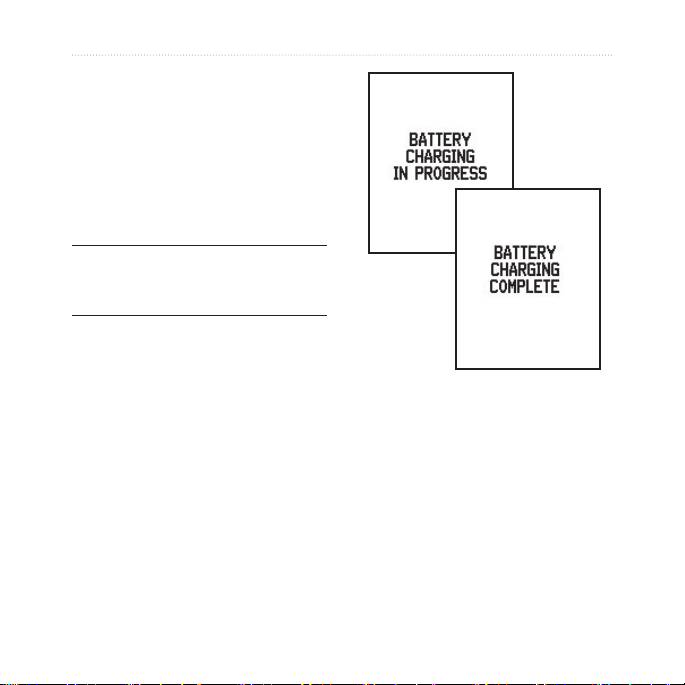
Charge the Battery
The Edge is powered by a built-in
lithium-ion battery that you can
recharge with the A/C charger
included in the product box. You
can also charge the Edge with
the USB cable and your personal
computer. Charge the Edge for
at least three hours before you
begin using it.
6 Edge™ 205/305 Owner’s Manual
WARNING: Be sure the mini-USB
port, weather cap, and surrounding
area are thoroughly dry before
charging or connecting to a personal
computer to prevent corrosion.
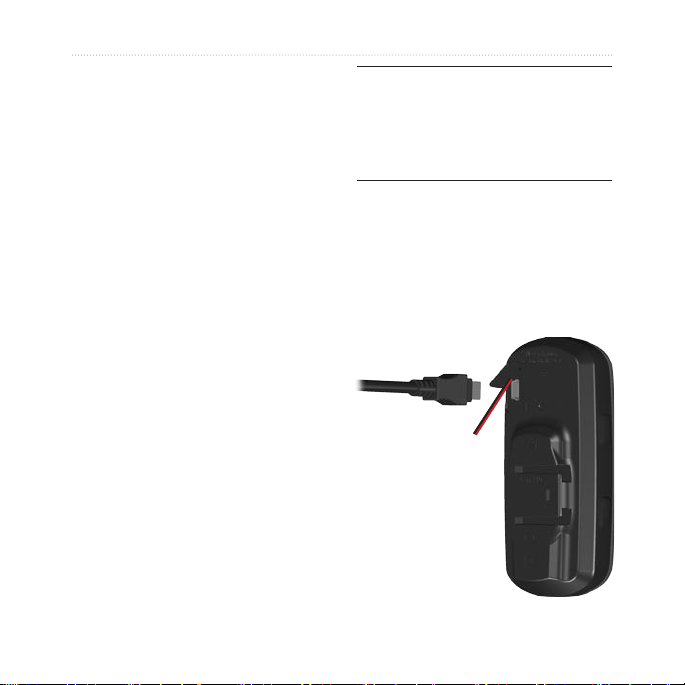
To charge the Edge:
1. Turn the Edge over and pull
back the weather cap from
the mini-USB port on the back
of the unit.
mini-USB port under
weather cap
2. Locate the A/C charger
included in the product box.
Plug the mini-USB end of the
charger into the
mini-USB port on the Edge.
Then plug the A/C charger
into a standard wall outlet.
NOTE: The unit will not charge
outside the temperature range of
0°C–50°C (32°F–122°F).
3. Plug the A/C charger into a
standard wall outlet. When the
battery is completely charged,
it can run for approximately
12 hours before recharging.
GETTING STARTED
Edge™ 205/305 Owner’s Manual 7
GETTING STARTED
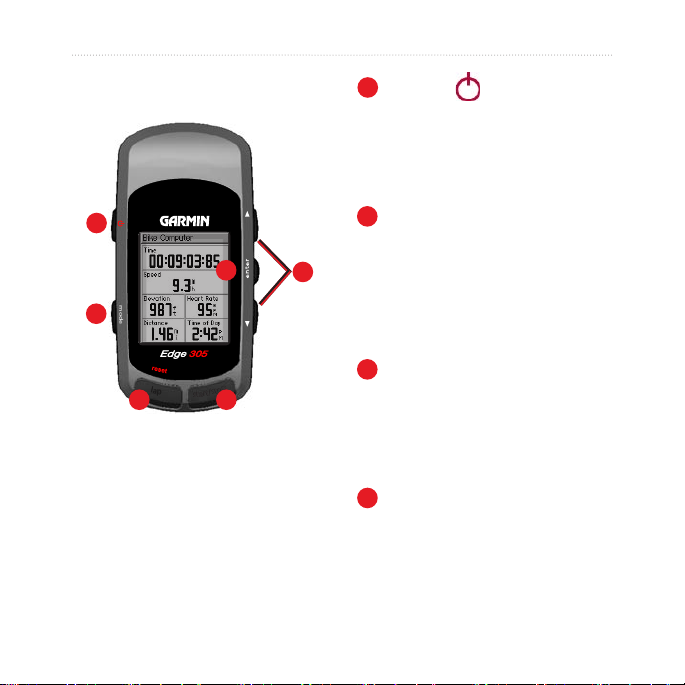
Buttons
1
power
• Press and hold to turn
unit on/off.
• Press to turn backlight
on/off.
2
1
mode
• Press to switch modes.
6
5
• Press to return to the
previous page.
2
• Press and hold to
switch bike profiles.
3
reset/lap
3
4
• Press and hold to reset
the timer.
• Press to create a new
lap.
4
start/stop
Press to start/stop the
timer.
8 Edge™ 205/305 Owner’s Manual
5
up/down
• Press to highlight
options.
• Press to scroll through
menus and data fields.
• Press to adjust contrast
when on the Satellite
page.
6
enter
Press to select options
and to acknowledge
messages.
NOTE: Press mode and reset/lap
simultaneously to reset the unit.
GETTING STARTED
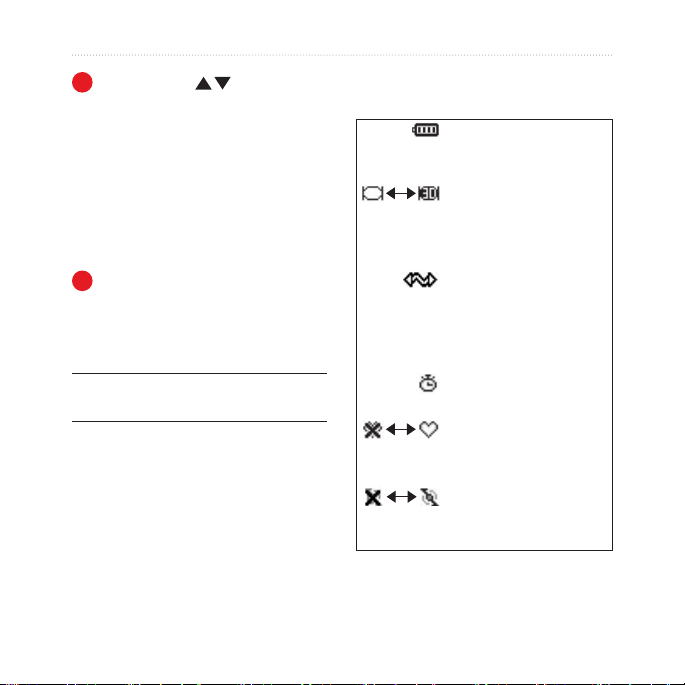
Icons
Battery icon shows the
current battery charge
level.
Satellite icon changes
from blank to 3D when
receiving satellite
signals.
USB connection icon
appears when you
connect the Edge to
your computer using
the USB cable.
Timer icon appears
when timer starts.
Heart Rate icon is
constant (no flashing X)
when receiving data.
Cadence icon is
constant (no flashing X)
when receiving data.
Edge™ 205/305 Owner’s Manual 9

GETTING STARTED
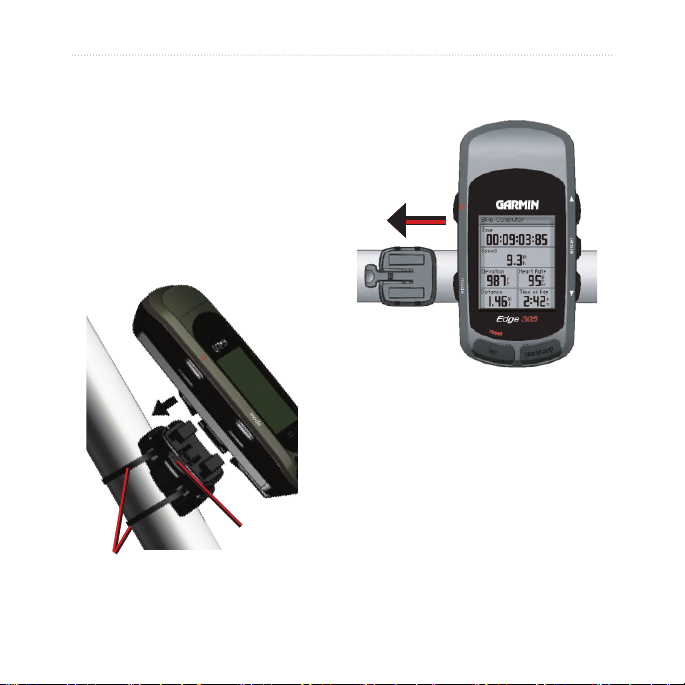
Position the Edge
For best results, position the
release
lever
wedge
(optional)
Edge with the face oriented
toward the sky. This position
allows the GPS antenna to
acquire satellite information
quickly.
You can install the bike mount
to the stem or handlebars. The
stem installation (shown here)
provides a more sturdy location.
The optional wedge should be
used under the mount for a better
viewing angle.
bike mount
For horizontal bars: Separate
and remove the top part of the
mount, turn it 90 degrees, and
replace. Continue with step 2.
For bars with a diameter less
than 1 in (25.4 mm): Place the
additional rubber pad under
To install the Edge on your
bike stem:
1. Place the wedge on the bike
stem, and then place the bike
the bike mount to increase the
diameter of the bar. The rubber
pad also keeps the mount from
slipping. Continue with step 2.
mount on the wedge. Make
sure the release lever is on
the left.
10 Edge™ 205/305 Owner’s Manual
GETTING STARTED
2. Attach the bike mount
securely using two cable ties.
4. Slide the unit left until it snaps
into place.
Make sure the cable ties are
threaded through both parts
of the bike mount.
3. Align the Edge with the bike
mount so that the unit is
vertical.
Top view of Edge being mounted
on a horizontal bar.
To release the unit:
Press down on the release lever,
and slide the unit to the right.
cable ties
Edge™ 205/305 Owner’s Manual 11
release lever
GETTING STARTED
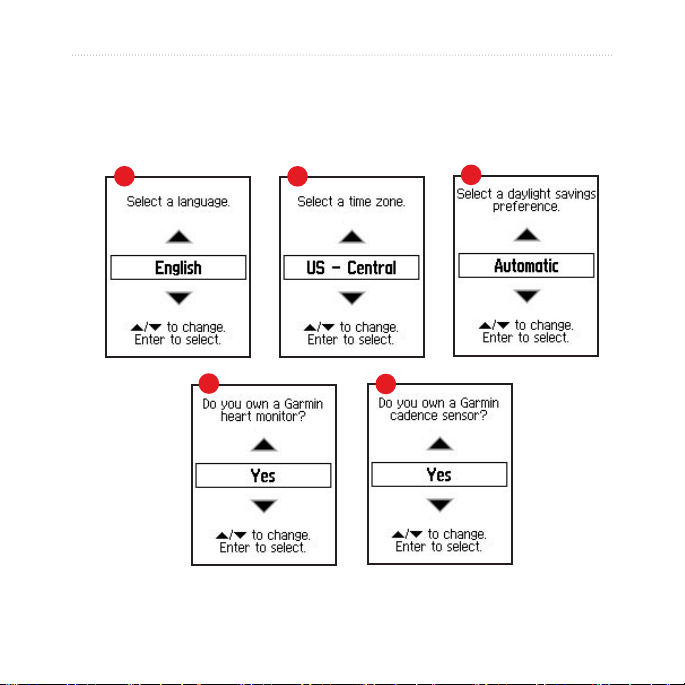
Configure the Edge
When you first turn on your Edge, the following setup screens appear.
Follow the on-screen instructions:
1
4
Screens 4 and
5 apply to Edge
305 only.
12 Edge™ 205/305 Owner’s Manual
2
5
3

Acquire Satellite Signals
Before you begin using the Edge,
you must acquire GPS satellite
signals. It may take 30–60
seconds to acquire signals.
To acquire satellite signals:
Go outdoors to an open area.
Then press and hold the Power
button to turn on the Edge.
On the Satellite page, the
available satellites are flashing
while the Edge searches for
satellite signals. Acquired
satellites and each corresponding
bar below change to solid. The
GPS accuracy appears at the top
of the page.
Wait while the Edge searches
for satellites. For best reception,
make sure the Edge is facing up.
Stand still in an open area, and
do not begin moving until the
Satellite page disappears. After
the Satellite page disappears,
you can begin your ride.
NOTE: To turn off GPS receiver and
use the Edge indoors, see page 56.
GETTING STARTED
Edge™ 205/305 Owner’s Manual 13
GETTING STARTED
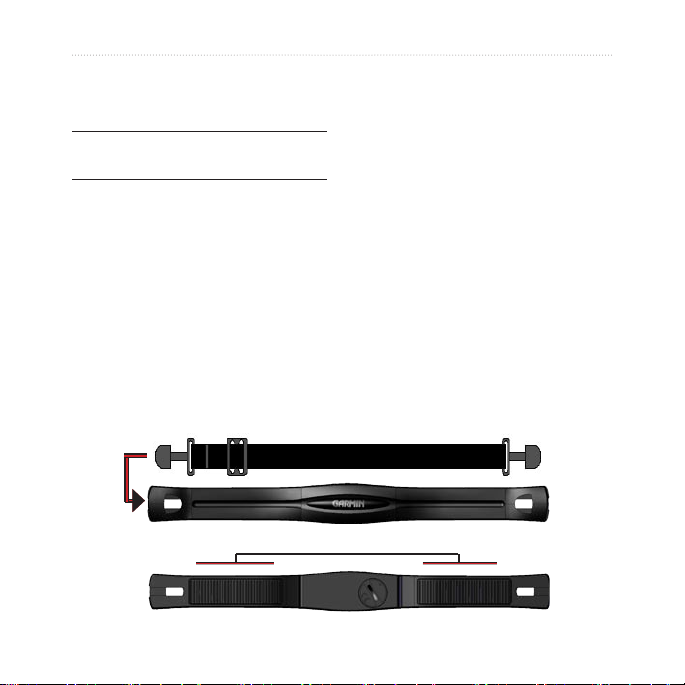
Position the Heart Rate Monitor
NOTE: The heart rate monitor is an
accessory for the Edge 305 only.
Wear the heart rate (HR) monitor
directly on your skin, just below
the breastplate. It should be snug
enough to stay in place during
your workout. To view heart rate
information on your Edge during
a workout, you must add it to the
data fields on one of the data
pages. See page 54 for more
14 Edge™ 205/305 Owner’s Manual
information on customizing the
data fields on your Edge.
To use the heart rate monitor:
1. Push one tab on the elastic
strap through the slot in the
heart rate monitor.
2. Wet both sensors on the back
of the heart rate monitor to
create a strong connection
between your pulse and the
transmitter.
sensors

GETTING STARTED
3. Place the heart rate monitor
directly on your skin, just
below the breastplate. Wrap
the strap around your chest
and attach the strap to the
other side of the heart rate
monitor.
NOTE: If you have trouble with
erratic heart rate readings, position
the transmitter on your back instead
of your chest, or try applying
electrode gel.
4. Tighten or loosen the strap as
necessary so that it fits snugly
against your body.
5. Turn on the Edge.
Edge™ 205/305 Owner’s Manual 15
6. Bring it within range (3
meters) of the heart rate
monitor. The heart rate
monitor automatically
transmits your heart rate
to the Edge, and the heart
rate icon changes from
flashing to constant.
TIP: Be sure to move away from
other heart rate monitors while the
Edge is trying to “pair” with your heart
rate monitor and begin receiving
heart rate data. Once the Edge pairs
with your heart rate monitor, you can
go near other heart rate monitors. For
more information on pairing, training,
and troubleshooting, see pages
71-75.
GETTING STARTED
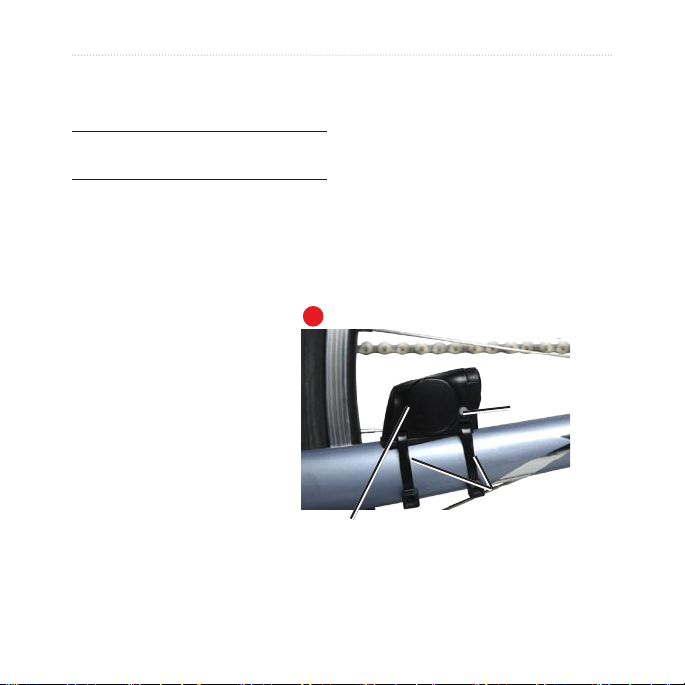
Position the GSC10 Sensor
NOTE: The GSC10 is an accessory
for the Edge 305 only.
The Edge 305 CAD includes a
To install the GSC10:
1. Place the GSC10 on the
rear chain stay (on the side
opposite of the drive train).
Loosely attach the GSC10
using two cable ties.
wireless speed and cadence
sensor. Both magnets must be
aligned with their respective
indication lines for the Edge
to receive data.
16 Edge™ 205/305 Owner’s Manual
GSC10 on rear chain stay
1
indication
line
reset button
cable ties

GETTING STARTED
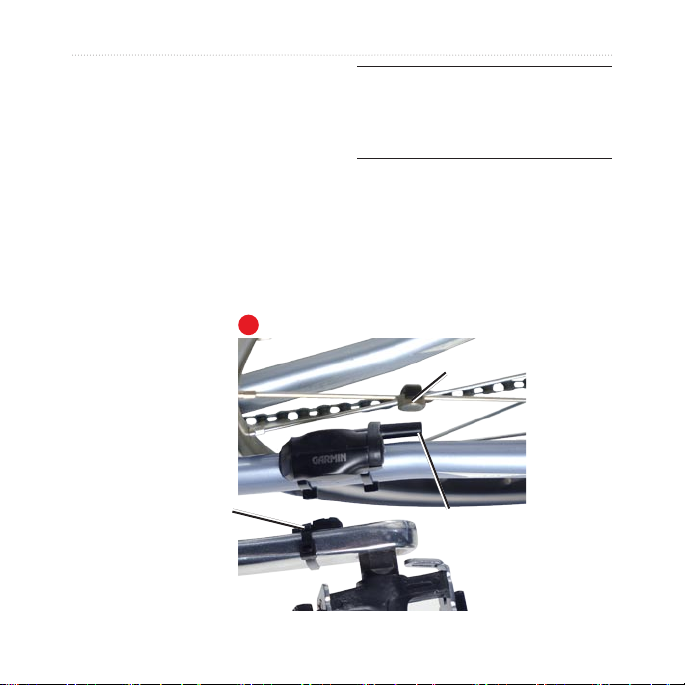
2. Attach the pedal magnet
Pedal magnet on crank arm
to the crank arm using the
adhesive mount and a cable
tie. Make sure the pedal
2
cable tie
indication
line
magnet is within 5 mm of the
GSC10 and the indication line
on the pedal magnet lines up
with the indication line on the
GSC10.
3. Attach the spoke magnet by
unscrewing the magnet from
the plastic piece. Then place
the spoke in the groove of
the plastic piece and tighten
slightly. The magnet can face
away from GSC10 if there is
not enough room between
4. Unscrew and move the
sensor arm to within 5 mm of
the spoke magnet. You can
also tilt the GSC10 closer to
either magnet for improved
alignment.
sensor arm and spoke. Make
sure the magnet is aligned
with the sensor arm indication
line.
Edge™ 205/305 Owner’s Manual 17
GETTING STARTED
5. Press the Reset button on the
GSC10. The LED light turns
red, then green. Pedal to test
the sensor alignment. The
red LED blinks each time the
crank arm passes the sensor,
and the green LED blinks
each time the wheel magnet
passes the sensor arm.
3
Spoke magnet on wheel
pedal
magnet
18 Edge™ 205/305 Owner’s Manual
NOTE: The LED blinks for the first
60 passes after a reset. Press
Reset again if you require additional
passes.
6. When everything is aligned
and working correctly, tighten
the cable ties, sensor arm,
and spoke magnet.
spoke
magnet
sensor arm
indication
line
GETTING STARTED
Set Your User Profile
The Edge uses information
that you enter about yourself to
calculate calorie consumption.
Set your user profile before you
begin using the Edge to ensure
it is recording accurate workout
data.
To set your user profile:
1. Press
mode to access the
Main Menu.
2. Select Settings > User
Profile.
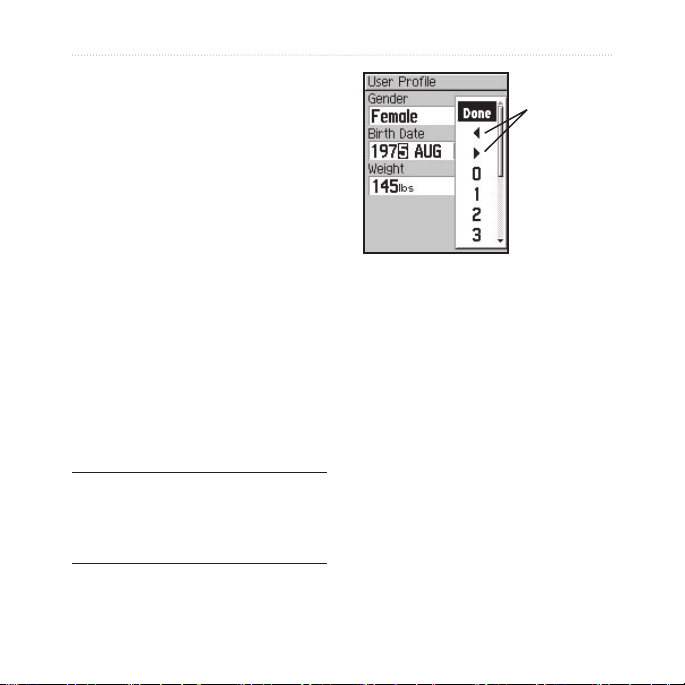
3. Enter your Gender, Birth
If you are setting your user profile
for the first time (Edge 305 with
heart rate monitor), a Max HR
message appears. Select Yes to
adjust your maximum heart rate
calculation based on your user
profile.
Date, and Weight.
TIP: When finished selecting options
or entering values on your Edge,
press the mode button to exit the
field or page.
Edge™ 205/305 Owner’s Manual 19
Select the
arrows to
move left or
right within a
field.
GETTING STARTED
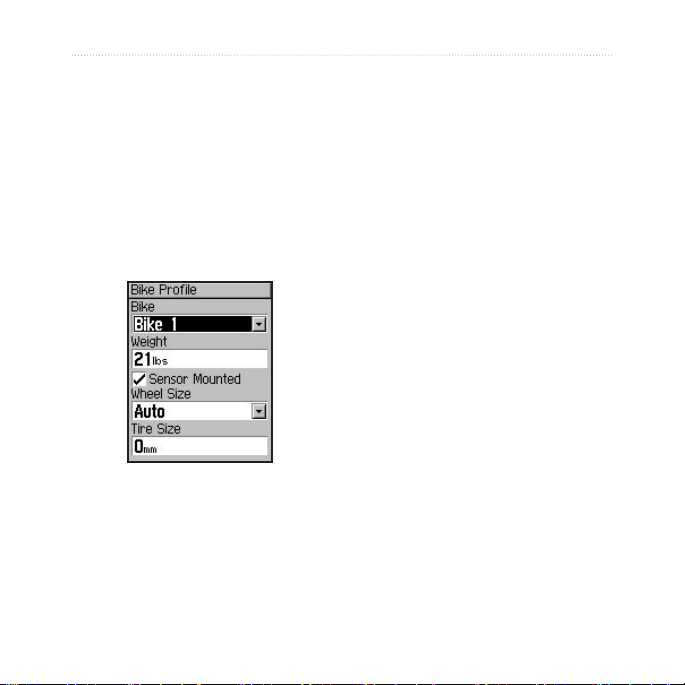
Set Your Bike Profile
You can set up to three profiles.
To set your bike profile:
1. Press
2. Select Settings > Bike
3. Select the bike profile you
4. Enter the Bike Weight.
20 Edge™ 205/305 Owner’s Manual
mode to access the
Main Menu.
Profile.
wish to use.
5. If you have an Edge 305
with the GSC10 speed and
cadence sensor on your bike,
select the Sensor Mounted
check box.
6. In the Wheel Size field, select
Auto to have the GSC10
automatically detect your tire
size using GPS data or select
Custom to enter your tire
size. For a table of tire sizes
and circumferences, see
pages 77–78.
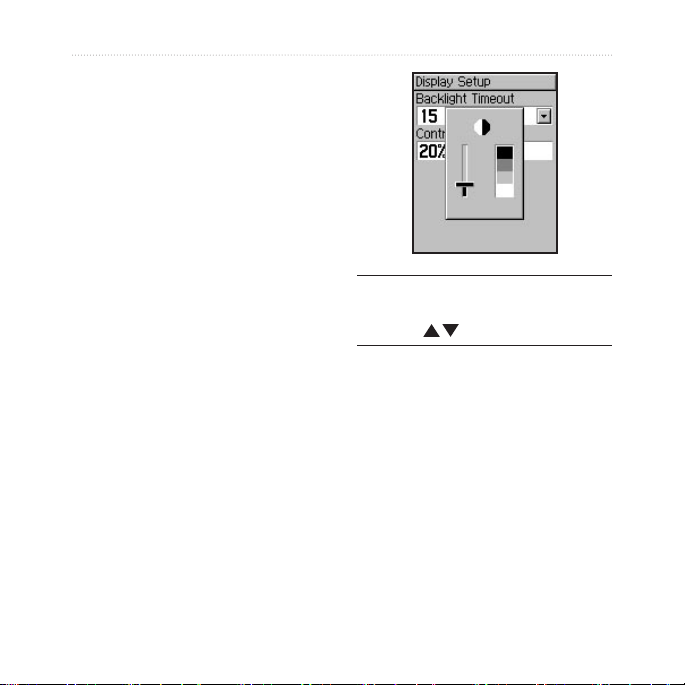
Change the Backlight and Contrast Settings
To change the Edge display:
1. Press mode to access the
Main Menu.
2. Select Settings > System >
Display.
3. Select the amount of time
the backlight stays on. Use a
short backlight timeout setting
to conserve battery power.
4. Select the amount of screen
contrast.
GETTING STARTED
NOTE: You can also adjust the
screen contrast on the Satellite page
using the arrows.
Edge™ 205/305 Owner’s Manual 21

TRAINING
TRAINING
The Edge offers several training
features and optional settings.
Use your Edge to set goals
and alerts, train with a Virtual
Partner™, program workouts, and
plan courses based on existing
rides.
Auto Pause®
You can set the Edge to pause
the timer automatically during
your ride when you stop moving
or your speed drops below a
custom value. This setting is
helpful if your course includes
stop lights or other places where
you need to slow down or stop.
When you turn on Auto Pause,
the Edge stores any paused time
as Rest Time and any paused
22 Edge™ 205/305 Owner’s Manual
distance as Rest Distance. To
add these data fields to a custom
page, see page 54.
NOTE: Rest time and distance for
Auto Pause are not stored in history.
Auto Lap®
You can use Auto Lap to
automatically mark the lap at a
specific position or after you have
traveled a specific distance. This
setting is helpful for comparing
your performance over different
parts of a ride (each 5K or a
major hill, for example).
To set Auto Pause/Lap:
1. Press mode to access the
Main Menu.
2 Select Training > Auto
Pause/Lap.

TRAINING
3. In the Auto Timer Pause
field, select When Stopped
or Custom Speed to enter a
value.
• Start And Lap–triggers
the lap counter at the GPS
location where you press
the start button and at any
locations during the ride
where you press the lap
button.
• Mark And Lap–triggers the
lap counter at a specific
GPS location marked
before the ride and at any
locations during the ride
4. In the Auto Lap Trigger field,
select By Distance to enter
where you press the lap
button.
a value or By Position to
choose an option:
• Lap Press only–triggers
the lap counter each time
you press the lap button
and every time you pass
that location again.
Edge™ 205/305 Owner’s Manual 23
TRAINING
Alerts
Use Edge alerts to train toward
certain time, distance, speed,
heart rate, and cadence goals.
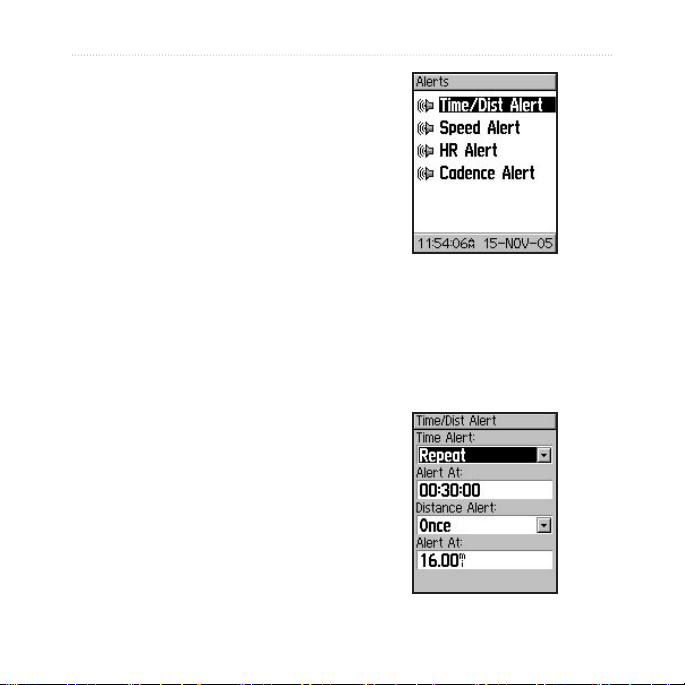
Using Time and Distance Alerts
Time and distance alerts are
useful for long workouts when
you want to train for a certain
amount of time or distance. When
you reach your goal, the Edge
beeps and displays a message.
To set a time or distance alert:
1. Press
2. Select Training > Alerts >
mode to access the
Main Menu.
Time/Dist Alert.
3. In the Time Alert field, select
Once or Repeat.
4. Enter a time in the Alert At
field.
24 Edge™ 205/305 Owner’s Manual
TRAINING
5. In the Distance Alert field,
select Once or Repeat.
6. Enter a distance in the Alert
At field.
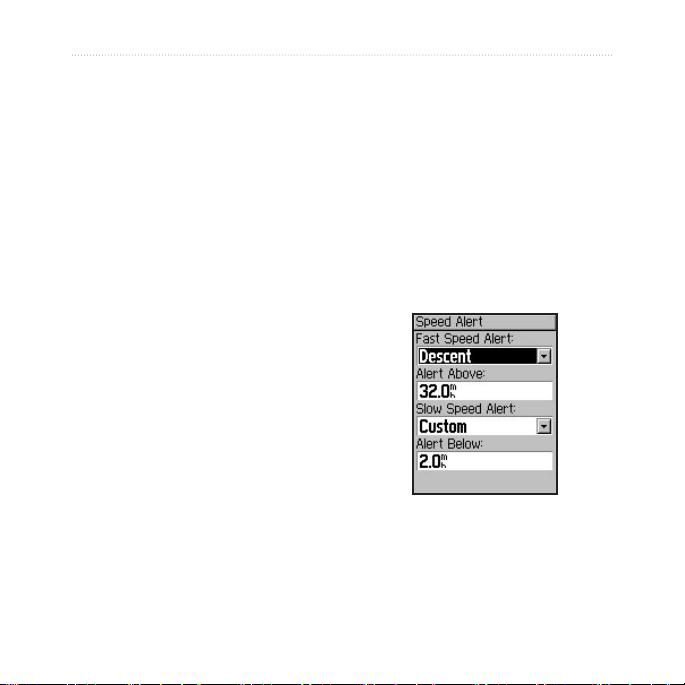
Using Speed Alerts
Speed alerts notify you if you
exceed or drop below a custom
speed setting during your ride.
The speed alert takes advantage
of Speed Zones, which are
ranges of speed that you can
store in the Edge. For more
information, or to set your Speed
Zones, see page 60.
Edge™ 205/305 Owner’s Manual 25
To set a speed alert:
1. Press mode to access the
Main Menu.
2. Select Training > Alerts >
Speed Alert.
3. In the Fast Speed Alert field,
select a Speed Zone from the
menu or select Custom to
enter your own alert value.
4. Repeat for the Slow Speed
Alert.
TRAINING
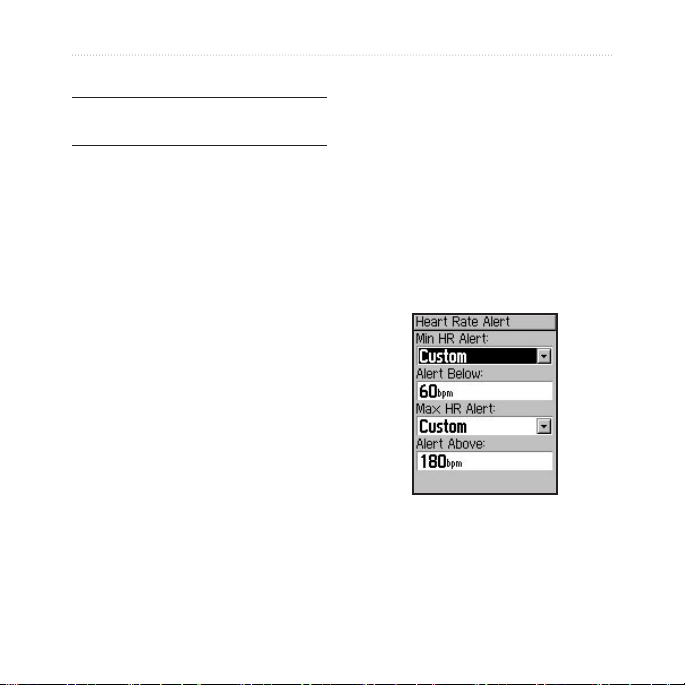
Using Heart Rate Alerts
NOTE: Heart rate alerts are a feature
of the Edge 305 only.
Similar to speed alerts, the heart
rate alert notifies you if your heart
rate exceeds or drops below
a specific number of beats per
minute (bpm).
To set a heart rate alert:
1. Press
mode to access the
Main Menu.
2. Select Training > Alerts >
HR Alert.
3. In the Min HR Alert field,
select a zone from the menu
or select Custom to specify
your own alert value.
Heart rate alerts can also notify
you if your heart rate exceeds
or drops below a certain heart
rate zone—a range of beats
per minute. The five commonly
accepted heart rate zones can
help you determine the intensity
of your workout. For more about
setting your heart rate zones, see
page 61. For more information
about training with heart rate
zones, see page 71.
26 Edge™ 205/305 Owner’s Manual
TRAINING
4. Repeat for the Max HR Alert.
The maximum value allowed
is 235 bpm.
NOTE: When entering custom
heart rate values, you must set your
minimum and maximum alerts at
least 5 bpm apart.
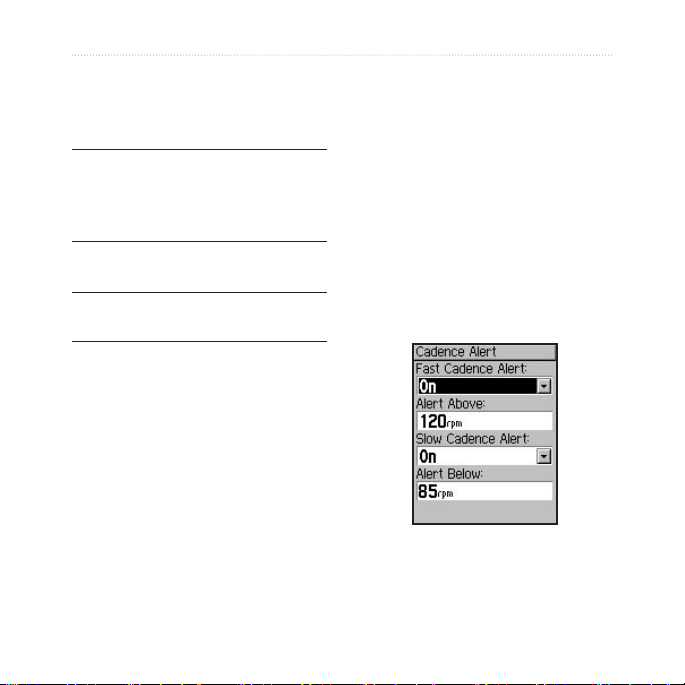
Using Cadence Alerts
NOTE: Cadence alerts are a feature
of the Edge 305 only.
To set a cadence alert:
1. Press mode to access the
Main Menu.
2. Select Training > Alerts >
Cadence Alert.
3. In the Fast Cadence Alert
field, select On.
4. Enter a value in the Alert
Above field. The maximum
cadence value allowed is 255.
Similar to speed alerts, the
cadence alert notifies you if your
cadence exceeds or drops below
a specific number of revolutions
of the crank arm per minute
(rpm). For more information about
training with cadence, see page
76.
5. Repeat for the Slow Cadence
Alert.
Edge™ 205/305 Owner’s Manual 27
TRAINING
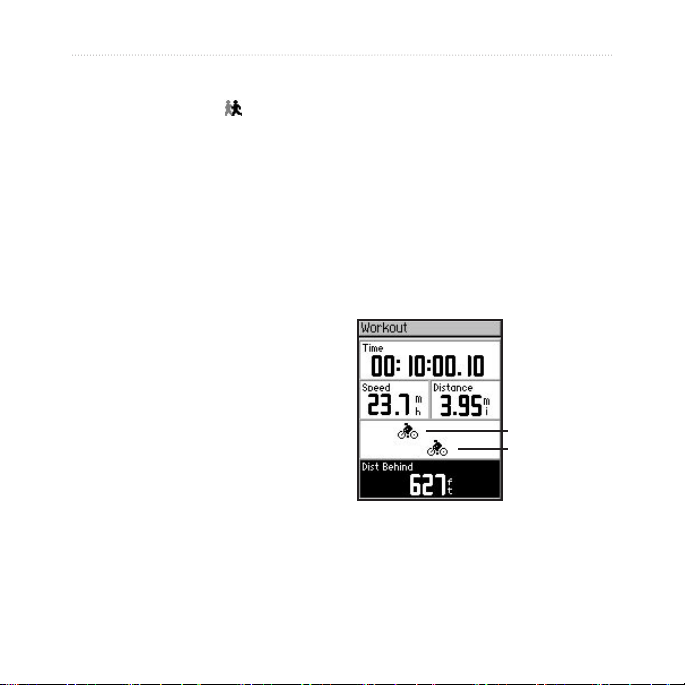
Virtual Partner™
Your Virtual Partner is a
unique tool designed to help
you meet your training goals.
The Virtual Partner competes
with you during quick workouts
and courses. The Virtual Partner
“rides” alongside (top bike
graphic) of you. Your current time,
speed, distance, and distance
from the Virtual Partner appears
on the Workout page. If you are
ahead of the Virtual Partner, the
bottom field background is white.
If you are behind, the background
is black (as shown).
28 Edge™ 205/305 Owner’s Manual
To see Virtual Partner data:
1. Set up a quick workout or
course.
2. Press mode to see the
Workout or Course page.
3. Press start.
4. Press enter to scroll through
the workout or course data
pages.
Virtual Partner
You
TRAINING
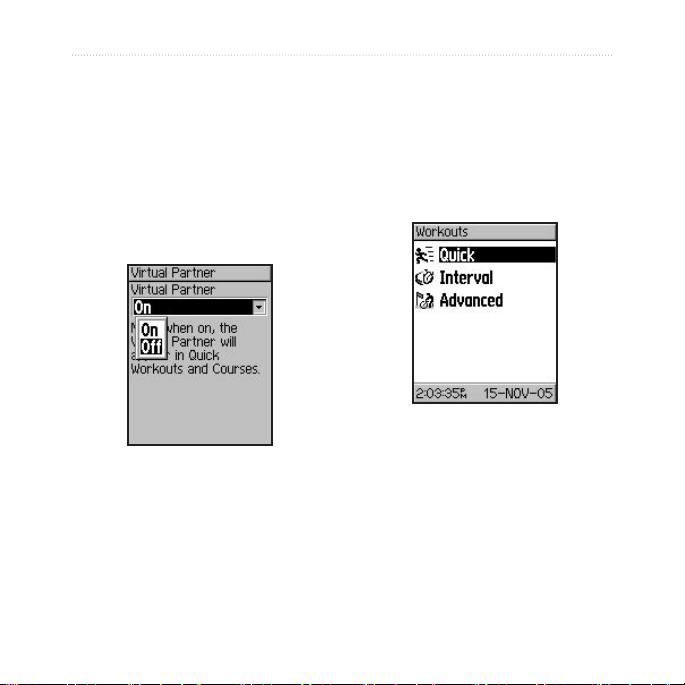
To turn off Virtual Partner:
1. Press mode to access the
Main Menu.
2. Select Training > Virtual
Partner.
3. In the Virtual Partner field,
select Off.
Edge™ 205/305 Owner’s Manual 29
Workouts: Quick, Interval, and Advanced
From the Main Menu, select
Training > Workouts to choose
the type of workout right for you.
Quick and interval workouts are
replaced each time you create
a workout of the same type.
Advanced workouts can be
saved, edited, and transferred
between Garmin Training Center
and your Edge.
 Loading...