

Page 1
®
Approach
owner’s manual
Page 2

© 2009 Garmin Ltd. or its subsidiaries
Garmin International, Inc.
1200 East 151st Street,
Olathe, Kansas 66062,
USA
Tel. (913) 397.8200
or (800) 800.1020
Fax (913) 397.8282
All rights reserved. Except as expressly provided herein, no part of this manual may be reproduced,
copied, transmitted, disseminated, downloaded or stored in any storage medium, for any purpose without
the express prior written consent of Garmin. Garmin hereby grants permission to download a single copy
of this manual onto a hard drive or other electronic storage medium to be viewed and to print one copy of
this manual or of any revision hereto, provided that such electronic or printed copy of this manual must
contain the complete text of this copyright notice and provided further that any unauthorized commercial
distribution of this manual or any revision hereto is strictly prohibited.
Information in this document is subject to change without notice. Garmin reserves the right to change
or improve its products and to make changes in the content without obligation to notify any person
or organization of such changes or improvements. Visit the Garmin Web site (www.garmin.com) for
current updates and supplemental information concerning the use and operation of this and other Garmin
products.
Garmin®, Garmin logo, and the Approach® are trademarks of Garmin Ltd. or its subsidiaries, registered
in the USA and other countries. These trademarks may not be used without the express permission of
Garmin.
This device complies with part 15 of the FCC Rules. Operation is subject to the following two (2)
conditions: (1) This device may not cause harmful interference and (2) this device must accept any
interference received including interference that may cause undesired operation.
January 2009 Part Number 190-01034-01 Rev. B Printed in Taiwan
Garmin (Europe) Ltd.
Liberty House
Hounsdown Business Park,
Southampton, Hampshire, SO40 9RB UK
Tel. +44 (0) 870.8501241 (outside the UK)
or 0808 2380000 (within the UK)
Fax +44 (0) 870.8501251
Garmin Corporation
No. 68, Jangshu 2nd Road,
Shijr, Taipei County,
Taiwan
Tel. 886/2.2642.9199
Fax 886/2.2642.9099
Page 3
Getting Started
See the Important Safety and
Product Information guide in
the product box for product
warnings and other important
information.
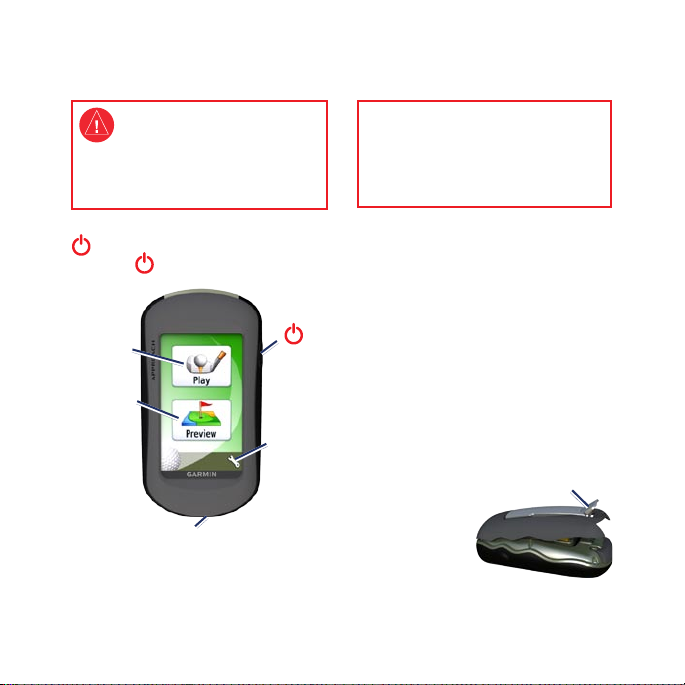
To turn on the Approach®, press
. To turn off the Approach, press
and hold .
Installing the Batteries
WARNING: Do not use a sharp
object to remove user-replaceable
batteries. Contact your local waste
disposal department to properly
recycle the batteries.
The Approach operates on two AA
batteries (not included). Use alkaline,
NiMH, or lithium batteries.
Use premium batteries for optimal
Play
mode
Find and
preview
courses
Mini-USB connector (under
weather cap)
Approach Quick Start Manual 1
Power
key
Settings
menu
performance and maximum battery
life. The best performance is
provided by lithium batteries and
NiMH rechargeable batteries that are
less than one year old with a capacity
greater than 2500 mAh.
To install the batteries:
1. Lift the latch, and
remove the
battery cover.
LatchLatch
Page 4
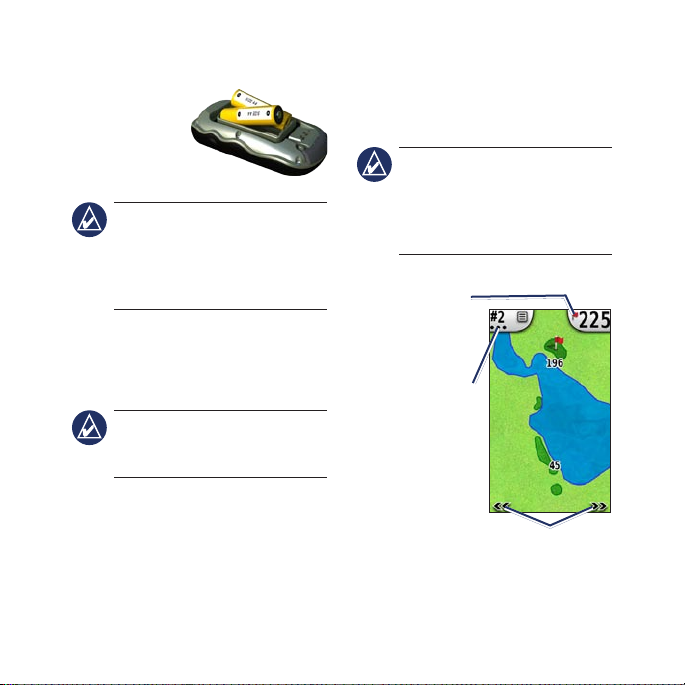
2. Insert the batteries,
observing
polarity.
3. Replace
the battery
cover, and push the latch down.
NOTE: Remove the batteries
when you do not plan to use the
Approach for several months.
When you remove the batteries,
stored data is not lost.
Play
1. From the main menu, touch Play.
2. Select a course from the list.
NOTE: In play mode, your
location on the course is
represented by a golf ball.
Using the Map
The map shows an overview of the
current hole you are playing. The
bottom arrows allow you to preview
distance to the middle of the green,
or use Touch Targeting to measure
the distance to any point on the map.
NOTE: Because pin locations
change, the Approach calculates
the distance to the middle of
the green and not the actual pin
location.
Distance to the
middle of the
green. Touch
to go to Green
Touch to access
the utility menu.
current hole is a
View.
Current hole.
The number of
dots indicates
par. For
example, the
par three.
Touch to view the
holes
upcoming holes. You can view the
2 Approach Quick Start Manual
Page 5

Touch Targeting
1. To measure the target distance,
touch anywhere on the screen.
2. Touchanddragyourngerto
position the red target circle.
Distance
to the
middle of
the green
from
target
circle
Distance
to target
circle
3. Touch Done to return to the map
of the hole.
Target
circle
Green View
The Green View is a detailed view
of the green that allows you to set a
2. Touch anywhere on the green to
set the pin location.
3. Touch
Done to save the pin
location, and return to the map of
the hole.
Keeping Score
The Approach allows you to keep
score for up to four players.
1. From the map, touch the hole
number in the upper-left corner.
2. From the utility menu, touch
Score.
Touch to
change
par.
Touch and
hold to
view the
individual
scorecard.
Keep
Touch
to enter
the
score.
more accurate pin location.
1. From the map, touch the distance
bubble in the upper-right corner.
Approach Quick Start Manual 3
3. Touch to enter your score.
Page 6

NOTE: Touch the par button at
the top of the scorecard to change
the par for the hole.
4. Touch and hold
player’s name for an individual
scorecard overview.
Touch and
hold to edit
the player’s
name.
5. Touch and hold Player or the
player’s name to edit the name
using the on-screen keyboard.
6. Touch
name.
Player or the
to save the player’s
After using the scorecard the rst
review the scorecard from your last
round of golf.
NOTE: The Approach only saves
the scorecard from your last round
of golf. Once you start a new
scorecard, it replaces the previous
scorecard. To view scorecards on
your computer, see page 6.
Measuring a Shot
1. From the map, touch the hole
number in the upper-left corner.
2. From the utility menu, touch
Measure Shot.
3. Touch
4. Walk to your ball.
5. To clear the distance or start a
Begin Measurement.
new measurement, touch Reset.
NOTE: Touch Back > Back >
to return to the map page while
measuring. Measuring continues
until you touch Reset.
time, the scorecard button appears on
the main menu. Touch Scorecard to
4 Approach Quick Start Manual
Page 7

Preview
Finding a Course by Spelling
the Name
1. Touch Preview > Spell Course.
2. Using the on-screen keyboard,
enter letters in the name of the
course. Touch .
3. Select the golf course from the
list.
Previewing a Course
Once you have found a course to
preview, the Approach provides you
Finding a Course Near You
Touch Preview > Search Near You.
A list of the closest courses appears.
Choose a course to preview.
Finding a Course by City
1. Touch Preview > Spell City.
2. Using the on-screen keyboard,
enter letters in the name of the
city. Touch .
3. Select the city from the list.
4. Select the golf course from the
list.
Approach Quick Start Manual 5
with a hole-by-hole overview of the
selected course.
Touch anywhere on the screen to
enable Touch Targeting. Touch the
distance bubble in the upper-right
corner to go to Green View.
NOTE: The Keep Score and
Measure Shot buttons are not
active in preview mode.
Touch Quit to return to the main
menu.
Page 8

Settings
Hole Transitioning—select
Automatic or Manual transitioning
to the next hole.
Units of Distance—select Yards or
Metric.
Battery Type—select Alkaline,
Lithium, or Rechargeable NiMH.
Viewing Scorecards on
the Computer
While only the most recent scorecard
can be viewed on the unit, every
scorecard recorded on the Approach
can be viewed on your computer.
1. Lift the weather cap on the bottom
of the Approach.
6 Approach Quick Start Manual
2. Connect the Approach to your
computer using the mini-USB
cable. Your Approach appears
as a removable drive in My
Computer on Windows computers
and as a mounted volume on Mac
computers.
NOTE: Some operating systems
or computers with multiple
network drives cannot display
the Approach drive. See your
operating system Help le to learn
how to map the drive.
3. Open the Garmin Approach
drive, and double-click
ScorecardViewer.html.
4. Select the scorecard you want to
view.
Acquiring GPS Satellites
1. Go outdoors to an open area,
away from tall buildings and trees.
2. Turn on the Approach. Acquiring
satellite signals can take a few
minutes.
Page 9

When the satellite signal is weak, a
blinking question mark appears on
the map.
Using the Clip
You can use the clip to mount the
Approach on your belt, pocket, or
bag.
Release key
Mounting
spine
Clip
Spine
attachment
3. Position the clip in the slot on the
spine attachment.
4. Slide the clip up until it locks in
place.
5. To remove the clip, press the
release key on the top of the clip,
and slide off.
Course Updates
This product may be eligible for free
course map updates. Go to
www.garmin.com/products/
approachg5.
Tips
To lock or unlock the screen,
•
press and quickly release .
To attach the clip:
1. Position the spine attachment in
the slots on the mounting spine of
the Approach.
2. Slide the spine attachment up
until it locks in place.
Approach Quick Start Manual 7
Touch Lock Screen (or Unlock
Screen).
To stop playing at any time
•
during the round, touch the hole
number in the upper-left corner >
Quit Round.
Page 10

Clearing User Data
CAUTION: This deletes all
user-entered information.
1. Turn off your Approach.
2. Pressyourngerontheupper-left
corner of the touch screen.
3. Whileholdingyourngeron
the touch screen, turn on the
Approach. Continue to hold your
ngeronthetouchscreenuntil
the message appears.
4. Touch Yes to clear all user data.
All original settings are restored.
Any items that you have saved are
erased.
Specications
Physical
Size: W × H × D: 1.4 × 4.5 × 2.3 in.
(114 × 58 × 36 mm)
Weight: 6.8 oz. (192.8 g) without
batteries
8 Approach Quick Start Manual
Display: diagonal: 3 in. (76 mm) backlit
65K color TFT display (240 × 400
pixels)
Case: Rugged, waterproof to IPX7
Temperature Range
158°F (from -20 to 70°C)*
*The temperature rating of the Approach
may exceed the usable range of some
batteries. Some batteries can rupture at
high temperatures.
: From -4°F to
Power
Source: Two AA batteries (alkaline,
NiMH, or lithium)
Accuracy
GPS: < 33 ft. (10 m) 95% typical*
*Subject to accuracy degradation to 100
m 2DRMS under the US DoD imposed
Selective Availability (SA) Program
when activated.
Velocity: 0.328 ft./sec. (0.1 m/sec) steady
state
Interface: USB mass storage device
Data Storage Life: Indenite; no
memory battery required
Page 11

Performance
Receiver: more than 12 channels, high-
sensitivity
Acquisition Times
: < 1 second (warm
start)
< 33 seconds (cold start)
< 36 seconds (Autolocate)
Update Rate: 1/second, continuous
Contact Garmin
Contact Garmin Product Support if
you have any questions while using
your Approach. In the USA, go to
www.garmin.com/support, or contact
Garmin USA by phone at (913)
397.8200 or (800) 800.1020.
Declaration of
Conformity (DoC)
Hereby, Garmin, declares that this Approach is in
compliance with the essential requirements and
other relevant provisions of Directive 1999/5/EC.
To view the full Declaration of Conformity, see
the Garmin Web site for your Garmin product:
www.garmin.com.
Approach Quick Start Manual 9
Software License
Agreement
BY USING THE APPROACH, YOU AGREE
TO BE BOUND BY THE TERMS AND
CONDITIONS OF THE FOLLOWING
SOFTWARE LICENSE AGREEMENT.
PLEASE READ THIS AGREEMENT
CAREFULLY.
Garmin grants you a limited license to use
the software embedded in this device (the
“Software”) in binary executable form in the
normal operation of the product. Title, ownership
rights, and intellectual property rights in and to
the Software remain in Garmin.
You acknowledge that the Software is the
property of Garmin and is protected under the
United States of America copyright laws and
international copyright treaties. You further
acknowledge that the structure, organization, and
code of the Software are valuable trade secrets
of Garmin and that the Software in source code
form remains a valuable trade secret of Garmin.
You agree not to decompile, disassemble, modify,
reverse assemble, reverse engineer, or reduce to
human readable form the Software or any part
thereof or create any derivative works based on
the Software. You agree not to export or re-export
the Software to any country in violation of
the export control laws of the United States of
America.
Page 12

For the latest free software updates (excluding map data) throughout the life of
your Garmin products, visit the Garmin Web site at www.garmin.com.
© 2009 Garmin Ltd. or its subsidiaries
1200 East 151st Street, Olathe, Kansas 66062, USA
Liberty House, Hounsdown Business Park, Southampton, Hampshire, SO40 9RB UK
No. 68, Jangshu 2nd Road, Shijr, Taipei County, Taiwan
January 2009 190-01034-01 Rev. B Printed in Taiwan
Garmin International, Inc.
Garmin (Europe) Ltd.
Garmin Corporation
www.garmin.com
 Loading...