

montana
600, 650, 650t
owner’s manual
™
series

© 2010 Garmin Ltd. or its subsidiaries
All rights reserved. Except as expressly provided herein, no part of this manual may be reproduced, copied,
transmitted, disseminated, downloaded or stored in any storage medium, for any purpose without the express
prior written consent of Garmin. Garmin hereby grants permission to download a single copy of this manual
onto a hard drive or other electronic storage medium to be viewed and to print one copy of this manual or of
any revision hereto, provided that such electronic or printed copy of this manual must contain the complete
text of this copyright notice and provided further that any unauthorized commercial distribution of this manual
or any revision hereto is strictly prohibited.
Information in this document is subject to change without notice. Garmin reserves the right to change
or improve its products and to make changes in the content without obligation to notify any person or
organization of such changes or improvements. Visit the Garmin Web site (www.garmin.com) for current
updates and supplemental information concerning the use and operation of this and other Garmin products.
®
Garmin
, BlueChart®, and City Navigator® are trademarks of Garmin Ltd. or its subsidiaries, registered in the
USA and other countries. Montana
™
, HomePort™, BaseCamp™, ANT™, and ANT+™ are trademarks of Garmin
Ltd. or its subsidiaries. These trademarks may not be used without the express permission of Garmin.
®
Windows
is a registered trademark of Microsoft Corporation in the United States and/or other countries.
®
Mac
is a registered trademarks of Apple Computer, Inc. microSD™ is a trademark of SD-3C, LLC.. Other
trademarks and trade names are those of their respective owners.

Table of Contents
Getting Started ........................1
Device Overview............................1
Battery Information ........................2
Turning the Device On or Off .........3
Satellite Signals .............................3
Registering Your Device ................3
About the Main Menu ....................3
Using the Touchscreen ..................4
Rotating the Screen .......................4
Turning On the Backlight ...............4
Proles...........................................5
Waypoints, Routes, and
Tracks ......................................6
Waypoints ......................................6
Using Sight ‘N Go ..........................7
Routes ...........................................7
Where To? Menu ...........................9
Tracks ..........................................10
Adventures ..................................12
Starting Navigation ......................13
Map..............................................13
Compass .....................................15
Elevation Plot...............................16
Trip Computer ..............................17
Camera and Photos ..............18
Taking a Photo .............................18
Viewing Photos ............................18
Geocaches ............................20
Downloading Geocaches.............20
Filtering the Geocache List ..........20
Navigating to a Geocache ...........21
Logging the Attempt.....................21
chirp .............................................22
Applications ..........................23
Using the 3D View .......................23
About Sharing Data .....................23
Setting a Proximity Alarm ............24
Calculating the Size of an Area ...24
Using the Calculator ....................24
Viewing the Calendar and
Navigation .............................13
Montana 600 Series Owner’s Manual c

Table of Contents
Almanacs ..................................24
Setting an Alarm ..........................25
Opening the Stopwatch ...............25
Satellite ........................................25
Customizing Your Device ....27
Customizing the Main Menu and
Application Drawer ....................27
Creating Shortcuts .......................27
Customizing Specic Pages ........27
Creating a Custom Prole ...........28
System Settings...........................28
Display Settings ...........................29
Appearance Settings ...................30
Setting the Device Tones .............31
Map Settings................................31
Camera Settings ..........................32
Tracks Settings ............................32
Changing the Units of Measure ...33
Time Settings ...............................33
Position Format Settings .............33
Heading Settings .........................33
Altimeter Settings ........................34
iv Montana 600 Series Owner’s Manual
Geocache Settings ......................35
Routing Settings ..........................35
Marine Map Settings....................36
Fitness .........................................37
Resetting Data .............................37
Device Information ...............38
Updating the Software .................38
Viewing Device Information .........38
Specications ..............................38
About the Batteries ......................38
Caring for the Device ...................39
Data Management .......................40
Appendix ...............................43
Optional Accessories ...................43
Optional Fitness Accessories ......43
Data Field Options .......................44
Troubleshooting ...........................50
Index ......................................52
Getting Started
Getting Started
WARNING
See the Important Safety and Product
Information guide in the product
box for product warnings and other
important information.
When using your device the rst time,
you should complete these tasks to set
up the device and get to know the basic
features.
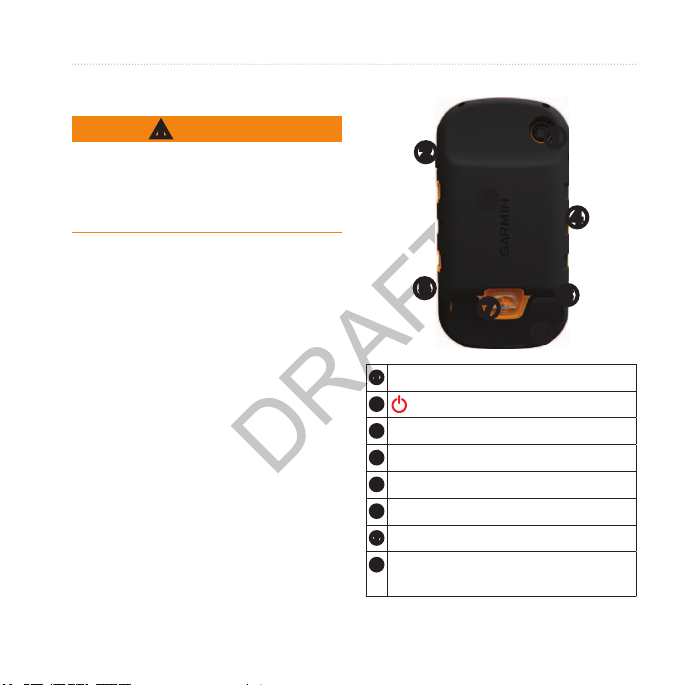
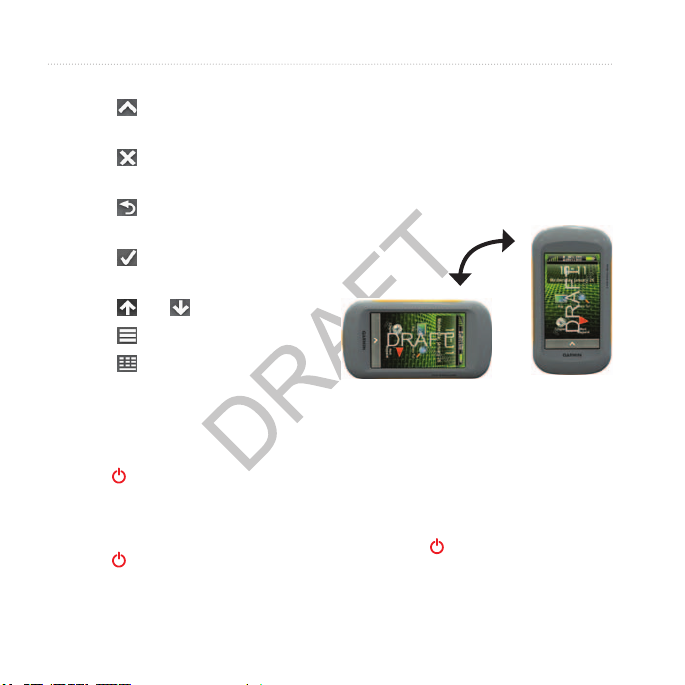
Device Overview
➋
➌
➎
➐
➊
➍
➏
➑
1. Install the batteries (page 2).
Camera lens (650 and 650t only)
2. Turn on the device (page 3).
3. Register the device (page 3).
4. Acquire satellites (page 3).
5. Calibrate the compass (page 15).
6. Mark a waypoint (page 6).
7. Create a route (page 7).
8. Record a track (page 10).
9. Navigate to a destination (page 13).
Montana 600 Series Owner’s Manual 1
➊
Power key
➋
microSD™ card slot (page 40)
➌
Auto mount power connector
➍
Headphone jack (page 14)
➎
Mini-USB port (under weather cap)
➏
Battery cover D-ring
➐
MCX port for GPS antenna (under
➑
weather cap)
Getting Started
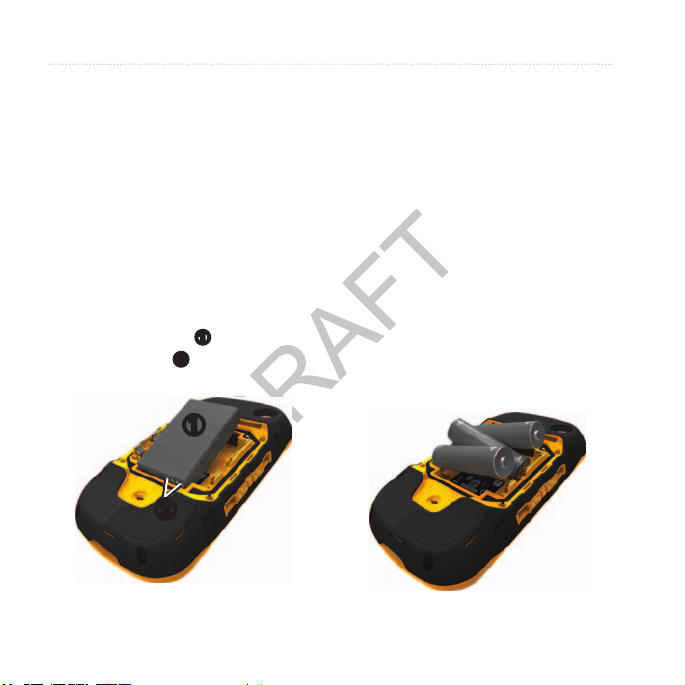
Battery Information
The device operates on the included
lithium-ion battery pack or three AA
batteries.
Installing the Battery Pack
1. Turn the D-ring counter-clockwise,
and pull up to remove the cover.
2. Locate the battery that came in the
product box.
3. Align the metal contacts on the
end of the battery ➊ with the
metal contacts ➋ in the battery
compartment.
5. Replace the battery cover, and turn
the D-ring clockwise.
Installing AA Batteries
Instead of the lithium-ion battery pack,
you can use alkaline, NiMH, or lithium
batteries. This is especially handy
when you are on the trail and cannot
charge the lithium-ion battery pack.
Use NiMH or lithium batteries for best
results.
1. Turn the D-ring counter-clockwise,
and pull up to remove the cover.
2. Insert three AA batteries, observing
polarity.
➊
➋
4. Insert the battery.
2 Montana 600 Series Owner’s Manual
3. Replace the battery cover, and turn
the D-ring clockwise.
4. Update the battery type in the
system settings (page 39).
Getting Started
Registering Your Device
• Go to http://my.garmin.com.
• Keep the original sales receipt, or a
photocopy, in a safe place.
Turning the Device On or Off
Hold .
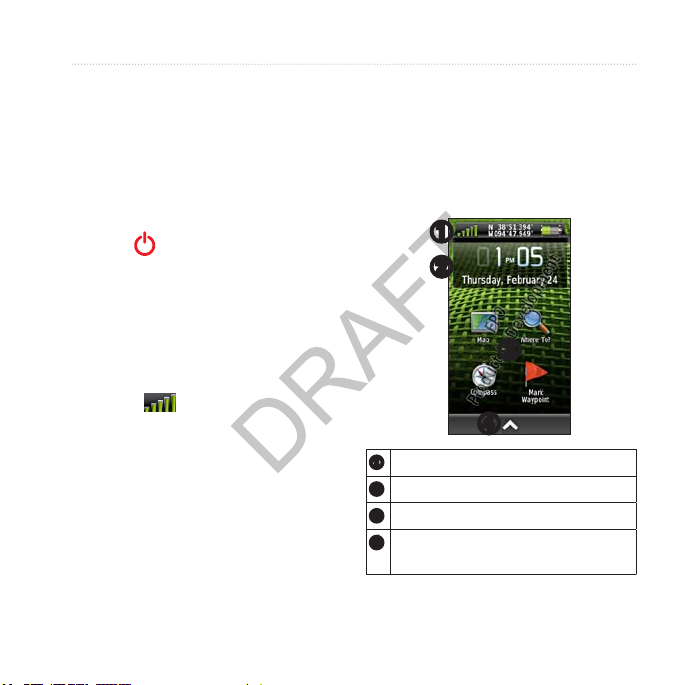
About the Main Menu
➊
➋
Satellite Signals
After the device is turned on, it begins
acquiring satellite signals. The device
may need a clear view of the sky to
acquire satellite signals. When at least
one of the bars is green, your
device has acquired satellite signals.
The time and date are set automatically
based on the GPS position. To adjust
the time settings, see page 33.
For more information about GPS, go to
www.garmin.com/aboutGPS.
Montana 600 Series Owner’s Manual 3
Status bar
➊
Current time and date
➋
Application icons
➌
Application drawer containing
➍
more application icons
➌
➍
Getting Started
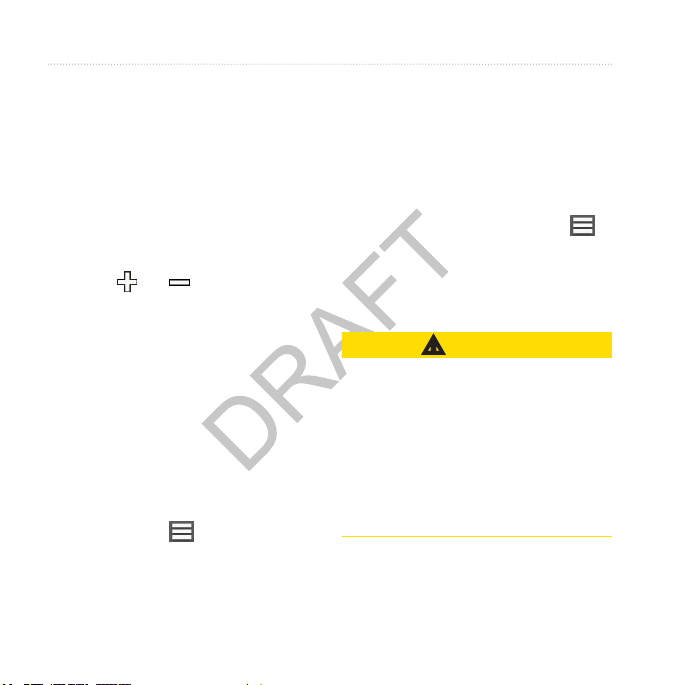
Using the Touchscreen
• Select to open the application
drawer.
• Select to close the page and
return to the previous page.
• Select to return to the previous
page.
• Select to save changes and close
the page.
• Select and to scroll.
• Select to open a menu.
• Select to search by name.
Locking the Screen
Lock the screen to prevent inadvertent
screen touches.
1. Press .
2. Select {lock icon}.
Unlocking the Screen
1. Press .
2. Select {unlock icon}.
4 Montana 600 Series Owner’s Manual
Rotating the Screen
To lock the screen orientation, see
page 29.
Rotate your device to view in
horizontal (landscape) or vertical
(portrait) mode.
Turning On the Backlight
The backlight will turn off after a
period of inactivity. To change the
backlight timeout, see page 29.
Select an option:
• Press .
• Touch the screen.
Alerts and messages also activate the

Getting Started
backlight.
Adjusting the Backlight
Brightness
1. While the device is on, press .
2. Use the slider bar to adjust the
brightness level.
Proles
Proles are a collection of settings that
optimize your device based on how
you are using it. For example, marine
use and recreational use.
When you are using a prole and you
change settings such as data elds or
units of measurement, the changes
are saved automatically as part of the
prole.
Selecting a Prole
1. Select > Prole Change.
2. Select a prole.
Montana 600 Series Owner’s Manual 5

Waypoints, Routes, and Tracks
Waypoints, Routes,
and Tracks
Waypoints
Waypoints are locations you record and
store in the device.
Creating a Waypoint
Select Mark Waypoint > Save.
Finding a Waypoint
1. Select Where To? > Waypoints.
3. Select a waypoint.
Editing a Waypoint
Before you can edit a waypoint, you
must create a waypoint.
1. Select > Waypoint Manager.
2. Select a waypoint.
3. Select an item to edit.
4. Enter the new information.
5. Select .
6 Montana 600 Series Owner’s Manual
Deleting a Waypoint
1. Select > Waypoint Manager.
2. Select a waypoint.
3. Select > Delete.
Increasing the Accuracy of a
Waypoint Location
Waypoint Averaging allows you to
increase the accuracy of a waypoint
location by collecting multiple samples
of the waypoint location.
1. Select > Waypoint Averaging.
2. Select a waypoint.
3. Move to the location.
4. Select Start.
5. When the Sample Condence status
bar reaches 100%, select Save.
For best results, collect four to
eight samples for the waypoint,
waiting at least 90 minutes between
samples.

Waypoints, Routes, and Tracks
Projecting a Waypoint
1. Select > Sight ‘N Go.
2. Point the device at an object or in
the direction of a location.
3. Select Lock Direction > Set
Course.
4. Select a unit of measure.
5. Enter the distance to the object, and
select .
6. Select Save.
Using Sight ‘N Go
You can point the device at an object in
the distance, such as a lighthouse, lock
in the direction, and then navigate to
the object.
1. Select > Sight ‘N Go.
2. Point the device at an object.
3. Select Lock Direction > Set
Course.
Montana 600 Series Owner’s Manual 7
Routes
A route is a sequence of waypoints that
leads you to your nal destination.
Creating a Route
1. Select > Route Planner >
Create Route > Select First Point.
2. Select a category.
3. Select the rst point in the route.
4. Select Use.
5. Select Select Next Point.
6. Repeat steps 2–5 until the route is
complete.
A route must contain at least two
points.
7. Select to save the route.
Editing the Name of a Route
1. Select > Route Planner.
2. Select a route.
3. Select Change Name.
4. Enter the new name.

Waypoints, Routes, and Tracks
5. Select .
Editing a Route
1. Select > Route Planner.
2. Select a route.
3. Select Edit Route.
4. Select a point.
5. Select an option:
• To view the point on the map,
select Review.
• To change the order of the point
on the route, select Move Down
or Move Up.
• To add an additional point on
the route, select Insert.
The additional point is inserted
before the point you are editing.
• To remove the point from the
route, select Remove.
Viewing a Route on the Map
1. Select > Route Planner.
2. Select a route.
3. Select View Map.
Deleting a Route
1. Select > Route Planner.
2. Select a route.
3. Select Delete Route.
Viewing the Active Route
1. While navigating a route, select
> Active Route.
2. Select a point in the route to view
additional details.
Reversing a Route
1. Select > Route Planner.
2. Select a route.
3. Select Reverse Route.
6. Select to save the route.
8 Montana 600 Series Owner’s Manual

Waypoints, Routes, and Tracks
Where To? Menu
You can use the Where To? menu to
nd a destination to navigate to. Not all
Where To? categories are available in
all areas and maps.
Additional Maps
You can use additional maps in the
device, such as BirdsEye™ satellite
imagery, BlueChart® g2, and City
Navigator® detailed maps. Detailed
maps may contain additional points of
interest, such as restaurants or marine
services. For more information, go to
http://buy.garmin.com or contact your
Garmin dealer.
Finding a Location by Name
1. Select Where To?.
2. Select a category.
3. Select .
Finding a Location Near
Another Location
1. Select Where To? > .
2. Select an option.
3. If necessary, select a location.
Finding a Point of Interest
Depending on the maps loaded on your
device, you can search for various
points of interest (POIs), such as
restaurants, hotels, and auto services.
1. Select Where To?.
2. Select an option to view POIs near
your current location:
• Select All POIs.
• Select a POI category.
3. If necessary, select to narrow
your search.
4. Select an item from the list.
4. Enter the name or part of the name.
5. Select .
Montana 600 Series Owner’s Manual 9

Waypoints, Routes, and Tracks
Finding an Address
You can use optional City Navigator®
maps to search for addresses.
1. Select Where To? > Addresses.
2. Enter the country.
3. Enter the city or postal code.
NOTE: Not all map data provides
postal code searching.
4. Select the city.
5. Enter the house number.
6. Enter the street.
2. Select Record, Do Not Show or
Record, Show On Map.
If you select Record, Show On
Map, a line on the map indicates
your track.
3. Select Record Method.
4. Select an option:
• To record tracks at a variable
rate to create an optimum
representation of your tracks,
select Auto.
• To record tracks at a specied
distance, select Distance.
Tracks
A track is a recording of your path.
The track log contains information
about points along the recorded path,
including time, location, and elevation
for each point.
• To record tracks at a specied
time, select Time.
5. Select Interval.
6. Select an option to record tracks
more or less often.
NOTE: Using the Most Often
Recording Track Logs
1. Select > Setup > Tracks >
Track Log.
10 Montana 600 Series Owner’s Manual
interval provides the most track
detail and lls up the device
memory quicker.

Waypoints, Routes, and Tracks
Saving the Current Track
The track being recorded is called the
current track.
1. Select > Track Manager >
Current Track.
2. Select what you want to save:
• To save the entire active track,
select Save Track.
• To select a portion of the current
track to save, select Save
Portion, and select a portion.
Viewing a Track on the Map
1. Select > Track Manager.
2. Select a track.
3. Select View Map.
The beginning and the end of the
track are marked by a ag.
Viewing the Elevation Plot of a
Track
1. Select > Track Manager.
2. Select a track.
Montana 600 Series Owner’s Manual 11
3. Select Elevation Plot.
Saving a Location on a Track
1. Select > Track Manager.
2. Select a track.
3. Select View Map.
4. Select a location on the track.
5. Select the information bar on the
top of the screen.
6. Select .
7. Select OK.
Changing the Track Color
1. Select > Track Manager.
2. Select a track.
3. Select Set Color.
4. Select a color.
Clearing the Current Track
Select > Setup > Reset > Clear
Current Track > Yes.
Deleting a Track
1. Select > Track Manager.

Waypoints, Routes, and Tracks
2. Select a track.
3. Select Delete > Yes.
Adventures
What are adventures?
Creating an Adventure
1. Select > Setup > Adventures >
Create Adventure > Add Item.
2. Select an item.
3. Select Use.
No what?
12 Montana 600 Series Owner’s Manual

Navigation
Navigation
You can navigate a route, a track, to a
waypoint, to a geocache, to a photo,
or to any saved location in the device.
You can use the map or the compass to
navigate to your destination.
Starting Navigation
You can begin navigating to a
destination by selecting Go. xx
1. Select Where To?.
2. Select a category.
3. Select a location.
4. Select Go.
Starting a Trackback
You can navigate back to the beginning
of a track. This can be helpful when
nding your way back to camp or the
trail head.
1. Select > Track Manager >
Current Track > View Map.
Montana 600 Series Owner’s Manual 13
2. Select Trackback.
Starting Navigation to Man
Overboard Location
Select > Man Overboard >
Start.
Stopping Navigation
Select > Where To? > Stop
Navigation.
Map
The position icon represents your
location on the map. As you travel, the
position icon moves and leaves a track
log (page 10). Waypoint names and
symbols also appear on the map.
For information about customizing
the map settings, see page 31. For
information about customizing the map
dashboard and data elds, see page 27.
Navigating with the Map
1. Begin navigation (page 13).
Navigation
The map page opens with your
route marked with a magenta line.
2. Use the magenta line to navigate to
your destination.
Browsing the Map
1. Select Map.
2. Drag the map to view different
areas.
3. Select and to zoom in and
out of the map.
4. Select the information bar on
the top of the screen to view
information about the selected
location (represented by a pin).
Measuring Distance
You can use the map to measure the
distance from a point to the current
location.
1. Select Map > > Measure
Distance.
The device automatically begins
measuring from your current
location.
3. Select the point to measure to.
The distance appears at the top of
the page.
To stop measuring, select Map > >
Stop Measuring.
Using the Map in Automobile
Mode
CAUTION
You can permanently damage your ears
and lose hearing if you listen to the
device, earbuds, or headphones at high
volume. Limit the amount of time you
listen at high volume. If you experience
ringing in your ears or mufed speech,
stop listening and have your hearing
checked.
You can follow a turn-by turn, road
route to your destination when using
City Navigator maps. Voice prompts
14 Montana 600 Series Owner’s Manual
 Loading...