

Page 1
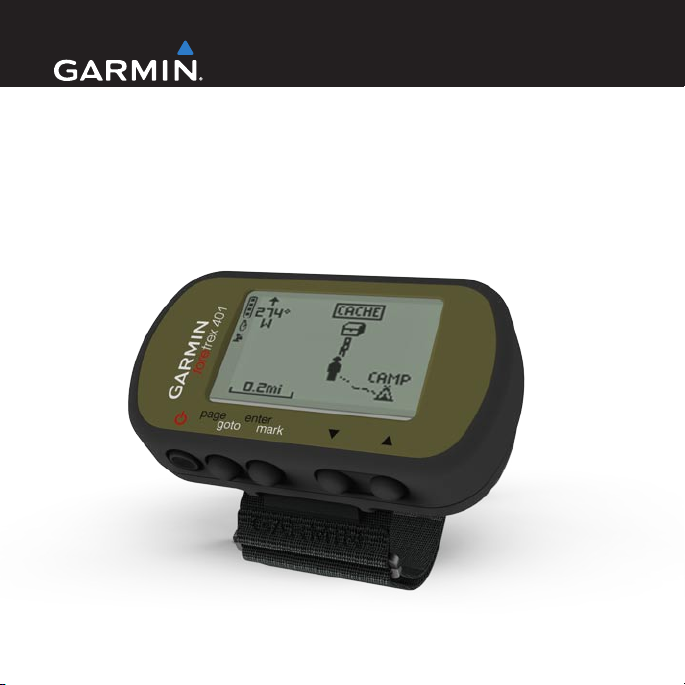
owner’s manual
foretrex® 301 and 401
PERSONAL NAVIGATOR
®
Page 2

© 2009 Garmin Ltd. or its subsidiaries
Garmin International, Inc.
1200 East 151st Street,
Olathe, Kansas 66062, USA
Tel. (913) 397.8200 or
(800) 800.1020
Fax (913) 397.8282
All rights reserved. Except as expressly
provided herein, no part of this manual may be
reproduced, copied, transmitted, disseminated,
downloaded or stored in any storage medium,
for any purpose without the express prior
written consent of Garmin. Garmin hereby
grants permission to download a single copy
of this manual onto a hard drive or other
electronic storage medium to be viewed and
to print one copy of this manual or of any
revision hereto, provided that such electronic
or printed copy of this manual must contain
the complete text of this copyright notice
and provided further that any unauthorized
commercial distribution of this manual or any
revision hereto is strictly prohibited.
Information in this document is subject to
change without notice. Garmin reserves
the right to change or improve its products
May 2009 Part Number 190-01068-00 Printed in Taiwan
Garmin (Europe) Ltd.
Liberty House
Hounsdown Business Park,
Southampton, Hampshire,
SO40 9LR UK
Tel. +44 (0) 870.8501241
(outside the UK)
0808 2380000 (within the UK)
Fax +44 (0) 870.8501251
and to make changes in the content without
obligation to notify any person or organization
of such changes or improvements. Visit the
Garmin Web site (www.garmin.com) for
current updates and supplemental information
concerning the use and operation of this and
other Garmin products.
Garmin®, Foretrex®, and the Garmin logo are
trademarks of Garmin Ltd. or its subsidiaries,
registered in the USA and other countries.
GSC™ 10 is a trademark of Garmin Ltd. or
it’s subsidiaries. These trademarks may not
be used without the express permission of
Garmin. Windows® is a registered trademark of
Microsoft Corporation in the United States and
other countries. Mac® is a registered trademark
of Apple Computer, Inc. Other trademarks
and trade names are those of their respective
owners.
Garmin Corporation
No. 68, Jangshu 2nd Road,
Shijr, Taipei County,
Taiwan
Tel. 886/2.2642.9199
Fax 886/2.2642.9099
Page 3
Introduction
Introduction
See the Important Safety and
Product Information guide in
the product box for product
warnings and other important
information.
Manual Conventions
When you are instructed to “press”
something, use the buttons on
the unit. Press to “select”
something in a list, and then press
enter.
The small arrows (>) used in the
text indicate that you should select a
series of items in order, for example,
“Press page > enter > select
TRACKS.”
Foretrex 301/401 Owner’s Manual i
Product Registration
Help us better support you by
completing our online registration
today. Go to http://my.garmin.com.
Keep the original sales receipt, or a
photocopy, in a safe place.
Contact Garmin
Contact Garmin Product Support if
you have any questions while using
your Foretrex. In the USA, go to
www.garmin.com/support, or contact
Garmin USA by phone at (913)
397.8200 or (800) 800.1020.
In the UK, contact Garmin (Europe)
Ltd. by phone at 0808 2380000.
In Europe, go to www.garmin.com
/support and click Contact Support
for in-country support information,
or contact Garmin (Europe) Ltd. by
phone at +44 (0) 870.8501241.
Page 4

Introduction
Foretrex® Features
Features Foretrex
301
Altimeter No Yes
Barometer No Yes
Cadence (optional
accessory required)
Electronic compass No Yes
Heart rate (optional
accessory required)
Timer Yes Yes
Waterproof Yes Yes
Wireless transfer No Yes
No Yes
No Yes
Foretrex
401
Optional Accessories
For a list of available accessories and
maps, refer to the Garmin Web site at
http://buy.garmin.com.
ii Foretrex 301/401 Owner’s Manual
Page 5

Introduction
Table of Contents
Waypoints, Tracks, and
Routes ................................. 8
Introduction .......................... i
Manual Conventions ....................i
Product Registration ....................i
Contact Garmin ...........................i
Optional Accessories ..................ii
Foretrex® Features .....................ii
Getting Started .................... 1
Buttons ...................................... 2
Installing Batteries ..................... 2
Turning On Your Foretrex .......... 3
Acquiring GPS Satellite
Signals .................................... 3
Using the Backlight .................... 3
Using the Main Pages ........ 4
Map Page .................................. 5
Compass Page .......................... 6
Elevation Page .......................... 7
Trip Computer ............................ 7
Main Menu ................................. 7
Foretrex 301/401 Owner’s Manual iii
Waypoints .................................. 8
Editing Waypoints ...................... 8
Hunt and Fish .......................... 10
Sun and Moon ......................... 10
Recording your Tracks............. 10
Creating and Navigating
Routes ....................................11
Settings ............................. 12
Map Menu Options .................. 12
Compass Menu Options .......... 12
Elevation Menu Options .......... 13
Trip Computer Options ............ 13
Main Menu Options ................. 13
Data Field Options ................... 15
Timer .................................. 20
Timer Options .......................... 20
Page 6

Introduction
GPS .................................... 21
Setting GPS Mode ................... 21
Satellite Reception................... 21
Signal Strength ........................ 21
Sky View .................................. 21
Appendix ........................... 22
Pairing the Foretrex 401 .......... 22
Wireless Data Transfers .......... 23
Connecting Your Foretrex
to a Computer ....................... 24
Jumpmaster ............................. 25
Clearing User Data .................. 26
Replacing the Wristband ......... 27
Cleaning the Unit and
Wristband .............................. 27
Specications .......................... 28
Software License
Agreement ............................ 29
Declaration of Conformity
(DoC) .................................... 29
FCC Compliance ..................... 30
Index .................................. 31
Storing the Foretrex ................. 25
Battery Information .................. 25
Optimizing Battery Life ............ 26
Resetting the Foretrex ............. 26
iv Foretrex 301/401 Owner’s Manual
Page 7
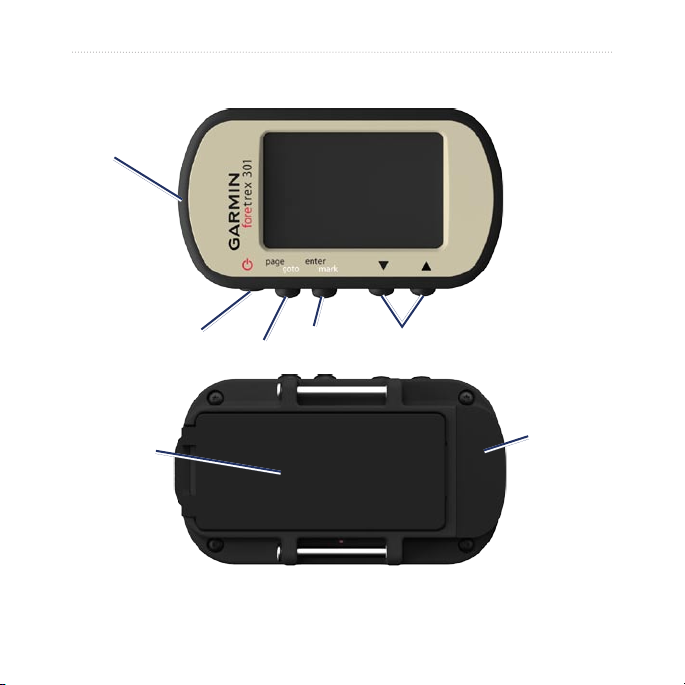
GPS antenna
Getting Started
Getting Started
Power/
backlight
Battery cover
(serial
number inside)
Foretrex 301/401 Owner’s Manual 1
enter/mark
page/goto
up/down
Mini-USB
(under
weather cap)
Page 8
Getting Started
Buttons
power
Press and hold to turn the
•
Foretrex on and off.
Press to turn the backlight on
•
and off.
page/goto
Press to view and navigate
•
through the menus.
Press to exit a menu or a page.
•
Press and hold to navigate to a
•
specic destination or waypoint.
enter/mark
Press to select options and to
•
acknowledge messages.
Press and hold to mark a
•
waypoint.
Press to access an options menu
•
(up/down)
Press to scroll through menus and
•
pages.
Press to select options on menus
•
and pages.
Press to zoom out ( ) and
•
in ( ) on the map.
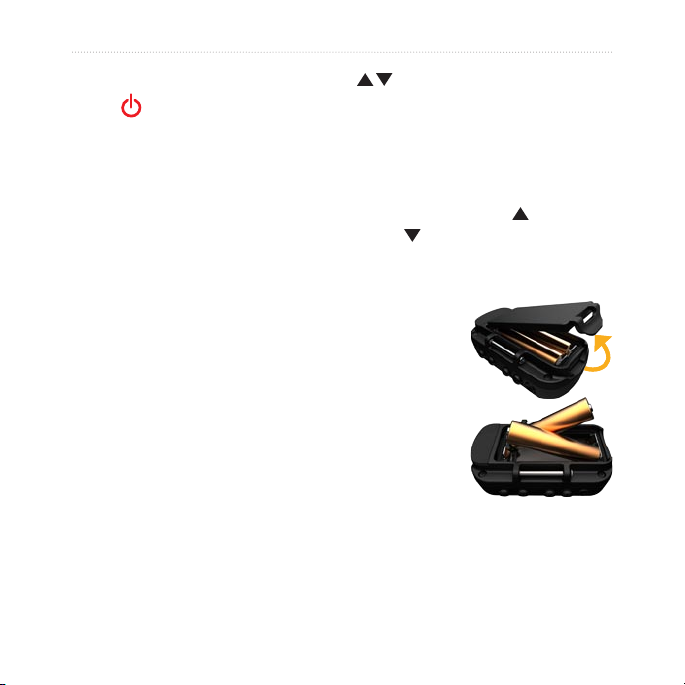
Installing Batteries
1. Carefully lift
up on the
battery door
until it comes
off.
2. Insert the
batteries,
observing
polarity.
3. Replace the
battery cover.
when on a main page.
2 Foretrex 301/401 Owner’s Manual
Page 9
Getting Started
NOTE: Remove the batteries
when you do not plan to use the
Foretrex for several months.
When you remove the batteries,
stored data is not lost.
2. Turn on the Foretrex and hold it
level. Acquiring satellite signals
can take a few minutes.
The ashes while the Foretrex
determines your location. When
satellites are acquired, the
Turning On Your Foretrex
Press and hold to turn the
Foretrex on. The rst time you turn
on your Foretrex you are prompted
to choose a language.
remains solid.
Using the Backlight
While the Foretrex is on, press and
quickly release . The backlight
stays on for 30 seconds. Press
again to turn off the backlight before
the automatic light timeout.
Acquiring GPS Satellite Signals
Before the Foretrex can nd your
current location and navigate a route,
you must acquire GPS signals.
1. Go outdoors to an open area,
away from tall buildings and trees.
Foretrex 301/401 Owner’s Manual 3
To adjust the backlight time:
1. From the main menu, select
SETUP > DISPLAY > LIGHT
TIMEOUT.
2. Use
time the backlight stays on.
to set the amount of
Page 10
Using the Main Pages
Using the Main Pages
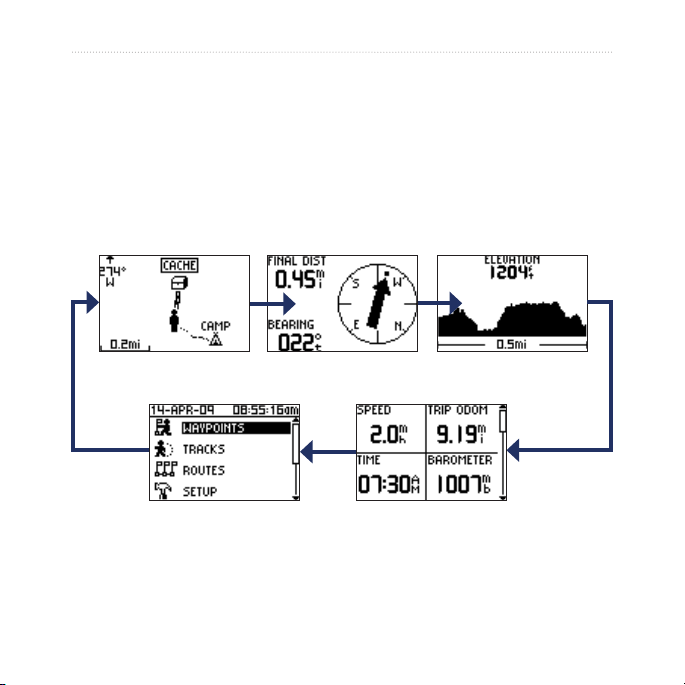
All of the information needed to operate the Foretrex is found on the following
ve main pages: the map page, the compass page, the elevation page (401
only), the trip computer page, and the main menu.
Press the page button to navigate through the main pages. Press enter to
access the option menus for these pages.
Map page
Main menu
4 Foretrex 301/401 Owner’s Manual
Compass page
Trip computer
Elevation page
(401 only)
Page 11
Using the Main Pages
Map Page
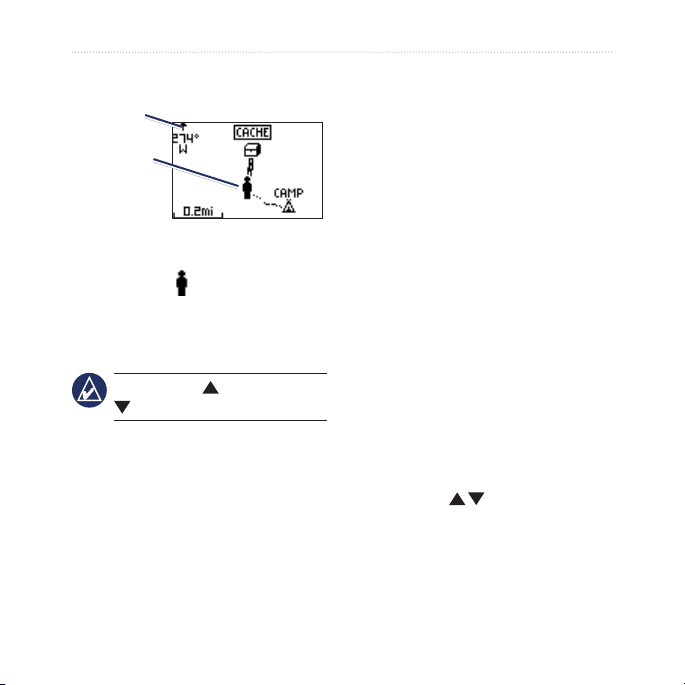
Heading
indicator
Position
icon
Map page
Your position on the map is
represented by . As you travel, the
position icon moves and leaves a
track log (trail). Waypoint names and
symbols are also shown on the map.
NOTE: Press to zoom out or
to zoom in.
The Foretrex automatically rotates
the map as you move, so that
waypoints ahead of you always
appear above your position. The
heading indicator shows the direction
To view the map with north up:
1. From the map page, press enter.
2. Select
To clear a track log:
1. From the map page, press enter.
2. Select
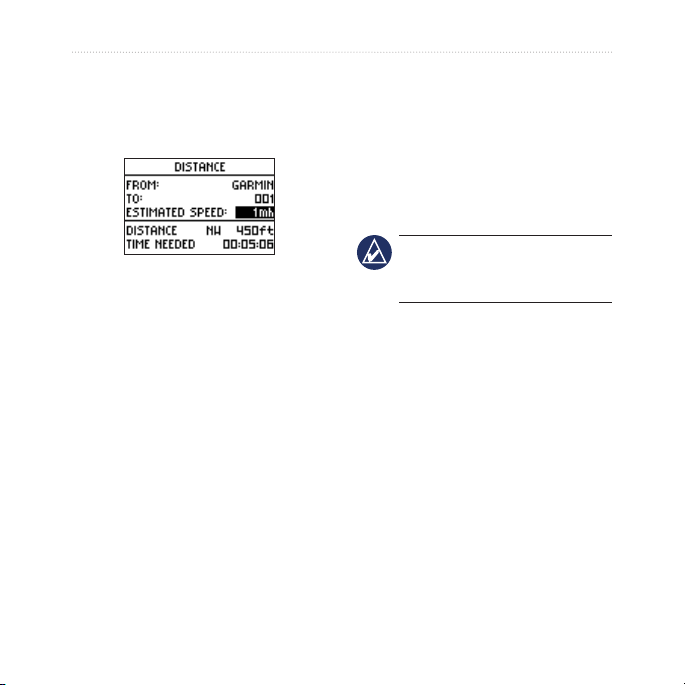
To measure distance:
1. From the map page, press enter.
2. Select
3. Select the FROM eld then select
4. Select the
5. Select the
MAP DETAIL > MAP
ORIENTATION > NORTH UP.
CLEAR TRACK LOG >
YES.
MEASURE DISTANCE
a starting waypoint from the
waypoint list.
TO eld then select
an ending waypoint from the
waypoint list.
ESTIMATED SPEED
eld. Use to select elds,
and press enter to edit the speed.
you are heading.
Foretrex 301/401 Owner’s Manual 5
Page 12
Using the Main Pages
The total distance between the two
points and the estimated travel time
appears at the bottom of the page.
The electronic compass (used in
the 401) is similar to a magnetic
compass when you are stationary
or walking. If you maintain a
higher speed, such as traveling in
automobile, the compass uses GPS
signals to determine your direction.
NOTE: Hold the compass
level when navigating to ensure
Compass Page
The compass page guides you to
your destination by displaying a
compass and a bearing pointer.
When you are navigating to a
specic location, the compass page
displays the name of the location,
maximum accuracy.
To calibrate the electric
compass:
1. From the compass page, press
enter.
2. Select CALIBRATE.
3. Follow the on-screen instructions.
two data elds that display distance
to nal destination and speed (by
default), and a direction arrow in the
compass ring. Follow the arrow to
navigate.
6 Foretrex 301/401 Owner’s Manual
Page 13
Using the Main Pages
Elevation Page (401 only)
The elevation page shows your
elevation. Press to zoom out or
to zoom in.
Trip Computer
The trip computer displays your
current speed, average speed,
maximum speed, trip odometer, and
other helpful statistics. Use to
scroll to see more elds.
To calibrate the barometric
altimeter:
NOTE: The barometric altimeter
is available only on the Foretrex
401.
1. From the main menu, select
SET UP > ALTIMETER >
CALIBRATE.
2. Follow the on-screen instructions.
To customize data elds, press enter.
See page 15 for more information.
Main Menu
The main menu gives you access to
setup screens including waypoints,
tracks, and routes. The main menu
displays the current date and time
along the top of the screen. Use
to select from the list of menu
options.
Foretrex 301/401 Owner’s Manual 7
Page 14
Waypoints, Tracks, and Routes
Waypoints, Tracks,
Editing Waypoints
and Routes
Waypoints
Waypoints are locations you record
and store in the Foretrex.
1. Press and hold mark.
2. Select
To navigate to a waypoint:
1. Press and hold goto.
2. Select the waypoint from the list.
8 Foretrex 301/401 Owner’s Manual
OK.
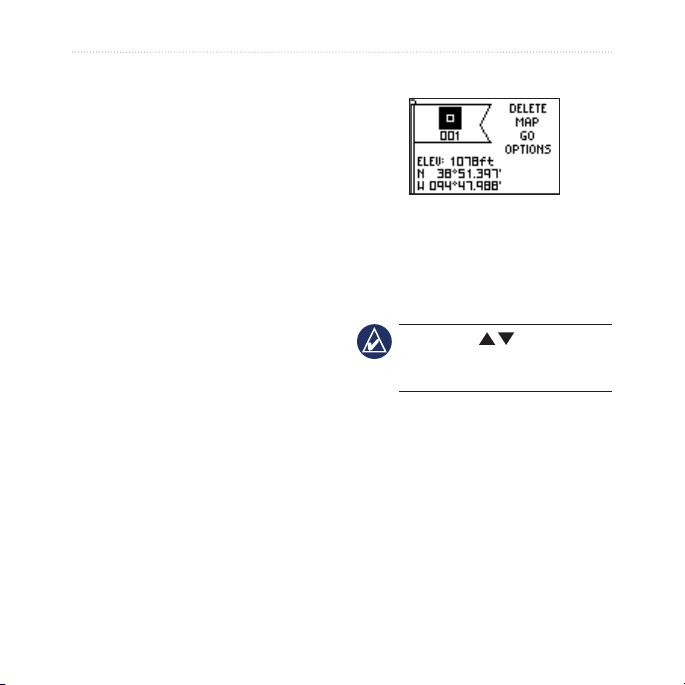
After you have marked a waypoint,
you can edit the name, the symbol,
the elevation, and the latitude/
longitude from the waypoint page.
To edit existing waypoints:
1. Select > WAYPOINTS > LIST
2. Select the waypoint you want to
Waypoint page
NOTE: Use to select the
letters and numbers. Press enter
to edit.
ALL.
edit.
Page 15
Waypoints, Tracks, and Routes
To change the symbol:
1. From the waypoint page, select
the waypoint symbol.
2. Select a new symbol from the list.
To change the name:
1. From the waypoint page, select
the name. The EDIT WAYPOINT
NAME page appears.
2. Press
enter to access the
character menu. Select a
character from the list.
3. Press
enter to advance to the
next character.
4. Repeat steps 2 and 3 as
necessary.
To change the elevation:
1. From the waypoint page, select
the elevation. The ENTER
CORRECT ELEVATION page
appears.
2. Press
enter to access the number
3. Press enter to advance to the
next eld.
4. Repeat steps 2 and 3 as
necessary.
5. Select
OK to save and exit.
To change the latitude/longitude:
1. From the waypoint page, select
the latitude/longitude eld. The
EDIT
LOCATION page appears.
2. Select a number from the list.
NOTE: To change the position
format, see page 14.
To delete a waypoint:
1. Select > WAYPOINTS > LIST
ALL.
2. Use
or enter to select the
waypoint you want to delete.
3. Select
DELETE > YES.
menu. Select a number from the
list.
Foretrex 301/401 Owner’s Manual 9
Page 16
Waypoints, Tracks, and Routes
Hunt and Fish
The hunting and shing almanac
provides the predicted best dates and
times for hunting and shing at your
current location.
To view the hunt and sh page:
1. From the main menu, select >
WAYPOINTS > LIST ALL.
2. Select the waypoint you want to
view.
3. Select
OPTIONS > HUNT/FISH.
NOTE: Press enter to view the
hunting and shing information
for a different date.
Sun and Moon
The Sun and Moon page shows
sunrise time, sunset time, moonrise
time, moonset time, and moon phase
for a specied date.
10 Foretrex 301/401 Owner’s Manual
To view the sun and moon page:
1. From the main menu, select >
WAYPOINTS > LIST ALL.
2. Select the waypoint you want to
view.
3. Select
OPTIONS > SUN/MOON.
NOTE: Press enter to view the
sun and moon information for a
different date.
Recording your Tracks
The Foretrex records a track log
while you are moving. You can save
these tracks and navigate to them at
another time.
1. From the main menu, select
TRACKS.
2. Select
3 Use
4. Press
SAVE TRACK.
and enter to set a
beginning point and an ending
point.
enter to name the track.
Follow the on-screen instructions.
Page 17
Waypoints, Tracks, and Routes
To clear current track:
From the tracks menu, select
CLEAR TRACK > YES.
To navigate to a saved track:
1. From the tracks menu, select
LIST SAVED.
2. Select the track.
3. Select
Foretrex 301/401 Owner’s Manual 11
NAVIGATE.
Creating and Navigating Routes
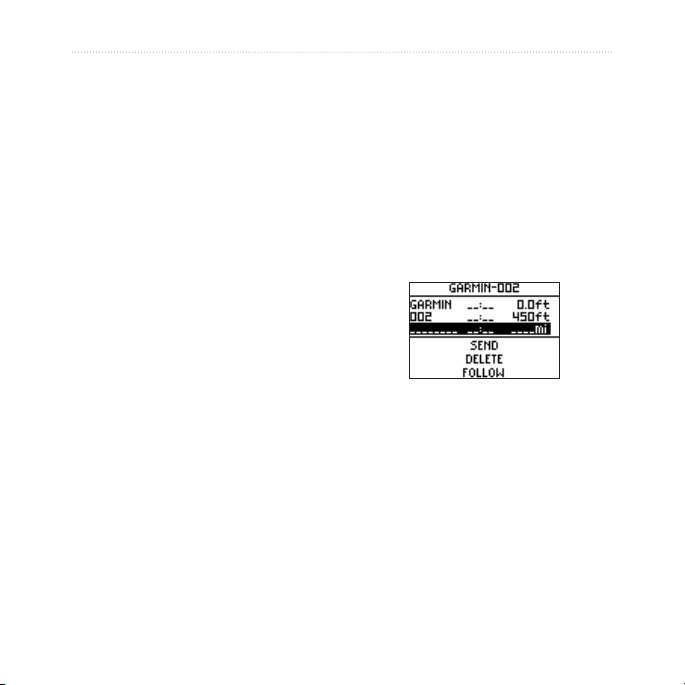
1. From the main menu, select
ROUTES > CREATE NEW.
2. Press
3. Select a waypoint for the rst
4. Select FOLLOW.
enter to access your saved
waypoints.
eld. Repeat in each eld until the
route is complete.
Page 18

Settings
Settings
Map Menu Options
On the map page, press enter to
access the map menu.
PAN TRACK LOG—use to
pan. Move the pointer to any point
along the track. Press enter to go
to a waypoint, mark a waypoint, or
zoom in or out.
CLEAR TRACK LOG—delete the
recorded track log.
MEASURE DISTANCE—measure
the distance between two waypoints.
See page 5 for instructions on
measuring distance.
12 Foretrex 301/401 Owner’s Manual
MAP DETAIL
preferences:
MAP ORIENTATION—select
•
how the map is shown on the
page. NORTH UP shows North
at the top of the page. TRACK
UP shows your current direction
of travel at the top of the page.
TRACKS—show or hide tracks
•
on the map.
WAYPOINTS—show or hide
•
waypoints on the map.
STOP NAVIGATION—stop the
current route.
Compass Menu Options
On the compass page, press enter to
access the compass menu.
CALIBRATE—hold the Foretrex
level and slowly turn in two full
circles in the same direction.
—set map
Page 19

Settings
CHANGE FIELDS—change the
data elds on the compass page. See
page 15 for more information on
changing data elds.
See page 15 for more information on
changing data elds.
RESET TRIP DATA—select YES
to reset the trip data and the altimeter
data.
Elevation Menu Options
On the elevation page, press enter to
access the elevation menu.
PLOT— select to plot over time or
distance.
ZOOM—select to change the
elevation scale.
VIEW POINTS—view the data
points on the elevation page.
Trip Computer Options
On the trip computer page, press
enter to access the trip computer
menu.
CHANGE FIELDS—change the
data elds on the trip computer page.
Foretrex 301/401 Owner’s Manual 13
Main Menu Options
WAYPOINTS—create a new
waypoint, list all waypoints, or
view the nearest waypoint to your
location. See page 8 for more
information.
TRACKS—manage your saved
tracks. Here you can clear the track
log, pan and trackback, save a track,
list saved tracks, or delete all saved
tracks.
ROUTES—create a new route, list
all routes, delete all routes.
SETUP—customize settings for the
Foretrex.
Page 20

Settings
TIME—select a 12-hour or
•
24-hour format, and the time
zone for your location. Select
YES to use daylight saving
time, NO to ignore it, or AUTO
to automatically turn daylight
saving time on and off.
Select YES to use automatic
time zones, NO change the time
zone manually, or AUTO to
automatically update your time
zone.
TIMER—show or hide timer
•
page and set timer preferences.
See page 20.
DISPLAY—adjust backlight and
•
display contrast.
UNITS—set position format
•
and map datum. Select units of
measurement for distance/speed,
elevation, vertical speed, and
pressure.
HEADING—customize compass
•
settings and calibrate the
compass.
SYSTEM—set preferences for
•
the GPS mode, the beeper, the
battery, the language, and the
interface. You can also enter
owner information, such as your
name, and set it to appear when
the unit powers on.
TRACKS—set track preferences.
•
ROUTES—select auto or
•
distance for route leg transition.
MAP—select NORTH UP or
•
TRACK UP and turn auto zoom
off or on. You can also select
bearing or course for the go to
line.
ALTIMETER—turn auto
•
calibration on or off.
14 Foretrex 301/401 Owner’s Manual
Page 21

RESET—reset trip data, delete
•
all waypoints, or restore to
factory defaults.
ABOUT FORETREX—view
•
the version software and the GPS
software version.
CONNECT—connect to compatible
Garmin devices, compatible
accessories, or receive data
wirelessly.
GPS—view the satellite signal
strength or the satellite sky view. See
page 21.
JUMPMASTER—enter the
Jumpmaster setting. Set the jump
type and information. See page 25.
Settings
Data Field Options
The following table lists all of the
Foretrex data elds and descriptions.
*Only available on the Foretrex 401.
Data Field Description
AMB PRESS*
(ambient
pressure)
AVG ASCENT The average
AVG DESCNT
(average
descent)
BAROMETER* The calibrated
BEARING The direction
The uncalibrated
current pressure.
vertical distance
of ascent.
The average
vertical distance
of descent.
current pressure.
from your current
location to a
destination.
Foretrex 301/401 Owner’s Manual 15
Page 22

Settings
Data Field Description
CADENCE*
(GSC™ 10
required)
Revolutions of
the crank arm
or strides per
minute.
COURSE The direction
from your
starting location
to a destination.
ELEVATION The altitude
above or below
sea level.
FINAL DEST
(destination)
The last
waypoint on your
route.
FINAL DIST
(distance)
The remaining
distance to your
nal destination.
FINAL ETA
(estimated time
of arrival)
The estimated
time of day you
will reach your
nal destination.
Data Field Description
FINAL ETE
(estimated time
en route)
The estimated
time needed to
reach your nal
destination.
GLIDE RATIO* The ratio of
horizontal
distance traveled
to the change in
vertical distance.
GR DEST*
(glide ratio
destination)
The glide ratio
required to
descend from
your present
position and
elevation to
the destination
elevation.
HEADING Your moving
direction.
HEART RATE*
(heart rate
monitor
Heart rate in
beats per minute
(bmp).
required)
16 Foretrex 301/401 Owner’s Manual
Page 23

Settings
Data Field Description
MAX ASCENT* The maximum
ascent rate in
feet/meter per
minute.
MAX
DESCNT*
(maximum
descent)
MAX ELEVTN
(maximum
elevation)
The maximum
descent rate in
feet/meter per
minute.
The highest
elevation
reached.
MAX SPEED The maximum
speed.
MIN ELEVTN
(minimum
elevation)
MOV’N AVG
(moving
average)
The lowest
elevation
reached.
Average speed
of the unit while
moving.
Data Field Description
MOV’N TIME
(moving time)
A running tally of
movement time
elapsed since
the last reset.
NEXT DEST
(destination)
The next
waypoint on your
route.
NEXT DIST
(distance)
The remaining
distance to the
next waypoint on
the your route.
NEXT ETA
(estimated time
of arrival)
The estimated
time of day you
will reach the
next waypoint on
the route.
NEXT ETE
(estimated time
en route)
The estimated
time needed until
you reach the
next waypoint on
the route.
Foretrex 301/401 Owner’s Manual 17
Page 24

Settings
Data Field Description
ODOMETER A running tally
of distance
traveled,
based upon
the distance
between
second-bysecond position
readings.
OFF COURSE The distance (left
or right) you are
from the original
course (path of
travel).
OVER’L SPD
(overall speed)
Your average
speed.
SPEED Display rate of
current speed.
STOP TIME Time spent
stopped.
Data Field Description
SUNRISE Time of sunrise
based on your
GPS position.
SUNSET Time of sunset
based on your
GPS position.
TIME Current time
of day based
on your time
settings (format,
time zone, and
daylight saving
time).
TO COURSE The direction
you must travel
to return to the
route.
TOT ASCENT
(total ascent)
The total
elevation
distance
ascended.
18 Foretrex 301/401 Owner’s Manual
Page 25

Settings
Data Field Description
TOT DESCNT
(total descent)
The total
elevation
distance
descended.
TOTAL TIME A running tally
of time since the
last reset.
TRIP ODOM
(odometer)
A running tally of
distance traveled
since last the
reset.
TURN The angle
difference
(in degrees)
between the
Data Field Description
VERT SPEED*
(vertical)
Your rate of
altitude gain/loss
over time.
VMG (velocity
made good)
The speed at
which you are
closing on a
destination along
a route.
VSPD DEST*
(vertical speed
destination)
The
measurement
of your rate
of ascent/
descent to a
predetermined
altitude.
bearing to your
destination and
your current
line of travel. ‘L’
means turn left.
‘R’ means turn
right.
Foretrex 301/401 Owner’s Manual 19
Page 26
Timer
Timer
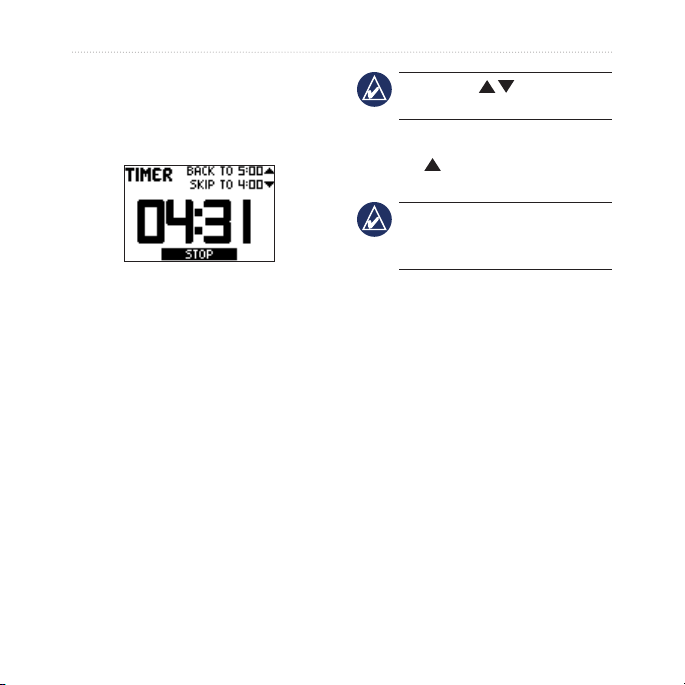
The timer page is not one of the
default main pages.
To display the timer:
1. From the main menu, select
SETUP > TIMER.
2. Select
To set the timer:
1. From the main menu, select
2. Select
3. Select a time increment from the
To use the timer:
1. On the timer page, press enter to
SHOW TIMER PAGE? >
YES.
SETUP > TIMER.
COUNT DOWN FROM.
menu or select custom.
start the timer.
NOTE: Use to change the
countdown time.
2. Press
3. Press
enter to stop the timer.
to reset the timer to the
original countdown time.
NOTE: When the timer is at
0:00, press enter to start the timer
counting up from 0:00.
Timer Options
From the main menu, select SETUP
> TIMER. The following options
appear:
WHEN EXPIRED—set the
•
timer to stop, count up, or repeat
when the timer expires.
EXPIRED TONE—select the
•
tone alert that sounds when the
timer expires.
INTERVAL TONE— select the
•
tone alert that sounds when the
interval time expires.
20 Foretrex 301/401 Owner’s Manual
Page 27
GPS
GPS
Setting GPS Mode
1. From the main menu, select
SETUP > SYSTEM > GPS
MODE.
2. Select the mode you want, or
select OFF to use the Foretrex
indoors.
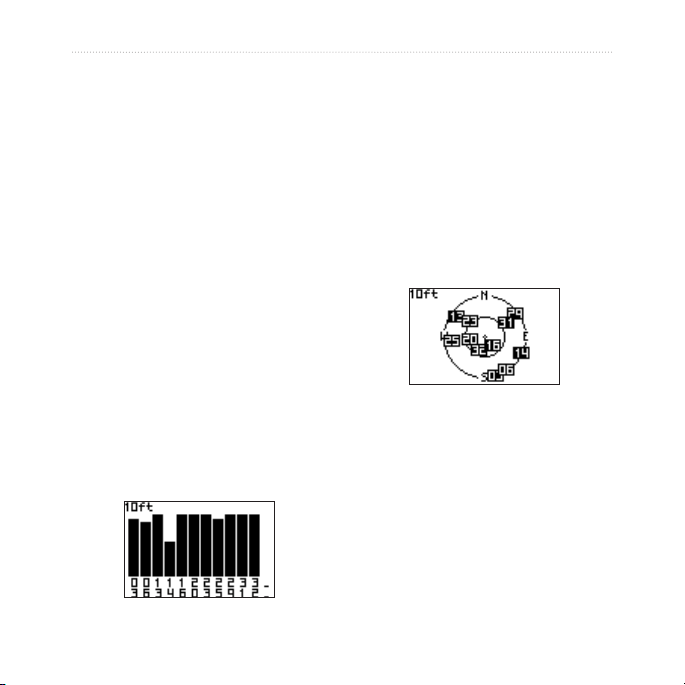
The bars indicate GPS satellite
strength. White bars indicate that the
Foretrex is still collecting data. Solid
bars indicate that the Foretrex is
tracking that satellites.
Sky View
Press enter on the satellite page to
switch to sky view.
Satellite Reception
The satellite page shows your current
location, GPS accuracy, satellite
locations, and signal strength.
Sky view shows the location of
Signal Strength
To view the satellite page, select
GPS from the main menu.
Foretrex 301/401 Owner’s Manual 21
the satellites from which you are
receiving a signal.
Page 28

Appendix
Appendix
Pairing the Foretrex 401
NOTE: The Foretrex 301 does
not have pairing capability.
The Foretrex 401 can be used
with an optional Garmin heart rate
monitor to display your heart rate.
It can also be used with an optional
Garmin cadence bike sensor (GSC
10) to display your pedaling cadence.
Pairing is connecting your Foretrex
401 with wireless sensors, such as a
heart rate monitor or a cadence bike
sensor. After you pair the rst time,
your Foretrex 401 automatically
recognizes the wireless sensor
whenever they are turned on and
within range of each other.
22 Foretrex 301/401 Owner’s Manual
To pair the Foretrex 401 with a
wireless sensor:
1. Place the Foretrex 401 within 10
feet (3 meters) of the wireless
sensor (heart rate monitor or GSC
10).
2. Put on the heart rate monitor or
turn on the GSC 10.
3. From the main menu, select
CONNECT > HEART RATE
MONITOR or BIKE CADENCE
SENSOR.
4. Select
SEARCH FOR NEW.
When the sensor is found, the
“Connected” message appears.
NOTE: To prevent your Foretrex
401 from pairing with wireless
sensors, select CONNECT >
HEART RATE MONITOR (or
BIKE CADENCE SENSOR) >
OFF.
Page 29

Appendix
Wireless Data Transfers
The Foretrex 401 can send and
receive waypoints, routes, and tracks
wirelessly from a compatible Garmin
device.
To receive data:
1. From the main menu, select
CONNECT > RECEIVE
WIRELESSLY.
2. A “CONNECTING” message
appears. When connected, a
“RECEIVING DATA” message
appears. A “TRANSFER
COMPLETE” message appears
when data is received.
To send a waypoint:
1. From the main menu, select
WAYPOINTS > LIST ALL.
2. Select the waypoint you want to
send.
3. From the waypoint menu, select
OPTIONS > SEND.
Foretrex 301/401 Owner’s Manual 23
To send a track:
1. From the main menu, select
TRACKS > LIST ALL.
2. Select the track you want to send.
3. From the track menu, select
OPTIONS > SEND.
To send a route:
1. From the main menu, select
ROUTES > LIST SAVED.
2. Select the route you want to send.
3. From the route menu, select
OPTIONS > SEND.
Page 30
Appendix
Connecting Your Foretrex to a Computer
You can use the Foretrex as a USB
mass storage device by connecting it
to your computer with a USB cable.
NOTE: The Foretrex is not
compatible with Windows® 95,
98, Me, or NT. It is also not
compatible with Mac® OS 10.3
and earlier. This is a common
limitation of most USB mass
storage devices.
1. Plug the small end of the USB
cable into the mini-USB port on
the back of the Foretrex (under
the weather cap).
2. Connect the larger end of the
USB cable to an available USB
port on your computer.
3. Select
24 Foretrex 301/401 Owner’s Manual
YES to enter mass storage
mode.
Your Foretrex appears as a
removable drive in My Computer
on Windows computers and as a
mounted volume on Mac computers.
A copy of the waypoints, tracks, and
routes on your Foretrex can be found
in the Garmin/GPX/current folder.
Adding Waypoints, Tracks,
and Routes
1. From your computer, open the
Garmin/GPX folder.
2. Paste your .gpx les into the GPX
folder.
NOTICE: If you are not sure
about the purpose of a le, do not
delete it. Your Foretrex memory
contains important system les
that should not be deleted.
Page 31
Appendix
Jumpmaster
and routes will be retained in the
unit’s memory without the need for
external power. It is always a good
practice to back up important user
data.
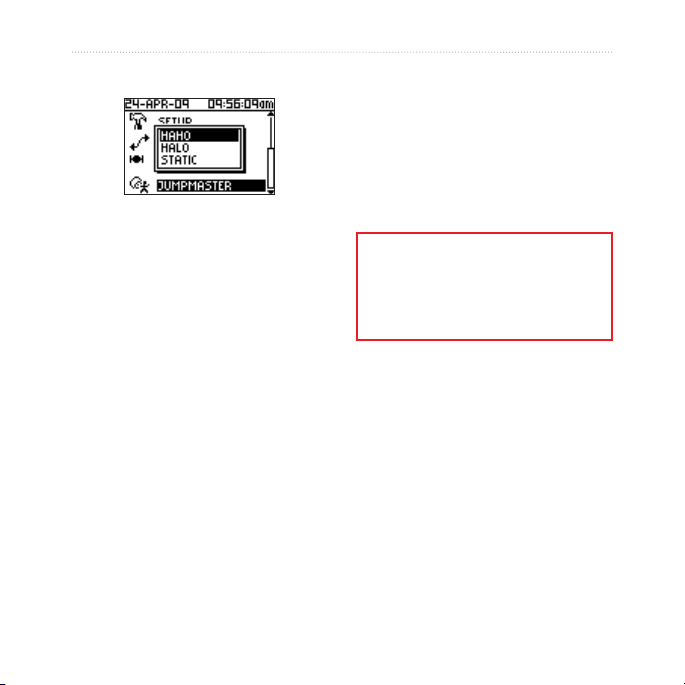
Jumpmaster is an accessory
designed for experienced skydivers.
A jumpmaster is the individual
in charge of a group of skydivers
coordinating a group or cargo
drop. From the main menu, select
JUMPMASTER.
For more information on Jumpmaster
go to www.garmin.com/manuals
/eTrexVista_Jumpmaster.pdf.
Storing the Foretrex
Do not store the Foretrex where
prolonged exposure to extreme
temperatures can occur, because it
can cause permanent damage. User
Battery Information
WARNING: Do not use a sharp object
to remove user-replaceable batteries.
Contact your local waste disposal
department to properly recycle the
batteries.
The Foretrex operates on two AAA
batteries. Use alkaline or NiMH
batteries. Use precharged NiMH
batteries for best results.
Select the battery type:
1. From the main menu, select
SETUP.
2. Select
3. Select
SYSTEM > BATTERY.
ALKALINE or NIMH.
information, such as waypoints
Foretrex 301/401 Owner’s Manual 25
Page 32

Appendix
Optimizing Battery Life
Use premium batteries for optimal
performance and maximum battery
life.
Consider the following suggestions to
maximize battery life:
Excessive use of the backlight
•
will signicantly decrease battery
life.
Select a shorter backlight timeout
•
(page 3).
Turn tones off if not needed.
•
From the main menu, select
SETUP > SYSTEM > BEEPER
> OFF.
Turn off the compass when
•
it is not being used (Foretrex
401 only). Select SETUP >
HEADING > COMPASS >
OFF.
26 Foretrex 301/401 Owner’s Manual
Resetting the Foretrex
If your Foretrex is locked up, press
and hold page and simultaneously
until the screen goes blank (about 7
seconds). This does not erase any of
your data or settings.
Clearing User Data
NOTICE: This deletes all history
and user-entered information.
To clear all user data, press and hold
enter on startup until the message
appears.
Page 33
Appendix
Replacing the Wristband
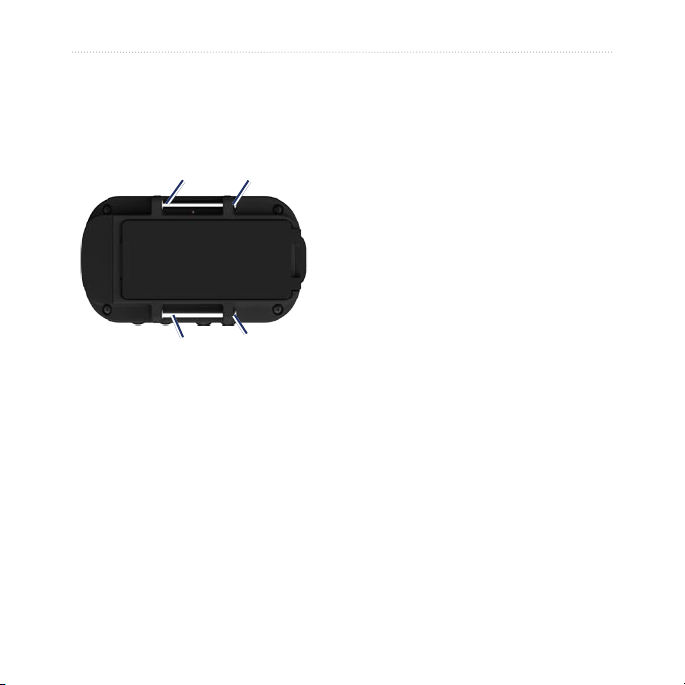
1. Use a #1 Phillips screwdriver to
remove the screws (2) on the
back of the unit.
Screw
Screw hole
To install the extension strap
(optional):
1. Thread the end of the Foretrex
strap through the plastic ring on
the extension strap.
2. Thread the other end of the
extension strap through the
plastic ring on the Foretrex strap.
3. Adjust as necessary.
Cleaning the Unit and Wristband
Screw
2. Remove the old wristband.
3. Align the loops of the new
wristband with the screw holes on
the back of the unit. Make sure
that the Garmin logo is facing up.
4. Replace the screws.
Foretrex 301/401 Owner’s Manual 27
Screw hole
The Foretrex is constructed of
high-quality materials and does not
require user maintenance other than
cleaning. Clean the unit using a cloth
dampened with a mild detergent
solution and then wipe dry. Avoid
chemical cleaners and solvents that
may damage plastic components.
The wristband should be hand
washed with mild detergent in warm
or hot water. Blot dry, then air dry.
Do not machine wash.
Page 34

Appendix
Specications
Physical
Size: W × H × D:
2.93 × 0.89 × 1.65 in.
(74.5 × 22.5 × 42 mm)
Weight (with wristband):
2.26 oz. (64 g) without batteries
Display: W × H: 1.44 × 0.92 in.
(23.368 × 36.576 mm)
100 × 64 pixels
Case: Rugged, waterproof to IPX7
Temperature Range: From -4°F to
140°F (from -20 to 60°C)*
*The temperature rating of the Foretrex
may exceed the usable range of some
batteries. Some batteries can rupture at
high temperatures.
Power
Source: Two AAA batteries
Accuracy
GPS: < 33 ft. (10 m) 95% typical*
*Subject to accuracy degradation to
100 m2 2DRMS under the US DoD
imposed Selective Availability (SA)
Program when activated.
Velocity: 0.328 ft./sec. (0.1 m/sec)
steady state
Interface: USB mass storage device
Data Storage Life: Indenite; no
memory battery required
Performance
Receiver: more than 12 channels,
high-sensitivity
Acquisition Times: < 1 second
(warm start)
< 33 seconds (cold start)
< 36 seconds (Autolocate)
Update Rate: 1/second, continuous
(alkaline or NiMH)
28 Foretrex 301/401 Owner’s Manual
Page 35

Appendix
Software License Agreement
BY USING THE FORETREX, YOU
AGREE TO BE BOUND BY THE
TERMS AND CONDITIONS OF THE
FOLLOWING SOFTWARE LICENSE
AGREEMENT. PLEASE READ THIS
AGREEMENT CAREFULLY.
Garmin grants you a limited license to
use the software embedded in this device
(the “Software”) in binary executable
form in the normal operation of the
product. Title, ownership rights, and
intellectual property rights in and to the
Software remain in Garmin.
You acknowledge that the Software
is the property of Garmin and is
protected under the United States
of America copyright laws and
international copyright treaties. You
further acknowledge that the structure,
organization, and code of the Software
are valuable trade secrets of Garmin
and that the Software in source code
form remains a valuable trade secret of
Garmin. You agree not to decompile,
Foretrex 301/401 Owner’s Manual 29
disassemble, modify, reverse assemble,
reverse engineer, or reduce to human
readable form the Software or any part
thereof or create any derivative works
based on the Software. You agree not to
export or re-export the Software to any
country in violation of the export control
laws of the United States of America.
Declaration of Conformity (DoC)
Hereby, Garmin, declares that this
Foretrex is in compliance with the
essential requirements and other
relevant provisions of Directive
1999/5/EC.
To view the full Declaration of
Conformity, see the Garmin Web site
for your Garmin product:
www.garmin.com.
Page 36

Appendix
FCC Compliance
This device complies with part 15 of the
FCC Rules. Operation is subject to the
following two conditions: (1) this device
may not cause harmful interference,
and (2) this device must accept any
interference received, including
interference that may cause undesired
operation.
Note: This equipment has been tested
and found to comply with the limits
for a Class B digital device pursuant to
part 15 of the FCC Rules. These limits
are designed to provide reasonable
protection against harmful interference in
a residential installation. This equipment
generates, uses, and can radiate radio
frequency energy and if not installed and
used in accordance with the instructions,
may cause harmful interference to
radio communications. However, there
is no guarantee that interference will
not occur in a particular installation.
If this equipment does cause harmful
interference to radio or television
reception, which can be determined by
30 Foretrex 301/401 Owner’s Manual
turning the equipment off and on, the
user is encouraged to try to correct the
interference by one of the following
measures:
Reorient or relocate the receiving
•
antenna
Increase the separation between the
•
equipment and receiver
Connect the equipment into an outlet
•
on a circuit different from that to which
the receiver is connected
Consult the dealer or an experienced
•
radio/TV technician for help.
This Category II radiocommunication
device complies with Industry Canada
Standard RSS-310.
Page 37

Index
Index
A
accessories ii, 22
altimeter 7, 14
B
backlight 3
barometric altimeter
7, 14
battery 2
life 26
type 25
buttons 2
C
cadence sensor 22
compass
calibrating 6
options 12
page 6
connecting
computer 24
unit to unit 24
Foretrex 301/401 Owner’s Manual 31
contacting Garmin i
custom data elds 15
D
data, transferring 23
data elds 15
changing 12, 13
distance
measuring 5
E
elevation
page 6
plot 13
zoom 13
F
les
adding 24
transferring 23
G
Garmin Product Support
i
GPS
acquiring signals 3
mode 21
modes 15
reception 21
sky view 21
GSC 10 16, 22
H
heart rate monitor 22
L
language 14
M
main menu 7
options 13
main pages 4
manual conventions i
map
detail 12
options 12
page 5
P
pairing 22
product registration i
Page 38

Index
R
resetting the unit 26
routes
creating 11
navigating 11
S
satellite signals 3, 21
sensors 22
serial number 1
specications 28
storing 25
T
U
USB, connecting 24
W
waypoints
editing 8
marking 8
navigating 8
wireless transfer 23
wristband
cleaning 27
extender strap 27
replacing 27
time 14
timer
options 20
setting 12, 13
tracks
navigating 10
recording 10
trip computer
options 13
page 7
32 Foretrex 301/401 Owner’s Manual
Page 39

Page 40

For the latest free software updates (excluding map data) throughout the life of
your Garmin products, visit the Garmin Web site at www.garmin.com.
© 2009 Garmin Ltd. or its subsidiaries
1200 East 151st Street, Olathe, Kansas 66062, USA
Liberty House, Hounsdown Business Park, Southampton, Hampshire, SO40 9LR UK
No. 68, Jangshu 2nd Road, Shijr, Taipei County, Taiwan
May 2009 Part Number 190-01068-00 Rev. A Printed in Taiwan
Garmin International, Inc.
Garmin (Europe) Ltd.
Garmin Corporation
www.garmin.com
 Loading...