

Page 1
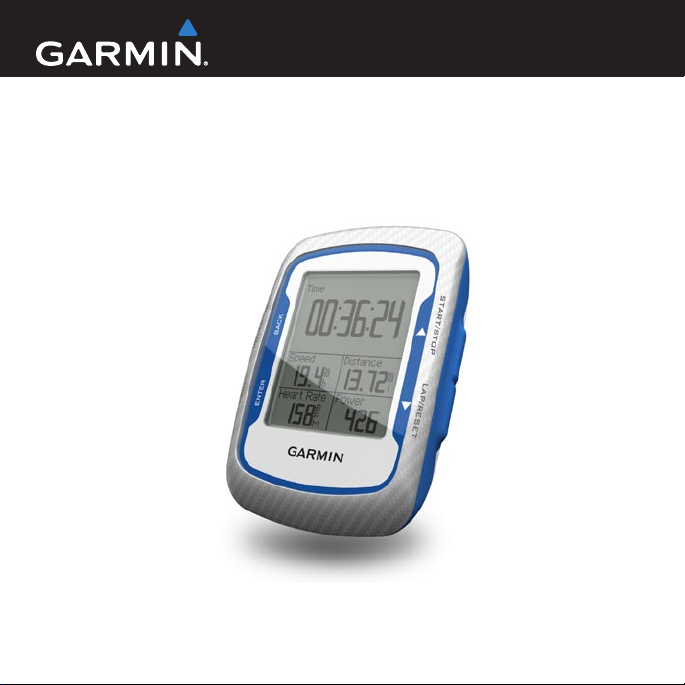
owner’s manual
®
EDGE
GPS-ENABLED BIKE COMPUTER
500
Page 2

© 2009 Garmin Ltd. or its subsidiaries
Garmin International, Inc.
1200 East 151st Street,
Olathe, Kansas 66062,
USA
Tel. (913) 397.8200 or
(800) 800.1020
Fax (913) 397.8282
Garmin (Europe) Ltd.
Liberty House,
Hounsdown Business Park,
Southampton, Hampshire, SO40 9LR UK
Tel. +44 (0) 870.8501241 (outside the UK)
0808 2380000 (within the UK)
Fax +44 (0) 870.8501251
Garmin Corporation
No. 68, Jangshu 2nd Road,
Shijr, Taipei County,
Taiwan
Tel. 886/2.2642.9199
Fax 886/2.2642.9099
All rights reserved. Except as expressly provided
herein, no part of this manual may be reproduced,
copied, transmitted, disseminated, downloaded
or stored in any storage medium, for any purpose
without the express prior written consent of Garmin.
Garmin hereby grants permission to download a
single copy of this manual onto a hard drive or
other electronic storage medium to be viewed and
to print one copy of this manual or of any revision
hereto, provided that such electronic or printed copy
of this manual must contain the complete text of
this copyright notice and provided further that any
unauthorized commercial distribution of this manual
or any revision hereto is strictly prohibited.
Information in this document is subject to change
without notice. Garmin reserves the right to change
or improve its products and to make changes in the
content without obligation to notify any person or
organization of such changes or improvements. Visit
the Garmin Web site (www.garmin.com) for current
updates and supplemental information concerning
the use and operation of this and other Garmin
products.
August 2009 Part Number 190-01071-00 Rev. A Printed in Taiwan
Garmin® is a trademark of Garmin Ltd. or its
subsidiaries, registered in the USA and other
countries. Garmin Training Center®, Auto Pause®,
Auto Lap®, Virtual Partner®, Edge®, Garmin
Connect™, GSC™10, ANT™, and ANT+™ are
trademarks of Garmin Ltd. or its subsidiaries. These
trademarks may not be used without the express
permission of Garmin.
Windows® is a registered trademark of Microsoft
Corporation in the United States and/or other
countries. Mac® is a registered trademark of Apple
Computer, Inc. Other trademarks and trade names
are those of their respective owners.
Page 3

Table of Contents
Getting Started .................... 1
About the Battery ....................... 1
Installing the Edge ..................... 2
Turning on the Edge .................. 4
Acquiring Satellite Signals ......... 7
Optional ANT+ Sensors ............. 7
Going for a Ride ........................ 8
Saving Your Ride Data .............. 8
Downloading Free Software ...... 8
Transferring History to Your
Computer ............................... 9
Training with Your Edge ... 10
Alerts ....................................... 10
Using Auto Lap by Position.......11
Using Auto Lap by Distance .... 12
Using Auto Pause .................... 12
Using Auto Scroll ..................... 13
Courses ................................... 14
ANT+ Sensors ................... 17
Tips for Pairing ANT+ Sensors
with Your Garmin Device ....... 17
Putting on the Heart Rate
Monitor .................................. 18
Using the Heart Rate
Monitor .................................. 19
Heart Rate Zone Table ............ 20
Replacing the Heart Rate
Monitor Battery ...................... 21
Installing the GSC 10............... 22
Replacing the GSC 10
Battery ................................... 25
Calibrating Your Power
Meter ..................................... 26
ANT+ Sensor
Troubleshooting .................... 28
History ............................... 30
Viewing History ........................ 30
Deleting History ....................... 31
Data Recording........................ 31
Edge 500 Owner’s Manual iii
Page 4

Data Management ............. 32
Loading Files ........................... 32
Deleting Files ........................... 33
Settings ............................. 34
Customizing Your Data
Fields .................................... 34
Data Fields .............................. 34
Changing Your System
Settings ................................. 38
Changing Your User Prole
Settings ................................. 39
Updating Your Bike Prole ....... 39
Changing the Start Notice ....... 40
GPS Settings ........................... 40
Setting Elevation Points........... 41
Buying Optional Accessories ... 43
Specications .......................... 43
Wheel Size and
Circumference ....................... 46
Troubleshooting ....................... 48
Index .................................. 50
Appendix ........................... 42
Registering Your Device .......... 42
About the Edge ........................ 42
Updating the Software ............. 42
Contacting Garmin Product
Support ................................. 42
Using the Backlight .................. 43
iv Edge 500 Owner’s Manual
Page 5
Getting Started
WARNING
Always consult your physician before
you begin or modify any exercise
program. See the Important Safety
and Product Information guide in the
product box for product warnings and
other important information.
Before you use the Edge® the rst time,
complete the following tasks:
1. Charge the battery (page 2).
2. Install the Edge (page 2).
3. Turn on the Edge (page 4).
4. Acquire satellites (page 7).
5. Set up optional ANT+ sensors
(page 7).
6. Go for a ride (page 8).
7. Save your ride (page 8).
Getting Started
8. Download Garmin Connect™, or
Garmin Training Center®
(page 8).
9. Transfer history to your computer
(page 9).
About the Battery
WARNING
This product contains a lithium-ion
battery. See the Important Safety and
Product Information guide in the
product box for product warnings and
other important information.
The Edge is powered by a built-in
lithium-ion battery that you can
recharge using the AC charger or the
USB cable included in the product box.
NOTE: The Edge will not charge
when outside the temperature range of
32°F–122°F (0°C–50°C).
Edge 500 Owner’s Manual 1
Page 6
Getting Started
Charging the Edge
NOTICE
To prevent corrosion, thoroughly dry
the mini-USB port, weather cap, and
surrounding area before charging or
connecting to a computer.
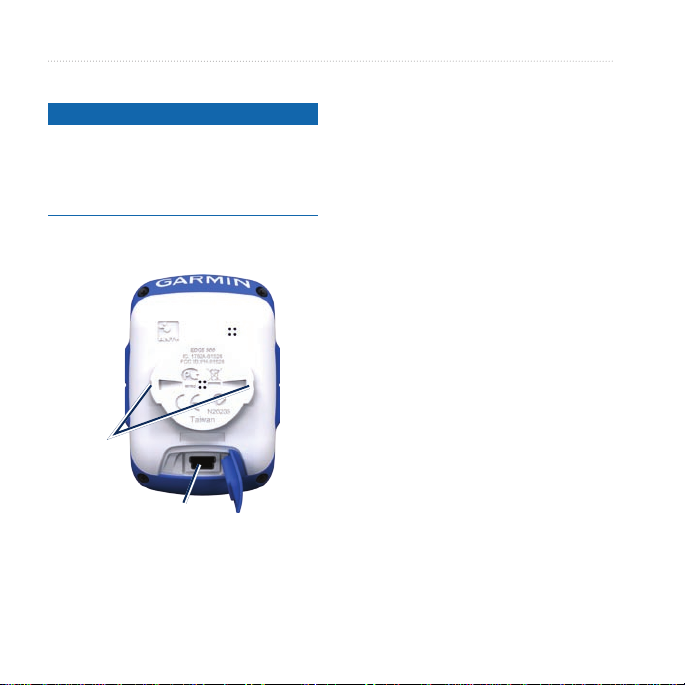
1. Pull up the weather cap from the
mini-USB port.
Tabs
Mini-USB port under
the weather cap
2. Plug the small end of the AC
charger into the mini-USB port.
To connect the Edge to your
computer using the USB cable, see
page 9.
3. Plug the other end of the AC
charger into a standard wall outlet.
4. Charge the Edge for at least three
hours before you begin using it.
A fully charged battery can run for
approximately 18 hours before it must
be recharged.
Installing the Edge
For the best GPS reception, position
the bike mount so the front of the
Edge is oriented toward the sky. You
can install the bike mount on the stem
(shown) or the handlebars.
1. Select a suitable and secure location
to mount the Edge where it does not
interfere with safe operation of your
bike.
2 Edge 500 Owner’s Manual
Page 7
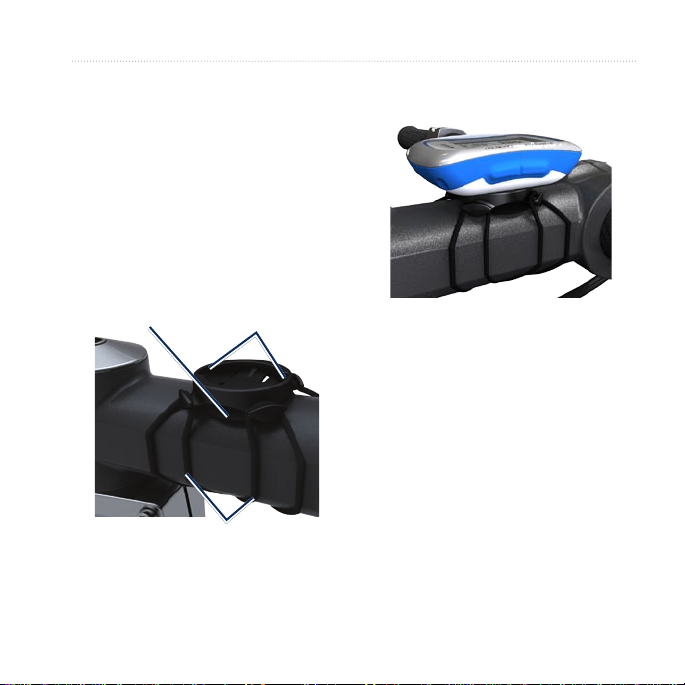
2. Place the rubber disk on the back of
5. Align the tabs on the back of the
the bike mount.
The rubber tabs align with the back
of the bike mount so it stays in
place.
3. Place the bike mount on the bike
stem.
4. Attach the bike mount securely
using the two O-rings.
Rubber
disk
Bike mount
tabs
6. Press down slightly and turn the
Releasing the Edge
1. Turn the Edge counter clockwise to
O-rings around
the bike stem
2. Lift the Edge off the mount.
Getting Started
Edge with the bike mount notches.
Edge Mounted on the
Bike Stem
Edge clockwise until it locks into
place.
unlock the device.
Edge 500 Owner’s Manual 3
Page 8
Getting Started
Turning on the Edge
Press and hold POWER to turn on the
Edge.
Conguring the Edge
The rst time you turn on the Edge,
you are prompted to congure system
settings and user prole settings.
Follow the on-screen instructions
•
to complete the initial setup.
Press and to view choices
•
and change the default selection.
Press ENTER to make a selection.
•
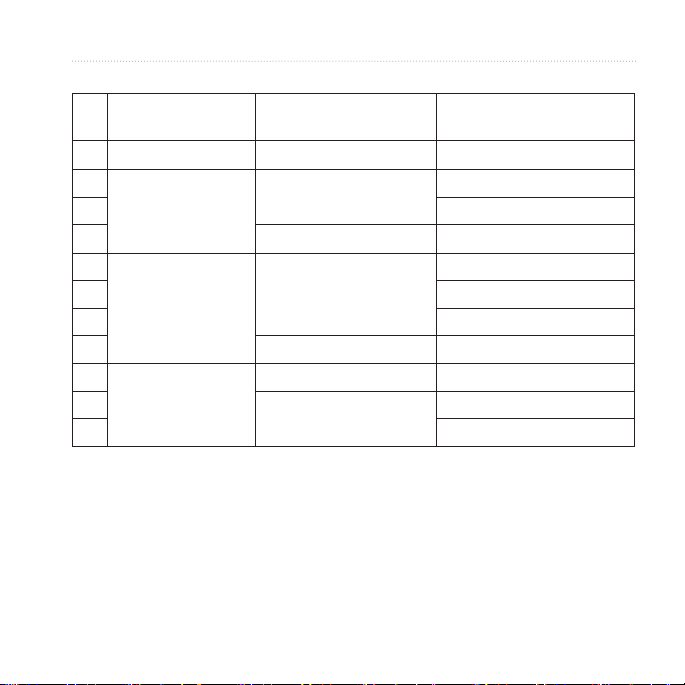
Use the table on page 5 to answer
•
the activity class question.
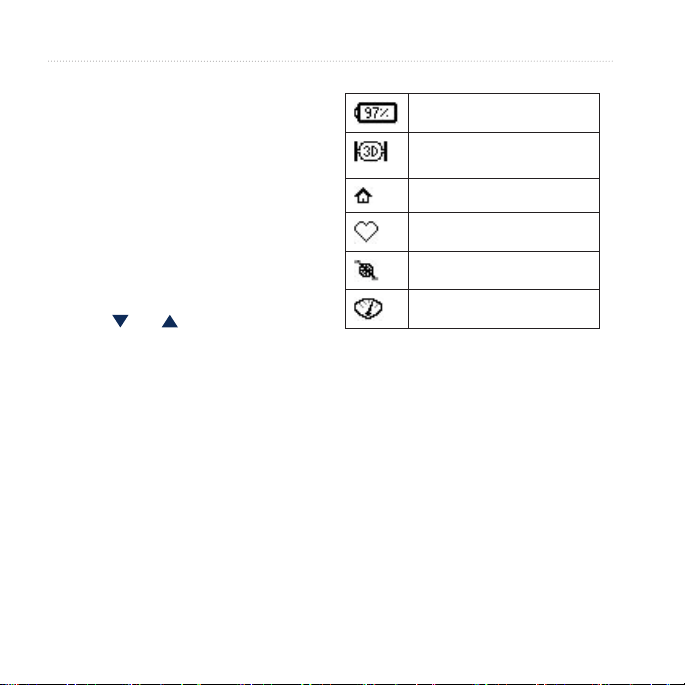
Icons
Battery charge level
GPS is on and receiving
signals.
GPS is turned off.
Heart rate sensor active
Cadence sensor active
Power sensor active
4 Edge 500 Owner’s Manual
Page 9
Getting Started
Activity Classes
Training
Description
0 No exercise - -
1 Occasional, light
exercise
2 15 to 30 minutes
3 Once a week Approximately 30 minutes
4 Regular exercise and
training
5 45 minutes to 1 hour
6 1 to 3 hours
7 3 to 5 times per week 3 to 7 hours
8 Daily training Almost daily 7 to 11 hours
9 Daily 11 to 15 hours
10 More than 15 hours
Training
Frequency
Once every two weeks Less than 15 minutes
2 to 3 times per week Approximately 45 minutes
Training Time Per Week
Edge 500 Owner’s Manual 5
Page 10
Getting Started
Buttons
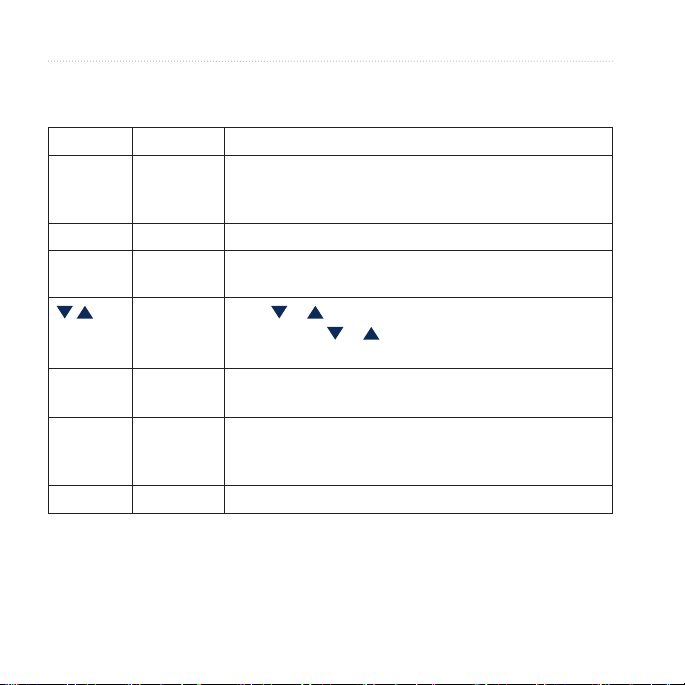
Each Edge button has multiple functions based on the mode you are using.
Button Mode Description
POWER/
LIGHT
BACK Menu Press BACK to cancel or return to the previous menu.
START/
STOP
Timer and
menu
Timer Press START/STOP to start and stop the timer.
Menu
Press and hold POWER to turn the device on and off.
Press LIGHT to activate the backlight. Press any button to
extend the back light for ve seconds.
Press or to select menus and settings.
Press and hold or to scroll quickly through settings.
LAP/
RESET
PAGE/
MENU
ENTER Menu Press ENTER to select options and acknowledge messages.
6 Edge 500 Owner’s Manual
Timer Press LAP to create a new lap.
Press and hold RESET to reset the timer.
Timer Press PAGE to scroll through training pages.
Press and hold MENU to switch between menu and timer
modes.
Page 11

Acquiring Satellite
Signals
It may take 30–60 seconds to acquire
signals.
1. Go outdoors to an open area.
2. Make sure the front of the Edge
is oriented toward the sky.
3. Wait while the Edge searches for
satellites.
Stand still, and do not begin
moving until the locating satellite
page disappears.
NOTE: To turn off the GPS receiver
and use the Edge indoors, see
page 40.
Optional ANT+ Sensors
NOTE: If you do not need to set up
ANT+ sensors, you can skip this
step.
To use an ANT+ sensor during your
ride, you must install it and pair it
with the Edge.
•
•
•
Getting Started
For heart rate monitor
instructions, see page 18.
For GSC 10 speed and cadence
sensor instructions, see page 22.
For power meter instructions,
see page 26, refer to the
manufacturer’s instructions, and
go to www.garmin.com
\intosports.
Edge 500 Owner’s Manual 7
Page 12

Getting Started
Going for a Ride
Before you can go record history,
you must acquire satellite signals
(page 7).
1. Press and hold MENU to view
the timer page.
2. Press START to start the timer.
History is only recorded while
the timer is running.
3. After completing your ride, press
STOP.
Saving Your Ride Data
Press and hold RESET to save your
ride data and reset the timer.
Downloading Free
Software
Garmin provides two software
options for storing and analyzing
your ride data:
Garmin Connect is Web-based
•
software.
Garmin Training Center is
•
computer software.
1. Go to www.garmin.com
/intosports.
2. Follow the on-screen instructions.
8 Edge 500 Owner’s Manual
Page 13
Transferring History to
Your Computer
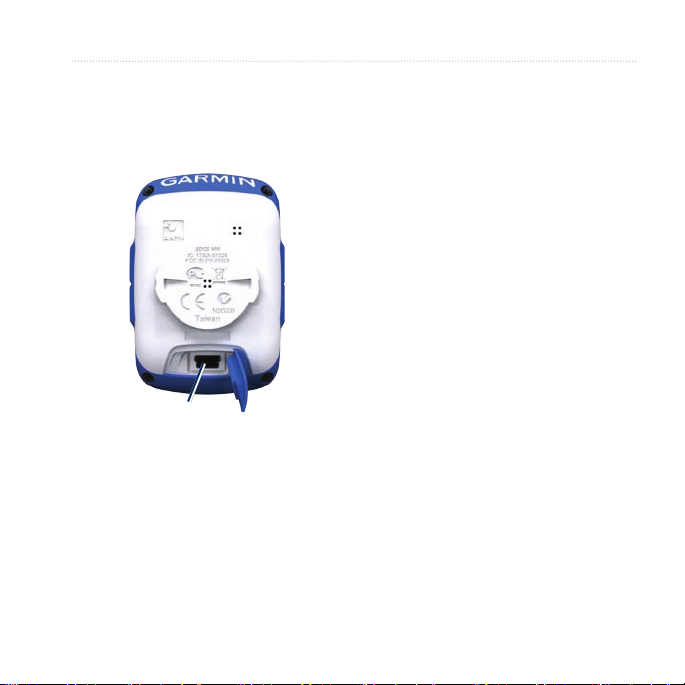
1. Lift the weather cap on the back of
the Edge.
Mini-USB port
under weather
cap
2. Plug the small end of the USB
cable into the mini-USB port.
3. Connect the larger end of the USB
cable to an available USB port on
your computer.
Getting Started
4. Open
Garmin Connect or Garmin
Training Center.
5. Follow the upload instructions
included with the software.
Edge 500 Owner’s Manual 9
Page 14

Training with Your Edge
Training with Your
Edge
NOTE
: To make sure the Edge
message tones are turned on, see
page 38.
Alerts
Use Edge alerts to train toward certain
time, distance, calorie, heart rate,
cadence, and power goals.
Using Time, Distance, and
Calorie Alerts
1. Press and hold MENU.
2. Select Training > Alerts.
3. Select Time Alert, Distance Alert,
or Calorie Alert.
4. Turn on the alert.
5. Enter a time, distance, or calorie
amount.
6. Go for a ride.
Each time you reach the alert amount,
the Edge beeps and displays a message.
10 Edge 500 Owner’s Manual
Using Advanced Alerts
If you have an optional heart rate
monitor, speed and cadence sensor, or
power meter, you can set up advanced
alerts.
1. Press and hold MENU.
2. Select Training > Alerts.
3. Select an option:
Select Heart Rate Alert to set
•
the minimum and maximum
heart rate in beats per minute
(bpm).
NOTE: For more information
about heart rate zones and
settings, see page 19.
Select Cadence Alert to set the
•
fast and slow cadence amounts
in revolutions of the crank arm
per minute (rpm).
Page 15

Select Power Alert to set the
•
minimum and maximum power
amounts in watts.
3. Go for a ride.
Each time you exceed or drop below
the specied heart rate, cadence or
power amount, the Edge beeps and
displays a message.
NOTE: To make sure the Edge
message tones are turned on, see
page 38.
2. Select Settings > Bike Settings >
3. In the Auto Lap Trigger eld,
Using Auto Lap by
Position
You can use Auto Lap® to
automatically mark the lap at a specic
position. This feature is helpful for
comparing your performance over
different parts of a ride (for example, a
long climb or training sprints).
1. Press and hold MENU.
Training with Your Edge
Auto Lap.
select By Position to choose an
option:
Select Lap Press Only to
•
trigger the lap counter each time
you press LAP and each time
you pass any of those locations
again.
Select Start And Lap to
•
trigger the lap counter at the
GPS location where you press
START and at any location
during the ride where you press
LAP.
Select Mark And Lap to trigger
•
the lap counter at a specic GPS
location marked before the ride
and at any location during the
ride where you press LAP.
Edge 500 Owner’s Manual 11
Page 16

Training with Your Edge
4. Customize optional lap data elds
(see page 34).
5. Go for a ride.
NOTE: During courses, use the By
Position option to trigger laps at all of
the lap positions saved in the course.
Using Auto Lap by
Distance
You can use Auto Lap® to
automatically mark the lap at a specic
distance. This feature is helpful for
comparing your performance over
different parts of a ride (for example,
every 10 miles or 40 kilometers).
1. Press and hold MENU.
2. Select Settings > Bike Settings >
Auto Lap.
3. In the Auto Lap Trigger eld,
select By Distance to enter a value.
4. Customize optional lap data elds
5. Go for a ride.
Using Auto Pause
You can use Auto Pause® to pause the
timer automatically when you stop
moving or your speed drops below a
specied value. This feature is helpful
if your ride includes stop lights or other
places where you need to slow down
or stop.
NOTE: The elapsed time data for Auto
Pause is not saved with your history
data.
1. Press and hold MENU.
2. Select Settings > Bike Settings >
(see page 34).
Auto Pause.
12 Edge 500 Owner’s Manual
Page 17

3. Select an option:
Select Off.
•
Select When Stopped to pause
•
the timer automatically when
you stop moving.
Select Custom Pace to pause
•
the timer automatically when
your speed drops below a
specied value.
4. Customize optional time data elds
(see page 34).
After you turn on Auto Pause, the
Edge can display any paused time
Using Auto Scroll
Use the auto scroll feature to
automatically cycle through all of the
training data pages while the timer is
running.
1. Press and hold MENU.
2. Select Settings > Bike Settings >
3. Select a display speed: Slow,
4. Go for a ride.
The training data pages scroll
as Time - Elapsed.
5. Go for a ride.
Training with Your Edge
Auto Scroll.
Medium, or Fast.
automatically. Press PAGE to
manually switch pages.
Edge 500 Owner’s Manual 13
Page 18

Training with Your Edge
Courses
Courses allow you to train using a
previously recorded activity. You can
follow the course trying to match
or exceed previously set goals. For
example, if the original course was
completed in 35 minutes, you will
race against a Virtual Partner® trying
to complete the course in under 35
minutes.
Garmin recommends that you use
Garmin Connect or Garmin Training
Center to create courses and course
points. Then you can transfer them to
your Edge (page 32).
Course Points
You can add course points, or places
on your course that you want to
remember, such as water stops or
distance goals. You must use Garmin
Connect or Garmin Training Center to
add course points to any course.
Creating Courses with Your
Edge
Before you can create a course, you
must have history with GPS track data
saved to the Edge.
1. Press and hold MENU.
2. Select Training > Courses >
<Create New>.
3. From the list of rides, select a
previous ride on which to base your
course.
4. Enter a descriptive course name in
the top eld (for example, 44KTT).
14 Edge 500 Owner’s Manual
Page 19
Starting a Course
1. Press and hold MENU.
2. Select Training > Courses.
3. Select a course from the list.
4. Select an option:
Select Do Course.
•
Select Map to preview the
•
course, and press BACK to
return to the course list.
Select Prole to preview the
•
elevation prole, and press
BACK to return to the course
list.
5. Press START.
History is recorded even if you are
not on the course. The “Course
Complete” message appears when
you nish.
Training with Your Edge
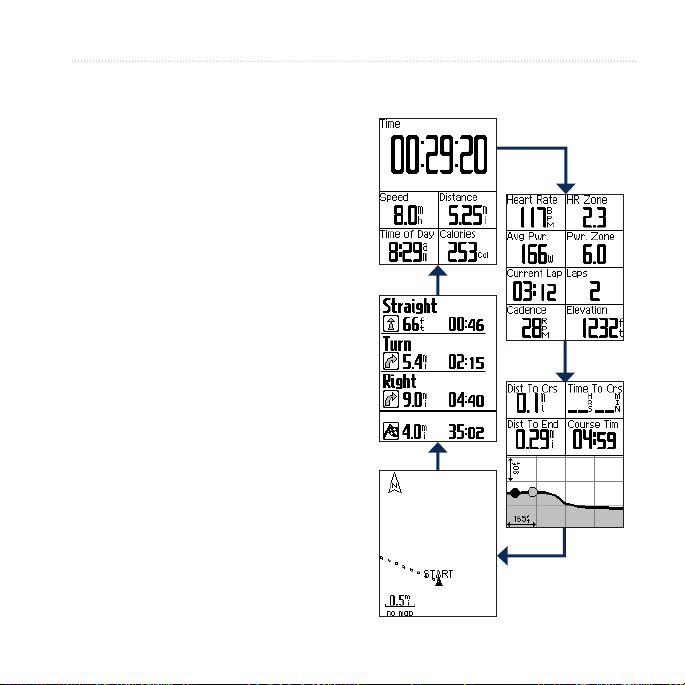
5. Press ENTER to view the data
pages:
Edge 500 Owner’s Manual 15
Page 20
Training with Your Edge
Off Course Options
You can include a warm up before you
begin your course. Press START to
begin the course, and then warm up as
normal. Be sure to stay away from your
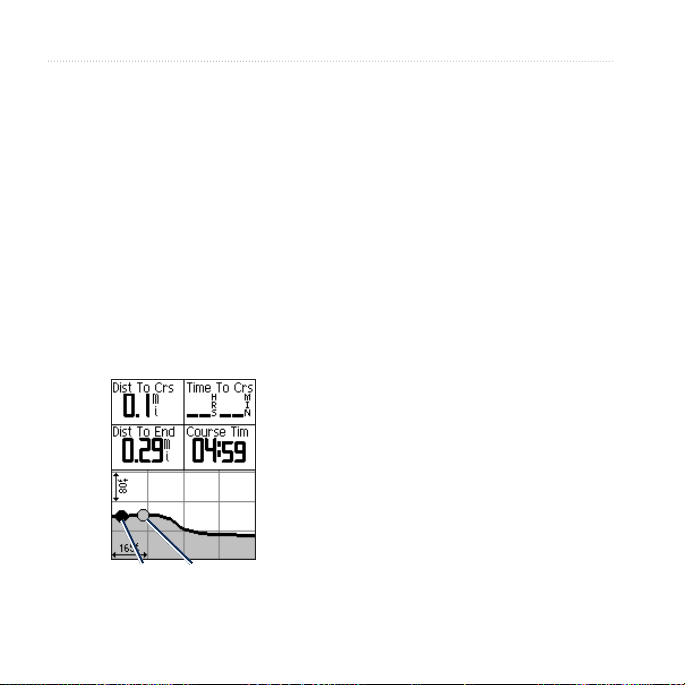
If you stray away from the course,
the Edge displays an “Off Course”
message. Use the course map or course
points to nd your way back to the
course.
course path as you warm up. When you
are ready to begin, head toward your
course. When you are on any part of
the course path, the Edge displays an
“On Course” message.
NOTE: As soon as you press START,
Stopping a Course
Press and hold MENU, and select
Training > Stop Course.
Deleting a Course
1. Press and hold MENU > select
your Virtual Partner starts the course
and does not wait for you to warmup.
2. Select the course you want to
3. Select Delete Course.
4. Select Yes.
Training > Courses.
delete.
You
16 Edge 500 Owner’s Manual
Virtual
Partner
Page 21

ANT+ Sensors
The Edge is compatible with the
following ANT+ accessories:
Heart rate monitor (page 18)
•
GSC 10 speed and cadence sensor
•
(page 22)
Third-party power meters
•
(page 26)
For information about purchasing
additional accessories, go to
http://buy.garmin.com.
Tips for Pairing ANT+
Sensors with Your Garmin
Device
Make sure the ANT+ sensor is
•
compatible with your Garmin
device.
Before you pair the ANT+ sensor
•
with your Garmin device, move 10
m away from other ANT+ sensors.
Using ANT+ Sensors
Bring the Garmin device within
•
range (3 m) of the ANT+ sensor.
After you pair the rst time, your
•
Garmin device automatically
recognizes the ANT+ sensor each
time it is activated. This process
occurs automatically when you
turn on the Garmin device and
only takes a few seconds when
the sensors are activated and
functioning correctly.
When paired, your Garmin device
•
only receives data from your
sensor, and you can go near other
sensors.
Edge 500 Owner’s Manual 17
Page 22
Using ANT+ Sensors
Putting on the Heart Rate
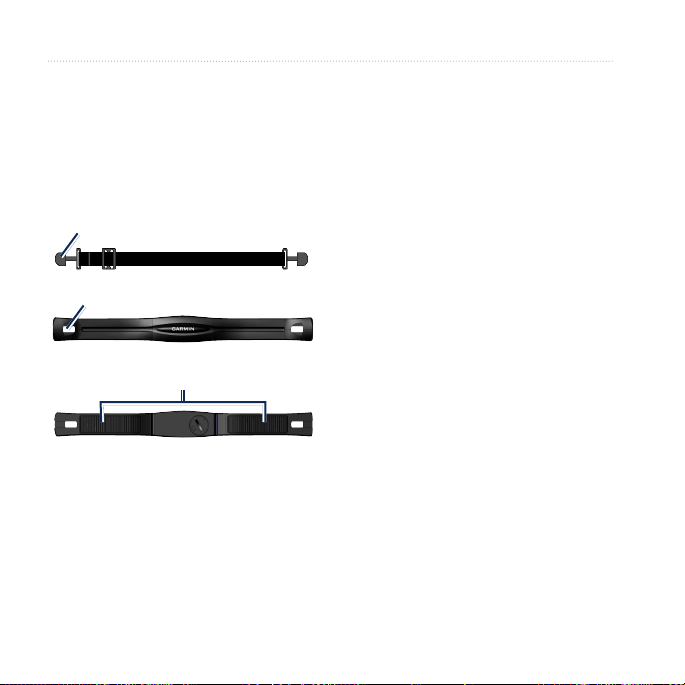
1. Push one tab on the strap through
Monitor
Wear the heart rate monitor directly on
your skin, just below your breastplate.
It should be snug enough to stay in
place during your ride.
Tab
Heart Rate Monitor Strap
Slot
Heart Rate Monitor (Front)
Electrodes
Heart Rate Monitor (Back)
2. Press the tab down.
3. Wet both electrodes on the back
4. Wrap the strap around your chest
The Garmin logo should be right-
After you put on the heart rate monitor,
it is on standby and ready to send data.
the slot in the heart rate monitor.
of the heart rate monitor to create
a strong connection between your
chest and the transmitter.
and attach it to the other side of the
heart rate monitor.
side up.
18 Edge 500 Owner’s Manual
Page 23

Using the Heart Rate
Monitor
For the most accurate calorie data
during your ride, set your maximum
heart rate, resting heart rate, and heart
rate zones using Garmin Connect or
Garmin Training Center.
1. Turn on the Edge.
2. Bring the Edge within range (3 m)
of the heart rate monitor.
3. Press and hold MENU.
4. Select Settings > Bike Settings >
Heart Rate > ANT+ HR.
5. Select Yes.
6. Select Rescan.
7. Press BACK to return to the main
menu.
When the heart rate monitor is
paired, a message appears and the
heart rate icon appears on the
main menu.
Using ANT+ Sensors
8. Customize optional data elds
(page 34).
9. Go for a ride.
TIP: If heart rate data does not appear
or if you have erratic heart rate data,
you may have to tighten the strap
on your chest or warm up for 5–10
minutes (see page 28).
Viewing Your Heart Rate Zones
and Settings
You can set your maximum heart rate,
resting heart rate, and heart rate zones
using Garmin Connect or Garmin
Training Center.
1. Press and hold MENU.
2. Select Settings > Bike Settings >
Heart Rate > HR Zones.
Edge 500 Owner’s Manual 19
Page 24
Using ANT+ Sensors
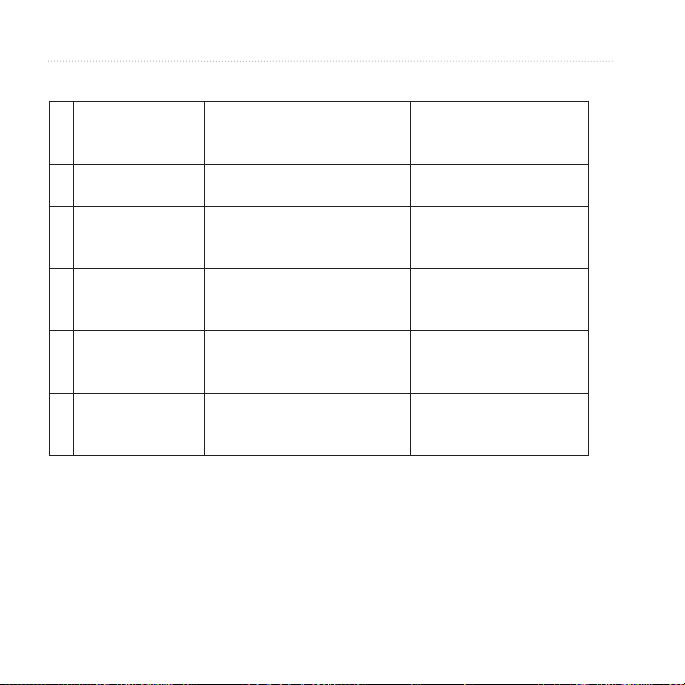
Heart Rate Zone Table
% of Maximum
Heart Rate or Rest
ing Heart Rate
1 50–60% Relaxed, easy pace; rhythmic
2 60–70% Comfortable pace; slightly
3 70–80% Moderate pace; more difcult to
4 80–90% Fast pace and a bit
5 90–100% Sprinting pace, unsustainable
Perceived Exertion Benets
-
breathing
deeper breathing, conversation
possible
hold conversation
uncomfortable; breathing
forceful
for long period of time; labored
breathing
Beginning-level aerobic
training; reduces stress
Basic cardiovascular
training; good recovery
pace
Improved aerobic capacity;
optimal cardiovascular
training
Improved anaerobic
capacity and threshold;
improved speed
Anaerobic and muscular
endurance; increased
power
20 Edge 500 Owner’s Manual
Page 25
About Heart Rate Zones
CAUTION
Consult your physician to specify heart
rate zones that are appropriate for your
tness level and health condition.
Many athletes are using heart rate
zones to measure and increase their
cardiovascular strength and improve
their level of tness. A heart rate zone
is a set range of heartbeats per minute.
The ve commonly accepted heart
rate zones are numbered from 1–5
according to increasing intensity.
How Do Heart Rate Zones
Affect Your Fitness Goals?
Knowing your heart rate zones can
help you measure and improve your
tness by understanding and applying
these principles:
Your heart rate is a good measure of
exercise intensity.
Training in certain heart rate zones
can help you improve cardiovascular
capacity and strength.
Knowing your heart rate zones can
prevent you from overtraining and can
decrease your risk of injury.
Replacing the Heart Rate
Monitor Battery
The heart rate monitor contains a userreplaceable CR2032 battery.
NOTE: Contact your local waste
disposal department to properly
dispose of batteries.
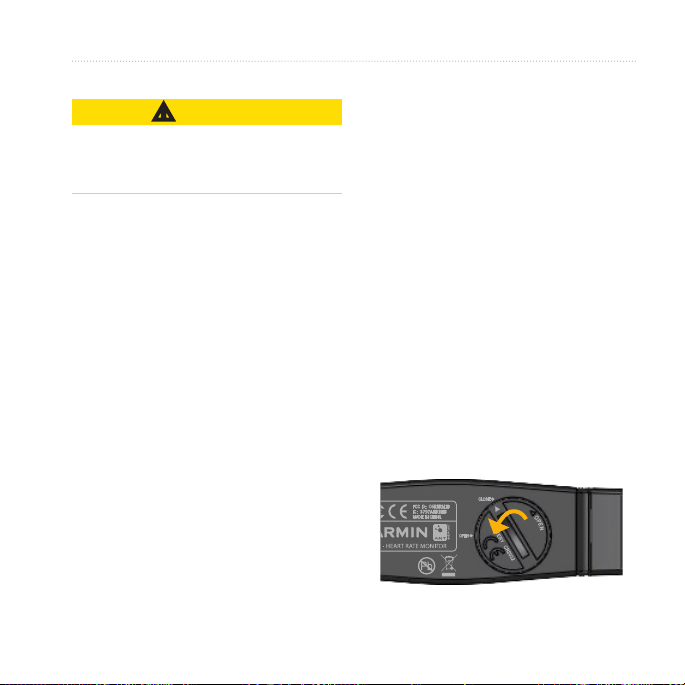
1. Locate the circular battery cover on
Using ANT+ Sensors
the back of the heart rate monitor.
Edge 500 Owner’s Manual 21
Page 26
Using ANT+ Sensors
2. Use a coin to twist the cover
counter-clockwise so the arrow on
the cover points to OPEN.
3. Remove the cover and battery.
4. Wait 30 seconds.
5. Insert the new battery with the
positive side facing up.
NOTE: Be careful not to damage
or lose the O-ring gasket on the
cover.
6. Use a coin to twist the cover
clockwise so the arrow on the cover
points to CLOSE.
Installing the GSC 10
Both magnets must be aligned with
their respective indication lines for the
Edge to receive data.
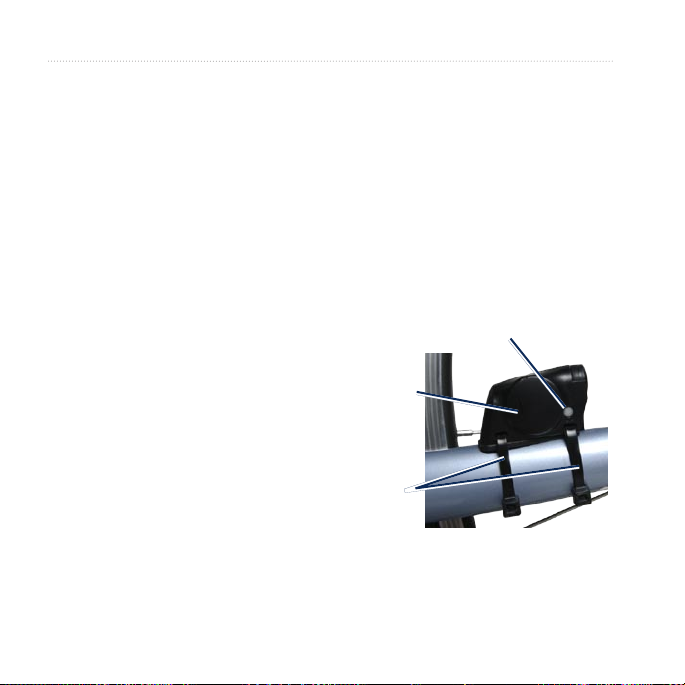
1. Place the GSC 10 on the rear chain
stay (on the side opposite the drive
train).
NOTE: Place the at rubber pad or
the triangle-shaped rubber pad on
the chain stay for stability.
Reset
button
Indication
line
Cable
ties
GSC 10 on Rear
Chain Stay
22 Edge 500 Owner’s Manual
Page 27
2. Loosely attach the GSC 10 using
4. Unscrew the spoke magnet from the
two cable ties.
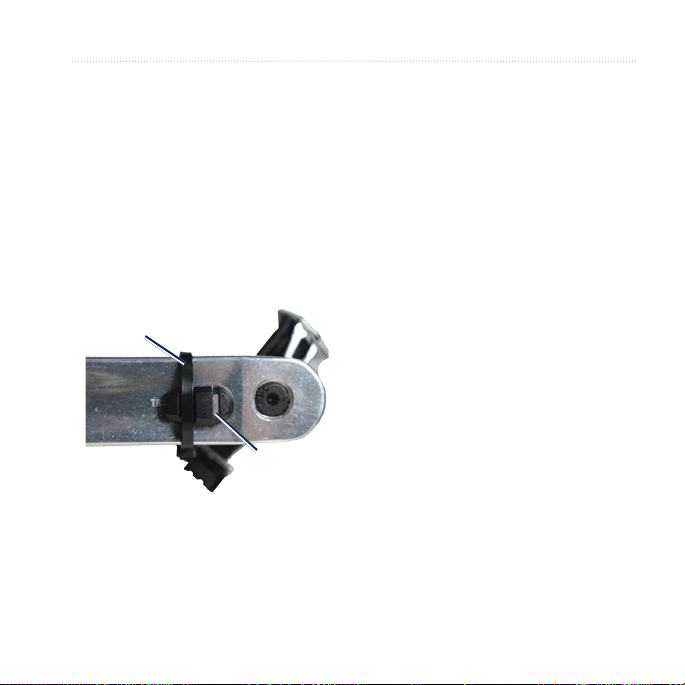
3. Attach the pedal magnet to the
5. Place the spoke in the groove of the
crank arm using the adhesive mount
and a cable tie.
The spoke magnet can face away
The pedal magnet must be within 5
mm of the GSC 10. The indication
line on the pedal magnet must line
up with the indication line on the
GSC 10.
Cable
tie
Indication
line
Pedal Magnet on
Crank Arm
Using ANT+ Sensors
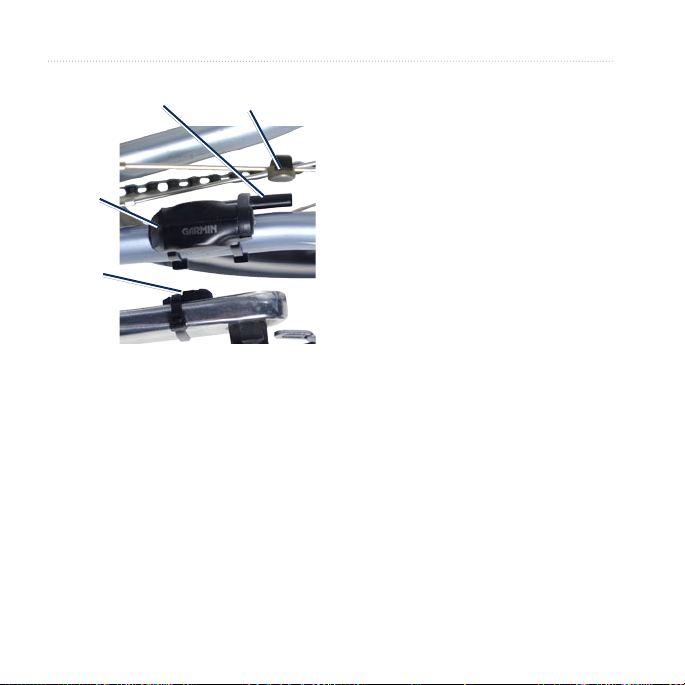
plastic piece.
plastic piece and tighten slightly.
from the GSC 10 if there is not
enough room between the sensor
arm and the spoke. The spoke
magnet must be aligned with the
sensor arm indication line.
Edge 500 Owner’s Manual 23
Page 28
Using ANT+ Sensors
Sensor arm
indication line
GSC 10
Pedal
magnet
GSC 10 and Magnet
Spoke
magnet
Alignment
6. Loosen the screw on the sensor
arm.
7. Move the sensor arm to within 5
mm of the spoke magnet.
You can also tilt the GSC 10 closer
to either magnet for improved
alignment.
8. Press the
Reset button on the
GSC 10.
The LED turns red, then green.
9. Pedal to test the sensor alignment.
The red LED blinks each time the
crank arm passes the sensor. The
green LED blinks each time the
wheel magnet passes the sensor
arm.
NOTE: The LED blinks for the rst
60 passes after a reset. Press Reset
again if you require additional
passes.
10. When everything is aligned and
working correctly, tighten the cable
ties, sensor arm, and spoke magnet.
24 Edge 500 Owner’s Manual
Page 29

About the GSC 10
Cadence data from the GSC 10 is
always recorded. If there is no GSC 10
paired, GPS data is used to calculate
the speed and distance.
Cadence is your rate of pedaling or
“spinning” measured by the number of
revolutions of the crank arm per minute
(rpm). There are two sensors on the
GSC 10: one for cadence and one for
speed.
For information about cadence alerts,
see page 10.
Non-Zero Averaging for
Cadence Data
The non-zero data averaging setting
is available if you are training with an
optional cadence sensor. The default
setting is to exclude zero values that
occur when you are not pedaling.
To turn the non-zero averaging on or
off, press and hold MENU, and select
Settings > Bike Settings > Data Avg.
Replacing the GSC 10
Battery
The GSC 10 contains a userreplaceable CR2032 battery.
NOTE: Contact your local waste
disposal department to properly
dispose of batteries.
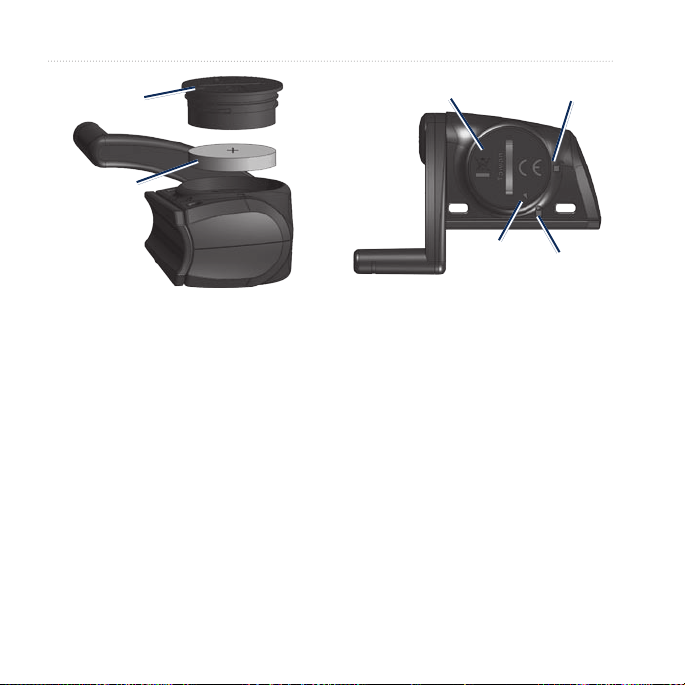
1. Locate the circular battery cover on
Using ANT+ Sensors
the side of the GSC 10.
Edge 500 Owner’s Manual 25
Page 30
Using ANT+ Sensors
Battery
cover
CR2032
battery
Battery
cover
Unlocked
2. Use a coin to twist the cover
counter-clockwise until it is loose
enough to remove (arrow points to
unlocked).
3. Remove the cover and battery.
4. Wait 30 seconds.
5. Insert the new battery with the
positive side facing up.
Arrow
Calibrating Your Power
Meter
For a list of third-party power meters
that are compatible with the Edge,
go to www.garmin.com/intosports.
For calibration instructions specic
to your power meter, refer to the
manufacturer’s instructions.
Locked
NOTE: Be careful not to damage
or lose the O-ring gasket on the
cover.
6. Use a coin to twist the cover back
into place (arrow points to locked).
26 Edge 500 Owner’s Manual
Page 31

Before you can calibrate your power
meter, it must be properly installed and
actively recording data.
1. Press and hold MENU.
2. Select Settings > Bike Settings
> Bike 1 > ANT+ Power >
Non-Zero Averaging for Power
Data
The non-zero data averaging setting
is available if you are training with
an optional power meter. The default
setting is to exclude zero values that
occur when you are not pedaling.
Calibrate.
3. Keep your power meter active by
pedaling until the message appears.
To turn the non-zero averaging on or
off, press and hold MENU, and select
Settings > Bike Settings > Data Avg.
Viewing Your Power Zones
You can set seven custom power zones
using Garmin Connect or Garmin
Training Center. If you know your
FTP (functional threshold power)
value, you can enter it, and allow the
software to calculate your power zones
automatically.
1. Press and hold MENU.
2. Select Settings > Bike Settings >
Bike 1 > Power Zones.
Using ANT+ Sensors
Edge 500 Owner’s Manual 27
Page 32
Using ANT+ Sensors
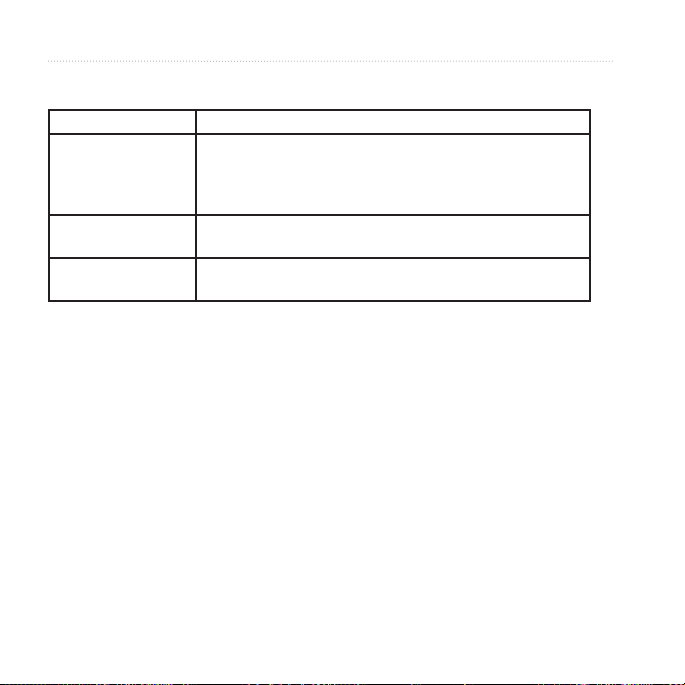
ANT+ Sensor Troubleshooting
Problem Solution
Stay 10 m away from other ANT sensors while pairing.
The ANT+ sensor
will not pair with my
device.
I have a third-party
ANT+ sensor.
The heart rate monitor
strap is too big.
•
Bring the device within range (3 m) of the heart rate
•
monitor while pairing.
If the problem persists, replace the battery.
•
Make sure it is compatible with the Edge (www.garmin
.com/intosports).
A smaller elastic strap is sold separately. Go to
http://buy.garmin.com.
28 Edge 500 Owner’s Manual
Page 33

Problem Solution
Make sure the heart rate monitor is snug against your body.
•
Reapply moisture to the electrodes. Use water, saliva, or
•
electrode gel.
Clean the electrodes. Dirt and sweat residue on the
•
electrodes can interfere with heart rate signals.
Position the heart rate monitor on your back instead of your
•
chest.
Wear a cotton shirt or wet your shirt if suitable for your
The heart rate data is
inaccurate or erratic.
•
activity. Synthetic fabrics that rub or ap against the heart
rate monitor can create static electricity that interferes with
heart rate signals.
Move away from sources of strong electromagnetic elds
•
and some 2.4 GHz wireless sensors, which can interfere
with your heart rate monitor. Sources of interference may
include very high voltage power lines, electric motors,
microwave ovens, 2.4 GHz cordless phones, and wireless
LAN access points.
Using ANT+ Sensors
Edge 500 Owner’s Manual 29
Page 34
History
History
Your Edge automatically saves history
when the timer is started. The Edge can
save at least 180 hours of ride data with
typical use. When the Edge memory
is full, an error message appears. The
Edge does not automatically delete or
overwrite your history. See page 31 to
learn how to delete history.
Upload your history (page 9) to
Garmin Connect or Garmin Training
Center periodically to keep track of all
of your ride data.
History includes time, distance,
calories, average speed, maximum
speed, altitude, and detailed lap
information. Edge history can also
include heart rate, cadence, and power.
NOTE: History is not recorded while
the timer is stopped.
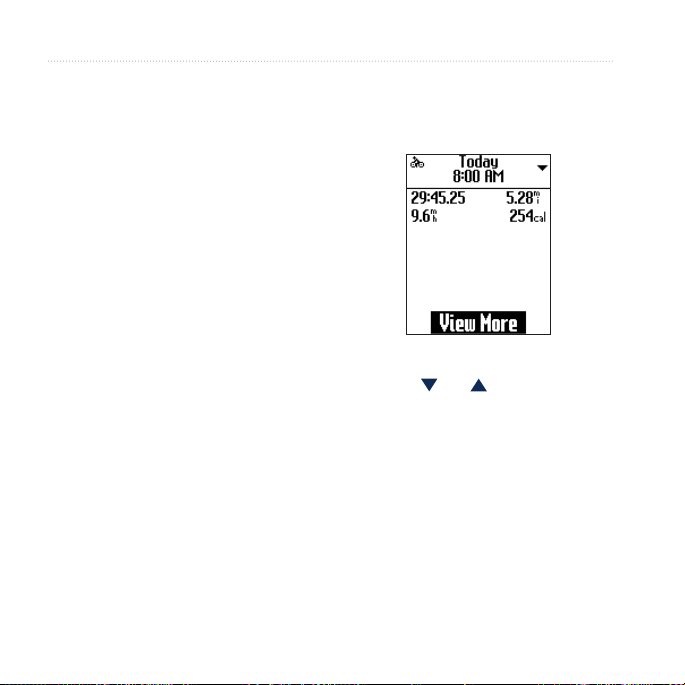
Viewing History
1. Press and hold MENU.
2. Select History > Activities.
3. Choose an option:
Use and to scroll through
•
your activities.
Select View More to view the
•
details of the entire ride or each
lap.
30 Edge 500 Owner’s Manual
Page 35

Deleting History
After you have transferred your history
to your computer, you may want to
delete the history from your Edge.
1. Press and hold MENU.
2. Select History > Delete.
3. Select an option:
Select Individual Activities to
•
delete one activity at a time.
Select All Activities to delete
•
all ride data from the history.
Select Old Activities to delete
•
activities recorded more than
one month ago.
Select All Totals to reset all the
•
ride distance and time totals.
4. Select Yes to conrm.
History
Data Recording
The Edge uses smart recording. It
records key points where you change
direction, speed, or heart rate.
When a third-party power meter
(page 26) is paired, the Edge records
points every second. Recording
points every second uses more of the
available space on the Edge, but creates
a very accurate record of your ride.
Edge 500 Owner’s Manual 31
Page 36

Data Management
Data Management
You can use the Edge as a USB mass
storage device.
NOTE: The Edge is not compatible
with Windows® 95, 98, Me, or NT. It
is also not compatible with Mac® OS
10.3 and earlier. This is a common
limitation of most USB mass storage
devices.
Loading Files
You can manually load the following
courses les to your Edge: .tcx, .t,
and .crs.
1. Lift the weather cap on the back of
the Edge.
2. Plug the small end of the USB
cable into the mini-USB port.
3. Connect the larger end of the USB
cable to an available USB port on
your computer.
NOTE
: Your Edge appears as a
removable drive in My Computer
on Windows computers and
as a mounted volume on Mac
computers.
4. Browse your computer for the le
you want to copy.
5. Highlight the le, and select Edit >
Copy.
6. Open the “Garmin” drive or
volume.
7. Open the “NewFiles” folder.
8. Select Edit > Paste.
32 Edge 500 Owner’s Manual
Page 37
Deleting Files
NOTICE
Your Edge memory contains important
system les that should not be deleted.
1. Open the Garmin drive or volume.
2. Highlight the le.
3. Press the Delete key on your
keyboard.
Disconnecting the USB Cable
When you are nished managing your
les, you can disconnect the USB
cable.
1. Complete the appropriate option:
For Windows computers, click
•
the eject icon in your
system tray.
For Mac computers, drag the
•
volume icon to the Trash .
2. Unplug the Edge from your
computer.
Data Management
Edge 500 Owner’s Manual 33
Page 38
Settings
Settings
You can customize the following
settings and Edge features:
Data elds (page 34)
•
System settings (page 38)
•
User proles (page 39)
•
Bike proles (page 39)
•
GPS Settings (page 40)
•
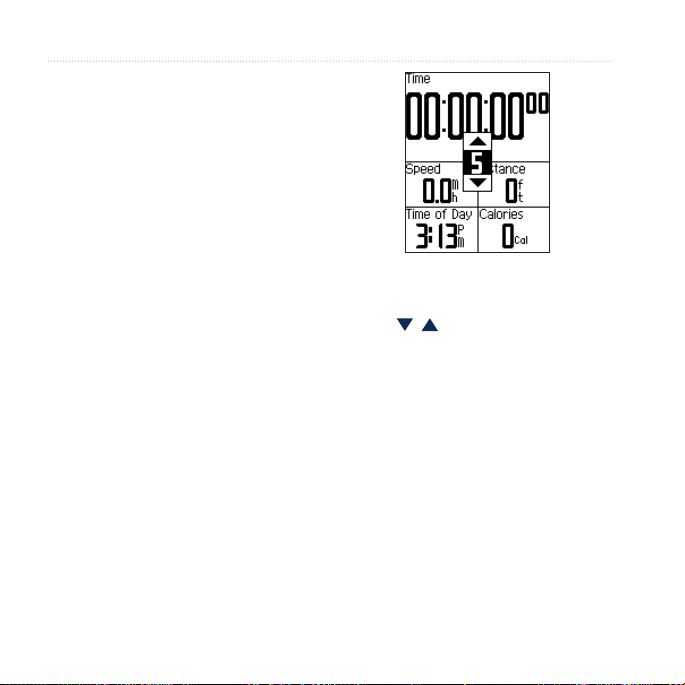
Customizing Your Data
Fields
You can set up custom data elds for
two training data pages.
1. Press and hold MENU.
2. Select Settings > Bike Settings
>Data Fields.
3. Select one of the pages.
4. Select the number of data elds you
want to see on this page.
To turn off an optional page, set the
5. Use , , and ENTER to change
6. Repeat for each page you wish to
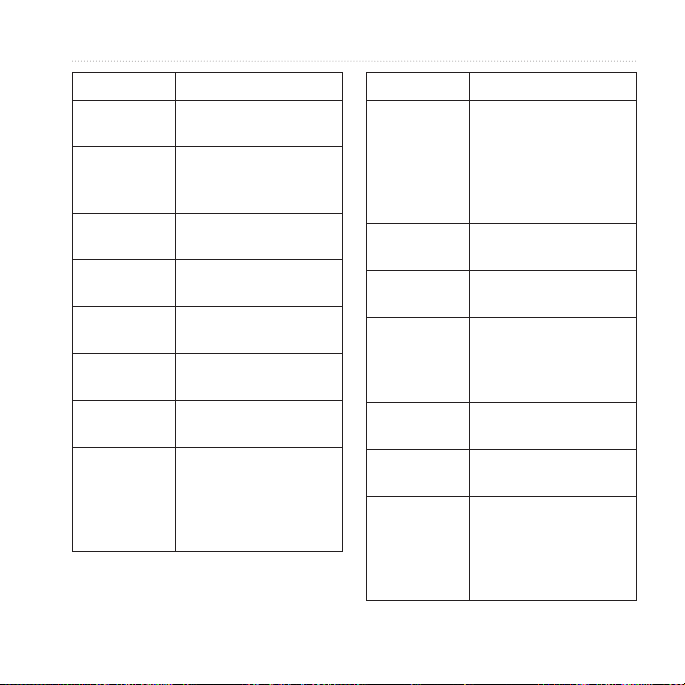
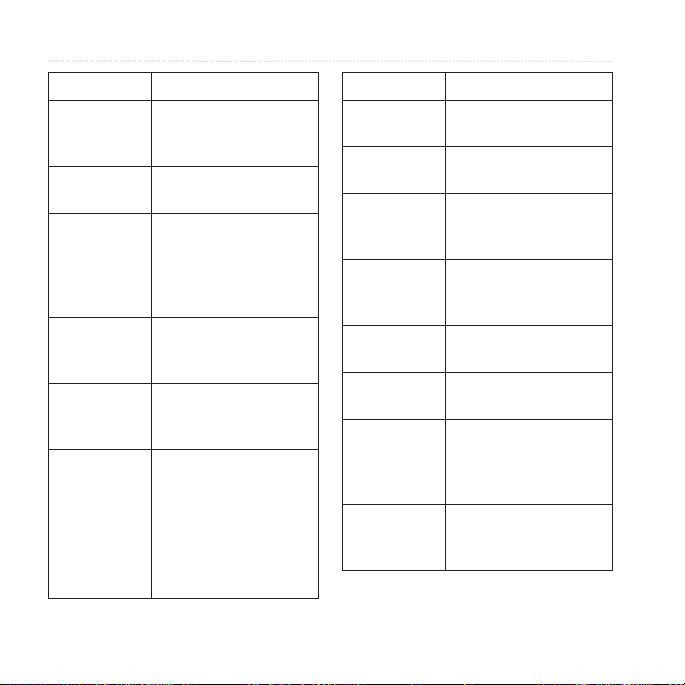
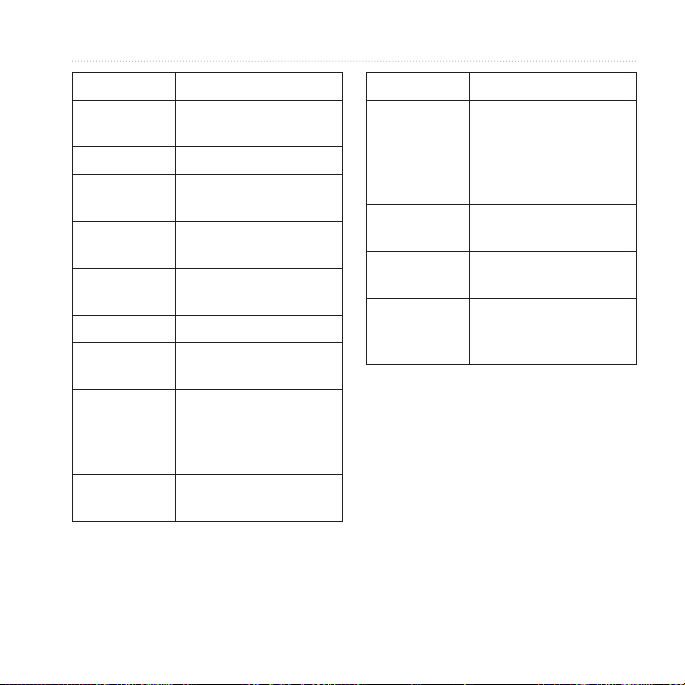
Data Fields
Data elds with the * symbol display
statute or metric units. Data elds
with the ** symbol require an optional
accessory.
number of data elds to zero.
the data elds.
customize.
34 Edge 500 Owner’s Manual
Page 39
Settings
Data Field Description
Cadence ** Revolutions of the crank
Cadence
– Avg. **
Cadence
– Lap **
Calories Amount of calories
Distance * Distance traveled on the
Dist – Lap * Distance traveled in the
Elevation * Distance above or below
GPS
Accuracy *
Edge 500 Owner’s Manual 35
arm per minute.
Average cadence for the
duration of your current
ride.
Average cadence for the
current lap.
burned.
current ride.
current lap.
sea level.
Margin of error for your
exact location. For
example, your GPS
location is accurate to
within +/- 19 ft.
Data Field Description
Grade
Heading Current direction you are
Heart Rate ** Heart rate in beats per
HR – %HRR **Percentage of heart rate
HR – %Max.
**
HR – Avg. ** Average heart rate for
HR – Avg.
%HRR **
Calculation of rise over
run. For example, if for
every 10 feet you climb
(elevation) you travel
200 feet (distance), your
grade is 5%.
traveling.
minute (bpm).
reserve (maximum heart
rate minus resting heart
rate).
Percentage of maximum
heart rate.
the ride.
Average percentage
of heart rate reserve
(maximum heart rate
minus resting heart rate)
for the run.
Page 40
Settings
Data Field Description
HR – Avg.
%Max. **
HR – Lap ** Average heart rate in the
HR – Lap
%HRR **
HR – Lap
%Max. **
HR Graph **
HR Zone ** Current range of heart
36 Edge 500 Owner’s Manual
Average percentage of
maximum heart rate for
the run.
current lap.
Average percentage
of heart rate reserve
(maximum heart rate
minus resting heart rate)
for the lap.
Average percentage of
maximum heart rate for
the lap.
Line graph showing your
current heart rate zone
(1-5).
rate (1–5). The default
zones are based on your
user prole, maximum
heart rate, and resting
heart rate.
Data Field Description
Laps Amount of laps
Power ** Current power output in
Power – Avg. **Average power output
Power
– KiloJoules
**
Power – Lap **Average power output in
Power – Max. **Top power achieved
Power Zone **Current range of power
PWR – Mov.
Avg. 3s
completed.
watts.
for the duration of your
current ride.
Total (cumulative)
amount of power output
in kilojoules.
the current lap.
during the current ride.
output (1–7) based on
your FTP or custom
settings.
The three-second
moving average of
power output.
Page 41
Settings
Data Field Description
PWR – Mov.
Avg. 30s
Speed * Current speed.
Speed
– Avg. *
Speed – Lap * Average speed in the
Temperature * Current temperature in
Time Stopwatch time.
Time – Avg.
Lap
Time
- Elapsed
Time – Lap Amount of time in the
Edge 500 Owner’s Manual 37
The 30-second moving
average of power output.
Average speed for the
ride.
current lap.
Fahrenheit or Celsius.
Average time to
complete the laps so far.
Amount of paused time
during the current ride.
Auto Pause must be
turned on.
current lap.
Data Field Description
Time of Day
Total Ascent * Total elevation gain for
Total Descent
*
Vertical
Speed *
Current time of day
based on your time
settings (format, time
zone, and daylight
saving time).
the current ride.
Total elevation lost for
the current ride.
Rate of ascent or
descent in feet/meters
per hour.
Page 42

Settings
Changing Your System
Settings
Changing the Audible Tones
1. Press and hold MENU.
2. Select Settings > System > Tones.
3. Turn on or turn off the tones for
keys and messages.
Changing the Backlight
1. Press and hold MENU.
2. Select Settings > System >
Display.
3. Change the settings:
Select Backlight Timeout to
•
change the amount of time the
backlight stays on.
TIP: Use a short backlight
setting to conserve battery
power.
Select Backlight Level to
•
change the brightness.
Select Contrast to change the
•
level of screen contrast.
Changing the System Setup
You can modify all of the settings you
congured in the initial setup.
1. Press and hold MENU.
2. Select Settings > System.
3. Select an option:
Select System Setup to modify
•
language, position format, unit
format, and time format.
Select Initial Setup to modify
•
all of the conguration settings
in the initial setup.
4. Follow the on-screen instructions.
38 Edge 500 Owner’s Manual
Page 43

Time Zones and Time Formats
Each time you turn on the Edge
and acquire satellites, the Edge
automatically detects your time zone
and the current time of day. To change
the time format to 12 hour or 24 hour,
see page 38.
Changing Your User
Prole Settings
The Edge uses information that you
enter about yourself to calculate
accurate ride data.
1. Press and hold MENU.
2. Select Settings > User Prole to
modify gender, age, weight, height,
and activity class settings.
3. Follow the on-screen instructions.
NOTE: For information about your
activity class, see page 5.
Settings
Updating Your Bike
Prole
The Edge uses the bike weight, the
odometer value, and the wheel size to
calculate accurate ride data.
1. Press and hold MENU.
2. Select Settings > Bike Settings >
Bike 1 > Bike Details.
3. Enter a name for the bike prole.
4. Enter the bike weight and odometer
value.
5. In the Wheel Size eld, select an
option:
Select Auto to calculate your
•
wheel size using GPS distance.
Select Custom to enter your
•
wheel size.
For a table of wheel sizes and
circumferences, see page 46.
Edge 500 Owner’s Manual 39
Page 44

Settings
Changing the Start Notice
This feature automatically detects
when your Edge has acquired satellites
and is moving. It is a reminder to start
the timer so you can record your ride
data.
1. Press and hold MENU.
2. Select Settings > Bike Settings >
Start Notice.
3. In the Mode eld, select an option:
Select Off.
•
Select Once.
•
Select Repeat to change the
•
amount of time to delay the
reminder.
GPS Settings
GPS settings include the following:
•
•
•
Training Indoors
1. Press and hold MENU.
2. Select GPS > GPS Status.
3. Select Off.
When GPS is off, speed and distance
data are not available, unless you are
using the Edge with the GSC 10. The
next time you turn on the Edge, it will
search for satellite signals again.
Turning satellites off (page 40)
Viewing the satellite page
(page 41)
Using elevation points (page 41)
40 Edge 500 Owner’s Manual
Page 45

Satellite Page
The satellite page shows your current
GPS satellite information. To view the
satellite page, press and hold MENU,
and select GPS > Satellite.
On the satellite page, GPS accuracy
appears at the top of the page. The
black bars represent the strength of
each satellite signal received (the
number of the satellite appears below
each bar).
For more information about GPS, go to
www.garmin.com/aboutGPS.
3. Enter a descriptive name.
4. Select
The next time you turn on the Edge,
it automatically searches for elevation
points within 30 m of your location.
The Edge uses the elevation data as the
starting point.
NOTE: If you do not want to use the
saved elevation point data, you must
delete elevation point.
Editing Elevation Points
1. Press and hold MENU.
2. Select GPS > Elevation Points.
Setting Elevation Points
3. Select the elevation point you wish
You can save up to 10 elevation points.
Using an elevation point each time you
4. Edit the name and elevation.
begin a particular training ride provides
more consistent and accurate elevation
data.
1. Press and hold MENU.
2. Select GPS > Set Elevation.
Settings
Save.
to edit.
Edge 500 Owner’s Manual 41
Page 46

Appendix
Appendix
Registering Your Device
Help us better support you by
completing our online registration
today:
Go to http://my.garmin.com.
•
Keep the original sales receipt, or a
•
photocopy, in a safe place.
About the Edge
To display important software
information and your unit ID, press
and hold MENU, and select Settings >
About Edge.
Updating the Software
1. Choose an option:
Use WebUpdater. Go to
•
www.garmin.com/products
/webupdater/.
Use Garmin Connect. Go to
•
http://connect.garmin.com/.
2. Follow the on-screen instructions.
Contacting Garmin
Product Support
Contact Garmin Product Support if you
have any questions about this product:
In the USA, go to www.garmin
•
.com/support, or contact Garmin
USA by phone at (913) 397.8200 or
(800) 800.1020.
In the UK, contact Garmin (Europe)
•
Ltd. by phone at 0808 2380000.
In Europe, go to www.garmin.com
•
/support and click Contact
Support for in-country support
42 Edge 500 Owner’s Manual
Page 47
information, or contact Garmin
(Europe) Ltd. by phone at +44 (0)
870.8501241.
Using the Backlight
Press LIGHT to turn on the
•
backlight.
Press any button to extend the
•
backlight another 5 seconds.
NOTE: Alerts and messages also
activate the backlight.
Change the backlight settings
•
(page 38)
Buying Optional
Accessories
Go to http://buy.garmin.com or contact
your Garmin dealer for information
about optional accessories and
replacement parts.
Appendix
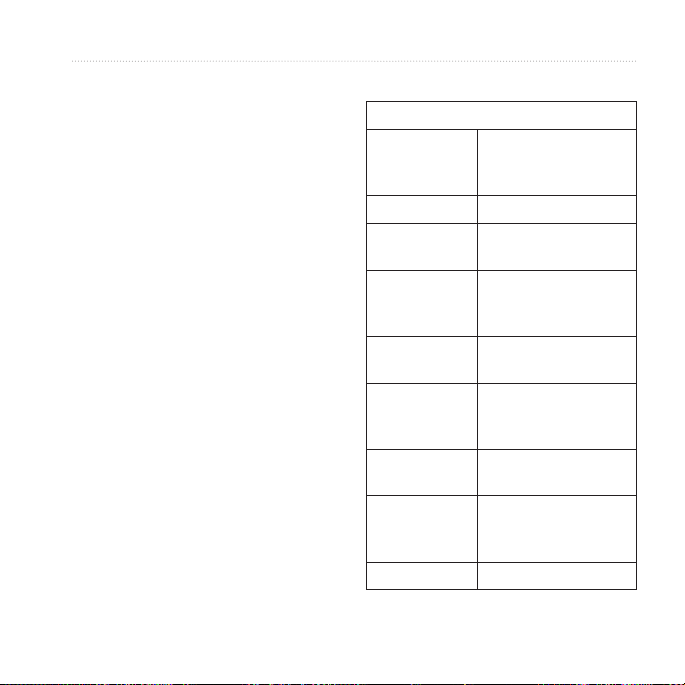
Specications
Edge Specications
Physical size W × H × D: 1.9 × 2.7 ×
Weight 2.0 oz. (56.7 g)
Display
Resolution W × H: 128 × 160
Water
resistance
Data storage
Computer
interface
Battery type 700 mAh rechargeable,
Battery life 18 hours, typical usage
0.85 in (48.3 × 68.6 ×
21.6 mm)
W × H: 1.25 × 1.5 in.
(31.8 x 37 mm)
pixels, with LED
backlight
IPX7
Approximately 50 MB
(at least 180 hours of
ride data, typical use)
USB
built-in, lithium-ion
battery
Edge 500 Owner’s Manual 43
Page 48
Appendix
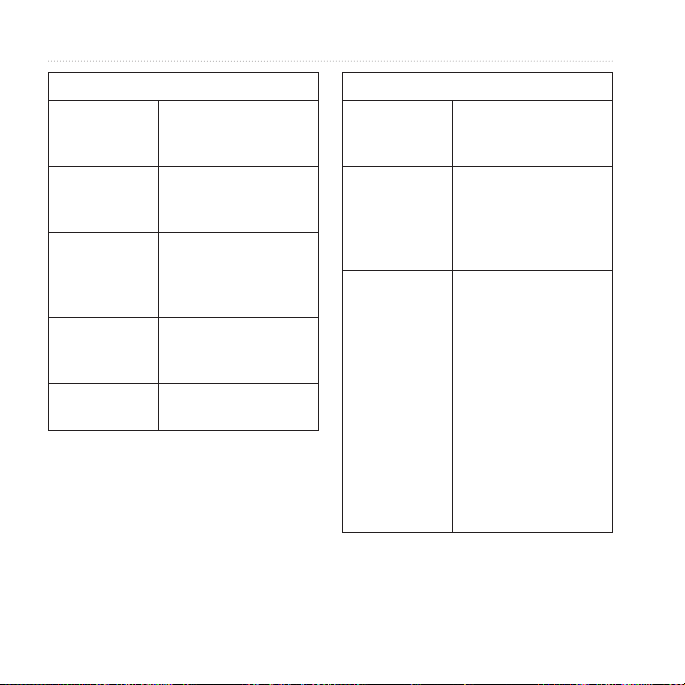
Edge Specications
Operating
temperature
range
Charging
temperature
range
Radio
frequency/
protocol
GPS receiver
Altimeter Internal barometric
44 Edge 500 Owner’s Manual
From 5°F to 140°F
(from -15°C to 60°C)
From 32°F to 122°F
(from 0°C to 50°C)
2.4 GHz/Dynastream
ANT+ wireless
communications
protocol
High-sensitivity
integrated GPS
receiver
altimeter
Bike Mount Specications
Physical size W × H × D: 37.8 × 37.8
Weight
(including
O-rings and
rubber spacer
pad)
O-rings
(EPDM)
× 9.2 in (37.8 × 37.8 ×
9.2 mm)
0.28 oz. (7.9 g)
Two sizes:
1.3 × 1.5 × 0.9 in.
•
AS568-125
1.7 × 1.9 × 0.9 in.
•
AS568-131
NOTE: Use EPDM
(Ethylene Propylene
Diene Monomer)
replacement O-rings
only.
Go to http://buy
.garmin.com or contact
your Garmin dealer.
Page 49
Appendix
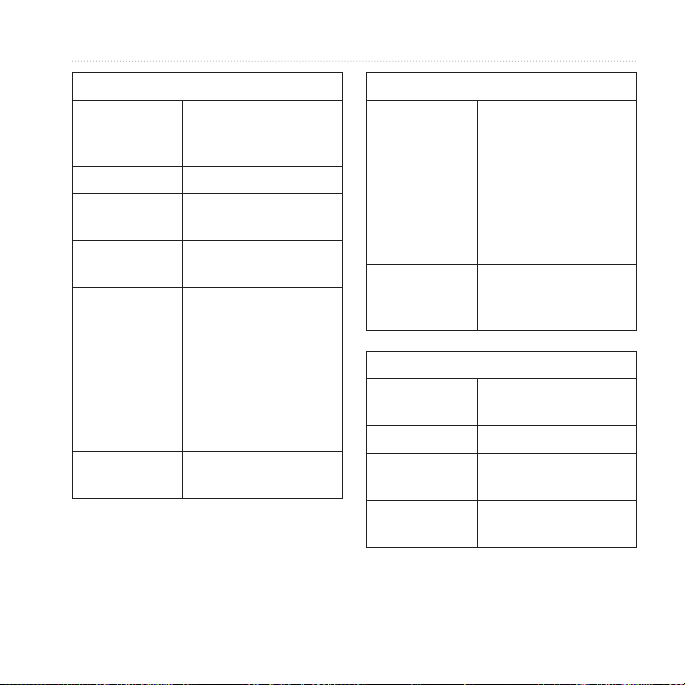
Heart Rate Monitor Specications
Physical size W × H × D: 13.7 × 1.3
Weight 1.6 oz. (44 g)
Water
resistance
Transmission
range
Battery User-replaceable
Battery life Approximately 3 years
Edge 500 Owner’s Manual 45
× 0.4 in. (34.7 × 3.4 ×
1.1 cm)
32.9 ft. (10 m)
Approximately 9.8 ft.
(3 m)
CR2032 (3 volts)
Perchlorate Material
– special handling may
apply.
See www.dtsc.ca.gov
/hazardouswaste
/perchlorate.
(1 hour per day)
Heart Rate Monitor Specications
Operating
temperature
Radio
frequency/
protocol
GSC 10 Specications
Physical size 2.0 × 1.2 × 0.9 in (5.1 ×
Weight 0.9 oz. (25 g)
Water
resistance
Transmission
range
From 14°F to 122°F
(from 10°C to 50°C)
NOTE: In cold
conditions, wear
appropriate clothing
to keep the heart rate
monitor near your body
temperature.
2.4 GHz ANT+ wireless
communications
protocol
3.0 × 2.3 cm)
IPX7
Approximately 9.8 ft.
(3 m)
Page 50
Appendix
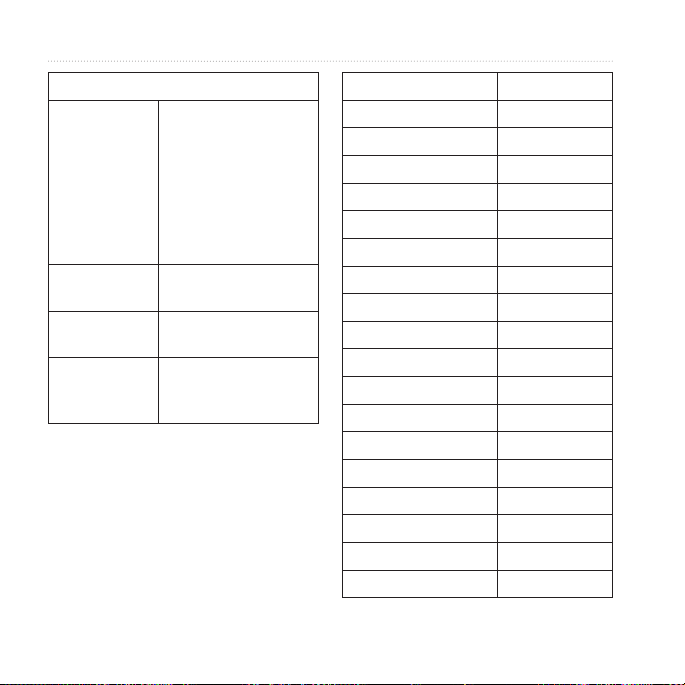
GSC 10 Specications
Battery User-replaceable
Battery life Approximately 1.4
Operating
temperature
Radio
frequency/
protocol
CR2032 (3 volts)
Perchlorate Material
– special handling may
apply.
See www.dtsc.ca.gov
/hazardouswaste
/perchlorate.
years (1 hour per day)
From 5°F to 158°F
(from -15°C to 70°C)
2.4 GHz ANT+ wireless
communications
protocol
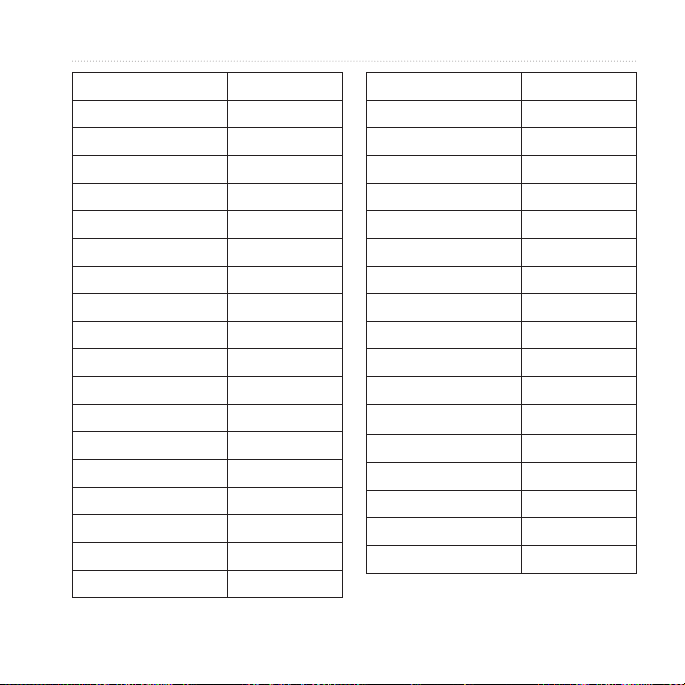
Wheel Size and
Circumference
The wheel size is marked on both sides
of the tire. To modify your bike prole,
see page 39.
46 Edge 500 Owner’s Manual
Wheel Size L (mm)
12 × 1.75 935
14 × 1.5 1020
14 × 1.75 1055
16 × 1.5 1185
16 × 1.75 1195
18 × 1.5 1340
18 × 1.75 1350
20 × 1.75 1515
20 × 1-3/8 1615
22 × 1-3/8 1770
22 × 1-1/2 1785
24 × 1 1753
24 × 3/4 Tubular 1785
24 × 1-1/8 1795
24 × 1-1/4 1905
24 × 1.75 1890
24 × 2.00 1925
24 × 2.125 1965
Page 51
Appendix
Wheel Size L (mm)
26 × 7/8 1920
26 × 1(59) 1913
26 × 1(65) 1952
26 × 1.25 1953
26 × 1-1/8 1970
26 × 1-3/8 2068
26 × 1-1/2 2100
26 × 1.40 2005
26 × 1.50 2010
26 × 1.75 2023
26 × 1.95 2050
26 × 2.00 2055
26 × 2.10 2068
26 × 2.125 2070
26 × 2.35 2083
26 × 3.00 2170
27 × 1 2145
27 × 1-1/8 2155
Edge 500 Owner’s Manual 47
Wheel Size L (mm)
27 × 1-1/4 2161
27 × 1-3/8 2169
650 × 35A 2090
650 × 38A 2125
650 × 38B 2105
700 × 18C 2070
700 × 19C 2080
700 × 20C 2086
700 × 23C 2096
700 × 25C 2105
700 × 28C 2136
700 × 30C 2170
700 × 32C 2155
700C Tubular 2130
700 × 35C 2168
700 × 38C 2180
700 × 40C 2200
Page 52
Appendix
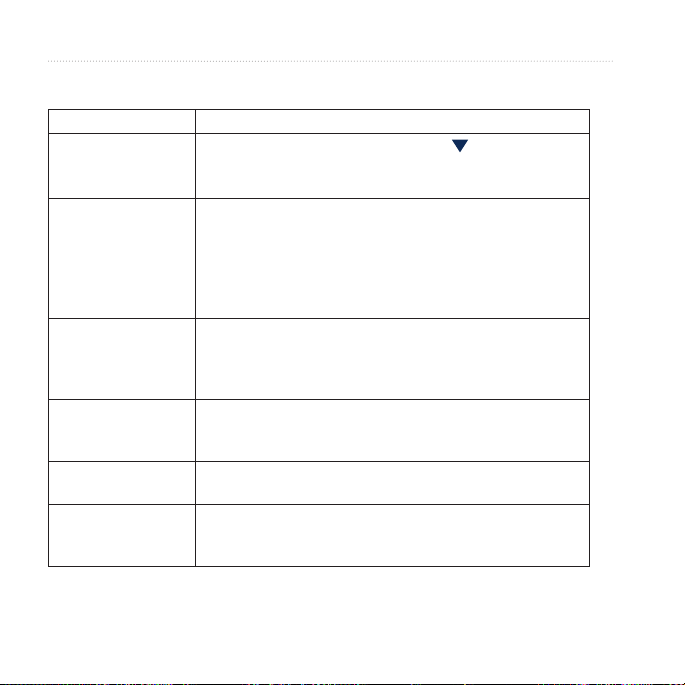
Troubleshooting
Problem Solution
The buttons do not
respond. How do I
reset the Edge?
I want to clear all the
user data from my
Edge.
My Edge does not
acquire satellite
signals.
The battery gauge
does not seem
accurate.
The battery does not
last long.
How do I know my
Edge is in USB mass
storage mode?
Press and hold the POWER, MENU, and button
simultaneously to reset the Edge.
NOTE: This does not erase any of your data or settings.
1. Turn off the Edge.
2. Press and hold MENU and POWER until the message
appears.
3. Select Yes to clear all user data.
NOTE: This deletes all user-entered information including
history.
1. Take your Edge out of parking garages and away from tall
buildings and trees.
2. Turn on the Edge.
3. Remain stationary for several minutes.
Allow the Edge battery to fully discharge, and then fully charge
the battery (without interrupting the charge cycle).
Reduce the back light time (page 38).
You should see a new removable disk drive in My Computer
on Windows computers and a mounted volume on Mac
computers.
48 Edge 500 Owner’s Manual
Page 53
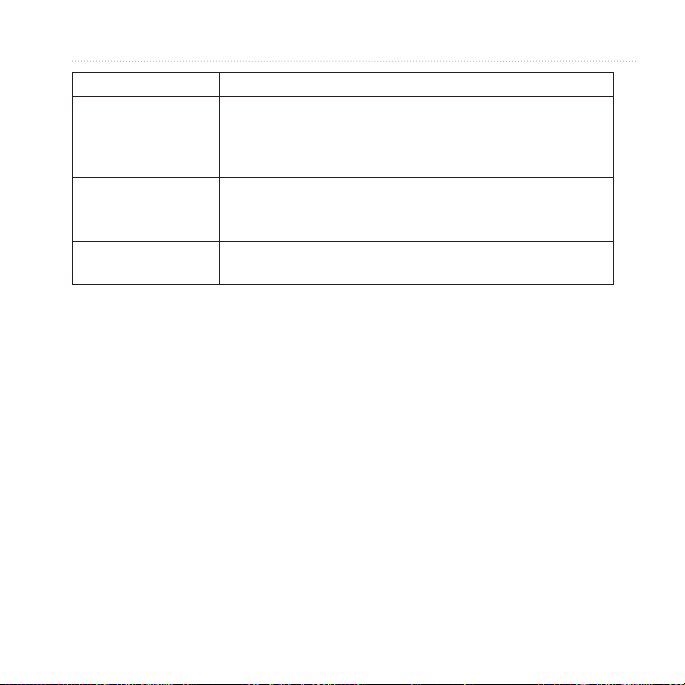
Problem Solution
I cannot see any new
removable drives in
my list of drives.
Some of my data is
missing from my
Edge history.
I need to replace the
O-rings for the mount.
If you have several network drives mapped on your computer,
Windows may have trouble assigning drive letters to your
Garmin drives. See the Help le for your operating system to
learn how to assign drive letters.
When the Edge memory is full, it will no longer record data.
Transfer data to your computer regularly to avoid losing data.
Go to http://buy.garmin.com or contact your Garmin dealer.
Purchase O-rings made of EPDM only.
Appendix
Edge 500 Owner’s Manual 49
Page 54

Index
Index
A
accessories 43
acquiring satellite signals 7,
48
activity classes 5
alerts 10
ANT+ sensors 7, 17–29
troubleshooting 28
Auto Lap 11, 12
Auto Pause 12
Auto Scroll 13
B
backlight 38, 43
battery 48
charging 1
conserving 38
bike mount 3, 44
bike prole 39
buttons 6
C
cadence
alerts 10
data elds 35
training 25
calibrating your power
meter 26
calorie alerts 10
calories 35
charging the Edge 1, 2
clearing user data 48
courses 14–16
loading 32
custom data elds 34–37
D
data elds 34–37
data recording 31
data uploading 32
deleting
les 33
history 31
distance
data elds 35
distance alerts 10
downloading software 8
E
elapsed time 12
elevation
data elds 35, 37
points 41
F
les
deleting 33
loading 32
G
Garmin Connect 8, 9,
14, 30
Garmin Product Support 42
Garmin Training Center 8,
9, 14, 30
GPS
accuracy 35
satellite page 41
settings 40
grade 35
50 Edge 500 Owner’s Manual
Page 55

GSC 10 25, 45
battery 25
installing 22
H
heart rate
alerts 10
data elds 35
settings 19
zones 19–21
heart rate monitor 45
battery 21
putting on 18
using 19
history 30, 49
deleting 31
transferring 9
viewing 30
I
icons 4
initial setup 4, 38
installing the Edge 3
L
lithium-ion battery 1, 43
loading les 32
M
mount 3, 44
O
O-rings 3, 44, 49
P
pairing ANT+ sensors 7, 17
pedal magnet 23
power
alerts 11
data elds 36
data recording 31
zones 27
power meters 26
product registration 42
product support 42
prole
bike 39
user 39
Index
R
recording history 8
registration 42
replacement parts 43
resetting Edge 48
S
safety information 1
satellite signals 41
acquiring 7
saving your data 8
sensors, pairing 7
settings 34
smart recording 31
software downloads 8
software updates 42
software version 42
specications 43
speed
data elds 37
speed and cadence
sensor 45
spoke magnet 23
start notice message 40
Edge 500 Owner’s Manual 51
Page 56

Index
T
technical specications 43
time
data elds 37
zones and formats 39
time alerts 10
timer 8
tire size 39
tones 38
training
indoors 40
training with your Edge 10
transferring data 9
troubleshooting 28, 48
U
unit ID 42
USB 2, 9, 32, 48
user prole 39
V
vertical speed 37
Virtual Partner 14, 16
W
weather cap 2, 9
wheel sizes 39, 46
Z
zones
heart rate 19
power 27
52 Edge 500 Owner’s Manual
Page 57

Page 58
For the latest free software updates (excluding map data) throughout the life of
your Garmin products, visit the Garmin Web site at www.garmin.com.
© 2009 Garmin Ltd. or its subsidiaries
1200 East 151st Street, Olathe, Kansas 66062, USA
Liberty House, Hounsdown Business Park, Southampton, Hampshire, SO40 9LR UK
No. 68, Jangshu 2nd Road, Shijr, Taipei County, Taiwan
August 2009 Part Number 190-01071-00 Rev. A Printed in Taiwan
Garmin International, Inc.
Garmin (Europe) Ltd.
Garmin Corporation
 Loading...