

Page 1
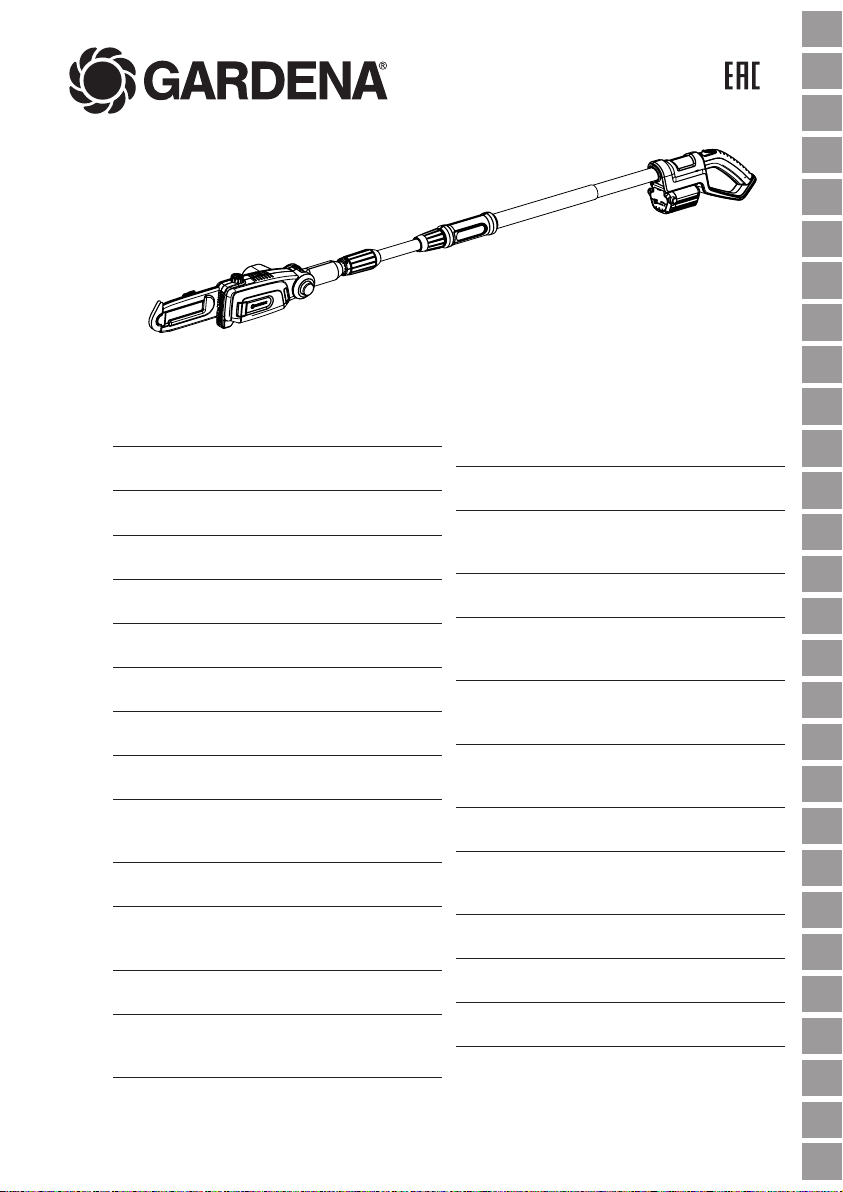
TCS Li-18/20 Art. 8866
D Betriebsanleitung
Accu-Hochentaster
GB Operating Instructions
Battery Pole Pruner
F Mode d’emploi
Élagueuse sur perche sur accu
NL Gebruiksaanwijzing
Accu-telescoopkettingzaag
S Bruksanvisning
Batteridriven Kvistsåg
DK Brugsanvisning
Akku-grensav til højtsiddende grene
FI Käyttöohje
Accu-raivaussaha
N Bruksanvisning
Accu-beskjæringssaks
I Istruzioni per l’uso
Potatore telescopico a batteria
E Instrucciones de empleo
Sierra de pértiga telescópica
conaccu
P Manual de instruções
Serra accu para poda em altura
PL Instrukcja obsługi
Akumulatorowa pilarka łańcuchowa
z trzonkiem teleskopowym
H Használati utasítás
Akkumulátoros magassági ágvágó
CZ Návod k obsluze
Akumulátorová teleskopická
vyvětvovací pilka
SK Návod na obsluhu
Akumulátorový teleskopický
odvetvovač
GR Οδηγίες χρήσης
Τηλεσκοπικό αλυσοπρίονο
μπαταρίας
RUS Инструкция по эксплуатации
Аккумуляторный высоторез
SLO Navodilo za uporabo
Akumulatorski obrezovalnik
za veje
HR Upute za uporabu
Akumulatorska teleskopska pila
SRB Uputstvo za rad
BIH Akumulatorska teleskopska
testera
UA Інструкція з експлуатації
Акумуляторного телескопічного
сучкоріза-пилки
RO Instrucţiuni de utilizare
Foarfecă cu acumulator pentru
rărirea crengilor copacilor înalţi
TR Kullanma Kılavuzu
Accu High Kesici
BG Инструкция за експлоатация
Телескопична акумулаторна
кастрачка
AL Manual përdorimi
Sharrë degësh me bateri
EST Kasutusjuhend
Akuga kõrglõikur
LT Eksploatavimo instrukcija
Akumuliatorinė aukštapjovė
LV Lietošanas instrukcija
Atzarotājs ar akumulatoru un
teleskopisko kātu
SRB
GR SK CZ H PL P E I N FI DK S NL F GB D
RUS
HR SLO
BIH
LV LT EST AL BG TR RO UA
Page 2
GARDENA Battery Pole Pruner TCS Li-18/20
GB
Translation of the original German operating instructions.
Please read the operating instructions carefully and observe the
notes given. Use these operating instructions to familiarise yourself with the product, the proper use and the safety instructions.
Contents: 1. Area of applications of your GARDENA
For safety reasons, children and young people under the age
of 16, as well as people not familiar with these operating
instructions, may not use this product. Persons with reduced
physical or mental abilities may use the product only if they are
supervised or instructed by a responsible person. Children must
be supervised to ensure that they do not play with the product.
v Keep these operating instructions in a safe place.
Battery Pole Pruner .................................16
2. Safety Instructions .................................16
3. Assembly. . . . . . . . . . . . . . . . . . . . . . . . . . . . . . . . . . . . . . . . .19
4. Initial Operation ....................................20
5. Operation ........................................22
6. Storage ..........................................23
7. Maintenance ......................................24
8. Troubleshooting ...................................25
9. Available accessories ...............................26
10. Technical Data ....................................26
11. Service / Warranty ..................................27
1. Area of applications of your GARDENA Battery Pole Pruner
Correct Use: The GARDENA Battery Pole Pruner is intended for delimbing trees,
Please note:
hedges, shrub and bushes with limbs of up to 8 cm in diameter in
private domestic gardens or allotments.
Compliance with these operating instructions is a prerequisite for
the proper use of this Pole Pruner.
WARNING! Risk of injury!
The Pole Pruner must not be used for felling trees.
Cut branches into parts to ensure that you cannot be
struck by falling branches or that fallen branches can
bounce up from the soil.
Do not stand under the branch while cutting.
2. Safety Instructions
If not used properly this product can be dangerous. The warnings and safety instructions
must be followed to ensure reasonable safety and efficiency in using this product. The operator
is responsible for following the warnings and instructions in this manual and on the product.
Never use the product unless the guards provided by the manufacturer are in the correct
position.
16
Page 3
Explanation of Symbols on your product.
WARNING!
Read the user instructions carefully
to make sure you understand all the
controls and what they do.
Always wear non-slip safety shoes.
Always wear a hard hat.
GB
Risk of fatal injury due to electric shock!
Keep at least 10 m away from electricity
lines.
Always wear protective gloves.
General Power Tool Safety Warnings
WARNING ! Read all safety warnings and
all instructions.
Failure to follow the warnings and instructions
may result in electric shock, fire and / orserious injury.
Save all warnings and instructions for future
reference.
The term “power tool” in the warnings refers to your
mains operated (corded) power tool or battery-operated
(cordless) power tool.
1) Work area safety
a) Keep work area clean and well lit.
Cluttered or dark areas invite accidents.
b) Do not operate power tools in explosive atmospheres, such as in the presence of flammable
liquids, gases or dust. EPower tools create sparks
which may ignite the dust or fumes.
c) Keep children and bystanders away while
operating a power tool. Distractions can cause you
to lose control.
2) Electrical safety
a) Power tool plugs must match the outlet. Never
modify the plug in any way. Do not use any adaptor
plugs with earthed (grounded) power tools.
Unmodified plugs and matching outlets will reduce risk
of electric shock.
b) Avoid body contact with earthed or grounded
surfaces, such as pipes, radiators, ranges and
refrigerators. There is an increased risk of electric
shock if your body is earthed or grounded.
c) Do not expose power tools to rain or wet
conditions. Water entering a power tool will increase
the risk electric shock.
d) Do not abuse the cord. Never use the cord for
carrying, pulling or unplugging the power tool.
Keep cord away from heat, oil, sharp edges or
moving parts. Damaged or entangled cords increase
the risk of electric shock.
e) When operating a power tool outdoors, use an
extension cord suitable for outdoor use.
Use of a cord suitable for outdoor use reduces the risk
of electric shock.
Always wear eye and ear protection.
Do not expose to rain.
Do not leave the product outdoors
while it is raining.
Direction of movement of
the chain.
f)
If operating a power tool in a damp location is unavoidable, use a residual current device (RCD) protected
supply. Use of an RCD reduces the risk of electric shock.
3) Personal safety
a) Stay alert, watch what you are doing and use
common sense when operating a power tool.
Do not operate power tools if you are tired or ill or if
you are under the influence of drugs, alcohol or
medication. A moment of inattention while operating
power tools may result in serious personal injury.
b) Use personal protective equipment. Always wear
eye protection. Personal protective equipment can
be purchased from specialist traders.
Protective equipment such as dust mask, non-skid
safety shoes, hard had, or hearing protection used for
appropriate conditions will reduce personal injuries.
c) Prevent unintentional starting. Ensure the switch
is in the off-position before connecting to power
source and / or battery pack, picking up or carrying
the tool. Carrying power tools with your finger on the
switch or energising power tools that have the switch on
invites accidents.
Remove any adjusting key or wrench before turn ing
d)
the power tool on. A wrench or a key left attached to a
rotating part of the power tools may result in personal injury.
e) Do not overreach. In order to prevent overtiredness, alternate working positions and ensure sufficient breaks are taken. Keep proper footing and
balance at all times. This enables better control of the
power tool in unexpected situations.
f) Dress properly. Do not wear loose clothing or
jewellery. Keep your hair, clothing and gloves away
from moving parts. Loose clothes, jewellery or long hair
can be caught in moving parts.
g) If devices are provided for the connection of dust
extraction and collection facilities, ensure these are
connected and properly used.
Use of dust collection can reduce dust-related hazards.
4) Power tool use and care
a) Do not force the power tool. Use the correct
power tool for your application. The correct power
tool will do the job better and safer at the rate for which
it was designed.
17
Page 4

b) Do not use the power tool if the switch does not
GB
turn it on and off.
Any power tool that cannot be controlled with the switch
is dangerous and must be repaired.
c) Disconnect the plug from the power source and /
or the battery pack from the power tool before
making any adjustments, changing accessories, or
storing power tools. Such preventive safety measures
reduce the risk of starting the power tool accidentally.
d) Store idle power tools out of the reach of
children and do not allow persons unfamiliar with
the power tool or these instructions to operate
the power tool.
Power tools are dangerous in the hands of untrained
users.
e) Maintain power tools.
Check for misalignment or binding of moving parts,
breakage of parts and any other condition that may
affect the power tool’s operation. If damaged, have
the power tool repaired before use.
Many accidents are caused by poorly maintained power
tools.
f) Keep cutting tools sharp and clean.
Properly maintained cutting tools with sharp cutting
edges are less likely to bind and are easier to control.
g) Use the power tool, accessories and tool bits etc.
in accordance with these instructions, taking into
account the working conditions and the work to be
performed.
Use of the power tool for operations different from those
intended could result in a hazardous situation.
5) Battery tool use and care
a) Recharge only with the charger specified by the
manufacturer.
A charger that is suitable for one type of battery pack
may create a risk of fire when used with another battery
pack.
b) Use power tools only with specifically designated
battery packs.
Use of any other battery packs may create a risk of injury
and fire.
c) When battery pack is not in use, keep it away from
other metal objects, like paper clips, coins, keys,
nails, screws or other small metal objects, that can
make a connection from one terminal to another.
Shorting the battery terminals together may cause burns
or a fire.
d) Under abusive conditions, liquid may be ejected
from the battery; avoid contact. If contact accidentally occurs, flush with water. If liquid contacts eyes,
additionally seek medical help.
Liquid ejected from the battery may cause irritation or
burns.
6) Service
a) Have your power tool serviced by a qualified
repair person using only identical replacement parts.
This will ensure that the safety of the power tool is
maintained.
Pole Pruner – safety instructions:
• Always ensure that body parts are kept clear of the
chain area. Do not remove the cut material or hold
the material that is to be cut when the blades are
turning. Only remove blocked material when the
device is switched off.
One moment of negligence when handling the Pole
Pruner can cause severe injuries.
• Always carry the Pole Pruner at its handle, and only
when the chain is not moving. During transport or
whilst storing the Pole Pruner, the bar cover must be
applied. Proper use of the Pole Pruner reduces the risk
of injuries by the chain.
• Hold the power tool by the insulated handle
surfaces as the chain may come into contact with
hidden power cables.
The contact of the bar with a “live” wire may energize
metal parts of the device and lead to electric shock.
Additional Safety Recommendations
Work area safety
Only use the Pole Pruner as intended.
The operator or user is responsible for accidents or
hazards occurring to other people or their property.
Pay special attention to the hazard for third parties
posed by the increased working radius when the
telescopic tube is extended.
Warning! When wearing hearing protection, and due to
the noise produced by the product, the operator may
not notice persons approaching.
Warning! This unit makes an electromagnetic field
while it operates. This field may under some con ditions
interfere with active or passive medical implants.
To decrease the risk of conditions that can possibly
injure or kill, we recommend persons with medical
implants to speak with their physician and the medical
implant manufacturer before operating.
Do not use the product when a thunderstorm is
approaching.
Electrical safety
Only connect charger to the AC voltage specified on the
rating plate.
Under no circumstances should an earth be connected
to any part of the product.
Personal safety
Always wear suitable clothing, gloves, and stout
shoes.
Thoroughly inspect the areas where the Pole Pruner is
to be used and remove all wires, hidden electric cables
and other foreign objects.
All adjustments (tilting the cutting head, adjusting the
length of the telescopic tube) must be made with the
protective cover applied and the Pole Pruner must not
be supported by the blade whilst doing so.
Before using the machine and after any impact, check
for signs of wear or damage. Have repairs carried out as
and when required.
Never attempt to work with an incomplete Pole
Pruner or one that has been subjected to unauthorised
modifications.
Power tool use and care
You should know how to switch off the device in the
event of an emergency.
Never hold the Pole Pruner at the protective cover.
Do not use the Pole Pruner when its safety devices are
damaged.
Do not use a ladder when using the Pole Pruner.
18
Page 5
Always use the device when standing on solid ground.
ß
ß
Remove the battery:
– before leaving the Pole Pruner unmonitored;
– before removing a blockage;
– before inspecting or cleaning the Pole Pruner or
performing other work;
– when hitting an object. You may only continue to use
the Pole Pruner once you are absolutely sure that the
entire Pole Pruner is in a safe operating condition;
– when the Pole Pruner begins to vibrate unusually
heavily. In this case, it must be inspected immediately.
Excessive vibration can cause injuries.
– before handing over the device to another person.
Warning! Keep toddlers away when you assemble the
unit. Small parts can be easily swallowed. There is also
a risk that the polybag can suffocate toddlers.
Maintenance and storage
RISK OF INJURY!
Do not touch the chain.
V When work is finished or interrupted, refit the
protective blade cover.
All nuts and screws must be firmly tightened to ensure
a safe operating condition of the device.
Battery safety
FIRE RISK!
The battery to be charged must be placed on a non-
flammable, heat resistant and non- conductive
surface while charging. Keep corrosive, flammable
and easily combustible objects clear of the battery
charger and the battery. Do not cover the battery
charger and the battery while charging. Unplug the
battery charger immediately in the event of smoke
formation or fire.
Only use the GARDENA Battery Charger supplied.
The use of other battery chargers may damage the
batteries irreparably and even cause a fire.
RISK OF EXPLOSION!
V Protect battery from heat and fire.
Do not leave on radiators or expose
to strong sunshine for long periods.
Do not use the battery charger outdoors.
V Protect the the battery charger from damp or wet
areas.
Only use the battery in ambient temperatures of
between 0 °C and 40 °C. A non-functioning battery
must be disposed of cor rectly. It may not be sent via
post. For further details, please contact your local
disposal companies. The charging cable should be
checked regularly for signs of damage or ageing (brittleness) and may only be used if it is in perfect condition.
The charger unit provided may only be used to charge
the rechargeable batteries supplied with the unit.
Non-rechargeable batteries must not be charged with
this battery charger (danger of fire). After charging,
disconnect the charger from the mains and from the
battery. Only charge battery between 0 – 45 °C. After
heavy duty service allow battery to cool down first.
Storage
The Pole Pruner must not be exposed to direct
sunlight while in storage.
Do not store the Pole Pruner in places with static
electricity.
GB
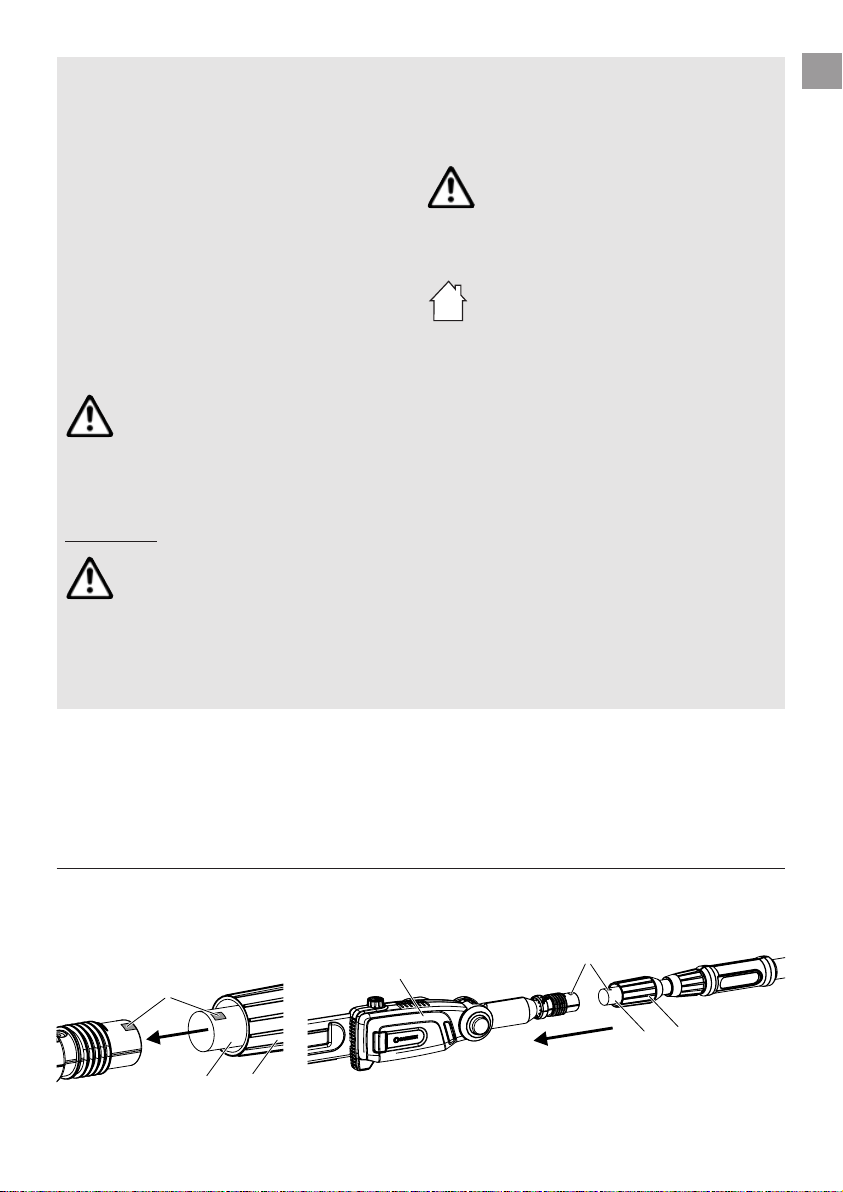
3. Assembly
Installing the telescopic handle:
M
3
2
The Pole Pruner, battery, battery charger, chain, bar, protective
cover complete with Allen key and the operating instructions are
included in the scope of delivery.
1
M
3
2
1. Slide telescopic pipe 2 into the motor unit 1 until you reach the
stop position. Ensure that the two markings
2. Tighten the grey nut 3.
M
face each other.
ß
19
Page 6
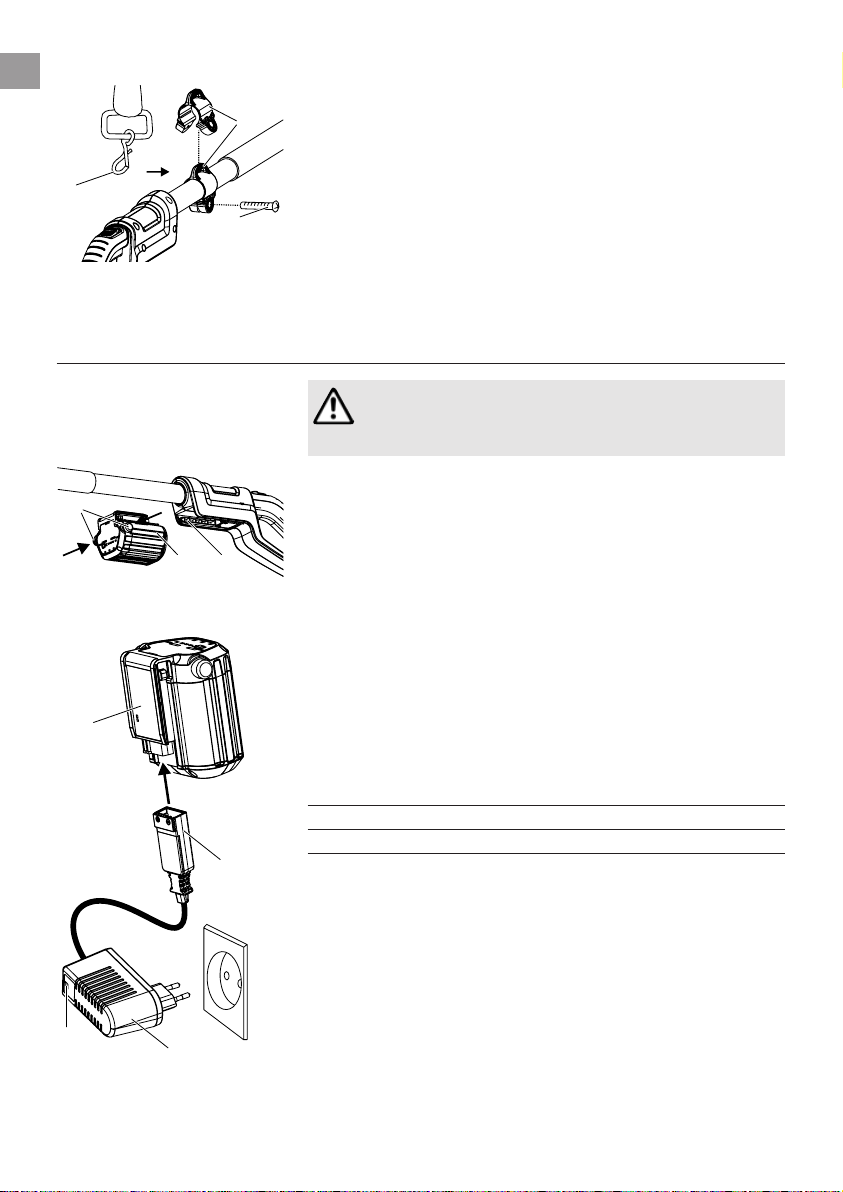
Installing the shoulder strap:
GB
l
4. Initial Operation
k
d
1. Widen the belt clip d and fasten it onto the beam using the
screw k.
2. Engage the shoulder strap clasp l to the belt clip d.
3. Adjust the shoulder strap to the desired length by using the
quick strap fastener.
CAUTION!
The supplied shoulder strap must be used.
Charging the battery:
4
5
65
7
WARNING!
Overvoltage damages batteries and the battery charger.
v Ensure the correct mains voltage.
Before using for the first time, the battery must be fully charged.
Charging time (for uncharged battery) see 10. Technical Data.
The lithium-ion battery can be charged in any state of charge,
and the charging process can be interrupted at any time without
harming the battery (no memory effect).
1. Depress both locking buttons
the battery holder 6 on the handle.
2. Plug the plug of the charger cable
3. Plug battery charger
Charging indicator lamp
once per second: Battery is being charged.
Charging indicator lamp
Battery is fully charged.
(For charging time, see 10. Technical Data.)
Battery charging status indicator during charging:
100 % charged L1, L2 and L3 lit.
66 – 99 % charged L1 and L2 lit, L3 flashing.
33 – 65 % charged L1 lit, L2 flashing.
0 – 32 % charged L1 flashing.
Check the charge status regularly while charging.
4. Once completely charged, disconnect the battery
battery charger 8. Disconnect the battery 5 from the battery
charger 8 first, then unplug the battery charger 8.
5. Slide battery
audibly engages.
5
into a mains socket.
8
onto the battery holder 6 on the handle until it
and remove the battery 5 from
4
into the battery 5.
7
at the charger unit flashes green
9
at the charger unit is lit green:
9
from the
5
9
20
8
Page 7

ßBßL1ßL2ßL3ß
2,6Ah
0
q
Avoid exhaustive discharge:
If the battery is empty, the full discharge protection automatically
switches off the device to prevent the battery from discharging
fully. To prevent the fully charged battery from self-discharging
via the unplugged charger, it should be disconnected from the
charger after charging. If the battery was stored for more than
1 year, it must be fully recharged. If the battery was fully discharged, the charging indicator lamp 9 will flash rapidly at the start
of charging (twice per second). If the charging indicator lamp 9
still flashes rapidly after 10 minutes, a fault has occurred (see
8. Troubleshooting). If the error-LED
a fault has occurred (see 8. Troubleshooting). In case of a completely empty battery it will take approx. 20 minutes until the
LEDs on the battery will indicate charging. But the charging
process is indicated by the flashing LED 9 on the charger.
Battery charging status indicator during operation:
W
v Press button
66 – 99 % charged L1, L2 and L3 lit.
33 – 65 % charged L1 and L2 lit.
10 – 32 % charged L1 lit.
1 – 9 % charged L1 flashing.
0 % charged No indicator.
B
on the battery.
ß
W
on the battery flashes,
ß
GB
Filling in chain oil:
w
Checking the oil lubrication
system:
DANGER!
Physical injury due to chain breakage when the chain
on the bar is not sufficiently lubricated.
v Check whether sufficient quantities of chain oil are
We recommend to use Art. 6006 GARDENA Oil or an equivalent
mineral chain oil from a specialist supplier.
1. Unscrew lid of oil tank
2. Fill chain oil into the filler neck
3. Close the lid of oil tank
The device must be cleaned thoroughly if oil has been spilled.
v Point the bar
Never let the bar come into contact with sand or soil as this
will lead to increased wear of the chain.
delivered prior to each use.
.
0
until the viewing window w is
again.
0
q
fully filled with oil.
at a bright wood cutting surface at a distance
of approx. 20 cm. After operating the machine for one minute,
clear traces of oil must be visible on the surface.
e
21
Page 8
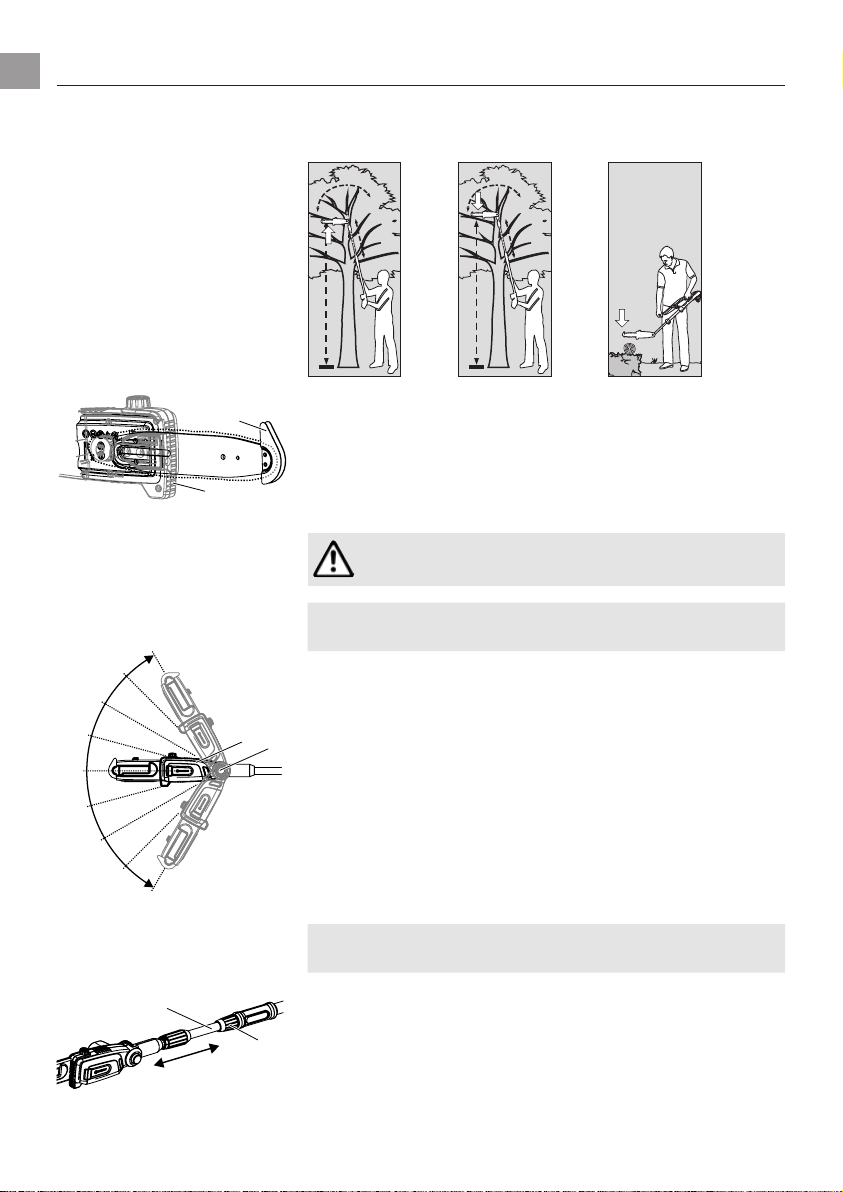
5. Operation
max. 4 m
ß
-60°
2
GB
Working positions: The Pole Pruner can be operated in 2 working positions
(above/below). To ensure a tidy cutting edge, thick branches
should be cut in 2 steps (Illustrations similar).
A
ß
B
Tilting the motor unit:
-45°
-30°
-15°
0°
15°
30°
45°
60°
Extending the telescopic
pipe:
1
max. 4m
Above
(thick branches):
1. From below, saw the
branch to no more
than 1/3 of the dia meter
(chain will push towards
the stop at
A
ß
engage.
).
the front
DANGER!
Do not stand under the branch while cutting.
The motor unit 1 can be tilted in 15° increments from
60° to – 60°.
1. Remove the battery from the handle (see 4. Initial Operation).
2. Keep both orange buttons
3. Tilt motor unit
4. Release both orange buttons
0
5. Put the battery on the handle (see 4. Initial Operation).
The telescopic tube 2 can be continuously extended by up to
50 cm.
max. 4 m
Above
(thick branches):
2. Cut off the branch
from above (chain
will push towards the
stop at the back
in the required direction.
1
B
).
ß
pressed.
0
and allow motor unit 1 to
0
Below:
Cut off from above
(chain will push towards
the stop at the back
B
).
ß
1. Remove the battery from the handle (see 4. Initial Operation).
50 cm
2. Loosen the orange nut
q
require length, and tighten the orange nut q again.
3. Put the battery on the handle (see 4. Initial Operation).
, extend the telescopic pipe 2 to the
q
22
Page 9

Starting the Pole Pruner:
w
r
w
4 m
t
DANGER!
Physical injury due to cut injury!
v Never override the safety devices (e.g. by strapping
Verify that the following conditions are met before
commencing work:
• The tank has been filled with sufficient chain oil
and the lubrication system has been checked
(see 4. Initial Operation).
• The chain is tensioned (see 7. Maintenance).
Switching on the Pole Pruner:
1. Open the snap fit of the protective cover
2. Slide the battery onto the handle (see 4. Initial Operation).
3. Hold the telescopic pipe of the Pole Pruner with one hand and
4. Push the starting lock-out
5. Release the starting lock-out
Switch off the Pole Pruner:
1. Release the start button
2. Remove the battery from the handle (see 4. Initial Operation).
3. Slide the protective cover
down the starting lock-out and/or the start button).
and remove from
the bar.
the handle with the other hand.
forwards and press the start
button t. The Pole Pruner starts.
r
r
.
t
onto the bar and close until the
snap fit engages.
w
.
w
GB
6. Storage
To put into storage:
Disposal:
(in accordance with
RL 2012/19/EU)
Store out of the reach of children.
1. Remove and charge battery (see 4. Initial Operation).
2. Clean Pole Pruner (see 7. Maintenance), and slide protective
cover
onto the bar and close until the snap fit engages.
w
3. Store Pole Pruner in a dry and frost-free location.
The product must not be added to normal household waste.
It must be disposed of in line with local environmental regulations.
v Important: Make sure that the unit is disposed of via your
municipal recycling collection centre.
23
Page 10
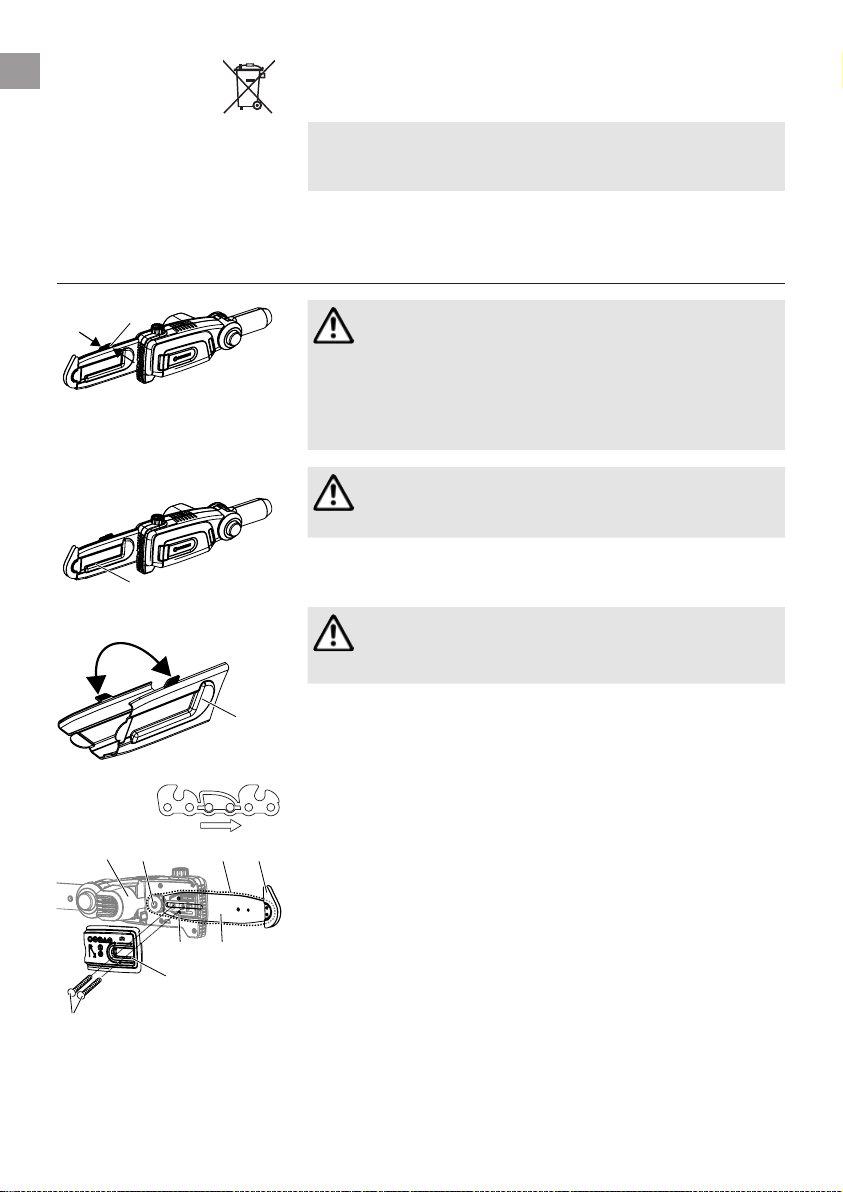
Disposal of
w
1
g s
ß
GB
batteries:
7. Maintenance
Li-ion
The GARDENA Pole Pruner contains lithium-ion batteries that
should not be discarded with normal household waste at the end
of their life.
Important:
Please return the lithium-ion batteries to your GARDENA dealer
or dispose of them properly at a public recycling centre.
1. Discharge lithium-ion batteries completely.
2. Dispose of lithium-ion batteries properly.
DANGER! Physical injury!
Cut injury when the Pole Pruner switches on
unintentionally.
v Before performing maintenance work, remove
the battery (see 4. Initial Operation), and slide the
protective cover
the snap fit engages.
onto the bar and close until
w
Cleaning the Pole Pruner:
e
Replacing the chain:
h
a
p
e
w
CAUTION! Damage to the Pole Pruner!
v Do not clean Pole Pruner under running water or
1. Clean Pole Pruner with a damp cloth.
2. Clean bar
CAUTION! Physical injury!
Cut injury due to the chain.
v Wear protective gloves when replacing the chain.
When the cutting performance reduces significantly (dull chain),
the chain must be replaced. The Allen key for the screws
situated inside the protective cover w. Only the original GARDENA
Spare Chain and Bar Art. 4048 or Spare Chain Art. 4049 may be
used.
1. Unscrew both screws
2. Remove the bar
A
3. Clean motor unit
4. Mount the new chain
5. Place the bar
6. Replace the lid
7. Tension the chain.
high pressure.
with a brush, if necessary.
e
and remove the lid a.
p
along with the chain s and release the used
chain s from the bar e.
attention to the rubber washers in the casing and cover a.
and ensure the direction of movement of the chain and that
the stop at the front faces upwards.
bolth is inserted in the bar e and the chain s is placed around
the drive sprocket g.
fasten slightly with the two screws p.
e
, bar e and lid a. In doing so, pay particular
1
via the stop at the front
s
on the motor unit 1 in such a way that the
e
(taking care of the rubber sealing gasket) and
a
is
p
A
of the bar e,
ß
24
Page 11
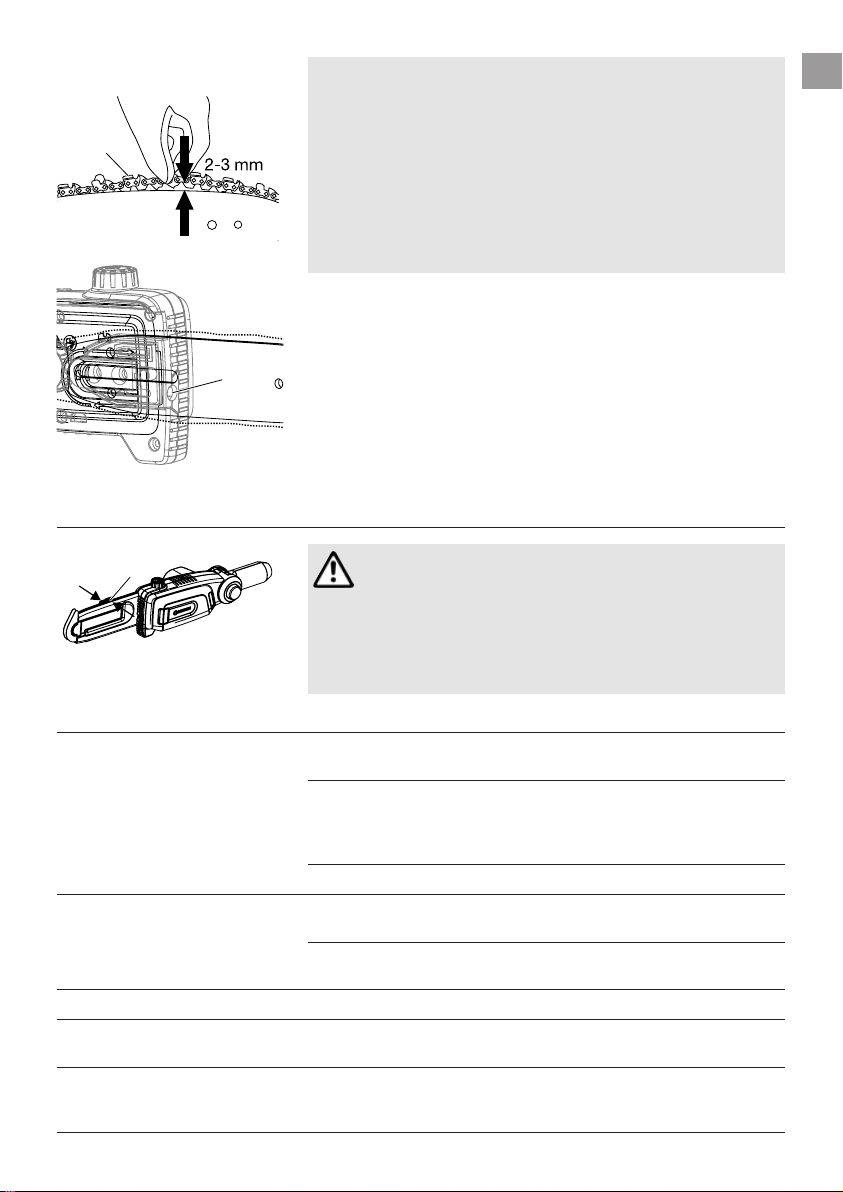
Tensioning the chain:
w
s
e
RISK OF BURN INJURIES!
A too tightly tensioned chain can lead to motor overload and
damage, whereas insufficient tensioning can cause the chain to
jump off the rail. A correctly tensioned chain offers the best cutting performance, optimum battery life and a longer service
life. Therefore, you should check the tensioning regularly as the
chain may expand when being used (especially when the chain is
new; following first installation, the tensioning of the chain must
be checked after the chainsaw has been used for a few minutes).
v However, do not tension the chain immediately after use
but wait until it has cooled down.
GB
j
1. Lift the chain
should be approx. 2 – 3 mm.
2. Turn the adjustment screw
the chain is too low, or turn the adjustment screw j anticlockwise when the tensioning of the chain is too strong.
3. Screw on the lid
4. Start the device for approx. 10 sec.
5. Check the tensioning of the chain again and re-adjust,
if necessary.
off the bar e in the middle of the bar. The gap
s
clockwise when the tensioning of
j
.
a
8. Troubleshooting
DANGER! Risk of physical injury!
Cut injury when the Pole Pruner switches on
unintentionally.
v Before performing troubleshooting work, remove
Problem Possible Cause Remedy
Pole Pruner does not
start up
Low runtime Chain tensioned excessively.
Hedge is not cleanly cut Chain dull or damaged.
Pole Pruner cannot be
switched off
Pole Pruner stops.
Error-LED
W
flashes
ß
Battery is flat.
Battery not pushed onto the
handle properly.
Chain blocked.
Chain not lubricated due to
lack of oil.
Start button is stuck.
Battery overload.
the battery (see 4. Initial Operation), and slide the
protective cover
snap fit engages.
onto the bar and close until the
w
v Charge battery
(see 4. Initial Operation).
v Push battery onto the
handle and make sure that
the locking buttons snaps
in correctly.
v Remove blockage.
v Tension chain
(see 7. Maintenance).
v Refill oil
(see 4. Initial Operation).
v Replace chain.
v Remove battery and loosen
start button.
v Wait for 10 sec.
Press button
battery and restart.
B
on the
ß
25
Page 12

Problem Possible Cause Remedy
GB
Pole Pruner stops.
Error-LED
Charging indicator lamp
the charger does not light up
Charging control lamp
on the charger flashes rapidly
(twice per second)
Pole Pruner stops.
Error-LED
The battery can no longer
be charged
Only the original GARDENA Replacement Battery BLi-18 (Art. 9840) may be used.
This can be obtained from your GARDENA dealer or directly from GARDENA Service.
W
flashes
ß
9
9
W
is lit
ß
For any other malfunctions please contact the GARDENA service department.
Repairs must only be done by GARDENA service departments or specialist dealers
approved by GARDENA.
High temperature. The allowed
operation temperature was
exceded.
Battery charger or charging
on
cable not plugged in properly.
Charging error.
Battery error /
battery defective.
Battery is defective.
v Leave battery to cool for
approx. 15 min.
Press button
battery and restart.
v Plug in battery charger and
charging cable properly.
v Unplug charger and plug
in again.
v Press button
battery and restart.
v Replace the battery
(Art. 9840).
9. Available accessories
B
on the
ß
B
on the
ß
GARDENA
Replacement Battery BLi-18
GARDENA Replacement Chain
and Bar
GARDENA Replacement Chain Chain for replacement. Art. 4049
GARDENA Chainsaw Oil For lubricating the chain. Art. 6006
Battery for additional duration or
for replacement.
Chain and bar for replacement. Art. 4048
Art. 9840
10. Technical Data
TCS Li-18/20 (Art. 8866)
Chain speed 3.8 m/s
Bar length 20 cm
Chain type 90 px
Oil tank volume 60 ml
Range of extension of
telescopic tube
Weight including battery 3.5 kg
26
0 – 50 cm
Page 13

TCS Li-18/20 (Art. 8866)
Workplace related
sound pressure level L
Uncertainty k
PA
Noise emission value L
Uncertainty k
WA
Hand / arm vibration a
Uncertainty k
a
vhw
1)
PA
WA
2)
79 dB(A)
3 dB(A)
1)
89 dB(A)
3 dB(A)
< 2.5 m/s
1.5 m/s
2
2
Battery lithium ion (18 V)
Battery capacity 2.6 Ah
Battery charging time approx. 3.5 Std. 80 % / approx. 5 Std. 100 %
Idling time * approx. 30 min. (with full battery)
Battery charger
Mains voltage 230 V / 50 – 60 Hz
Max. output current 600 mA
Output voltage 18 V (DC)
Measuring process complying with 1) DIN EN ISO 22868 2) DIN EN ISO 22867.
* The actual running time may differ from the stated idle time depending on application, type of cuttings and state of maintenance.
The stated vibration emission value has been measured according to a standardised
test procedure and can be used for comparison of one electric power tool with
another. It can also be used for preliminary evaluation of exposure. The vibration
emission value can vary during actual use of the electric power tool.
GB
11. Service / Warranty
Service: Please contact the address on the back page.
Guarantee: GARDENA Manufacturing GmbH guarantees this unit for 2 years
(from date of purchase). This guarantee covers all serious defects
of the unit that can be proved to be material or manufacturing
faults. Under warranty we will either replace the unit or repair it
free of charge if the following conditions apply:
• The unit must have been handled properly and in keeping with
the requirements of the operating instructions.
• Neither the purchaser or a non-authorised third party have
attempted to repair the unit.
The chain and bar are wearing parts and are not covered by the
guarantee.
This manufacturer’s guarantee does not affect the user’s existing
warranty claims against the dealer / seller.
If you have problems with this unit, please contact our Service.
27
Page 14

D Produkthaftung
Wir weisen ausdrücklich darauf hin, dass wir nach dem Produkthaftungsgesetz nicht für durch unsere Geräte
hervorgerufene Schäden einzustehen haben, sofern diese durch unsachgemäße Reparatur verursacht oder
bei einem Teileaustausch nicht unsere originale GARDENA Teile oder von uns freigegebene Teile verwendet
wurden und die Reparatur nicht vom GARDENA Service oder dem autorisierten Fachmann durchgeführt wird.
Entsprechendes gilt für Ergänzungsteile und Zubehör.
GB Product Liability
We expressly point out that, in accordance with the product liability law, we are not liable for any damage
caused by our units if it is due to improper repair or if parts exchanged are not original GARDENA parts or
parts approved by us, and, if the repairs were not carried out by a GARDENA Service Centre or an authorised
specialist. The same applies to spare parts and accessories.
F Responsabilité
Nous vous signalons expressément que GARDENA n’est pas responsable des dommages causés par ses
appareils, dans la mesure où ces dommages seraient causés suite à une réparation non conforme, dans
la mesure où, lors d’un échange de pièces, les pièces d’origine GARDENA n’auraient pas été utilisées, ou si
la réparation n’a pas été effectuée par le Service Après-Vente GARDENA ou l’un des Centres SAV agréés
GARDENA. Ceci est également valable pour tout ajout de pièces et d’accessoires autres que ceux préconisés
par GARDENA.
NL Productaansprakelijkheid
Wij wijzen er nadrukkelijk op, dat wij op grond van de wet aansprakelijkheid voor producten niet aansprakelijk
zijn voor schade ont staan door onze apparaten, indien deze door onvakkundige reparatie veroorzaakt zijn, of er
bij het uitwisselen van onderdelen geen gebruik gemaakt werd van onze originele GARDENA onderdelen of door
ons vrijgegeven onderdelen en de reparatie niet door de GARDENA technische dienst of de bevoegde vakman
uitgevoerd werd. Ditzelfde geldt voor extra-onderdelen en accessoires.
S Produktansvar
Tillverkaren är inte ansvarig för skada som orsakats av produkten om skadan beror på att produkten har
reparerats felaktigt eller om, vid reparation eller utbyte, andra än Original GARDENA reservdelar har använts.
Samma sak gäller för kompletteringsdelar och tillbehör.
DK Produktansvar
Vi gør udtrykkeligt opmærksom på, at vi i henhold til produktansvarsloven ikke er ansvarlige for skader
forårsaget af vores udstyr, såfremt det sker på grund af uautoriserede reparationer eller hvis dele er skiftet
ud og der ikke er anvendt originale GARDENA dele eller dele godkendt af os, eller hvis reparationerne ikke
er udført af GARDENA-service eller en autoriseret fagmand. Det samme gælder for ekstra udstyr og tilbehør.
FI Tuotevastuu
Korostamme nimenomaan, että tuotevastuulain nojalla emme ole vastuussa laitteistamme johtuneista
vahingoista, mikäli nämä ovat aiheutuneet epäasianmukaisesta korjauksesta tai osia vaihdettaessa ei ole
käytetty alkuperäisiä GARDENA-varaosia tai hyväksymiämme osia ja korjauksen on suorittanut muu kuin
GARDENA-huoltokeskus tai valtuuttamamme ammattihenkilö. Tämä pätee myös lisäosiin ja lisävarusteisiin.
I Responsabilità del prodotto
Si rende espressamente noto che, conformemente alla legislazione sulla responsabilità del prodotto,
non si risponde di danni causati da nostri articoli se originati da riparazioni eseguite non correttamente
o da sostituzioni di parti effettuate con materiale non originale GARDENA o comunque da noi non
approvato e, in ogni caso, qualora l’intervento non venga eseguito da un centro assistenza GARDENA
o da personale specializzato autorizzato. Lo stesso vale per le parti complementari e gli accessori.
E Responsabilidad de productos
Advertimos que conforme a la ley de responsabilidad de productos no nos responsabilizamos de daños causados por nuestros aparatos, siempre y cuando dichos daños hayan sido originados por arreglos o reparaciones
indebidas, por recambios con piezas que no sean piezas originales GARDENA o bien piezas no autorizadas
por nosotros, así como en aquellos casos en que la reparación no haya sido efectuada por un Servicio Técnico
GARDENA o por un técnico autorizado. Lo mismo es aplicable para las piezas complementarias y accesorios.
P Responsabilidade sobre o produto
Queremos salientar que segundo a lei da responsabilidade do fabricante, nós não nos responsabilizaremos por
danos causados pelo nosso equipamento, quando estes ocorram em decorrência de reparações inadequadas
ou da substituição de peças por peças não originais da GARDENA, ou peças não autorizadas.
A responsabilidade tornar-se-à nula também depois de reparações realizadas por oficinas não autorizadas pela
GARDENA. Esta restrição valerá também para peças adicionais e acessórios.
PL Odpowiedzialność za produkt
Zwracamy Państwa uwagę, że nie ponosimy odpowiedzialności za uszkodzenia naszych maszyn, bądź szkody spowodowane ich wadliwym funkcjonowaniem, powstałe na skutek nieprawidłowo przeprowadzonych
napraw lub użycia nieoryginalnych części zamiennych. Naprawy winny być przeprowadzane tylko przez punkty
serwisowe Husqvarna lub autoryzowane serwisy. Dotyczy to również części uzupełniających i oprzyrządowania.
364
Page 15

H Termékszavatosság
Nyomatékosan utalunk arra a tényre, hogy a természavatossági törvény szerint nem kell jótállást vállalnunk
azokra a károkra, amelyeket nem a mi készülékeink okoztak, ha ezeket szakszerűtlen javítás okozta vagy egy
alkatrész kicserélésénél nem a mi eredeti GARDENA alkatrészeinket vagy általunk engedélyezett alkatrészeket
használtak fel és a javítást nem a GARDENA szerviz vagy egy erre felhatalmazott szakember végezte.
Hasonlóképpen érvényes ez a kiegészítő alkatrészekre és tartozékokra is.
CZ Odpovědnost za výrobek
Výslovně upozorňujeme na to, že podle zákona o odpovědnosti za výrobek neneseme odpovědnost za
škody způsobené našimi přístroji, pokud byly způsobené neodbornou opravou nebo použitím jiných než
našich originálních náhradních dílů GARDENA nebo námi schválených dílů a neprovedením opravy servisem
GARDENA nebo autorizovaným odborníkem. Odpovídající platí i pro doplňkové díly a příslušenství.
SK Predmet záruky
Upozorňujeme dôrazne na to, že podľa zákona o poskytovaní záruk nezodpovedáme za škody spôsobené našimi
výrobkami, v prípade, že boli boli vyvolané neodbornými opravami, výmenou dielcov, ktoré nepatria k originálnym dielom GARDENA alebo neboli nami schválené arovnako boli spôsobené servisnými zásahmi, ktoré neboli
vykonané servisom GARDENA alebo autorizovaným odborníkom. Rovnako to platí pre doplnky a príslušenstvo.
GR
Ευθύνη για το προϊόν
Σας υπενθυμίζουμε ρητά, ότι σύμφωνα με το νόμο περί ευθύνης για τα προϊόντα δεν ευθυνόμαστε για
ενδεχόμενες βλάβες που προκαλούνται από πς συσκευές μας, εφόσον οφείλονται σε μία ακατάλληλη
επισκευή ή σε μια αντικατάσταση τμημάτων για την οποία δεν έχουν χρησιμοποιηθεί τα πρωτότυπα
ανταλλακτικά της GARDENA ή τα από μας εγκεκριμένα ανταλλακτικά και σε περίπτωση που δεν εκτελείται η
επισκευή από το Τμήμα Εξυπηρέτησης Πελατών της GARDENA ή από έναν εξουσιοδοτημένο εξειδικευμένο
τεχνίτη. Το ίδιο ισχύει για εξαρτήματα και συμπληρωματικά τμήματα.
SLO Jamstvo za izdelek
Pismeno poudarjamo, da po zakonu jamstva za izdelek nismo odgovorni za škodo, ki bi nastala zaradi uporabe
našega izdelka, prav tako tudi ne za škodo ki bi nastala zaradi nepravilnega popravila izdelka ali pri napačni
zamenjavi delov, ki niso originalni deli GARDENA ali pri uporabi z naše strani potrjenih delov, ki pa niso
bili vgrajeni v servisu GARDENA ali v naši pooblaščeni servisni službi. Enako velja tudi za nadomestne dele
in opremo.
HR Odgovornost za proizvod
Izričito napominjemo da u skladu sa Zakonom o odgovornosti za proizvode nismo odgovorni za štete
uzrokovane našim uređajima ako su one izazvane nestručnim popravkom ili u slučaju zamjene dijelova nisu
korišteni originalni GARDENA dijelovi ili dijelovi koje smo odobrili i popravak nije izvršio GARDENA servis
ili ovlašteni stručnjak. Isto vrijedi i za dodatne dijelove i pribor.
RO Responsabilitatea legala a produsului
Menţionam in mod expres ca, in concordanta cu responsabilitatea legala a produsului, nu suntem răspunzători
de nici un accident provocat de produsele noastre daca se datorează reparării necorespunzătoare sau daca
piesele de schimb nu sunt originale GARDENA sau aprobate de GARDENA, sau daca reparaţiile nu au fost
efectuate de un Centru de Sevice GARDENA sau un specialist autorizat. Aceleaşi prevederi se aplica si pieselor
de schimb si accesoriilor.
BG Отговорност за качество
Изрично подчертаваме, че съгласно закона за отговорност за качество, ние не носим отговорност
за вредите причинени от нашите уреди, ако същите са причинени от неправилен ремонт или при
подмяната на части не са използвани оригинални части на GARDENA или части одобрени от нас
и ремонта не е извършен от сервиз на GARDENA или оторизиран специалист.
Същото важи за допълнителните части и принадлежности.
EST Tootevastutus
Juhime teie tähelepanu sellele, et tootevastutusseaduse kohaselt ei vastuta me meie seadmete poolt põhjustatud
kahjude eest, kui need on tekkinud asjatundmatu paranduse tagajärjel või kui detaili vahetamisel ei kasutatud
GARDENA originaalvaruosi ega meie poolt kasutada lubatud varuosi ja kui parandustöid ei ole teinud GARDENA
klienditeenindusspetsialistid ega meie volitatud spetsialistid. Sama kehtib lisadetailide ja tarvikute kohta.
LT Atsakomybė už produkciją
Nurodome, kad remdamiesi Atsakomybės už produkciją jstatymu, neatsakome už nuostolius, sukeltus
mūsų prietaisų, jei jie atsirado dėl netinkamo remonto, arba, jei keičiant dalis, buvo naudojamos neoriginalios
GARDENA dalys arba dalys, kurių mes neleidome naudoti, o remontą atliko ne GARDENA servisas arba
nejgaliotasis specialistas. Tas pats galioja papildomoms dalims ir priedams.
LV Produkta atbildība
Mēs skaidri norādām uz to, ka saskaņā ar Produktu atbildības likumu, mēs neatbildam par mūsu iekārtu
radītiem zaudējumiem, ciktāl tos ir izraisījis neatbilstošs remonts vai daļu nomaiņa ar neoriģinālām GARDENA
daļām vai ne ar mūsu norādītajām detaļām un remontu nav veicis GARDENA serviss vai pilnvarots speciālists.
Tas pats attiecas uz papildinošajām daļām un piederumiem.
365
Page 16

D EG-Konformitätserklärung
Der Unterzeichnete Husqvarna AB, 561 82 Huskvarna, Sweden bestätigt,
dass die nachfolgend bezeichneten Geräte in der von uns in Verkehr
gebrachten Ausführung die Anforderungen der harmonisierten EU-Richtlinien,
EU-Sicherheitsstandards und produktspezifischen Standards erfüllen.
Bei einer nicht mit uns abgestimmten Änderung der Geräte verliert diese
Erklärung ihre Gültigkeit.
GB EU Declaration of Conformity
The undersigned Husqvarna AB, 561 82 Huskvarna, Sweden hereby certifies that,
when leaving our factory, the units indicated below are in accordance with the
harmonised EU guidelines, EU standards of safety and product specific standards.
This certificate becomes void if the units are modified without our approval.
F Certificat de conformité aux directives européennes
Le constructeur, soussigné :
Husqvarna AB, 561 82 Huskvarna, Sweden déclare qu’à la sortie de ses usines le
matériel neuf désigné ci-dessous était conforme aux prescriptions des directives
européennes énoncées ci-après et conforme aux règles de sécurité et autres
règles qui lui sont appli cables dans le cadre de l’Union européenne.
Toute modification portée sur ce produit sans l’accord express de GARDENA
supprime la validité de ce certificat.
NL EU-overeenstemmingsverklaring
Ondergetekende Husqvarna AB, 561 82 Huskvarna, Sweden bevestigt, dat de
volgende genoemde apparaten in de door ons in de handel gebrachte uitvoering
voldoen aan de eis van, en in over een stemming zijn met de EU-richtlijnen,
de EU-veiligheids standaard en de voor het product specifieke standaard.
Bij een niet met ons afgestemde verandering aan de apparaten verliest deze
verklaring haar geldigheid.
S EU Tillverkarintyg
Undertecknad firma Husqvarna AB, 561 82 Huskvarna, Sweden intygar härmed
att nedan nämnda produkter överensstämmer med EU:s direktiv,
EU:s säkerhets standard och produktspecifikation. Detta intyg upphör att gälla
om produkten ändras utan vårt tillstånd.
DK EU Overensstemmelse certificat
Undertegnede Husqvarna AB, 561 82 Huskvarna, Sweden bekræfter hermed,
at enheder listet herunder, ved afsendelse fra fabrikken, er i overensstemmelse
med harmoniserede EU retningslinier, EU sikkerheds standarder og produkt
specifikations standarder. Dette certifikat træder ud af kraft hvis enhederne er
ændret uden vor godkendelse.
FI EU-yhdenmukaisuusvakuutus
Allekirjoittanut Husqvarna AB, 561 82 Huskvarna, Sweden vakuuttaa, että
allamai nitutlaitteet täyttävät tehtaaltamme lähtiessään yhdenmukaistettujen
EU-direktiivien, EU-turvallisuus standardien ja tuotekoh taisten standardien
vaatimukset. Laitteisiin tehdyt muutokset, joista ei ole sovittu kanssamme,
johtavat tämän vakuutuksen raukeamiseen.
I Dichiarazione di conformità alle norme UE
La sottoscritta Husqvarna AB, 561 82 Huskvarna, Sweden certifica che il prodotto
qui di seguito indicato, nei modelli da noi commercializzati, è conforme alle
direttive armonizzate UE nonché agli standard di sicurezza e agli standard
specifici di prodotto. Qualunque modifica apportata al prodotto senza nostra
specifica autorizzazione invalida la presente dichiarazione.
E Declaración de conformidad de la UE
El que subscribe Husqvarna AB, 561 82 Huskvarna, Sweden declara que la
presente mercancía, objeto de la presente declaración, cumple con todas las
normas de la UE, en lo que a normas técnicas, de homo logación y de seguridad
se refiere. En caso de realizar cualquier modificación en la presente mercancía
sin nuestra previa autori zación, esta declaración pierde su validez.
P Certificado de conformidade da UE
Os abaixo mencionados Husqvarna AB, 561 82 Huskvarna, Sweden, por este
meio certificam que ao sair da fábrica osaparelhos abaixo mencionados estão
de acordo com as directrizes harmonizadas da UE, padrões de segurança
e de produtos específicos. Este certificado ficará nulo se as unidades forem
modificadas sem a nossa aprovação.
PL Deklaracja zgodności Unii Europejskiej
Husqvarna AB, 561 82 Huskvarna, Sweden potwierdza, że poniżej określone
urządzenia w wersji oferowanej przez nas do sprzedaży spełniają wymagania
zharm onizowanych dyrektyw Unii Europejskiej, standardu bezpieczeństwa
Unii Europejskiej i standardu specyficznego dla tego typu produktów.
W przypadku zmiany urządzenia, która nie została z nami uzgodniona,
niniejsza deklaracja traci moc obowiązywania.
H EU-Megfelelőségi nyilatkozat
Alulírott, a Husqvarna AB, 561 82 Huskvarna, Sweden igazolja azt, hogy az
alábbiakban megnevezett készülékek, az általunk forgalomba hozott kivitelben
teljesítik a harmonizációs EU-irányelvek, az EU biztonsági szabványok és
a termékre jellemző szabványok követelményeit. Ha a készülékeken a mi
beleegyezésünk nélkül változtatást végeznek, akkor ez a nyilatkozat érvényét
veszti.
CZ Prohlášení o shodě EU
Podepsaný Husqvarna AB, 561 82 Huskvarna, Sweden potvrzuje, že dále uvedené
přístroje v námi do provozu uvedeném provedení splňují požadavky harmonizovaných směrnic EU, bezpečnostních norem EU a norem specifických pro výrobek.
Při námi neschválené změně přístrojů ztrácí toto prohlášení platnost.
SK EU-Vyhlásenie o zhode
Nižšie uvedená firma Husqvarna AB, 561 82 Huskvarna, Sweden vyhlasuje,
že uvedené zariadenia, ktoré uviedla na trhu v tomto vyhotovení, spĺňajú
požiadavky harmonizovaných smerníc EU, bezpečnostných noriem EU a noriem
špecifických pre výrobok.
Pri zmene zariadenia, ktorá nebola odsúhlasená výrobcom stráca toto vyhlásenie
platnosť.
GR Δήλωση Συμμόρφωσης προς τις Οδηγίες της ΕΕ
Η υπογράφουσα Husqvarna AB, 561 82 Huskvarna, Sweden δηλώνει, ότι τα
εξής αναφερόμενα εκδιδόμενα από την εταιρία μας προϊόντα ανταποκρίνονται
σε όλες τις εναρμονισμένες προδιαγραφές της ΕΕ, στα πρότυπα ασφάλειας
της ΕΕ και στα ειδικά για το προϊόν πρότυπα.
Σε μία μη συμφωνημένη με την εταιρία μας τροποποίηση των συσκευών αυτή
η δήλωση χάνει την ισχύ της.
SLO EV-izjava o skladnosti
Podpisani proizvajalec »Husqvarna AB, 561 82 Huskvarna, Sweden« s podpisom
potrjuje, da sledeče opisana naprava, ki smo jo poslali na tržišče izpolnjuje
zahteve harmoniziranih standardov ES-smernic, ES-varnostnih standardov in
izdelku specifičnih standardov. V primeru spremembe na napravi brez našega
pisnega dovoljenja ta izjava izgubi svoj pomen in veljavnost.
HR Izjava o sukladnosti EU-a
Dolje potpisana tvrtka Husqvarna AB, 561 82 Huskvarna, Sweden ovime
potvrđuje da dolje navedeni uređaji u izvedbi plasiranoj na tržište ispunjavaju
zahtjeve harmoniziranih EU smjernica, EU sigurnosnih normi i normi za
određene proizvode. Ova izjava postaje ništavna u slučaju izmjene uređaja koje
nismo odobrili.
RO UE-Certificat de conformitate
Prin prezenta Husqvarna AB, 561 82 Huskvarna, Sweden, certifica faptul ca,
in momentul in care produsele menţio nate mai jos ies din fabrica sunt in
concordanta cu directivele UE, standardele de siguranţa UE si standardele
specifice ale produsului UE. Acest certificat devine
nul in cazul modificării aparatului fără aprobarea noastră.
BG EС-Декларация за съответствие
Подписаната фирма Husqvarna AB, 561 82 Huskvarna, Sweden декларира, че
описаните по-долу уреди, пуснати в продажба съгласно нашата спецификация,
изпълняват изискванията на хармонизираните ЕС-директиви, ЕС-стандарти за
безопасност и специфичните производствени стандарти. При промяна на уреда,
която не е съгласувана с нас, тази декларация губи своята валидност.
EST ELi vastavusdeklaratsioon
Allakirjutanu Husqvarna AB, 561 82 Huskvarna, Sweden kinnitab,
et kirjeldatud seade vastab meie poolt ringlusse viidud kujul ELi harmoniseeritud
direktiividele, ELi ohutusstandarditele ja tootega seotud standarditele.
Meiega kooskõlastamata muudatuse tegemise korral seadmel kaotab see
deklaratsioon kehtivuse.
LT ES Atitikties deklaracija
Pasirašanti įmonė Husqvarna AB, 561 82 Huskvarna, Sweden patvirtina,
kad žemiau nurodyti prietaisai ir jų modeliai, kurie buvo pagaminti mūsų
gamyklose atitinka ES direktyvas, ES saugumo standartus ir specifinius
gaminio standartus. Atlikus bet kokį prietaiso pakeitimą, kuris nėra suderintas
su mumis, ši deklaracija praranda galiojimą.
LV ES-atbilstības deklaracija
Parakstījusies Husqvarna AB, 561 82 Huskvarna, Sweden, Vācija apstiprina,
ka sekojoši apzīmētās iekārtas, kuras mēs izplatām, savā izpildījumā atbilst
harmonizētajām ES direktīvām, ES drošības standartiem un produkta
specifiskajiem standartiem.
Ar mūsu neapstiprinātām izmaiņām iekārtā šī deklarācija zaudē
savu derīgumu.
366
Page 17

Bezeichnung der Geräte:
Description of the units:
Désignation du matériel :
Omschrijving van de apparaten:
Produktbeskrivning:
Beskrivelse af produktet:
Laitteiden nimitys:
Descrizione dei prodotti:
Descripción de la mercancía:
Descrição dos aparelhos:
Nazwa urządzenia:
A készülékek megnevezése:
Označení přístrojů:
Označenie zariadenia:
Ονομασία της συσκευής:
Opis naprave:
Oznaka uređaja:
Descrierea articolelor:
Обозначение на уредите:
Seadmete nimetus:
Prietaisų pavadinimas:
Iekārtu apzīmējums:
Typen:
Types:
Types :
Type:
Typ:
Typer:
Tyypit:
Tipi:
Típos:
Tipos:
Typy:
Típusok:
Typy:
Typ:
Τύποι:
Tipi:
Tipovi:
Tipuri:
Типове:
Tüübid:
Tipai:
Tipi:
TCS Li-18/20
EU-Richtlinien:
EU directives:
Directives européennes :
EU-richtlijnen:
EU directiv:
EU Retningslinier:
EY-direktiivit:
Direttive UE:
Normativa UE:
Directrizes da UE:
Dyrektywy Unii Europejskiej:
EU-irányelvek:
Směrnice EU:
EU-Predpisy:
Οδηγίες της ΕΕ:
ES-smernice:
EU smjernice:
Directive UE:
EС-директиви:
ELi direktiivid:
Harmonisierte EN:
EN ISO 12100
EN ISO 11680-1
EN 60745-1
Accu-Hochentaster
Battery Pole Pruner
Élagueuse sur perche sur accu
Accu-telescoopkettingzaag
Batteridriven Kvistsåg
Akku-grensav til højtsiddende grene
Accu-raivaussaha
Potatore telescopico a batteria
Sierra de pértiga telescópica conaccu
Serra accu para poda em altura
Akumulatorowa pilarka łańcuchowa
z trzonkiem teleskopowym
Akkumulátoros magassági ágvágó
Akumulátorová teleskopická vyvětvovací
pilka
Akumulátorový teleskopický odvetvovač
Τηλεσκοπικό αλυσοπρίονο μπαταρίας
Akumulatorski obrezovalnik za veje
Akumulatorska teleskopska pila
Foarfecă cu acumulator pentru rărirea
crengilor copacilor înalţi
Телескопична акумулаторна кастрачка
Akuga kõrglõikur
Akumuliatorinė aukštapjovė
Atzarotājs ar akumulatoru un
teleskopisko kātu
Art.-Nr.:
Art. No.:
Référence :
Art.nr.:
Art.nr.:
Art. nr.:
Tuoten:o
Art.:
Art. No:
Art. no:
Nr artykułu:
Cikkszám:
Číslo artiklu:
Art.:
Αριθ. είδους:
Art št.:
br. art.
Nr art.:
Арт. номер:
Toote nr :
Gaminio nr.:
Izstr.:
Art. 8866
ES direktyvos:
ES-direktīvas:
2006/42/EG
2011/65/EG
2014/30/EG
Ladegerät / Battery charger:
2014/35/EG
Batterie / Battery:
IEC 62133
Ladegerät / Battery charger:
EN ISO 12100
IEC 60335-1
IEC 60335-2-29
Hinterlegte Dokumentation:
GARDENA-Technische Dokumentation,
M. Kugler 89079 Ulm
Deposited Documentation:
GARDENA Technical Documentation,
M. Kugler 89079 Ulm
Documentation déposée:
Documentation technique GARDENA,
M. Kugler 89079 Ulm
Anbringungsjahr der CE-Kennzeichnung:
Year of CE marking:
Année d’apposition du marquage CE :
Installatiejaar van de CE-aanduiding:
Märkningsår:
CE-Mærkningsår:
CE-merkin kiinnitysvuosi:
Anno di applicazione della certificazione CE:
Colocación del distintivo CE:
Ano de marcação pela CE:
Rok nadania oznakowania CE:
CE-jelzés elhelyezésének éve:
Rok umístění značky CE:
Rok udelenia značky CE:
Έτος σήματος CE:
Leto namestitve CE-oznake:
Godina dobivanja CE oznake:
Anul de marcare CE:
Година на поставяне на CE-маркировка:
CE-märgistuse paigaldamise aasta:
Metai, kada pažymėta CE-ženklu:
CE-marķējuma uzlikšanas gads:
Ulm, den 11.02.2016
Ulm, 11.02.2016
Fait à Ulm, le 11.02.2016
Ulm, 11-02-2016
Ulm, 2016.02.11.
Ulm, 11.02.2016
Ulmissa, 11.02.2016
Ulm, 11.02.2016
Ulm, 11.02.2016
Ulm, 11.02.2016
Ulm, dnia 11.02.2016
Ulm, 11.02.2016
Ulm, 11.02.2016
Ulm, dňa 11.02.2016
Ulm, 11.02.2016
Ulm, 11.02.2016
Ulm, dana 11.02.2016
Ulm, 11.02.2016
Улм, 11.02.2016
Ulm, 11.02.2016
Ulm, 11.02.2016
Ulme, 11.02.2016
Der Bevollmächtigte
Authorised representative
Le mandataire
De gevolmachtigde
Auktoriserad representant
Autoriseret repræsentant
Valtuutettu edustaja
Persona delegata
La persona autorizada
O representante
Pełnomocnik
Meghatalmazott
Zplnomocněnec
Splnomocnený
Ο εξουσιοδοτημένος
Pooblaščenec
Ovlaštena osoba
Conducerea tehnică
Упълномощен
Volitatud esindaja
Įgaliotasis atstovas
Pilnvarotā persona
Reinhard Pompe
Vice President
2013
367
Page 18

Deutschland /Germany
GARDENA
Manufacturing GmbH
Central Service
-
Lorenser-Straße 40
Hans
-
89079 Ulm
D
Produktfragen:
(+49) 731 490
Reparaturen:
(+49) 731 490
service
Albania
COBALT Sh.p.k.
Rr. Siri Kodra
1000 Tirana
Argentina
Husqvarna Argentina S.A.
Av.del Libertador 5954
Piso 11–Torre B
(C1428ARP) Buenos Aires
Phone: (+54) 11 5194 5000
info.gardena
ar.husqvarna.com
Armenia
Garden Land Ltd.
61 Tigran Mets
0005 Yerevan
Australia
Husqvarna Australia Pty. Ltd.
Locked Bag 5
Central Coast BC
NSW 2252
Phone: (+61) (0) 2 43527400
customer.service
husqvarna.com.au
Austria /Österreich
Husqvarna Austria GmbH
Industriezeile 36
4010 Linz
Tel.: (+43) 732 77 0101
service.gardena
husqvarnagroup.com
Azerbaijan
Firm Progress
a. Aliyev Str. 26A
1052 Baku
Belgium
GARDENA Belgium NV/ SA
Sterrebeekstraat 163
1930 Zaventem
Phone: (+32) 2 7 2092 12
Mail: info
Bosnia / Herzegovina
SILK TRADE d.o.o.
Industrijska zona Bukva bb
74260 Tešanj
Brazil
Husqvarna do Brasil Ltda
Av. Francisco Matarazzo,
1400
São Paulo
CEP: 05001
Tel: 0800
marketing.br.husqvarna
husqvarna.com.br
Bulgaria
Хускварна България ЕООД
Бул. „Андрей Ляпчев” Nº 72
1799 София
Тел.: (+ 359)02/9753076
www.husqvarna.bg
Canada /USA
GARDENA Canada Ltd.
100 Summerlea Road
Brampton, Ontario L6T 4X3
Phone: (+1) 905 792 9330
info
Chile
Maquinarias Agroforestales
Ltda. (Maga Ltda.)
Santiago, Chile
Avda. Chesterton
# 8355 comuna Las Condes
Phone: (+56) 2 202 4417
Dalton
Zipcode: 7560330
Temuco, Chile
Avda. Valparaíso # 01466
Phone: (+56) 45 222 126
Zipcode: 4780441
-
123
-
290
@gardena.com
–
@
@
@
@gardena.be
–
19º andar
–
SP
-
903
-
112252
@
@gardenacanada.com
@maga.cl
-
485
368
China
Husqvarna (China) Machinery
Manufacturing Co., Ltd.
No. 1355, Jia Xin Rd.,
Ma Lu Zhen, Jia Ding Dist.,
Shanghai
201801
Phone: (+86) 21 59159629
Domestic Sales
www.gardena.com.cn
Colombia
Husqvarna Colombia S.A.
Calle 18 No. 68 D
Industrial de Montevideo
Bogotá, Cundinamarca
Tel. 571 2922700 ext. 105
jairo.salazar
husqvarna.com.co
Costa Rica
Compania Exim
Euroiberoamericana S.A.
Los Colegios, Moravia,
200 metros al Sur delColegio
Saint Francis
Phone: (+506) 297 68 83
exim_euro
Croatia
SILK ADRIA d.o.o.
Josipa Lončara 3
10090 Zagreb
Phone: (+385) 1 3794 580
silk.adria
Cyprus
Med Marketing
17 Digeni Akrita Ave
P.O. Box 27017
1641 Nicosia
Czech Republic
Husqvarna Česko s.r.o.
Türkova 2319/ 5b
149 00 Praha 4 – Chodov
Bezplatná infolinka:
800 100425
servis
Denmark
GARDENA /Husqvarna
Consumer Outdoor Products
Salgsafdelning Danmark
Box 9003
S
-
200 39 Malmö
info
@gardena.dk
Dominican Republic
BOSQUESA, S.R.L
Carretera Santiago Licey
Km. 5 ½
Esquina Copal II.
Santiago
Dominican Republic
Phone: (+809 ) 736-0333
joserbosquesa
Ecuador
Husqvarna Ecuador S.A.
Arupos E1-181 y 10 de
Agosto
Tel. (+593) 22800739
francisco.jacome
husqvarna.com.ec
Estonia
Husqvarna Eesti OÜ
Consumer Outdoor Products
Kesk tee 10, Aaviku küla
Rae vald
Harju maakond
75305 Estonia
kontakt.etj
Finland
Oy Husqvarna Ab
Consumer Outdoor Products
Lautatarhankatu 8 B /PL 3
00581 HELSINKI
info
@gardena.fi
France
Husqvarna France
9/ 11 Allée des pierresmayettes
92635 Gennevilliers Cedex
France
http: //www.gardena.com/ fr
N° AZUR: 0 81000 78 23
(Prix d’un appel local)
-
31, zona
@
–
San José
@racsa.co.cr
@zg.t
-
com.hr
@cz.husqvarna.com
@claro.net.do
Quito, Pichincha
@
@husqvarna.ee
Georgia
ALD Group
Beliashvili 8
1159 Tleilisi
Great Britain
Husqvarna UK Ltd
Preston Road
Aycliffe Industrial Park
Newton Aycliffe
County Durham
DL5 6UP
@
info.gardena
husqvarna.co.uk
Greece
Π.ΠΑΠΑΔΟΠΟΥΛΟΣ ΑΕΒΕ
Λεωφ. Αθηνών 92
Αθήνα
Τ.Κ.104 42
Ελλάδα
Τηλ. (+30) 210 5193100
@papadopoulos.com.gr
info
Hungary
Husqvarna Magyarország Kft.
-
3
Ezred u. 1
1044 Budapest
Telefon: (+36) 1 251
vevoszolgalat.husqvarna
husqvarna.hu
Iceland
Ó. Johnson & Kaaber
Tunguhalsi 1
110 Reykjavik
@ojk.is
ooj
Ireland
Husqvarna UK Ltd
Preston Road
Aycliffe Industrial Park
Newton Aycliffe
County Durham
DL5 6UP
info.gardena
husqvarna.co.uk
Italy
Husqvarna Italia S.p.A.
Via Como 72
23868 VALMADRERA (LC)
Phone: (+39) 0341.203.111
@gardenaitalia.it
info
Japan
KAKUICHI Co. Ltd.
Sumitomo Realty &
Development Kojimachi
BLDG., 8F
-
1 Nibanncyo
5
Chiyoda
Tokyo 102
Phone: (+81) 33 264 4721
m_ishihara
Kazakhstan
LAMED Ltd.
155/ 1, Tazhibayevoi Str.
050060 Almaty
IP Schmidt
Abayavenue 3B
110 005 Kostanay
Korea
Kyung Jin Trading CO.,LTD.
107-4, SunDuk Bld.,
YangJae-dong,
Seocho-gu,
Seoul, (zipcode: 137-891)
Phone: (+82) (0)2 574-6300
Kyrgyzstan
Alye Maki
av. Moladaya Guardir J 3
720014
Bishkek
Latvia
Husqvarna Latvija
Consumer Outdoor Products
Bākūžu iela 6
LV-1024 Rīga
@husqvarna.lv
info
Lithuania
UAB Husqvarna Lietuva
Consumer Outdoor Products
Ateities pl. 77C
-
52104 Kaunas
LT
centras
@
-
ku
-
0084
@kaku
-
ichi.co.jp
@husqvarna.lt
-
4161
@
Luxembourg
Magasins Jules Neuberg
39, rue Jacques Stas
Luxembourg
Case Postale No. 12
Luxembourg 2010
Phone: (+352) 40 14 01
api
Mexico
AFOSA
Av. Lopez Mateos Sur # 5019
Col. La Calma 45070
Zapopan, Jalisco
Mexico
Phone: (+52) 33 3 818
icornejo
Moldova
Convel S.R.L.
290A Muncesti Str.
2002 Chisinau
Netherlands
GARDENA Nederland B.V.
Postbus 50176
1305 AD ALMERE
Phone: (+31) 36 521 0000
info
Neth. Antilles
Jonka Enterprises N.V.
Sta. Rosa Weg 196
P.O. Box 8200
Curaçao
Phone: (+599) 9 767 6655
pgm
New Zealand
Husqvarna New Zealand Ltd.
PO Box 76
Manukau City 2241
Phone: (+64) (0) 9 9202410
support.nz
Norway
GARDENA
Husqvarna Consumer
Outdoor Products
Salgskontor Norge
Kleverveien 6
1540 Vestby
info
Peru
Husqvarna Perú S.A.
Jr. Ramón Cárcamo 710
Lima 1
Tel : (+ 51) 13 320400 ext.416
juan.remuzgo
husqvarna.com
Poland
Husqvarna
Poland Spółka z o.o.
ul. Wysockiego 15 b
03
Phone: (+ 48) 22330 9600
gardena
Portugal
Husqvarna Portugal, SA
Lagoa
2635
Tel.: (+351) 21 922 85 30
Fax : (+351) 21 922 85 36
info
Romania
Madex International Srl
Soseaua Odaii 117
RO 013603 Bucure
Phone: (+ 40) 21 352.76.03
madex
Russia /Россия
ООО „Хускварна“
141400, Московская обл.,
г. Химки,
улица Ленинградская,
владение 39, стр.6
Бизнес Центр
„Химки Бизнес Парк“,
помещение ОВ02_04
http://www.gardena.ru
Serbia
Domel d.o.o.
Autoput za Novi Sad bb
11273 Belgrade
Phone: (+381) 118 4888 12
miroslav.jejina
Gasperich 2549
@neuberg.lu
@afosa.com.mx
@gardena.nl
@jonka.com
-
437
@husqvarna.co.nz
@gardena.no
@
-
371 Warszawa
@husqvarna.com.pl
-
Albarraque
-
595 Rio de Mouro
@gardena.pt
@ines.ro
-
123,
ti, S1
ş
@domel.rs
-
3434
Singapore
Hy-Ray PRIVATE LIMITED
40 Jalan Pemimpin
#02
-
08 Tat Ann Building
Singapore 577185
Phone: (+65) 6253 2277
shiying
@hyray.com.sg
Slovak Republic
Husqvarna Česko s.r.o.
Türkova 2319/ 5b
149 00 Praha 4 – Chodov
Bezplatná infolinka:
800 154044
servis
@sk.husqvarna.com
Slovenia
Husqvarna Austria GmbH
Industriezeile 36
4010 Linz
Tel.: (+43) 732 77 0101
service.gardena
husqvarnagroup.com
South Africa
Husqvarna
South Africa (Pty) Ltd
Postnet Suite 250
Private Bag X6,
Cascades, 3202
South Africa
Phone: (+27) 33 846 9700
info
@gardena.co.za
Spain
Husqvarna España S.A.
Calle de Rivas nº10
28052 Madrid
Phone: (+34) 91 708 0500
atencioncliente
Suriname
Agrofix n.v.
Verlengde Hogestraat #22
Phone: (+ 597) 472426
agrofix
@sr.net
Pobox : 2006
Paramaribo
Suriname
–
Sweden
Husqvarna AB
S
-
561 82 Huskvarna
info
@gardena.se
Switzerland /Schweiz
Husqvarna Schweiz AG
Consumer Products
Industriestrasse 10
5506 Mägenwil
Phone: (+41) (0) 62 88737 90
info
@gardena.ch
Turkey
GARDENA Dost Diş Ticaret
Mümessillik A.
Sanayi Çad. Adil Sokak
No: 1/ B Kartal
34873 Istanbul
Phone: (+90) 216 38 93939
info
@gardena
Ukraine /Україна
ТОВ «Хусварна Україна»
вул. Васильківська, 34,
офіс 204
-
г
03022, Київ
Тел. (+38) 044 498 39 02
info
@gardena.ua
Uruguay
FELI SA
Entre Ríos 1083 CP 11800
Montevideo
Tel: (+598) 22 0318 44
info
@felisa.com.uy
Venezuela
C
orporación Casa y Jardín C.A.
Av. Caroní, Edif. Trezmen, PB.
Colinas de Bello Monte.
1050 Caracas.
Tlf: (+ 58) 212 992 33 22
info
@casayjardin.net.ve
-
20.960. 08/ 1115
1864
8866-20.960.04/0216
GARDENA
©
© GARDENA
Manufacturing GmbH
Manufacturing GmbH
D- 89070 Ulm
D-89070 Ulm
http://www.gardena.com
http: //www.gardena.com
-
@
@gardena.es
South America
.
Ş
-
dost.com.tr
–
Uruguay
485
 Loading...