

Page 1

Page 2

TABLE OF
CONTENTS
First Things First . . . . . . . . . . . . . . . . .3
The ReadMe File . . . . . . . . . . . . . . . . . . . . .3
Setup and Installation . . . . . . . . . . . . . . . . .4
Introduction . . . . . . . . . . . . . . . . . . . . . . . . .6
Using This Manual . . . . . . . . . . . . . . . . . . . .8
Menu and Interface Reference . . . . . .9
Launcher Screen . . . . . . . . . . . . . . . . . . . . .9
Saving and Loading . . . . . . . . . . . . . . . . . .10
Main Menu . . . . . . . . . . . . . . . . . . . . . . . . .10
Play Menu . . . . . . . . . . . . . . . . . . . . . . . . .11
Tools Menu . . . . . . . . . . . . . . . . . . . . . . . .12
Options . . . . . . . . . . . . . . . . . . . . . . . . . . .13
Career Menu . . . . . . . . . . . . . . . . . . . . . . .18
Common Interface Elements . . . . . . . . . .19
Dashboard . . . . . . . . . . . . . . . . . . . . . . . . .28
Maps . . . . . . . . . . . . . . . . . . . . . . . . . . . . . .29
View Options . . . . . . . . . . . . . . . . . . . . . .30
Files & Options . . . . . . . . . . . . . . . . . . . . .31
Park Administration . . . . . . . . . . . . . . . . . .31
Rides . . . . . . . . . . . . . . . . . . . . . . . . . . . . .41
Shops . . . . . . . . . . . . . . . . . . . . . . . . . . . . .42
Scenery . . . . . . . . . . . . . . . . . . . . . . . . . . .42
Paths . . . . . . . . . . . . . . . . . . . . . . . . . . . . .43
Te r rain Tools . . . . . . . . . . . . . . . . . . . . . . .43
Demolish . . . . . . . . . . . . . . . . . . . . . . . . . .47
Control Panels . . . . . . . . . . . . . . . . . . . . . .48
Coaster Building Toolbox . . . . . . . . . . . . .61
Fireworks MixMaster
Peep Group Editor . . . . . . . . . . . . . . . . . .64
Scenario Editor . . . . . . . . . . . . . . . . . . . . .66
™
. . . . . . . . . . . . . . .63
1
Page 3

A Tycoon’s Guide To … . . . . . . . . . . .74
Managing A Park . . . . . . . . . . . . . . . . . . . .74
Becoming A Tycoon . . . . . . . . . . . . . . . . . .78
Sharing Your Creations . . . . . . . . . . . . . . .81
Building a Roller Coaster . . . . . . . . . . . . .84
Creating Paths . . . . . . . . . . . . . . . . . . . . . .89
Managing Land and Shaping Terrain . . . . .92
Designing and Constructing Buildings . . .95
Awards for Park Appearance . . . . . . . . . .96
Creating Fireworks Shows . . . . . . . . . . . .96
Putting Your Group in the Park . . . . . . . .98
Create Your Own Scenarios . . . . . . . . . . .99
Sandbox Mode . . . . . . . . . . . . . . . . . . . . .100
About the VIPeeps . . . . . . . . . . . . . . . . . .100
Credits . . . . . . . . . . . . . . . . . . . . . . . . . . .102
Atari Web Sites . . . . . . . . . . . . . . . . . . . .105
Technical Support . . . . . . . . . . . . . . . . . .106
End-User License Agreement . . . . . . . . .108
Controls . . . . . . . . . . . . . . . . . . . . . .112
FIRST THINGS FIRST
THE README FILE
The RollerCoaster Tycoon
Agreement and updated information about the game. We strongly encourage you to read this file in
order to benefit from changes made after this manual went to print.
To view this file, double-click on it in the
(usually C:\Program Files\Atari\RollerCoaster Tycoon 3).You can also view the ReadMe file by first
clicking on the Start button on your Windows
RollerCoaster Tycoon®3,and then on the ReadMe file.
System Requirements
Operating System Windows
Processor Pentium
Memory 128 MB RAM; 256 MB for XP (256 MB; 384 MB for
Hard Disk Space 600 MB Free
CD–ROM Drive 4X Speed or faster (8X Speed or faster recommended)
Video 32 MB or greater Hardware Transform & Lighting capable video
Sound Windows
DirectX
If your PC does not meet the video hardware requirements above,this game will not run.
®
®
3 CD-ROM game has a ReadMe file where you can view both the License
RollerCoaster Tycoon
®
taskbar, then on Programs, then on Atari, then on
®
98/Me/2000/XP (Windows®XP recommended)
®
III 733 MHz or compatible (Pentium®4 1.3 GHz or
®
3 directory found on your hard drive
compatible recommended)
XP recommended)
card, including ATI Radeon
™
or GeForce™2 or higher.
(64 MB Hardware T&L capable video card recommended)
®
98/Me/2000/XP-compatible 16-bit sound card
(PC audio solution containing Dolby Digital Live required
for Dolby Digital audio)
DirectX®version 9.0 (included) or higher
32
Page 4

SETUP AND INST ALLATION
1. Start Windows®98/Me/2000/XP.
2. Insert the RollerCoaster Tycoon
3. If AutoPlay is enabled, the RollerCoaster T ycoon®3 launcher screen should appear. If AutoPlay is
not enabled, or the installation does not start automatically, click on the Start button on your
Windows
®
taskbar, then on Run.Type D:\StartMe.exe and click on OK. Note: If your CD-
ROM drive is assigned to a letter other than D, substitute that letter.
4. On the RollerCoaster T ycoon®3 launcher screen, click the Install RCT3 button and follow the
on–screen instructions to finish installing the RollerCoaster Tycoon®3 CD-ROM game.
5. After installing the game, we strongly recommend that you check for updates. Re-insert the
game disc into your CD-ROM drive and click on the Updates button on the launcher screen.
6. After RollerCoaster Tycoon®3 is installed, you may launch the game either from the launcher
screen by clicking Play RCT3, or by clicking on the Star t button, then Programs > Atari >
RollerCoaster Tycoon 3 > Play RollerCoaster Tycoon 3 (for XP users, click on the
Start button, then on All Programs > Atari > RollerCoaster Tycoon 3 > Play
RollerCoaster T ycoon 3).
7. Visit atari.com/rollercoastertycoon for the latest information about the game.
Note:You must have the RollerCoaster T ycoon
®
3 CD–ROM game disc into your CD–ROM drive.
®
3 game disc in your CD-ROM drive to play.
Installation of DirectX
RollerCoaster Tycoon®3 requires DirectX
9.0 or higher installed on your computer, click “Yes” to accept the DirectX®9.0 License Agreement.
This will then launch the DirectX
®
®
9.0 or higher in order to run. If you do not have DirectX
®
9.0 Installer.
®
Microsoft Photo Story®3
Microsoft Photo Story 3 for Windows lets you create fun and exciting video stories from your pictures.
By using
Photo Story 3,you can touch-up, add motion, effects, music, and more to your pictures and
save them as a video story that you and others can watch in a media player that supports playback
of Windows Media
Photo Story 3 is included with RollerCoaster Tycoon®3 so you can share the screenshots and the peep
photos you take in
exciting way.
When you are installing
Photo Story 3.To install Photo Story 3 for Windows, click OK, and then follow the instructions on the
screen. If
Photo Story 3 for Windows is already installed on your computer, or if your computer is not
running the Microsoft Windows XP operating system, the game setup program will skip this step.
Note:To install Microsoft Photo Story 3 for Windows,your computer must be running the Microsoft
Windows XP operating system, and Windows Media Player 10 must be installed. For a complete list of
system requirements, see the
(
www.micr osoft.com/photostory).
Atari does not control, and disclaims any responsibility or liability for, the functioning and performance of thirdparty web sites and any content on or available through third-party web sites.
If you do not choose to install Photo Story 3 when you are first installing RollerCoaster Tycoon
can choose to install
Click the Install Photo Story 3 button on the
Insert the
Story 3 for Windows folder on the game CD-ROM, and then double-click the Photo Story 3 Setup file
named PStory.msi file to begin installing
For complete information about using
®
Video (WMV) files, such as Windows Media Player 10.
RollerCoaster Tycoon®3 with your friends and family in a fun and
RollerCoaster Tycoon®3, the setup program will ask you if you want to install
Microsoft Photo Story 3 for WindowsWeb site
Photo Story 3 at any time by doing one of the following:
RollerCoaster Tycoon®3 launcher screen.
RollerCoaster Tycoon
®
3 CD in your CD-ROM drive. In Windows Explorer, locate the Photo
Photo Story 3.
Photo Story 3, see Photo Story 3 for Windows Help.
®
3,you
4
5
Page 5

INTRODUCTION
Welcome to RollerCoaster T ycoon
RollerCoaster Tycoon®3 is completely new and redesigned to take the series to all-new heights.
Featuring incredible 3D graphics and the exclusive new
®
3,the third installment of the world’s greatest tycoon game.
CoasterCam
™
,you can now see your park
from any angle and ride what you build. From street level to blimp, feel your park pulse with fun
and excitement like never before.
If you’ve played
RollerCoaster Tycoon
that made those games great are the foundation for
®
or RollerCoaster Tycoon®2,you are in for a treat; all the features
RollerCoaster Tycoon
®
3, including coaster con-
struction, park creation, retail management, staff supervision, scenario design, ride exchange and
more.
We’ve also designed
RollerCoaster Tycoon®3 to appeal to new players. More than ever, you can play
RollerCoaster Tycoon®3 any way you want; whether you want to drop down a few rides and shops to
see how the peeps react, micromanage prices and wages, tinker with landscaping and park layout, or
build and ride the most awesome roller coasters ever imagined.You can look forward to the following features in the game:
3D Camera Controls
Fluid camera movement, unrestricted zoom controls and 4 camera control pre-sets allow you to see
your park from virtually any vantage point — from a wide angle shot of your whole park to extreme
close-up on the expressions of the peeps.
Ride The Rides – CoasterCam
With the new CoasterCam
™
you can now ride any ride in your amusement park. Experience first
hand the gut-wrenching white-knuckle spine-tingling blackout-inducing g-forces of loops, spirals and
towering drops; or a gentle trip through the park on a monorail or chairlift; or the dizzying delights of
the carousel and ferris wheel.
All New Peeps
Peeps (RollerCoaster T ycoon
®
park guests and employees) now come in many shapes, colors and sizes.
Peeps also now appear in groups, such as families, couples or circle of friends. And occasionally, a
VIPeep celebrity will show up to wow their fans.You can even customize the look of your peeps with
the all new Peep Designer.
Note: Peeps behave differently than in previous RCT games. For more
details regarding peep behavior, see the FAQ section of the ReadMe file.
™
Day and Night
Things are different after the sun goes down –– the stars come out, the lights come on and the
coasters get scary.At night the park needs to be teen-friendly, but during the day, your park needs to
appeal to families.The challenge is finding a happy balance.
Improved Coaster Construction and Game Controls
RollerCoaster Tycoon®3 offers new ease-of-use features, such as coaster construction auto–complete,
and improved game controls including a new dashboard interface to maximize the information available to you while maintaining an unobstructed view of your amusement park.
Fireworks MixMaster
Tantalize your guests with a dazzling fireworks show. And not just any show, but one you’ve created
using the new Fireworks MixMaster
™
™
, an easy to use editing tool that allows you choreograph daz-
zling pyrotechnic wonders synchronized to your own music library.
PhotoStory 3 and Photo Spots
You can now place Photo Spots near your favorite scenery creations, allowing the peeps to stop and
pose while the group leader takes a snapshot. If you created a group in the Peep Designer, their
snapshots are saved to your My Pictures folder (found within your my Documents folder) where you
can create a multimedia presentation using
PhotoStory 3, which comes bundled with RollerCoaster
Tycoon®3. (For complete information about using Photo Story 3, see Photo Stor y 3 for Windows Help.)
Coasters From RollerCoaster T ycoon®and RollerCoaster T ycoon®2
RollerCoaster Tycoon®3 is backward compatible with the user-created coaster s from RollerCoaster
®
Tycoon
and RollerCoaster Tycoon
loaded and enjoyed in your new parks.You no longer have to imagine what it would be like to ride
the favorite coasters you created.
in how costers are represented in 2D and how they are constructed in 3D. See page 83 for more
information.
®
2. So any coaster you created in the previous games can be
Note: Some coasters may not work properly due to differences
6
7
Page 6

Five Theme Categories
You can decorate your amusement park using five diverse and comprehensive themes:
Generic – For all your amusement park needs
•
Spooky – Frighten you park guests silly
•
Sci-Fi – To inspire guests with visions of tomorrow
•
Western – For transporting peeps to the early American frontier
•
Adventure – Give your visitors a taste of Arabian nights or Caribbean escapades
•
Game Difficulty
In previous versions of RollerCoaster Tycoon
RollerCoaster Tycoon®3 allows you to play all of the scenarios at three difficulty levels: Apprentice,
Entrepreneur and Tycoon.When you first begin
are available, the remaining are locked and become unlocked as you complete scenarios at
Apprentice level.
®
,the game offered easy, medium and hard scenarios.
RollerCoaster Tycoon®3, only a third of the scenarios
Sandbox
Throw caution to the wind and cast off all the constraints of ordinary scenario play. Now you can
create the crowning achievement of amusement parks without worrying about money, time or other
restrictions. Experiment to your heart’s content with any aspect of the game.
USING THIS MANUAL
With all the freedom and flexibility offered in RollerCoaster Tycoon
complexity.The game’s interface has been designed to be easy to navigate once you get the hang of
it, but there is a lot to absorb. For that reason, we’ve broken the manual into two sections.
The first part,“Menu and Interface Reference” (pages 9–73), provides a thorough explanation of each
menu and panel you’ll encounter in the game.The second part, “A Tycoon’s Guide To …” (pages
74–101) provides advice and hints about how to succeed in virtually any aspect of the game. We
also encourage you to take advantage of the in-game tutorials, which provide step-by-step animated
instructions about how to get started on your
Throughout the manual you will find an interview with the real-world roller coaster designer John
Wardley. For more information about John and his creations visit
RollerCoaster Tycoon®3 career.
®
3, there is also an added layer of
www.john-wardle y.demon.co.uk.
MENU AND INTERF ACE
REFERENCE
LAUNCHER SCREEN
The Launcher screen is displayed when you insert the RollerCoaster Tycoon®3 game disc into your
CD–ROM drive.You can also display the Launcher screen by double-clicking on the StartMe.exe
program on the CD–ROM game disc.
READ INSTALL GUIDE
(after the game is installed, this is replaced by the
INSTALL – Installs the RollerCoaster Tycoon® 3 CD–ROM game (after the game is installed, this is
replaced by the
README – Displays the game’s ReadMe file.
MANUAL – Opens the PDF file version of this game manual. If Acrobat Reader is not installed on
your computer, you will be prompted first to install it.
ACROBAT READER – Installs Adobe®Acrobat Reader version 5.0.5 (if Acrobat Reader 5.0.5 or
newer is already installed, this button is grayed out).
PHOTO STORY 3 – Installs Microsoft Photo Story 3 for Windows. (If Photo Story 3 is already
installed, this button is replaced by one that reads RUN PHOTO STORY 3.)
is not running on the Microsoft Windows XP operating system, this button is grayed out.
REPAIR or UNINSTALL button).
– Opens the Install Guide that offers instructions for installing the game
PLAY button).
Note: If your computer
98
Page 7
UPDATES – Checks the Internet for any patches or other updates and if found, prompts you to
download and install the update. An Internet connection and separate account is required for this
feature to work properly. (If the game is not installed, this button is grayed out.)
RCT3 WEBP AGE – Opens your web browser to the RollerCoaster T ycoon
®
website.
SA VING AND LOADING
Save your progress at any time by click on the SAVE button (found under the Tools and Options button). When the SAVE dialog box appears, confirm the name of your save game and click the SAVE
button.
Load a previously saved game from the career screen by clicking on a scenario button and
then on the LOAD button.When the LOAD dialog box appears, select a game from the list
and then click the LOAD button. To load a saved game while playing, click the LOAD but-
ton (found under the Files and Settings button) and follow the same steps.
MAIN MENU
Play
Play a Sandbox game, Career game (classic scenario-based gameplay), custom scenario (a scenario
you added) or Tutorial scenarios.
Tools
Gives you access to the Peep Designer, Scenario Editor, Building Designer and Coaster Designer.
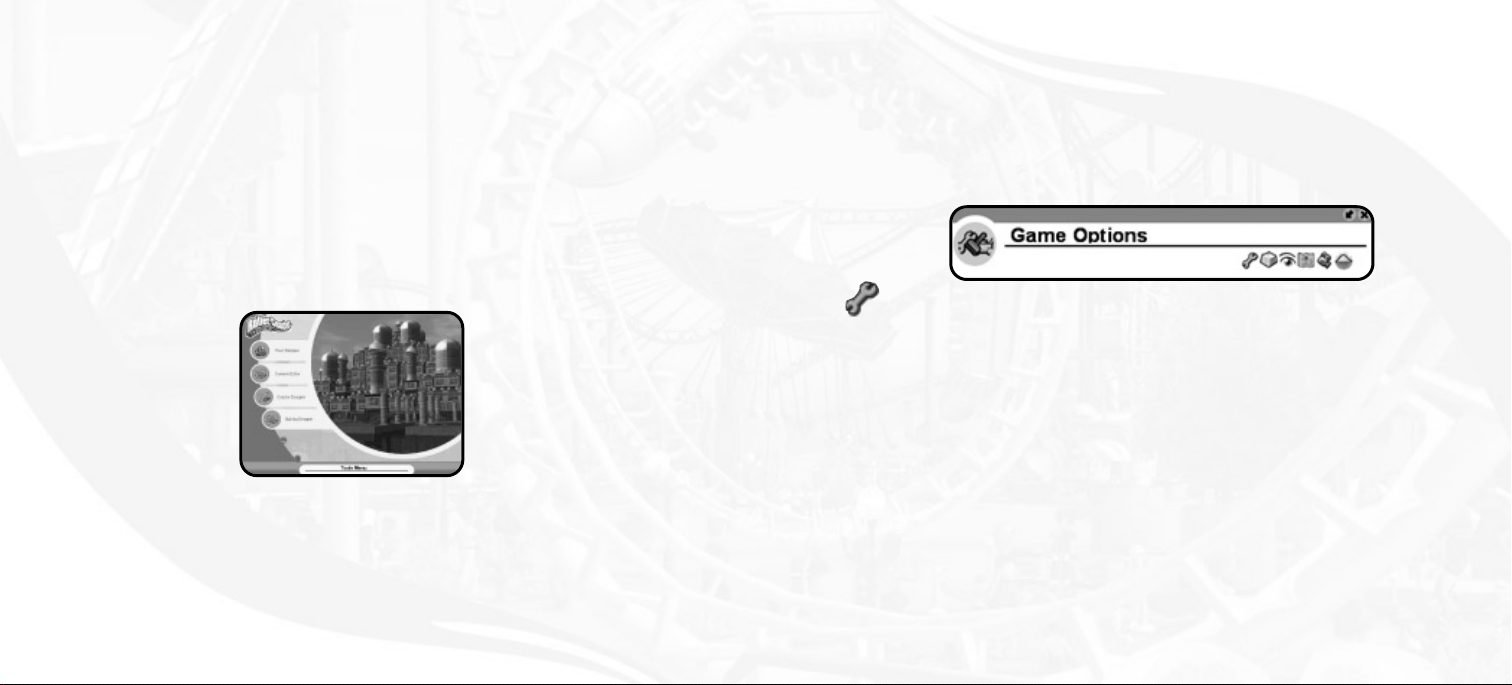
Options
Adjust various game options and settings.You can also access the Game Options window while playing the game.
Exit
Quit RollerCoaster Tycoon
®
3.
PLAY MENU
Tutorial mode
Gives you access to the lesson scenarios where you can master the various features before
encountering them in a scenario.
Career mode
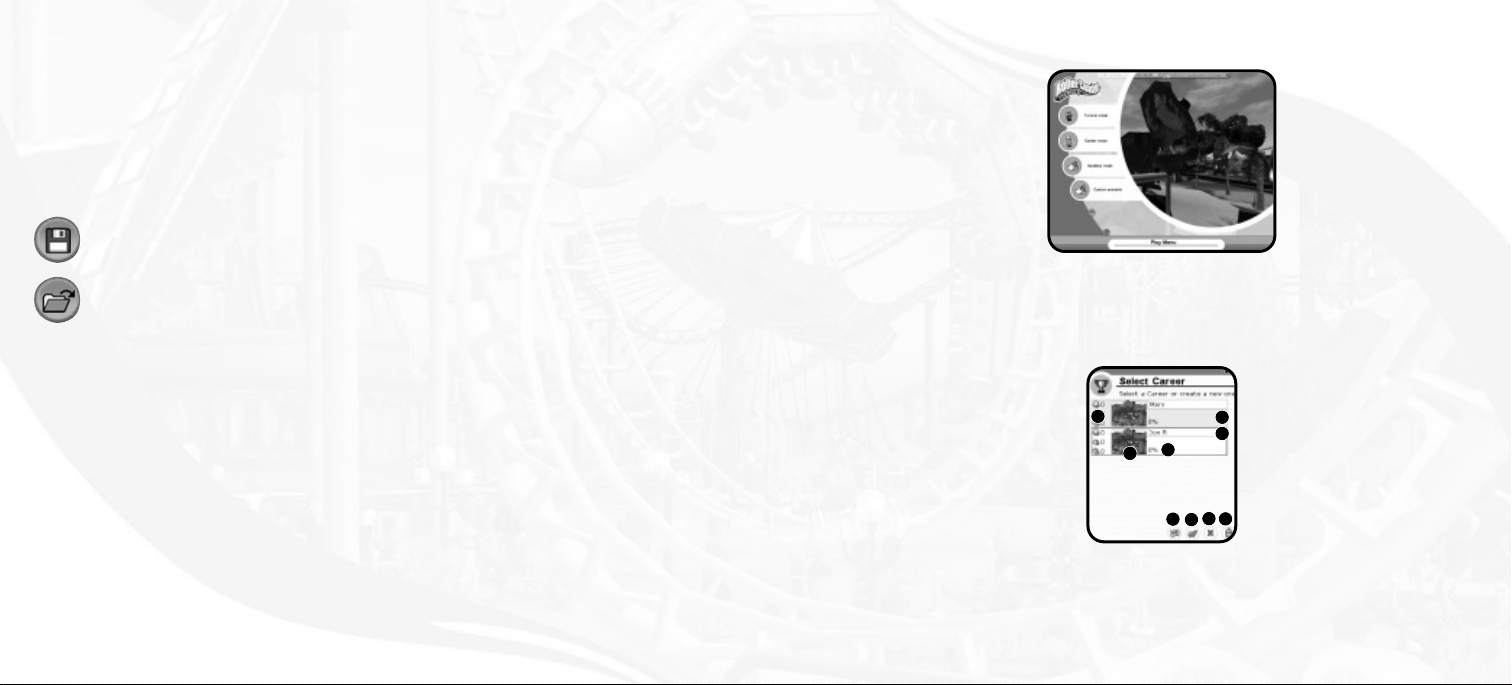
The classic RollerCoaster Tycoon
1. Saved Profile – When selected, the profile
is highlighted with a blue outline.
2. Thumbnail View – Provides a glimpse of
the park in the selected profile.
®
gameplay, where you face the challenges offered in scenarios.
3
2
1
4
5
8
9
6
7
3. Scenario Completion Level – Shows
the number of scenarios that have been
completed at each difficulty setting.
4. Profile Name – Click to edit.
1110
Page 8
5. Game Completion Level – Percentage
of the entire game that has been completed.
6. New Career – Create a new career.
7. Load Career – Load the selected career.
8. Return to Previous Menu
9. Delete Profile – Delete selected pro-
file (cannot be undone).
Sandbox
Load or start a new sandbox game, in which you can play without the constraints of time or money.
See page 81 for information about where these files are stored.
Custom Scenario
Here is where you get to match your park building skills against the custom scenario designs of
others, or even your own. See page 81 for information about where these files are stored.
Building Designer
Construct awesome castles, palaces, mansions and more with the Building Designer tool, then use
them in your parks.
Coaster Designer
Ta ke your time and design your ultimate ride right. Any coaster you create can be added to your
game or traded with other players.
OPTIONS
TOOLS MENU
Peep Designer
Allows you to customize peeps and create groups, such as couples, families or other small parties.
Scenario Editor
Create your own scenarios, which you can trade with your friends and other players.
Game Settings
Currency – Select your favorite currency.
•
Distance and Speed – Choose metric (kilometers, meters and kilograms) or imperial
•
(miles, feet and pounds).
Temperature – Set to Celsius or Fahrenheit.
•
Game V olume – Slider adjusts the audio level of in-game sounds.
•
Music V olume – Slider adjusts the audio level of in-game music.
•
GUI V olume – Slider adjusts the audio level of clicks and other game system sounds.
•
Import My Music – Allows you to use your .mp3, .wma and .wav files as soundtracks to
•
rides and fireworks shows. Create a folder in the My Music folder (within the My Documents
folder of your PC), and name it RCT3.Then, put your favorite music files there.When you
click the song selection field in the attraction’s control panel, the game will look in the RCT3
folder and include your song files in the list of songs that may be assigned to that ride.
13
1312
Page 9
Keyboard Bindings
Click on an assigned keyboard shortcut and type a new key to change that shor tcut setting.
Graphic Settings
(Note: When you first run RollerCoaster Tycoon
optimum performance on your PC. Of course, you are free to change them but bear in mind
when experimenting that higher graphical settings can degrade performance on some computers. Use the ‘reset defaults’ button to restore the auto-configured settings at any time.)
Screen Resolution – Click the drop-down list to select one of the four screen resolutions
•
supported by the game.
Anti-Aliasing Quality – Open the drop-down list to select what level of anti-aliasing will
•
be used.
32-bit Color – Enable this checkbox to use high color graphics.
•
Full Screen – When checked, causes the game to run full-screen.
•
Detail Level and Draw Distance – Adjust the slider to set amount of detail that will be
•
drawn as well as the draw distances for each item listed.
Blend – When checked, various blending techniques (such as shadow blending and texture
•
blending) are employed to display your park in a more visually pleasing manner.
Compress T extur es – When checked, textures are compressed to save memory.This
•
results in a barely discernable loss of visual quality.
Textures – This slider controls the maximum level of detail for displaying textures.
•
Geometry Imposter Distance – The distance an object is from the camera before some
•
3D objects will be replaced with 2D graphic.
®
3, the game automatically sets these for
Visibility Alpha – This slider controls the level of translucency when the View Scenery,View
•
Peeps or View Ride Supports option is turned off (see “View Options” on page 30).
Graphics Detail Button – (Button with tools-shaped icon) Click this icon to have the
•
game auto-detect your hardware and adjust the graphical settings best suited for your system.
Bloom – When checked, the game uses advanced features of your video hardware (if
•
present) to display certain objects with a flaring shine effect.This technology is not available
on all video hardware.
Aggressive Z-Bias – When checked, the game uses advanced features of your video
•
hardware (if present) to reduce flickering. Use at your own risk!
Camera Settings
Allows you to change how the game camera behaves, as well as the cameras carried by peeps
and those used on rides.
Allow All Photos – When checked, the peep group you created will take pictures of each
•
other and save them to disc.These are stored in the My Pictures folder (within the My
Documents folder of your PC).
Allow Photo Spot Photos – When checked, your peep group will take pictures of each
•
other at the places where you inserted Photo Spot objects. These are saved to the My
Pictures folder (within the My Documents folder of your PC).
Allow Rollercoaster Camera Photos – When checked, roller coaster camera points
•
take pictures of your peep family and save them to the My Pictures folder (within the My
Documents folder of your PC).
Auto Scroll – When checked, causes the screen to be nudged when the pointer touches
•
the edge of the screen.
14
15
Page 10

Control Mode – A drop-down list allows you to select from the following camera modes
•
and settings:
1. Normal – Default camera for the game provides ease of use and flexibility.
2. Advanced – An alternate to Normal with slightly different button assignments.
Camera Controls – A setting of 0, 1 or 2 changes the mouse buttons that control
camera movements.
Ignore Scenery – When checked, the camera will rotate around a spot on the
ground; when unchecked, the camera will rotate on a spot on the scenery.
Focus on Screen Middle – When checked, the camera will rotate around a spot in
the middle of the screen; when unchecked, the camera will rotate around the position
of the mouse pointer.
3. Freelook – Camera controls designed to assist you in looking up.
Sensitivity Flying – This setting determines how the camera moves in response to
mouse movement; the higher the number, the more sensitive the camera is to mouse
movement.
4. Isometric – Restricts movement of the camera to 90° angles (useful for veterans of
RCT and RCT2 who want to experience RollerCoaster Tycoon®3 in the same manner).
Isometric Rotation Sensitivity – This setting determines how the camera moves in
response to mouse movement while in isometric mode; the higher the number, the
more responsive the camera.
Scenic Settings
3D Trees and Plants – When checked, causes trees and plants to be displayed using 3D
•
models. Uncheck this setting to cause trees and plants to be displayed with 2D “sprites.”
Simple T errain Textures – When checked, causes the game to use lower-detailed textures
•
for the terrain to save on memory.
Use Reflective Water* – When checked, causes water to reflect the surrounding
•
environment.
Reflect Background* – When checked, causes the water to reflect the background.
•
Reflect T errain* – When checked, causes the water to reflect the nearby terrain.
•
Reflect Scenery* – When checked, causes the water to reflect nearby scenery.
•
Reflect People* – When checked, causes the water to reflect nearby peeps.
•
Clouds – When checked, clouds are displayed in the overhead sky.
•
Sky – When checked, the sky includes gradients, the sun, stars and the moon.
•
Background – When checked, a background far beyond the edges of the amusement
•
park is displayed.
* May not be present when RollerCoaster T ycoon
®
3 is played on some lower-end graphics cards.
1716
Page 11
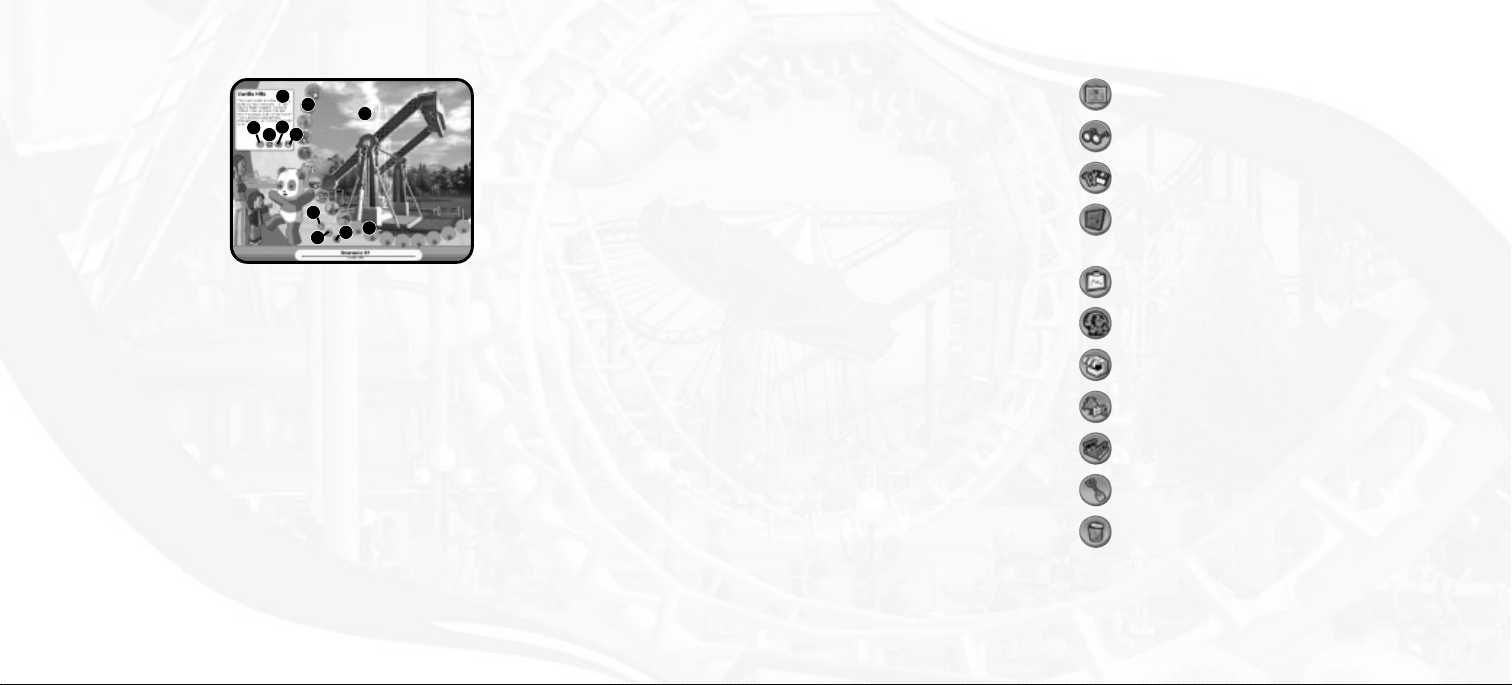
CAREER MENU
COMMON INTERFACE ELEMENTS
7
1
5
3
6
4
9
11
10
1. Unlocked Scenarios
2. Locked Scenarios
3. Start Game – Play selected scenario from
the beginning.
4. Resume Game – Load the last saved game
of this scenario.
5. Load Game – Load any previously saved
game of this scenario.
6. Save Game –Save the current game (if a
game is in progress).
18
8
2
7. Scenario Description
8. Screenshot of Selected Scenario
9. Return to Game – Continue playing
the current game (if a game is in
progress).
10. Return to the Main Menu
11. Quit Game – Exit RCT3 and return to
Windows.
Maps
View Options
Files and Options
Exit
Park Administration
Ride Placement
Shop and Facilities Placement
Scenery Placement
Paths Placement
Ter rain T ools
Delete
You can manage any object in the park (shops, rides, peeps or scener y) by clicking on it.This reveals
that object’s control panel, where you can view statistics and adjust settings. When you select an
object in the park, its control panel appears in the lower-right corner of the screen. When you select
an object from a list browser to place in the park, its construction panel will appear in the lower-left
corner of the screen.
19
Page 12
General
Found on all control panels:
4
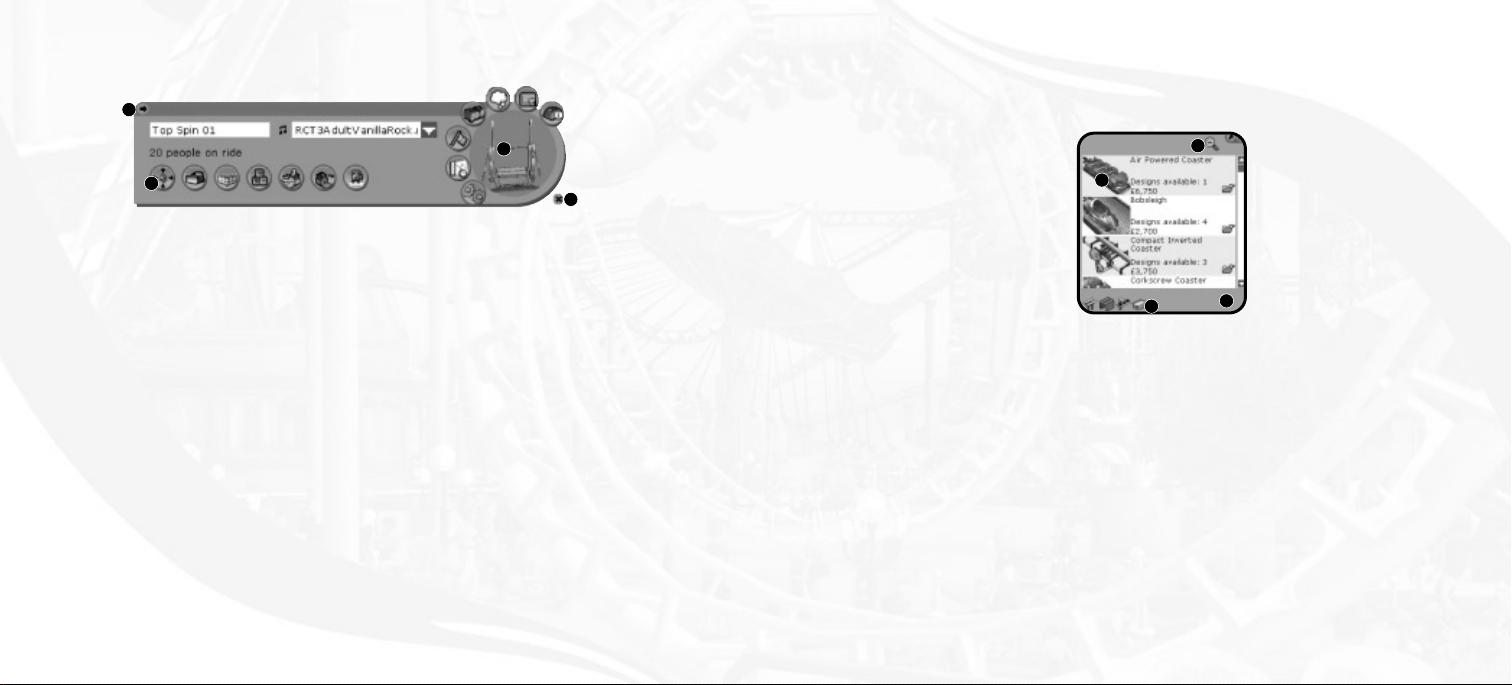
Coaster and Track Ride Browser
This toolbox is used for all track rides, including coasters, transport rides, auto rides and water rides.
Ride Browser shows all of the different coaster types you may place in your park. Double-click a
coaster type to see additional details.
2
1. Close – Closes the control panel and
cancels any pending action with
the item.
2. Camera – Centers the screen on
the object.
20
3
1
3. Close-up – Close–up view of the item;
double–click to move the view so the
selected object is in the center of
the screen.
4. Retract Panel – Hides the detail panel.
1
1. Build Custom Design – Click to
build a custom-designed coaster using the
coaster construction toolbox.
2. Build Saved Ride – Opens the Track
Browser, where you can choose from a list
of pre-designed track layouts.
3
4
2
3. Expand / Contract All – Causes the
list to expand to show the large
thumbnail picture and object details
OR contract to show a simple list.
4. Filter T ype – Causes the list to include
only the categories that are NOT
grayed-out. Click to turn the filter
on or off.
21
Page 13
Attraction List Browser
This toolbox is used for placing all shops, facilities and all non-track rides, including junior rides, thrill
rides and gentle rides.
2
1
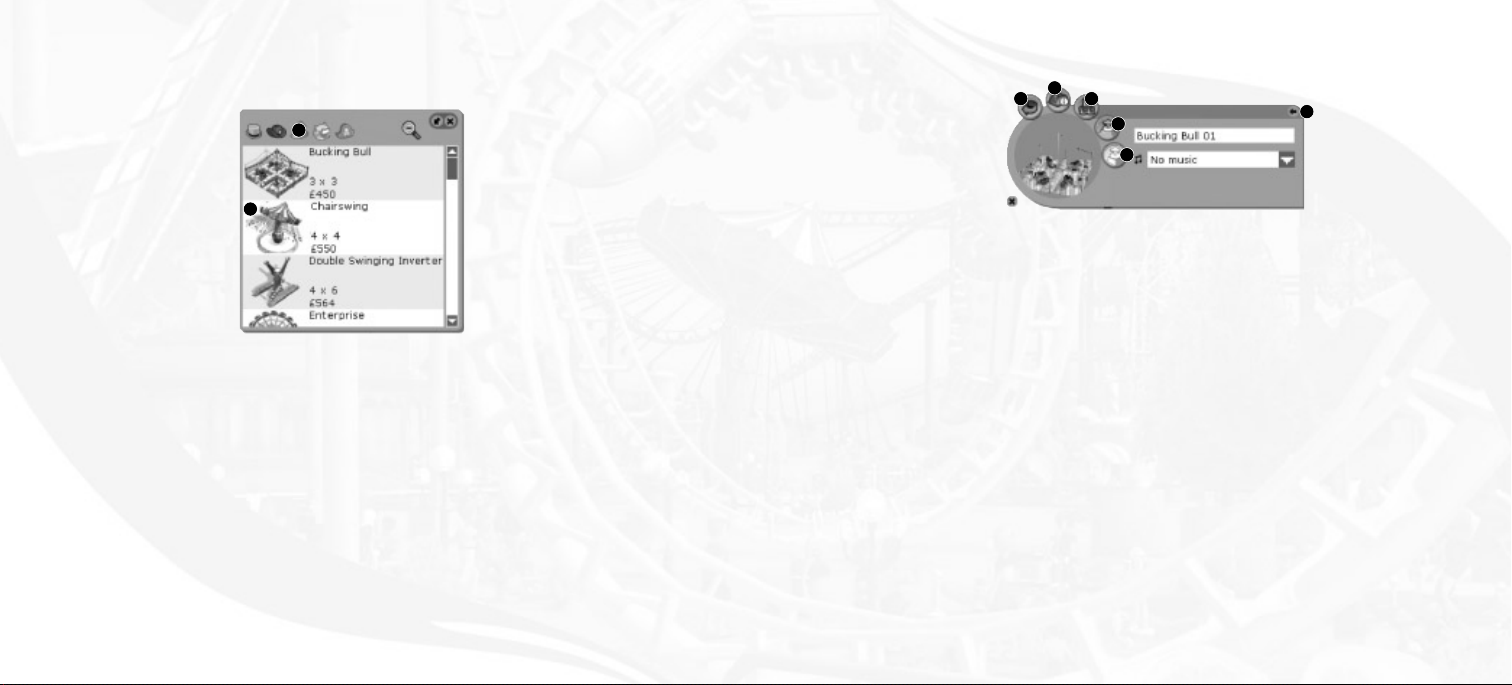
Shop/Ride/Scenery Construction Panel
Found on construction panels for shops, rides and most scenery:
3
1 4
5
6
2
1. Object Placement – Click to attach this
object to your pointer so you may place it
in the park.
22
2. Theme Category – Click to filter the
list with this category. When the icon is
grayed out, items from that category are
removed from the list.
1. Rotate – Turn the selected item 90°
counter–clockwise
2. Collapse – Hides the detail por tion of
control panel.
3. Information – Expands the control panel
to display details, statistics and settings for
the object.
4. Color – Displays the color options for
that object.
5. Conform Land – When clicked, and as
you place an object in the park, causes
the land around the object to flatten.
6. Cut Land – When clicked, and as you
place an object in the park, causes the
land around the object to be cut.
23
Page 14
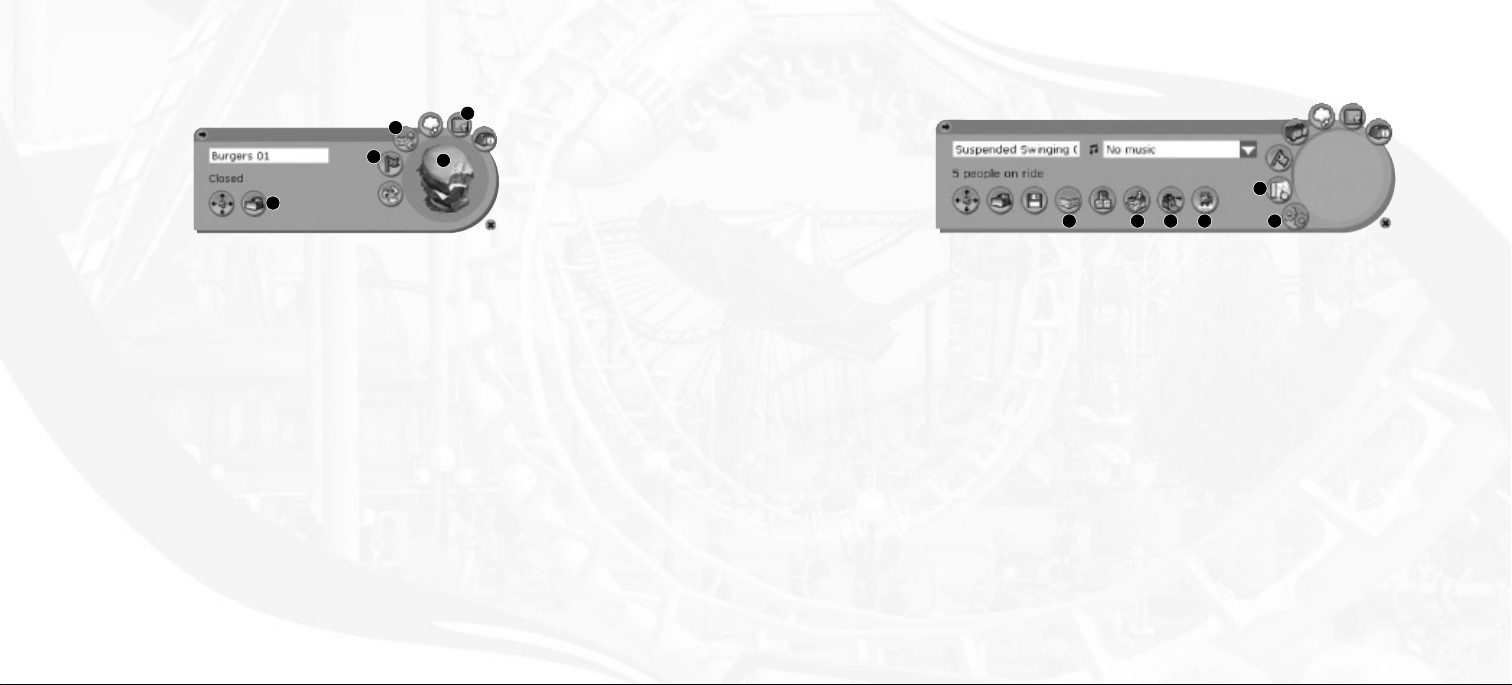
Shop/Ride Control Panel
Found on control panels for shops and rides:
Ride Control Panel
Found on control panels for rides:
5
1. Open Indicator – Allows you to open
or close the attraction.
2. Inventory – Adjust price(s) and (for
shops) the inventory selection.
3. Statistics – View the sales history of the
attraction.
24
2
1
3
4
4. Close-up – If the selected object is a
ride, double-clicking on the close-up
allows you to ride the ride. For all other
objects, double-clicking centers the game
screen on the object.
5. Demolish – Deletes this object from
the park and adds the resale price to
your cash.
1 4632
1. Fence – Select the type of fence that will
border the ride.
2. Entrance – Select the type of entrance
that will be used.
3. Exit – Select the type of exit that will
be used.
5
4. Launch Condition – Adjust when the
ride will start the next cycle.
5. Test Results – View the results of the
ride’s test run.
6. CoasterCam – Click to ride this ride.
25
Page 15
Track Ride Construction Panel
Found on control panels for track rides:
1
2 3
Park Management Control Panel
Found on control panels for administration:
1
4
8
10
7
5
6
11
9
12
43
2
1. Construction Options – Expands the
track options portion of the object
control window, allowing you to build
or change track pieces for the ride.
2. Track Pieces – Shows the tracks you
can place next.
3. Lift – Adds or removes the chain drive
for the highlighted track piece.
4. Loading Station – Toggles whether or
not a boarding station is added to the
highlighted track piece.
5. Block Brake – Toggles whether or not
a block brake is added to the highlighted
track piece. (For track rides with more
than one train.)
6. Straight Brake – Toggles whether or not
straight brakes are added to the highlighted
track piece. (To reduce the speed of trains
on a track ride.)
26
7. Photo T rigger – Toggles whether or
not a photo trigger is added to the highlighted track piece.
8. Bank – Adjusts the banking options for
the highlighted track piece.
9. Remove – Removes the selected
(or previous) track piece.
10. Autocomplete – Automatically places
the remaining tracks for the coaster
being edited. After an autocomplete solution is found, click the icon again to
accept the autocomplete solution, or
click on another track piece to cancel.
11. Height markers – Click to turn the
height markers on or off for this ride.
12. Special T racks – Shows what special
tracks may be added next. This selection
changes depending on what piece has
last been placed.
1. Pin – Minimizes the current window or
toolbox and pins it to the edge of
the screen
2. Scroll – Scrolls the list up and down.
3. Sort – Sorts the list by the selected
criteria.
4. Dropdown – Causes a list to be
displayed.
27
Page 16
DASHBOARD
The dashboard can be found at the top edge of the screen and gives you quick access to
critical information.
1
1. Scenario Objectives – Click to reveal the
scenario briefing and the goals you need to
reach to complete the scenario.These are
grouped by difficulty level,Apprentice (easy),
Entrepreneur (hard) and Tycoon (expert).
Indicates you are playing at
Apprentice level
Indicates you are playing at
Entrepreneur level
Indicates you are playing at
Tycoon level
When you complete all of the Apprentice
objectives, this indicator changes to the
Entrepreneur icon.The Tycoon icon
appears after the Entrepreneur objectives
have been accomplished. A checkmark
next to an objective indicates you have
completed that objective.
65432
7
If a VIPeep objective is listed, click the
Setup Route button to prepare for a visit
from the VIPeep.
See “Tycoon’s Guide for Hosting A
VIPeep” for instructions on how to use
the “Setup Route” feature.
2. Day/Night Settings – Allows you to
restrict the game’s time of day to Day,
Night or Day and Night, giving you the
ability to edit your park for a particular
time of day. (Present only in Sandbox
mode and the Scenario Editor.)
3. Game–time Speed – Select the speed
at which time runs: Paused, Normal, Fast
or Speedy.
4. Cash – Shows your current cash levels.
Double-click to open your Finances
window.
5. Park Attendance – Shows the total
number of peeps in your park.
98
10
6. Park Rating – Shows your park’s current
approval rating. Hold the pointer over this
icon to see the numeric rating value and a
breakdown of how this value was calculated.
Note: The park rating is recalculated once
11
per game week.
7. Game Message Console – Impor tant
messages appear in this pull-down.You can
even elect to have additional messages
appear here, such as thoughts from
various peeps. Click the open list to close
it. Click the icon next to a message to move
the camera to the item mentioned by the
message. If a message is longer than the
width of the console, hold the mouse cursor
over the message to display the full text.
8. Weather – Shows current temperature
and weather conditions.
9. Date and Time – The present date
and time.
10. Toggle Group Marker – Turns the
peep group indicator on or off. When
on, the peep families you created with
the Peep Designer will be labeled with
bubbles, each containing the name of
that peep.
11. Fireworks Camera – Switch to
camera ideal for viewing fireworks.
MAPS
Displays various thumbnail maps of your park as well as checkboxes to display or hide the
location of assorted objects or peeps, the ownership status of land in and around the park,
and the types of themed elements used.
2928
Page 17
VIEW OPTIONS
These options allow you to display or hide various terrain indicators and park scenery as
you build your park.
Ter rain Grid – Displays or hides a grid that reveals how the terrain undulates tile-by-tile.
Ter rain Contours – Displays or hides topographical contour lines.The difference in ele-
vation between one contour line and the next is 2 meters (if you selected the “metric”
setting in the game options panel) or about 2 yards (for the “imperial” setting).
Peeps – Displays or grays out peeps.
Supports – Displays or grays out the pilings for tracks and walkways.
FILES & OPTIONS
Allows you to load or save games and gives you access to various options and settings.
About – Displays the About box, showing version number, legal notice and game credits.
Game Options – Displays the Game Options control panel. See “Options” on
page 13 for details.
Save Game – Saves your current progress. In the Save Game dialog box, click on the
game-name field and type in a name of your choosing, and then click the Save button. If the
name you typed is the same as one already saved, the game will ask you if you want to
overwrite it.
Load Game – Opens a dialog box where you may load a previously saved game.
Ride Height – Displays or hides markers that show the height of your rides.
Path Height – Displays or hides markers that show the height of your paths.
Scenery – Displays or grays out scenery.
30
Return to Career Screen – Exits your current game and returns to the Career Screen,
where you may play any of the other unlocked scenarios. Note: Save your game before
returning to the Career Screen, or your progress will be lost.
PARK ADMINISTRA TION
The Administration tools give you access to financial and staff management.There are seven
buttons that appear when you click on the Park Administration button.
Park Operations Finances
Research
Attractions
Staff
Objectives
Guests
31
Page 18
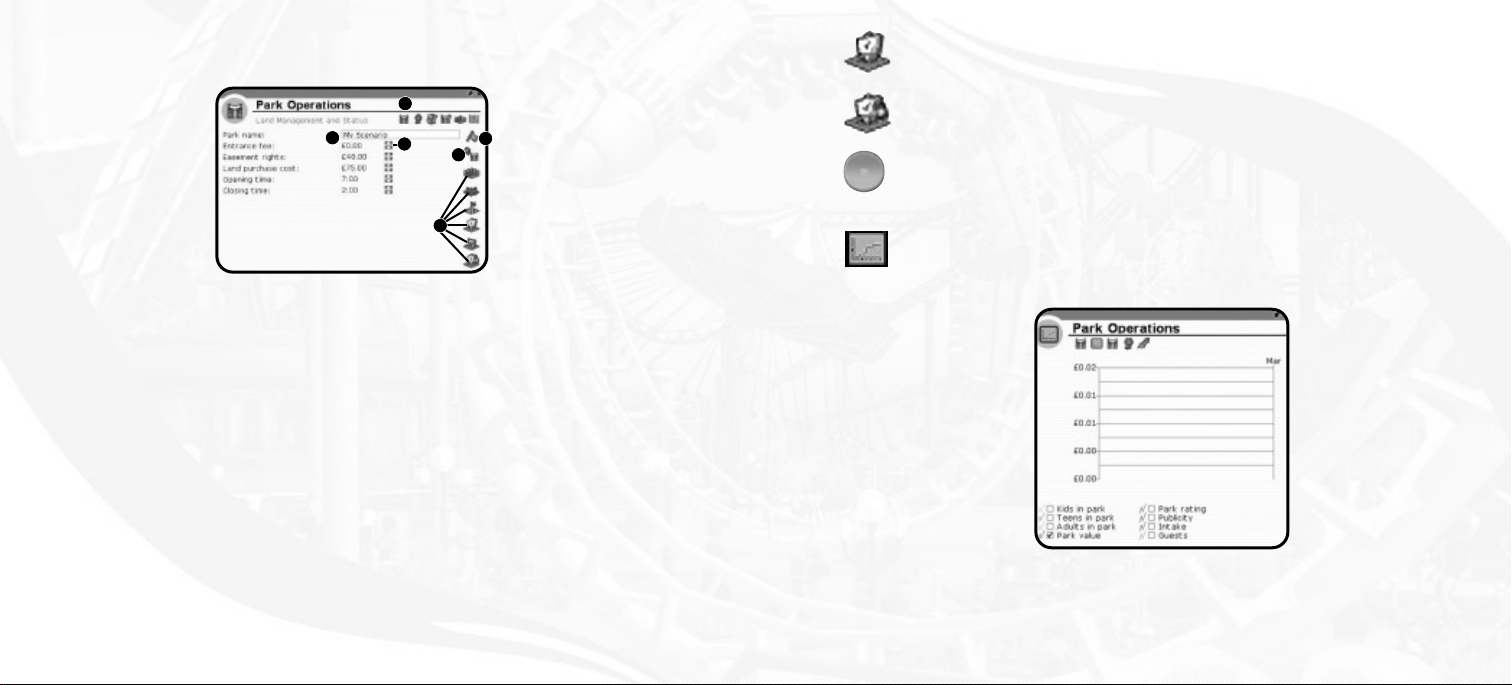
Park Operations
Land and Status
1
1. Park Name – The name of your amusement
park; click to edit.
2. Park Status – Shows if the park is open
or closed; click to change.
3. Center on Park Entrance – Click to
center the view on the park entrance.
4. Park Detail
5. Entrance Fee – Shows the current
entrance fee; click the up or down arrows
to change the price. In some scenarios,
the entrance fee cannot be adjusted.
6. Land Management – These buttons allow
you to buy land or the construction rights to
land.You must own land before you can build
on it or shape the terrain.
4
5
Construction rights may be leased if you
only want to place track pieces over the
land. Land-ownership status is indicated
by the following grids:
•
•
•
•
•
•
2
3
6
Outlined Blue Grid – Land
you own.
Land with For Sale Signs –
Land you may purchase.
Dashed Blue Grid – Land for
which you have construction rights.
Land with Barricade Signs –
Land construction rights you may
lease.
Land with No Grid – Land you
may never own.
Solid Blue Grid – Land that you
may own or lease after you meet a
scenario objective.
Purchase Land – Drag the mouse button over the outlined blue grid to purchase it.
When finished, click the Purchase Land button again.
Construction Rights Easement – Drag the mouse button over the outlined yellow
grid to lease it. When finished, click the Construction Rights Easement button again.
Land Selection Brush Size – The size of the brush for selecting land. Enlarge the
brush size by place the mouse over the brush size button and dragging the mouse button
to the right. Reduce the brush size by dragging the mouse button to the left.
Graphs and Stats
Click on a checkbox at the bottom to display the relative data in the line graph.The labels
at the left edge of the graph change to match the box you last checked.
3332
Page 19

Marketing
The top half of the window lists marketing campaigns that you are currently running. To start a new
marketing campaign, click on one of the three buttons in the lower half of the window.
Fireworks
Open this window to set up your fireworks displays using the Fireworks MixMaster™. See the
section “Tycoon’s Guide for Creating a Fireworks Show” for instructions on how to use the
Fireworks MixMaster
™
.
Coupon for Free Ride – Choose a ride and have tickets for free admission to the ride
•
inserted in major newspapers or magazines for a number of weeks.This will increase park
attendance.
Ad Campaign for Park – Buy advertising in major magazines and newspapers and see the
•
profits rise as more guests flock to your park.
Vouchers for Free Park Admission – Prepare for droves of peeps as free admission to
•
the park is offered to readers of the major newspapers and magazines you’ve selected.
After setting the options, click Start This Marketing Campaign and the cost of the campaign will be
deducted from your cash.
Awards
Shows the awards your park has won.
34
1
1. Open Fireworks MixMaster Editor –
Opens the current show in the Fireworks
MixMaster show editor.
2. Load a Show – Opens the Load Fireworks
dialog box, where you may add a fireworks
show to your park.
2
3
4
3. Fireworks Displays – Opens the
Fireworks MixMaster show list, where
you may create a new show, save the
show currently being edited, and change
the time the show is launched and the
months in which it plays.
4. Fireworks – Opens a window
containing a selection of of fireworks
bases that you may add to your park.
35
Page 20

Financial Management
See a summary of your park’s net worth broken down into various categories.
4
2
1
3
1. Park V alue – Current value of the land
and the amusement park.
2. Cash – Total cash on hand.
3. Company V alue – Value of the land,
the amusement park and the cash
on hand.
4. Outstanding Loan – Amount of debt.
Monthly Summary
This window shows monthly summaries in a variety of categories for the past five months.
Graphs and Stats
Click on a checkbox at the bottom to display the relative data in the line graph. Note:The labels
along the left edge of the graph change to the most recently clicked category.
36
37
Page 21

Staff
This window lets you examine the activities of all of your staff members and hire new ones.
1
15
11
8
13
18
4 5
3
7
9
16
1. Sort – Reorder the list by Job, Employee
Name, Patrol Area,Tasks, Uniform Type,
Wage, Current Activity, Happiness, Warnings
issued to Employee,Training level, Start
Date, Laziness.
2. Employee Name – Click to edit the name.
3. View Employee Location – Click to center
the view on that employee.
4. Assigned T ask – Jobs that are assigned to
this employee. Click to unassign.
5. Unassigned T ask – Jobs the employee can
do but is not currently assigned. Click to
assign the task to the employee.
2
6
10 14
12
17
6. Edit Patrol Area – Define the area the
employee will work. Click this icon and
drag the mouse button over the area of
the park to set patrol area. The
employee’s patrol area will show up as a
blue grid. Drag the mouse button on the
blue grid to erase it from the employee’s
patrol area.
7. Employee’s Current Activity
8. Employee’s Star t Date
9. Weekly Wage – Click the arrow but-
tons to change.
10. Training Level – Click the training icon
to change (the cost of training is
removed from your cash).
11. Uniform T op – Click to change.
12. Uniform Bottom – Click to change.
13. Happiness Level
14. Warn or Fire Employee
15. Happiness Level – Increase training or
pay to raise happiness.
16. Hire Staff – Click on an icon to hire a
new staff member. Icons from left to
right are: Janitor, Mechanic, Security Guard
17. Show Staff – Click on an icon to dis-
play staff members in the central list.
Icons from left to right are: Janitors,
Mechanics, Security Guards, Enter tainers,
Shop Vendors and Park Inspector. Note:
By default, vendors are not displayed.
18. Expand Staff Panels – Click on the
[+] icon to show expanded staff information in the list. Click on the [-] icon to
show abbreviated staff information
in the list.
and Entertainer.
Scenario Objectives
Performs the same function as the Objectives button found in the Dashboard. See the Dashboard
section on page 28.
Research
The list shows categories that you can research. Click on the arrows to set the amount of money
you wish to spend on research. Move sliders to adjust how much of the total research budget that
category will receive. Research must be conducted to gain new Rides, Shops, Extras for Shops, and
Scenery Items. When research is complete, the message console will notify you that a new item may
be purchased for your park. When all the research of a particular category is completed, your
research funds will be automatically redistributed among the other categories. When all possible
items have been researched, funding will stop. Keep in mind, not every scenario contains the same
items available to research.
3938
Page 22

John W ardley:Research/T echnolo gy
Where do ideas for new coaster technologies
come from and what type of new technologies
can we expect to see?
We are constantly scanning all industries (particularly the aerospace industry) for new
technology that we can apply to roller coasters. New methods of propulsion, such as linear
induction motors (LIMs), linear synchronous motors (LSMs) and pressurized fluidics are
making considerable in-roads into coaster design at the present. In addition, new
plastic materials for applications in coaster wheels and bearings are also under test.
Attractions Management
The Attractions Management window gives you summary information about all the rides, shops and
facilities in your park. Click on one of the icons at the top of the window to switch between Rides,
Shops and Facilities.
To sort the listed attractions by name, click on the Name button.The button on the right lets you
sort the listed attractions by a number of other criteria.To change the sor t criteria, click on the dropdown menu on the right. Click on the button below it to re-sort.
Click on an attraction to open its individual control panel.
RIDES
This button opens a section of buttons allowing you to select and place rides in the park
Roller
Coasters
Gentle
Rides
Clicking one of these buttons opens a list browser that shows the rides for that category that you
can place in your park. Not all rides are available for all scenarios. You may add other rides to a list
browser after you’ve completed some research.
Junior
Rides
Transport
Rides
Thrill
Rides
Water
Rides
Other
Rides
GUESTS
Use the Guests dialog box to see lists of Individual Guests, or lists of Guest Summarized
Details.You may sort each of these lists by “thoughts” or “status.”
40
41
Page 23

SHOPS
Clicking on this button reveals a list browser with a vast selection of shops and facilities you
may add to your park. Not all shops are available for all scenarios.You can increase the
variety of shop inventory or add new shops to the list browser after you’ve completed
some research.
SCENERY
Click to display all the scenery that can be placed in your amusement park. Scenery is
organized in the following categories. Many scenery items are also sorted by theme
(Generic, Spooky, Sci–fi, Adventure, Western).
Each of these buttons opens a toolbox that contains all of the selections in that category
that are available for decorating your park. Not all scenery items are available in all scenarios, and some scenery items will be added to the toolboxes after you’ve researched them.
Trees and Plants
Fences
Walls and Roofs – See “Designing and Constructing Buildings” on page 95 for tips on
custom structures.
Path Extras – Lamps, benches, trash bins
Ride Events – Animated elements triggered by track rides. To use a Ride Event, click in the
toolbox on an element and place it next to the track of a coaster or other track ride.
Next, click the trigger-point button in that ride event’s control panel. Notice one of the track
pieces near the ride event is highlighted; this is where the ride must be before the ride
event will animate.To change which track piece triggers the ride event, click the trigger-point
button in that ride event’s control panel and move the pointer over the track where you
want the trigger to occur – when the track piece turns blue, click on the track.
Fireworks – All the fireworks launch points may be found here (see page 35).
PATHS
Click to display the kinds of paths that can be placed in your amusement park. Paths are
organized into walkways and queues and are further organized by path texture, ramps, stairs
and platforms.
After you select the path button, the path building construction panel, where you may either
draw or build footpaths. Path “drawing” works much like that of
“toolbox” mode uses a similar interface used for building track rides. Both methods of
placing pathways are fully described in the section, “Tycoon’s Guide to Creating Paths”
on page 89.
RollerCoaster Tycoon®2.Path
TERRAIN TOOLS
42
Props,Statues
This section of tools gives you the ability to shape terrain, to prepare land for rides and scenery, to
change the texture of the ground cover and to place bodies of water. In many cases, the pointer
will change shape to match the function you are performing.
43
Page 24

Ter rain Brush Size – Changes the “brush” size used for painting new textures on the
terrain, or the size of the area affected when altering landscape.To change the brush size,
click on the up and down arrows.
Ter rain Shaping Tools – Several tools can be found here for changing how the terrain
is shaped.
Pulling – Raises or lowers the terrain as you hold down the mouse button and drag the
pointer up and down.
Smooth T errain
A toolset for smoothing terrain for various situations.
Tweak T errain Tools
Each of the tools in this section works pretty much the same way; first make sure the tool is
the size you want, next position the pointer on the terrain you want to affect, and then drag
the mouse button up or down.When brush size is one square, you may also adjust the edge
or corner of a terrain tile by dragging the mouse button up or down over the tile’s edge
or corner.
Freeform Corner-Pulling – A tool for raising or lowering a highlighted grid area.
Snap Corners To Neighboring Corners – Helps smooth the terrain that you previ-
ously shaped with the freeform corner-pulling tool.
Corner Snapping to Scenery – Raises or lowers a highlighted area of terrain so that it
snaps to the height of scenery found in the grid.
Corner Snapping to Coasters – Raises or lowers a highlighted area of terrain so it
snaps to the height of ride entrances found in the grid.
Terrain-Editing Mode
Spray – Raises or lowers the terrain more and more the longer you hold down the
mouse button. Change the speed at which spray mode affects terrain by clicking on the
arrows to change the value.
Remove Cliffs – Drag the mouse button over the area around cube-shaped edges to
make the terrain flow smoothly.
Create Cliffs – Drag the mouse button over a hilly area to make it terraced with
cube-shaped edges.
Flatten T errain – Drag the mouse button over undulating terrain to flatten it to the
height where you first began dragging.
Flatten for Scenery and Rides – Drag the mouse button over an area of terrain to
make it suitable for paths, scenery or rides. The terrain is flattened to a height where you
first began dragging.This is particularly important if you plan to build elevators, ramps or
stairs to or from this area.
Flatten Dynamically – Drag the mouse button over terrain to flatten an area to the
height of the grid square under the mouse pointer.
Averager – Drag the mouse button over terrain to make its shape more moderate
between extremes found in the area.
4544
Page 25

Lower Terrain T ools
Water – With this button enabled, simply click on the land anywhere in your park to add
water.The level of the water will be the same as the part of the land where you clicked.
Remove water by clicking on it again.
Trough – Drag the mouse button over terrain to lower it to a narrow and shallow trough.
Crater – Drag the mouse button over terrain to lower it to a crater-sized depression with
sloping edges.
Canyon – Drag the mouse button over terrain to lower it to a deep and wide depression
with steep edges.
Raise T errain Tools
Hill – Drag the mouse button over terrain to raise it with rounded peaks and slopes.
Mountain – Drag the mouse button over terrain to raise it, producing sharp peaks.
Mesa – Drag the mouse button over terrain to raise it with a flat top.
Ridge – Drag the mouse button over terrain to create a raised formation with a
rounded top.
Ter rain T exture – Opens the toolbox to give you a selection of textures to paint the ter-
rain or the exposed surfaces of cliffs (or raised cubic-shaped areas).
46
DELETE OBJECTS
Allows you remove scenery and structures from the park.
One-Click Delete – Causes clicking to delete one item at a time. If you click on a ride,
shop or facility, the game will prompt you to confirm its deletion.
Area Select –Allows you to mark an entire area for demolition by dragging the mouse
button over it. Only scenery and structures are deleted with this tool.
Note: Rides, attractions, shops and facilities can only be removed by clicking on that element to
open its control panel and clicking on the Demolish button found there or by using the One-Click
Delete button.
47
Page 26

CONTROL PANELS
In this section are the descriptions of all the control panels for each element that may be placed in
your park.
Rides
5
6
4
3
Ride Details Panel
1
9
2
4
8
6
7
5
3
7
8
9
10
1. Graphs
2. Maintenance
3. Ride Details
4. Finances
5. Guest Opinions
6. Ride V ehicles
7. Ride Status – Click to select Open, Test
or Close.
48
2
13
1
12
11
8. Test Results
9. Ride Operating Mode
10. Construction
11. Customers
12. Close Ride Control Panel
13. Ride Close-up
Each of these panels is described on the
following pages.
1. Name – Click to edit.
2. Music – Click to show a list of available
music (entries from game music directory
and the Windows®My Music directory
found in My Documents), click on a
song to assign it to the ride.
3. CoasterCam
™
– Click to ride the ride.
4. Choose Exit – Click to choose the
ride’s exit.
5. Choose Entrance – Click to choose
the ride’s entrance.
6. Color Details – Click to change the
colors of various par ts of the ride
7. Choose Fence – Click to choose what
fence will surround the ride.
8. Demolish – Click to remove the
entire ride.
9. View – Click to center the view on
the ride.
49
Page 27

Ride Finance Panel
2
3
4
Ride V ehicles Panel
4
1
3
5 6
2
5
1
9
7
8
1. Admission Price – Click the arrows
to adjust. Note:Some scenarios do not
permit ticket prices to be adjusted.
2. Projected Hourly Income – Shows
potential income per real-world hour.
3. Hourly Costs – Shows cost per real-
world hour.
50
4. Projected Profit – Shows projected
profit per real-world hour.
5. Lifetime Profit
1. Color Selector for Beam
2. Color Selector for Supports
3. Color Selector for Track
4. Ride Capacity
5. Recolor Track to a Single Color – Reset
all track color choices to a single color.
Ride Test Results Panel
1
2
1. Test Results Category – Click arrow to
select Basic or Advanced (not available
on all rides).
6. Car T ype – Allows the user to select
the design of the ride’s car.
7. Color Selector for Car Exterior
8. Color Selector for Car Trim
9. Color Selector for Seats
2. Rating Results List – Shows rating
categories for the ride (these values
remain blank if the ride has not
undergone testing).
5150
Page 28

Ride Operating Mode
Shows the conditions that must be satisfied before the ride will launch.
1
2
3
Shops and Facilities
3
4
5
6
7
2
1
1. Wait For setting – Click arrow to adjust.
Shows how much of the ride must be
loaded before it will launch (this setting will
be overridden if you select a minimum or
maximum waiting time).
3. Maximum W aiting Time – When
checked, causes the ride to launch
without regard to the ride load.
Adjust the waiting time by clicking
the arrows.
2. Minimum W aiting Time – When checked,
causes the ride to wait before checking if the
ride-load conditions have been met.Adjust the
waiting time by clicking the arrows.
CoasterCam™Controls
Double-click in the ride’s thumbnail picture located in the ride’s control panel to activate the
CoasterCam. While you are riding a coaster or other attraction, you will see controls for the
CoasterCam appear in the lower-right corner of the screen. These buttons allow you to move the
camera from the hood of the ride to a position near the head of a peep or to any of the other
positions on that ride. Click the arrow buttons to switch to another coaster! If you want to keep
the buttons on the screen, click the “tack” icon.
8
1. Shop Close-up
2. Shop Control panel
3. Shop Finances panel
4. Shop Opinion panel
6. Shop Status – Click to select Open
or Close.
7. Shop Inventory Sales panel
8. Close Shop Management interface –
This also deselects the shop.
5. Shop Inventory Selection panel
Shop Opinion Panel
Open this panel to see a list of peeps’ recent thoughts about the shop.
5352
Page 29

Shop Control Panel
Shop Inventory Panel
Open this panel to see a list of inventory sold by the shop. Drag an icon to the list to add it to sales
inventory. Drag an item from the list to the trash can to delete it from inventory.
1
2
4 3
1. Name – Click to edit.
2. Shop Status
Shop Finances Panel
1
2
3
4
1. Hourly Income – Shows income in
real-world hours.
2. Hourly Costs
54
3. Demolish – Click to remove the
entire ride.
4. View – Click to center the view on
the ride.
3. Hourly Profit
4. Lifetime Profit
1 2
1. Inventory items
Shop Inventory Extra Panel
Shows what extras can be added to your inventory.
1 2
1. Type of Extra
2. Price of each inventory item
2. Quantity of Extra
55
Page 30

PEEPS (STAFF,VIPS AND GUESTS)
To open a peep control panel for a guest or staff member, click on that character in the park.
3
4
5
2
Peep Control Panel
1
2
6
7
1. Peep Close-up
2. Peep Control panel
3. Peep Thoughts panel
4. Peep Ride History panel
5. Peep Pockets panel
3 4
1. Peep Name – Click to edit.
2. Current Peep Activity
1
8
6. Peep Status panel
7. Peep Cash panel
3. Pick Up Peep – Click to grab the peep,
then move the mouse and click again to
drop the peep.
Peep Thoughts Panel
This panel lists the selected peep’s most recent thoughts.
4. Monitor Peep Thoughts – Click to
send this peep’s thoughts to the
dashboard’s message pull-down.
8. Peep’s Group panel
Each of these panels is described on the
following pages.
5756
Page 31

Peep Ride History Panel
Open this panel to view a list of this peep’s recently visited rides and attractions, as well as his or her
favorite ride.
Peep Status Panel
3
1 2 4
5
Peep Pockets Panel
This panel shows a list of items that the peep is carrying.
58
1. List of status categories
2. Status ratings for each category
3. Ride intensity preference
4. Duration in the park
5. Nausea tolerance
Peep Cash Panel
This panel shows how much money the peep has spent on various items, as well as the amount of
cash he or she has left.
59
Page 32

Peep’s Group Panel
12
COASTER BUILDING TOOLBOX
Coaster Information Panel
3
Click on the ride name to edit it.To change the ride’s music, click on the music button. Click on the
arrow to close the Coaster Information panel.
2
1
3
1. Group Names – Click on a name to switch
to that peep.
2. Gender and Age
Scenery Management
2
5
6
1. Delete Item
2. Collapse Control Panel*
3. Open Control Panel*
4. Color Options*
60
3. Peep Group Leader
3
4
1
5. Name – Click to edit.*
6. Properties, Status or Options*
* Not on all scenery items.
1. Coaster Information Panel
2. Rotate – Turn the selected coaster
or track piece 90° counter-clockwise.
3. Construction Panel
4
5
4. Ride Status – Click to change to
Closed,Test or Open.
5. Color Options – Recolor currently
selected track pieces.
61
Page 33

Coaster T rack Pieces
1
2
1. Curved T racks*
2. Track Inclines and Drops*
3. Toggle Pull Chain or Launcher*
(straight flat and inclined pieces only).
4. Toggle Loading Station*
(straight flat pieces only).
5. Toggle Block Brakes*
(straight flat pieces only).
6. Toggle Straight Brakes*
(straight flat pieces only).
4 7
3 8
56
10 119
12
7. Camera T rigger*
(straight flat pieces only).
8. Adjust Bank Angle*
9. AutoComplete – Click to finish
construction of the coaster automatically.
10. Delete – Click to delete selected
track piece.
11. Height Indicators – Click to toggle
display of track piece height indicators.
12. Specialty T racks – Specialty track
options vary from coaster to coaster and
are available only in conjunction with
certain track pieces.
* Pieces that are grayed out cannot be added.
FIREWORKS MIXMASTER
™
The following section outlines the Fireworks MixMaster™building interface. (See “Creating Fireworks
Shows” on page 96 for more information.)
1
3
4
5
6
1. Music Selector Panel
2. Fireworks tracks
3. Play the fireworks show
4. Pause playback
8
6. Zoom in time scale
7, Zoom out time scale
8. Time scale
9. Collapse Fireworks MixMaster
2
™
5. Stop playback and rewind
9
7
62
63
Page 34

PEEP GROUP EDITOR
2
3
1
4
6
Peep Designer
15
7
5
11
10
9
8
1
4
7 9
10
13
2
3
5
6
8
12
11
14
1. Peep group name – Click arrow to
reveal list of all peep groups.
2. Add new group
3. Delete current group
4. Save current group
5. Member List – Click on a peep name
to highlight, double-click to change
peep name.
64
6. Gender and Age
7. Group Leader
8. Add-a-Peep panel
9. Delete highlighted peep
10. Peep Designer panel
11. Select Leader – Click to designate
highlighted peep as group leader
1. Current Look
2. Gender and Age Selector
3. Peep Name – Click to edit.
4. Body and Hair Type – Click arrows to
cycle through options.
5. Body and Hair Color – Click arrows to
cycle through options.
6. Add Head Accessory – Check to add
(not available for every selection).
7. Upper Clothing Type – Click arrows to
cycle through options.
8. Upper Clothing Color – Click arrows to
cycle through options.
9. Add Body Accessory – Check to add
(not available for every selection).
10. Lower Clothing Type – Click arrows
to cycle through options.
11. Lower Clothing Color – Click arrows
to cycle through options.
12. Add Lower Body Accessory –
Check to add (not available for
every selection).
13. Ride Intensity Preference – Click
arrow to select intensity preference.
14. Randomize Appearance
15. Return to Peep Group Page
65
Page 35

SCENARIO EDITOR
Inventions and Research Panel
1
2
3
4
5
6
7
8
1. Inventions and Research Panel
2. Park Land Panel
3. Financial Options Panel
4. Guest Settings Panel
5. Other Park Options Panel
66
6. Objectives Panel
7. Save/Load Panel
8. Exit Scenario Editor
1 2 3
6
7 8
1. Excluded Items Column – Items that
will not be available in this scenario.
2. Researchable Items Column – Items
that will be researched in this scenario.
3. Available Items Column – Items that
are available in this scenario.
4. Highlighted Item – Click to select.
Press the CTRL key and click to highlight
multiple items. Press the SHIFT key and click
to highlight a list.
4
5
5. Close-up – Close-up of selected item.
6. Add Button – Click to move selected
items to this column.
7. Category List Filters – Click to show
or hide items from each category.
8. Theme List Filters – Click to show or
hide items from each theme.
67
Page 36

Park Land Panel
Financial Options Panel
1. Scenario Name – Click to edit.
2. Open/Closed – Start scenario with park
open or closed.
3. Land at Start – Select land owned by
the park at start (blue outline grid).
4. Land Available – Select land that may
be purchased (For Sale signs).
5. Lease Only Land – Select land that may
be leased for construction rights
(barricade signs).
1
7. Starting Entrance Fee
8. Leased Land – Select land for which
9. Park Hours – Click to edit the opening
10. Land Prices – Click to edit the cost
11. Unlockable Land – Land available
2
7
10
3
9
6
8
4
5
11
the construction rights have already
been leased.
and closing times.
per square.
after an objective has been completed.
6. Unavailable Land – Select land that may
never be owned (no grid).
The park entrance and guest spawn-point can be found under the scenery selections. Create a path
before placing the entrance or spawn point and then put these on the path.
68
1
3
4
10
2
5
6
1. Starting Loan Amount – Click arrows
to adjust.
2. Loan Interest Rate – Click arrows
to adjust.
3. Starting Cash or Debt – Click arrows
to adjust.
4. Starting Entrance Fee – Click arrows
to adjust.
5. Starting Park Value
6. Starting Company Value
7
8
9
7. Ignore Money – Check to set money
as being ignored.
8. Fixed Entry Fee – Check to set the
entrance fee to a fixed fee so it may not
be adjusted by the player.
9. Rides Free – Check to set all rides to
be free so they may not be adjusted by
the player.
10. Maximum Loan – Click to adjust the
highest amount the player may borrow.
69
Page 37

Guest Settings Panel
Other Park Options Panel
1
2
3
4
5
6
1. Average Cash Per Guest – Click up or
down arrows to adjust.
2. Initial Peep Happiness – Click up or
down arrows to adjust.
3. Initial Peep Hunger – Click up or
down arrows to adjust.
4. Initial Peep Thirst – Click up or
down arrows to adjust.
70
5. Initial Peep Ride Intensity
Preference Av erage – Click up or
down arrows to adjust.
6. Default Guest Generation Rate –
Click up or down arrows to adjust (park
price and marketing campaigns also affect
generation rate).
1
2
3
4
5
1. Forbid Marketing – Check to forbid the
user from using marketing campaigns.
2. Forbid T ree Removal – Check to forbid
the user from removing trees.
3. Forbid Terrain Adjustment – Check to
forbid the user from adjusting terrain.
4. Forbid T all Buildings – Check to
forbid the user from building above
50 meters (or yards).
5. Rating Difficulty – Check to make
it more difficult to achieve a high
park rating.
71
Page 38

Objectives Panel
Save Panel
1
8
5
7
1. Difficulty Level – Click to select which
difficulty level is being edited.
2. Select Objective – Choose an objective
for the currently selected difficulty level.
3. Reward – Choose a reward from the
list for the currently selected difficulty level.
4. Change Objective Settings – Details for
the selected objective appear here. Adjust
the settings of the selected objective.
3
2
6
4
5. Briefing T ext – Type a briefing for your
scenario here.
6. Objective List – Shows list of
objectives already selected for this
difficulty level.
7. Delete Selected Objective
8. Scenario Name – Enter the name for
your scenario.
1
2
1. Scenario List – List of scenarios that
can be loaded; click to highlight.
2. Scenario Name – Name of scenario
currently being edited; click to edit.
3. Save – Save scenario currently being edited.
4
3 5
4. Cancel – Return to Scenario Editor.
5. Delete Highlighted Scenario
7372
Page 39

A TYCOON’S GUIDE TO …
MANAGING A P ARK
As you strive to meet the objectives in each scenario, there are some basics that you must master
no matter what you are trying to achieve. Fortunately, the basics of effectively managing a
RollerCoaster Tycoon
Attract Visitors With Marketing
Most scenarios begin with visitors (or peeps) already in the park. But it’s always good to attract
more. Within the Budget & Finances dialog box, you’ll find a section devoted to Marketing. You can
target each marketing campaign toward various age groups. Just make sure your park can handle the
crowds, or the peeps are likely to leave unsatisfied.
peeps with different ride preferences.
What sort of tests must a coaster design pass before it can
As well as the design calculations being checked throughout the design process, the actual
fabrication is constantly monitored by independent inspectors in the fabrication factories,
to ensure that the welding and componentry conforms to the specifications set out in
and many tests are carried out during the commissioning process using instrumentation
to monitor performance under loads considerably higher than those which would be
®
3 park are pretty straightforward.
Note:Different marketing campaigns attract
John W ardley:Design
move from paper to park?
the design.Throughout the erection on site, the installation is constantly checked,
imposed on the structures during normal operation.
Pleasing the Peeps
Once you have peeps in the park, you’ll want to keep them there and give them a reason to spend
money. Here are some strategies:
Coordinating Themed Décor
When you build an area of your amusement park, make sure the surrounding area is part of the
same theme; Spooky plants go with Spooky buildings; Western lamps go with Western benches,
and so on.
Clean and Secure
Peeps hate messy paths, so make sure you have enough janitors and trash bins. Breakdowns also
drive peeps away, so hire enough mechanics and assign them the task of inspecting as well as
repairing attractions. Employ enough security to keep the vandals and litter in check.
74
75
Page 40

Build What The Peeps W ant
You can check the opinions of individual peeps and even what they think of individual attractions.
You can see what the guests think of your rides by opening the Attraction Management dialog box
and sorting the lists by popularity, favorites and satisfaction. This will give you a good idea what the
peeps think of objects in your park. Also check out the guest button found under the park management buttons to see all the thoughts of guests in your park.
Once you’ve sampled the peep’s opinions, install only the rides or attractions you know the peeps
want. It’s always good to have a variety of rides that appeal to peeps with varying preferences. And
don’t forget — peeps LOVE fireworks!
It also goes without saying that your park should have plenty of toilets and food and drink shops.You
should also install cash machines here and there. If peeps really like your park, they’ll pull more funds
from the cash machines after they’ve spent all their pocket money.
See the ReadMe file for FAQs regarding peep behavior.
Sufficient Staffing
Janitors keep the park clean. Mechanics inspect and fix rides. Security Guards keep mischief at a
minimum, and Entertainers attract and amuse peeps. Hire too many employees, and you may not be
able pay them. Hire too few, and some areas of your park may fall into disrepair. Also consider
investing in training to make your staff better at their jobs.
John W ardley:Maintenance
Who takes care of a coaster once it’s up and what
does a coaster cost to maintain?
The park’s maintenance and operations crews are trained by the manufacturers in
operating and maintaining the ride, and detailed manuals are provided to document
all aspects of this. Coasters require daily checks and maintenance, which costs
the park many hundreds of thousands of dollars a year. But this ensures that the
coaster will operate safely and reliably during the operating periods.
76
77
Page 41

Manage Finances and Generate Profits
RCT3 contains plenty of tools to help you manage your finances, including access to loans and the
ability to sell objects if you need to raise cash.You should regularly consult the graphs and monthly
summaries to detect any trends early.
Also, be aware that time-of-day and time-of-year has an effect on what is in demand.Tinker with staff
salaries, shop prices and the variety of inventory you sell. Stay aware of all your running costs and be
ready to take steps to stop recurring losses.
BECOMING A TYCOON
Scenarios
Each scenario has three sets of objectives; Apprentice (easy), Entrepreneur (hard) and Tycoon
(expert). Each objective has its own reward, such as a cash bonus, reduced loan interest, real estate
opportunities, new rides, and so on.
RollerCoaster Tycoon
unlocked at the beginning of the game. As you solve a scenario’s Apprentice objectives, one of the
locked scenarios on the Career screen will be unlocked. In addition, Scenario 17 can only be
unlocked after you’ve solved the first sixteen scenarios’ Entrepreneur objectives and Scenario 18 only
after you solve all the other scenarios’Tycoon objectives.
Yo ur progress is saved with your career settings, so when you load a career from the main menu, you
can see your overall performance summarized there.
78
®
3 offers 18 scenarios for you to test your tycoon skills. Six scenarios are
Park Inspector
If you’ve already played RollerCoaster T ycoon®3 a bit, you may have noticed park inspector, Mr
Jobsworth, roving the park. He’s there to help you with many of the details or give you hints, such
as informing you that peeps cannot get to a ride you’ve built or letting you know your employees
are slacking off. Mr. Jobsworth’s messages appear in the message console.
Awards
Awards are granted when you maintain certain standards, such as park safety, family friendliness,
beautification, thrill factor, sales goals or employee satisfaction. In most cases, the awards are
accompanied by a cash bonus or other reward.
Park Rating
Your present park rating is the average evaluation given by all the peeps who have visited your park.
Some scenario objectives require you to maintain a certain park rating for a certain number of
months. But in all cases, a positive park rating creates good word-of-mouth and generates higher
park attendance. Park rating is also shown on one of the financial graphs, so you can track your
progress over time.
79
Page 42

Key Strategies
Generate a positive cash flow as soon as possible
Evaluate everything in your park right from the beginning and make sure it is open and can generate
income. Assign janitors to high traffic areas and put trash bins throughout the park. Give mechanics a
patrol area that includes rides or attractions that may already be broken down — and make sure
mechanics also inspect attractions. And don’t be afraid to sell what you don’t need.
Make sure the basics are covered
Be sure to offer your guests the necessities: food, drink and (of course) toilets. Moderately thrilling
attractions appeal to a wider group of peeps.Your park may also be rewarded for good use of shade
trees (for arid climates) and shelter (for rainy climates). Plants and entertainers boost the spirits.
Adequate lighting is a must to satisfy nighttime visitors.
Don’t do too much too soon
Ta ke your time! Building an amusement park is like caring for a house plant. A little trimming here…
a little nourishing there… let the processes have their intended effects.Then, add a few things at a
time. Success in some scenarios requires you to expand the park to grand degrees, but if you try to
do this too soon, you’ll spend all your cash and almost certainly fail.
Pause the game when building complex structures
By default, RollerCoaster T ycoon®3 automatically pauses when you are constructing a track ride. But
the clock keeps running as you place scenery, paths and build customized structures. Pause the game
and you can take your time to perfect your creations.
SHARING YOUR CREATIONS
Nearly everything you can create in RollerCoaster Tycoon®3 can be saved and loaded in other
scenarios and even saved and shared with other players. If RollerCoaster T ycoon
the default location, the saved files can be found in the following directories:
Peeps
Create your group and turn them loose in other players’ parks.
filename.txt where filename is the name you assigned to the peep group you saved. Saved in the
RCT3/Peeps folder within the My Documents Folder.
Coasters*
Let other players ride your coasters and test their nausea tolerance.
filename.trk where filename is the name you assigned to the coaster you saved. Saved in the
RCT3/Coasters folder within the My Documents folder.
Structures
Express the architectural genius within.
filename.dat where filename is the name you assigned to a structure you saved. Saved in the
RCT3/Structures folder within the My Documents folder.
®
3 was installed to
80
81
Page 43

Fireworks Shows
Playing with fire has never been as fun as it is in other players’ parks.
filename.fws where filename is the name you assigned to the fireworks show you saved.
Saved in the
RCT3/Fireworks folder within the My Documents folder.
Scenarios
Are you a game design mastermind? Share your masterworks.
filename.dat where filename is the name you assigned to the park name. Saved in the
RCT3/Scenarios folder within the My Documents folder.
Amusement Parks
Yo ur sandbox creations will make others green with envy.
filename.dat where filename is the name you assigned to the park name. Saved in the
RCT3/Parks folder within the My Documents folder.
* If you assigned a song file from your library, the game will expect to find it in the
My Music/RCT3 folder found within the My Documents folder of your PC.
Trading with Others
Note: Song files are NOT saved with any saved game, coaster, park, scenario or any other saved
element in RollerCoaster
My Music/RCT3 folder of your PC.
While we hope you’ll want to share your RollerCoaster T ycoon
strongly encourage you to respect the copyright owners of your music files. Please do not make
illegal copies of copyrighted music. We support copyright laws all over the world and the rights of
artists to profit from their compositions. Piracy is wrong and hurts ar tists.
From time to time, we’ll post links to web sites where you can post your creations online.
Visit
rollercoastertycoon.com or atari.com/rollercoastertycoon for links to these
web sites.
®
Tycoon 3. The game only plays game music or other music found in the
®
3 creations with other players, we
Loading Creations of Others
First, copy the file containing the data for the Peep Group, Coaster, Structure, Fireworks, Scenario or
Amusement Park to the directory indicated on the previous page in the Sharing Your Creations
section. If music linked to the item is not from the game, make sure the file is located in the My
Music folder found within the My Documents folder.
When you start the game, the creations will appear in the list of Peeps, Coasters, Structures or
Fireworks. Scenarios and Amusement Parks can be loaded from the Sandbox screen.
Loading Rides from RCT and RCT2
Do you have coasters you created for RollerCoaster T ycoon®or RollerCoaster Tycoon®2? Copy the
.TD4 or .TD6 file to the My Documents\RCT3\Coasters directory. Next, star t RCT3 and
either enter a scenario, the sandbox or the coaster designer. Notice when you click on the rides button, a new button is present at the bottom of the stack. Click this button to show a list of RCT and
RCT2 coasters present in the directory. Click one of the coasters from the list to add it to your park,
then save the old coaster in the RCT3 format by clicking the SAVE icon found in the coaster's control panel.The search button found on the import window also searches the selected hard drive for
any other .TD4 or .TD6 files and then adds them to this list.
82
83
Page 44

John W ardley:Construction
Where are components made,what type of crew generally
installs a coaster, and how long does it take to
build a new coaster?
Although the chosen manufacturer will operate from one base, frequently the
components – track, support structure, cars, brakes, lifts, control
systems etc. etc. – will be fabricated in many different locations around the world,
and only come together for the first time on site. Civil engineers will prepare
the foundation, steel erectors will put up the structure and track, and mechanical
and systems engineers will install and commission the ride.
From initial concept to opening day can take up to three years.
BUILDING A ROLLER CO ASTER
The Coaster Builder Toolbox
Open the Coaster Builder Toolbox by clicking on the Construction Button of the Ride Control Panel.
Yo u’ll notice a good selection of track pieces are available for constructing your coaster or other
track ride. These var y from ride to ride.The grayed-out pieces cannot be used at the present time.
Coaster Building Checklist — the Essentials
Here are a few tips to get you started on the right path to building a successful coaster.
Prepare the Terrain
Use the tool that Flattens Terrain In Increments For Rides And Scenery to prepare the land around
where you plan to put the ride entrance and exit.This will ensure that you’ll be able to build a path
to the ride. If the auto-flatten option is enabled, the game will do this automatically.
Make Your Boarding Station Long Enough
If you increase the number of cars per train, the boarding station must be longer than a single track
length. As a rule of thumb, your boarding station should be at least three track-lengths long.
Start with a Lift Chain
Most rides require you to add a lift chain to the entire incline at the beginning of the ride. As a precaution, extend the lift chain to the first level track-piece after the incline as well.
Test While Building
After you’ve created your first incline, change the ride status from Closed to Test.This will cause the
ride to run as you build it so you can see the results of each new section of the track you build as
you build it, and will help you identify ride failures quickly.
Change the Banking Setting for Curved Track Pieces
Yo u’ll manage the g-forces and intensity better this way. Properly banked turns also help keep the
ride from breaking down frequently.
84
85
Page 45

Manage Excessive Speed
Don’t forget to use brakes when necessary to control speed.
Use Special Track Sections
Special track pieces like loops and corkscrews add excitement.
Add Camera Triggers to the Most Exciting Points in your Ride
Pictures of your peep group on the ride will be saved to the game directory.
Auto Complete
When your coaster is nearly complete, click on Auto Complete to finish it off. When you click the
Auto Complete button, you’ll notice the game draws the track on the screen as it calculates the last
few tracks. If you notice this taking too long, click on the Auto Complete button again to interrupt
the Auto Complete process and return to editing your track manually. If the Auto Complete button
finds a solution, it will draw the solution with highlighted track pieces. If you are satisfied with the
solution, click on the Auto Complete button again to confirm. If you don’t want the offered solution,
just click on the Delete Track Piece button next to the Auto Complete button.
Think Theme
When the last track piece has been laid, choose an entrance and exit that matches the nearby
scenery theme.
Test
Activate the Test setting to generate a test results report. Most peeps will not ride an
untested coaster.
Take it for a spin
Ride the ride to see what your peeps will experience.
Testing
After you finish coaster construction (or the contruction of any other powered ride), you should give
it a test run. Most peeps will not ride your coaster until the test results have been completed. After
your rides have completed a test run, peeps who prefer that ride’s excitement, nausea and intensity
settings will be drawn to it.
The T rack-Building Interface
The track-building interface colors the track pieces that you can add in yellow, unavailable track
pieces are shown as white with a slightly visible outline. Specialty pieces appear in the right portion
of the toolbox only when they may be added, and this may change depending on what piece you
just placed.
Adding tracks works like this:
1. Click to select a new track piece
2. Click it again to add it
3. Click the same icon again to add another.
When you want to add a different track piece, click to select it, click again to add it, click the same
icon again to add another, and so on.
John W ardley:T esting
How is a new ride tested once it’s constructed?
What considerations are made before it can be
opened to the public?
Once erected, the ride will be tested first component by component (running the motors and
chain lifts, operating the brakes, checking the control systems etc.). Once the track gauge and
clearance envelope has been checked, a train will be run round the track, normally containing a
load to simulate the weight of the passengers (we used to use sandbags, but now we use special
water-filled dummies). Once this has gone round the track, accelerometers and other
measuring devices are attached to the train and structure, whilst the ride is run many
hundreds of laps with a heavily overloaded payload.All sorts of situations are then simulated
to prove the safety systems before the ride can be given its certificate and opened to the public.
86
87
Page 46

Saving and Loading
Click anywhere on a coaster to reveal the Ride Control panel, then click on the Information button.
Next, click on the Save button and follow the on-screen instructions for saving your coaster. After the
coaster has been saved to your hard drive, you can share it with other players and use it in other
scenarios or sandbox games.
Managing Y our Coaster
After the test run is complete, you can make adjustments to the intensity or nausea ratings by adding
or removing banking, straight brakes or lifts where needed. In some cases you may need to reconstruct parts of the track, and when you’ve worked out the kinks, you can click the on the Auto
Complete button to finish it off. After the ride is open for business, you should assign a mechanic to
regularly inspect it.
CREATING PATHS
Peeps and employees ordinarily wander throughout your amusement park on the paths you’ve laid
out for them. Make sure the terrain where you want build a path is mostly level.
instructions for this section assume you are using the path building tools and have selected
a path texture design.
The paths you may place are:
Paths – Ground-level walkways that conform to the shape of the terrain.
•
Ramps – Sloping walkways that ascend or descend one meter or about three feet
•
(depending on your game option settings).
Stairs – Ascend or descend two meters or about six feet (depending on your game option
•
settings).
Platforms – Elevated walkways that are level and do not conform to the shape of the
•
terrain below.
Queue Paths – Peeps will only use these to queue up for rides and attractions. Queue
•
paths can be ground paths, ramps, stairs or platforms.
There are two ways to build paths: With the path-building toolbox; or in the classic “mouse-dragging” mode. Each of these is described on the following page.
Note: The
88
89
Page 47

The Path-Building Toolbox
The path-building toolbox works much the same way as the coaster-building toolbox. Click on the
“flat path” icon to lay a straight walkway. Click on a “turn” icon to change the direction of the path.
Click on a “ramp” or “stair” icon to build ascending or descending pieces.
Classic Path Building
Players of the previous RollerCoaster Tycoon
same way. Instructions for use the classic path building method are below. It takes a little practice to
get the hang of classic path building, but once you master it, you may find path building a breeze.
®
games can still create paths, ramps and footbridges the
Simple Paths
Go to the path building tool and select a surface texture, and then drag the mouse button on the
ground or click single tiles where you want the path to be drawn.
Stairs and Ramps
Peeps often need to get to elevated areas, platforms or ride entrances in your park.
To b uild a stairway or ramp up from the ground or a platform, carefully move the pointer to the
edge of an existing path tile or platform until an arrow appears and an outline of the next tile
appears. Next, hold down the mouse button and drag the mouse up a little until the outline changes
to a ramp; drag the mouse button a little further until the outline changes to stairs. Release the
mouse button to place that piece. Additional sections of the same ramp or stair piece can be placed
simply by clicking on the arrow of the segment.
To level off the next outlined segment of a stairway or ramp, hold down the mouse button while
dragging the mouse down a little – the outline of the next segment will change. Release the mouse
button to place that piece.
Platforms
After you’ve built a ramp or stairway and leveled off the top piece, you can quickly place an entire
platform area by moving the pointer to the edge of an existing platform tile and clicking on the red
arrow that appears there.
Elevators
Sometimes space will not permit building a staircase. In these instances, an elevator may be better
suited. Elevators can be found under Transport Rides. Click on the elevator ride and then move the
pointer to the position on the ground where the lowermost portion of the elevator will reside
(make sure a path can lead to it). Next, without moving the pointer, hold the shift key to make an
outline of the next higher elevator section to be displayed, and then click the mouse button to put
the segment in place. Repeat until the elevator is the desired height.The elevator is managed like
other rides, so make sure it is tested and open.
Lights, Benches and Trash Bins
Paths are ideal places to install benches, trash bins and lamp posts. See the Path Extras browser list
for all the items available. Click on an item in the browser list and then move the pointer to the edge
of the path tile where you want to place the item and then click to place it.You may repeat this as
needed until you close the browser list.
90
91
Page 48

MANAGING LAND AND SHAPING TERRAIN
You can buy land adjacent to your park and even lease construction rights. When you own land, you
can also shape much of the terrain to the limits of your imagination and budget.
Buying Land
After your park is running smoothly and you’ve built up some cash reserves, expand your park by
buying more land.
or to shape its terrain.
Construction Rights
Some of the land near your park cannot be purchased, but you may lease construction rights. This
grants you an easement over the land so you can build track sections of coasters, trams or other
track rides.
A coaster today can cost upwards of $15 million — many are costing more than twice that.
Who makes the decision to build a new ride and what is the first
It is a collaboration between the park and the designers. Sometimes manufacturers lead the
process with a new type of coaster product. Sometimes the park’s marketing people lead
by identifying a need to enter tain a specific segment of their market. Occasionally, the
Basic T errain Shaping
Note:Your park must own land to build attractions, shops, paths or scenery on it,
John W ardley:Breaking Ground
What does a new, big coaster cost these days?
step in the design process?
physical layout of the park throws up a need to fill a gap in the park’s developed
area (i.e. a vacant lot). Frequently, the designers have an idea for a storyline within
a themed development that needs a coaster as the transit system to take
riders through an adventure. But more often than not, it is a
combination of all these factors, and some!
Use the terrain shaping tools described earlier in this manual to alter the topography of the terrain.
Some areas may not be altered if the scenario restricts it. In some cases you’ll want to smooth
terrain for paths or rides, and sometimes you will want to create a body of water for the water
rides you want to add. Or you can even shape the terrain just to suit your fancy.
Simulating T unnels
Technically, RollerCoaster T ycoon®3 does not permit you to build tunnels, but you can dig a trench, lay
your track pieces and then cover the trench with walkway platforms or structural rooftops. It’s up
to you.
Preparing Land for Rides
You can pretty much place a ride nearly anywhere in your park, but the most important element to
keep in mind is the ride entrances and exits — these must be accessible to your paths, which can be
a complex process if the terrain is quite irregular.
The best way to ensure success in connecting your ride entrances and exits to pathways is to use
the Prepare Terrain For Rides tool, which smoothes the land and snaps the elevation to increments
accessible by ramps and stairs.
92
93
Page 49

Preparing Land for Bodies of Water
Use the Lower Land tools to shape the terrain for ponds and lakes.
Decorating and Texturing Land
Peeps love plush landscaping and varying ground cover. Place foliage around the park by accessing
the Scenery section of the Item Placement menu. Remember to use foliage of the same theme as
the surrounding structures and attractions. Change the ground cover using the Color Terrain tool in
the Terrain Shaping toolset.
DESIGNING AND CONSTRUCTING
BUILDINGS
One of the most powerful features in RollerCoaster T ycoon®3 is the ability to construct almost any
kind of edifice from the vast variety of structural pieces in the game; be it a castle, palace, mansion,
ghost town, shanty village or skyscraper.
Simple Construction
Open a construction set browser list and click on one of the pieces in the set — this causes a
grayed-out image of the piece to connect to your pointer. Press
ments. Position the piece where you want to place it and click the mouse button.Voila! The piece
has been placed at ground level. Continue to place pieces in the park this way until you close the
browser list.
To place pieces or rooftops above or below the ground-floor level, move the piece to the spot over
the ground where you want to place it, and then hold SHIFT and move the pointer up or down.
This causes the grayed-out piece to slide up and down (even below the ground).When your piece is
in the desired position, click to place it there.This is also useful when you want put up a wall piece
next to another but the shape of the land prevents the wall tops from aligning precisely; just hold
down SHIFT and move the pointer until the tops align.
Yo u can also hold down
ALT to cut the land around the building piece.
CTRL to force the terrain to flatten around the building piece. Hold down
Saving and Loading Buildings
Save your building to use in later scenarios or to trade with other players. Open the Custom
Structures menu and click the Select Objects button.Then, drag the mouse button over the ground
to mark the area under the building you want to save (taking care that the base of your structure
and a one-square margin around the structure is highlighted), name the object and click on the
Save button.
Load buildings created by other by copying the file to the directory indicated in the Sharing Your
Creations section of this manual.The next time you play RCT3, the new building will appear in the list
of Saved Selections.
Z to turn the piece at 90° incre-
94
95
Page 50

AWARDS FOR PARK APPEARANCE
Use scenery and foliage all from the same theme and you’ll be more likely to win awards (as well as
a fat bonus) for park appearance and beauty. Some generic scenery items may also be used,
but sparingly.
CREATING FIREWORKS SHOWS
One of the most exciting innovations in RollerCoaster T ycoon®3 is fireworks! With the Fireworks
MixMaster
Fireworks are a sure way to increase your park rating.
The Fireworks MixMaster
When you open the scenery buttons and click on the Fireworks MixMaster button (at the bottom
of the list), the Fireworks MixMaster controls will be displayed.
Fireworks Show Checklist
Launch Points
Before you do anything else, you’ll need to add a few fireworks launch points to your park. Click on
the Fireworks button to open the interface to the selection of launch points available. Click one and
add a launch point to your park.You can place launch points anywhere.
™
,you be able to choreograph pyrotechnical wonders synchronized to your favorite tunes.
™
Music
If you’re going to create a show that uses music from your library, make sure the song file is in the
My Music/RCT3 folder found within the My Documents folder.
Make the Show
Open a blank show by clicking on the button Fireworks Shows button (the one with the three rockets) and then in the details panel, click the Add Fireworks Display button, which will open the timeline.
With the Fireworks MixMaster timeline open, click on one of the tracks to display a list of fireworks.
Click on one and it will appear in the track.You can drag the firework to any place in the timeline
where it does not overlap another firework on the same track. Next, move the pointer over a launch
point that you placed in your park (you’ll know it’s a launch point because it glows when the pointer is
over it). Click on the launch point and the firework is now assigned to a launch point.The direction in
which the firework will be launched is indicated by a small line protruding from the launcher. Repeat
these steps until your fireworks show is complete.
Delete a firework from the timeline by right-clicking on it. Double-check that each firework has a
launch point by clicking on each firework in the timeline; if a launch point is glowing white, the selected
firework is ready to launch! Test the show by clicking on PLAY.
Save for Later
Click on the Fireworks Displays button (the one with a rocket and calendar) to open the list of fireworks; the highlighted item in the list is the current show you are editing. Click the Save button and
the game will store the show for later use. Change the time of day and time of year the show will
run in this panel, too.
Fireworks Show Tutorial
You may practice using the Fireworks MixMaster by running the fireworks tutorial.
9796
Page 51

PUTTING YOUR GROUP IN THE PARK
Create a group of your friends or family with the Peep Designer and watch how they react to your
amusement park.
The Peep Designer
The Peep Designer can be accessed from the Tools button found on the Main Menu.
How to Create and Customize a Peep Group
First, click the Add Peep Group button.This creates a new peep group.
Next, click Add Group Member, and then highlight the peep name and click Edit This Peep.
On the Peep Designer, change the age, gender, skin tone and clothing to suit your tastes; or, click the
randomize button to let the computer do the picking. When done, click the Save This Peep button
and return to the group window.
Repeat these steps until you have added and edited all the group members you want and click the
Save This Group button.The Peep Designer automatically assigns who is the group leader, but you
can choose the group leader by highlighting a peep in the list and clicking the Designate Group
Leader button.
CREATE YOUR OWN SCENARIOS
Free the RollerCoaster Tycoon
Who knows, maybe you’ll become the ultimate roller coaster tycoon.
®
within by using the Scenario Editor to challenge other players.
The Scenario Editor
From the Main Menu, click the Tools button and select Scenario Editor. The editor gives you access to
all the nuts and bolts of what goes into creating a scenario.
Scenario Creation Checklist
Keep your early creations small and simple. If you’re new to creating RollerCoaster Tycoon
start out with small scenarios that are simple to complete. (Don’t forget to save often.)
Start with an entrance path that runs through a park gate and then place a peep spawning point on
the path outside the park.
Designate what land is owned by the park, what area can be purchased, what area will offer
construction rights and what area is off limits.
Use the terrain shaping and coloring tools as well as selecting the background to create the stage for
your scenario.
Populate the land with foliage, scenery, paths and a few rides.
Edit the peep options; such as average cash, ride preference and other settings.
Next, select what items can be researched, the amount of player starting cash, what awards may be
won, restrictions and financial options.
Finally, define the objectives for each of the difficulty settings. If you are including a VIPeep in the
scenario, select the VIPeep and the parameters affecting that VIPeep by clicking on the VIPeep icon
found at the bottom of the Scenario Objectives dialog box that appears after you add “VIP” to the
list of objectives.
Save the scenario. Click the Normal Time Speed button in the dashboard to play your scenario.
®
scenarios,
98
99
Page 52

SANDBOX MODE
Want to play RollerCoaster Tycoon®3 without any restrictions. Click the Sandbox button and load a
pre-existing game or start a new one. All the controls are the same, but money is no object and
you have no objectives to reach. Enjoy!
Cami O – Star of Stage and Screen
Beautiful young movie star secretly yearns for life to be the way it was before she
was famous; she shuns bodyguards and being told what to do.
ABOUT THE VIPEEPS
New to RollerCoaster Tycoon®3 are a collection of very important peeps who may visit your parks
from time to time.These VIPeeps have their own requirements, demands and needs.And if they
enjoy themselves during their visit to your park, you’ll be rewarded with a special bonus.
Here are the bios of each VIPeep.
Joe Sluggerball – Sports Celebrity
Joe is a famous baseball player and is a big hit with the peeps — only problem is,
he’s a bit skittish with crowds and shies away from autograph hunters!
Clint Bushton – Politician
As presidential candidate, Mr. Bushton expects to be given the red carpet treatment, and has a roving eye for the ladies.
Kara Oki – Teen Idol
Earnest and pretty Kara Oki is a favorite teen pop-star, and the more intense the
ride the better she likes it.
100
Mr. Jobsworth – Park Inspector
Mr. Jobsworth is picky and intolerant of any flaws in your park. But underneath it all,
he has a heart of gold and acts as the
areas that need improving, and when he finds exceptional accomplishments he’ll
reward you with a trophy and a bonus.
RCT3 hint agent. He informs you about park
Hosting A VIP eep
When a scenario objective requires you to host a VIPeep, you must carefully follow specific steps to
accomplish the objective.
At the beginning of a scenario, pause the game and read the scenario objectives regarding the VIP.
Beneath the VIPeep’s name you will see that celebrity’s arrival date and preferences.
Immediately add the elements the VIPeep wants to see, then click on the Setup Route button (the
icon shaped like little footprints found in the Scenario Objectives dialog box to the right of the VIP
objective) which causes the VIP Options dialog box to appear.
Click on a path somewhere in the park and you’ll notice three things, a little trail of footsteps
appears, a stack of pulsating circles appears where you clicked, and a location appears in the VIP
Options dialog box. The stack of pulsating circles is a “waypoint.” The trail of footsteps is the path
the VIP will follow.
Repeat this process until you get to an attraction that the VIPeep wanted to see, and then click a
“waypoint” on that attraction’s ticket booth. Continue until you’ve created a trail to all objectives,
and then all the way back out of the park. You may remove or reorder the waypoints by using the
buttons in the VIP Options dialog box.
Un-pause and wait for the celebrity to show. If all goes according to plan, you will have completed
the objective and successfully hosted the VIPeep!
101
Page 53

CREDITS
Atari
Ken Allen
Senior Producer
John Billington
Senior Brand Manager
Bob Welch
Executive Producer
Alex Ahlund
Associate Producer
Paul Hellier
Director of Technology
Tom Nichols
Director of Marketing
Stacey Clement
PR Manager
Steve Martin
Director of Creative Services
Liz Mackney
Director of Editorial & Documentation Ser vices
Charlie Rizzo
Art Director
Kurt Carlson
Documentation Specialist
Paul Collin
Copywriter
Michael Gilmartin
Director of Publishing Support
Chuck Nunez
Q.A. Manager
Ken Ford
I.T.Manager/Western Region
Michael Vetsch
Manager of Technical Support
Jason Cordero
Jason Kausch
Q.A.Testing Supervisors
Michael O’Shea
Lead T ester
Jeff Loney
Assistant Lead Tester
Randy Alfonso
Ed Baraf
Mike Greenler
Jason Holt
Sean Mclaren
Glad Papellero
Howell Selburn
Joe Taylor
Carl Vogel
Joseph Aragones
Joel Yabrudy
Dae Kim
Geoff Nappo
Testers
Dave Strang
Manager,Engineering Services and Compatibility Lab
Ken Edwards
Engineering Ser vices Specialist
Dan Burkhead
Eugene Lai
Engineering Ser vices Technicians
Chris McQuinn
Senior Compatibility Analyst
Cuong Vu
Compatibility T est Lead
Randy Buchholz
Patricia-Jean Cody
Mark Florentino
Scotte Kramer
Compatibility Analysts
Jon Nelson
Director,Global Web Services
Scott Lynch
Producer,Online
Gerald “Monkey” Burns
Senior Programmer,Online
Richard Leighton
Senior Web Designer, Online
Sarah Horton
Online Marketing Manager
Todd Curtis
Vice President, Operations
Eddie Pritchard
Director of Manufacturing
Lisa Leon
Lead Senior Buyer
Gardnor Wong
Senior Buyer
Ta r a Moretti
Buyer
Janet Sieler
Materials Planner
Nichole Mackey
Process Planner
Special Thanks
Chris Sawyer – The ORIGINAL RollerCoaster
Tycoon
Jacqui Lyons – Marjacq
Greg Lauzon – Writer
John Wardley – Real-world coaster designer
Producer: Andreas Graf Rittberg / Private BVT
Production GmbH & Co. KG – Munich Germany
Executive Producer: Siggi Koegl / ATTACTION –
Munich, Germany
Wise Monkey Ltd.
Jeff Royle and Ian McNaughton –
AT I Technologies Inc.
John Strout and Ken Schutt –
American Micro Devices Inc.
Isolina Pommier and Susan Kittleson –
Windows Gaming
Frontier Developments
Chris Sawyer, David Braben
Executive Producers
Jonny Watts
Producer
Jonathan Roach
Lead Programmer
Sam Denney
Lead Artist
John Bichard
Ian Collinson
Oscar Cooper
Andrew Fray
Andrew Gillett
Rick Griffiths
Matthew Halpin
Andrew Scott
Programming T eam
103102
Page 54

Gary Bickmore
Simon Brewer
Marc Cox
Dariusz Drobnica
Jeremy Kay
Tjaart Kruger
Stefan Scheffers
Dean Searle
Hayden Scott-Baron
Martin Squires
Dean Stolpmann
Art Team
Gavin Gibbons
Gerard Huke
Milan Medvec
Richard Parke
Animation T eam
David Scantlebury
Robin Bryce
Patrick Byrne
Tim Hughes
Jon Lewis
Peter Halpin
Game Engine Team
Jonathan Pace
Andrew Thomas
Alex Smyth
Track Designers
Stuart Fraser
Jonathan Pace
James Taylor
Level Designers
Michael Brookes
QA Supervisor
Alistair Lindsay
Music
Steve Cowell
Sound Effects
David Walsh
Managing Director
Marjacq Micro Ltd.
Representation
ATARI WEB SITES
To get the most out of your new game, visit us at:
atari.com/rollercoastertycoon
If you would like to chat with other gamers, as well as developers, visit our Community Forum
area at:
ataricommunity.com
Kids, check with your parent or guardian before visiting any web site.
Chat Messages:Atari does not monitor,control, endorse, or accept responsibility for the con-
tent of chat messages.You are strongly encouraged not to give out identity or other personal
information through chat message transmissions.Kids, check with your parent or guardian if
you are concerned about any chat you receive.
Use of Atari web sites is subject to terms and conditions, which you can access at:
atari.com/us/tos
105104
Page 55

TECHNICAL SUPPORT (U.S.& Canada)
Help Via the Internet
Up-to-the-minute technical information about Atari products is generally available 24 hours a day,
7 days a week via the Internet at:
atarisupport.com
Through this site you’ll have access to our FAQ (Frequently Asked Questions) documents, our
FTP (File Transfer Protocol) area where you can download patches if needed, our Hints/Cheat
Codes if they’re available, and an E-Mail area where you can get help and ask questions if you do
not find your answers within the
Note: In the event we must send you a Hint Sheet, FAQ document, patch or update disc via E-mail,
we may require verifiable consent from a parent or guardian in order to protect children’s privacy
and safety online. Consent Forms are available at the web site listed above.
Help Via Telephone in the United States & Canada
For phone assistance, call Atari Technical Support at (425) 951-7108. Our Interactive V oice
Response system is generally available 24/7, providing automated support solutions immediately.
Great News! We’ve improved our Automated Systems so that you can get product-specific
Troubleshooting help more quickly. All you need to do is enter the product’s
prompted to do so.This will take you directly to all of our known issues and solutions for this title.
The product’s
and is usually identified by a number such as 04-12345.When prompted by the Automated System,
enter the last five digits of your product’s Part #. (For example, Par t # 04-12345 would require
that you enter the “12345” portion of the number for that product.)
feature a five-digit Part # without an “04-” prefix.
Live support is generally available Monday through Friday, 8:00 AM until 6:00 PM (Pacific Time).
Note: We may be closed on major holidays.
Part # is located in several places (on the CD label, package and/or plastic disc case)
FAQ.
Part # when
Note: Some products simply
Before making your call, we ask that you be at your computer, have the following information available, and be ready to take notes:
System Make and Model
•
Processor Type
•
Operating System, including version number if possible (such as Windows®98;
•
Windows®Me)
RAM (Memory)
•
Video and sound card data and drivers
•
Any screen or error messages you’ve encountered (and where)
•
Product Return Procedures in the United States & Canada
In the event our technicians at (425) 951-7108 determine that you need to forward materials
directly to us, please include a brief letter explaining what is enclosed and why. Make sure you include
the Return Merchandise Authorization Number (RMA#) supplied to you by the technician, and your
telephone number in case we need to call you.You will receive the mailing address when the
technician gives you the RMA#. Any materials not containing this RMA# will be returned to
you unprocessed.
Warranty Policy in the United States & Canada
If our technicians determine that the product storage medium is found to be defective within ninety
(90) days of original purchase, (unless otherwise provided by applicable law), Atari will replace the
item free of charge, to the original purchaser, if the item is accompanied b
and packaging.
y the original dated receipt
106
107
Page 56

END-USER LICENSE AGREEMENT
IMPORTANT — READ CAREFULLY: Please be sure to carefully read and understand all of the rights and restrictions described
in this End-User License Agreement (“EULA”).
AGREEMENT
This document is an agreement between you and Atari, Inc. and its affiliated companies (“Company”). The enclosed software
game disc(s), cartridge or Game Pak (“Software”) and any accompanying printed materials are licensed to you only on the condition that you accept all of the terms contained in this EULA.
By opening this package and installing or otherwise using the Software you agree to be bound by the terms of this EULA. If you
do not agree to the terms of this EULA you may not install or use the Software and within 15 days of purchase you must call
the T ech Support telephone number listed in the manual accompanying the Software (the “Manual”).Select the Automated Phone
System’s Main Menu option for Consumer Services and follow the prompts.
You will be given a Return Merchandise Authorization number (RMA #) by the technician. You then have 15 days from the date
of this contact to return the Software in its protective covering,the Manual and the original sales invoice to the address supplied
to you.
If this is a PC product, when you install the Software you will be asked to review and either accept or not accept the terms of
the EULA by clicking the “I Accept” button. By clicking the “I Accept” button you acknowledge that you have read the EULA,
understand it and agree to be bound by its terms and conditions.
COPYRIGHT
The Software is protected by copyright laws and international copyright treaties, as well as other intellectual property laws and
treaties.All title and copyrights in and to the Software (including but not limited to any images, photographs, animations, video,
music, text and “applets” incorporated into the Software) and any printed materials accompanying the Software are owned by
the Company or its Licensors.
GRANT OF LICENSE
The Software is licensed and not sold to you and its use is subject to this EULA.The Company grants you a limited, personal,
non-exclusive license to use the Software in the manner described in the user documentation.The Company reserves all rights
not expressly granted to you in this EULA.
PERMITTED USES
1. If the Software is configured for loading on a hard drive, you may install and use the Software on a single computer.
2. You may make and maintain one copy of the Software for backup and archival purposes,provided that the original and
copy of the Software are kept in your possession.
3. You may permanently transfer all your rights under this EULA,provided you retain no copies,you transfer all of the Software
(including all component parts, the media and printed materials and any upgrades) and the recipient reads and accepts
this EULA.
RESTRICTIONS
1. You may not delete or obscure any copyright, trademark or other proprietary notice on the Software or accompanying
printed materials.
2. You may not decompile,modify, reverse engineer,disassemble or otherwise reproduce the Software.
3. You may not copy, rent, lease, sublicense, distribute, publicly display the Software,create derivative works based on the
Software (except to the extent expressly permitted in the Editor and End-User Variation section of this Agreement or other
documentation accompanying the Software) or otherwise commercially exploit the Software.
4. You may not electronically transmit the Software from one computer, console or other platform to another or over a network.
5. You may not use any backup or archival copy of the Software for any purpose other than to replace the original copy in
the event it’s destroyed or becomes defective.
EDITOR AND END-USER V ARIATIONS
If the Software includes a feature that allows you to modify the Software or to construct new variations (an “Editor”), you may
use such Editor to create modifications or enhancements to the Software, including the construction of new levels (collectively
the “Variations”), subject to the following restrictions. Your Variations: (i) must only work with the full, registered copy of the
Software; (ii) must not contain modifications to any executable file; (iii) must not contain any libelous, defamatory or other illegal material, material that is scandalous or invades the rights of privacy or publicity of any third party; (iv) must not contain any
trademarks,copyright-protected work or other property of third parties; and (v) may not be commercially exploited by you, including but not limited to making such Variations available for sale or as part of a pay-per-play or timesharing service.
TERMINATION
This EULA is effective until terminated. You may terminate this EULA at any time by destroying the Software. This EULA will
terminate automatically without notice from the Company if you fail to comply with any provisions of this EULA.All provisions of
this EULA as to warranties, limitation of liability,remedies and damages will survive termination.
109108
Page 57

LIMITED WARRANTY AND DISCLAIMER OF WARRANTIES
You are aware and agree that use of the Software and the media on which is recorded is at your sole risk.The Software and
media are supplied “AS IS.”Unless otherwise provided by applicable law,the Company warrants to the original purchaser of this
product that the Software storage medium will be free from defects in materials and workmanship under normal use for ninety
(90) days from the date of purchase.The warranty is void if the defect has arisen through accident, abuse, neglect or misapplication. If the Software fails to conform to this warranty,you may at your sole and exclusive remedy, obtain a replacement free
of charge if you return the defective Software. Follow the Product Return Procedures described in the Manual. The Company
does not warrant that the Software or its operations or functions will meet your requirements, or that the use of the Software
will be without interruption or error.
TO THE FULLEST EXTENT PERMISSIBLE UNDER APPLICABLE LAW, EXCEPT FOR THE EXPRESS WARRANTY SET
FORTH ABOVE,THE COMPANY DISCLAIMS ALL WARRANTIES,EXPRESS OR IMPLIED, INCLUDING AND WITHOUT LIMITATION, THE IMPLIED WARRANTIES OF MERCHANTABILITY AND FITNESS FOR A PARTICULAR PURPOSE AND NONINFRINGEMENT. EXCEPT FOR THE EXPRESS WARRANTY SET FORTH ABOVE, THE
COMPANY DOES NOT WARRANT, GUARANTEE OR MAKE ANY REPRESENTATION REGARDING THE USE OR THE
RESULTS OF THE USE OF THE SOFTWARE IN TERMS OF ITS CORRECTNESS, ACCURACY, RELIABILITY,
CURRENTNESS OR OTHERWISE. SOME JURISDICTIONS DO NOT ALLOW THE EXCLUSION OF OR LIMITATIONS ON
IMPLIED WARRANTIES, SO THE ABOVE EXCLUSIONS AND LIMITATIONS MAY NOT APPLY TO YOU.
LIMITATION OF LIABILITY
IN NO EVENT WILL THE COMPANY OR ITS EMPLOYEES OR LICENSORS BE LIABLE FOR ANY INCIDENTAL,
INDIRECT,SPECIAL, CONSEQUENTIAL OR PUNITIVE DAMAGES,OR ANY DAMAGES WHATSOEVER (INCLUDING,WITHOUT LIMITATION, DAMAGES FOR INJURY TO PERSON OR PROPERTY, FOR LOSS OF PROFITS, BUSINESS INTERRUPTION, LOSS OF BUSINESS INFORMATION,LOSS OF PRIVACY,FAILURE TO MEET ANY DUTY AND NEGLIGENCE) ARISING OUT OF OR IN ANY WAY RELATED TO THE USE OR INABILITY TO USE THE SOFTWARE,EVEN IF THE COMPANY OR
AN AUTHORIZED REPRESENTATIVE OF THE COMPANY HAS BEEN ADVISED OF THE POSSIBILITY OF SUCH DAMAGES.
SOME JURISDICTIONS DO NOT ALLOW THE EXCLUSION OF LIABILITY FOR INCIDENTAL OR CONSEQUENTIAL DAMAGES, SO THE ABOVE EXCLUSION MAY NOT APPLY TO YOU.
IN NO EVENT WILL THE LIABILITY OF THE COMPANY FOR DAMAGES WITH RESPECT TO THE SOFTWARE EXCEED THE
AMOUNTS ACTUALLY PAID BY YOU FOR THE SOFTWARE.
CHOICE OF LAW AND VENUE
This EULA is governed by the laws of the United States of America and the State of New York, exclusive of its conflicts of law
provisions.The exclusive venue for litigation regarding or arising from this EULA is New York County,New York and you agree to
submit to the Jurisdiction of the courts of New York County, New York for any such litigation.
MISCELLANEOUS
If any provision or portion of this EULA is found to be unlawful,void, or for any reason unenforceable, it will be severed from and
in no way affect the validity or enforceability of the remaining provisions of the EULA.
This EULA constitutes the entire agreement between you and the Company regarding the Software and its use.
© 2004 Atari Interactive, Inc.All Rights Reserved. RollerCoaster Tycoon®3 game © 2004 Chris
Sawyer. Programming © 2004 Frontier Developments Ltd. All Rights Reserved. All trademarks are
the property of their respective owners. Developed by Frontier Developments Ltd.
Pentium is a trademark or registered trademark of Intel Corporation or its subsidiaries in
the United States and other countries.
Manufactured under license from Dolby Laboratories.
Por tions utilize Microsoft Windows Media Technologies. Copyright ©1999-2002 Microsoft
Corporation. All Rights Reserved.
AT I and RADEON are trademarks and/or registered trademarks of ATI Technologies Inc.
12034
110
111
Page 58

CONTROLS
MOUSE
Camera Movement – Normal
Right mouse button (hold) and move mouse Strafe camera
Mouse wheel Zoom in and out
Mouse wheel (hold) + move mouse side-to-side Rotate camera
Right mouse button + left mouse button (hold)
+ move mouse side-to-side Rotate camera
Mouse wheel (hold) + move mouse
forward / backward Tilt camera
Right mouse button + left mouse button (hold)
+ move mouse forward / backward Tilt camera
Right mouse button (hold) + move mouse
side to side Rotate camera around camera position
Right mouse button (hold) + move
mouse forward/backward) Tilt camera up and down over camera
Mouse wheel (hold) + move mouse side-to-side Strafe camera
Right mouse button + left mouse button (hold)
+ move mouse side-to-side Strafe camera
Mouse wheel (hold) + move mouse
forward / backward Zoom in and out
Right mouse button + left mouse button (hold)
+ move mouse forward / backward Zoom in and out
Right mouse button (hold) + move mouse Strafe camera
Mouse wheel Zoom in and out
Mouse wheel (hold) + move mouse Rotate camera 90 degrees right and left
Right mouse button + left mouse button (hold)
+ move mouse Rotate camera 90 degrees right and left
CONTROLS ACTION
Camera Movement – Freelook View
position
Camera Movement – Isometric View
112
Page 59

KEYBOARD
Camera Movement
Ctrl–C Toggle CoasterCam™ON / OFF
A Pan left
D Pan right
W Pan forward
S Pan backward
Q Rotate left
E Rotate right
R Reset Camera
Home Tilt up
End Tilt down
Page Up Zoom in
Page Dow n Zoom out
Shift (while placing an object) + move mouse Raises and lowers the elevation of the object
Ctrl (while placing an object) Modifies the land around an object by
Alt (while placing an object) Cuts the land around an object by moving
Enter Rotate isometric view 90° counter-clockwise
Shift–Enter Rotate isometric view 90° clockwise
Esc Exit current game
F10 Capture a screen shot (file saved to My
T Toggles between displaying the game
Shift-L Toggles “pointer light” ON / OFF
Z (while placing an item) Rotate 90° counter-clockwise
CONTROL ACTION
moving the mouse
the mouse
Isometric View Controls
Miscellaneous
Pictures directory)
full-screen or in a window
 Loading...