

Page 1
INSTRUCTION BOOKLET
Page 2
CO
T
n
n
.
T
d s
c
X
s
.
Some people (about 1 in 4000) may have seizures or blackouts triggered by
light flashes or patterns, such as while watching TV or playing video games,
even if they have never had a seizure before.
Anyone who has had a seizure, loss of awareness, or other symptom linked
to an epileptic condition should consult a doctor before playing a video game.
Parents should watch when their children play video games. Stop playing
and consult a doctor if you or your child have any of the following symptoms:
Loss of awareness
To reduce the likelihood of a seizure when playing video games:
Sit or stand as far from the screen as possible.
Play video games on the smallest available television screen.
Play in a well-lit room.
Take a 10 to 15 minute break every hour.
Some people (about 1 in 4000) may have seizures or blackouts triggered by
S
4000)
igg
by
Some people (about 1 in 4000) may have seizures or blackouts triggered by
g p g pyg g
light flash
hil
,
light flashes or patterns, such as while watching TV or playing video games,
even if they have never had a seizure before.
e
even if they have never had a seizure before.
Anyone who has had a seizure, loss of awareness, or other symptom linked
Any
dAnyone who has had a seizure, loss of awareness, or other symptom linked
to an epileptic condition should consult a doctor before playing a video game.
t
diti
to an epileptic condition should consult a doctor before playing a video game.
Parents should watch when their children play video games. Stop playing
P
hild
gParents should watch when their children play video games. Stop playing
and consult a doctor if you or your child have any of the following symptoms:
hild h
:and consult a doctor if you or your child have any of the following symptoms:
Convulsions Eye or muscle twitching Loss of awareness
C
Convulsions
Ey
gEye or muscle twitching
Loss of awareness
Loss of awareness
Altered vision Involuntary movements Disorientation
Alt
n
Altered vision
I
tsInvoluntary movements
Di
nDisorientation
pyg g
T
likelihood of
To reduce the likelihood of a seizure when playing video games
Sit or stand as far from the screen as possible.
Si
ible.Sit or stand as far from the screen as possible.
Play video games on the smallest available television screen.
Pl
Play video games on the smallest available television screen.
Do not play if you are tired or need sleep.
D
Do not play if you are tired or need sleep.
Play in a well-lit room.
Pl
lit
Play in a well-lit room.
y
Tak
Take a 10 to 15 minute break every hour
PLEASE CAREFULLY READ THE SEPARATE HEALTH AND
SAFETY PRECAUTIONS BOOKLET INCLUDED WITH THIS
PRODUCT BEFORE USING YOUR NINTENDO ® HARDWARE
SYSTEM, GAME DISC OR ACCESSORY. THIS BOOKLET
CONTAINS IMPORTANT HEALTH AND SAFETY INFORMATION.
IMPORTANT SAFETY INFORMATION: READ THE FOLLOWING
WARNINGS BEFORE YOU OR YOUR CHILD PLAY VIDEO GAMES
WARNING - Seizures
ome people (about 1 in
Some people (about 1 in 4000) may have seizures or blackouts triggered by
es or patterns, such as w
light flashes or patterns, such as while watching TV or playing video games,
ven if they have never had a seizure before.
even if they have never had a seizure before.
one who has had a seizure, loss of awareness, or other symptom linke
Anyone who has had a seizure, loss of awareness, or other symptom linked
o an epileptic con
to an epileptic condition should consult a doctor before playing a video game.
arents should watch when their c
Parents should watch when their children play video games. Stop playing
and consult a doctor if you or your c
and consult a doctor if you or your child have any of the following symptoms:
onvulsions
Convulsions Eye or muscle twitching Loss of awareness
ered visio
Altered vision Involuntary movements Disorientation
o reduce the
To reduce the likelihood of a seizure when playing video games:
1.
t or stand as far from the screen as poss
Sit or stand as far from the screen as possible.
2.
ay video games on the smallest available television screen.
Play video games on the smallest available television screen.
3.
o not play if you are tired or need sleep.
Do not play if you are tired or need sleep.
4.
ay in a well-
Play in a well-lit room.
5.
e a 10 to 15 minute break every hour
Take a 10 to 15 minute break every hour.
WARNING -
Playing video games can make your muscles, joints, skin or eyes hurt after a
few hours. Follow these instructions to avoid problems such as tendinitis, carpal
tunnel syndrome, skin irritation or eyestrain:
Avoid excessive play. It is recommended that parents monitor their children for
appropriate play.
Take a 10 to 15 minute break every hour, even if you don't think you need it.
If your hands, wrists, arms or eyes become tired or sore while playing, stop and
rest them for several hours before playing again.
If you continue to have sore hands, wrists, arms or eyes during or after play, stop
playing and see a doctor.
on should consult a doctor before playing a video game.
room.
Repetitive Motion Injuries and Eyestrain
may have seizures or blackouts tr
e watching TV or playing video games
ren play video games. Stop playin
ave any of the following symptoms
e or muscle twitchin
nvoluntary movemen
a seizure when playing video games
sorientatio
ered
WARNING - Electric Shock
To avoid electric shock when you use this system:
Do not use the Nintendo GameCube during a lightning storm. There may be a
risk of electric shock from lightning.
Use only the AC adapter that comes with your system.
Do not use the AC adapter if it has damaged, split or broken cords or wires.
Make sure that the AC adapter cord is fully inserted into the wall outlet or
extension cord.
Always carefully disconnect all plugs by pulling on the plug and not on the cord.
Make sure the Nintendo GameCube power switch is turned OFF before removing
the AC adapter cord from an outlet.
CAUTION - Motion Sickness
Playing video games can cause motion sickness. If you or your child feel dizzy or
nauseous when playing video games with this system, stop playing and rest. Do
not drive or engage in other demanding activity until you feel better.
CAUTION - Laser Device
The Nintendo GameCube is a Class I laser product. Do not attempt to
disassemble the Nintendo GameCube. Refer servicing to qualified personnel only.
Caution - Use of controls or adjustments or procedures other than those specified
herein may result in hazardous radiation exposure.
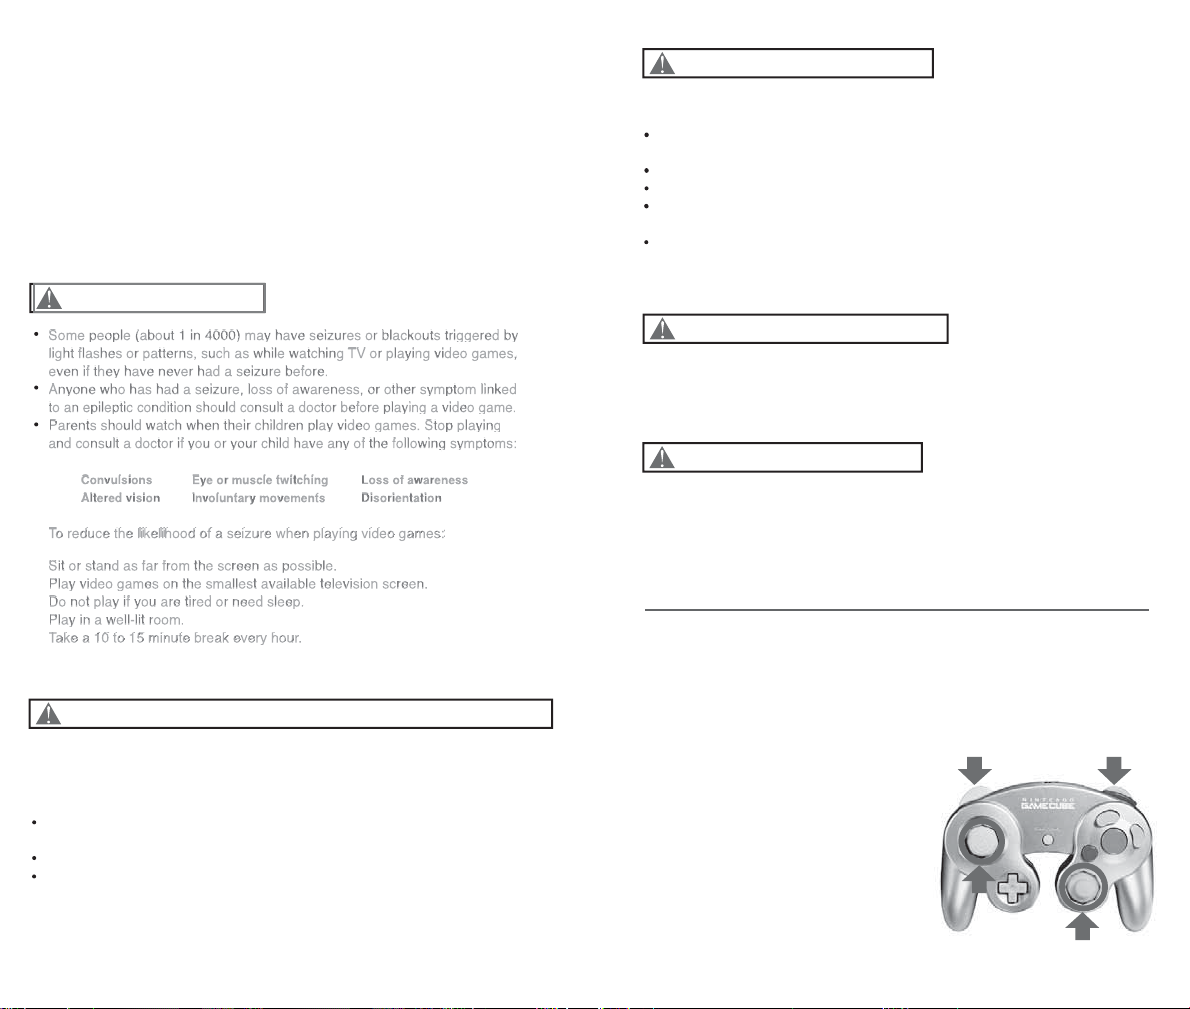
CONTROLLER NEUTRAL POSITION RESET
NTROLLER NEUTRAL POSITION RESE
If the L or R Buttons are pressed or the Control Stick or C Stick are moved out of
If the L or R Buttons are pressed or the Control Stick or C Stick are moved out of
neutral position when the power is turned ON, those positions will be set as the
eutral position when the power is turned ON, those positions will be set as the
neutral position, causing incorrect game control during game play.
eutral position, causing incorrect game control during game play
To reset the controller, release all buttons and
o reset the controller, release all buttons
sticks to allow them to return to the correct
an
ticks to allow them to return to the
neutral position, then hold down the X, Y and
orrect neutral position, then hold down the
START/PAUSE Buttons simultaneously for 3
, Y and START/PAUSE Buttons
seconds.
imultaneously for 3 seconds
L Button R Button
Control
Stick
C Stick
Page 3
NINTENDO, NINTENDO GAMECUBE AND THE OFFICIAL SEAL ARE TRADEMARKS OF NINTENDO.
© 2001 NINTENDO. ALL RIGHTS RESERVED.
LICENSED BY
THIS GAME REQUIRES A
MEMORY CARD FOR SAVING
GAME PROGRESS, SETTINGS
OR STATISTICS.
Memory
Card
T
he official seal is your assurance
that this product is licensed or
manufactured by Nintendo. Always
look for this seal when buying video
game systems, accessories, games
and related products.
Nintendo does not license the sale or use of products without the Official Nintendo Seal.
Violence
THIS GAME SUPPORTS
SIMULTANEOUS GAME PLAY
WITH TWO PLAYERS AND
CONTROLLERS.
2 Player
Simultaneous
CONTENTS
Controls . . . . . . . . . . . . 2
Help for Parents . . . . . . 3
Introduction . . . . . 5
IMPORTANT LEGAL INFORMATION
Copying of any video game for any Nintendo system is illegal and is strictly
prohibited by domestic and international intellectual property laws. “Back-up” or
“archival” copies are not authorized and are not necessary to protect your software.
Violators will be prosecuted.
This video game is not designed for use with any unauthorized copying device
or any unlicensed accessory. Use of any such device will invalidate your Nintendo
product warranty. Nintendo (and/or any Nintendo licensee or distributor) is not
responsible for any damage or loss caused by the use of any such device. If use
of such device causes your game to stop operating, disconnect the device carefully
to avoid damage and resume normal game play. If your game ceases to operate
and you have no device attached to it, please contact the game publisher’s
“Technical Support” or “Customer Service” department.
The contents of this notice do not interfere with your statutory rights.
This booklet and other printed materials accompanying this game are protected
by domestic and international intellectual property laws.
Dexter’s Diner . . 6
Playing the Game . . 8
Combat . . . . . . . . . . . 10
Special Abilities . . . . . 11
Controlling Vehicles . . 14
Collectibles . . . . . . . . 15
True Jedi Status . . . . . 16
Status Screen . . . . . . 17
Free Play . . . . . . . . . . 18
Saving & Loading . . . . 19
Pause Menu . . . . 20
Credits . . . . . . . . 21
www.LEGOSTAR WARSTHEVIDEOGAME.com
www.LEGO.com
Page 4

CONTROLS
MENU CONTROLS
Highlight menu option +Control Pad 1/
Select highlighted option A Button
Change setting +Control Pad 4/
Go back/Cancel Y Button
CHARACTER CONTROLS
Move character Control Stick
Jump/Hover (if available)* A Button
Attack/Defend B Button
Use the Force/Special Ability X Button (hold down)
Tag friendly character Face character and
press the Y Button
Pause game/In-game options START/PAUSE
* Not all characters can jump or double jump.
VEHICLE CONTROLS
Move vehicle Control Stick
Fire weapon B Button
Speed up (podracer only) A Button
Pause game/In-game options START/PAUSE
FREE PLAY CHARACTER CONTROLS
Cycle character left/right L Button/R Button
2
3
HELP FOR PARENTS
®
LEGO
Star Wars
tested to be suitable for players of all ages. But if you’re a
young player, you might find that your parents will want to
join in. And although we’ve tried to make the game as easy
as possible, even for older people — inevitably, they’re going
to need help.
We all know how impatient adults can be. So to save time
explaining things to them, we suggest that you draw their
attention to the following quickstart tips:
• Jedi characters can use the Force to move or transform
objects highlighted with a Force glow effect. Press
and hold the X Button to use this Special Ability.
• All LEGO objects can be played with. If you get stuck,
look for LEGO objects to help you out in some way.
• Press the A Button to jump. Press the A Button again
in the air to execute a double-jump that leaps you over
high obstacles or up to high ledges.
• Press the B Button to attack.
• You can “tag” certain characters to take control of them
and use their Special Abilities. To do that, walk up to
a friendly character and press the Y Button.
• Sometimes you’ll need the abilities of a specific character
to progress, so be ready to tag nearby characters if you
can’t find a way forward.
• When you first start the game in Dexter’s Diner, walk
through the door marked “I” then through the door
marked “1” to play the first scene from
Episode I
locked at first.
: The Video Game
The Phantom Menace.
has been designed and
Star Wars:
All other scenes are
2
3
Page 5

INTRODUCTION
• Once you complete this first scene, you’ll be able to play
in Episode II and Episode III as well — so even if you get
stuck on one path, you’ll still find a way to progress
further through a different Episode door.
• A second player can join in the game at any time.
Just insert a second Nintendo GameCube Controller
and press START/PAUSE. The new player will take control
of a nearby friendly character. (Kids: this is a good way
to help out your parents if they get into trouble.)
• When you unlock Free Play Mode, you can switch
between characters at will by using the L and R Buttons.
This is a unique feature of
Game that isn’t in other games, and it’s a lot of fun!
• All gamers can find more gameplay details and advanced
techniques in the rest of this manual.
If you can just get them to pay attention to these first simple
concepts, then even adults who’ve never played a game
before will be able share the LEGO
Game adventure!
LEGO
®
Star Wars
Star Wars
: The Video
: The Video
The ancient darkness of the Sith grows ever more powerful.
Even the noble Jedi Order, guardians of peace and justice
for so long, are threatened by this deepening evil.
®
LEGO
In
the whole epic story of
Menace,
and Episode III:
Scene by scene, the action sees you taking
control of a wide variety of characters
fighting against the Sith threat: powerful
Jedi like Obi-Wan Kenobi, Anakin Skywalker
and Jedi Master Yoda; courageous droids
like R2-D2; the hapless Gungan Jar Jar
Binks; Chewbacca the Wookiee,
and others . . . .
And the world of LEGO
Wars
of secrets!
As you build your collection
LEGO
of
Video Game characters,
you’ll use their special
powers to discover more
and more of the game.
And as you collect more
and more LEGO Studs,
you’ll be able to acquire
further playable
characters — even the
most fearsome of your
dark side adversaries!
The fate of the galaxy
is in your hands!
Star Wars
: The Video Game,you can experience
Star Wars:
Episode II:
Attack of the Clones
Revenge of the Sith.
Star
: The Video Game is full
Star Wars
: The
Episode I
The Phantom
4
5
Page 6

DEXTER’S DINER
Welcome to the world of LEGO
Your adventure begins in Dexter’s Diner on the planet
Coruscant. Here in the capital of the Republic, heroes
and villains mingle from all over the galaxy. And Dexter
knows them all . . . .
When you first start the game, you’ll be in control of Qui-Gon
Jinn, an experienced Jedi Master. Also in the Diner you’ll see
Dexter behind the counter and Obi-Wan Kenobi. As your loyal
Jedi Padawan, Obi-Wan will follow you wherever you go.
As you progress, new characters will join you here as they
are added to your collection, and you’ll be able to take them
into Free Play Mode
Directly in front of you are
three doors, numbered
“I,” “II” and “III.”
These “Episode Doors”
correspond to the three
Star Wars
I:
The Phantom Menace,
Episode II:
Clones
movies Episode
Attack of the
and Episode III:
(see page 18)
®
Star Wars
.
: The Video Game!
Revenge of the Sith.
To begin with, Episode
Doors II and III are locked. They will unlock and become
available for play once you have completed the first scene
in Episode I, “Negotiations.” You’ll then be able to play
the three Episodes in parallel: you can move from one
Episode to another through the Diner, without losing your
progress in each adventure.
To start your game, move Qui-Gon through the Episode I door.
In the next room, you’ll see six new doors and an exit back
to the main Diner area. Each door leads to a different scene
in Episode I. Walk through the door marked “1,” and you’ll
start playing the first scene of Episode I, “Negotiations.”
DEXTER JETTSTER
The proprietor of Dexter’s
Diner, Dexter Jettster,
stands behind the counter
in the main Diner area.
If you walk up to him you
can browse the items he
has for sale.
To begin with, you’ll be able to see some game hints.
Later, he’ll also give you the opportunity to purchase special
items, bonus characters and secret features in exchange
for LEGO
see
You can select an item from Dexter's shelves by using
the Control Stick and pressing the A Button to bring the item
down onto the counter. Then you can see how much it costs
and decide if you'd like to buy it (provided you have enough
LEGO Studs). To buy the item, press the A Button. To cancel
the purchase, press the Y Button.
When you finish talking with Dexter, press the Y Button
to return to the Diner.
®
Studs. (For more information about LEGO Studs,
page 15
.)
THE PARKING LOT
Besides the three Episode Doors, you’ll see another door
in the Diner, leading to the Parking Lot. In the Parking Lot,
watch your collection of LEGO Mini-kit Vehicles grow as you
explore further through the game.
Each scene contains the pieces for one LEGO Mini-kit Vehicle
hidden inside 10 LEGO Canisters. When you successfully
build a complete vehicle, you’ll get a big reward!
6
7
Page 7

PLAYING THE GAME
Player 1
LEGO Studs
Player 1
Character
Through your LEGO
you’ll take control of a wide variety of different characters,
all with their own individual moves and abilities. But your
basic controls are always the same.
Not all moves are available to all characters. And from time
to time, you’ll need to use a specific character’s ability
in order to progress. See
on how to change characters in a scene.
Player 1
Hearts
®
Star Wars
Player 2
Hearts
: The Video Game adventure,
Tagging
on
LEGO Studs
page 9
Player 2
Player 2
Character
for information
TWO PLAYER DROP-IN/DROP-OUT
At any point in the action a second player can join in and you
can play together. To do that, connect a second Controller
and press START/PAUSE. The new player will take control
of a nearby friendly character.
Either player can drop out at any time and leave his or her
character to continue under computer control. Just press
START/PAUSE and select
DROP OUT
from the Pause Menu.
HEARTS
Every time your character is injured, he, she or it loses
a heart. When the last heart is lost, your character will
fall apart, and you’ll lose some of the LEGO
collected up to that point.
®
Studs you’ve
MOVING AROUND
Move your character using the Control Stick. The farther you
push the stick in the direction you want you go, the faster
your character will move.
TAGGING
Different characters have different abilities. To take control
of a friendly character, move up to that character and press
the Y Button.
Two players can swap control by moving close to each other
and holding the Y Button at the same time.
8
9
Page 8

COMBAT
SPECIAL ABILITIES
LIGHTSABER
• Press the B Button to attack with your lightsaber.
• Press the A Button to jump, then press the B Button
in mid-air for an attacking forward leap.
• Press the A Button twice to double-jump, then press
the B Button in mid-air to launch a special slam attack.
• Time your attacks carefully in sequence to execute
powerful combo moves.
• Press the B Button when under attack to defend
with your lightsaber.
• Hold down the B Button to maintain a defensive stance.
• If you time your defensive move correctly, you can deflect
blaster bolts back to your attackers.
BLASTER/BOWCASTER
• Press the B Button to fire a blaster or bowcaster.
DEACTIVATE DROIDS
Astromech droids can use their probes to deactivate other
droids for a short time.
• When standing next to another droid, press and hold
the B Button to use this ability.
Jedi and Sith characters
can use the Force to
control the very building
blocks of matter.
When you control a Forceenabled character, look
for Force-highlighted LEGO
objects. Then press
and hold the X Button
to use the Force
to move or transform
the highlighted object.
Some dark-colored objects will
only respond to the dark side powers of a Sith Lord.
®
FORCE PUSH
Jedi can harness the power of the Force against characters
such as battle droids. When in range, press and hold
the X Button to send a Force-highlighted enemy flying.
DARK SIDE FORCE POWERS
It is said that the Sith have special Force powers of their
own. But details are kept secret, hidden deep within
the Jedi Archives. Interest in these abilities can lure
even the strongest character to the dark side.
10
11
Page 9

DOUBLE-JUMP
A number of characters can jump unusually high. To make
use of this Special Ability, press and hold the A Button
to jump and then, while in the air, press and hold
the A Button once more.
ACTIVATING PANELS
Certain types of droids can interface with computer access
panels. Move the droid so it faces the panel, then press and
hold the X Button.
HYPER JUMP
Certain characters, including the gangly Gungan Jar Jar
Binks, have a double-jump move that launches them even
higher into the air — where they can reach platforms that
might elude even Jedi.
HOVER
A variety of characters have the ability to hover above the
ground. Some can even fly short distances, able to reach
places inaccessible to other characters. Certain astromech
droids, for example, are fitted with anti-grav boosters. Press
and hold the A Button, then move around as normal to hover.
ASCENSION GUN
Characters equipped with
blasters or bowcasters can
use the Ascension Gun
ability. Stand beneath
a grapple hook point,
then press and hold
the X Button to ascend.
Protocol droids such as
C-3PO or TC-14 can
activate Protocol Panels
marked like this.
Astromech droids such
as R2-D2 or R4-P17 can
activate Astromech
Panels marked like this.
BLEND IN
Battle droids have limited threat awareness, and will
certainly never fire upon a fellow battle droid. In Free Play
Mode, this can be the perfect way to catch them unaware.
12
13
Page 10

CONTROLLING
VEHICLES
COLLECTIBLES
In some scenes you take control of a starship
or other vehicle.
• Move the Control Stick to move your craft left, right,
up or down.
• In a starship, fire your forward blasters by pressing
the B Button.
• In a podracer, speed up by pressing the A Button.
• A second player can play in a vehicle scene just like
in the rest of the game.
The LEGO
objects to pick up and collect. Explore and experiment!
Some objects will be out of reach when you first encounter
them — but remember that different characters have
different Special Abilities. In Free Play Mode, you can bring
new characters into a scene and use their abilities to reach
new places.
®
Star Wars
: The Video Game world is full of
LEGO STUDS
Pick up LEGO Studs wherever you can. If you successfully
complete a scene, the Studs you collected will be added to
your banked total. You can then exchange them to unlock
extra characters, bonuses and cheats in Dexter’s Diner.
When two players are active, their LEGO Stud totals are
added together in a shared bank account.
Using the transforming power of the Force, destroying
objects and defeating enemies will all yield LEGO Studs.
Differently-colored studs have different values:
SILVER
GOLD
BLUE
If your character falls apart, you lose some of the LEGO
Studs you collected up to that point in the scene.
=10
= 100
= 1000
14
HEARTS
If you’ve lost any hearts, try to pick up replacements.
15
Page 11

STATUS SCREEN
LEGO®CANISTERS
Hidden in each scene are the
parts to build one special
Mini-kit Vehicle — distributed
in 10 special LEGO Canisters.
If you can collect all 10 LEGO
Canisters and complete the craft,
you’ll be rewarded with a
substantial LEGO Stud bonus.
When you visit the Parking Lot outside
Dexter’s Diner, you’ll see your collection
of vehicles growing as you explore
through the game.
LEGO
TRUE JEDI STATUS
Those who play with the
expertise and finesse of a true
Jedi will be rewarded. As you
progress through a scene, the
LEGO Studs you collect will
contribute to your True Jedi
Status meter. If you can reach
the True Jedi target for that scene,
you’ll be rewarded with a secret collectible.
• Attain True Jedi Status on every scene
to reveal the game’s ultimate secret.
When you successfully complete a scene, you’ll be
presented with a Status Screen showing all the rewards
you’ve collected.
®
• LEGO
• New characters are added to your collection as you
• Each scene has 10 LEGO Canisters to collect,
Studs can be traded with Dexter in the Diner.
progress through the game. They are then available
for selection in Free Play Mode.
each containing one of the parts for a special
LEGO Mini-kit Vehicle. Find all the LEGO
Canisters and complete the vehicle
for a LEGO Stud bonus. Be warned,
some LEGO Canisters are hard to find.
And some can only be reached
with the special abilities
of Free Play characters.
16
17
Page 12

FREE PLAY
SAVING & LOADING
In Free Play, you can explore any unlocked scene with your
choice of characters — and switch between them at will.
By using the Special Abilities of new characters you’ll be
able to reach new areas, discover secrets and increase
your collection of LEGO
As you progress through the game, your collection of
available Free Play characters will grow. Some you’ll meet
in the normal course of play, and some you’ll need to
purchase from Dexter. Characters from your collection will
join you from time to time in Dexter’s Diner. You can walk up
to them and tag them if you like.
To play a scene in Free Play, walk through the level-select
door as normal from the Diner and select
from the menu that appears.
The character or characters under your control at that time
will be selected for Free Play. Press the A Button to enter
the scene with those characters. If you’re in two-player
mode, both players must press the A Button to continue.
To change your primary characters from the ones currently
under control, select an available character from the
character display by moving the blue highlight over that
character and pressing the A Button. A second player
can do the same with the green highlight.
Once you confirm your primary character selections,
additional characters are automatically picked for you
to play with (ensuring that you have as broad a range
of abilities as possible at your command), and you enter
the scene in Free Play Mode.
Press the L or R Button to cycle through your group
of characters. This works in the same way
for a second player.
®
Studs and LEGO Canisters.
FREE PLAY
SAVING YOUR PROGRESS
When you first complete a level or purchase an item
from the shop in Dexter’s Diner, you will be asked to select
a save game slot. Choose a slot by pressing the Control
Stick
, and press the A Button to confirm.
4/3
LOADING SAVED GAME DATA
FROM THE TITLE SCREEN
To load a saved game from the Title screen, press the Control
Stick
1/2
Press
the A Button to load the selected game.
IN MID GAME
To see your saved games after startup, press START/PAUSE
to access the In-game Options Menu, then select
and choose
4/3
to select
to select a save game slot, and press
LOAD GAME
LOAD GAME
from the startup menu.
, and press the A Button.
QUIT
18
19
Page 13

PAUSE MENU
CREDITS
Either player can press START/PAUSE during the action
to pause the game and bring up the Pause Menu.
If two players are active, then the player who pressed
START/PAUSE is in control of the menu.
While the Pause Menu is displayed, you can see how many
®
LEGO
Canisters you’ve collected and how close you are
to attaining True Jedi Status for that scene.
From the Pause Menu, you can choose to:
• Resume the game from where you left off.
• Select
OPTIONS
to change in-game options such as
the volume level of sound and music.
EXIT
• Select
to return to Dexter’s Diner. The LEGO Studs
and LEGO Canisters you collected up to that point
in the scene will not be added to your collection.
TRAVELLER’S TALES
Managing Director
Jon Burton
Lead Programmer
John Hodskinson
Lead Artist
James Cunliffe
Lead Animator
Jeremy Pardon
Lead Engine Programmer
Alistair Crowe
Lead Tools Programmer
Roland Hougs
Design
Jon Burton
James Cunliffe
John Hodskinson
James Kay
Glyn Scragg
Game Programming
Ralph Ferneyhough
John Hodskinson
Michael Jackson
Glyn Scragg
Chris Stanforth
Level Setup & Artwork
Neil Allen
Dave Burton
Bev Bush
Deborah Crook
James Cunliffe
Nicola Daly
Rhoda Daly
Alan Dooley
Paul McCormack
Level Layout
Neil Allen
James Cunliffe
Character Modelling
James Cunliffe
Jeremy Pardon
William Thompson
Character Animation
Jeremy Pardon
Cutscene Animation
Annika Barkhouse
Chris Dicker
Ross Norcross
Jeremy Pardon
Additional Cutscene
Animation
Edward Cates
Richard Drumm
Bill Martin
Storyboard Art
William Thompson
Music & Sound Fx
David Whittaker
Conversions Team
Argiris Baltzis
Alistair Crowe
Kevin Edwards
Andy Holdroyd
Roland Hougs
Engine Programming
Alistair Crowe
Dave Dootson
Steve Monks
Glyn Scragg
Richard Taylor
Tools Programming
Alistair Crowe
Roland Hougs
Office Manager
Bev Deakin
Thanks
Fay Briscoe, Sam,
Ben & Helen Burton,
Dawn Burton,
Phil, Chris & Bexie Bush,
Francesca Charlesworth,
Samantha Crowe,
Jacob & Sarah Cunliffe,
Sarah Ellen Daly,
Leah Donohue, Amanda,
Charlotte & Heather Edwards,
Emma & George, Donna,
Molly-Rose & Grace,
Alison Scragg,
Jayne Stephen,
Rachel Thompson
TT GAMES
Managing Director
Tom Stone
Development Director
Jonathan Smith
Producer
Loz Doyle
Business Development
Director
Garry Edwards
Marketing Assistant
Richard Earl
Thanks
Jens Kronvold
Frederiksen,
Mikael Denhardt Nielsen,
Jay Bruns,
Jenny Robertson,
Jill Wilfert,
Henrik Poulsen,
Mads Ryder & everyone
®
Company
at LEGO
Alex Camilleri,
Geoff Smith, Tim Green,
Nic Doucet, Ian Johnson,
David Ratcliffe,
Carol Paul & the former
LEGO Interactive
Everyone at Eidos
Everyone at LucasArts
& LFL
Special Thanks
Toby, Sam, George, Harry,
William, Rose, Ella,
Grahame Chilton,
Charlie & Andy Killebrew,
& all our testers
SKYWALKER
SOUND
Lead Sound Designer
Nick Peck
Sound Designer
Aren Downie
Foley Artists
Marnie Moore
Ellen Hauer
Foley Engineer
Frank Rinella
Foley Recordist
George Peterson
Special Thanks
Josh Lowden, Glen Kiser,
Jim Diaz, Ben Burtt
20
21
Page 14

EIDOS UK
Producer
Luke Valentine
Assistant Brand Manager
Alex Price
Creative
Andy Cockell
Gus Aliyu
Jodie Brock
Philippa Pratley
Advertising Manager
James O’Reilly
Head of Communications
Chris Glover
European PR Manager
Emily Britt
UK PR Manager
Gareth Ramsay
Group Localisation Manager
Caroline Simon
Localisation Coordinator
Monica Dalla Valle
Head of Support Services
Flavia Timiani
QA Manager
Marc Titheridge
QA Supervisor
Dave Pettit
PTC
Allison Archer
Head of Mastering
& Compatibility
Jason Walker
Mastering Supervisor
Jason Walker
EIDOS INC.
CEO & President, Eidos
North America
Bill Gardner
Vice President of Product
Development
John Spinale
Global Brand Manager
Jefferson Dong
Associate Brand Manager
Maly Ly
22
Public Relations Director
Michelle Seebach Curran
Public Relations Manager
Kjell Vistad
Public Relations
Coordinator
Loretta Stevens
Channel Marketing
Specialists
Janty Sumimoto
Ilana Budanitsky
Marketing Communications
Director
Stephanie Lipetzky
Creative Services Project
Manager
Eileen Buenviaje
Media Specialist
Michael Tran
Graphic Designer
James Song
Production Manager
Gregory Wu
Product Operations
Clayton Palma
Colby McCracken
QA/CS Manager
Mark Cartwright
Product Test Coordinator
Mackenzie Hume
Quality Assurance
Kip Ernst
Ergin Dervisoglu
Richard Campbell
John Hayes
Clint Waasted
Dan Franklin
Jeff Lowe
Erik Kennedy
Nicholas Cooprider
Richard Hartzell
Elizabeth Rutlin
Stephen Cavoretto
Special Thanks
Hanshaw Ink & Image
VERY SPECIAL THANKS
George Lucas
LUCASARTS
Rachel Bryant
Chris Williams
Ryan Kaufman
Justin Lambros
Chuck McFadden
Toby Mast
John Geoghegan
Greg Rosenfeld
Anne Marie Hawkins
Terri Dome
Special Thanks
Seth Steinberg, Mary Bihr,
Peter Hirschmann,
Matt Shell, Sam Saliba,
Jim Ward
Star Wars
Original
composed by John
Williams. (P) & © Lucasfilm
Ltd. & TM. All rights
reserved. Published by
Bantha Music (BMI).
Administered by and/or
co-published with Warner-
Tamerlane Music
Publishing Corp.
music
LUCAS
LICENSING
Stacy Arnold-Strider
Stacy Cheregotis
Chris Gollaher
Darren Phillipson
Derek Stothard
Paula Reick
Kerry Phelan
Howard Roffman
THE LEGO
®
COMPANY
Director, Global Innovation
& Marketing
Jay Bruns
Senior Producer
Dan Llewellyn
Executive Producer
Gary Moore
VP, Global Partnerships
& Alliances
Jill Wilfert
www.LEGO.com
EIDOS, INC., LICENSE & LIMITED WARRANTY
Eidos, Inc., warrants to you, the original purchaser of this Game Disc, that
for a period of ninety (90) days from the date of your purchase, this Game
Disc shall be free from defects in materials and workmanship. If, at any time
during the applicable ninety (90) day warranty period you determine that
this limited warranty has been breached, Eidos, Inc., agrees, in its sole
option, to repair or replace, free of charge, any such Game Disc, provided the
disc is returned postage-paid to the Eidos, Inc., Factory Service Center and a
proof of date of purchase is included. This limited warranty is not applicable
to normal wear and tear and shall be void with respect to any defects that
arise from disc abuse, unreasonable use, mistreatment or neglect. This Game
Disc is sold “as is” without any warranties of any kind, express or implied,
including implied warranties of merchantability or fitness for a particular
purpose, other than the limited warranty expressly stated above.
No other claims arising out of your purchase and use of this disc shall be
binding on or obligate Eidos, Inc., or its licensors in any manner. Eidos, Inc.,
and/or its licensors will not be liable to you for any losses or damages
incurred for any reason as a result of your use of this Game Disc, including,
but not limited to, any special, incidental, or consequential damages
resulting from your possession, use or malfunction of this Game Disc.
This limited warranty states the entire obligation of Eidos, Inc., and/or its
licensors with respect to the purchase of your disc. If any part of this limited
warranty is determined to be void or illegal, the remainder shall remain
in full force and effect. For warranty support please contact our Customer
Support department at (415) 615-6220. Our staff is available Monday
through Friday, 9:00 a.m. to 12:00 p.m. and 1:00 p.m. to 5:00 p.m.
Pacific Time. You are responsible for all toll charges. Customer Support
Representatives will not provide game hints, strategies or codes.
PRODUCT RETURN PROCEDURE
In the event our support agents determine that your game disc is defective,
you will need to forward material directly to us. Please include a brief letter
explaining what is enclosed and why you are sending it to us. The agent you
speak with will give you an authorization number that must be included and
you will need to include a daytime phone number so that we can contact you
if necessary. Any materials not containing this authorization number will be
returned to you unprocessed and unopened.
Send your postage-paid package to the following address:
Eidos, Inc. Customer Services
RMA# (state your authorization number here)
651 Brannan Street, Suite 400
San Francisco, CA 94107
You are responsible for postage for your game to our service center.
LucasArts, the LucasArts logo, and Star Wars are registered trademarks of Lucasfilm Ltd.
© 2005 Lucasfilm Entertainment Company Ltd. or Lucasfilm Ltd. &
All rights reserved. LEGO, the LEGO logo and the Minifigure are trademarks of LEGO
Group. © 2005 The LEGO Group.
or ™as indicated.
®
 Loading...