

Page 1

Pub. 43004-024H
GAI-TRONICS® CORPORATION
A HUBBELL COMPANY
Model ICP9000
Navigator Series Console
Installation and Service Manual
GAI-Tronics Corporation 400 E. Wyomissing Ave. Mohnton, PA 19540 USA
610-777-1374 800-492-1212 Fax: 610-796-5954
V
ISIT WWW.GAI-TRONICS.COM FOR PRODUCT LITERATURE AND MANUALS
Page 2

CONFIDENTIALITY NOTICE
This manual is provided solely as an operational, installation, and maintenance guide and contains
sensitive business and technical information that is confidential and proprietary to GAI-Tronics.
GAI-Tronics retains all intellectual property and other rights in or to the information contained herein,
and such information may only be used in connection with the operation of your GAI-Tronics product or
system. This manual may not be disclosed in any form, in whole or in part, directly or indirectly, to any
third party.
COMPUTER SOFTWARE COPYRIGHTS
This product contains copyrighted computer programs stored in semiconductor memory. These programs
are copyrighted by GAI-Tronics Corporation and may not be reproduced in any form without express
written permission from GAI- Tronics.
WARRANTY
GAI-Tronics warrants for a period of one (1) year from the date of shipment, that any GAI-Tronics equipment supplied hereunder
shall be free of defects in material and workmanship, shall comply with the then-current product specifications and product
literature, and if applicable, shall be fit for the purpose specified in the agreed-upon quotation or proposal document. If (a)
Seller’s goods prove to be defective in workmanship and/or material under normal and proper usage, or unfit for the purpose
specified and agreed upon, and (b) Buyer’s claim is made within the warranty period set forth above, Buyer may return such
goods to GAI-Tronics’ nearest depot repair facility, freight prepaid, at which time they will be repaired or replaced, at Seller’s
option, without charge to Buyer. Repai r or replacement shall be Buyer’s sole and exclusive remedy, and the warranty period on
any repaired or replacement equipment shall be one (1) year from the date the original equipment was shipped. In no event shall
GAI-Tronics’ warranty obligations with respect to equipment exceed 100% of the total cost of the equipment supplied hereunder.
The applicability of any such third-party warranty will be determined solely by GAI-Tronics.
Services. Any services GAI-Tronics provides hereunder, whether directly or through subcontractors, shall be performed in
accordance with the standard of care with which such services are no r mally provided in the industry. If the services fail to meet
the applicable industry standard, GAI-Tronics will, for a period of one (1) year from the date of completion, re-perform such
services at no cost to the Buyer. Re-perfor mance o f s ervi ces shall be Buyer’s sole and exclu si ve remedy, and in no event sh al l
GAI-Tronics’ warranty obligatio ns with respect to services exceed 100% of the total cost of services provided hereunder.
Limitations/Exclusions. The warranty on any equipment supplied hereunder is subject to Customer’s use in compliance
with applicable FCC regulations and manufacturer specifications. The warranties herein shall not apply to, and GAI-Tronics
shall not be responsible for, any damage to the goods or failure of the services supplied hereunder, to the extent caused by
accident, misuse, abuse, neglect, system design, product modification, failure to follow instructions con tained in the product
manual, repair, or attempted repair by anyone not authorized by GAI-Tronics, improper installation, installation of parts that do
not conform to the quality or specifications of the original parts or accessories, damage or loss occurred during shipment, or any
unit which is not new when sold or upon which the serial number has been defaced, modified or removed. Th e warranty does not
extend to damage incurred by natural causes including Force Majeure. The warranty does not cover microprocessors if failure is
due to static damage or application of improper voltage.
THE WARRANTIES AND REMEDIES CONTAINED
HEREIN ARE IN LIEU OF AND EXCLUDE ALL OTHER WARRANTIES AND REMEDIES, WHETHER
EXPRESS OR IMPLIED BY OPERATION OF LAW OR OTHERWISE, INCLUDING ANY W ARRANTIES OF
MERCHANTABILITY OR FITNESS FOR A PARTICULAR PURPOSE.
Operational and Maintenance Procedures
modification of the equipment provided hereunder, or use of unqualified maintenance or service technicians will severely impair
the operational effectiveness of the entire communicatio n system. Buyer hereby agrees to indemnify, defend and hold GAITronics harmless from and against any and all third party claims arising, in any manner, out of: (a) Buyer’s neglect of the
equipment; (b) Buyer’s use of technicians not authorized by GAI-Tronics to service the equipment; or (c) Buyer’s improper use
or modification of the equipment or failure to follow the operational and maintenance procedures provided with the equipment.
. Buyer acknowledges that any improper use, maintenance, or
Limitation of Liability/Damages. In no event (even should circumstances cause the exclusive warranties and remedies
set forth in the Warranty section to fail of their essential purpose) shall either party be liable for any indirect, incidental, special or
consequential damages (including, but not limited to, loss of use, loss of anticipated profits, or damages arising from delay)
whether such claims are alleged to have arisen out of breach of warranty, breach of contract, strict or absolute liability in tort, or
other act, error or omission, or from any other cause whatsoever, or any combination of the foregoing.
Motorola, STAT-ALERT, and RapidCall are registered trademarks of Motorola, Incorporated .
12/10 Publication 43004-024H ii
Page 3

Table of Contents
FOREWORD...............................................................................................................................................................1
SCOPE OF MANUAL ....................................................................................................................................................2
ORDERING REPLACEMENT PARTS .............................................................................................................................. 2
SERVICE AND REPAIR.................................................................................................................................................2
SAFE HANDLING OF CMOS INTEGRATED CIRCUIT DEVICES......................................................................................3
FEATURES OF THE ICP9000 NAVIGATOR SERIES CONSOLE .......................................................................................4
SYSTEM REQUIREMENTS FOR CUSTOMER-SUPPLIED PC............................................................................................5
MODEL CHART........................................................................................................................................................... 6
SPECIFICATIONS.........................................................................................................................................................9
DESCRIPTION .................................................................................................................... .....................................11
TONE REMOTE CONTROL.........................................................................................................................................11
DC REMOTE CONTROL ............................................................................................................................................12
E&M REMOTE CONTROL.........................................................................................................................................12
INSTALLATION.......................................................................................................................................................13
FCC INTERFERENCE WARNINGS..............................................................................................................................13
EQUIPMENT REQUIRED ............................................................................................................................................13
MOUNTING CONSIDERATIONS..................................................................................................................................13
CABLE INSTALLATION SAFETY CONSIDERATIONS ...................................................................................................14
TELEPHONE LINE LIGHTNING AND OVER-VOLTAGE PROTECTION............................................................................14
LINE CONNECTIONS .................................................................................................................................................14
LINE LEVEL SETTINGS .............................................................................................................................................15
Line Input (Receive Audio) Level Adjustment.....................................................................................................15
Line Output (Transmit) Level Adjustment...........................................................................................................15
TYPES OF BASE STATION CONTROL.........................................................................................................................16
MCU CONNECTIONS................................................................................................................................................17
Electrical Interface.............................................................................................................................................17
Power Supply (3308-00124-00)..........................................................................................................................18
Battery Revert Power Supply (XCP0080A).........................................................................................................18
Ground Cable .....................................................................................................................................................18
External Accessories Connector.........................................................................................................................18
Model XAAB002A Audio Accessory Box Connections .......................................................................................19
Selected/Unselected Audio Connections.............................................................................................................20
MCU to PC Communications Connections.........................................................................................................21
RS-485 Cable for Navigator MCU to Edgeport USB Converter ........................................................................22
Channel Interface Cable.....................................................................................................................................22
ACCESSORIES...........................................................................................................................................................23
Microphones.......................................................................................................................................................23
XCP0140A Headset Interface Box......................................................................................................................24
Handset/Headset Connector...............................................................................................................................24
XDM003A Desk Mic/Gooseneck Mic..................................................................................................................24
XFS002A Footswitch ..........................................................................................................................................24
System Jumper Table..........................................................................................................................................25
CARD SUITE PROGRAMMING SOFTWARE....................................................................................................27
GENERAL DESCRIPTION...........................................................................................................................................27
Connections ........................................................................................................................................................27
Installation..........................................................................................................................................................27
NAVIGATOR CONFIGURATION.........................................................................................................................29
CUSTOMIZIN G THE NAVIGATOR DESKTOP ...............................................................................................................29
ADMINISTRATOR LOG ON ........................................................................................................................................29
MENU FUNCTIONS....................................................................................................................................................30
File Open ............................................................................................................................................................30
File Save .............................................................................................................................................................31
File Exit ..............................................................................................................................................................31
Setup - Select Com Port......................................................................................................................................31
Setup - Configure Database................................................................................................................................32
Setup - Audio Options.........................................................................................................................................32
12/10 Publication 43004-024H
iii
Page 4

Table of Contents ICP9000 Navigator Installation and Service Manual
Setup - Operator Setup........................................................................................................................................33
Setup - Control Setup..........................................................................................................................................36
Setup - Card Suite File........................................................................................................................................37
Tools – Error Log...............................................................................................................................................37
Tools - Options – Create Profile.........................................................................................................................38
Tools - Options - Save Profile.............................................................................................................................39
Tools - Reset Console..........................................................................................................................................39
Logon..................................................................................................................................................................39
Diagnostics.........................................................................................................................................................40
Window - Organize.............................................................................................................................................40
CONSOLE DIAGNOSTICS.....................................................................................................................................41
ENTERING THE DIAGNOSTIC MODE..........................................................................................................................41
USER PARAMETERS MENU.......................................................................................................................................42
Side Tone Volume Adjust....................................................................................................................................42
Microphone Selection and Sensitivity.................................................................................................................43
Printer Error Messages......................................................................................................................................44
SERVICE DIAGNOSTICS ............................................................................................................................................ 44
Audio Diagnostic ................................................................................................................................................44
Internal Diagnostics ...........................................................................................................................................46
Alert Level...........................................................................................................................................................47
Page Level .......................................................................................................................................................... 47
Security...............................................................................................................................................................47
START-UP DISPLAY .................................................................................................................................................48
Boot-Up Error Code Definitions.........................................................................................................................48
Options Code Definitions....................................................................................................................................48
CARD Suite Software Version.............................................................................................................................48
Firmware Version – Host – DSP – Display CPK...............................................................................................48
FEATURES AND OPTIONS ...................................................................................................................................49
DTMF DECODE .......................................................................................................................................................49
16-FREQUENCY CONTROL........................................................................................................................................49
PAGING ENCODE ......................................................................................................................................................49
POSITIVE MODE CONTROL/SECURE.........................................................................................................................50
PRINTER INTERFACE ................................................................................................................................................51
LOGGING RECORDER OUTPUT MODULE .................................................................................................................. 52
DC CONTROL CP0010/XCP0010A..........................................................................................................................52
Installation/Relocation........................................................................................................................................52
4-CHANNEL E&M CONTROL CP0040/XCP0040A..................................................................................................54
SUPERVISORY CONTROL CP0050/XCP0050A.........................................................................................................55
DIRECT ENHANCED FULL DUPLEX PHONE INTERFACE CP0070 (OPTION CODE CTI)..............................................55
Ring Detect Sensitivity........................................................................................................................................55
EXTERNAL ENHANCED FULL DUPLEX PHONE INTERFACE CP0060 (OPTION CODE CTH) .......................................56
25-PAIR TELCO INTERFACE XCP0030A..................................................................................................................57
BATTERY REVERT XCP0080A.................................................................................................................................59
AUDIO ACCESSORY BOX XAAB002A .....................................................................................................................59
MDC1200 STAT-ALERT SIGNALING CP0650/TDN9413A...................................................................................60
RapidCall Buttons...............................................................................................................................................61
Receiving RapidCall Transmissions...................................................................................................................65
PAGING.....................................................................................................................................................................67
TYPES OF PAGING ....................................................................................................................................................67
2-TONE PAGING .......................................................................................................................................................67
Group Call..........................................................................................................................................................68
PLECTRON PAGING...................................................................................................................................................71
5/6-TONE PAGING ....................................................................................................................................................73
TROUBLESHOOTING ............................................................................................................................................75
REPLACEMENT PARTS LIST ......................................................................................................................................78
MAIN CIRCUIT BOARD ........................................................................................................................................79
DEFINITIONS AND ACRONYMS.........................................................................................................................83
12/10 Publication 43004-024H iv
Page 5

F orew ord
User Instructions (USA)
This equipment complies with Part 68 of the FCC rules and the requirements adopted by the ACTA. On this
equipment is a label that contains, among other information, a product identifier in the format
US:AAAEQ##TXXXX. If requested, this number must be provided to the telephone company.
A plug and jack used to connect this equipment to the premises wiring and telephone network must comply with the
applicable FCC Part 68 rules and requirements adopted by the ACTA. A compliant telephone cord and modular
plug is provided with this product. It is designed to be connected to a compatible modular jack that is also
compliant. See installation instructions for details.
The REN is used to determine the number of devices that may be connected to a telephone line. Excessive RENs on
the telephone line may result in the devices not ringing in response to an incoming call. In most but not all areas, the
sum of the RENs should not exceed five (5.0). To be certain of the number of devices that may be connected to a
line, as determined by the total RENs, contact the local telephone company. For products approved after July 23,
2001, the REN for this product is part of the product identifier that has the format US:AAAEQ##TXXXX. The
digits represented by ## are the REN without a decimal point (e.g., 03 is an REN of 0.3). For earlier products, the
REN is separately shown on the label.
If this equipment [GAI-Tronics telephone] causes harm to the telephone network, the telephone company will notify
you in advance that temporary discontinuance of service may be required. But if advance notice isn’t practical, the
telephone company will notify the customer as soon as possible. Also, you will be advised of your right to file a
complaint with the FCC if you believe it is necessar y.
The telephone company may make changes in its facilities, equipment, operations, or pro cedures that could affect
the operation of the equipment. If this happens the telephone company will provide advance notice in order for you
to make necessary modifications to maintain uninterrupted service.
If trouble is experienced with this equipment, please contact GAI-Tronics Corporation at 800-492-1212 or www.gaitronics.com for repair or warranty information. If the equipment is causing harm to the telephone network, the
telephone company may request that you disconnect the equipment until the problem is resolved.
Connection to party line service is subject to state tariffs. Contact the state public utility commission, public service
commission or corporation commission for information.
This equipment uses a telephone handset and it is hearing aid compatible.
User Instructions (Canada) CP -01, Issue 8, Part I: Section 14.1
NOTICE: The Industry Canada label identifies certified equipment. This certification means that the equip ment
meets certain telecommunications network protective, operational and safety requirements as prescribed in the
appropriate Terminal Equipment Technical Requirements document (s). The Department does not guarantee the
equipment will operate to the user’s satisfaction. Before installing this equipment, users should ensure that it is
permissible to be connected to the facilities of the local telecommunications compan y. The equipment must also be
installed using an acceptable method of connection. The customer should be aware that compliance with the above
conditions may not prevent degradation of service in some situation s. Rep airs to certified equipment should be
coordinated by a representative designated by the supplier. Any repairs or alterations made by the user to this
equipment, or equipment malfunctions, may gi ve the telecommunications company cause to request the user to
disconnect the equipment. Users should ensure for their own protection that the electrical ground connections of the
power utility, telephone lines and internal metallic water pipe system, if present, are connected together. This
precaution may be particularly important in rural areas.
CAUTI ON
Users should not attempt to make such connections themselves, but should contact the appropriate electric
inspection authority, or electrician, as appropriate.
CP-01, Issue 8, Part I: Section 1 4.2
NOTICE: The Ringer Equivalence Number (REN) assigned to each terminal device provides an indication of the maximum
number of terminals allowed to be connected to a telephone interface. The termination on an interface may consist of any
combination of devices subject only to the requirement t hat the sum of the Ringer Equivalen ce Numbers of all the devices does
not exceed 5.
1 12/10
Page 6

Foreword ICP9000 Navigator Installation and Service Manual
Scope of Manual
This manual offers descriptive data and service information for the ICP9000 Navigator Series Console.
Service diagrams and printed circuit board details are a part of this service manual.
The ICP9000 Navigator Series Console Operator’s Manual, Pub. 43004-025, is another publication
related to the operation of the console. It is available through a shortcut in the XAC2000A Navigator
Programming Software or on our website at www.gai-tronics.com.
Instructions for configuring the console are included with the GAI-Tronics CARD Suite Software. The
software must be registered with GAI-Tronics prior to use.
Ordering Replacement Parts
When ordering replacement parts or requesting equipment information, please include the complete
identification number. This applies to all components, kits, and chassis. If the component part number is
not known, the order should include the number of the chassis or kit of which it is a part and sufficient
description of the desired component to identify it. Order parts from:
Customer Service
GAI-Tronics Corporation
400 E. Wyomissing Ave.
Mohnton, PA 19540
US: 800-492-1212
Outside US: 610-777-1374
Service and Repair
Inoperative or malfunctioning equipment should be returned to the factory for repair. Please call
1-800-492-1212 to obtain a Return Authorization number, published repair prices, and shipping
instructions. A Return Authorization number can also be obtained by visiting our website at
www.gai-tronics.com
OTE: A purchase order or credit card number is required prior to processing non-warranty repairs.
N
12/10 2
Page 7

ICP9000 Navigator Installation and Service Manual Foreword
Safe Handling of CMOS Integrated Circuit Devic es
Many of the integrated circuit devices used in communications equipment are of the Complementary
Metal Oxide Semiconductor (CMOS) type. Because of their high open circuit impedance, CMOS
integrated circuits are vulnerable to damage from static charges. Care must be taken handling, shipping,
and servicing them and the assemblies in which they are used.
Even though protection devices are provided in CMOS integrated circuit inputs, the protection is effective
only against over-voltage in the hundreds of volts range such as is encountered in an operating system. In
a system, circuit elements distribute static charges and load the CMOS circuits, decreasing the chance of
damage. However, CMOS circuits can be damaged by improper handling of the modules, even in a
system.
To avoid damage to circuits, observe the following handling, shipping, and servicing precautions:
1. Prior to and while servicing a circuit module, particularly after moving within the service area,
momentarily touch both hands to a bare metal, earth-grounded surface. This will discharge any static
charge that may have accumulated on the person doing the servicing.
OTE: Wearing a conductive wrist strap will minimize static build-up during servicing.
N
2. Whenever possible, avoid touching any electrically conductive parts of the circuit module with your
hands.
3. Power down the unit before installing or removing the circuit module.
4. When servicing a circuit module, avoid carpeted areas, dry environments, and certain types of
clothing (silk, nylon, etc.) because they contribute to static build-up. Similarly, disconnect the test
probe prior to removing the ground lead.
5. All electrically powered test equipment should be grounded. Apply the ground lead from the test
equipment to the circuit module before connecting the test probe.
6. If a circuit module is removed from the system, it is desirable to lay it on a conductive surface (such
as a sheet of aluminum foil) that is connected to ground through 100k of resistance.
7. When soldering, be sure the soldering iron is grounded, and has a grounded tip.
8. Prior to connecting jumpers, replacing circuit components, or touching CMOS pins (if this becomes
necessary in the replacement of an integrated circuit device), be sure to discharge any static build-up
as described in procedure 1. Since voltage differences can exist across the human body, it is
recommended that only one hand be used if it is necessary to touch pins on the CMOS device and
associated board wiring.
9. When replacing a CMOS integrated circuit device, leave the device in its conductive rail container or
conductive foam until it is to be inserted into the printed circuit module.
10. All low impedance test equipment (such as pulse generators, etc.) should be connected to CMOS
device inputs after power is applied to the CMOS circuitry. Similarly, such low impedance
equipment should be disconnected before power is turned off.
11. Replacement modules shipped separately from the factory will be packaged in a conductive material.
Any modules being transported from one area to another should be wrapped in a similar material
(aluminum foil may be used). Never use non-conductive material for packaging these modules.
3 12/10
Page 8

Foreword ICP9000 Navigator Installation and Service Manual
Features of the ICP9000 Navigator Seri es Console
• Enhanced multi-tasking operation
• Graphical User Interface (GUI) features touch-screen, mouse or wand support
• Desktop layout customizable each operator, including right or left-hand operation
• Available in 4-, 8-, and 12-channel control (4- and 8-channel consoles are field expandable)
• Accommodates a minimum of 10 consoles per system
• Supports Tone, DC, and E&M control types
• Includes Paging Encoder for individual, sequential multi-channel group, stack paging and one-touch
paging
• DTMF Decode for Automatic Number Identification
• 16-Frequency control per channel
• 24 programmable buttons allocated as two per channel to support channel functions such as alert tone,
frequency change, infinite or timed mute, monitor and supervisor as well as one-touch paging using
preprogrammed aliases.
• Optional full-duplex teleph one in te rface capability
• Supports headset, desktop microphone, and footswitch
• Allows standard PC applications to capture printer port output for logging
• Multiple dispatcher profiles allow custom configuration of channel names, programmable buttons,
channel and window positioning and colors and feature restriction
• Individual master volume controls for select and unselect speakers
• Individual select and unselect volumes per channel
®
• Easy-to-use Windows
-based programming application
• VU-meter for receive and transmit audio
• 12/24-hour clock
• Logging recorder output
• Custom paging and multiple alert tones
12/10 4
Page 9

ICP9000 Navigator Installation and Service Manual Foreword
System Requirements for Customer-Supplied PC
The minimum PC system requirements for installing and running the ICP9000 Navigator are:
• Microsoft Windows 2000, XP, or Windows 7 (Virtual Mode only) operating system
• Pentium™ II or compatible processor (600 MHz or better)
• 128 Mb of RAM
• 10 GB free hard disk storage
• SVGA Plug-and-Play monitor
• Video graphics controller with 16 Mb of RAM
• CD-ROM or DVD drive
• One parallel port
• Two serial ports or EdgePort/2 manufacturing no. 301-1000-02; or EdgePort/4 301-1000-04 USB to
serial expansion box
• Two USB ports
• Sound Card (Soundblaster is recommended) with Line-In jack
OTES:
N
1. The ICP9000 Navigator operating software is not currently compatible with Windows Vista operating
system.
2. The use of high-quality, PC speakers (minimum 4-watt output) is strongly recommended.
In addition, the operating environment should be a controlled environment such as typical office
conditions without extremes in temperature, humidity or dust. The System Manager must be Microsoft
Windows
Pentium™ is a trademark of Intel Corporation.
Microsoft© is a registered trad emark of Microsoft Corporation.
Windows 2000 is a trademark of Microsoft Corporation
Windows XP is a trademark of Microsoft Corporation
Windows Vista is a trademark of Microsoft Corporation
Windows 7 is a trademark of Microsoft Corporation
®
literate and knowledgeable of the use of a computer mouse, copying files, etc.
5 12/10
Page 10
Foreword ICP9000 Navigator Installation and Service Manual
Model Chart
The Main Control Unit (MCU) model number, located on the nameplate on the end of the unit (could be
the bottom or side, depending on mounting configuration), specifically identifies GAI-Tronics’
equipment. The last two digits in the model number indicate the number of channels available within that
specific unit (04A = 4 channels, 08A = 8 channels, 12A = 12 channels). Factory-installed options are
identified in the display area of the Navigator PC screen upon the initial application of power.
The following is a list of the ICP9000 Navigator Series Console models:
Model Description
ICPN9004A 4-Channel Navigator Series MCU (expandable)
ICPN9008A 8-Channel Navigator Series MCU (expandable)
ICPN9012A 12-Channel Navigator Series MCU
12/10 6
Page 11

ICP9000 Navigator Installation and Service Manual Foreword
The following options may be ordered pre-installed in your ICP9000 Navigator Series Console:
Option Description
CP0010 DC Control (Order one for each dc channel)
CP0040 E&M Signaling (One option for every four channels – requires CP0050)
CP0050 Supervisory Control
CP0060 External Enhanced Full Duplex Phone Interface
CP0070 Direct Enhanced Full Duplex Phone Interface
CP0650 MDC1200 STAT-ALERT Signaling (Not compatible with Logging Recorder Output Module)
The following features are included in the standard console and are available through either programming
selection or direct access:
• DTMF Decode
• Positive Mode Control
• Paging Encode
• Multi-Select Option
• 16-Frequency Capability
• Logging Recorder Output
7 12/10
Page 12

Foreword ICP9000 Navigator Installation and Service Manual
The following field installation kits and accessories are available for installation in the ICP9000
Navigator Series Console:
Kit Description
XCP0010A DC Control Kit (one per dc channel)
XCP0030A 25-Pair Telco Interface Kit
XCP0040A 4-Channel E&M Signaling Kit (requires CP0050 or XCP0050A)
XCP0050A Supervisory Control Kit
XCP0060A External Enhanced Phone Interface Kit
XCP0070A Direct Enhanced Phone Interface Kit
XCP0080A Battery Revert Power Supply Kit
XCP0100A 4-Channel Expansion Kit
XCP0140A Headset Box
XCP0150A 25-foot cable, 25-pair with connector
XCP0160A 50-foot cable, 25-pair with connector
XHS003C Amplified Headset (requires XCC003B)
XCC003C Coiled Cord with PTT (requires XCP0140A or XAAB002A)
XDM003A Desk Mic (requires XAAB002A for remote MCU installations)
XCP0600A Output Control Module Kit, 32 outputs
XRM0001A Control Module Relay Kit, 8 Form “C”, 10 A
XFS002A Dual Footswitch
XAAB002A Audio Accessory Box with Telephone Inter face
TDN9413A MDC1200 STAT-ALERT Signaling Kit (Logging Recorder Output Module requires
removal prior to installation)
The following programming software and cable are required for programming the ICP9000 Series
Navigator Console (PC and MCU).
Model Description
XAC4000A Programming Bundle CD; includes CARD Suite Software (included with console
purchase)
XAC2000A Graphical User Interface (GUI) Software (included with console purchase)
XCP0170A Programming Cable (PC to MCU)
12/10 8
Page 13

ICP9000 Navigator Installation and Service Manual Foreword
Specifications
General
Temperature range.................................................................................................................. 0º C to +50º C
Humidity................................................................................................................................... 95% at 50º C
Physical size............................................................................................. 8.75 H × 17 W × 11.125 D inches
Rack-mount size........................................................................................................................................ 5U
Power input............................................... 120/240 V ac, +
or +10.5 to 18 V dc
Weight (without option s)
ICPN9004A ..........................................................................................................................20.5 lbs.
ICPN9008A .............................................................................................................................22 lbs.
ICPN9012A ..........................................................................................................................23.5 lbs.
Audio General
Audio response.............................................................. +3 dB at 300 to 3000 Hz (except guard tone notch)
Hum and noise...............................................................Transmit – Less than 50 dB below full rated power
Receive – Less than 55 dB below full rated power
Audio distortion............................................................................................................... Less than 2% THD
Compression ........................................................................................Normalizes input variations of 30 dB
15%; 47 to 63 Hz with external power module;
Receiver Audio
Input............................................................................................. −25 dBm to +11 dBm, selectable in steps
Cross-talk.............................................................. 60 dB below rated output levels at rated line impedance
Input impedance................................................................................................................ 600 ohms nominal
Tone Remote Control
Guard tone................................................................................ 2100, 2175, 2325, 2800 (default = 2175 Hz)
Function tones........................................................................... 1950, 1850, 1750, 1650, 1550, 1450, 1350,
1250, 1150, 1050, 950, 850, and 750
Default function tones................................................................................................ F1 Transmit: 1950 Hz
F2 Transmit: 1850 Hz
F3 Transmit: 1350 Hz
F4 Transmit: 1250 Hz
Monitor: 2050 Hz
Functional tones are selectable via GAI-Tronics’ CARD Suite Software Application
9 12/10
Page 14

Foreword ICP9000 Navigator Installation and Service Manual
Transmit Audio
Condenser microphone........................................................................ Selectable, Digital steps 1 through 5
Microphone sensitivity.......................................... Reference 165 mV, selectable, Digital steps 1 through 5
Audio out to phone line................................................................. −20 dBm to +11 dBm into 600-ohm load
Line balance....................................................................................................................... 70 dB at 1000 Hz
DC Remote Control
Audio out to phone line............................................................................................. F1 Transmit: +5.5 mA
F2 Transmit: +12.5 mA
Monitor: −2.5 mA
Output currents are selecta ble via GAI -Tronics’ CARD Suite Software Application
FCC Informati on
FCC Registration Number ....................................................................................... US: ADGOT01B46053
Ringer Equivalence Number (REN).......................................................................................................... .1
Network Connection (USOC)................................................................................................................ RJ11
IC Informatio n (Canada)
IC Certification Number.............................................................................................................. 8226048 A
Ringer Equivalence Number (REN).......................................................................................................... .1
Connecting Method............................................................................................................................ CA11A
12/10 10
Page 15
Description
The ICP9000 Navigator Series Master Control Unit (MCU) is a multi-channel console designed to
operate with conventional radio systems and a PC. Its graphical user interface (GUI) supports touchscreen, mouse or wand operation. It uses tone remote control to interact with the base stations, but dc
remote control and E&M control are available as options. The ICP9000 Navigator allows control of up to
12 individual base stations.
Operating parameters are programmed using GAI-Tronics’ CARD (Configuration Application for Radio
Dispatch) Suite Software application, Model XAC1000A.
Tone Remote Control
Tone control is a particular scheme of remote radio control. This scheme uses tones of different
frequencies and levels to command the radio to perform various tasks. Control tones are categorized as
high level guard tone, function tone, or low level guard tone. These tones are generated by the console
and routed to the base stations via wire line connections (leased or owned dry lines).
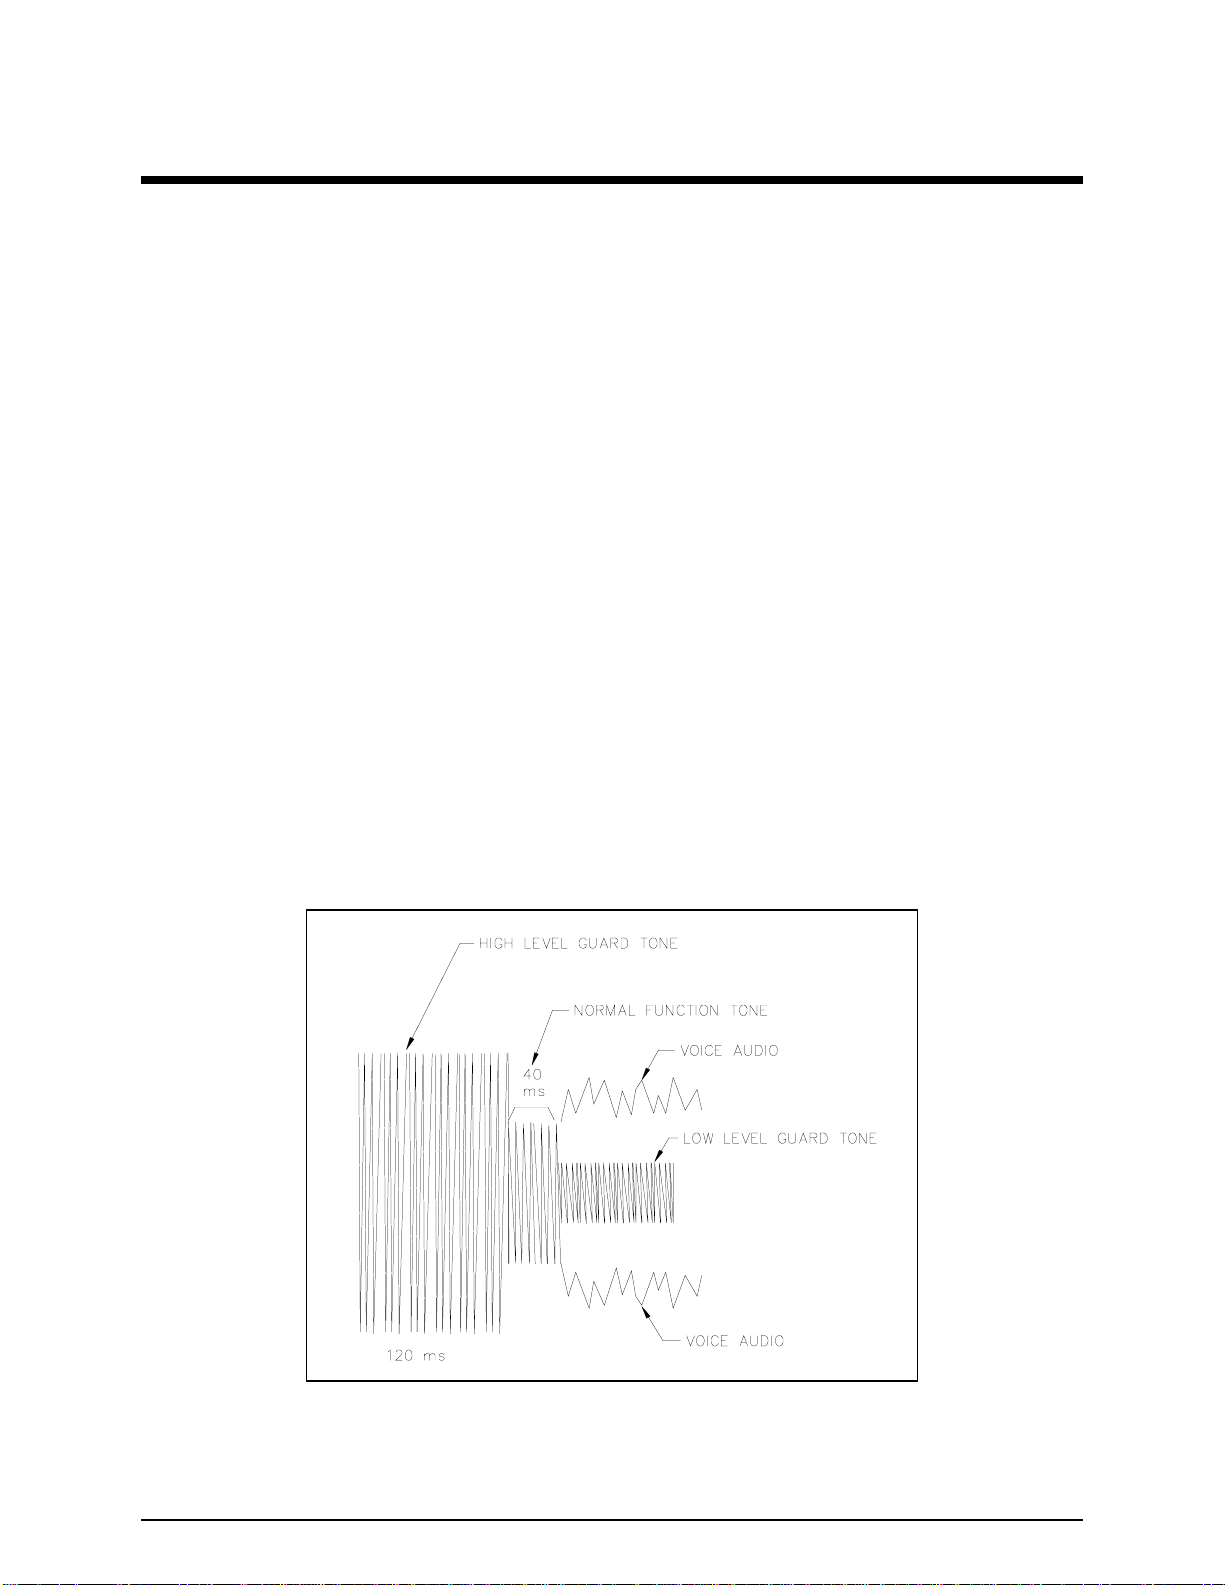
High level guard tone precedes all control tone sequences and notifies the selected base station of a
change in its operating mode. High level guard tone is normally active for 120 ms, but the duration is
programmable from 120 to 4000 ms in 10 ms increments. Refer to Figure 1.
Following the high level guard tone is function tone. Function tone is normally active for 40 ms, but the
duration is programmable between 40 and 4000 ms in 10 ms increments. It forces the radio to perform a
task specified by the tone’s frequency. Low level guard tone follows function tone and remains active as
long as the base station is transmitting. Low level guard tone is present only when the tone control
sequence is a command that causes the radio to transm it.
Figure 1. Tone Remote Control Tones
11 12/10
Page 16

Description ICP9000 Navigator Installation and Service Manual
DC Remote Control
DC control is a method of remote radio control. This scheme uses dc currents of differing magnitudes
and polarities to command the radio to perform various tasks. The dc control currents are directly
impressed upon the audio wire line connections between the console and base stations.
E&M Remote Control
E&M remote control is another scheme of remote radio control. This scheme uses two pair of leads to
control communication between the console and base station. The console uses the “M” leads to signal
the base station when to transmit, and uses the “E” leads to detect when to receive.
12/10 12
Page 17

Installation
The ICP9000 Navigator Series computer (purchased separately) can be placed on any flat level surface
that provides the operator with a comfortable working position with full visibility of the computer desktop
screen controls and indicators. The MCU can be placed up to 50 feet away in a convenient location,
using the RS-232 connection. For greater distances, use the RS-485 connection.
FCC Interference Warnings
The FCC requires that manuals pertaining to Class A and Class B computing devices contain warnings
about possible interference with local and resi den tia l radio and TV reception. Please read these warnings
and all safety information in the Foreword section of this manual.
Equipment Required
Test Equipment & Tools
• RF service monitor
• AC voltmeter with dB ranges for measuring
audio levels
• #1 & #2 Phillips screwdrivers
• 1/8-inch flat blade screwdriver
Documentation
• base station’s tone remote adapter manual
• these installation instructions
Mounting Considerations
The ICP9000 Navigator MCU has three possible
mounting configurations. A desktop or any
suitable flat surface can be used when the
included adhesive-back ed rubber feet are applied
to the MCU. The feet are located in the accessory
box inside an envelope.
Rack mounting is also possible with the included
hardware. The MCU measures 11.125 inches
deep by 8.75 inches tall using 5U spacing in a
conventional 19-inch rack.
The unit is also wall-mountable by installing the
brackets in the other set of holes included on the
unit. Refer to Figure 2 for mounting hole
dimensions.
Figure 2. MCU Mounting Hole Dimensions
OTE: The MCU must be mounted to studs or secured with anchors that will support 20 lbs.
N
13 12/10
Page 18

Installation ICP9000 Navigator Installation and Service Manual
Cable Installation Safety Consideration s
Interconnecting, communications, and Class 2 dc power cables should be separated from electrical light
or other Class I circuits by at least 2 inches. The exception is where Class I wiring or power circuits are
run in a raceway, or are metal-sheathed or metal-clad, or are permanently separated from the conductors
of the other circuitry by a continuous and firmly fixed nonconductor such as porcelain tubes or flexible
tubing in addition to the insulation on the wire. Comm unica tions cab les and in-building wiring should be
listed and marked for the purpose according to NEC Article 800.
Telephone Line Lightning and Over-voltage Protec tion
The ICP9000 Navigator has an over-current phone line fuse that protects against occasional extreme fault
conditions that may get past the primary protectors. An example of such a fault condition is a power line
cross. For maximum surge and lightning protection, building primary (over-voltage) protectors should be
installed at the point where the telephone lines enter the radio equipment building. Primary protectors are
usually required by local codes and should be provided by your leased line provider.
Line Connections
Line Considerations - Privat e Circuit
If leased lines from your local telephone company are used between the console and a tone remote
adapter or base station, the telephone company (Local Exchange Carrier) may request a Facility Interface
Code (FIC). The FIC is subject to local availability. See Table 1.
Table 1. Analog Facility Interface Code
FIC Description
02NO2 2-wire private line; no signaling conversion by LEC (IN-Band)
02NO4 4-wire private line; no signaling conversion by LEC (IN-Band)
Metallic 2 or 4-wire metallic private line (“Hoot and Holler” circuits)
Within a manufacturing plant, a campus, or large building, customer-supplied metallic pairs may be used.
While using tone control, it is not necessary to have dc continuity on these lines. Continuity is required
for dc control.
Circuit Condi tioning
The console is designed to work with good-quality analog speech band or leased private circuit. This was
previously known as ‘basic’ conditioning under Series 2000/3002 service. The line must be non-PSTN
(no dial tone, talk-battery, or signaling). This equipment falls under the Category II, FCC Tariff #260
Service and is exempt from FCC Part 68 registration. (Ref. FCC Form 730 Application Guide pages 1–
5.)
For 2-wire operation, 2000 Series lines may be used with or without conditioning. C1 or C2 conditioning
is available for these lines and relates to the envelope delay distortion and attenuation. A basic
conditioned line may be used if it is the only type available. Overall system quality is limited by the
quality of these lines.
12/10 14
Page 19

ICP9000 Navigator Installation and Service Manual Installation
Line Level Settings
The ICP9000 Navigator Console allows the installer to adjust level settings through the on-screen
diagnostics. These procedures assume that the base stations have been properly adjusted.
Line Input (Receive Audio) Level Adjustment
The line input level adjustment allows the receive audio of each channel to be compensated for line loses
between the base station and console, ensuring the optimum audio performance of the console. It is
important to set this level properly as maladjustment can cause distortion or over-compression of the
receive audio.
1. Adjust the base station receive audio level to the console by applying an RF signal modulated with a
1000 Hz tone at rated system deviation to the base station receiver.
2. Adjust the base station output control for the desired level (e.g. –10 dBm) to the audio control line.
Do not exceed the line supplier’s recommended maximum operating level.
Navigator MCU Adjustment
1. Connect an ac voltmeter, or other appropriate measuring device, across the receive audio pair of the
console MCU according to Table 8. Make a note of the measurement.
2. Enter the Navigator Diagnostics. Select
and select
3. Use the channel
INPUT LEVEL.
VOL Up/Down buttons to select the proper input level settings. The level can be
SERVICE DIAGNOSTICS, then AUDIO. Enter the password 1490,
changed in 3 dB increments. Select the setting that is closest to, but not higher than, the measured
level. For example, if the measured level is –11 dB, the console should be set at a –12 dB input
sensitivity setting.
4. Repeat this process for each channel.
5. Press the
MODE button when the setting is complete. When prompted, press 1 to save, or 2 to
abandon changes.
Line Output (Transmit) Level Adjustment
The output of each channel can be adjusted to accommodate for line losses from the console to the base
station. Adjustment of the line out should be similar to that of the line input adjustment where the audio
level at the base station is measured while the output level of the console is adjusted to achieve the
optimum audio level at the base station.
1. Connect an ac voltmeter, or other appropriate measuring device, across the transmit audio pair at the
base station. Refer to Table 8 for the correct test connections.
2. Enter the Navigator Diagnostics. Select
and select
OUTPUT ADJUST.
SERVICE DIAGNOSTICS, then AUDIO. Enter the password 1490,
3. The MCU will produce a 2175 Hz signal output on all channel audio pairs. Refer to Table 8 for the
correct connections.
4. Use the channel VOL Up/Down buttons to raise or lower the output level of the MCU channel.
5. Repeat this process for each channel.
6. Press the
MODE button when complete. When prompted, press 1 to save, or 2 to abandon changes.
15 12/10
Page 20
Installation ICP9000 Navigator Installation and Service Manual
Types of Base Station Control
The ICP9000 Navigator is capable of either tone or dc control depending on the position of jumpers
JU620 through JU623. For dc control, the console must have option CP0010 or XCP0010A. Refer to
Table 2.
Table 2. Jumper Positions for DC or Tone Control Selection
Function Jumper No. Position
Ch. 1, 5, 9 JU620 IN
OUT
Ch. 2, 6, 10 JU621 IN
OUT
Ch. 3, 7, 11 JU622 IN
OUT
Ch. 4, 8, 12 JU623 IN
OUT
Tone Control
DC Control (option CP0010 or XCP0010A)
Tone Control
DC Control (option CP0010 or XCP0010A)
Tone Control
DC Control (option CP0010 or XCP0010A)
Tone Control
DC Control (option CP0010 or XCP0010A)
NOTE: If operating in dc mode, the console must also be programmed for dc under Type of Interface in
the CARD Suite Software.
Two Wire Control (default)
In this configuration, a single two-wire line is used to carry the control tones or dc control currents (as
applicable per channel) and the transmitter audio, from the ICP9000 Navigator to the base station. This
same 2-wire line is used to return the receive audio back to the console from the base station. Refer to
Table 3 for the appropriate system configuration.
Four Wire Audio/Control
In this configuration, one pair of lines is used to carry both control tones or dc control currents (as
applicable per channel) and the transmitter audio from the ICP9000 Navigator to the base station. The
other pair is used to carry the receive audio from the base station back to the console. Refer to Table 3 for
the appropriate system configuration.
OTE: In this configuration, RX audio can still be received on original 2-wire pair.
N
Table 3. Slave Module – 2-Wire/4-Wire
Function Jumper No. Position
Ch. 1, 5, 9 – 2W/4W Select JU602 2W – 2 wire control
4W – 4 wire control
Ch. 2, 6, 10 – 2W/4W Select JU606 2W – 2 wire control
4W – 4 wire control
Ch. 3, 7, 11 – 2W/4W Select JU610 2W – 2 wire control
4W – 4 wire control
Ch. 4, 8, 12 – 2W/4W Select JU614 2W – 2 wire control
4W – 4 wire control
12/10 16
Page 21
ICP9000 Navigator Installation and Service Manual Installation
MCU Connections
The electrical hook-up of the ICP9000 Navigator MCU requires these basic connections: the ground wire,
one to three channel interface cables, and the power supply cable.
WARNING
Voltages hazardous to life may be present at the exposed control line terminals under certain conditions
during the following procedures. These voltages are also present on some component leads. Care should
be taken to avoid shock during installation.
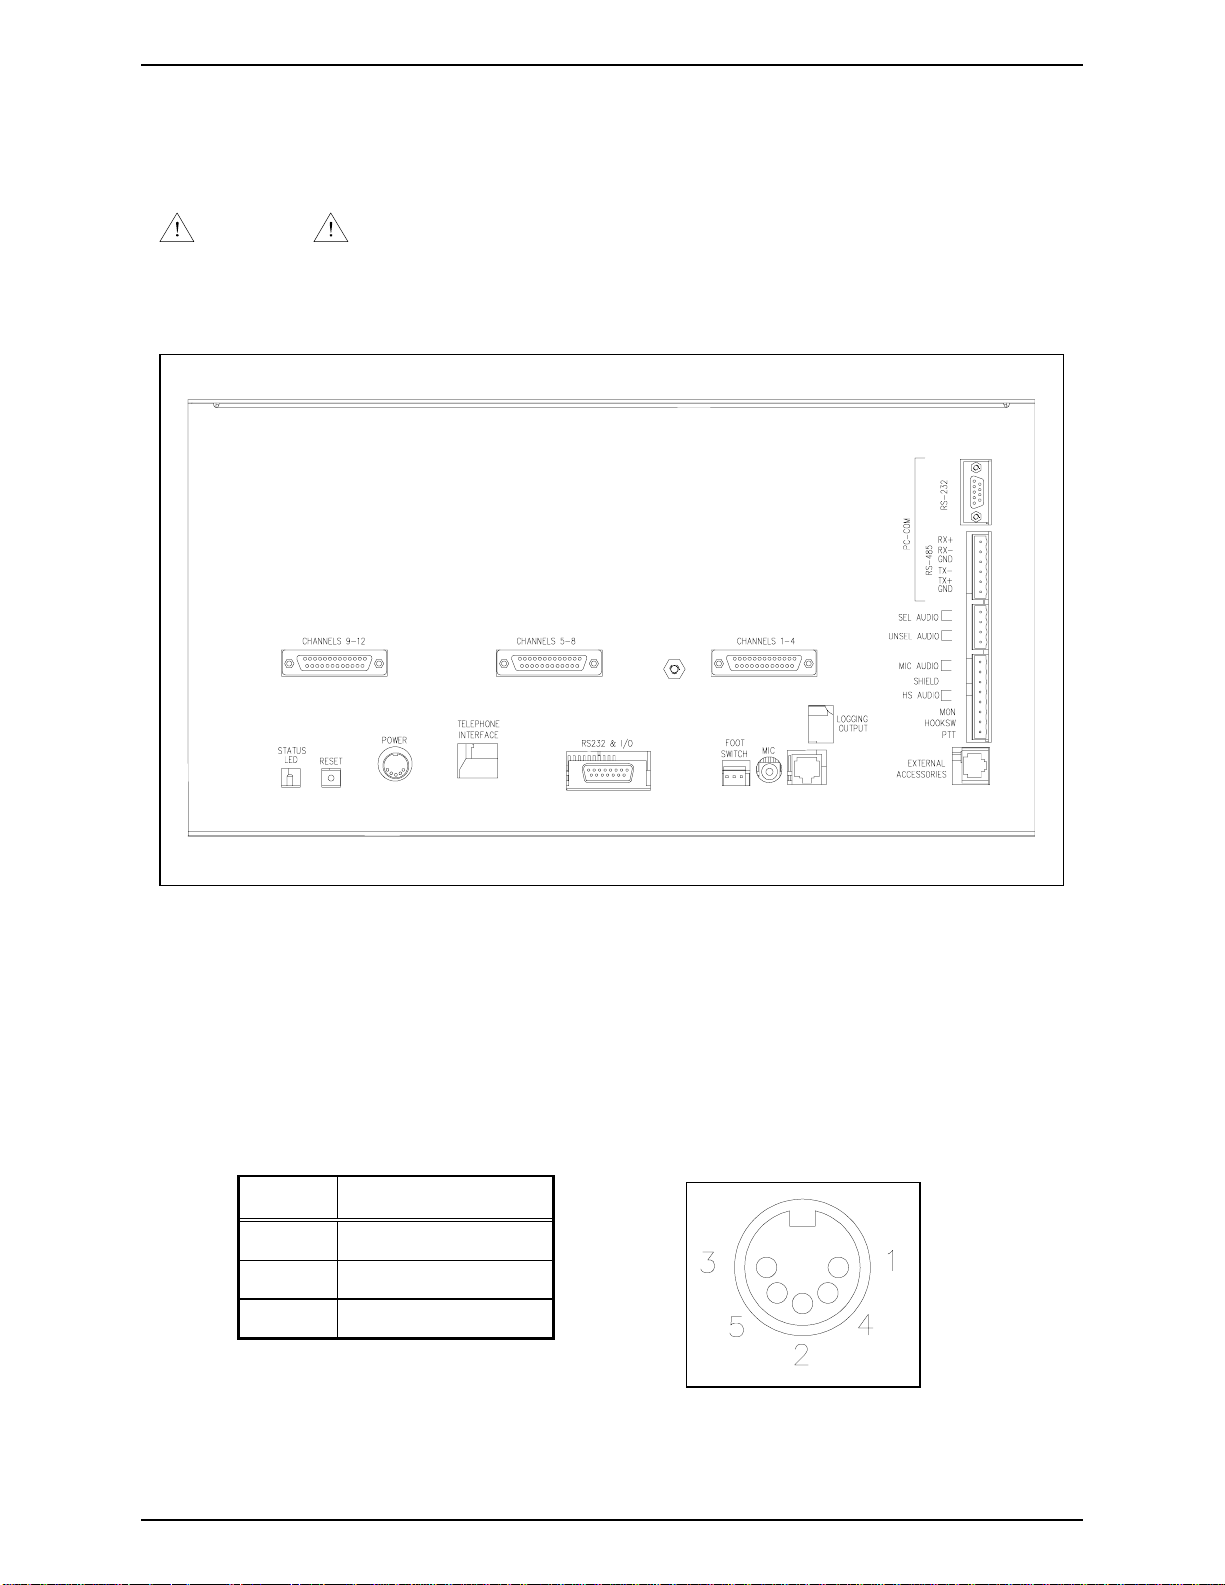
Figure 3. View of ICP9000 Navigator MCU Back Panel with Connectors
Electrical Interface
All of the electrical connections to the console are made at the rear panel. Power to the console is
furnished through a 5-pin, DIN connector, P5. The Figure 3 shows the rear view of the ICP9000
Navigator MCU and the locations of the various connectors. The pinout for the power DIN connector is
shown in Table 4:
Table 4. Power DIN Connector Pinout
Pins Function
1, 4 B-, Batt-, GND tab
3, 5 B+, IN
2 Batt+
Figure 4. Power Connector Pinout
17 12/10
Page 22

Installation ICP9000 Navigator Installation and Service Manual
Power Supply (3308-00124-00)
The ICP9000 Navigator MCU requires an external power supply provided with the unit. This is a selfcontained unit that can be located at some convenient spot near the MCU. It requires an input of 90–264
V ac 50-60 Hz and delivers a regulated output of 12 V dc at 4.2 amps maximum.
Battery Revert Power Supply (XCP0080A)
The relay and associated devices for battery revert are incorporated on the main printed circuit board.
This option includes a modified power supply.
Ground Cable
The ICP9000 Navigator MCU is designed with a high degree of protection against electro-static discharge
(ESD), power line surges and telephone line surges. The protection circuitry is designed to shunt the
transient current to earth ground through the GND terminal, located on the back panel of the console.
This terminal must be connected to a high quality earth ground in order to obtain maximum protection.
N
OTE: This ground should be connected through a utility entrance ground cable and the telephone
entrance ground cable, if different from the utility ground. Lightning is essentially RF, and as such does
not like long leads or sharp bends. Make connections appropriately.
External Accessories Connector
The rear panel connector labeled EXTERNAL ACCESSORIES, an 8-pin modular connector, provides for
a desk microphone connection. It can also be used as a convenient connection to the Audio Accessory
Box if only a short cable length is required. The pinout is mirrored with respect to J1 on the Audio
Accessory Box so the modular cable provided with the Audio Accessory Box will provide the proper
connection. See the pinout in Table 5 below.
Table 5. Pinout for J9
Pin No. Function
1 Not connected
2 Config. RS-232 RXD
3 Monitor
4 Audio ground
5 Mic Hi
6 PTT
7 Config. RS-232 TXD
8 Hand/Headset audio
12/10 18
Page 23
ICP9000 Navigator Installation and Service Manual Installation
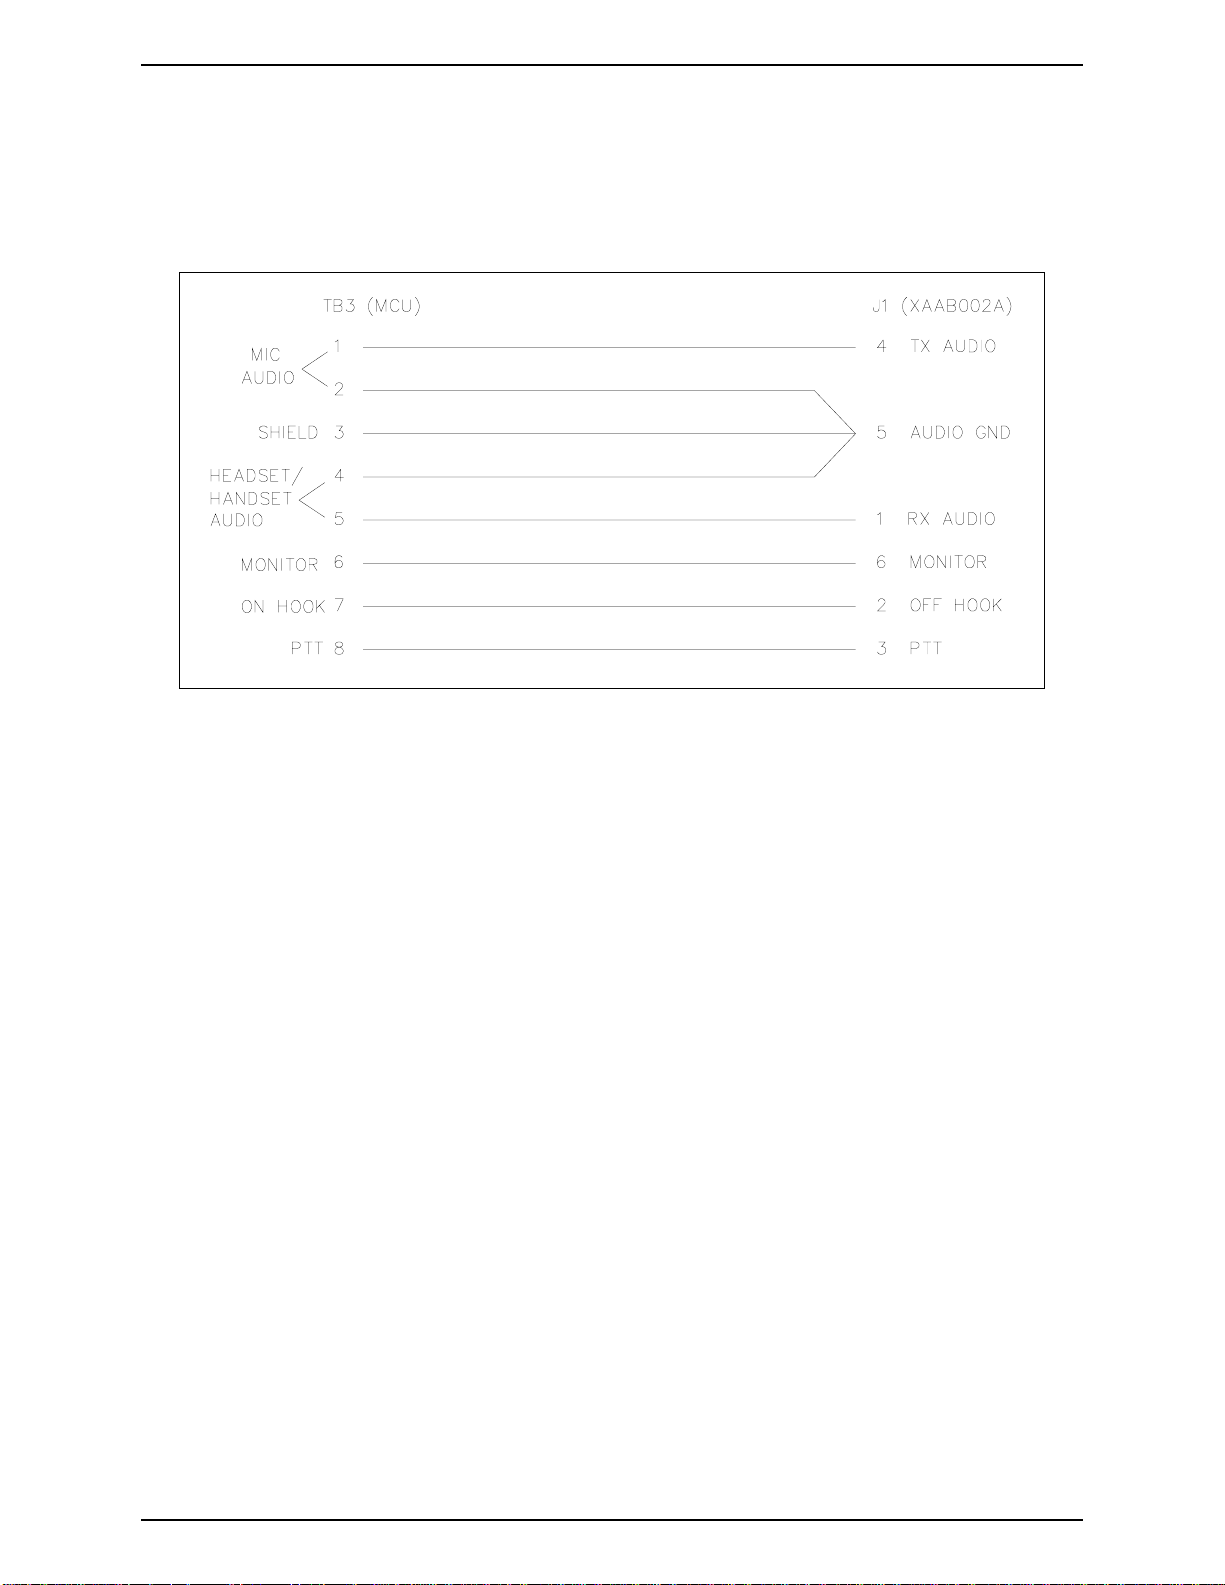
Model XAAB002A Audio Accessory Box Connections
The rear panel connector TB3, an 8-pin removable terminal block, provides connections for the Model
XAAB002A Audio Accessory Box, if it is not installed directly next to the MCU. Use a multi-pair 8conductor cable to connect TB3 on the MCU to J1 on the Audio Accessory Box. Connect the
microphone and headset audio returns to ground only at the Audio Accessory Box. See Figure 5 below.
Figure 5. Connections to Audio Accessory Box
19 12/10
Page 24

Installation ICP9000 Navigator Installation and Service Manual
Selected/Unselected Audio Connections
The rear panel connector TB2, a 4-pin removable terminal block, provides connection from the MCU to
the line-in jack on the computer’s sound card. Cable Part No. 61531-029 is provided to connect the audio
to the computer. This cable is provided with a 1/8-inch stereo plug at one end and tinned leads at the
other. Connection to TB2 is displayed in Figure 6 below.
Figure 6. Audio Connections – Cable No. 61531-029
12/10 20
Page 25
ICP9000 Navigator Installation and Service Manual Installation
MCU to PC Communications Connections
The RS-232 connection can be used if the distance between the MCU and the computer is less than 50
feet. A 10-foot, straight-through DB9 extension cable (Part No. 61504-083) has been provided for
connecting the MCU to the PC. This cable connects to the rear panel conne cto r, J2 4 (DB9 female ).
Jumpers JU1 and JU2 on the Navigator Display Extender PCBA must remain in positions 1 and 2 to
maintain straight-through cable functionality (factory positioned).
Table 6. MCU to PC (J24)
Pin No. Function
1 Not connected
2 TX (out)
3 RX (in)
4 DTR (in)
5 Ground
6 Not connected
7 Not connected
8 CTS (out)
9 Not connected
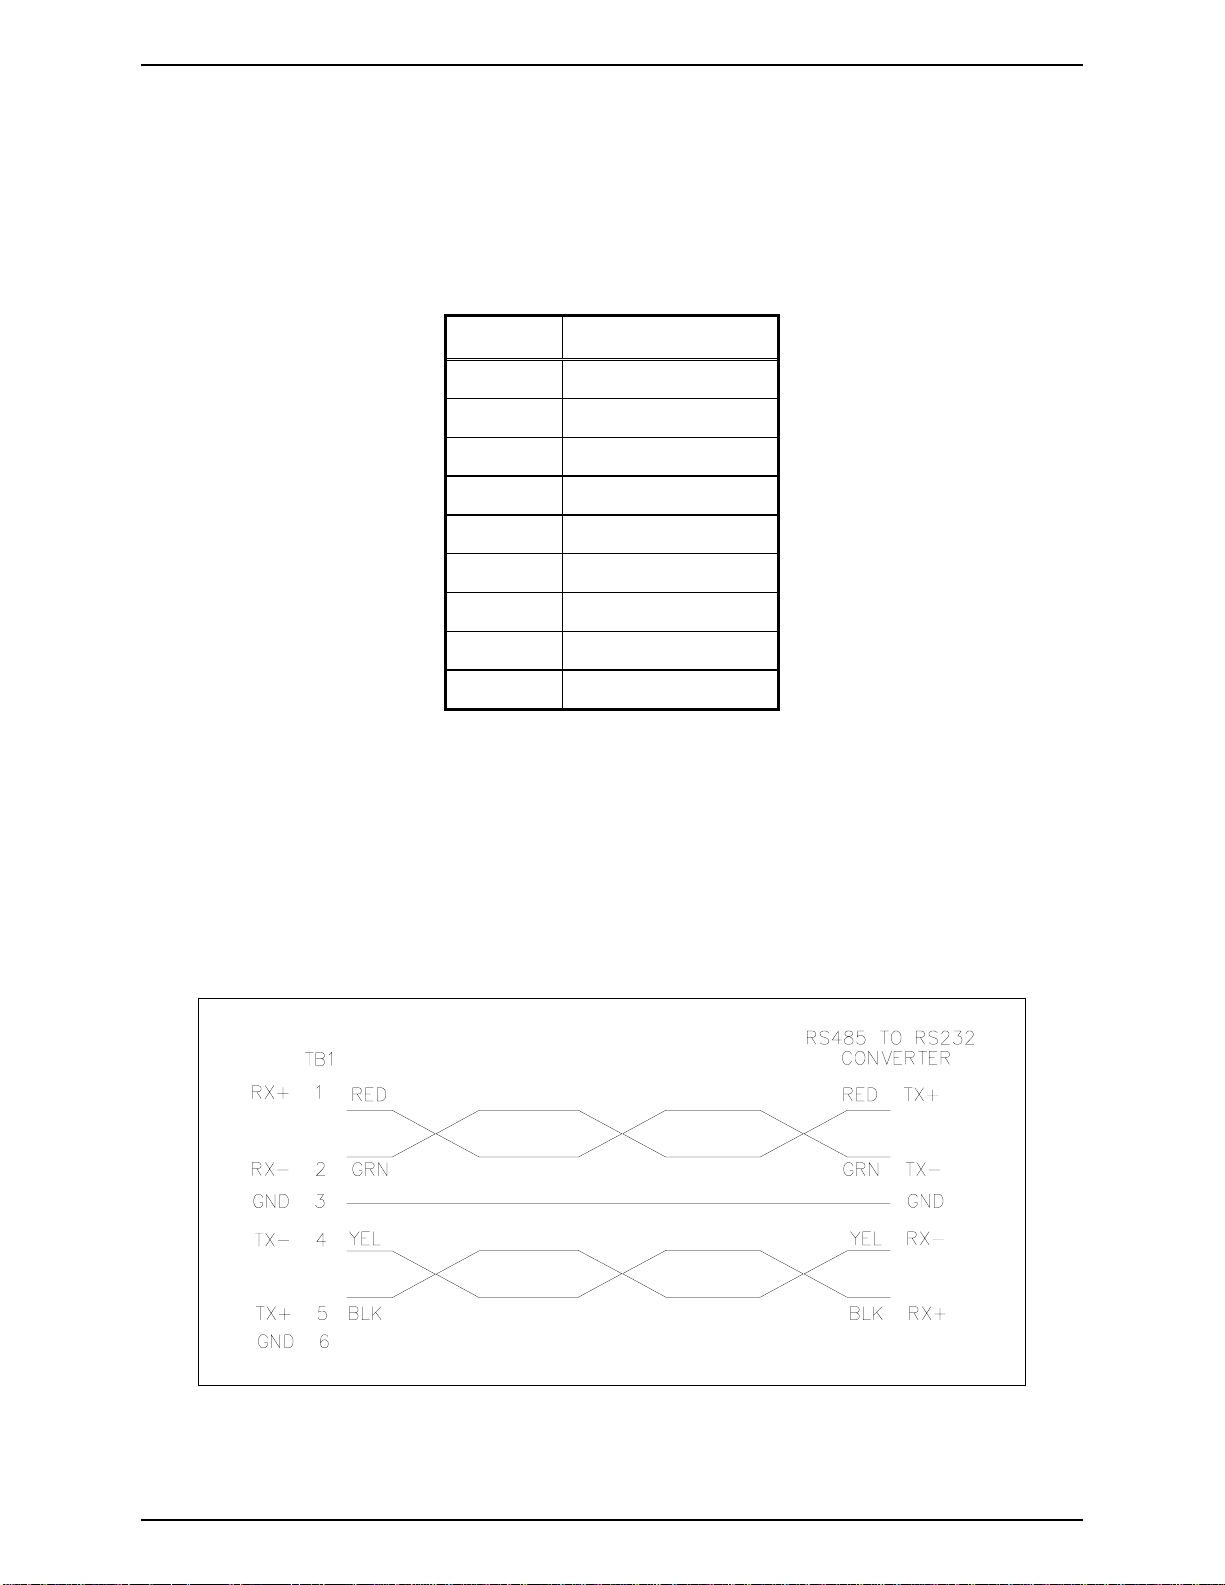
The RS-485 connection must be used when the distance between the MCU and the computer is ov er 50
feet. The rear panel connector TB1, a six-position removable term inal blo ck , provides conn ect ion for RS485 communication.
Use a multi-twisted pair cable for the RS-485 connection. An RS-485 converter at the PC side is
required. An externally powered full duplex with a ground converter, such as GAI-Tronics Part No.
69275-026, is recommended. Depending on the converter used, terminating resistors maybe required.
The Navigator PCBA has terminating resistors built in.
Figure 7. RS-485 Connections
21 12/10
Page 26
Installation ICP9000 Navigator Installation and Service Manual
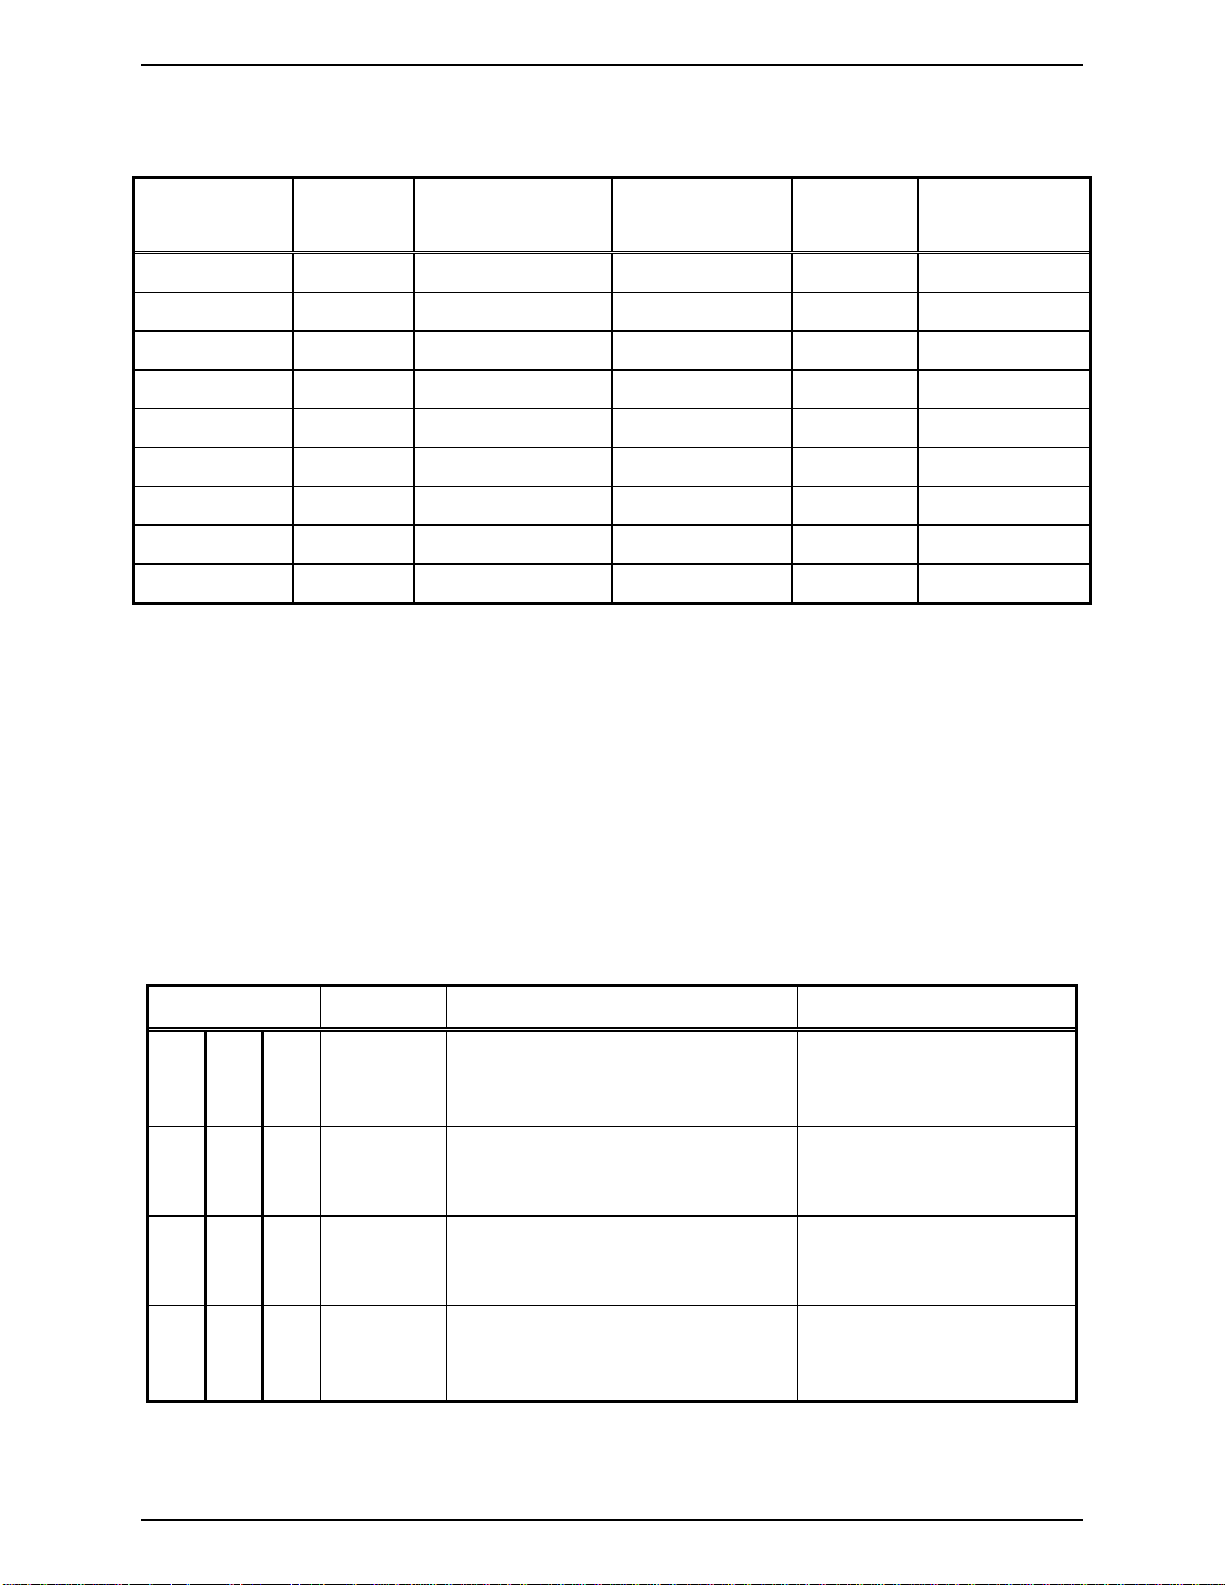
RS-485 Cable for Navigator MCU to Edgeport USB Converter
Table 7. Wiring Diagram
Edgeport
Connector
Pin
Number
Description
Navigator
Connector (TB1)
Pin
Number
Description
DB-9 female 1 No connection
DB-9 female 2 No connection
DB-9 female 3 TX Data Neg. (−) 6-pin Phoenix 2 RX −
DB-9 female 4 RX Data Pos. (+) 6-pin Phoenix 5 TX +
DB-9 female 5 Signal ground 6-pin Phoenix 3 & 6 GND
DB-9 female 6 No connection
DB-9 female 7 TX Data Pos. (+) 6-pin Phoenix 1 RX +
DB-9 female 8 RX Data Neg. (−) 6-pin Phoenix 4 TX −
DB-9 female 9 No connection
• Pins 3 and 6 can be jumpered together on the Navigator 6-pin connector and one of these pins runs to
the DB-9 connector.
• Set the individual switches of the 8-posit ion switch on the Edgeport/2i as follows:
Starting with switch 1: D, D, D, D, U, U, X, X (D = down; U = up; X = doesn’t matter)
Channel Interface Cable
A 12-pair interface cable (one supplied for each four channels of operation) plugs into the 25-pin
D-connectors on the back of the console. Refer to Figure 3 showing the rear view of the console. The
ICP9004A 4-channel console employs only one 25-pin D-connector-cable assembly for connections to
the base station(s) control and audio pairs, generally through a termination block or connector. Refer to
Table 8 for wire colors and pin functions.
Table 8. Channel Interface Connectors and Cable Colors
Channel No. Pin No. Wire Colors Pin Function
1 5 9 14
15
1, 2
2 6 10 3
4
5, 6
3 7 11 8
9
10, 11
4 8 12 12
13
24, 25
White/blue
Blue/white
White/orange, Orange/white
White/green
Green/white
White/brown, Brown/white
White/gray
Gray/white
Red/blue, Blue/red
Red/orange
Orange/red
Red/green, Green/red
TX Audio + /RX 2-Wire
TX Audio – /RX 2-Wire
RX Audio 4-Wire
TX Audio + /RX 2-Wire
TX Audio – /RX 2-Wire
RX Audio 4-Wire
TX Audio + /RX 2-Wire
TX Audio – /RX 2-Wire
RX Audio 4-Wire
TX Audio + /RX 2-Wire
TX Audio – /RX 2-Wire
RX Audio 4-Wire
Some installations can use the optional XCP0030A 25-pair Telco Interface Option Field Installation Kit,
when the telephone company supplies a 50-pin standard USOC, RJ21X Telephone Connector.
12/10 22
Page 27
ICP9000 Navigator Installation and Service Manual Installation
Accessories
Microphones
The rear panel connector (labeled MIC) is normally provided to support the Model XDM003A External
Desktop Microphone. For higher level microphones requiring an operating bias such as an Electret
condenser microphone, install jumper JU6 to provide the operating bias and jumper JU5 to reduce the
gain of the microphone pre-amp.
Refer to Figure 8 below for the board position of JU5 and JU6. The default for these jumpers is OUT.
Figure 8. Main Board Microphone Jumper Positions
NOTE
The following sections discuss the connections for accessories that may or may not be available for your
set up. Please contact GAI-Tronics Customer Service for additional information.
23 12/10
Page 28

Installation ICP9000 Navigator Installation and Service Manual
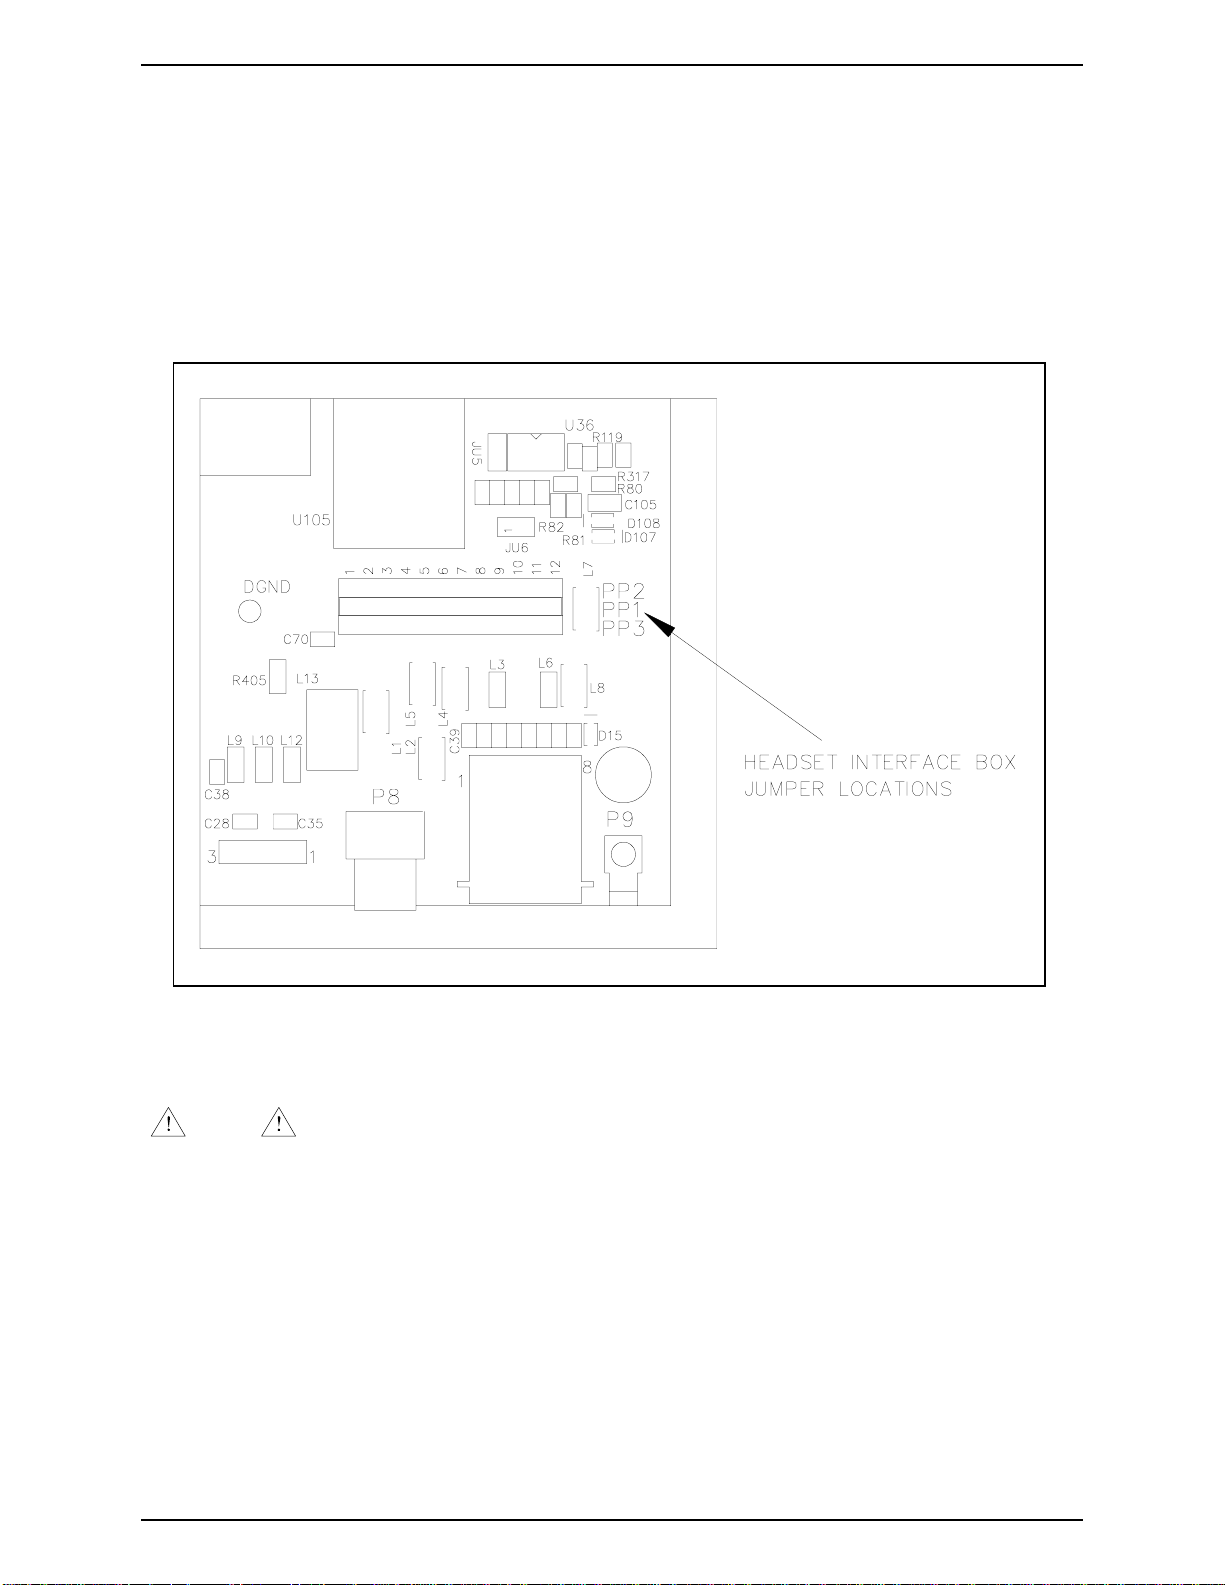
XCP0140A Headset Interface Box
The interface box allows the use of several headset accessories,
Table 9. Headset Modular Jack
Pin No. Pin Function
such as the Startset II, Supra headband-style monaural headset, and
Supra headband-style noise-canceling headset. The headset jack is
assembled for mounting beneath a horizontal surface or edge. Its
use requires proper jumper installation. See Figure 8 for jumper
locations.
If left-hand mounting is required, reverse the assembly. The
headset plugs into the modular-style headset jack (located directly
beneath the Logging Output jack) on the rear panel of the MCU.
See Table 9 for the headset modular jack pinout.
1. Remove the Navigator control ribbon cable from PP1 on the
1 TX Lo
2 TX Hi
3 PTT
4 On-hook
5 GND
6 RX Audio
7 PTT Return
Navigator Display Extender PC board and PP1 on the main
board. Keep the cable for future use. Use Figure 8 for
reference on the main board.
8 N/C
2. Position the shorting clip from PP1 to PP2 to enable operation of the headset. This option must
also be enabled and the sensitivity of the headset microphone set in the User Parameters Menu as
described in the Console Diagnostics section. Refer to Table 9 for the headset jack pinout.
Handset/Headset Connector
Table 10. Desk Mic Connector
An 8-pin modular connector is provided for direct connection of
Pinout
the XCP0500A Desktop Handset or the XDM002A Microphone.
(The XDM002A is not recommended for console operation.)
Pin No. Pin Function
No jumper settings are required.
1 Logic GND
XDM003A Desk Mic/Gooseneck Mic
This heavy-duty desktop/gooseneck microphone connects
directly to the RCA connector labeled
MIC located on the rear
panel of the MCU via the 61531-028 microphone extension
cable (12 feet in length) packaged with the Navigator. No
jumper settings are required.
XFS002A Footswitch
This accessory, which provides both hands-free PTT and
monitor functions, is provided with a cable fitted with a keyed
connector containing three contacts. This connector mates with
P7 on the back of the MCU. Table 11 defines the function of each pin.
NOTE
Table 11. Footswitch Connector Pinout
If the desk mic or footswitch is connected after the MCU has
been powered up, the MCU must be powered down and
powered up again. This allows the MCU to read the polarity
of the monitor switch. DO NOT press the monitor switch
while the console is powering up, or the polarity will be read
incorrectly.
2 RS-232 Host TX
3 PTT
4 Mic Hi
5 Mic Lo
6 Monitor
7 RS-232 Host RX
8 10 V dc
Pin No. Pin Function
1 PTT
2 GND
3 Monitor
12/10 24
Page 29

ICP9000 Navigator Installation and Service Manual Installation
System Jumper Table
Table 12 is provided to assist the installer in determining the correct placement of console slave board
jumpers, for various system configurations. Each ICP9000 Navigator MCU is equipped with one CSD
slave board for ICPN9004A (4 channels), two slave boards for ICPN9008A (8 channels) and three slave
boards for ICPN9012A (12 channels) operation.
Each channel can be individually configured to support 2-wire, 4-wire, bridging, or terminating modes of
operation (parallel or single console). Refer to Figure 9.
The ICP9000 Navigator MCU is shipped with all line termination resistors in place. For parallel
operation of multiple consoles, the last console on any particular line should have its 2W or 4W
termination jumpers in place and any intermediate console should have the line termination jumpers
removed.
Table 12. CSD Slave Unit Table
Channel Function Jumper No. Position Condition
Ch. 1, 5, 9 4W RX Termination JU603 IN
Ch. 2, 6, 10 4W RX Termination JU607 IN
Ch. 3, 7, 11 4W RX Termination JU611 IN
Ch. 4, 8, 12 4W RX Termination JU615 IN
Ch. 1, 5, 9
TX Source Impedance
JU601 IN
2W RX Termination
Impedance
Ch. 2, 6, 10
TX Source Impedance
JU605 IN
2W RX Termination
Impedance
Ch. 3, 7, 11
TX Source Impedance
JU609 IN
2W RX Termination
Impedance
Ch. 4, 8, 12
TX Source Impedance
JU613 IN
2W RX Termination
Impedance
OUT
OUT
OUT
OUT
OUT
OUT
OUT
OUT
600 ohm (default)
Parked – Bridging Impedance
600 ohm (default)
Parked – Bridging Impedance
600 ohm (default)
Parked – Bridging Impedance
600 ohm (default)
Parked – Bridging Impedance
600 ohm (default)
Parked – Bridging Impedance
(parallel console)
600 ohm (default)
Parked – Bridging Impedance
(parallel console)
600 ohm (default)
Parked – Bridging Impedance
(parallel console)
600 ohm (default)
Parked – Bridging Impedance
(parallel console)
25 12/10
Page 30

Installation ICP9000 Navigator Installation and Service Manual
The Figure 9 shows the positions on the upper portion of the CSD slave board.
Figure 9. 2-Wire/4-Wire Jumper Configuration
12/10 26
Page 31

CARD Suite Programming Software
General Description
GAI-Tronics’ CARD Suite Programming Software, included in the No. XAC4000A Programming
Bundle CD, is needed to program some of the functions and parameter settings of the dispatch equipment.
It allows entry of operational programming data into your personal computer for transfer to the
equipment. The programmed data can be retrieved, edited, archived, and printed in hard copy for record
keeping. Detailed programming information can be found in CARD Suite’s Help file. The following
information is provides as guidance to ini ti ate the prog ram m ing applicat ion.
Connections
The GAI-Tronics equipment must be connected to your personal computer with the programming cable,
part number XAC0170A, before the programming software can be used. To make this connection, attach
the cable to the COM1 or COM2 connector on the computer. Connect the other end to the programming
jack on the GAI-Tronics equipment.
Installation
The minimum system requirement necessary to support the CARD Suite Software Application is
Windows 95 or newer. However, CARD Suite is not compatible with Windows NT. It is compatible
with Windows XP (Home or Profes sio nal ), Vist a, and Window s 7 when used in Virtual Mode.
The CARD Suite Programming Application components are contained on CD-ROM. Please exit all other
programs that are running until the installation is complete.
1. Place the CD in the PC’s CD-ROM drive. If the “auto-run” feature on your CD-ROM drive is
enabled, a program selection chart will be displayed. Select Card Suite for downloading. If for any
reason the installation does not start up automatically, it can be run from the Start menu.
Select the
where x represents the drive letter that is associated with your CD-ROM drive. A CARD Suite icon
should appear on the desktop display after successful installation.
2. After opening the program, select the appropriate product icon, click on File in the toolbar and select
New Archive to begin creating an archive.
3. Enter an archive description (name) and customer/site (name), select the method of creating the
archive (default values or reading a connected unit), and click Ok button to create the archive.
4. View the Help file for programming guidance.
START button and then select Run from the Start menu. At the prompt, type x:\Setup.exe
27 12/10
Page 32

CARD Suite Programming Software ICP9000 Navigator Installation and Service Manual
12/10 28
Page 33

Naviga tor Configuration
Customizing the Navigator Desktop
The Navigator offers great flexibility in customizing the layout to suit each operator. Customization
allows the following:
• The boarder of each channel can be color-coded per operator to group similar services.
• The channels can be placed in the channel area above the information window in any position or
order per operator to ease use and to reduce eye fatigue.
• The individual channel selection button labels and their associated programmable button labels are
configurable.
• The four alert tone button labels are configurable.
• The toolbar buttons can be reordered or even removed per operator.
• The assignment and order of available paging aliases per operator.
• Access to certain features can be restricted by removing menu bar items per operator.
• The application can be configured per operator to prevent exiting the Navigator and to restrict access
to other windows programs and display settings.
Administrator Log On
When starting the application for the first time, a logon screen appears. Enter the user name and
password, and press
OK. This is the Administrator User name and Password.
Figure 10.
29 12/10
Page 34

Navigator Configuration ICP9000 Navigator Installation and Service Manual
Menu Functions
File Open
Opens and copies the database ICP9000Config.mdb to the specified path. This is used with a previously
saved database. The database includes all user profiles.
Figure 11.
12/10 30
Page 35

ICP9000 Navigator Installation and Service Manual Navigator Configuration
File Save
Saves the database to a path determined by the user. Use the Open function to retrieve the originally
saved database.
Figure 12.
The above section refers to backing up the profile database.
File Exit
Closes the ICP9000 Navigator GUI application.
Setup - Select Com Port
This selection can be set in the operator setup and should only be enabled only for authorized personnel.
This selects the current communications port to connect to the main CPU.
WARNING
ALL Communications between the MCU and the PC cease during this selection.
Figure 13.
31 12/10
Page 36

Navigator Configuration ICP9000 Navigator Installation and Service Manual
Setup - Configure Database
Use this form to add the channel button labels, programmable button names, and alert tone button labels.
N
OTES:
1. Channel button labels must be 12 characters or less, programmable button names must be six
characters or less, and alert tone labels must be six characters or less.
2. If no label is desired on a particular button, enter one or more spaces in the field for that button. This
includes Programmable Buttons 1 and 2 as well as the four Alert Tone buttons.
Figure 14.
Setup - Audio Options
Audio options are established for host PC sound card settings. Use this form to set up audio parameters
Mixer name, Master Volume, and Line In. Mixer name must be chosen first. Only one name is available
unless there is more then one sound card. The names for Master Volume and Line In are dependent on
the sound card manufacturer.
Figure 15.
12/10 32
Page 37

ICP9000 Navigator Installation and Service Manual Navigator Configuration
Setup - Operator Setup
The Operator Setup form contains two tabbed sections, Operator Options and One-Touch Options. The
Operator Options tab is divided into four sections, Operator Options, Tool Options, Channel and Control
Selection, and is used to configure the operator char ac teri st ics fo r an indiv idual op era tor pro file. The One
Touch Options tab defines the aliases, and the order of the aliases assigned to an individual operator’s
profile.
When either tabbed window is active, the window always displays the
NEXT buttons. The buttons represent func tio ns tha t are relate d to the opera tor pro fi le, not the indiv idu al
SAVE, DELETE, EXIT, PREVIOUS, and
options displayed in the tabbed window.
The name of the current operator
profile is displayed in the status bar
at the bottom of the window.
To create a Setup file for another
operator, press the
NEXT button.
When all operator parameters are
configured, press the
SAVE button to
save current operator configurations
before pressing the
EXIT button to
close the form.
DELETE button will remove the
The
current operator's profile from the
system. The
NEXT and PREVIOUS
buttons are used to navigate alreadydefined operator profiles.
OTE: Allowing the pointer to
N
hover over a selected option will
initiate its tool tip.
Figure 16.
Operator Options
Each operator is assigned a unique
user name and password. When
defining the operator profile, the
password must be entered twice to
ensure accuracy of the assigned
password.
The Operator Options portion of the
form enables the user to select which
options are made available to each
individual operator.
33 12/10
Page 38

Navigator Configuration ICP9000 Navigator Installation and Service Manual
Tool Options
The Tool Options allow the user to configure which buttons are available in the Navigator tool bar for
each individual operator. The factory default setting displays all available buttons.
Channel Selection
The Channel Selection section determines which channels are displayed in the main window for each
individual operator.
Control
The Control portion has four different modes of operation that determine what action the display takes
after a button press.
1. Display Always On - the operator will be unable to close the Control form.
2. Push On/Off - using the Control tool options button, the operator has the ability to display the Control
form and close the form.
3. Auto Extinguish - the Control form is closed five seconds after a control button is pressed.
4. Inactivity On/Off - Control form is automatically closed if a control button has not been selected
within a pre-programmed amount of time set by the timeout.
12/10 34
Page 39

ICP9000 Navigator Installation and Service Manual Navigator Configuration
One Touch Options
The One Touch Options portion of the form enables the user to select which aliases are available to each
individual operator.
The left window displays all aliases that are unassigned to this operator. The right window displays those
aliases assigned to this operator.
Pressing the
REMOVE button will remove all assigned aliases and put them back into the unassigned alias list.
ADD button will move all unassigned aliases to the assigned alias window. Pressing the
The drag-and-drop feature allows
the user to add single aliases to the
assigned alias window, one alias at a
time. Similarly, assigned aliases can
be removed from an operator by
dragging and dropping to the
unassigned alias window on the left.
The order of assigned aliases can be
changed using the drag-and-drop
feature.
Default Profile/User
It is advisable for the system
administrator to create a “defau lt ”
profile/user upon initial
configuration of the Navigator. The
default profile/user is initialized
under two conditions:
Figure 17.
1. If the Navigator software is
closed out and re-started, or
2. If a user logs off through the
Log On screen.
Under these two conditions, the
Navigator automatically logs off any
user and loads the default
profile/user screen. If no default
profile/user is set, the Navigator
loads a predefined default
profile/user. This predefined
profile/user allows access t o all
button presses; however, it has very
limited access to menu/con fig ura tion
screens.
35 12/10
Page 40

Navigator Configuration ICP9000 Navigator Installation and Service Manual
Setup - Control Setup
The Control Display is divided into 32 frames. Each frame contains setup functions for an individual
control button. The control caption box allows up to 13 characters for alias labeling. Choosing the
Momentary button causes the output to be turned on until the control button is released. The
PushOn/PushOff choice latches the button in either the On or the Off position. The Timeout selection
causes the output to turn off when the time expires. The timeout can be programmed from one to 100
seconds. Use the box in the upper right hand corner to program the communication port for the I/O
control. When all parameters are configured, press the
press the
OTE: If Timeout is selected, the button acts as a push on/off. When the timeout expires the output is
N
EXIT button to save and close the form.
SAVE button to save current configurations or
turned off.
If selected, the Disable choice prevents the control button from being displayed on the screen (default
setting). Any selection other than Disable allows the Control button to be displayed.
Figure 18.
12/10 36
Page 41

ICP9000 Navigator Installation and Service Manual Navigator Configuration
Setup - Card Su ite File
The operator uses this menu item to open a Card Suite configuration file. An existing archive file must be
exported from the ICP9000 using the Card Suite software, creating a filename with the .cst extension.
The Navigator GUI opens this file, and extracts the paging alias information from the archived data. The
paging alias information is used when configuring the available one-touch paging aliases for operator
profiles.
Tools – Error Log
Shows a view of all the communication errors received from main CPU.
Figure 19.
37 12/10
Page 42

Navigator Configuration ICP9000 Navigator Installation and Service Manual
Tools - Options – Create Profile
While this form is visible, the layout of the desktop can be configured. Several aspects of the GUI can be
altered to allow for different profiles:
The position of each channel can be changed by clicking on and dragging the frame of a channel to a new
location.
The frame color of each channel can be selected by double clicking on the frame of the channel. The
color can then be selected based on the standard color palette.
The position of each toolbar button can be changed to group functions together by right clicking and
dragging the toolbar button to a new location. Pressing the
ALIGN button center justifies the newly
ordered Tool Option buttons, preserving the horizontal alignment, and preventing buttons from
overlapping each other.
The position of where pop-up forms, such as multi-select, paging, secure, and signaling, can be changed
by turning on the function and clicking and dragging the window to the desired location.
Right-handed and left-handed operation can be selected from the Window, Organize menu.
Once the layout is satisfactory, the profile can be saved according to a dispatcher’s login name. This
profile can then be recalled by logging in with that user name. The shortcut key for this form is
<Ctrl+P>.
Figure 20.
12/10 38
Page 43

ICP9000 Navigator Installation and Service Manual Navigator Configuration
Tools - Options - Save Profile
Saves settings to the current user logged on. The shortcut key combination is <Ctrl+S>.
Tools - Reset Console
This reboots the console’s MCU.
Logon
The Operator Log On box allows the user to login to Navigator. If a profile had been saved for that user,
the settings are applied.
Figure 21.
OTE: If the operator selects LOG OFF, the Navigator resets to its default screen.
N
39 12/10
Page 44

Navigator Configuration ICP9000 Navigator Installation and Service Manual
Diagnostics
Opens a window where console diagnostics can be accessed. This screen is password-protected and
should only be accessed by authorized personnel.
Window - Organize
Allows the toolbar to be organized for left- hand or right-hand operation.
12/10 40
Page 45

Console Diagnostics
Entering the Diagnostic Mode
The ICP9000 Navigator Series Console contains several internal diagnostics designed to assist in the
installation and servicing of the unit. The opening menu for these diagnostics is accessed by selecting
Diagnostics from the menu bar. Each of the selections from the opening menu links to another menu that
lists settings or other diagnostic and installation aids.
ICPN9000 Navigator Series
1) USER PARAMETERS
2) SERVICE DIAGNOSTICS
<1-2> TO SELECT <MODE> TO EXIT
Figure 22. Diagnostic Menu
To restrict access to certain features in the diagnostic mode, the security level under service diagnostics
can be used. When one of these menu items is selected, depending on the security level setting, you may
be prompted to enter a service password. The service password is 1490. If an incorrect password is
entered, nothing happens and you can press the
MODE key to return to the normal operations.
• Press 1 to advance to the User Parameters menu. This menu is used to set certain operational
characteristics of the console. If the security level is set to 1 or highest, entry of the service password
is required.
• Press 2 to advance to the Service Diagnostics menu option. This menu allows access to the internal
diagnostics and to wire line transmission and receive level settings. If the security level is set to 2 or
moderate or higher, entry of the service password is required.
• Press the
MODE button to exit the current menu and return to the previous menu or normal
operations.
Setting the security level to 3 or none allows access to any of the service/user menus without the need to
enter the service password.
41 12/10
Page 46

Console Diagnostics ICP9000 Navigator Installation and Service Manual
User Parameters Menu
The User Parameters menu is shown below.
USER PARAMETERS
1) SIDE TONE VOLUME ADJUST
2) MIC SELECTION/SENSITIVITY
3) PRINTER ERROR
<1–3> TO SELECT <MODE> TO EXIT
Figure 23. User Parameter Menu
Side Tone Volume Adjust
Side tone is the tone as heard by the operator during tone generation. There are several tones generated
by the console that can be lowered when using a headset to reduce ear fatigue. These tones include error
beeps, paging tones, alert tones and talk-prohibit tones.
When the operator elects to adjust the side tone volume, the console displays the current volume and the
instructions on the display as shown below. To adjust the side tone volume, use the
SCROLL Up or
Down buttons to the right of the information window. A beep is generated as the volume is adjusted to
allow the volume to be set to a comfortable level. When the level is correct, press the
USER PARAMETERS
1) SIDE TONE VOLUME ADJUST 5 <SCROLL UP/DOWN>
2) MIC SELECTION/SENSITIVITY
3) PRINTER ERROR
<MODE> TO EXIT
MODE key to exit.
Figure 24. Side Tone Volume Adjust
12/10 42
Page 47

ICP9000 Navigator Installation and Service Manual Console Diagnostics
Microphone Selection and Sensitivity
There are two microphone ports available on the Navigator when microphones are locally connected to
the Navigator MCU. These are the desk/hand/headset port and the gooseneck port. By default, the
Navigator is shipped with the desk/hand/headset port selected. If a gooseneck microphone is to be used,
it must be selected from this menu and the proper sensitivity set.
When the operator elects to change the microphone or the microphone sensitivity, the console displays the
current microphone setting and sensitivity as shown below.
MIC SELECTION/SENSITIVITY
1) DESK/HAND/HEADSET
2) GOOSENECK <= SENSE: 3
<1–2> TO SELECT <MODE> TO EXIT
Figure 25. Mic Selection and Sensitivity Menu
The sensitivity of the microphone actually controls the microphone compressor and does not adjust the
output level of the microphone. The microphone audio is limited to a certain level to prevent distortion
and clipping of voice audio. Increasing the sensitivity of a microphone simply adds pre-gain to the
microphone so that less pronounced voices will have pre-amplification applied. A louder voice would
require less amplification for best audio performance so a lesser sensitivity would be used.
Automatic microphone selection can be used when a headset or handset is used from time to time and the
operator wishes to revert to another microphone when neither of these is in use. For example, to use the
gooseneck microphone when the handset is on-hook, select the Desk/Hand/Headset until an
A appears
after the selection and select the gooseneck microphone as shown in the information window above.
When the headset is connected or the handset is taken off-hook, it now becomes the active microphone
and the gooseneck microphone is disabled. When the headset is disconnected or the handset is placed
back on-hook, that microphone is disabled and the gooseneck microphone is again active. To disable this
feature, repeat the procedure above until an
M is displayed after the selection. The setting of this feature
is maintained until changed by the operator.
43 12/10
Page 48

Console Diagnostics ICP9000 Navigator Installation and Service Manual
Printer Error Messages
The console supports the use of a serial printer to log decoded ANI information as well as access to other
diagnostic data. If the printer is enabled through the CARD Suite software and the console detects and
error, PRINTER ERROR is displayed on the bottom line of the information window unless the printer
error message is disabled. This is useful to detect when the printer has lost power or is out of paper.
To disable or enable the printer error, enter the printer error screen. The console displays the current
setting as shown below.
USER PARAMETERS
1) SIDE TONE VOLUME ADJUST
2) MIC SELECTION/SENSITIVITY
3) PRINTER ERROR: ON (1=ON, 2=OFF)
<MODE> TO EXIT
Figure 26. Printer Error Message Enable
Service Diagnostics
The Service Diagnostics mode is used in servicing the unit and should only be used by a service
technician. If you enter this mode, press the
1) AUDIO 4) PAGE LEVEL
2) INTERNAL 5) SECURITY
3) ALERT LEVEL
<1–5> TO SELECT <MODE> TO EXIT
Figure 27. Service Diagnostics Menu
Audio Diagnostic
When 1 is pressed from the Service Diagnostics menu and the correct password has been entered, the
audio/communication test s elec t ions are shown. These tests are desc ribed below.
Test 1 – Communications Test
This test exercises communication between the console’s microcomputers. During this test, a constant
2000 Hz should be present at the selected speaker and a “gated” (that is, alternately on and then off)
2000 Hz signal should be present at the unselected speaker.
MODE button to return to the console main diagnostic menu.
SERVICE DIAGNOSTICS
Also during the test, the information window shows three numeric fields that indicate communication
status between the microcomputers. The third numeric field indicates communication errors and should
remain 00 as long as the test is running.
If the correct signals are not heard at the speakers or the third numeric field does not show 00, service is
required to correct the problem .
12/10 44
Page 49

ICP9000 Navigator Installation and Service Manual Console Diagnostics
Test 2 – Audio Loop Test
Before running this test, any external connections that configure the console for 2-wire operation should
be removed. Test 2 allows testing the wire line input and output audio paths for any channel. To execute
this test, place different audio sources on the receive wire line connections for each channel to be tested.
The output on each of the console’s channels should be the sum of these audio sources.
For example, if 1000 Hz is placed on the receive wire line connections for channel 1 and 2000 Hz is
placed on the receive wire line connections for channel 12, then a signal that is the sum of the 1000 Hz
and 2000 Hz signals should be present on the transmit wire line connections on every channel.
If the audio loop test fails, check the connection between the channel I/O pins and the slave board. If
these connections are in order, then the slave board should be replaced.
OTE: For proper operation, the slave must be configured as a 4-wire using JU602, JU606, JU610, and
N
JU614.
Test 3 – Output Adjust
NOTE: Use this test to adjust the overall line output (transm it ) leve l for each channel.
Test 3 allows setting the level of high level guard tone output on the console’s wire lines. During this
test, 2000 Hz is output on each channel. Pressing a channel’s
VOL Up/Down buttons allows increasing or
decreasing the level of the tone output on that channel.
When the output level on each channel matches the desired level of high level guard tone (usually +2
dBm), press
MODE to exit the Audio Diagnostics menu. Then, you are prompted to save the output levels
just selected. To save these levels, press 1; to abandon changes and exit, press 2.
Test 4 – Gain Stage Test
This test allows verifying that the output gain control circuitry for each channel is working properly.
Upon entry into this test, 2000 Hz at the highest output level (approximately +10 dBm) is placed on each
channel’s wire line. Then, every 4 seconds, the level of this tone is decreased by 6 dB until it reaches the
lowest level changes back to the highest setting, and the test begins again. If this test fails, the slave
board should be replaced.
Test 5 – Input Level Adjust
NOTE: Use this test to adjust for the proper line input (receive) level for each channel.
This mode allows the expected input level for each channel to be set to control the non-compressed level
of the each receive audio compressor. If the receive audio for a channel is expected to be -12 dB, the
level for that channel should be set to -12 dB. The MCU adds this amount of gain to the channel in order
to achieve the optimum internal operating audio level. During com press ion, this g ain is reduced to keep
the receive audio at a nominal level. When the audio is no longer above the compression threshold, the
MCU releases the compressor back to the original setting. The range is 0 dB to –24 dB, in 6 dB steps.
MODE to exit this test.
Press
45 12/10
Page 50

Console Diagnostics ICP9000 Navigator Installation and Service Manual
Internal Diagnostics
Internal diagnostics are used to ensure the proper function of certain aspects of the MCU. Certain internal
tests may be performed to test the operation of a console feature or to troubleshoot a problem. For certain
tests it is advised to disconnect the MCU from any landlines or other devices before performing the test.
1 - Supervisory
This test allows the optional supervisory board to be tested. The Supervisory test exercises supervisory
control on each channel.
2 - Phone
This test of the optional phone-patch board allows audio to be routed to and from the phone patch board
and to verify the I/O port of the external phone interface.
3 - DC
This test allows the optional dc boards and channels to be tested. The channel positions for dc boards and
the current output on each board can be tested.
CAUTION
The MCU can generate in excess of 160 V dc at 15 mA on the line outputs
during this test and maintains this voltage after the test during a no-load situation. Care should be
taken to ensure that contact is not made with the line out connections of the MCU during or several
minutes after executing this test.
4 - RS-232
This test allows the RS-232 printer/programming port to be tested. The transmit and receive paths of the
RS-232 are checked as well as the transmit and data paths of the RS-232 cable. This is done by shorting
transmit and data at pins 10 and 11. For this test, the TX and RX pins of the RS-232 port must be
connected.
OTE: This diagnostic does not test the communications between the MCU and the PC. The
N
communications between the MCU and the PC are tested automatically during operation. A failure in the
communications between the MCU and the PC is automatically detected and reported to the console
operator via the PC monitor.
5 - I/O Pins
This test allows the general purpose and encode in/out pins of the RS-232 port to be tested.
6 - E&M
This test allows the optional E&M board to be tested. The E&M board exercises the M lead outputs and
reads the E lead inputs for each channel present.
7 - Memory
This test allows CARD Suite parameters in hexadecimal form to be examined in the information window.
OTE: If any values in this window are modified, they are immediately saved and could affect the proper
N
operation of this unit.
12/10 46
Page 51

ICP9000 Navigator Installation and Service Manual Console Diagnostics
Alert Level
When 3 is selected from the Service Diagnostic menu, and the correct password had been entered, the
Alert Tone Level may be adjusted. The alert tone level is adjusted by using the scroll keys to increase or
decrease the tone level. The available adjustment levels are –15 dB to 0 dB in –3 dB increments.
Page Level
When 4 is selected from the Service Diagnostic Menu, and the correct password had been entered, the
Page Tone Level may be adjusted. The page tone level is adjusted by using the scroll keys to increase or
decrease the tone level. The available adjustment levels are –15 dB to 0 dB in –3 dB increments.
Security
When 5 is selected from the Service Diagnostic Menu, you are prompted to select the desired security
level using the numeric keypad. No security is useful during initial set-up and installation so the
password is not required while adjusting line levels and other levels. The highest security level provides
complete restriction to the consol e diag nostics and user adjustments.
47 12/10
Page 52

Console Diagnostics ICP9000 Navigator Installation and Service Manual
Start-Up Display
Boot-Up Error Code Definitions
The following error codes are displayed automatically upon boot-up:
Master – 00
If anything other than 00 is displayed for the master error, contact GAI-Tronics field service.
Slave – 00 00 00
00 = OK
01 = Slave not present
02 = Slave malfunction
04 = Slave malfunction
06 = Slave malfunction
80 = Slave malfunction
Options Code Definitions
Any options that are installed are identified by the option codes in the information window. They are as
follows:
• ENC = Paging Encode • MLS = Multi-Line Select
• SLT = STAT-ALERT (MDC1200) • MFQ = Multi-Frequency
• PMC = Positive Mode Control • CDC = DC Option
• DEC = DTMF Decode • E&M = E&M Option
• SUP = Supervisory Control • CTH = Full Duplex Phone Board (External Interface)
• CTI = Telephone Interface (Direct)
CARD Suite Softw are Version
Version x.x.x : The CARD Suite version that programmed the console.
Firmware Version – Host – DSP – Display CPK
Firmware Version: NAVXX HNAVXX MASTXX
12/10 48
Page 53

Fea tures and Options
The ICP9000 Navigator contains several software and hardware enabled options. Each software option
can be enabled or disabled using the CARD Suite Software so that the feature is not present in the console
during use. Refer to the CARD Suite software on-line help for more information.
Hardware options are automatically enabled when the hardware is installed in the MCU. However, the
option may have to be enabled and configured using the CARD Suite Software prior to use. Refer to the
CARD Suite software on-line help for more information.
DTMF Decode
The DTMF decode feature adds automatic number identification (ANI) capability for systems using
DTMF (dual tone multi-frequency) signaling. DTMF Decode must be enabled and programmed for your
system using the CARD Suite Software. For details refer to the online help in the CARD Suite Software
application.
16-Frequency Control
This standard feature allows up to 16 frequencies with individual aliases to be programmed for each
channel of the ICP9000 Navigator. By default, the console is configured with one active frequency. To
enable more frequencies, the CARD Suite Software must be used.
Using the CARD Suite Software, each channel can be configured to use 1 to 16 frequencies per channel.
If less than four frequencies are enabled for a channel, the F1 – F4 keys function as individual frequency
select buttons on that channel. If, however, five or more frequencies are enabled for a channel, the F1 F4 keys assume the function of SELECT, UP, HOME and DOWN for that channel. Refer to the ICP9000
Navigator Series Console Operator’s Manual, available in the XAC2000A Navigator Software, for
complete user instructions.
Paging Encode
The paging encode feature adds support for DTMF, 2-Tone sequential, Plectron, 5/6 Tone, 1500, 2805
and immediate DTMF paging operation. Each paging type and the parameters for each must be
configured using the CARD Suite Software. Refer to the Paging section of this manual, and the ICP9000
Navigator Series Console Operator’s Manual (ava ilable in the XAC2000A Navigator Software) for
paging encode, and the on-line help in the CARD Suite Software for details of configuration and
operation.
49 12/10
Page 54

Features and Options ICP9000 Navigator Installation and Service Manual
Positive Mode Control/Secure
The Positive Mode Control feature is used to control a secure-equipped base station. In this modified
tone-control scheme, there are two function tones present in any tone sequence that causes the radio to
transmit. Immediately following the high level guard tone, there is a coded/clear function tone that
instructs the radio equipment whether or not voice audio is to be encrypted. The normal transmit function
tone follows the coded/clear function tone.
Up to four Console Interface Units (CIUs) can be connected to and controlled by the ICP9000 Navigator
MCU through the I/O pins of the RS-232 & I/O. These pins are assigned automatically to channels that
have secure operation enabled via the CARD Suite Software.
The assignment is made in the order of the channels programmed: That is, the first secure channel from
channel 1 to 12 will have I/O pins 7 and 12 assigned, the second secure channel will have I/O pins 8 and
15 assigned to it. This continues until all four pairs of CIU I/O connections have been used. Any other
secure channels are not assigned I/O pins. Refer to Table 14 for pinout information in connecting the
CIU to the MCU. Refer to Table 14 for pinout information in connecting the CIU to the MCU.
Table 13. CIU Pin Connection
Pin No. Pin Function Description
P912-8 Clear PTT Input to CIU instructs either a clear/coded signal to be sent.
P912-11 RCV DVP Output from CIU indicates receive audio was decrypted.
Table 14. RS-232 & I/O – DB15 Male Connector
Pin No. Pin Function Asserted State
1 Encode control IN 4 Indicates that receive audio on CIU 4 is coded
2 Encode control IN 3 Indicates that receive audio on CIU 3 is coded
3 Encode control OUT 3 Instructs CIU 3 to transmit in the clear mode
4 Encode control OUT 4 Instructs CIU 4 to transmit in the clear mode
5 General Purpose I/O 2
6 General Purpose I/O 1
7 Encode control OUT 1 Instructs CIU 1 to transmit in the clear mode
8 Encode control OUT 2 Instructs CIU 2 to transmit in the clear mode
12 Encode control IN 1 Indicates that receive audio on CIU 1 is coded
15 Encode control IN 2 Indicates that receive audio on CIU 2 is coded
12/10 50
Page 55

ICP9000 Navigator Installation and Service Manual Features and Options
Printer Interface
The Printer feature, when enabled through the CARD Suite Software, allows a printed log of receive
DTMF decode and signaling information to be captured. Optionally, an application such as Windows
HyperTeminal may be used on the Navigator PC to capture this data.
NOTE
The printer feature requires the use of a serial printer. A parallel printer output
is not available.
Installation
1. Use the CARD Suite Software application to configure the console. The Printer Installed selection
(Console Parameters tab) must be enabled. Select the desired Printer Incoming Messages and Printer
Outgoing Messages on the Digital Signaling Console Parameters tab.
2. After programming has been completed, disconnect the programming cable from the RS-232 port.
3. Attach a customer-provided 25-pin serial interface (DB25) from the printer interface cable to the
printer and the 15-pin interface to the RS-232 & I/O connector on the MCU. Secure the plug screws
on each interface. Refer to the printer’s instruction manual for information concerning printer use.
Table 15.
Connect to: Pin
Description Navigator
DB25 (Printer) DB9 (PC)
Ground 9 7 5
TX Data 10 3 2
RX Data 11 2 3
DSR 13 11 4
DTR 14 6 6
The following cables are available:
• Model XCP0170A – connects from the MCU’s RS-232 and I/O connector to the PC’s RS-232 port
(DB9). This cable is also used to program the MCU with the CARD Suite Software application.
• Model CP-SPTR-CBL – this is a serial printer cable that connects from the MCU’s RS-232 and I/O
connector to the printer’s 25-pin serial port.
51 12/10
Page 56

Features and Options ICP9000 Navigator Installation and Service Manual
Logging Recorder Output Module
This standard feature consists of an additional board that is installed in the ICP9000 Navigator MCU.
This feature adds a logging recorder output that provides a line-level sum of the transmit mic audio,
paging tones, receive audio, parallel console audio, and all signaling. This 600-ohm balanced output
should be connected to a suitable logging recorder to record all audio activity taking place on the console.
Refer to Figure 3 in this manual for the Logging Output connector location on the rear panel.
OTE: The signaling control/module and the logging recorder output module are mutually exclusive. If
N
signaling control is required, the logging recorder module must be removed because they both occupy the
same board location. These two features can not co-exist.
DC Control CP0010/XCP0010A
This option provides standard dc control currents on a per channel basis. Its operation requires the
installation of one CDC card for each dc-controlled channel.
Installation/Relocation
1. Disconnect power from the ICP9000 Navigator MCU.
2. Remove the ten screws securing the side cover panel and gently lift the cover. See Figure 28 below.
Figure 28.
3. Disconnect all plugs attached to the inner slave board mounting plate. See Figure 28. Then remove
the four screws attaching the mounting plate to the main enclosure. This allows you to remove the
mounting plate.
12/10 52
Page 57

ICP9000 Navigator Installation and Service Manual Features and Options
Figure 29.
4. Remove the bypass shorting jumper(s) (JU620 or JU621 or JU622 or JU623) associated with the
channel(s) being modified to dc.
5. Mount the XCP0010A DC Control Option CDC board to the appropriate slave board (1, 2, or 3) and
channel (1, 2, 3, or 4 for each board). The CDC board must be mounted on the bottom side of the
slave panel, engaging the P62x and JU62x headers on the CSD PCBA.
6. Fasten the CDC board to the inner PCBA mounting plate using the three supplied #4-40 screws. See
Figure 29.
7. After the PCBAs have been properly mounted, you may reassemble the MCU by reversing the
disassembly procedure. Verify that all CSD-to-main board ribbon cables are properly positioned into
their protective guides and connected to their respective main board connectors as follows:
Table 16. Main Board-to-CSD Slave Board Connectors
Channel Main Board Connector
1-4 P1
5-8 P2
9-12 P3
N
OTE: The XCP0010A DC Control Option has been factory-calibrated to provide the standard
control currents and does not normally require field adjustment.
10. Reconnect power to the ICP9000 Navigator MCU.
After the MCU has been reassembled, it is necessary to program the MCU. Using the CARD Suite
software, edit the channel parameters accordingly.
53 12/10
Page 58

Features and Options ICP9000 Navigator Installation and Service Manual
4-Channel E&M Control CP0040/XCP0040A
The 4-Channel E&M Control Option consists of an additional board that must be installed into the
required supervisor option CP0050/XCP0050A of the MCU. This option adds E&M control in groups of
four channels, up to 12 channels, to the console.
In addition to the transmit and receive audio lines, E&M control uses two pairs of leads, M-lead pair and
E-Lead pair, to provide control between the console and the base station. The connection to the
transmitter should include the transmitter’s M-lead input and the transmitter’s common (positive or
negative ground). Polarity of the M-lead pair is not important as each M-lead pair is implemented with a
solid-state relay which provides a contact closure between the pair and provides up to 4000 V
between the console and the transmitter. The M-lead can switch up to 350 V dc at 130 mA continuous.
The E-lead connection to the receiver should include the receiver’s E-lead output and the receiver’s
common (positive or negative ground). The console’s E-lead is asserted when an approximate 0.6 V dc
or greater differential is applied across the E-lead pair. Polarity of the E-Lead pair is not important as the
E-lead is implemented using a bi-directional optocoupler providing 5000 V
isolation. Each E-lead
RMS
input can tolerate up to 50 V differential across the input pair.
If supervisor control of parallel consoles is required, the E&M output lines from those consoles should be
plugged directly into the
CONSOLE connection of the E&M supervisor option. This ensures that parallel
consoles are not able to transmit on supervised channels.
isolation
RMS
To ensure that transmit audio from parallel consoles is also supervised, the landlin e audio connec tio ns
from the console to be supervised should be connected to the
FROM PARALLEL CONSOLE on the E&M
supervisor option as well. The supervisor M-lead input is also implemented using a solid state relay that
maintains the necessary isolation.
Refer to the CARD Suite Software for details on configuring E&M control and supervisor control when
installing this option. Refer to Table 17 for the pinout of the E&M connectors as seen in Figure 31.
Table 17. Radio E& M Connections
Channel M-Lead E-Lead
1 6 & 5 16 & 15
2 8 & 7 14 & 13
3 10 & 9 4 & 3
4 12 & 11 2 & 1
The mating connector for the E&M connection is the same style as used to mate with a Motorola GM300
radio. The AMP Part No. is 104422-1 and should be available through most radio dealers.
12/10 54
Page 59

ICP9000 Navigator Installation and Service Manual Features and Options
Supervisory Control CP0050/XCP0050A
The Supervisory Control option provides the ability to override parallel consoles on selected channel(s) to
comply with FCC regulations. The unit mounts as a “bustle-back” on the rear panel of the console. Refer
to the ICP9000 Navigator Series Console Operator’s Manual, available in the Help menu of the
XAC2000A Navigator Software, for user instructions for the supervisory control.
Direct Enhanced Full Duplex Phone Interface CP0070 (Option Code CTI)
The Direct Enhanced Phone Interface option consists of an optional telephone interface board. It adds a
PSTN phone interface, inbound and outbound phone calling capability, phone patch and radio patch
features to the ICP9000 Navigator.
Ring Detect Sensitivity
Jumper J400 is provided to allow operation under a wide range of ring voltages. It provides two ring
sensitivities:
• JU400 IN (default) – 70 V ac ring voltage
• JU400 OUT (parked) – 25 V ac ring voltage
Refer to the ICP9000 Navigator Series Console Operator’s Manual, Pub. 43004-025, available in the
XAC2000A Navigator Software, for complete user inst ruction s.
55 12/10
Page 60

Features and Options ICP9000 Navigator Installation and Service Manual
External Enhanced Full Duplex Phone Interface CP0060 (O ption Code CTH)
This optional interface includes a telephone interface board. It allows connection to an external telephone
unit, such as a 911 phone, and adds inbound phone call capability, phone patch, and radio patch. Refer to
Table 18 for the pin description of the external phone inter fa ce connec to r.
Table 18. External Phone Interface Connector Pin Description
J400
Pin #* Description
1 Off-Hook Sense
2 Ring Mute Contact Closure
3 Handset TX Audio
4 Handset RX Audio
5 Handset RX Audio
6 Handset TX Audio
7 Ring Mute Contact Closure
8 Off-Hook Sense
*looking into connector, pin 1 is on the left
To activate the off-hook sense, pin 1 (or pin 8) should be connected to a 3–12 V dc source. When pin 8
(or pin 1) is grounded, the off-hook sense is activated. When activated, the console either automatically
takes the phone off-hook (if possible) or provides a ringing indication that an off-hook request is being
made. Refer to the ICP9000 Navigator Series Console Operator’s Manual, Pub. 43004-025, for user
instructions for the External Phone Interface option.
The ring mute provides a closure across pins 2 and 7 to deactivate an external ringer when the phone is
accessed.
12/10 56
Page 61

ICP9000 Navigator Installation and Service Manual Features and Options
25-Pair Telco Interface XCP0030A
The Telco Interface Kit adapts the DB25 rear panel co nnect ors to a single 50- pin stand ard connect or
USOCK designated RJ27X. The unit mounts on the rear panel of the ICP9000 Navigator MCU and plugs
into the three DB25 connectors, P40 (a) (b) (c). The Model XCP0030A 25-Pair Telco Interface Kit
includes the following components:
Qty Description
1 Telco Interface Adapter
2
6-32 × 1.625 screws
Installation
Rear Panel Mounting
1. Disconnect the power from the ICP9000 Navigator MCU and remove all attached cables from the
rear cover. Remove stand-offs.
Figure 30.
2. Mount the Telco Interface to the rear of the MCU. Refer to Figure 30. Position the Telco Interface
so that the three DB25 connector plugs line up with the DB25 connector receptacles on the rear panel.
3. Secure the Telco Interface with the supplie d #6- 32 screws shown in Figure 30, tightening them until
the Telco unit is snug against the rear panel.
4. Plug one end of a standard RJ27X connector into the XCP0030A receptacle and terminate the other
end to an applicable punch block. Mount the connector plug bracket over the 50-pin connector and
secure with two screws. The bracket secures the connector to the Telco interface.
5. Reattach all other cables and reconnect the power.
57 12/10
Page 62

Features and Options ICP9000 Navigator Installation and Service Manual
Supervisory Mounting
1. Disconnect the power from the ICP9000 Navigator MCU and remove all attached cables from the
rear cover. Remove the stand-offs.
2. Mount the Telco Interface (where applicable) to the Supervisory unit on the rear of the console.
Refer to Figure 31. Position the Telco Interface so that the three DB25 connector plugs line up with
the DB25 connector receptacles on the rear panel.
3. Secure the Telco Interface with the supplie d #6- 32 screws shown in Figure 31, tightening them until
the unit is snug against the rear panel.
4. Reattach all cables and reconnect the power.
OTE: The Supervisory unit input connectors and output connectors can each have a separate Telco
N
Interface unit attached.
Figure 31.
12/10 58
Page 63

ICP9000 Navigator Installation and Service Manual Features and Options
Table 19. RJ27X Telco Interface Pin Connections
Pair # (Pin #)
Pin Function (Pin #)
(for dc pos, neg)
Pair # (Pin #)
Pin Function (Pin #)
(for dc pos, neg)
1 (1, 26) TX 1 (14, 15) 13 (13, 38) TX 7 (8, 9)
2 (2, 27) RX 1 (1, 2) 14 (14, 39) RX 7 (10, 11)
3 (3, 29) TX 2 (3, 4) 15 (15, 40) TX 8 (12, 13)
4 (4, 29) RX 2 (5, 6) 16 (16, 41) RX 8 (24, 25)
5 (5, 30) TX 3 (8, 9) 17 (17, 42) TX 9 (14, 15)
6 (6, 31) RX 3 (10, 11) 18 (18, 43) RX 9 (1, 2)
7 (7, 32) TX 4 (12, 13) 19 (19, 44) TX 10 (3, 4)
8 (8, 33) RX 4 (24, 25) 20 (20, 45) RX 10 (5, 6)
9 (9, 34) TX 5 (14, 15) 21 (21, 46) TX 11 (8, 9)
10 (10, 35) RX 5 (1, 2) 22 (22, 47) RX 11 (10, 11)
11 (11, 36) TX 6 (3, 4) 23 (23, 48) TX 12 (12, 13)
12 (12, 37) RX 6 (5, 6) 24 (24, 49) RX 12 (24, 25)
Battery Revert XCP0080A
The standard battery revert feature consists of several components located on the main board of the
ICP9000 Navigator MCU. In order to provide for battery back-up, a secondary power source capable of
providing the necessary power for the MCU must be connected to pins 2 (+) and pins 1 or 4 (-) of the
main power connector, P5, of the MCU. Refer to Table 4 for details.
Audio Accessory Box XAAB002A
The Model XAAB002A Audio Accessory Box allows the Navigator MCU to be mounted remotely from
the operator position. It provides plug-in connection ports for footswitch, headset, desk microphone, and
telephone accessories. See XAAB002A Installation and Operation Manual, Pub. 43004-026 for product
specifics.
59 12/10
Page 64

Features and Options ICP9000 Navigator Installation and Service Manual
MDC1200 STAT-ALERT Signaling CP0650/TDN9413A
The ICP9000 Navigator’s MDC1200 Stat-Alert Signaling option supports encode and decode of
MDC1200 data. To access the signaling screen, press the
toolbar. The console enters signaling mode and opens the Signaling window as shown below.
Figure 32.
SIGNALING button located in the Navigator
RapidCall buttons on the ICP9000 Navigator are:
ALERT, RADIO DISABLE, RADIO ENABLE and EMR RESET.
CALL ALERT, SELECT CALL, RADIO CK, SHORT CALL
Call Alert and Short Call Alert are used to alert mobile operators away from their vehicles to call the
console operator. When a mobile radio receives a Call Alert, it will generate alert tones until the mobile
operator manually shuts them off or transmits.
Radio Check allows the console operator to determine if a mobile radio is operational or within range.
The mobile radio will return an acknowledgement that it received the Radio Check.
Radio Disable prevents radio use should a mobile radio be lost or stolen. An appropriately equipped
mobile radio that receives a Radio Disable message (specifically directed to that radio) will become
inoperative. Radio Enable re-enables a disabled mobile radio.
Select Call allows an individual ID or group to be called without disturbing other units. Select Call is
essentially a RapidCall paging feature. The receiving mobile will generate alert beeps prior to unmuting
its speaker.
All call types available in the Navigator, with the exception of Select Call, require an acknowledgement
from the destination radio unless the destination ID is a group ID or contains a wildcard digit. Most field
units can be programmed with a unique ID as well as a group ID to allow for addressing a number of
units as a group. Unique ID’s range from “0001” to “DEEE”. Note that “0000” is not a valid ID. A
group ID is any ID with the number ‘E’ or ‘*’ as the fourth digit and can range from “E001” to “EEEE”.
For example, the ID “E001” or “*001” is a group ID while “0E01” or “0*01” is not. A wildcard ID is any
ID containing an ‘F’ or ‘#’ in any location. Some examples of a wildcard ID are “#001”, “0F01” and
“####”. A wildcard ID matches any number. Therefore, a wildcard ID of “000#” matches any ID from
“0001” to “000E”. Note that the use of wildcards in the fourth position such as “#001” will not match a
group ID of “E001”.
12/10 60
Page 65

ICP9000 Navigator Installation and Service Manual Features and Options
The Navigator supports the printing or logging of RapidCall traffic. Upon receipt of any call type and for
clearing of Emergency Alerts, a printer log entry is made. Using CARD Suite, the printing of each type
of call, incoming and outgoing, can be enabled and disabled.
RapidCall signaling may be transmitted on a selected channel or on a CARD Suite-assigned channel.
Note that PTT-ID transmissions may be enabled or disabled on each channel and PTT-ID transmissions
occur on any channel in which PTT-ID transmission is enabled.
RapidCall Buttons
Call Alert
When the CALL ALERT button is pressed, the Signaling window changes to what is shown below.
Figure 33.
The second line of the information window flashes “*C A LL ALERT*.” The right side of this line shows
either the ID displayed on the top line of the queue, “UNIT _ _ _ _” or the last ID used. Refer to Figure
34 below.
MOTOROLA PL-A TRANSMIT
*CALL ALERT* UNIT _ _ _ _
1/2 UNIT 0339 0339 CALL ALERT 11:04A
2/2 UNIT 0339 0339 CALL ALERT 11:04A
<0-9/*/#> TO ENTER ID
<SCROLL UP/DOWN> TO SELECT ALIAS
Figure 34. Call Alert Display
61 12/10
Page 66

Features and Options ICP9000 Navigator Installation and Service Manual
Selecting a unit ID for transmission is accomplished in one of three ways.
• Instant Send – If a valid unit ID or alias name is shown on the second line of the information
window, the
TRANSMIT button may be pressed to immediately send the Call Alert to this ID.
• Manual Entry – A specific mobile unit ID can be entered using the numeric keypad. The ID entered
will be displayed on the second line of the information window. In case a mistake is made during
digit entry, the
entered, the
it is desired to enter an ID manually, the
CLEAR button can be pressed and another attempt made. When the correct ID is
TRANSMIT button is pressed to send the Call Alert. If an alias is currently displayed and
CLEAR button can be pressed to select manual entry mode.
• Alias List Entry – A pre-programmed alias can be selected by using the
buttons. When the desired alias is shown, the
addition to using the
ALIAS SELECT buttons, a quick select method is available using the letters
TRANSMIT button is pressed to send the Call Alert. In
ALIAS SELECT Up/Down
indicated on the numeric keypad. To use this feature, the alias list entry must first be selected by
pressing either
ALIAS SELECT button. Using the numeric keypad, the letters indicated on each key
will cause the alias beginning with that letter to be selected.
For example, pressing the ‘2’ key, will select the first alias in the list beginning with the letter ‘A’.
Pressing the ‘2’ key a second time will select the first alias beginning with the letter ‘B’. Pressing the
‘2’ key a third time will select the first alias beginning with the letter ‘C’. A fourth press of the ‘2’
key will again select the first alias beginning with the letter ‘A’. If, however, there are no aliases
beginning with the letter ‘B’, the second press of the ‘2’ key will select the first alias beginning with
the letter ‘C’. Likewise, if there are no aliases beginning with the lett er ‘C’, the thi rd press of the ‘2’
key will select the first alias beginning with the letter ‘A’. Changing the numeric key that is pressed
will cause the first letter of the key to be used to select the alias.
After selecting the unit ID, the
TRANSMIT button, the information window shows “WAIT” and, if configured, a printer log entry is made
TRANSMIT button is pressed to send the Call Alert. After pressing the
indicating all the pertinent information associated with the Call Alert. If the destination ID is a group or
wildcard ID, no acknowledgement of the Call Alert is required and, after pressing the
TRANSMIT button,
the Call Alert is sent and call alert mode is exited immediately.
If an acknowledgement is required and a radio respo ns e is receiv ed, the info rmation window reads
“ACKNOWLEDGED” and the acknowledgement is logged on the printer. If an acknowledgement is not
received, the information window shows “RETRY #1”, the Call Alert is automatically resent and a printer
log entry is made indicating the retry. Call Alert is sent up to a maximum of five times; the initial check
plus the four retries. If no response is received after the fifth attempt, the information window shows
“NOT ACKNOWLEDGED” and a printer log is made indicating the lack of acknowledgement.
The “ACKNOWLEDGED” or “NOT ACKNOWLEDGED” message will remain on the screen until the
next incoming message is received or another mode of operation is selected. At any time during the Call
Alert mode, the operator may exit by pressing the
CALL ALERT button a second time or the SIGNALING
button located in the Navigator toolbar.
12/10 62
Page 67

ICP9000 Navigator Installation and Service Manual Features and Options
Short Call Alert
For transmitting to older radio systems, a Short Call Alert may be used. A Short Call Alert is made by
pressing the
ALERT-S*.” Follow the above procedure in Call Alert for selecting a unit ID and sending.
Radio Check
SHORT CALL ALERT button. The second line of the information window will flash “*CALL
When the RADIO CK button is pressed, the Signaling window changes to that shown in Figure 33, but with
the
RADIO CK button depressed and lit. The second line of the information window flashes “Radio
Check.” The right side of this line shows either the ID displayed on the top line of the queue,
“Unit _ _ _ _” or the last ID used. Refer to Figure 35. Selecting a unit ID for transmission is
accomplished in one of the three ways discussed previously in the Call Alert section. However, since this
call type is designed to determine if a particular radio is within range, group and wildcard ID’s are not
permitted.
After pressing the
MOTOROLA PL-A TRANSMIT
*RADIO CHECK* UNIT 0 3 3 9
1/2 UNIT 0339 0339 CALL ALERT 11:04A
2/2 UNIT 0339 0339 CALL ALERT 11:04A
TRANSMIT button, Radio Check behaves in the same fashion as Call Alert.
<0-9/*/#> TO ENTER ID
<SCROLL UP/DOWN> TO SELECT ALIAS
Figure 35. Radio Check Display
Radio Enable/Radio Disable
Radio Enable and Radio Disable are activated by pressing the RADIO ENABLE or RADIO DISABLE button. As
a safeguard against accidental enabling or disabling of a radio, a window will be displayed upon pressing
the button, asking the operator to confirm that they wish to enable or disable a radio. If the operator
selects ‘Yes’, the second line of the information window flashes “*RADIO ENABLE*” or “*RADIO
DISABLE*.” Depending on how the console has been configured using CARD Suite, the right side of
this line may show either the ID from the displayed queue entry or “UNIT _ _ _ _”. Refer to Figure 36
and Figure 37.
63 12/10
Page 68

Features and Options ICP9000 Navigator Installation and Service Manual
Selecting a unit ID for transmission is accomplished in one of the three ways discussed previously in the
Call Alert section. However, since this call type must be used with care, group and wildcard ID’s are not
permitted.
After selecting a unit ID and pressing the
TRANSMIT button, Radio Enable and Radio Disable behave in
the same fashion as Call Alert. However, the acknowledgement for a Radio Enable and Radio Disable
differ from other call types. Instead of simply seeing that the call was acknowledged in the information
window, the addressed radio will respond with an inbound Radio Enable or Radio Disable message. This
inbound acknowledgement will be stacked in the queue as any other call as “RAD ENABL” or “RAD
DSABL” and a printer log of the incoming message will be made.
MOTOROLA PL-A TRANSMIT
*RADIO ENABLE* UNIT _ _ _ _
1/2 UNIT 0339 0339 CALL ALERT 11:04A
2/2 UNIT 0339 0339 CALL ALERT 11:04A
<0-9/*/#> TO ENTER ID
<SCROLL UP/DOWN> TO SELECT ALIAS
Figure 36. Radio Enable Display
MOTOROLA PL-A TRANSMIT
*RADIO DISABLE* UNIT _ _ _ _
1/2 UNIT 0339 0339 CALL ALERT 11:04A
2/2 UNIT 0339 0339 CALL ALERT 11:04A
<0-9/*/#> TO ENTER ID
<SCROLL UP/DOWN> TO SELECT ALIAS
Figure 37. Radio Disable Display
12/10 64
Page 69

ICP9000 Navigator Installation and Service Manual Features and Options
Select Call
When the SELECT CALL button is pressed, the second line of the information window flashes “*SELECT
CALL*.” The border indicator of the
SELECT CALL button flashes indicating that an ID may now be
selected. The right side of this line shows either the most recently received ID in the queue, “UNIT _ _ _
_” or the last ID used. Refer to Figure 38. Selecting a unit ID for transmission is accomplished in one of
the three ways discussed previously in the Call Alert section.
After selecting the unit ID, the
TRANSMIT button, the border indicator of the SELECT CALL button will light steady, the information
TRANSMIT button is pressed to send the Select Call. Upon pressing the
window will show “WAIT” and a printer log will be made. When the top right of the information
window shows “TALK NOW”, the operator may begin speaking. Select Call does not require an
acknowledgement even when a unique ID is used.
After releasing the
be made to the same ID by pressing the
TRANSMIT button, the ID can no longer be changed. Transmissions can continue to
TRANSMIT button again. Each transmission will generate a new
printer log entry. To change the ID, the operator must exit and reenter Select Call mode.
MOTOROLA PL-A TRANSMIT
*SELECT CALL* UNIT _ _ _ _
1/2 UNIT 0339 0339 CALL ALERT 11:04A
2/2 UNIT 0339 0339 CALL ALERT 11:04A
<0-9/*/#> TO ENTER ID
<SCROLL UP/DOWN> TO SELECT ALIAS
Figure 38. Select Call Display
Receiving RapidCall Transmissions
PTT and Post PTT
When a PTT or Post PTT ID call is received, the queue position, caller’s alias name (if programmed), unit
ID, call type and call time are displayed on the screen. A PTT call will be displayed as “PTT ID” while a
Post PTT call will be displayed a “P-PTT ID.” Upon receipt of this call, a printer log entry will be made
with the pertinent information. A maximum of 15 entries can be stored in the queue. This includes
RapidCall entries and DTMF Decode entries if the option is available. Emergency Alerts will take
precedence over all other call types when stored in the queue. Use the Up/Down buttons located to the
right of the information window to scroll through the queue. To remove a particular queue entry, use the
Up/Down buttons to place the entry on the top line of the queue in the information window and press the
DEL button located next to the information window. Note that Emergency Alerts may require clearing
before they can be removed from the queue.
Emergency A lert
When an Emergency Alert is received and the console is programmed to acknowledge emergency calls,
an acknowledgement is automatically sent back to the transmitting unit. Upon receipt of the Emergency
Alert, a printer log entry is made. The console will flash the alias name (if programmed), unit ID,
“EMERGENCY”, and a steady alert tone will be generated. In addition, the queue will be popped to the
top so that the Emergency Call is now visible in the information window.
65 12/10
Page 70

Features and Options ICP9000 Navigator Installation and Service Manual
Pressing the EMR RESET button will silence the alert tone and the queued emergency will stop flashing.
A printer log entry will be made indicating the time that the Emergency Alert was cleared by the operator.
To remove the Emergency Alert from the queue, press the
Emergency Alert from the queue using the
must first be cleared by the operator using the
DEL button will generate an error beep. The Emergency Alert
EMR RESET button.
DEL button. Attempting to remove a flashing
Non-emergency calls will be placed in the queue below any Emergency Alert. An incoming Emergency
Alert will always be placed at the top of the queue and be given the highest priority. When the
RESET button is pressed, the Emergency Alert at the top of the queue will be lowered in priority and
placed below any other, flashing Emergency Alerts. When the
EMR RESET button is pressed for the next
EMR
Emergency Alert at the top of the queue, it will be lowered in priority and placed below any other flashing
Emergency Alerts, and so on. Emergency Alerts will always be shown at the top of the queue until they
are removed from the queue by properly placing them on the top line of the queue in the information
window and pressing the
Call Alert
DEL button.
When a Call Alert is received, the queue position, the transmitting unit’s alias name (if programmed), unit
ID and the call time will be displayed in the queue with flashing “CALL ALERT”. If configured, a
printer log entry will also be made. A series of four alert beeps, every 10 seconds, will be heard by the
operator indicating an unattended Call Alert has been received. Upon pressing any button, the alert beeps
will cease and “CALL ALERT” will cease flashing.
Ensuing calls will be stacked while the Call Alert is displayed, except an Emergency Alert, which will
override a Call Alert. If a Call Alert is received during an Emergency Alert, the Call Alert will be stacked
in the queue below the Emergency Alert. When all Emergency Alerts have been cleared, the Call Alert
tone will sound indicating an unattended Call Alert has been received. As soon as any button is pressed,
however, the alert tone will stop.
Short Call Alert
When receiving a Short Call Alert, there is limited information available. The call will be placed in the
queue as any other call and “SHORT CAL ALERT” along with the time the call was received will be
displayed. A printer log entry will also be made if configured to do so. Received Short Call Alerts
behave similarly to received Call Alerts.
Selective Call
When a Selective Call is received, two alert beeps will be heard once. The queued item will read “SLCT
CALL” and the queue position, transmitting unit’s alias name, and unit ID will be displayed. In addition,
a printer log entry will be made if configured to do so.
12/10 66
Page 71

Paging
Types of Paging
The ICP9000 Navigator supports the following types of paging: DTMF, 2-Tone, Plectron 5/6-Tone, 1500,
2805, and Immediate DTMF. The CARD Suite Software application is used to set the parameters for
these paging types.
OTE: In many applications below 800 MHz, the maximum allowable signaling time, as prescribed by
N
FCC regulations, is 3 seconds and only signal once. Therefore, be sure that regulations applying to this
system are not violated before programming the tone length values that would cause the console to signal
for more than the allowed time.
It may be necessary to program the Page PTT (push-to-talk) function tone frequency and the pretime
value for these paging modes. If the Page PTT frequency for a particular channel is disabled, the function
tone used when paging (on that channel) will be the same tone used during a normal transmission.
The PTT pretime compensates for delay in the system that may inadvertently cut off part of the paging
tones. The pretime value is the amount of time in milliseconds (ms) before paging tones begin.
2-Tone Paging
The 2-Tone paging format requires a 3-digit prefix or capcode. This capcode and the selected code plan
determine what paging tone frequencies are transmitted. The console can be programmed to
automatically insert some or all of these digits.
Refer to the example provided below, and to Table 20 and Table 21 to assist you in determining the
capcodes you will need.
2-Tone Paging - Example 1
Suppose the number of 2-Tone keypad digits accepted from the user on the selected channel is 2, and
Code Plan R has been selected. The 8-second group call has been selected and the preset 2-Tone digit is
7. Also, the A tone length is set to 1 second and the B tone length is set to 3 seconds.
If the console operator entered the digits 43 and pressed the
generate 1251.4 Hz for one second followed by 669.9 Hz for three seconds. These tone frequencies are
located on Table 21 according to the following procedure.
1. Locate the chosen code plan (R in this example) on Table 20.
2. From the same chart, locate the most significant digit (MSD) of the 2-Tone prefix (7 in this example).
3. Next, determine the 2-digit number that appears at the intersection of the code plan row and the MSD
column (62 in this example).
TRANSMIT button, the console would
67 12/10
Page 72

Paging ICP9000 Navigator Installation and Service Manual
4. The first digit of this number (6 in this example) corresponds to a number under the Group # heading
on Table 21, and indicates which row of frequencies on Table 21 will be used for the A tone. In this
example, the A tone number entered by the console operator is 4, which corresponds to 1251.4 Hz.
5. The second digit of the number from chart B (2 in this example) also corresponds to a number under
Table 21 Group #, and indicates which row of frequencies on Table 21 will be used for the B tone. In
this example, the B tone number entered by the console operator is 3, which corresponds to 669.9 Hz.
The previous example involves the console operator being required to enter two digits from the keypad
(programming the number of 2-Tone digits accepted from the user on the selected channel to 2).
However, if all three digits were required from the console operator (programming the number of 2-Tone
digits accepted from the user on the selected channel to 3), the procedure for finding the frequencies from
Table 21 would be the same except that the most significant digit of the prefix would be the first digit
entered from the keypad.
If no digits were required from the operator (programming the number of 2-Tone digits accepted from the
user on the selected channel to 0) both the A and B tone frequencies would be predetermined through
programming and the same tone sequence would be sent every time a 2-Tone page is generated on this
particular channel.
Group Call
A group call occurs when both tones of a 2-Tone paging sequence are the same frequency. If the console
is programmed to allow 8 second group calls on a particular channel, then whenever a paging sequence is
generated that consists of two tones of the same frequency, the page consists of an 8 second burst of that
tone frequency.
However, 8 second group calls do not apply when the GE code plan has been selected. In the GE system,
a “diagonal” tone of 742.5 Hz is inserted in place of the first tone if that tone is the same as the second
tone.
Example 2
Suppose the number of 2-Tone keypad digits accepted from the user on the selected channel is 2 and the
GE code plan has been selected. The preset 2-Tone digit is 4.
Therefore, if the operator entered 55 as the paging digits and pressed the
TRANSMIT button, the console
would send the 2-Tone sequence A = 742.5 Hz, B = 907.5 Hz. This would alert a pager with a GE
capcode of 455.
12/10 68
Page 73

ICP9000 Navigator Installation and Service Manual Paging
Table 20. Code Plans
Important Note:
The 1st digit indicates Chart A Group # Source for the A tone, and the 2nd digit
indicates Chart A Group # Source for B Tone.
MSD Digit of 3 Di git Capcode Code
Plan
Gen Enc
Gen Enc
Modified
B
C
D
E
F
G
H
J
K
0 1 2 3 4 5 6 7 8 9
42 11 22 12 44 55 21 45 54 24
42 11 22 33 44 55 66 DD EE FF
N/A 11 22 33 12 13 21 31 23 32
N/A 11 22 12 44 14 21 41 24 42
N/A 11 22 12 15 55 21 51 25 52
N/A 11 22 12 21 16 66 61 26 62
N/A 11 13 33 44 31 14 41 34 43
N/A 11 13 33 31 55 15 51 35 52
N/A 11 13 33 31 16 66 61 36 63
N/A 11 14 41 44 55 15 45 54 51
N/A 11 14 41 44 16 66 61 46 64
L
M
N
P
Q
R
S
T
U
V
W
Y
GE
SP
N/A 11 15 51 16 55 66 61 56 65
N/A 23 22 33 44 32 24 42 34 43
N/A 23 22 33 32 55 25 52 35 53
N/A 23 22 33 32 26 66 62 36 63
N/A 24 22 42 44 55 25 45 54 52
N/A 24 22 42 44 26 66 62 46 64
N/A 25 22 52 26 55 66 62 56 65
N/A 34 43 33 44 55 35 45 54 53
N/A 34 43 33 44 36 66 63 46 64
N/A 35 53 33 36 55 66 63 56 65
N/A 46 64 56 44 55 66 45 54 65
N/A 77 88 99 78 79 87 97 89 98
AA BA BB AB CC CA CB AC BC N/A
99 AA BB DD 9D D9 AD DA BD DB
69 12/10
Page 74

Paging ICP9000 Navigator Installation and Service Manual
Table 21. Tone Group Frequency Chart
The chart below cross-references the 2-Tone Paging Code to the frequency in Hz.
Tone
Group #
1
2
3
4
5
6
A
B
Z
GE(A)
GE(B)
GE(C)
Plectron
10
0
1
2
3
4
5
6
7
8
9
330.5 349.0 368.5 389.0 410.8 433.7 457.9 483.5 510.5 539.0
569.1 600.9 634.5 669.9 707.3 746.8 788.5 832.5 879.0 928.1
1092.4 288.5 296.5 304.7 313.0 953.7 979.9 1006.9 1034.7 1063.2
321.7 339.6 358.6 378.6 399.8 422.1 445.7 470.5 496.8 524.6
553.9 584.8 617.4 651.9 688.3 726.8 767.4 810.2 855.5 903.2
1122.5 1153.4 1185.2 1217.8 1251.4 1285.8 1321.2 1357.6 1395.0 1433.4
358.9 398.1 441.6 489.8 543.3 602.6 668.3 741.3 822.2 912.0
371.5 412.1 457.1 507.0 562.3 623.7 691.8 767.4 851.1 944.1
346.7 384.6 426.6 473.2 524.8 582.1 645.7 716.1 794.3 881.0
682.5 592.5 757.5 802.5 847.5 892.5 937.5 547.5 727.5 637.5
652.5 607.5 787.5 832.5 877.5 922.5 967.5 517.5 562.5 697.5
667.5 712.5 772.5 817.5 862.5 907.5 952.5 532.5 577.5 622.5
643.0 910.0 1036.0 1082.0 1130.0 1287.0 1465.0 1820.0 1985.0 2688.0
1472.9 1513.5 1555.2 1598.0 1642.0 1687.2 1733.7 1781.5 1830.5 1881.0
Group
#
1
2
3
4
5
6
7
8
9
A
B
C
D
E
11
1930.2 1989.0 2043.8 2094.5 2155.6 2212.2 2271.7 2334.6 2401.0 2468.2
F
12/10 70
Page 75

ICP9000 Navigator Installation and Service Manual Paging
Plectron Paging
The Plectron paging feature requires a 4-digit prefix (capcode). Like 2-Tone paging, the capcode and
code plan determine at what frequency the paging tones are transmitted.
Plectron paging uses the Plectron Code Plan Chart (Table 22) and Plectron Tone Group/Frequency Chart
(Table 23). Refer to the example below and the tables to determine the capcodes you need.
Plectron Pagi ng Example
Suppose the number of Plectron keypad digits accepted from the user on the selected channel is 0 and the
capcode has been programmed to 3456. The A tone length is 1 second and the B tone length is 2 seconds.
If the console operator were to press the
TRANSMIT button, the console would send an A tone of 330.5
Hz for 1 second, and then a B tone of 564.7 Hz for 2 seconds.
The frequencies for the A and B tones are determined from the charts, according to the following
procedure:
1. Locate the first two digits of the prefix (3 and 4 in this example) on Table 22.
2. In the column beneath this two digit number, there are two P numbers (P5 and P6 in this example)
that correspond to tone groups on Table 22. Using the P number for the third digit of the prefix,
determine the correct tone group from the Table 23.
3. Find the frequency of A tone (330.5 Hz) by locating the intersection of the tone group row with the
column headed by the third prefix digit (5 in this example).
4. Find the frequency of the B tone is in the same manner by using the tone group for the fourth prefix
digit as listed in Table 22 below.
71 12/10
Page 76

Paging ICP9000 Navigator Installation and Service Manual
Table 22. Plectron Paging Code Plan Chart
Most Significa nt Digits-to-Tone Source
1st 2 (MS)
Digits
3rd digit tone
source
4th digit tone
source
1st 2 (MS)
Digits
3rd digit tone
source
4th digit tone
source
3rd and 4th
Digits
00 01 02 03 04 05 06 07 08 09 10 11 12 13 14 15 16 17
P1 P2 P1 P2 P3 P1 P3 P2 P3 P4 P1 P4 P2 P4 P3 P4 P5 P1
P1 P2 P2 P1 P3 P3 P1 P3 P2 P4 P4 P1 P4 P2 P4 P3 P5 P5
18 19 20 21 22 23 24 25 26 27 28 29 30 31 32 33 34 35
P5 P2 P5 P3 P5 P4 P5 P6 P1 P6 P2 P6 P3 P6 P4 P6 P5 P6
P1 P5 P2 P5 P3 P5 P4 P6 P6 P1 P6 P2 P6 P3 P6 P4 P6 P5
Table 23. Plectron Tone Group/Frequency Chart (in Hz)
0
1
2
3
4
5
6
7
8
9
Tone Group P1
Tone Group P2
Tone Group P3
Tone Group P4
Tone Group P5
Tone Group P6
643 672 701 732 765 799 834 871 910 950
992 1036 1082 1130 1180 1232 1287 1344 1403 1465
1530 1598 1669 1743 1820 1901 1985 2073 2164 2260
2361 2465 2575 2688 2807 2932 3062 3197 3339 3487
282.2 294.7 307.8 321.4 335.6 330.5 366.0 382.3 399.2 416.9
435.3 454.6 474.8 495.8 517.8 540.7 564.7 589.7 615.8 742.5
12/10 72
Page 77

ICP9000 Navigator Installation and Service Manual Paging
5/6-Tone Paging
The 5/6-tone paging type provides a method to page a series of tone bursts that can be customized based
on the type of 5/6-tone paging and a 2-digit preamble. Motorola EIA 5/6-tone paging supports a
programmable preamble frequency and dual addressing.
5/6 Tone Paging Example
Using the tables below, the duration and frequency of each tone in a 5/6-tone page can be determined
based on the paging capcode. For example, if CCIR is the 5/6-tone paging type and the operator enters a
capcode of 10002, the console generates the following page.
As indicated in Table 25, the tone burst is generated three times with a 900-ms gap between each burst. If
the 5-tone diagnostic is enabled via CARD Suite, the tone burst is generated only once. Note that the
second “0” in the sequence is replaced with an “R”. This is a repeat tone. Since 5-tone paging is a
sequential burst of tones with no gap between tones, it is not possible to send two digits back- to- back
using the same frequency. Therefore, to allow the encoder to send two of the same digits back-to-back
and to allow the decoder to recognize these digits, repeat digit is used. When the decoder recognizes the
repeat tone, the digit decoded is the same as the previously decoded digit.
Actual Paged Digit
Frequency (Hz) from Table 26
Duration (ms) from Table 25
1 0 0 0 2
1 0 R 0 2
1124 1981 2110 1981 1197
100 100 100 100 100
Capcode
Table 24. Motorola EIA Preamble Frequencies (Hz)
600 1587 570 1010
741 1728 650 1240
882 1869 675 1520
1023 370 750 1750
1164 450 825 1860
1305 550 850 2135
1446
73 12/10
Page 78

Paging ICP9000 Navigator Installation and Service Manual
Table 25. 5/6 Tone Paging Tone Timing
Preamble (ms)
Gap (ms)
1st Address
Tone (ms)
Next 4 Tone
(ms)
Gap Between
Bursts (ms)
Number of
times to signal
Total Duration
(s)
Motorola
EIA
BOS/
Bruchcal
5/6 Tone Type
Modified
ZVEI
ZVEI
CCIR
70ms
CCIR
Extended
st
1
Tone
CCIR
EEA
690 0 0 0 0 0 0 0
45 0 0 0 0 0 0 0
33 70 70 70 100 70 1000 40
33 70 70 70 100 70 100 40
800 600 600 600 900 900 900 900
2 3 3 3 3 3 1 3
2.95 2.85 2.39 2.39 3.65 3.2 1.75 2.75
Digit
0
1
2
3
4
5
6
7
8
9
Table 26. 5/6 Tone Paging Tone Frequencies (Hz)
Motorola
EIA
BOS/
Bruchcal
ZVEI
5/6 Tone Type
Modified
ZVEI
CCIR
70 ms
CCIR
Extended
st
1
Tone
CCIR
EEA
600 2400 2400 2400 1981 1981 1981 1981
741 1060 1060 970 1124 1124 1124 1124
882 1160 1160 1060 1197 1197 1197 1197
1023 1270 1270 1160 1275 1275 1275 1275
1164 1400 1400 1270 1358 1358 1358 1358
1305 1530 1530 1400 1446 1446 1446 1446
1446 1670 1670 1530 1540 1540 1540 1540
1587 1830 1830 1670 1640 1640 1640 1640
1728 2000 2000 1830 1747 1747 1747 1747
1869 2200 2200 2000 1860 1860 1860 1860
R
X
459 2600 2600 2400 2110 2110 2110 2110
2010 - - - - - - -
12/10 74
Page 79

T roubleshooting
The following is a list of potential problems you may encounter and possible solutions.
Problem Possible Solution
There is partial or no
communications between
the MCU and the PC.
There is little/no
select/unselect audio from
the PC.
There is low or no mic
audio.
Ensure that the proper COM port is selected within the Navigator
application.
Ensure that the PC is connected to the MCU properly:
RS-232 to RS-232, if connected directly to the PC.
RS-485 to RS-485/RS-232 converter if using the RS-485 port of the MCU.
Ensure that the NULL MODEM jumpers are set correctly on the MCU
interface card if using RS-232.
Ensure the volume sliders on the Navigator screen are at a reasonable level.
Ensure the PC speakers have power and both the speakers and soundcard
are functioning using another windows application.
Ensure the select and unselect audio connections between the MCU and the
PC soundcard are proper.
Ensure that an accessory is not off-hook and forcing the select speaker to be
muted.
Ensure the setting of the mic and its level in the Mic Selection/Level Menu.
If using an audio accessory box, ensure that the audio accessory box is
functioning correctly and that automatic mic selection is not enabled and
the desk/handset/headset mic is selected.
Ensure the microphone is functioning correctly by connecting to another
device.
Communications appears
normal, but the Navigator
buttons do not respond.
75 12/10
Ensure that an accessory mic does not have a contact closed/opened. The
console reads the state of the monitor input of the accessory port P9
immediately following reset.
If the input is closed or low, the input is assumed to be normally closed and
go high upon assertion.
If the input is opened or high, the input is assumed to be normally opened
and go low upon assertion. If an accessory is connected after the MCU is
powered up, perform a hardware reset to ensure the proper behavior of this
input.
Page 80

Troubleshooting ICP9000 Navigator Installation and Service Manual
Problem Possible Solution
“Printer Off-Line” is being
displayed in the information
window.
“Parameter Error” is being
displayed in the information
window.
Excessive noise, hiss or
buzz, is heard on a channel
while no audio is present.
During paging no side-tone
is heard.
The PHONE button
indicates that the phone is
ringing but the ringing is
not heard.
Ensure the printer or additional COM port of the PC is attached and
“connected” to the printer/programming port of the MCU.
If no printer or capture software is used, the error can be defeated using the
printer error diagnostic or by disabling the printer via the CARD Suite
software.
The nonvolatile internal programming and configuration memory of the
MCU has detected an error during power-up and the programming and
operation of the console may be affected.
Contact your service representative to have the console reprogrammed.
Ensure that the input sensitivity of the channel is set according to the
anticipated receive audio level at the console. Too much sensitivity can
amplify background noise on the landline.
Check the side-tone level setting in the Sidetone Level menu.
Check the side-tone level setting in the Sidetone Level menu.
Check the speaker volume levels.
When ALERT is pressed
and then released, nothing
happens or the Alert is
heard but no voice
transmission is allowed.
The ALERT button must be pressed and held for at least 1 second before the
console completes the alert cycle and voice transmission is allowed.
12/10 76
Page 81

ICP9000 Navigator Installation and Service Manual Troubleshooting
Problem Possible Solution
The alert tone or paging
tones are transmitted at too
high/low of a level.
On a tone channel with PL
enabled by the CARD Suite
software, no
PL is displayed
on the status line.
The channel transmit level
is too high or low.
The transmission of one
channel can be heard in the
receive audio.
When a transmission is
initiated, the audio/tones are
heard and feedback is
heard.
The transmit level of both the alert tone and page tone levels may be
adjusted, with the Alert Level or Page Level diagnostic, from 0 dBm to –15
dBm in 3 dB steps.
All tones are generated at a –2 dBm reference to high level guard tone.
Therefore, a setting of 0 dB alert-tone level results in a tone 2 dB below
high level guard tone.
Since the console has no way of detecting the current PL setting of the base
station, the PL must be set before it will be displayed. This is necessary
each time the console is powered up.
The output level adjust diagnostic should be run. This diagnost ic allows
each channel’s output level to be set for different line loads.
The output level adjust diagnostic should be run. This diagnost ic allows
each channel’s output level to be set for different line loads.
The channel is receiving itself. The channel has been jumper-configured
for 2-wire operation and programmed for 4-wire operation with CARD
Suite application.
77 12/10
Page 82

Troubleshooting ICP9000 Navigator Installation and Service Manual
Replacement Parts List
Description Part No.
ICP Main PCBA 69405-002
Replacement Slave PCBA CP-CSD
DC PCBA Replacement Kit XCP0010A
Direct Telephone Interface PCBA Replacem ent Kit XCP0070A
External Telephone Interface PCBA Replacement Kit XCP0060A
Supervisor PCBA Replacement Kit XCP0050A
ICP Lightning Protection Board CP-CLP
ICP Power Supply 3308-00124-00
ICP Power Supply with Battery Revert CP-BR-PS
ICP9000 Display Extender 69509-001
OTE: For availability of all other parts, please contact the GAI-Tronics Service Department.
N
12/10 78
Page 83

Main Circuit Board
79 12/10
Page 84

Main Circuit Board ICP9000 Navigator Installation and Service Manual
Figure 39. ICP Main Board 69405-001
80
Page 85

ICP9000 Navigator Installation and Service Manual Schematics
Figure 40. ICP9000 Display Extender PCBA
81
Page 86

Main Circuit Board ICP9000 Navigator Installation and Service Manual
Notes:
82
Page 87

Term Definition
Definitions and Acronyms
CSQ
Capcode
Carrier Squelch
CTCSS
CDCSS
Diagnostics
DTMF
HLGT
LLGT
Patch
PTT
Carrier squelch
The identifying number on the outside of the radio pager. It is related to the tone or
digital code that gives the address and other information about this particular pager.
Detection of a valid mobile signal is based on loss (squelch) of random channel
noise.
Continuous Tone Controlled Subaudible System - A means of grouping users of a
common radio channel. Subaudible tones are transmitted with audio; a particular
radio’s speaker (or the speakers of a group of radios) will unmute to broadcast a
transmission only if the associated subaudible tone identifies it as belonging to the
radio’s user group.
Continuous Digital Coded Squelch System - A system analogous to CTCSS but
using low speed digital signaling instead of subaudible tones.
Tests to determine if any hardware or software problems exist.
Dual-Tone, Multi-Frequency – is a method used by the telephone system to
communicate the keys pressed when dialing. Pressing a key on the phone’s keypad
generates two simultaneous tones, one for the row and one for the column.
High level guard tone
Low level guard tone
A term synonymous with interconnect
Push-to-talk – a switch that causes the radio to transmit when pressed.
RX, Receive
TX, Transmit
Squelch
To accept a signal from a radio.
To send a signal to a radio.
A system that prevents audio from being heard when no signal is being received.
83 12/10
Page 88

Notes: ICP9000 Navigator Installation and Service Manual
84
 Loading...