

Page 1

®
®
FUSION
MS-BB300R
B L A C K B O X E N T E R T A I N M E N T S Y S T E M
O W N E R ’ S M A N U A L
ENGLISH
FUSIONENTERTAINMENT.COM
Page 2

All rights reserved. Under the copyright laws, this manual may not be copied, in whole or in part, without the written consent of Garmin. Garmin reserves the
right to change or improve its products and to make changes in the content of this manual without obligation to notify any person or organization of such
changes or improvements. Go to www.garmin.com for current updates and supplemental information concerning the use of this product.
Garmin®, the Garmin logo, and the FUSION® logo are trademarks of Garmin Ltd. or its subsidiaries, registered in the USA and other countries. Fusion and
FUSION-Link™ are trademarks of Garmin Ltd. or its subsidiaries. These trademarks may not be used without the express permission of Garmin.
Apple®, the Apple logo, iPod®, iPod touch®, iPod classic®, iPod nano®, and iPhone® are trademarks of Apple Inc., registered in the U.S. and other countries.
Android™ is a trademark of Google Inc. Bluetooth® word mark and logos are owned by the Bluetooth SIG, Inc. and any use of such marks by Garmin is under
license. NMEA®, NMEA 2000®, and the NMEA 2000 logo are registered trademarks of the National Marine Electronics Association. Sirius, XM and all related
marks and logos are trademarks of Sirius XM Radio Inc. All rights reserved. Other trademarks and trade names are those of their respective owners.
Made for iPhone 5, iPhone 4s, iPhone 4, iPhone 3GS, iPhone 3G, iPod touch (2nd through 5th generation), iPod classic, and iPod nano (4th through 7th
generation).
"Made for iPod and iPhone" means that an electronic accessory has been designed to connect specifically to an iPod or an iPhone respectively, and has been
certified by the developer to meet Apple performance standards. Apple is not responsible for the operation of this device or its compliance with safety and
regulatory standards. Please note that the use of this accessory with an iPhone may affect wireless performance.
Page 3

Table of Contents
Getting Started 1
Device Controls 1
Remote Screen 1
Assigning the Remote to a FUSION Stereo 1
Adjusting the Backlight Brightness and Contrast 1
Adjusting the Volume 1
Selecting a Source 2
Switching Between Remote Control Mode and NMEA 2000
Repeater Mode
Bluetooth Device Playback 2
Connecting a Compatible Bluetooth Device 2
Selecting a Different Bluetooth Source 2
USB, MTP, and Apple® Device Playback 2
Connecting a USB Device 3
Controlling Music Playback on a USB Flash Drive 3
MTP File Information 3
Radio 3
Setting the Tuner Region 3
Changing the Radio Station 3
Presets 3
SiriusXM Satellite Radio 3
Enabling the SiriusXM Source 3
Locating the SiriusXM Radio ID 3
Activating a SiriusXM Subscription 4
SiriusXM Controls 4
Parental Control Settings on the FUSION NRX Remote
Control
DAB Playback 4
Setting the Tuner Region 4
Scanning for DAB Stations 4
DAB Presets 4
Connecting an Auxiliary Device 5
Additional Settings 5
Bluetooth Settings 5
iPhone® and iPod® Settings 5
MTP Settings 5
USB Settings 5
FM and AM Settings 5
General Settings 5
Zone Settings 5
Assigning the Remote to a Zone 6
Appendix 6
Registering Your FUSION MS-BB300 6
Troubleshooting 6
Supported NMEA 2000 PGN Information 7
Index 8
2
4
Table of Contents i
Page 4

Page 5
Getting Started
This manual contains instructions for using the FUSION® MSBB300 stereo with a compatible FUSION NRX series remote
control. The FUSION NRX series remote control is included in
the FUSION MS-BB300R stereo and remote bundle and is an
optional accessory for other models.
The FUSION MS-BB300 stereo can also be controlled using a
FUSION-Link™ compatible multi-function display (MFD) through
the NMEA 2000® network.
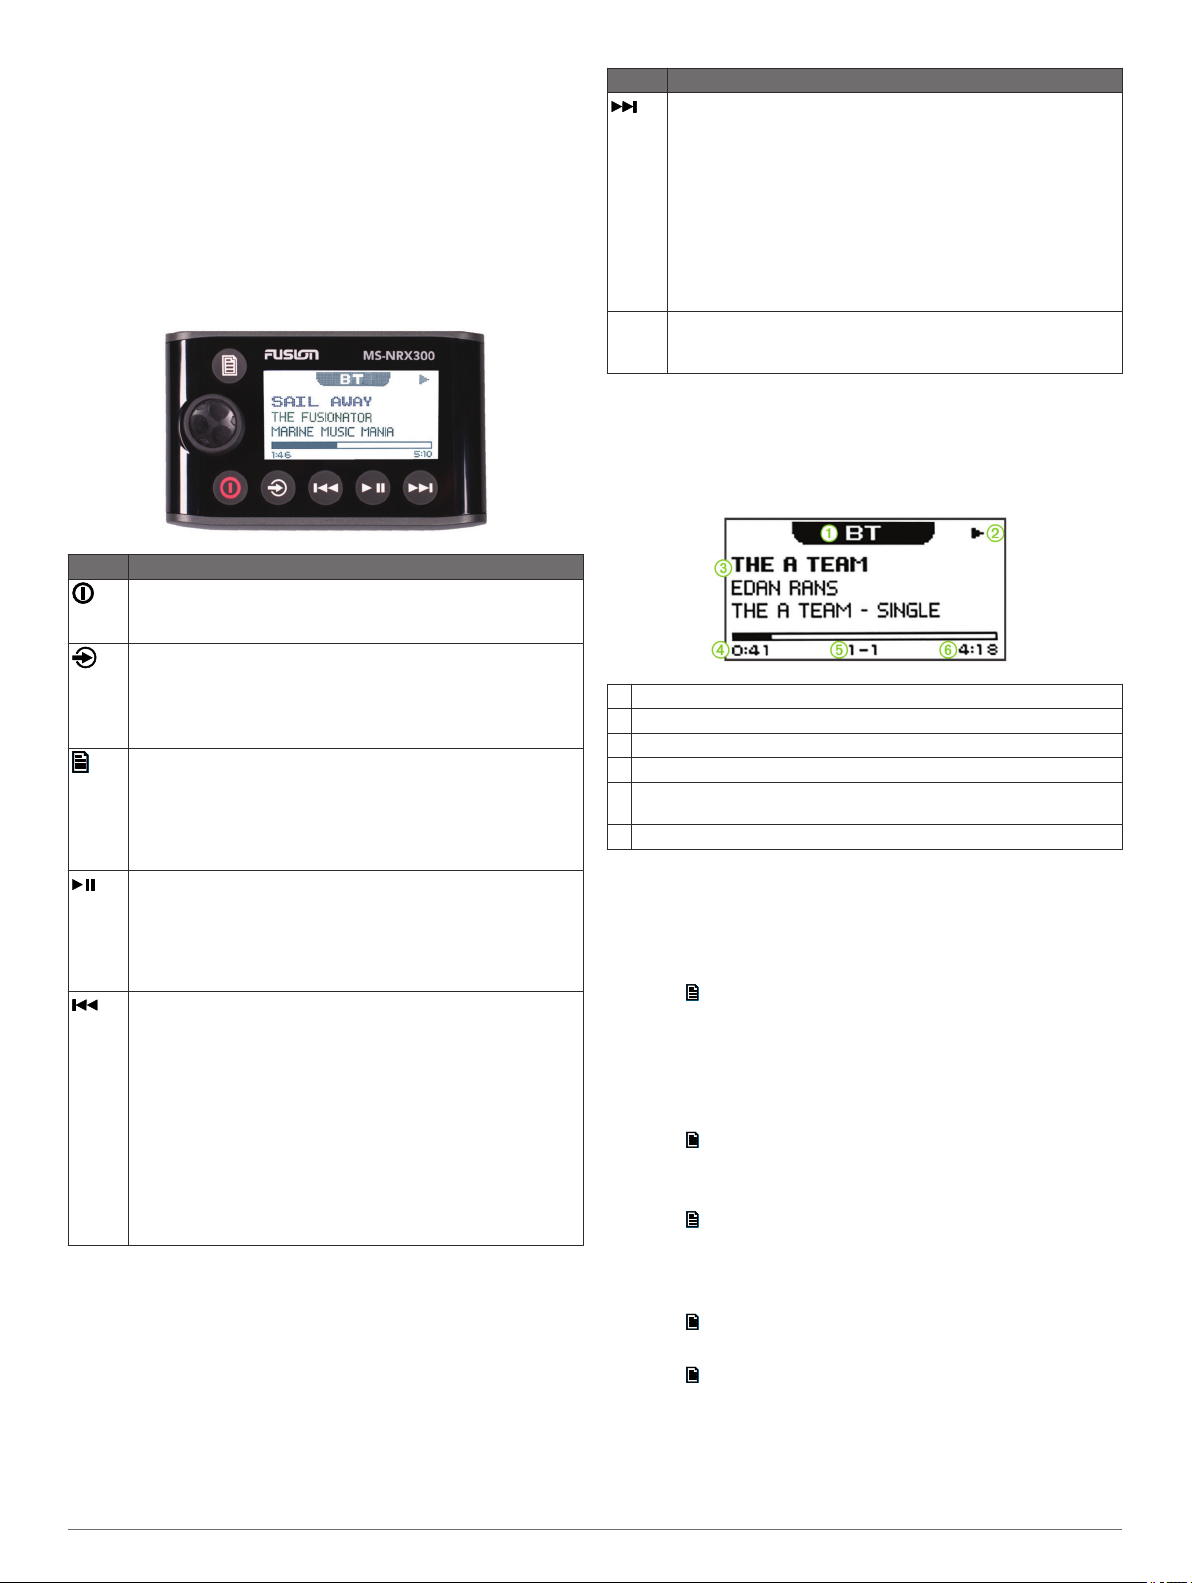
Device Controls
Button Function
• Select to turn on the device.
• Select to mute and un-mute the audio.
• Hold to turn off the remote and stereo.
• Select to cycle the available sources.
TIP: You can use the dial to browse and select the source
when the available sources are shown.
• Hold to switch from remote control mode to NMEA 2000
mode.
• Select to open the menu.
• Select to return to the previous screen from the menu.
• Hold to exit the menu.
• Select to switch from NMEA 2000 mode to remote control
mode.
• SIRIUSXM: Select to open the browse menu.
• BT or USB: Select to pause or resume the current track.
• AM/FM: Select to cycle through the tuning modes (auto,
manual, and presets).
• SIRIUSXM: Select to move through the tuning modes (auto
and presets), when you have at least one preset channel.
• DAB: Select to scan for DAB stations.
• BT or USB: Select to skip to the beginning of the track or to
the previous track.
• AM/FM:
◦ Auto or manual tuning: Select to tune to the previous
station.
◦ Hold for faster station skipping in manual mode.
◦ Presets: Select to change to the previous preset.
• AUX: Select to decrease the gain for the connected source.
• SIRIUSXM: Select to return to the previous channel.
• DAB: Select to return to the previous DAB station in the
ensemble. When you reach the beginning of the current
ensemble, the stereo automatically changes to the last
available station in the previous ensemble.
Button Function
• BT or USB: Select to skip to the next track.
• AM/FM:
◦ Auto or manual tuning: Select to tune to the next station.
◦ Hold for faster station skipping in manual mode.
◦ Presets: Select to change to the next preset.
• AUX: Select to increase the gain for the connected source.
• SIRIUSXM: Select to advance to the next channel.
• DAB: Select to advance to the next DAB station in the
ensemble. When you reach the end of the current
ensemble, the stereo automatically changes to the first
available station in the next ensemble.
Dial • Turn to adjust the volume, move through the menus, or
adjust a setting.
• Press to select an option or a setting.
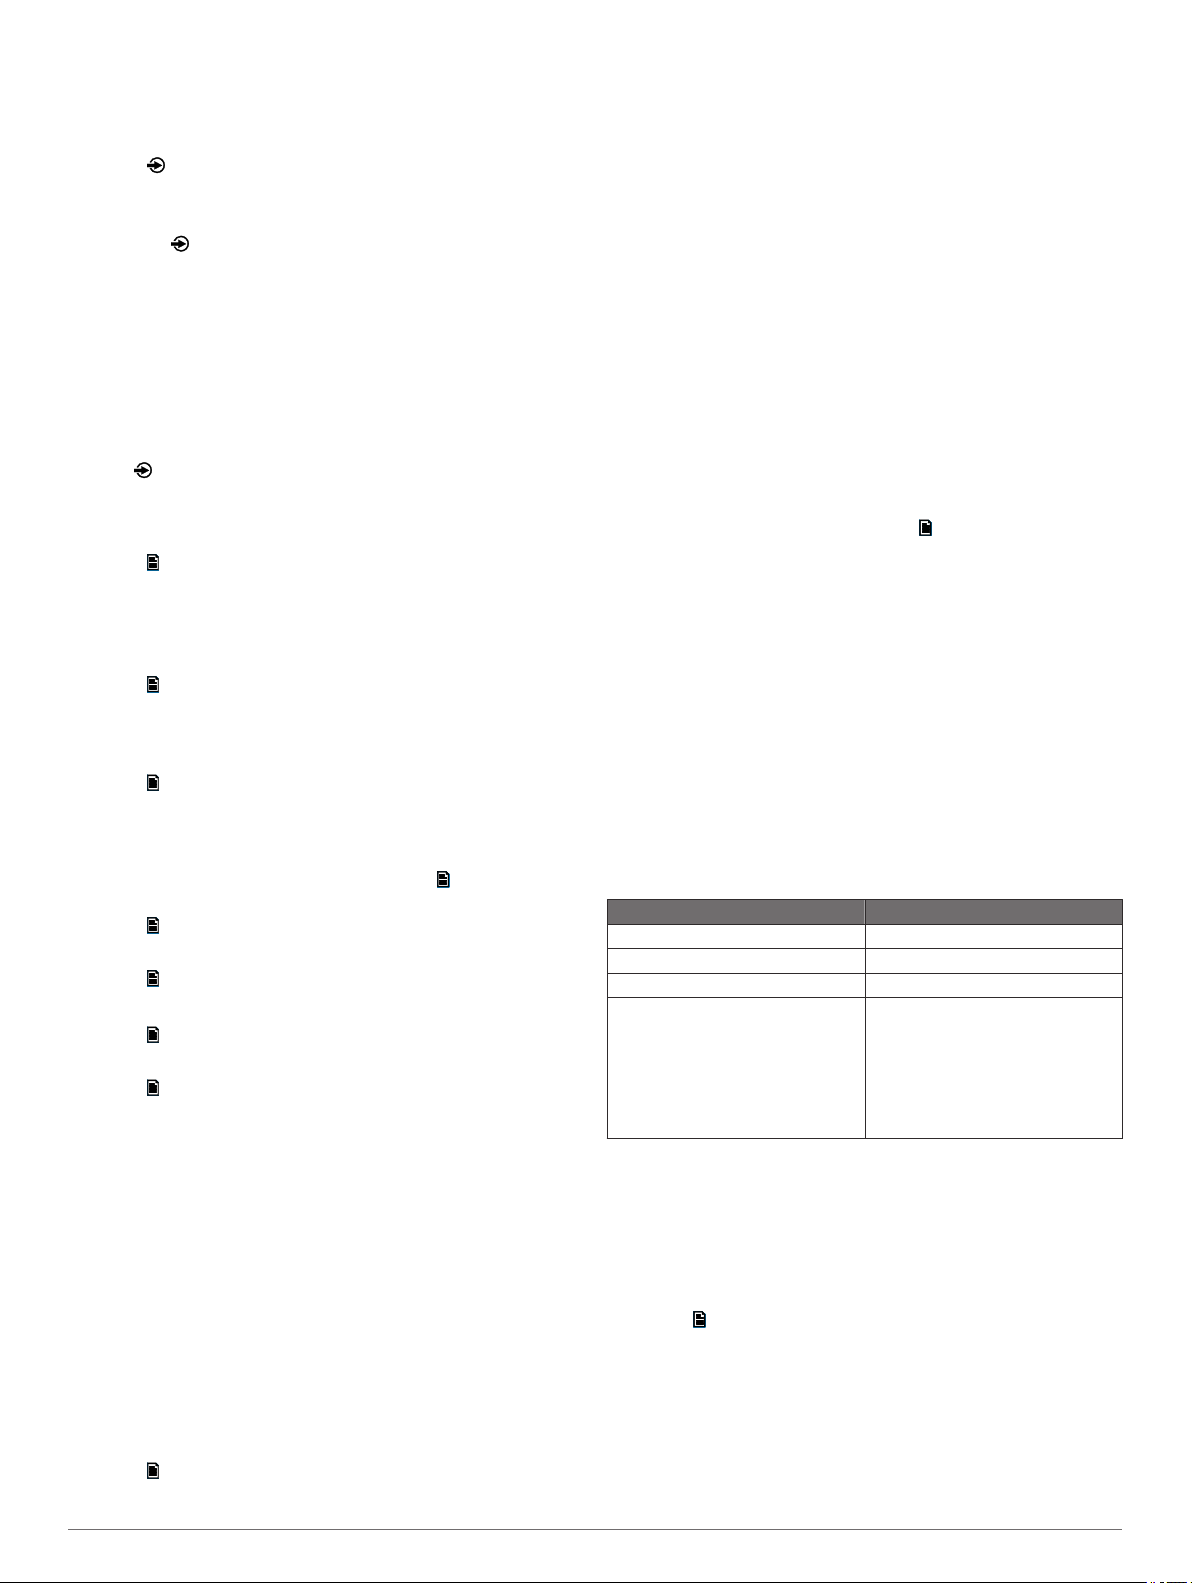
Remote Screen
The information displayed on the remote screen varies
depending on the source selected on the stereo. This example
shows the stereo playing a track on a device connected using
Bluetooth® wireless technology.
Source
À
Play status icon
Á
Track details (if available)
Â
Elapsed time
Ã
Current track number out of total number of tracks in the playlist (if
Ä
available)
Track duration (if available)
Å
Assigning the Remote to a FUSION Stereo
You must assign the remote control to the stereo after installing
the remote control. When multiple FUSION stereos are installed
on the NMEA 2000 network, you can assign a remote control to
a specific stereo.
Select > Settings > Stereo.
1
Select a FUSION stereo.
2
Press the dial to save and exit the menu.
3
Adjusting the Backlight Brightness and Contrast
Select > Settings > LCD.
1
Press the dial to select brightness or contrast.
2
Adjust the brightness or contrast.
3
Select to exit the menu.
4
Enabling the Power Save Feature
You can set the backlight to turn off automatically, after a period
of time, to save power.
Select > Settings.
1
Select the Power Save check box.
2
Select to exit the menu.
3
Adjusting the Volume
Use the dial to adjust the volume.
1
If necessary, press the dial to switch between zones.
2
Getting Started 1
Page 6
TIP: To control all zones at the same time, press the dial until
all zones are highlighted.
Selecting a Source
Select .
1
Select an option:
2
• Turn the dial to highlight a source.
• Select repeatedly to highlight a source.
Press the dial to select the source.
3
Switching Between Remote Control Mode and NMEA 2000 Repeater Mode
By default, the remote control is in remote control mode when
you power it on, allowing you to control a connected FUSION
MS-BB300 device. You can switch to NMEA 2000 repeater
mode to view supported data sentences from connected NMEA
2000 devices.
Hold to switch from remote control mode to NMEA 2000
1
repeater mode.
While in NMEA 2000 repeater mode, you can control the
volume and playback of the current source.
Select to switch from NMEA 2000 repeater mode to remote
2
control mode.
Selecting NMEA 2000 Information to View
Before you can view NMEA 2000 information, you must set the
remote control to NMEA 2000 repeater mode.
Select > Settings > NMEA Monitor.
1
Select the NMEA 2000 supported data sentences to view.
2
You can view information only from sensors connected to the
same NMEA 2000 network as the remote control.
Select to exit the menu.
3
Cycling NMEA 2000 Information Automatically
By default, when in NMEA 2000 repeater mode, the remote
shows one type of information. You can cycle through all
available NMEA 2000 information by pressing repeatedly or by
setting up automatic cycling.
Select > Settings > NMEA Monitor > Cycle Screens.
1
Select the time between cycles.
2
Select to exit the menu.
3
Selecting Units of Measure
Select > Settings > NMEA Monitor > Set Units.
1
Select the units of measure for distance, speed, and depth.
2
Select to exit the menu.
3
Bluetooth Device Playback
You can pair the stereo to up to eight Bluetooth media devices.
You can control the playback using the keys, but you cannot
browse the music collection. You should select the song or
playlist on the media device.
The availability of song information such as song title, artist
name, and track duration depends on the capability of the media
player and music application. The shuffle and repeat status
icons are not supported over Bluetooth wireless technology.
Connecting a Compatible Bluetooth Device
You can play media from a compatible Bluetooth device using
the Bluetooth wireless connection.
Select the Bluetooth source.
1
Select > Discoverable to make the stereo visible to your
2
compatible Bluetooth device.
Enable Bluetooth on your compatible Bluetooth device.
3
Bring the compatible Bluetooth device within 10 m (33 ft.) of
4
the stereo.
On your compatible Bluetooth device, search for Bluetooth
5
devices.
On your compatible Bluetooth device, select the stereo from
6
the list of detected devices.
On your compatible Bluetooth device, follow the on-screen
7
instructions to pair and connect to the discovered stereo.
When pairing, your compatible Bluetooth device may ask you
to confirm a code on the stereo. The stereo does not display
a code, but it does connect correctly when you confirm the
message on the Bluetooth device.
If your compatible Bluetooth device does not immediately
8
connect to the stereo, repeat steps 1 through 7.
Selecting a Different Bluetooth Source
When you have more than one Bluetooth device paired to the
stereo, you can select a different source when needed. You can
connect the stereo to up to eight Bluetooth devices.
With the BT source selected, select .
1
Select a Bluetooth device.
2
USB, MTP, and Apple® Device
Playback
You can connect various USB media players and smartphones
to the stereo. For example, you can connect an Android
smartphone, a USB flash drive, or a compatible Apple device.
How you access the USB source depends on which type of
media player is connected. The stereo is designed to be used
with one USB connection at a time. You must disconnect one
USB device before connecting another.
NOTE: If you connect an Apple media player to the USB port on
the stereo, you must either disable Bluetooth on the media
player, or unpair the Bluetooth connection from the stereo to
avoid possible media-playback issues.
Media Player Source Selections
Android device MEDIA
Apple device IPOD
USB flash drive USB
MP3 media player (as a massstorage device)
You can browse the music collection on the USB source using
the categories the device supports, such as songs, albums, and
artists on MTP and Apple devices.
NOTE: The USB source does not support library browsing. You
can browse the folder structure.
You can also browse the files according to the folder structure
on your media player. For example, from the IPOD source, you
can select > Albums.
The availability of song information such as song title, artist
name, track duration, and album cover artwork depends on the
capability of the media player and music application.
NOTE: Different operating systems and media players provide
different levels of support for MTP. Go to
www.fusionentertainment.com for device compatibility
information.
USB
NOTE: If your MP3 media player
does not support mass-storage
when connected using USB, you
must connect it to the stereo as an
auxiliary device (Connecting an
Auxiliary Device, page 5).
™
2 Bluetooth Device Playback
Page 7

Connecting a USB Device
You can connect a USB device to the USB port on the stereo.
Locate the USB port on the back of the stereo.
1
Connect the USB device to the USB port.
2
Select the USB source.
3
Controlling Music Playback on a USB Flash Drive
Connect a compatible USB flash drive or media player to the
1
stereo.
Select the USB source.
2
Select .
3
Select the name of the USB drive to view the file structure of
4
the USB flash drive or media player.
Select a song to begin music playback.
5
MTP File Information
After you connect the MTP device, the stereo downloads the full
list of song names from the device and creates a song title
index. This process must be completed before music playback
can begin. For devices with large music collections, this may
take several minutes. The song count appears during this
process. You can use other sources while this process is
underway.
For best results, the music folders on an MTP device should not
contain more than 300 files each. Exceeding 300 files per folder
can cause the MTP device to become unresponsive and reset
the connection to the device.
Music files must be located in a folder using one of these
names. The folder must be located in the root directory of the
MTP device.
• My Music
• My_Music
• mobile
• Music
These guidelines also apply to memory cards installed in the
MTP device.
Radio
To listen to AM or FM radio, you must have a suitable marine
AM/FM antenna properly connected to the stereo and be within
range of a broadcasting station. For instructions on connecting
an AM/FM antenna, see the stereo installation instructions.
To listen to SiriusXM® radio, you must have the appropriate
equipment and subscriptions (SiriusXM Satellite Radio,
page 3). For instructions on connecting a SiriusXM Connect
Vehicle Tuner, see the stereo installation instructions.
To listen to DAB stations, you must have the appropriate
equipment (DAB Playback, page 4). For instructions on
connecting a DAB adapter and antenna, see the installation
instructions provided with your adapter and antenna.
Setting the Tuner Region
You must select the region you are in to receive AM and FM
stations properly.
If you are connected to a compatible SiriusXM tuner and
antenna, and have a subscription (USA only), you must select
the region you are in to receive SiriusXM stations properly.
NOTE: SiriusXM is not available in all regions.
If you are connected to a compatible DAB module and antenna
(not included), you must select the region you are in to receive
DAB stations properly.
NOTE: DAB stations are not available in all regions.
Select > Settings > Tuner Region.
1
Select the region you are in.
2
Changing the Radio Station
Select an applicable source, such as FM.
1
Select repeatedly to move through the tuning modes:
2
• Select Auto to scan and stop on the next available station.
• Select Manual to select a station manually.
• Select Presets to select a saved station preset.
Select or to tune to the station.
3
Presets
You can save your favorite AM stations and FM stations as
presets for easy access.
You can save your favorite SiriusXM channels if you are
connected to an optional SiriusXM tuner and antenna.
Saving a Station as a Preset
With an applicable source selected, tune the stereo to a
1
station.
Select > Presets.
2
Select Save Current.
3
TIP: You can quickly save the selected station as a preset by
holding .
Selecting a Preset from a List
Before you can select a preset from a list, you must save at
least one station as a preset.
Select the applicable source.
1
Select > Presets.
2
Select a preset from the list.
3
Removing Presets
With an applicable source selected, select > Presets >
1
Remove Preset.
Select an option:
2
• To remove one preset, select the preset.
• To remote all presets, select Remove All Presets.
SiriusXM Satellite Radio
Only SiriusXM brings you more of what you love to listen to, all
in one place. Get over 140 channels, including commercial-free
music plus the best sports, news, talk, comedy and
entertainment. Welcome to the world of satellite radio. A
SiriusXM Vehicle Tuner and subscription are required. For more
information, go to www.siriusxm.com.
Enabling the SiriusXM Source
You must enable the SiriusXM source before you can listen to
SiriusXM Satellite Radio.
Select > Settings > Tuner Region > USA.
Locating the SiriusXM Radio ID
You must have the radio ID of your SiriusXM Connect Tuner
before you can activate your SiriusXM subscription. You can
locate the SiriusXM Radio ID on the back of the SiriusXM
Connect Tuner or its packaging, or by tuning your stereo to
channel 0.
With the SiriusXM source selected, select > Channels >
All Channels > Radio ID.
The SiriusXM Radio ID does not include the letters I, O, S, or F.
Radio 3
Page 8

Activating a SiriusXM Subscription
Before you can activate the SiriusXM subscription, you must
have the Radio ID (Locating the SiriusXM Radio ID, page 3).
With the SiriusXM source selected, tune to channel 1.
1
You should be able to hear the preview channel. If not, check
the SiriusXM Connect Tuner and antenna installation and
connections, and try again.
Tune to channel 0 to locate the Radio ID.
2
Contact SiriusXM listener care by phone at (866) 635-2349 or
3
go to www.siriusxm.com/activatenow to subscribe in the
United States. Contact SiriusXM by phone at (877) 438-9677
or go to www.siriusxm.ca/activatexm to subscribe in Canada.
Provide the Radio ID.
4
The activation process usually takes 10 to 15 minutes, but
can take up to an hour. For the SiriusXM Connect Tuner to
receive the activation message, it must be turned on and
receiving the SiriusXM signal.
If the service is not activated within the hour, go to
5
http://care.siriusxm.com/refresh or contact SiriusXM by phone
at 1-855-MYREFRESH (697-3373).
SiriusXM Controls
When in SiriusXM mode, select .
Presets: Opens the list of preset SiriusXM channels.
Category: Opens a list of channel categories.
NOTE: You can select and to view channels within a
category.
Parental Control Settings on the FUSION NRX Remote Control
You can lock and unlock SiriusXM radio channels, clear all
locked channels, and change your passcode using a FUSION
NRX remote control.
When in SiriusXM mode, select > Parental.
Unlock: Unlocks the parental controls.
Lock/Unlock: Unlocks or locks channels.
Clear all Locked: Unlocks all locked channels.
Change PIN: Changes the parental passcode.
Locking a SiriusXM Channel Using the FUSION NRX Remote Control
When in SiriusXM mode, select > Parental.
1
If necessary, select Unlock and Enter your passcode.
2
Select Parental > Lock > Channel.
3
Select a channel.
4
Select Parental > Unlock to lock the parental controls
5
(optional).
DAB Playback
When you connect a compatible Digital Audio Broadcasting
(DAB) module and antenna, such as the FUSION MS-DAB100A
to the FUSION MS-BB300 stereo, you can tune in to and play
DAB stations.
DAB broadcasts are not available in all regions. When the
stereo is not set to a compatible region, the DAB source is not
available.
Setting the Tuner Region
You must select the region you are in to receive DAB stations
properly.
Select > Settings > Tuner Region.
1
Select the region you are in.
2
Scanning for DAB Stations
Before you can scan for DAB stations, you must connect a
compatible DAB module and antenna (not included) to the
stereo. Because DAB signals are broadcast in select countries
only, you must also set the tuner region to a location where DAB
signals are broadcast.
Select the DAB source.
1
Select to scan for available DAB stations.
2
When scanning is complete, the first available ensemble
found begins playing.
NOTE: After the first scan is complete, you can select
again to re-scan for DAB stations. When the re-scan is
complete, the system starts playing the first station in the
ensemble you were listening to when you started the re-scan.
Changing DAB Stations
Select the DAB source.
1
If necessary, select to scan for local DAB stations.
2
Select or to change the station.
3
When you reach the end of the current ensemble, the stereo
automatically changes to the first available station in the next
ensemble.
Selecting a DAB Station from a List
Select the DAB source.
1
If necessary, select to scan for local DAB stations.
2
Select > Browse > Stations.
3
Select a station from the list.
4
Selecting a DAB Station from a Category
Select the DAB source.
1
If necessary, select to scan for local DAB stations.
2
Select > Browse > Categories.
3
Select a category from the list.
4
Select a station from the list.
5
DAB Presets
You can save your favorite DAB stations as presets for easy
access.
You can save up to 15 DAB-station presets.
Saving a DAB Station as a Preset
With the DAB source selected, change the stereo to a DAB
1
station.
Select > Browse > Presets > Save Current.
2
TIP: You can quickly save the selected DAB station as a preset
by holding .
Selecting a DAB Preset from a List
Before you can select a DAB preset from a list, you must save at
least one DAB station as a preset.
Select the DAB source.
1
Select > Browse > Presets > View Presets.
2
Select a preset from the list.
3
Removing DAB Presets
With the DAB source selected, select > Browse > Presets.
1
Select an option:
2
• To remove one preset, select Remove Preset, and select
the preset.
• To remove all presets, select Remove All Presets.
4 DAB Playback
Page 9

Connecting an Auxiliary Device
You can connect various auxiliary devices to the stereo. These
devices have either RCA connectors, a line output, or a
headphone output jack.
Locate the auxiliary connectors on the stereo.
1
If necessary, connect an RCA-to-3.5 mm adapter cable to the
2
auxiliary device.
Connect the auxiliary device to the RCA connectors on the
3
device.
Additional Settings
The available settings vary based on the source selected.
Bluetooth Settings
When a compatible Bluetooth smartphone or media player is
paired and connected to your FUSION MS-BB300 stereo, you
can play media and change options using the remote control.
From the Bluetooth source, select .
Discoverable: Allows the FUSION MS-BB300 stereo to be
discovered by a Bluetooth smartphone or media player when
pairing.
Remove Device: Removes a saved, paired Bluetooth
smartphone or media player from the FUSION MS-BB300
stereo.
iPhone® and iPod® Settings
When a compatible iPhone or iPod is connected to the USB port
of your stereo, you can play media and change options using
the remote control.
From the iPod source, select > iPod Settings.
Repeat: Sets the repeat method for the track or playlist.
Shuffle: Sets the shuffle method for the tracks or album.
MTP Settings
When a compatible MTP device, such as an Android
smartphone, is connected to the USB port of your stereo, you
can play media and change options using the remote control.
From the MEDIA source, select .
Repeat: Sets the repeat method for the track or playlist.
Shuffle: Sets the shuffle method for the tracks or album.
USB Settings
When a compatible USB flash drive is connected to the USB
port of your stereo, you can play supported audio formats and
change options using the remote control.
From the USB source, select .
Repeat: Sets the repeat method for the track or folder.
Shuffle: Sets the shuffle method for the tracks or folder.
FM and AM Settings
In addition to changing stations, you can manage your preset
stations using the remote control.
From the FM or AM source, select > Presets.
Save Current: Saves the currently playing station as a preset.
Remove Preset: Allows you to remove one or all preset stations
from the device.
TIP: You can quickly save the selected station as a preset by
holding .
General Settings
Select > Settings.
NOTE: When an option button is filled, the option is on. When
the button is clear, the option is off.
NOTE: Not all options and settings are available for all stereos.
See the stereo owner's manual for more details.
Zone: Enables you to configure the speaker zones.
Zone > Tone: Adjusts the bass, middle, and treble tones.
LCD: Sets the brightness and contrast.
Power Save: Enables and disables the backlight power-save
feature.
Key Sound: Enables and disables the sound.
Wake with Stereo: Turns on the remote when the stereo is
turned on by an MFD.
NMEA Monitor: Sets the data to view, the data display cycle,
and the units of measure for NMEA 2000 data from a
connected FUSION-Link compatible multi-function display
(MFD).
Language: Sets the language used on the remote.
Searching: Enables FUSION Alpha Search Technology (FAST),
which allows you to quickly search for tracks by letter or
number. If your iPhone, iPod, or MTP media source contains
more than 100 artists, songs, or albums, you can enable a
fast search to quickly navigate by letter or number. The Off
option turns off FAST searching and displays artist, album,
and song lists using the default layout. The 100-800 options
display lists using the FAST search menu.
Tuner Region: Sets the region used by the FM, AM, DAB, or
SiriusXM source.
Tel Mute: Sets the behavior of the mute wire. The device can
either mute the audio or switch to the AUX input when the
optional mute wire is activated.
ARTWORK: Shows or hides the album cover artwork on a
connected FUSION-Link compatible multi-function display
(MFD).
NOTE: Album art cannot be shown on a remote control or
when the media player is connected using Bluetooth
technology.
Sources: Remove sources you do not want to see in the source
list.
Set Device Name: Assigns a name to a connected stereo.
Stereo: Assigns the remote control to a connected stereo.
Update: Updates the connected stereo, remote control, or
accessory.
Update > Factory Reset: Resets the connected stereo settings
to factory default values.
About: Shows the installed software version of the
entertainment system and the remote.
Zone Settings
You can adjust the settings for each available zone using the
remote control. Each zone has different settings you can adjust.
Select > Settings > Zone.
Tone: Sets the bass, mid, and treble for all zones.
Assign: Assigns the remote control to a single zone or to all
zones.
Internal Amplifier: Selects the internal stereo amplifier or an
external amplifier.
Zone 1 Settings
Select > Settings > Zone > Zone 1.
Balance: Sets the left and right balance of the zone.
Volume Limit: Sets the maximum volume for the zone.
Set Zone Name: Assigns a name to the zone.
Connecting an Auxiliary Device 5
Page 10

Zone 2 Settings
Select > Settings > Zone > Zone 2.
Enable: Enables and disables the zone.
Link to Zone 1: Enables zone 2 to use the same volume
settings as zone 1.
Balance: Sets the left and right balance of the zone.
Volume Limit: Sets the maximum volume for the zone.
Set Zone Name: Assigns a name to the zone.
Zone 3 Settings
Select > Settings > Zone > Zone 3.
Enable: Enables and disables the zone.
Balance: Sets the left and right balance of the zone.
Volume Limit: Sets the maximum volume for the zone.
Sub Filter: Sets the frequency filter of the subwoofer.
Sub Level: Sets the output level of the subwoofer.
Volume Control: Allows the volume of this zone to be controlled
by another amplifier or stereo and provides a fixed line-level
output when the option button is cleared.
Set Zone Name: Assigns a name to the zone.
Assigning the Remote to a Zone
Select > Settings > Zone > Assign.
1
Select a zone or all zones.
2
Select to exit the menu.
3
Appendix
Registering Your FUSION MS-BB300
Help us better support you by completing our online registration
today.
• Go to www.fusionentertainment.com.
• Keep the original sales receipt, or a photocopy, in a safe
place.
The stereo keeps locking up when connected to an Apple device
• Press and hold the power button to reset the stereo.
• Reset the Apple device. Go to www.apple.com for more
information.
• Make sure you have the latest version of iTunes® and the
latest operating software on your Apple device.
The stereo is not finding my connected Apple device
• Make sure you have the latest version of iTunes and the
latest operating software on your Apple device.
• Make sure you have the latest version of the FUSION-Link
™
application on your Apple device.
• Reset the Apple device.
Go to www.apple.com for more information.
• Contact your FUSION dealer or send an email to FUSION
from www.fusionentertainment.com .
My Bluetooth audio is interrupted by short breaks
• Ensure the media player is not covered or obstructed.
Bluetooth technology performs best with line-of-sight
operation.
• Bring the media player within 10 m (33 ft.) of the stereo.
• Turn off the Discoverable setting after pairing a Bluetooth
device to the stereo.
The stereo does not display all song information from my Bluetooth source
The availability of song information such as song title, artist
name, track duration, and album cover artwork depends on the
capability of the media player and music application.
Album cover artwork and shuffle and repeat status icons are not
supported by Bluetooth technology.
Troubleshooting
The stereo does not respond to key presses
• Turn off power to the stereo for two minutes to reset the
stereo.
SiriusXM Troubleshooting
Advisory Description Resolutions
Check Antenna The radio has detected a fault with the SiriusXM
Check Tuner The stereo is having difficulty communicating with the
No Signal The SiriusXM Connect Vehicle Tuner is having
Subscription
Updated
antenna. The antenna cable may be disconnected or
damaged.
SiriusXM Connect Vehicle Tuner. The tuner may be
disconnected or damaged.
difficulty receiving the SiriusXM satellite signal.
The radio has detected a change in your SiriusXM
subscription status.
• Verify that the antenna cable is connected to the SiriusXM Connect
Vehicle Tuner.
• Inspect the antenna cable for damage and kinks. Replace the antenna
if the cable is damaged. SiriusXM products are available at your local
car audio retailer, or at www.shop.siriusxm.com .
Verify that the SiriusXM Connect Vehicle Tuner cable is connected
securely to the stereo.
• Verify that your vessel is outdoors with a clear view of the sky.
• Verify that the SiriusXM antenna is mounted securely to the vessel.
• Remove obstructions above or next to the SiriusXM antenna.
• Inspect the cable antenna for damage and kinks. Replace the antenna
if the cable is damaged. SiriusXM products are available at your local
car audio retailer or at www.shop.siriusxm.com .
• Consult the SiriusXM Connect Vehicle Tuner installation manual for
more information on antenna installation.
• Select any button to clear the message.
• Go to www.siriusxm.com or call 866-635-2349 with questions about
your subscription
6 Appendix
Page 11
Advisory Description Resolutions
Channel Not
Available
Channel Not
Subscribed
Channel Locked The channel you requested is locked by the parental
The channel you requested is not a valid SiriusXM
channel, or the channel that you were listening to is
no longer available. You may see this message briefly
the first time you connect a new SiriusXM Connect
Vehicle Tuner.
The channel you requested is not included in your
SiriusXM subscription package, or the channel you
were listening to is no longer included in your
SiriusXM subscription package.
control feature.
Go to www.siriusxm.com for more information about the SiriusXM
channel lineup.
Go to www.siriusxm.com or call 866-635-2349 for more information about
your subscription package or to subscribe to the channel.
Refer to the parental control section in the manual to unlock channels.
Supported NMEA 2000 PGN Information
PGN Number Data Field
127250 Heading sensor reference:
• 0: True
• 1: Magnetic
128259 Water speed reference:
• 00: Paddle wheel
• 01: Pitot tube
• 02: Doppler log
• 03: Correlation log (ultrasound)
• 04: Electromagnetic (EM) log
128267 Water depth:
• Offset add or subtract
129025 Position:
• Latitude and longitude
129026 Course Over Ground (COG) and Speed Over Ground
129029 Global Navigation Satellite System (GNSS) position
129284 Navigation data:
130306 Wind data reference:
130310 Water temperature and air pressure
130311 Water temperature and air pressure
130312 Temperature and temperature source:
130314 Actual pressure and pressure source:
130577 Direction data and COG reference:
(SOG)
COG reference:
• 0: True
• 1: Magnetic
data
• ETA date
• 0x02 : Apparent wind (relative to the vessel
centerline)
• - 00 : Sea temperature
• 00 : Atmospheric pressure
• 0: True
• 1: Magnetic
Appendix 7
Page 12

Index
A
AM 3
Android device 2, 3
Apple device 2, 6
auxiliary input 5
B
backlight 1
Bluetooth devices 2, 5
D
DAB 3, 4
device, registration 6
F
FM 3
I
iPod 5
K
keys 5
L
language 5
M
media player
radio 4
remote control 4
MTP 2, 3, 5
N
NMEA 2000 2
P
presets 3, 4
DAB 4
product registration 6
R
radio
AM 3, 5
FM 3
SiriusXM 3, 4, 6
registering the device 6
remote control, media player 4
S
SiriusXM 3
Satellite Radio 3, 4, 6
SiriusXM Satellite Radio 4
source 2
speaker zones 1
T
tone 5
U
USB 2, 3, 5
flash drive 2, 3
V
volume, adjusting 1
Z
zones, setting 5, 6
8 Index
Page 13

Page 14

®
FUSION SUPPORT
New Zealand 09 369 2900
Australia 1300 736 012
Europe +44 (0) 370 850 1244
USA 623 580 9000
Pacific +64 9 369 2900
FUSIONENTERTAINMENT.COM
August 2016 Printed in Taiwan 190-01914-10_0A
 Loading...