

Page 1
U7000
MANUAL DE USUARIO
USER’S MANUAL
MANUEL DE L’UTILISATEUR
MANUALE D’USO
MANUAL DO UTILIZADOR
BEDIENUNGSANLEITUNG
Page 2

Page 3

U7000
ESPAÑOL
MANUAL DE USUARIO
Page 4

Page 5

MEDIDAS DE SEGURIDAD
La imagen del rayo dentro del
triangulo equilátero alerta al
usuario de “voltaje peligroso” e
intenta prevenir de un riesgo de
descarga eléctrica.
Existe peligro de explosión si la batería no se reemplaza correctamente. Cambiela solo por la misma batería o una
Español
equivalente.
Advertencia:
- El aparato no debe ser expuesto a gotas o salpicaduras ni deben colocarse sobre éste objetos que contengan
líquidos, tales como vasos.
- No exponga el aparato a fuentes de llama viva, tales como velas encendidas. De lo contrario, existe peligro de
incendio.
- El equipo debe de estar conectado a una fuente de alimentación con las características descritas en el manual de
usuario o como esta indicado en el equipo. Si usted no está seguro del tipo de características de la red eléctrica de
su hogar (por ejemplo 120 o 230 V), consulte con su distribuidor local o con su compañía eléctrica.
- No abra el equipo o toque las partes internas del mismo. Consulte con su distribuidor local para recibir asistencia
técnica si es necesaria la apertura del equipo.
- El enchufe se utiliza como elemento de desconexión de la red, este elemento debe ser accesible fácilmente.
- Preste atención a los aspectos medio ambientales derivados de la eliminación de la batería.
- La batería del mando a distancia no debe ser expuesta a calor excesivo, como la luz solar, fuego o similares.
- El encargado de mantenimiento tiene que utilizar el tornillo indicado en la placa posterior.
- Asegúrese que el equipo dispone de una distancia mínima de 5 cm a su alrededor para garantizar la suficiente
ventilación del mismo.
- Asegúrese que no se impide la correcta ventilación del equipo cubriéndolo con objetos tales como periódicos,
manteles, cortinas, etc.
- Use el equipo en climas moderados (no en climas tropicales).
-No abra el equipo para evitar la exposición del mismo a la radiación.
Limpieza del equipo: Una vez el equipo esté desconectado de la red eléctrica, usted puede limpiar el chasis, el
panel frontal y el mando a distancia con un paño suave humedecido ligeramente con una solución de detergente.
Accesorios: No inserte ningún accesorio o equipo sin el consentimiento del fabricante. Tal acción puede ser riesgo
de incendio, electrocución u otros daños personales.
Ubicación: Las ranuras y aberturas del chasis están diseñadas para garantizar una correcta ventilación y para evitar
un recalentamiento del equipo. No bloquee estas aberturas ni permita que sean bloqueadas por situar el equipo
en ubicaciones tales como una cama, un sofá u otras superficies similares, tampoco debe estar situado sobre un
radiador o sobre una fuente de calor.
Protección del cable de alimentación: Sitúe el cable de alimentación fuera del paso, donde no pueda ser
pisado. Por favor, preste especial atención a las clavijas, contactos y al punto donde el cable sale del equipo.
Entrada de líquidos y objetos: Nunca coloque objetos de ningún tipo en las aberturas del equipo, ya que
podrían tocar puntos peligrosos de tensión o cortocircuitar diferentes componentes que podrían provocar un incendio
o una descarga eléctrica. No derrame ningún liquido en el equipo.
Nota: Se puede formar humedad dentro del equipo en las siguientes condiciones:
Cuando el equipo pasa repentinamente de un ambiente frío o una habitación con aire acondicionado a un ambiente
cálido.
Inmediatamente después que una fuente de calor o estufa haya sido encendida.
En una entorno con mucho vapor o muy húmedo.
Si se produce algún tipo de humedad dentro de la unidad, es posible que no funcione correctamente. Para solucionar
este problema, conecte la alimentación y espere dos horas para que la humedad se evapore.
Recambios: Cuando alguna de las partes del equipo necesite ser reemplazada, el usuario debe asegurarse que
el servicio técnico utiliza las piezas de recambio especificadas por el fabricante o con las mismas características que
la pieza original. El reemplazo desautorizado de alguna de las piezas puede suponer riesgo de incendio, descarga
eléctrica u otros peligros.
Comprobaciones de seguridad: Después del mantenimiento y reparaciones realizadas, el usuario debe solicitar
al servicio técnico una comprobación general de seguridad para garantizar que la máquina está en las condiciones
apropiadas.
En caso de que el receptor esté sometido a cambios bruscos de temperatura, es posible que se produzca una
condensación de agua en su interior. Si esto ocurre, deje apagado el receptor durante, al menos, dos horas.
Advertencia:
Para reducir el riesgo de descarga eléctrica,
nunca abra el receptor usted mismo. La
manipulación debe darse solamente por
personal cualificado.
El signo de admiración dentro
de un triángulo equilátero
alerta al usuario de una acción
importante.
rev 1.2
PAG.
2
Page 6
INSTALACIÓN RÁPIDA
INSTALACIÓN RÁPIDA
Realice los pasos siguientes para la correcta instalación de su receptor.
PASO 1 : CONFIGURACIÓN TV
Para poder visualizar correctamente la señal del receptor en la Tv se debe configurar el formato y el
modo de la salida de video.
- Modo de salida de video: para una correcta visualización de la imagen seleccione la salida de video
“HD”.
- Formato de salida. Se podrá seleccionar entre los siguientes formatos: 480I, 576I, 576P, 720P_50,
720P_60, 1080I_25, 1080I_30, 1080P_50, 1080P_60 o AUTO.
FAQ
No habrá señal de video/audio por HDMI en algunos televisores cuando se configure la
salida de video en modo “SD” o el modo de video con la configuración “576I” o “480I”.
Esto sucederá debido a que el propio televisor no es compatible con la resolución de la
pantalla “576I” y “480I”. Para poder recuperar la imagen/video, realice una doble pulsación sobre la tecla amarilla del mando a distancia. El intervalo entre las dos pulsaciones
no debe de ser demasiado larga o el receptor interpretará como una pulsación normal.
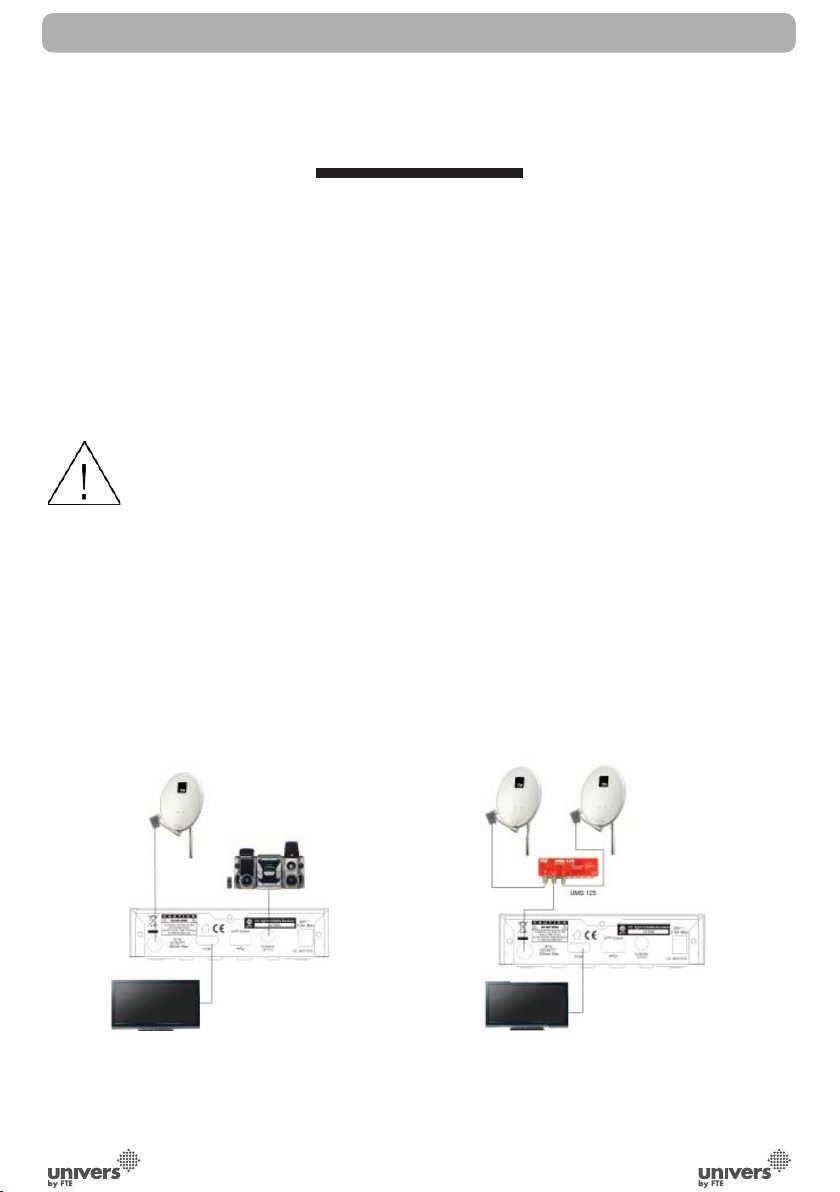
PASO 2 : CONEXIONES
Dependiendo del tipo de instalación se deberá conectar y configurar el receptor de una manera u otra.
El cable coaxial con señal de satélite siempre irá conectado al conector “IF In” del receptor y el conector
HDMI deberá ir conectado al televisor .
A continuación podrá ver cuatro ejemplos de instalación. En caso de dudas, por favor contacte con un
instalador.
Español
Ejemplo 1 – Sistema básico
rev 1.2
PAG.
Ejemplo 2 – Conmutadores DISEqC
3
Page 7
Español
IMAGEN 1
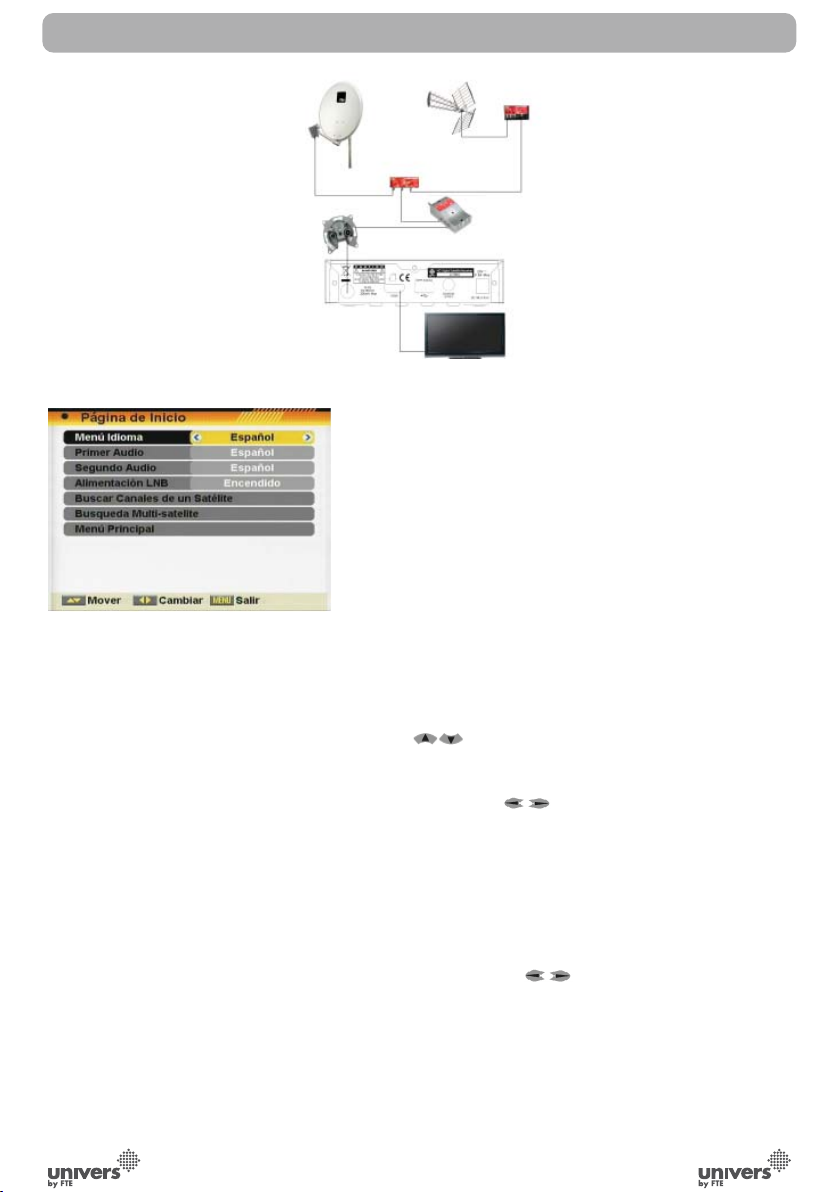
INSTALACIÓN RÁPIDA
Ejemplo 3 – Combinado con terrestre
PASO 3: CONFIGURACIONES BÁSICAS DEL
RECEPTOR
El receptor incluye un asistente de instalación (página de inicio)
que le ayudará a configurar algunos parámetros del mismo.
Al encender el receptor por primera vez se muestra la siguiente
imagen (Imagen 1):
El receptor está pre-programado con los canales de los satélites
Astra (en posición 1 del conmutador DISEqC), Hotbird (en
posición 2 del conmutador DISEqC), Hispasat (en posición 3 del
conmutador DISEqC) y Turksat (en posición 4 del conmutador
DISEqC). Si la configuración de su instalación es diferente a
este caso, por favor siga los pasos de instalación para sintonizar
los canales.
Para desplazarse por las diferentes opciones del menú utilice
las teclas . Si le aparece el mensaje “Cortocircuito en
LNB” por favor verifique las conexiones antes de continuar.
Idioma
: con las teclas [ ] podrá seleccionar los diferentes
idiomas en los que se pueden ver los menús. Los idiomas que
se incluyen son: Inglés, alemán, francés, español, italiano,
portugués, turco, polaco, ruso, danés, griego, húngaro,
holandés, árabe, persa, kiswahili, sueco, búlgaro y eslovaco.
Primer Audio
más de un idioma. Usted puede elegir uno como preferente,
para ello utilice las teclas[ ]. Si el programa de televisión
posee el idioma que usted ha elegido, éste se escuchara
automáticamente. Si el programa de TV no tiene ese idioma,
se escuchará la opción que usted elija como segundo audio. La
selección de idiomas de audio incluyen: Inglés, alemán, francés,
español, italiano, portugués, turco, polaco, ruso, danés, griego,
húngaro, holandés, árabe, persa y eslovaco.
PAG.
: algunos canales de televisión se emiten en
4
rev 1.2
Page 8
INSTALACIÓN RÁPIDA
rev 1.2
IMAGEN 2
IMAGEN 3
Segundo Audio
idioma utilizando las teclas[ ]. Si el programa de televisión
no posee entre sus idiomas el primer audio elegido, pero sí
el segundo, reproducirá este último por defecto. En caso
que el programa de TV no contenga ninguno de los idiomas
solicitado, se reproducirá aquel que esté por defecto en la
transmisión de dicho canal. La selección de idiomas de audio
incluyen: Inglés, alemán, francés, español, italiano, portugués,
turco, polaco, ruso, danés, griego, húngaro, holandés, árabe,
persa y eslovaco.
Alimentación LNB
a un LNB será necesario alimentarlo configurando está opción
a “Encendido”. Si por el contrario, el receptor está instalado
en una instalación comunitaria SMATV posiblemente no se
deberá alimentar. Como esta configuración depende del tipo
de instalación, le recomendamos consulte a su instalador en
caso de duda.
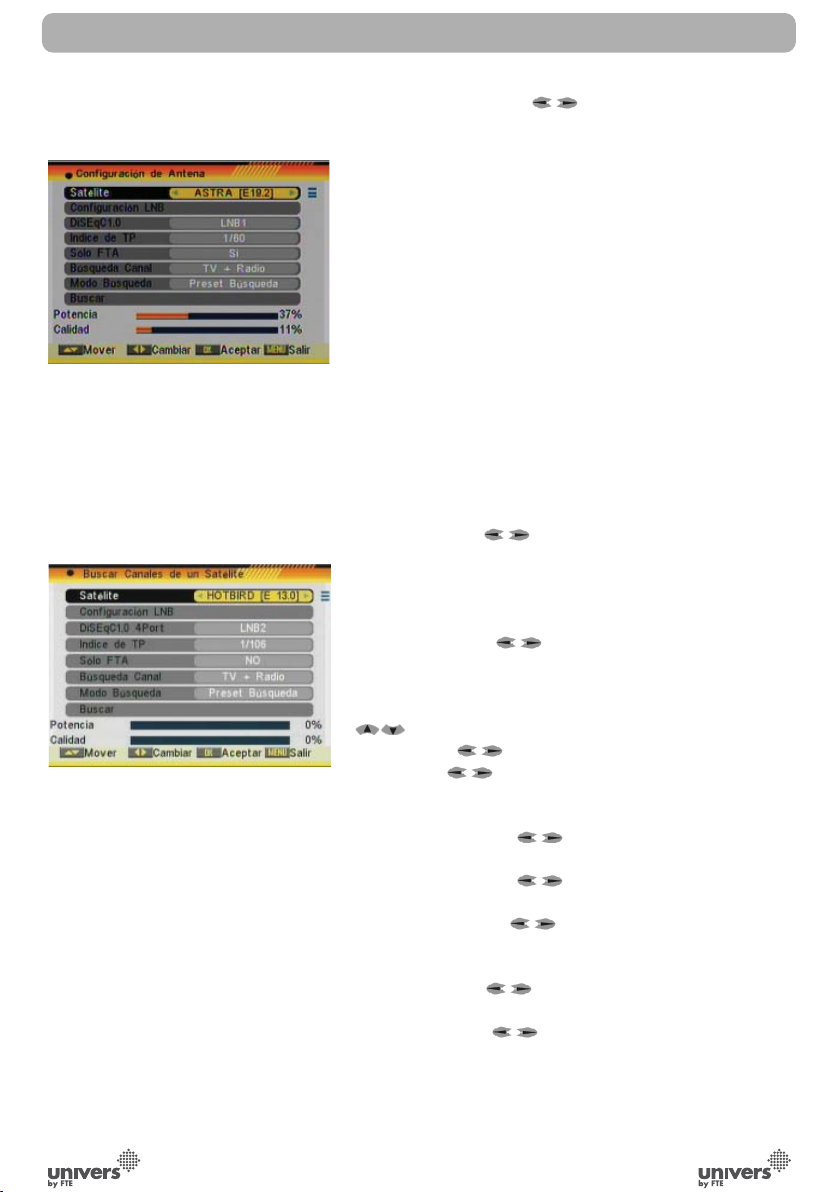
Buscar canales de un satélite
opciones (Imagen 2):
1. Satélite: utilice [ ] para cambiar de satélite o pulse
[OK] para desplegar la lista de satélites disponibles.
2. Configuración LNB: Al seleccionar esta opción y pulsar
[OK], accederá al menú de Configuración LNB. En este menú
se puede modificar los siguientes aspectos (Imagen 3):
- Tipo LNB: utilice [ ] para cambiar entre “Universal”,
“Standard” o “User”. Si elije “Standard” o “User” se podrá
variar la frecuencia del LNB. Al pulsar [OK] aparecen las frecuencias que pueden ser editadas. Desplácese mediante [
tamente con [ ].
- 22K: utilice [ ] para “Encender” o “Apagar” el tono de
22KHz. Esta opción no se mostrará activa si en tipo de LNB
se ha elegido “Universal”
- DISEqC1.0: utilice [ ] para cambiar las opciones
DISEqC 1.0
- DISEqC1.1: utilice [ ] para cambiar las opciones
DISEqC 1.1
- Posicionador: utilice [ ] para cambiar entre Ninguno /
DISEqC 1.2 / GoToX. *
* Este receptor no permite mover motores
- Polaridad: utilice [
“Horizontal” o “Vertical”.
- Toneburst: utilice [
“Encendido”.
Una vez haya configurado el LNB pulse [Exit] para guardar los
cambios y volver a la ventana anterior para seguir configurando la antena.
: Usted puede elegir la segunda opción de
: Si el receptor está conectado directamente
: Se pueden editar las siguientes
] a la frecuencia que quiera modificar y edítela direc-
] para cambiar entre “Automático”,
] para cambiar entre “Apagado” y
Español
PAG.
5
Page 9
Español
IMAGEN 4
INSTALACIÓN RÁPIDA
3. DISEqC1.0: utilice [ ] para cambiar las opciones
DISEqC 1.0
4. Índice de TP: utilice [ ] para seleccionar el TP
deseado.
5. Solo FTA: utilice [ ] para buscar sólo canales libres o
también canales codificados. Si selecciona “Si” sólo se buscarán
los canales libres.
6. Búsqueda canal: utilice [
canales que quiera sintonizar con el receptor. “TV + Radio”,
sólo canales “TV” o sólo canales “Radio”.
7. Modo Búsqueda: utilice [ ] para seleccionar entre
“Preset Búsqueda” o “Auto Búsqueda”. La “Preset Búsqueda”
escanea una lista de satélites y frecuencias pre-definidas,
mientras que la “Auto Búsqueda” realiza una búsqueda ciega
de todas las frecuencias y configuraciones posibles.
8. Mueva la selección a la opción “Buscar” y pulse [Ok] para
empezar la búsqueda. Las barras muestran el progreso de la
búsqueda y los canales encontrados aparecen en una lista.
Si en cualquier momento desea salir de este menú pulse la
tecla [Exit]. Si ha hecho modificaciones sobre la configuración
de LNB, aparecerá una pantalla pidiendo confirmación de
guardar los cambios. Seleccione “Sí” para guardar o “No” para
omitir los cambios.
] para seleccionar el tipo de
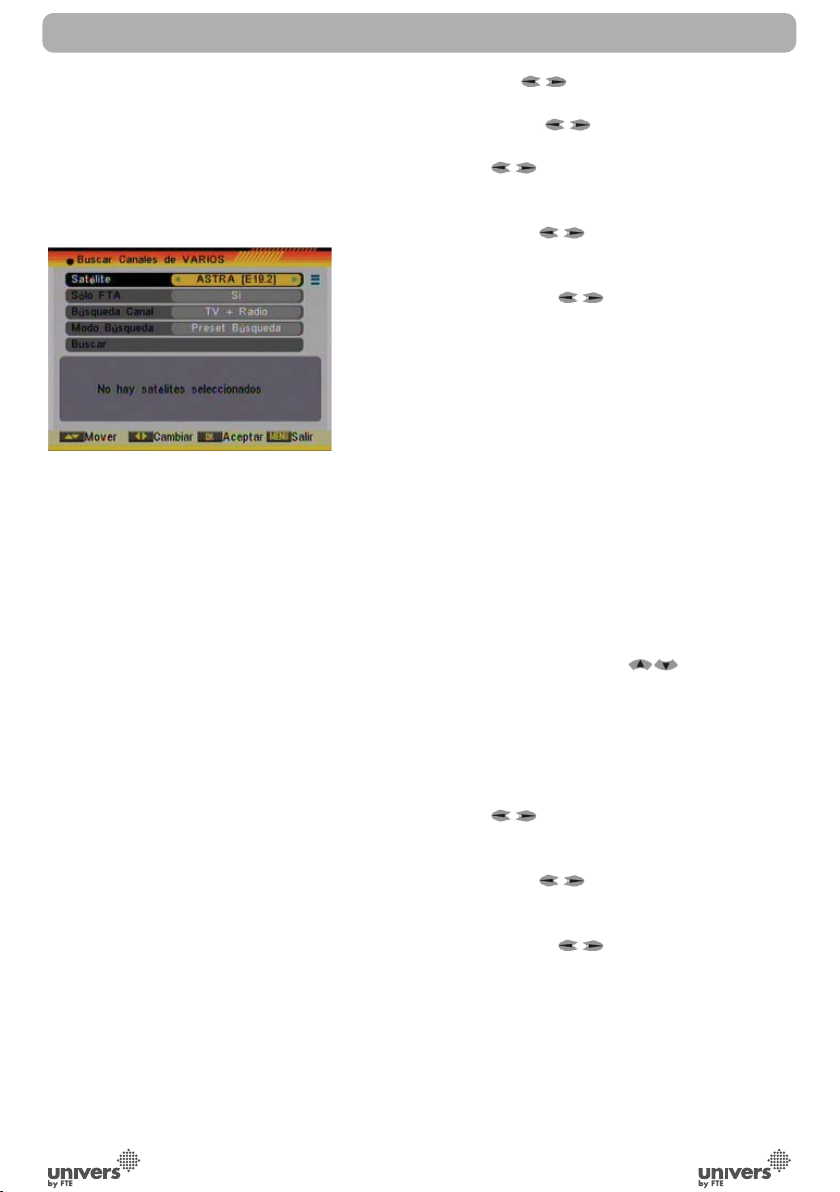
Buscar Canales de VARIOS Satélites
siguientes opciones (Imagen 4):
1. Satélite: pulse [OK] para abrir la lista de satélites disponibles.
Desplácese por dicha lista usando [ ] y marque /
desmarque los satélites que le interesen pulsando la tecla
[OK]. Una vez finalizada su selección, pulse [Exit] para cerrar
la lista de satélites. En la parte inferior de la pantalla puede
ver los satélites que están seleccionados. El receptor usará
DISEqC1.0 / 1.1 / 1.2 y GoToX para buscar los satélites
marcados y escanear los canales.
2. Solo FTA: utilice [ ] para buscar sólo canales libres o
también canales codificados. Si selecciona “Si” sólo se buscarán
los canales libres.
3. Búsqueda canal: utilice [ ] para seleccionar el tipo de
canales que quiera sintonizar con el receptor. “TV + Radio”,
sólo canales “TV” o sólo canales “Radio”.
4. Modo Búsqueda: utilice [ ] para seleccionar entre
“Preset Búsqueda” o “Auto Búsqueda”. La “Preset Búsqueda”
escanea una lista de satélites y frecuencias pre-definidas,
mientras que la “Auto Búsqueda” realiza una búsqueda ciega
de todas las frecuencias y configuraciones posibles.
5. Mueva la selección a la opción “Buscar” y pulse [Ok] para
empezar la búsqueda. Las barras muestran el progreso de la
búsqueda y los canales encontrados aparecen en una lista.
PAG.
6
: Se pueden editar las
rev 1.2
Page 10

INSTALACIÓN RÁPIDA
6. Se puede detener la búsqueda pulsando [Exit]. En este caso,
los canales encontrados hasta el momento son memorizados.
IMAGEN 5
Menú principa
principal en la pantalla.
l: Al seleccionar esta opción aparecerá el menú
PASO 4: CONFIGURACIÓN DE LA HORA
Es recomendable realizar la configuración del reloj antes de
comenzar a disfrutar de nuestro receptor, al necesitar la hora
para algunas de las aplicaciones. Para ello siga los pasos que a
continuación se detallan.
Acceda al menú principal, una vez en esta pantalla, seleccione
la opción “Configuración Sistema” y confirme con la tecla [OK].
Desplácese hasta la opción “Configurar Hora y Programador” y
confirme pulsando [OK].
Cuando seleccione “Conf. tiempo local” y pulse [OK] se
mostrará una imagen como la siguiente (Imagen 5):
1. Uso GMT: esta opción le permitirá seleccionar si desea
introducir manualmente la hora y la fecha (Uso GMT: Apagado)
o si por el contrario quiere que sea automático por el horario
que recibe del satélite (Uso GMT: Encendido).
2. Offset GMT: esta opción sólo está disponible cuando “Uso
GMT” está encendido. Utilice [ ] para cambiar la diferencia
horaria respecto a GMT.
3. Verano: esta opción sólo está disponible cuando “USO GMT”
está encendido. Utilice [ ] para encender / apagar el
horario de verano.
4. Fecha: si “Uso GMT” está apagado, podrá cambiar la fecha.
Utilice el teclado numérico para introducir la fecha correcta.
5. Hora: si “Uso GMT” está apagado, podrá cambiar la hora.
Utilice el teclado numérico para introducir la hora correcta.
NOTA: si el canal actual informa la fecha y la hora, cuando
entre en este menú verá la información recibida a través del
canal. Si el canal actual no informa la fecha y la hora, deberá
introducirla manualmente. La mayoría de canales soportan la
señal de fecha y hora.
6. Mostrar hora: Utilice [ ] para encender/apagar esta
opción. Cuando esta opción está encendida, la hora será
mostrará en el TV en un recuadro en el margen superior
derecho.
7. Pulse [Exit] para salir del menú.
Español
rev 1.2
PAG.
7
Page 11
INSTALACIÓN RÁPIDA
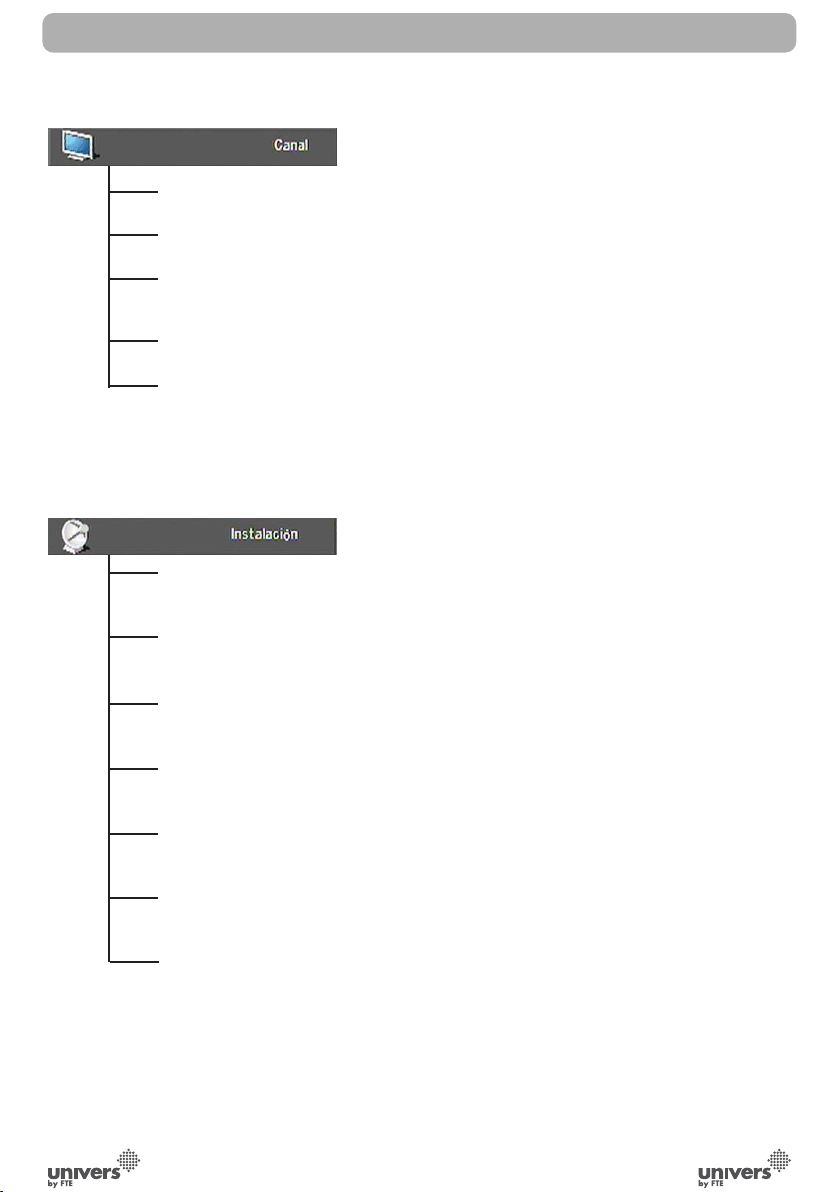
Lista Canales TV: Muestra la lista de canales de televisión sintonizados.
Español
Lista Canales Radio: Muestra la lista de canales de radio sintonizados.
Configuración de Canales: Puede seleccionar si desea que el receptor muestre un canal
concreto cada vez que se enciende.
Listar canales Favoritos: Se puede editar el nombre de los grupos de favoritos.
Borrar Todo: Borra todos los canales memorizados.
Búsqueda de un Satélite: Una vez configurada la antena, permite la búsqueda de
canales de un satélite.
Búsqueda multi-satélite: Una vez configurada la antena, permite la búsqueda de canales
de varios satélite.
Buscar Canales de un TP: Una vez configurada la antena, permite la búsqueda de
canales de un solo TP.
Listado de Satélites: Muestra los satélite memorizados. Se pueden añadir y editar
satélites en la lista.
Listado de TP: Muestra los TP memorizados en cada satélite. Se pueden añadir y editar
TP.
Guía de Satélite: Aplicación que permite, mediante la introducción de la longitud y latitud
local y la posición del satélite, saber que orientación y elevación tendrá la antena.
Configuración Unicable: Permite configurar el receptor para una instalación unicable.
PAG.
8
rev 1.2
Page 12
INSTALACIÓN RÁPIDA
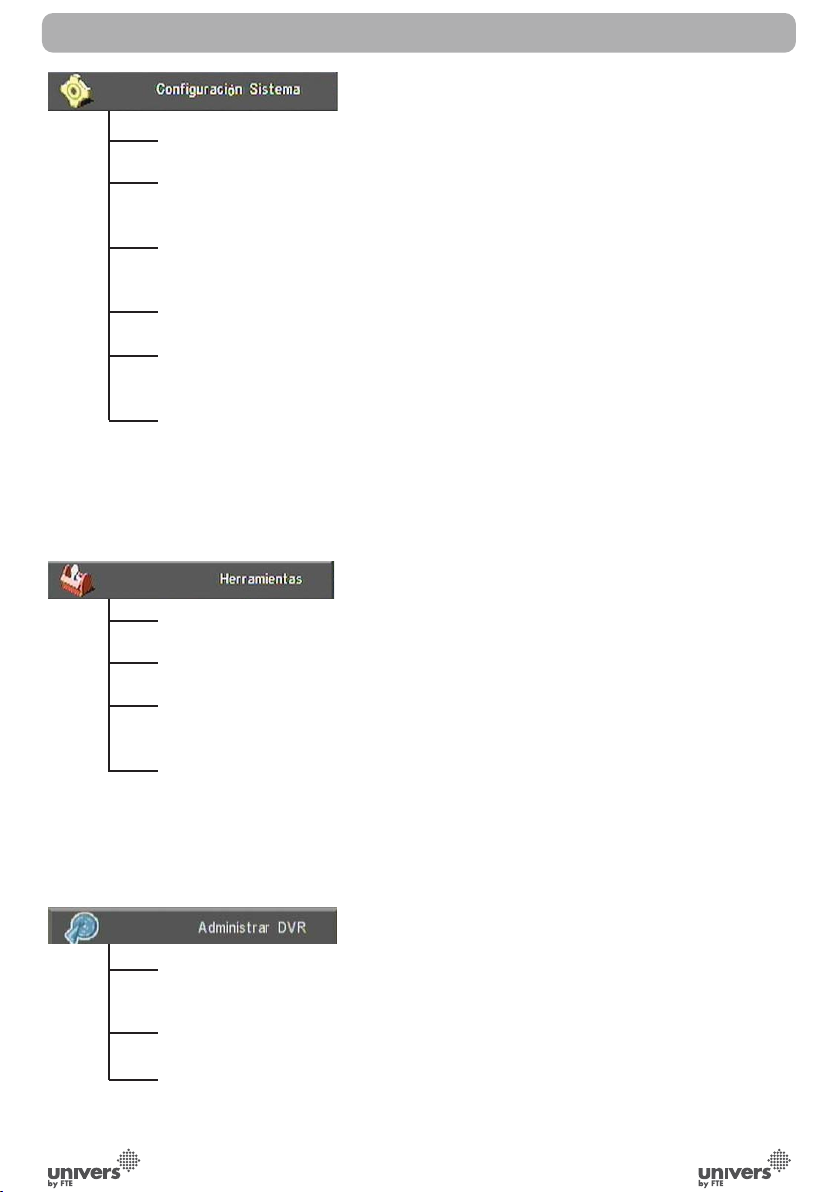
Idioma: Permite elegir el idioma en el que aparecen los menús de pantalla
Sistema de TV: Para ajustar el estándar de emisión de vídeo y otros parámetros para la
visualización en pantalla.
Configurar Hora y Programador: En este menú puede configurar la hora del receptor y
programadores para encendido/apagado.
Configuración de OSD: Puede configurar los subtítulos de información de canal.
Bloqueado con contraseña: Para bloquear menús y modificar la contraseña de bloqueo
del receptor
Configuración de energía: Para habilitar o deshabilitar la opción de Standby automático
al cabo de 3 horas, encender o apagar la alimentación al LNB o activar / desactivar el modo
de bajo consumo del receptor.
Información: Proporciona información técnica del canal de televisión sintonizado
Configuración rápida: Esta opción saltar al asistente de instalación.
Valores por defecto: Esta opción realiza un reset al receptor y vuelve a sus valores de
fábrica
Español
rev 1.2
Actualización de software: Para la actualización de su receptor mediante USB o por
satélite (OTA) y también para realizar backup de la información del receptor en un dispositivo
USB.
Lista multimedia: Permite gestionar grabaciones *, música, fotos y vídeos.
Control multimedia: Permite seleccionar la partición del disco y formatearlo.
Información del disco: Permite ver información del disco duro.
* Esta función solamente está disponible en modelos con funcionalidad PVR ready
PAG.
9
Page 13

ÍNDICE
1. Descripción del Panel y Mando a Distancia
1.1. Descripción del Panel Frontal.......................................................................................13
1.2. Descripción del Panel Trasero...................................................................................13
1.3. Descripción del Mando a Distancia..............................................................................14
2. Operaciones Básicas
2.0. Encender el receptor......................................................................................................15
Español
2.1. StandBy......................................................................................................................15
2.2. TTX......................................................................................................................15
2.3. Mute......................................................................................................................16
2.4. Número......................................................................................................................16
2.5. CH+/CH-..................................................................................................16
2.6. TV/Radio...............................................................................................16
2.7. Vol+/Vol-.................................................................................................16
2.8. Exit.................................................................................................................16
2.9. Menú.....................................................................................................16
2.10. Recall....................................................................................................16
2.11. Lista Canales de TV.................................................................................................16
2.12. EPG..............................................................................................................17
2.13. List.........................................................................................................................17
2.14. Favoritos..............................................................................................................17
2.15. Pista / Modo de Audio...............................................................................................18
2.16. Información........................................................................................................18
2.17. FAV+/FAV-.......................................................................................................18
2.18. Zoom......................................................................................................................18
2.19. Subtítulos..........................................................................................................18
2.20. Corto-circuito LNB......................................................................................................18
2.21. REC................................................................................................................18
2.22. TimeShift........................................................................................................19
2.23. GOTO................................................................................................................20
3. Menú Canal
3.1 Lista Canales TV............................................................................................21
3.1.1. Favoritos.....................................................................................................21
3.1.2. Mover..........................................................................................................21
3.1.3. Ordenar...................................................................................................22
3.1.4. Editar Canales..........................................................................................22
3.1.4.1. Borrar........................................................................................22
3.1.4.2. Omitir........................................................................................23
3.1.4.3. Bloquear....................................................................................23
3.1.4.4. Editar.........................................................................................23
3.1.5. Buscar......................................................................................................24
3.2. Lista Canales Radio.........................................................................................24
3.3 Configuración de Canales.............................................................................................24
PAG.
10
rev 1.2
Page 14

ÍNDICE
3.3.1. Iniciar en Canal……………........……………………………………………………24
3.3.2. Canales de Inicio……………………………………………………...........……….24
3.4. Listar Nombre de Favoritos.....................................................................................25
3.5. Borrar Todos los Canales..........................................................................................25
4. Instalación
4.1. Buscar Canales de un Satélite...................................................................................26
4.2. Buscar Canales de Varios Satélites...............................................................27
4.3. Buscar Canales de un TP.............................................................................28
4.4. Listado de Satélites...................................................................................... 29
4.5. Listado de TP............................................................................................ 29
4.6. Guía de Satélite.....................................................................................................30
4.7. Configuración Unicable...................................................................................... 31
5. Configuración Sistema
5.1. Idioma................................................................................................................32
5.2. Sistema de TV..................................................................................................33
5.3. Configurar Hora y Programador............................................................................33
5.3.1. Programador……………………..........................………………………………33
5.3.2. Conf. tiempo local.…........…………….........................………..……..……35
5.3.3. Apagado Temporizado…………………………….............…………………………35
5.4. Configuración de OSD..................................................................................................35
5.5. Bloqueo con Contraseña............................................................................................36
5.6. Alimentación LNB y Bajo consumo ........………………………................……………………....…37
Español
6. Herramientas
6.1. Información.............................................................................................................38
6.2. Página de Inicio…………………………........................……………………....………38
6.3. Valores por Defecto....................................................................................................38
6.4. Actualización de Software..........................................................................................39
6.4.1. Actualizar por USB ……………………….......………………………........……39
6.4.2. Copia de seguridad USB …....……………………………….......………....39
6.4.3. Actualizar por Satélite.........................................................................40
7. Administrar Multimedia
7.1. Lista del contenido multimedia...........................................................................41
7.1.1. Administrar grabación - Record List.................................................42
7.1.1.1. Reproducir una grabación............………………………………42
7.1.1.2. Renombrar una grabación............………………………………42
7.1.1.3. Bloquear una grabación.............………………………………42
7.1.1.4. Copiar grabaciones..................………………………………42
7.1.1.5. Borrar grabaciones...............….............……………………42
7.1.2. Reproductor multimedia................................................................43
7.1.2.1. Editar archivos y carpetas............………………………………43
rev 1.2
PAG.
11
Page 15

ÍNDICE
7.1.2.2. Añadir un archivo a la lista..............…………………………44
7.1.2.3. Buscar un archivo.........………….............…………………44
7.1.2.4. Logotipo..................................……………………………44
7.1.2.5. Configurar Slide Show.............................…………………45
7.1.2.6. Reproductor de audio ..........….................…………………45
7.1.2.7. Visor de imagenes ......................……………………………45
7.1.2.8. Reproductor de vídeo.......................................................45
Español
7.2. Control del Disco Duro......................................................................................46
7.2.1. Tipo de grabación.......................................………....…………………46
7.2.2. Tamaño del Timeshift..........……...…….................…………………………46
7.2.3. Auto Timeshift..........……...…….................…………………………46
7.2.4. Valor del salto...............……...…….................…………………………46
7.2.5. Grabación de Timeshift...........……..............………....…………………46
7.2.6. Disco...................................……..............………....…………………46
7.2.7. Formatear disco duro..........……...…….................…………………………46
7.3. Información del disco......................................................................................47
8. Especificaciones Técnicas............................................................................................48
9. Declaración de conformidad.....................................................................................49
PAG.
rev 1.2
12
Page 16
DESCRIPCIÓN DEL PANEL Y MANDO A DISTANCIA
1. DESCRIPCIÓN DEL PANEL Y MANDO A DISTANCIA
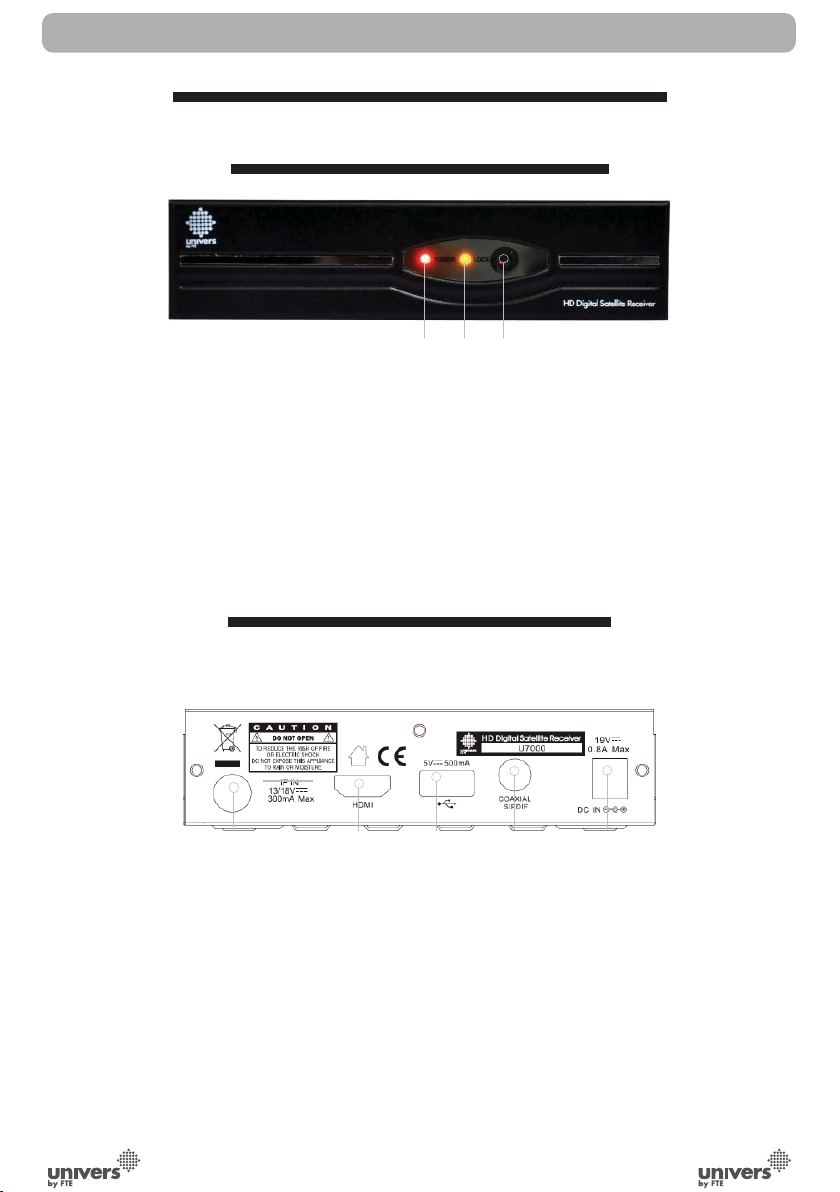
1.1. DESCRIPCIÓN DEL PANEL FRONTAL
1
2 3
1. Indicador POWER: Indica que llega alimentación.
2. Indicador LOCK: Indica que hay suficiente nivel de señal en la entrada IF IN.
3. Sensor-IR: Sensor de recepción para la señal IR del mando a distancia.
1.2. DESCRIPCIÓN DEL PANEL TRASERO
Español
1 2
1. IF IN: Entrada de señal satélite. Max. 300mA
HDMI: Salida HDMI para conectar al televisor.
2.
3. USB: Conector para dispositivos externos tipo USB 2.0 de alta velocidad.
4. COAXIAL S/PDIF: Salida coaxial para audio digital (AC3).
5. DC IN: Entrada para conectar a una fuente de alimentación de 19 VDC.
rev 1.2
PAG.
3
13
4
5
Page 17
Español
■
►
II
■
■
DESCRIPCIÓN DEL PANEL Y MANDO A DISTANCIA
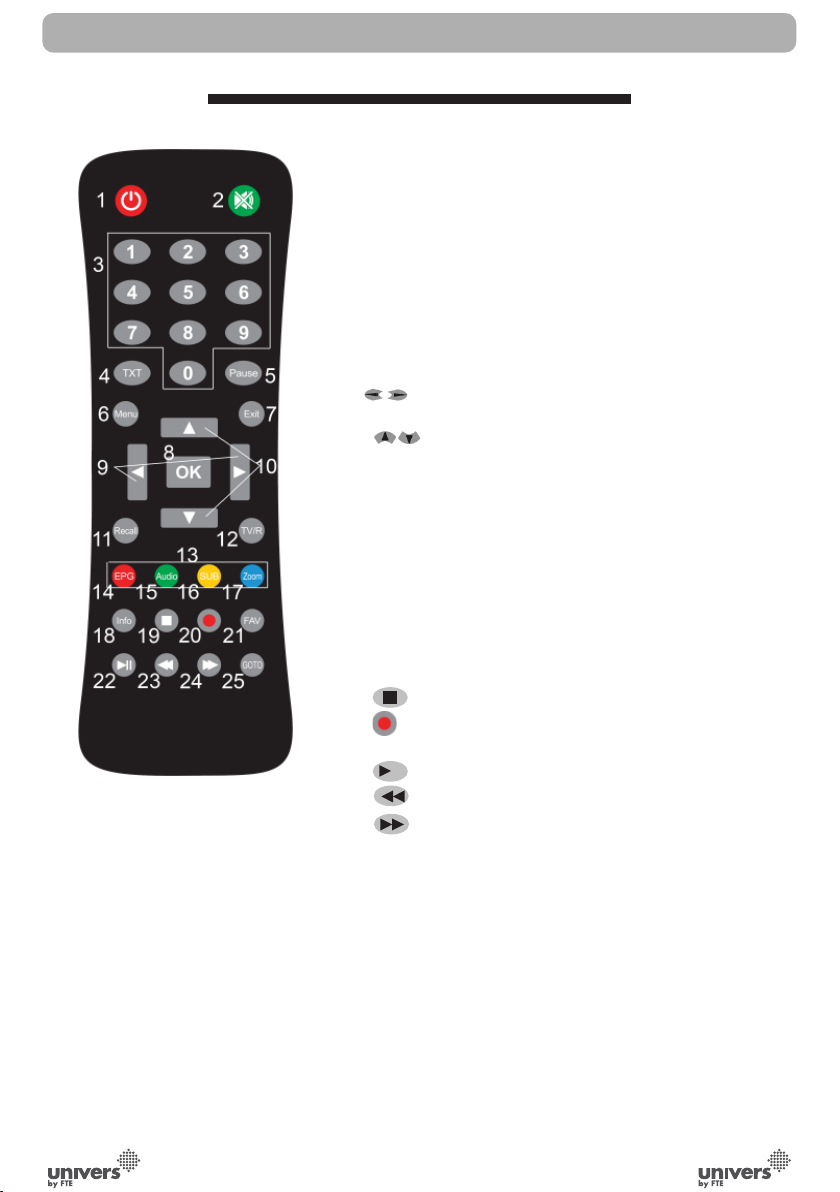
1.3. DESCRIPCIÓN DEL MANDO A DISTANCIA
1.- POWER: Enciende o pone el receptor en modo reposo.
2.- MUTE: Enciende o apaga el sonido.
3.- TECLADO: Teclado para entrada directa de números y
nombres.
4.- TXT: Abre o cierra el teletexto.
5.- Pause: Si lo pulsa una vez detendrá la imagen, que volverá
al modo normal cuando vuelva a pulsarlo.
6.- MENU: Abre el menú principal.
7.- EXIT: Sale de un menú o detiene las operaciones actuales.
8.- OK: Confirman las selecciones o abre la lista de canales.
9.en el menú.
10.- : Cambio de canal o controlan el cursor en el
menú.
11.- Recall: Permite cambiar entre el canal actual y el último
canal seleccionado.
12.- TV/R: Alterna entre canales de TV o de radio.
13.- Teclas de color: Botones para las opciones de los menús.
14.- EPG: Muestra las informaciones de la EPG.
15.- Audio: Abre el menú de audio.
16.- SUB: Activa o desactiva los subtítulos.
17.- ZOOM: Función Zoom.
18.- INFO: Muestra la información del canal y el nivel de
señal.
19.-
20.-
21.- FAV: Abre la lista de canales favoritos.
22.-
23.-
24.-
25.- GOTO: Salto a posición especificada. *
: Ajusta el volumen de sonido o controlan el cursor
: Detiene las grabaciones. *
: Inicio rápido de la grabación. *
: Inicia o pausa las grabaciones. *
: Retrocede las grabaciones. *
: Avanza las grabaciones. *
* Esta función solamente está disponible en modelos
con funcionalidad PVR ready
rev 1.2
PAG.
14
Page 18

OPERACIONES BASICAS
2. OPERACIONES BÁSICAS
2.0. ENCENDER EL RECEPTOR
Encienda el botón [Power ON/OFF] en la parte posterior del
receptor.
Cuando el receptor es usado por primera vez, mostrará la página
de inicio donde podrá configurar rápidamente el receptor.
En otros casos, mostrará el mismo canal que la última vez que
se apagó.
? PREGUNTAS FRECUENTES
P: El botón de mi receptor está encendido y está funcionando
en modo TV, pero en el televisor no aparece nada:
R: Asegúrese que el televisor ha sido configurado a la entrada
de vídeo correcta. Por ejemplo, si ha conectado el receptor
a la entrada Video1 del televisor, necesitará seleccionar la
entrada adecuada en su televisor. Normalmente, esto se realiza
mediante el botón AV en el mando a distancia de su televisor.
P: Mi receptor está funcionando en modo TV, pero la pantalla
del televisor no muestra nada, excepto un aviso de “No hay
señal”:
R: Significa que el canal que ha seleccionado no tiene señal.
Puede ser debido a varios motivos:
1. El canal que ha seleccionado no pertenece al satélite al cual
está orientado la antena. Seleccione otro canal.
2. La señal del canal actual es demasiado débil. Pruebe a
cambiar a otros canales con señal más fuerte. Si el problema
persiste, por favor consulte con un instalador para servicio
técnico.
3. Se ha seleccionado un tipo de LNB incorrecto en el menú de
instalación o la configuración de DISEqC no es correcta.
Español
rev 1.2
OSD 1
2.1. STANDBY
1. Pulse la tecla [Power] para conmutar el modo TV con el
modo Stand-By.
2. En el modo Stand-By, pulse la tecla [Power] otra vez para
volver a conmutar al modo TV. El último canal activo antes de
pasar al modo Stand-By será el mostrado.
3. Para apagar completamente el receptor, pulse el botón de
alimentación principal (en la parte posterior del receptor).
2.2. TTX
1. Pulse la tecla [Text] en el modo TV para abrir la página
de teletexto (OSD 1). Este servicio depende del soporte del
proveedor del canal.
2. Si el canal no soporta información de teletexto, se mostrará
“No hay Datos del Teletexto” en la pantalla.
PAG.
15
Page 19
Español
OSD 2
OPERACIONES BASICAS
2.3. MUTE
1. Pulse la tecla [Mute] para silenciar el sonido. Un icono (OSD
2) aparecerá en la pantalla para indicar que el sonido está
silenciado.
2. Pulse la tecla [Mute] otra vez para restaurar el sonido.
2.4. NÚMERO
En modo TV puede entrar el número de canal directamente
mediante el mando a distancia para cambiar al canal deseado.
2.5. CH+/CH-
En el modo TV, pulse [ ] para cambiar el canal.
2.6. TV/RADIO
En el modo TV, pulse [TV/R] para conmutar al modo Radio. En
el modo Radio pulse [TV/R] para conmutar al modo TV.
2.7. VOL+/VOL-
En el modo TV, pulse [ ] para ajustar el volumen.
2.8. EXIT
La tecla [Exit] permite salir del menú actual.
2.9. MENÚ
La tecla [Menú] permite entrar en el menú o salir del menú
actual.
OSD 3
OSD 4
2.10. RECALL
Pulsar la tecla [Recall] permite cambiar entre el canal actual y el
último canal seleccionado.
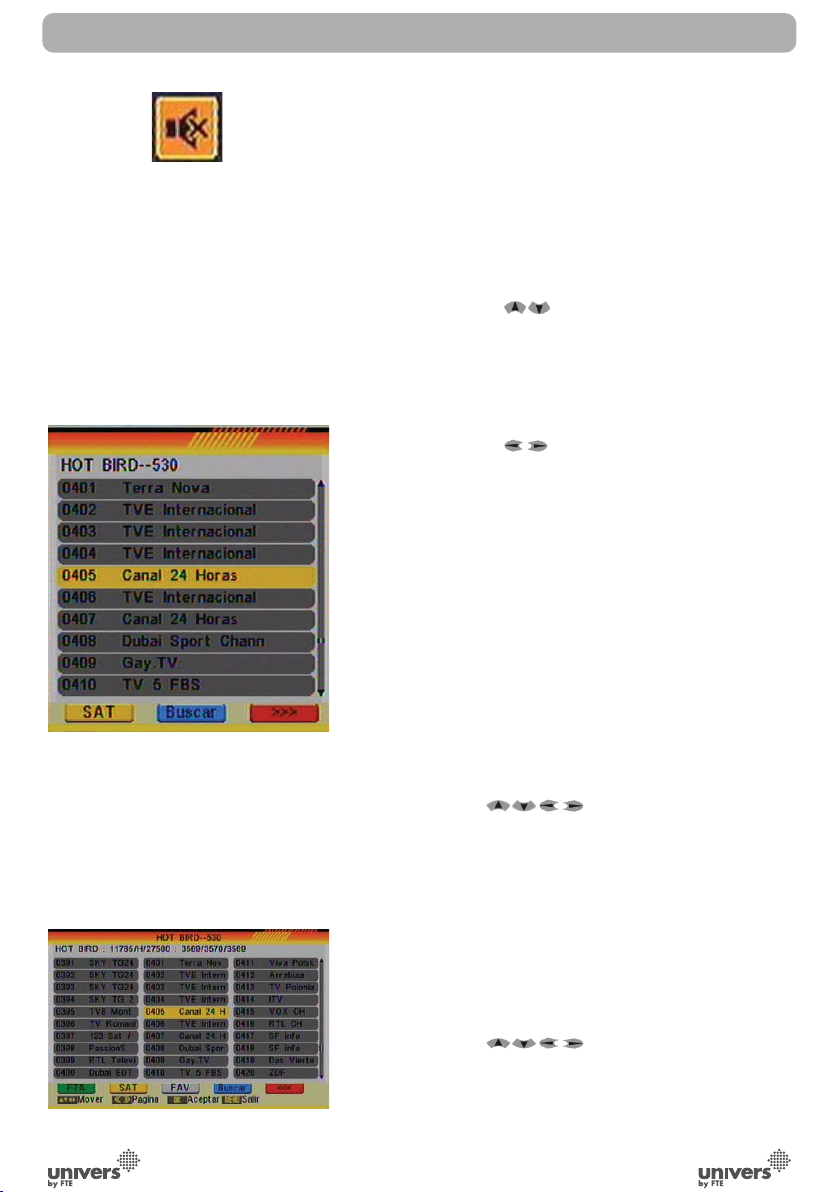
2.11. LISTA CANALES DE TV
En el modo TV, pulse [OK] para entrar en la “Lista de
canales”.
Lista de canales reducida (OSD 3):
En esta lista, podrá desplazarse por los diferentes canales
mediante las teclas [ ].
1. Pulse la tecla [Amarilla] para abrir la lista de Satélites. Una
vez seleccionado un satélite, la lista sólo mostrará los canales
de dicho satélite.
2. Pulse la tecla [Azul] para abrir la ventana “Buscar”. Puede
usar esta funcionalidad para buscar canales por su nombre.
3. Pulse la tecla [Roja] para abrir la lista de canales completa.
4. Una vez esté seleccionado el canal deseado, pulse [OK] para
cambiar y mostrar el canal marcado.
Lista de canales completa (OSD 4):
En esta lista, podrá desplazarse por los diferentes canales
mediante las teclas [ ].
En esta ventana obtendrá más información que en la lista de
canales reducida como la frecuencia, polaridad, velocidad de
símbolo y PID del canal seleccionado.
1. Pulse la tecla [Verde] para ordenar los canales por libres o
PAG.
16
rev 1.2
Page 20
OSD 5
OSD 6
OPERACIONES BASICAS
codificados. Los canales libres son situados al principio y los
codificados al final de la lista.
2. Pulse la tecla [Amarilla] para abrir la lista de Satélites. Una
vez seleccionado un satélite, la lista sólo mostrará los canales
de dicho satélite.
3. Pulse la tecla [FAV] para abrir la lista de Favoritos. Una vez
seleccionado un grupo de favoritos, la lista sólo mostrará los
canales de dicho grupo.
4. Pulse la tecla [Azul] para abrir la ventana “Buscar” (OSD
5). Puede usar esta funcionalidad para buscar canales por su
nombre.
5. Pulse la tecla [Roja] para abrir la lista de canales reducida.
6. Una vez esté seleccionado el canal deseado, pulse [OK]
para cambiar y mostrar el canal marcado.
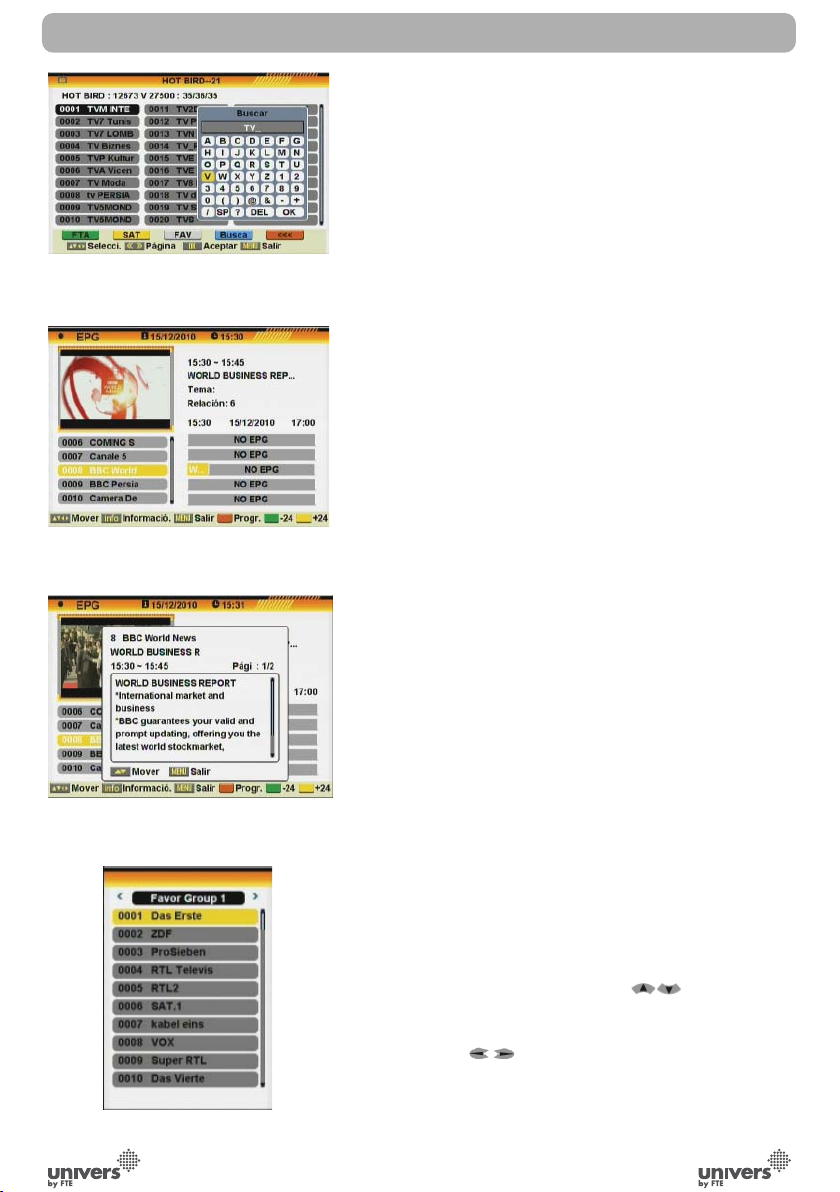
2.12. EPG
1. El receptor dispone de Guía Electrónica de Programa
(EPG) para ofrecerle información de la programación de
ciertos canales como título, subtítulos, descripción, horario de
comienzo y fin de la programación. Esta función depende del
servicio del proveedor del canal. Pulse la tecla [EPG] para ver
la pantalla EPG (OSD 6).
2. Pulse la tecla [INFO] en la ventana de EPG para mostrar la
información detallada del evento seleccionado (OSD 7).
3. Con la tecla [Roja] puede programar un temporizador con el
horario de comienzo y de fin de dicho evento. (para programar
una grabación, el evento no debe haber empezado todavía).
4. Pulse la tecla [Amarilla] para mostrar la información de la
EPG dentro de 24 horas.
5. Pulse la tecla [Verde] para volver a mostrar la información de
la EPG de 24 horas anteriores.
6. Para cerrar el menú EPG pulse la tecla [Exit].
Español
rev 1.2
OSD 7
OSD 8
2.13. LIST
En modo TV, pulse la tecla [List] para acceder directamente al
menú “Lista de Canales de TV” o al menú “Lista de Canales de
Radio” dependiendo el modo en que se encuentre.
2.14. FAVORITOS
1. En el modo TV pulse la tecla [Fav] para mostrar la ventana
Grupos de Favoritos en la pantalla como la imagen que se
muestra al lado (OSD 8):
2. En la ventana Grupos de Favoritos puede seleccionar el
canal favorito deseado con las teclas [ ] y confirmarlo
con [OK] para conmutar a dicho canal. En grupos más grandes
se puede navegar con [Pup/Pdw].
3. Con las teclas [ ] puede seleccionar diferentes Grupos
de Favoritos.
4. Pulse [Exit] para cerrar la ventana de Grupos de Favoritos.
PAG.
17
Page 21
OSD 9
OPERACIONES BASICAS
? PREGUNTAS FRECUENTES
P: ¿Porque en la pantalla se muestra “Sin Programa Favorito!”
después de pulsar la tecla [Fav]?
R: Ningún canal ha sido asignado todavía al Grupo Favorito.
Puede hacerlo en el menú “Canal”.
Español
OSD 10
OSD 11
OSD 12
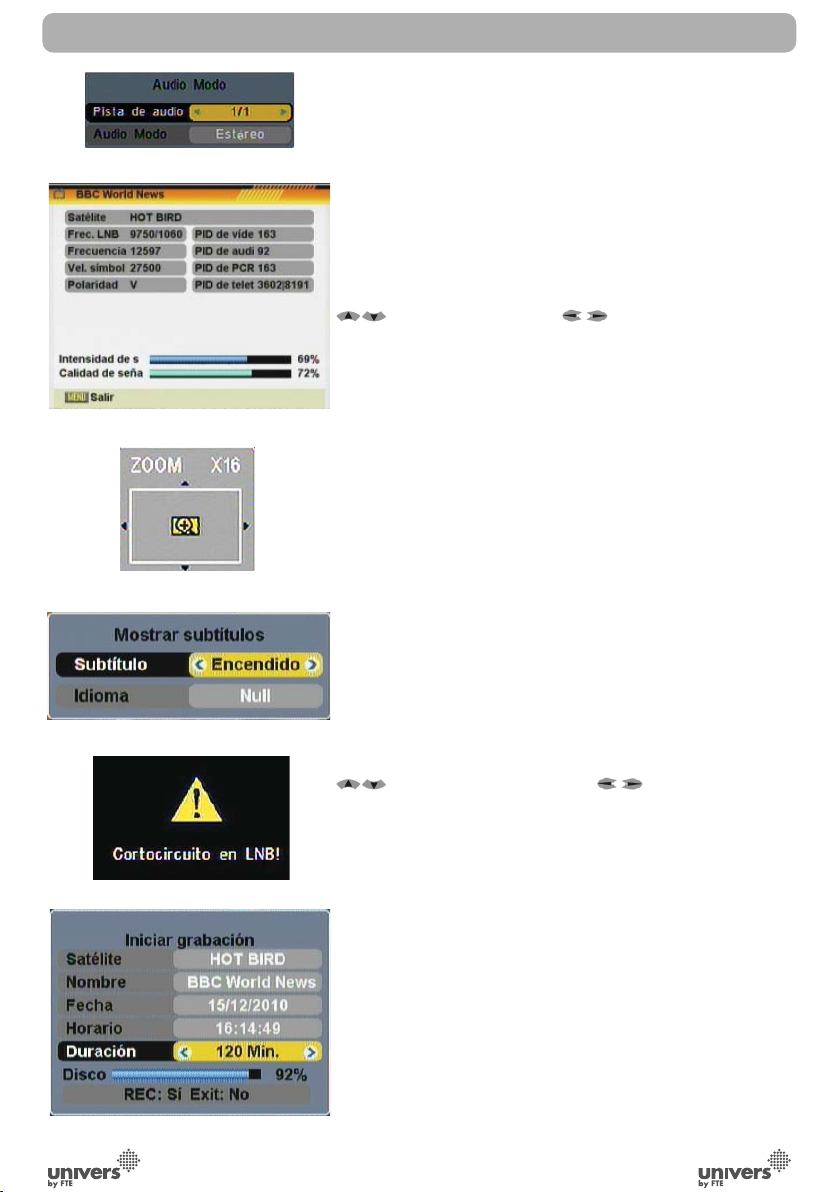
2.15. PISTA / MODO DE AUDIO
1. En el modo TV, pulse la tecla [Audio] para abrir la ventana de
Modo de Audio (OSD 9).
2. Seleccione la opción que quiera ajustar con los botones [
] y cambie el valor con [ ].
3. Pulse [Exit] para salir.
2.16. INFORMACIÓN
En modo TV, pulse la tecla [Info] para abrir la pantalla de
información. En la ventana se muestran los parámetros del
canal actual (OSD 10).
2.17. FAV+/-
1. En modo TV pulse la tecla [FAV+/FAV-] para cambiar
canales directamente del Grupo de Favoritos actual.
2. La secuencia de los canales favoritos sigue el orden existente
en la lista de Grupos Favoritos.
2.18. ZOOM
1. Pulse la tecla [Zoom] en el modo TV para ampliar la imagen.
La imagen se puede ampliar hasta x16 veces (OSD 11).
2. Pulse [Exit] para salir de la función.
2.19. SUBTÍTULOS
1. En modo TV, pulse la tecla [SUB] para abrir la ventana de
Subtítulos (OSD 12).
2. Seleccione la opción que quiera ajustar con los botones [
] y cambie el valor con [ ], dependiendo del
proveedor.
3. Pulse [Exit] para salir.
OSD 13
OSD 14
2.20. CORTO-CIRCUITO LNB
Cuando hay un cortocircuito en la LNB, se notificará al usuario
mediante un mensaje en pantalla “Cortocircuito en LNB” (OSD
13). Por favor, verifique sus cables y conexiones. Cuando el
cruce se solucione el mensaje desaparecerá.
2.21. REC*
Inicio rápido de grabación (OSD 14).
Si desea grabar un programa inmediatamente, apriete la tecla
REC. Una nueva ventana es mostrada en pantalla donde podrá
ver seleccionar la duración de la grabación (desde 15 a 180
minutos en intervalos de 15 minutos).
Los otros datos que aparecen en esta ventana son informativos
del canal de grabación, la fecha, la hora y el espacio disponible
PAG.
18
rev 1.2
Page 22
►
II
►
II
►
II
■
■
OSD 15
OSD 16
OPERACIONES BASICAS
en el disco duro.
Una vez haya fijado la duración en minutos confirme de nuevo
con la tecla REC y la grabación empezará.
Pulse [Exit] para cancelar el inicio de grabación rápida.
Nota: Si el disco duro está lleno, un mensaje de alerta será
mostrado en la pantalla. Por favor, elimine algunos archivos
para poder grabar de nuevo.
Nota: Si durante una grabación, el disco duro se llenara, la
grabación finalizaría y se almacenará hasta el instante de llenado
del disco (sin perder los datos almacenados anteriormente).
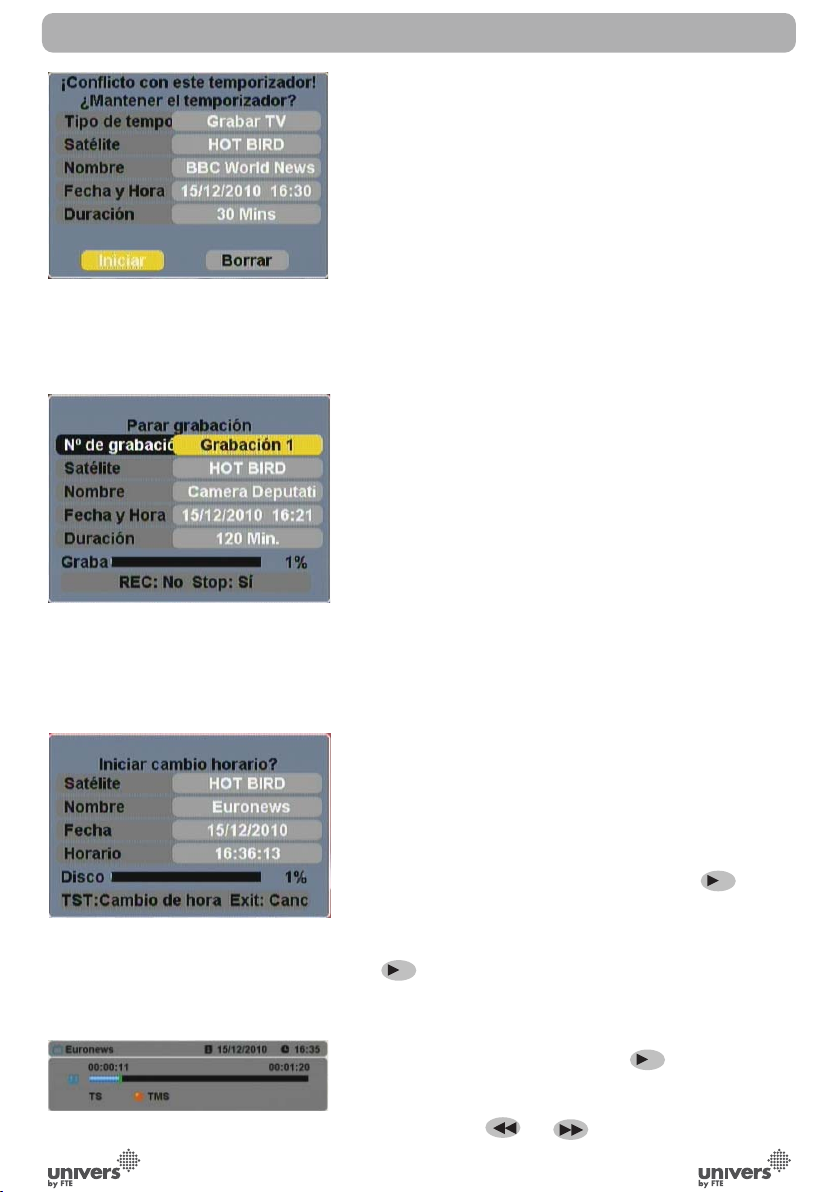
Si al hacer un inicio rápido de grabación y fijar la duración, ésta
entrara en conflicto con un temporizador, un mensaje de alerta
será mostrado en pantalla.
Dicho mensaje informa con el primer temporizador que entraría
en conflicto la grabación rápida y le pide que confirme que
desea hacer en el momento del temporizador (OSD 15).
- Si pulsa de nuevo la tecla “Rec”: mantendrá el evento
programado. El receptor realizará la grabación rápida hasta el
momento del evento programado en que pasará a realizarlo,
obviando la duración seleccionada en la grabación rápida.
- Si pulsa la tecla “Exit”: hará la grabación rápida y obviará los
eventos temporizados que se encontrara en conflicto. De todas
formas, en el momento del evento temporizado se vuelve a
preguntar al usuario si quiere realizar el evento programado. En
caso de no responder, continuaría con la grabación rápida.
Para detener una grabación manualmente antes de la
finalización de la duración programada, pulse la tecla [Stop].
Una nueva ventana será mostrada para pedir confirmación del
final manual de grabación (OSD 16). Si pulsa la tecla [Rec]
seguirá con la grabación. Pulse la tecla [Stop] de nuevo para
finalizar la grabación de forma manual antes del final de la
duración programada.
Español
rev 1.2
OSD 17
OSD 18
2.22. TIME SHIFT*
Si usted está viendo un programa y desea detenerlo, para
continuar viéndolo después, presione la tecla [
mando a distancia. Una ventana será mostrada para pedir
confirmación del inicio de Time Shift (OSD 17). Pulse [EXIT]
para cancelar el inicio del timeshift. Confirme de nuevo con la
tecla [
] y el timeshift empezará. El programa se detendrá y
se irá almacenando en el disco duro de su receptor. El OSD le
mostrará el tiempo desde que se ha activado la función (OSD
18).
Cuando desee continuar, ariete el botón [
la información se encuentra en su disco duro, tiene disponible
las funciones de avance y retroceso rápido.
Apretando el botón [
PAG.
19
] o [
] varias veces puede ajustar
] en el
] de nuevo. Como
Page 23
Español
►
II
OSD 19
OSD 20
OPERACIONES BASICAS
la velocidad de avance. Opciones: 2x, 4x y 8x.
También puede pulsar las teclas [ ] para hacer un salto
hacia atrás / adelante.
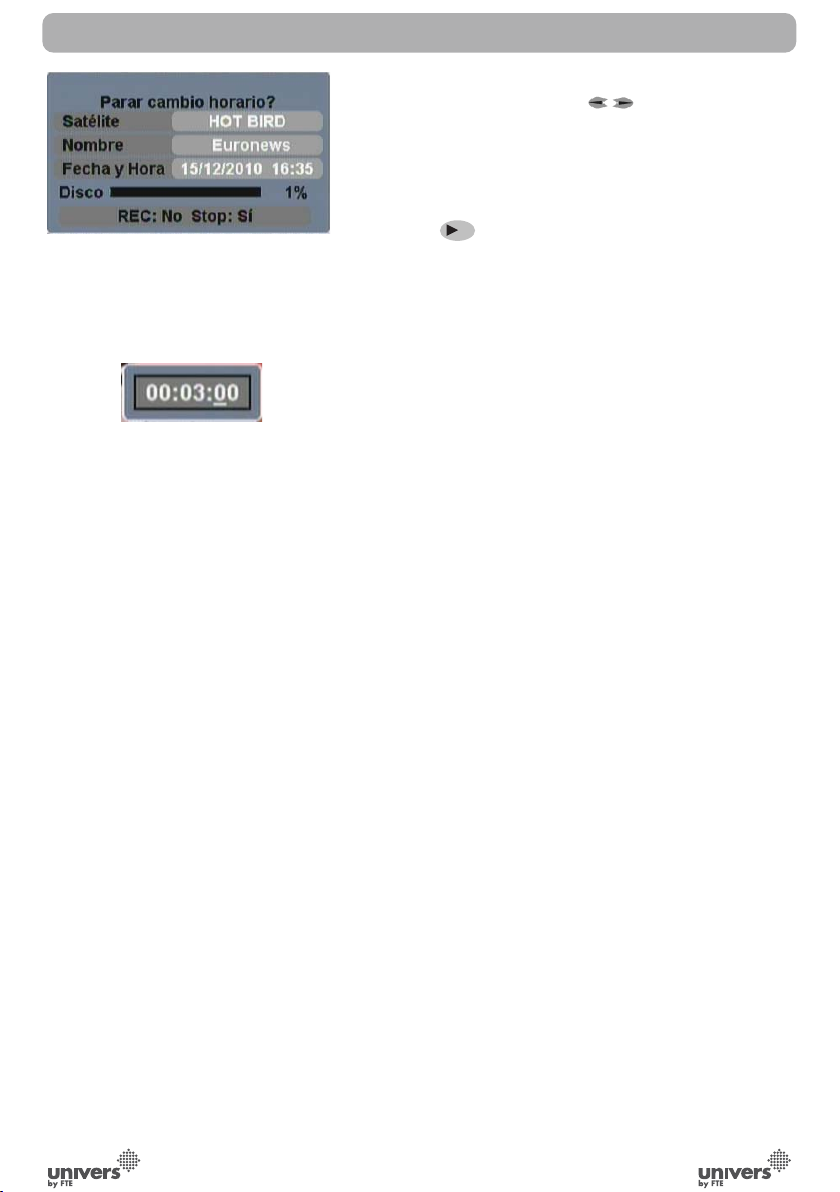
Para abandonar la función Time Shift, pulse la tecla [Stop] para
igualar la diferencia de tiempo de reproducción con la real. Al
pulsar nuevamente la tecla [Stop], una ventana será mostrada
para pedir confirmación del final de Time Shift (OSD 19). Si
pulsa la tecla [
[Stop] de nuevo para abandonar el Time Shift.
] seguirá en modo Time Shift. Pulse la tecla
2.23. GOTO*
En una reproducción en curso, pulse la tecla [GoTo] para ir a un
punto en concreto de la reproducción.
Al pulsar esta tecla, se muestra una ventana donde podrá
introducir, mediante los números del mando a distancia, la hora:
minuto: segundo concreta (OSD 20).
Si el valor introducido es superior al límite de la reproducción,
una ventana de error será mostrada.
* Esta función solamente está disponible en modelos
con funcionalidad PVR ready
rev 1.2
PAG.
20
Page 24
MENÚ CANAL
3. MENÚ CANAL
OSD 21
OSD 22
Pulse la tecla [Menú] del mando a distancia para entrar en el
menú principal (OSD 21).
1. Pulse las flechas del mando a distancia [ ] para
seleccionar la opción Canal.
2. Pulse [OK] para entrar en el submenú Canal
En el submenú canal (OSD 22):
3. Pulse las teclas [
seleccionar las diferentes opciones del menú.
4. Pulse [OK] para entrar en la opción del submenú elegida.
- Lista Canales TV
- Lista Canales Radio
- Configuración de Canales
- Listar nombres de Favoritos
- Borrar Todos los Canales
] del mando a distancia para
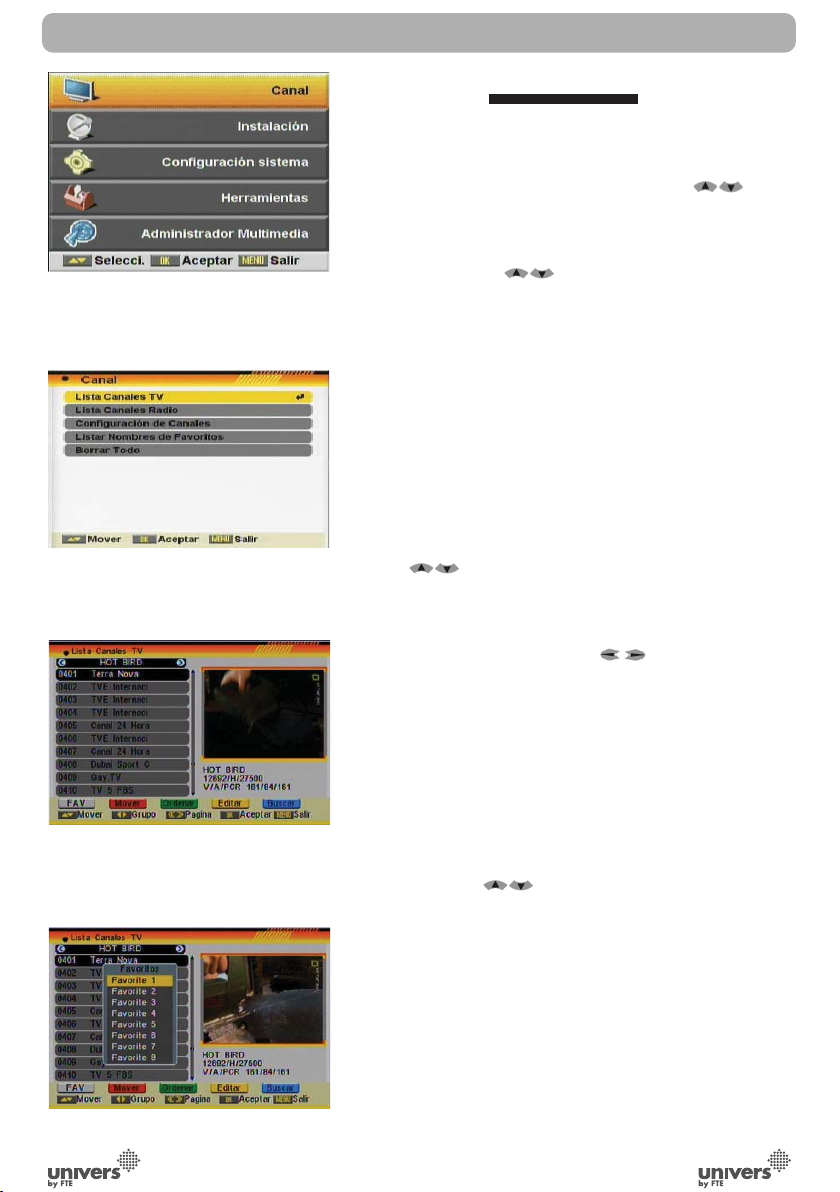
3.1. LISTA CANALES TV
Al entrar en este menú, aparece en pantalla una imagen como
la mostrada en la imagen (OSD 23):
1. Puede mover la selección apretando las teclas del mando a
distancia [ ] y pulsando [OK] pre-visualizará la imagen del
programa de TV elegido, en la ventana situada a la derecha.
2. Pulse las teclas [Pup/ Pdw] para mostrar las siguientes
páginas de canales.
3. Apretando las teclas del mando [ ] podrá cambiar de
grupo de canales y el satélite que quiere mostrar.
4. Las teclas de colores ofrecen más funcionalidades para
administrar la lista de canales.
5. Pulse [Menu] para salir del menú.
Español
rev 1.2
OSD 23
OSD 24
3.1.1. FAVORITOS
1. Pulse la tecla [Fav] para abrir la ventana de “Favoritos” (OSD
24).
2. Puede seleccionar entre 8 grupos de favoritos distintos
mediante las teclas[ ]. Pulse [OK] para asignar el canal
seleccionado a un grupo de favoritos.
3. Pulse [OK] otra vez para quitar el canal del grupo de
favoritos.
4. Pulse la tecla [Exit] para volver a la lista de canales de TV.
Los canales asignados a grupos de favoritos están indicados
con un icono a continuación del nombre.
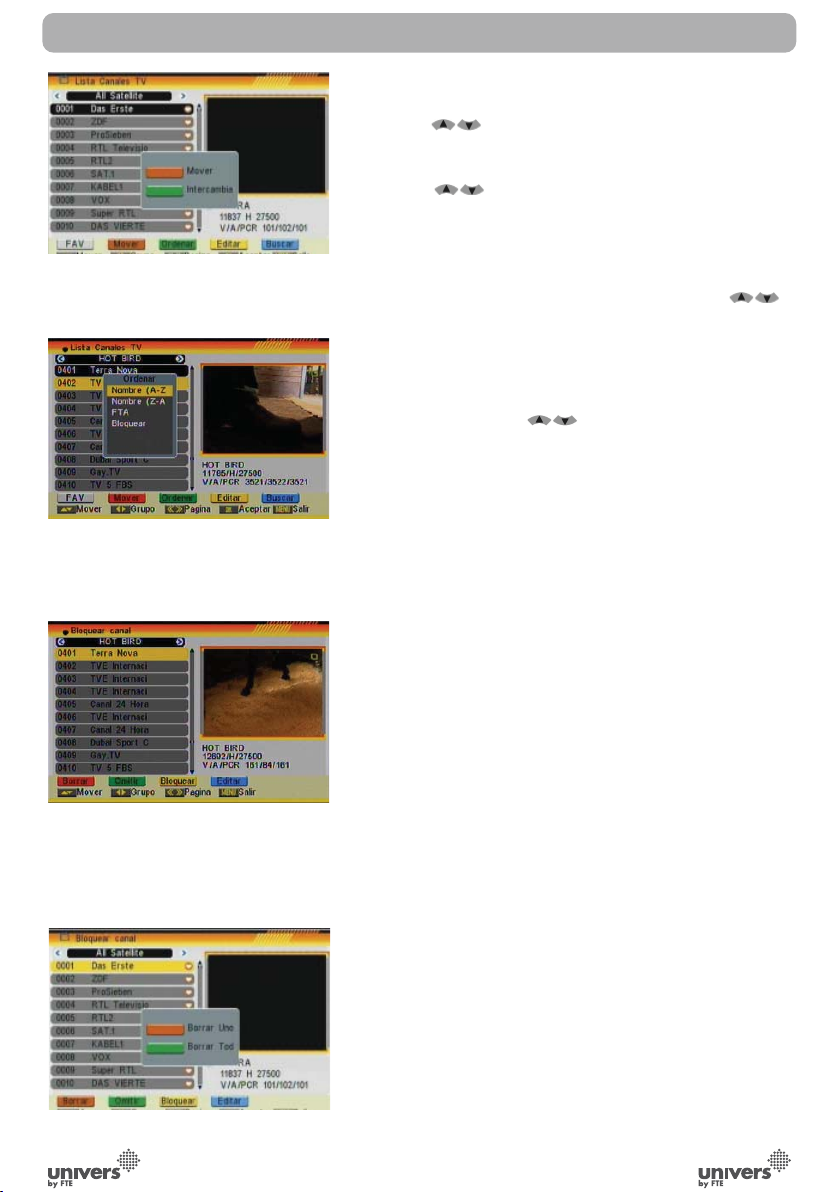
3.1.2. MOVER
1. Para mover / intercambiar canales: Al pulsar la tecla [Roja]
verá una imagen como el OSD 25. Podrá mover o intercambiar
la posición de los canales:
PAG.
21
Page 25
Español
OSD 25
OSD 26
MENÚ CANAL
- Mover:
- Pulse de nuevo la tecla [Roja] para mover los canales.
- Pulse [ ] para desplazarse por la lista y [OK] para
seleccionar los canales que quiera mover. Aparecerá una
marca al lado de los canales seleccionados.
- Pulse [ ] para desplazarse y la tecla [Roja] para
confirmar la nueva posición de los canales.
- Intercambiar:
- Pulse la tecla [Verde] para intercambiar la posición del
canal.
- Mueva el canal a la posición deseada mediante [
Pulse [OK] para confirmar la nueva posición.
3.1.3. ORDENAR
1. Pulse la tecla [Verde] para abrir la ventana para ordenar los
canales (OSD 26). Pulse [ ] para seleccionar y [OK] para
confirmar la elección.
2. Las posibilidades de ordenación son:
- Nombre (A-Z): Aparecen en orden alfabético, ignorando los
símbolos.
- Nombre (Z-A): Aparecen en orden alfabético, ignorando los
símbolos.
- FTA/CAS: Ordena los canales en secuencia de libres y codi-
ficados. Los canales gratuitos aparecen primero en la lista de
canales y los canales codificados aparecen a continuación.
- Bloquear: Los canales que no están bloqueados aparecen pri-
mero en la lista de canales y los canales bloqueados aparecen a continuación.
- Defecto: carga los canales en el orden por defecto.
].
OSD 27
OSD 28
3.1.4. EDITAR CANALES
1. Para editar un canal, pulse la tecla [Amarilla]. Aparecerá una
ventana donde se pedirá la contraseña del equipo. Por defecto
el código es “0000”.
2. Dentro del menú editar (OSD 27), podrá borrar, omitir,
bloquear y editar el canal.
3. Pulse [Exit] para salir del menú. Aparecerá entonces un
mensaje para confirmar si desea guardar los cambios.
3.1.4.1 BORRAR
Para borrar uno o más canales de su lista, pulse la tecla [Roja]
dentro del menú “Editar Lista de canales” sobre el canal que se
desee eliminar.
Aparece una confirmación para borrar un canal o borrar todos
los canales de la lista (OSD 28):
- Confirme pulsando la tecla [Roja] para seleccionar los canales
PAG.
22
rev 1.2
Page 26
OSD 29
MENÚ CANAL
uno a uno. Sólo se borrarán los canales seleccionados.
- Confirme pulsando la tecla [Verde] para seleccionar todos los
canales.
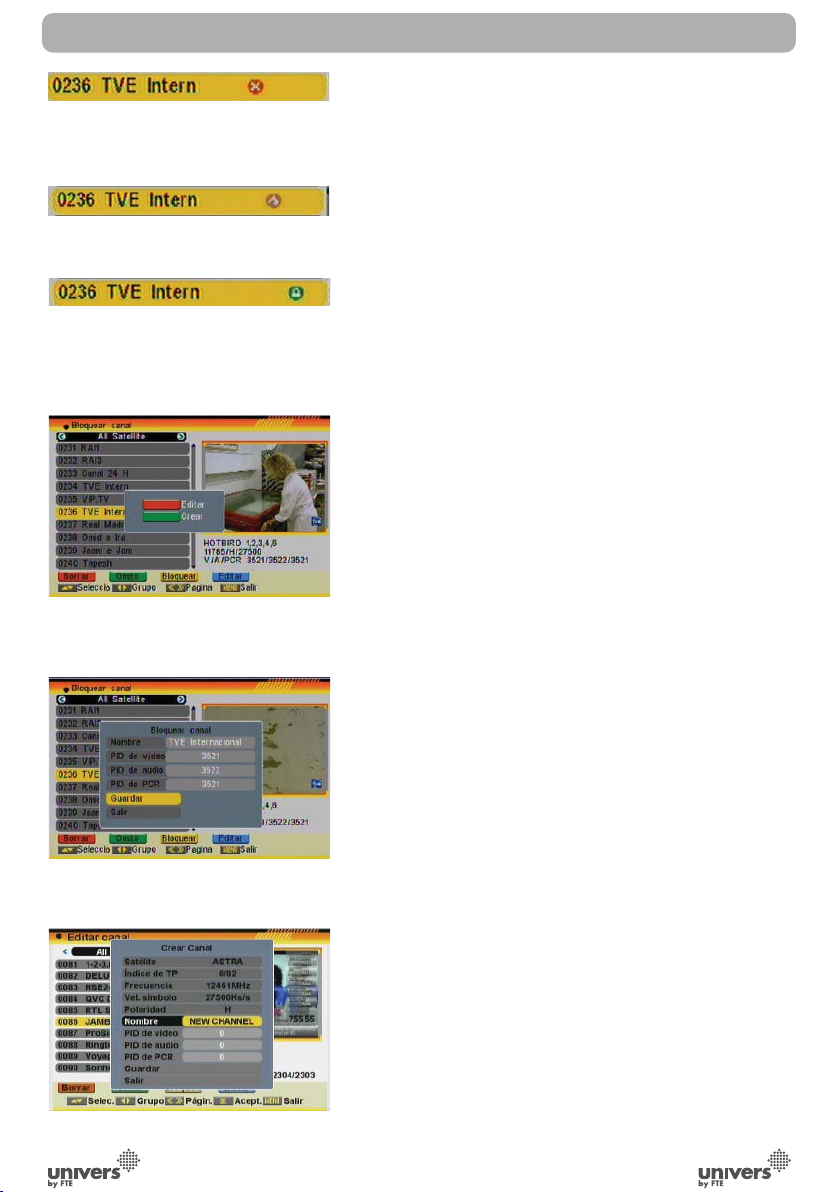
Le aparecerá una marca después del nombre del canal (OSD
29). Los canales marcados se borrarán una vez se confirme el
guardar los cambios cuando salga de este menú.
Español
OSD 30
OSD 31
OSD 32
OSD 33
3.1.4.2 OMITIR
Para omitir uno o más canales de su lista, pulse la tecla [Verde]
dentro del menú “Editar Lista de canales” sobre el canal que
se desee omitir. Le aparecerá una marca después del nombre
del canal (OSD 30). Los canales marcados, serán omitidos
cuando cambie de canal en el modo TV. Los canales marcados
se omitirán una vez se confirme el guardar los cambios cuando
salga de este menú.
3.1.4.3 BLOQUEAR
Para bloquear uno o más canales de su lista, pulse la tecla
[Amarilla] dentro del menú “Editar Lista de canales” sobre el
canal que se desee bloquear. Le aparecerá una marca después
del nombre del canal (OSD 31). La próxima vez que desee
entrar en ese canal tendrá que introducir una contraseña para
poder visualizarlo. Los canales marcados se bloquearán una
vez se confirme el guardar los cambios cuando salga de este
menú.
3.1.4.4 EDITAR
Pulsando la tecla [Azul] en la ventana de editar canales, otra
nueva ventana se abrirá dando a elegir dos opciones (OSD
32):
1. Editar el canal actual: Pulse la tecla [Roja] para editar el
canal actual (OSD 33).
- Seleccione la opción “Nombre” para modificar el nombre del
canal.
- Los elementos PID de Video, audio y PCR también pueden
ser modificados introducir el nuevo valor.
- Después de haber modificado los datos, seleccione “Guardar”
y pulse [OK] para guardar los cambios y salir del modo de
edición. Para salir del modo edición sin guardar los cambios,
seleccione “Salir” y pulse [OK] sin guardar los cambios.
2. Crear: Pulse la tecla [Verde] para crear un nuevo canal (OSD
34).
- Seleccione la opción “Nombre” para añadir el nombre del
canal.
- Introduzca los nuevos valores de PID de Video, audio y PCR
para el nuevo canal.
rev 1.2
OSD 34
PAG.
23
Page 27
Español
OSD 35
OSD 36
MENÚ CANAL
- Después de haber modificado los datos, seleccione “Guardar”
y pulse [OK] para guardar los cambios y salir del modo de
edición. Para salir del modo edición sin guardar los cambios,
seleccione “Salir” y pulse [OK] sin guardar los cambios.
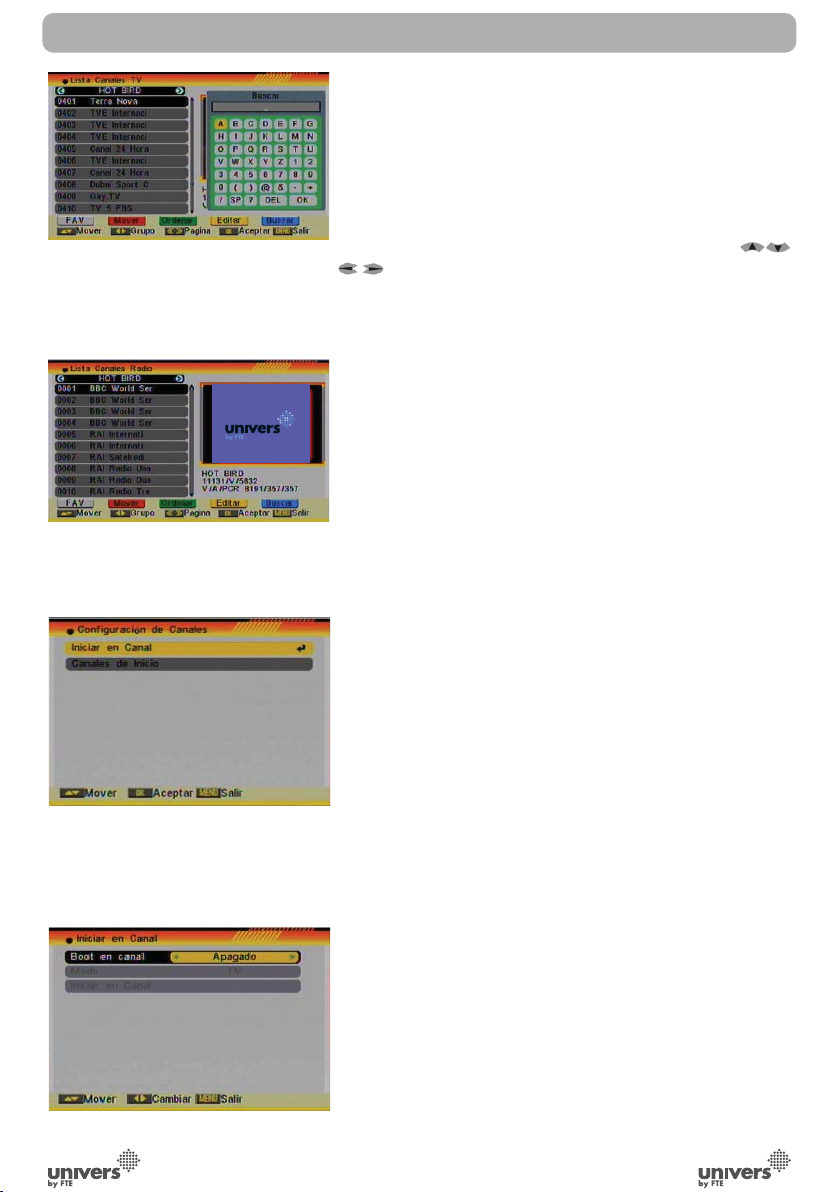
3.1.5. BUSCAR
1. Pulse la tecla [Azul] para abrir la ventana de “Buscar” que
observamos en la siguiente OSD 35. Utilice las teclas [
] para escribir los caracteres del nombre del canal.
Presione [OK] para confirmar los caracteres.
2. Después de escribir los caracteres, seleccione OK en la
ventana y pulse [OK] en el mando a distancia.
3. Para salir de este menú pulse la tecla [Exit] y volverá a la
lista de canales.
3.2. LISTA CANALES RADIO
Este menú (OSD 36) posee las mismas funciones que
anteriormente se han descrito para el menú “Lista Canales
Video” con la única particularidad que no existe información de
video asociada a los canales. En la ventana se visualizará un
logo fijo de Univers.
3.3. CONFIGURACIÓN DE CANALES
Al entrar en este menú, podrá ver en pantalla una imagen
como OSD 37:
OSD 37
OSD 38
3.3.1 INICIAR EN CANAL
Pulse [OK] para entrar en la opción “Iniciar en canal” (OSD
38).
1. Si configura la opción “Arrancar en canal” a Encendido,
podrá editar las dos siguientes opciones. En caso de dejar dicha
opción en Apagado, las siguientes dos opciones no pueden ser
editadas, y el receptor siempre se encenderá por el último canal
en el que estaba antes de ser apagado.
2. Modo: le permite elegir si desea iniciar el decodificador con
los canales de televisión o con los canales de radio.
3. En la opción “Canal de inicio” puede seleccionar el canal que
desee sea mostrado cada vez que se encienda el receptor.
4. Pulse [Exit] para salir del menú.
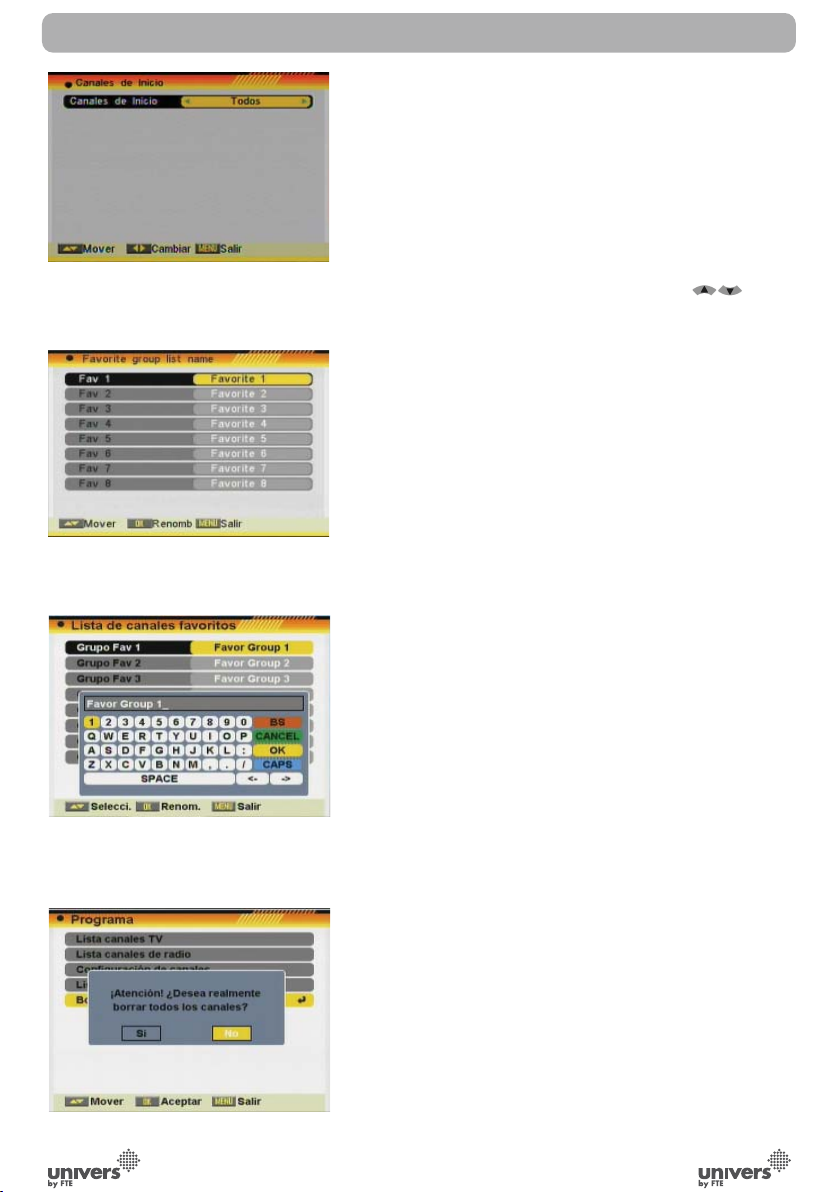
3.3.2 CANALES DE INICIO
Pulse [OK] para entrar en la opción “Canales de Inicio” (OSD
39).
1. En esta opción puede elegir en los canales que son mostrados
en el receptor cuando este es encendido. Se puede elegir entre
“Todos”, “Libres” o “Codificado”.
PAG.
24
rev 1.2
Page 28
OSD 39
MENÚ CANAL
2. Si se eligen los canales libres, los canales codificados serán
omitidos cuando se cambie mediante el mando con [CH+/-].
3. Pulse [Exit] para salir del menú.
Español
3.4. LISTAR NOMBRE DE FAVORITOS
En este menú podrá renombrar los grupos de favoritos. Al
pulsar [OK] sobre esta opción, se mostrará una pantalla similar
a OSD 40.
Para cambiar el nombre de los grupos de favoritos:
1. Pulse las teclas del mando a distancia [ ] para
desplazarse por los diferentes grupos de favoritos.
2. Pulse la tecla [Ok] para editar el nombre del grupo de
favoritos.
3. Una vez haya cambiado el nombre del grupo por uno de su
elección, desplácese hasta la opción Ok y pulse [OK] (OSD
41).
4. Si el nombre ya es usado por otro grupo, aparece un mensaje
de alerta para modificarlo.
5. Pulse [Exit] para salir de esta opción.
OSD 40
OSD 41
3.5. BORRAR TODO
Para borrar todos los canales:
1. Introduzca la contraseña del equipo. Por defecto el código
es “0000”.
2. Si ha introducido correctamente la contraseña, se mostrará
una segunda ventana solicitando confirmación (OSD 42).
3. Seleccione “Sí” para borrar todos los canales o “No” para
cancelar y confirme pulsando [OK]
4. En el paso 2 como en el paso 3, puede cancelar la operación
pulsando [Exit] sin guardar.
? PREGUNTAS FRECUENTES
P: Si por error he borrado todos los canales, ¿qué puedo
hacer?
R: Hay tres maneras para restaurarlo:
- Rehacer la búsqueda en el menú instalación.
- Utilizar la opción “Valores por Defecto” en el menú herramientas.
Recuperará los canales pre-configurados de fábrica.
- Utilizar la opción del menú Herramientas “Actualizar software”
“Backup USB”.
rev 1.2
OSD 42
PAG.
25
Page 29
Español
OSD 43
OSD 44
OSD 45
OSD 46
INSTALACIÓN
4. INSTALACIÓN
Pulse la tecla [Menú] del mando a distancia para entrar en el
menú principal (OSD 43).
1. Pulse las flechas del mando a distancia [ ] para
seleccionar la opción Instalación.
2. Pulse [OK] para entrar en el submenú Instalación
En el submenú Instalación (OSD 44):
3. Pulse las teclas del mando a distancia [
desplazarnos por las diferentes opciones del menú.
4. Pulse [Ok] para entrar en la opción del submenú elegida.
- Buscar Canales de un Satélite
- Buscar Canales de VARIOS Satélites
- Buscar Canales de un TP
- Listado de Satélites
- Listado de TP
- Guía de Satélite
- Configuración Unicable
] para
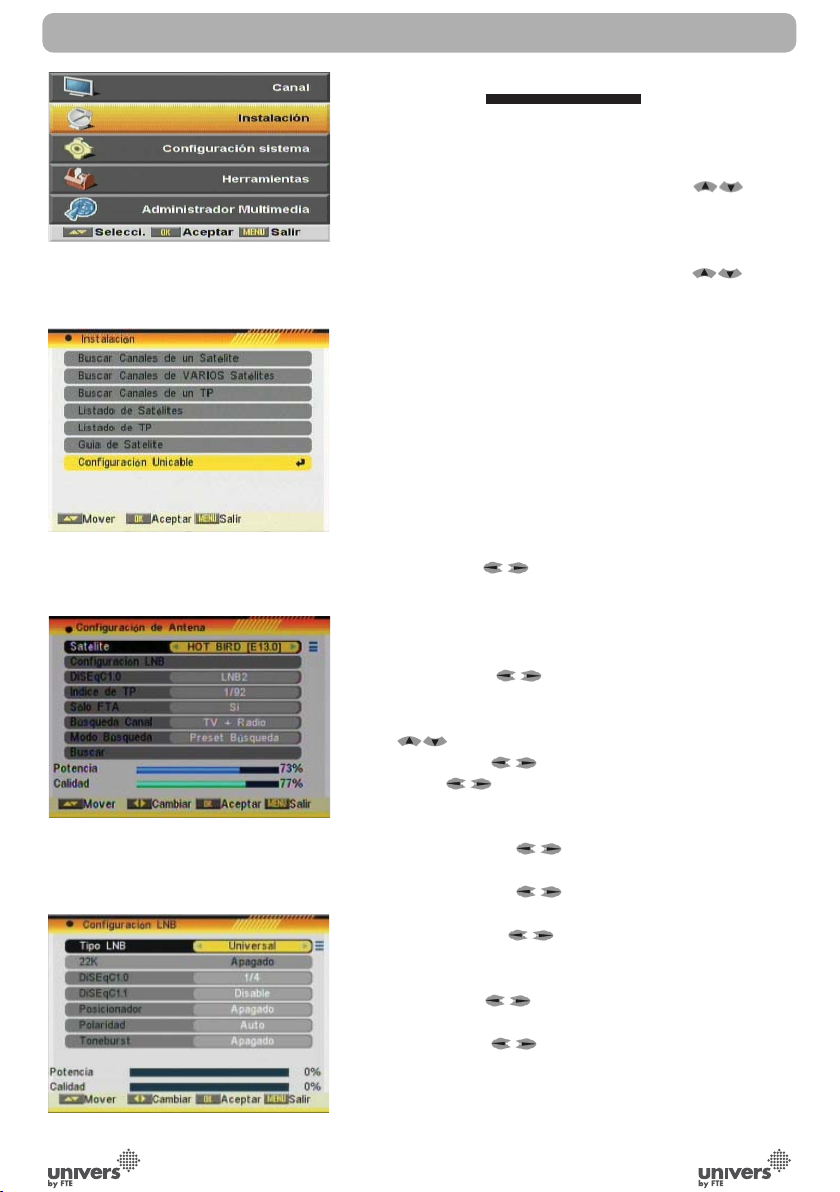
4.1. BUSCAR CANALES DE UN SATÉLITE
Al entrar en este menú, aparece una pantalla similar a OSD 45.
Se pueden editar las siguientes opciones:
1. Satélite: utilice [ ] para cambiar de satélite o pulse
[OK] para desplegar la lista de satélites disponibles.
2. Configuración LNB: Al seleccionar esta opción y pulsar
[OK], accederá al menú de Configuración LNB (OSD 46). En
este menú se puede modificar los siguientes aspectos:
- Tipo LNB: utilice [ ] para cambiar entre “Universal”,
“Standard”, “Usuario” o “Unicable”. Al pulsar [OK] aparecen
las frecuencias que pueden ser editadas. Desplácese mediante [ ] a la frecuencia que quiera modificar y edítela
directamente con [ ].
- 22K: utilice [ ] para “Encender” o “Apagar” el tono de
22KHz. Esta opción no se mostrará activa si en tipo de LNB
se ha elegido “Universal”
- DISEqC1.0: utilice [ ] para cambiar las opciones
DISEqC 1.0
- DISEqC1.1: utilice [ ] para cambiar las opciones
DISEqC 1.1
- Posicionador: utilice [ ] para cambiar entre Apagado /
DISEqC 1.2 / GoToX. *
* Este receptor no permite mover motores
- Polaridad: utilice [
“Horizontal” o “Vertical”.
- Toneburst: utilice [ ] para cambiar entre “Apagado” y
“Posición A” y “Posición B”.
Una vez haya configurado el LNB pulse [Exit] para guardar los
cambios y volver a la ventana anterior para seguir configurando
la antena.
] para cambiar entre “Automático”,
rev 1.2
PAG.
26
Page 30
OSD 47
OSD 48
INSTALACIÓN
3. DISEqC1.0: utilice [ ] para cambiar las opciones
DISEqC 1.0
4. Índice de TP: utilice [ ] para seleccionar el TP
deseado.
5. Solo FTA: utilice [ ] para buscar sólo canales libres
o también canales codificados. Si selecciona “Si” sólo se
buscarán los canales libres.
6. Búsqueda canal: utilice [
canales que quiera sintonizar con el receptor. “TV + Radio”,
sólo canales “TV” o sólo canales “Radio”.
7. Modo Búsqueda: utilice [ ] para seleccionar entre
“Preset Búsqueda”, “Auto Búsqueda” o “Búsqueda de red”. La
“Preset Búsqueda” escanea una lista de satélites y frecuencias
pre-definidas, mientras que la “Auto Búsqueda” realiza una
búsqueda ciega de todas las frecuencias y configuraciones
posibles. Si selecciona “Búsqueda de red”, al sintonizar el TP
seleccionado se identificará la NIT (Network identification) y el
receptor buscará automáticamente todos los TP de esta red.
8. Mueva la selección a la opción “Buscar” y pulse [Ok] para
empezar la búsqueda. Las barras muestran el progreso de la
búsqueda y los canales encontrados aparecen en una lista
(OSD 47).
Si en cualquier momento desea salir de este menú pulse la
tecla [Exit]. Si ha hecho modificaciones sobre la configuración
de LNB, aparecerá una pantalla pidiendo confirmación de
guardar los cambios. Seleccione “Sí” para guardar o “No” para
omitir los cambios.
] para seleccionar el tipo de
Español
rev 1.2
OSD 49
OSD 50
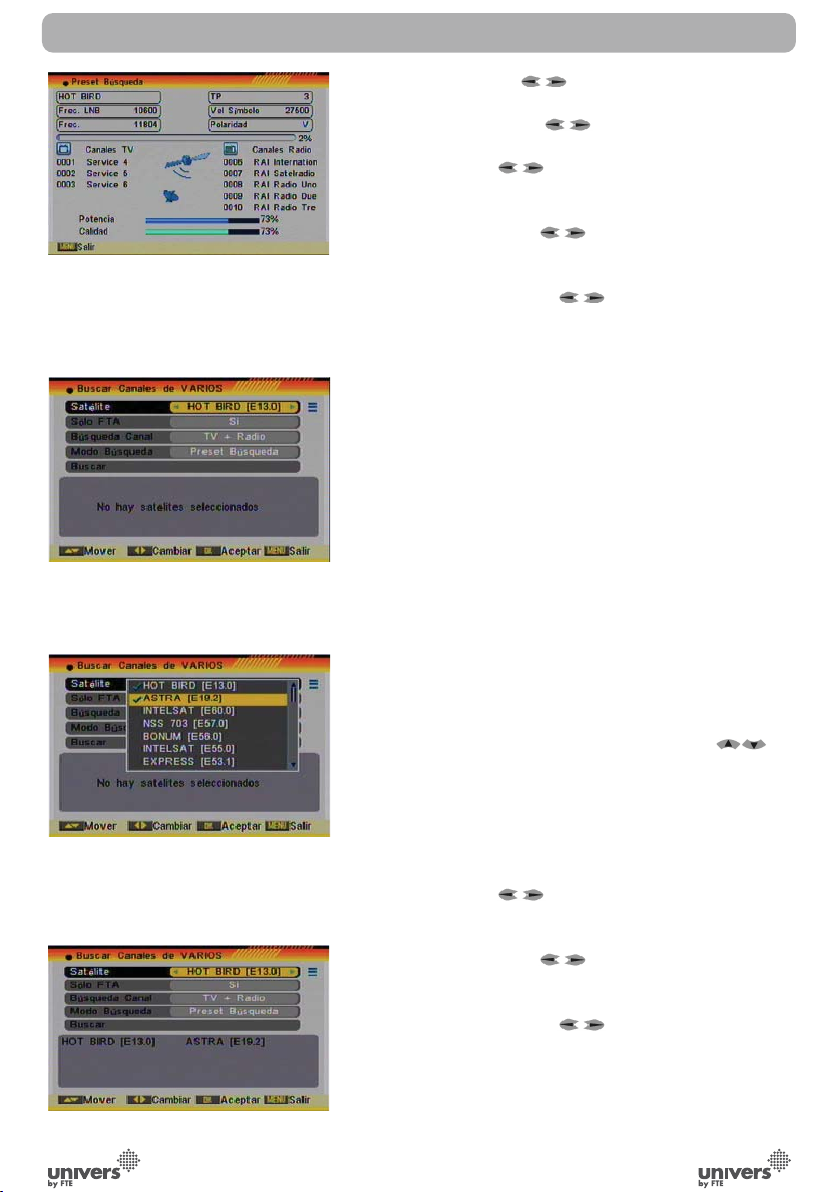
4.2. BUSCAR CANALES DE VARIOS SATÉLITES
Al entrar en este menú, aparece una pantalla similar OSD 48:
1. Satélite: pulse [OK] para abrir la lista de satélites disponibles
(OSD 49). Desplácese por dicha lista usando [ ] y
marque / desmarque los satélites que le interesen pulsando la
tecla [OK]. Una vez finalizada su selección, pulse [Exit] para
cerrar la lista de satélites. En la parte inferior de la pantalla
puede ver los satélites que están seleccionados (OSD 50). El
receptor usará DISEqC1.0 / 1.1 / 1.2 y GoToX para buscar los
satélites marcados y escanear los canales.
2. Solo FTA: utilice [ ] para buscar sólo canales libres
o también canales codificados. Si selecciona “Si” sólo se
buscarán los canales libres.
3. Búsqueda canal: utilice [ ] para seleccionar el tipo de
canales que quiera sintonizar con el receptor. “TV + Radio”,
sólo canales “TV” o sólo canales “Radio”.
4. Modo Búsqueda: utilice [ ] para seleccionar entre
“Preset Búsqueda”, “Auto Búsqueda” o “Búsqueda de red”. La
“Preset Búsqueda” escanea una lista de satélites y frecuencias
pre-definidas, mientras que la “Auto Búsqueda” realiza una
búsqueda ciega de todas las frecuencias y configuraciones
posibles. Si selecciona “Búsqueda de red”, al sintonizar el TP
PAG.
27
Page 31

Español
OSD 51
OSD 52
OSD 53
OSD 54
INSTALACIÓN
seleccionado se identificará la NIT (Network identification) y el
receptor buscará automáticamente todos los TP de esta red.
5. Mueva la selección a la opción “Buscar” y pulse [Ok] para
empezar la búsqueda. Las barras muestran el progreso de la
búsqueda y los canales encontrados aparecen en una lista.
6. Se puede detener la búsqueda pulsando [Exit]. En este caso,
los canales encontrados hasta el momento son memorizados.
4.3. BUSCAR CANALES DE UN TP
Al entrar en este menú, aparece una pantalla similar OSD 51:
1. Satélite: utilice [ ] para cambiar de satélite o pulse
[OK] para desplegar la lista de satélites disponibles.
2. Índice de TP: utilice [ ] para seleccionar el TP
deseado.
Si alguno de los TP de la lista tiene canales sintonizados y
memorizados en el receptor, las siguientes tres opciones
“Frecuencia”, “Velocidad de símbolo” y “Polaridad” no podrán
ser editadas.
Esto implica que no se puedan modificar los parámetros por
error y perder los canales ya almacenados al cambiar cualquier
valor de la base de datos.
En el caso que algún valor, como por ejemplo la velocidad de
símbolo de un TP, haya sido modificado por el proveedor y el
receptor tenga los canales de ese TP sintonizados, se deberá
eliminar el TP (hecho que borrará todos los canales del TP),
volverlo a crear con los datos correctos y volver a realizar la
búsqueda del TP.
También tiene la opción de añadir, borrar, o borrar todos los
TP.
- Pulsando la tecla [Roja] se podrá añadir un nuevo TP a la lis-
ta (OSD 52). Se deberá introducir la frecuencia del TP, la
velocidad de símbolo y la polaridad. Para introducir la fre-
cuencia y la velocidad de símbolo, utilice el teclado numérico
del mando a distancia. Las frecuencias posibles están com-
prendidas entre 3000~13450 MHz y las velocidades de sím-
bolo entre 1000~45000 KS/s. Fuera de estos valores se
mostrará una ventana de error.
- Pulsando la tecla [Verde] se puede borrar un TP. Aparece una
ventana pidiendo confirmación antes de borrar (OSD 53).
Seleccione “Si” y pulse [OK] si desea borrar el TP.
- Pulsando la tecla [Amarilla] se borrará toda la lista de TP
memorizados para ese satélite. Aparece una ventana pidi-
endo confirmación antes de borrar. Seleccione “Si” y pulse
[OK] si desea borrar todos los TP.
3. Para los TP, se puede utilizar el teclado numérico del mando
a distancia para editar la frecuencia del TP o la velocidad de
símbolo.
4. Polaridad: se puede modificar la polaridad para la búsqueda
entre “Horizontal” y “Vertical” mediante las teclas [ ].
5. Buscar canales de un TP: al seleccionar esta opción aparece
rev 1.2
PAG.
28
Page 32

rev 1.2
OSD 55
OSD 56
OSD 57
OSD 58
OSD 59
INSTALACIÓN
una nueva ventana donde podrá configurar los siguientes
parámetros (OSD 54):
- Solo FTA: utilice [ ] para buscar sólo canales libres
o también canales codificados. Si selecciona “Si” sólo se
buscarán los canales libres.
- Búsqueda canal: utilice [ ] para seleccionar el tipo de
canales que quiera sintonizar con el receptor. “TV + Radio”,
sólo canales “TV” o sólo canales “Radio”.
- Búsqueda NIT: Si selecciona esta opción como “Apagado”, el
receptor realizará la búsqueda del TP seleccionado. Si en esta
opción selecciona “Encendido”, al sintonizar el TP seleccionado
se identificará la NIT (Network identification) y el receptor
buscará automáticamente todos los TP de esta red.
6. Pulse [Ok] para empezar la búsqueda. Las barras muestran
el progreso de la búsqueda y los canales encontrados aparecen
en una lista.
7. Se puede detener la búsqueda pulsando [Exit]. En este caso,
los canales encontrados hasta el momento son memorizados.
4.4. LISTADO DE SATÉLITES
Al entrar en este menú, aparece una pantalla similar OSD 55:
1. Desplácese por la lista de satélites usando [ ].
2. Pulse la tecla [Roja] para editar el satélite. Al pulsar la
tecla [Roja] una ventana aparece donde se puede modificar
el nombre del satélite y su longitud. Una vez haya realizado los
cambios, desplácese hasta la opción “Guardar” y confirme con
[OK] (OSD 56). En el caso de no querer guardar los cambios,
desplácese hasta la opción “Exit” y confirme con [OK].
3. Pulse la tecla [Verde] para añadir un satélite. Al pulsar la
tecla [Verde] una ventana aparece donde se puede añadir el
nombre del satélite y su longitud. Una vez haya realizado los
cambios, desplácese hasta la opción “Guardar” y confirme con
[OK]. En el caso de no querer guardar los cambios, desplácese
hasta la opción “Exit” y confirme con [OK].
4. Pulse la tecla [Amarilla] para borrar el satélite seleccionado.
Al pulsar la tecla [Amarilla] una ventana de confirmación
aparece en la pantalla (OSD 57). Desplácese sobre la opción
“Sí” si desea eliminar el satélite o desplácese hasta la opción
“No” si no quiere eliminarlo.
4.5. LISTADO DE TP
Al entrar este menú, aparece una pantalla similar OSD 58:
1. Pulse [ ] para cambiar el satélite seleccionado. Pulse [
] para cambiar de TP en la lista.
2. Pulse la tecla [Roja] para editar el TP. Al pulsar la tecla
[Roja] una ventana aparece donde se puede modificar la
frecuencia del TP, la velocidad de símbolo y la polaridad (OSD
59). Si alguno de los TP de la lista tiene canales sintonizados
y memorizados en el receptor, las siguientes tres opciones
“Frecuencia”, “Velocidad de símbolo” y “Polaridad” no podrán
Español
PAG.
29
Page 33

Español
OSD 60
OSD 61
OSD 62
INSTALACIÓN
ser editadas.
Esto implica que no se puedan modificar los parámetros por
error y perder los canales ya almacenados al cambiar cualquier
valor de la base de datos.
En el caso que algún valor, como por ejemplo la velocidad de
símbolo de un TP, haya sido modificado por el proveedor y el
receptor tenga los canales de ese TP sintonizados, se deberá
eliminar el TP (hecho que borrará todos los canales del TP),
volverlo a crear con los datos correctos.
En esta misma ventana se puede hacer una búsqueda de ese TP
habiendo seleccionado en la opción anterior si el tipo de canales
a buscar es FTA (canales libres) o no (libres+codificados). Para
ello desplácese hasta la opción “Buscar” y pulse [OK].
3. Pulse la tecla [Verde] para añadir un TP. Al pulsar la tecla
[Verde] una ventana aparece donde se puede añadir un TP
y todas sus parámetros (OSD 60). Al salir de esta ventana
mediante la tecla [Exit] se pide confirmación para memorizar
los datos de dicho TP. Seleccione “Si” y pulse [OK] para
memorizar el nuevo TP. En esta misma ventana se puede hacer
una búsqueda de ese TP habiendo seleccionado en la opción
anterior si el tipo de canales a buscar es FTA (canales libres)
o no (libres+codificados). Para ello desplácese hasta la opción
“Buscar” y pulse [OK].
4. Pulse la tecla [Amarilla] para borrar el TP seleccionado. Al
pulsar la tecla [Amarilla] una ventana de confirmación aparece
en la pantalla. Desplácese sobre la opción “Sí” si desea eliminar
el TP o desplácese hasta la opción “No” si no quiere eliminarlo
(OSD 61).
5. Pulse la tecla [Azul] para borrar todos los TP del satélite
marcado. Al pulsar la tecla [Azul] una ventana de confirmación
aparece en la pantalla. Desplácese sobre la opción “Sí” si desea
eliminar todos los TP o desplácese hasta la opción “No” si no
quiere eliminarlos.
OSD 63
4.6. GUÍA DE SATÉLITE
Al entrar en este menú, aparece una pantalla similar OSD 62:
En este submenú, se puede entrar la longitud y latitud local
como referencia y la longitud del satélite. El receptor calculará
la elevación y el azimut para orientar la antena al satélite
seleccionado.
1. Use los números de su mando a distancia para entrar
directamente los valores “Longitud local”, “Latitud local” y
“Longitud satélite”.
2. Pulse las teclas [ ] para seleccionar “Este” u “Oeste”
en “Longitud local” o “Longitud satélite” o para seleccionar
“Norte” o “Sur” en “Latitud local”.
3. Seleccione “Comienzo” y pulse [OK]. El resultado de
orientación y elevación de la antena se mostrará en la pantalla
(OSD 63).
4. La orientación es el ángulo entre el Sur y el satélite.
PAG.
30
rev 1.2
Page 34

OSD 64
INSTALACIÓN
5. Pulse [Exit] para salir de este menú.
4.7 CONFIGURACIÓN UNICABLE
Si dispone de una instalación Unicable, que le permita distribuir
la señal de un satélite por un único cable hasta 8 receptores
como máximo, en esta opción del menú puede configurar el
receptor (OSD 64). Puede hacerlo de 2 maneras:
1. Configuración manual: Pulse [OK] para ver las opciones:
- Canal FI: seleccione con las teclas [
número del 1 al 8.
- Frecuencia FI: con las teclas [ ] elija la frecuencia.
2. Configuración automática. El sistema unicable asigna
automáticamente la frecuencia con la que trabaja cada
receptor.
Cada receptor del sistema Unicable debe tener un canal y
frecuencia diferentes al resto.
] el
Español
rev 1.2
PAG.
31
Page 35

Español
OSD 65
OSD 66
OSD 67
CONFIGURACIÓN
5. CONFIGURACIÓN SISTEMA
Pulse la tecla [Menú] del mando a distancia para entrar en el
menú principal (OSD 65).
1. Pulse las flechas del mando a distancia [ ] para
seleccionar la opción Configuración Sistema.
2. Pulse [OK] para entrar en el submenú Configuración
Sistema.
En el submenú Configuración Sistema (OSD 66):
3. Pulse las teclas del mando a distancia [
desplazarse por las diferentes opciones del menú.
4. Pulse [OK] para entrar en la opción del submenú elegida.
- Idioma
- Sistema de TV
- Configurar Hora y Programador
- Configuración de OSD
- Bloqueado con Contraseña
- Alimentación LNB y Bajo consumo
] para
5.1. IDIOMA
Al entrar en este menú, podrá ver en pantalla una imagen
similar a OSD 67:
1. Idioma: con las teclas [ ] podrá seleccionar los
diferentes idiomas en los que se pueden ver los menús. Los
idiomas que se incluyen son: Inglés, Alemán, Francés, Español,
Italiano, Portugués, Turco, Polaco, Ruso, Danés, Griego,
Holandés, Húngaro, Árabe, Persa, Kiswahili, Sueco, Búlgaro,
Eslovaco.
2. Primer Audio: algunos canales de televisión se emiten en
más de un idioma. Usted puede elegir uno como preferente,
para ello utilice las teclas[ ]. Si el programa de televisión
posee el idioma que usted ha elegido, éste se escuchara
automáticamente.
Si el programa de TV no tiene ese idioma, se escuchará la
opción que usted elija como segundo audio. La selección de
idiomas de audio incluyen: Inglés, Alemán, Francés, Español,
Italiano, Portugués, Turco, Polaco, Ruso, Danés, Griego,
Holandés, Húngaro, Árabe, Persa, Eslovaco.
3. Segundo Audio: Usted puede elegir la segunda opción de
idioma utilizando las teclas[ ]. Si el programa de televisión
no posee entre sus idiomas el primer audio elegido, pero sí el
segundo, reproducirá este último por defecto. En caso que el
programa de TV no contenga ninguno de los idiomas solicitado,
se reproducirá aquel que esté por defecto en la transmisión de
dicho canal. La selección de idiomas de audio incluyen: Inglés,
Alemán, Francés, Español, Italiano, Portugués, Turco, Polaco,
Ruso, Danés, Griego, Holandés, Húngaro, Árabe, Persa,
Eslovaco.
rev 1.2
PAG.
32
Page 36

OSD 68
CONFIGURACIÓN
4.Idioma subtítulos: Usted puede elegir el idioma del subtítulo
predetermidado utilizando las teclas [ ]. La selección del
idioma del subtítulo incluyen: Inglés, Alemán, Francés, Español,
Italiano, Portugués, Turco, Polaco, Ruso, Danés, Griego,
Holandés, Húngaro, Árabe, Persa.
5. Una vez elegidas las diferentes opciones de idiomas, pulsar
[Exit] para salir.
5.2. SISTEMA DE TV
Al entrar en este menú, podrá ver en pantalla una imagen
similar a OSD 68:
1. El modo de video le permitirá elegir el formato de emisión
de video. Se puede elegir, mediante las teclas [ ],
las siguientes posibilidades: 480I, 576I, 576P, 720P_50,
720P_60, 1080I_25, 1080I_30, 1080P_50, 1080P_60 o
AUTO en modo HD.
2. La relación de aspecto le permitirá seleccionar, mediante
las teclas [ ], los diferentes formatos de imágenes en
pantalla. Puede seleccionar entre Auto / 4:3 PS / 4:3 LB /
16:9.
3. En Salida Video puede elegir, mediante las teclas
[ ], el modo de video de salida: SD / HD. Se recomienda
seleccionar el modo HD cuando la conexión se realice por
HDMI.
4. Digital Audio Out: le permitirá seleccionar el tipo de la salida
digital de audio. Opciones: Salida LPCM / Salida BitStream. Si
conecta esta salida a un equipo con Dolby digital seleccione la
opción Bit Stream Out.
5. Pulse [Exit] para salir del menú.
Español
rev 1.2
OSD 69
OSD 70
5.3. CONFIGURAR HORA Y PROGRAMADOR
En este menú podrá ver en pantalla una imagen como el
OSD 69. Mediante [ ] y pulsando [OK] podrá entrar en
“Programador”, “Conf. tiempo local” o “Apagado temporizado”.
5.3.1. PROGRAMADOR
Cuando seleccione “Programador” y pulse [OK] se mostrará
una imagen como la siguiente (OSD 70):
En la primera fila se muestra la fecha y la hora del receptor,
si está es incorrecta, por favor modifíquela en el menú
“Configurar hora y programador” tal y como se describe en este
documento.
1. Número programador: mediante esta opción puede
seleccionar el número de programador. En total hay 8
programadores disponibles.
2. Periodicidad: seleccione la periodicidad de la programación.
Puede elegir entre una vez, diario, semanal, mensual, anual o
apagado. Si selecciona apagado, las siguientes opciones de
este menú estarán desactivadas y no se podrán modificar.
3. Servicio: puede elegir entre “Grabar TV” */ “Grabar Radio”*
PAG.
33
Page 37

Español
OSD 71
OSD 72
OSD 73
CONFIGURACIÓN
(de esa manera programará una grabación de un canal de
TV.) o “Reproducir TV” / “Reproducir Radio” (de esa manera,
asignará las funciones de despertador un canal concreto de
TV o de Radio), modo “Mensaje” (creando un mensaje de
texto que aparecerá en pantalla) o Auto OTA Config (realizará
actualizaciones de software por OTA en la fecha y hora
programadas.
4. Opción de
“Reproducir Radio”: Si elige esta opción se activarán los siguientes
campos de la imagen para ser configurados (OSD 71).
- Canal de inicio: pulse [OK] para desplegar la lista de canales
y seleccione el canal que quiere ver.
- Fecha de inicio: introduzca, utilizando las teclas numéricas del
mando a distancia, la fecha en la que quiere que se active el
servicio de despertador.
- En hora: introduzca, utilizando las teclas numéricas del mando
a distancia, la hora en la que quiere que se active el servicio de
despertado.
- Duración: indique el tiempo que desea que el receptor se
mantenga encendido en dicho canal. Finalizado el mismo, el
receptor pasara a StandBy. Si no desea que el receptor pase a
modo StandBy, configure la duración a 00:00.
Nota: Si la fecha / hora de inicio es anterior a la fecha / hora
actual un mensaje de alerta será mostrado y deberá cambiar la
fecha / hora de inicio.
5. Opción de Mensaje: Si elige esta opción se activarán los
siguientes campos de la imagen para ser configurados (OSD 72).
- Mensaje de inicio: utilice las teclas [ ] para seleccionar
el texto que desea que aparezca en pantalla.
- Fecha de inicio: introduzca, utilizando las teclas numéricas
del mando a distancia, la fecha en la que quiere que se active
el servicio.
- En hora: introduzca, utilizando las teclas numéricas del mando
a distancia, la hora en la que quiere que se active el servicio.
Automáticamente se mostrará el mensaje aunque el receptor
esté encendido o en StandBy.
Nota: Si la fecha / hora de inicio es anterior a la fecha / hora
actual un mensaje de alerta será mostrado y deberá cambiar la
fecha / hora de inicio.
6. Auto OTA Config.:Si elige esta opción se activarán los
siguientes campos de la imagen para ser configurados (OSD
73).
- Fecha de inicio: introduzca, utilizando las teclas numéricas del
mando a distancia, la fecha en la que quiere que se actualice el
software del receptor.
- En hora: introduzca, utilizando las teclas numéricas del mando
a distancia, la hora en la que quiere que se actualice el software
del receptor.
7. Pulse [Exit] para salir del menú.
“Grabar TV” */ “Grabar Radio” */ “Reproducir Canal” /
rev 1.2
PAG.
34
Page 38

OSD 74
OSD 75
CONFIGURACIÓN
Nota: Si el receptor se encuentra en Stand-by y con el modo
de bajo consumo activo, éste se encenderá 1 minuto antes del
evento programado.
* Esta función solamente está disponible en modelos
con funcionalidad PVR ready
5.3.2. CONF. TIEMPO LOCAL
Cuando seleccione “Conf. tiempo local” y pulse [OK] se
mostrará una imagen como la siguiente (OSD 74):
1. Uso GMT: esta opción le permitirá seleccionar si desea
introducir manualmente la hora y la fecha (Uso GMT: Apagado)
o si por el contrario quiere que sea automático por el horario
que recibe del satélite (Uso GMT: Encendido).
2. Offset GMT: esta opción sólo está disponible cuando “Uso
GMT” está encendido. Utilice [ ] para cambiar la diferencia
horaria respecto a GMT.
3. Verano: esta opción sólo está disponible cuando “USO GMT”
está encendido. Utilice [ ] para encender / apagar el
horario de verano.
4. Fecha: si “Uso GMT” está apagado, podrá cambiar la fecha.
Utilice el teclado numérico para introducir la fecha correcta.
5. Horario: si “Uso GMT” está apagado, podrá cambiar la hora.
Utilice el teclado numérico para introducir la hora correcta.
NOTA: si el canal actual informa la fecha y la hora, cuando
entre en este menú verá la información recibida a través del
canal. Si el canal actual no informa la fecha y la hora, deberá
introducirla manualmente. La mayoría de canales soportan la
señal de fecha y hora.
6. Mostrar hora: Utilice [ ] para encender/apagar esta
opción. Cuando esta opción está encendida, la hora será
mostrará en el TV en un recuadro en el margen superior
derecho (OSD 75).
7. Pulse [Exit] para salir del menú.
Español
rev 1.2
OSD 76
OSD 77
5.3.3. APAGADO TEMPORIZADO
Mediante esta opción podrá configurar el tiempo que desea que
su receptor esté encendido. Pasado ese tiempo, el receptor
pasará a modo Stand By.
Para cambiar dicho tiempo, colóquese sobre esta opción y,
pulsando la tecla [OK] podrá seleccionar los diferentes valores:
10, 20, 30, 40, 50, 60, 70, 80, 90, 100, 110, 120 minutos o
apagado temporizado off (OSD 76).
5.4. CONFIGURACIÓN DE OSD
En este menú podrá ver en pantalla una imagen como OSD 77:
1. Mostrar Substitutos: pulse [ ] para seleccionar entre
apagado o encendido. Si el canal posee subtítulo de información y la
opción está encendida, la información será mostrada en la pantalla.
Si la opción está apagada, la información no será mostrada.
2. Duración OSD: esta opción sirve para configurar el tiempo
PAG.
35
Page 39

Español
OSD 78
CONFIGURACIÓN
que la ventana de información del canal será mostrada en la
pantalla cuando se cambia de canal. Utilice las teclas [
] para ello.
3. Posición: Para definir la posición de la barra de información
en la pantalla (arriba / abajo)
4. OSD Transparencia: con esta opción se puede configurar la
transparencia de los menús. Pulse [
entre 10%, 20%, 30%, 40% o Apagado.
5.Logo desde USB: esta opción permite mostrar el logo desde el
USB. Si esta opción esta activada y el receptor detecta en el USB
la imagen que esta predefinida como logo, importará la imagen.
6. Valores por defecto?: seleccionando esta opción y pulsando
la tecla [OK], volverá a los parámetros de OSD originarios de
fábrica.
7. Pulse [Exit] para salir del menú.
] para seleccionar
5.5. BLOQUEADO CON CONTRASEÑA
Si usted lo desea es posible no solo introducir una contraseña
para que nadie sin conocimiento de ella pueda acceder a
aquellos canales configurados como bloqueados, sino que
también puede proteger los menús y configuraciones de su
receptor con la misma contraseña. Todo esto es posible dentro
del menú Bloqueado con Contraseña.
1. Cuanto se intente acceder a este menú le aparecerá una
pantalla solicitándole una contraseña, si usted aún no la ha
modificado, el código por defecto es “0000”. Una vez verificada,
ya podrá ver en la pantalla una imagen como la de la fotografía
(OSD 78).
2. Bloquear Menús: si esta opción está configurada a “Sí”, será
necesario introducir una contraseña cada vez que se quiera
acceder al menú de instalación.
3. Bloquear Canales: si esta opción está configurada a “Sí”,
cada vez que se intente acceder a algún canal que se encuentre
configurado como bloqueado, el usuario tendrá que introducir una
contraseña para poder acceder al mismo. Por el contrario sino se
encuentra activado, el bloqueo de canales no será posible.
4. Nueva contraseña Menú: se puede modificar la contraseña
de acceso al menú de instalación. La contraseña podría ser
cambiada siempre que el usuario se de cuenta que cualquier
persona no autorizada pueda saber la contraseña del receptor.
Puede escribir la nueva contraseña directamente con el teclado
del mando a distancia. La nueva contraseña tiene un máximo de
4 dígitos. Una vez introducida el programa saltará directamente
a la casilla de confirmar contraseña. Si la confirmación de la
contraseña y la contraseña nueva no coinciden, aparecerá
un mensaje de alerta. Si ha realizado los todos los pasos
correctamente aparecerá en pantalla el mensaje “Contraseña
cambiada correctamente”.
5. Nueva contraseña canal: se puede modificar la contraseña
de acceso a los canales.
rev 1.2
PAG.
36
Page 40

CONFIGURACIÓN
NOTA: la contraseña por defecto en ambos casos es “0000”.
6. Pulse [Exit] para salir del menú.
OSD 79
OSD 80
5.6. CONFIGURACIÓN DE ENERGÍA
En este menú podrá ver en pantalla una imagen como OSD 79:
1. Standby automático: En esta opción puede programar el
apagado automático del receptor desde el momento en que se
pulsa por última vez cualquier tecla del mando (OSD 80). La
programación se puede realizar al cabo de un periodo de tiempo
comprendido entre 1h y 8h, con intervalos de 1h. El tiempo por
defecto son 3 horas.
-Encendido: El receptor pasará a modo standby de forma
automática al cabo de este tiempo, siempre y cuando durante
este periodo de tiempo no se hayan enviado comandos al
receptor vía mando a distancia o botones del panel frontal y no
se ejecuten temporizaciones programadas.
-Apagado: La función Auto standby queda deshabilitada.
2. Alimentación LNB: Si el receptor está conectado directamente
a un LNB será necesario alimentarlo configurando está opción
a “Encendido”. Si por el contrario, el receptor está instalado
en una instalación comunitaria SMATV posiblemente no se
deberá alimentar. Como esta configuración depende del tipo
de instalación, le recomendamos consulte a su instalador en
caso de duda.
Si lo desea, puede situar la opción en “Apagado” y verificar si
el receptor recibe algún canal. Si recibe canales, seguramente
se encuentra en una instalación comunitaria y deberá dejar esta
opción en “Apagado”. Dicha prueba nunca provoca daño alguno
al receptor ni a la instalación.
3. Bajo consumo: En esta opción del menú podrá activar /
desactivar el modo de bajo consumo que dispone el receptor. El
modo de bajo consumo permite ahorrar consumo de corriente
cua
ndo el receptor se encuentra en Stand-by.
4. Pulse [Exit] para salir del menú.
Español
rev 1.2
PAG.
37
Page 41

Español
OSD 83
OSD 84
OSD 85
HERRAMIENTAS
6. HERRAMIENTAS
Pulse la tecla [Menú] del mando a distancia para entrar en el
menú principal (OSD 83).
1. Pulse las flechas del mando a distancia [ ] para
seleccionar la opción Herramientas.
2. Pulse [Ok] para entrar en el submenú Herramientas
En el submenú herramientas (OSD 84):
3. Pulse las teclas del mando a distancia [
desplazarse por las diferentes opciones del menú.
4. Pulse [Ok] para entrar en la opción del submenú elegida.
- Información
- Configuración rápida
- Valores por Defecto
- Actualización de Software
] para
6.1. INFORMACIÓN
1. Al seleccionar esta opción y pulsar [OK] podrá ver en pantalla
una imagen parecida a la siguiente (OSD 85):
La pantalla exhibe información del receptor.
2. Pulse [Exit] para salir de la ventana de información.
6.2. CONFIGURACIÓN RÁPIDA
El receptor incluye un asistente de instalación que le ayudará a
configurar los diferentes parámetros del mismo. En este menú
podrá ver en pantalla una imagen como (OSD 86):
1. Menú Idioma: con las teclas [ ] podrá seleccionar los
diferentes idiomas en los que se pueden ver los menús.
2. Primer Audio: algunos canales de televisión se emiten en
más de un idioma. Usted puede elegir uno como preferente .
3. Segundo Audio: Usted puede elegir la segunda opción de
idioma utilizando las teclas [ ].
4. Alimentación LNB: Si el receptor está conectado directamente
a un LNB será necesario alimentarlo configurando está opción
a “Encendido”. Si por el contrario, el receptor está instalado en
una instalación comunitaria SMATV posiblemente no se deberá
alimentar.
5. Buscar canales de un satélite: Al seleccionar esta opción y
pulsar [OK], se mostrará la ventana de configuración de antena
explicada en este manual.
6. Buscar Canales de VARIOS Satélites: Al seleccionar esta
opción y pulsar [OK], se mostrará la ventana de buscar canales
de varios satélites explicada en este manual.
OSD 86
6.3. VALORES POR DEFECTO
Al pulsar [OK] sobre esta opción:
1. Aparece una ventana que pide la contraseña para entrar en
PAG.
38
rev 1.2
Page 42

OSD 87
OSD 88
OSD 89
HERRAMIENTAS
dicha opción. Si no ha sido modificada, por defecto el código
es “0000”.
2. Una vez verificada la contraseña aparecerá en pantalla un
mensaje advirtiéndole que esta operación cargará los valores
por defecto y borrará todos los canales añadidos por el usuario
(OSD 87).
3. Confirme si desea volver a los valores de fábrica, pulsando
sobre la opción” Si”.
4. Si desea salir de cualquiera de las opciones anteriores antes
de cargar los valores de fábrica por favor pulse [Exit].
6.4. ACTUALIZACIÓN DE SOFTWARE
Existe la posibilidad de realizar la actualización del receptor a
través de satélite (OTA) o a través del puerto USB y también de
realizar un backup de la información del receptor en el dispositivo
USB conectado como se puede ver en el OSD 88.
6.4.1. ACTUALIZAR POR USB
Esta opción permite actualizar el software del receptor con los
datos recibidos desde una memoria USB. Para ello, conecte
una memoria USB al receptor y acceda a esta opción de menú
(OSD 89).
La última versión de software para actualizar debe estar
colocada en la raíz de su memoria USB.
1. Modo actualizar: Seleccione, mediante [ ], el modo de
actualización.
2. Actualizar archivo: Seleccione, mediante [ ], el nombre
del archivo para actualizar.
3. Seleccione “Iniciar” y pulse [OK]. Un mensaje de alerta
aparece indicándole que no retire el disco durante la lectura.
4. Al acabar la lectura del archivo le pide conformidad
para finalizar la actualización escribiendo en el receptor la
actualización. Pulse [OK] para actualizar el receptor (OSD
90). Si durante la lectura del archivo, éste estuviera corrupto
o fuera un archivo no adecuado para este modelo de receptor,
un mensaje de alerta aparecerá en pantalla de “Error de lectura
de disco USB”.
5. Después de pulsar [OK] el receptor realiza la escritura en la
flash y se reinicia para finalizar la actualización.
Español
rev 1.2
OSD 90
Para más información acerca de actualizar receptores, por favor
visite http://www.universbyfte.com en el apartado de actualizar
receptores.
6.4.2. COPIA DE SEGURIDAD USB
Esta opción permite guardar información del receptor en el
dispositivo USB. Opciones: Software o canales y la configuración
PAG.
39
Page 43

Español
OSD 91
OSD 92
HERRAMIENTAS
actual. (OSD 91)
Una vez seleccionado el tipo de información que desea exportar
al dispositivo USB, seleccione “Empezar” y pulse [OK] para
empezar a guardar los datos.
6.4.3. ACTUALIZAR POR SATÉLITE
Esta opción permite actualizar el software del receptor a través
de los datos recibidos por satélite. Por el momento se ofrecen
actualizaciones a través del satélite Astra.
1. Seleccione el satélite Astra. Seleccione el TP o entre
directamente los valores para la actualización.
2. Seleccione “Comienzo” y pulse [OK] para empezar la
actualización de software (OSD 92). Este proceso puede
necesitar hasta 60 minutos con lo que recomendamos que
realice esta operación sólo si no tiene intención de ver la
televisión durante este periodo.
En el momento de la realización de este manual, los datos para
la actualización son los siguientes:
- Satélite: Astra
- Frecuencia de TP: 12604 MHz.
- Velocidad de símbolo: 22000
- Polaridad: Horizontal
- PID de bajada: 1294
OSD 93
La opción “Auto OTA Config” permitira activar el modo de
actualización por OTA de forma automática. Opciones: Auto,
apagado o confirmar.(OSD 93).
-Auto: realizará la actualización de forma automática.
-Apagado: no realizará la actualización.
-Confirmar: pedirá confirmación por parte del usuario para
empezar la actualización.
Para configurar los parametros relativos a la actualización automática, acceder a la opción Programador.
Para posibles variaciones en los datos de actualización a través
de satélite, por favor visite http://www.universbyfte.com.
PAG.
40
rev 1.2
Page 44

ADMINISTRAR DVR
7. ADMINISTRAR MULTIMEDIA
OSD 94
OSD 95
Pulse la tecla [Menú] del mando a distancia para entrar en el
menú principal (OSD 94).
1. Pulse las flechas del mando a distancia [ ] para
seleccionar la opción Administrar DVR.
2. Pulse [Ok] para entrar en el submenú Administrar DVR
En el submenú Administrar DVR (OSD 95):
3. Pulse las teclas del mando a distancia [
desplazarse por las diferentes opciones del menú.
4. Pulse [Ok] para entrar en la opción del submenú elegida.
- Lista del contenido Multimedia
- Control Disco Duro
- Información del Disco Duro
] para
7.1. LISTA DEL CONTENIDO MULTIMEDIA
Esta opción de menú contiene las listas de las grabaciones
así como de archivos propios de música, fotos y vídeo que
contenga el disco duro. Puede administrar el contenido y
acceder al reproductor multimedia.
En la primera pantalla deberá seleccionar la partición del disco
duro donde están los archivos multimedia.
Pulse las flechas del mando a distancia [ ] para seleccionar
y luego pulse [Ok] para proceder. Ahora podrá acceder a las
diferentes listas de contenido multimedia.
Pulse para desplazarse por las diferentes opciones.
- Administrar grabación (Lista de grabaciones). * Esta función
solamente está disponible en modelos con funcionalidad
PVR ready.
- Reproductor multimedia (Lista de música, Lista de imágenes,
Lista de videos, Lista de todos los archivos).
Español
Archivos grabados
Opciones
rev 1.2
OSD 96
PAG.
Ventana de
pre-visualización del
archivo seleccionado
Información del archivo
seleccionado
Información ocupación
del disco duro
41
Page 45

Español
OSD 97
OSD 98
ADMINISTRAR DVR
7.1.1. ADMINISTRAR GRABACIÓN - RECORD LIST
* Esta función solamente está disponible en modelos
con funcionalidad PVR ready
Al acceder a esta opción de menú podrá reproducir, renombrar,
bloquear y borrar grabaciones.
Puede acceder a esta opción a través del menú o directamente
pulsando la tecla [PVR] de su mando a distancia. (OSD 96)
7.1.1.1. REPRODUCIR UNA GRABACIÓN
Si quiere reproducir una grabación, solo tiene que seleccionarla
y apretar la tecla [OK]. Mientras no pulsa le tecla [OK], en la
ventana de pre-visualización verá el archivo grabado.
7.1.1.2. RENOMBRAR UNA GRABACIÓN
1. Pulse la tecla [Roja] para renombrar la grabación. Aparece
una ventana en donde podrá cambiar el nombre de la grabación
desplazándose mediante los cursores (OSD 97).
2. Pulse la tecla [Amarilla] “Ok” para salir y modificar el
nombre.
3. Pulse la tecla [Exit] para salir.
7.1.1.3. BLOQUEAR UNA GRABACIÓN
Con esta función es posible bloquear una grabación de manera
que sea necesario introducir una clave para reproducirla.
1. Si quiere bloquear una grabación, selecciónela y pulse la
tecla [Verde].
2. El canal bloqueado queda marcado con un icono (OSD 98).
OSD 99
OSD 100
OSD 101
7.1.1.4. COPIAR GRABACIONES
Esta función permite copiar grabaciones de una partición a otra
del disco duro.
1. Con las teclas [ ] seleccione la grabación que quiera
copiar.
2. Pulse la tecla [Amarilla]. Aparece una nueva ventana (OSD
99).
3. Con las teclas [ ] seleccione la partición destino donde
se copiará el archivo.
4. Seleccione “Iniciar” y pulse [OK] para copiar. Aparece una
nueva ventana indicando el estado del proceso de copiado
(OSD 100).
5. Seleccione “Cancelar” para salir de la función.
7.1.1.5. BORRAR GRABACIONES
1. Para borrar una o más grabaciones, pulse la tecla [Azul]
sobre la grabación que se desee eliminar.
2. Aparece una ventana de confirmación para borrar una
grabación o borrar todas las grabaciones de la lista (OSD
101):
- Confirme pulsando la tecla [Roja] para seleccionar las
grabaciones una a una.
- Confirme pulsando la tecla [Verde] para seleccionar todas las
PAG.
42
rev 1.2
Page 46

OSD 102
ADMINISTRAR DVR
grabaciones.
3. Aparecerá una marca después del nombre de las grabaciones
(OSD 102).
4. Las grabaciones marcadas se borrarán una vez se confirme
el guardar los cambios cuando salga de este menú.
7.1.2. REPRODUCTOR MULTIMEDIA
En esta opción de menú podrá acceder y gestionar el
contenido del disco duro que previamente haya copiado de su
ordenador.
También podrá crear listas de reproducción de música, fotos
o vídeos.
Pulse para desplazarse por las diferentes listas.
Pulse la tecla [Menu] para salir.
- LISTAS DE CONTENIDO DEL DISCO DURO
Estas listas contienen todos los archivos de disco duro que
usted haya copiado previamente desde su ordenador.
El material se muestra organizado en las carpetas que haya
creado, y se puede mostrar de diferentes maneras en las
siguientes listas:
- Todos los archivos (ALL)
- Archivos audio
- Imagenes
- Vídeos
Español
rev 1.2
OSD 103
OSD 104
- LISTAS DE REPRODUCCIÓN
Estas listas se crean añadiendo los archivos que usted desee
de las listas anteriores. Se pueden crear 3 listas:
- Lista de Imágenes
- Lista de música
- Lista de videos
Pulse [OK] en cualquier archivo de una lista para reproducir
todos los archivos que contenga.
Las funciones son similares en todas las listas.
Pulse las teclas [ ] para desplazarse por los archivos y
pulse [OK] para entrar y salir a las carpetas o abrir un archivo o
lista de reproducción. (OSD 103)
7.1.2.1. EDITAR ARCHIVOS Y CARPETAS
Permite gestionar el archivo o carpeta.
-Seleccione el archivo o carpeta y pulse la tecla [Roja]
-Aparecerán nuevas funciones (OSD 104):
-RENOMBRAR
Pulse la tecla [Roja] para renombrar el archivo.
- Aparece una ventana en donde podrá cambiar el
nombre de la grabación desplazándose mediante los
cursores. Pulse la tecla [Amarilla] (Ok) para salir y
modificar el nombre.
PAG.
43
Page 47

Español
OSD 105
ADMINISTRAR DVR
-BORRAR
Pulse la tecla [Verde] para borrar el archivo.
- Aparece una ventana donde puede seleccionar entre
borrar el archivo seleccionado [Rojo] o todos los archivos
[Verde] (OSD 105)
- Aparecerá la marca de borrado después del nombre
del archivo.
- Las grabaciones marcadas se borrarán una vez se
confirme el guardar los cambios cuando salga de este
menú.
-MOVER
Pulse la tecla [Amarilla] para mover el archivo.
- Aparece una marca detrás del archivo que quiere
mover (OSD 106).
- Sitúese sobre el directorio donde quiera moverlo y
pulse de nuevo la tecla [Amarilla]. Un mensaje aparecerá
en pantalla solicitando confirmación.
OSD 106
OSD 107
OSD 108
OSD 109
-CREAR NUEVO DIRECTORIO
Sitúese dentro del directorio donde quiera crear uno
nuevo y pulse la tecla [Azul].
- Aparece una ventana en donde podrá dar el nombre del
nuevo directorio desplazándose mediante los cursores y
pulsando la tecla [Amarilla] (OK) (OSD 107)
7.1.2.2. AÑADIR UN ARCHIVO A LA LISTA
Sitúese sobre el archivo que quiera añadir a su lista de
reproducción personalizada y pulse el botón [Verde].
- Aparece una ventana donde puede seleccionar entre añadir
a la lista el archivo seleccionado [Rojo] o todos los archivos
[Verde] (OSD 108).
- Aparecerá una marca después del nombre del archivo (OSD
109).
7.1.2.3. BUSCAR ARCHIVO
1. Pulse la tecla [Azul] para abrir la ventana de “Buscar”. Utilice
las teclas [ y ] para escribir los caracteres del
nombre del archivo.
Presione [OK] para confirmar los caracteres (OSD 110).
2. Después de escribir los caracteres, seleccione OK en la
ventana y pulse [OK] en el mando a distancia.
7.1.2.4. LOGOTIPO
*Solo disponible para la lista de imágenes del disco duro.
1. Pulse la tecla [Amarilla] sobre la imagen que desee que
aparezca como fondo de pantalla cuando esté escuchando la
radio o la lista de reproducción de archivos de audio.
2. Pulse la tecla [Roja] para confirmar o pulse la tecla [Verde]
para recuperar el fondo de pantalla inicial con el logo de
Univers.
rev 1.2
PAG.
44
Page 48

►
II
OSD 110
OSD 111
ADMINISTRAR DVR
7.1.2.5. CONFIGURAR SLIDE SHOW
*Solo disponible para la lista de reproducción de imágenes.
Esta función le permitirá configurar el “slide show”, es decir la
reproducción de la lista de imágenes.
1. Pulse la tecla [OK] (Setup) mientras está visualizando una
imagen en pantalla.
2. Aparecerá una ventana en pantalla donde deberá configurar
varios parámetros (OSD 111):
- Tamaño que ocupan las imágenes en pantalla
- Tiempo que se muestra cada imagen en pantalla
- Repetir: cuando llegue al final empezará de nuevo
- Effect: efectos de las transiciones entre imágenes
- Todos Mp: Encender o apagar música de fondo. Si se
configura como “encendido” se escuchará de fondo la
música de la lista.
7.1.2.6. REPRODUCTOR DE AUDIO
1. Pulse [OK] sobre el archivo que quiera reproducir.
2. Se abrirá un reproductor tal y como aparece en (OSD 112).
- [Rojo]: Pausa / Reproducción
- [Verde]: Retroceso rápido
- [Amarillo]: Avance rápido
- [Azul]: Modo de reproducción, solo en caso de
reproducir la lista con varios archivos.
- [ ]: Control de volumen
Español
rev 1.2
OSD 112
OSD 113
OSD 114
7.1.2.7. VISOR DE IMAGENES
1. Pulse [OK] sobre el archivo de imagen que quiera visualizar.
2. Se mostrará en pantalla la imagen seleccionada.
Si el archivo está dentro de la lista de reproducción de imágenes,
las mostrará todas en forma de “slide show” (OSD 13).
- Con las teclas [ ] pasa a la anterior o siguiente
imagen.
- Con las teclas [ ] podrá rotar la imagen.
- Con la tecla [
- Con la tecla [OK] puede configurar los ajustes del
visor
- Con la tecla [EXIT] sale del visor de imágenes
- Con la tecla [MENU] muestra u oculta las opciones.
] pausa o reinicia la reproducción.
7.1.2.8. REPRODUCTOR DE VIDEO
1. Pulse la tecla [OK] sobre un video o una lista de videos.
2. El archivo se reproducirá en pantalla. En caso de reproducir
una lista, reproducirá todos los archivos uno detrás de otro.
(OSD 114).
PAG.
45
Page 49

Español
OSD 115
ADMINISTRAR DVR
7.2.- CONTROL DISCO DURO
Dentro de este menú podrá encontrar las opciones “Tipo de
grabación” *, “Tamaño Reservado TMS” *, “Auto Timeshift” *,
“Valor de Salto” *, “Disco” y “Formatear Disco duro” (OSD
115).
7.2.1. TIPO DE GRABACIÓN*
En esta opción podrá configurar el formato de video de
las grabaciones. Opciones: MPEG, Original TS (Transport
Stream).
7.2.2. TAMAÑO TIMESHIFT*
Muestra el tamaño disponible de Timeshift.
7.2.3. AUTO TIMESHIFT*
Puede configurar el Timeshift de dos modos:
- Encendido: Desde el momento que el usuario accede al canal,
el receptor guarda toda la información del canal en un buffer.
- Apagado: El receptor no almacenará información del canal.
Si el usuario realiza una Pausa la imagen se le detendrá, pero
al continuar visualizando el canal continuará en el momento
actual.
7.2.4. VALOR SALTO*
En esta opción podrá confi gurar el valor del salto hacia atrás
/ adelante.
En una reproducción en curso, pulse las teclas para realizar
un salto de un cierto período de tiempo en la reproducción.
Dicho período es confi gurable y los pasos de salto pueden ser:
1, 3, 5, 10 y 15 minutos.
Si el paso del salto está confi gurado a 10 minutos, cada vez
que pulse esta tecla saltará automáticamente 10 minutos en la
reproducción.
7.2.5 GRABACIÓN DE TIMESHIFT
En la opción “Grabación de Timeshift” puede seleccionar entre
dos opciones:
-Encendido: Permite realizar la función de Timeshift mientras
se esta realizando la grabación de un canal.
- Apagado: Se deshabilita la funcíon de Timeshift mientras una
grabación esta en curso.
7.2.6 DISCO
En esta opción podrá seleccionar las partición que desee de
su disco duro.
7.2.7. FORMATEAR DISCO DURO
Esta opción formateará el disco duro borrándolo
completamente.
Un mensaje aparecerá en pantalla solicitando confirmación.
Seleccionando [OK] el disco duro será formateado y perderá
todas las grabaciones memorizadas.
PAG.
46
rev 1.2
Page 50

Nota: Para este proceso no hay vuelta atrás. Después de
seleccionar esta opción, los datos serán formateados.
OSD 116
7.3.- INFORMACION DEL DISCO
En información del HDD puede ver información del tamaño del
disco duro y del espacio que queda libre (OSD 116).
* Esta función solamente está disponible en modelos
con funcionalidad PVR ready
Español
rev 1.2
PAG.
47
Page 51

VIDEO
Decodificación
Bit rate
Relación de aspecto
Píxeles activos
Español
Conector de salida
AUDIO
Decodificación
Modo
Bit rate
Conector de salida
DEMODULADOR
Demodulación
Velocidad de símbolo
Outer code
Inner code
Energy dispersion
SEÑAL DE ENTRADA
Frecuencia
Nivel de entrada
Ancho de banda del canal
Conector de entrada
ESPECIFICACIONES TECNICAS
8. ESPECIFICACIONES TÉCNICAS
MPEG-2 SD&HD, MEPG-4 H.264/AVC SD&HD
Máx. 20 Mbps
4:3PS, 4:3LB, 16:9, Auto
480I, 576I, 576P, 720P_50, 720P_60, 1080I_25, 1080I_30,
1080P_50, 1080P_60, AUTO
HDMI
MPEG-2/MPEG-1 layer I, II & III, AAC, Dolby Digital
Mono, Dual, Stereo, Joint stereo
Máx. 384Kbps
HDMI / SPDIF coaxial
QPSK, 8PSK
SCPC/MCPC
RS (204, 188, 8)
ALL DVB rates
DVB-S & DVB-S2 recommendation
950MHz ~ 2150MHz
-65dBm ~ -25dBm
36MHz
Conector tipo F
CONTROL LNB
Alimentación
Control polarizador
Control DiSEqC
VARIOS
Conector USB
Alimentación
Fuente de alimentación externa
Consumo en stand-by (modo de bajo consumo)
Consumo
Temperatura de trabajo
Temperatura de almacenaje
Dimensiones (W x D x H)
Peso
13/18V (300mA máx.) con protección cortocircuito
Polarización 13/18V (vertical/horizontal)
DiSEqC1.0, DiSEqC1.1, DiSEqC 1.2 y GoToX
* Este receptor no permite mover motores
2.0
19V DC, 0,8A Max.
100~240VAC 50~60 Hz
< 0,5 watt
Máx. 16 watt
+5° a +40°
-20° a +70°
138x113x33 mm
0.45Kg
PAG.
48
rev 1.2
Page 52

DECLARACIÓN DE CONFORMIDAD
“WE , UNIVERS BY FTE, DECLARE
THAT THE PRODUCT
U7000
IS IN CONFORMITY WITH FOLLOWING DIRECTIVES
LOW VOLTAGE DIRECTIVE 2006/95/EC
EMC DIRECTIVE 2004/108/EC”
SI DESEA UNA COPIA DE LA DECLARACIÓN
PUEDE SOLICITARLA A LA COMPAÑÍA.
Español
rev 1.2
PAG.
49
Page 53

U7000
ENGLISH
USER’S MANUAL
Page 54

Page 55

SAFETY PRECAUTION
The lightning flash with arrowhead
symbol, within an equilateral triangle,
is intended to alert the user to
“dangerous voltage” and to prevent
from a risk of electric shock.
Danger of explosion if battery is incorrectly replaced. Replace only with the same or equivalent type.
Warning:
-The apparatus shall not be exposed to dripping or splashing and that no objects filled with liquids, such as vases,
shall be placed on the apparatus.
- Do not place naked flame sources, such as lighted candles on the apparatus; otherwise, there is the danger of
English
fire.
- The unit should be connected to a power supply only of the type described in the operating instructions or as
marked on the unit. If you are not sure of the type of power supply (for example: 120 or 230V) to your home, consult
your local dealer or local power company.
- Do not open the cabinet or touch any parts in the inner mechanism. Consult your local dealer for technical service
if the opening is required.
- The mains plug is used as the disconnect device, the disconnect device shall remain readily operable.
- Take attention to the environmental aspects of battery disposal. The battery of remote control should not be
exposed excessive heat such as sunshine, fire or the like.
- Maintenance man must use the appointed screw in the rear plate.
- Ensure a minimum distance of 5 cm around the apparatus for sufficient ventilation.
- Ensure that the ventilation is not impeded by covering the ventilation openings with items such as newspapers,
table-cloths, curtains, etc.
- Use the apparatus only in moderate climates (not in tropical climates).
- Do not open the cabinet to avoid the unit direct exposure to radiation.
Unit Cleaning: After the unit power is turned off, you can clean the cabinet, panel and remote control with a soft
cloth lightly moistened with a mild detergent solution.
Attachments: Never add any attachments and/or equipment without the manufacturer consent; as such additions
may result in the risk of fire, electric shock or other personal injury.
Locating: Slots and openings in the cabinet are provided for ventilation to protect it from overheating. Do not block
these openings or allow them to be blocked by placing the STB on a bed, sofa or other similar surface, nor should it
be placed over a radiator or heat register.
Power-Cord Protection: Place the power-supply cord out of the way, where it will not be walked on. Please take
special attentions to cords at plugs, convenience receptacles and the point where they exit from the unit.
Object and Liquid Entry: Never put objects of any kind into this STB through openings, as they may touch
dangerous voltage points or short-out parts that could result in a fire or electric shock. Never spill any liquid on the
STB.
Note: Moisture may be formed inside the unit in the following conditions:
When the unit is suddenly moved from a cold environment or an air-condition room to a warm place.
Immediately after a heater has been turned on.
In a steamy or very humid room.
If the moisture forms inside the unit, it may not operate properly. To correct this problem, turn on the power and wait
about two hours for the moisture to evaporate.
Parts Replacement: When the unit parts need to be replaced, user should make sure the service technician use the
replacement parts specified by the manufacturer or having the same characteristics as the original part. Unauthorized
replacement may put the unit in the risk of fire, electric shock or other hazards.
Safety Check: After all the maintenances and repairs are done, user is required to request the service technician to
conduct the overall safety check to ensure the machine is in the proper condition.
WARNING: To reduce the risk of
electric shock, don’t open the cabinet.
Refer servicing to qualified personnel
only.
PAG.
2
The exclamation point within an
equilateral triangle is intended
to alert the user to important
operating and maintenance
(servicing).
rev 1.2
Page 56

QUICK INSTALLATION GUIDE
QUICK INSTALLATION GUIDE
Follow next steps for the correct installation of this receiver.
STEP 1: OUTPUT VIDEO CONFIGURATION
In order to correctly visualise the reception signal on TV, you must configure the format and mode of
the video output.
- Video output mode: In order to get a correct visualization of the image select “HD” video output.
- Output format. You will be able to select among the following formats: 480I, 576I, 576P, 720P_50,
720P_60, 1080I_25, 1080I_30, 1080P_50, 1080P_60 or AUTO.
Q: There will be no any video&audio output via HDMI when switch the Video Output to
“SD” or switch the Display Mode to “576I” or “480I” on some TV set.
A: Because the TV set itself does not support the display resolution on 576I&480I. When
it happened, there is a recovered way with double press the YELLOW Key from RCU.
The interval between the double press should not be too long, or it will do its own action
as normal.
STEP 2: CONNECTIONS
The coaxial cable, with satellite signal, must be connected to the “IF IN” connector. The “HDMI” connector must be connected to the TV set.
English
Depending on the type of installation, the receiver should be connected and configured following next
examples.
Example 1 – Basic System
rev 1.2
PAG.
Example 2 – DISEqC switches
3
Page 57

QUICK INSTALLATION GUIDE
Example 3 – Combined with terrestrial
English
IMAGE 1
STEP 3: BASIC CONFIGURATION OF THE
RECEIVER
The receiver includes an installation assistant (Quick Setup)
that will help you to setup the different parameters.
When the receiver is turned on at first time, the next menu is
shown on the TV (Image 1):
The receiver is programmed with all the channels of Astra (at
position 1 of the DISEqC), Hotbird (at position 2 of the DISEqC),
Hispasat (at position 3 of the DISEqC) and Turksat (at position
4 of the DISEqC). If your installation is different to this case,
please follow installation steps to search the channels.
In order to move through the different options of this menu,
please use the keys [ ] of your remote control. If a “Short
circuit on the LNB” message is shown on the TV, please check
the connections before continuing the installation.
Language
of languages include: English, German, French, Spanish,
Italian, Portuguese, Turkish, Polish, Russian, Danish, Greek,
Hungarian, Dutch, Arabic, Farsi, Kiswahili, Swedish, Bulgarian
and Slovak.
First Audio
This function allows you to set the preferred audio language for
those channels using [ ]. If a channel offers the same
audio language as the “First Audio” you set the system will play
this audio language as default. If the channel does not offer
this audio language then the system will compare the offered
languages with the second audio language. The selections of
audio languages include: English, German, French, Spanish,
Italian, Portuguese, Turkish, Polish, Russian, Danish, Greek,
Hungarian, Dutch, Arabic, Farsi and Slovak.
: press [ ] to select languages. The selection
: Some channels offer more than one audio language.
PAG.
rev 1.2
4
Page 58

QUICK INSTALLATION GUIDE
rev 1.2
IMAGE 2
IMAGE 3
Second Audio
corresponds with “First Audio” but with “Second Audio” the
system will play the second audio language as default. If no
audio language corresponds with the “Second Audio” then the
default language of the current channel will be played instead.
The selections of audio languages include: English, German,
French, Spanish, Italian, Portuguese, Turkish, Polish, Russian,
Danish, Greek, Hungarian, Dutch, Arabic, Farsi and Slovak.
LNB Power
your receiver is connected to the LNB directly then you need to
set the LNB Power to “On”. If your receiver is connected to a
multi switch (SMATV signal distribution system) then it may be
that you don’t need to provide the power to the LNB. But since
this is depending on the kind of installed distribution system we
recommend you to contact your installer or to refer to the user
manual of this system to get the correct information.
Single search
1. Satellite: Press [ ] to switch Satellites or press [OK] to
enter satellite list to select directly.
2. LNB Configuration: Selecting this option and pressing [OK],
the LNB Configuration menu will be displayed. In this menu,
next options can be modified (Image 3):
- LNB Type: Press [ ] to switch among “Standard”, “User”
and “Universal” mode. If you select “Standard” or “User”, the
frequency of the LNB can be changed. Pressing [OK] the
frequencies will appear to be edited. Select the frequency
you want to edit and change the value with [ ]
- 22K: Use [ ] to switch “ON” and “Off”. The 22 kHz sig-
nal is used in KU Universal LNBs to change between low
band and high band. After choosing LNB type “Universal”
you cannot modify 22K.
- DiSEqC1.0: Use [ ] to switch the options of DiSEqC
switches.
- DiSEqC1.1: Use [ ] to switch the options of DiSEqC1.1
switches.
- Positioner: Press [ ] to select between “None /
DiSEqC1.2 / GoToX”. *
* This receiver does not allow moving Diseq motors
- Polarity: Press [ ] to switch between “Auto / H / V”.
Once the LNB is configured, press [Exit] to save the chan-
ges and go to the previous window to continue configuring
the antenna.
- Toneburst: Press [
“Off”.
3. DiSEqC1.0: Use [
switches.
4. On “TP Index” item use [ ] to select the desired
PAG.
: If the channel has no audio language that
: Here you can set the power output to the LNB. If
: You can edit the following items (Image 2):
] to switch this function “On” or
] to switch the options of DiSEqC
5
English
Page 59

English
IMAGE 4
QUICK INSTALLATION GUIDE
transponder.
5. In the “FTA Only” item, press [ to select to scan only
free channels or even scrambled channels. If you select “Yes” it
will scan free channels only.
6. In “Scan Channel” item, press [ ] to select to scan TV +
Radio Channels, or just TV channels or just Radio channels.
7. In “Scan Mode” item you can select “Auto Scan” to blind scan
or “Preset Scan” to scan all preset transponders.
8. Move the highlight to “Search” and press [OK] button to
start scanning. Bars are showing the progress of the channel
scanning in the lower part of the window and the found channels
are listed.
You can stop the scan with [Exit] and save the so far found
channels.
9. Press [Exit] to exit this menu. A window to confirm the
changes will appear.
Multi search
1. On “Satellite” item press [OK] to open the satellite list.
Then press [ ] to move the highlight and press [OK]
to mark/unmark and [EXIT] to finish the selection. You can
select several satellites in this menu. At the bottom of the
screen you can see the selected satellites. The system will use
DiSEqC1.0/1.1, DiSEqC1.2 and GoToX functions to search
the marked satellites and scan channels.
2. On “FTA Only” item, press [ ] to select scanning of all
channels or just scanning of free channels. If you select “Yes” it
will scan free channels only.
3. On “Scan Channel” item, press [ ] to select the
scanning range from TV + Radio Channels, only TV channels or
only Radio channels.
4. On “Scan Mode” item, you can select “Auto Scan” to make
a blind scan or “Preset Scan” to scan all preset transponders of
the selected satellites.
5. Select “Search” and press [OK] to start scanning. In the
lower part of the window the progress of scanning and the
found channels are displayed.
6. Press [Exit] to cancel or finish the scanning and saving the
found channels.
Main Menu
on the TV.
: You can edit the following items (Image 4):
: Selecting this option, the main menu will appear
PAG.
rev 1.2
6
Page 60

QUICK INSTALLATION GUIDE
IMAGE 5
STEP 4: TIME CONFIGURATION
It is recommended to setup the clock before starting to enjoy
the receiver, because correct time maybe is required by some
applications. Please complete following options:
Press the [Menu] key of the remote control for appearing the
main menu. Select the “System Setup” option and confirm
pressing [OK].
Once in the “System Setup” option, please select “Local Time
setting” option and press [OK]. Select “Time” option and press
[OK]. Image 5 is watched on the TV. For setting up the time,
please complete:
1. GMT Usage: this option will allow you to select if the date
and time will be introduced manually (GMT Usage: Off) or if
you wish to introduce the offset respect GMT manually (GMT
Usage: On).
2. GMT Offset: If GMT Usage is On, the offset respect GMT
has to be configured depending on your region or country. Use
the [
offset values are between -12:00 and +12:00
3. Summer: this option is only available when “USE GMT” is
enabled. Use [ ] to switch on/off the summer timetable.
4. Date / Time: In order to introduce manually the time and
date. Before these values can be modified, the automatic
control of GMT has to be turned off.
NOTE: If the current channel provides the correct time
information, you will see the current time after you entered
“Time” menu. If the channel doesn’t provide time information,
you have to input the date and time information manually. The
most channels support the time signal.
5. Show time: Use [ ] to switch on/off this option. When
the option is enabled, the time will be displayed at the TV in a
frame in the top right margin.
6. Press [Exit] to exit the menu.
] keys to choose the offset. Remember that the
English
rev 1.2
PAG.
7
Page 61

English
QUICK INSTALLATION GUIDE
TV Channel List: This option shows the list of TV stored channels.
Radio Channel List: This option shows the list of Radio stored channels.
Channel Setup: This option allows setting the receiver to start in a predefined channel.
Favourite Channel List Name: It allows changing the name of the favourite groups.
Delete All: This option deletes all TV and Radio stored channels.
Single Satellite Search: Once the antenna is configured, this option allows search for
the channels of one satellite.
Multi Satellite Search: Once the antenna is configured, this option allows search for the
channels of various satellites.
TP Scan: Once the antenna is configured, this option allows search for the channels of
one TP.
Satellite List: This option shows all the stored satellites. This list can be modified.
TP List: This option shows all the stored TP. This list can be modified.
Satellite Guide: After introducing some data, this application allows to know which
orientation and elevation should be the antenna.
Unicable Configuration.
PAG.
8
rev 1.2
Page 62

QUICK INSTALLATION GUIDE
Language: This option allows choosing the language of the menus.
TV System: This option allows choosing the video Standard and other parameters of
the screen.
Time & Timer Setting: Timer setting menu.
OSD Setting: This option allows configuring the subtitles of the channel information.
Parental Lock: In this option, user can lock the access to the menu and change the
password of the receiver.
Power setting: Activate or deactivate the automatic Standby option after 3 hours, turns
on or off the LNB power or enable / disable Low Power Consumption mode.
English
rev 1.2
Information: Shows all the technical information for the selected channel.
Quick Setup: The installation assistant will be loaded.
Factory Default: This option resets the receiver and loads the factory default values.
Software Upgrade: For updating your receiver through USB or satellite (OTA) and also
for making backup of the information of the receiver in a USB device.
Media List: Allows to reproduce, to block and to delete recordings. Multimedia Player.*
Media control: It allows selecting the disk partition and formatting it. *
Disk Information: You can see the capacity of the hard disk. *
* This function will only be available in models with PVR ready functionability
PAG.
9
Page 63

INDEX
1. Panel & Remote Control Description
1.1. Front Panel Description…….......................................…………………………13
1.2. Rear Panel Description……................................………….…………………..13
1.3. Remote Control Description…...............................................…………………………..14
2. Basic Operations
2.0. Switch on STB……………………….....................................………………………………...15
2.1. Standby ……………………..............................................………………………15
2.2. TTX …………..................................................……………………………………..15
2.3. Mute……………............................................………………………………………..16
2.4. Channel Number…………...........................……………………………………………………16
2.5. CH + / CH -…...............................................…………………….…………………………..16
2.6. TV/RADIO…………........................…………………………………………………….16
2.7. Vol+/Vol-…......................................……………………………………………………….16
English
2.8. Exit….................................……………………………………………………..16
2.9. Menu……………………...................................…………………………………..16
2.10. Recall…..............................................………………………………………...16
2.11. Channel List…………………….........................…………………………………...16
2.12. EPG…………………...............................…………………………………………...17
2.13. List………………................................…………………………………………………17
2.14. Favourites………....................................………………………………………………...17
2.15. Audio Track / Mode…...........................……………………………………………….18
2.16. Information……..................................…………………………………………...18
2.17. FAV +/-…..................................……………………………………………….18
2.18. ZOOM………………………………….............…………………………………...18
2.19. Subtitles……………………………….............……………………………………...18
2.20. LNB Short………………………….......…………………………………………...18
2.21. REC key........................................................................................19
2.22. TimeShift........................................................................................19
2.23. Go To........................................................................................20
3. Channel
3.1. TV Channel List…………....................……………………………………………..21
3.1.1. Favourite………...............................………………………………….……………21
3.1.2. Move.……………..........................……………………………………….…………21
3.1.3. Sort......................................………………………… …………………….………..22
3.1.4. Edit….......................................…………………………………………….22
3.1.4.1 Delete…........................................…………….…...22
3.1.4.2 Skip….......................…………………………………..…………..22
3.1.4.3 Lock..….................................………………………… …….……….23
3.1.4.4 Edit..........................…………………...………………………...23
3.1.5. Find…………….........................……………………..……..………………..…….23
3.2. Radio Channel List……..................................……………………………………......24
3.3 Channel Setup…………..................................………………………………......24
PAG.
10
rev 1.2
Page 64

INDEX
3.3.1. Start-up Channel……………................................……………………………......24
3.3.2. Channel Play Type………........................…………………………………......24
3.4. Favourite Channel List Name……..........……………………………………......24
3.5. Delete All…….....................…………........…………………………………….25
4. Installation
4.1. Single Search…………......................……………………..…………………..26
4.2. Multi Search………...........................…………...………..…………………….27
4.3. TP Scan………..………………................………………………..…………………...28
4.4. Satellite List………….............................………………………...………………...29
4.5. TP List………….............................………………………...………………...29
4.6. Satellite Guide…………..................…………………………..………………...30
4.7. Unicable Configuration…..................…………………………..………………...30
5. System Setup
5.1. Language………………….............………………………...…………………...31
5.2. TV System……………..............…………………………..…………………...32
5.3. Time & Timer Setting ………....................………………………...………………32
5.3.1. Timer.......................................................................................32
5.3.2. Local Time setting........................................................................34
5.3.3. Sleep Timer................................................................................34
5.4. OSD Setting…………………………………..............................…………………...34
5.5. Parental Lock…………………………............................…………………………….35
5.6. Power setting……………………….............................……………………………..35
English
6. Tools
6.1. Information…………………………...................................………………………….37
6.2. Quick Setup………………………………......................……………………...37
6.3. Factory Default………………………………………..………………..............................38
6.4. Software Update………………………….………………………............................38
6.4.1. Upgrade by USB...................................................................38
6.4.2. Backup to USB .................................................................................39
6.4.3. Upgrade by Satellite...................................................................39
7. Media Management
7.1. Media List.............................................................................................40
7.1.1. Record Management - Record List....................................................41
7.1.1.1. How to reproduce a recording....................………………………41
7.1.1.2. How to rename a recording.....................………………………41
7.1.1.3. How to block a recording..........................………………………41
7.1.1.4. How to copy a recording.......................………………………41
7.1.1.5. How to delete recordings.................………………………41
7.1.2. Multimedia player.............................................................................42
7.1.2.1. Edit files and folders................................…………..……………42
rev 1.2
PAG.
11
Page 65

INDEX
7.1.2.2. Addind a new file to the list.................………………………43
7.1.2.3. Search for file………….........………………………................43
7.1.2.4. Logo.............................................……………………………43
7.1.2.5. Configure the slide show.....................…………………………44
7.1.2.6. Audio player…………....………………………................44
7.1.2.7. Picture viewer.............................................…………….44
7.1.2.8. Video player.................................................................44
7.2. Media Control..............................................................................................44
7.2.1. Record type .......................................................................................45
7.2.2. Timeshift size...................................................................................45
7.2.3. Auto Timeshift......................................................................................45
7.2.4. Jump Step Value.................................................................................45
7.2.5. Disk ................................................................................................45
7.2.6. Format Disk..................………….............……….........…………………45
English
7.3. Disk Information..............................................................................................45
8. Technical Specification……………………………………........................................46
9. Conformity declaration……………………………………........................................47
PAG.
rev 1.2
12
Page 66

PANEL & REMOTE CONTROL DESCRIPTION
1. PANEL & REMOTE CONTROL DESCRIPTION
1.1. FRONT PANEL DESCRIPTION
1 2 3
1. POWER LED: Indicates that the mains voltage is available.
2. LOCK LED: Indicates a sufficient signal level at the IF IN input.
3. IR-SENSOR: Reception sensor for the IR remote control signals.
English
1.2. REAR PANEL DESCRIPTION
1 2
1. IF IN: Satellite input. Max. 300mA
2. HDMI: HDMI output for connecting to a TV.
3. USB: Connector for external USB 2.0 HighSpeed devices.
4. COAXIAL S/PDIF: Coaxial output for digital audio (AC3).
5. DC IN: 19 VDC connection (power supply).
rev 1.2
PAG.
3
13
4
5
Page 67

English
■
►
II
■
■
PANEL & REMOTE CONTROL DESCRIPTION
1.3. REMOTE CONTROL DESCRIPTION
1. POWER: Switches receiver ON or in stand-by-mode.
2. MUTE: Switches audio on and off.
3. NUMERIC KEYS: For direct typing values and names.
4. TXT: Opens and closes teletext.
5. Pause: If you press it once, you will stop the image, and it
will come back to normal mode when you press it again.
6. Menu: Opens the main menu.
7.- Exit: Exit menus or stop operations.
8. OK: Confirms selections or opens channel list.
9.
menus.
10. : Changes channels volume or controls the cursor
in menus.
11. Recall: Watch the last viewed channel.
12. TV/R: Switches between TV and Radio channels.
13. Color Keys: Controls menu options.
14. EPG: Shows the EPG information.
15. Audio: Opens audio menu.
16. SUB: Switches subtitle on and off.
17. Zoom: Zoom function.
18. Info: Shows channel information with signal bar.
19.-
20.-
21.- FAV: Opens favourite channel list.
22.-
23.-
24.-
25.- GOTO: To move to the specified position. *
: Adjusts audio volume or controls the cursor in
: Stop button for recording. *
: Quick start for recording. *
: Start / Stop button for recording. *
: Backward button for recording. *
: Forward button for recording. *
* This function will only be available in models with PVR
ready functionability
rev 1.2
PAG.
14
Page 68

BASIC OPERATIONS
2. BASIC OPERATIONS
2.0. SWITCH ON STB
Switch the [Device’s Main Power] switch on.
When the STB is first used it will display the quick setup page
where the receiver can be configured quickly.
For further use the STB will play the same channel as last time
when it was switched off.
? FREQUENTLY ASKED QUESTION
Q: The power of my STB is on and it is running in TV mode but
English
the TV screen shows nothing:
A: Make sure the TV set has been set to the correct video input
(not the TV channels). For example, if you have connected the
STB to the Video1 input of the TV set, then you need to select
the corresponding Input on the TV. Mostly it is done with the AV
button of the TVs remote control unit.
Q: My STB is running in TV mode but the TV screen shows
nothing except one ball and “No Signal”.
A: That means the channel you selected has no signal. This can
be caused by several reasons:
1. The channel you selected is not from the satellite to which
your dish is pointing. Select another channel.
2. The signal of current TV channel is too weak. You can
try to change to other channels with a stronger signal. If the
problems still exist, please consult your local dealer or installer
for technical service.
3. You selected the wrong LNB type in the installation menu or
your DiSEqC switch configuration is not correct.
2.1. STANDBY
1. Press [Power] button to switch from TV mode to Standby
mode.
2. In Standby mode press [Power] button again to switch back
to TV mode. The last active channel will be showed.
3. To switch off the STB complete press the main power button
(placed at the rear panel of the receiver).
rev 1.2
OSD 1
2.2. TTX
1. Press [TXT] button in TV mode to open the teletext page
(OSD 1). This service is depending on the support of the
channel provider.
2. If the channel does not support teletext information, it will
show “No Teletext Data” on the screen.
PAG.
15
Page 69

OSD 2
BASIC OPERATIONS
2.3. MUTE
1. Press the [Mute] button to mute the sound. On the screen
an icon will be displayed to indicate the muted sound (OSD 2).
2. Press the [Mute] button again to restore the sound.
2.4. CHANNEL NUMBER
In TV mode you can enter the channel number directly with your
remote control unit and confirm the number with the OK button
to change to the desired channel.
2.5. CH +/ CH -
In TV mode press [ ] to change channel.
English
OSD 3
OSD 4
2.6. TV/RADIO
In TV mode, press [TV/R] to switch to Radio mode. In Radio
mode press [TV/R] again to switch back to TV mode.
2.7. VOL+/VOL-
In TV mode, press [ ] to adjust volume.
2.8. EXIT
Press [Exit] button to exit the current menu.
2.9. MENU
Press [Menu] button to enter or exit the current menu.
2.10. RECALL
Pressing the [Recall] button allows you to toggle between the
actual and the last selected channel.
2.11. CHANNEL LIST
In TV mode press [OK] button to open the Channel List
window.
Reduced Channel List (OSD 3):
You can use [ ] keys to navigate this list.
1. Press [Yellow] button to open the SAT list. After selecting a
satellite the channel list will be reduced to the channels of this
satellite.
2. Press [Blue] button to open the “Find” window. You can use
this feature to find channel by their names.
3. Press [Red] button to open the expanded channel list.
4. Once the desired channel is selected, press [OK[ to change
and display the marked channel.
Expanded Channel List (OSD 4):
PAG.
16
rev 1.2
Page 70

OSD 5
OSD 6
OSD 7
BASIC OPERATIONS
You can use [ ] keys to navigate this list.
In this view, you can get more information about the frequency,
polarity, symbol rate and PID of the selected channel.
1. Press [Green] button to sort the channels by free and
scrambled channels. Free channel are listed first and scrambled
channels last.
2. Press [Yellow] button to open the SAT list. After selecting a
satellite the channel list will be reduced to the channels of this
satellite.
3. Press [FAV] button to open FAV list. After selecting a
Favourite Group the channel list will be reduced to the channels
of this group.
4. Press [Blue] button to open the “Find” window (OSD 5). You
can use this feature to find channel by their names.
5. Press [Red] button to open the reduced channel list.
6. Once the desired channel is selected, press [OK[ to change
and display the marked channel.
2.12. EPG
1. The STB supports Electronic Program Guides (EPG) to give
you information about the actual programs of certain channels
like event name, subtitle, description, start and finish time. This
feature is depending on the service of the channel provider.
Press [EPG] to open the EPG window (OSD 6).
2. Press the [INFO] button in the EPG menu to display the
detailed information of the actual event in the selected channel
(OSD 7).
3. With the [Red] button you can program a timer with the start
and finish time and date of this event. (To program a recording,
the event does not have to be started).
4. Press the [Yellow] button to show the EPG information in
24 hours time.
5. Press the [Green] button to show again the EPG information
from the last 24 hours.
6. To close the EPG menu press [Exit].
English
rev 1.2
OSD 8
2.13. LIST
In TV mode, press [List] button to access directly to the “TV
Channel List” menu or to the “Radio Channel List” menu.
2.14. FAVOURITES
1. In TV mode press the [Favourite] button to display the
Favourite Group window on the screen as the picture beside
shows (OSD 8).
2. In the Favourite Group window you can select the desired
favourite channel with [
PAG.
17
] and confirm it with [OK] to
Page 71

English
OSD 9
OSD 10
OSD 11
BASIC OPERATIONS
switch to it. In bigger groups you can navigate with [Pup/
Pdw].
3. With [ ] you can select different Favourite Group.
4. Press [Exit] to close the Favourite Group window.
? FREQUENTLY ASKED QUESTION
Q: Why the screen displays “No Favourite Channel” after
pressing the [Favourite] button?
A: No channels have been assigned to a Favourite Group yet.
You can do this in the channel menu.
2.15. AUDIO TRACK / MODE
1. In TV mode, press the [Audio] button to open the Audio
Mode window (OSD 9).
2. Select the item you want to adjust with [ ] and change
the value with [ ].
3. Press [Exit] to leave this window.
2.16. INFORMATION
In TV mode, press [Info] button can open information screen
(OSD 10), in the window shows the parameters of current
channel.
2.17. FAV +/-
1. In TV mode press the [FAV+/FAV-] buttons to switch
between the favourites channels in the current Favourite Group
directly.
2. The sequence of the favourite channels is following the
sequence in the related Favourite Group list.
OSD 12
OSD 13
2.18. ZOOM
1. Press [Zoom] button in TV mode to zoom the image. Image
can be augmented x16 times (OSD 11).
2. Press [Exit] to exit this function.
2.19. SUBTITLES
1. In TV mode, press [Sub] button to open the Subtitle Mode
window (OSD 12).
2. Select the item you want to adjust with [ ] and change
the value with [ ] depending on the provider information.
3. Press [Exit] to leave this window.
2.20. LNB SHORT
When LNB is short, it will notify user on screen “LNB Short!”
(OSD 13). Please check your cables and connections for
shorts. When the short is removed the warning message will
disappear.
PAG.
18
rev 1.2
Page 72

►
II
►
II
OSD 14
OSD 15
OSD 16
BASIC OPERATIONS
2.21. REC*
To start the recording (OSD 14).
If you would like to record a programme immediately, press the
Key REC. A new window will appear on the screen, where you
can select the length of the recording (from 15 to 180 minutes
in a range of 15 minutes interval).
The rest of the data that appear in this window inform you about
the recording channel, the date, the time and the free space on
the hard disk. Once the minutes length is settled, confirm again
by pressing the REC key and it will start to record.
Press [Exit] to cancel the recording.
Note: If the hard disk is full, a warning message will be shown
on the screen. Please, delete some fi les in order to be able to
record again.
Note: If during the recording, the hard disk fi lls up, the recording
stops and will only store the data recorded until that moment
(without losing the previously stored data).
In case you execute a fast recording and fixing the duration,
this will get in conflict with a timer, an alert message will be
shown in the screen. This message informs with the fi rst timer
that would be in conflict in the fast recording, and it requests
the confirmation that you want to do in the moment of the timer
(OSD 15).
- If you push again “Rec”: it will keep the event programmed.
The receiver will carry out the fast recording until the moment of
the programmed event, when it will do it, obviating the selected
duration in the fast recording.
- If you push “Exit”: it will make the fast recording and will
obviate the temporised events that will get in conflict. Anyway,
in the moment of the temporised event the user are inquired
again about if he wants to carry out the programmed event. In
case of no response, it will continue with the fast recording.
In order to stop a recording before the ending of the programmed
length, press the [Stop]-Key. A new window will be shown in
order to confirm the end of the recording (OSD 16). If you
press the Key [Rec], the recording will continue. Press the key
[Stop] again to end the recording manually, if you want to end
the recording before the programmed length.
English
rev 1.2
OSD 17
OSD 18
2.22. TIME SHIFT*
If you are watching a program and you want to stop it and later
continue watching it, press the key [
A new window will be shown in order to confirm the Timeshift
(OSD 17). Press [Exit] to cancel the Timeshift. Confirm again
by pressing the [
program will stop and will be stored on the hard disk of your
receiver. The OSD will show you the time since the function is
activated (OSD 18).
PAG.
19
] key and it will start timeshifting. The
] on the remote control.
Page 73

►
II
■
■
►
II
OSD 19
BASIC OPERATIONS
When you wish to continue watching the program, press the
button [
possible to fast forward and reward. Pressing the button [
] or [
Options: 2x, 4x and 8x.
You can also use the keys [
reward.
In order to leave the Time Shift option, press the key [Stop] to
equal the difference between the reproduction time with the
real one. When you press [Stop] again, it will appear a window
to ask for the confirmation to finish the Time Shift (OSD 19).
If you press the key [
Press the key [Stop] again to leave the Time Shift settings.
] again. If the information is on the hard disk, it is
] several times, you can settle the speed of forward.
] in order to go forward/
], it will continue in Time Shift mode.
English
OSD 20
2.23. GOTO*
On a current reproduction, press the key [GoTo] to go to a
certain point of the reproduction. When you press this key, a
window appears where you can introduce, using the numbers on
the remote control, the hour: minute: second you want to go to
(OSD 20) .If the introduced value is higher to the reproduction
limit, an error window will be shown.
* This function will only be available in models with PVR
ready functionability
rev 1.2
PAG.
20
Page 74

OSD 21
OSD 22
CHANNEL
3. CHANNEL
Press [Menu] in the TV mode to enter the main menu (OSD
21).
1. Press [ ] to select the Channel item.
2. Press [OK] to enter the selected item.
In the Channel menu (OSD 22):
3. Press [
4. Press [OK] to enter the selected item among.
- TV Channel List
- Radio Channel List
- Channel setup
- Favourite channel list name
- Delete All
] to select the wanted menu item.
3.1. TV CHANNEL LIST
If you enter the Channel List menu a window like the one
besides will open (OSD 23).
1. You can move the highlighted channel with [ ] and
press [OK] to preview the highlighted program in the preview
window.
2. Press [Pup/Pdw] on the RCU to jump between the channels
by pages.
3. Press [ ] to switch the Program Group.
4. The colour buttons offer further functions to manage the
channel list.
5. Press “Menu” to leave this menu.
English
rev 1.2
OSD 23
OSD 24
3.1.1. FAVOURITE
1. Press [FAV] to open the Favourite window (OSD 24).
2. You can select between 8 favourites groups with [ ].
Press [OK] to assign the channel to a Favourite group.
3. Press [OK] again to remove the channel from the marked
Favourite group.
4. Press [Exit] button to return to the TV Channel List. The
channels of Favourites Groups are indicated with a favourite
icon behind the name.
3.1.2. MOVE
To move/change channels: Pushing the [Red] button, you will
see a picture like OSD 25. You will be able to move or change
the position of the channels:
- Move:
- Push again the [Red] button to move the channels.
- Press [ ] to scroll up and down the list and [OK] in
order to select the channels you wish to move. A mark will
appear beside the selected channels.
PAG.
21
Page 75

CHANNEL
- Press [ ] to scroll up and down and the [Red] button
to confirm the new position of the channels.
- Swap:
- Push the [Green] button to change the position of the
channel.
- Move the channel to the desired position with [ ].
Press [OK] to confirm the position.
English
OSD 25
OSD 26
OSD 27
OSD 28
3.1.3. SORT
1. Press [Green] to open the Sort window (OSD 26). Press [
] to select and [OK] to confirm your choice.
2. The ways of sorting are:
- Name (A-Z): Sorting in Alphabetical Order, ignoring “$” sym-
bol.
- Name (Z-A): Sorting in Alphabetical Order, ignoring “$” sym-
bol.
- FTA: Sort channel by free and scrambled sequence. Free
channels will be listed first and scrambled channels behind
in the channel list.
- Lock: Unlocked channels are listed first end locked channels
at the end.
- Default: Load the default sort of channels.
3.1.4. EDIT
1. After pressing the [Yellow] button a window for entering the
password will open. The default password is “0000”.
2. You can Delete, Skip, Lock and Edit the channel (OSD
27).
3. Press [Exit] to leave the Channel Editing. The system will ask
you to confirm the saving of the changes you made.
3.1.4.1 DELETE
In Channel Edit menu press [Red] button to mark a channel
for deleting.
A confirmation of deleting one or all channels from the list is
displayed (OSD 28):
- Please, confirm pushing the [Red] button to select the channels
one by one. Only the selected channels will be deleted.
- Confirm pushing the [green] button to select all the channels
from the list.
Marked channels (OSD 29) will be deleted after you confirm to
save the changes when you leave this menu.
OSD 29
3.1.4.2 SKIP
In Channel Edit menu, press [Green] button to place a Skip icon
behind the name of the highlighted channel. Marked channels
(OSD 30) will be skipped when you change channels in TV
PAG.
22
rev 1.2
Page 76

OSD 30
OSD 31
CHANNEL
mode after you confirm to save the changes when you leave
this menu.
3.1.4.3 LOCK
In Channel Edit menu, press [Yellow] button to place a Lock icon
behind the name of the highlighted channel. Marked channels
(OSD 31) will be locked and displayed only after password has
been entered if you confirm to save the changes when you
leave this menu.
OSD 32
OSD 33
OSD 34
3.1.4.4 EDIT
Pressing the [Blue] button in the TV Channel List Edit menu will
open another window where you can choose between Edit the
actual channel or create a new channel (OSD 32).
1. Edit current channel: To edit the channel press the [Red]
button (OSD 33).
- Name: You can edit the name of the current channel using the
keys on the remote control.
- On the “Video PID”, “Audio PID” and “PCR PID” items you
can input numbers to modify the item’s value.
- After modification select “Save” and press [OK] button to save
the modified values and exit “Edit” mode. Or select “Exit” and
press [OK] to leave Edit mode without saving the modifica-
tions.
2. Create: Press [Green] button to open the Create window
(OSD 34).
- Press [OK] button on the “Satellite” item to display the satelli-
te list. You can select the satellite for which you want to crea-
te a new channel.
- With marked “TP Index” item press [ ] to select the TP
number where the channel can be found. The next three
items will show the related parameters.
- Highlight the “Name” item and edit the name of the current
channel using the keys on the remote control.
- In “Video PID”, “Audio PID” and “PCR PID” items you can
enter the numbers directly to set these parameters of the
new channel.
- After modification select “Save” and press [OK] to save the
new channel and leave the Edit mode. Select “Exit” and press
[OK] to exit the Edit mode without saving the new channel.
English
rev 1.2
OSD 35
3.1.5. FIND
1. Press [Blue] button to open the “Find” window like showed
besides (OSD 35). Press [ ] to select the leading
character of the channel name and press [OK] to confirm it.
2. After entering the character(s) highlight “OK” in the window
and press [OK] on the RCU.
PAG.
23
Page 77

English
OSD 36
OSD 37
CHANNEL
3. Press [Exit] button to close the Find window and brings you
back to the channel list.
3.2. RADIO CHANNEL LIST
Basically the operation of “Radio Channel List” is same as “TV
Channel List”, except that in the small channel window the
Univers Logo will be displayed (OSD 36).
3.3. CHANNEL SETUP
When you enter the “Channel Setup” menu you will see a
screen like beside (OSD 37):
3.3.1. START-UP CHANNEL
Press [OK] to enter “Start-up Channel” menu to see the screen
like showed beside (OSD 38):
1. If you set of “Boot on Channel” to “On” you can edit the
following two items. If the setting is “Off” the box always starts
with the channel that was running when the box has been
switched off.
2. On the “Mode” item you can select either “TV channel” or
“Radio channel”.
3. On “Start-up Channel” item you can open the channel list by
pressing [OK]. Then you can select the channel of you choice.
Press [OK] again to confirm.
OSD 38
OSD 39
OSD 40
3.3.2. CHANNEL PLAY TYPE
Press [OK] to enter “Channel Play Type” menu (OSD 39).
1. Here you can select the “playing channels” as “Free”,
“Scrambled” or “All”.
2. If you select “Free” then all scrambled channels will be
skipped when you change channels with [CH+/-].
3. Press [Exit] to leave the “Channel Setup” menu.
3.4. FAVOURITE CHANNEL LIST NAME
In this menu, user is able to change the name of the Favourite
Groups. Press [OK] to enter this menu and you will see a
screen like beside (OSD 40).
To change the name of the Favourites Groups:
1. Press [ ] and select a Favorite Group.
2. Press [Ok] button to edit the name of the Group.
3. Once the name is correct, select “Ok” option and confirm
pressing [OK] (OSD 41).
4. If the name is used by other group, an alert message will
appear on the TV.
5. Select “Exit” and press [OK] to leave this menu.
PAG.
24
rev 1.2
Page 78

OSD 41
CHANNEL
3.5. DELETE ALL
To delete all channels:
1. Enter the password. The default password is “0000”.
2. After entering the password correct a safety question will
show up where you have to confirm first (OSD 42).
3. Select “Yes” to delete all channels or “No” to cancel and
confirm with [OK].
4. In step 2 and step 3, pressing [Exit] will exit the function
directly without saving.
OSD 42
? FREQUENTLY ASKED QUESTION
English
Q: IF I incautiously delete all channels, what should I do?
A: There are three ways to restore:
- To re-search all channels at the “Installation” menu.
- Use “Factory Default” function to restore all channels in the
“Tools” menu. The receiver will load the factory channels.
- Using the option of the tool menu “updating software” “Backup
USB”.
rev 1.2
PAG.
25
Page 79

English
OSD 43
OSD 44
OSD 45
OSD 46
INSTALLATION
4. INSTALLATION
Press [Menu] in the TV mode to enter the main menu (OSD
43).
1. Press [ ] to select the Installation item.
2. Press [OK] to enter the selected item.
In the Installation menu (OSD 44):
3. Press [
4. Press [OK] to enter the selected item among.
- Single Search
- Multi Search
- TP Scan
- Satellite List
- TP List
- Satellite Guide
- Unicable Configuration
] to select the wanted menu item.
4.1. SINGLE SEARCH
After selecting Antenna Setup another window will be opened
(OSD 45).
You can edit the following items:
1. Satellite: Press [ ] to switch Satellites or press [OK] to
enter satellite list to select directly.
2. LNB Configuration: Selecting this option and pressing [OK],
the LNB Configuration menu will be displayed (OSD 46). In this
menu, next options can be modified:
- LNB Type: Press [ ] to switch among “Standard”,
“User”, “Universal” and “Unicable” mode. Pressing [OK] the
frequencies will appear to be edited. Select the frequency
you want to edit and change the value with [ ]
- 22K: Use [ ] to switch “ON” and “Off”. The 22 kHz sig-
nal is used in KU Universal LNBs to change between low
band and high band. After choosing LNB type “Universal”
you cannot modify 22K.
- DiSEqC1.0: Use [ ] to switch the options of DiSEqC
switches.
- DiSEqC1.1: Use [ to switch the options of DiSEqC1.1
switches.
- Positioner: Press [ to select between “None /
DiSEqC1.2 / GoToX”. *
* This receiver does not allow moving Diseq motors
- Polarity: Press [ ] to switch between “Auto / H / V”.
- Toneburst: Press [ ] to switch this function “On”
“Position A” or “Position B”.
Once the LNB is configured, press [Menu] to save the changes
and go to the previous window to continue configuring the
antenna.
3. DiSEqC1.0: Use [ ] to switch the options of DiSEqC
PAG.
26
rev 1.2
Page 80

OSD 47
INSTALLATION
switches.
4. On “TP Index” item use [ ] to select the desired
transponder.
5. In the “FTA Only” item, press [ ] to select to scan only
free channels or even scrambled channels. If you select “Yes” it
will scan free channels only.
6. In “Scan Channel” item, press [
Radio Channels, or just TV channels or just Radio channels.
7. In “Scan Mode” item you can select “Auto Scan” to blind scan
, “Preset Scan” to scan all preset transponders or “NIT Search”
(the NIT (Network Identification) will be identified and the
receiver will automatically search all the TP of this network).
8. Move the highlight to “Search” and press [OK] button to
start scanning. Bars are showing the progress of the channel
scanning in the lower part of the window and the found channels
are listed (OSD 47).
You can stop the scan with [Exit] and save the so far found
channels.
9. Press [Exit] to exit this menu. A window to confirm the
changes will appear.
] to select to scan TV +
English
rev 1.2
OSD 48
OSD 49
OSD 50
4.2. MULTI SEARCH
When you enter the “Multi Search” menu a window like the one
beside will open (OSD 48).
1. On “Satellite” item press [OK] to open the satellite list (OSD
49). Then press [ ] to move the highlight and press [OK] to
mark/unmark and [EXIT] to finish the selection. You can select
several satellites in this menu. At the bottom of the screen you
can see the selected satellites (OSD 50). The system will use
DiSEqC1.0/1.1, DiSEqC1.2 and GoToX functions to search
the marked satellites and scan channels.
2. On “FTA Only” item, press [ ] to select scanning of all
channels or just scanning of free channels. If you select “Yes” it
will scan free channels only.
3. On “Scan Channel” item, press [ ] to select the
scanning range from TV + Radio Channels, only TV channels or
only Radio channels.
4. On “Scan Mode” item, you can select “Auto Scan” to make
a blind scan , “Preset Scan” to scan all preset transponders or
“NIT Search” (the NIT (Network Identification) will be identified
and the receiver will automatically search all the TP of this
network).
5. Select “Search” and press [OK] to start scanning. In the
lower part of the window the progress of scanning and the
found channels are displayed.
6. Press [Exit] to cancel or finish the scanning and saving the
found channels.
PAG.
27
Page 81

English
OSD 51
OSD 52
OSD 53
OSD 54
INSTALLATION
4.3. TP SCAN
When you enter “TP Scan” menu a window like the one beside
will be displayed (OSD 51):
1. On “Satellite” item, press [ ] to select the satellite
you want to scan or press [OK] to open the satellite list for
selection.
2. On “TP Index” item use [
transponder.
If any of the TP of the list have tuned and stored channels into
the receiver, the following three options “Frequency”, “Symbol
Rate” and “Polarity” will not be able to be edited.
It means that the parameters cannot be modified by error
neither loosing the stored channels when any value of the data
base is changed.
In case of any value, for example the Symbol Rate of a TP,
has been modified by the provider and the receiver has these
channels tuned, the TP must be deleted (it will delete all the
channels of this TP), create it again with the correct data, and
to carry out a new search of the TP.
In this item you can also add, delete or delete all TP.
- Press [Red] button to add a new TP (OSD 52). You have to
set the parameters of “TP Frequency”, “Symbol Rate” and
“Polarity” for this new transponder. Therefore use the number
buttons of the RCU. The available range are “3000~13450
MHz” and “1000~45000KS/s”.
- Press [Green] button to delete the current TP. A safety ques-
tion will be displayed for confirmation to delete the current
transponder or not (OSD 53). If you select “Yes”, the current
transponder will be deleted and the total number of transpon-
ders will be reduced.
- Press [Yellow] button to delete all TP. A safety question will
be displayed for confirmation to delete all transponders or
not. If you select “Yes”, all transponders will be deleted.
3. For transponders you also can use number buttons to modify
the parameters of “TP Frequency” and “Symbol Rate” or [
] to change the value directly. “Polarity” and “Scan Mode” are
used for setting scans conditions. Press [ ] to select a
different mode.
4. Polarity: Press [ ] to switch between “Auto / H / V”.
5. Search channels of the TP: Selecting this option, a new
window appears, where you can configure the following
parameters (OSD 54):
- On “FTA Only” item, press [ ] to select scanning of all
channels or just scanning of free channels. If you select “Yes”
it will scan free channels only.
- On “Scan Channel” item, press [ ] to select the scanning
range from TV + Radio Channels, only TV channels or only
Radio channels.
- Search NIT: If you select this option as “Off”, the receiver
PAG.
28
] to select the desired
rev 1.2
Page 82

OSD 55
OSD 56
INSTALLATION
will search the selected TP. In case you select “On”, the NIT
(Network Identification) will be identified and the receiver will
automatically search all the TP of this network.
6. Press [OK] to start scanning.
7. On the “TP Scan” item, press [Exit] to cancel the scanning
and saving the found channels.
4.4. SATELLITE LIST
When you enter the “Satellite List” menu you can see a window
like the one beside (OSD 55):
1. Move through the satellite list using [ ].
2. Press [Red] button to enter edit satellite menu (OSD 56).
You can edit the satellite’s name and its longitude. Once you
have edited the satellite, select “Save” option and confirm with
[OK]. If you prefer to exit without saving the changes select
“Exit” and press [OK].
3. Press [Green] button to open the “Add satellite” window. You
can edit the satellite’s name and its longitude. Once you have
edited the satellite, select “Save” option and confirm with [OK].
If you prefer to exit without saving the changes select “Exit” and
press [OK].
4. After pressing [Yellow] button you will be asked “Are you
sure to delete?” (OSD 57). Select “Yes” to delete the marked
satellite. Select “No” to cancel the operation.
English
rev 1.2
OSD 57
OSD 58
OSD 59
4.5. TP LIST
When you open the “TP List” menu you will see a window like
the one beside (OSD 58).
1. Press [ ] to change the marked satellite. Press [
] to change the marked TP.
2. Press [Red] button to open the “Edit TP” menu (OSD 59).
Here you can edit the Transponder’s data like frequency, polarity
and Symbol Rate. If any of the TP of the list have tuned and
stored channels into the receiver, the following three options
“Frequency”, “Symbol Rate” and “Polarity” will not be able to
be edited.
It means that the parameters cannot be modified by error
neither loosing the stored channels when any value of the data
base is changed.
In case of any value, for example the Symbol Rate of a TP,
has been modified by the provider and the receiver has these
channels tuned, the TP must be deleted (it will delete all the
channels of this TP), create it again with the correct data. In
this window, the search of the channels of the TP can be done
selecting the “Search” option and pressing [OK].
3. Press [Green] button to open the “Add TP” menu (OSD
60). Here you can add a new TP and setup its parameters like
frequency, polarity and Symbol Rate. In this window, the search
PAG.
29
Page 83

English
OSD 60
OSD 61
INSTALLATION
of the channels of the TP can be done selecting the “Search”
option and pressing [OK].
4. Press [Yellow] button will open a dialog box asking you to
confirm the deletion of the current TP (OSD 61). If you select
“Yes” all the related channels will be deleted. If you select “No”
the operation will be cancelled.
5. Pressing the [Blue] button will open a dialog box asking you
to confirm the deletion of all Transponders. If you select “Yes”,
all channels of the current satellite will be deleted. If you select
“No” the operation will be cancelled.
4.6. SATELLITE GUIDE
When you enter “Satellite Guide” menu, you will see the screen
like beside (OSD 62).
Here you can enter your local longitude and latitude and the
satellite’s longitude. The receiver calculates the antenna’s
azimuth and elevation to point your antenna to the selected
satellite.
1. Use the [Number] buttons to input the values of “Local
Longitude”, “Local Latitude” and “Satellite Longitude”.
2. Press [ ]buttons to select east or west in “Local
Longitude” and “Satellite Longitude” or to select north or south
in “Local Latitude”.
3. Highlight the “Start” item and press [OK]. In the lower part
of the window the corresponding values for the antenna setting
are displayed (OSD 63).
4. Orientation means the angle between south and satellite.
5. Press [Exit] to leave this feature
OSD 62
OSD 63
OSD 64
4.7 UNICABLE CONFIGURATION
If you have an Unicable installation that allows you to distribute
a satellite signal through a unique cable up to 8 receivers as
maximum, in this menu option you can configure the receiver
(OSD 64). There are two ways of doing it:
1. Automatic Configuration. Unicable system assigns
automatically the frequency that every receiver uses to work.
2. Manual Configuration: Press [OK] to check the options:
- FI Channel: select with [ ] keys the numbers
from 1 to 8.
- FI Frequency: With [ ] keys choose the
frequency.
Each receiver of the Unicable system must have a channel and
frequency different from the rest.
PAG.
30
rev 1.2
Page 84

rev 1.2
OSD 65
OSD 66
OSD 67
SYSTEM SETUP
5. SYSTEM SETUP
Press [Menu] in the TV mode to enter the main menu (OSD
65).
1. Press [ ] to select the System Setup item.
2. Press [OK] to enter the selected item.
In the System Setup menu (OSD 66):
3. Press [
4. Press [OK] to enter the selected item among.
- Language
- TV System
- Time & Timer Setting
- OSD Setting
- Parental Lock
- Power setting
] to select the wanted menu item.
5.1. LANGUAGE
After selecting the “Language” menu you will see a window like
beside (OSD 67):
1. Language: press [ ] to select languages. The selection
of languages include: English, German, French, Spanish,
Italian, Portuguese, Turkish, Polish, Russian, Danish, Greek,
Hungarian, Dutch, Arabic, Farsi, Kiswahili, Swedish, Bulgarian,
Slovak.
2. First Audio: Some channels offer more than one audio
language. This function allows you to set the preferred audio
language for those channels using [ ]. If a channel offers
the same audio language as the “First Audio” you set the
system will play this audio language as default. If the channel
does not offer this audio language then the system will compare
the offered languages with the second audio language. The
selections of audio languages include: English, German,
French, Spanish, Italian, Portuguese, Turkish, Polish, Russian,
Danish, Greek, Hungarian, Dutch, Arabic, Farsi, Slovac.
3. Second Audio: If the channel has no audio language that
corresponds with “First Audio” but with “Second Audio” the
system will play the second audio language as default. If no
audio language corresponds with the “Second Audio” then the
default language of the current channel will be played instead.
The selections of audio languages include: English, German,
French, Spanish, Italian, Portuguese, Turkish, Polish, Russian,
Danish, Greek, Hungarian, Dutch, Arabic, Farsi, Slovak.
4. Subtitles language: You can choose the predetermined
subtitles language by using [ ] keys. The selection of the
subtitles language includes: English, German, French, Spanish,
Italian, Portuguese, Turkish, Polish, Russian, Danish, Greek,
Hungarian, Dutch, Arabic, Farsi.
5. Press [Exit] to return back from “Language” menu.
PAG.
31
English
Page 85

English
OSD 68
SYSTEM SETUP
5.2. TV SYSTEM
When you enter the “TV System” menu you will see the screen
like below (OSD 68):
1. Display Mode is used to switch the display mode. You can
select from 480I, 576I, 576P, 720P_50, 720P_60, 1080I_25,
1080I_30, 1080P_50, 1080P_60 or AUTO in HD mode.
Press [
2. Aspect Mode is used to switch the screen aspect ratio mode.
You can select from Auto / 4:3 PS / 4:3 LB / 16:9. Press
[ ] to select the needed mode.
3. In video output you can choose, by the means of [ ]
keys, the video output mode: SD / HD. We recommend selecting HD mode when the connection is made by HDMI.
4. Digital Audio Out: It will allow you to select the type of audio
digital output. Options: LPCM Out / BitStream Out. If you connect this output to a device with Dolby digital, select BitStream
Out option.
5. Press [Exit] to close the “TV System” menu.
] to select the desired mode.
5.3. TIME & TIMER SETTING
When you enter “Time” “Local Time Setting” or “Sleep Timer” a
menu with three items will be opened (OSD 69). Use [ ]
to select between the three options and confirm with [OK].
OSD 69
OSD 70
5.3.1. TIMER
Select “Timer” item and press [OK] to enter the “Timer list”
menu (OSD 70).
The current time will be displayed in the first column. If the
current time is incorrect, please modify it with the [Number]
buttons at the “Time” menu.
1. Timer Number: You can press [ ] to set the Timer
number. There are totally 8 timers.
2. Timer Mode: Select how often the timer is running: Once,
Daily, Weekly, Monthly and Yearly. Or switch the timer off.
3. Timer Service: You can choose between “DVR Recorder” */
“Radio Recorder” * (so you can program a recording of a TV or
a Radio channel) / “Reproduce Channel” / “Reproduce Radio”
(that way, you will assign the alarm function to a concrete TV
or Radio channel) , “Message mode” (creating a text message
that will appear on the screen) or Auto OTA Config (It will make
software updates by OTA at the date and time programmed).
4. “DVR Recorder” * / “Radio Recorder” * / “Channel
reproduction” / “Radio reproduction” option: if you select this
option, the following fields of the image will be shown in order
to be configured (OSD 71).
- Start channel: Press [OK] to open the channel list and select
the channel you want to watch.
- Start date: Introduce using the numerical keys on the remote
PAG.
32
rev 1.2
Page 86

OSD 71
OSD 72
SYSTEM SETUP
control the date on which you want to activate the alarm
service.
- On time: Introduce using the numerical keys on the remote
control the time on which you want to activate the alarm
service.
- Length: Settle the length of time you want the receiver to keep
one channel. Once it is finished, the receiver will be settled
in StandBy. If you do not want the receiver to be settled on
Stand-By, you have to configure the length to 00:00.
Note: If the date/ start time is prior to the current date/hour,
a warning message will be shown and you have to change the
date/start time.
5. Message option: If you select this option, the following image
fields will be active in order that you can configure them (OSD
72).
- Start message: Use the keys [
want to appear on the screen
- Start date: Introduce using the numerical keys on the remote
control the date on which you want to activate the service.
- On time: Introduce using the numerical keys on the remote
control the time on which you want to activate the service.
Automatically, a message will be shown although the receiver
is ON or in Standby.
Note: If the date/ start time is prior to the current date/hour,
a warning message will be shown and you have to change the
date/start time.
6. Auto OTA Config.:If you choose this option, the following
fields of the image will appear in order to be configured (OSD
73).
-Starting date: Insert, using the numerical keys of the remote,
the date when you want the software of the receiver to be
updated.
-On time: Insert, using the numerical keys of the remote,
the time when you want the software of the receiver to be
updated.
7. Press [Exit] to leave the “Timer” menu.
Note: If the receiver is in stand-by, and Low Power Consumption
mode is active, the receiver will switch on 1 minute before the
programmed event.
* This function will only be available in models with PVR
ready functionability
] to select the text you
English
rev 1.2
OSD 73
5.3.2. LOCAL TIME SETTING
When you select “Local Time Setting” and press [OK] then you
will see a window like the one beside (OSD 74):
1. GMT Usage: This item is used to set the time by using the
time signal from the satellite. Press [
setting.
2. The “GMT Offset” item is only available when “GMT Usage”
is set to “On”. Press [
PAG.
33
] to set the “GMT Offset” value.
] to change the
Page 87

English
OSD 74
OSD 75
SYSTEM SETUP
With every time you press the button the time offset will be
increased / decreased by half an hour.
3. Summer: this option is only available when “USE GMT” is
enabled. Use [ ] to switch on/off the summer timetable.
4. “Date” and “Time” items are only available when the “GMT
Usage” is set to “Off”. Press [ ] to select one item and
use number buttons to input time and date directly.
NOTE: If the current channel provides the correct time
information, you will see the current time after you entered
“Time” menu. If the channel doesn’t provide time information,
you have to input the date and time information manually. The
most channels support the time signal.
5. Show time: Use [
the option is enabled, the time will be displayed at the TV in a
frame in the top right margin (OSD 75).
6. Press [Exit] to exit the menu.
] to switch on/off this option. When
5.3.3. SLEEP TIMER
Press [OK] button in this option to set the sleep timer. You will
see “OFF,10, 20, 30, 40, 50, 60, 70, 80, 90, 100, 110 120.
(OSD 76)
If you set a sleep time, the system will change to Standby mode
after the chosen time period.
OSD 76
OSD 77
5.4. OSD SETTING
When you select “OSD Setting” you will see a screen like
beside (OSD 77):
1. Subtitle Display: Press [ ] to select “On” or “Off”. If the
current channel has subtitle information, it will be displayed if
this function is “On”. If this function is “Off” subtitles won’t be
displayed.
2. OSD Timeout: This setting determines the duration the info
window is displayed on the screen when you change channels.
Press [ ] to set the time between 1 to 10 seconds.
3. Position: To define the position of the information’s bar (top/
bottom).
4. OSD Transparency: With this parameter you can set the
transparency of the menus. Press [ ] select the value
between 10%, 20%, 30%, and 40% and “NO” (means no
transparency function).
5.Logo from USB: This option allows showing the logo from
USB. If this option is activated and the receiver detects the
image that is predetermined as logo in the USB, it will import
the image.
6. Load OSD Setting Default: If you want to reset your OSD
settings to the default settings then select this item and press
[OK].
7. Press [Exit] button to leave the “OSD Setting” menu.
PAG.
34
rev 1.2
Page 88

OSD 78
SYSTEM SETUP
5.5. PARENTAL LOCK
You can set a password for anyone who wishes to operate
the “Installation” menu. You can also set the password to
lock channels. Below you find how to set and change the
password.
1. On “Parental Lock”, press [OK] to open a dialogue box and
input the password. After you entered the correct password,
you will see a screen like beside (OSD 78):
2. Menu Lock: If Menu Lock is set to “Yes” then you need to
enter the password every time you want to open then menu. If
it is set to “No” then you can open the menu without entering
the password first.
3. Channel Lock: If set to “Yes” then you need to enter the
password before you can see those channels which have been
marked as locked channels in the Channel menu. If it is set to
“No” then even those channels can be selected without entering
the password first.
4. New menu password: The password of the installation menu
access can be modified You should do this after you set up
the receiver the first time and every time when you think that
your password is known by unauthorized persons. To change
the password, enter the new password in the “New Password”
item and repeat the same one in the “Confirm Password” item.
If the passwords are not identically then you will see a warning
message. If you entered the same new password in both fields
then you will see the message “Saving Data, Please Wait…”.
From now on you need to use the new password to open locked
menus or locked channels.
New channel password: The password of the channels access
can be modified.
NOTE: The password by default in both cases is “0000”
5. Press [Exit] to leave the “Parental Lock” menu.
English
rev 1.2
OSD 79
5.6. POWER SETTING
When you select this option, you will see a screen like beside
(OSD 79):
1. Automatic standby: In this option you can program the
automatic turning off of the receiver (OSD 80).
The programming can be made after a period of time between
1 and 8 hours, with 1 h. intervals. The default time is 3 hours.
-On: The receiver will be in standby mode automatically after
this time, as long as during this time no commands have been
sent to the receiver through the remote control or buttons of
the front panel, and no programmed timers are run.
-Off: Auto standby function gets deactivated.
2. LNB Power: If your receiver is connected to the LNB directly
then you need to set the LNB Power to “On”. If your receiver is
connected to a multi switch (SMATV signal distribution system)
PAG.
35
Page 89

English
OSD 80
SYSTEM SETUP
then it may be that you don’t need to provide the power to
the LNB. But since this is depending on the kind of installed
distribution system we recommend you to contact your installer
or to refer to the user manual of this system to get the correct
information.
You also just can change this setting and check if you still can
receive the channels. If the LNB Power is off and you still can
see all channels then we recommend this setting.
3. Low Power Consumption: At this option, you could enable
/ disable the low power consumption mode. This mode allows
saving current consumption when the receiver is stand-by.
4. Press [Exit] button to leave this menu.
PAG.
rev 1.2
36
Page 90

OSD 83
OSD 84
OSD 85
TOOLS
6. TOOLS
Press [Menu] in the TV mode to enter the main menu (OSD
83).
1. Press [ ] to select the Tools item.
2. Press [OK] to enter the selected item.
In the Tools menu (OSD 84):
3. Press [
4. Press [OK] to enter the selected item among.
- Information
- Quick Setup
- Factory Default
- Software Upgrade
] to select the wanted menu item.
6.1. INFORMATION
1. When you select the “Information” menu you will see a
screen like beside (OSD 85). The screen displays data about
the current channel. This function is the same as the function
[Info] in the full screen TV mode.
2. Press [Exit] button to leave the information display.
6.2. QUICK SETUP
The receiver includes an installation assistant that will help you
to setup the different parameters as you can see at OSD 86.
1. Language: press [ ] to select the language that will
appear on the menus.
2. First Audio: Some channels offer more than one audio
language. This function allows you to set the preferred audio
language for those channels using[ ].
3. Second Audio: Some channels offer more than one audio
language. This function allows you to set the second audio
language for those channels using[ ].
4. LNB Power: If your receiver is connected to the LNB directly
then you need to set the LNB Power to “On”. If your receiver is
connected to a multi switch (SMATV signal distribution system)
then it may be that you don’t need to provide the power to the
LNB.
5. Single Search: Selecting this option and pressing [OK], you
will access to the Antenna Setup menu.
6. Multi search: Selecting this option and pressing [OK], you
will access to “Multi search” menu.
English
rev 1.2
OSD 86
PAG.
37
Page 91

English
OSD 87
OSD 88
OSD 89
TOOLS
6.3. FACTORY DEFAULT
When you press [OK] on the “Default Value” item:
1. A dialogue box will occur where you need to enter the
password.
2. After you input the correct password a warning message will
be displayed like the one beside (OSD 87).
3. If you select “Yes” then all changes you made will be reset to
default values. Make sure you really want to do this!
4. Press [Exit] in both steps will close the window without
resetting the receiver.
6.4. SOFTWARE UPGRADE
It is possible to make the updating of the receiver by the means
of satellite (OTA) or by the means of USB port, and it is also
possible to make a backup of the information of the receiver in
the USB device, connected as you can see in OSD 88.
6.4.1. UPGRADE BY USB
This option allows updating the software of the receiver with the
received data from a USB memory device. To do it, connect a
USB memory device to the receiver and accede to this menu
option (OSD 89).
The last software version to be loaded must be placed at the
root path of your USB device.
1. Upgrade mode: Select with [ ], the mode of
upgrading.
2. Update file: Select with [ ], the name of the file to be
loaded.
3. Select “Start” and press [OK]. An alert message appears
indicating not to take out the memory device during the loading
process.
4. Once the file has been loaded, it requires the conformity
to end the upgrading process, writing into the receiver the
upgrading. Press [OK] to upgrade the receiver (OSD 90). In
case during the reading of the file, it is corrupted or it would be
a not appropriated for this model of receiver, an alert message
would appear “Error reading the USB disk”.
5. After pressing [OK] the receiver will write into the Flash
memory, and it will reboot to end the upgrading process.
OSD 90
For further information about the upgrading of the receivers,
please visit http://www.universbyfte.com, in the chapter about
upgrading receivers.
PAG.
38
rev 1.2
Page 92

TOOLS
6.4.2. BACKUP TO USB
This option allows saving information of the receiver in the
USB device. Options: Software or channels and the current
configuration (OSD 91).
Once you have selected the type of information that you want
to export to the USB device, select “start” and press [OK] in
order to save the data.
OSD 91
OSD 92
OSD 93
6.4.3. UPGRADE BY SATELLITE
This function can upgrade the software of your receiver through
data sent by a satellite. At the moment we offer satellite updates
only through ASTRA1 satellite.
1. Select the satellite and TP or input the TP value and
download PID.
2. Then mark “Start” and press [Enter] to begin the download
of the upgrade (OSD 92). This may need up to 60 Minutes.
Therefore we suggest using of this function only if you don’t
intent to watch TV during this time.
At the moment of writing this manual, the data for the software
upgrade by Satellite is:
•Satellite: Astra
•TP Frequency: 12604 MHz.
•Symbol Rate: 22000
•Polarity: Horizontal
•Download PID: 1294
“Auto OTA Config” option will allow activating the updating mode
by OTA automatically. Options: Auto, off or confirm (OSD 93).
-Auto: It will make the updating automatically.
-Off: It will not make the update.
-Confirm: It will request the user’s confirmation to start the
updating.
In order to configure the parameters concerning the automatic
updating, you have to access to the Programmer option.
For changes in the data of the satellite please visit http://www.
universbyfte.com .
English
rev 1.2
PAG.
39
Page 93

English
OSD 94
OSD 95
DVR MANAGEMENT
7. MEDIA MANAGEMENT
Press the key [Menu] on the remote control to go to the main
menu (OSD 94).
1. Press the arrows on the remote control [ ] to settle the
option of DVR management.
2. Press [Ok] to enter the submenu DVR Management
In the submenu DVR management (OSD 95):
3. Press the keys on the remote control [
different options on the menu.
4. Press [Ok] to go to the selected option on the submenu.
- Media List
- Hard Disk Control
- Disk Information
] to move to the
7.1. MEDIA LIST
This menu option has the lists of recordings as well as the
music, pictures and video files that the HDD contains. You can
manage the contents and to access to the multimedia player.
In the first screen you will have to select the HDD partition
where multimedia files are.
Press the cursors button of the remote control to select the
desired item and then press OK to proceed. Now you will be
able to select different multimedia contents lists.
Press [ ] to move along the different options.
- Mananage the recordings (Record List). * This function
will only be available in models with PVR ready
functionability
- Multimedia Player (Music List, Picture List, Video List, List
of all files).
Recorded files
Options
OSD 96
PAG.
40
Preview window of
the selected file
Information about
the selected file.
Information about
the capacity of
the hard disk
rev 1.2
Page 94

DVR MANAGEMENT
7.1.1. RECORD MANAGEMENT - RECORD LIST *
* This function will only be available in models with PVR
ready functionability
With this option of the menu, you can reproduce, rename, block
and delete recordings.
You can go to this option using the menu or directly pressing
the key [PVR] on the remote control.
Information on the window (OSD 96)
OSD 97
OSD 98
OSD 99
7.1.1.1. HOW TO REPRODUCE A RECORDING
If you want to reproduce a recording, you only have to select it
and press the key [OK]. In the meanwhile, you can watch the
recorded file on the preview window.
7.1.1.2. HOW TO RENAME A RECORDING
1. Press the key [Red] to rename a recording. A window will
appear where you can change the name of the record (OSD
97).
2. Press the key [Yellow] “OK” to go out and modify the
name.
3. Press the [Exit] key to leave.
7.1.1.3. HOW TO BLOCK A RECORDING
With this function it is possible to block a recording so it is
necessary to introduce a password to watch it.
1. If you want to block a recording, select it and press the
[Green] key
2. The blocked channel is marked with an icon (OSD 98).
7.1.1.4. RECORDING COPIES
This function allows copying the recordings from one partition to
the other of the hard disk.
1. With the buttons [ ] you can select the recording you
wish to copy.
2. Press the [yellow] key. A new Windows will appear (OSD
99).
3. With the keys [ ] select the destination partition where
the file will be copied.
4. Select “Start” and press [OK] in order to copy. A new window
will appear, it will show the status of the copying process (OSD
100).
5. Select “Cancel” in order leave the function.
English
rev 1.2
OSD 100
7.1.1.5. HOW TO DELETE RECORDINGS
1. To delete one or more recordings, press the [Blue] key on
the recording you want to delete.
2. A confirmation of deleting one or all recordings from the list
is displayed (OSD 101):
- Please, confirm pushing the [Red] button to select the records
one by one.
- Confirm pushing the [green] button to select all the records
PAG.
41
Page 95

English
OSD 101
OSD 102
DVR MANAGEMENT
from the list.
3. A mark will appear on the name of the records (OSD 102).
4. The marked recordings will be deleted once you confirmed
that you want to save the changes by leaving the menu.
7.1.2. MULTIMEDIA PLAYER
In this menu option you can accede and manage the contents
of the HDD previously copied from your computer.
You also can create playlists of music, pictures or videos.
Press [ ] to shift along the different lists.
Press [Menu] button to Exit.
- CONTENT LISTS OF THE HARD DISK
These lists contain all the files of the HDD that you have copied
previously from your computer.
The content is shown organized in the same folders you have
created, and it can be shown in different manners in the
following lists:
- All the files (ALL)
- Audio Files
- Pictures
- Video
- PLAYLISTS
These lists are created adding the files you want to the previous
lists. You can create 3 lists:
- Picture List
- Music List
- Video List
Press [OK] on any file from one list to play all the files
contained.
OSD 103
OSD 104
The functions are similar in all the lists.
Press the keys [ ] to move along the files and press [OK]
to enter and exit of the folders or open a file or playlist. (OSD
103)
7.1.2.1. EDIT FILES AND FOLDERS
It allows you to manage the file or folder.
- Select the file or folder and press the [Red] button.
- New functions will appear: (OSD 104)
- RENAME
1. Press the [Red] button to rename the file.
2. A new window appears where you can change the
name of the recording moving through cursors. Press
the [Yellow] key “OK” to exit and modify the name.
-DELETE
1. Press the [Green] button to delete the file.
2. A new window appears where you can select between
PAG.
42
rev 1.2
Page 96

OSD 105
OSD 106
OSD 107
DVR MANAGEMENT
deleting the selected file [Red] or all the files [Green]
(OSD 105).
3. The deletion mark will appear after the name of the
file.
4. The selected recording will be deleted once you
confirm to save the changes when you exit the menu.
-MOVE
1. Press the [Yellow] button to move the file.
2. A mark appears behind the file you want to move
(OSD 106).
3. Go to the folder you want to move and press again the
[Yellow] button. A message will appear on the screen
requesting for confirmation.
-CREATE A NEW FOLDER
1. Get into the folder where you want to create a
newone, and press the [Blue] button.
2. A new window appears where you can name the
new folder moving through the arrows and pressing the
[Yellow] key “OK” (OSD 107).
7.1.2.2. ADDING A NEW FILE TO THE LIST
1. Go over the file you want to add to your customized playlist
and press the [Green] button.
2. A new window appears where you can select between
adding the selected file to the list [Red] or all the files [Green]
(OSD 108).
3. A new mark will appear after the name of the file (OSD
109).
7.1.2.3. SEARCH FOR FILE
1. Press the [Blue] button to open the “Search” window. Use
the buttons [ and ] to write the characters of the
file name.
Press [OK] to confirm the characters. (OSD 110)
2. After writing down the characters, select OK and press [OK]
on the remote control.
English
rev 1.2
OSD 108
OSD 109
7.1.2.4. LOGO
*Only available for the picture list of the Hard Disk.
1. Press the [Yellow] button over the picture you want it to
appear as background when you are listening to the radio or
the Audio playlist.
2. Press the [Red] key to confirm or press the [Green] key to
recover the initial screen background with the Univers logo.
7.1.2.5. CONFIGURE THE SLIDE SHOW
*Only available for the picture playlist.
This function allows you to configure the “slide show”, therefore,
to play the picture playlist.
PAG.
43
Page 97

English
►
II
OSD 110
OSD 111
OSD 112
DVR MANAGEMENT
1. 1. Press the [OK] button (Setup), when you see the picture
in full screen.
2. A new window will appear where you should configure some
parameters (OSD 111):
- Size of the pictures on the screen.
- Time of viewing each picture on the screen.
- Repeat: When the playlist finishes, it starts again.
- Effect: Transition effects between picture and picture.
- All Mp: Switch On or Off the background music. If it
is configured as “On”, the music of the playlist will be
played.
7.1.2.6. AUDIO PLAYER
1. Press [OK] over the file you want to play.
2. A Player will be opened as it is shown in the picture (OSD
112).
- [Red]: Pause / Play
- [Green]: Fast Rewind
- [Yellow]: Fast Forward
- [Blue]: Play Mode, only in case of playing the list with
various files.
- [ ]: Volume control.
7.1.2.7. PICTURE VIEWER
1. Press [OK] over the file that you want to show.
2. The selected picture will be shown on the screen.
If the file is included into the Picture Playlist, they all will be
shown in “slide show” mode (OSD 113).
- With the [ ] keys you can move to the last or
following picture.
- You can rotate the picture with the buttons [ ].
- With the [
the playing.
- With the [OK] key, you can configure the adjustments
of the viewer.
- With the [EXIT] key, you can leave the picture viewer.
- With the [MENU] key you can show or hide the
options.
] key you can make a pause or re-start
OSD 113
7.1.2.8. VIDEO PLAYER
1. Press the button [OK] over a video or a list of videos.
2. The fi le will be played on the screen. In case that you play a
playlist, it will play all the fi les one by one. (OSD 114)
7.2. MEDIA CONTROL
Inside this menu you will be able to find the options “Record
Type”*, “Timeshift Size”*, “Auto Timeshift”*, “Jump Step Value”*,
“Disk” and “Hard disk formatting” (OSD 115).
* This function will only be available in models with PVR
OSD 114
ready functionability
PAG.
44
rev 1.2
Page 98

OSD 115
DVR MANAGEMENT
7.2.1. RECORD TYPE*
In this option, you can configure the video format of the
recordings. Options: MPEG, Original TS (Transport Stream).
7.2.2. TIMESHIFT SIZE*
Shows the available Timeshift size.
7.2.3. AUTO TIMESHIFT*
You can configure the Timeshift in two ways:
On: From the moment the user access to the channel, the
receiver keeps all the channel information in a buffer.
Off: the receiver will no store any channel information. If the
users makes a Pause the image will stop, but when he wants to
continue watching the program it will be running in the current
moment.
7.2.4. JUMP STEP VALUE*
With this option you can settle the jump marks forward and
reward.
On a current reproduction, press the keys [ ] to make a
jump of a certain period of time on the reproduction.
This period is configurable and the jumps can be: 1, 3, 5, 10
and 15 minutes.
If they are configured every 10 minutes, each time that you
press this key, it will jump automatically 10 minutes forward /
reward on the reproduction.
English
rev 1.2
OSD 116
7.2.5. TMS TO REC
In the “Timeshift recording” option we can select between two
options:
-On: It allows the running of the Timeshift while recording a
channel.
- Off: The Timeshift option gets disabled while recording.
7.2.5. DISK
In this option you will be able to select the partition you wish of
your hard disk.
7.2.6. FORMAT DISK
This option will format the hard disk, erasing it completely.
A message will appear on the screen requesting for confirmation.
Once you press [OK], the hard disk will be formatted and you
will lose all the saved recordings.
Note: This process is irreversible. Once you have selected this
option, the data will be lost.
7.3.- DISK INFORMATION
In the HDD information submenu you can see the capacity
of the hard disk. You also see the free space available (OSD
116).
* This function will only be available in models with PVR
ready functionability
PAG.
45
Page 99

VIDEO
Decoding
Bit rate
Aspect ratio
Active pixel (HDMI)
Output connector
AUDIO
Decoding
Mode
Bit rate
Output connector
DEMODULATOR
English
Demodulation
Symbol rate
Outer code
Inner code
Energy dispersion
INPUT SIGNAL
Frequency
Input level
Channel bandwidth
Input socked
TECHNICAL SPECIFICATION
8. TECHNICAL SPECIFICATION
MPEG-2 SD&HD, MEPG-4 H.264/AVC SD&HD
Max.20 Mbps
4:3PS, 4:3LB, 16:9, Auto
480I, 576I, 576P, 720P_50, 720P_60, 1080I_25,
1080I_30, 1080P_50, 1080P_60, AUTO
HDMI
MPEG-2/MPEG-1 layer I, II & III, AAC, Dolby Digital
Mono, Dual, Stereo, Joint stereo
Max 384Kbps
HDMI , Coaxial SPIDF
QPSK, 8PSK
SCPC/MCPC
RS (204, 188, 8)
ALL DVB rates
DVB-S & DVB-S2 recommendation
950MHz ~ 2150MHz
-65dBm ~ -25dBm
36MHz
F-type connector
LNB CONTROL
Power supply
Polarized control
DiSEqC control
MISCELLANEOUS
USB Connector
Supply voltage
External power supply
Stand-by power consumption
(Low Power Consumption mode)
Power consumption
Operation temperature
Storage temperature
Dimension (W x D x H)
Weight
13/18V (300mA max) with short circuit protection
Polarized control 13/18V polarization (V/H)
DiSEqC1.0, DiSEqC1.1 and DiSEqC1.2, GoToX *
* This receiver does not allow moving Diseq
motors
USB 2.0
19V DC, 0,8A Max.
100~240VAC~50~60Hz
< 0,5 watt
Max. 16 watts
+5° to +40°
-20° to +70°
138x113x33 mm
0.45 Kg
PAG.
46
rev 1.2
Page 100

CONFORMITY DECLARATION
“WE , UNIVERS BY FTE, DECLARE
THAT THE PRODUCT
U7000
IS IN CONFORMITY WITH FOLLOWING DIRECTIVES
LOW VOLTAGE DIRECTIVE 2006/95/EC
EMC DIRECTIVE 2004/108/EC”
English
rev 1.2
PAG.
47
 Loading...