

FEBRUARY 2011
OCF30 GAS & ELECTRIC FRYERS
3000 CONTROLLER
TRAINING MANUAL
818-0665

3000 CONTROLLER USER GUIDE
Contents
Quick Reference: Using the 3000 .............................................................................................................. 3
Menu Summary Tree ................................................................................................................................... 6
Main Menu: Programming your Fryer ....................................................................................................... 8
Main Menu: Navigation ............................................................................................................................. 8
Main Menu: Product Setup–Single Setpoint Cooking .............................................................................. 9
Main Menu: Product Setup–Multiple Setpoint (Segmented) Cooking .................................................... 11
Overview ............................................................................................................................................ 11
Multiple Setpoint (Segmented) Cooking Setup .................................................................................. 13
1. Set Up Product .......................................................................................................................... 13
2. Enter Total Cook Time and Starting (1st) Temp ........................................................................ 13
3. Enter 2nd Temp and Time Remaining ...................................................................................... 13
4. Enter 3rd Temp and Time Remaining ....................................................................................... 14
5. Enter 4th Temp and Time Remaining ....................................................................................... 14
6. End Temp Changes or Repeat Step 5 if needed ...................................................................... 14
7. Create 1st Shake Alarm ............................................................................................................. 15
8. Create 2nd Shake Alarm ........................................................................................................... 15
9. Create 3rd Shake Alarm ............................................................................................................ 15
10. Set Cool Temp, Setpoint, Filter Prompt, and Instant ON ...................................................... 16
11. Exit or Set Up Additional Products ........................................................................................ 16
Main Menu: Vat Setup ............................................................................................................................ 17
1. Enter Vat Setup ......................................................................................................................... 17
2. Vat Set Up: Vat System ............................................................................................................. 17
3. Vat Set Up: Time/Date .............................................................................................................. 19
4. DST Set Up (daylight savings time) .......................................................................................... 19
5. Vat Set Up: Filter ...................................................................................................................... 20
6. Vat Set Up: E-Log ...................................................................................................................... 21
7. Vat Set Up: Change Password .................................................................................................. 21
Main Menu: Tech Mode .......................................................................................................................... 22
Filter Menu ................................................................................................................................................. 23
Filter Menu: Controller ON ...................................................................................................................... 23
1. Enter Filter Menu – Controller ON ...................................................................................................... 23
2. Filter Menu: Filter –Controller ON ...................................................................................................... 23
3. Filter Menu: Clean and Filter – Controller ON .................................................................................... 24
4. Filter Menu: Dispose – Controller ON ................................................................................................ 25
Filter Menu: Controller OFF .................................................................................................................... 25
1. Enter Filter Menu – Controller OFF .................................................................................................... 25
2. Filter Menu: Dispose – Controller OFF ............................................................................................... 26
2. Boil Out – Controller OFF ................................................................................................................... 26
Polish Menu: Fryer ON ............................................................................................................................ 27
Enter Polish: Fryer ON ........................................................................................................................... 27
Polish: Fryer ON ..................................................................................................................................... 27
Info Mode: Viewing Operational Stats .................................................................................................... 28
1. Info Mode: Dispose Stats – Information since last dispose ................................................................ 28
2. Info Mode: Daily Stats – Information by day of the week over the past week .................................... 29
3. Info Mode: Selected Period Stats – Information for a specifically defined period of time .................. 30
4. Info Mode: Last Load Stats –Inform at ion about last c ook .................................................................. 31
Scan Mode: Viewing Daily Stats .............................................................................................................. 31
Appendix A: 3000 Controller Error Log Co d es ...................................................................................... 34
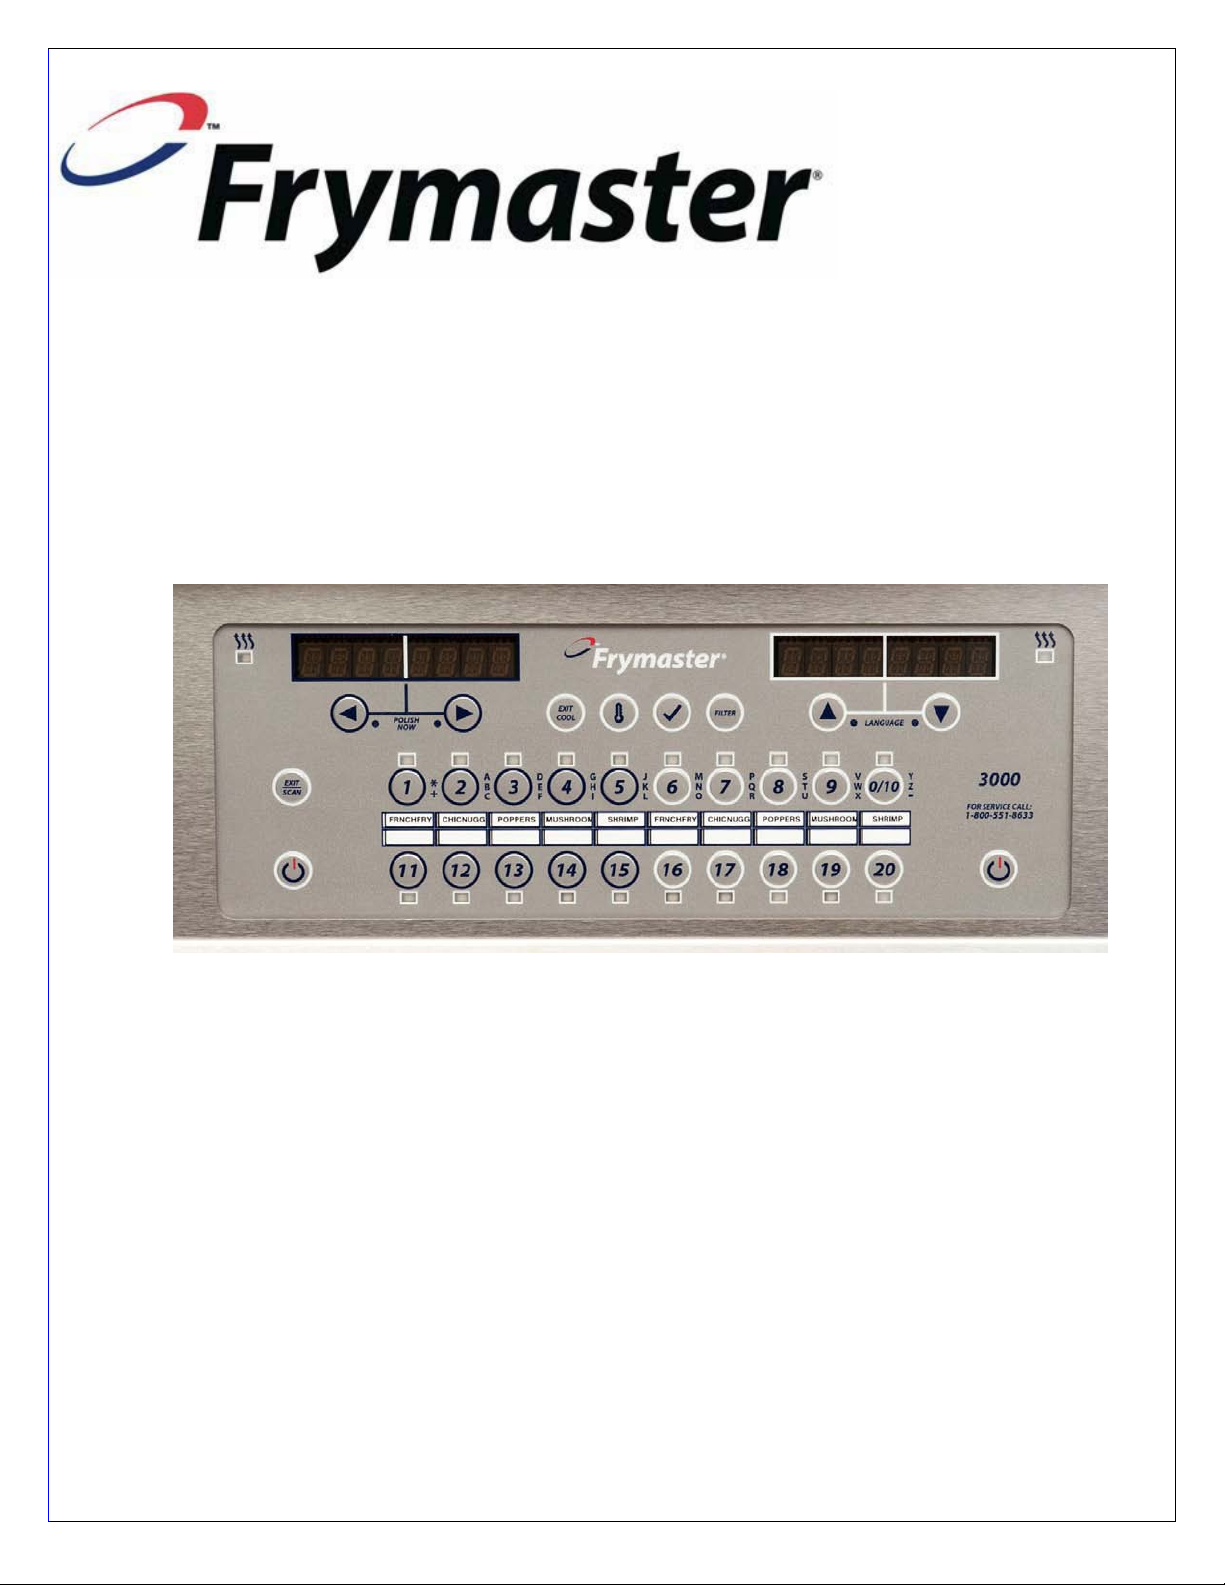
2
3000 CONTROLLER USER GUIDE
Use to scroll through
menu, programming
options.
Press together
to launch POLISH.
Exits COOL
mode.
Heats oil
back to
setpoint.
Check
actual,
setpoint
temps &
software
version.
Press to scroll through
menu & programming
options.
Press together to
change to 2nd
language.
Enter
codes,
respond
to leftdisplay
prompts.
Access
FILTER
prompts.
Product Button LED: Lit when button is active. All
buttons with a common setpoint light simultaneously.
2
7
8
9
10
6
6
5
5
3
3
1
4
11
1
12
Menu strip slot
(access behind
bezel):
insert
customized
product names
2
MENU
STRIP
1.
On/Off
Turn controller(s) on/off; exi t fi lter/polish cycles.
2.
Display screens.
Written information prompts.
mode, press to view product setup.
4.
Product Button LEDs
Lights for products that cook at setpoint. Flash during cook cycle.
5.
Left/Right Scroll
Navigate options in left display window. Press both simultaneously to launch
polish cycle.
6.
Up/Down Scroll
Navigate options in right display window. Press at end of cook to release
cook. Press both simultaneously to change to a second language.
7.
Exit Cool
Press and release to exit COOL mode. Heats oil back to setpoint. Press
and hold to cancel melt cycle.
8.
Thermometer
With controller on, shows setpoint in left display & vat temp on the right.
and software version.
9.
Checkmark
With controller off or on, press and release to get recovery time (Normal for
programming functions. See instructions for programming functions below.
10.
Filter
With controller off or on, press for cooks remaining in filter cycle. Press and
press and hold to access dispose & boil out.
11.
Exit/Scan
Press to view product specs or to exit main menu programming functions.
See instructions for produ ct sp ecs/ programming functions.
12.
Menu Strip
Remove from panel to access customizable menu strip.
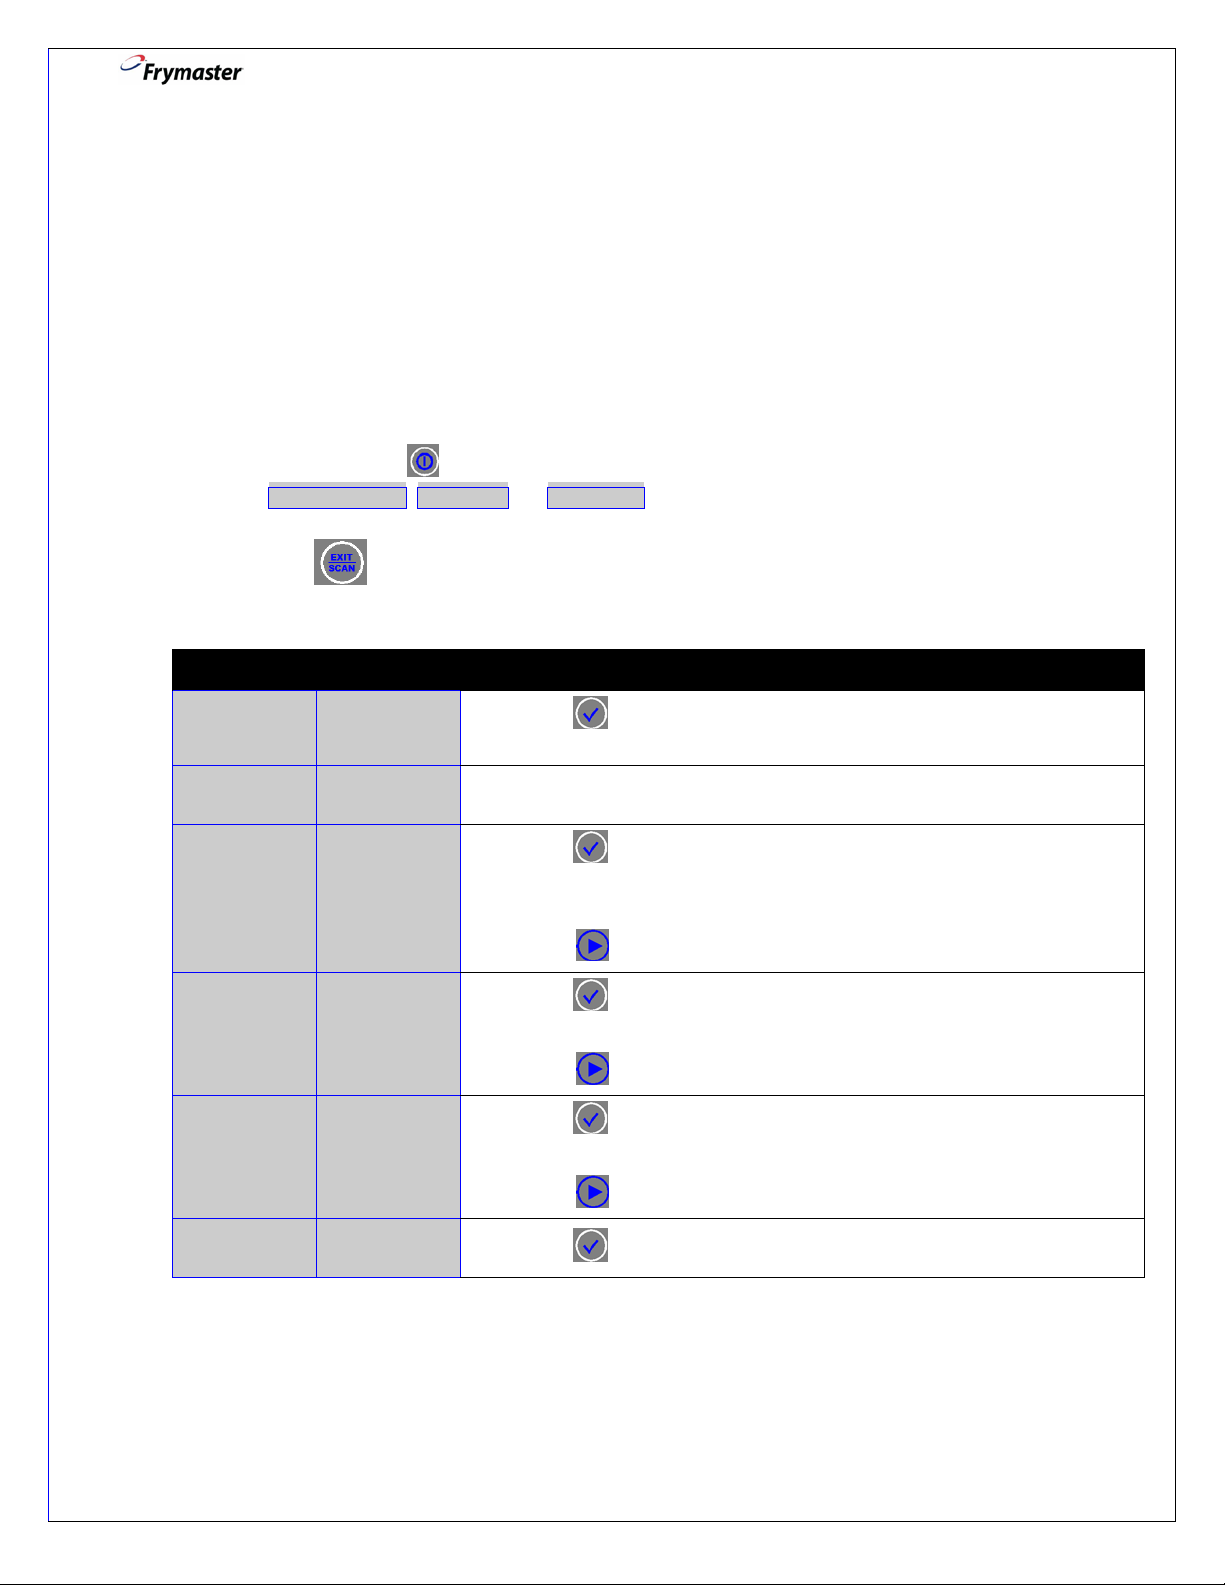
Quick Reference: Using the 3000
Controller Button Navigation
Product buttons
3.
Press to start, complete, or cancel (press & hold) a product cook. In scan
(Toggles for split pot.). When off, shows setpoint, date, time, type of fryer
Electric is 1:40 or less & Gas is 2:2 5 or less). With cont rol ler of f, pres s and
hold for 5 seconds for info mode functions, or 10 seconds for main menu:
hold to access filter menus (filter, clean and filter, dispose). With frypot off,
Cooking
1. Press ON/OFF1: System information displays2 and oil heats to setpoint.
2. DROP: Oil is at set temperature. Press product button3 and drop product.
3. SHAKE: If shake is needed, alarm sounds.
4. DONE: Audible alarm sounds. Press blinking produ ct butt o n3 to cancel alarm and remove product.
To cancel cook at any time: Press and hold blinking product button3.
3

3000 CONTROLLER USER GUIDE
Left Display
Right Display
Action
SETUP.
2. Press to program menu items and cooking parameters.
PRODUCT SETUP
ENTER CODE
3. Enter 1650.
SELECT
PRODUCT
select and advance to next product set up feature
or to move back one product set up feature.
SHORT NAME
ABBREVIATED
7. Enter abbreviated four-character product name with the text
COOKING MODE
SINGLE
nt (segmented) cooking is desired, press
(SEGMENTED) product setup and follow the instruc tions
1 TIME
0:00 OR
ENTERED TIME
10. Enter total cook time with numbered keys.
COOL MODE activation / deactivation
1. Press ON/OFF1: Oil heats to setpoint temperature.
2. COOL: After the programmed idle time, controller reverts to idle temperature and displays COOL. With
full frypots only, press at any time to reduce frypot’s temperature to COOL mode. Default is 250°F
(121°C)
3. Press Exit Cool to return oil to setpoint.
Polish (Fryer must be ON)
1. To polish, press and hold
2. Controller displays2 “POLISH NOW” alternating with “YES” and “NO”.
3. Select YES (button under YES display5) to launch polish cycle or NO to continue cooking.
4. Follow prompts.
5. Controller turns off when polish cycle is complete.
simultaneously.
Filter (Fryer must be ON to record filter events and to display filter feature prompts)
1. To filter, press and hold FILTER10. NOTE: Only one frypot can be filtered at one time; “WAIT TO
FILTER” may scroll until frypot is ready to filter.
2. Select desired filter function (filter, clean and filter, or dispose).
3. Controller displays2 “FILTER NOW” alternating with “YES” and “NO”.
4. Select YES (press button under YES display5) to launch filter cycle.
5. Select NO (press button under NO display5) to delay filter and cooking continues. Press NO two times
and filter count resets.
6. Follow prompts.
7. Controller turns off when filter cy cle is comple te.
Note: Controller must be OFF to access BOIL OUT filter function.
Product Setup
OFF OFF
1. Press/hold about 10 seconds until PRODUCT SETUP is
displayed. MAIN MENU will flash before displaying PRODUCT
PRODUCT SETUP [BLANK]
[BLANK] 4. Press desired product button.
LONG NAME PRODUCT NAME
OR BUTTON
NUMBER
PRODUCT NAME
OR BUTTON
NUMBER
SETPOINT
PREVIOUSLY
5. Enter product name with text keys. Move cursor from letter to
letter with
name will alternate in the display window with the cook time
during a cook (full frypot).
6. Press
keys. This name will alternate in the display window with the
cook time during a cook (split frypot).
8. Press to select and advance.
9. Press to select and advance. (Default is SINGLE SETPOINT
NOTE: If multiple setpoi
MULTIPLE. Then go to MULTIPLE SETPOINT
11. Press to select and advance.
forward one letter or back one letter. This
to
4
3000 CONTROLLER USER GUIDE
Left Display
Right Display
Action
1 TEMPR
TEMP
12. Enter cooking temperature.
13. Press .
15. Press to select and advance.
1 ALARM TIME
0:00 OR
16. Enter time in cook cycle for audible alarm for shaking or stirring.
17. Press to select and advance.
1 ALARM NAME
SHAKE
19. Press to select and advance.
1 ALARM MODE
AUTO
22. Press to select and advance.
24. Press to select and advance.
2 ALARM TIME
0:00
25. Enter time in cook cycle for second alarm for shaking or stirring.
26. Press to select and advance.
NUMBER.
INSTANT ON
0 OR
PREVIOUSLY SET
product button is pressed, before the controller adjusts the heat
in response to the temperature.
32. Press to select and advance.
EXIT
EXIT
button to lock in programming choices and continue
with additional product programming (#4 above).
SELECT
[BLANK]
Press 2 times to return to OFF.
1 SENSITIVITY NUMBER 14. Enter the level of sensitivity, 0-9, for the product.
(SHAKE time)
1 ALARM TONE SHORT
FILTER PROMPT 0 OR
PREVIOUSLY
ENTERED TIME
PREVIOUSLY
ENTERED
(e.g. 30 second SHAKE into a 3 minute COOK would be
entered :30)
18. Press to scroll to choice of alarm names. (Default is
SHAKE).
20. Press . Default is AUTO (cancels alarm automatically after
a few seconds).
21. If MANUAL is desired press
(requires user to turn off alarm).
23. Press to scroll to choice of shake alar m tones.
(Default is SHORT).
Leave at 0:00 if second alarm is not needed.
27. Enter number of cook cycles before a filter prompt. Enter “0” to
bypass filter prompt.
28. Press
to select and advance.
to scroll to MANUAL
HOLD TIME 0:00 OR
PRODUCT
SEE MANUAL FOR MORE DETAILS ON CONTROLLER OPERATION.
NUMBER
PREVIOUSLY
ENTERED TIME .
29. Enter value. Press to select and advance. (Default is 30
seconds).
30. This is the time, in seconds, the fryer heats at 100%, after the
31. Enter time to hold product before discarding (Default is 0
seconds).
33. Press
5
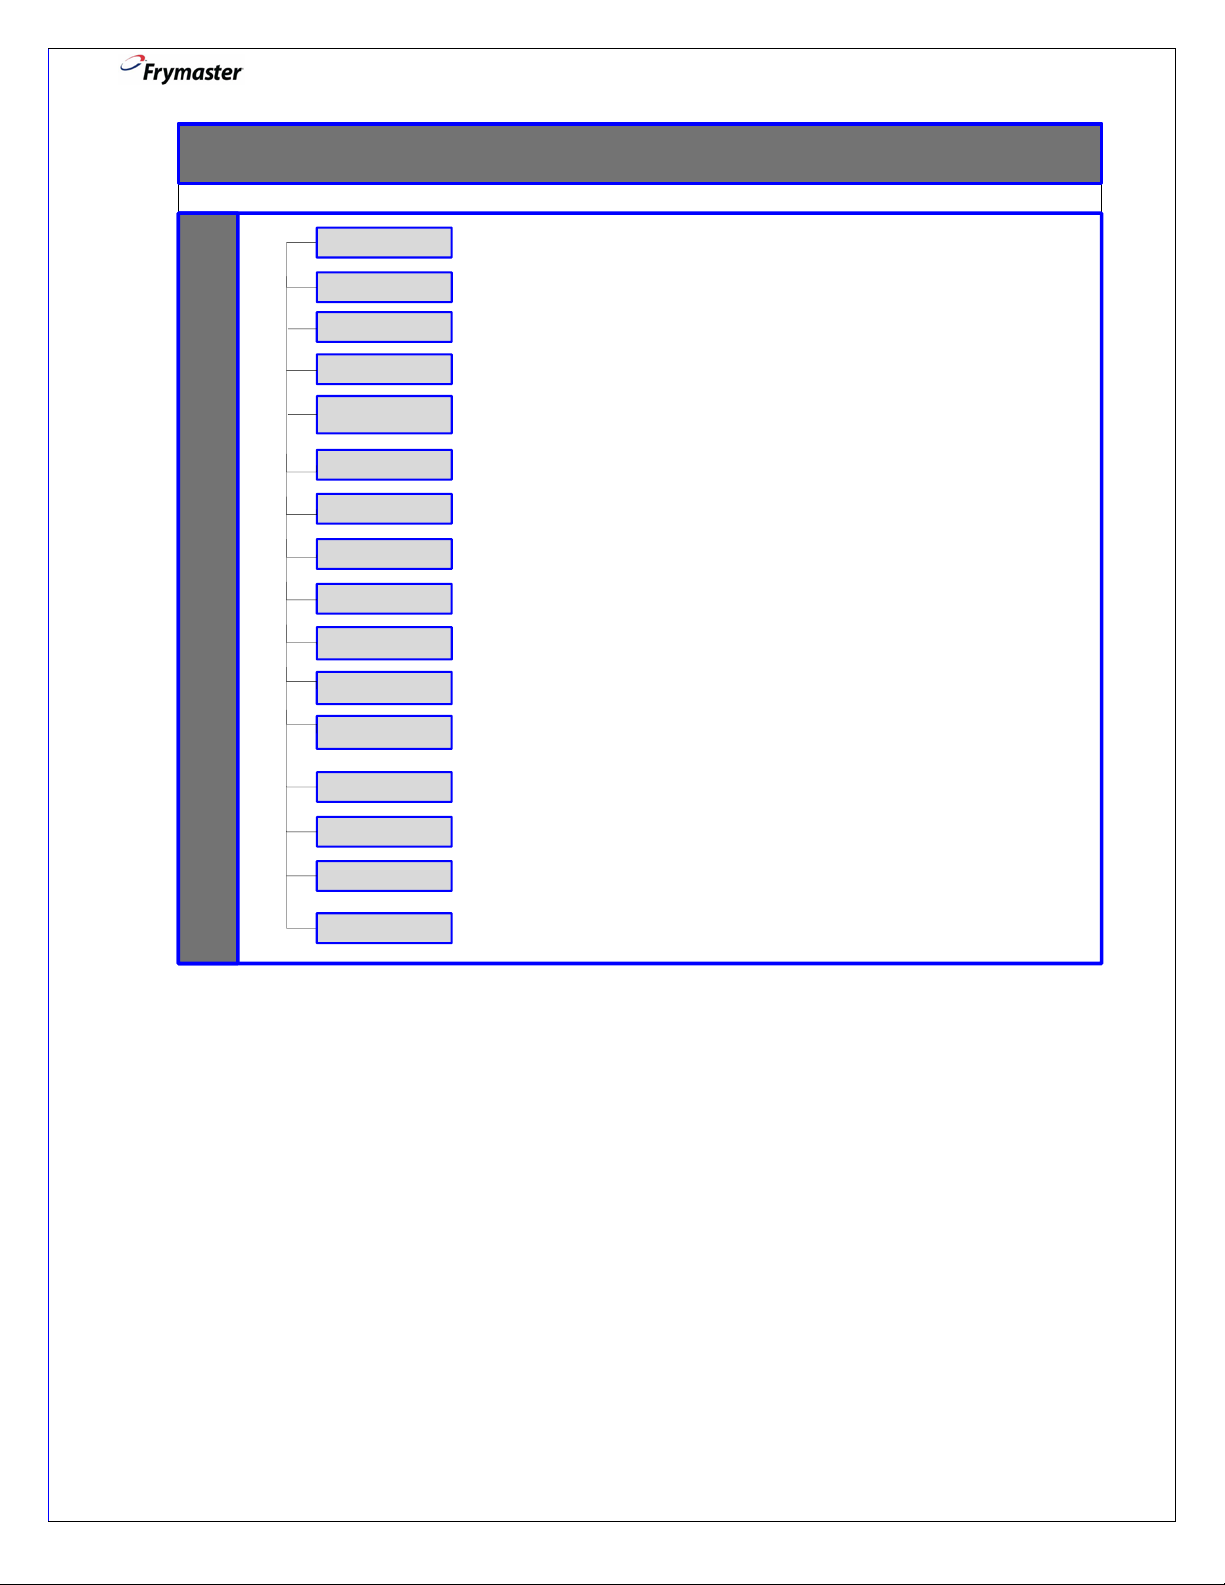
Menu Summary Tree
3000 Controller Menu Summary Tree
MAIN MENU AND TECH MODESINFO MODE FILTER
FILTER
CLEAN AND FILTER
BOIL OUT
DISPOSE
LAST LOAD STATS
LAST DISPOSE
STATS
DAILY STATS
SELECTED PERIOD
STATS
SHORT NAME
COOKING MODE
LONG NAME
1 TIME
1 ALARM TIME
1 TEMP
1 SENSITIVITY
1 ALARM NAME
RECOVERY ALARM
1 ALARM MODE
DRAIN SWITCH
WASTE
1 ALARM TONE
2nd LANGUAGE
ENERGY
(GAS OR ELEC)
LANGUAGE
LOCALE
(CE OR NON-CE)
EOD FILTER TIME
FLUSHING TIMER
BOIL OUT TIMER
COOKS TILL FILTER
FRESH OIL
COOL MODE
DEFAULT
SYSTEM TEMPR
FORMAT
SYSTEM VOLUME
EXIT MELT TEMP
TYPE (VAT)
COOL MODE TEMP
1 POLISH
1 POLISH PROMPT
TIME
PRODUCT SETUP
SELECT PRODUCT
FILTER PROMPT
VAT SETUP
SYSTEM
FILTER
E-LOG
TIME/DATE
1 POLISH START
TEMP
TECH MODE
INSTANT ON
HOLD TIME
NOTE: Numbered items
(such as 1 TIME) may
have multiple entries.
BASKET LIFT
1 POLISH
DURATION
For technicians’ use only
3000 CONTROLLER USER GUIDE
6
3000 CONTROLLER USER GUIDE
3000 Controller Menu Summary Tree
SCAN MODE
1 TEMPR
COOKS SINCE
LAST DISPOSE
COOKS TODAY
1 TIME
1 SENSITIVITY
1 ALARM TIME
EXIT
1 ALARM MODE
SHORT NAME
COOKS REMAINING
LONG NAME
1 ALARM TONE
HOLD TIME
1 ALARM NAME
INSTANT ON
FILTER PROMPT
NOTE: Numbered items
(such as 1 TIME) may
have multiple entries.
7
3000 CONTROLLER USER GUIDE
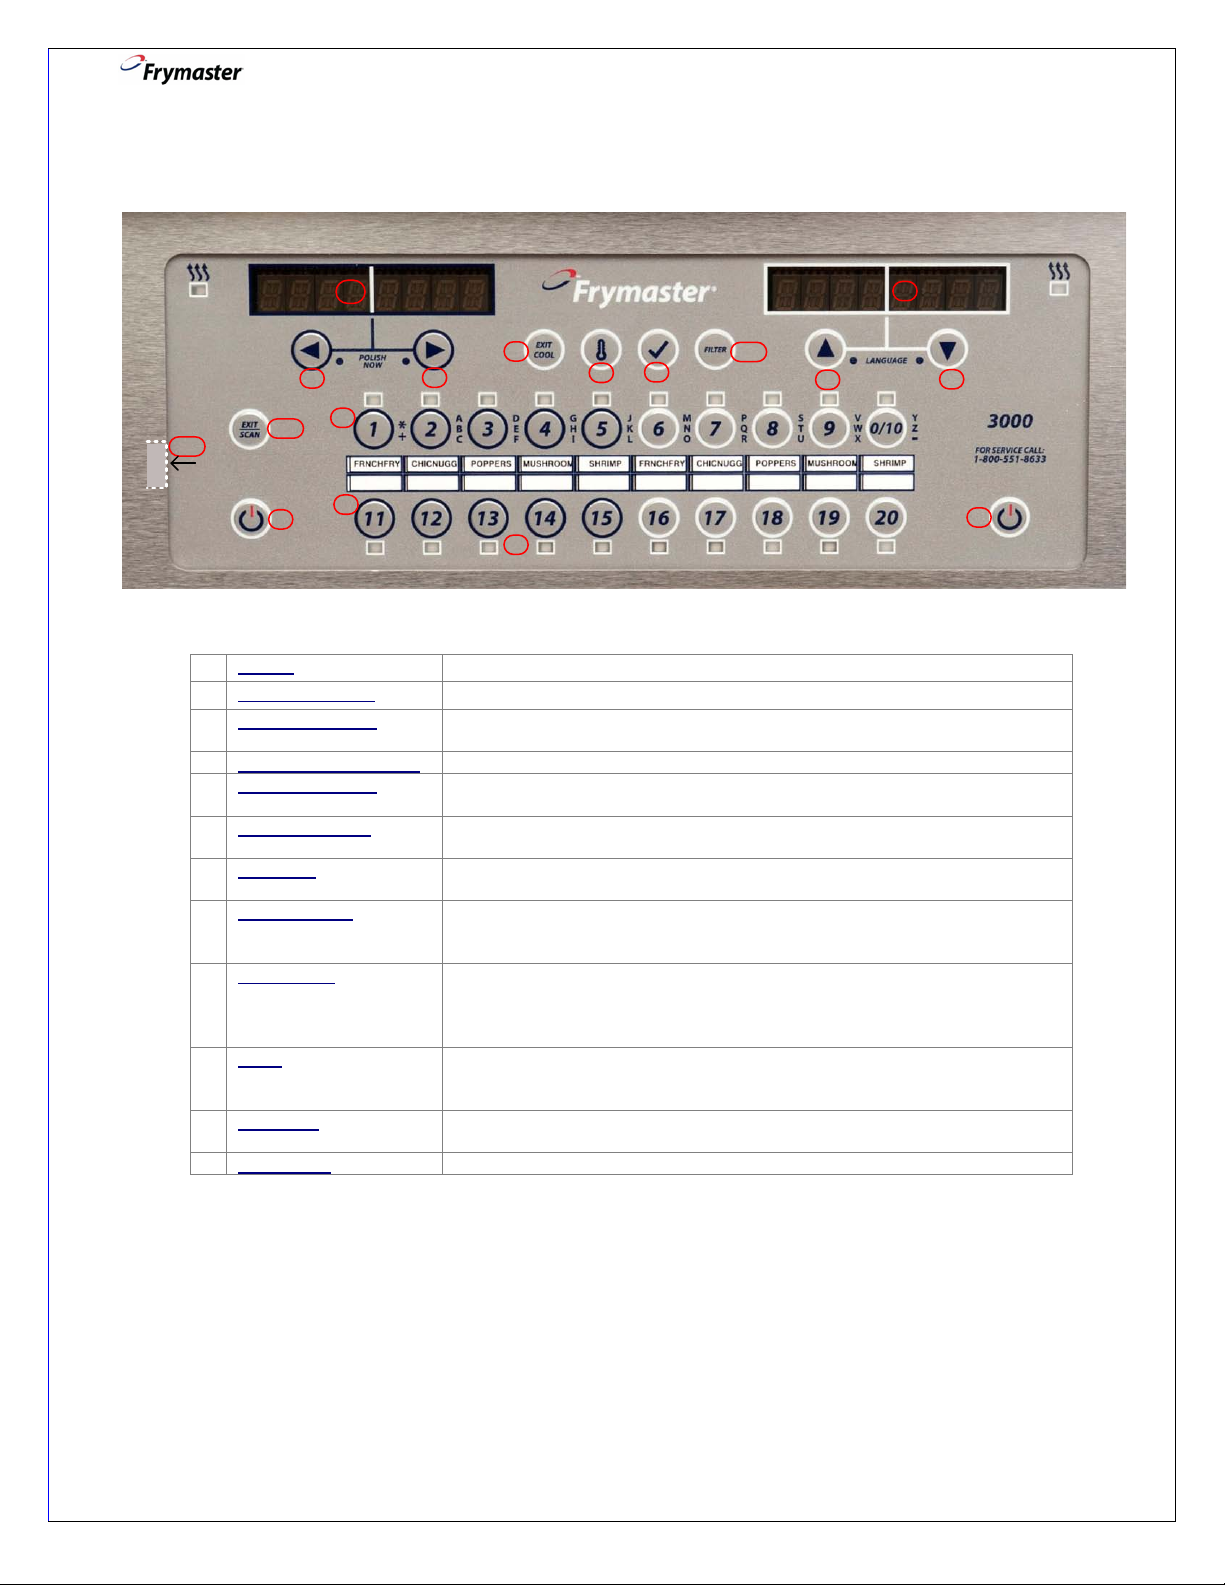
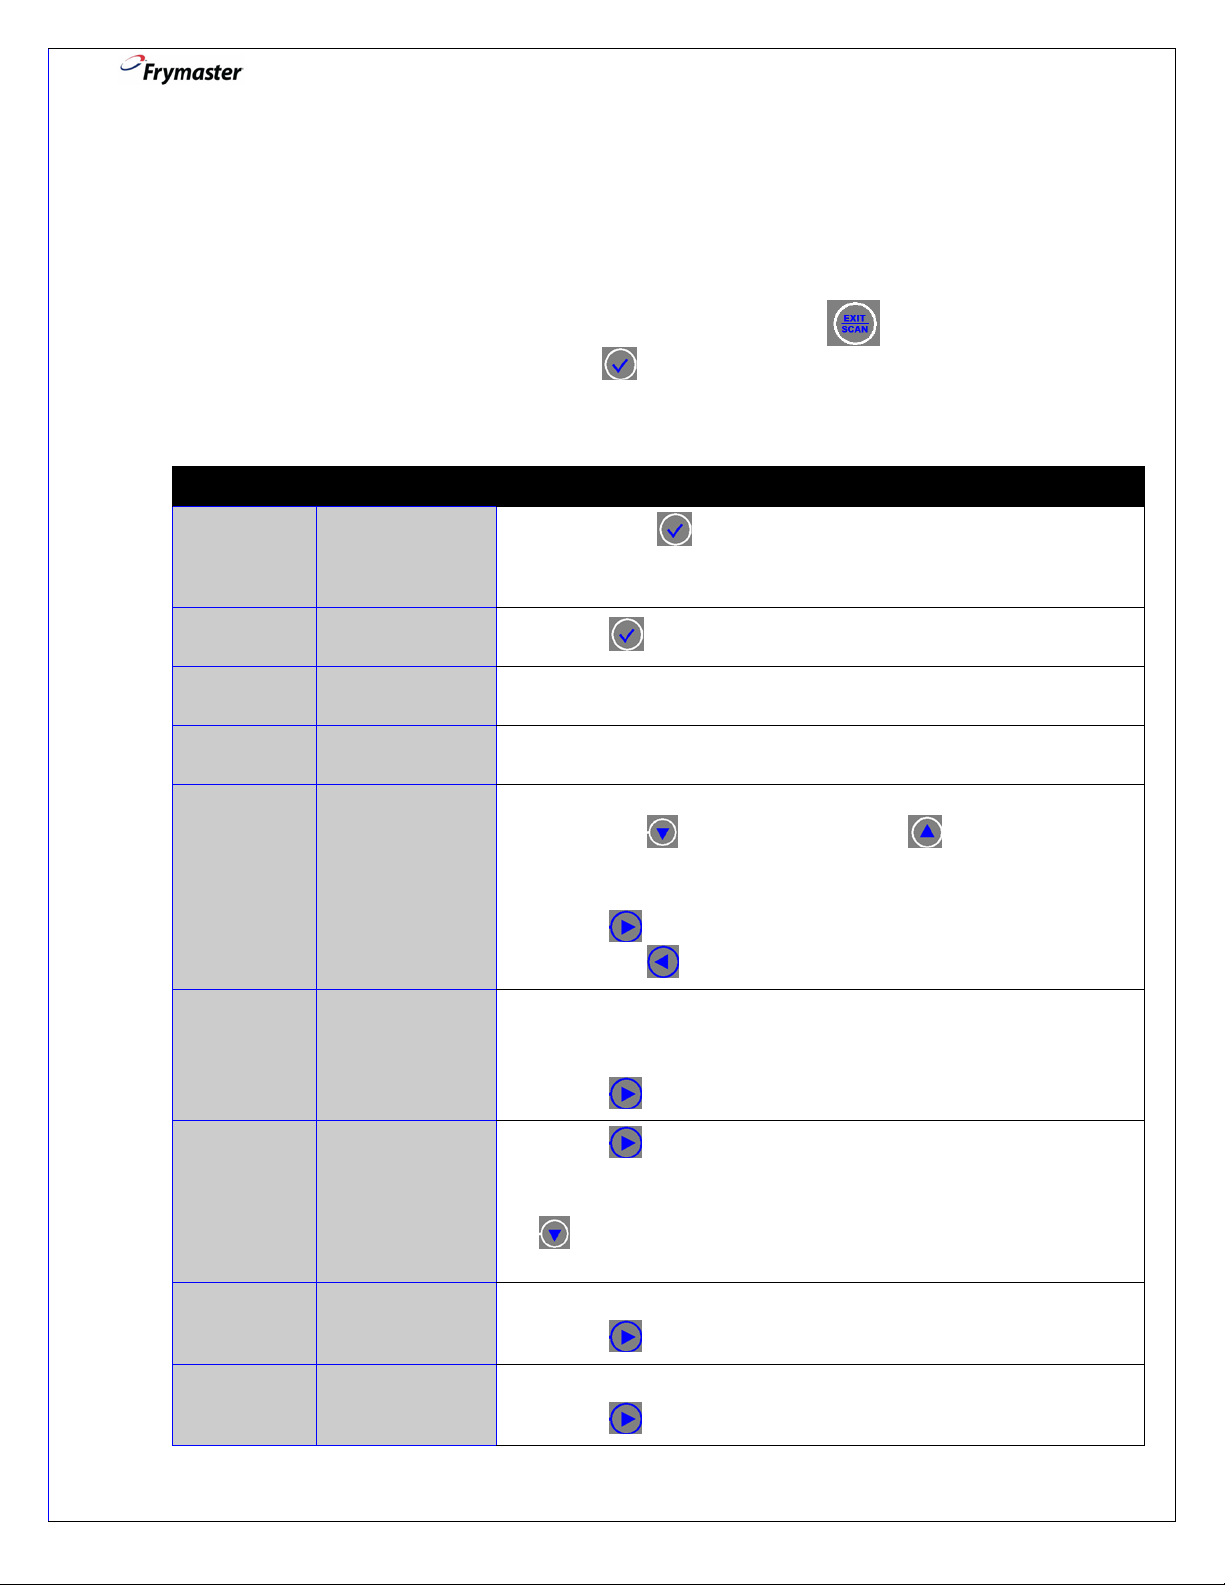
Main Menu: Programming your Fryer
The main menu is used to access the setup opt ions to program the 3000 controll er for
your fryer.
Main Menu: Navigation
Turn the controller off and follow the steps below to scroll to the menu you wish
to enter: PRODUCT SETUP, VAT SETUP, or TECH MODE.
NOTE: Press to return to main menu at any time during the set up process. Press twice
to return to OFF.
Left Display Right Display
Action
OFF OFF
MAIN MENU [BLANK]
PRODUCT
SETUP
[BLANK]
TECH MODE [BLANK]
EXIT EXIT
[BLANK]
1. Press about 10 seconds until controller displays MAIN
MENU. Press EXIT/SCAN to return to OFF.
2. Main Menu will flash, then go to PRODUCT SETUP.
3. Press to enter PRODUCT SETUP to program menu items
and cooking parameters.
OR
Press
4. Press to enter VAT SETUP.
OR
Press
5. Press to e nter TECH MODE to program technical features.
OR
Press
6. Press to return the controller to OFF.
to scroll to VAT SETUP.
to scroll to TECH MODE.
to scroll to EXIT.
8
3000 CONTROLLER USER GUIDE
keys. Move cursor from letter to
Main Menu: Product Setup–Single Setpoint Cooking
To program food items, make sure the controller is OFF and follow the steps below.
NOTE: Exit from a programming step at any time by pressing until the display
returns to its pre-programming status. A press is needed in order to lock in the
programming choice.
Left Display Right Display
Action
OFF OFF
PRODUCT
SETUP
PRODUCT
SETUP
SELECT
PRODUCT
LONG NAME PRODUCT NAME
SHORT NAME ABBREVIATED
[BLANK]
ENTER CODE
[BLANK]
OR BUTTON
NUMBER
PRODUCT NAME
OR BUTTON
NUMBER
34. Press/hold about 10 seconds until PRODUCT SETUP is
displayed. MAIN MENU will flash bef ore displaying
PRODUCT SETUP.
35. Press to program menu items and cooking parameters.
36. Enter 1650.
37. Press desired product button.
38. Enter product name with text
letter with forward one letter or back one letter.
This name will alternate in the display window with the cook
time duri ng a cook (full frypot).
39. Press
feature or
to select and advance to next product set up
to move back one product set up feature.
40. Enter abbreviated four-character product name with the text
keys. This name will alternate in the display window with the
cook time during a cook (split frypot).
41. Press
to select and advance.
COOKING
MODE
1 TIME 0:00 OR
1 TEMPR TEMP
SINGLE
SETPOINT
PREVIOUSLY
ENTERED TIME
42. Press to select and advance. (Default is SINGLE SET-
POINT
NOTE: If multiple setpoint (segmented) cooking is desired, press
MULTIPLE. Then go to MULTIPLE SETPOINT (SEGMENTED)
product setup and follow the instructions
43. Enter total cook time with numbered keys.
44. Press
to select and advance.
45. Enter cooking temperature.
46. Press
.
9

3000 CONTROLLER USER GUIDE
ute COOK would
Left Display Right Display
1 SENSITIVITY
1 ALARM TIME
(SHAKE time)
1 AL AR M
NAME
1 AL ARM
MODE
1 AL AR M
TONE
NUMBER
0:00 OR
PREVIOUSLY
ENTERED TIME
SHAKE
AUTO
SHORT
Action
47. Enter the level of sensitivity, 0-9, for the product.
48. Press
49. Enter time in cook cycle for audible alarm for shaking or
stirring. (e.g. 30 second SHAKE into a 3 min
be entered :30)
50. Press to select and advance.
51. Press to scroll to choice of alarm names. (Default is
SHAKE).
52. Press
53. Press . Default is AUTO (cancels alarm automatically
after a few seconds).
54. If MANUAL is desired press
(requires user to turn off alarm).
55. Press
56. Press to scroll to choice of shake alarm tones.
(Default is SHORT).
to select and advance.
to select and advance.
to scroll to MANUAL
to select and advance.
2 ALARM TIME
FILTER
PROMPT
INSTANT ON 0 OR
PREVIOUSLY SET
HOLD TIME 0:00 OR
EXIT EXIT
0:00
0 OR
PREVIOUSLY
ENTERED
NUMBER.
NUMBER
PREVIOUSLY
ENTERED TIME.
57. Press
to select and advance.
58. Enter time in cook cycle for second alarm for shaking or
stirring. Leave at 0:00 if second alarm is not needed.
59. Press
to select and advance.
60. Enter number of cook cycles before a filter prompt. Enter “0”
to bypass filter prompt.
61. Press
to select and advance.
62. Enter value. Press to select and advance. (Default is 30
seconds).
63. This is the time, in seconds, the fryer heats at 100%, after
the product button is pressed, before the controller adjusts
the heat in response to the temperature.
64. Enter ti m e to hold product before discarding (Default is 0
seconds).
65. Press
to select and advance.
66. Press button to lock in programming choices and
continue with additional product programming (#4 above).
SELECT
PRODUCT
[BLANK]
Press 2 times to return to OF F.
10
3000 CONTROLLER USER GUIDE
Cook for how long?
Then change to what
Time remaining in Cook cycle
total time remaining]
initial
total
2 minutes
320
11 minutes [13 – 2]
3 minutes
330
4 minutes [7-3]
4 minutes
No entry–product continues
to cook at 330 until DONE
No entry–product finishes
cooking at last setting
Main Menu: Product Setup–Multiple Setpoint (Segmented) Cooking
Overview
The 3000 controller is capable of multiple setpoint (segmented) cooking, a feature that allows a cooking
cycle to be broken into a number of smaller cook cycles, each with its own cooking temperature and time.
An abbreviated version of the programming for a 13-minute cook cycle with four cooking temperatures is
shown below.
Step 1
Step 2
Step 3
Step 4
EXAMPLE: Total cook time of 13 minutes, with 3 temperature changes.
Set total cook time and initial setpoint.
Set the time of the first cooking segment, (2 minutes) and the setpoint of the first
temperature change.
Set the duration of the second cooking segment (4 minutes) and the setpoint of the
second temperature change.
Set the duration of the third cooking segment (3 minutes) and the setpoint of the third
temperature change.
The four remaining minutes in the cook time elapse at the final temperature. No entry is
required to use the final minutes
1. Start with total cook time of 13. Cook for 2 minutes at 340 until timer is at 11.
2. Cook for 4 minutes at 320 until timer is at 7
3. Cook for 3 minutes at 330 until timer is at 4.
4. Cook last 4 minutes at 330.
Step 1
Step 2
Step 3
Step 4
Temp?
Enter this number for temp
change
4 minutes 310 7 minutes [11-4].
setpoint of 340
Enter this number for point in
cycle to change temp
[subtract desired cook time from
cook time of 13 minutes
11

3000 CONTROLLER USER GUIDE
Enter 13:00, the combined time of all cook cycles, and 340°F (171°C),
initial setpoint.
1:
2 min.
2:00 4:00 6:00 8:00 10:00 12:00
4 min.
3 min.
4 min.
No entry is required
for the final 4 minutes
of the cook time. The
computer simply
counts downs the
remaining minutes at
the final setpoint,
which was
established in step 4.
2:
3:
4:
0
1
4
2
3
5 6 7 8 9 10 11 12 13
Remaining cook
time
Minus segment
length
Entered on
3000
13
-2
11
Remaining cook
time
Minus segment
length
Entered on
3000
11
-4
7
Remaining cook
time
Minus segment
length
Entered on
3000
7
-3
4
Enter
320°F(160°C),
the first
temperature
change.
Enter
310°F(154°C),
the 2nd
temperature
change.
Enter
330°F(166°C),
the 3rd
temperature
change.
340°F(171°C)
320°F(160°C)
310°F(154°C)
330°F(166°C)
There can be a total of five (5), cooking segments.
12

3000 CONTROLLER USER GUIDE
Multiple Setpoint (Segmented) Cooking Setup
1. Set Up Product
LEFT DISPLAY Right Display
Action
OFF OFF
PRODUCT
SETUP
PRODUCT
SETUP
SELECT
PRODUCT
LONG NAME PRODUCT
SHORT NAME ABBREVIATED
[BLANK]
ENTER CODE
[BLANK]
NAME OR
BUTTON
NUMBER
PRODUCT
NAME OR
BUTTON
NUMBER
1-1. Press checkmark key until Product Setup is
displayed. MAIN MENU will flash bef ore displaying
PRODUCT SETUP.
1-2. Press to program menu items and cooking
parameters.
1-3. Enter 1650
1-4. Press desired product button
1-5. Enter product name with text keys. Advance cursor with
back one letter forward one letter. This name
will alternate with the cook time during a cook. Press
to select and advance to next product set up feature
or
1-6. Enter abbreviated four-character product name with text
keys. This name alternates with time in the display
during a cook. Press
to move back one product setup feature.
to select and advance.
2. Enter Total Cook Time and Star ting (1st) Temp
COOKING
MODE
1 TIME 0:00 OR
1 TEMP TEMP
SINGLE
SETPOINT
PREVIOUSLY
ENTERED TIME
2-1. Press . If multiple setpoint cooking desired press
MULTIPLE and follow the instructions. (Default is
SINGLE SETPOINT)
2-2. Enter total cook time for segmented item and press
to select and advance.
2-3. Enter initial cooking temperature and press to
select and advance.
1 SENSITIVITY NUMBER
2-4. Enter the level of sensitivity, 0-9, for the product. Press
to select and advance.
3. Enter 2nd Temp and Time Remaining
13

3000 CONTROLLER USER GUIDE
2 TIME 0:00 OR
PREVIOUSLY
ENTERED TIME
2 TEMP 0:00 OR
PREVIOUSLY
ENTERED
TEMPERATURE
2 SENSITIVITY 0 OR
PREVIOUSLY
ENTERED
VALUE
3-1. Enter time remaining after first temperature change (see
page 4-13) and press
3-2. Enter first temperature change and press to select
and advance.
3-3. Enter the level of s en s itivity, 0-9, for the product and
press
to select and advance.
4. Enter 3rd Temp and Time R em ai ni ng
3 TIME 0:00 OR
PREVIOUSLY
PROGRAMMED
TIMe
3 TEMP 0:00 OR
PREVIOUSLY
PROGRAMMED
TEMPERATURE
4-1. Enter time remaining after second temperature change
and press
to select and advance.
4-2. Enter temperature of the second segment and press
to select and advance.
to select and advance.
3 SENSITIVITY 0 OR
PREVIOUSLY
ENTERED
VALUE
4-3. Enter the level of s en s itivity, 0-9, for the product and
press
to select and advance.
5. Enter 4th Tem p and Time Rem aining
4 TIME 0:00 OR
PREVIOUSLY
ENTERED TIME
4 TEMP 0:00 OR
PREVIOUSLY
PROGRAMMED
TEMPERATURE
4 SENSITIVITY 0 OR
PREVIOUSLY
ENTERED
VALUE
5-1. Enter time remaining after third temperature change
and press
to select and advance.
5-2. Enter temperature of the third segment and press to
select and advance.
5-3. Enter the level of s en s itivity, 0-9, for the product and
press
to select and advance.
6. End Temp Changes or Repeat Step 5 if needed
5 Time 0:00 OR
PREVIOUSLY
ENTERED TIME
entered time
6-1. Leave at zero if no more segments are needed and
press
to select and advance. If more segments
are needed, continue programming as shown in Step 5
for a maximum of 5.
14

3000 CONTROLLER USER GUIDE
7. Create 1st Shake Alarm
1 ALARM TIME
SHAKE OR STIR
TIME
0:00 OR
PREVIOUSLY
ENTERED TIME
7-1. Enter time in cook cycle for audible alarm for shaking or
stirring (e.g. 30 second SHAKE into a 3-minute COOK
would be entered 2:30). Press
.
1 ALARM NAME SHAKE
7-2. Press to scroll to choice of alarm names. Default
7-3. Press
1 ALARM MODE AUTO DEFAULT
1 ALARM TONE SHORT
7-4. Press to scroll to confirm Auto or Manual shake
7-5. Press to scroll to choice of shake alarm tones.
8. Create 2nd Shake Alarm
2 SHAKE TIME 0:00 OR
PREVIOUSLY
ENTERED TIME
2 SHAKE
ALARM MODE
AUTO
DEFAULT
8-1. Enter time in cook cycle for a second audible alarm for
8-2. Press to scroll to confirm Auto or Manual shake
is SHAKE.
to select and advance.
alarm mode. Press
Press
to select and advance.
shaking. Press
to select and advance.
to select and advance. If time left
at 0:00, menu will advance to Step 10.
alarm mode. Press
to select and advance.
2 SHAKE
ALARM TONE
SHORT
8-3. Press to scroll to choice of shake alarm tones.
9. Create 3rd Shake Alarm
3 SHAKE TIME 0:00 OR
PREVIOUSLY
ENTERED TIME
3 SHAKE
ALARM MODE
3 SHAKE
ALARM TONE
AUTO DEFAULT
SHORT
9-1. Enter time for third audible alarm for shaking. Press
9-2. Press to scroll to confirm Auto or Manual shake
9-3. Press to scroll to choice of alarm tones. Press
Press
to select and advance.
to select and advance.
alarm mode. Press
to select and advance.
to select and advance.
15

3000 CONTROLLER USER GUIDE
10. Set Cool Temp, Setpoint, Filter Prompt, and Instant ON
AFTER
COOKING
SETPOINT
10-1. Press to scroll t o COOL or SETPOINT. COOL is
the temperature the fryer will go to after the cook cycle
is complete. COOL = 250; SETPOINT = cooking temp.
Default is SETPOINT. Press
advance.
FILTER
PROMPT
INSTANT ON 0 OR
0 OR
PREVIOUSLY
ENTERED
NUMBER.
PREVIOUSLY
ENTERED
NUMBER
10-2. Enter number of cook cycl es before a filter prom pt and
press
to select and advance.
10-3. This is the time, in seconds, the fryer heats at 100%,
after the product button is pressed, before the controller
adjusts the temperature. Enter value and press
Default is 0.
11. Exit or Set Up Additional Products
EXIT EXIT
SELECT
PRODUCT
[BLANK]
11-1. Press the but t on for additional programming.
11-2. Refer back to Product Setup in Step 1. Press 2
times to return to OFF.
to select and
.
16

3000 CONTROLLER USER GUIDE
OFF
OFF
PRODUCT
[BLANK]
VAT SETUP
ENTER CODE
SYSTEM
[BLANK]
LANGUAGE
ENGLISH
2ND
SPANISH
LOCALE
NON-CE
ENERGY
ELEC
TYPE
EL30-14
Main Menu: Vat Setup
To program the Vat Setup, make sure the controller is OFF and follow the steps below.
Vat Setup mode allows the controller to be set for language displays, vat sizes, and
temperature range displays. With the controller OFF follow the steps below.
1. Enter Vat Setup
Left Display Right Display
1-1. Press and hold for about 10 seconds until the
controller displays Main Menu changing to PRODUCT
SETUP.
(See Main Menu: Product Setup–Single Setpoint Cooking for
instructions on Product Setup.)
Action
SETUP
1-2. Press to scroll to VAT SETUP and press .
1-3. Enter 1656 to advance to system setup.
2. Vat Set Up: Vat System
2-1. SYSTEM shows in left display. Press to enter System
2-2. Press to scroll to choice and press to select and
LANGUAGE
2-3. Press to scroll to choice and press to select and
2-4. Press to scroll to choices: CE (European
Setup.
Note: Pressing will scroll to TIME/DATE, DST SETUP,
FILTER, E-LOG, or CHANGE PASSWORD.
advance (Default is ENGLISH).
advance. (This option allows another language to be
toggled easily from the front panel–ex. Spanish as a
second language.). (Default is SPANISH).
Conformity standards) or Non-CE (non-European
standards), (Default is NON-CE).
Press
to select and advance.
2-5. Press to scroll to choices: Gas or Electric.
FULL
Press
2-6. Press to scroll choices: Gas- GL30 Full, GL30 Split,
to select and advance.
Electric- EL30-14 Full, EL30-14 Split, EL30-17 Full, EL3017 Split.
With the current fryer vat type displayed, press
to select
and advance.
17

3000 CONTROLLER USER GUIDE
SYSTEM
9
SYSTEM
F
EXIT MELT
180º (82 ºC)
COOL MODE
250F
FRESH OIL
NONE
WASTE
NONE
DRAIN
YES
RECOVERY
DISABLED
BASKET LIFT
DISABLED
EXIT
EXIT
VOLUME
TEMPR
FORMAT
TEMPR
TEMPR
COOL MODE
DEFAULT
0
2-7. Sets sound level for controller. Enter level, 0-9 (0=Off/
9=Loudest) (Default is 9). Press
to select and advance.
2-8. Press to scroll choices: F for Fahrenheit; C for
Celsius (Default is F).
Press
to select and advance.
2-9. Use numbered keys to select a temperature from 100° F
(38° C) to 180° F (82° C) (Default is 180°F (82°C).
Press
to select and advance.
This is the temperature for the fryer to exit the melt cycle.
2-10. Use numbered keys to select a setback temperature.
(Default is 250°F (121°C).
Press
to select and advance.
This is the temperature during setback or idle mode.
2-11. Use numbered keys to select a number of minutes the
frypot sits idle before going to cool mode. (Default is 0,
disabling this feature).
Press
to select and advance.
SWITCH
ALARM
This option is only available on the far left computer on multiple
batteries.
2-12. Press
to scroll choices NONE, JIB, Bulk-RTI, or
Bulk-FL (Frontline). (Default is NONE).
Press
to select and advance.
This option is only available on the far left computer on multiple
batteries.
2-13. Press
to scroll choices NONE, Bulk-RTI, or Bulk-FL
(Frontline). (Default is NONE).
Press
to select and advance.
2-14. Press to scroll choices YES and NO. Press to
select and advance (Default is YES).
2-15. Press to scroll choices DISABLED and ENABLED.
This is a recovery alarm that locks out the fryer if it does not
heat properly (Default is DISABLED).
Press
to select and advance.
2-16. Press to scroll choices DISABLED and ENABLED.
If the fryer has basket lifts, set to ENABLED (Default is
DISABLED). Press
to select and advance.
Press button to return the controller to OFF.
18

3000 CONTROLLER USER GUIDE
OFF
OFF
PRODUCT
[BLANK]
VAT SETUP
ENTER CODE
SYSTEM
[BLANK]
TIME/DATE
[BLANK]
TIME ENTRY
TIME
DATE
MM/DD/YY
ENTER DATE
DATE
EXIT
EXIT
DST
ENABLED
DST START
3
DST START
2
DST END
11
DST END
1
3. Vat Set Up: Time/Date
3-1. Press unt il Product Setup is displayed.
SETUP
FORMAT
3-2. Press to scroll to VAT SETUP and press .
See the
Main Menu: Product Setup–Single Setpoint
Cooking for Product setup.
3-3. Enter 1656.
3-4. Press to scroll to TIME/DATE.
3-5. Press .
3-6. Use numbered keys to change time.
Press
3-7. Press to scroll choices.
With the date format displayed, press
advance.
3-8. Use numbered keys to change date.
Press
3-9. Press button once and press to scroll to System,
Time/Date, DST SETUP, Filter, E-Log or, Change
Password. With desired choice displayed, press
to select and advance.
to select and
to select and advance.
to
select and advance or press
controller to OFF.
Vat Set Up:
4. DST Set Up (daylight savings time)
4-1. Press to scroll to choices. (Default is ENABLED).
MONTH
SUNDAY
MONTH
SUNDAY
Press
4-2. Use numbered keys to program month. Press to select
and advance.
4-3. Use numbered keys to program week of the month (1-5
weeks). Press
4-4. Use numbered keys to program month. Press to select
and advance.
4-5. Use numbered keys to program week of the month (1-5
weeks). Press
to select and advance.
3 times to return the
to select and advance.
to select and advance.
19

3000 CONTROLLER USER GUIDE
EXIT
EXIT
FILTER
FILTER
[BLANK]
COOKS TILL
20
EOD FILTER
21:00
FLUSHING
5
BOIL OUT
30
1 POLISH
DISABLED
1 POLISH
08:00
1 POLISH
15
1 POLISH
300F
EXIT
EXIT
With desired choice displayed, press to select and
4-6. Press button once and press to scroll to System,
Time/Date, DST SETUP, Filter, E-Log, or Change
5. Vat Set Up: Filter
FILTER
TIME
TIMER
Password. With desired choice displayed, Press
select and advance or Press
3 times to return the
to
controller to OFF.
5-1. Press button once then press until you have
scrolled to Filter.
5-2. Press .
5-3. Use numbered keys to select a number of cooks that occur
before a filt er prompt. (Default is 20). Press
to select
and advance.
5-4. Use numbered keys to program end of day filter alert time.
Enter time in 24-hour format (Default is 21:00). Press
to
select and advance.
5-5. Use numbered keys to select the time oil will circulate
through the filter in Clean and Filter. Enter the time in
TIMER
TIMER
PROMPT
TIME
DURATION
START
TEMPR
minutes (Default is 5 minutes). Press
to select and
advance.
5-6. Use numbered keys to select the time for the boil out timer.
Enter the time in minutes (Default is 30 minutes). Press
to select and advance.
5-7. Press to scroll choices ENABLED and DISABLED.
(Default is DISABLED). Press
to select and advance.
5-8. Use numbered keys to program polish alert time. Enter time
in 24-hour format. Press
to select and advance. This is
the time the polish prompt will occur each day if Polish
timer is ENABLED.
5-9. Use numbered keys to select number of minutes to polish
(Default to 15 minutes).
Press
to select and advance.
5-10. Use numbered buttons to select a minimum temperature
required for a polish to begin. (Default is 300° F).
Press
to select and advance.
5-11. Press button once and press to scroll to System,
Time/Date, DST SETUP, Filt er, E-Log or Change Password
20

3000 CONTROLLER USER GUIDE
E-LOG
E-Log
[BLANK]
NOW
TIME/DATE
A
TIME/DATE
EXIT
EXIT
CHANGE
CHANGE
[BLANK]
PRODUCT
1650
VAT SETUP
1656
EXIT
EXIT
6. Vat Set Up: E-Log
advance or press 2 times to return the controller to
OFF.
6-1. Press button once then press until you have
scrolled to E-Log.
6-2. Press t o select and advance.
This is a log of the ten most recent error codes. If no errors
have occurred, NO ERROR will show in display and
will skip to EXIT .
6-3. Displays current time and date. Press to select and
advance.
E#
6-4. Errors listed A-J. Press to scroll through errors. Error
codes are listed in Appendix A of this manual.
6-5. Press button once and press to scroll to System,
Time/Date, DST SETUP, Filter, E-Log or Change
Password.
With desired choice displayed, press
times to return the controller to OFF.
7. Vat Set Up: Change Password
PASSWORD
7-1. Press button once then press until you have
scrolled to CHANGE PASSWORD.
or press 3
PASSWORD
SETUP
7-2. Press t o select and advance.
7-3. Use numbered keys to change code. Press to select
and advance.
7-4. Use numbered keys to change code. Press to select
and advance.
7-5. Press button once and press to scroll to System,
Time/Date, DST SETUP, Filter, E-Log or Change
Password.
With desired choice displayed, press
or press 3
times to return the controller to OFF.
21

3000 CONTROLLER USER GUIDE
Main Menu: Tech Mode
Tech Mode is for technicians only.
22

3000 CONTROLLER USER GUIDE
DROP
DROP
1-1. Press and hold the FILTER button about 3 seconds until
If button is not held, COOKS REMAINING will display.
FILTER
FILTER
1-4. Follow the instructions below to navigate the filter options.
[BLANK]
FILTER
2-1. Press .
LEFT (split
only)
Right (split
only)
FILTER NOW?
YES NO
and bypasses filtration. Cooking continues.
FILTER PAN
CONFIRM
2-4. Ensure the filter pan is in place and the filter media
Filter Menu
The 3000 Controller has four Filter menu options:
• FILTER-- available if controller is ON
• CLEAN AND FILTER – available if controller is ON
• DISPOSE -- available if controller is ON or OFF
• BOIL OUT-- only available if controller is OFF.
All are accessed by pressing and holding the FILTER button f or 3 seconds until the FILTER
MENU is displayed.
Only one frypot can be filtered at a time. If more than one filter is initiated, the controller
displays “WAITING FOR FILTER”.
Filter Menu: Controller ON
1. Enter Filter Menu – Controller ON
Left Display Right Display
FILTER is displayed.
1-2. Press t o scroll to Filter, Clean and Filter, Dispose, or
Exit.
1-3. With the desired choice displayed press
NOTE: Split pots will display the following information alternately in either the left or right
window, depending on which pot is selected. When the left pot is selected, use
instead of
for selections and to confirm actions when requested.
2. Filter Menu: Filter –Controller ON
Left Display Right Display
Action
.
button
Action
vats
vats
2-2. If split vat , press to select left vat or to select right
vat.
2-3. Press to select Yes which turns vat off. selects No
23

3000 CONTROLLER USER GUIDE
READY
CONFIRM.
OPEN DRAIN
VALVE
[BLANK]
DRAINING
countdown
down.
TURN FILTER
ON
CONFIRM
FLUSHING
countdown
down.
CLOSE DRAIN
VALVE
[BLANK]
FILLING
countdown
down.
TURN FILTER
FULL
CONFIRM
of filling. Turn Filter Off. Press to CONFI RM.
OFF
OFF
2-12. Controller returns to OFF automatically when vat full is
confirmed.
CLEAN AND
FILTER
[BLANK]
CLEAN NOW?
YES NO
continues.
FILTER PAN
CONFIRM
CONFIRM.
OPEN DRAIN
VALVE
[BLANK]
3-4. Open drain valve. Beeps until drain valve is opened.
DRAINING
COUNTDOWN
3-5. None required. 40 second timed event. Time counts
down
SCRUB VAT
ETE?
YES
TURN FILTER
ON
CONFIRM
FLUSHING
COUNTDOWN
3-8. None required. 5:00 minute timed event. Time counts
down.
FILL VAT
YES
3-9. Press YES.
CLOSE DRAIN
VALVE
[BLANK]
3-10. Close drain valve. Beeps until drain valve closed.
FILLING
COUNTDOWN
3-11. None required. 1:30 minute timed event. Time counts
Left Display Right Display
?
timer
timer
timer
OFF
WHEN
Action
(paper/powder, pad or screen) is ready. Press to
2-5. Open drain valve. Beeps until drain valve is opened.
2-6. None required. 40 second timed event. Time counts
2-7. Turn filter on. Press to CONFIRM.
2-8. None required. 30 second timed event. Time counts
2-9. Close drain valve. Beeps until drain valve is closed
2-10. None required. 45 second timed event. Time co unts
2-11. This ensures all the oil has returned to the frypot from the
filt er pan. Usually complete when bubbling occurs at end
3. Filter Menu: Clean and Filter – Controller ON
Left Display Right Display
READY
?
TIMER
COMPL
3-1. Press .
3-2. Press to select YES which turns vat off. selects
NO and bypasses CLEAN AND FILTER. Cooking
3-3. Ensure the filter pan is in place and the filter media
(paper/powder, pad or screen) is ready. Press
3-6. Press YES when complete.
3-7. Turn filter on. Press to CONFIRM.
Action
to
TIMER
24

3000 CONTROLLER USER GUIDE
TIMER
down.
TURN FILTER
CONFIRM
3-12. This ensures all the oil has returned to the Frypot from the
of filling. Turn filter off. Press to CONFIRM.
OFF
OFF
3-13. Controller returns to OFF automatically when vat full is
confirmed.
DISPOSE
[BLANK]
4-1. Press t o select and advance.
DISPOSE
YES NO
and bypasses dispose. Cooking continues.
REMOVE
CONFIRM
INSERT
UNIT
CONFIRM
OPEN DRAIN
VALVE
[BLANK]
4-5. Open the drain valve. Beeps until drain valve opened.
DISPOSING
COUNTDOWN
4-6. None required. 60 second timed event. Time counts
down.
VAT EMPTY?
CONFIRM
4-7. Press to CONFIRM when empty.
VAT CLEAN?
CONFIRM
4-8. Press to CONFIRM when clean.
CLOSE DRAIN
VALVE
[BLANK]
4-9. Close the drain valve. Beeps until drain valve closed.
REMOVE
UNIT
CONFIRM
INSERT
FILTER PAN
CONFIRM
FILL VAT
CONFIRM
4-12. Fill vat with fresh oil. Press to CONFIRM.
OFF
OFF
4-13. Controller returns to OFF automatically af ter last
confirmation.
Left Display Right Display
OFF WHEN
FULL
filter pan. Usually complete when bubbling occurs at end
Action
4. Filter Menu: Dispose – Controller ON
Left Display Right Display
NOW?
FILTER PAN
4-2. Press . A YES answer turns fryer off. selects NO
4-3. Remove filter pan. Press to CONFIRM.
Action
DISPOSAL
DISPOSAL
4-4. Insert disposal unit under the drain. Press to
CONFIRM.
TIMER
4-10. Remove disposal unit. Press to CONFIRM.
4-11. Insert the pan. Press to CONFIRM.
Filter Menu: Controller OFF
1. Enter Filter Menu – Controller OFF
25

3000 CONTROLLER USER GUIDE
OFF
OFF
1-1. Press and hold the FILTER button about 3 seconds until
If button is not held, COOKS REMAINING will display.
FILTER
FILTER
1-4. Follow the instructions below to navigate the filter options.
OFF
OFF
2-1. Press and hold the filter button until FILTER is displayed.
FILTER
FILTER
2-2. No action needed. Defaults to Dispose.
DISPOSE
[BLANK]
2-3. Press t o select and advance.
and bypasses dispose. Cooking continues.
REMOVE
PAN
CONFIRM
INSERT
AL UNIT
CONFIRM
OPEN DRAIN
VALVE
[BLANK]
2-7. Open the drain valve. Beeps until drain valve opened.
DISPOSING
COUNTDOWN
2-8. None required. 60 second timed event. Time counts
down.
VAT EMPTY?
CONFIRM
2-9. Press to CO NFIRM when empty.
VAT CLEAN?
CONFIRM
2-10. Press to CONFIRM when clean.
CLOSE DRAIN
VALVE
[BLANK]
2-11. Close the drain valve. Beeps until drain valve closed.
REMOVE
AL UNIT
CONFIRM
INSERT
PAN
CONFIRM
FILL VAT
CONFIRM
2-14. Fill vat with fresh oil. Press to CONFIRM.
OFF
OFF
2-15. Controller returns to OFF automatically after last
confirmation.
Left Display Right Display
Action
FILTER is displayed.
1-2. Press to scroll to Dispose, Boil- out, or Exit.
1-3. With the desired choice displayed press
.
NOTE: Split pots will display the following information alternately in either the left or right
window, depending on which pot is selected. When the left pot is selected, use
instead of
for selections and to confirm actions when requested.
button
2. Filter Menu: Dispose – Controller OFF
Left Display Right Display
Action
DISPOSE
NOW?
FILTER
DISPOS
DISPOS
FILTER
YES NO
TIMER
2-4. Press . A YES answer turns fryer off. selects NO
2-5. Remove filter pan. Press to CONFIRM.
2-6. Insert disposal unit under the drain. Press to
CONFIRM.
2-12. Remove disposal unit. Press to CONFIRM.
2-13. Insert the pan. Press to CONFIRM.
2. Boil Out – Controller OFF
26

3000 CONTROLLER USER GUIDE
OFF
OFF
2-1.
DISPOSE
[BLANK]
2-3.
2-4.
BOIL OUT
YES NO
IS VAT
CONFIRM
REMOVE
CONFIRM
IS SOLUTION
CONFIRM
IS SOLUTION
CONFIRM
OFF
OFF
POLISH NOW?
YES NO
Left Display Right Display
FILTER
BOIL OUT
NOW?
PREPA
RED?
FILTER
PAN
IN THE
VAT?
START BOIL
OUT
BOIL OUT
BOIL OUT
DONE
FILTER
[BLANK]
CONFIRM
COUNTDOWN
TIMER
CONFIRM
Action
Press and hold the filter button until FILTER is displayed.
2-2. No action needed.
Press to scroll to BOIL OUT.
Press to select and adv ance.
2-5. Press to select YES. selects NO and bypasses
BOlL OUT. Controller returns to OFF.
2-6. Ensure oil has been removed from the frypot? Press
to CONFIRM.
2-7. Remove filter pan. Press to CONFIRM. (Never run boil
out solution through the filter pan or pump.)
2-8. Ensure solution is in the vat. Press to CONFIRM.
2-9. Press to CONFIRM. Turns on heater and heats to
195ºF (91 ºC).
2-10. None required. 30:00 minute timed event. Time counts
down.
2-11. Press to CONFIRM. Cancels the alarm.
REMOV
ED?
2-12. Remove boil out solution. Press to CONFIRM.
2-13. Controller returns to OFF automatically after last
confirmation.
Polish Menu: Fryer ON
Enter Polish: Fryer ON
The 3000 controller displays a series of prompts when a polish filter cycle is under way. To initiate
a polish, press and hold the
appears. The steps are detailed below. A “waiting to polish” message may display until the signal
is received that the vat is ready for polish cycle to begin.
Polish: Fryer ON
Left Display Right Display
arrows simultaneously for about 3 seconds until POLISH NOW
Action
1. Press to select YES. selects NO and bypasses polish.
Cooking continues.
27

3000 CONTROLLER USER GUIDE
OPEN DRAIN
[BLANK]
3. Open the drain valve. Beeps until drain valve is opened.
DRAINING
COUNTDOWN
POLISHING
COUNTDOWN
6. None required. The oil flows from the filter pan to the frypot
CLOSE DRAIN
FILLING
COUNTDOWN
8. None required. 45 second timed event. Time counts down.
TURN FILTER
CONFIRM
OFF
OFF
10.
LAST
[BLANK]
Left Display Right Display
FILTER PAN
READY?
VALVE
TURN FILTER
ON
VALVE
OFF WHEN
FULL AND
PRESS
CONFIRM
CONFIRM
TIMER
CONFIRM
TIMER
TIMER
Action
2. Ensure the filter pan is in place and the filter media
(paper/powder, pad or screen) is ready. Press
to
CONFIRM.
4. None required. 40 second timed event. Time counts down.
5. Turn filter on. Press to CONFIRM.
and back to the filter pan for the time specified in vat set up.
(Fryer default is 00:00 disabling the polish function).
7. Close the drain valve. Beeps until drain valve is opened.
9. Turn filter off. Press to CONFIRM.
Controller returns to OFF automatically after last
confirmation.
Info Mode: Viewing Operational Stats
The 3000 controller col l ects an d stores information on the coo k cy cles and filter cycles. This
data is accessed in the info mode, which is accessed by pressing the checkmark key
the controller off unt i l Info Mode displays. The steps to view the data are detailed below.
1. Info Mode: Dispose Stats – Information since last
dispose
Left Display Right Display
OFF OFF
DISPOSE
STATS
TOTAL
COOKS
Action
1-1. Press until INFO MODE is displayed.
1-2. Press to scroll: Last Dispose Stats, Daily Stats,
Selected Period Stats, Last Load Stats, or EXIT. With the
desired stats displayed, press
NUMBER
1-3. Press . This is the number of cooks since the la st dispose.
.
with
28

3000 CONTROLLER USER GUIDE
FILTERS --
NUMBER
FILTERS BY-
NUMBER
POLISHES --
NUMBER
OIL LIFE
NUMBER
OIL LIFE- 1
NUMBER
PRIOR
AVG OIL LIFE
NUMBER
AVG COOKS
NUMBER
RESET STATS
EXIT
EXIT
Left Display Right Display
LAST
DISPOSE
SINCE
DISPOSE
PASSED
SINCE
DISPOSE
SINCE
DISPOSE
POLISHES
BY-PASSED
SINCE
DISPOSE
DISPOSE
PRIOR
OIL LIFE – 2
DISPOSES
DATE
NUMBER
DAYS
DAYS
NUMBER
DAYS
Action
1-4. Press . This is the date of the last dispose.
1-5. Press . This is the number of filters since the last dispose.
1-6. Press . This is the number of by-passed filters since the last
dispose.
1-7. Press . This is the number of polishes since the last
dispose.
1-8. Press . This is the number of by-passed polishes since the
last dispose
1-9. Press . This is the number of days since the last dispose.
1-10. Press . This is the oil life in number of days 1 dispose prior.
1-11. Press . This is the oil life in number of days 2 disposes
prior.
.
DAYS
1-12. Press . This is the average oil life of past 3 disposes.
1-13. Press . This is the average number of cooks over past 3
RESET LAST
DISPOSE
STATS
disposes.
YES NO
3-1. Press . YES advances to ENTER CODE NO
advances to EXIT.
3-2. Enter 1656. COMPLETE displays in left window and
changes to EXIT
1-14. Press button once and press t o scroll to Last
Dispose Stats, Daily Stats, Selected Period Stats, Last
Load Stats, or EXIT. Press
2 times to return the
controller to OFF.
2. Info Mode: Daily Stats – Informat ion by day of the
week over the past week
DAILY STATS [BLANK]
MON DATE
2-1. With the desired stats displayed, press .
2-2. Press to scroll a day within the prior week.
29

3000 CONTROLLER USER GUIDE
FILTERS –
NUMBER AND
FILTERS
NUMBER AND
COOKS
NUMBER AND
EXIT
EXIT
DATE
TIME
COOKS
NUMBER
QUIT COOK
NUMBER
ON HOURS
NUMBER
RESET USAGE
ENTER CODE
With the desired date displayed, press .
FILTERS NUMBER AND
DAY
PRIOR WEEK
BYPASSED
DAY
DAY
DAY
2-3. Press to scroll number of times the vat was
filtered on the various days of the prior week.
Press
.
2-4. Press to scroll number of daily filter cycles that
occurred on the various days of the prior week.
Press
.
2-5. Press to scroll number of times the filter prompt
was bypassed on the various days of the prior week.
Press
.
2-6. Press to scroll number of cook cy cles on the
various days of the prior week occurred.
Press
.
2-7. Press button once and press to scroll to Last
Dispose Stats, Daily Stats, Selected Per i od Stats, Last
Load Stats, or EXIT. Press
2 times to return the
controller to OFF.
3. Info Mode: Selected Period Stats – Information
for a specifically defined period of time
SELECTED
PERIOD
STATS
RESET USAGE YES NO
[BLANK]
3-3. With the desired stats displayed, press .
3-4. Press . This is the date and time the selected period
started.
3-5. Press . This is the total number of cooks since start of
selected period.
3-6. Press . This is the total number of cooks that were
cancelled since start of the selected period.
3-7. Press . This is the total number of hours the fryer was on
since start of the selected period.
3-8. Press . YES advances to ENTER CODE No
advances to EXIT.
3-9. Enter 1656. COMPLETE displays in left window and
changes to EXIT.
30

3000 CONTROLLER USER GUIDE
LAST LOAD
[BLANK]
PRODUCT
PRODUCT
ACTUAL TIME
NUMBER
PROGRAM
NUMBER
MIN TEMP
NUMBER
AVG TEMP
NUMBER
HEAT ON
%
EXIT EXIT
3-10. Press button once and press t o scroll to Last
Dispose Stats, Daily Stats, Selected Period Stats, Last
Load Stats, or EXIT. Press
controller to OFF.
2 times to return the
4. Info Mode: Last Load Stats –Information about
last cook
STATS
STARTED NUMBER
TIME
MAX TEMP NUMBER
NAME
MINUTES
MINUTES
MINUTES
4-1. With the desired stats displayed, press .
4-2. Press . This is the product la st cooked.
4-3. Press . This is the time the last cook started.
4-4. Press . This is the actual cook time including stretch
time.
4-5. Press . This is the programmed cook time.
4-6. Press . This is the maximum temperature of the oil
during the last cook.
READY FOR
COOK
EXIT EXIT
YES OR NO
4-7. Press . This is the minimum temperature of the oil
during the last cook.
4-8. Press . This is the average temperature of the oil
during the last cook.
4-9. Press . This is the percentage of the cook time the
heat source was on during the last cook.
4-10. Displays if the fryer was back to set temperature before
the cook cycle was start ed. Press
4-11. Press to scroll to Last Dispose Stats, Daily Stats,
Selected Period Stats, Last Load Stats, or EXIT.
With the desired stats displayed, press
2 times to return the controller to OFF.
. Returns to EXIT.
or press
Scan Mode: Viewing Da ily Stats
The SCAN mode can be used to see current stats about any product quickly throughout the
day. To enter the SCAN mode, the controller must be on. Follow the steps below to view stats.
31

3000 CONTROLLER USER GUIDE
DROP
DROP
SELECT
[BLANK]
SHORT NAME
4 CHARACTER
COOKS SINCE
NUMBER
Numbers of cooks since last dispose.
1 COOK TEMP
TEMP
1 ALARM TIME
SHAKE TIME
The time during a cook till a product shake alarm occurs.
1 ALARM
ALARM NAMES
The alarm name programmed for the product.
1 ALARM
SHORT,
The shake alarm tone the product is programmed with.
Left Display Right Display
PRODUCT
Action
Press and release .
Press a product button to check daily stats.
LONG NAME 8 CHARACTER
PRODUCT
NAME
ABBREVIATED
PRODUCT
COOKS
REMAINING
COOKS TODAY NUMBER
LAST DISPOSE
1 COOK TIME TIME
NUMBER
Press to progress to next product stat.
Press to progress to next product stat.
Number of cooks remaining until filter prompt. If filter prompt is
Disabled, right window will say DISABLED.
Press
to progress to next product stat.
Number of cooks completed today.
Press
to progress to next product stat.
Press to progress to next product stat.
Time that product is programmed to cook.
Press
to progress to next product stat.
Temperature that product is programmed to cook.
Press
to progress to next product stat.
NOTE: Display will go to 2 COOK TIME, etc. if multiple setpoints
are being used until all are revi ew ed.
1
SENSITIVITY
NUMBER
The level of sensitivity the product is programmed to cook at.
Press
Press to progress to next product stat.
NAME
1 ALARM
MODE
TONE
AUTO OR
MANUAL
MEDIUM,
LONG DOUBLE
OR LONG
SHORT, NONE
Press to progress to next product stat.
The alarm mode the product is programmed with.
Press
Press to progress to next product stat.
NOTE: Display will go to 2 ALARM TIME, etc. if multiple alarms
are being used until all are revi ew ed.
FILTER
PROMPT
NUMBER
The number of cook cycles before a filter prompt occurs.
Press
to progress to next product stat.
to progress to next product stat.
to progress to next product stat.
32

3000 CONTROLLER USER GUIDE
HOLDHOLD
TIME
EXIT
EXIT
Left Display Right Display
INSTANT ON Number
TIME
Action
The number of seconds the fryer will heat before the cont r oller
checks the temperature . Press
stat.
The time to hold product before discarding.
Press
to progress to next product stat.
Press button once and press another product button to
check that product’s daily stats.
Press
2 times to return to DROP.
to progress to next product
33

3000 CONTROLLER USER GUIDE
Appendix A: 3000 Contr oller Error Log Codes
Code ERROR MES S A G E EXPLANATION
E03 ERR4OR TEMP PROBE FAILURE TEMP Probe reading out of range.
E04 HI 2 BAD High limit reading is out of range.
E05 HOT HI 1 High limit temperature is past more than 410°F
(210°C), or in CE countries, 394°F (202°C).
E06 HEATING FAILURE A component has failed in the high limit circuit such as
controller, interface board, contactor or open-high limit.
E07 ERROR MIB SOFTWARE Internal MIB software error.
E08 ERROR ATO BOARD AT board connection lost; ATO board failure.
E15 ERROR MIB BOARD Cooking controller detects MIB connections lost.
Check software version on each controller. If versions
are missing, check CAN connections between each
controller. MIB board failure.
E17 ERROR ATO PROBE ATO RTD reading out of range.
E20 INVALID CODE LOCATION SD card removed during update.
E21 CHANGE FILTER PAPER 25-hour timer has expired. Change filter paper and
follow prompts.
E22 OIL IN PAN ERROR Oil may be present in the f ilt er pan.
E25 RECOVERY FAULT Recover time exceeded maximum time limit. Recovery
time should not exceed 1:40 for electric.
E27 LOW TEMP ALARM Oil temperature has dropped 30°F (17°C) lower than
setpoint in idle mode or 45°F (25°C) in cook mode.
(This message may appear if a product is dropped and
the start cook button is not pressed immediately or if
too large of cook loads are dropped.)
34
 Loading...