

Page 1

GN 86 M DH XS ARG
User Manual
Manual del usuario
Page 2

GB
Dear Customer,
Thank you for relying on this product.
We aim to allow you to optimally and efciently use this
environment-friendly product produced in our modern facilities under
precise conditions with respect to sense of quality in total.
We advise you to read these operating manual thoroughly before using
the oven and keep it permanently so that the features of the built-in oven
you have purchased will stay the same as the rst day for a long time.
NOTE:
This Operating Manual is prepared for multiple models. Your appliance
may not feature some functions specied in the manual.
The product images are schematic.
This product has been produced in modern environment-friendly
facilities without adversely affecting nature.
Products marked with (*) are optional.
"Complies with WEEE Regulation"
2
Page 3
GB
CONTENTS
Important Warnings 4
Introducing The Appliance 6
Technical Specications 7
Installation Of Appliance 7
Important Warnings 13
Control Panel 14
Program Types 16
Cooking Recommendations 17
Cooking Table 17
Electronic Cooking Programmer 18
Using The Oven 22
Replacing Oven Lamp 23
Cleaning And Mounting Oven Door 24
Accessories 25
Maintenance And Cleaning 26
Cleaning Oven Glass 26
Troubleshooting 27
Steam Cleaning 27
Environmentally-Friendly Disposal 28
Package Information 28
3
Page 4

GB
IMPORTANT WARNINGS
1. WARNING: To avoid electric shock, ensure that the
appliance circuit is open before changing the lamp.
2. WARNING: All supply circuit connections must be
disconnected before accessing terminals.
3. WARNING: The accessible parts may be hot during
use of grid. Children must be kept away.
4. WARNING: Fire hazard; do not store materials on
cooking surface.
5. WARNING: If the surface is cracked, open the
appliance circuit to avoid risk of electric shock.
6. WARNING: Appliance and its accessible parts are
hot during operation.
7. Setting conditions of this appliance are specied
on the label.(Or on the data plate)
8. Accessible parts might be hot during use of grill.
Small children should be kept away.
9. WARNING: Appliance is intended for cooking only. It
should not be used for other purposes like heating a room.
10. There are additional protective tools avoiding
contact with oven doors. This part must be attached
when it's likely that there are children around.
11. Do not use steam cleaners to clean the appliance.
12. NEVER try to put out the re with water. Only
shut down the appliance circuit and then cover the
ame with a cover or a re blanket.
4
Page 5

GB
13. Hard and abrasive cleaners or hard metal scrapers
should not be used to clean the oven glass door, as
these can scratch the surface and cause breaking.
14. Ensure that door is fully closed after food is
placed.
15. Children under 8 years of age should be kept
away, if they cannot be monitored continuously.
16. Touching the heating elements should be avoided.
17. This appliance can be used by children over 8
years of age, people with physical, hearing or mental
challenges or people with lack of experience or knowledge; as long as control is ensured or information is
provided regarding the dangers.
18. The appliance hasn't been designed for operation
with an external time or a separate remote control
system.
19.This device has been designed for domestic use.
20. Cleaning and user maintenance can't be made
by children without adult supervision.
21. Children must not play with the appliance.
Cleaning and user maintenance shouldn't be made
by children unless they are older than 8 years old
and under adult supervision.
22. Make sure that children at and under 8 can't
reach appliance and appliance cable.
23. Keep curtains, tissue paper or combustible
(inammable) materials away from appliance before
starting to use it. Do not place inammable or
combustible materials in or on the appliance.
5
Page 6
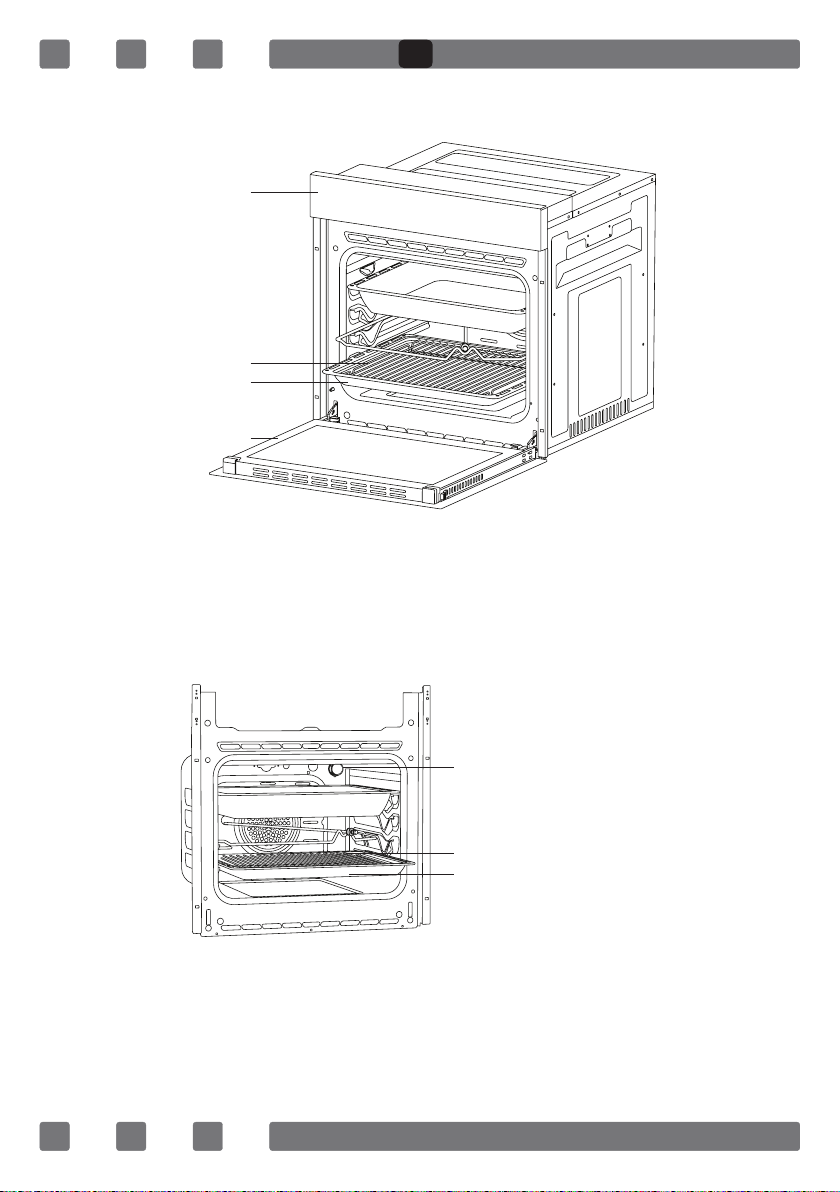
INTRODUCING THE APPLIANCE
1
2
3
4
1.Control Panel 2.In Tray Wire Grill
3.Standard Tray 4.Oven door
GB
5
6
7
5. Lamp
6. In Tray Wire Grill
7. Standard Tray
6
Page 7
GB
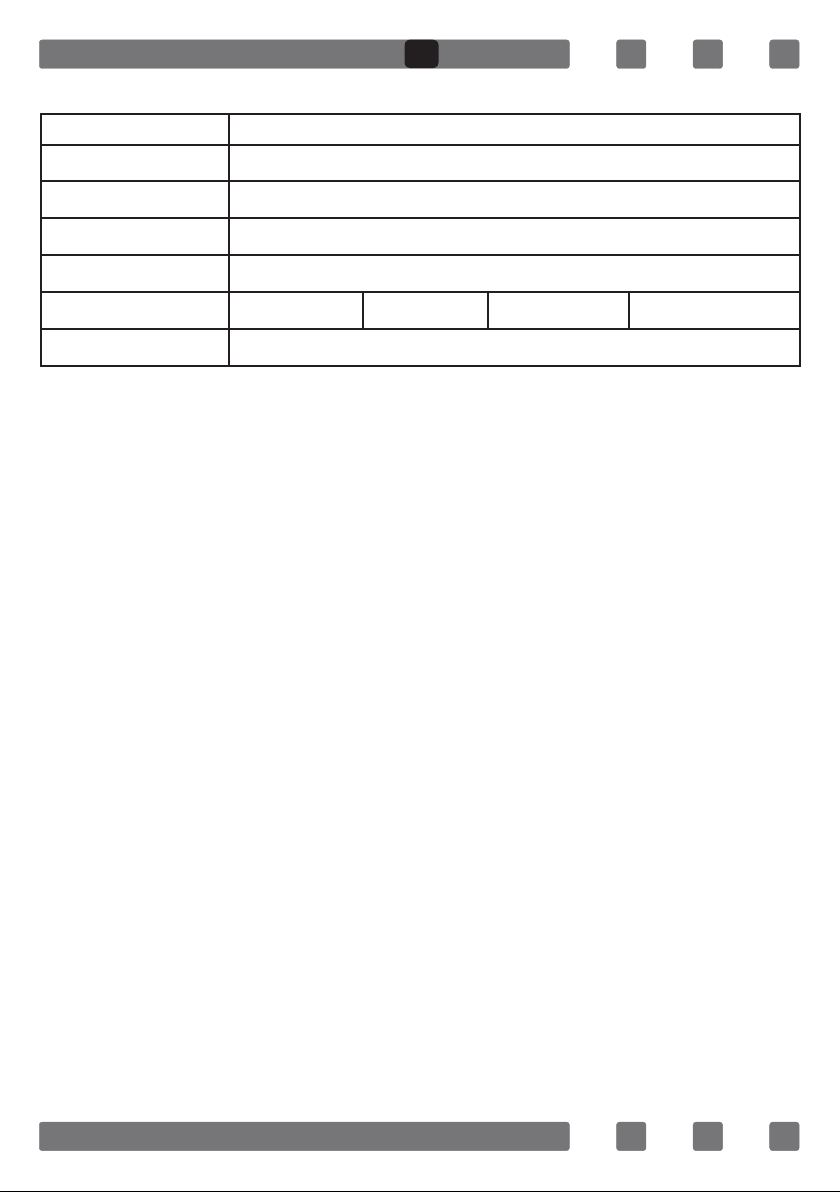
TECHNICAL SPECIFICATIONS
SPECIFICATIONS 60 cm Built-In Oven
Lamp Power 15W
Thermostat
Lower Heater 1200W
Upper Heater 1000W
Grill Heater Small Grill 1000W Big Grill 2000W
Supply Voltage 220V-240V 50/60 Hz
40-240 / Max °C
Technical specications can be changed without prior notice to
improve product quality.
The values provided with the appliance or its accompanying documents
are laboratory readings in accordance with the respective standards.
These values may differ depending on the use and ambient conditions.
Figures in this guide are schematic and may not be exactly match your
product.
INSTALLATION OF APPLIANCE
Ensure that electrical installation is suitable for operationalising the
appliance. If not, call an electrician and plumber to make necessary
arrangements. Manufacturing rm can't be hold responsible for damages
to arise due to operations by unauthorized people and product warranty
becomes void.
WARNING: It is customer's responsibility to prepare the location the
product shall be placed on and also have power utility prepared.
WARNING: The rules about electrical local standards must be adhered
to during product installation.
WARNING: Check for any damage on the product before installing it.
Do not have product installed if it's damaged. Damaged products pose
danger for your safety.
7
Page 8
GB
Important Warnings for Installation:
Cooling fan shall take extra steam out
and prevent outer surfaces of appliance
from overheating during operation of
oven. This is a necessary condition for
better appliance operation and better
cooking.
Cooling fan shall continue operation
after cooking is nished. Fan shall
automatically stop after cooling is
completed.
Figure 1
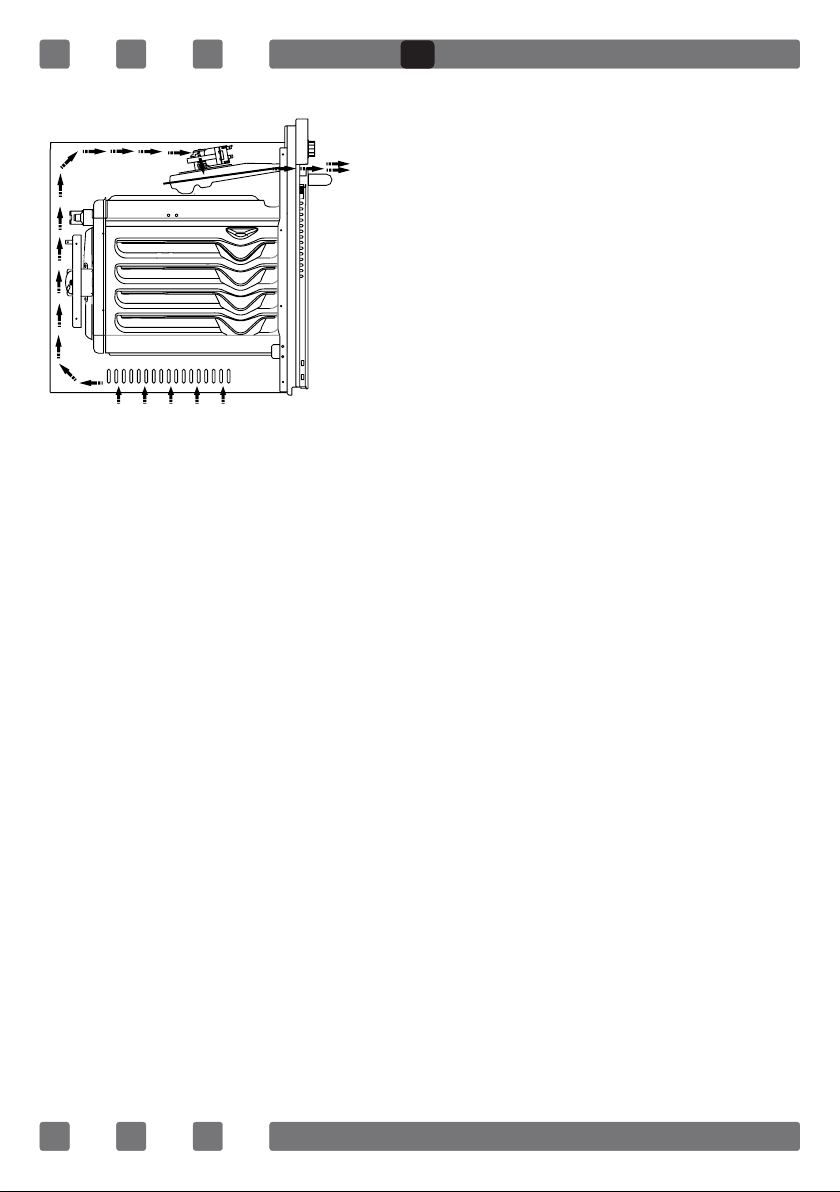
A clearance must be left behind the enclosure where you'll place the
appliance for efcient and good operation. This clearance shouldn't
be ignored as it's required for ventilation system of the appliance to
operate.
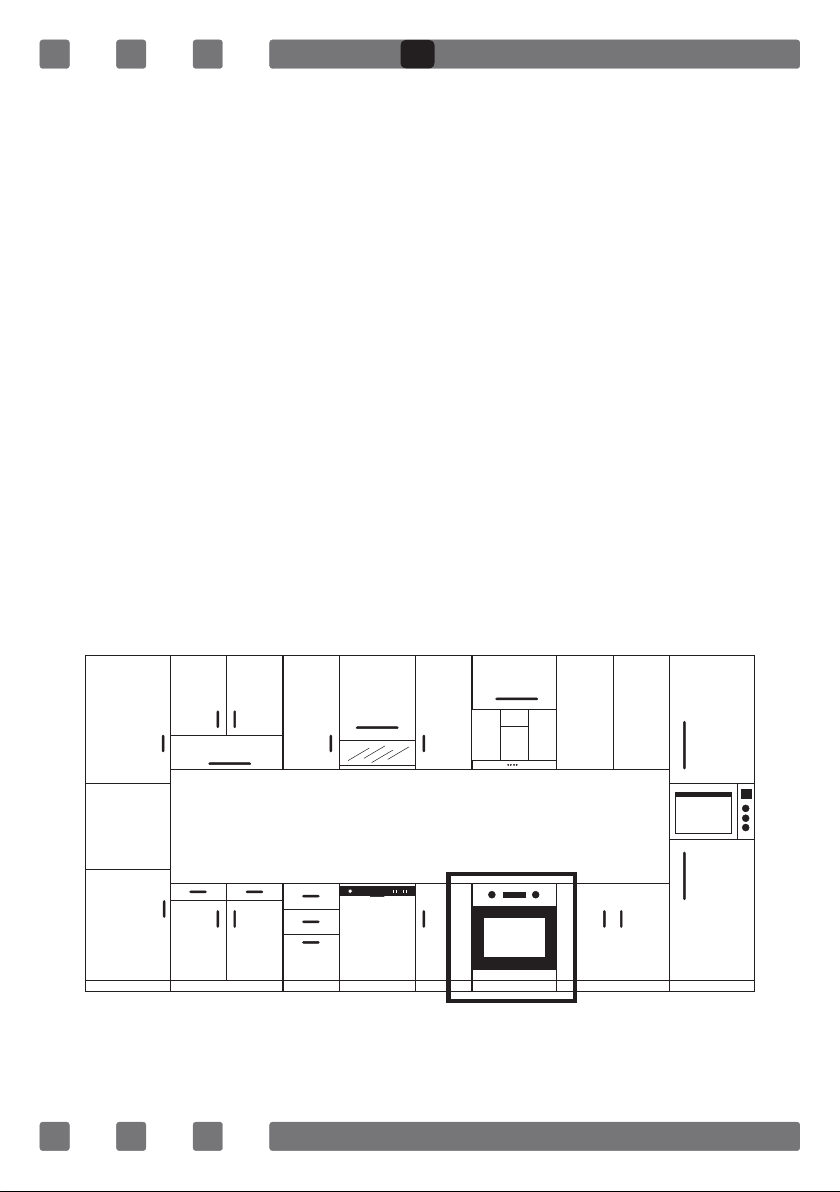
Right Place For Installation
Product has been designed to be mounted to worktops procured from
market. A safe distance must be left between the product and kitchen
walls or furniture. See the drawing provided on the next page for proper
distances. (values in mm).
• Used surfaces, synthetic laminates and adhesives must be heat
resistant. (minimum 100°C).
• Kitchen cupboards must be level with product and secured.
• If there is a drawer below the oven, a rack must be placed
between oven and drawer.
WARNING: Do not install the product next to refrigerators or coolers.
The heat emitted by the product increases the energy consumption of
cooling devices.
WARNING: Do not use door and/or handle to carry or move the product.
8
Page 9

GB
60 cm Built-In Oven Installation and Mounting
Place of use for product must be located before starting installation.
Product mustn't be installed in places which are under the effect of
strong air ow.
Carry the product with minimum two people. Do not drag the product
so that oor isn't damaged.
Remove all transportation materials inside and outside the product.
Remove all materials and documents in the product.
Installation Under Counter
Cabin must match the dimensions provided in Figure 2.
A clearance must be provided at the rear part of the cabin as
indicated in the gure so that necessary ventilation can be achieved.
After mounting, the clearance between lower and upper part of
the counter is indicated in Figure 5 with "A". It's for ventilation and
shouldn't be covered.
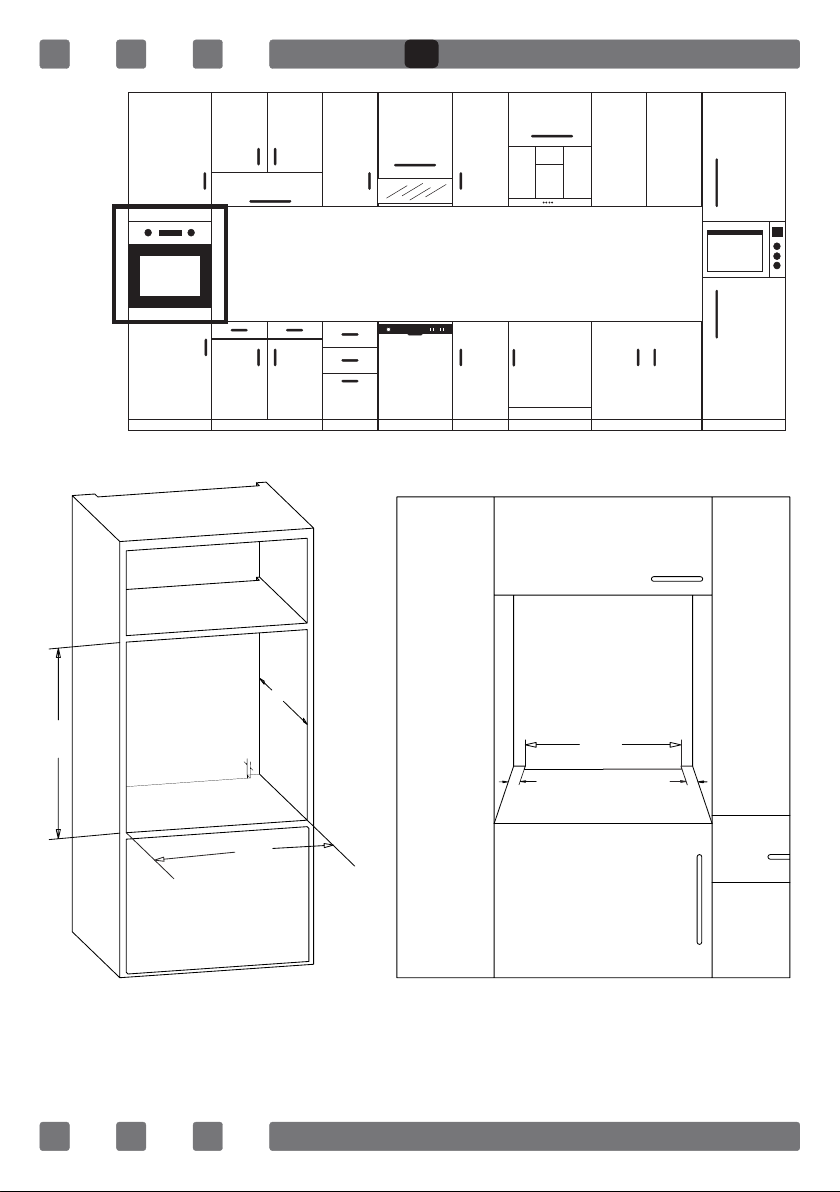
Installation In An Elevated Cabinet
Cabin must match the dimensions provided in Figure 4.
The clearances with the dimensions indicated in the gure must be
provided at the rear part of cabin, upper and lower sections so that
necessary ventilation can be achieved.
Installation Requirements
Product dimensions are provided in the Figure 3.
Furniture surfaces for mounting and mounting materials to be used
must have a minimum temperature resistance of 100 °C.
Mounting cabin must be secured and its floor must be plane for
product not to tilt over.
Cabin floor must have a minimum strength that would handle a load
of 60 kg.
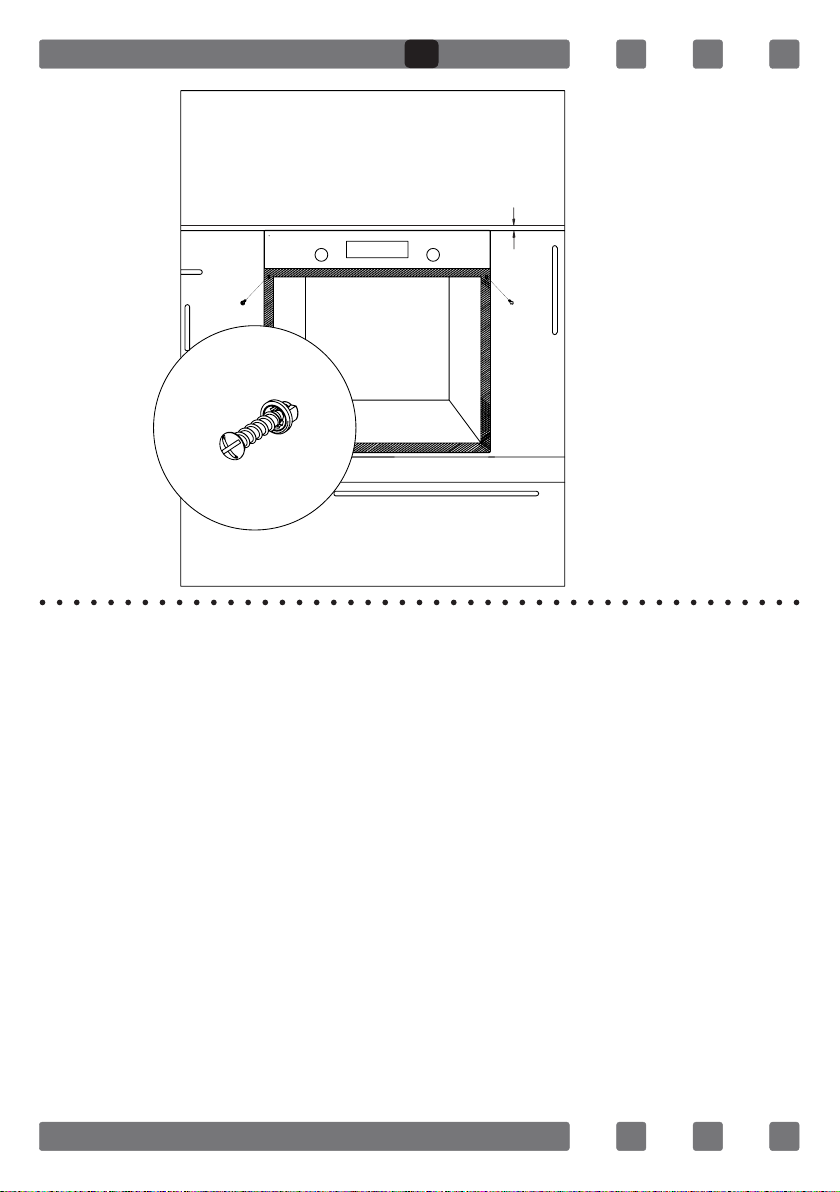
Placing and Securing the Oven
Place the oven into the cabin with two or more people.
Ensure that oven's frame and front edge of the furniture match
uniformly.
9
Page 10
GB
Supply cord mustn't be under the oven, squeeze in between oven
and furniture or bend.
Fix the oven to the furniture by using the screws provided with the
product. Screws must be mounted as shown in Figure 5 by passing
them through plastics attached to frame of the product. Screws mustn't
be overtightened. Otherwise, screw sockets might be worn.
Check that oven doesn't move after mounting. If oven isn't mounted in
accordance with instructions, there is a risk of tilt over during operation.
Electrical Connection
Mounting place of the product must have appropriate electrical
installation.
Network voltage must be compatible with the values provided on
type label of product.
Product connection must be made in accordance with local and
national electrical requirements.
Before starting the mounting disconnect network power. Do not
connect the product to network until its mounting is completed.
Mounting
Figure 2
10
Page 11
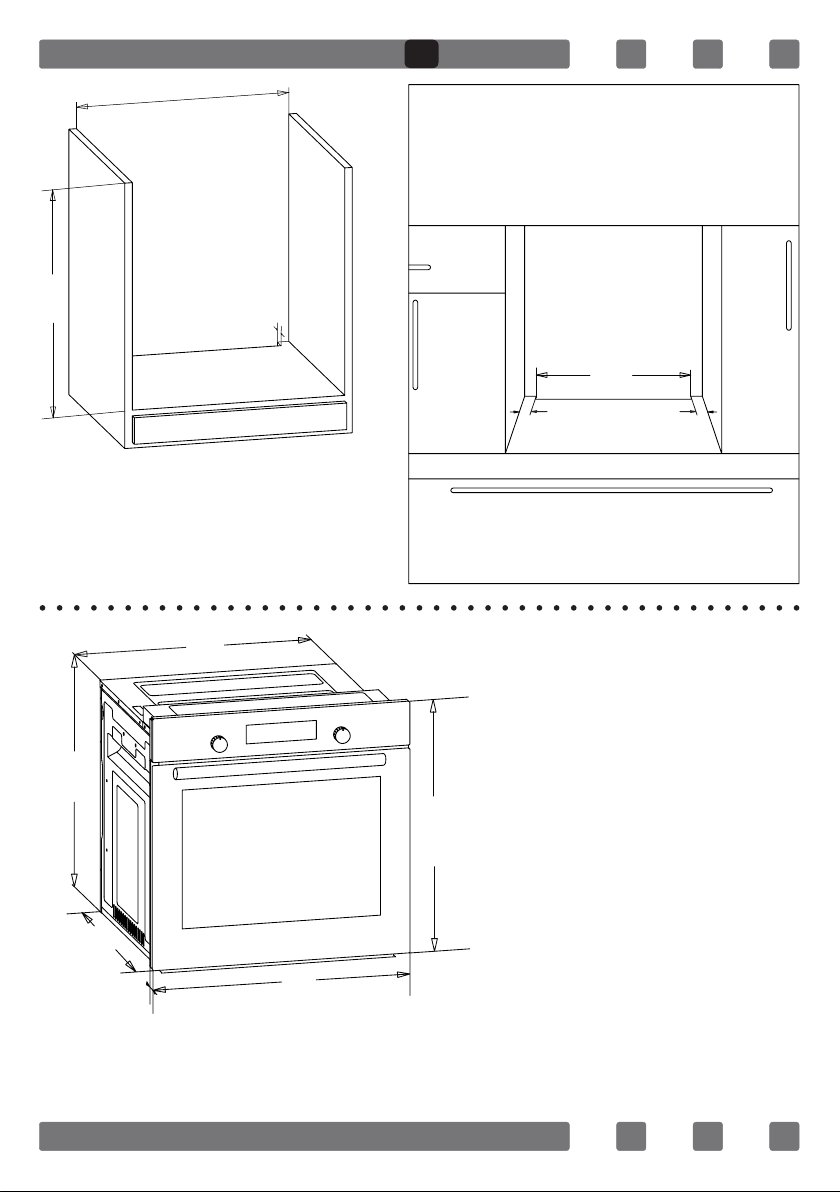
560
GB
600
545
555
35
500
30
595
30
565
22
595
Figure 3
11
Page 12
GB
Figure 4
590
550
35
560
500
30 30
12
Page 13
GB
A
Figure 5
IMPORTANT WARNINGS
Electrical Connection and Safety
This oven must be installed and connected to its place correctly
according to manufacturer instructions and by an authorized service.
Appliance must be installed in an oven enclosure providing high
ventilation.
Electrical connections of the appliance must be made only via sockets
having earth system furnished in compliance with rules. Contact an
authorized electrician if there is no socket complying with the earthed
system at where appliance will be placed. Manufacturing company is
by no means responsible for damage resulting from connection of
non-earthed sockets to appliance.
Plug of your oven must be earthed; ensure that socket for the plug
is earthed. Plug must be located in a place that can be accessed after
installation.
Your oven has been manufactured as 220-240 V 50/60 Hz. AC power
supply compliant and requires a 16 Amp fuse. If your power network
is different that these indicated values, refer to an electrician or your
authorized service.
13
Page 14
GB
When you need to replace the electrical fuse, please ensure that
electrical connection is made as follows:
• Phase (to live terminal) brown cable
• Blue cable to neutral terminal
• Yellow-green cable to earth terminal
Oven disconnecting switches must be in an accessible place for nal
user while oven is in its place.
Power supply cable (plug in cable) mustn't touch hot parts of the appliance.
If supply cord (plug in cable) is damaged, this cord must be replaced
by the importer or its service agent or an equally competent personnel to
prevent a hazardous situation.
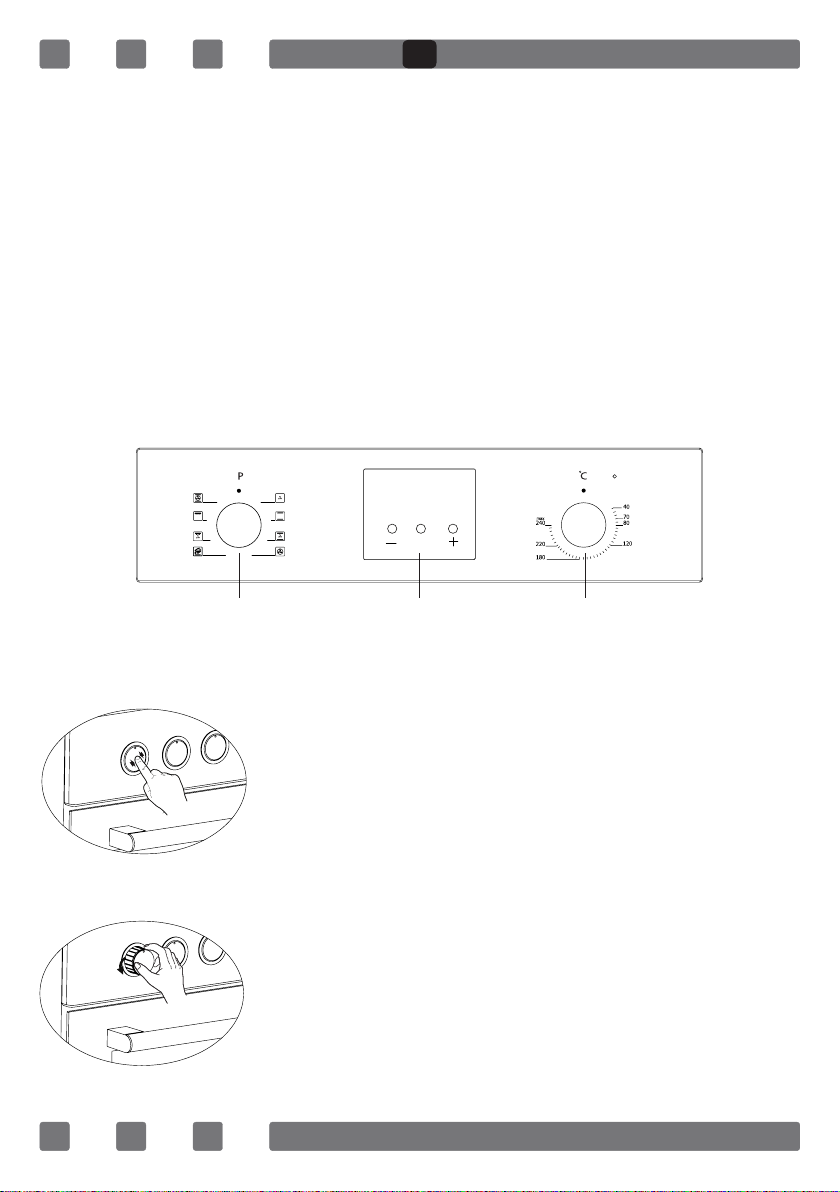
CONTROL PANEL
Function Button Digital Timer Thermostat
Adjustment can be made only when button is popped for models with
pop-up button.
Make sure that button is popped by pressing on the
button as shown in the gure at left side.
Figure 6
You can make necessary adjustments by turning
right or left when button is popped enough.
Figure 7
14
Page 15
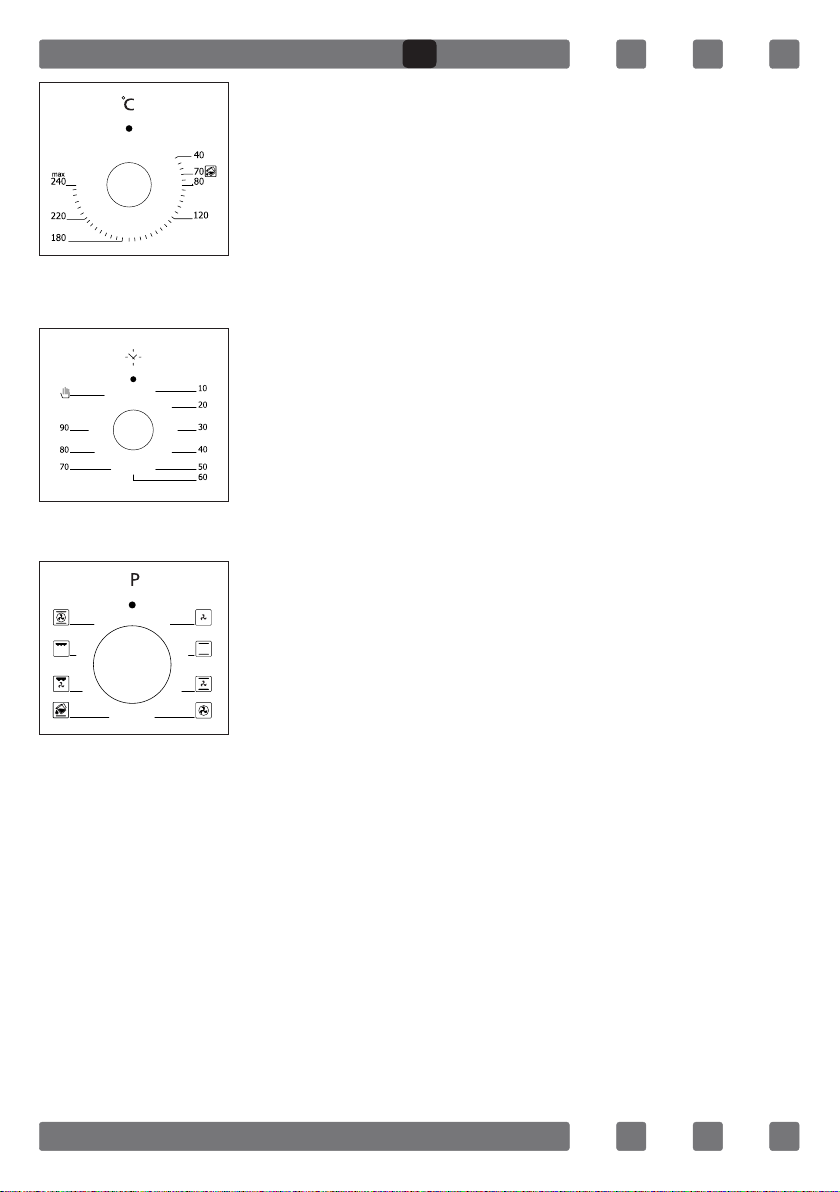
Figure 8
Figure 9
GB
Thermostat Button: Helps to set cooking temperature
of the food to be cooked in the oven. You can set
the desired temperature by turning the button after
placing the food into the oven. Check cooking table
related to cooking temperatures of different foods.
*Mechanical Timer Button: Helps to set time for the
food to be cooked in the oven. Timer de-energizes
the heaters when set time expires and warns you by
ringing. See cooking table for cooking times.
Program Button: Helps to set with which heaters the
food placed in oven will be cooked. Heater program
types in this button and their functions are stated
below. Every model might not have all heater types
and thus program types of these heaters.
Figure 10
15
Page 16

GB
PROGRAM TYPES
Heating program types in your appliance and important explanations
of them are provided below for you can cook different foods appealing
to your taste.
Multifunctional Cooking Fan
Grill
Grill and Fan
Steam Cleaning and Lower
Heating Element
Lower and Upper Heating
Elements
Lower-Upper Heating Element
and Fan
Turbo Heater and Fan
Multi Functional Cooking: Suitable for baking and roasting. Lower and
upper heaters operate as well as quick transmission of heat via air ow.
Suitable for cooking requiring single tray and intense heat.
Grill: Grill cooker is used for grilling meat like foods such as steak,
sausage and sh. While grilling, tray should be placed in the lower
rack and water must be placed in it.
Grill and fan: Suitable for cooking meat type foods. Do not forget to
place a cooking tray in a lower rack inside the oven and a little water
in it while grilling.
Lower heating element: Select this program towards end of cooking
time if lower part of the food cooked will be roasted.
Fan: Can be used to prevent the cooling of your cooked food.
Lower and upper heating elements: A program that can be used for
cooking foods like cake, pizza, biscuit and cookie.
Lower and upper heating element and fan: The program suitable for
cooking foods like cakes, dried cakes, lasagne. Suitable for cooking
meat dishes, as well.
Turbo heater and fan: Suitable for baking and roasting. Keep heat
setting lower than “Lower and Upper Heater” program since heat is
conveyed immediately via air ow.
16
Page 17

GB
COOKING RECOMMENDATIONS
You can nd in the following table the information of food types which
we tested and identied their cooking values in our labs. Cooking times
can vary depending on the network voltage, quality of material to be
cooked, quantity and temperature. Dishes to cook by using these values
might not appeal to your taste. You can set various values for obtaining
different tastes and results appealing to your taste by making tests.
WARNING: Oven must be preheated for 7-10 minutes before placing
the food in it.
COOKING TABLE
Food
Cake Static / Static+Fan 170-180 2-3 35-45
Small Cake Static / Turbo+Fan 170-180 2 25-30
Pie Static / Static+Fan 180-200 2 35-45
Pastry Static 180-190 2 20-25
Cookie Static 170-180 2 20-25
Apple Pie Static / Turbo+Fan 180-190 1 50-70
Sponge cake Static 200/150* 2 20-25
Pizza Static Fan 180-200 3 20-30
Lasagne Static 180-200 2-3 25-40
Meringue Static 100 2 50
Grilled Chicken** Grill+Fan 200-220 3 25-35
Grilled Fish** Grill+Fan 200-220 3 25-35
Calf Steak** Grill+Fan Max 4 15-20
Grilled Meatball** Grill+Fan Max 4 20-25
Cooking
Function
Cooking
Temperature (°C)
Cooking
Rack
Cooking
Time (min.)
* Do not preheat. First half of cooking time is recommended to be at
200°C de while the other half at 150°C.
** Food must be turned after half of the cooking time.
17
Page 18
GB
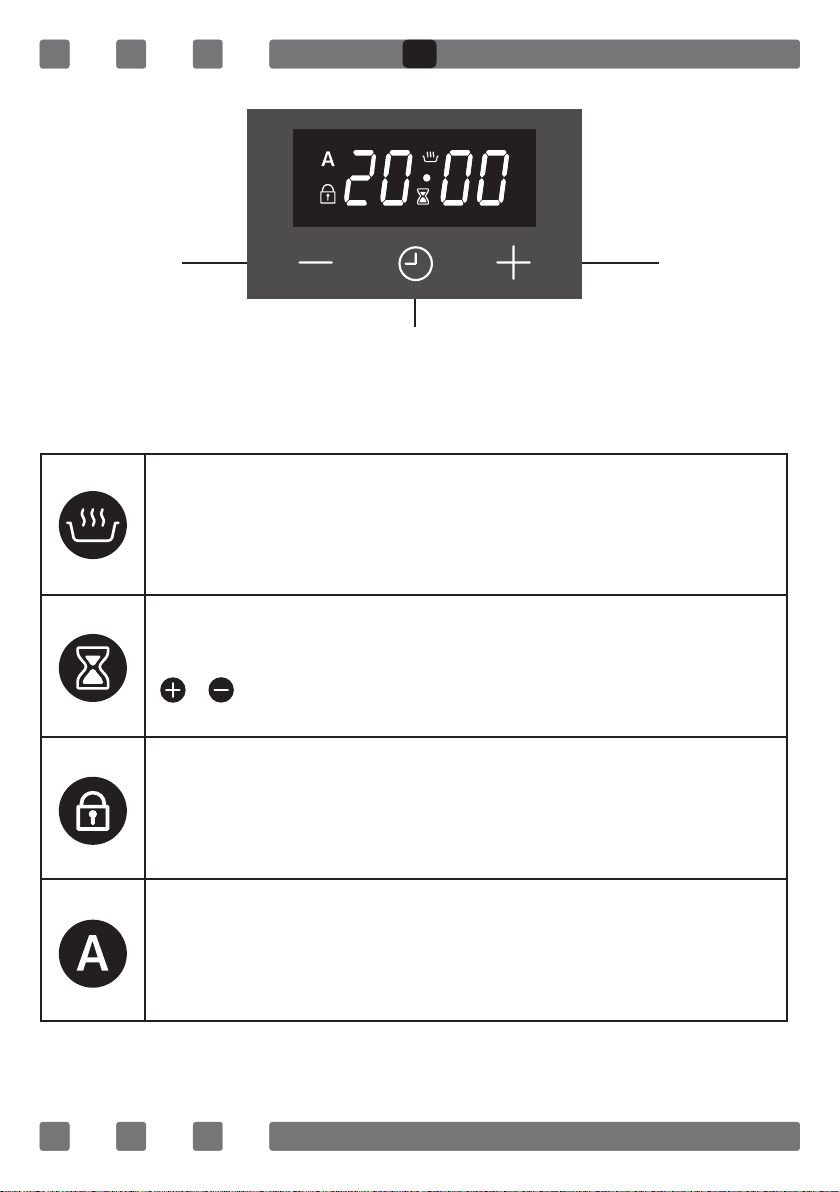
Minus Button
SCREEN SYMBOLS
Oven Status Indication
• On: Cooking or ready for cooking.
• Off: No cooking.
Minute Minder Status Indication
• On: Minute minder alarm active.
• Flashing: Minute minder adjustment mode , adjustment possible by
or buttons or current minute minder alarm completed.
• Off: Minute minder is not active.
Child Lock Indication
• On: Child Lock is active.
• Off: Child Lock is inactive.
Plus Button
Time of Day
Adjustment Button
Automatic cooking Status Indication
• On: Full or semi auto-cooking active.
• Flashing: Auto cooking completed or power on condition.
• Off: No auto cooking active.
18
Page 19

GB
It is an electronic timing module enabling your food you have put in
the oven to be ready for service at any time you like. The only thing you
need to do is to programme the cooking time of the food and also the
time when you would like your food to be ready.
It is also possible to use a minute-programmed alarm clock independent
from the oven.
The case where the time clock is behind or ahead is not a malfunction.
The oven time clock may be put back or ahead according to mains frequency as it runs directly with mains voltage. This is not a malfunction.
POWER ON
At power on, oven is inactive, time of day and symbols are ashing.
The indicated time of day is not correct and has to be adjusted. Press
to activate the oven and proceed adjusting the time of day as below.
TIME OF DAY ADJUSTMENT
Time of Day adjustment is only possible when no cooking program is
in progress. Press and simultaneously for 3 seconds to enter the
adjustment mode and then the dot symbol in between hours and minutes
digits will start to ash.Using either and adjust the desired duration.
The maximum adjustable duration is 23h 59 minutes.
Adjustment mode will be abandoned within 6 seconds after the last button press or can be terminated immediately by pressing the button.
Note: Time of Day adjustment is also activated in rst 7 seconds after
power on.
SETTING THE MINUTE MINDER
With this function, you can adjust a duration in minutes . After the
adjusted time has been elapsed, an alarm sound will be produced.
Press button once to enter the minute minder adjustment mode,
symbol will start ashing on the screen. Using either or ,adjust the
desired duration. The maximum adjustable duration is 10 hour. Adjustment mode will be abandoned within 6 seconds after the last button
press or can be terminated immediately by pressing the button.
19
Page 20

GB
CANCELLING THE ALARM BUZZER SOUND
Once the adjusted minute minder duration is elapsed, the buzzer
alarm will start to sound , accompanied by the ashing symbol on the
screen. Any button press will stop the alarm sound and this indication.
If no button is pressed, the alarm sound will end automatically after 5
minutes, but the ashing symbol will go on.
SEMI AUTOMATIC COOKING
This cooking program is intented to start cooking immediately for a
specied duration. After the oven is set to the desired function and
Temperature via the oven knobs:
1. Press the button twice, symbol will ash on the screen.
and duration of cooking will show on the screen one after another.
2. Using or buttons, adjust the desired cooking duration.
3. After 6 seconds of the last button press or by pressing twice, the
adjustment is completed. will be steady on the screen and the
display shows the current time of day.
FULL AUTOMATIC COOKING
This cooking program is intented to perform a delayed cooking by
programming the time of day ,when the food should be ready. In other
words, the oven will start cooking not immediately but will automatically
calculate the time to start cooking.
1. Perform step 1 and 2 of the semi auto cooking as above.
(cooking duration adjustment)
2. Press button once again, symbol will ash on the screen and
duration of cooking will show on the screen one after another.
3. Using or buttons, adjust the desired end of cooking time.
symbol will disappear but symbol will be still ashing on the
screen. This indicates that an automatic cooking is programmed
but cooking has not started yet.
4. After 6 seconds of the last button press or by pressing , the
adjustment will be completed, the display shows the current time
of day.
20
Page 21

GB
AUTO COOKING END
After the automatic cooking has been completed, symbol will be
ashing on the screen and the buzzer alarm will sound. Any button
press will stop the alarm sound but the ashing symbol will go on till
button is pressed. The buzzer alarm will sound for 7 minutes if not
stopped.
POWER INTERRUPTS
After any interrupt of mains power, your oven will be inactive after the
power is restored, for safety reasons. After power on, the time of day
digits and symbol will ash and the time of day has to be adjusted.
(see:power on)
Note: The ashing symbol indicates that the oven is inactive and
you have to enter the manual mode.
CHILD LOCK
This function is intented to prevent any unauthorized modication of
the timer settings. This function will be active, within 30 seconds after
the last button press. will appear. To deactive it, press the button
for 3 seconds. will disappear.
PROGRAMMABLE OPTIONS
Alarm tone:
Pressing and holding the button for 3 seconds will result in the
currenly valid buzzer tone being produced. By pressing and buttons, you may scroll through 3 available buzzer tones. The last heard
buzzer tone will be automatically recorded as the selected tone. After
6 seconds of the last button press or by pressing , the adjustment is
completed.
Brightness setting:
Pressing and holding the button for 3 seconds will result in the
currenly valid brightness setting being showed.By pressing and
buttons, you may scroll through 8 available brightness setting. The last
seen brightness setting will be automatically recorded as the selected
setting. After 6 seconds of the last button press or by pressing , the
adjustment is completed.
Note: Default settings are highest.
Note: Programmable options are nonvolatile and will be resident after
any power failure.
21
Page 22

GB
USING THE OVEN
Initial Use of Oven
Here are the things you must do at rst use of your oven after making
its necessary connections as per instructions:
1. Remove labels or accessories attached inside the oven. If any, take
out the protective folio on front side of the appliance.
2. Remove dust and package residues by wiping inside of the oven
with a damp cloth. Inside of oven must be empty. Plug the cable of
appliance into the electrical socket.
3. Set the thermostat button to the highest temperature (240 Max. °C)
and run the oven for 30 minutes with its door closed. Meanwhile a
slight smoke and smell might occur and that's a normal situation.
4. Wipe inside of the oven with a slightly warm water with detergent
after it becomes cold and then dry with a clean cloth. Now you can use
your oven.
Normal Use of Oven
1. Adjust thermostat button and temperature at which you want to
cook the food to start cooking.
2. You can set cooking time to any desired time by using the button at
models with mechanical timer. Timer will de-energize heaters when time
expired and provide warning beep as ringing. (GN 82)
3. Timer turns the heaters off and provides audible signal when
cooking time expires in line with the information entered in the models
with digital timer. (GN 86)
4. Cooling system of the appliance will continue to operate after
cooking is completed. Do not cut the power of appliance in this situation
which is required for appliance to cool down. System will shut down
after cooling is completed.
22
Page 23

Rack Positions:
GB
Rack 4
Rack 3
Rack 2
Rack 1
Figure 11
rack. Do not let the wire rack lean against
the back wall of the oven. The shelf positions are shown on the side.
REPLACING OVEN LAMP
WARNING: To avoid electric shock, ensure that the appliance circuit is
open before changing the lamp. (having circuit open means power is off)
First disconnect the power of appliance and ensure that appliance is cold.
Remove the glass protection by turning as indicated in the gure on the
left side. If you have difculty in turning, then using plastic gloves will
help you in turning.
Then remove the lamp by turning, install the new lamp with same speci-
cations. Reinstall glass protection, plug the power cable of appliance into
electrical socket and complete replacement. Now you can use your oven.
Lamp assembly (Type G9): Lamp assembly (Type E14):
It is important to place it right in the wire
220-240 V, AC
15-25 W
Figure 12
220-240 V, AC
15 W
Figure 13
23
Page 24

GB
CLEANING AND MOUNTING OVEN DOOR
Figure 14
Figure 14.1 Figure 14.2 Figure 15.1 Figure 15.2
Open the door fully
by pulling the oven
door toward
yourself. Then
perform unlock
operation by
pulling the hinge
lock upwards
with the aid of
screwdriver as
indicated in
Figure 14.1.
Set the hinge lock
to the widest angle
as in Figure 14.2.
Adjust both hinges
connecting oven
door to the oven to
the same position.
Later, close the
opened oven door
so that it will be
in a position to
contact with
hinge lock as in
Figure 15.1.
Figure 15
For easier removal
of oven door, when
it comes close to
closed position,
hold the cover
with two hands as
in Figure 15.2
and pull upwards.
Reversely perform respectively what you did while opening door to
reinstall oven door back.
24
Page 25

ACCESSORIES
GB
Tray (2 pcs.)
Used for pastry (cookie, biscuit etc.), frozen
foods.
Wire Grill
Used for roasting or placing foods to be
baked, roasted and frozen into desired rack.
In Tray Wire Grill
Foods to stick while cooking such as steak
are placed on in tray grill. Thus contact of
food with tray and sticking are prevented.
Wire Racks
You can place deep tray and tray on lower and
upper wire racks while cooking.
25
Page 26

GB
MAINTENANCE AND CLEANING
1. Remove the power plug from electrical socket.
2. Do not clean inner parts, panel, trays and other parts of the
product with hard tools such as bristle brush, wire wool or knife.
Do not use abrasive, scratching materials or detergent.
3. Rinse after wiping the parts at inner parts of the product with
soapy cloth, then dry thoroughly with a soft cloth.
4. Clean glass surfaces with special glass cleaning material.
5. Do not clean your product with steam cleaners.
6. Never use combustibles like acid, thinner and gas while cleaning
your product.
7. Do not wash any part of the product in dishwasher.
8. "Use potassium stearate (soft soap) for dirt and stains.
You can perform cleaning with a soft textured cloth not to scratch
surfaces according to the gures below.
CLEANING OVEN GLASS
Lift by pressing on plastic latches on left and right side as shown in
Figure 16 and pulling the prole toward yourself as in Figure 17. Glass
is released after prole is removed as shown in Figure 18. Remove the
released glass by pulling toward yourself carefully. Outer glass is xed
to oven door prole. You can perform glass cleaning easily after glasses
are released. You can mount glasses back by performing the operations
reversely after cleaning and maintenance are completed. Ensure that
prole is seated properly in place.
Figure 16 Figure 17 Figure 18
26
Page 27

GB
STEAM CLEANING*
It enables cleaning the soils softened
thanks to the steam to be generated in
the oven.
1.Remove all the accessories in the
oven.
2.Pour a half litre of water into the tray
and Place the tray at the bottom of the
boiler.
3. Set the switch to the steam cleaning
mode.
Figure 18
4.Set the thermostat to 70° C degrees
and operate the oven for 30 minutes.
5. After operating the oven for 30 minutes, open the oven door and
wipe the inner surfaces with a wet cloth.
6. Use dish-washing liquid, warm water and a soft cloth for stubborn
dirt, then dry off the area you have just cleaned with a dry cloth.
TROUBLESHOOTING
You can solve the problems you can face with your product by
checking the following points before calling the technical service.
If Oven Doesn't Work;
• Check if electrical cable of the oven is plugged.
• Safely check if there is power in the network.
• Check the fuses.
• Check if electrical cable of the oven is damaged.
27
Page 28

GB
ENVIRONMENTALLY-FRIENDLY DISPOSAL
Dispose of packaging in an environmentally-friendly
manner.
This appliance is labelled in accordance with European
Directive 2012/19/EU concerning used electrical and
electronic appliances (waste electrical and electronic
equipment - WEEE). The guideline determines the
frame work for the return and recycling of used
appliances as applicable throughout to the EU.
PACKAGE INFORMATION
Packaging materials of the product are manufactured from recyclable
materials in accordance with our National Environment Regulations.
Do not dispose of the packaging materials together with the domestic
or other wastes. Take them to the packaging material collection points
designated by the local authorities.
28
Page 29

ES
Estimado cliente,
Gracias por conar en este producto.
Nuestro objetivo es que pueda utilizar de manera óptima y eciente
este producto respetuoso con el medio ambiente, que hemos fabricado
en nuestras modernas instalaciones en condiciones especícas para
garantizar la calidad general.
Además de leer detenidamente este manual de funcionamiento antes
de utilizar el horno, se recomienda conservar el manual para que las características del horno empotrado que ha comprado puedan mantenerse
como el primer día con el paso del tiempo.
NOTA:
Este manual de funcionamiento es aplicable a varios modelos. Es posible que el electrodoméstico no disponga de algunas de las funciones que
se mencionan en el manual.
Las imágenes del producto son esquemáticas.
Este producto se ha fabricado en instalaciones modernas y respetuosas
con el medio ambiente sin ningún impacto negativo en la naturaleza.
Los productos marcados con un asterisco (*) son optativos.
“Cumple con el Reglamento WEEE”
29
Page 30

ES
ÍNDICE
Advertencia importantes .............................................. 31
Presentación del aparato .............................................. 34
Ficha técnica .............................................................. 35
Instalación del aparato................................................. 35
Advertencia importantes .............................................. 41
Panel de mandos......................................................... 42
Tipos de programa ....................................................... 43
Consejos para la cocción .............................................. 45
Tabla de cocción ......................................................... 45
Programador electrónico de cocción .............................. 46
Uso del horno ............................................................. 50
Sustitución de la bombilla del horno ............................. 51
Limpieza y montaje de la puerta del horno ..................... 52
Accesorios .................................................................. 53
Mantenimiento y limpieza ............................................ 54
Limpieza del cristal de la puerta del horno ..................... 54
Solución de problemas ................................................ 55
Limpieza con vapor......................................................55
Desecho ecológico del horno ........................................ 56
Información del paquete .............................................. 56
30
Page 31

ES
ADVERTENCIAS IMPORTANTES
1. ADVERTENCIA: Para evitar descargas eléctricas,
asegúrese de que el circuito del aparato esté abierto
antes de cambiar la bombilla.
2. ADVERTENCIA: Todas las conexiones del circuito de
suministro deben desconectarse antes de acceder a los
terminales.
3. ADVERTENCIA: Las partes accesibles pueden
calentarse durante el uso de la parrilla. Los niños
deben mantenerse lejos.
4. ADVERTENCIA: Peligro de incendio; no guardar
ningún material ni objeto sobre la supercie de cocción.
5. ADVERTENCIA: Si se agrieta la supercie, abrir el
circuito del aparato para evitar el riesgo de descarga
eléctrica.
6. ADVERTENCIA: El aparato y las piezas accesibles se
calientan durante el uso.
7. Las condiciones de ajustes de este aparato se
indican en la etiqueta (o en la placa de datos).
8. Las partes accesibles pueden calentarse durante
el uso de la parrilla. Los niños pequeños deberían
mantenerse lejos.
9. ADVERTENCIA: Este aparato está diseñado
exclusivamente para cocinar. No debe utilizarse para
otros propósitos, como para calefacción.
31
Page 32

ES
10. Hay herramientas protectoras adicionales que
evitan el contacto con las puertas del horno. Se deberán
acoplar tales piezas cuando puedan haber niños cerca.
11. No use limpiadores de vapor para limpiar el
aparato.
12. NO TRATE NUNCA de apagar el fuego con agua.
Apagar únicamente el circuito del aparato, y a continuación
cubrir la llama con una tapa o una manta ignífuga.
13. No se deben usar limpiadores duros y abrasivos
ni raspadores de metal duro para limpiar la puerta de
vidrio del horno, ya que pueden rayar la supercie y
causar roturas.
14. Asegúrese de que la puerta esté completamente
cerrada después de colocar la comida.
15. En caso de no poder vigilar adecuadamente a
los menores de 8 años, deberá mantenerles lejos del
aparato.
16. Debe evitarse tocar los elementos calientes.
17. Los niños de más de 8 años, así como personas
con discapacidades físicas, auditivas y mentales, o
con falta de conocimientos o experiencia, podrán utilizar
el aparato siempre y cuando se asegure que los mismos
estén debidamente informados sobre los peligros y
vigilados adecuadamente.
18. Este aparato no está diseñado para funcionar
con temporizadores externos ni sistemas de mandos
a distancia o control remoto aparte.
32
Page 33

ES
19.Este aparato está destinado únicamente al uso
doméstico.
20. Los niños no deberán realizar la limpieza y el
mantenimiento sin estar vigilados por parte de un
adulto.
21. Los niños no deben jugar con el aparato. Los
niños no deberán realizar la limpieza y el mantenimiento,
salvo que sean mayores de 8 años y estén debidamente
vigilados por parte de un adulto.
22. Asegúrese de que ningún menor de 8 años
acceda al aparato y al cable del mismo.
23. Mantenga las cortinas, papel de seda o materiales
combustibles (inamables) alejados del aparato antes
de comenzar a usarlo. No coloque productos ni materiales
inamables o combustibles en ni sobre el aparato.
33
Page 34

ES
INTRODUCCIÓN SOBRE EL ELECTRODOMÉSTICO
1
2
3
4
1.Panel de mandos 2.Rejilla para bandeja de horno
3.Bandeja normal 4.Puerta del horno
5
6
7
5. Luz
6. Rejilla para bandeja de horno
7. Bandeja normal
34
Page 35

ES
ESPECIFICACIONES TÉCNICAS
ESPECIFICACIONES Horno empotrado de 60 cm
Potencia de luz 15W
Termostato 40-240 / Máx. °C
Elemento calefactor inferior 1200W
Elemento calefactor superior 1000W
Elemento calefactor turbo 1800W
Elemento calefactor de grill Grill pequeño 1000W Grill grande 2000W
Tensión de suministro 220V-240V 50/60 Hz
Las especicaciones pueden cambiar sin previo aviso con el n de mejorar
la calidad del producto.
Los valores proporcionados con el electrodoméstico o en los documentos
que se adjuntan son las lecturas realizadas en el laboratorio con arreglo a las
normas correspondientes. Estos valores pueden variar en función del uso y
las condiciones ambientales.
Los grácos que aparecen en esta guía son esquemáticos y puede que no
coincidan exactamente con su producto.
INSTALACIÓN DEL ELECTRODOMÉSTICO
Asegúrese de que la instalación eléctrica es conveniente para la operatividad
del aparato. Si no, llame a un electricista y un fontanero para hacer los
arreglos necesarios. La empresa de fabricación no se puede hacer responsable
de los daños que surjan debido a las operaciones por parte de personas no
autorizadas y la garantía del producto queda anulada.
ADVERTENCIA: El cliente es responsable de preparar el lugar de instalación
del producto y el suministro eléctrico.
ADVERTENCIA: Durante la instalación del producto debe respetarse la normativa
eléctrica local.
ADVERTENCIA: Compruebe si el producto presenta algún desperfecto antes
de instalarlo. No instale el producto si tiene algún desperfecto. Los productos
dañados pueden poner en peligro la seguridad personal.
35
Page 36

ES
Advertencias importantes para la instalación:
El ventilador de enfriamiento deberá
extraer vapor adicional y evitar que las
supercies externas del electrodoméstico
se sobrecalienten durante el funcionamiento
del horno. Esto es una condición necesaria
para el mejor funcionamiento del aparato
y una mejor cocción.
El ventilador de enfriamiento seguirá
funcionando después de terminar la
cocción. El ventilador se detendrá
Figura 1
automáticamente después de que se
complete el enfriamiento.
Para garantizar un funcionamiento ecaz y adecuado, debería dejarse
un espacio detrás del sitio en el que se instala el electrodoméstico. Este
espacio es fundamental para que el sistema de ventilación del electrodoméstico funcione, por lo que no debe ignorarse.
Lugar de instalación adecuado
• El producto está diseñado para instalarse con las encimeras disponibles en el mercado. Debe dejarse una distancia de seguridad
entre el producto y las paredes o el mueble de cocina. Consulte la
distancia en los esquemas suministrados en la página siguiente.
(Los valores se expresan en mm).
• Las supercies empleadas, así como los laminados sintéticos y los
adhesivos, deben ser resistentes al calor (mínimo 100 °C).
• Los muebles de cocina deben estar nivelados con el producto y bien
sujetos.
• Cuando haya un cajón debajo del horno, habrá que colocar un soporte
entre este y el horno.
ADVERTENCIA: No instale el producto al lado de frigorícos o neveras.
El calor que desprende aumenta el consumo energético de los equipos
de enfriamiento.
ADVERTENCIA: No utilice la puerta y/o el tirador para transportar o mover
el producto.
36
Page 37

ES
Instalación y montaje del horno empotrado de 60 cm
Antes de instalar el producto, hay que elegir el lugar de instalación.
El producto no debe instalarse en lugares expuestos a fuertes corrientes de
aire.
Para transportar el producto se necesitan dos personas como mínimo. No
arrastre el producto si no quiere estropear el suelo.
Quite todo el material de embalaje del interior y el exterior del producto.
Retire todo el material y los documentos que acompañan al producto.
Instalación bajo la encimera
El mueble debe tener las medidas que se indican en la Figura 2.
En la parte trasera del armario debe dejarse el espacio que se indica en la
gura para garantizar la ventilación necesaria.
Tras el montaje, el espacio que debe quedar entre la parte superior y la
parte inferior de la encimera debe coincidir con el que se indica en la Figura
5 mediante la letra “A”. Permite la ventilación y no debe cubrirse.Instalación
en un armario elevado
Instalación en un armario de pared
El mueble debe tener las medidas que se indican en la Figura 4.
En las secciones superior e inferior de la parte trasera del armario hay que
dejar el espacio que se indica en la gura para permitir la ventilación.
Requisitos de instalación
Las medidas del producto se proporcionan en la Figura 3.
Las superficies de los muebles en las que se instala el producto y los materiales de montaje utilizados deben resistir temperaturas mínimas de 100 °C.
El mueble en el que se instala debe estar sujeto y tener el suelo plano para
que el producto no se incline.
El suelo debe estar preparado para soportar un peso de 60 kg.
Colocación y sujeción del horno
El horno debe colocarse en el mueble entre dos o más personas.
Asegúrese de que el armazón del horno queda alineado con el borde delantero del mueble y uniforme.
37
Page 38

ES
El cable de alimentación no debe quedar debajo del horno, aplastado entre
el horno y el mueble ni doblado.
Utilice los tornillos suministrados con el producto para jar el horno al mueble. Los tornillos deben introducirse en los elementos de plástico acoplados
en el armazón del producto, como se muestra en la Figura 5. No apriete los
tornillos en exceso. La rosca de los oricios de los tornillos podría desgastarse.
Compruebe que el horno no se mueve después de montarlo. Si no se instala
conforme a las instrucciones, existe el riesgo de que se incline durante el
funcionamiento.
Conexión eléctrica
El lugar elegido para colocar el producto debe tener una instalación eléctrica
adecuada.
La tensión de red debe ser compatible con los valores indicados en la
etiqueta del producto.
La conexión del producto debe efectuarse con arreglo a los requisitos de los
códigos eléctricos locales y nacionales.
Antes de empezar, desconecte el suministro eléctrico de la red. No conecte
el producto a la red hasta que haya terminado de instalar el producto.
Montaje
Figura 2
38
Page 39

560
ES
600
545
555
35
500
30
595
30
565
22
595
Figura 3
39
Page 40

ES
Figura 4
590
550
35
560
500
30 30
40
Page 41

ADVERTENCIAS IMPORTANTES
Conexión eléctrica y seguridad
ES
A
Figura 5
Un servicio técnico autorizado debe instalar y conectar correctamente este
horno con arreglo a las instrucciones del fabricante.
El electrodoméstico debe instalarse en un hueco que disponga de buena
ventilación.
En las conexiones eléctricas del electrodoméstico solo pueden emplearse
tomas con puesta a tierra conforme con las normas. Póngase en contacto
con un electricista autorizado si no existe ninguna toma con puesta a tierra
adecuada en el lugar de instalación del electrodoméstico. El fabricante no
será responsable de los daños que ocasione la conexión del electrodoméstico
a tomas sin puesta a tierra.
La conexión del horno debe contar con la correcta descarga a tierra.
El horno funciona con corriente alterna de 220-240 V (50/60 Hz) y necesita
un fusible de 16 A. Si la red eléctrica no cumple estas especicaciones, consulte a un electricista o al servicio autorizado.
41
Page 42

ES
Cuando tenga que cambiar el fusible eléctrico, asegúrese de realizar la
conexión eléctrica como sigue:
• Cable marrón de fase (a terminal activo)
• Cable azul a terminal neutro
• Cable amarillo verdoso a terminal de tierra
Los interruptores de desconexión del horno deben estar en un lugar accesible
una vez que el horno esté instalado en su sitio.
El cable de alimentación (el que se enchufa) no debe estar en contacto
con ninguna parte caliente del electrodoméstico.
Cuando se estropee, el importador, su agente de servicio o cualquier otra
persona competente
PANEL DE MANDOS
Botón de función Temporizador digital Termostato
El ajuste solo se puede hacer cuando el botón se abre para modelos
con botón emergente.
Asegúrese de pulsar el mando para extraerlo, como
se muestra en la gura del lado izquierdo.
Figura 6
Una vez que el mando sobresalga lo suciente,
podrá girarlo a derecha o a izquierda para hacer
los ajustes necesarios.
Figura 7
42
Page 43

ES
Botón del termostato: Permite programar la temperatura
de cocción de los alimentos que se van a cocinar en el
horno. Después de colocar los alimentos en el horno,
puede girar el botón para programar la temperatura que
desee. Consulte la temperatura de cocción de los diferentes alimentos en la tabla relacionada.
Figura 8
Botón de programa: Permite programar los elementos
calefactores que se utilizarán para cocinar los alimentos que se han introducido en el horno. Los tipos
de programas que ofrece este botón y sus funciones
se indican a continuación. Es posible que algunos
modelos no dispongan de todos los tipos de elemen-
Figura 9
tos calefactores y, por consiguiente, no ofrezcan algunos tipos de programas.
TIPOS DE PROGRAMA
A continuación se proporcionan los tipos de programas del electrodoméstico,
junto con una explicación de cada uno de ellos, para que pueda preparar diferentes
platos como más le guste.
Cocción multifunción Ventilador
Grill
Grill y ventilador
Limpieza con vapor y elemento
calefactor inferior
Elementos calefactores inferior y
superior
Elementos calefactores inferior y
superior y ventilador
Turbo y ventilador
43
Page 44

ES
Cocción multifunción: Es adecuado para hornear y asar. Funcionan
los elementos calefactores inferior y superior y se produce una rápida
transmisión del calor por medio de la circulación de aire. Sirve para
cocinar en una sola bandeja con calor intenso.
Grill: Se utiliza para asar pescado y carne, como filetes y salchichas.
Cuando se utiliza el grill, es preciso colocar la bandeja en el nivel inferior
y añadir agua.
Grill y ventilador: Es adecuado para cocinar productos cárnicos. No
olvide colocar una bandeja en el nivel inferior del interior del horno y un
poco de agua.
Elemento calefactor inferior: Seleccione este programa al final del tiempo
de cocción si quiere que la parte inferior de los alimentos se doren.
Ventilador: Se puede utilizar para evitar que se enfríen los alimentos que
se han cocinado.
Elementos calefactores inferior y superior: Este programa puede utilizarse
para preparar pasteles, pizza, galletas y pastas.
Elementos calefactores inferior y superior y ventilador: Es un programa
adecuado para preparar pasteles, tortas y lasaña. También sirve para
preparar platos a base de carne.
Turbo y ventilador: Es adecuado para hornear y asar. Ofrece un calor
menos intenso que el programa “Elementos calefactores inferior y
superior” a causa de la transmisión inmediata del calor por medio de la
circulación de aire.
44
Page 45

ES
RECOMENDACIONES DE COCCIÓN
En la tabla siguiente puede encontrar la información relacionada con
los tipos de alimentos con los que hemos experimentado, cuyos valores
de cocción hemos identicado en nuestros laboratorios. Los tiempos de
cocción pueden variar en función de la tensión de la red, la calidad de los
alimentos que se van a cocinar, la cantidad y la temperatura. Es posible
que los platos que cocine con estos valores no sean de su gusto. Puede
programar distintos valores para probar distintos sabores hasta que obtenga el resultado que sea de su agrado.
ADVERTENCIA: El horno debe calentarse durante 7-10 minutos antes
de introducir los alimentos.
TABLA DE COCCIÓN
Alimentos
Pastel Estático / Estático+Ventilador 170-180 2-3 35-45
Pastel pequeño Estático / Turbo+Ventilador 170-180 2 25-30
Pastel Estático / Estático+Ventilador 180-200 2 35-45
Repostería Estático 180-190 2 20-25
Pastas Estático 170-180 2 20-25
Pastel de manzana Estático / Turbo+Ventilador 180-190 1 50-70
Bizcocho Estático 200/150* 2 20-25
Pizza Ventilador Estático 180-200 3 20-30
Lasaña Estático 180-200 2-3 25-40
Merengue Estático 100 2 50
Pollo asado** Parrilla+Ventilador 200-220 3 25-35
Pescado al horno** Parrilla+Ventilador 200-220 3 25-35
Filete de ternera** Parrilla+Ventilador Máx 4 15-20
Albóndigas a la parrilla** Parrilla+Ventilador Máx 4 20-25
Función de
Cocción
Temperatura de
Cocción (°C)
Parrilla de
Cocción
Tiempo de
Cocción (mín.)
* No precalentar. Se recomienda utilizar una temperatura de 200 °C durante
la primera mitad del tiempo de cocción y bajarla a 150 °C durante la segunda
parte.
** Es preciso girar los alimentos a mitad del tiempo de cocción.
45
Page 46

ES
Botón de
minutos
SÍMBOLOS DE PANTALLA
Indicación del estado del horno
• Encendido: Cocinando o listo para cocinar.
• Apagado: No cocinando.
Indicador de estado de minutero
• Encendido: Alarma activa de minutero.
• Parpadeando: Modo de ajuste de minutero, ajuste posible mediante
los botones o o cuando la alarma actual de minutero se
completa.
• Apagado: El minutero no está activo.
Indicación de bloqueo infantil
• Encendido: El bloqueo para niños está activado.
• Apagado: El bloqueo para niños no está activado.
Botón de
añadir
Hora del día
Botón de ajuste
Indicación de estado de cocción automática
• Encendido: Cocción completa o semi automática activada.
• Parpadeando: Condición de cocción automática completada o
encendida.
• Apagado: Cocción automática no activada.
46
Page 47

ES
Es un módulo de sincronización electrónico que permite que los
alimentos que haya puesto en el horno estén listos para ser servidos en
cualquier momento que desee. Lo único que tiene que hacer es programar
el tiempo de cocción de la comida y también el momento en que desea
que su comida esté lista.
También es posible utilizar una alarma programada por minutos
independiente del horno.
En caso de que el temporizador esté atrasado o adelantado no es un
mal funcionamiento. El temporizador del horno puede ser atrasado o
adelantado según la frecuencia de la red eléctrica, ya que se ejecuta
directamente con la tensión general. Esta no es una falla de funcionamiento.
ENCENDIDO
Al encenderlo, el horno está inactivo, los símbolos de la hora del día
y parpadean. La hora indicada del día no es correcta y tiene que ser
ajustada. Pulse para activar el horno y proceda ajustando la hora del
día como se muestra a continuación.
AJUSTE DE LA HORA
El ajuste de la hora del día sólo es posible cuando no hay un programa
de cocción en curso. Pulse y simultáneamente durante 3 segundos para entrar en el modo de ajuste y luego el símbolo de punto entre
las horas y los dígitos de minutos comenzarán a parpadear. Puede ajustar la duración deseada usando y . La duración máxima ajustable
es 23h 59 minutos.
El modo de ajuste será abandonado dentro de 6 segundos después de
que se pulse el último botón o se puede terminar inmediatamente pulsando el botón .
Nota: El ajuste de la hora del día también se activa en los primeros 7
segundos después de encenderlo.
AJUSTE DEL MINUTERO
Con esta función, puede ajustar la duración en minutos . Una vez
transcurrido el tiempo ajustado, se producirá un sonido de alarma.
Pulse el botón una vez para entrar en el modo de ajuste del minuto,
el símbolo, empezará a parpadear en la pantalla. Con o con,ajuste la duración deseada. La duración máxima ajustable es de 10 horas.
El modo de ajuste será abandonado dentro de 6 segundos después de
que se pulse el último botón o se puede terminar inmediatamente pulsando el botón .
47
Page 48

ES
CANCELACIÓN DEL SONIDO DEL TIMBRE DE LA ALARMA
Una vez transcurrido el tiempo ajustado de alarma, el timbre de la
alarma comenzará a sonar, acompañada por el parpadeo del símbolo en la
pantalla. Cualquier pulsación de botón detendrá el sonido de la alarma
y esta indicación. Si no se pulsa ningún botón, el sonido de la alarma
nalizará automáticamente después de 5 minutos, pero el símbolo
parpadeante continuará.
COCCIÓN SEMI AUTOMÁTICA
Este programa de cocción está diseñado para comenzar a cocinar de
inmediato durante una duración especicada. Después de ajustar el
horno a la función deseada y
temperatura mediante las perillas del horno:
1. Pulse el botón dos veces, el símbolo parpadeará en la pantalla.
y la duración de la cocción se mostrará en la pantalla una tras otra.
2. Al usar los botones o , ajuste la duración de cocción deseada.
3. Después de 6 segundos de que el último botón fue pulsado o pulse
dos veces, ahora el ajuste se ha completado. será constante en
la pantalla y la pantalla mostrará la hora actual del día.
COCCIÓN TOTALMENTE AUTOMÁTICA
Este programa de cocción está diseñado para realizar una cocción
retardada programando la hora del día, cuando el alimento debe estar
listo. En otras palabras, el horno comenzará a cocinar no de inmediato,
pero automáticamente calculará el tiempo para iniciar la cocción.
1. Realice los pasos 1 y 2 de la cocción semiautomática como se
indicó anteriormente. (ajuste de duración de la cocción)
2. Pulse el botón una vez de nuevo, el símbolo parpadeará en la
pantalla y la duración de la cocción se mostrará en la pantalla una
tras otra.
3. Al usar los botones o , ajuste el tiempo nal de cocción. el
símbolo desaparecerá pero el símbolo seguirá parpadeando en
la pantalla. Esto indica que se programa una cocción automática,
pero la cocción aún no ha comenzado.
4. Después de 6 segundos de haber pulsado el último botón o al
pulsar , el ajuste se completará, la pantalla mostrará la hora
actual del día.
48
Page 49

ES
FIN DE COCCIÓN AUTOMÁTICA
Una vez nalizada la cocción automática, el símbolo parpadeará
en la pantalla y sonará la alarma del zumbador. Cualquier pulsación
de botón detendrá el sonido de la alarma, pero el símbolo parpadeante
continuará hasta que el botón sea pulsado. La alarma del zumbador
sonará durante 7 minutos si no se detiene.
INTERRUPTORES DE ENERGÍA
Después de cualquier interrupción de la alimentación, el horno estará inactivo después de que se restablezca la alimentación, por razones
de seguridad. Después de encendido, los dígitos de la hora del día y el
símbolo parpadearán y la hora del día deberá ajustarse. (consulte:
encendido)
Nota: El símbolo parpadeando indica que el horno está inactivo y
que tiene que entrar en el modo manual.
BLOQUEO PARA NIÑOS
Esta función está diseñada para evitar cualquier modicación no autorizada
de los ajustes del temporizador. Esta función estará activa, dentro de los
30 segundos siguientes a la última pulsación del botón .
aparecerá. Para desactivarlo, pulse el botón durante 3 segundos.
desaparecerá.
OPCIONES PROGRAMABLES
Tono de la alarma:
Al pulsar y mantener pulsado el botón durante 3 segundos se
obtendrá el tono de zumbador válido actualmente. Al pulsar los botones
y , podrá desplazarse por 3 tonos de timbre disponibles. El último
tono de timbre oído será grabado automáticamente como el tono seleccionado. Después de 6 segundos de que el último botón fue pulsado o
pulse , el ajuste se ha completado.
Ajuste de brillo:
Al pulsar y mantener pulsado el botón durante 3 segundos se mostrará el ajuste de brillo válido actualmente. Al pulsar los botones y
puede desplazarse por 8 conguraciones de brillo disponibles. El último
ajuste de brillo visto se grabará automáticamente como el ajuste seleccionado. Después de 6 segundos de que el último botón fue pulsado o
pulse , el ajuste se ha completado.
Nota: Los valores predeterminados son los más altos.
Nota: Las opciones programables son no volátiles y residirán después
de cualquier fallo de alimentación.
49
Page 50

ES
USO DEL HORNO
Uso inicial del horno
A continuación se explican las operaciones que hay que realizar la primera
vez que se utiliza el horno tras haber efectuado las conexiones necesarias
según las instrucciones:
1. Quite las etiquetas o los accesorios que haya en el interior del horno.
Retire la película protectora (si la hubiera) del frontal del electrodoméstico.
2. Elimine el polvo y los restos de embalaje del interior del horno con
un trapo húmedo. El interior del horno debe estar vacío. Enchufe el cable
del electrodoméstico en la toma de corriente.
3. Sitúe el botón del termostato en la temperatura más alta (240 °C
máx.) y deje que el horno funcione durante 30 minutos con la puerta cerrada.
Durante este tiempo puede notar que sale un poco de humo y olor del
horno, pero es normal.
4. Limpie el interior del horno con agua templada y detergente cuando
se enfríe y luego séquelo con un trapo limpio. Ahora puede utilizar el
horno.
Uso normal del horno
1. Programe el termostato y la temperatura en los valores que quiera
utilizar para empezar a cocinar.
2. En los modelos que disponen de temporizador mecánico puede utilizar
el botón para programar el tiempo de cocción que desee. El temporizador
apagará los elementos calefactores cuando transcurra el tiempo programado
y generará un pitido a modo de aviso.
3. Según la información introducida en los modelos con temporizador
digital, el temporizador apaga los elementos calefactores y genera una
señal acústica cuando el tiempo de cocción termina.
4. El sistema de enfriamiento del electrodoméstico seguirá funcionando
cuando termine el tiempo de cocción. No corte la corriente del electrodoméstico, ya que es necesario que el electrodoméstico se enfríe. El sistema
se apagará después del periodo de enfriamiento.
50
Page 51

ES
Posiciones de las rejillas:
Es importante colocar bien las guías me-
Estante 4
Estante 3
Estante 2
Estante 1
Figura 10
tálicas. No permita que las guías metálicas lleguen a la pared trasera del horno.
En el lateral se indican las posiciones de
los soportes.
CAMBIO DE LA BOMBILLA
ADVERTENCIA: Para evitar descargas eléctricas, asegúrese de que el cir-
cuito del electrodoméstico se encuentra abierto antes de cambiar la luz
(esto signica que está apagado). Primero tiene que desconectar la corriente del electrodoméstico y asegurarse de que se ha enfriado.
Para quitar el cristal de protección, gírelo como se indica en la gura
del lado izquierdo. El uso de guantes de plástico puede facilitar la operación
en caso de que tenga problemas para girarlo.
Gire la bombilla para quitarla e instale otra nueva que tenga las mismas
especicaciones. Vuelva a instalar el cristal de protección y conecte el
cable del electrodoméstico en la toma de corriente para terminar. Ahora
puede utilizar el horno.
Luz (tipo G9): Luz (tipo E14):
220-240 V, AC
15-25 W
Figura 11
51
220-240 V, AC
15 W
Figura 12
Page 52

ES
LIMPIEZA Y MONTAJE DE LA PUERTA DEL HORNO
Figura 13
Figura 14
Figura 13.1 Figura 13.2 Figura 14.1 Figura 14.2
Tire de la puerta del
horno hacia usted para
abrirla por completo.
Para desbloquearla,
empuje el pasador
de la bisagra hacia
arriba con la ayuda del
destornillador, como
se indica en la
Figura 13.1
Ajuste el cierre de la
bisagra en el ángulo
más abierto, como se
muestra en la
Figura 13.2.
Coloque las dos bisa-
gras de la puerta del
horno en la misma
posición.
Luego cierre la puer-
ta del horno hasta
que se encuentre en
una posición en la
que haga contacto
con el cierre de bisa-
gra, como se muestra
en la Figura 14.1.
Para facilitar la
desinstalación de
la puerta del horno,
sujete la cubierta
con ambas manos
cuando esté a punto
de cerrarse, como se
muestra en la
Figura 14.2, y tire
hacia arriba.
Para volver a instalar la puerta, realice el mismo procedimiento en
orden inverso.
52
Page 53

ACCESORIOS
ES
Bandejas (2 unidades)
Se usa para repostería (galletas, pastas, etc.)
y congelados.
Rejilla
Se usa para asar o para colocar los alimentos
que se van a hornear o a asar y los alimentos
congelados en el nivel del horno deseado.
Rejilla para bandeja de horno
Los alimentos que se pegan durante la cocción,
como los letes, se colocan en una rejilla para
bandeja. Esto evita el contacto con la bandeja
y evita que los alimentos se peguen.
Guías metálicas
Durante la cocción se pueden colocar bandejas y fuentes en las guías metálicas inferior y
superior.
53
Page 54

ES
MANTENIMIENTO Y LIMPIEZA
1. Desconecte el enchufe de la toma de corriente.
2. No utilice utensilios duros, como cepillos de cerdas, estropajos metálicos
ni cuchillos, para limpiar el interior, el panel, las bandejas y otras partes
del producto.
No utilice productos abrasivos, materiales que rayen las supercies ni
detergente.
3. Aclare tras limpiar el interior del producto con un trapo enjabonado y
luego seque con un paño suave.
4. Utilice productos de limpieza especícos para limpiar las supercies
de cristal.
5. No utilice limpiadores a vapor.
6. Nunca utilice combustibles, como ácido, diluyente y gas, mientras
limpia el producto.
7. No lave ninguna parte del producto en el lavavajillas.
8. Utilice estearato de potasio (jabón suave) para la suciedad y las manchas.
Si no quiere arañar las supercies, puede utilizar un trapo de textura
suave como se indica en las guras siguientes.
LIMPIEZA DEL CRISTAL DEL HORNO
Presione los cerrojos de plástico de los lados izquierdo y derecho Figura 15
para levantar el cristal y tire del marco hacia usted como se muestra en la
Figura 16. El cristal se suelta después de extraer el marco, como se muestra
en la Figura 17. Tire del cristal hacia usted con cuidado una vez que esté
suelto. El cristal exterior está fijo al marco de la puerta del horno. Una vez
que están sueltos, los cristales se limpian con facilidad. Para instalarlos de
nuevo tras realizar las operaciones de limpieza y mantenimiento, es preciso
realizar el procedimiento de desmontaje en orden inverso. Asegúrese de
que el marco queda correctamente alojado en su sitio.
Figura 15 Figura 16 Figura 17
54
Page 55

ES
LIMPIEZA CON VAPOR*
Permite ablandar y eliminar la
suciedad mediante el vapor que se
genera.
1. Quite todos los accesorios del horno.
2. Vierta medio litro de agua en la
bandeja y colóquela en el fondo de la
caldera.
3.Sitúe el interruptor en el modo de
limpieza con vapor .
4. Programe el termostato en 70° C y
Figura 18
ponga en funcionamiento el horno durante 30 minutos.
5. Después de 30 minutos, abra la puerta del horno y pase un trapo
húmedo por las superficies internas.
6. Utilice líquido lavavajillas, agua caliente y un trapo suave para la
suciedad difícil; luego seque la zona que acaba de limpiar con un trapo
seco.
SOLUCIÓN DE PROBLEMAS
A continuación se indican las comprobaciones que puede realizar para
resolver los problemas que puedan surgirle antes de llamar al servicio
técnico.
Si el horno no funciona
• Compruebe si el cable eléctrico del horno está enchufado.
• Compruebe si hay corriente eléctrica sin exponerse a ningún riesgo.
• Compruebe los fusibles.
• Compruebe si el cable eléctrico del horno está dañado.
55
Page 56

ES
ELIMINACIÓN ECOLÓGICA
Deseche el embalaje de manera respetuosa con el
medio ambiente.
Este electrodoméstico está etiquetado con arreglo a la
Directiva Europea 2012/19/UE sobre aparatos electrónicos y eléctricos usados (residuos de aparatos eléctricos y electrónicos, RAEE). En la directiva se establecen
las directrices de devolución y reciclaje de los aparatos
usados que son válidas en todo el territorio de la UE.
INFORMACIÓN DEL EMBALAJE
El embalaje del producto se fabrica con materiales reciclables con arreglo
a la normativa medioambiental nacional. No deseche los materiales de
embalaje con la basura doméstica ni otros residuos. Deposítelos en los
puntos de recogida de material de embalaje designados por las autoridades
competentes.
56
Page 57

Page 58

Page 59

Page 60

SERVICIO TECNICO AUTORIZADO
Ud podra consultar la liste de nuestro Servicio Tecnico Autorizado en
nuestra pagina web www.spar.com.ar
O bien, comunicandose al 011-4311-7655
 Loading...