

Franke GL 76 M LD XS, GL 76 M RD XS, GL 76 MT C XS, GL 76 M XS Instructions For Use And Installation
Page 1
Instructions for use and installation
Built-in multi-function oven with cooking modes
Kullanım ve montaj talimatları
programlı çok fonksiyonlu ankastre fırı
n
8
8
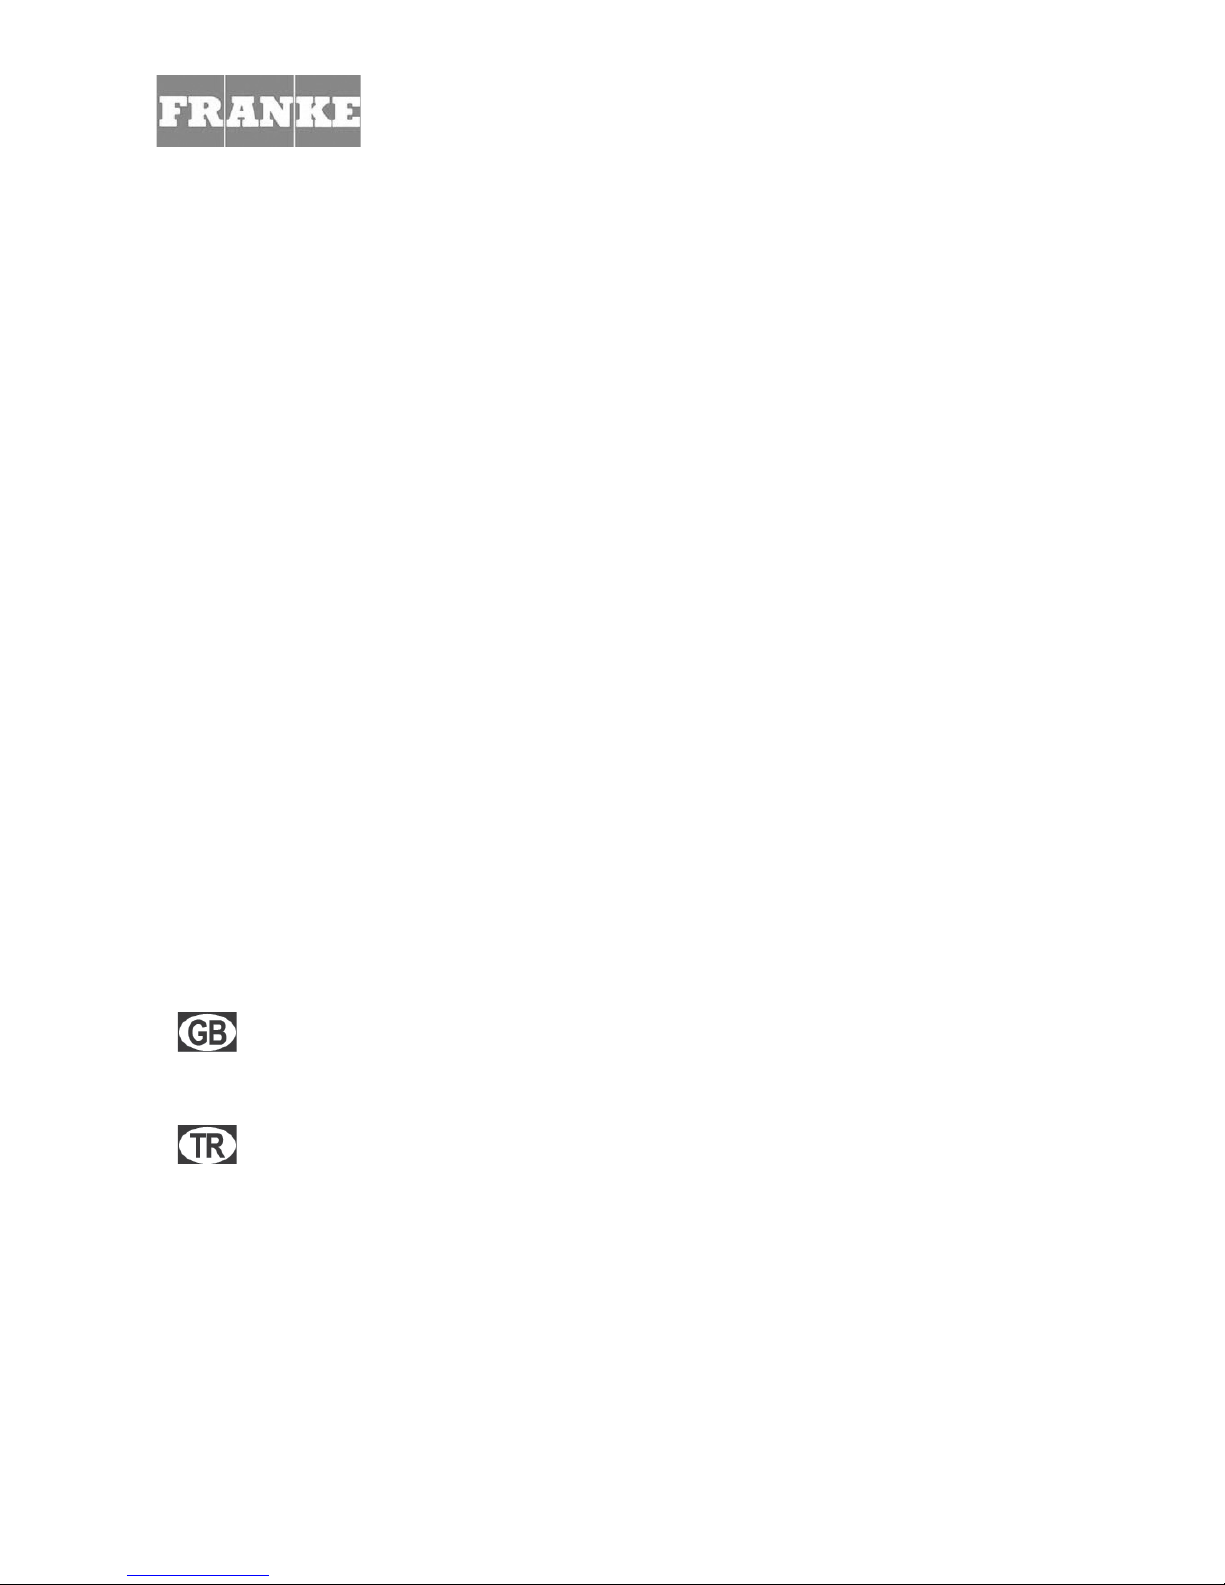
GL 76 M LD XS
GL 76 M RD XS
GL 76 MT C XS
Page 2

Page 3

1
Contents
Introduction ............................................................................................... 1
Switching on the first time ......................................................................... 1
Suggestions................................................................................................. 1
A close look................................................................................................ 2
Use............................................................................................................. 3-4
Cooking table............................................................................................. 16
Cleaning and maintaining the oven............................................................. 17-18
Service........................................................................................................ 19
Safety warnings .......................................................................................... 19 -20
Installation .................................................................................................. 21
Installation ins
tructions............................................................................... 22
Connection to power mains ...................................................................... 22
Technical data............................................................................................. 23
Introduction
Than
k you for choosing a Franke
product.
Before using the
appl
iance, please
read
the warnin
gs and instructions
in
this
manual. This will
make it easier
to operate and also prolong its service
life. K
eep
this booklet
for
further
reference.
Switching on the first time
When using the oven for the first time, run it empty with the temperature knob set to
maximum and the door open for at least 40 minutes – make sure the room is well
ventilated during this procedure.
The odour produced during this procedure is produced by the evaporation of the
substance
used to protect the oven during the period between manufacture and installation. The oven
can be used normally once this first procedure has been completed.
Suggestions
When cooking food, do not place it in the oven when the oven is cold; rather, allow it to
reach the set temperature before placing the food in it.
During cooking, never place pans or containers directly on the oven floor; place them on
the provided grills or drip trays in one of the five provided shelves; Failure to observe this
precaution can damage the oven's in
ternal enamelling.
Do not cover the walls of the oven with aluminium foil, especially in the lower part of the
cooking compartment.
Any repairs must be done by Franke authorised service centre.
In case of need, contact our local service centre and use only original spare parts.
Your Franke oven uses a special enamel which is easy to keep clean; make sure to clean it
frequently to avoid baking on dirt and cooking residue.
Self-cleaning panes (if any) can be cleaned with soap and water (see cleaning instructions).
Note: - before switching on the oven, read the Timer Instructions.
- if the oven is equipped with an automatic cooking or switching off programmer, select
the “manual” option indicated by the symbol to use the oven manually .
Timer Instruction....................................................................................... 5-15
Page 4
2
A close look
Control Panel
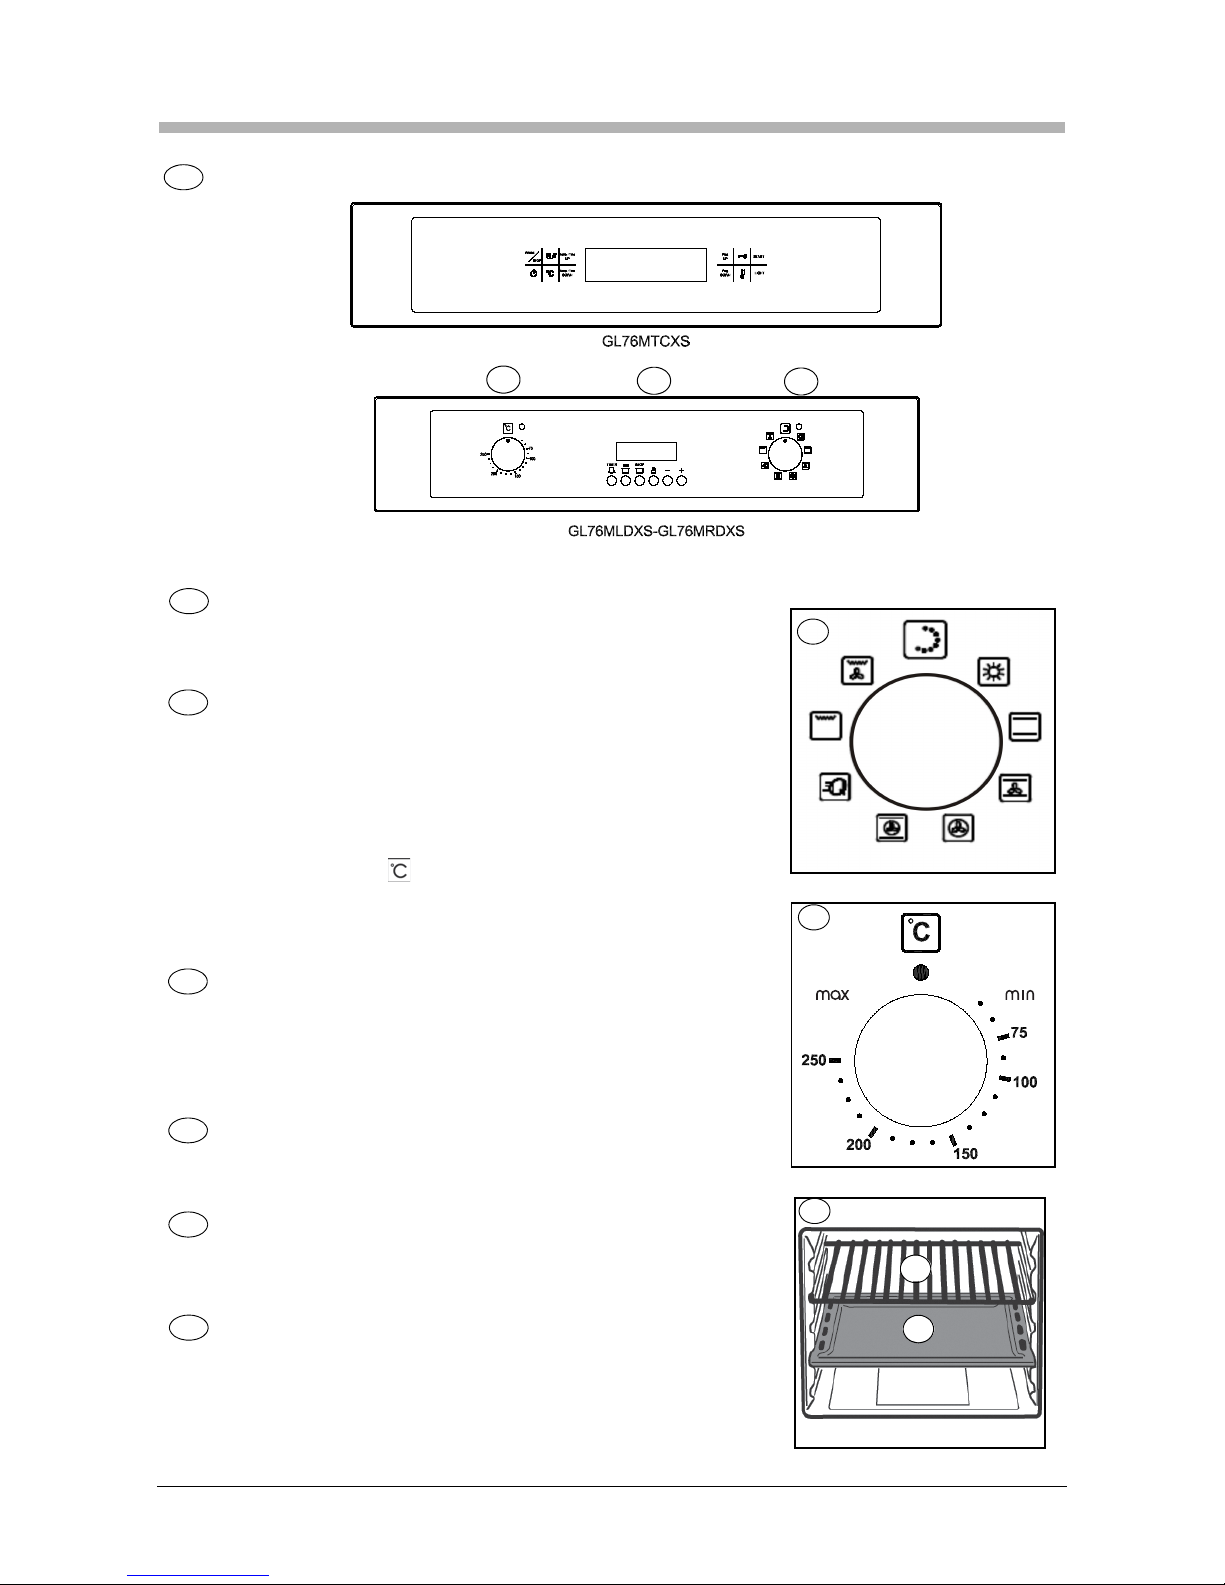
Program selector knob
Selects the mode of operation of the oven depending on the type of
cooking desired. When the knob is set to a program, the oven's internal
light lights up to show that the oven is on.
Digital
Timer
Franke ovens have a variety of methods of monitoring and controlling
cooking times, consult pag.4 for specific detailed instructions; after you
have identified the type of control provided by your oven, you will find full
instructions on how to use it
Thermostat indicator light
Highlighted by the symbol this indicates that the electrical heating
elements are on. The indicator light turns off when the set temperature
has been reached, and turns back on again when the heating elements are
switched on again. Use this light to check that the oven is at the correct
temperature before inserting the food.
Temperature regulator knob (Thermostat)
Sets the temperature required for the type of food being cooked, and
ensures that it is kept constant throughout the cooking cycle. To select
the temperature, turn the knob clockwise so that the index mark
indicates the temperature in question. Maximum temperature is around
260°C.
Drip tray and grille guides
Used for
locating the grilles and drip trays in
the five
av
ailable positions (1
to 5 starting from the bottom); the cooking table indicates
which position gives best results for each type of cooking.
Drip tray
Normally used for collecting juice from roasts or for cooking food
directly; the drip tray can be removed from the oven if not required. The
drip trays are constructed in AA enamelled food safe steel.
Grid
Used for supporting pans, pastry moulds, and any containers other than
the provided drip trays, and especially for cooking with the meat and fish
grill and fan grill functions, toasting bread, etc.
A
B
C
A
G
H
I
I
H
G
A
B
B
C
A
Page 5
3
Use
This oven combines the advantages of traditional “static” natural convection ovens with
those of modern “fan ovens”. It is an extremely versatile appliance which allows for easy
and safe selection of 5 different cooking methods. Use knobs (B) and (F) on the control
panel to select the program
and temperature. For best results from your Franke oven,
consult the cooking table pag. 19.
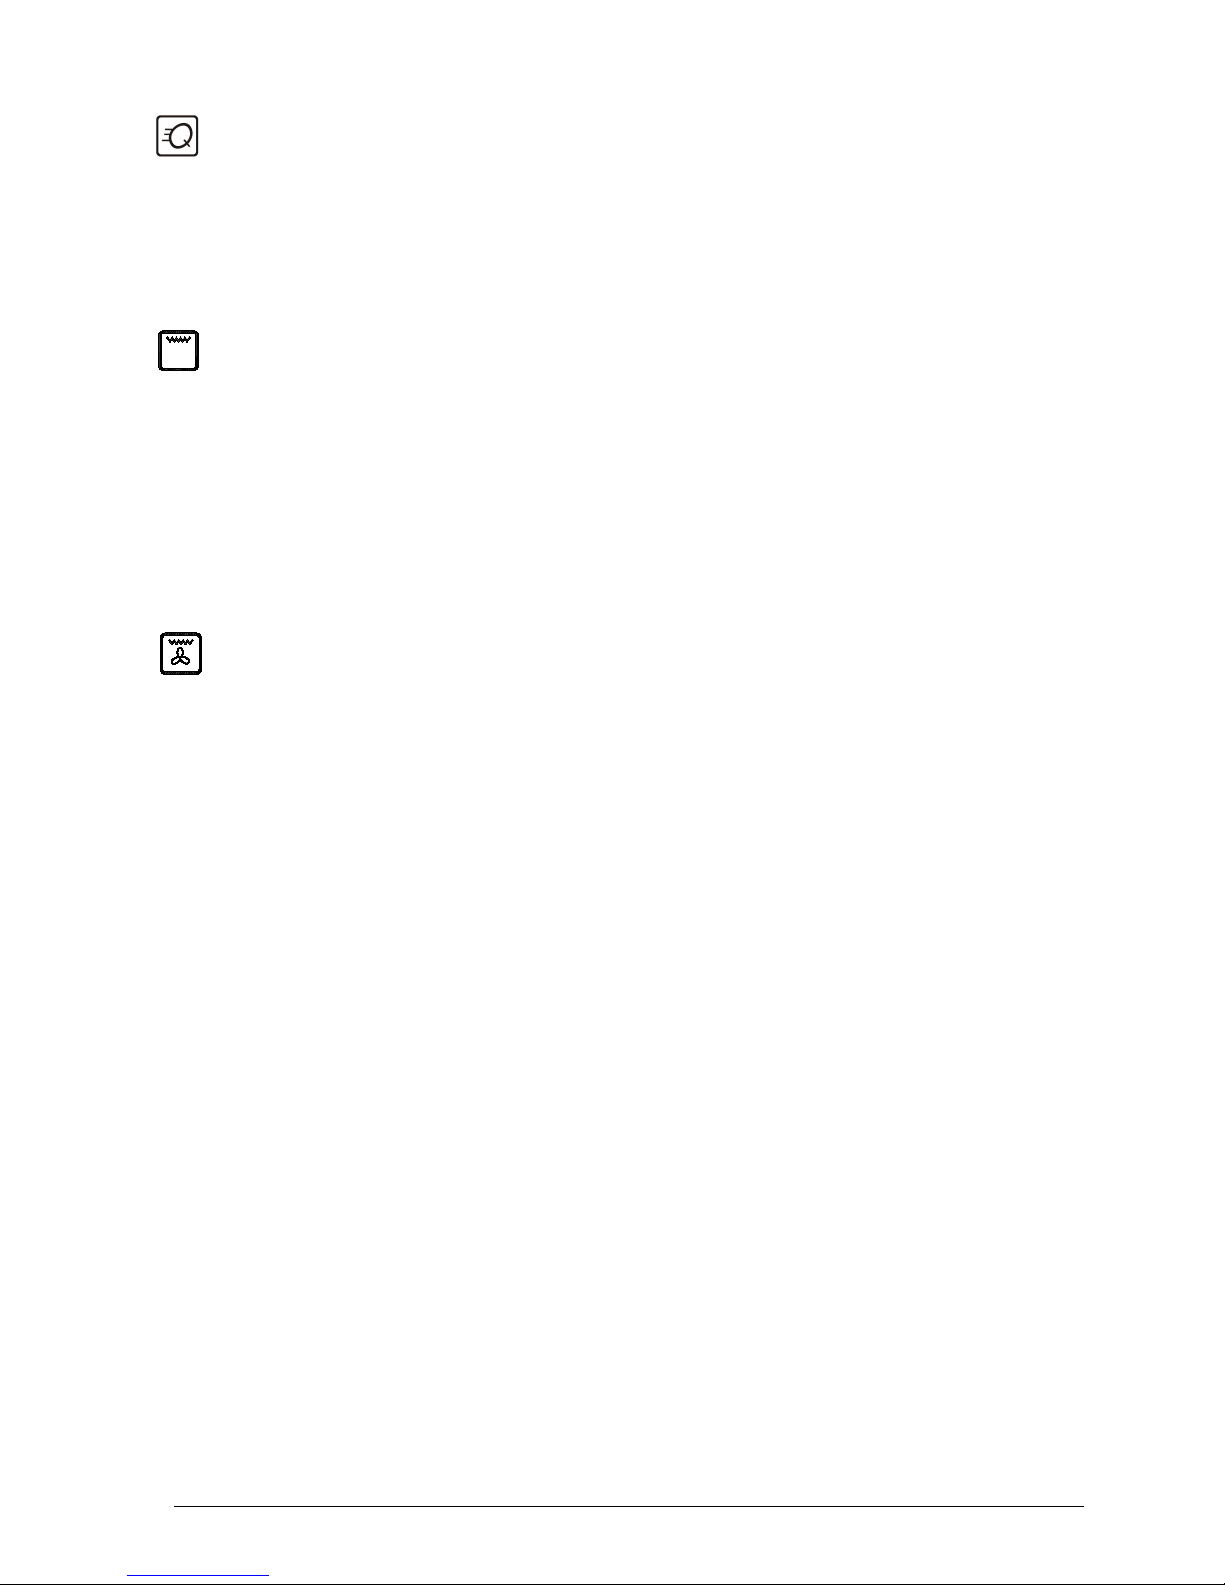
Cooling fan
In or
der to
reduce the temperature at the front of the
oven, the cont
rol
panel
and side
pane
ls, Franke ov
ens are equipped with a
cool
ing fan
which automati
cally
turns
on when
the oven
is hot. When the
fan
is
running, you will noti
ce ho
t air
blowing from the front of
the ov
en between
the fron
t panel and the
oven
door; Franke
has made sure
that the air je
t
does not disturb the kitchen environment and that noise i
s kept to a minimum.
To protect the surrounding kitchen units, the fan keeps running after cooking
until the oven has cooled down.
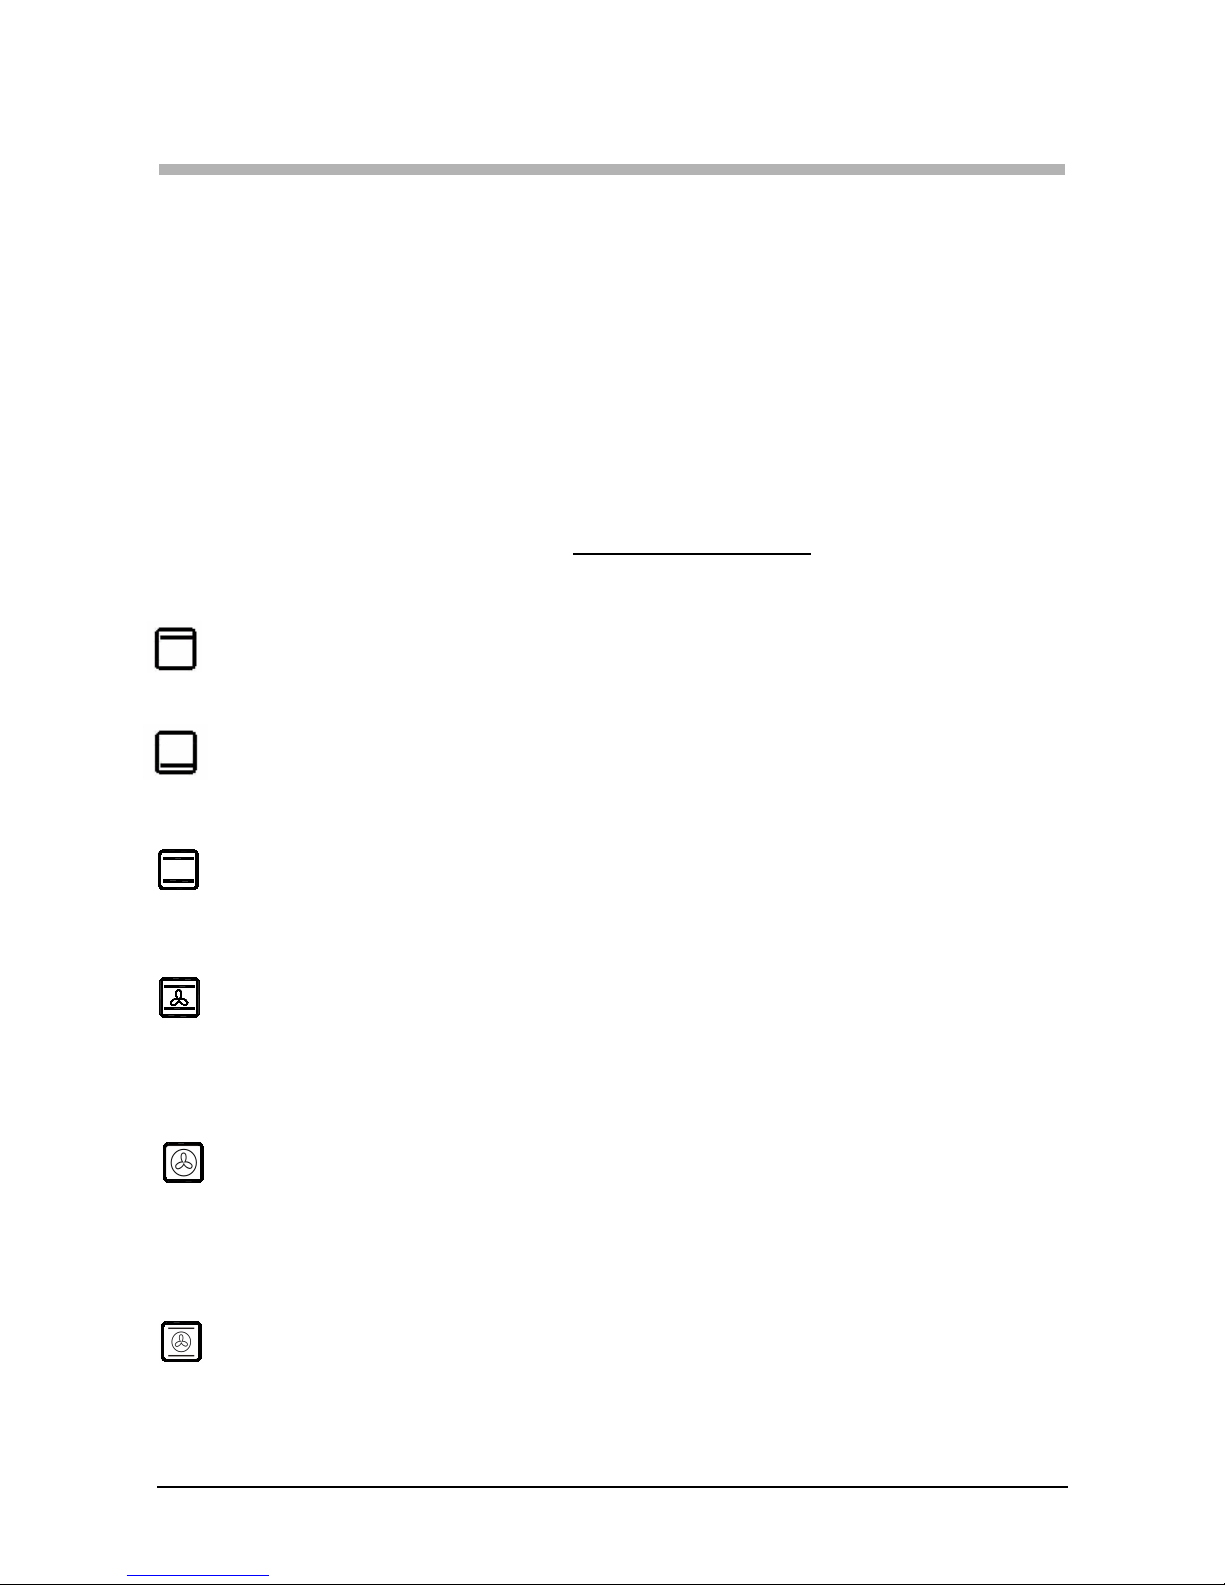
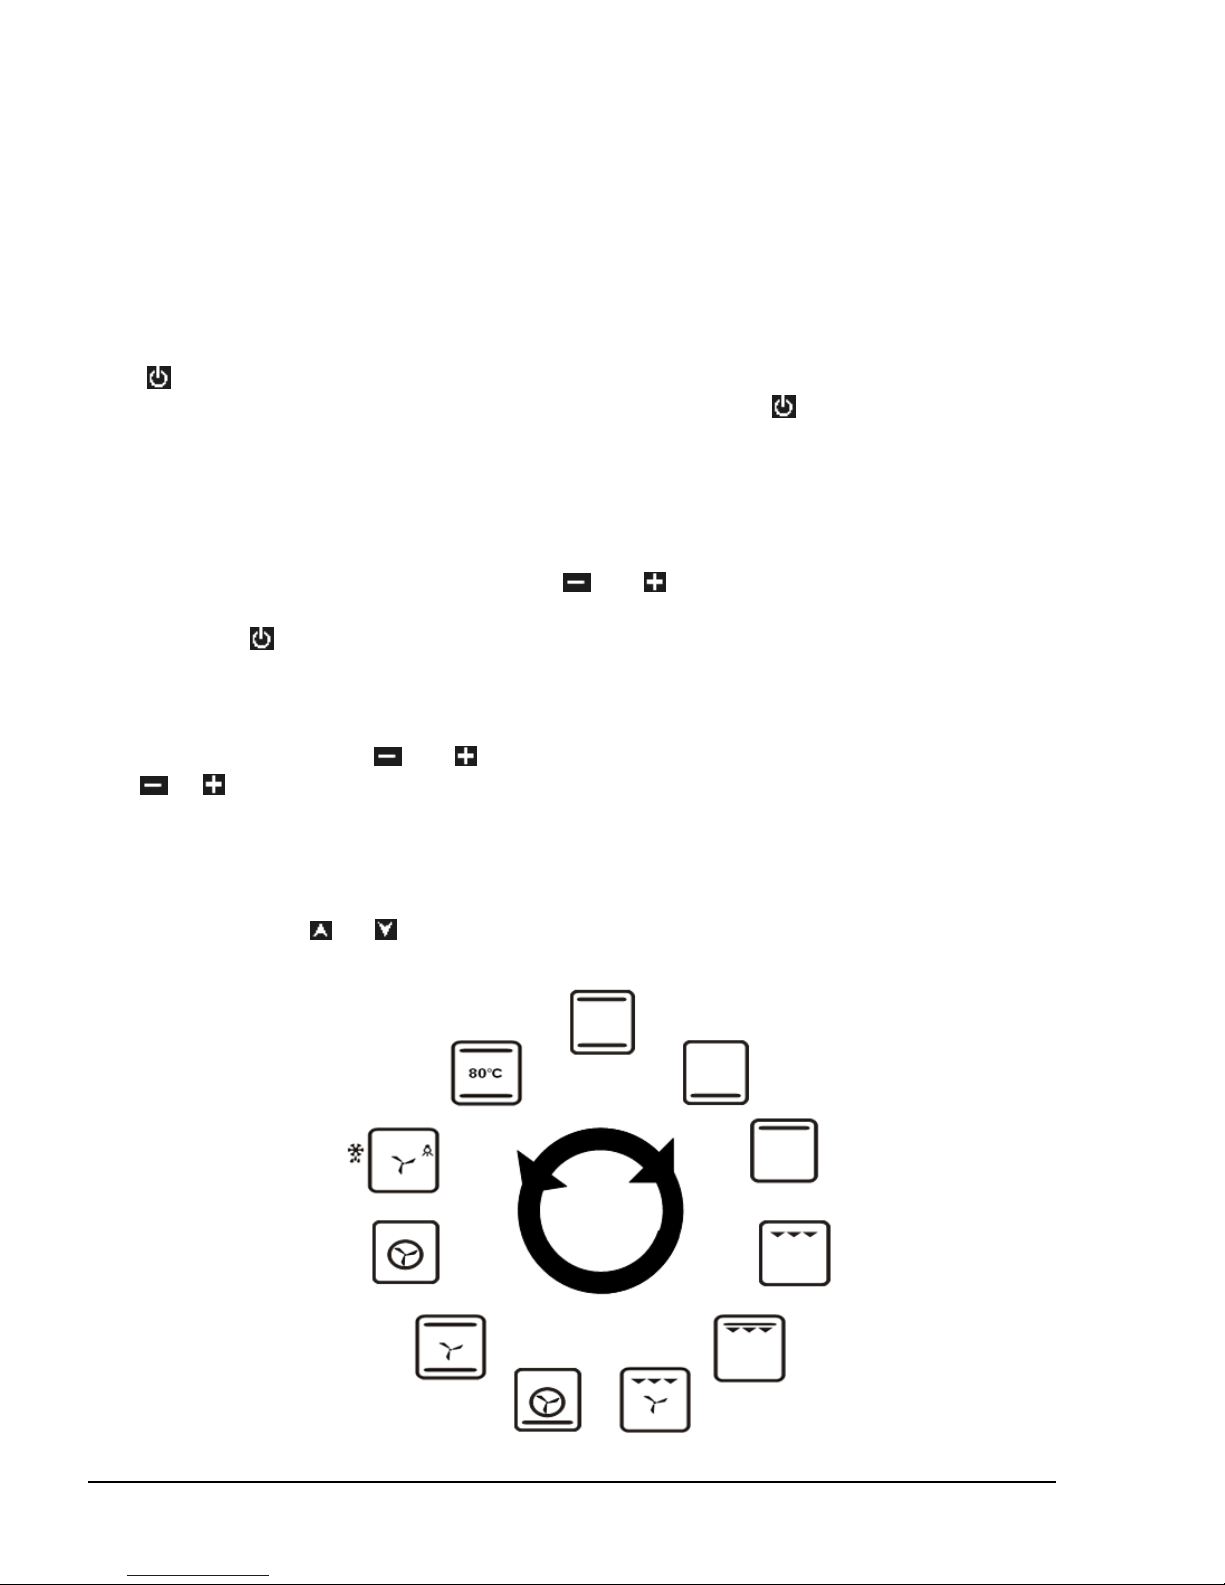
Cooking programmes
Natural static cooking
Set the thermostat knob (F) to between 50°C and Max (250°C).
The heat source is both above the food (roof heating element) and below it (floor heating
element). This is the traditional cooking method which results in uniform cooking on a
single shelf.
Fan cooking
Set the thermostat knob (F) to between 50°C and Max (250°C).
This turns on the top (roof) element, the bottom (floor) element and the fan.
The resulting constant, even heat cooks and browns the food uniformly. With this mode,
you can also cook various dishes at the same time, on up to a maximum of 2 different rack
heights.
Select termo
stat tempereture from between 50°C to 250 °C for keeping
Select the desired tempereture between 50°C to 250 °C. Suitable for very
or gently reheating.
slow cooking and
warming up of food.
cooked food
warm
Top Element only
Bottom Element only
Multy Power Ventilated Mode
The thermostat knob (E) should be set to between 50°C and Max (250°C).
The circular heating element is turned on, accompanied by the partial action of the top
and bottom heating elements and the fan.Compared with the previous cooking mode, it
yis mor powerful and quicker to reach the desired temperature;this, together with the
uniform distribution of the heat,makes it ideal for cooking meat roasts and fish as well as
The thermostat knob (E) should be set to between 50 C and Max (250 C).The circular
Power Ventilated Mode
heating element is turned on.Because of the uniform distribution of the heat , it cooks
and roasts the food completely and entirely. It is possible to cook different food at the
same time which has same cooking temperature.
pasta bakes.
°
°
Page 6
4
Defrost: When the termostat is in off position, perform the oven in upper+bottom+fan position or
gril+fan position
Grill
The thermostat knob (F) should normally be set to Max (250°C), although a
lower temperature can be set, in which case grilling will be slower.
The grill heating element at the top of the oven turns on. In this case the fast surface cooking due
to infrared radiation keeps the interior of the meat tender; the grill can also be used quickly
toasting up to 9 slices of bread. Franke ovens, fo r safety reasons, are intended to grill food with
the oven door completely closed.
Warning: the grill heating element is very hot when in use; take care not to touch it
accidentally when handling the food; Franke has designed the opening
of the oven
compartment in such a way as to protect your hands.
Fan grill cooking
The thermostat knob (F) should normally be set to Max (250°C), although a
lower temperature can be set, in which case grilling will be slower.
The grill heating element at the top of the oven turns on, as well as the fan. This combines
unidirectional heating with fan driven distribution of the air throughout the oven. It thus
prevents burning the surface of the food and increases penetration of the heat. This
function gives excellent results for mixed meat and vegetable kebabs, sausages, pork ribs
and lamb chops, devilled chicken, quail with sage, pork fillets, etc...
Pizza / Quick Cooking
The thermostat knob (E) should be set to between 50 C and Max (250 C).
The circular heating element, along with the top and bottom heating elements and the fan
are turned on.This is the mostpowerful cooking mode available in your Franke oven, and
the heat distribution was espacially designed to perform a prevalent action towards the
bottom; this makes it ideal for the preparation of pizzas and for cooking frozen food quickly.
It can be used to reach the desired temperature quickly,and then select any of the other
cooking modes available.
°
°
Page 7
5
The electronic cooking timer
button, a small
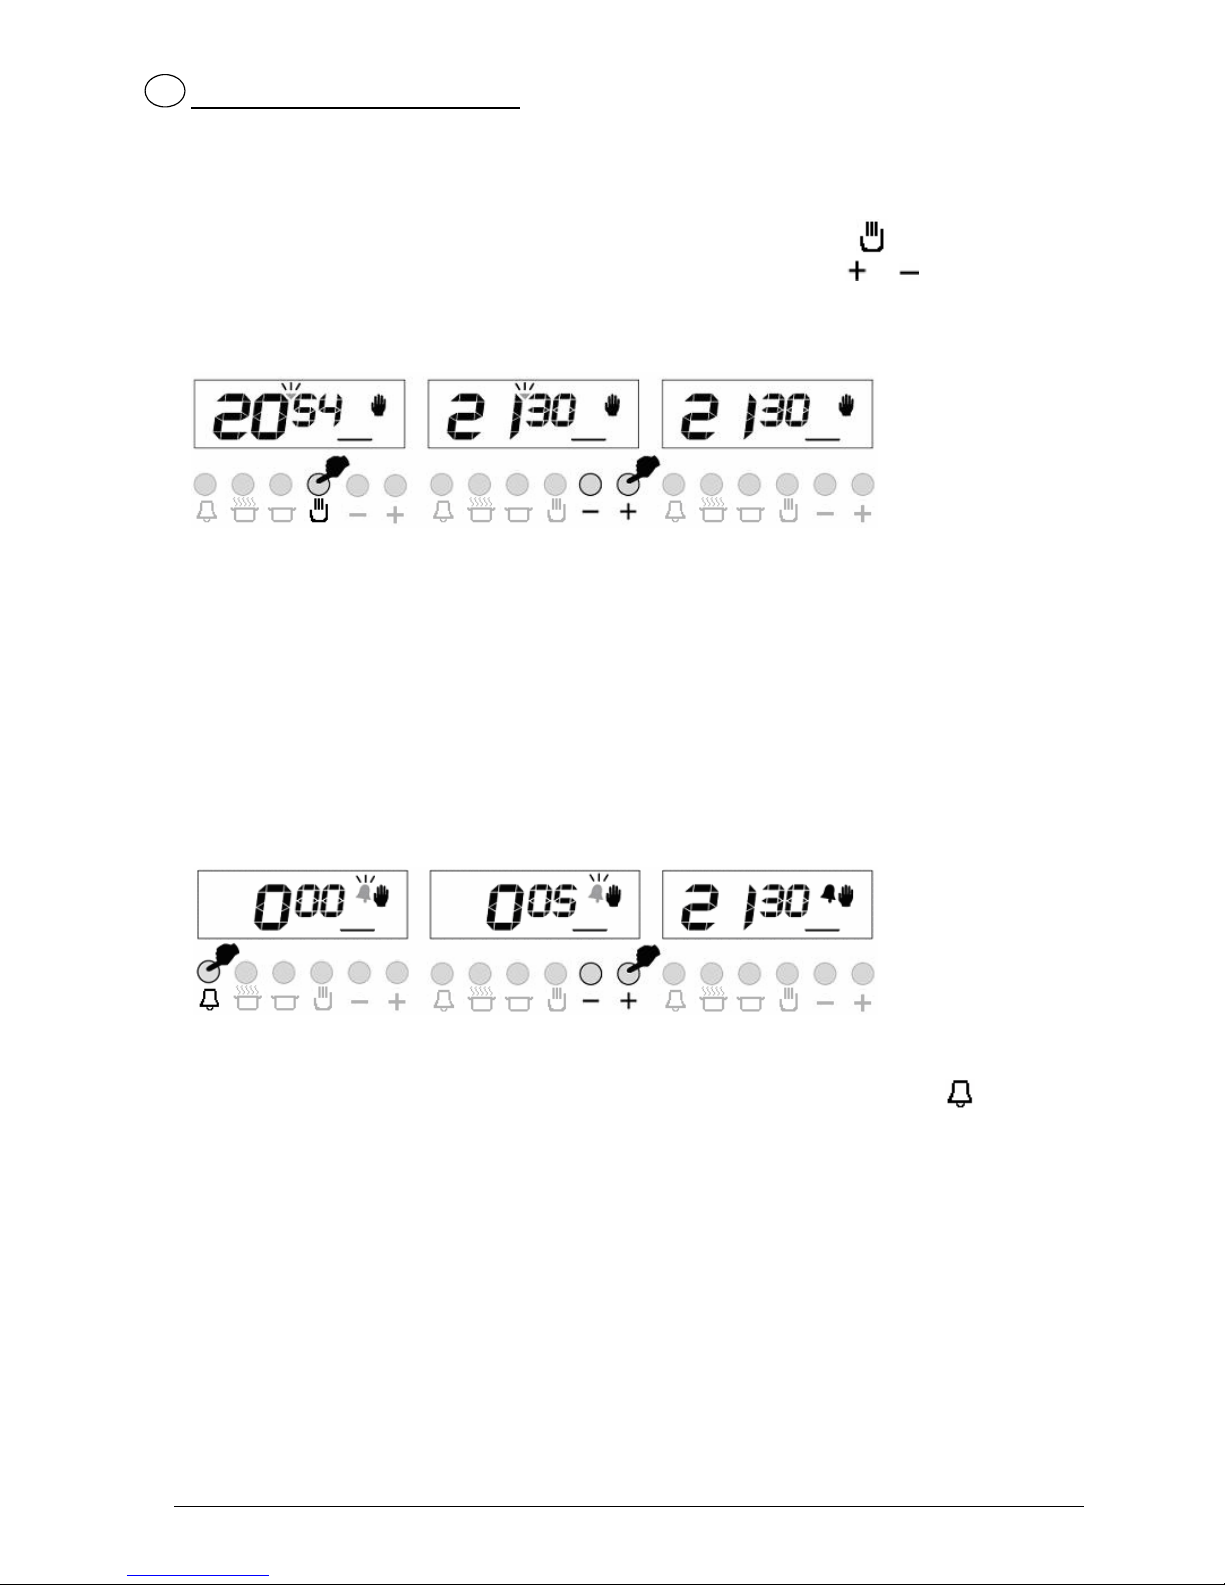
triangle between the hours and minutes will start to flash, use the or buttons for
adjustment. Long presses of those buttons will enable fast adjustments.
1) Switch into time
Adjust the ti een will be
+ or – buttons. nds.
2)
adjustment mode.
the
me using 3) Scr
stabilized in 5 seco
ADJUSTING THE BUZZER ALARM
With this feature, you can program after how much elapsed time you should be warned
by a buzzer sound.
1) Switch into buzzer alarm 2) Give in the period of 3) After a few seconds screen
mode. time to be counted down will return to clock mode
Note: Once programmed, the remaining time can be seen by pressing the
button
once
TIME OF DAY ADJUSTMENT
You can adjust the displayed time only if no automatic cooking program is in progress
(there is just the time and the hand icon on the screen). Press the
C
Page 8
6
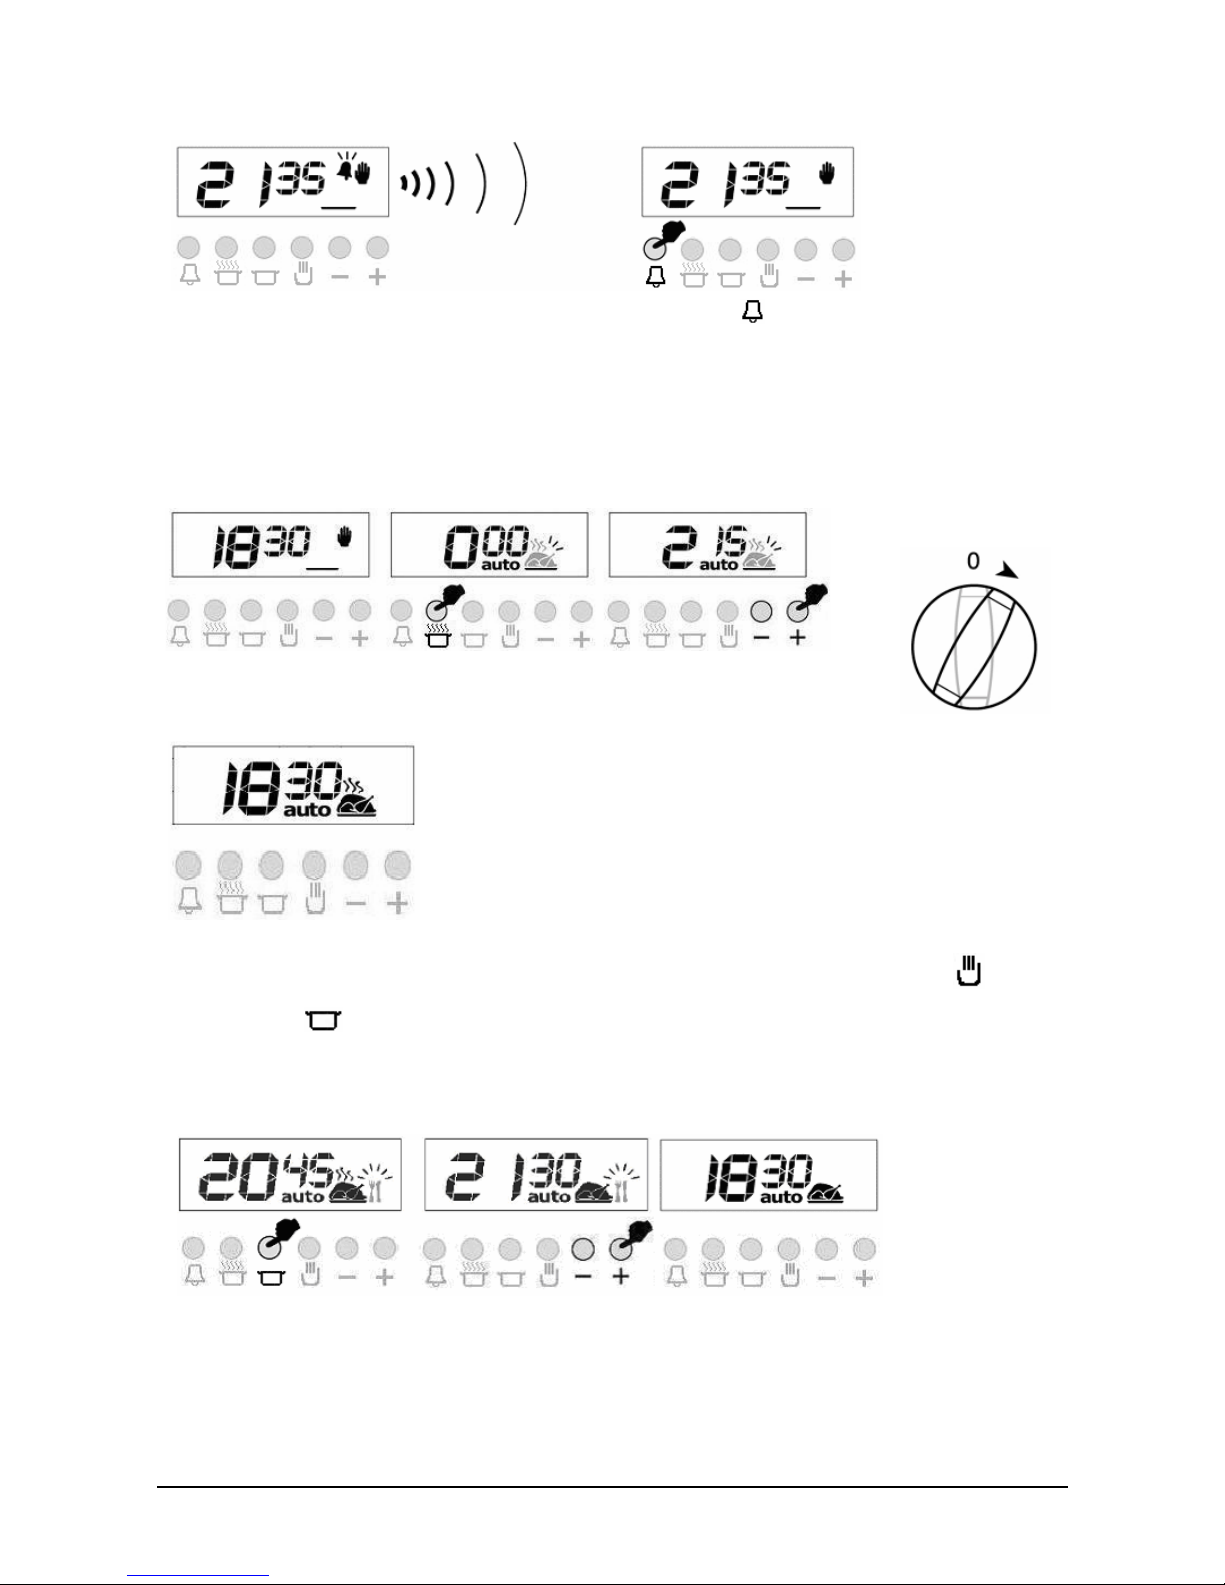
CANCELLING THE BUZZER SOUND
1) Buzzer will sound after the programmed 2) Press the button to cancel.
amount of time elapses.
AUTOMATIC COOKING PROGRAM
If you want to start cooking immediately, you just have to give in the cooking time.
Example: We placed our food into the oven and want it to be cooked for 2 hours and 15
minutes.
1) Current time is 18:30. 2) Switch into cooking time 3) Adjust the cooking time using
mode.
the + or – buttons.
Now, you have programmed your
oven to cook the food for 2 hours
and 15 minutes. Please do not
forget to bring the function and/or
temperature knobs of your oven to
appropriate positions.
4) After a few seconds, the screen
will indicate that cooking has
started and show the current time
Note: You may cancel the automatic cooking mode any time by pressing the button.
In the above example, cooking immediately started after giving in the cooking period. By
pressing the
button, you can see the ready time , ie. the time when the food will be
ready to serve, and if you want, you can al so change it. In the example below, the ready
time will be changed to 21:30.
1) Displayed is the ready 2) Set it to the desired time 3) In a few seconds, screen
time 18:30+2:15=20:45. by using the + or – buttons. switches to clock mode.
Page 9
7
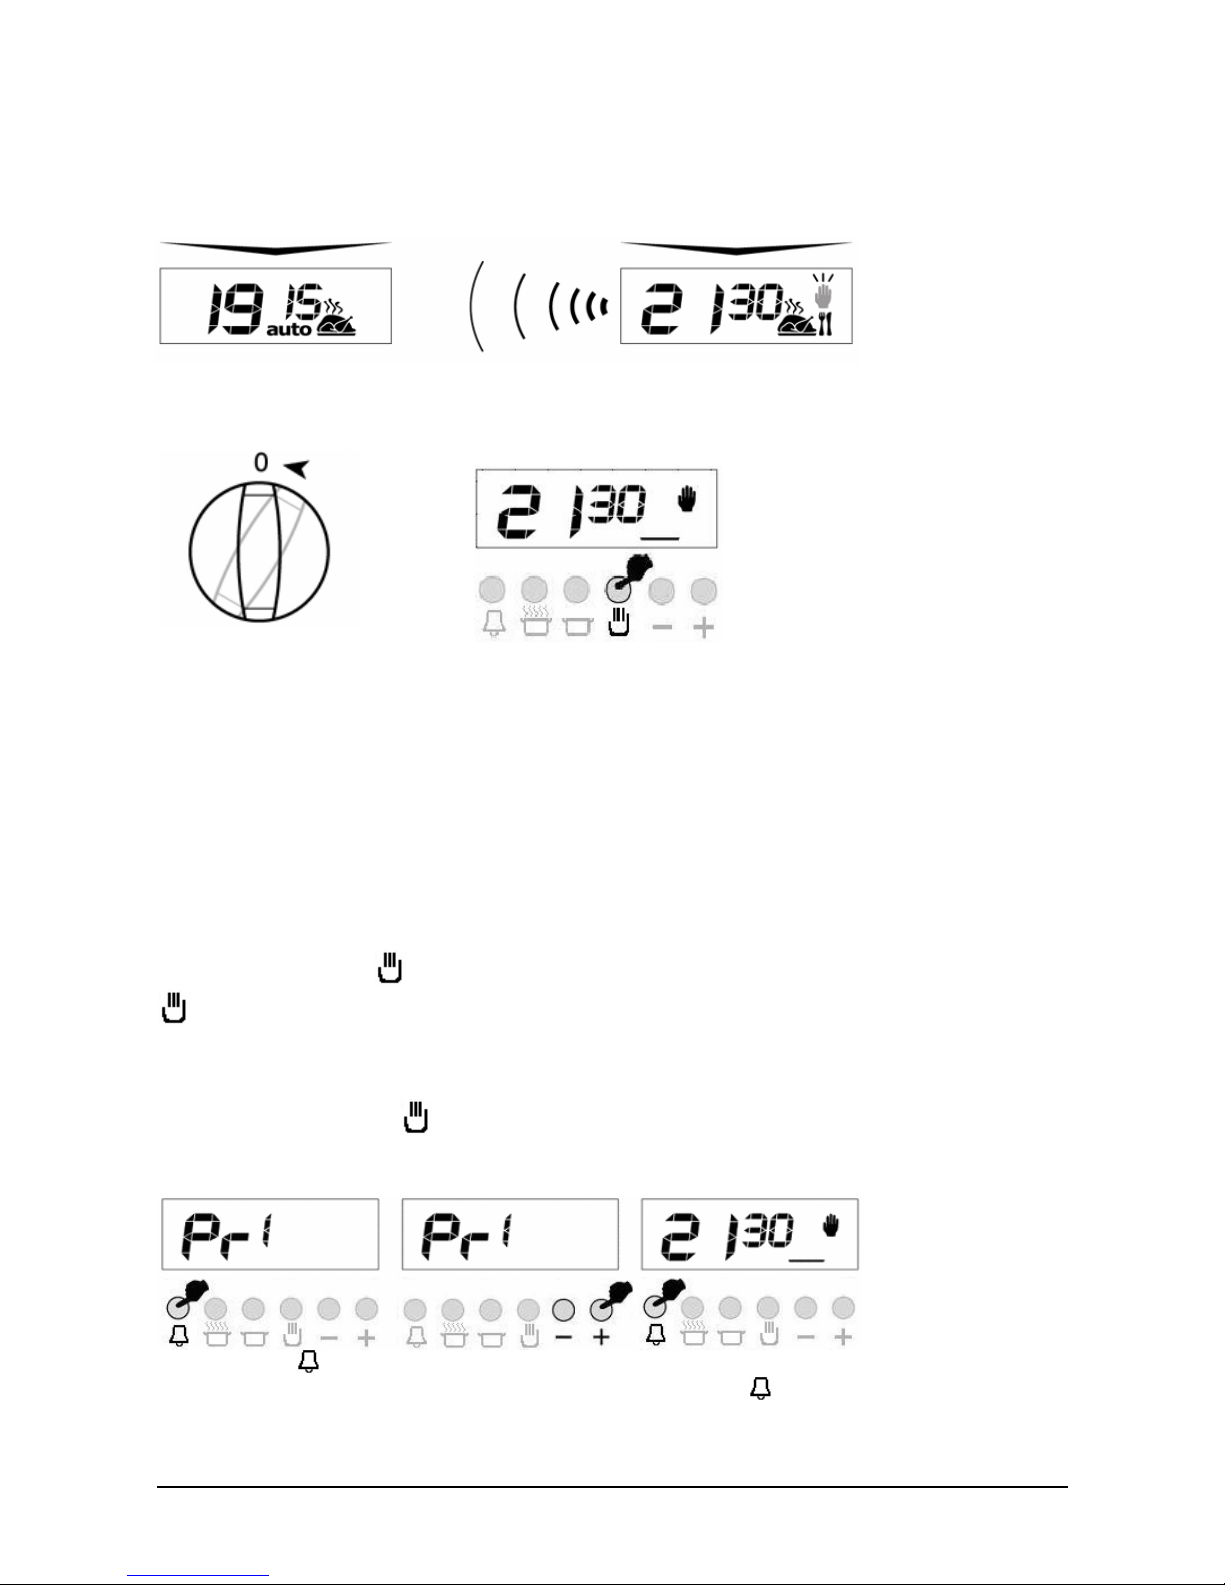
We now have programmed our oven to get the food ready at 21:30. Since the cooking
time was preprogrammed as 2 hours 15 minutes, your oven will start cooking at 19:15, so
that the food is ready at 21:30.
Screen just when cooking starts Screen just when cooking ends
When automatic cooking is completed, a buzzer alarm is heared and will sound, if not
stopped, for 7 minutes.
1) Switch your oven OFF
2) Reset the timer.
Note: Your oven will be inoperative until you reset the timer.
In the example shown, cooking time has been progr ammed first, the ready time was
calculated automatically and was editted by us. It is also poss ible first to program the
ready time, in that cas e the cooking time will be calculated automat ically and should be
editted thereafter.
During the automatic cooking program, the backlight color of the screen will be green
before and red during cooking.
IN CASE MAINS POWER LOSS
Mains power interrupts will switch your oven into OFF mode. In that case the hand icon
on the screen will flash and 12:00 will be displayed. Any cooking program will also be
cancelled. Press the
button to get your oven operative, press once again to the
button switch to adjust the clock (See TIME OF DAY ADJUSTMENT)
Note: If you will not use your oven right now, be sure that it is in OFF position.
FLASHING HAND ICON INDICATES THAT YOUR OVEN IS INOPERATIVE AND YOU
SHOULD PRESS THE
BUTTON TO RESET
BUZZER VOLUME ADJUSTMENT
1) Long press the button 2) Using the + or – buttons, 3) Save your selection by
for 5 sec, you will hear the you may adjust the volume pressing the
button.
current tone. (3 steps available).
Page 10

BUZZER TONE ADJUSTMENT
Press the button for 5 seconds ( till you see ‘pr 1’ on the screen).
Press the
button to decrease buzzer volume
Press the
button to increase buzzer volume (default is already high)
Press the
button to record the last heard tone.
CREATING YOUR BACKLIGHT COLOUR
Press the button for 5 seconds (till display indicates 'r xx' , where xx is a number between
00 and 100 indicating the red content)
Press the
or button to change the red colour content on the display between 00 and 100
You may press
button to switch to green and blue and make the same colour content
adjustment via or as in red.
When desired colour is obtained, press the button for 5 seconds to record it.
Note: To exit without recording press the
button .
AUTO BACKLIGHT COLOUR CHANGE in AUTO MODE ON/OFF
Press the button for 5 seconds ( till display indicates ON or OFF). Backlight colour change
option toggles from ON to OFF or vice versa.
If this option is ON, backlight colour is red during cooking, green as waiting the cooking time
in auto mode. If this option is OFF, backlight colour doesn't change at auto mode.
BACKLIGHT ON/OFF
Press the button 5 second (till display indicates ON or OFF). Backlight option toggles from
ON to OFF or vice versa.
If this option is ON, backlight is always ON. If this option is OFF, backlight is OFF at manual
status. Backlight will be turned on for 15 seconds when a valid button is pressed.
CLICK ON/OFF
Press the button for 5 seconds (till display indicates ON or OFF). Click option toggles from
ON to OFF or vice versa.
If this option is ON, click is heard when a button is pressed. If this option is OFF, no click tone
is produced.
RETURN to DEFAULT SETTINGS
Press the button for 10 seconds (until ‘pr d’ appears on the display ).
Defaults :
Buzzer : high tone
Backlight colour : 0% red, 50% green, 100% blue ( light blue tone )
Backlight colour changing at auto mode : ON
Backlight : ON
Click tone : ON
8
.
Page 11
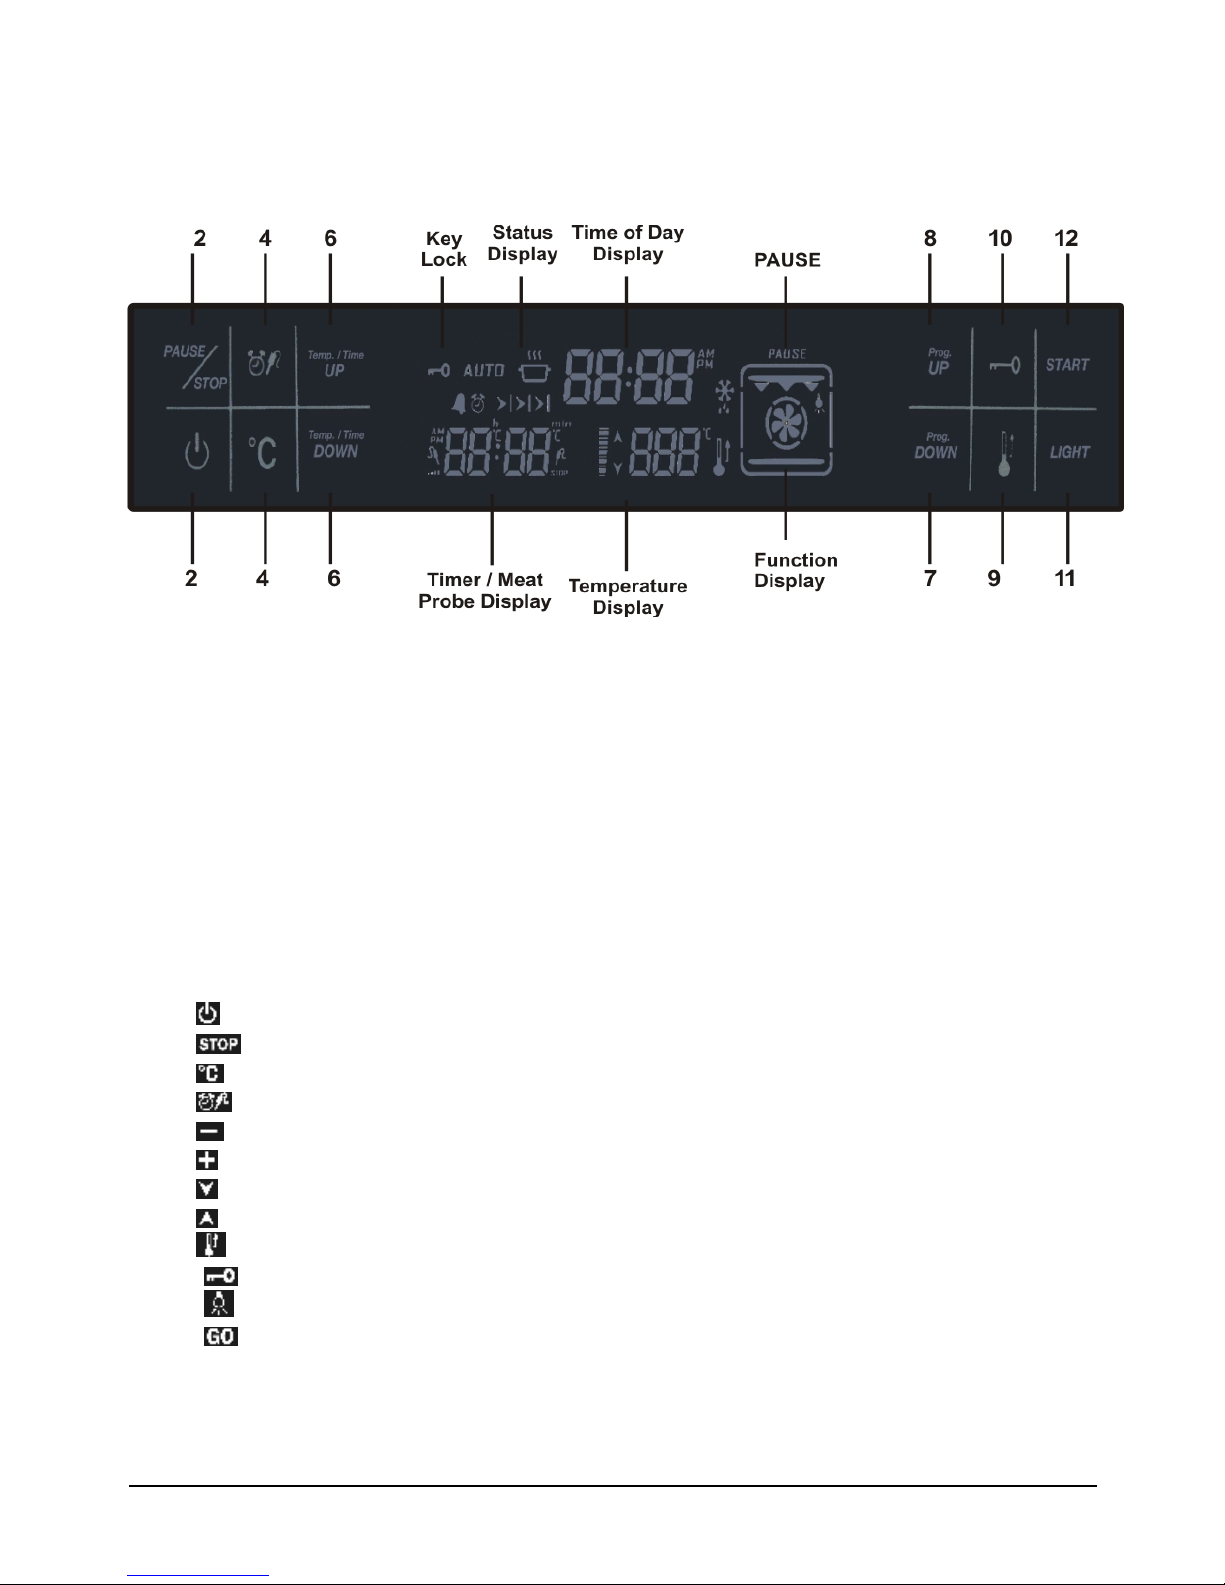
DISPLAY AND TOUCH KEYS OVERVIEW
GL 76 M TC XS
Display :
Time of day – shows the time of day;
Combination Display-indicates the selected cooking function
Temperature Display –indicates the adjusted oven temperature
Timer / Meat probe Display – shows timer or food temperature status
Status symbol- shows the oven status
Pause – indicates that the cooking with the parameters on screen, is paused by user
Key lock indicator
Touch keys :
1.
ON/OFF- switches the device ON or OFF
2. – Stops any program;
3. - Temperature adjustment;
4. Timer Menu/Meat probe functions;
5. - Minus;
6. - Plus;
7. - Function adjustment-down;
8. - Function adjustment-up;
9. - Rapid Heat Up;
10. - Activates or deactivates the keylock;
11. - Lamp ON or OFF;
12. Start Cooking Key;
9
Page 12
1. General Overview:
Resistance and fan combinations in the menu can be selected using touch
keys in the user interface. Cooking time, end time ( if meat probe is used end
temperature ) , cooking temperature are adjustable. Additionally keep warm, heat
up, real time display, stopwatch, and key lock functions are available.
SWITCHING THE CONTROL ON or OFF:
key activates or deactivates the control (independently from child lock). When
the control is OFF, the screen is completely blank. Pressing key for 1 second,
activates the control. The current time of day appears on the display.
Note: In case of any occurred power interrupt, the current time of day will not be
correct any more. A flashing 0:00 will appear on the time of day display. It is
impossible to use any features of the control without setting the time of day. The
correct time can be adjusted using the and keys.
Pressing for 1 second as control is ON, sets the control in the OFF state.
ADJUSTING TIME OF DAY:
Touch and hold both and buttons until time of day digits start flashing. Using
or keys, set the correct time. Wait for 7 seconds, flashing will stop, adjustment
is completed.
SELECTING A COOKING FUNCTION :
Using either of or keys, you may scroll through the function menu.
10
Page 13
The current function will flash on the Function Display for 7 seconds and the default
cooking temperature assigned to this function will appear on the temperature display
(Note: For some functions, a temperature control is not possible and the temperature
display is blank).
The is steady on the status display, whereas is flashing, indicating that
you are ready to cook but not started yet.
CHANGING THE ASSIGNED DEFAULT OVEN TEMPERATURE:
The Temperature Setting on the Temperature Display might be changed by touching
the button- the Temperature Display starts flashing- and setting the desired
value using or in 5 degree intervals.
(!)Note: If you want to replace the default temperature setting for this function with
this adjusted temperature permanently, touch for approximately 5 seconds, until
a buzzer tone is heard. The factory set default temperature for this function is now
permanently changed.
MANUAL COOKING:
Once a function is selected, touching the key, initiates cooking with a
temperature setting on the temperature display (if any). disapears , and the
time passed in cooking starts to be displayed on the timer/meat probe display.
Cooking will continue until it is ended by the user manually ( see: to pause,edit or
end cooking) or the maximum allowed cooking time, depending on the selected
cooking temperature, has passed, as listed below:
050-120 C 10h
121-200 C 6h
201-250 C 3h
In half and full automatic cooking, as described later, cooking is ended automatically
depending on the parameters entered by the user before initiating cooking (by
touching )
TO PAUSE, EDIT or END COOKING:
Touching during cooking, interrupts the cooking progress and
starts flashing, whereas other portions of the display remain the same. All oven
heating elements and turbo fan are disabled temporarily. Cooking is paused.
To end cooking, touch once again, all cooking related indications on the display
disappear. The temperature display will indicate the residual heat ,if any ( see:
Residual Heat Indication ).
11
Page 14
Note: After cooking has ended, touching brings the previous function and
temperature settings on the screen, by a second touch, cooking may be initiated
again.
To edit the cooking parameters (Fuction, Temperature, etc), use the appropriate
buttons as described in this document. Touching will restart cooking with the
edited parameters.
AUTOMATIC COOKING:
Automatic cooking means, that cooking will end automatically according to the
parameters you tell the control after selecting the cooking function and temperature
but before touching .
Half Automatic Cooking:
This method is used when NO meat probe is used and you want to start cooking
immediately, entering the desired cooking duration.
1) Select the desired function and adjust (if needed) the temperature as
described before in this document.
2) Touch key. will flash on the timer screen.
3) Adjust the required cooking duration using and keys. appears on
the status display.
4) Touch key, disappears, cooking starts. The cooking end time is
displayed on the timer display, together with symbol .
Full Automatic Cooking:
This method is used when NO meat probe is used and you want the food to be ready
at a certain time in future. Therefore, this method is also called ‘Delayed Cooking’
1) Go through steps 1 to 3 of half automatic cooking (setting the cooking
duration)
2) Touch key again, flashes on the timer screen together with the
current cooking end time.
3) Adjust the desired end time using and keys. on the status display
may disappear whereas is still there, indicating that a delayed cooking
is programmed and cooking will not start immediately.
4) Touch key, disappears, cooking starts. The cooking end time is
displayed on the timer display, together with symbol .
( If duration is brought to 0:00, two warning beeps occur)
12
Page 15
Cooking with Meat Probe:
Meat probe is a sensor, connected to plug inside the oven and inserted into the meat
to be cooked. Using the meat probe, cooking is automatically ended when the meat
reaches the desired temperature.
1) Select the desired function and adjust (if needed) the temperature as
described before in this document.
2) Touch key. The default value of the meat probe temperature will flash on
the right two digits of the timer/meat probe display. will appear on the
screen.
3) Adjust the desired meat temperature at cooking end in the range 20-99 C
using and keys.
4) Touch
, disappears, cooking starts. The actual meat temperature is
displayed on the left , the adjusted end temperature on the right portion of
the timer/meat probe display.
During Cooking:
The 5 bars on the temperature display give an indication about the actual
oven temperature. Each bar is assigned to 1/5 th of the adjusted value. The uparrow near the bars flashes, when the heating elements are currently active.
AUTOMATIC END OF COOKING:
After cooking ends automatically, the temperature display will indicate the
residual heat ,if any ( see: Residual Heat Indication ),
buzzer will sound for 7 minutes. Touching
will cancel the latter.
will be flashing and
Residual Heat Indication:
After cooking has ended manually or automatically, if the internal oven
temperature is above 60
°C, ‘down arrow’ on the right side of heat bars flashes
every 2 second and also “hot” is displayed on the temperature display. Each one of
the 5 heat bars symbolize now 60 °C. This indication goes on until the oven
temperature falls below 60 °C.
SPECIAL FEATURES:
Lamp ON/OFF: The lamp inside the oven will be ON, whenever a function is being
or is adjusted. It will get OFF, after cooking and residual heat indication ends.
However, it can be switched ON or OFF touching , except using the defrost
function.
13
Page 16

Heat Up Rapidly: Sometimes it is desired to bring the oven temperature rapidly to
the adjusted value. Touching will energize the circular resistance and/or turbo fan
temporarily to achieve a rapid heat up. symbol will be visible on the screen, after
reaching the adjusted oven temperature, it will vanish and a buzzer tone is heard.
Note: Rapid heat up is not allowed for some functions (grill) or when the actual
temperature is less than 50C away from the adjusted one or the adjusted
temperature is below 100 C.
Child Lock:
Child lock can be activated or deactivated via touching the key for 1
second, until the symbol appears on the screen. When child lock is activated, no
key except
Minute Minder Alarm:
Touch and release
time in minutes, using the
alarm lasting 7 minutes will be produced after the adjusted time has elapsed. This
alarm can be stopped touching any of
Alarm Clock:
Touch and release
alarm time , using the
alarm will be produced when the adjusted time has come. This alarm can be stopped
touching any of
ERROR INDICATIONS:
When situations which prevent normal operation occur, the device enters error
mode. Device is in the standby status but an error code is displayed on Time of Day
Display. Even if the error recovers, this code will remain on the display until
is touched. A total number of 8 error codes exist:
Err1: Communication error
Err2: PT1000 open circuit
Err3: PT1000 short circuit
Err4: Temperature exceed in user interface
Err5: Temperature exceed in the power module.
Err6: Temperature sensor failure in the user interface.
Err7: Temperature sensor failure in the power module.
Err8: Main power error. There is no warm up detected although heating
elements seem to be activated.
, is accepted.
key until appears in a flashing manner. Give in the
or keys. Flashing will stop after 7 seconds, a buzzer
or keys.
key until appears in a flashing manner. Give in the
or keys. Flashing will stop after 7 seconds, a buzzer
or keys.
key
14
Page 17

Programmable Options
Buzzer Tone: There are three buzzer tones to select.
Touch the key 5 seconds long, time of day display will show the currently valid
tone as “tn 1” (high) or “tn 2 (medium)” or “tn 3 (low)". The valid tone can be
changed by a key touch within 7 seconds after the last one. Default tone is “tn
1”.
Key Sound: There are three key sound options to select.
Touch the key key 5 seconds long, time of day display will show the currently
valid key tone as “bt” (beep tone) or“c” (click tone) or “nt" (no tone). The valid key
sound can be changed by a
key touch within 7 seconds after the last one.
Default key sound is “bt”.
Time of Day Mode 24h/12h: Default mode is 24 hours. If 12h am/pm
mode is desired, touch both
and keys 5 secons long. Mode changes and a beep
tone occurs. Do the same for vice versa.
Auto Power Save (APS): APS is an option not set as factory setting. If set,
the control will be switched OFF automatically, whenever there is nothing other than
the time of day to be displayed. Touching 5 seconds long in idle mode (no
cooking related operation present) activates this option, Time of day digits will show
PS ON for a few seconds accompanied with a beep tone. Cancelling this option is
done in the same way, PS OF will be shown on the screen.
15
Page 18

16
Cooking table
NOTE: The instructions in the table are the result of cooking tests carried out by a team of professional chefs. They are given only as a
guide and can be changed according to personal tastes.
Setting the
selector knob
Type of food Weight
(Kg)
Rack position
Pre-
heating
time
(min.)
Setting the
thermostat
knob
Cooking
duration
(min.)
Natural static
cooking
Roast pork
Omelettes
Cod-gilthead-turbot
Ordinary bread
Pies
Freshwater fish
Polenta with sauce
Cheesecakes
1
1.5
1
1
1
1.5
0.5
1.5
3
2
3
2-4 cont.
2
3
2
2
9.5
10.5
9.5
9.5
10.5
10.5
9.5
9.5
180°C
200°C
180°C
175°C
200°C
200°C
180°C
180°C
65-75
25-30
15
25-30
40-45
35-40
25-30
25-30
Assisted
cooking
Roast pork loin
Baked rabbit
Crescia Marchigiana (quick flat bread)
Baked crayfish
Cod-gilthead-turbot
Ordinary bread
Fruit tarts
Savoury pies
1
1
1.5 0.5
2
2
1.5
2
3
2
2
3
2-4 cont.
2-4 cont.
2
3-5 cont.
9
9.5
10
10
7.5
9
9
9
180°C
190°C
200°C
200°C
150°C
180°C
175°C
180°C
60-70
55-65
25-30
30-40
25-30
25-30
30-35
40-45
Cooking +
fan
Pumpkin bread
Wholemeal bread
Puff pastry
Salt biscuits
Vegetable pies
Cakes
Cheese pies
Trout en papillote
2.5
1
1
0.75
1
0.5
1.5
0.
3
2, 3 or 4
1-4 cont.
1-4 cont.
1-3-5 cont.
3
2 or 3
3
3
7
8
8
8
7
7
7
8.5
180°C
190°C
190°C
190°C
180°C
180°C
180°C
200°C
25-30
30-35
30-35
25-30
55-60
25-30
25-30
15-20
"Multi power"
cooking + fan
Baked rabbit +
Meat pies +
Savoury pies
1.5
1.5
1.5
1-3-5 cont.
1-3-5 cont.
1-3-5 cont.
7.5 200°C
115-125
50-55
35-40
Chicken
Roast suckling-pig
Salt biscuits
Fruit tarts
Baked potatoes
1.5
6.5
0.3
1.5
1
2
3
3
3
3
6
7.5
6
7.5
6
180°C
200°C
180°C
200°C
180°C
60-65
370-390
20
30-35
30-35
Pizza "quick
cooking"
Buns
Ordinary bread
Black bread
Pizza
Roast beef
Knuckle of pork/veal
Tu r k e y
1
1
1
0.9
1.5
1
1
3
1-4 cont.
3
1-3-5 cont.
3
3
3
11.5
5.5
5.5
11.5
5.5
5.5
5.5
Max.
180°C
180°C
Max.
180°C
180°C
180°C
55-60
20-25
25-30
10-11
35-40
11
0-120
45-50
Grill Chicken wings
Chops
Scallops
Baked potatoes
Freshwater fish
Tomatoes au gratin
Eel kebabs
Tu rk e y k e ba bs
1
0.8
0.5
0.5
1
0.4
0.5
0.5
4 or 5
3
3 or 4
3
3 or 4
2 or 3
3
4
7
7
7
7
7
7
7
7
Max.
Max.
Max.
Max.
Max.
Max.
Max.
Max.
25-30
20-25
14-16
25-30
25-30
20-25
25-30
25-30
Grill + fan
cooking
Chicken legs
Spare-ribs
Guinea-fowl
Gilthead en papillote
Chicken
Quails
Sausages
Veg etables
1
0.5
1.2
0.3
1.5
0.8
1
1
4 or 5
4
4
3
3
4
4
4 or 5
9.5
14
14
8
14
14
14
14
220°C
Max.
Max.
200°C
Max.
Max.
Max.
Max.
20-25
40-45
30-35
20-25
35-40
30-35
20-25
10-15
Page 19

17
Cleaning and maintaining the oven
Important
Before maintaining the oven, always remove the power plug from its mains socket or
switch off power with the master power switch.
– The stainless steel and enamelled parts of
the oven will stay as good as new if regularly
cleaned with water or special detergents, make sure to dry them carefully after
cleaning.
– Never use scouring pads, steel wool, muriatic acid or other products which could
scratch or mark the surface. Do not use steam cleaners.
– Stains on the base of the oven, due to various cooking products (sauces, sugar, egg
white and fats) are always produced by spills and splashes. Splashes occur during
cooking and the result of cooking at too high a temperature, while spills are due to the
use of insufficiently capacious cooking vessels or an incorrect estimate of increases in
volume during cooking. These two problems can be solved by using cooking vessels
with high borders or by using the provided drip tray. As regards cleaning the lower part
of the oven, clean off any stains when the oven is still slightly warm; the longer you
delay cleaning them off, the harder it is to remove them.
Cleaning the oven door
– The oven door must be cleaned, both inside and out, when the oven is completely cold using
hot water. Do not use abrasive cloths. Clean the glass with special detergent.
– Clean the e
namelled surfaces, and the oven interior, with hot water and non-abrasive
detergent.
Replacing the oven light
Franke ovens are equipped with a circular lamp positioned on the top left at the back of
the compartment.
Replace the oven light as follows:
- Switch off power to the appliance with the master power switch used in connecting the
oven to the mains supply, or by
removing the plug from the mains socket, if it can be
reached.
- Unscrew the glass cover (A).
- Unscrew the bulb and replace with a high temperature resistant bulb (300°C) of the
following type:
Voltage: 220/230V - 50Hz
Power: 15W
Fitting: (E14) small
- Refit the glass cover (A) and reconnect the power supply.
A
Page 20

18
R
emoving the oven door
Removal oven door for easy cleaning
Before cleaning the oven door, we advise you to follow below steps to
seperate oven door from the oven body:
1. Open the door completely. Dismount the locking part on the hinge by
lifting with screwdriver.
2. Push the locking part in the direction of the glass door to the hinge body.
3. Open the glass door to the back slightly and insert the locking part
to it’s place on hinge. Make sure that this is done on both for left and
right hinges.
4. Lift the door slightly and pull the door with your two hands to
seperate from the oven.
Inserting the oven door
After cleaning, for inserting oven door to oven body it is recommended
to apply below steps:
1. Hold the door in open position and insert the hinge to hinge counter part.
2. Open the glass door to the back slightly for getting the locking part
and then push ahead and lock with screwdriver.
3. Open and close the door to make sure that it has been fitted
correctly.
Don't work the oven unless install the glass door
( For GL 76 M TC XS )
Page 21

19
Service
In case of malfunction, contact a Franke Technical Service Centre (see attached list).
Do not call in unauthorised technicians.
When contacting the Service Centre, quote the following information:
–Type of fault;
– Appliance model (Art.);
– Serial number (S.N.);
This information is given on the appliance dataplate on the warranty certificate.
Safety warnings
Always contact a Franke Technical Service Centre in the following conditions:
To ensure safe, efficient operation of the appliance:
• always have the appliance serviced by a Franke Authorised Service Centre
• always insist on the use of original spare parts
• The applia
nce is designed for non-professional, domestic use; do not attempt to
modify its specifications.
• The dataplate is marked with symbols indicating the countries for which the
instructions apply
• The electrical safety of the oven is only guaranteed when the appliance is effectively
earthed, as required by established legislation.
• Do not touch the heating elements or the door when the oven is on, as they
reach very high temperatures. Keep children away from the oven when it is in
use.
Do not allow children to touch:
- the controls or the appliance itself;
- the packing elements (bags, polystyrene, staples, etc.);
- the oven in use
, and immediately after use, while it is still hot;
- the appliance when not in use (at which time the otherwise hazardous components are
no longer a source of risk).
Page 22

20
Do not:
- touch the appliance with wet hands or other parts of the body;
- use the appliance when barefoot;
- pull the appliance or power cable to remove the plug from the power socket;
- use the appliance in an unsuitable or hazardous manner;
- block the ventilation and cool
ing vents;
- route the power cables of other appliances across the hot parts of the appliance;
- expose the oven to atmospheric agents (rain, sun);
- use the oven to store objects of any kind;
- use flammable fluids in the proximity of the appliance;
- use adapters, multiple-sockets and/or extension leads;
- install or repair the appliance without the aid of an authorised technician.
- installation (to the manufacturer's instructions);
- doubt regarding the operation of the appliance;
- replacement of the power socket if incompatible with the appliance's plug,
Contact a Franke Authorised Service Centre in the following cases:
- immediately after having removed the packaging, if you have doubts about the
condition of the appliance;
- replacement of or damage to the power cable;
- malfunction or poor operation; always insist on original spare parts.
Observe the following precautions:
- only use the appliance for cooking food, and for no other purposes;
- before cleaning or servicing the oven or in case of malfunction, disconnect the
appliance from the electrical power supply;
- use oven gloves for placing cooking dishes in the oven or removing them;
- since the ends o
f the door handle may be hotter due to jets of hot air, always grasp it at
its centre;
- always check that the control knobs are in the off position when the oven is not in use;
- should you decide to stop using the oven, disconnect it from the mains.
• The manufacturer is not liable for damages resulting from: incorrect installation,
improper, incorrect or unreasonable use.
contact with your electrician.
Page 23

21
Installation
Important: installation must be done in compliance with established standards and
regulations. It must be done by a Franke Technical Service Centre
Kitchen unit requirements
For built-in units, the components
(plastic materials and wooden
veneer) must be assembled with
heat resistant adhesive (max
100°C): unsuitable materials and
adhesives can result in warping and
failure of the adhesive. The unit
must allow sufficient room for the
electrical cabling. The unit must be
robust enough to support the
weight of the applia
nce.
The oven must be securely installed
in the compartment. The oven may
be installed in a column unit or
underneath the top of a modular
unit, so long as sufficient ventilation
is provided.
Page 24

22
Installation instructions
Connection to power mains
FRANKE ovens are equipped with a three pole power cable with free terminals.
If the oven is permanently connected to the power supply, install a device to ensure that it
is disconnected from the power supply, with a contacts opening distance (of at least 3
mm) to ensure total disconnection in conditions of category III overvoltage. Make sure:
a) the plug
and socket are suitable for a 16A current
b) both are easily accessible and positioned so that no live part can be accessed when
inserting or removing the plug
c) the plug can be easily inserted
d) when plugged in, the oven doesn't rest against the plug when installed in the cabinet
e) the same socket must not be used for two plugs
f) a 3 x 1.5 mm2 cable
type
H05VV-F should be used to replace
the power cable
g) the polarity of connection of the free terminals must be
respected
(Brown=Phase – Blue=Neutral – YellowGreen=Earth)
N.B: make sure that the characteristics of your power system
(voltage, maximum power and current), are
compatible with
those of your FRANKE oven.
Place the appliance in the compartment; secure the oven to the unit with
the 4 screws provided, through the holes in its side panels.
If the oven is to be fitted underneath a cooktop, first turn the cooktop
assembly (R) to the right or left so that the oven fits properly.
BLU
MARRONE
BROWN
BLUE
GIALLO-VERDE
YELLOW-GREEN
L
N
Page 25

23
Technical data
INFORMATION FOR USERS
Pursuant to the article of Legislative Decree n. 15, of 25th July, “Actuation of Directives 2002/95/
EC, 2002/96/EC and 2003/108/EC, concerning a reduction in the use of dangerous substances in
electric and electronic appliances, as well as waste disposal”
The symbol of the barred dustbin shown on the appliance indicates that at the end of its useful life it must be
coll
ected separately from other waste.
The user must therefore contact a waste sorting company specialized in the collection of electronic and
electrical appliances, to consign the product.
Proper waste sorting for subsequent recycling of parts and materials, and disposal compatible with the
environment contributes to prevent possible negative effects on public health and the environment and
facilitates the reuse of the materials used to produce the appliance.
Improper disposal may subject the user to the fines indicated in the Legislative Decree. n. 22/1997” (article 50
and thereafter of Leg. Decree n. 22/1997).
Useable dimensions of the oven:
435 mm. wide
424 mm. deep
315 mm. high
Useable volume of the oven:
58 litres
Consumption (static operation):
0. kWh
Consumption (fan operation):
0.7 kWh
Power voltage and frequency:
20V ~ 50Hz
Total power and fuse rating:
3,300kW - 16A
Heating element power:
roof 1200 W
floor 1300 W
grill 3200 W
fan 30 W
oven light 1 x 15 W
tangential fan 15 W
The appliance complies with the
following EU Directives:
–//EEC
(LowVoltage);
– 89/336/EECof
//(Electromagnetic
Compatibility)
turbo resistance 2050 W
Page 26

24
İçindekiler
Giriş............................................................................................... 24
İlk çalıştırma .................................................................................. 24
Öneriler ......................................................................................... 24
Yakından görünüm........................................................................ 25
Kullanım şekli ................................................................................ 26-27
Örnek pişirme tablosu ................................................................... 38
Fırının temizliği ve bakımı ............................................................. 39
Yardım ........................................................................................... 41
Güvenlik uyarıları .......................................................................... 41-42
Kurulum......................................................................................... 43
Montaj talimatları .........................................................
.................. 44
Elektrik ş
ebekesine bağlantı .........................................................
44
Teknik Veriler................................................................................. 46
Giriş
Bir Franke ürününü seçtiğiniz için teşekkürler.
Cihazı kullanmadan önce, kullanma kılavuzunda yer alan uyarı ve tavsiyeleri
dikkatlice okumanızı tavsiye ederiz. Böylelikle cihazı daha uzun süre verimli bir şekilde
kullanabilir ve muhafaza edebilirsiniz. Bu kullanma kılavuzunu gerektiğinde kullanmak
üzere özenle saklayınız.
İlk çalıştırma
Fırını ilk kez kullanmadan önce, içi boş olacak şekilde sıcaklık ayar düğmesini
maksimuma getirerek en az 40 dakika süreyle, kapısı açık olarak ve bulunduğu
mekan iyi havalandırılacak şekilde çalıştırınız.
Bu işlem esnasında çıkacak koku, fırının üretim ile montaj aşamaları arasındaki
süreçte fırını koruma amacıyla kullanılan maddelerin buharlaşması nedeniyle ortaya
çıkan kokudur. Bu i
şlem tamamlandığında fırın kullanıma hazırdır.
Öneriler
Pişireceğiniz yemeği fırın soğukken değil, seçmiş olduğunuz sıcaklığa eriştikten sonra
fırına koymak daha iyi sonuç verecektir, böylece yemekleriniz daha lezzetli olacaktır.
Pişirme sırasında, kapları ve tencereleri asla doğrudan fırın tabanına koymayınız,
bunlar fırındaki 5 kattan b
irinde bulunan ızgaraların veya tepsilerin üzerine
yerleştirilmelidir; bu talimata riayet edilmemesi halinde, fırının iç emayesi zarar görebilir.
Fırın panellerini, özellikle de iç pişirme bölmesinin panellerini, asla alüminyum
folyo ile kaplamayınız.
Gerekli onarımlar,
Bu gibi durumlarda en yakın yardım merkezimizi arayınız ve sadece orijinal yedek
parça kullanılmasını talep ediniz.
Franke marka fırınınızda kolay temizlenen özel emaye kullanılmıştır, bununla
birlikte fırını sıkça temizleyerek kalan yemek artıklarının tekrar pişirilmesini
önlemek oldukça yararlıdır.
Otomatik temizlemeli paneller (eğer fırında mevcutsa) su ve süngerle
temizlenmelidir (temizlik talimatlarına bakınız).
NOT: - fırını yakmadan önce zamanlayıcı saatinin kullanımına ilişkin talimatları
okuyunuz.
- Eğer fırın otomatik pişirme ve kapatma programlayıcısı ile donatılmışsa, fırını
manuel olarak kullanmak için SIMGESIYLE BELIRTILEN ‘MANUEL’
SEÇENEĞINI SEÇMEK GEREKLIDIR.
Franke yetkili servis personeli taraf
ından yapılmalıdır.
Zaman Saati Kullanım ı.
................................................................. 28-37
Page 27

25
Yakından görünüm
Kontrol Paneli
Program seçme düğmesi
Yapılacak pişirme türüne göre fırının çalışma şeklini seçmeye
yarar. Bu düğme, herhangi bir program üzerine getirildiğinde,
fırının çalışmakta olduğunu belirten fırın dahili lambası yanar.
Franke fırınları ürün yelpazesinde, her bir ürünün detaylı
talimatları verilmiş olan çeşitli kontrol sistemleri ve pişirme süreleri
yönetimi mevcuttur; fırın fonksiyonlarınd
an doğru şekilde
yararlanabilmek için fırınınızda bulunan kontrol tipini belirlemek
yeterli olacaktır.
Termostat ikaz lambası
Sembol , fırın rezistanslarının çalışmakta olduğunu gösterir. Bu
lamba, ayarlanan sıcaklığa ulaşıldığında söner ve fırın yeniden
ısınmaya başladığında tekrar yanar. Yiyecekleri fırına koymadan
önce, fırının gerekli sıcaklığa ulaşıp ulaşmadığını kontrol ediniz.
Sıcaklık ayar düğmesi (Termostat)
Yapmak istediğiniz yemek cinsine göre en uygun sıcaklığın
seçilmesini ve pişirme süresince sıcaklığın sabit kalmasını sağlar.
İstenilen sıcaklığı seçmek için, düğmedeki ok işaretini istediğiniz
rakama gelinceye kadar saat yönüne çeviriniz. Maksimum sıcaklık
yaklaşık 260°C'dir.
Tepsi ve ızgara kılavuzları
Bunlar, ızgara ve
teps
ileri
doğru şekilde 5 değişik pozisyonda
(alttan ba
şlayarak 1'den
5'e ka
dar) yerleştirmeye
yarar
; örnek
pişirme
tablosun
da, fır
ının her kullanım şekline göre
ideal pozisyonla ilgili bilgileri bulabilirsiniz.
Tepsi
Normalde ızgara pişirim sırasında akan yağ ve sosları toplamaya
veya üzerinde doğrudan pişirme yapmaya yarar; tepsi, pişirme
sırasında kullanılmayacaksa fırından çıkarılmalıdır. Tepsi, gıda
amaçlı kullanıma uygun “AA” tipi emaye çeliktendir.
Izgara
Yemekleri
nizin b
ulund
uğu sahanların, hamur i
şi kalıplarının ve
fır
ınla beraber verilmiş tepsiden farklı di
ğer tüm kapların üzerine
konu
lduğu ta
şıyıcılar o
larak, ya da et-balık, fanlı ızgara ve ekmek
kızartma gibi fonksiyonlarda kullanılır.
A
B
C
A
G
H
I
F
I
H
G
B
Dijital Zaman Saati
B
C
A
Page 28

Kullanım şekli
Bu fırında, gelene
ksel
fırınlarda
ki do
ğal “statik” konvansiyonel
pişirme avantajlarıyla
modern fırınlardaki gü
çle
ndirilmiş “fanlı” pişirme avantajları bir araya
getirilmiş
bulunmaktadır. Son derece kullanışlı bir fırın olup
, 5 farklı pişirme türü arasından
seçim yapmanıza imkan tanır.
Kontrol paneli üzerindeki (B) ve (F) düğmeleri
vasıtasıyla istenilen sıcaklıklar ve farklı programlar seçilebilir. Franke fırınınızı en iyi
şekilde kullanabilmek için bilgilendirme sayfasını inceleyiniz.
Soğutma fanı
Franke fırınları; fırın kapağı, kontrol paneli ve yan panellerin maruz kaldığı
sıcaklığı azaltmak amacıyla fırın sıcakken otomatik olarak devreye giren bir
soğutma fanı ile donatılmıştır. Bu fan çalışırken, fırının ön kısmından ve
kapağından dışarı doğru üflenen bir hava hissedilebilir; bu havanın fırın ortamında
rahatsızlık yaratmamasına ve gürültü seviyesinin mümkün olduğunca düşük
tutulmasına özen gösterilmiştir.
Fırına yakın olan eşyaların da korunması amacıyla fırın yeterince
soğuyana kadar bu fan çalışmaya devam edecektir.
Pişirme programları
Doğal statik pişirme
Termostat düğmesi (F), 50°C ile Maks. (250°C) sıcaklıkları arasında
ayarlanmalıdır.
Isıtma işlemi hem yukarıdan (üst rezistans), hem de aşağıdan (alt rezistans)
yapılır. Bu geleneksel pişirme fonksiyonudur ve sadece tek raf üzerinde
yemeklerinizin homojen olarak pişirilmesini sağlar.
Fanlı pişirme
Termostat düğmesi (F), 50°C ile Maks. (250°C) sıcaklıkları arasında
ayarlanmalıdır.
Üst rezistans (tavan), alt rezistans (taban) ve fırın iç fanı devreye girer.
Sabit ve eşit dağılımlı sıcaklık, yemeği her noktadan pişirir ve kızartır. Maksimum
2 katı kullanmak suretiyle, aynı anda birbirinden farklı yemekler pişirmek de
mümkündür.
Sadece Üst ısıtıcı çalışır.Sıcak hava üstten kazana yayılarak üst kısmın pişmesini
sağlar.
o
veya yemeklerin ısıtılması açısından kullanıma uygundur.
Isıtma işlemi aşağıdan (alt rezistans) yapılır.
Taban Rezistans
Ust Rezistans
50 C ile 250 C arasında istenilen sıcaklığı seçiniz. Bu tip pişirme çok yavaş pişirme
o
Turbo fanlı pişirme
Termostat düğmesi (E) 50 C ile Max (250 C) arasına getirilmelidir.
Dairesel ısıtıcı eleman devreye girer ve fan çalışmaya başlar.Sabit ve eşit dağılımlı sıcak,
yemeği her noktasında pişirir ve kızartır.Pişirme sıcaklıkları benzer olan birbirinden farklı
yemek türlerini aynı anda pişirmeniz mümkün olur.
Bu Franke fırındaki mevcut fanlı pişirme türleri arasında en hassas olanıdır ve tatlılarla
hamur işlerinin pişirilmesi için ideal olup,aynı anda üç katta pişirme yapılmasına imkan
tanır.
°
°
26
Page 29

''Multy power'' fanlı pişirme
Termostat düğmesi (E) 50 C ile Max (250 C) arasına getirilmelidir.
Dairesel rezistans devreye girer ve buna üst rezistans (tavan), alt rezistans (taban) ile
fan da kısmen eşlik ederler.Bir önceki fonksiyona nispeten sıcaklığa daha hızlı ve güçlü
şekilde erişilir; sıcaklığın aynı zamanda daha eşit dağılımı sayesinde bu fonksiyon et ve
balık ızgaralar,rostolar ile fırında makama benzeri hamur işi türlerini pişirmek için idealdir.
''Quick cooking'' pizza pişirme
Termostat düğmesi (E) 50 C ile Max (250 C) arasına getirilmelidir.
Dairesel rezistans, tavan-taban rezistanslar ve fanla birlikte devreye girer.Franke fırınınızın
mevcut fonksiyonları içinde en güçlü olanı budur ve sıcaklığın dağılımı aşağı tarafa öncelik
verilecek şekilde tasarlanmıştır; bu şekilde pizzaların ya da genel anlamda dondurulmuş
gıdaların hızlı şekilde hazırlanması için ideal bir fonksiyon durumuna getirilmiştir.Bu fonksiyon
istenilen sıcaklığa hızlı şekilde erişmek ve sonrasında herhangi bir program seçmek için
kullanılabilir.
''Izgarada Pişirme''
Termosta
ancak bunun altında bir sıcaklığı seçmek de mümkündür; bu durumda
ızgara işlemi daha yavaş gerçekleşecektir.
Fırının üst tarafında yer alan ızgara rezistansı devreye girer. Bu şekilde, kızıl ötesi
ışınlarla yemeğin yüzeyi hızlı bir şekilde pişerken, etlerin iç kısımlarının yumuşak
kalması sağlanır; aynı zamanda 9 dilime kadar ekmekle tost yapmak için de ızgara
pişirme fonksiyonunu kullanmak mümkündür. Franke fırını, güvenlik bakımından
sadece fırın kapağı komple kapalı durumdayken ızgara yapmaya izin verecek şekilde
tasarlanmış ve üretilmişlerdir.
Dikkat: Izgara rezistansı çalışırken çok sıcaktır; yemekleri koyarken ve çıkartırken
bunlara kazara temastan kaçınınız; bununla birlikte, Franke fırının ağız kısmı,
elleri mümkün olduğunca koruyacak şekilde tasarlamıştır.
t düğmesi
°
°
°
°
(F) normalde Maks. pozisyonunda
(250
°C)
bulunmalıdır,
Fanlı ızgara pişirme
Termostat düğmesi (F) normalde Maks. pozisyonunda bulunmalıdır,
ancak bunun altında bir sıcaklığı seçmek de mümkündür; bu durumda
ızgara işlemi daha yavaş gerçekleşecektir.
Fırının üst tarafındaki ızgara rezistansı devreye girer ve fan çalışmaya başlar. Tek
yönlü ısı yayılımına, fırın içindeki havanın fanla sağlanan sirkülasyonu da eklenir.
Bu durum, ısının derine işleme gücünü arttırarak yemeklerin yüzey kısımlarının
yanmasını önler. Et ve sebzelerle yapılan şişlerde, sosis-sucuk türlerinde, kuzu
pirzolalarında, bazı tavuk ve bıldırcın yemeklerinde vs. fanlı ızgara fonksiyonu ile
çok iyi neticeler alınabilir.
BUZ ÇÖZME: Termostat kapalı iken alt üst rezistans+fan veya gril+fan pozisyonuna getirdiğinizde buz çözme sağlanır.
27
Page 30

28
Elektronik pişirme programlayıcısı
SAAT AYARI
Saat ayarı, ancak yürürlükte bir pişirme programı yokken yapılabilir.(ekranda sadece saat ve el
ikonu gözükür). tuşuna basınız, ekranda saat ve dakika arasında bir üçgen flaşlamaya
başlar, ile saati ileri, ile geriye doğru ayarlayabilirsiniz.Bu tuşlara uzun basış, saati daha
hızlı değiştirecektir.
1) Saat ayarı moduna geçiniz. 2) + veya – tuşları ile saati 3) 5 saniye sonra ekran
ayarlayınız.
sabitlen
ecektir.
ALARM SÜRE AYARI
Bu fonksiyon ile, ayarladığınız süre kadar sonra saatinizin alarmının çalmasını sağlayabilirsiniz.
1) Alarm süre ayarı modunu 2) + veya – tuşları ile süreyi 3) Birkaç saniye sonra ekran
seçiniz. giriniz.(örnek : 5 dakika) saati gösterir konuma dönecektir.
Not: Alarmın çalmasına ne kadar zaman kaldığı, tuşuna basılarak ekranda görülebilir.
Page 31

29
ÇALMAKTA OLAN ALARMI SUSTURMA
1) Ayarlanan alarm süresi dolduğunda alarm
2) tuşuna basarak alarmı
susturabilirsiniz.
çalmaya başlar.
OTOMATİK PİŞİRME PROGRAMI
Fırına sürdüğünüz yemeği hemen pişirmeye başlayacaksanız, sadece pişme süresini girmeniz
yeterlidir.
Örnek: Fırınımıza pişireceğimiz yemeği koyduk ve 2 saat 15 dakika pişmesini istiyoruz.
1) Saat şu anda 18:30 2) Pişirme süresi ayar 3) + veya – tuşları ile süreyi
moduna giriniz. giriniz.
Fırın saatiniz, fırındaki yemeğinizi
şu andan başlayarak 2 saat 15
dakika boyunca pişirecek şekilde
programlandı.Fırın üzerindeki diğer
kumanda düğmelerini istediğiniz
piş irme fonksiyonu ve ısıya göre
uygun konumlara getirmey
i
unutmayınız.
4) Birkaç saniye sonra ekran şu
anki saati ve yemeğin pişmekte
olduğunu gösterir duruma geçecektir.
Not: Pişirme programı yaparken veya program yürürken, tuşuna basarak programı iptal
etmeniz müm kündür.
Yukarıdaki örnekte pişme süresi girerek otomatik pişirme sürecinin hemen başlatılabildiğini
gördük.
tuşuna basarak yemeğin hazır olacağı (pişme bitim) zamanını görmek ve istenirse
ayarlamak da mümkündür. Aşağıdaki örnekte yemek saat 21:30 da hazır olacak şekilde bir ayar
yapılmaktadır.
1) Ekranda yemeğin hazır 2) + veya – tuşları yardımı ile 3) Birkaç saniye sonra ekran
olacağı süre 18:30+2:15= pişme bitim süresini ayarlayı- saati gösterir konuma
20:45 gözükmekte. nız. dönecektir.
Bu durumda yemeğimiz 21:30 da hazır olacak şekilde fırınımızı programlamış olduk. Yemeğin
pişirme süresini 2 saat 15 dakika olarak daha önceden programlamıştık. Bu durumda fırınımız
pişirme işlemine saat 19:15 de başlayacak, yemeğimizi 2 saat 15 dakika pişirecek ve 21:30 da
pişirme programı sonlanm
ış olacaktır.
Pişirme işlemi başladığında Pişirme işlemi bittiğinde
gözükecek ekran gözükecek ekran
Page 32

30
Pişirme programı tamamlandığında, sesli ikaz devrededir ve susturulmaz ise 7 dakika boyunca
çalacaktır.
1) Fırını kapatınız. 2) Fırın saatini resetleyiniz.
Not: Fırınınız, siz fırın saatini resetleyene kadar devre dışı kalacaktır.
Yukarıdaki örnekte önce pişirme süresi girilmiş, otomatik hesaplanan pişme bitim zamanı ise
ikinci aşamada tarafımızca değiştirilmişti. İstenirse önce pişme bitim zamanını girmek de
mümkündür; bu durumda pişirme süresi otomatik hesaplanacak ve istenirse ikinci aşamada
değiştirilebilecektir.
Otomatik pişirme programı boyunca pişirme öncesinde ekran rengi yeşil, pişirme esnasında ise
kırmızı olacaktır.
ELEKTRİK KESİLDİĞİNDE
Şebeke elektriğinin kesilmesi halinde, fırınınız emniyet gerekçesi ile devre dışı kalacaktır.Bu
durum ekrandaki el ikonunun flaşlaması ile ifade edilir. Bu konumda yürürlükte bir pişirme
programı varsa da silinmiş olacaktır. Ekranda gözüken saat de doğru değildir, ayarlanması
gerekecektir. Önce tuşuna basarak fırını devreye alınız, daha sonra ikinci bir kez
tuşuna basarak saatinizi ayarlayabilirsiniz. (Bkz. saat ayarı)
Not: Fırınınızı çalıştırmayacaksanız, fırın üzerindeki düğmeyi kapalı konuma getirmeyi
unutmayınız.
FLAŞLAYAN ‘EL İKONU’ , FIRININ DEVRE DIŞI OLDUĞUNU VE NORMAL KONUMA
GEÇMEK İÇİN ‘
TUŞUNA’ BASMANIZ GEREKTİĞİNİ İFADE EDER.
ALARM SES ŞİDDETİ AYARI
1) tuşuna 5 saniye boyunca 2) + veya – tuşları ile sesi 3) tuşuna basarak ayarlabasınız, şu an ayarlı olan sesi arttırabilir veya azaltabilir- dığınız ses şiddetini hafızaya
duyunuz. siniz. (3 seviye) kaydediniz.
Page 33

BUZZER TONU
• tuşuna 5 saniye basınız ( ekranda ‘pr 1’ yazacaktır).
• tuşuna basarak buzzer ses tonunu azaltabilirsiniz.
• tuşuna basarak buzzer ses tonunu artırabilirsiniz.
• tuşuna tekrar basarak seçilen ses tonunu hafızaya kaydedebilirsiniz.(Fabrika çıkışı
yüksek tondur. Üç farklı ses tonu seçilebilir).
AYDINLATMA RENGİ
• tuşuna 5 saniye basınız (ekranda 'r xx ’ görülene kadar).
• veya tuşlarına basarak kırmızı renk yüzdesini 00 ile 100 arasında
değiştirebilirsiniz.
• tuşuna basarak yeşil ('g xx') ve mavi ('b xx') renk içinde kırmızıdaki gibi ayar
yapabilirsiniz.
• İstenen renk ekranda oluşturulduğunda tuşuna 5 saniye basarak kaydediniz.
NOT : Program modundan tuşuna basarak kayıt yapmadan çıkabilirsiniz.
AUTO MODE AYDINLATMA RENGİ DEĞİŞİMİ - ON/OFF
• tuşuna 5 saniye basınız(Ekranda ON veya OFF yazacaktır).
Eğer özellik ON seçilmişse, Yemek pişirme süresi boyunca aydınlatma rengi
kırmızı, pişme bitim süresi girilmişse bekleme esnasında aydınlatma rengi yeşil olacaktır.
Eğer özellik OFF seçilmişse, pişme süresi veya pişme bitim süresi için bekleme
anında aydınlatma rengi değişmeyecektir.
AYDINLATMA - ON/OFF
•
tuşuna 5 saniye basınız (Ekranda ON veya OFF yazacaktır).
Eğer özellik ON seçilmişse, aydınlatma her zaman yanar durumdadır.
Eğer özellik OFF seçilmişse, manuel durumda iken aydınlatma sönük durumda
olacaktır.(Aydınlatma, tuş basımlarında, son tuş basımından itibaren 15 saniye yanar
durumda kalır)
TUŞ SESİ (CLICK) - ON/OFF
• tuşuna 5 saniye basınız (Ekranda ON veya OFF yazacaktır).
Eğer özellik ON seçilmişse, her tuş basımında click sesi duyulur.
Eğer özellik OFF seçilmişse, tuş basımlarında click sesi duyulmaz.
FABRİKA AYARLARINA DÖNÜŞ
• tuşuna 10 saniye boyunca basınız (Ekranda ‘pr d’ yazacaktır).
Fabrika Ayarları :
Buzzer : Yükses ses tonu
Aydınlatma rengi : Kırmızı %0, Yeşil %50, Mavi %100
Auto Mode Aydınlatma Rengi Değişimi : ON
Aydınlatma : ON
Tuş Sesi (Click) : ON
31
Page 34

GL 76 M TC XS
Genel Bakış:
Ön panel
fan kombinasyonlarından birisi seçilebilir, fırın iç aydınlatmasına kumanda edilebilir,
pişirme ısısı ayarlanabilir. Pişirmenin başlangıç, bitiş zamanı ve pişirme süresi, et
probu kullanılıyorsa pişirmenin sonlandırılması için yemek ısısının ulaşması gereken
değer gibi otomatik pişirme fonksiyonlarına da ulaşılabilir. Hızlı ısıtma ve sıcak tutma
fonksiyonu vardır. Bunların yanı sıra tuş kilidi, gerçek zaman ekranı ve çalar saat
modu gibi ilave fonksiyonlar ve kullanıcı tarafından seçilebilir bazı seçenekler de
bulunmaktadır.
TUŞ TANIMLAMALARI:
STOP tuşu: RUN modunda basıldığında pause, pause modunda basıldığında
standby moda geçilir.
ON/OFF Tuşu: Paneli (yaklaşık 1s basarak) on/off yapmaya yarar. Paneli
çocuk kilidinden bağımsız olarak ON/OFF yapar.
Hızlı ısıtma tuşu: Seçilmiş fonksiyonda yer alan ısıtıcılara, istenen ısıya çabuk
ulaşabilmek adına, geçici olarak ilave rezistanslar eklemeye yarar.
Lamba tuşu: Fırın aydınlatmasını toggle eder. Lamba ikonu lamba yanarken
gösterilir. Kombinasyon ayar moduna girildiğinde lamba otomatik olarak yanar.
Soğuma bittiğinde lamba manuel olarak yakılmışsa bile söner. Buz çözme
fonksiyonunda lamba söndürülemez.
Çocuk Kilidi Tuşu: Çocuk kilidi tuşuna uzun basarak (yaklaşık 1s) devreye
alınıp çıkarılabilir. Çocuk kilidi devrede iken ON/OFF hariç hiçbir tuş basımı yapılamaz,
keylock sembolü gösterilir.
TIMER tuşu: Timer ve takılıysa et probu ısısını seçme tuşudur. Çalar saat
ayar modunda çalar saat ikonu, alarm ayar modunda çan ikonu, pişirme süresi
ayarında pişirme süresi ikonu, bitim saati ayarında bitim saati ikonu gösterilir. Et
probu takılı ise et probu sıcaklığı ayar modunda et probu ikonu ve sol iki digitte et
probu sıcaklığı gösterilir. Timer digitlerinde ayarlanacak değer (Et probu ayarında sağ
iki digit) flaşlar. Auto ikonu ayar yapıldı ise gösterilir.
deki dokunmatik tuşlar yardımıyla menüde var olan fırın rezistans ve
32
Page 35

C tuşu: Isı ayarı menüsüne girmeye yarar, ayarlanacak ısı flaşlar.
GO tuşu: Pause modundan ekranda gözüken ayarlı değerlere göre RUN
moduna geçirir. Standby modda uzun (1s) basıldığında RUN moduna geçilir.
Kombinasyon tuşları ( >, <): > tuşu birinci kombinasyondan, < tuşu
sonuncu kombinasyondan başlayarak kombinasyonları ekrana getirir.
Digit Ayar Tuşları ( +, - ): Flaşlamakta olan digitlerdeki değerleri
ayarlamaya yarar.
Ön Panel Konumları:
POWER ON: Power On ‘da saat 0:00 flaşlar durumdan başlayarak gösterilir, -
ve + tuşları ile hemen ayarlanabilir. Saat ayarlanmadan veya saat ayar modundan
çıkmadan fırının herhangi bir özelliğini kullanmak mümkün değildir.
OFF: Panel ve dolayısıyla fırın devre dışıdır. Ekran tamamen karanlıktır.
ON/OFF tuşuna uzun (yaklaşık 1s) basılarak on/off yapılabilir. Off moduna geçerken
ekran yavaş yavaş karartılır. OFF modunda ON/OFF tuşu haricindeki tuşların hiçbir
işlevi yoktur.
STANDBY: Fırın devre dışıdır. Standby modda, TIMER tuşu ile sadece alarm
kurulabilir, hızlı ısıtma ve C tuşunun işlevi yoktur. > veya < tuşuna basılarak birinci
veya sonuncu kombinasyondan, GO tuşuna basılarak en son kombinasyondan
kombinasyon ayar moduna girilebilir. Programlanabilir opsiyonlar standby modda
değiştirilebilir.
PAUSE MODU: Pause modu kombinasyon ayarlı ancak pişirme GO tuşuna
basılarak başlatılmadığında veya pişirmeye ara verildiğinde bulunulan moddur. Pause
modunda pause ikonu 1 saniyede bir flaşlar. Kombinasyon ayar moduna girildiğinde
giriş tuşuna göre ekranda ilgili kombinasyon flaşlar. Bir kombinasyon seçili durumda
iken TIMER/Et Probu tuşuna basılarak pişirme süresi “|>|”, pişirme bitim saati “>|”,
alarm timer ve çalar saat menüleri sırayla ekrana gelir. Et probu takılı ise et probu
bitim ısısı, alarm timer ve çalar saat menüleri sırayla ekrana gelir. C tuşuna basılarak
pişirme ısısı ayarı da yapılabilir. GO tuşu ise onaylama ve RUN moduna geçme anlamı
taşır. Ayar modları yaklaşık 7 saniyedir. Ayar modlarında ayarlanan digitler flaşlar. 7
saniye dolduğunda ayar modundan çıkılır ancak pause modu devam eder.
RUN MODU: Bir kombinasyon seçili halde GO tuşuna basıldığında girilen
moddur. GO tuşuna basmak yapılan ayarları onaylamak ve süreçi başlatmak anlamına
gelir. Ekranda auto ve dumanlı tencere ikonlarından biri veya ikisi birden mutlaka
vardır. Pişirme, ekranda dumanlı tencere ikonu varsa devrede yoksa devrede değildir.
Buz çözme fonksiyonu seçilmiş ise lamba kapatılamaz.
Run modunda fırın devrede iken:
Ayarlı sıcaklık 5 bar olmak üzere o anki ısıya göre bar gösterilir.
33
Page 36

Rezistanslar devrede ise ısının yükseldiği anlamında barların hemen sağında
yukarı ok ikonu 2 saniyede bir flaşlar, devreden çıkınca söndürülür.
ERROR MODU: Panelin normal çalışmasını engelleyen durumlar oluştuğunda
hata moduna girilir. Hata modunda panel standby konumdadır ancak saat ekranında
ErrX yazılarak oluşan hata kullanıcıya bildirilir. Oluşan hata düzelse bile kullanıcı STOP
tuşuna basmadan hata ekrandan silinmez. 8 tane hata raporlanır.
Err1: Haberleşme hatası
Err2: PT1000 açık devre
Err3: PT1000 kısa devre
Err4: Aşırı ön panel ısısı (Isı sınır değeri geçtiyse)
Err5: Aşırı güç modülü ısısı (Isı sınır değeri geçtiyse)
Err6: Kullanıcı modülü devre sensörü hatası (NTC sensörde problem varsa)
Err7: Güç modülü devre sensörü hatası (NTC sensörde problem varsa)
Err8: Ana güç hatası (Fırında ısınma olmuyor ise)
Saat Ayarı: “-“ ve “+” tuşlarına birlikte uzun (yaklaşık 1s) basılarak saat ayar
moduna girilebilir. Saat ayar modunda saat flaşlar, 7 saniye ayar yapılmaz ise saat
sabitlenir.
Isıtıcı ve Fan kombinasyonları:
1. Geleneksel pişirme: Isı hem üst hem alt ısıtıcıdan gelir. Hemen her tür
yemeği pişirmeye uygundur. 200 C
2. Alt ısıtıcı konumu: Yemeklerin pişmesini tamamlamak ve besinleri ısıtmak
için ısı yalnızca alt ısıtıcıdan gelir. 180 C
3. Üst ısıtıcı konumu: Yemeklerin üst kısmını pişirmek ve kızartmak için ısı
yalnızca alt ısıtıcıdan gelir. 180 C
4. Izgara konumu: Az miktarda besinin ve küçük parçaların ızgara yapılması
için kullanılır.
5. Dual ızgara konumu: Bu konumda ızgara ve üst ısıtıcı birlikte çalışır.
6. Turbo ızgara konumu: Izgara elemanı ve fırın fanı birlikte çalışarak sıcak
havayı yiyeceğin etrafında dolaştırır. 200 C
7. Hamurlu pişirme konumu: Üst ve alt ısıtıcılar fırın kabinini ısıtır; fan sıcak
havayı tepsilerin arasında dolaştırır. 200 C
8. Pizza konumu: Bu konumda, alt ısıtıcı, dairesel ısıtıcı ve fan kullanılır.
200 C
34
Page 37

9. Fanlı pişirme konumu: Bu konumda dairesel ısıtıcı ve fan kullanılır.
200 C
10. Defrost (buz çözdürme) konumu: Fırın fanı, kabin içindeki havayı
ısıtmadan, oda sıcaklığında dolaştırır.
11. Sıcak tutma konumu: Yiyeceklerin sıcaklığını korumak için
alt ve üst ısıtıcı default 80 C de çalıştırılır.
Manuel pişirme :
Herhangi bir program yapılmaksızın, sadece ısıtıcı kombinasyonu ve ısı değeri
girilerek yapılan pişirmedir. En basit fırındaki seçici komütatör ve ısı termostatı ile
yapılan pişirmeye karşılık gelir.
Kesintili maksimum pişirme süresi 10 saattir.
Manuel Pişirmeye özgü maksimum kesintisiz pişirme süreleri:
050-120 C 10h
121-200 C 6h
201-250 C 3h
251-300 C 2h
Maksimum pişirme süresi dolduğunda otomatik pişirme bitmiş gibi davranılır.
1. Panel on iken “>” veya “<” basılarak 1. veya sonuncu kombinasyondan
başlayarak kombinasyon ayar moduna girilir. Fırın çerçevesi sabit, ilgili
ikonlar flaşlatılarak gösterilir. Fırın aydınlatması devreye girer, ampul ve
tencere ikonu gösterilir.
2. > ve < tuşları ile kombinasyonlar değiştirilebilir. İlgili ısıtıcılar ve varsa fan
flaşlar, ısı göstergesinde bulunulan kombinasyona atanmış ısı görünür.
3. Ekrandaki ısı değeri değiştirilmek isteniyorsa, C ye basılır. Kombinasyon
parametreleri sabitlenir, ısı flaşlar + ve – tuşları ile istenen ısı 5 er derece
ara ile ayarlanır.
4. GO ya basılır, pişirme başlamıştır.
Sıcak tutma kombinasyonundaki fırın ısısı default 80 C dir ve 60 C ile 90 C
arasında ayarlanabilir. Sıcak tutma esnasında ısı digitlerinin ilkinde alt ve üst
segment, yanında ise ayarlı ısı gösterilir.
Manuel pişirme başladığında timer göstergesinde pişme süresi 60 dakikaya
kadar saniye biriminde, daha sonra dakika biriminde gösterilir. Manuel pişirme
süresinin ilerlediği en soldaki ok ( >) gösterilerek ifade edilir.
NOT: Ekranda ayarlı bir ısıtıcı kombinasyonu yokken ısı ve timer ayarı
yapılamaz, önce bir kombinasyon seçilmelidir.
35
Page 38

Yarı otomatik pişirme:
Pişirmenin hemen başlatıldığı konumdur. Pişme süresi veya bitim saati girilerek
pişirme hemen başlatılır. Et probu kullanılıyorsa yemeğin ulaşacağı ısı girilerek
uygulanır.
1. Manuel pişirme adımları 1 – 3 uygulanır (GO ya basılmaz).
2. TIMER’ a basılır.
Et probu yoksa timer göstergesinde pişirme süresi flaşlar (süre ikonu
da yanar durumdadır). + ve – ile ayarlanır.
Et probu bağlı ise timer göstergesinde stop ısısı default değerde (80 C)
flaşlar. (Et probu sembolü de yanar durumdadır) + ve – ile
ayarlanabilir.
NOT: AUTO ikonu ayar yapıldığı andan itibaren gösterilir.
3. GO ya bas, pişirme başlamıştır.
Tam otomatik pişirme:
Pişirmenin hemen değil gecikmeli olarak başladığı konumdur. Bu gecikme
zamansaldır. Bitim saati ve pişirme süresi girilerek uygulanır. Et probu kullanılıyorsa
pişme süresi ve bitim saati ayarlanamaz.
1. Yarı otomatik pişirme adımları 1 – 2 uygulanır (GO ya basılmaz).
2. TIMER’ a bir daha basılır.
Et probu yoksa bitiş saati (bu durumda şimdiki saat + girilmiş olan
pişirme süresi) flaşlar (bitim zamanı ikonu da yanar durumdadır). + ve –
ile ayarlanır.
3. GO ya basılır. Pişirme, zamanı gelince başlayacaktır ve dumanlı tencere
ikonu o zaman belirecektir.
Yarı otomatik veya tam otomatik pişirme ayarlanırken auto süresi sıfıra
getirilirse 1 kez alarm çalınarak sürenin sıfırlandığı kullanıcıya bildirilir. Süre ayarı
yapılırken saat 1 dakika ilerlerse pişirme süresi sabit kalacak şekilde bitim saati
ötelenir.
Durdurma, Değiştirme ve Sonlandırma:
STOP tuşu ile RUN moduna ara verilir, rezistanslar ve fan OFF olur ve pause
moduna geçilir. Tekrar stop tuşuna basılırsa pişirme sonlanır, standby moda geçilir.
Standby modda GO ya basarak en son onaylı değerler ekrana getirilebilir. Tekrar GO
tuşuna basarak RUN moduna geçilebilir veya ilgili tuşlarla fırın kombinasyonu, ısı ve
timer/et probu değiştirilerek GO tuşuna tekrar basılarak RUN moduna geçilebilir.
Pişirme kombinasyonlarının default ısı değerleri değiştirildiğinde C tuşuna 5
saniye basılarak ayarlı sıcaklık 50 – 250 C arasında ise hafızaya kaydedilebilir.
Hızlı Isıtma :
Ayarlı olan ısı 100 C nin üzerinde ve bu ısıya 50C den daha uzak olunduğunda
hızlı ısıtma devreye alınabilir. Hızlı ısıtma tuşunun kombinasyon seçildikten sonra
36
Page 39

işlevi vardır. RUN modunda istenen ısıya ulaşılınca söner. İstenen ısıya gelindiğinde
hızlı ısıtma ikonu kaybolur, bip tonu duyulur ve ayarlanan konuma dönülür.
Hızlı ısıtma, ısıtıcılara dairesel ısıtıcı ve fan ilavesi ile yapılır. Geleneksel pişirme
konumunda sadece fan ilave olur. Dairesel ısıtıcı ve fan içeren konumlarda ilave
ısıtma yapılmaz. Hızlı ısıtma devreye alındıktan sonra kombinasyon değiştirilirse hızlı
ısıtma iptal edilmiş olur.
Soğuma Göstergesi:
Fırın iç ısısı 60 C üzerinde iken geçerlidir. Isı barlarının sağındaki aşağı ok
sembolü 2 saniyede bir flaşlar ve fırın devre dışıdır. Rezistanslar OFF-fırın çerçevesi
ekrandadır. Lamba standby konuma geçene kadar yanar. Isı göstergesinde hot
yazmaktadır. Isı barlarının her biri 60 C ‘yi sembolize eder.
Çalar Saat:
Timer tuşuna standby modda iki kez basıldığında veya kombinasyon seçili iken
4 kez basıldığında çalar saat ayar moduna girilir, saat timer digitlerinde flaşlar. Alarm
saati – ve + tuşlarını kullanarak ayarlanır. Ayarlanan saat geldiğinde alarm çalmaya
ve çalar saat ikonu flaşlamaya başlar. Tuş basımı ile alarm susturulmaz ise alarm 7
dakika çalar.
Alarm Timer’ı:
Timer tuşuna standby modda bir kez basıldığında veya kombinasyon seçili iken
3 kez basıldığında alarm timer’ı ayar moduna girilir, alarm timer digitlerinde 0:00
flaşlar. Alarm timer’ı – ve + tuşlarını kullanarak ayarlanır. Timer sıfıra geldiğinde
alarm çalmaya ve çan ikonu flaşlamaya başlar. Tuş basımı ile alarm susturulmaz ise
alarm 7 dakika çalar.
PROGRAMLANABİLİR OPSİYONLAR:
Buzzer Tonu: Fabrika çıkışı buzzer tonu 1.ton yani tn 1’dir. Standby modda
iken – tuşuna uzun (yaklaşık 5s) basılarak ayar moduna girilir, saat ekranına tn 1, tn
2 veya tn 3 gelir. En son tuş basımında sonra 6-7s içinde her tuş basımında tn1 ise tn
2, tn 2 ise tn3, tn3 ise tn 1 şeklinde değişir.
Tuş Tonu: Fabrika çıkışı tuş tonu beep ton’dur. Standby modda iken + tuşuna
uzun (yaklaşık 5s) basılarak ayar moduna girilir, saat ekranına nt, ct veya bt gelir. En
son tuş basımından sonra 6-7s içinde her tuş basımında no ise click, click ise beep,
beep ise no şeklinde değişir.
Auto Power Save(APS): Fabrika çıkışı APS aktif değildir (PS OF). Standby
modda hızlı ısıtma tuşuna uzun basılarak (yaklaşık 5s) devreye alınıp çıkarılabilir. Saat
ekranında 7 saniye PS On veya PS OF gösterilir. APS devrede iken standby moda
girildiğinde alarm kurulu değilse ve soğuma göstergesi ekranda yoksa fırın en son tuş
basımından 1 dakika sonra otomatik olarak kapanır yani OFF durumuna geçer.
Saat Modu: Fabrika çıkışı 24 saat modundadır. Standby modda – ve +
tuşlarına uzun basılarak (yaklaşık 5s) 24 saat modu ile am/pm modu değiştirilebilir.
37
Page 40

38
Örnek pişirme tablosu
NOT: tabloda verilmiş olan örnekler, profesyonel aşçılardan oluşan bir takım tarafından yapılan pişirme testlerinin
sonucudur. Her halükarda, bunlar örnek olarak verilmiştir ve kişisel zevklerinize göre değiştirilebilir.
Seçim
düğmesinin
ayarlanması
Yemek tipleri Ağırlık
(Kg)
Kat pozisyonu Ön-ısıtma
süresi
(dak.)
Ter mostat
düğmesinin
ayarlanması
Pişirme
süresi
(dak.)
Doğal statik
pişirme
Domuz Rosto
Omletler
Tepsi d e Bal ık
Unlu Mamuller
Börekler
Ta tl ı su balığı
Mısır unu tatlısı
Te re y ağlı Kekler
1
1.5
1
1
1
1.5
0.5
1.5
3
2
3
2-4 arası
2
3
2
2
9.5
10.5
9.5
9.5
10.5
10.5
9.5
9.5
180°C
200°C
180°C
175°C
200°C
200°C
180°C
180°C
65-75
25-30
15
25-30
40-45
35-40
25-30
25-30
Fan yardımıyla
pişirme
Domuz Filota
Fırında tavşan
Pizza
Fırında Istakoz
Tepsi d e Bal ık
Unlu Mamuller
Meyveli Kekler
Salatalı Kekler
1
1
1.5 0.5
2
2
1.5
2
3
2
2
3
2-4 arası
2-4 arası
2
3-5 arası
9
9.5
10
10
7.5
9
9
9
180°C
190°C
200°C
200°C
150°C
180°C
175°C
180°C
60-70
55-65
25-30
30-40
25-30
25-30
30-35
40-45
Fanlı pişirme Şekerli Ekmek
Entegral Ekmek
Ta tl ı Pastalar
Tuzlu Kekler
Sebzeli Kekler
Köstebek Kekler
Peynirli Kekler
Fırında Alabalık
2.5
1
1
0.75
1
0.5
1.5
0.3
2 veya 3 veya 4
1-4 arası
1-4 arası
1-3-5 arası
3
2 veya 3
3
3
7
8
8
8
7
7
7
8.5
180°C
190°C
190°C
190°C
180°C
180°C
180°C
200°C
25-30
30-35
30-35
25-30
55-60
25-30
25-30
15-20
"Multy power"
fanlı pişirme
Fırında Tavşan +
Etli Börekler +
Salatalı Kekler
1.5
1.5
1.5
1-3-5 arası
1-3-5 arası
1-3-5 arası
7.5 200°C
115-125
50-55
35-40
Tavuk
Domuz Eti
Tuzlu Kekler
Meyveli Kekler
Fırında Patates
1.5
6.5
0.3
1.5
1
2
3
3
3
3
6
7.5
6
7.5
6
180°C
200°C
180°C
200°C
180°C
60-65
370-390
20
30-35
30-35
"Quick cooking"
pizza pişirme
Mayalı Ekmek
Unlu Mamuller
Siyah Ekmek
Pizza
Rosto-Biftek
Domuz Sarma
Hindi
1
1
1
0.9
1.5
1
1
3
1-4 arası
3
1-3-5 arası
3
3
3
11.5
5.5
5.5
11.5
5.5
5.5
5.5
Maks.
180°C
180°C
Maks.
180°C
180°C
180°C
55-60
20-25
25-30
10-11
35-40
110-120
45-50
Izgarada pişirme Tavuk Kanat
Pirzola
Midye
Fırında Patates
Ta tl ı su balığı
I
zgara Domates
Yılan Balığı Şiş
Hindi Şiş
1
0,8
0,5
0,5
1
0,4
0,5
0,5
4 veya 5
3
3 veya 4
3
3 veya 4
2 veya 3
3
4
7
7
7
7
7
7
7
7
Maks.
Maks.
Maks.
Maks.
Maks.
Maks.
Maks.
Maks.
25-30
20-25
14-16
25-30
25-30
20-25
25-30
25-30
Fanlı ızgara
pişirme
Tavuk But
Domuz Pirzola
Gine Tavuğu
Çipura Balığı
Tavuk
Bıldırcınlar
Sosis-salamlar
Sebzeler
1
0.5
1.2
0.3
1.5
0.8
1
1
4 veya 5
4
4
3
3
4
4
4 veya 5
9.5
14
14
8
14
14
14
14
220°C
Maks.
Maks.
200°C
Maks.
Maks.
Maks.
Maks.
20-25
40-45
30-35
20-25
35-40
30-35
20-25
10-15
Page 41

39
Fırının temizliği ve bakımı
Önemli
Fırının bakımını yapmadan önce, daima fişini prizden çekiniz ya da elektrik
tesisatındaki ana elektrik şalteri vasıtasıyla ana hat elektriğini kesiniz.
– Özel temizlik ürünleri ve su kullanılarak temizlenmeleri ve iyi bir şekilde
kurutulmaları halinde, paslanmaz çelik ve emaye aksamlar daima ilk günkü gibi
yeni ka
lacaktır.
– Çizilmeleri ve zımparalamayı önlemek için kesinlikle tel bez veya çelik yün,
muriatik asit kullanmayın. Buharlı temizleme cihazlarını kullanmayınız.
–Fırın tabanında ortaya çıkabilecek muhtelif lekeler (soslar, şekerler, yumurta
lekeleri ve yağlar) daima yemeklerin taşmasından yada sıçramasından
kaynaklanan lekelerdir. Yemek sıçramaları, pişirme esnasında gerçekleşir ve
çok yüksek sıcaklıklarda pişirme işleminden kaynaklanabilir, taşmalar ise
gereğinden küçük kaplardan yada pişirme esnasında yemeğin hacminin ne
kadar artabileceğinin yanlış hesaplanmasından kaynaklanır. Bu iki sorun,
yüksek kenarlı kaplar veya fırın ekipman kitinde bulunan tepsi kullanılarak
çözülebilir. Fırının taban kısmının temizlenmesi ile ilgili olarak, buradaki olası
lekeleri fırın henüz ılıkken temizlemenizi öneririz; temizlik işi ne kadar
ertelenirse, lekelerin çıkarılması o kadar zorlaşır.
Fırın kapağının temizlenmesi
–Fırın kapağı, gerek iç gerekse dış tarafından tamamen soğukken ve sıcak su
kullanarak temizlenmeli, çizici özellikte bezler kullanmaktan kaçınılmalıdır. Cam
kısımları birlikte verilen deterjanlarla temizleyiniz.
–Emayeli kısımlar ve fırının iç bölümleri için sıcak su
ve çizmeyen deterjanlar
kullanınız.
Fırın lambasının değiştirilmesi
Franke fırınlarında, arka sol üst tarafta yuvarlak bir lamba bulunmaktadır.
Fırının içindeki lambayı değiştirmeniz gerekirse, aşağıdaki işlemleri takip ediniz:
- Öncelikle cihazın elektrik hattına bağlantısında kullanılan çok kutuplu anahtar
vasıtasıyla elektrik bağlantısının kesilmesi yada kolayda ise fişinin prizden
çekilmesi gereklidir.
- Koruyucu cam kapağı (A) sökünüz.
- Lambayı çevirerek sökünüz v
e aşağıda belirtilen özelliklere sahip yüksek ısıya
(300°C) dayanıklı bir yenisiyle değiştiriniz:
Gerilim: 220/230V - 50Hz
Güç: 15W
Bağlantı: (E14) minyon
- Koruyucu cam kapağı (A) tekrar takınız ve cihazın elektrik beslemesini yeniden
açınız.
A
Page 42

40
Fırın kapağının sökülmesi
Camı tekr
ar içine yerleştirmede
n önce cihazı k
esinlikle kull
anmayınız.
Fırın Kapağının Kolay Temizlenmesi için Yerinden Çıkarılması
Fırın kapağını temizlemeye başlamadan önce, kapağı gövdesinden ayırmak için
aşağıdaki adımlar izlenmelidir;
1. Fırın kapağını tamamen açınız.Menteşe üzerindeki kilit dilini tornavida yardımı ile
yukarıya kaldırarak yerinden kurtarınız.
2. Kilit dilini cam yönünde menteşe gövdesine kadar itiniz.
3. Camı geriye doğru bir miktar esneterek kilit dilini, menteşe yatağına
oturtunuz.Bu işlemi sağ ve sol her iki menteşe için uygulayınız.
4. Camı yukarı doğru kaldırarak menteşe karşılığından kurtarınız ve iki elinizin desteği
ile kapağı fırından ayırmak için çekiniz.
Fırın Kapağını Yerleştirme
Fırın kapağı temizlendikten sonra kapağı fırın gövdesine yerleştirmek için aşağıdaki
adımlar izlenmelidir;
1. Kapağı açık pozisyonda tutunuz ve menteşeyi, menteşe karşılığındaki yerine
oturtunuz.
2. Camı geriye doğru bir miktar esneterek kilit dilini boşa çıkartınız ve tornavida
yardımı ile ileri doğru iterek yerine oturtup kilitleyiniz.
3. Kapağın doğru yerleştirildiğinden emin olmak için kapağı birkaç kez açıp kapayınız.
Page 43

41
Yardım
Olası çalışma sorunları ortaya çıkması halinde, ekteki listede yer alan bir Franke
Teknik Yardım Merkezi ile temasa geçiniz.
Yetkili olmayan servislere asla başvur
mayınız.
Aşağıdaki hususları belirtiniz:
– Sorunun tipi;
– Cihazın modeli (Art.);
–Seri numarası (S.N.);
Bu bilgileri
fırınla birlikte verilen garanti belgesinde bulunan etiketin üzerinde
bulabilirsiniz.
Güvenlik uyarıları
Aşağıdaki du
rumlar
da sadece Franke Yetkili Servislerine başvurunuz:
Bu elektrikli ev-içi kullanım cihazının verimli ve güvenli olmasını temin için:
• Sadece Franke Yetkili Servislerine ba
• Daima orijinal yedek parça kullanılması nı talep ediniz
• Cihaz, evlerde kullanım için olup profesyonel kullanım amaçlı değildir; bu
özellikler
ini değiştirmeye çalışmayınız.
• Cihazın veri etiketinde, ürünlerin gideceği ve kullanım talimatlarının geçerli
olduğu ülkelerin sembolleri bulunmaktadır.
• Cihazın elektrik sistemi, sadece ürünün yasalarca öngörülen bir toprak
bağlantısının yapılması halinde garanti kapsamına girmektedir.
• Kullanım sırasında fırının ısıtıcı rezistanslarına ve kapağın bazı
noktalarına değmemeye dikkat ediniz, zira çok sıcak olabilirler, özellikle
de çocukları uzak tutmaya özen gösteriniz.
Çocukların dokunmaması gereken aksamlar:
- genel anlamda cihazın tamamı ve kumandaları;
- ambalaj malzemeleri (plastik torbalar, polistirol köpük, metal kısımlar, vs.);
-kullanım sırasında ve kullanımdan hemen sonra çok sıcak olabileceğinden
cihazın kendisi;
-kullanım dışı bırakılmış cihaz (böyle
bir durumda, tehlike yaratabilecek
aksamlara karşı önlem alınmalıdır).
ş
vurunuz.
Page 44

42
Aşağıdaki hareketlerden kaçınınız:
- cihaza vücudunuzun nemli noktalarıyla dokunmak;
- cihazı yalın ayak haldeyken kullanmak;
- cihazın prizle bağlantısını kesmek için fırının kendisini yada kabloyu tutarak
çekmek;
- uygun olmayan ve tehlikeli işlemler yapmak;
- havalandırma ya da dış tahliye kanallarını tıkamak;
-d
iğer elektrikli cihazlara ait kabloları cihazın sıcak kısımlarıyla temas halinde
bırakmak;
- cihazı atmosferik etkenlere maruz bırakmak (yağmur, güneş);
-fırını muhtelif eşyaların konulduğu bir saklama yeri gibi kullanmak;
- cihaz yakınında alev alıcı sıvılar kullanmak;
- adaptörler, priz çoğaltıcılar ve/veya uzatma kabloları kullanmak;
- kalifiye olmayan kişilere montaj ve onarımını yaptırmak.
Aşağıdaki durumlarda kesinlikle Franke Yetkili Servislerine başvurunuz:
-montaj (imalatçı talimatlarına göre);
-çalışma şekli ha
kkınd
a emin olunmaması halinde
;
-cihazın fişinin prize uymamas halinde
prizin d
eğiştiri
lmesi için elektrikçinize ba
-ambalajı açtıktan
hemen so
nra, cihazın eksiksiz oldu
ğundan şüph
e edilme
si
halinde;
-elektrik ka
blosunun
değiştirilmesi ya d
a hasar görmesi halinde;
-arıza ya da iyi çalışmaması halinde (böyle durumlarda orijinal yedek parça
talep ediniz).
Aşağıdaki işlemlerin yapılması uygundur:
- sadece yemek pişirmek amaçlı kullanınız, farklı bir amaç için kullanmayınız;
- herhangi bir temizlik ve bakım işleminden önce ya da sorunlu çalışması halinde
cihazın elektrik bağlantısının kesiniz;
-kapl
ar fırına sürülürken ve çıkarılırken fırın eldiveni kullanınız;
- hava çıkışları nedeniyle uç noktaları sıcak olabileceğinden, kapak tutma
kulpunun daima tam merkezinden tutunuz;
- cihazın kullanılmadığı zamanlar, düğmelerin stop pozisyonunda olduklarını
kontrol ediniz;
- cihazı kullanım dışı bırakmaya karar verdiğinizde elektrik şebekesinden
bağlantısını kesiniz.
•Aşağıdaki durumlardan dolayı doğabilecek olası hasarlardan imalatçı firma
sorumlu değildir: hatalı montaj, amaç dışı, hatalı ve uygun olmayan kullanım
şekli.
ı
ş
vurunuz.
Page 45

43
Kurulum
Önemli: Cihazın kurulumu (montajı) yürürlükteki yönetmeliklere ve normlara
uygun olarak yapılmalıdır. Sadece Franke Yetkili Servis personeli taraf ndan ı yapılmalıdır.
Cihaz kasasının özellikleriyle ilgili bilgiler
Ankastre (gömme) mobilyalarda
kullanılan aksam (plastik
malzemeler ve sunta türü ahşap
malzeme) ısıya dayanıklı
tutkallarla yapıştırılmış olmalıdır
(maksimum 100°C): uygun
olmayan malzeme ve tutkal
kullanımı deformasyon ve
açılmalara neden olur. Mobilya,
elektrik bağlantılarının se
rbestçe
geçişini sağlayacak şekilde
olmalıdır. Fırının içine
yerleştirildiği mobilya, cihazın
ağırlığını rahatça taşıyabilecek
sağlamlıkta olmalıdır.
Fırın, yuvasına güvenli şekilde
monte edilmelidir. Fırın, sütun
şeklinde bir mobilya içine ya da
modüler bir mobilya yüzeyi
altına yerleştirilebilir; her iki
durumda da yeterli
havalandırma sağlanmalıdır.
Page 46
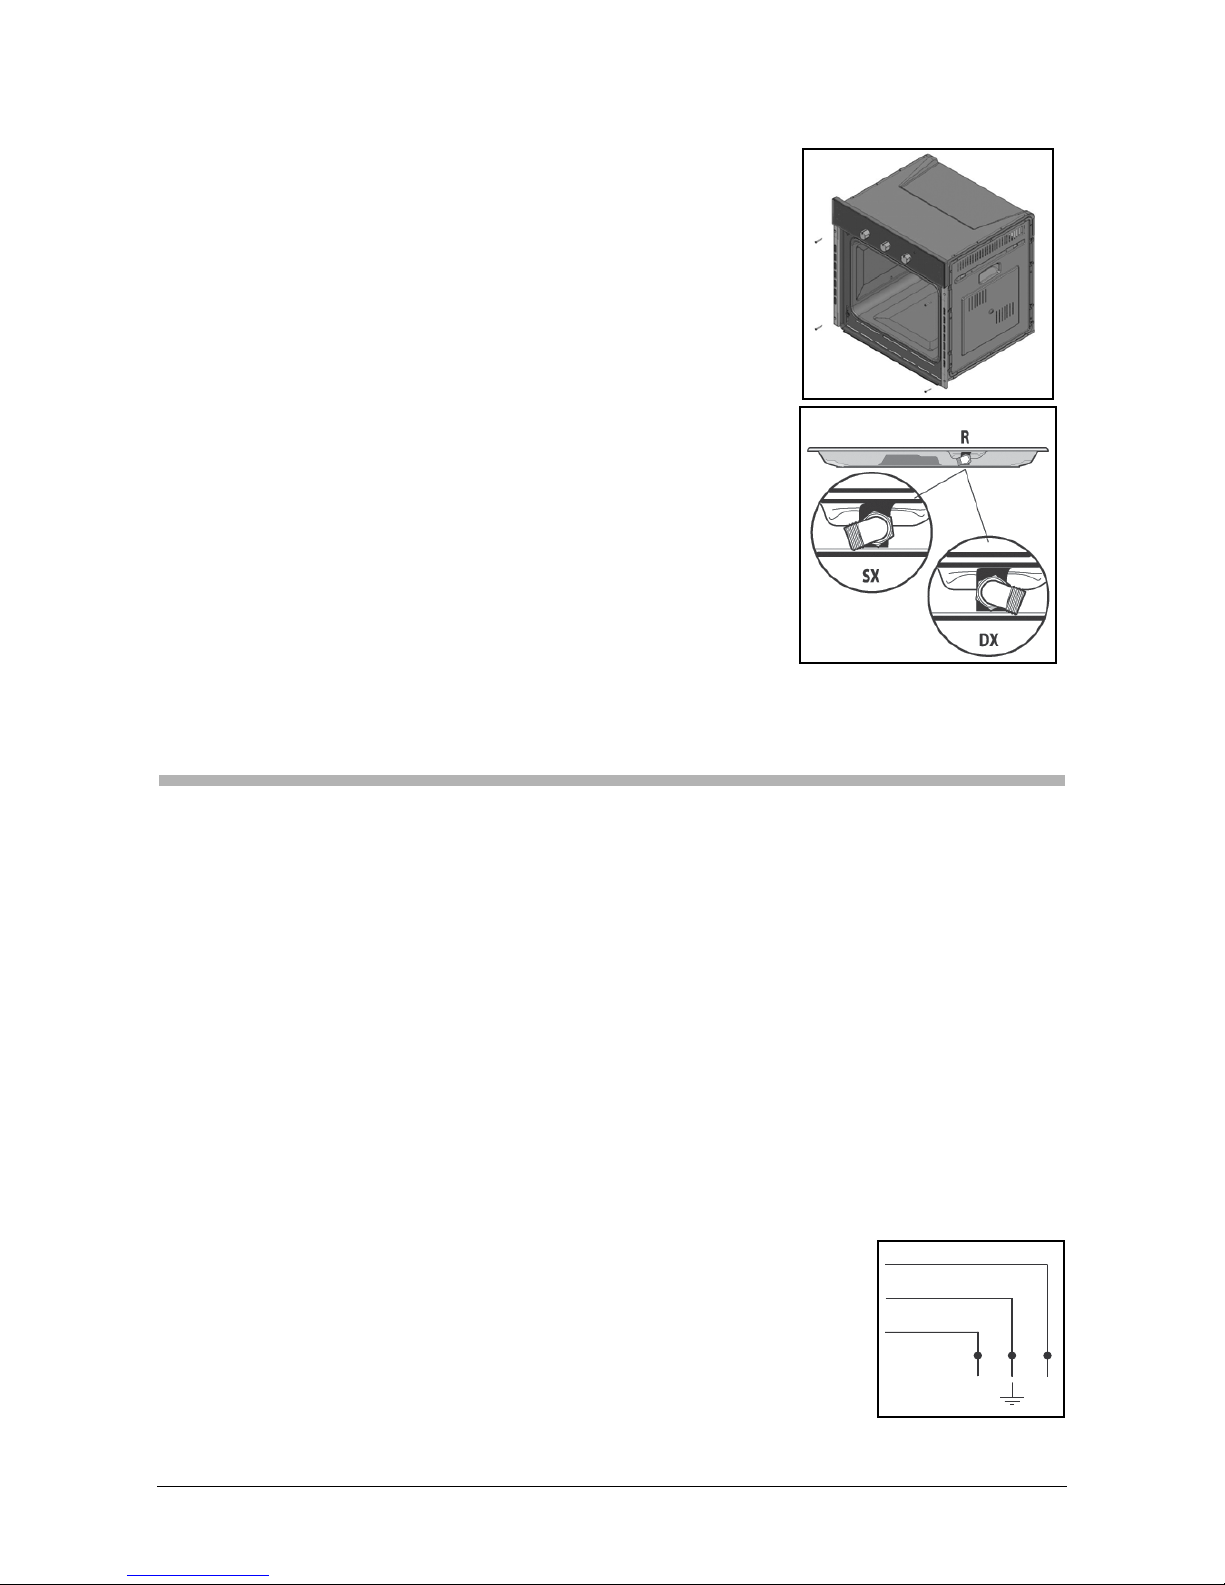
44
Montaj talimatları
Elektrik şebekesine bağlantı
FRANKE fırınınız, üç kutuplu serbest terminalli bir besleme kablosuyla
donatılmıştır.
Eğer fırın besleme şebekesine devamlı bağlantılı şekildeyse, aşırı-gerilim III
kategorisi durumunda kontakları arasındaki açıklık mesafe
si akımı komple
kesecek şekilde tasarlanmış (en az 3 mm) bir akım kesme cihazı (akım şalteri)
monte ediniz. Aşağıdakileri kontrol ediniz:
a. fiş ve prizin 16A akım için uygun olmalıdır
b) hem kolay erişilebilir olmalı hem de aynı fişin çıkarılması veya takılması
esnasında elektrikli hiçbir aksama erişmek mümkün olmayacak şekilde
yerleştirilmiş olmalı
c) fiş, bir zorlama gerekmeden çıkarılabilmelidir
d) eğer fırın bir mobilya içine ankastre monteli ise, fişi takıldığında üzerine baskı
yapmamalıdır
e) aynı prize 2 elektrikli cihaz birden bağlanmamalıdır
f) eğer elektrik besleme kablosu değiştirilecekse, H05VV-F
tipi 3 x 1.5 m
2
ölçülerinde ye
nisi ile değişt
irilmel
idir
g)boş te
rminallerin
destek kutuplarına dikkat edilmesi esastır
(Kahve
rengi=Faz –
Mavi=Nötr –
Sarı/Yeşil=T
oprak)
NOT: evinizdeki elektrik bağlant
ısının
özel
likleri
(geri
lim,
ma
ksi
mum gü
ç ve akım), FRANKE
fır
ınınızın özel
likleri
il
e
uyumlu olmalıdır.
Cihazı boşluğa yerleştiriniz; fırının gövdesini ekipman kitindeki 2
vidayı kullanarak yanlardaki deliklerden kasaya sabitleyiniz.
Fırınınızı bir set üstü ocak altına yerleştirecekseniz, fırının tam
olarak oturması için yerleştirme öncesinde yüzey rakorunu sağa
veya sola hareket ettirerek yerleştiriniz.
BLU
MARRONE
BROWN
BLUE
GIALLO-VERDE
YELLOW-GREEN
L
N
Page 47

45
Page 48

46
Teknik Veriler
Kullanlabilir frnn boyutlar:
genilik 435 mm
derinlik 424 mm
yükseklik 315 mm
Kullanlabilir frn hacmi:
58 litre
Sarfiyat (statik fonksiyonlu):
0, kWs
Sarfiyat (fan fonksiyonlu):
0, kWs
Besleme gerilimi ve frekans:
20V ~ 50Hz
Toplam güç ve sigorta:
3,300kW - 16A
Rezistans gücü:
üst W 1.200
alt W 1.300
zgara W 3.200
fan motoru W 30
frn aydnlatma lambas W 15 x 1
teet fan W 15
Bu cihaz, aadaki Avrupa
Birlii direktifleri ile uyumludur:
–1/0/ tarihli //EEC
(& (Alçak Gerilim);
–// tarihli 89/336/EEC
(&
(Elektromanyetik Uygunluk)
turbo rezistans 2050 W
KULLANICILARA YÖNELİK BİLGİLER
25 Temmuz tarihli kanun kararnamesinin 15 sayılı maddesi “Elektrikli ve elektronik
cihazlarda tehlikeli madde kullanımının azaltılmasıyla ve ayrıca bunların imhası ile ilgili
2002/95/CE, 2002/96/CE ve 2003/108/CE direktifleri” nin uygulanması uyarınca
Ürünün üzerindeki üzeri çarpı işaretli çöp kutusu sembolü, ürünün kullanım ömrü sona erdiği zaman
diğer atıklardan/çöplerden ayrılması gerektiğini belirtir.
Dolayısı ile ürünün kullanıcısının, cihazı uygun elektronik ve elektroteknik atık toplama merkezlerine
teslim etmesi
gerekecektir.
Ürünün, geri dönüşüm amacıyla tahsis edilmiş toplama tesislerine teslim edilmesi, çevreyle dost bir
şekilde muameleye tabi tutulması ve elden çıkarılması, çevre ve insan sağlığına gelebilecek olumsuz
etkilerin önlenmesine yardımcı olmakla birlikte, cihazın yapımında kullanılan malzemelerin geri
dönüştürülebilmesini sağlayacaktır.
Ürünün kullanıcı tarafından kanunlara uygun olmayan bir şekilde imhası/atılması, 22/1997 sayılı
kanun hükümlerince cezai işleme tabidir (22/1997 sayılı kanunun 50. maddesi).
 Loading...