

Forney 52765 Owner's Manual
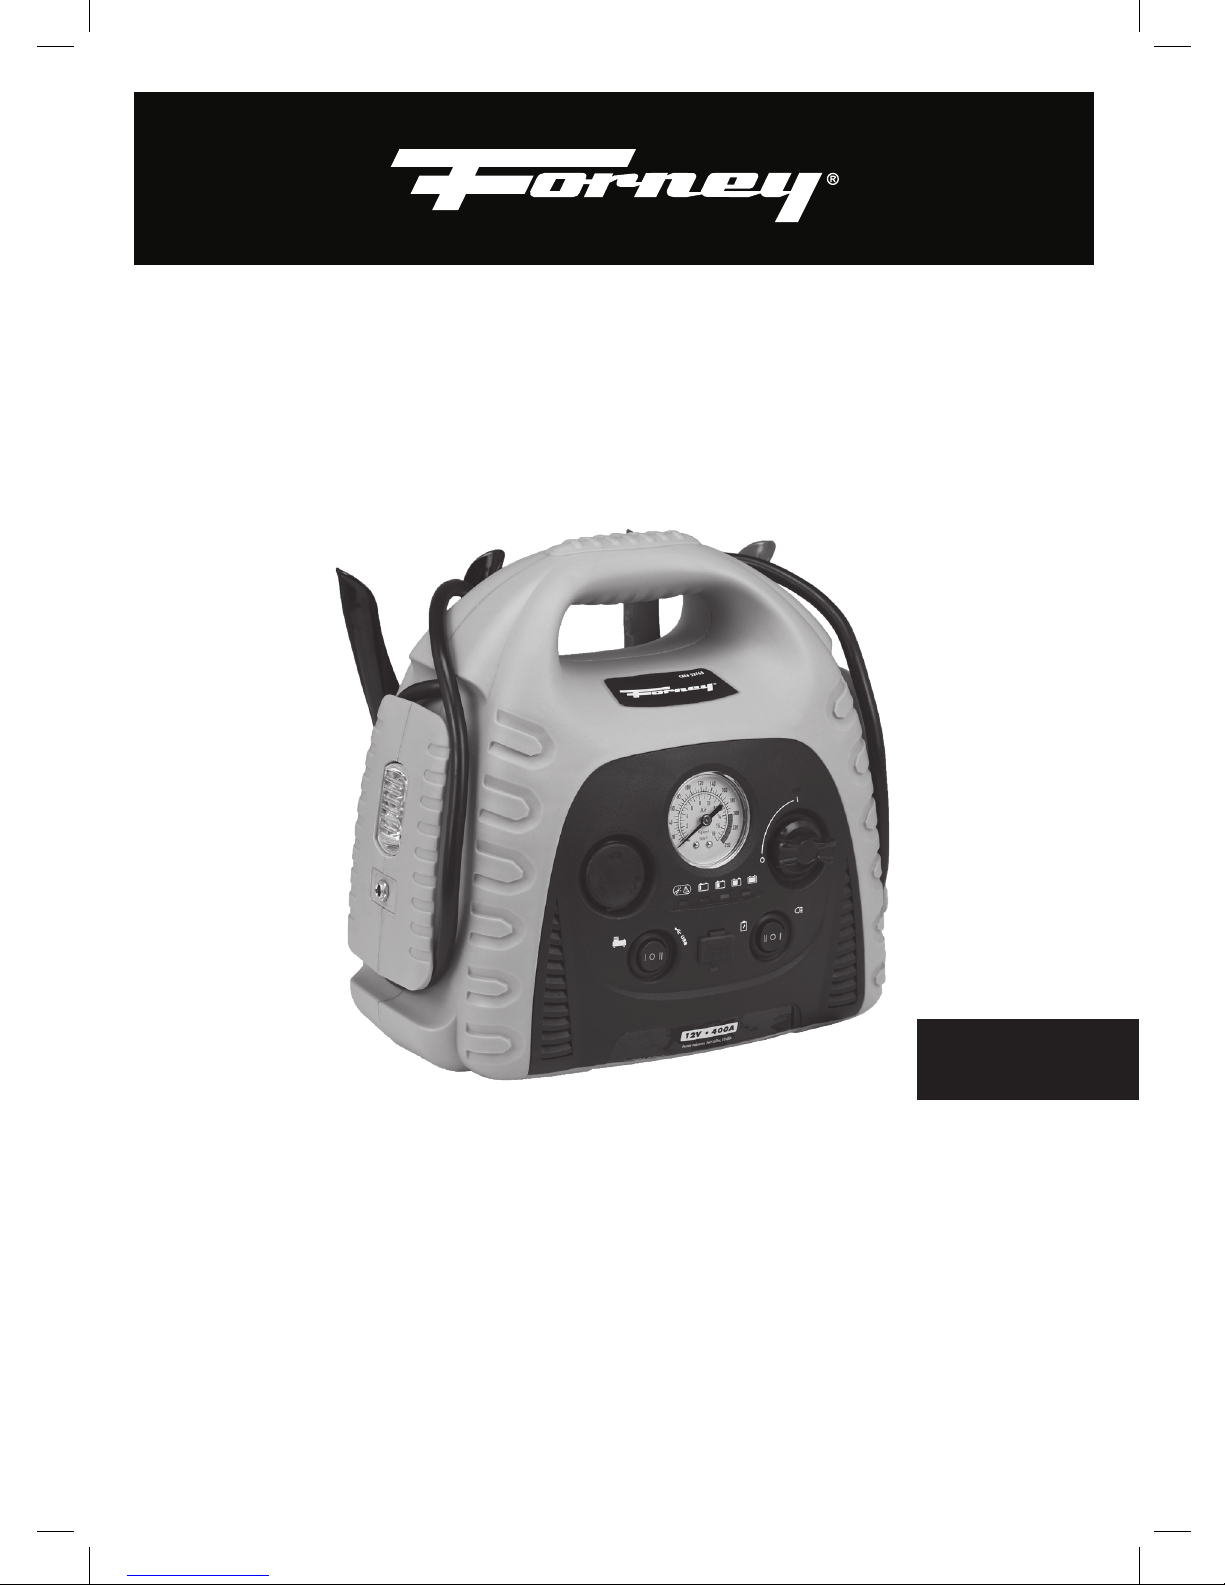
52765
12V • 900A JUMPSTART
JUMP START WITH AIR COMPRESSOR & INVERTER
POWER TO GET THE JOB DONE™
OWNER’S MANUAL
• 17AH Internal Battery
• Max Working Pressure 250 PSI
• AC Output 120V 1.67A (200W)
• DC Output 12V 15A
• USB Output 5V DC 1.1A
• Cranking Amps 400A
• Peak Amps 900A
• Reverse Polarity Protected
• Wrong Connection Protection
• Low Voltage Warning
• CEC and DOE Compliant
ENGLISH

2
WWW.FORNEYIND.COM
Working in the vicinity of a lead-acid battery is dangerous. Batteries generate explosive gases during
normal battery operation. For this reason, it is of utmost importance that each time before using your
charger, you read this manual and follow the instructions exactly.
This unit contains or emits chemicals known to the State of California to cause cancer and birth defects or
other reproductive harm. Wash hands after handling.
SAFETY INSTRUCTIONS
WARNING
Read the user instructions carefully before use.
Save them for future reference.
Wear ANSI-approved splash-resistant safety
goggles and heavy-duty rubber work gloves
whenever connecting, disconnecting, or
working near battery. Battery acid can cause permanent
blindness.
WARNING:
• Wear safety glasses. Incorrect handling may cause a
risk of personal injury if you get battery acid in your
eyes, rinse your eyes with clean water for at least 10
minutes and then seek medical attention immediately.
• If the jump starter is handled wrongly, there is a risk
of explosion and serious personal injury and/or
material damage.
• Never short-circuit the clamps with any metal object
or by allowing them to touch each other.
• Check that the vehicle battery is 12V, or there will be
a risk of explosion and/or serious injury.
• Before you start the jump starter, check that the
clamps are connected with the right polarity,
otherwise the device or the battery could explode
and cause serious injury and/or material damage.
• CAUTION: The jump starter cannot be used to
replace the vehicle's own battery.
• Only use the built-in charger. Other chargers
may shorten the lifetime of the battery or cause it
to explode and cause personal injury or material
damage.
TO ENSURE THE MAXIMUM PRODUCT LIFE AND EFFICIENCY, PLEASE NOTE:
• Fully charge the battery when first received.
• Fully charge the battery after each use.
• Fully charge the battery every 3 months.
INTENDED USE
• The jump starter is intended to start cars, boats etc. with 12V batteries.
• The jump starter has a 12V outlet which can be used to power most appliances that are designed to be
connected to a 12V outlet (max. 15A).
• LED light for emergency lighting.
• 200W inverter to power appliances designed for 120V. Indicator lights for inverter status.
• The built-in battery in the jump starter can be charged with an external charger connected to the charging
connection. The jump starter has a built-in overcharge protection.
• 5V USB 1.1A connection for charging mobile phones etc.
• Indicator lights showing battery level.

3
WWW.FORNEYIND.COM
CHARGE THE JUMP STARTER BATTERY
JUMP STARTING
1. Charge the built-in battery in the jump starter
before using it for the first time.
2. Check the charge level in the built-in battery by
pressing the battery control switch and reading the
indicator lights. If the red indicator light comes on,
the battery should be charged.
3. Always keep the battery fully charged for best
results and battery life. The battery capacity and
lifetime will be affected if it is left discharged for a
long time.
4. Charge the built-in battery in the jump starter every
three months if not used.
5. The battery will last longer if you follow the
instructions below.
1. Make sure the vehicle battery is 12V, or there will
be a risk of explosion and/or serious injury.
2. Make sure the power switch is in the OFF position
until clamps are connected to the vehicle battery.
3. Before you start the jump starter, make sure the
clamps are connected with the right polarity.
4. Follow the instructions below, or otherwise there is
a risk of personal injury and/or material damage.
5. Switch off the ignition and all systems (lights, radio,
air-conditioning etc.) in the vehicle. Connect the red
positive clamp (+) on the jump starter firmly to the
positive terminal (+) in the vehicle battery.
6. Connect the black negative clamp (-) to the negative
terminal (-) on the battery or to a metal part of the
vehicle. If the connection is made correctly, the
green light will come on.
7. If connecting the clamps backward, the cables
reversed/alert LED will flash, and an audio alarm
will sound. DO NOT turn your jump starter on.
This could cause serious damage. Reverse the
connections, and the cables reversed/alert LED will
6. Charge the battery before using it for the first time.
7. Charge the battery fully after each use.
8. Charge the battery fully every 3 months.
9. Connect the charger to a main outlet.
10. Connect the charger plug to the socket.
11. The three indicator lights flash in turn to show that
the built-in battery is being charged.
12. It takes 6-40 hours to charge the built-in battery
fully, depending on the condition of the battery.
13. When the battery is fully charged, the green
indicator light comes on.
14. Disconnect the charger.
turn off, and the audio alarm will stop. NOTE: The
jump starter is designed for use on 12V batteries
only. If connecting to a 24V battery, the alert Error
LED will be flash, and an audio alarm will sound.
DO NOT turn your jump starter on. This could
cause serious damage.
8. The green ON LED will be on if the connection is
right. Turn the power switch to the ON position.
9. Crank the engine for 3-5 seconds. If the engine
does not start within 10 seconds, stop cranking and
wait at least 4 minutes before attempting to start
the vehicle again. (This permits the battery to cool
down.)
10. After the engine starts, turn the power switch to
the OFF position. Then disconnect the NEGATIVE
(BLACK) clamp and then the POSITIVE (RED) clamp
in that order.
11. Always return the cables to their stored position.
12. Recharge the jump starter as soon as possible after
use.
CHECK INTERNAL BATTERY STATUS
Turn the TEST / LAMP switch to the TEST position and check the battery’s voltage on the 3 BATTERY STATUS LEDs.
If the voltage of battery inside the jump starter is too low, the alert Low Voltage LED will flash, and an audio alarm
will sound. Turn the switch to the middle position after test.
WORK LIGHT
Turn the TEST / LAMP switch to the LAMP position, the work light on the side of jump starter will turn on. Turn the
switch to the middle position after use.
Recharge the jump starter as soon as possible after using the work light.

4
WWW.FORNEYIND.COM
5V USB PORT
The USB outlet provides up to 1.1A at 5V DC.
1. Turn the USB switch to the USB position, and the
USB indicator LED will be on;
2. Plug the device into the USB port;
3. Reverse these steps when finished using the USB
port;
4. Recharge the jump starter as soon as possible after
using the USB port.
POWER SUPPLY VIA 12V OUTLET
• Max. output is 15A (180W).
• The outlet has overload protection with automatic
reset.
• The internal battery in the jump starter can be
emergency charged from the vehicle's 12V outlet.
However, it cannot be charged fully in this way. Use
the AC charger in the usual case.
1. Open the cover over the outlet.
2. Connect the 12V product to the outlet.
3. If the output socket of jump starter is overloaded by
output current (15A max), the circuit will be cut off
automatically. Reduce the amp draw of electrical
equipment on the socket and the circuit will be
restored automatically in a few minutes.
4. Recharge the jump starter as soon as possible after
using the output socket
COMPRESSOR
WARNING: The compressor can be run continuously
for maximum 10 minutes and then it needs to cool
down for at least 10 minutes. When inflating tires, the
pressure will rise very quickly - pay attention.
Inflation
1. Open the compressor compartment and pull out
the air hose.
2. Place the nozzle over the valve and press it right
down. Fold down the locking lever into the locked
position.
3. Start the compressor with the compressor power
switch.
4. Monitor the air pressure on the pressure gauge
until the desired pressure is reached.
5. When the desired pressure has been reached, turn
off the compressor with the power switch, fold up
the locking lever and disconnect the nozzle from
the valve. Replace the hose in the compressor
compartment.
6. Use an adapter to inflate beach balls, air
mattresses, inflatable boats etc.
INVERTER
The inverter can supply 120VAC, 60Hz, 200W.
• To protect the battery, the inverter is fitted with
under voltage protection. If the voltage falls too low,
an alarm will be emitted and the inverted will be
switched off. It will be reset automatically when the
battery voltage is higher.
• The inverter is fitted with short-circuit protection,
which switches off the jump starter if the connected
equipment short-circuits.
• If the indicator light on the inverter comes on, check
that the connected equipment is working correctly
and does not need too much power for the jump
starter. Also check the charge level in the battery.
• The fuse trips in the following situations. Replace the
fuse if necessary.
– If the connected equipment needs too much
power.
– In the event of a short circuit in the connected
equipment.
1. Set the inverter power switch to the ON position.
2. Insert the cable from the external equipment into
the 120V outlet.
3. Start the external equipment.
4. The inverter can be switched off automatically or
with the power switch.
5
WWW.FORNEYIND.COM
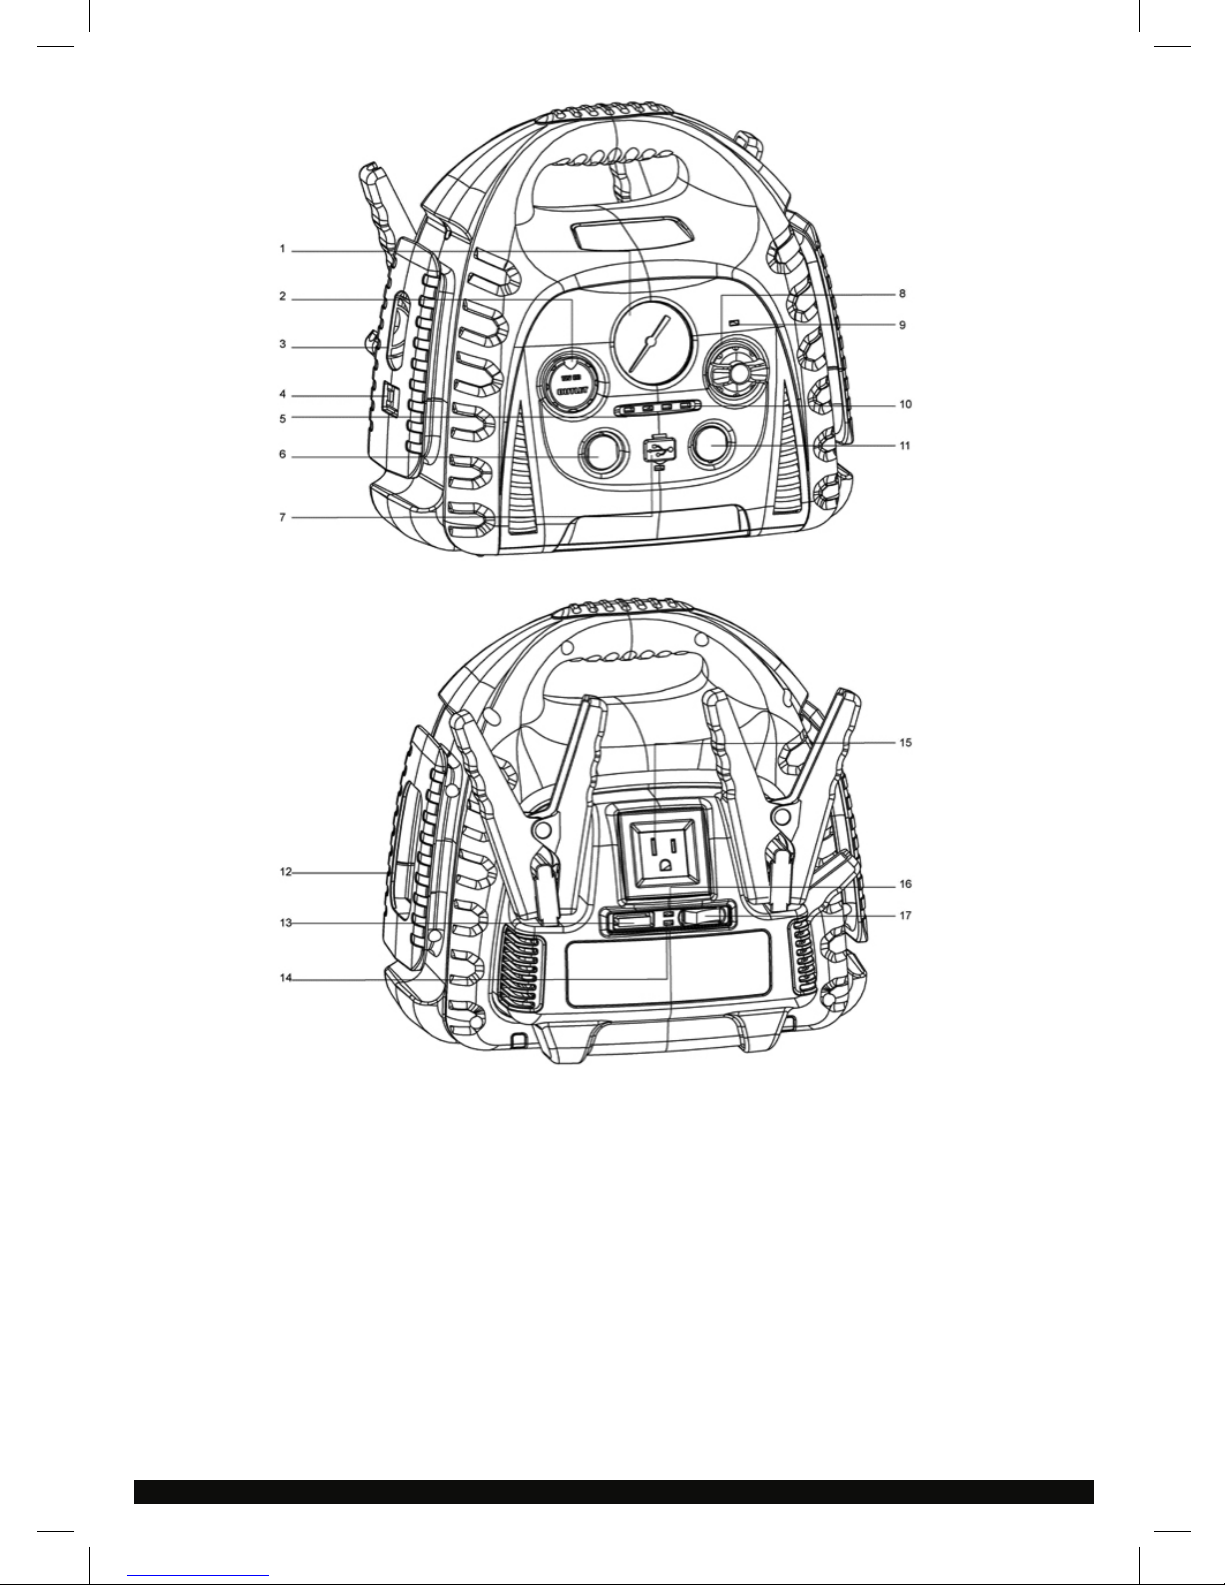
1. Pressure Gauge
2. 12V outlet
3. Emergency lighting
4. Charging connection
5. Indicator light for correct/incorrect connection
6. Power switch for compressor/USB
7. 5V USB connection
8. Power switch
9. Indicator light for correct/incorrect connection
10. Indicator lights for charge level
11. Battery control button/switch for emergency light
12. Compressor compartment
13. Inverter fuse
14. Indicator light for inverter fault
15. 120V outlet
16. Indicator light for inverter
17. Inverter power switch

6
WWW.FORNEYIND.COM
LIMITED WARRANTY
FORNEY INDUSTRIES, INC. 2057 VERMONT DR.,
FORT COLLINS CO 80525 MAKES THIS LIMITED
WARRANTY TO THE ORIGINAL RETAIL PURCHASER
OF THIS PRODUCT. THIS LIMITED WARRANTY IS NOT
TRANSFERABLE OR ASSIGNABLE.
Subject to the terms and conditions below, Forney
Industries, Inc. of Fort Collins, Colorado warrants this
product to the original retail purchaser, to be free from
defects in material and workmanship for a period of
one year (as specified below) from the date of sale.
Within the warranty periods listed below, Forney will
replace or repair any warranted parts or components
that fail due to defects in material or workmanship.
Proof of purchase is required.
For warranty service, return the product, with proof of
purchase to Forney Industries, Inc., 3900 Canal Drive,
Fort Collins, CO 80524 or contact customer service at
1-800-521-6038. Registration on line is available at
www.forneyind.com.
Forney Industries must be notified in writing within thirty
(30) days of any equipment failure that begins within
the warranty time periods. All implied warranties begin
on the delivery date of the equipment to the original
retail purchaser.
1 Year – Parts & Labor (90 days for industrial use): All
components and parts inside and outside the battery
charger. Included, but not limited to cables, clamps.
Knobs, wheels and axle are not covered.
Consumable components that fail due to normal wear
are not covered under this warranty.
Equipment that has been modified or changed by anyone
other than Forney Industries or their authorized repair
station, or equipment that has been improperly installed
or operated or misused based on industry standards, or
equipment that has not had reasonable and necessary
maintenance or equipment which has been used for
purposes outside of the specifications or the original
intended use is not covered by this warranty.
Forney makes no other warranties, including warranty
for any accessories used with this product that are not
manufactured by Forney Industries and/or approved for
use with this product. This ‘Limited Warranty” is void if the
product is misused, subjected to abuse or is repaired or
modified by anyone other than Forney or its authorized
repair station. It is the purchaser’s obligation to read and
follow the instructions provided in the owner’s manual.
Using this product in any other way than its original
intended use will void the warranty.

STOP!
PLEASE DO NOT RETURN
TO THE STORE
If you have questions, issues or concerns with your purchase,
please call customer service at 1-800-521-6038
Monday through Friday from 7 a.m. – 5 p.m. (MST)
or at www.forneyind.com/about-us/contact-us.
Please take time to register your product at
www.forneyind.com/support/product-registration.
Thank you.
For the most up-to-date
warranty information,
visit www.forneyind.com
Forney Industries, Inc.
2057 Vermont Drive
Fort Collins, CO 80525
800-521-6038
www.forneyind.com
 Loading...