

Ford Gen-2 Gold Owner's Manual

V ehicle Security and Remote Start Systems
Remote Start System with Deluxe Vehicle Security
Sistema de encendido por control remoto y seguridad para vehículos de lujo
Système de démarrage à distance avec antivol de véhicule haut
de gamme
Owner's Manual
Manual del propietario
Guide de l’utilisateur
1031555
4/06
Gen-2 Gold Owners, 1031555 RevA - TRANSLATED.pmd 6/14/2006, 2:44 PM1
For the Ultimate in Comfort, Convenience and Security For the Ultimate in Comfort, Convenience and Security
For the Ultimate in Comfort, Convenience and Security
For the Ultimate in Comfort, Convenience and Security For the Ultimate in Comfort, Convenience and Security
TM
Featuring PowerCode Technology
TM

Contents
Using the Remote Control Start Function .......................................3
Starting Your Vehicle............................................................................................. 3
Entering the Vehicle While it is Running via Remote Start .................................... 4
Turning on the Rear-Window Defroster............................................................... 4
Using the “Quick-stop” Feature ............................................................................ 5
Using the Remote Security & Convenience Functions ...................6
Arming the Security System ................................................................................. 6
Disarming the Security System............................................................................. 7
Convenience and Safety Features ....................................................................... 7
System Operation.............................................................................9
Interior Theft Sensor (IT-s):................................................................................. 10
Security system will not arm: ............................................................................. 10
Attempted Theft Alert: ......................................................................................... 11
The Interior Status Indicator ................................................................................ 11
System Maintenance ...................................................................... 11
Changing the Remote Control Battery: ............................................................... 11
Adding Remote Controls to Your System: .......................................................... 12
Deleting Lost or Stolen Remote Control Transmitters from Your System: ......... 12
Changing the Shock Sensor (IT-s) settings: ....................................................... 1 3
Emergency Disarm Procedure .......................................................13
Safety Features ............................................................................... 14
Power Window / Moonroof Disable.................................................................... 14
Automatic Door Locking ...................................................................................... 14
Starting with Doors Open.................................................................................... 14
Trouble Shooting ...........................................................................14
Failed Attempt to Remote S tart ............................................................................ 14
Notice:
Do not remote start vehicle in an enclosed environment (i.e. closed garage). Prolonged
operation of a motor vehicle in an enclosed environment can cause a harmful
buildup of Carbon Monoxide. Carbon Monoxide is harmful to your health. Exposure
to high levels of carbon monoxide can cause headaches, dizziness or in extreme
cases unconsciousness and/or death.
Congratulations on your purchase of a Ford Motor Company PowerCode Vehicle
security and/or convenience system. PowerCode TechnologyTM represents the latest
in automotive convenience and protection systems. Your PowerCode system,
purchased today, is ready to accept tomorrows advancements in technology.
Consult your dealer for details on how to upgrade your PowerCode system.
PowerCode TechnologyTM , IT-s, Lite Touch and Real-Panic are Registered
Trademarks of Code Systems, Inc.
2
Gen-2 Gold Owners, 1031555 RevA - TRANSLATED.pmd 6/14/2006, 2:44 PM2

Using the Remote Control Start Function
Your Ford/Lincoln/Mercury vehicle may be equipped with a Securilock Anti-Theft
system. If so, your PowerCode Remote Control Start system interfaces with the
Securilock system, fully maintaining the level of security provided by the Securilock
system. The PowerCode Securilock interface is sold separately.
QUICKSTART
Press to DISARM the
Security System and
1
Press With Ignition
on to Activate Valet
Service Mode
2
Starting Your Vehicle:
The remote control start function is activated by pressing and holding*** the
button on the PowerCode remote control transmitter. The system will check the
vehicle to ensure that it is safe to start, including making sure all doors are closed,
and if all safety parameters are correct the engine will start within 5 seconds (diesel
engines vehicle take 30 seconds to allow the glowplugs sufficient time in all
conditions to heat up). Press and hold*** the button again to turn off the vehicle.
UNLOCK Drivers Door
(or all doors depending
to installation option**)
Press Again to Unlock
All Doors**
Press and HOLD*** to
Activate Remote Start
Press Again to Turn
on Rear Defroster**
After Remote Started
Note: On certain model vehicles, each time the remote control start
feature is activated the vehicle doors will lock, and all power windows
(and moonroof if equipped) will be disabled while the vehicle is remote
started. The windows (and moonroof if equipped) will resume normal
operation after the remote start is shut down, or the vehicle is being
used with the key.
The factory RKE keyfob cannot be used to activate the remote start function.
*** “Press & Hold” refers to pushing a transmitter button for more than one second..
Gen-2 Gold Owners, 1031555 RevA - TRANSLATED.pmd 6/14/2006, 2:44 PM3
3
Using the Remote Control Start Function (Con’t)
If your vehicle fails to start:
If your vehicle fails to attempt to start and provides feedback through by honking the
horn a certain amount of times, check the troubleshooting section of this manual for
possible causes.
If the vehicle attempts to start but stalls, depending on how the system was
configured, it may re-attempt to start after pausing 5 seconds, then re-attempting up
to four times. If the vehicle does not start after the fourth attempt, the system will
abort the start process.
Your vehicle can be started by remote control whether the alarm is armed or
disarmed. When the alarm is armed, the impact sensor turns off when the vehicle is
started to prevent the engine vibration from setting off the alarm.
Remote Start Safety Features:
For safety and security reasons, the system will shut down the engine during
remote start operation if any of the following occur:
• The brake pedal is pressed before the vehicle ignition key is turned on
• The hood is opened
• The alarm is triggered
As a safety precaution, the vehicle will shut off if left unattended for 10 minutes
(run-time can optionally be set to 15 minutes if desired** ).
Entering the Vehicle While it is Running via Remote Start:
1. Press* to unlock the door(s) and turn off alarm system (if not already off)
2. Enter the vehicle (Do not press the brake pedal)
3. Insert the key into the ignition and turn to the ON (run) position.
4. Press the brake pedal. The remote starter disengages and the vehicle will
operate normally.
Note: If the vehicle stalls after attempting this procedure, make sure the key was
turned all the way forward in the ignition switch.
Pre-Heating or Pre-Cooling the Interior of the Vehicle:
Before exiting the vehicle, set the temperature controls to the desired setting and
operation. After the system starts the vehicle, the heater or air-conditioning will
activate and heat or cool the interior to your setting.
Turning on the Rear-Window Defroster** (optional):
While the vehicle is running via remote start, press* on the remote control. The
system will flash the parking lights to confirm and activate the vehicle’s rear
4
Gen-2 Gold Owners, 1031555 RevA - TRANSLATED.pmd 6/14/2006, 2:44 PM4

Using the Remote Control Start Function (Con’t)
defroster for 10 minutes, or for the remainder of your vehicle’s preset run time limit.
Using the “Quick-stop” Feature:
If you want to make a short stop and leave your vehicle running (to keep the interior
warm or cool, for instance), the quick stop feature allows you to do this while
keeping your vehicle secure and your keys with you.
To engage quick stop:
1. Stop the vehicle and place the transmission in PARK.
2. With your foot
lights** will turn on and the doors will unlock, indicating that the vehicle is now
running via remote start.
3. Remove the keys from the ignition and exit the vehicle. Press* to arm the alarm
system if desired.
Note: Do not leave children or animals unattended in the vehicle when
using the quick stop feature. For safety purposes on certain model
vehicles, the power windows and moonroof (if equipped) will be disabled
during Quick Stop mode.
Service/Valet Mode:
Service mode is used when servicing the vehicle to prevent the system from
unexpectedly starting the engine while being serviced. While in service mode, the
systems keyless entry functions will operate normally, but the security system will
not arm and the remote start function is temporarily disabled.
To engage the service/valet mode, turn the ignition key to the ON (RUN) position
and press* the 2 button on the PowerCode remote control transmitter. The system
will begin flashing the dash mounted status indicator in a double-flash pattern
indicating that the system is in Service mode.
off the brake pedal, press* on the remote control. The parking
To return the system to its normal operating mode, turn the ignition key to
the ON (RUN) position and press* the 2 button on the PowerCode remote control
transmitter again. The status indicator will shut off, indicating that the system is in
now in its normal operating mode.
Important Note: When taking your vehicle in for service is recommended that you
inform the service personnel that your vehicle is equipped with a remote control
start system.
* “Press” refers to pushing a transmitter button for approximately one second.
** See your dealer for details on available installation features and options.
Gen-2 Gold Owners, 1031555 RevA - TRANSLATED.pmd 6/14/2006, 2:44 PM5
5

Using the Remote Security & Convenience Functions
Your PowerCode system’s security functions can be controlled using either the
supplied PowerCode systems remote control transmitter or the vehicle’s factory RKE
keyfobs (if equipped). Also note, that the PowerCode system, while integrated with
the factory RKE system, does not alter the functionality of the factory RKE system in
any way.
Press to ARM the
Press for Car Find
Press and HOLD for
Panic Alarm
Press to turn on
Headlights or Auxiliary
Output Function**
Press to activate
Auxiliary Output
Function**
1
2
Security System
and Lock Doors
Press to DISARM
Security System and
Unlock Drivers Door
(or all doors depending
to installation option**)
Press Again to Unlock
All Doors**
Press and HOLD To
Open Trunk or Hatch**
QUICKSTART
Arming the Security System
Using the PowerCode Remote Control Transmitter:
Press* the button on the PowerCode remote control transmitter. The system will
lock the doors and flash the parking lights** two times to indicate that the security
system has armed. If the button is pressed* a second time within 5 seconds, the
system will chirp the horn two times confirming that the system has armed.
Using the factory supplied Keyless Entry Remote control:
Press* the button on the factory RKE keyfob. When the factory keyless system
locks the doors, the PowerCode system will flash the parking lights one time, pause
for 15 seconds and then flash the parking lights** two more times to indicate that the
security system has armed. To override the 15 second arming delay, press* the
button on the factory RKE keyfob a second time within 5 seconds of the first press.
The PowerCode security system can also be armed by pressing the “Lock” button
* “Press” refers to pushing a transmitter button for approximately one second.
** See your dealer for details on available installation features and options.
6
Gen-2 Gold Owners, 1031555 RevA - TRANSLATED.pmd 6/14/2006, 2:44 PM6
Using the Remote Security & Convenience Functions (Con’t)
on either front door or the 7/8 and 9/0 buttons together on the outside door mounted
keypad.
Note: To lock the vehicle’s doors without arming the security system, press “Unlock”
then “Lock” on either the factory RKE keyfob or door mounted lock/unlock switch. If
desired, your PowerCode system can be programmed to only arm when locking the
doors using the PowerCode remote control transmitter.
Disarming the Security System:
Using your PowerCode remote control transmitter:
Press* the button on the PowerCode remote control transmitter. The system will
unlock the drivers doors (or all doors depending upon installed options**) and flash
the parking lights** one time to indicate that the security system is disarmed. If the
button is pressed* a second time within 5 seconds, the system will unlock all doors
and chirp the horn confirming that the system has disarmed. Additionally, the
PowerCode system turns on the interior dome light for one minute, or until the ignition
key is turned on to provide an illuminated entry into your vehicle.
Using your factory supplied Keyless Entry Remote control:
Press* the button on your factory RKE keyfob. When the driver’s door unlocks,
the PowerCode system also disarms. The system will flash the parking lights** one
time to indicate it has disarmed. If your vehicle is equipped with a door mounted RKE
keypad, unlocking the doors by entering your PIN will also disarm the security
system. When using the door mounted RKE keypad, your PIN must be entered within
10 seconds to prevent the alarm from sounding.
Convenience and Safety Features
Activating Headlight control / Auxiliary Output Function 1**:
Headlight control is an optional feature of your PowerCode security system. To
activate headlight control, press* the
1
button on your PowerCode remote control
transmitter. The system will turn the headlights on for 20 seconds or until the
button is pressed* again.
* “Press” refers to pushing a transmitter button for approximately one second.
** See your dealer for details on available installation features and options.
Gen-2 Gold Owners, 1031555 RevA - TRANSLATED.pmd 6/14/2006, 2:44 PM7
1
7
Using the Remote Security & Convenience Functions (Con’t)
Activating Auxiliary Output Function 2**
To activate auxiliary output function 2 control, press* the 2 button on your
PowerCode remote control transmitter.
Remote Control Power Trunk/Hatch release**
Press and hold*** the button on your PowerCode remote control transmitter. The
system will activate the power trunk or hatch release (if equipped) and disarm the
security system.
Note: Make sure to rearm the security system if you will be leaving your vehicle
unattended again after opening your trunk or rear hatch.
Remote Control Progressive Find function
The remote control vehicle find function can help locate your vehicle in a crowded
parking lot. Pressing* the button on your PowerCode remote control transmitter
will chirp the horn 5 times. Subsequent presses* of the button within 5 seconds
of first press will activate the find function again - sounding the horn slightly louder
on the second and third activations and then at a constant sound level (equal to the
third activation).
Remote Control Panic Mode
The remote control panic function helps draw attention to your vehicle and yourself
in a threatening situation. Press and hold*** the button on your PowerCode
remote control transmitter to activate the panic function. Pressing* the button on
the PowerCode transmitter prior to the end of the 30 second cycle will end the panic
mode.
Illuminated Entry and Exit
When the alarm system is disarmed, the vehicle courtesy lights will turn on for 1
minute, or until the vehicle is started or the system is rearmed.
When the ignition is turned off, the vehicle courtesy lights will turn on for 1 minute, or
until the system is armed.
* “Press” refers to pushing a transmitter button for approximately one second.
** See your dealer for details on available installation features and options.
*** “Press & Hold” refers to pushing a transmitter button for more than one second.
8
Gen-2 Gold Owners, 1031555 RevA - TRANSLATED.pmd 6/14/2006, 2:44 PM8

Using the Remote Security & Convenience Functions (Con’t)
Memory Seats**
If your vehicle is equipped with memory seats and/or functions, the memory
functions will be activated when you disarm the security system or unlock the doors
using the PowerCode remote control transmitter in the same manner as with the
factory equipped RKE keyfob.
Power Side Sliding Doors**
On vehicles equipped with Power Side Sliding doors, the driver side power sliding
door is controlled by pressing* the
transmitter. The passenger side power sliding door is controlled by pressing* the
button on the PowerCode remote control transmitter.
Note: Prior to activating the power sliding door with the PowerCode remote control,
all doors must be unlocked with either the PowerCode or factory transmitter.
Pressing the button the first time will open the selected door. Then pressing the
button again will close the selected door.
Power Rear Liftgate Operation**
On vehicles equipped with the Rear Power Liftgate option, the power liftgate is
controlled by pressing* the 2 button on the PowerCode remote control transmitter.
Pressing the button the first time will open the power liftgate, then pressing* the
button a second time will close the power liftgate.
button on the PowerCode remote control
1
2
2
System Operation
When the Security System is Armed:
• All interior entry points are monitored for unauthorized entry;
• The Interior Theft Sensor monitors for impact to the vehicles body or glass;
• The system status indicator flashes once every four seconds.
If any monitored entry point is opened or hard impact is detected, the system will
activate an alarm cycle. During the alarm cycle:
• The horn sounds in a random pattern;
• The parking lights flash** in a random pattern;
• The system status indicator begins to flash rapidly.
* “Press” refers to pushing a transmitter button for approximately one second.
** See your dealer for details on available installation features and options.
9
Gen-2 Gold Owners, 1031555 RevA - TRANSLATED.pmd 6/14/2006, 2:45 PM9
System Operation (Con’t)
The alarm cycle lasts for 30 seconds. At the end of the 30 second cycle, the system
will pause for 10 seconds and then begin monitoring for any further alarm
conditions. If another alarm condition is detected the system will go in to another
alarm cycle. The system will trip up to 5 times for each different alarm condition (i.e.
door open or hard impact to the vehicle body)
Interior Theft Sensor (IT-s):
While the security system is armed, the IT-s monitors for impact to both the vehicles
body and glass. If a light, not-threatening, impact is detected the system will chirp
the horn to warn-away would be intruders. In the event that a hard impact is
detected, the system will trip an alarm cycle.
Temporarily overriding the IT-s :
Pressing* the button on your PowerCode remote control transmitter within 5
seconds of arming the security system will disable the Interior Theft Sensor (IT-s)
for that arming cycle. The system will confirm this command by chirping the horn
three times. Rearming the security system will re-enable the IT-s.
Automatic arming**:
Your PowerCode security system can be programmed to arm and/or lockout the
starter automatically. Your PowerCode security system is programmed from the
factory for manual arming. If you would like to activate the automatic starter lockout
and/or automatic arming features of your system, contact 1-800-FORD-KEY for
instructions on activating these and your systems other programmable features.
When automatic arming is activated, one minute after the ignition key has been
turned off (if all entry points are closed) the system will flash the parking lights two
times to indicate the security system is armed.
Security system will not arm:
If the parking lights only flash** once when you attempt to arm the security system
and the horn only chirps once when the is pressed* a second time, the security
system is either in Valet mode or a protected entry point is open. If a entry is open
when the system attempts to arm, the system will wait up to 5 minutes for the open
entry point to be closed. If the entry is still open after five minutes, the system will go
ahead and arm, ignoring the open entry point until after it is closed. Once closed that
entry point will then be monitored. If all of your doors are closed, the system is in
Service/Valet mode. In this case, refer to the “Service/Valet mode” section of this
manual.
* “Press” refers to pushing a transmitter button for approximately one second.
** See your dealer for details on available installation features and options.
10
Gen-2 Gold Owners, 1031555 RevA - TRANSLATED.pmd 6/14/2006, 2:45 PM10
System Operation (Con’t)
Attempted Theft Alert:
If the horn chirps four times when you disarm your security system, this indicates
that the alarm was tripped while you were away from your vehicle. You will also
notice that the dash mounted status LED
is also flashing rapidly at that time.
After disarming the system, enter the
vehicle and press the override/
programming button before turning the
ignition key on to identify the cause of
the alarm trip. The horn will chirp a
number of times, indicating which zone
in the chart below tripped the alarm.
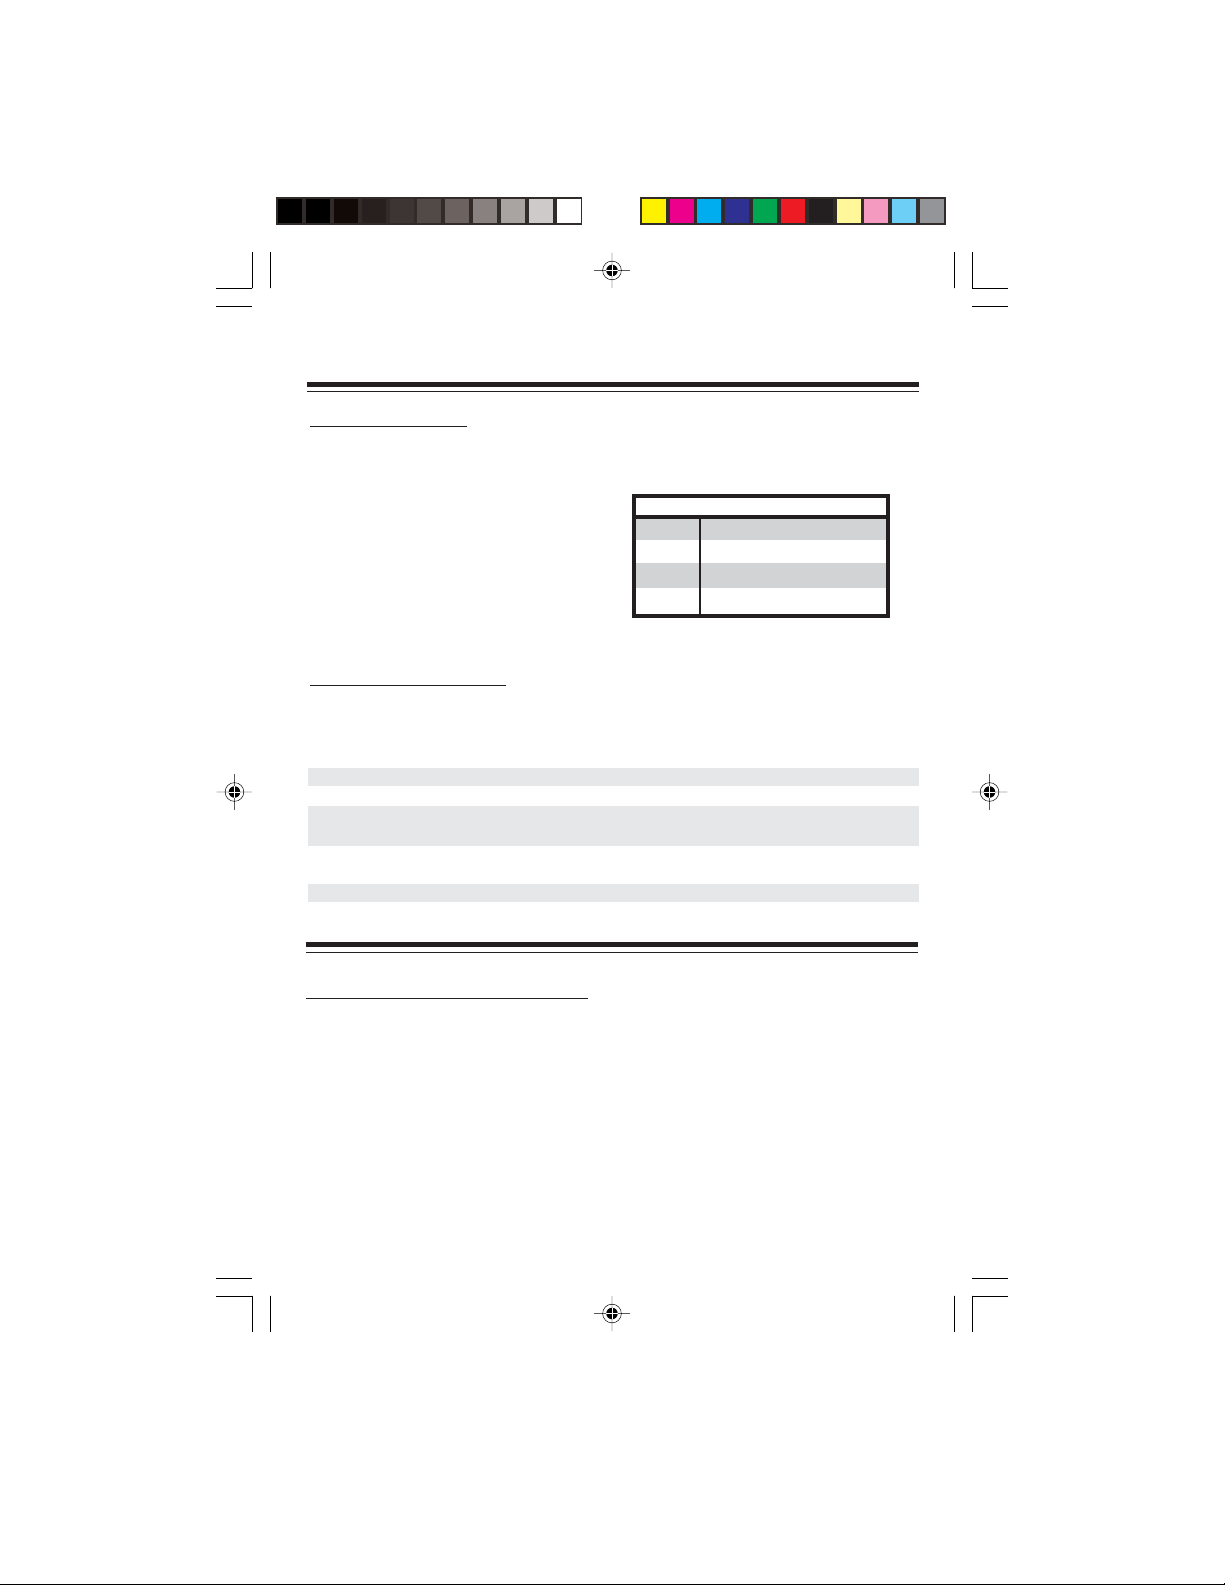
The Interior Status Indicator
The Status Indicator is a high-intensity red light mounted in a visible location on the
vehicle instrument panel. This red light gives a visual indication of the alarm system’s
state of operation. Note the chart below:
If the Status Indicator is... ....then the Security System
Off is disarmed
Flashing Slowly (once every 4 second) is armed
Flashing Very Quickly was triggered in your absence
Double Flash is in Valet/Service mode
(2 flashes, off, 2 flashes)
On (not flashing) is in Pre-arm mode
Trip ID Chart
1 chirp IT-s
2 chirps Entry door
3 chirps Hood
5 chirps Ignition was turned on
(see Attempted Theft ID, above)
System Maintenance
Changing the Remote Control Batteries:
The (2) 3-volt lithium batteries supplied in your remote control should last
approximately one year, depending on usage. When the batteries begin to weaken,
you will notice a decrease in range, or the distance from your vehicle that your
remote transmitter will operate. Follow the instructions below to change the remote
transmitter batteries.
1. Insert the edge of a coin into the slot at the bottom of the remote control. Twist
the coin to pry the remote control halves apart.
2. Remove the old batteries and replace with new ones. Be sure to observe the (+)
sign on the battery and position it facing upward.
3. Carefully snap the case halves back together, then test the remote control.
It is not necessary to reprogram the remote control after changing the
battery.
Gen-2 Gold Owners, 1031555 RevA - TRANSLATED.pmd 6/14/2006, 2:45 PM11
11

System Maintenance (Con’t)
Adding Remote Controls to Your System:
The system has the ability to operate from up to eight (8) remote controls. Follow
these instructions to add a remote control to your system.
1. Make sure the security system is disarmed and the ignition is off.
2. Open the driver’s door.
3. Turn vehicle ignition on.
4. Press and hold programming/override button under the instrument panel.
After 15 seconds, the horn will chirp three (3) times. This indicates that the unit
has entered the remote control programming mode.
5. Release the programming/override button.
6. Press* the button on the remote control to be programmed.
The horn will sound once, indicating that the system has “learned” that remote
control.
7. Repeat step 6 for any additional remote controls.
8. Turn the vehicle ignition off to exit the programming mode. Test all remote
controls to ensure that they work properly.
Deleting Lost or Stolen Remote Control Transmitters from Your System:
Lost or stolen PowerCode remote control transmitters can be deleted two ways:
1) Reprogramming all eight transmitter code locations in memory;
2) If your vehicle is equipped with factory installed RKE, Pressing the vehicle’s door
mounted “unlock” switch while the PowerCode system is in transmitter learn
mode, erases all learned transmitters. After erasing transmitters, all active
transmitters will have to be reprogrammed to the PowerCode system (refer to
the instructions above).
Your Systems Programmable Operating Characteristics:
Your PowerCode system has several programmable settings such as Ignition
triggered door lock, Ignition triggered door unlock and automatic arming features
which can be changed to tailor your systems operation to your own personal
desires and/or requirements. If you are interested in changing any of these settings,
call 1-800-FORD-KEY for information regarding the different programmable features
and the steps to change the settings.
* “Press” refers to pushing a transmitter button for approximately one second.
12
Gen-2 Gold Owners, 1031555 RevA - TRANSLATED.pmd 6/14/2006, 2:45 PM12
System Maintenance (Con’t)
Changing the Shock Sensor (IT-s) settings:
Your PowerCode systems IT-s sensitivity settings can be tailored to your individual
requirements. Your installer at the time of installation has set your IT-s to a medium
sensitivity. To make your systems IT-s either more or less sensitive, follow these
steps:
1. Follow the instructions on the previous page to put your system in transmitter
learn mode.
2. Press and release the programming/override button
The system will chirp the horn four times to acknowledge the system in option
settings mode.
3. Press* the
The system will chirp the horn one time. Your “Lite-touch” sensitivity can now
be increased by pressing* the button on your PowerCode remote control
transmitter or decreased by pressing* the on your PowerCode remote
control transmitter. The system chirps the horn one time each time either
button is pressed.
4. Press* the button on your PowerCode remote control transmitter one time.
The system will chirp the horn two times. Your “Full shock” sensitivity can now
be increased by pressing* the button on your PowerCode remote control
transmitter or decreased by pressing* the on your PowerCode remote
control transmitter. The system chirps the horn one time each time either
button is pressed.
5. Turn the ignition key off to exit programming mode and save settings.
After changing your shock sensor settings, it is recommended that you arm your
security system and double check your settings. A setting too high can cause the
system to “false alarm”. Conversely, a setting too low could prevent the system from
adequately protecting your vehicle.
button on your PowerCode remote control transmitter one time.
Emergency Disarm Procedure
If your remote control transmitter is lost or fails to function, use this procedure to
disarm the system and start your vehicle.
1. Use the keys to enter the vehicle. The alarm will sound once the door is opened.
2. Insert the key into the ignition and turn to the ON position.
3. Locate and press the programming/override button mounted under the instrument
panel. The alarm will turn off and you will be able to start your vehicle.
* “Press” refers to pushing a transmitter button for approximately one second.
Gen-2 Gold Owners, 1031555 RevA - TRANSLATED.pmd 6/14/2006, 2:45 PM13
13
Safety Features & Trouble Shooting
Safety Features
Power Window / Moonroof Disable (if equipped)
On certain model vehicles, each time the remote control start feature is activated, all
power windows and the moonroof (if equipped) will be disabled while the vehicle is
running via remote start. The windows and moonroof will resume normal operation
after the remote start is shut down, or the vehicle is being used with the key.
Automatic Door Locking
Each time the remote control start feature is activated, the power door locks will be
activated prior to the vehicle starting. The doors can be unlocked at any time via the
PowerCode remote control.
Starting with Doors Open
For safety reasons, all vehicles doors must be shut when attempting a remote start.
If any door is left open, the system will alert you by honking the horn 3 times when
attempting a remote start, then abort the process. Once the door is shut, the system
can be remote started normally.
Troubleshooting
Failed Attempt to Remote Start
When attempting a remote start of your vehicle, the system has several safety
checks that it performs. If any of these inputs are present that should not be, the
system will respond back to you with several horn “honks” to help you identify
which input is present. These “honks” will occur after initiating a start sequence
with the transmitter, the system will turn on the ignition, but then respond back with
several horn “honks” and abort the starting process.
When this occurs, count the number of “honks” and refer to the information below to
correct the situation preventing a remote start.
2 Chirps BRAKE is being pressed, or the HOOD is open
3 Chirps One of the vehicles DOORS are open
4 Chirps TACH not programmed - see dealer
5 Chirps The KEY is in the ignition
6 Chirps The Remote Start System is in SERVICE/VALET mode
14
Gen-2 Gold Owners, 1031555 RevA - TRANSLATED.pmd 6/14/2006, 2:45 PM14
 Loading...