

Page 1

ColdFlow - 341000
Kämmer Series 341000 FCD KMENIM4104-01 03/18
USER INSTRUCTIONS
Cryogenic Control Valves 4K
FCD KMENIM4104-01 03/18
Maintenance
Experience In Motion
1
Page 2

STOP!
STOP!
Contents
1 Using Kämmer Valves And Actuators Correctly
2 Initial Installation
3. Trim Parts
4 Actuator
5 Identification
6 Spare Parts
7 Technical Tables
8 Trouble Shooting
Kämmer Series 341000 FCD KMENIM4104-01 03/18
1 USING KÄMMER VALVES AND ACTUATORS CORRECTLY
1.1 General
The following instructions are designed to assist in installing and performing maintenance as required on FLOWSERVE
Kämmer products. Product users and maintenance personnel should Thoroughly review this maintenance instruction prior
to installing and prior to performing any maintenance on the product.
DANGER: Please review also the general Installation and Operational Manual (IOM) for general safety instructions.
1.2 Terms concerning safety
The safety terms DANGER, WARNING, CAUTION and NOTE are used in these instructions to highlight particular dangers
and/or to provide additional information on aspects that may not be readily apparent.
DANGER: indicates that death, severe personal injury and / or substantial property damage will occur if proper precautions
are not taken.
WARNING: indicates that death, severe personal injury and / or substantial property damage can occur if proper precautions
are not taken.
CAUTION: indicates that minor personal injury and / or property damage can occur if proper precautions are not taken.
NOTE: indicates and provides additional technical information, which may not be very obvious even to qualified personnel.
Compliance with other, not particularly emphasized notes, with regard to transport, assembly, operation and maintenance
and with regard to technical documentation (e.g. in the operating instruction, product documentation or on the product
itself) is essential, in order to avoid faults, which in themselves might directly or indirectly cause severe personal injury or
property damage.
2
Page 3

2 INITIAL INSTALLATION
2.1 Unpacking
2.1.1 Valve and Actuator are delivered separately. This
allows for more compact transport boxes and easier
installation. After unpacking the valve and actuator,
clearly mark the parts for proper assembly. The trim is
installed inside the valve body to avoid damage during
transport. To remove the trim assembly from the valve
please refer to section 3.1
Kämmer Series 341000 FCD KMENIM4104-01 03/18
2.1.2 Marking (figure 1)
Valve components have been marked with the serial
number in order to allow a proper disassembly and
assembly. The valve body is marked on top of the
cover plate (1.1), trim kit at the upper part of the
extension(1.2) and the bonnet on the side (1.3). All
relevant technical data is shown on a stainless steel
nameplate attached to the actuator. See also section 5
Identification.
2.2 Preparation for vacuum box installation (figure 2)
2.2.1 After trim has been removed from the valve body (see
chapter 3.1) mount the installation flange (2:1) on the
bonnet flange thread of the valve.
CAUTION: Please ensure that the mounting flange has
been tightened with the correct torque (see table 7.3).
2.2.2 Attach hoisting equipment of adequate lifting capacity
to the hoisting lug (3:1) and lower the valve body into
the vacuum box. See also table 7.2 for approximate
maximum weights of this subassembly.
1.1
1.3
1.2
Figure 1: Marking
2.1
Figure 2: Mounting Preparation
CAUTION: take care when lowering the valve
subassembly into the vacuum box.
Mounting (figure 3)
Insert the mounting Tool (3.1) between the valve
cover plate (3.2) and the mounting flange (3.3) before
reaching the final position inside the box.
3.2
3.3
3.1
Figure 3: Mounting
3
Page 4

2.3 Welding
2.3.1 Pipe connections
Position the valve inside the vacuum box and secure it
with the mounting tool. The pipe connections for inlet
and outlet can now be welded.
NOTE: Ensure that the trim internals are removed and
that the mounting flange is the correct size.
For the standard pipe sizes refer to table 7.2 BW (mm).
2.3.2 Welding cover plate (figure 4)
Kämmer Series 341000 FCD KMENIM4104-01 03/18
With the mounting tool (4.1) in position tack weld the
cover plate to the vacuum box to secure it‘s position.
Rotating the mounting tool will provide space for the
tack welding.
NOTE: ensure the valve can move freely and is not
under tension while welding it to the vacuum box.
Damage to trim and trim guiding may occur.
Remove the mounting tool (4:1)and weld the entire
circumference of the cover plate to the vacuum tank.
2.4 Pressure testing
After welding all the valves into the vacuum tank
perform a pressure test with all valves. For this all
valves must be fitted with mounting flanges. This
mounting flange has a dual purpose: firstly it assists
in mounting the valves into the vacuum tank and
secondly to seal the valve at the bonnet connection in
order to pressurize the piping system without the trim
assemblies and actuators mounted.
CAUTION: Ensure all mounting flanges are in place and
properly tightened. A loose mounting flange cannot
sustain the pressure and will result in unwanted or
unsecure leakage.
4.1
Figure 4: Cover Plate Welding
2.5 Cleaning
With the mounting flanges in place, clean and purge the
entire piping system with a cleaning media to remove
dirt and welding residues from the system.
2.6 Remove mounting flanges (Figure 5)
After completing all tests, cleaning and mounting
procedures, remove all mounting flanges (5.1) and
spacer plates (5.2) from the valves. Flowserve Essen
offers a refund system for returning the mounting
flanges and mounting tools after use. For further details
please contact Flowserve Essen Order administration.
4
5.1
5.2
Figure 5: Remove Mounting Flange
Page 5

3. TRIM PARTS
Kämmer Series 341000 FCD KMENIM4104-01 03/18
3.1 Remove Trim assembly
3.1.1 Remove actuator (See section 4)
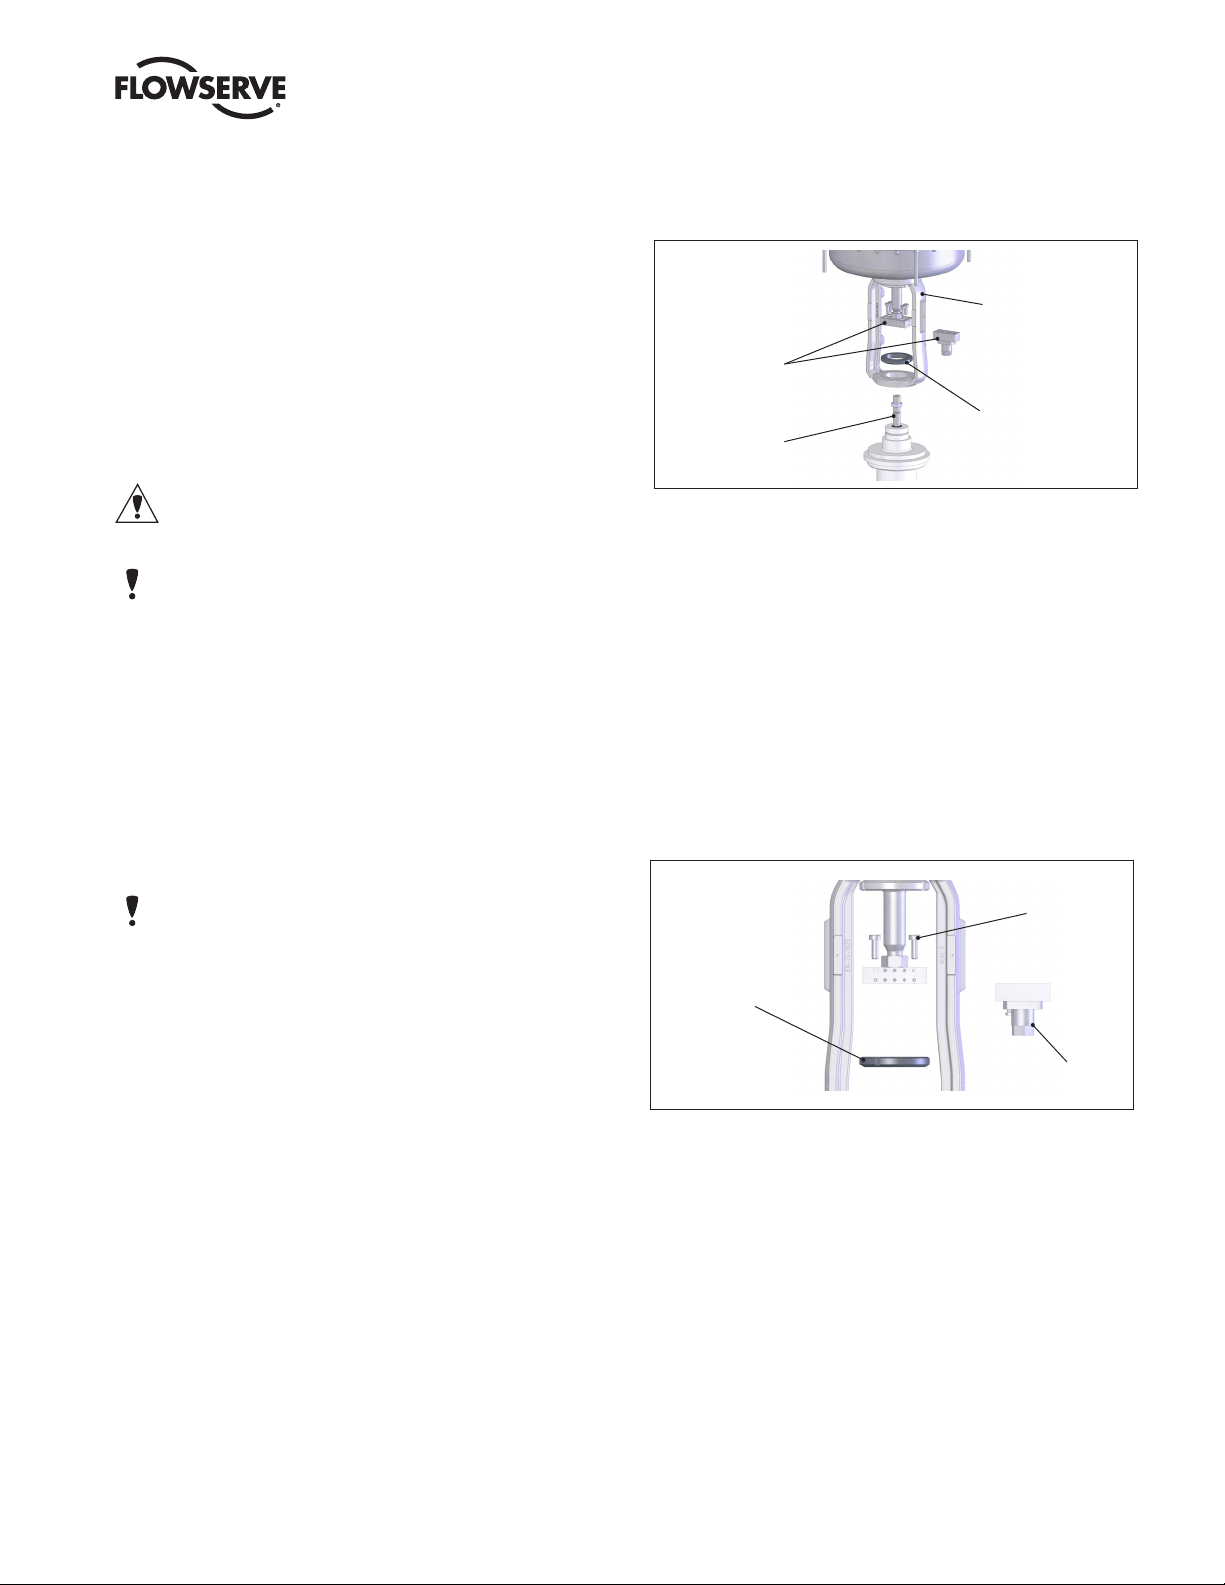
3.1.2 Remove bonnet (figure 6)
3.1.3 Unscrew the bonnet (6.1) counter clockwise with a
suitable tool and carefully remove the bonnet from
the stem.
CAUTION: do not rotate the stem in any direction.
Severe damage to the bellows seal and/or the trim
assembly may occur.
3.1.4 Carefully remove the trim assembly (7.1) - consisting
of bellows seal, extension and plug - from the valve
housing (Figure 7)
CAUTION: do not rotate the trim assembly within the
valve body. Remove the trim assembly in an upright
position avoiding any contact of the trim assembly with
the valve housing. Severe damage of the bellows seal
and/or the trim assembly may occur.
6.1
Figure 6: Bonnet
7.1
Figure 7: Trim Assembly
3.2 Install Trim assembly (Figure 8)
3.2.1 Insert body O-Ring seal (8.1)
3.2.2 Carefully insert trim assembly (8.2) into valve housing.
CAUTION: do not rotate the trim assembly within the
valve body in any direction. Insert the trim assembly
in an upright position. Avoid any contact of the trim
assembly with the valve housing. Severe damage of
the bellows seal and/or the trim assembly may occur.
3.2.3 Bonnet assembly
(Figure 9)
Carefully place the bonnet (9.1) over the stem (9.2)
and tighten the bonnet clockwise with the suitable tool
to the correct torque (see table 7.3). Ensure that
the
wiper ring (9.3) seats correctly on the stem
8.2
9.3
8.1
Figure 8: Body O-Ring
9.1
9.2
Figure: 9 Bonnet assembly
5
Page 6

3.3 Disassemble trim assembly (figure 11)
3.3.1 The trim assembly consists out of 3 parts: the stem
with bellows (11.1), the extension (11.2) and the plug
(11.3). All three components can be disassembled and
replaced individually. These parts are secured with pins
(11.4). To remove the pins carefully drive them out by
a suitable tool. When replacing one or more parts of
the assembly always use new pins (see spare parts
table) and make sure that they are in place and secure.
Kämmer Series 341000 FCD KMENIM4104-01 03/18
Figure 10: Trim Assembly
11.1
11.2
11.4
11.4
11.3
Figure 11: Trim Parts
6
Page 7

4 ACTUATOR
Kämmer Series 341000 FCD KMENIM4104-01 03/18
4.1 KP Diaphragm Actuator
4.1.1 First Installation after unpacking (figure 12)
ColdFlow Series 341000 will be delivered in two parts:
valve subassembly and actuator. Especially for small
sizes the mounted actuator might cause damage to
the valve. Also for welding the valve into the vacuum
cold box actuator and trim must be removed from the
valve body.
Remove the locknut (12.1) from the valve bonnet.
Place the actuator with the installed yoke plate (12.2 )
onto the valve bonnet. Before connecting the coupling
(12.3) slip the locknut over the valve stem (12.4)
and screw the locknut onto the bonnet thread. For
tightening torques please refer to chapter 7.3
CAUTION: Be careful while placing the yoke plate over
the stem. Damage of the stem and/or the entire trim
assembly may occur.
NOTE: Make sure that the Serial Number of the valve
(engraved at the bonnet) and of the actuator (Tag plate)
correspond to each other.
4.1.2 Removing for repair or maintenance (figure 13)
12.1
12.4
Figure 12: Actuator Mounting
12.3
12.2
We recommend separating the actuator from the valve
during all repair work. However, many maintenance
and adjusting operations can be carried out in an
installed condition.
4.1.2.1 Shut off air supply
4.1.2.2 Disconnect all air tubing from the actuator
4.1.2.3 Remove and install actuator (figure 14)
Typically for a quick removal of the actuator the 2 yoke
nut screws (14.1) are removed. After this remove the
coupling screws (14.2) from the coupling and take off
both coupling parts.
NOTE: If there are accessories such as positioners and/
or limit switches connected to the coupling, please
carefully disconnect the lever or if necessary the entire
accessory.
NOTE: Ensure that the plug assembly is not rotated
with the plug seated. This may cause irreparable
damage to the seating faces.
Figure 13: Actuator Assembly
14.2
14.1
14.1
Figure 14: Remove and install actuator
7
Page 8

4.1.3 Install Actuator (figure 15)
The actuator stem must be fully extended:
Kämmer Series 341000 FCD KMENIM4104-01 03/18
Actuators with air-to-open action must be fully vented.
Actuators with air-to close action apply pressure.
Manually depress the plug stem to ensure the plug is
fully seated.
4.1.3.1 Screw coupling insert locknut (15.1) and coupling
insert (15.2) as far as possible onto plug stem (15.3)
4.1.3.2 Place the actuator assembly on the valve engaging the
yoke rod threads in the lower yoke plate (15.4) and
ensuring the actuator faces in the right direction.
4.1.3.3 Unscrew the coupling insert until the lower yoke rods
are raised from the lower yoke plate by around 2 mm.
NOTE: Ensure that the plug assembly is not rotated with
the plug seated. This may cause irreparable damage to
the seating faces.
4.1.3.4 Refit the coupling (figure 16)
Refit the coupling (16.1), ensuring that the arrows
(16.2 ), embossed on the coupling halves, point upward
towards the actuator, and secure with 2 coupling
screws (16.3).
4.1.3.5 Apply supply pressure respectively vent actuator to
50% stroke and refit and tighten yoke nuts.
4.1.3.6 Connect all tubing.
15.3
Figure 15: Install Actuator
16.1
16.3
15.115.2
15.4
16.2
Figure 16: Refit the Coupling
8
Page 9
4.2 FlowAct Actuator
4.2.1 First Installation (figure 17)
The FlowAct actuator is equipped with a casted yoke,
for all assembly and disassemble the entire actuator
including the yoke must be installed or removed.
Remove the locknut (17.1) from the valve bonnet. Place
the actuator and yoke assembly (17.2 ) onto the valve
bonnet. Before connecting the coupling (17.3 ) slip
the locknut over the valve stem (17.4 ) and screw the
locknut onto the bonnet thread. For tightening torques
please refer to chapter 7.3
CAUTION: Be careful while putting the yoke plate
through the stem. Damage of the stem and/or the
entire trim assembly may occur.
NOTE: Ensure that the serial sumber of the valve
(engraved at the bonnet) and actuator (Tag plate)
correspond to each other.
4.2.2 Removing for repair or maintenance
Kämmer Series 341000 FCD KMENIM4104-01 03/18
17.2
17.3
17.1
17.4
Figure 17: Actuator Mounting
We recommend separating the actuator from the valve
during all repair work. However, many maintenance and
adjusting operations can be carried out in an installed
condition.
4.2.2.1 Shut off air supply
4.2.2.2 Disconnect all air tubing from the actuator
4.2.2.3 Remove actuator coupling (figure 18)
NOTE: If there are accessories such as positioners and/
or limit switches connected to the coupling, please
carefully disconnect the lever or if necessary the entire
accessory. Remove four screws (18.1) from the upper
coupling half.
4.2.2.4 Remove locknut (18.2)
NOTE: The lower coupling half is still connected to the
stem and can’t be removed from the actuator at this
stage.
4.2.2.5 Carefully raise the actuator assembly vertically around
40 mm. Be aware that most of the FlowAct actuators
are heavy, please use suitable lifting equipment.
4.2.2.6 Remove the lower coupling half (18.3) counter
clockwise from the stem.
18.1
18.2
18.3
Figure 18: Remove and install actuator
NOTE: Ensure that the plug assembly is not rotated with
the plug seated. This may cause irreparable damage
to the seating faces and/or the bellows seal.
9
Page 10

4.2.3 Installation
The actuator stem must be fully extended. Actuators
with air-to-open action must be fully vented. Actuators
with air-to close action apply pressure. Manually
depress the plug stem to ensure the plug is fully
seated.
4.2.3.1 Using suitable lifting equipement, carefully place the
actuator onto the valve assembly. Before the actuator
is fully lowered slip the locknut onto the bonnet and
thread on the lower coupling half onto the stem.
4.2.3.2 Tighten the locknut. For tightening torques please refer
to chapter 7.3
4.2.3.3 Reinstall the coupling
4.2.3.4 Connect all tubing
Kämmer Series 341000 FCD KMENIM4104-01 03/18
Figure 19: Actuator Assembly
10
Page 11

5 IDENTIFICATION
5.1 The complete valve assembly (valve plus actuator) are
clearly marked with the serial number.
CAUTION: Ensure that only parts of the same serial
number are assembled together. Serious damage of
the parts may occur.
Kämmer Series 341000 FCD KMENIM4104-01 03/18
Figure 20: Body Identification
Figure 21: Trim Identification
Figure 22: Bonnet Identification
11
Page 12

6 SPARE PARTS
6.1 Miscellaneous parts
Kämmer Series 341000 FCD KMENIM4104-01 03/18
DN ANSI
4 0.16“
6 0.25“
8 0.31“
10 0.39“
20 0.79“
25 1“
32 1.25“
40 1.5“
50 2“
65 2.5“
80 3“
100 4“ 70-341KA0274.00
125 5“ 70-341KA2274.00
150 6“ 70-341KA5284.00 70-S46031084 ID 175 x 3,55
200 8“ 70-341KB0284.00 70-S46031086 ID 225 x 4
Stem with bellows Pin O-Ring Bellows O-Ring Bellows Adapter
part # qty part # part # Dimension part # Dimension
2 70-0100375A2
70-341B20471.00
2 70-0100376A215 0.59“
70-341B50471.00 2 70-0100380A2 70-S46031165 ID 59,92 x 2,62
70-341K80271.00 1 70-0100377A2 70-S46031024 ID 104,37 x 3,53
1 70-0100378A2 70-S46031031 ID 158,43 x 3,53
70-S46031147 ID 33,4 x 2,4
12
Page 13

6.2 Spare Parts Table Plug
Kämmer Series 341000 FCD KMENIM4104-01 03/18
DN ANSI Kvs Cv
0,011 0,013 3H 0.12H 70-3419421ACT 70-3419451ACT
0,017 0,02 3G 0.12G 70-3419422ACT 70-3419452ACT
0,025 0,029 3F 0.12F 70-3419423ACT 70-3419453ACT
4 0.16“
0,04 0,047 3E 0.12E 70-3419424ACT 70-3419454ACT
0,063 0,074 3D 0.12D 70-3419425ACT 70-3419455ACT
0,1 0,12 3C 0.12C 70-3419426ACT 70-3419456ACT
0,16 0,19 3B 0.12B 70-3419427ACT 70-3419457ACT
0,25 0,29 3A 0.12A 70-3419428ACT 70-3419458ACT
6 0.25“
8 0.31“
10 0.39“
15 0.59“
20 0.79“
25 1“
32 1.25“
40 1.5“
50 2“
65 2.5“
80 3“
100 4“
125 5“
150 6“
200 8“
0,4 0,47 4,5B 0.18B 70-3419429ACT 70-3419459ACT
0,63 0,74 4,5A 0.18A 70-3419430ACT 70-3419460ACT
1 1,2 7B 0.28B 70-3419431ACT 70-3419461ACT
1,6 1,9 7A 0.28A 70-3419432ACT 70-3419462ACT
1,6 1,9 10B 0.40B 70-3419432XCT 70-3419462XCT
2,5 2,9 10A 0.40A 70-3419433XCT 70-3419463XCT
4 4,7 15B 0.63B 70-3419434XCT 70-3419464XCT
6,3 7,4 15A 0.63A 70-3419435XCT 70-3419465XCT
6,3 7,4 20B 0.80B 70-3419435VCT 70-3419465VCT
10 12 20A 0.80A 70-3419436VCT 70-3419466VCT
10 12 25B 1.00B 70-3419436ECT 70-3419466ECT
16 19 25A 1.00A 70-3419437ECT 70-3419467ECT
16 19 32B 1.25B 70-3419437GCT 70-3419467GCT
25 29 32A 1.25A 70-3419438GCT 70-3419468GCT
25 29 40B 1.60B 70-3419438HCT 70-3419468HCT
40 47 40A 1.60A 70-3419439HCT 70-3419469HCT
40 47 50B 2.00B 70-3419439LCT 70-3419469LCT
63 74 50A 2.00A 70-3419440LCT 70-3419470LCT
63 74 63B 2.50B 70-3419440MCT 70-3419470MCT
100 120 63A 2.50A 70-3419441MCT 70-3419471MCT
100 120 80B 3.20B 70-3419441PCT 70-3419471PCT
160 190 80A 3.20A 70-341944APCT 70-341947APCT
160 190 100B 3.90B 70-341944ARCT 70-341947ARCT
250 290 100A 3.90A 70-341944BRCT 70-341947BRCT
250 290 125B 4.90B 70-341944BZCT 70-341947BZCT
400 470 125A 4.90A 70-341944CZCT 70-341947CZCT
400 470 140B 5.50B 70-341944CTCT 70-341947CTCT
560 650 140A 5.50A 70-341944ETCT 70-341947ETCT
560 650 190B 7.48B 70-341944EICT 70-341947EICT
900 1040 190A 7.48A 70-341944HICT 70-341947HICT
Trim # Part #
mm in equal percentage linear
13
Page 14

7 TECHNICAL TABLES
7.1 Cv Table
Kämmer Series 341000 FCD KMENIM4104-01 03/18
Kvs Cv
0,011 0,013
0,017 0,02 0.12G 3G
0,025 0,029 0.12F 3F
0,04 0,047 0.12E 3E
0,063 0,074 0.12D 3D
0,1 0,12 0.12C 3C
0,16 0,19 0.12B 3B
0,25 0,29 0.12A 3A
0,4 0,47
0,63 0,74 0.18A 4,5A
1 1,2
1,6 1,9
2,5 2,9 0.40A 10A
4 4,7
6,3 7,4
10 12
16 19
25 29
40 47
63 74
100 120
160 190
250 290
400 470
560 650
900 1040 7.48A 190A
Seat Trim#
mm in mm 10 20 40 60
0.12H 3H
3
0.18B 4.5B
4,5
0.28B 7B
7
0.28A 7A
0.40B 10B
10
0.63B 15B
15
0.63A 15A
0.80B 20B
20
0.80A 20A
1.00B 25B
25
1.00A 25A
1.25B 32B
32
1.25A 32A
1.60B 40B
40
1.60A 40A
2.00B 50B
50
2.00A 50A
2.50B 63B
63
2.50A 63A
3.20B 80B
80
3.20A 80A
3.90B 100B
100
3.90A 100A
4.90B 125B
125
4.90A 125A
5.50B 140B
140
5.50A 140A
7.48B 190B
190
4 6 8 10 15 20 25 32 40 50 65 80 100 125 150 200
0.16˝ 0.25˝ 0.31˝ 0.39˝ 0.59˝ 0.79˝ 1˝ 1.25˝ 1.5˝ 2˝ 2.5˝ 3˝ 4˝ 5˝ 6˝ 8˝
* Alloy 6 plug only / equal percentage characteristic only
14
Page 15

7.2 Dimensional Data
Kämmer Series 341000 FCD KMENIM4104-01 03/18
DN ANSI
D2 D3 D30 D31 D35 BW weight
[mm] [mm] [mm] [mm] [mm] [mm] [kg]
4 0,16˝ 45 35 600 39 70 8 x 1 1,5
D31
6 0,25˝ 45 35 600 39 70 8 x 1 1,5
8 0,31˝ 45 35 600 39 70 12 x 1 1,5
D35
10 0,39˝ 65 45 875 39 70 12 x 1 2,4
15 0,59˝ 65 45 875 39 70 21,3 x 1,6 2,4
20 0,79˝ 65 45 875 39 70 26,9 x 1,6 2,4
25 1˝ 80 65 875 48 110 28 x 1,5 5,0
D30
32 1,25˝ 80 65 875 48 110 42,4 x 2 5,3
40 1,5˝ 85 65 875 48 120 48,3 x 2 7,1
50 2˝ 85 62 875 48 120 60,3 x 2 7,1
65 2,5˝ 125 105 875 57 190 76,1 x 2,6 30
80 3˝ 125 105 875 57 190 88,9 x 3,05 30
100 4˝ 175 125 1000 59 230 114 x 3 53
D2
125 5˝ 175 140 1000 59 270 139,7 x 3 63
150 6˝ 225 175 1000 60 330 168,3 x 3 85
D3
200 8˝ 300 225 1000 60 430 219,1 x 3 117
7.3 Bonnet Torque Table
DN ANSI
Bonnet Flange
[Nm]
Actuator Nut
[Nm]
4 0.16“ 70 210
6 0.25“ 70 210
8 0.31“ 70 210
10 0.39“ 70 210
15 0.59“ 70 210
20 0.79“ 70 210
25 1“ 120 210
32 1.25“ 120 210
40 1.5“ 120 210
50 2“ 120 210
65 2.5“ 200 430
80 3“ 200 430
100 4“ 280 -
125 5“ 280 -
150 6“ 315 -
200 8“ 380 -
15
Page 16

Kämmer Series 341000 FCD KMENIM4104-01 03/18
7.4 Actuator Selection
KP Diaphragm KF Diaphragm FlowAct
DN Inch
4 0.16˝ 10 0.394 X X X
6 0.25˝ 10 0.394 X X X
8 0.31˝ 10 0.394 X X X X
10 0.38˝ 10 0.394 X X X X
15 0.5˝ 10 0.394 X X X X
20 0.75˝ 10 0.394 X X X X
25 1˝ 20 0.787 X X X X X
32 1.25˝ 20 0.787 X X X X X
40 1.5˝ 20 0.787 X X X X X
50 2˝ 20 0.787 X X X X X
65 2.5˝ 40 1.575 X X X X
80 3˝ 40 1.575 X X X X
100 4˝ 60 2.362 X X
125 5˝ 60 2.362 X X
150 6˝ 60 2.362 X X
200 8˝ 80 3,150 X X
Stroke
[mm]
Stroke
[in]
P1 P2 P3 P4 P5 F2 F3 F4 1502 3002
220
daN
400
daN
900
daN
2000
daN
3500
daN
675
daN
1000
daN
1500
daN
3900
daN
6000
daN
16
Page 17

Kämmer Series 341000 FCD KMENIM4104-01 03/18
8 TROUBLE SHOOTING
Problem Possible cause Remedy
Actuator or
stem moves
stiffly
Excessive
leakage
Inadequate flow
1 Operating temperature too high for selected
1 Note the operating data and contact Flowserve
fittings
2 Inadequate air supply 2 Check system for leaks in air supply or signal lines, re
tighten connections or replace lines if necessary
3 Positioner defect 3 See operating instructions for positioner
1 Bonnet is loose 1 See step 3.2.3 for re-tightening the bonnet correctly
2 Worn or damaged plug 2 Rework or replace plug
3 Gaskets damaged 3 Renew gaskets
4 Inadequate actuator thrust 4 Check air feed. If air feed is OK, contact Flowserve
5 Plug incorrectly adjusted 5 Correctly adjust plug according to step 3.3.1
6 Incorrect direction of flow 6 Check specification. Contact Flowserve
7 Handwheel incorrectly adjusted (acts as an
7 Adjust handwheel
end-stop)
1 Plug incorrectly adjusted (short stroke 1 Correctly adjust plug according to step 3.3.1
2 Positioner defect 2 See operating instructions for positioner
3 Operating requirements too high 3 Check operating data. Contact Flowserve
1 Plug adjustment incorrect 1 Correctly adjust plug according to step 3.3.1
Plug slams
2 Inadequate supply pressure 2 Check air supply, seal leaks, remove blockages
3 Trim too large for flow rate 3 Replace trim
17
Page 18

Notes:
Kämmer Series 341000 FCD KMENIM4104-01 03/18
18
Page 19

Notes:
Kämmer Series 341000 FCD KMENIM4104-01 03/18
19
Page 20

Kämmer Series 341000 FCD KMENIM4104-01 03/18
Flowserve Essen GmbH
Schederhofstrasse 71
45145 Essen
Germany
Phone: +49 (0)201 8919 5
Fax: +49 (0)201 8919 662
Your contact:
All data subject to change without notice
©04.2017 Flowserve Corporation. Flowserve and Kämmer are registered trademarks of Flowserve Corporation
20
Alle Angaben ohne Gewähr. Änderungen vorbehalten
 Loading...