

Fisher & Paykel DE6060P, DE6060G, DE5060G Installation Instructions Manual
Installation instructions
https://producthelp.fisherpaykel.com/au/Dry/Dryers/Vented/DE6060P1/User_Guide_DE6060P1/03_Installation_instructions
Updated: Sat, 07 Jul 2018 04:48:17 GMT
Powered by
Please read and follow the ‘Safety and warnings’ and ‘Installation instructions’ sections carefully before using your dryer!
Accessories
Please check you received the following accessories with your Fisher & Paykel dryer. You will find them inside the drum:
• 1 x Drying rack (DE6060P and DE6060G only)
• 1 x Installation instructions and user guide
• 1 x Wall mounting kit
• 1 x Duct adapter
Unpacking
To ensure the best performance from your new dryer please follow the instructions below.
Removing the packaging
1. Remove the outer packaging (including the polystyrene packer and plastic wrapping). All packaging must be
removed prior to use.
1

• Ensure packaging materials are kept out of reach of children.
https://producthelp.fisherpaykel.com/au/Dry/Dryers/Vented/DE6060P1/User_Guide_DE6060P1/03_Installation_instructions
Updated: Sat, 07 Jul 2018 04:48:17 GMT
Powered by
• Please help protect the environment and dispose of the packaging from around the dryer in an
environmentally friendly manner.
2. Tilt the dryer backwards and ‘walk’ it off the base one foot at a time. Not doing so may cause damage to your
floor and dryer.
3. Remove all packaging and accessories from inside the drum and ensure you remove protective covers from
the door and console.
Location
• The dryer must be installed in a well-ventilated, dust- free environment.
• The dryer must not be installed on any textured floor coverings (eg carpet, rugs).
• Do not install the dryer behind a lockable door, sliding door, or behind a door where the
hinge is on the opposite side to that of the dryer in such a way that the full opening of
the door is inhibited. Ensure the dryer door can always be opened fully.
• Do not install the dryer outside, in a damp place, where there is a risk of freezing,
where it may be rained on, in direct sunlight or close to a source of heat.
• Do not place your dryer on top of its power cable.
Venting
Correct installation is very important for all dryers to ensure maximum efficiency and safety.
Never run the dryer unless the airflow system is free from obstruction.
There must be adequate ventilation to avoid the back flow of gases into the room from appliances burning fuels,
including open fires, when operating the dryer.
Exhaust air must not be discharged into a flue which is used for exhausting fumes from appliances burning gas or other
fuels.
2

External venting
https://producthelp.fisherpaykel.com/au/Dry/Dryers/Vented/DE6060P1/User_Guide_DE6060P1/03_Installation_instructions
Updated: Sat, 07 Jul 2018 04:48:17 GMT
Powered by
Your dryer has been designed to be vented outside to provide the following advantages:
• Ensures optimum efficiency by preventing recirculation of moist air.
• Eliminates condensation on walls and ceilings.
• Reduces the chance of lint being sucked into the dryer.
• Prevents lint and other fine particles being blown into the room.
All external venting systems should be:
• Made from 100 mm diameter flexible foil sleeved with a galvanised metal pipe where the vent system goes
through the wall, or 100 mm diameter galvanised metal piping.
• Exhausted outside and not into another confined space, eg the roof cavity of a house.
• Fitted with a vent cap outside to stop rain water entering the dryer exhaust system.
• Angled to avoid condensation running back into the dryer.
• The vent system should be a maximum of 2 metres with no more than three 90° bends.
• Vent systems over 2 metres long require special installation. Contact a Fisher & Paykel trained and supported
service technician.
Internal venting
The dryer is set up in the factory for front venting. If front venting is used there must be adequate ventilation to avoid the
build up of moisture in the room, which can affect the performance of the dryer. Venting must comply with local by-laws
and regulations.
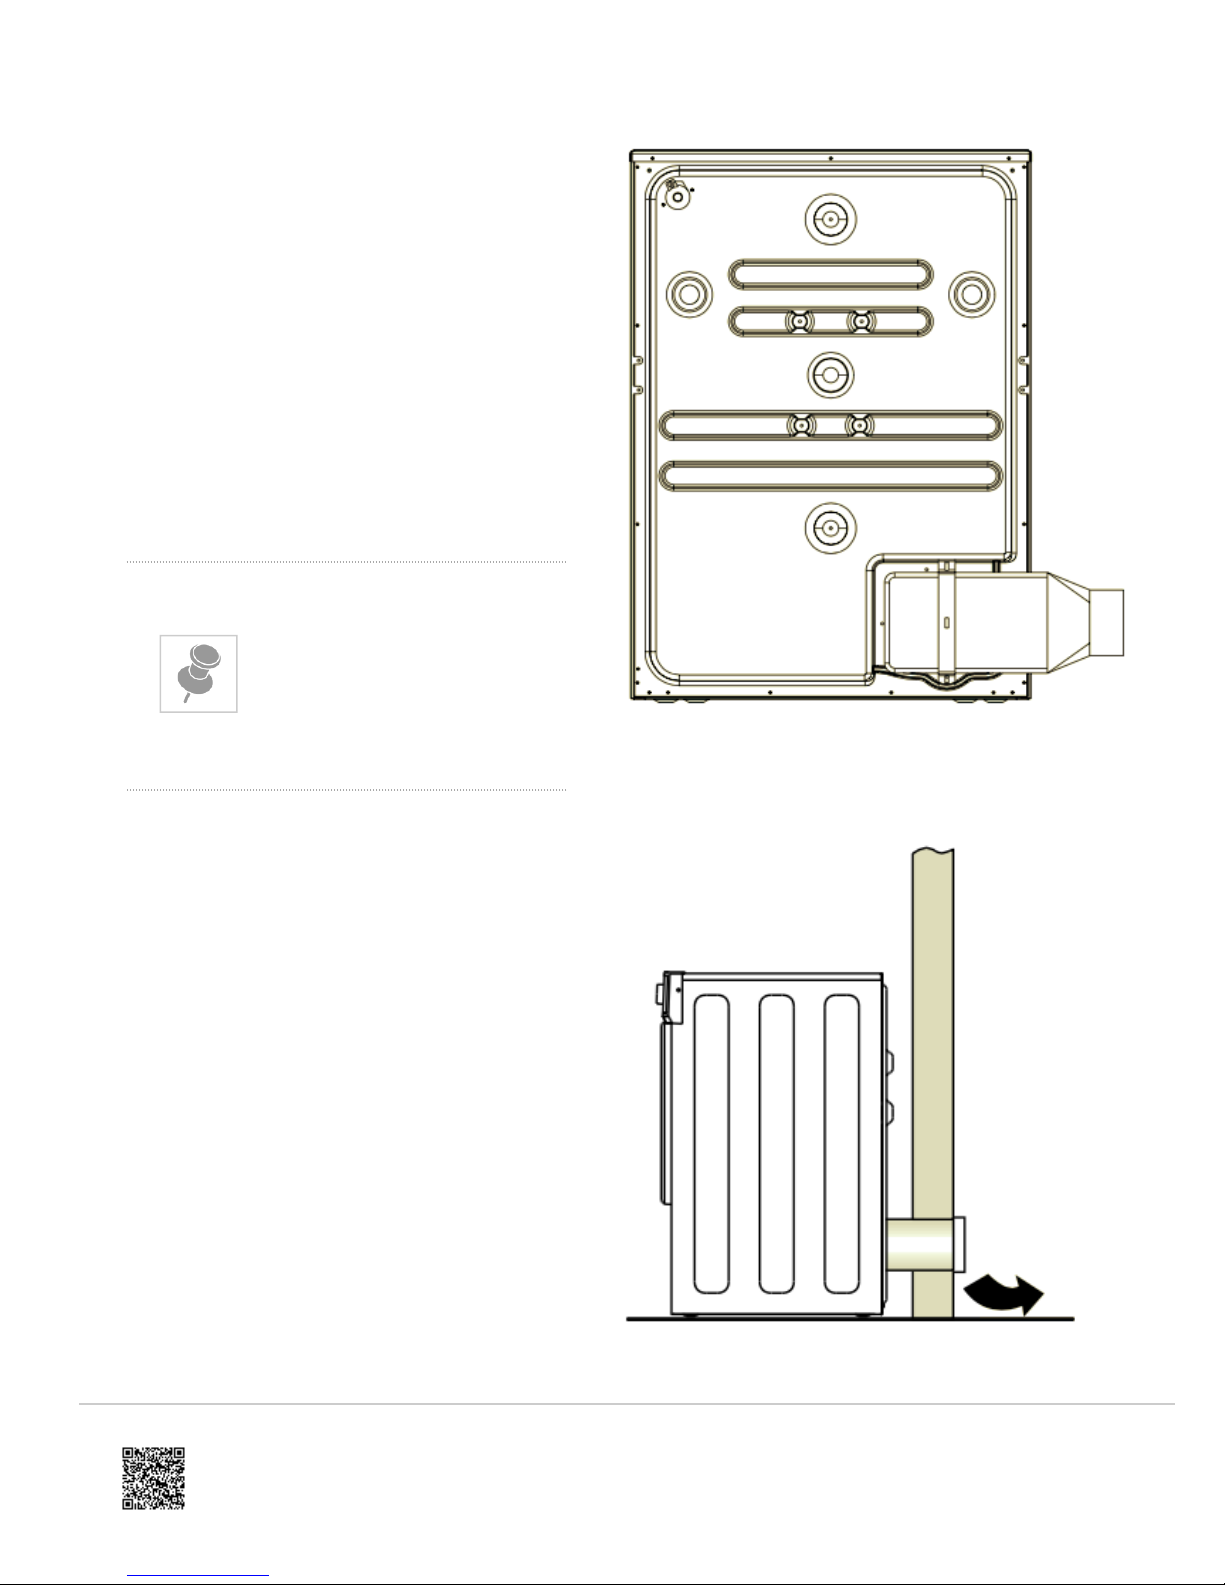
Installation options
There are two different ways your dryer can be positioned. Freestanding or inverted and mounted on a wall.
3
Free standing
https://producthelp.fisherpaykel.com/au/Dry/Dryers/Vented/DE6060P1/User_Guide_DE6060P1/03_Installation_instructions
Updated: Sat, 07 Jul 2018 04:48:17 GMT
Powered by
The dryer stands on the floor and can easily be moved
into position.
1. Move the dryer into the desired position. Do not lift
the dryer by the top panel.
2. Have a minimum clearance on all sides of at least
20 mm.
3. Have a minimum clearance at the rear of 75 mm.
The spacers from the accessory wall mounting kit
can be used to set this distance.
4. Install the dryer on a stable and level floor.
Free standing venting options
The vent system should be
a maximum of 2 metres
with no more than three 90°
bends.
Through-wall venting with kit
Through-wall venting
The dryer is vented directly through the wall using Kit
part number PD-SVHCW4, in combination with the duct
adaptor supplied with the dryer. The dryer is vented with
a kit that can be positioned to remove the air to the side.
Kit part number PD-DK4W.
Movable venting
The dryer is vented through a window using Kit part
number PD-F0408, in combination with the duct adaptor
supplied with the dryer. This requires the dryer to be a
minimum distance of 140 mm from the wall to ensure the
ducting is not restricted with tight bends or can be
crushed.
Before a rear venting option is installed the dryer must
be changed from the front venting factory setup.
Remove the outlet grille from the front left-hand side and
Through-wall venting
4
 Loading...