

Page 1

User guide
Ceramic glass cooktops
CT280, CT560, CT655 ‘classic range’ models
NZ AU
Page 2

Page 3

Contents
Introduction 2
Safety instructions 2
Controls - conventional models 3
Controls - touch control models 4
Cookware 9
Cleaning 10
Problem solving - touch control models 12
Frequently asked questions 13
Manufacturer’s warranty 14
Customer care 15
Important!
SAVE THESE INSTRUCTIONS
The models shown in this User Guide may not be available in all markets and are
subject to change at any time. For current details about model and specification
availability in your country, please go to our website www.fisherpaykel.com or
contact your local Fisher & Paykel dealer.
1
Page 4
Introduction
Congratulations on the purchase of your new Ceramic Cooktop.
We strongly recommend that you read this User Guide carefully to take full advantage of the
features offered by this product. This books covers operational instructions for the CT560, CT655
and CT280 series ceramic cooktops.
Safety instructions
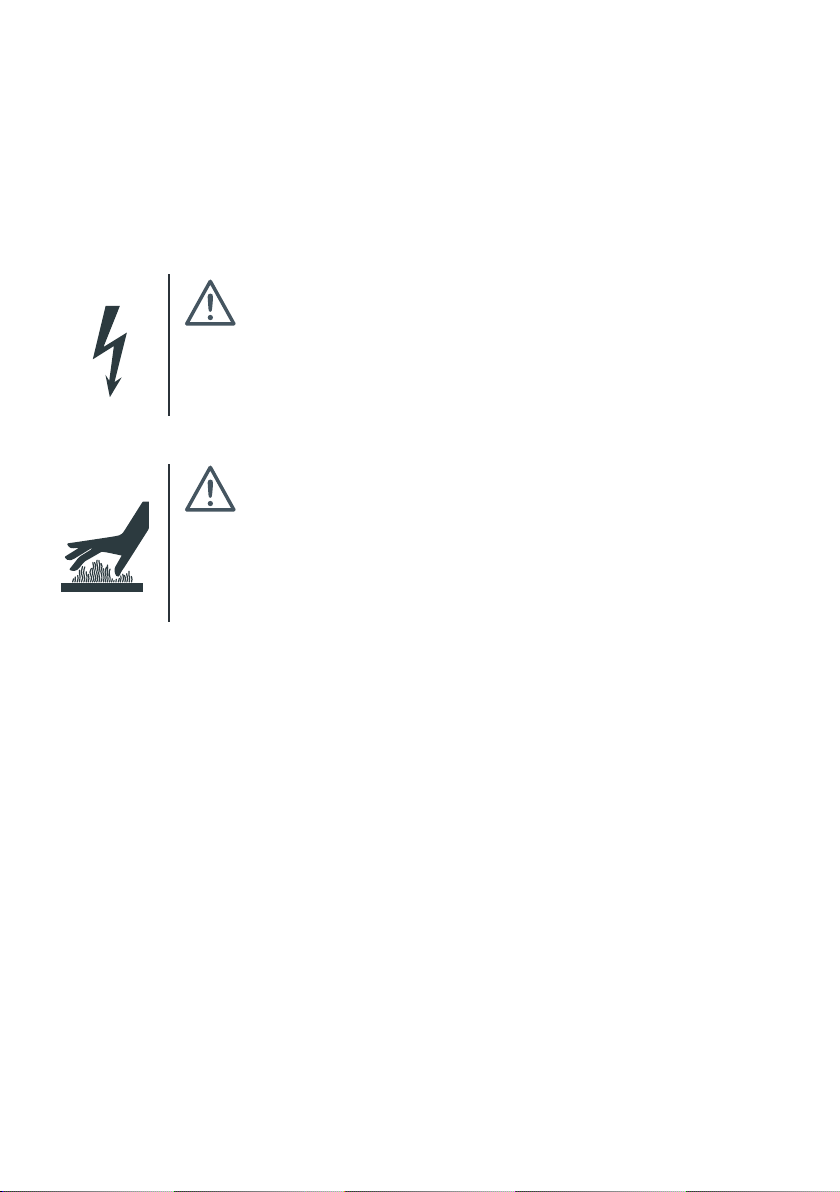
WARNING!
Electrical Shock Hazard
Do not attempt to use this appliance if the ceramic glass surface is cracked.
Switch the appliance off and the power supply.
Failure to follow these instructions could result in death or electrical shock.
WARNING!
Hot Surface Hazard
During use accessible parts of this appliance will become hot enough to
cause burns.
Avoid body or clothing contact with the ceramic glass until it is cool.
General safety precautions
1
Household appliances are not intended to be played with by children.
2
Children or persons with a disability that may limit their ability to use the appliance, should
have a competent person instruct them in its use. This person should be satisfied that they
can then use the appliance without danger to themselves or their surroundings.
3
Where this appliance is installed in marine craft or in caravans, it shall not be used as a
space heater.
4
If the electrical supply cord is damaged it must only be replaced by an authorised person.
5
This appliance should be connected to a circuit which incorporates an isolating switch providing
full disconnection from the power supply.
5
Do not use a steam cleaner.
Important!
Some heavy-duty scourers can scratch the ceramic glass of your cooktop.
First use
Your cooktop/hob has individual elements below a ceramic glass surface. The diameters of the
cooking area are clearly marked. The elements become red when turned on full. An indicator
light will glow whenever and element is turned on.
2
Page 5
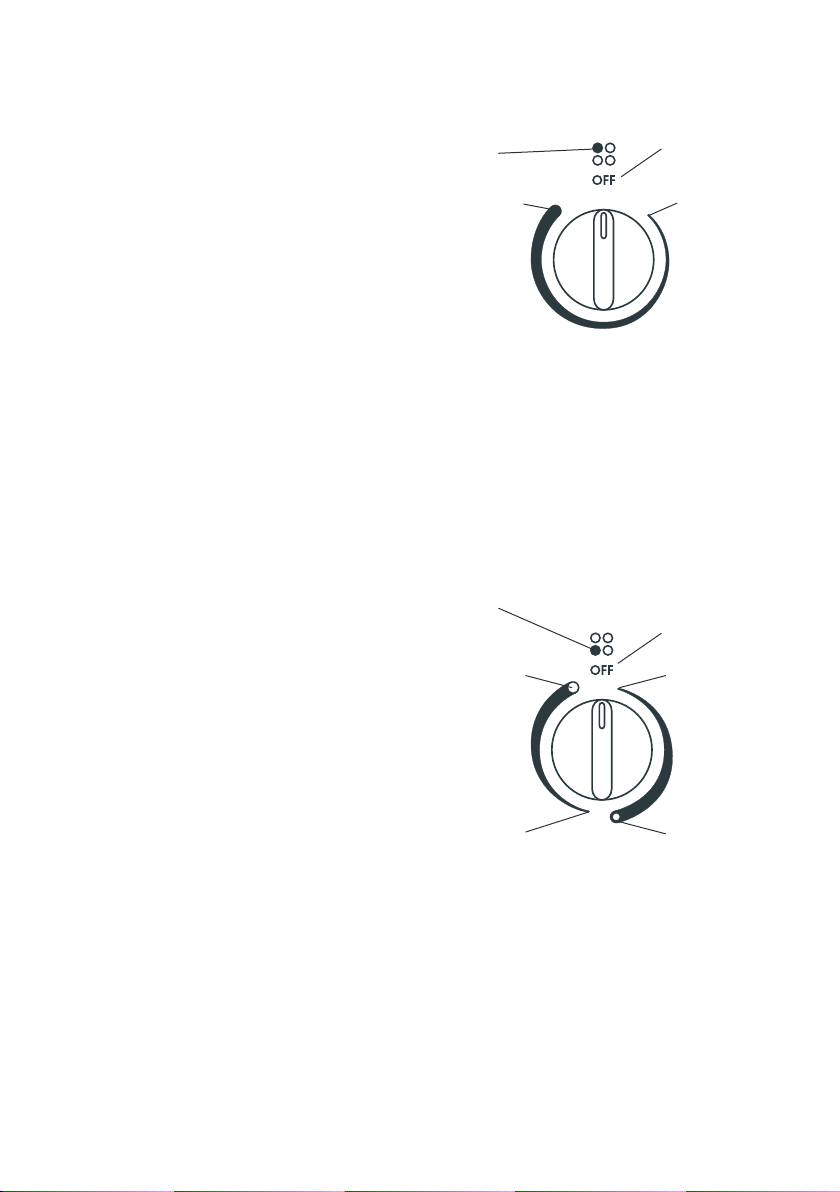
Controls - conventional models
As the control knob is turned clockwise, the heat
output is increased. Turn the control knob to
the High setting to begin cooking and adjust as
necessary.
The elements are contolled by variable energy
regulators giving infinite control. At the low
setting delicate warming, melting chocolate and
keeping milk warm at a very low temperature may
be carried out. The High setting can be used for
boiling or frying. Once your pan is hot, reduce the
temperature to maintain a steady heat and cook
food through.
Different types of pots and pans used, like heavy based saucepans, will vary in cooking efficiency.
Cooking results are influenced by pot quality and size. It is essential that pot size matches the
diameter of the cooking zone. Use flat bottom pots and pans of good quality. Low heat or slow
cooking is often due to incorrect pot size. See ‘Cookware’ for more information.
Element
indicator
Temperature
setting (High)
Off setting
Temperature
setting (Low)
Dual element control
Select the full element by turning the knob anticlockwise to High. To heat the inner element only,
turn clockwise to High.
Element
indicator
Full element
temperature
setting (High)
Full element
temperature
setting (Low)
Off setting
Inner element
temperature
setting (Low)
Inner element
temperature
setting (High)
3
Page 6
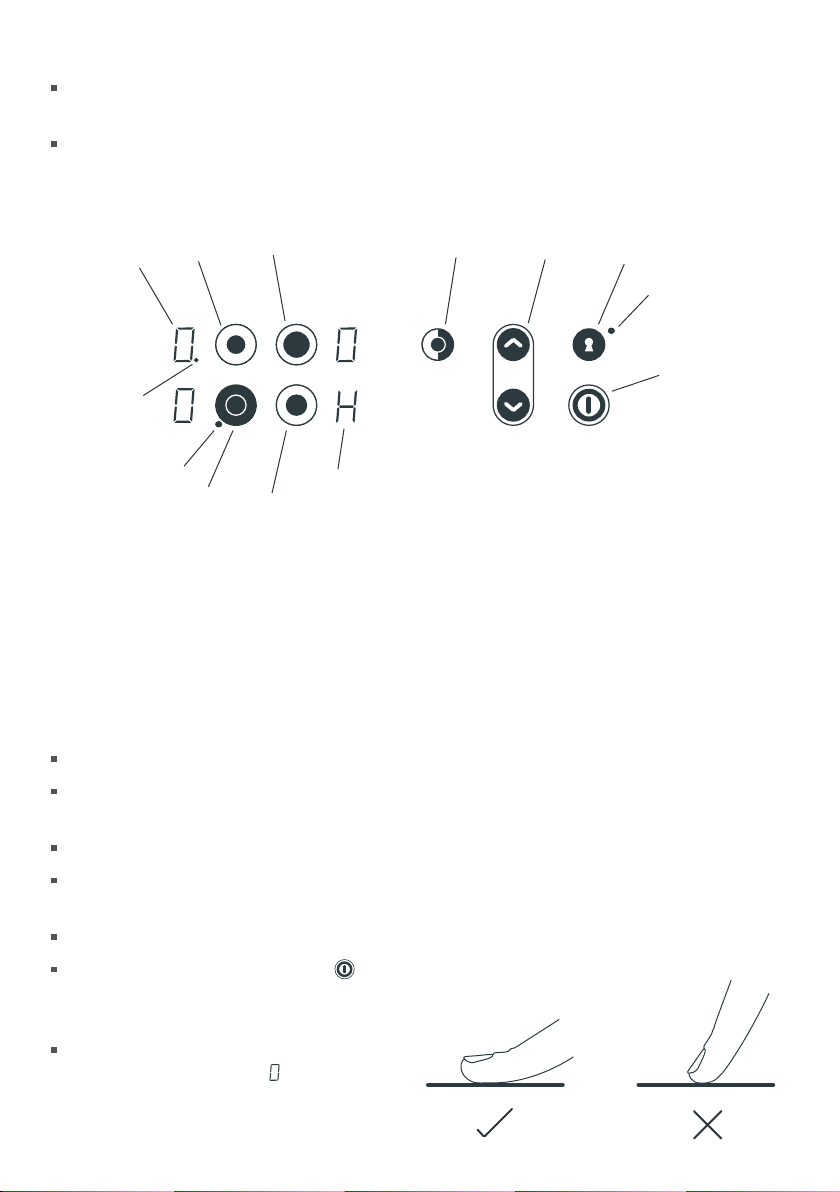
Controls - touch control models
Your cooktop has temperature settings ranging from 1-9, the lowest setting being 1 and the
highest setting 9.
The low settings (from 1-5), offer a subtle and broad range of simmer settings (refer to the
‘Temperature Setting Guide’). Setting 1 is ideal for melting chocolate and keeping milk warm at
a very low temperature and setting 5 is great for rapidly simmering small amounts of food.
3
2
1
5
6
1. Element selected indicator light
2. Element temperature display
3. Left rear element button
4. Right rear element button
5. Dual element ON indicator light
6. Left front element button
7. Right front element button
4
7
8
9
Sol X Soft touch controls
8. Element Surface Hot indicator
9. Dual Element button
10. Temperature setting arrow buttons
11. Keylock button
12. Keylock ON indicator light
13. ON/OFF button
10
11
12
13
Touch controls
Your cooktop has four individual elements below a ceramic glass surface.
Each element is operated by using the touch controls. When using touch controls it is best to
use the ball of your finger rather than the tip as shown below.
A red light beside the element button indicates which element is selected.
The left front element is designed for dual element control, using either the inner or full element
(see Dual element control).
Your cooktop will beep once when the touch controls are selected.
To turn your cooktop on, touch the
button with the ball of your finger for
approximately 3 seconds.
You will notice all the element indicator
displays will come on with
flashing red light.
and a small
4
Page 7

Using the elements
1
With the cooktop turned on, touch the corresponding element button in the touch controls for
the element you wish to cook on.
2
The red light will stop flashing and remain static, beside the element that is selected. (If no
element is selected within 5-10 seconds the cooktop will automatically turn off ).
3
Select the element temperature setting, using the arrows as required. The element is now ready
to cook on
Note: The ‘Cooking Suggestions’ in the ‘Temperature Setting Guide’ will vary due to the
types of pots you use and the quantities you need to cook. You will need to experiment with the
temperature settings to match the desired cooking results you want.
Different types of cooking utensils, like heavy based saucepans, will vary in cooking efficiency.
Turning an element off
.
1
Select the element you wish to turn off.
2
Check the red light is beside the corresponding element button. If the red light is not on, touch
the corresponding element button once
3
Using the arrow button, touch both of the up and down arrows together. Or, using the arrow
button.
.
button, scroll the element temperature setting down to
4
To turn all of the elements off at once, touch the
Temperature limiters
Temperature limiters are fitted to the element to prevent the glass from overheating. You will
notice the limiters turn the elements on and off during cooking, on low temperature settings
this occurs more often than on higher temperature settings.
Surface hot indicator light
The Surface Hot Indicator Light is shown on the ceramic glass as . The light will glow whenever
an element is hot. After an element has been turned off, the Surface Hot Indicator Light will
continue to glow
until the element surface temperature is cool to touch.
Automatic timeout safety feature
If you forget to turn an element off, the element will automatically turn off after a number of
hours. If the element is left unattended on a high temperature setting, the automatic timeout
function will occur sooner than if the element is left unattended at a lower temperature. This
timeout function ranges from 1.5 hours on setting 9, to 6 hours on setting 1.
5
Page 8

Keylock
To lock the controls for cleaning or to prevent children from playing, touch the button, then
touch the
locked (except for the
even though the controls are still locked.
button. A light will go on beside the keylock button. All the controls are now
button). If the cooktop is turned off, the keylock light will go out,
To release the keylock, make sure the cooktop is turned on and touch the
button again.
Heating tip
When you need to boil, simmer or fry your food, first set the temperature to 9 (maximum) and
then once boiling or your pan is hot, reduce the temperature setting to maintain a steady heat
to cook your food through. This will reduce the time it takes to cook. Your cooktop can be set to
do this automatically with the ‘Auto Heat-Reduce’ function.
Temperature setting guide
Deilcate warming
for small amounts
of food, melting
and foods that
burn quickly
100
80
Gentle
simmering, slow
warming
Reheating and
rapid simmering
Boiling, sauté and
searing
Maximum heat
60
40
20
Percentage of Power %
0123456789
Temperature Setting
6
Page 9

Dual element control
The left front element is designed for dual element control, using either the inner or full element.
1
With the cooktop turned on, touch the
button in the touch controls. The red light
will stop flashing and remain static.
2
Select the element temperature setting,
using the arrows as required. Only the inner
element will come on. (Remember the
cooktop regulates the element temperature,
and you may notice the element turn off and
back on again).
3
To select the full element, touch the button. Note: You cannot select the full element until
you have set the temperature.
4
A red light will show beside the
the full element temperature with the arrows.
1
4
button, when the full element is selected. You can modify
Sol X Dual element controls
3 2
To return to the inner element only, touch the
button again. The dual setting is cleared
when the cooktop is turned off.
Auto heat-reduce
Your cooktop has an effort saving function, to quickly bring your element to the maximum
temperature setting (9), then automatically reduce the element temperature setting to maintain
a lower heat to cook your food at. This limits the risks of spill overs and burning.
Ideal for boiling water for pasta and then automatically lowering the heat and maintaining a
rapid simmer until al dente.
To set the function, turn the element on by touching the corresponding element button.
Using the arrows scroll past 9 to display
the temperature setting you would like the element to reduce to.
The temperature settings of 1-9 you set the element to reduce to, correspond with the same
temperature settings for standard element use, 1 being low and 9 being high. Every temperature
setting between 1 and 9 has a different fixed time. (Refer to the ‘Auto Heat-Reduce Guide’).
Eg. Auto Heat Reduce 6 setting, will heat and maintain the element to the maximum
temperature (9), for 2.5 minutes. After the time has elapsed, the element will reduce to the lower
temperature setting of 6 and maintain this until the element or cooktop is turned off. Please
note, the maximum temperature (9) never reduces.
. When is showing, use the arrows again to select
7
Page 10

While this function is activated the element indicator will flash between
temperature setting, until the fixed time elapses, and the reduced temperature setting is reached.
and the reduced
Auto Heat-Reduce Guide
Auto HeatReduce
setting
1 1 min 1
2 3 min 2 slow warming
3 5 min 3
4 7 min 4 gentle simmering
5 8.5 min 5
6 2.5 min 6
7 3.5 min 7 reheating
8 4.5 min 8 boiling
9 remains on 9 9 searing
Time on
maximum
heat setting
Reduces
temperature
setting to
Cooking suggestion
8
Page 11

Cookware
To get the best results out of your cooktop follow these simple suggestions :
Use heavy gauge, flat, smooth bottom pans that conform to the diameter of the cooking area.
This will provide good contact with the glass and help reduce cooking times.
Cookware with a stainless steel sandwich base or enamelled cast iron will give you the best
results.
When food comes to the boil reduce the temperature setting.
Never use plastic or aluminium foil dishes on the cooktop.
Aluminium and copper-bottomed cookware can cause a metallic residue to remain on the
cooktop. If left, this becomes difficult to remove. Clean the cooktop after every use.
Jagged edges on saucepans or heavy frypans will scratch the cooktop.
Using a lid will reduce cooking times.
9
Page 12

Cleaning
Caring for your cooktop
Use cleaner on the cooktop while it is warm to touch. Rinse and wipe dry with a clean cloth or
paper towel. The cooktop may become stained if cleaning residue remains.
Remove any food, spillovers or grease from the cooktop while it is still warm using the razor
blade scraper provided held at a 30° angle.
WARNING!
Cut Hazard
When the safety cover is retracted the blade in the scraper is razor
sharp. Use with extreme care and always store safely and out of reach of
children.
Metallic stains
Important!
Some heavy-duty scourers can scratch the ceramic glass of your cooktop.
Copper based or aluminium saucepans may cause metallic staining. These stains show as a
metallic sheen on the cooktop. If the cooktop is not cleaned regularly and the stains are allowed
to burn onto the surface, they may react with the glass and will no longer be removable. The
use of a glass cooktop conditioner will help prevent damage if applied after every use.
Spillovers
Clean the following spillovers immediately, using the razor blade scraper provided.
Do not let sugar, jam, plastic, plastic wrap and aluminium foil melt onto the cooktop surface.
Clean these immediately using the razor blade scraper provided.
Anything that melts onto the glass surface may cause pitting if it is left to cool before removing.
Pitting may also occur when a food with a high sugar content is spilt onto the cooktop and
not cleaned up immediately.
Turn the element off, carefully scrape the spill to a cool area of the cooktop surface and clean up
with a dish cloth or paper towel.
As soon as the cooktop is cool enough to safely touch, clean with cooktop cleaner.
Remember some foods e.g. peas and swede have a naturally high sugar content.
Spillovers - touch control models
If you have a spillover on the controller area, the unit may beep and turn itself off. The controller
may not function while it has liquid on it. We recommend turning the product off at the wall
before cleaning the controller area and turning back on.
Be careful to dry the controller area with a paper towel after cleaning as the presence of moisture
may confuse the controller.
10
Page 13

Stainless steel surround
Important!
Do not use harsh/abrasive cleaning agents to clean your cooktop as they may damage the
stainless steel finish and the knobs.
Important!
Commercial stainless steel cleaner containing chlorine compounds are corrosive and may
damage the appearance of your cooktop.
Brushed Stainless Steel
Brushed stainless steel can be cleaned with a commercial stainless steel cleaner (see ‘Important’
above) or wiped with a clean damp cloth and dried with a lint free cloth.
Regular use of a stainless steel cleaner will reduce fingerprints and other marks.
Do not use steel soap pads as this may dull the appearance of the appliance over time.
Do not use abrasive cleaners on brushed stainless steel, as they will permanently damage the
surface.
Iridium (Matt Stainless Steel)
This easy clean surface requires only a mild dishwashing detergent and warm water.
Rinse and then dry with a lint free cloth.
Regular use of a stainless steel cleaner will reduce fingerprints and other marks.
Do not use steel soap pads as this may dull the appearance of the appliance over time.
Do not use abrasive cleaners on Iridium stainless steel as they will permanently damage the
surface.
Energy saving tips
Place a pan on the element prior to turning on the heat.
Always use a lid to retain the heat.
Choose cookware of the proper size, material and construction.
Minimise the amount of liquid or fat to reduce cooking times.
Use residual heat retained in the glass after the element is turned off to continue the cooking
process or to keep foods warm.
Select the proper temperature setting for the cooking task.
11
Page 14

Problem solving - touch control models
If you find you are experiencing problems operating the cooktop, we recommend that using the
ball of your finger works better than the tip of your finger on the touch controls. A slight film of
water over the touch controls may make the buttons unresponsive.
If there has been a mains power failure or fluctuation, the cooktop may need to be reset by
turning the power at the wall off and on again.
If the power has been turned off at the wall, wait 5 seconds for the cooktop to “Beep” before
touching the touch controls. Touching the touch controls before this time may deactivate the
cooktop. If this happens you will need to reset the cooktop by turning the power at the wall off
and on again.
If the display shows or , this indicates a problem with the cooktop. Turn the power at the
wall off and on again. If the same code remains, call your Authorised Service Centre.
If there is continuous “Beeping” from your cooktop, it indicates there is water on the controls.
Wipe the water off to stop the “Beeping” and dry with a paper towel.
A blinking is caused by the controls becoming too hot and automatically turning off as a safety
measure. Check that you do not have a saucepan above the touch controls then wait until the
temperature has dropped.
12
Page 15

Frequently asked questions
Q
Is it possible for my cooktop to shatter?
A
This is highly unlikely. The glass is very robust and strong and goes through a vigorous testing
process before it is accepted.
Q
Does the glass scratch easily?
A
No, the glass is very tough. However check that your pots do not have jagged edges on the
bottom and do not use a heavy-duty scourer..
Q
Will the surface overheat?
A
Each element is fitted with temperature limiters that prevent overheating.
Q
What is the best way to clean my cooktop?
A
See Cleaning instructions.
Q
Why do the elements appear to turn off while cooking/heating?
A
In order to maintain the selected temperature the element may pulse on and off.
Q
Do I need special pans?
A
Flat bottom pans are recommended as they are more energy efficient and stable.
Q
How can I achieve a low setting for delicate cooking and simmering?
A
The lowest power element is the inner part of the dual element and you may want to
experiment by turning the control below the marked low setting.
Q
Can I install my cooktop above my DishDrawer® or Fisher & Paykel oven?
A
You can install conventional cooktop models above your DishDrawer® or Fisher & Paykel oven
with a standard bench height (see Installation Instructions for clearances below benchtop).
You cannot, however install the CT560 Touch control models above your DishDrawer®.
13
Page 16

Manufacturer’s warranty
Before you call for service or assistance ...
Check the things you can do yourself. Refer to the installation instructions and your user guide
and check that:
1
Your product is correctly installed.
2
You are familiar with its normal operation.
If after checking these points you still need assistance, please refer to the Service & Warranty
book for warranty details and your nearest Authorised Service Centre, or contact us through our
website:
www.fisherpaykel.com
14
Page 17

15
Page 18

16
Page 19

Page 20

Copyright © Fisher & Paykel 2006. All rights reserved.
The product specifications in this booklet apply to
the specific products and models described at the
date of issue. Under our policy of continuous product
improvement, these specifications may change at any
time. You should therefore check with your Dealer to
ensure this booklet correctly describes the product
currently available.
www.fisherpaykel.com
NZ AU
Ceramic glass cooktop user guide
Published: 07/2006
Part No. 599064 H
 Loading...