

DishDrawer®
Use and Care Guide
MODELS:
DD124P5
DD224P5


Contents
1
US CA
Safety and warnings
Controls
Operation
Wash program chart
Caring for your dinnerware
Dishwasher standards test
Accessories
Loading
Detergent dispenser
Rinse agent dispenser
Option adjustments
User maintenance instructions
Troubleshooting
Fault codes
Warranty and service
3
6
8
9
10
11
12
14
16
18
19
21
24
26
29
Important!
SAVE THESE INSTRUCTIONS
The models shown in this User Guide may not be available in all markets
and are subject to change at any time. For current details about model and
specification availability in your country, please go to our website www.
dcsappliances.com or contact your local DCS by Fisher & Paykel dealer.

US CA

Safety and warnings
Your DishDrawer has been carefully designed to operate safely during normal dishwashing
procedures. Please keep the following guidelines in mind when you are using your
DishDrawer®. Please read all instructions before operating the DishDrawer®.
Important safety precautions
The information in this manual must be followed to minimize the risk of fire or explosion or to
prevent property damage, personal injury or loss of life.
Use the DishDrawer® only for its intended function as described in this User Guide.
Use only detergents or rinse agent recommended for use in a domestic Dishwasher and keep
them out of reach of children. Check that the detergent dispenser is empty after the completion
of each wash program.
When loading items to be washed, locate sharp items so that they are not likely to damage the
lid seal and load sharp knives with the handles up to reduce the risk of cut type injuries.
Do not touch the heater plate during or immediately after use.
Do not operate your DishDrawer® unless all the enclosure panels are properly in place.
Do not tamper with the controls.
Do not abuse, sit on, stand in or on the drawer or dish rack of the DishDrawer®.
The cup racks are designed to support cups, glasses and kitchen utensils. When the cup racks
are in the DishDrawer® do not lean on or use the cup racks to support your body weight.
To reduce the risk of injury, do not allow children to play in or on the DishDrawer®.
Under certain conditions hydrogen gas may be produced in a hot water heater system that has
not been used for two weeks or more. HYDROGEN GAS IS EXPLOSIVE. If the hot water system
has not been used for such a period, before using the dishwasher, turn on all hot water taps and
let the water flow from each for several minutes. This will release any accumulated hydrogen
gas. As gas is flammable, do not smoke or use an open flame during this time.
Remove the door to the washing compartment when removing an old dishwasher from service
or discarding it.
Dishwasher detergents are alkaline. They can be dangerous if swallowed. Avoid contact with
skin and eyes, keep children and infirm person(s) away from the dishwasher when the drawer is
opened.
3
US CA

US CA
4
Safety and warnings
Important safety precautions
Installation
This DishDrawer® must be installed and located in accordance with the Installation Instructions
before it is used. If you did not receive Installation Instruction sheets with your DishDrawer®, you
can order them by calling your Authorized Service Agent or from the DCS by Fisher & Paykel
website, www.dcsappliances.com.
Installation and service must be performed by a qualified technician.
If the power supply cord is damaged, it must be replaced by a dealer or Authorized Service Center
or a similar qualified trades person in order to avoid a hazard.
Ensure the DishDrawer® is secured to adjacent cabinetry using the brackets provided. Failure to
do so may result in an unstable product, which may cause damage or injury.
Do not operate this appliance if it is damaged, malfunctioning, partially disassembled or has
missing or broken parts, including a damaged power supply cord or plug.
Do not store or use gas, or other flammable vapors and liquids in the vicinity of the DishDrawer®.
Connect to a properly rated, protected and sized power supply circuit to avoid electrical overload.
Make sure that the power supply cord is located so that it will not be stepped on, tripped over or
otherwise subject to damage or stress.
Do not install or store the DishDrawer® where it will be exposed to temperatures below freezing
or exposed to weather.
Do not use an extension cord or a portable electrical outlet device (e.g. multi-socket outlet box)
to connect the DishDrawer® to the power supply.
This appliance must be grounded. In the event of a malfunction or breakdown, grounding will
reduce the risk of electric shock by providing a path of least resistance for electric current. This
appliance is equipped with a cord having an equipment-grounding conductor and a grounding
plug. The plug must be plugged into an appropriate outlet that is installed and grounded
in accordance with all local codes and ordinances. Improper connection of the equipmentgrounding conductor can result in a risk of electric shock. Check with a qualified electrician or
service representative if you are in doubt as to whether the appliance is properly grounded.
Maintenance
Do not repair or replace any part of the appliance or attempt any servicing unless specifically
recommended in this User Guide. We recommend that you call an Authorized Service Agent.
Keep the floor around your appliance clean and dry to reduce the possibility of slipping.
Keep the area around/underneath your appliance free from the accumulation of combustible
materials, such as lint, paper, rags and chemicals.
When cleaning the underside of the filter plate, care must be taken on the sharp outer edge to
avoid the risk of cut type injuries.

Safety and warnings
Important safety precautions
Important!
Under no circumstances should you open the drawer while the DishDrawer® is in operation.
Operational
Always press the
opening the drawer.
The DishDrawer® must be used with the motor assembly, filter plate, drain filter and spray arm in
place.
When disconnecting the appliance grasp the plug rather than the power supply cord or junction
of cord to avoid damage.
Take care when loading the DishDrawer® not to load dishware items so they prevent the lid from
properly sealing with the drawer. Items should be placed so they do not protrude above and/or
forced into the drawer, otherwise a service call may result.
Household appliances are not intended to be played with by children. Children or persons with a
disability which limits their ability to use the appliance, should have a responsible person instruct
them in its use. The instructor should be satisfied that they can then use the appliance without
danger to themselves or their surroundings.
Close supervision is necessary if this appliance is used by or near children. Do not allow children
to play inside, on or with this appliance or any discarded appliance.
If a Dishwasher cleaner is used, we would strongly recommend a wash program with detergent
should be run immediately afterward, to prevent any damage to the DishDrawer®.
The DishDrawer® is designed for washing normal household utensils. Items that are
contaminated by petrol, paint, steel or iron debris, corrosive, acidic or alkaline chemicals are not
to be washed in the DishDrawer®.
If the DishDrawer® is not being used for long periods of time, turn the electricity and water supply
to the DishDrawer® off.
button to pause and wait until you hear the three additional beeps before
5
US CA
US CA
6
Controls
If you have a double DishDrawer®, each drawer has its own controls and can run independently
of the other.
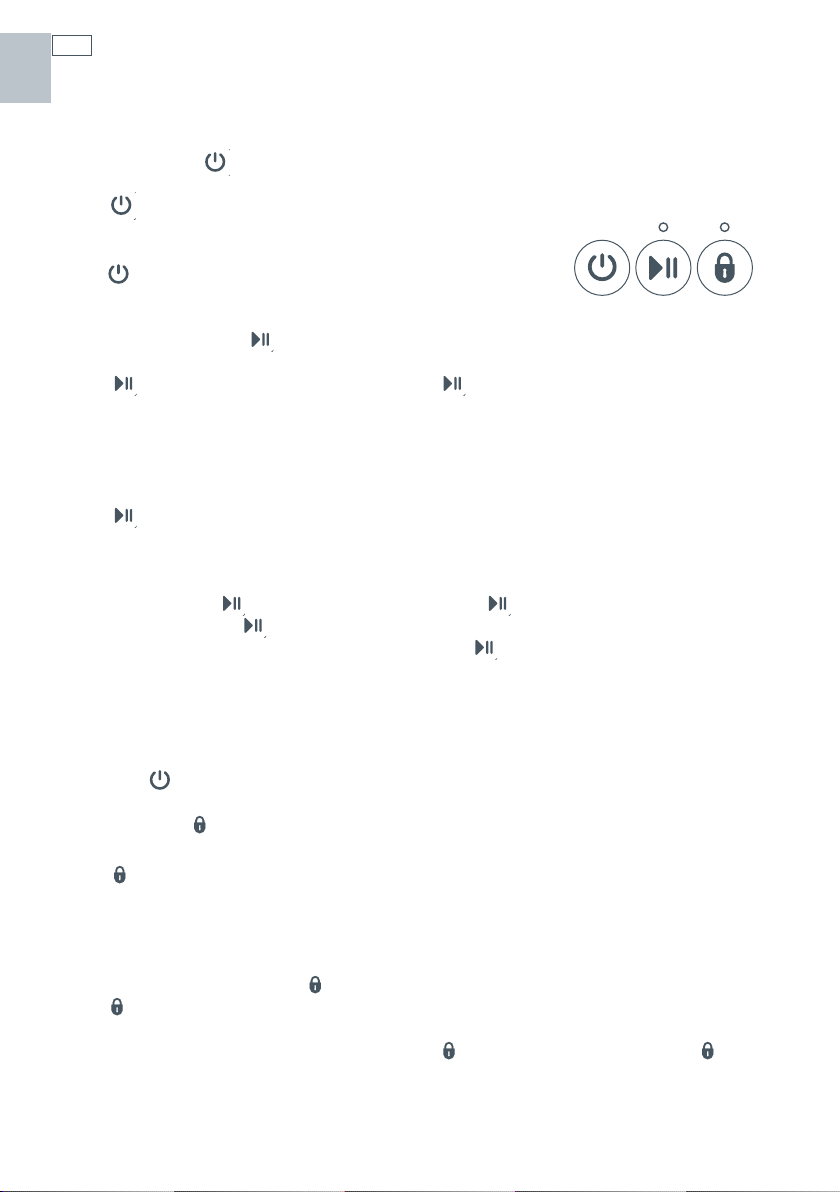
Power button
The button turns the DishDrawer® on or off. Opening
the drawer will automatically turn the DishDrawer® on for
30 seconds. To end a wash program in mid cycle, press
the
button. Any water in the DishDrawer® will be
pumped out.
Start/Pause button
The
button starts a wash program. Press the button to pause or restart the DishDrawer®
during a wash program. When paused, wait for three beeps before opening the drawer. Forcing
the drawer open while in mid cycle may cause damage or injury.
Delay Start
The button also sets the Delay Start feature which can delay the start of a wash program
from 1 to 12 hours.
To activate Delay Start
1
Press and hold the button until the light above the button turns purple.
2
Continue holding the button down until the desired delay time has been reached. The
DishDrawer® will emit audible ‘beeps’ as you hold the
another hour delay.
3
The DishDrawer® will start once the drawer is closed and the delay time has elapsed.
button down, each beep indicates
To cancel Delay Start
Press the button.
Lock button (optional)
The button activates/deactivates the Keylock or the Childlock functions.
Keylock
The Keylock feature disables all the buttons on the DishDrawer®.
To activate, press and hold the
the
button is lit when Keylock is activated.
To cancel the Keylock feature, press and hold the
disappears.
button until you hear one beep (3 seconds). The light above
button until the light above the button

Controls
Childlock
The Childlock feature locks the drawer and disables all the buttons on the badge.
To activate, press and hold the
the
button is lit when Childlock is activated.
button until you hear two beeps (5 seconds). The light above
7
US CA
To cancel the Childlock feature, press and hold the
disappears.
button until the light above the button
Wash program selector
Press the button inside the drawer to select a wash program. The DishDrawer® will
remember the last program used.
Eco button (optional)
Press the button if you would like the wash program to use less energy and water. The red
ECO light will indicate the feature is on. If your dishes are heavily soiled or you require enhanced
dry performance, we do not recommend ECO programs.
Power failure
If the DishDrawer® is operating and a power failure occurs, it will stop. The DishDrawer® may be
unable to be opened during this time. When the power supply is resumed, the DishDrawer® will
restart in the same part of the wash program.
US CA
8
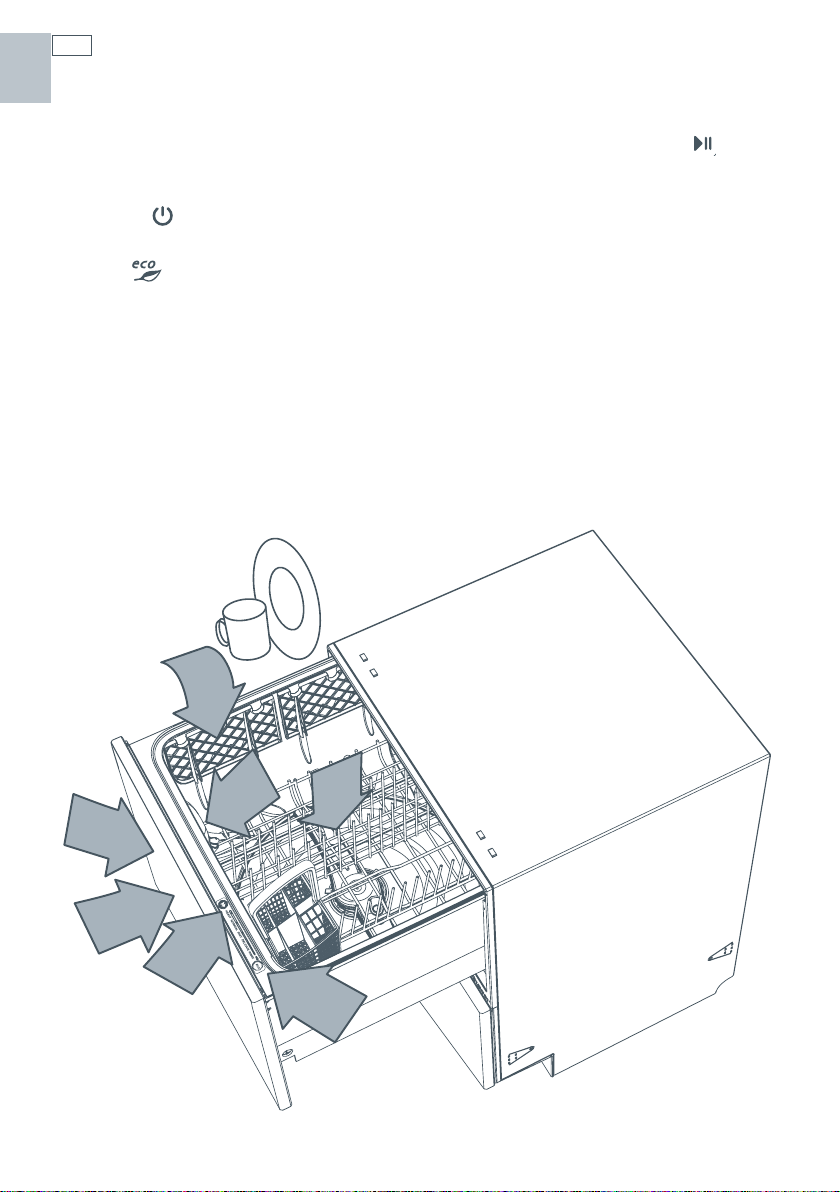
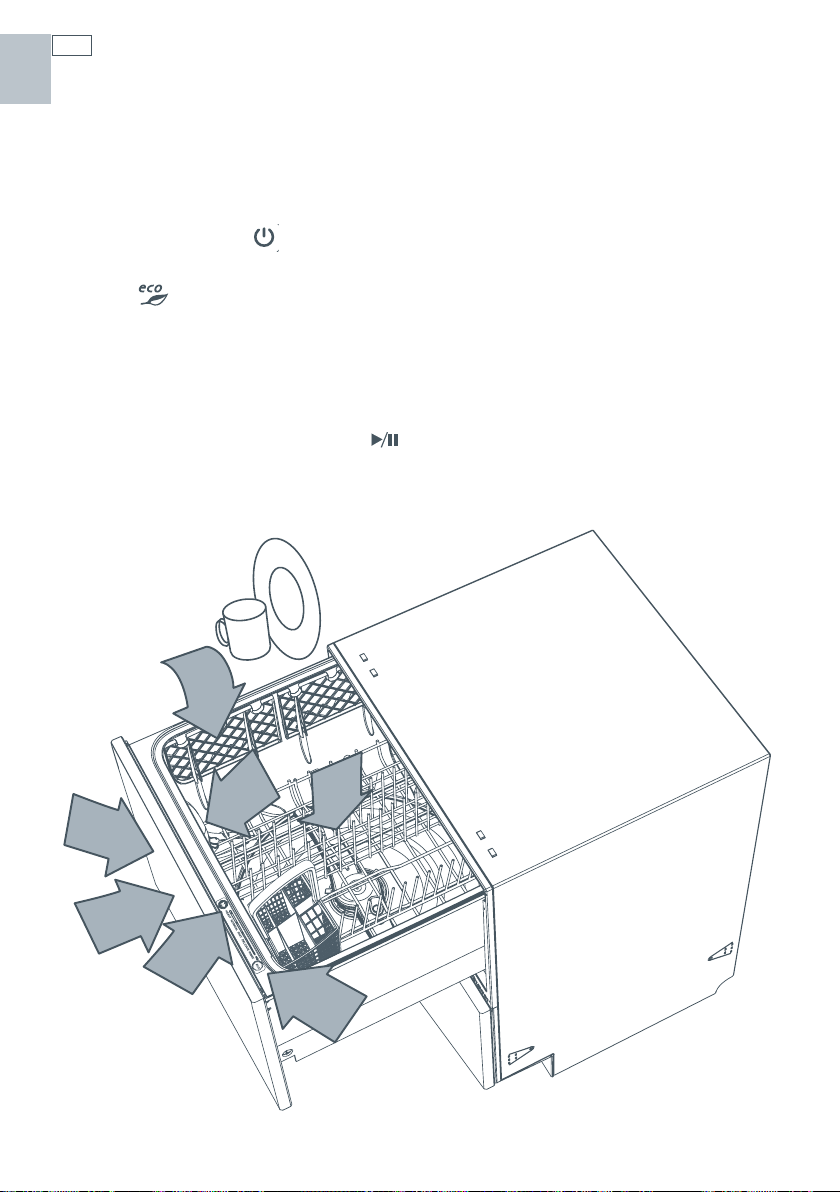
Operation
1
Load dishes
Remove all food scraps and load the dishes.
2
Add detergent
3
Check rinse agent
4
Press the button
5
Select a wash program
6
Select (optional)
7
Check
Ensure there is nothing obstructing the
spray arm. The drain filter must be level with
the filter plate.
8
Start
Close the drawer and press the
9
Finish
The DishDrawer® will beep six times to
indicate the end of the wash program. At
the end of the wash program the drying fan
will continue to run for a set time or until the
drawer is opened. The fan assists with drying
and uses negligible amounts of energy. It
is normal for some water to remain in the
drain filter area after the wash program is
complete.
DD224 only: At the end of a wash program,
you may find both drawers draining
simultaneously. This is normal.
button.
4
8
5
1
2,3
7
6

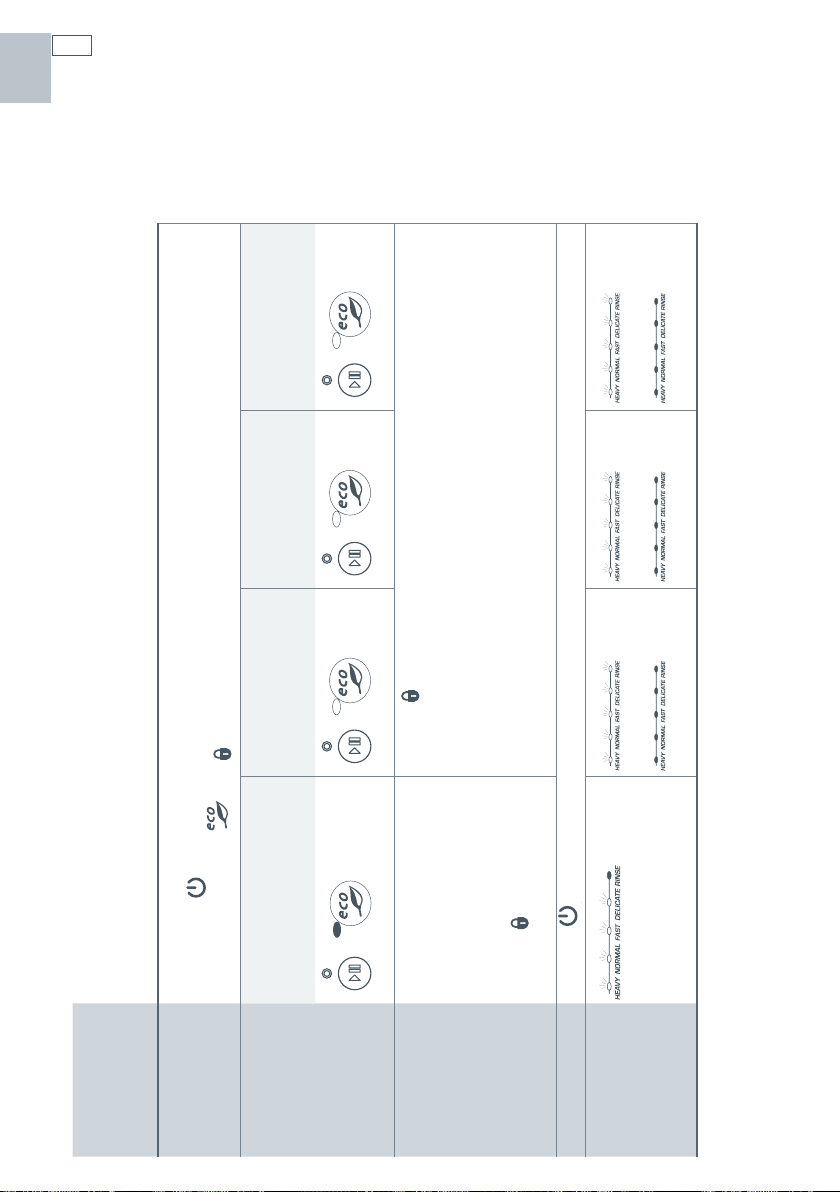
Wash program chart
Standard wash program - when to use
Heavy
Heavily soiled
pots, pans and
dishes.
Normal
Dishes with
normal soils
for optimum
Fast
Lightly soiled
dishes.
Delicate
Lightly soiled and
heat sensitive
crockery.
wash and dry
performance.
pre wash 1 pre wash 1 pre wash pre wash
pre wash 2 pre wash 2
main wash 150
o
F main wash 140oF main wash 130oF main wash 120oF
post rinse 1 post rinse post rinse post rinse
post rinse 2
o
final rinse 163
F final rinse 140oF final rinse 120oF final rinse 130oF
drying phase drying phase drying phase
Eco wash program - when to use
Heavy
Heavily soiled
everyday dishes.
Normal
Normal soiled
dishes for
optimum energy
use.
Fast
Lightly soiled, non
greasy dishes.
Delicate
Lightly soiled,
non greasy and
heat sensitive
crockery.
Rinse
Prevents odors and
soils drying on dishes.
9
US CA
pre wash 1 pre wash pre wash
pre wash 2
main wash 150
o
F main wash 130oF main wash 115oF main wash 115oF
post rinse 1 post rinse post rinse post rinse
post rinse 2
o
final rinse 150
F final rinse 130oF final rinse 115oF final rinse 120oF
drying phase drying phase drying phase
Note:
Wash times can vary depending on the incoming water temperature, ambient conditions, type
of dish load and whether the drawer has been opened during the wash. Wash times are only
APPROXIMATE and are based on 120°F incoming water.

US CA
10
Caring for your dinnerware
The combination of high temperatures and dishwasher detergent may cause damage to
some items if they are washed in a dishwasher. Remember, if in any doubt about any aspect
concerning items washed in the DishDrawer®, follow the instructions from the manufacturer of
the items, or wash the item by hand.
Cutlery & silverware
All cutlery and silverware should be rinsed immediately after use to prevent tarnishing caused
by some foods. The Rinse wash program is useful for this. Silver items should not come into
contact with stainless steel, e.g. other cutlery. Mixing these items can cause staining. Remove
silver cutlery from the DishDrawer® and hand dry it immediately after the program has finished
if needed.
Aluminum
Aluminum can be dulled by dishwasher detergent. The degree of change depends on the
quality of the product.
Other metals
Iron and cast iron objects can rust and stain other items. Copper, pewter and brass tend to stain.
Woodware
Wooden items are generally sensitive to heat and water. Regular use in a dishwasher may cause
deterioration over time. If in doubt, wash by hand.
Glassware
Most everyday glassware is dishwasher safe. Crystal, very fine and antique glassware may etch
that is, become opaque. You may prefer to wash these items by hand.
Plastic
Some plastic may change shape or color with hot water. Check manufacturer’s instructions
about washing plastic items. Washable plastic items should be weighed down so they do not
flip over and fill with water or fall through the basket during the wash.
Decorated items
Most modern china patterns are dishwasher safe. Antique items, those with a pattern painted
over the glaze, gold rims or hand painted china may be more sensitive to machine washing. If in
doubt, wash by hand.
Glued items
Certain adhesives are softened or dissolved in machine washing. If in doubt, wash by hand.
Vacation time
If the DishDrawer® is not going to be used for some time, we recommend you ensure the baskets
are empty. Leave the inside of the DishDrawer® clean. Leave the drawers ajar to allow air to
circulate. Turn off both the power and water supply to the DishDrawer®.
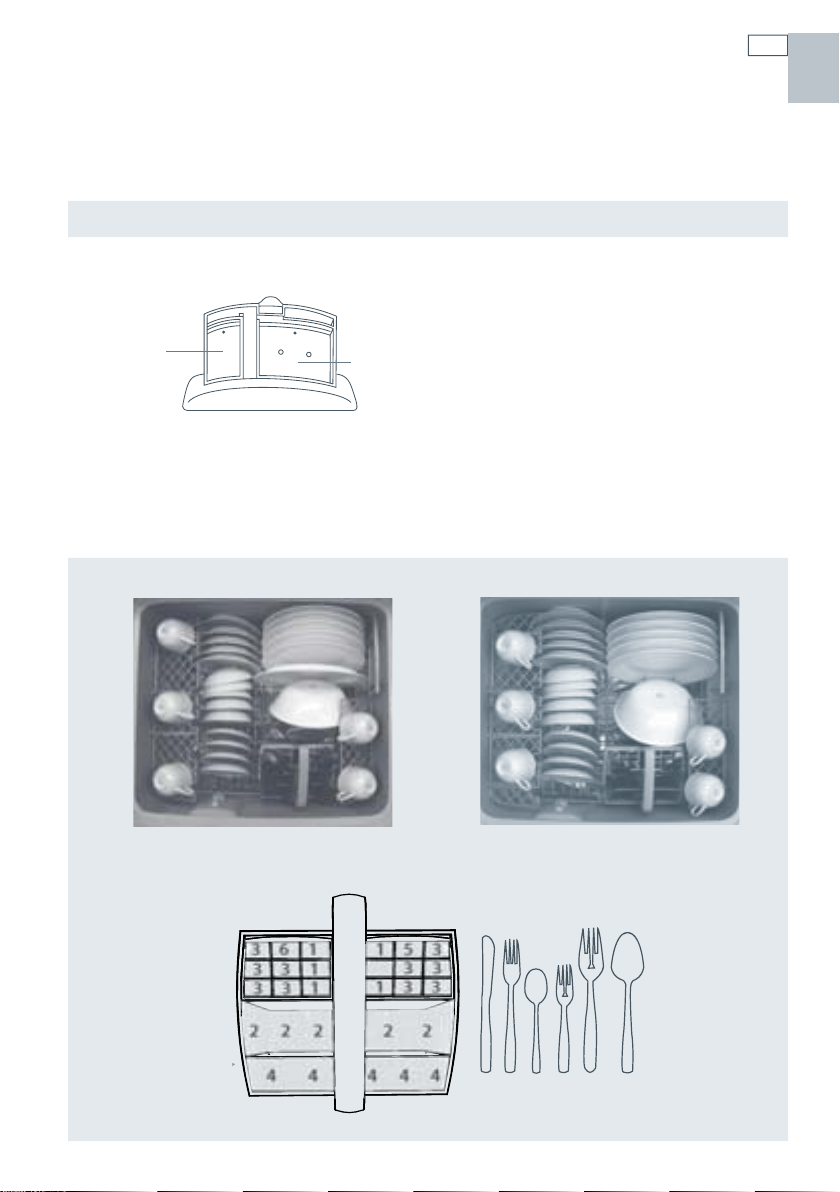
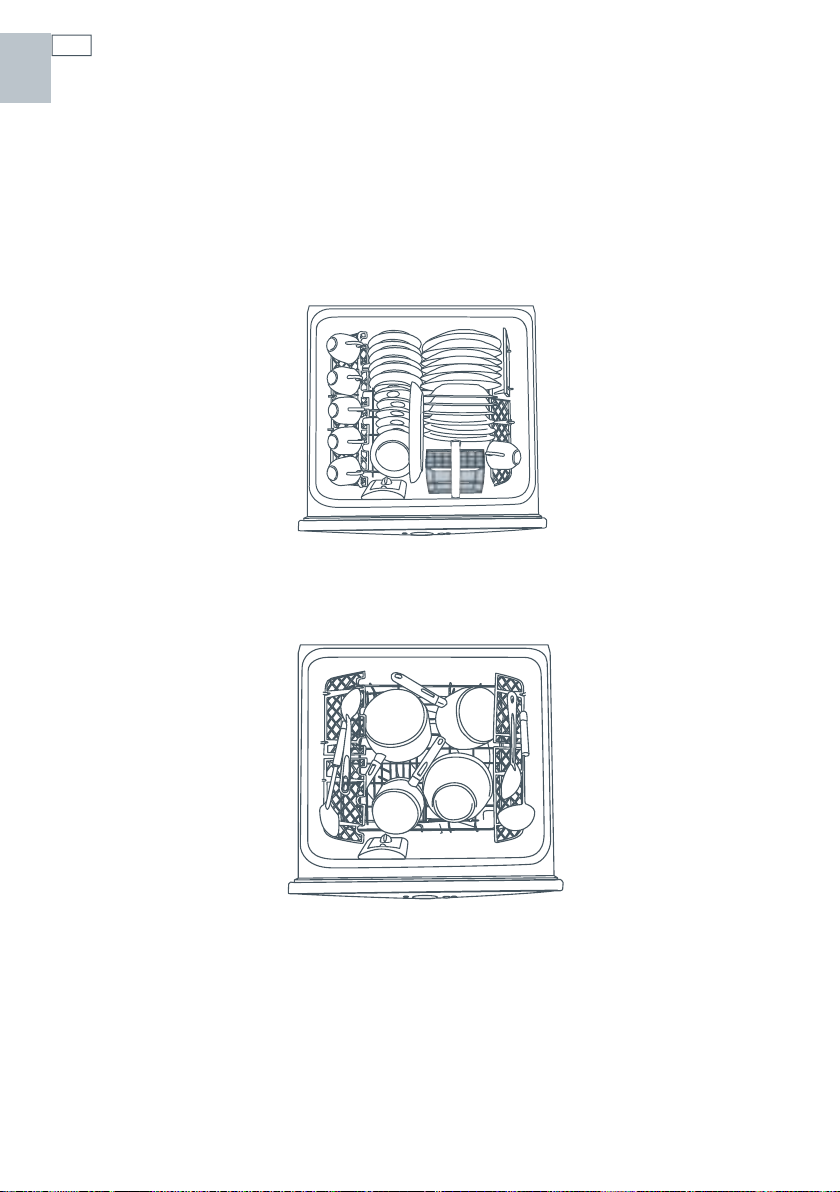
Dishwasher standards test
The DishDrawer®s are tested to various standards for both wash and dry performance.
The following are loading pattern diagrams, detergent quantities and rinse agent quantities used
for the DishDrawer®.
11
US CA
Wash Program
Detergent Quantities
a
Open detergent dispenser
Rinse Agent
Recommended Loading Pattern
Normal Cycle
a. 5g (pre wash) per drawer
b. 10g (main wash) per drawer
b
Setting 4
Top drawer Bottom drawer
361
331
1
33
153
33
133
222 2 2
44 444
12 3 4 5 6
US CA
12
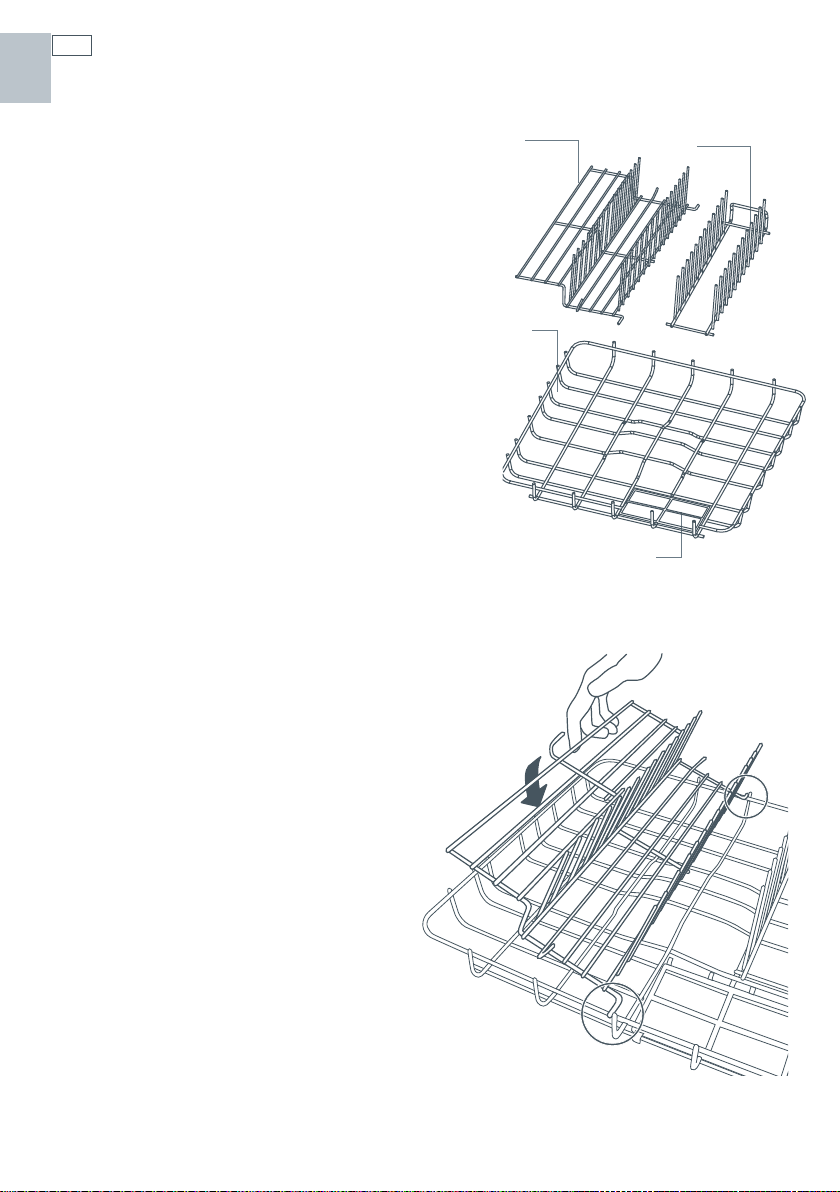
Accessories
The inserts and racks can be added or removed to
suit your individual needs. If you have the double
DishDrawer® model, some of the accessories are
interchangeable between the two drawers. For
example you can combine the two Mega Racks into
one drawer and wash all cups and glasses, leaving
the other drawer for plates and larger items.
a. basket
The basket holds some of the accessories in place
and keeps dishes away from the spray arm.
b. Drain filter access panel
The drain filter access panel is designed to snap
onto the basket over the drain filter. This prevents
objects from touching the base of the DishDrawer®
and stopping the rotation of the spray arm, while
still giving access to the drain filter.
c. Mega rack
The Mega rack is designed to hold
glasses, cups and small plates.
c
a
d
b
d. Plate insert
The plate insert supports plates and
bowls.
How to install the Mega rack
To install the Mega rack, place the outer
legs of the rack on top of the basket,
and clip the Mega rack to the side of the
basket. When the Mega rack is correctly
installed it should not feel loose in the
basket.

Accessories
Cup racks
Cups, glasses and kitchen utensils can be placed on the
left and right hand side of the cup racks.
For best performance ensure there are no large items
below, blocking the wash water from reaching the cup
racks.
Wine glasses can be supported on the cup racks if used in
conjunction with the Mega rack.
There are stops on the cup rack to prevent cups from
touching the DishDrawer® wall. This will maximize the dry
and wash performance.
Cutlery basket
Cutlery, small kitchen utensils and some plastic lids are best
placed into the cutlery basket.
For best wash performance, we recommend loading cutlery
with handles pointing down and sharp utensils with their
handles facing up, to reduce the risk of injury.
Mix spoons, knives and forks within each section, to stop
cutlery from nesting together and to ensure the water
circulates freely.
Keep stainless steel from touching silver cutlery to avoid
staining.
Small items, like plastic lids, can be placed under the antinesting grid. This will prevent them from being displaced by
wash water and falling to the bottom, where they may stop
the spray arm rotation.
13
US CA
US CA
14
Loading
Wash water for the DishDrawer® comes from the spray arm which is situated inside the base of
the drawer. The spray arm rotates, providing wash water to all areas of the wash compartment
so care needs to be taken when loading dishes to ensure there is enough space for the water to
reach all areas, particularly the cup racks. If there are any items blocking the spray arm path or
the wash water, then the performance will be reduced.
How to load your DishDrawer®
Note: The basket and its inserts are not designed to be lifted out of the DishDrawer® while
loaded with dishes.

Loading
How NOT to load your DishDrawer®
15
US CA
Overcrowded and wash water will not
reach some of the dinnerware.
Cups, glasses and bowls must have their
openings facing down.
Ensure dishware items are not forced
into or protrude out of the drawer as it
may prevent the lid from properly sealing
which could result in a service call.
Locate sharp items safely to prevent
injuring the user and damaging the lid
assembly.
Check the bottom of the cutlery basket to
ensure sharp or pointed items have not
come through as they may stop spray arm
rotation.
The plates are nesting together and wash
water may not get through.
Ensure cutlery are not nesting or stuck
together. They need to be evenly spread
out.
Ensure cutlery has not fallen through the
basket and stopped the spray arm from
rotating.
The large bowl is blocking wash water
reaching the cup racks.
Large utensils should be on cup racks so
they do not become dislodged and stop the
spray arm from rotating.
Sharp or pointed items must be placed
horizontally or with sharp edges/points
facing down to avoid risk of injury.
US CA
16
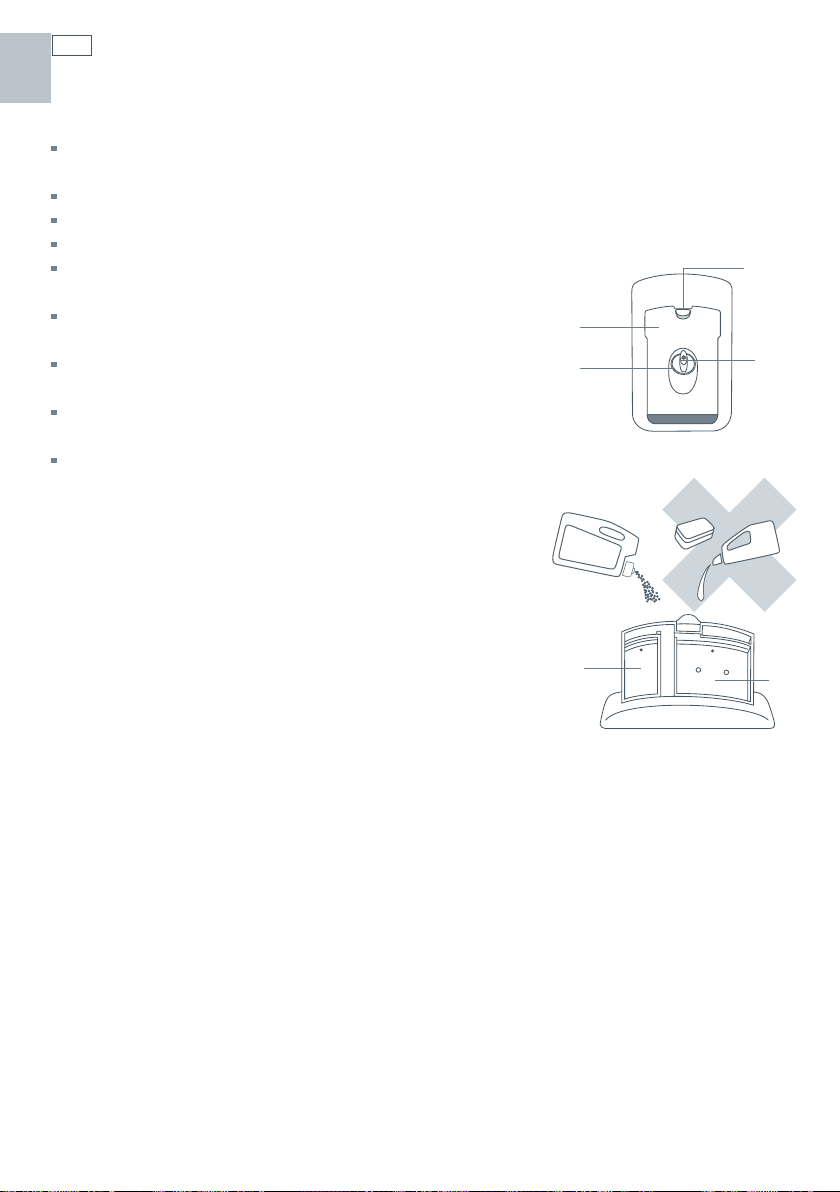
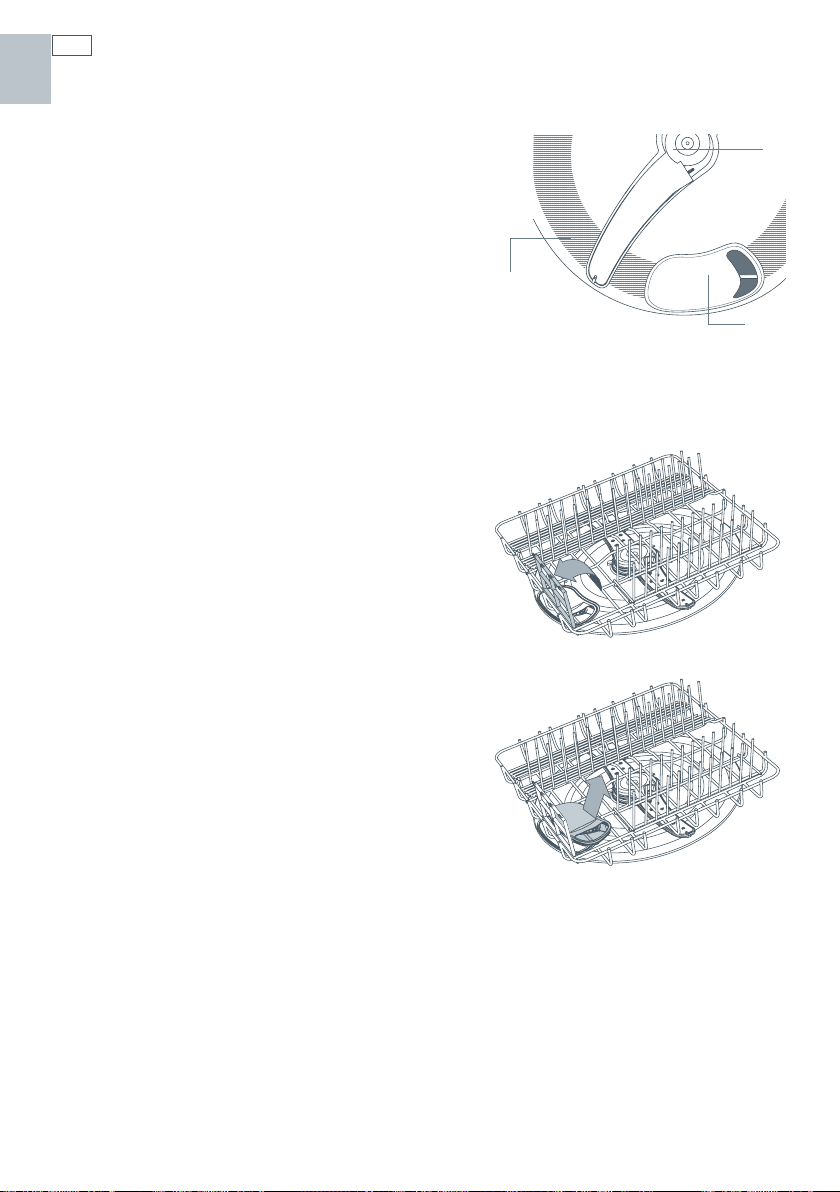
Detergent dispenser
Important!
Only use powdered detergent recommended for domestic automatic dishwashers in the
detergent dispenser.
Dishwasher detergents are strongly alkaline and can be dangerous if swallowed.
Avoid contact with skin and eyes.
Keep children and infirm persons away from the DishDrawer® when the drawer is open.
Check that the detergent receptacle is empty after completion
of the wash cycle.
Do not place dishwasher tablets in the
detergent dispenser
Detergent and dishwasher tablets should not
be in direct contact with dishes or cutlery.
Liquid detergents are not suitable to be used in
the DishDrawer®.
Hand washing liquids, soap, laundry detergents
or disinfectants will damage the DishDrawer®.
Filling the detergent dispenser
1
Press the latch down and the door will open.
2
Pour in detergent. No detergent is needed for the Rinse
program.
3
After filling the main wash compartment, close the dispenser
door until it clicks shut. The detergent will automatically be
released into the DishDrawer® during the wash program.
a,b
e
Closed detergent dispenser
a
c
d
b
Open detergent dispenser
a
Pre Wash Compartment
10g / 2 teaspoon capacity
b
Main Wash Compartment
30g / 6 teaspoon capacity
c
Detergent Dispenser Latch
d
Rinse Agent Indicator Light
e
Rinse Agent Plug

Detergent dispenser
Detergent quantities
The detergent quantities recommended below are for individual drawers.
Wash type Wash program Detergent quantities
prewash
(teaspoons)
Hard (>150ppm or >9gpg) All* 2 6
Medium (100-150ppm or 6-9gpg) All* 2 4
Soft (<100ppm or <6gpg) Heavy
Normal
Delicate
Fast
* No detergent is required in the pre wash compartment for the fast wash program.
1
1
main wash
(teaspoons)
17
US CA
3
2
1
1
Hard water situations
If you live in a hard water situation, we
recommend the installation of a household
water softener to improve the water quality,
detergent effectiveness and prevent the
build-up of calcium deposits on dishes and
in the DishDrawer®.
Certain brands of dishwasher detergent
contain varying quantities of phosphates,
which help soften water. We suggest
you use a detergent with high phosphate
content to improve the wash. The detergent
compartments need to be completely FULL
and rinse agent is used with its setting fixed
at 5.
We recommend the use of a dishwasher
cleaner/descaler whenever you notice
a build-up of calcium deposits in your
DishDrawer®.
After you have used the dishwasher
cleaner/descaler you must run another
wash program with detergent to prevent
damage to the DishDrawer®.
Soft water situations
If you live in an area of naturally soft water
or your household water is softened,
avoid using too much detergent in your
DishDrawer®. An excess amount of detergent
is very aggressive on glassware and may
cause irreversible etching.
Etching is a chemical deterioration that
occurs on the surface of glassware when
it is subjected to high temperatures, too
much detergent and/or soft water situations.
Etching is caused by a combination of very
hot water, which causes the detergent to
become very aggressive, but because the
water is soft, there are no water hardness
mineral ions for the detergent to bind to,
so it extracts mineral ions directly from the
glass.
Etching looks like rainbow-colored film, as
the glass is subjected to further washing the
surface will eventually appear opaque. This
type of etching is irreversible.
To prevent further etching from occurring
on glassware, use less detergent (follow the
recommended detergent quantities in the
User Guide for soft water situations), and
ensure the dishwasher is not overloaded,
so water can reach all the dishes during the
wash.
US CA
18
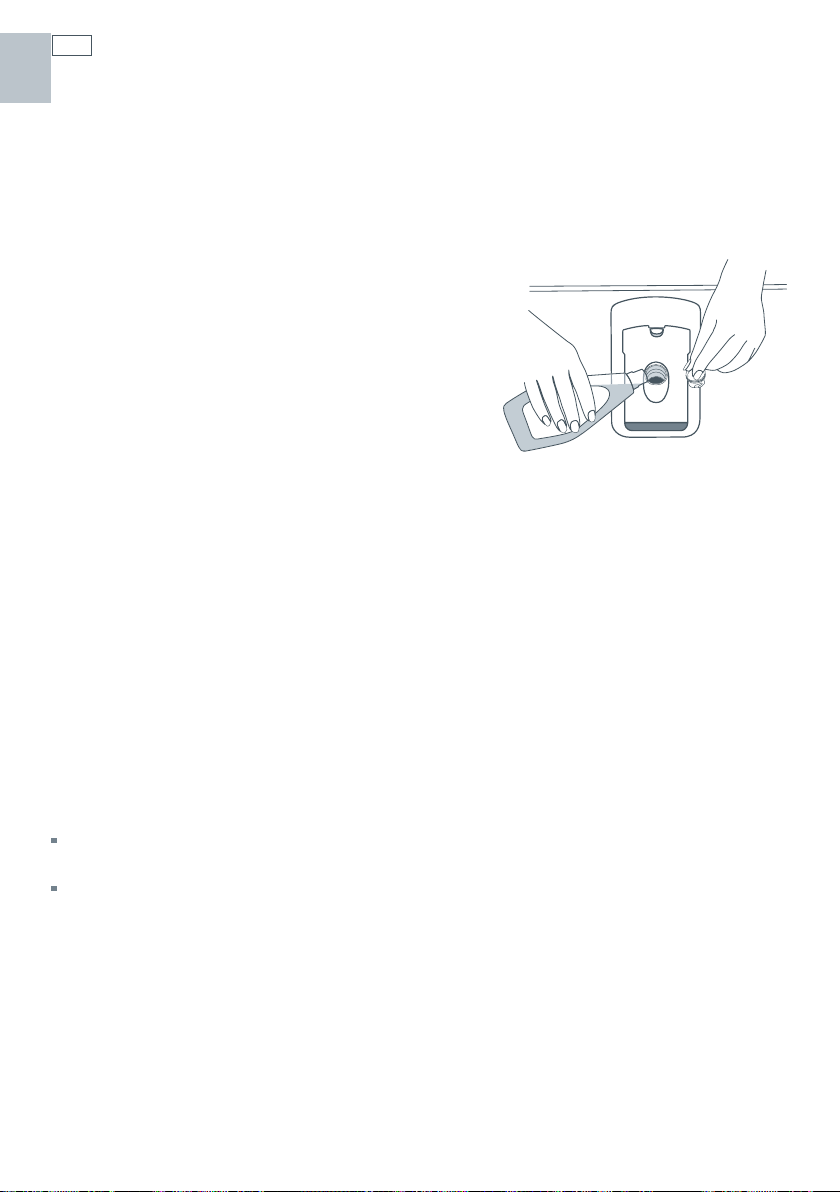
Rinse agent dispenser
We highly recommend the regular use of liquid rinse agent to give the best drying results. Rinse
agent gives a streak free, sparkling clean look to glass and chinaware, in addition it
prevents metal from tarnishing. The rinse agent dispenser is on the inside of each drawer,
located underneath the detergent dispenser. The dispenser holds approximately 1.7 fl oz (50 ml)
of rinse agent.
Filling the rinse agent dispenser
1
Turn the plug counter-clockwise and remove.
2
Pour the rinse agent into the circular opening.
3
Take care not to spill rinse agent into the
DishDrawer®. Any spillages must be wiped up to
prevent excess foaming. Failure to wipe rinse agent
spillages may result in a service call which will not be
covered by warranty.
4
Fit the plug back into the original position.
How much rinse agent to use
The regulator may need adjusting to suit your water conditions. The lowest setting is ‘1’ and
the highest is ‘5’. Refer to Option Adjustments section to adjust the rinse agent setting. If there
is excessive foam at the end of the wash, reduce the setting. If dishes are wet or streaky after
drying, increase the setting.
Rinse agent indicator light
If the rinse agent indicator light is red, refill the dispenser. If the rinse agent indicator light is
dimly lit or not lit at all, there is enough rinse agent for the wash.
Note:
Lighter colored rinse agents will not dim the indicator light as effectively as darker colored rinse
agents.
When the rinse agent is being dispensed, you may notice some unusual noises during the wash,
this is normal.

Option adjustments
The following options can be adjusted to suit your preferences.
Rinse Agent setting
Reduce the Rinse agent setting if there is excess foam after a wash program.
Increase the Rinse agent setting if dishes are wet or streaky after a wash program.
Auto Power setting
By default, DishDrawer® will automatically turn on whenever the drawer is opened. Washing will
not start until the drawer is closed and the
DishDrawer® to turn on automatically, this feature can be turned off.
End of Wash Program Beeps
By default, DishDrawer® will beep six times at the end of a wash program. This feature can be
turned off.
Closed Drawer option
The Closed Drawer option will lock the DishDrawer® when the drawer is closed. When you wish
to open the drawer, press the
automatically seal and lock after 30 seconds. If the Lock feature is used in conjunction with the
Closed Drawer Option, pressing the
must be turned off to enable DishDrawer® to be opened.
button. When the drawer is fully closed again, the lid will
button has been pressed. If you do not want the
button will not unlock the drawer. The Lock feature
19
US CA
Note: this option is highly recommended if the DishDrawer is to be used in motor homes.
US CA
20
Option adjustments
1
Closed Drawer
option
On Off
End of Wash
Program Beeps
option
Press the button to turn power on. Open DishDrawer.2 Press and hold the and buttons for 5 seconds until one long beep sounds.
Enter Option Adjustment Mode
1
Follow the steps
below Rinse Agent setting Auto Power option
How to make option adjustments
First
On Off
button to turn the selected option on or off.
Press the
button to
On Off
red / off purple / on blue / on red / on
The current setting is shown
on the wash program
selector in red lights. If four
Make an
adjustment
red lights are lit, the option
selected setting is set to four.
increase the setting.
Press the
Press the button to save the change.
Save
Rinse Agent setting set to
Example
four
The option sequence will start again from the Rinse Agent setting.
1

User maintenance instructions
Cleaning the surfaces
Important!
We do not recommend the use of the following cleaning aids on/in your DishDrawer® as they may damage
the surfaces:
Plastic or stainless steel scouring pads
Abrasive, solvent, household cleaners
Acid or alkaline cleaners
Hand washing liquids or soap
Laundry detergents or disinfectants
Proprietary ‘Stainless Steel’ cleaners or polishes as these may damage the protective coating.
1
Wipe with a clean damp cloth. Take care not to wet the control panel.
2
Dry with a clean lint-free cloth.
21
US CA
US CA
22
User maintenance instructions
Cleaning the drain filter, spray arm and
filter plate
We recommend that the drain filter is cleaned
whenever there is evidence of food particles.
The spray arm and filter plate may need cleaning
about once a month in normal use or more often
should the need arise.
a
b
If a dishwasher cleaner/descaler is used, you must
run a wash program with detergent immediately
afterward to prevent any damage to your
DishDrawer®.
Important !
The DishDrawer® must be used with the filter plate,
drain filter and spray arm correctly in place.
Cleaning the drain filter
1
Lift up the drain filter access panel on the basket
(if fitted).
2
Lift and remove the drain filter.
3
Empty, rinse clean under running water and
replace back into the allocated space.
4
Ensure the drain filter is flush with the filter plate.
c
Internal parts of the DishDrawer®
a Spray arm
b Filter plate
c Drain filter
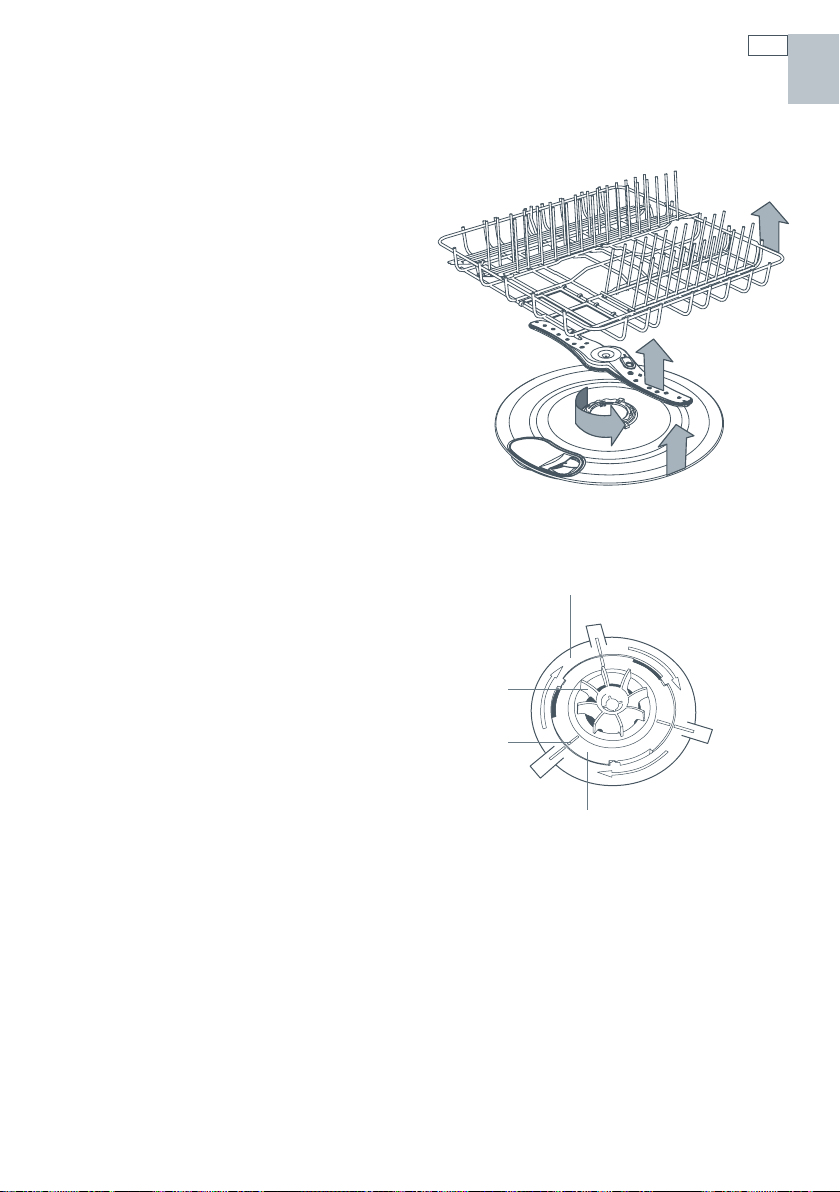
User maintenance instructions
Cleaning the spray arm and filter plate
Ensure the DishDrawer® is cool before you start cleaning and follow the instructions for
removing the drain filter and spray arm.
1
Remove the basket carefully. Lift from the back
end first to prevent knocking the detergent
and rinse agent dispenser.
2
Lift the spray arm and shake any foreign material
out.
Rinse the spray arm clean under running water
and wipe with a damp cloth.
3
In the center of the filter plate there are two rings.
Hold the center ring still and turn the outer ring
counter-clockwise, about a 1/8 turn. This will
release the filter plate.
4
Lift the filter plate out.
When cleaning the underside of the filter plate,
take care handling the sharp outer edge to avoid
the risk of cuts.
Remove any foreign material, wash in hot soapy
water and rinse thoroughly in clean water. The
heater plate can be wiped with a damp cloth.
5
Replace the filter plate so it lies flat in the base of
the drawer ensuring the filter plate is fully locked
into position with the center ring.
6
To lock the filter plate into position, ensure the
lines align with each other (refer to the diagram
for the correct position). The filter plate must not
be able to move about freely.
7
Replace the spray arm back onto the impeller.
8
Replace the basket, lowering the front edge of the
basket into position first.
Note: Where there is broken crockery or glass in the
drawer, it must be carefully removed to prevent
damage to the DishDrawer®.
a
b
c
d
Correct locking position of filter
plate with motor assembly
(under spray arm)
a Outer ring
b Impeller
c Correct alignment marks
d Center ring
2
3
23
US CA
1
1
4
US CA
24
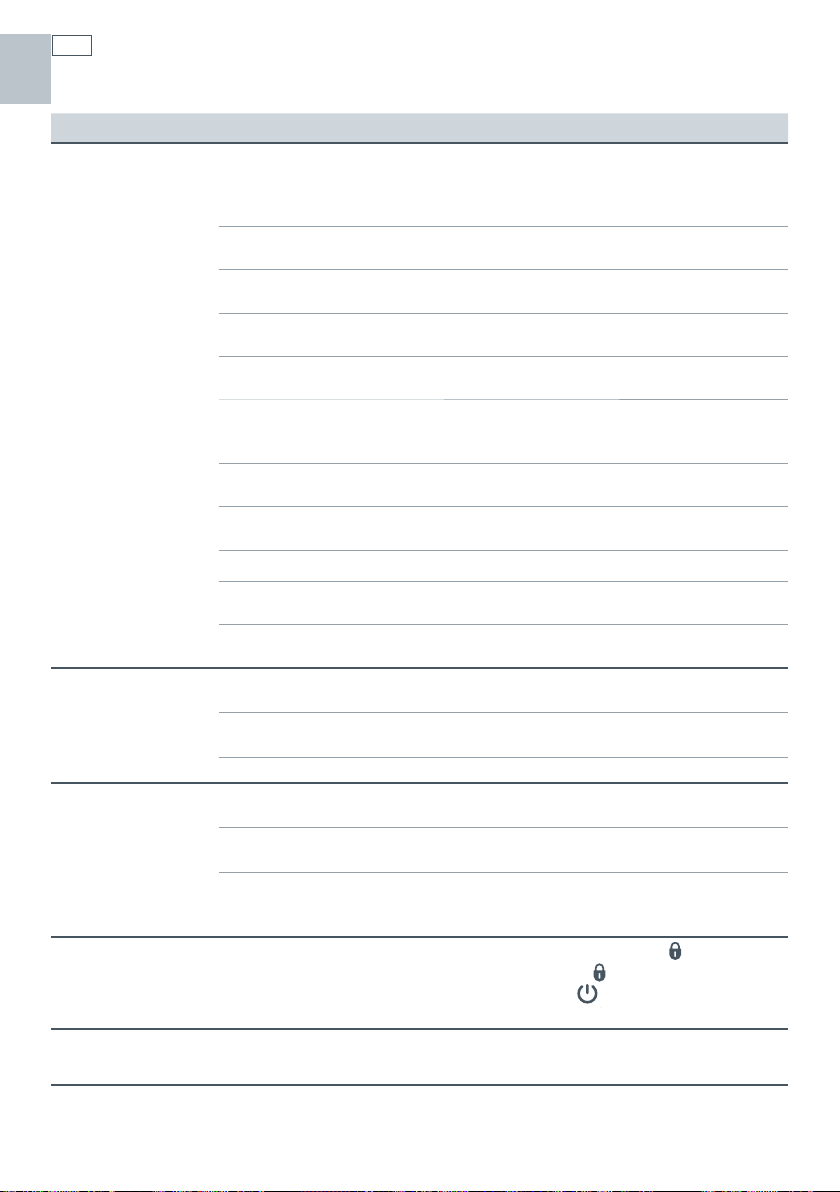
Troubleshooting
Problem Possible Cause What to do
Unclean dishes
Foaming Incorrect amount of
Water leaking Drain hose disconnected
DishDrawer® will
not open
Power failure
during cycle.
Wash program unsuitable
for the load.
Spray arm unable to rotate. Ensure no items are obstructing the spray
DishDrawer® overloaded/
incorrectly loaded.
Filter plate/drain filter is
incorrectly inserted.
Detergent put in the wrong
compartment.
Excess food not removed
from dinnerware prior to
loading.
Unsuitable detergent. Use recommended brands of dishwasher
Not enough detergent. Refer to the detergent section or the
Spray arm holes are blocked. Clean the spray arm.
Filter plate/drain filter is
blocked.
Mega rack incorrectly
installed.
detergent.
Too much egg in the wash
load.
Rinse agent setting too high. Decrease the rinse agent setting.
from waste pipe.
Supply inlet hose not
properly connected.
Other leaks. Turn water and power supplies to the
Childlock function is on or
the Closed Drawer option is
on, or both.
Refer to the wash programs section for a
suitable wash program, or the soils were
too heavily baked on and dishes may need
soaking.
arm path.
Refer to the section on loading.
Refer to the care and cleaning section.
Detergent must be placed in the large
compartment.
Scrape all food scraps off dinnerware prior to
loading.
detergent. Only use powder detergent.
detergent manufacturer’s instructions.
Clean the filter plate and drain filter.
Refer to the accessories section for correct
installation.
Refer to the detergent section or consult the
detergent manufacturer’s instructions.
Increase the amount of detergent.
Reconnect the drain hose to the waste pipe.
Ensure the inlet hose is connected securely.
DishDrawer® off. Call your dealer or
Authorized Service Agent.
Turn Lock off. Hold down the
the light above the
and/or press the button to open the
DishDrawer®.
Wait until power resumes, cycle will restart in
same part of wash program.
button disappears
button until
Troubleshooting
Problem Possible Cause What to do
Continuous
beeping
Intermittent
beeping
DishDrawer® will
not start
Excess water in the
DishDrawer®
Water marks on the
dishes
DishDrawer®
interior is stained
Dishes did not dry Incorrect loading. Ensure the dishes are not nesting together.
No detergent
dispensed
Excessive motor
noise
A fault has occurred. Refer to the Fault codes section.
DishDrawer® is in pause
mode.
Power supply is not
connected.
The drawer is not closed
properly.
Lock feature is on.
button not pressed.
Drain hose(s) bent or
kinked.
Blocked filters. Clean the filter plate/drain filter. Refer to the
Rinse agent depleted. Refill the rinse agent dispenser.
Rinse agent setting too low. Increase the rinse agent setting.
DishDrawer® overloaded/
incorrectly loaded.
Some foods, like tomato
based products, may
stain the inside of the
DishDrawer®.
Rinse agent depleted. Refill the rinse agent dispenser.
Rinse agent setting too low. Increase the rinse agent setting.
Eco wash program used. Choose a standard wash program.
Detergent dispenser was
wet when loaded.
The filter plate and/or spray
arm is incorrectly placed.
No water in the motor area. This usually occurs on the first use or when
Close the DishDrawer® and press the
button.
Connect the power supply.
Ensure the drawer is firmly closed.
Turn Lock off. Hold down the
the light above the
Press the button.
Straighten the drain hose(s).
Care and cleaning section.
Refer to the section on loading.
Pre-rinse dishes before placing in the
DishDrawer®. Alternatively, using the Rinse
program after adding the dishes may
minimize staining.
Clean the dispenser and ensure the
dispenser is dry when adding detergent.
Refer to the care and cleaning section for
details on correct placement.
the DishDrawer® has not been used for
long periods of time. Run the DishDrawer®
through a wash program.
button disappears.
button until
25
US CA

US CA
26
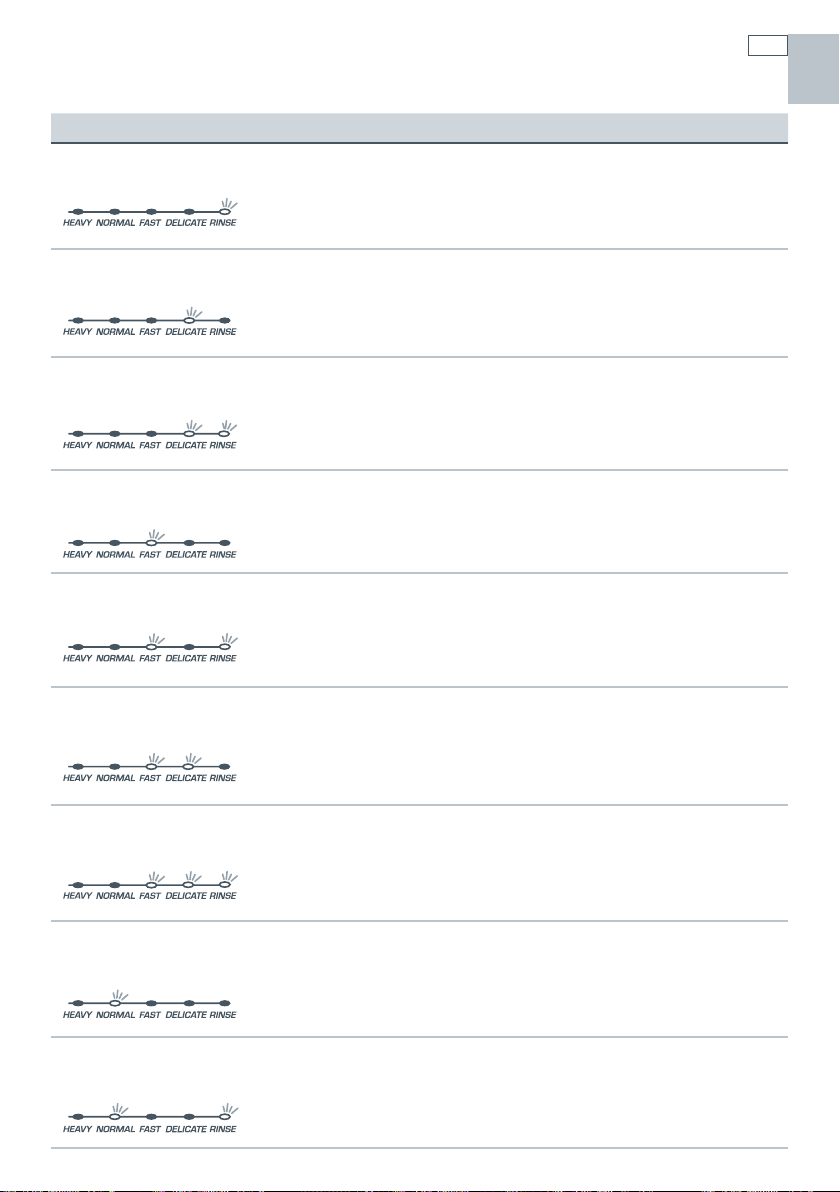
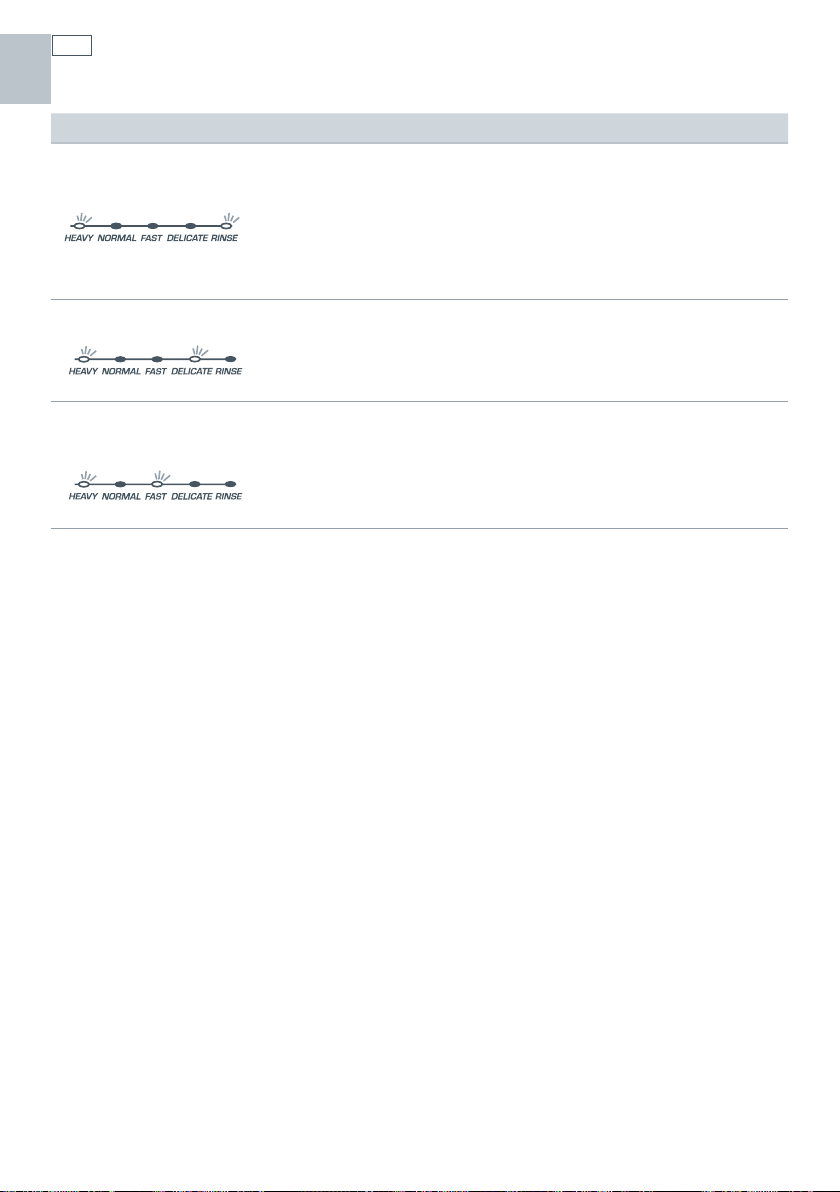
Fault codes
How to recognize a fault code
When a fault has occurred, the DishDrawer® will continuously beep every second.
The fault code will be displayed on the wash program selector.
Each fault code is shown in the following chart.
How to attend to a fault code
1
Press the button to remove the fault code.
2
If the fault code and continuous beeps cannot be removed by pressing the button, turn the
DishDrawer® off at the power supply.
3
We recommend you check the following chart and correct the fault where possible.
4
After attending to the fault, turn the DishDrawer® on at the power supply.
5
If the fault code and continuous beeps remain, turn the water and power supply off to the
DishDrawer®.
6
When calling your Authorized Service Center advise them of the fault code that has appeared
on the DishDrawer®. This information will help the Authorized Service Center respond to your
request.
Fault Codes Possible Causes What to Do
F1
Flood switch has been
activated.
Turn the water and power supply to the
DishDrawer® off and call your Authorized
Service Center.
Fault codes
27
US CA
F2
F3
F4
F5
F6
F7
Motor problem. Call your Authorized Service Center.
Temperature sensor
failed.
Faulty temperature
sensor or element
Lid fault
Lid fault
Lid fault Call your Authorized Service Center.
Ensure water coming in through the inlet
hose is less than 149
install a tempering valve on your water
supply.
Call your Authorized Service Center.
1
Turn power supply to DishDrawer off,
then turn on power supply. Fault may
reset.
2
Call your Authorized Service Center.
1
Turn power supply to DishDrawer off,
then turn on power supply. Fault may
reset.
2
Call your Authorized Service Center.
o
F. You may need to
F8
F9
Electrical problem
Electronics
malfunction.
1
Turn power supply to DishDrawer off.
2
Call your Authorized Service Center.
Call your Authorized Service Center.
US CA
28
Fault codes
Fault Codes Possible Causes What to Do
U1
Fill Fault
1
Turn the DishDrawer® water supply on.
2
Ensure the spray arm is placed on the
impeller and can rotate and if the
DishDrawer® is full of water, it will
need to be emptied manually.
3
Call your Authorized Service Center.
U2
U4
Loading Check loading to ensure no items extend
beyond the height of the drawer.
Fault in the other
drawer preventing the
use of this drawer
Check other drawer, attend to fault code
on that drawer.

Service
Before you call for service or assistance ...
Check the things you can do yourself. Refer to the installation instructions and your user guide
and check that:
Your product is correctly installed.
1
You are familiar with its normal operation.
2
If the circuit breaker tripped or the fuse blown.
3
If there is a power outage in the area.
4
If after checking these points and you still need assistance, please contact your local DCS
authorized service agency or DCS Customer Care Representative for warranty service. Our
number is (888) 281-5698. Please have the following information ready before you call:
•
Model Number (can be found inside of the cabinet, bottom left of the top drawer)
•
Serial Number (can be found inside of the cabinet, bottom left of the top drawer)
•
Date of installation
•
A brief description of the problem
Your satisfaction is of the utmost importance to us. If a problem cannot be resolved to your
satisfaction, please email us at support@dcsappliances.com or write:
Fisher & Paykel Appliances, Inc.
Attention: DCS Customer Care
5900 Skylab Road
Huntington Beach, CA 92647
29
US CA
www.dcsappliances.com

US CA
30
Warranty
Limited warranty
When you purchase any new Fisher & Paykel whiteware product for personal or consumer use
you automatically receive a two year limited warranty covering parts and labor for servicing
within the 48 mainland United States, Hawaii, Washington DC and Canada. In Alaska the limited
warranty is the same except that you must pay to ship the product to the service shop or the
service technician’s travel to your home. Products for use in Canada must be purchased through
the Canadian distribution channel to ensure regulatory compliance.
If the product is installed in a motor vehicle, boat or similar mobile facility, you receive the
same two year limited warranty, but you must bring the vehicle, boat or mobile facility
containing the product to the service shop at your expense or pay the service technician’s
travel to the location of the product.
Fisher & Paykel undertakes to:
Repair without cost to the owner either for material or labor any part of the product, the serial
number of which appears on the product, which is found to be defective. In Alaska, you must
pay to ship the product to the service shop or for the service technician’s travel to your home.
If the product is installed in a motor vehicle, boat or similar mobile facility, you must bring it to
the service shop at your expense or pay for the service technician’s travel to the location of the
product. If we are unable to repair a defective part of the product after a reasonable number of
attempts, at our option we may replace the part or the product, or we may provide you a full
refund of the purchase price of the product (not including installation or other charges).
This warranty extends to the original purchaser and any succeeding owner of the product
for products purchased for ordinary single-family home use.
All service under this limited warranty shall be provided by Fisher & Paykel or its Authorized
Service Agent during normal business hours.
How long does this limited warranty last?
Our liability under this limited warranty expires TWO YEARS from the date of purchase of the
product by the first consumer.
Our liability under any implied warranties, including the implied warranty of merchantability
(an unwritten warranty that the product is fit for ordinary use) also expires ONE YEAR (or such
longer period as required by applicable law) from the date of purchase of the product by the first
consumer. Some states do not allow limitations on how long an implied warranty lasts, so this
limit on implied warranties may not apply to you.
This warranty does not cover:
A Service calls that are not related to any defect in the product. The cost of a service call will
be charged if the problem is not found to be a defect of the product. For example:

Warranty
1. Correct faulty installation of the product.
2. Instruct you how to use the product.
3. Replace house fuses, reset circuit breakers, correct house wiring or plumbing, or replace
light bulbs.
4. Correct fault(s) caused by the user.
5. Change the set-up of the product.
6. Unauthorized modifications of the product.
7. Noise or vibration that is considered normal, for example, drain/fan sounds, regeneration
noises or user warning beeps.
8. Correcting damage caused by pests, for example, rats, cockroaches etc.
B Defects caused by factors other than:
1. Normal domestic use or
2. Use in accordance with the product’s user guide.
C Defects to the product caused by accident, neglect, misuse, fire, flood or Act of God.
D The cost of repairs carried out by non-authorized repairers or the cost of correcting such
unauthorized repairs.
E Travel fees and associated charges incurred when the product is installed in a location with
limited or restricted access. (eg airplane flights, ferry charges, isolated geographic areas).
F Normal recommended maintenance as set forth in the product’s user guide.
31
US CA
If you have an installation problem contact your dealer or installer. You are responsible for
providing adequate electrical, exhausting and other connection facilities.
We are not responsible for consequential or incidental damages (the cost of repairing or
replacing other property damaged if the product is defective or any of your expenses caused if
the product is defective). Some states do not allow the exclusion or limitation of incidental or
consequential damages, so the above limitation or exclusion may not apply to you.
You may be required to provide reasonable proof of the date of purchase of the product
before the product will be serviced under this limited warranty.
Commercial use
If you are using the product in a commercial setting (any use other than a single family
dwelling), we agree to repair or replace, without cost to you for parts only, any defective
parts, the serial number of which appears on the product. Our liability for these repairs
expires ONE YEAR from the date of original purchase.
At our option we may replace the part or the product, or we may provide you a full refund
of the purchase price of the product (not including installation or other charges). All
service under this limited warranty shall be provided by Fisher & Paykel or its Authorized
Service Agent during normal business hours.

US CA
32
No other warranties
This limited warranty is the complete and exclusive agreement between you and Fisher & Paykel
regarding any defect in the product. None of our employees (or our Authorized Service Agents)
are authorized to make any addition or modification to this limited warranty.
Warrantor: Fisher & Paykel Appliances, Inc.
If you need further help concerning this limited warranty, please contact us at:
Fisher & Paykel Appliances, Inc.
5900 Skylab Road
Huntington Beach
CA 92647
This limited warranty gives you specific legal rights, and you may also have other rights
which vary from state to state.

US CA
FR

US CA

Sommaire
35
US CA
FR
Sécurité et mises en garde
Commandes
Fonctionnement
Graphique de programmes de lavage
Entretien de la vaisselle
Test du lave-vaisselle
Accessoires
Chargement
Distributeur de détergent
Distributeur du produit de rinçage
Ajustement des options
Instructions d’entretien pour l’utilisateur
Dépannage
Codes d’erreur
Garantie et service
37
40
42
43
44
45
46
48
50
52
53
55
58
60
63
Important!
CONSERVER CES INSTRUCTIONS
Les modèles illustrés dans ce guide de l’utilisateur peuvent ne pas être offerts
dans tous les marchés et sont sujets à changement sans préavis. Pour obtenir
la plus récente information sur les modèles et les spécifications offerts dans
votre pays, veuillez visiter notre site Web à l’adresse www.dcsappliances.com ou
contacter le détaillant local DCS by Fisher & Paykel.

US CA
FR

Sécurité et mises en garde
Votre DishDrawer® a été spécifiquement conçu pour fonctionner en toute sécurité dans des
conditions normales d’utilisation. Veuillez conserver ces consignes en tête lorsque vous utilisez
votre DishDrawer®. Veuillez lire toutes ces instructions avant d’utiliser votre DishDrawer®.
Consignes de sécurité importantes
Il importe de suivre les directives comprises dans le présent manuel afin de réduire le risque
d’incendie ou d’explosion ou de prévenir tout dommage matériel, toute blessure ou toute perte
de vie.
L’usage du DishDrawer® doit se limiter à sa fonction prévue, comme le décrit le présent Guide de
l’utilisateur.
N’utiliser que des détergents ou des produits de rinçage recommandés aux fins des lavevaisselle domestiques et les conserver hors de la portée des enfants. Vérifier que le distributeur
de détergent soit vide au terme de chaque programme de lavage.
Lors du chargement des articles à laver, repérer ceux qui sont tranchants et les disposer
de manière à ce qu’ils ne risquent pas d’endommager le joint d’étanchéité du couvercle; il
conviendra aussi de charger les couteaux tranchants en prenant soin de placer le manche vers
le haut pour réduire le risque de blessure ou de coupure.
Ne pas toucher le plateau chauffant durant l’utilisation, ni immédiatement après.
Ne pas faire fonctionner le DishDrawer® à moins que tous les panneaux du module soient mis
en place de façon appropriée.
Ne pas altérer les boutons de réglage.
Ne pas s’asseoir ni se tenir debout dans le tiroir ou le panier à vaisselle du DishDrawer®, ou sur
ceux-ci; ne pas en abuser indûment.
Les paniers à tasses sont conçus pour supporter les tasses, les verres et les ustensiles de cuisine.
Lorsque les paniers à tasses sont dans le DishDrawer®, ne pas s’appuyer sur ceux-ci, ni les
utiliser pour soutenir votre poids corporel.
Afin de réduire le risque de blessure, ne pas permettre aux enfants de jouer à l’intérieur du
DishDrawer®, ni sur celui-ci.
Dans certaines conditions, il se peut qu’un système de radiateur à eau chaude qui n’a pas
été utilisé depuis deux semaines ou plus produise de l’hydrogène. L’HYDROGÈNE EST UN
GAZ EXPLOSIF. Si le système d’eau chaude n’a pas été utilisé durant deux semaines ou plus, il
conviendra d’ouvrir tous les robinets d’adduction d’eau chaude et de laisser l’eau s’écouler de
chacun d’eux durant plusieurs minutes avant d’utiliser le lave-vaisselle. Cette action aura pour
effet de libérer tout l’hydrogène accumulé. Le gaz étant inflammable, ne pas fumer ni utiliser de
flamme nue pendant ce temps.
Enlever la porte du compartiment de lavage au moment de retirer du service un ancien lavevaisselle ou d’en disposer.
Les détergents à vaisselle sont alcalins. Il peut être dangereux d’en avaler. Éviter tout contact
avec la peau et les yeux et éloigner les enfants et les personnes atteintes d’incapacité du lavevaisselle lorsque le tiroir est ouvert.
37
US CA
FR

US CA
FR
38
Sécurité et mises en garde
Consignes de sécurité importantes
Installation
Il est essentiel d’installer et de positionner le DishDrawer® conformément aux instructions
d’installation avant de l’utiliser. Si les pages présentant les instructions d’installation n’étaient
pas jointes à votre DishDrawer®, vous pouvez les commander en appelant votre agent de service
autorisé ou en visitant le site de DCS by Fisher & Paykel à l’adresse www.dcsappliances.com.
L’installation et l’entretien doivent être effectués par un technicien qualifié.
Si le cordon d’alimentation est endommagé, il faut le faire remplacer chez un dépositaire, à un
centre de service autorisé ou par une personne de métier dotée de compétences similaires afin
d’éviter tout danger.
S’assurer que le DishDrawer® est solidement fixé aux cabinets adjacents au moyen des supports
fournis. Autrement, le produit risque d’être instable, ce qui peut causer des dommages ou des
blessures.
Ne pas faire fonctionner cet appareil s’il est endommagé, s’il fonctionne mal, s’il est partiellement
démonté, si des pièces se sont brisées ou détachées ou si la fiche ou le cordon d’alimentation est
endommagé.
Ne pas entreposer ou utiliser de gaz ou d’autres liquides ou vapeurs inflammables à proximité du
DishDrawer®.
Brancher la fiche à un circuit d’alimentation électrique convenablement catégorisé, protégé et
calibré pour éviter toute surcharge électrique.
Installer le cordon d’alimentation de façon à ce qu’il ne puisse se faire marcher dessus, faire
trébucher quiconque ou autrement subir des tensions ou des dommages.
Ne pas installer ni entreposer le DishDrawer® à un endroit où il sera exposé à des conditions
climatiques ou à des températures sous le point de congélation.
Ne pas brancher le DishDrawer® au moyen d’une rallonge électrique ou d’un appareil de sortie
électrique portatif (par ex. : des boîtes à prises multiples).
Cet appareil doit être mis à la terre. Dans le cas d’un bris ou d’une défectuosité, la mise à la terre
réduit le risque de chocs électriques en fournissant un chemin de moindre résistance au courant
électrique. Cet appareil est équipé d’un cordon comportant un conducteur avec mise à la terre
et une broche de mise à la terre. La fiche doit être branchée à une prise appropriée correctement
raccordée et mise à la masse conformément à la réglementation locale. Le raccordement
incorrect du câble de mise à la terre de l’appareil peut accroître le risque de chocs électriques.
Vérifier auprès d’un électricien ou d’un technicien qualifié lorsque vous êtes incertain si l’appareil
est correctement mis à la terre.
Entretien
Ne pas réparer ni remplacer quelque partie de l’appareil que ce soit, ni tenter de procéder
à l’entretien de ce dernier, à moins que le présent Guide de l’utilisateur ne le recommande
expressément. Il est conseillé d’appeler un agent de service autorisé.
Voir à ce que le plancher sur lequel repose l’appareil soit propre et sec afin de réduire toute
possibilité de chute.
Empêcher l’accumulation de matières combustibles comme la poussière, le papier, les chiffons et
les produits chimiques autour de l’appareil et sous celui-ci.
Lors du nettoyage du dessous de la plaque de filtration, faire attention au rebord externe
tranchant pour éviter le risque de coupure.

Sécurité et mises en garde
Consignes de sécurité importantes
Important!
Ne jamais ouvrir le DishDrawer® lorsqu’il est en état de fonctionnement, et ce, sous aucune circonstance.
Fonctionnement
Toujours appuyer sur le bouton
additionnels avant d’ouvrir le tiroir.
Le DishDrawer® doit être utilisé avec l’ensemble moteur, la plaque de filtration, le filtre de vidange
et le bras gicleur bien en place.
Pour débrancher l’appareil, saisir la fiche plutôt que sur le cordon d’alimentation ou la jonction du
cordon afin de prévenir tout dommage.
Au moment de charger le DishDrawer®, faire attention de ne pas charger les articles d’une façon
qui empêchera le couvercle de bien sceller le tiroir. Il importe de ne pas enfoncer les articles de
force dans le tiroir, ni de les placer de façon à ce qu’ils en dépassent, à défaut de quoi les services
d’un réparateur pourraient se révéler nécessaires.
Les appareils domestiques ne sont pas conçus pour servir de jouets aux enfants. Une personne de
confiance devrait expliquer l’utilisation de l’appareil aux enfants et aux personnes atteintes d’une
invalidité limitant leur capacité à utiliser ce dernier. Il faut que cette personne de confiance soit
satisfaite que ceux-ci peuvent utiliser l’appareil sans mettre en danger leur propre personne ou
leur entourage.
Il est nécessaire de surveiller étroitement toute utilisation de l’appareil par les enfants ou près
d’eux. Ne pas permettre aux enfants de jouer sur ou dans l’appareil, ni avec celui-ci, ni avec
quelque appareil que ce soit.
Il est fortement suggéré d’exécuter un programme de lavage avec du détergent immédiatement
après chaque usage d’un agent nettoyant pour lave-vaisselle, et ce dans le but de prévenir tout
dommage au DishDrawer®.
Le DishDrawer® est conçu pour laver des ustensiles de cuisine normaux. Les articles qui sont
contaminés par du pétrole, de la peinture, des débris de fer ou d’acier, de la corrosion ou des
produits chimiques acides ou alcalins ne doivent pas être lavés au moyen du DishDrawer®.
Si le DishDrawer® n’est pas utilisé durant de longues périodes, couper l’alimentation en eau et en
électricité de l’appareil.
pour interrompre le cycle et attendre les trois bips sonores
39
US CA
FR

US CA
40
Commandes
FR
Dans le cas d’un DishDrawer® double, chaque tiroir est doté de ses propres commandes et peut
fonctionner indépendamment de l’autre.
Bouton Power (mise en marche)
Le bouton met le DishDrawer® en état de marche ou hors
d’état de marche. Le fait d’ouvrir le DishDrawer® le mettra en état
de marche durant 30 secondes. Pour interrompre un programme de lavage au milieu du cycle,
appuyer sur le bouton
. Il faut déverser toute l’eau qui se trouve dans le DishDrawer®.
Bouton Start/Pause (démarrage ou pause)
Le bouton amorce un programme de lavage. Appuyer sur le bouton pour interrompre
ou recommencer le cycle de lavage du DishDrawer®. En cas d’interruption, attendre les trois bips
sonores avant d’ouvrir le tiroir. Le fait d’ouvrir le tiroir de force au milieu du cycle peut causer des
dommages ou des blessures.
Bouton Delay Start (mise en marche différée)
Le bouton configure aussi la fonction de mise en marche différée, qui peut retarder
l’exécution d’un programme de lavage d’une à 12 heures.
Pour activer la Mise en marche différée
1
Appuyer sur le bouton et le tenir enfoncé jusqu’à ce que la lumière au-dessus du bouton
devienne mauve.
2
Continuer d’enfoncer le bouton jusqu’à ce que le délai souhaité soit affiché. Le DishDrawer®
émettra des bips sonores pendant que vous enfoncez le bouton
heure de plus au délai.
3
Le Dishdrawer® démarrera une fois que le tiroir est fermé et que le délai d’attente s’est écoulé.
Pour annuler la Mise en marche différée
; chaque bip indique une
Appuyer sur le bouton .
Bouton Lock (verrou) (facultatif )
Le bouton active ou désactive les fonctions Lock (verrou) ou Childlock (verrou pour enfant).
Keylock (verrou des touches)
La fonction Keylock (verrou des touches) désactive toutes les touches du DishDrawer®. Pour
l’activer, appuyer sur le bouton
lumière au-dessus du bouton
Pour désactiver la fonction Keylock (verrou des touches), appuyer sur le bouton
enfoncé jusqu’à ce que la lumière au-dessus de celui-ci s’éteigne.
et le tenir enfoncé jusqu’à l’émission d’un bip (3 secondes). La
s’allume lorsque le verrou des touches est activé.
et le tenir

Commandes
Childlock (verrou pour enfant)
La fonction Childlock (verrou pour enfant) verrouille le tiroir et désactive toutes les fonctions. Pour
l’activer, appuyer sur le bouton
lumière au-dessus du bouton
et le tenir enfoncer jusqu’à l’émission de deux bips (5 secondes). La
s’allume lorsque le verrou pour enfant est activé.
41
US CA
FR
Pour désactiver la fonction Childlock, appuyer sur le bouton
la lumière au-dessus de celui-ci s’éteigne.
et le tenir enfoncé jusqu’à ce que
Sélecteur de programme de lavage
Appuyer sur le bouton à l’intérieur du tiroir pour sélectionner un programme de lavage. Le
DishDrawer® relancera le dernier programme utilisé.
Bouton ECO (facultatif)
Appuyer sur le bouton si vous préférez que le programme de lavage utilise moins d’énergie
et d’eau. La lumière rouge ECO indiquera que la fonction est activée. Si votre vaisselle est très
sale, ou si vous avez besoin d’un séchage intensif, il n’est pas recommandé d’utiliser la fonction
ECO.
Panne de courant
Si une panne de courant survient tandis que le DishDrawer® est en état de marche, il cessera
de fonctionner. Il peut être impossible d’ouvrir le DishDrawer® pendant ce temps. Lorsque le
courant revient, le DishDrawer® recommence à fonctionner à la même partie du cycle de lavage
où il était avant que la panne ne survienne.
US CA
42
Fonctionnement
FR
1
Charger la vaisselle
Retirer tous les restes de nourriture et
charger la vaisselle.
2
Ajouter le détergent
3
Vérifier la quantité de produit de rinçage
4
Appuyer sur le bouton
5
Sélectionner un programme de lavage
6
Choisir (en option)
7
Effectuer une vérification
S’assurer que rien n’obstrue le bras gicleur.
Le filtre de vidange doit être de niveau avec
la plaque de filtration.
8
Procéder à la mise en marche
Fermer le tiroir et appuyer sur le bouton
9
Fin
Le DishDrawer® émettra six bips sonores
pour indiquer la fin du programme de
lavage. À la fin du programme de lavage,
le ventilateur asséchant continuera de
fonctionner durant une période déterminée
ou jusqu’à l’ouverture du tiroir. Le ventilateur
contribue au séchage et utilise une quantité
d’énergie négligeable. Il est normal qu’un
peu d’eau se trouve sur la surface du filtre de
vidange au terme du programme de lavage.
DD224 seulement : À la fin du programme
de lavage, les deux tiroirs peuvent se vider
.
simultanément. Cela est tout à fait normal.
4
8
5
1
2,3
7
6

Graphique de programmes de lavage
Programme de lavage normal – usages convenables
Intensif
Casseroles,
marmites et plats
très salis.
pré-lavage 1 pré-lavage 1 pré-lavage pré-lavage
pré-lavage 2 pré-lavage 2
lavage principal
66 °C (150 °F)
post-rinçage 1 post-rinçage post-rinçage post-rinçage
post-rinçage 2
rinçage final
73 °C (163 °F)
phase de séchage phase de séchage phase de séchage
Normal
Vaisselle
normalement
sale pour un
lavage et un
séchage de
qualité optimale.
lavage principal
60 °C (140 °F)
rinçage final
60 °C (140 °F)
Rapide
Vaisselle
légèrement sale.
lavage principal
54 °C (130 °F)
rinçage final
49 °C (120 °F)
Délicat
Vaisselle
ou poterie
légèrement sale et
thermosensible.
lavage principal
49 °C (120 °F)
rinçage final
54 °C (130 °F)
Eco wash program - when to use
Intensif
Vaisselle de tous
les jours très sale.
pré-lavage 1 pré-lavage pré-lavage
pré-lavage 2
lavage principal
66 °C (150 °F)
post-rinçage 1 post-rinçage post-rinçage post-rinçage
post-rinçage 2
rinçage final 66
°C (150 °F)
phase de séchage phase de séchage phase de séchage
Normal
Vaisselle
normalement
sale pour une
consommation
d’énergie
optimale.
lavage principal
54 °C (130 °F)
rinçage final
54 °C (130 °F)
Rapide
Vaisselle
légèrement sale et
non graisseuse.
lavage principal
46 °C (115 °F)
rinçage final
46 °C (115 °F)
Délicat
Vaisselle
ou poterie
légèrement sale,
non graisseuse et
thermosensible.
lavage principal
46 °C (115 °F)
rinçage final
49 °C (120 °F)
Rinçage
Prévient les odeurs et
le séchage de restes
d’aliments sur la
vaisselle.
43
US CA
FR
Note
Les temps de lavage peuvent varier en fonction de la température de l’eau, les conditions
ambiantes, du type de vaisselle chargée et de l’ouverture possible du tiroir durant le lavage. Les
temps de lavage ne sont indiqués qu’à titre APPROXIMATIF et sont basés sur une eau d’arrivée de
49 °C (120 °F).

US CA
FR
44
Entretien de la vaisselle
Le détergent de lave-vaisselle, combiné à des températures élevées, peut endommager certains
articles lavés dans le lave-vaisselle. En cas de doute concernant un aspect quelconque de tout
article lavé dans le DishDrawer®, se reporter aux instructions fournies par le fabricant de l’article
en question ou laver l’article à la main.
Coutellerie et argenterie
Il est important de rincer la coutellerie et l’argenterie immédiatement après chaque usage
afin de prévenir le ternissement causé par certains aliments. Le programme de lavage
Rinçage est avantageux à cet effet. Par exemple, les articles en argent ne doivent pas entrer
en contact avec l’acier inoxydable d’autres ustensiles. Tout contact entre ces métaux peut
causer du ternissement. Retirer la coutellerie en argent du DishDrawer® et la sécher à la main
immédiatement après la fin du programme, le cas échéant.
Aluminium
Le détergent à vaisselle peut ternir l’aluminium. L’ampleur du ternissement dépend de la qualité
du produit.
Autres métaux
Les objets en fer et en fonte sont sujets à la rouille et peuvent tacher d’autres articles. Le cuivre,
l’étain et le laiton ont eux aussi tendance à tacher.
Vaisselle en bois
Les articles en bois sont généralement sensibles à l’eau et à la chaleur. Le fait de les laver régulièrement
dans le lave-vaisselle peut les détériorer au fil du temps. En cas de doute, les laver à la main.
Verrerie
La plupart des articles de verre à usage quotidien peuvent être mis au lave-vaisselle en toute
sûreté. Une action de morsure peut toutefois s’exercer sur le cristal et les articles anciens ou en
verre très fin (c.-à-d. les rendre opaques). Il conviendrait de laver ces articles à la main.
Plastique
Selon sa nature, le plastique peut changer de forme ou de couleur dans l’eau chaude. Il
conviendra de consulter les instructions du fabricant concernant le lavage des articles en
plastique. Il faut enfoncer les articles en plastique lavable de façon à ce qu’ils ne se renversent pas
et ne se remplissent pas d’eau ou à ce qu’ils ne tombent pas à travers le panier durant le lavage.
Articles décorés
La plupart des motifs peints sur des articles en porcelaine modernes conviennent au lavevaisselle. Il se peut que les articles anciens, les articles garnis d’or, les articles dont le motif est
peint à l’extérieur du glacis et les articles en porcelaine peints à la main soient plus sensibles au
lavage à la machine. En cas de doute, les laver à la main.
Articles collés
Le lavage à la machine adoucit ou dissout certains produits adhésifs. En cas de doute, laver à la
main les articles collés.
Vacances
Si on ne prévoit pas utiliser le DishDrawer® durant une certaine période, il est recommandé de
vérifier que les paniers sont vides. Veiller à ce que l’intérieur du DishDrawer® soit propre. Laisser
les tiroirs entrouverts pour permettre à l’air de circuler. Couper le courant et l’alimentation en
eau du DishDrawer®..

Test du lave-vaisselle
Les appareils DishDrawer® sont testés en fonction de diverses normes relatives au rendement du
lavage et du rinçage. Voici des diagrammes de chargement type et des indications de quantités
de détergent et de produit de rinçage à utiliser dans le DishDrawer®.
45
US CA
FR
Programme de lavage
Quantité de détergent
a
distributeur de détergent ouvert
Produit de
rinçage
Chargement type recommandé
Cycle Normal
a. 5 g à thé (pré-lavage) par tiroir du
compartiment
b. 10 g à thé (lavage principal) par tiroir
b
Réglage 4
tiroir du haut
361
331
1
33
153
33
133
222 2 2
44 444
tiroir du bas
12 3 4 5 6

US CA
FR
46
Accessoires
Les récipients encastrables et les paniers peuvent
être ajoutés ou enlevés pour répondre à vos besoins
personnels. Si vous avez acheté le modèle DishDrawer®
double, certains des accessoires sont interchangeables
d’un tiroir à l’autre. Vous pouvez par exemple combiner
les deux paniers Mega en un seul tiroir et laver toutes les
tasses et les verres en conservant l’autre tiroir pour les
plats et les articles de plus grandes dimensions.
a. Panier
Le panier contient certains des accessoires en place et
conserve la vaisselle à distance du bras gicleur.
b. Panneau d’accès au filtre de vidange
Le panneau d’accès au filtre de vidange est conçu pour
s’encastrer avec un claquement sur le panier par-dessus
le filtre de vidange. Cela empêche les objets de toucher la
base du DishDrawer® et d’arrêter ainsi la rotation du bras
gicleur, tout en maintenant l’accès au filtre de vidange.
c. Panier Mega
Le panier Mega est conçu pour contenir
les tasses, les verres et les petits plats.
c
a
d
b
d. Récipient pour plats encastrable
Le récipient pour plats encastrable
contient les plats et les bols.
Comment installer le panier Mega
Pour installer le panier Mega, placer ses
pattes extérieures sur le panier principal et
fixer le panier Mega sur le côté du panier
principal. Une fois le panier Mega bien
installé, il ne devrait pas branler dans le
panier principal.

Accessoires
Paniers à tasses
On peut placer les tasses, les verres et les ustensiles de
cuisine à gauche et à droite des paniers à tasses.
Dans le but d’obtenir un meilleur rendement, inspecter
le dessous afin de confirmer qu’aucun article de grandes
dimensions ne bloque l’eau de lavage et l’empêche ainsi
d’atteindre les paniers à tasses.
Les paniers à tasses peuvent également supporter les
verres à vin au moyen du panier Mega.
Le panier à tasses est doté de butées afin d’empêcher les
tasses de toucher la paroi intérieure du DishDrawer®. Cette
mesure maximisera le rendement du lavage et du séchage.
Panier de coutellerie
Il conviendra de placer la coutellerie, les petits ustensiles de
cuisine et certains couvercles de plastique dans le panier à
ustensiles.
Afin d’améliorer l’efficacité du lavage et de réduire le risque
de blessure, il est recommandé de placer la coutellerie le
manche vers le bas et de placer les ustensiles tranchants le
manche vers le haut.
Mêler les cuillers, les couteaux et les fourchettes dans chaque
section afin d’empêcher la coutellerie de s’imbriquer et de
laisser l’eau circuler librement.
Empêcher l’acier inoxydable d’entrer en contact avec la
coutellerie en argent afin d’éviter tout ternissement.
Les petits articles comme les couvercles en plastique peuvent
être placés sous la grille. Cela évitera qu’ils ne soient déplacés
par l’eau de lavage et qu’ils tombent au fond du lave-vaisselle
où ils peuvent compromettre la rotation du bras de lavage.
47
US CA
FR

US CA
FR
48
Chargement
L’eau de lavage du DishDrawer® est projetée par le bras gicleur qui est situé à la base du tiroir. Le
bras gicleur tourne en projetant de l’eau dans toutes les parties du compartiment de lavage; il
faut donc charger la vaisselle en prenant soin de s’assurer qu’il y a assez d’espace pour que l’eau
puisse atteindre toutes les sections, spécialement les paniers à tasses. Si la voie du bras gicleur
ou de l’eau de lavage est bloquée par un article, le rendement en sera réduit.
Chargement du DishDrawer®
Note: Le panier et ses récipients encastrables ne sont pas conçus pour être soulevés hors du
DishDrawer® alors qu’ils sont chargés de vaisselle.

Chargement
Comment NE PAS charger votre DishDrawer®
49
US CA
FR
Le panier est surchargé et l’eau de lavage
n’atteindra pas une partie de la vaisselle.
Il faut ranger les tasses, les verres et les
bols la face ouverte vers le bas.
S’assurer ne pas enfoncer de force les
articles de vaisselle, ni de les laisser
dépasser du tiroir, car le couvercle pourrait
ainsi ne pas sceller correctement, ce
qui pourrait nécessiter les services d’un
réparateur.
Installer les articles tranchants de
façon sécuritaire afin de prévenir toute
blessure à l’endroit de l’utilisateur ou tout
dommage à l’assemblage du couvercle.
Inspecter le fond du panier de coutellerie
pour s’assurer qu’il ne s’y trouve aucun
article tranchant ou pointu qui pourrait
stopper la rotation du bras gicleur.
Les plats sont collés les uns contre les autres,
ce qui pourrait empêcher l’eau de lavage de
passer.
S’assurer que la coutellerie ne s’imbrique ni
ne se plaque pas. Les plats et les ustensiles
doivent être étalés uniformément.
Vérifier que la coutellerie ne soit pas tombée
à travers le panier, entravant ainsi la rotation
du bras gicleur.
Le saladier bloque l’eau de lavage et l’empêche
ainsi d’atteindre les paniers à tasses.
Il faut ranger les grands ustensiles sur les
paniers à tasses afin d’éviter qu’ils ne se
déplacent et viennent bloquer la rotation du
bras gicleur.
Il est important de placer les articles
tranchants ou pointus à l’horizontale, ou
alors le manche pointant vers le haut, dans
le but d’éviter tout risque de blessure.

US CA
50
Distributeur de détergent
FR
Important!
N’utiliser que le détergent en poudre recommandé pour les lave-vaisselle automatiques
domestiques dans le distributeur de détergent.
Les détergents à vaisselle ont une teneur fortement alcaline et peuvent se révéler dangereux en
cas d’ingestion.
Éviter tout contact avec la peau et les yeux.
Tenir les enfants et les personnes atteintes d’incapacité à
l’écart du DishDrawer® lorsque le tiroir est ouvert.
Voir à ce que le récipient du détergent soit vide au terme de
chaque programme de lavage.
Ne jamais placer de tablettes de détergent dans le distributeur.
Le détergent et les tablettes de détergent ne doivent jamais
être en contact avec la vaisselle ou la coutellerie.
Les détergents liquides ne conviennent pas au DishDrawer®.
Remplissage du distributeur de détergent
1
Appuyer sur le loquet et la porte s’ouvrira.
2
Verser le détergent. Le programme de rinçage ne nécessite
aucun détergent.
3
Après avoir rempli le ou les compartiments, boucher le
distributeur jusqu’à ce qu’il se ferme en émettant un clic. Le
détergent sera automatiquement diffusé dans le DishDrawer®
durant le programme de lavage.
a,b
e
distributeur de détergent fermé
a
c
d
b
distributeur de détergent ouvert
a
Compartiment de prélavage :
capacité de 10 g/2 cuillère à thé
b
Compartiment de prélavage principal :
capacité de 30 g/6 cuillères à thé
c
Loquet du distributeur de détergent
d
Lumière de l’indicateur du produit de rinçage
e
Bouchon du produit de rinçage

Distributeur de détergent
Quantités de détergent
Les quantités de détergent recommandées ci-dessous conviennent aux tiroirs individuels.
Type d’eau Programme de lavage Quantités de détergent
Pré-lavage
(cuillers à thé)
Dure (>150ppm ou >9gpg) Tous* 2 6
Moyenne (100-150ppm ou 6-9gpg) Tous* 2 4
Douce (<100ppm ou <6gpg) Intensif
Normal
Délicat
Rapide
* Aucun détergent n’est requis dans le compartiment de pré-lavage pour le programme de
lavage rapide.
Environnement d’eau dure
Si vous vivez dans un environnement
d’eau dure, il est recommandé d’installer
un adoucisseur d’eau domestique afin
d’améliorer la qualité de l’eau et l’efficacité
du détergent et de prévenir l’accumulation
de dépôts de calcium sur les plats et dans le
DishDrawer®.
Environnement d’eau douce
Si vous vivez dans un environnement d’eau
douce naturelle ou si l’eau de la maison est
adoucie, éviter d’utiliser trop de détergent
dans votre DishDrawer®. Une quantité
excessive de détergent provoque une action
très agressive sur la verrerie et peut produire
des morsures irréversibles.
1
1
Lavage principal
(cuillers à thé)
3
2
1
1
51
US CA
FR
Certaines marques de détergent à
vaisselle contiennent diverses quantités
de phosphates, car ceux-ci contribuent à
adoucir l’eau. Il est suggéré d’utiliser un
détergent à haute teneur en phosphate
afin d’améliorer l’efficacité du lavage. Les
compartiments du détergent doivent être
complètement REMPLIS et le réglage du
produit de rinçage doit être ajusté à 5.
Il est recommandé d’utiliser un détartrant
ou un nettoyant de lave-vaisselle lorsqu’on
remarque une accumulation de dépôts de
calcium dans le DishDrawer®.
Après chaque utilisation de détartrant ou
de nettoyant de lave-vaisselle, exécuter
un autre programme de lavage avec du
détergent afin de prévenir tout dommage
au DishDrawer®.
La morsure est une détérioration chimique
qui survient sur la surface de la verrerie
lorsque cette dernière est exposée
à des températures élevées, à une
quantité excessive de détergent ou à un
environnement d’eau douce. La morsure
est causée par une combinaison d’eau très
chaude et de détergent, ce qui confère à ce
dernier une action agressive; or, l’eau étant
douce, elle ne contient pas les ions minéraux
d’eau dure qui se lient au détergent, ce
qui pousse ce dernier à extraire les ions
minéraux directement du verre.
La morsure ressemble à un film reflétant les
couleurs de l’arc-en-ciel; au fur et à mesure
des lavages, la surface du verre deviendra
éventuellement opaque. Ce type de morsure
est irréversible.
Afin d’empêcher d’autres morsures sur la
verrerie, utiliser moins de détergent (suivre
les instructions du Guide de l’utilisateur
concernant les quantités de détergent
convenant aux environnements d’eau douce)
et s’assurer que le lave-vaisselle n’est pas
surchargé, afin que l’eau puisse atteindre tous
les plats et les ustensiles durant le lavage.

US CA
52
Distributeur du produit de rinçage
FR
Il est fortement recommandé d’utiliser régulièrement un produit de rinçage liquide pour
produire un meilleur séchage. Les produits de rinçage confèrent un aspect clair et un éclat
brillant au verre et à la porcelaine, en plus de prévenir le ternissement du métal. Le distributeur
de produit de rinçage est sur l’intérieur de chaque tiroir, sous le distributeur de détergent. Le
distributeur peut contenir environ 50 ml (1,7 oz liq.) de produit de rinçage.
Remplissage du distributeur de produit de
rinçage
1
Tourner le capuchon dans le sens contraire des
aiguilles d’une montre et l’enlever.
2
Verser le produit de rinçage dans l’ouverture
circulaire.
3
Prendre garde de ne pas renverser le produit de
rinçage dans le DishDrawer®. Il est important
d’essuyer tout déversement afin de prévenir la
production excessive de mousse. Le fait de ne pas essuyer les renversements pourrait entraîner
l’obligation de faire appel aux services d’un réparateur, ce que la garantie ne couvre pas.
4
Remettre le capuchon fermement en place, dans sa position initiale.
Quantité de produit de rinçage à utiliser
Le régulateur pourrait faire l’objet d’ajustements en fonction des conditions de votre eau. Le
réglage le plus bas est de «1» et le plus élevé est de «5». Consulter la section Ajustement des
options pour ajuster le réglage du produit de rinçage. S’il se forme de la mousse excessive au
terme du lavage, réduire le réglage. Si les plats sont mouillés ou marqués de coulées d’eau après
le séchage, augmenter le réglage.
Lumière de l’indicateur du produit de rinçage
Lorsque l’indicateur du produit de rinçage affiche une lumière rouge, remplir le distributeur. Si la
lumière de l’indicateur du produit de rinçage est faiblement allumée, ou si elle est inexistante, il y
a assez de produit de rinçage pour effectuer le lavage.
Note
Les produits de rinçage plus pâles n’éclaireront pas la lumière de l’indicateur aussi efficacement
que les produits de rinçage plus foncés.
Il est normal d’entendre des bruits inhabituels durant le lavage au moment de la distribution du
produit de rinçage.

Ajustement des options
Les options suivantes peuvent être ajustées pour convenir à vos préférences.
Réglage du produit de rinçage (Rinse Agent)
Réduire le réglage du produit de rinçage s’il y a de la mousse excessive au terme d’un
programme de lavage.
Augmenter le réglage du produit de rinçage si les plats sont mouillés ou couverts de traînées au
terme d’un programme de lavage.
Réglage de mise en marche automatique (Auto Power)
Le DishDrawer® s’allume automatiquement par défaut chaque fois que le tiroir est ouvert. Le
lavage ne s’amorcera pas jusqu’à ce que le tiroir soit fermé et que le bouton
Si vous ne souhaitez pas que le DishDrawer® s’allume automatiquement, il est possible de
désactiver cette fonction
Bips sonores au terme du programme de lavage
Le DishDrawer® émet par défaut six bips sonores pour indiquer la fin du programme de lavage. Il
est possible de désactiver cette fonction.
Option Closed Drawer (tiroir fermé)
L’option Closed Drawer (tiroir fermé) permet de verrouiller le DishDrawer® lorsque le tiroir est
fermé. Au moment d’ouvrir le tiroir, appuyer sur le bouton
le couvercle se scellera et se verrouillera automatiquement au bout de 30 secondes.
Si la fonction Lock (verrou) est utilisée en conjonction avec l’option Closed Drawer, le fait
d’appuyer sur le bouton
ouvrir le DishDrawer®.
ne verrouille pas le tiroir. Il faut désactiver la fonction Lock pour
. Une fois que le tiroir sera refermé,
soit enfoncé.
53
US CA
FR
Note: cette option est fortement recommandée si le DishDrawer® sera utilisé dans un véhicule
récréatif.

US CA
FR
54
Ajustement des options
1
Activé Désactivé
Option Bips
sonores au terme
du programme de
lavage Option Tiroir fermé
Mise en marche
automatique option
Réglage
du produit
de rinçage
rouge / activé mauve / activé bleu / activé rouge / activé
Appuyer sur le bouton pour établir le courant. Ouvir le DishDrawer®.
Appuyer sur les boutons et et les tenir enfoncés durant 5 secondes, ou jusqu’à l’émission d’un long bip sonore.
Accéder au mode Option Adjustment (ajustement des options)
1
2
pour activer ou désactiver l’option choisie.
Appuyer sur le bouton
Activé Désactivé
Activé Désactivé
Le réglage actuel est indiqué par les
lumières rouges du sélectionneur
de programme de lavage. Si quatre
lumières rouges sont allumées, le
réglage sélectionné par l’option est
de quatre. Appuyer sur le bouton pour augmenter le réglage.
Appuyer sur le bouton pour sauvegarder la modification.
Réglage du produit de rinçage fixé
à quatre
Suivre les étapes
ci-dessous
Ajustement des options
Premièrement
Faire un
ajustement
Sauvegarder
Exemple
Le défilement des options recommencera à partir du réglage du produit de rinçage.
1

Instructions d’entretien pour l’utilisateur
Nettoyage des surfaces
Important!
L’usage des produits de nettoyage suivants sur ou dans le DishDrawer® est déconseillé, car ils pourraient
endommager les surfaces:
Tampons à récurer en plastique ou en acier inoxydable
Nettoyants domestiques abrasifs et solvants
Nettoyants acides ou alcalins
Le savon et les savons à mains liquides
Désinfectants ou détergents à lessive
Les produits nettoyants ou à polir de marque privée pour acier inoxydable peuvent endommager
le fini protecteur.
1
Laver avec un chiffon humide et propre. S’assurer de ne pas mouiller le panneau de commande.
2
Assécher avec un chiffon propre non pelucheux.
55
US CA
FR

US CA
56
Instructions d’entretien pour l’utilisateur
FR
Nettoyage du filtre de vidange, du bras gicleur
et de la plaque de filtration
Il est recommandé de nettoyer le filtre de
vidange chaque fois qu’on y voit des traces de
particules de nourriture. Un usage normal justifie
le nettoyage mensuel du bras gicleur et de la
plaque de filtration; il conviendrait également de
le nettoyer plus souvent s’il y a lieu.
Dans le but de prévenir tout dommage au
DishDrawer®, il est fortement recommandé
d’exécuter un programme de lavage avec du
détergent immédiatement après toute utilisation
d’un détartrant ou d’un nettoyant pour lavevaisselle.
b
Composantes internes du DishDrawer®
a Bras gicleur
b Plaque de filtration
c Filtre de vidange
Important !
La plaque de filtration, le filtre de vidange et le
bras gicleur doivent être bien en place lorsque le
DishDrawer® est en état de marche.
a
c
Nettoyage du filtre de vidange
1
Soulever le panneau d’accès du filtre de vidange
sur le panier (si encastré).
2
Soulever et retirer le filtre de vidange.
3
Vider le filtre puis le rincer avec de l’eau courante
propre et le remettre dans l’espace lui étant
attribué.
4
Veiller à ce que le filtre de vidange soit de niveau
avec la plaque de filtration.

Instructions d’entretien pour l’utilisateur
Nettoyage du bras gicleur et de la plaque de filtration
Ne pas commencer le nettoyage si le DishDrawer® dégage une chaleur quelconque et suivre les
instructions pour enlever le filtre de filtration et le bras gicleur.
1
Retirer le panier avec soin. Le lever d’abord par
l’arrière afin d’empêcher qu’il ne se cogne sur
le distributeur de détergent et de produit de
rinçage.
2
Soulever le bras gicleur et le secouer pour taire
tomber toute matière étrangère.
Rincer le bras gicleur avec de l’eau courante
propre et l’essuyer au moyen d’un linge humide.
3
Deux anneaux se trouvent au milieu de la plaque
de filtration. Immobiliser l’anneau interne et faire
tourner l’anneau externe d’environ 1/8 de tour
dans le sens contraire aux aiguilles d’une montre.
La plaque de filtration sera ainsi libérée.
4
Soulever la plaque de filtration.
Faire attention au rebord externe tranchant pour
éviter le risque de coupure lors du nettoyage du
dessous de la plaque de filtration.
En retirer toute matière étrangère, le laver dans
l’eau chaude et savonneuse et le rincer à fond
dans de l’eau propre. On peut nettoyer le plateau
chauffant à l’aide d’un linge humide.
5
Replacer la plaque de filtration de façon à ce
qu’elle repose à plat sur la base du tiroir et vérifier
que la plaque de filtration est verrouillée et bien
alignée avec l’anneau du milieu.
6
Afin de bien fermer la plaque de filtration, vérifier
que les lignes soient alignées les unes sur les
autres (se reporter au diagramme pour obtenir la
position adéquate) Il ne faut pas que la plaque de
filtration puisse se déplacer librement.
7
Replacer le bras gicleur sur la turbine.
8
Replacer le panier en rabaissant d’abord son
rebord avant.
Note: Il est important de retirer soigneusement du tiroir
toute pièce de vaisselle brisée ou tout verre cassé afin que
le DishDrawer® ne soit pas endommagé.
a
b
c
d
Position de verrou adéquate de la
plaque de filtration avec l’ensemble
moteur (sous le bras gicleur)
a Anneau externe
b Turbine
c Marques d’alignement correct
d Anneau du milieu
2
3
4
1
1
57
US CA
FR

US CA
58
Dépannage
FR
Problème Cause possible Que faire
Vaisselle sale
Formation de mousse Quantité de détergent
Fuite d’eau Le tuyau de vidange est
Le DishDrawer® ne
s’ouvre pas
Panne de courant en
cours de cycle
Le programme de lavage ne
convient pas à la charge.
Le bras gicleur ne peut pas
tourner.
Le DishDrawer® contient
une charge excessive ou mal
installée.
La plaque de filtration ou le
filtre de vidange est installé
incorrectement.
Le détergent se trouve dans le
mauvais compartiment.
L’excédent de nourriture n’a pas
été enlevé de la vaisselle avant
le nettoyage.
Détergent inadéquat. Utiliser les marques de détergent à vaisselle
Quantité de détergent
insuffisante.
Les trous du bras gicleur sont
bloqués.
La plaque de filtration ou le
filtre de vidange est bloqué.
Le panier Mega n’est pas
correctement installé.
incorrecte.
Trop d’œufs dans la charge de
lavage.
Réglage du produit de rinçage
trop élevé.
débranché du boyau d’évacuation.
Le tuyau d’alimentation n’est
pas correctement raccordé.
Autres fuites. Débrancher l’alimentation en eau et en électricité
La fonction Childlock (verrou
pour enfant) ou l’option
Closed Drawer (tiroir fermé)
est activée, ou alors les deux
le sont.
Consulter la section concernant les programmes de
lavage pour déterminer le programme de lavage
adéquat; il est possible que certaines taches aient été
trop cuites et que la vaisselle ait besoin d’un trempage.
Vérifier qu’aucun article n’obstrue la voie du bras
gicleur.
Consulter la section portant sur le chargement.
Consulter la section concernant l’entretien par
l’utilisateur.
Placer le détergent dans le grand compartiment.
Gratter la vaisselle pour y déloger tous les morceaux
de nourriture avant le chargement.
recommandées. Utiliser uniquement un détergent
en poudre.
Se reporter à la section sur le détergent ou aux
instructions du fabricant du détergent.
Nettoyer le bras gicleur.
Nettoyer la plaque de filtration et le filtre de
vidange.
Se reporter à la section traitant des accessoires pour
veiller à une installation correcte.
Se reporter à la section concernant le détergent ou
consulter les instructions du fabricant du détergent.
Augmenter la quantité de détergent.
Réduire le réglage du produit de rinçage.
Raccorder le tuyau de vidange au tube de vidange.
Vérifier que le tuyau d’alimentation est solidement
raccordé.
du DishDrawer®. Appeler votre dépositaire ou un
agent de service autorisé.
Désactiver la fonction Lock (verrou). Appuyer sur le
bouton
bouton
bouton
Attendre que l’alimentation se rétablisse; le
programme de lavage reprend où il s’est arrêté.
jusqu’à ce que de la lumière au-dessus du
s’eteigne, on peut aussi appuyer sur le
pour ouvrir le DishDrawer®.

Dépannage
Problème Cause possible Que faire
Bips sonores
continuels
Bips sonores
intermittents
Le DishDrawer® ne
se met pas en état de
marche
Le DishDrawer®
contient trop d’eau
Les plats sont
marqués de traînées
d’eau
L’intérieur du
DishDrawer®
est taché
La vaisselle n’a pas séché Charge inadéquate. Voir à ce que la vaisselle ne s’entasse pas.
Le distributeur ne
diffuse pas de détergent
Bruit excessif du
moteur
Une erreur est survenue. Se reporter à la section Codes d’erreur.
Le DishDrawer® est en mode
pause.
L’alimentation électrique n’est
pas branchée.
Le tiroir n’est pas bien fermé. Vérifier que le tiroir est solidement fermé.
La fonction Lock (verrou) est
activée.
Le bouton
enfoncé.
Le ou les tuyaux de vidange
sont pliés ou entortillés.
Filtres bloqués. Nettoyer la plaque de filtration et le filtre de vidange.
Quantité insuffisante de
produit de rinçage.
Réglage du produit de rinçage
trop bas.
Surcharge ou chargement
incorrect du DishDrawer®.
Certains aliments, comme les
produits à base de tomate,
peuvent tacher l’intérieur du
DishDrawer®.
Réserve de produit de rinçage
épuisée.
Réglage du produit de rinçage
trop bas.
Utilisation du programme de
lavage Eco.
Le détergent était humide
lorsqu’il a été versé.
La plaque de filtration ou le
bras gicleur n’est pas placé
correctement.
Il n’y a pas d’eau dans la région
du moteur.
n’a pas été
Fermer le DishDrawer® et appuyer sur le bouton
Brancher l’alimentation électrique.
Désactiver la fonction Lock (verrou). Appuyer sur le
bouton
bouton
Appuyer sur le bouton .
Redresser les tuyaux de vidange.
Consulter la section concernant l’entretien par l’utilisateur.
Vérifier s’il y a assez de produit de rinçage dans le
distributeur.
Augmenter le réglage du produit de rinçage.
Consulter la section portant sur le chargement.
Rincer préalablement la vaisselle avant de la
mettre dans le DishDrawer®. Une autre alternative
afin de réduire les tâches serait de sélectionner le
programme de rinçage du DishDrawer®.
Remplir à nouveau le distributeur du produit de
rinçage.
Augmenter le réglage du produit de rinçage.
Choisir un programme de lavage standard.
Nettoyer le distributeur et voir à ce qu’il soit sec au
moment d’y verser le détergent.
Se reporter à la section sur l’entretien par
l’utilisateur pour lire les détails décrivant une pose
correcte.
Cette situation survient habituellement lors du
premier usage ou lorsque le DishDrawer® n’a pas
été utilisé durant de longues périodes. Exécuter
un programme de lavage.
jusqu’à ce que la lumière au-dessus du
s’éteigne.
59
US CA
FR
.

US CA
60
Codes d’erreur
FR
Reconnaître un code d’erreur
Dès qu’une erreur survient, le DishDrawer® émet un bip sonore chaque seconde, de façon
continue.
Le code d’erreur sera affiché sur l’intérieur du panneau de commande.
Le graphique suivant décrit chaque code d’erreur.
Comment réagir à un code d’erreur
1
Appuyer sur le bouton pour supprimer le code d’erreur.
2
Si cela ne fonctionne pas, et que des bips continuent de se faire entendre, couper l’alimentation
électrique du DishDrawer®.
3
Il est recommandé de consulter le graphique suivant et de corriger l’erreur s’il y a lieu.
4
Après avoir procédé aux actions indiquées, brancher l’alimentation électrique du DishDrawer®.
5
Si le code d’erreur et les bips continus reprennent, couper l’alimentation en eau et en électricité
du DishDrawer®.
6
Durant l’appel au centre de service autorisé, aviser le personnel du code d’erreur affiché sur le
DishDrawer®. Cette information aidera le centre de service autorisé à répondre à votre demande.

Codes d’erreur Causes possibles Que faire
F1
L’interrupteur de
débordement d’eau a
été activé.
Couper l’alimentation en eau et en
électricité du DishDrawer® et appeler le
centre de service autorisé.
Codes d’erreur
61
US CA
FR
F2
F3
F4
F5
F6
Problème de moteur. Appeler le centre de service autorisé.
Défaillance de la sonde
de température.
Défaillance de
l’élément ou de la
sonde de température.
Défaillance du
couvercle
Défaillance du
couvercle
Vérifier que l’eau provenant du tuyau
d’alimentation n’est pas plus chaude que
65 °C (149 °F). Il pourrait être nécessaire
d’installer une valve de remise en
température.
Appeler le centre de service autorisé.
1
Couper l’alimentation du DishDrawer®,
puis le remettre en marche. La
défaillance peut se réinitialiser.
2
Communiquer avec le centre de service
autorisé.
1
Couper l’alimentation du DishDrawer®,
puis le remettre en marche. La
défaillance peut se réinitialiser.
2
Communiquer avec le centre de service
autorisé.
F7
F8
F9
Défaillance du
couvercle
Problème électrique
Défaillance
électronique.
Communiquer avec le centre de service
autorisé.
1
Couper l’alimentation du DishDrawer®.
2
Communiquer avec le centre de service
autorisé.
3
Le bloqueur d’eau s’est déclenché (le
cas échéant)
Appeler le centre de service autorisé.

US CA
62
Codes d’erreur
FR
Codes d’erreur Causes possibles Que faire
U1
Erreur de remplissage.1 Ouvrir l’alimentation en eau du
DishDrawer®.
2
S’assurer que le bras gicleur peut
tourner au centre; en outre, il faudra
vider le DishDrawer® manuellement s’il
est rempli d’eau.
3
Appeler le centre de service autorisé.
U2
U4
Chargement Vérifier le chargement pour s’assurer
qu’aucun article n’excède la hauteur du
tiroir.
Défaillance de l’autre
tiroir empêchant
l’utilisation de ce tiroir.
Vérifier si l’autre tiroir présente une
défaillance.

Service
Avant d’appeler le service technique ou pour toute assistance …
Vérifier ce que l’on peut faire soi-même. Se reporter aux instructions d’installation et au guide
d’utilisation pour vérifier ce qui suit :
1 Le produit est correctement installé.
2 L’utilisateur en connaît son fonctionnement normal.
3 Le disjoncteur ne s’est pas déclenché ou le fusible n’est pas grillé.
4 Il y a une panne de courant dans la région.
Si, après vérification de tous ces points, une assistance est toujours requise, prendre contact avec
le centre de service agréé DCS local ou le représentant du Service à la clientèle DCS pour tout
service sous garantie. Notre numéro de téléphone est le (888) 281-5698. Avant d’appeler, avoir
les informations suivantes à portée de la main :
•
Numéro de modèle (se trouve à l’intérieur de l’habillage, en bas à gauche du tiroir supérieur)
•
Numéro de série (se trouve à l’intérieur de l’habillage, en bas à gauche du tiroir supérieur)
•
Date d’installation
•
Une brève description du problème
Votre satisfaction revêt la plus grande importance pour nous. Si un problème ne peut être résolu
à votre entière satisfaction, veuillez nous envoyer un courriel à support@dcsappliances.com ou
un courrier postal à :
63
US CA
FR
Fisher & Paykel Appliances, Inc.
Attention : DCS Customer Care
5900 Skylab Road
Huntington Beach, CA 92647 États-Unis
www.dcsappliances.com

US CA
64
Garantie
FR
Garantie limitée
Lorsque vous achetez un nouvel appareil électroménager Fisher & Paykel pour une utilisation
ménagère, vous recevez automatiquement une garantie limitée de deux ans couvrant les pièces
de rechange et la main d’oeuvre pour le service dans les 48 états du continent américain, Hawaï,
Washington D.C. et au Canada. Eu égard à l’Alaska, la garantie limitée est identique sauf que vous
devez prendre en charge les frais d’expédition du produit jusqu’au service clientèle ou prendre
en charge les frais de déplacement du technicien de maintenance jusqu’à votre domicile. Les
produits destinés à être utilisés au Canada doivent être achetés par l’intermédiaire de la chaîne
de distribution canadienne pour garantir la conformité avec la réglementation en vigueur.
Si le produit est installé dans un véhicule automobile, sur un bateau ou sur une unité mobile
similaire, vous bénéficiez de la même garantie limitée de deux ans, mais il relève de votre
responsabilité d’amener le véhicule, bateau ou l’unité mobile dans laquelle est installé le
produit au service après-vente à vos frais ou de prendre en charge les frais de déplacement du
technicien de maintenance jusqu’au lieu où se trouve le produit.
Fisher & Paykel s’engage à :
Réparer sans frais encourus sur le propriétaire en termes de main d’oeuvre ou de matériau
une quelconque partie du produit, dont le numéro de série se trouve sur le produit, s’avérant
défectueuse. Eu égard à l’Alaska, vous devez prendre en charge les frais d’expédition du produit
jusqu’au service clientèle ou prendre en charge les frais de déplacement du technicien de
maintenance jusqu’à votre domicile. Si le produit est installé dans un véhicule automobile, sur un
bateau ou sur une unité mobile similaire, il relève de votre responsabilité d’amener le véhicule,
bateau ou l’unité mobile dans laquelle est installé le produit au service après-vente à vos frais ou
de prendre en charge les frais de déplacement du technicien de maintenance jusqu’au lieu où
se trouve le produit. Si nous ne pouvons pas réparer une pièce défectueuse du produit après un
nombre raisonnable de tentatives, nous procéderons au remplacement de la pièce ou du produit
ou nous vous proposerons de vous rembourser intégralement le prix d’achat du produit (frais
d’installation et autres frais étant exclus), selon notre choix.
Cette garantie s’étend à l’acheteur original et à tout propriétaire successeur du produit pour les
produits achetés pour toute utilisation ménagère par une seule famille. Le service en vertu de
cette garantie limitée devra être assuré par Fisher & Paykel ou par son agent agréé pendant les
heures normales de bureau.
Durée de cette garantie limitée?
Notre responsabilité en vertu de cette garantie limitée expire DEUX ANS après la date
d’achat du produit par le premier consommateur.
Notre responsabilité en vertu de toutes garanties implicites, y compris la garantie implicite
de qualité marchande (une garantie implicite selon laquelle le produit est adapté à toute

Garantie
utilisation ordinaire) expire également UN AN (ou durée supérieure comme requis par la loi en
vigueur) à compter de la date d’achat du produit par le premier consommateur. Certains états
n’autorisent pas les limitations sur la durée de la garantie implicite, il est donc possible que les
limitations sur les garanties implicites ne vous concernent pas.
Cette garantie ne couvre pas les points suivants :
A Les déplacements d’un technicien de maintenance jusqu’à votre domicile pour tout
problème non lié à un défaut dans le produit. Les frais du déplacement vous seront
facturés si le problème s’avère ne pas être un défaut du produit. Par exemple :
1. Rectifier une mauvaise installation du produit.
2. Vous expliquer comment utiliser le produit.
3. Remplacer les fusibles de la maison ou procéder au réglage des disjoncteurs, refaire le
câblage ou la plomberie de la maison ou remplacer les ampoules.
4. Rectifier les défaillances provoquées par l’utilisateur.
5. Rectifier le réglage du produit.
6. Modifications non autorisées du produit.
7. Bruit ou vibrations considérés comme normaux, par exemple, bruits de tuyauterie/
ventilateur, bruits de régénération ou sonneries d’avertissement destinées à l’utilisateur.
8. Réparations des dommages provoqués par des animaux nuisibles comme les rats ou les
cafards, etc.
B Défauts causés par des facteurs autres que :
1. L’utilisation ménagère normale ou
2. L’utilisation en conformité avec le manuel d’utilisation du produit.
C Les défaillances du produit causées par accident, la négligence, une mauvaise utilisation,
l’incendie, l’inondation ou une catastrophe naturelle.
65
US CA
FR
D Les frais des réparations effectuées par des réparateurs non agréés ou les frais associés à la
correction de telles réparations non autorisées.
E Les frais de déplacement et frais associés encourus lorsque le produit est installé dans un
endroit disposant d’un accès limité ou restreint (p. ex. : frais d’avions, frais de ferry et zones
géographiques isolées).
F La maintenance recommandée normale comme énoncée dans le manuel d’utilisation du produit.
En cas de problème avec l’installation, prenez contact avec votre revendeur ou installateur.
Les raccordements électriques et d’évacuation et autres raccordements relèvent de votre
responsabilité. Nous ne sommes pas responsable des dommages indirects (les frais des
réparations ou les frais de remplacement d’autres propriétés endommagées si le produit est
défectueux ou vos dépenses encourues si le produit est défectueux). Certains états n’autorisent
pas l’exclusion ou la limitation des dommages indirects, il est donc possible que la limitation ou
l’exclusion ci-dessus ne s’applique pas à votre situation.

US CA
66
Garantie
FR
Il est possible qu’il vous soit demandé de fournir une preuve valable de la date d’achat du
produit avant que le produit puisse être accepté par le service clientèle en vertu de cette
garantie limitée.
Utilisation commerciale
Si vous utilisez le produit dans un environnement commercial (toute autre utilisation que
l’utilisation par une unité familiale simple), nous nous engageons à réparer ou remplacer, sans
frais de pièces uniquement, les pièces défectueuses dont le numéro de série figure su le produit.
Notre responsabilité eu égard à ces réparations expire UN AN à compter de la date d’achat
originale.
Selon notre choix, nous procéderons au remplacement de la pièce ou du produit ou nous vous
proposerons de vous rembourser intégralement le prix d’achat du produit (frais d’installation et
autres frais étant exclus). Le service en vertu de cette garantie limitée devra être assuré par Fisher
& Paykel ou par son agent agréé pendant les heures normales de bureau.
Aucune autre garantie
Cette garantie limitée constitue l’intégralité de l’accord exclusif passé entre l’acheteur et Fisher
& Paykel eu égard à toute défaillance du produit. Aucun de nos employés (ou de nos agents
agréés) n’est autorisé à procéder à un quelconque ajout ou à une quelconque modification de
cette garantie limitée.
Garant : Fisher & Paykel Appliances, Inc.
Si vous avez besoin d’assistance eu égard à cette garantie limitée, veuillez nous contacter
au numéro ci-dessus ou nous écrire à l’adresse ci-dessous :
Fisher & Paykel Appliances, Inc
5900 Skylab Road
Huntington Beach
CA 92647
Cette garantie limitée vous donne des droits juridiques spécifiques et il est également possible
que vous bénéficiez d’autres droits pouvant varier d’un état à un autre.

US CA
ES

US CA
ES

Índice
69
US CA
ES
Seguridad y advertencias
Controles
Operación
Tabla del programa de lavado
Cuidados de su vajilla
Prueba de estándares del Lavavajillas
Accesorios
Carga
Dispensador de detergente
Dispensador del agente de enjuague
Ajuste de las opciones
Instrucciones de mantenimiento del usuario
Resolución de problemas
Códigos de error
Garantía y servicio
71
74
76
77
78
79
80
82
84
86
87
89
92
94
97
¡Importante!
CONSERVE ESTE INSTRUCTIVO
Los Modelos que aparecen en esta Guía de Usuario pudieran no estar
disponibles en todos los mercados y están sujetos a cambio en cualquier
momento. Para más información actualizada sobre los modelos y las
especificaciones disponibles en su país de origen, favor de visitar nuestra
página www.dcsappliances.com o póngase en contacto con su distribuidor
local de DCS by Fisher & Paykel.

US CA
ES

Seguridad y advertencias
Su DishDrawer® fue cuidadosamente diseñado para operar con seguridad durante los procedimientos
normales de lavado de vajilla. Favor de tener en cuenta las siguientes recomendaciones cuando utilice
su DishDrawer®. Lea todo el instructivo antes de operar su DishDrawer®.
Medidas de seguridad importantes
La información de este manual se debe seguir para minimizar el riesgo de incendio o explosión,
o para prevenir daños a la propiedad, heridas personales o la muerte.
Utilice el DishDrawer® sólo para la función prevista tal como se describe en esta Guía del
usuario.
Sólo utilice detergentes o agentes de enjuague recomendados para lavavajillas domésticos y
manténgalos lejos del alcance de los niños. Verifique que el dosificador de detergente esté vacío
después de que termine cada programa de lavado.
Al cargar artículos por lavar coloque los artículos afilados de tal manera que no dañen la junta
de la tapa y coloque los cuchillos afilados con el mango hacia arriba para reducir el riesgo de
heridas.
No toque la placa del calentador durante o inmediatamente después del uso.
No utilice el DishDrawer® hasta que todos los paneles del recinto estén en su lugar.
No forzar los controles.
No maltrate ni se siente o pare sobre el cajón o armario del DishDrawer®.
Los estantes para copas están diseñados para recibir copas, vasos y utensilios de cocina.
Cuando los estantes de copas están en el DishDrawer® no los presione ni utilice para soportar el
peso de su cuerpo.
Para reducir el riesgo de daños, no permita que los niños jueguen dentro o sobre del
DishDrawer®.
Bajo ciertas condiciones, se puede producir gas hidrógeno en un sistema calentador de agua
que no se ha utilizado por dos semanas o más. EL HIDRÓGENO ES UN GAS EXPLOSIVO. Si el
sistema de agua caliente no se ha utilizado por dicho período, antes de utilizar el lavavajillas,
abra todas las llaves de agua caliente y deje que fluya el agua de todas ellas por varios minutos.
Esto liberará cualquier gas hidrógeno acumulado. Como el gas es inflamable, no fume ni utilice
una llama abierta durante este tiempo.
Retire la puerta del compartimiento de lavado al poner fuera de servicio un lavavajillas viejo o
al desecharlo.
Los detergentes de lavavajillas son alcalinos. Pueden ser peligrosos si se tragan. Evite el
contacto con la piel y los ojos, mantenga a los niños y personas enfermas lejos del lavavajillas
cuando el cajón esté abierto.
71
US CA
ES

US CA
ES
72
Seguridad y advertencias
Medidas de seguridad importantes
Instalación
Este DishDrawer® se debe instalar y ubicar de acuerdo con las instrucciones de instalación antes
de utilizarse. Si no recibió las instrucciones de instalación con su DishDrawer®, puede pedirlas
llamando a su Agente de servicio autorizado o a través de de la página en internet de DCS by
Fisher & Paykel: www.dcsappliances.com.
La instalación y el servicio deben ser realizados por un técnico calificado.
Si se daña el cordón eléctrico, debe ser reemplazado por el vendedor o el Centro de servicio
autorizado o una persona de la profesión igualmente calificada para evitar riesgos.
Cerciórese de que el DishDrawer® esté fijado al armario adyacente utilizando las ménsulas
proporcionadas. De lo contrario se puede producir una inestabilidad en el producto, lo que puede
causar daños o heridas.
No utilice este aparato si está dañado, funcionando mal, parcialmente desensamblado o si
presenta piezas faltantes o rotas, incluyendo un cable o enchufe dañado.
No almacene ni use gas u otros vapores o líquidos inflamables en las cercanías del DishDrawer®.
Conéctelo a un circuito de suministro de energía adecuadamente evaluado, protegido y
dimensionado para evitar una sobrecarga eléctrica.
Cerciórese de que el cordón eléctrico esté colocado de tal forma que no sea pisado, no se pueda
tropezar con él u otra forma que genere daños o tensión.
No instale ni almacene el DishDrawer® donde sea expuesto a temperaturas por debajo del punto
de congelación o expuesto a la intemperie.
No utilice un cordón prolongador o un dispositivo eléctrico portátil (p.e. cajas de conexión
múltiple) para conectar el DishDrawer® en la fuente de energía.
Este electrodoméstico deberá aterrizarse a tierra. En caso de falla o descompostura, el aterrizaje
a tierra reducirá el riesgo de descarga eléctrica al ofrecer un camino de menor resistencia para
la corriente eléctrica. Este electrodoméstico está equipado con un cordón provisto de un equipo
y una clavija de conexión a tierra. La clavija deberá enchufarse a un tomacorriente adecuado
instalado y aterrizado a tierra, de acuerdo con todos los códigos y reglamentaciones locales. Una
conexión inadecuada del equipo conductor de aterrizaje a tierra puede provocar una descarga
eléctrica. Consulte a un electricista calificado o representante de servicio si tuviera dudas con
relación a la adecuada conexión a tierra de su electrodoméstico.
Mantenimiento
No repare o reemplace ninguna parte del aparato ni intente darle servicio salvo que esté
específicamente recomendado en esta Guía del usuario. Le recomendamos que recurra a un
Agente de servicio autorizado.
Mantenga el piso alrededor de su aparato limpio y seco para reducir la posibilidad de resbalarse.
Mantenga el área alrededor/debajo de su aparato libre de la acumulación de materiales
combustibles, tales como pelusas, papel, alfombras y químicos.
Al limpiar la parte inferior de la placa del filtro, se debe tener cuidado con el borde exterior
afilado para evitar riesgos de heridas.

Seguridad y advertencias
Medidas de seguridad importantes
Importante
Bajo ninguna circunstancia debe abrir el cajón mientras el DishDrawer® esté funcionando.
Funcionamiento
Siempre presione el botón
adicionales antes de abrir el cajón.
El DishDrawer® se debe utilizar con el motor, la placa del filtro, el filtro de drenaje y el brazo
aspersor en sitio.
Al desconectar el aparato tire del enchufe y no del cordón eléctrico o codo de unión para evitar
daños.
Al cargar el DishDrawer® tenga cuidado de no cargar la vajilla de tal forma que evite que la tapa
cierre adecuadamente el cajón. Los artículos se deben colocar de tal forma que no sobresalgan
por encima y/o se fuercen en el cajón, de lo contrario puede generar un daño que requiera una
llamada de servicio.
Los aparatos domésticos no están diseñados para que los niños jueguen con ellos. Los niños o
las personas con alguna discapacidad que limite su habilidad para utilizar el aparato deben ser
ayudados por una persona responsable en su uso. El instructor debe quedar satisfecho con su
capacidad para utilizar el aparato sin peligro para sí mismo o para su entorno.
Se necesita una supervisión cercana si el aparato se utiliza por o cerca de niños. No permita que
los niños jueguen dentro, sobre o con este aparato o cualquier aparato desechado.
Si se utiliza un limpiador de lavavajillas, recomendamos que se ejecute un programa de lavado
con detergente inmediatamente después, para evitar cualquier daño al DishDrawer®.
El DishDrawer® está diseñado para lavar utensilios domésticos normales. Los artículos
contaminados con petróleo, pintura, fragmentos de acero o hierro, químicos corrosivos, ácidos o
alcalinos no se deben lavar en el DishDrawer®.
Si no se piensa utilizar el DishDrawer® por un período prolongado, apague el suministro de
electricidad y agua del DishDrawer®.
para poner en pausa y espere hasta que escuche los tres bips
73
US CA
ES

US CA
74
Controles
ES
Si posee un DishDrawer® doble, cada cajón posee sus propios controles y se pueden hacer
funcionar de forma independiente.
Botón de encendido
El botón enciende o apaga el DishDrawer®. Al abrir el
cajón se encenderá automáticamente el DishDrawer® por 30
segundos. Para terminar un programa de lavado en la mitad
del ciclo, presione el botón
el DishDrawer® será bombeada hacia afuera.
. Cualquier residuo de agua en
Botón Inicio/Pausa
El botón comienza un programa de lavado. Presione el botón para poner en pausa o
reiniciar el DishDrawer® durante el programa de lavado. Cuando se encuentre en pausa, espere
tres bips antes de abrir el cajón. Si fuerza la apertura del cajón a la mitad de un ciclo puede
causar daños o heridas.
Inicio diferido
El botón también configura una función de Inicio diferido que puede diferir el inicio del
programa de lavado de 1 a 12 horas.
Para activar el Inicio diferido
1
Presione y mantenga pulsado el botón hasta que la luz sobre el botón se vuelva
morado.
2
Continúe pulsando el botón hasta que se alcance el tiempo de inicio diferido deseado. El
DishDrawer® emitirá ‘bips’ audibles mientras mantiene pulsado el botón
otra hora diferida.
3
El DishDrawer® se pondrá en marcha una vez que se haya cerrado el cajón y haya transcurrido el
tiempo diferido.
, cada bip indica
Para cancelar el Inicio diferido
Presione el botón .
Botón de bloqueo (opcional)
El botón activa/desactiva las funciones de bloqueo de las teclas o Bloqueo de niños.
Bloqueo de teclas
La función de bloqueo de teclas desactiva todos los botones del DishDrawer®.
Para activarla, presione y mantenga pulsado el botón
La luz encima del botón
Para cancelar la función de bloqueo de teclas, presione y mantenga pulsado el botón
que la luz encima del botón
se enciende cuando la función de bloqueo de teclas está activada.
desaparezca.
hasta que escuche un bip (3 segundos).
hasta

Controles
Bloqueo de niños
La función de bloqueo de niños bloquea el cajón y desactiva todos los botones. Para activarla,
presione y mantenga pulsado el botón
encima del botón
se enciende cuando la función de Bloqueo de niños está activada.
hasta que escuche dos bips (5 segundos). La luz
75
US CA
ES
Para cancelar la función de Bloqueo de niños, presione y mantenga pulsado el botón
que la luz encima del botón
desaparezca.
hasta
Selector de programa de lavado
Presione el botón adentro del cajón para seleccionar un programa de lavado. El DishDrawer®
recordará el último programa utilizado.
Botón Eco (opcional)
Presione el botón si desea que el programa de lavado utilice menos energía y agua. La luz
roja ECO indicará que la función está encendida. Si sus platos están muy sucios o si requiere un
rendimiento de secado mejorado, no recomendamos los programas ECO.
Fallo de energía
Si el DishDrawer® está funcionando y ocurre un fallo de energía, se detendrá. Es posible que no
se pueda abrir el DishDrawer® durante este tiempo. Cuando regrese el suministro de energía, el
DishDrawer® volverá a reiniciarse en la misma parte del programa de lavado.

US CA
76
Operación
ES
1
Cargue los platos
Elimine todos los restos de comida y cargue
los platos.
2
Añada detergente
3
Verifique el agente de enjuague
4
Presione el botón
5
Seleccione un Programa de lavado
6
Seleccionar (opcional)
7
Verifique
Cerciórese de que no haya nada que
obstruya el brazo aspersor. El filtro de
drenaje debe estar nivelado con la placa del
filtro.
8
Inicio
Cierre el cajón y presione el botón
9
Fin
El DishDrawer® emitirá seis bips para indicar
el fin del programa de lavado. Al final del
programa de lavado el ventilador de secado
continuará funcionando por un tiempo
determinado o hasta que se abra el cajón.
El ventilador ayuda al secado y utiliza una
cantidad insignificante de energía. Es normal
que quede un poco de agua en el área del
filtro de drenaje después de terminado un
programa de lavado.
DD224 solamente: Al final del programa de
lavado, verá que ambos cajones desaguan
simultáneamente. Esto es normal.
.
4
8
5
1
2,3
7
6

Tabla del programa de lavado
Programa de lavado estándar - cuándo utilizarlo
Pesado
Recipientes,
cacerolas y platos
muy sucios.
prelavado 1 prelavado 1 prelavado prelavado
prelavado 2 prelavado 2
lavado principal
66 °C (150 °F)
postlavado 1 postlavado postlavado postlavado
postlavado 2
enjuague final
73 °C (163 °F)
fase de secado fase de secado fase de secado
Normal
Platos con
suciedad
normal para
un rendimiento
óptimo del
lavado
y del secado.
lavado principal
60 °C (140 °F)
enjuague final
60 °C (140 °F)
Rápido
Platos poco
sucios.
lavado principal
54 °C (130 °F)
enjuague final
49 °C (120 °F)
Delicado
Vajilla poco sucia
y sensible al calor.
lavado principal
49 °C (120 °F)
enjuague final
54 °C (130 °F)
Enjuague
Evita olores y que la
suciedad se seque en
los platos.
77
US CA
ES
Programa de lavado Eco - cuándo utilizarlo
Pesado
Platos cotidianos
muy sucios.
prelavado 1 prelavado prelavado
prelavado 2
lavado principal
66 °C (150 °F)
postlavado 1 postlavado postlavado postlavado
postlavado 2
enjuague final
66 °C (150 °F)
fase de secado fase de secado fase de secado
Normal
Platos
normalmente
sucios para un
uso óptimo de la
energía.
lavado principal
54 °C (130 °F)
enjuague final
54 °C (130 °F)
Rápido
Platos poco sucios
sin grasa.
lavado principal
46 °C (115 °F)
enjuague final
46 °C (115 °F)
Delicado
Vajilla poco sucia,
no grasosa y
sensible al calor.
lavado principal
46 °C (115 °F)
enjuague final
49 °C (120 °F)
Nota:
Los tiempos de lavado pueden variar dependiendo de la temperatura de entrada del agua, las condiciones
ambientales, el tipo de carga de platos y si se ha abierto el cajón durante el lavado. Los tiempos de lavado
sólo son APROXIMADOS y se basan en que el agua entre a una temperatura de 49 °C (120 °F) .

US CA
ES
78
Cuidados de su vajilla
La combinación de altas temperaturas y el detergente de lavavajillas puede causar daños
a algunos artículos si se lavan en una lavavajillas. Recuerde, si tiene alguna duda acerca de
cualquier aspecto concerniente a los artículos lavados en el DishDrawer®, siga las instrucciones
del fabricante de los artículos, o lávelos a mano.
Cubiertos y Platería
Todos los cubiertos y platería se deben enjuagar inmediatamente después del uso para evitar
el manchado por algunas comidas. El Enjuague del programa de lavado es útil para esto. Los
artículos de plata no deben entrar en contacto con el acero inoxidable, por ejemplo otros
cubiertos. La mezcla de estos artículos puede causar un manchado. Retire los cubiertos de
plata del DishDrawer® y si es necesario, séquelos a mano inmediatamente después que haya
terminado el programa.
Aluminio
El aluminio se puede opacar por el detergente del lavavajillas. El grado de cambio depende de la
calidad del producto.
Otros metales
Los objetos de hierro o de hierro fundido se pueden oxidar y manchar otros artículos. El cobre,
pewter y bronce tienden a mancharse.
Madera
Los artículos de madera son generalmente sensibles al calor y al agua. Un uso regular en el
lavavajillas puede causar un deterioro con el tiempo. Si tiene dudas, lave a mano.
Vidrio
La mayoría de los objetos de vidrio cotidianos se pueden lavar con seguridad en el lavavajillas.
El cristal, y los objetos de vidrio muy fino y antiguo, por ejemplo, pueden volverse opacos. Es
preferible lavarlos a mano.
Plástico
Algunos plásticos pueden cambiar de forma o color con el agua caliente. Verifique las
instrucciones del fabricante acerca del lavado de artículos de plástico. Los artículos de plástico
lavables se deben cargar hacia abajo para que no se volteen y llenen de agua o caigan por la
cesta durante el lavado.
Artículos decorados
La mayoría de los diseños chinos modernos se pueden lavar con seguridad en el lavavajillas. Los
artículos antiguos que poseen diseños pintados sobre un esmalte, bordes dorados o diseños
chinos pintados a mano pueden ser más sensibles al lavado en lavavajillas. Si tiene dudas de
cómo lavar estos artículos, lávelos a mano.
Artículos pegados
Algunos adhesivos se suavizan o disuelven en el lavavajillas. Si tiene dudas de cómo lavar los
artículos pegados, lávelos a mano.
Vacaciones
Si el DishDrawer® no se va a utilizar por algún tiempo, recomendamos cerciorarse de que las
cestas estén vacías. Deje limpio el interior del DishDrawer®. Deje entreabiertos los cajones para
permitir que circule el aire. Apague el suministro de energía y agua del DishDrawer®.

Prueba de estándares del Lavavajillas
Los DishDrawer®s se prueban con varios estándares tanto para el rendimiento de lavado como
de secado. A continuación se presentan los diagramas de patrones de carga, cantidades de
detergente y agente de enjuague utilizados por el DishDrawer®.
79
US CA
ES
Programa de lavado
Cantidades de detergente
a
abra el dosificador de detergente
Agente de enjuague
Patrón de carga recomendado
Ciclo Normal
a. 5 g (prelavado) por cajón
b. 10 g (lavado principal) por cajón
b
El valor 4
cajón superior cajón inferior
361
331
1
33
153
33
133
222 2 2
44 444
12 3 4 5 6

US CA
ES
80
Accesorios
Los separadores y estantes se pueden añadir
o quitar para adaptarse a sus necesidades
individuales. Si tiene el modelo de DishDrawer®
doble, algunos accesorios son intercambiables
entre los dos cajones. Por ejemplo puede
combinar los dos Mega estantes en un cajón y
lavar todas las copas y vasos, dejando el otro
cajón para la vajilla y los artículos más grandes.
a. Cesta
La cesta contiene algunos accesorios en sitio y
mantiene los platos lejos del brazo aspersor.
b. Panel de acceso al filtro de drenaje
El panel de acceso al filtro de drenaje está
diseñado para desengancharse en la cesta sobre
el filtro de drenaje. Esto evita que los objetos
toquen la base del DishDrawer® y detengan la
rotación del brazo aspersor, proporcionando al
mismo tiempo acceso al filtro de drenaje.
c. Mega estante (Mega Rack)
c
a
d
b
El Mega estante está diseñado para
albergar los vasos, copas y platos
pequeños.
d. Separador de platos
El separador de platos soporta platos y
tazones.
Cómo instalar el Mega estante
Para instalar el Mega estante, coloque
las patas exteriores del estante en la
parte superior de la cesta, y enclipse
el Mega estante al costado de la cesta.
Cuando el Mega estante está bien
instalado no se debe sentir suelto en la
cesta.

Accesorios
Estante para copas
Las copas, vasos y utensilios de cocina se pueden colocar
en los lados izquierdo y derecho de los estantes para
copas.
Para un mejor rendimiento, cerciórese de que no haya
artículos grandes debajo que bloqueen la llegada del agua
de lavado a los estantes para copas.
Las copas de vino se pueden colocar en los estantes para
copas si se utilizan junto con el Mega estante.
Existen unos retenes en el estante para copas para evitar
que las copas toquen la pared del DishDrawer®. Esto
maximizará el secado y el rendimiento del lavado.
Cesta para cubiertos
Los cubiertos, utensilios pequeños de cocina y algunas tapas
de plástico se colocan en la cesta de cubiertos.
Para un mejor rendimiento del lavado, recomendamos cargar
los cubiertos con los mangos apuntando hacia abajo y los
utensilios afilados con sus mangos apuntando hacia arriba,
para reducir el riesgo de heridas.
Mezcle cucharas, cuchillos y tenedores en cada sección, para
evitar que los cubiertos se aniden y garantizar que el agua
circule libremente.
Evite que los cubiertos de acero inoxidable entren en
contacto con los de plata para evitar manchas.
Los artículos pequeños como tapas de plástico pueden
colocarse bajo la rejilla de la cavidad para artículos frágiles
y ligeros, la cual evita que el agua de lavado los dispare y
caigan al fondo, donde pudieran detener la rotación de los
brazos de rocío o aspersores.
81
US CA
ES

US CA
ES
82
Carga
El agua de lavado del DishDrawer® proviene del brazo aspersor que está situado dentro de
la base del cajón. El brazo aspersor gira, abasteciendo agua de lavado a todas las áreas del
compartimiento de lavado, así que es necesario tener cuidado al cargar los platos para garantizar
que haya suficiente espacio y lugar para que el agua llegue a todas las áreas, particularmente los
estantes de copas. Si existe cualquier artículo que bloquee el brazo aspersor o el agua de lavado,
el rendimiento será menor.
Cómo cargar su DishDrawer®
Nota: La cesta y sus separadores no están diseñados para sacarse del DishDrawer® cuando están
cargados de platos.

Carga
Cómo NO se debe cargar su DishDrawer®
83
US CA
ES
El abarrotamiento evitará que el agua de
lavado llegue a algunos artículos de la
vajilla
Las copas, vasos y tazones deben tener su
abertura orientada hacia abajo.
Cerciórese de que los artículos no se
fuercen o sobresalgan del cajón ya
que pueden evitar que la tapa se selle
adecuadamente, lo que puede tener como
resultado una llamada de servicio.
Ubique los artículos afilados de forma
segura para evitar heridas al usuario y
dañar el ensamblaje de la tapa.
Verifique la parte inferior de la cesta de
cubiertos para cerciorarse de que los
artículos afilados o puntiagudos no hayan
atravesado ya que pueden detener la
rotación del brazo aspersor.
Los platos se anidan y el agua de lavado no
pasa entre ellos.
Cerciórese de que los cubiertos no se
aniden o atasquen entre sí. Deben estar
diseminados uniformemente.
Cerciórese de que los cubiertos no se hayan
caído por la cesta y obstruyan la rotación del
brazo aspersor.
El tazón grande impide que el agua de
lavado llegue a los estantes de copas.
Los utensilios grandes deben estar en
los estantes para copas para que no se
desplacen y detengan la rotación del brazo
aspersor.
Los artículos afilados o puntiagudos se
deben colocar horizontalmente o con los
extremos afilados/puntiagudos hacia abajo
para evitar riesgos de heridas

US CA
ES
84
Dispensador de detergente
Importante!
Sólo utilice detergente en polvo recomendado para los lavavajillas domésticos automáticos en el
dosificador de detergente.
Los detergentes de lavavajillas son extremadamente alcalinos y pueden ser peligrosos si se
tragan.
Evite el contacto con la piel y los ojos.
Mantenga a los niños y personas enfermas lejos del
DishDrawer® cuando el cajón esté abierto.
Verifique que el receptáculo del detergente esté vacío
después de terminado el ciclo de lavado.
No ponga tabletas para lavavajillas dentro del dispensador
de detergente.
El detergente y las tabletas para lavavajillas no deberán
entrar en contacto con la vajilla o la cuchillería.
Los detergentes líquidos no son recomendables para
utilizarse con su DishDrawer®.
Los líquidos de lavado a mano, jabón, detergentes para ropa
o desinfectantes producen daños al DishDrawer®.
Llenado del dosificador de detergente
a,b
e
dosificador de detergente cerrado
c
d
1
Presione el pestillo y la puerta se abrirá.
2
Vierta el detergente. No se necesita detergente para el
programa de enjuague.
3
Una vez llenado el (los) compartimiento(s), cierre el
dosificador hasta que suene un clic. El detergente será
automáticamente liberado en el DishDrawer® durante el
programa de lavado.
a
abra el dosificador de detergente
a
Compartimiento de prelavado:
Capacidad de 10g/2 cucharadita
b
Compartimiento de lavado principal:
Capacidad de 30g/6 cucharaditas
c
Pestillo del dosificador de detergente
d
Luz indicadora de agente de enjuague
e
Enchufe del agente de enjuague
b

Dispensador de detergente
Cantidades de detergente
Las cantidades de detergente recomendadas a continuación son para cajones individuales.
Tipo de agua Programa de lavado Cantidades de detergente
prelavado
(cucharillas)
Fuerte (>150ppm or >9gpg) Todo* 2 6
Mediano (100-150ppm or 6-9gpg) Todo* 2 4
Suave (<100ppm or <6gpg) Pesado
Normal
Delicado
Rápido
* No se necesita detergente en el compartimiento de prelavado para el programa de lavado rápido.
1
1
lavado
principal
(cucharillas)
3
2
1
1
85
US CA
ES
Situaciones de agua dura
Si vive en un lugar donde el agua es dura,
le recomendamos la instalación de un
ablandador de agua doméstico para mejorar
la calidad del agua, la efectividad del
detergente y para prevenir el depósito de
calcio en los platos y en el DishDrawer®.
Algunas marcas de detergente para
lavavajillas contienen cantidades variables
de fosfatos, que ayudan a ablandar el agua.
Le sugerimos que utilice un detergente con
altas cantidades de fosfato para mejorar el
lavado. Los compartimientos de detergente
necesitan estar completamente LLENOS y el
agente de enjuague se utiliza con su valor
fijado en 5.
Le recomendamos utilizar un limpiador/
desincrustador de lavavajillas si observa
depósitos de calcio en su DishDrawer®.
En cuanto haya utilizado un limpiador/
desincrustador de lavavajillas debe
ejecutar otro programa de lavado con
detergente para prevenir daños en el
DishDrawer®.
Situaciones de agua blanda
Si vive en una zona de agua blanda natural
o su agua doméstica está ablandada,
evite usar demasiado detergente en su
DishDrawer®. Una cantidad excesiva de
detergente es muy agresiva sobre los vidrios
y puede causar ataques irreversibles.
El ataque es un deterioro químico que ocurre
sobre la superficie de los vidrios cuando
está sujeta a altas temperaturas, demasiado
detergente y/o situaciones de agua blanda.
El ataque es causado por una combinación
de agua muy caliente, que causa que el
detergente se vuelva muy agresivo, pero
dado que el agua es blanda, no tiene los
iones minerales de agua dura con los que se
empalme el detergente, así que extrae los
iones minerales directamente del vidrio.
El ataque parece una película coloreada de
arco iris, como el vidrio está sujeto a lavados
frecuentes, la superficie aparecerá eventualmente
opaca. Este tipo de ataque es irreversible.
Para evitar que ocurra un mayor ataque sobre
el vidrio, utilice menos detergente (siga las
cantidades de detergente recomendadas en
la Guía del usuario para situaciones de agua
blanda), y cerciórese de que el lavavajillas no
esté sobrecargado, de tal manera que el agua
alcance todos platos durante el lavado.

US CA
86
Dispensador del agente de enjuague
ES
Recomendamos mucho el uso regular de un agente de enjuague líquido para obtener los mejores
resultados de secado. El agente de enjuague proporciona un aspecto libre de vetas, un brillo al
vidrio y a la vajilla china, y además evita que el metal se deslustre. El dosificador del agente de
enjuague se encuentra en el interior de cada cajón, ubicado debajo del dosificador de detergente.
El dosificador tiene una capacidad aproximada de 1.7fl.oz (50ml) de agente de enjuague.
Llenado del dosificador de agente
de enjuague
1
Gire el tapón en el sentido contrario a las agujas del
reloj y retírelo.
2
Vierta el agente de enjuague en la apertura circular.
3
Tenga cuidado de no derramar agente de enjuague
en el DishDrawer®. Cualquier derrame debe ser
secado para evitar un exceso de espuma. Si no seca
el derrame de agente de enjuague, puede generar
una llamada de servicio que no estará cubierta por la garantía.
4
Coloque nuevamente el tapón en su posición original.
Cuánto agente de enjuague utilizar
El regulador puede necesitar un ajuste para adaptarse a las condiciones de su agua. El valor más
bajo es ‘1’ y el más alto es ‘5’. Remítase a la sección Ajustes de opciones para ajustar los valores
del agente de enjuague. Si hay demasiada espuma al final del lavado, reduzca el valor. Si los
platos están mojados o veteados después del secado, aumente el valor.
Luz indicadora del agente de enjuague
Si la luz indicadora del agente de enjuague está roja, vuelva a rellenar el dosificador. Si la luz
indicadora del agente de enjuague está ligeramente alumbrada o no alumbrada, hay suficiente
agente de enjuague para el lavado.
Nota:
Los agentes de enjuague de color claro no atenuarán la luz indicadora con la misma efectividad
que los agentes de enjuague de color oscuro.
Cuando se está dosificando el agente de enjuague, puede observar algunos ruidos inusuales
durante el lavado, esto es normal.

Ajuste de las opciones
Las siguientes opciones se pueden ajustar para adaptarse a sus preferencias.
Valor del agente de enjuague
Reduzca el valor del agente de enjuague si hay exceso de espuma después del programa de lavado.
Aumente el valor del agente de enjuague si los platos están húmedos o veteados después del
programa de lavado.
Valor del autoencendido
El DishDrawer® se encenderá automáticamente cuando se abra el cajón. El lavado no comenzará
hasta que se cierre el cajón y se presione el botón
encienda automáticamente, esta función se puede apagar.
Bips de fin del programa de lavado
El DishDrawer® emitirá seis bips al final del programa de lavado. Esta función se puede
desactivar.
Opción Cajón cerrado
La opción Cajón cerrado bloqueará el DishDrawer® una vez cerrado el cajón. Cuando desee
abrir el cajón, presione el botón
bloqueará automáticamente la tapa después de 30 segundos. Si la función de bloqueo se utiliza
junto con la opción Cajón cerrado, al pulsar el botón
de bloqueo se debe apagar para permitir que se abra el DishDrawer®.
. Cuando se cierre otra vez totalmente el cajón, se sellará y
. Si no desea que el DishDrawer® se
no se desbloqueará el cajón. La función
87
US CA
ES
Nota: opción altamente recomendada si pretende utilizar su DishDrawer® en coches-casa.

US CA
ES
88
Ajuste de las opciones
1
Opción Cajón
cerrado
Opción de Bips de
fin del programa de
lavado
Opción de
autoencendido
rojo / apagado morado / encendido azul / encendido rojo / encendido
para activar o desactivar la opción seleccionada.
Presione el botón
bpara
Activado Desactivado
Activado Desactivado
Activado Desactivado
Introduzca el Modo de ajuste de las opciones
Siga los
siguientes pasos Valor del agente de enjuague
Cómo realizar ajustes de las opciones
Primero
Presione el botón para encender. Abra su DishDrawer®.2 Presione y mantenga pulsado los botones y por 5 segundos hasta que suene un bip largo.
1
`
El valor actual se muestra en
el selector del programa de
lavado en luces rojas. Si están
Realizar
un ajuste
encendidas cuatro luces rojas, el
valor seleccionado de la opción
aumentar el valor.
se determina en cuatro.
Presione del botón
Presione el botón para guardar los cambios.
Guardar
Valor del agente de enjuague
Ejemplo
establecido en cuatro
La secuencia de opciones comenzará nuevamente desde el valor del agente de enjuague.
1

Instrucciones de mantenimiento del usuario
Limpieza de las superficies
Importante!
No recomendamos el uso de los siguientes utensilios de limpieza sobre o adentro de su DishDrawer® ya que
pueden dañar las superficies:
Paños de restregar de plástico o acero inoxidable
Limpiadores abrasivos o solventes domésticos
Limpiadores ácidos o alcalinos
Líquidos o jabones para lavado a mano
Detergentes de ropa o desinfectantes
Limpiadores de marca para ‘Acero Inoxidable’ o agentes para pulir, ya que pudieran causar daño
a la capa protectora.
1
Limpie con un trapo húmedo y limpio. Tenga cuidado de no mojar el panel de control.
2
Seque con un trapo limpio que no suelte pelusa.
89
US CA
ES

US CA
90
Instrucciones de mantenimiento del usuario
ES
Limpieza del filtro de drenaje, el brazo aspersor
y la placa del filtro
Recomendamos que el filtro de drenaje se limpie
cada vez que haya evidencia de partículas de
comida. El brazo aspersor y la placa de filtro
pueden requerir limpieza una vez al mes en uso
normal o más seguido si se presenta la necesidad.
b
a
Si utiliza un limpiador/desincrustador de
lavavajillas, debe ejecutar un programa de lavado
con detergente inmediatamente después para
evitar dañar su DishDrawer®.
Importante !
El DishDrawer® se debe utilizar con la placa del filtro,
el filtro de drenaje y el brazo aspersor correctamente
instalados.
Limpieza del filtro de drenaje
1
Levante el panel de acceso al filtro de drenaje en
la cesta (si está colocada).
2
Levante y saque el filtro de drenaje.
3
Vacíe, enjuague con agua corriente limpia y
vuelva a colocarlo en el espacio asignado.
4
Cerciórese de que el filtro de drenaje se lave con
la placa del filtro.
c
Partes internas del DishDrawer®
a Brazo aspersor
b Placa del filtro
c Filtro de drenaje

Instrucciones de mantenimiento del usuario
Limpieza del brazo aspersor y de la placa del filtro
Cerciórese de que el DishDrawer® esté frío antes de comenzar la limpieza y siga las instrucciones
para retirar el filtro de drenaje y el brazo aspersor.
1
Retire cuidadosamente la cesta. Levante primero
por el extremo de atrás para evitar golpear
el dosificador del detergente y del agente de
enjuague.
2
Levante el brazo aspersor y sacuda cualquier
material extraño.
Enjuague el brazo aspersor con agua corriente
limpia y limpie con un paño húmedo.
3
En el centro de la placa del filtro hay dos anillos.
Sujete el anillo del centro y gire el anillo exterior
en el sentido contrario a las manecillas del reloj,
como 1/8 de vuelta. Esto soltará la placa del filtro.
4
Levante y saque la placa del filtro.
Al limpiar la parte inferior de la placa del filtro, se
debe tener cuidado al manipular el borde exterior
afilado para evitar riesgo de cortaduras.
Retire cualquier material extraño, lave con agua
jabonosa caliente y enjuague meticulosamente
con agua limpia. La placa de calentamiento se
puede limpiar con un paño húmedo.
5
Vuelva a colocar la placa del filtro de tal
manera que quede plana en la base del cajón
cerciorándose que la placa del filtro esté
completamente bloqueada en su posición con el
anillo del centro.
6
Para bloquear la placa del filtro en su posición,
cerciórese de que las líneas estén alineadas entre
sí (remítase al diagrama para ver la posición
correcta). La placa del filtro no debe poder
moverse libremente.
7
Vuelva a colocar el brazo aspersor en el impulsor.
8
Vuelva a colocar la cesta, bajando el borde frontal
de la cesta a su posición inicial.
Nota: Si hay vajilla o vidrio roto en el cajón, se
debe retirar cuidadosamente para evitar daños
en el DishDrawer®.
a
b
c
d
Posición de bloqueo correcta de
la Placa de filtro con el conjunto
de motor (bajo el brazo aspersor)
a Anillo exterior
b Propulsor
c Marcas de alineación correcta
d Anillo del centro
2
3
4
1
1
91
US CA
ES

US CA
92
Resolución de problemas
ES
Problema Causa posible Qué hacer
Platos sucios
Formación de
espuma
Fuga de agua Manguera de drenaje
El DishDrawer® no
se abre
Programa de lavado
inadecuado para la carga.
El brazo aspersor no puede
girar.
DishDrawer® sobrecargado/
incorrectamente cargado.
La placa del filtro / filtro de
drenaje está incorrectamente
introducido.
El detergente está en el
compartimiento equivocado.
Exceso de comida no retirada de
la vajilla antes de la limpieza.
Detergente no adecuado. Utilice marcas de detergente de lavavajillas
No hay suficiente detergente. Remítase a la sección de detergente o a las
Los agujeros del brazo
aspersor están bloqueados.
La placa del filtro / filtro de
drenaje está bloqueado.
Mega estante
incorrectamente instalado.
Cantidad de detergente
insuficiente.
Demasiado huevo en la carga
de lavado.
El valor del agente de enjuague
es demasiado elevado.
desconectada de la tubería
de desagüe.
La manguera de suministro
de entrada no está
correctamente conectada.
Otras fugas. Apague los suministros de agua y electricidad del
La función de bloqueo de
niños está activada o la
opción de Cajón cerrado está
activada, o ambas.
Remítase a la sección de programas de lavado
para un programa de lavado adecuado, o la
suciedad estaba demasiado pegada y los platos
necesitan remojarse.
Cerciórese de que los artículos no obstruyan el
camino del brazo aspersor.
Remítase a la sección de cómo cargar.
Remítase a la sección de mantenimiento del
usuario.
El detergente se debe colocar en el
compartimiento grande.
Raspe todos los residuos de comida de la vajilla
antes de cargarla.
recomendadas. Utilice sólo detergente en
polvo.
instrucciones del fabricante de detergente.
Limpie el brazo aspersor.
Limpie la placa de filtro y el filtro
de drenaje.
Remítase a la sección de accesorios para una
instalación correcta.
Remítase a la sección de detergente o consulte las
instrucciones del fabricante de detergente.
Aumente la cantidad de detergente.
Disminuya la cantidad de detergente.
Vuelva a conectar la manguera de drenaje a la
tubería de desagüe.
Cerciórese de que la manguera de entrada esté
conectada de forma fija.
DishDrawer®. Llame a su distribuidor o al agente
de servicio autorizado.
Desactive la función de bloqueo. Mantenga
pulsado el botón
encima del botón
para abrir el DishDrawer®.
hasta que desaparezca la luz
,y/o presione el botón
Falla de suministro
eléctrico durante el ciclo
Espere hasta que el suministro eléctrico se
reanude; el ciclo reiniciará en el mismo lugar
del programa de lavado.

Resolución de problemas
Problema Causa posible Qué hacer
Bips continuos Ha ocurrido un error. Remítase a la sección de códigos de errores.
Bips intermitentes El DishDrawer® está en modo
El DishDrawer® no
arrancará
Excesiva agua en el
DishDrawer®
Marcas de agua en
los platos
El interior del
DishDrawer®
está manchado
Los platos no se
secan
No se dosificó
detergente
Ruido de motor
excesivo
pausa.
La fuente de energía está
conectada.
El cajón no está
correctamente cerrado.
La función de bloqueo está
activada.
Botón no pulsado. Presione el botón .
Manguera(s) de drenaje
encorvadas o dobladas.
Filtros bloqueados. Limpie la placa de filtro/filtro de drenaje.
Agente de enjuague
insuficiente.
Valor del agente de enjuague
demasiado bajo.
DishDrawer® sobrecargado/
incorrectamente cargado.
Algunas comidas, como los
productos a base de tomate,
pueden manchar el interior del
DishDrawer®.
Carga incorrecta. Cerciórese de que los platos no estén anidados
Agente de enjuague agotado. Llene el dosificador de agente de enjuague.
Valor del agente de enjuague
demasiado bajo.
Programa de lavado Eco
utilizado.
El detergente estaba húmedo
al cargarse.
La placa del filtro / brazo
aspersor está colocado
incorrectamente.
No hay agua en el área del
motor.
Cierre el DishDrawer® y presione el botón
Conecte el suministro de energía.
Cerciórese de que el cajón esté firmemente
cerrado.
Desactive el bloqueo. Mantenga pulsado el
botón
botón
Enderece la(s) manguera(s) de drenaje.
Desbloquee la(s) manguera(s) de drenaje.
Remítase a la sección de mantenimiento del
usuario.
Cerciórese de que haya suficiente agente de
enjuague en el dosificador.
Aumente el valor del agente de enjuague.
Remítase a la sección de cómo cargar.
Pre-enjuague los platos antes de colocarlos en
el DishDrawer®. Alternativamente, el uso del
programa de enjuague después de añadir los
platos puede minimizar el manchado.
unos con otros.
Aumente el valor del agente de enjuague.
Elija un programa de lavado estándar.
Limpie el dosificador y cerciórese de que esté
seco al añadir el detergente.
Remítase a la sección de mantenimiento del
usuario para obtener detalles sobre la correcta
colocación.
Esto ocurre generalmente durante la primera
utilización o cuando el DishDrawer® no se ha
utilizado por períodos de tiempo prolongados.
Ejecute el programa de lavado en el DishDrawer®.
hasta que desaparezca la luz encima del
93
.
US CA
ES

US CA
94
Códigos de error
ES
Cómo reconocer un código de error
Cuando ocurre un error, el DishDrawer® emitirá continuamente un bip por segundo.
Se mostrará el código de error en el panel de control interior.
Cada código de error se muestra en el siguiente cuadro.
Cómo proceder ante un código de error
1
Presione el botón para quitar un código de error.
2
Si un código de error y un bip continuo no se pueden quitar pulsando el botón desconecte
su DishDrawer® de la toma eléctrica.
3
Le recomendamos que verifique el siguiente cuadro y corrija el error si es posible.
4
Después de atender un error, encienda el DishDrawer® en el suministro de energía.
5
Si el código de error y el bip continuo continúan, apague el suministro de agua y de energía del
DishDrawer®.
6
Al llamar al Centro de servicio autorizado infórmeles sobre el código de error que ha aparecido
en el DishDrawer®. Esta información le ayudará al Centro de servicio autorizado a responder a
su petición.

Códigos de error
Códigos de error Causas posibles Qué hacer
F1
El conmutador de
inundación se ha
activado.
Apague el suministro de agua y de
energía del DishDrawer® y llame a su
Centro de servicio autorizado.
95
US CA
ES
F2
F3
F4
F5
F6
Problema de motor. Llame a su Centro de servicio autorizado
El sensor de
temperatura ha fallado.
Sensor de temperatura
o elemento erróneo
Error de la tapa
Error de la tapa
Cerciórese de que el agua que entra por
la manguera de entrada no esté a una
temperatura superior a los 65 °C (149 °F).
Puede ser que necesite instalar una
válvula de templado en su suministro de
agua.
Llame a su Centro de servicio autorizado
1
Apague su DishDrawer®, después
enciéndalo. El error pudo haberse
corregido.
2
Llame a su Centro de Servicio autorizado
1
Apague su DishDrawer®, después
enciéndalo. El error pudo haberse
corregido.
2
Llame a su Centro de servicio autorizado.
F7
F8
F9
Error de la tapa Llame a su Centro de servicio autorizado.
Problema eléctrico
Funcionamiento
defectuoso de la
electrónica.
1
Apague su DishDrawer®.
2
Llame a su Centro de servicio
autorizado
Llame a su Centro de servicio autorizado.

US CA
96
Códigos de error
ES
Códigos de error Causas posibles Qué hacer
U1
Error de llenado
1
Encienda el suministro de agua del
DishDrawer®.
2
Cerciórese que el brazo aspersor pueda
girar por el centro, y si el DishDrawer®
está lleno de agua, necesitará vaciarlo
manualmente.
3
Llame a su Centro de servicio
autorizado.
U2
U4
Carga Verifique la carga y asegúrese que
ningún artículo ocupe más espacio que
la altura del cajón.
Error en el otro cajón
que impide el uso de
éste.
Verifique el otro cajón y preste atención
al código de error en ese cajón.

Garantía y servicio
Antes de llamar para pedir servicio o ayuda...
Compruebe las cosas que puede hacer usted mismo. Consulte el manual de instrucciones y su
guía del usuario y asegúrese de que:
1 Su producto esté correctamente instalado.
2 Esté familiarizado con su funcionamiento normal.
3 Si se ha disparado el disyuntor o si se quemó el fusible.
4 Si hay un apagón en el área.
Si después de comprobar estos puntos todavía necesita ayuda, comuníquese con su agencia
de servicio local autorizada de DCS o con un Representante de Cuidado del Cliente de DCS
para conseguir servicio bajo la garantía. Nuestro número es (888) 281-5698. Por favor tenga la
siguiente información lista antes de llamar:
•
Número de Modelo (se puede hallar adentro del gabinete, en la parte inferior izquierda del cajón
superior)
•
Número de Serie (se puede hallar adentro del gabinete, en la parte inferior izquierda del cajón
superior)
•
Fecha de instalación
•
Una breve descripción del problema
Su satisfacción es de suprema importancia para nosotros. Si no se puede resolver un problema
de manera satisfactoria, envíenos un correo electrónico a support@dcsappliances.com o
escriba a:
97
US CA
ES
Fisher & Paykel Appliances, Inc.
Attention: DCS Customer Care
5900 Skylab Road
Huntington Beach, CA 92647
www.dcsappliances.com

98
Garantía
US CA
ES
Garantía limitada
Cuando usted adquiere cualquier producto electrodoméstico nuevo Fisher & Paykel para uso
personal o doméstico, usted recibe automáticamente una garantía limitada válida por dos
años que cubre partes y mano de obra para reparaciones dentro de los 48 Estados Unidos
continentales, Hawai, Washington D.C. y Canadá. En Alaska, la garantía limitada es la misma
excepto que usted debe pagar para enviar el producto al servicio técnico, o pagar el viaje del
técnico de reparaciones a su casa. Los productos, para ser utilizados en Canadá, deben ser
adquiridos a través del canal de distribución canadiense para asegurar el cumplimiento de las
normas.
Si el producto se instala en un vehículo motorizado, bote o instalación móvil similar, usted
recibe la misma garantía limitada por dos años, pero debe hacerse cargo, de su propio peculio,
de llevar el vehículo, bote o instalación móvil que contiene el producto al servicio técnico, o
pagar el viaje del técnico de reparaciones hasta el lugar donde se encuentre el producto.
Fisher & Paykel se compromete a:
Reparar sin costo para el dueño, tanto en materiales como mano de obra, cualquier parte
del producto que esté defectuosa, y cuyo número de serie aparece en el mismo. En Alaska,
usted debe pagar por el envío del producto al servicio técnico, o pagar el viaje del técnico de
reparaciones a su casa. Si el producto se instala en un vehículo motorizado, bote o instalación
móvil similar, usted debe hacerse cargo de llevarlo al servicio técnico, de su propio peculio, o
pagar el viaje del técnico de reparaciones hasta el lugar donde está el producto. Si no podemos
reparar una parte defectuosa del producto después de una cantidad razonable de intentos,
podemos reemplazar la parte o el producto, o podemos devolverle la totalidad del precio de
compra del producto (sin incluir costos de instalación u otros costos) a nuestra total discreción.
Esta garantía es válida para el comprador original, así como para cualquier dueño subsecuente
del producto, para productos adquiridos para uso doméstico normal de una sola familia.
Cualquier servicio en los términos de esta garantía limitada lo deberá proporcionar Fisher &
Paykel o su Agente de Servicio Técnico Autorizado, durante el horario comercial normal.
¿Cuánto dura esta garantía limitada?
Nuestra responsabilidad en los términos de esta garantía limitada caduca a los DOS AÑOS
posteriores a la fecha de compra del producto por el primer consumidor.
Nuestra responsabilidad en los términos de cualquier garantía implícita, incluyendo la garantía
implícita de comerciabilidad (una garantía no escrita de que el producto es adecuado para uso
normal) también caduca al AÑO (o período de duración más largo tal como sea requerido por
la ley vigente) a partir de la fecha de compra del producto por el primer consumidor. Algunos
estados no permiten limitaciones acerca de cuánto tiempo dura una garantía implícita, así que
este límite sobre las garantías implícitas pudiera no aplicarse a usted.
 Loading...