

INSTRUCTION MANUAL
ISTRUZIONI PER L’USO
DVD Home Theater System
Sistema di Home Theatre a dischi DVD
DC-TS960WL
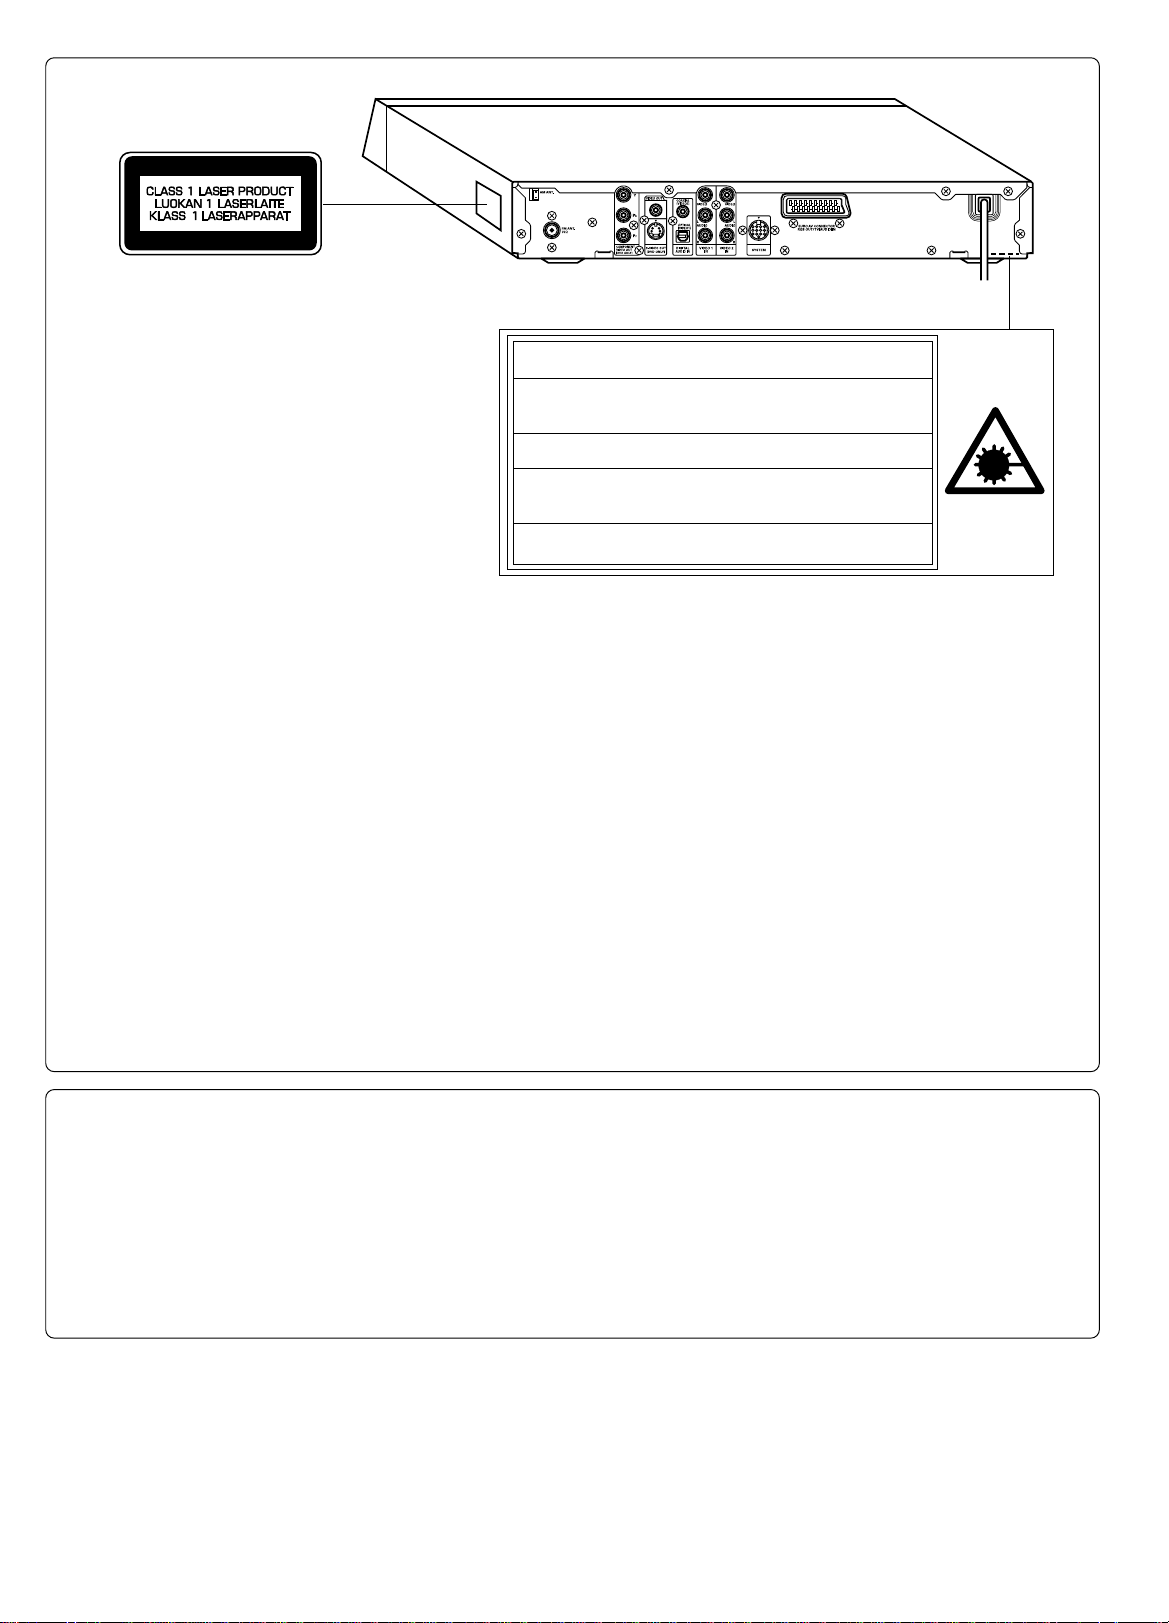
CAUTION – INVISIBLE LASER RADIATION WHEN OPEN AND
INTERLOCKS DEFEATED. AVOID EXPOSURE TO BEAM.
ADVARSEL – USYNLIG LASER STRÅLING VED ÅBNING, NÅR
SIKKERHEDSAFBRYDERE ER UDE AF FUNKTION, UNDGÅ UDS ÆTTELSE
FOR STRÅLING.
VARNING – OSYNLIG LASER STRÅLNING NÄR DENNA DEL ÄR ÖPPNAD
OCH SPÄRR ÄR URKOPPLAD. STRÅLEN ÄR FARLIG.
VORSICHT – UNSICHTBARE LASERSTRAHLUNG TRITT AUS, WENN
DECKEL GEÖFFNET UND WENN SICHERHEITSVERRIEGELUNG
ÜBERBRÜCKT IST. NICHT, DEM STRAHL AUSSETZEN.
VARO – AVATTAESSA JA SUOJALUKITUS OHITETTAESSA OLET ALTTIINA
NÄKYMÄTTÖMÄLLE LASERSÄTEILYLLE. ÄLÄ KATSO SÄTEESEEN.
CAUTION – USE OF CONTROLS OR ADJUSTMENTS OR PERFORMANCE OF PROCEDURES OTHER THAN THOSE SPECIFIED HEREIN MAY
RESULT IN HAZARDOUS RADIATION EXPOSURE.
ACHTUNG – WENN ANDERE ALS DIE HIER SPEZIFIZIERTEN BEDIENUNGS- ODER JUSTIEREINRICHTUNGEN BENÜTZT ODER ANDERE
VERFAHRENS-WEISEN AUSGEFÜHRT WERDEN, KANN DIES ZU GEFÄHRLICHER STRAHLUNGSEXPOSITION FÜHREN.
ATTENTION – L’EMPLOI D’ORGANES DE COMMANDE OU DE RÉGLAGE, OU L’EXÉCUTION DE PROCÉDURES, AUTRES QUE CEUX
SPÉCIFIÉS DANS LE MODE D’EMPLOI, PEUT PROVOQUER UNE EXPOSITION DANGEREUSE AU RAYONNEMENT.
OPGELET – HET GEBRUIK VAN REGELAARS OF HET MAKEN VAN AFSTELLINGEN E.D. DIE NIET IN DEZE GEBRUIKSAANWIJZING ZIJN
BESCHREVEN KAN LEIDEN TOT SCHADELIJKE STRALINGEN.
VARNING! OM APPARATEN ANVÄNDS PÅ ANNAT SÄTT ÄN VAD SOM BESKEIV I DENNA BRUKSANVISNING, KAN ANVÄNDAREN UTSÄTTAS
FÖR OSYNLIG LASERSTRÅLNING, SOM ÖVERSKRIDER GRÄNSEN FÖR LASERKLASS 1.
VAROITUS! LAITTEEN KÄYTTÄMINEN MUULLA KUIN TÄSSÄ KÄYTTÖOHJEESSA MAINITULLA TAVALLA SAATTAA ALTISTAA KÄYTTÄJÄN
TURVALLISUUSLUOKAN 1 YLITTÄVÄLLE NÄKYMÄTTÖMÄLLE LASERSÄTEILYLLE.
CAUTELA – L’USO DI COMANDI, AGGIUSTAMENTI O PROCEDIMENTI DIVERSO DA QUELLO QUI SPECIFICATO PUÒ DAR LUOGO AD
ESPOSIZIONE A RADIAZIONI PERICOLOSE.
PRECAUCION – EL USO DE CONTROLES O AJUSTES, O PROCEDIMIENTOS DE OPERACION DIFERENTES DE LOS ESPECIFICADOS EN
ESTE DOCUMENTO RESULTARAN EN EXPOSICION PELIGROSA A LA RADIACION.
CUIDADO – O USO DOS CONTROLOS OU AJUSTES OU DESEMPENHOS DE PROCEDIMENTOS OUTROS QUE NÃO OS ESPECIFICADOS
NAS INSTRUÇÕES DE OPERAÇÃO PODEM RESULTAR EM PERIGOSAS EXPOSIÇÕES À RADIAÇÃO.
This set complies with the EMC Directive 89/336, with the LVD Directive 73/23 and with the R&TTE Directive 1999/5/EC.
Dieses Gerät entspricht der EMC-Direktive 89/336, der LVD-Direktive 73/23 und der R&TTE-Direktive 1999/5/EC.
Cet appareil est conforme à la Directive EMC 89/336, à la Directive BT 73/23 et à la Directive R&TTE 1999/5/CE.
Dit toestel voldoet aan de EMC-richtlijn 89/336, de LVD-richtlijn 73/23 en de R&TTE-richtlijn 1999/5/EG.
Detta paket lyder under EMC-direktiv 89/336, tillsammans med LVD-direktiv 73/23 och R&TTE-direktiv 1999/5/EC.
Questo apparecchio è conforme alla Direttiva EMC 89/336, alla Direttiva LVD 73/23 e alla Direttiva R&TTE 1999/5/CE.
Este equipo cumple la directiva 89/336 de EMC, la directiva 73/23 de LVD y la directiva 1999/5/CE de R&TTE.
Este aparelho está em conformidade com a Directiva EMC 89/336, com a Directiva LVD 73/23 e com a Directiva R&TTE 1999/5/EC.
1
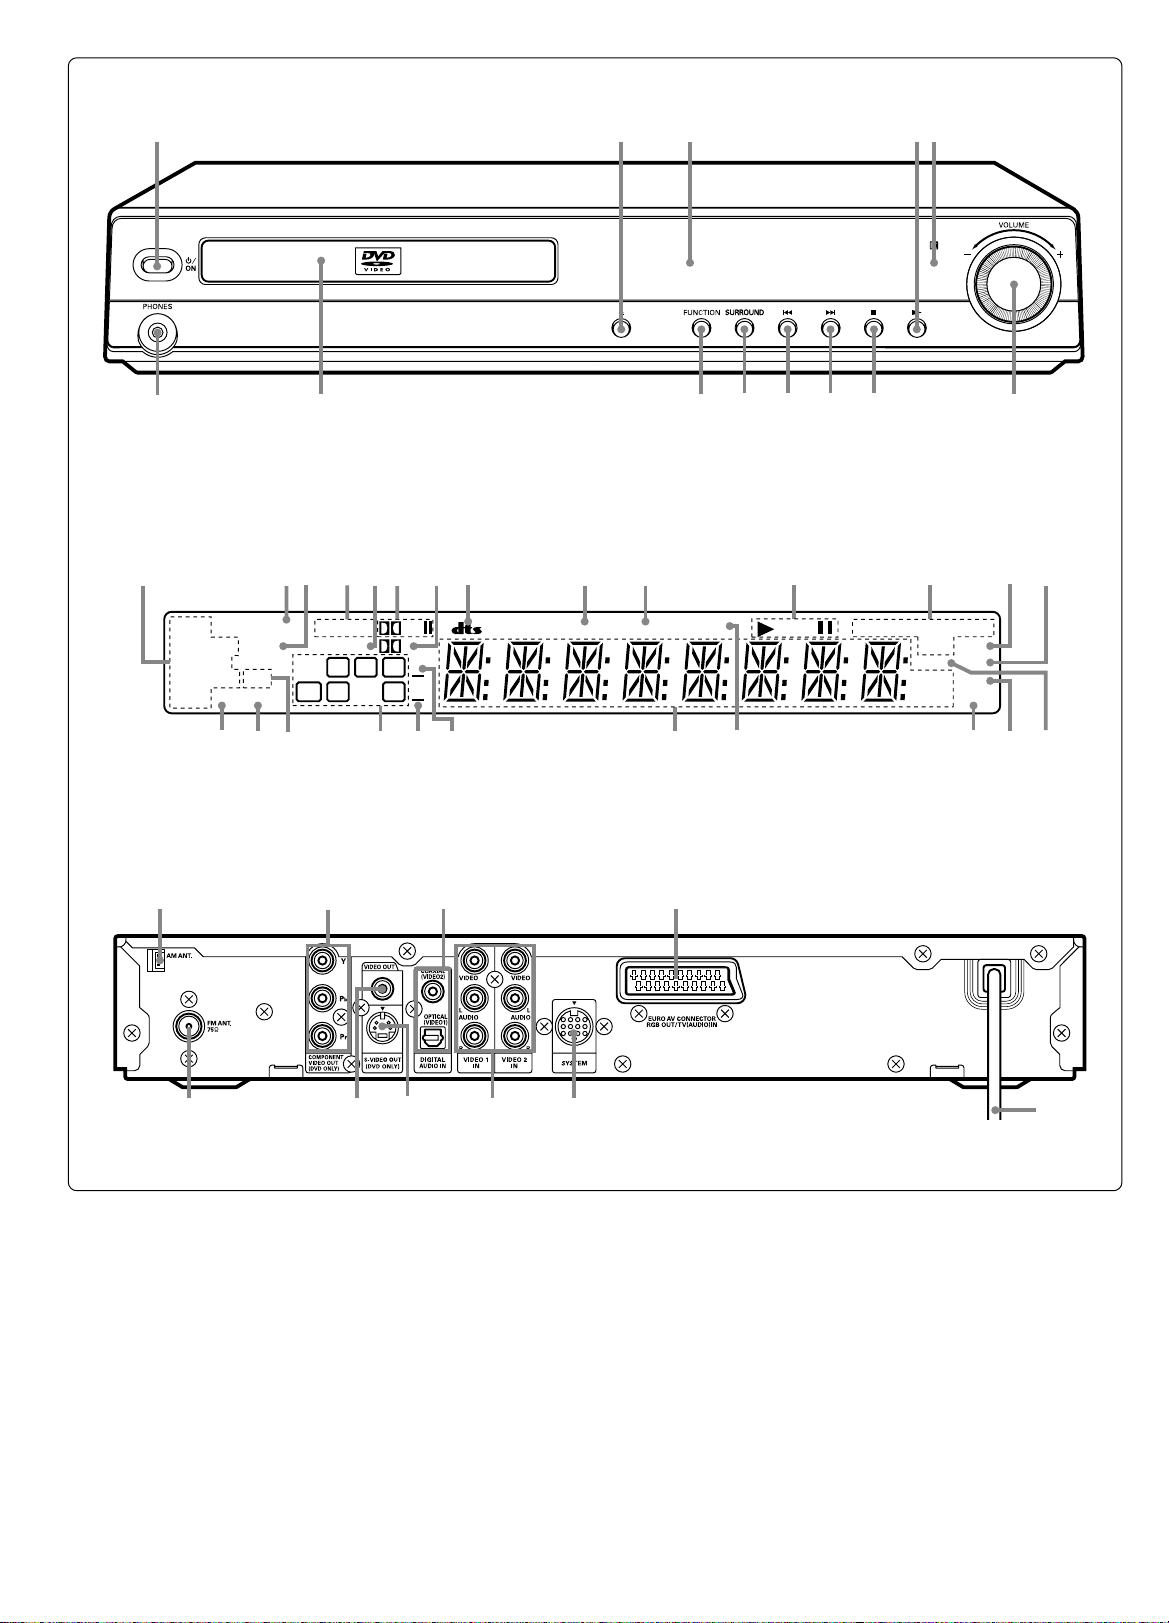
Fig./Abb./Afb. 1a
12345
678910111213
1234567891011121314
HALL
PROGRESSIVE
STADIUM
STUDIO
THEATER
CLUB
NIGHT
LSTR
MONO
VIRTUAL
PL
D
RCL
T
C
RSLSSW
123 4
678910
ALLREPEATSLEEPPCM 96KVCDVD
1
RDM
A--B
PGM
RDS
WMA
MHz
MP3
kHz
17
Fig./Abb./Afb. 1b
Fig./Abb./Afb. 1c
15161819202122232425
5
2
42
1
41
40
39
38
37
36
35
34
33
32
31
30
29
28
27
26
25
24
23
2
3
4
5
6
7
8
9
10
11
12
13
14
15
16
17
18
19
20
21
22
Fig./Abb./Afb. 2 Fig./Abb./Afb. 3
Remote sensor
Fernbedienungssensor
Détecteur de télécommande
Afstandsbedieningssensor
Fjärrkontrollfönster
Within approx. 6 meters
Innerhalb von ca. 6 Metern
À environ 6 mètres
Binnen een afstand van ong. 6 meter
Inom ca. 6 meter
Entro circa 6 metri
A aproximadamente 6 metros
A aproximadamente 6 metros
Sensore del telecomando
Sensor remoto
Sensor remoto
Fig./Abb./Afb. 4
3
4
TV
Euro AV lead (not supplied)
Euro-AV-Kabel (kein Lieferumfang)
Câble Euro AV (non fourni)
Euro AV-kabel (niet meegeleverd)
SCART-kabel (medföljer ej)
Cavo SCART (Euro AV) (venduto separatamente)
Cable Euro AV (no suministrado)
Cabo Euro AV (não fornecido)
S-video lead (not supplied)
S-Videokabel (kein Lieferumfang)
Câble S-vidéo (non fourni)
S-videokabel (niet meegeleverd)
S-videokabel (medföljer ej)
Cavo S-video (venduto separatamente)
Cable S-vídeo (no incluido)
Cabo S-video (não fornecido)
AV
(RGB input facility)
(RGB-Eingang)
(prise d’entrée RVB)
(ingang voor RGB-signaal)
(RGB-ingång)
(dispositivo di ingresso RGB)
(toma de entrada RGB)
(entrada RGB)
Fig./Abb./Afb. 7
TV
S-VIDEO IN 1
Fig./Abb./Afb. 8
TV
COMPONENT VODEO IN
YPbP
r
Component video lead (not supplied)
Videokomponentekabel (kein Lieferumfang)
Câble vidéo composite (non fourni)
Component videokabel (niet meegeleverd)
Komponentvideokabel (medföljer ej)
Cavo component Video (venduto separatamente)
Cable de componente de vídeo (no suministrado)
Cabo de componente de vídeo (não fornecido)
Fig./Abb./Afb. 9
5
DIGITAL AUDIO
OUT (OPTICAL)
DIGITAL
AUDIO IN
DIGITAL
AUDIO IN
Fig./Abb./Afb. 10
6
Audio lead (not supplied)
Audiokabel (kein Lieferumfang)
Câble audio (non fourni)
Audiokabel (niet meegeleverd)
Ljudkabel (medföljer ej)
Cavo audio (venduto separatamente)
Cable de audio (no suministrado)
Cabo de áudio (não fornecido)
IN
LINE 2
OUT
LINE 1
IN
DIGITAL
AUDIO IN
(COAX.)
OUT
DIGITAL
AUDIO OUT
Audio equipment
Audiogerät
Equipement audio
Audio-apparatuur
Ljudutrustning
Apparecchio audio
Equipo de audio
Equipamento áudio
L
AUDIO
R
Fig./Abb./Afb. 11
MD deck, etc
MD-Deck etc.
Platine MD, etc.
MD-toestel, enz.
MD-däck etc.
Piastra MD (per minischi), ecc.
Pletina de MD, etc.
Leitor de MD, etc.
(COAX.)
Coaxial lead (not supplied)
Koaxialkabel (kein Lieferumfang)
Câble coaxial (non fourni)
Coaxkabel (niet meegeleverd)
Koaxialkabel (medföljer ej)
Cavo coassiale (venduto separatamente)
Cable coaxial (no suministrado)
Cabo coaxial (não fornecido)
Optical lead (not supplied)
Optisches Kabel (kein Lieferumfang)
Câble optique (non fourni)
Optische kabel (niet meegeleverd)
Optisk kabel (medföljer ej)
Cavo ottico (venduto separatamente)
Cable óptico (no incluido)
Cabo óptico (não fornecido)
VIDEO
LINE1(AUX1)
IN OUT
DIGITAL
AUDIO(OPT.)
Game machine, etc
Spielekonsole etc.
Console de jeu, etc.
Gametoestel, enz.
Spelkonsol etc.
Consolle per videogiochi, ecc.
Videoconsola, etc.
Consola de jogos, etc.
Fig./Abb./Afb. 12
7

Fig./Abb./Afb. 14a
1
2
Screws (not supplied)
Schrauben (nicht mitgeliefert)
Vis (non fournies)
Schroeven (niet meegeleverd)
Skruvar (medföljer ej)
Viti (non fornite)
Tornillos (no suministrados)
Parafusos (não fornecidos)
Fig./Abb./Afb. 13
Fig./Abb./Afb. 14b
8
9
f) Audio lead (not supplied)
Fig./Abb./Afb. 17
10
11

Fig./Abb./Afb. 19
Fig./Abb./Afb. 20
Fig./Abb./Afb. 21
Fig./Abb./Afb. 22
Hello! Holà! ¡Hola!
Fig./Abb./Afb. 23
Cut off
Abgeschnitten
Découpe
Afgesneden
Avklippt
Eliminazione
Corte
Cortar
Fig./Abb./Afb. 24 Fig./Abb./Afb. 25 Fig./Abb./Afb. 26
12

[ENGLISH]
PRECAUTIONS
- The apparatus shall not be exposed to dripping or splashing.
- No objects filled with liquids, such as vases, shall be placed on the
apparatus.
- Do not use where there are extremes of temperature (below 5°C or
exceeding 35°C) or where direct sunlight may strike it.
- Because of the DVD player’s extremely low noise and wide dynamic
range, there might be a tendency to set the volume on the amplifier
unnecessarily high. Doing so may produce an excessively large
output from the amplifier which could damage your speakers.
- Sudden changes in the ambient temperature may cause condensation
to form on the optical lens inside the unit. If this happens, take out the
disc, leave the unit for about 2 hours, and then proceed to operate.
- When carrying the unit, be sure to remove any disc which may be
inside and turn the power off. Wait at least 10 seconds, then unplug
the mains lead from the AC outlet. Carrying the unit with a disc inside
may damage the disc and/or the unit.
- Do not install these equipments in a confined space, such as a book
case or built in cabinet.
- Placing the main unit (JCX-TS960), front speaker with mains lead
(ASX-TS960WLF) and surround speaker with mains lead (ASXTS960WLR) in a well ventilated area is strongly recommended.
Do not place any object on the top of the unit.
Do not block ventilation holes.
The cabinet of the unit warms up when it is used for a long time, but
it is not a malfunction.
- The main unit (JCX-TS960) is not completely disconnected from the
mains when the z/ON button is set to the z position.
- The surround speaker with mains lead (ASX-TS960WLR) is not
disconnected from the mains unless it is unplugged from the AC
outlet.
Either the main unit or remote control can be
operated. However, for convenience, this instruction
manual explains operation using the remote control.
Note:
This handling description is printed prior to product development.
When a part of the product specification must be changed to improve
operability or other functions, priority is given to the product specification
itself. In such instances, the instruction manual may not entirely match
all the functions of the actual product.
Therefore, the actual product and packaging, as well as the name and
illustration, may differ from the manual.
Warning for transmitter
Important Information:
1. Explicitly specify the technical instructions and the scope of use
defined in the related documents and provide the explanation about
all the control method, adjusting procedure and usage of switches.
2. Do not change the emitter frequency nor boost the emitter power
(including the power of excess load wireless frequency power amplifier).
Do not put up an external aerial nor use other remodeled aerial.
3. In use of the unit, avoid any act which interferes with legal wireless
communication services. Should any interference arise, immediately
stop using the unit, remove the interference, and avoid such an act in
the future.
4. When micro-power wireless equipment is used, avoid interference
with wireless communication services or emissive interference from
industrial, scientific and medical treatment equipment.
5. Do not use the unit in an aircraft or near an airport.
Warning for using the front speaker with a built-in transmitter
- Keep the front speaker at least 22cm away from all heart pacemakers.
The radio waves may disrupt the operation of the pacemaker.
- Do not operate the front speaker in medical institutions, hospitals or
near medical electric equipment.
The radio waves may cause nearby equipment to incorrectly operate
or fail.
- When other equipment or a medical apparatus incorrectly operates or
fails to operate due to radio waves, cease use of wireless front
speaker.
The radio waves may cause nearby equipment to incorrectly operate
or fails.
In-plant radio stations (necessary to be licensed) and special lowpower radio stations (not necessary to be licensed) for movable body
identification used for production lines and amateur radio stations
(necessary to be licensed) as well as industrial, scientific and medical
equipment such as a microwave oven use the frequency band used by
this unit.
1. Before using this unit, make sure that no in-plant radio stations or
special low-power radio stations for movable body identification or
amateur radio stations are operated nearby.
2. If this unit should adversely radio-interfere with an in-plant radio
station for movable body identification, immediately change the
frequency band used by this unit or stop emitting electric waves
and consult your dealer or the service station of our company about
measures for avoiding interference (for example, installation of a
partition).
3. If any trouble occurs such as this unit adversely radio-interfering
with a special low-power radio stations for movable body
identification or an amateur radio station, contact your dealer or the
service station of our company.
GB-1 [ENGLISH]
BEFORE OPERATION
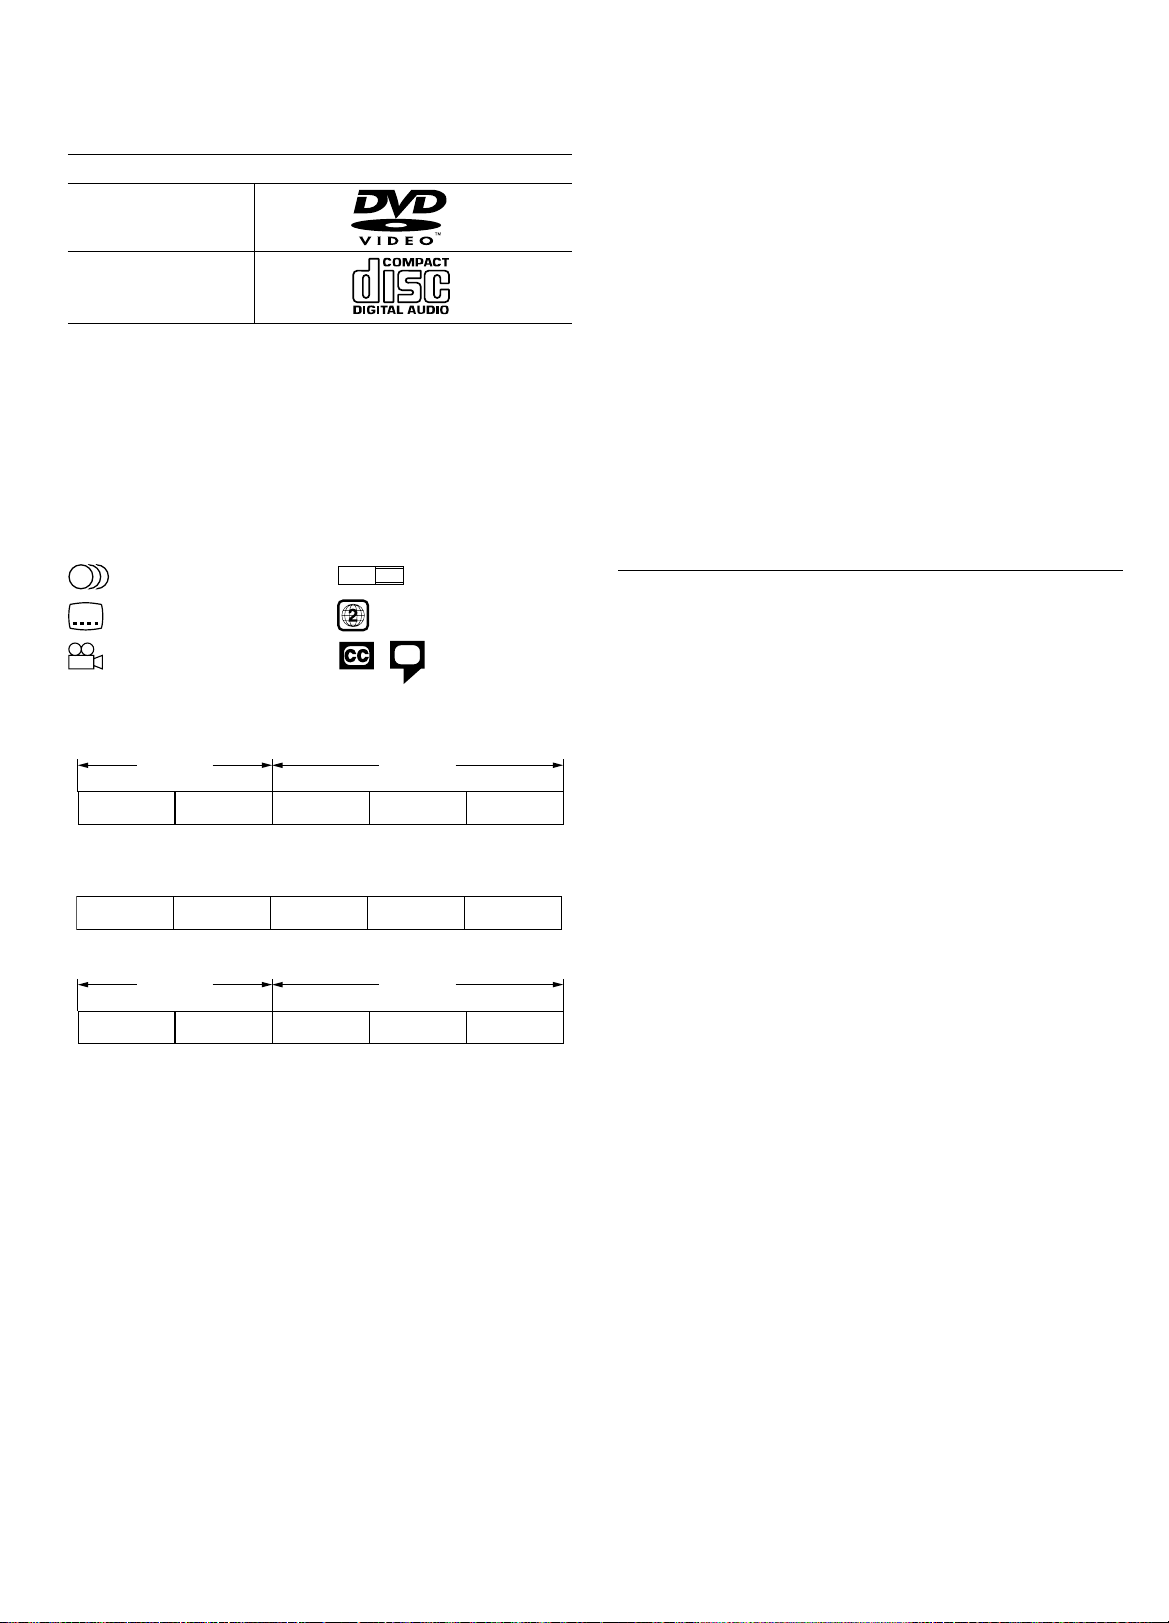
Playable discs
The following types of discs can be played on this unit.
Disc type and logo mark
DVD Video
Music CD
Region number
Region number (Regional restriction code) is built-in to the unit and DVD
discs.
There is a region number on the rear of the unit.
The same region number or region number “ALL” of DVD discs can be
used on this unit.
DVD disc
There are the marks on some DVD disc packages.
Example:
Multiple languages Multi-aspect
3
2
Multi-language subtitles Region number
Multi-angle Closed caption
3
DVD discs are divided into titles, and the titles are sub-divided into
chapters.
Title 1
Chapter 1 Chapter 2
Video or Super video CD/Music CD disc
These CD discs are divided into tracks.
Track 1 Track 2 Track 3 Track 4 Track 5
Chapter 1 Chapter 2 Chapter 3
LB16:9
Title 2
About JPEG
This unit does not explain JPEG/Kodak picture CD playback.
If the user accidentally plays back graphics, the unit is not guaranteed for
all graphics.
Notes on handling discs
- Do not expose the disc to direct sunlight, high humidity or high
temperatures for extended periods of time.
- Discs should be returned to their cases after use.
- Do not apply paper or write anything on the disc surface.
- Handle the disc by its edge. Do not touch the playing surface (glossy
side).
- Fingerprints and dust should be carefully wiped off the playing surface
of the disc with a soft cloth.
Wipe in a straight motion from the centre to the outside of the disc.
- Never use chemicals such as record cleaning sprays, antistatic
sprays or fluids, benzene or thinner to clean discs.
About [DVD], [VCD], [CD] and [DATA]
In this manual, the type of disc available per function is indicated by the
following marks.
[DVD] : DVD discs can be played back.
[VCD] : Video CDs and super video CDs can be played back.
[CD] : Music CDs can be played back.
[DATA] : Data CDs in MP3 or WMA format can be played back.
This product incorporates copyright protection technology that is protected
by method claims of certain U.S. patents and other intellectual property
rights owned by Macrovision Corporation and other rights owners. Use of
this copyright protection technology must be authorized by Macrovision
Corporation, and is intended for home and other limited viewing uses only
unless otherwise authorized by Macrovision Corporation. Reverse
engineering or disassembly is prohibited.
Microsoft, Windows Media, and Windows Logo are trademarks or registered
trademarks of Microsoft Corporation in both the United States and other
countries.
Manufactured under license from Dolby Laboratories.
“Dolby”, “Pro Logic” and the double-D symbol are trademarks of Dolby
Laboratories.
“DTS” and “DTS Digital Surround” are registered trademarks of Digital
Theater Systems, Inc.
MP3/WMA CD disc
Directory 1
File 1 File 2 File 1 File 2 File 3
Note:
- Only the above types of discs can be played on this unit.
DVD-Audio, DVD-ROM, DVD-RAM, DVD-RW (VR mode), CD-ROM,
CVD, SACD, etc. cannot be played.
- This unit can play back the video CD (VCD) and super video CD
(SVCD).
- Some DVD-R, DVD-RW (Video mode), DVD+R and DVD+RW discs
can be played.
- This unit is to be used exclusively with the PAL (or NTSC) colour
system discs. SECAM system discs cannot be used with this unit.
Directory 2
GB-2[ENGLISH]

CONTROLS
REMOTE CONTROL
Front panel (Fig. 1a)
1. Power button (z/ON)
2. Open/Close button (q)
3. FL display
4. Play button (a)
5. Remote sensor (IR)
6. Volume control (VOLUME)
7. Stop button (n)
8. Next/Skip/Preset tuning button (e)
9. Previous/Skip/Preset tuning button (f)
10. Surround button (SURROUND)
11. Function button (FUNCTION)
12. Disc tray
13. Headphones socket (PHONES)
FL display (Fig. 1b)
1. Surround mode indicators
(HALL, STADIUM, STUDIO, THEATER, CLUB)
2. Progressive indicator (PROGRESSIVE)
3. Night mode indicator (NIGHT)
4. Disc indicator (VCD/CD/DVD)
5. Headphones virtual indicator (VIRTUAL)
6. Dolby Pro Logic/Pro Logic II indicator (s PL II)
7. Dolby Digital indicator (s D)
8. DTS indicator (dts)
9. PCM indicator (PCM)
10. 96kHz indicator (96K)
11. Play/Pause indicators (a, k)
12. Repeat mode indicators (REPEAT, 1, ALL, A-B)
13. Random play indicator (RDM)
14. Programme indicator (PGM)
15. RDS indicator (RDS)
16. WMA indicator (WMA)
17. MP3 indicator (MP3)
18. Sleep timer indicator (SLEEP)
19. Message or number indicators
(Title, chapter, track, playing time or other information)
20. Title/Track indicator (T)
21. Chapter indicator (C)
22. Input/Output channel indicators (L, C, R, SW, LS, RS)
23. Audio output indicators (L, R)
24. FM mono indicator (MONO)
25. FM stereo indicator (ST)
Back panel (Fig. 1c)
1. AM loop aerial terminal (AM ANT.)
2. Component video output sockets (COMPONENT VIDEO OUT)
3. Digital audio input sockets (DIGITAL AUDIO IN)
4. Euro AV socket (EURO AV CONNECTOR RGB OUT/TV (AUDIO) IN)
5. Mains lead
6. System control socket (SYSTEM)
7. Audio/Video input sockets (VIDEO 1 IN, VIDEO 2 IN)
8. S-Video output socket (S-VIDEO OUT)
9. Video output socket (VIDEO OUT)
10. FM aerial terminal (FM ANT. 75 Ω)
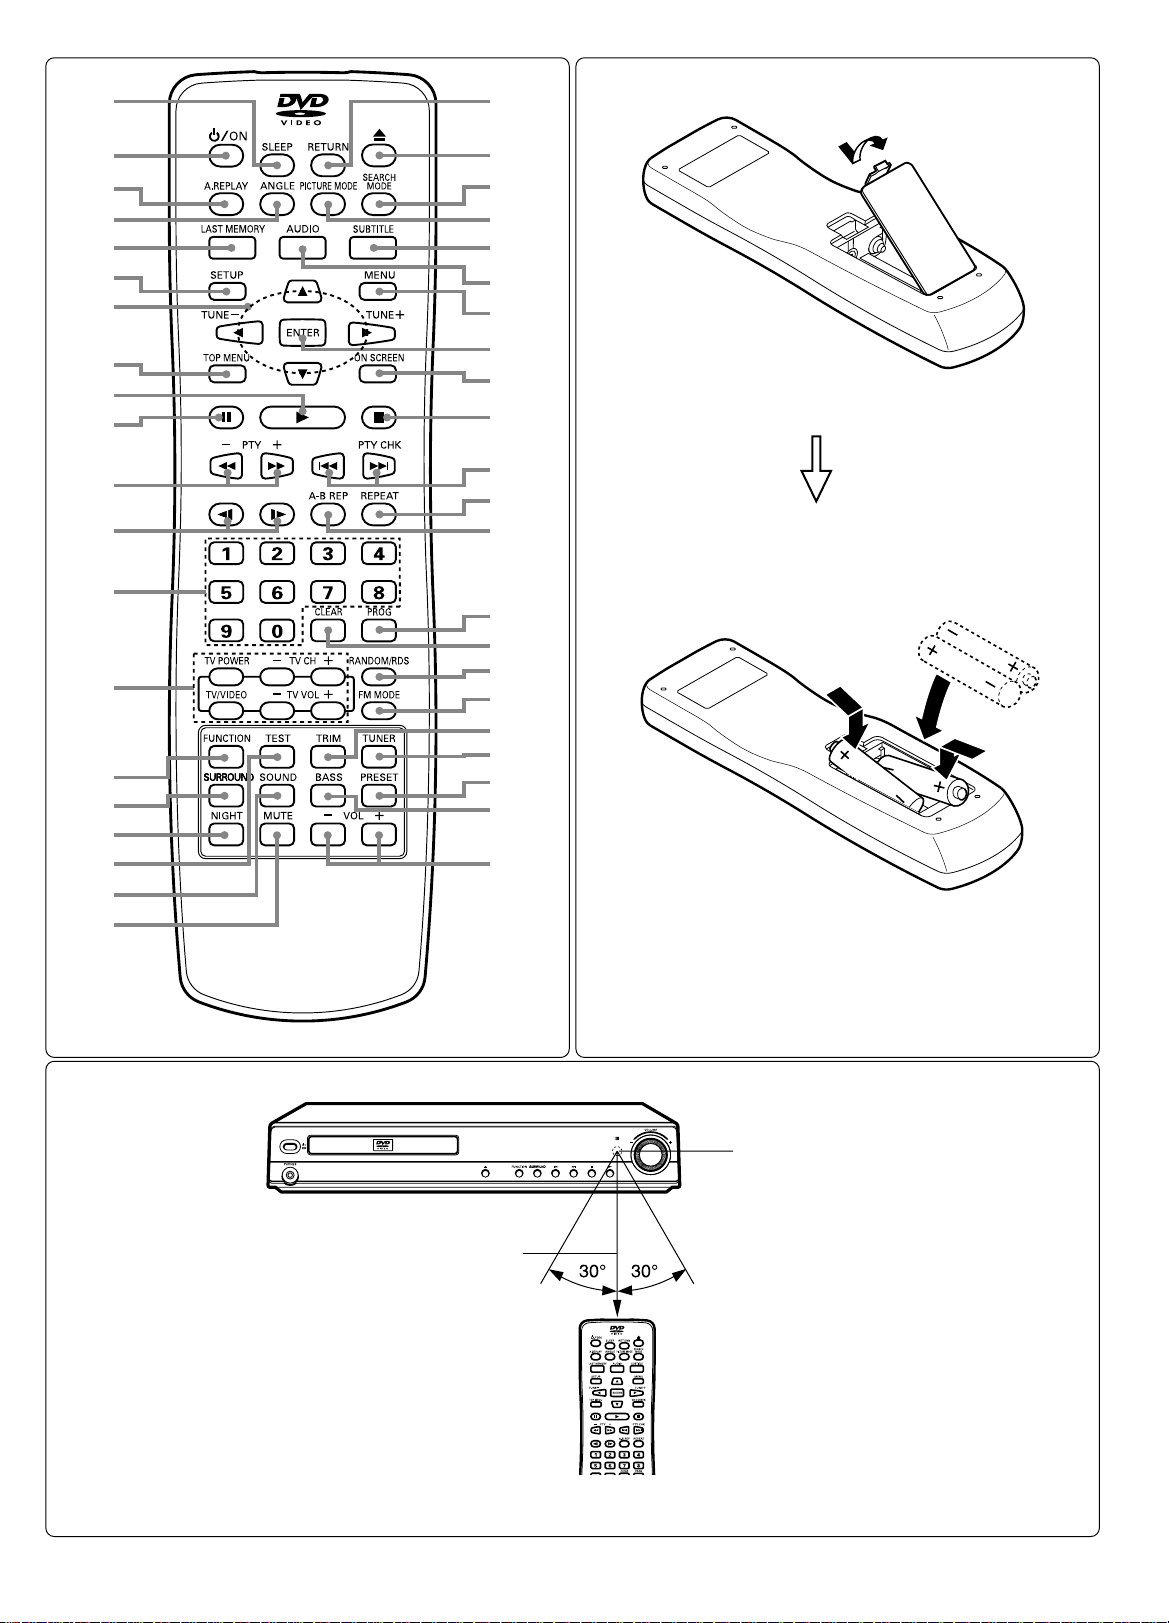
Controls (Fig. 2)
1. Return button (RETURN)
2. Open/Close button (q)
3. Search mode button (SEARCH MODE)
4. Picture mode button (PICTURE MODE)
5. Subtitle button (SUBTITLE)
6. Audio button (AUDIO)
7. Menu button (MENU)
8. Enter button (ENTER)
9. On-screen display button (ON SCREEN)
10. Stop button (n)
11. Next/Previous/Skip/Programme type check buttons
(f, e, PTY CHK)
12. Repeat button (REPEAT)
13. A-B repeat button (A-B REP)
14. Programme button (PROG)
15. Clear button (CLEAR)
16. Random play/Radio data system mode button (RANDOM/RDS)
17. FM mode button (FM MODE)
18. Trim button (TRIM)
19. Tuner function button (TUNER)
20. Preset tuning button (PRESET)
21. Bass button (BASS)
22. Volume buttons (– VOL +)
23. Muting button (MUTE)
24. Sound preset button (SOUND)
25. Test tone button (TEST)
26. Night mode button (NIGHT)
27. Surround button (SURROUND)
28. Function button (FUNCTION)
29. TV controls
Note:
Setting the preset code according to your TV will allow you to operate
the TV using these buttons (See page 26).
TV POWER: TV power button
– TV CH +: TV channel scanning buttons
TV/VIDEO: TV/Video select button
– TV VOL +: TV volume buttons
30. Number buttons (1 - 9, 0)
31. Forward slow/Reverse slow buttons ( , )
32. Fast forward/Fast reverse/Programme type select buttons
(d, c, – PTY +)
33. Pause/Step button (k)
34. Play button (a)
35. Top menu button (TOP MENU)
36. Tuning/Directional arrow buttons (TUNE–, TUNE+, 4, a, 5, b)
37. Setup button (SETUP)
38. Last memory button (LAST MEMORY)
39. Angle button (ANGLE)
40. Angle replay button (A.REPLAY)
41. Power button (z/ON)
42. Sleep button (SLEEP)
Inserting batteries
Install two “R6/AA” batteries (not supplied) as shown in Fig. 3.
Note:
Remove the batteries if the remote control is not to be used for a month
or more. Batteries left in the unit may leak and cause damage.
Remote control range (Fig. 4)
GB-3 [ENGLISH]

SYSTEM SETUP GUIDE
A
C
B
D
Example of speaker lead connection
(See the next page for more details)
A: System lead (Large DIN 13-pin)
B: Front speaker leads (Gray/Violet/Red plugs)
C: Centre speaker lead (Green plug)
D: Surround speaker lead (White plug)
Example of placing the speakers
Front speaker
with mains lead
Mains leads
Plasma flat-panel display
(not supplied)
Main unit
Front speaker
Surround speaker
Centre speaker
Surround speaker
with mains lead
Within approx. 7 meters
Front speaker
with mains lead
Within approx. 10 meters
Surround speaker with mains lead
In order to produce an optimum surround-sound effect, the front, centre
and surround speakers should be placed approximately the same distance
from the listening position.
Arranging the speakers as shown in the figure below will provide a more
effectual surround-sound effect. It is recommended to turn down the
volume of the internal speaker of the TV.
Centre speaker
Front left speaker
(with subwoofer)
Front right speaker
(with subwoofer)
Front speaker
Centre speaker
When placing the centre speaker on a TV, make sure that the top
face of the TV is level. Do not place the centre speaker on a TV
whose top face is slanted.
Surround speaker
Be sure to fasten the speaker lead. If the speaker lead is loose,
you may pull it with your hand by accident or stumble over it to
cause the speaker to fall down.
Within approx. 7 meters
- Place the front speakers (subwoofer incorporated) to the right and left
of the TV.
- Place the centre speaker above or below the TV. Position it as near
to the TV as possible.
- Place the surround (L, R) speakers as shown in the figure.
The speaker of the unit is so designed that it can be used near a TV.
However colour shading may occur on the TV depending on the placement.
In such a case, move the speaker away from the TV.
Example of speaker installation (Fig. 5)
It is recommended to install the speakers so that the transmitter (with
mains lead) incorporating side of the front speaker should come face to
face with the receiver (with mains lead) incorporating side of the surround
speaker as far as possible. If they are faced in different directions, it may
be hard to receive the radio wave.
Surround left
speaker
Surround right
speaker
GB-4[ENGLISH]
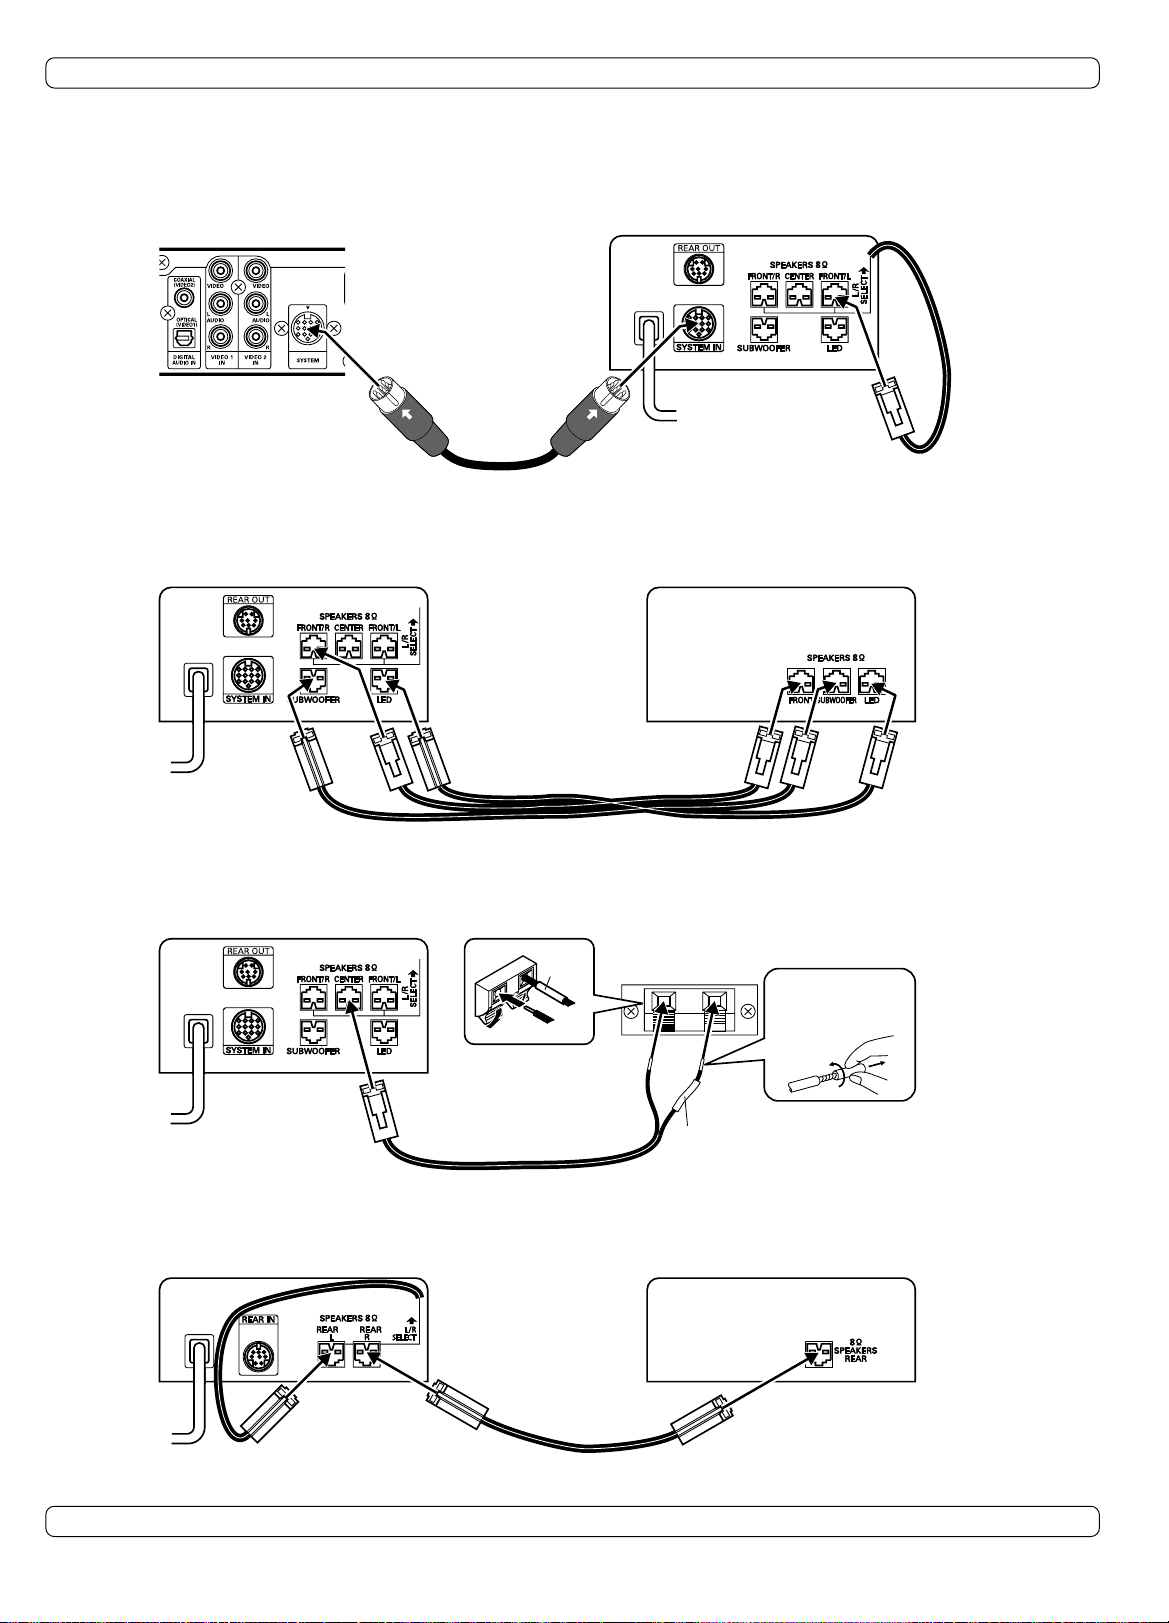
Do not connect the mains lead to an AC outlet until all connections have been made.
Connecting the unit to speakers
Because the terminals of the speakers and the plugs of the supplied speaker leads are colour-coded, make connections according to the colours.
The front speakers and surround speakers can be placed either to the right or to the left.
A Connect the main unit and front speaker with mains lead
Main unit
System lead (Large DIN 13-pin)
Front speaker with mains lead
Red
B Connect the front left and right speakers
Front speaker with mains lead Front speaker
Front speaker leads
(gray, violet and red plugs)
C Connect the centre speaker and the front speaker with mains lead
Front speaker with mains lead
Green
Green
Centre speaker
Black Red
Green
Centre speaker lead (green plug)
D Connect the surround left and right speakers
Surround speaker with mains lead Surround speaker
Red Violet GrayRedViolet Gray
Twist and pull it
off.
White
White
Surround speaker lead (white plug)
Use only with the supplied speakers. Do not use with other speakers. Connecting other speaker may damage the speaker and/or the unit.
White
GB-5 [ENGLISH]
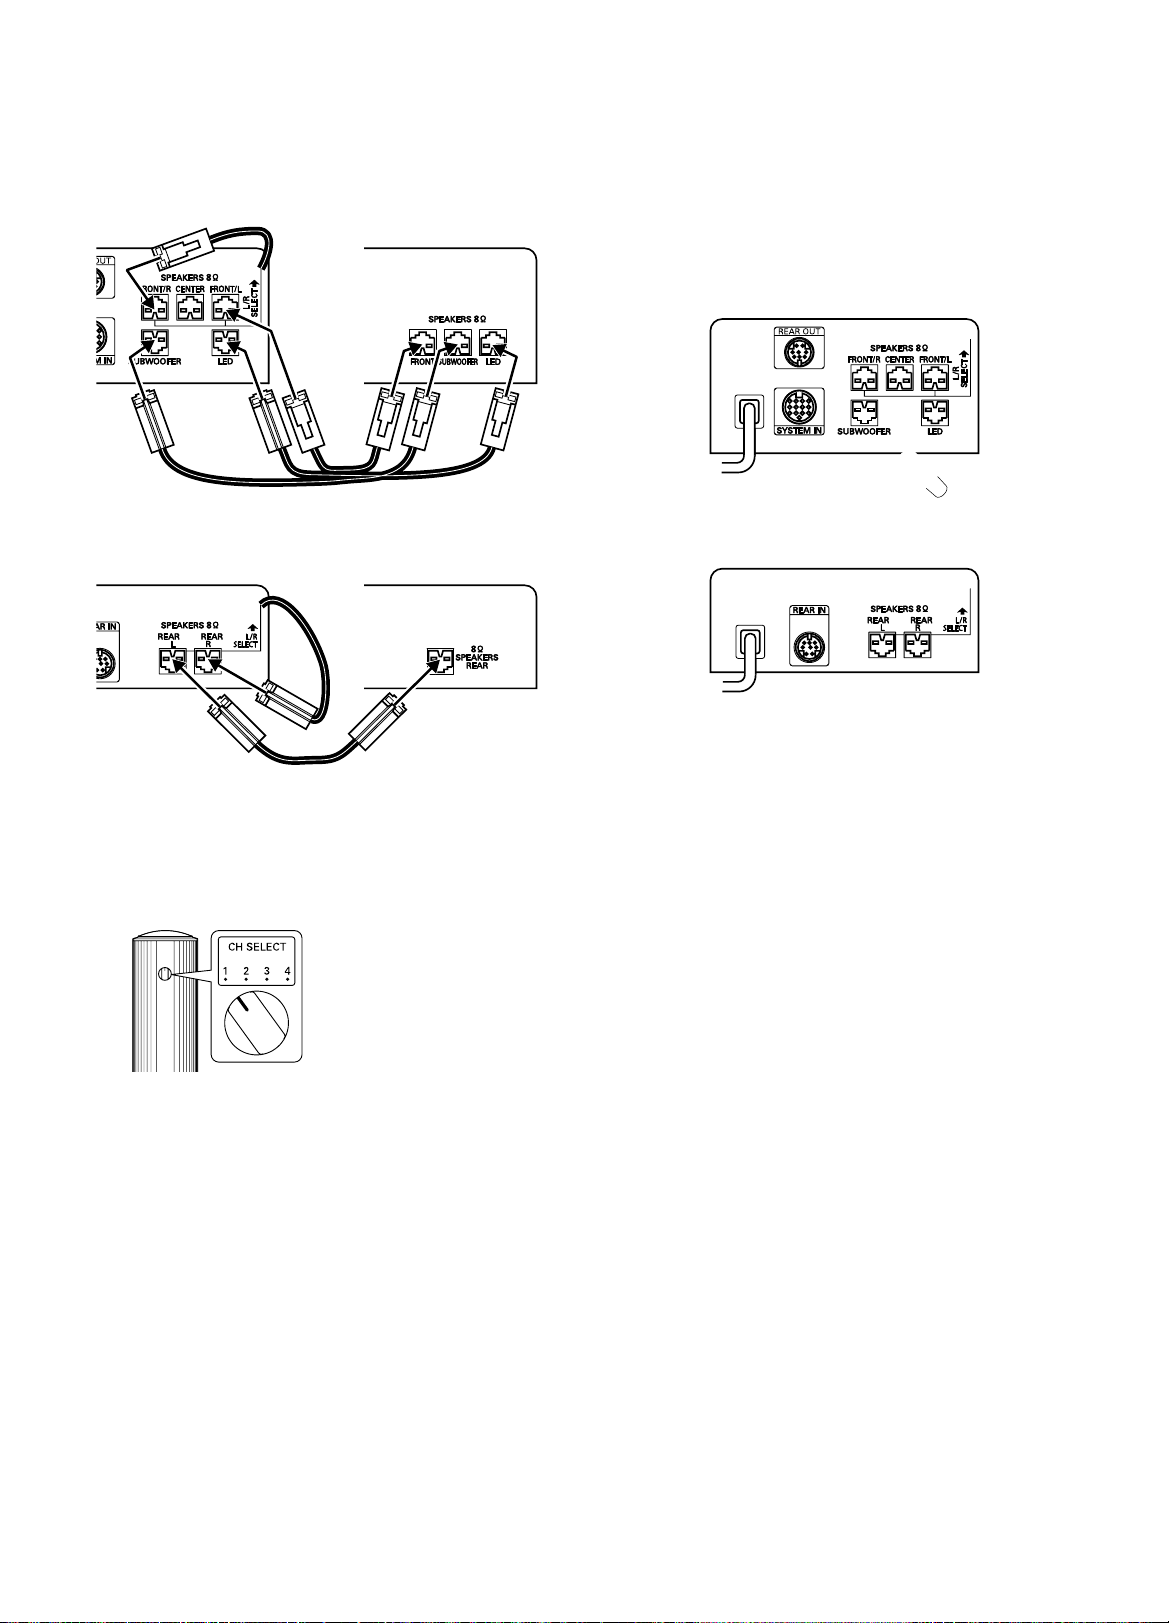
Reversing the positions of the speakers
It is possible to reverse the positions of front speakers and surround
speakers shown in the previous page.
In consideration of the connection of the mains lead etc., select a favorable
one from the two installation patterns.
Installation of the front speaker with mains lead at the right side
Front speaker with mains lead
Red
Red
Violet Gray
Installation of the surround speaker with mains lead at the right side
Surround speaker with mains lead Surround speaker
Front speaker
Red Violet Gray
About surround speaker connections
Because the surround speakers of this unit are of the wireless type, it is
not necessary to connect the assistant speaker lead under normal
conditions.
If noise is caused to the surround speaker when used in wireless mode,
change the setting of the CH SELECT switch on the back of the front
speaker with mains lead.
If noise is still caused, connect the surround speaker with mains lead to the
front speaker with mains lead using the supplied assistant speaker lead.
In this case, the audio signal is sent to the surround speaker through the
assistant speaker lead.
White
White
The other connections should be as shown in the previous page.
White
Changing the frequency setting
If noise (or skipping sound) is heard when using surround speaker in
wireless mode, change the setting of the CH SELECT switch on the back
of the front speaker with mains lead. It may improve the sounds.
CH SELECT
1 (2,414 MHz)
2 (2,432 MHz)
3 (2,450 MHz)
4 (2,468 MHz)
GB-6[ENGLISH]

CONNECTING THE UNIT TO ANOTHER
DEVICE
- After the completion of all connections, adjust the image aspect ratio
for the TV (“4:3 LB”, “4:3 PS” and “16:9”) (See page 20).
- When connecting the unit to a progressive-mode-ready TV with NTSC
colour system capability, use the COMPONENT VIDEO OUT sockets.
It is possible to select the progressive mode (Auto/Video/Film) (See
page 20).
Cautions in making connections
- Before connecting the unit to another device, turn off the power
of the unit and disconnect the mains plug from the AC outlet.
- Connect the unit directly to a TV. If the unit is connected to a TV
through a VCR, images may be disturbed due to the copyright
protection function.
- Carefully read the instruction manual of the device to be connected.
- Before plugging and unplugging the mains lead of the unit, power off
the TV and devices connected to the unit. Failure to do so may
damage the speaker.
- To send out the video signal of a device being connected with the
VIDEO 1 IN “VIDEO” (or VIDEO 2 IN “VIDEO”) socket, the TV should
be connected to the VIDEO OUT or EURO AV CONNECTOR RGB
OUT/TV (AUDIO) IN socket. The video signal coming via the VIDEO
1 IN “VIDEO” (or VIDEO 2 IN “VIDEO”) socket will not be sent through
the S-VIDEO OUT or COMPONENT VIDEO OUT sockets.
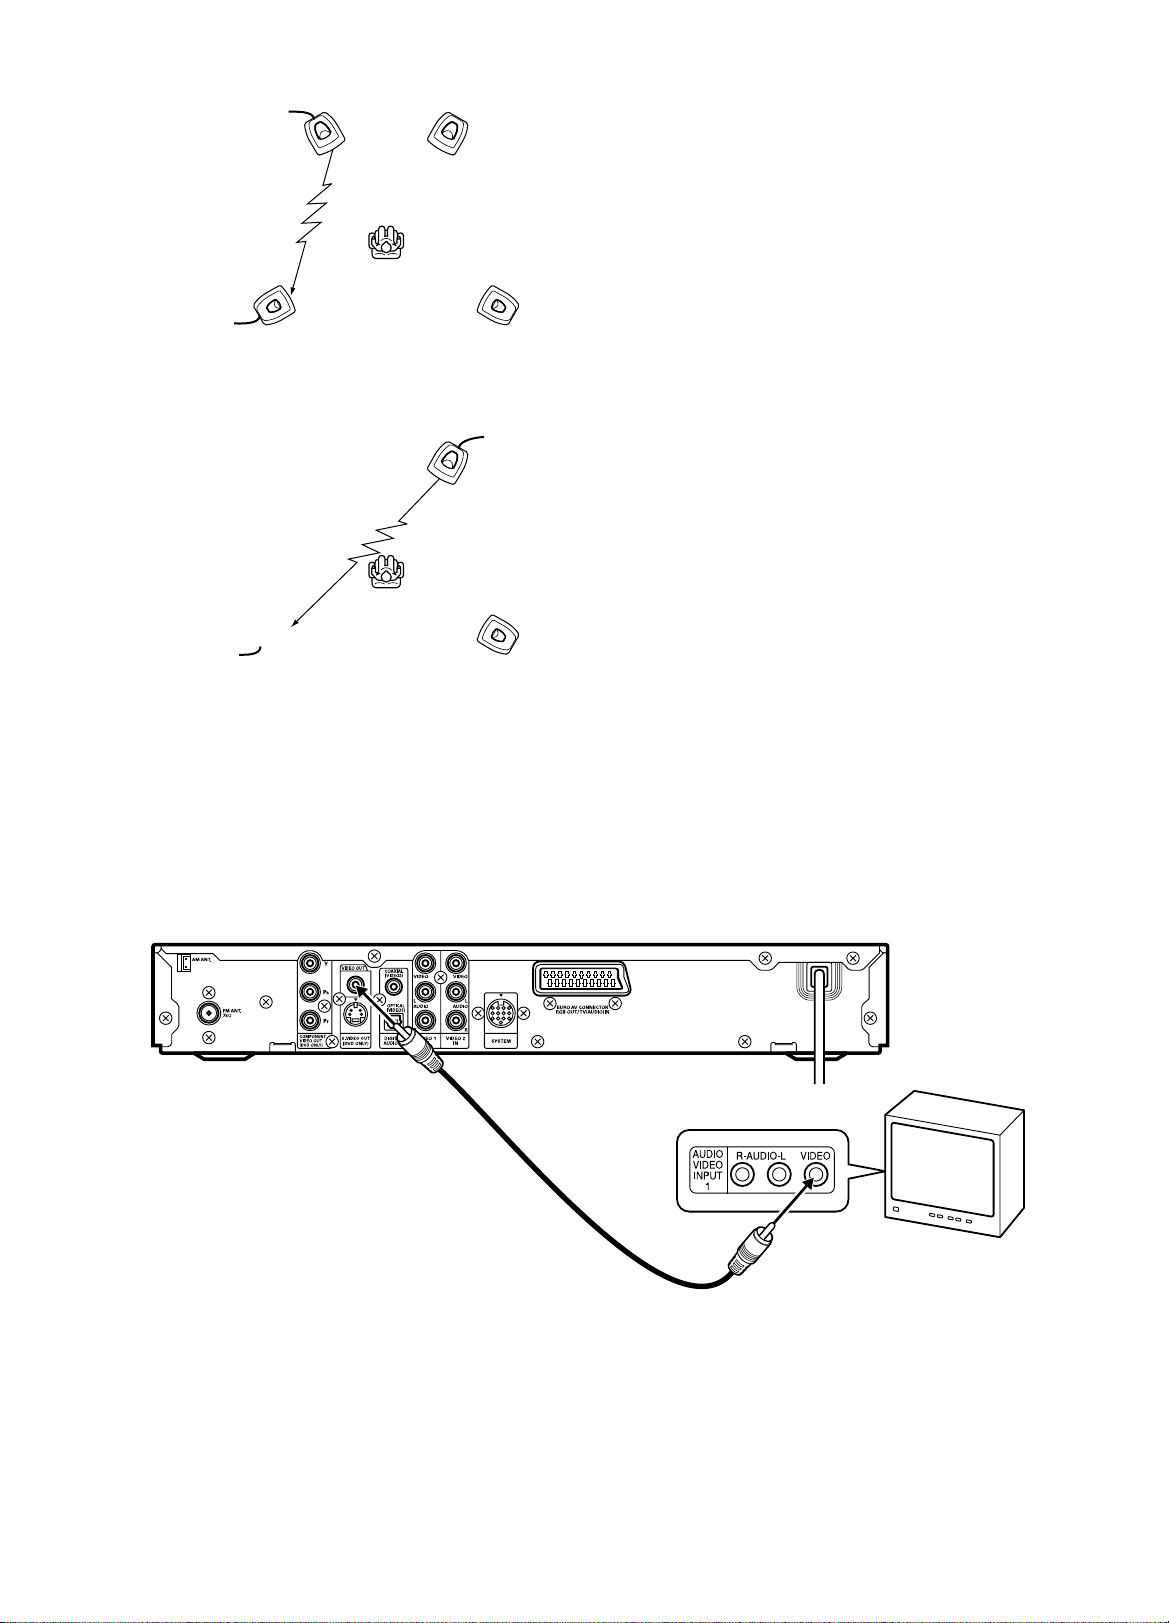
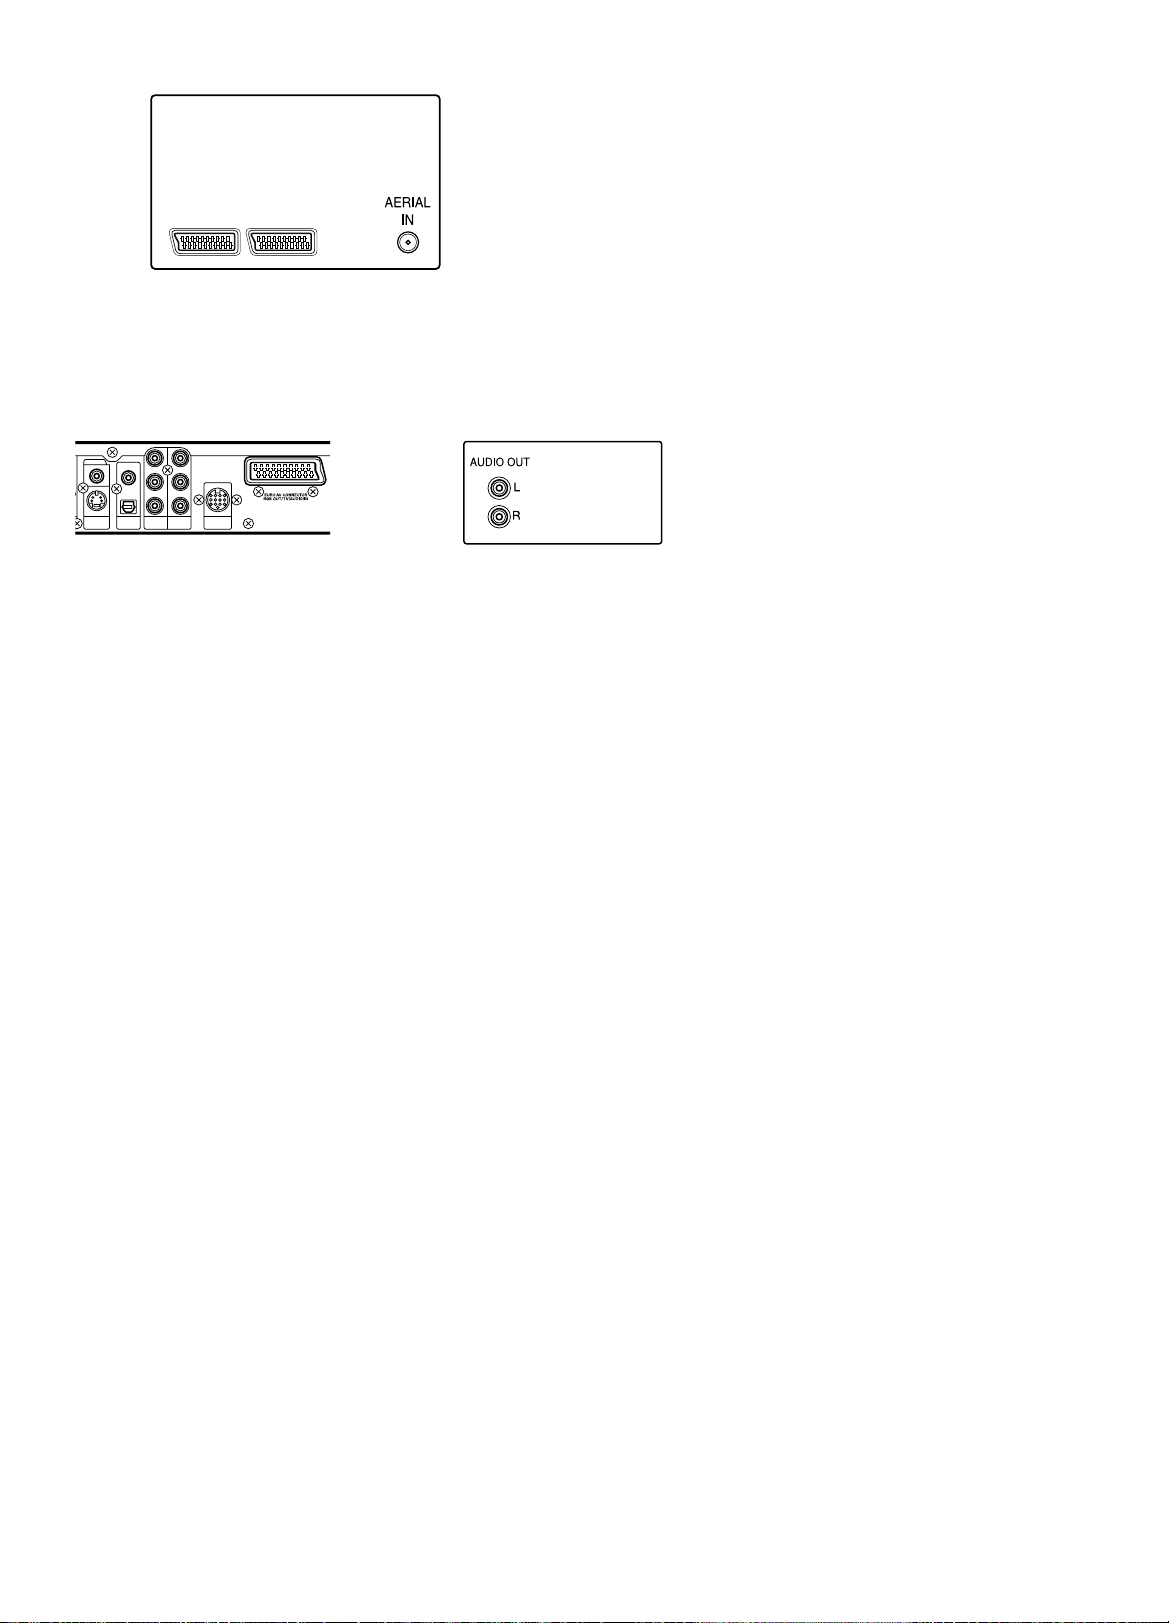
Connecting the unit to a TV
When connecting the unit to a TV having a VIDEO INPUT socket (Fig.
6)
If your TV has the VIDEO INPUT socket, connect the unit to the VIDEO
INPUT socket.
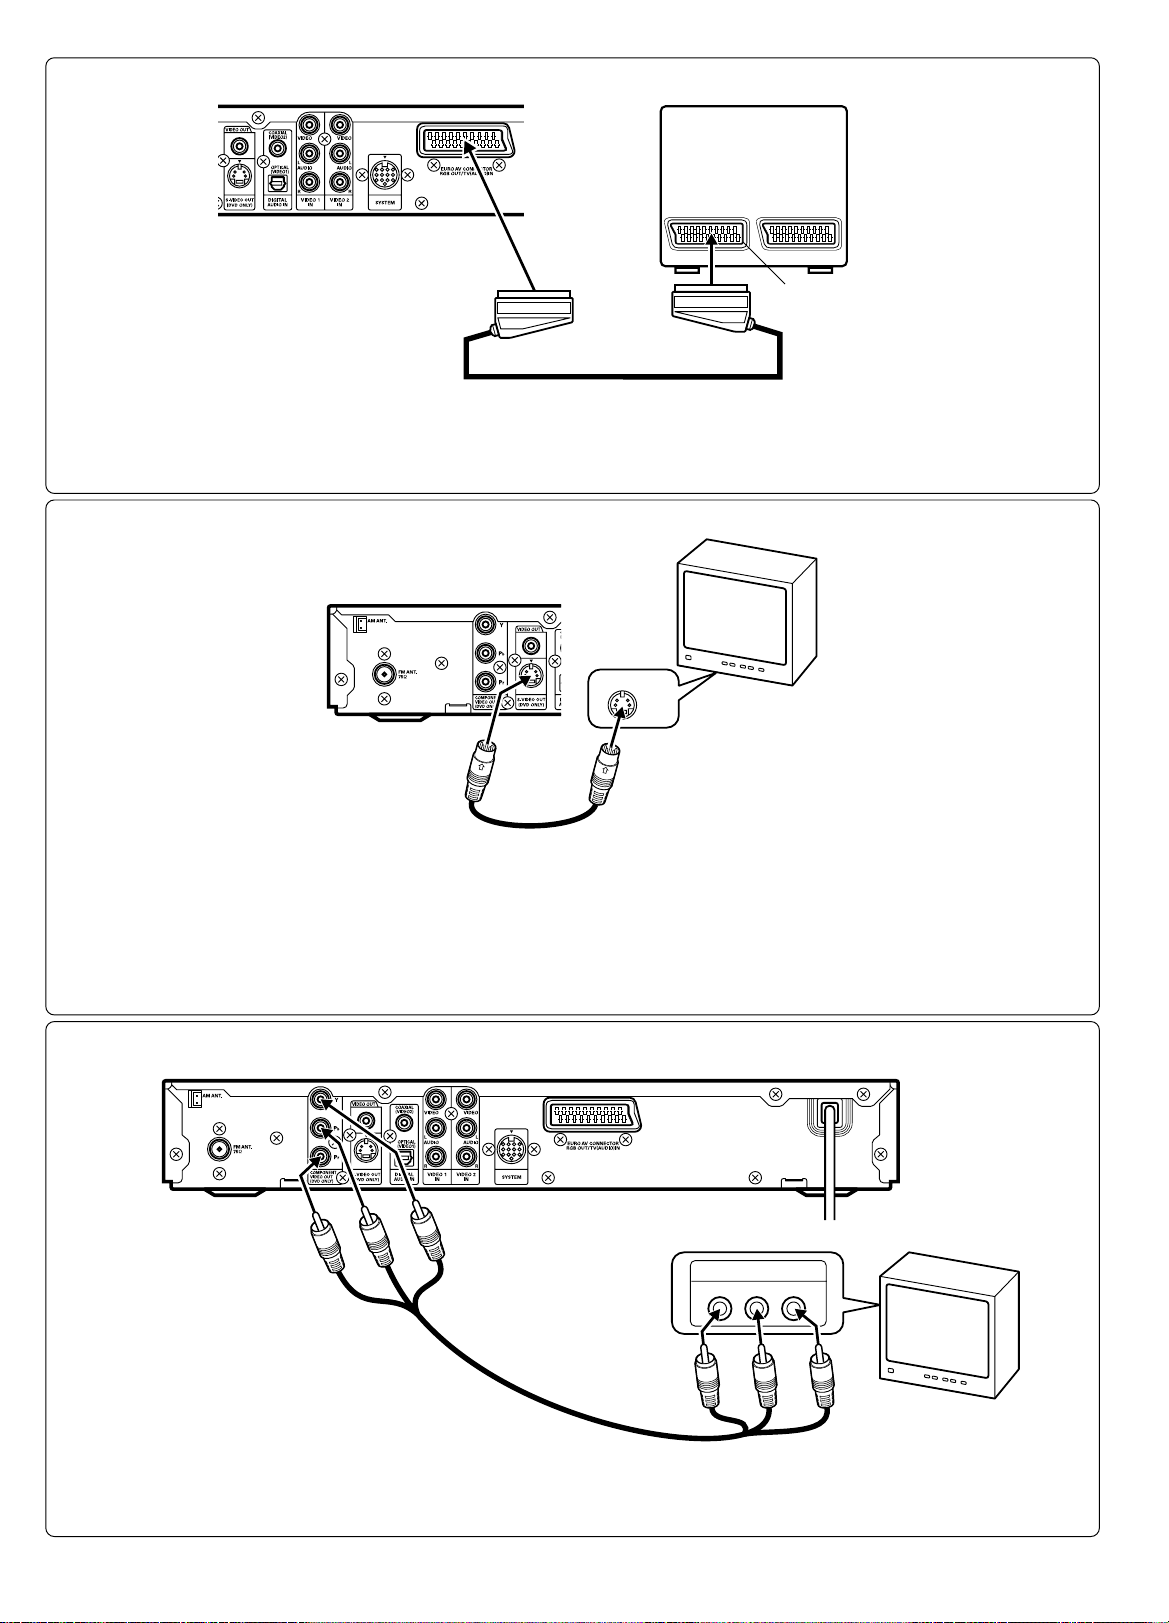
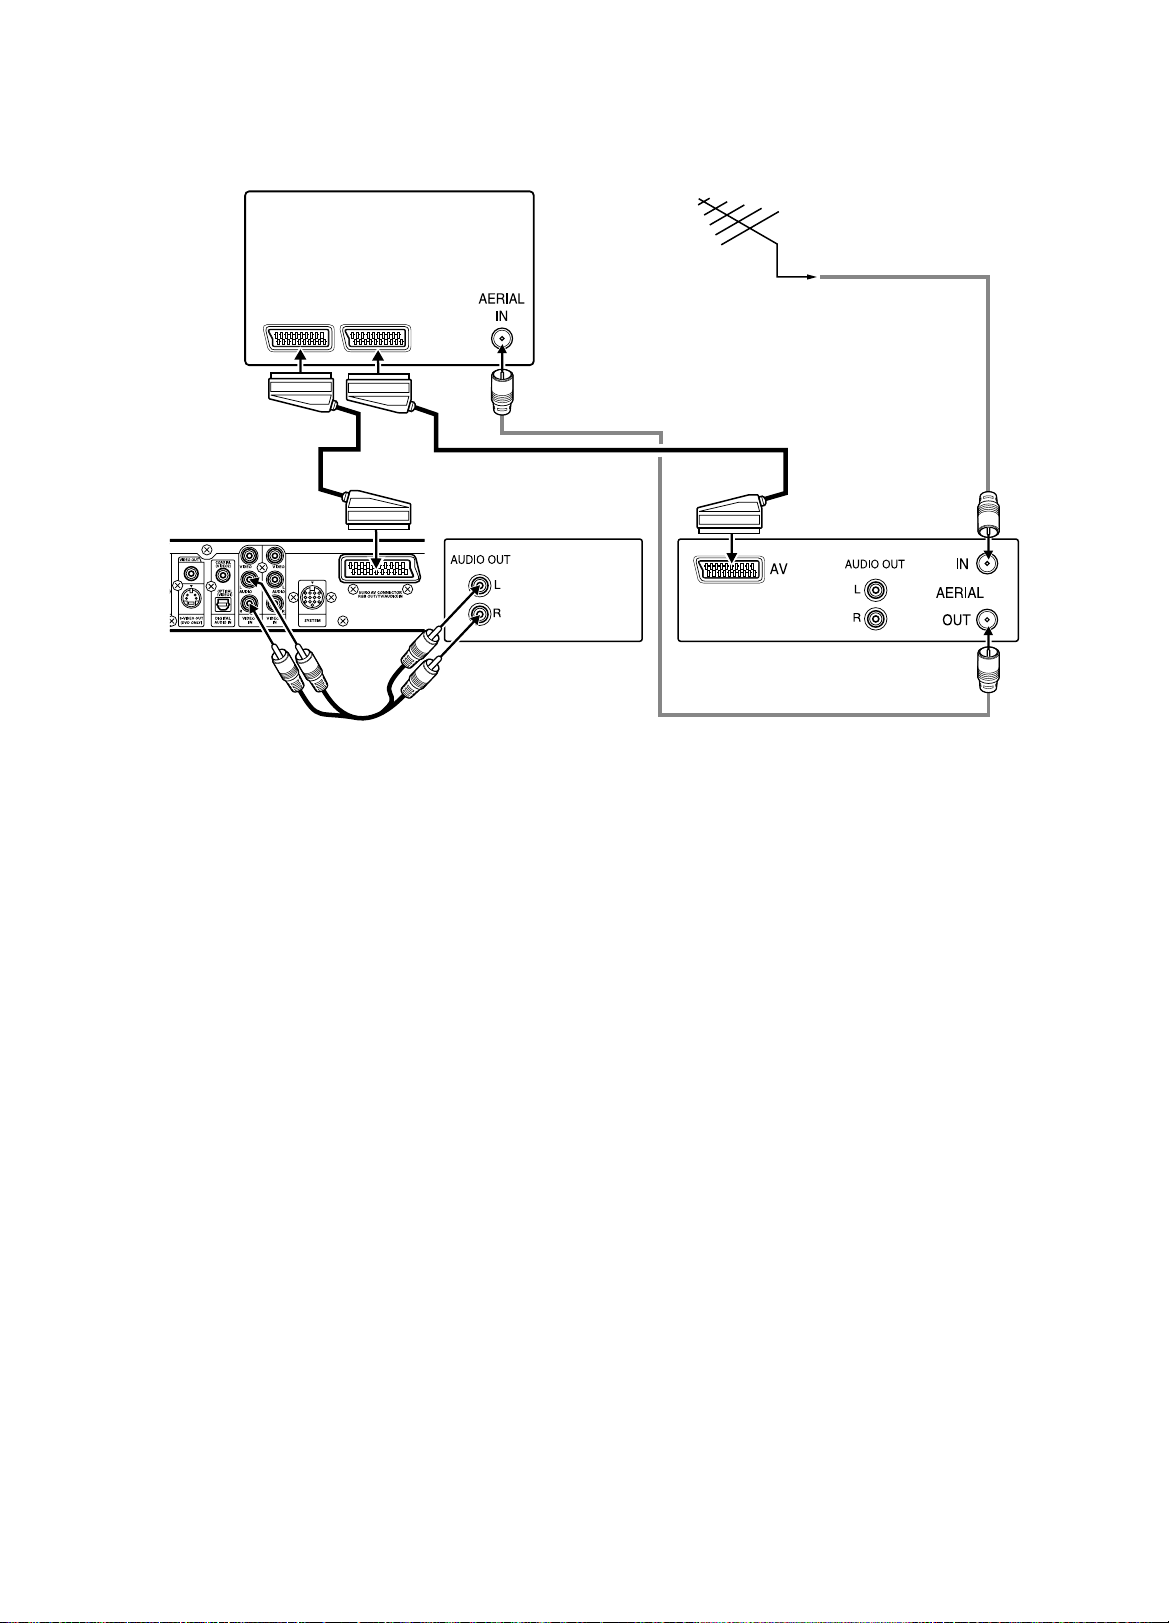
When connecting the unit to a TV having an EURO-AV socket (Fig. 7)
You can enjoy high quality picture playback. (Do not connect the video
lead to the VIDEO OUT socket.)
In this case, select “VIDEO OUT SELECT: RGB” (default) on “Changing
the display setting” setting (See page 20.)
When connecting the unit to a TV having an S-VIDEO INPUT socket
(Fig. 8)
You can enjoy clearer picture playback. (The VIDEO OUT socket connection
is not necessary.)
When connecting the unit to a TV having COMPONENT VIDEO INPUT
sockets (Fig. 9)
(Only for TV with NTSC colour system capability)
You can enjoy high quality picture playback. (The VIDEO OUT or SVIDEO OUT socket connection is not necessary.)
In this case, select “VIDEO OUT SELECT: COMPONENT” on “Changing
the display setting” setting (See page 20.)
An LCD video projector with NTSC colour system capability can also be
connected.
Connecting headphones
Connect stereo headphones (not supplied) to the PHONES socket for
monitoring or for private listening. The speakers are automatically
disconnected when headphones are connected.
AERIAL/MAINS LEAD CONNECTIONS
Aerials (Fig. 13)
In areas close to a transmitter the simple indoor aerial is sufficient to
receive broadcasts. Extend the aerial wire as straight as possible and,
while listening to the sound from the system, secure it in a position which
yields minimal distortion and noise.
In fringe areas or where reception is distorted or noisy, an FM external
aerial (not supplied) should be connected instead of the simple indoor
aerial. Consult your dealer.
AM loop aerial
Assemble the loop aerial as shown in Fig. 14a. Unwind the aerial wires,
then connect the plug to the AM ANT. terminal. If you have difficulty
inserting the plug, turn it over and reinsert it. Place the loop aerial in a
position which yields the best AM reception, or attach it to a wall or other
surface as shown in Fig. 14b.
Note:
To minimize noise, the speaker, mains and any other leads should not
come close to the indoor or external aerial lead and AM loop aerial. Do not
place the aerial leads close to the system.
Mains supply
(Main unit, Front speaker with mains lead and Surround speaker with
mains lead)
After all connections have been made, connect the mains lead to an AC
outlet.
Note:
Do not connect the mains lead to an AC outlet until all connections have
been made.
SYSTEM CONNECTIONS EXAMPLES
JCX-TS960, TV and Audio equipment (Fig. 15)
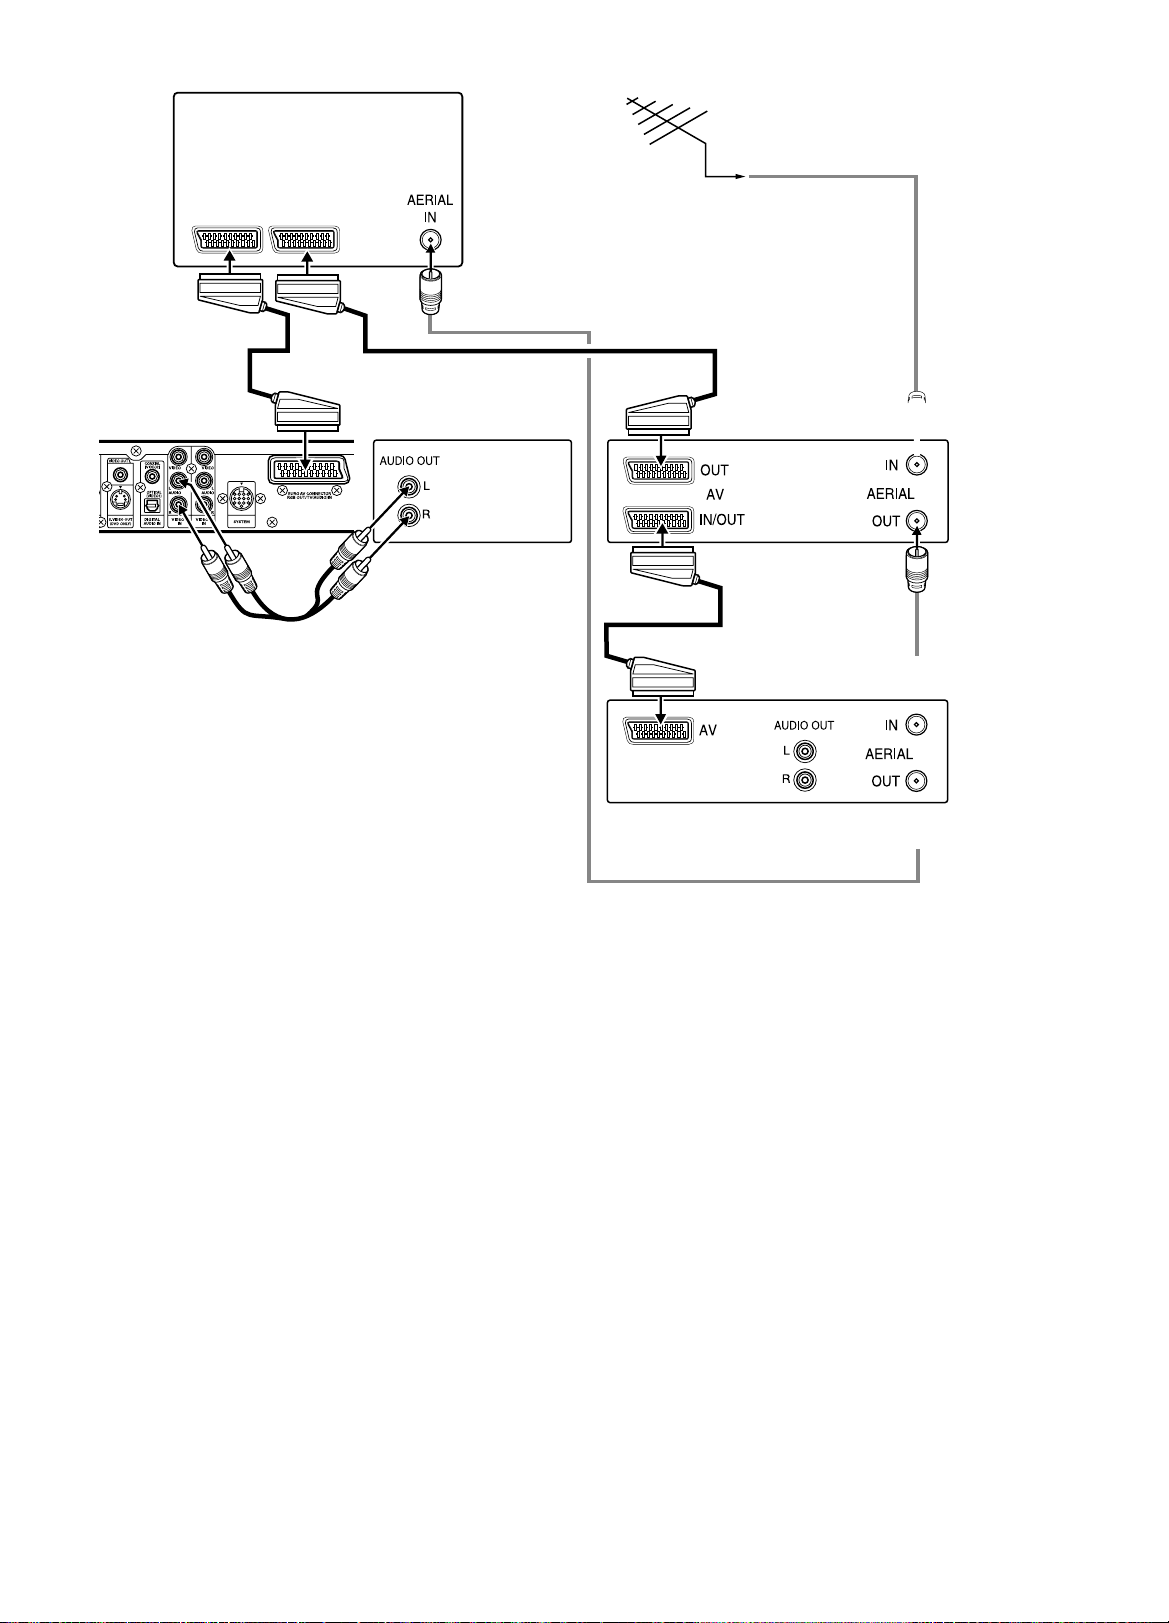
JCX-TS960, TV and VCR (Fig. 16)
JCX-TS960, TV, VCR and Audio equipment (Fig. 17)
JCX-TS960, TV, VCR, STB (Set Top Box) and Audio equipment (Fig.
18)
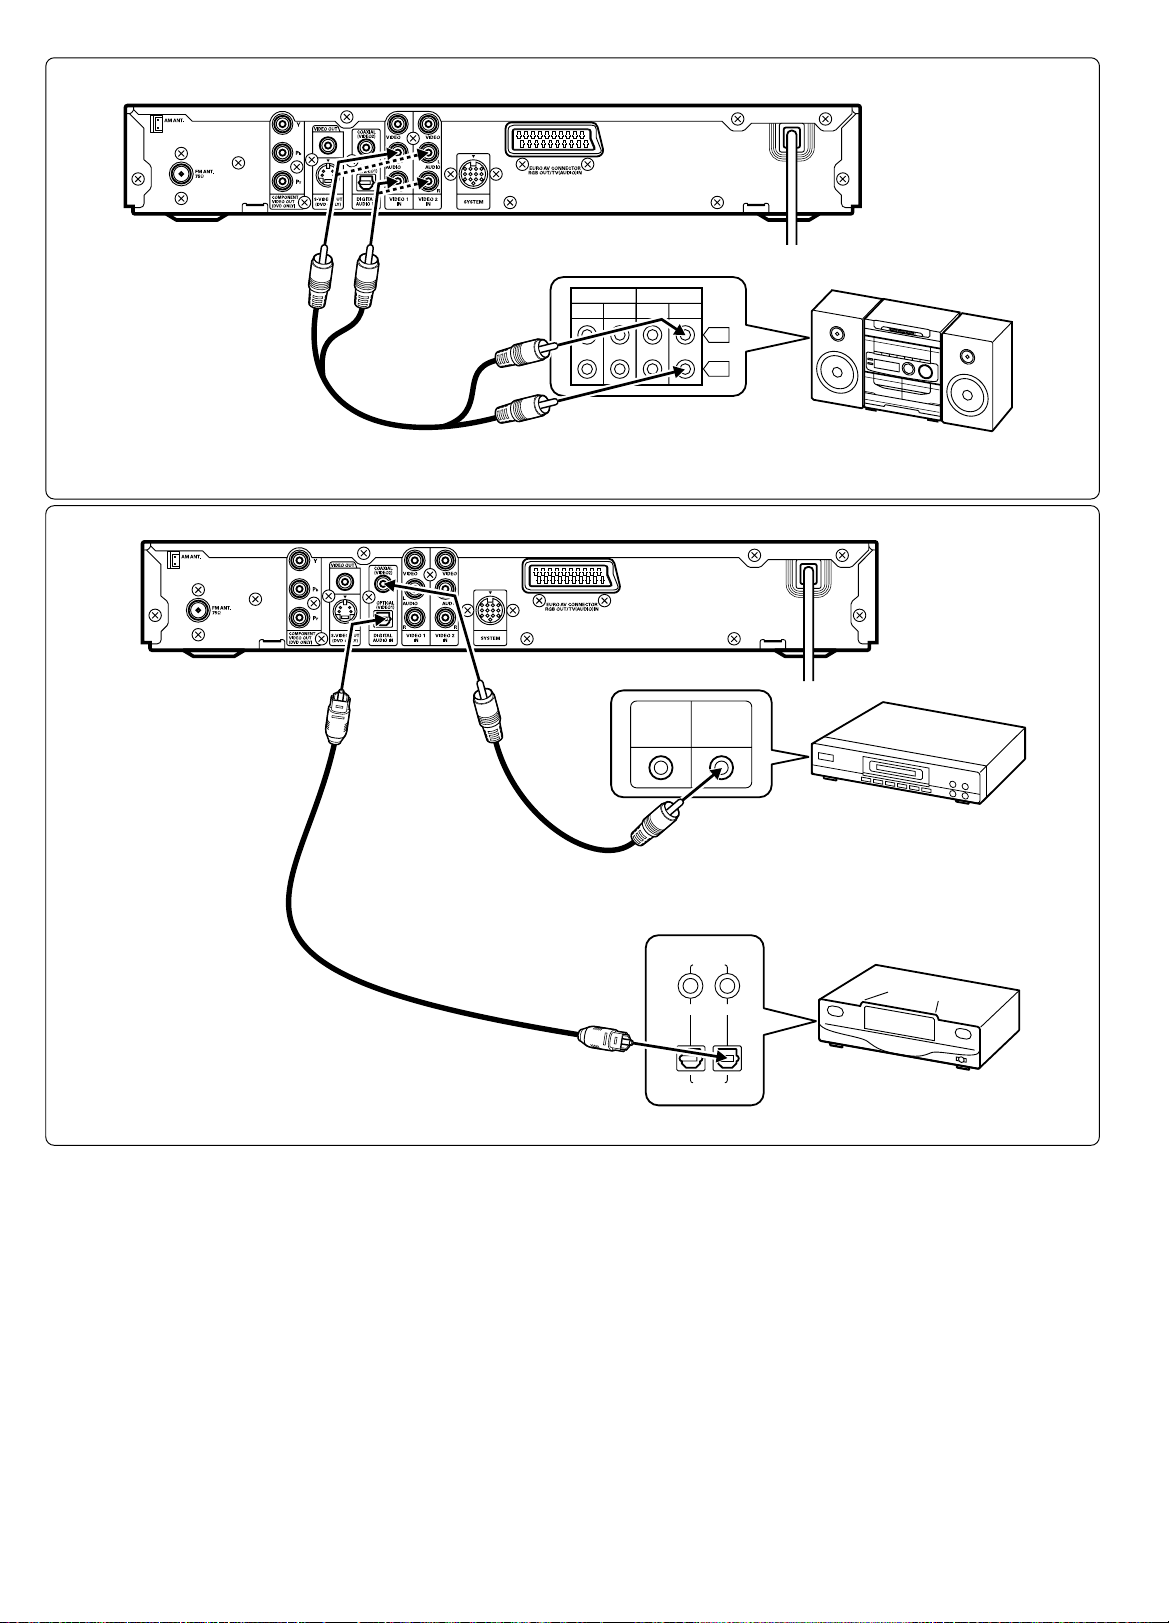
Example of another device connection (Fig. 10)
Connecting the analog audio output of another
device (Fig. 11)
Connecting the analog audio output of an audio equipment to the unit will
allow you to enjoy powerful sounds from the speakers of this unit.
Connecting the digital audio output of another
device (Fig. 12)
Connecting the digital audio output (optical/coaxial) of a MD deck or game
machine to this unit will allow you to enjoy 5.1- channel-ready sounds with
a surround-sound effect.
Note:
If the video signal of an external device is not to be inputted, it is possible
to input only the digital audio signal by changing the digital audio input
function mode (See page 25).
GB-7 [ENGLISH]

COMMON OPERATION
Either the main unit or remote control can be operated. However,
for convenience, this instruction manual explains operation using
the remote control.
Turning the power on and off
1. Turn on the power switch on the back of the surround speaker.
2. Press the z/ON button.
The main unit and the surround speaker are powered on and the
display is illuminated. The power of the front speaker is turned on
automatically.
- “HELLO” is shown on the FL display.
- The source selected before turning off the power is selected.
1. Press the z/ON button again to power off the main unit and front
speaker. “GOOD-BYE” is shown on the FL display.
2. Turn off the power switch on the back of the surround speaker.
Starting playback through one-touch operation
Even if the power is turned off, only pressing the one button will start
playback or broadcast receiving with the power turned on automatically.
Playback (when a disc is in the unit)
Pressing the a (Play) button will start playback.
Radiobroadcast receiving
Pressing the TUNER button will start broadcast receiving.
- Broadcast receiving is started with the radio station selected before
turning off the power.
Taking out the disc through one-touch operation
Pressing the q button will make the disc tray open.
Selecting the desired source
Select the desired source by pressing the FUNCTION button. Each time
the button is pressed, the display changes as shown below.
DVD/CD v TV v VIDEO 1 v V1 OPT v VIDEO 2 v V2 COAX v FM
TUNER v AM TUNER v DVD/CD ...
Note:
- When the a (Play) button or TUNER button is pressed, the source
selection is changed automatically.
- When the source selection is changed, disc playback stops
automatically.
Adjusting the volume
Adjust the volume with the VOL “+” or “–” button.
The volume level (VOL 0 to VOL MAX) appears on the FL display
whenever the VOL button is pressed.
- To adjust the volume on the main unit, turn the VOLUME knob.
Setting the sound quality as desired
1. Select a sound mode by pressing the SOUND button.
BASS v TREBLE v FLAT v Return to the original display
BASS ...
2. Press the b / a button or ENTER button.
Mode Button Level
BASS b / a –5 to +5
TREBLE b / a –5 to +5
FLAT ENTER BASS 0/TREBLE 0
- To set the sound quality to “FLAT” (initial value), select “FLAT” and
press the ENTER button. “- -FLAT- -” is shown on the FL display.
3. Set the sound quality as desired by repeating steps 1 and 2.
4. Press the SOUND button. The original display returns.
Note:
If no button is operated for approx. 10 seconds during setting, the setting
ends automatically.
Emphasizing the deep bass
Set the deep bass as desired by pressing the BASS button.
BOOST 1 v BOOST 2 v OFF v NORMAL v BOOST 1 ...
- When headphones are connected, pressing the BASS button will not
change the setting. In this case, “-BASS-” is shown on the FL display.
Selecting a surround mode
Selecting a surround mode according to the disc to be played back and the
situation will allow you to enjoy a surround-sound effect easily.
For details on the surround mode, refer to “About surround mode” on the
next page.
Select the desired surround mode by pressing the SURROUND button.
AUTO v s PL II MOVIE v s PL II MUSIC v s PL DOLBY PL
HALL v STADIUM v STUDIO v THEATER v CLUB v 2.1ch
AUTO ...
Note:
- If no button is operated for approx. 4 seconds during setting, the
setting ends automatically.
- Depending on the audio signal to be played back, the surround mode
selection may be changed forcedly or limited.
v
v
v
To reduce the volume temporarily
Press the MUTE button. “MUTE” blinks on the FL display. To restore the
previous volume setting, press the button again.
GB-8[ENGLISH]

About surround mode
Mode: AUTO
Function: DVD/CD, V1 OPT, V2 COAX
The unit automatically detects the audio signal format stored on the
disc and selects the appropriate surround mode.
- In the case of a DVD disc or external digital audio input whose
audio signal is encoded with Dolby Digital (5.1ch), “s D” is
shown on the FL display and playback is done with Dolby Digital
5.1 channel surround sound. Not all DVD discs are encoded with
5.1ch surround sound.
- In the case of a DVD disc or external digital audio input whose
audio signal is encoded with DTS, “dts” is shown on the FL display
and playback is done with DTS surround sound. Not all DVD discs
are encoded with DTS surround sound.
- In the case of a DVD disc or external digital audio input whose
audio signal is encoded with Dolby Digital 2-channel or mono, “s
PL II” is shown on the FL display at the same time and playback
is done in Dolby Pro Logic II MOVIE mode.
- In the case of a DVD disc or external digital audio input whose
audio signal is encoded with 2-channel Linear PCM (stereo), “s
PL II” is shown on the FL display and playback is done in Dolby
Pro Logic II MUSIC mode.
- In the case of video CDs and super video CDs, playback is done
in Dolby Pro Logic II MOVIE mode. In the case of music CDs, MP3
discs and WMA discs, playback is done in Dolby Pro Logic II
MUSIC mode.
Function: TV, VIDEO1, VIDEO2
Playback is done in Dolby Pro Logic II MOVIE mode.
Function: FM TUNER
Playback is done in Dolby Pro Logic II MUSIC mode.
Function: AM TUNER
The surround mode is set to 2.1 channel and playback is done through
the front Lch/Rch and the subwoofer only.
ss
Mode:
s PL II MOVIE
ss
Playback is done in Dolby Pro Logic II 5.1ch surround mode. Even in the
case of a disc on which audio signals are 2ch-recorded in a mode suitable
for movie playback, a pseudo 5.1ch surround sound effect (widening) can
be produced.
ss
Mode:
s PL II MUSIC
ss
Playback is done in Dolby Pro Logic II 5.1ch surround mode. Even in the
case of a disc on which audio signals are recorded stereophonically in a
mode suitable for music playback, a pseudo 5.1ch surround sound effect
(widening) can be produced.
ss
Mode:
s PL DOLBY PL
ss
Playback is done in Dolby Pro Logic 5.1ch surround mode. It is suitable
for playback of a disc on which audio signals are recorded in the
conventional Dolby surround mode.
Mode: HALL
2ch-recorded (stereo) audio signals are played back with a pseudo 5.1ch
surround sound effect (widening), producing sound effects that make you
feel as if you were listening to music in a concert hall.
Mode: STADIUM
2ch-recorded (stereo) audio signals are played back with a pseudo 5.1ch
surround sound effect (widening), producing realistic sound effects that
make you feel as if you were watching sports in a baseball stadium or
soccer stadium.
Mode: STUDIO
2ch-recorded (stereo) audio signals are played back with a pseudo 5.1ch
surround sound effect (widening), producing sound effects that make you
feel as if you were in a recording studio.
Mode: CLUB
2ch-recorded (stereo) audio signals are played back with a pseudo 5.1ch
surround sound effect (widening), producing sound effects that make you
feel as if you were in a club or discotheque.
Mode: 2.1ch
The surround mode is set to 2.1 channel and playback is done through the
front Lch and Rch and the subwoofer only.
Note:
In the following cases, only AUTO or 2.1ch surround mode can be
selected.
- In the case of an external digital audio input whose source is LPCM
96kHz
- In the case of a DVD disc or external digital audio input whose audio
signal is other than Dolby digital 2ch or in the case of DTS playback
When headphones are connected
Mode: AUTO,
HALL, STADIUM, STUDIO, THEATER, CLUB
Playback is done in 2ch mode (stereo) using virtual mode with a surround
sound effect (widening). In the case of AM TUNER, however, playback is
done in normal 2ch mode (stereo).
“VIRTUAL” appears on the FL display.
Mode: 2ch
Playback is done in normal 2ch mode (stereo).
ss
s PL II MOVIE,
ss
ss
s PL II MUSIC,
ss
ss
s PL DOLBY PL,
ss
Adjusting the surround-sound effect of the Dolby
Pro Logic II MUSIC mode
About Dolby Pro Logic II MUSIC mode
PANO (Panorama mode):
It is possible to largely widen the front sound field image to the right
and left to reach the surround speakers, producing an encircling
surround-sound effect.
C.WIDTH (Centre width):
If the centre image is felt to be too strong, it can be adjusted to produce
a sound field suitable for music playback by apportioning the centre
channel signals to the front L/R channels. It is possible to apportion
the centre channel signals to the front channels in eight levels of 0
(output from centre speaker only) to 7 (centre channel signal output
from front speaker only).
DIMEN (Dimension):
It is possible to adjust the front-and-rear volume balance within a
range of –3 to +3. When turning up the sound field on the front side,
shift the volume balance to the “+” side. When turning up the sound
field on the rear side, shift the volume balance to the “–” side. If the
surround-sound effect is felt to be too strong, shift the volume balance
to the front side. If the surround-sound effect is felt to be insufficient,
shift the volume balance to the rear side.
1. Select the “s PL II MUSIC” mode by pressing the SURROUND
button. “s PL II” and “MUSIC” are shown on the FL display.
2. Select a parameter by pressing the 4 / 5 button.
PANO
wv
3. Press the b / a button.
C.WIDTH
Set the parameter by pressing the b / a button.
Mode: Level
PANO: “ON” or “OFF”
C.WIDTH: 0 to 7
DIMEN: –3 to +3
4. Set the parameters by repeating steps 2 and 3.
wv
DIMEN
wv
PANO ...
Mode: THEATER
2ch-recorded (stereo) audio signals are played back with a pseudo 5.1ch
surround sound effect (widening), producing natural sound effects that
make you feel as if you were seeing a movie in a movie theater.
GB-9 [ENGLISH]
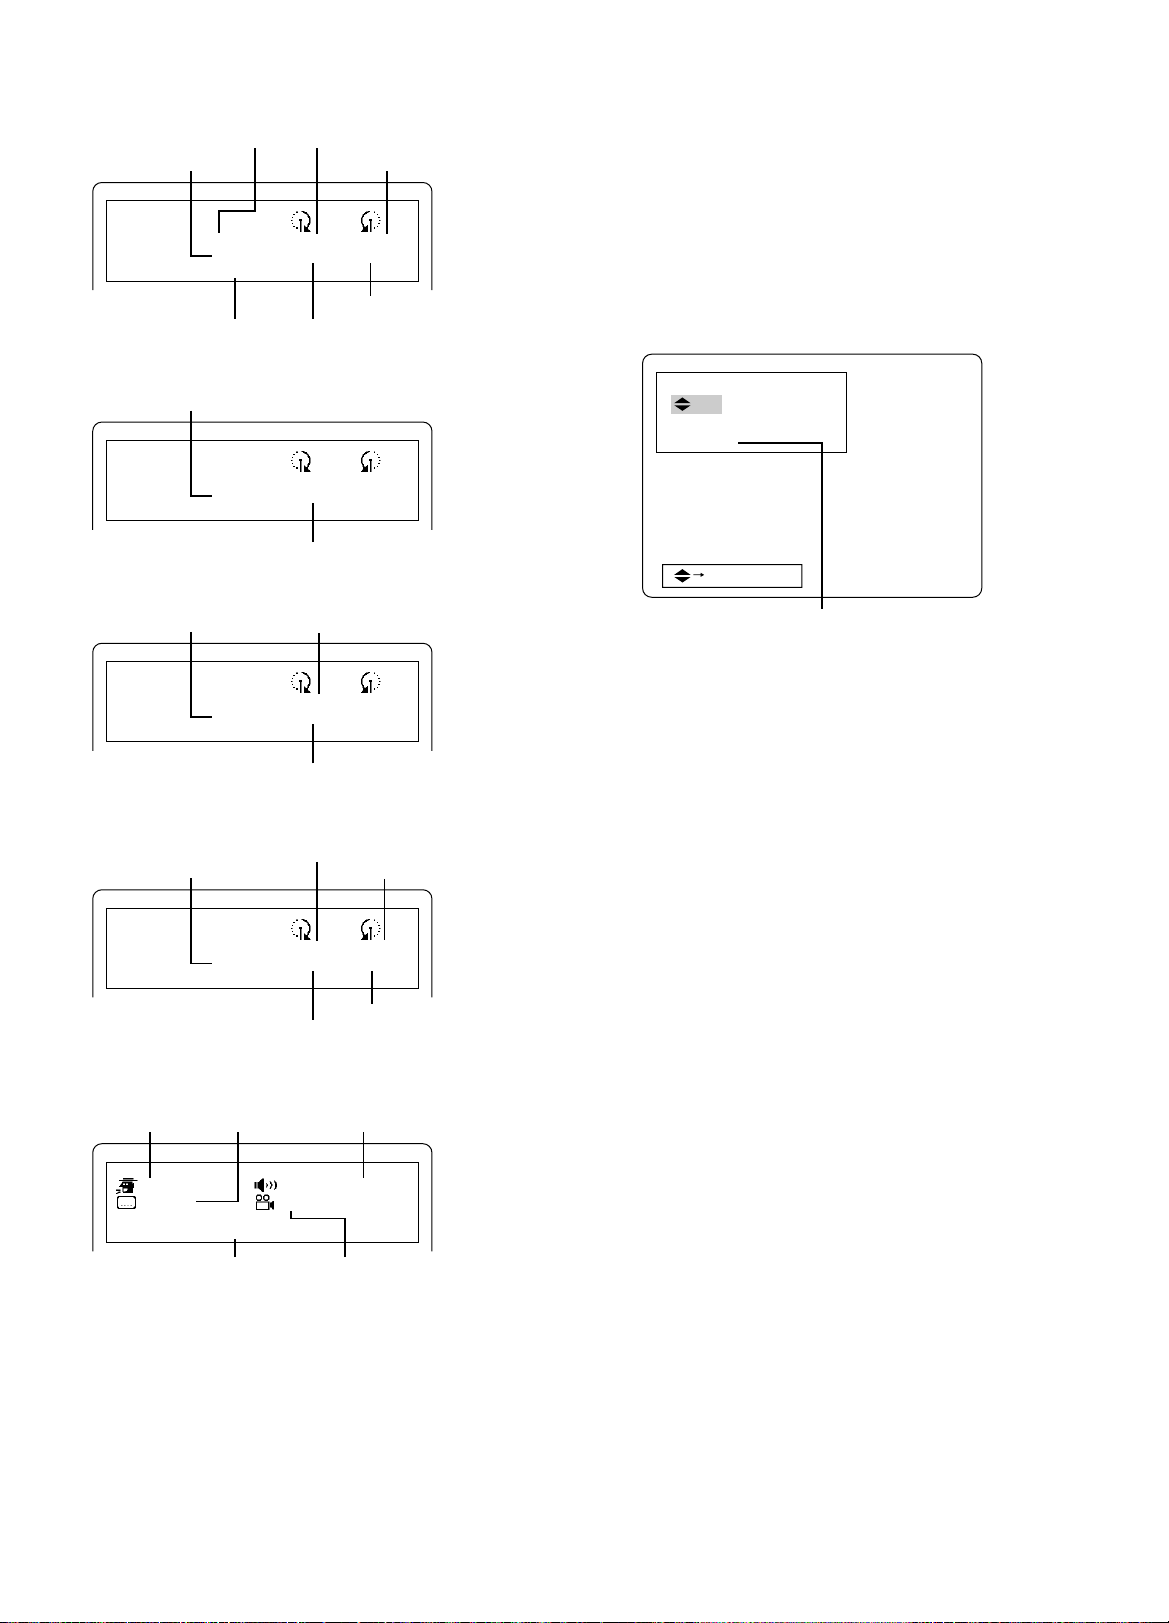
Setting the night mode
TEST TONE
LEVEL : B A QUIT : TEST
L
0
0
LS
C
0
R
0
0
RS
When the volume is set to a low level, for example, at night, setting the
night mode to “ON” will make sounds at low-volume levels easy to hear.
If you do not want sudden and drastic sound level changes due to
explosive sounds etc., setting this mode to “ON” will reduce extreme
sound level changes.
Press the NIGHT button.
The FL display becomes dimmer than usual. “NIGHT ON” is shown on the
FL display and the “NIGHT” indication in red letters lights up.
To set the night mode to “OFF”, press the NIGHT button again.
About Input/Output channel indicators (L, C, R, SW,
LS, RS)
These indicators are switched to the input channel display or output
channel display by the function or audio signal format.
Function: DVD/CD, V1 OPT, V2 COAX
Audio signal format: Display mode
PCM: Displays speaker output channel (Output display)
Dolby Digital: Displays the original channel (Input display)
DTS: Displays the original channel (Input display)
MP3/WMA: Displays speaker output channel (Output display)
Function: TV, VIDEO1, VIDEO2, FM TUNER, AM TUNER
Audio signal format: Display mode
Analog: Displays speaker output channel (Output display)
Note:
- When headphones are connected in the output display mode, “L” and
“R” remain lit only.
- Output and Input display modes are not switch by manual.
- When “SW” appears in the input display, LFE (Low Frequency Effect)
channel is included in the audio source.
Adjusting the FL display brightness
While pressing the ON SCREEN button on the remote control, press the
n button on the main unit.
NORMAL (Normal)
wv
DARK (Dark)
Locking the disc tray
It is possible to lock the disc tray in order to prevent children from misusing
it.
With the disc tray opened by pressing the q button, press and hold the q
button on the main unit until “LOCKED” appears on the FL display.
As a result, it becomes impossible to open the disc tray by pressing the q
button.
- To release the disc tray lock, press and hold the q button on the main
unit until “UNLOCKED” appears on the FL display.
- When the q button is pressed while the disc tray is locked, “DISC
TRAY LOCKED” appears on the TV screen and “LOCKED” appears
on the FL display.
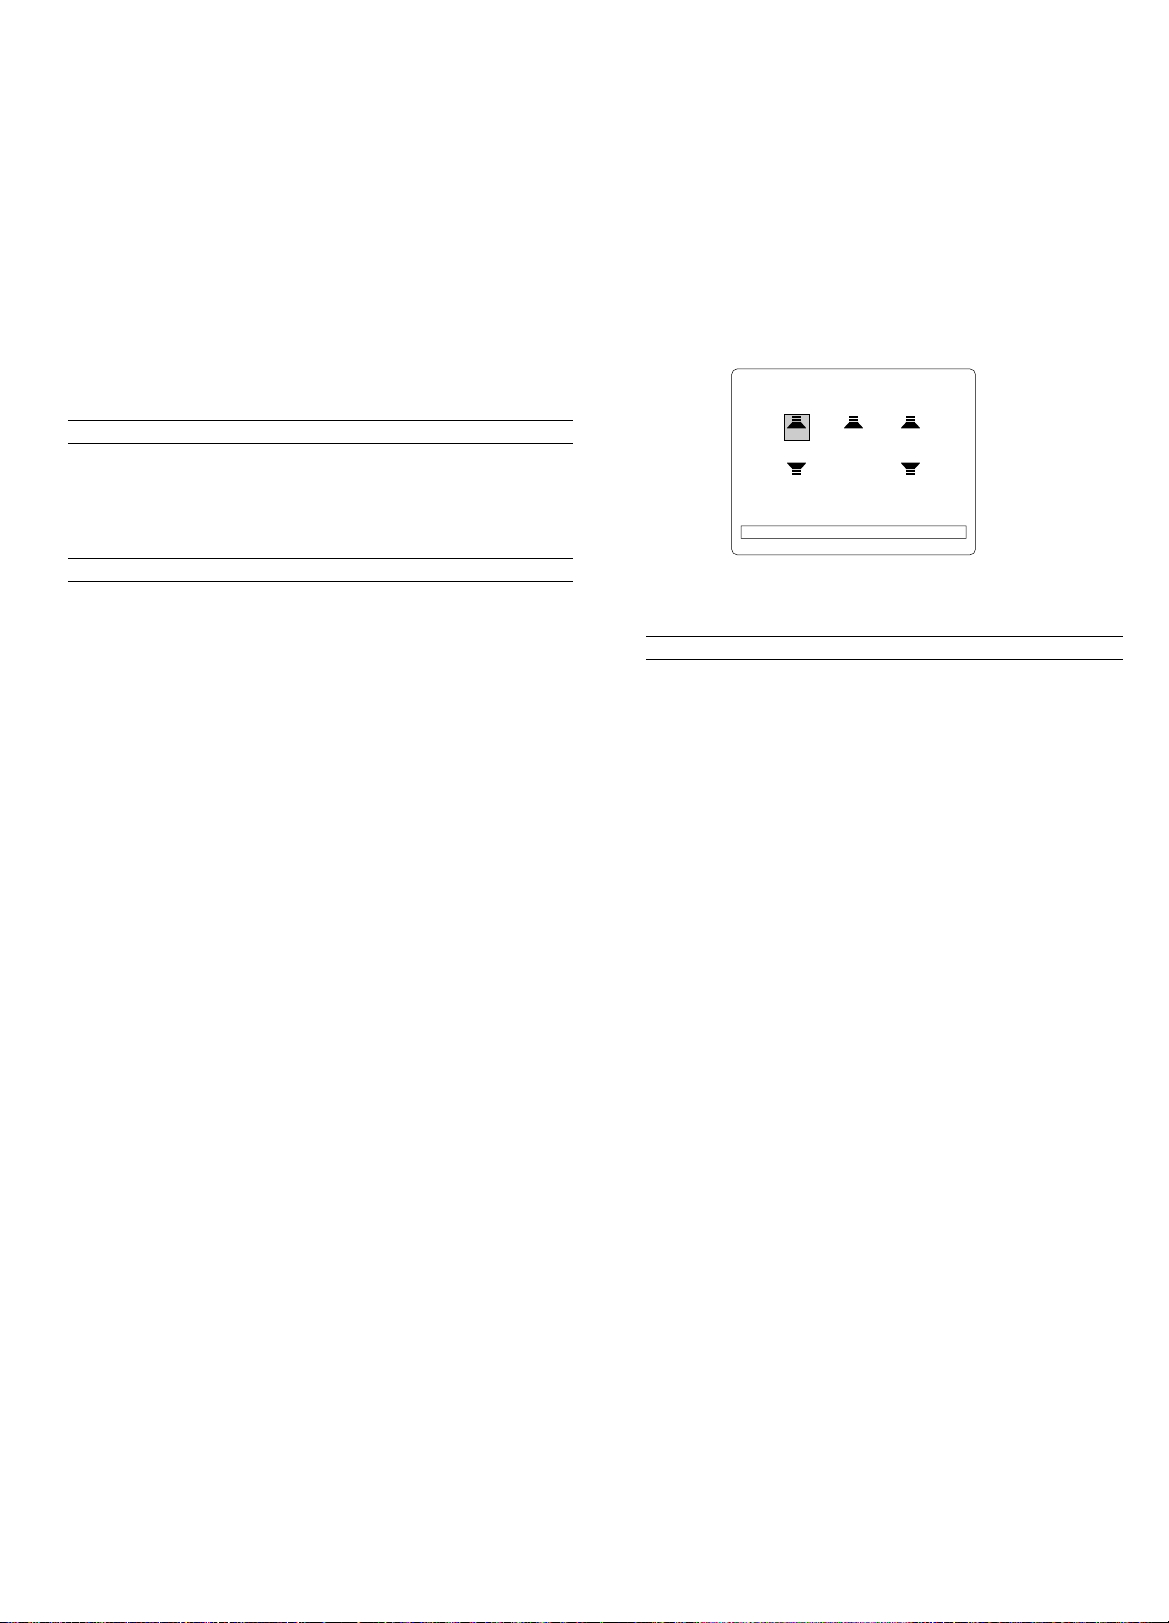
Adjusting the volume balance of the front, centre
and surround speakers
This unit is set to the standard level at the factory before shipping. In order
to enjoy a more effectual surround-sound effect, adjust the volume
balance of each speaker according to the size of the room and the
placement of the speakers.
Preparation:
- Power on the TV and select the video input connected to the unit.
- If a disc is being played back, press the n button twice to stop the
playback completely.
- Disconnect the headphones if connected.
1. Select “DVD/CD” by pressing the FUNCTION button.
2. Press the TEST button. The “TEST TONE” screen appears on the TV
screen.
“L” blinks and “FNTL 0” appears on the FL display.
The test tone is heard from the speakers in the following sequence
with the display changing every approx. 2 seconds.
TV screen (FL display): Speaker
L ([L] FNTL 0): Front left speaker
C ([C] CENT 0): Centre speaker
R ([R] FNTR 0): Front right speaker
RS ([RS] SURR 0): Surround right speaker
LS ([LS] SURL 0): Surround left speaker
3.
Adjust the volume of the total test tone by pressing the VOL “+” or “–”
button.
4. Press the b / a button while the test tone is heard from the speaker
whose volume is to be adjusted.
At the listening position, make adjustments so that the volumes of the
test tones heard from all the speakers become the same.
The level is shown on the TV screen and the FL display.
Adjustable range:
L, R : –10 to 0
C, RS, LS : –10 to +10
If necessary, repeat this step.
5. Press the TEST button. The “TEST TONE” screen disappears.
Note:
After the test tone is heard from each speaker five times, speaker setting
ends automatically.
Adjusting the subwoofer level
- Disconnect the headphones if connected.
1. Press the TRIM button. “FNTL 0” appears on the FL display.
2. Select “SUBW 0” by pressing the ENTER button.
3. Press the b / a button to adjust the level as desired.
Adjustable range:
SUBW : –10 to +10
4. Press the TRIM button. The displayed speaker and level disappear.
Note:
- In the case of adjusting the subwoofer level, the test tone does not
sound. It is recommended to adjust the subwoofer level while playing
back music, etc.
- If no button is operated for approx. 15 seconds during setting, the
speaker setting ends automatically.
GB-10[ENGLISH]

DISC PLAYBACK [DVD] [VCD] [CD]
DVD
C
D
RSLSSW
RCL
Important note:
- Some DVD or VCD discs have different functions that may not be
explained in this instruction manual. You may need extra
instructions. In this case, please follow the instructions displayed
on the TV screen or jacket or case of the disc.
- The disc information takes priority in various setting.
- “ ” may appear on the TV screen during operation. This icon
means that the function is not available on the disc now.
- In this instruction manual, the language in on-screen display is
English. If you changed the language, please follow the selected
language in on-screen display.
- The screen shown as an example in this manual may be different
from the actual screen.
- For improvement, on-screen displays subject to change without
notice.
Disc playback
1. Press the q button. The disc tray opens. “OPEN” is shown on the FL
display. “OPEN” and “SANYO” are shown on the TV screen.
2. Place the disc on the disc tray. Properly place the disc with the signal
surface faced downward (Fig. 19).
3. Press the a (Play) button.
The disc tray closes automatically. “CLOSE”, “READING” and “ a ”
are shown on the TV screen and playback is started.
Example: DVD
Chapter number Elapsed playing time
- If the disc is placed on the tray with the signal surface faced upward
or the disc is badly scratched, “NO PLAY” is shown on the TV screen.
In this case, place the disc properly or replace the disc.
Preparations
- When playing back a DVD or VCD disc, power on the unit and TV and
select the video input connected to the unit.
- Select the desired language for the on-screen menus. The following
languages can be selected.
English (default), Spanish, French, German, Italian, Portuguese,
Japanese, Chinese
(See “Changing the language setting” on page 19.)
- According to the TV connected to the unit, select a video signal output
mode and playback picture size (See pages 7, 20).
Selecting the progressive mode (Only for NTSC discs)
Note:
If you use a TV with PAL colour system only or non-progressive-scan TV
with NTSC, skip this section.
Please check the TV and the connection.
- The TV is NTSC colour system capability and ready for progressive
mode.
- The COMPONENT VIDEO OUT sockets of the unit are connected to
the COMPONENT VIDEO INPUT sockets of the TV.
Select “Changing the display setting” setting as follows. (See page 20.)
1. Select “VIDEO OUT SELECT: COMPONENT”.
2. Select “NTSC DISC: NTSC PROGRESSIVE”.
3. Select “PROGRESSIVE MODE” as desired.
When a disc menu appears
There may be cases where a menu appears when a DVD disc is played
back. In such cases, select the desired item by using the 4/5/b/a buttons
and ENTER button.
There may also be cases where a menu appears when a VCD disc is
played back.
Note:
- Do not touch the disc tray while it is moving.
- Never place anything except a disc on the disc tray. Foreign objects
can damage the unit.
- Only one disc must be placed on the disc tray at a time.
- To open or close the disc tray, be sure to use the q button. Do not
press the disc tray with your hand.
Stopping playback
Press the n button.
To start playback from the point where you stopped (Resume
function)
When the n button is pressed once during playback, “RESUME n ” is
displayed.
When the a (Play) button is pressed, playback starts from the point where
you stopped.
To stop playback completely
Press the n button twice. Playback is stopped completely. When the a
(Play) button is pressed, playback starts from the beginning of the disc.
Taking out the disc
Press the q button. Take out the disc after the disc tray opens completely.
Press the q button again to close the disc tray.
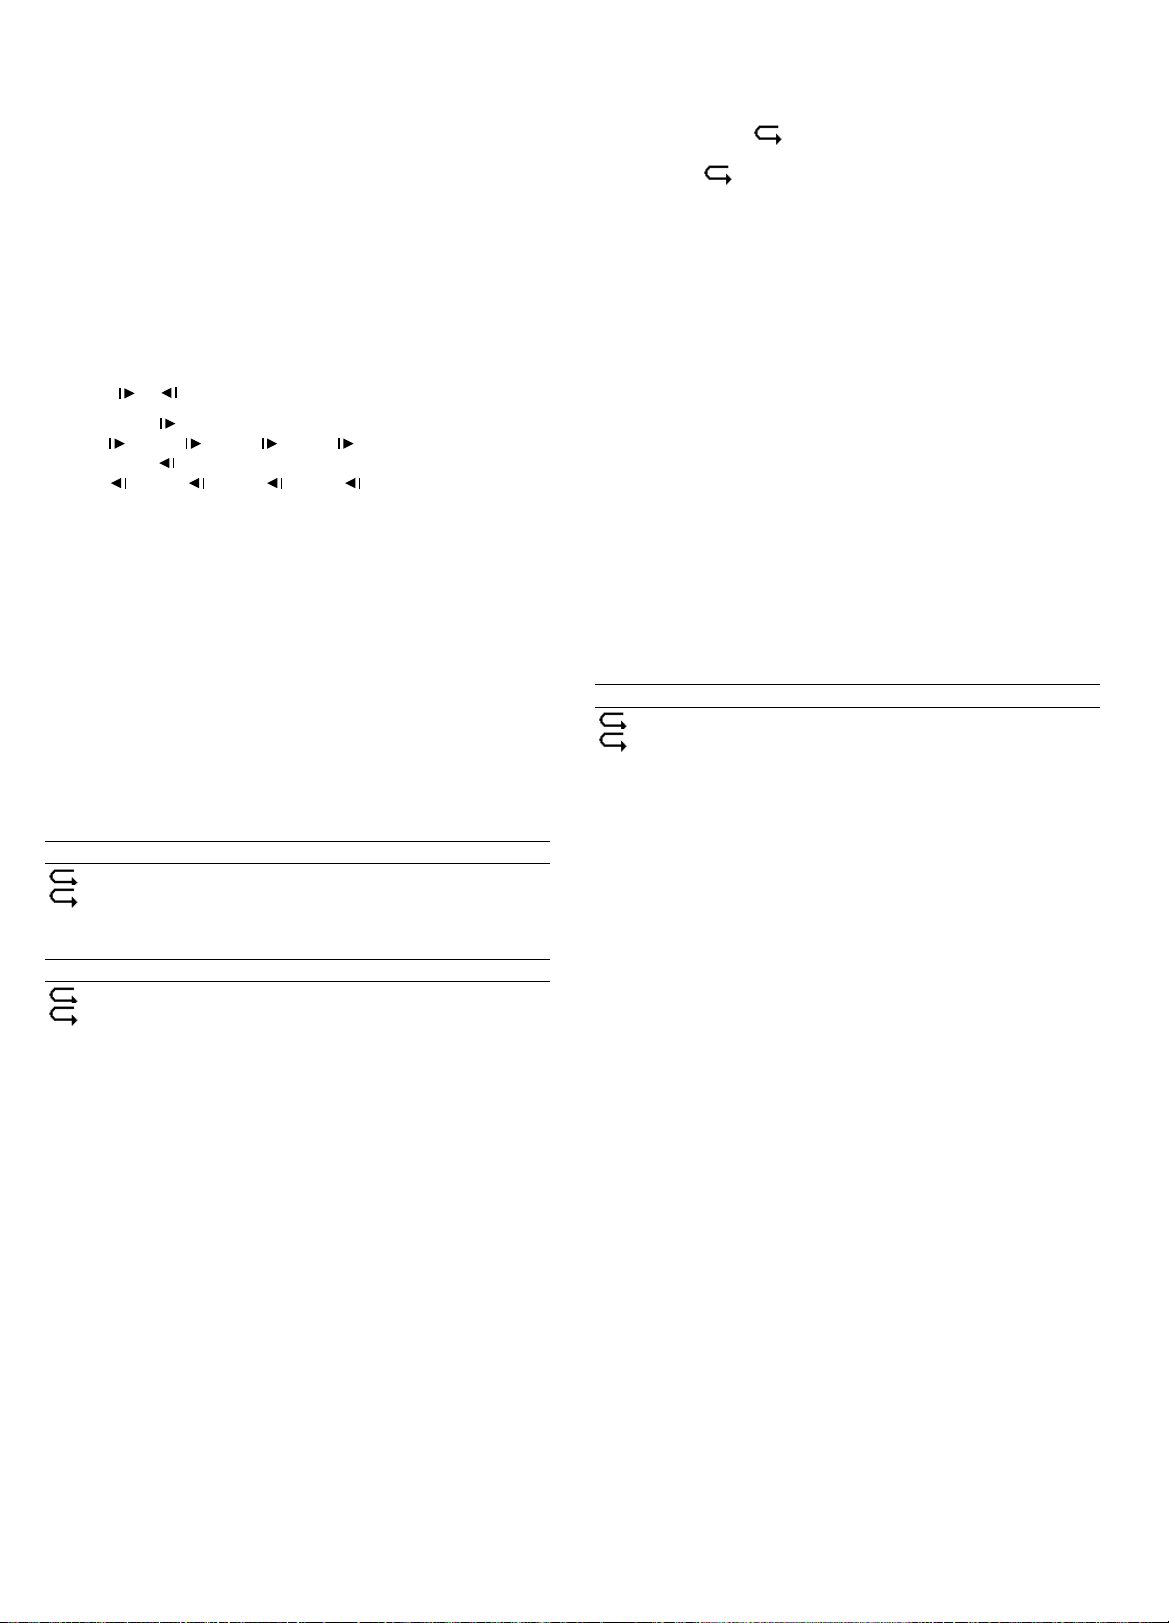
Skipping to what you want to play back (Fig. 20)
Skipping forward
Press the e button during playback.
Playback starts from the beginning of the next chapter or track.
Skipping backward
Press the f button during playback.
Playback starts from the beginning of the chapter or track being played
back. When the button is pressed again, playback starts from the beginning
of the previous chapter or track.
GB-11 [ENGLISH]

CHAPTER SEARCH _ _ _
TIME SEARCH _ : _ _ : _ _
VARIOUS DISC PLAYBACK FUNCTIONS
“ ” may appear on the TV screen during operation. This icon means
that the function is not available on the disc now.
Making selections on the DVD menu [DVD]
1. Press the MENU button. The DVD menu appears.
2. Select the desired item by pressing the 4/5/b/a buttons.
In the case of some discs, selections can be made with the Number
button.
3. Press the ENTER button. The selected item is executed or the next
menu is displayed.
Make setting as desired by repeating steps 2 and 3.
Making selections on the top menu [DVD]
1. Press the TOP MENU button. The top menu appears.
2. Select the desired title by pressing the 4/5/b/a buttons.
On some discs, selections can be made with the Number buttons.
3. Press the ENTER button. Playback of the selected title starts.
Note:
Selecting a menu operation may differ depending on the disc used and
may not be possible on some discs.
Making selections on the menu of a VCD [VCD]
When a VCD (Video CD or Super video CD) with playback control (PBC)
function is played back, the menu appears automatically. Operate the
buttons according to the menu.
The operation may differ depending on the disc used. Read the instruction
manual of the VCD.
1. Play back a disc with playback control function. The menu appears.
2. Select the desired item by pressing the Number buttons.
3. Press the ENTER button. Playback of the selected title starts. If
another menu appears, operate the buttons according to the menu
screen.
To return to the menu screen, press the RETURN button during playback.
Play back the disc without using the menu screen
[VCD]
Note:
If “PBC” appears on the FL display, press the n button twice. “PBC”
disappears.
1. Enter the desired track number with the Number buttons in the
complete stop mode.
It is also possible to make selections by pressing the f or e button
repeatedly.
2. Press the ENTER or a (Play) button. Playback of the selected track
starts.
To return to the menu screen (PBC playback), stop playback completely
by pressing the n button twice, and then press the a (Play) button.
Chapter search [DVD]
1. Press the SEARCH MODE button twice during playback.
Example:
2. Enter the desired chapter number with the Number buttons.
3. Press the ENTER or a (Play) button. Playback starts from the
selected chapter.
Note:
- To make a correction during setting, press the CLEAR button to clear
the entered number displayed on the screen.
- To cancel the setting, press the SEARCH MODE button 1 to 3 times
to clear the display.
Time search [DVD] [VCD] [CD]
Note:
For VCD: If “PBC” appears on the FL display, press the n button twice.
1. Press the SEARCH MODE button three times for a DVD disc or press
the SEARCH MODE button once for a VCD or CD during playback.
Example:
2. Enter the desired time with the Number buttons.
Example: 1 hour 4 minutes 8 seconds
Press “1” v “0” v “4” v “0” v “8”.
Example: 35 minutes 46 seconds
Press “3” v “5” v “4” v “6”.
3. Press the ENTER or a (Play) button. Playback starts from the
specified time.
Track search [VCD] [CD]
1. Enter the desired track number with the Number buttons.
Example: To select Track No.15, press “1” and then “5”.
2. Press the ENTER or a (Play) button. Playback starts from the
selected track.
Still picture [DVD] [VCD]/Pause [CD]
Press the k button during playback. “ k ” appears on the TV screen and the
FL display. To return to normal playback, press the a (Play) button.
Frame by frame advance playback [DVD] [VCD]
Press the k button during still picture.
Each time the button is pressed, “ k a ” appears on the TV screen and the
picture advances one frame.
To return to normal playback, press the a (Play) button.
Title search [DVD]
1. Press the SEARCH MODE button once.
Example:
TITLE SEARCH _ _
2. Enter the desired title number with the Number buttons.
Example: To select Title No.12, press “1” and then “2”.
3. Press the ENTER or a (Play) button. Playback starts from the
selected title.
GB-12[ENGLISH]
Fast playback [DVD] [VCD] [CD]
Press the c or d button during playback or still picture.
Fast forward: c button
[DVD] [VCD]
FF1 c v FF2 c v FF3 c v FF1 c ...
[CD]
FF1 c v FF2 c v FF1 c ...
Fast reverse: d button
[DVD] [VCD]
FR1 d v FR2 d v FR3 d v FR1 d ...
[CD]
FR1 d v FR2 d v FR1 d ...
To return to normal playback, press the a (Play) button.
Slow motion playback [DVD] [VCD]
Press the or button during playback or still picture.
Forward slow: button [DVD] [VCD]
SF1 v SF2 v SF3 v SF1 ...
Reverse slow: button [DVD]
SR1 v SR2 v SR3 v SR1 ...
To return to normal playback, press the a (Play) button.
Note:
- The sound is muted during still picture (pause), frame by frame
advance playback and slow motion playback.
- In the case of a DVD or VCD, the sound is muted during fast playback.
Repeat playback [DVD] [VCD] [CD]
It is possible to repeat the whole disc, title, chapter or track.
Note:
For VCD: If “PBC” appears on the FL display, press the n button twice to
turn the indication off.
Select a repeat mode by pressing the REPEAT button during playback.
Each time the button is pressed, the repeat mode selection changes as
shown below.
[DVD]
TV screen (FL display): Operation
CHAPTER (REPEAT 1): Repeat of chapter being played back
TITLE (REPEAT ALL): Repeat of title being played back
OFF (None): Normal playback mode
[VCD] [CD]
TV screen (FL display): Operation
TRACK (REPEAT 1): Repeat of track being played back
DISC (REPEAT ALL): Repeat of whole disc
OFF (None): Normal playback mode
To return to normal playback, select “OFF” by pressing the REPEAT
button.
Designated range repeat playback [DVD] [VCD] [CD]
(Fig. 21)
1. Press the A-B REP button at the beginning of the section you want to
repeat (Point A). “ A -” appears on the TV screen.
2. Press the A-B REP button at the end of the section you want to repeat
(Point B). “ A - B” appears on the TV screen.
The specified section (between points A and B) is played back
repeatedly.
To return to normal playback, select “OFF” by pressing the A-B REP
button.
Random playback [VCD] [CD]
Note:
For VCD: If “PBC” appears on the FL display, press the n button twice to
turn the indication off.
Press the RANDOM/RDS button.
“RANDOM PLAY” appears on the TV screen, “RDM” appears on the FL
display and the tracks are played back at random.
To stop random playback, press the RANDOM/RDS button again.
Random playback is stopped to return to normal playback.
Note:
- When the CLEAR button is pressed during random playback, “OFF”
appears on the TV screen and random playback is cleared to return
to normal playback.
Repeat playback at random [VCD] [CD]
Press the REPEAT button during random playback to select a repeat
mode.
TV screen (FL display): Operation
TRACK (REPEAT 1): Repeat of track being played back
RANDOM (REPEAT ALL): Repeat of all tracks at random
OFF (None): Normal playback mode
GB-13 [ENGLISH]
Programmed playback [VCD] [CD]
It is possible to select tracks and play them in the desired order. Up to 32
selections can be programmed.
Note:
For VCD: If “PBC” appears on the FL display, press the n button twice to
turn the indication off.
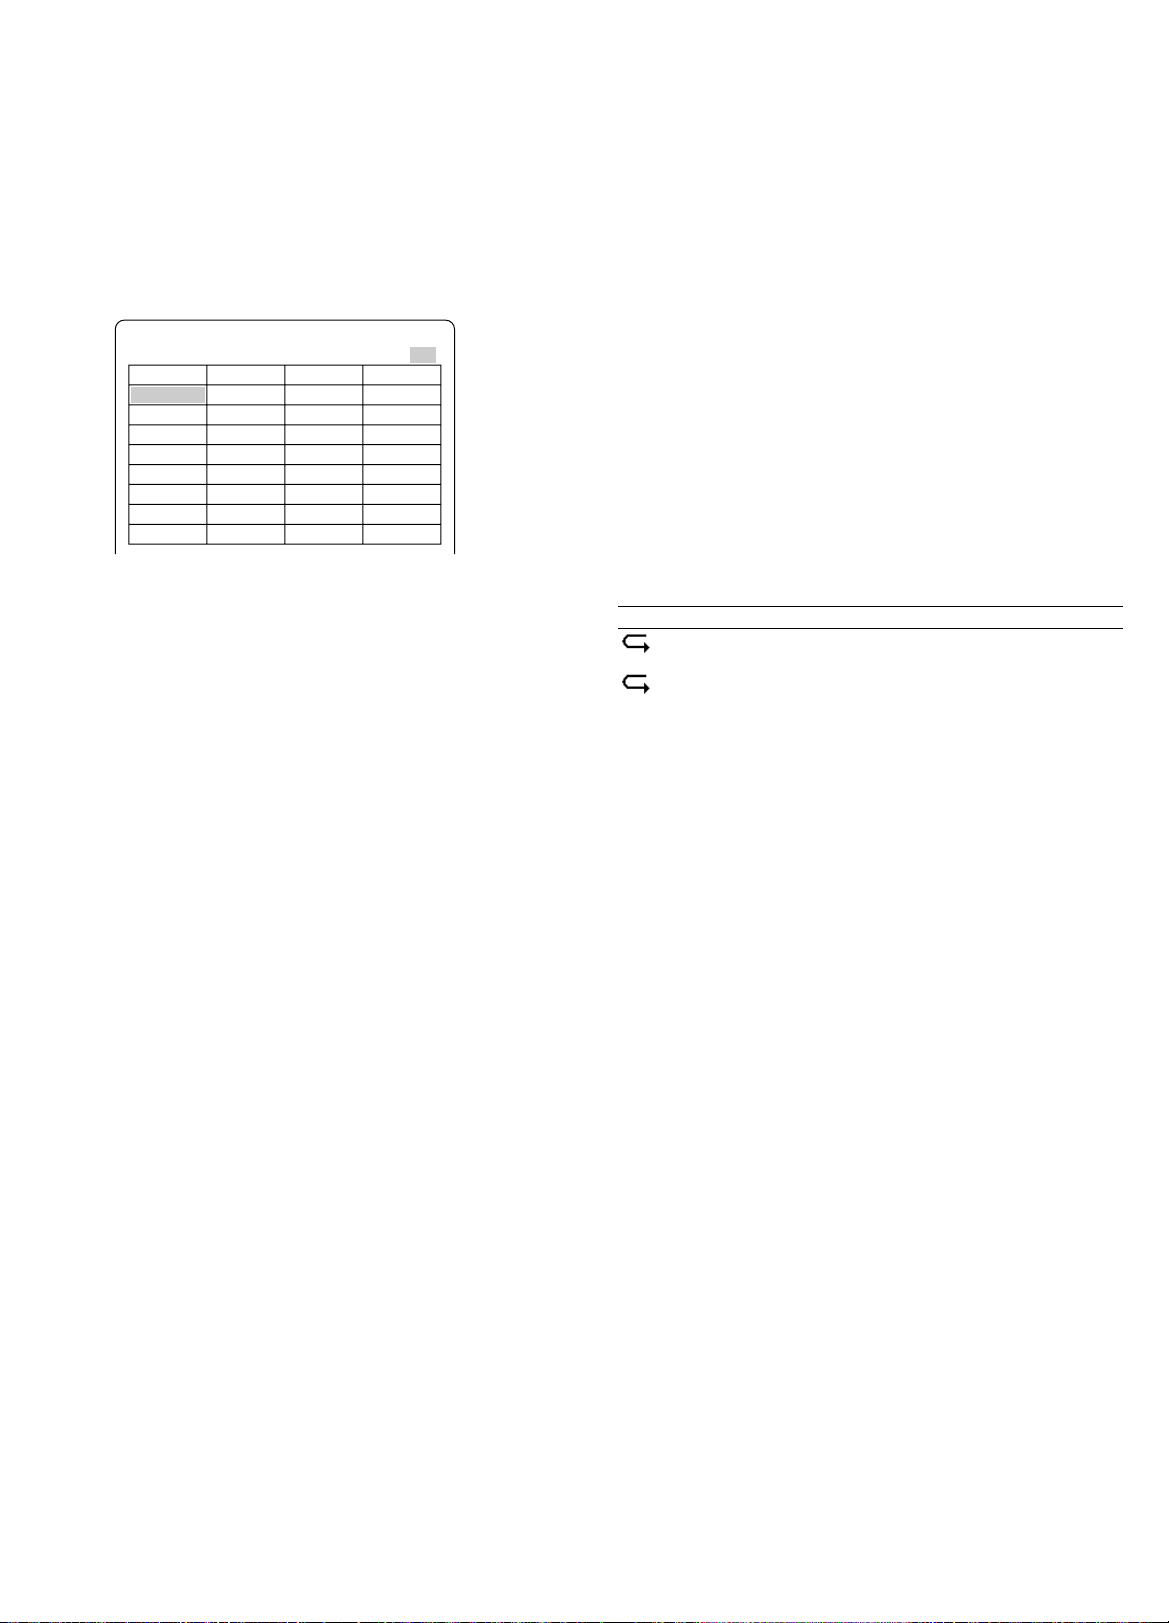
1. Press the PROG button in the stop mode.
The “PROGRAM” screen appears on the TV screen.
“PGM” blinks on the FL display.
2. Select the desired track number with the Number buttons.
Example: To select Track No.21, press “2” and then “1”.
To select Track No.3, press “3”.
PROGRAM
All Clear
No. : Tr.
1 : – –
2 : – –
3 : – –
4 : – –
5 : – –
6 : – –
7 : – –
8 : – –
Clear No. 1 Track 3
No. : Tr.
9 : – –
10 : – –
11 : – –
12 : – –
13 : – –
14 : – –
15 : – –
16 : – –
No. : Tr.
17 : – –
18 : – –
19 : – –
20 : – –
21 : – –
22 : – –
23 : – –
24 : – –
No. : Tr.
25 : – –
26 : – –
27 : – –
28 : – –
29 : – –
30 : – –
31 : – –
32 : – –
- To make a correction during programming, select the track
number again by pressing the Number buttons.
- It is also possible to select the track number with the 4/5 button.
3. Press the ENTER button.
The next programme number is selected.
4. Repeat steps 2 and 3 to select tracks in the desired order.
To cancel the programming, press the PROG button.
5. Press the a (Play) button while the “PROGRAM” screen is displayed.
“PGM” remains lit on the FL display, and the selected tracks are
played back in the programmed order.
Note:
- Because the programme is retained unless the disc tray is opened/
closed, it is possible to play back the programme after stopping it.
Selecting normal playback or programmed playback
[VCD] [CD]
Normal playback
Press the a (Play) button.
Programmed playback
Press the PROG button to display the “PROGRAM” screen and then press
the a (Play) button.
Clearing the programme [VCD] [CD]
To clear all the programmes
1. Press the PROG button in the stop mode.
The “PROGRAM” screen appears on the TV screen.
2. Select “All Clear” by pressing the b / a button.
3. Press the ENTER button.
All the programmes are cleared.
4. Press the PROG button.
The “PROGRAM” screen disappears.
To clear programmes one by one
1. Press the PROG button in the stop mode.
The “PROGRAM” screen appears on the TV screen.
2. Select “PROGRAM No.” by pressing the b / a button.
3. Select the number of the programme you want to clear by pressing the
4 / 5 button.
4. Select “Clear” by pressing the b / a button.
5. Press the ENTER button.
The selected programme is cleared, and the next programme
advances.
6. Repeat steps 2 to 5.
7. Press the PROG button.
The “PROGRAM” screen disappears.
Repeat playback of programme [VCD] [CD]
Press the REPEAT button during programmed playback to select a repeat
mode.
TV screen (FL display): Operation
TRACK (REPEAT 1): Repeat of programmed track being played
back
PROGRAM (REPEAT ALL): Repeat of all programmed tracks
OFF (None): Normal playback mode
Note:
- When the CLEAR button is pressed during programmed playback,
“OFF” appears on the TV screen and programmed playback is
stopped to return to normal playback. However the programme is not
cleared.
- When the disc tray is opened/closed, the programme is cleared.
- If the CLEAR button is pressed during programme-repeat playback,
the repeat function is cancelled.
Changing the programme [VCD] [CD]
1. Press the PROG button in the stop mode.
The “PROGRAM” screen appears on the TV screen.
2. Select “PROGRAM No.” by pressing the b / a button.
3. Select the number of the programme you want to change by pressing
the 4 / 5 button.
4. Select “Track” by pressing the b / a button.
5. Select the desired track number with the Number buttons.
6. Press the ENTER button.
GB-14[ENGLISH]
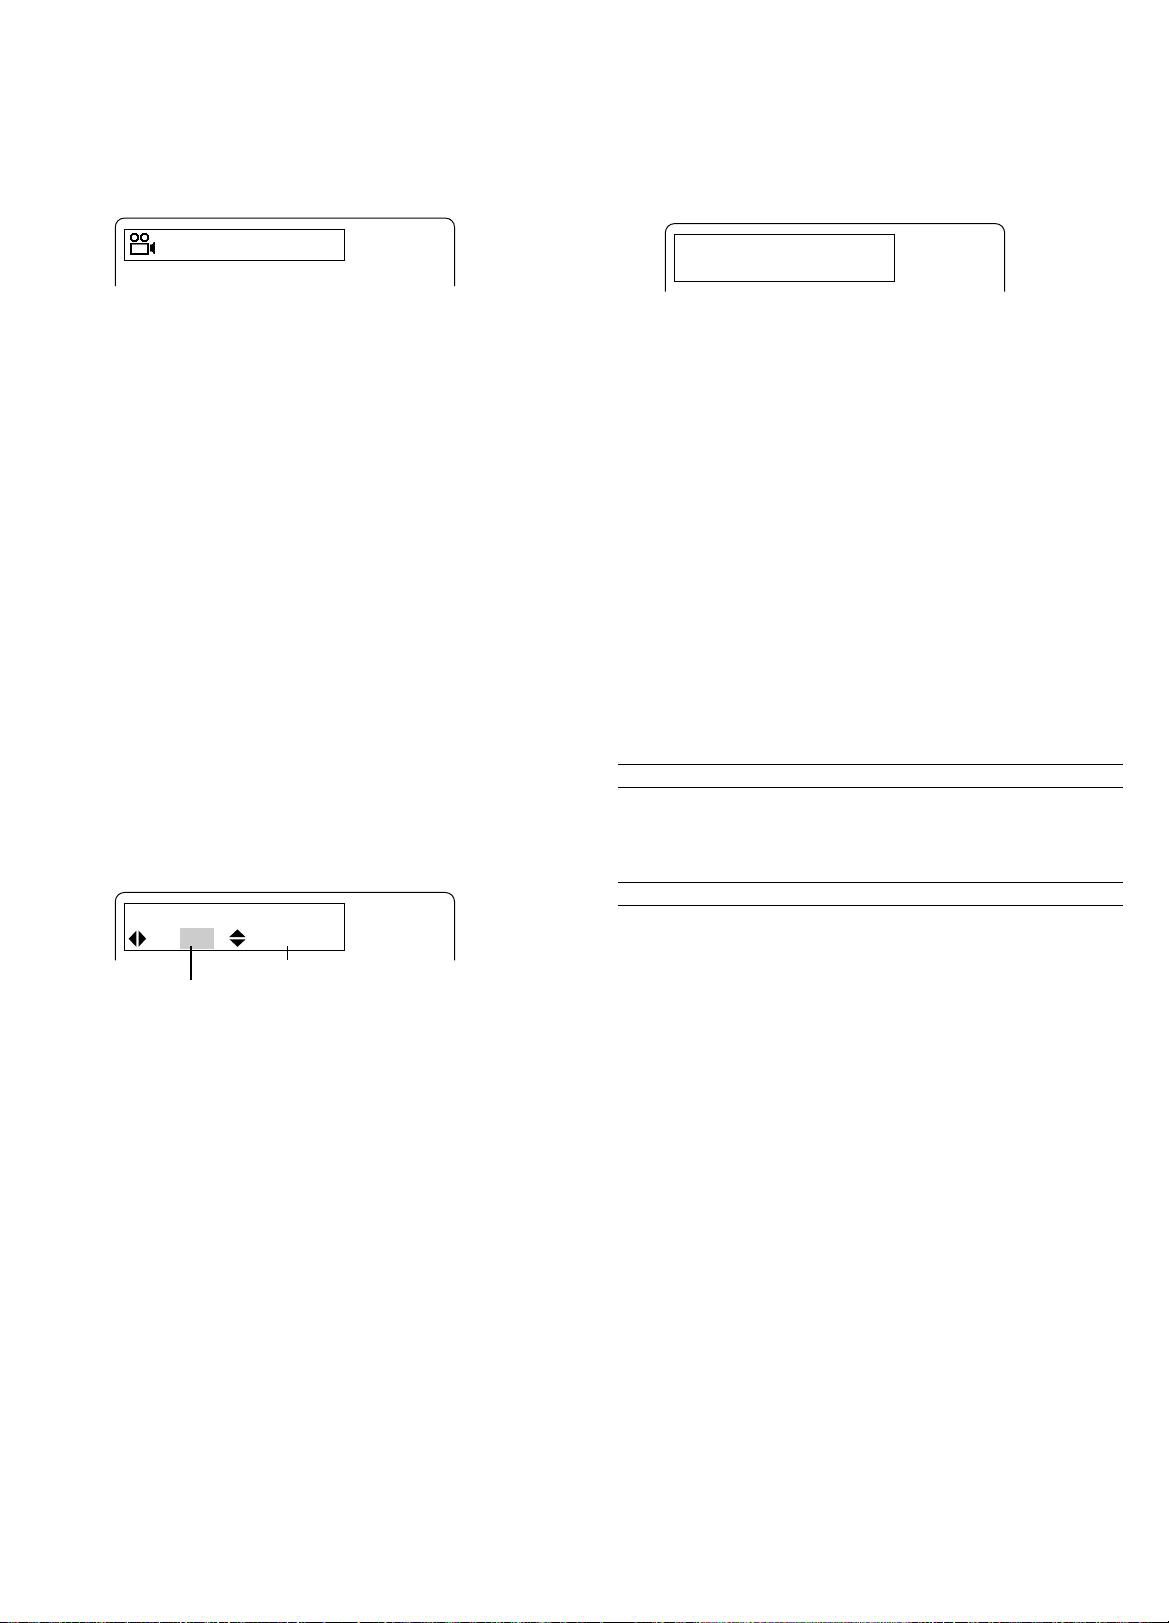
Checking the disc information [DVD] [VCD] [CD]
LAST MEMORY PLAY?
YES
NO
CLEAR
ENTER/ a
1. Press the ON SCREEN button during playback.
Example: DVD
Title number
Chapter number
DVD
TITLE : 1
CHAPTER : 3
COMPONENT : INTERLACE
Video signal output mode
Example: VCD (during PBC playback)
Track number
Title elapsed playing time
Title remaining playing time
a
00:04:12
00:01:23
02:01:32
00:00:58
Chapter remaining playing time
Chapter elapsed playing time
Starting playback from the point where you stopped
last [DVD]
By storing the point where you stopped last, it becomes possible to start
playback of the disc from that point even after turning off the power or
opening/closing the disc tray. (Last memory playback)
1. Press the LAST MEMORY button during playback.
“LAST MEMO n ” appears on the TV screen and playback stops.
“L.M.-STOP” appears on the FL display.
2. Press the q button to take out the disc or press the z/ON button to turn
off the power.
3. Place on the disc tray the disc for which the last stopping point is stored
or press the z/ON button to turn on the power.
The “LAST MEMORY PLAY?” screen appears.
- It may be necessary to press the a (Play) button on some discs.
VCD
DISC :
TRACK : 2
COMPONENT : INTERLACE
:
00:45
a
:
:
Track elapsed playing time
Example: VCD (during playback not using PBC function)
Track number Disc elapsed playing time
VCD
DISC :
TRACK : 4
COMPONENT : INTERLACE
29:25
00:45
a
:
:
Track elapsed playing time
Example: CD
Disc elapsed playing time
Track number
CD
DISC :
TRACK : 2
COMPONENT : INTERLACE
Disc remaining playing time
a
07:23
03:40
31:46
01:08
Track remaining playing time
Track elapsed playing time
2. Press the ON SCREEN button again if during playback of DVD.
Example: DVD
Subtitle language
A kind of audioAudio language
The memory is released.
4. Press the ENTER or a (Play) button.
When “YES” is selected, playback starts from the point where you
stopped last.
The stopping point data is cleared after last memory playback.
Note:
- Last memory playback is available for up to five discs.
- Last memory playback may not be available on some discs.
- Unlike the resume function, the stopping point data is not cleared even
if the disc is taken out. However if last memory playback is set for more
than five discs, the stopping point data is cleared in chronological
order.
- The last memory can be recorded on only one position for one disc.
DVD
ENGLISH
CHINESE
COMPONENT : INTERLACE
DOLBY DIGITAL3/2.1
1/1
Video signal output mode
Camera angle
a
To clear the display on the screen, press the ON SCREEN button again.
GB-15 [ENGLISH]
Selecting the desired camera angle [DVD] (Fig. 22)
AUDIO CHANGE
01 ENGLISH
In the case of a DVD disc (multi angle) that contains scenes shot
simultaneously from multiple camera angles, it is possible to select the
desired camera angle.
Press the ANGLE button during playback.
Each time the button is pressed, the angle selection changes.
Example:
3
Selecting audio soundtrack language of DVD [DVD]
(Fig. 23)
Multiple audio soundtrack languages are recorded on some DVD discs. In
the case of such discs, it is possible to select the desired language.
Press the AUDIO button during playback or still picture.
Each time the button is pressed, the language selection changes.
Example:
Angle replay [DVD]
Press the A.REPLAY button during multi-angle playback.
The unit skips back to the scene that was played back approx. 10 seconds
ago and selects the next angle for playback. Each time the button is
pressed, the angle selection changes.
Selecting picture mode [DVD] [VCD] [CD]
Select a picture mode by pressing the PICTURE MODE button.
Each time the button is pressed, the picture mode selection changes as
shown below.
STANDARD v CINEMA 1 v CINEMA 2 v STANDARD ...
STANDARD: Standard picture mode
CINEMA 1: Picture contrast is emphasized, making the colours of
picture dimmer as a whole. Clear-cut picture is obtained.
CINEMA 2: Picture contour is softened, making the colours of picture
clearer as a whole. Select this mode when noise is
conspicuous.
Selecting subtitle language [DVD]
Some DVD discs have multiple subtitle languages recorded on them and
such subtitle languages can be displayed on the TV screen during
playback. If multiple subtitle languages are recorded, it is possible to
select the desired subtitle language. It is also possible to turn on/off the
subtitle display.
1. Press the SUBTITLE button during playback or still picture.
The current subtitle setting is displayed.
Example:
SUBTITLE CHANGE
ON/OFF 01 ENGLISH
Currently selected subtitle language
Currently selected subtitle display
2. To turn on/off the subtitle display, select “ON” or “OFF” by pressing the
b / a button.
ON: Displaying the subtitle
OFF: Not displaying the subtitle
When changing the subtitle language selection, select the desired
language by pressing the 4 / 5 button.
To clear the setting screen, press the SUBTITLE button again.
Note:
- When the power of the unit is turned on/off or the disc tray is opened/
closed, the selected subtitle language is cancelled to return to the
original setting.
- When selecting an audio soundtrack recorded in DTS mode, “dts”
appears on the FL display.
Note:
- It is not possible to change the audio soundtrack language selection
on a disc on which multiple audio soundtrack languages are not
recorded.
- On some discs, it may not be possible to change the audio soundtrack
language selection in spite of multiple audio soundtrack languages
being recorded on them.
- When the power is turned off or the disc is replaced, the originally
selected audio soundtrack language is restored.
Selecting audio soundtrack language of VCD or CD
[VCD] [CD]
On some video CDs, super video CDs or music CDs, it may be possible,
for example, to mute the singing voice and play only the accompaniment
for singing a song in karaoke by changing the audio channel selection.
Press the AUDIO button during playback or still picture (pause).
Each time the button is pressed, the audio channel selection changes as
shown below.
Example: Video CD or music CD
TV screen (FL display): Operation
STEREO (None): Both right and left channels
LEFT MONO (L): Left channel only
RIGHT MONO (R): Right channel only
Example: Super video CD (when the number of audio streams is two)
TV screen (FL display): Operation
1 STEREO, 2 STEREO (None): Both right and left channels
1 LEFT MONO, 2 LEFT MONO (L): Left channel only
1 RIGHT MONO, 2 RIGHT MONO (R): Right channel only
- The number of channels that can be selected depends on the number
of audio streams recorded on the disc.
Note:
When the power is turned off, the source selection is changed or the disc
is replaced, “STEREO” or “1 STEREO” is restored.
GB-16[ENGLISH]
DIR_S002
PAGE 1/ 3
DIR_S021
DIR_S022
MUSIC021
MUSIC022
MUSIC023
MUSIC024
MUSIC025
a
MUSIC026
MUSIC027
MUSIC028
MUSIC029
MUSIC030
MUSIC031
MUSIC032
45b a ENTER/ a MENU RETURN
MP3/WMA CD PLAYBACK [DATA]
ROOT
PAGE 1/ 2
DIR_S001
DIR_S002
DIR_S003
MUSIC001
MUSIC002
MUSIC003
MUSIC004
n
MUSIC005
MUSIC006
MUSIC007
MUSIC008
MUSIC009
MUSIC010
MUSIC011
45b a ENTER/ a MENU RETURN
This unit can play back MP3 or WMA (Windows Media Audio) music files
recorded on data CDs (CD-R, CD-RW, etc.).
About playback of MP3/WMA files
- Disc must conform to ISO9660 Level 1.
- This unit is not ready for Packet writing software, Joliet, Romeo or
HFS.
- If a CD has both audio CD tracks and MP3/WMA files, only the audio
CD tracks are played back.
- It may takes 60 seconds or more for this unit to read the MP3/WMA
files depending on the file structure.
- In order to obtain high sound quality, it is recommended to record data
using a sampling frequency of 44.1kHz and a bit rate of 128kbps or
more.
- Only when a file name or directory name is composed of half-size
alphanumeric characters and “_” (underscore), up to 8 characters of
the name are displayed as they are. Letters inputted otherwise will not
be displayed normally.
- This unit can recognize up to 671 files (8.3 format) or 767 directories
(8 characters). Files exceeding this limit cannot be played back. The
unit can display up to 8 directory hierarchy levels.
- Some MP3/WMA CDs may not be played back in the recorded order.
A dropout may occur or some MP3/WMA CDs may not be played back
depending on the recording conditions.
- This unit is ready for MP3’s ID tag Ver.1 and can display up to 30
characters. Only half-size alphanumeric characters can be displayed.
Characters may not be displayed properly depending on the encoding
software.
- Noise may occur before and after or in a piece of music or it may not
be played back depending on the encoding software used to create a
MP3/WMA discs. We cannot cover encoding software, encoding
operation, etc. relating to operation of a PC.
- Some MP3/WMA CDs cannot be played back depending on the
recording conditions.
<MP3>
- MP3 files with an extension “.mp3” or “.MP3” can be played back.
- Sampling frequency and bit rate of MP3 file
- 44.1kHz, 48kHz, 64kbps ~ 320kbps (constant bit rate or variable
bit rate)
- The unit conforms to only MPEG Audio Layer 3.
<WMA>
- WMA files with an extension “.wma” or “.WMA” can be played back.
- Sampling frequency and bit rate of WMA file
- 32kHz, 44.1kHz, 48kHz, 48kbps or higher
- WMA file versions 7, 8 and 9
WMA9 Professional files, WMA9 Lossless files or DRM (copyright
protection) files cannot be played back.
- When creating a WMA disc, be sure the copyright function is off.
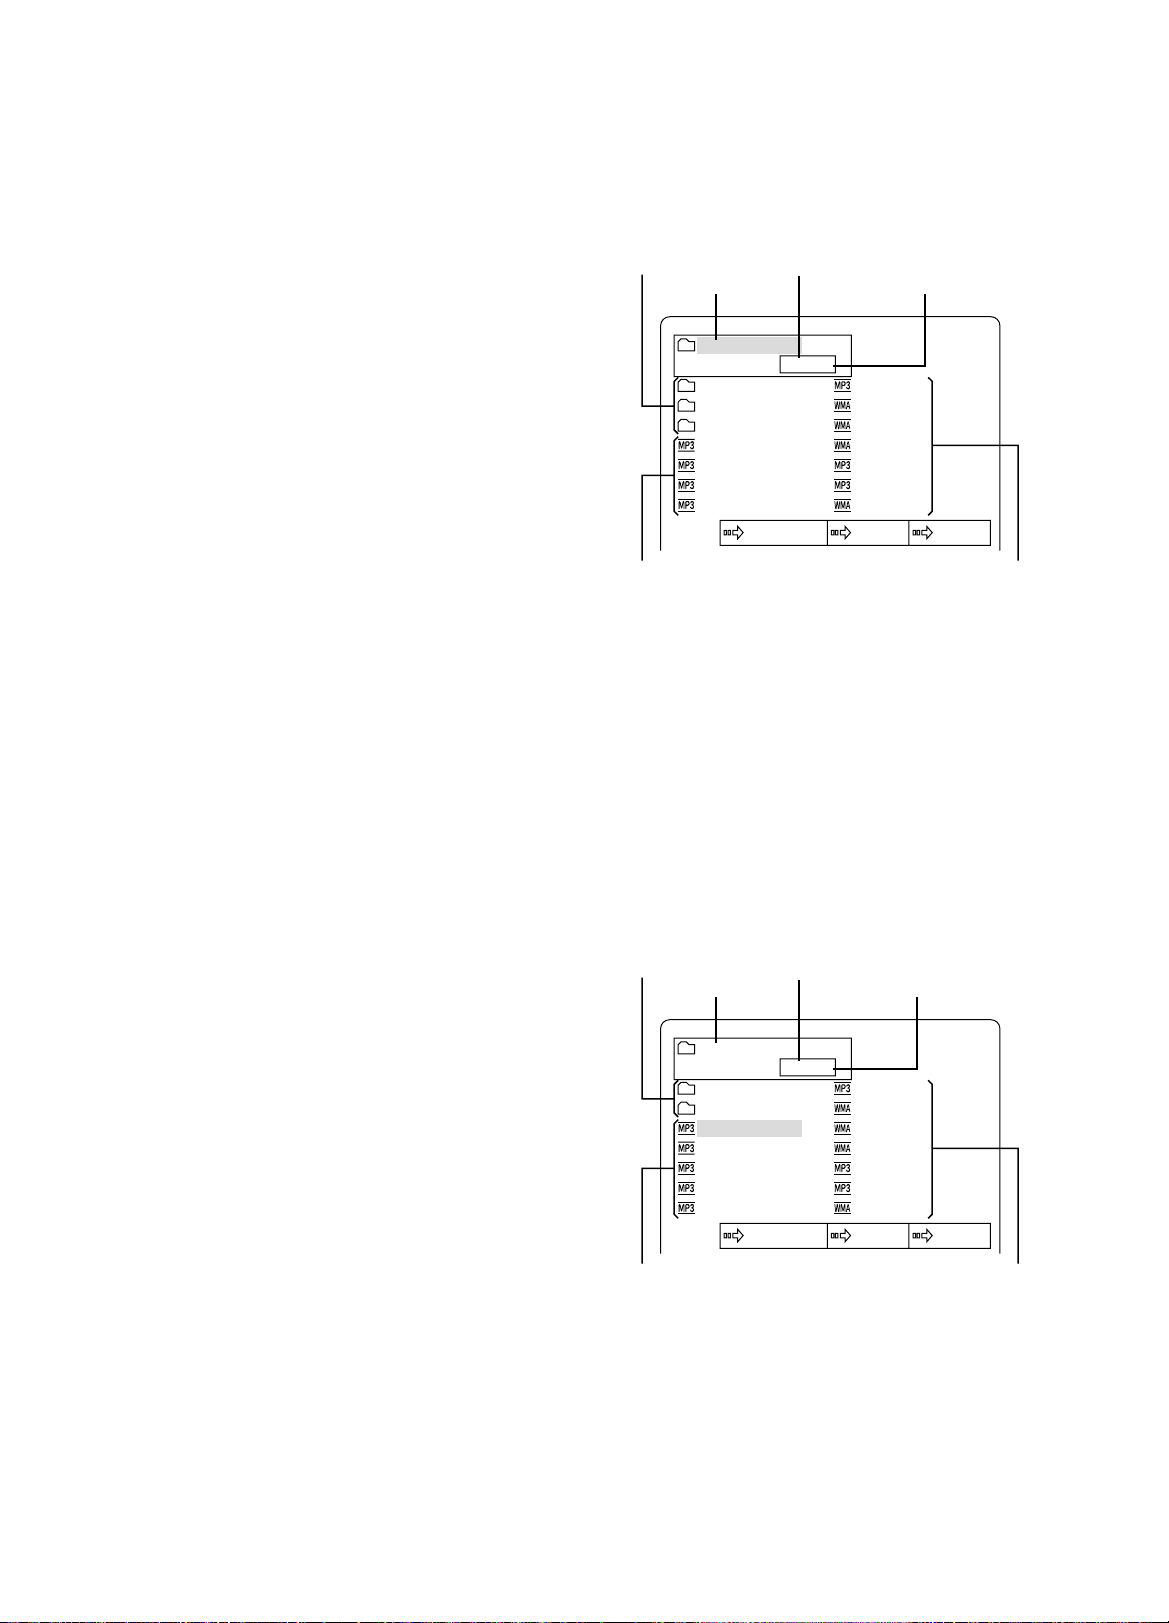
MP3/WMA CD playback
1. Press the q button. The disc tray opens.
2. Place the disc on the disc tray.
3. Press the q button.
The disc tray closes. “MP3” or “WMA” appears and then “ROOT”
appears on the FL display.
The music file/directory list screen of the first directory appears on the
TV screen.
Example:
Sub-directory
Directory name
File File
4. Select the desired file or directory by pressing the 4/5/b/a buttons.
- Each time the button is pressed, the highlighted box moves to
select a file or sub-directory in the directory.
- When selecting a file in the directory or sub-directory, select the
desired sub-directory, and then press the ENTER button to
display the contents of the sub-directory.
- To return to the previous directory screen, press the RETURN
button.
- To return to the file/directory list screen of the first directory, press
the MENU button.
5. Press the ENTER or a (Play) button.
The selected file or all the files in the selected directory are played
back, and then the subsequent music files are played back sequentially.
- “MP3” or “WMA” appears on the FL display.
- “ a ” appears and the name of the file being played back is
highlighted on the TV screen.
Example:
Sub-directory
Directory name
Current page number
Total page number
Current page number
Total page number
GB-17 [ENGLISH]
File File

Stopping playback
MP3
FILE MUSIC005
a
03 : 33
TAG INFORMATION
TITLE
ARTIST
ALBUM
True Romance
Club Lyrico
25th Anniversary Super Best
Press the n button.
Pause
Press the k button during playback.
To return to normal playback, press the a (Play) or k button.
File skip
Press the f or e button.
Note:
- When the f button is pressed while a file is being played back,
playback starts from the beginning of the file.
- Fast reverse playback and fast forward playback are not available.
- Skipping can be made only within the same directory.
Repeat playback
Select a repeat mode by pressing the REPEAT button during playback.
Each time the button is placed, the repeat mode selection changes as
shown below.
TV screen (FL display): Operation
FILE (REPEAT 1): Repeat of file being played back
DIRECTORY (REPEAT ALL): Repeat of all files in directory being
played back
OFF (None): Normal playback mode
To return to normal playback, select “OFF” by pressing the REPEAT
button.
Note:
When the CLEAR button is pressed during repeat playback, repeat
playback is cancelled and normal playback mode is selected.
Displaying the file information
If a file contains music information, it is possible to display the file
information (file name, tag information, etc.).
Press the ON SCREEN button during playback or in pause mode.
The file name, elapsed playing time and tag information (TITLE/ARTIST/
ALBUM) are shown on the TV screen.
Example:
Elapsed playing timeFile name
To clear the display on the screen, press the ON SCREEN button again.
Note:
File name and tag information are displayed correctly only when they are
composed of half-size alphanumeric characters. Other characters are
replaced by “?” (question mark) for displaying.
GB-18[ENGLISH]

CHANGING THE INITIAL SETTINGS [DVD]
The disc information takes priority in various setting.
Preparations:
Select “DVD/CD” by pressing the FUNCTION button. If a disc is being
played back, perform the following steps after stopping playback completely
by pressing the n button twice.
Changing the language setting
Select the language to be used for the on-screen display, audio, subtitle
and DVD menu.
1. Press the SETUP button in the stop mode. The “SETUP MENU”
screen appears.
SETUP MENU
a
LANGUAGE DISPLAY SPEAKER PARENTAL
5
OSD :
AUDIO :
SUB TITLE :
DVD MENU :
SELECT : 4 5 b a
SAVE&QUIT : SETUP
2. Select “LANGUAGE” by pressing the b / a buttons. The language
submenu appears.
3. Select the item you want to change by pressing the 4 / 5 buttons.
Example: To select “SUB TITLE”
SETUP MENU
ENGLISH
DISC
DISC
DISC
5. Press the SETUP button. The “SETUP MENU” screen disappears.
Note:
If the selected language is not recorded on the disc, one of the languages
recorded on the disc is used.
Note:
- In this instruction manual, the language in on-screen display
is English. If you changed the language, please follow the
selected language in on-screen display.
- For improvement, on-screen displays subject to change
without notice.
Selecting other languages
When selecting a language not shown on the menu, enter the corresponding
four-digit language code.
1. Select “OTHERS” by performing step 4 above.
The language code field appears.
2. Enter the corresponding language code by pressing the Number
buttons.
When entering a language code, refer to the LANGUAGE CODE LIST
(See page 23). To correct the entry, press the CLEAR button and enter
the language code again.
3. Press the ENTER button. The entered language is selected.
4. Press the SETUP button. The “SETUP MENU” screen disappears.
LANGUAGE DISPLAY SPEAKER PARENTAL
5
OSD :
AUDIO :
4
SUB TITLE :
5
DVD MENU :
ENGLISH
DISC
DISC
DISC
ab
4. Select the desired language by pressing the b / a buttons.
The selected language is displayed. [Example: ENGLISH]
SETUP MENU
LANGUAGE DISPLAY SPEAKER PARENTAL
5
OSD :
AUDIO :
4
SUB TITLE :
5
DVD MENU :
ENGLISH
DISC
ENGLISH
DISC
ab
Item:
Selectable languages
OSD:
ENGLISH
ITALIANO
wv
ESPAÑOL
wv
PORTUGUES
wv
FRANÇAIS
wv
wv
DEUTSCH
wv
ENGLISH ...
AUDIO/SUBTITLE/DVD MENU:
DISC
wv
wv
ITALIAN
CHINESE
ENGLISH
wv
wv
SPANISH
wv
PORTUGUESE
OTHERS
wv
wv
DISC ....
FRENCH
wv
JAPANESE
wv
- When “DISC” is selected, the language preselect on a disc is
used. When “OTHERS” is selected, the desired language should
be selected by entering the corresponding language code.
wv
wv
GERMAN
wv
GB-19 [ENGLISH]

Changing the display setting
1. Press the SETUP button in the stop mode. The “SETUP MENU”
screen appears.
SETUP MENU
a
LANGUAGE DISPLAY SPEAKER PARENTAL
2. Select “DISPLAY” by pressing the b / a buttons. The display submenu
appears.
SETUP MENU
ba
LANGUAGE DISPLAY SPEAKER PARENTAL
TV TYPE :
VIDEO OUT SELECT :
NTSC DISC :
PROGRESSIVE MODE :
SCREEN SAVER :
SELECT : 4 5 b a
SAVE&QUIT : SETUP
5
4 : 3 LB
RGB
PAL60
AUTO
ON
TV TYPE:
Set the screen size according to the TV to be connected to this unit.
4:3 LB (Letterbox):
Select when a conventional TV set is connected. When the wide
screen disc is played back, the black bands appear at the top and
bottom of screen (Fig. 24).
4:3 PS (Panscan):
Select when a conventional TV set is connected. When the wide
screen disc is played back, it displays pictures cropped to fill to your
TV screen. The left and right edges are cut off (Fig. 25).
16:9 :
Select when a wide screen TV set is connected. Played in “FULL” size
(Fig. 26). (Setting the wide screen TV to “FULL” mode is also
necessary.)
Note:
- The screen size may differ depending on the DVD discs.
- If you select “16:9” to get rid of the black bands on screen when wide
screen disc is played, picture may be slightly distorted.
- In some discs, even if “4:3 PS” is selected, the black bands may
remain on the screen.
3. Select the item you want to change by pressing the 4 / 5 buttons.
Example: To select “TV TYPE”
SETUP MENU
LANGUAGE DISPLAY SPEAKER PARENTAL
4
TV TYPE :
5
VIDEO OUT SELECT :
NTSC DISC :
PROGRESSIVE MODE :
SCREEN SAVER :
SELECT : 4 5 b a
SAVE&QUIT : SETUP
5
4 : 3 LB
RGB
PAL60
AUTO
ON
ab
4. Select the desired mode by pressing the b / a buttons.
Example: To select “TV TYPE: 16:9”
SETUP MENU
LANGUAGE DISPLAY SPEAKER PARENTAL
4
TV TYPE :
5
VIDEO OUT SELECT :
NTSC DISC :
PROGRESSIVE MODE :
SCREEN SAVER :
SELECT : 4 5 b a
SAVE&QUIT : SETUP
5
16 : 9
RGB
PAL60
AUTO
ON
ab
5. Press the SETUP button.
The “SETUP MENU” screen disappears.
VIDEO OUT SELECT:
Select the video output.
RGB: EURO AV CONNECTOR RGB OUT/TV (AUDIO) IN socket
COMPONENT: COMPONENT VIDEO OUT sockets
NTSC DISC:
Select the desired video output signal format when playing back the NTSC
discs.
VIDEO OUT SELECT: RGB
PAL60
wv
NTSC INTERLACE (Interlace)
VIDEO OUT SELECT: COMPONENT
PAL60
wv
NTSC INTERLACE (Interlace)
wv
NTSC PROGRESSIVE
(Progressive)
Note:
- If your TV is not NTSC colour system capability, select “PAL60”.
- Before selecting “NTSC PROGRESSIVE”, check the TV and the
connection.
- The TV is NTSC colour system capability and ready for progressive
mode.
- The COMPONENT VIDEO OUT sockets of the unit are connected
to the COMPONENT VIDEO INPUT sockets of the TV.
- Set the progressive signal output mode as shown below after selecting
“NTSC PROGRESSIVE”.
PROGRESSIVE MODE:
AUTO
Typical DVD video discs consist of a video source or a film source. In
this mode, the unit automatically identifies a video source or a film
source and sends video signals accordingly. Usually select this mode.
VIDEO
The term video source means that TV programmes (30 frames and 60
fields per second) such as dramas and animations are converted and
recorded on DVD disc. This mode is selected when the recorded video
signals are of the video source type.
FILM
The term film source means that movie films (24 frames per second)
are converted and recorded on DVD disc. This mode is selected when
the recorded video signals are of the film source type.
Note:
If flicker occurs when the “AUTO” mode is selected, select the “VIDEO” or
“FILM” mode.
SCREEN SAVER:
If the same picture is displayed on the TV screen for a long time, the image
may burn into the screen. In order to prevent this burn-in, the screen saver
is used to display a moving video picture on the TV screen if a picture is
stopped or still (pause) on the screen for 5 minutes or more.
Select “ON” or “OFF”.
GB-20[ENGLISH]
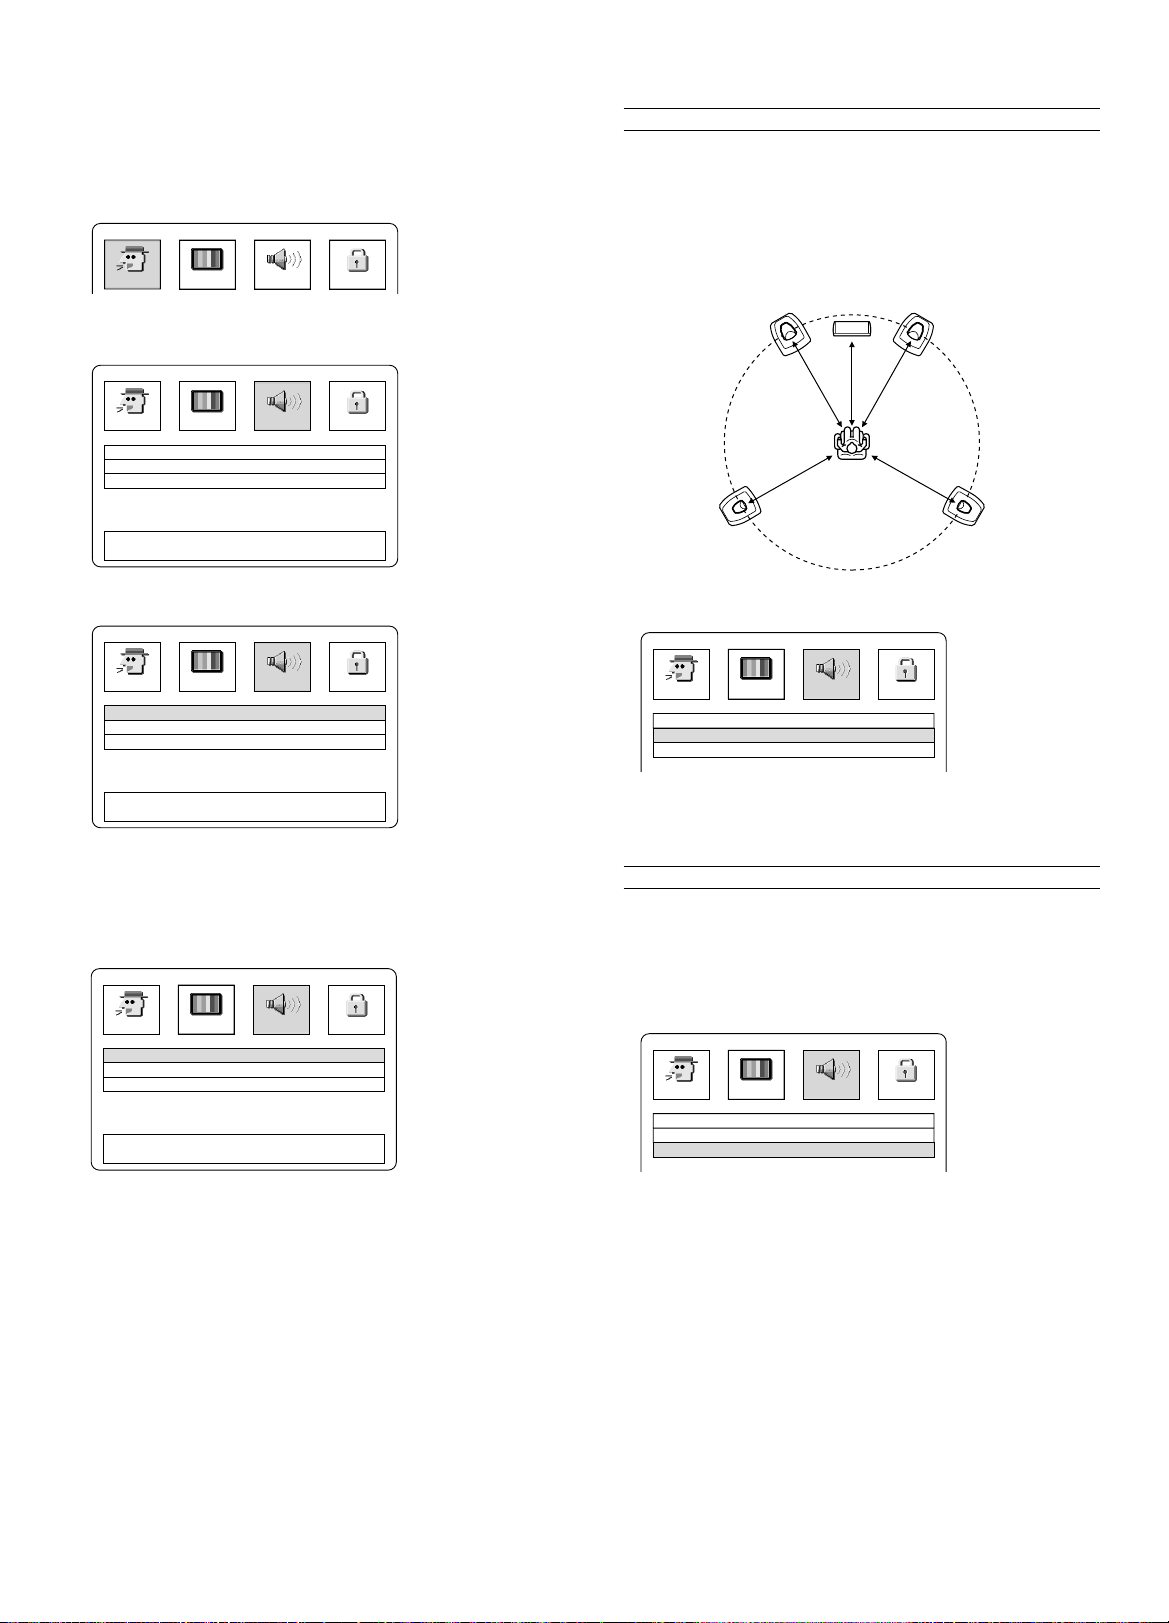
Changing the audio setting
D-RANGE CONTROL :
CENTER DELAY :
SURROUND DELAY :
ON
2 ms
5 ms
5
LANGUAGE DISPLAY SPEAKER PARENTAL
SETUP MENU
4
5
ab
D-RANGE CONTROL :
CENTER DELAY :
SURROUND DELAY :
ON
0 ms
10 ms
5
4
5
ab
LANGUAGE DISPLAY SPEAKER PARENTAL
SETUP MENU
The sound from speakers can reach the listening position at different times
depending on the speaker placements. You can allow for this difference
by changing the delay time of the centre and surround speakers.
You also can change the dynamic range control.
1. Press the SETUP button in the stop mode. The “SETUP MENU”
screen appears.
SETUP MENU
a
LANGUAGE DISPLAY SPEAKER PARENTAL
2. Select “SPEAKER” by pressing the b / a buttons. The speaker
submenu appears.
SETUP MENU
LANGUAGE DISPLAY SPEAKER PARENTAL
D-RANGE CONTROL :
CENTER DELAY :
SURROUND DELAY :
SELECT : 4 5 b a
SAVE&QUIT : SETUP
ba
5
0 ms
5 ms
ON
6. Set the delay time to the appropriate value by pressing the b / a
buttons.
Difference between D1 and D2: Delay time
When D1
<
D2: 0 ms
=
When D1 > D2
Approx. 30cm: 1 ms
Approx. 60cm: 2 ms
Approx. 90cm: 3 ms
Approx. 120cm: 4 ms
Approx. 150cm: 5 ms
Centre speaker
Front right speakerFront left speaker
D2
D1 D1
D3 D3
Surround left
speaker
Surround right
speaker
3. Select “D-RANGE CONTROL” by pressing the 4 / 5 buttons.
SETUP MENU
LANGUAGE DISPLAY SPEAKER PARENTAL
4
D-RANGE CONTROL :
5
CENTER DELAY :
SURROUND DELAY :
SELECT : 4 5 b a
SAVE&QUIT : SETUP
5
0 ms
5 ms
ON
ab
4. Select “ON” or “OFF” by pressing the b / a buttons.
ON: It will compress the dynamic range. It may have no effect with
some discs.
OFF: Sound with a wide dynamic range.
Example: To select “OFF”
SETUP MENU
LANGUAGE DISPLAY SPEAKER PARENTAL
4
D-RANGE CONTROL :
5
CENTER DELAY :
SURROUND DELAY :
SELECT : 4 5 b a
SAVE&QUIT : SETUP
5
OFF
0 ms
5 ms
ab
Example: To select “2 ms”
7. Select “SURROUND DELAY” by pressing the 4 / 5 buttons.
8. Set the delay time to the appropriate value by pressing the b / a
buttons.
Difference between D1 and D3: Delay time
When D1
<
D3: 0 ms
=
When D1 > D3
Approx. 150cm: 5 ms
Approx. 300cm: 10 ms
Approx. 450cm: 15 ms
Example: To select “10 ms”
5. Select “CENTER DELAY” by pressing the 4 / 5 buttons.
GB-21 [ENGLISH]
9. Press the SETUP button. The “SETUP MENU” screen disappears.

Changing the parental control setting
1PARENTAL LEVEL :
CHANGE PASSWORD :
5
4
5
ab
LANGUAGE DISPLAY SPEAKER PARENTAL
SETUP MENU
1. Press the SETUP button in the stop mode. The “SETUP MENU”
screen appears.
SETUP MENU
a
LANGUAGE DISPLAY SPEAKER PARENTAL
2. Select “PARENTAL” by pressing the b / a buttons. The parental
control password input field appears.
SETUP MENU
LANGUAGE DISPLAY SPEAKER PARENTAL
ENTER PASSWORD
Enter a number in 4 digits,
then press "ENTER".
SELECT : 4 5 b a
SAVE&QUIT : SETUP
3. Select the password input field by pressing the 4 / 5 buttons.
SETUP MENU
LANGUAGE DISPLAY SPEAKER PARENTAL
ENTER PASSWORD
Enter a number in 4 digits,
then press "ENTER".
4. Enter a 4-digit password by pressing the Number buttons.
“ ” is displayed instead of the entered number.
If you make a mistake, press the CLEAR button and enter a password
again.
SETUP MENU
LANGUAGE DISPLAY SPEAKER PARENTAL
ENTER PASSWORD
Enter a number in 4 digits,
then press "ENTER".
5. Press the ENTER button.
When the password is registered for the first time
The message “To confirm, enter password again, then press “ENTER”.”
appears.
When the password is already registered
The submenu shown in step 7 appears. Go to step 8.
6. Enter the same password by pressing the Number buttons.
7. Press the ENTER button. The parental control submenu appears and
“PARENTAL LEVEL” is selected.
SETUP MENU
b
5
5
5
8. Select the desired level by pressing the b / a buttons.
(“Level: OFF, 1 ~ 8”)
Example: To select “1”
9. Press the SETUP button. The “SETUP MENU” screen disappears.
Parental Control
MPAA (Motion Picture Association of America) Guideline is a rating
system that provides advanced cautionary information to parent about the
content of movie programmes.
The parental lock level is equivalent to the following MPAA Rating System.
Level 7: NC-17 (No one 17 and under admitted)
Level 6: R (Restricted)
Level 4: PG-13 (Parents strongly cautioned)
Level 3: PG (Parental guidance suggested)
Level 1: G (General audiences)
Some DVD discs contain a restriction level which enables parents to
prevent playback of discs by children. This unit is equipped with a
password designed to prevent children changing the level.
You cannot play DVD video discs rated higher than the level you selected
unless you cancel the parental lock function.
For example, when you select level “5”, the unit will not play discs with
ratings of “6”, “7” or “8”.
The information will appear on the TV screen.
Changing the password
1. Perform the steps 1 to 5 above.
2. Select “CHANGE PASSWORD” by pressing the 4 / 5 buttons.
3. Press the ENTER button.
The message “CHANGE PASSWORD Enter a number in 4 digits,
then press “ENTER”.” appears.
4. Enter a new password by pressing the Number buttons.
5. Press the ENTER button.
The message “To confirm, enter password again, then press “ENTER”.”
appears.
6. Enter the same password.
7. Press the ENTER button.
The new password is registered.
8. Press the SETUP button.
The “SETUP MENU” screen disappears.
If you forget the password
1. Enter “788444” instead of the password in the password input field.
Even if screen indicates: “CHANGE PASSWORD Enter a number in
4 digits, then press “ENTER”.”, the user may still enter above six digits
password.
2. Press the ENTER button.
The password is released. Register a new password again.
LANGUAGE DISPLAY SPEAKER PARENTAL
4
5
CHANGE PASSWORD :
5
ab
OFFPARENTAL LEVEL :
GB-22[ENGLISH]

LANGUAGE CODE LIST
Code Abbreviation of
the language
6565 aa Afar
6566 ab Abkhazian
6570 af Afrikaans
6577 am Amharic
6582 ar Arabic
6583 as Assamese
6589 ay Aymara
6590 az Azerbaijani
6665 ba Bashkir
6669 be Byelorussian
6671 bg Bulgarian
6672 bh Bihari
6673 bi Bislama
6678 bn Bengali; Bangla
6679 bo Tibetan
6682 br Breton
6765 ca Catalan
6779 co Corsican
6783 cs Czech
6789 cy Welsh
6865 da Danish
6869 de German
6890 dz Bhutani
6976 el Greek
6978 en English
6979 eo Esperanto
6983 es Spanish
6984 et Estonian
6985 eu Basque
7065 fa Persian
7073 fi Finnish
7074 fj Fiji
7079 fo Faeroese
7082 fr French
7089 fy Frisian
7165 ga Irish
7168 gd Scots Gaelic
7176 gl Galician
7178 gn Guarani
7185 gu Gujarati
7265 ha Hausa
7273 hi Hindi
7282 hr Croatian
7285 hu Hungarian
7289 hy Armenian
7365 ia Interlingua
Language
Code Abbreviation of
the language
7369 ie Interlingue
7375 ik Inupiak
7378 in Indonesian
7383 is Icelandic
7384 it Italian
7387 iw Hebrew
7465 ja Japanese
7473 ji Yiddish
7487 jw Javanese
7565 ka Georgian
7575 kk Kazakh
7576 kl Greenlandic
7577 km Cambodian
7578 kn Kannada
7579 ko Korean
7583 ks Kashmiri
7585 ku Kurdish
7589 ky Kirghiz
7665 la Latin
7678 ln Lingala
7679 lo Laothian
7684 lt Lithuanian
7686 lv Latvian, Lettish
7771 mg Malagasy
7773 mi Maori
7775 mk Macedonian
7776 ml Malayalam
7778 mn Mongolian
7779 mo Moldavian
7782 mr Marathi
7783 ms Malay
7784 mt Maltese
7789 my Burmese
7865 na Nauru
7869 ne Nepali
7876 nl Dutch
7879 no Norwegian
7967 oc Occitan
7977 om (Afan) Oromo
7982 or Oriya
8065 pa Punjabi
8076 pl Polish
8083 ps Pashto, Pushto
8084 pt Portuguese
8185 qu Quechua
8277 rm Rhaeto-Romance
Language Code Abbreviation of
the language
Language
8278 rn Kirundi
8279 ro Romanian
8285 ru Russian
8287 rw Kinyarwanda
8365 sa Sanskrit
8368 sd Sindhi
8371 sg Sangro
8372 sh Serbo-Croatian
8373 si Singhalese
8375 sk Slovak
8376 sl Slovenian
8377 sm Samoan
8378 sn Shona
8379 so Somali
8381 sq Albanian
8382 sr Serbian
8383 ss Siswati
8384 st Sesotho
8385 su Sundanese
8386 sv Swedish
8387 sw Swahili
8465 ta Tamil
8469 te Telugu
8471 tg Tajik
8472 th Thai
8473 ti Tigrinya
8475 tk Turkmen
8476 tl Tagalog
8478 tn Setswana
8479 to Tonga
8482 tr Turkish
8483 ts Tsonga
8484 tt Tatar
8487 tw Twi
8575 uk Ukrainian
8582 ur Urdu
8590 uz Uzbek
8673 vi Vietnamese
8679 vo Volapük
8779 wo Wolof
8872 xh Xhosa
8979 yo Yoruba
9072 zh Chinese
9085 zu Zulu
GB-23 [ENGLISH]

LISTENING TO THE RADIO
To turn the unit on and listen to the last received station, press the
TUNER button.
Automatic/Manual tuning
1. Press the TUNER button to select the band (FM or AM TUNER).
2. Automatic tuning
Press the “TUNE +” or “TUNE –” button for at least 1 second to tune
in a station. The unit will scan up or down the band and receive the next
receivable station. Press the button again to continue.
Manual tuning
Press the “TUNE +” or “TUNE –” button briefly until the desired
frequency is displayed.
PL
RCL
ST
RSLSSW
To preset stations
Up to 24 FM and 12 AM stations can be preset.
Automatic presetting (APT)
1. Press the TUNER button to select the band.
2. Press the PROG button for at least 3 seconds. “PGM” blinks.
The automatic tuning mode is set and automatic presetting begins
from the low end of the band.
When 24 FM or 12 AM stations have been preset or the high end of
the band is reached, automatic presetting stops. “PGM” disappears
and the station memorized on the preset number 1 will be heard.
3. To preset stations on the other band, follow steps above.
Note:
If APT is activated, all previously programmed stations of the band will be
cleared and new stations will be programmed.
Manual presetting
1. Tune in the station to be preset.
2. Press the PROG button.
PL
RCL
ST
3. While “PGM” is blinking, press the number button to select the number
to be preset.
Example: To select No. 3, press 3. To select No. 12, press 1, then 2.
- The PRESET button can also be used.
ST
4. While “PGM” is blinking, press the ENTER button.
- In this example, “FM 101.70 MHz” is preset on the preset number
12.
ST
ST
5. Repeat steps above to add more preset stations.
- When presetting a new station, the previous preset station is cleared.
RSLSSW
PL
RCL
RSLSSW
PL
RCL
RSLSSW
PL
RCL
RSLSSW
MHz
MHz
MHz
MHz
MHz
PGM
PGM
PGM
Listening to preset stations
1. Press the TUNER button to select the band.
2. Press the number button to select the preset number, then press the
ENTER button.
- The PRESET button can also be used. Press the PRESET button
briefly.
Preset scan tuning
1. Press the TUNER button to select the band.
2. Press the PRESET button for at least 1 second. The preset number
appears. Each of the preset stations is tuned in for 5 seconds.
3. When the desired station has been tuned in, press the PRESET
button again to keep the reception locked at that station.
- When all the preset stations have been scanned, the unit receives the
broadcast station which had been received before pressing the
button.
- Scanning can be stopped also by pressing the n button.
To receive FM stereo broadcasts
Mode changes to stereo and monaural by turns whenever the FM MODE
button is pressed. When an FM stereo broadcast is received in stereo
mode, “ST” appears automatically.
- If the receiving condition is not good, press the FM MODE button to
change to monaural (“MONO”) mode. The reception may be improved
but not in stereo mode.
- When other FM frequency is selected, the monaural mode is released
automatically. However, the mode remains monaural in manual
tuning.
Listening to FM stations with RDS
RDS (Radio Data System) permits FM stations to send additional signals
with the regular programme signals. For example, the stations send their
station names and information about what type of broadcast programmes,
such as sports or music, etc.
When tuned in FM broadcast which provides the RDS service, the “PS”
RDS mode is set automatically and the station name appears on the
display.
Note:
- Some FM broadcasts do not provide RDS service.
- RDS may not work correctly if the signal strength is weak.
- RDS is not available for AM broadcasts.
Selecting the RDS mode
Press the RANDOM/RDS button while listening to an FM station. Each
time the button is pressed, the display mode changes as follows.
PS v PTY v RT v Frequency
PS (Programme Service)
The station name is displayed. If no PS signal is received, “NO PS”
appears, then station frequency is displayed.
PTY (Programme Type)
The broadcast programme type is displayed. If no PTY signal is
received, “NO PTY” appears, then station name or station frequency
is displayed.
RT (Radio Text)
Text messages the station sends will be displayed. If no RT signal is
received, “NO RT” appears.
Frequency
Station frequency (non-RDS service)
After several seconds, the PS mode returns if RDS signal is received.
GB-24[ENGLISH]

To search a preset station by PTY codes
A particular programme type broadcast can be located by specifying the
PTY codes.
1. Press the RANDOM/RDS button to select “PTY” while listening to an
FM broadcast.
2. Press the PTY “+” or “–” button within 2 seconds to select the desired
PTY code. The PTY code changes as shown below;
NEWS: News
AFFAIRS: Current affairs
INFO: Information
SPORT: Sport
EDUCATE: Education
DRAMA: Drama
CULTURE: Culture
SCIENCE: Science
VARIED: Varied
POP M: Pop music
ROCK M: Rock music
EASY M: Easy-listening
LIGHT M: Light classics
CLASSICS: Serious classics
OTHER M: Other music
WEATHER: Weather
FINANCE: Finance
CHILDREN: Children’s programmes
SOCIAL: Social affairs
RELIGION: Religion
PHONE IN: Phone in
TRAVEL: Travel
LEISURE: Leisure
JAZZ: Jazz music
COUNTRY: Country music
NATION M: National music
OLDIES: Oldies music
FOLK M: Folk music
DOCUMENT: Documentary
TEST: Alarm Test
ALARM: Alarm
(or in the reverse sequence)
3. Press the PTY CHK button within 10 seconds.
The unit searches 24 preset stations and stops when it finds a
broadcast of the PTY code you have selected, then tunes into that
station.
- To continue searching after the first stop, press the PTY CHK
button within 10 seconds.
- If no broadcast is found, the original station is heard.
To cancel searching, press the n button.
SLEEP TIMER OPERATION
The sleep timer automatically switches off the power after a preset time
has elapsed. The volume will gradually be reduced (fade-out) during the
1-minute period before the unit turns off. There are 4 time periods
available: 30, 60, 90 and 120 minutes.
Press the SLEEP button repeatedly to select the desired sleep time.
“SLEEP” appears and the selected time blinks on the display.
PL
RCL
RSLSSW
SLEEP
To check the remaining sleep time
Press the SLEEP button once. After several seconds, the original display
returns.
To release the sleep timer while in operation
Press the SLEEP button until “SLEEPOFF” appears. The timer is also
released if the power is switched off.
COMBINING THE UNIT WITH ANOTHER
DEVICE
Enjoying analog sounds sent from the TV connected to the EURO AV
CONNECTOR RGB OUT/TV (AUDIO) IN socket
1. Select “TV” by pressing the FUNCTION button.
2. Operate the TV connected to the unit.
Enjoying analog sounds sent from the external device connected to
the VIDEO 1 IN or VIDEO 2 IN sockets
1. Select “VIDEO 1” or “VIDEO 2” by pressing the FUNCTION button.
2. Operate the device connected to the unit.
Enjoying digital sounds sent from the external device connected to
the DIGITAL AUDIO IN socket
1. Select “V1 OPT” or “V2 COAX” by pressing the FUNCTION button.
2. Operate the device connected to the unit.
Changing the digital audio input function mode
It is possible to select a mode for inputting only the digital audio signal
according to the external device connected to the DIGITAL AUDIO IN
socket.
1. Select “V1 OPT” or “V2 COAX” by pressing the FUNCTION button.
2. Press the FUNCTION button on the main unit while pressing the n
button on the main unit.
Each time the button is pressed, the selection changes as shown
below.
V1 OPT
or
V2 COAX
Note:
- This mode selection can be made for “V1 OPT” and “V2 COAX”
individually.
- In the case of “V1 OPT” (or “V2 COAX”), both VIDEO 1 IN sockets (or
VIDEO 2 IN sockets) and the DIGITAL AUDIO IN OPTICAL (VIDEO
1) socket (or DIGITAL AUDIO IN COAXIAL (VIDEO 2) socket) are
selected.
- In the case of “OPTICAL” (or “COAXIAL”), only the DIGITAL AUDIO
IN OPTICAL (VIDEO 1) socket (or DIGITAL AUDIO IN COAXIAL
(VIDEO 2) socket) is selected.
- When enjoying video sent from the external device connected to the
VIDEO 1 IN “VIDEO” (or VIDEO 2 IN “VIDEO”) socket, use the VIDEO
OUT or EURO AV CONNECTOR RGB OUT/TV (AUDIO) IN socket.
wv
OPTICAL
wv
COAXIAL
After several seconds, the original display returns and the brightness of
the display reduces.
GB-25 [ENGLISH]

OPERATING THE TV WITH THE REMOTE
CONTROL OF THIS UNIT
It becomes possible to operate your TV with the remote control of this unit
by entering the maker code of the TV.
If the maker code is not listed, this operation is not possible. Even if the
maker code is listed, this operation may not be possible depending on the
model.
To set the remote control code for TV
To enter the remote control code for your brand of TV, follow the steps
below.
1. In the chart below, find the code corresponding to your brand of TV.
TV brands Code
Blaupunkt 071
Grundig 071, 072, 076, 105, 106, 146, 171
Hitachi 006, 007, 028, 047, 058, 064, 075, 077, 078, 079,
080, 082, 124, 126, 127, 134, 145, 159
ITT 028, 059, 083, 107, 128, 138, 162, 168
JVC 019, 023, 024, 025, 042, 058, 060, 065, 073, 136
LG 006, 063, 074, 075, 112, 121, 134, 145, 150, 151,
161, 171
Loewe 029, 074, 084
Mitsui 058, 059, 060, 061, 062, 063, 064, 071, 076, 086,
087, 089, 090, 091, 092, 122, 132, 134, 137, 178
Mitsubishi 006, 018, 045, 121, 161
Nokia 025, 028, 031, 059, 097, 128, 138, 139, 140, 162, 168
Panasonic 004, 016, 028, 043, 044, 098, 099
Philips 046, 078, 097, 100, 126, 163
Pioneer 052, 119, 167, 169, 179
Saba 028, 061, 126, 129, 134, 135, 141
Samsung 006, 020, 033, 034, 035, 046, 059, 063, 067, 068,
074, 112, 114, 121, 142, 144, 145, 154, 161
Sanyo 001, 002, 003, 022, 029, 058, 059, 118, 125, 131,
172, 173
Sharp 005, 017, 051, 058, 089, 130
Sony 015, 050, 103, 117
Telefunken 049, 145, 155, 156, 160
Thomson 026, 061, 070, 110, 126, 129, 135, 141, 156, 157
Toshiba 008, 048, 058, 062, 072, 103, 104, 118, 123, 158, 167
CLEANING THE UNIT
Clean the outside of the unit with a clean soft cloth moistened with
lukewarm water. Do not use benzene, thinner or alcohol since they will mar
the finish of the surfaces.
2. While holding down the TV POWER button, enter the 3-digit code
using the number buttons and press the ENTER button.
3. Release the TV POWER button.
The remote control is now set to operate your TV.
To use the remote control for TV
Press the desired function button (TV POWER, – TV CH +, TV/VIDEO, –
TV VOL +).
- When using the remote control, the remote control must be pointed
toward your TV.
Note:
- There may be some TV models that cannot be operated with this
remote control. If this is the case, use the original remote control
supplied with the TV.
IMPORTANT NOTE:
If the batteries in the remote control are changed, the code settings
for the TV must be re-entered.
Write your code number below for future reference.
TV:
GB-26[ENGLISH]

TROUBLESHOOTING GUIDE
General (power supply)
SYMPTOM
POSSIBLE CAUSE
CORRECTIVE ACTION
The power turns off immediately after being turned on.
The protection circuit works to turn off the power because the power
is turned on with the speaker leads short-circuited.
Make sure that all the speaker leads are connected properly.
The unit is exposed to external strong electrical shocks caused by
lightning, excessive static electricity, etc.
Turn off the power, unplug the mains lead, plug the mains lead
approx. 30 seconds later, and turn on the power.
The unit does not operate properly.
The internal microcomputer is frozen due to external electrical shocks
(caused by lightning or excessive static electricity) or low power
supply voltage.
Unplug the mains lead from the outlet and then plug it in the outlet
approx. 5 seconds later.
Video
SYMPTOM
POSSIBLE CAUSE
CORRECTIVE ACTION
No picture (Or unusual screen size)
The TV is not set to receive video signals from the unit.
Select the correct input function on the TV so that it can receive
video signals from the unit.
The function selection is not proper.
Select the correct function.
The TV screen size setting is not proper.
Set the screen size properly according to the TV to be connected
to this unit.
Picture from external input device is not displayed.
TV set (Monitor) is not connected to the video output terminal of the
unit.
Connect TV set (Monitor) to the video output terminal of the unit.
Audio
SYMPTOM
POSSIBLE CAUSE
CORRECTIVE ACTION
No sound
The volume is turned down.
Adjust the volume.
The source selection is not proper.
Change the source selection according to the device to which the
audio input lead is connected.
An unplayable disc such as a CD-ROM is loaded.
Load a playable disc.
No sound comes out from the speakers other than the front speaker. (Red
lamp of the surround speaker with mains lead is lighted up)
A source or stereo source not containing an effect signal is played
back in the Dolby surround, Dolby digital or DTS mode.
The 2.1ch mode is selected.
Select another surround mode.
No sound comes out from the centre speaker.
The Dolby digital or DTS source does not contain a centre channel
signal is played back.
It is not a malfunction.
No sound comes out from the surround speaker.
The unit is affected by interference of the same frequency band or
multi-pass.
Changeover the transmission channel, or connect the assistant
speaker lead.
The unit is not power-ON or the system lead is not connected.
Turn ON the power, or connect the system lead.
An obstacle causes a good position and a bad position, depending on
the electric wave state.
Move slightly the front speaker (built-in transmitter) or the surround
speaker (built-in receiver) position.
The front speaker (built-in transmitter) and the surround speaker
(built-in receiver) are a pair and are separately purchased units.
The front speaker and the surround speaker must be purchased
as a unit. If not, independently configured systems will not
communicate.
No sound comes out from the subwoofer.
The deep bass is set “OFF”.
Set the deep bass to “BOOST 1”, “BOOST 2” or “NORMAL”.
A digital device or high-frequency device produces noise.
The unit is placed too close to such a digital device or high-frequency
device.
Place the unit away from such a device.
Skipping sound
The waves have light-like characteristics, such as reflection, refraction,
and diffraction. Therefore, the strength (or lack of strength) of the
electric wave may cause the sound to stop, depending on the place.
Change the place of installation.
The distance between the front speaker (built-in transmitter) and
surround speaker (built-in receiver) is too long.
Maintain a maximum distance of 10 meters.
Sounds are suddenly (and continuously) skipped.
Apparatus, such as Bluetooth and the wireless LAN, using the same
frequency band (2.4GHz) as near, or a microwave oven, is operating.
Install the equipment with enough distance from the other devices.
Static may appear on the television screen.
There is AV equipment with which the aerial is attached around the
front speaker (built-in transmitter).
Keep the front speaker (built-in transmitter) away from the aerial
input terminal of the AV equipment.
GB-27 [ENGLISH]

Disc playback
SYMPTOM
POSSIBLE CAUSE
CORRECTIVE ACTION
The unit does not start playback (or stop playback immediately).
An unplayable disc is loaded. (“NO PLAY” appears.)
Check the playable disc type and TV system.
The setup menu screen is displayed.
Press the SETUP button to clear the setup menu.
The parental control is selected.
Cancel the parental control or change the parental control setting.
A disc with a wrong region number is loaded. (“NO PLAY” appears.)
Load a disc whose region number is “2” or “ALL”.
Button operation does not work.
Certain functions may not be available on some discs. (“ ” appears
on the screen.)
It is not a malfunction.
It is not possible to select another subtitle language or audio soundtrack
language.
It is not possible to select another language on a disc that does not
contain multiple languages.
It is not a malfunction.
A MP3 or WMA disc cannot be played back.
The disc does not conform to the relevant format or condition or the
recording condition of it is poor.
Replace the disc with a one conforming to the relevant format or
condition or one whose recording condition is good.
It takes a long time for the unit to read the files on a MP3 or WMA disc.
It is due to the file structure.
It is not a malfunction.
The picture is disturbed or dark during playback of a DVD disc.
This unit is ready for the copy guard of the analog copy protect system.
When a disc containing a copy-protection signal is played back,
therefore, a striped pattern may appear on some pictures depending
on the TV used.
It is not a malfunction.
Reception of FM/AM broadcasts
SYMPTOM
POSSIBLE CAUSE
CORRECTIVE ACTION
Radiobroadcasts are hard to hear due to much noise.
Radiobroadcasts are affected by the power supply.
Plug the mains lead in another outlet.
Reverse the plug polarity of the mains lead.
Radiobroadcasts are affected by an electric appliance such as a
motor and fluorescent lamp or a TV.
Place the unit away from the noise source.
Turn off the TV.
Adjust the position and orientation of the aerial.
The preset stations cannot be selected.
The preset data is lost.
Preset stations again.
Remote control
SYMPTOM
POSSIBLE CAUSE
CORRECTIVE ACTION
The remote control does not work properly.
The remote control is too far away from the remote sensor window.
Operate the remote control within approx. 6 meter of the remote
sensor window.
The batteries in the remote control are dead.
Replace the batteries.
Note:
If abnormal display or operation is found, turn off the power with the z /ON
button and then turn it on, or turn off the power, disconnect the mains plug
and then connect the mains plug several seconds later.
GB-28[ENGLISH]

[DEUTSCH]
VORSICHTSMASSNAHMEN
- Das Gerät darf weder Nässe noch Spritzwasser ausgesetzt werden.
- Es dürfen keine mit Flüssigkeit gefüllten Gegenstände, wie
beispielsweise Vasen, auf das Gerät gestellt werden.
- Das Gerät nicht bei extremen Temperaturen verwenden (unter 5°C
oder über 35°C) und keiner direkten Sonneneinstrahlung aussetzen.
- Wegen des extrem niedrigen Rauschfaktores und des weiten
Dynamikbereichs des DVD-Players ist man versucht, die Lautstärke
des Verstärkers unnötig hoch einzustellen. Das kann eine übermäßig
starke Ausgangsleistung des Verstärkers zur Folge haben und die
Lautsprecher beschädigen.
-Plötzliche Änderungen der Umgebungstemperatur können zur Bildung
von Kondenswasser auf der Laseroptik im Inneren des Geräts führen.
Entnehmen Sie unter diesen Umständen die Disk und warten Sie
etwa zwei Stunden, bevor Sie das Gerät in Betrieb nehmen.
- Vergewissern Sie sich vor dem Transport des Geräts, dass sich keine
Disk im Inneren befindet und schalten Sie das Gerät ab. Warten Sie
danach mindestens 10 Sekunden lang, bevor Sie das Netzkabel aus
der Steckdose herausziehen. Das Tragen des Geräts mit einer
eingelegten Disk kann sowohl die Disk als auch das Gerät beschädigen.
- Stellen Sie das Gerät nicht an einen beengten Platz, wie beispielsweise
in ein Bücherregal oder einen Einbauschrank.
- Es wird ausdrücklich empfohlen, das Gerät (JCX-TS960), die FrontLautsprecher mit Netzkabel (ASX-TS960WLF) und die SurroundLautsprecher mit Netzkabel (ASX-TS960WLR) nur in einem gut
durchlüfteten Bereich in Betrieb zu nehmen.
Stellen Sie keine Gegenstände auf das Gerät.
Versperren Sie nicht die Lüftungsöffnungen.
Das Gehäuse des Geräts erwärmt sich nach längerem Betrieb.
Hierbei handelt es sich nicht um eine Störung.
- Das Hauptgerät (JCX-TS960) ist nicht vollständig vom Netz getrennt,
wenn der z/ON-Schalter in der Position z steht.
- Die Surround-Lautsprecher mit Netzkabel (ASX-TS960WLR) sind
nur dann vom Netz getrennt, wenn der Stecker aus der Steckdose
herausgezogen wird.
Warnung in Bezug auf den Sender
Wichtige Informationen:
1. Halten Sie sich explizit an die technischen Anweisungen und den
Gebrauchsumfang, der in den entsprechenden Dokumenten
angegeben ist, und machen Sie sich mit den Erklärungen zu
Steuerungsmethoden, Anpassungsprozeduren und Bedienung der
Schalter vertraut.
2. Ändern Sie die Frequenz des Senders nicht und erhöhen Sie auch
nicht die Leistung des Senders (einschließlich der Leistung des
kabellosen Überlastungs-Frequenzkraftverstärkers). Stellen Sie keine
externe Antenne auf und verwenden Sie keine umgebaute Antenne.
3. Vermeiden Sie beim Betrieb des Geräts alles, was den rechtlichen
Bestimmungen für kabellose Kommunikationsdienste widerspricht.
Sollte es zu einer Störung kommen, beenden Sie sofort den Betrieb
des Geräts, beheben Sie die Störung und vermeiden Sie solch einen
Vorfall in der Zukunft.
4. Wenn kabellose Micro-Power-Geräte verwendet werden, vermeiden
Sie die Störung drahtloser Kommunikationsdienste und
Sendestörungen von industriellen, wissenschaftlichen und
medizinischen Geräten.
5. Verwenden Sie das Gerät nicht in einem Flugzeug oder in der Nähe
eines Flughafens.
Warnung zur Verwendung des Front-Lautsprechers mit eingebautem
Sender
- Wahren Sie einen Abstand von mindestens 22 cm zwischen dem
Front-Lautsprecher und allen Herzschrittmachern.
Die Radiowellen können zur Störung des Schrittmachers führen.
- Betreiben Sie die Front-Lautsprecher nicht in medizinischen
Einrichtungen, Krankenhäusern oder in der Nähe von medizinischen
elektrischen Geräten.
Die Radiowellen können dazu führen, dass Geräte in der Nähe nicht
korrekt arbeiten oder ausfallen.
- Beenden Sie den Betrieb der kabellosen Front-Lautsprecher, wenn
andere Geräte oder ein medizinischer Apparat durch die Radiowellen
nicht richtig arbeiten oder ausfallen.
Die Radiowellen können dazu führen, dass Geräte in der Nähe nicht
korrekt arbeiten oder ausfallen.
Es kann entweder das Gerät oder die Fernbedienung
zur Steuerung benutzt werden. Zu Ihrem Komfort
beschränkt sich dieses Handbuch auf die Steuerung
des Geräts mit Hilfe der Fernbedienung.
Hinweis:
Diese Beschreibung wurde vor der Fertigstellung des Produkts gedruckt.
Wenn ein Teil der Produktspezifikation zur Verbesserung der
Bedienbarkeit oder anderer Funktionen geändert werden muss, wird
der Produktspezifikation Vorrang gegeben. In solchen Fällen kann es
vorkommen, dass die Bedienungsanleitung nicht in allen Punkten die
tatsächlichen Funktionen des Geräts wiedergibt.
Daher ist es möglich, dass das tatsächliche Gerät, die Verpackung, der
Name und das Aussehen vom Handbuch abweichen.
Innerbetriebliche Funksender (müssen zugelassen sein) und spezielle
Funksender mit niedriger Leistung (müssen nicht zugelassen sein) zur
Identifikation beweglicher Körper an Produktionslinien und AmateurFunksender (müssen zugelassen sein), sowie industrielle,
wissenschaftliche und medizinische Geräte, wie beispielsweise
Mikrowellen, verwenden den gleichen Frequenzbereich wie dieses
Gerät.
1. Bevor Sie dieses Gerät in Betrieb nehmen, stellen Sie bitte sicher,
dass keine innerbetrieblichen Funksender oder spezielle
Funksender mit niedriger Leistung zur Identifikation beweglicher
Körper oder Amateur-Funksender in der Nähe betrieben werden.
2. Wenn dieses Gerät einen innerbetrieblichen Funksender zur
Identifikation beweglicher Körper nachteilig stört, ändern Sie sofort
den Frequenzbereich, der von diesem Gerät verwendet wird oder
unterbrechen Sie die Ausstrahlung elektrischer Wellen und wenden
Sie sich an Ihren Händler oder den Kundendienst Ihres
Unternehmens, um zu erfahren, wie Sie solche Störungen
vermeiden können (beispielsweise durch die Aufstellung einer
Trennwand).
3. Wenn es zu Problemen kommt, beispielsweise wenn dieses Gerät
spezielle Funksender mit niedriger Leistung zur Identifikation
beweglicher Körper oder einen Amateur-Funksender nachteilig
stört, wenden Sie sich an Ihren Händler oder den Kundendienst
Ihres Unternehmens.
D-1 [DEUTSCH]

VOR INBETRIEBNAHME
Abspielbare Medien
Folgende Disk-Typen können auf diesem Gerät abgespielt werden.
Disk-Typ und Markenzeichen
Video-DVD
Musik-CD
Regionalcode
Sowohl das Gerät als auch manche DVDs enthalten einen Regionalcode
(Regionaler Beschränkungskennung).
Sie finden die Kennziffer des Regionalcodes auf der Rückseite des
Geräts.
DVDs mit dem gleichen Regionalcode oder dem Regionalcode “ALL”
können auf diesem Gerät abgespielt werden.
DVD
Auf einigen DVD-Hüllen finden Sie folgende Symbole.
Beispiele:
Verschiedene Bildformate
3
Mehrere Sprachen
2
Mehrsprachige Untertitel Regionalcode
Verschiedene Blickwinkel
3
DVDs sind in mehrere Titel unterteilt. Die Titel sind wiederum in Kapitel
unterteilt.
Titel 1
Kapitel 1 Kapitel 2
Video- oder Super Video-CD/Musik-CD
Diese CDs sind in Titel (oder Tracks) unterteilt.
Titel 1 Titel 2 Titel 3 Titel 4 Titel 5
MP3-/WMA-CDs
Verzeichnis 1
Kapitel 1 Kapitel 2 Kapitel 3
LB16:9
Untertitel für
Hörgeschädigte
Titel 2
Verzeichnis 2
Über JPEG
Dieses Gerät ist nicht zur Wiedergabe von JPEG/Kodak-Bild-CDs geeignet.
Wenn der Benutzer aus Versehen eine Bild-CD einlegt, kann nicht
garantiert werden, dass alle Bilder wiedergegeben werden können.
Hinweise zum Umgang mit DVDs/CDs
- Setzen Sie DVDs/CDs nicht über längere Zeit direkter
Sonneneinstrahlung, hoher Luftfeuchtigkeit oder hohen Temperaturen
aus.
- DVDs/CDs sollten nach dem Gebrauch wieder in die Hülle gelegt
werden.
- Kleben Sie keine Papieretiketten auf die DVD/CD und schreiben Sie
nichts auf die Oberfläche.
- Fassen Sie die DVD/CD an der Kante an. Berühren Sie nicht die
Aufnahmeoberfläche (die glänzende Seite).
- Fingerabdrücke und Staub sollten vorsichtig mit einem weichen Tuch
von der Aufnahmeoberfläche der DVD/CD entfernt werden.
Wischen Sie dabei in einer geradlinigen Bewegung von der Mitte zum
äußeren Rand.
- Verwenden Sie zur Reinigung niemals Chemikalien, wie beispielsweise
Reinigungssprays für Schallplatten, Antistatik-Sprays oder –
Flüssigkeiten, Benzin oder Verdünner.
Über [DVD], [VCD], [CD] und [DATA]
In diesem Handbuch werden die Disk-Arten, für die eine Funktion verfügbar
ist, durch die folgenden Symbole dargestellt:
[DVD] : DVDs können abgespielt werden.
[VCD] : Video-CDs und Super Video-CDs können abgespielt werden.
[CD] : Musik-CDs können abgespielt werden.
[DATA] : Daten-CDs im MP3- oder WMA-Format können abgespielt
werden.
Dieses Produkt enthält durch Copyright und US- sowie andere Patente
geschützte Technik, die sich in Besitz der Macrovision Corporation
anderer Rechteinhaber befindet. Die Nutzung dieser geschützten Rechte
muss von Macrovision Corporation autorisiert werden und beschränkt
sich, wenn nicht anders vereinbart, auf den Heimgebrauch und andere
beschränkte Nutzung. Ein Nachbau oder ein Zerlegen sind nicht gestattet.
Microsoft, Windows Media und Windows sind sowohl in den Vereinigten
Staaten als auch in anderen Ländern Markenzeichen oder registrierte
Markenzeichen der Microsoft Corporation.
Hergestellt unter der Lizenz von Dolby Laboratories.
“Dolby”, “Pro Logic” und das Doppel-D-Sybmol sind Markenzeichen von
Dolby Laboratories.
“DTS” und “DTS Digital Surround” sind registrierte Markenzeichen von
Digital Theater Systems, Inc.
Datei 1 Datei 2 Datei 1 Datei 2 Datei 3
Hinweis:
- Nur die oben genannten Disks können auf diesem Gerät abgespielt
werden.
DVD-Audio, DVD-ROM, DVD-RAM, DVD-RW (VR-Modus), CD-ROM,
CVD, SACD usw. können nicht abgespielt werden.
- Auf diesem Gerät können Video-CDs (VCD) und Super Video-CDs
(SVCD) abgespielt werden.
- Einige DVD-R, DVD-RW (Video-Modus), DVD+R und DVD+RW
können abgespielt werden.
- Dieses Gerät kann ausschließlich mit Medien in PAL- oder NTSCNorm betrieben werden. Medien der SECAM-Norm können auf
diesem Gerät nicht abgespielt werden.
D-2[DEUTSCH]

BEDIENELEMENTE
FERNBEDIENUNG
Vorderseite (Abb. 1a)
1. Hauptschalter (z/ON)
2. Auswurftaste (q)
3. Display
4. Wiedergabe-Taste (a)
5. Fernbedienungssensor (IR)
6. Lautstärkeregler (VOLUME)
7. Stopptaste (n)
8. Taste für Nächster/Überspringen/Voreinstellung (e)
9. Taste für Vorheriger/Überspringen/Voreinstellung (f)
10. Surround-Taste (SURROUND)
11. Funktionstaste (FUNCTION)
12. Disk-Schublade
13. Kopfhörerbuchse (PHONES)
Display (Abb. 1b)
1. Surround-Modus-Anzeige
(HALL, STADIUM, STUDIU, THEATER, CLUB)
2. Progressive-Anzeige (PROGRESSIVE)
3. Nachtmodus-Anzeige (NIGHT)
4. Disk-Anzeige (VCD/CD/DVD)
5. Kopfhörer-Anzeige (VIRTUAL)
6. Dolby Pro Logic/Pro Logic II-Anzeige (s PL II)
7. Dolby Digital-Anzeige (s D)
8. DTS-Anzeige (dts)
9. PCM-Anzeige (PCM)
10. 96 kHz-Anzeige (96K)
11. Wiedergabe-/Pause-Anzeige (a, k)
12. Repeat-Modus-Anzeige (REPEAT, 1, ALL, A-B)
13. Zufallswiedergabe-Anzeige (RDM)
14. Programmanzeige (PGM)
15. RDS-Anzeige (RDS)
16. WMA-Anzeige (WMA)
17. MP3-Anzeige (MP3)
18. Einschlaftimer-Anzeige (SLEEP)
19. Nachricht- oder Nummern-Anzeige
(Titel, Kapitel, Spielzeit oder andere Informationen)
20. Titel-Anzeige (T)
21. Kapitel-Anzeige (C)
22. Eingangs-/Ausgangskanal-Anzeige (L, C, R, SW, LS, RS)
23. Audioausgang-Anzeige (L, R)
24. FM Mono-Anzeige (MONO)
25. FM Stereo-Anzeige (ST)
Rückseite (Abb. 1c)
1. Anschluss AM-Antenne (AM ANT.)
2. Videokomponenten-Ausgänge (COMPONENTE VIDEO OUT)
3. Digitale Audioeingänge (DIGITAL AUDIO IN)
4. Euro AV-Anschluss (EURO AV CONNECOR RGB OUT/TV (AUDIO)
IN)
5. Netzkabel
6. Systemanschlüsse (SYSTEM)
7. Audio-/Videoeingang (VIDEO 1 IN, VIDEO 2 IN)
8. S-Videoausgang (S-VIDEO OUT)
9. Videoausgang (VIDEO OUT)
10. Anschluss FM-Antenne (FM ANT. 75 Ω)
Bedienelemente (Abb. 2)
1. Return-Taste (RETURN)
2. Auswurftaste (q)
3. Suchmodus-Taste (SEARCH MODE)
4. Bildmodus-Taste (PICTURE MODE)
5. Untertitel-Taste (SUBTITLE)
6. Audio-Taste (AUDIO)
7. Menü-Taste (MENU)
8. Eingabetaste (ENTER)
9. Bildschirmanzeigen-Taste (ON SCREEN)
10. Stopptaste (n)
11. Nächster/Vorheriger/Überspringen/Programmtyp-Steuertasten
(f, e, PTY CHK)
12. Wiederholungstaste (REPEAT)
13. A-B-Wiederholungstaste (A-B REP)
14. Programmtaste (PROG)
15. Löschen-Taste (CLEAR)
16. Zufallswiedergabe/Radiodaten-Systemmodustaste (RANDOM/RDS)
17. FM-Modus-Taste (FM MODE)
18. Trim-Taste (TRIM)
19. Tuner-Funktionstaste (TUNER)
20. Sendervoreinstellungstaste (PRESET)
21. Bass-Taste (BASS)
22. Lautstärketasten (– VOL +)
23. Stummschalt-Taste (MUTE)
24. Klangvoreinstellung-Taste (SOUND)
25. Testtontaste (TEST)
26. Nachtmodus-Taste (NIGHT)
27. Surround-Taste (SURROUND)
28. Funktionstaste (FUNCTION)
29. TV-Bedienelemente
Hinweis:
Wenn Sie den Voreinstellungscode entsprechend Ihrem Fernsehgerät
einrichten, können Sie das Fernsehgerät mit diesen Tasten bedienen
(siehe Seite 26).
TV POWER: TV-Hauptschalter
– TV CH +: TV-Kanal-Suchtasten
TV/VIDEO: TV-/Video-Auswahltaste
– TV VOL +: TV-Lautstärketasten
30. Zahlentasten (1 - 9, 0)
31. Langsamer Vorlauf/Langsamer Rücklauf ( , )
32. Schneller Vorlauf/Schneller Rücklauf/Programmartauswahl
(d, c, – PTY +)
33. Pause-/Schritt-Taste (k)
34. Wiedergabe-Taste (a)
35. Hauptmenütaste (TOP MENU)
36. Tuning/Richtungspfeiltasten (TUNE–, TUNE+, 4, a, 5, b)
37. Setup-Taste (SETUP)
38. Last-Memory-Taste (LAST MEMORY)
39. Blickwinkel-Taste (ANGLE)
40. Blickwinkel-Wiedergabe-Taste (A.REPLAY)
41. Hauptschalter (z/ON)
42. Einschlaf-Taste (SLEEP)
Einlegen der Batterien
Legen Sie zwei “R6/AA”-Batterien (nicht im Lieferumfang enthalten) ein,
wie in Abb. 3 dargestellt.
Hinweis:
Entnehmen Sie die Batterien, wenn die Fernbedienung länger als einen
Monat nicht verwendet werden soll. Wenn Batterien im Gerät verbleiben,
kann Batterieflüssigkeit austreten und das Gerät beschädigen.
Reichweite der Fernbedienung (Abb. 4)
D-3 [DEUTSCH]
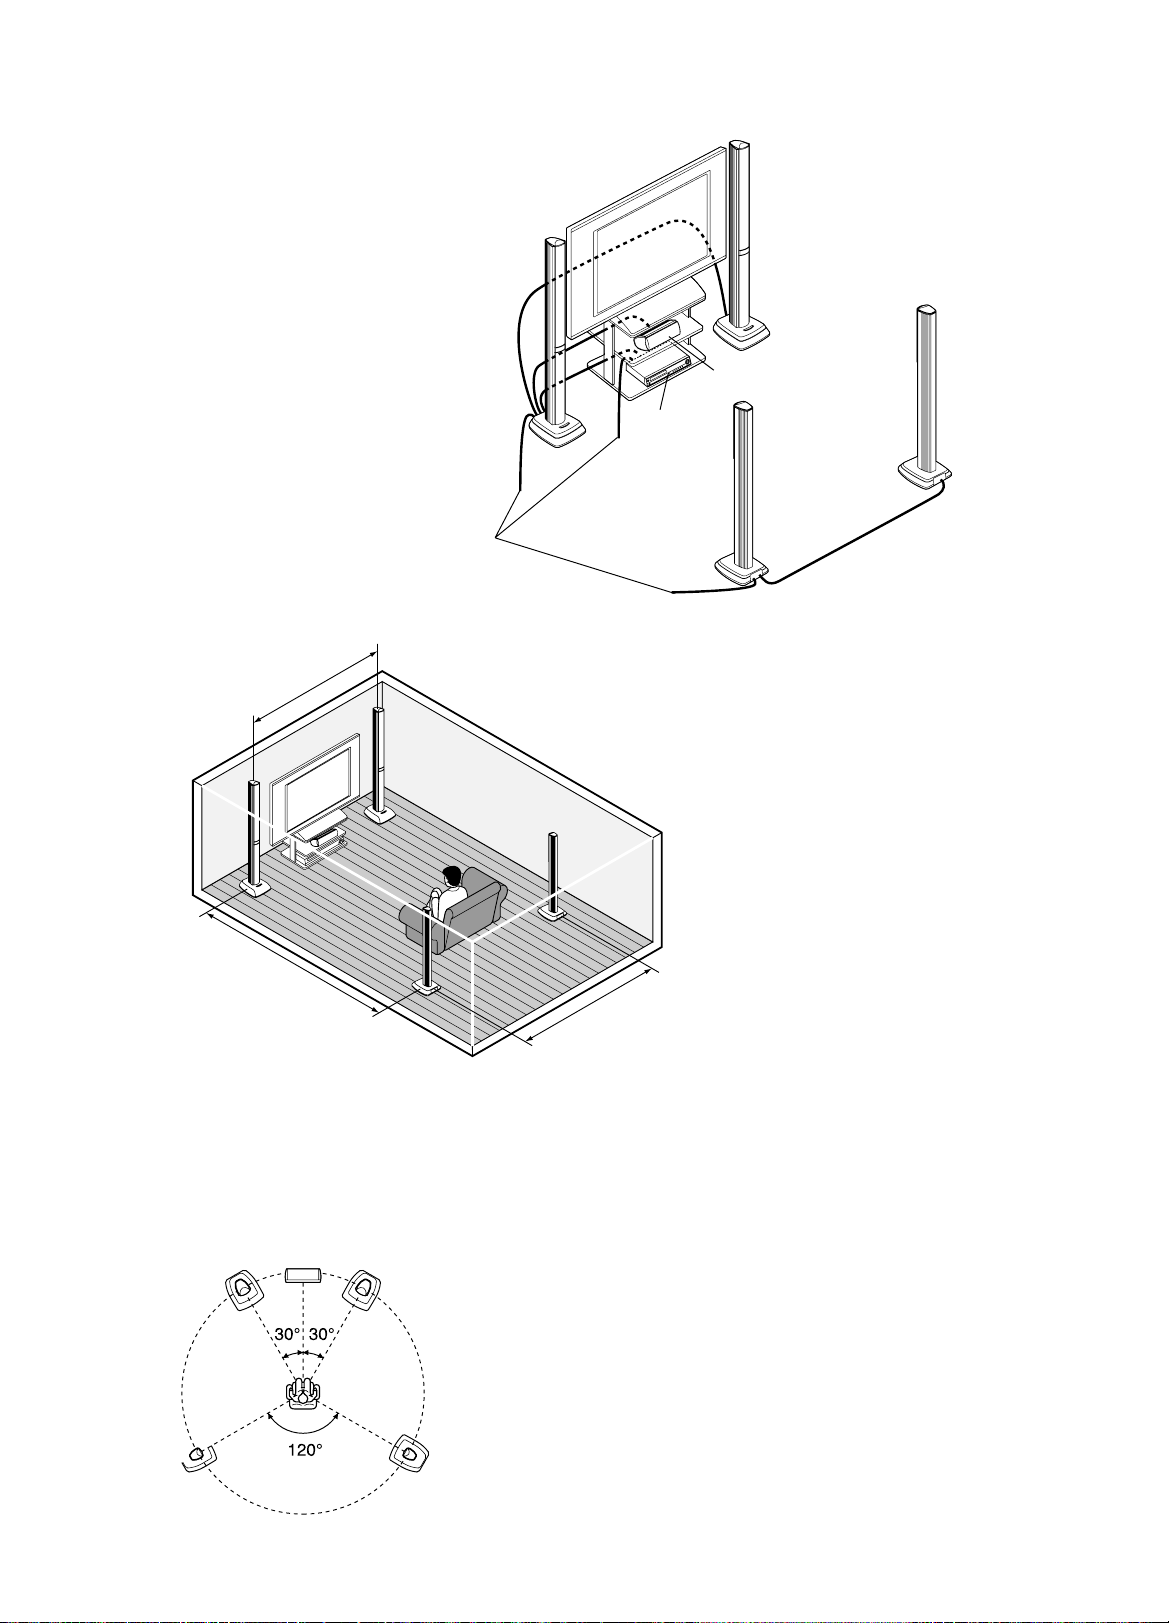
SYSTEMEINRICHTUNG
A
C
B
D
Beispiel für eine Lautsprecherverbindung
(Weitere Einzelheiten auf der nächsten Seite)
Front-Lautsprecher
mit Netzkabel
A: Systemkabel (Großer DIN 13-Pin)
B: Front-Lautsprecherkabel (grau/violett/rote Stecker)
C: Center-Lautsprecherkabel (grüner Stecker)
D: Surround-Lautsprecherkabel (weißer Stecker)
Netzkabel
Beispiel für die Aufstellung der Lautsprecher
Plasma-Flachbildschirm
(nicht im Lieferumfang
enthalten)
Hauptgerät
Front-Lautsprecher
Surround-Lautsprecher
Center-Lautsprecher
Surround-Lautsprecher
mit Netzkabel
Um einen optimalen Surround-Sound-Effekt zu erzielen, sollten Front-,
Center- und Surround-Lautsprecher ungefähr im selben Abstand zur
Hörposition aufgestellt werden.
Wenn Sie die Lautsprecher wie in der Abbildung dargestellt aufstellen,
erzielen Sie einen intensiveren Surround-Sound-Effekt. Es wird empfohlen,
die Lautstärke der internen Lautsprecher des Fernsehgeräts herunter zu
drehen.
D-4[DEUTSCH]

Schließen Sie das Netzkabel erst dann an eine Steckdose an, wenn alle Verbindungen hergestellt wurden.
Verbindung des Geräts mit den Lautsprechern
Da die Anschlüsse der Lautsprecher und die Stecker der mitgelieferten Lautsprecherkabel farbkodiert sind, können Sie die Verbindungen entsprechend
den Farben herstellen.
Die Front- und Surround-Lautsprecher können rechts oder links platziert werden.
A Verbinden Sie das Hauptgerät und den Front-Lautsprecher mit dem Netzkabel
Hauptgerät
Systemkabel (Großer DIN 13-Pin)
Front-Lautsprecher mit Netzkabel
Rot
B Stellen Sie die Verbindung zwischen dem linken und rechten Front-Lautsprecher her
Front-Lautsprecher mit Netzkabel Front-Lautsprecher
Front-Lautsprecherkabel
(grau, violett und rote Stecker)
C
Stellen Sie die Verbindung zwischen dem Center-Lautsprecher und dem Front-Lautsprecher mit dem Netzkabel her
Rot Violett GrauRotViolett Grau
D Stellen Sie die Verbindung zwischen dem linken und rechten Surround-Lautsprecher her
Verwendung nur mit den mitgelieferten Lautsprechern. Nicht mit anderen Lautsprechern verwenden. Der Anschluss anderer Lautsprecher kann die
Lautsprecher und/oder das Gerät beschädigen.
D-5 [DEUTSCH]

Umkehrung der Lautsprecherpositionen
Es ist möglich, die Positionen der Front- und Surround-Lautsprecher, wie
sie auf der vorangehenden Seite gezeigt wurde, umzukehren.
Wählen Sie unter Berücksichtigung der Verbindung der Netzkabel usw.
die Aufstellung aus, die günstiger ist.
Aufstellung der Front-Lautsprecher mit Netzkabel auf der rechten Seite
Front-Lautsprecher mit Netzkabel
Rot
Rot
Violett Grau
Aufstellung der Surround-Lautsprecher mit Netzkabel auf der rechten Seite
Surround-Lautsprecher mit Netzkabel Surround-Lautsprecher
Front-Lautsprecher
Rot Violett Grau
Über Surround-Lautsprecheranschlüsse
Da die Surround-Lautsprecher dieses Geräts kabellos sind, ist es unter
normalen Bedingungen nicht notwendig, das Zusatz-Lautsprecherkabel
zu verwenden.
Wenn bei der Verwendung der Surround-Lautsprecher im kabellosen
Modus ein Rauschen zu hören ist, ändern Sie die Einstellung des
Schalters CH SELECT auf der Rückseite des Front-Lautsprechers mit
dem Netzkabel.
Wenn das Rauschen anhält, verbinden Sie unter zu Hilfenahme des
mitgelieferten Zusatz-Lautsprecherkabels den Surround-Lautsprecher
mit dem Netzkabel mit dem Front-Lautsprecher mit dem Netzkabel. In
diesem Fall wird das Audiosignal über das Zusatz-Lautsprecherkabel an
den Surround-Lautsprecher gesendet.
Front-Lautsprecher mit Netzkabel
Surround-Lautsprecher mit Netzkabel
Weiß
Weiß
Die anderen Verbindungen entsprechen denen auf der vorangehenden
Seite.
Weiß
Änderung der Frequenzeinstellung
Wenn bei der Verwendung der Surround-Lautsprecher im kabellosen
Modus ein Rauschen (oder Klangaussetzer) zu hören sind, ändern Sie die
Einstellung des Schalters CH SELECT auf der Rückseite des FrontLautsprechers mit dem Netzkabel. Dies kann zur Verbesserung des
Sounds führen.
CH SELECT
1 (2,414 MHz)
2 (2,432 MHz)
3 (2,450 MHz)
4 (2,468 MHz)
Zusatz-Lautsprecherkabel (Kleiner DIN 8-Pin)
D-6[DEUTSCH]

VERBINDUNG DES GERÄTS MIT EINEM
ANDEREN GERÄT
- Passen Sie, nachdem alle Verbindungen hergestellt wurden, das
Bildseitenformat des Fernsehgeräts an (“4:3 LB”, “4:3 PS” und “16:9”)
(siehe Seite 20).
- Verwenden Sie die Anschlüsse COMPONENT VIDEO OUT, wenn
Sie das Gerät mit einem Fernsehgerät verbinden, das mit dem
Progressive Modus ausgerüstet ist und der NTSC-Norm entspricht.
Sie können den Progressive-Modus auswählen (Auto/Video/Film)
(siehe Seite 20).
Seien Sie bei der Verbindung der Anschlüsse vorsichtig.
- Schalten Sie den Strom des Geräts ab und ziehen Sie den
Netzstecker aus der Steckdose, bevor Sie das Gerät mit einem
anderen Gerät verbinden.
- Verbinden Sie das Gerät direkt mit einem Fernsehgerät. Wenn
das Gerät über einen Videorekorder mit einem Fernsehgerät
verbunden ist, können die Bilder durch die CopyrightSchutzfunktion gestört werden.
- Lesen Sie die Bedienungsanleitung des Geräts sorgfältig durch, das
angeschlossen werden soll.
- Bevor Sie das Netzkabel des Geräts ein- und ausstecken, schalten
Sie das Fernsehgerät und alle anderen Gerät aus, die mit dem Gerät
verbunden sind. Wird dies unterlassen, können die Lautsprecher
beschädigt werden.
- Um das Videosignal eines Geräts zu übertragen, das mit dem
Anschluss VIDEO 1 IN “VIDEO” (oder VIDEO 2 IN “VIDEO”) verbunden
ist, sollte das Fernsehgerät mit dem VIDEO OUT- oder EURO AV
CONNECTOR RGB OUT/TV (AUDIO) IN-Anschluss verbunden sein.
Das Videosignal, das über den Anschluss VIDEO 1 IN “VIDEO” (oder
VIDEO 2 IN “VIDEO”) kommt, wird nicht über die Anschlüsse SVIDEO OUT oder COMPONENT VIDEO OUT gesendet.
Verbinden Sie das Gerät mit einem Fernsehgerät.
Wenn Sie das Gerät mit einem Fernsehgerät verbinden, das einen
VIDEO INPUT-Anschluss hat (Abb. 6).
Wenn Ihr Fernsehgerät über einen VIDEO INPUT-Anschluss verfügt,
verbinden Sie das Gerät mit dem VIDEO INPUT-Anschluss.
Wenn Sie das Gerät mit einem Fernsehgerät verbinden, das einen
EURO AV-Anschluss hat (Abb. 7).
Sie können eine qualitativ hochwertige Bildwiedergabe genießen.
(Verbinden Sie das Videokabel nicht mit dem VIDEO OUT-Anschluss.)
Wählen Sie in diesem Fall “VIDEO OUT SELECT: RGB” (Standard) unter
der Einstellung “Änderung der Anzeige” aus (siehe Seite 20).
Wenn Sie das Gerät mit einem Fernsehgerät verbinden, das einen SVIDEO INPUT-Anschluss hat (Abb. 8).
Sie können eine klarere Bildwiedergabe genießen. (Eine Verbindung mit
dem VIDEO OUT-Anschluss ist nicht notwendig.)
Wenn Sie das Gerät mit einem Fernsehgerät verbinden, das einen
COMPONENT VIDEO INPUT-Anschluss hat (Abb. 9).
(Nur für Fernsehgeräte, die der NTSC-Norm entsprechen.)
Sie können eine qualitativ hochwertige Bildwiedergabe genießen. (Eine
Verbindung mit dem VIDEO OUT- oder S-VIDEO OUT-Anschluss ist nicht
notwendig.)
Wählen Sie in diesem Fall “VIDEO OUT SELECT: COMPONENT” unter
der Einstellung “Änderung der Anzeige” aus (siehe Seite 20).
Es kann auch ein LCD-Videoprojektor angeschlossen werden, der der
NTSC-Norm entspricht.
Beispiel für die Verbindung mit einem anderen Gerät
(Abb. 10)
Verbindung mit dem analogen Audio-Ausgang eines
anderen Geräts (Abb. 11)
Durch die Verbindung des analogen Audio-Ausgangs eines Audio-Geräts
mit dem Gerät können Sie kräftigeren Sound über die Lautsprecher
dieses Geräts genießen.
Verbindung mit dem digitalen Audio-Ausgang eines
anderen Geräts (Abb. 12)
Wenn Sie den digitalen Audioausgang (optisch/coaxial) eines MD-Spielers
oder einer Spielekonsole mit diesem Gerät verbinden, können Sie 5.1Kanal-Sound mit Surround-Sound-Effekt genießen.
Hinweis:
Wenn das Videosignal eines externen Geräts nicht eingespeist wird, ist es
möglich, nur das digitale Audiosignal einzuspeisen, indem der
Funktionsmodus des digitalen Audioeingangs geändert wird (siehe Seite
25).
Kopfhörer anschließen
Verbinden Sie Stereo-Kopfhörer (nicht im Lieferumfang enthalten ) mit
dem PHONES-Anschluss, um den Sound zu kontrollieren oder um Dritte
nicht zu stören. Die Verbindung zu den Lautsprechern wird automatisch
getrennt, wenn Kopfhörer angeschlossen sind.
ANTENNENANSCHLÜSSE
Antennen (Abb. 13)
In Gegenden, die sich in der Nähe eines Senders befinden, reicht eine
einfache Zimmerantenne zum Empfang von Rundfunkübertragungen
aus. Verlegen Sie das Antennenkabel so gerade wie möglich und befestigen
Sie es, während Sie einen Sender eingeschaltet haben, so, dass Störungen
und Rauschen minimal sind.
In abgelegenen Gebieten oder in Gegenden, wo der Empfang durch
Rauschen oder Verzerrungen gestört ist, sollte eine FM-Außenantenne
(nicht im Lieferumfang enthalten) anstelle der einfachen Zimmerantenne
angeschlossen werden. Bitten Sie Ihren Fachhändler um Rat.
AM-Rahmenantenne
Bauen Sie die Rahmenantenne wie in Abb. 14a gezeigt zusammen.
Entrollen Sie das Antennenkabel und schließen Sie den Stecker dann an
den AM ANT.-Anschluss an. Wenn Sie Schwierigkeiten beim Einstecken
des Steckers haben, drehen Sie ihn und stecken Sie ihn erneut ein. Stellen
Sie die Rahmenantenne in eine Position, in der der AM-Empfang am
besten ist, oder montieren Sie die Antenne an einer Wand oder einer
anderen Fläche, wie in Abb. 14b dargestellt.
Hinweis:
Damit die Störungen so gering wie möglich sind, verlegen Sie die Kabel
der Lautsprecher, Stromversorgung und alle anderen Kabel nicht in der
Nähe der Zimmer- oder Außenantenne und der AM-Rahmenantenne.
Verlegen Sie die Antennenkabel nicht in der Nähe der Anlage.
Hauptanschlüsse
(Hauptgerät, Front-Lautsprecher mit Netzkabel und SurroundLautsprecher mit Netzkabel)
Schließen Sie das Netzkabel an eine Steckdose an, nachdem alle
Verbindungen hergestellt wurden.
Hinweis:
Schließen Sie das Netzkabel erst dann an eine Steckdose an, wenn alle
Verbindungen hergestellt wurden.
BEISPIEL FÜR SYSTEMANSCHLÜSSE
JCX-TS960, TV und Audio-Gerät (Abb. 15)
JCX-TS960, TV und Videorekorder (Abb. 16)
JCX-TS960, TV, Videorekorder und Audio-Gerät (Abb. 17)
JCX-TS960, TV, Videorekorder, STB (Set Top Box) und Audio-
Gerät (Abb. 18)
D-7 [DEUTSCH]

ALLGEMEINER BETRIEB
Es kann entweder das Gerät oder die Fernbedienung zur Steuerung
benutzt werden. Zu Ihrem Komfort beschränkt sich dieses Handbuch
auf die Steuerung des Geräts mit Hilfe der Fernbedienung.
Ein- und Ausschalten des Geräts
1. Drücken Sie den Hauptschalter auf der Rückseite des Surround-
Lautsprechers.
2. Drücken Sie den z/ON-Schalter.
Das Hauptgerät und der Surround-Lautsprecher werden eingeschaltet
und das Display ist erleuchtet. Der Front-Lautsprecher wird automatisch
eingeschaltet.
- Auf dem Display erscheint die Anzeige “HELLO”.
- Es wird die Quelle ausgewählt, die vor dem Ausschalten des
Geräts ausgewählt war.
1. Drücken Sie den z/ON-Schalter erneut, um das Hauptgerät und die
Front-Lautsprecher auszuschalten. Auf dem Display erscheint die
Anzeige “GOOD-BYE”.
2. Drücken Sie den Hauptschalter auf der Rückseite des Surround-
Lautsprechers.
Wiedergabe sofort starten
Auch wenn das Gerät ausgeschaltet ist, wird durch das Drücken einer
Taste die Wiedergabe oder der Radioempfang gestartet und das Gerät
automatisch eingeschaltet.
Wiedergabe (wenn sich eine Disk im Gerät befindet)
Durch Drücken der Taste a (Wiedergabe) wird die Wiedergabe gestartet.
Radioempfang
Durch Drücken der Taste TUNER wird der Radioempfang gestartet.
- Der Radioempfang erfolgt über den Radiosender, der vor dem
Ausschalten des Geräts ausgewählt war.
Auswurf der Disk über die Betätigung einer Taste
Durch Drücken der Taste q öffnet sich die Disk-Schublade.
Auswahl der gewünschten Quelle
Wählen Sie die gewünschte Quelle durch Drücken der Taste FUNCTION
aus. Jedes Mal, wenn Sie die Taste drücken, ändert sich die Anzeige wie
folgt:
DVD/CD v TV v VIDEO 1 v V1 OPT v VIDEO 2 v V2 COAX v FM
TUNER v AM TUNER v DVD/CD ...
Hinweis:
- Wenn die Taste a (Wiedergabe) oder TUNER gedrückt wird, wird die
Auswahl der Quelle automatisch geändert.
- Wenn die Auswahl der Quelle geändert wird, stoppt die Wiedergabe
der Disk automatisch.
Anpassen der Lautstärke
Mit der Taste VOL “+” oder “–” passen Sie die Lautstärke an.
Immer wenn die VOL-Taste betätigt wird, erscheint der Lautstärkepegel
(VOL 0 bis VOL MAX) im Display.
- Drehen Sie am Lautstärkeregler VOLUME, um die Lautstärke am
Hauptgerät einzustellen.
Gewünschte Klangqualität einstellen
1. Wählen Sie durch Drücken der Taste SOUND einen Klangmodus aus.
BASS v TREBLE v FLAT v Rückkehr zur ursprünglichen
Anzeige v BASS ...
2. Drücken Sie die Taste b / a oder ENTER.
Modus Taste Einstellung
BASS b / a –5 bis +5
TREBLE b / a –5 bis +5
FLAT ENTER BASS 0/TREBLE 0
- Um die Klangqualität “FLAT” einzustellen (die Anfangseinstellung),
wählen Sie “FLAT” aus und drücken Sie die ENTER-Taste. Auf
dem Display erscheint die Anzeige “- -FLAT- -”.
3. Wiederholen Sie die Schritte 1 und 2, um eine andere Klangeinstellung
auszuwählen.
4. Drücken Sie die SOUND-Taste. Es erscheint wieder die Grundanzeige.
Hinweis:
Wenn während der Einstellung für ungefähr 10 Sekunden keine Taste
betätigt wird, wird die Einstellung automatisch beendet.
Verstärkung der Bässe
Drücken Sie die Taste BASS, um die gewünschte Bassverstärkung
auszuwählen.
BOOST 1 v BOOST 2 v OFF v NORMAL v BOOST 1 ...
- Wenn Kopfhörer angeschlossen sind, wird die Einstellung durch
Drücken der BASS-Taste nicht geändert. In diesem Fall erscheint
“-BASS-” im Display.
Auswahl eines Surround-Modus
Sie können ganz einfach den Surround-Sound-Effekt genießen, indem
Sie den Surround-Modus entsprechend der wiederzugebenden Disk und
der Situation auswählen.
Einzelheiten zum Surround-Modus finden Sie im Abschnitt “Über den
Surround-Modus” auf der nächsten Seite.
Wählen Sie den gewünschten Modus durch Drücken der Taste
SURROUND aus.
AUTO v s PL II MOVIE v s PL II MUSIC v s PL DOLBY PL
HALL v STADIUM v STUDIO v THEATER v CLUB v 2.1ch
AUTO ...
Hinweis:
- Wenn während der Einstellung für ungefähr 4 Sekunden keine Taste
betätigt wird, wird die Einstellung automatisch beendet.
- Abhängig von dem wiederzugebenden Audiosignal kann die Auswahl
des Surround-Modus bereits feststehen oder eingeschränkt sein.
v
v
Vorübergehendes Abschalten des Tons
Drücken Sie die MUTE-Taste. “MUTE” blinkt auf dem Display. Wollen Sie
die ursprüngliche Lautstärke wiederherstellen, drücken Sie die Taste
erneut.
D-8[DEUTSCH]

Über den Surround-Modus
Modus: AUTO
Funktion: DVD/CD, V1 OPT, V2 COAX
Das Gerät erfasst automatisch das Format des Audiosignals, das auf der
Disk gespeichert ist und wählt den geeigneten Surround-Modus aus.
-
Ist eine DVD oder ein externes digitales Audiosignal mit Dolby Digital
5.1-Kanal codiert, erscheint “s D” im Display und die Wiedergabe
erfolgt mit Dolby Digital 5.1-Kanal-Surround Sound. Nicht alle DVDs
sind im Dolby Digital 5.1-Kanal-Surround Sound codiert.
- Ist eine DVD oder ein externes digitales Audiosignal mit DTS
codiert, erscheint “dts” im Display und die Wiedergabe erfolgt mit
DTS-Surround Sound. Nicht alle DVDs sind im DTS-Surround
Sound codiert.
- Ist eine DVD oder ein externes digitales Audiosignal mit Dolby
Digital 2-Kanal oder mono codiert, erscheint “s PL II” im Display
und die Wiedergabe erfolgt im Dolby Pro Logic II MOVIE-Modus.
- Ist eine DVD oder ein externes digitales Audiosignal mit 2-Kanal
PCM (Stereo) codiert, erscheint “s PL II” im Display und die
Wiedergabe erfolgt im Dolby Pro Logic II MUSIC-Modus.
- Wenn eine Video-CD oder Super-Video-CD eingelegt ist, erfolgt
die Wiedergabe im Dolby Pro Logic II MOVIE-Modus. Wenn eine
Musik-CD, MP3-Disk oder WMA-Disk eingelegt ist, erfolgt die
Wiedergabe im Dolby Pro Logic II MUSIC-Modus.
Funktion: TV, VIDEO1, VIDEO2
Die Wiedergabe erfolgt im Dolby Pro Logic II MOVIE-Modus.
Funktion: FM TUNER
Die Wiedergabe erfolgt im Dolby Pro Logic II MUSIC-Modus.
Funktion: AM TUNER
Der Surround-Modus wird auf 2.1-Kanal eingestellt. Die Wiedergabe
erfolgt nur über den rechten/linken Front-Lautsprecher und den
Subwoofer.
Modus:
Die Wiedergabe erfolgt im Dolby Pro Logic II 5.1-Kanal-Surround-Modus.
Wenn auf einer Disk das Audiosignal mit zwei Kanälen in einem Modus
aufgezeichnet ist, der für die MOVIE-Wiedergabe geeignet ist, kann ein
Pseudo-5.1-Kanal-Surround-Sound-Effekt (Widening, Aufweitung) erzeugt
werden.
Modus:
Die Wiedergabe erfolgt im Dolby Pro Logic II 5.1-Kanal-Surround-Modus.
Wenn auf einer Disk das Audiosignal in Stereoqualität in einem Modus
aufgezeichnet ist, der für die MUSIC-Wiedergabe geeignet ist, kann ein
Pseudo-5.1-Kanal-Surround-Sound-Effekt (Aufweitung) erzeugt werden.
Modus:
Die Wiedergabe erfolgt im Dolby Pro Logic 5.1-Kanal-Surround-Modus.
Dieser Modus ist geeignet für die Wiedergabe einer Disk, deren Audiosignal
im konventionellen Dolby-Surround-Modus aufgezeichnet ist.
Modus: HALL
Audiosignale, die mit 2 Kanälen (stereo) aufgezeichnet sind, werden mit
einem Pseudo-5.1-Kanal-Surround-Sound-Effekt (Aufweitung)
wiedergegeben. So entstehen Soundeffekte, die dem Hörgenuss in einer
Konzerthalle gleichen.
Modus: STADIUM
Audiosignale, die mit 2 Kanälen (stereo) aufgezeichnet sind, werden mit
einem Pseudo-5.1-Kanal-Surround-Sound-Effekt (Aufweitung)
wiedergegeben. So entstehen realistische Soundeffekte, die dem Besuch
eines Sportereignisses in einem Stadium gleichen.
Modus: STUDIO
Audiosignale, die mit 2 Kanälen (stereo) aufgezeichnet sind, werden mit
einem Pseudo-5.1-Kanal-Surround-Sound-Effekt (Aufweitung)
wiedergegeben. So entstehen Soundeffekte, die dem Hörgenuss in
einem Aufnahmestudio gleichen.
Modus: THEATER
Audiosignale, die mit 2 Kanälen (stereo) aufgezeichnet sind, werden mit
einem Pseudo-5.1-Kanal-Surround-Sound-Effekt (Aufweitung)
wiedergegeben. So entstehen natürliche Soundeffekte, die dem Hörgenuss
in einem Kino gleichen.
ss
s PL II MOVIE
ss
ss
s PL II MUSIC
ss
ss
s PL DOLBY PL
ss
Modus: CLUB
Audiosignale, die mit 2 Kanälen (stereo) aufgezeichnet sind, werden mit
einem Pseudo-5.1-Kanal-Surround-Sound-Effekt (Aufweitung)
wiedergegeben. So entstehen Soundeffekte, die dem Hörgenuss in
einem Club oder einer Diskothek gleichen.
Modus: 2.1ch
Der Surround-Modus wird auf 2.1-Kanal eingestellt. Die Wiedergabe
erfolgt nur über den rechten/linken Front-Lautsprecher und den Subwoofer.
Hinweis:
In den folgenden Fällen kann nur der Surround-Modus AUTO oder 2.1Kanal ausgewählt werden.
- Bei einem externen digitalen Audiosignal, dessen Quelle LPCM 96
kHz ist.
- Bei einer DVD oder einem externen digitalen Audioeingang, dessen
Audiosignal ein anderes als Dolby Digital 2-Kanal ist, oder im Fall
einer DTS-Wiedergabe.
Wenn Kopfhörer angeschlossen sind
Modus: AUTO,
HALL, STADIUM, STUDIO, THEATER, CLUB
Die Wiedergabe erfolgt im 2-Kanalmodus (Stereo) mit einem virtuellen
Modus mit Surround-Sound-Effekt (Aufweitung). Wenn als Quelle AM
TUNER ausgewählt ist, erfolgt die Wiedergabe im normalen 2-Kanalmodus
(Stereo).
“VIRTUAL” blinkt auf dem Display.
Modus: 2ch
Die Wiedergabe erfolgt im normalen 2-Kanalmodus (stereo).
ss
s PL II MOVIE,
ss
ss
s PL II MUSIC,
ss
ss
s PL DOLBY PL,
ss
Anpassen des Surround-Sound-Effekts im Dolby Pro
Logic II MUSIC-Modus
Über den Dolby Pro Logic II MUSIC-Modus
PANO (Panorama-Modus):
Es ist möglich, das vordere Soundfeld nach rechts und links
auszudehnen, sodass es die Surround-Lautsprecher erreicht. So
wird ein umfassender Surround-Sound-Effekt erzielt.
C.WIDTH (Center-Weite):
Wenn das Center-Feld zu stark erscheint, kann es so angepasst
werden, dass ein Klangfeld erzeugt wird, das für die Wiedergabe von
Musik geeignet ist. Hierfür wird das Signal des Center-Kanals auf den
rechten und linken Front-Kanal aufgeteilt. Das Signal des CenterKanals kann in acht Schritten aufgeteilt werden: 0 (Ausgabe nur über
den Center-Lautsprecher) bis 7 (Center-Kanalsignal wird nur über die
Front-Lautsprecher ausgegeben).
DIMEN (Dimension):
Es ist möglich, die Lautstärkebalance der Front- und Rücklautsprecher
innerhalb eines Bereichs von –3 bis +3 anzupassen. Wenn Sie das
Klangfeld im Vorderbereich erhöhen möchten, verschieben Sie die
Lautstärkebalance zur “+”-Seite. Wenn Sie das Klangfeld im
Rückbereich erhöhen möchten, verschieben Sie die Lautstärkebalance
zur “–”-Seite. Wenn der Surround-Sound-Effekt zu stark erscheint,
verschieben Sie die Lautstärkebalance zur Vorderseite. Wenn der
Surround-Sound-Effekt nicht ausreichend erscheint, verschieben Sie
die Lautstärkebalance zur Rückseite.
1. Wählen Sie den Modus “s PL II MUSIC” durch Drücken der Taste
SURROUND aus. “s PL II” und “MUSIC” werden im Display angezeigt.
2. Wählen Sie durch Drücken der Taste 4 / 5 einen Parameter aus.
PANO
wv
3. Drücken Sie die Taste b / a.
C.WIDTH
Legen Sie durch Drücken der Taste b / a einen Parameter fest.
Modus: Level
PANO: “ON” oder “OFF”
C.WIDTH: 0 bis 7
DIMEN: –3 bis +3
4. Legen Sie die Parameter fest, indem Sie die Schritte 2 und 3
wiederholen.
wv
DIMEN
wv
PANO ...
D-9 [DEUTSCH]

Nachtmodus einstellen
TEST TONE
LEVEL : B A QUIT : TEST
L
0
0
LS
C
0
R
0
0
RS
Wenn die Lautstärke niedrig eingestellt ist, zum Beispiel nachts, sind leise
Geräusche einfacher zu hören, wenn der Nachtmodus auf “ON” geschaltet
wird. Wenn Sie plötzliche und drastische Veränderungen der Lautstärke
z.B. durch plötzliche Geräusche usw. vermeiden möchten, werden durch
die Einstellung dieses Modus auf “ON” starke Änderungen der Lautstärke
reduziert.
Drücken Sie die NIGHT-Taste.
Das Display leuchtet schwacher als normal. Im Display erscheint “NIGHT
ON” und die Anzeige “NIGHT” in roten Buchstaben leuchtet auf.
Drücken Sie die Taste NIGHT erneut, um den Nachtmodus auf “OFF” zu
schalten.
Über die Anzeige Eingang-/Ausgangkanal (L, C, R,
SW, LS, RS)
Die Eingangskanal- oder Ausgangskanalanzeige wird durch die Funktion
oder das Audiosignalformat gewechselt.
Funktion: DVD/CD, V1 OPT, V2 COAX
Audiosignalformat: Display-Modus
PCM: Zeigt den Lautsprecherausgabekanal an (Ausgabeanzeige)
Dolby Digital: Zeigt den Grundkanal an (Einganganzeige)
DTS: Zeigt den Grundkanal an (Einganganzeige)
MP3/WMA: Zeigt den Lautsprecherausgabekanal an (Ausgabeanzeige)
Funktion: TV, VIDEO1, VIDEO2, FM TUNER, AM TUNER
Audiosignalformat: Display-Modus
Analog: Zeigt den Lautsprecherausgabekanal an (Ausgabeanzeige)
Hinweis:
- Wenn im Ausgangsanzeigemodus Kopfhörer angeschlossen sind,
sind nur “L” und “R” erleuchtet.
- Ausgang- und Eingangsanzeigemodi können nicht manuell gewechselt
werden.
- Wenn im Eingabedisplay “SW” erscheint, ist der LFE-Kanal (Low
Frequency Effect) in der Audioquelle enthalten.
Helligkeit des Displays einstellen
Drücken Sie die Taste ON SCREEN auf der Fernbedienung, während Sie
die Taste n am Gerät gedrückt halten.
NORMAL (Normal)
wv
DARK (Dunkel)
Verschließen der Disk-Schublade
Es ist möglich, die Disk-Schublade zu sperren, um einen Missbrauch
durch Kinder zu verhindern.
Öffnen Sie die Disk-Schublade durch Drücken der q-Taste. Drücken und
halten Sie die q-Taste am Gerät, bis im Display die Anzeige “LOCKED”
erscheint.
Danach kann die Schublade nicht mehr durch Drücken der q-Taste
geöffnet werden.
- Um die Schubladensperre aufzuheben, drücken und halten Sie die q-
Taste am Gerät, bis im Display die Anzeige “UNLOCKED” erscheint.
- Wenn die q-Taste gedrückt wird während die Disk-Schublade gesperrt
ist, erscheint “DISC TRAY LOCKED” auf dem Fernsehbildschirm und
“LOCKED” im Display.
Lautstärkebalance der Front-, Center- und SurroundLautsprecher einstellen
Vor der Auslieferung wurde das Gerät auf eine Grundlautstärke eingestellt.
Passen Sie die Lautstärke jedes Lautsprechers entsprechend der
Raumgröße und der Aufstellung der Lautsprecher an, um einen kräftigeren
Surround-Sound-Effekt zu erzielen.
Vorbereitung:
- Schalten Sie das Fernsehgerät ein und wählen Sie den Videoeingang,
über den das Gerät angeschlossen ist.
- Wenn eine Disk wiedergegeben wird, drücken Sie die Taste n
zweimal, um die Wiedergabe vollständig zu beenden.
- Entfernen Sie die Kopfhörer falls sie angeschlossen sind.
1. Wählen Sie “DVD/CD” durch Drücken der Taste FUNCTION aus.
2. Drücken Sie die TEST-Taste. Auf dem Fernseh-Bildschirm erscheint
die Anzeige “TEST TONE”.
“L” blinkt und “FNTL 0” erscheint im Display.
Der Testton ist in der folgenden Reihenfolge aus den Lautsprechern
zu hören. Die Anzeige ändert sich ungefähr alle 2 Sekunden.
Fernseh-Bildschirm (Display): Lautsprecher
L ([L] FNTL 0): Linker Front-Lautsprecher
C ([C] CENT 0): Center-Lautsprecher
R ([R] FNTR 0): Rechter Front-Lautsprecher
RS ([RS] SURR 0): Rechter Surround-Lautsprecher
LS ([LS] SURL 0): Linker Surround-Lautsprecher
3. Stellen Sie die Lautstärke des Testtons durch Drücken der Taste VOL
“+” oder “–” ein.
4. Drücken Sie die Taste b / a während der Ton aus dem Lautsprecher
zu hören ist, dessen Lautstärke eingestellt werden soll.
Passen Sie an der Hörposition die Lautstärke so an, dass die Testtöne
sich aus allen Lautsprechern gleich anhören.
Der Pegel wird auf dem Fernseh-Bildschirm und dem Display angezeigt.
Bereich:
L, R : –10 bis 0
C, RS, LS : –10 bis +10
Wiederholen Sie diesen Schritt wenn notwendig.
5. Drücken Sie die TEST-Taste. Die Anzeige “TEST TONE” verschwindet.
Hinweis:
Die Lautsprechereinstellung wird automatisch beendet, nachdem der
Testzyklus fünf Mal durchlaufen wurde.
Anpassen des Subwoofer-Pegels
- Entfernen Sie die Kopfhörer falls sie angeschlossen sind.
1. Drücken Sie die TRIM-Taste. “FNTL 0” erscheint auf dem Display.
2. Drücken Sie die Taste ENTER, um “SUBW 0” auszuwählen.
3. Drücken Sie die Taste b / a, um die Lautstärke wie gewünscht
einzustellen.
Bereich:
SUBW : –10 bis +10
4. Drücken Sie die TRIM-Taste. Die Lautsprecher- und Pegelanzeige
erlischt.
Hinweis:
- Wenn der Subwoofer-Pegel eingestellt wird, wird kein Testton
gesendet. Es empfiehlt sich, den Subwoofer-Pegel einzustellen,
während Musik usw. wiedergegeben wird.
- Wenn während der Einstellung für ungefähr 15 Sekunden keine Taste
betätigt wird, wird die Lautsprechereinstellung automatisch beendet.
D-10[DEUTSCH]

DISK-WIEDERGABE [DVD] [VCD] [CD]
DVD
C
D
RSLSSW
RCL
Wichtiger Hinweis:
- Bestimmte DVDs oder VCDs besitzen zusätzliche Funktionen, die
in diesem Handbuch möglicherweise nicht erklärt werden. Dazu
benötigen Sie unter Umständen andere Anleitungen. Befolgen Sie
in diesem Fall die Anweisungen, die auf dem Bildschirm des
Fernsehgeräts angezeigt werden oder auf der Schutzhülle der
Disk aufgedruckt sind.
- Die Disk-Informationen haben bei den unterschiedlichen
Einstellungen Vorrang.
- Es kann vorkommen, dass “ ” auf dem Bildschirm erscheint.
Dieses Symbol bedeutet, dass diese Funktion auf der Disk derzeit
nicht zur Verfügung steht.
- In dieser Bedienungsanleitung sind die Bildschirmanweisungen
auf Englisch wiedergegeben. Wenn Sie die Sprache geändert
haben, befolgen Sie bitte die Bildschirmanweisungen in der
gewählten Sprache.
- Die Abbildungen von Beispielen in diesem Handbuch können sich
von der aktuellen Darstellung auf Ihrem Fernseher unterscheiden.
- Änderungen der Bildschirmanzeige aufgrund technischer
Verbesserungen sind vorbehalten.
Vorbereitung
- Schalten Sie das Gerät und das Fernsehgerät ein und wählen Sie den
Videoeingang für dieses Gerät, während eine DVD oder VCD
wiedergegeben wird.
-Wählen Sie die gewünschte Sprache für die Bildschirmmenüs aus.
Sie können zwischen den folgenden Sprachen wählen:
Englisch (Einstellung ab Werk), Spanisch, Französisch, Deutsch,
Italienisch, Portugiesisch, Japanisch und Chinesisch
(Siehe “Einstellen der Sprache” auf Seite 19.)
-Wählen Sie entsprechend dem Fernsehgerät, das mit dem Gerät
verbunden ist, einen Videosignal-Ausgangmodus und ein Bildformat
für die Wiedergabe (siehe Seiten 7, 20).
Auswahl des Progressive-Modus (Nur bei NTSC-Disks)
Hinweis:
Haben Sie einen Fernseher, der nur die PAL-Norm oder NTSC-Signale
nicht durch Vollbildübertragung darstellen kann, überspringen Sie diesen
Abschnitt.
Überprüfen Sie bitte das Fernsehgerät und die Verbindung.
- Das Fernsehgerät entspricht der NTSC-Norm und verfügt über den
Progressive-Modus.
- Die Anschlüsse COMPONENT VIDEO OUT des Geräts sind mit den
Anschlüssen COMPONENT VIDEO INPUT des Fernsehgeräts
verbunden.
Wählen Sie die Einstellung “Änderung der Anzeige” wie folgt (siehe Seite
20).
1. Wählen Sie “VIDEO OUT SELECT: COMPONENT” aus.
2. Wählen Sie “NTSC DISC: NTSC PROGRESSIVE” aus.
3. Wählen Sie, wenn gewünscht, “PROGRESSIVE MODE” aus.
Wiedergabe
1. Drücken Sie die q-Taste. Die Disk-Schublade wird geöffnet. Auf dem
Display erscheint die Anzeige “OPEN”. Auf dem Bildschirm des
Fernsehgeräts erscheint die Anzeige “OPEN” und “SANYO”.
2. Legen Sie eine Disk in die Disk-Schublade ein. Legen Sie die Disk
sorgfältig mit der Aufnahmeoberfläche nach unten ein (Abb. 19).
3. Drücken Sie die Taste a (Wiedergabe).
Die Disk-Schublade wird automatisch geschlossen. Auf dem Bildschirm
des Fernsehgeräts erscheint die Anzeige “CLOSE”, “READING” und
“ a ” und die Wiedergabe wird gestartet.
Beispiel: DVD
Kapitelnummer Verstrichene Spielzeit
- Wenn die Disk mit der Aufnahmeoberfläche nach oben eingelegt
wurde oder wenn die Disk stark verkratzt ist, erscheint die Anzeige
“NO PLAY” auf dem Bildschirm des Fernsehgeräts. Legen Sie in
diesem Fall die Disk richtig herum ein oder wechseln Sie die Disk.
Wenn ein Disk-Menü erscheint
Es kann vorkommen, dass ein Menü erscheint, wenn eine DVD abgespielt
wird. Wählen Sie in diesem Fall über die Tasten 4/5/b/a den gewünschten
Menüpunkt aus und drücken Sie die ENTER-Taste.
Es kann auch vorkommen, dass ein Menü erscheint, wenn eine VCD
abgespielt wird.
Hinweis:
- Berühren Sie die Disk nicht, während sie sich bewegt.
- Legen Sie nur Disks in die Disk-Schublade. Fremdkörper können das
Gerät beschädigen.
- Legen Sie immer nur eine Disk in die Schublade ein.
- Benutzen Sie die Taste q, um die Schublade zu öffnen oder zu
schließen. Schieben Sie die Schublade nicht mit der Hand zu.
Wiedergabe anhalten
Drücken Sie die n-Taste.
Starten der Wiedergabe an dem Punkt, an dem sie beendet wurde
(Resume-Funktion)
Wenn die n -Taste während der Wiedergabe einmal gedrückt wird, wird
“RESUME n ” angezeigt.
Wenn die a (Wiedergabe)-Taste gedrückt wird, beginnt die Wiedergabe
an dem Punkt, an dem sie zuvor angehalten wurde.
Wiedergabe vollständig beenden
Drücken Sie die n -Taste zweimal. Die Wiedergabe wird vollständig
angehalten. Wenn die a (Wiedergabe)-Taste gedrückt wird, beginnt die
Wiedergabe am Anfang der Disk.
Auswerfen der Disk
Drücken Sie die q-Taste. Entnehmen Sie die Disk, nachdem sich die
Schublade vollständig geöffnet hat.
Drücken Sie die q-Taste erneut, um die Schublade zu schließen.
Zu einer bestimmten Wiedergabeposition wechseln
(Abb. 20)
Vorwärts springen
Drücken Sie während der Wiedergabe die Taste e.
Die Wiedergabe beginnt am Anfang des nächsten Kapitels oder des
nächsten Titels.
Rückwärts springen
Drücken Sie während der Wiedergabe die Taste f.
Die Wiedergabe beginnt am Anfang des Kapitels oder des Titels, der
gerade wiedergegeben wird. Wenn die Taste erneut gedrückt wird,
beginnt die Wiedergabe am Anfang des vorherigen Kapitels oder Titels.
D-11 [DEUTSCH]

CHAPTER SEARCH _ _ _
TIME SEARCH _ : _ _ : _ _
VERSCHIEDENE WIEDERGABEFUNKTIONEN
TITLE SEARCH _ _
Es kann vorkommen, dass “ ” auf dem Bildschirm erscheint. Dieses
Symbol bedeutet, dass diese Funktion auf der Disk derzeit nicht zur
Verfügung steht.
Titelsuche [DVD]
1. Drücken Sie einmal die Taste SEARCH MODE.
Beispiel:
Vornehmen einer Auswahl im DVD-Menü [DVD]
1. Drücken Sie die MENU-Taste. Auf dem Bildschirm erscheint das
DVD-Menü.
2. Drücken Sie die Tasten 4/5/b/a, um das gewünschte Menü
auszuwählen.
Bei einigen DVDs kann die Auswahl über die Zifferntasten
vorgenommen werden.
3. Drücken Sie die ENTER-Taste. Die gewünschte Auswahl wird
ausgeführt oder es wird das nächste Menü angezeigt.
Nehmen Sie nach Wunsch Einstellungen vor, indem Sie die Schritte
2 und 3 wiederholen.
Vornehmen einer Auswahl im Hauptmenü [DVD]
1. Drücken Sie die Taste TOP MENU. Auf dem Bildschirm erscheint das
Hauptmenü.
2. Drücken Sie die Tasten 4/5/b/a, um den gewünschten Titel
auszuwählen.
Bei einigen DVDs kann die Auswahl über die Zifferntasten
vorgenommen werden.
3. Drücken Sie die ENTER-Taste. Die Wiedergabe des ausgewählten
Titels beginnt.
Hinweis:
Die Auswahl einer Menüfunktion hängt von der verwendeten DVD ab und
ist bei einigen DVDs unter Umständen nicht möglich.
Vornehmen einer Auswahl im VCD-Menü [VCD]
Wenn eine VCD (Video-CD oder Super Video-CD) mit Playback Control
(PBC)-Funktion wiedergegeben wird, erscheint das Menü automatisch.
Betätigen Sie die Tasten entsprechend dem Menü.
Abhängig von der VCD können sich die Funktionen unterscheiden. Lesen
Sie die Gebrauchsanweisung der VCD.
1. Legen Sie eine VCD mit Playback Control-Funktion ein. Auf dem
Bildschirm erscheint das Menü.
2.
Wählen Sie den gewünschten Titel durch Drücken der Zifferntasten aus.
3. Drücken Sie die ENTER-Taste. Die Wiedergabe des ausgewählten
Titels beginnt. Wenn ein anderes Menü erscheint, treffen Sie die
Auswahl entsprechend der Menüanzeige.
Drücken Sie während der Wiedergabe die Taste RETURN, um zum
Menübildschirm zurückzukehren.
Wiedergabe einer VCD ohne Verwendung des
Menübildschirms [VCD]
Hinweis:
Wenn im Display die Anzeige “PBC” erscheint, drücken Sie zweimal die
Taste n. Die Anzeige “PBC” erlischt.
1. Geben Sie die Nummer des gewünschten Titels über die Zifferntasten
ein, wenn die Wiedergabe vollständig beendet ist.
Sie können auch eine Auswahl vornehmen, indem Sie wiederholt die
Taste f oder e betätigen.
2. Drücken Sie die Taste ENTER oder a (Wiedergabe). Die Wiedergabe
des ausgewählten Titels beginnt.
Um zum Menübildschirm zurückzukehren (PBC-Wiedergabe), stoppen
Sie die Wiedergabe vollständig, indem Sie die Taste n zweimal drücken,
und drücken Sie dann die Taste a (Wiedergabe).
2. Geben Sie über die Zifferntasten die Nummer des gewünschten Titels
ein.
Beispiel: Um den Titel Nr. 12 auszuwählen, drücken Sie erst “1” und
dann “2”.
3. Drücken Sie die Taste ENTER oder a (Wiedergabe). Die Wiedergabe
beginnt mit dem ausgewählten Titel.
Kapitelsuche [DVD]
1. Drücken Sie während der Wiedergabe zweimal die Taste SEARCH
MODE.
Beispiel:
2. Geben Sie über die Zifferntasten die gewünschte Kapitelnummer ein.
3. Drücken Sie die Taste ENTER oder a (Wiedergabe). Die Wiedergabe
beginnt mit dem ausgewählten Kapitel.
Hinweis:
-Drücken Sie die Taste CLEAR, um während der Einstellung eine
Korrektur vorzunehmen. So wird die auf dem Bildschirm angezeigte
Zahl gelöscht.
- Um die Einstellung abzubrechen, drücken Sie die Taste SEARCH
MODE ein- bis dreimal, um die Anzeige zu löschen.
Zeitsuche [DVD] [VCD] [CD]
Hinweis:
Bei VCDs: Wenn im Display die Anzeige “PBC” erscheint, drücken Sie
zweimal die Taste n.
1. Drücken Sie während der Wiedergabe einer DVD die Taste SEARCH
MODE dreimal. Drücken Sie während der Wiedergabe einer VCD
oder CD die Taste SEARCH MODE einmal.
Beispiel:
2. Geben Sie über die Zifferntasten die gewünschte Zeit ein.
Beispiel: 1 Stunde 4 Minuten 8 Sekunden
Drücken Sie “1” v “0” v “4” v “0” v “8”.
Beispiel: 35 Minuten 46 Sekunden
Drücken Sie “3” v “5” v “4” v “6”.
3. Drücken Sie die Taste ENTER oder a (Wiedergabe). Die Wiedergabe
beginnt bei der ausgewählten Zeitposition.
Titelsuche [VCD] [CD]
1. Geben Sie über die Zifferntasten die Nummer des gewünschten Titels
ein.
Beispiel: Um den Titel Nr. 15 auszuwählen, drücken Sie erst “1” und
dann “5”.
2. Drücken Sie die Taste ENTER oder a (Wiedergabe). Die Wiedergabe
beginnt mit dem ausgewählten Titel.
Standbild [DVD] [VCD]/Pause [CD]
Drücken Sie während der Wiedergabe die Taste k. “ k ” wird auf dem
Fernsehbildschirm und Display angezeigt. Drücken Sie die Taste
a (Wiedergabe), um zur normalen Wiedergabe zurückzukehren.
Einzelbild-Wiedergabe [DVD] [VCD]
Drücken Sie im Standbild-Modus die Taste
Jedes Mal, wenn Sie die Taste drücken, erscheint “
Fernsehbildschirm und das nächste Einzelbild wird angezeigt.
Drücken Sie die Taste a (Wiedergabe), um zur normalen Wiedergabe
zurückzukehren.
k.
k a
” auf dem
D-12[DEUTSCH]

Schnelle Wiedergabe [DVD] [VCD] [CD]
Drücken Sie während der Wiedergabe oder im Standbild-Modus die Taste
c oder d.
Schneller Vorlauf: Taste c
[DVD] [VCD]
FF1 c v FF2 c v FF3 c v FF1 c ...
[CD]
FF1 c v FF2 c v FF1 c ...
Schneller Rücklauf: Taste d
[DVD] [VCD]
FR1 d v FR2 d v FR3 d v FR1 d ...
[CD]
FR1 d v FR2 d v FR1 d ...
Drücken Sie die Taste a (Wiedergabe), um zur normalen Wiedergabe
zurückzukehren.
Wiedergabe in Zeitlupe [DVD] [VCD]
Drücken Sie während der Wiedergabe oder im Standbild-Modus die Taste
oder .
Zeitlupe vorwärts: Taste [DVD] [VCD]
SF1 v SF2 v SF3 v SF1 ...
Zeitlupe rückwärts: Taste
SR1 v SR2 v SR3 v SR1 ...
Drücken Sie die Taste a (Wiedergabe), um zur normalen Wiedergabe
zurückzukehren.
Hinweis:
- Im Standbild-Modus (Pause), während der Einzelbildwiedergabe und
der Zeitlupenwiedergabe ist der Ton stumm geschaltet.
- Bei einer DVD oder VCD ist der Ton während der schnellen Wiedergabe
stumm geschaltet.
Wiederholung eines bestimmten Abschnitts [DVD]
[VCD] [CD] (Abb. 21)
1. Drücken Sie zu Beginn des Abschnitts, den Sie wiederholen möchten,
die Taste A-B REP (Punkt A). Auf dem Bildschirm erscheint “ A
-”.
2. Drücken Sie am Ende des Abschnitts, den Sie wiederholen möchten,
die Taste A-B REP (Punkt B). Auf dem Bildschirm erscheint “ A
- B”.
Der ausgewählte Abschnitt (zwischen den Punkten A und B) wird
wiederholt abgespielt.
Um zur normalen Wiedergabe zurückzukehren wählen Sie “OFF” durch
Drücken der Taste A-B REP aus.
Zufallswiedergabe [VCD] [CD]
Hinweis:
Bei VCDs: Wenn im Display die Anzeige “PBC” erscheint, drücken Sie
zweimal die Taste n, um die Anzeige auszuschalten.
Drücken Sie die Taste RANDOM/RDS.
Auf dem Fernsehbildschirm erscheint die Anzeige “RANDOM PLAY”. Im
Display erscheint die Anzeige “RDM” und die Titel werden nach dem
Zufallsprinzip wiedergegeben.
Drücken Sie erneut die Taste RANDOM/RDS, um die Zufallswiedergabe
zu beenden.
Die Zufallswiedergabe wird gestoppt. Die Wiedergabe erfolgt wieder im
normalen Modus.
Hinweis:
- Wenn während der Zufallswiedergabe die Taste CLEAR gedrückt
wird, erscheint auf dem Fernsehbildschirm die Anzeige “OFF”, die
Zufallswiedergabe wird beendet und die Wiedergabe erfolgt wieder
im normalen Modus.
Wiederholung [DVD] [VCD] [CD]
Es ist möglich, die gesamte Disk, einen Titel oder ein Kapitel zu wiederholen.
Hinweis:
Bei VCDs: Wenn im Display die Anzeige “PBC” erscheint, drücken Sie
zweimal die Taste n, um die Anzeige auszuschalten.
Drücken Sie während der Wiedergabe die Taste REPEAT, um einen
Wiederholungsmodus auszuwählen.
Jedes Mal, wenn Sie die Taste drücken, ändert sich die Art der Wiederholung
wie folgt:
[DVD]
Fernsehbildschirm (Display): Funktion
CHAPTER (REPEAT 1): Wiederholung des aktuellen Kapitels
TITLE (REPEAT ALL): Wiederholung des aktuellen Titels
OFF (Keine): Normaler Wiedergabemodus
[VCD] [CD]
Fernsehbildschirm (Display): Funktion
TRACK (REPEAT 1): Wiederholung des aktuellen Titels
DISC (REPEAT ALL): Wiederholung aller Titel
OFF (Keine): Normaler Wiedergabemodus
Um zur normalen Wiedergabe zurückzukehren wählen Sie “OFF” durch
Drücken der Taste REPEAT aus.
Wiederholung Zufallswiedergabe [VCD] [CD]
Drücken Sie die Taste REPEAT während der Zufallswiedergabe, um
einen Wiederholungsmodus auszuwählen.
Fernsehbildschirm (Display): Funktion
TRACK (REPEAT 1): Wiederholung des aktuellen Titels
RANDOM (REPEAT ALL): Alle Titel werden willkürlich wiederholt.
OFF (Keine): Normaler Wiedergabemodus
D-13 [DEUTSCH]

Programmierte Wiedergabe [VCD] [CD]
Es ist möglich, Titel auszuwählen und sie in der gewünschten Reihenfolge
abzuspielen. Es können bis zu 32 Titel programmiert werden.
Hinweis:
Bei VCDs: Wenn im Display die Anzeige “PBC” erscheint, drücken Sie
zweimal die Taste n, um die Anzeige auszuschalten.
1. Drücken Sie im Stopp-Modus die Taste PROG.
Auf dem Fernsehbildschirm erscheint die Anzeige “PROGRAM”.
“PGM” blinkt im Display.
2. Geben Sie über die Zifferntasten die Nummern der gewünschten Titel
ein.
Beispiel: Um Titel Nr. 21 auszuwählen, drücken Sie “2” und dann “1”.
-Wählen Sie die Titelnummer durch Drücken der Zifferntasten
- Sie können die Titelnummer auch über die Taste 4/5 auswählen.
3. Drücken Sie die ENTER-Taste.
Die nächste Programmnummer wird ausgewählt.
4. Wiederholen Sie die Schritte 2 und 3, um die Titel in der gewünschten
Reihenfolge auszuwählen.
Drücken Sie die Taste PROG, um die Programmierung abzubrechen.
5. Drücken Sie die Taste a (Wiedergabe), während die Anzeige
“PROGRAM” angezeigt wird.
Die Anzeige “PGM” im Display leuchtet weiterhin und die ausgewählten
Titel werden in der programmierten Reihenfolge abgespielt.
Hinweis:
- Es ist möglich, das Programm nach der Beendigung erneut
wiederzugeben, da das Programm so lange gespeichert bleibt, bis die
Disk-Schublade geöffnet/geschlossen wird.
Um Titel Nr. 3 auszuwählen, drücken Sie “3”.
PROGRAM
All Clear
No. : Tr.
1 : – –
2 : – –
3 : – –
4 : – –
5 : – –
6 : – –
7 : – –
8 : – –
Clear No. 1 Track 3
No. : Tr.
9 : – –
10 : – –
11 : – –
12 : – –
13 : – –
14 : – –
15 : – –
16 : – –
No. : Tr.
17 : – –
18 : – –
19 : – –
20 : – –
21 : – –
22 : – –
23 : – –
24 : – –
No. : Tr.
25 : – –
26 : – –
27 : – –
28 : – –
29 : – –
30 : – –
31 : – –
32 : – –
erneut aus, um während der Programmierung eine Korrektur
vorzunehmen.
Programmierung löschen [VCD] [CD]
Alle Programme löschen
1. Drücken Sie im Stopp-Modus die Taste PROG.
Auf dem Fernsehbildschirm erscheint die Anzeige “PROGRAM”.
2. Drücken Sie die Taste b / a, um “All clear” auszuwählen.
3. Drücken Sie die ENTER-Taste.
Alle Programme werden gelöscht.
4. Drücken Sie die PROG-Taste.
Die Anzeige “PROGRAM” erlischt.
Programmierung einzeln löschen
1. Drücken Sie im Stopp-Modus die Taste PROG.
Auf dem Fernsehbildschirm erscheint die Anzeige “PROGRAM”.
2. Drücken Sie die Taste b / a, um “PROGRAM No.” auszuwählen.
3. Drücken Sie die Taste 4 / 5, um die Nummer des Programms
auszuwählen, das gelöscht werden soll.
4. Drücken Sie die Taste b / a, um “Clear” auszuwählen.
5. Drücken Sie die ENTER-Taste.
Das ausgewählte Programm wird gelöscht und das nächste Programm
nach vorne verschoben.
6. Wiederholen Sie die Schritte 2 bis 5.
7. Drücken Sie die PROG-Taste.
Die Anzeige “PROGRAM” erlischt.
Programmierte Wiedergabe wiederholen [VCD] [CD]
Drücken Sie die Taste REPEAT während der programmierten Wiedergabe,
um einen Wiederholungsmodus auszuwählen.
Fernsehbildschirm (Display): Funktion
TRACK (REPEAT 1): Wiederholung des aktuellen programmierten
Titels
PROGRAM (REPEAT ALL): Wiederholung aller programmierten
Titel
OFF (Keine): Normaler Wiedergabemodus
Hinweis:
- Wenn während der programmierten Wiedergabe die Taste CLEAR
gedrückt wird, erscheint auf dem Fernsehbildschirm die Anzeige
“OFF”, die programmierte Wiedergabe wird beendet und die
Wiedergabe erfolgt wieder im normalen Modus. Die Programmierung
wird aber nicht gelöscht.
- Die Programmierung wird gelöscht, wenn die Disk-Schublade geöffnet/
geschlossen wird.
- Wenn während der wiederholten programmierten Wiedergabe die
Taste CLEAR gedrückt wird, wird die Wiederholungsfunktion beendet.
Normale oder programmierte Wiedergabe auswählen
[VCD] [CD]
Normale Wiedergabe
Drücken Sie die Taste a (Wiedergabe).
Programmierte Wiedergabe
Drücken Sie die Taste PROG, um den Bildschirm “PROGRAM” anzuzeigen
und drücken Sie dann die Taste a (Wiedergabe).
Programmierung ändern [VCD] [CD]
1. Drücken Sie im Stopp-Modus die Taste PROG.
Auf dem Fernsehbildschirm erscheint die Anzeige “PROGRAM”.
2. Drücken Sie die Taste b / a, um “PROGRAM No.” auszuwählen.
3. Drücken Sie die Taste 4 / 5, um die Nummer des Programms
auszuwählen, das geändert werden soll.
4. Drücken Sie die Taste b / a, um “Track” auszuwählen.
5. Geben Sie über die Zifferntasten die Nummern der gewünschten Titel
ein.
6. Drücken Sie die ENTER-Taste.
D-14[DEUTSCH]

Disk-Informationen überprüfen [DVD] [VCD] [CD]
LAST MEMORY PLAY?
YES
NO
CLEAR
ENTER/ a
1. Drücken Sie während der Wiedergabe die Taste ON SCREEN.
Beispiel: DVD
Titelnummer
Kapitelnummer
DVD
TITLE : 1
CHAPTER : 3
COMPONENT : INTERLACE
Videosignal-Ausgabemodus
Beispiel: VCD (während PBC-Wiedergabe)
Titelnummer
Verstrichene Spielzeit Titel
Verbleibende Spielzeit Titel
a
00:04:12
00:01:23
02:01:32
00:00:58
Verbleibende Spielzeit Kapitel
Verstrichene Spielzeit Kapitel
Wiedergabe an dem Punkt starten, an dem sie
beendet wurde [DVD]
Indem Sie den Punkt speichern, an dem Sie die Wiedergabe gestoppt
haben, ist es möglich, die Wiedergabe der Disk wieder an diesem Punkt
zu starten, auch wenn das Gerät ausgeschaltet oder die Disk-Schublade
geöffnet/geschlossen wurde. (Wiedergabe vom letzten Speicherpunkt
an.)
1. Drücken Sie während der Wiedergabe die Taste LAST MEMORY.
Die Anzeige “LAST MEMO n ” erscheint auf dem Fernsehbildschirm
und die Wiedergabe stoppt. “L.M.-STOP” erscheint im Display.
2. Drücken Sie die Taste q , um die Disk auszuwerfen oder drücken Sie
die Taste z/ON, um das Gerät auszuschalten.
3. Legen Sie die Disk ein, für die der letzte Haltepunkt gespeichert
wurde, oder drücken Sie die Taste z/ON, um das Gerät einzuschalten.
Der Bildschirm “LAST MEMORY PLAY?” erscheint.
- Bei einigen Disks kann es notwendig sein, die Taste
a (Wiedergabe) zu drücken.
VCD
DISC :
TRACK : 2
COMPONENT : INTERLACE
:
00:45
a
:
:
Verstrichene Spielzeit Titel
Beispiel: VCD (bei der Wiedergabe ohne PBC-Funktion)
Titelnummer Verstrichene Spielzeit Disk
VCD
DISC :
TRACK : 4
COMPONENT : INTERLACE
29:25
00:45
a
:
:
Verstrichene Spielzeit Titel
Beispiel: CD
Verstrichene Spielzeit Disk
Titelnummer
CD
DISC :
TRACK : 2
COMPONENT : INTERLACE
Verbleibende Spielzeit Disk
a
07:23
03:40
31:46
01:08
Verbleibende Spielzeit Titel
Verstrichene Spielzeit Titel
2. Drücken Sie während der Wiedergabe einer DVD erneut die Taste ON
SCREEN.
Beispiel: DVD
Sprache Untertitel
Eine AudioartSprache Audio
Der Speicher wird gelöscht.
4. Drücken Sie die Taste ENTER oder a (Wiedergabe).
Wenn “YES” ausgewählt wird, beginnt die Wiedergabe an dem Punkt,
an dem Sie sie zuletzt beendet haben.
Die Daten des Haltepunktes werden nach der Wiedergabe ab diesem
Punkt gelöscht.
Hinweis:
- Die Wiedergabe ab dem letzten Haltepunkt kann für bis zu fünf Disks
gespeichert werden.
- Die Wiedergabe ab dem letzten Haltepunkt ist bei einigen Disks
möglicherweise nicht verfügbar.
- Im Gegensatz zu der Resume-Funktion werden die Daten des
Haltepunkts nicht gelöscht, wenn die Disk entnommen wird. Wenn
der letzte Haltepunkt für mehr als fünf Disks gespeichert wird, werden
die Haltepunkt-Daten in chronologischer Reihenfolge gelöscht.
- Der letzte Haltepunkt kann pro Disk nur für eine Position gespeichert
werden.
DVD
ENGLISH
CHINESE
COMPONENT : INTERLACE
DOLBY DIGITAL3/2.1
1/1
Videosignal-Ausgabemodus
Kameraperspektive
a
Drücken Sie die Taste ON SCREEN erneut, um die Anzeige auf den
Bildschirm zu löschen.
D-15 [DEUTSCH]

Auswahl einer bestimmten Kameraperspektive
AUDIO CHANGE
01 ENGLISH
[DVD] (Abb. 22)
Bei einigen DVDs (Multi-Angle) ist es möglich, für bestimmte Szenen, die
gleichzeitig mit mehreren Kameras aufgenommen wurden, die gewünschte
Kameraperspektive auszuwählen.
Drücken Sie während der Wiedergabe die Taste ANGLE.
Jedes Mal, wenn die Taste gedrückt wird, wird die Wahl der
Kameraperspektive geändert.
Beispiel:
3
Auswahl der Synchronsprache einer DVD [DVD]
(Abb. 23)
Auf einigen DVDs ist der Film in mehreren Sprachen gespeichert. Bei
einer solchen DVD können Sie die gewünschte Sprache auswählen.
Drücken Sie während der Wiedergabe oder im Standbild-Modus die Taste
AUDIO.
Jedes Mal, wenn die Taste gedrückt wird, wird die Wahl der Sprache
geändert.
Beispiel:
Wiederholung mit Auswahl der Kameraperspektive
[DVD]
Drücken Sie die Taste A.REPLAY während der Multi-Angle-Wiedergabe.
Das Gerät springt zu der Szene zurück, die ungefähr 10 Sekunden zuvor
abgespielt wurde, und wählt für die Wiedergabe die nächste
Kameraperspektive aus. Jedes Mal, wenn die Taste gedrückt wird, wird
die Wahl der Kameraperspektive geändert.
Auswahl Bildmodus [DVD] [VCD] [CD]
Wählen Sie durch Drücken der Taste PICTURE MODE einen Bildmodus
aus.
Jedes Mal, wenn Sie die Taste drücken, ändert sich die Art des Bildmodus
wie folgt:
STANDARD v CINEMA 1 v CINEMA 2 v STANDARD ...
STANDARD: Standard-Bildmodus
CINEMA 1: Der Bildkontrast wird betont. Dadurch werden die Bildfarben
im Ganzen dunkler. Sie erzielen ein scharf umrissenes Bild.
CINEMA 2: Der Bildkontrast wird aufgeweicht. Dadurch werden die
Bildfarben im Ganzen heller. Wählen Sie diesen Modus,
wenn es zu auffälligem Rauschen kommt.
Auswahl einer Untertitel-Sprache [DVD]
Einige DVDs enthalten Untertitel in mehreren Sprachen. Diese Untertitel
können während der Wiedergabe auf dem Fernsehbildschirm dargestellt
werden. Wenn die DVD über Untertitel in mehreren Sprachen verfügt,
können Sie die gewünschte Sprache für die Untertitel auswählen. Es ist
auch möglich, die Anzeige der Untertitel ein-/auszuschalten.
1. Drücken Sie während der Wiedergabe oder im Standbild-Modus die
Taste SUBTITLE.
Die aktuelle Einstellung für die Untertitel wird angezeigt.
Beispiel:
SUBTITLE CHANGE
ON/OFF 01 ENGLISH
Aktuell ausgewählte Untertitelsprache
Aktuell ausgewählte Untertitelanzeige
2. Um die Untertitelanzeige ein-/auszuschalten, wählen Sie durch
Drücken der Taste b / a “ON” oder “OFF” aus.
ON: Untertitel anzeigen
OFF: Keine Untertitel anzeigen
Wenn die Sprachauswahl für die Untertitel geändert werden soll,
wählen Sie durch Drücken der Taste 4 / 5 die gewünschte Sprache
aus.
Drücken Sie die Taste SUBTITLE erneut, um die Einstellung zu
beenden.
Hinweis:
- Wenn das Gerät ein-/ausgeschaltet oder die Disk-Schublade geöffnet/
geschlossen wird, wird die Auswahl der Untertitelsprache gelöscht
und die ursprüngliche Einstellung wird wiederhergestellt.
- Die Anzeige “dts” erscheint im Display, wenn eine Audiospur
ausgewählt wird, die im DTS-Modus aufgezeichnet wurde.
Hinweis:
-Die Änderung der Synchronsprache kann nur bei einer Disk
vorgenommen werden, auf der mehrere Synchronsprachen
aufgezeichnet sind.
- Bei einigen DVDs ist es eventuell nicht möglich, die Synchronsprache
zu ändern, obwohl die entsprechende Sprache auf der DVD
aufgezeichnet ist.
- Wenn das Gerät ausgeschaltet oder die Disk ausgeworfen wird, wird
die ursprüngliche Synchronsprache wiederhergestellt.
Auswahl der Synchronsprache einer VCD oder CD
[VCD] [CD]
Bei einigen Video-CDs, Super Video-CDs oder Musik-CDs ist es möglich,
durch Änderung der Audiokanalauswahl z.B. die Singstimme stumm zu
stellen und nur die Begleitung abzuspielen, um ein Lied als Karaoke zu
singen.
Drücken Sie während der Wiedergabe oder im Standbild-Modus (Pause)
die Taste AUDIO.
Jedes Mal, wenn Sie die Taste drücken, ändert sich die Auswahl des
Audiokanals wie folgt:
Beispiel: Video-CD oder Musik-CD
Fernsehbildschirm (Display): Funktion
STEREO (Keiner): Linker und rechter Kanal
LEFT MONO (L): Nur linker Kanal
RIGHT MONO (R): Nur rechter Kanal
Beispiel: Super Video-CD (wenn es zwei Audio-Datenspuren gibt)
Fernsehbildschirm (Display): Funktion
1 STEREO, 2 STEREO (Keiner): Linker und rechter Kanal
1 LEFT MONO, 2 LEFT MONO (L): Nur linker Kanal
1 RIGHT MONO, 2 RIGHT MONO (R): Nur rechter Kanal
- Die Anzahl der Kanäle, die ausgewählt werden können, hängt von der
Anzahl der Audio-Datenspuren ab, die auf der Disk gespeichert sind.
Hinweis:
Wenn das Gerät ausgeschaltet, die Auswahl der Quelle geändert oder die
Disk ausgetauscht wird, wird “STEREO” oder “1 STEREO”
wiederhergestellt.
D-16[DEUTSCH]

DIR_S002
PAGE 1/ 3
DIR_S021
DIR_S022
MUSIC021
MUSIC022
MUSIC023
MUSIC024
MUSIC025
a
MUSIC026
MUSIC027
MUSIC028
MUSIC029
MUSIC030
MUSIC031
MUSIC032
45b a ENTER/ a MENU RETURN
WIEDERGABE VON MP3-/WMA-CDs [DATA]
ROOT
PAGE 1/ 2
DIR_S001
DIR_S002
DIR_S003
MUSIC001
MUSIC002
MUSIC003
MUSIC004
n
MUSIC005
MUSIC006
MUSIC007
MUSIC008
MUSIC009
MUSIC010
MUSIC011
45b a ENTER/ a MENU RETURN
Dieses Gerät kann MP3- oder WMA (Windows Media Audio)-Musikdateien
wiedergeben, die auf Daten-CDs gespeichert wurden (CD-R, CD-RW,
usw.).
Über die Wiedergabe von MP3-/WMA-Dateien
- Die Disk muss der ISO-Norm 9660 Stufe 1 entsprechen.
- Dieses Gerät kann nicht für Packet Writing Software, Joliet, Romeo
oder HFS ausgelegt.
- Wenn auf einer CD sowohl Audio-Tracks als auch MP3-/WMADateien gespeichert sind, werden nur die Audio-Tracks
wiedergegeben.
- Abhängig von der Dateistruktur kann es 60 Sekunden oder länger
dauern, bis das Gerät die MP3-/WMA-Dateien gelesen hat.
- Um eine hohe Klangqualität zu erzielen, empfiehlt es sich, die Daten
mit einer Abtastfrequenz von 44,1 kHz und einer Bitrate von 128 kbps
oder mehr zu speichern.
- Nur wenn ein Datei- oder Verzeichnisname aus alphanumerischen
Halbzeichen und “_” (Unterstrich) bestehen, werden bis zu acht
Zeichen des Namens wie sie sind angezeigt. Andere Buchstaben und
Zeichen werden nicht normal angezeigt.
- Dieses Gerät kann bis zu 671 Dateien (8.3-Format) oder 767
Verzeichnisse (8 Zeichen) erkennen. Dateien, die über diese
Beschränkungen hinausgehen, können nicht abgespielt werden.
Das Gerät kann bis zu 8 Ebenen einer Verzeichnisstruktur anzeigen.
- Bei einigen MP3-/WMA-CDs werden die Titel möglicherweise nicht in
der aufgezeichneten Reihenfolge abgespielt. Abhängig von den
Aufzeichnungsbedingungen kann es bei einigen MP3-/WMA-CDs zu
Aussetzern kommen oder sie werden gar nicht abgespielt.
- Dieses Gerät ist für MP3-ID-Tags der Version 1 ausgelegt und kann
bis zu 30 Zeichen anzeigen. Es können nur alphanumerische
Halbzeichen angezeigt werden. Abhängig von der Codierungssoftware
werden möglicherweise nicht alle Zeichen richtig angezeigt.
- Abhängig von der Codierungssoftware, die verwendet wurde, um
eine MP3-/WMA-Disk zu erstellen, kann es vor, nach oder während
der Wiedergabe eines Musiktitels zu Rauschen kommen oder das
Stück wird gar nicht abgespielt. Wir können die Codierungssoftware,
den Codierungsvorgang usw. nicht abdecken, die mit dem Betrieb
eines PCs verbunden sind.
- Abhängig von den Aufzeichnungsbedingungen können einige MP3/WMA-CDs möglicherweise nicht wiedergegeben werden.
<MP3>
- Es können MP3-Dateien mit der Erweiterung “.mp3” oder “.MP3”
abgespielt werden.
- Abtastfrequenz und Bitrate von MP3-Dateien
- 44,1 kHz, 48 kHz, 64 kbps – 320 kbps (konstante Bitrate oder
variable Bitrate)
- Das Gerät entspricht nur dem MPEG Audio Layer 3.
<WMA>
- Es können WMA-Dateien mit der Erweiterung “.wma” oder “.WMA”
abgespielt werden.
- Abtastfrequenz und Bitrate von WMA-Dateien
- 32 kHz, 44,1 kHz, 48 kHz, 48 kbps oder höher
- WMA-Dateiversionen 7, 8 und 9
WMA9 Professional-Dateien, WMA9 Lossless-Dateien oder DRM
(Urheberschutz)-Dateien können nicht abgespielt werden.
- Stellen Sie sicher, dass die Copyright-Funktion ausgeschaltet ist,
wenn Sie eine WMA-Disk erstellen.
Wiedergabe von MP3-/WMA-CDs
1. Drücken Sie die Taste q. Die Disk-Schublade wird geöffnet.
2. Legen Sie eine Disk in die Disk-Schublade ein.
3. Drücken Sie die Taste q.
Die Disk-Schublade wird geschlossen. “MP3” oder “WMA” und die
Anzeige “ROOT” erscheinen im Display.
Die Liste der Musikdateien/Verzeichnisse des ersten Verzeichnisses
erscheint auf dem Fernsehbildschirm.
Beispiel:
Unterverzeichnis
Verzeichnisname
Datei Datei
4. Drücken Sie die Tasten 4/5/b/a, um die gewünschte Datei oder das
Verzeichnis auszuwählen.
- Jedes Mal, wenn die Taste gedrückt wird, bewegt sich das
hervorgehobene Feld zur Auswahl einer Datei oder eines
Unterverzeichnis innerhalb des Verzeichnisses.
- Wenn eine Datei in dem Verzeichnis oder Unterverzeichnis
ausgewählt werden soll, wählen Sie das gewünschte
Unterverzeichnis aus und drücken Sie dann die ENTER-Taste,
um den Inhalt des Unterverzeichnisses anzuzeigen.
-Drücken Sie die Taste RETURN, um zum vorherigen
Verzeichnisbildschirm zurückzukehren.
-Drücken Sie die MENU-Taste, um zum Datei-/
Verzeichnislistenbildschirm des ersten Verzeichnisses
zurückzukehren.
5. Drücken Sie die Taste ENTER oder a (Wiedergabe).
Die ausgewählte Datei oder alle Dateien im ausgewählten Verzeichnis
werden abgespielt. Danach werden alle nachfolgenden Musikdateien
nacheinander abgespielt.
- “MP3” oder “WMA” erscheint im Display.
- “ a ” erscheint und der Name der Datei, die gerade wiedergegeben
wird, wird auf dem Fernsehbildschirm hervorgehoben.
Beispiel:
Unterverzeichnis
Verzeichnisname
Aktuelle Seitenzahl
Gesamtseitenzahl
Aktuelle Seitenzahl
Gesamtseitenzahl
D-17 [DEUTSCH]
Datei Datei

Wiedergabe anhalten
MP3
FILE MUSIC005
a
03 : 33
TAG INFORMATION
TITLE
ARTIST
ALBUM
True Romance
Club Lyrico
25th Anniversary Super Best
Drücken Sie die Taste n.
Pause
Drücken Sie während der Wiedergabe die Taste k.
Drücken Sie die Taste a (Wiedergabe) oder k, um zur normalen
Wiedergabe zurückzukehren.
Datei überspringen
Drücken Sie die Taste f oder e.
Hinweis:
- Wenn die Taste f gedrückt wird, während eine Datei abgespielt
wird, beginnt die Wiedergabe am Anfang der Datei.
- Der schnelle Rücklauf und der schnelle Vorlauf sind nicht verfügbar.
- Dateien können nur innerhalb des gleichen Verzeichnisses
übersprungen werden.
Wiedergabe wiederholen
Drücken Sie während der Wiedergabe die Taste REPEAT, um einen
Wiederholungsmodus auszuwählen.
Jedes Mal, wenn Sie die Taste drücken, ändert sich die Art der Wiederholung
wie folgt:
Fernsehbildschirm (Display): Funktion
FILE (REPEAT 1): Wiederholung der aktuellen Datei
DIRECTORY (REPEAT ALL): Wiederholung aller Dateien in dem
Verzeichnis, das abgespielt wird.
OFF (Keine): Normaler Wiedergabemodus
Um zur normalen Wiedergabe zurückzukehren wählen Sie “OFF” durch
Drücken der Taste REPEAT aus.
Hinweis:
Wenn die Taste CLEAR während der wiederholten Wiedergabe gedrückt
wird, wird diese abgebrochen und es wird wieder der normale
Wiedergabemodus ausgewählt.
Anzeige der Dateiinformationen
Wenn eine Datei Musikinformationen enthält, ist es möglich, die
Dateiinformationen (Dateiname, Tag-Informationen usw.) anzuzeigen.
Drücken Sie während der Wiedergabe oder im Pause-Modus die Taste
ON SCREEN.
Der Dateiname, die verstrichene Spielzeit und die Tag-Informationen
(TITLE/ARTIST/ALBUM) werden auf dem Fernsehbildschirm angezeigt.
Beispiel:
Verstrichene SpielzeitDateiname
Drücken Sie die Taste ON SCREEN erneut, um die Anzeige auf den
Bildschirm zu löschen.
Hinweis:
Dateiname und Tag-Informationen werden nur dann richtig angezeigt,
wenn sie aus alphanumerischen Halbzeichen bestehen. Andere Zeichen
werden für die Anzeige durch ein “?” (Fragezeichen) ersetzt.
D-18[DEUTSCH]

ÄNDERUNG DER GRUNDEINSTELLUNG
[DVD]
Die Disk-Informationen haben bei den unterschiedlichen
Einstellungen Vorrang.
5. Drücken Sie die SETUP-Taste. Der Bildschirm “SETUP MENU”
verschwindet.
Hinweis:
Wenn die ausgewählte Sprache auf der Disk nicht gespeichert ist, wird
eine der Sprachen verwendet, die auf der Disk aufgezeichnet sind.
Vorbereitungen:
Wählen Sie “DVD/CD” durch Drücken der Taste FUNCTION aus. Führen
Sie die folgenden Schritte durch, wenn eine Disk abgespielt wird und
nachdem Sie durch zweimaliges Drücken der Taste n die Wiedergabe
vollständig angehalten haben.
Änderung der Spracheinstellung
Wählen Sie die Sprache aus, die für die Bildschirmanzeige, Audio,
Untertitel und das DVD-Menü verwendet wird.
1. Drücken Sie im Stopp-Modus die Taste SETUP. Der Bildschirm
“SETUP MENU” erscheint.
SETUP MENU
a
LANGUAGE DISPLAY SPEAKER PARENTAL
5
OSD :
AUDIO :
SUB TITLE :
DVD MENU :
SELECT : 4 5 b a
SAVE&QUIT : SETUP
2. Drücken Sie die Tasten b / a, um “LANGUAGE” auszuwählen. Das
Sprachen-Untermenü erscheint.
3. Drücken Sie die Tasten 4 / 5, um das Element auszuwählen, das Sie
ändern möchten.
Beispiel: Auswahl von “SUB TITLE“
SETUP MENU
ENGLISH
DISC
DISC
DISC
Hinweis:
-
In dieser Bedienungsanleitung sind die Bildschirmanweisungen
auf Englisch wiedergegeben. Wenn Sie die Sprache geändert
haben, befolgen Sie bitte die Bildschirmanweisungen in der
gewählten Sprache.
- Änderungen der Bildschirmanzeige aufgrund technischer
Verbesserungen sind vorbehalten.
Auswahl anderer Sprachen
Wenn eine Sprache ausgewählt werden soll, die nicht im Menü angezeigt
ist, geben Sie den entsprechenden vierstelligen Sprachcode ein.
1. Wählen Sie “OTHERS” aus, indem Sie Schritt 4 von oben durchführen.
Das Feld für den Sprachcode erscheint.
2. Geben Sie den entsprechenden Sprachcode ein, indem Sie die
Zifferntasten drücken.
Schlagen Sie den Sprachcode für die Eingabe in der LISTE DER
SPRACHCODES (siehe Seite 23) nach. Drücken Sie die Taste
CLEAR und geben Sie den Sprachcode erneut ein, um die Eingabe
zu korrigieren.
3. Drücken Sie die ENTER-Taste. Die eingegebene Sprache wird
ausgewählt.
4. Drücken Sie die SETUP-Taste. Der Bildschirm “SETUP MENU”
verschwindet.
LANGUAGE DISPLAY SPEAKER PARENTAL
5
OSD :
AUDIO :
4
SUB TITLE :
5
DVD MENU :
ENGLISH
DISC
DISC
DISC
ab
4. Drücken Sie die Tasten b / a, um die gewünschte Sprache
auszuwählen. Die ausgewählte Sprache wird angezeigt. [Beispiel:
ENGLISH]
SETUP MENU
LANGUAGE DISPLAY SPEAKER PARENTAL
5
OSD :
AUDIO :
4
SUB TITLE :
5
DVD MENU :
ENGLISH
DISC
ENGLISH
DISC
ab
Punkt:
Auswählbare Sprachen
OSD:
ENGLISH
ITALIANO
wv
ESPAÑOL
wv
PORTUGUES
wv
FRANÇAIS
wv
wv
DEUTSCH
wv
wv
wv
ENGLISH ...
AUDIO/SUBTITLE/DVD MENU:
DISC
wv
wv
ITALIAN
CHINESE
ENGLISH
wv
wv
SPANISH
wv
PORTUGUESE
OTHERS
wv
wv
DISC ....
FRENCH
wv
JAPANESE
wv
GERMAN
wv
- Wenn “DISC” ausgewählt wird, wird die Voreinstellungssprache
einer Disk ausgewählt. Wenn “OTHERS” ausgewählt ist, wird die
gewünschte Sprache durch die Eingabe des entsprechenden
Sprachcodes ausgewählt.
D-19 [DEUTSCH]

Änderung der Anzeige
1. Drücken Sie im Stopp-Modus die Taste SETUP. Der Bildschirm
“SETUP MENU” erscheint.
SETUP MENU
a
LANGUAGE DISPLAY SPEAKER PARENTAL
2. Drücken Sie die Tasten b / a, um “DISPLAY” auszuwählen. Das
Anzeigen-Untermenü erscheint.
SETUP MENU
ba
LANGUAGE DISPLAY SPEAKER PARENTAL
TV TYPE :
VIDEO OUT SELECT :
NTSC DISC :
PROGRESSIVE MODE :
SCREEN SAVER :
SELECT : 4 5 b a
SAVE&QUIT : SETUP
3. Drücken Sie die Tasten 4 / 5, um das Element auszuwählen, das Sie
ändern möchten.
Beispiel: Auswahl von “TV TYPE“
LANGUAGE DISPLAY SPEAKER PARENTAL
4
TV TYPE :
5
VIDEO OUT SELECT :
NTSC DISC :
PROGRESSIVE MODE :
SCREEN SAVER :
SELECT : 4 5 b a
SAVE&QUIT : SETUP
5
SETUP MENU
5
4 : 3 LB
RGB
PAL60
AUTO
ON
4 : 3 LB
RGB
PAL60
AUTO
ON
ab
Hinweis:
- Die Bildschirmgröße kann abhängig von der verwendeten DVD
unterschiedlich sein.
- Wenn Sie bei der Wiedergabe einer DVD im Breitbildformat die Größe
“16:9” wählen, um nicht die schwarzen Streifen auf dem Bildschirm zu
sehen, kann das Bild unter Umständen leicht verzerrt wiedergegeben
werden.
- Bei manchen DVDs bleiben die schwarzen Streifen auch bei der
Wiedergabe im “4:3 PS”-Modus auf dem Bildschirm sichtbar.
VIDEO OUT SELECT (AUSWAHL VIDEOAUSGANG):
Wählen Sie den Videoausgang aus.
RGB: Anschluss EURO AV CONNECTOR RGB OUT/TV (AUDIO) IN
COMPONENT: Anschluss COMPONENT VIDEO OUT
NTSC DISC (NTSC-DISK):
Wählen Sie das gewünschte Format für das Videoausgangssignal aus,
wenn Sie NTSC-Disks abspielen.
VIDEO OUT SELECT: RGB
PAL60
wv
NTSC INTERLACE (Interlace)
VIDEO OUT SELECT: COMPONENT
PAL60
wv
NTSC INTERLACE (Interlace)
wv
NTSC PROGRESSIVE
(Progressive)
Hinweis:
-Wählen Sie “PAL60” aus, wenn Ihr Fernsehgerät nicht der NTSC-
Norm entspricht.
- Überprüfen Sie das Fernsehgerät und die Verbindung, bevor Sie
“NTSC PROGRESSIVE” auswählen.
- Das Fernsehgerät entspricht der NTSC-Norm und verfügt über
den Progressive-Modus.
- Die Anschlüsse COMPONENT VIDEO OUT des Geräts sind mit
den Anschlüssen COMPONENT VIDEO INPUT des
Fernsehgeräts verbunden.
- Stellen Sie den Ausgangsmodus für das progressive Signal wie unten
gezeigt ein, nachdem Sie “NTSC PROGRESSIVE” ausgewählt haben.
4. Drücken Sie die Tasten b / a, um den gewünschten Modus
auszuwählen.
Beispiel: Auswahl von “TV TYPE: 16:9“
SETUP MENU
LANGUAGE DISPLAY SPEAKER PARENTAL
4
TV TYPE :
5
VIDEO OUT SELECT :
NTSC DISC :
PROGRESSIVE MODE :
SCREEN SAVER :
SELECT : 4 5 b a
SAVE&QUIT : SETUP
5
16 : 9
RGB
PAL60
AUTO
ON
ab
5. Drücken Sie die SETUP-Taste.
Der Bildschirm “SETUP MENU” verschwindet.
TV TYPE (TV-TYP):
Wählen Sie die passende Einstellung für das Bildformat des Fernsehers
aus, der mit dem Gerät verbunden ist.
4:3 LB (Letterbox):
Wählen Sie diese Option, wenn ein herkömmliches Fernsehgerät
angeschlossen ist. Wenn eine DVD im Breitbildformat wiedergegeben
wird, erscheint oben und unten auf dem Bildschirm ein schwarzer
Streifen (Abb. 24).
4:3 PS (Panscan):
Wählen Sie diese Option, wenn ein herkömmliches Fernsehgerät
angeschlossen ist. Wenn eine DVD im Breitbildformat wiedergegeben
wird, werden die Bilder zugeschnitten, damit sie auf den Bildschirm
Ihres Fernsehgeräts passen. Die seitlichen Bildkanten links und
rechts werden abgeschnitten (Abb. 25).
16:9
Wählen Sie diese Option, wenn ein Fernsehgerät im Breitbildformat
angeschlossen ist. Wiedergabe in der Größe “FULL” (Abb. 26).
(Zusätzlich ist es notwendig, auch den Breitbildfernseher auf das
Format “FULL” einzustellen.)
PROGRESSIVE MODE (PROGRESSIVE-MODUS):
AUTO
Die normale DVD besteht aus einer Videoquelle oder eine Filmquelle.
In diesem Modus identifiziert das Gerät automatisch eine Video- oder
Filmquelle und sendet die entsprechenden Videosignale. Sie sollten
im Allgemeinen diesen Modus auswählen.
VIDEO
Der Begriff Videoquelle bedeutet, dass Fernsehprogramme (30 Bilder
und 60 Felder pro Sekunde) wie Fernseh- und Animationsfilme
umgewandelt und auf einer DVD gespeichert werden. Dieser Modus
wird ausgewählt, wenn die aufgezeichneten Videosignale vom Typ
Videoquelle sind.
FILM
Der Begriff Filmquelle bedeutet, dass Filme (24 Bilder pro Sekunde)
umgewandelt und auf einer DVD gespeichert werden. Dieser Modus
wird ausgewählt, wenn die aufgezeichneten Videosignale vom Typ
Filmquelle sind.
Hinweis:
Wenn das Bild flackert, wenn der Modus “AUTO” ausgewählt ist, wählen
Sie den Modus “VIDEO” oder “FILM” aus.
SCREEN SAVER (BILDSCHIRMSCHONER):
Wenn über längere Zeit das gleiche Bild auf dem Fernsehbildschirm
angezeigt wird, kann sich das Bild in den Bildschirm einbrennen. Um
dieses Einbrennen zu verhindern, wird der Bildschirmschoner verwendet.
Hierbei wird ein sich bewegendes Videobild auf dem Fernsehbildschirm
angezeigt, wenn ein Bild auf dem Bildschirm für 5 Minuten oder länger
angehalten oder im Standbild-Modus (Pause) angezeigt wird.
Wählen Sie “ON” oder “OFF” aus.
D-20[DEUTSCH]

Audioeinstellungen
D-RANGE CONTROL :
CENTER DELAY :
SURROUND DELAY :
5
LANGUAGEDISPLAYSPEAKERPARENTAL
SETUP MENU
4
5
D-RANGE CONTROL :
CENTER DELAY :
SURROUND DELAY :
5
4
5
ab
LANGUAGEDISPLAYSPEAKERPARENTAL
SETUP MENU
Abhängig von der Position der Lautsprecher erreichen die Töne das Ohr
zu verschiedenen Zeiten. Sie können diesen Zeitunterschied ausgleichen,
indem Sie die Verzögerungszeit für den Center- und Surround-Lautsprecher
ändern.
Außerdem können Sie den Dynamikbereich (DRC) verändern.
1. Drücken Sie im Stopp-Modus die Taste SETUP. Der Bildschirm
“SETUP MENU” erscheint.
SETUP MENU
a
LANGUAGE DISPLAY SPEAKER PARENTAL
6. Drücken Sie die Tasten b / a, um die Verzögerungszeit zu wählen.
Unterschied zwischen D1 und D2: Verzögerungszeit
Wenn D1
<
D2: 0 ms
=
Wenn D1 > D2
Ungefähr 30 cm: 1 ms
Ungefähr 60 cm: 2 ms
Ungefähr 90 cm: 3 ms
Ungefähr 120 cm: 4 ms
Ungefähr 150 cm: 5 ms
2. Drücken Sie die Tasten b / a, um “SPEAKER” auszuwählen. Das
Lautsprecher-Untermenü erscheint.
SETUP MENU
LANGUAGE DISPLAY SPEAKER PARENTAL
D-RANGE CONTROL :
CENTER DELAY :
SURROUND DELAY :
SELECT : 4 5 b a
SAVE&QUIT : SETUP
ba
5
0 ms
5 ms
ON
3. Wählen Sie durch Drücken der Tasten 4 / 5 “D-RANGE CONTROL”
aus.
SETUP MENU
LANGUAGE DISPLAY SPEAKER PARENTAL
4
D-RANGE CONTROL :
5
CENTER DELAY :
SURROUND DELAY :
SELECT : 4 5 b a
SAVE&QUIT : SETUP
5
0 ms
5 ms
ON
ab
4. Drücken Sie die Tasten b / a, um “ON” oder “OFF” auszuwählen.
ON: Der Dynamikbereich wird komprimiert. Diese Einstellung zeigt
bei bestimmten DVDs keinen Effekt.
OFF: Sound mit großem Dynamikbereich
Beispiel: Auswahl von “OFF”
SETUP MENU
D1 D1
D2
D3 D3
Beispiel: Auswahl von “2 ms”
7. Wählen Sie durch Drücken der Tasten 4 / 5 “SURROUND DELAY”
aus.
8. Drücken Sie die Tasten b / a, um die Verzögerungszeit zu wählen.
Unterschied zwischen D1 und D2: Verzögerungszeit
Wenn D1
Wenn D1 > D3
Beispiel: Auswahl von “10 ms“
<
D3: 0 ms
=
Ungefähr 150 cm: 5 ms
Ungefähr 300 cm: 10 ms
Ungefähr 450 cm: 15 ms
LANGUAGE DISPLAY SPEAKER PARENTAL
4
D-RANGE CONTROL :
5
CENTER DELAY :
SURROUND DELAY :
SELECT : 4 5 b a
SAVE&QUIT : SETUP
5
OFF
0 ms
5 ms
ab
5. Wählen Sie durch Drücken der Tasten 4 / 5 “CENTER DELAY” aus.
D-21 [DEUTSCH]
9. Drücken Sie die SETUP-Taste. Der Bildschirm “SETUP MENU”
verschwindet.

Einstellen der Kindersicherung
1PARENTAL LEVEL :
CHANGE PASSWORD :
5
4
5
ab
LANGUAGE DISPLAY SPEAKER PARENTAL
SETUP MENU
1. Drücken Sie im Stopp-Modus die Taste SETUP. Der Bildschirm
“SETUP MENU” erscheint.
SETUP MENU
a
LANGUAGE DISPLAY SPEAKER PARENTAL
2. Drücken Sie die Tasten b / a , um “PARENTAL” auszuwählen. Das
Bildschirmfenster für die Kindersicherung wird geöffnet.
SETUP MENU
LANGUAGE DISPLAY SPEAKER PARENTAL
ENTER PASSWORD
Enter a number in 4 digits,
then press "ENTER".
SELECT : 4 5 b a
SAVE&QUIT : SETUP
3. Wählen Sie durch Drücken der Tasten 4 / 5 das Passworteingabefeld
aus.
SETUP MENU
LANGUAGE DISPLAY SPEAKER PARENTAL
ENTER PASSWORD
Enter a number in 4 digits,
then press "ENTER".
4. Geben Sie durch Drücken der Zifferntasten ein vierstelliges Passwort
ein.
Anstelle der eingegebenen Ziffern wird “ ” angezeigt.
Drücken Sie die Taste CLEAR und geben Sie das Passwort erneut
ein, wenn Sie einen Fehler machen.
SETUP MENU
LANGUAGE DISPLAY SPEAKER PARENTAL
ENTER PASSWORD
Enter a number in 4 digits,
then press "ENTER".
5. Drücken Sie die ENTER-Taste.
Wenn das Passwort zum ersten Mal registriert wird
Die Meldung “To confirm, enter password again, then press “ENTER”.”
erscheint.
Wenn das Passwort bereits registriert ist
Das Untermenü, das in Schritt 7 gezeigt wird, erscheint. Gehen Sie zu
Schritt 8.
6. Geben Sie das gleiche Passwort ein, indem Sie die entsprechenden
Zifferntasten drücken.
7. Drücken Sie die ENTER-Taste. Das Untermenü für die Kindersicherung
erscheint und “PARENTAL LEVEL” ist ausgewählt.
SETUP MENU
LANGUAGE DISPLAY SPEAKER PARENTAL
4
5
CHANGE PASSWORD :
b
5
5
5
5
ab
OFFPARENTAL LEVEL :
8. Drücken Sie die Tasten b / a, um die gewünschte Ebene auszuwählen.
(“Level: OFF, 1 – 8”)
Beispiel: Auswahl von “1”
9. Drücken Sie die SETUP-Taste. Der Bildschirm “SETUP MENU”
verschwindet.
Kindersicherung
Die MPAA-Richtlinie (Motion Picture Association of America) der
Vereinigung der amerikanischen Filmproduzenten stuft Filme nach ihrem
Inhalt ein und bietet so Eltern eine Hilfe bei der Beurteilung von Filmen.
Die Stufen der Kindersicherung entsprechen dem folgenden
Einstufungssystem der MPAA (in Klammern die entsprechenden
Einstufungen der Freiwilligen Selbstkontrolle (FSK)).
Stufe 7: NC-17 (Nicht unter 18 Jahren (FSK 18))
Stufe 6: R (Personen unter 17 Jahren nur mit volljährigem Begleiter (FSK
16/18))
Stufe 4: PG-13 (Elterliche Kontrolle dringend angeraten)
Stufe 3: PG (Elterliche Kontrolle empfehlenswert (FSK 6))
Stufe 1: G (Ohne Altersbeschränkung)
Einige DVDs sind mit einer Codierung ausgestattet, die es den Eltern
ermöglichen, ein Abspielen durch Kinder zu verhindern. Dieses Gerät ist
mit einer Passwort-Abfrage ausgerüstet, um zu verhindern, dass Kinder
die Freigabeeinstellungen verändern können.
DVDs mit einer höheren Einstufung als der festgelegten können nur
abgespielt werden, wenn die Kindersicherung abgeschaltet wird.
Wenn Sie beispielsweise Stufe “5” wählen, gibt das Gerät keine DVDs mit
der Einstufung “6”, “7” oder “8” wieder.
Eine entsprechende Information wird auf dem Fernsehbildschirm
angezeigt.
Ändern des Passworts
1. Führen Sie die Schritte 1 bis 5 von oben durch.
2. Wählen Sie durch Drücken der Tasten 4 / 5 “CHANGE PASSWORD”
aus.
3. Drücken Sie die ENTER-Taste.
Die Meldung “CHANGE PASSWORD Enter a number in 4 digits, then
press “ENTER”.” erscheint.
4. Geben Sie ein neues Passwort ein, indem Sie die entsprechenden
Zifferntasten drücken.
5. Drücken Sie die ENTER-Taste.
Die Meldung “To confirm, enter password again, then press “ENTER”.”
erscheint.
6. Geben Sie das gleiche Passwort erneut ein.
7. Drücken Sie die ENTER-Taste.
Das neue Passwort ist registriert.
8. Drücken Sie die SETUP-Taste.
Der Bildschirm “SETUP MENU” verschwindet.
Wenn Sie das Passwort vergessen
1. Geben Sie “788444” statt des Passworts im Passworteingabefeld ein.
Auch wenn auf dem Bildschirm die Meldung “CHANGE PASSWORD
Enter a number in 4 digits, then press “ENTER”.” angezeigt wird,
können dennoch Passwörter mit mehr als 4 Stellen eingegeben
werden.
2. Drücken Sie die ENTER-Taste.
Das Passwort wird gelöscht. Geben Sie ein neues Passwort ein.
D-22[DEUTSCH]

LISTE DER SPRACHCODES
Code Abkürzung der
Sprache
6565 aa Afar
6566 ab Abchasisch
6570 af Afrikaans
6577 am Amharisch
6582 ar Arabisch
6583 as Assamesisch
6589 ay Aymarisch
6590 az
6665 ba Baschkirisch
6669 be Weissrussisch
6671 bg Bulgarisch
6672 bh Biharisch
6673 bi Bislama
6678 bn Bengalisch; Bangla
6679 bo Tibetanisch
6682 br Bretonisch
6765 ca Katalanisch
6779 co Korsisch
6783 cs Tschechisch
6789 cy Walisisch
6865 da Dänisch
6869 de Deutsch
6890 dz Bhutani
6976 el Griechisch
6978 en Englisch
6979 eo Esperanto
6983 es Spanisch
6984 et Estisch
6985 eu Baskisch
7065 fa Persisch
7073 fi Finnisch
7074 fj Fidschianisch
7079 fo Färöisch
7082 fr Französisch
7089 fy Friesisch
7165 ga Irisch
7168 gd Schottisch-Gälisch
7176 gl Galizisch
7178 gn Guaranisch
7185 gu Guaratisch
7265 ha Hausa
7273 hi Hindi
7282 hr Kroatisch
7285 hu Ungarisch
7289 hy Armenisch
7365 ia Interlingua
Sprache
Aserbaidschanisch
Code Abkürzung der
Sprache
7369 ie Interlingue
7375 ik Inupiak
7378 in Indonesisch
7383 is Isländisch
7384 it Italienisch
7387 iw Hebräisch
7465 ja Japanisch
7473 ji Jiddisch
7487 jw Javanisch
7565 ka Georgisch
7575 kk Kazachisch
7576 kl Grönländisch
7577 km Kambodschanisch
7578 kn Kanadisch
7579 ko Koreanisch
7583 ks Kashmiri
7585 ku Kurdisch
7589 ky Kirgisisch
7665 la Latein
7678 ln Lingala
7679 lo Laothisch
7684 lt Litauisch
7686 lv Lettisch
7771 mg Malagasy
7773 mi Maori
7775 mk Mazedonisch
7776 ml Malayalasisch
7778 mn Mongolisch
7779 mo Moldawisch
7782 mr Marathi
7783 ms Malaiisch
7784 mt Maltesisch
7789 my Burmesisch
7865 na Nauruisch
7869 ne Nepalesisch
7876 nl Niederländisch
7879 no Norwegisch
7967 oc Occitan
7977 om (Afan) Oromo
7982 or Oriya
8065 pa Punjabi
8076 pl Polnisch
8083 ps Paschtu
8084 pt Portugiesisch
8185 qu Quechua
8277 rm Rätoromanisch
Sprache Code Abkürzung der
Sprache
Sprache
8278 rn Kirundi
8279 ro Rumänisch
8285 ru Russisch
8287 rw Kinyarwanda
8365 sa Sanskrit
8368 sd Sindhi
8371 sg Sangro
8372 sh Serbo-Kroatisch
8373 si Singhalesisch
8375 sk Slowakisch
8376 sl Slowenisch
8377 sm Samoanisch
8378 sn Shona
8379 so Somali
8381 sq Albanisch
8382 sr Serbisch
8383 ss Siswati
8384 st Sesotho
8385 su Sudanesisch
8386 sv Schwedisch
8387 sw Swahili
8465 ta Tamil
8469 te Telugu
8471 tg Tajik
8472 th Thailändisch
8473 ti Tigrinya
8475 tk Turkmenisch
8476 tl Tagalog
8478 tn Setswanaisch
8479 to Tongalisch
8482 tr Türkisch
8483 ts Tsonga
8484 tt Tatarisch
8487 tw Twi
8575 uk Ukrainisch
8582 ur Urdu
8590 uz Vietnamesisch
8673 vi Volapük
8679 vo Volapük
8779 wo Wolof
8872 xh Xhosa
8979 yo Yoruba
9072 zh Chinesisch
9085 zu Zulu
D-23 [DEUTSCH]

- Wenn ein neuer Sender gespeichert wird, wird ein auf diesem
Speicherplatz liegender Festsender gelöscht.
Wiedergabe von Festsendern
1. Drücken Sie die Taste TUNER, um einen Frequenzbereich
auszuwählen.
2. Drücken Sie die Zifferntaste, um die Nummer des Festsenders
auszuwählen, und drücken Sie dann die ENTER-Taste.
- Die Taste PRESET kann ebenfalls verwendet werden. Drücken
Sie kurz die Taste PRESET.
Festsender-Suchlauf
1. Drücken Sie die Taste TUNER, um einen Frequenzbereich
auszuwählen.
2. Halten Sie die Taste PRESET für mindestens eine Sekunde gedrückt.
Die Nummer des Speicherplatzes wird eingeblendet. Jeder Festsender
wird 5 Sekunden lang wiedergegeben.
3. Drücken Sie erneut die Taste PRESET, um diesen Sender zu
empfangen, wenn Sie den gewünschten Sender hören.
D-24[DEUTSCH]

Suche eines Festsenders nach PTY-Kennung
Eine Sendung in einer bestimmten Programmart kann durch die Angabe
der PTY-Kennung gefunden werden.
1. Drücken Sie während der Wiedergabe eines FM-Senders die Taste
RANDOM/RDS, um “PTY” auszuwählen.
2. Drücken Sie innerhalb von 2 Sekunden die Taste PTY “+” oder “–”,
um die gewünschte PTY-Kennung auszuwählen. Die PTY-Kennung
ändert sich wie hier dargestellt:
NEWS: Nachrichten
AFFAIRS: Aktuelle Meldungen
INFO: Information
SPORT: Sport
EDUCATE: Bildung
DRAMA: Theater
CULTURE: Kultur
SCIENCE: Wissenschaft
VARIED: Verschiedenes
POP M: Popmusik
ROCK M: Rockmusik
EASY M: Leichte Musik
LIGHT M: Leichte klassische Musik
CLASSICS: Ernste klassische Musik
OTHER M: Andere Musik
WEATHER: Wetter
FINANCE: Finanzen
CHILDREN: Kinderprogramme
SOCIAL: Gesellschaftliche Angelegenheiten
RELIGION: Religion
PHONE IN: Sendungen mit telefonischer Hörerbeteiligung
TRAVEL: Reise
LEISURE: Freizeit
JAZZ: Jazz-Musik
COUNTRY: Country-Musik
NATION M: Landestypische Musik
OLDIES: Oldies
FOLK M: Folkloristische Musik
DOCUMENT: Dokumentarische Sendungen
TEST: Alarmtest
ALARM: Alarm
(oder in umgekehrter Reihenfolge)
3. Drücken Sie innerhalb von 10 Sekunden die Taste PTY CHK.
Das Gerät durchsucht die 24 Festsender, stoppt den Suchlauf, wenn
eine Sendung mit der gewählten PTY-Kennung gefunden wurde, und
stellt diesen Sender ein.
- Um den Suchlauf nach dem ersten Stopp fortzusetzen, drücken
Sie innerhalb von 10 Sekunden erneut die Taste PTY CHK.
- Wenn keine entsprechende Sendung gefunden wurde, wird der
ursprünglich eingestellte Sender wiedergegeben.
Drücken Sie die Taste n, um die Suche abzubrechen.
EINSCHLAFZEIT EINSTELLEN
Der Sleep-Timer schaltet das Gerät automatisch ab, nachdem ein
voreingestellter Zeitraum verstrichen ist. Eine Minute vor dem Abschalten
des Geräts wird die Lautstärke allmählich verringert (ausgeblendet). Es
stehen 4 Zeiteinstellungen zur Wahl: 30, 60, 90 und 120 Minuten.
Drücken Sie mehrmals die Taste SLEEP, um die gewünschte Einschlafzeit
auszuwählen. “SLEEP” erscheint im Display und die ausgewählte Zeit
blinkt.
PL
RCL
RSLSSW
SLEEP
Überprüfen der verbleibenden Einschlafzeit
Drücken Sie einmal die Taste SLEEP. Nach einigen Sekunden erscheint
wieder die ursprüngliche Anzeige.
Abschalten der Einschlafzeit
Drücken Sie die Taste SLEEP bis die Anzeige “SLEEPOFF” erscheint.
Der Timer wird auch abgeschaltet wenn das Gerät ausgeschaltet wird.
DAS GERÄT MIT EINEM ANDEREN GERÄT
KOMBINIEREN
Analogen Sound genießen, der über den Fernseher gesendet wird,
der mit dem Anschluss EURO AV CONNECTOR RGB OUT/TV (AUDIO)
IN verbunden ist
1. Wählen Sie “TV” durch Drücken der Taste FUNCTION aus.
2. Bedienen Sie das Fernsehgerät, das mit dem Gerät verbunden ist.
Analogen Sound genießen, der über ein externes Gerät gesendet
wird, das mit dem Anschluss VIDEO 1 IN oder VIDEO 2 IN verbunden
ist
1. Wählen Sie durch Drücken der FUNCTION-Taste “VIDEO 1” oder
“VIDEO 2” aus.
2. Bedienen Sie das Gerät, das mit diesem Gerät verbunden ist.
Digitalen Sound genießen, der über ein externes Gerät gesendet
wird, das mit dem Anschluss DIGITAL AUDIO IN verbunden ist
1. Wählen Sie durch Drücken der FUNCTION-Taste “V1 OPT” oder “V2
COAX” aus.
2. Bedienen Sie das Gerät, das mit diesem Gerät verbunden ist.
Den Funktionsmodus der digitalen Audioquelle ändern
Sie können entsprechend dem externen Gerät, das mit dem Anschluss
DIGITAL AUDIO IN verbunden ist, einen Modus für den Eingang nur des
digitalen Audiosignals auswählen.
1. Wählen Sie durch Drücken der FUNCTION-Taste “V1 OPT” oder “V2
COAX” aus.
2. Drücken Sie am Hauptgerät die Taste FUNCTION, während Sie am
Hauptgerät die Taste n gedrückt halten.
Jedes Mal, wenn Sie die Taste drücken, ändert sich die Auswahl wie
folgt:
V1 OPT
oder
V2 COAX
Hinweis:
- Diese Auswahl kann unabhängig für “V1 OPT” und “V2 COAX”
getroffen werden.
- Bei “V1 OPT” (oder “V2 COAX”) werden beide VIDEO 1 IN-Anschlüsse
(oder VIDEO 2 IN-Anschlüsse) und der Anschluss DIGITAL AUDIO IN
OPTICAL (VIDEO 1) (oder der Anschluss DIGITAL AUDIO ON
COAXIAL (VIDEO 2)) ausgewählt.
- Bei “OPTICAL” (oder “COAXIAL”) wird nur der Anschluss DIGITAL
AUDIO IN OPTICAL (VIDEO 1) (oder DIGITAL AUDIO IN COAXIAL
(VIDEO 2)) ausgewählt.
- Wenn Sie ein Videosignal wiedergeben möchten, das von dem
externen Gerät gesendet wird, das mit dem Anschluss VIDEO 1 IN
“VIDEO” (oder VIDEO 2 IN “VIDEO”) verbunden ist, verwenden Sie
den Anschluss VIDEO OUT oder EURO AV CONNECTOR RGB
OUT/TV (AUDIO) IN.
wv
OPTICAL
wv
COAXIAL
Nach einigen Sekunden erscheint wieder die ursprüngliche Anzeige und
die Helligkeit der Anzeige verringert sich.
D-25 [DEUTSCH]

DAS FERNSEHGERÄT MIT DER
FERNBEDIENUNG DIESES GERÄTS
BEDIENEN
Durch die Eingabe des Herstellercodes Ihres Fernsehgeräts können Sie
das Fernsehgerät mit der Fernbedienung dieses Geräts bedienen.
Wenn der Herstellercode hier nicht aufgelistet ist, ist diese Funktion nicht
möglich. Abhängig vom Modell kann diese Funktion nicht möglich sein,
auch wenn der Herstellercode hier aufgelistet ist.
Fernbedienungscode für das Fernsehgerät einstellen
Um den Fernbedienungscode für Ihr Fernsehgeräts einzustellen, folgen
Sie den unten beschriebenen Schritten:
1. Suchen Sie in der unten dargestellten Tabelle den Code, der der
Marke Ihres Fernsehgeräts entspricht.
TV-Marken Code
Blaupunkt 071
Grundig 071, 072, 076, 105, 106, 146, 171
Hitachi 006, 007, 028, 047, 058, 064, 075, 077, 078, 079,
080, 082, 124, 126, 127, 134, 145, 159
ITT 028, 059, 083, 107, 128, 138, 162, 168
JVC 019, 023, 024, 025, 042, 058, 060, 065, 073, 136
LG 006, 063, 074, 075, 112, 121, 134, 145, 150, 151,
161, 171
Loewe 029, 074, 084
Mitsui 058, 059, 060, 061, 062, 063, 064, 071, 076, 086,
087, 089, 090, 091, 092, 122, 132, 134, 137, 178
Mitsubishi 006, 018, 045, 121, 161
Nokia 025, 028, 031, 059, 097, 128, 138, 139, 140, 162, 168
Panasonic 004, 016, 028, 043, 044, 098, 099
Philips 046, 078, 097, 100, 126, 163
Pioneer 052, 119, 167, 169, 179
Saba 028, 061, 126, 129, 134, 135, 141
Samsung 006, 020, 033, 034, 035, 046, 059, 063, 067, 068,
074, 112, 114, 121, 142, 144, 145, 154, 161
Sanyo 001, 002, 003, 022, 029, 058, 059, 118, 125, 131,
172, 173
Sharp 005, 017, 051, 058, 089, 130
Sony 015, 050, 103, 117
Telefunken 049, 145, 155, 156, 160
Thomson 026, 061, 070, 110, 126, 129, 135, 141, 156, 157
Toshiba 008, 048, 058, 062, 072, 103, 104, 118, 123, 158, 167
GERÄT REINIGEN
Säubern Sie das Gerätegehäuse mit einem sauberen Lappen, der mit
lauwarmem Wasser befeuchtet ist. Verwenden Sie kein Benzin, keinen
Verdünner oder Alkohol, da diese Substanzen die Geräteoberfläche
beschädigen.
2. Geben Sie über die Zifferntasten den dreistelligen Code ein, während
Sie die Taste TV POWER gedrückt halten, und drücken Sie dann die
ENTER-Taste.
3. Lassen Sie die Taste TV POWER los.
Sie können nun mit der Fernbedienung Ihr Fernsehgerät bedienen.
Die Fernbedienung für das Fernsehgerät verwenden
Drücken Sie die Taste mit der gewünschten Funktion (TV POWER, – TV
CH +, TV/VIDEO, – TV VOL +).
- Wenn Sie die Fernbedienung verwenden möchten, müssen Sie mit
ihr auf das Fernsehgerät zeigen.
Hinweis:
- Es gibt einige Fernseher-Modelle, die nicht mit dieser Fernbedienung
bedient werden können. Wenn dies der Fall ist, verwenden Sie bitte
die Original-Fernbedienung, die im Lieferumfang Ihres Fernsehgeräts
enthalten war.
WICHTIGER HINWEIS:
Wenn die Batterien der Fernbedienung gewechselt werden, muss
die Codeinstellung für das Fernsehgerät erneut eingegeben werden.
Notieren Sie Ihren Code, damit Sie ihn später schneller finden.
TV:
D-26[DEUTSCH]

FEHLERSUCHE
Allgemein (Stromversorgung)
SYMPTOM
MÖGLICHE URSACHE
MASSNAHME
Das Gerät schaltet sich sofort nach dem Einschalten wieder aus.
Durch den Stromkreisschutz wurde das Gerät abgeschaltet, da es
beim Einschalten des Geräts zu einem Kurzschluss der
Lautsprecherkabel gekommen ist.
Stellen Sie sicher, dass alle Lautsprecherkabel richtig
angeschlossen sind.
Das Gerät ist starken externen elektrischen Spannungen ausgesetzt,
die z.B. durch Blitzeinschlag, übermäßige statische Elektrizität usw.
verursacht werden.
Schalten Sie das Gerät aus und ziehen Sie den Netzstecker aus
der Steckdose. Warten Sie ungefähr 30 Sekunden, stecken Sie
den Netzstecker wieder in die Steckdose und schalten Sie das
Gerät ein.
Das Gerät funktioniert nicht normal.
Durch einen externen Stromstoß (Blitzeinschlag, starke statische
Elektrizität) oder durch eine Stromquelle mit niedriger Spannung
wurde der interne Mikrocomputer lahm gelegt.
Ziehen Sie den Netzstecker aus der Steckdose und stecken Sie
ihn ungefähr 5 Sekunden später wieder ein.
Video
SYMPTOM
MÖGLICHE URSACHE
MASSNAHME
Kein Bild (oder ungewöhnliche Bildschirmgröße)
Das Fernsehgerät ist so eingestellt, dass es das Signal des Geräts
nicht empfangen kann.
Wählen Sie am Fernseher den korrekten Eingang aus, damit
Videosignale vom Gerät empfangen werden können.
Die falsche Funktion wurde ausgewählt.
Wählen Sie die richtige Funktion aus.
Die Einstellung der Fernsehbildschirmgröße ist nicht richtig.
Wählen Sie die richtige Einstellung für das Bildformat des
Fernsehers aus, der mit dem Gerät verbunden ist.
Das Bild einer externen Quelle wird nicht angezeigt.
Das Fernsehgerät (Monitor) ist nicht mit dem Videoausgang des
anderen Geräts verbunden.
Verbinden Sie das Fernsehgerät (Monitor) mit dem Videoausgang
des anderen Geräts.
Audio
SYMPTOM
MÖGLICHE URSACHE
MASSNAHME
Kein Ton
Der Lautstärkeregler ist auf Minimum eingestellt.
Drehen Sie den Lautstärkeregler auf.
Die falsche Quelle wurde ausgewählt.
Ändern Sie die Auswahl der Quelle entsprechend dem Gerät, mit
dem der Audioeingang verbunden ist.
Es wurde eine Disk eingelegt, die nicht abgespielt werden kann, wie
z.B. eine CD-ROM.
Legen Sie eine Disk ein, die abgespielt werden kann.
Die Audiowiedergabe erfolgt nur über den Front-Lautsprecher. Die
anderen Lautsprecher sind stumm. (Das rote Lämpchen des SurroundLautsprechers mit dem Netzkabel leuchtet.)
Eine Quelle oder Stereoquelle, die kein Effektsignal enthält, wird im
Dolby Surround-, Dolby Digital- oder DTS-Modus wiedergegeben.
Der 2.1-Kanal-Modus ist ausgewählt.
Wählen Sie einen anderen Surround-Modus aus.
Keine Tonwiedergabe vom Center-Lautsprecher.
Die Dolby Digital- oder DTS-Quelle enthält kein Signal für den CenterKanal.
Dies ist keine Fehlfunktion.
Keine Tonwiedergabe von den Surround-Lautsprechern.
Das Gerät wird durch Interferenzen im gleichen Frequenzbereich
oder Multi Pass beeinflusst.
Wechseln Sie den Übertragungskanal oder setzen Sie das Zusatz-
Lautsprecherkabel ein.
Das Gerät ist nicht eingeschaltet oder das Systemkabel ist nicht
angeschlossen.
Schalten Sie das Gerät ein oder stellen Sie eine Verbindung mit
dem Systemkabel her.
Ein Hindernis führt zu einer guten und schlechten Aufstellposition,
abhängig von der Beschaffenheit der elektrischen Wellen.
Verschieben Sie die Front-Lautsprecher (eingebauter Sender)
oder die Surround-Lautsprecher (eingebauter Empfänger) ein
wenig zu einer Seite.
Die Front-Lautsprecher (eingebauter Sender) und die SurroundLautsprecher (eingebauter Empfänger) wurden unabhängig
voneinander erworben.
Die Front-Lautsprecher und die Surround-Lautsprecher müssen
als eine Einheit erworben werden. Unabhängig voneinander
konfigurierte Systeme können nicht miteinander kommunizieren.
Keine Tonwiedergabe vom Subwoofer.
Der tiefe Bass ist auf “OFF” gestellt.
Stellen Sie den tiefen Bass auf “BOOST 1”, “BOOST 2” oder
“NORMAL” ein.
Ein Digital- oder Hochfrequenzgerät erzeugt ein Rauschen.
Das Gerät wurde zu nahe an solch einem Gerät aufgestellt.
Stellen Sie das Gerät weiter entfernt von diesem Gerät auf.
Klangaussetzer
Die Wellen haben licht-ähnliche Eigenschaften, wie z.B. Reflektion,
Refraktion und Defraktion. Daher kann die Stärke (oder fehlende
Stärke) der elektrischen Wellen abhängig von der Position dazu
führen, dass die Klangwiedergabe abbricht.
Ändern Sie die Aufstellung.
Der Abstand zwischen den Front-Lautsprechern (eingebauter Sender)
und den Surround-Lautsprechern (eingebauter Empfänger) ist zu
groß.
Halten Sie einen Maximalabstand von zehn Metern ein.
Es kommt plötzlich (und wiederholt) zu Tonsprüngen.
Ein Bluetooth-Gerät, Wireless-LAN oder ein anderes Gerät, das
den gleichen Frequenzbereiche (2,4 GHz) verwendet, oder ein
Mikrowellengerät wird betrieben.
Stellen Sie die Anlage mit genügend Abstand zu anderen Geräten
auf.
Auf dem Fernsehbildschirm kommt es zu atmosphärischen Störungen.
Die AV-Anlage, die mit der Antenne verbunden ist, steht in direktem
Kontakt zum Front-Lautsprecher (eingebauter Sender).
Stellen Sie den Front-Lautsprecher (eingebauter Sender) entfernt
vom Antenneneingang der AV-Anlage auf.
D-27 [DEUTSCH]

Wiedergabe
SYMPTOM
MÖGLICHE URSACHE
MASSNAHME
Die Wiedergabe kann nicht gestartet werden (oder stoppt plötzlich).
Es wurde eine Disk eingelegt, die nicht abgespielt werden kann. (Die
Anzeige “NO PLAY” erscheint.)
Überprüfen Sie das Fernsehsystem und welche Disks abgespielt
werden können.
Der Menüeinstellungs-Bildschirm wird angezeigt.
Drücken Sie die Taste SETUP, um die Anzeige zu beenden.
Die Kindersicherung ist eingeschaltet.
Schalten Sie die Kindersicherung aus oder ändern Sie die
Einstellung.
Es wurde eine Disk mit dem falschen Regionalcode eingelegt. (Die
Anzeige “NO PLAY” erscheint.)
Legen Sie eine Disk ein, deren Regionalcode “2” oder “ALL” ist.
Bestimmte Tasten funktionieren nicht.
Bestimmte Funktionen sind bei einigen Disks möglicherweise nicht
verfügbar. (Die Anzeige “ ” erscheint auf dem Bildschirm.)
Dies ist keine Fehlfunktion.
Es kann keine andere Sprache für die Untertitel oder die Synchronsprache
ausgewählt werden.
Auf einer Disk, die nur eine Sprache enthält, kann keine andere
Sprache ausgewählt werden.
Dies ist keine Fehlfunktion.
Eine MP3- oder WMA-Disk kann nicht abgespielt werden.
Die Disk entspricht nicht dem relevanten Format oder der
Beschaffenheit oder die Aufzeichnungsqualität ist schlecht.
Ersetzen Sie die Disk durch eine, die dem entsprechenden
Format oder der Beschaffenheit entspricht, oder deren
Aufzeichnungsqualität besser ist.
Es dauert sehr lange, bis das Gerät die Dateien einer MP3- oder WMADisk gelesen hat.
Dies liegt an der Dateistruktur.
Dies ist keine Fehlfunktion.
Bei der Wiedergabe einer DVD ist das Bild gestört oder dunkel.
Dieses Gerät ist mit einem Kopierschutz für das analoge
Kopierschutzsystem ausgestattet. Wenn eine Disk abgespielt wird,
die ein kopiergeschütztes Signal hat, kann es abhängig vom
Fernsehgerät bei einigen Bildern zu einem Streifenmuster kommen.
Dies ist keine Fehlfunktion.
Empfang von Radiosendungen
SYMPTOM
MÖGLICHE URSACHE
MASSNAHME
Der Radioempfang ist stark verrauscht.
Der Radioempfang wird durch die Stromzufuhr beeinflusst.
Stecken Sie den Netzstecker in eine andere Steckdose.
Kehren Sie die Steckerpolarität des Netzkabels um.
Der Radioempfang wird durch ein elektrisches Gerät, wie z.B. einen
Motor, eine Leuchtstofflampe oder ein Fernsehgerät beeinflusst.
Stellen Sie das Gerät mit Abstand zur Störungsquelle auf.
Schalten Sie den Fernseher aus.
Verändern Sie die Position und Ausrichtung der Antenne.
Die Festsender können nicht ausgewählt werden.
Die Festsender wurden gelöscht.
Stellen Sie die Festsender erneut ein.
Fernbedienung
SYMPTOM
POSSIBLE CAUSE
CORRECTIVE ACTION
Die Fernbedienung funktioniert nicht einwandfrei.
Die Fernbedienung ist zu weit vom Fenster des
Fernbedienungssensors entfernt.
Betätigen Sie die Fernbedienung innerhalb eines Abstands von
sechs Metern zum Fenster des Fernbedienungssensors.
Die Batterien der Fernbedienung sind leer.
Ersetzen Sie die Batterien.
Hinweis:
Wenn es zu einer ungewöhnlichen Anzeige oder Funktion kommt, schalten
Sie das Gerät über die Taste z /ON aus und wieder ein oder schalten Sie
das Gerät aus, ziehen Sie den Netzstecker und schließen Sie ihn einige
Sekunden später wieder an.
D-28[DEUTSCH]

[FRANÇAIS]
PRECAUTIONS
-N’exposez pas l’appareil à des gouttes d’eau ou des éclaboussures.
- Ne posez aucun objet rempli de liquide, notamment un vase, sur
l’appareil.
-N’utilisez pas l’appareil dans des lieux soumis à des températures
extrêmes (en dessous de 5°C ou au-dessus de 35°C), ou à la lumière
directe du soleil.
- Comme le lecteur de DVD possède un niveau de bruit extrêmement
faible et une gamme dynamique étendue, la tendance est de régler le
volume de l’amplificateur à un niveau inutilement élevé. Cela peut
entraîner un niveau de sortie trop important qui risque d’endommager
les enceintes.
- Des variations soudaines de la température ambiante pourraient
provoquer la formation de condensation sur la lentille optique située
à l’intérieur de l’appareil. Dans ce cas, retirez le disque, n’utilisez pas
l’appareil pendant 2 heures environ, puis remettez-le en marche.
- Lorsque vous transportez l’appareil, veillez à ce qu’il ne contienne
aucun disque et éteignez-le. Attendez au moins 10 secondes, puis
débranchez le câble d’alimentation du secteur. Transporter l’appareil
alors qu’il contient un disque pourrait endommager le disque et/ou
l’appareil.
-N’installez pas cet appareil dans un endroit confiné, tel qu’une
bibliothèque ou une armoire encastrée.
- Il est vivement conseillé de placer l’unité principale (JCX-TS960),
l’enceinte avant avec câble d’alimentation (ASX-TS960WLF) et
l’enceinte Surround avec câble d’alimentation (ASX-TS960WLR)
dans un lieu bien ventilé.
Ne posez aucun objet sur l’appareil.
N’obstruez pas les orifices de ventilation.
Il est normal que le boîtier de l’appareil chauffe en cas d’utilisation
prolongée.
-L’unité principale (JCX-TS960) n’est pas totalement débranchée du
secteur lorsque la touche z/ON est réglée sur la position z.
-L’enceinte Surround avec câble d’alimentation (ASX-TS960WLR)
n’est véritablement hors tension que si vous débranchez sa fiche de
la prise secteur.
L’appareil peut être commandé à partir de l’unité
principale ou de la télécommande. Par commodité,
ce mode d’emploi explique le fonctionnement à
partir de la télécommande.
Remarque :
Ce mode d’emploi est imprimé avant que ce produit soit développé.
Lorsque certaines caractéristiques techniques du produit doivent être
modifiées pour améliorer ses fonctions ou son utilisation, la priorité est
donnée aux caractéristiques techniques du produit. Dans ce cas, le
mode d’emploi peut ne pas correspondre totalement à l’ensemble des
fonctions du produit fini.
Par conséquent, le produit fini, son nom, son aspect et son emballage,
peuvent être différents du contenu de ce manuel.
Avertissement relatif à l’émetteur
Informations importantes :
1. Spécifiez explicitement les instructions techniques et la portée
d’utilisation définies dans les documents connexes, et fournissez les
explications relatives à toutes les méthodes de commande, aux
procédures de réglage et à l’utilisation des commutateurs.
2. Ne modifiez pas la fréquence de l’émetteur dans l’espoir d’augmenter
sa puissance (y compris la puissance de l’amplificateur de puissance
à fréquence sans fil à charge excessive). N’installez pas une antenne
extérieure et n’utilisez pas une antenne modifiée.
3. Lors de l’utilisation de l’appareil, évitez tout comportement contraire
aux prescriptions en vigueur en matière de communications sans fil.
En cas d’interférences, arrêtez immédiatement l’appareil, éliminez la
cause de l’interférence et évitez que cela se reproduise.
4. En cas d’utilisation d’un appareil sans fil de puissance très faible,
évitez toute interférence avec les services de communication sans fil
ou les appareils industriels, scientifiques et médicaux.
5. N’utilisez pas l’appareil dans un avion ou à proximité d’un aéroport.
Avertissement relatif à l’utilisation de l’enceinte avant avec émetteur
intégré
- Maintenez l’enceinte avant à 22 cm minimum de tout stimulateur
cardiaque.
Les ondes radio peuvent altérer le bon fonctionnement des stimulateurs
cardiaques.
-N’utilisez pas l’enceinte avant en milieu hospitalier ou médicalisé, ou
encore à proximité d’un appareil médical électrique.
Les ondes radio peuvent entraîner une panne ou un mauvais
fonctionnement des appareils avoisinants.
- Lorsque d’autres appareils ou équipements médicaux ne fonctionnent
pas correctement ou refusent de fonctionner en raison des ondes
radio, cessez d’utiliser l’enceinte avant sans fil.
Les ondes radio peuvent entraîner une panne ou un mauvais
fonctionnement des appareils avoisinants.
La gamme des fréquences utilisées par cet appareil est partagée par
les stations de radio internes (licence requise) ainsi que par des
stations de radio spéciales de faible puissance (licence non requise)
utilisées pour l’identification des éléments mobiles utilisés sur les
chaînes de production ainsi que les stations radio amateur (licence
requise) et les équipements industriels, scientifiques et médicaux,
notamment les fours à micro-ondes.
1. Avant d’utiliser cet appareil, assurez-vous qu’aucune station de
radio interne, aucune station de radio spéciale de faible puissance
utilisée pour l’identification des éléments mobiles, et aucune
station radio amateur ne fonctionne à proximité.
2. Si cet appareil émet des interférences radio qui gênent une station
de radio interne utilisée pour l’identification des éléments mobiles,
modifiez immédiatement sa gamme de fréquences ou cessez
d’émettre des ondes électriques et consultez votre revendeur ou
la station de service de votre société afin de déterminer les
mesures à prendre pour éliminer ces interférences (l’aménagement
d’une cloison, par exemple).
3. En cas de problème, notamment si cet appareil émet des
interférences radio qui gênent des stations de radio spéciales de
faible puissance utilisées pour l’identification des éléments mobiles
ou une station radio amateur, contactez votre revendeur ou la
station de service de votre société.
F-1 [FRANÇAIS]

AVANT UTILISATION
Disques reconnus
Cet appareil peut lire les types de disques ci-dessous.
Type de disque et logo
DVD vidéo
CD audio
Numéro de région
Un numéro de région (code de limite régionale) est incorporé à l’appareil
et aux DVD.
Un numéro de région figure à l’arrière de l’appareil.
Les DVD qui portent le même numéro de région ou le numéro de région
"ALL" peuvent être utilisés sur cet appareil.
DVD
L’emballage de certains DVD porte des indications.
Exemple :
Multilingue Multi-aspect
3
2
Sous-titres multilingues Numéro de région
Multi-angle Sous-titre
3
Les DVD sont divisés en titres, eux-mêmes divisés en chapitres.
Titre 1
Chapitre 1 Chapitre 2
CD vidéo ou super CD vidéo/CD audio
Ces CD sont divisés en plages.
Plage 1 Plage 2 Plage 3 Plage 4 Plage 5
CD MP3/WMA
Répertoire1 Répertoire 2
Fichier 1 Fichier 2 Fichier 1 Fichier 2 Fichier 3
Chapitre 1 Chapitre 2 Chapitre 3
LB16:9
Titre 2
A propos de JPEG
Cet appareil ne permet pas la lecture des CD photos Kodak/JPEG.
En cas de lecture fortuite de graphiques, l’appareil n’est pas garanti pour
tous les graphiques.
Remarques sur la manipulation des disques
-N’exposez pas les disques aux rayons directs du soleil, à une
humidité élevée ou à des températures élevées pendant des périodes
prolongées.
- Rangez les disques dans leur boîtier après utilisation.
- Ne collez pas de papier et n’écrivez pas sur la surface des disques.
- Saisissez les disques par les bords. Ne touchez pas leur surface de
lecture (face brillante).
- Eliminez délicatement les empreintes et la poussière de la surface
des disques avec un chiffon doux.
Eliminez-les en un mouvement linéaire du centre vers l’extérieur du
disque.
- Ne nettoyez jamais des disques avec des produits chimiques tels que
des aérosols de nettoyage, des aérosols ou des liquides anti-statiques,
du benzène ou du diluant.
A propos de [DVD], [VCD], [CD] et [DATA]
Dans ce manuel, le type de disque disponible par fonction est indiqué au
moyen des mentions suivantes :
[DVD] : Possibilité de lire des DVD.
[VCD] : Possibilité de lire des CD vidéo et des super CD vidéo.
[CD] : Possibilité de lire des CD audio.
[DATA] : Possibilité de lire des CD de données au format MP3 ou WMA.
Ce produit intègre une technologie de protection des droits d’auteur qui
est elle-même protégée par certains brevets américains ou d’autres droits
de propriété intellectuelle détenus par Macrovision Corporation et d’autres
détenteurs de droits. L’utilisation de cette technologie de protection des
droits d’auteur doit être autorisée par Macrovision Corporation et est
destinée à une utilisation privée ou limitée, sauf autorisation contraire de
Macrovision Corporation. L’ingénierie inverse ou le désassemblage sont
interdits.
Microsoft, Windows Media et le logo Windows sont des marques ou des
marques déposées de Microsoft Corporation aux Etats-Unis et dans
d’autres pays.
Fabriqué sous licence de Dolby Laboratories.
"Dolby", "Pro Logic" et le symbole du double D sont des marques de Dolby
Laboratories.
"DTS" et "DTS Digital Surround" sont des marques déposées de Digital
Theater Systems, Inc.
Remarque :
- Seuls les types de disques ci-dessus peuvent être lus sur cet appareil.
Les DVD-Audio, DVD-ROM, DVD-RAM, DVD-RW (mode VR), CDROM, CVD, SACD, etc. ne peuvent pas être lus.
- Cet appareil peut lire les CD vidéo (VCD) et les super CD vidéo
(SVCD).
- Il est possible de lire certains DVD-R, DVD-RW (mode vidéo), DVD+R
et DVD+RW.
- Cet appareil doit être utilisé exclusivement avec des disques conçus
pour le système de couleurs PAL (ou NTSC). Les disques du système
SECAM ne peuvent pas être utilisés avec cet appareil.
F-2[FRANÇAIS]

COMMANDES
TELECOMMANDE
Panneau avant (Fig. 1a)
1. Touche d’alimentation (z/ON)
2. Touche d’ouverture/fermeture (q)
3. Affichage fluorescent
4. Touche de lecture (a)
5. Détecteur du signal de commande à distance (IR)
6. Commande du volume (VOLUME)
7. Touche d’arrêt (n)
8. Touche Suivant/Saut/Syntonisation programmée (e)
9. Touche Précédent/Saut/Syntonisation programmée (f)
10. Touche Surround (SURROUND)
11. Touche de fonction (FUNCTION)
12. Plateau du disque
13. Prise casque (PHONES)
Affichage fluorescent (Fig. 1b)
1. Témoins de mode Surround
(HALL, STADIUM, STUDIO, THEATER, CLUB)
2. Témoin de mode progressif (PROGRESSIVE)
3. Témoin de mode nuit (NIGHT)
4. Témoin de disque (VCD/CD/DVD)
5. Témoin virtuel du casque (VIRTUAL)
6. Témoin Dolby Pro Logic/Pro Logic II (s PL II)
7. Témoin Dolby Digital (s D)
8. Témoin DTS (dts)
9. Témoin PCM (PCM)
10. Témoin 96 kHz (96K)
11. Témoins de lecture/pause (a, k)
12. Témoins du mode de répétition (REPEAT, 1, ALL, A-B)
13. Témoin de lecture aléatoire (RDM)
14. Témoin de programme (PGM)
15. Témoin RDS (RDS)
16. Témoin WMA (WMA)
17. Témoin MP3 (MP3)
18. Témoin de la minuterie d’endormissement (SLEEP)
19. Témoins de message ou de numéro
(Titre, chapitre, plage, durée de lecture ou autre information)
20. Témoin de titre/plage (T)
21. Témoin de chapitre (C)
22. Témoins des canaux d’entrée/sortie (L, C, R, SW, LS, RS)
23. Témoins de sortie audio (L, R)
24. Témoin FM mono (MONO)
25. Témoin FM stéréo (ST)
Panneau arrière (Fig. 1c)
1. Borne d’antenne cadre AM (AM ANT.)
2. Bornes de sortie pour composant vidéo (COMPONENT VIDEO OUT)
3. Bornes d’entrée audio numérique (DIGITAL AUDIO IN)
4. Prise Euro AV (EURO AV CONNECTOR RGB OUT/TV (AUDIO) IN)
5. Cordon d’alimentation
6. Prise de commande du système (SYSTEM)
7. Prises d’entrée audio/vidéo (VIDEO 1 IN, VIDEO 2 IN)
8. Prise de sortie S-Vidéo (S-VIDEO OUT)
9. Prise de sortie vidéo (S-VIDEO OUT)
10. Borne d’antenne FM (FM ANT. 75 Ω)
Commandes (Fig. 2)
1. Touche de retour (RETURN)
2. Touche d’ouverture/fermeture (q)
3. Touche du mode de recherche (SEARCH MODE)
4. Touche du mode d’image (PICTURE MODE)
5. Touche Sous-titres (SUBTITLE)
6. Touche Audio (AUDIO)
7. Touche Menu (MENU)
8. Touche Entrée (ENTER)
9. Touche d’affichage à l’écran (ON SCREEN)
10. Touche d’arrêt (n)
11. Touches Suivant/Précédent/Saut/Vérification du type de programme
(f, e, PTY CHK)
12. Touche de répétition (REPEAT)
13. Touche de répétition A-B (A-B REP)
14. Touche de programmation (PROG)
15. Touche d’effacement (CLEAR)
16. Touche de lecture aléatoire/mode RDS (RANDOM/RDS)
17. Touche de mode FM (FM MODE)
18. Touche de coupure (TRIM)
19. Touche de la fonction tuner (TUNER)
20. Touche de syntonisation programmée (PRESET)
21. Touche des graves (BASS)
22. Touches du volume (– VOL +)
23. Touche du silencieux (MUTE)
24. Touche de préréglage du son (SOUND)
25. Touche de la tonalité de test (TEST)
26. Touche du mode Nuit (NIGHT)
27. Touche Surround (SURROUND)
28. Touche de fonction (FUNCTION)
29. Commandes du téléviseur
Remarque :
En réglant le code de présélection en fonction de votre téléviseur,
vous pouvez commander celui-ci à l’aide de ces touches (voir page
26).
TV POWER : Touche d’alimentation du téléviseur
– TV CH +: Touches de balayage des canaux du téléviseur
TV/VIDEO: Touche de sélection TV/Vidéo
– TV VOL +: Touches du volume du téléviseur
30. Touches numériques (1 - 9, 0)
31. Touches d’avance lente/retour lent ( , )
32. Touches d’avance rapide/retour rapide/sélection du type de
programme (d, c, – PTY +)
33. Touche de pause/avance pas à pas (k)
34. Touche de lecture (a)
35. Touche du menu principal (TOP MENU)
36. Touches de syntonisation/déplacement (TUNE–, TUNE+, 4, a, 5, b)
37. Touche de réglage (SETUP)
38. Touche de dernière mémorisation (LAST MEMORY)
39. Touche Angle (ANGLE)
40. Touche de relecture d’angle (A.REPLAY)
41. Touche d’alimentation (z/ON)
42. Touche de mise en veille (SLEEP)
Insertion des piles
Insérez deux piles "R6/AA" (non fournies), de la manière illustrée à la
Fig. 3.
Remarque :
Retirez les piles si vous envisagez de ne pas utiliser la télécommande
pendant un mois ou davantage. En effet, les piles risqueraient de couler
et de provoquer des dégâts.
Portée de la télécommande (Fig. 4)
F-3 [FRANÇAIS]

GUIDE D’INSTALLATION DU SYSTEME
A
C
B
D
Exemple de raccordement des cordons des enceintes
(Pour plus de détails, reportez-vous à la page suivante.)
Ecran plat plasma
(non fourni)
Enceinte avant avec
cordon d’alimentation
A: Cordon système (grande fiche DIN à 13 broches)
B: Cordons des enceintes avant (fiches grise/violette/rouge)
C: Cordon de l’enceinte centrale (fiche verte)
D: Cordon des enceintes Surround (fiche blanche)
Cordon d’alimentation
Exemple de disposition des enceintes
Enceinte avant
Enceinte Surround
Enceinte centrale
Unité principale
Enceinte Surround
avec cordon
d’alimentation
A 7 mètres environ
Enceinte avant avec
cordon d’alimentation
A 10 mètres environ
Enceinte Surround avec cordon d’alimentation
Pour obtenir un effet sonore Surround optimal, les enceintes avant,
centrale et Surround doivent se trouver à une distance à peu près égale
de la position d’écoute.
En disposant les enceintes de la manière illustrée, vous obtiendrez un
effet Surround plus efficace. Il est conseillé de diminuer le volume de
l’enceinte interne du téléviseur.
Enceinte centrale
Enceinte avant gauche
(avec subwoofer)
Enceinte avant droite
(avec subwoofer)
Enceinte avant
Enceinte centrale
Lorsque vous placez l’enceinte centrale sur un téléviseur, assurezvous que la face supérieure du téléviseur est bien horizontale. Ne
posez pas l’enceinte centrale sur un téléviseur dont la face
supérieure est inclinée.
Enceinte Surround
N’oubliez pas de fixer le cordon de l’enceinte. En cas d’oubli,
vous pouvez tirer dessus accidentellement ou trébucher et
provoquer la chute de l’enceinte.
A 7 mètres environ
- Placez les enceintes avant (subwoofer intégré) à droite et à gauche
du téléviseur.
- Placez l’enceinte centrale au-dessus ou en dessous du téléviseur.
Positionnez-la le plus près possible du téléviseur.
- Placez les enceintes Surround (L, R) de la manière illustrée.
L’enceinte de l’appareil est conçue pour pouvoir être utilisée à proximité
d’un téléviseur. Toutefois, les couleurs affichées peuvent s’assombrir,
selon la position de l’enceinte par rapport au téléviseur. Vous devez alors
écarter l’enceinte du téléviseur.
Exemple d’installation des enceintes (Fig. 5)
Il est conseillé d’installer les enceintes afin que la face de l’enceinte avant
qui intègre l’émetteur (avec cordon d’alimentation) soit dirigée vers le côté
de l’enceinte Surround la plus éloignée qui intègre le récepteur (avec
cordon d’alimentation). Si les deux enceintes ne sont pas dirigées l’une
vers l’autre, la réception peut s’avérer difficile.
Enceinte Surround
gauche
Enceinte Surround
droite
F-4[FRANÇAIS]

Ne branchez pas le cordon d’alimentation sur une prise secteur aussi longtemps que tous les raccordements ne sont pas terminés.
Raccordement de l’appareil aux enceintes
Comme les bornes des enceintes et les fiches des cordons d’enceinte fournis portent un code de couleur, effectuez les raccordements en respectant ces
couleurs.
Les enceintes avant et les enceintes Surround peuvent être placées à droite ou à gauche.
A Raccordez l’unité principale et l’enceinte avant avec cordon d’alimentation.
B Raccordez les enceintes avant gauche et droite.
C Raccordez l’enceinte centrale et l’enceinte avant avec cordon d’alimentation.
D Raccordez les enceintes Surround gauche et droite.
Utilisez-les exclusivement avec les enceintes fournies. Ne les utilisez pas avec d’autres enceintes. Raccorder d’autres enceintes peut endommager
celles-ci et/ou l’appareil.
F-5 [FRANÇAIS]

Inversion de la position des enceintes
Il est possible d’inverser la position des enceintes avant et des enceintes
Surround illustrées à la page précédente.
En prenant en compte le raccordement du cordon d’alimentation,
notamment, sélectionnez un des deux types d’installation recommandés.
Installation de l’enceinte avant avec cordon d’alimentation du côté
droit
Installation de l’enceinte Surround avec cordon d’alimentation du
côté droit
Les autres raccordements doivent être effectués de la manière illustrée à
la page précédente.
Modification du réglage de la fréquence
Si l’utilisation des enceintes Surround en mode sans fil s’accompagne de
bruit (ou d’un son de coupure), modifiez le réglage du commutateur CH
SELECT à l’arrière de l’enceinte avant avec cordon d’alimentation. Cela
peut améliorer le son.
F-6[FRANÇAIS]

RACCORDEMENT A UN AUTRE APPAREIL
- Une fois tous les raccordements terminés, réglez le rapport d’aspect
de l’image du téléviseur ("4:3 LB", "4:3 PS" et "16:9") (voir page 20).
- Lorsque vous raccordez l’appareil à un téléviseur prêt pour le mode
progressif et compatible avec le système de couleurs NTSC, utilisez
les prises COMPONENT VIDEO OUT. Il est possible de sélectionner
le mode progressif (Auto/Vidéo/Film) (voir page 20).
Précautions relatives aux raccordements
- Avant de raccorder l’unité à un autre appareil, mettez-la hors
tension et débranchez sa fiche de la prise secteur.
- Raccordez l’appareil directement à un téléviseur. S’il est raccordé
à un téléviseur par l’intermédiaire d’un magnétoscope, les images
risquent d’être troubles sous l’effet de la fonction de protection
des droits d’auteur.
- Lisez attentivement le mode d’emploi du dispositif à raccorder.
- Avant de brancher et de débrancher le cordon d’alimentation de
l’appareil, mettez hors tension le téléviseur et les autres dispositifs qui
sont raccordés à l’appareil. En cas d’oubli, vous risquez d’endommager
les enceintes.
- Pour reproduire le signal vidéo d’un dispositif raccordé à la prise
VIDEO 1 IN "VIDEO" (ou VIDEO 2 IN "VIDEO"), le téléviseur doit être
raccordé à la prise VIDEO OUT ou EURO AV CONNECTOR RGB
OUT/TV (AUDIO) IN. Le signal vidéo en provenance de la prise
VIDEO 1 IN "VIDEO" (ou VIDEO 2 IN "VIDEO") n’est pas acheminé
par l’intermédiaire des prises S-VIDEO OUT ou COMPONENT VIDEO
OUT.
Raccordement de l’appareil à un téléviseur
Raccordement de l’appareil à un téléviseur équipé d’une8 r6.82Tf-29215089 -1.23 TD-0.0102 TINPS-V(Fig. 6)D0 Tc(Ž)TjT*/F4 1Tc-0.Siw(56 EO"), le t)Tj/F369Tf22.0378 0 TD0 Tw(Ž)Tj/F4 1 Tf0.556 0 TD(l)Tj/F1 1 Tf0.222 0 TD(Ž)Tj/F4 1 Tf0./F4 1Tc-0.1142 Twsiseur doit
F-7 [FRANÇAIS]

PROCEDURES DE FONCTIONNEMENT
CONJOINTES
L’appareil peut être commandé à partir de l’unité principale ou de
la télécommande. Par commodité, ce mode d’emploi explique le
fonctionnement à partir de la télécommande.
Mise sous et hors tension
1. Activez le commutateur d’alimentation situé à l’arrière de l’enceinte
Surround.
2. Appuyez sur la touche z/ON.
L’unité principale et l’enceinte Surround sont mises sous tension et
l’affichage s’allume. L’enceinte avant est automatiquement mise sous
tension.
- "HELLO" apparaît sur l’affichage fluorescent.
- La source sélectionnée est celle qui l’était au moment où l’appareil
a été mis hors tension.
1. Appuyez de nouveau sur la touche z/ON pour mettre l’unité principale
et l’enceinte avant hors tension. "GOOD-BYE" apparaît sur l’affichage
fluorescent.
2. Désactivez le commutateur d’alimentation situé à l’arrière de l’enceinte
Surround.
Lancement de la lecture par touche unique
Même si l’appareil est hors tension, il vous suffit d’appuyer sur une seule
touche pour le mettre sous tension et lancer la lecture ou la réception
d’une émission de radio.
Lecture (lorsqu’un disque est présent dans l’appareil)
Appuyez sur la touche a (Lecture) pour lancer la lecture.
Réception de la radio
Appuyez sur la touche TUNER pour écouter la radio.
-L’appareil diffuse les émissions de la station qui était sélectionnée la
dernière fois qu’il a été mis hors tension.
Retrait du disque par touche unique
Appuyez sur la touche q pour ouvrir le plateau du disque.
Sélection de la source désirée
Sélectionnez la source de votre choix en appuyant sur la touche FUNCTION.
Chaque pression de la touche modifie le contenu de l’affichage dans
l’ordre indiqué ci-dessous.
DVD/CD v TV v VIDEO 1 v V1 OPT v VIDEO 2 v V2 COAX v FM
TUNER v AM TUNER v DVD/CD ...
Remarque :
- Lorsque vous appuyez sur la touche a (Lecture) ou TUNER, vous
sélectionnez automatiquement une autre source.
- Lorsque vous sélectionnez une autre source, la lecture du disque
s’arrête automatiquement.
Réglage du volume
Réglez le volume à l’aide de la touche VOL "+" ou "–".
Le niveau du volume (VOL 0 à VOL MAX) apparaît sur l’affichage
fluorescent chaque fois que vous appuyez sur la touche VOL.
- Pour régler le volume de l’unité principale, tournez le bouton VOLUME.
Réglage de la qualité sonore désirée
1. Sélectionnez un mode sonore en appuyant sur la touche SOUND.
BASS v TREBLE v FLAT v Retour à l’affichage d’origine
BASS ...
2. Appuyez sur la touche b / a ou sur la touche ENTER.
Mode Touche Niveau
BASS b / a –5 à +5
TREBLE b / a –5 à +5
FLAT ENTER BASS 0/TREBLE 0
- Pour régler la qualité sonore sur "FLAT" (valeur initiale),
sélectionnez "FLAT" et appuyez sur la touche ENTER.
"- -FLAT- -" apparaît sur l’affichage fluorescent.
3. Réglez la qualité sonore selon votre choix en répétant les étapes 1 et
2.
4. Appuyez sur la touche SOUND. L’affichage d’origine réapparaît.
Remarque :
Il est automatiquement mis fin au réglage si vous n’appuyez sur aucune
touche pendant 10 secondes environ.
Renforcement des graves profonds
Réglez les graves profonds selon votre choix en appuyant sur la touche
BASS.
BOOST 1 v BOOST 2 v OFF v NORMAL v BOOST 1 ...
- Si un casque est raccordé, appuyer sur la touche BASS n’a aucun
effet. "-BASS-" apparaît alors sur l’affichage fluorescent.
Sélection d’un mode Surround
Pour profiter facilement d’un effet Surround, sélectionnez un mode
Surround en fonction de la situation et du disque lu.
Pour plus d’informations sur le mode Surround, reportez-vous à la section
"A propos du mode Surround", à la page suivante.
Sélectionnez le mode Surround de votre choix en appuyant sur la touche
SURROUND.
AUTO v s PL II MOVIE v s PL II MUSIC v s PL DOLBY PL
HALL v STADIUM v STUDIO v THEATER v CLUB v 2.1ch
AUTO ...
Remarque :
- Il est automatiquement mis fin au réglage si vous n’appuyez sur
aucune touche pendant 4 secondes environ.
- La sélection du mode Surround peut être limitée ou modifiée d’office
en fonction du signal audio à reproduire.
v
v
v
Pour réduire temporairement le volume
Appuyez sur la touche MUTE. "MUTE" apparaît sur l’affichage fluorescent.
Pour rétablir le niveau de volume précédent, appuyez de nouveau sur
cette touche.
F-8[FRANÇAIS]

A propos du mode Surround
Mode : AUTO
Fonction : DVD/CD, V1 OPT, V2 COAX
L’appareil détecte automatiquement le format du signal audio
enregistré sur le disque et sélectionne le mode Surround approprié.
- Si un DVD ou une entrée audio numérique externe dont le signal
audio est encodé avec Dolby Digital (5.1 canaux), "s D" apparaît
sur l’affichage fluorescent et le son est reproduit en mode Surround
Dolby Digital 5.1 canaux. Tous les DVD ne sont pas encodés
avec un son Surround 5.1 canaux.
- Si un DVD ou une entrée audio numérique externe dont le signal
audio est encodé avec DTS, "dts" apparaît sur l’affichage
fluorescent et le son est reproduit en mode Surround DTS. Tous
les DVD ne sont pas encodés avec un son Surround DTS.
- Si un DVD ou une entrée audio numérique externe dont le signal
audio est encodé avec Dolby Digital 2 canaux ou mono, "s PL
II" apparaît sur l’affichage fluorescent et le son est reproduit en
mode Dolby Pro Logic II MOVIE .
- Si un DVD ou une entrée audio numérique externe dont le signal
audio est encodé avec Linear PCM à 2 canaux (stéréo), "s PL
II" apparaît sur l’affichage fluorescent et le son est reproduit en
mode Dolby Pro Logic II MUSIC.
- Dans le cas de CD vidéo et de super CD vidéo, la lecture s’opère
en mode Dolby Pro Logic II MOVIE. Dans le cas des CD
musicaux, des disques MP3 et des disques WMA, la lecture
s’opère en mode Dolby Pro Logic II MUSIC.
Fonction : TV, VIDEO1, VIDEO2
La lecture s’effectue en mode Dolby Pro Logic II MOVIE.
Fonction : FM TUNER
La lecture s’effectue en mode Dolby Pro Logic II MUSIC.
Fonction : AM TUNER
Le mode Surround est réglé sur 2.1 canaux et le son n’est reproduit
que par les enceintes avant gauche/droite et le subwoofer.
ss
Mode :
s PL II MOVIE
ss
La lecture s’effectue en mode Surround Dolby Pro Logic II 5.1 canaux.
Même dans le cas d’un disque dont les signaux audio ont été enregistrés
sur 2 canaux dans un mode adapté à la lecture des films, il est possible
d’obtenir un effet sonore Surround pseudo 5.1 canaux (son élargi).
ss
Mode :
s PL II MUSIC
ss
La lecture s’effectue en mode Surround Dolby Pro Logic II 5.1 canaux.
Même dans le cas d’un disque dont les signaux audio ont été enregistrés
en stéréo dans un mode adapté à la lecture de la musique, il est possible
d’obtenir un effet sonore Surround pseudo 5.1 canaux (son élargi).
ss
Mode :
s PL DOLBY PL
ss
La lecture s’effectue en mode Surround Dolby Pro Logic 5.1 canaux. Ce
mode convient à la lecture d’un disque sur lequel les signaux audio sont
enregistrés dans le mode Surround Dolby conventionnel.
Mode : HALL
Les signaux audio enregistrés sur 2 canaux (stéréo) sont lus avec un effet
sonore Surround pseudo 5.1 canaux (son élargi), produisant des effets
sonores qui vous donnent l’impression que vous écoutez la musique dans
une salle de concert.
Mode : STADIUM
Les signaux audio enregistrés sur 2 canaux (stéréo) sont lus avec un effet
sonore Surround pseudo 5.1 canaux (son élargi), produisant des effets
sonores réalistes qui vous donnent l’impression que vous regardez une
rencontre sportive dans un stade de baseball ou de football.
Mode : STUDIO
Les signaux audio enregistrés sur 2 canaux (stéréo) sont lus avec un effet
sonore Surround pseudo 5.1 canaux (son élargi), produisant des effets
sonores qui vous donnent l’impression que vous écoutez la musique dans
un studio d’enregistrement.
Mode : THEATER
Les signaux audio enregistrés sur 2 canaux (stéréo) sont lus avec un effet
sonore Surround pseudo 5.1 canaux (son élargi), produisant des effets
sonores naturels qui vous donnent l’impression que vous regardez un film
dans un cinéma.
Mode : CLUB
Les signaux audio enregistrés sur 2 canaux (stéréo) sont lus avec un effet
sonore Surround pseudo 5.1 canaux (son élargi), produisant des effets
sonores qui vous donnent l’impression que vous êtes dans un club ou une
discothèque.
Mode : 2.1ch
Le mode Surround est réglé sur 2.1 canaux et le son n’est reproduit que
par les enceintes avant gauche et droite et le subwoofer.
Remarque :
Dans les cas suivants, seul le mode Surround AUTO ou 2.1ch peut être
sélectionné.
- Dans le cas d’une entrée audio numérique externe dont la source est
- Dans le cas d’un DVD ou d’une entrée audio numérique externe dont
En cas de raccordement d’un casque
Mode : AUTO,
HALL, STADIUM, STUDIO, THEATER, CLUB
La lecture s’effectue en mode 2 canaux (stéréo) en recourant à un mode
virtuel avec effet Surround (son élargi). Dans le cas du TUNER AM,
toutefois, la lecture s’opère en mode 2 canaux (stéréo) normal.
"VIRTUAL" apparaît sur l’affichage fluorescent.
Mode : 2ch
La lecture s’effectue en mode 2 canaux (stéréo) normal.
Réglage de l’effet Surround du mode Dolby
Pro Logic II MUSIC
A propos du mode Dolby Pro Logic II MUSIC
PANO (Mode Panorama) :
C.WIDTH (Largeur centrale) :
DIMEN (Dimension) :
1. Sélectionnez le mode "s PL II MUSIC" en appuyant sur la touche
2. Sélectionnez un paramètre en appuyant sur la touche 4 / 5.
3. Appuyez sur la touche b / a.
4. Réglez les paramètres en répétant les étapes 2 et 3.
F-9 [FRANÇAIS]
LPCM 96 kHz
le signal audio est différent de Dolby Digital 2 canaux ou dans le cas
d’une lecture DTS
ss
s PL II MOVIE,
ss
Il est possible d’élargir sensiblement l’image du champ sonore avant
vers la droite et la gauche afin d’atteindre les enceintes Surround et
d’obtenir un effet Surround plus enveloppant.
Si l’image centrale semble trop proéminente, elle peut être réglée
pour obtenir un champ sonore mieux adapté à la lecture de la musique
en répartissant les signaux du canal central vers les signaux gauche/
droit avant. Il est possible de répartir les signaux du canal central vers
les canaux avant sur huit niveaux compris entre 0 (reproduction du
son par l’enceinte centrale uniquement) et 7 (reproduction du signal
du canal central à partir de l’enceinte avant uniquement).
Il est possible de régler la balance avant-arrière du volume dans une
plage comprise entre –3 et +3. Lorsque vous augmentez le champ
sonore à l’avant, déplacez la balance du volume vers le côté "+".
Lorsque vous augmentez le champ sonore à l’arrière, déplacez la
balance du volume vers le côté "–". Si l’effet Surround est trop
proéminent, déplacez la balance du volume vers l’avant. Si l’effet
Surround est insuffisant, déplacez la balance du volume vers l’arrière.
SURROUND. "s PL II" et "MUSIC" apparaissent sur l’affichage
fluorescent.
PANO
wv
C.WIDTH
Réglez le paramètre en appuyant sur la touche b / a.
Mode : Niveau
PANO : "ON" ou "OFF"
C.WIDTH : 0 à 7
DIMEN : –3 à +3
ss
s PL II MUSIC,
ss
wv
DIMEN
ss
s PL DOLBY PL,
ss
wv
PANO ...

Réglage du mode Nuit
TEST TONE
Lorsque le volume est réglé sur un niveau faible, par exemple, la nuit, "ON"
du mode Nuit facilite l’écoute au niveau de volume faible. Si vous ne
souhaitez pas que des sons violents, par exemple, entraînent un
changement soudain et violent du niveau sonore, "ON" ce mode pour
réduire les variations de niveau sonore extrêmes.
Appuyez sur la touche NIGHT.
L’affichage fluorescent s’atténue. "NIGHT ON" apparaît sur l’affichage
fluorescent et l’indication "NIGHT" s’affiche en lettres rouges.
Pour désactiver le mode "OFF", appuyez de nouveau sur la touche
NIGHT.
A propos des témoins des canaux d’entrée/sortie
(L, C, R, SW, LS, RS)
Ces témoins affichent le canal d’entrée ou le canal de sortie selon la
fonction ou le format du signal audio.
Fonction : DVD/CD, V1 OPT, V2 COAX
Format du signal audio : mode d’affichage
PCM : Affiche le canal de sortie des enceintes (affichage de la sortie)
Dolby Digital : Affiche le canal d’origine (affichage de l’entrée)
DTS : Affiche le canal d’origine (affichage de l’entrée)
MP3/WMA : Affiche le canal de sortie des enceintes (affichage de la
sortie)
Fonction : TV, VIDEO1, VIDEO2, FM TUNER, AM TUNER
Format du signal audio : mode d’affichage
Analogique : Affiche le canal de sortie des enceintes (affichage de la
sortie)
Remarque :
- Si le casque est raccordé en mode d’affichage de la sonnerie, seuls
"L" et "R" demeurent affichés.
- Les modes d’affichage de la sortie et de l’entrée ne peuvent pas être
commutés manuellement.
- Lorsque "SW" apparaît sur l’affichage de l’entrée, le canal LFE (Low
Frequency Effect) est inclus dans la source audio.
Réglage de la luminosité de l’affichage fluorescent
Tout en appuyant sur la touche ON SCREEN de la télécommande,
appuyez sur la touche n de l’unité principale.
NORMAL (Normal)
wv
DARK (Intensité)
Verrouillage du plateau du disque
Il est possible de verrouiller le plateau du disque pour empêcher les
enfants d’y accéder.
Le plateau du disque ayant été ouvert en appuyant sur la touche q,
appuyez sur la touche q de l’unité principale et maintenez-la enfoncée
jusqu’à ce que "LOCKED" apparaisse sur l’affichage fluorescent.
Il est alors impossible d’ouvrir le plateau du disque en appuyant sur la
touche q.
- Pour déverrouiller le plateau du disque, appuyez sur la touche q de
l’unité principale et maintenez-la enfoncée jusqu’à ce que
"UNLOCKED" apparaisse sur l’affichage fluorescent.
- Si vous appuyez sur la touche q alors que le plateau du disque est
verrouillé, "DISC TRAY LOCKED" s’affiche sur l’écran du téléviseur
et "LOCKED" apparaît sur l’affichage fluorescent.
Réglage de la balance du volume des enceintes
avant, centrale et Surround
Cet appareil est réglé en usine sur un niveau standard avant son
expédition. Pour obtenir un effet sonore plus efficace, réglez la balance
du volume de chaque enceinte en fonction de la taille de la pièce et de la
disposition des enceintes.
Préparation :
- Mettez le téléviseur sous tension et sélectionnez l’entrée vidéo
raccordée à l’appareil.
- Si un disque est en cours de lecture, appuyez deux fois sur la touche
n pour l’arrêter complètement.
-Débranchez le casque éventuellement raccordé.
1. Sélectionnez "DVD/CD" en appuyant sur la touche FUNCTION.
2. Appuyez sur la touche TEST. L’écran "TEST TONE" apparaît sur le
téléviseur.
"L" clignote et "FNTL 0" apparaît sur l’affichage fluorescent.
Les enceintes reproduisent la tonalité de test dans l’ordre suivant
tandis que le contenu de l’affichage change toutes les 2 secondes
environ.
Ecran du téléviseur (affichage fluorescent) : Enceinte
L ([L] FNTL 0) : Enceinte avant gauche
C ([C] CENT 0) : Enceinte centrale
R ([R] FNTR 0) : Enceinte avant droite
RS ([RS] SURR 0) : Enceinte Surround droite
LS ([LS] SURL 0) : Enceinte Surround gauche
3. Réglez le volume de la tonalité de test totale en appuyant sur la touche
VOL "+" ou "–".
4. Appuyez sur la touche b / a pendant que la tonalité de test est
reproduite par l’enceinte dont vous souhaitez régler le volume.
A partir de la position d’écoute, effectuez les réglages afin que les
tonalités de test reproduites par toutes les enceintes possèdent le
même niveau de volume.
Le niveau est indiqué sur l’écran du téléviseur et sur l’affichage
fluorescent.
Plage de réglage :
L, R : –10 à 0
C, RS, LS : –10 à +10
Si nécessaire, répétez cette étape.
5. Appuyez sur la touche TEST. L’écran "TEST TONE" disparaît.
Remarque :
Lorsque chaque enceinte a reproduit la tonalité de test à cinq reprises, le
réglage des enceintes prend automatiquement fin.
Réglage du niveau du subwoofer
-Débranchez le casque éventuellement raccordé.
1. Appuyez sur la touche TRIM. "FNTL 0" apparaît sur l’affichage
fluorescent.
2. Sélectionnez "SUBW 0" en appuyant sur la touche ENTER.
3. Appuyez sur la touche b / a pour régler le niveau désiré.
Plage de réglage :
SUBW : –10 à +10
4. Appuyez sur la touche TRIM. L’enceinte et le niveau affiché
disparaissent.
Remarque :
- En cas de réglage de niveau du subwoofer, aucune tonalité de test
n’est émise. Il est conseillé de régler le niveau du subwoofer en
écoutant de la musique, par exemple.
- Le réglage des enceintes prend automatiquement fin si vous n’appuyez
sur aucune touche pendant 15 secondes environ.
F-10[FRANÇAIS]

LECTURE DES DISQUES [DVD] [VCD] [CD]
DVD
C
D
RSLSSW
RCL
Remarque importante :
- Certains DVD ou VCD disposent de différentes fonctions qui ne
sont pas nécessairement décrites dans ce mode d’emploi. Des
instructions supplémentaires pourraient s’avérer nécessaires. Dans
ce cas, suivez les instructions affichées sur l’écran du téléviseur ou
celles qui figurent sur la pochette ou le boîtier du disque.
- Les informations sur le disque sont prioritaires dans différentes
configurations.
- Il est possible que " " apparaisse sur l’écran du téléviseur en
cours de fonctionnement. Cette icône signifie que la fonction n’est
pas disponible sur le disque à ce moment.
- Dans ce mode d’emploi, la langue d’affichage à l’écran est
l’anglais. Si vous avez choisi une autre langue, suivez les indications
affichées dans cette langue.
-L’écran repris comme exemple dans ce manuel peut être différent
de l’écran réel.
- Dans un souci d’amélioration, les affichages à l’écran peuvent être
modifiés sans avis préalable.
Lecture des disques
1. Appuyez sur la touche q. Le plateau du disque s’ouvre. "OPEN"
apparaît sur l’affichage fluorescent. "OPEN" et "SANYO" s’affichent
sur l’écran du téléviseur.
2. Placez le disque dans le plateau du disque. Veillez à bien diriger vers
le bas la face sur laquelle les signaux sont enregistrés (Fig. 19).
3. Appuyez sur la touche a (Lecture).
Le plateau du disque se ferme automatiquement. "CLOSE",
"READING" et " a " s’affichent sur l’écran du téléviseur et la lecture
commence.
Exemple : DVD
Numéro de chapitre Temps de lecture écoulé
- Si le disque est placé dans le tiroir avec la face enregistrée dirigée
vers le haut ou si le disque est très griffé, "NO PLAY" s’affiche sur
l’écran du téléviseur. Vous devez alors replacer le disque
correctement ou le remplacer.
Préparatifs
- Lorsque vous lisez un DVD ou un VCD, mettez l’appareil et le
téléviseur sous tension, puis sélectionnez l’entrée vidéo raccordée à
l’appareil.
-Sélectionnez la langue d’affichage des menus à l’écran. Vous avez le
choix entre les langues suivantes :
Anglais (par défaut), Espagnol, Français, Allemand, Italien,
Portugais, Japonais, Chinois
(Reportez-vous à la section "Configuration de la langue", page 19.)
-
Selon le téléviseur raccordé à l’appareil, sélectionnez un mode de
sortie du signal vidéo et un format d’image de lecture (voir pages 7, 20).
Sélection du mode progressif (uniquement pour disques NTSC)
Remarque :
Si vous utilisez un système qui n’est compatible qu’avec le système
couleur PAL ou un téléviseur à balayage non progressif utilisant NTSC,
ignorez cette section.
Vérifiez le téléviseur et le raccordement.
- Le téléviseur est compatible avec le système couleur NTSC et est
prêt pour le mode progressif.
- Les prises COMPONENT VIDEO OUT de l’appareil sont raccordées
aux prises COMPONENT VIDEO INPUT du téléviseur.
Sélectionnez le réglage “Configuration de l’affichage” de la manière
suivante. (Voir page 20.)
1. Sélectionnez “VIDEO OUT SELECT: COMPONENT”.
2. Sélectionnez “NTSC DISC: NTSC PROGRESSIVE”.
3. Sélectionnez “PROGRESSIVE MODE” si vous le souhaitez.
Si un menu de disque s’affiche
Il peut arriver qu’un menu s’affiche lors de la lecture d’un DVD. Vous devez
alors sélectionner sur l’option souhaitée à l’aide des touches 4/5/b/a et
de la touche ENTER.
Il est également possible qu’un menu s’affiche lors de la lecture d’un VCD.
Remarque :
- Ne touchez pas le plateau du disque lorsque celui-ci est en mouvement.
- Mis à partir un disque, vous ne devez jamais rien déposer dans le
plateau. Tout objet étranger risque d’endommager l’appareil.
- Vous ne pouvez déposer qu’un seul disque à la fois dans le plateau.
- Pour ouvrir ou fermer le plateau du disque, utilisez exclusivement la
touche q. Ne poussez pas le plateau avec la main.
Arrêt de la lecture
Appuyez sur la touche n.
Pour reprendre la lecture là où vous l’avez arrêtée (fonction de
reprise)
Si vous appuyez une fois sur la touche n en cours de lecture, "RESUME
n " s’affiche.
Si vous appuyez sur la touche a (Lecture), la lecture redémarre là où vous
l’avez arrêtée.
Pour arrêter complètement la lecture
Appuyez deux fois sur la touche n. La lecture est totalement arrêtée.
Quand vous appuyez sur la touche a (Lecture), la lecture recommence à
partir du début du disque.
Ejection du disque
Appuyez sur la touche q. Laissez le plateau s’ouvrir complètement, puis
retirez le disque.
Appuyez de nouveau sur la touche q pour refermer le plateau.
Saut jusqu’au passage souhaité (Fig. 20)
Saut avant
Appuyez sur la touche e en cours de lecture.
La lecture commence à partir du début de la plage ou du chapitre suivant.
Saut arrière
Appuyez sur la touche f en cours de lecture.
La lecture commence à partir du début de la plage ou du chapitre en cours
de lecture. Si vous appuyez de nouveau sur cette touche, la lecture
commence à partir du début de la plage ou du chapitre précédent.
F-11 [FRANÇAIS]

CHAPTER SEARCH _ _ _
TIME SEARCH _ : _ _ : _ _
DIVERSES FONCTIONS DE LECTURE DES
DISQUES
Il est possible que " " apparaisse sur l’écran du téléviseur en cours
de fonctionnement. Cette icône signifie que la fonction n’est pas
disponible sur le disque à ce moment.
Sélection d’une option du menu d’un DVD [DVD]
1. Appuyez sur la touche MENU. Le menu d’un DVD apparaît.
2.
Sélectionnez l’option souhaitée en appuyant sur les touches
Certains disques permettent d’opérer cette sélection à l’aide des
touches numériques.
3. Appuyez sur la touche ENTER. L’option sélectionnée est exécutée ou
le menu suivant apparaît.
Effectuez le réglage souhaité, puis répétez les étapes 2 et 3.
Sélection d’une option du menu principal [DVD]
1. Appuyez sur la touche TOP MENU. Le menu principal apparaît.
2. Sélectionnez le titre désiré en appuyant sur les 4/5/b/a.
Certains disques permettent d’opérer cette sélection à l’aide des
touches numériques.
3. Appuyez sur la touche ENTER. La lecture du titre sélectionné
commence.
Remarque :
La sélection des options de menu peut varier selon le disque et n’est pas
possible avec tous les disques.
Sélection d’une option du menu d’un VCD [VCD]
Le menu apparaît automatiquement en cas de lecture d’un VCD (CD vidéo
ou super CD vidéo) avec fonction de contrôle de la lecture (PBC). Utilisez
les touches correspondant au menu.
Le fonctionnement peut varier selon le disque utilisé. Lisez le manuel
d’instructions du VCD.
1. Lisez un disque à l’aide de la fonction de contrôle de la lecture. Le
menu apparaît.
2. Sélectionnez l’option de votre choix en appuyant sur les touches
numériques.
3.
Appuyez sur la touche ENTER. La lecture du titre sélectionné commence.
Si un autre menu s’affiche, appuyez sur les touches correspondantes.
Pour revenir à l’écran de menu, appuyez sur la touche RETURN en cours
de lecture.
Lecture du disque sans utiliser l’écran de menu [VCD]
Remarque :
Si "PBC" apparaît sur l’affichage fluorescent, appuyez deux fois sur la
touche n. "PBC" disparaît.
1. Entrez le numéro de la plage souhaité à l’aide des touches numériques
alors que vous êtes en mode d’arrêt complet.
Vous pouvez aussi opérer des sélections en appuyant plusieurs fois
sur la touche f ou e.
2. Appuyez sur la touche ENTER ou sur la touche a (Lecture). La lecture
de la plage sélectionnée commence.
Pour revenir à l’écran de menu (lecture PBC), arrêtez complètement la
lecture en appuyant deux fois sur la touche n, puis appuyez sur la touche
a (Lecture).
4/5/b/a.
Recherche de chapitre [DVD]
1. Appuyez deux fois sur la touche SEARCH MODE en cours de lecture.
Exemple :
2. A l’aide des touches numériques, saisissez le numéro du chapitre
souhaité.
3. Appuyez sur la touche ENTER ou sur la touche a (Lecture). La lecture
du chapitre sélectionné commence.
Remarque :
- Pour corriger un réglage en cours, appuyez sur la touche CLEAR pour
effacer le numéro affiché que vous venez d’entrer.
- Pour annuler le réglage, appuyez 1 à 3 fois sur la touche SEARCH
MODE pour effacer l’affichage.
Recherche temporelle [DVD] [VCD] [CD]
Remarque :
Pour un VCD : Si "PBC" apparaît sur l’affichage fluorescent, appuyez
deux fois sur la touche n.
1. En cours de lecture, appuyez trois fois sur la touche SEARCH MODE
dans le cas d’un DVD ou appuyez une fois sur la touche SEARCH
MODE dans le cas d’un VCD ou d’un CD.
Exemple :
2. A l’aide des touches numériques, saisissez l’heure souhaitée.
Exemple : 1 heure 4 minutes 8 secondes
Appuyez sur "1" v "0" v "4" v "0" v "8".
Exemple : 35 minutes 46 secondes
Appuyez sur "3" v "5" v "4" v "6".
3. Appuyez sur la touche ENTER ou sur la touche a (Lecture). La lecture
commence à partir de l’heure spécifiée.
Recherche de plage [VCD] [CD]
1. A l’aide des touches numériques, saisissez le numéro de la plage
souhaitée.
Exemple : Pour sélectionner la plage No. 15, appuyez sur "1", puis sur
"5".
2. Appuyez sur la touche ENTER ou sur la touche a (Lecture). La lecture
commence à partir de la plage sélectionnée.
Arrêt sur image [DVD] [VCD]/Pause [CD]
Appuyez sur la touche k en cours de lecture. " k " apparaît sur l’écran du
téléviseur et sur l’affichage fluorescent. Pour revenir au mode normal de
lecture, appuyez sur la touche a (Lecture).
Lecture image par image [DVD] [VCD]
Appuyez sur la touche k en mode d’arrêt sur image.
Chaque fois que vous appuyez sur la touche, "
du téléviseur et la lecture avance d’une image à la fois.
Pour revenir au mode normal de lecture, appuyez sur la touche a
(Lecture).
k a
" s’affiche sur l’écran
Recherche de titre [DVD]
1. Appuyez une fois sur la touche SEARCH MODE.
Exemple :
TITLE SEARCH _ _
2. A l’aide des touches numériques, saisissez le numéro du titre souhaité.
Exemple : Pour sélectionner le titre No. 12, appuyez sur "1", puis sur
"2".
3. Appuyez sur la touche ENTER ou sur la touche a (Lecture). La lecture
du titre sélectionné commence.
F-12[FRANÇAIS]

Lecture rapide [DVD] [VCD] [CD]
Appuyez sur la touche c ou d en cours de lecture ou en mode d’arrêt
sur image.
Avance rapide : touche
[DVD] [VCD]
FF1 c v FF2 c v FF3 c v FF1 c ...
[CD]
FF1 c v FF2 c v FF1 c ...
Retour rapide : touche
[DVD] [VCD]
FR1 d v FR2 d v FR3 d v FR1 d ...
[CD]
FR1 d v FR2 d v FR1 d ...
Pour revenir au mode normal de lecture, appuyez sur la touche a
(Lecture).
cc
c
cc
dd
d
dd
Lecture lente [DVD] [VCD]
Appuyez sur la touche ou en cours de lecture ou en mode d’arrêt
sur image.
Ralenti avant : touche [DVD] [VCD]
SF1 v SF2 v SF3 v SF1 ...
Ralenti arrière : touche [DVD]
SR1 v SR2 v SR3 v SR1 ...
Pour revenir au mode normal de lecture, appuyez sur la touche a
(Lecture).
Remarque :
- Le son est coupé en mode d’arrêt sur image (pause), de lecture image
par image et de lecture lente.
- Dans le cas d’un DVD ou d’un VCD, le son est coupé pendant la
lecture rapide.
Lecture répétée [DVD] [VCD] [CD]
Il est possible de répéter la totalité d’un disque, d’un titre, d’un chapitre ou
d’une plage.
Remarque :
Pour un VCD : Si "PBC" apparaît sur l’affichage fluorescent, appuyez
deux fois sur la touche n pour faire disparaître cette indication.
Sélectionnez un mode de répétition en appuyant sur la touche REPEAT
en cours de lecture.
Chaque fois que vous appuyez sur cette touche, vous changez de mode
de répétition dans l’ordre indiqué ci-dessous.
[DVD]
Ecran du téléviseur (affichage fluorescent) : Fonctionnement
CHAPTER (REPEAT 1): Répétition du chapitre en cours de lecture
TITLE (REPEAT ALL): Répétition du titre en cours de lecture
OFF (Aucun) : Mode normal de lecture
[VCD] [CD]
Ecran du téléviseur (affichage fluorescent) : Fonctionnement
TRACK (REPEAT 1): Répétition de la plage en cours de lecture
DISC (REPEAT ALL): Répétition de la totalité du disque
OFF (Aucun) : Mode normal de lecture
Pour revenir au mode normal de lecture, sélectionnez "OFF" en appuyant
sur la touche REPEAT.
Lecture répétée d’une partie déterminée [DVD] [VCD]
[CD] (Fig. 21)
1. Appuyez sur la touche A-B REP au début de la partie que vous
souhaitez répéter (point A). " A -" s’affiche sur l’écran du téléviseur.
2. Appuyez sur la touche A-B REP à la fin de la partie que vous souhaitez
répéter (point B). " A - B" s’affiche sur l’écran du téléviseur.
La partie spécifiée (comprise entre les points A et B) est lue de
manière répétée.
Pour revenir au mode normal de lecture, sélectionnez "OFF" en appuyant
sur la touche A-B REP.
Lecture aléatoire [VCD] [CD]
Remarque :
Pour un VCD : Si "PBC" apparaît sur l’affichage fluorescent, appuyez
deux fois sur la touche n pour faire disparaître cette indication.
Appuyez sur la touche RANDOM/RDS.
"RANDOM PLAY" s’affiche sur l’écran du téléviseur, "RDM" apparaît sur
l’affichage fluorescent et les plages sont lues dans un ordre aléatoire.
Pour arrêter la lecture aléatoire, appuyez de nouveau sur la touche
RANDOM/RDS.
La lecture aléatoire s’arrête et le mode normal de lecture est rétabli.
Remarque :
- Si vous appuyez sur la touche CLEAR pendant la lecture aléatoire,
"OFF" s’affiche sur l’écran du téléviseur et la lecture aléatoire cède le
pas au mode normal de lecture.
Lecture répétée aléatoire [VCD] [CD]
Appuyez sur la touche REPEAT en cours de lecture aléatoire pour
sélectionner un mode de répétition.
Ecran du téléviseur (affichage fluorescent) : Fonctionnement
TRACK (REPEAT 1): Répétition de la plage en cours de lecture
RANDOM (REPEAT ALL): Répétition aléatoire de toutes les plages
OFF (Aucun) : Mode normal de lecture
F-13 [FRANÇAIS]

Lecture programmée [VCD] [CD]
Il est possible de sélectionner des plages et de les lire dans l’ordre ainsi
déterminé. Vous pouvez programmer jusqu’à 32 plages.
Remarque :
Pour un VCD : Si "PBC" apparaît sur l’affichage fluorescent, appuyez
deux fois sur la touche n pour faire disparaître cette indication.
1. Appuyez sur la touche PROG en mode d’arrêt.
L’écran "PROGRAM" s’affiche sur l’écran du téléviseur.
"PGM" clignote sur l’affichage fluorescent.
2. A l’aide des touches numériques, sélectionnez le numéro de la plage
souhaitée.
Exemple :Pour sélectionner la plage No. 21, appuyez sur "2", puis
- Pour effectuer une correction en cours de programmation,
- Vous pouvez aussi sélectionner le numéro de plage à l’aide de la
3. Appuyez sur la touche ENTER.
Le numéro de programme suivant est sélectionné.
4. Répétez les étapes 2 et 3 pour sélectionner les plages dans l’ordre
souhaité.
Pour annuler la programmation, appuyez sur la touche PROG.
5. Appuyez sur la touche a (Lecture) pendant que l’écran "PROGRAM"
est affiché.
"PGM" demeure indiqué sur l’affichage fluorescent tandis que les
plages sélectionnées sont lues dans l’ordre programmé.
Remarque :
- Comme le programme est conservé aussi longtemps que le plateau
du disque n’est pas ouvert/fermé, il est possible d’arrêter, puis de
reprendre la lecture programmée.
sur "1".
Pour sélectionner la plage No. 3, appuyez sur "3".
PROGRAM
All Clear
No. : Tr.
1 : – –
2 : – –
3 : – –
4 : – –
5 : – –
6 : – –
7 : – –
8 : – –
Clear No. 1 Track 3
No. : Tr.
9 : – –
10 : – –
11 : – –
12 : – –
13 : – –
14 : – –
15 : – –
16 : – –
No. : Tr.
17 : – –
18 : – –
19 : – –
20 : – –
21 : – –
22 : – –
23 : – –
24 : – –
No. : Tr.
25 : – –
26 : – –
27 : – –
28 : – –
29 : – –
30 : – –
31 : – –
32 : – –
sélectionnez de nouveau le numéro de la plage à l’aide des
touches numériques.
touche 4 / 5.
Effacement du programme [VCD] [CD]
Pour effacer tous les programmes
1. Appuyez sur la touche PROG en mode d’arrêt.
L’écran "PROGRAM" s’affiche sur l’écran du téléviseur.
2. Sélectionnez "All Clear" en appuyant sur la touche b / a.
3. Appuyez sur la touche ENTER.
Tous les programmes sont effacés.
4. Appuyez sur la touche PROG.
L’écran "PROGRAM" disparaît.
Pour effacer les programmes individuellement
1. Appuyez sur la touche PROG en mode d’arrêt.
L’écran "PROGRAM" s’affiche sur l’écran du téléviseur.
2. Sélectionnez "PROGRAM No." en appuyant sur la touche b / a.
3. Sélectionnez le numéro du programme que vous souhaitez effacer en
appuyant sur la touche 4 / 5.
4. Sélectionnez "Clear" en appuyant sur la touche b / a.
5. Appuyez sur la touche ENTER.
Le programme sélectionné est effacé et vous accédez au programme
suivant.
6. Répétez les étapes 2 à 5.
7. Appuyez sur la touche PROG.
L’écran "PROGRAM" disparaît.
Lecture répétée d’un programme [VCD] [CD]
Appuyez sur la touche REPEAT en cours de lecture programmée pour
sélectionner un mode de répétition.
Ecran du téléviseur (affichage fluorescent) : Fonctionnement
TRACK (REPEAT 1): Répétition de la plage programmée en cours
de lecture
PROGRAM (REPEAT ALL): Répétition de toutes les plages
programmées
OFF (Aucun) : Mode normal de lecture
Remarque :
- Si vous appuyez sur la touche CLEAR pendant la lecture programmée,
"OFF" s’affiche sur l’écran du téléviseur et la lecture programmée
cède le pas au mode normal de lecture. Toutefois, le programme n’est
pas effacé.
-Dès que vous ouvrez/fermez le plateau du disque, le programme est
effacé.
- Si vous appuyez sur la touche CLEAR en mode de lecture répétée
d’un programme, la répétition est annulée.
Sélection de la lecture normale ou de la lecture
programmée [VCD] [CD]
Lecture normale
Appuyez sur la touche a (Lecture).
Lecture programmée
Appuyez sur la touche PROG pour afficher l’écran "PROGRAM", puis
appuyez sur la touche a (Lecture).
Modification du programme [VCD] [CD]
1. Appuyez sur la touche PROG en mode d’arrêt.
L’écran "PROGRAM" s’affiche sur l’écran du téléviseur.
2. Sélectionnez "PROGRAM No." en appuyant sur la touche b / a.
3. Sélectionnez le numéro du programme que vous souhaitez modifier
en appuyant sur la touche 4 / 5.
4. Sélectionnez "Track" en appuyant sur la touche b / a.
5. A l’aide des touches numériques, sélectionnez le numéro de la plage
souhaitée.
6. Appuyez sur la touche ENTER.
F-14[FRANÇAIS]

Vérification des informations du disque [DVD] [VCD]
LAST MEMORY PLAY?
YES
NO
CLEAR
ENTER/ a
[CD]
1. Appuyez sur la touche ON SCREEN en cours de lecture.
Exemple : DVD
Numéro de titre
Numéro de chapitre
DVD
TITLE : 1
CHAPTER : 3
COMPONENT : INTERLACE
Mode de sortie du signal vidéo
Exemple : VCD (en cours de lecture PBC)
Numéro de plage
Temps de lecture écoulé du titre
Temps de lecture restant du titre
a
00:04:12
00:01:23
02:01:32
00:00:58
Temps de lecture restant du chapitre
Temps de lecture écoulé du chapitre
Démarrage de la lecture là où vous l’avez arrêtée
[DVD]
En mémorisant le point où vous avez arrêté la lecture, il est possible de
relancer celle-ci à partir de cet endroit, même après mise hors tension de
l’appareil ou ouverture/fermeture du plateau du disque (Lecture à partir du
dernier point mémorisé).
1. Appuyez sur la touche LAST MEMORY en cours de lecture.
"LAST MEMO n" s’affiche sur l’écran du téléviseur et la lecture
s’arrête. "L.M.-STOP" apparaît sur l’affichage fluorescent.
2. Appuyez sur la touche q pour retirer le disque ou sur la touche z/ON
pour mettre l’appareil hors tension.
3. Placez dans le plateau le disque dont le point d’arrêt de la lecture est
mémorisé, ou appuyez sur la touche z/ON pour mettre l’appareil sous
tension.
L’écran "LAST MEMORY PLAY?" s’affiche.
- Certains disques exigent éventuellement que vous appuyez sur
la touche a (Lecture).
VCD
DISC :
TRACK : 2
COMPONENT : INTERLACE
:
00:45
a
:
:
Temps de lecture écoulé de la plage
Exemple : VCD (en cours de lecture sans fonction PBC)
Numéro de plage
VCD
DISC :
TRACK : 4
COMPONENT : INTERLACE
Temps de lecture écoulé du disque
a
29:25
00:45
:
:
Temps de lecture écoulé de la plage
Exemple : CD
Temps de lecture écoulé du disque
Numéro de plage
CD
DISC :
TRACK : 2
COMPONENT : INTERLACE
Temps de lecture restant du disque
a
07:23
03:40
31:46
01:08
Temps de lecture restant de la plage
Temps de lecture écoulé de la plage
La mémoire est effacée.
4. Appuyez sur la touche ENTER ou sur la touche a (Lecture).
Si "YES" est sélectionné, la lecture commence à partir de l’endroit où
elle s’était arrêtée.
Les données du point d’arrêt sont effacées au terme de la lecture à
partir du dernier point mémorisé.
Remarque :
- La lecture à partir du dernier point mémorisé est possible pour cinq
disques maximum.
- La lecture à partir du dernier point mémorisé n’est pas disponible sur
certains disques.
- Contrairement à la fonction de reprise, les données du point d’arrêt ne
sont pas effacées lorsque le disque est retiré de l’appareil. Toutefois,
si la lecture à partir du dernier point mémorisé est définie pour plus de
cinq disques, les données des points d’arrêt sont effacées dans
l’ordre chronologique.
- Le point d’arrêt de la lecture ne peut être enregistré que pour un seul
point par disque.
2. Appuyez de nouveau sur la touche ON SCREEN pendant la lecture
d’un DVD.
Exemple : DVD
Langue de la
bande son
DVD
ENGLISH
CHINESE
COMPONENT : INTERLACE
Mode de sortie du signal vidéo
Langue des
sous-titres
DOLBY DIGITAL3/2.1
1/1
Un type de son
a
Angle de prise de vues
Pour effacer l’affichage à l’écran, appuyez de nouveau sur la touche ON
SCREEN.
F-15 [FRANÇAIS]

Sélection de l’angle de prise de vues désiré [DVD]
AUDIO CHANGE
01 ENGLISH
(Fig. 22)
Dans le cas d’un DVD (multi-angle) contenant des scènes filmées
simultanément sous plusieurs angles, il est possible de sélectionner
l’angle de prise de vues désiré.
Appuyez sur la touche ANGLE en cours de lecture.
Appuyez plusieurs fois sur cette touche pour changer d’angle de prise de
vues.
Exemple :
3
Relecture d’angle [DVD]
Appuyez sur la touche A.REPLAY en cours de lecture multi-angle.
L’appareil revient environ 10 secondes en arrière et sélectionne l’angle de
prise de vues suivant. Appuyez plusieurs fois sur cette touche pour
changer d’angle de prise de vues.
Sélection d’un mode d’image [DVD] [VCD] [CD]
Sélectionnez un mode d’image en appuyant sur la touche PICTURE
MODE.
Chaque fois que vous appuyez sur cette touche, vous changez de mode
d’image dans l’ordre suivant.
STANDARD v CINEMA 1 v CINEMA 2 v STANDARD ...
STANDARD : Mode d’image standard
CINEMA 1 : Le contraste de l’image est accentué tandis que les couleurs
sont globalement atténuées. Vous obtenez des images
parfaitement piquées.
CINEMA 2 : Le contour de l’image est adouci tandis que les couleurs
sont globalement plus pâles. Sélectionnez ce mode si des
parasites sont apparents.
Sélection de la langue des sous-titres [DVD]
Des sous-titres en plusieurs langues peuvent être enregistré sur certains
DVD. Chaque langue peut ainsi être affichée sur l’écran du téléviseur
pendant la lecture. Si des sous-titres sont enregistrés en plusieurs
langues, il est possible d’en sélectionner une. Vous pouvez aussi activer/
désactiver l’affichage des sous-titres.
1. Appuyez sur la touche SUBTITLE en cours de lecture ou en mode
d’arrêt sur image.
Le réglage actuel des sous-titres apparaît.
Exemple :
SUBTITLE CHANGE
ON/OFF 01 ENGLISH
Langue des sous-titres actuellement sélectionnée
Affichage des sous-titres actuellement sélectionné
2. Pour activer/désactiver l’affichage des sous-titres, sélectionnez
"ON" ou "OFF" en appuyant sur la touche b / a.
ON: Les sous-titres sont affichés.
OFF: Les sous-titres ne sont pas affichés.
Lorsque vous modifiez la langue d’affichage des sous-titres,
sélectionnez la langue de votre choix en appuyant sur la touche 4 / 5.
Pour effacer l’écran de réglage, appuyez de nouveau sur la touche
SUBTITLE.
Remarque :
- Lorsque l’appareil est mis sous/hors tension ou si le plateau du disque
est ouvert/fermé, la sélection de la langue des sous-titres est effacée
et le réglage d’origine est rétabli.
Sélection de la langue de la bande son des DVD
[DVD] (Fig. 23)
Sur certains DVD, la bande son est enregistrée en plusieurs langues. Si
c’est le cas, vous pouvez en sélectionner une.
Appuyez sur la touche AUDIO en cours de lecture ou en mode d’arrêt sur
image.
Appuyez plusieurs fois sur cette touche pour changer de langue.
Exemple :
- Si vous sélectionnez une bande son enregistrée en mode DTS, "dts"
apparaît sur l’affichage fluorescent.
Remarque :
- Il n’est pas possible de sélectionner la langue de la bande son sur un
disque dont la bande son n’a été enregistrée que dans une seule
langue.
- Certains disques ne permettent pas de changer la langue de la bande
son malgré que la bande son ait été enregistrée en plusieurs langues.
- Si vous mettez l’appareil hors tension ou changez de disque, la langue
de la bande son d’origine est rétablie.
Sélection de la langue de la bande son des VCD ou
CD [VCD] [CD]
Certains CD vidéo, super CD vidéo ou CD audio permettent, par exemple,
de couper la voix d’un chanteur et d’écouter uniquement l’accompagnement
musical afin de pouvoir utiliser l’enregistrement pour un karaoké, et cela
par simple sélection du canal audio.
Appuyez sur la touche AUDIO en cours de lecture ou en mode d’arrêt sur
image (pause).
Chaque fois que vous appuyez sur la touche, la sélection du canal audio
change dans l’ordre indiqué ci-dessous.
Exemple : CD vidéo ou CD audio
Ecran du téléviseur (affichage fluorescent) : Fonctionnement
STEREO (Aucun): Canaux gauche et droit
LEFT MONO (L): Canal gauche uniquement
RIGHT MONO (R): Canal droit uniquement
Exemple : Super CD vidéo (comportant deux flux audio)
Ecran du téléviseur (affichage fluorescent) : Fonctionnement
1 STEREO, 2 STEREO (Aucun) : Canaux gauche et droit
1 LEFT MONO, 2 LEFT MONO (L): Canal gauche uniquement
1 RIGHT MONO, 2 RIGHT MONO (R): Canal droit uniquement
- Le nombre de canaux susceptibles d’être sélectionnés dépend du
nombre de flux audio enregistrés sur le disque.
Remarque :
En cas de mise hors tension, de sélection d’une autre source ou de
remplacement du disque, "STEREO" ou "1 STEREO" est rétabli.
F-16[FRANÇAIS]

DIR_S002
PAGE 1/ 3
DIR_S021
DIR_S022
MUSIC021
MUSIC022
MUSIC023
MUSIC024
MUSIC025
a
MUSIC026
MUSIC027
MUSIC028
MUSIC029
MUSIC030
MUSIC031
MUSIC032
45b a ENTER/ a MENU RETURN
LECTURE DE CD MP3/WMA [DATA]
ROOT
PAGE 1/ 2
DIR_S001
DIR_S002
DIR_S003
MUSIC001
MUSIC002
MUSIC003
MUSIC004
n
MUSIC005
MUSIC006
MUSIC007
MUSIC008
MUSIC009
MUSIC010
MUSIC011
45b a ENTER/ a MENU RETURN
L’appareil peut lire des fichiers musicaux MP3 ou WMA (Windows Media
Audio) enregistrés sur des CD de données (CD-R, CD-RW, etc.).
A propos de la lecture des fichiers MP3/WMA
- Le disque doit être conforme à la norme ISO9660 Niveau 1.
-L’appareil n’est pas prêt pour les logiciels d’écriture par paquets,
Joliet, Romeo ou HFS.
- Si un CD comporte à la fois des plages audio et des fichiers MP3/
WMA, seules les plages audio sont lues.
- Cet appareil peut prendre 60 secondes ou davantage pour lire les
fichiers MP3/WMA, selon l’arborescence des fichiers.
- Pour un son de qualité élevée, il est recommandé d’enregistrer les
données à une fréquence d’échantillonnage de 44,1 kHz et un débit
binaire de 128 kbits/s ou davantage.
-C’est uniquement si un nom de fichier ou de répertoire est composé
de caractères alphanumériques minuscules et de "_" (trait de
soulignement) que les 8 premiers caractères du nom s’affichent. Les
autres caractères ne sont pas affichés normalement.
- Cet appareil peut reconnaître jusqu’à 671 fichiers (au format 8,3) ou
767 répertoires (8 caractères). Au-delà de cette limite, les fichiers ne
sont pas lus. L’appareil peut afficher jusqu’ à 8 niveaux d’arborescence
de répertoires.
- Il est possible que certains CD MP3/WMA ne soient pas lus dans
l’ordre où ils ont été enregistrés. Une chute de niveau peut survenir
ou certains CD MP3/WMA peuvent s’avérer impossible à lire, en
fonction des conditions d’enregistrement.
- Cet appareil est prêt à reconnaître les fichiers MP3 conformes à la
norme ID tag Ver.1 et peut afficher jusqu’à 30 caractères. Seuls les
caractères alphanumériques minuscules peuvent être affichés. Selon
le logiciel d’encodage, il est possible que certains caractères ne
s’affichent pas correctement.
- Des parasites peuvent apparaître pendant, avant et après un morceau
de musique. Il est aussi possible que celui-ci ne puisse pas être lu en
raison du logiciel d’encodage utilisé pour créer le disque MP3/WMA.
Comme l’encodage est exécuté par un logiciel d’encodage sur un PC,
nous ne pouvons pas garantir son bon fonctionnement.
- Les conditions d’enregistrement peuvent empêcher la lecture de
certains CD MP3/WMA.
<MP3>
- Cet appareil peut lire les fichiers MP3 qui portent une extension
".mp3" ou ".MP3".
-Fréquence d’échantillonnage et débit binaire des fichiers MP3
- 44,1 kHz, 48 kHz, 64 kbits/s ~ 320 kbits/s (débit binaire constant
ou variable)
- Cet appareil est excessivement conforme à la norme MPEG Audio
Layer 3.
<WMA>
- Cet appareil peut lire les fichiers WMA qui portent une extension
".wma" ou ".WMA".
-Fréquence d’échantillonnage et débit binaire des fichiers WMA
- 32 kHz, 44,1 kHz, 48 kHz, 48 kbits/s ou supérieur
- Fichier WMA versions 7, 8 et 9
Il n’est pas possible de lire des fichiers WMA9 Professional, des
fichiers WMA9 Lossless ou des fichiers DRM (protection des
droits d’auteur).
- Lorsque vous créez un disque WMA, n’oubliez pas de désactiver la
fonction de protection des droits d’auteur
Lecture de CD MP3/WMA
1. Appuyez sur la touche q. Le plateau du disque s’ouvre.
2. Placez le disque dans le plateau du disque.
3. Appuyez sur la touche q.
Le plateau du disque se ferme. "MP3" ou "WMA" s’affiche, puis
"ROOT" apparaît sur l’affichage fluorescent.
La liste des fichiers musicaux/répertoires contenus dans le premier
répertoire s’affiche sur l’écran du téléviseur.
Exemple :
Sous-répertoire
Nom de répertoire
Fichier Fichier
4. Sélectionnez le fichier ou le répertoire souhaité en appuyant sur les
touches 4/5/b/a.
- Chaque fois que vous appuyez sur une touche, le cadre de
sélection se déplace pour sélectionner un fichier ou un sousrépertoire du répertoire.
- Lorsque vous sélectionnez un fichier dans le répertoire ou le
sous-répertoire, sélectionnez le sous-répertoire de votre choix,
puis appuyez sur la touche ENTER pour afficher son contenu.
- Pour revenir à l’écran du répertoire précédent, appuyez sur la
touche RETURN.
- Pour revenir à la liste des fichiers/répertoires du premier répertoire,
appuyez sur la touche MENU.
5. Appuyez sur la touche ENTER ou sur la touche a (Lecture).
Le fichier sélectionné ou l’ensemble des fichiers du répertoire
sélectionné sont lus, puis les fichiers musicaux suivants sont lus dans
l’ordre.
- "MP3" ou "WMA" apparaît sur l’affichage fluorescent.
-" a " apparaît et le nom du fichier en cours de lecture s’affiche en
surbrillance sur l’écran du téléviseur.
Exemple :
Sous-répertoire
Nom de répertoire
Numéro de la page en cours
Nombre total de pages
Numéro de la page en cours
Nombre total de pages
F-17 [FRANÇAIS]
Fichier
Fichier
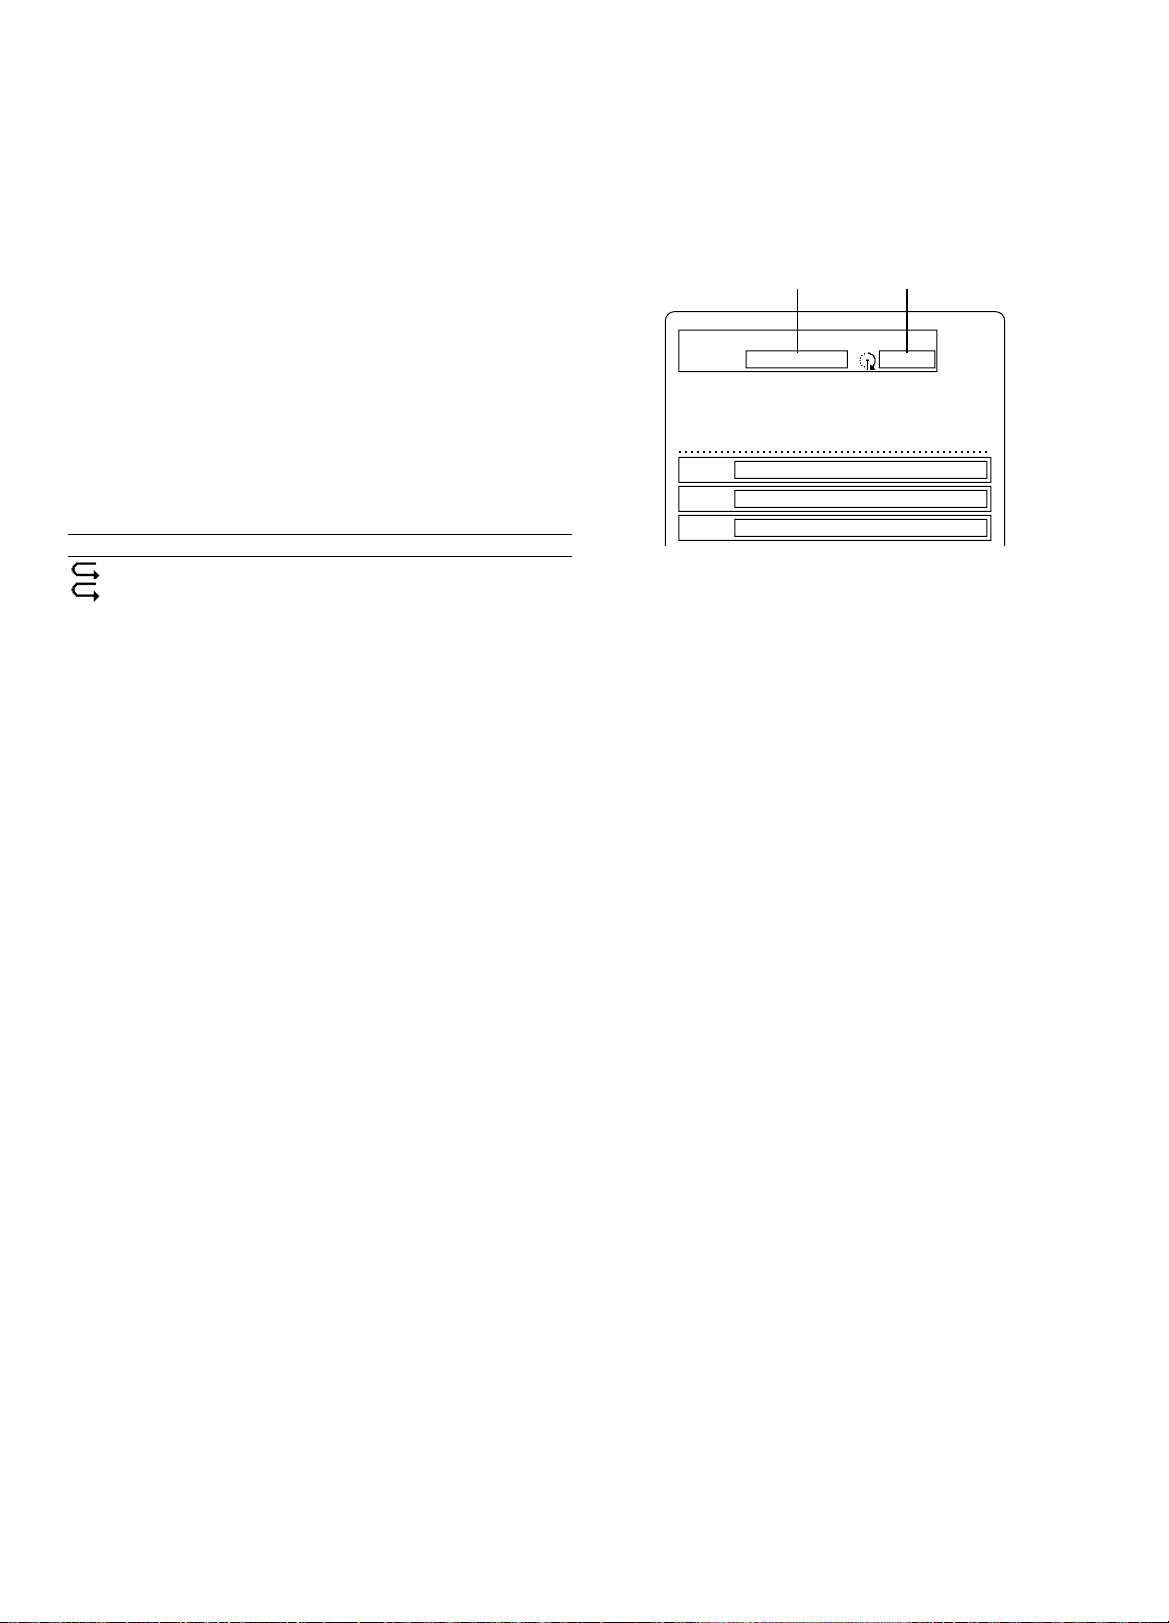
Arrêt de la lecture
MP3
FILE MUSIC005
a
03 : 33
TAG INFORMATION
TITLE
ARTIST
ALBUM
True Romance
Club Lyrico
25th Anniversary Super Best
Appuyez sur la touche n.
Pause
Appuyez sur la touche k en cours de lecture.
Pour revenir au mode normal de lecture, appuyez sur la touche a
(Lecture) ou k.
Saut de fichier
Appuyez sur la touche f ou e.
Remarque :
- Si vous appuyez sur la touche f pendant la lecture d’un fichier, la
lecture commence à partir du début du fichier.
- La lecture avant rapide et la lecture arrière rapide ne sont pas
disponibles.
- Le saut n’est possible qu’au sein d’un même répertoire.
Lecture répétée
Sélectionnez un mode de répétition en appuyant sur la touche REPEAT
en cours de lecture.
Chaque fois que vous appuyez sur cette touche, vous changez de mode
de répétition dans l’ordre indiqué ci-dessous.
Ecran du téléviseur (affichage fluorescent) : Fonctionnement
FILE (REPEAT 1): Répétition du fichier en cours de lecture
DIRECTORY (REPEAT ALL): Répétition de tous les fichiers du
répertoire en cours de lecture
OFF (Aucun) : Mode normal de lecture
Pour revenir au mode normal de lecture, sélectionnez "OFF" en appuyant
sur la touche REPEAT.
Remarque :
Si vous appuyez sur la touche CLEAR en cours de lecture répétée, cette
dernière est annulée et le mode normal de lecture est rétabli.
Affichage des informations sur le fichier
Si un fichier contient des informations musicales, il est possible de les
afficher (nom de fichier, informations d’identification, etc.).
Appuyez sur la touche ON SCREEN en cours de lecture ou en mode
pause.
Le nom de fichier, le temps de lecture écoulé et les informations
d’identification (TITLE/ARTIST/ALBUM) s’affichent sur l’écran du
téléviseur.
Exemple :
Temps de lecture écouléNom de fichier
Pour effacer l’affichage à l’écran, appuyez de nouveau sur la touche ON
SCREEN.
Remarque :
Le nom de fichier est les informations d’identification ne s’affichent
correctement que si elles sont constituées de caractères alphanumériques
minuscules. Les autres caractères sont remplacés par "?" (point
d’interrogation) à l’écran.
F-18[FRANÇAIS]

MODIFICATION DES REGLAGES INITIAUX
[DVD]
Les informations sur le disque sont prioritaires dans différentes
configurations.
Préparatifs :
Sélectionnez "DVD/CD" en appuyant sur la touche FUNCTION. Si un
disque est en cours de lecture, procédez de la manière suivante après avoir
arrêté complètement la lecture en appuyant deux fois sur la touche
Configuration de la langue
Sélectionnez la langue à appliquer à l’affichage à l’écran ainsi qu’aux
menus relatifs au son, au sous-titre et au DVD.
1. Appuyez sur la touche SETUP en mode d’arrêt. L’écran "SETUP
MENU" apparaît.
SETUP MENU
a
LANGUAGE DISPLAY SPEAKER PARENTAL
5
OSD :
AUDIO :
SUB TITLE :
DVD MENU :
SELECT : 4 5 b a
SAVE&QUIT : SETUP
2. Sélectionnez "LANGUAGE" en appuyant sur la touche b / a. Les
sous-menus de sélection de la langue s’affichent.
3. Sélectionnez l’option que vous souhaitez modifier en appuyant sur la
touche 4 / 5.
Exemple : Pour sélectionner "SUB TITLE"
SETUP MENU
ENGLISH
DISC
DISC
DISC
n.
5. Appuyez sur la touche SETUP. L’écran "SETUP MENU" disparaît.
Remarque :
Si la langue sélectionné n’est pas enregistrée sur le disque, elle est
remplacée par une autre langue qui figure sur le disque.
Remarque :
- Dans ce mode d’emploi, la langue d’affichage à l’écran est
l’anglais. Si vous avez choisi une autre langue, suivez les
indications affichées dans cette langue.
- Dans un souci d’amélioration, les affichages à l’écran peuvent
être modifiés sans avis préalable.
Sélection d’autres langues
Lorsque vous sélectionnez une langue qui ne figure pas dans le menu,
saisissez le code de langue à quatre chiffres correspondant.
1. Sélectionnez "OTHERS" en exécutant l’étape 4 ci-dessus.
Le champ du code de langue apparaît.
2. A l’aide des touches numériques, saisissez le code de langue
correspondant.
Lorsque vous saisissez un code de langue, reportez-vous à la LISTE
DES CODES DE LANGUE (voir page 23). Pour corriger l’entrée,
appuyez sur la touche CLEAR et saisissez de nouveau le code de
langue.
3. Appuyez sur la touche ENTER. La langue saisie est sélectionnée.
4. Appuyez sur la touche SETUP. L’écran "SETUP MENU" disparaît.
LANGUAGE DISPLAY SPEAKER PARENTAL
5
OSD :
AUDIO :
4
SUB TITLE :
5
DVD MENU :
4.
Sélectionnez la langue de votre choix en appuyant sur la touche
ENGLISH
DISC
DISC
DISC
ab
La langue sélectionnée s’affiche. [Exemple : ENGLISH]
SETUP MENU
LANGUAGE DISPLAY SPEAKER PARENTAL
5
OSD :
AUDIO :
4
SUB TITLE :
5
DVD MENU :
ENGLISH
DISC
ENGLISH
DISC
ab
Option :
Langues sélectionnables
OSD:
ENGLISH
ITALIANO
wv
ESPAÑOL
wv
PORTUGUES
wv
FRANÇAIS
wv
wv
DEUTSCH
wv
ENGLISH ...
AUDIO/SUBTITLE/DVD MENU:
DISC
wv
wv
ITALIAN
CHINESE
ENGLISH
wv
wv
SPANISH
wv
PORTUGUESE
OTHERS
wv
wv
DISC ....
FRENCH
wv
JAPANESE
wv
- Si "DISC" est sélectionné, c’est la langue présélectionnée sur le
disque qui est utilisée. Si "OTHERS" est sélectionné, la langue
doit être sélectionnée en saisissant le code de langue
correspondant.
b / a.
wv
wv
GERMAN
wv
F-19 [FRANÇAIS]

Configuration de l’affichage
1. Appuyez sur la touche SETUP en mode d’arrêt. L’écran "SETUP
MENU" apparaît.
SETUP MENU
a
LANGUAGE DISPLAY SPEAKER PARENTAL
Remarque :
- La taille de l’écran peut varier selon les DVD.
- Si vous sélectionnez "16:9" pour éliminer les bandes noires de l’écran
en cas de lecture d’un disque grand écran, il est possible que l’image
soit légèrement déformée.
- Avec certains disques, les bandes noires demeurent affichées même
si vous sélectionnez "4:3 PS".
2. Sélectionnez "DISPLAY" en appuyant sur la touche b / a. Le sous-
menu d’affichage apparaît.
SETUP MENU
ba
LANGUAGE DISPLAY SPEAKER PARENTAL
TV TYPE :
VIDEO OUT SELECT :
NTSC DISC :
PROGRESSIVE MODE :
SCREEN SAVER :
SELECT : 4 5 b a
SAVE&QUIT : SETUP
5
4 : 3 LB
RGB
PAL60
AUTO
ON
3. Sélectionnez l’option que vous souhaitez modifier en appuyant sur la
touche 4 / 5.
Exemple : Pour sélectionner "TV TYPE"
SETUP MENU
LANGUAGE DISPLAY SPEAKER PARENTAL
4
TV TYPE :
5
VIDEO OUT SELECT :
NTSC DISC :
PROGRESSIVE MODE :
SCREEN SAVER :
SELECT : 4 5 b a
SAVE&QUIT : SETUP
5
4 : 3 LB
RGB
PAL60
AUTO
ON
ab
4. Sélectionnez le mode de votre choix en appuyant sur la touche b / a.
Exemple : Pour sélectionner "TV TYPE: 16:9"
SETUP MENU
LANGUAGE DISPLAY SPEAKER PARENTAL
4
TV TYPE :
5
VIDEO OUT SELECT :
NTSC DISC :
PROGRESSIVE MODE :
SCREEN SAVER :
SELECT : 4 5 b a
SAVE&QUIT : SETUP
5
16 : 9
RGB
PAL60
AUTO
ON
ab
5. Appuyez sur la touche SETUP.
L’écran "SETUP MENU" disparaît.
VIDEO OUT SELECT :
Sélectionnez la sortie vidéo.
RGB : Prise EURO AV CONNECTOR RGB OUT/TV (AUDIO) IN
COMPONENT : Prises COMPONENT VIDEO OUT
NTSC DISC :
Sélectionnez le format du signal de sortie vidéo souhaité pour la lecture
des disques NTSC.
VIDEO OUT SELECT: RGB
PAL60
wv
NTSC INTERLACE (Entrelacé)
VIDEO OUT SELECT: COMPONENT
PAL60
wv
NTSC INTERLACE (Entrelacé)
wv
NTSC
PROGRESSIVE (Progressif)
Remarque :
- Si votre téléviseur ne reconnaît pas le système de couleurs NTSC,
sélectionnez “PAL60”.
- Avant de sélectionner “NTSC PROGRESSIVE”, vérifiez le téléviseur
et le raccordement.
- Le téléviseur est compatible avec le système couleur NTSC et est
prêt pour le mode progressif.
- Les prises COMPONENT VIDEO OUT de l’appareil sont
raccordées aux prises COMPONENT VIDEO INPUT du téléviseur.
-Réglez le mode de sortie du signal progressif de la manière illustrée
ci-dessous après avoir sélectionné “NTSC PROGRESSIVE”.
PROGRESSIVE MODE :
AUTO
Les DVD vidéo sont normalement constitués d’une source vidéo ou
d’une source film. Dans ce mode, l’appareil identifie automatiquement
une source vidéo ou une source film et envoie les signaux vidéo
correspondants. En règle générale, sélectionnez ce mode.
VIDEO
Par source vidéo, il faut entendre les programmes TV (30 ou 60 images
par seconde, notamment les séries et les animations qui sont converties
et enregistrées sur DVD. Ce mode est sélectionné lorsque les signaux
vidéo enregistrés sont de type source vidéo.
FILM
Par source film, il faut entendre les films (24 images par seconde) qui
sont convertis et enregistrés sur DVD. Ce mode est sélectionné
lorsque les signaux vidéo enregistrés sont de type source film.
Remarque :
Si le mode "AUTO" s’accompagne de scintillement, sélectionnez le mode
"VIDEO" ou "FILM".
TV TYPE :
Réglez la taille de l’écran en fonction du téléviseur raccordé à cet appareil.
4:3 LB (Letterbox) :
Sélectionnez cette option en cas de raccordement à un téléviseur
conventionnel. En cas de lecture d’un disque grand écran, des
bandes noires apparaissent en haut et en bas de l’écran (Fig. 24).
4:3 PS (Panscan) :
Sélectionnez cette option en cas de raccordement à un téléviseur
conventionnel. En cas de lecture d’un disque grand écran, les images
sont recadrées pour remplir la totalité de l’écran du téléviseur. Les
bords gauche et droit sont coupés (Fig. 25).
16:9
Sélectionnez cette option en cas de raccordement à un téléviseur
grand écran. L’image occupe la totalité de l’écran (Fig. 26). (Il n’est
pas nécessaire de régler le téléviseur grand écran sur le mode
"FULL".)
SCREEN SAVER :
Si une même image demeure affichée sur l’écran du téléviseur pendant
une période prolongée, elle risque de l’abîmer. Pour éviter cela,
l’économiseur d’écran affiche une image vidéo animée sur l’écran du
téléviseur en cas d’arrêt ou d’arrêt sur image (pause) d’une durée égale
ou supérieure à 5 minutes.
Sélectionnez "ON" ou "OFF".
F-20[FRANÇAIS]

Configuration du son
D-RANGE CONTROL :
CENTER DELAY :
SURROUND DELAY :
ON
2 ms
5 ms
5
LANGUAGE DISPLAY SPEAKER PARENTAL
SETUP MENU
4
5
ab
D-RANGE CONTROL :
CENTER DELAY :
SURROUND DELAY :
ON
0 ms
10 ms
5
4
5
ab
LANGUAGE DISPLAY SPEAKER PARENTAL
SETUP MENU
Le son reproduit par les enceintes peut atteindre la position d’écoute à des
moments différents, selon l’emplacement des enceintes. Vous pouvez
éviter ces différences en modifiant la durée de la temporisation des
enceintes centrale et Surround.
Vous pouvez également modifier le réglage de la commande de la gamme
dynamique.
1. Appuyez sur la touche SETUP en mode d’arrêt. L’écran "SETUP
MENU" apparaît.
SETUP MENU
a
LANGUAGE DISPLAY SPEAKER PARENTAL
2. Sélectionnez "SPEAKER" en appuyant sur la touche b / a. Le sous-
menu des enceintes apparaît.
SETUP MENU
LANGUAGE DISPLAY SPEAKER PARENTAL
D-RANGE CONTROL :
CENTER DELAY :
SURROUND DELAY :
SELECT : 4 5 b a
SAVE&QUIT : SETUP
3.
Sélectionnez "D-RANGE CONTROL" en appuyant sur la touche
ba
5
SETUP MENU
0 ms
5 ms
ON
4 / 5.
6. Sélectionnez la durée de la temporisation en appliquant la valeur
appropriée à l’aide des touches b / a.
Différence entre D1 et D2 : Durée de temporisation
<
Si D1
D2 : 0 ms
=
Si D1 > D2
Environ 30 cm : 1 ms
Environ 60 cm : 2 ms
Environ 90 cm : 3 ms
Environ 120 cm : 4 ms
Environ 150 cm : 5 ms
Enceinte centrale
Enceinte avant droiteEnceinte avant gauche
D2
D1 D1
D3 D3
Enceinte
Surround
gauche
Exemple : Pour sélectionner "2 ms"
Enceinte
Surround
droite
LANGUAGE DISPLAY SPEAKER PARENTAL
4
D-RANGE CONTROL :
5
CENTER DELAY :
SURROUND DELAY :
SELECT : 4 5 b a
SAVE&QUIT : SETUP
5
0 ms
5 ms
ON
ab
4. Sélectionnez "ON" ou "OFF" en appuyant sur la touche b / a.
ON: La gamme dynamique est compressée. Il est possible que ce
réglage soit sans effet sur certains disques.
OFF: Son avec gamme dynamique étendue.
Exemple : Pour sélectionner "OFF"
SETUP MENU
LANGUAGE DISPLAY SPEAKER PARENTAL
4
D-RANGE CONTROL :
5
CENTER DELAY :
SURROUND DELAY :
SELECT : 4 5 b a
SAVE&QUIT : SETUP
5
OFF
0 ms
5 ms
ab
5. Sélectionnez "CENTER DELAY" en appuyant sur la touche 4 / 5.
7.
Sélectionnez "SURROUND DELAY" en appuyant sur la touche
4 / 5.
8. Sélectionnez la durée de la temporisation en appliquant la valeur
appropriée à l’aide des touches b / a.
Différence entre D1 et D2 : Durée de temporisation
<
Si D1
D3 : 0 ms
=
Si D1 > D3
Environ 150 cm : 5 ms
Environ 300 cm : 10 ms
Environ 450 cm : 15 ms
Exemple : Pour sélectionner "10 ms"
9. Appuyez sur la touche SETUP. L’écran "SETUP MENU" disparaît.
F-21 [FRANÇAIS]

Configuration du contrôle parental
1. Appuyez sur la touche SETUP en mode d’arrêt. L’écran "SETUP
MENU" apparaît.
SETUP MENU
a
LANGUAGE DISPLAY SPEAKER PARENTAL
2. Sélectionnez "PARENTAL" en appuyant sur la touche b / a. Le
champ de saisie du mot de passe de contrôle parental apparaît.
SETUP MENU
LANGUAGE DISPLAY SPEAKER PARENTAL
ENTER PASSWORD
Enter a number in 4 digits,
then press "ENTER".
SELECT : 4 5 b a
SAVE&QUIT : SETUP
3. Sélectionnez le champ de saisie du mot de passe en appuyant sur la
touche 4 / 5.
SETUP MENU
b
5
LANGUAGE DISPLAY SPEAKER PARENTAL
ENTER PASSWORD
Enter a number in 4 digits,
then press "ENTER".
5
4. A l’aide des touches numériques, saisissez un mot de passe à
4 chiffres.
" " s’affiche en lieu et place du nombre saisi.
En cas d’erreur, appuyez sur la touche CLEAR et réintroduisez le mot
de passe.
5. Appuyez sur la touche ENTER.
Si le mot de passe est enregistré pour la première fois
Le message "To confirm, enter password again, then press
"ENTER"." s’affiche. Il vous demande d’entrer de nouveau le mot
de passe pour le confirmer, puis d’appuyer sur la touche ENTER.
Si le mot de passe est déjà enregistré
Le sous-menu illustré à l’étape 7 s’affiche. Passez à l’étape 8.
6. A l’aide des touches numériques, saisissez le même mot de passe.
7. Appuyez sur la touche ENTER. Le sous-menu du contrôle parental
s’affiche et "PARENTAL LEVEL" est sélectionné.
F-22[FRANÇAIS]

LISTE DES CODES DE LANGUE
Code Abréviation de
la langue
6565 aa
6566 ab
6570 af
6577 am
6582 ar
6583 as
6589 ay
6590 az
6665 ba
6669 be
6671 bg
6672 bh
6673 bi
6678 bn
6679 bo
6682 br
6765 ca
6779 co
6783 cs
6789 cy
6865 da
6869 de
6890 dz
6976 el
6978 en
6979 eo
6983 es
6984 et
6985 eu
7065 fa
7073 fi
7074 fj
7079 fo
7082 fr
7089 fy
7165 ga
7168 gd
7176 gl
7178 gn
7185 gu
7265 ha
7273 hi
7282 hr
7285 hu
7289 hy
7365 ia
Langue
Afar
Abkhaze
Afrikaans
Amharique
Arabe
Assamais
Aymara
Azerbaïdjanais
Bachkir
Biélorusse
Bulgare
Bihari
Bislama
Bengali; Bangla
Tibétain
Breton
Catalan
Corse
Tchèque
Gallois
Danois
Allemand
Bhoutan
Grec
Anglais
Esperanto
Espagnol
Estonien
Basque
Perse
Finnois
Fidji
Faerce
Français
Frison
Irlandais
Ecossais gaélique
Galicien
Guarani
Gujarati
Hausa
Hindi
Croate
Hongrois
Arménien
Interlingua
Code Abréviation de
la langue
7369 ie
7375 ik
7378 in
7383 is
7384 it
7387 iw
7465 ja
7473 ji
7487 jw
7565 ka
7575 kk
7576 kl
7577 km
7578 kn
7579 ko
7583 ks
7585 ku
7589 ky
7665 la
7678 ln
7679 lo
7684 lt
7686 lv
7771 mg
7773 mi
7775 mk
7776 ml
7778 mn
7779 mo
7782 mr
7783 ms
7784 mt
7789 my
7865 na
7869 ne
7876 nl
7879 no
7967 oc
7977 om
7982 or
8065 pa
8076 pl
8083 ps
8084 pt
8185 qu
8277 rm
Langue Code Abréviation de
Interlingue
Inupiak
Indonésien
Islandais
Italien
Hébreu
Japonais
Yiddish
Javanais
Géorgien
Kazakh
Groenlandais
Cambodgien
Kannada
Coréen
Cachemirien
Kurde
Kirghiz
Latin
Lingala
Laotien
Lituanien
Latvien, Letton
Malgache
Maori
Macédonien
Malaisien
Mongolien
Moldavien
Marathi
Malais
Maltais
Birman
Nauru
Népalais
Néerlandais
Norvégien
Occitan
(Afan) Oromo
Oriya
Pendjabi
Polonais
Pashto, Pushto
Portugais
Quechua
Rhasto-Roman
la langue
8278 rn
8279 ro
8285 ru
8287 rw
8365 sa
8368 sd
8371 sg
8372 sh
8373 si
8375 sk
8376 sl
8377 sm
8378 sn
8379 so
8381 sq
8382 sr
8383 ss
8384 st
8385 su
8386 sv
8387 sw
8465 ta
8469 te
8471 tg
8472 th
8473 ti
8475 tk
8476 tl
8478 tn
8479 to
8482 tr
8483 ts
8484 tt
8487 tw
8575 uk
8582 ur
8590 uz
8673 vi
8679 vo
8779 wo
8872 xh
8979 yo
9072 zh
9085 zu
Langue
Kirundi
Roumain
Russe
Kinyarwanda
Sanskrit
Sindhi
Sangro
Serbo-Croate
Singalais
Slovaque
Slovène
Samoan
Shona
Somalien
Albanais
Serbe
Siswati
Sesotho
Soudanais
Suédois
Swahili
Tamoul
Tegoulou
Tadjik
Thaï
Tigrigna
Turcoman
Tagalog
Setswana
Tonga
Turc
Tsonga
Tatar
Twi
Ukrainien
Ourdou
Ouzbek
Vietnamien
Volapük
Wolof
Xhosa
Yoruba
Chinois
Zoulou
F-23 [FRANÇAIS]

ECOUTE DE LA RADIO
Pour mettre l’appareil sous tension et écouter la dernière station de
radio captée, appuyez sur la touche TUNER.
Syntonisation automatique/manuelle
1. Appuyez sur la touche TUNER pour sélectionner la gamme d’ondes
(FM ou AM TUNER).
2. Syntonisation automatique
Maintenez la touche "TUNE +" ou "TUNE –" enfoncée pendant au
moins 1 seconde pour syntoniser une station. L’appareil balaie la
gamme d’ondes vers le haut ou le bas et reçoit la première station qu’il
peut capter. Appuyez de nouveau sur cette touche pour continuer.
Syntonisation manuelle
Appuyez brièvement sur la touche "TUNE +" ou "TUNE –" jusqu’à ce
que la fréquence souhaitée s’affiche.
PL
RCL
ST
RSLSSW
Pour programmer des stations
Vous pouvez programmer jusqu’à 24 stations FM et 12 stations AM.
Programmation automatique (APT)
1. Appuyez sur la touche TUNER pour sélectionner la gamme d’ondes.
2. Maintenez la touche PROG enfoncée pendant au moins 3 secondes.
"PGM" clignote.
Le mode de syntonisation automatique est réglé et la programmation
automatique commence à partir du bas de la gamme d’ondes.
Lorsque 24 stations FM ou 12 stations AM ont été programmées ou
que le haut de la gamme d’ondes est atteint, la programmation
automatique s’arrête. "PGM" disparaît et vous entendez la station
mémorisée sous le numéro de présélection 1.
3. Pour programmer les stations de l’autre gamme d’ondes, répétez la
procédure ci-dessus.
Remarque :
Si APT est activé, toutes les stations de la gamme d’ondes précédemment
programmée sont effacées et remplacées par de nouvelles.
Programmation manuelle
1. Syntonisez la station à programmer.
2. Appuyez sur la touche PROG.
PL
RCL
ST
3. Lorsque "PGM" clignote, appuyez sur la touche numérique
correspondant au numéro de présélection de votre choix.
Exemple : Pour sélectionner la présélection No. 3, appuyez sur 3.
Pour sélectionner la présélection No. 12, appuyez sur 1, puis sur 2.
- Vous pouvez aussi utiliser la touche PRESET.
ST
4. Lorsque "PGM" clignote, appuyez sur la touche ENTER.
- Dans cet exemple, "FM 101.70 MHz" est programmé sous le
numéro de présélection 12.
ST
ST
5. Répétez les étapes ci-dessus pour programmer d’autres présélections.
- Lorsque vous programmez une nouvelle station, la station
précédemment enregistrée sous le numéro de présélection est effacée.
RSLSSW
PL
RCL
RSLSSW
PL
RCL
RSLSSW
PL
RCL
RSLSSW
MHz
MHz
MHz
MHz
MHz
PGM
PGM
PGM
Ecoute des stations programmées
1. Appuyez sur la touche TUNER pour sélectionner la gamme d’ondes.
2. Appuyez sur la touche numérique correspondant au numéro de la
présélection de votre choix, puis appuyez sur la touche ENTER.
- Vous pouvez aussi utiliser la touche PRESET. Appuyez brièvement
sur la touche PRESET.
Syntonisation par balayage des stations programmées
1. Appuyez sur la touche TUNER pour sélectionner la gamme d’ondes.
2. Maintenez la touche PRESET enfoncée pendant au moins 1 seconde.
Le numéro de la présélection apparaît. Chacune des stations
programmées est syntonisée pendant 5 secondes.
3. Lorsque la station souhaitée est syntonisée, appuyez de nouveau sur
la touche PRESET pour verrouiller la réception sur cette station.
- Lorsque toutes les stations programmées ont été balayées, l’appareil
se règle sur la station qui était captée au moment où vous avez
appuyé sur la touche.
- Vous pouvez également arrêter le balayage en appuyant sur la touche
n.
Pour capter des émissions FM stéréo
Chaque pression de la touche FM MODE bascule entre le son stéréo et
le son mono. Lorsque vous captez une émission FM stéréo en mode
stéréo, "ST" s’affiche automatiquement.
- Si la réception laisse à désirer, appuyez sur la touche FM MODE pour
revenir en mono ("MONO"). Vous pouvez ainsi améliorer la qualité de
la réception, mais celle-ci n’est plus en stéréo.
-Dès que vous réglez la radio sur une autre fréquence FM, le mode
mono est automatiquement désactivé. Toutefois, il demeure activé en
mode de syntonisation manuelle.
Ecoute des stations FM avec RDS
Le système RDS (Radio Data System) permet aux stations FM d’émettre
des signaux complémentaires aux signaux de programme ordinaires.
Elles peuvent ainsi diffuser leurs noms et des informations relatives à
leurs types de programmes (sports, musique, etc.).
Lorsque vous captez une station FM qui diffuse des informations de
service RDS, le mode RDS "PS" est automatiquement activé et le nom de
la station apparaît sur l’affichage.
Remarque :
- Certaines stations FM ne fournissent pas de service RDS.
- Il est possible que le service RDS ne fonctionne pas correctement si
le signal est faible.
- Le service RDS n’est pas disponible pour les émissions AM.
Sélection du mode RDS
Appuyez sur la touche RANDOM/RDS pendant l’écoute d’une station FM.
Chaque pression de la touche modifie le mode d’affichage dans l’ordre
suivant :
PS v PTY v RT v Frequency
PS (Service de programmes)
Le nom de la station est affiché. Si aucun signal PS n’est capté, "NO
PS" apparaît, puis la fréquence de la station s’affiche.
PTY (Type de programme)
Le type de programme diffusé est affiché. Si aucun signal PTY n’est
capté, "NO PTY" apparaît, puis le nom ou la fréquence de la station
s’affiche.
RT (Radio texte)
Les messages texte diffusés par la station sont affichés. Si aucun
signal RT n’est capté, "NO RT" s’affiche.
Frequency
Fréquence de la station (service non RDS)
Après quelques secondes, le mode PS est rétabli en cas de réception
d’un signal RDS.
F-24[FRANÇAIS]

Pour rechercher une station programmée à l’aide des codes PTY
Un type de programme particulier peut être recherché en spécifiant les
codes PTY.
1. Appuyez sur la touche RANDOM/RDS pendant sélectionner "PTY"
pendant l’écoute d’une station FM.
2. Dans les 2 secondes, appuyez sur la touche PTY "+" ou "–" pour
sélectionner le code PTY souhaité. Le code PTY change dans l’ordre
suivant;
NEWS : Actualités
AFFAIRS : Questions d’actualité
INFO : Informations
SPORT : Sport
EDUCATE : Education
DRAMA : Théâtre
CULTURE : Culture
SCIENCE : Sciences
VARIED : Divers
POP M : Musique pop
ROCK M : Musique rock
EASY M : Musique d’ambiance
LIGHT M : Musique classique légère
CLASSICS : Musique classique sérieuse
OTHER M : Autre musique
WEATHER : Météo
FINANCE : Finances
CHILDREN : Programmes pour enfants
SOCIAL : Problèmes sociaux
RELIGION : Religion
PHONE IN : Ligne ouverte
TRAVEL : Voyages
LEISURE : Loisirs
JAZZ : Jazz
COUNTRY : Musique country
NATION M : Musique nationale
OLDIES : Anciens succès
FOLK M : Musique folklorique
DOCUMENT : Documentaire
TEST : Test d’alarme
ALARM : Alarme
(ou dans l’ordre inverse)
3. Dans les 10 secondes, appuyez sur la touche PTY CHK.
L’appareil examine les 24 stations programmées et s’arrête sur celles
qui diffusent un programme correspondant au code PTY que vous
avez sélectionné, puis il syntonise cette station.
- Pour poursuivre la recherche, appuyez sur la touche PTY CHK
dans les 10 secondes.
- Si aucune émission n’est trouvée, l’appareil revient sur la station
d’origine.
Pour annuler la recherche, appuyez sur la touche n.
UTILISATION DE LA MINUTERIE
D’ENDORMISSEMENT
La minuterie d’endormissement éteint automatiquement l’appareil au
terme d’un laps de temps préalablement déterminé. Le volume diminue
graduellement (fondu) pendant la minute qui précède la mise hors tension
de l’appareil. Vous avez le choix entre 4 durées d’endormissement : 30,
60, 90 et 120 minutes.
Appuyez plusieurs fois sur la touche SLEEP pour sélectionner la durée
souhaitée. "SLEEP" apparaît et la durée sélectionnée clignote sur
l’affichage.
PL
RCL
RSLSSW
SLEEP
Pour vérifier la durée d’endormissement restante
Appuyez une fois sur la touche SLEEP. Quelques secondes plus tard,
l’affichage initial réapparaît.
Pour désactiver la minuterie d’endormissement qui a été activée
Appuyez sur la touche SLEEP jusqu’à ce que "SLEEPOFF" apparaisse.
La minuterie est également désactivée si vous mettez l’appareil hors
tension.
ECOUTE D’UN AUTRE APPAREIL
Ecoute du son analogique provenant d’un téléviseur raccordé à la
prise EURO AV CONNECTOR RGB OUT/TV (AUDIO) IN
1. Sélectionnez "TV" en appuyant sur la touche FUNCTION.
2. Suivez les instructions d’utilisation du téléviseur raccordé à l’appareil.
Ecoute du son analogique provenant d’un appareil externe raccordé
aux prises VIDEO 1 IN ou VIDEO 2 IN
1. Sélectionnez "VIDEO 1" ou "VIDEO 2" en appuyant sur la touche
FUNCTION.
2. Suivez les instructions d’utilisation de l’appareil raccordé.
Ecoute du son numérique provenant d’un appareil externe raccordé
à la prise DIGITAL AUDIO IN
1. Sélectionnez "V1 OPT" ou "V2 COAX" en appuyant sur la touche
FUNCTION.
2. Suivez les instructions d’utilisation de l’appareil raccordé.
Changement de mode de fonction de l’entrée audio numérique
Il est possible de sélectionner un mode pour limiter l’entrée au signal
numérique choisi en fonction de l’appareil externe raccordé à la prise
DIGITAL AUDIO IN.
1. Sélectionnez "V1 OPT" ou "V2 COAX" en appuyant sur la touche
FUNCTION.
2. Appuyez sur la touche FUNCTION de l’unité principale, maintenez-la
enfoncée et appuyez sur la touche n.
Chaque fois que vous appuyez sur la touche, la sélection change
dans l’ordre suivant :
V1 OPT
ou
V2 COAX
Remarque :
- La sélection du mode peut être opérée individuellement pour "V1
OPT" et "V2 COAX".
- Dans le cas de "V1 OPT" (ou "V2 COAX") les prises VIDEO 1 IN (ou
les prises VIDEO 2 IN) et la prise DIGITAL AUDIO IN OPTICAL
(VIDEO 1) (ou la prise DIGITAL AUDIO IN COAXIAL (VIDEO 2)) sont
toutes deux sélectionnées.
- Dans le cas de "OPTICAL" (ou "COAXIAL"), seule la prise DIGITAL
AUDIO IN OPTICAL (VIDEO 1) (ou la prise DIGITAL AUDIO IN
COAXIAL (VIDEO 2)) est sélectionnée.
- Si vous regardez un signal vidéo provenant d’un appareil externe
raccordé à la prise VIDEO 1 IN “VIDEO” (ou VIDEO 2 IN “VIDEO”),
utilisez la prise VIDEO OUT ou EURO AV CONNECTOR RGB OUT/
TV (AUDIO) IN.
wv
OPTICAL
wv
COAXIAL
Après quelques secondes, l’affichage initial réapparaît et sa luminosité
diminue.
F-25 [FRANÇAIS]

UTILISATION DU TELEVISEUR A L’AIDE DE
LA TELECOMMANDE DE CET APPAREIL
Il est possible d’utiliser votre téléviseur à partir de la télécommande de cet
appareil en saisissant le code du fabricant du téléviseur.
Si vous ne disposez pas du code du fabricant, cela n’est pas possible.
Toutefois, même si vous disposez du code, la commande à distance de
certains modèles peut s’avérer impossible.
Pour définir le code de commande à distance du téléviseur
Pour saisir le code de commande à distance de la marque de votre
téléviseur, procédez de la manière suivante.
1. Dans le tableau ci-dessous, recherchez le code correspondant à la
marque de votre téléviseur.
Marques de Code
téléviseurs
Blaupunkt 071
Grundig 071, 072, 076, 105, 106, 146, 171
Hitachi 006, 007, 028, 047, 058, 064, 075, 077, 078, 079,
080, 082, 124, 126, 127, 134, 145, 159
ITT 028, 059, 083, 107, 128, 138, 162, 168
JVC 019, 023, 024, 025, 042, 058, 060, 065, 073, 136
LG 006, 063, 074, 075, 112, 121, 134, 145, 150, 151,
161, 171
Loewe 029, 074, 084
Mitsui 058, 059, 060, 061, 062, 063, 064, 071, 076, 086,
087, 089, 090, 091, 092, 122, 132, 134, 137, 178
Mitsubishi 006, 018, 045, 121, 161
Nokia 025, 028, 031, 059, 097, 128, 138, 139, 140, 162, 168
Panasonic 004, 016, 028, 043, 044, 098, 099
Philips 046, 078, 097, 100, 126, 163
Pioneer 052, 119, 167, 169, 179
Saba 028, 061, 126, 129, 134, 135, 141
Samsung 006, 020, 033, 034, 035, 046, 059, 063, 067, 068,
074, 112, 114, 121, 142, 144, 145, 154, 161
Sanyo 001, 002, 003, 022, 029, 058, 059, 118, 125, 131,
172, 173
Sharp 005, 017, 051, 058, 089, 130
Sony 015, 050, 103, 117
Telefunken 049, 145, 155, 156, 160
Thomson 026, 061, 070, 110, 126, 129, 135, 141, 156, 157
Toshiba 008, 048, 058, 062, 072, 103, 104, 118, 123, 158, 167
NETTOYAGE DE L’APPAREIL
Nettoyez l’extérieur de l’appareil avec un chiffon doux et propre imbibé
d’eau tiède. N’utilisez pas de benzène, de diluant ou d’alcool, car ceux-ci
pourraient altérer la finition des surfaces.
2. Tout en maintenant la touche TV POWER enfoncée, saisissez le code
à 3 chiffres à l’aide des touches numériques, puis appuyez sur
ENTER.
3. Relâchez la touche TV POWER.
La télécommande est maintenant prête à piloter votre téléviseur.
Pour utiliser la télécommande pour le téléviseur
Appuyez sur la touche de fonction souhaitée (TV POWER, – TV CH +, TV/
VIDEO, – TV VOL +).
- Lorsque vous utilisez la télécommande, dirigez-la vers le téléviseur.
Remarque :
- Certains modèles de téléviseurs ne peuvent pas être pilotés à l’aide
de cette télécommande. Si c’est le cas, utilisez la télécommande
fournie avec le téléviseur.
REMARQUE IMPORTANTE :
Si vous remplacez les piles de la télécommande, vous devez saisir
de nouveau le code du téléviseur.
Notez le numéro de code afin de pouvoir le consulter ultérieurement.
Téléviseur :
F-26[FRANÇAIS]

GUIDE DE DEPANNAGE
Généralités (alimentation)
SYMPTOME
CAUSE POSSIBLE
REMEDE
L’appareil s’éteint immédiatement après sa mise sous tension.
Le circuit de protection intervient pour couper l’alimentation, car
l’appareil est mis sous tension alors que les cordons des enceintes
sont court-circuités.
Vérifiez si les cordons de toutes les enceintes sont correctement
raccordés.
L’appareil a subi un choc électrique externe important provoqué par
la foudre, une charge d’électricité statique élevée, etc.
Mettez l’appareil hors tension, débranchez le câble d’alimentation,
puis rebranchez-le environ 30 secondes plus tard et remettez
l’appareil sous tension.
L’appareil ne fonctionne pas correctement.
Le micro-ordinateur interne est bloqué en raison d’un choc électrique
externe (provoqué par la foudre ou un excès d’électricité statique) ou
la tension d’alimentation est insuffisante.
Débranchez le cordon d’alimentation de la prise secteur, puis
rebranchez-le environ 5 secondes plus tard.
Vidéo
SYMPTOME
CAUSE POSSIBLE
REMEDE
Absence d’image (ou taille d’écran inhabituelle)
Le téléviseur ne reçoit aucun signal vidéo de l’appareil.
Sélectionnez la fonction d’entrée correcte sur le téléviseur afin
qu’il puisse recevoir les signaux vidéo provenant de l’appareil.
La fonction n’est pas correctement sélectionnée.
Sélectionnez la fonction correcte.
Le réglage de la taille de l’écran du téléviseur n’est pas correct.
Réglez correctement la taille de l’écran en fonction du téléviseur
raccordé à cet appareil.
L’image provenant de la source d’entrée externe n’est pas affichée.
Le téléviseur (moniteur) n’est pas raccordé à la borne de sortie vidéo
de l’appareil.
Raccordez le téléviseur (moniteur) à la borne de sortie vidéo de
l’appareil.
Audio
SYMPTOME
CAUSE POSSIBLE
REMEDE
Aucun son
Le volume est réglé au minimum.
Réglez le volume.
La source n’est pas correctement sé glez le volume.
F-27 [FRANÇAIS]

Lecture des disques
SYMPTOME
CAUSE POSSIBLE
REMEDE
La lecture ne démarre pas (ou s’arrête immédiatement).
Vous avez chargé un disque qui ne peut pas être lu. ("NO PLAY"
s’affiche.)
Vérifiez le système du téléviseur ainsi que les types de disques
qui peuvent être lus.
L’écran du menu de configuration s’affiche.
Appuyez sur la touche SETUP pour effacer le menu de
configuration.
Le contrôle parental est activé.
Annulez le contrôle parental ou modifiez son réglage.
Vous avez chargé un disque qui possède un code de région erroné.
("NO PLAY" s’affiche.)
Chargez un disque qui porte le code de région "2" ou "ALL".
Les touches ne réagissent pas.
Certaines fonctions ne sont pas disponibles sur tous les disques.
(" " apparaît à l’écran.)
Il ne s’agit pas d’une défaillance.
Il n’est pas possible de sélectionner des sous-titres ou une bande son
dans une autre langue.
Il n ‘est pas possible de sélectionner une autre langue sur un disque
qui n’en contient qu’une seule.
Il ne s’agit pas d’une défaillance.
Il n’est pas possible de lire un disque MP3 ou WMA.
Le disque n’est pas conforme à ce format, il est en mauvais état ou a
été mal enregistré.
Remplacez le disque par un autre conforme à ce format, en bon
état ou dont l’enregistrement a été correctement effectué.
L’appareil tarde à commencer la lecture des disques d’un disque MP3 ou
WMA.
Cela s’explique par l’arborescence des fichiers.
Il ne s’agit pas d’une défaillance.
L’image d’un disque DVD est brouillée ou foncée.
Cet appareil est prévu pour protéger contre la copie des disques dotés
d’un système de protection contre la copie analogique. En cas de
lecture d’un disque contenant un signal de protection contre la copie,
des bandes peuvent apparaître sur l’image, selon le téléviseur utilisé.
Il ne s’agit pas d’une défaillance.
Réception des émissions FM/AM
SYMPTOME
CAUSE POSSIBLE
REMEDE
De nombreux parasites empêchent d’entendre clairement les émissions
de radio.
Cela est dû à l’alimentation électrique.
Branchez le cordon d’alimentation sur une autre prise.
Inversez la polarité de la fiche du cordon d’alimentation.
Les parasites proviennent d’un appareil électrique,notamment un
moteur, un éclairage fluorescent ou un téléviseur.
Eloignez l’appareil de la source des parasites.
Eteignez le téléviseur.
Réglez la position et l’orientation de l’antenne.
Il n’est pas possible de sélectionner les stations programmées.
Les données de programmation sont perdues.
Recommencez la programmation des stations.
Télécommande
SYMPTOME
CAUSE POSSIBLE
REMEDE
La télécommande ne fonctionne pas correctement.
La télécommande n’est pas assez proche de la fenêtre de détection
des signaux de commande à distance.
Utilisez la télécommande dans un rayon de 6 mètres environ de
cette fenêtre.
Les piles de la télécommande sont à plat.
Remplacez les piles.
Remarque :
En cas de problème d’affichage ou de fonctionnement, mettez l’appareil
hors tension à l’aide de la touche z /ON, puis remettez-le sous tension ou
mettez-le hors tension, débranchez la fiche du cordon d’alimentation, puis
rebranchez-la quelques secondes plus tard.
F-28[FRANÇAIS]

[NEDERLANDS]
AANDACHTSPUNTEN
- Stel het apparaat niet bloot aan opspattend of neerdruppelend water.
- Plaats geen objecten die gevuld zijn met een vloeistof, zoals vazen,
op het apparaat.
- Gebruik het apparaat niet op plaatsen waar extreme temperaturen
kunnen voorkomen (beneden 5°C of boven 35°C) of in direct zonlicht.
- Omdat de DVD-speler uiterst zachte passages kan weergeven en
een groot dynamisch bereik heeft, wordt het volume van de versterker
gemakkelijk te hoog ingesteld. Daardoor kan het signaal vanaf de
versterker zo groot worden, dat de luidsprekers in uw systeem
beschadigd kunnen raken.
- Door plotselinge veranderingen in de omgevingstemperatuur kan op
de lens binnenin het apparaat condens ontstaan. Neem, wanneer dat
gebeurt, de disc uit het apparaat, wacht ongeveer 2 uur en neem het
apparaat daarna opnieuw in gebruik.
- Verwijder, voordat u het apparaat gaat vervoeren, de disc uit het
apparaat en schakel de netvoeding uit. Wacht ten minste 10 seconden
en haal pas dan de stekker uit het stopcontact. Het apparaat kan
beschadigd raken wanneer het wordt vervoerd terwijl er een disc in zit.
- Plaats dit apparaat niet in een kleine ruimte, zoals in een boekenkast
of inbouwkast.
- Wij adviseren u om het hoofdtoestel (JCX-TS960), de voorluidspreker
met het netsnoer (ASX-TS960WLF) en de surroundluidspreker met
netsnoer (ASX-TS960WLR) alleen in een goed geventileerde ruimte
te gebruiken.
Plaats geen objecten bovenop het apparaat.
Zorg ervoor dat de ventilatieopeningen niet afgedekt worden.
De behuizing van het apparaat wordt warm wanneer het langdurig
wordt gebruikt; dit is geen defect.
- Het hoofdtoestel (JCX-TS960) wordt niet volledig losgekoppeld van
het stroomnet als de knop z/ON in de stand z wordt gezet.
- De surroundluidspreker met netsnoer (ASX-TS960WLR) is niet
losgekoppeld van het stroomnet zolang de stekker niet uit het
stopcontact wordt gehaald.
Het systeem kan zowel via de hoofdunit als met
behulp van de afstandsbediening worden bediend.
Voor de overzichtelijkheid gaan we er in deze
handleiding van uit dat u het systeem met de
afstandsbediening bedient.
Opmerking:
Deze handleiding is geschreven voordat het uiteindelijke product in
productie werd genomen.
Wanneer de specificatie van een onderdeel gewijzigd moet worden om
het bedieningsgemak of andere functies te verbeteren, bevat de
productspecificatie zelf de meest actuele informatie. In dergelijke
gevallen kan het voorkomen dat niet alle in de handleiding beschreven
functies overeenkomen met die van het uiteindelijke product.
Het uiterlijk en de verpakking van het product en de typeaanduiding en
afbeeldingen kunnen daarom afwijken van de handleiding.
Waarschuwing voor de zender
Belangrijke informatie:
1. Volg de technische instructies en de gebruiksmogelijkheden die
vermeld zijn in de relevante documenten en volg de beschreven
afregelmethodes en het gebruik van de schakelaars.
2. Wijzig de frequentie van de zender niet en verhoog het vermogen van
de zender niet (overbelast een draadloze eindversterker niet). Plaats
geen externe antenne of gebruik geen aangepaste antenne.
3. Zorg ervoor dat het apparaat nooit storingen veroorzaakt in wettelijk
toegelaten draadloze communicatiediensten. Als er zich een storing
voordoet, dient u onmiddellijk het gebruik van het apparaat te stoppen,
de storing te verhelpen en dergelijke storingen in de toekomst te
vermijden.
4. Als draadloze uitrusting met microvermogen wordt gebruikt, dient u
storingen te vermijden in draadloze communicatiediensten of emissieve
storing afkomstig van industriële, wetenschappelijke en medische
apparatuur.
5. Gebruik het apparaat niet in een vliegtuig of in de omgeving van een
luchthaven.
Waarschuwing voor gebruik van de voorluidspreker met ingebouwde
zender
- Hou de voorluidspreker op een afstand van minstens 22 cm van een
pacemaker.
De radiogolven kunnen de werking van de pacemaker verstoren.
- Gebruik de voorluidspreker niet in medische instellingen, ziekenhuizen
of nabij medische apparatuur.
Door de radiogolven kan apparatuur in de omgeving verkeerd werken
of defect raken.
- Als andere toestellen of medische apparatuur niet goed werkt of
defect raakt ten gevolge van de radiogolven, dient u het gebruik van
de draadloze voorluidspreker stop te zetten.
Door de radiogolven kan apparatuur in de omgeving verkeerd werken
of defect raken.
Interne radiostations (licentie verplicht) en speciale radiostations met
laag vermogen (geen licentie verplicht) voor de identificatie van
beweegbare voorwerpen op productielijnen en amateurradiostations
(licentie verplicht), alsook industriële, wetenschappelijke en medische
apparatuur zoals microgolfovens, gebruiken de frequentieband die
door dit apparaat wordt gebruikt.
1. Voor u dit apparaat gebruikt, dient u na te gaan of er in de omgeving
geen interne radiostations, speciale radiostations met laag
vermogen voor de identificatie van bewegende voorwerpen of
amateurradiostations worden gebruikt.
2. Als dit apparaat radiostoringen veroorzaakt in interne radiostations
voor de identificatie van beweegbare lichamen, dient u onmiddellijk
de frequentieband te wijzigen die door dit apparaat wordt gebruikt
of de uitstraling van elektrische golven stop te zetten, waarna u
contact opneemt met uw verkoper of de onderhoudsdienst van ons
bedrijf om de storing te verhelpen (bijvoorbeeld installatie van een
scheiding).
3. Als het toestel radiostoringen veroorzaakt in speciale radiostations
van laag vermogen voor de identificatie van beweegbare lichamen
of een amateurradiostation, dient u contact op te nemen met uw
verkoper of de onderhoudsdienst van ons bedrijf.
[NEDERLANDS]NL-1


BEDIENINGSELEMENTEN
AFSTANDSBEDIENING
Frontpaneel (afb. 1a)
1. Aan/uit-toets (z/ON)
2. Uitwerptoets (q)
3. Display
4. Weergavetoets (a)
5. Sensor voor de afstandsbediening (IR)
6. Volumeregeling (VOLUME)
7. Stoptoets (n)
8. Volgende/overslaan/voorkeuzezendertoets (e)
9. Vorige/overslaan/voorkeuzezendertoets (f)
10. Surroundtoets (SURROUND)
11. Functietoets (FUNCTIE)
12. Lade
13. Koptelefoonaansluiting (PHONES)
Display (afb. 1b)
1. Surround-indicatoren
(HALL, STADIUM, STUDIO, THEATER, CLUB)
2. Progressive-indicator (PROGRESSIVE)
3. Nachtstandindicator (NIGHT)
4. Discindicator (VCD/CD/DVD)
5. Virtuele koptelefoonindicator (VIRTUAL)
6. Dolby Pro Logic/Pro Logic II-indicator (s PL II)
7. Dolby Digital-indicator (s D)
8. DTS-indicator (dts)
9. PCM-indicator (PCM)
10. 96kHz-indicator (96K)
11. Weergave-/pauze-indicatoren (a, k)
12. Herhaalindicatoren (REPEAT, 1, ALL, A-B)
13. Willekeurige weergave-indicator (RDM)
14. Programma-indicator (PGM)
15. RDS-indicator (RDS)
16. WMA-indicator (WMA)
17. MP3-indicator (MP3)
18. Slaapindicator (SLEEP)
19. Melding- of cijferindicatoren
(titel, hoofdstuk, track, weergavetijd of andere informatie)
20. Titel/trackindicator (T)
21. Hoofdstukindicator (C)
22. Ingang-/uitgangskanaalindicatoren (L, C, R, SW, LS, RS)
23. Audio-uitgangsindicatoren (L, R)
24. FM-mono-indicator (MONO)
25. FM-stereo-indicator (ST)
Achterpaneel (afb. 1c)
1. AM-lusantenne (AM ANT.)
2. Uitgangen componentvideo (COMPONENT VIDEO OUT)
3. Digitale audio-ingangen (DIGITAL AUDIO IN)
4. Euro AV-aansluiting (EURO AV CONNECTOR RGB OUT/TV (AUDIO)
IN)
5. Netsnoer
6. Aansluiting systeembediening (SYSTEM)
7. Audio-/video-ingangen (VIDEO 1 IN, VIDEO 2 IN)
8. S-Video-uitgang (S-VIDEO OUT)
9. Video-uitgang (VIDEO OUT)
10. FM-antenneaansluiting (FM ANT. 75 Ω)
Bedieningselementen (afb. 2)
1. Toets Terug (RETURN)
2. Uitwerptoets (q)
3. Toets Zoeken (SEARCH MODE)
4. Toets Picturemodus (PICTURE MODE)
5. Toets Ondertiteling (SUBTITLE)
6. Toets Audio (AUDIO)
7. Toets Menu (MENU)
8. Toets Enter (ENTER)
9. Toets On-screen-display (ON SCREEN)
10. Stoptoets (n)
11. Toetsen Volgende/vorige/overslaan/programmatype
(f, e, PTY CHK)
12. Herhaaltoets (REPEAT)
13. Herhaaltoets A-B (A-B REP)
14. Toets Programma (PROG)
15. Toets Wissen (CLEAR)
16. Toets Willekeurig weergeven/radiodatasysteem (RANDOM/RDS)
17. Toets FM-modus (FM MODE)
18. Toets Trimmen (TRIM)
19. Toets tunerfunctie (TUNER)
20. Toets voor afstemmen op voorkeuzezenders (PRESET)
21. Lagetonentoets (BASS)
22. Volumeregelingstoetsen (– VOL +)
23. Toets Dempen (MUTE)
24. Geluidvoorkeuzetoets (SOUND)
25. Testtoontoets (TEST)
26. Nachtstandtoets (NIGHT)
27. Surroundtoets (SURROUND)
28. Functietoets (FUNCTION)
29. TV-bedieningselementen
Opmerking:
Als u de voorkeuzecode instelt overeenkomstig uw tv, kunt u de tv
bedienen met deze knoppen (zie pagina 26).
TV POWER: Aan/uit-toets tv
– TV CH +: tv-kanaaltoetsen
TV/VIDEO: tv/video-keuzetoets
– TV VOL +: tv-volumetoetsen
30. Cijfertoetsen (1 - 9, 0)
31. Toetsen Langzaam vooruitspoelen/Langzaam achteruitspoelen
( , )
32. Keuzetoetsen Snel vooruitspoelen/Snel achteruitspoelen/
Programmatype (d, c, – PTY +)
33. Toets Pauze/Stap (k)
34. Weergavetoets (a)
35. Toets Top menu (TOP MENU)
36. Afstem-/pijltoetsen (TUNE–, TUNE+, 4, a, 5, b)
37. Insteltoets (SETUP)
38. Toets Laatste geheugen (LAST MEMORY)
39. Toets Camerastandpunt (ANGLE)
40. Herhaaltoets camerastandpunt (A. REPLAY)
41. Aan/uit-toets(z/ON)
42. Slaaptoets (SLEEP)
Batterijen plaatsen
Plaats twee “R6/AA” batterijen (niet meegeleverd) zoals aangegeven in
afb. 3.
Opmerking:
Verwijder de batterijen wanneer u de afstandsbediening gedurende een
maand of langer niet gebruikt. Als u de batterijen in het apparaat laat zitten,
kunnen ze gaan lekken en schade veroorzaken.
Bereik van de afstandsbediening (afb. 4)
[NEDERLANDS]NL-3
 Loading...