Field controls WMO-1 Manual

BLOCKED VENT SWITCH
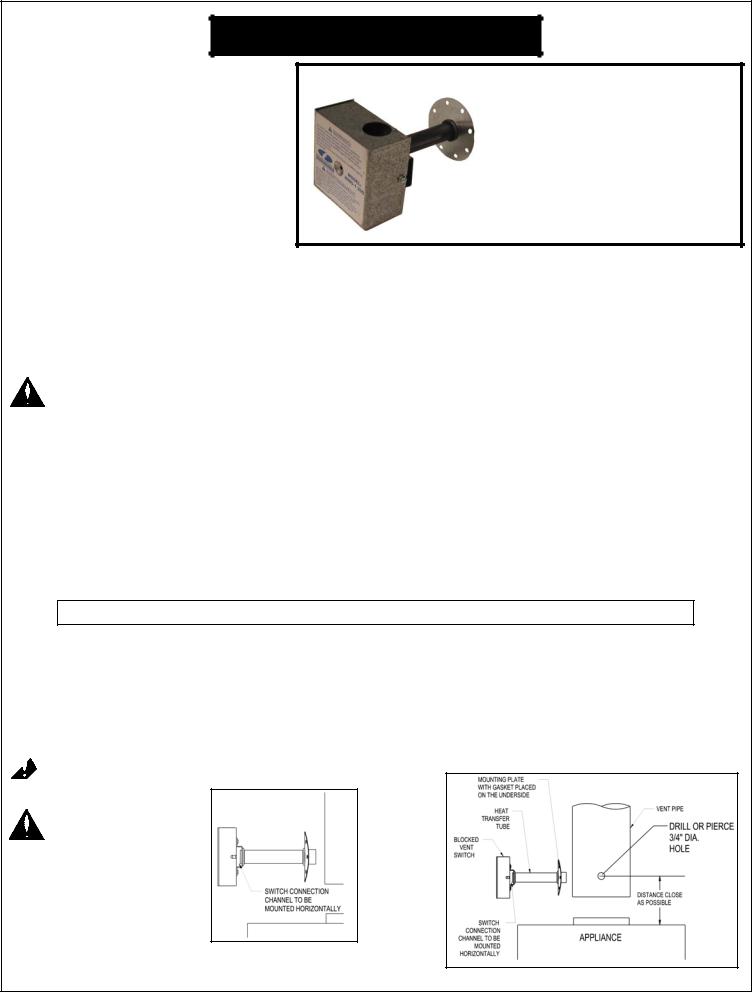
The WMO-1 Blocked Vent Switch is recommended for installation with an oil fired appliance that normally operates with its vent system under a negative pressure. This device is intended to detect a blocked vent system, responds to hot flue gases backing up through its heat transfer tube, and can be wired to shut off the oil burner. It requires manual resetting.
Model: WMO-1
ITEMS SUPPLIED IN THIS KIT:
1-Blocked vent switch assembly
1-Gasket
1-Instruction sheet
This device MUST be installed by a qualified agency* in accordance with the manufacturer’s installation instructions.
The definition of a qualified agency is: any individual, firm, corporation or company which either in person or through a representative is engaged in, and is responsible for, the installation and operation of oil appliances, who is experienced in such work, familiar with all the precautions required, and has complied with all the requirements of the authority having jurisdiction.
 WARNING: Read the installation instructions carefully and completely before proceeding with the installation.
WARNING: Do NOT reset the device or restart the appliance unless the cause has been identified and corrected by a qualified agency. Insure the switch appliance combination has been cleaned by a qualified agency before placing back into service. Annual inspection and cleaning by a qualified agency is required.
•Wiring MUST be in accordance with the current Canadian Electric Code and any other applicable federal, provincial and local code requirements.
•For installations in the USA, all wiring shall be in accordance with the National Electrical Code and applicable local codes.
•For continued safe operation, the appliance-switch combination is required to be inspected and maintained annually by a qualified agency. Failure to properly maintain the appliance-switch combination can lead to Death, Personal Injury and or Property Damage.
INSTALLATION
MOUNTING IN THE VENT PIPE
SEE THE APPLIANCE MANUFACTURER’S INSTRUCTIONS FOR THE SPECIFIC LOCATION.
IF THE APPLIANCE MANUFACTURER DOES NOT SPECIFY A LOCATION, REFER TO FIGURE 1.
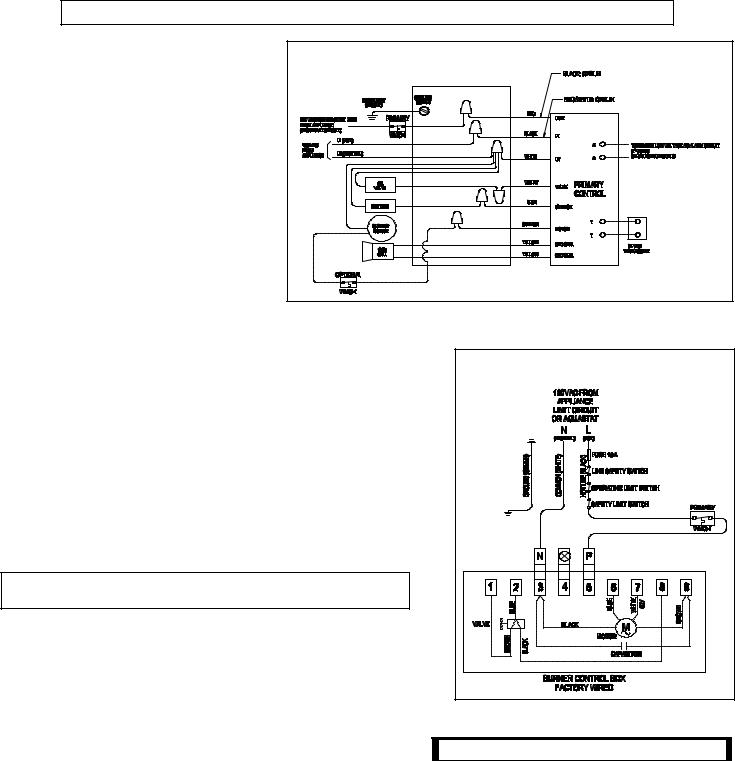
1.Drill or pierce a clean hole (about 3/4” diameter) in the vent pipe near the appliance outlet. (See Figure 1)
2.The heat transfer tube must have the fiber gasket installed against the mounting plate before attaching the unit to the vent pipe
3.Insert the heat transfer tube with gasket into the 3/4” diameter hole placed in the vent pipe during step 1.
4.Secure the assembly to the vent pipe with a minimum of 4 sheet metal screws. The channel must be mounted horizontally, unless specified differently by the appliance manufacturer. (See Figure 1)
 CAUTION: Disconnect electrical power supply to the appliance when wiring the blocked vent switch.
WARNING:
Switch connection channel must be mounted horizontally, unless specified differently by the appliance manufacturer.
Figure 1

|
WIRING INSTRUCTIONS |
|
|
|
|||
|
|
|
|
|
FOLLOW THE APPLIANCE MANUFACTURER’S WIRING DIAGRAM. |
||
|
|
IF THE APPLIANCE MANUFACTURER DOES NOT SUPPLY A WIRING DIAGRAM, REFER TO DIAGRAMS A OR B. |
|||||
5. |
Wire the blocked vent switch in |
|
|||||
|
series with the limit control circuit to |
|
|||||
|
the primary control or as an optional |
|
|||||
|
location in series with the orange |
|
|||||
|
wire from the primary control to the |
|
|||||
|
burner motor. (See Diagram A and |
|
|||||
|
B) Route all wiring with an |
|
|||||
|
acceptable |
wiring |
enclosure |
in |
|
||
|
accordance with the current CSA |
|
|||||
|
C22.1 |
Canadian |
Electric Code |
|
|||
|
Part 1 and any other applicable |
|
|||||
|
federal, provincial and local code |
|
|||||
|
requirements. For installations in the |
|
|||||
|
USA all wiring shall be in accordance |
|
|||||
|
with the National Electrical Code |
|
|||||
|
and applicable local codes. |
|
|
||||
6. |
The following are typical wiring |
Diagram A |
|||||
|
diagrams. |
Read |
and |
follow |
the |
||
|
appliance manufacturer’s instructions |
Honeywell R7184B & Carlin 60200-02 |
|||||
|
and wiring diagram. |
|
|
|
|
||
MAINTENANCE: |
|
|
|
|
|||
Note: For continued safe operation, the appliance-switch |
|
||||||
combination is required to be inspected and maintained annually by |
|||||||
a qualified agency. |
|
|
|
|
|||
7. |
Disconnect power to the appliance. |
|
|||||
8. |
Remove the two screws holding on the WMO-1 blocked vent |
||||||
|
switch assembly cover. |
|
|
|
|||
9. |
Remove the cover. |
|
|
|
|
||
10. |
Remove the two screws holding the control box to the heat |
|
|||||
|
transfer tube assembly. The control box slides, unlocking it |
|
|||||
|
from the heat transfer tube assembly. |
|
|||||
DO NOT DENT OR SCRATCH THE SURFACE OF THE THERMAL SWITCH. |
|||||||
IF THE THERMAL SWITCH IS DAMAGED, REPLACEMENT IS REQUIRED. |
|||||||
11. |
Carefully remove any buildup from the thermal switch surface. |
||||||
12. |
Clear and remove any buildup or obstruction inside the heat |
||||||
|
transfer tube. |
|
|
|
|
||
13. |
Remount, lock and refasten the control box with the two screws |
||||||
|
removed in step 10. |
|
|
|
Diagram B |
||
|
|
|
|
|
|
|
|
|
|
|
|
|
|
|
Riello |
14.Reattach the assembly cover with screws removed in step 8.
15.Re-establish power to the appliance.
|
|
|
|
|
|
|
|
|
|
|
|
|
|
|
|
120 VAC |
10 FL AMPS |
60 LR AMPS |
|
|
|
|
|
|
|
240 VAC |
5 FL AMPS |
30 LR AMPS |
|
|
|
|
|
|
 Loading...