

Page 1
702675_003
Instruction manual
Page 6
IMPORTANT:
Read all instructions before using.
Guide d’utilisation
Page 17
IMPORTANT:
Lire toutes les instructions avant de démarrer les travaux.
Manual de instrucciones
Página 28
IMPORTANTE:
Lea todas las instrucciones antes de usar.
Instruction manual
Guide d’utilisation
Manual de instrucciones
CLEANTEX
CT 26 E AC
CT 36 E AC
CT 48 E AC
Festool GmbH
Wertstraße 20
D-73240 Wendlingen
Germany
Tel.: +49 (0)7024-804-0
Fax: +49 (0)7024-804-20608
E-Mail: info@tts-festool.com
Page 2

Page 3

Page 4
1-4
1-1
1-3
1-2
1-5
1-6
1-10
1-11
1-12
1-13
1-9
1-7
1-8
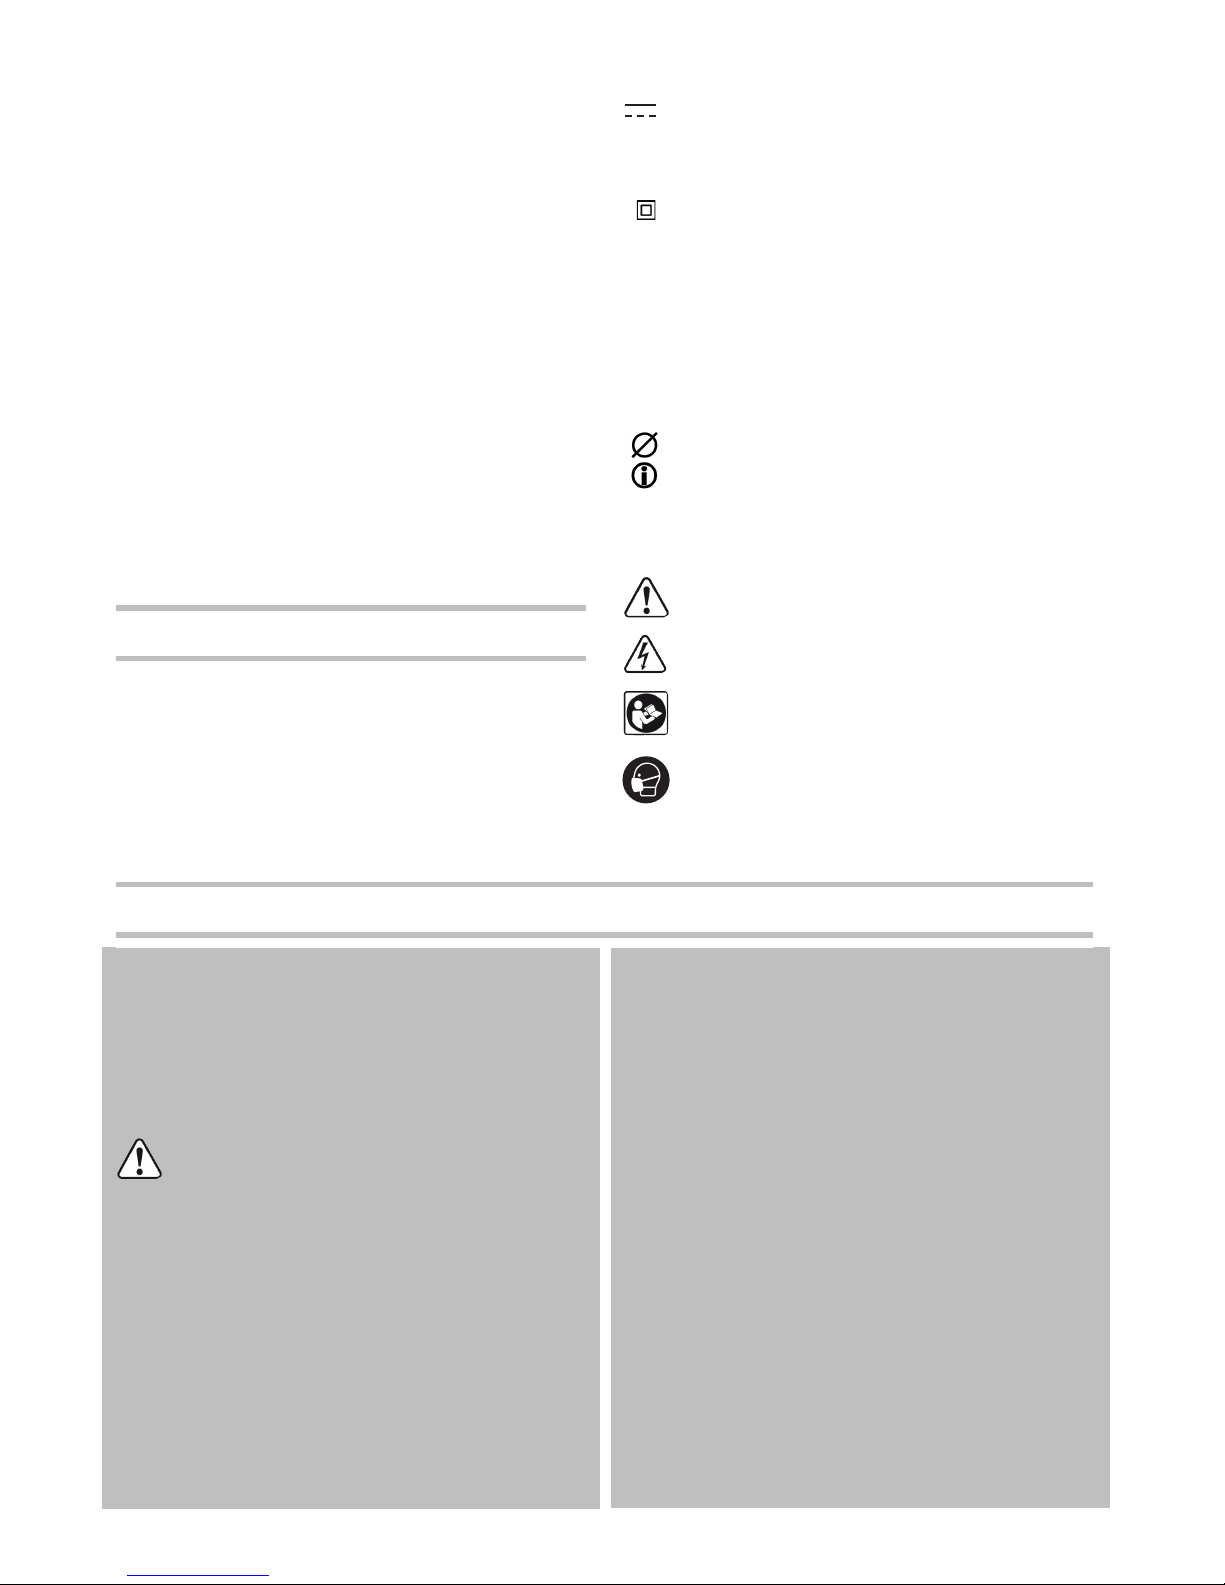
2
2-2
2-3
2-1
1
Page 5

Page 6
6
Contents
Symbols
Safety instructions
Important Safety Instructions
When using an electrical appliance, basis precautions should always be followed, including the following:
READ ALL INSTRUCTIONS
BEFORE USING THIS DUST EXTRACTOR
:
WARNING
-
To reduce the risk of fire, electric
shock, or injury
:
– Do not leave the dust extractor when plugged in.
Unplug from outlet when not in use and before
servicing.
– Use indoors only.
– Do not allow to be used as a toy. Close attention
is necessary when used by or near children.
– Use only as describes in this manual. Use only
manufacturer's recommended attachments.
– Do not use with damaged cord or plug. If the dust
extractor is not working as it should, has been
dropped, damaged, left outdoors, or dropped into
water, return it to a service center.
– Do not pull or carry by cord, use cord as a handle,
close a door on cord, or pull cord around sharp
Symbols ............................................... 6
Safety instructions............................... 6
Technical data...................................... 7
Functional description......................... 8
Intended use ........................................ 8
Operation ............................................. 9
Settings................................................ 10
Working................................................ 10
Filter..................................................... 11
After finishing work ............................. 14
Service and maintenance .................... 14
Accessories.......................................... 15
Disposal ............................................... 15
Warranty............................................... 15
Vvolts
Wwatts
Aamperes
Hz hertz
~ alternating current
d.c.
direct current
n
0
no load speed
Class II Construction
.../min
min
-1
revolutions or reciprocation per minute
hhour
min minutes
sseconds
kg kilograms
diameter
tip, hint
Pa pascal
dB decibel
Warning of general danger
Risk of electric shock
Read the Operating Instructions/Notes!
Wear a dust mask.
Page 7
7
edges or corners. Do not run dust extractor over
cord. Keep cord away from heated surfaces.
– Do not unplug by pulling on cord. To unplug,
grasp the plug, not the cord.
– Do not handle plug or dust extractor with wet
hands.
– Do not put any object into openings. Do not use
with any opening blocked; keep free of dust, lint,
hair, and anything that may reduce air flow.
– Keep hair, loose clothing, fingers, and all parts of
body away from openings and moving parts.
– Turn off all controls before unplugging.
– Use extra care when cleaning on stairs.
– Do not use to pick up flammable or combustible
liquids, such as gasoline, or use in areas where
they may be present.
– Connect to a properly grounded outlet only. See
Grounding instructions.
– Do not pick up anything that is burning or smok-
ing, such as cigarettes, matches, or hot ashes.
– Do not use without dust bag and/or filters in
place.
SAVE THESE INSTRUCTIONS
GROUNDING INSTRUCTIONS
This appliance must be grounded. If it should malfunction or breakdown, grounding provides a path
of least resistance for electric current to reduce the
risk of electric shock. This vacuum cleaner is
equipped with a cord having an equipment-grounding conductor and grounding plug. The plug must
be inserted into a appropriate outlet that is properly
installed and grounded in accordance with all local
codes and ordinances.
WARNING
- Improper connection of the
equipment grounding conductor can result
in a risk of electric shock. Check with a qual-
ified electrician or service person if you are in doubt
as to whether the outlet is properly grounded. Do
not modify the plug provided with the dust extractor
- if it will not fit the outlet, have a proper outlet installed by a qualified electrician.
Polarization Instructions
To reduce the risk of electric shock, this vacuum
cleaner has a polarized plug (one blade is wider
than the other). This plug will fit in a polarized outlet only one way. If the plug does not fit fully in the
outlet, reverse the plug. If it still does not fit, contact a qualified electrician to install the proper outlet. Do not change the plug in any way.
Health hazard by dust
WARNING!
Various dust created by power
sanding, sawing, grinding, drilling and other
construction activities contains chemicals
known (to the State of California) to cause cancer,
birth defects or other reproductive harm. Some examples of these chemicals are:
• lead from lead-based paints,
• crystalline silica from bricks and cement and
other masonry products, and
• arsenic and chromium from chemically treated
lumber.
The risk from these exposures
varies, depending on how often
you do this type of work. To reduce your exposure to these
chemicals: work in a well ven-
tilated area, and work with approved safety equipment, such as dust masks that
are specially designed to filter out microscopic particles. Wash hands after handling.
Technical data
WARNING
TO REDUCE THE RISK OF INJURY, USER MUST
READ INSTRUCTION MANUAL.
Dust extractor CT 26 E AC, CT 36 E AC, CT 48 E AC
Power consumption (dust extractor only) 2.9 - 8.3 A (350 - 1000 W)
1.)
Total connected load max. 12 A (1440 W)
Max. rating of connected Power Tool 3.7 A
2.)
Volume flow (air), turbine max. 234 m³/h (8.4 cu.ft./h)
Vacuum, turbine max. 24000 Pa
Page 8

8
Functional description
The pictures for the functional description are on a
fold-out page at the beginning of the instruction
manual. When reading of the manual you can fold
out this page for having always an overview of the
machine.
Intended use
The dust extractor is designed for use as specified
for the aspiration and evacuation of non-noxious
dusts, dirt, sand, shavings etc..
The dust extractor is designed as specified for vacuuming water.
The dust extractor is designed for household, commercial or both use.
Filter surface 6318 cm² (979.3 sq.in.)
Suction hose (diameter x length) 27 mm x 3.5 m (1.06 in. x 11.48 in.)
Protection type IP X4
Sound pressure level as per IEC 60704-2-1 71 dB(A)
Container capacity CT 26 E AC 26 l (6.9 gal.)
CT 36 E AC 36 l (9.5 gal.)
CT 48 E AC 48 l (12.7 gal.)
Dimensions L x W x H CT 26 E AC 630 x 365 x 540 mm
(24.8 in. x 14.4 in. x 21.3 in.)
CT 36 E AC 630 x 365 x 596 mm
(24.8 in. x 14.4 in. x 23.5 in.)
CT 48 E AC 740 x 406 x 1005 mm
(29.1 in. x 16.0 in. x 39.6 in.)
Weight CT 26 E AC 14.7 kg (32.4 lbs)
CT 36 E AC 15.2 kg (33.5 lbs)
CT 48 E AC 19.6 kg (43.2 lbs)
1.
) 8.3 A (1000 W) is the medium value for different operation conditions, a maximum power consumption of 10 A (1200 W) is possible.
2.
) When the suction power adjuster [1-7] is adjusted to the lowest suction power (see page 10, chapter Settings - Adjusting the suction
power) the maximal rating of a connected power tool can be 9.1 Amps.
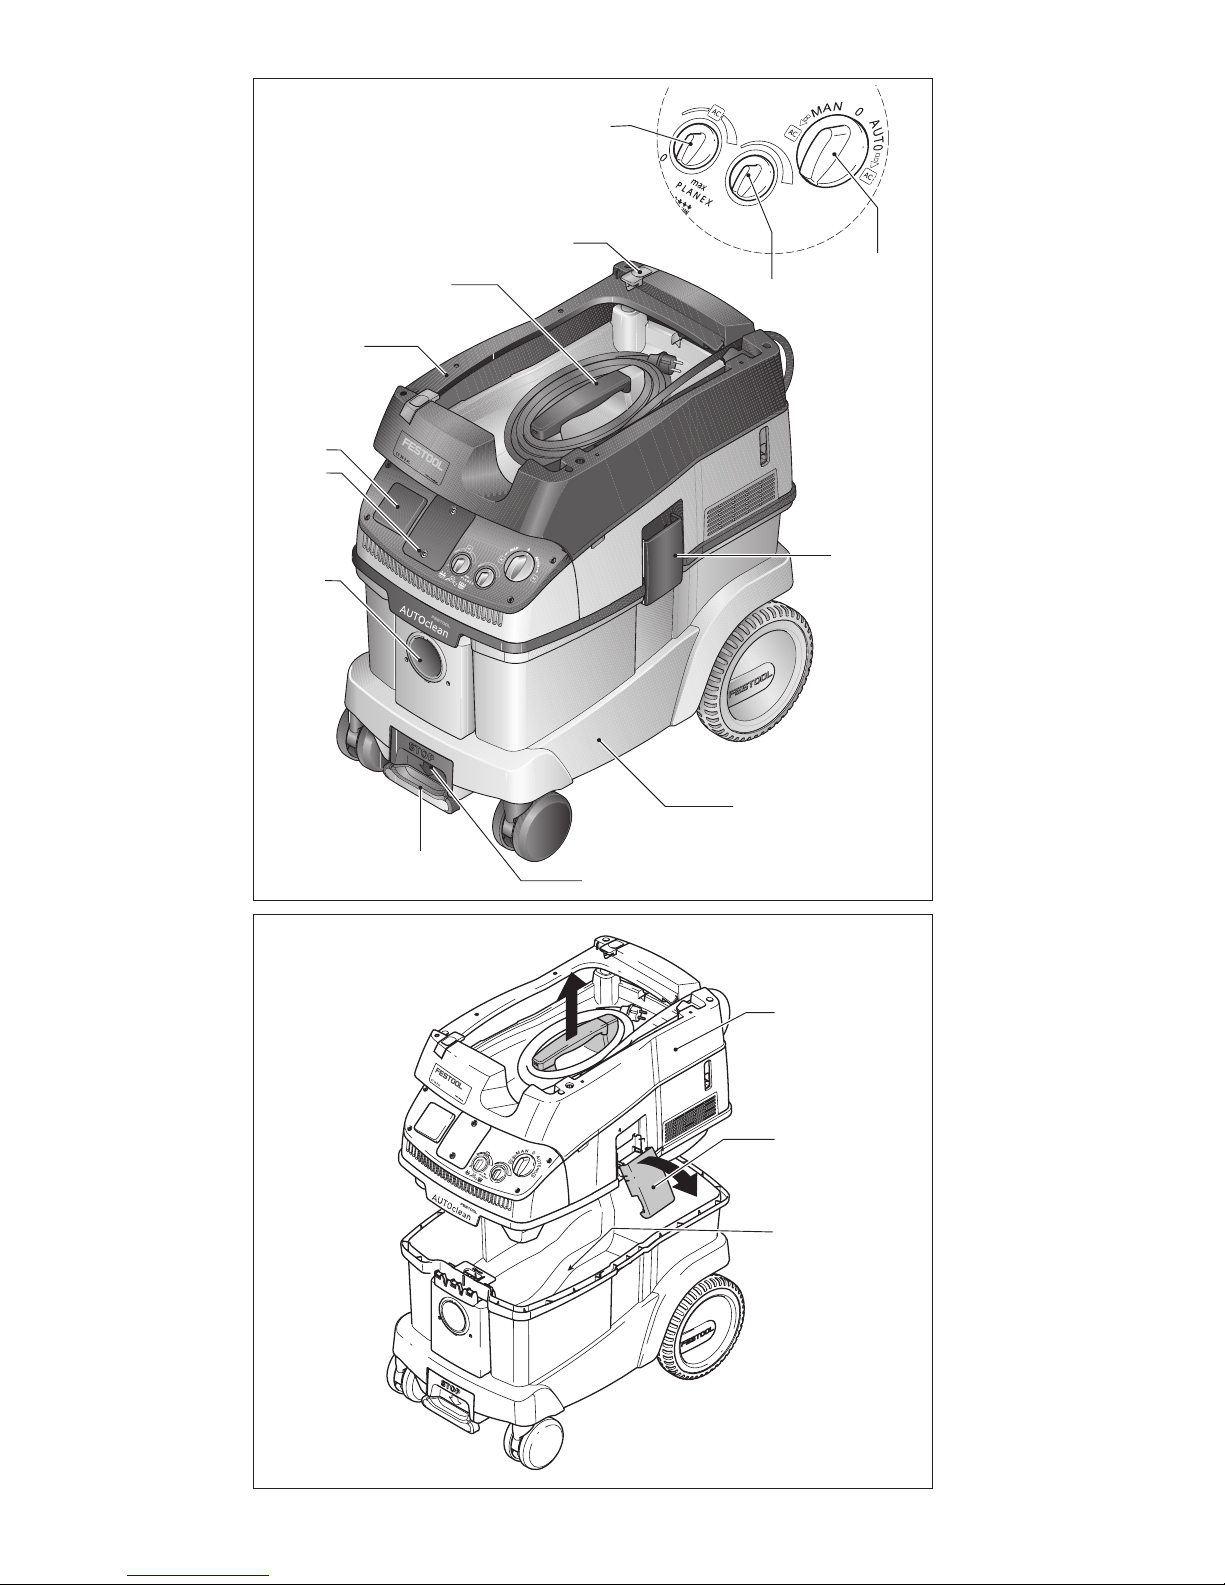
Dust extractor CT 26 E AC, CT 36 E AC, CT 48 E AC
[1-1]
Intake opening
[1-2]
Module slot
[1-3]
Appliance socket
[1-4]
Hose store
[1-5]
Handle
[1-6]
SysDoc
[1-7]
Automatic cleaning
[1-8]
Suction power adjuster
[1-9]
Switch
[1-10]
Locking clip
[1-11]
Dust container
[1-13]
Brake
WARNING
The user will be liable for damage due to improper use.
Page 9
9
Operation
Consider the pictures on the fold-out page.
Initial operation
X
Open the locking clips
[2-2]
and remove the top
section of the machine
[2-1]
.
X
Remove the accessories from the dust container
[2-3]
and the packaging!
X
Insert a filter or disposal bag in the dirt trap (see
chapter Changing the filter bag and Changing
the disposal bag).
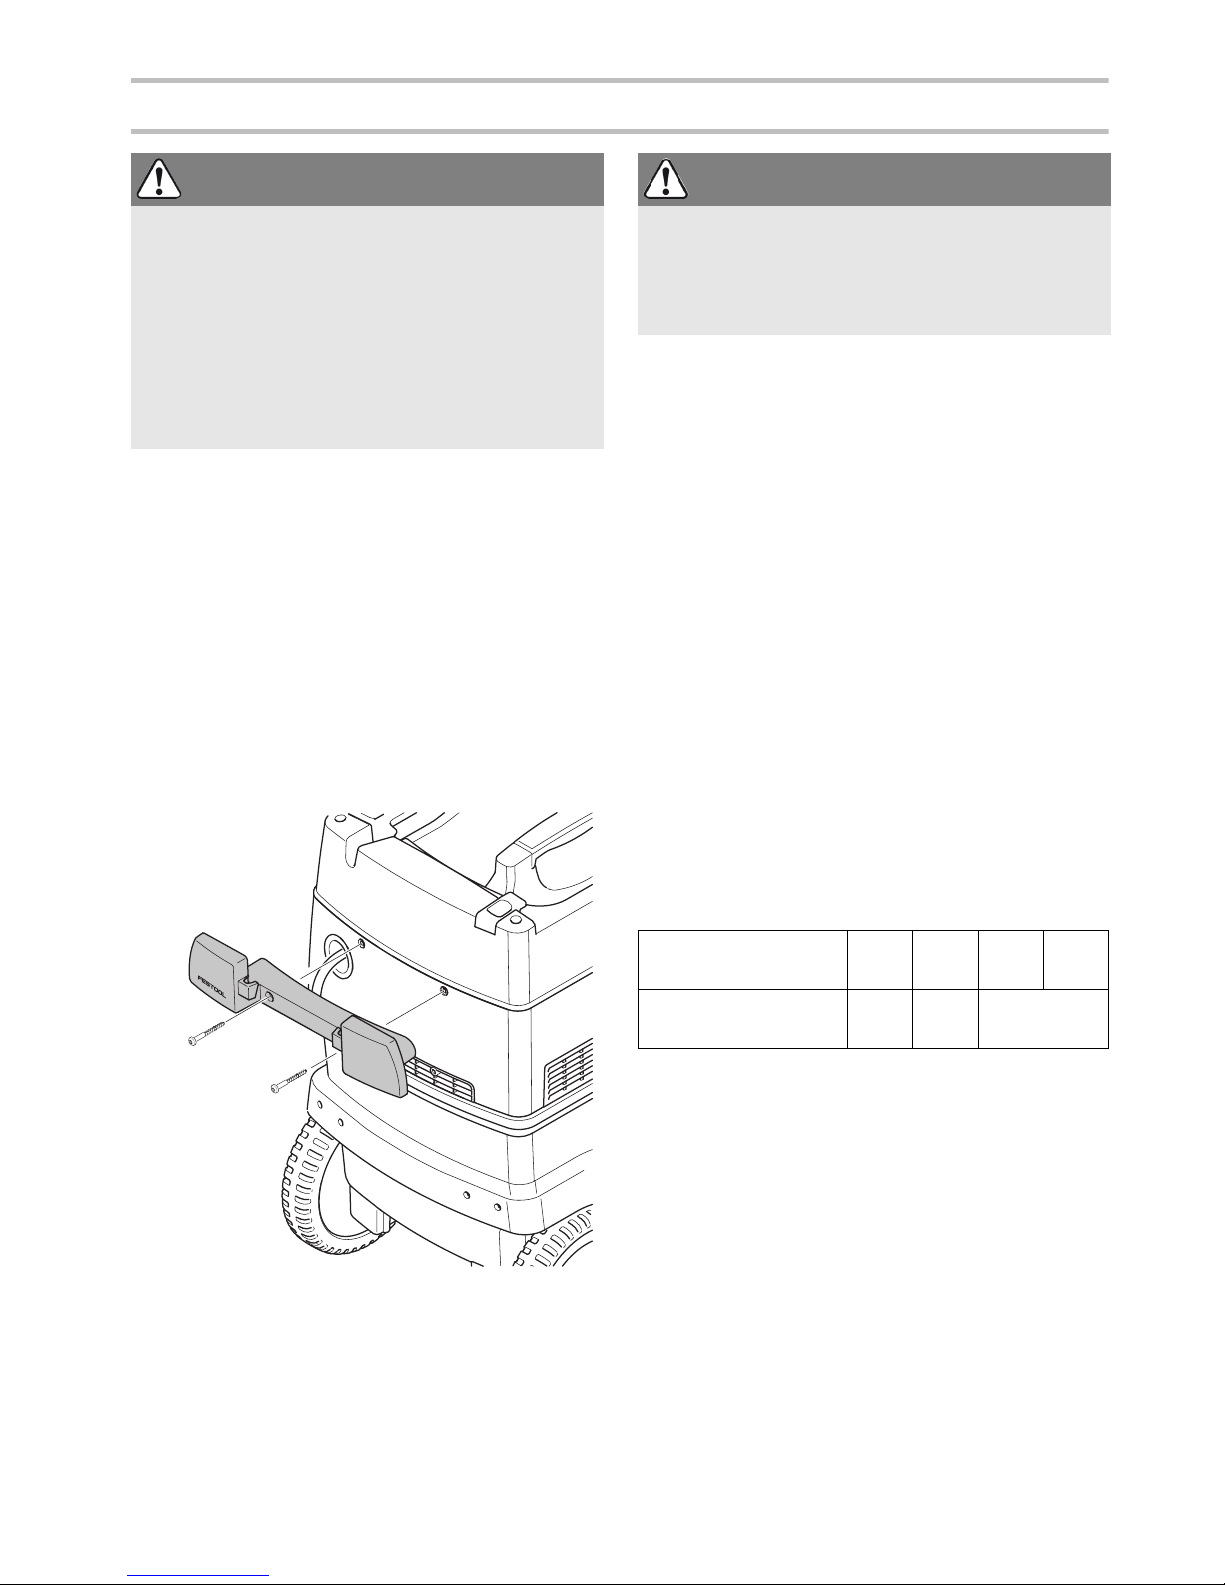
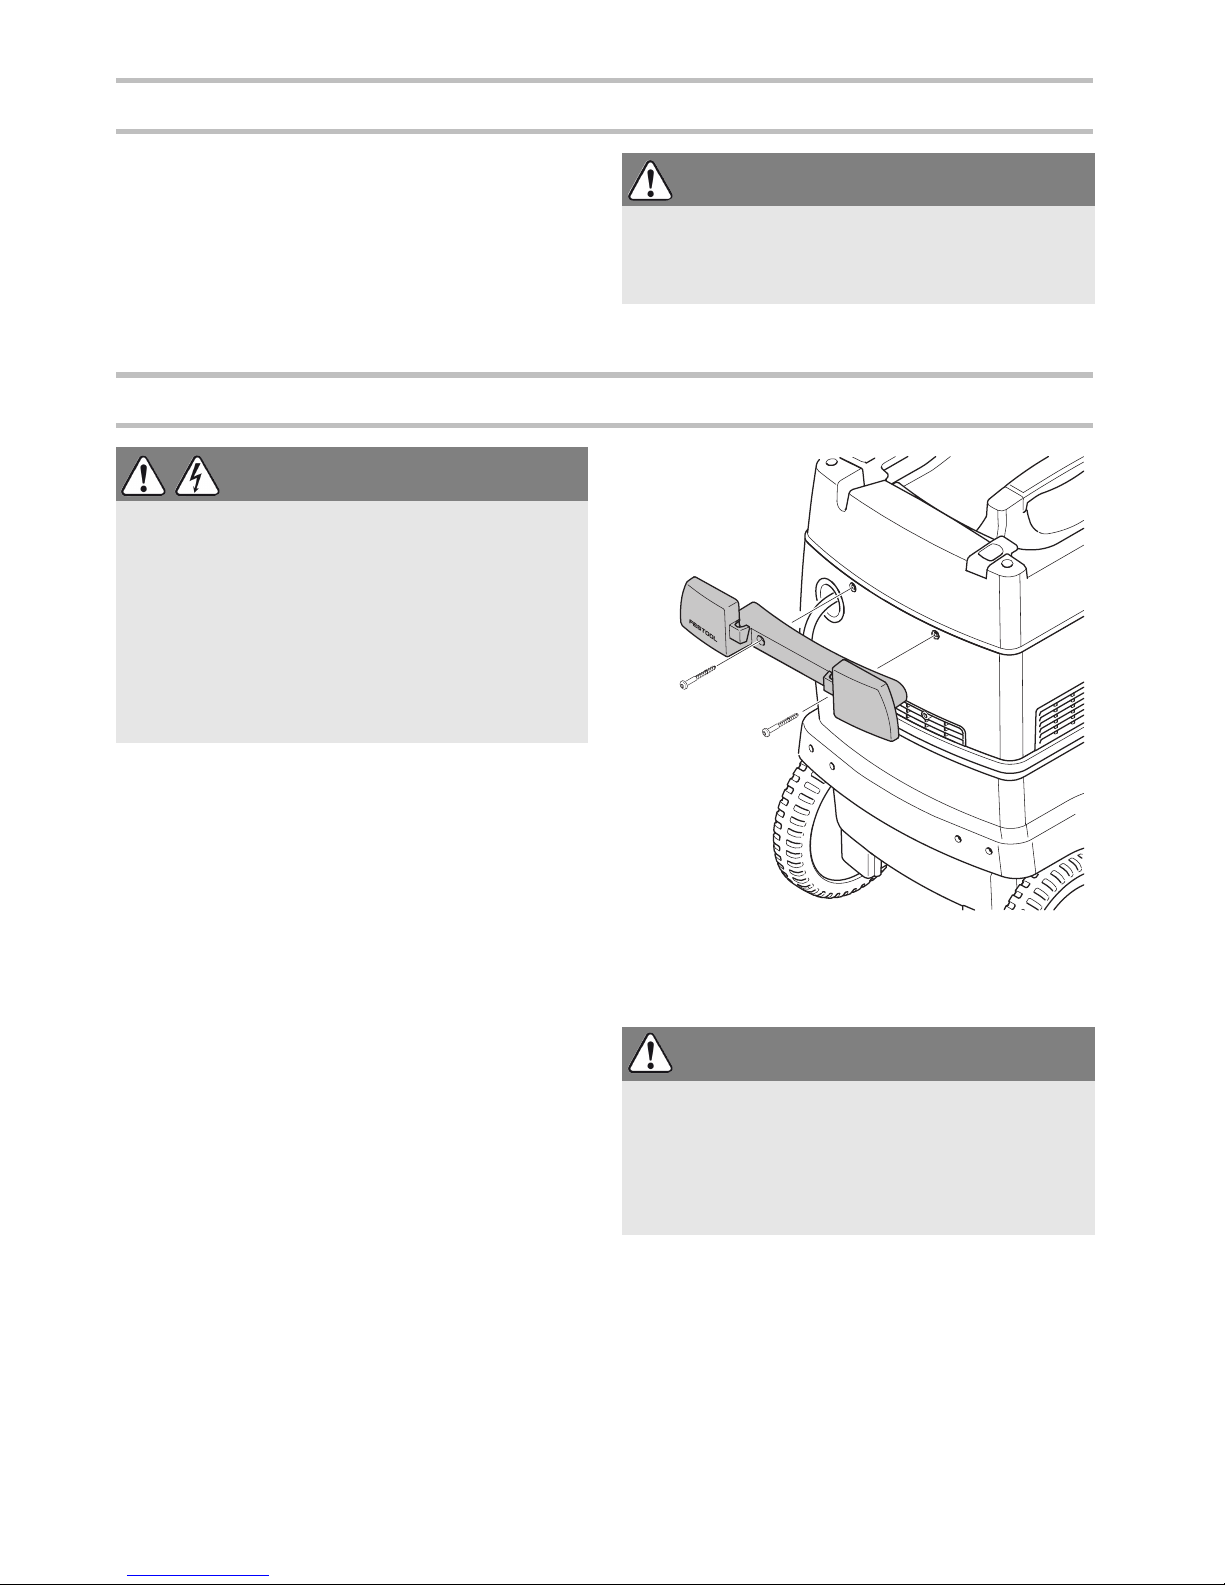
X
Attach the cable holder to the rear of the mobile
dust extractor (see Fig.
[3]
).
X
Replace the top section
[2-1]
and close the
locking clips
[2-2]
.
X
Connect the suction hose to the machine.
Switch on/off
X
Insert the plug into an earthed socket.
The switch
[1-9]
serves as an On/Off switch. It has
three positions:
Switch position "0"
Appliance socket
[1-3]
is disconnected from the
power, mobile dust extractor is switched off.
"MAN" switch position
Appliance socket
[1-3]
is disconnected from the
power, the mobile dust extractor starts.
"Auto" switch position
Appliance socket
[1-3]
is connected to the power,
the mobile dust extractor starts when the connected tool is switched on.
Extension Cord
If an extension cord is required, it must have sufficient cross-section to prevent an excessive drop in
voltage or overheating. An excessive drop in voltage
reduces the output and can lead to failure of the
motor. The table below shows you the correct cord diameter as a function of the cord length for this tool.
Use only U.L. and CSA listed extension cords.
Never use two extension cords together. Instead,
use one long one.
L
The lower the AWG number, the stronger the
cord
.
The antistatic system
Friction inside the extraction hose causes static
electricity to develop during extraction. Operating
personnel may receive unpleasant electric shocks
while working. The mobile dust extractor is fitted
with an antistatic system as standard to discharge
any static electricity that may develop. However, always use the enclosed antistatic extraction hose.
WARNING
Unauthorised voltage or frequency!
Risk of accident
X
The mains voltage and the frequency of the power source must correspond with the specifications on the machine's name plate.
X
In North America, only Festool machines with
the voltage specifications 120 V/60 Hz may be
used.
3
CAUTION
Risk of injury from tools starting up unexpectedly
X
Before setting the switch to the "AUTO" or
"MAN" position, make sure that the connected
tool is switched off.
Total Extension Cord
Lenght (feet)
25 50 100 150
Cable size (AWG) 14 12 not recom-
mended
Page 10
10
Settings
Consider the pictures on the fold-out page.
Connecting electric power tools
X
Connect the electric power tool to the appliance
socket
[1-3]
.
Connecting pneumatic tools
If the compressed air module
[1-2]
(496141) is installed, the automatic switch-on function of the
mobile dust extractor also works in combination
with pneumatic tools.
We also recommend installing the VE service unit
(495886). The service unit filters and lubricates the
compressed air and enables an adjustment of the
air pressure. An IAS adapter (454757) is available to
connect Festool pneumatic tools to the IAS system.
The operating pressure of the tool must be 6 bar for
the automatic switch-on unit to function correctly.
Temperature cut-out
To prevent overheating, a temperature cut-out
switches the mobile dust extractor off when it
reaches a critical temperature.
X
Switch off the mobile dust extractor and allow to
cool for about 5 minutes.
L
If the mobile dust extractor will not switch on
again, please contact a Festool service workshop.
Adjusting the suction power
You can use the suction power adjuster
[1-8]
to
adapt the machine suction power to different applications.
AUTO
Clean
- Cleaning the main filter
To maintain a constant suction power when extracting fine dust, you can adjust the frequency of the
automatic
[1-7]
cleaning system in infinite variables using the rotary knob. Always use the automatic cleaning system in combination with a disposal bag.
Before performing wet extraction tasks or
working with a filter bag, set the
[1-7]
rotary
knob to position 0.
X
Set the automatic cleaning function to the highest setting when
[1-7]
extracting large quanti-
ties of dust.
Manual cleaning
If the suction power decreases, cleaning can
be started manually by turning the switch
[1-9]
to the AC symbol positioned on either
side of the switch.
We recommend cleaning the main filter completely if severely clogged:
X
Cover the end of the nozzle or suction hose with
your hand for 2 seconds.
X
Turn the switch
[1-9]
to the AC symbol.
L
When the CT-VS closing slide is used (order no.:
497926), the filter can be cleaned fully without
removing the connected electric power tools.
In intensive applications that generate adherent
dust, it may be necessary to clean the filter element
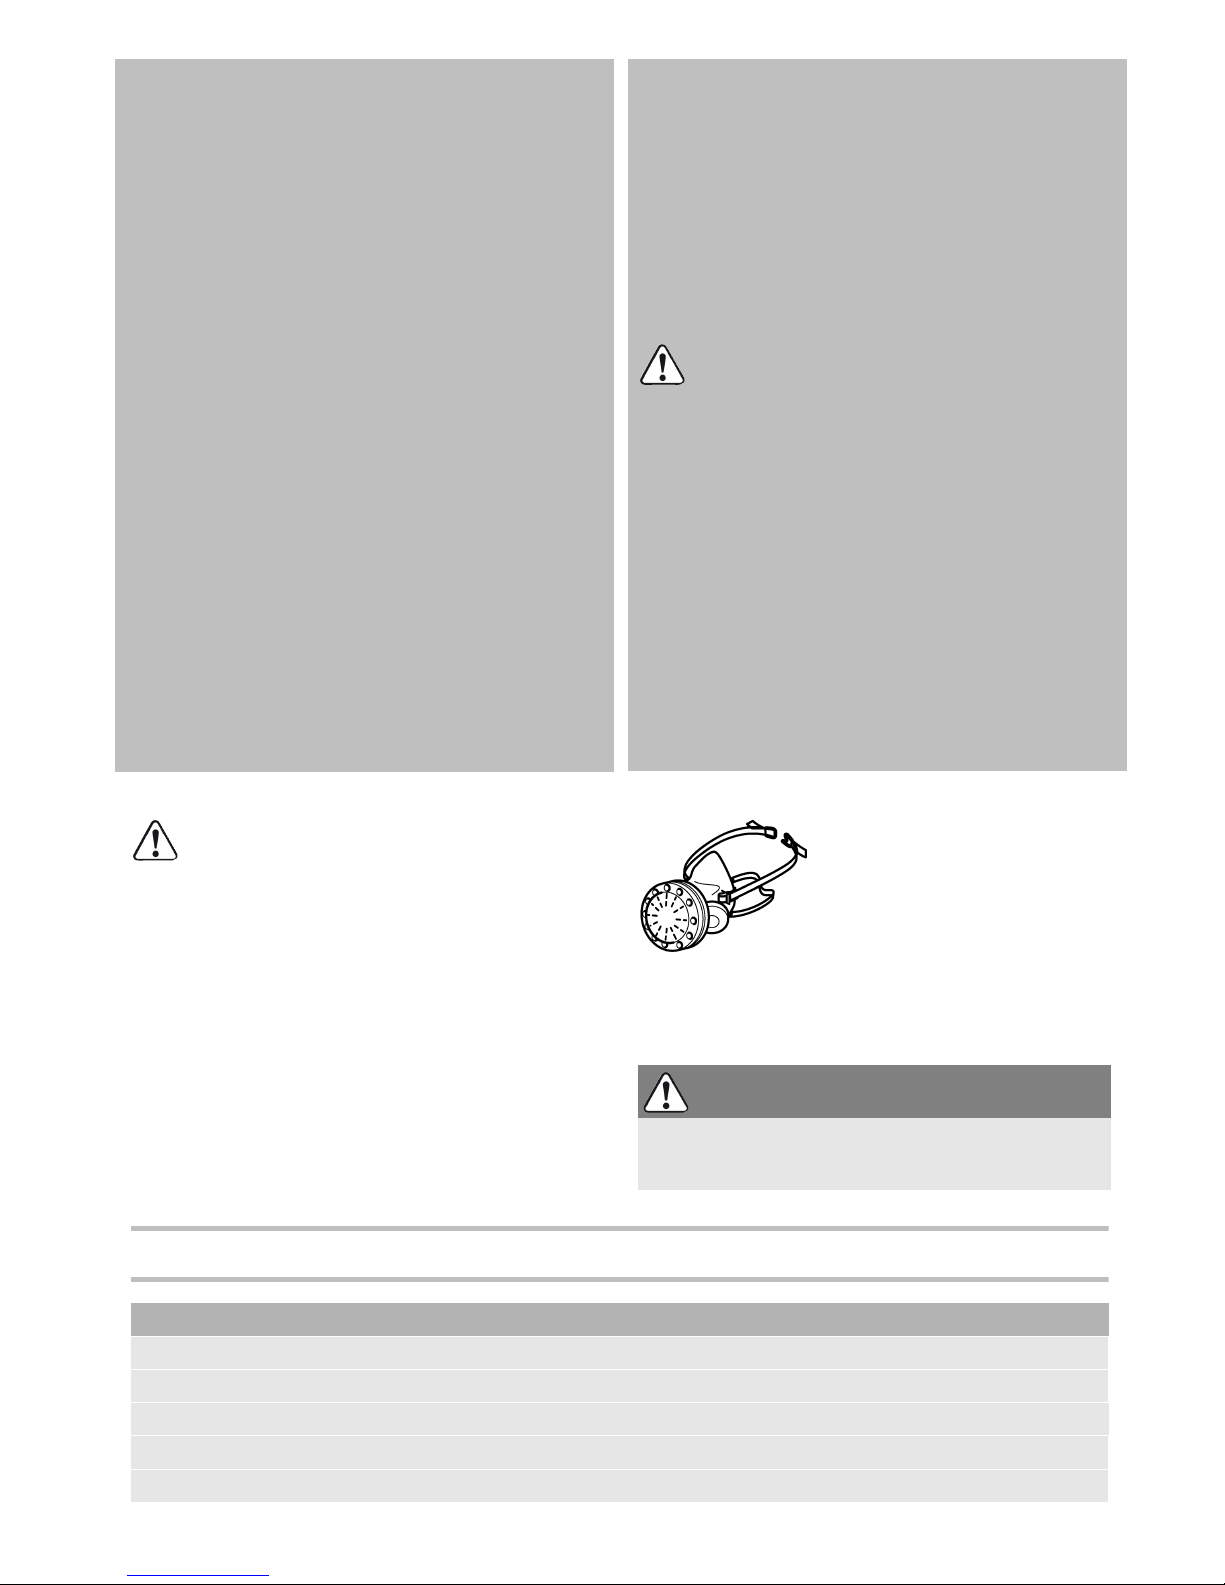
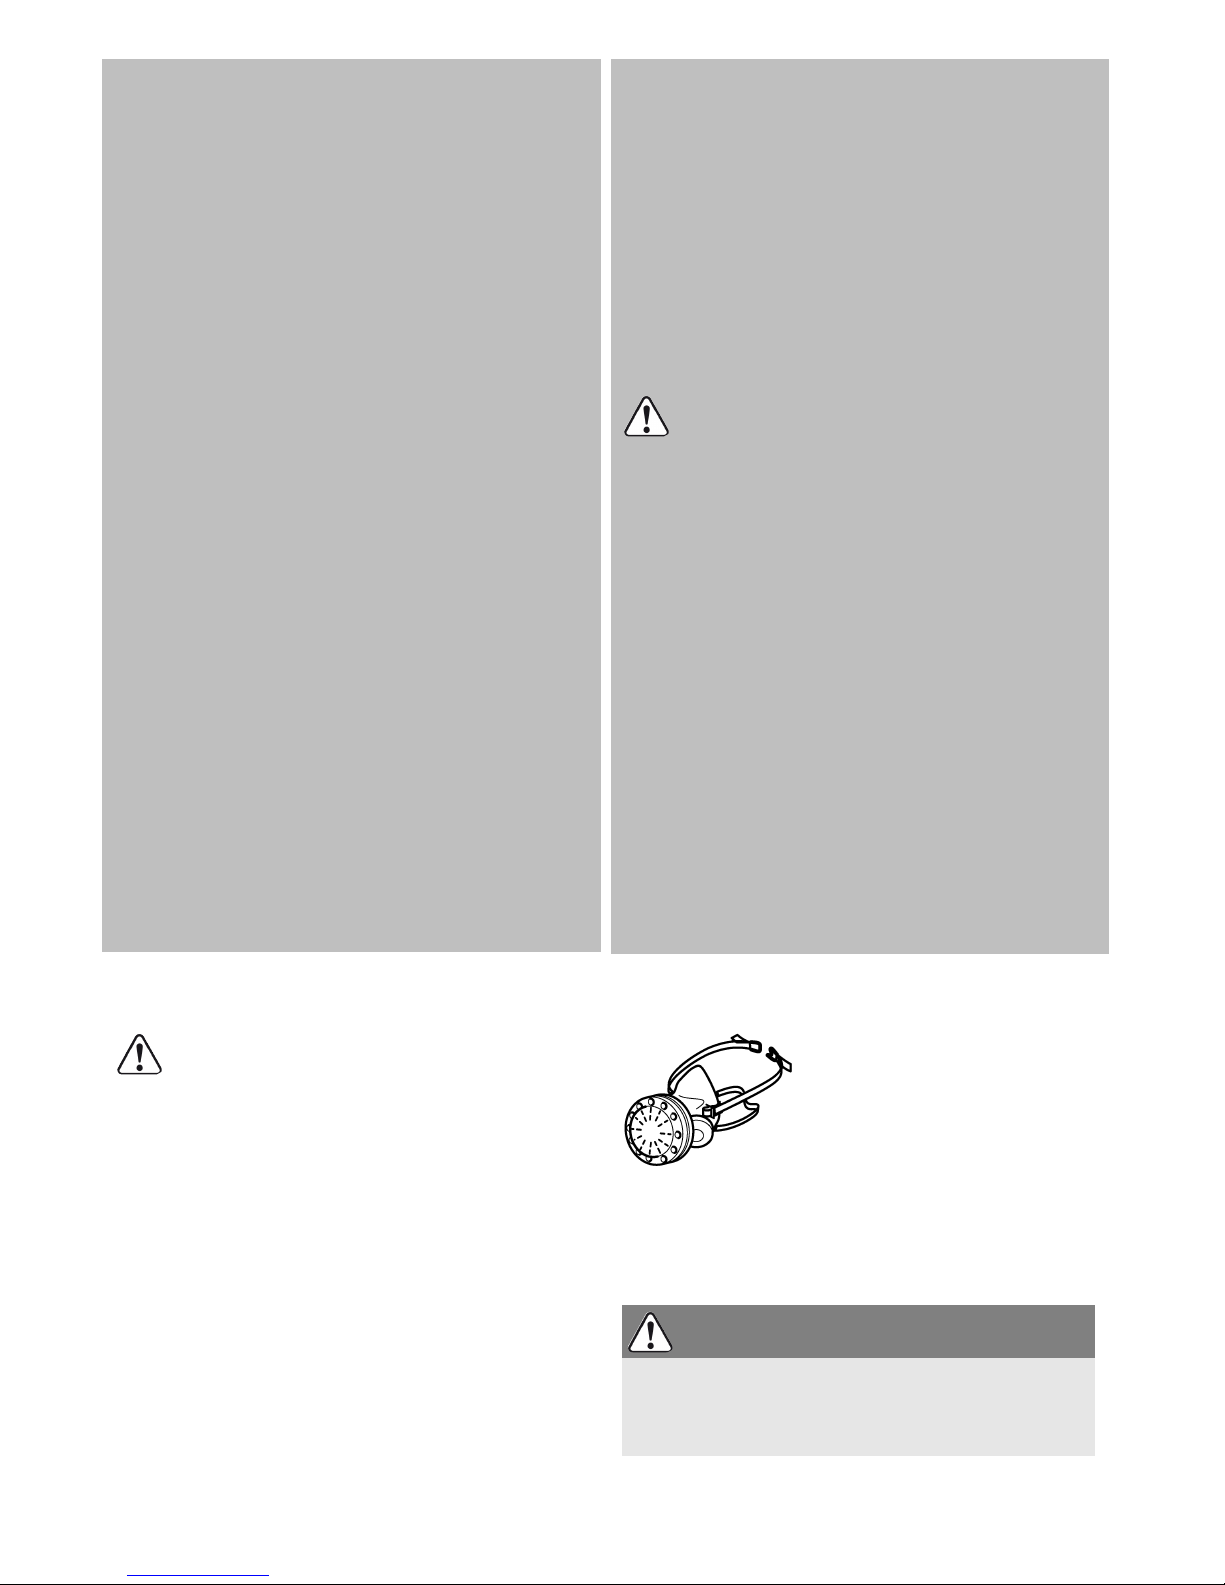
mechanically under certain circumstances (extract). Wear a dust mask!
Applying the brake
Folding out the brake lever
[1-13]
prevents the mobile dust extractor from rolling. To achieve this, lift
the front end of the mobile dust extractor slightly
and push the brake lever downwards until it latches
into place. Push the lever
[1-12]
again to release.
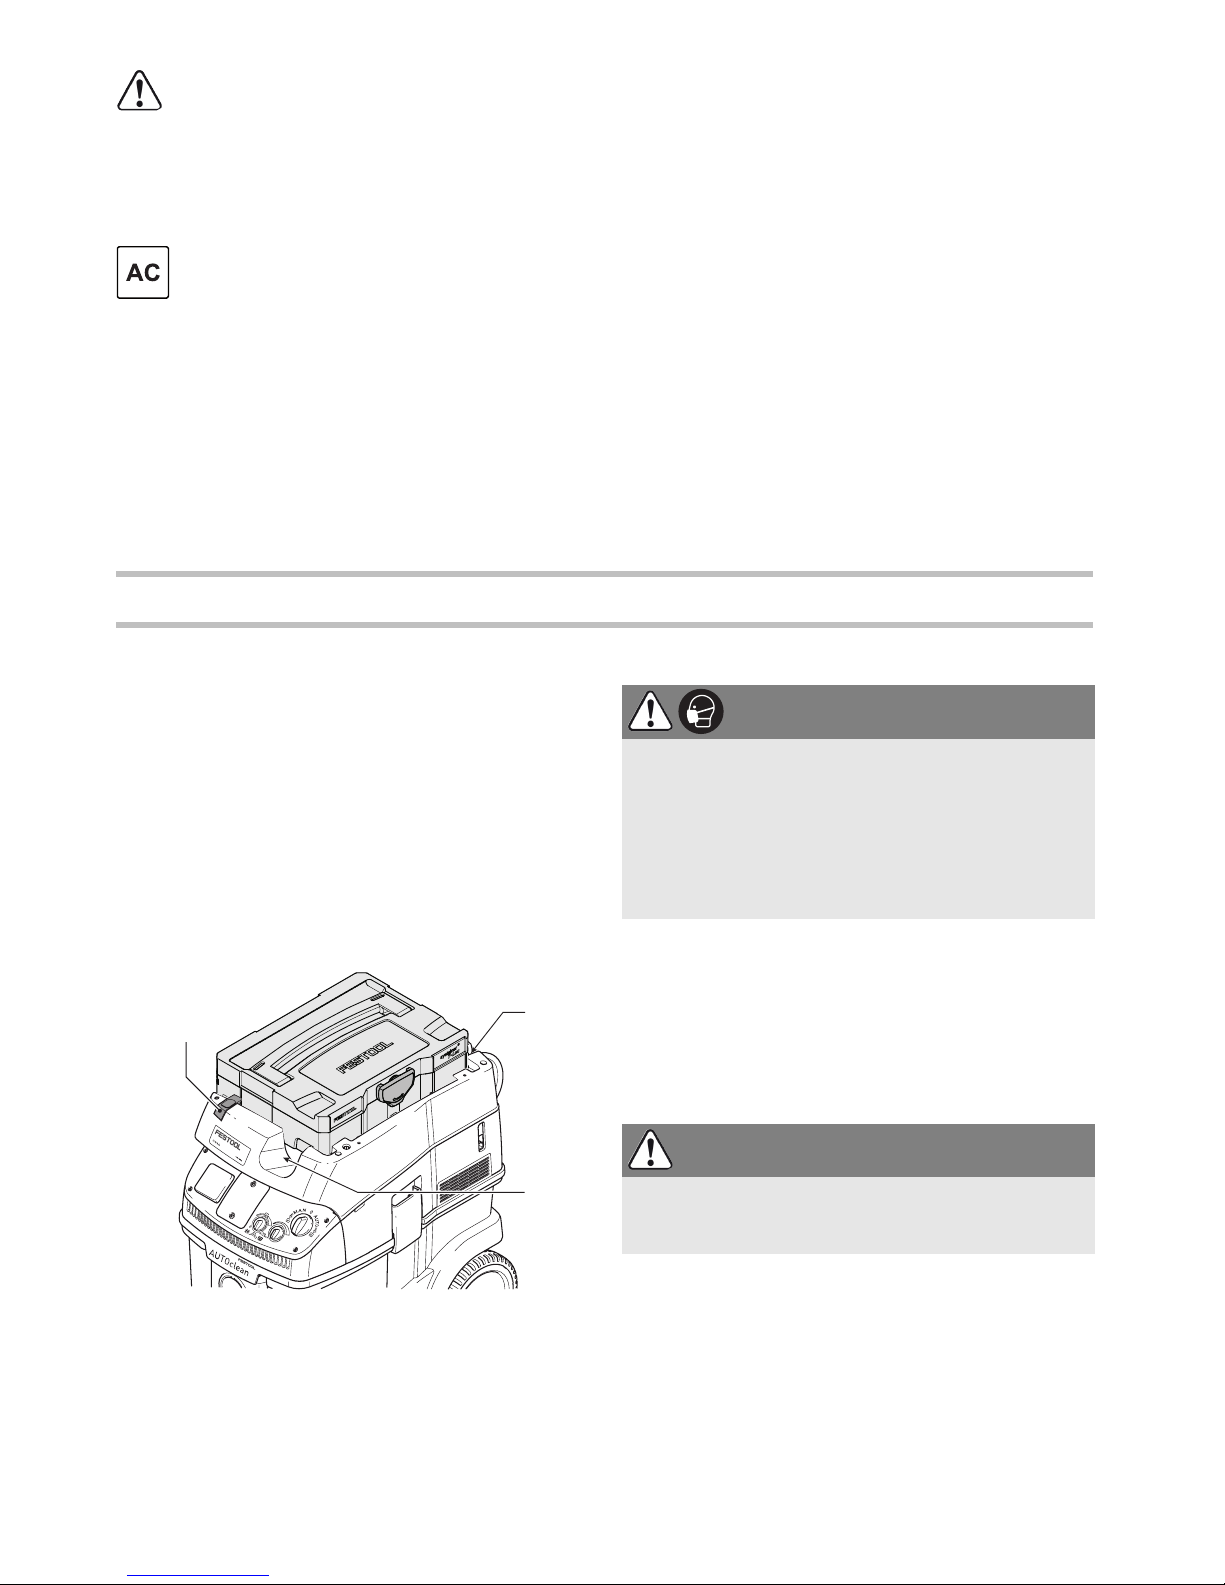
Working
Handling
Hose store:
after finishing work, you can feed the
suction hose through the recess
[4-3]
and place it
in the hose store. You can do the same with the
mains cable through the other recess
[4-2]
.
WARNING
Risk of injury
X
Observe the maximum connected loads for the
appliance socket (see chapter "Technical data").
X
Make sure that the power tool is switched off before connecting or disconnecting.
WARNING
Risk of injury
X
Make sure that the pneumatic tool is switched
off before connecting or disconnecting.
Page 11

11
SysDoc Systainer attachment system:
a Systainer
can be attached to the storage area via the two
slides
[4-1]
.
Extracting dry materials
Remember:
A damp main filter will clog more
quickly when dry materials are extracted. Therefore, dry the main filter before extracting dust or replace the damp filter with a dry one.
Extracting fluids
L
The main filter shall only be used for extracting
dry materials.
Before extracting fluids, remove the filter or disposal bag (see chapter Changing the filter bag
and Changing the disposal bag). We recommend
using a special wet filter.
The dust extractor stops automatically when the
maximum level is reached.
Special features of the CT 36 E AC-LHS
To use the mobile dust extractor in combination
with the
PLANEX
:
X
Use the accompanying kink-resistant suction
hose D 36 mm x 3.5 m-AS.
X
Use the accompanying special suction sleeve to
connect the
PLANEX
.
X
Insert the accompanying CT-VS closing slide
between the intake opening
[1-1]
and the suc-
tion hose.
X
Fit the tool holder as described in the accompanying installation instructions.
X
When performing extraction work with the
PLANEX
, always use disposal bags to prevent
dust from escaping into the surrounding area.
Filter
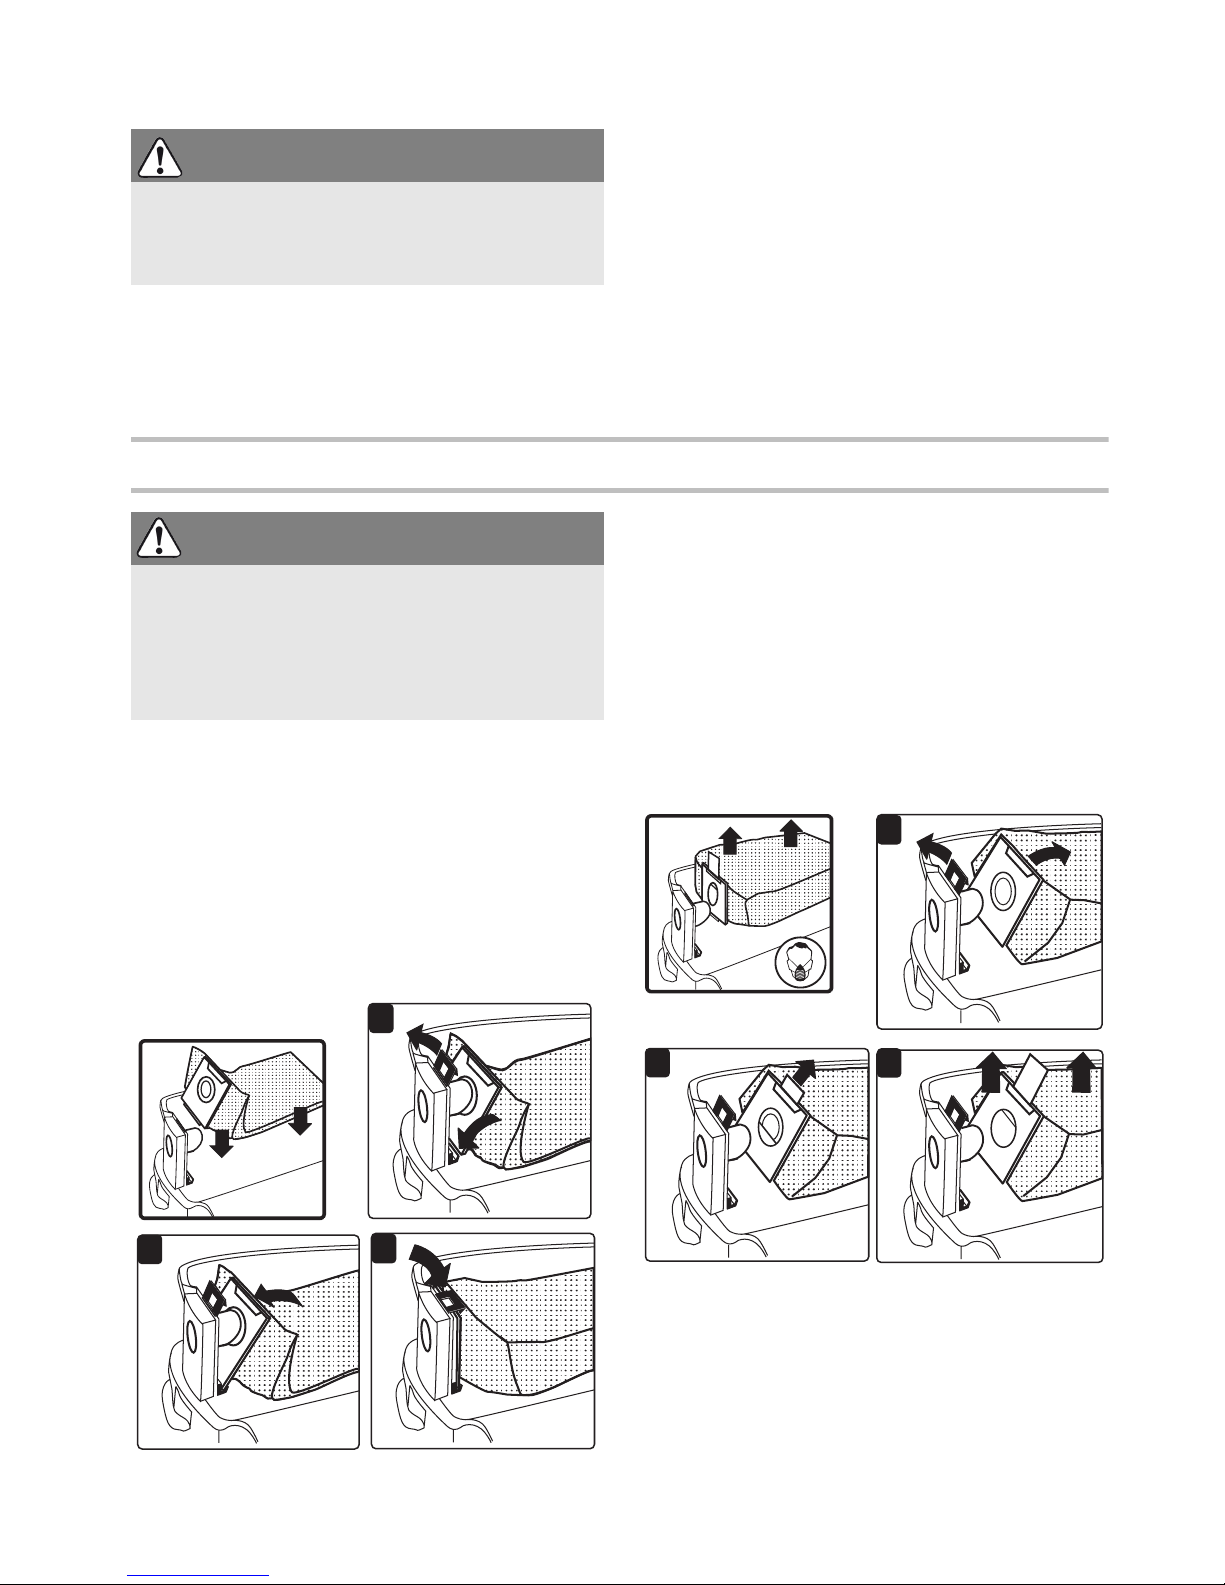
Changing the filter bag
Inserting the filter bag
X
Open the locking clips
[2-2]
and remove the top
section of the machine
[2-1]
.
X
Insert a new filter bag (SC-FIS-CT 26/36/48)
(Fig.
[5]
) in the inlet port of the dust container
and interlock it.
Important:
be aware that the
locking engages.
WARNING
Not suitable to vacuum hazardous or toxic substances or dusts e.g. asbestos.
X
The filters will not be able to capture all particles
and may exhaust them back into the environment.
WARNING
Risk of injury
X
Do not evacuate combustible liquids!
4
4-1
4-2
4-3
CAUTION
Escaping foam and fluids
X
Switch off the machine immediately and empty
the dust container.
WARNING
Risk of injury
X
During the following procedure, take care not to
raise dust more than is unavoidable. Moisten the
main filter with a water spray before removing it.
Page 12

12
L
Make sure that the filter bag is not pinched between the top and bottom sections.
X
Replace the top section
[2-1]
and close the
locking clips
[2-2]
.
Removing the filter bag
X
Open the locking clips
[2-2]
and remove the top
section of the machine
[2-1]
.
X
Remove the filter bag (Fig.
[6]
).
X
Dispose of the used bag in accordance with statutory regulations.
X
Clean the dust container
[2-3]
.
X
Insert a new filter bag if necessary (see Inserting the filter bag).
X
Replace the top section
[2-1]
and close the
locking clips
[2-2]
.
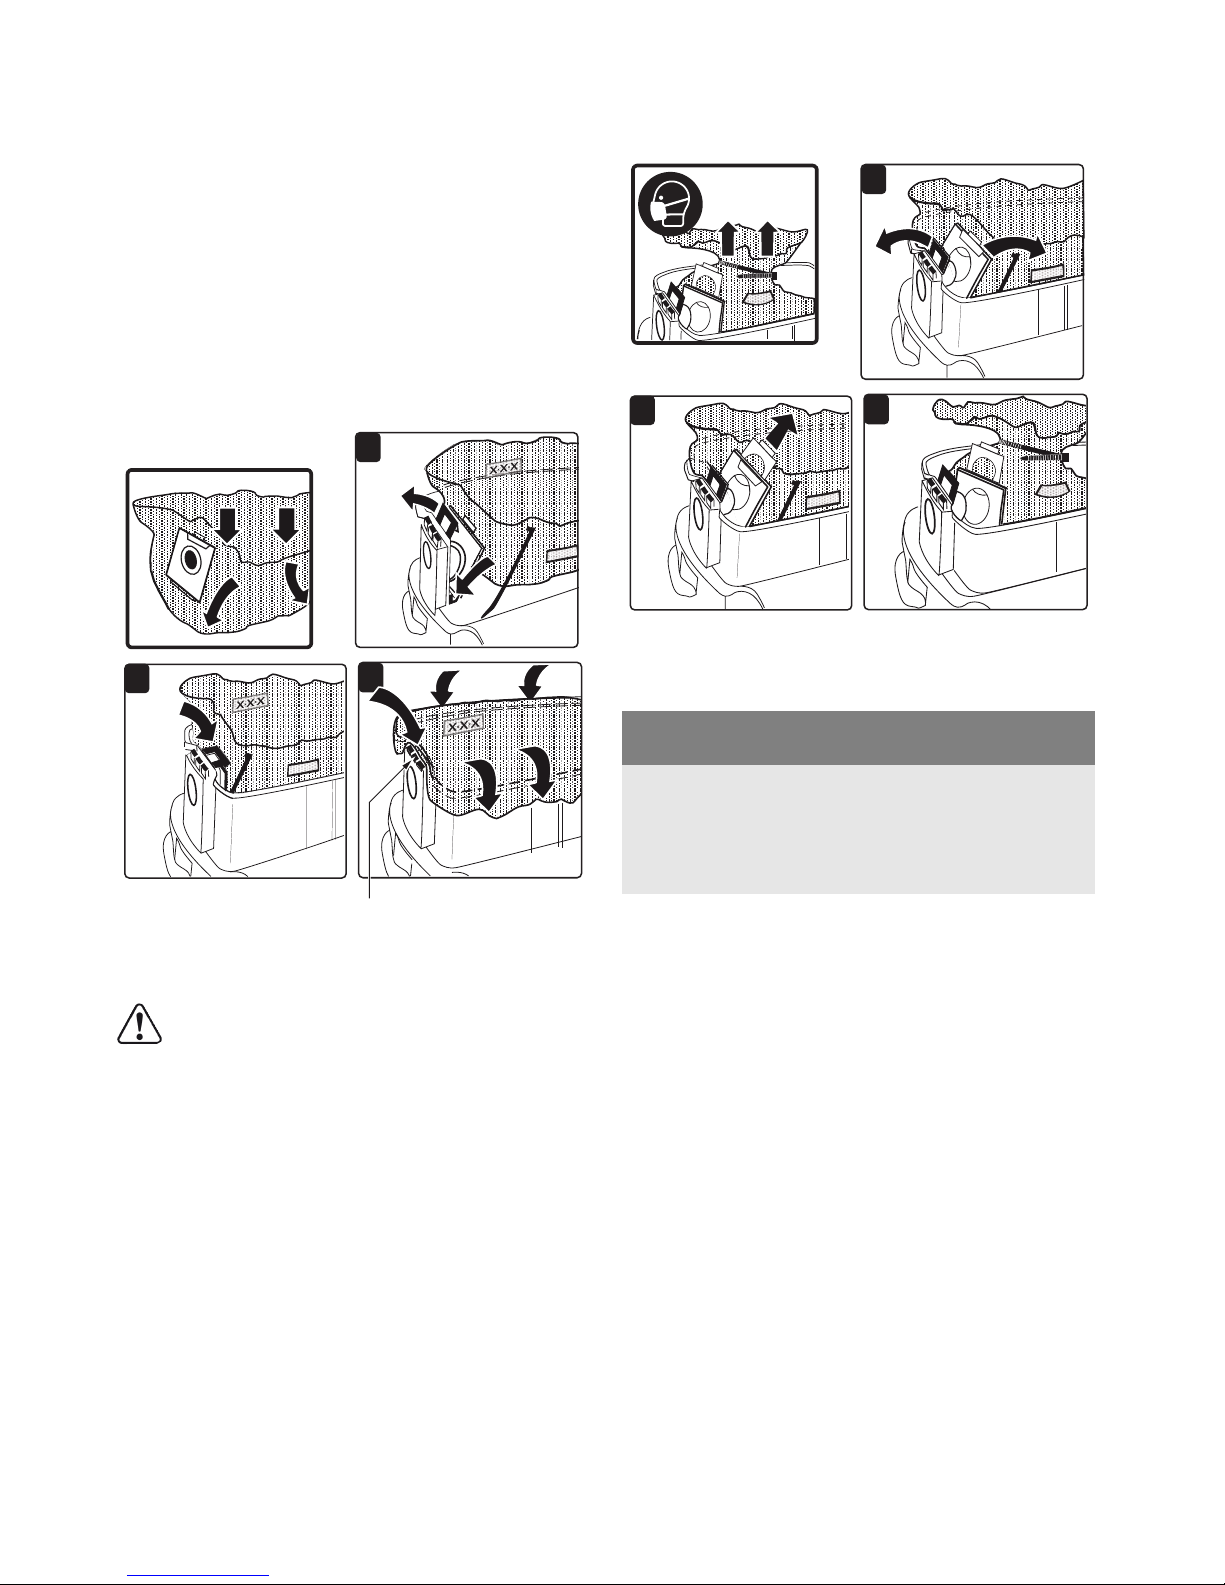
Changing the disposal bag
Inserting the disposal bag [7]
X
Open the locking clips
[2-2]
and remove the top
section of the machine
[2-1]
.
X
Insert a new disposal bag (ENS-CT26/36/48) on
the inlet nozzle of the container and lock in position.
Important:
The lateral openings on the disposal
bag must be positioned inside the container.
Make sure that the bolt engages.
X
Place the disposal bag over the edge of the container.
Make sure that the contacts
[7-1]
are free.
X
Replace the top section
[2-1]
and close the
locking clips
[2-2]
.
Removing the disposal bag [8]
X
Open the locking clips
[2-2]
and remove the top
section of the machine
[2-1]
.
1
2
3
5
SC-FIS-CT 26/36/48
1
3
6
1
2
3
1
2
3
7
ENS-CT 26/36/48
7-1
Page 13

13
X
Close the disposal bag.
X
Remove the disposal bag.
X
Dispose of the used disposal bag in accordance
with statutory regulations.
X
Clean the dust container
[2-3]
.
X
Replace the top section
[2-1]
and close the
locking clips
[2-2]
.
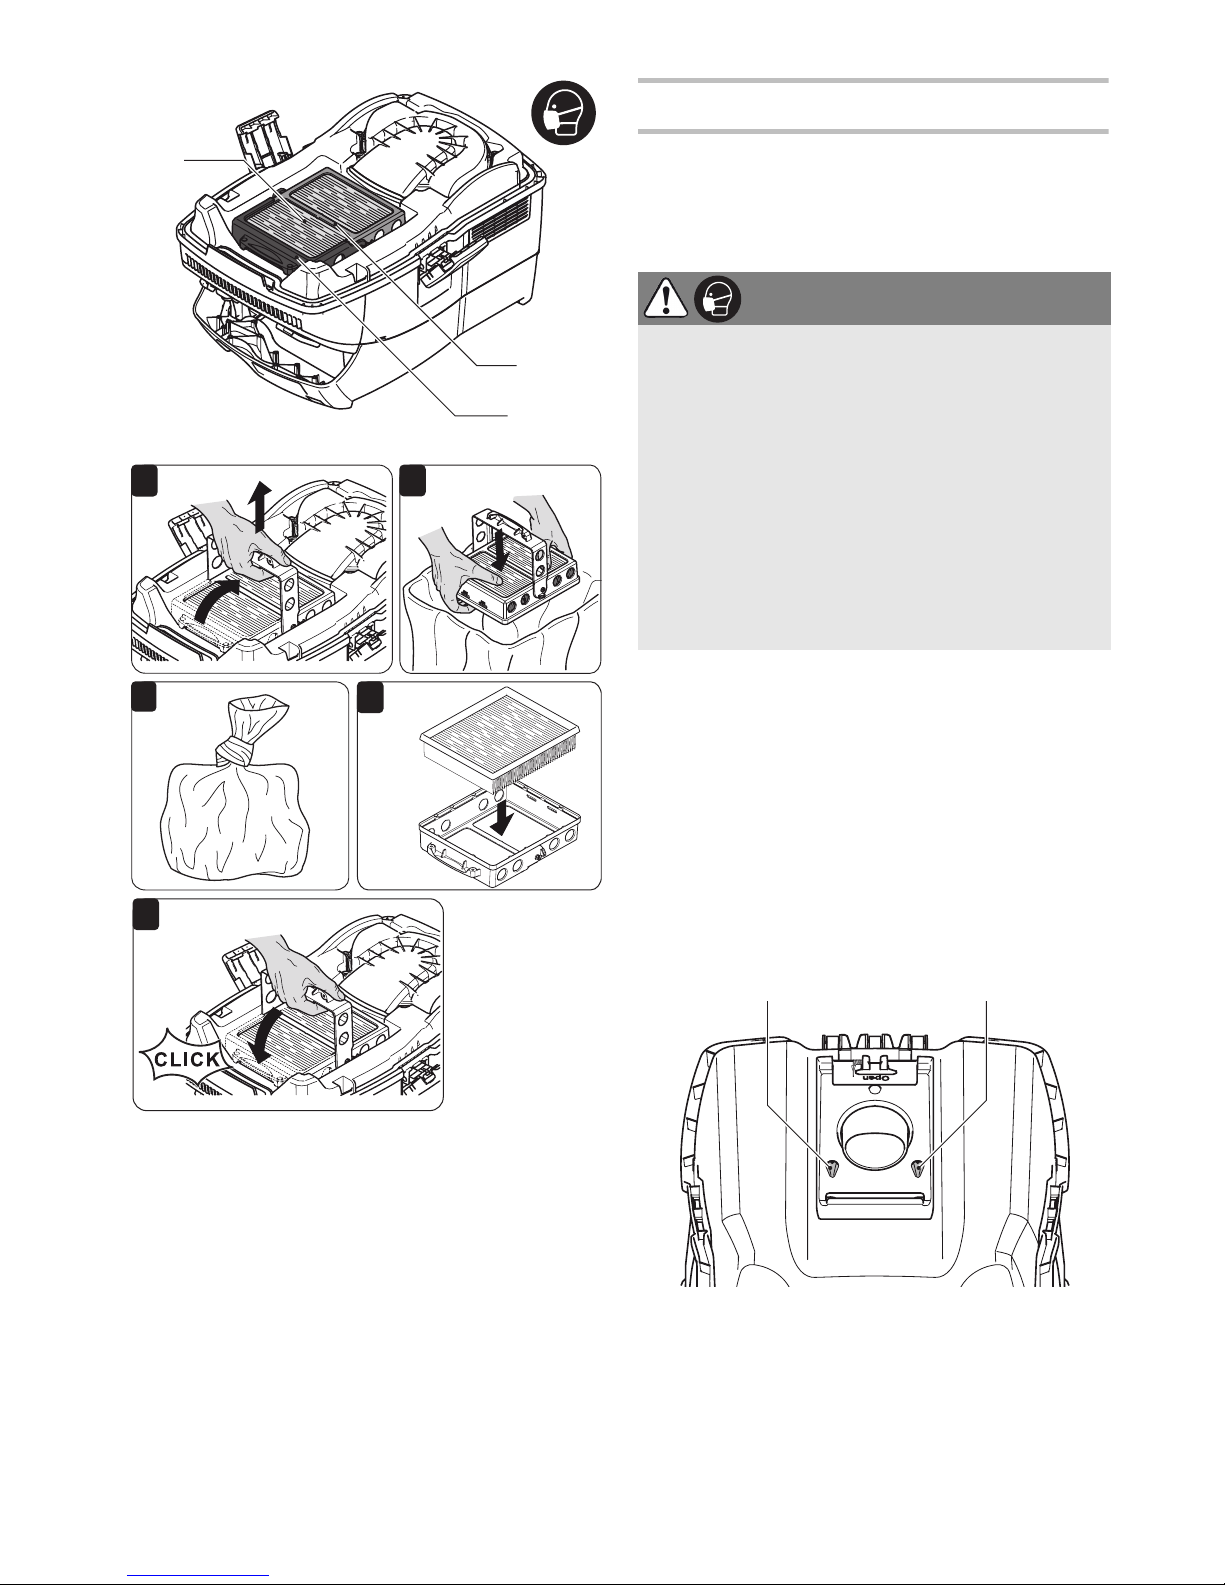
Changing the main filter
X
Open the locking clips
[2-2]
and remove the top
section of the machine
[2-1]
.
X
Turn the top section of the machine so that the
main filter is facing upwards (Fig.
[9]
).
X
Fold over the lever
[9-3]
and remove the retain-
er
[9-2]
.
X
Remove the used main filter
[9-1]
and replace
with a new one.
X
Dispose of the used main filter in accordance
with statutory regulations.
X
Insert the retainer
[9-2]
and fold over the lever
[9-3]
until it engages.
X
Replace the top section
[2-1]
and close the
locking clips
[2-2]
.
NOTE
Motor damage
X
Never operate the extractor without a main filter
fitted as the motor may become damaged.
1
2
3
8
9-1
9-3
9
9-2
1
2
3
5
4
HF-CT26/36/48
Page 14

14
After finishing work
X
Switch off the mobile dust extractor and disconnect the plug.
X
Wind up the mains power cable.
X
Empty the dust container.
X
Place the mobile dust extractor in a dry room inaccessible to unauthorised users.
Emptying the dust container
The dust container
[2-3]
can be emptied once the
top section has been removed.
X
After extracting fluids, clean the fill level sensors
[10-1]
regularly with a soft cloth and in-
spect for damage.
Service and maintenance
A dust test must be performed at least once a year
by the manufacturer or an instructed person. This
test may include checks to determine whether the
filter is damaged, the machine is sealed properly
and the monitoring features are functioning correctly.
During maintenance and repair work, all components that cannot be cleaned satisfactorily must be
replaced. The old components must be sealed in
impermeable plastic bags prior to disposal in compliance with applicable regulations for this type of
waste.
CAUTION
Hazardous dust
Damage to the respiratory passage
X
Wipe down the mobile dust extractor and clean
all accessories thoroughly using the extractor
(inside and out) before removing from the working area.
X
Parts that you were not able to clean thoroughly
must be sealed in an airtight plastic bag prior to
transportation.
X
Wear a dust mask!
10-1 10-1
10
WARNING
Any maintenance or repair work that requires
opening of the motor or gear housing should only
be carried out by an authorised Customer Service
Centre (name supplied by your dealer)!
X
Maintenance or repair work carried out by an
unauthorised person can lead to the wrong connection of the power leads or other components,
which in turn can lead to accidents with serious
consequences.
WARNING
To prevent accidents, always remove the plug
from the power supply socket before carrying out
any maintenance or repair work on the tool!
X
Do not use compressed air to clean the electrical
tool! Do not try to clean parts inside the tool in
this way, as you could let foreign objects in
through the openings of the tool housing.
Page 15

15
Accessories
Use only original Festool accessories and Festool
consumable material intended for this machine because these components are designed specifically
for the machine. Using accessories and consumable material from other suppliers will most likely
affect the quality of your working results and limit
any warranty claims. Machine wear or your own
personal workload may increase depending on the
application. Protect yourself and your machine, and
preserve your warranty claims by always using
original Festool accessories and Festool consumable material!
The accessory and tool order number can be found
in the Festool catalog or on the Internet under
www.festool-usa.com.
Modules
The following modules for upgrading the mobile
dust extractor are available in the accessories programme. Modules must be fitted to the module slot
[1-2]
by an authorised service workshop:
– Compressed air module,
– Energy box module (EAA) for using the automatic
switch-on unit on the EAA.
You can find more detailed information on the modules at "www.festool-usa.com".
Disposal
Do not throw the tool in your household waste!
Dispose of machines, accessories and packaging at
an environmentally responsible recycling centre.
Observe the valid national regulations.
Warranty
Conditions of 1+2 Warranty
You are entitled to a free extended warranty (1 year
+ 2 years = 3 years) on new Festool power tool purchased from an authorized retailer. Festool shall be
responsible for all shipping costs during the first
year of the warranty. During the second and third
year of the warranty the customer is responsible for
shipping the tool to Festool. Festool will pay for return shipping to the customer using UPS Ground
Service. All warranty service is valid 3 years from
the date of purchase on your receipt or invoice.
Festool Limited Warranty
This warranty is valid on the pre-condition that the
tool is used and operated in compliance with the
Festool operating instructions. Festool warrants,
only to the original consumer purchaser, that the
specified tool will be free from defects in materials
and workmanship for a term of one year from the
date of procurement. Festool makes no other warranty, express or implied, for Festool portable power tools. No agent, representative, distributor, dealer or employee of Festool has the authority to increase or otherwise change the obligations or
limitations of this warranty. The obligations of Festool in its sole discretion under this warranty shall
be limited to the repair or replacement of any Fes-
tool portable power tool that is found to be defective
as packaged with the User Manual.
Excluded from coverage under this warranty are:
normal wear and tear; damages caused by misuse,
abuse or neglect; damage caused by anything other
than defects in material and workmanship. This
warranty does not apply to accessory items such as
circular saw blades, drill bits, router bits, jigsaw
blades, sanding belts, and grinding wheels. Also
excluded are “wearing parts”, such as carbon
brushes, lamellas of air tools, rubber collars and
seals, sanding discs and pads, and batteries.
If your Festool power tools require repair, please go
to www.festoolusa.com and download the Repair
Order Form. Enclosing the completed form with
your tool will expedite the repair. You can find address details at the bottom of the form. Please call
our Service Department at 888-337-8600 to arrange a shipping label if the tool is eligible for free
shipping to our repair facility (see Conditions of 1+2
Warranty section for eligibility). No collect shipments will be accepted.
IN NO EVENT SHALL FESTOOL BE LIABLE FOR
ANY CONSEQUENTIAL OR INCIDENTAL DAMAGES
FOR BREACH OF THIS OR ANY OTHER WARRANTY,
EXPRESSED OR IMPLIED WHATSOEVER. ALL
WARRANTIES IMPLIED BY STATE LAW, INCLUD-
Page 16

16
ING THE IMPLIED WARRANTIES OF MERCHANTABILITY AND FITNESS FOR A PARTICULAR PURPOSE, ARE HEREBY LIMITED TO THE DURATION
OF THREE YEARS.
Some states in the U.S. and some Canadian provinces do not allow the limitations on how long an
implied warranty lasts, so the above limitation may
not apply to you. With the exception of any warran-
ties implied by state or province law as hereby limited, the foregoing express limited warranty is exclusive and in lieu of all other warranties, guarantees, agreements and similar obligations of
Festool.
This warranty gives you specific legal rights and you
may also have other rights which vary from state to
state in the U.S. and province to province in Canada.
Page 17
17
Sommaire
Symboles
Consignes de sécurité
Importantes consignes de sécurité
Lors de l'utilisation d'un outil électrique, respectez
les mesures fondamentales de précaution, y compris les points suivants :
LISEZ TOUTES LES INSTRUCTIONS
AVANT D'UTILISER LE PRESENT ASPIRATEUR
MOBILE
:
AVERTISSEMENT
-
Afin de minimiser les risques d'incendie, de choc électrique et de
blessures
:
– Ne laissez pas l'aspirateur mobile sans sur-
veillance lorsque celui-ci est branché. Débranchez l'aspirateur mobile si vous ne l'utilisez pas
et avant de procéder à sa maintenance.
– Utilisez l’aspirateur mobile uniquement à l'inté-
rieur.
– N'autorisez pas une utilisation de l'aspirateur
mobile en tant que jouet. Soyez particulièrement
attentif lorsque l'aspirateur mobile est utilisé par
des enfants ou à proximité d'enfants.
– Utilisez l'aspirateur mobile uniquement confor-
mément aux explications de la notice. Utilisez
exclusivement les accessoires recommandés par
le fabricant.
– N'utilisez pas l'aspirateur mobile avec un câble
ou une fiche mâle endommagé. Si l'aspirateur
mobile ne fonctionne pas normalement, s'il est
tombé par terre, s'il a été endommagé, s'il a été
laissé à l'air libre ou s'il est tombé dans l'eau,
renvoyez-le à un atelier de réparation.
– Ne tirez ou ne portez pas l'appareil par le câble,
n'utilisez pas le câble comme poignée, ne coincez pas le câble dans des portes ou ne guidez pas
le câble le long d'arêtes vives. Ne roulez pas avec
Symboles.............................................. 17
Consignes de sécurité ......................... 17
Caractéristiques techniques................ 19
Description fonctionnelle..................... 19
Utilisation en conformité avec les ins-
tructions............................................... 20
Mise en service .................................... 20
Réglages .............................................. 21
Mode de travail..................................... 22
Filtre..................................................... 23
Après le travail..................................... 25
Entretien et maintenance .................... 26
Accessoires .......................................... 26
Recyclage............................................. 27
Garantie................................................ 27
VVolt
WWatts
AAmpère
Hz Hertz
~Tension alternative
d.c.
courant continu
n
0
Vitesse de rotation à vide
Classe II conception
.../min
min
-1
tours ou course par minute
hheure
min minute
s seconde
kg kilogramme
Diamètre
Information, astuce
Pa pascal
dB décibel
Avertissement de danger général
Risque d'électrocution
Lire les instructions / les remarques !
Porter une protection respiratoire !
Page 18
18
l'aspirateur mobile sur le câble. Eloignez le câble
de surfaces chaudes.
– Ne débranchez pas l'aspirateur mobile en tirant
sur le câble. Pour débrancher, saisissez la fiche
mâle, non le câble.
– Ne manipulez pas le câble ou l'aspirateur mobile
avec des mains mouillées.
– Ne placez aucun objet dans les ouvertures. N'uti-
lisez pas l'aspirateur mobile si les ouvertures
sont bouchées ; gardez les ouvertures exemptes
de poussière, de peluches, de cheveux et autres
objets, qui pourraient diminuer le flux d'air.
– Gardez les cheveux, vêtements amples, doigts et
toutes les parties du corps éloignés des ouvertures et des pièces mobiles.
– Coupez tout avant de débrancher l'aspirateur
mobile.
– Soyez particulièrement prudent lorsque vous
nettoyez des escaliers.
– N'aspirez pas de liquides inflammables et explo-
sibles, tels qu'essence, ou n'utilisez pas l'aspirateur mobile dans des zones où de tels liquides se
trouvent.
– Branchez l'aspirateur mobile uniquement dans
une prise de courant avec terre appropriée. Voir
les instructions de mise à la terre.
– N'aspirez rien qui brûle ou fume, tels que ciga-
rettes, allumettes ou cendre chaude.
– N'utilisez pas l'aspirateur mobile sans sac à
poussières et/ou filtre en place.
CONSERVEZ CES INSTRUCTIONS
INSTRUCTIONS DE MISE A LA TERRE
Cet appareil doit être relié à la terre. En cas de défaut ou de panne de l'appareil, la mise à la terre assure le chemin le plus direct (avec la résistance la
plus faible) pour le courant électrique, afin de minimiser le risque d'un choc électrique. Cet aspirateur
mobile est équipé d'un câble possédant un conducteur de protection et une fiche mâle de sécurité
("Schuko"). La fiche mâle doit être branchée dans
une prise de courant appropriée, qui est correctement installée et mise à la terre, conformément
aux codes et ordonnances locaux.
AVERTISSEMENT
- Un mauvais raccordement du conducteur de protection peut entraîner un risque de choc électrique. Si vous
n'êtes pas certain si la prise de courant est correctement reliée à la terre, faites vérifier cela par un
électricien qualifié ou un chargé de maintenance.
Ne modifiez pas la fiche mâle livrée avec l'aspirateur mobile – si la fiche mâle ne s'adapte pas dans
la prise de courant, faites dans ce cas installer une
prise de courant appropriée par un électricien.
Instructions relatives à la polarisation
Afin de diminuer le risque de choc électrique, cet
aspirateur mobile possède une fiche mâle polarisée (une broche est plus large que l'autre). La fiche
mâle s'adapte uniquement dans un sens dans la
prise de courant polarisée. Si la fiche mâle ne
s'adapte pas correctement dans la prise de courant, tournez la fiche. Si, après cela, elle ne s'adapte toujours pas, demandez à un électricien d'installer une prise de courant appropriée. Ne remplacez
en aucun cas la fiche mâle.
La poussière, un risque
pour la santé
AVERTISSEMENT!
Certaines poussières
créées par le ponçage mécanique, le sciage,
le meulage, le perçage et autres activités re-
liées à la construction contiennent des substances
chimiques connues (dans l’État de la Californie)
comme pouvant causer le cancer, des anomalies
congénitales ou représenter d’autres dangers pour
la reproduction. Voici quelques exemples de telles
substances:
• plomb provenant de peintures à base de plomb,
• silice cristallisée utilisée dans les briques, le ciment et autres matériaux de maçonnerie, et
• arsenic et chrome du bois d’oeuvre traité avec un
produit chimique.
Le risque d’exposition à de tels
produits varie selon la fréquence à laquelle vous faites ce
genre de travail. Pour réduire
les risques d’exposition à ces
substances chimiques : travaillez dans un endroit adéquatement ventilé et utilisez un équipement de sécurité approuvé, tel que
masques antipoussières spécialement conçus pour
filtrer les particules microscopiques.
AVERTISSEMENT
POUR RÉDUIRE LE RISQUE DE DOMMAGES,
L'UTILISATEUR DOIT LIRE LE MANUEL D'INSTRUCTION.
Page 19

19
Caractéristiques techniques
Description fonctionnelle
The pictures for the functional description are on a
fold-out page at the beginning of the instruction
manual. When reading of the manual you can fold
out this page for having always an overview of the
machine.
Aspirateurs mobiles CT 26 E AC, CT 36 E AC, CT 48 E AC
Puissance absorbée (aspirateurs mobiles seulement) 2.9 - 8.3 A (350 - 1 000 W)
1)
Puissance connectée totale max. 12 A (1 440 W)
Puissance max. de l’outil électrique connectée 3.7 A
2)
Débit volumique (air), turbine max. 234 m³/h (8.4 cu.ft./h)
Dépression, turbine max. 24 000 Pa
Surface filtrante 6 318 cm² (979.3 sq.in.)
Tuyau d’aspiration D 27 mm x 3.5 m (1.06 in. x 11.48 in.)
Degré de protection IP X4
Niveau de pression acoustique selon IEC 60704-2-1 71 dB(A)
Volume de la cuve CT 26 E AC 26 l (6.9 gal.)
CT 36 E AC 36 l (9.5 gal.)
CT 48 E AC 48 l (12.7 gal.)
Dimensions L x l x h CT 26 E AC 630 x 365 x 540 mm
(24.8 in. x 14.4 in. x 21.3 in.)
CT 36 E AC 630 x 365 x 596 mm
(24.8 in. x 14.4 in. x 23.5 in.)
CT 48 E AC 740 x 406 x 1005 mm
(29.1 in. x 16.0 in. x 39.6 in.)
Poids CT 26 E AC 14.7 kg (32,4 lbs)
CT 36 E AC 15.2 kg (33,5 lbs)
CT 48 E AC 19.6 kg (43.2 lbs)
1.
) 8,3 A (1000 W) est la valuer moyenne de differentes conditions d'usage, une consommation de 10 A (1200 W) est possible.
2.
) Si le dispositif de régulation de la puissance d’aspiration [1-7] est ajusté a la force d’aspiration (voir page 21, chap. Réglages - Ré-
gulation de la force d'aspiration) plus basse, la puissance maximale de l’outil électrique connectée peut être 9,1 A.
[1-1]
Orifice d'aspiration
[1-2]
Fiche modulaire (module pneumatique
pour CT 36 E LE)
[1-3]
Prise de l'appareil
[1-4]
Compartiment de rangement du tuyau
[1-5]
Poignée
[1-6]
SysDoc
[1-7]
Nettoyage automatique
[1-8]
Dispositif de régulation de la puissance
d’aspiration
[1-9]
Interrupteur de l'appareil
[1-10]
Agrafe de fermeture
[1-11]
Cuve de collecte
[1-13]
Frein
Page 20
20
Utilisation en conformité avec les instructions
Les aspirateurs mobiles sont appropriés de façon
conforme aux prescriptions pour l'aspiration de
poussières non dangereuses pour la santé.
L'aspirateur mobile est prévu de façon conforme
aux prescriptions pour l'aspiration d'eau.
L'aspirateur mobile est approprié pour l’utilisation
à la maison, commerciale ou tous.
Mise en service
Attention aux illustrations au début de la présente
notice d’utilisation.
Première mise en service
X
Ouvrez les agrafes de fermeture
[2-2]
et retirez
la partie supérieure de l'appareil
[2-1]
.
X
Retirez les accessoires de la cuve de collecte
[2-3]
et de l'emballage !
X
Placez un sac filtre ou un sac d'élimination des
déchets dans la cuve de collecte (voir chapitres
Remplacement du sac filtre (SC-FIS-CT 26/36/
48) et Remplacement du sac d'élimination des
déchets).
X
Remontez la partie supérieure
[2-1]
et fermez
les agrafes de fermeture
[2-2]
.
X
Montez l'enrouleur de câble sur la face arrière
de l'aspirateur mobile (voir figure
[3]
).
X
Raccordez le tuyau d’aspiration à l'appareil.
Marche/Arrêt
X
Branchez la fiche secteur dans une prise de
courant dotée d'une terre.
L'interrupteur
[1-9]
fait office d'interrupteur mar-
che/arrêt (I = MARCHE, 0 = ARRÊT).
Position d'interrupteur "0"
La prise de l'appareil
[1-3]
est hors tension ; l'aspi-
rateur mobile est désactivé.
Position d'interrupteur "MAN"
La prise de l'appareil
[1-3]
est hors tension ; l'aspi-
rateur mobile démarre.
AVERTISSEMENT
Seul l’utilisateur est tenu responsable des dommages qui résulteraient d’une utilisation non
conforme aux prescriptions.
AVERTISSEMENT
Tension ou fréquence non admissible !
Risque d'accident
X
La tension et la fréquence d'alimentation électrique doivent être conformes aux indications de
la plaque signalétique.
X
En Amérique du nord, utilisez uniquement les
outils Festool fonctionnant sous une tension de
120 V/60 Hz.
AVERTISSEMENT
Risques de blessures dus à un démarrage incontrôlé des outils
X
Avant de commuter l'interrupteur en position
"AUTO" ou "MAN", s'assurer que l'outil raccordé
soit arrêté.
3
Page 21

21
Position d'interrupteur "AUTO"
La prise de l'appareil
[1-3]
est sous tension ; l'aspirateur mobile démarre lors de la mise en marche
de l'outil raccordé.
Rallonge électrique
Si une rallonge électrique est nécessaire, elle doit
présenter une section suffisante afin d'éviter une
chute de tension excessive ou une surchauffe. Une
chute de tension excessive réduit la puissance et
peut entraîner la destruction du moteur. Le tableau
ci-dessous vous présente la section correcte de la
rallonge en fonction de sa longueur pour cette appareil.
Utilisez exclusivement des rallonges recommandées par U.L. et CSA.
N'utilisez jamais deux rallonges raccordées l'une à
l'autre, mais remplacez-les par une rallonge plus
longue.
L
Plus le calibre AWG est bas, plus le câble est résistant.
Système antistatique
Lors de l'aspiration, il en résulte des charges
d'électricité statique par frottement dans le tuyau
d’aspiration. Ces charges peuvent se manifester
par des chocs électriques désagréables pour l'opérateur. Pour dériver ces charges d'électricité statique, l'aspirateur mobile est équipé de série avec un
système antistatique. A cet égard, il convient toutefois d'utiliser le tuyau d’aspiration antistatique
fourni.
Réglages
Attention aux illustrations au début de la présente
notice d’utilisation.
Raccordement d'un outil électrique
X
Raccordez l'outil électrique sur la prise de l'appareil
[1-3]
.
Raccordement d'un outil pneumatique
Avec le montage du module d'air comprimé
[1-2]
(496141), le dispositif d'enclenchement automatique de l'aspirateur mobile fonctionne également
en relation avec des outils pneumatiques.
Nous recommandons le montage supplémentaire
de l'unité d'alimentation VE (495886). L'unité d'ali-
mentation filtre et huile l'air comprimé, et permet
de réguler la pression d'air. Une pièce de raccordement (454757) est disponible pour le raccordement
d'outils pneumatiques Festool avec système IAS.
Afin de garantir un fonctionnement irréprochable
du dispositif d'enclenchement automatique, la
pression de service de l'outil doit être de 6 bars.
Protection thermique
Afin de protéger l'appareil contre une surtempérature, une protection thermique coupe l'aspirateur
mobile avant d'atteindre une température critique.
X
Mettre l'aspirateur mobile hors tension et le
laisser refroidir pendant env. 5 minutes.
L
Si l'aspirateur mobile ne peut ensuite pas être
remis en marche, veuillez consulter un atelier
du service après-vente Festool.
Régulation de la force d'aspiration
La puissance d'aspiration peut être régulée par le
biais du dispositif de régulation de la puissance
d’aspiration
[1-8]
. Ceci permet une adaptation pré-
cise à différentes tâches d'aspiration.
AUTO
Clean
- Nettoyer le filtre principal
Pour garantir une haute dépression d’aspiration
constante pour des poussières fines, il est possible
de régler
[1-7]
en continu la fréquence du nettoyage
automatique à l'aide du commutateur. Utilisez le nettoyage automatique uniquement en combinaison
avec un sac d'élimination des déchets.
Longueur totale de la
rallonge (pieds)
25 50 100 150
Section de la rallonge (AWG)
14 12 pas recom-
mandé
AVERTISSEMENT
Risques de blessures
X
Respectez les valeurs de raccordement maximales au niveau de la prise de l'appareil (voir
chapitre "Caractéristiques techniques").
X
Assurez-vous que l'outil électrique soit arrêté
lors du branchement et du débranchement.
AVERTISSEMENT
Risques de blessures
X
Assurez-vous que l'outil pneumatique soit arrêté lors du branchement et du débranchement.
Page 22
22
Pour l'aspiration de liquides ou l'utilisation
d'un sac filtre, placer le commutateur
[1-7]
en
position 0.
X
En cas de poussières importantes, placez le nettoyage automatique
[1-7]
sur la valeur maximale.
Nettoyage manuel
En cas de baisse de la dépression d’aspiration, le nettoyage peut être démarré manuellement en tournant
[1-9]
le commutateur sur
le symbole
AC
d'un côté ou de l'autre du commuta-
teur.
En cas de fort encrassement du filtre principal,
nous recommandons un nettoyage complet :
X
Du plat de la main, fermez l'ouverture des buses ou du tuyau d'aspiration pendant
2 secondes.
X
Tournez le commutateur
[1-9]
sur le symbole
AC
.
L
En cas d'utilisation de l'obturateur CT-VS (N° de
commande : 497926), le nettoyage complet est
possible sans démontage de l'outil électrique
raccordé.
En cas d'utilisation intensive avec des poussières adhérentes, un nettoyage mécanique du filtre principal
(par exemple par aspiration) peut s'avérer nécessaire. Utilisez lors une protection respiratoire !
Serrage du frein
Le déplacement involontaire de l'aspirateur mobile
est empêché en rabattant le levier de frein
[1-13]
.
Pour ce faire, soulever légèrement l'aspirateur mobile à l'avant et presser le levier de frein vers le bas,
jusqu'à ce qu'il s'enclenche. Pour desserrer le frein,
pressez le levier
[1-12]
.
Mode de travail
Maniement
Rangement du tuyau :
après le travail, vous pouvez
guider le tuyau d’aspiration à travers l'ouverture
[4-
3]
et le déposer dans le compartiment de rangement
du tuyau. Vous pouvez guider le câble d'alimentation
à travers l'ouverture
[4-2]
et le déposer également
dans le compartiment de rangement du tuyau.
Insert Systainer SysDoc :
un Systainer peut être
fixé sur la surface de rangement au moyen des
deux verrous
[4-1]
.
Aspiration de substances sèches
Attention :
Un élément filtrant humide se colmate
plus rapidement lors de l'aspiration de substances
sèches. Pour cette raison, l'élément filtrant devrait
être séché avant l'aspiration de poussières ou remplacé par un élément filtrant sec.
Aspirations de liquides
L
L‘élément filtre ne doit être utilisé que pour
l‘aspiration de substances sèches.
Avant d'aspirer des liquides, retirez le sac filtre ou
le sac d'élimination des déchets (voir chapitre
Remplacement du sac filtre (SC-FIS-CT 26/36/48)
et Remplacement du sac d'élimination des déchets
). Nous recommandons l’utilisation d’un filtre à liquides spécial.
4
4-1
4-2
4-3
AVERTISSEMENT
Ne convient pas pour aspirer des substances ou
des poussières dangereuses ou toxiques telles
que l'amiante.
X
Les filtres ne sont pas conçus pour arrêter toutes les particules et l'aspirateur risque de les rejeter dans l'atmosphère.
AVERTISSEMENT
Risques de blessures
X
Il est interdit d’aspirer des liquides inflammables!
Page 23
23
L'aspiration est interrompue automatiquement en
atteignant la hauteur de remplissage maximale.
Particularités CT 36 E AC-LHS
Pour utiliser l'aspirateur en combinaison avec le
PLANEX
:
X
Utilisez le tuyau d’aspiration D 36 mm x 3,5 mAS fourni résistant aux plis.
X
Utilisez le manchon d'aspiration spécial fourni
pour raccorder le
PLANEX
.
X
Placez l'obturateur fourni CT-VS entre l'ouverture d'aspiration
[1-1]
et le tuyau d’aspiration.
X
Montez le porte-outil selon la notice de montage fournie.
X
Pour les travaux d'aspiration avec le
PLANEX
,
utilisez exclusivement le sac d'élimination des
déchets pour une élimination sans poussière.
Filtre
Remplacement du sac filtre
(SC-FIS-CT
26/36/48)
Insertion du sac filtre [5]
X
Ouvrez les agrafes de fermeture
[2-2]
et retirez la
partie supérieure de l'appareil
[2-1]
.
X
Insérez un nouveau sac filtre (SC-FIS-CT 26/36/
48).
Important:
Veillez à ce que le verrou s'enclen-
che.
L
Assurez-vous de ne pas coincer le sac filtre entre
la partie supérieure et la partie inférieure.
X
Remontez la partie supérieure
[2-1]
et fermez les
agrafes de fermeture
[2-2]
.
Retrait du sac filtre [6]
X
Ouvrez les agrafes de fermeture
[2-2]
et retirez
la partie supérieure de l'appareil
[2-1]
.
X
Retirez le sac filtre.
X
Éliminez le sac filtre usagé conformément aux
prescriptions légales.
X
Nettoyez la cuve de collecte
[2-3]
.
X
Remontez la partie supérieure
[2-1]
et fermez les
agrafes de fermeture
[2-2]
.
ATTENTION
Emergence de mousse et de liquides
X
Arrêtez immédiatement l'appareil et videz la
cuve de collecte.
AVERTISSEMENT
Risques de blessures
X
Pendant les opérations suivantes, veillez à ne
pas générer plus de poussières qu'il ne faut.
Avant d'enlever l'élément filtrant, humidifiez-le
à l'aide d'un vaporisateur d'eau..
1
2
3
5
SC-FIS-CT 26/36/48
6
1
2
3
Page 24
24
Remplacement du sac d'élimination des dé-
chets
Insertion du sac d'élimination des déchets [7]
X
Ouvrez les agrafes de fermeture
[2-2]
et retirez la
partie supérieure de l'appareil
[2-1]
.
X
Placez un nouveau sac d'élimination des déchets
(ENS-CT26/36/48) dans les orifices du réservoir
et verrouillez ce dernier.
Important :
les ouvertures latérales du sac d'élimination des déchets doivent être à l'intérieur de
la cuve de collecte. Veillez à ce que le verrou s'enclenche.
X
Placez le sac d'élimination des déchets sur les
rebords du réservoir.
Veillez à ce que les contacts
[7-1]
ne soient
pas couverts.
X
Remontez la partie supérieure
[2-1]
et fermez les
agrafes de fermeture
[2-2]
.
Retrait du sac d'élimination des déchets [8]
X
Ouvrez les agrafes de fermeture
[2-2]
et retirez la
partie supérieure de l'appareil
[2-1]
.
X
Fermez le sac d'élimination des déchets.
X
Retirez le sac d'élimination des déchets.
X
Éliminez le sac d'élimination des déchets usagé
conformément aux prescriptions légales.
X
Nettoyez la cuve de collecte
[2-3]
.
X
Remontez la partie supérieure
[2-1]
et fermez les
agrafes de fermeture
[2-2]
.
Remplacement du filtre principal
X
Ouvrez les agrafes de fermeture
[2-2]
et retirez
la partie supérieure de l'appareil
[2-1]
.
X
Tournez la partie supérieure de l'appareil de
manière à ce que le filtre principal soit dirigé
vers le haut (figure
[9]
).
X
Relevez la poignée
[9-3]
et retirez le support
[9-
2]
.
X
Retirez le filtre principal usagé
[9-1]
et rempla-
cez-le par un neuf.
X
Éliminez le filtre principal usagé conformément
aux prescriptions légales.
X
Placez le support
[9-2]
et abaissez la poignée
[9-3]
jusqu'à ce qu'elle s'encliquette.
X
Remontez la partie supérieure
[2-1]
et fermez
les agrafes de fermeture
[2-2]
.
1
2
3
7
ENS-CT 26/36/48
7-1
AVIS
Endommagement du moteur
X
N'aspirez jamais alors que le filtre principal
n'est pas monté : risque d'endommagement du
moteur.
1
2
3
8
Page 25
25
Après le travail
X
Arrêtez l'aspirateur mobile et débranchez la fiche secteur.
X
Enroulez le câble d'alimentation secteur.
X
Videz la cuve de collecte.
X
Déposez l'aspirateur mobile dans un local sec
et protégé contre tout utilisation non autorisée.
Vidage de la cuve de collecte
Après avoir retiré la partie supérieure, la cuve de
collecte
[2-3]
peut être vidée.
X
Après l'aspiration de liquides, nettoyez régulièrement les capteurs de niveau
[10-1]
à l'aide
d'un chiffon doux et examinez leur état.
9-1
9-3
9
9-2
1
2
3
5
4
HF-CT26/36/48
AVERTISSEMENT
Poussières nocives pour la santé
Lésions des voies respiratoires
X
Nettoyez entièrement l'aspirateur mobile et tous
les accessoires par aspiration et en les essuyant
(à l'intérieur et à l'extérieur), avant de le retirer
de la zone contaminée.
X
Les composants qui ne peuvent pas être entièrement nettoyés doivent être enfermés hermétiquement pour le transport dans un sac en
plastique.
X
Portez une protection respiratoire !
10-1 10-1
10
Page 26

26
Entretien et maintenance
Observez les consignes suivantes :
– Un contrôle technique doit être effectué au moins
une fois par an par le fabricant ou une personne
instruite (endommagement du filtre, étanchéité
de l'appareil et fonctionnement des dispositifs de
contrôle, etc.).
– Lors de l'exécution des travaux de maintenance
et de réparation, tous les objets contaminés qui
ne peuvent pas être nettoyés de façon satisfaisante doivent être éliminés. De tels objets doivent être éliminés dans des sachets
imperméables, en accord avec les prescriptions
en vigueur pour l'élimination de tels déchets.
Accessoires
Utilisez uniquement les accessoires Festool et consommables Festool d'origine prévus pour cette
machine, car ces composants systèmes sont parfaitement adaptés les uns par rapport aux autres.
Si vous utilisez des accessoires et consommables
d'autres marques, la qualité du résultat peut être
dégradée et les recours en garantie peuvent être
soumis à des restrictions. L'usure de la machine ou
votre charge personnelle peuvent augmenter selon
chaque application. Pour cette raison, protégezvous, votre machine et vos droits à la garantie en
utilisant exclusivement des accessoires Festool et
des consommables Festool d'origine !
Les références des accessoires et des outils figurent dans le catalogue Festool ou sur Internet sous
"www.festoolusa.com".
Modules
Les modules suivants sont disponibles dans la
gamme d'accessoires de l'aspirateur et peuvent
être montés
[1-2]
sur la fiche modulaire par un
atelier de service après-vente agréé :
– module pneumatique,
– module pour satellite d'alimentation (EAA), pour
l'utilisation du dispositif d'enclenchement automatique sur le satellite EAA.
Vous trouverez des informations complémentaires
concernant les modules sur le site Internet
"www.festoolusa.com".
AVERTISSEMENT
Tout travail de maintenance ou de réparation, qui
nécessite l'ouverture du moteur ou du carter
d'engrenages doit uniquement être effectué par
un centre service-client autorisé (nom fourni par
votre revendeur) !
X
Les travaux de maintenance ou de réparation effectués par un personnel non autorisé peuvent
conduire à la mauvaise connexion de câbles
d'alimentation ou d'autres composants, ce qui
peut entraîner à son tour des accidents avec des
conséquences graves.
AVERTISSEMENT
Pour éviter les accidents, retirez toujours la fiche
mâle de la prise d'alimentation électrique avant
d'effectuer tout travail de maintenance ou de réparation sur la machine !
X
N'utilisez pas d'air comprimé pour nettoyer
l'outil électrique ! N'essayez pas de nettoyer des
parties à l'intérieur de la machine de cette façon,
étant donné que des corps étrangers pourraient
pénétrer dans les ouvertures du carter de la machine.
Page 27

27
Recyclage
Ne jetez pas les outils électriques avec les ordures ménagères!
Eliminez les appareils, les acces-
soires et les emballages de façon compatible avec
l'environnement. Respectez en cela les dispositions nationales en vigueur .
Garantie
Conditions de la garantie (1+2 ans)
Vous avez droit à une prolongation de garantie gratuite (1 an + 2 ans = 3 ans) sur votre outil électrique
Festool neuf acheté chez un distributeur autorisé.
Festool assumera tous les coûts d’expédition pendant la première année de la garantie alors que les
deuxième et troisième années, les coûts devront
être assumés par le client. Festool paiera les frais
de retour de l’outil au client par service de livraison
terrestre UPS. La garantie est valable pour une période de 3 ans à compter de la date d’achat indiquée
sur votre reçu ou votre facture.
Garantie limitée de Festool
Cette garantie est valable à condition que l’outil soit
utilisé conformément aux instructions de Festool.
Festool garantit, à l’acheteur initial seulement, que
l’outil indiqué sera exempt de tout défaut de matériau et de fabrication pendant un an à compter de la
date d’achat. Festool ne donne aucune garantie
supplémentaire, implicite ou explicite, sur les instruments portables électriques Festool. Aucun
agent, représentant commercial, distributeur, vendeur ou employé de Festool n’est autorisé à prolonger ou à modifier les obligations ou restrictions de
la présente garantie. Les obligations de Festool
sont, à son entière discrétion, limitées à la réparation ou à l’échange des outils portables électriques
Festool trouvés défectueux dans le présent emballage, tels que fournis avec le présent Guide d’utilisation.
Cette garantie exclut l’usure normale, les dommages causés par un usage impropre, les abus ou la
négligence, ou tout dommage autre que ceux attribuables à des défauts de matériau et de fabrication.
Cette garantie ne s’applique pas aux accessoires
tels que lames de scie circulaire, mèches de perceuse et vilebrequin, lames de scie sauteuse, ban-
des abrasives et meules. Sont également exclues
les pièces d’usure, telles que balais de charbon, lamelles pour outils à air comprimé, joints et manchons de caoutchouc, disques et patins ponceurs,
ainsi que les piles.
En cas de nécessité de dépannage, veuillez visiter
notre site www.festoolusa.com et téléchargez le fiche d'accompagnement. Annexé à votre outil, le
formulaire rempli va accélérer la réparation. Vous
pouvez retrouver les coordonnées au bas de page
du formulaire. Si l'envoi gratuit est approprié pour
votre outil (voir conditions de la garantie 1+2), contactez notre département de service (tel. 888-337-
8600) pour organiser un bulletin d'expédition. Envoies en port dû ne seront pas acceptés.
FESTOOL N’EST EN AUCUN CAS RESPONSABLE
DES DOMMAGES DIRECTS OU INDIRECTS, IMPLICITES OU EXPLICITES, DÉCOULANT DE LA RUPTURE DE CETTE GARANTIE OU DE TOUTE AUTRE
GARANTIE. TOUTES LES GARANTIES IMPLICITES,
Y COMPRIS LES GARANTIES IMPLICITES DE QUALITÉ MARCHANDE ET D’ADÉQUATION À UN USAGE
PARTICULIER, SONT LIMITÉES À UNE PÉRIODE DE
TROIS ANS.
Certains états américains et certaines provinces
canadiennes ne permettent pas la limitation des
garanties implicites; il se pourrait donc que les limites indiquées ci-dessus ne s’appliquent pas dans
votre cas. À l’exception de certaines garanties implicites des provinces ou des états indiquées ici, la
présente garantie est exclusive et remplace toute
autre garantie, convention et obligation similaire de
Festool.
Cette garantie vous confère des droits légaux spécifiques, et vous pouvez aussi avoir d’autres droits
pouvant varier d’un état à l’autre, ou d’une province
à l’autre au Canada.
Page 28

28
Índice
Símbolos
Indicaciones de seguridad
Indicaciones de seguridad importantes
Observe las medidas básicas de precaución siempre que utilice una máquina eléctrica, incluidas las
siguientes:
LEA TODAS LAS INSTRUCCIONES
ANTES DE UTILIZAR EL SISTEMA MÓVIL DE ASPI-
RACIÓN
:
ADVERTENCIA
-
Para disminuir el riesgo de
incendio, de descargas eléctricas y de lesiones
:
– Tenga el sistema móvil de aspiración siempre vi-
gilado mientras esté enchufado. Desenchufe el
sistema móvil de aspiración cuando no lo utilice
y cuando vaya a efectuar el mantenimiento.
– Solamente utilice el sistema móvil de aspiración
en el interior.
– No permita que el sistema móvil de aspiración
se utilice como juguete. Preste especial atención
si los niños utilizan el sistema móvil de aspiración o cuando se use estando ellos cerca.
– Aplique el sistema móvil de aspiración única-
mente como se describe en las instrucciones.
Utilice exclusivamente accesorios recomendados por el fabricante.
– No utilice el sistema móvil de aspiración si el ca-
ble o el enchufe está deteriorado. Si el sistema
móvil de aspiración no funciona como debiera, si
se ha caído, está dañado, se ha dejado a la intemperie o sumergido en agua, llévelo a un taller
para su reparación.
– No tire del cable ni lo utilice como asidero para
desplazar el aspirador; procure que el cable no
quede aprisionado en las puertas ni roce bordes
cortantes. No pase el sistema móvil de aspira-
Símbolos .............................................. 28
Indicaciones de seguridad................... 28
Datos técnicos...................................... 30
Descripción de las funciónes .............. 30
Uso conforme a lo previsto.................. 31
Puesta en servicio................................ 31
Ajustes ................................................. 32
Trabajo ................................................. 33
Filtro..................................................... 34
Al finalizar el trabajo ........................... 37
Mantenimiento y cuidado..................... 37
Accesorios............................................ 38
Reciclaje............................................... 38
Garantía ............................................... 38
VVoltios
WVatios
AAmperios
Hz Hertzios
~ Tensión alterna
d.c.
Corriente directa
n
0
Revoluciones por minuto en vacio
Clase II Constucción
.../min
min
-1
Revoluciones por minuto
hhora
min minuto
ssegundo
kg kilogramo
Diámetro
Indicación, consejo
Pa Pascal
dB decibelio
Aviso ante un peligro general
Peligro de electrocución
¡Leer las instrucciones e indicaciones!
¡Utilizar protección respiratoria!
Page 29

29
ción por encima del cable. Mantenga el cable alejado de superficies calientes.
– No desenchufe el sistema móvil de aspiración ti-
rando del cable. Tire siempre del enchufe, no del
cable.
– No manipule el cable ni el sistema móvil de as-
piración con las manos mojadas.
– No introduzca ningún objeto en las aberturas. No
utilice el sistema móvil de aspiración si hay alguna abertura obstruida; mantenga las aberturas
limpias de polvo, hilachas, pelos o cualquier otra
cosa que pueda reducir el flujo de aire.
– Mantenga el pelo, la ropa holgada, los dedos o
cualquier otra parte del cuerpo alejados de las
aberturas y de las piezas en movimiento.
– Apáguelo todo antes de desenchufar el sistema
móvil de aspiración.
– Tenga especial precaución cuando pase el aspi-
rador en escaleras.
– No recoja líquidos inflamables o explosivos,
como puede ser la gasolina, ni utilice el sistema
móvil de aspiración en zonas donde se encuentren estos líquidos.
– Enchufe el sistema móvil de aspiración sólo en
una caja de contacto adecuada que disponga de
conexión a tierra. Véanse las instrucciones para
la puesta a tierra.
– No recoja ningún objeto que arda o humee, como
cigarrillos, fósforos o ceniza caliente.
– No utilice el sistema móvil de aspiración si el
saco para polvo y/o el filtro está desmontado.
GUARDE ESTAS INSTRUCCIONES
INSTRUCCIONES PARA LA PUESTA A TIE-
RRA
Esta máquina requiere una puesta a tierra. En caso
de tener un fallo o una avería, la puesta a tierra proporciona el recorrido más corto de resistencia para
la corriente eléctrica reduciendo así el peligro de
recibir una descarga eléctrica. El sistema móvil de
aspiración está equipado con un cable que tiene
conductor de protección y enchufe Schuko. El enchufe debe conectarse en una caja de contacto adecuada que esté correctamente instalada y puesta a
tierra de acuerdo con los códigos y disposiciones
locales.
ADVERTENCIA
- Una conexión incorrecta del
conductor de protección puede conllevar peligro de descarga eléctrica. Si no está seguro
de si la caja de contacto está puesta a tierra, haga
que lo compruebe un electricista especializado o
un operario de mantenimiento. No modifique el enchufe con el que se suministra el sistema móvil de
aspiración; si el enchufe no se ajusta a la caja de
contacto, es conveniente que un técnico electricista
instale una caja de contacto apropiada.
Instrucciones sobre la polarización
Este sistema móvil de aspiración tiene un enchufe
polarizado (una clavija es más ancha que la otra)
para reducir el riesgo de recibir una descarga eléctrica. El enchufe sólo se puede insertar en una dirección en la caja de contacto polarizada. Si el enchufe no entra en la caja de contacto, gírelo. Si esta
medida tampoco da resultado, llame a un técnico
electricista para instalar una caja de contacto apropiada. En ningún caso debe cambiar el enchufe.
Riesgos para la salud producidos por el polvo
ADVERTENCIA!
Algunos polvos creados por
lijadoras motorizadas, aserraderos, trituradores, perforadoras y otras actividades de
construcción contienen sustancias químicas que se
sabe (en el Estado de California) causan cáncer, defectos de nacimiento u otros daños al sistema reproductivo. Algunos ejemplos de estas sustancias
químicas son:
• Plomo de las pinturas con base de plomo
• Sílice cristalino de los ladrillos y cemento y otros
productos de mampostería, y
• Arsénico y cromo de madera tratada con sustancias químicas
El riesgo de exposición a estas
sustancias varía, dependiendo
de cuantas veces se hace este
tipo de trabajo. Para reducir el
contacto con estas sustancias
químicas: trabaje en un área
con buena ventilación y trabaje con equipo de seguridad aprobado, como mascarillas para el polvo diseñadas específicamente para filtrar partículas
microscópicas.
ADVERTENCIA
PARA REDUCIR EL RIESGO DE LESIÓN, EL USUARIO DEBE LEER EL MANUAL DE INSTRUCCIÓN.
Page 30

30
Datos técnicos
Descripción de las funciónes
Las imágenes con la dotación de suministro se encuentran en una hoja desplegable al comienzo de
este manual de instrucciones. Cuando lea este manual, le recomendamos que despliegue esta página
para disponer fácilmente de una vista general de la
máquina.
Sistemas móviles de aspiración CT 26 E AC, CT 36 E AC, CT 48 E AC
Consumo de potencia (sistema móvile de aspiración solamente)
2.9 - 8.3 A (350 - 1000 W)
1.)
Consumo nominal total máx. 12 A (1440 W)
Potencia max. de herramienta electrica acoplada 3.7 A
2.)
Caudal de aire (volumen), turbina máx. 234 m³/h (8.4 pies³/h)
Depresión, turbina máx. 24000 Pa
Superficie del filtro 6318 cm² (979.3 pulg.²)
Nivel de intensidad sonora según IEC 60704-2-1 71 dB(A)
Tubo flexible de aspiración D 27 mm x 3.5 m (1.06 pulg. x 11.48 pulg.)
Tipo de protección IP X4
Capacidad del depósito CT 26 E AC 26 l (6.9 gal.)
CT 36 E AC 36 l (9.5 gal.)
CT 48 E AC 48 l (12.7 gal.)
Dimensiones (L x An x Al) CT 26 E AC 630 x 365 x 540 mm
(24.8 pulg. x 14.4 pulg. x 21.3 pulg.)
CT 36 E AC 630 x 365 x 596 mm
(24.8 pulg. x 14.4 pulg. x 23.5 pulg.)
CT 48 E AC 740 x 406 x 1005 mm
(29.1 pulg. x 16.0 pulg. x 39.6 pulg,)
Peso CT 26 E AC 14.7 kg (32.4 lbs)
CT 36 E AC 15.2 kg (33.5 lbs)
CT 48 E AC 19.6 kg (43.2 lbs)
1.
) 8,3 A (1000 W) es el valor medio de condiciónes de trabajo, un consumo de potencia de 10 A (1200 W) es possible.
2.
) Si la regulación de la capacidad de aspiración [1-7] esta ajustada a la capacidad de aspiración (véase pagina 32, capítulo Ajustes -
Regulación de la capacidad de aspiración) minima, la potencia maxima de la herramienta electrica acoplada puede ser 9,1 A.
[1-1]
Orificio de aspiración
[1-2]
Ranura de conexión para módulo
[1-3]
Caja de contacto de la máquina
[1-4]
Compartimento para tubos flexibles
[1-5]
Empuñadura
[1-6]
SysDoc
[1-7]
Limpieza automática
[1-8]
Regulación de la capacidad de aspiración
[1-9]
Interruptor
[1-10]
Pinzas de cierre
[1-11]
Depósito para la suciedad
[1-13]
Freno
Page 31

31
Uso conforme a lo previsto
Los sistemas móviles de aspiración están indicados
conforme a las normas para succionar y aspirar
polvo perjudicial para la salud, suciedad, arena, virutas, etc.
Este sistema móvil de aspiración ha sido diseñado
conforme a las normas para aspirar agua.
Este sistema móvil de aspiración es apropiado para
el uso en casa, commercial o ambos.
Este sistema móvil de aspiración es apropiado para
el uso en el exterior y estocaje en el interior.
Puesta en servicio
Tenga en cuenta las imágenes al principio del manual.
Primera puesta en servicio
X
Abra las pinzas de cierre
[2-2]
y extraiga la par-
te superior de la herramienta
[2-1]
.
X
¡Retire los accesorios del depósito para la suciedad
[2-3]
y el embalaje!
X
Introduzca una bolsa filtrante o una bolsa de
evacuación en el depósito para suciedad (véanse los capítulos Sustitución de la bolsa filtrante
(SC-FIS-CT 26/36/48) y Cambio de la bolsa de
evacuación).
X
Vuelva a colocar la parte superior
[2-1]
y cierre
las pinzas correspondientes
[2-2]
.
X
Monte el enrollacables en la parte trasera del
sistema móvil de aspiración (véase la figura
[3]
).
X
Conecte el tubo flexible de aspiración a la herramienta.
Conexión y desconexión
X
Conecte el enchufe a una toma de corriente con
protección de puesta a tierra.
El interruptor de la máquina
[1-9]
se utiliza como
interruptor de conexión y desconexión. Presenta
tres posiciones:
Posición "0" del interruptor
La caja de contacto de la máquina
[1-3]
no recibe
corriente, el sistema móvil de aspiración está apagado.
ADVERTENCIA
El usuario responde de los daños y accidentes
que puedan derivarse de un uso no conforme a lo
previsto.
ADVERTENCIA
Tensión o frecuencia no permitida
Peligro de caída
X
La tensión de red y la frecuencia de la red eléctrica deben coincidir con los datos que figuran
en la placa de tipo.
X
En Norteamérica sólo las máquinas Festool
pueden utilizarse con una tensión de 120 V/60
Hz.
ATENCIÓN
Peligro de lesiones a causa de herramientas
eléctricas sin control
X
Antes de girar el interruptor a la posición "AUTO" o "MAN", asegúrese de que la herramienta
eléctrica conectada esté apagada.
3
Page 32

32
Posición "MAN" del interruptor
La caja de contacto de la máquina
[1-3]
no recibe
corriente, el sistema móvil de aspiración arranca.
Posición "Auto" del interruptor
La caja de contacto de la máquina
[1-3]
es conductora de corriente, el sistema móvil de aspiración
arranca al encender la herramienta conectada.
Alargador
Si fuera necesario utilizar un alargador, éste deberá estar provisto de una sección transversal suficiente como para evitar una pérdida excesiva de
voltaje o que se produzca un sobrecalentamiento.
Una pérdida excesiva de voltaje reduce el rendimiento y puede causar el fallo del motor. La tabla
que aparece a continuación indica el diámetro correcto del cable en función de la longitud del cable
de ésta maquina.
Use sólo los alargadores U.L. y CSA que figuran en
la relación.
No utilice nunca dos alargadores juntos. Se recomienda usar un solo cable largo.
L
Cuanto menor sea el número AWG, más fuerte
será el cable.
Sistema antiestático
Durante la aspiración se generan cargas estáticas
a causa del rozamiento que se produce en el tubo
flexible de aspiración. Como consecuencia, el personal que maneja la herramienta puede sufrir desagradables descargas eléctricas. Con el objeto de
desviar las cargas estáticas, el sistema móvil de
aspiración está equipado de serie con un sistema
antiestático. Para ello, se debe utilizar el tubo flexible de aspiración antiestático incluido en la dotación de suministro de la herramienta.
Ajustes
Tenga en cuenta las imágenes al principio del manual.
Conexión de la herramienta eléctrica
X
Enchufe la herramienta eléctrica en la caja de
contacto de la máquina
[1-3]
.
Conexión de la herramienta neumática
Si se monta el módulo neumático
[1-2]
(496141), la
conexión automática del sistema móvil de aspira-
ción funciona también en combinación con herramientas neumáticas.
Asimismo, recomendamos el montaje adicional de
la unidad de alimentación VE (495886). La unidad
de alimentación filtra y engrasa el aire comprimido
y permite regular la presión neumática. Para conectar herramientas neumáticas de Festool con el
sistema IAS se requiere una pieza de empalme IAS
(454757).
A fin de garantizar un buen funcionamiento de la
conexión automática, la presión de servicio de la
herramienta debe ser de 6 bar.
Protector contra sobretemperatura
A fin de proteger el sistema móvil de aspiración
ante un sobrecalentamiento, el protector contra
sobretemperatura desconecta la herramienta antes de alcanzar una temperatura crítica.
X
Apague el sistema móvil de aspiración y deje
que se enfríe durante aprox. 5 minutos.
L
Si el sistema móvil de aspiración no puede volverse a encender, consulte a un taller de servicio de Festool.
Regulación de la capacidad de aspiración
La potencia de aspiración se puede ajustar a través
del interruptor de regulación de la capacidad de as-
Longitud total del
cable alargador (pie)
25 50 100 150
Dimensiones del
cable (AWG)
14 14 no recomen-
dado
ADVERTENCIA
Peligro de lesiones
X
Respete el consumo nominal máximo en la caja
de contacto de la máquina (véase el capítulo
"Datos técnicos")
X
Asegúrese de que la herramienta eléctrica esté
apagada al enchufarla y desenchufarla.
ADVERTENCIA
Peligro de lesiones
X
Asegúrese de que la herramienta neumática
esté apagada al enchufarla y desenchufarla.
Page 33
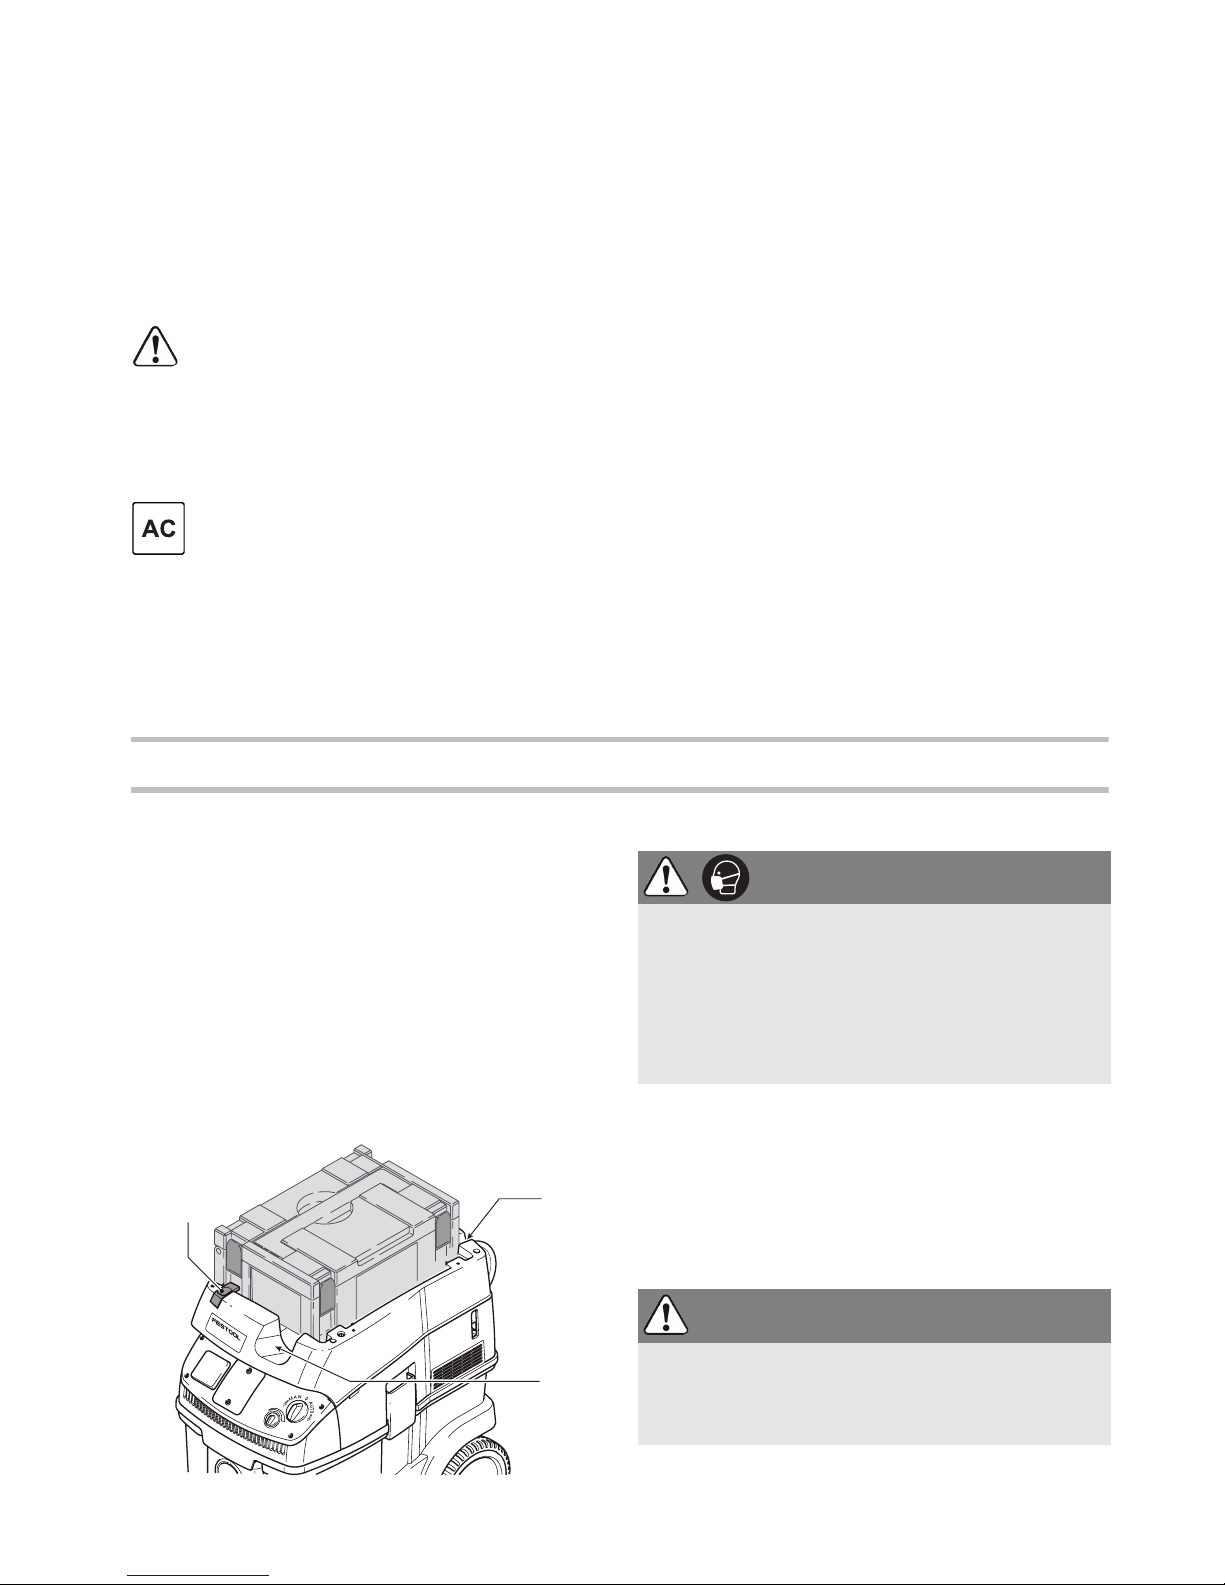
33
piración
[1-8]
. De esta manera puede adaptarse
con precisión a diferentes trabajos de aspiración.
AUTO
Clean
- Limpiar el filtro principal
Para garantizar una potencia de aspiración elevada
constante al aspirar polvos finos, en el botón giratorio
[1-7]
puede ajustar de forma progresiva la
frecuencia de la limpieza automática. Utilice la limpieza automática únicamente con una bolsa de evacuación.
Sitúe el botón giratorio para aspirar en mojado y trabajar con bolsa filtrante
[1-7]
en po-
sición 0.
X
Si la cantidad de polvo es elevada, ajuste la limpieza automática
[1-7]
al valor máximo.
Limpieza manual
Si la potencia de aspiración va disminuyendo, la limpieza se puede iniciar manualmente girando el interruptor de la máquina
[1-9]
a la posición con el símbolo AC en uno de los dos lados del interruptor de la máquina.
Cuando el nivel de suciedad del filtro principal sea
extremadamente elevado, recomendamos una
limpieza completa:
X
Tape durante 2 segundos el orificio de la boquilla o del tubo flexible con la palma de la mano.
X
Gire el interruptor de la máquina
[1-9]
a la po-
sición con el símbolo
AC
.
L
Si se utiliza la corredera de enclavamiento CTVS (referencia: 497926), se puede realizar una
limpieza completa sin desmontar la herramienta eléctrica conectada.
En caso de un uso muy intenso, el polvo puede estar
muy incrustado, por lo que será necesario limpiar
el filtro principal de forma mecánica (p. ej., aspirando). Utilice siempre para ello una protección
respiratoria.
Bloqueo del freno
El sistema móvil de aspiración se puede bloquear
accionando la palanca de freno
[1-13]
. Para ello,
levantar ligeramente el sistema móvil de aspiración por la parte delantera y presionar la palanca
de freno hacia abajo hasta que enclave. Presione la
palanca para soltar el freno
[1-12]
.
Trabajo
Manejo
Compartimento para tubos flexibles:
al concluir el
trabajo se puede pasar el tubo flexible de aspiración a través de la abertura
[4-3]
y guardarlo en el
compartimento correspondiente. Igualmente puede conducir el cable de red por la abertura
[4-2]
y
guardarlo en el compartimento para tubos flexibles.
Bandeja SysDoc para Systainer:
en la superficie
para depositar objetos se puede fijar un Systainer
con las dos correderas
[4-1]
.
Aspiración de sustancias secas
Atención:
un filtro principal húmedo se obstruye
más rápidamente al aspirar sustancias secas. Por
ese motivo, es aconsejable dejar secar el filtro
principal o sustituirlo por uno seco antes de aspirar
polvo.
Aspiración de líquidos
4-1
4-2
4-3
ADVERTENCIA
Esta aspiradora no es adecuada para recoger
sustancias o polvos peligrosos o tóxicos, como
por ejemplo asbestos.
X
Los filtros no podrán atrapar todas las partículas y es posible que las expulsen de vuelta al
medio ambiente.
ADVERTENCIA
Peligro de lesiones
X
¡No está permitido aspirar / succionar líquidos
inflamables!
Page 34
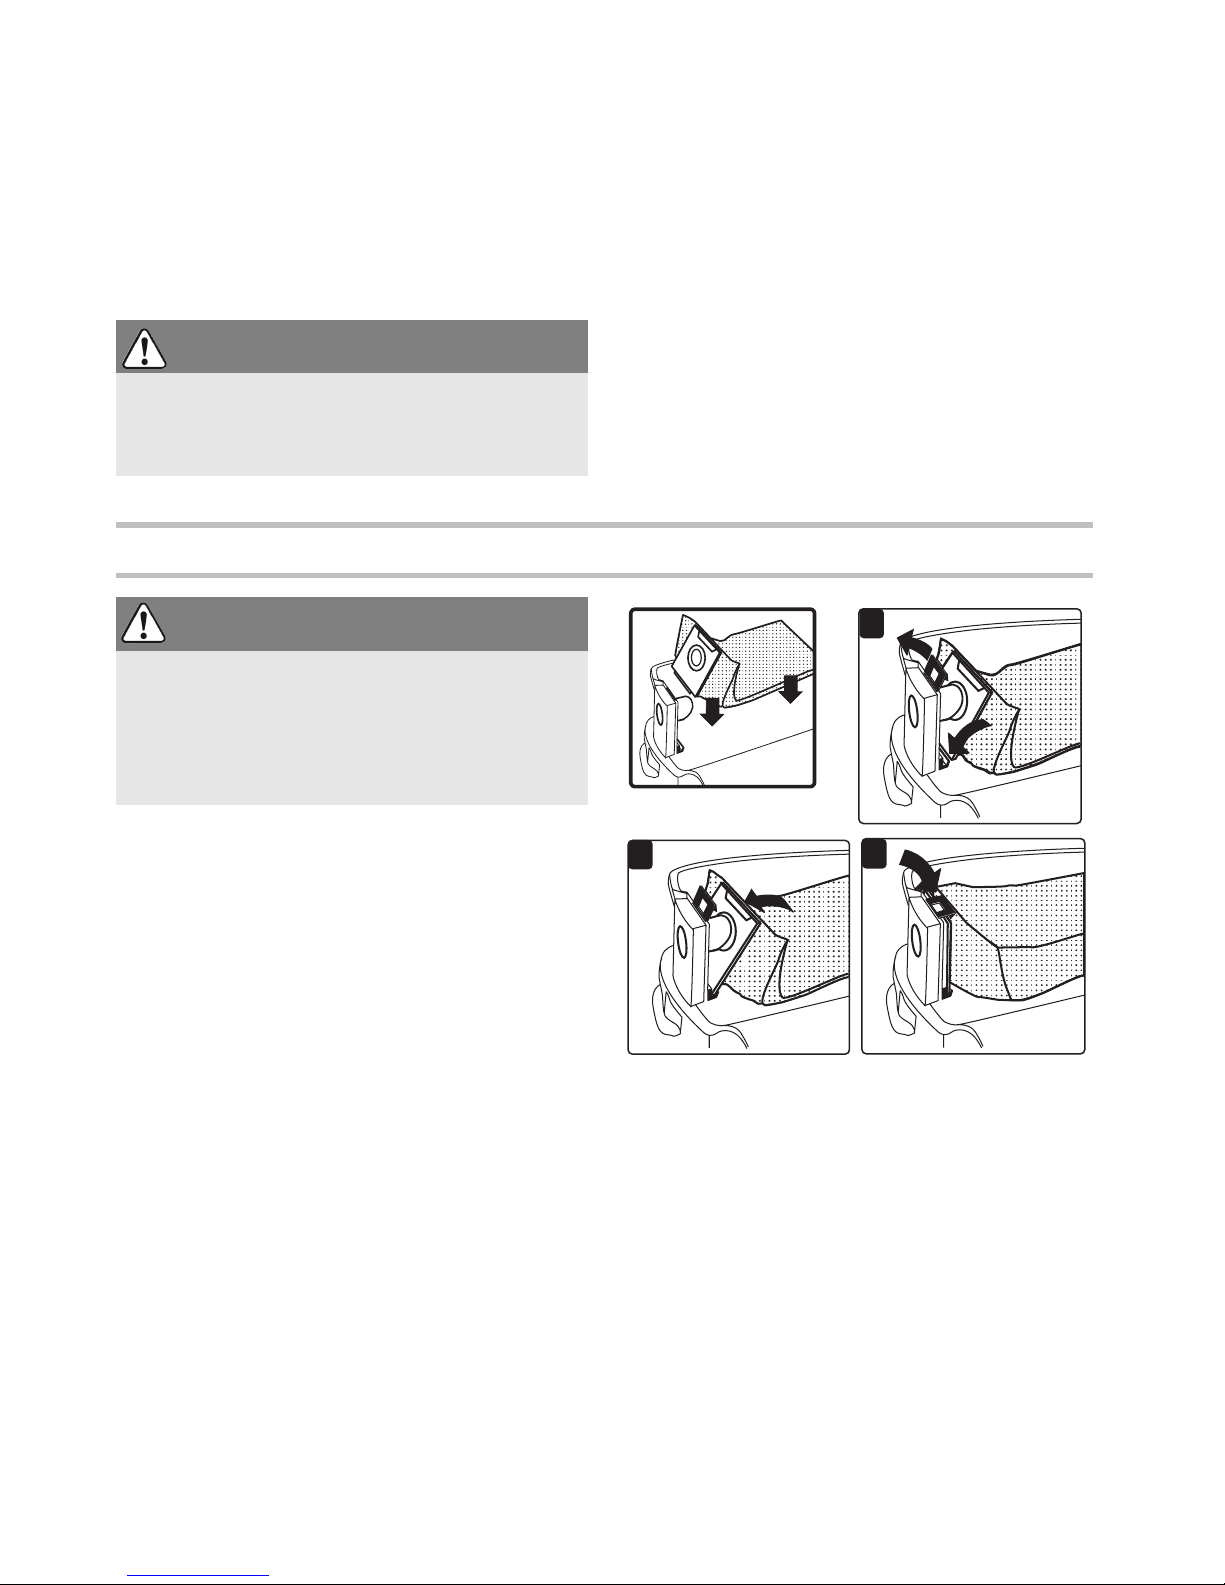
34
L
El elemento filtrante sólo debe utilizarse para
aspirar sustancias secas.
Retire la bolsa filtrante o la bolsa de evacuación antes de aspirar líquidos (véase Sustitución de la bolsa filtrante (SC-FIS-CT 26/36/48) y Cambio de la
bolsa de evacuación). Se recomienda el empleo de
un filtro húmedo especial.
Cuando se alcanza el nivel de llenado máximo, la
aspiración se interrumpe automáticamente.
Particularidades CT 36 E AC-LHS
Para poder utilizar el sistema móvil de aspiración
en combinación con
PLANEX
:
X
Utilice el tubo flexible de aspiración D 36 mm x
3,5 m-AS resistente a las roturas suministrado.
X
Utilice el manguito de aspiración especial suministrado para conectar
PLANEX
.
X
Coloque la corredera de enclavamiento CT-VS
suministrada entre el orificio de aspiración
[1-
1]
y el tubo flexible de aspiración.
X
Monte el soporte para herramientas siguiendo
las instrucciones de montaje adjuntas.
X
Para trabajos de aspiración con
PLANEX
para
una eliminación con poco polvo utilice únicamente la bolsa de evacuación.
Filtro
Sustitución de la bolsa filtrante
(SC-FIS-
CT 26/36/48)
Colocación de la bolsa filtrante [5]
X
Abra las pinzas de cierre
[2-2]
y extraiga la par-
te superior de la herramienta
[2-1]
.
X
Coloque una nueva bolsa filtrante (SC-FIS-CT
26/36/48).
Importante:
Asegùrese de que el
pestillo se enclave.
L
Asegúrese de que la bolsa filtrante no se enganche entre las partes superior e inferior.
X
Vuelva a colocar la parte superior
[2-1]
y cierre
las pinzas correspondientes
[2-2]
.
Extracción de la bolsa filtrante [6]
X
Abra las pinzas de cierre
[2-2]
y extraiga la par-
te superior de la herramienta
[2-1]
.
X
Retire la bolsa filtrante.
X
Elimine la bolsa filtrante usada teniendo en
cuenta las disposiciones vigentes aplicables.
ATENCIÓN
Espuma o líquidos que sobresalen
X
Desconecte la herramienta de inmediato y vacíe
el depósito para la suciedad.
ADVERTENCIA
Peligro de lesiones
X
Procure no levantar más polvo del necesario
cuando realice las tareas que se describen a
continuación. Humedezca el elemento filtrante
con un rociador de agua antes de retirarlo.
1
2
3
5
Page 35
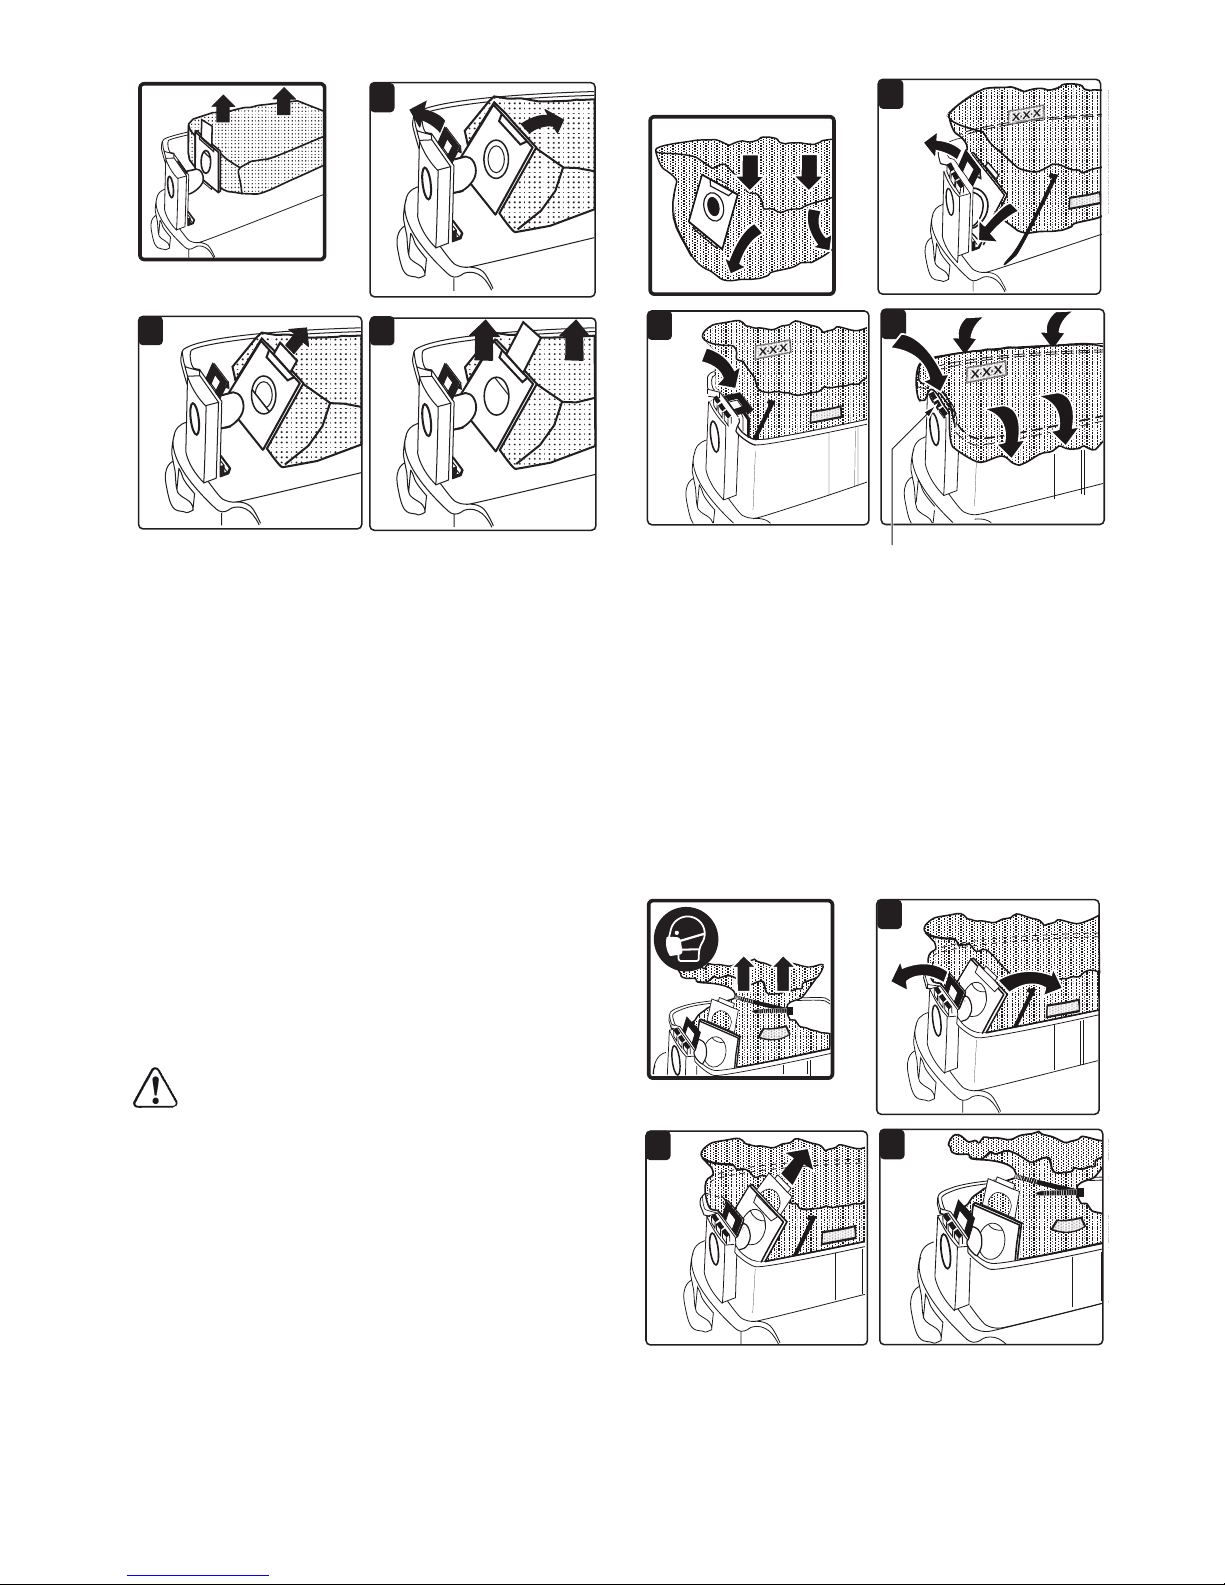
35
X
Limpie el depósito para la suciedad
[2-3]
.
X
Vuelva a colocar la parte superior
[2-1]
y cierre
las pinzas correspondientes
[2-2]
.
Cambio de la bolsa de evacuación
Inserción de la bolsa de evacuación [7]
X
Abra las pinzas de cierre
[2-2]
y extraiga la par-
te superior de la herramienta
[2-1]
.
X
Introduzca una nueva bolsa de evacuación
(ENS-CT26/36/48) en el empalme del depósito y
bloquéelo.
Importante:
los orificios laterales de la bolsa de
evacuación deben estar dentro del depósito
para suciedad. Asegúrese de que el pestillo se
enclava.
X
Coloque la bolsa de evacuación por encima del
borde del depósito.
Asegúrese de que los contactos
[7-1]
están
libres.
X
Vuelva a colocar la parte superior
[2-1]
y cierre
las pinzas correspondientes
[2-2]
.
Extracción de la bolsa de evacuación [8]
X
Abra las pinzas de cierre
[2-2]
y extraiga la par-
te superior de la herramienta
[2-1]
.
X
Cierre la bolsa de evacuación.
X
Retire la bolsa de evacuación.
X
Elimine la bolsa de evacuación usada teniendo
en cuenta las leyes aplicables.
X
Limpie el depósito para la suciedad
[2-3]
.
X
Vuelva a colocar la parte superior
[2-1]
y cierre
las pinzas correspondientes
[2-2]
.
6
1
2
3
1
2
3
7
ENS-CT 26/36/48
7-1
1
2
3
8
Page 36
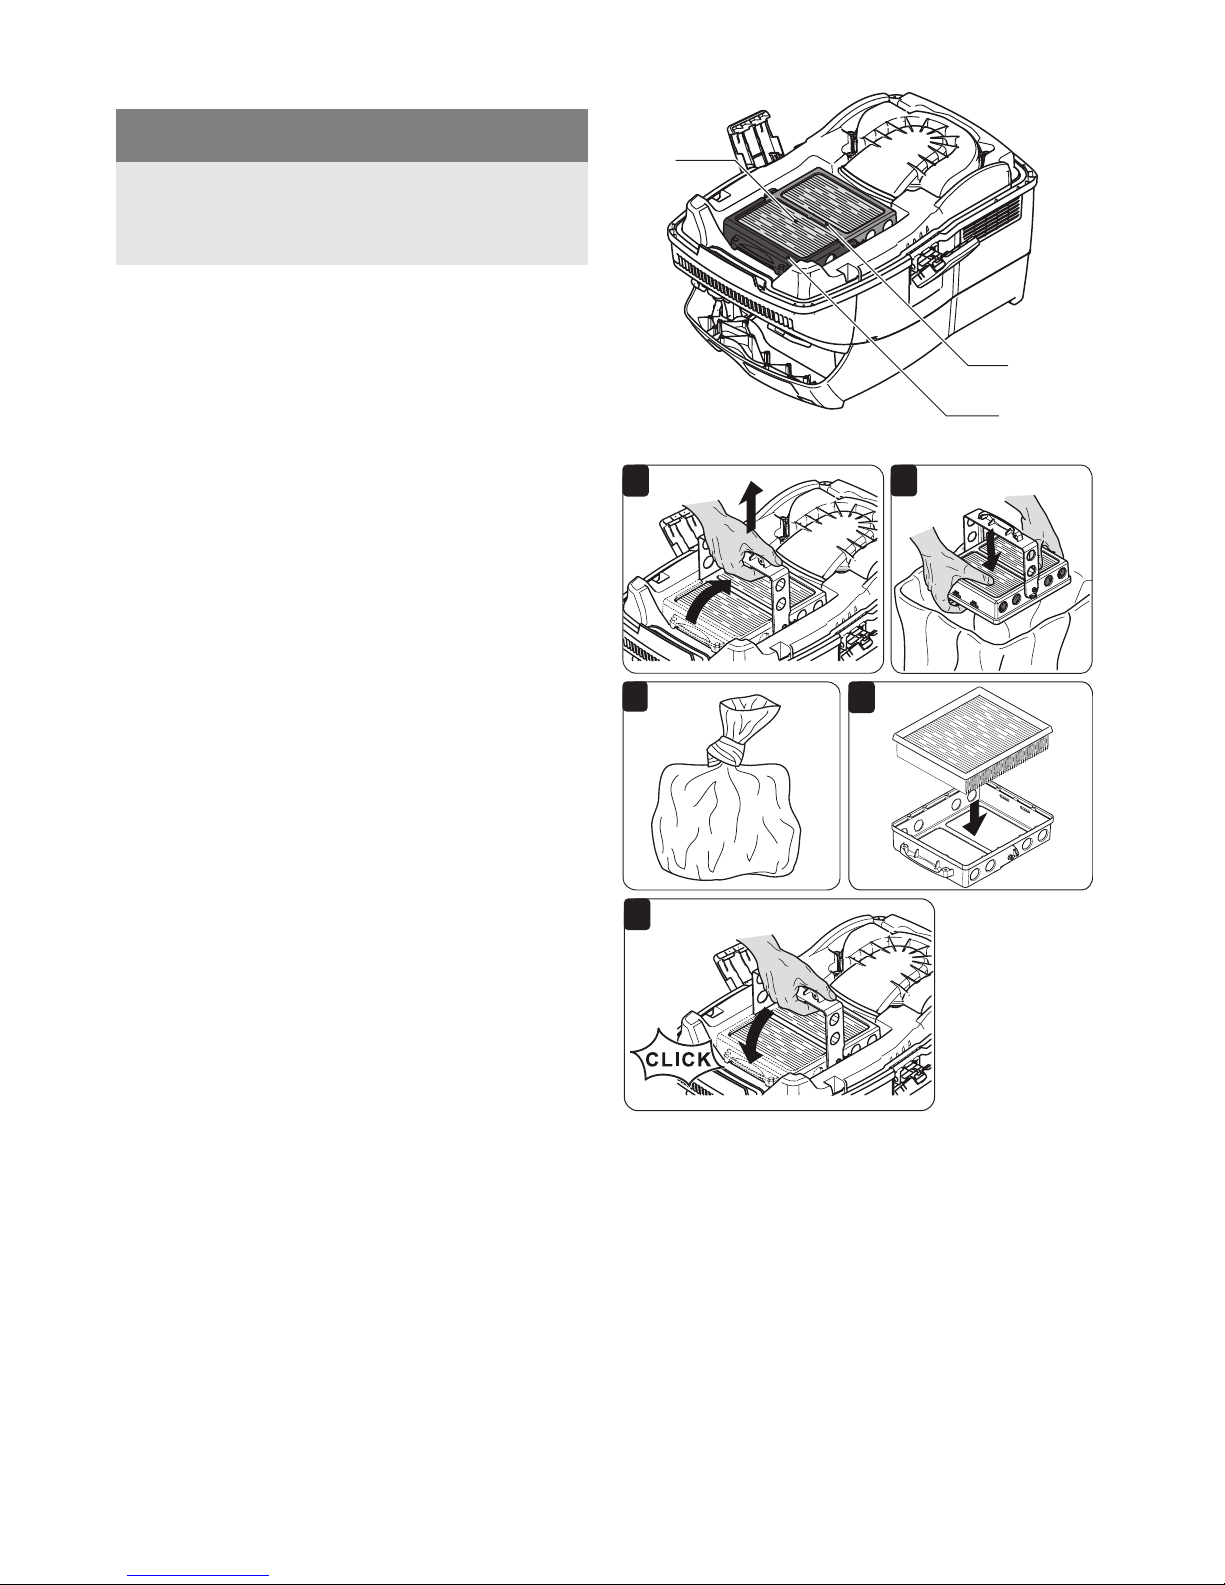
36
Cambio del filtro principal
X
Abra las pinzas de cierre
[2-2]
y extraiga la par-
te superior de la herramienta
[2-1]
.
X
Vuelva a colocar la parte superior
[2-1]
y cierre
las pinzas correspondientes
[2-2]
.
X
Gire la parte superior de la herramienta de manera que el filtro principal quede orientado hacia arriba (figura
[9]
).
X
Mueva la palanca
[9-3]
y extraiga el soporte
[9-
2]
.
X
Extraiga el filtro principal usado
[9-1]
y sustitú-
yalo por uno nuevo.
X
Deseche el filtro principal usado teniendo en
cuenta las leyes aplicables.
X
Inserte el soporte
[9-2]
y mueva la palanca
[9-
3]
hasta que se enclave.
NOTA
Daños en el motor
X
El motor puede provocar daños si se aspira sin
tener un filtro principal montado.
7-1
7-3
7
7-2
1
2
3
5
4
Page 37
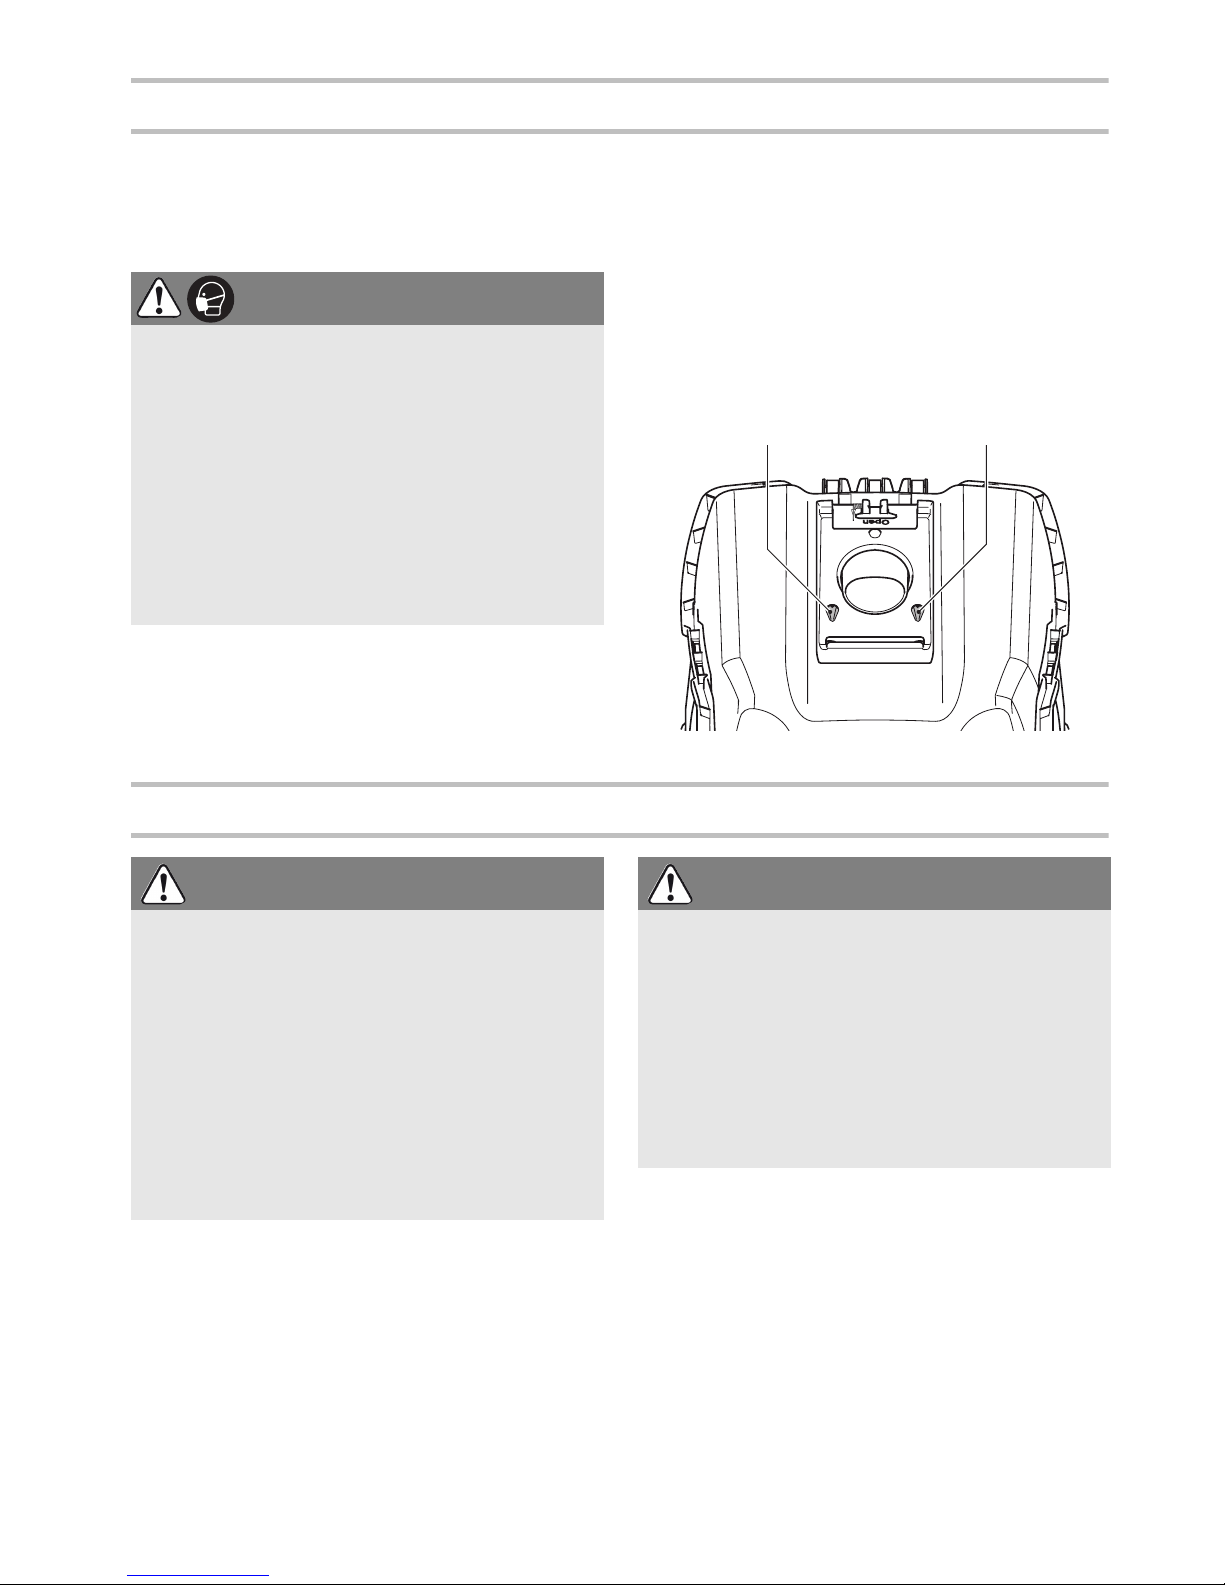
37
Al finalizar el trabajo
X
Apague el sistema móvil de aspiración y extraiga el enchufe de la toma de corriente.
X
Enrolle el cable de conexión a la red eléctrica.
X
Vacíe el depósito para la suciedad.
X
Guarde el sistema móvil de aspiración en un lugar seco, protegido contra un uso no autorizado.
Vaciado del depósito para la suciedad
Una vez extraída la parte superior
[2-3]
, se puede
vaciar el depósito para la suciedad.
X
Después de aspirar líquidos, limpie regularmente los sensores del nivel de llenado
[10-1]
con un paño suave y compruebe si presentan
daños.
Mantenimiento y cuidado
El fabricante o una persona capacitada debe realizar
un control técnico del polvo al menos una vez al año
con el objeto de comprobar, p. ej., posibles daños del
filtro, la estanqueidad de la herramienta y el correcto
funcionamiento de los dispositivos de control.
Al efectuar los trabajos de mantenimiento y reparación se deben eliminar todas las piezas sucias que
no se puedan limpiar de forma satisfactoria. Estas
piezas deben eliminarse en bolsas estancas en
cumplimiento con las disposiciones vigentes para
la eliminación de este tipo de residuos.
ADVERTENCIA
Polvo perjudicial para la salud
Daños en las vías respiratorias
X
Limpie el sistema móvil de aspiración y todos los
accesorios aspirándolos y limpiándolos a fondo
(por dentro y por fuera), antes de retirarlo de la
zona de trabajo.
X
Las piezas que no puedan limpiarse completamente se deben transportar dentro de una bolsa
de plástico hermética.
X
¡Utilice una mascarilla de protección!
8-1 8-1
8
ADVERTENCIA
Cualquier trabajo de mantenimiento o reparación
que requiera abrir el motor o la carcasa del engranaje deberá ser realizado únicamente por un
Centro de Atención al Cliente (nombre proporcionado por su concesionario).
X
Los trabajos de mantenimiento o reparación
realizados por una persona no autorizada podrían provocar la conexión incorrecta de los conductores de alimentación u otros componentes,
lo que a su vez podría provocar accidentes con
consecuencias graves.
ADVERTENCIA
Para prevenir los accidentes, antes de realizar
cualquier trabajo de mantenimiento o reparación
en la máquina retire siempre el enchufe de la
toma de corriente.
X
No utilice aire a presión para limpiar las herramientas eléctricas No intente limpiar las partes
internas de la máquina de este modo, ya que podría permitir la entrada de objetos extraños a través de las aperturas de la carcasa de la máquina.
Page 38

38
Accesorios
Utilice únicamente los accesorios Festool originales y el material de consumo Festool diseñados
para esta máquina, puesto que los componentes de
este sistema están óptimamente adaptados entre
sí. La utilización de accesorios y material de consumo de otros fabricantes puede afectar a la calidad
de los resultados de trabajo y conllevar una limitación de los derechos de la garantía. El desgaste de
la máquina o de su carga personal puede variar en
función de la aplicación. Utilice únicamente accesorios originales y material de consumo de Festool
para su propia protección y la de la máquina, así
como de los derechos de la garantía.
Los números de pedido de los accesorios y las herramientas figuran en el catálogo de Festool o en la
dirección de Internet www.festool-usa.com.
Módulos
Para ampliar el sistema móvil de aspiración existen
los siguientes módulos disponibles en el programa
de accesorios que pueden ser montados en
[1-2]
la
ranura de conexión para módulos por parte del taller de servicio al cliente autorizado:
– módulo neumático,
– módulo para el cabezal de aspiración (EAA) para
la utilización de la conexión automática en el
EAA.
Encontrará más información sobre los diferentes
modelos en la dirección de Internet "www.festool.com".
Reciclaje
¡No desechar las herramientas eléctricas junto
con los residuos domésticos!
Recicle los aparatos,
accesorios y embalajes de forma respetuosa con el
medio ambiente. Tenga en cuenta la normativa vigente del país.
Garantía
Condiciones de la Garantía 1 + 2
Usted tiene derecho a una garantía extendida gratuita (1 año + 2 años = 3 años) para su nueva herramienta mecánica Festool comprada en comprada
en un vendedor autorizado. Festool se hará responsable por los gastos de envío durante el primer año
de garantía. Durante el segundo y tercer año de garantía el cliente es responsable por el costo del envío de la herramienta a Festool. Festool pagará el
embarque de regreso al cliente usando UPS
Ground Service. Todo el servicio de garantía es válido por 3 años desde la fecha de la compra de
acuerdo a la fecha de su recibo o factura de compra.
Garantía limitada de Festool
Esta garantía es válida con la condición previa de
que la herramienta se usa y opera de conformidad
con las instrucciones de operación de Festool. Festool garantiza, sólo al comprador original, que la
herramienta especificada estará libre de defectos
de fabricación y materiales durante un periodo de
un año a partir de la fecha de compra. Festool no
otorga otras garantías, ni explícitas ni implícitas
para ninguna de las herramientas mecánicas por-
tátiles Festool. Ningún agente, representante, distribuidor, comerciante o empleado de Festool está
autorizado para extender o modificar de cualquier
manera las obligaciones o limitaciones de esta garantía. Las obligaciones de Festool, a su propia entera discreción, están limitadas a la reparación o
sustitución de cualquier herramienta portátil Festool que se encuentre estar defectuosa en el momento de ser embalada junto con el manual de
usuario.
Quedan excluidos de la cobertura en esta garantía:
el desgaste normal; los daños causados por uso indebido, el abuso o negligencia; los daños causados
por cualquier otra causa que no sean defectos del
material o de la fabricación. Esta garantía no aplica
a accesorios como cuchillas de sierras circulares,
brocas de taladro, barrenas de buriladora, cuchillas de sierra, cuchillas para sierras de calado, correas de lijadoras y ruedas de esmeril. También se
excluyen las “partes que se desgastan” como cepillos de carbón, laminillas de herramientas de aire,
collarines de hule y sellos, discos y cojines de lijado, y baterías.
Page 39

39
Si sus herramientas eléctricas Festool necesitan
reparación, por favor vaya a www.festoolusa.com y
baje el formato de orden de reparación. Adjunte el
formato rellenado con la herramienta para agilizar
la reparación. Puede encontrar la dirección en la
parte inferior del impreso. Por favor llame nuestro
departamento de servicio al 888-337-8600 para recibir una etiqueta de envío si la herramienta cumple con los requisitos necesarios para el envío sin
costo a nuestro centro de reparación (véase las
condiciones 1+2 garantía, parte autorización). No
se acepta envío por cobrar.
EN NINGÚN CASO FESTOOL SE HARÁ RESPONSABLE POR LOS DAÑOS SECUNDARIOS O CONSECUENTES OCASIONADOS POR LA VIOLACIÓN DE
ESTA O CUALQUIER OTRA GARANTÍA, SEA EXPLÍCITA O IMPLÍCITA. TODAS LAS GARANTÍAS IMPLICADAS POR LEYES ESTATALES, INCLUYENDO LAS
GARANTÍAS IMPLICADAS DE COMERCIALIZACIÓN
Y ADECUACIÓN A UN PROPÓSITO PARTICULAR,
QUEDAN LIMITADAS A TRES AÑOS DE DURACIÓN.
Algunos estados de EE.UU. y algunas provincias de
Canadá no permiten las limitaciones en cuanto a la
duración de las garantías implícitas, de modo que
la limitación arriba indicada puede que no le afecte.
A excepción de algunas garantías implicadas por
leyes estatales o provinciales, limitadas por la presente, la anteriormente citada garantía, expresamente limitada, es exclusiva y sustituye a cualquier
otra garantía, acuerdo u obligación similar de Festool.
Esta garantía le concede derechos legales específicos y usted podría tener otros derechos legales que
varían de estado a estado en EE.UU. y de provincia
a provincia en Canadá.
 Loading...