

Page 1

MUSTANG FLOOR
™
ADVANCED OWNER'S MANUAL
MUSTANG FLOOR
BY
FENDER
®
ADVANCED OWNER'S MANUAL
Page 2
MUSTANG
Contents
Getting Started!
Data Wheel
Contents
Getting Started! . . . . . . . . . . . . . . . 2
Data Wheel . . . . . . . . . . . . . . . . . . 2
Footswitch Modes . . . . . . . . . . . . . . 3
Tap/Tuner . . . . . . . . . . . . . . . . . . 3
Amplifier Menus . . . . . . . . . . . . . . . 4
Effects Menus . . . . . . . . . . . . . . . . 4
Expression Pedal . . . . . . . . . . . . . . . 5
EXP-1 and MS-4 . . . . . . . . . . . . . . . 6
Saving Presets . . . . . . . . . . . . . . . . 7
Utility Menus . . . . . . . . . . . . . . . . . 7
Output Jacks . . . . . . . . . . . . . . . . . 8
Aux/Phone Jacks . . . . . . . . . . . . . . . 8
Insert Loop . . . . . . . . . . . . . . . . . . 9
USB Port . . . . . . . . . . . . . . . . . . . 9
MIDI . . . . . . . . . . . . . . . . . . . . . 9
Factory Restore & Firmware Update . . . . . 9
FAQ . . . . . . . . . . . . . . . . . . . . . 9
MIDI Appendix . . . . . . . . . . . . . . . .10
™
FLOOR
customize the Mustang Floor in ways not available from the
Mustang Floor alone.
Fender FUSE, free of charge from
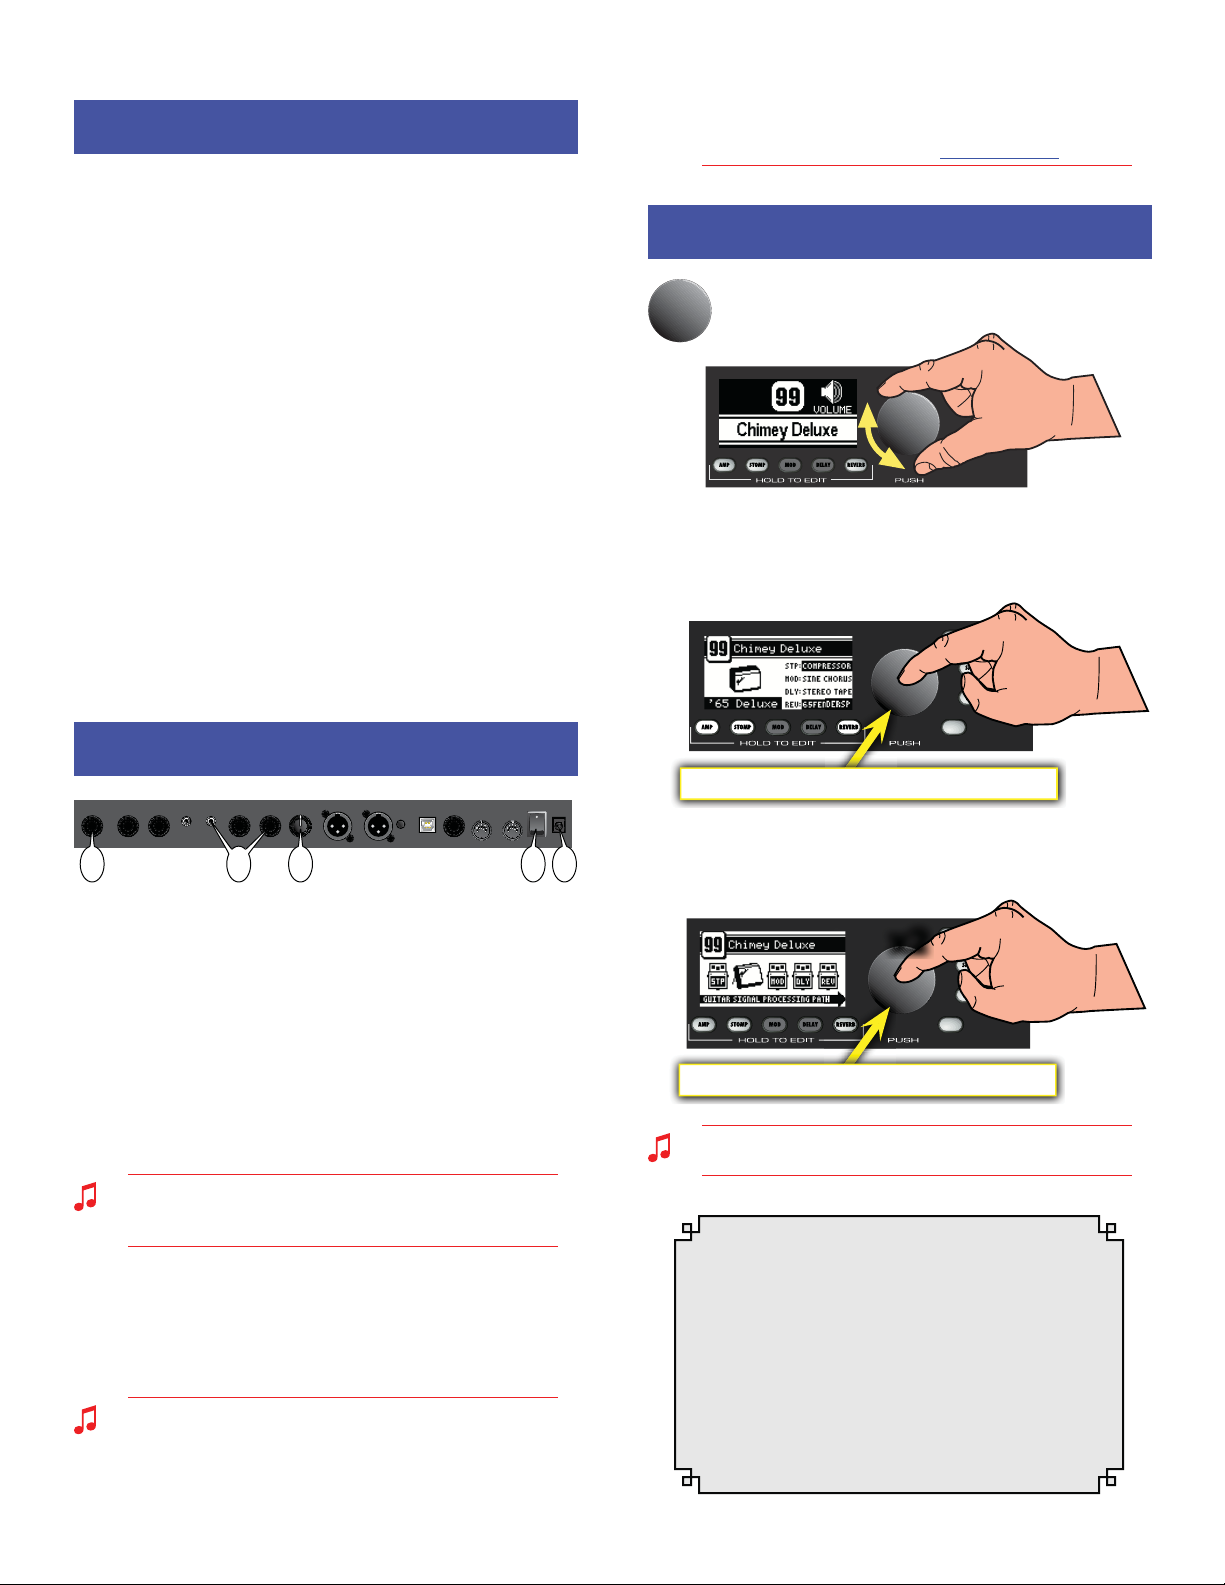
Data Wheel
Turn the big DATA WHEEL to select presets in play mode
(press the EXIT button, if lit, to return to play mode):
Press the DATA WHEEL to see basic information about the current
preset, such as the current amplifier model and the effects
assigned under each of the four effect categories:
Please download the latest version of
fuse.fender.com.
Getting Started!
USB EXP-1/
INSERT LOOPINPUT POWER
SEND RETURN
PHONESAUX IN XLR OUTLEVELUNBALANCED OUT MIDI
RL
GROUND
RL
LIFT
MS-4
OUT IN
I
0
13 4 52
The basic Mustang™ Floor setup:
1. Plug the supplied power adapter into a grounded outlet.
2. Press the POWER switch to the "1" position to turn the Mustang
Floor on.
3. Plug your guitar into the INPUT jack.
4. Connect the input of your guitar amplifier or PA system to the
L UNBALANCED OUT jack –OR– plug your headphones into the
PHONES jack.
5. Turn the LEVEL knob to at least halfway up.
The LEVEL knob controls the output level of all the analog
outputs on the Mustang Floor, including the UNBALANCED
OUT jacks, the XLR OUT jacks and the PHONES jack.
6. Turn on your PA system or guitar amplifier –OR– put on your
headphones and start exploring the Mustang Floor!
7. Be sure to power off your amplifier (or PA) before powering
down the Mustang Floor.
The Mustang Floor is fully integrated with Fender® FUSE™
software which allows you to configure and operate the
Mustang Floor with ease from your computer. You can use
Fender FUSE to download free presets from Fender artists;
backup and restore presets for different occasions; and
PEDAL
Push to view the Preset Information screen
Press the DATA WHEEL a second time to see where each effect is
located in the guitar signal processing path:
x2
PEDAL
Push twice to view the Signal Path screen
You can change the order of effects in the signal path to create
unique sounds using Fender FUSE software.
The DATA WHEEL has many functions! Enter any
edit mode by pressing one of the buttons below
the screen and the DATA WHEEL is used to navigate
and edit in the menu currently being displayed.
Depending on the menu, you will press or turn the
DATA WHEEL to select items and adjust settings,
as described in this manual and shown on screen.
Using the DATA WHEEL is intuitive, but if you ever
get lost, just press EXIT to return to play mode.
2
Page 3
MUSTANG
Footswitch Modes
REEEEVEVEVEERR
ELAAELAYYYY
DTTOMOMOMTPPSESESETR
ELALALAYY
OOOMPR
Tap / Tuner
™
FLOOR
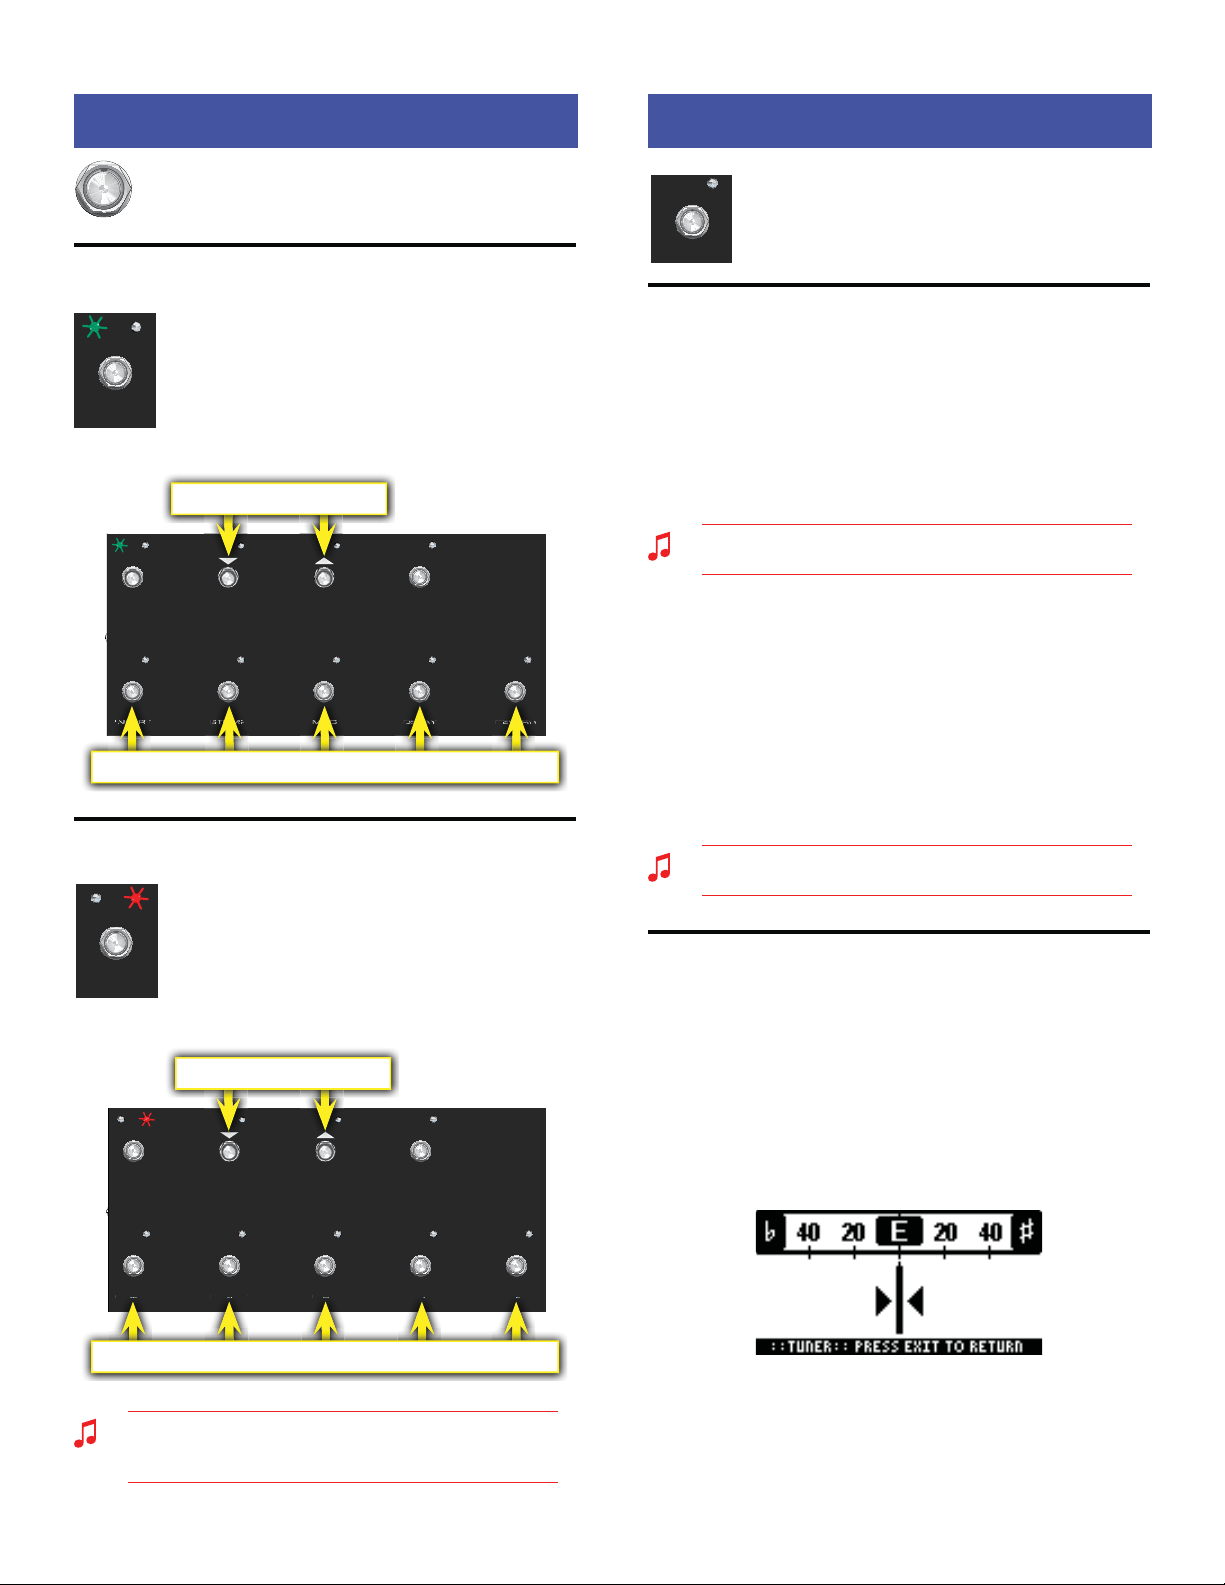
Footswitch Modes
Press the MODE button to switch between PRESET and
FX SELECT modes:
PRESET Mode
In PRESET mode the green LED lights up and the
bottom five footswitch buttons (0•5, 1•6, 2•7, 3•8, 4•9)
are used to select presets from the current bank of
five presets. Press the BANK/PRESET buttons to select
PRESET / FX SELECT
MODE
different banks of five presets to choose from, then
press one of the numbered footswitch buttons to
select a preset from the bank as displayed on screen.
Select Preset Banks
PRESET / FX SELECT
0U52
BANK / PRESET
U
STOMPINSERT MOD DELAY REVERB
TAP/TUNERMODE
73
U
84
Select Presets from the current Bank
FX SELECT Mode
In FX SELECT mode the red LED lights up and the
bottom five footswitch buttons (INSERT, STOMP,
MOD, DELAY, REVERB) are used to select/bypass
PRESET / FX SELECT
MODE
to select presets up ordown, one at a time.
effects for the current preset (the INSERT button
selects/bypasses external effects connected to the
INSERT LOOP jacks). Press the BANK/PRESET buttons
Tap / Tuner
Use the TAP / TUNER button to:
•Tap in delay time or modulation rate effect settings
TAP/TUNER
•Activate the on-board guitar tuner
TAP Button
When either a delay or modulation effect is active, the LED next to
the TAP/TUNER button will blink in sync with the effect time/rate
setting (modulation rates can have up to 12 second intervals and
the LED may blink infrequently). If both a delay and modulation
effect are active simultaneously, the LED will blink in sync with the
delay effect and the TAP/TUNER button will only control the delay
time setting (you can bypass the delay effect temporarily if you
want to use the TAP/TUNER button to set the modulation rate).
You can use the effect settings menus or Fender FUSE to set
delay time and modulation rates more precisely.
Using TAP to set effect time/rate settings:
U
91U6
1. Select a delay or modulation effect that causes the TAP/TUNER
LED to blink, using the effects menus (see "Selecting Effects"
under Effects Menus, page4).
2. Press the TAP/TUNER button rhythmically (twice minimum)
in time with the desired interval. If you press the TAP/TUNER
button only once, the interval will be set to the maximum
value. You can see the maximum/minimum values for the
current effect in the effect settings menu (see page 5).
Watch the actual time/rate TAP values change while you are
tapping them in, by opening the effect settings menu!
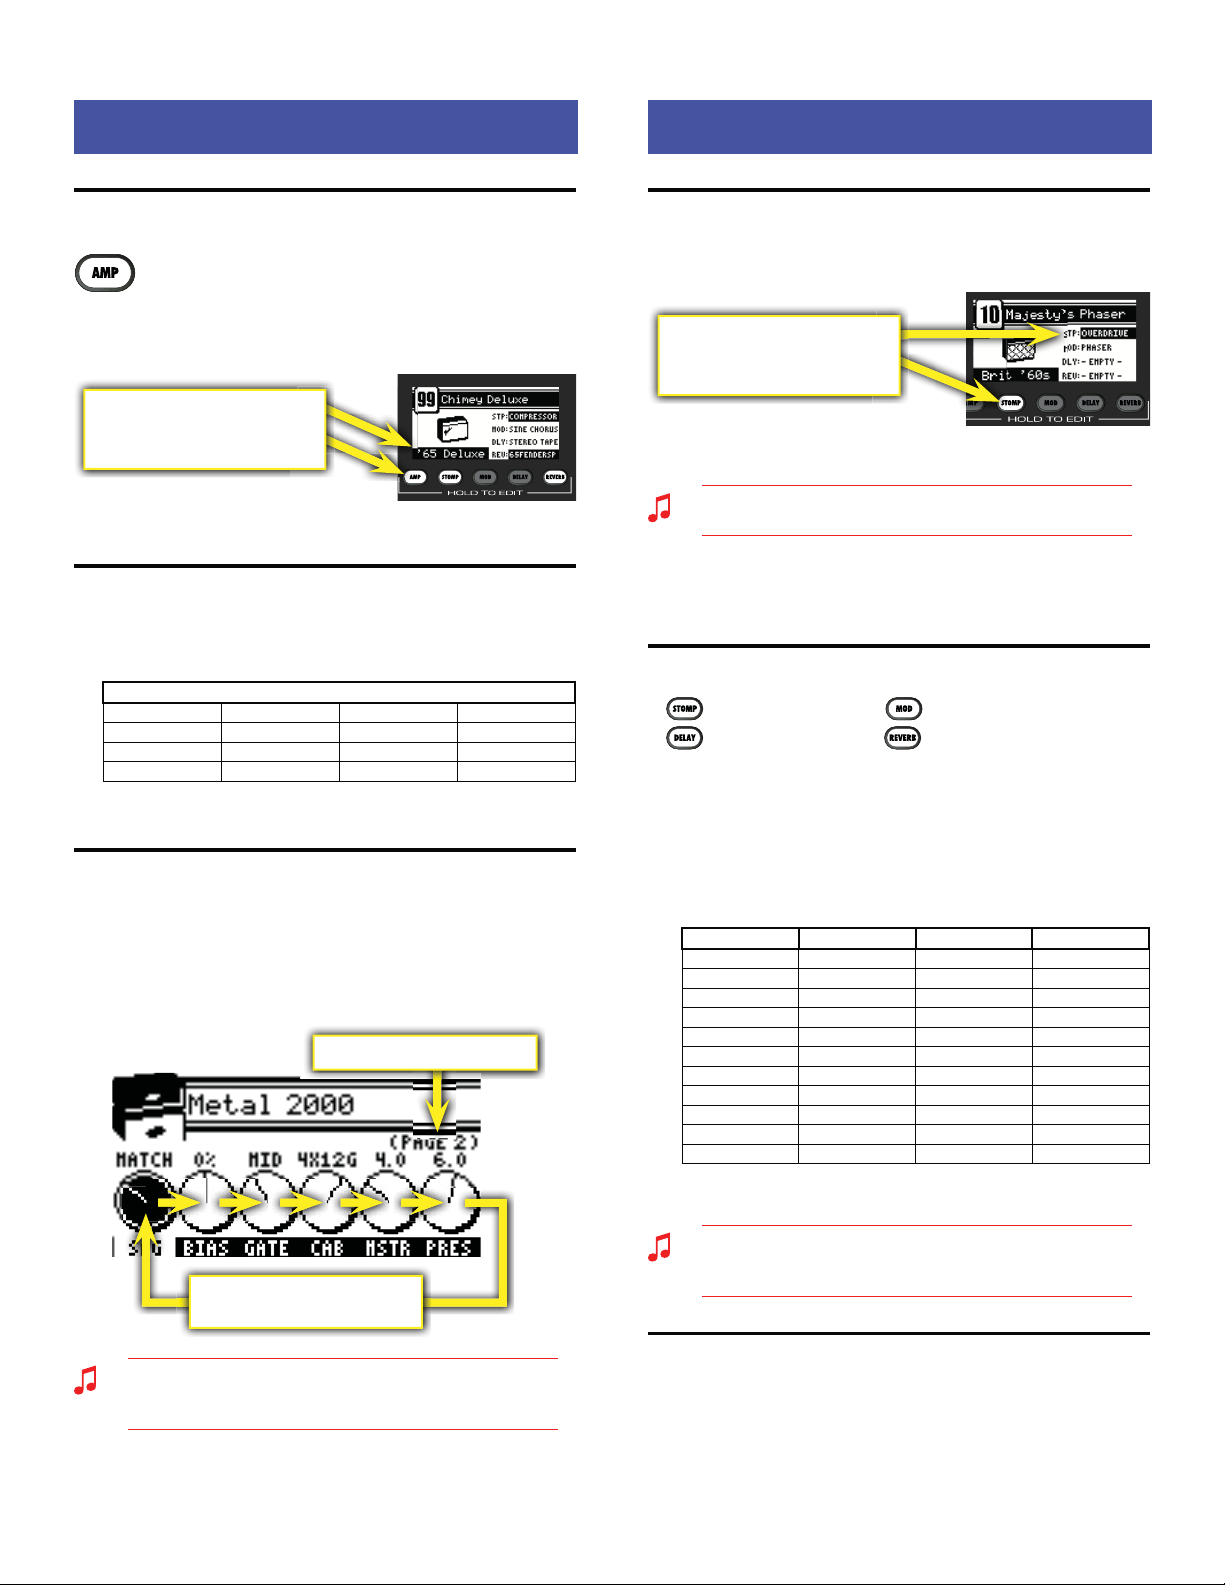
TUNER Button
The Mustang™ Floor has a built-in Tuner mode that displays a
chromatic guitar tuner on screen.
Select Presets
PRESET / FX SELECT
0U52
BANK / PRESET
U
STOMPINSERT MOD DELAY REVERB
TAP/TUNERMODE
73
U
84
U
91U6
1. Press and hold the TAP/TUNER button until the Tuner screen
appears.
2. Strike any single string on your guitar and watch the screen.
The note of the string being tuned is displayed along with a
fine tuning needle:
Select / bypass Ef fects
To use the Tuner:
3. Turn the tuning peg on your guitar until the fine tuning needle
indicates the string is in tune, as shown above.
Each FX Select footswitch button will function only when an
effect is assigned to that category for the current preset. See
4. Press EXIT or TAP/TUNER to exit from the Tuner.
Effect Menus on page 4 to choose effects.
3
Page 4
MUSTANG
Amplifier Menus
Effects Menus
™
FLOOR
Amplifier Menus
Bypassing Amp Settings
You can turn on or off (bypass) all amp settings that
have been selected for the current preset by pressing
the AMP button.
selections, and settings for a variety of parameters such as tone,
gain, volume, and speaker cabinet simulation.
The amp menus contain amplifier modeling
The Amp name is highlighted and
the AMP button lights up when
Amp settings are active
Preset Information screen
Selecting Amplifier Models
1. Press and hold the AMP button until the amp menu opens.
2. Turn the DATA WHEEL to select one of 13 amplifier models:
AMP MODELS
'57 Deluxe '65 Prince ton Britis h '60s Americ an '90s
'59 Bassma n '65 Twin Reverb Britis h '70s Metal 20 00
'57 Champ Super-Sonic (Burn) British '80s Studio Preamp
'65 Delu xe Reverb
3. Press EXIT to return to play mode.
Adjusting Amplifier Settings
1. Press and hold the AMP button until the amp menu opens.
2. Press the DATA WHEEL one or more times until the setting that
you want to adjust is highlighted, then turn the DATA WHEEL
to adjust the setting. (Press the DATA WHEEL repeatedly to
access "Page 2" of the amplifier settings. )
"PAGE 2" of the Amp settings
Effects Menus
Bypassing Effects
You can turn on or off (bypass) effects that have been selected for
the current preset by pressing the corresponding effect button.
The Effect name is highlighted and
the Effect button lights up when an
effect is active
Preset Information screen
Effects can also be bypassed (turned on-off) using the
footswitch buttons when in FX SELECT mode.
Effects that are shown on screen as "–EMPTY–" can not be
activated until an effect has been selected in that category (see
Selecting Effects, below).
Selecting Effects
— Stompbox effects — Modulation effects
— Delay effects — Reverb effects
To select Effects:
1. Press and hold one of the four effects buttons to open the
effects menu.
2. Turn the DATA WHEEL to select one of the corresponding
effects:
STOMPBOX MODULATION DELAY REVERB
Overdrive Sine Chorus Mono Delay Small Hall
Wah Triangle Chorus Mono Echo Filter Large Hall
Touch Wah Sine Flan ger Stereo Ec ho Filter Small Roo m
Fuzz Triangle Flanger Multitap Delay L arge Room
Fuzz Touch Wah Vibratone Ping Pong Delay Small Plate
Simple Compressor Vintage Tremolo Ducking Delay Large Plate
Compressor Sine Tremolo Reverse Delay Ambient
Ring Modulator Tape Delay Arena
Step Filter Stereo Tape Delay Fender '63 Spring
Phaser Fender '65 Spring
Pitch Shifter
Press the DATA WHEEL repeatedly
to select the next Amp setting
You can hold down the AMP button and turn the DATA WHEEL
to scroll through settings faster! To de-select a highlighted
amp setting, press and hold the AMP button momentarily.
3. Press EXIT to return to play mode.
4
3. Press EXIT to return to play mode.
You can switch to a different effects category at any time, even
while you are in the effects selection menus, by pressing and
holding a different Effects button.
Adjusting Effect Settings
1. Press and hold one of the four effect buttons (STOMP, MOD,
DELAY, REVERB) to open the corresponding effects menu.
2. Turn the DATA WHEEL to select the effect you want to work
with.
Page 5

MUSTANG
Expression Pedal
™
FLOOR
3. Press the DATA WHEEL one or more times until the setting that
you want to adjust is highlighted, then turn the DATA WHEEL
to adjust the setting.
You can also hold down an Effect button and turn the DATA
WHEEL to scroll through settings faster!
Press the DATA WHEEL repeatedly
to select the next Effect setting
4. Press EXIT to return to play mode.
You can bypass an effect at any time, even while you are in
the effect settings menus, by pressing the Effect button, or
corresponding footswitch button (when in FX SELECT mode).
Pedal Menus
Press the PEDAL button to configure the Mustang Floor
expression pedal as well as an external EXP-1 expression
pedal (optional) when connected. Press the PEDAL
button repeatedly to access each of the pedal menus described
below. Many menu items are dynamic and only appear under the
appropriate conditions. For example, if Expression Behavior mode
is set to "off," none of the parameter menus for Expression mode
will appear. Likewise, all EXP-1 pedal parameters will appear only
when an EXP-1 pedal is connected to the Mustang Floor. Note:
EXP-1 menu items are prefaced with "EXP-1" instead of "FLOOR" on
screen.
The current Volume or Expression mode state of the pedal
is stored with the current preset when you save a preset. See
"Pedal Default" under Utility Menus on page 7 to override.
VOLUME MODE MENUS
• Volume Enable — (O n/Of f) Select "On" if you want the pedal to
control the master volume level in Volume mode, or select "Off" if
you want the pedal to be off in Volume mode.
• Global Volume Heel / Global Volume Toe — (0–100%) Use
these menus to set the master volume level with the heel of the
pedal in the fully down position (Heel Volume) and with the toe
of the pedal in the fully down position (Toe Volume).
Expression Pedal
Your Mustang™ Floor is equipped with a dual-mode expression
pedal. Switch between Volume mode and Expression mode by
pressing down hard on the toe end of the pedal. An icon in the
upper right corner of the screen displays the current pedal mode.
"VOLUME OFF" or "EXP OFF" appears if the current pedal mode
is set to "off" for the current preset in the Volume Enable or
Expression Behavior pedal menus below.
Volume mode icon Expression mode icon
Volu me mode is used to control master volume (or the pedal
can be set to off in Volume mode).
Expression mode can be used to control almost any effect or
amp parameter on the Mustang Floor (or the pedal can be set
to off in Expression mode). Some common uses are to control
the frequency parameter of a Wah effect or the rate/time
parameter of a modulation or delay effect.
The Global Volume Heel and Toe settings are stored globally
and affect all presets. Every other pedal parameter is stored
locally and affects an individual preset.
EXPRESSION MODE MENUS
• Expression Behavior — (Off, Amp, Stomp, Mod, Delay, Reverb, Volume)
Select the category that you want to control with the expression
pedal in Expression mode or select "Off" if you want the pedal to
be off in Expression mode.
You must have an effect selected for the current preset on
the Mustang Floor to make that category of effect become
available for selection in this menu.
• Expression Parameter — (Variable) Select the parameter that
you want to control with the pedal in Expression mode. Your
options will change depending on the category you selected
in the Expression Behavior menu above, and the effect module
selected for the current preset.
• Expression Heel / Expression Toe — (Variable) Use these menus
to set the level of the active parameter with the heel of the pedal
in the fully down position (Heel Setting) and with the toe of
the pedal in the fully down position (Toe Setting). Your options
will change depending on the category you selected in the
Expression Behavior menu, above.
• Expression Mode — (Capture, Live) If "Live" is selected, the cur-
rent pedal position will override the stored preset setting for
the assigned expression pedal parameter when a preset is first
selected. If "Capture" is selected, the pedal is disabled until you
move the pedal after a preset has been selected.
5
Page 6

MUSTANG
EXP-1 & MS-4
™
FLOOR
• Bypass Effect — (On/O ff ) Select "On" to bypass the effect current-
ly selected in the Expression Behavior menu when switching the
pedal to Volume mode or select "Off" to leave the effect active.
• Reset Parameter to Preset Value when Switching to Volume
Mode — (On/O ff ) Select "On" to return the Expression Mode
Parameter to the stored preset value when switching to Volume
mode. Select "Off" if you want the parameter be left set to the
position of the pedal when switching to Volume mode.
Pedal Calibration
Occasionally it may become necessary to calibrate the Mustang
Floor's expression pedal and/or an EXP-1 expression pedal connected to the Mustang Floor, to reset the parameter range of the
pedal(s) to ensure consistent performance.
To calibrate the expression pedal and EXP-1 pedal:
1. (Optional) Plug an EXP-1 pedal into the "EXP-1 / MS-4" jack on
the back of the Mustang Floor using the included cable.
2. Turn the Mustang Floor off.
3. Press and hold the UTIL button on the Mustang Floor while
turning the Mustang Floor back on. Continue holding the UTIL
button down until it is no longer illuminated.
4. Rock the Mustang Floor expression pedal (and the EXP-1, if
connected, through the full range of motion between heel and
toe positions.
4. The Mustang Floor expression pedal and the EXP-1, if con-
nected, have been calibrated!
Pedal Tension
Occasionally it may become necessary to adjust the tension of the
axle nut on the expression pedal to increase or decrease the ease
of pedal movement.
To use the EXP-1 and MS-4 simultaneously, plug the EXP-1 into
the Mustang Floor and then plug the MS-4 into the second jack
on the EXP-1.
EXP-1 Expression Pedal (P/N 2301050000)
Configure the EXP-1 expression pedal through the pedal menus
(see Pedal Menus, page 5). The EXP-1 only functions in Expression
mode when connected to the Mustang Floor. The green LED indicates when the EXP-1 pedal is powered on and the red LED indicates whether Expression mode is currently enabled.
MS-4 Four-Button Footswitch (P/N 0080996000)
The MS-4 footswitch display and LEDs show you much of the same
information as the Mustang Floor screen, so you can for example,
tune your guitar and select presets by watching the footswitch
without ever looking at the screen onboard the Mustang Floor!
The MS-4 allows you to:
• Select Quick Access presets (QA1/QA2/QA3)
• Select presets (up/down/bank)
• Bypass effects
• Activate the Tuner
To a djust pedal tensio n :
Pry off the circular "F" cap from the right side of the pedal with a
small flat blade screwdriver, then use a 10 mm socket wrench to
adjust the axle tension. Do not over-tighten the axle nut to avoid
damaging the pedal assembly.
10 mm
EXP-1 & MS-4
EXP-1/
EXP-1 / MS-4 jack on the back of the Mustang Floor.
Your Mustang™ Floor gives you the option of adding an
MS-4
external EXP-1 expression pedal and an MS-4 fourbutton footswitch for additional flexibility. Both the
EXP-1 and MS-4 can be connected together through the
The footswitch has three modes that are identified by the three
LEDs labeled MODE 1, MODE 2 and MODE 3. The footswitch also
has a Tuner mode which is indicated when all of the mode LEDs
are off.
To switch between modes, press the MODE button. To activate
Tuner mode, press and hold the MODE button.
• Mode 1—Select one of three Quick Access presets using the buttons labeled: QA1 / QA2 / QA3 (in line with the MODE 1 LED). The
number of the preset will appear in the display of the footswitch.
You can any assign any preset to be a Quick Access preset in
the utility menus. (see Utility Menus, page 7).
• Mode 2—Select presets down/up, or in banks of 10, using the
buttons labeled: DOWN / UP / BANK (in line with the MODE2
LED). The number of the preset will appear in the display of the
footswitch.
6
Page 7

MUSTANG
Saving Presets
Utility Menus
• Mode 3—Bypass the Stompbox, Modulation or Delay effects,
using the buttons labeled: STOMP / MOD / DELAY (in line with
the MODE3 LED). The footswitch button LEDs indicate the
effects that are active.
• Tuner Mode —Press and hold the MODE button to activate the
Tuner. The screen on the Mustang Floor and the footswitch both
display tuner information. The footswitch will display the nearest
note and the button LEDs will indicate sharp and flat. "In tune" is
indicated when the green LED below the footswitch display lights
up.
Press any footswitch button to exit Tuner mode.
Saving Presets
Your Mustang™ Floor gives you the powerful ability to save every
setting on the unit as part of a preset. When you select a preset,
every effect setting, amp setting and expression pedal parameter
is instantly recalled to your pre-programmed settings.
The SAVE button will light up red when you edit any
setting on the Mustang Floor. This indicates that you
have temporarily modified the current preset. You can undo your
modifications simply by selecting a different preset and then back
again to the preset you started from.
™
FLOOR
Utility Menus
Press the UTIL button to activate the utility menus.
Press the UTIL button repeatedly to step through each
of the utility menus. Turn the DATA WHEEL to make selections.
Utility menu settings are stored globally and affect all presets. Some
of the descriptions below cover multiple menus and are not in the
exact same order in which they appear on the Mustang Floor.
For the best results when connecting the Mustang Floor into the
INPUT jack on a guitar amplifier (rather than the power amp
input), set your amp as clean as possible using a low gain setting
and start with your BASS and TREBLE tone controls turned down
and your MID tone control turned up, then adjust as needed.
• Output Configure — (Mon o/Stereo) If "Mono" (default) is selected,
left and right channels are summed together prior to the output
voicing and bass/treble menus below; you can independently
set the voicing and bass/treble settings for the left and right
UNBALANCED OUT jacks and XLR OUT jacks only when the output
configure menu is set to "Mono." Select "Stereo" to send stereo
left and right channel signals to the left and right UNBALANCED
OUT jacks and XLR OUT jacks.
All
The EXIT button will not cancel temporary changes to the
current preset. Only by selecting a different preset using the
DATA WHEEL, Footswitch, or Fender FUSE, will your temporary
changes be erased.
To save your own custom presets:
1. To save a custom preset, first modify an existing preset by
changing any setting(s) that you choose.
2. Press the SAVE button. The SAVE and EXIT buttons should light
up. You can press EXIT at this point to cancel the save process.
3. Turn the DATA WHEEL to select a preset destination to
overwrite.
4. Press the DATA WHEEL if you want to edit the name of
your new preset. Use the soft-key buttons to perform the
corresponding functions shown along the bottom of the
screen. Turn the DATA WHEEL to select characters.
• Left / Right Output Voicing -OR- Output Voicing —
PA+Bass, PA+Treble, PA Mid-Scoop, Combo Amp, Combo+Bass, Combo+Treble, Combo
Mid-Scoop, Stack Amp, Stack+Bass, Stack+Treble, Stack Mid-Scoop) When the
Output Configure menu (above) is set to "Mono" you can independently choose the "voicing" of the signals sent out through the
left and right UNBALANCED OUT jacks and XLR OUT jacks. When
the Output Configure menu is set to "Stereo," only one Output
Voicing menu is available and both left and right channels must
be set to the same voicing. The voicing options are active only
when the Amp settings are active (not bypassed) and a speaker
cabinet is selected within the Amp settings (see Amplifier Menus,
page 4). While the PHONES jack is used, output voicing is inter-
nally set to "PA System" for all analog outputs (UNBALANCED, XLR
and PHONES, but not USB) and the settings selected in the voicing menus are temporarily ignored.
It is recommended that you start with one of the 3 main voicings
(PA System, Combo, or Stack) and then choose one of the alternatives (+Bass, +Treble, Mid-Scoop) only if you find the main settings lacking in bass, treble, or having too much mid-frequency
response.
Below are some suggested ways you can use the Output
Configure menu settings combined with the Output Voicing
menus:
1. Mono combo guitar amplifier (default): Set Output Configure
to "Mono" and set either Left Output Voicing or Right Output
Voicing to "Combo," corresponding to the left or right jack you
are using.
(PA System,
5. Press the SAVE button a second time to confirm the save. Your
new preset has been created!
Memory Lock must be off to save presets (see "Memory Lock"
under the Utility Menus, below).
R
UNBALANCED
OUTPUT
t
(OR XLR OUTPUT)
L
UNBALANCED
OUTPUT
t
(OR XLR OUTPUT)
7
Page 8

MUSTANG
Output Jacks
Aux / Phones Jacks
™
FLOOR
2. Stereo PA system: Set Output Configure to "Stereo" and set
Output Voicing to "PA System."
R
UNBALANCED
OUTPUT
t
(OR XLR OUTPUT)
3. Mono PA system -AND- Mono monitor (or combo amplifier): Set
Output Configure to "Mono," then set Right Out Voicing to "PA
System" and Left Out Voicing to "Combo."
• Left / Right Bass, Left / Right Treble -OR- Bass / Treble —
(0%-100 %) Use these utility menus to adjust the bass and treble
levels of the signals sent from the UNBALANCED OUT, XLR OUT,
and PHONES jacks. Select "0%" for the least amount of bass/
treble and select "100%" (default setting) for maximum bass/
treble.
When the Output Configure menu (above) is set to "Mono"
you can set the bass and treble levels independently for the left
and right UNBALANCED OUT jacks and XLR OUT jacks. When the
Output Configure menu is set to "Stereo," only one Bass and one
Treble menu are available and both left and right channels must
be set to the same setting.
• Memory Lock — (On/ Off ) Use this menu to prevent accidental
preset modifications. You will still be able to make temporary
changes to presets with memory lock on, but you won't be able
to save those changes until memory lock is switched off.
• Pedal Default — (From Preset/From Pedal) Select "From Preset" if you
want the pedal mode (volume or expression) to always be set to
the mode last stored with each preset, or select "From Pedal" if
you want to override the stored preset pedal mode and keep the
pedal in whatever mode it's currently in when you select a preset.
• Quick Access #1 / #2 / #3 — (Preset 00-99) Use these three utility
menus to choose Quick Access presets. You can then access those
presets quickly from the MS-4 footswitch (see MS-4 on page 6).
These menus appear only when an MS-4 is connected.
• LCD Contrast — (0-100) Use this menu to adjust the contrast of
the Mustang Floor display.
• MIDI In Channel — (1-16, O mni) Select the MIDI receiving channel.
L
UNBALANCED
OUTPUT
t
(OR XLR OUTPUT)
R
UNBALANCED
OUTPUT
t
(OR XLR OUTPUT)
L
UNBALANCED
OUTPUT
t
(OR XLR OUTPUT)
• EXP-1 Expression CC# — (0 -127) Select the Continuous Controller
number transmitted by the EXP-1 pedal level. This menu appears
only when an EXP-1 is connected.
• EXP-1 Switch CC# — (0 -127) Select the Continuous Controller
number transmitted when the EXP-1 pedal is switched on-off.
menu appears only when an EXP-1 is connected.
• About This Amp — This menu displays the Firmware version
currently running on the unit. Use this information to determine
if an update is available for your Mustang Floor.
Output Jacks
This
Unbalanced Outputs
UNBALANCED OUT
RL
The Mustang Floor provides unbalanced outputs for connection to
mono or stereo amplifiers or a combination of sound equipment.
Use the utility menus (see Utility Menus, page 7) to adjust the
mixing and voicing of the signals sent from these jacks. Use the
LEVEL knob to adjust the output level to accommodate the input
sensitivity of outboard equipment and avoid unwanted signal
distortion.
XLR Outputs
XLR OUT
RL
The Mustang Floor provides XLR outputs for connection to
soundboards and recording equipment when a low signalto-noise ratio is required. Use the LEVEL knob to adjust the
output level to accommodate the input sensitivity of outboard
equipment. Use the utility menus (see Utility Menus, page 7)
to adjust the mixing and voicing of the signals sent from these
jacks. Press the GROUND LIFT button IN to disconnect the ground
connection which may reduce line noise in some situations.
Normally leave this button in the OUT position.
GROUND
LIFT
• MIDI Out Channel — (1-16) Select the MIDI transmitting channel.
• MIDI Through — (O n/Of f) Turn MIDI echo on or off. Note: Sysex
packets are not echoed. If you are using the Mustang Floor
with other gear that requires Sysex, it is recommended that the
Mustang Floor is placed at the end of your MIDI chain.
• Pedal Volume CC# / Pedal Expression CC# — (0 -127) Select the
Continuous Controller number transmitted by the pedal level in
Volume mode and in Expression mode using these utility menus.
• Pedal Switch CC# — (0-127) Select the Continuous Controller
number transmitted when switching the pedal between Volume
mode and Expression mode.
8
Aux / Phones Jacks
Auxiliary Input
AUX IN
using a mini-stereo cable. Use the volume control on your player
to adjust the auxiliary volume level.
You can use the Auxiliary jack to input audio into your
Mustang Floor for accompaniment. Connect the headphone output on your media player to the AUX IN jack
Page 9

MUSTANG
Insert Loop
USB Port
MIDI
Factory Restore &
Firmware Update
FAQ
Phones Jack
PHONES
output voicing is automatically set to "PA SYSTEM" while the
PHONES jack is used, internally overriding the output voicing
setting in the utility menu. Use the LEVEL knob to adjust the
output level.
to the output on your effects device. The on/off state of the insert
loop is stored as part of each preset.
Plug in your headphones, ear buds, or powered speakers
to enjoy the Mustang Floor's stereo features. This jack
may also be used as a stereo recording output. The
A headphones icon will appear on screen when the
PHONES jack is in use.
Insert Loop
INSERT LOOP
SEND RETURN
Connect external effects devices to the
Mustang Floor using the SEND and RETURN
jacks. Connect SEND to the input on your
external effects device and connect RETURN
™
FLOOR
Factory Restore &
Firmware Update
Factory Restore
You can restore your Mustang Floor to the original factory settings
if desired. All user presets will be erased!
To restore the Mustang Floor to factory settings:
1. Turn t he un it off.
2. Press and hold the EXIT button while turning the unit back
on. Continue holding the EXIT button until it is no longer
illuminated.
The FACTORY RESTORE function will erase all user modified
!
presets. It will also remove any custom effect selections that
have been modified using Fender FUSE software.
You can bypass the external effects that you have connected
through the INSERT LOOP by pressing the INSERT footswitch
button on the Mustang Floor when in FX SELECT mode.
USB Port
USB
Use the USB port to connect the Mustang™ Floor to your
computer and take your music to the next level:
• Use Fender® FUSE™ software to control the Mustang Floor
from your computer and access bonus features not available
from the Mustang Floor alone!
Please download the Fender FUSE owner's manual from
fender.com
• Record and edit Mustang Floor digital audio using your
favorite recording software.
MIDI
OUT IN
Controller numbers (CC#) for outgoing expression pedal events.
Incoming MIDI Program Changes 0-99 are used to select Mustang
Floor presets 0-99. Incoming MIDI Continuous Controllers are used
to adjust Mustang Floor parameters as listed in the MIDI Appendix
starting on page 10.
for system requirements.
MIDI
The Mustang Floor is MIDI (Musical Instrument
Digital Interface) compatible. Use the utility
menus (see Utility Menus, page 7) to configure
MIDI channel settings and select Continuous
fuse.
Firmware Update
From time to time, Fender may make available firmware updates
for your Mustang Floor to improve operation or to add new
features. To update the firmware on your unit you will need to
connect it through the USB port to a computer with Fender FUSE
software and an internet connection.
Please see the Fender FUSE manual at
details.
FAQ
There are several great places you can go to learn more about your
Mustang Floor:
• www.fender.com/support
• Join a Fender Community forum where you can ask questions
and read threads. There's even a forum just for the Mustang:
www.fender.com/community/forums
• Log on to the Fender Knowledge Base to download and
read "Frequently Asked Questions" (FAQ):
community/forums/faq.php
fuse.fender.com
www.fender.com/
for
9
Page 10

MUSTANG
MIDI Appendix
Bypass = CC# 23 (0-63 e ect OFF, 64-127 e ect ON)
CC# 28 = Stomp E ect CC# 29 CC# 30 CC# 31 CC# 32 CC# 33
Overdri ve = 1 Level Gain Low M id High
Touch Wah = 3 Mix Sensit ivity Heel Freq Toe Freq High Q
Fuzz Touch Wah = 5 Level Gain Sensitivi ty Octave Peak
Simple Comp = 6 Type - - - -
Compressor = 7 Level Threshold Ratio Attack Time Release Time
Bypass = CC# 24 (0-63 e ect OFF, 64-127 e ect ON)
CC# 38 = Mod E ect CC# 39 CC# 40 CC# 41 CC# 42 CC# 43
Sine Choru s = 1 Level Rate D epth Average Del ay LR Phase
Triangle Choru s = 2 Level Rate D epth Average De lay LR Phase
Sine Flanger = 3 Level Rate Depth Fee dback LR Phase
Triangle Flang er = 4 Level Rate Depth F eedback LR Phase
Vibraton e = 5 Level Rotor Spe ed Depth Fe edback LR P hase
Vintage Trem olo = 6 Level Rate D uty Cycle Attack Time Release T ime
Sine Tremolo = 7 Level Rate Dut y Cycle LFO Clip ping Tri Shaping
Ring Modul ator = 8 Level Frequenc y Depth LFO Shap e LFO Phase
Step Filter = 9 Leve l Rate R esonance Min Freq Max Freq
Phaser = 10 Level Rate Dept h Feedbac k LFO Shap e
Pitch Shif ter = 11 Level Pitch D etune Fe edback Pre Delay
Touch Wah = 13 Mix Sensitiv ity Heel Freq Toe Freq High Q
™
FLOOR
MIDI Appendix
Stomp CC's
None = 0 - - - - -
Wah = 2 Mix Frequ ency Heel Freq Toe Freq High Q
Fuzz = 4 Level Gain O ctave Low High
Modulation CC's
None = 0 - - - - -
Wah = 12 Mix Frequenc y Heel Freq Toe Freq High Q
10
Delay CC's
Bypass = CC# 25 (0-63 e ect OFF, 64-127 e ect ON)
CC# 48 = Delay E ect CC# 49 CC# 50 CC# 51 CC# 52 CC# 53 CC# 54
None = 0------
Mono Delay = 1 Lev el Delay Time Feedback Brightne ss At tenuation -
Mono Echo Fil ter = 2 Level Delay Time Feedback Frequency Resona nce Input Level
Stereo Echo F ilter = 3 Level Delay Time Feedback Frequenc y Resonance Input Level
Multita p Delay = 4 Level Delay Time Feedback Brightnes s Mode -
Ping Pong Del ay = 5 Level Delay Time Feedback Brightness Stereo -
Ducking D elay = 6 Level Delay Time Feedback Release Thres hold -
Reverse De lay = 7 Level Delay Time FFdbk RF dbk Tone -
Tape Delay = 8 Level Delay Time Feedback Fl utter Bright ness Stere o
Stereo Tape Delay = 9 Le vel Delay Tim e Fe edback Flu tter Sep aration B rightness
Page 11

MUSTANG
™
FLOOR
Reverb CC's
Bypass = CC# 26 (0-63 e ect OFF, 64-127 e ect ON)
CC# 58 CC# 59 CC# 60 CC# 61 CC# 62 CC# 63
None = 0 - - - - Small Hall = 1 Level Dec ay Dwell D i usion Tone
Large Hall = 2 Le vel De cay Dwell Di usion Tone
Small Room = 3 Leve l Dec ay Dwell D i usion Tone
Large Roo m = 4 Level Decay Dwell Di usion Tone
Small Plate = 5 Level Dec ay Dwell Di u sion Tone
Large Plat e = 6 Level Decay Dwell Di usio n Tone
Ambient = 7 Leve l Dec ay Dwell D i usion Tone
Arena = 8 Level Dec ay Dwell Di usion Tone
63 Fender Spr ing = 9 Level Dec ay Dwell Di usion Tone
65 Fender Spri ng = 10 Level Decay D well Di usion Tone
Amp CC's
Bypass = CC# 27 (0-63 amp OFF, 64-127 amp ON)
CC# 68 CC# 69 CC# 70 CC# 71 CC# 72 CC# 73 CC# 74 CC# 75 CC# 76 CC# 77 CC# 78 CC# 79
None = 0------- - ---
Fender '57 Del uxe = 1 Gain Ch. Vol ume Trebl e Middle Bass S ag Bias Noise Gate Type Cab - -
Fender '59 Ba ssman = 2 G ain C h. Volume Treble Middle Bass Sag Bias Noise Ga te Type Cab Presenc e Blend
Fender '57 Cha mp = 3 Gain Ch. Volu me Trebl e Middle Bass S ag Bia s Nois e Gate Type Ca b - -
Fender '65 Delu xe Reverb = 4 G ain Ch . Volume Trebl e Middle Bass S ag Bias Noise Gate Type Cab - -
Fender '65 Pri nceton = 5 Gain Ch. Volume Treble Middle Bass Sag Bias Noise Ga te Type Cab - -
Fender '65 Twin Rever b = 6 Gain Ch. Volum e Treble Middle Bass Sag Bias Noise G ate Type Cab - -
Fender Sup er-Sonic (Burn) = 7 Gain Ch. Volume Treble Middle Bass Sag Bias Noise Gat e Type Cab G ain2 Master Vol
British '6 0s = 8 Gain Ch. Vol ume Trebl e Middle Bass Sag Bias Noise Gate Type Cab Cut Ma ster Vol
British '70 s = 9 Gain Ch. Volu me Trebl e Middle Bass S ag Bia s Nois e Gate Type Ca b Presence Ble nd
British '8 0s = 10 Gain Ch. Volum e Treble Middle Bass Sa g Bias N oise Gate Type C ab Presence Mas ter Vol
America n '90s = 11 Gain Ch. Volu me Trebl e Middle Bass S ag Bia s Nois e Gate Type Ca b Presence Mas ter Vol
Metal 200 0 = 12 Gain Ch. Volume Treble Middle Bass Sag B ias N oise Gate Type C ab Presence Ma ster Vol
Studio Pre amp = 13 Gain Ch. Volum e Treble Middle Bass - - Noise Gat e Type Cab - -
Miscellaneous CC's
Pedal Volume = CC# 7
Tuner Toggle = CC# 20 (0-63 Tune r OFF, 64-127 Tuner ON)
All FX Byp ass = CC# 22 (0-63 All e ects OFF, 64-127 All e ects ON)
Fx Inser t = CC# 27 (0-63 Insert O FF, 64-127 Insert ON)
Tap Tempo=CC# 80
Program Changes
Values 0-99 select presets 0-99
11
Page 12

Specifications
TYPE: PR 2300
PART N UMBERS: 2301060000 (120V, 60Hz) 2301060000 (120V, 60Hz) DS 2301061000 (110V, 60Hz) TW DS
2301063000 (240V, 50Hz) AUS DS 2301064000 (230V, 50Hz) UK DS 2301065000 (220V, 50Hz) ARG DS
2301066000 (230V, 50Hz) EUR DS 2301067000 (100V, 50/60Hz) JPN DS 2301069000 (220V, 60Hz) ROK DS
POWER REQUIREMENTS: AC/DC ADAPTER: 12VDC 800 mA
INPUT IMPEDANCE GUITAR: 1MΩ AUX: 13kΩ
FOOTSWITCHES (OPTIONAL): EXP-1 expression pedal (P/N 2301050000) MS-4 four-button footswitch (P/N 0080996000)
DIMENSIONS 520mm W x 220mm D x 8 0 mm H
WEIGHT: 9 lb (4.08 kg)
Product specif ications are subject to change witho ut notice.
᳝↦᳝ᆇ⠽䋼ܗ㋴
䚼ӊ䚼ӊৡ⿄
(Part Name)
䪙
(PB)
䚼ߚ⬉ᄤܗӊ
䚼ߚᴎ఼ࡴᎹ䞥ሲ䚼ӊ
䚼ߚ݊Ҫ䰘ሲ䚼ӊ
O: 㸼⼎䆹᳝↦᳝ᆇ⠽䋼䆹䚼ӊ᠔᳝ഛ䋼ᴤ᭭Ёⱘ䞣ഛ SJ/T 11363-2006 㾘ᅮⱘ⦄䞣㽕∖ҹϟ
X: 㸼⼎䆹᳝↦᳝ᆇ⠽䋼㟇ᇥ䆹䚼ӊⱘᶤϔഛ䋼ᴤ᭭Ёⱘ䞣䍙ߎ SJ/T 11363-2006 㾘ᅮⱘ⦄䞣㽕∖
x o o o o o
x o o o o o
x o o o o o
(Hazardous Substances’ Name)
∲
(Hg) 䬝 (Cd)
݁Ӌ䫀
(Cr6+)
⒈㘨㣃
(PBB)
⒈Ѡ㣃䝮
(PBDE)
This product is covered by one or more of the following patents:
US Pat. 6,222,110
AMPLIFICADOR DE AUDIO
IMPORTADO POR: Instrumentos Musicales Fender S.A. de C.V., Calle Huerta # 132, Col. Carlos Pacheco, C.P. 228890, Ensenada, Baja California, Mexico.
RFC: IMF870506R5A Hecho en China. Servicio de Cliente: 001-8665045875
A PRODUCT OF:
FENDER MUSICAL INSTRUMENTS CORPORATION
CORONA, CALIFORNIA, USA
Fender®, Mustang™ and Fender® FUSE™ are trademarks of FMIC.
Other trademarks are property of their respective owners.
Copyright © 2012 FMIC. All rights reserved. (ENGLISH) REV. A
 Loading...