

Page 1
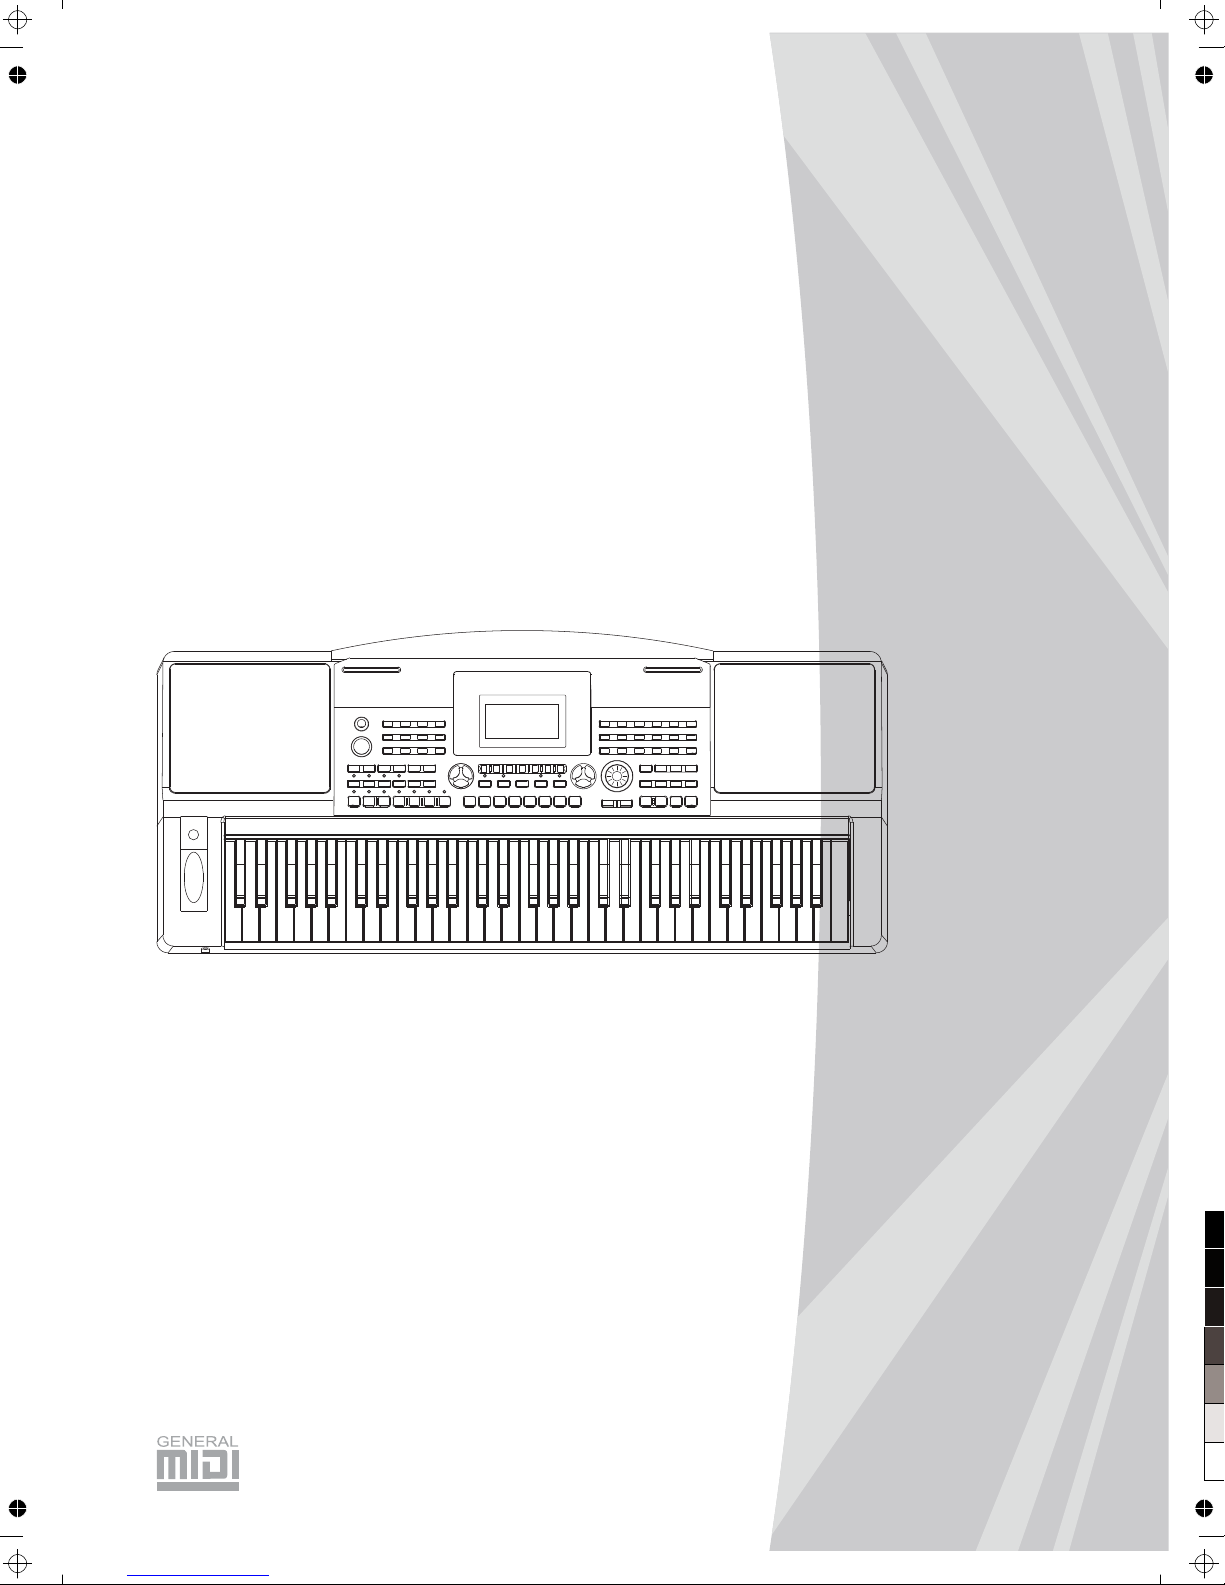
ELECTRONIC
KEYBOARD
Owner's Manual
100
95
75
25
5
0
Page 2
2
INFORMATION FOR YOUR SAFETY!
THE FCC REGULATION WARNING (for USA)
This equipment has been tested and found to comply with
the limits for a Class B digital device, pursuant to Part 15 of
the FCC Rules.
These limits are designed to provide reasonable protection
against harmful interference in a residential installation. This
equipment generates, uses, and can radiate radio frequency
energy and, if not installed and used in accordance with the
instructions, may cause harmful interference to radio
communications. However, there is no guarantee that
interference will not occur in a particular installation.
If this equipment does cause harmful interference to radio or
television reception, which can be determined by turning the
equipment off and on, the user is encouraged to try to
correct the interference by one or more of the following
measures:
Reorient or relocate the receiving antenna.
Increase the separation between the equipment and
receiver.
Connect the equipment into an outlet on a circuit
different from that to which the receiver is connected.
Consult the dealer or an experienced radio/TV technician
for help.
Unauthorized changes or modification to this system can
void the user's authority to operate this equipment.
CAUTION
The normal function of the product may be disturbed by
Strong Electro Magnetic Interference. If so, simply reset
the product to resume normal operation by following the
owner's manual. In case the function could not resume,
please use the product in other location.
PRECAUTIONS
PLEASE READ CAREFULLY BEFORE PROCEEDING
Please keep this manual in a safe place for future reference.
Power Supply
Please connect the designated AC adaptor to an AC outlet
of the correct voltage.
Do not connect it to an AC outlet of voltage other than that
for which your instrument is intended.
Unplug the AC power adaptor when not using the
instrument, or during electrical storms.
Connections
Before connecting the instrument to other devices, turn off
the power to all units. This will help prevent malfunction and
/ or damage to other devices.
Location
Do not expose the instrument to the following conditions to
avoid deformation, discoloration, or more serious damage:
Direct sunlight
Extreme temperature or humidity
Excessive dusty or dirty location
Strong vibrations or shocks
Close to magnetic fields
Interference with other electrical devices
Radios and televisions placed nearby may experience
reception interference. Operate this unit at a suitable
distance from radios and televisions.
Cleaning
Clean only with a soft, dry cloth.
Do not use paint thinners, solvents, cleaning fluids, or
chemical-impregnated wiping cloths.
Handling
Do not apply excessive force to the switches or controls.
Do not let paper, metallic, or other objects into the
instrument. If this happens, unplug the AC adaptor from the
wall outlet. Then have the instrument inspected by qualified
service personnel.
Disconnect all cables before moving the instrument.
100
95
75
25
5
0
Page 3
3
Contents
Panel & Display Description
Front Panel............................................................ ..... .4
Rear Panel..........................................................................5
Display.................................................................................6
Setup
Power Supply.......................................................................7
Setting a Music Stand.........................................................7
Connecting a Footswitch....................................................7
Connecting a Volume Pedal...............................................7
Connections
Connecting a pair of Headphones.......................................8
Connecting an Audio Equipment.........................................8
Connecting an MP3/CD Player............................................8
Connecting a Computer.......................................................8
Connecting to Other Device.................................................9
Playing the Demos...........................................................10
Playing Voices
Playing Voices....................................................................10
Playing Two Voices Simultaneously-DUAL........................11
Playing Different Voices with Both Hands-LOWER............11
Touch..................................................................................11
Sustain...............................................................................12
Pitch Bend Wheel..............................................................12
Modulation.........................................................................12
Transpose..........................................................................12
Octave...............................................................................13
Piano.................................................................................13
Metronome........................................................................13
Freesolo............................................................................14
Playing Auto Accompaniment (rhythm track only).............14
Playing Auto Accompaniment (all tracks)..........................15
Accompaniment Sections..................................................15
Playing Different Accompaniment Sections.......................15
Fade In/Out........................................................................16
Accompaniment Volume....................................................16
Chord Fingering.................................................................16
Tempo........................................................................18
One Touch Setting.............................................................18
Harmony
...........................................19
Applying the Harmony effect.............................................19
IFX....................................................................................20
...................................21
.......................................21
.......................................................................21
Playing in the Guitar Mode................................................22
Piano .......................................................................22
Playing in the Piano Mode................................................22
.........................................23
Synth
...................................................................24
...............................................................24
DSP Effect........................................................................25
. .......
Auto Accompaniment
Turning on the Harmony effect
Performance Assistant
What's the performance assistant?
Enter the Performance Assistant
Guitar Mode
Mode
Exit the Performance Assistant
Enter the synth
Create user voice
Mixer...................................................................................25
Pedal Function
Volume Pedal......................................................................26
Foot Switch.........................................................................26
Other Functions
Tune....................................................................................27
Beat.....................................................................................27
Split Point............................................................................28
Pedal Assign.......................................................................28
Fade In................................................................................28
Fade Out ............................................................................28
Harmony..............................................................................29
Reverb Level.......................................................................29
Chorus Level.......................................................................29
MIDI In.................................................................................29
MIDI Out..............................................................................29
Registration Memory
Registering the Panel Settings............................................30
Recalling the Registered Panel Settings.............................30
Selecting a Registration Bank.............................................30
ing ............................30
Song Recording
Start Recording...................................................................31
Stop Recording...................................................................32
...........................................................32
...............................................................32
Song
Listening to the Songs........................................................33
Song Control.......................................................................33
Lesson Mode......................................................................33
Chord Dictionary
DICT1 (Chord Learning Mode)............................................35
DICT2 (Chord Examining Mode).........................................35
Operation........................................................36
Play.....................................................................................36
Load....................................................................................37
Save....................................................................................38
Delete..................................................................................38
Format.................................................................................38
...................39
MIDI Functions
What's MIDI?.......................................................................40
MIDI Terminals....................................................................40
Downloading Data from the Computer................................40
Troubleshooting................................................................41
Specifications....................................................................41
Appendices
Voice List.............................................................................42
Style List.............................................................................46
Song List ...........................................................................48
Demo List............................................................................49
Chord List............................................................................50
MIDI Implementation Chart.................................................51
Freez the Accompaniment Parameter
Playback Recording
Delete User Song
Connecting a USB Device
USB Device
Keyboard and ASCII Character Relative Table
100
95
75
25
5
0
Page 4
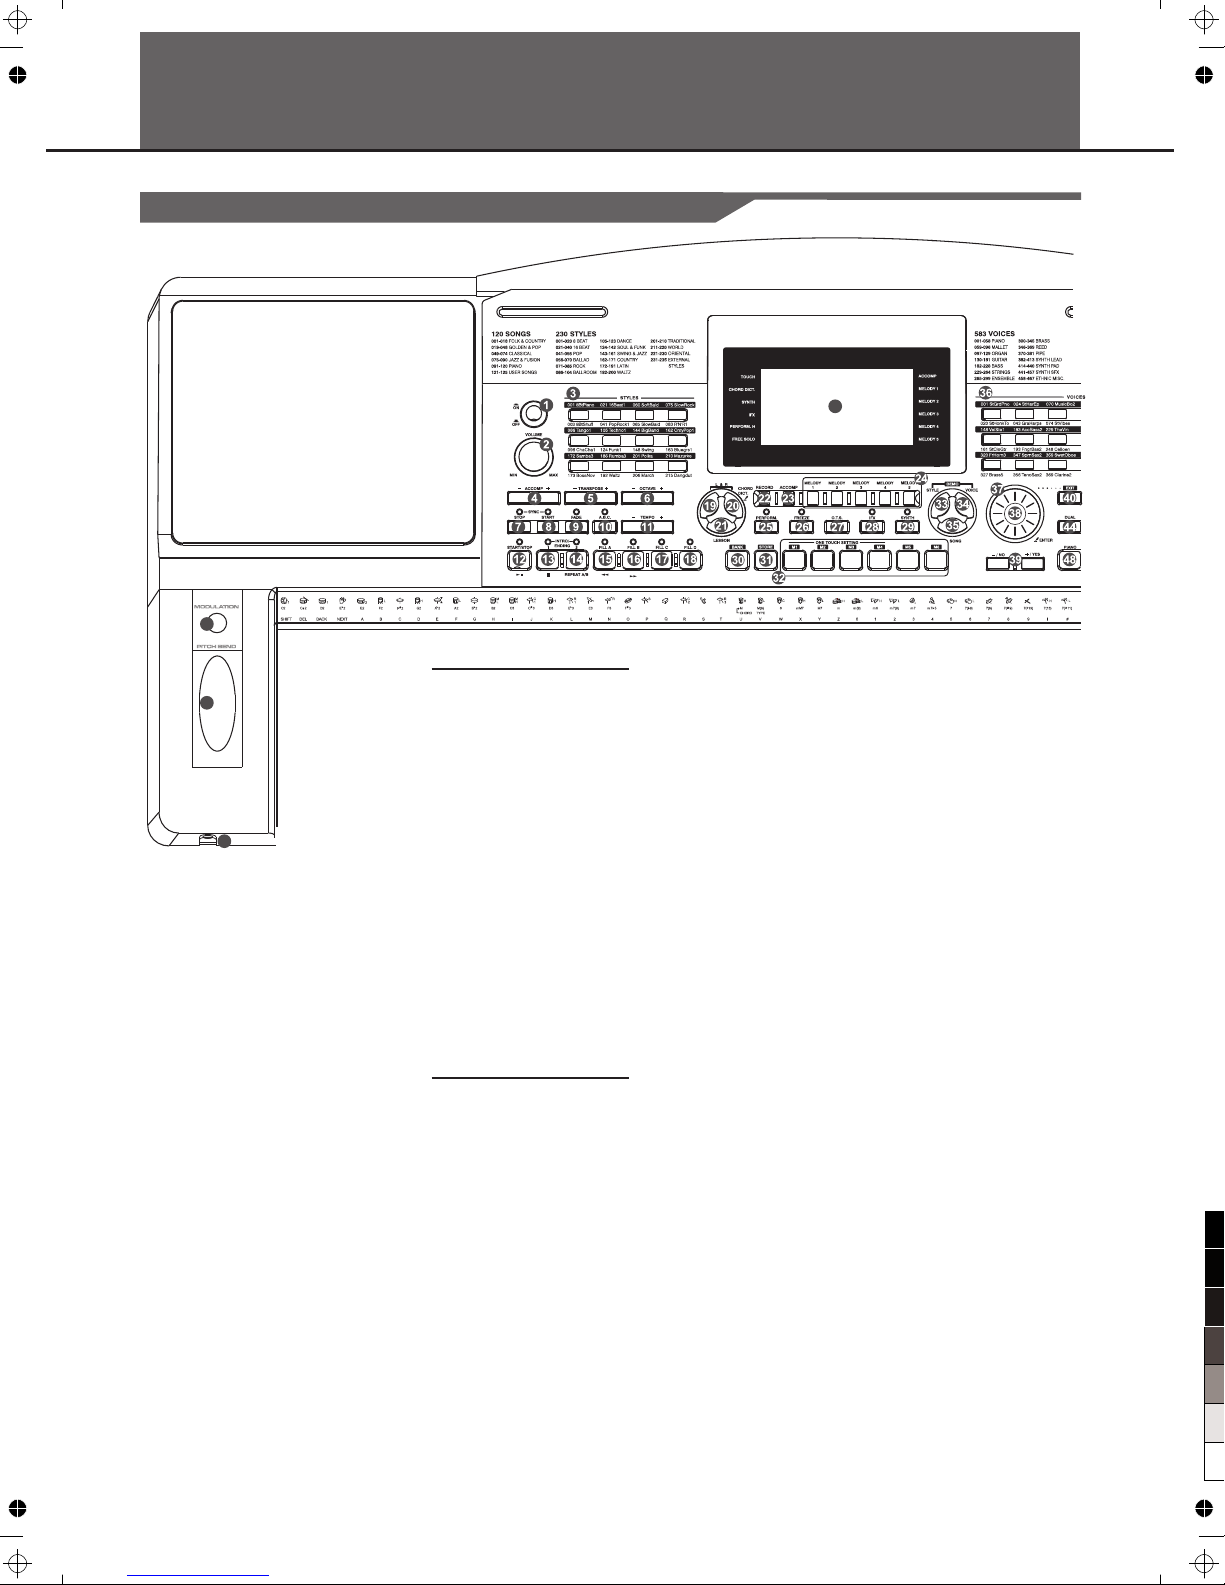
1. POWER ON/OFF BUTTON
Turn the power on and off.
2. MASTER VOLUME Knob
Set a volume level with it control.
3. STYLE DIRECT SELECT BUTTON
Select a direct style.
4. ACCOMP VOLUME +/- BUTTON
Adjust ACCOMP volume.
5. TRANSPOSE +/- BUTTON
Adjust TRANSPOSE value.
6. OCTAVE+/- BUTTON
Adjust OCTAVE value.
7. SYNC STOP BUTTON
Turn the Sync Stop on and off.
8. SYNC START BUTTON
Turn the Sync Start on and off.
9. FADE BUTTON
Turn the Fade in or Fade out on.
10. A.B.C. BUTTON
Turn the A.B.C. MODE on and off.
11. TEMPO+/- BUTTON
Adjust the current tempo.
19. LEFT HAND BUTTON
Choose the left hand in Lesson mode.
20. RIGHT HAND BUTTON
Choose the right hand in Lesson Mode.
CHORD DICTIONARY BUTTON
Hold the button to enter the Chord Dictionary.
21. LESSON BUTTON
Enter the lesson mode.
22. RECORD BUTTON
Enter the record mode.
23. ACCOMP BUTTON
Select the accomp track to record.
24. MELODY 1-5 BUTTON
Select the melody1-5 track to record.
25. PERFORM. BUTTON
Enter the Performance Assistant.
26. FREEZE BUTTON
Freeze the style's parameter.
27. ONE TOUCH SETTING BUTTON
Enter the One Touch Setting Mode.
28. IFX BUTTON
Turn the Insert Effect on and off.
Hold the button to enter the Insert Effect
29. SYNTH BUTTON
Enter the Synth menu.
30. BANK BUTTON
Select a bank.
31. STORE BUTTON
Save a registered panel settings.
4
STYLE MO DE:
12. START/STOP BUTTON
Start or stop pl ay ing the style.
13. INTR O1 /E ND ING1 BUTTON
Play the Intro o r En ding 1.
14. INTR O2 /E ND ING2 BUTTON
Play the Intro o r En ding 2.
15. FILL -I N A BUTTON
A Fill-in A plays.
16. FILL -I N B BU TTON
A Fill-in B plays.
17. FILL -I N C BU TTON
A Fill-in C plays.
18. FILL -I N D BU TTON
A Fill-in D plays.
SONG MODE:
12. START/STOP BUTTON
Start or stop playing the song.
13. PAUSE BUTTON
Pause the playing song or
s t a r t it .
14. REPEAT A/B BUTTON
Set the location of loop begin
an d lo op end to the c urrent
song.
15. REW BUTTON
Rewind the song.
16. FF BUTTON
Fast forward the song.
PHONES
53
54
55
52
Panel & Display Description
Front Panel
Menu.
100
95
75
25
5
0
Page 5
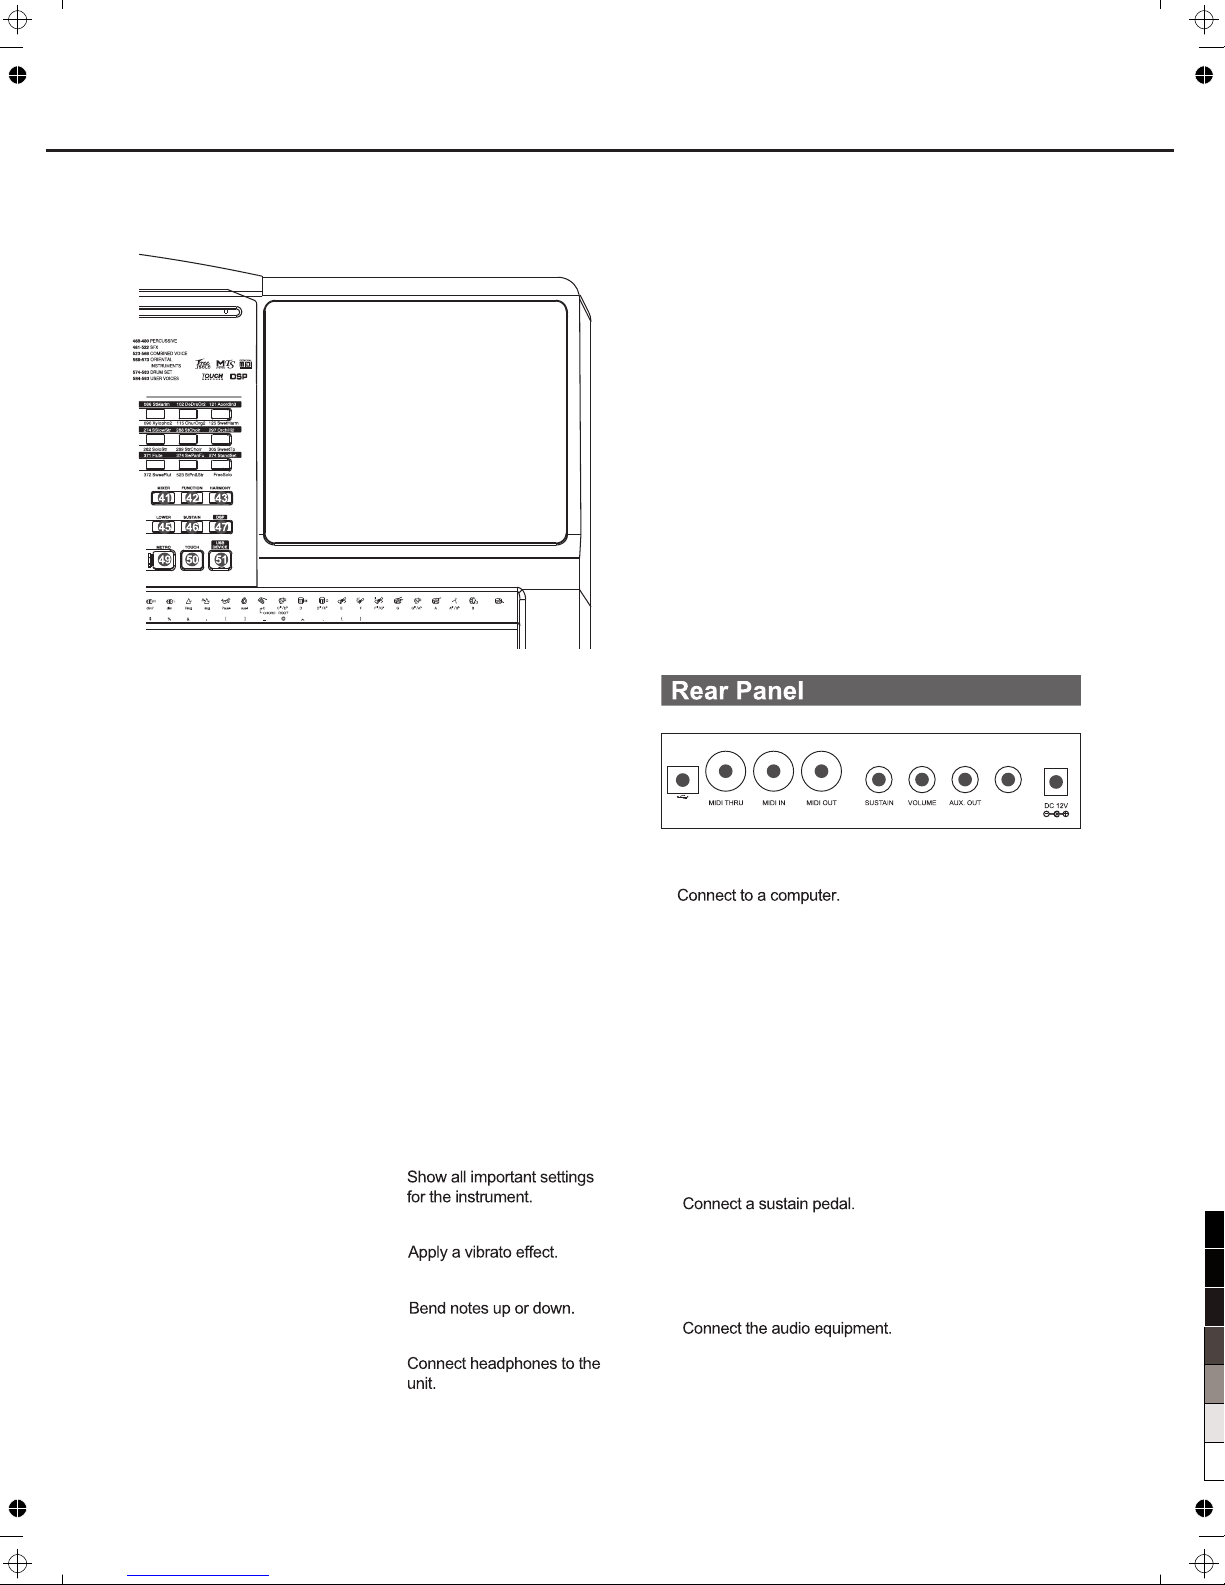
32. M1-M6 BUTTON
Register the panel settings.
ONE TOUCH SETTING
Press the One Touch
Button to instantly
reconfigure all relevant
settings.
33. STYLE BUTTON
Enter the Style Mode.
34. VOICE BUTTON
Enter the Voice Mode.
35. SONG BUTTON
Enter the Song Mode.
36. VOICE DIRECT
SELECT BUTTON
Select a direct voice.
37. DATA DIAL
Increase and decrease the
value.
38. ENTER BUTTON
Enter Menu or Affirm.
39. - / NO,+/YES BUTTON
nd the Decrease a Increase
value.
40. EXIT BUTTON
Exit Menu or Cancel.
41. MIXER BUTTON
Enter mixer menu.
42. FUNCTION BUTTON
Enter function menu.
43. HARMONY BUTTON
Turn the harmony effect on
and off.
44. DUAL BUTTON
Turn the Voice R2 on and
off.
5
1. USB JACK
2. MIDI THRU
3. MIDI IN
4. MIDI OUT
5. SUSTAIN JACK
6. VOLUME JACK
7. AUX.OUT
8. AUX.IN
9. DC 12V
Setting menu.
45. LOWER BUTTON
Turn the Voice L on and off.
46. SUSTAIN BUTTON
Turn the sustain on and off.
47. DSP BUTTON
Turn the DSP effect on and off.
48. PIANO BUTTON
Turn the piano mode on and off.
49. METRO BUTTON
Turn the metronome on and off.
50. TOUCH BUTTON
Enter the Touch
51. USB DEVICE BUTTON
Enter the menuUSB Device
52. LCD Display
53. MODULATION BUTTON
54. PITCH BEND
55. PHONES
Connect a volume pedal
Connect the MI DI I N of other Device to the MIDI
OUT jack on the rear panel
Use MIDI cable to link the MIDI THRU port to other
MIDI instrument MIDI IN port.
AUX. IN
USB
1
2
3
4
5
6
7
8
9
Panel & Display Description
Connect the MI DI O UT of othe r De vice to the
MIDI IN jack on th e re ar panel
Connect the MP 3/ CD player
Connect DC 12V power
adaptor.(Optional)
100
95
75
25
5
0
Page 6
Display
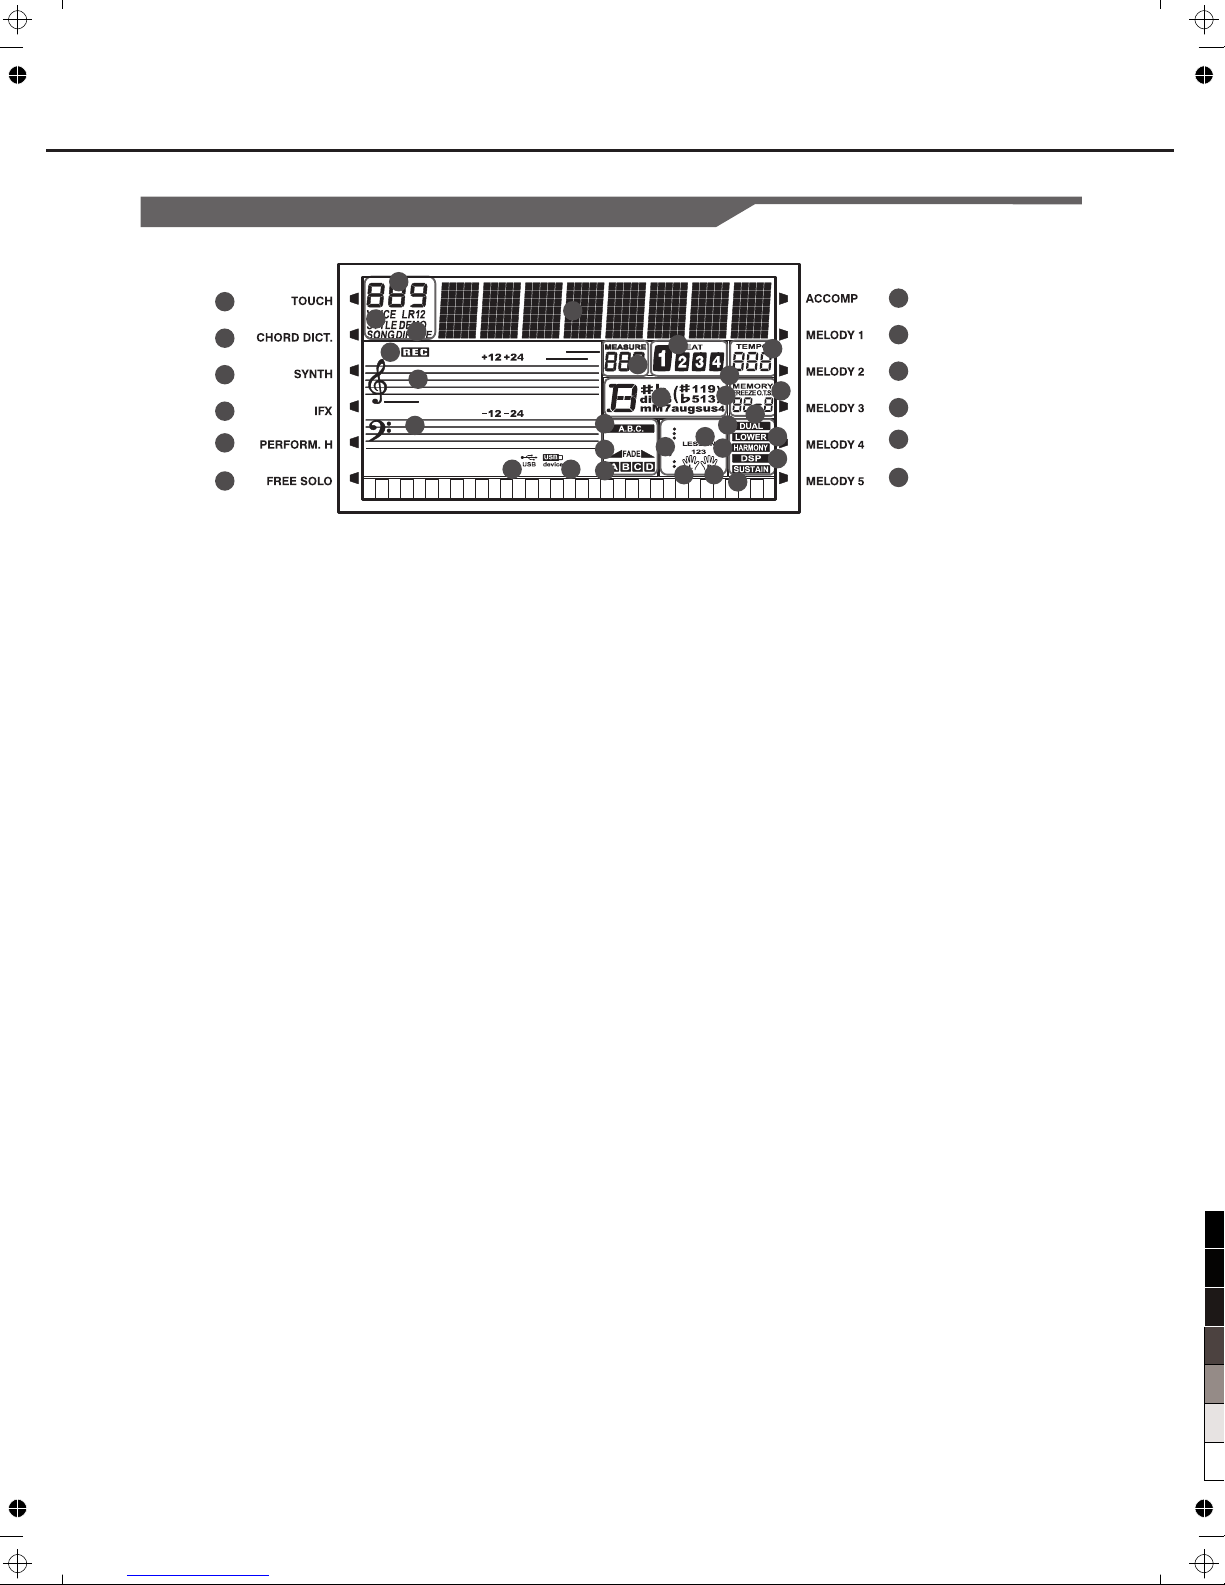
1. TOUCH
2. CHORD D IC T.
3. SYNTH
4. IFX
5. PERFO RM .H
6.FREE S OL O
7.SERI AL NUMBER
8.VOIC E/ ST YL E/DEMO/SONG
9. DIR/F IL E
10. RECO RD
11. TREBL E CL EF
12. BASS C LE F
13. USB
1
2
3
4
5
8
9
10
11
12
13 14
15
17
19
20
21
23
24
25
26
27
28
29 30
31
33
35
36
37
38
39
40
41
6
16
14. USB DE VI CE
15. STRI NG
16. MEAS UR E
17.BEAT
18. TEMP O
19. CHOR D
20. MEMO RY FL AG
21. FREE ZE F LA G
22. ONE TOUCH SETTIN G
23. MEMO RY NU MB ER
24. A.B .C.
25. FADE
26. SECT IO N A/B/C/D
27. NOTE I ND IC ATION
28. LESS ON
29. LEFT H AN D
30 .RIGH T HA ND
31. DUAL
32. LOWE R
33. HARM ON Y
34. DSP
35. SUSTAIN
36 .ACCO MP
37-41. M EL OD Y1 --5
6
7
22
32
34
18
Panel & Display Description
100
95
75
25
5
0
Page 7
AUX.I N
USB
音量踏板接口
AUX.I N
USB
7
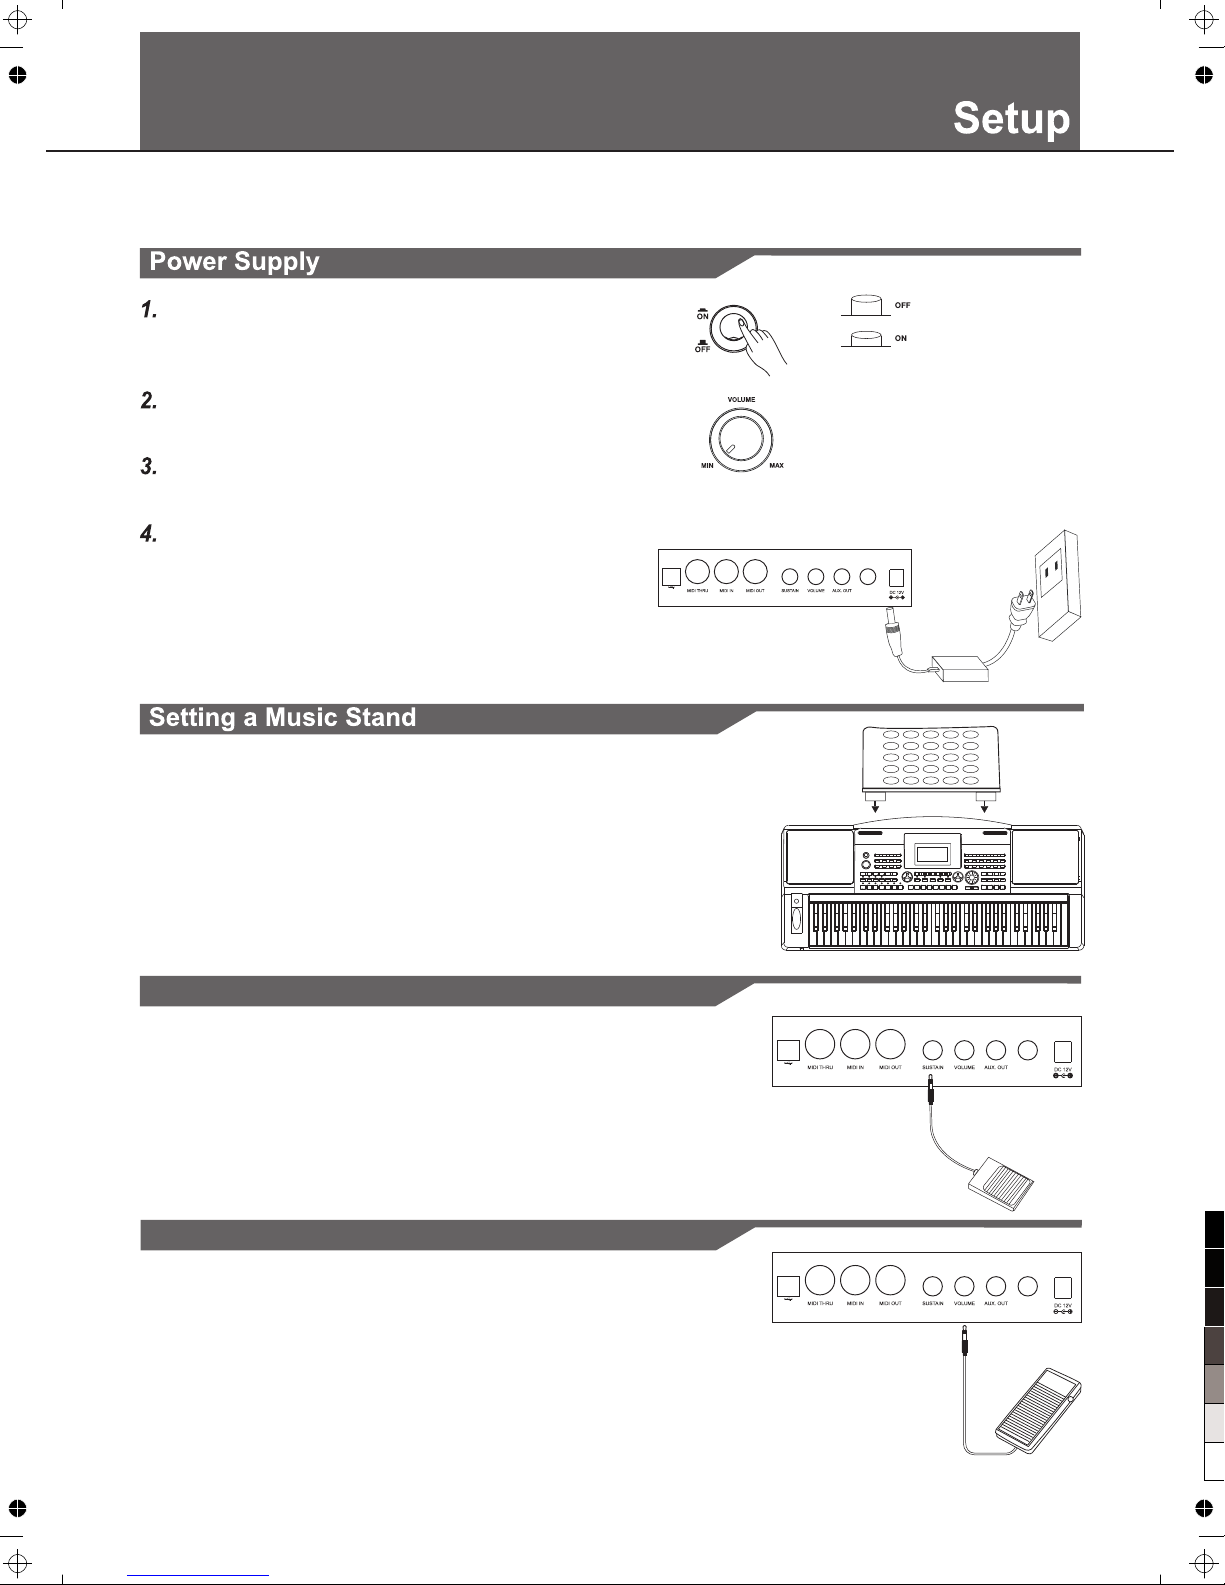
Connecting a Footswitch
Connecting a Volume Pedal
An optional volume control can be plugged into the volume jack for
adjusting the volume of sound.
This section contains information about setting up your instrument and preparing to play. Please go through this section
carefully before turning the power on.
The instrument is supplied with a music stand that can be attached
to the instrument by inserting it into the slot at the rear of the panel.
The sustain function lets you produce a natural sustain as you
play by pressing a footswitch. Plug an optional footswitch into
this jack and use it to switch sustain on and off.
First, please make sure that POWER ON/OFF switch of the
instrument is set to OFF. Then turn the MASTER VOLUME
control to the minimum volume level
Connect the AC adaptor to the power supply jack.
Plug the AC adaptor into an AC outlet. And when turning the
power OFF, simply reverse the procedure please.
Turn the power ON.
Note:
When the keybo ar d is not in use or in the time of thund er storm,
please disco nnect the power for safety purp os e.
AUX.IN
USB
100
95
75
25
5
0
Page 8
AUX.I N
USB
AUX.I N
USB
AUX.I N
USB
8
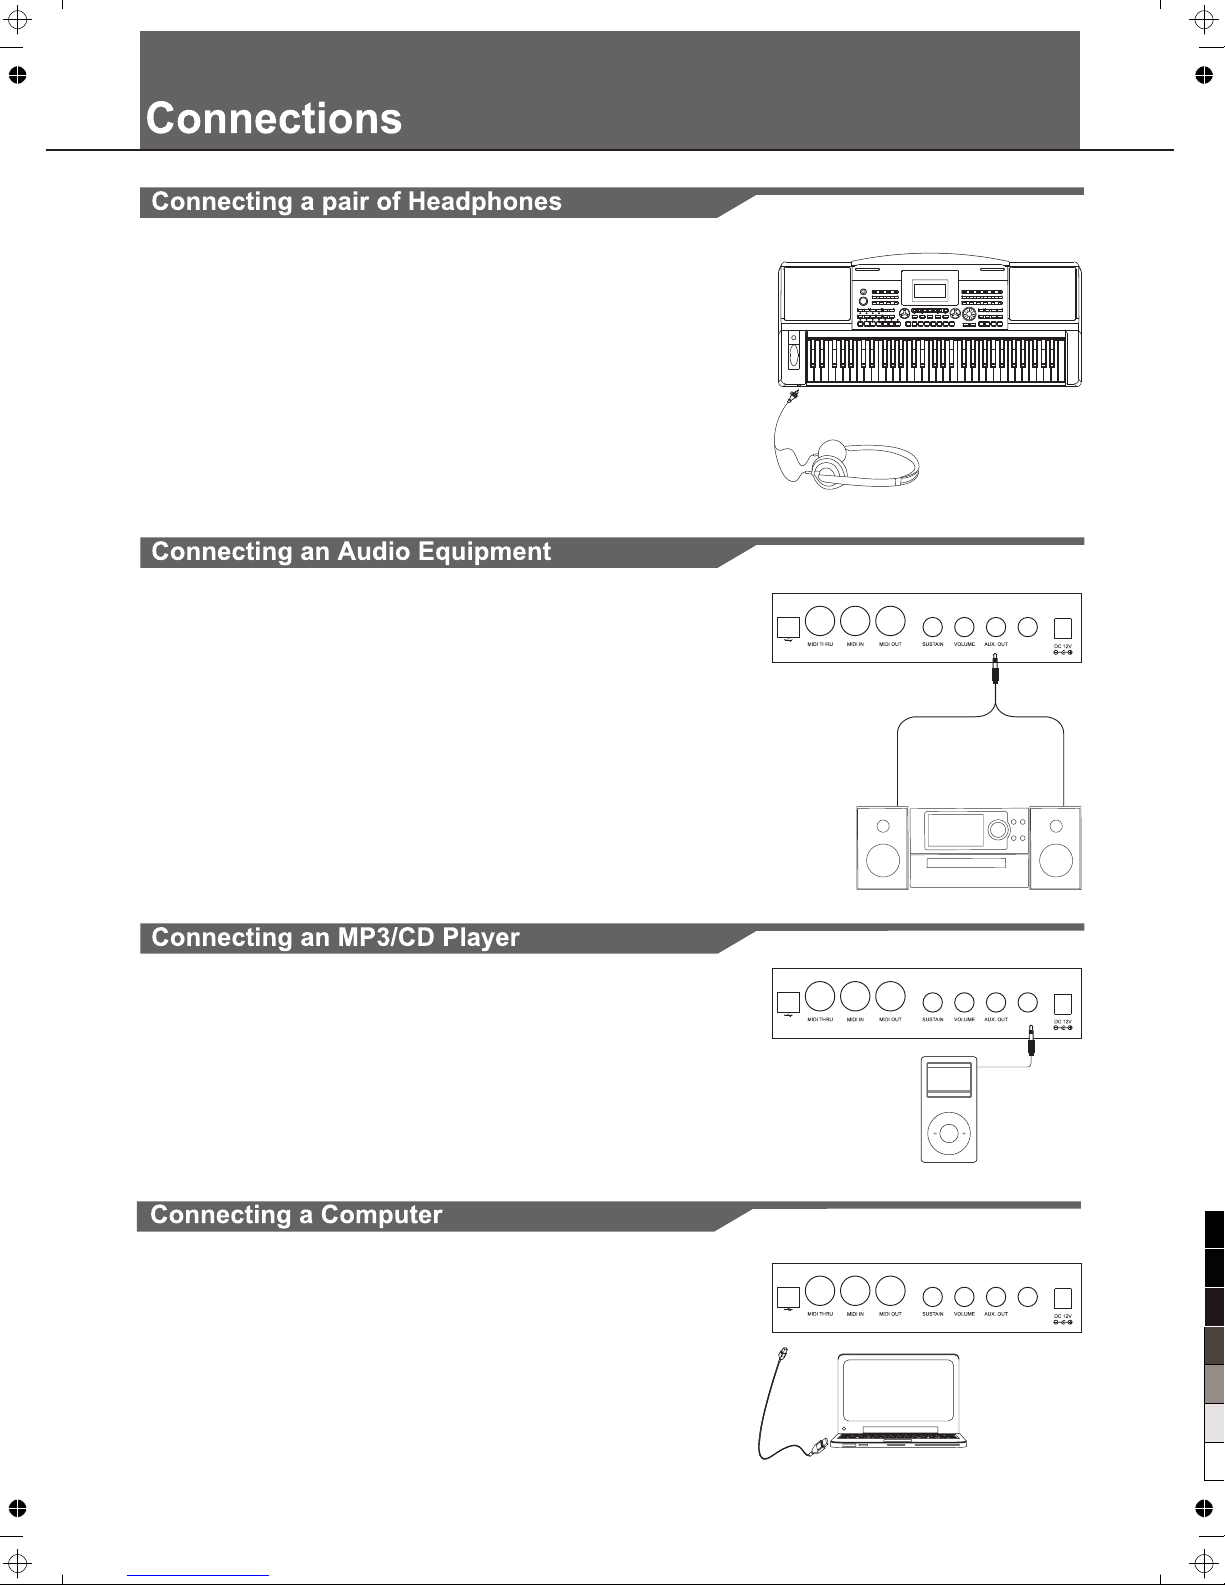
A standard pair o f st ereo headphones can be plug ge d in here for
private prac ti ce or late-night playing. The interna l st ereo speaker
system is auto ma tically shut off when a pair of headphone s is
plugged into t he PHONES jack.
Note:
Do not listen wi th t he headphones at high volum e fo r long periods
of time.Doin g so m ay cause hearing loss.
The rear-panel AUX.OUT jack delivers the output of the instrument
for connection to a keyboard amplifier, stereo sound system, a mixing
console, or tape recorder. Use an audio cord to plug into the AUX.OUT
jack located on the rear panel then plug the other end of the cord into
AUX.IN of the amplifier.
Note:
To avoid damaging the speakers, please ensure that the volume has
been set to the minimum level before connecting the power and other
devices.
Connect the audio output of an MP3/CD player or other audio source
to the stereo AUX.IN jack on the rear panel. The input signal is mixed
with the instrument signal, allowing you to play along.
The instrume nt r eceives and transmits MIDI me ssages via the
USB connecto r.
100
95
75
25
5
0
Page 9
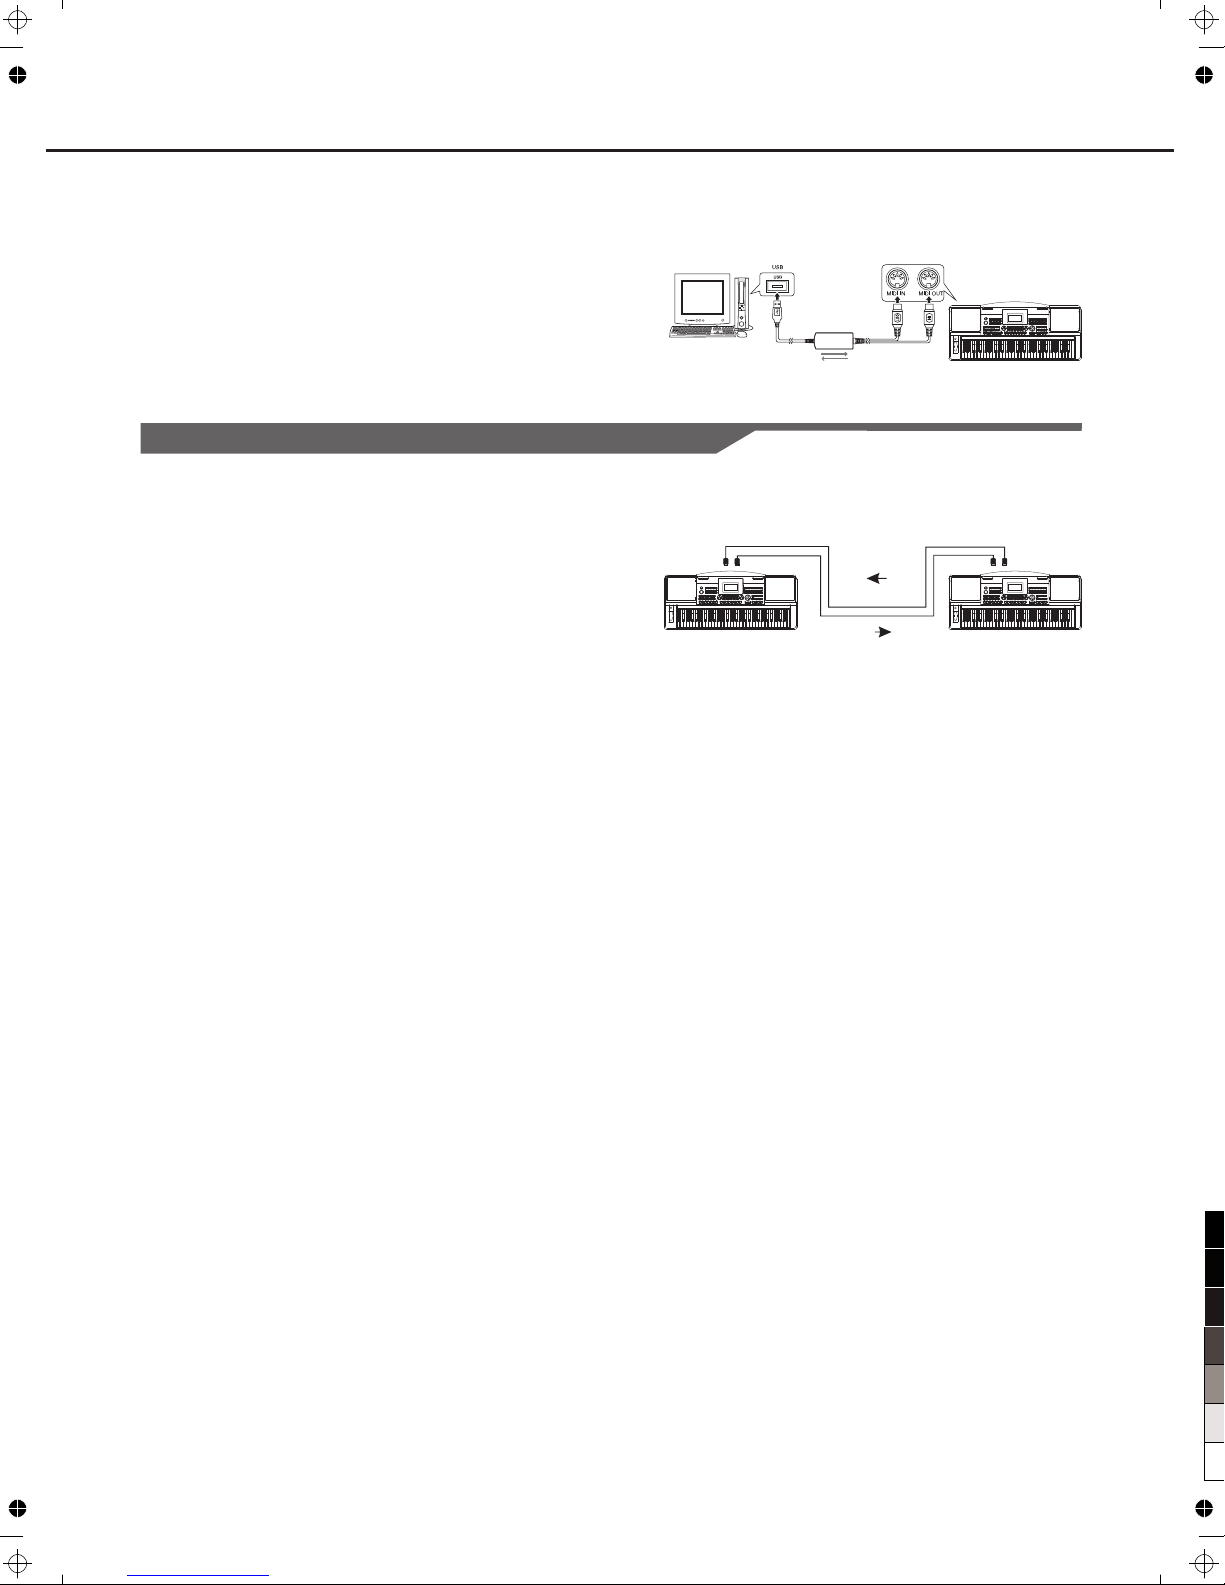
A USB-MIDI interface
MIDI IN
MIDI OU T
MIDI IN M IDI OUT
Connecting to other device
9
Connecting the MIDI IN /OUT to Computer via The MIDI/USB converter.
Connect the MIDI OUT of other Device to the MIDI IN jack on the rear
panel, this instrument will as sound module.
Connect the MIDI IN of other Device to the MIDI OUT jack on the rear
panel. this instrument will as Midi Controller.
Connections
100
95
75
25
5
0
Page 10
10
D a n c e M 1 d
S t G r d P n o
Playing the Demos
The instrument features 5 wonderful demos. Please refer to DEMO
LIST.
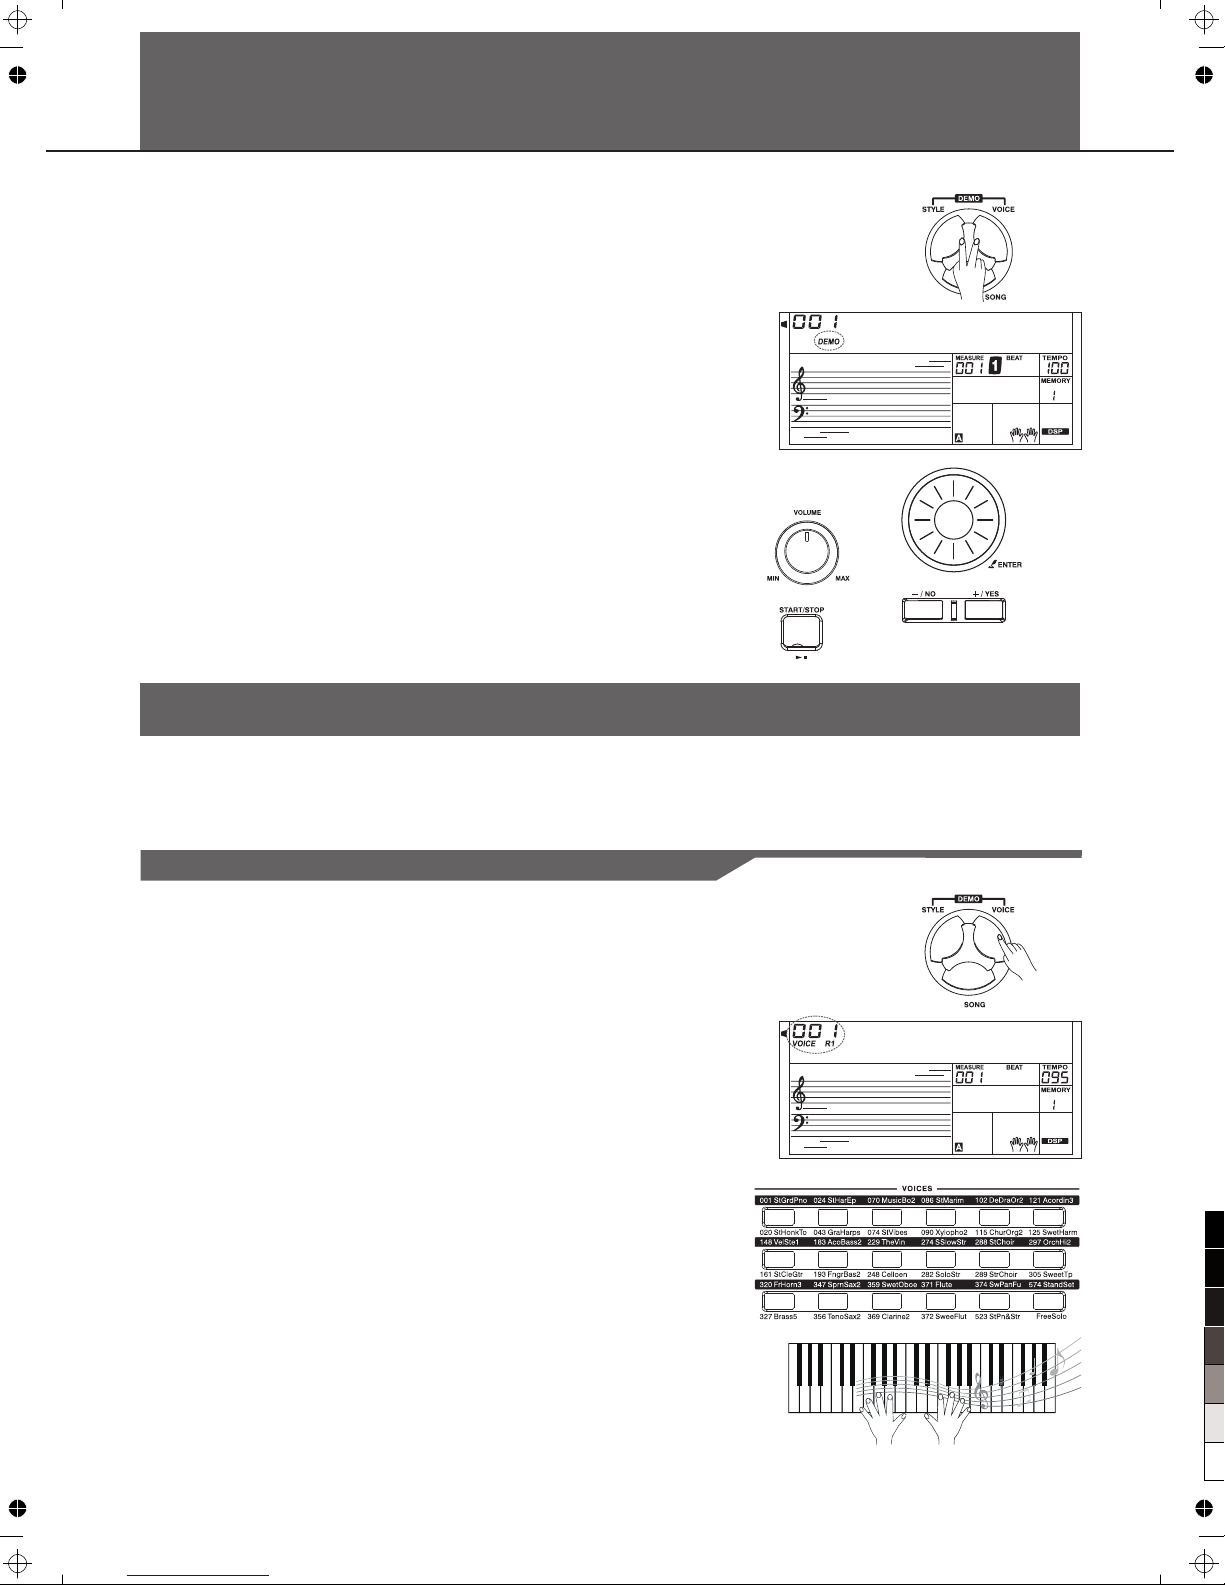
1.Press the [STYLE] and [VOICE] buttons simultaneously to start
Playing the demo.
2.Select a demo song.
Use the data dial, the [+/YES] button or the [-/NO] button to select a
demo song.
3.Set a volume level with the [MASTER VOLUME] knob.
4.Press the [STYLE] and [VOICE] buttons simultaneously again or
press the [START/STOP] button to stop playing and exit the demo
Mode.
Note:
In the DEMO mode, all buttons except START/STOP, TEMPO+,
TEMPO-, +/YES, -/NO, VOLUME, POWER ON/OFF will be not
available.
The instrument features 583 exceptionally realistic voices, including piano, guitar, strings, brass and
more. Please refer to Voice List
Playing Voices
Playing Voices
1.Press the [VOICE] button
Enter the VOICE mode. LCD shows VOICE R1 and the voice
number.
2.Select a voice.
Use the data dial, the [+/YES] button, the [-/NO] button to select the
voice you want to play. You can also use the Voice Direct Button to
a voice. 2 direct voices for each button (upper & lower key).
3.Play the voice.
Note:
While changing a voice, pay attention to the rules. If you press the
same button, the voice will be changed between the upper and lower
key. When the upper/lower voice is on, and then you press another
direct button, the corresponding upper/lower voice will be selected.
“ ”
select
You can play the keyboard and listen to the wonderful voice.
100
95
75
25
5
0
Page 11
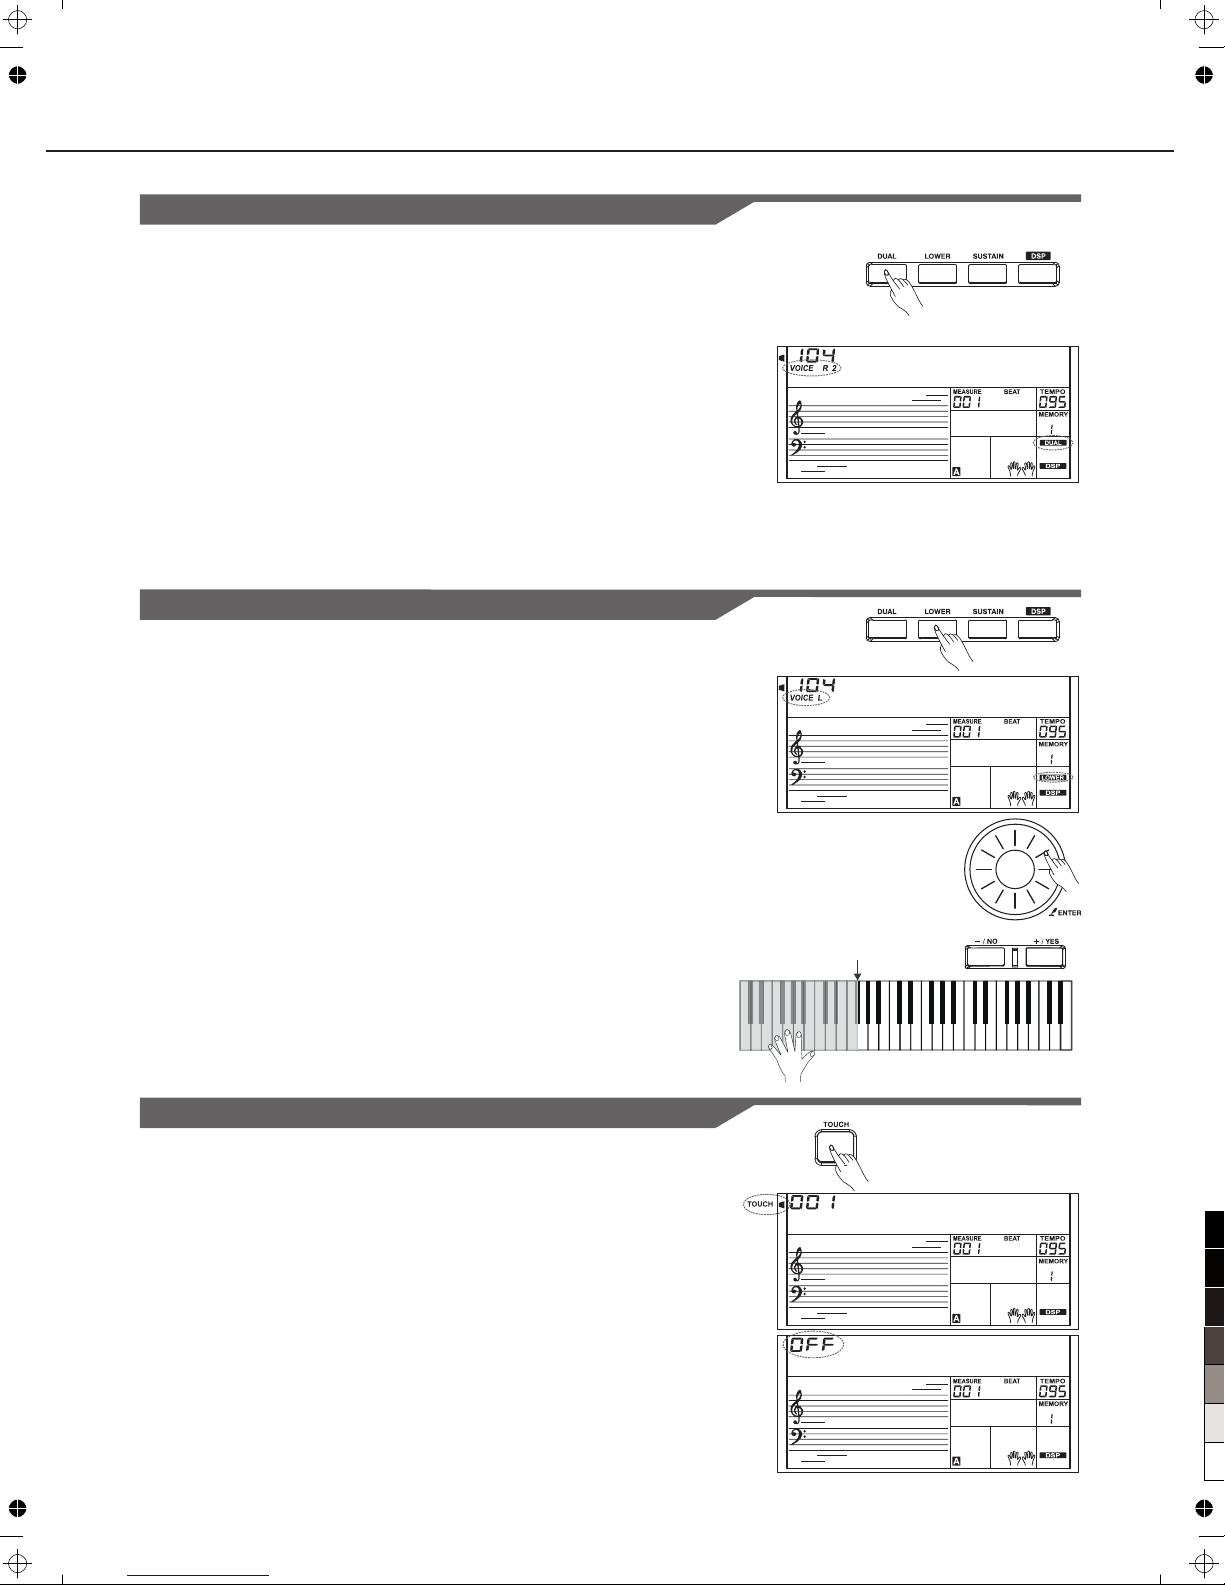
The keyboard is equipped with a touch response feature that lets you
dynamically and expressively controls the level of the voice with your
playing strength just as on an acoustic instrument.
1.Press the [TOUCH] button. The LCD shows the touch value
ranging from off to level 3.
2.Use the data dial, the [+/YES] button, the [-/NO] button or the
[TOUCH] button to change the touch response level.
Default level of touch response is 2.
If the value is set to OFF, that means no touch response to keyboard.
that
Touch
Playing Different Voices with Both Hands-LOWER
1.Press the [LOWER] button.
2.Play the voices.
The notes you play with your right and left hands sound two
different voices. The number of the lower voice will be displayed on
the LCD.
3.Selecting a voice for VOICE L.
When the number of the lower voice is displayed, you can select a
voice for Voice L. Use the data dial, the [+/YES] button or the [-/NO]
Button.
Split Point
The Point on the keyboard that separates voice L and voice R1/R2 is
called the "split point". The split point is set to F#3/G3 at the factory
setting. However you can set this to any key you want. Refer to
Setting The Split Point.
11
1 9 7 0 P c O r
1 9 7 0 P c O r
T o u c h
T o u c h
Playing two Voices Simultaneously-DUAL
1.Press the [DUAL] button.
2.Play the voices.
Two different voices are sounded simultaneously in a layer.The
number of the dual voice will be displayed on the LCD.
3.Selecting a voice for VOICE R2.
When the number of the dual voice is displayed, you can select a
voice for Voice R2. Use the data dial, [+/YES] and [-/NO] button, or
Voice Direct Buttons.
Note:
While the keyboard has splited, only the right hand area can respond
the dual voice, the left hand area can't respond it.
Playing the Voices
Default Split Point
100
95
75
25
5
0
Page 12
Transpose
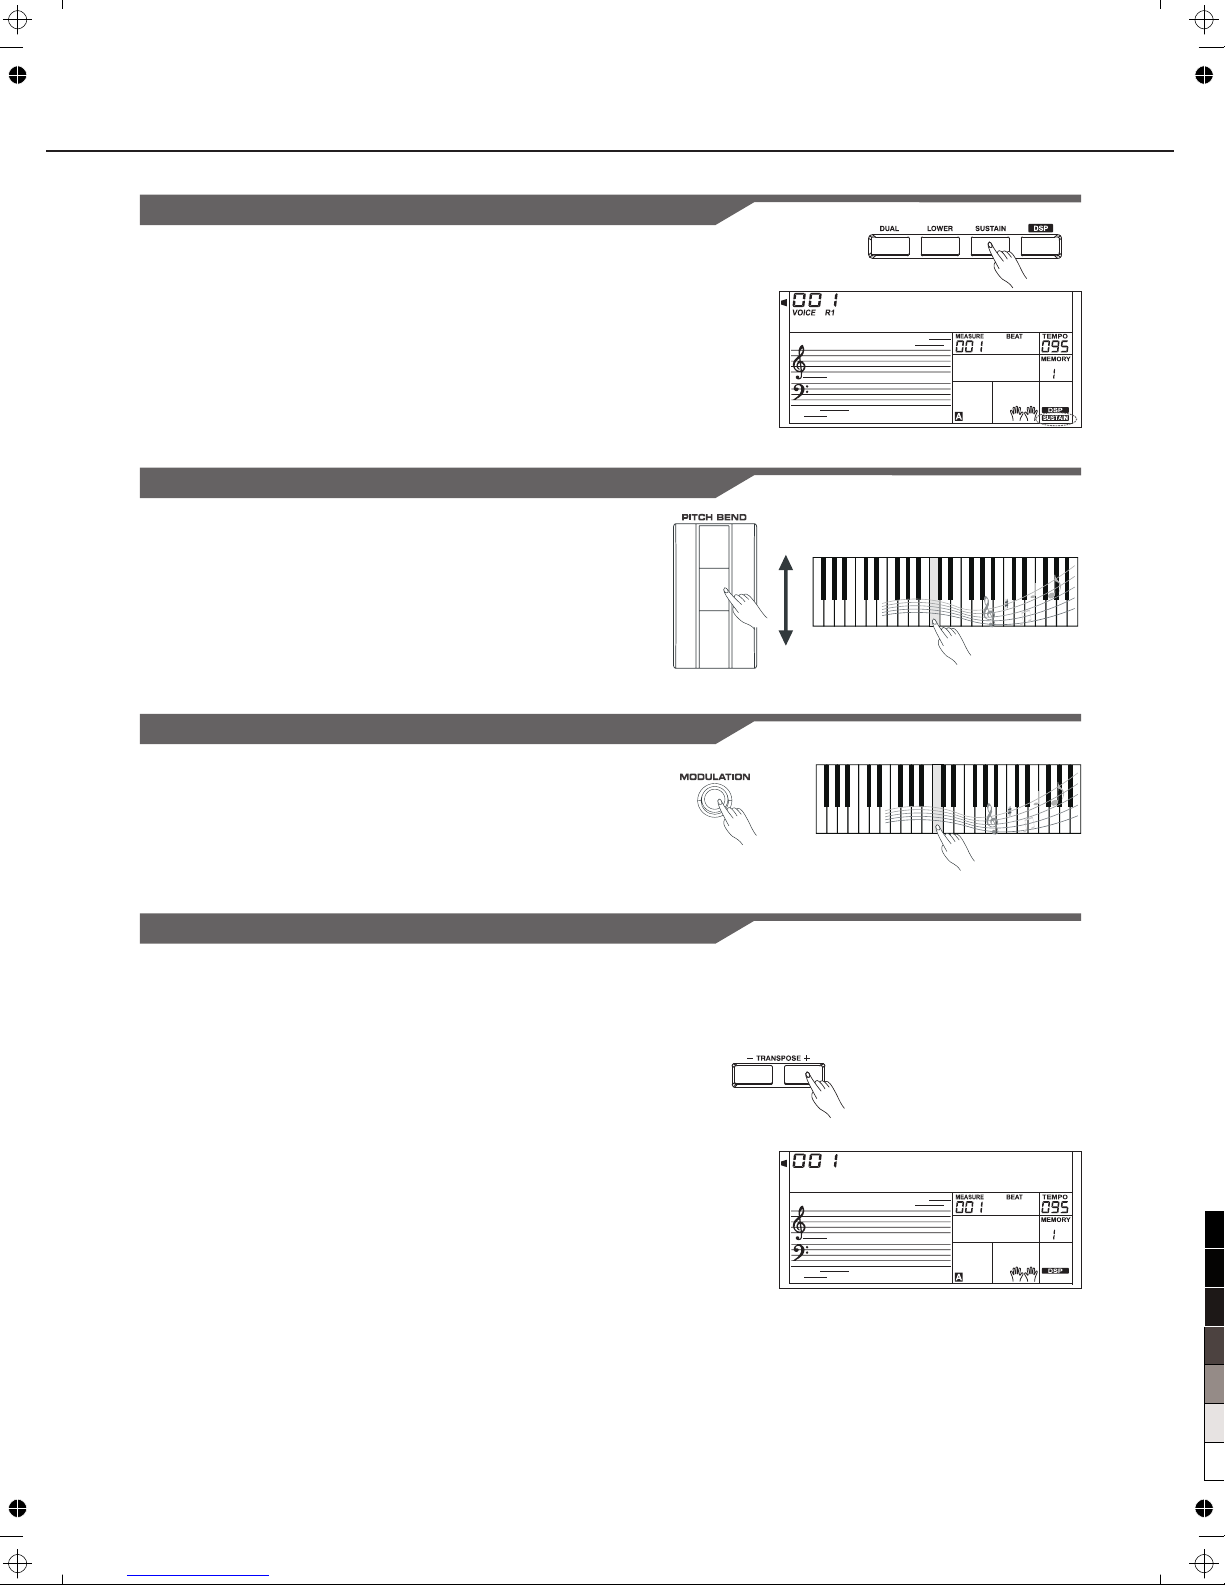
Transpose function allows the overall pitch of the instrument to be
transposed up or down by a maximum of one octave in semitone steps.
S t G r d P n o
T r a n s p o s
12
Playing the Voices
Sus tain
1.When the sustain is turned on, all notes will play with a longer
sustain.
2.Press the [SUSTAIN] button to turn the SUSTAIN effect ON or
OFF.
Note:
When you step on the sustain pedal , the sustain effect is stronger
than the effect by pressing the [SUSTAIN] button.
" "
Pitch Bend Wheel
Modulation
Use the pitch bend wheel to bend notes up (roll the wheel away you)
or down(roll the wheel toward you ) while playing the keyboard.The
pitch bend wheel is self-centering and will automatically return
to normal pitch when released.
The Modulation function applies a vibrato effect to notes played on the
keyboard. Press the [MODULATION] button while playing the keyboard
then you will hear the vibrato effect.
Press [TRANS PO SE +] or [TRANSPOSE -] to adjust th e va lue
from-12 to +12 s em itones.
Press [TRANS PO SE +] and [TRANSPOSE -] or press [+ /Y ES]
and [-/NO] sim ul taneously will set the valu e to d efault: 0.
1.
2.
Higher(+2)
Semitone
Lower(-2)
Semitone
100
95
75
25
5
0
Page 13
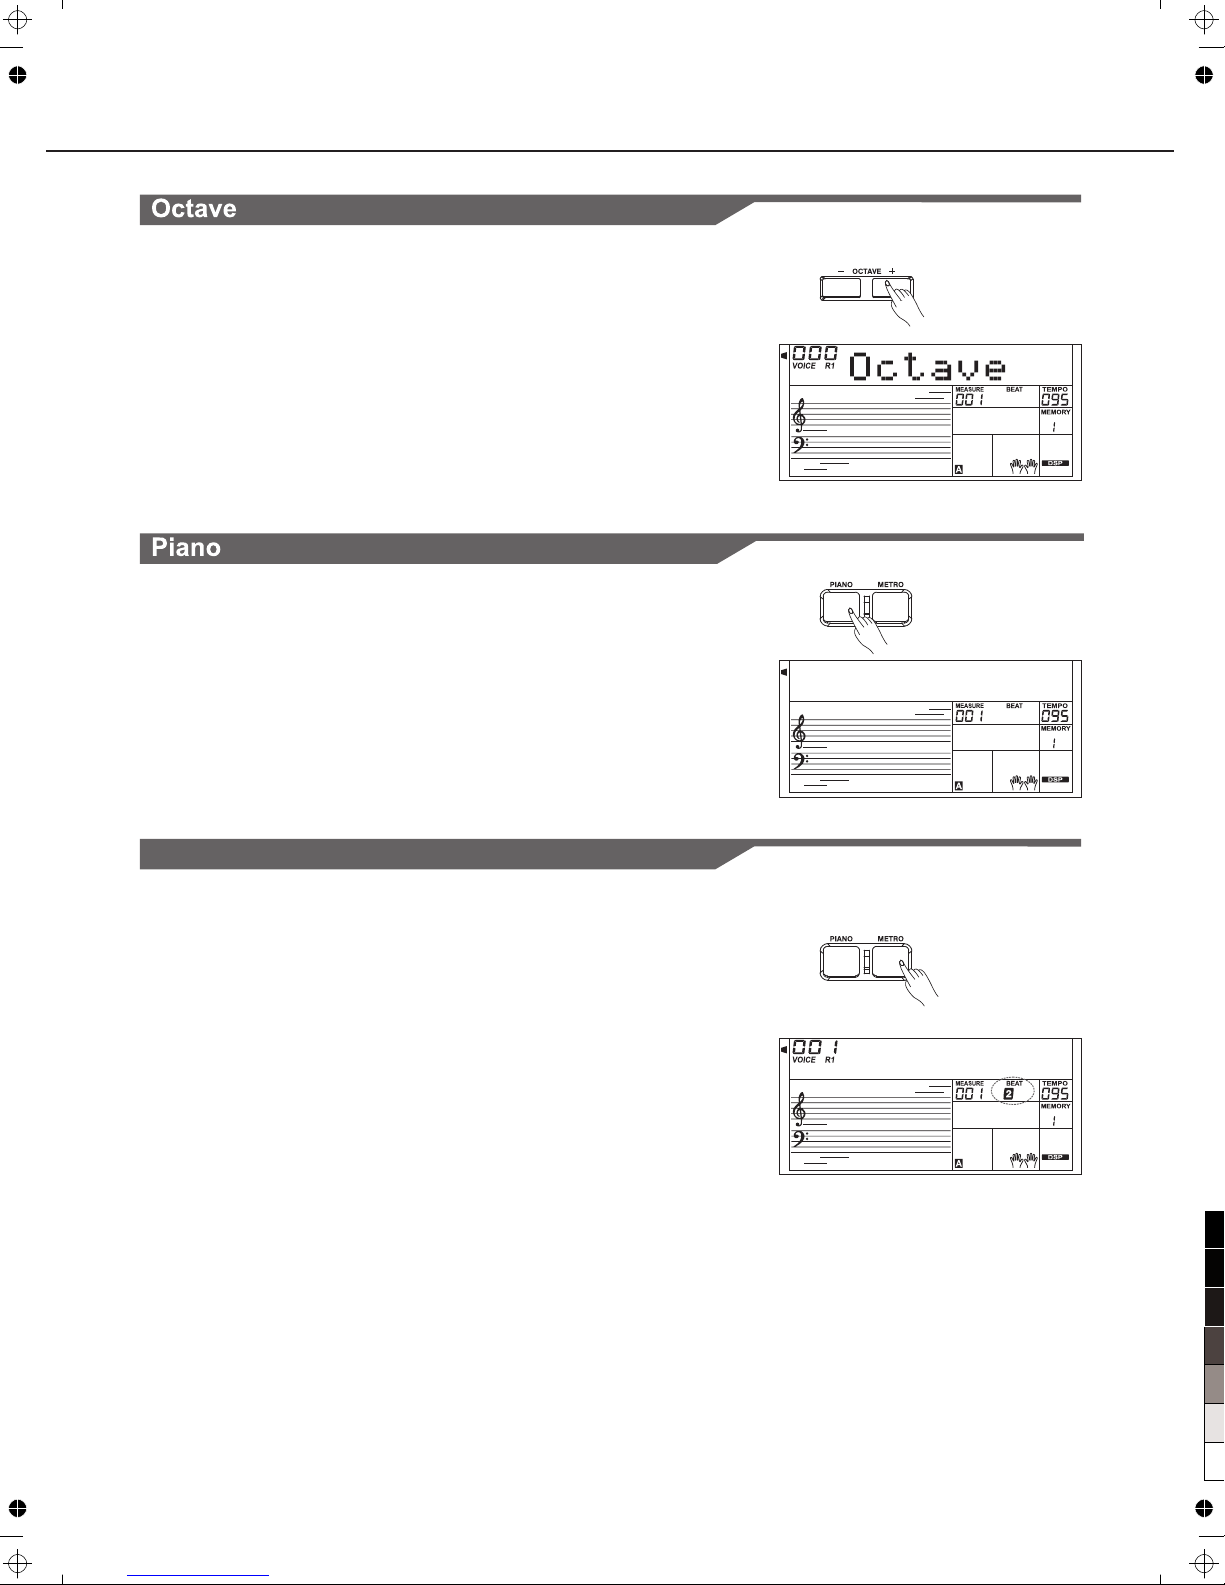
P i a n o
S t G r d P n o
13
Metronome
1.
2.
Press the [METRO] button to turn the metronome on.
Press the [METRO] button again to turn the metronome off.
Playing the Voices
1.
Press [OCTAVE +] or [OCTAVE -] to cha ng e the octave value.
This functio n ca n change the keyboard from -1 t o +1 o ctave.
Press [OCTAVE +] and [OCTAVE -] or pr es s [+/YES] and[-/NO]
simultaneo usly will set value to default: 0 .
2.
Octave funct io n determines the relative oct ave setting for the
played voice R 1,R2 and L.keyboard
1.
Press [PIANO ] bu tton to enter piano and exit pian o mode.
In the PIANO mod e, y ou can start a style. Press the [START/
STOP] button to play.
2.
No matter what s et ting you've made from the panel , you can
instantly ca ll u p the piano setting by a single b ut ton press.
100
95
75
25
5
0
Page 14
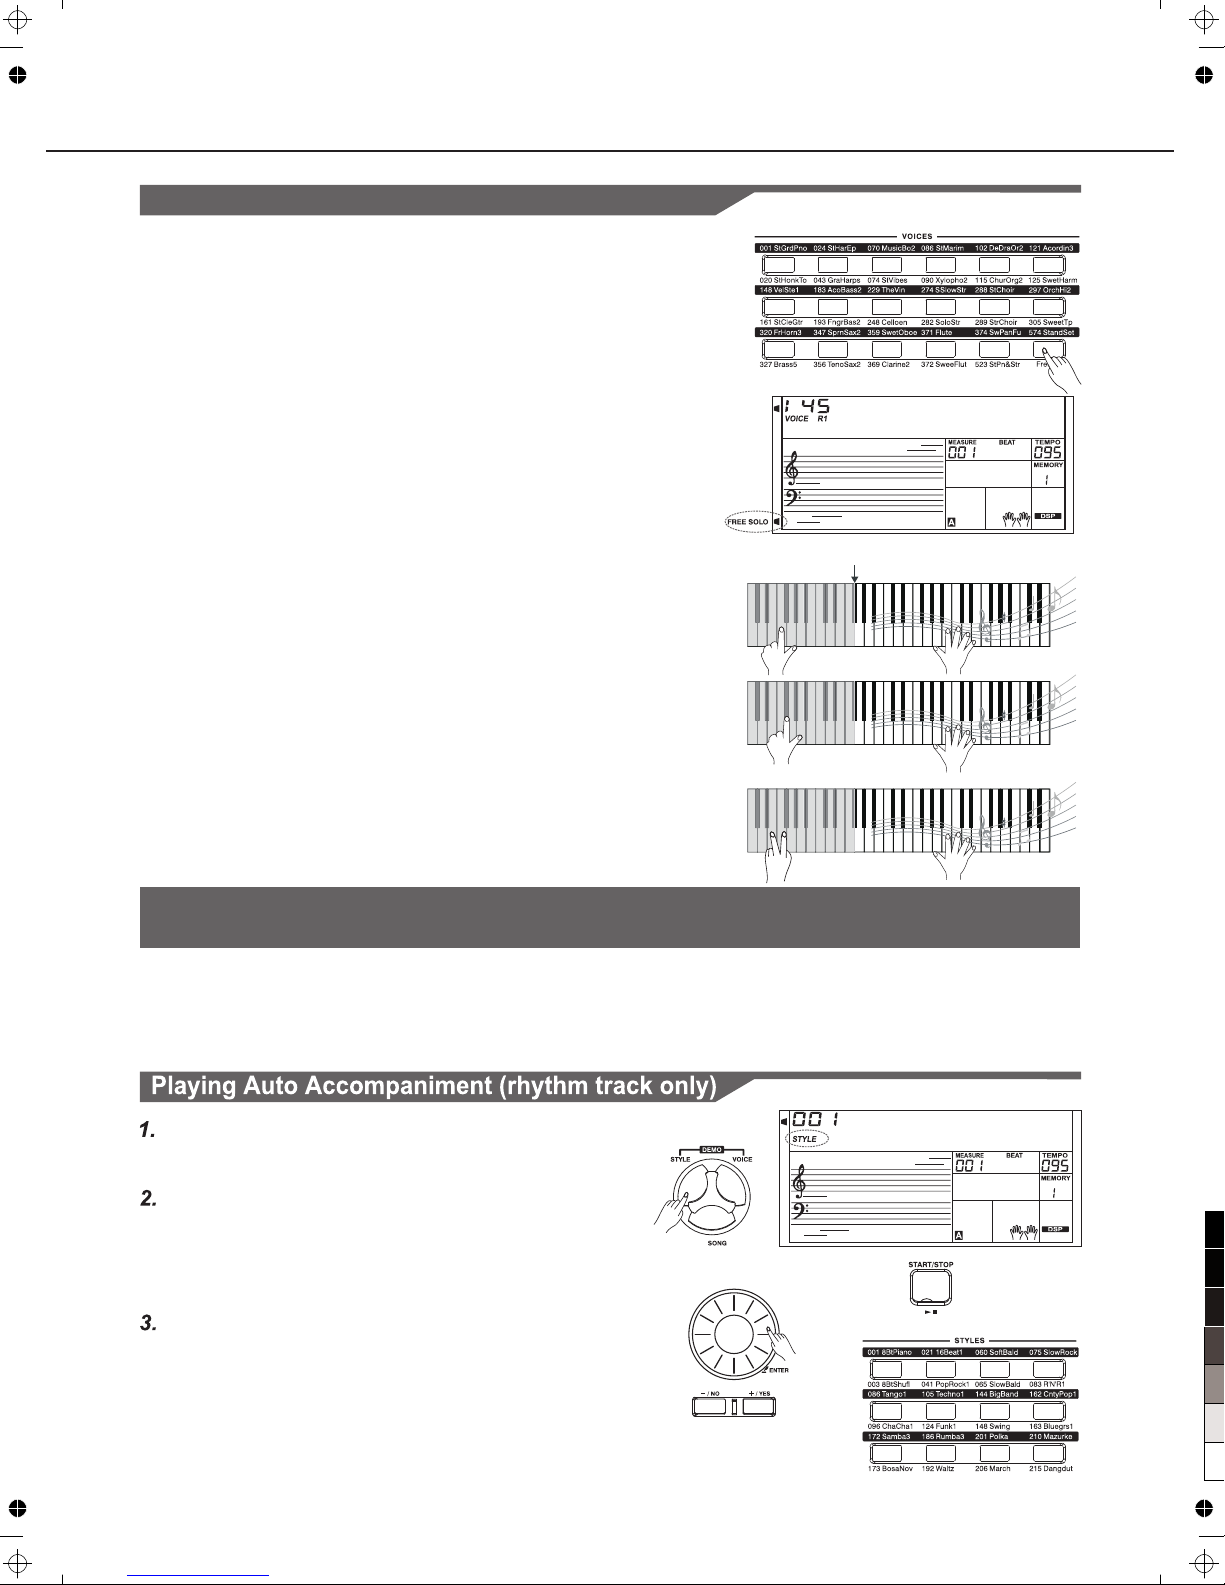
Freesolo
S t S t e G t
8 B t P i a n o
14
1.Press [Freesolo] button to enter freesolo function, then auto
chord, dual voice and lower voice function will be turned off.
bass
Using the freesolo function, you can switch voice fast, accurately,
seamlessly, and play a variety of real instrument special skills.
Furthermore, you can play closer to the real sense of musical
instruments by using real sound sampling techniques.
2.
You can use the right area keyboard to play and use the left area
keyboard to switch voice after turn on the freesolo function.
Press and holding a white key of the left area keyboard, the first
layer voice will be valid. Release the key, the first layer voice will be
invalid and the basic voice will be valid;
Press and holding a black key of the left area keyboard, the second
layer voice will be valid. Release the key, the second layer voice will
be invalid and the basic voice will be valid;
Press two or more white keys of the left area keyboard simultaneously,
the first layer voice will be valid. Release these white keys, the current
voice will not change.
Press two or more black keys of the left area keyboard simultaneously,
the second layer voice will be valid. Release these black keys, the
current voice will not change.
3.
The auto accompaniment feature puts a full backing band at your fingertips. To use it, all you have to do is play the chords with
your left hand as you perform and the selected accompaniment style matching your music will automatically play along,
instantly following the chords you play. With auto accompaniment, even a solo performer can enjoy playing with the backing of
entire band or orchestra. The instrument features 230 styles in a variety of different musical genres. Try selecting some of the
different styles (Refer to Style List) and play with the auto accompaniment.
While changing a style, pay attention to the rules. If the same button
has been pressed twice, the style will be swapped from one to another.
When the upper/lower style is on, and you then press another Direct
Select Button, the corresponding upper/lower style will be selected.
Playing the Voices
Auto Accompaniment
Enter the STYLE mode. LCD shows STYLE and the style
number.
" "
select the sty le y ou want to play.Also, you can use the Style
Direct Selec t Bu tton to select a style. 2 direct st yles for each
button (uppe r & lo wer key).
Select a style .
Use the Data Dia l, t he [+/YES] button, the [-/NO] b ut ton to
Press the [START/STOP]button to start the rhyth m tr acks of
the auto accom pa niment.
Note:
Press the [STY LE ] button.
Default Split Point
100
95
75
25
5
0
Page 15
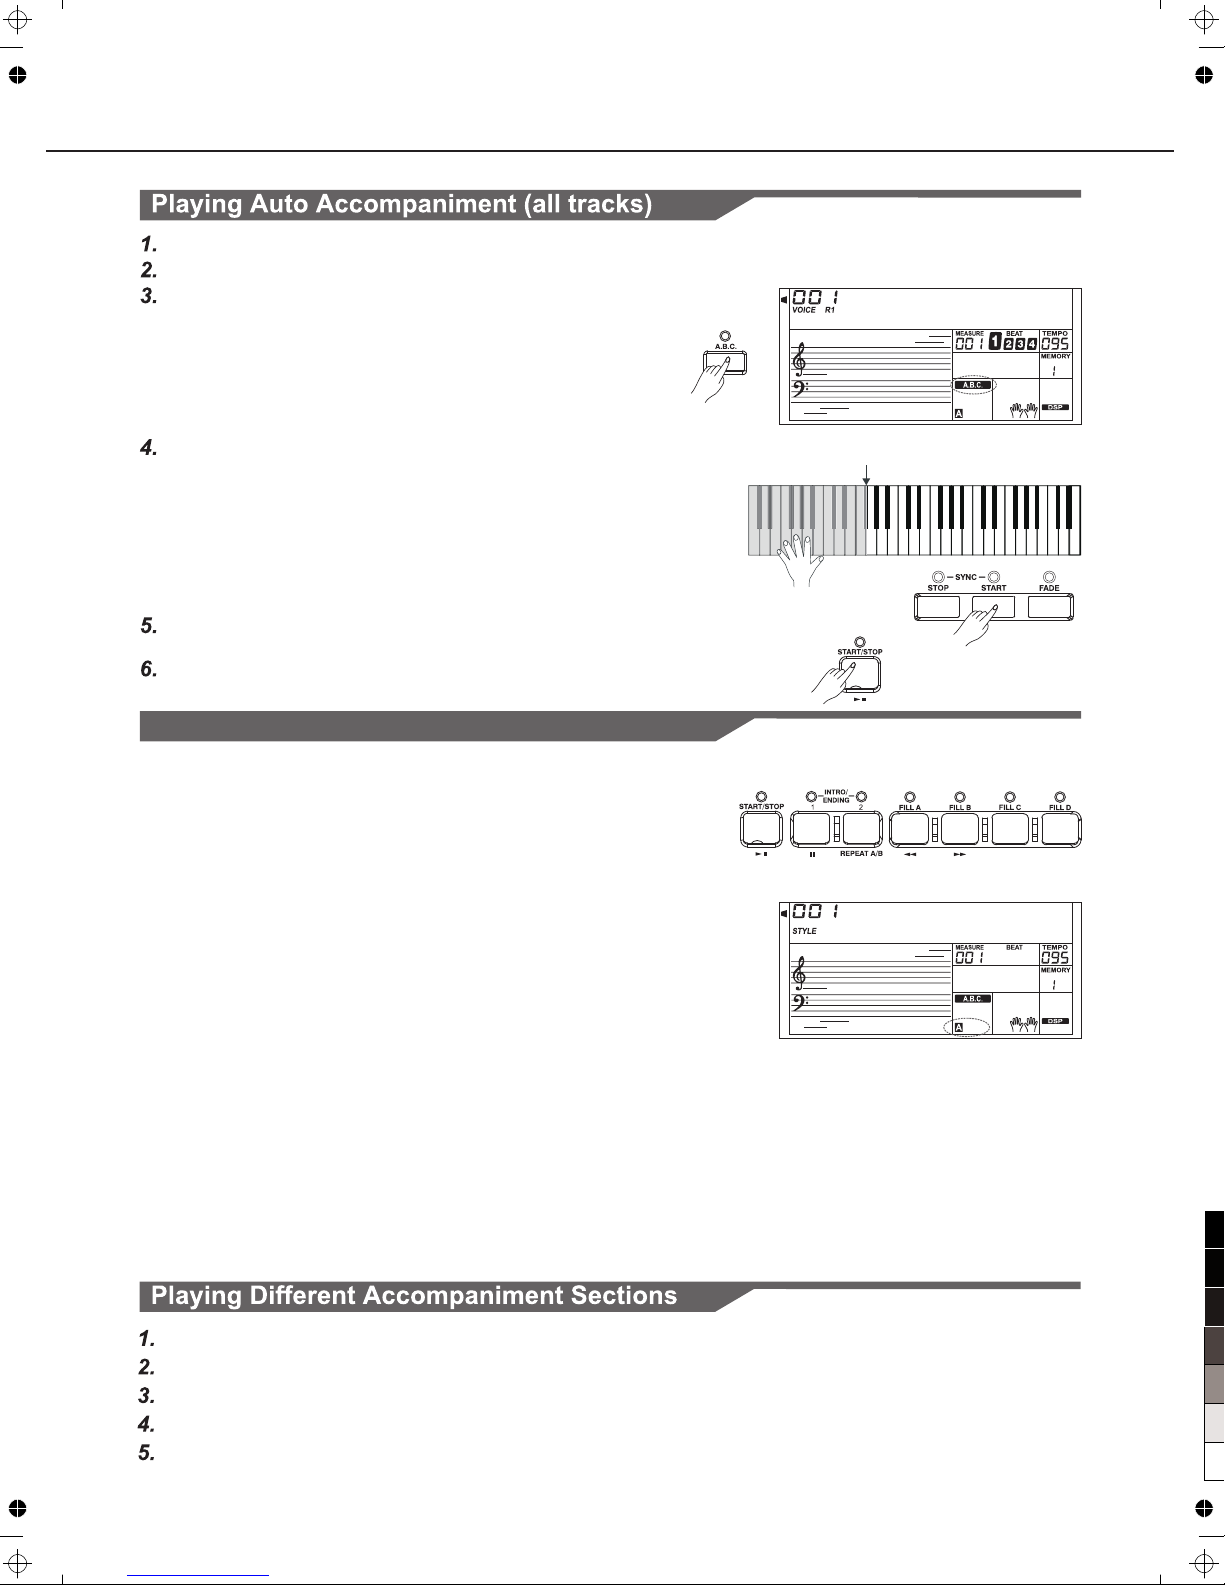
Accompaniment Sections
There are various types of Auto Accompaniment sections that allow
you to vary the arrangement of the accompaniment to match the song
you are playing.
They are: Intro (1, 2), Main (A, B,C,D), Fill-in (A, B,C,D) and Ending(1,
2). By switching among them during your performance you can easily
produce the dynamic elements of a professional-sounding
arrangement in your performance.
INTRO Section
This is used for the beginning of the song. When the intro finishes
playing, accompaniment shifts to the main section.
MAIN Section
This is used for playing the main part of the song. It plays an
accompaniment pattern of several measures, and repeats indefinitely
until another section's button is pressed.
FILL-IN Section
The fill-in section let you add dynamic variations and breaks in the
rhythm of the accompaniment, to make your performance sound even
more professional. When the fill-in is finished, it leads smoothly into the
selected main section (A, B,C,D).
ENDING Section
This is used for the ending of the song. When the ending is finished,
the auto accompaniment stops automatically. The length of the ending
differs depending on the selected style.
8 B t P i a n o
8 B t P i a n o
15
Press the [STY LE ] button.
Select a style .
n
Tur n SY NC START on.
Press the [FIL L- IN A] button.
Tur n th e A.B.C. o .
Auto Accompaniment
Default Split Point #F3
Press the [STYLE]button.
Tur n on t he A.B.C. .
Press the [A.B .C .]button,the specified le ft-hand Section of the
keyboard bec omes the “Auto Accompaniment”se ct ion, and
chords playe d in this section are automatic al ly detected and
used as a basis fo r fu lly automatic accompani me nt with the
selected sty le .
Select a style.
Tur n SY NCHRONIZED START ON.
Press the [SYN C START] button, now the be at lamp flashes
in time with the t em po. This c ondition is called synchron iz ed
start standb y.
As soon as you pla y a ch ord with your left hand, the au to
accompanim ent starts.For example, pla y a C ma jor chord to
start the auto a cc ompaniment.
Try p la ying other chord with your left h and.
Press the [START/STOP] button again to stop the acc ompaniment
100
95
75
25
5
0
Page 16
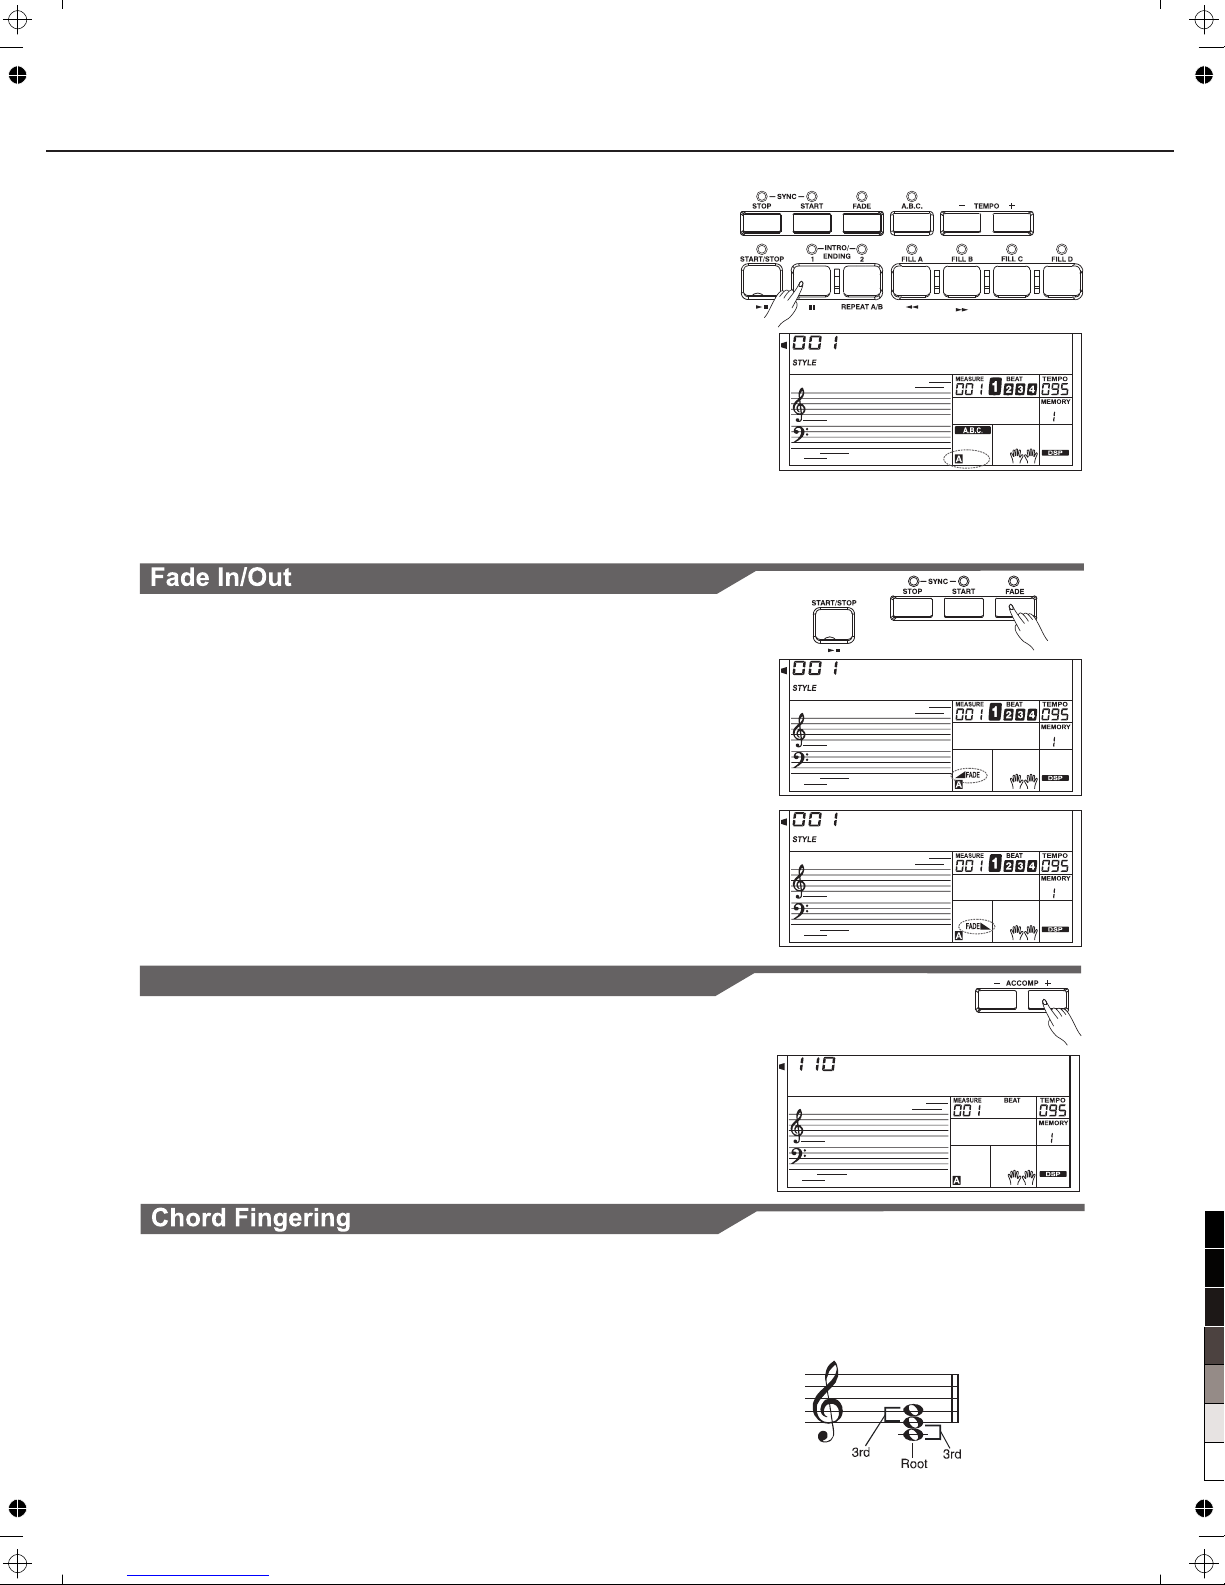
8 B t P i a n o
16
Accompaniment Volume
8 B t P i a n o
8 B t P i a n o
A c c o m p
16
6.Press the [INTRO/ENDING] button.Now the A flashes on LCD, the
style is ready to play.
7.As soon as you play a chord with your left hand, the auto
Accompaniment starts. When the playback of the intro1 is finished,
it automatically leads into Main A section.
8.Press the [FILL-IN B] /[FILL-IN C] /[FILL-IN D] button.A fill-in plays,
automatically followed by the Main B/C/D section.
9.Press the [INTRO/ENDING] again will lead it into the Ending Section.
When the ending is finished, the auto accompaniment automatically
stops.
" "
Note:
Hold down the FILL-IN A/B/C/D button when the style is playing, the
selected FILL pattem repeats continuously until button is released.
Press FILL-IN A/B/C/D when style stop, it will change to the normal
section, the icon A/B/C/D on LCD will be lightened.
1.Press [ACCOMP+] or [ACCOMP -] button to adjust ACCOMP volume,
LCD displays Accomp volume which ranging from 0 to 127.
2.Press [ACCOMP +] and [ACCOMP-] button simultaneously to turn
off ACCOMP volume.
3.Press [ACCOMP +] and [ACCOMP-] button simultaneously again to
turn on ACCOMP volume.
Auto Accompaniment
Fade In
The Fade In produces smooth fade-ins when starting the Style.
Press the [FADE] button when Style playback is stopped and
press the [START/STOP] button to start Style playback.
Fade Out
The Fade Out produces smooth fade-outs when stopping the Style.
Press the [FADE] button during style playback.
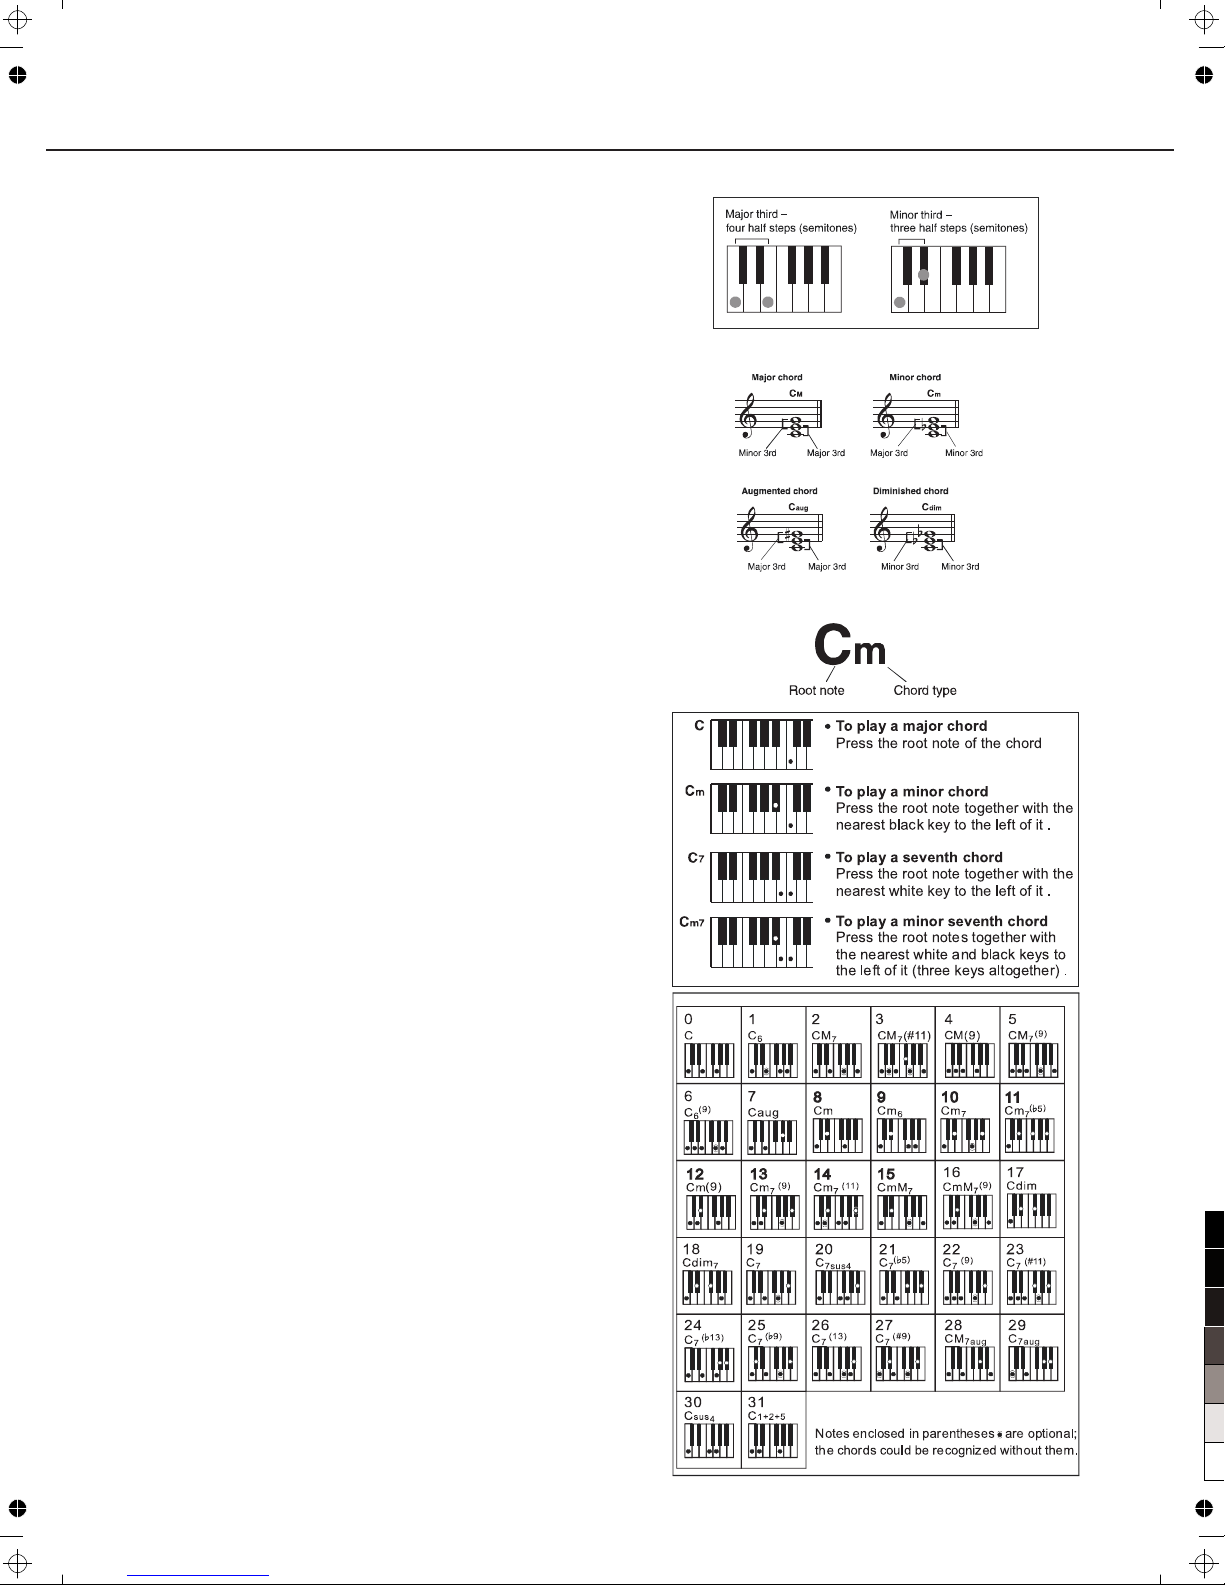
How the chords a re p layed or indicated with you r le ft hand (in the
auto accompa ni ment section of the keyboar d) i s referred to as
"fingering ". There are 2 t ypes of fingerings as describ ed b elow.
Chord Ba si cs
Three or more no te s are played together is defi ne d as a "chord".
The most basic c ho rd type is the "triad" consisti ng three notes:
the root, thir d an d fifth degree of the correspon ding scale. A "C
major triad" , fo r example, is made up of the otes C (th e root), E
(the third not e of t he C major scale) and G (the fifth no te of the
C major scale) .
100
95
75
25
5
0
Page 17
17
In the C major triad shown, the lowest note is the "root" of the chord
(this is the chord's "root position" using other chord notes for the
lowest note results in “inversion”). The root is the central sound of
the chord, which supports and anchors the other chord notes. The
distance (interval) between adjacent notes of triad in root position is
either a major or minor third.
The lowest interval in our root-position trial (between the root and the
third) determines whether the triad is a major or minor chord, and we
can shift the highest note up or down by a semitone to produce two
additional chords, as shown.
The basic characteristics of the chord sound remain intact even if we
change the order of the notes to create different inversions. Successive
chords in a chord progression can be smoothly connected, for
example, by choosing the appropriate inversions.
Reading Chord Names
Chord names tell you just about everything you need to know about a
chord (other than the inversion/voicing). The chord name tells you what
the root of a chord is, whether it is major, minor or diminished, whether
it requires a major or flatted seventh, what alterations or tension does it
use...all at a glance.
The CHORD FINGER mode
The Chord Finger mode lets you finger your own chords on the AUTO
ACCOMPANIMENT section of the keyboard.
SINGLE FINGER
Single-finger accompaniment makes it simple to produce beautifully
orchestrated accompaniment using major, seventh, minor and minorseventh chord by pressing a minimum number of keys on the AUTO
ACCOMPANIMENT section of the keyboard.
MULTI-FINGER
This is the default accompaniment mode. You can use either type of
single fingering or chord fingering in this mode.
Auto Accompaniment
100
95
75
25
5
0
Page 18
8 B t P i a n o
18
Tempo
Auto Accompaniment
8 B t P i a n o
One Touch Setting
One Touch Setting is a powerful and convenient function that lets you
instantly recognize virtually all Auto-accompaniment-related panel
settings with the touch of a single button.
1.Press the [O.T.S.] button to turns on the One Touch Setting for
current style.
2.Press one of the [ONE TOUCH SETTING] buttons [M1]-[M4].
Various panel settings (such as voice, effect, etc.) that match the
selected style can be instantly recalled with just a single button
Press. Auto accompaniment is automatically turned on during mode.
3.Play the keyboard.
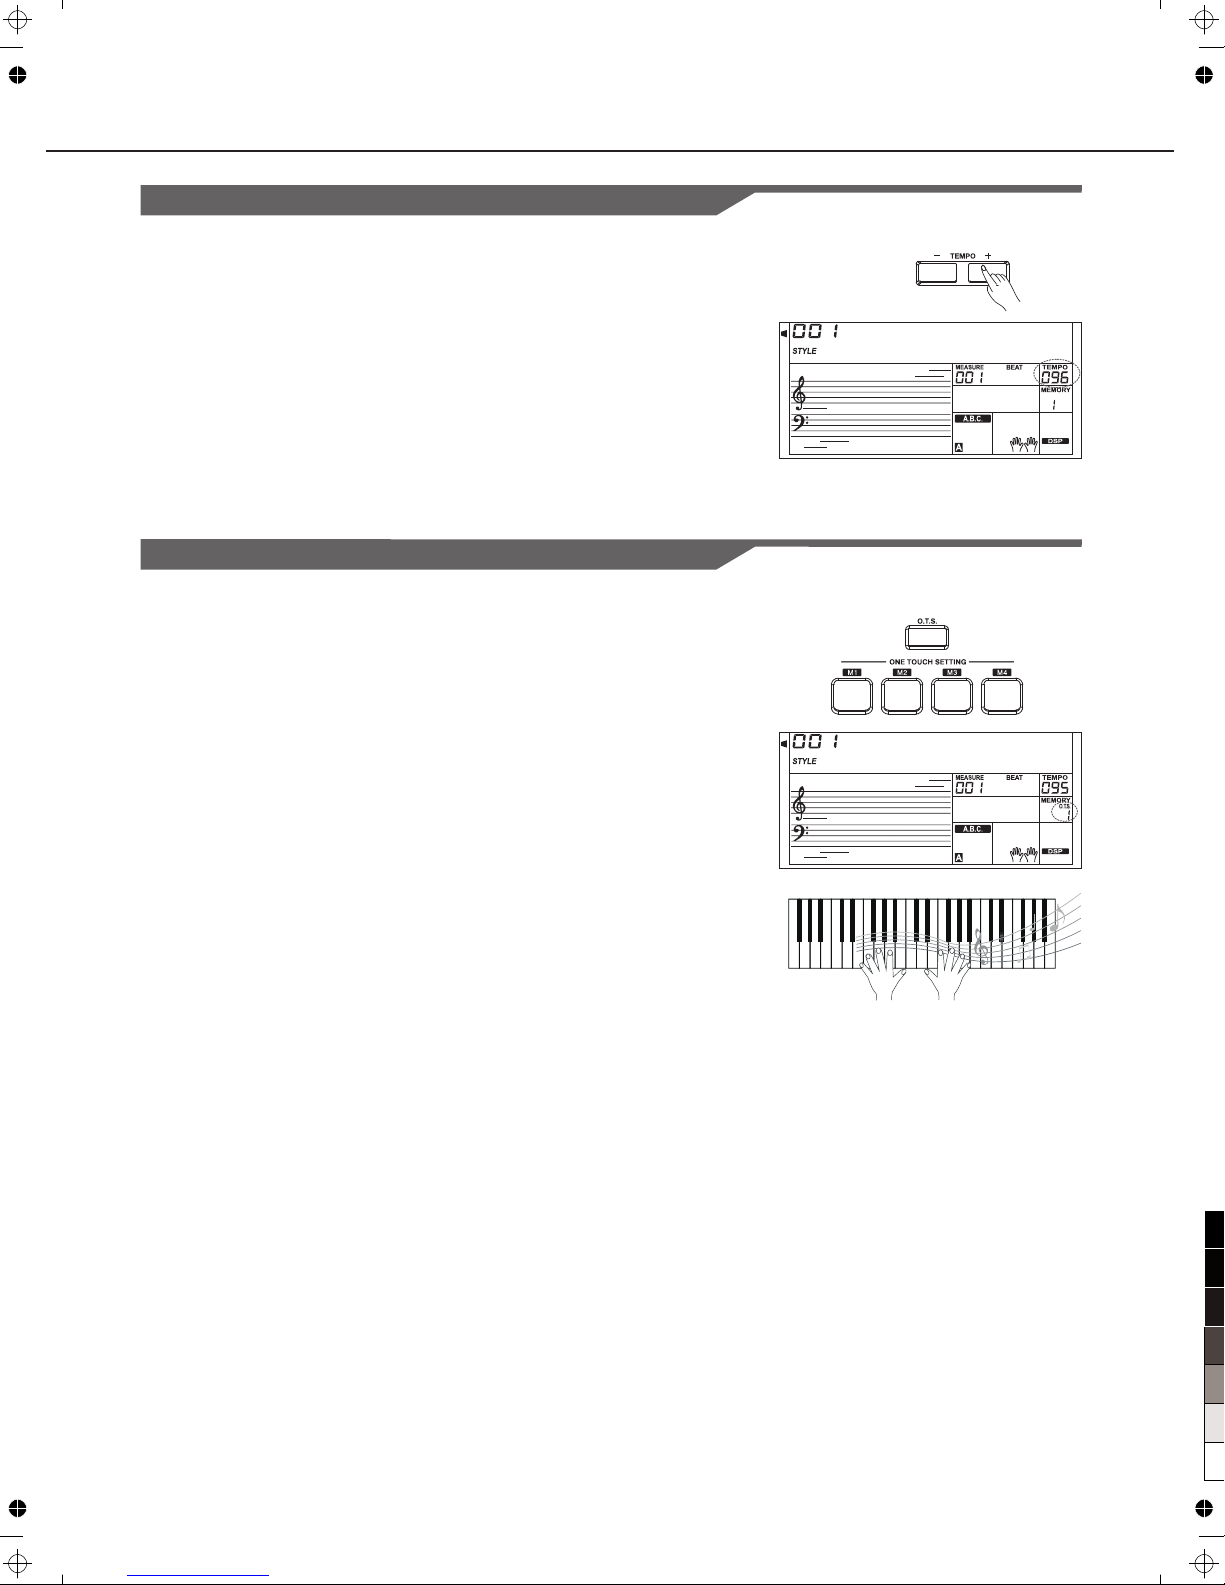
Each style of th e in strument has been with a default o r
standard tem po ; however, this can be changed b y us ing the
[TEMPO+]/[ TE MPO-]buttons.
set
2.
Change the tem po
Use the [TEMPO +] o r [TEMPO-] button to change the t em po.
While the temp o da ta is flashing, use the Data Di al c an also
change the tem po .
To restore the def au lt tempo setting, press the
[TEMPO+]/[ TE MPO-] buttons simultaneou sly.
1.
One Touch Setting par am et er l ist:
Part ON/OFF (V OI CER1,R2,L)
Voice Change( VOICER1,R2,L)
Voice Volume(V OICER1,R2,L)
Voice Reverb Le vel(VOICER1,R2,L)
Voice Chorus Le vel(VOICER1,R2,L)
100
95
75
25
5
0
Page 19
O f f
D u e t
19
Harmony
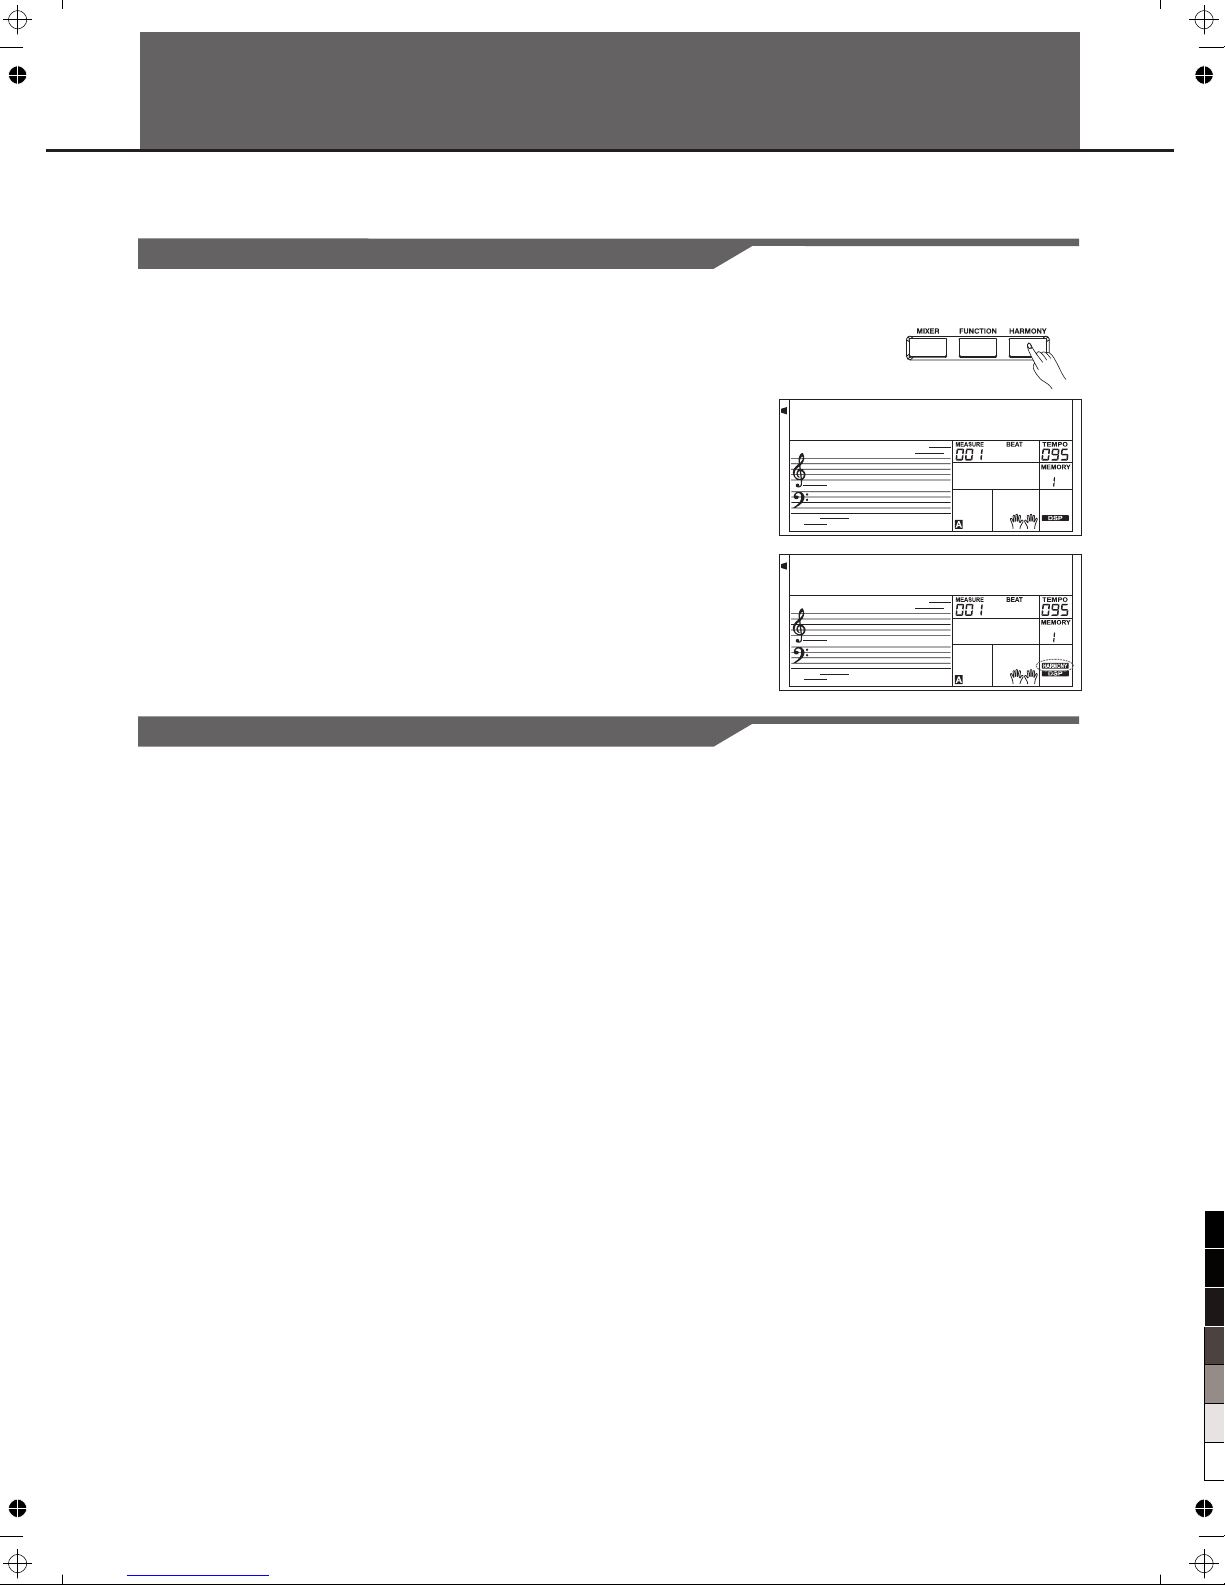
You can add a variety of harmony notes to the keys you played in the right-hand section.
Turning on the Harmony effect
Press the [HARMONY]button to turn on or off the harmony effect.
In the main mode and harmony is off, press the [HARMONY] button,
the LCD will display "off". Press the [HARMONY] button again to turn
on the harmony and the LCD will display the current harmony type and
the harmony flag.
Applying the Harmony effect
1.Press the [A.B.C.] button to turn atuo accompaniment on.
2.Play a chord wi th y our left hand.
3.Play some notes in the right-hand range of the keyboard.
When a harmony t yp e is selected, this type automa tically add
one or more harm on y notes to a single-note melo dy p layed in
the right-ha nd .
Note:
While"1+5" or " octave" is selected to a harm on y type, you can use
the harmony effect witho ut playing the chord.
You can select the harm on y ef fe ct type in the function men u.
100
95
75
25
5
0
Page 20
S t G r d P n o
L o w P a s s
20
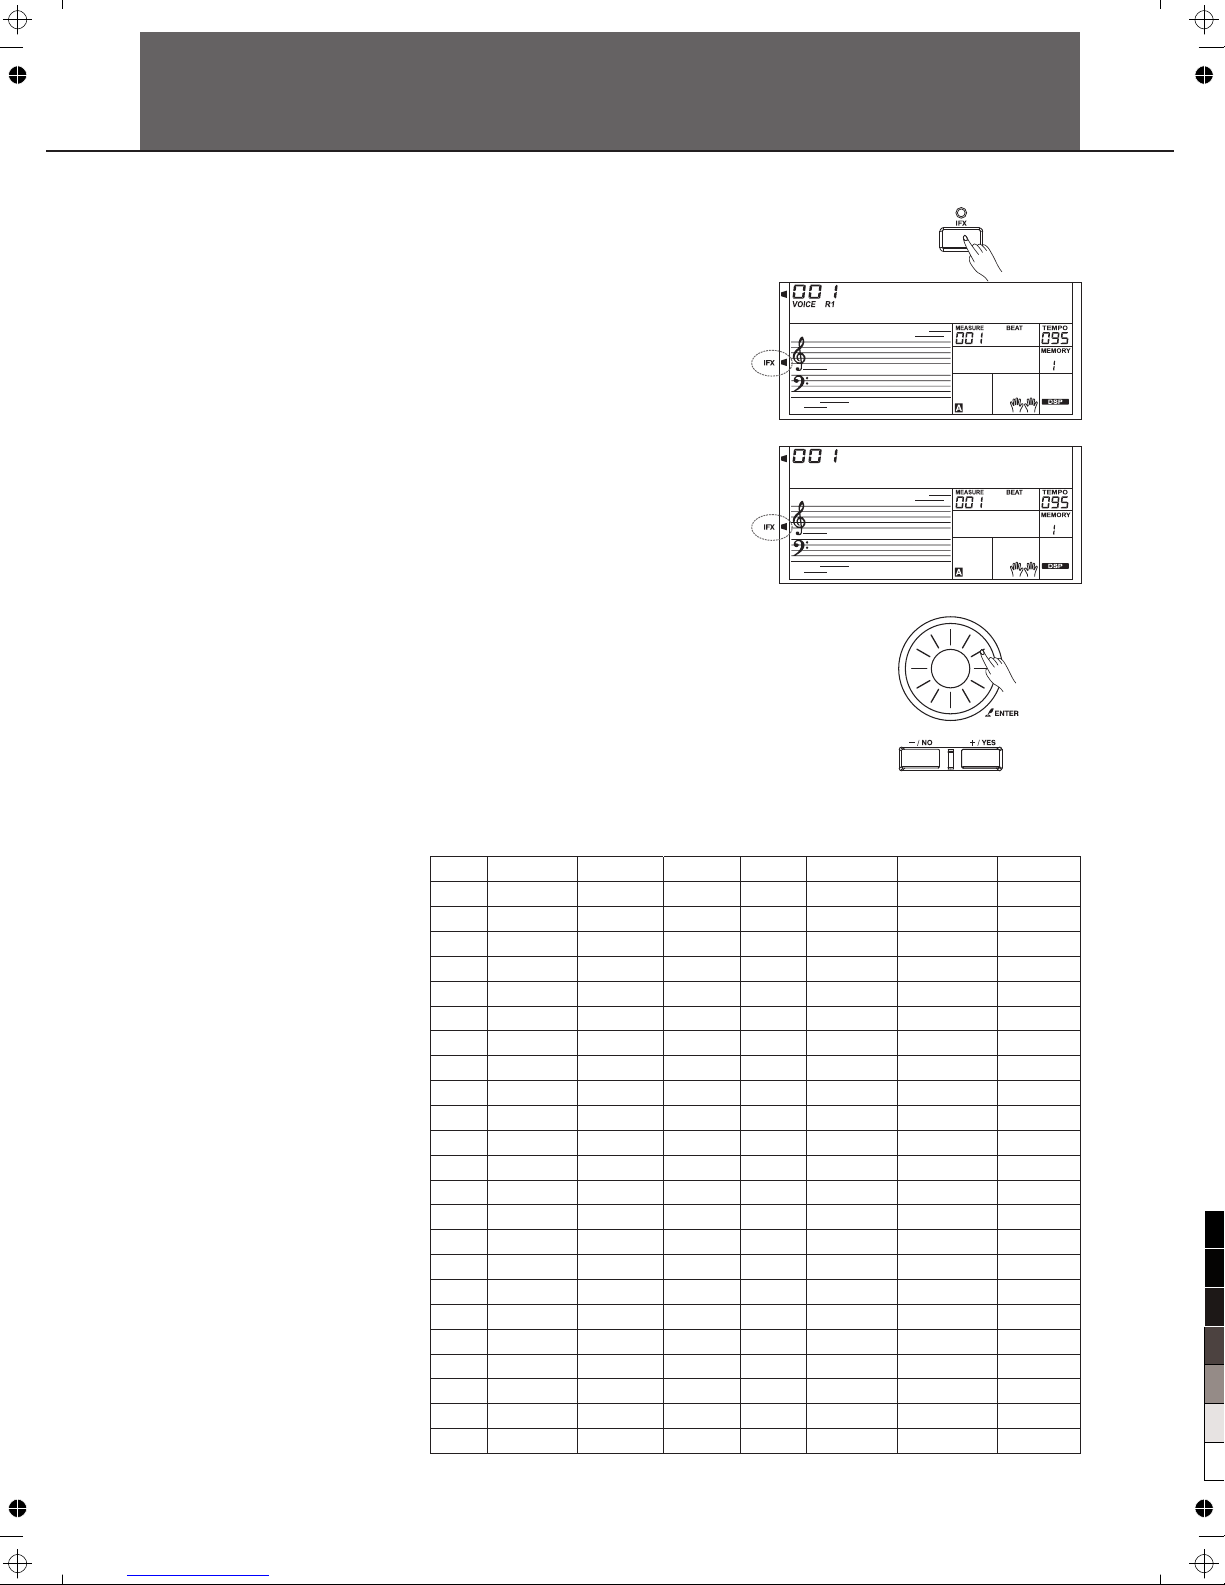
IFX
There are 45 preset insert effects in all, including Chorus、Flanger、
Phaser、Tremolo、EQ、Distortion、Wah、Compressor and
LowPass Filter.
The insert effect is set to off when the keyboard is power on. Press
[IFX] button to turn on the effect function, the insert effect flag will be
lighted. Press [IFX] button again to turn off the effect function and
the insert effect flag will be turn off.
1.
Press and holding [IFX] button about two second to enter the insert
effect menu selection mode, use [+/YES]/[-/NO] or Data Dial to select
the effect type you want. If the insert effect is turned on, you can feel
the effect by playing the keyboard. Press [ENTER] button to enter the
next menu if the current effect has parameter.
Use [+/YES]/[-/NO] button or Data Dial to select the parameter you
want and press [ENTER] button to enter the parameter setting mode.
Use [+/YES]/[-/NO] button or Data Dial to set the value. Press
[ENTER]/ [EXIT] button to return to previous menu. At any time,
Press other button to quit the effect menu selection mode.
The switch status of the effect will not change after quit the effect
selection menu display. LCD displays the first type effect when you
enter the menu after power on. When you enter the menu next time,
you will find the effect type is the same as last time except you restart
the keyboard.
The effect is keyboard channel. The specific effects and
parameters as follow table, each parameter value range from 0 to 127.
If the flag "-" mark in the table indicate the parameter is inexistence.
Insert effect type and parameter:
apllied to
2.
3.
4.
5.
NO type Param1 P ar am2 NO type Param1 Par am 2
1 - 24 - 2 25 - 3 26 - 4 27 - 5 28 - 6 29 - 7 30 - 8 31 - -
9 32 - 10 33 - 11 34 - 12 35 Mix Gain
13 36 Mix Gain
14 37 Mix Gain
15 38 Mix Rate
16 39 Mix Rate
17 - - 40 Mix Rate
18 - - 41 Mix Sense
19 - - 42 Mix Sense
20 - - 43 Mix Sense
21 - - 44 Mix Sense
22 - - 45 Threshold Ratio
23 - -
LowPass
STD CHR
Lite CHR
Deep CHR
Warm CHR
BRT CHR
STD FLG
Lite FLG
Deep FLG
CrazyFLG
STD PHS
Lite PHS
HeavyPHS
VTG TRM
MDN TRM
Panner
BasBoost
BasPunch
MidBoost
LM Boost
HM Boost
Hi Boost
Low Cut
CutOff
Mix
Mix
Mix
Mix
Mix
Mix
Mix
Mix
Mix
Mix
Mix
Mix
Mix
Mix
Mix
Rate
Rate
Rate
Rate
Rate
Rate
Rate
Rate
Rate
Rate
Rate
Rate
Rate
Rate
Rate
Mid Cut
LoMidCut
HiMidCut
High Cut
S-Hi Cut
Enhance
Loudness
Add Air
Live EQ
PhoneSim
RadioSim
Dist
Overdriv
Fuzz
ST A.Wah
LT A.Wah
DP A.Wah
ST S.Wah
LT S.Wah
DP S.Wah
CR S.Wah
Comp
100
95
75
25
5
0
Page 21
21
S t e e 1 G t r
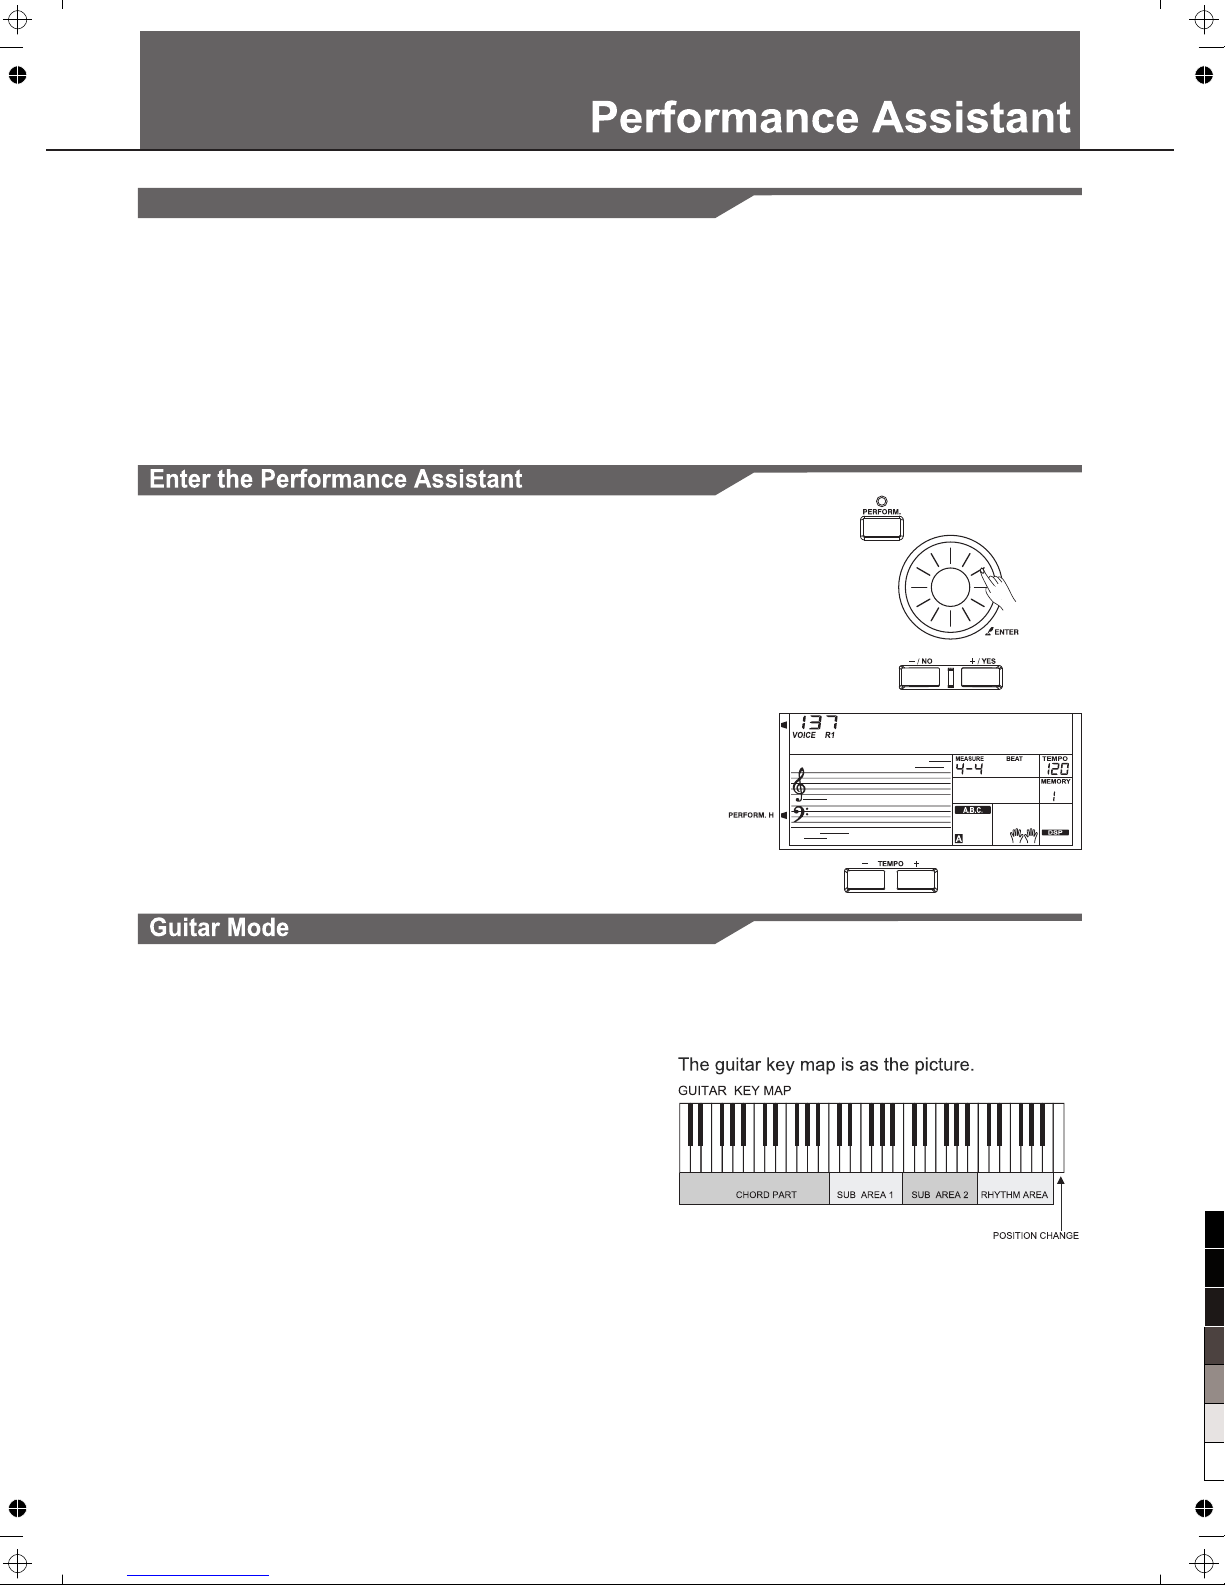
What's the performance assistant?
Performance assistant is an easy-to-use function. With this function
you will find playing will be more interesting.Even if you are not a
keyboard player, the performance assistant will help you to play
your familiar instrument voice on the keyboard. If you're a pianist,
you can easier to achieve many hard perform skills on the keyboard
with the help of this function.
Performance assistant will provided many wonderful phrases. Just
use several keys and you will perform your own wonderful music.
There are 2 voic es y ou can select to perform: GUITAR, PIANO.
Press the [PER FO RM.] button you can enter the per form mode.
The default se tt ing is Guitar Mode and the LCD wi ll d isplay
Guitar's voi ce n ame. You can use the Data Dial, [+/ YE S] or [-/NO]
button to chan ge t he voice you want to perform.
In the measure f ie ld in LCD, the "4-4" will be disp la yed. It means
the default be at v alue is the 4/4 and you can use [EN TE R] or
[EXIT] butto n to c hange the beat value you want. There are 4
kinds of beat yo u ca n select: 2-4, 3-4, 4-4 and 6-8 .
In Performan ce As sistant mode, use [TEMPO+] or [ TEMPO-] to
change the tem po .
Guitar key m ap
The Guitar Mode makes you perform a guitar voice with keyboard
just like you're playing a real guitar. In this mode you can use some
perform skills like strum (5), broken chord (5), echoism (5) and
also 2 endings.
Chord part
C2 to B3 is the chord part area. Play a chord in this area.
Sub Area 1
C4 to B4 (only white keys) is the sub area 1. 5 types broken chord
are provided in this area.
Sub Area 2
The 6 keys: C5 to A5 (only white keys) is just like real guitar's 6
strings. Play a free solo in this area.
Rhythm Area
C6 to G6 (only white keys) is the rhythm area. Wonderful styles
and strums are provided in this area.Use A6 to B6 to play an ending.
Position C hange
Press C7, the guitar position will be changed.
100
95
75
25
5
0
Page 22
22
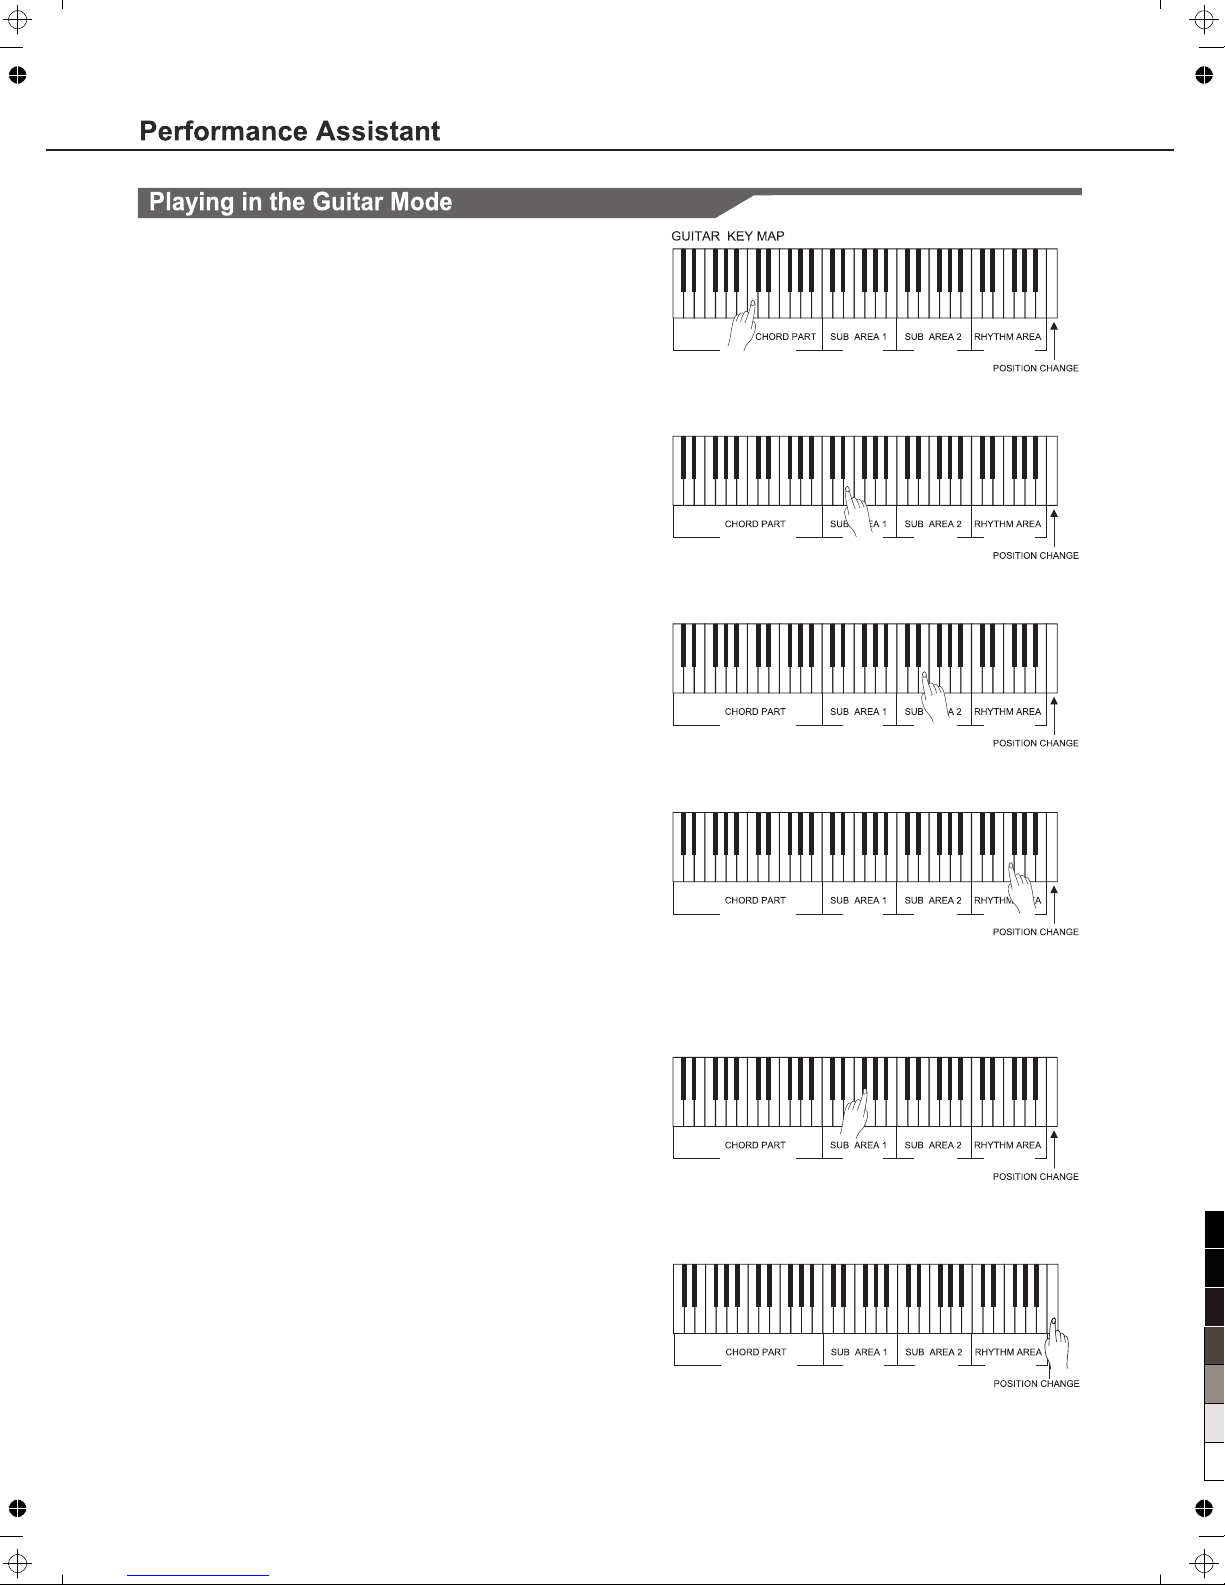
Play a chord in the chord part.
A chord type will be displayed on the LCD and the guitar base will
be sounded.
Play a broken chord in the sub area 1.
When the chord type displayed, press a white key in the sub area
1, a wonderful broken chord phrase will start. Try to change the
white key and you will hear some different type of phrase. Change
the chord with your left hand; you will hear the broken chord phrase
has a little bit change
Play a free solo in the sub area 2.
When the chord type displayed, press a white key in the sub area 2
you can play guitar free solo, sounds like you're playing a real one.
Try to change the chord with your left hand, and play your free solo.
The last white key B5 is invalid.
Play a strum rhythm in the rhythm area.
When the chord type displayed, press a white key in the rhythm
area you can play the magic strum rhythm. Try to change the chord
with your left hand, and play your strums.
End the guitar performing.
Press the A6 or B6 to end your guitar performs. When the ending is
finished, the phrase stops automatically.
Play the echoism.
All of black keys on Sub area 1, Sub area 2 and Rhythm area are
echoism keys. There are 5 kinds of echoism to
arrange on the C#, D#, F#, G#, A# circularly.
Change the position
Press the C7, the PERFORM.H icon will be lightened on the LCD. It
means that the guitar position has been changed to the High
position. Try to play the white keys in sub area 1, Sub area 2 and
Rhythm area, listen to the phrase you are performing now.
100
95
75
25
5
0
Page 23
S t G r d P n o
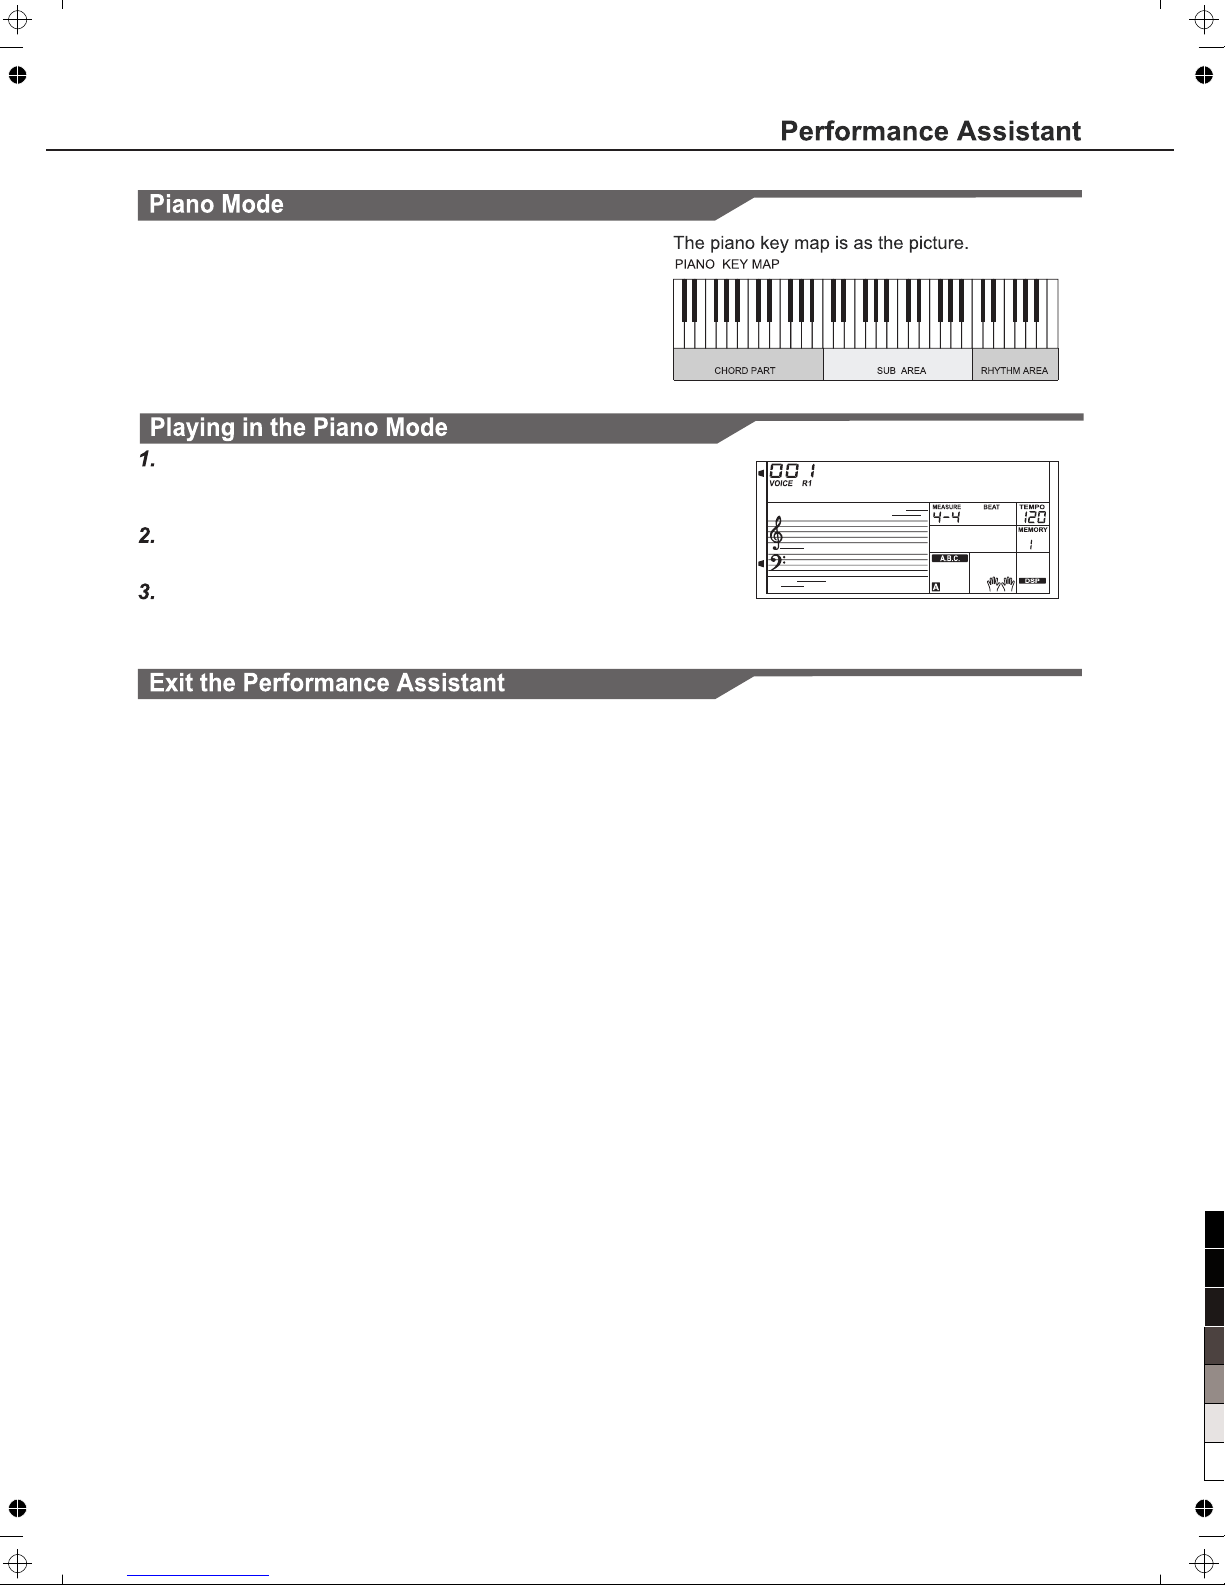
Piano Ke y Ma p
In Piano Mode, y ou c an easily to achieve many har d pi ano
perform skil ls j ust like playing the acoust ic o ne. In this mode you
can use some per fo rm skills like piano rhythm ( 5) , broken chord
(5) and also 3 end ings.
The piano key ma p is s imilar with the guitar key ma p. P ress A6 to
C7 will start en di ng. All the black keys above C4 ar e in valid.
Select P ia no M od e.
In performan ce a ssistant mode, use Data Dia l, [+/YES] or [-/NO]
button to sele ct P iano Mode.
Play a cho rd i n ch or d part.
Use Sub area and R hythm area to play some phrases .
Press the A6,B6 o r C7 t o ending your piano perform . Wh en the
ending is fini shed, the phrase stops automa ti cally.
23
When the phras e st ops, press the [VOICE], [STYL E], [SONG],
[DEMO], [PER FO RM.] and the Direct Select Butt on t o exit the
Performanc e Ass istant.
100
95
75
25
5
0
Page 24
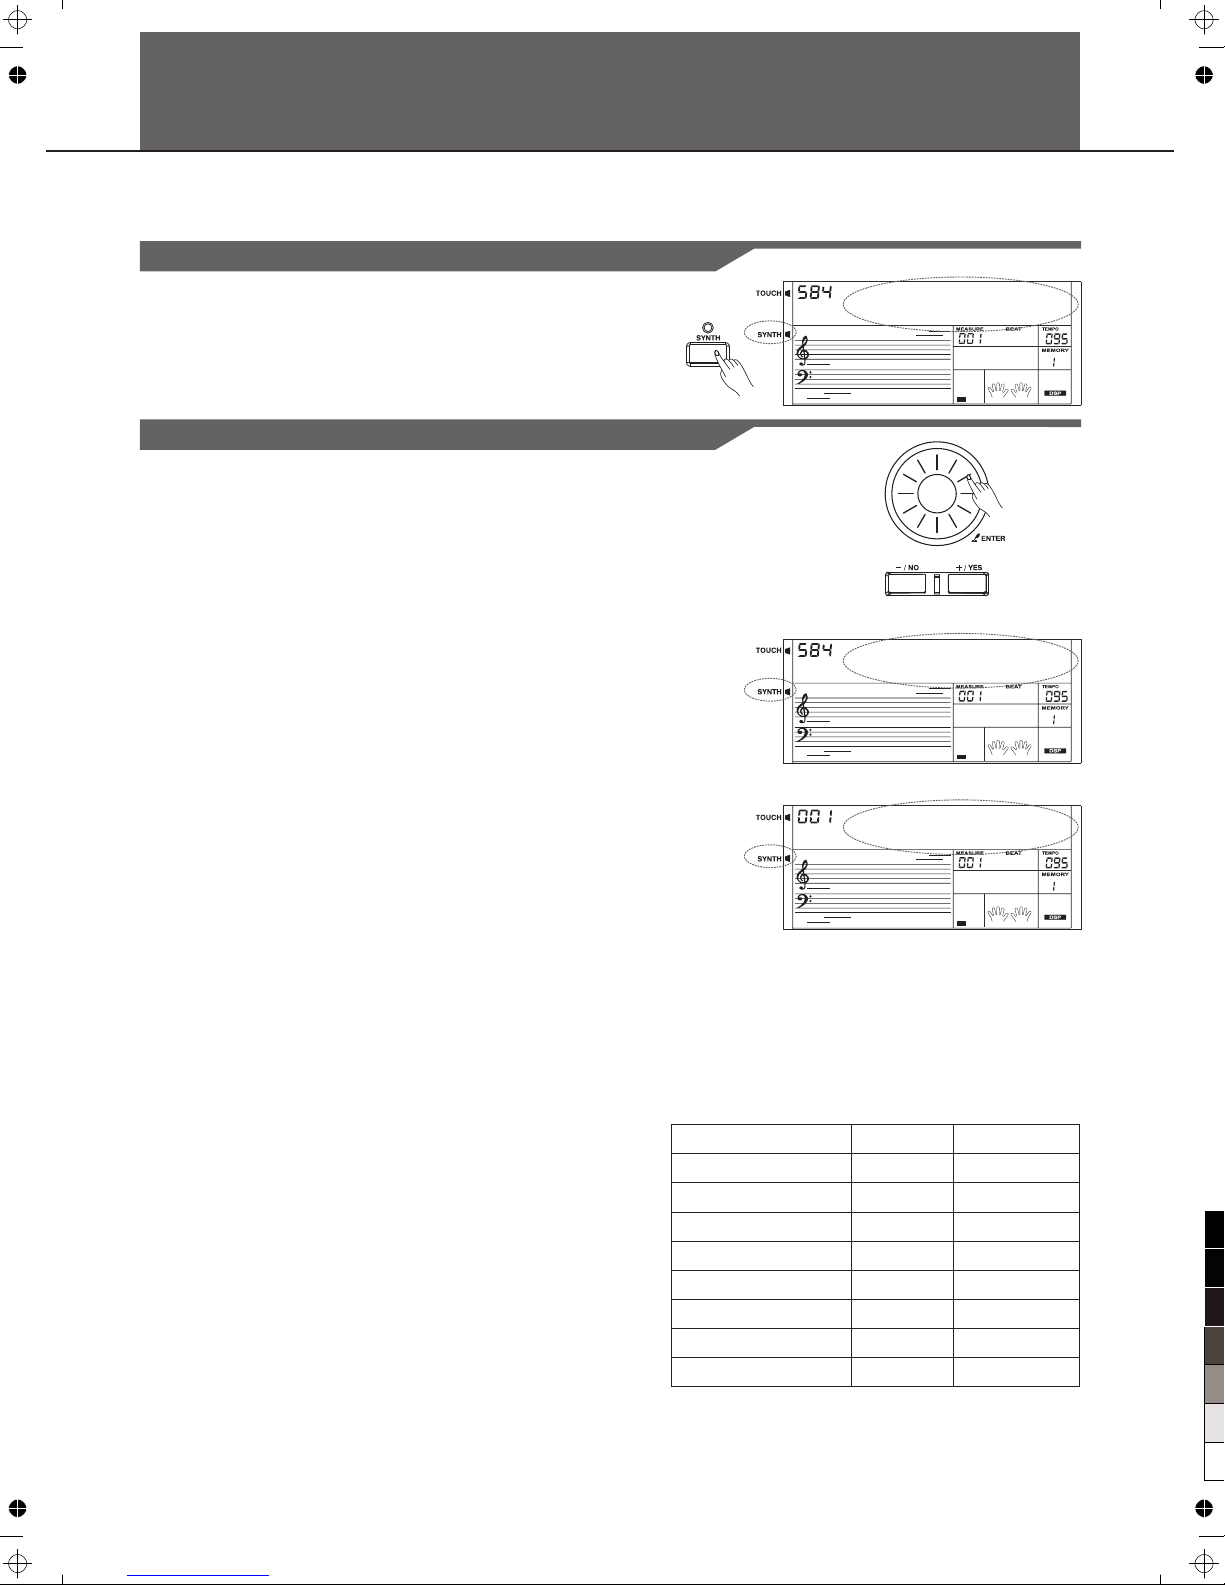
Enter the synth
Synth
Press [SYNTH ] bu tton to enter synth function mo de, lower, dual,
auto accompa ni ment, piano, harmony and fu nc tion will be turned
off.
Create user voice
Parameter name
584 - 593
584
001 - 573
001
000 - 127
064
000 - 127
064
000 - 127
064
000 - 127
064
000 - 127
064
000 - 127 064
A
U s e r V o i c
A
V o c _ E d i t
A
P c m V o i c e
24
You ca n us e the synth function to create yo urself voice on the basis of the bu il t-in voice samples.
User voice num be r
PcmVoice
Vib Rate
VibDepth
VibDelay
EnvAttac
EnvRelea
EnvDecay
Range Default
NOTE:
The voice edit in g function is invalid at the so ng p laying, demo
playing, rec or ding and mode.USB Device
1.
2.
3.
4.
5.
6.
Press [SYNTH ] bu tton to enter the user voice numb er select
mode, LCD disp lays "UserVoic" and the user voi ce n umber.
The synth flag w il l be lighted. Use [+/YES]/[-/ NO] button or
Data Dial to sel ec t a voice number you want.
Press [ENTER ] bu tton to enter the next menu. There are two
menus: "Voc_E di t" and "Delete". Use [+/YES]/ [-/NO] button or
Data Dial to sel ec t the menu and you can press [EXIT] b utton
to return to the p re vious menu.
Press [ENTER ] bu tton to enter voice parameter s election after
you select the " Voc _Edit" menu, LCD displays " Pc mVoice"
and sample voi ce number. Use [+/YES]/[-/NO] bu tton or Data
Dial to select v oi ce parameter, the voice para me ter will
display on the L CD as follows "PcmVoice", "Vib Rate",
"VibDepth", "VibDelay", "Env At tac", "EnvRelea", "EnvDec ay".
If you select th e "D elete" menu and press [ENTER] b utton,
LCD displays " Su re?".Press [+/YES] button t o delete the user
voice, and the n re turn to previous menu; If you pre ss [-/NO]
button to canc el t he operation, and then retu rn t o previous
menu. You can also p ress [SYNTH] or [EXIT] button to re turn
to previous me nu .
Press [ENTER ] bu tton to enter the parameter val ue setting
mode after you s el ect a voice parameter. At this mo de , the
parameter va lu e will flash on LCD. Use [+/YES ] /[ -/NO] button
or Data Dial to ad ju st the value, you can play the ke yb oard to
feel the voice e ffect.
Press [SYNTH ] bu tton and LCD displays "Sure ?" . Press
[+/YES] butt on t o save the user voice , and then retu rn to
previous men u, If you press [-/NO] button to canc el the
operation, a nd t hen return to previous menu .
At any time, pre ss [ EXIT] button to return to the pre vi ous
menu.
User v oice pa rameter:
100
95
75
25
5
0
Page 25
DSP Effect
Option
LCD Display
Range
XXX Rhythm_s
XXX Rhythm_m
XXX Bass
XXX Chord1
XXX Chord2
XXX Chord3
XXX Phrase1
XXX Phrase2
XXX Upper1
XXX Upper2
XXX Lower
XXX U_Disk
S t G r d P n o
R h y t h m _ s
25
With the built in digital effects, you can add ambiance and depth to
your music in a variety of ways such as adding reverb that makes
you sound like you are playing in a concert hall or adding harmony
notes for a full, rich sound.
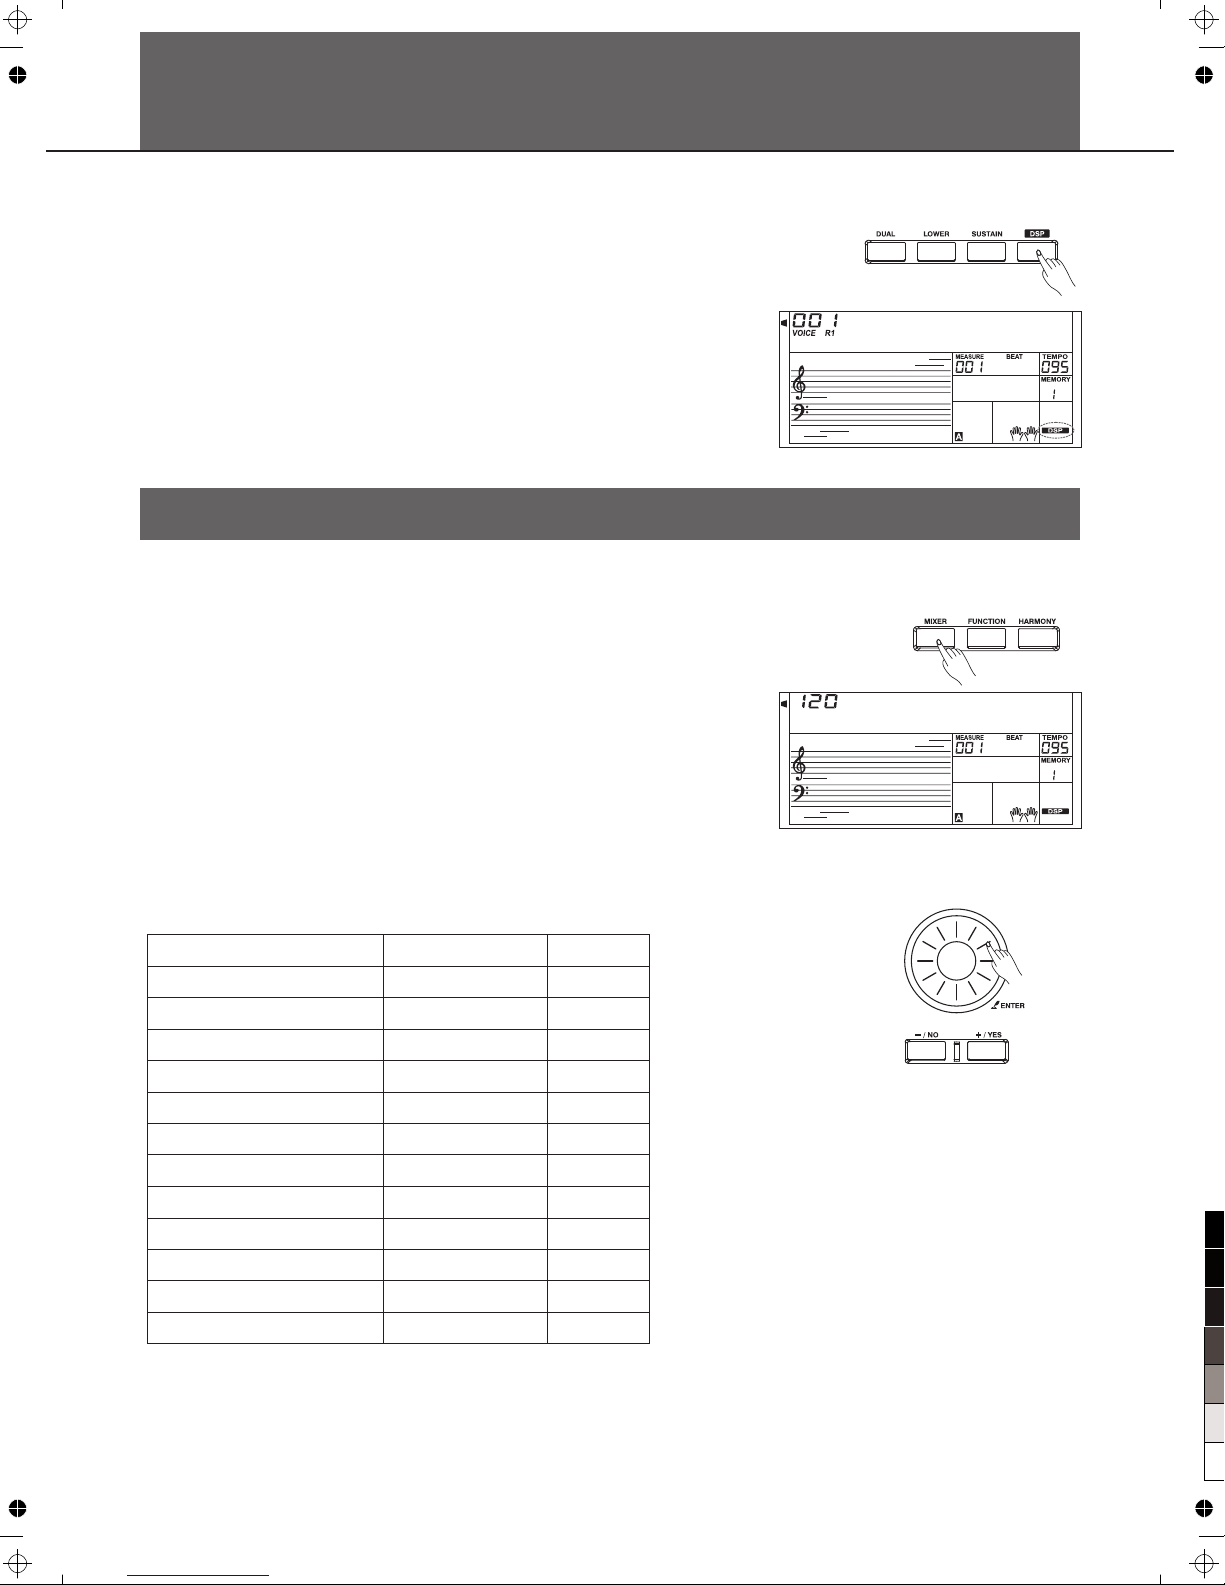
1.The DSP effect is set to ON when keyboard is power on.
2.Press [DSP] button to switch DSP effect on or off.
Mixer
Rhythm s VOLUME
Rhythm m VOLUME
BASS VOLUME
Chord 1 VOLUME
Chord 2 VOLUME
Chord 3 VOLUME
Phrase 1 VOLUME
Phrase 2 VOLUME
VOICE R1 VOLUME
VOICE R2 VOLUME
VOICE L VOLUME
USB Device Midi Play Volume
1.Press the [MIXER] button.
Now you have ent er ed the menu of MIXER. Use the [MIXE R]
button to sele ct a p art to change its volume.
Adjust the vol um e of a musical part.To adjust the sel ected
volume setti ng , please use the Data Dial or the [+ /YES]/[-/NO]
button.
Press and but ton simultaneously to turn
off part volume.
Press[+/YE S] and[-/NO]button simulta neously again to
turn on part vol um e.
[+/YES] [- /N O]
Any time press [ EX IT] to quit this menu.
The option and p arameters are as the follows:
2.
3.
0
0
0
0
0
0
0
0
0
0
0
0
-
-
-
-
-
-
-
-
-
-
-
-
127
127
127
127
127
127
127
127
127
127
127
127
100
95
75
25
5
0
Page 26
Pedal Function
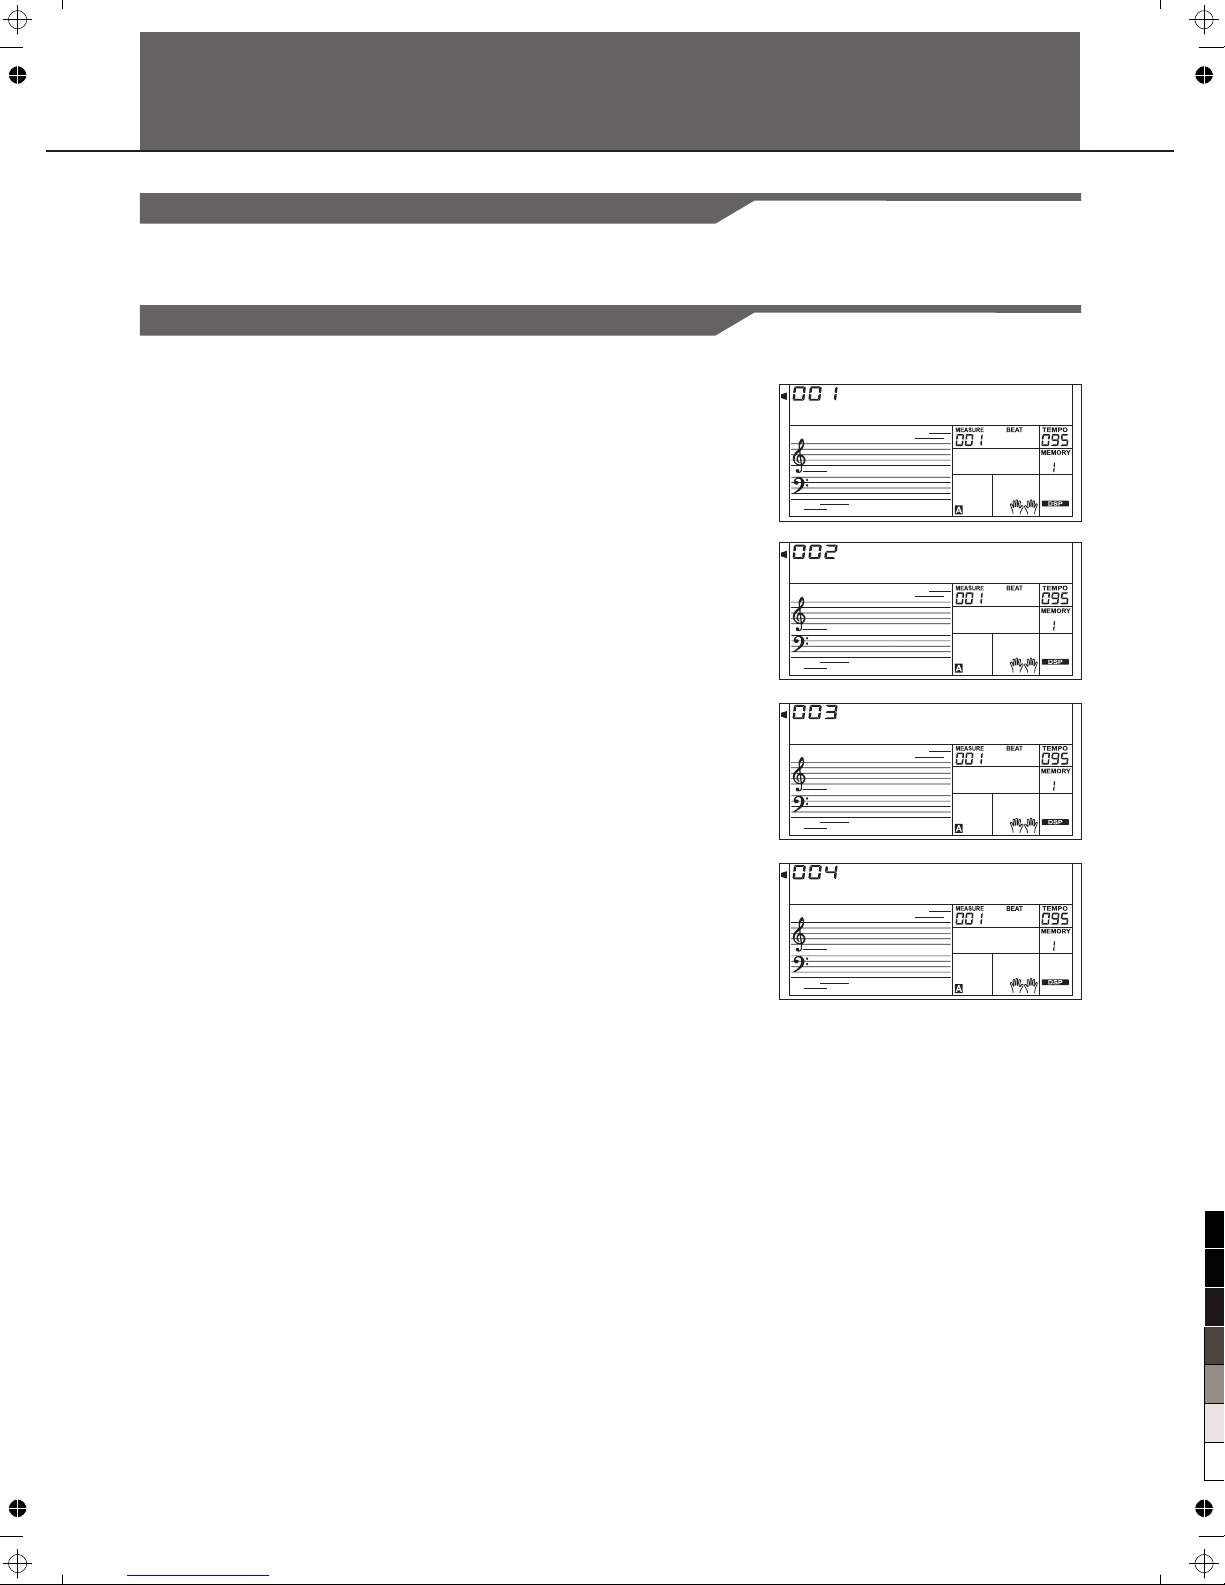
You can step the volume pedal to control the volume.
Volume Pedal
Foot Switch
P e d S u s t
P e d S t / T
P e d M e m
P e d S o f t
26
The keyboard c an a ssign the pedal in function m en u. (See
FUNCTION)
1.
2.
3.
4.
Pedal Su st ai n
If pedal assig n is s et as "Ped Sust", step on the susta in pedal,
all notes play ed on the keyboard have a longer su st ain.
Pedal So ft
If pedal assig n is s et as "Ped Soft", step on the soft pe dal, all
notes played o n th e keyboard have a softer effect.
Pedal St ar t/ St op
If pedal assig n is s et as "Ped St/S", the pedal will ha ve the
same functio n as [ START/STOP] button.
Pedal Me mo ry S el ect
If pedal assig n is s et as "Ped Mem", it will load the n ex t
memory param et er when you step the pedal.
100
95
75
25
5
0
Page 27
Option
LCD Disp la y Range Defaul t
TUNE
BEAT
SPLIT POINT
PEDAL ASSIGN
FADE IN
FADE OUT
HARMONY
REVERB LEVEL
CHORUS LEVEL
MIDI RECEIVE
MIDI TRANSMIT
Follow voice
Follow voice
ALL
001
T u n e
B e a t
27
Other Functions
Tune
This function sets the pitch of entire keyboard by steps of cents.
The LCD displays the tune value. Use [+/YES]/[-/NO] or Data Dial
to change tune value. Its range is from-50 to 50 cents .
Press [+/YES] and [-/NO] together will set the tune value to its
default setting.
1.
2.
Beat
This functio n se ts the beat value range from 0, 2-9 .
The LCD displa ys beat value. Use [+/YES]/[-/N O] or Data Dial
to change the be at v alue.
-50…50
0,2…9
1…61
Sust、Soft、St/S、Mem
1-20
1-20
Duet、1+5、Octave、
CtryDuet、Trio、
Block、4 Close1、4
Close2、4 Open
0-127
0-127
1-16、ALL
1-16
000
004
019
Sust(001)
010
010
Duet(001)
XXX Tune
XXX Beat
XXX Split Pt
00X Ped ****
0XX Fade In
0XX Fade Out
00X Duet
XXX Rev Lev
XXX Chr Lev
XXX Midi In
XXX Midi Out
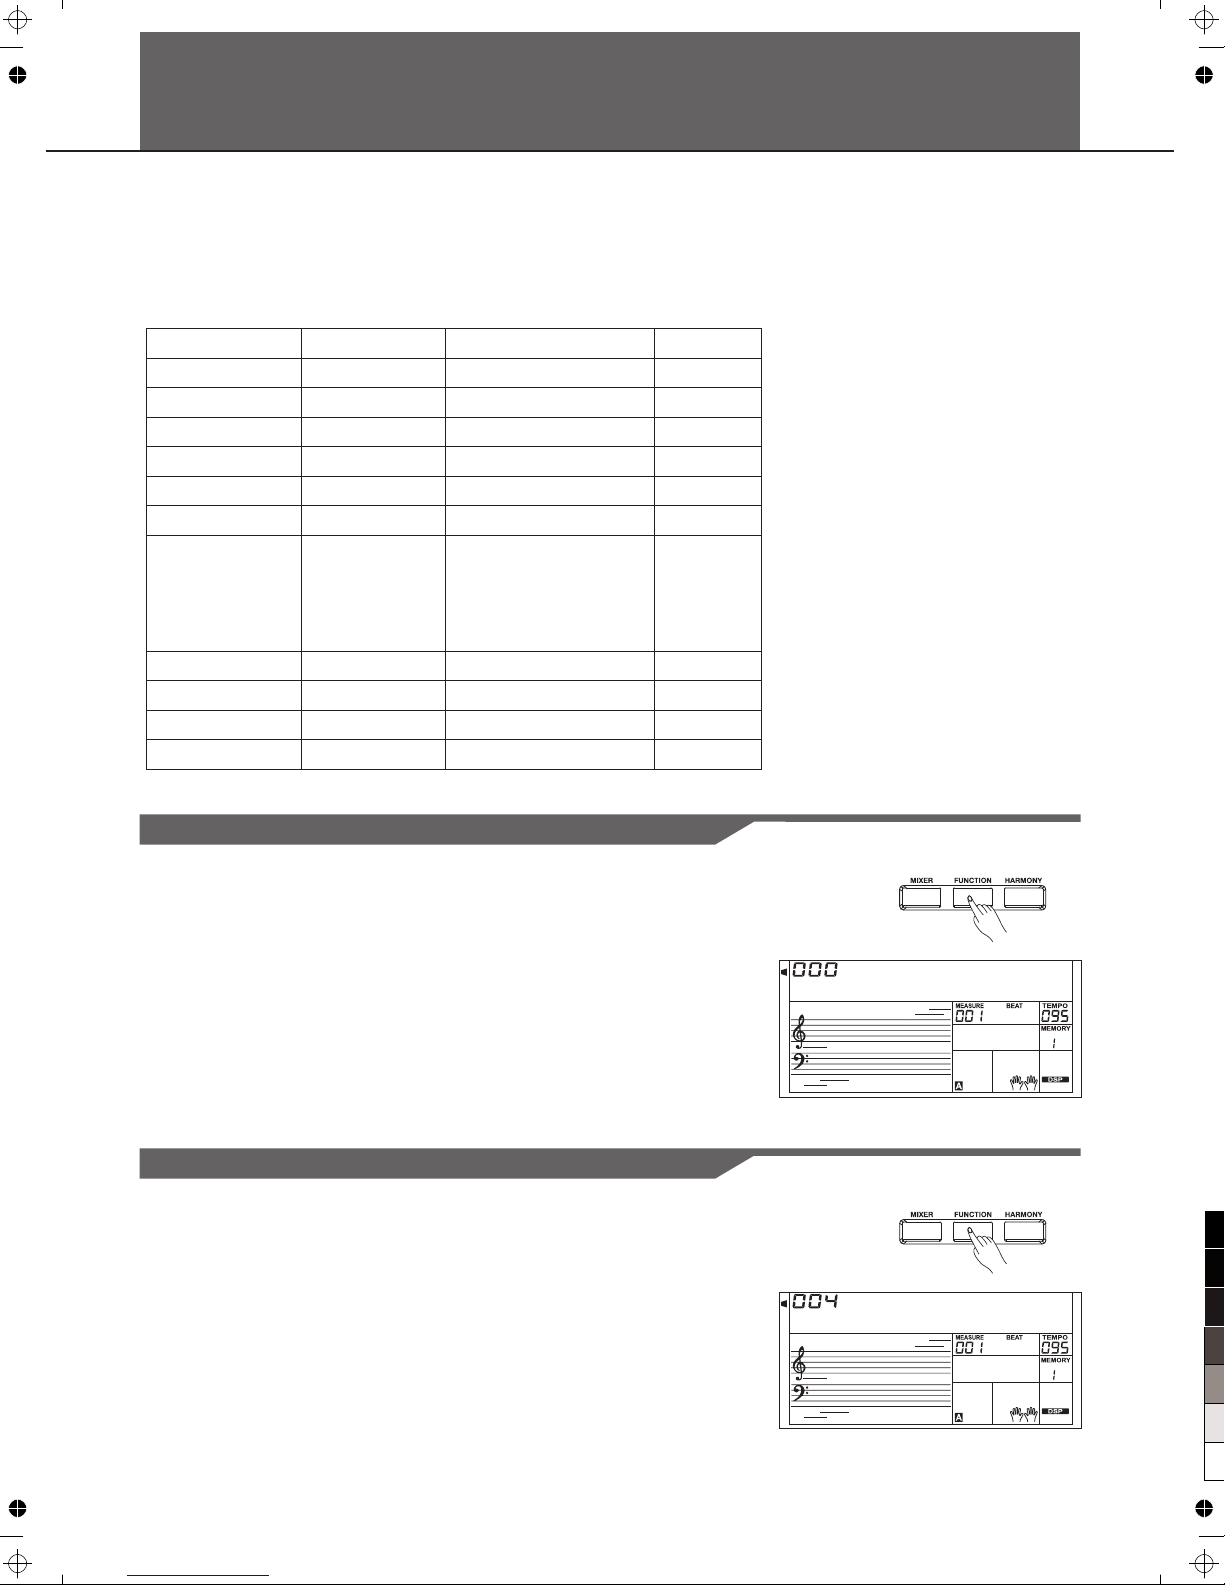
Press [FUNCT IO N] button to enter function men u. The defau lt option of the menu is "Tu ne". When you enter the menu
next time, you w il l find the option is the same as la st t ime. Use [FUNCTION] button to s el ect the option to set. Use
[+/YES]/[- /N O] or Data Dial to set parameter. Any t ime press [EXIT] to quit this men u.
The option and p arameters are as the follows:
100
95
75
25
5
0
Page 28
Pedal Assign
P e d S o f t
S p 1 i t P t
F a d e I n
F a d e O u t
28
Split Point
This function sets the point that separates the entire keyboard to
two sections.
The LCD displays split point value. Use [+/YES]/[-/NO] or Data
Dial to change split point. The keyboard can also be used to
change split point.
The part below the split point is the part of the chord area.
2.
1.
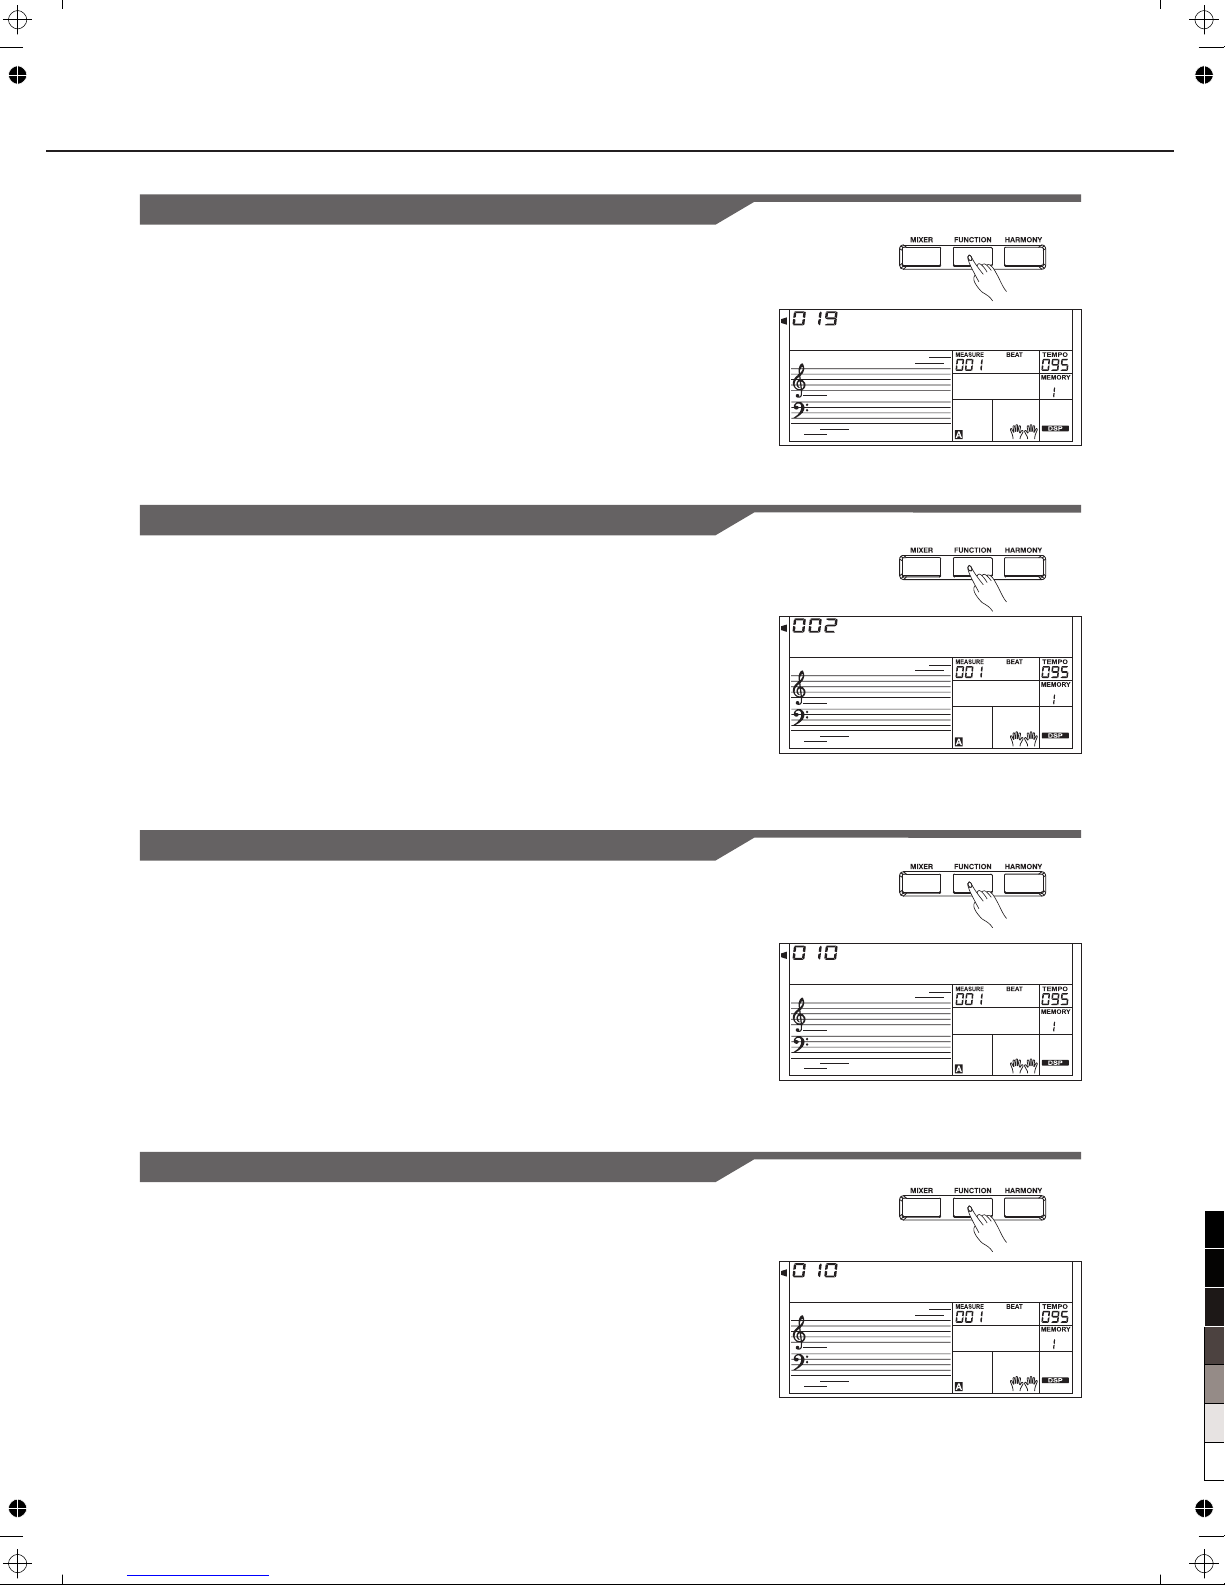
This function sets pedal type as sustain pedal, soft pedal,
start/stop pedal or memory select pedal.
The LCD displays the type of pedal. Use [+/YES]/[-/NO] or Data
Dial to change pedal assign. The pedal can be set as sustain
pedal, soft pedal, start/stop pedal or memory select pedal.
The default pedal type is sustain pedal.
2.
1.
The LCD displays Fade In value. Use [+/YES]/[-/NO] or Data Dial to
change Fade In time. The range is form 1 to 20 second.
Fade In
The LCD displays Fade Out value. Use [+/YES]/[-/NO] or Data Dial
to change Fade Out time. The range is form 1 to 20 second.
Fade Out
Other Functions
100
95
75
25
5
0
Page 29
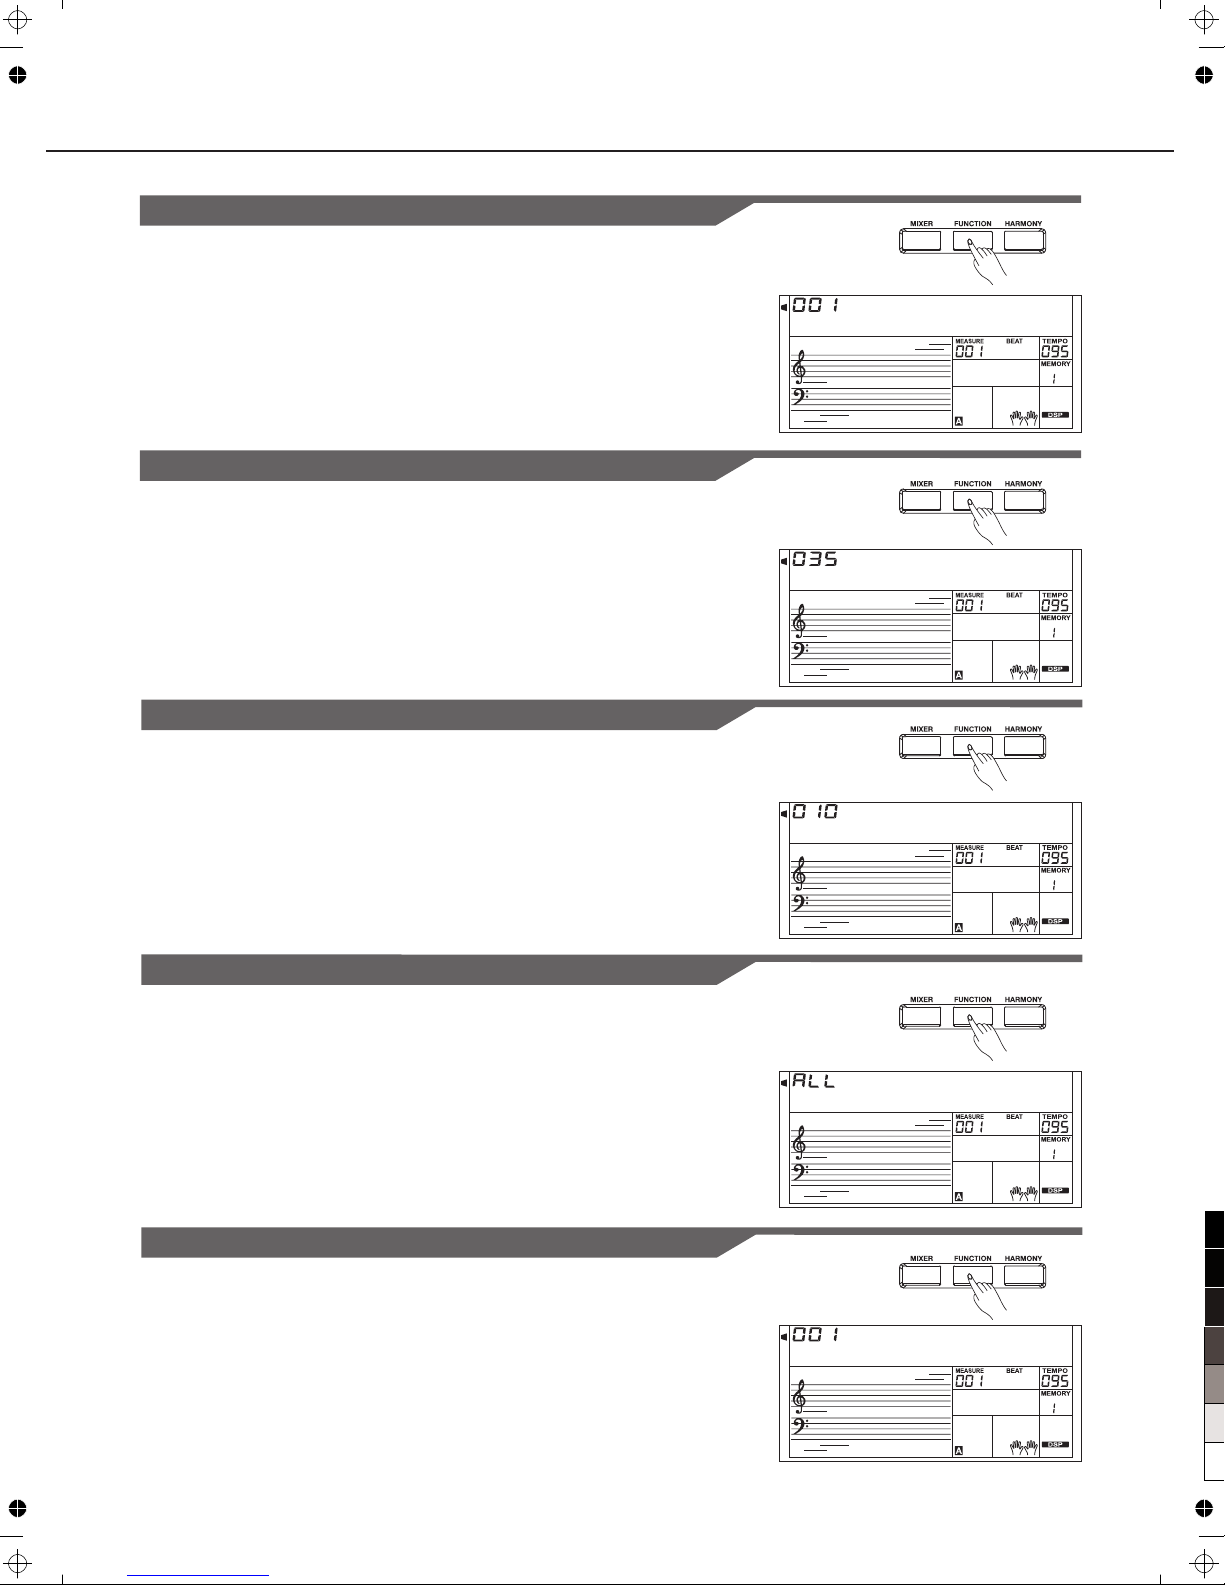
MIDI In
You can set the channel of MIDI IN by RECEIVE. The default setting
is “ALL”, channel 1~16 can also be selected. Use [+/YES]/[-/NO]
button or Data Dial to select the channel.
MIDI Out
You can set the channel of MIDI OUT by TRANSMIT. The default
setting is “001”, channel 2~16 can also be selected. Use [+/YES]/
[-/NO] button or Data Dial to select the channel.
Harmony
D u e t
R e v L e v
C h r L e v
M i d i I n
M i d i O u t
29
There are 9 harmony effects for you to select, including Duet, 1+5,
Octave, CtryDuet, Trio, Block, 4 Close1 and 4 Close2, 4 Open. Use
[+/YES]/[-/NO] or Data Dial to select.
Reverb Level
The LCD displays reverb level. Use [+/YES]/[-/NO] or Data Dial to
change reverb level.The level ranges from 0 to 127.
Chorus Level
The LCD displays chorus level. Use [+/YES]/[-/NO] or Data Dial to
change chorus level. The level ranges from 0 to 127.
Other Functions
100
95
75
25
5
0
Page 30
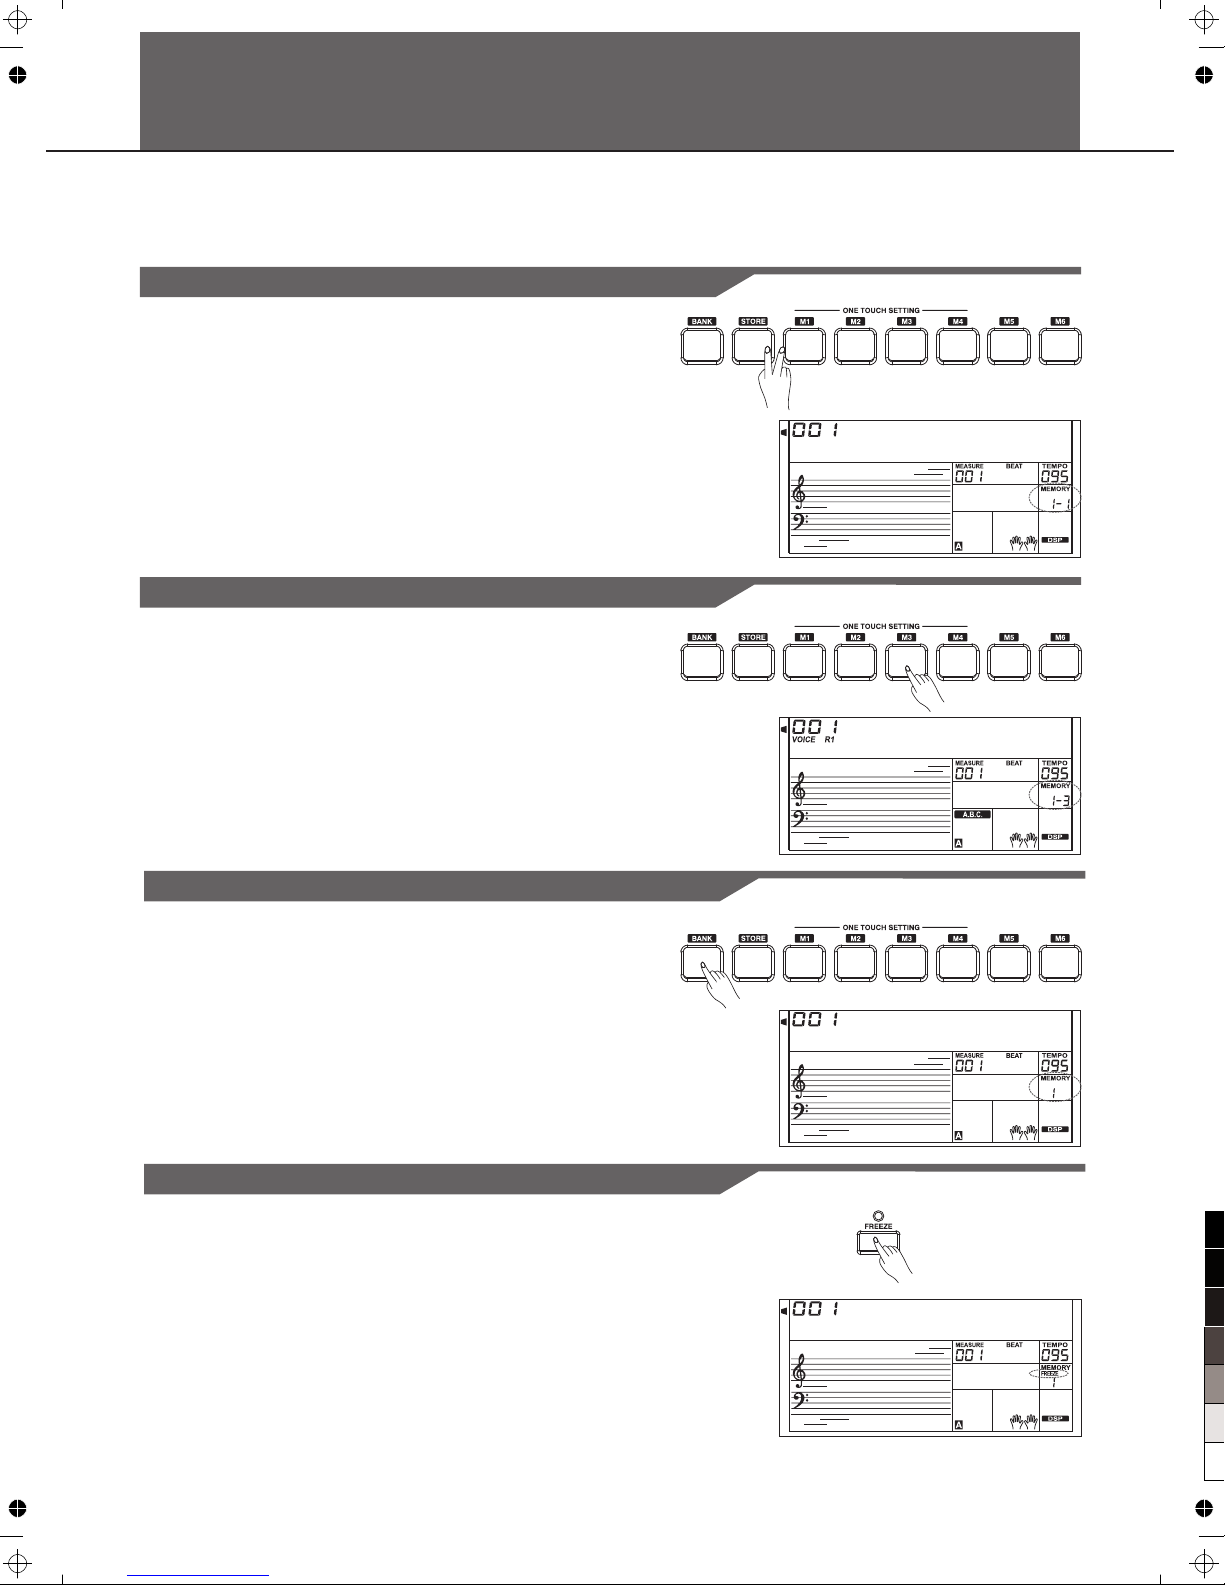
Press the [BAN K] b utton.
There are 8 bank s at a ll and each bank has 6 memories
(M1-M6). Pre ss t he [BANK] button, the LCD displ ays “Mem
Bank”
.
Select a bank
Use the Data Dia l, [ +/YES] or [-/NO] button to sele ct a bank.
2.
1.
Selecting a Registration Bank
M e m S t o r
S t G r d P n o
M e m B a n k
M e m B a n k
30
Register Memory
The keyboard i s an i nstrument with a variety of con trols and functions, the Regi stration Memory feature can m ak e
your perform an ce more easily and efficiently. It allows you to save vi rt ually all panel settings to a R eg istration Memory
setting, and y ou c an instantly recall custo m pa nel settings by pressing a sing le button.
Registering the Panel Setting
There are 8 memo ry b anks, each bank has 6 memorie s (M 1-M6).
While holding the [STORE] button, press one of the REGISTRATION
MEMORY buttons: [M1] - [M6].
Notice that the new settings will replace the previous memory data.
Press one of the REGISTRATION MEMORY buttons:
[M1] - [M6]. In this example, the panel settings stored in the memory
3 of bank 1 are recalled.
Note:
Registration data cannot be recalled when the One Touch Setting
function is on.
Recalling the Registered Panel Settings
When you use memory, the parameter of the Accompaniment will
not change (including the style number, section, volume, tempo,
transpose, chord status, mixer, split point) after freeze function is
turn on.
Freezing the Accompaniment Parameter
100
95
75
25
5
0
Page 31
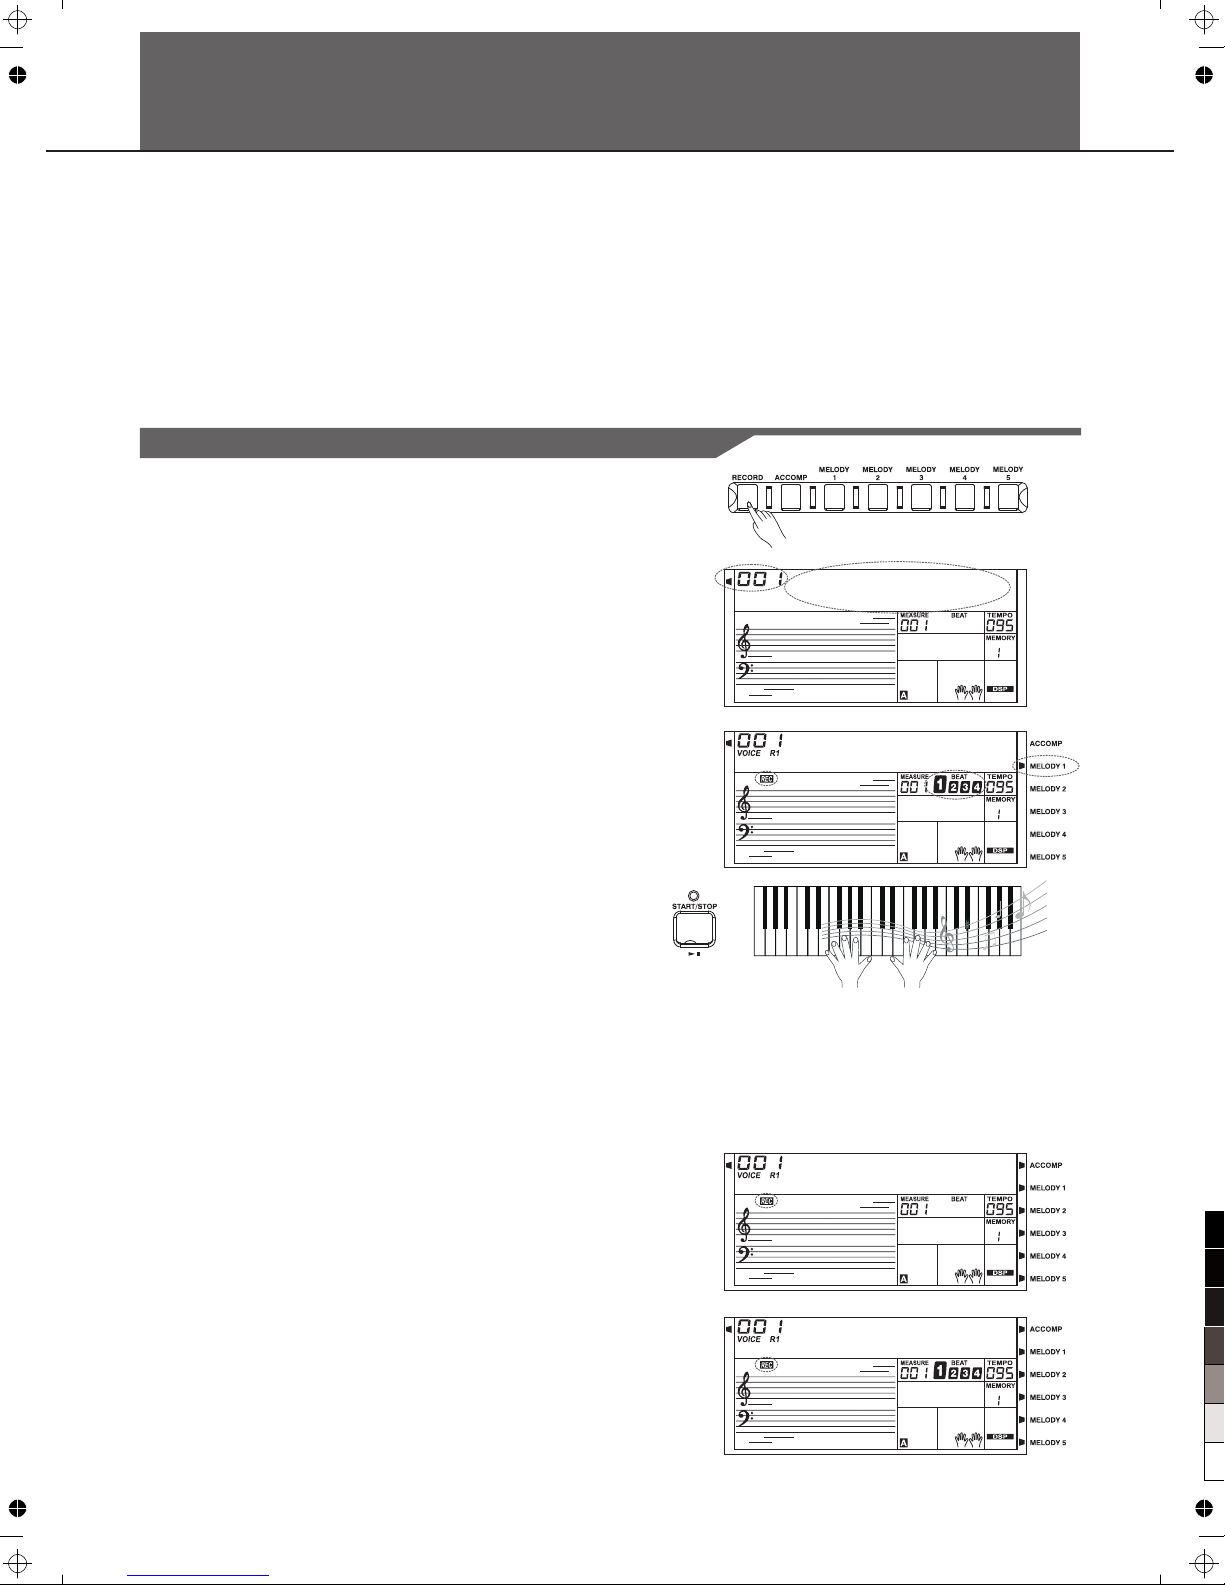
With the easy- to -use song recording featu re s, you can record your own keyboa rd performances as a User song. 5 u se r
songs can be rec or ded with 6 tracks (1 ACCOMP track, 5 MELODY tracks) each .
style and this r ec orded track is users
The recorded d at a will not lost when you turn off the power.
Among them, th e ac companiment track is used for r ecording song's accom p;
Melody track s ar e used for recording melodi es .
Accomp track a nd m elody track can be recorded t og ether, but you can not record two me lody tracks at the same time,
Of course you ca n on ly record accomp or melody; Ac co mp and melody track can be multip le, simultaneous playback .
R e c S o n g 1
S t G r d P n o
S t G r d P n o
S t G r d P n o
31
Song Recording
Start Recording
Note:
The recording track instructions cursor has three states:Blinking,
Light, Go out.
Blinking: Means the track was choose for recording. If the track have
recorded data
Light: Means this track have data, the recording process will have
recorded data synchronization playback.
Go out: Means this track have no data or have data but forbidden
playback.
Style can only be recorded in "Accomp" track.
, this original data will be replaced.
When recording an existing song, the keyboard will automatically
select the empty track next to the occupied track. For example, if
"Melody 1" is occupied, "Melody 2" will be selected as the record
track. When all 6 tracks have been recorded and a specific track
needs to be revised, press the button of the desired track and start
recording. The original data will be replaced.
2.
3.
1.
4.
Press [RECOR D] b utton to enter user song select ion mode.
The LCD lighte ns "RecSong1” and sequence nu mb er.5 user
songs can be rec or ded.
Press [+/YES ]/ [-/NO] button to select the use r so ng you want
to record.
Press [RECOR D] b utton again to enter record pre paration
mode. LCD lightens the "REC " beats and
In the recordi ng p reparation status, you ca n ad just
parameters s uc h as the voice, style and tempo .
Press [START/STO P] button or play the keyboard to s tart
recording. " "
flag. Four the
keyboard aut om atically selected empty t ra ck " Melody 1"(or
other track) o n LC D flash,indicates waiti ng f or recording.
recording a ne w song, the keyboard will autom at ically select
"Melody 1" as th e re corded track. Press "Accomp " (or "Melody
2" to "Melody 5" ) to m ake your own selection.
When choosin g th e accomp tack and A .B .C. w as
open,play an e ffective c hords in the area of the left hand
would start re co rding.
When
Before you sta rt r ecording, you need to selec t a us er song to keep
the recordin g so ng, and set the recording tra ck s
100
95
75
25
5
0
Page 32
R e c _ F u l l
R e c S o n g 1
D e l e t e ?
32
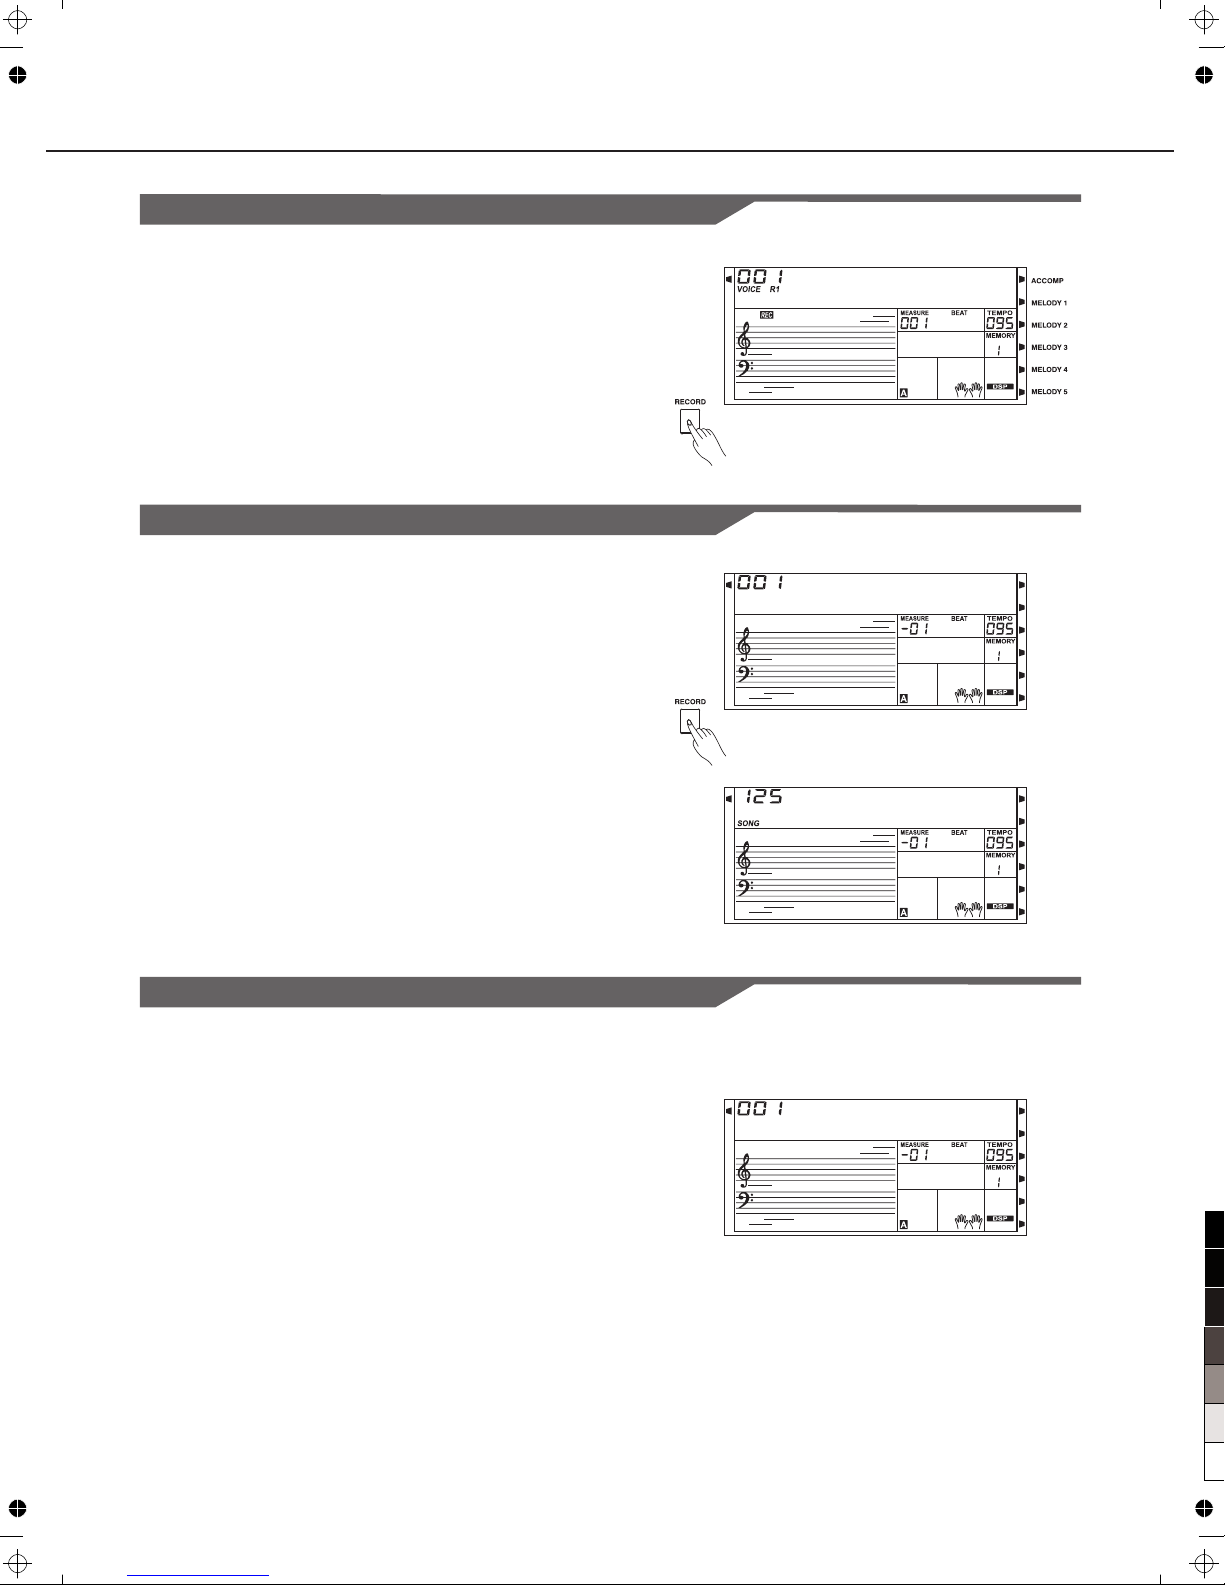
Stop Recording
When recording is in process, you can press [RECORD]
button to stop recording.
When recording is in process, if the memory is full, the
recording will stop and save automatically, the LCD
displayed "Rec_Full".
If you choose the accomp recording, the recording will
stop automatically when the ending of rhythm is finished.
2.
1.
3.
Playback Recording
Delete User Song
Pressing and holding [RECORD] and [SONG] button together
and turn power on simultaneously, the user song will be erased.
In the recording preparation status, pressing and holding
[RECORD] button for two second, the LCD will display Delete? ,
Press the button to select
the track you want to delete, when the track cursor is lightened,
it indicated that the track data you want to delete, otherwise, it
indicated that the track date you want to keep. If all the track
cursor are lightened, the whole user song will be erase after
comfirm.
Choose the track you want to delete, press [+/YES] to confirm
and the recorded data in this track will be erased, press [-/NO]
to quit this step, and back to the recording preparation status.
" "
"Accomp" (or "Melody2" to "Melody 5")
2.
1.
Song Recording
Press [RECORD] button when recording is in process,it will
stop recording and enter the song play mode, and the current
recorded song will play automatically in circle.
Press the [SONG] button to enter the song mode and it will play
all songs circularly. Use the Data Dial, [+/YES] or [-/NO] button
to select a song, there are 125 songs in all, including 5 user songs
(1-5). If there is no data in the selected user song, it will play "No
file" and stop playing. You can also select one user song in song
stop playing mode, press [PLAY/STOP] button, this user song
will play circularly.
2.
1.
3.
N o F i l e !
100
95
75
25
5
0
Page 33
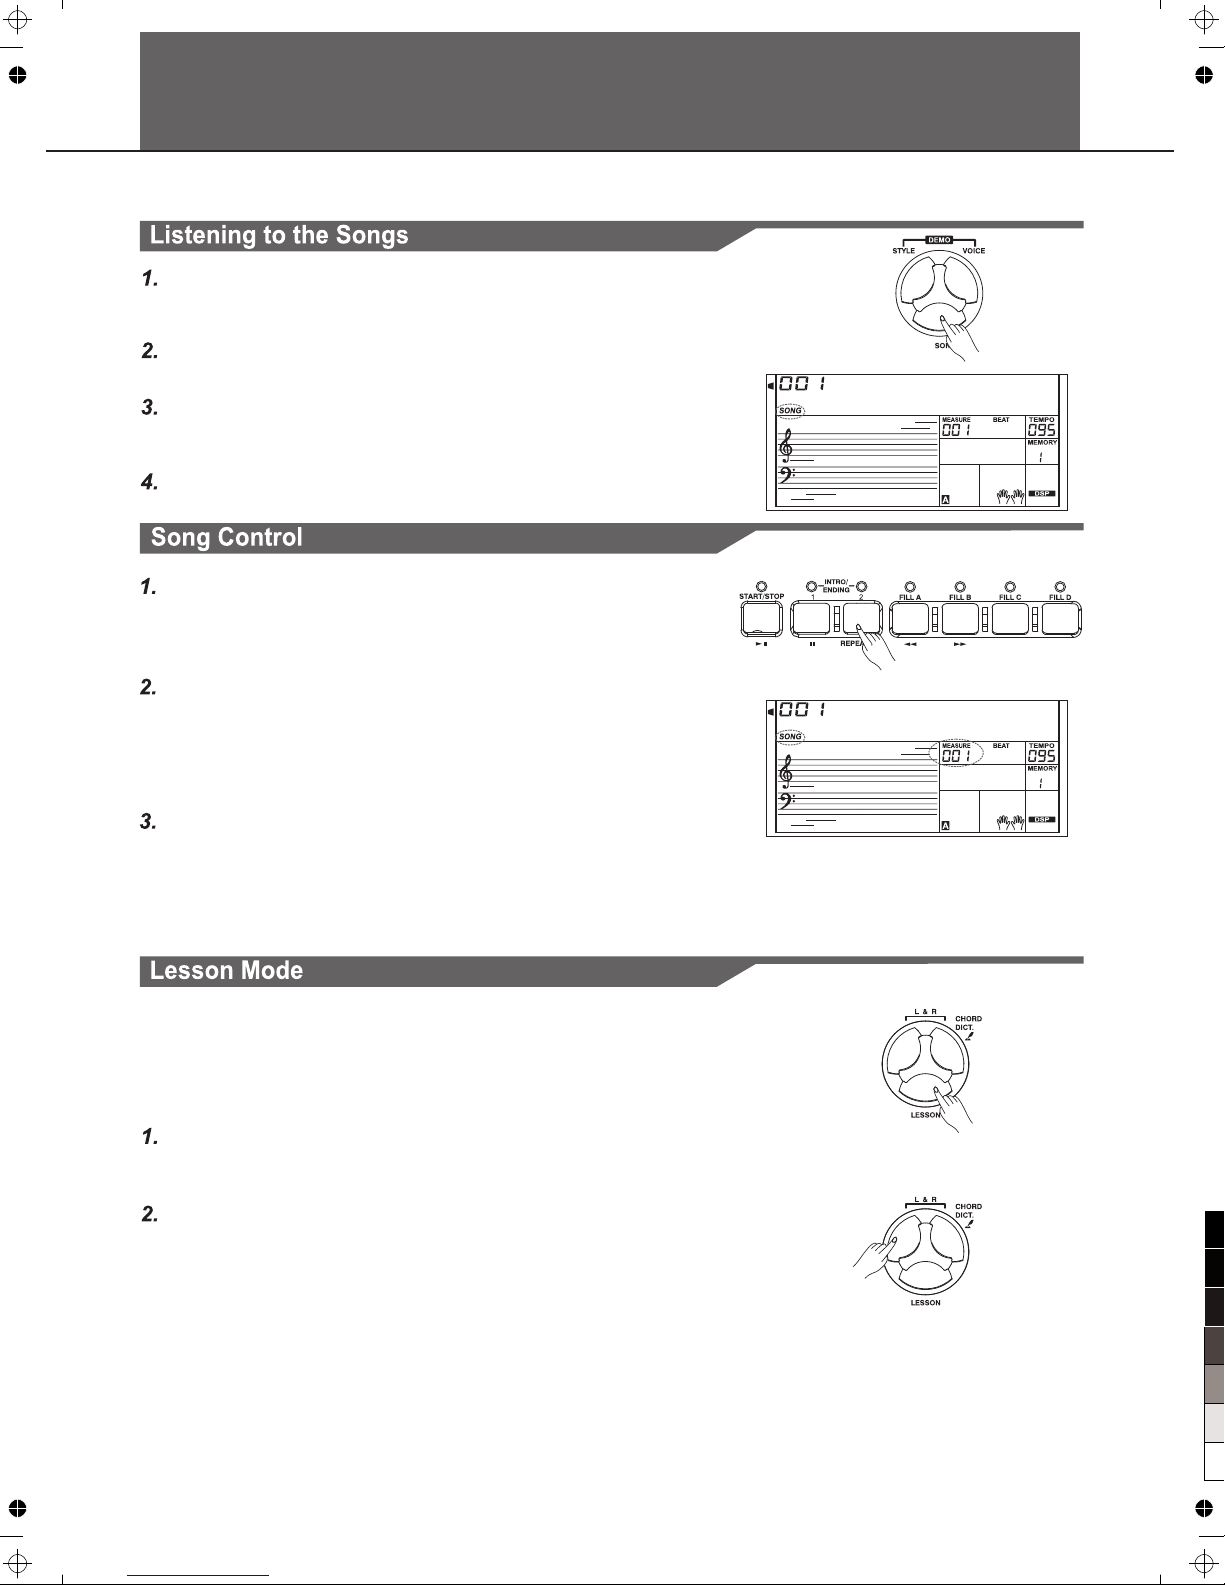
R e d R i v e r
R e d R i v e r
33
Song
The keyboard h as 1 25 songs in all, including 5 us er s ongs.
Press the [SON G] b utton to enter the song mode and it w ill
play all songs c ircularly.
Use the Data Dia l, [ +/YES] or [-/NO] button to sele ct a song.
Once you start p la ying a song by pressing [START/STOP]
button, it wil l pl ay current song repeatedl y.
When the songs i s st opped, press [STYLE],[VOI CE],[DUAL]
or [LOWER] wil l ex it the song mode.
Introd uc to ry b eat
Before song st ar t playing, it has the introdu ct ory beat, the
measure star ts f rom negative value. It begins t o play song when
the measure go es t o 1.
REW, FF and PAUSE
When the song is p la ying:
Press the [FF] b ut ton to fast forward the song.
Press the [REW ] bu tton to rewind the song (base on
the
measure.
Press the [PAUSE] button to p au se the playing song.
Song Rep ea t
When playing t he s ong, press [REPEAT A/B ] button to set the
location of lo op b egin and loop end to the curren t so ng. Press
the [REPEAT A/B] to set the loop begin and pre ss it again to set
the loop end. Wh en i n loop status, press [REPEAT A/B] again to
quit the loop pl aying status.
In the instrum en t, there are 2 different ways to practice t he
songs: time va lu e training and note correct io n training. And the
keyboard has a g ra ding system to help you to know w el l about
your progres s.
Press the [LES SO N] button.
In Song mode, pr es s the [LESSON] button will ente r the lesson
mode.
Select the pra ct ice hand.
There are 3 leve ls o f the lessons. Use [LEFT] or [RIG HT] button
to select whic h ha nd you want to practice. If neith er hand is
selected, th e ke yboard will automatical ly s elect the right hand
practice for y ou .
Note:
According to t he t ype of the song, the content of you r practice by
left hand is different. If y ou c hoose a chord song, the left ha nd
practices th e ch ord, otherwise, practices t he melody. Wh en the
song is playin g, the staff a nd the keyboard displayed on th e LC D
indicate the m el ody and chord position, the n um bered musical
notation dis pl ayed on LCD shows the last note p la yed by RIGHT
track, and it wi ll b e convenient for you to practic e.
100
95
75
25
5
0
Page 34
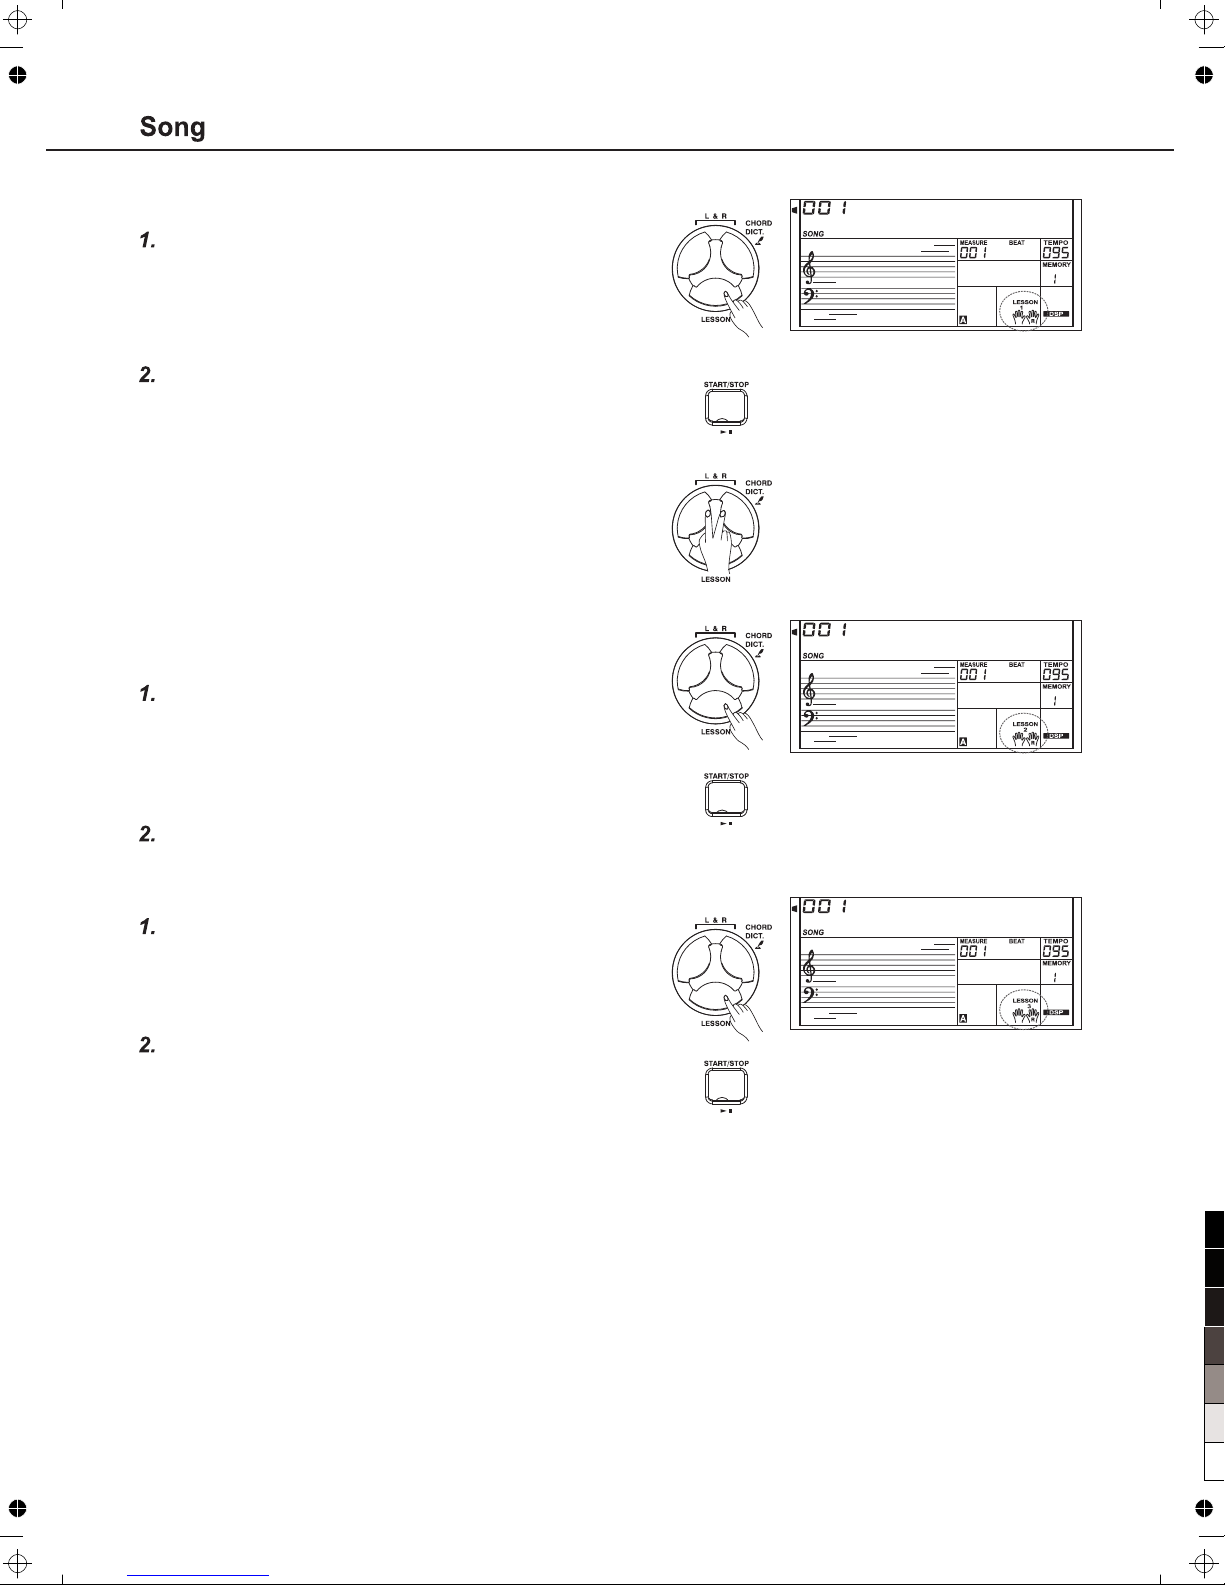
R e d R i v e r
R e d R i v e r
R e d R i v e r
34
Lesson 1 - P ra ct ic e timing
Press the [LES SO N] button to enter the lesson mod e.
Press [LESSO N] b utton to enter the lesson mode, t he lesson 1
icon is lighte ned on the LCD.
In Lesson 1 mode , th e keyboard only grade the tim e va lue of
the playing, d on 't care the correction of the n ot e.
Press the [START/STOP] button to start practice .
If [RIGHT] is se le cted, it will mute melody of righ t hand and
you will have to f ol low the time value of the right h an d. As long
as the time valu e is c orrect, the melody will sou nd .
If [LEFT] is sel ec ted, it will mute the changing ch ord and melody
by left hand. You wi ll have to follow time value of the l ef t hand.
As long as the tim e va lue is correct, the chord/mel ody will
sound.
If [LEFT] and [R IG HT] are selected, the chord/m el ody on left
hand and the mel ody on right hand will be muted. You wi ll have
to follow time v al ue on both left and right hand.
Lesson 2 - P ra ct ic e note accuracy
Press the [LES SO N] button again to enter the less on 2 mode.
In LESSON 2 mode , th e keyboard only grades your p ra ctice by
the note; does n' t care about the correctness of t he timing. Only
when you play th e co rrect note, the song will con ti nue to the
next note.
Press the [START/STOP] button to start to practic e.
Lesson 3 - P er fo rm ance
Press the [LES SO N] button in LESSON 2 to enter the le sson 3
mode.
In LESSON 3 mode , it w ill score your practice by the co rrection
of the time valu e an d note.
Press the [START/STOP] button to start to practic e.
100
95
75
25
5
0
Page 35
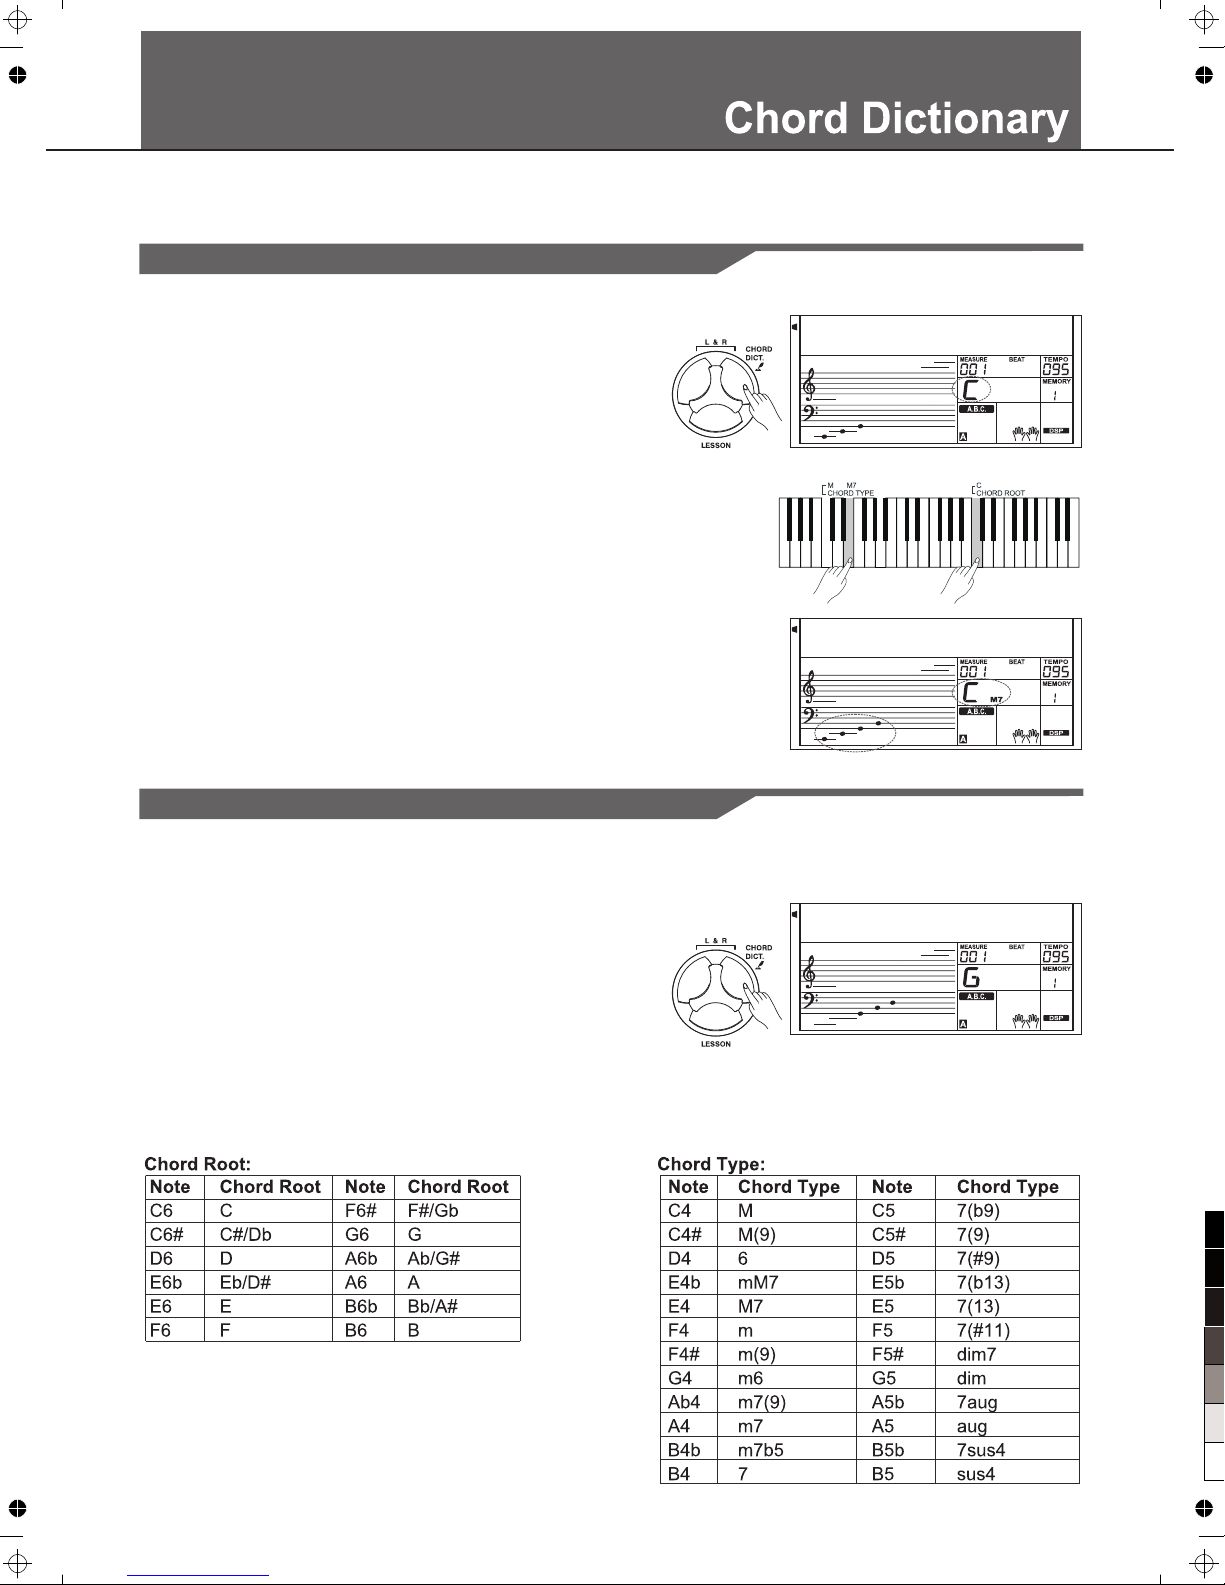
D i c t . 1
D i c t . 1
D i c t . 2
35
Chord dictio nary is essentially a built-i n chord b oo k tha t he lp you to check the Chord notes. You ca n learn the chord
and test in this f ea tures.
" "
Press the [CHO RD D ICT.] button and hold it for longer t han 2
seconds to ent er t he DICT 1 mo de.
In DICT 1 mode, the key above C4 a re used to assign the Chord
Type, the keys ab ov e C6 are used to assign the Chord R oo t.
When the Chord Type and Chord R oot are confirmed, the LCD
will display t he Chord and its keyboard posit io n. For example, if
you want to play a C M7 C hord, press the C6 key in the sec ti on of
the keyboard l ab eled CHORD ROOT. The root note you set will
be shown on the LC D but the note doesn't sound.
Press the E4 key i n th e section of CHORD TYPE which has
labeled M7 . The notes you sho uld pay for the specified chord
(root and chor d ty pe) are shown in the LCD as the not at ion and
also in the keyb oa rd diagram.
When the Chord Type and Chord R oot are confirmed, the LCD
will display t he chord and its keyboard posit io n. A promp t so und
will be heard wh en you play it correctly.
Press the [CHO RD D ICT.] button again to enter the DIC T 2
mode. This is an Examining m ode. The c ho rd area on the LCD
will display a r andom chord while the keyboar d po sition doesn't
display anyt hi ng on LCD.
When you play th e co rrect chord within 3 second s, t he next
chord (rando m) will be displayed on LCD to wait f or t he correct
chord playin g. If not, LCD will display the cor re sponding
keyboard pos ition automatically. In DICT 2 mode, press the
[CHORD DICT.] bu tt on again to turn off chord dictionary.
24 Chord s wi ll b e di splayed in the dictiona ry m od e as
follow s:
DICT 2 (Chord Examining Mode)
DICT 1 (Chord Learning Mode)
100
95
75
25
5
0
Page 36
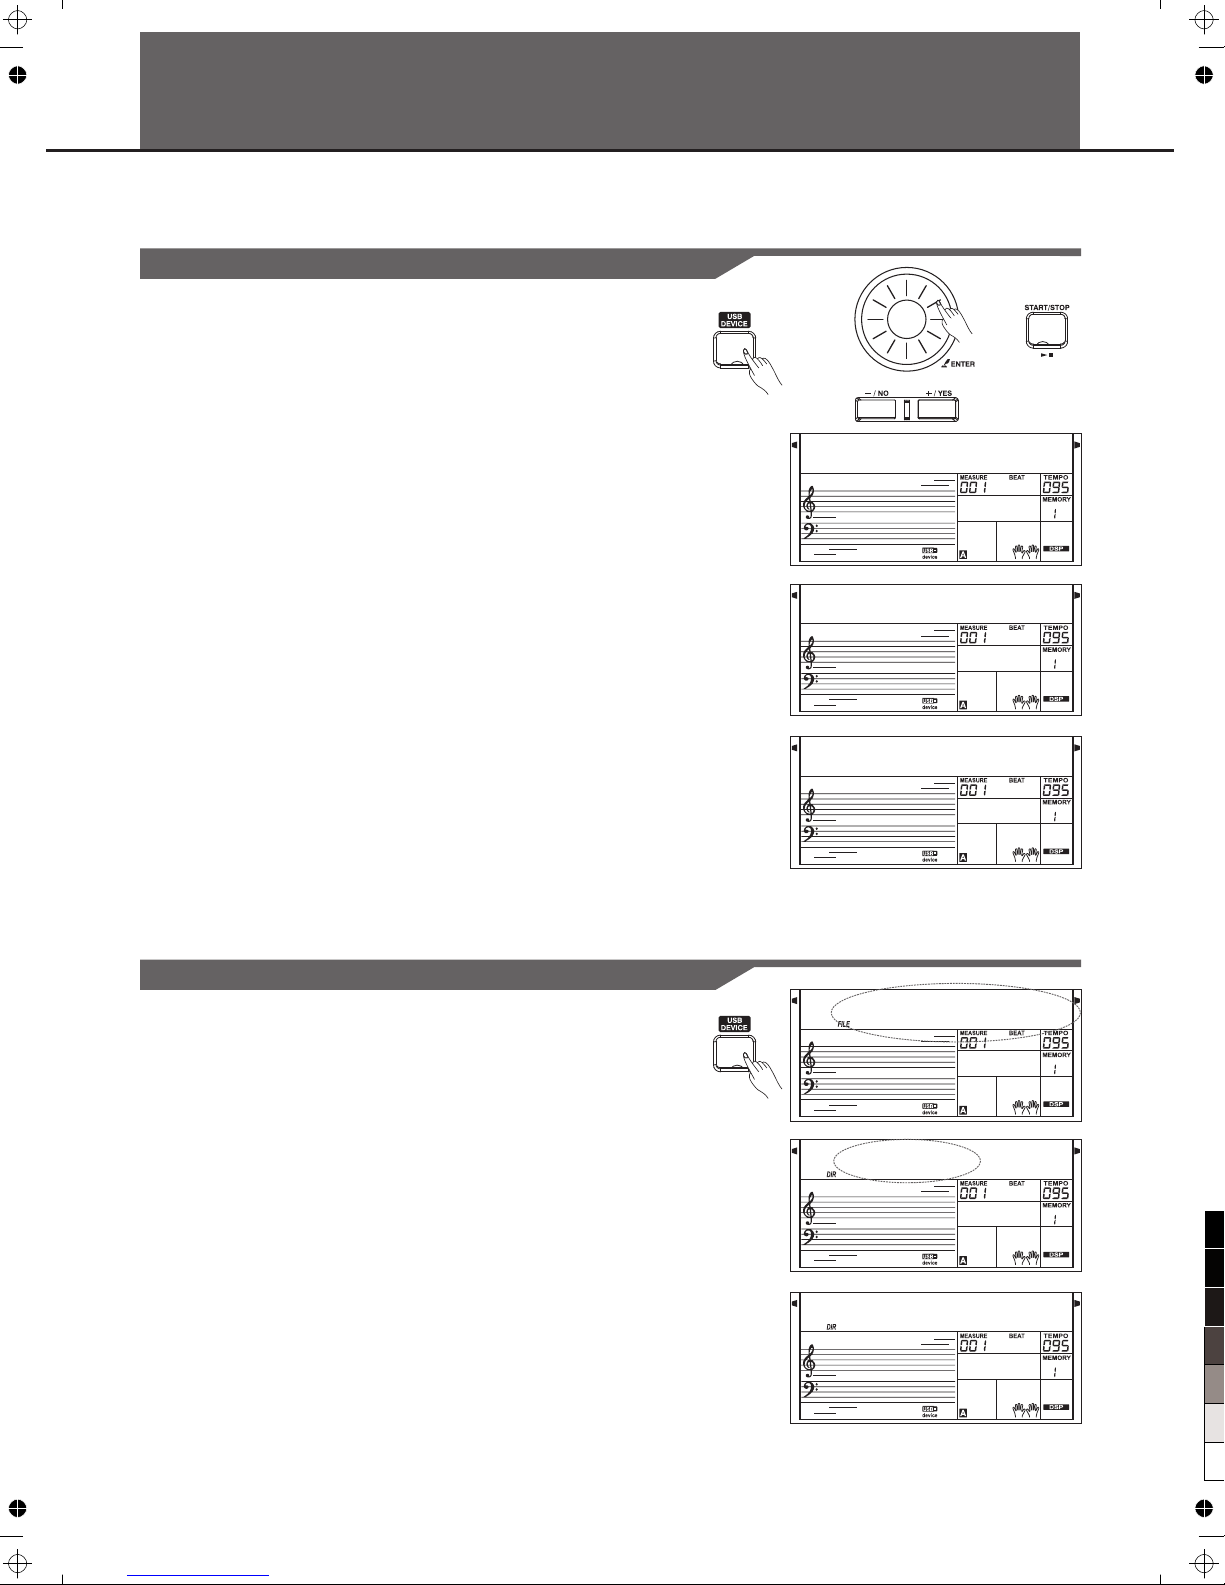
There is a stand ard USB Storage Device extern al i nterface which supports t he U SB Storage Device of 16M ~ 32G
capability. It is compati ble with the file system format o f th e FAT 16/32. It is better to u se t he USB Storage Device
which is forma tt ed by the keyboard. Please do n' t edit these files which come fro m the keyboard at PC.
USB Device Operation
Connecting a USB Device
W a i t . . . !
N o D i s k !
P l a y
36
1.
2.
3.
4.
5.
6.
7.
Play
S N G _ Z Z Z Z
M M K D
. .
1.
2.
3.
4.
5.
In the mod e, you can use the key as follows:[ US B
DEVICE],[E NT ER],[EXIT],[+/YES],[- /N O],Data Dial and
[START /STOP] .
Press [USB DEV IC E] button to enter mode , pr ess
again to exit mode.
The LCD will dis play "Wait...!" afte r you press [USB DEVICE]
button, then i f a connect to the k ey board
and the initialize o k, the LCD display
"play", if the initialize fa il, LCD display
"DiskErr!" , if t he keyboard don't connect any
, LCD display "N oD isk!".
In the mod e, you can use [+/YES]/[-/NO] but ton
or Data Dial to ch oo se menu, press [ENTER]butto n to enter
the next opera ti on, press [EXIT]to return to pr evious menu
and press[US B DE VICE] button to exit mo de .
If the midi file i n could be ident ified and
selected, LC D wi ll display file name and the "F IL E" flag sign, if
there is no midi f il e identified inside the cur re nt directory, LCD
will display t he sub-directory name and the " DI R" sign. The
file name will d isplay in ascending order, but y ou c an only
select the pre vi ous 512 files of the director y. When savin g,
loading, del eting, formatting, all key wi ll b e invalid and LCD
display "Wait...!". You can press [STY LE],[SONG]and Style
Direct Selec t bu tton to exit mode.
When playing m idi, press [MIXER]button to adj ust the playing
volume, the vo lu me range from 0 to 127.
You ca n on ly deal with file in the "MMKD" d ir ectory except
play and forma t. The LCD wil l not display directory name
when you execu te l oading, saving and deleti ng o peration.
USB Device
USB Device
USB Device
USB Storage De vi ce
USB Storage De vi ce
USB Storage De vi ce
USB Storage
Device
USB Device
USB Device
USB Storage De vi ce
USB Device
Press [USB DEV IC E] button to enter mode , LC D
will display " Play", and then you can use [+/YE S] /[-/NO]button
or Data Dial to se le ct other menu(Load, Save, D el ete, Format).
Select the men u "P lay" and press [ENTER] button , LCD will
display the MI DI f iles and directories in the r oo t of the
. If the midi file i n could be
identified a nd selected, LCD will display f il e name and the
"FILE" sign.
If there is no mid i fi le identified inside the cu rr ent directory, LCD
will display t he sub-directory name and the " DI R" sign. Press
[ENTER] butt on t o enter the current sub-direc tory, then ne w
midi files or su b- directories of the direct or y will be displayed.
If there is neit he r midi file nor sub-directo ry i n the current
directory, LCD will displ ay ".." a nd t he
"DIR" sign, yo u ca n press [ENTER] button to exit th e directory.
Use [+/YES]/ [- /NO] button or Data Dial to selec t a midi file.
Press [START/STO P] button to play it repeatedly. Press
[ENTER] butt on t o play all files in the current dir ectory
circularly. Press [START/STOP]button again to stop pla yi ng,
press [EXIT] bu tton to return to previous menu o r press [USB
DEVICE] butt on t o exit the mode.
USB Device
USB
Storage Devi ce USB Storage Devic e
USB Device
100
95
75
25
5
0
Page 37
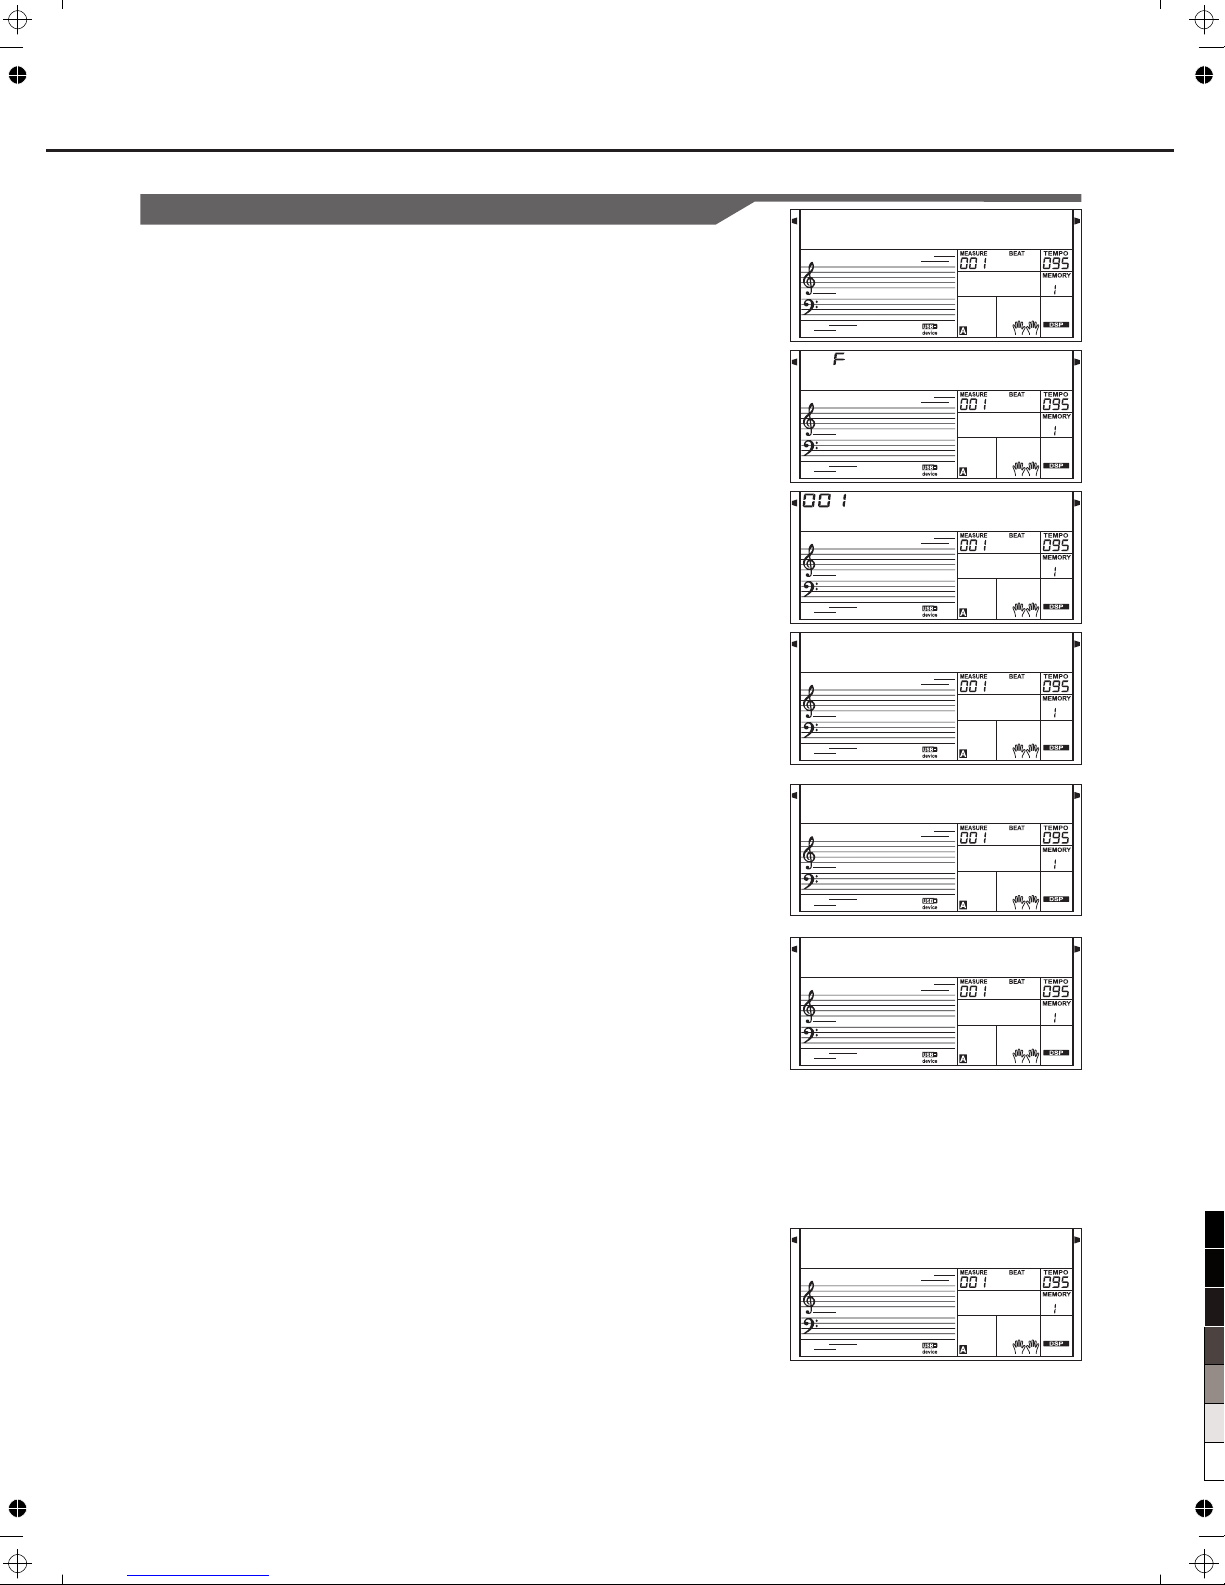
Load
L o a d S o n g
S N G _ 0 0 0 1
U s e r S o n g
S u r e ?
W a i t . . . !
L o a d S t y
L o a d M e m
37
Load Son g:
1.
2.
3.
Load Sty le :
Load Memory:
1.
2.
3.
1.
2.
3.
Connecting a USB Device
Select the men u "L oad" and press [ENTER]but to n, the Load sub
menu are displ ayed on LCD, it includes "LoadS on g", "LoadSty" ,
"LoadMem" an d "L oadVoic". Use [+/YES],[- /N O]button or Data
Dial to select o ne .
Select the men u "L oadSong" and press [ENTER ]b utton, the
MIDI files in th e "S ONG" directory of are
displayed on t he LCD, the main name of the file inc lu des 8
characters , th e postfix name is .mid. You can sel ec t songs by
using [+/YES ], [-/NO]button or Data Dial.
Press [ENTER ]b utton to aff irm the desired file, the use r so ng
number will be d isplayed on LCD, you can select t he m by
using [+/YES ], [-/NO]button or Data Dial.
Press [ENTER ]b utton, "Sure?" will be disp la yed on LCD, you
can press [ENT ER ]/[+/YES]button to load the f ile or press
[EXIT]/[-/ NO ]button to cancel.
Select the men u "L oadSty" and press [ENTER] but ton, the Sty
files in the "ST YL E" directory of are
displayed on L CD, the main name of the file inclu de s 8
characters , th e postfix name is .sty. You can select styles by
using [+/YES ], [-/NO]button or Data Dial.
Press [ENTER ]b utton to aff irm the desired file, the use r st yle
number will be d isplayed on LCD, you can select t he m by
using [+/YES ], [-/NO]button or Data Dial.
Press [ENTER ]b utton, "Sure?" will be disp la yed on LCD, you
can press [ENT ER ]/[+/YES]button to load the f ile or press
[EXIT]/[-/ NO ]button to cancel.
Select the men u "L oadMem" and press [ENTER] bu tton, the
Mem files in the " ME MORY" di rectory of
are displaye d on LCD, the main name of the file inc lu des 8
characters , th e postfix name is .mem. You can sel ec t styles by
using [+/YES ], [-/NO]button or Data Dial.
Press[ENTE R] button to affirm the desired file, the us er
memory numbe r wi ll be displayed on LCD, you can s el ect
them by using [+ /Y ES],[-/NO]button or Data Di al.
Press the [ENT ER ]button, "Sure?" will be disp layed on LCD,
you can press [E NT ER]/[+/YES]button to load t he file or
press[EXIT ]/ [-/NO]button to cancel.
USB Storage De vi ce
USB Storage De vi ce
USB Storage De vi ce
100
95
75
25
5
0
Page 38
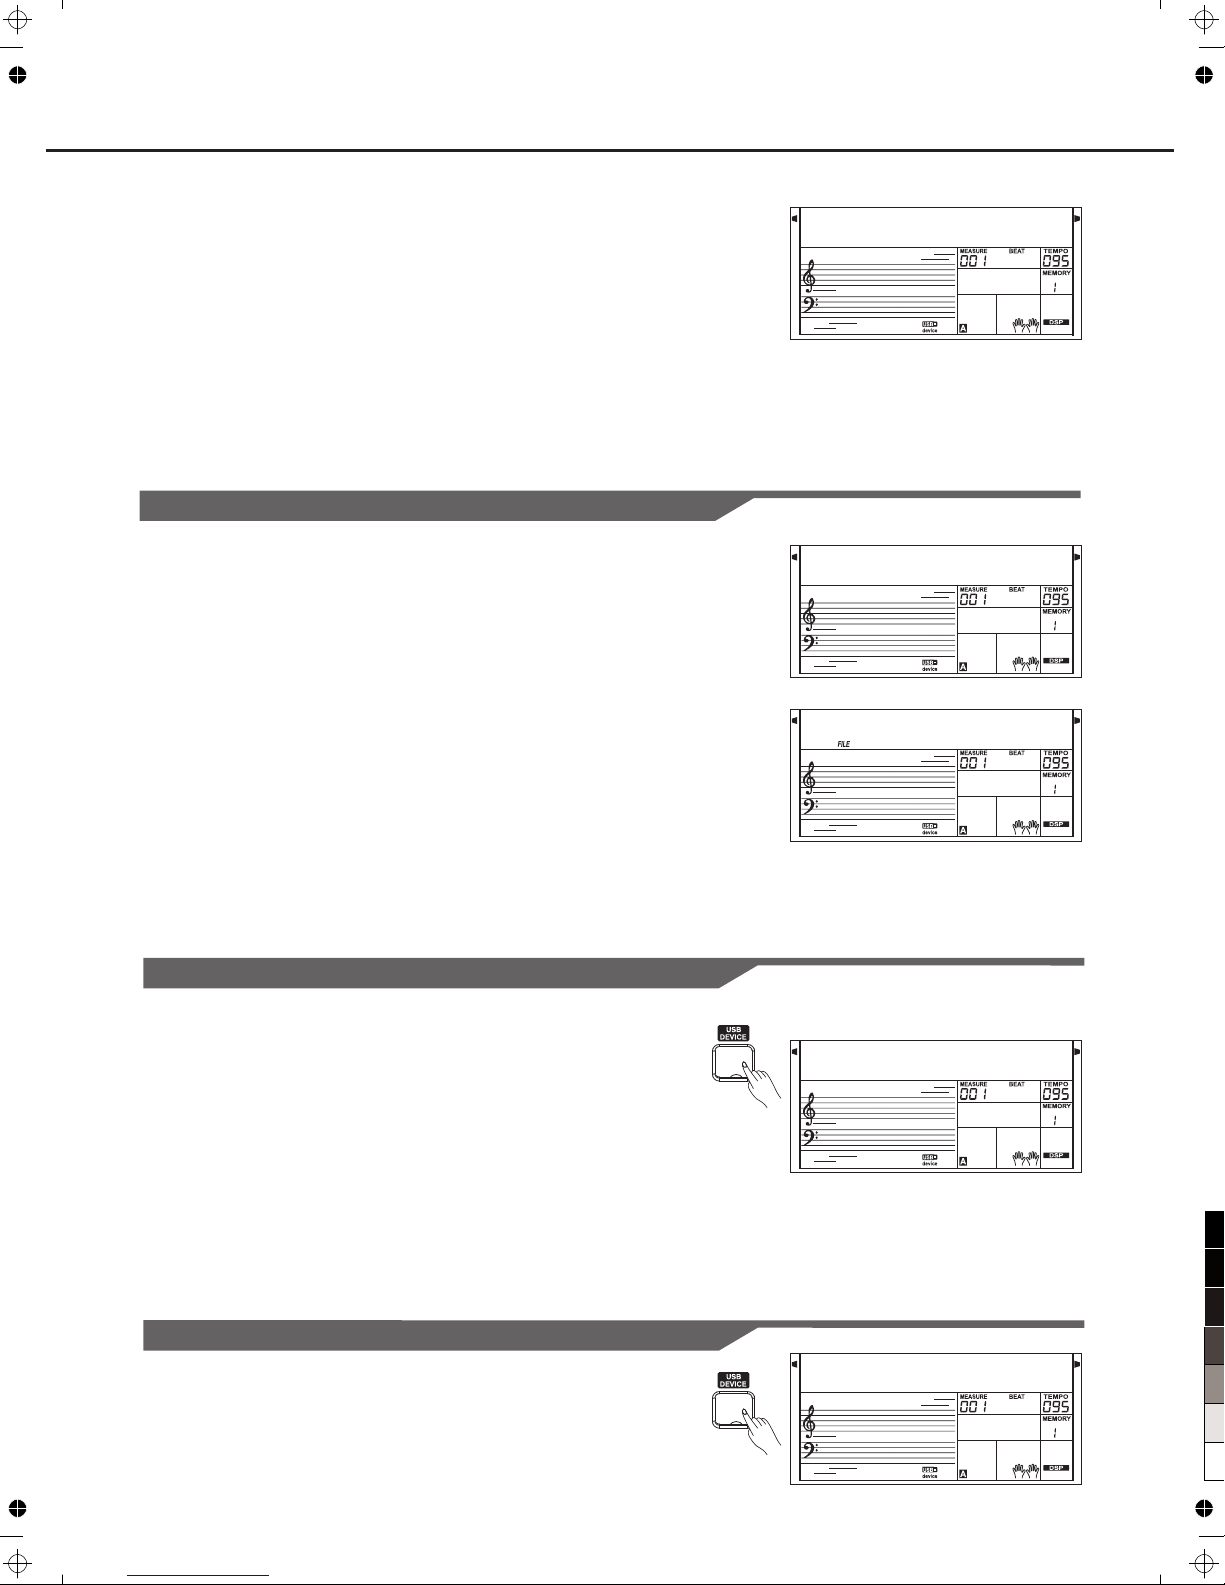
Load Voice:
L o a d V o i c
U s e r S o n g
S N G _ Z Z Z Z
D e l e t e ?
F o r m a t
38
1.
2.
3.
Save
1.
2.
3.
Delete
1.
2.
3.
Format
Select the men u "L oadVoic" and press [ENTER] bu tton, the
Voic files in the " VO ICE" directory of are
displayed on L CD, the main name of the file inclu de s 8
characters , th e postfix name is .voc You can sele ct s tyles by
using [+/YES ], [-/NO]button or Data Dial.
Press [ENTER ] bu tton to affi rm the desired file, the user voi ce
number will be d isplayed on LCD, you can select t he m by
using [+/YES ], [-/NO]button or Data Dial.
Press the [ENT ER ]button, "Sure?" will be disp layed on LCD,
you can press [E NT ER]/[+/YES]button to load t he file or
press[EXIT ]/ [-/NO]button to cancel.
USB Storage De vi ce
Select the men u "S ave" and press [ENTER]butto n, the Save
sub menu are dis played on LCD, it includes "Sav eS ong",
"SaveSty" , "S av eMem" and "SaveVoic". You can se le ct them
by using [+/YE S] ,[-/NO]button or Data Dial.
Select what yo u wa nt and press [ENTER] button, if t he desired
file is empty, LCD will displ ay "NoFile!", and then LCD will
display the pr ev ious menu after about two sec on d, otherwise,
you can play the k ey board to input the file name , yo u ca n only
input the file n am e in capital letters, the shi ft k ey is invalid in
this mode, the m ax imum of the file name length is 8 l et ter.
Each type of the d at a has the default file name.
" " " "
Press [ENTER ] bu tton to save the file after the fil e name
inputs finis h, i f the current directory have th e same name,
SameName will be displayed on LCD. Oth erwise, Sure?
will be displa yed on LCD. You just need to press
[ENTER]or[ +/ YES]button to save the file.
Select the men u "D elete" and press [ENTER] bu tt on, the
delete sub men u are displayed on LCD, it includ es
"UserSong" , "U serSty" , "UserMem" and "User Voic". Use
[+/YES],[- /N O]button or Data Dial to select o ne.
Select the men u yo u want and press [ENTER]butto n, if the
default dire ct ory have the file which accor d wi th the menu, the
file name will b e displayed on LCD, otherwise , LC D display
"NoFile!", a nd t hen LCD will display the prev io us menu after
about two seco nd .
Select the fil e th at you want to delete and Press [EN TER]
button, "Sur e? " will be displayed on LCD, pre ss [ ENTER] or
[+/YES] butt on t o delete the file.
Select the men u "F ormat" and press [ENTER] butt on, "Sure?"
are displaye d on LCD. Press [ENTER] button to for mat the
.
USB
Storage Devi ce
Connecting a USB Device
100
95
75
25
5
0
Page 39
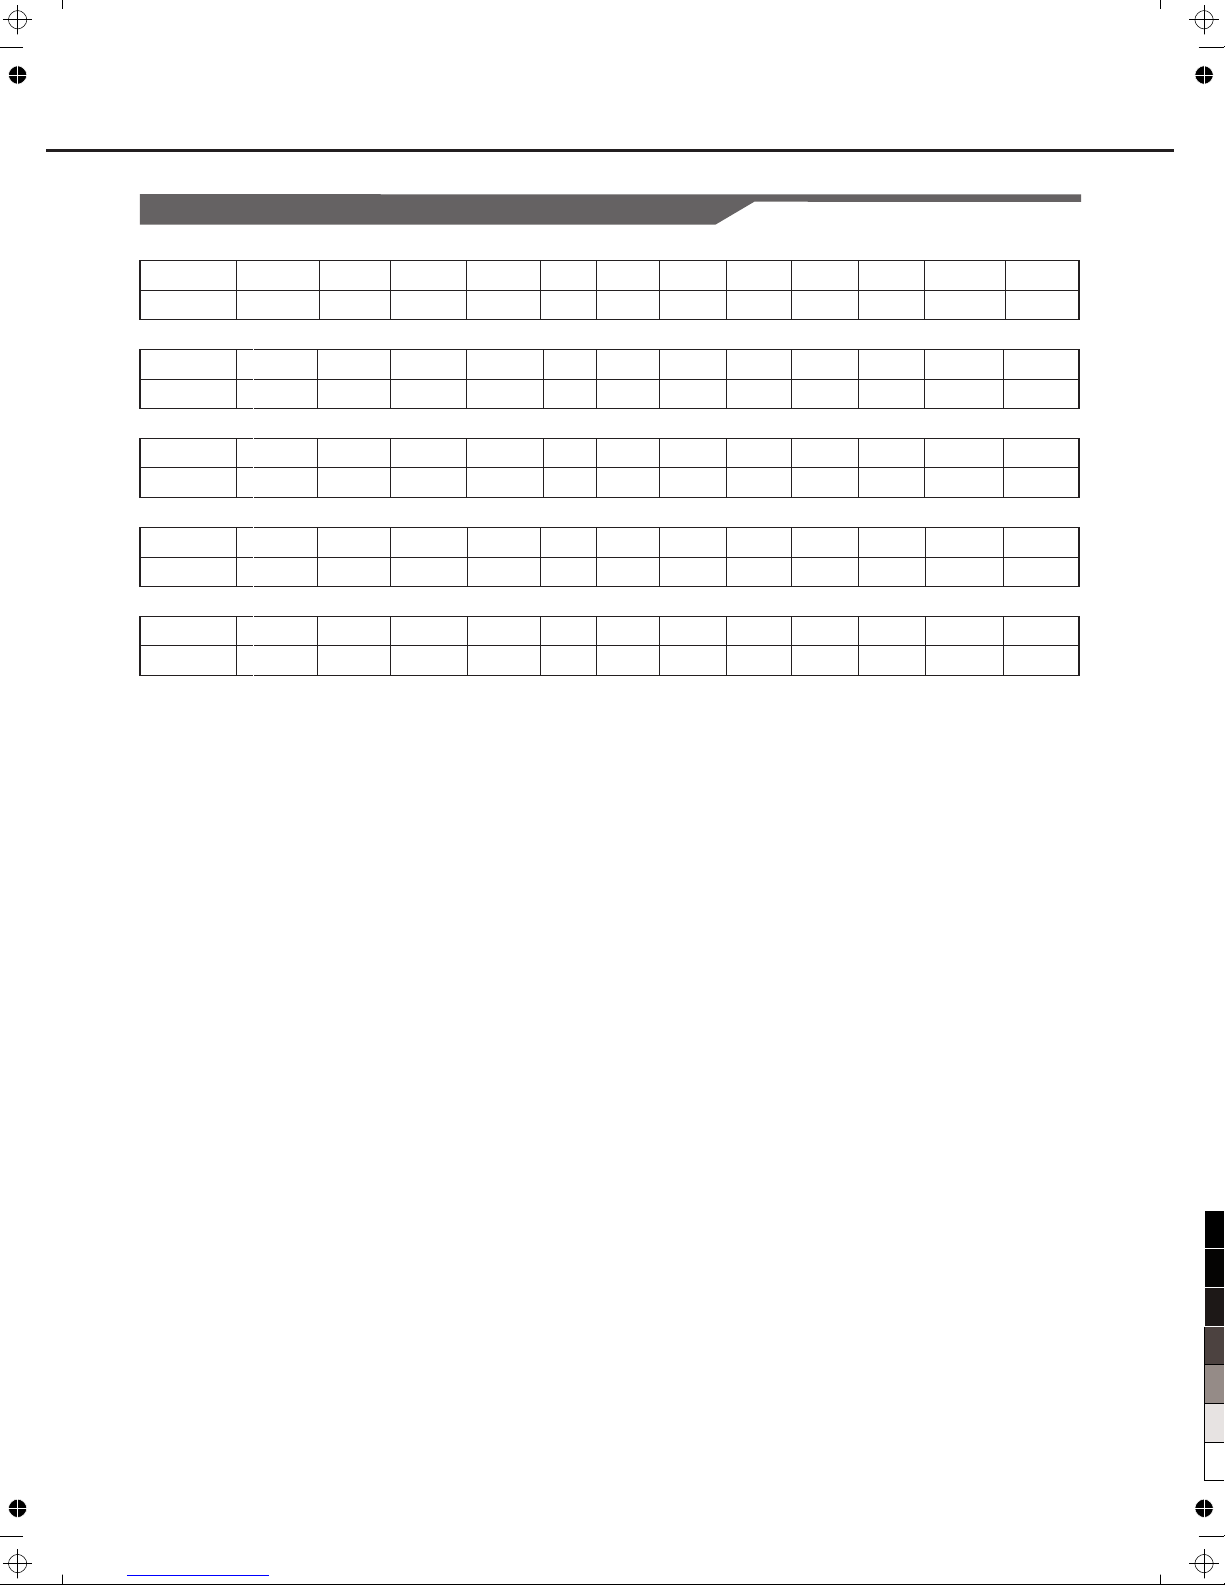
Keyboard and ASCII Character Relative Table
NOTE
LETTER
39
NOTE
LETTER
NOTE
LETTER
NOTE
LETTER
NOTE
LETTER
C2 Bb2
SHIFT G
C3
I
C4
U
C5
6
C6
-
C#2
DEL
C#3
J
C#4
V
C#5
7
C#6
@
B2
H
B3
T
B4
5
B5
]
B6
D2
BACK
D3
K
D4
W
D5
8
D6
^
Eb2
NEXT
Eb3
L
Eb4
X
Eb5
9
Eb6
`
E2
A
E3
M
E4
Y
E5
!
E6
{
F2
B
F3
N
F4
Z
F5
#
F6
}
F#2
C
F#3
O
F#4
0
F#5
$
F#6
G2
D
G3
P
G4
1
G5
%
G6
Ab2
E
Ab3
Q
Ab4
2
Ab5
&
Ab6
Bb3
S
Bb4
4
Bb5
[
Bb6
A2
F
A3
R
A4
3
A5
A6
,
Connecting a USB Device
100
95
75
25
5
0
Page 40
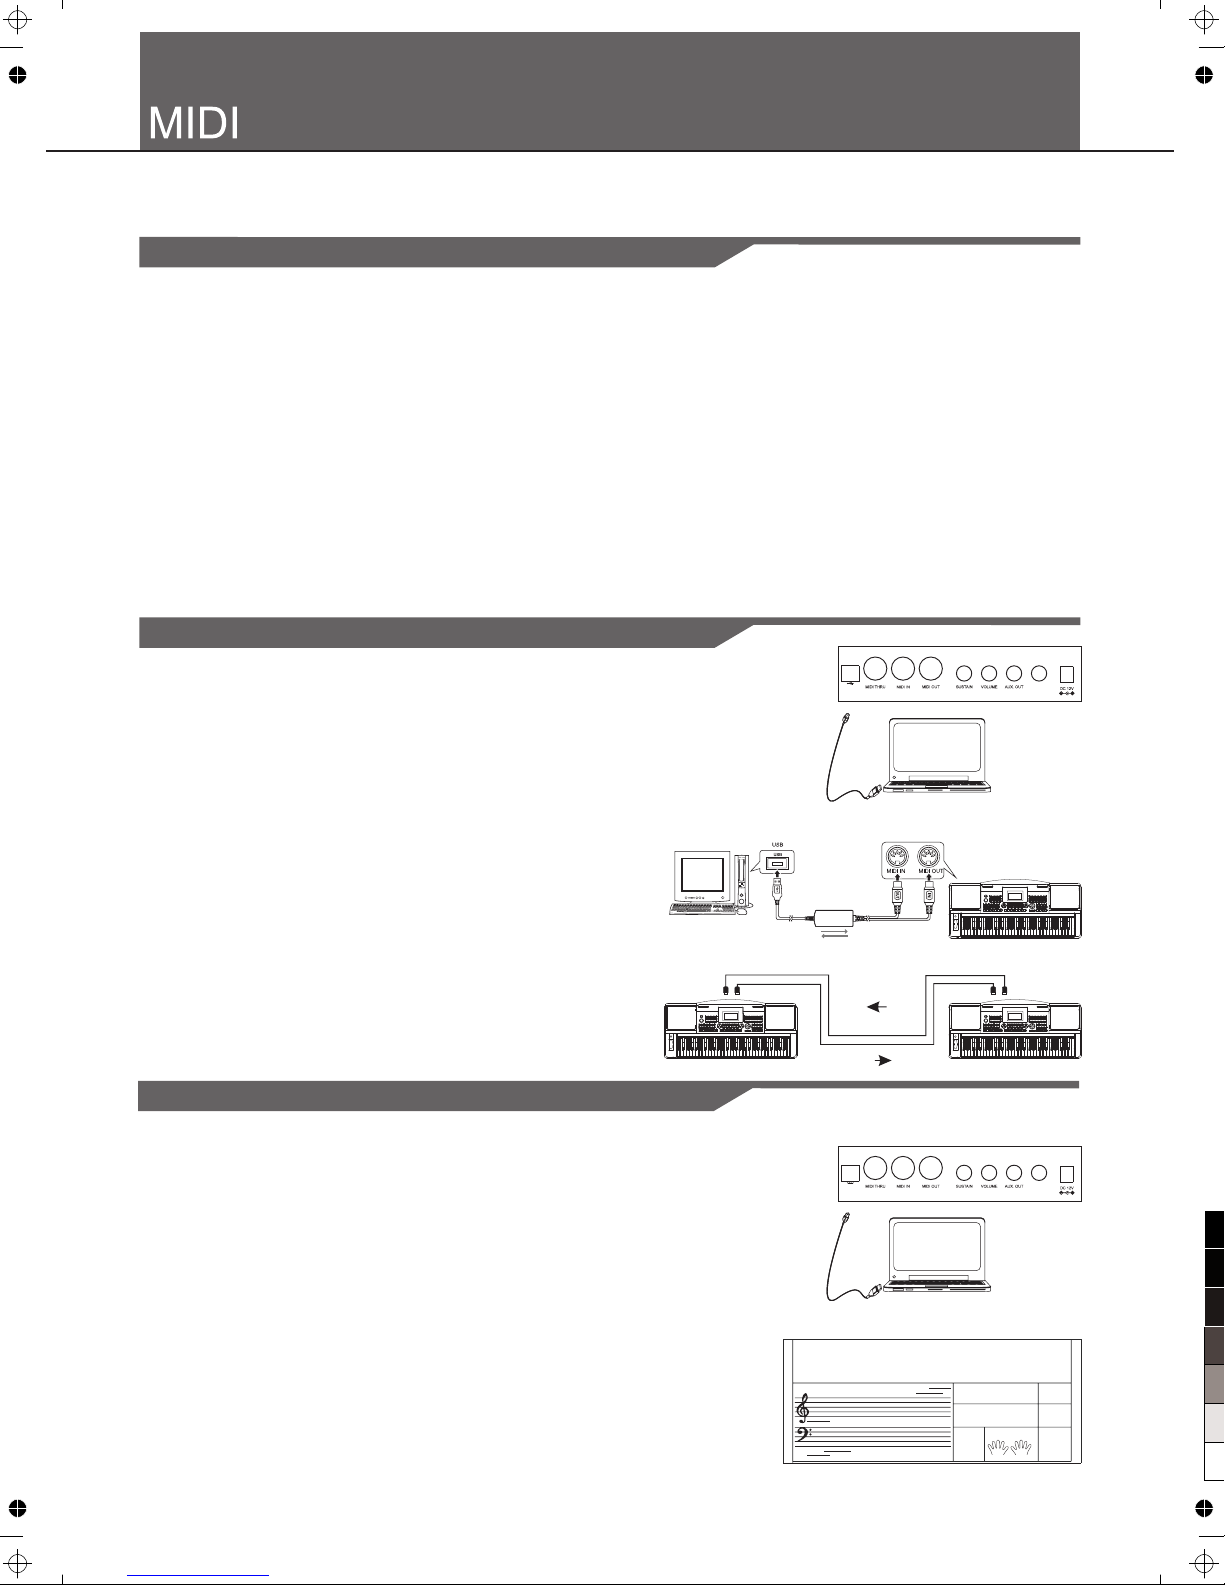
A USB-MIDI interface
AUX.IN
USB
P C L i n k . .
AUX.IN
USB
40
What's MIDI?
Midi Terminals
In order to exchange MIDI data between multiple devices, each
device must be connected by a cable.
MIDI IN: Receives MIDI data from a computer.
MIDI OUT: Transmits the instrument information as MIDI data to
another MIDI device.
Connect the MIDI OUT of other Device to the MIDI IN jack on the
rear panel, this instrument will as sound module.
Connect the MIDI IN of other Device to the MIDI OUT jack on the
rear panel. this instrument will as Midi Controller.
MIDI THRU PORT: You can use MIDI cable to link the MIDI THRU
port to other MIDI instrument MIDI IN port. The message that the
MIDI IN port receives will be auto sent to the MIDI THRU port, so
that one MIDI instrument can control many MIDI instrument at the
same time.
Downloading Data from the Computer
Connect a standard USB cable between the rear-panel of the USB jack
of the instrument and the USB jack on your computer.
Power on the instrument first, and then open the PCSUITE software in
your computer, the "PCLink.." will be displayed on LCD. The PCSUITE
will connect successfully with the instrument.
You can download SMF MIDI files to the keyboard as user songs or
upload the user songs.
You can upload user styles to the computer as a backup or download
them to the keyboard.
You can upload user voices to the computer as a backup or download
them to the keyboard.
You can upload memory files to the computer as a backup or download
them to the keyboard.
Concrete operating methods see software operation instructions!
By using the MID I fu nctions you can expand your m us ical possibilities. This section expl ains what MIDI is, and what
it can do, as well a s ho w you can use MIDI on your instru me nt.
MIDI is an acron ym t hat stands for Musical Instru ment Digital
Interface, w hi ch allows electronic musi ca l instruments to
communicat e wi th each other, by sending and re ce iving
compatible N ote, Control Change, Progra m Ch ange and various
other types of M ID I data, or messages. The instrument can
control a MIDI d ev ice by transmitting note rela ted data and
various type s of c ontroller data. The instrument can be
controlled b y th e incoming MIDI messages wh ic h automatically
determine to ne g enerator mode, select MID I ch annels, voices
and effects, change para meter values and of course play t he
voices speci fi ed for the various parts. MIDI me ssages can be
divided into t wo g roups: Channel messages a nd S ystem
messages.
MIDI IN
MIDI OU T
MIDI IN M IDI OUT
100
95
75
25
5
0
Page 41
41
Problem
The speakers produce a pop sound
whenever the power is turned ON or OFF.
No sound when the keyboard is played.
When using a mobile phone, noise is
produced.
The auto accompaniment does not play
back even Sync is in standby condition and
a key is pressed.
Certain notes sound at wrong pitch.
The Harmony function does not operate.
“ ”
Troubleshooting
Possible Cause and Solution
This is normal and is no cause for alarm.
The R1/R2/L voice volume (Mixer) settings could be set too
low. Make sure the voice volumes are set at appropriate
levels.
Using a mobile phone in close proximity to the instrument
may produce interference. To prevent this, turn off the mobile
phone or use it further away from the instrument.
You may be trying to start accompaniment by playing a key
in the right-hand range of the keyboard. To start the
accompaniment with Sync Start, make sure to play a key in
the left-hand range of the keyboard.
Make sure that the tuning value is set to 0 . Press and
hold the [+/YES] and [-/NO] buttons at the same time, then
turning the power on will set INSTRUMENT to default.
And Harmony cannot be turned on when a drum kit is
selected for the voice R1.
“ ”
Specifications
LCD Display
Multi-functional LCD
Keys
61
Polyphony
64
Voice
583
Style
230
Song
125, include 5 user songs
Demo
5
Control button
Power on/off switch, Volume, Perform., IFX, Tempo+/-,
Mixer, Function, Lesson, Left, Right/Chord Dict., Bank,
Store, M1-M6, Freeze, O.T.S., Enter, Back, +/Yes, -/No,
Style, Voice, Demo, Song, Piano, Metro, Dual, Touch,
Sustain, Lower, DSP, Harmony, Synth, USB Device.
* All specifications and appearances are subject to change without notice.
Accompaniment Control
Start/Stop, Sync stop, Sync start,Intro1/Ending1
[Pause], Intro2/Ending2[REPEAT A/B ], Fill-in A [FF],
Fill-in B [Rew], Fill-in C, Fill-in-D, Fade, A.B.C.
Record Function
Record, Accomp, Melody 1, Melody 2, Melody 3,
Melody 4, Melody 5.
Panel Memory
48
Connectors
DC IN, Headphones, AUX IN, AUX OUT, Sustainpedal, Volume Pedal, USB, MIDI IN,MIDI OUT, MIDI
THRU,U-HOST.
Power Supply
DC IN
Speaker
Dimensions
970(L)X390(W)X160(H)MM
Weight
9Kg
15W+15W, 25W+25W
100
95
75
25
5
0
Page 42
GUI TAR
PIANO
CHROM ATIC P ER CUS SI ON
No. Name LCD Name
1
2
3
4
5
6
7
8
9
10
11
12
13
14
15
16
17
18
19
20
21
22
23
24
25
26
27
28
29
30
31
32
33
34
35
36
37
38
39
40
41
42
43
44
45
46
47
48
49
50
51
52
53
54
55
56
57
58
Stereo Grand Piano
Acoustic Grand Piano (wide)
Acoustic Grand Piano (wide) 2
Acoustic Grand Piano (dark)
Octave Piano 1
Octave Piano 2
Dreamscape
Piano & Strings
Piano & Choir
Acoustic Grand Piano
Stereo Bright Piano
Bright Acoustic Piano
Bright Acoustic Piano (wide)
Bright Acoustic Piano (wide) 2
Chorus Piano
Piano Pad
Piano & Vibraphone
Electric Grand Piano
Electric Grand Piano (wide)
Stereo Honk-Tonk
Honky-tonk Piano
Honky-tonk Piano (wide)
Honky-tonk Piano (wide) 2
Stereo Hard Electric Piano
Detuned Electric Piano 1
Detuned Electric Piano 2
Detuned Electric Piano 3
Electric Piano 1
Electric Piano 2
Electric Piano (wide) 1
Electric Piano (wide) 2
EP Legend
EP Phase
60's Electric Piano
Electric Piano 1 (velocity mix)
Electric Piano 2 (velocity mix)
Velocity Crossfade Electric Piano
Layered Electric Piano 1
Layered Electric Piano 2
Nylon Electric Piano
Warm Electric Piano
Cloudy Electric Piano
Grand Harpsichord
Harpsichord
Harpsichord 2
Harpsichord (wide)
Harpsichord (octave mix)
Harpsichord (octave mix) 2
Harpsichord Release
Harpsichord (with key off)
Piano & Harpsichord
Stereo Clavichord
Clavi
Clavi 2
Clavi (wide) 1
Clavi (wide) 2
Clavi Wah
Pulse Clavi
59
60
61
62
63
64
65
66
67
68
69
70
71
72
73
74
75
76
77
78
79
80
81
82
83
84
85
86
87
88
89
90
91
92
93
94
95
96
97
98
99
100
101
102
103
104
105
106
107
Celesta
Celesta 2
Birght Celeasta
Celesta & Sine
Reecho Bell
Celesta & Music Box
Glockenspiel
Glockenspiel 2
Glockenspiel & Sine
Glockenspiel & Celesta
Music Box
Music Box 2
Music Box 3
Toy Box
Music Box & Harp
Stereo Vibrapho
Rigid Vibraphone
Vibraphone
Vibraphone 2
Vibraphone (wide)
Vibraphone (wide) 2
Vibraphone & Bell
Vibraphone & Harpsichord
Marimba
Marimba 2
Marimba (wide)
Sine Marimba
Stereo Marimba
Marimba & Vibraphone
Wood Drum
Xylophone
Xylophone 2
Tubular Bells
Church Bell
Carillon
Dulcimer
Santur
Shorty
Drawbar Organ
Drawbar Organ 2
Mellow Drawbar Organ
Detuned Drawbar Organ
Detuned Drawbar Organ 2
Italian 60's Organ
1970 Percussive Organ
Percussive Organ
Percussive Organ 2
Light Click Organ
ORGAN
108
109
110
111
112
113
114
115
116
117
118
119
120
121
122
123
124
125
126
127
128
129
130
131
132
133
134
135
136
137
138
139
140
141
142
143
144
145
146
147
148
149
150
151
152
153
154
155
156
157
158
159
160
161
Detuned Percussive Organ
Stereo Rotary Organ
Rock Organ
Rotary Organ
Slow Rotary Organ
Detuned Church Organ
Church Organ
Church Organ 2
Church Organ (octave mix)
Reed Organ
Puff Organ
Accordion
Accordion 2
Accordion 3
Chorus Accordion
Mustte
Accord It Solo
Sweet Harmonica
Harmonica
Harmonica 2
Detuned Harmonica
Tango Accordion
Acoustic Guitar (nylon)
Acoustic Guitar (nylon 2)
Acoustic Guitar (nylon + key off)
Ukulele
Velocity Nylon Guitar
Chorus Nylon Guitar
Bright Nylon Guitar
Acoustic Guitar (steel)
Acoustic Guitar (steel) 2
Steel Guitar with Body Sound
Tremolo Steel Guitar
Mandolin
12-Strings Guitar
Chorus Steel Guitar
Nylon & Steel Guitar
Stereo Steel Guitar
Steel Guitar Bend
Steel Guitar Harmonics
Velocity Steel Guita 1
Velocity Steel Guita 2
Velocity Steel Guita 3
Velocity Steel Guita 4
Electric Guitar (jazz)
Electric Guitar (jazz) 2
Electric Guitar (pedal steel)
Mellow Guitar
Velocity Jazz Guitar
Jazz Guitar Detuned
Mid Tone Guitar
Electric Guitar (clean)
Electric Guitar (clean) 2
Stereo Clean Guitar
Soft Stereo Drawbar Organ
42
StGrdPno
GrandPnW
GrandPW2
GrandPnD
OctPno1
OctPno2
Dreamscp
Pno&Str
Pno&Cho
GrandPno
StBrtPno
BritePno
BritePnW
BritePW2
ChoruPno
PianoPad
Pno&Vib
E.Grand
E.GrandW
StHonkTo
HnkyTonk
HnyTonkW
HnyTonW2
StHarEp
DetunEP1
DetunEP2
DetunEP3
E.Piano1
E.Piano2
EPnoW1
EPnoW2
EPLegend
EPPhase
60'sEP
E.PnoV1
E.PnoV2
VeCrosEP
LayerEp1
LayerEp2
NylonEP
WarmEp
CloudyEp
GraHarps
Harpsi
Harpsi2
HarpsiW
HarpsiO
HarpsiO2
HarpsiR
HarpsiOf
Pno&Harp
StClavi
Clavi
Clavi2
ClaviW1
ClaviW2
ClaviWa
PluseClv
Celesta
Celesta2
BirCelea
Celes&Si
RechBell
Celes&MB
Glocken
Glocken2
Glock&Si
Glock&Ce
MusicBox
MusicBo2
MusicBo3
ToyBox
Mbx&Harp
StVibes
RigiVibe
Vibra
Vibra2
VibraW
VibraW2
Bell&Vib
Vib&Harp
Marimba
Marimba2
MarimbaW
SinMrmb
StMarim
Mar&Vib
WoodDrum
Xylophon
Xylopho2
TubulBel
ChurBell
Carillon
Dulcimer
Santur
Shorty
DrawOrgn
DrawOrg2
SfDrawOr
MellDrOr
DeDraOrg
DeDraOr2
60'sOrgn
1970PcOr
PercOrgn
PercOrg2
LClickOr
DePerOrg
StRotaOr
RockOrgn
RotaOrgn
SloRotOr
DeChuOrg
ChurOrgn
ChurOrg2
ChurOrgO
ReedOrgn
PuffOrgn
Acordion
Acordin2
Acordin3
ChAccord
Mustte
AccordSo
SwetHarm
Harmnica
Harmnic2
DetHarmo
TangoAcd
NylonGtr
NylonGt2
NylGtrOf
Ukulele
NylnGtVe
ChoNyGt
BrNyGt
SteelGtr
SteelGt2
SteelBdy
TremGt
Mandolin
12StrGtr
ChoSteGt
Ny&SteGt
StSteGt
GtBend
GtHarm
VelSte1
VelSte2
VelSte3
VelSte4
JazzGtr
JazzGt2
PedalGtr
MelloGt
JazzGtVe
JazzGtDt
MidTonGt
CleanGtr
CleanGt2
StCleGtr
Voice List
No.
Name
LCD Name
No.
Name
LCD Name
100
95
75
25
5
0
Page 43
162
163
164
165
166
167
168
169
170
171
172
173
174
175
176
177
178
179
180
181
182
183
184
185
186
187
188
189
190
191
192
193
194
195
196
197
198
199
200
201
202
203
204
205
206
207
208
209
210
211
212
213
214
215
216
217
218
219
220
221
222
223
224
225
226
227
228
229
230
231
232
233
234
235
236
237
238
239
240
241
242
243
244
245
246
247
248
249
250
251
252
253
254
255
256
257
258
259
260
261
262
263
264
265
266
267
268
Velocity Clean Guitar
Electric Guitar (detuned clean)
Electric Guitar (muted velo-sw)
Electric Guitar (muted)
Electric Guitar (funky cutting)
Jazz Man
Stereo Muted Guitar
Guitar Pinch
Overdriven Guitar
Detuned Overdriven Guitar
Distortion Guitar
Distortion Guitar 2
Distortion Guitar (with feedback)
Distortion Guitar (with feedback) 2
Distorted Rhythm Guitar
5th Distortion
Distortion Guitar Octave
Stereo Distorted Guitar
Guitar Feedback
Guitar Harmonics
Acoustic Bass
Acoustic Bass 2
Acoustic Bass Detuned
Acoustic Bass Filter
Jazz Style
A.Bass & Mute G.T.
Resonant Bass
Velocity Crossfade Bass
Wah Bass 1
Wah Bass 2
Electric Bass (finger)
Electric Bass (finger) 2
Electric Bass (finger) 3
Detuned Finger Bass
Dark Finger Bass
Finger Slap Bass
Resonant Finger Bass
Wah Finger Bass
Bass & Distorted Elec Guitar
Electric Bass (pick)
Electric Bass (pick) 2
Mute Pick Bass
Detuned Pick Bass
Fretless Bass
Fretless Bass 2
1990 Bass
Fretless Bass & Sine
Fretless Bass Detuned 1
Fretless Bass Detuned 2
Fretless Bass Detuned 3
Slap Bass 1
Slap Bass 2
Slap Bass 3
Slap Bass 4
Power Slap Bass
Lash Thumb Bass
Resonant Slap Bass
Velocity Switch Slap Bass
Synth Bass 1
Synth Bass 2
Synth Bass 3 (resonance)
Synth Bass 4 (attack)
Synth Bass (warm)
Clavi Bass
Hammer
Synth Bass (rubber)
Attack Pulse
The Violin
Violin
Violin 2
Violin (slow attack)
Mono Violin
Octave Violin
Electric Violin
Violin & Viola
Two Violin
Soft Violin
Velocity Violin
Viola
Viola 2
Viola 3
Dark Viola
Cello
Cello 2
Cello 3
Cello 4
Celloen 16'
Chamber Music
Contrabass
Contrabass 2
Tremolo Strings
Tremolo Strings 2
Slow Tremolo Strings 1
Slow Tremolo Strings 2
Pizzicato Strings
Pizzicato Strings 2
Octave Pizzicato
Orchestral Harp
Orchestral Harp 2
Yang Chin
Africa
Timpani
Timpani 2
The Strings
String Ensembles 1
String Ensembles 2
Synth Strings 1
269
270
271
272
273
274
275
276
277
278
279
280
281
282
283
284
285
286
287
288
289
290
291
292
293
294
295
296
297
298
299
Synth Strings 2
Synth Strings 3
Synth Strings 4
Synth Strings 5
Resonant Strings
Stereo Slow Strings
Slow Strings
Strings and Brass
Legato Strings
Orchestra
Arco Strings
60's Strings
1970 Strings
Solo Strings
Choir Aahs
Choir Aahs 2
Choir Aahs 3
Choir Aahs 4
Mellow Choir
Stereo Choir Aahs
Strings & Choir
Humming
Voice Oohs
Analog Voice
Synth Voice
Choral
Bass Hit Plus
Orchestra Hit
Orchestra Hit 2
Euro Hit
6th Hit
BASS
STRING S & ORCH ESTRA L INS TRU MENT S
BRASS
300
301
302
303
304
305
306
307
308
309
310
311
312
313
314
315
316
317
318
319
320
321
322
Trumpet
Trumpet 2
Trumpet 3
Dark Trumpet Soft
Resonant Trumpet
Sweet Trumpet
Wah Trumpet
Trombone
Trombone 2
Bright Trombone
Dark Trombone
Strings & Trombone
Tuba
Tuba 2
Tuba Solo
Soft Tuba
Muted Trumpet
Muted Trumpet 2
French Horn
French Horn 2 (warm)
French Horn 3
Stereo French Horn
Horn Orchestra
43
CleGtVel
DetClnGt
MutVelGt
MutedGtr
FunkGt
JazzMan
StMuGt
GtPinch
Ovrdrive
DtOdrvGt
DistGtr
DistGt2
FeedbkGt
FeedbkG2
DistRyth
5thDist
DistGtO
StDistor
GtrFedbk
GtrHarmo
AcoBass
AcoBass2
AcosBaDt
AcBasFil
JazzSty
Bs&GtMu
ResBass
VelCBass
WahBass1
WahBass2
FngrBass
FngrBas2
FngrBas3
DtFngrBa
DarkFiBs
FngrSlap
ResoFnBa
WahFnBs
Ba&DtEG
PickBass
PickBas2
MuPkBass
DetPicBs
Fretless
Fretlss2
90Bass
Fret&Sin
FretDet1
FretDet2
FretDet3
SlapBas1
SlapBas2
SlapBas3
SlapBas4
PowSlap
LashThm
ResonSlp
VeloSSlp
SynBass1
SynBass2
ResoBass
AtackBas
WarmBass
ClavBass
Hammer
RubbBass
AtackPls
TheVin
Violin
Violin2
SlViolin
MonoVin
OctVin
EViolin
Vin&Vio
TwoVin
SoftVin
VelVioli
Viola
Viola2
Viola3
ViolaD
Cello
Cello2
Cello3
Cello4
Celloen
Chamber
Contrabs
Contrbs2
TremStr
TremStr2
SlwTrSt1
SlwTrSt2
PizzStr
PizzStr2
OctoPizz
Harp
Harp2
YangChin
Africa
Timpani
Timpani2
TheStr
Strings1
Strings2
SynStrs1
SynStrs2
SynStrs3
SynStrs4
SynStrs5
ResonSt
SSlowStr
SlowStr
Str&Bras
LegatStr
Orchstr
ArcoStr
60'sStr
70'sStr
SoloStr
ChoirAah
ChoirAh2
ChoirAh3
ChoirAh4
MelCho
StChoir
StrChoir
Humming
VoiceOoh
AnaVoice
SynVoice
Choral
BassHit
OrchHit
OrchHi2
EuroHit
6thHit
Trumpet
Trumpet2
Trumpet3
DarkTrp
ResoTp
SweetTp
WahTp
Trombone
Trmbone2
BritBone
DarkTrom
Str&Trb
Tuba
Tuba2
TubaSolo
SoftTuba
MuteTrp1
MuteTrp2
FrHorn
FrHorn2
FrHorn3
StFrHorn
5thHornO
Voice List
No.
Name
LCD Name
No.
Name
LCD Name
No.
Name
LCD Name
ENSEM BLE
100
95
75
25
5
0
Page 44
323
324
325
326
327
328
329
330
331
332
333
334
335
336
337
338
339
340
341
342
343
344
345
Brass Section
Brass Section 2 (octave mix)
Brass Section 3
Brass Section 4
Brass Section 5
Brass Swell
Brass Band
Bright Brass Section
Dark Brass
Mute Brass Ensemble
Sforzato Brass
Brass & Strings
Synth Brass 1
Synth Brass 2
Synth Brass 3
Synth Brass 4
Analog Synth Brass 1
Analog Synth Brass 2
Jump Brass
Octave Synth Brass
Synth Brass & Strings 1
Synth Brass & Strings 2
Echo Brass
429
430
431
432
433
434
435
436
437
438
439
440
441
442
443
444
445
446
447
448
449
450
451
452
453
454
455
456
457
458
459
460
461
462
463
464
465
466
467
468
469
470
471
472
473
474
475
476
477
478
479
480
Pad 5 (bowed)
Pad 5 (bowed) 2
Pad 6 (metallic)
Pad 6 (metallic) 2
Pan Pad
Pad 7 (halo)
Pad 7 (halo) 2
Pad 8 (sweep)
Pad 8 (sweep) 2
Dipolar Pad
Rising
Congregate
FX 1 (rain)
FX 2 (soundtrack)
Progenitor
FX 3a (synth mallet)
FX 3 (crystal)
FX 4 (atmosphere)
Warm Air
FX 5 (brightness)
Smog
FX 6 (goblins)
Choir Bell
FX 7 (echoes)
FX 7 (echoes) 2
FX 7a (echo bell)
FX 7a (echo bell) 2
FX 7b (echo pan)
FX 8 (sci-fi)
Sitar
Sitar 2 (bend)
Banjo
Shamisen
Koto
Taisho Koto
Kalimba
Bag Pipe
Fiddle
Shanai
Tinkle Bell
Agogo
Steel Drums
Woodblock
Castanets
Taiko Drum
Concert Bass Drum
Melodic Tom
Melodic Tom 2 (power)
Synth Drum
Rhythm Box Tom
Electric Drum
Reverse Cymbal
346
347
348
349
350
351
352
353
354
355
356
357
358
359
360
361
362
363
364
365
366
367
368
369
370
371
372
373
374
375
Soprano Sax
Soprano Sax 2
Soprano Sax Soft
Slow Soprano Sax
Sweet Soprano Sax
Alto Sax
Soft Alto Sax
Super Alto Sax
Sax Band
Tenor Sax
Tenor Sax 2
Baritone Sax
Soft Baritone Sax
Sweet Oboe
Oboe
Oboe 2
English Horn
English Horn 2
Analog Horns
Woodwinds
Bassoon
Bassoon 2
Clarinet
Clarinet 2
Piccolo
Flute
Sweet Flute
Recorder
Sweet Pan Flute
Pan Flute
376
377
378
379
380
381
382
383
384
385
386
387
388
389
390
391
392
393
394
395
396
397
398
399
400
401
402
403
404
405
406
407
408
409
410
411
412
413
414
415
416
417
418
419
420
421
422
423
424
425
426
427
428
Dark Pan Flute
Blown Bottle
Shakuhachi
Whistle
Whistle 2
Ocarina
Lead 1 (square)
Square
Lead 1b (sine)
Slow Square Lead
Sine Solo
Square Lead 1
Lead 1a (square 2)
Thick Square
Corrie
Quint
2 Oscillators Lead
Lead 2a (sawtooth 2)
Wavy Sawtooth
Lead 2 (sawtooth)
Lead 2b (saw + pulse)
Super Analog
Big Lead
Lead 2c (double sawtooth)
Bauble Lead
PWM 4th
Lead 3 (calliope)
Lead 4 (chiff)
Lead 5 (charang)
Lead 5a (wire lead)
Lead 6 (voice)
Lead 7 (fifths)
Fifths Lead Soft
Fifth Lead
Lead 8 (bass + lead)
Massiness
Lead 8a (soft wrl)
Pad 1 (new age)
Slow Square
New Year Pad
Pad 2 (warm)
PWM Pad
Pad 2a (sine pad)
Warmly Pad
Horn Pad
Pad 3 (polysynth)
Pad 3 (polysynth) 2
Click Pad
Analog Pad
Poly Pad
Pad 4 (choir)
Pad 4a (itopia)
44
Lead 2d (sequenced analog)
Brass
Brass2
Brass3
Brass4
Brass5
BrasSwel
BrasBand
BrBraSec
DarkBras
MuteEns
SfrzBras
Bras&Str
SynBras1
SynBras2
SynBras3
SynBras4
AnaBras1
AnaBras2
JumpBras
SynBraOc
SyBr&St1
SyBr&St2
EchoBr
SprnoSax
SprnSax2
SopSaxSf
SlSopSax
SweSpSax
AltoSax
SoftAlto
SuprAlto
SaxBand
TenorSax
TenoSax2
BariSax
SoftBari
SwetOboe
Oboe
Oboe2
EngHorn
EngHorn2
AnaHorns
Woodwind
Bassoon
Basson2
Clarinet
Clarine2
Piccolo
Flute
SweeFlut
Recorder
SwPanFu
PanFlute
DarPanFu
Bottle
Shakhchi
Whistle
Whistle2
Ocarina
SquareLd
Square
SineLead
SlwSquLd
SineSolo
SquarLd1
SquarLd2
ThickSqu
Corrie
Quint
2OscLd
SawLead2
SquAnaLd
WavySaw
SawLead1
SawPlsLd
SuperAna
BigLead
DubSawLd
BaubleLd
PWM4th
CaliopLd
ChiffLd
CharanLd
WireLead
VoiceLd
FifthsLd
FiftLdSf
FifLead
BassLead
Massin
SftWrlLd
NewAgePd
SlowSqu
NewYrPd
WarmPad
PWMPad
SinePad
WarmlyPd
HornPad
PolySyPd
PolySyP2
ClickPd
AnaloPad
PolyPad
ChoirPad
ItopiaPd
BowedPad
BowdPad2
MetalPad
MetaPad2
PanPad
HaloPad
HaloPad2
SweepPad
SweePad2
DipolPad
Rising
Congrega
FXRain
Soundtrk
Progenit
SynMalet
Crystal
Atmosphr
WarmAir
Bright
Smog
Goblins
ChoirBel
Echoes
Echoes2
EchoBell
EchoBel2
EchoPan
Sci-Fi
Sitar
Sitar2
Banjo
Shamisen
Koto
TaishoKt
Kalimba
Bagpipe
Fiddle
Shanai
TnklBell
Agogo
SteelDrm
WoodBlok
Castanet
TaikoDum
ConBasDm
MelodTom
MeldTom2
SynDrum
RhythBox
ElecDrum
RevCymbl
Voice List
No.
Name
LCD Name
No.
Name
LCD Name
No.
Name
LCD Name
REED
PIPE
SYNTH L EAD
SYNTH PA D
SYNTH S FX
ETHNI C MISC.
PERCU SSIVE
100
95
75
25
5
0
Page 45
481
482
483
484
485
486
487
488
489
490
491
492
493
494
495
496
497
498
499
500
501
502
503
504
505
506
507
508
509
510
511
512
513
514
515
516
517
518
519
520
521
522
523
524
525
526
527
528
529
530
531
532
533
534
535
536
537
538
539
540
541
542
543
544
545
546
547
548
549
550
551
552
553
554
555
556
557
558
559
560
561
562
563
564
565
566
567
568
569
570
571
572
573
574
575
576
577
578
579
580
581
582
583
Guitar Fret Noise
Guitar Cutting Noise
Acoustic Bass String Slap
Breath Noise
Flute Key Click
Seashore
Rain
Thunder
Wind
Stream
Bubble
Bird Tweet
Dog
Horse Gallop
Bird Tweet 2
Sheep
Telephone Ring
Telephone Ring 2
Door Creaking
Door
Scratch
Wind Chime
Helicopter
Car Engine
Car Stop
Car Pass
Car Crash
Siren
Train
Jetplane
Starship
Burst Noise
Applause
Laughing
Screaming
Punch
Heart Beat
Footsteps
Gunshot
Machine Gun
Lasergun
Explosion
Stereo Piano & Strings Pad
Stereo Piano & Choir
Stereo Piano & Synth Strings
Stereo Piano & Warm Pad
Stereo Piano & Soft Ep
FM Electric Piano
Digital Piano
E.Piano & Strings
E.Piano & Ac Guitar
E.Piano & Vibraphone
E.Piano 2 & Pad
E.Piano 2 & Strings
Harpsichord & Stereo Strings
Music Box & Stereo Strings
Vibraphone & Stereo Strings
Vibraphone Octave
Vibraphone & Marimba & Kalimba
Marimba & Kalimba
Marimba Delay
Xylophone Octave
Organ & Stereo Strings
Stereo Organ & Piano
Rock Organ & Strings
Church Organ & Choir
Church Organ & Strings
Acoustic Guitar & Flute
Acoustic Guitar & Clav
24 String Guitar
Steel Guitar & Warm Pad
Stereo Strings & Horn
Orchestra
Full Strings 1
Full Strings 2
Symphonic
Stereo Choir & Strings
Stereo Choir & Steel Guitar
3 Trumpet Loose
Trombone & Stereo Strings
3 Trombones Loose
3 Muted Trumpets Loose
Club Brass
Brass & Woodwinds
Woodwinds & Strings
Section Woods Small
Pan Flute & Strings Pad
Koto & Shamisen
SFX
COMBI NED VOI CE
45
FretNoiz
GtCtNoiz
BsStSlap
BrthNoiz
FlKeyClk
Seashore
Rain
Thunder
Wind
Stream
Bubble
Tweet
Dog
HouseGlp
Tweet2
Sheep
Telphone
Telphon2
DoorCrek
Door
Scratch
WindChim
Helicptr
CarEngin
CarStop
CarPass
CarCrash
Siren
Train
Jetplane
Starship
BurtNois
Applause
Laughing
Scream
Punch
HeartBet
Footstep
Gunshot
MachnGun
Lasergun
Explosio
StPn&Str
StPn&Cho
StPn&Syn
StPn&Pad
StPn&Ep
FMEp
DigiPn
EP&Str
EP&Gt
Ep&Vib
Ep&Pad
Ep2&Str
Harps&St
Mxb&Str
Vib&Str
VibOct
VibMK
Mar&Kal
MarDel
XylopOct
Org&Str
StOr&Pno
RoOr&Str
ChuOr&Ch
ChuOr&St
Gt&Fl
Gt&Cl
24Gt
StGt&Pad
StStr&Hn
Orchest
FullStr1
FullStr2
Symphon
StCh&Str
Ch&Gt
3Trump
Tb&StStr
3Tromb
3MuTrumb
ClubBras
Br&Wood
Wind&Str
WoodSma
PanFu&St
Koto&Sh
Voice List
No.
Name
LCD Name
No.
Name
LCD Name
Kanoun
Aoud
Bouzouk
Nay
Mizmar
DRUM SE T
Kanoun
Aoud
Bouzouk
Nay
Mizmar
Standard Set
Room Set
Power Set
Electronic Set
Analog Set
Jazz Set
Brush Set
Orchestra Set
SFX Set
Arabic Set
StandSet
RoomSet
PowerSet
ElectSet
AnalgSet
JazzSet
BrushSet
OrcheSet
SFXSet
ArabiSet
100
95
75
25
5
0
Page 46
1
2
3
4
5
6
7
8
9
10
11
12
13
14
15
16
17
18
19
20
21
22
23
24
25
26
27
28
29
30
31
32
33
34
35
36
37
38
39
40
41
42
43
44
45
46
47
48
49
50
51
52
53
54
55
56
57
58
59
60
61
62
63
64
65
66
67
68
69
70
8Beat Piano
8Beat 1
8Beat Shuffle
Guitar Pop 1
8Beat Hip Hop
8Beat R&B
8Beat Pop
Pop Funk 1
Rhythm & Beat 1
8Beat Disco 1
8Beat Rock
Guitar Pop 2
8Beat 2
Sweet Beat
8Beat Dance
8Beat Disco 2
Pop Funk 2
8Beat 3
60’s 8Beat
Rhythm & Beat 2
16Beat 1
16Beat Funk 1
16Beat Ballad 1
16Beat R&B
Pop 16Beat 1
16Beat Funk 2
16Beat Dance
Pop 16Beat 2
16Beat 2
Pop 16Beat 3
Pop 16Beat 4
Modern 16Beat
16Beat Hot
16Beat Modern
16Beat Funk 3
16Beat 3
Cool Beat
16Beat Ballad 2
16Beat 4
Pop Shuffle
Pop Rock 1
Pop Dance 1
Pop Fusion
Analog Night 1
6/8 Pop
Brit. Pop 1
Brit. Pop 2
Pop Hit
Fusion Shuffle
Analog Night 2
Guitar Pop 3
Pop Beat
Soft Beat
60’s Pop
Sting Latin
R&B Ballad 1
Guitar Ballad
Ballad Rcok
Piano Pop
Soft Ballad
Natural Ballad
Love Ballad
Easy Ballad
Miami Ballad
Slow Ballad
Folk Ballad
Pop Ballad 1
Pop Ballad 2
EP Ballad
New R&B Ballad
Rock
New Wave
Ska
Pop Rock 2
Slow Rock
70's Rock & Roll
Folk Rock
Soft Rock
Old Rock
Easy Rock
New Shuffle
Rock Hip Hop
Rock&Roll 1
Rock Shuffle
Rock & Roll 2
Tango 1
Spain Matador
Twist 1
Twist 2
Big Band Fox
Tango 2
Slow Fox
Slow Waltz 1
Swing Fox
Salsa 1
Cha Cha 1
Cha Cha 2
Beguine 1
Beguine 2
Rumba 1
Samba 1
Samba 2
Jive
Fox Trot
105
106
107
108
109
110
111
112
113
114
115
116
117
118
119
120
121
122
123
124
125
126
127
128
129
130
131
132
133
134
135
136
137
138
139
140
141
142
143
144
145
146
147
148
149
150
151
152
153
154
155
156
Techno 1
Hip Hop 1
Dream Dance
House
Pop Dance 2
Down Beat
Techno 2
Progressive
Rap 1
Rap 2
Disco
Soft Disco
Disco Party
70's Disco
70's Disco Funk
Club Dance
Euro Dance
Hip Hop 2
Garage
Funk 1
Classic Funk
Jay R&B
Gospel Swing
Gospel
Funk 2
Electric Funk
Groove Funk
Rubber Funk
Cool Funky
Jazz Funk
Groove
Soul
Hip Hop Soul
Hip Hop Beat
R&B
Soul Beat
R&B Ballad 2
British Soul Pop
Latin Jazz 1
Big Band
Dixieland 1
Guitar Swing 1
Broadway Big Band
Swing
Latin Jazz 2
Fusion
Acid Jazz
Cool Jazz Ballad
Swing Shuffle
Big Band Medium
Dixieland 2
Acoustic Jazz
8 BEAT
BALLAD
ROCK
16 BEAT
POP
72
73
74
75
76
77
78
79
80
81
82
83
84
85
86
87
88
89
90
91
92
93
94
95
96
97
98
99
100
101
102
103
104
71
BALLROOM
SOUL & FUNK
SWING&JAZZ
8BtPiano
8Beat1
8BtShufl
GtPop1
8BtHiHop
8BeatR&B
8BtPop
PopFunk1
Rhy&Bt1
8BtDisc1
8BtRock
GtPop2
8Beat2
SweetBt
8BtDance
8BtDisc2
PopFunk2
8Beat3
60's8Bt
Rhy&Bt2
16Beat1
16BtFuk1
16BtBld1
16BtR&B
Pop16Bt1
16BtFuk2
16BDanc
Pop16Bt2
16Beat2
Pop16Bt3
Pop16Bt4
Modrn16B
16BtHot
16BModr
16BtFuk3
16Beat3
CoolBeat
16BtBld2
16Beat4
PopShufl
PopRock1
PopDanc1
PopFusn
AnalgNt1
6/8Pop
BritPop1
BritPop2
PopHit
FusShufl
AnalgNt2
GtPop3
PopBeat
SoftBeat
60’sPop
StigLatn
R&BBad1
GtBallad
BalladRk
PianoPop
SoftBald
NatuBld
LoveBld
EasyBld
MiamiBld
SlowBald
FolkBld
PopBld1
PopBld2
EPBallad
NewRBBld
Rock
NewWave
Ska
PopRock2
SlowRock
70'sRock
FolkRock
SoftRock
OldRock
EasyRock
NewShufl
RkHipHop
R'N'R1
RockShfl
R'N'R2
Tango1
Matador
Twist1
Twist2
BandFox
Tango2
SlowFox
SlowWlz1
SwingFox
Salsa1
ChaCha1
ChaCha2
Beguine1
Beguine2
Rumba1
Samba1
Samba2
Jive
FoxTrot
Techno1
HipHop1
DrmDance
House
PopDanc2
DownBeat
Techno2
Progress
Rap1
Rap2
Disco
SoftDisc
DscParty
70'sDisc
70'sFunk
ClubDanc
EuroDanc
HipHop2
Garage
Funk1
ClasFunk
JayR&B
GopSwing
Gospel
Funk2
ElecFunk
GrooveFk
RubberFk
ColFunky
JazzFunk
Groove
Soul
HipHopSl
HipHopBt
R&B
SoulBeat
R&BBld2
BritSoul
LatinJz1
BigBand
Dixland1
GtSwing1
BwayBand
Swing
LatinJz2
Fusion
AcidJazz
CoolJzBd
SwingSfl
BandMid
Dixland2
AcoustJz
Style List
No.
Name
LCD Name
No.
Name
LCD Name
No.
Name
LCD Name
DANCE
46
100
95
75
25
5
0
Page 47
157
158
159
160
161
162
163
164
165
166
167
168
169
170
171
172
173
174
175
176
177
178
179
180
181
182
183
184
185
186
187
188
189
190
191
Guitar Swing 2
Ragtime
Modern Jazz Ballad
Swing Ballad
Orchestra Swing
Country Pop 1
Bluegrass 1
Country 8Beat
Modern Country
Country Pop 2
Bluegrass 2
2/4 Country
Country Quick Steps
Country Folk
Country Shuffle
Samba 3
Bossa Nova
Latin
New Reggae
Dance Reggae
Pasodoble
Lite Bossa
Latin Rock
Beguine 3
Slow Bolero
Disco Samba
Mambo
Meneito
Rumba 2
Rumba 3
Tikitikita
Lambada
Pop Cha Cha 1
Pop Cha Cha 2
Salsa 2
Waltz
Old Waltz
English Waltz
German Waltz
Italian Mazurka
Mexico Waltz
ViennaWaltz
Slow Waltz 2
Jazz Waltz
Polka
6/8 March
German Polka
Party Polka
Army March
March
US March
COUNTRY
LATIN
WALTZ
TRADITIONAL
193
194
195
196
197
198
199
200
201
202
203
204
205
206
207
192
GtSwing2
Ragtime
MdJzBald
SwingBal
OrhSwing
CntyPop1
Bluegrs1
Ct8Beat
ModernCt
CntyPop2
Bluegrs2
2/4Cntry
QuickStp
CntyFolk
CnyShufl
Samba3
BosaNov
Latin
NewRegga
DanRegga
Pasodobl
LteBossa
LatinRck
Beguine3
SlBolero
DscSamba
Mambo
Meneito
Rumba2
Rumba3
Tikitkta
Lambada
PChaCha1
PChaCha2
Salsa2
Waltz
OldWaltz
EngWaltz
GemWaltz
ItaMazuk
MexWaltz
VinaWtz
SlwWltz2
JzWaltz
Polka
6/8March
GerPolka
PtyPolka
ArmMarch
March
USMarch
Style List
No.
Name
LCD Name
208
209
210
211
212
213
214
215
216
217
218
219
220
221
222
223
224
225
226
227
228
229
230
Musette
French Musette
Mazurke
Enka Ballad
Laendler
Hawaiian
Sirtake
Dangdut
6/8 Flipper
New Age
Tarantella
Scottish
Norteno
WORLD
ORIENTAL
Musette
FMusette
Mazurke
EnkaBald
Laendler
Hawaiian
Sirtake
Dangdut
6/8Flipp
NewAge
Tarantel
Scottish
Norteno
No.
Name
LCD Name
Zarb 6/8
Zarb Tempo
Bandary
Zarb Daf
Pop 4/4
Saidi IR
Cifte
Baladi
Masmoudi
Wehda
Zarb 6/8
ZarbTemp
Bandary
Zarb Daf
Pop 4/4
Saidi IR
Cifte
Baladi
Masmoudi
Wehda
47
100
95
75
25
5
0
Page 48
1
2
3
4
5
6
7
8
9
10
11
12
13
14
15
16
17
18
19
20
21
22
23
24
25
26
27
28
29
30
31
32
33
34
35
36
37
38
39
40
41
42
43
44
45
46
47
48
49
50
51
52
Red River Valley
Troika
Susanna
Wave of Danube
Long Long Ago
Cai Yun Zhui Yue
Cai Cha Pu Die
Give You A Rose
Flowing Rill
Santa Lucia
Jambalaya
Ding! Dong! Merrily On High
Battle Hymne Of The Republic
The Old Gray Mare
American Patrol
Christmas Is Coming
Sippin`Cider Through A Straw
Christmas Sound
On London Bridge
Are You Lonesome Tonight
Only You
End Of The World
House Of Rising Sun
Solveig's Song
The Blue-Bells Of Scotland
Over The Rainbow
Beautiful Dreamer
It`S Been A Long Long Time
Edelweiss
O Sole Mio
Der Deitcher`s Dog
Joy to The World
Silent Night
Ave Maria
Five Hundred Miles
Happy New Year
Jeanie With The Light Brown Hair
My Bonnie
Song Of The Pearlfisher
Summer Palace
Go Tell It On The Mountain
Entertainer
Annie Laurie
Rumba Romance
El Bimbo
Last Rose Of Summer
The Old King Cole
Brahms Waltz
Aida
Carmen-Prelude
FOLK & COUNTRY
GOLDEN & POP
Pianosonatan 08 IN Cm IN Pathetique
It`s Beginning To Look A Lot Like Christmas
CLASSICAL
53
54
55
56
57
58
59
60
61
62
63
64
65
66
67
68
69
70
L'Arlesienne
Uungarische Tanz
Mazurka
Pizzicato Polka
Menuett
Rigoletto
Serenade
Song Without Words
Swan
Valse (Swan lake)
The Happy Farmer
The Sleeping Beauty
La Traviata
Wiegenlied
Mov.2 Adagio Non Troppo
Piano Sonata No.9 In D
Mov.1 Andante Grazioso
Piano Sonata No.11 In A
[Alla TurSonata11ca]
Prelude In C
Chinese Dance
Emperors Waltz
March Militaire
Symphony No.40
ShanZhaShu
You Are My Sunshine
June Samba
Funk
I Can......
Sea Shore
Guitar&Saxphone
The Hip Hop`s Night
Blue Lunch
Cobweb
Wine
Jazz Old Man
Dark Eyes
Carlos
Sad
The Jazz
Fur Elise
Military March
Habanera
Minuet
Austria Variation
Old Macdonald Had A Farm
Wedding March
2-Part Invention #13 In
A Minor.B.W. Iii
Minuet In G
Turkish March
Hey Diddle Diddle
71
72
73
74
75
76
77
78
79
80
81
82
83
84
85
86
87
88
89
90
91
92
93
94
95
96
97
98
99
100
101
JAZZ & FUSION
PIANO
Prelude To Act 2 (Swan Lake)
RedRiver
Troika
Susanna
Danube
LongAgo
CaiYun
CaChPDie
GiveRose
FlowRill
SantaLuc
Jambalay
DingDong
Battle
GrayMare
USPatrol
IsComing
SCTStraw
Sound
LdBridge
Lonesome
OnlyYou
EndWorld
HouseSun
Solveig
BlueBell
Rainbow
Dreamer
LongTime
Edelweis
OSoleMio
DerDDog
JoyWorld
SltNight
AveMaria
FHMiles
HappyNY
LikeXmas
LighHair
MyBonnie
SongOfTP
SummerPa
GoTellIt
Entertai
AnnieLau
Romance
ElBimbo
LastRose
OldKingC
Piano08
BrmsWalz
Aida
Carmen2
L'Arlesi
Uungaris
Mazurka
Polka
Menuett
Rigolett
Serenade
SongNoWd
Swan
SwanLak1
SwanLak2
HpFarmer
SleepBty
LaTravia
Wiegenli
Sonata9
Sonata11
Prelude
ChDance
EmprWalz
MilMar1
Symphony
ShanZhaS
MySun
JunSamba
Funk
I Can…
SeaShore
Gt&Sax
HipHopNt
BluLunch
Cobweb
Wine
JzOldMan
DarkEyes
Carlos
Sad
TheJazz
FurElise
MMarch
Habanera
Minuet
AVariati
OldAFarm
Wedding
Invntion
MinuetG
TurkishM
HeDiddle
Song List
No.
Name
LCD Name
No.
Name
LCD Name
48
100
95
75
25
5
0
Page 49
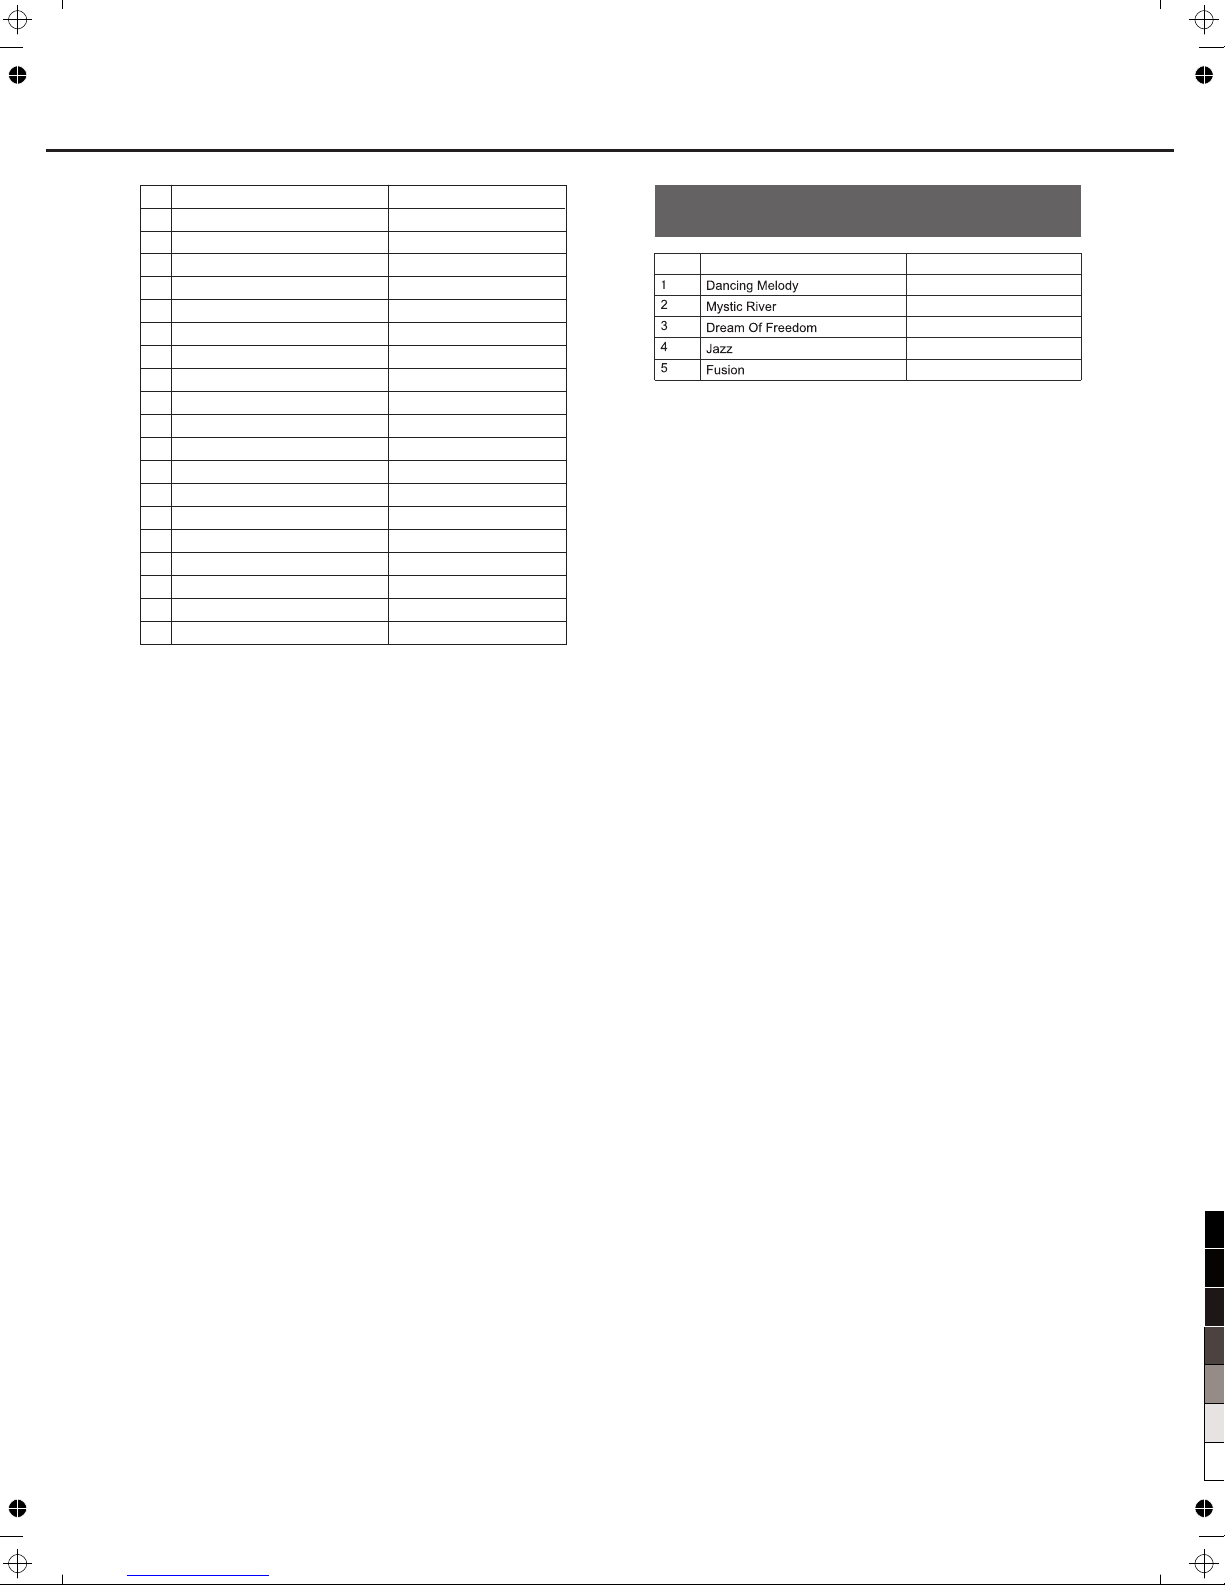
49
102
103
104
105
106
107
108
109
110
111
112
113
114
115
116
117
118
119
120
Italian Polka
Moseta Dance
Bulie Dance
Fantasia
Wild Rose
Away In A Manger
Jack & Jill
Waltz
Chopsticks
Four Little Swans
Old France
Jesus Saviour Pilot Me
Eclogue
Brave Cavalier
America The Beautiful
Music Box Dancer
Angles We Have Heard On High
Did You Ever See A Lassie
ItaPolka
MosetaDn
BulieDn
Fantasia
WildRose
AwayInAM
JackJill
Angles
Waltz
Lassie
Chopstik
FLSwans
OldFranc
PilotMe
Eclogue
SantaCT
Cavalier
USFair
Dancer
No.
Name
LCD Name
Santa Claus Is Coming To Town
DanceMld
MystRivr
Dream
Jazz
Fusion
Demo List
No.
Name
LCD Name
Song List
100
95
75
25
5
0
Page 50
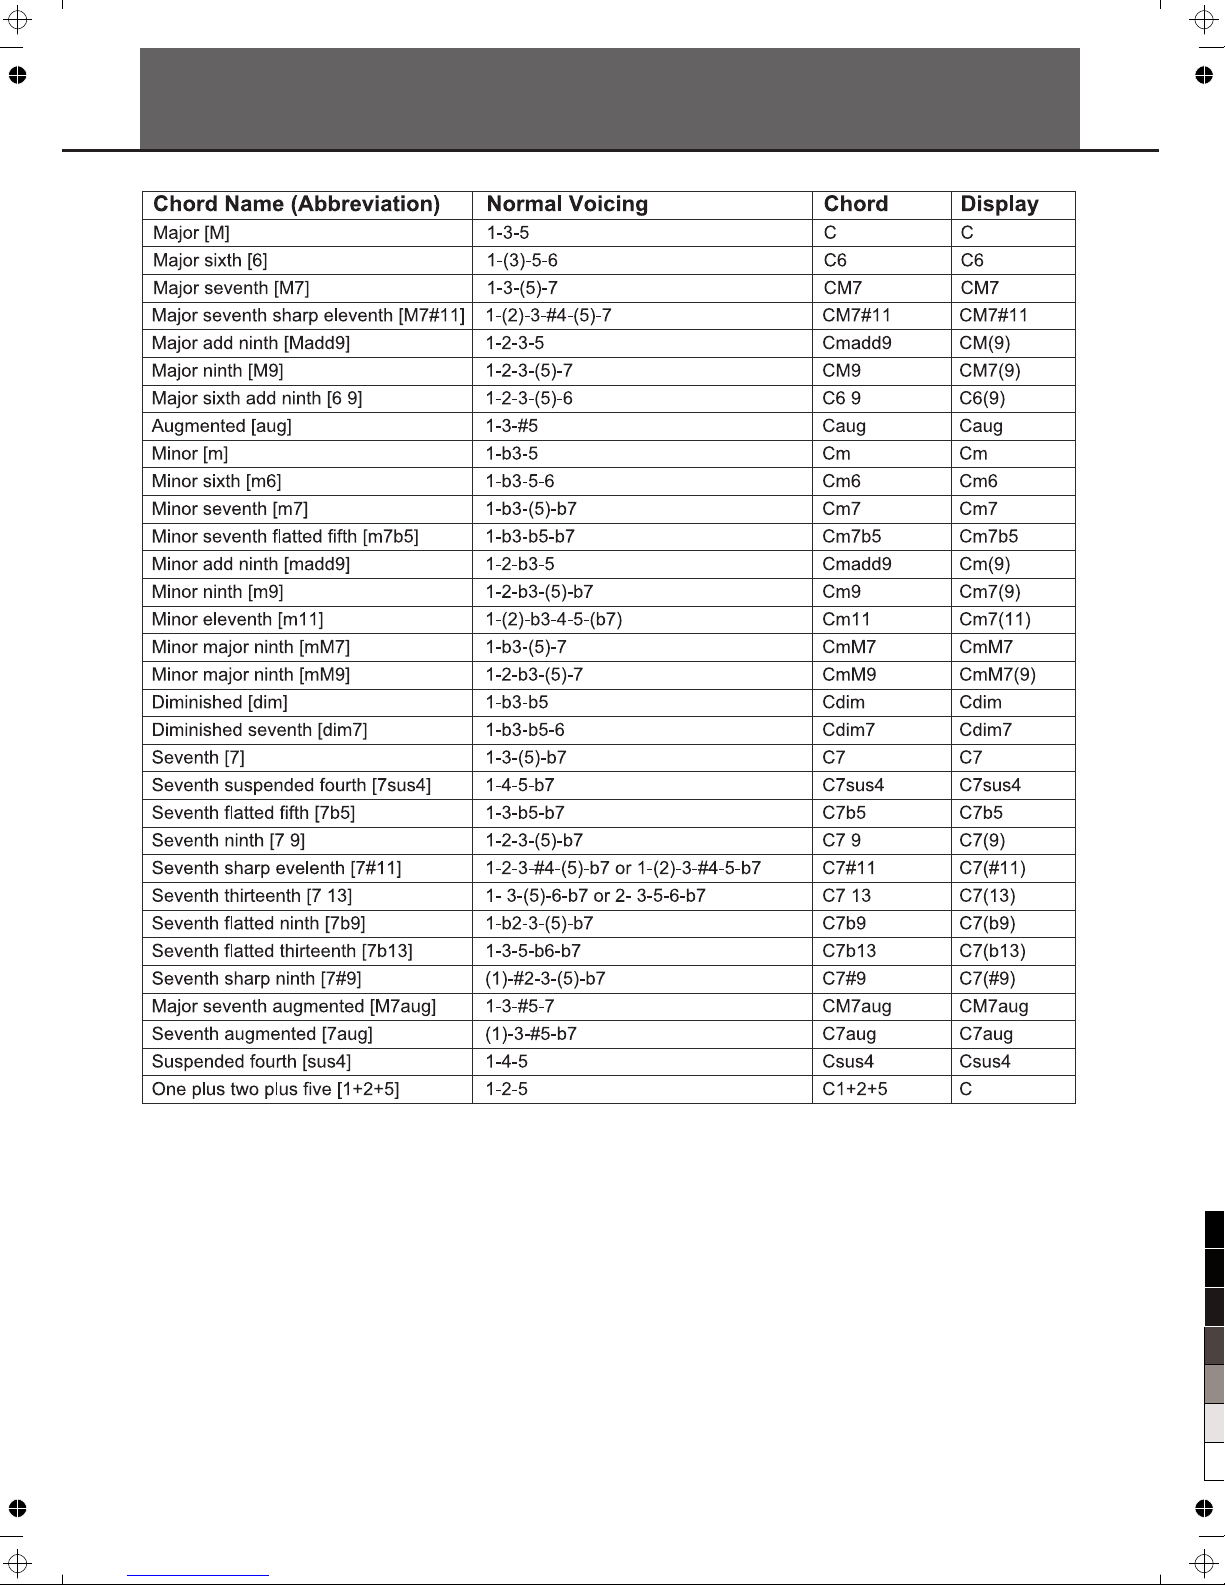
50
Chord List
100
95
75
25
5
0
Page 51
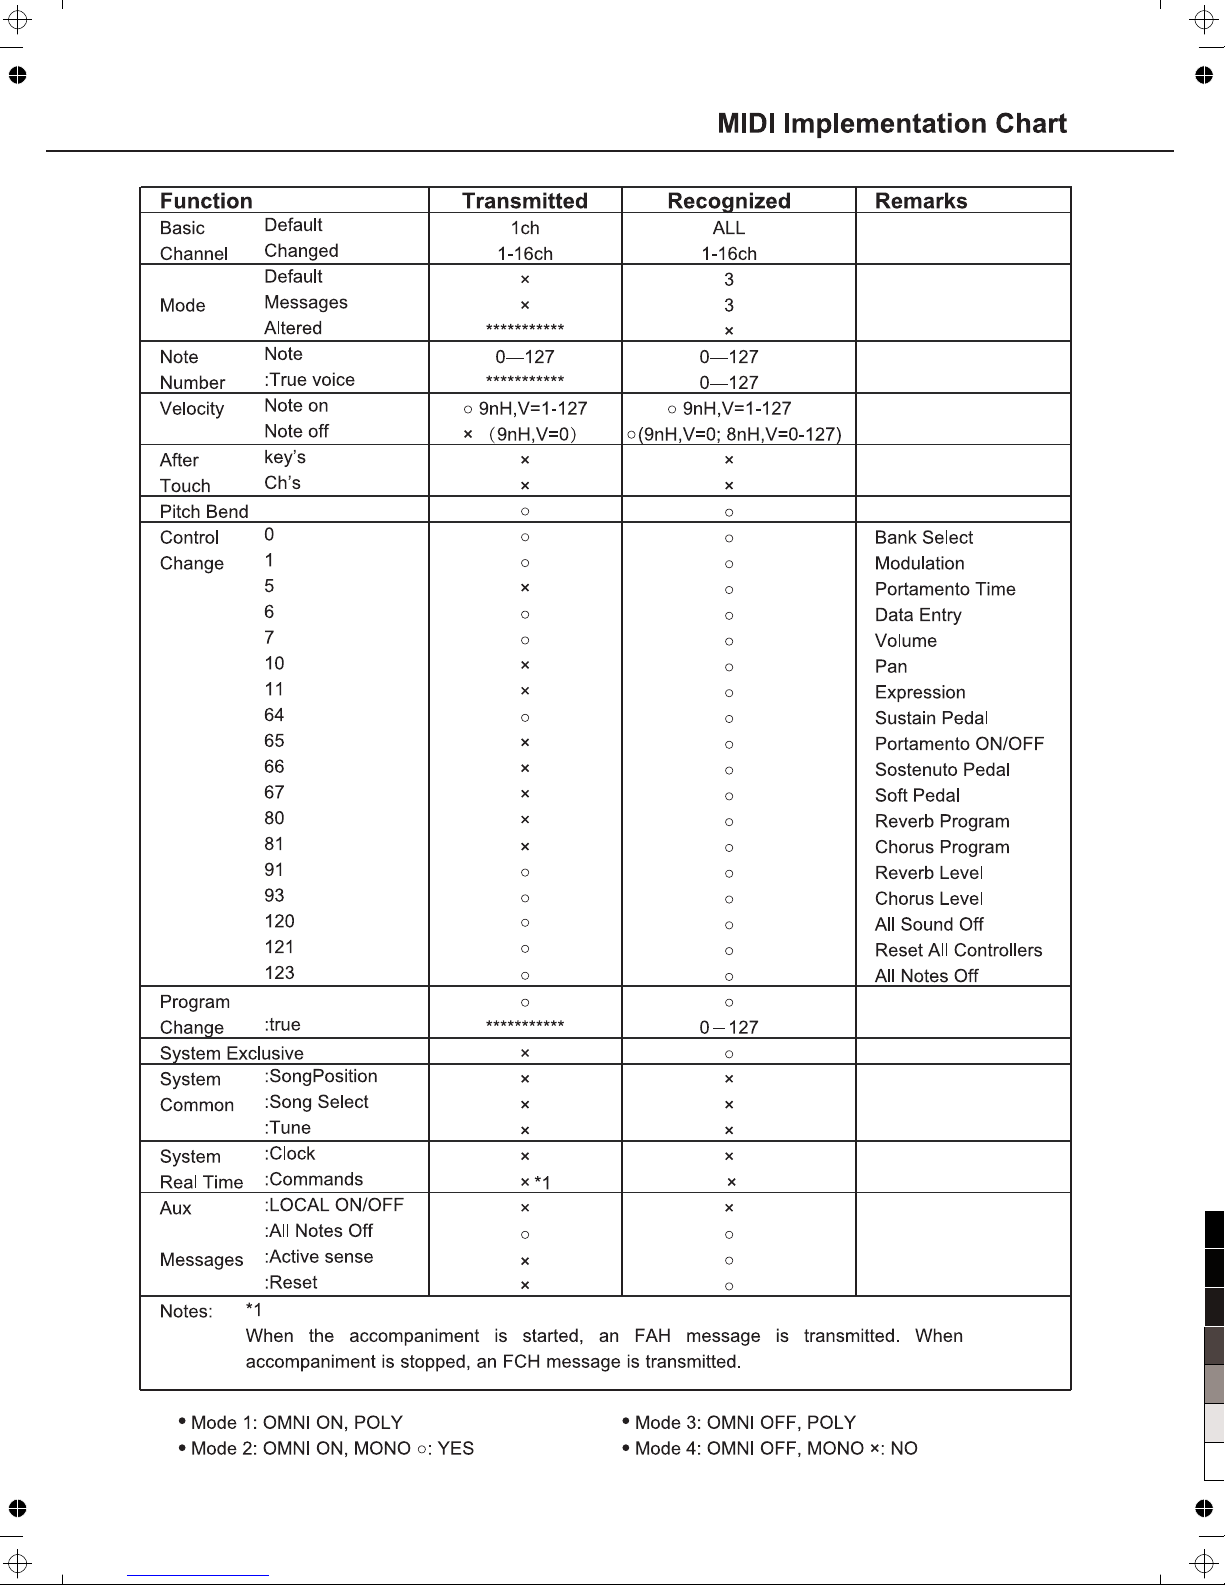
51
A800_G06
100
95
75
25
5
0
Page 52
100
95
75
25
5
0
 Loading...