

123
456
789
0BA
- enter a number from 00 to 99 to programme
activation time of relay 1 (enter 00 to deactivate the relay)
- press key A
- enter a number from 00 to 99 to programme
activation time of relay 2 (enter 00 to deactivate the relay)
- press key A
- enter a number from 00 to 03 to programme
activation mode of relay 1 (for code selection refer to
ming codes”)
- press key A
- enter a number from 00 to 03 to programme
activation mode of relay 2 (for code selection refer to
ming codes”)
- press key A (red LED flashes)
- enter 55
- press key A (red LED off)
Restoring the default programming
To delete all the programmed codes and
restore the keypad default programming (for
the codes refer to
- switch off the keypad
- switch on the keypad again holding key B
pressed until you hear the confirmation
tone.
Notes:
- Write down the programming code and the
relay activation codes in the table.
- The relay activation codes can only be
changed by knowing the programming code.
- An acoustic signal indicates key pressing.
- If the entered code is not correct, you hear
a dissuasion tone (keys are deactivated for
2 seconds).
- Press A during programming if you do not
want to change a code. This allows you to
go to the next programming operation without changing the code.
- The programming code and the relay activation codes must be different.
- Press B to cancel the last number you have
entered.
OPERATION
-Enter the code of the relay to be activated.
-Press key A to confirm the code. If the code
is correct, the relay activates (green LED on)
with the programmed time and operating
mode.
Notes:
- Press key B to delete an incorrect code
before confirming it.
-If you enter an incorrect code and confirm it
with key A you hear a dissuasion tone (keys
are deactivated for approx. 3 seconds). This
time increases up to a max. of 30 seconds
each time an incorrect code is entered.
-The numbers entered and not confirmed with
key A are deleted automatically 25 seconds
after the last key you have pressed.
“operating modes and program-
“operating modes and program-
“default programming”
):
- 4 -
BISTABLE OPERA TION
This function is possible only if the keypad
has been programmed properly. See “
ing the relay activation time and mode”
To activate the relays for indefinite time:
- enter one of the codes for the relay to be
activated
- press key A (green LED on). The relay
activates for indefinite time.
- enter the code again to deactivate the relay
- press key A (green LED off and relay deactivation).
DIRECT ACTIVA TION
Press key A to activate the relays directly
(this function is possible only if the keypad
has been programmed properly. See
ing the relay activation time and mode”)
the two relays are activated if both of them are
programmed to be directly activated by key A.
EXIT PUSH-BUTTONS
Two buttons can be connected between terminals P1, P2 and ground in order to activate
the two relays according to the programmed
activation time and mode.
P2 P1
Exit push-buttons
for direct activation of
and relaisRL1 RL2
EMERGENCY
In case of power failure all the data are
recorded in a nonvolatile memory and will not
be lost.
Red LED.
Indication of programming mode.
Chang-
.
“Chang-
. Both
Green LED.
Indication of code
accepted.
Key B.
Clear.
Key A.
Enter and direct activation of relays (if programmed).
Table of codes
Master programming code
1st code
2nd code
rd
3
code
th
code
4
th
5
code
r
e
6th code
l
a
th
7
code
y
8th code
1
th
9
code
10th code
th
11
code
th
code
12
Activation time
Activation mode
st
1
code
nd
2
code
3rd code
th
4
code
th
5
code
r
th
6
code
e
l
7th code
a
th
y
8
code
th
2
9
code
th
10
code
11th code
th
12
code
Activation time
Activation mode
Tone table
Acknowledge
012345
Dissuasion
012345
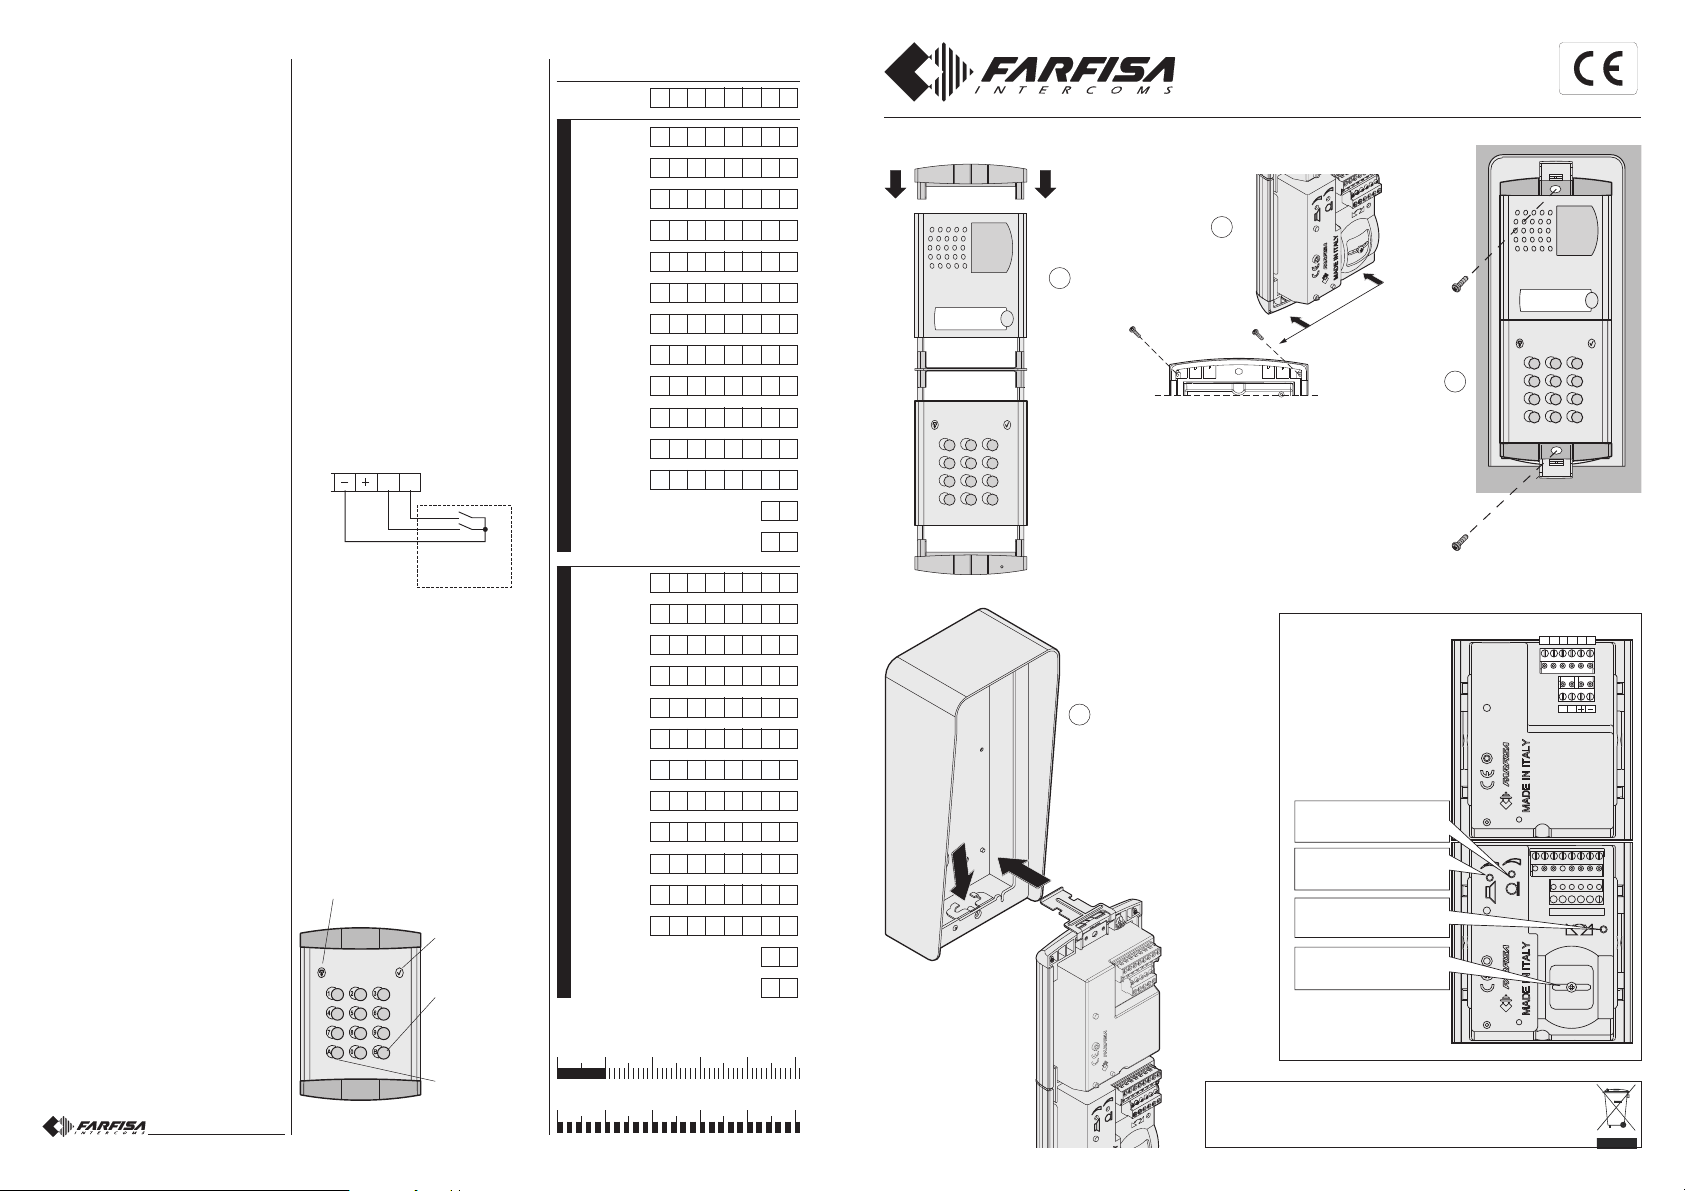
Installation of the push-button panel
1
123
456
789
0BA
Mounting modules.
Fixing of the module frames on the
upper side by the 2 small screws
included in the rain shelter.
ONE-WA Y VIDEOKIT
3
4
Fix lower part of the frame to the
rain shelter and make the electrical connections.
Fixing of frame to rain shelter. Align the frame before
tightening the screws.
ADJUSTMENTS
FC52PL
2
Transmitter adjustable
volume
Receiver
adjustable
volume
Anti-feedback adjustment (Larsen effect)
Pan-tilt of the camera
(±15°)
PL41PCED
ACI srl Farfisa Intercoms
Via E. Vanoni, 3 • 60027 Osimo (AN) • Italy
Tel: +39 071 7202038 (r.a.) • Fax: +39 071 7202037
e-mail: info@acifarfisa.it • www.acifarfisa.it
ACI Farfisa Intercoms reserves the right to modify the products illustrated at any time.
Dispose of the device in accordance
with environmental regulations.
NC2 NA2 NC1 NA1
C2 C1
P1
P2
S
L+
Y
FHX
- 1 -
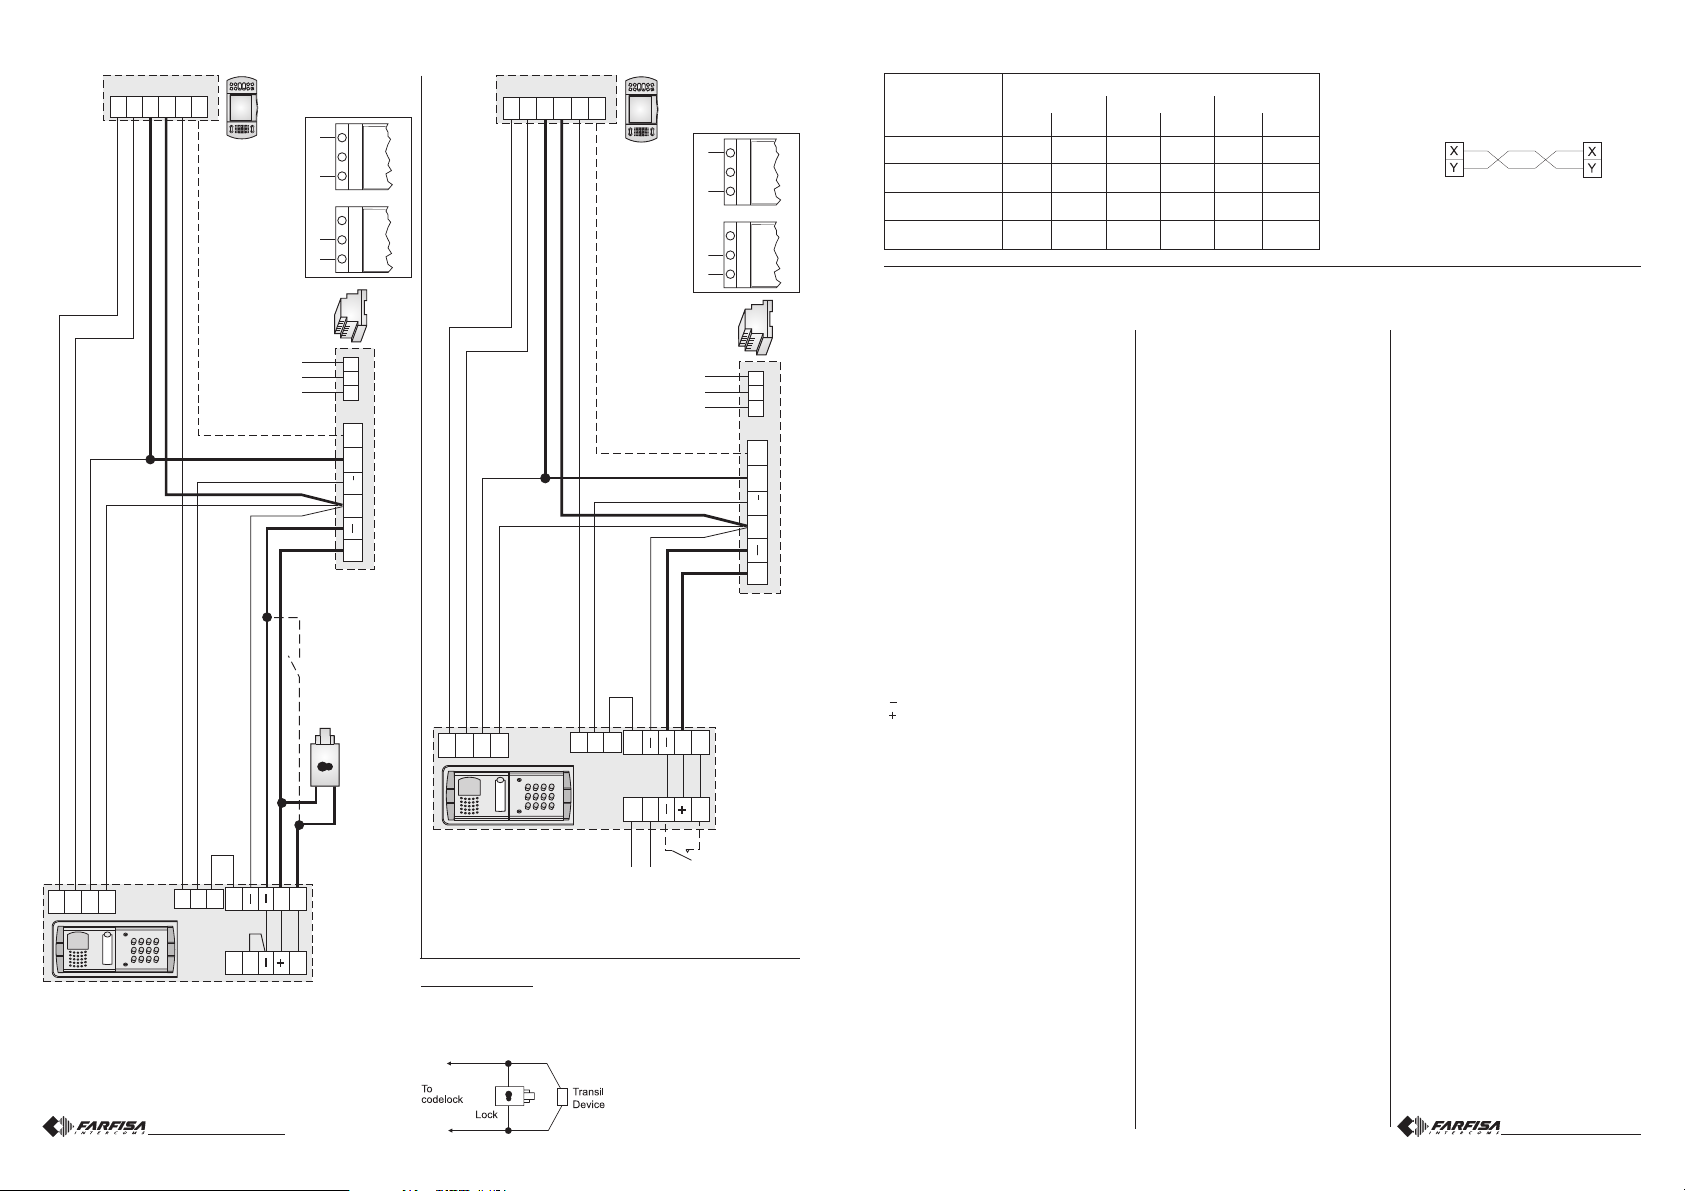
INSTALLA TION DIAGRAMS
VIDEOINTERCOM
PUSHBUTTON
PANEL
POWER SUPPLY
230V
127V
0
1181E
A
H
F
C
4
X
Y
H
F
10
4
X
Y
H
F
1 2 3
4 5 6
7 8 9
0 BA
FC52PL
PL41PCED
PL92
TO AUTO-
MATIC GATE
EXIT PUSH-
BUTTON
(optional)
NA1
C1
P1
1
A
S
PCE
EH9161CW +
back-box or
surface adaptor
F
X
Y
H
10
VIDEOINTERCOM
4 5 6
1 2 3
0 BA
7 8 9
PCE
F
X
Y
H
4
PL92
EH9161CW +
1
NC1
back-box or
surface adaptor
C1
127V
230V
- 2 -
0
A
110-127Vac 220-230Vac
1181E
EXIT
PUSHBUTTON
S
PL41PCED
NA1
PUSHBUTTON
FC52PL
127V0 230V
127V0 230V
4
H
C
F
POWER SUPPLY
A
(optional)
ELECTRIC DOOR
LOCK (12Vac - 1A)
PANEL
127V0 230V
1181E
127V0 230V
110-127Vac 220-230Vac
VERY IMPORT ANT
To comply with the European S tandards on Electromagnetic Compatibility and to increase the reliability of the product, it is necessary to
connect a suppression device when switching inductive loads i.e.
electric releases and electric locks.
The enclosed suppression devices
(transil) must be connected as close
as possible to the loads (ideally
across the terminals. See figure).
1181E
CABLES
Terminals Distance
50m
165 Ft
(
mm²
)
(
AWG
)
X . Y
F . H . C . 4 . 10
(*) F . H
(*) A . -
0.35
0.5
0.75
1.5
22
20
18
16
ACCESS CONTROL KEYP AD
The keypad allows for the activation of 2
relays with programmable codes.
Technical data
Power supply 12Vac/dc ±10%
Stand-by current 0.06A
Maximum current consumption 0.15A
Contact ratings 12Vac - 2A
Number of codes for relay 1 12 (+ direct
Number of codes for relay 2 12 (+ direct
Activation time for each relay from 1 to 99 sec.
Operating temperature 0° ÷ +40°C
Maximum allowable humidity 85% RH
Terminals
NC2 normally closed contact of relay 2
NA2 normally open contact of relay 2
C2 common contact of relay 2
NC1 normally closed contact of relay 1
NA1 normally open contact of relay 1
C1 common contact of relay 1
ground or alternate voltage input
positive or alternate voltage input
P2 activation of the relay 2; if momentarily
connected to ground it allows the activation for the programmed time
P1 activation of the relay 1; if momentarily
connected to ground it allows the activation for the programmed time
PROGRAMMING
Default programming
The article is supplied from the factory with
the following codes:
Programming code: 11
Activation code 1 of relay 1: 12345678
Other activation codes of relay 1
(from 2 to 12): none
Activation time code of relay 1: 01 (1 sec.)
Operating mode of relay 1: 00 (monostable)
Activation code 1 of relay 2: 90
Other activation codes of relay 2
(from 2 to 12): none
activation)
activation)
(or bistable)
100m
330 Ft
200m
(
mm²
)
(
AWG
)
0.35
22
0.75
18
1
16
2.5
14
Activation time code of relay 2: 01 (1 sec.)
Operating mode of relay 2: 00 (monostable)
(
mm²
0.35
660 Ft
)
(
AWG
)
22
1
16
2
14
-
-
All codes are user-modifiable.
Operating modes and programming codes
Monostable 00
Bistable 01
Monostable and direct activat. by key A02
Bistable and direct activation by key A03
Changing the programming code
To change the programming code:
- enter the actual programming code
- press key A (red LED flashes)
- enter 00
- press key A (red LED on)
- enter the new programming code with 1 to 8
digits (from 0 to 99999999)
- press key A (red LED flashes)
- enter 55
- press key A (red LED off).
Changing the activation codes of relay 1
To change the activation codes of relay 1:
- enter the programming code
- press key A (red LED flashes)
- enter 01 (identification code of relay 1)
- press key A (red LED on)
- enter a number with 1 to 8 digits to programme code 1 (from 0 to 99999999)
- press key A
- enter a number with 1 to 8 digits to programme code 2 (from 0 to 99999999)
- press key A
- enter a number with 1 to 8 digits to programme code 3 (from 0 to 99999999)
- press key A
- repeat the operation to programme all codes
as necessary (max.12). When programming is completed press key A repeatedly
until the red LED starts flashing
- enter 55
- press A (red LED off).
Changing the activation codes of relay 2
To change the activation codes of relay 2
follow the procedure described above, changing the relay identification code (02 instead of
01).
Note. For distances longer than 100m (330ft) max 200m
(660ft) use twisted pair wire for conductores X and Y.
(*)
Cable in bold face type.
Changing one relay activation code
To change one relay activation code, without
modifying the others:
- enter the programming code
- press key A (red LED flashes)
- enter 01 or 02 (for relay 1 or 2, respectively)
- press key A (red LED on)
- press key A repeatedly to reach the code to
be changed
- enter a number with 1 to 8 digits (from 0 to
99999999)
- press key A repeatedly until the red LED
starts flashing
- enter 55
- press key A (red LED off).
Example
To change activation code 7 of relay 2:
- enter the programming code
- press key A (red LED flashes)
- enter 02
- press key A (red LED on)
- press key A six times
- enter a number with 1 to 8 digits
- press key A six times (red LED flashes)
- enter 55
- press key A (red LED off).
Deleting one relay activation code
To delete one relay activation code, without
modifying the others:
- enter the programming code
- press key A (red LED flashes)
- enter 90
- press key A (red LED on)
- enter a 3-digit number “nxx”; n indicates the
relay associated with the code to be deleted
(1 or 2); xx indicates the code to be deleted
(from 01 to 12)
- press key A (red LED flashes)
- enter 55
- press key A (red LED off).
Changing the relay activation time and mode
To change the relay activation time and mode:
- enter the programming code
- press key A (red LED flashes)
- enter 03
- press key A (red LED on)
- 3 -
 Loading...