

Page 1

PIANO COTTURA VETROCERAMICO
Installazione - Uso - Manutenzione
IT
COOKING HOBS VITROCERAMIC
Installation - Use - Maintenance
TABLES DE CUISSON VITROCÉRAMIQUE
Installation - Emploi - Entretien
KOCHFELD
Installation - Gebrauch - Wartung
GLASKERAMIK
PLACA DE COCCION VIDRIOCERÁMICO
Instalación - Uso - Mantenimiento
INBOUW-KOOKPLAAT
Installatie - Gebruik - Onderhoud
VERGLAASD KERAMIEK
GB
FR
DE
ES
NL
PLANO DE COZEDURA VIDROCERÂMICA
Instalação - Uso - Manutenção
TOUCH CONTROL JAEGER
PT
Page 2

IGBF
Caro Cliente,
sentitamente La ringraziamo e ci congratuliamo
per la scelta da Lei fatta.
Questo nuovo prodotto,
accuratamente progettato e
costruito con materiali di
primissima qualità, è stato
accuratamente collaudato
per poter soddisfare tutte le
Sue esigenze di una
perfetta cottura.
La preghiamo pertanto di
leggere e rispettare le facili
istruzioni che Le permetteranno di raggiungere
eccellenti risultati sin dalla
prima utilizzazione.
Con questo moderno apparecchio Le formuliamo i
nostri più vivi auguri.
IL COSTRUTTORE
Indice
Dear customer,
We thank you and congratulate you on your
choice.
This new carefully designed product, manufactured with the highest
quality materials, has
been carefully tested to
satisfy all your cooking
demands.
We would therefore request you to read and
follow these easy instructions which will allow you to obtain excellent results right from
the start.
May we wish you all the
very best with your modern appliance!
THE MANUFACTURER
Index
Cher client,
merci et sincères félicitations pour le choix que
vous avez fait.
Ce nouveau produit,
développé avec soin et
fabriqué avec des matières
de toute première qualité, a
été soigneusement rodé
pour satisfaire toutes Vos
exigences d’une cuisson
parfaite.
Veuillez lire attentivement
les instructions simples
portées sur cette notice qui
vous permettront d’obtenir
d’excellents résultats dès la
première utilisation.
Nous vous souhaitons une
entière et pleine satisfaction
quant à l’utilisation de cet
appareil moderne.
LE CONSTRUCTEUR
Index
Istruzioni
per l’utente
installazione 4
uso 4-8
manutenzione 10
Istruzioni per
l’installatore
installazione 16
posizionamento 16
collegamento elettrico 16
elementi riscaldanti 20
QUESTO PRODOTTO È STATO
CONCEPITO
DI
STRUTTORE DECLINA OGNI
RESPONSABILITÀ
EVENTUALI
PERSONE
NON
ZIONE O DA USO IMPROPRIO
ERRONEO OD ASSURDO
PER UN IMPIEGO
TIPO DOMESTICO. IL CO
NEL CASO DI
DANNI A COSE O
DERIVANTI DA UNA
CORRETTA INSTALLA
Instructions
for use
installation 4
use 4-8
maintenance 10
Instructions for the
installation technician
installation 16
positioning 16
electrical connection 16
heating elements 20
THIS APPLIANCE IS
CONCEIVED
-
ONLY. THE
USE
MANUFACTURER
ANY WAY BE HELD
IN
RESPONSIBLE
OR
INJURIES
,
.
BY
CAUSED
INSTALLATION
UNSUITABLE
USE
ABSURD
FOR DOMESTIC
SHALL NOT
FOR WHATEVER
DAMAGES ARE
INCORRECT
OR
BY
,
WRONG OR
.
Notice
d’emploi
installation 4
emploi 4-8
entretien 10
Modalités
d’installation
installation 16
positionnement 16
branchement électrique16
élements de chauffe 20
CE PRODUIT EST CONÇU
EXCLUSIVEMENT
DOMESTIQUE
CONSTRUCTEUR
TOUTE
DOMMAGES
CAUSÉES
INSTALLATION
PAR UN USAGE
OU
IMPROPRE
ABSURDE
POUR USAGE
.
LE
DÉCLINE
RESPONSABILITÉ POUR
ET
BLESSURES
PAR UNE
INCORRECTE
,
ERRONÉ OU
.
2
Page 3

DENLP
Sehr geehrter Kunde,
wir danken Ihnen und
beglückwünschen uns
für Ihre Wahl.
Dieses neue Produkt,
sorgfältig entworfen und
mit erstklassigen Materialien hergestellt,
wurde genau geprüft um
alle Ihre Forderungen an
ein perfektes Kochen zu
erfüllen.
Wir bitten Sie deshalb
die einfachen Anweisungen zu lesen und einzuhalten, damit von der
ersten Anwendung an
ausgezeichnete Ergebnisse erreicht werden
können.
Mit diesem modernen
Apparat wünschen wir
Ihnen das Beste.
DER HERSTELLER
Inhaltsverzeichnis
Estimado Cliente,
le agradecemos mucho y le
felicitamos por su elección.
Este nuevo producto,
cuidadosamente estudiado
y construido con materiales
de primera calidad, ha sido
probado esmeradamente
para poder satisfacer todas
sus exigencias de una
perfecta cocción.
Por lo tanto le rogamos lea
y respete las fáciles instrucciones que le permitirán llegar a resultados excelentes desde la primera
utilización.
Con este moderno aparato
le expresamos nuestras
mejores felicitaciones.
EL CONSTRUCTOR
Indice
Geachte klant,
wij danken u en feliciteren ons met de door u
gedane keuze.
Dit nieuwe produkt,
zorgvuldig ontworpen
en geconstrueerd uit
materialen van de allerbeste kwaliteit, is gedegen uitgetest om al uw
eisen voor een perfect
kookresultaat te kunnen
bevredigen.
Wij verzoeken u daarom
de eenvoudige instructies te lezen en te respecteren, dewelke het u
toe zullen staan om al
vanaf het eerste gebruik
uitstekende resultaten te
bereiken.
Met dit moderne apparaat doen wij u onze
welgemeende gelukwensen toekomen.
DE FABRIKANT
Index
Ex.mo. Sr. Cliente,
Agradecemos, muito sinceramente a sua escolha, e
aproveitamos da ocasião
para o felicitar.
Este novo produto, que foi
projectado com grande
atenção e construído com os
melhores materiais, foi verificado e aprovado, de
maneira a dar-lhe imensa
satisfação para um cozinhado perfeito.
Por conseguinte, pedimos
que leia e siga as fáceis
instruções que lhe permitirão de alcançar excelentes resultados desde o
início da sua utilização.
Juntamente com este moderno aparelho, aproveitamos para lhe enviar os
nossos melhores cumprimentos.
O FABRICANTE
Índice
Anweisungen
für den Benutzer
Installation 5
Anwendung 5-9
Instandhaltung 15
Anweisungen
für den Installateur
Installation 17
Aufstellung 17
elektrischer Anschluß
17
Heizelemente 21
DIESES PRODUKT IST ALS
HAUSHALTSGERÄT
DACHT. FÜR SCHADEN AN
ODER PERSONEN,
SACHEN
DIE AUF FALSCHE INSTAL-
LATION BZW. UNGEEIGNETEN
GEBRAUCH
BRAUCH ZURÜCKZUFÜHREN
, ÜBERNIMMT DER
SIND
HERSTELLER
VERANTWORTUNG
GE-
ODER MISS-
KEINERLEI
.
Instrucciones
para el usuario
instalación 5
utilización 5-9
mantenimiento 15
Instrucciones
para el instalador
instalación 17
colocación 17
conexión eléctrica 17
elementos calefactores 21
ESTE PRODUCTO FUE CONCE
BIDO PARA UN USO DE TIPO
DOMÉSTICO
TOR DECLINA CUALQUIER
RESPONSABILIDAD
SO DE DAÑOS EVENTUALES A
COSAS
DERIVEN
INSTALACIÓN
DE
ERRADO O ABSURDO
O
PERSONAS QUE
DE
UN
USO IMPROPIO
. EL
CONSTRUC
EN EL CA-
UNA
INCORRECTA O
,
.
Instructies
voor de gebruiker
installatie 5
gebruik 5-9
onderhoud 15
Instructies
voor de installateur
installatie 17
plaatsing 17
elektrische aansluiting
verwarmingselementen
-
DIT PRODUKT IS ALS
HUISHOUDELIJK
-
GEDACHT
BESCHADIGINGEN
SPULLEN
VERKEERDE INSTALLATIE
AAN
MISBRUIK OF VERKEERDE
GEBRUIK
NEEMT DE FABRIKANT GEEN
VERANTWOORDELIJKHEID
.
ZICH
APPARAAT
.
VOOR
OF
PERSONEN DIE
ZIJN TE WIJTEN
AAN
Instruções
para o utilizador
instalação 5
utilização 5-9
manutenção 15
Instruções
para o instalador
instalação 17
posicionamento 17
17
conexão eléctrica 17
21
elementos aquecedores
ESTE PRODUTO FOI CONCEBI
DO PARA UMA UTILIZAÇÃO
TIPO DOMÉSTICA. O
DE
FABRICANTE
RESPONSABILIDADES NO
AS
,
DE
EVENTUAIS DANOS A
CASO
OU
COISAS
,
DERIVADOS
INSTALAÇÃO
OP
USO IMPRÓPRIO
DE
ERRÓNEO OU ABSURDO
DECLINA TODAS
PESSOAS
DE
UMA
INCORRECTA OU
,
.
21
-
3
Page 4

IGBF
Istruzioni
per l’utente
Instructions
pertaining to user
Instructions
pour l’utilisateur
Installazione
Tutte le operazioni relative
all’installazione
(allacciamento elettrico)
devono essere eseguite da
personale qualificato
secondo le norme vigenti.
Per le istruzioni specifiche
vedi la parte riservata
all’installatore.
La versione COMBI è stata
realizzata per essere
combinata a un forno MAX
2,4 kW marchiato CE o
pannello comandi con
specifica predisposizione
per il collegamento
elettrico.
Uso
Elementi riscaldanti comando manuale
(Figg. 1 - 2 - 2a - 3)
Ruotare la manopola sulla
posizione corrispondente
alle necessità di cottura
tenendo presente che a
numero maggiore corrisponde maggiore
erogazione di calore, vedi
tabella “utilizzo elementi
riscaldanti”.
Elementi a doppio
circuito
Per attivare il secondo
circuito, ruotare la
manopola di comando fino
alla posizione di massimo
(numero 11), continuare a
ruotare nello stesso senso
fino al numero 0 per
attivare il secondo circuito,
quindi rilasciare la
manopola. Il secondo
circuito resterà attivo per
tutte le regolazioni dal
numero 11 al numero 1.
Per il disinserimento
riportare la manopola in
posizione 0 (zero).
Installation
All operations relative to
installation (electric
connection) should be
carried out by skilled
personnel in conformity
with the rules in force.
As for the specific
instructions see part
pertaining to installer.
The COMBI version is
designed for use in
conjunction with a CE
marked oven of
maximum 2.4 kW, or in
conjunction with a
control panel that has a
provision for the
necessary electrical
connections.
Use
Heating elements
manual control (Fig. 1 - 2
- 2a - 3)
Rotate the knob
concerned to the position
correspondant to the
needs of cooking taking
into conside-ration that to
a higher number a higher
heat supply corresponds,
see table “use of heating
elements”.
Double-circuit
elements
To switch on the second
element, turn the
cooking control to
maximum (11), then turn
it again in the same
direction as far as 0, then
release it. The second
element stays on for all
settings between 11 and
1.
To switch the second
element off again, turn
the cooking control back
to 0.
Installation
Toutes les opérations relatives
à l’installation (raccordement
électrique) doivent être faites
par un personnel qualifié, en
conformité avec les normes en
vigueur.
En ce qui concerne les
instructions spécifiques
voir la partie réservée à
l’installateur.
La version COMBI a été
réalisée pour être associée à
un four MAX 2,4 kW
arborant le label CE ou à
un panneau de commande
spécifiquement prévu pour
le raccordement électrique.
Emploi
Eléments de chauffe commande manuelle (Fig. 1 - 2
- 2a - 3).
Amener le bouton de
commande dans la position
correspondante
à la puissance souhaitée ,
sachant qu’au numéro le plus
élevé correspond le maximum
de puissance (voir notre
tableau “utilisation des
élements de chauffe”).
Eléments a double
circuit
Pour activer le second
circuit, tourner le bouton
de commande jusqu’à la
position maximum
(numéro 11) puis continuer
à tourner dans le même
sens jusqu’au numéro 0
pour activer le second
circuit et relâcher le
bouton. Le second circuit
restera activé pendant tous
les réglages entre 11 et 1.
Pour désactiver le second
circuit, tourner le bouton
jusqu’à la position 0.
Le lampade spia accese
indicano:
When pilot lights are lit,
they indicate.
Les voyants lumineux
allumés indiquent:
4
Page 5

DENLP
Anweisungen
für den Benutzer
Instrucciones
para el usuario
Instructies voor
de gebruiker
Instruções para
o utilizador
Installation
Alle Operationen hinsichtlich der Installation
(elektrischer Anschluß)
müssen vom zugelassenen
Fachpersonal gemäß den
geltenden Bestimmungen
ausgeführt werden.
Für die spezifischen Anweisungen siehe die dem Installateur vorbehaltene
Seite.
Die Version COMBI wurde
realisiert, um mit einem
Ofen MAX 2,4 kW mit CEKennzeichnung oder mit
einem Bedienfeld mit spezifischer Vorrüstung für den
Stromanschluss kombiniert
zu werden.
Anwendung
Heizkörper - Handbedienung (Abb. 1 - 2 - 2a - 3).
Den Schaltknopf in die für
das Kochen erforderliche
Stellung drehen und darauf
achten, daß eine höhere
Zahl einer höheren Wärmeversorgung entspricht.
Siehe Tabelle “Anwendung
der Heizkörper”.
Instalación
Todas las operaciones relativas a la instalación (conexión eléctrica) tienen que
ser efectuadas por personal
cualificado según las
normas vigentes.
Para las instrucciones específicas véase la parte reservada al instalador.
La versión COMBI ha sido
realizada para ser
combinada con un horno
MAX 2,4 kW con la marca
CE o panel de mandos con
la predisposición especifica
para la conexión eléctrica.
Utilización
Elementos calentadores mando manual (Fig. 1 - 2 2a - 3).
Girar el puño en la posición
que corresponda a las necesidades de cocción, teniendo en cuenta que a un
número mayor corresponde
mayor erogación de calor,
véase tabla “utilización
elementos calentadores”.
Zweikreissystem
Zur Aktivierung des
zweiten Kreislaufs den
Schaltknopf bis zur
maximalen Position (Ziffer
11) drehen; anschließend in
die gleiche Richtung bis zur
Ziffer 0 weiterdrehen, um
den zweiten Kreislauf zu
aktivieren, und den Knopf
loslassen. Der zweite
Kreislauf bleibt während
allen Einstellungen
zwischen 11 und 1 aktiviert.
Zur Deaktivierung des
zweiten Kreislaufs den
Knopf bis zur Position 0
drehen.
Die Kontrolleuchten zeigen
an:
A - Die daß ein bzw.
mehrere Heizelemente
Elementos con
doble circuito
Para activar el segundo
circuito, girar el botón de
mando hasta el tope
(número 11), girarlo hasta
el número 0 y soltarlo. El
segundo circuito se
mantiene activado para
todas las regulaciones entre
11 y 1.
Para desactivar el segundo
circuito, girar el botón
hasta el 0.
Las lámparas indicadoras
encendidas indican:
A - inserción de uno o más
elementos de calentamiento.
Installatie
Alle handelingen met
betrekking tot de installatie
(elektrische verbinding)
moeten worden uitgevoerd
door gekwalificeerd
personeel volgens de
geldende normen. Zie voor
de specifieke instructies
het gedeelte gereserveerd
voor de installateur.
De COMBI uitvoering is
ontworpen om te worden
gecombineerd met een
oven van MAX 2,4 kW
met EG-merk of
bedieningspaneel dat
specifiek geschikt is voor
elektrische aansluiting.
Gebruik
VerwarmingselementenHandbediening
(Fig. 1 - 2 - 2a - 3)
Draai de bedieningsknop
naar de gewenste kook
positie, er rekening mee
houdend dat een groter
getal correspondeert met
een grotere toevoer van
warmte, zie de tabel
“gebruik verwarmingselementen”.
Planet met dubbele
stroomkring
Om het tweede circuit te
activeren moet de
controleknop in de
hoogste stand (nummer
11) worden gezet en dan
in dezelfde richting
doorgedraaid tot nummer
0. Het tweede circuit
wordt dan geactiveerd en
u kunt de knop loslaten.
Het tweede circuit blijft
actief tijdens alle
instellingen tussen 11 en 1.
Om het tweede circuit uit
te schakelen moet de knop
in stand 0 worden gezet.
Als de kontroelempjes
aangaan betekent dat:
Instalação
Todas as operações relativas à instalação (conexão eléctrica) terão de ser
efectuadas por pessoal qualificado, segundo as normas
em vigor.
Para instruções específicas,
veja-se a parte reservada
para o técnico instalador.
A versão COMBI foi
realizada para ser
combinada a um forno
MAX 2,4 kW com a
marcação CE ou quadro de
comandos com especifica
predisposição para a ligação
eléctrica.
Utilização
Elementos de aquecimento comando manual (Fig. 1 - 2
- 2a - 3).
Rodar o punho em posição
correspondente à maneira
de cozinhar. O número
mais elevado corresponde a
uma maior distribuição de
calor. Veja-se a tabela sobre a “utilização de elementos de aquecimento”.
Elementos com
circuito duplo
Para activar o segundo
circuito, rode o botão de
comando até à posição
máxima (número 11) e, de
seguida, continue a rodá-lo
na mesma direcção até ao
número 0 para activar o
segundo circuito. Solte o
botão. O segundo circuito
ficará activado durante
todas as regulações entre 11
e 1.
Para desactivar o segundo
circuito, rode o botão até à
posição 0.
As lâmpadas espia acesas
indicam:
5
Page 6
IGBF
A - inserimento di uno o
più elementi riscaldanti.
B - che nella zona
dell’elemento riscaldante
indicato la temperatura del
piano è superiore a 50°C.
Va comunque considerato normale, per certi tipi
di lampada, il permanere
di una leggera luminescenza anche a comandi
disinseriti.
A - one or more heating
elements are switched
on.
B -the top temperature at
the indicated spot is
higher than 50° C.
Some types of pilot
lights will maintain
some slight
luminescence even after
disconnection. That is
quite normal.
A - le branchement d’un ou
plus éléments de chauffe
B - que la température au
point indiqué de l’élément
de chauffe est supérieure à
50°C.
Pour de certains types de
voyants lumineux la
permanence d’une légère
luminiscence même à
commandes déconnectées
est tout à fait normale.
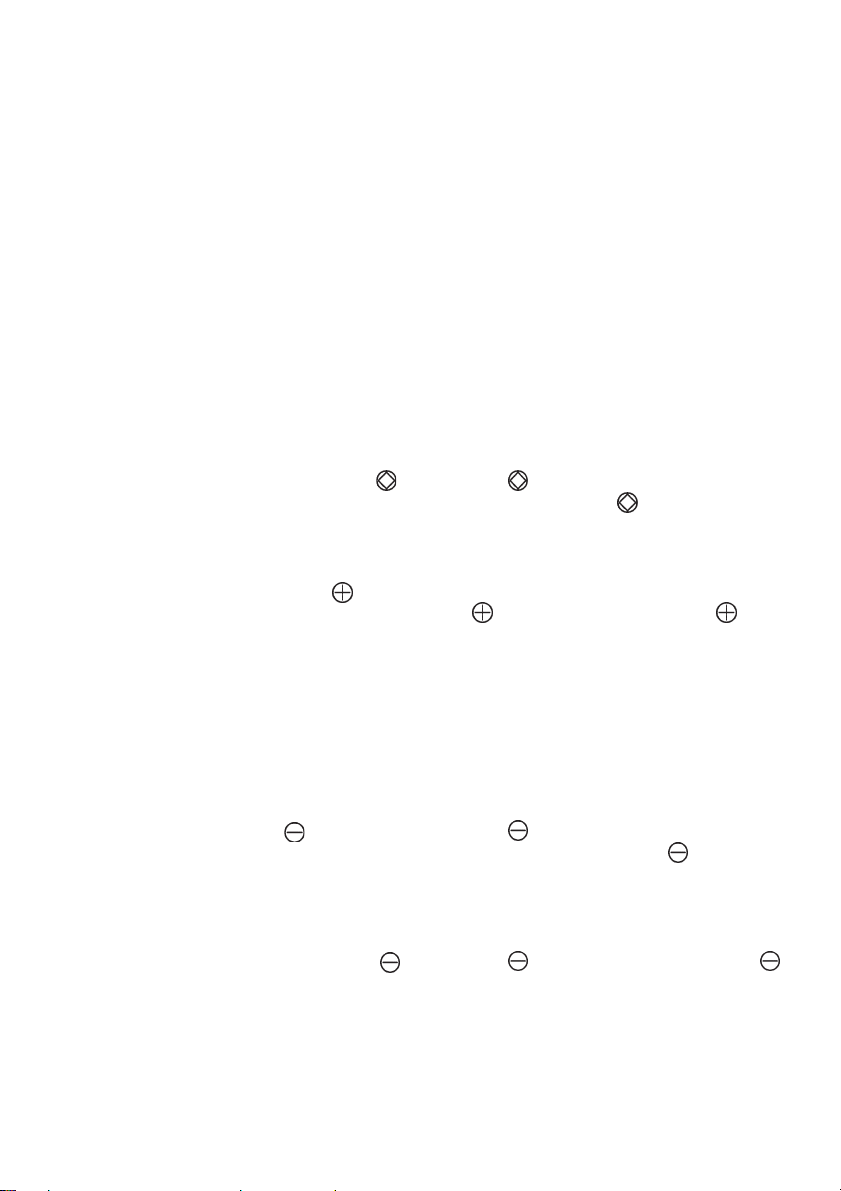
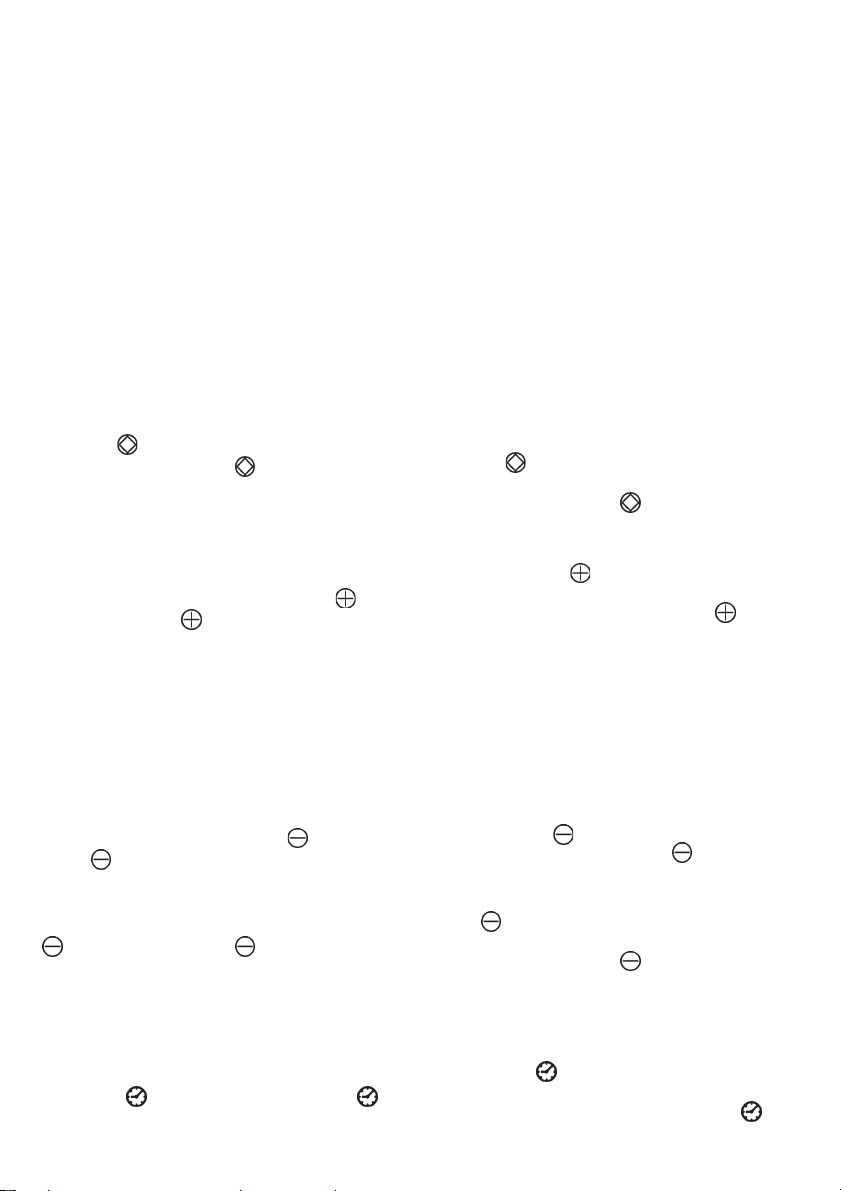
Elementi riscaldanti Touch control
(Figg. 1-3a)
Al momento dell’allacciamento elettrico appare la
scritta INIT.
1 - Accensione
Porre il dito sul simbolo .
Lampeggiano i quattro numeri
0 (zero) dei singoli elementi
riscaldanti e si accende il led
A. Porre immediatamente il
dito sul simbolo
dell’elemento riscaldante
prescelto per regolare il livello
da 1 a 9 desiderato.
Tenere presente che a numero
maggiore corrisponde
maggiore erogazione di calore,
vedi tabella “Utilizzo degli
elementi riscaldanti”
Per diminuire il livello di
cottura porre il dito sul
simbolo
.
Heating elements - Touch
control
(Fig. 1-3a)
The writing INIT will appear
when electrical connection is
completed.
1 - Switching on
Press symbol ; the 0 (zero)
figure of each heating
element will
start to flash and led A will
switch on.
Immediately press the
symbol corresponding to
the selected heating element
to adjust the cooking level
from 1 to 9. Please bear in
mind that higher the figure
you select the greater will
heating output, see table
“How to use heating
elements”.
To decrease the cooking level,
press symbol .
Eléments de chauffe commande à touche
(Fig. 1-3a)
Au moment du raccordement
éléctrique l’inscription INIT va
apparaître.
1 - Allumage
Touchez du doigt le symbole
. Chacun des quatre 0
(zéro) correspondants aux
élements de chauffe va clignoter et le led A va
s’allumer. Touchez tout de
suite le symbole de
l’élément de chauffe choisi de
façon à régler comme désiré le
niveau de cuisson de 1 à 9.
Prenez soin que les numéros
les plus élevés correspondent à
des débits de chaleur plus
élevés aussi, voir la table
“Utilisation des éléments de
chauffe”. Pour diminuer le
niveau de cuisson, touchez le
symbole .
2 - Spegnimento
Porre il dito sul simbolo
sino a quando appare
lampeggiando il numero 0
(zero).
3 - Programmazione
tempo di cottura
2 - Switching off
Press symbol until figure
0 (zero) starts to flash.
3 - How to program
cooking times
The heating element placed
2 - Extinction
Appuyez sur le simbole
jusqu’au moment où le 0 (zéro)
apparaît en clignotant.
3 - Programmation du
temps de cuisson
L’élément de chauffe qui se trou-
6
Page 7
DENLP
eingeschaltet sind.
B - Die Temperatur der
betreffenden Heizkörper
liegt über 50°C.
Das Fortbestehen eines
leichten Nachleuchtens ist
bei bestimmten
Kontrolleuchten auch nach
Abschaltung des Apparats
allerdings als normal zu
betrachten.
Heizelemente Tipptasten
(s. Abb.-1-3a)
Sobald der Elektroanschluß
hergestellt ist; leuchtet der
Text INIT auf.
1 - Einschaltung
Das Symbol mit dem
Finger berühren. Die vier
Ziffern 0 (Null), die das
jeweilige Heizelement angeben, blinken und die Lumineszenzdiode A leuchtet.
Anschließend das dem
gewünschten Heizelement
entsprechende Symbol
mit dem Finger berühren, um
die Hitze auf den gewünschten Stand von 1 bis 9
einzustellen. Darauf achten,
daß mit steigender Zahl auch
die Heizleistung zunimmt
(siehe Tabelle “Verwendung
der Heizelemente”). Um die
Kochtemperatur zurückzubringen, das entsprechende
Symbol
berühren.
2 - Ausschaltung
Das entsprechende Symbol
mit dem Finger berühren,
bis die Ziffer 0 (Null)
blinkend erscheint.
3 - Programmierung der
Kochzeit
Das Heizelement neben
dem Symbol
Zeituhr angeschlossen, welche
ist an eine
B - que en la zona del
elemento calentador
indicado la temperatura es
superior a 50°C.
De todas maneras se considera normal para ciertos
tipos de lámpara, la persistencia de una luminiscencia ligera aún con los
mandos desconectados.
Elementos calefactores touch control
(Fig. 1-3a)
En el momento de la conexión
eléctrica aparece la palabra
INIT.
1 - Encendido
Poner el dedo sobre el símbolo
. Destellan los cuatro
números 0 (cero) de
los elementos simples de
calentamiento y se enciende el
led A.
Poner inmediatamente el dedo
sobre el símbolo del
elemento de calentamiento
elegido para regular el novel
deseado desde el 1 al 9. Tener
presente que a un número
mayor corresponde mayor
suministro de calor, ver tabla
“Utilización de los elementos
de calentamiento”.
Para disminuir el nivel de
cocción poner el dedo sobre el
símbolo .
2 - Apagamiento
Poner el dedo sobre el símbolo
hasta que aparezca
destellando el número 0
(cero).
3 - Programación del
tiempo de cocción
El elemento de calentamiento
contiguo al símbolo
conectado a un TIMER
A - dat één of meerdere
platen in werking zijn
getreden.
B - dat de temperauur van de
aangegeven verwarmingselement hoger is dan 50°C.
Het voortduren van een
flauwe uitstraling ook
na uitschakeling van het
toestel is een normaal
verschijnsel bij bepaalde
soorten kontroelempjes.
Verwarmings-elementen touch control
(z. Afb. 1-3a)
Als de ekektrische aansluiting
tot stand is gebracht licht het
schrift INIT op.
1 - Inschakeling
Het symbool met de
vinger aanraken. De vier
cijfertekens 0 (nul) van de
verwarmingselementen knipperen en de LED-diode A gaat
aan. Nu op het symbool
van de gewenste element met
de vinger aanraken om de
warmte op de gewenste
hoogte van 1 tot 9 te regelen.
Let U er op dat het hoogste
nummer de grootste warmteuitstraling vertegen-woordigt.
Zie tabel “Gebruik verwarmingselementen”. Teneinde de
kooktemperatuur terug te
brengen raakt men het corresponderende symbol
2 - Uitschakeling
Het corresponderende
symbool
aanraken tot her nummer 0
(nul) knippert.
met de vinger
3 - Programmering van de
kooktijd
Ledere verwarmingselement
naast het symbool
een schakelklok verbonden die
está
tot 99 minuten door aanraking
is met
A - inserção de um mais
elementos aquecimento.
B - que na zona do elemento
aqucedor indicado a
temperatura é superior a
50°C.
De qualquer maneira é
considerado normal, para
certos tipos de lâmpada, a
permanência de uma ligeira
luminescência mesmo com
os comandos desligados.
Elementos de aquecimento - touch control
(Fig. 1-3a)
Ao momento da ligação
eléctrica aparece a escrita
INIT.
1 - Acendimento
Colocar o dedo sobre o símbolo
. Lampejam os quatro
números 0 (zero)
dos elementos de aquecimento
individuais e acende-se o led A.
Colocar imediatamente o dedo
sobre o símbolo do
elemento de aquecimento
escolhido para regular o nível
desejado desde 1 a 9.
Ter presente que o número
maior distribuição de calor,
consultar a tabela “Utilização
dos elementos de
aquecimento”.
Para diminuir o nível de
cozedura o dedo sobre o
aan.
símbolo .
2 - Apagamento
Colocar o dedo sobre o símbolo
a até que aparece
lampejando o número 0 (zero).
3 - Programação do
tempo de cozedura
O elemento de aqueci-mento
imediato ao símbolo
está
7
Page 8

IGBF
L’elemento riscaldante attiguo
al simbolo
un TIMER programmabile
sino a 99 minuti agendo sui
simboli
corrispondenti.
Un segnale acustico
avverte l’avvenuto termine del
tempo programmato.
è collegato ad
next to symbol is
connected to a TIMER
which can be programmed
for up to 99 minutes by
operating the corresponding
symbols . An alarm
will ring when the
programmed time has
elapsed.
ve près du symbole est
connecté à un minuteur programmable jusqu’à 99 minutes.
Pour effectuer la programmation, appuyez sur les symboles
correspondants. Un
signal acoustique annonce que le
temps programmé s’est écoulé.
4 - Sicurezza della
programmazione
elementi riscaldanti
e del timer
Si effettua ponendo il dito
sul simbolo
Si accende il led C e
quanto predisposto rimane
protetto contro eventuali
manovre errate.
Lo sblocco avviene
ritoccando il simbolo
In ogni caso quando
vengono toccati anche
involontariamente due tasti
dello stesso
elemento riscaldante
(questo anche in caso di
travasamento di liquido che
interessi i due tasti) la
programmazione si sblocca,
gli elementi riscaldanti si
spengono e appare la scritta
INIT che si elimina
toccando il simbolo
.
.
.
4 - Heating
elements
programming safety
and timer safety
The safeties are turned
on by pressing symbol
Led C will switch on
and the selection made
will thus be protected
against any faulty
operation.
To unblock press again
symbol
In any case whenever
two keys of the
same heating element
are accidentally touched
at the same time (or
whenever liquids are
split over the two keys at
the same time) the
programmed selection
will deactivate, the
heating elements will
switch off and the
writing INIT will appear,
which can be turned off
by pressing symbol
.
4 - Securité de la
programmation des
éléments de chauffe
et du minuteur
On branche les sécurités
en touchant le symbole
.
Le led C va s’allumer et la
sélection éffectuée sera
protégée dans le cas de
fautes eventuelles.
Touchez à nouveau le
symbole
débloquer.
En tout cas si par
mégarde l’on appuye
simultané-ment sur deux
touches
élément de chauffe (ou si
du liquide déborde sur les
deux touches en même
temps) la programmation
s’arrêtera, les éléments de
chauffe s’éteigneront et
l’inscription INIT
apparaîtra. Pour l’effacer,
touchez le symbole
.
pour le
du même
.
Elementi
a doppio circuito
Per attivare il secondo
circuito, premere il tasto
del simbolo (+) per portare
il livello di cottura a 9,
quindi continuare a
premere il tasto del simbolo
(+) fino a che non si
accende la spia E
corrispondente. Il secondo
circuito resterà attivo per
tutte le regolazioni dal
numero 9 al numero 1.
Per il disinserimento
portare la regolazione a 0
(zero).
Double-circuit
elements
To switch on the second
element, press the + key
until cooking level 9 is
reached, then continue to
press the + key until
LED “E” lights. The
second element stays on
for all settings between 9
and 1.
To switch the second
element off again, reset
the cooking level to 0.
Eléments
à double circuit
Pour activer le second
circuit, appuyer sur le
symbole (+) pour amener le
niveau de cuisson à 9 puis
continuer à appuyer sur le
symbole (+) jusqu’à ce que
le led E correspondant
s’allume. Le second circuit
restera activé pendant tous
les réglages entre 9 et 1.
Pour désactiver le second
circuit, amener le niveau de
cuisson à 0.
8
Page 9

DENLP
bis zu 99 Minuten durch
Drücken der entsprechenden Symbole
programmiert werden kann.
Ein Hörsignal gibt das
Auslaufen der programmierten Kochzeit an.
4 - Sperre für die
programmierten
Heizelemente und
Kochzeiten
Um die Sperre zu aktivieren, das Symbol
dem Finger berühren. Die
Lumineszenzsiode C
leuchtet, und hiermit
bleiben die programmierten
Werten vor versehentlichen
Veränderungen geschützt.
Um die Sperre aufzuhben,
das Symbol
berühren. Wenn jedoch
zwei Tasten
selben Heizelements
auch unabsichtlich berührt
werden (auch wenn eine
Flüssigkeit überläuft, und
die zwei Tasten dadurch
betroffen sind), wird die
Programmierung gelöscht,
die Heizelemente schalten
sich aus, und die Meldung
INIT leuchtet (diese wird
durch
Berührung des Symbols
gelöscht).
nochmals
des
programable
hasta 99 minutos obrando
sobre los símbolos
correspondientes.
Un señal acústico advierte que
se ha llegado al fin del tiempo
programado.
4 - Seguridad de la
programación de los
elementos de calentamiento y del timer
Se efectúa poniendo el dedo
sobre el símbolo
mit
enciende el led C y todo
cuanto predispuesto
permanece protegido contra
eventuales maniobras
erradas.
El desbloqueo se verifica
volviendo a tocar el símbolo
aunque
si involuntariamente se
tocan dos teclas
mismo elemento de
calentamiento (esto
también en caso de
transvasamiento de líquido
que comprometa las dos
teclas) la programación se
desbloquea, los elementos
de calentamiento se apagan
y aparece la palabra INIT
que se elimina tocando el
símbolo
. Se
. De todas maneras
del
.
van het corresponderende
symbool
grammeerd kan worden. Een
hoorsignaal betekent dat de
geprogrammeerde kooktijd is
afgelopen.
gepro-
4 - Blokkeerinrichting
voor de geprogrammeerde elementen en
kooktijden
Teneinde de blokkeerinrichting in te schakelen
raakt men het symbol
met de vinger aan. De
LED-diode C gaaat
aan en daardoor blijft de
geprogram-meerde plaat
en kooktijd beschermd
tegen verkeerde manoeuvres. Om deze blokkering
los te zetten moet men het
symbool
aanraken. In ieder geval
als twee tasten v
de zelfde verwarmingselement ook onopzettelijk
aangeraakt worden (of als
de twee toetsen door het
overkoken van een
vloeistof betroffen zijn)
wordt de programmering
geannuleerd, de elementen
gaan uit en het schrift INIT
licht of (dit wordt door
aanraking van het symbool
uitgedaan).
nog een keer
ligado a um TIMER
programável até
99 minutos agindo nos
símbolos
correspondentes.
Um sinal acústico adverte a
chegada ao fim do tempo
programado.
4 - Segurança da
programação dos
elementos de aquecimento e do timer
Efectua-se colocando o dedo
sobre o símbolo
Acende-se a led C e quanto
predisposto fica protegido
contra eventuais manobras
erradas.
O debloqueio verifica-se
tocando de novo
o símbolo
Em todo o caso quando
vêem tocados mesmo
an
involuntariamente duas
teclas do mesmo
elemento de aquecimento
(isto também no caso de
transvasamento de líquido
que diz respeito às duas
teclas) a programação
desbloqueia-se, os
elementos de aquecimento
apagam-se e aparece a
inscrição INIT que se
elimina tocando o símbolo
.
.
.
Zweikreissystem
Zur Aktivierung des
zweiten Kreislaufs auf
das Symbol (+) drücken,
bis die Kochstufe 9
angewählt ist; anschließend weiterhin auf das
Symbol (+) drücken, bis
die entsprechende Led E
aufleuchtet. Der zweite
Kreislauf bleibt während
allen Einstellungen
zwischen 9 und 1
aktiviert.
Zur Deaktivierung des
zweiten Kreislaufs die
Kochstufe 0 anwählen.
Elementos
a doble circuito
Para activar el segundo
circuito, pulsar la tecla (+):
se lleva el nivel de cocción a
9. Luego, pulsar de nuevo
la tecla (+) hasta que el
correspondiente testigo E se
encienda. El segundo
circuito se mantiene
activado para todas las
regulaciones entre 9 y 1.
Para desactivar el segundo
circuito, girar el botón
hasta el 0.
Elementen
met
dubbele stroomkring
Om het tweede circuit te
activeren op het (+)
teken drukken om het
kooknivo op 9 te
brengen. Vervolgens
blijven drukken op het
(+) teken totdat de
bijbehorende Led E aan
gaat. Het tweede circuit
blijft actief tijdens alle
instellingen tussen 9 en 1.
Om het tweede circuit uit
te schakelen moet het
kooknivo op 0 worden
gesteld.
Elementos com
circuito dublo
Para activar o segundo
circuito, prima o símbolo
(+) para colocar o nível de
cozedura na posição 9 e, de
seguida, continue a premir
o símbolo (+) até o
indicador luminoso E
correspondente se acender.
O segundo circuito ficará
activado durante todas as
regulações entre 9 e 1.
Para desactivar o segundo
circuito, coloque o nível de
cozedura na posição 0.
9
Page 10

I led B accesi segnalano che
IGBF
nella zona dell’elemento
riscaldante indicato la
temperatura del piano è
superiore a 50°C.
When lit, leds B indicate
that the plate temperature within the given
heating element zone is
higher than 50° C.
Le leds B allumés signalent
que la zone de l’élément de
chauffe indiqué a une
température supérieure aux
50°C.
N.B.: - Nell’uso degli
elementi riscaldanti si
consigliano recipienti a
fondo piatto con diametro
uguale o leggermente superiore a quello indicato sul
piano;
- evitare trabocchi di
liquido; pertanto ad
ebollizione avvenuta o
comunque a liquido
riscaldato ridurre
l’erogazione di calore;
- non lasciare inseriti gli
elementi riscaldanti a vuoto
o con pentole o tegami
vuoti;
- al termine della cottura
riportare il comando in
posizione 0 (zero).
Al verificarsi di una anche minima frattura della superficie del piano di
cottura disinserire
immediatamente l’alimentazione elettrica.
Manutenzione
(Fig.-4) Prima di tutto
rimuovere residui di cibo e
spruzzi di grasso dalla
superficie di cottura con un
raschietto. Successivamente
pulire nella zona calda con
Sidol o Stahlfix con carta
da cucina, indi risciacquare
con acqua e asciugare con
uno straccio pulito.
Tracce di fogli di alluminio,
di oggetti di plastica,
zucchero o cibi fortemente
saccariferi devono essere
rimosse immediatamente
dalla zona calda di cottura
con un raschietto per evitare possibili danni alla
superficie del piano.
In nessun caso usare spugne o strofinacci abrasivi;
evitare anche l’uso di deter
N.B.: - When one makes
use of heating elements,
we advise receptacles
with flat bottom having
same diameter or lightly
higher than that of the
hot area.
- Avoid overflows of
liquid, therefore when
boiling has happened, or
in any case when liquid
is heated, reduce the
heat supply.
- Don’t leave the heating
elements on without receptacles on the top or
with void pots and pans.
- At the end of cooking
take again the knob to
position 0.
In the event of even a
slight fracture on the
cooking surface,
disconnect the electric
power supply
immediately.
Maintenance
(Fig.-4) First of all remove
stray food bits and grease
drops from the cooking
surface with the special
scraper (fig. 4). Then clean
the hot area as best as
possible with SIDOL,
STAHLFIX or other similar
products with a papertowel, then rinse again
with water and dry with a
clean cloth.
Pieces of aluminum foil
and plastic material which
have inadvertently melted
or sugar remains or highly
sacchariferous food have to
be removed immediately
from the hot cooking area
with the special scraper
(fig. 4).-This is to avoid any
possible damage to the
N.B.: - Nous recommandons l’utilisation de
recipients à fond plat d’un
diamètre égal ou
légérement supérieur à
celui de la zone chaude;
- Eviter les débordements
de liquide; réduire la
puissance une fois
l’ebullition atteinte;
- Ne pas laisser fonctionner
les éléments de chauffe à
vide ou avec un recipient
vide;
- En fin de cuisson, ramener le bouton de commande sur la position 0.
Si vous constatez l’apparition d’une fissure,
même légère, sur la surface du plan de cuisson,
débranchez immédiatement l’appareil.
Entretien
(Fig.-4) Avant tout enlever
les restes de nourriture et
les giclées de graisse de la
surface de cuisson avec une
paillette métallique.
Nettoyer ensuite dans la
zone chaude avec Sidol ou
Stahfix et du papier de
cuisine, rincer par de l’eau
et essuyer avec un chiffon
propre.
Les traces d’aluminium,
d’objets en plastique, de
sucre ou de nourriture très
riche en sucre doivent être
enlevés instamment da la
zone chaude de cuisson par
l’aide d’une paillette métallique pour éviter de
possible dégâts à la surface
du plan.
N’utiliser absolument pas
10
Page 11

DENLP
Fig. 1 - Abb. 1 - Afb. 1
no
no
non
nein
no
neen
não
OVALE
no
no
non
nein
no
neen
não
COMMUTATORE -
sì
yes
oui
ja
sì
ja
sìm
SWITCH
- COMMUTATEUR -
Fig. 2 - Abb 2 - Afb. 2
SCHALTER
- BOTÓN -
SCHAKELAAR
OVAL
OVALE
OVAL
OVAL
OVALE
OVAL
Utilizzo elementi riscaldanti -
Verwendung der Heizelemente gebruik verwarmingselementen -
commutatore regolatore d’energia touch control intensità calore
switch energy regulator touch control heat intensity
commutateur doseur d’energie commande à touche intensité chaleur
Schalter Stromregler Tipptasten Hitze
botón regulador de energía touch control intensidad calor
schakelaar energie regelaar touch control warmte intensiteit
comutador regulador de energía touch control intensidade do calor
1 1-2 1
2 3-4 2-3
3 5-6 4
4 7-8 5-6
5 9-10 7-8
6 10-11 9
Fig. 2a
Abb. 2a
Afb .2a
01 234
use of heating elements -
Uso de los elementos calefactores
utilização dos elementos de aquecimento
utilisation elements de chauffe -
-
tenue
- weak -
schwach -
dolce -
mild -
moderada -
lento
mässig -
medio -
mittel -
forte -
stark -
sehr stark -
media -
fuerte -
vivo -
tenue-
gentle
zeer laag
- slow -
lenta -
medium
medium -
strong
bright
viva -
faible -
zwak-
- doux -
lent -
laag
- moyen -
- fort -
hoog
- vif -
zeer hoog
- COMUTADOR
fraco
- ligeire
- lento
médio
- forte
- vivo
GRILL: La funzione GRILL si ottiene nella posizione 11
GRILL: Turn the knob to position 11 for the GRILL function
GRILL : La fonction GRILL est activée sur la position 11
GRILL: Die Funktion GRILL ist in der Schalterposition 11 verfügbar
GRILL: La función GRILL se obtiene en la posición 11
GRILL: De GRILL-functie wordt op stand 11 geactiveerd
GRILL: A função GRILL obtém-se na posição 11
11
Page 12

IGBF
Fig. 3 - Abb. 3 - Afb. 3
12
OVALE
OVAL
GRILL
GRILL
✱
doppio circuito
✱
double circuit
✱
double circuit
✱
Doppelkreis
✱
doble circuito
✱
dubbele stroomkring
✱
duplo circuito
Page 13

DENLP
✱
doppio circuito
✱
double circuit
✱
double circuit
✱
Doppelkreis
✱
doble circuito
✱
dubbele stroomkring
✱
duplo circuito
6 Timer - Timer - Minuteur - Zeituhr - Timer -
Schakelklok - Timer
7 Posteriore destro - Rear right side - Posterieur droit -
Hinterrecht - Posterior derecho - Rechtse achterkant -
Posterior direito
8 Posteriore sinistro - Rear left side - Posterieur gauche -
Hinterlink - Posterior izquierdo - Linkse achterkant -
Posterior esquerdo
9 Anteriore sinistro - Front left side - Anterieur gauche
- Vorderlink - Anterior izquierdo - Linkse voorkant -
Anterior esquerdo
10 Anteriore destro - Front right side - Anterieur droit -
Vorderrecht - Anterior derecho - Rechtse voorkant -
Anterior direito
Fig. 3a - Abb. 3a - Afb. 3a
13
Page 14

IGBF
CLASSE I (TIPO Y)
CLASS I (TYPE-Y)
CLASSE I (TYPE Y)
KLASSE I (TYP-Y)
CLASE I (TIPOY)
KLAS I (TYPE-Y)
CLASSE I (TIPOY)
Fig. 4 - Abb. 4 - Afb. 4
Fig. 5 - Abb. 5 - Afb. 5
H05RR-F3x1.5*
H05RR-F4x0.75*
* Tenendo conto del fattore di contemporaneità 0,75
* Considering contemporaneity factor 0,75
* En tenant compte du coefficient de simultaneité 0,75
* Bei Gleichzeitigkeitsfaktor 0,75
* Tomando en cuenta el factor de simultaneidad 0,75
* In aanmerking van de Geleijktijdigheidsfactor 0,75
* Tomando en consideração o factor de simultaneidade 0,75
14
H05RR-F3x2.5*
H05RR-F4x1.5*
H05RR-F4x1.5*
H05RR-F5x1.5*
Fig. 6 - Abb. 6 - Afb. 6
Page 15

DENLP
Die Lumineszenzdioden
B zeigen an, daß die
Temperatur der
betreffenden
Heizelementen über
50°C liegt.
N.B.
- Für den Gebrauch
der Heizelemente empfehlen sich Töpfe mit geradem Boden und gleichem oder nur wenig größerem Durchmesser.
- Vermeiden Sie das Überlaufen von Flüssigkeiten,
indem Sie nach Erreichen
des Siedepunkts oder
Erhitzen der Flüssigkeit
die Wärmezufuhr
zurückschalten;
- lassen Sie die
Heizelemente nicht ohne
Topf oder mit leeren
Töpfen eingeschaltet;
- nach dem Kochen
schalten Sie die
Heizelemente aus.
Los led B encendidos señalan
que en la zona del elemento
de calentamiento indicado, la
temperatura del plano el
superior a 50°C.
N.B. - En el uso de cos
elementos calentadores se
aconseja utilizar recipientes
con fondo plano de diámetro igual o ligeramente superior a aquel indicado por
la serigrafia.
- Evitar desbordamientos
de líquido. Por lo tanto, a
ebullición completa o de
todas formas una vez que
esté caliente el líquido,
reducir la potencia;
- No dejar encendidas los
elementos calentadores vacíos o con ollas o cacerolas
vacías.
- Al terminar la cocción,
colocar el botón en posición
“0”.
Als de kontrolelempjes B
aangaan betekent dat de
temperauur van de aangegeven verwarmingselement hoger is dan 50°C.
N.B.: - Bij het gebruik van
de elementen wordt aangeraden om gebruik te maken van pannen met een
platte bodem, waarvan de
diameter gelijk is of iets
groter dan is aangegeven
op de plaat;
- Overkoken van vloeistof
vermijden; daarom bij het
aan de kook raken of hoe
dan ook bij verwarmde
vloeistoffen de toevoer van
warmte verminderen;
- de elementen niet ingeschakeld laten zonder pan
of met een lege pan of
braadpan
- Bij beeindiging van het
koken de bedieningskop
naar de “0” positie brengen.
Os led B acesos assinalam
que na zona di elemento de
aquecimento indicado a
temperatura do plano é
superior a 50°C.
N.B.: - Quando se usam os
elementos aquecedores aconselhamos recipientes com
fundo redondo e chato, de
diâmetro igual ou ligeiramente superior ao indicado
na superfície de aquecimento.
- Evite derramar líquidos
sobre a superfície de
aquecimento e portanto
quando se atinge a fervura
diminua o calor da superfície
de aquecimento.
- Não deixe os elementos aquecedores ligados sem nenhum recipiente em cima ou
com recipiente vazios.
- No final da cozedura
coloque o manípulo na
posição de desligado.
Sobald ein Rib in der
Oberfläche sichtbar
wird, ist das Gerät
sofort vom
Versorgungsnetz zu
trennen.
Instandhaltung
(Abb. 4) Vor allem Essensreste und Fettspritzer von
der Kochoberfläche mit
einem Schaber entfernen.
Danach die warme Fläche
mit Sidol oder Stahlfix
und Küchenpapier säubern, dann mit Wasser abwaschen und einem sauberen Lappen trocknen.
Spuren von Aluminiumfolie, Plastikgegenständen,
Zucker oder stark zuckerhaltigen Speisen
müssen sofort von der
warmen Kochfläche mit
einem Schaber entfernt
werden um mögliche
Schäden der Plattenober
fläche zu vermeiden. Auf
keinen Fall Schwämme
oder Scheuerlappen verwenden; den Gebrauch
Al verificarse la más
leve fractura del vidrio,
desconectar de
inmediato la
alimentación eléctrica.
Mantenimiento
(Fig. 4) Antes de todo
quitar los residuos de
comida y las salpicaduras
de grasa de la superficie de
cocción con una raedera.
Luego limpiar en la zona
caliente con Sidol o Stahifix
con papel de cocina. Luego
aclarar con agua y secar
con un trapo limpio.
Trazas de papel de aluminio, de objetos de plástico,
azucar o comidas muy sacaríferas tienen que ser
quitadas inmediatamente
de la zona caliente de cocción con una raedera para
evitar posibles daños a la
superficie de cocción.
En ningún caso utilicen esponjas o estropajos; eviten
también utilizar detergentes químicos agresivos co-
Bij het vaststellen van zelfs
het kleinst mogelijke
scheurtje in het oppervlak
van de kookplaat onmiddellijk de elektriciteitstoevoer onderbreken.
Onderhoud
(Fig. 4)
Voor het koken
etensresten en vetspatten
van het kookoppervlak
verwijderen met een
schraper. Vervolgens de
warme zone reinigen met
Sidol of Stahlfix en keukenpapier, naspoelen met
water en drogen met een
schoon stuk keukenpapier. Stukjes aluminiumfolie, plastic voorwerpen, suiker of sterk
suikerhoudend voedsel
moeten onmiddellijk van
de kookzone verwijderd
worden met een schraper
om mogelijke beschadigingen aan het oppervlak
van de plaat te voorkomen. In geen enkel geval sponzen of ruwe
doeken gebruiken; ook het
No caso em que se verifique
até mesmo uma pequena
racha na superfície do
plano de cozedura, deslique
imediatamente o aparelho
da corrente electrica.
Manutenção
(
Fig. 4) Antes de mais nada,
elimine, por meio de uma
raspadeira, todos os restos de
comida e salpicos de gordura
da superfície de cozimento.
Em seguida, limpe a zona
quente com Sidol ou Stahlfix,
com papel de cozinha, em seguida, enxague com água e
enxugue com um pano limpo.
Quaisquer restos de folha de
alumínio, de objectos de plástica, de açúcar ou de comida
muito açucarada terão de ser
removidos imediatamente da
zona quente onde se cozinhou,
por meio de uma raspadeira,
afim de evitar possíveis danos
à superfície da chapa de cozimento.
De nenhuma maneira se deverà utilizar uma esponja ou
esfregão abrasivo. Evitar
15
Page 16

IGBF
sivi chimici aggressivi come
Fornospray o smacchiatori.
surface of the top.
Under no circumstances
should abrasive sponges or
irritating chemical
detergents be used such as
oven sprays or spot
removers.
d’éponges ou de torchons abrasifs; éviter aussi l’emploi
de détergents chimiques
agressifs comme Fornospray ou de dégraisseurs.
16
Istruzioni
per
l’installatore
Installazione
Le presenti istruzioni sono
rivolte all’installatore qualificato quale guida all’installazione, regolazione e
manutenzione secondo le
leggi e le normative in vigore.
Gli interventi devono sempre essere effettuati ad apparecchiatura disinserita
elettricamente.
Posizionamento
(Fig. 5). L’apparecchio è
previsto per essere incassato in un piano di lavoro
come illustrato nell’apposita figura.
Predisporre su tutto il perimetro del piano il sigillante
a corredo.
Collegamento
elettrico
(Fig. 6). Prima di effettuare
l’allacciamento elettrico
accertarsi che:
- le caratteristiche
dell’impianto siano tali da
soddisfare quanto indicato
sulla targa matricola
applicata sul fondo del
piano;
- che l’impianto sia munito
di un efficace collegamento
di terra secondo le norme e
le disposizioni di legge in
vigore. La messa a terra è
obbligatoria a termini di
legge.
Nel caso che l’apparecchiatura non sia munita di
cavo e/o di relativa spina
utilizzare materiale idoneo
Instructions for
the installation
Modalités
d’installation
technician
Installation
These Instructions are
for the qualified technician, as a guide to the installation, adjustment
and maintenance, according to the laws and
standards in force. Any
of these operations must
always be carried out
when the appliance has
been disconnected from
the electric system.
Positioning
(Fig. 5). The appliance
can be fitted into a working area as illustrated on
the figure. Apply the
seal supplied over the
whole perimeter of the
working area.
Electrical
connection
(Fig. 6) Prior to carrying
out the electrical connection, please ensure that:
- the plant characteristics are such as to follow what is indicated
on the matrix plate
placed at the bottom
of the working area;
- that the plant is fitted
with an efficient earth
connection, following
the standards and law
provisions in force.
The earth connection
is compulsory in terms
of the law.
Should there be no cable
and/or plug on the equipment, use suitable ab-
Installation
Ces instructions sont faites
pour le technicien spécialisé
comme guide à l’installation, au réglage e à l’entretien suivant les lois et les
normes en vigueur.
Les interventions doivent
toujours être effectuées
quand l’appareil est débranché.
Positionnement
(Fig. 5). L’appareil est prévu pour être encastré dans
une table de travail comme
indiqué dans le dessin spécial. Préparer la colle pour
seller ci-jointe sur tout le
périmètre du plan.
Branchement
électrique
(Fig. 6) Avant d’effectuer le
branchement électrique,
s’assurer que:
- les caracteristiques de
- que l’installation dispose
La mise à terre est
obligatoire aux termes de la
loi.
Si l’appareil n’a pas de câble et /ou de prise corre-
l’installation soient de
nature à satisfaire toutes
les indications portées
sur la plaque
signalétique située sous
l’appareil;
d’un raccordement à la
terre secon les normes et
les dispositions en
vigueur.
Page 17

DENLP
von aggressiven chemischen Putzmitteln wie
Fornospray oder Fleckenreinigern vermeiden.
mo Fornospray o quitamanchas.
gebruik van aggresieve
reinigingsmiddelen zoals
Fornospray of vlekverwijderaars vermijden.
igualmente a utilização de
detersivos químicos agressivos
como Fornospray ou produtos
para tirar nódoas.
Anweisungen
für den
Installateur
Installation
Die angegebenen Anweisungen sind an den
zugelassenen Installateur
als Richtlinie für die
Installation, Regelung
und Instandhaltung, gemäß den geltenden Gesetzen und Normen, gerichtet. Die Eingriffe
dürfen nur bei ausgeschaltetem Apparat vorgenommen werden.
Aufstellung
(Abb. 5). Der Apparat ist
für den Einbau in eine
Arbeitsplatte vorgesehen. Siehe Abbildung.
Auf den ganzen Perimeter der Platte die mitgelieferte Dichtmasse
verteilen.
Elektrischer Anschluß
(Abb. 6) Vor dem Anschluß an das elektrische
Netz sich davon überzeugen, daß:
- die Eigenschaften der
Anlage mit denen auf
dem unter der Ofenplatte angebrachten
Leistungsschild übereinstimmen;
- die Anlage mit einem
wirksamen Erdanschluß gemäß den
geltenden Normen
und Gesetzbestimmungen versehen ist.
Der Erdanschluß ist
gemäß Gesetz verbindlich.
Falls der Apparat nicht
mit einem Kabel und/
Instrucciones
para el
instalador
Instalación
Las presentes instrucciones
están dirigidas al instalador
como guía para la instalación, regulación y
mantenimiento según las
leyes y las normas vigentes.
Las intervenciones tienen
que ser efectuadas siempre
con el aparato desenchufado.
Colocación
(Fig. 5). El aparato ha sido
estudiado para ser empotrado en un tablero de trabajo
como ilustrado en la relativa figura. Preparar sobre todo el perímetro de la
superficie la masilla impermeable en dotación.
Conexión eléctrica
(Fig. 6) Antes de efectuar la
conexión eléctrica comprobar que:
- las características de la
instalación satisfagan
cunato indicado en la
placa matrícula colocada
sobre el fondo de la superficie de cocción;
- que la instalación tenga
una eficaz conexión de
tierra según las normas
y las prescripciones de
ley vigentes. La puesta a
tierra es obligatoria por
ley.
En el caso de que el aparato
no tenga el cable y/o el relativo enchufe utilizar material apto para la absorción
indicado en la placa
Instructies
voor de
installateur
Installatie
De onderstaande instructies zijn bedoeld voor de
gekwalificeerde installateur, die de installatie, regeling en het onderhoud
uitvoert volgens de geldende wetten en normen.
Reparaties moeten altijd
worden uitgevoerd terwijjl de stroomvoorziening van het apparaat is
onderbroken.
Plaatsing
(Fig. 5). Het apparaat is
voorzien om te worden verzonken in een keukenblad
zoals geillustreerd in de
betreffende figuur. Dicht de
ruimte tussen het keukenblad en de plaat rondom af
met de bijgeleverde kit.
Elektrische ansluiting
(Fig. 6) Alvorens de elektrische aansluiting te
verrichten verzekert men
zich ervan dat:
- de karakteristieken
van het stroomvoorzienende apparaat
voldoen aan hetgeen is
vermeld op de registratieplaat onderop
de kookplaat;
- dat het stroomvoorzienende apparaat voorzien is van een effectieve aardeverbinding volgens de
wettelijk voorgeschreven normen en
beschikkingen. Het
aarden is verplicht
volgens de wet.
Instruções
para o
instalador
Instalação
Estas instruções são dedicadas particularmente para
o instalador qualificado,
para serem utilizadas como
guia à instalação, regulação
e manutenção, segundo as
leis e normas em vigor. As
intervenções terão de ser
sempre efectuadas quando o
aparelho estiver desligado
da corrente eléctrica.
Posicionamento
(Fig. 5). O aparelho foi
projectado par ser montado
num plano de trabalho como está ilustrado na figura
correspondente. Vedar todo
o perímetro da superfície de
trabalho, com o vedador
fornecido com o aparelho.
Conexão eléctrica
(Fig. 6) Antes de efectuar a
conexão eléctrica, será preciso assegurar que:
- as características da insta-
- a instalação esteja munida
No caso que o aparelho não
esteja munido de cabo e/ou
da relativa tomada, utilize o
material apropriado para
lação sigam o que está
indicado sobre a chapa
da matriz aplicada no
fundo da chapa de cozimento.
de uma conexão à terra
eficaz, segundo as normas e disposições das leis
em vigor. A conexão à
terra é obrigatória nos
termos da lei.
17
Page 18

IGBF
per l’assorbimento indicato
in targa matricola e per la
temperatura di lavoro. Il
cavo in nessun punto dovrà
raggiungere una
temperatura superiore di 50
°
C a quella ambiente.
Desiderando un collegamento diretto alla rete, è
necessario interporre un
interruttore onnipolare con
apertura minima fra i contatti di 3 mm dimensionato
per il carico di targa e rispondere alle norme in
vigore (il cavo di terra
giallo/verde non deve essere
interrotto dall’interruttore). La presa o
l’interruttore onnipolare
devono essere facilmente
raggiungibili con l’apparecchiatura installata.
N.B.: - Il costruttore declina
ogni responsabilità nel caso
che quanto sopra e le usuali
norme antiinfortunistiche
non
vengano rispettate.
sorption material for the
working temperature as
well, as indicated on the
matrix plate. Under no
circumstance must the
cable reach a temperature
above 50°C of the ambient
temperature.
Should a direct connection
to the network be required, it will be necessary
to interpose an omnipolar
switch with minimum
aperture between the 3
mm. contacts,
dimensioned to bear the
plate load and it must
follow the standards in
force (the yellow/green
earth cable must not be
interrupted by the switch).
The plug or omnipolar
switch must be easily
reached on the installed
equipment.
The manufacturers decline
any responsibility in the
event of non-compliance
with what is described
above and the accident
prevention norms not
being respected and
followed.
spondante, utiliser de la
matière apte à l’absorption
indiquée sur la plaque signalétique et à la température de travail. Le câble ne
devra jamais atteindre une
température supérieure de
50°C à celle ambiante.
Si on désire une connexion
directe au réseau, il faut
prévoir un dispositif de
coupure omnipolaire avec
une distance d’ouverture
entre les contacts de 3 mm
dimensionné à la puissance
de plaque et qui suit les
normes en vigueur (le fil de
terre de couleur jaune/vert
ne doit pas être coupé par
l’interrupteur). La prise ou
l’interrupteur omnipolaire
doivent être facilement
accessibles après la mise en
place de l’appareil.
Le Constructeur décline
toute responsabilité au cas
où ces normes et les autre
normes contre les accidents
ne seraient pas observées.
18
Page 19

DENLP
oder mit einem entsprechenden Stecker
ausgerüstet ist, muß
gleichwertiges Material
zur Stromentnahme, wie
auf dem Leistungsschild
angegeben, und für die
Arbeitstemperatur verwendet werden. Das
Kabel darf an keiner
Stelle eine Temperatur
von mehr als 50°C über
der Raumtemperatur erreichen.
Falls ein direkter Anschluß an das Stromnetz
gewünscht wird, ist es
notwendig einen allpoligen Schalter mit
einer Mindestöffnung
von 3mm zwischen den
Kontakten, gemäß
Leistungsschild, zu legen
und den geltenden
Normen entsprechen.
(Das gelbgrüne Erdkabel
darf nicht vom Schalter
ausgeschaltet werden).
Die Steckdose oder der
allpolige Schalter
müssen bei dem installierten Apparat leicht zu
erreichen sein.
Der Hersteller lehnt jede
Verantwortung ab falls
oben genannte Ausführungen und die üblichen
Unfallnormen nicht eingehalten werden.
matrícula y para la temperatura de trabajo. El cable
en ningún punto tendrá
que llegar a una temperatura superior de 50°C a
la temperatura ambiente.
Si se quiere una conexión
directa a la red, es necesario
interponer un interruptor
omnipolar con abertura mínima entre los contactos de
3 mm dimensionado para la
carga de placa y responder
a las normas vigentes (el
cable de tierra amarillo/
verde no tiene que ser
interrumpido por el interruptor). El enchufe o el
interruptor omnipolar tienen que ser fácilmente alcanzables con el aparato
instalado.
El constructor declina
cualquier responsabilidad
en el caso de que lo dicho
arriba y las usuales normas
contra los infortunios no
sean respetadas.
In het geval dat het apparaat niet is uitgerust met
een kabel en/of stekker,
dient gebruik gemaakt te
worden van materiaal,
geschikt voor de stroomvoering en de werktemperatuur, zoals aangegeven
op de registratieplaat. De
kabel mag op geen enkel
punt een temperatuur bereiken die hoger is dan
50°C boven de omgevingstemperatuur. Wenst
men een directe verbinding met het lichtnet, dan is
het noodzakelijk een onderbrekingsschakelaar
tussen te plaatsen, met een
minimale afstand van 3
mm tussen de contacten,
die gedimensioneerd is
voor het geregistreerd vermogen en voldoet aan de
geldende normen (de aardekabel geel/groen mag
niet door de schakelaar
worden onderbroken). De
stekker of schakelaar moet
gemakkelijk bereikbaar
zijn als de apparatuur
eenmaal geinstalleerd is.
De fabrikant wijst iedere
verantwoordelijkheid af
in geval dat het bovenstaande en de gebruikelijke preventieve normen
niet worden gerespecteerd.
absorver o que está indicado na chapa da matriz,
para uma devida temperatura de cozimento. O tubo
não deverá nunca atingir a
temperatura de 50°C acima
da temperatura ambiente.
Se desejar uma conexão directa à rede, será necessário
interpor um interruptor
onipolar com abertura
mínima de 3 mm. entre os
contactos, cuja dimensão
deverá seguir a carga mencionada na chapa, seguindo
igualmente as normas em
vigor ( o cabo de terra amarelo/verde não deve ser
interrompido pelo interruptor). A tomada ou o interruptor onipolar deverão
ser posicionados para uma
fácil manipulação do aparelho instalado.
O construtor declina qualquer responsabilidade no
caso que não tenham sido
respeitadas todas as disposições aqui em cima, assim
como as normas para a
prevenção de acidentes.
19
Page 20

IGBF
Elementi riscaldanti - Heating elements - Elements de chauffe
V tipo - type - type W regolazione - regulation -réglage
triplo circuito radiante Ø 145 1200 commutatore 0+6
triple-circuit radiant Ø 145 1200 commutator 0+6
triple circuit radiant Ø 145 1200 commutateur 0+6
triplo circuito radiante Ø 180 - Ø 195 1700 - 1900 commutatore 0+6
triple-circuit radiant Ø 180 - Ø 195 1700 - 1900 commutator 0+6
triple circuit radiant Ø 180 - Ø 195 1700 - 1900 commutateur 0+6
triplo circuito radiante Ø 210 2100 commutatore 0+6
triple-circuit radiant Ø 210 2100 commutator 0+6
triple circuit radiant Ø 210 2100 commutateur 0+6
monocircuito radiante Ø 145 1200 regolatore d’energia 0+11
single-circuit radiant Ø 145 1200 energy regulator 0+11
monocircuit radiant Ø 145 1200 doseur d’energie 0+11
monocircuito radiante Ø 180 - Ø 195 1700 - 1900 regolatore d’energia 0+11
single-circuit radiant Ø 180 - Ø 195 1700 - 1900 energy regulator 0+11
monocircuit radiant Ø 180 - Ø 195 1700 - 1900 doseur d’energie 0+11
monocircuito radiante Ø 210 2100 regolatore d’energia 0+11
single-circuit radiant Ø 210 2100 energy regulator 0+11
monocircuit radiant Ø 210 2100 doseur d’energie 0+11
230 V
~
misto alogeno/radiante Ø 145 1200 regolatore d’energia 0+11
mixed-circuit radiant/halogen
mixte halogène/
misto alogeno/radiante Ø 180 1800 regolatore d’energia 0+11
mixed-circuit radiant/halogen
mixte halogène/
doppio circuito radiante Ø 210/120 2100 regolatore d’energia 0÷11
double circuit radiant Ø 210/120 2100 energy regulator 0÷11
double circuit radiant Ø 210/120 2100 doseur d’energie 0
doppio circuito radiante ovale 145x250 1800 regolatore d’energia 0
double circuit oval radiant 145x250 1800 energy regulator 0÷11
double circuit ovale radiant 145x250 1800 doseur d’energie 0
doppio circuito radiante ovale 145x300 2000 commutatore 0+4
double circuit oval radiant 145x300 2000 commutator 0+4
double circuit ovale radiant 145x300 2000 commutateur 0+4
monocircuito radiante 200x350 1500 regolatore d’energia 0
single-circuit radiant 200x350 1500 energy regulator 0÷11
monocircuit radiant 200x350 1500 doseur d’energie 0
monocircuito radiante 145x380 300 interruttore 0+1
single-circuit radiant 145x380 300 switch 0+1
monocircuit radiant 145x380 300 interrupteur 0+1
radiant Ø 145 1200 doseur d’energie 0+11
radiant Ø 180 1800 doseur d’energie 0+11
Ø 145 1200 energy regulator 0+11
Ø 180 1800 energy regulator 0+11
÷
11
÷
11
÷
11
÷
11
÷
11
20
Page 21

DENLP
Heizelemente - Elementos calefactores - Verwarmingselementen - Elementos aquecedores
V Typ - tipo - type - tipo W
dreifacher Strahlungskreis Ø 145 1200 Umschalter 0+6
Drievoudige straalings-stroomkring Ø 145 1200 stroomwisselaar 0+6
Drievoudige straalings-stroomkring Ø 180 - Ø 195 1700 - 1900 stroomwisselaar 0+6
Drievoudige straalings-stroomkring Ø 210 2100 stroomwisselaar 0+6
Eenvoudige straalings-stroomkring Ø 145 1200 energieregelaar 0+11
Eenvoudige straalings-stroomkring Ø 180 - Ø 195 1700 - 1900 energieregelaar 0+11
Eenvoudige straalings-stroomkring Ø 210 2100 energieregelaar 0+11
gemischter Halogen-/Strahlungskreis Ø 145 1200 Energieregler 0+11
230 V
~
gemischter Halogen-/Strahlungskreis Ø 180 1800 Energieregler 0+11
Dubbele ovale straalings-stroomkring 145x250 1800 energieregelaar 0÷11
Dubbele ovale straalings-stroomkring 145x300 2000 stroomwisselaar 0+4
Eenvoudige straalings-stroomkring 200x350 1500 energieregelaar 0÷11
Eenvoudige straalings-stroomkring 145x380 300 schakelaar 0+1
Triple circuito radiante Ø 145 1200 conmutador 0+6
Triplo circuito radiante Ø 145 1200 comutador 0+6
dreifacher Strahlungskreis Ø 180 - Ø 195 1700 - 1900 Umschalter 0+6
Triple circuito radiante Ø 180 - Ø 195 1700 - 1900 conmutador 0+6
Triplo circuito radiante Ø 180 - Ø 195 1700 - 1900 comutador 0+6
dreifacher Strahlungskreis Ø 210 2100 Umschalter 0+6
Triple circuito radiante Ø 210 2100 conmutador 0+6
Triplo circuito radiante Ø 210 2100 comutador 0+6
Einzel-Strahlungskreis Ø 145 1200 Energieregler 0+11
Monocircuito radiante Ø 145 1200 regulador de energía 0+11
Monocircuito radiante Ø 145 1200 regulador de energía 0+11
Einzel-Strahlungskreis Ø 180 - Ø 195 1700 - 1900 Energieregler 0+11
Monocircuito radiante Ø 180 - Ø 195 1700 - 1900 regulador de energía 0+11
Monocircuito radiante Ø 180 - Ø 195 1700 - 1900 regulador de energía 0+11
Einzel-Strahlungskreis Ø 210 2100 Energieregler 0+11
Monocircuito radiante Ø 210 2100 regulador de energía 0+11
Monocircuito radiante Ø 210 2100 regulador de energía 0+11
Mixto/halógeno/radiante Ø 145 1200 regulador de energía 0+11
Gemengd halogeen/uitstraaling Ø 145 1200 energieregelaar 0+11
Misto halogéneo/radiante Ø 145 1200 regulador de energía 0+11
Mixto/halógeno/radiante Ø 180 1800 regulador de energía 0+11
Gemengd halogeen/uitstraaling Ø 180 1800 energieregelaar 0+11
Misto halogéneo/radiante Ø 180 1800 regulador de energía 0+11
Doppelstrahlungskreis Ø 210/120 2100 Energieregler 0÷11
Doble circuito radiante Ø 210/120 2100 regulador de energía 0
Dubbele straalings-stroomkring Ø 210/120 2100 energieregelaar 0÷11
Duplo circuito radiante Ø 210/120 2100 regulador de energía 0
ovaler Doppelstrahlungskreis 145x250 1800 Energieregler 0÷11
Doble circuito radiante oval 145x250 1800 regulador de energía 0
Duplo circuito radiante oval 145x250 1800 regulador de energía 0
ovaler Doppelstrahlungskreis 145x300 2000 Umschalter 0+4
Doble circuito radiante oval 145x300 2000 conmutador 0+4
Duplo circuito radiante oval 145x300 2000 comutador 0+4
Einzel-Strahlungskreis 200x350 1500 Energieregler 0÷11
Monocircuito radiante 200x350 1500 regulador de energía 0
Monocircuito radiante 200x350 1500 regulador de energía 0
Einzel-Strahlungskreis 145x380 300 Schalter 0+1
Monocircuito radiante 145x380 300 interruptor 0+1
Monocircuito radiante 145x380 300 interruptor 0+1
Einstellung - regulación - regeling - regulação
÷
11
÷
11
÷
11
÷
11
÷
11
÷
11
21
Page 22

Page 23

Page 24

La Casa costruttrice declina ogni responsabilità per le possibili inesattezze contenute nel presente
opuscolo, imputabili ad errori di stampa o di trascrizione. Si riserva il diritto di apportare ai propri
prodotti quelle modifiche che ritiene necessarie o utili, senza pregiudicare le caratteristiche essenziali.
The manufacturer declines all responsibility for possible inaccuracies contained in this pamphlet, due
to printing or copying errors. We reserve the right to make on our own products those changes to be
considered necessary or useful, without jeopardizing the essential characteristics.
Dans un souci constant d’amélioration qualitative, le constructeur se réserve la possibilité d’apporter
à ses produits les modifications utiles, sans compromettre ses caractéristiques essentielles.
Le constructeur décline toutes responsabilité pour d’eventuelles inexactitudes contenues dans cette
notice, imputables à des erreurs d’impression ou de transcription.
Die Herstellerfirma übernimmt keinerlei Verantwortung für eventuell in dieser Broschüre enthaltene
Ungenauigkeiten, die auf Druckfehler zurückzuführen sind und behält sich das Recht vor an ihren
Produkten alle für notwendig erachteten Änderungen anzubringen, ohne die wesentlichen Eigenschaften zu beeinflussen.
El constructor declina toda responsabilidad por las posibles inexactitudes contenidas en el presente
documento, imputables a errores de impresión o relacionadas. El constructor se reserva el derecho
de aportar a sus propios productos aquellas modificaciones que se considere necesarias o útiles, sin
perjudicar las características esenciales.
De Fabrikant wijst iedere verantwoordelijkheid af voor enige onjuistheden in deze brochure welke
geweten kunnen worden aan copie - of drukfouten. Hij behoudt zich het recht voor aan zijn eigen
produkten wijzigingen aan te brengen die hij voor noodzakelijk of nuttig houdt zonder dat de
wezenlijke kenmerken erdoor benadeeld worden.
O Fabricante não assume nenhuma responsabilidade acerca de eventuais inexactidões contidas na
presente publicação, devidas a erros de impressão ou de transcrição. Reserva-se o direito de efectuar nos próprios produtos as eventuais modificações que considerar necessárias ou úteis, sem
prejudicar as características essenciais.
COD. 1.000.72.0
 Loading...