

Page 1
Bluetooth speaker with FM/DAB
Bluetooth-högtalare med FM/DAB
Bluetooth-høyttaler med FM/DAB
Bluetooth-kaiutin, jossa FM/DAB
Bluetooth-Lautsprecher mit UKW/DAB
Art.no. Model
38-5698 BDX1400
Ver. 20130820
English 3
Svenska 16
Norsk 28
Suomi 40
Deutsch 52
Page 2

2
Page 3

Bluetooth speaker with FM/DAB
Art.no 38-5698 Model BDX1400
Please read theentire instruction manual before using theproduct and save it for future
reference. We reserve theright for any errors in text or images and any necessary changes
made to technical data. If you have any questions regarding technical problems please
contact our Customer Services.
Contents
1. Safety ...........................................................................................4
2. Product description ....................................................................4
3. Buttons and functions ...............................................................5
4. Assembly .....................................................................................7
5. Connections ................................................................................. 7
6. Operating instructions ............................................................... 8
7. Settings ....................................................................................... 8
Sound........................................................................................................10
8. Connections ............................................................................... 10
Bluetooth connection .............................................................................10
AUX connection .......................................................................................10
9. Radio .........................................................................................10
9.1 FM-radio ............................................................................................10
Settings .............................................................................................................................. 11
Setting radio stations ....................................................................................................... 11
Saving radio stations to the memory presets ............................................................... 11
Using presets..................................................................................................................... 12
FM radio display info ........................................................................................................ 12
FM settings ........................................................................................................................ 12
9.2 DAB radio ...........................................................................................12
DAB Settings ...................................................................................................................... 12
Full scan ............................................................................................................................. 13
Removing preset channels .............................................................................................. 13
Station selection ............................................................................................................... 13
Saving radio stations to the memory presets ............................................................... 13
Using presets..................................................................................................................... 14
DAB radio display info ...................................................................................................... 14
10. Care and maintenance ...........................................................14
11. Disposal ...................................................................................14
12. Specifications .......................................................................... 15
English
3
Page 4

English
1. Safety
• Follow all theinstructions in theinstruction manual and heed all warnings.
• Do not place theproduct where there is arisk of it falling into water or other liquid. Do not
place any objects which contain liquid onto thespeaker such as vases, drinks, etc.
• The ventilation openings must not be obstructed. Make sure that there is sufficient
air circulation to prevent overheating. Make sure that theproduct is placed in
alocation where there is adequate surrounding air circulation and that no heaters
or other sources of heat are in near proximity.
• This product should only be repaired by aqualified service technician.
• The product should not be taken apart or modified. Certain exposed parts inside
thecasing carry dangerous current. Contact with these can lead to fire or electric shock.
• The product is designed for indoor use only.
• Never subject theproduct to high temperature, dust, heavy vibration, impacts,
humidity or moisture.
• The mains lead should be checked regularly. Never use theproduct if themains
lead or its plug is damaged or if theproduct is not functioning properly.
• The mains lead must be changed if damaged. This is to prevent therisk of electric
shock or fire and should only be carried out by themanufacturer, qualified service
facility or qualified technician.
• Never lay themains lead over hot surfaces or pull it round sharp edges or corners.
Place themains lead out of theway of all foot traffic.
• Only use thestand that is included with this product. Place theproduct on steady
level surface to prevent therisk of it tipping over.
• Unplug theproduct from thewall socket during thunder storms or if it is not to be
used for along time. The product’s plug should always be easily accessible.
2. Product description
• Powerful 3-way speaker with integrated 8″ subwoofer (2×40 W + 1×80 W).
• Wireless streaming via Bluetooth (A2DP apt-X).
• Alarm Clock
• DAB+/FM-radio with AUX input.
• Comes with remote control and detachable foot.
4
Page 5
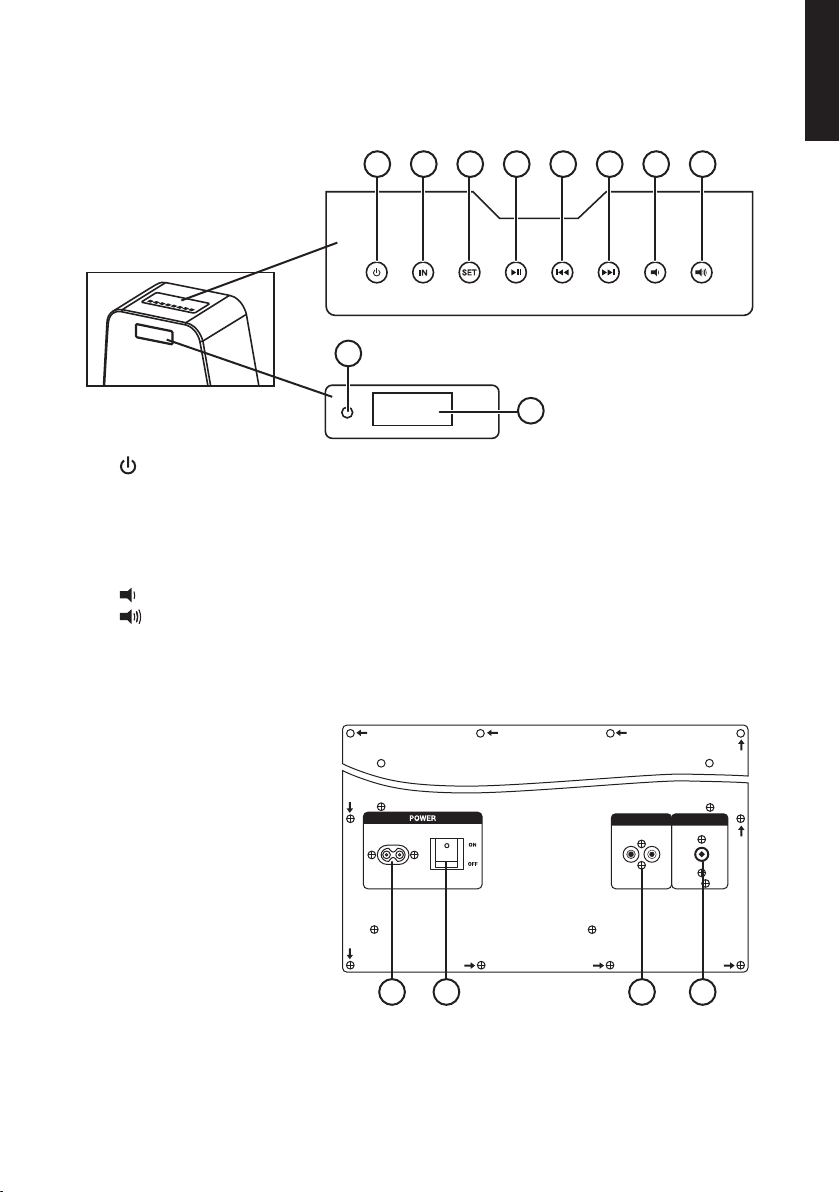
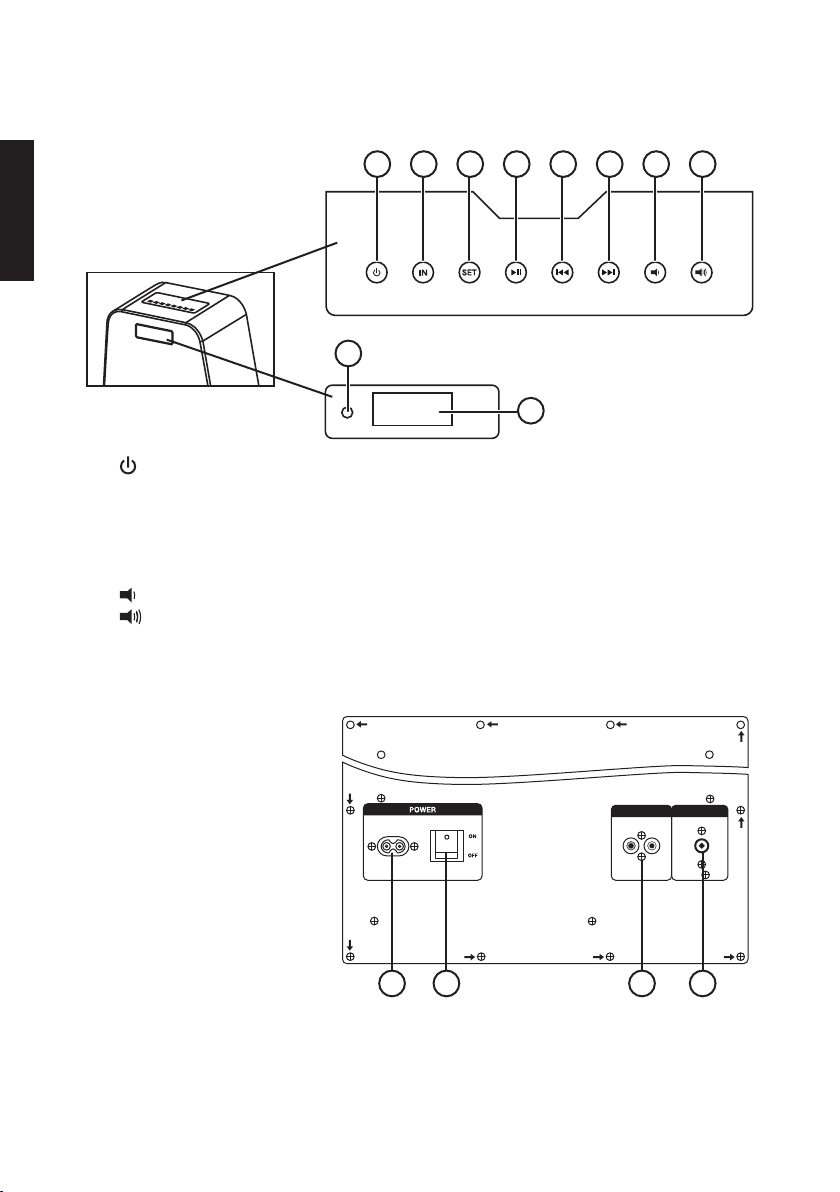
3. Buttons and functions
Control panel and display
1
2 3 4 5 6 7 8
9
1. [ ] Standby
2. [ IN ] Input selector: Bluetooth, AUX, FM/DAB
3. [ SET ] Settings
4. [ ►II ] Play/pause
5. [ I◄◄ ] Previous track/fast rewind/time settings
6. [ ►►I ] Next track/fast forward/time settings
] Decrease volume
7. [
8. [ ] Increase volume
9. Remote control’s IR sensor
10. Display
English
10
Back panel
11. AC mains connection
12. Power switch
13. AUX input for external
audio sources
14. Aerial input
AUX IN FM/DAB
R L
11 12 1413
5
Page 6
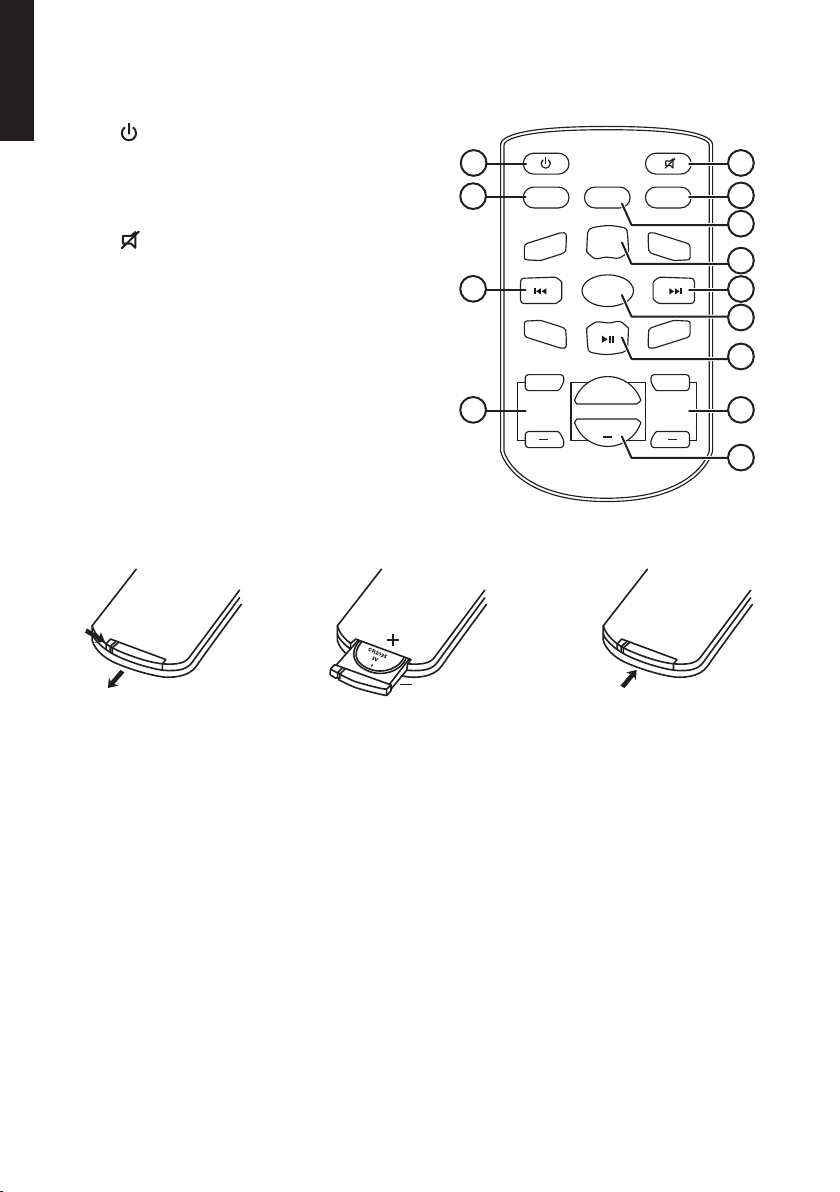
Remote control
English
15. [
] Standby
16. [ INPUT ] Input selector
17. [ I◄◄ ] Previous track/fast
rewind/time settings
18. [ TREBLE +/- ] Treble control
19. [ ] Mute
20. [ SETUP ] Time and alarm settings
21. [ DISPLAY ] Display settings
22. [ MENU ] FM/DAB
23. [ ►►I ] Next track/fast forward/time settings
24. [ ENTER ] Confirms selection
25. [ ►II ] Play/pause/radio station preset save
26. [ BASS ] Bass settings
27. [ VOLUME +/- ] Volume control
Inserting batteries into theremote control
15
16
17
18
INPUT
+
TREBLE
DISPLAY
MENU
ENTER
+
VOLUME
VOLUME
SETUP
BASS
19
20
21
22
23
24
25
+
26
27
1. Press in thebattery holder’s latch and slide it out.
2. Insert one CR2025 battery according to themarkings in thebattery compartment.
3. Reinsert thebattery holder.
Note:
• Use only thesize and type of battery specified and ensure correct insertion.
• Never subject theremote control to knocks or blows.
• Remove thebatteries if theremote control is not to be used for along period.
6
Page 7
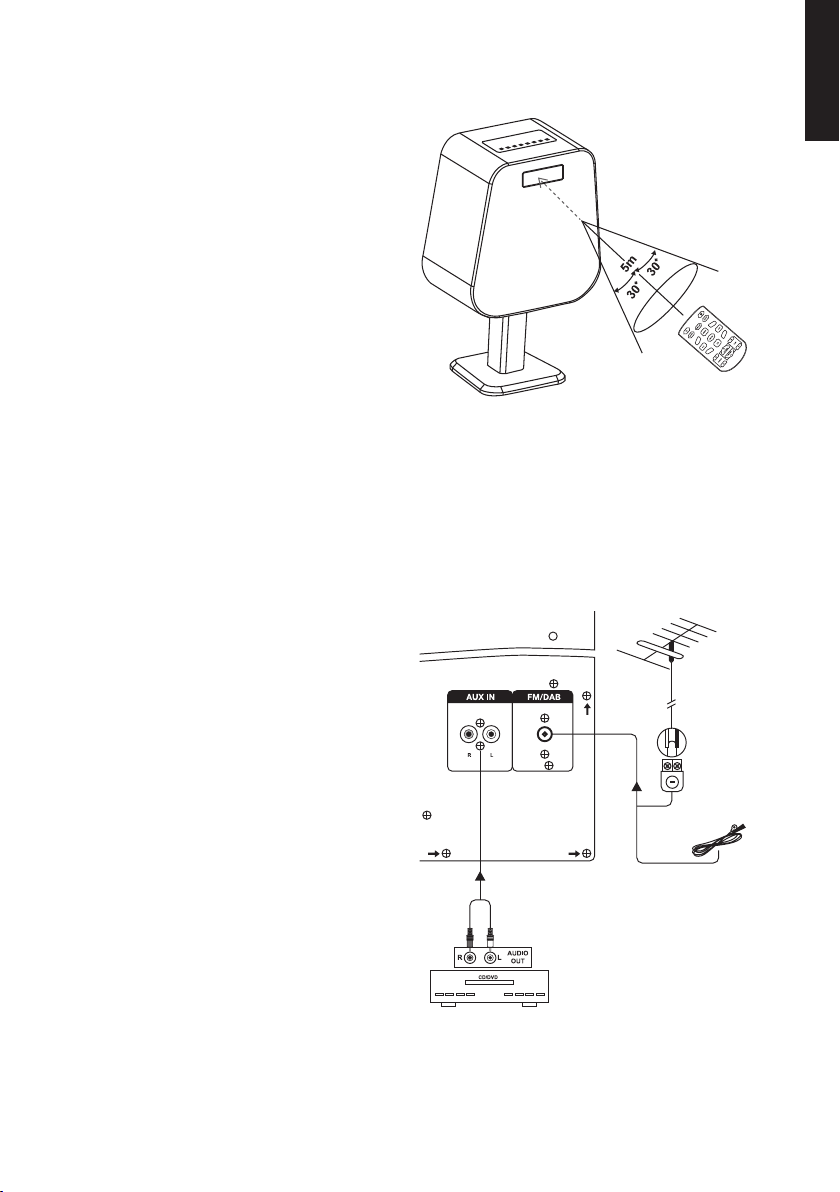
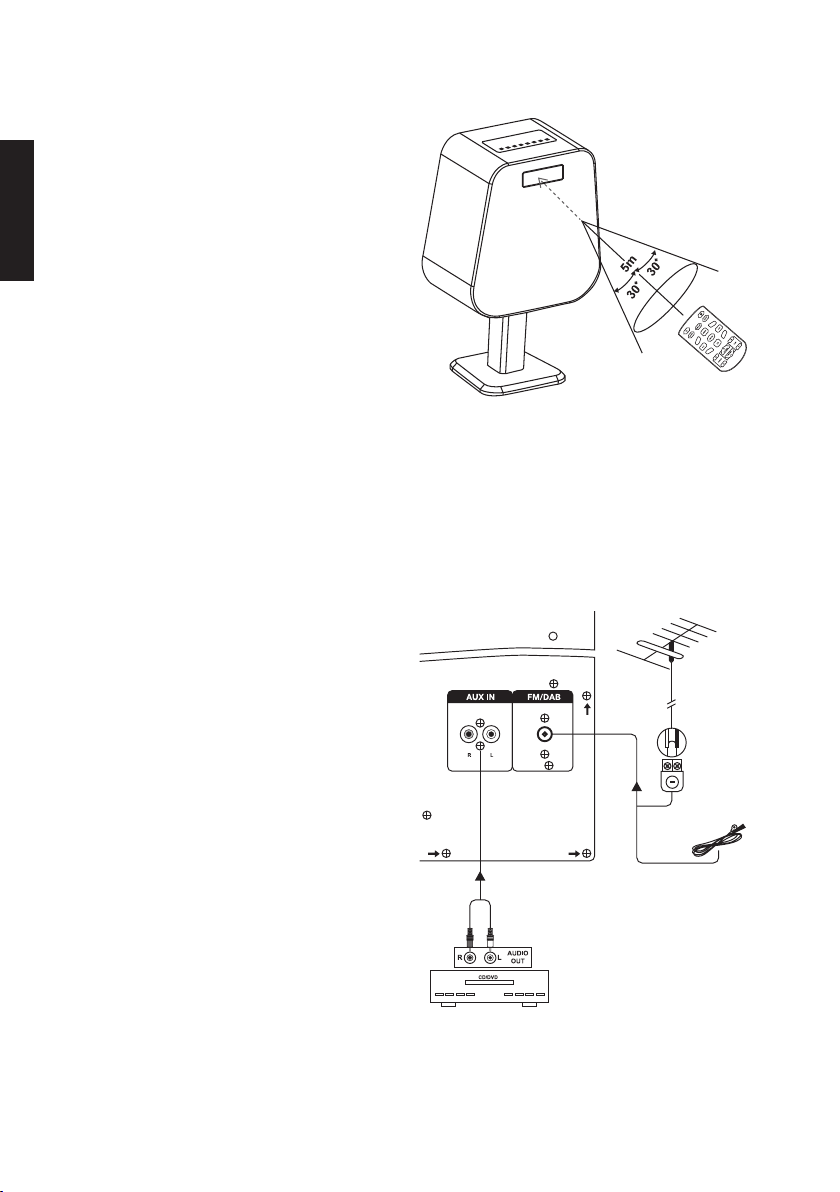
Using theremote control
Aim theremote control towards thetop
of thespeaker. Range: 5 metres within
amax 30° window.
Causes of interference:
• Intense lighting
• Obstacles between theremote
and IR sensor.
• Simultaneous use of other remotes.
• Weak batteries.
4. Assembly
The speaker comes with thefoot unattached.
• Securely screw the3 parts of thespeaker foot together by inserting thefully
threaded screws from both sides.
• Securely screw thefoot to thespeaker using thesupplied bolt.
5. Connections
Back panel connections:
AUX IN Input for external audio
sources, e.g. CD, DVD, etc.
(cable sold separately).
FM/DAB Indoor aerial connection
(included) or outdoor aerial
(sold separately).
English
7
Page 8

English
6. Operating instructions
• Connect one end of the mains lead to thespeaker and theother end to awall socket.
• Set thepower switch (12) to theON position.
• The speaker will start in standby mode, with the [ ] (1) appearing dimly lit on
thedisplay (10).
Switching thespeaker on
1. Turn thespeaker on (activate) by pressing thestandby button [ ] (1) or [ ] (15) on
theremote control.
2. The display and control panel will shine fully when thespeaker is active.
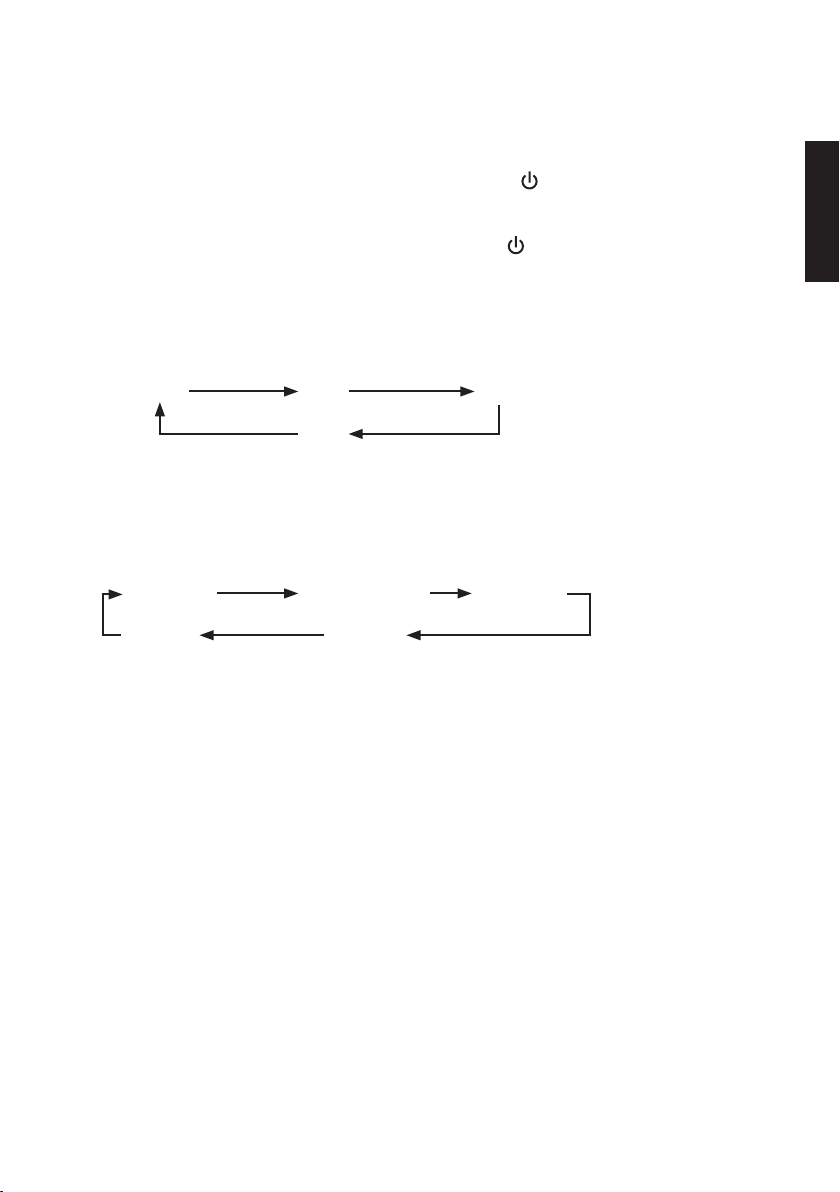
Selecting an input source
Press [ IN ] (2) or [ INPUT ] (16) therequired number of times until thedesired input
source appears.
DAB BT AUX
FM
7. Settings
Press [ SET ] (3) or [ SETUP ] (20) therequired number of times until thedesired setting
appears (sub-menu). The name of theselected setting and current setting will be
shown on thedisplay.
Set time Set sleep time Set alarm
Bass Treble
Set time (time settings)
1. Make sure that “Set time” shows on thedisplay.
2. Press [ ENTER ] (24) to begin setting thetime.
3. The hour setting will begin flashing. Set thecorrect hour using [ I◄◄ ] (17)
and [ ►►I ] (23).
4. Press [ ENTER ] (24) to confirm your selection. Set theminutes in thesame way.
5. The set time will then be displayed. Note: The clock only has a24-hour display format.
With thecontrol panel you can set thetime directly using [ I◄◄ ] (5) or [ ►►I ] (6)
in the“Set time” mode. Confirm by pressing [ SET ] (3).
Note: The time must be reset if thespeaker is turned off using thepower switch (12).
Set sleep time (automatic sleep timer settings)
1. Make sure that “Set sleep time” is shown on thedisplay.
2. Press [ ENTER ] (24) to begin setting thesleep timer.
8
Page 9

3. Select thedesired time for automatic sleep timer shut-off with [ I◄◄ ] (17)
and [ ►►I ] (23). Select between (minutes):
off → 05 → 10 → 15 → 20 → 25 → 30 → 40 → 50 → 60 → 70 → 80 → 90 → off
4. Press [ ENTER ] to confirm.
5. The icon in theupper left hand corner will appear when theautomatic sleep
timer is activated.
With thecontrol panel you can set thesleep timer directly using [ I◄◄ ] (5)
or [ ►►I ] (6) in “Set sleep time” mode. Confirm by pressing [ SET ] (3).
Set alarm (alarm settings)
1. Make sure that “Set alarm” shows on thedisplay.
2. Press [ ENTER ] (24) to begin setting thealarm time.
3. Either “ON” or “OFF” will begin flashing, select (ON) with [ I◄◄ ] (17) and[ ►►I ] (23).
4. Press [ ENTER ] (24) to begin setting the“ON” time.
5. “hour” will begin flashing on thedisplay. Set thecorrect hour using [ I◄◄ ] (17)
and [ ►►I ] (23).
6. Press [ ENTER ] to confirm the“ON” time. Set theminutes in thesame way.
7. Once thealarm time has been set and confirmed, you can set thetype of alarm.
Toggle between thevarious settings using [ I◄◄ ] and[ ►►I ]: DAB (DAB-radio)
→ BUZZER → FM (FM-radio), etc. Press [ ENTER ] to confirm your choice.
8. Turning off thealarm:
- When thealarm sounds press [ ENTER ] (24). “ON/OFF” will show on
thedisplay.
- Select (OFF) with [ I◄◄ ] (17) and [ ►►I ] (23) to turn off thealarm.
- Press [ ENTER ] (24) to confirm your selection.
With thecontrol panel you can set thealarm time directly using [ I◄◄ ] (5) or [ ►►I ] (6)
in “Set alarm” mode. Confirm by pressing [ SET ] (3).
Note: The alarm will not work if thespeaker is turned off using thepower switch (12).
English
Bass (bass settings)
• Press [ BASS + ] (26) or [ BASS - ] (26) on theremote control.
• Adjustment range ± 10 dB.
• The set bass level will be graphically shown on thedisplay.
• With thecontrol panel you can set thebass directly using [ I◄◄ ] (5) or [ ►►I ] (6)
in “Bass” mode.
Treble (treble settings)
• Press [ TREBLE + ] (18) or [ TREBLE - ] (18) on theremote control.
• Adjustment range ± 10 dB.
• The set treble level will show on thedisplay.
• With thecontrol panel you can set thetreble directly using [ I◄◄ ] (5) or [ ►►I ] (6)
in “Treble” mode.
9
Page 10

Sound
English
Volume
• Press [ ] or [ ] on thecontrolpanel to adjust thevolume.
Or:
• Press [ VOL + ] or [ VOL - ] on theremote control to adjust thevolume.
• The volume level will show on thedisplay.
Mute (temporarily turns off volume)
Press [
Press [ ] again to turn on thevolume.
] on theremote control to mute.
8. Connections
Bluetooth connection
1. Press [ IN ] (2) until “Bluetooth” appears on thedisplay.
2. After afew seconds “Scan” will appear on thedisplay. This indicates that
thespeaker is in search mode and is ready to detect other Bluetooth devices.
3. Activate Bluetooth on thedevice to be paired. Once thespeaker detects
thedevice “Connected” will appear on thedisplay. The speaker will appear under
”Detected devices” as “BDX1400”.
4. If you are prompted to enter aPIN code, enter “0000” (certain devices even require
that you approve theconnection).
5. You should now be able to hear theaudio from theconnected device through
thespeaker. Playback can now be controlled from theremote.
AUX connection
1. Connect anexternal audio source via theAUX socket (13). A cable with RCA plugs
is required to make this connection (sold separately).
2. Press [ IN ] (2) or [ INPUT ] (16) therequired number of times until “Aux” appears on
thedisplay.
9. Radio
The speaker is equipped with both FM and DAB radio.
9.1 FM-radio
Connect thesupplied FM aerial to theaerial connection (14) on theback panel.
The radio will display RDS information (Radio Data System) on thedisplay.
10
Page 11

Settings
FM
Press [ IN ] (2) or [ INPUT ] (16) therequired number of
times until FM appears. Press MENU (22) to select menu
settings: Auto scan (automatic channel search) – Scan
setting – Audio setting – System.
1. Press [ IN ] (2) or [ INPUT ] (16) therequired number of
times until “FM” appears on thedisplay.
2. The tuner will start from thelowest tuner frequency
thefirst time theFM radio is used.
Setting radio stations
Manual search: Press [ I◄◄ ] (17)/(5) or [ ►►I ] (23)/(6)
to search for astation manually.
Automatic search: Hold in one of thebuttons [ I◄◄ ] (17)/(5)
or [ ►►I ] (23)/(6) for about 3 seconds to activate automatic
station scan. Press [ MENU ] (22) to enter thesettings menu.
Press [ I◄◄ ] (17) or [ ►►I ] (23) to select thedesired function:
• Auto scan – automatic station search.
• Scan setting – selects thetype of stations to be
searched for: All stations – Strong stations only.
• Audio setting – Forced mono (forced mono during
poor reception) – Stereo allowed (stereo allowed even
during poor reception).
• System – Factory reset – SW version (current software
version).
Press [ ENTER ] (24) to confirm your selection.
English
Saving radio stations to the memory presets
You can save up to 20 radio stations presets.
A. Using Auto scan. All detected stations will then be
saved to thepresets.
B. Using manual scan.
Make sure that theradio station (frequency) you wish to
save shows on thedisplay. Saving station presets:
1. Hold in [ ►II ] (25) for about 5 sec until “Preset Store”
appears on thedisplay.
2. Select apreset slot (1–20) to save thestation in with
[ I◄◄ ] (17)/(5) or [ ►►I ] (23)/(6).
3. Press [ ENTER ] (24) to confirm your selection.
“Preset X stored” will appear in thedisplay once
thechannel is saved.
11
Page 12

Using presets
English
1. Press [ ►II ] (25), for about 5 sec until “Preset Recall”
appears on thedisplay.
2. Select thedesired preset (1–20) with [ I◄◄ ] (17)/(5)
or [ ►►I ](23)/(6).
3. Press [ ENTER ] (24) to confirm your selection.
FM radio display info
Frequency and RDS info, including channel name and
additional info will appear if available.
If no RDS info is available, “No Radio Text” appears on
thedisplay.
FM settings
FM
Press [ IN ] (2) or [ INPUT ] (16) therequired number of times until FM appears.
Press MENU (22) to select menu settings:
• Auto scan – automatic station search.
• Scan setting – selects thetype of stations to be searched for:
All stations – Strong stations only.
• Audio setting – Forced mono (forced mono during poor reception)
– Stereo allowed (stereo allowed even during poor reception).
• System – Factory reset – SW version (current software version).
9.2 DAB radio
Connect thesupplied FM aerial to theaerial connection (14) on theback panel.
The DAB radio receives DAB/DAB+/DMB-R digital radio and displays station info,
and which programme/song is being broadcast.
DAB Settings
DAB
Press [ IN ] (2) or [ INPUT ] (16) therequired number of times until DAB appears.
Press MENU (22) to select menu settings:
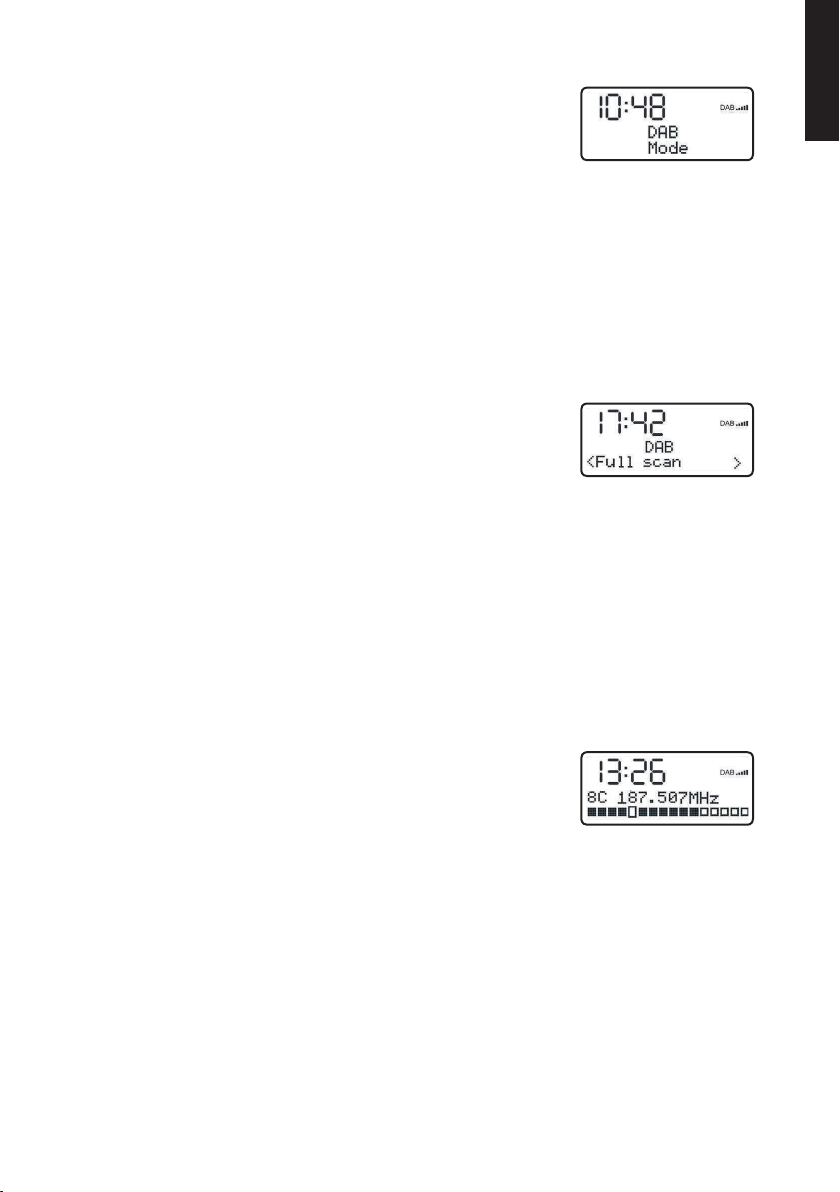
• Full scan (automatic station search)
• Manual tune (manual station search)
• DRC (Dynamic range compression) difference between off, high, low)
• Prune (remove weak stations)
• System (system settings) – System Factory reset, SW version (current software version).
Toggle through thesub-menus using [ I◄◄ ] (17) and [ ►►I ] (23). Confirm by pressing
[ ENTER ] (24).
12
Page 13
1. Press [ IN ] (2) or [ INPUT ] (16) therequired number of
times until “DAB” appears on thedisplay.
2. The first time theDAB radio is used or if thestation list/
presets are empty anautomatic station scan will be
started. You may also want to conduct amanual scan
because of thefollowing reasons:
- To save new channels.
- A current channel has disappeared or its signal is weak.
- If reception was bad for theprevious search due to adefective aerial, etc.
- If you have bad reception on thechannels you want to save or you only want
to search after channels with strong reception.
Full scan
1. Press [ MENU ] (22) and select “Full scan”.
2. Press [ ENTER ] (24) to start scanning.
3. Once scanning is complete theDAB radio will return to
thecurrently set radio station.
Removing preset channels
1. Press [ MENU ] (22) and select “Prune”.
2. “Prune?” appears. Select “Yes” to remove thehighlighted station marked
with a“?” or select ”No” to cancel.
3. Press [ ENTER ] (24) to confirm your selection.
Station selection
1. Select thedesired station from thestation list using [ I◄◄ ] (17)/(5) or [ ►►I ](23)/(6).
2. Press [ ENTER ] (24) to confirm your selection.
3. Details for thenew channel will appear on thedisplay.
English
Manual search: Press [ I◄◄ ] (17)/(5) or [ ►►I ] (23)/(6) to
search for thedesired station manually.
Saving radio stations to the memory presets
You can save up to 20 radio stations presets.
A. Using Auto scan. All detected stations will then be saved to thepresets.
B. Using manual scan.
13
Page 14

Make sure that theradio station (frequency) you wish
English
to save shows on thedisplay. Saving station presets:
1. Hold in [ ►II ] (25) for about 5 sec until “Preset Store”
appears on thedisplay.
2. Select apreset slot (1–20) to save thestation on with
[ I◄◄ ] (17)/(5) or [ ►►I ] (23)/(6).
Using presets
1. Press [ ►II ] (25), for about 5 sec until “Preset Recall”
appears on thedisplay.
2. Select thedesired preset (1–20) with [ I◄◄ ] (17)/(5)
or [ ►►I ](23)/(6).
3. Press [ ENTER ] (24) to confirm your selection.
DAB radio display info
Station name and DLS (Dynamic Label Segment)
- information broadcast from thestation, e.g. programme
name, song name and contact details. Long DLS (more
than 18 characters) is scrolled on thedisplay.
Displaying additional information
Press [ DISPLAY ] (21) repeatedly to display additional
information. DLS text, DL Plus information (if available),
signal strength, programme type, artist name, station
frequency, signal error, bit rate (transfer rate), codec/DAB
variant, time and date.
10. Care and maintenance
Unplug themains lead before cleaning theproduct.
Clean theproduct using asoft, moist cloth. Use amild detergent and never use
solvents or strong, abrasive cleaning agents for cleaning theproduct.
11. Disposal
This product should be disposed of in accordance with local regulations.
If you are unsure how to proceed, contact your local authority.
14
Page 15

12. Specifications
Voltage 220–240 V AC, 50/60 Hz
Power consumption 240 W
Standby mode power consumption ≤1 W
Bluetooth 2.1 + EDR, A2DP
DAB/DAB + DAB band III
FM 87.5–108 MHz, 50 kHz/step
Output power L/R CH 30 W + 30 W (RMS@THD = 10 % 8 ohm)
SW CH 64 W THD = (RMS@THD = 10 % 8 ohm)
Frequency range L/R CH (200 Hz – 20 kHz)
SW CH (40 – 200 Hz)
Sensitivity L/R: 600 mV.
SW: 160 mV.
S/N ≥ 70 dB
Remote control range 5 metres within max 30°
Size 527×285×800 mm
English
15
Page 16

Bluetooth-högtalare med FM/DAB
Art.nr 38-5698 Modell BDX1400
Läs igenom hela bruksanvisningen före användning och spara den sedan för framtida
bruk. Vi reserverar oss för ev. text- och bildfel samt ändringar av tekniska data.
Vid tekniska problem eller andra frågor, kontakta vår kundtjänst (se adressuppgifter
Svenska
på baksidan).
Innehållsförteckning
1. Säkerhet ..................................................................................... 17
2. Produktbeskrivning .................................................................. 17
3. Knappar och funktioner ...........................................................18
4. Montering ..................................................................................20
5. Anslutningar .............................................................................. 20
6. Användning ...............................................................................21
7. Inställningar .............................................................................21
Ljud ...........................................................................................................22
8. Anslutningar .............................................................................. 23
Bluetooth-anslutning .............................................................................23
AUX-anslutning ......................................................................................23
9. Radio .........................................................................................23
9.1 FM-radio ............................................................................................23
Settings (inställningar) ..................................................................................................... 23
Inställning av önskad radiofrekvens .............................................................................. 24
Spara radiofrekvens i minnet .......................................................................................... 24
Lyssna på en sparad radiofrekvens ................................................................................ 24
Information på displayen vid FM-lyssning .................................................................... 24
Settings (FM-inställningar).............................................................................................. 25
9.2 DAB-radio ..........................................................................................25
Settings (DAB-inställningar) ............................................................................................ 25
Gör en fullständig sökning ............................................................................................... 26
Ta bort frekvenser som har hittats men som inte fungerar ........................................ 26
Välj önskad frekvens ........................................................................................................ 26
Spara radiofrekvens i minnet .......................................................................................... 26
Lyssna på en sparad radiofrekvens ................................................................................ 26
Information på displayen vid DAB-lyssning .................................................................. 27
10. Skötsel och underhåll.............................................................27
11. Avfallshantering .....................................................................27
12. Specifikationer ........................................................................27
16
Page 17

1. Säkerhet
• Följ instruktionerna i bruksanvisningen och beakta alla varningar.
• Placera inte produkten så att den kan falla ner i vatten eller annan vätska. Ställ inte
heller några föremål som innehåller vätska på produkten, t.ex. en blomvas eller dryck.
• Ventilationsöppningarna får inte blockeras. Säkerställ tillräcklig luftcirkulation för att
förhindra överhettning. Se till att produkten placeras så att luften obehindrat kan
cirkulera runt den och att inte värmeelement eller liknande värmekällor finns i närheten.
• Produkten får endast repareras av kvalificerad servicepersonal.
• Produkten får inte demonteras eller ändras. Farlig spänning finns oskyddad på
komponenter inuti produktens hölje. Kontakt med dessa kan leda till brand eller
ge elektriska stötar.
• Produkten är avsedd endast för inomhusbruk.
• Utsätt aldrig produkten för höga temperaturer, dammig miljö, starka vibrationer,
stötar, fukt eller väta.
• Nätsladden bör regelbundet kontrolleras. Använd aldrig produkten om nätsladden
eller stickproppen är skadade eller när den inte fungerar normalt.
• Om nätsladden skadats får den, för att risk för elektrisk stöt eller brand ska undvikas,
endast bytas av tillverkaren, dess serviceställe eller av kvalificerad servicepersonal.
• Placera aldrig nätsladden över heta ytor eller över skarpa kanter och hörn. Se till
att nätsladden placeras så att man inte går eller trampar på den.
• Använd endast stativet som medföljer. Placera produkten så att den inte riskerar
att falla omkull.
• Bryt strömmen till produkten genom att dra stickproppen ur vägguttaget vid
åskväder och när den inte ska användas under en tid. Produktens stickpropp
måste vara lättåtkomlig.
Svenska
2. Produktbeskrivning
• Kraftfull 3-vägshögtalare med inbyggd 8″ subwoofer (2×40 W + 1×80 W).
• Trådlös uppspelning via Bluetooth (A2DP apt-X).
• Klocka med väckning.
• DAB+/FM-radio samt AUX-ingång.
• Levereras med fjärrkontroll och löstagbar fot.
17
Page 18
3. Knappar och funktioner
Kontrollpanel och display
1
2 3 4 5 6 7 8
Svenska
9
1. [ ] Standby
2. [ IN ] Ingångsväljare Bluetooth, AUX, FM/DAB
3. [ SET ] Inställningar
4. [ ►II ] Play/pause
5. [ I◄◄ ] Föregående spår/snabbspola bakåt/tidsinställning
6. [ ►►I ] Nästa spår/snabbspola framåt/tidsinställning
] Minska volymen
7. [
8. [ ] Öka volymen
9. IR-mottagare (till fjärrkontroll)
10. Display
10
Baksida
11. AC-anslutning för nätsladd
12. Strömbrytare
13. AUX-ingång för extern
ljudkälla
14. Antenningång
AUX IN FM/DAB
R L
11 12 1413
18
Page 19

Fjärrkontroll
15. [
] Standby
16. [ INPUT ] Ingångsväljare
17. [ I◄◄ ] Föregående spår/snabbspola
bakåt/tidsinställning
18. [ TREBLE +/- ] Diskantinställning
19. [ ] Stäng av ljudet tillfälligt
20. [ SETUP ] Inställning av tid och alarm
21. [ DISPLAY ] Inställning av display
22. [ MENU ] FM/DAB
23. [ ►►I ] Nästa spår/snabbspola
framåt/tidsinställning
24. [ ENTER ] Bekräfta val
25. [ ►II ] Play/pause/spara
radiofrekvens i minnet
26. [ BASS +/- ] Basinställning
27. [ VOLUME +/- ] Volymkontroll
Sätt i batterier i fjärrkontrollen
15
16
17
18
INPUT
+
TREBLE
DISPLAY
MENU
ENTER
+
VOLUME
VOLUME
SETUP
BASS
19
20
21
Svenska
22
23
24
25
+
26
27
1. Tryck in spärren på batterihållaren och dra ut batterihållaren.
2. Sätt i 1×CR2025-batteri enligt märkningen i batterihållaren.
3. Tryck in batterihållaren.
Obs!
• Använd endast rätt typ av batteri och vänd det rätt.
• Utsätt inte fjärrkontrollen för slag eller stötar.
• Ta ur batterierna om fjärrkontrollen inte ska användas under en längre period.
19
Page 20
Användning av fjärrkontrollen
Rikta fjärrkontrollen mot övre delen av
högtalaren. Räckvidd 5 m inom
max 30° vinkel.
Fjärrkontrollens räckvidd försämras av:
• Stark belysning.
Svenska
• Hinder mellan fjärrkontrollen och
IR-sensorn.
• Om andra fjärrkontroller används
samtidigt.
• Dåligt batteri i fjärrkontrollen.
4. Montering
Högtalaren levereras med foten omonterad.
• Skruva ihop fotens 3 delar med de medföljande helgängade skruvarna
från båda sidorna.
• Skruva fast foten på högtalaren med den medföljande bulten.
5. Anslutningar
Anslutningar på baksidan:
AUX IN Ingång för extern ljudkälla,
t.ex. CD- eller DVD-spelare
(kabel säljs separat).
FM/DAB Anslutning för inomhusantenn (medföljer) eller utomhusantenn
(säljs separat).
20
Page 21
6. Användning
• Anslut nätsladden till högtalaren och till ett eluttag.
• Ställ strömbrytaren (12) i läge ON.
• Högtalaren startar i standbyläge, displayen (10) och [ ] (1) lyser svagt.
Slå på högtalaren
1. Slå på högtalaren (aktivera) med standbyknappen [ ] på kontrollpanelen (1)
eller fjärrkontrollen (15).
2. Displayen och kontrollpanelen på ovansidan lyser starkare när högtalaren är aktiv.
Välj ljudkälla
Tryck på [ IN ] (2) eller [ INPUT ] (16) upprepade gånger för att välja önskad ljudkälla.
DAB BT AUX
FM
7. Inställningar
Tryck på [ SET ] (3) eller [ SETUP ] (20) upprepade gånger för att välja önskad inställning
(undermeny). Benämning på vald inställning och aktuell inställning visas på displayen.
Set time Set sleep time Set alarm
Bass Treble
Set time (ställ in klockan)
1. Se till att ”Set time” visas på displayen.
2. Tryck på [ ENTER ] (24) för att bekräfta att tiden ska ställas in.
3. Timangivelsen blinkar på displayen. Ställ in rätt timme med [ I◄◄ ] (17) och [ ►►I ] (23).
4. Tryck på [ ENTER ] (24) för att bekräfta. Ställ in minuter på samma sätt.
5. Inställd tid visas på displayen. Klockan har 24-timmarsvisning.
På kontrollpanelen går det att ställa in tiden direkt med [ I◄◄ ] (5) eller [ ►►I ] (6) i läge
”Set time”. Bekräfta med [ SET ] (3).
Obs! Klockan måste ställas in igen om högtalaren har varit avstängd med strömbrytaren (12).
Svenska
Set sleep time (automatisk avstängning efter inställd tid)
1. Se till att ”Set sleep time” visas på displayen.
2. Tryck på [ ENTER ] (24) för att bekräfta att automatisk avstängning ska ställas in.
3. Ställ in önskad tid till automatisk avstängning med [ I◄◄ ] (17) och [ ►►I ] (23).
Stega mellan de olika inställningarna (minuter):
off → 05 → 10 → 15 → 20 → 25 → 30 → 40 → 50 → 60 → 70 → 80 → 90 → off
4. Tryck på [ ENTER ] för att bekräfta.
5. En ikon visas i övre vänstra hörnet av displayen när automatisk avstängning är aktiverad.
21
Page 22

På kontrollpanelen går det att ställa in ”sleep time” direkt med [ I◄◄ ] (5) eller [ ►►I ] (6)
i läge ”Set sleep time”. Bekräfta med [ SET ] (3).
Set alarm (ställ in alarm)
1. Se till att ”Set alarm” visas på displayen.
2. Tryck på [ ENTER ] (24) för att bekräfta att alarm ska ställas in.
3. ”ON” eller ”OFF” blinkar, välj tillslag (ON) med [ I◄◄ ] (17) och [ ►►I ] (23).
4. Tryck på [ ENTER ] (24) för att bekräfta tillslag.
Svenska
5. ”hour” blinkar på displayen. Ställ in rätt timme med [ I◄◄ ] (17) och [ ►►I ] (23).
6. Tryck på [ ENTER ] för att bekräfta tillslagstid. Ställ in minuter på samma sätt.
7. När tiden är inställd och bekräftad ska du välja alarmljud. Stega mellan de olika
inställningarna med [ I◄◄ ] och [ ►►I ]: DAB (DAB-radio) → BUZZER (summer)
→ FM (FM-radio) etc. Tryck på [ ENTER ] för att bekräfta valet.
8. När alarmet ljuder, stäng av så här:
- Tryck på [ ENTER ] (24). ”ON/OFF” visas på displayen.
- Välj frånslag (OFF) med [ I◄◄ ] (17) och [ ►►I ] (23) för att stänga av alarmet.
- Tryck på [ ENTER ] (24) för att bekräfta.
På kontrollpanelen går det att ställa in alarmtiden direkt med [ I◄◄ ] (5) eller [ ►►I ] (6)
i läge ”Set alarm”. Bekräfta med [ SET ] (3).
Obs! Alarmet fungerar inte om högtalaren är avstängd med strömbrytaren (12).
Bass (ställ in basåtergivning)
• Tryck på [ BASS + ] (26) eller [ BASS - ] (26) på fjärrkontrollen.
• Justeringsområde ± 10 dB.
• Inställd bas visas grafiskt på displayen.
• På kontrollpanelen går det att ställa in basåtergivningen direkt med
[ I◄◄ ] (5) eller [ ►►I ] (6) i läge ”Bass”.
Treble (ställ in diskant)
• Tryck på [ TREBLE + ] (18) eller [ TREBLE - ] (18) på fjärrkontrollen.
• Justeringsområde ± 10 dB.
• Inställd diskant visas grafiskt på displayen.
• På kontrollpanelen går det att ställa in diskantåtergivningen direkt med
[ I◄◄ ] (5) eller [ ►►I ] (6) i läge ”Treble”.
Ljud
Ställ in volym
• Tryck på [ ] eller [ ] på kontrollpanelen för att justera volymen.
Eller:
• Tryck på [ VOL + ] eller [ VOL - ] på fjärrkontrollen för att justera volymen.
• Inställd volym visas grafiskt på displayen.
Stäng av ljudet tillfälligt (mute)
Tryck på [ ] på fjärrkontrollen en gång för att stänga av ljudet helt.
Tryck på [ ] en gång till för att slå på ljudet igen.
22
Page 23

8. Anslutningar
Bluetooth-anslutning
1. Tryck på [ IN ] (2) på kontrollpanelen tills ”Bluetooth” visas på displayen.
2. Efter några sekunder visas ”Scan” på displayen, det visar att högtalaren
är i sökläge och kan hittas av andra Bluetooth-enheter.
3. Aktivera Bluetooth-sökning på den andra enheten. När högtalaren är ansluten
till den andra enheten visas ”Connected” på displayen. Högtalaren visas under
”Hittade enheter” som ”BDX1400”.
4. Om du uppmanas att ange en PIN-kod, ange ”0000” (vissa enheter kräver också
att du godkänner anslutningen).
5. Nu går det att lyssna till ljudet från den anslutna enheten genom högtalaren.
Uppspelningen kan styras från fjärrkontrollen.
AUX-anslutning
1. Anslut en extern ljudkälla till AUX-anslutningen (13). Kabel med RCA-kontakter
behövs (säljs separat).
2. Tryck på [ IN ] (2) eller [ INPUT ] (16) upprepade gånger tills ”Aux” visas på displayen.
9. Radio
Högtalaren har både FM- och DAB-radio.
9.1 FM-radio
Anslut bifogad FM-antenn till antennanslutningen (14) på högtalarens baksida.
Radion visar RDS-information (Radio Data System) på displayen.
Svenska
Settings (inställningar)
Välj ljudkälla FM
Tryck på [ IN ] (2) eller [ INPUT ] (16) upprepade gånger för att välja FM.
Tryck på [ MENU ] (22) för att välja: Auto scan (automatisk frekvenssökning) – Scan setting (sökinställningar) – Audio setting – System.
1. Tryck på [ IN ] (2) eller [ INPUT ] (16) upprepade
gånger tills ”FM” visas på displayen.
2. Första gången som FM används visas den lägsta
FM-frekvensen.
23
Page 24

Inställning av önskad radiofrekvens
Manuell sökning: Tryck på [ I◄◄ ] (17)/(5) eller [ ►►I ] (23)/(6) för att söka efter
önskad frekvens.
Automatisk sökning: Håll in en av knapparna [ I◄◄ ] (17)/(5) eller [ ►►I ] (23)/(6)
i ca 3 sekunder för att starta automatisk frekvenssökning.
Tryck på [ MENU ] (22) för att öppna inställningsmeny. Tryck på [ I◄◄ ] (17) eller [ ►►I ] (23)
för att välja önskad funktion:
Svenska
• Auto scan – automatisk frekvenssökning.
• Scan setting – välj vilka frekvenser som ska sökas: All stations (sök alla frekvenser)
– Strong stations only (sök endast starka frekvenser).
• Audio setting – Forced mono (mono vid svag signal)
– Stereo allowed (stereo tillåten även vid svag signal).
• System – Factory reset (återställning till fabriksinställning)
– SW version (aktuell programvaruversion).
Tryck sedan på [ ENTER ] (24) för att bekräfta.
Spara radiofrekvens i minnet
Det går att spara upp till 20 radiofrekvenser i minnet.
A. Gör en automatisk frekvenssökning (Auto scan). Hittade frekvenser sparas i minnet.
B. Spara radiofrekvenser manuellt.
Se till att den radiofrekvens som ska sparas visas på displayen. Spara den i minnet så här:
1. Håll in [ ►II ] (25) tills ”Preset Store” visas på displayen
i ca 5 sekunder.
2. Välj snabbt på vilken plats som frekvensen ska sparas
(1–20) med [ I◄◄ ] (17)/(5) eller [ ►►I ] (23)/(6).
3. Tryck sedan på [ ENTER ] (24) för att bekräfta.
”Preset X stored” visas på displayen när frekvensen
är sparad.
Lyssna på en sparad radiofrekvens
1. Tryck på [ ►II ] (25), displayen visar ”Preset Recall”
i ca 5 sekunder.
2. Välj snabbt önskad frekvens (1–20) med [ I◄◄ ] (17)/(5)
eller [ ►►I ] (23)/(6).
3. Tryck sedan på [ ENTER ] (24) för att bekräfta.
Information på displayen vid FM-lyssning
Frekvensen visas, om RDS-information finns visas kanalnamnet
och övrig RDS-information.
Om ingen RDS-information finns visas ”No Radio Text”
på displayen.
24
Page 25

Settings (FM-inställningar)
Välj ljudkälla FM
Tryck på [ IN ] (2) eller [ INPUT ] (16) upprepade gånger för att välja FM.
Tryck på [ MENU ] (22) för att välja:
• Auto scan – automatisk frekvenssökning
• Scan setting – välj vilka frekvenser som ska sökas: ”All stations” (sök alla frekvenser)
eller ”Strong stations only” (sök endast starka frekvenser).
• Audio setting – ”Forced mono” (mono vid svag signal), ”Stereo allowed” (stereo
tillåtet även vid vid svag signal).
• System- ”Factory reset” (återställning till fabriksinställning), ”SW version” (visar
installerad programvaruversion).
9.2 DAB-radio
Anslut bifogad antenn till antennanslutningen (14) på högtalarens baksida.
DAB-radion tar emot DAB/DAB+/DMB-R digitalradio och visar information om
frekvensen, och om programmet/musiken som spelas.
Settings (DAB-inställningar)
Välj ljudkälla DAB
Tryck på [ IN ] (2) eller [ INPUT ] (16) upprepade gånger för att välja DAB.
Tryck på [ MENU ] (22) för att välja:
• Full scan (automatisk frekvenssökning)
• Manual tune (manuell frekvenssökning)
• DRC (Dynamic range compression) (skillnad mellan off, high, low)
• Prune (ta bort svaga frekvenser)
• System (systeminställningar) – System Factory reset (återställning till
fabriksinställning), SW version (visar installerad programvaruversion).
Navigera i undermenyerna med [ I◄◄ ] (17) och [ ►►I ] (23). Bekräfta med [ ENTER ] (24).
Svenska
1. Tryck på [ IN ] (2) eller [ INPUT ] (16) upprepade gånger
tills ”DAB” visas på displayen.
2. Första gången DAB-radion används eller om frekvenslistan är tom, genomför
radion en frekvenssökning. Du kan också behöva göra en manuell sökning p.g.a.
någon av följande orsaker:
- Nya frekvenser tillkommer hela tiden.
- Frekvenser försvinner eller kan inte längre tas emot.
- Om inte mottagningen var god vid föregående frekvenssökning, t.ex. dålig antenn.
- Om du har dålig mottagning av vissa frekvenser och du endast vill söka efter
starka frekvenser.
25
Page 26

Gör en fullständig sökning
1. Tryck på [ MENU ] (22) och välj ”Full scan”.
2. Tryck sedan på [ ENTER ] (24) för att bekräfta och
starta sökningen.
3. När sökningen är färdig återgår DAB-radion till den
senast avlyssnade frekvensen.
Svenska
Ta bort frekvenser som har hittats men som inte fungerar
1. Tryck på [ MENU ] (22) och välj ”Prune”.
2. ”Prune?” markera ”Yes” för att ta bort frekvenserna som är markerade med ”?”
eller markera ”No” för att avbryta.
3. Tryck sedan på [ ENTER ] (24) för att bekräfta.
Välj önskad frekvens
1. Välj önskad frekvens från frekvenslistan med [ I◄◄ ] (17)/(5) eller [ ►►I ] (23)/(6).
2. Tryck sedan på [ ENTER ] (24) för att bekräfta.
3. Detaljerna för den nya frekvensen visas på displayen.
Manuell sökning: Tryck på [ I◄◄ ] (17)/(5) eller
[ ►►I ] (23)/(6) eller för att leta efter önskad frekvens.
Spara radiofrekvens i minnet
Det går att spara upp till 20 radiofrekvenser i minnet.
A. Gör en automatisk frekvenssökning (Auto scan).
Hittade frekvenser sparas i minnet.
B. Spara radiofrekvenser manuellt.
Se till att den radiofrekvens som ska sparas visas på
displayen. Spara den i minnet så här:
1. Håll in [ ►II ] (25) tills ”Preset Store” visas på displayen
i ca 5 sekunder.
2. Välj snabbt på vilken plats som frekvensen ska sparas
(1–20) med [ I◄◄ ] (17)/(5) eller [ ►►I ] (23)/(6).
Lyssna på en sparad radiofrekvens
1. Tryck på [ ►II ] (25), displayen visar ”Preset Recall”
i ca 5 sekunder.
2. Välj snabbt önskad frekvens (1–20) med [ I◄◄ ] (17)/(5)
eller [ ►►I ] (23)/(6).
3. Tryck sedan på [ ENTER ] (24) för att bekräfta.
26
Page 27

Information på displayen vid DAB-lyssning
Frekvensens namn visas och DLS (Dynamic Label Segment) - information som sänds ut från frekvensen, t.ex.
programnamn, melodinamn och kontaktdetaljer. Lång DLS
(längre än 18 tecken) skrollas på displayen.
Visa ytterligare information
Tryck på [ DISPLAY ] (21) upprepade gånger för att visa
ytterligare information. DLS-text, DL Plus-information (om
det är tillgängligt), signal strength (signalstyrka), programtyp, artistnamn, frekvens, signalfel, bit rate (överföringshastighet), codec/DAB-variant, tid och datum.
10. Skötsel och underhåll
Dra ur stickproppen före rengöring. Torka av produkten med en lätt fuktad, mjuk trasa.
Använd ett milt rengöringsmedel, aldrig lösningsmedel eller starka, slipande rengöringsmedel.
11. Avfallshantering
När du ska göra dig av med produkten ska detta ske enligt lokala föreskrifter.
Är du osäker på hur du ska gå tillväga, kontakta din kommun.
12. Specifikationer
Strömförsörjning 220–240 V AC, 50/60 Hz
Effektförbrukning 240 W
Effektförbrukning (i standbyläge) ≤ 1 W
Bluetooth 2.1 + EDR, A2DP
DAB/DAB + DAB band III
FM 87,5–108 MHz, 50 kHz/steg
Uteffekt L/R CH 30 W + 30 W (RMS@THD = 10 % 8 ohm)
SW CH 64 W THD = (RMS@THD = 10 % 8 ohm)
Frekvensområde L/R CH (200 Hz – 20 kHz)
SW CH (40 – 200 Hz)
Känslighet L/R: 600 mV
SW: 160 mV
S/N ≥ 70 dB
Fjärrkontroll, räckvidd 5 meter vid vinkel max 30°
Mått 527×285×800 mm
Svenska
27
Page 28

Bluetooth-høyttaler med FM/DAB
Art. nr. 38-5698 Modell BDX1400
Les brukerveiledningen grundig før produktet tas i bruk og ta vare på den for framtidig
bruk. Vi reserverer oss mot ev. feil i tekst og bilde, samt forandringer av tekniske data.
Ved tekniske problemer eller spørsmål, ta kontakt med vårt kundesenter.
(Se opplysninger om kundesenteret i denne bruksanvisningen).
Innholdsfortegnelse
1. Sikkerhet .................................................................................... 29
2. Produktbeskrivelse ..................................................................29
Norsk
3. Knapper og funksjoner ............................................................. 30
4. Montering ..................................................................................32
5. Tilkoblinger ................................................................................ 32
6. Bruk ............................................................................................33
7. Innstillinger ..............................................................................33
Lyd ............................................................................................................34
8. Tilkoblinger ................................................................................ 35
Bluetooth-tilkobling ...............................................................................35
AUX-tilkobling .........................................................................................35
9. Radio .........................................................................................35
9.1 FM-radio ............................................................................................35
Settings (innstillinger) ...................................................................................................... 35
Innstilling av ønsket radiostasjon .................................................................................. 36
Lagre radiokanaler i minnet............................................................................................. 36
Lytte til lagrede radiokanaler .......................................................................................... 36
Når man lytter til FM kommer det informasjon opp på displayet .............................. 36
Settings (FM-innstillinger) ............................................................................................... 37
9.2 DAB-radio ..........................................................................................37
Settings (DAB-innstillinger) ............................................................................................. 37
Foreta et fullstendig s
Fjerne kanaler som ikke fungerer .................................................................................. 38
Velg ønsket kanal ............................................................................................................. 38
Lagre radiokanaler i minnet............................................................................................. 38
Lytte til lagrede radiokanaler .......................................................................................... 38
Når man lytter til DAB kommer det informasjon opp på displayet ............................ 39
10. Stell og vedlikehold ................................................................39
11. Avfallshåndtering ................................................................... 39
12. Spesifikasjoner .......................................................................39
øk ................................................................................................. 38
28
Page 29

1. Sikkerhet
• Følg bruksanvisningen og vær spesielt oppmerksom på alle advarsler.
• Plasser ikke produktet slik at det kan komme i kontakt med vann eller annen væske.
Plasser aldri produktet nær gjenstander som kan føre til at væske skylles over det.
• Ventilasjonsåpningene må ikke tildekkes. Sørg for god luftsirkulasjon rundt produktet.
Dette for å hindre overoppheting. Pass på at produktet plasseres slik at luften kan
sirkulere uhindret rundt det og at det ikke står for nær varmeovner eller liknende.
• Produktet må kun repareres av kyndig servicepersonell.
• Produktet må ikke demonteres eller forandres på. Farlig spenning ligger ubeskyttet
på visse komponenter under produktets deksel. Kontakt med disse kan føre til
brann eller gi elektriske støt.
• Produktet er kun beregnet for innendørs bruk.
• Utsett aldri produktet for høye temperaturer, fuktighet, støvete omgivelser, sterke
vibrasjoner eller støt.
• Strømledningen bør kontrolleres regelmessig. Produktet må ikke tas i bruk hvis
strømledning, støpsel eller annet er skadet eller ikke fungerer som det skal.
• Dersom strømledningen er skadet skal den, for å unngå elektrisk støt eller brann,
skiftes av produsenten, på et serviceverksted eller av annen kyndig serviceperson.
• Sørg for at strømledningen aldri kommer i kontakt med varme flater eller skarpe
kanter eller hjørner. Påse at strømledningen plasseres slik at man ikke går eller
tramper på den.
• Bruk kun det stativet som følger med produktet. Plasser produktet slik at det ikke velter.
• Bryt strømmen til produktet, ved å trekke støpselet ut av strømuttaket, ved tordenvær
eller når det ikke skal brukes på en stund. Apparatets støpsel må være lett tilgjengelig.
2. Produktbeskrivelse
• Kraftig 3-veishøyttaler med innebygd 8″ subwoofer (2×40 W – 1×80 W).
• Trådløs avspilling via Bluetooth (A2DP apt-X).
• Klokke med vekking.
• DAB+/FM-radio samt AUX-inngang.
• Leveres med fjernkontroll og avtakbar fot.
Norsk
29
Page 30

3. Knapper og funksjoner
Kontrollpanel og display
1
2 3 4 5 6 7 8
Norsk
9
1. [ ] Standby
2. [ IN ] Inngangsvelger Bluetooth, AUX, FM/DAB
3. [ SET ] Innstillinger
4. [ ►II ] Play/pause
5. [ I◄◄ ] Foregående spor/hurtigspole bakover/tidsinnstilling
6. [ ►►I ] Neste spor/hurtigspole framover/tidsinnstilling
] Redusere volumet
7. [
8. [ ] Heve volumet
9. IR-mottaker for fjernkontroll
10. Display
Bakside
11. AC-tilkoblingspunkt
for strømledning
12. Strømbryter
13. AUX-inngang for
ekstern lydkilde
14. Antenneinngang
10
AUX IN FM/DAB
R L
11 12 1413
30
Page 31

Fjernkontroll
15. [
] Standby
16. [ INPUT ] Inngangsvelger
17. [ I◄◄ ] Foregående spor/hurtigspole
bakover/tidsinnstilling
18. [ TREBLE +/- ] Diskantinnstilling
19. [ ] Steng lyden midlertidig
20. [ SETUP ] Innstilling av tid og alarm
21. [ DISPLAY ] Innstilling av display
22. [ MENU ] FM/DAB
23. [ ►►I ] Neste spor/hurtigspole framover/
tidsinnstilling
24. [ ENTER ] Bekrefter valg
25. [ ►II ] Play/pause/lagre radiokanal i minnet
26. [ BASS +/- ] Innstilling av bass
27. [ VOLUME +/- ] Volumkontroll
Sett batterier i fjernkontrollen
15
16
17
18
INPUT
+
TREBLE
DISPLAY
MENU
ENTER
+
VOLUME
VOLUME
SETUP
BASS
19
20
21
22
23
24
25
+
Norsk
26
27
1. Trykk inn sperren på batteriholderen og trekk holderen ut.
2. Plasser 1×CR2025-batteri i holderen. Følg merkingen for riktig plassering av poler.
3. Skyv holderen inn igjen.
Obs!
• Bruk den batteritypen som er beskrevet i brukerveiledningen og plasser
det riktig i holderen.
• Utsett ikke fjernkontrollen for slag eller støt.
• Ta ut batteriet dersom produktet ikke skal brukes over tid.
31
Page 32

Bruk av fjernkontrollen
Vend fjernkontrollen mot den øvre delen
av høyttaleren. Rekkevidden er 5 meter
og maks vinkel på 30°.
Fjernkontrollens rekkevidde kan
forstyrres av:
• Sterk belysning.
• Hindringer mellom fjernkontroll
og IR-sensor.
• Andre fjernkontroller som brukes
samtidig med denne.
• Dårlig batteri i fjernkontrollen.
Norsk
4. Montering
Høyttaleren leveres med foten umontert.
• Skru sammen de 3 delene til foten med de helgjengede medfølgende skruene.
Skru inn fra begge sider.
• Fest foten til høyttaleren med medfølgende bolt.
5. Tilkoblinger
Koblingspunkter på baksiden:
AUX IN Inngang for ekstern lydkilde,
f.eks. CD- eller DVD-spiller
(kabel selges separat).
FM/DAB Tilkobling for innendørsantenne
(medfølger) eller utendørsantenne
(selges separat).
32
Page 33

6. Bruk
• Strømledningen kobles til høyttaleren og deretter til et strømuttak.
• Still strømbryteren (12) på ON.
• Høyttaleren starter i standbymodus. Displayet (10) og [ ] (1) lyser svakt.
Slå på høyttaleren
1. Slå på høyttaleren (aktiver) med standbyknappen [ ] (1) eller på fjernkontrollen [ ] (15).
2. Displayet og kontrollpanelet på oversiden lyser sterkere når høyttaleren er aktiv.
Velg lydkilde
Trykk på [ IN ] (2) eller [ INPUT ] (16) gjentatte ganger for å velge ønsket lydkilde.
DAB BT AUX
FM
7. Innstillinger
Trykk på [ SET ] (3) eller [ SETUP ] (20) gjentatte ganger for å velge ønsket innstilling
(undermeny). Benevning på valgt innstilling og aktuell innstilling vises på displayet.
Set time Set sleep time Set alarm
Bass Treble
Set time (stille inn klokken)
1. Påse at «Set time» vises på displayet.
2. Trykk på [ ENTER ] (24) for å bekrefte at tiden skal stilles inn.
3. Timeangivelsen blinker i displayet. Still inn riktig time med [ I◄◄ ] (17) eller [ ►►I ] (23).
4. Trykk på [ ENTER ] (24) for å bekrefte. Still inn minutter på samme måte.
5. Innstilt tid vises på displayet. Klokken har 24-timers vising.
På kontrollpanelet kan man stille inn tiden direkte med [ I◄◄ ] (5) eller [ ►►I ] (6)
under «Set time». Bekrefte med [ SET ] (3).
Obs! Klokken må stilles inn på nytt hvis høyttaleren har vært avstengt med
strømbryteren (12).
Set sleep time (automatisk avstenging etter innstilt tid)
1. Påse at «Set sleep time» vises på displayet.
2. Trykk på [ ENTER ] (24) for å bekrefte at automatisk avstenging skal stilles inn.
3. Still inn ønsket tid for automatisk avstenging med [ I◄◄ ] (17) og [ ►►I ] (23).
Man kan veksle mellom de forskjellige innstillingene (minutter):
off → 05 → 10 → 15 → 20 → 25 → 30 → 40 → 50 → 60 → 70 → 80 → 90 → off
4. Trykk på [ ENTER ] for å bekrefte.
5. Et ikon vises i det øvre venstre hjørnet på displayet når automatisk avstenging er aktivert.
Norsk
33
Page 34

På kontrollpanelet kan man stille inn «sleep time» direkte med [ I◄◄ ] (5) eller [ ►►I ] (6)
under «Set sleep time». Bekrefte med [ SET ] (3).
Set alarm (still inn alarmen)
1. Påse at «Set alarm» vises på displayet.
2. Trykk på [ ENTER ] (24) for å bekrefte at alarmen skal stilles inn.
3. «ON» eller «OFF» blinker. Velg tilslag (ON) med [ I◄◄ ] (17) og [ ►►I ] (23).
4. Trykk på [ ENTER ] (24) for å bekrefte tilslag.
5. «hour» blinker i displayet. Still inn riktig time med [ I◄◄ ] (17) eller [ ►►I ] (23).
6. Trykk på [ ENTER ] for å bekrefte tid for tilslag. Still inn minutter på samme måte.
7. Når tiden er innstilt og bekreftet, skal alarmlyden stilles inn. Forflytting mellom
innstillingene med [ I◄◄ ] og [ ►►I ]: DAB (DAB-radio) → BUZZER (summer)
→ FM (FM-radio) etc. Trykk på [ ENTER ] for å bekrefte.
8. Når alarmen varsler skrues den av slik:
Norsk
- Trykk på [ ENTER ] (24). «ON/OFF» vises på displayet.
- Velg fraslag (OFF) med [ I◄◄ ] (17) og [ ►►I ] (23) for å skru av alarmen.
- Trykk på [ ENTER ] (24) for å bekrefte.
På kontrollpanelet kan man stille inn alarmtiden direkte med [ I◄◄ ] (5) eller [ ►►I ] (6)
under «Set alarm». Bekrefte med [ SET ] (3).
Obs! Alarmen virker ikke hvis høyttaleren er skrudd av med strømbryteren (12).
Bass (still inn bassgjengivelsen)
• Trykk på [ BASS + ] (26) eller [ BASS - ] (26) på fjernkontrollen.
• Justeringsområde ± 10 dB.
• Innstilt bass vises grafisk på displayet.
• På kontrollpanelet kan man stille inn bassgjengivelsen direkte med
[ I◄◄ ] (5) eller [ ►►I ] (6) under «Bass».
Treble (still inn diskanten)
• Trykk på [ TREBLE + ] (18) eller [ TREBLE - ] (18) på fjernkontrollen.
• Justeringsområde ± 10 dB.
• Innstilt diskant vises grafisk på displayet.
• På kontrollpanelet kan man stille inn diskantgjengivelsen direkte med
[ I◄◄ ] (5) eller [ ►►I ] (6) under «Treble».
Lyd
Still inn volumet
• Trykk på [ ] eller [ ] på kontrollpanelet for å justere volumet.
Eller:
• Trykk på [ VOL+ ] eller [ VOL- ] på fjernkontrollen for å justere volumet.
• Innstilt volum vises grafisk på displayet.
Skru av lyden midlertidig (mute)
Trykk på [
Trykk en [ ] én gang til for å aktivere lyden igjen.
] på fjernkontrollen én gang for å skru av lyden helt.
34
Page 35

8. Tilkoblinger
Bluetooth-tilkobling
1. Trykk på [ IN ] (2) til «Bluetooth» vises på displayet.
2. Etter noen sekunder kommer «Scan» opp på displayet. Dette viser at høyttaleren
er i søkemodus og kan oppdages av andre Bluetooth-enheter.
3. Aktivering av Bluetooth-søking på den andre enheten. Når høyttaleren er koblet
til den andre enheten vises «Connected» på displayet. Høyttaleren vises under
«Enhet funnet» som «BDX1400».
4. Hvis du oppfordres til å oppgi PIN-kode, oppgi «0000» (enkelte enheter krever
også at du godkjenner tilkoblingen).
5. Nå kan man lytte til den tilkoblede enheten gjennom høyttaleren. Avspillingen kan
styres fra fjernkontrollen.
AUX-tilkobling
1. En ekstern lydkilde kobles til AUX-uttaket (13). Man trenger da kabel med
RCA-kontakter (selges separat).
2. Trykk på [ IN ] (2) eller [ INPUT ] (16) gjentatte ganger til «AUX» vises i displayet.
9. Radio
Høyttaleren har både FM- og DAB-radio.
9.1 FM-radio
Den medfølgende FM-antennen kobles til antenneuttaket (14) som er på høyttalerens
bakside. Radioen viser RDS-informasjon (Radio Data System) på displayet.
Norsk
Settings (innstillinger)
Velg lydkilde FM
Trykk på [ IN ] (2) eller [ INPUT ] (16) gjentatte ganger for å velge FM.
Trykk på [ MENU ] (22) for å velge: Auto scan (automatisk kanalsøk) – Scan setting
(søkeinnstillinger) – Audio setting – System.
1. Trykk på [ IN ] (2) eller [ INPUT ] (16) gjentatte ganger
til «FM» vises i displayet.
2. Første gang man bruker FM kommer den laveste
FM-frekvensen opp.
35
Page 36

Innstilling av ønsket radiostasjon
Manuelt søk: Trykk på [ I◄◄ ] (17)/(5) eller [ ►►I ] (23)/(6) for å velge ønsket radiostasjon.
Automatisk søk: Hold en av knappene [ I◄◄ ] (17)/(5) eller [ ►►I ] (23)/(6) inne
i ca. 3 sekunder for å starte automatisk kanalsøk.
Trykk [ MENU ] (22) for å åpne innstillingsmenyen. Trykk på [ I◄◄ ] (17) eller [ ►►I ] (23)
for å velge ønsket funksjon:
• Auto scan – automatisk kanalsøking.
• Scan setting – velge hvilke kanaler/stasjoner som skal søkes opp: All stations
(søke alle stasjoner) – Strong stations only (søk kun sterke stasjoner).
• Audio setting – Forced mono (mono ved svake signaler)
– Stereo allowed (stereo tillatt også ved svake signaler).
• System – Factory reset (tilbake til fabrikkinnstillingene)
Norsk
– SW version (aktuell programvareversjon).
Trykk deretter på [ ENTER ] (24) for å bekrefte.
Lagre radiokanaler i minnet
Inntil 20 stasjoner kan lagres.
A. Foreta en automatisk kanalsøking (Auto scan). De kanalene man finner lagres i minnet.
B. Lagre radiokanaler manuelt.
Pass på at frekvensen til radiokanalen som skal lagres er vist på displayet.
Lagring i minnet gjøres slik:
1. Hold [ ►II ] (25) inne til «Preset Store» vises på displayet
i ca. 5 sekunder.
2. Velg raskt hvilken plass kanalen skal lagres på (1–20)
med [ I◄◄ ] (17)/(5) eller [ ►►I ] (23)/(6).
3. Trykk deretter på [ ENTER ] (24) for å bekrefte.
«Preset X stored» vises på displayet når kanalen er lagret.
Lytte til lagrede radiokanaler
1. Trykk på [ ►II ] (25), og «Preset Recall» vises på
displayet i ca. 5 sekunder.
2. Velg raskt ønsket stasjon (1–20) med [ I◄◄ ] (17)/(5)
eller [ ►►I ](23)/(6).
3. Trykk deretter på [ ENTER ] (24) for å bekrefte.
Når man lytter til FM kommer det informasjon opp på displayet
Frekvensen kommer opp. Hvis det finnes RDS-informasjon
vil kanalnavnet og øvrig RDS-informasjon også komme opp.
Hvis det ikke finnes noen RDS-informasjon vil «No Radio Text»
komme opp i displayet.
36
Page 37

Settings (FM-innstillinger)
Velg lydkilde FM
Trykk på [ IN ] (2) eller [ INPUT ] (16) gjentatte ganger for å velge FM.
Trykk på [ MENU ] (22) for å velge:
• Auto scan – automatisk kanalsøk
• Scan setting – velge hvilke kanaler/stasjoner som skal søkes opp: «All stations»
(søke alle stasjoner) – «Strong stations only» (søk kun sterke stasjoner).
• Audio setting – «Forced mono» (mono ved svake signaler) – «Stereo allowed»
(stereo tillatt også ved svake signaler).
• System – «Factory reset» (tilbake til fabrikkinnstillingene) – «SW version» (viser
innstilt programvareversjon).
9.2 DAB-radio
Den medfølgende antennen kobles til antenneuttaket (14) som er på høyttalerens bakside.
DAB-radioen tar mot DAB/DAB+/DMB-R digitalradio og viser informasjon om kanalen,
og om programmet/musikken som spilles.
Settings (DAB-innstillinger)
Velg lydkilde DAB
Trykk på [ IN ] (2) eller [ INPUT ] (16) gjentatte ganger for å velge DAB.
Trykk på [ MENU ] (22) for å velge:
• Full scan (automatisk kanalsøk)
• Manual tune (manuelt stasjonssøk)
• DRC (Dynamic range compression) forskjell mellom off, high, low)
• Prune (fjerne svake stasjoner)
• System (systeminnstillinger) – System Factory reset (tilbakestilling til
fabrikkinnstilling), SW version (viser innstilt programvareversjon).
Bla i undermenyene med [ I◄◄ ] (17) og [ ►►I ] (23). Bekrefte med [ ENTER ] (24).
1. Trykk på [ IN ] (2) eller [ INPUT ] (16) gjentatte ganger til
«DAB» vises i displayet.
2. Den første gangen DAB-radioen brukes, eller hvis listen over kanaler er tom,
vil radioen foreta kanalsøk. Det kan også være andre årsaker til å foreta en
manuell kanalsøking utfra en av følgende årsaker:
- Det kommer nye kanaler hele tiden.
- Kanaler forsvinner eller de kan være vanskelige å tas imot.
- Fordi mottaksforholdene var dårlige ved foregående kanalsøk, f.eks. dårlig antenne.
- Hvis du har dårlig mottak av enkelte kanaler og du kun vil søke etter sterke kanaler.
Norsk
37
Page 38

Foreta et fullstendig søk
1. Trykk på [ MENU ] (22) og velg «Full scan».
2. Trykk på [ ENTER ] (24) for å bekrefte og starte søkingen.
3. Når søkingen er fullført vil DAB-radioen gå tilbake til den
kanalen du lyttet til sist.
Fjerne kanaler som ikke fungerer
1. Trykk på [ MENU ] (22) og velg «Prune».
2. «Prune?» merk «Yes» for å fjerne kanaler som er markert
med «?» eller merk «No» for å avbryte.
3. Trykk deretter på [ ENTER ] (24) for å bekrefte.
Norsk
Velg ønsket kanal
1. Velg raskt ønsket kanal fra listen med [ I◄◄ ] (17)/(5) eller [ ►►I ](23)/(6).
2. Trykk deretter på [ ENTER ] (24) for å bekrefte.
3. Detaljene for den nye kanalen vises på displayet.
Manuelt søk: Trykk på [ I◄◄ ] (17)/(5) eller [ ►►I ] (23)/(6)
for å lete etter ønsket kanal.
Lagre radiokanaler i minnet
Inntil 20 stasjoner kan lagres.
A. Foreta en automatisk kanalsøking (Auto scan).
De kanalene man finner lagres i minnet.
B. Lagre radiokanaler manuelt.
Pass på at frekvensen til radiokanalen som skal lagres er
vist på displayet. Lagring i minnet gjøres slik:
1. Hold [ ►II ] (25) inne til «Preset Store» vises på displayet
i ca. 5 sekunder.
2. Velg raskt hvilken plass kanalen skal lagres på (1–20)
med [ I◄◄ ] (17)/(5) eller [ ►►I ] (23)/(6).
Lytte til lagrede radiokanaler
1. Trykk på [ ►II ] (25), og «Preset Recall» vises på
displayet i ca. 5 sekunder.
2. Velg raskt ønsket stasjon (1–20) med [ I◄◄ ] (17)/(5)
eller [ ►►I ](23)/(6).
3. Trykk deretter på [ ENTER ] (24) for å bekrefte.
38
Page 39

Når man lytter til DAB kommer det informasjon opp på displayet
Kanalens navn vises, i tillegg til DLS (Dynamic Label
Segment)-informasjonen som sendes ut fra kanalen, som
f.eks. programnavn, navn på melodi og kontaktdetaljer.
Når DLS-informasjonen er lang (lengre enn 18 tegn) skrolles
teksten på displayet.
Vis ytterligere informasjon
Trykk på [ DISPLAY ] (21) gjentatte ganger for å vise mer
informasjon. DLS-tekst, DL Plus-informasjon (hvis det er
tilgjengelig), signal strength (signalstyrke), programtype,
artistnavn, kanalnummer (frekvens), signalfeil, bit rate
(overføringshastighet), codec/DAB-variant, tid og dato.
10. Stell og vedlikehold
Trekk alltid ut støpselet før rengjøring. Rengjør produktet med en myk, lett fuktet klut.
Bruk et mildt rengjøringsmiddel ved behov. Unngå å bruke løsemidler og slipende
rengjøringsmidler.
11. Avfallshåndtering
Når produktet skal kasseres, må det skje i henhold til lokale forskrifter.
Ved usikkerhet, ta kontakt med lokale myndigheter.
12. Spesifikasjoner
Strømforsyning 220–240 V AC, 50/60 Hz
Effektforbruk 240 W
Effektforbruk (i standbymodus) ≤ 1 W
Bluetooth 2.1 + EDR, A2DP
DAB/DAB+ DAB band III
FM 87,5–108 MHz, 50 kHz/trinn
Effekt ut L/R CH 30 W + 30 W (RMS@THD = 10 % 8 ohm)
SW CH 64 W THD = (RMS@THD = 10 % 8 ohm)
Frekvensområde L/R CH (200 Hz – 20 kHz)
SW CH (40 – 200 Hz)
Følsomhet L/R: 600 mV
SW: 160 mV
S/N ≥ 70 dB
Fjernkontroll, rekkevidde 5 meter ved vinkel på maks 30°
Mål 527×285×800 mm
Norsk
39
Page 40

Bluetooth-kaiutin, jossa FM/DAB
Tuotenumero 38-5698 Malli BDX1400
Lue käyttöohjeet ennen tuotteen käyttöönottoa ja säilytä ne tulevaa tarvetta varten.
Pidätämme oikeuden teknisten tietojen muutoksiin. Emme vastaa mahdollisista tekstitai kuvavirheistä. Jos tuotteeseen tulee teknisiä ongelmia, ota yhteys myymälään tai
asiakaspalveluun (yhteystiedot käyttöohjeen lopussa).
Sisällysluettelo
1. Turvallisuus ............................................................................... 41
2. Tuotekuvaus .............................................................................. 41
3. Painikkeet ja toiminnot............................................................42
4. Asennus .....................................................................................44
5. Liitännät ..................................................................................... 44
6. Käyttö ......................................................................................... 45
7. Asetukset .................................................................................. 45
Suomi
Ääni ...........................................................................................................46
8. Liitännät ..................................................................................... 47
Bluetooth-liitäntä ...................................................................................47
AUX-liitäntä .............................................................................................47
9. Radio .........................................................................................47
9.1 FM-radio ............................................................................................47
Settings (asetukset) .......................................................................................................... 47
Radiokanavan hakeminen ............................................................................................... 48
Radiokanavan tallentaminen muistiin ........................................................................... 48
Tallennetun radiokanavan kuunteleminen .................................................................... 48
FM-tilassa näytöllä näkyvät tiedot ................................................................................ 48
Settings (FM-asetukset) .................................................................................................. 49
9.2 DAB-radio ..........................................................................................49
Settings (DAB-asetukset) ................................................................................................ 49
Täyden haun suorittaminen ............................................................................................ 50
Haettujen, toimimattomien kanavien poistaminen ..................................................... 50
Kanavan valitseminen ...................................................................................................... 50
Radiokanavan tallentaminen muistiin ........................................................................... 50
Tallennetun radiokanavan kuunteleminen .................................................................... 50
DAB-tilassa näytöllä näkyvät tiedot .............................................................................. 51
10. Puhdistaminen ja huolto .......................................................51
11. Kierrättäminen ........................................................................ 51
12. Tekniset tiedot ........................................................................51
40
Page 41

1. Turvallisuus
• Noudata käyttöohjetta ja huomioi kaikki varoitukset.
• Älä sijoita laitetta sellaiseen paikkaan, josta se voi pudota veteen tai muuhun
nesteeseen. Älä laita laitteen päälle nesteitä sisältäviä esineitä, kuten maljakoita
tai juomia.
• Älä peitä laitteen tuuletusaukkoja. Ehkäise laitteen ylikuumeneminen varmistamalla
riittävä ilmankierto. Sijoita laite siten, että ilma pääsee kiertämään vapaasti sen ympärillä.
Varmista, että laitteen lähellä ei ole lämpöä tuottavia esineitä, kuten lämpöpattereita.
• Laitteen saa korjata vain valtuutettu huoltoliike.
• Älä pura tai muuta laitetta. Kotelon sisällä on vaarallista jännitettä sisältäviä
suojaamattomia komponentteja. Niiden koskettaminen voi aiheuttaa tulipalon
tai sähköiskun.
• Laite on tarkoitettu vain sisäkäyttöön.
• Älä altista laitetta korkeille lämpötiloille, pölylle, tärinälle, iskuille, kosteudelle tai vedelle.
• Tarkasta virtajohdon kunto säännöllisesti. Älä käytä laitetta, jos sen virtajohto tai
pistoke on vaurioitunut tai jos laite ei toimi normaalisti.
• Vioittuneen johdon saa vaihtaa ainoastaan valmistaja, sen määräämä huoltopiste tai
valtuutettu ammattilainen. Näin vähennetään sähköiskujen ja tulipalojen mahdollisuutta.
• Älä sijoita virtajohtoa kuumien pintojen tai terävien reunojen tai kulmien päälle.
Sijoita virtajohto siten, että sen päälle ei voi astua ja että siihen ei voi kompastua.
• Käytä mukana tulevaa telinettä. Sijoita laite siten, että se ei pääse kaatumaan.
• Katkaise laitteesta virta ukkosella tai jos laite on pitkään käyttämättä irrottamalla
pistoke pistorasiasta. Sijoita pistoke helppopääsyiseen pistorasiaan.
2. Tuotekuvaus
• Tehokas 3-tiekaiutin, jossa kiinteä 8″:n subwoofer (2×40 W + 1×80 W).
• Langaton musiikin toisto Bluetoothin kautta (A2DP apt-X).
• Kello ja herätys.
• DAB+-/FM-radio ja AUX-liitäntä.
• Mukana kaukosäädin ja irrotettava jalusta.
Suomi
41
Page 42

3. Painikkeet ja toiminnot
Ohjauspaneeli ja näyttö
1
2 3 4 5 6 7 8
9
1. [ ] Valmiustila
2. [ IN ] Äänilähteen valinta: Bluetooth, AUX, FM/DAB
3. [ SET ] Asetukset
Suomi
4. [ ►II ] Play/pause
5. [ I◄◄ ] Edellinen raita/pikakelaus taaksepäin/ajan asettaminen
6. [ ►►I ] Seuraava raita/pikakelaus eteenpäin/ajan asettaminen
] Äänenvoimakkuuden vähentäminen
7. [
8. [ ] Äänenvoimakkuuden lisääminen
9. IR-vastaanotin (kaukosäädintä varten)
10. Näyttö
10
Tausta
11. AC-liitäntä virtajohdolle
12. Virtakytkin
13. Ulkoisen äänilähteen AUXliitäntä
14. Antenniliitäntä
AUX IN FM/DAB
R L
11 12 1413
42
Page 43

Kaukosäädin
15. [
] Valmiustila
16. [ INPUT ] Äänilähteen valinta
17. [ I◄◄ ] Edellinen raita/pikakelaus
taaksepäin/ajan asettaminen
18. [ TREBLE +/- ] Diskanttiasetukset
19. [ ] Äänen mykistäminen tilapäisesti
20. [ SETUP ] Aikavyöhykkeen valinta ja
herätyksen asettaminen
21. [ DISPLAY ] Näytön asetukset
22. [ MENU ] FM/DAB
23. [ ►►I ] Seuraava raita/pikakelaus
eteenpäin/ajan asettaminen
24. [ ENTER ] Valinnan vahvistaminen
25. [ ►II ] Play/pause/radiokanavan
tallentaminen muistiin
26. [ BASS +/- ] Basson asetukset
27. [ VOLUME +/- ] Äänenvoimakkuuden säätö
Paristojen asettaminen kaukosäätimeen
15
16
17
18
INPUT
+
TREBLE
DISPLAY
MENU
ENTER
+
VOLUME
VOLUME
SETUP
BASS
19
20
21
22
23
24
25
+
26
27
Suomi
1. Paina paristolokeron sivulla olevaa lukitsinta ja irrota paristolokero.
2. Aseta lokeroon yksi CR2025-paristo paristolokeron merkintöjen mukaisesti.
3. Aseta paristolokero paikalleen.
Huom.!
• Käytä oikeantyyppistä paristoa ja varmista, että asetat sen oikein päin.
• Älä altista kaukosäädintä iskuille.
• Poista paristo, jos kaukosäädin on pitkään käyttämättä.
43
Page 44

Kaukosäätimen käyttö
Suuntaa kaukosäädin kaiuttimen yläosaa
kohti. Kaukosäätimen kantama on
5 metriä enintään 30°:een kulmassa.
Kaukosäätimen kantamaa heikentävät
seuraavat tekijät:
• Voimakas valaistus.
• Kaukosäätimen ja IR-anturin
väliset esteet.
• Muiden kaukosäädinten
samanaikainen käyttö.
• Kaukosäätimen heikko paristo.
4. Asennus
Kaiuttimen jalusta toimitetaan irrallisena.
• Kiinnitä jalustan kolme osaa yhteen mukana tulevilla ruuveilla molemmilta sivuilta.
• Kiinnitä jalusta kaiuttimeen mukana tulevalla pultilla.
Suomi
5. Liitännät
Takaosan liitännät:
AUX IN Ulkoisen äänilähteen liitäntä
esim. CD- tai DVD-soittimelle
(johto myydään erikseen).
FM/DAB Liitäntä sisäantennille (mukana)
tai ulkoantennille
(myydään erikseen).
44
Page 45

6. Käyttö
• Liitä virtajohto kaiuttimeen ja pistorasiaan.
• Aseta virtakytkin (12) asentoon ON.
• Kaiutin käynnistyy valmiustilassa, ja näytön taustavalo (10) ja kuvake [ ] (1) palavat
himmeinä.
Kaiuttimen käynnistäminen
1. Käynnistä kaiutin kaukosäätimellä tai painamalla valmiustilan painiketta [
2. Näytön taustavalo ja yläosan ohjauspaneelin taustavalo palavat kirkkaammin, kun
kaiutin on päällä.
Äänilähteen valitseminen
Valitse äänilähde painamalla painiketta [ IN ] (2) tai [ INPUT ] useita kertoja.
DAB BT AUX
FM
] (1).
7. Asetukset
Valitse asetukset (alavalikko) painamalla painiketta [ SET ] (3) tai [ SETUP ] (20) useita
kertoja. Valittu asetus ja käytössä oleva asetus näkyvät näytöllä.
Set time Set sleep time Set alarm
Bass Treble
Set time (kellonajan asettaminen)
1. Varmista, että näytöllä näkyy teksti ”Set time”.
2. Hyväksy kellonajan asettaminen painikkeella [ ENTER ] (24).
3. Tunnit vilkkuvat näytöllä. Aseta tunnit painikkeilla [ I◄◄ ] (17) ja [ ►►I ] (23).
4. Hyväksy painikkeella [ ENTER ] (24). Aseta minuutit samalla tavalla.
5. Asetettu kellonaika näkyy näytöllä. Kellossa on 24 tunnin näyttötapa.
Aika voidaan asettaa suoraan ohjauspaneelista painikkeella [ I◄◄ ] (5) tai [ ►►I ] (6)
tilassa ”Set time”. Vahvista valinta painikkeella [ SET ] (3).
Huom.! Jos kaiutin on sammutettu virtakytkimestä (12), kellonaika on asetettava uudelleen.
Set sleep time (kaiuttimen automaattinen sammuttaminen asetetun ajan kuluttua)
1. Varmista, että näytöllä näkyy teksti ”Set sleep time”.
2. Hyväksy automaattinen sammuttaminen painikkeella [ ENTER ] (24).
3. Aseta aika, jonka jälkeen kaiutin sammuu automaattisesti painikkeilla [ I◄◄ ] (17)
ja [ ►►I ] (23). Valitse jokin seuraavista minuuttiasetuksista:
off → 05 → 10 → 15 → 20 → 25 → 30 → 40 → 50 → 60 → 70 → 80 → 90 → off
4. Hyväksy valinta painamalla [ [ENTER ].
5. Näytön vasemmassa yläkulmassa näkyy kuvake, kun automaattinen poiskytkentä
on aktivoitu.
Suomi
45
Page 46

Aika voidaan asettaa suoraan ohjauspaneelista painikkeella [ I◄◄ ] (5) tai [ ►►I ] (6)
tilassa ”Set sleep time”. Vahvista valinta painikkeella [ SET ] (3).
Set alarm (herätysajan asettaminen)
1. Varmista, että näytöllä näkyy teksti ”Set alarm”.
2. Vahvista herätysajan asettaminen painikkeella [ ENTER ] (24).
3. Näytöllä vilkkuu teksti ”ON” tai ”OFF”, valitse käynnistäminen (ON) painikkeilla
[ I◄◄ ] (17) ja [ ►►I ] (23).
4. Vahvista painikkeella [ ENTER ] (24).
5. Näytöllä vilkkuu teksti ”hour”. Aseta tunnit painikkeilla [ I◄◄ ] (17) ja [ ►►I ] (23).
6. Vahvista painikkeella [ ENTER ] (24). Aseta minuutit samalla tavalla.
7. Kun aika on säädetty ja vahvistettu, valitse herätysääni. Siirry vaihtoehdosta toiseen
painikkeilla [ I◄◄ ] ja [ ►►I ]: DAB (DAB-radio) → BUZZER (summeri)
→ FM (FM-radio) jne. Vahvista valinta painikkeella [ ENTER ] (24).
8. Sammuta herätys seuraavalla tavalla:
- Paina [ ENTER ] (24). Näytöllä näkyy teksti”ON/OFF”.
- Valitse herätyksen sammuttaminen (OFF) painikkeilla [ I◄◄ ] (17) ja [ ►►I ] (23).
- Hyväksy valinta painikkeella [ ENTER ] (24).
Herätysaika voidaan asettaa suoraan ohjauspaneelista painikkeella [ I◄◄ ] (5)
tai [ ►►I ] (6) tilassa ”Set alarm”. Vahvista valinta painikkeella [ SET ] (3).
Suomi
Huom.! Jos kaiutin on sammutettu virtakytkimestä (12), herätys ei ole käytössä.
Bass (basson asetukset)
• Säädä bassoa kaukosäätimen painikkeilla [ BASS+ ] (26) ja [ BASS- ] (26).
• Säätöalue ± 10 dB.
• Asetettu basson voimakkuus esitetään graafisesti näytöllä.
• Bassoa voidaan säätää suoraan ohjauspaneelista painikkeella [ I◄◄ ] (5)
tai [ ►►I ] (6) tilassa ”Bass”.
Treble (diskantin säätäminen)
• Säädä diskanttia kaukosäätimen painikkeilla [ TREBLE + ] (18) ja [ TREBLE - ] (18).
• Säätöalue ± 10 dB.
• Asetettu diskantti esitetään graafisesti näytöllä.
• Diskanttia voidaan säätää suoraan ohjauspaneelista painikkeella [ I◄◄ ] (5)
tai [ ►►I ] (6) tilassa ”Treble”.
Ääni
Äänenvoimakkuuden säätäminen
• Säädä äänenvoimakkuutta ohjauspaneelin painikkeilla [
Toinen tapa:
• Säädä äänenvoimakkuutta kaukosäätimen painikkeilla [ VOL + ] tai [ VOL - ].
• Asetettu äänenvoimakkuus esitetään graafisesti näytöllä.
Äänen tilapäinen mykistäminen (mute)
Sammuta ääni kokonaan painamalla kaukosäätimen painiketta [
Kytke ääni takaisin päälle painamalla uudestaan painiketta [ ].
46
] tai [ ].
].
Page 47

8. Liitännät
Bluetooth-liitäntä
1. Paina painiketta [ IN ] (2), kunnes näytöllä näkyy teksti ”Bluetooth”.
2. Muutaman sekunnin kuluttua näytöllä näkyy teksti ”Scan”. Kaiutin on hakutilassa
ja hakee muita Bluetooth-laitteita.
3. Aktivoi Bluetooth-haku liitettävästä laitteesta. Kun kaiutin on liitetty laitteeseen,
näytöllä näkyy teksti "Connected". Kaiutin näkyy löydettyjen laitteiden kohdalla
koodilla ”BDX1400”.
4. Jos laite kysyy PIN-koodia, syötä ”0000”. Tietyissä laitteissa liitäntä täytyy
myös hyväksyä.
5. Nyt voit kuunnella liitettyä laitetta kaiuttimen kautta. Ohjaa toistoa kaukosäätimellä.
AUX-liitäntä
1. Liitä ulkoinen äänilähde kaiuttimen AUX-liitäntään (13). Liittämiseen tarvitaan kaapeli,
jossa on RCA-liitin (myydään erikseen).
2. Paina painiketta [ IN ] (2) tai [ INPUT ] (16) useita kertoja, kunnes näytöllä näkyy
teksti ”Aux”.
9. Radio
Kaiuttimessa on sekä FM- että DAB-radio.
9.1 FM-radio
Liitä mukana tuleva FM-antenni kaiuttimen takana olevaan antenniliitäntään (14).
Kaiutin näyttää RDS-tiedot (Radio Data System) näytöllä.
Suomi
Settings (asetukset)
FM-äänilähteen valitseminen
Valitse FM painamalla painiketta [ IN ] (2) tai [ INPUT ] (16) useita kertoja.
Valitse toiminto valikosta [ MENU ]-painikkeella (22): Auto scan (automaattinen
kanavahaku) – Scan setting (hakuasetukset) – Audio setting – System.
1. Paina painiketta [ IN ] (2) tai [ INPUT ] (16) useita
kertoja, kunnes näytöllä näkyy teksti "FM”.
2. Kun FM-valintaa käytetään ensimmäisen kerran,
näytöllä näkyy pienin FM-taajuus.
47
Page 48

Radiokanavan hakeminen
Manuaalinen haku: Etsi kanavia painikkeilla [ I◄◄ ] (17)/(5) ja [ ►►I ] (23)/(6).
Automaattinen haku: Aloita automaattinen kanavahaku painamalla painiketta
[ I◄◄ ] (17)/(5) tai [ ►►I ] (23)/(6) kolmen sekunnin ajan.
Avaa asetusvalikko painikkeella [ MENU ] (22). Valitse toiminto painikkeilla
[ I◄◄ ] (17) ja [ ►►I ] (23):
• Auto scan – automaattinen kanavahaku.
• Scan setting – valitse haettavat kanavat: All stations (hakee kaikki kanavat)
– Strong stations only (hakee vain vahvat kanavat).
• Audio setting – Forced mono (mono signaalin ollessa heikko)
– Stereo allowed (stereo käytössä myös signaalin ollessa heikko).
• System – Factory reset (tehdasasetusten palauttaminen)
– SW version (nykyinen ohjelmistoversio).
Vahvista valinta painikkeella [ ENTER ] (24).
Radiokanavan tallentaminen muistiin
Kaiuttimen muistiin voi tallentaa 20 kanavaa.
A. Käynnistä automaattinen kanavahaku (Auto scan). Löydetyt kanavat
Suomi
tallennetaan muistiin.
B. Tallenna radiokanavat manuaalisesti.
Varmista, että tallennettavan radiokanavan taajuus näkyy näytöllä.
Tallenna kanava muistiin seuraavalla tavalla:
1. Paina painiketta [ ►II ] (25), kunnes teksti ”Preset Store”
näkyy näytöllä noin 5 sekunnin ajan.
2. Valitse kanavan tallennuspaikka (1–20) painikkeilla
[ I◄◄ ] (17)/(5) ja [ ►►I ] (23)/(6).
3. Vahvista valinta painikkeella [ ENTER ] (24). Kun kanava
on tallennettu, näytöllä näkyy teksti ”Preset X stored”.
Tallennetun radiokanavan kuunteleminen
1. Paina painiketta [ ►II ] (25), näytöllä näkyy teksti
”Preset Recall” noin 5 sekunnin ajan.
2. Valitse kanava (1–20) painikkeilla [ I◄◄ ] (17)/(5)
ja [ ►►I ](23)/(6).
3. Vahvista valinta painikkeella [ ENTER ] (24).
FM-tilassa näytöllä näkyvät tiedot
Näytöllä näkyvät taajuus, RDS-tietojen ollessa käytössä
kanavan nimi ja muut RDS-tiedot.
Jos RDS-tiedot eivät ole käytössä, näytöllä näkyy teksti
”No Radio Text”.
48
Page 49

Settings (FM-asetukset)
FM-äänilähteen valitseminen
Valitse FM painamalla painiketta [ IN ] (2) tai [ INPUT ] (16) useita kertoja.
Valitse toiminto valikosta [ MENU ]-painikkeella:
• Auto scan – automaattinen kanavahaku
• Scan setting – valitse haettavat kanavat: ”All stations” (hakee kaikki kanavat)
tai ”Strong stations only” (hakee ainoastaan vahvat kanavat).
• Audio setting – ”Forced mono” (mono signaalin ollessa heikko), ”Stereo allowed”
(stereo käytössä myös signaalin ollessa heikko).
• System – ”Factory reset” (tehdasasetusten palauttaminen), ”SW version” (näyttää
asennetun ohjelmistoversion).
9.2 DAB-radio
Liitä mukana tuleva antenni kaiuttimen takana olevaan antenniliitäntään (14).
DAB-radio vastaanottaa DAB/DAB+/DMB-R-digitaaliradiolähetyksiä ja näyttää
radiokanavan ja ohjelman/soitettavan kappaleen tiedot.
Settings (DAB-asetukset)
DAB-äänilähteen valitseminen
Valitse DAB painamalla painiketta [ IN ] (2) tai [ INPUT ] (16) useita kertoja.
Valitse toiminto valikosta [ MENU ]-painikkeella (22):
• Full scan (automaattinen kanavahaku)
• Manual tune (manuaalinen kanavahaku)
• DRC (Dynamic range compression, off, high, low)
• Prune (heikkojen asemien poistaminen)
• System (järjestelmäasetukset) – System Factory reset (tehdasasetusten
palauttaminen), SW version (näyttää asennetun ohjelmistoversion).
Navigoi alavalikossa painikkeilla [ I◄◄ ] (17) ja [ ►►I ] (23).
Vahvista valinta painikkeella [ ENTER ] (24).
Suomi
1. Paina painiketta [ IN ] (2) tai [ INPUT ] (16) useita kertoja,
kunnes näytöllä näkyy teksti "DAB”.
2. Kun DAB-radiota käytetään ensimmäisen kerran tai jos kanavaluettelo on tyhjä,
radio suorittaa kanavahaun. Kanavahaun suorittaminen manuaalisesti voi olla
tarpeellista seuraavista syistä:
- Halutaan hakea uusia kanavia.
- Kanavia katoaa tai niiden vastaanottaminen ei onnistu.
- Kanavien vastaanotto ei onnistunut hyvin edellisen haun yhteydessä,
esimerkiksi antennista johtuen.
- Tiettyjen kanavien vastaanotto on huono, ja halutaan hakea vain
vahvat kanavat.
49
Page 50

Täyden haun suorittaminen
1. Paina painiketta [ MENU ] (22) ja valitse ”Full scan”.
2. Vahvista valinta ja aloita haku painikkeella [ ENTER ] (24).
3. Kun haku on valmis, DAB-radio palaa viimeiseksi
kuunneltuun kanavaan.
Haettujen, toimimattomien kanavien poistaminen
1. Paina painiketta [ MENU ] (22) ja valitse ”Prune”.
2. Kun kaiutin kysyy ”Prune?, valitse ”Yes” niiden kanavien poistamiseksi,
jotka on merkitty kysymysmerkillä ”?” tai keskeytä valitsemalla ”No”.
3. Vahvista valinta painikkeella [ ENTER ] (24).
Kanavan valitseminen
1. Valitse kanava kanavaluettelosta painikkeilla [ I◄◄ ] (17)/(5) ja [ ►►I ](23)/(6).
2. Vahvista valinta painikkeella [ ENTER ] (24).
3. Uuden kanavan tiedot näkyvät näytöllä.
Manuaalinen haku: tsi kanavaa painikkeilla [ I◄◄ ] (17)/(5)
ja [ ►►I ] (23)/(6).
Suomi
Radiokanavan tallentaminen muistiin
Kaiuttimen muistiin voi tallentaa 20 kanavaa.
A. Käynnistä automaattinen kanavahaku (Auto scan).
Löydetyt kanavat tallennetaan muistiin.
B. Tallenna radiokanavat manuaalisesti.
Varmista, että tallennettavan radiokanavan taajuus näkyy
näytöllä. Tallenna kanava muistiin seuraavalla tavalla.
1. Paina painiketta [ ►II ] (25), kunnes teksti ”Preset Store”
näkyy näytöllä noin 5 sekunnin ajan.
2. Valitse kanavan tallennuspaikka (1–20) painikkeilla
[ I◄◄ ] (17)/(5) ja [ ► ► I ] (23)/(6).
Tallennetun radiokanavan kuunteleminen
1. Paina painiketta [ ►II ] (25), näytöllä näkyy teksti
”Preset Recall” noin 5 sekunnin ajan.
2. Valitse kanava (1–20) painikkeilla [ I◄◄ ] (17)/(5)
ja [ ►►I ](23)/(6).
3. Vahvista valinta painikkeella [ ENTER ] (24).
50
Page 51

DAB-tilassa näytöllä näkyvät tiedot
Näytöllä näkyvät kanavan nimi ja kanavan lähettämät DLStiedot (Dynamic Label Segment), kuten ohjelman nimi,
kappaleen nimi ja yhteystiedot. Pitkät DLS-tiedot (yli
18 merkin pituiset) näkyvät näytöllä liukuvana tekstinä.
Muiden tietojen katsominen
Katso muut tiedot painamalla painiketta [ DISPLAY ] (21)
useita kertoja. Muita tietoja ovat DLS-teksti, DL Plus -tiedot
(jos ne ovat saatavana), signal strength (signaalin vahvuus),
ohjelman tyyppi, artistin nimi, kanavan numero (taajuus),
signaalivirhe, bit rate (siirtonopeus), codec/DAB-versio,
kellonaika ja päivämäärä.
10. Puhdistaminen ja huolto
Irrota laitteen pistoke pistorasiasta ennen laitteen puhdistamista. Pyyhi laite kevyesti
kostutetulla, pehmeällä liinalla. Käytä mietoa puhdistusainetta. Älä käytä vahvoja,
hankaavia puhdistusaineita tai liuotinaineita.
11. Kierrättäminen
Kierrätä tuote asianmukaisesti, kun poistat sen käytöstä.
Tarkempia kierrätysohjeita saat kuntasi jäteneuvonnasta.
12. Tekniset tiedot
Virtalähde 220–240 V AC, 50/60 Hz
Virrankulutus 240 W
Virrankulutus (valmiustilassa) ≤ 1 W
Bluetooth 2.1 + EDR, A2DP
DAB/DAB + DAB band III
FM 87,5–108 MHz, 50 kHz/taajuus
Antoteho L/R CH 30 W + 30 W (RMS@THD = 10 % 8 ohmia)
SW CH 64 W THD = (RMS@THD = 10 % 8 ohmia)
Taajuusalue L/R CH (200 Hz – 20 kHz)
SW CH (40 – 200 Hz)
Herkkyys L/R: 600 mV
SW: 160 mV
S/N-arvo ≥ 70 dB
Kaukosäätimen kantama 5 metriä kulman ollessa enint. 30°
Mitat 527×285×800 mm
Suomi
51
Page 52

Bluetooth-Lautsprecher mit UKW/DAB
Art.Nr. 38-5698 Modell BDX1400
Vor Inbetriebnahme diekomplette Bedienungsanleitung durchlesen und aufbewahren.
Irrtümer, Abweichungen und Änderungen behalten wir uns vor. Bei technischen Problemen
oder anderen Fragen freut sich unser Kundenservice über eine Kontaktaufnahme
(Kontakt siehe Rückseite).
Inhaltsverzeichnis
1. Sicherheitshinweise .................................................................53
2. Produktbeschreibung ............................................................... 53
3. Tasten und Funktionen ............................................................54
4. Montage ..................................................................................... 56
5. Anschlüsse.................................................................................56
6. Bedienung .................................................................................. 57
7. Einstellungen ...........................................................................57
Audio ........................................................................................................59
8. Anschlüsse.................................................................................59
Bluetooth-Verbindung ...........................................................................59
AUX-Anschluss .......................................................................................59
9. Radio .........................................................................................59
Deutsch
9.1 UKW-Radio ........................................................................................59
Settings (Einstellungen) ................................................................................................... 60
Einstellung des gewünschten Senders:.......................................................................... 60
Speichern von Radiosendern ........................................................................................... 60
Gespeicherten Sender anhören ....................................................................................... 61
Beim UKW-Radiohören wird zusätzliche Information angezeigt ............................... 61
9.2 DAB-Radio .........................................................................................61
Settings (DAB-Einstellungen) .......................................................................................... 61
Einen vollständigen Sendersuchlauf durchführen ........................................................ 62
Nicht funktionierende, bzw. unerwünschte Sender entfernen .................................... 62
Einen Sender auswählen ................................................................................................. 62
Speichern von Radiosendern ........................................................................................... 62
Gespeicherten Sender anhören ....................................................................................... 63
Beim DAB-Radiohören wird zusätzliche Information angezeigt ................................ 63
10. Pflege und Wartung ...............................................................63
11. Hinweise zur Entsorgung ......................................................63
12. Technische Daten .................................................................... 64
52
Page 53

1. Sicherheitshinweise
• Die Anweisungen in derBedienungsanleitung befolgen und alle Warnungen beachten.
• Das Gerät immer so aufstellen, dass es nicht in Wasser oder andere Flüssigkeiten
fallen kann. Niemals Gegenstände mit Flüssigkeiten (z. B. Blumenvasen oder
Getränke) auf dasProdukt stellen.
• Niemals dieVentilationsöffnungen blockieren. Um Überhitzung zu vermeiden, für
ausreichende Luftzirkulation sorgen. Das Gerät so aufstellen, dass für ausreichende
Belüftung gesorgt ist und dass sich keine Heizungen oder andere Wärmequellen in
derNähe befinden.
• Reparaturen unbedingt qualifizierten Servicetechnikern überlassen.
• Das Gerät nicht demontieren oder technisch verändern. Im Inneren des Produktes
befinden sich nicht isolierte Komponenten mit gefährlicher Stromspannung.
Bei Kontakt können diese zu Bränden oder Stromschlägen führen.
• Das Gerät ist nur zur Verwendung in Innenräumen geeignet.
• Das Gerät niemals hohen Temperaturen, staubigen Umgebungen, starken
Erschütterungen oder Feuchtigkeit aussetzen.
• Den Netzstecker regelmäßig kontrollieren. Niemals dasProdukt benutzen,
wenn dasNetzkabel oder derStecker beschädigt ist.
• Um Stromschläge oder Feuer zu vermeiden, dasNetzkabel bei Beschädigung
nur vom Hersteller, seinem Kundendienst oder qualifiziertem Fachpersonal
austauschen lassen.
• Das Netzkabel niemals auf heiße Flächen oder scharfe Kanten legen. Das Netzkabel
so verlegen, dass man nicht unabsichtlich darauf treten bzw. darüber stolpern kann.
• Ausschließlich diemitgelieferte Halterung benutzen. Das Produkt so aufstellen,
dass es nicht umfallen kann.
• Das Gerät während eines Gewitters oder einer längeren Zeitspanne, in deres nicht
verwendet wird, von derStromversorgung trennen. Den Netzstecker immer leicht
zugänglich lassen.
Deutsch
2. Produktbeschreibung
• Leistungsstarker 3-Wegelautsprecher mit integriertem 8″ Subwoofer
(2×40 W + 1×80 W).
• Kabellose Tonwiedergabe via Bluetooth (A2DP apt-X).
• Uhr mit Weckfunktion.
• DAB+/UKW-Radio sowie AUX-Eingang.
• Inklusive Fernbedienung und abnehmbarem Sockel.
53
Page 54

3. Tasten und Funktionen
Bedienfeld und Display
1
9
1. [ ] Standby
2. [ IN ] Wahl derAudioquelle: Bluetooth, AUX, UKW/DAB
3. [ SET ] Einstellungen
4. [ ►II ] Play/Pause
5. [ I◄◄ ] Zurückblättern/Zurückspulen/Zeiteinstellung
6. [ ►►I ] Vorblättern/Vorspulen/Zeiteinstellung
] Lautstärke senken
7. [
8. [ ] Lautstärke erhöhen
9. IR-Empfänger (für Fernbedienung)
10. Display
Deutsch
2 3 4 5 6 7 8
10
Rückseite
11. AC-Anschluss für
Netzkabel
12. Ein-/Ausschalter
13. AUX-Eingang für externe
Audioquelle
14. Antennenanschluss
AUX IN FM/DAB
R L
11 12 1413
54
Page 55

Fernbedienung
15. [
] Standby
16. [ INPUT ] Wahl derAudioquelle
17. [ I◄◄ ] Zurückblättern/Zurückspulen/
Zeiteinstellung
18. [ TREBLE +/- ] Höheneinstellung
19. [ ] Stummschaltung
20. [ SETUP ] Einstellen derUhrzeit und
des Alarms
21. [ DISPLAY ] Displayeinstellungen
22. [ MENU ] UKW/DAB
23. [ ►►I ] Vorblättern/Vorspulen/Zeiteinstellung
24. [ ENTER ] Auswahl bestätigen
25. [ ►II ] Play/Pause/Sender speichern
26. [ BASS +/- ] Bassregler
27. [ VOLUME +/- ] Lautstärkeregler
Batterie in dieFernbedienung einlegen
15
16
17
18
INPUT
+
TREBLE
DISPLAY
MENU
ENTER
+
VOLUME
VOLUME
SETUP
BASS
19
20
21
22
23
24
25
+
26
27
Deutsch
1. Die Verriegelung derBatteriehalterung eindrücken und dieBatteriehalterung
herausziehen.
2. 1×CR2025-Batterie entsprechend derMarkierung in derBatteriehalterung einsetzen.
3. Die Batteriehalterung wieder hineinschieben.
Hinweis:
• Stets den richtigen Batterietyp benutzen und diePole korrekt ausrichten.
• Die Fernbedienung vor Stößen und Vibrationen schützen.
• Bei längerem Nichtgebrauch des Produkts dieBatterie entnehmen.
55
Page 56

Bedienung derFernbedienung
Die Fernbedienung auf den oberen Teil des
Lautsprechers richten. Reichweite 5 m bei
einem Ausstrahlwinkel von max. 30°.
Die Reichweite derFernbedienung wird
beeinträchtigt durch:
• Starke Beleuchtung.
• Hindernisse zwischen
Fernbedienung und IR-Empfänger.
• Gleichzeitige Benutzung von
anderen Fernbedienungen.
• Schwache Batterie in
derFernbedienung.
4. Montage
Der Lautsprecher wird mit unmontiertem Sockel ausgeliefert.
• Die drei Teile des Sockels mit den mitgelieferten Schrauben mit Vollgewinde von
beiden Seiten zusammenschrauben.
• Den Sockel am Lautsprecher mithilfe dermitgelieferten Schraube festschrauben.
5. Anschlüsse
Anschlüsse auf derRückseite:
AUX IN Eingang für externe Audio-
Deutsch
quelle, z. B. CD- oder DVD-Player
(Kabel separat erhältlich).
UKW/DAB Anschluss für Zimmerantenne (inklusive) oder Hausantenne
(separat erhältlich).
56
Page 57

6. Bedienung
• Netzkabel anden Lautsprecher und dann andie Steckdose anschließen.
• Den Ein-/Ausschalter (12) auf ON stellen.
• Der Lautsprecher startet in den Standby-Modus, dasDisplay (10) und
[ ] (1) leuchten leicht.
Einschalten des Lautsprechers
1. Den Lautsprecher durch drücken auf dieStandby-Taste [ ] (1) oder auf
derFernbedienung aktivieren [ ] (15).
2. Das Display und dasBedienfeld auf derOberseite leuchten stärker, wenn
dasGerät eingeschaltet ist.
Audioquelle auswählen
Um diegewünschte Audioquelle auszuwählen, mehrmals auf [ IN ] (2) oder
[ INPUT ] (16) drücken.
DAB BT AUX
FM
7. Einstellungen
Um diegewünschte Einstellung (Untermenü) auszuwählen, mehrmals auf [ SET ] (3)
oder [ SETUP ] (20) drücken. Die ausgewählte Einstellung mit den aktuellen Werten
wird auf dem Display angezeigt.
Set time Set sleep time Set alarm
Deutsch
Bass Treble
Set time (Uhrzeit einstellen)
1. Zur Einstellung „Set time“ wechseln (wird auf dem Display angezeigt).
2. Auf [ ENTER ] (24) drücken, um dieZeit einzustellen.
3. Die Zeitanzeige auf dem Display blinkt. Die aktuelle Stunde mit [ I◄◄ ] (17)
und [ ►►I ] (23) einstellen.
4. Zum Bestätigen auf [ ENTER ] (24) drücken. Die Minuten auf diegleiche
Weise einstellen.
5. Die eingestellte Zeit wird auf dem Display angezeigt. Die Zeitanzeige erfolgt
im 24-Stunden-Format.
Wenn „Set time“ ausgewählt ist, kann dieZeit am Bedienfeld direkt mit [ I◄◄ ] (5)
oder [ ►►I ] (6) eingestellt werden. Mit [ SET ] (3) bestätigen.
Hinweis: Wenn derLautsprecher mit dem Ein-/Ausschalter (12) ausgeschaltet wurde,
muss dieZeit erneut eingestellt werden.
57
Page 58

Set sleep time (automatisches Abschalten nach voreingestellter Zeit - Sleep-Timer)
1. Zur Einstellung „Set sleep time“ wechseln (wird auf dem Display angezeigt).
2. Auf [ ENTER ] (24) drücken, um den Sleep-Timer einzustellen.
3. Den Sleep-Timer mit [ I◄◄ ] (17) und [ ►►I ] (23) einstellen. Es kann durch
folgende Einstellungen (Minuten) geblättert werden:
off → 05 → 10 → 15 → 20 → 25 → 30 → 40 → 50 → 60 → 70 → 80 → 90 → off
4. Zum Bestätigen auf [ ENTER ] (24) drücken.
5. Bei aktiviertem Sleep-Timer wird ein Symbol in deroberen linken Ecke angezeigt.
Wenn „Set sleep time“ ausgewählt ist, kann derSleep-Timer am Bedienfeld direkt mit
[ I◄◄ ] (5) oder [ ►►I ] (6) eingestellt werden. Mit [ SET ] (3) bestätigen.
Set alarm (Alarm einstellen)
1. Zur Einstellung „Set alarm“ wechseln (wird auf dem Display angezeigt).
2. Auf [ ENTER ] (24) drücken, um den Alarm einzustellen.
3. „ON“ oder „OFF” blinkt, Einschaltzeit (ON) mit [ I◄◄ ] (17) und [ ►►I ] (23) auswählen.
4. Zum Bestätigen auf [ ENTER ] (24) drücken.
5. Auf dem Display blinkt „hour“. Die Stunde mit [ I◄◄ ] (17) und [ ►►I ] (23) einstellen.
6. Zum Bestätigen auf [ ENTER ] (24) drücken. Die Minuten auf diegleiche Weise einstellen.
7. Wenn dieZeit eingestellt und bestätigt ist, kann dasAlarmsignal eingestellt werden.
Mit [ I◄◄ ] bzw. [ ►►I ] lässt sich zwischen den verschiedenen Einstellungen
wechseln: DAB (DAB-Radio) → BUZZER (Summer) → FM (UKW-Radio) etc.
Zum Bestätigen auf [ ENTER ] (24) drücken.
8. Wenn derAlarm ertönt, kann er wie folgt abgestellt werden:
- Auf [ ENTER ] (24) drücken. Auf dem Display wird „ON/OFF“ angezeigt.
- Zum Abschalten (OFF) mit [ I◄◄ ] (17) und [ ►►I ] (23) auswählen.
- Zum Bestätigen auf [ ENTER ] (24) drücken.
Wenn „Set alarm“ ausgewählt ist, kann dieAlarmzeit am Bedienfeld direkt mit
Deutsch
[ I◄◄ ] (5) oder [ ►►I ] (6) eingestellt werden. Mit [ SET ] (3) bestätigen.
Hinweis: Der Alarm funktioniert nicht, wenn derLautsprecher mit dem
Ein-/Ausschalter (12) ausgeschaltet ist.
Bass (Einstellen derBasswiedergabe).
• Auf derFernbedienung auf [ BASS + ] (26) oder [ BASS - ] (26) drücken.
• Einstellungsbereich ± 10 dB.
• Die Basseinstellung wird graphisch auf dem Display angezeigt.
• Wenn „Bass“ ausgewählt ist, kann dieBasseinstellung am Bedienfeld
direkt mit [ I◄◄ ] (5) oder [ ►►I ] (6) eingestellt werden.
Treble (Einstellen derHöhenwiedergabe)
• Auf derFernbedienung auf [ TREBLE+ ] (18) oder [ TREBLE- ] (18) drücken.
• Einstellungsbereich ± 10 dB.
• Die Höheneinstellung wird graphisch auf dem Display angezeigt.
• Wenn „Treble“ ausgewählt ist, kann dieHöheneinstellung am Bedienfeld direkt
mit [ I◄◄ ] (5) oder [ ►►I ] (6) eingestellt werden.
58
Page 59

Audio
Einstellen derLautstärke
• Um dieLautstärke einzustellen auf [ ] oder [ ] drücken.
Oder:
• An derFernbedienung auf [ VOL+ ] oder [ VOL- ] drücken.
• Die Lautstärke wird graphisch auf dem Display angezeigt.
Stummschaltung (Mute)
An derFernbedienung auf [ ] drücken, um den Ton abzuschalten.
Nochmals auf [ ] drücken, um den Ton wieder einzuschalten.
8. Anschlüsse
Bluetooth-Verbindung
1. Auf [ IN ] (2) drücken, bis „Bluetooth“ auf dem Display angezeigt wird.
2. Nach ein paar Sekunden wird auf dem Display „Scan“ angezeigt. Dies bedeutet,
dass derLautsprecher im Suchmodus ist und von anderen Bluetooth-Einheiten
gefunden werden kann.
3. Die Bluetooth-Suchfunktion am anzuschließenden Gerät aktivieren. Wenn
derLautsprecher angeschlossen ist, wird auf dem Display „Connected“ angezeigt.
Der Lautsprecher wird bei den „gefundenen Einheiten“ als „BDX1400“ angezeigt.
4. Bei eventueller PIN-Abfrage den folgenden PIN angeben „0000“ (vier Nullen).
Bei manchen Geräten muss dieVerbindung noch zusätzlich akzeptiert werden.
5. Jetzt kann Musik von dem angeschlossenen Gerät auf dem Lautsprecher
abgespielt werden, solange es in Reichweite ist. Die Wiedergabe kann über
dieFernbedienung gesteuert werden.
Deutsch
AUX-Anschluss
1. Ein externes Gerät über ein Audiokabel anAUX (13) anschließen. Hierfür ist ein
Cinch-Kabel (separat erhältlich) notwendig.
2. Um dieangeschlossene Audioquelle auszuwählen, mehrmals auf [ IN ] (2) oder
[ INPUT ] (16) drücken, bis „Aux“ angezeigt wird.
9. Radio
Der Lautsprecher ist sowohl mit UKW- als auch mit DAB-Radio ausgestattet.
9.1 UKW-Radio
Die mitgelieferte UKW-Antenne anden Antennenanschluss (14) auf derRückseite
des Lautsprechers anschließen. RDS-Informationen (Radio Data System) werden
auf dem Display angezeigt.
59
Page 60

Settings (Einstellungen)
FM als Audioquelle auswählen
Zum Auswählen von FM, mehrmals auf [ IN ] (2) oder [ INPUT ] (16) drücken.
Auf [ MENU ] (22) drücken, um eine von folgenden Wahlmöglichkeiten auszuwählen:
Auto scan (automatischer Sendersuchlauf) – Scan setting (Einstellungen für Sendersuchlauf) – Audio setting – System.
1. Zum Auswählen von „FM“, mehrmals auf [ IN ] (2) oder
[ INPUT ] (16) drücken.
2. Bei derersten Benutzung des UKW-Radios wird
dieniedrigste Frequenz angezeigt.
Einstellung des gewünschten Senders:
Manuelles Einstellen eines Senders: Auf [ I◄◄ ] (17)/(5) oder [ ►►I ] (23)/(6) drücken,
um nach dergewünschten Frequenz zu suchen.
Automatischer Sendersuchlauf: Zum Starten des Sendersuchlaufs eine derTasten
[ I◄◄ ] (17)/(5) oder [ ►►I ] (23)/(6) für ca. 3 Sekunden gedrückt halten.
Auf [ MENU ] (22) drücken, um zum Einstellungsmenü zu gelangen. Zum Auswählen
dergewünschten Funktion auf [ I◄◄ ] (17) oder [ ►►I ] (23) drücken:
• Auto scan – Automatischer Sendersuchlauf.
• Scan setting – Einstellung für den Sendersuchlauf: All stations (alle Sender)
– Strong stations only (nur Sender mit sehr gutem Empfang).
• Audio setting – Forced mono (Monowiedergabe bei schlechtem Empfang)
– Stereo allowed (Stereowiedergabe auch bei schlechtem Empfang).
• System – Factory reset (Auslieferungszustand wieder herstellen)
Deutsch
– SW version (Anzeige derFirmware).
Zum Bestätigen auf [ ENTER ] (24) drücken.
Speichern von Radiosendern
Bis zu 20 Sender können gespeichert werden.
A. Einen Sendersuchlauf durchführen (Auto scan). Die gefundenen Sender
werden gespeichert.
B. Radiosender manuell speichern.
Die Frequenz des zu speichernden Senders einstellen und wie folgt speichern:
1. [ ►II ] (25) gedrückt halten, bis „Preset Store“ für
ca. 5 Sekunden angezeigt wird.
2. Schnell mit [ I◄◄ ] (17)/(5) oder [ ►►I ] (23)/(6)
den Speicherplatz auswählen (1–20).
3. Zum Bestätigen auf [ ENTER ] (24) drücken.
Wenn derSender gespeichert ist wird
„Preset X stored“ angezeigt.
60
Page 61

Gespeicherten Sender anhören
1. Auf [ ►II ] (25) drücken. Auf dem Display wird für
ca. 5 Sekunden „Preset Recall“ angezeigt.
2. Schnell mit [ I◄◄ ] (17)/(5) oder [ ►►I ] (23)/(6)
diegewünschte Senderposition auswählen (1–20).
3. Zum Bestätigen auf [ ENTER ] (24) drücken.
Beim UKW-Radiohören wird zusätzliche Information angezeigt
Die Frequenz wird angezeigt. Wenn RDS-Informationen
zugänglich sind, werden derSendername und weitere
RDS-Informationen angezeigt.
Ist keine RDS-Information zugänglich, wird „No Radio Text“
angezeigt.
Settings (UKW-Einstellungen)
FM als Audioquelle auswählen
Zum Auswählen von FM, mehrmals auf [ IN ] (2) oder [ INPUT ] (16) drücken.
Auf [ MENU ] (22) drücken, um eine von folgenden Wahlmöglichkeiten auszuwählen:
• Auto scan – Automatischer Sendersuchlauf.
• Scan setting – Einstellung für den Sendersuchlauf: „All stations“ (alle Sender)
– „Strong stations only“ (nur Sender mit sehr gutem Empfang).
• Audio setting – „Forced mono“ (Monowiedergabe bei schlechtem Empfang)
– „Stereo allowed“ (Stereowiedergabe auch bei schlechtem Empfang).
• System – „Factory reset“ (Auslieferungszustand wieder herstellen)
– „SW version“ (Anzeige derFirmwareversion).
Deutsch
9.2 DAB-Radio
Die mitgelieferte Antenne anden Antennenanschluss (14) auf derRückseite des Lautsprechers anschließen. Das DAB-Radio kann DAB/DAB+/DMB-R Digitalradio empfangen
und Informatioon über den Sender, dieSendung und dieMusik anzeigen.
Settings (DAB-Einstellungen)
DAB als Audioquelle auswählen
Zum Auswählen von DAB, mehrmals auf [ IN ] (2) oder [ INPUT ] (16) drücken.
Auf [ MENU ] (22) drücken, um eine von folgenden Wahlmöglichkeiten auszuwählen:
• Full scan (automatischer Sendersuchlauf)
• Manual tune (manuelles Suchen des Senders)
• DRC (Dynamic range compression) Auswahl zwischen off, high, low)
• Prune (empfangsschwache Sender entfernen)
• System (Stemeinstellungen) – System Factory reset (Zurücksetzen auf
Werkseinstellung), SW version (Anzeige deraktuellen Firmware).
61
Page 62

In den Untermenüs kann mit [ I◄◄ ] (17) und [ ►►I ] (23)
navigiert werden. Mit [ ENTER ] (24) bestätigen.
1. Zum Auswählen von „DAB“, mehrmals auf [ IN ] (2) oder
[ INPUT ] (16) drücken.
2. Bei derersten Benutzung des DAB-Radios, oder wenn dieSenderliste leer ist,
wird ein Sendersuchlauf durchgeführt. Es kann jedoch auch eine manuelle Suche
notwendig sein, wenn z. B.:
- Neue Sender hinzukommen.
- Sender verschwinden oder nicht mehr empfangen werden können.
- Wenn derEmpfang beim anfänglichen Sendersuchlauf schlecht war.
- Der Empfang von manchen Sendern schlecht ist und gewünscht wird,
dass nur Sendern mit gutem Empfang in derSenderliste sind.
Einen vollständigen Sendersuchlauf durchführen
1. Auf [ MENU ] (22) drücken, und „Full Scan“ auswählen.
2. Zum Bestätigen und Starten des Suchlaufs auf
[ ENTER ] (24) drücken.
3. Nach erfolgtem Sendersuchlauf kehrt dasDAB-Radio
zu dem zuletzt gehörten Sender zurück.
Nicht funktionierende, bzw. unerwünschte Sender entfernen
1. Auf [ MENU ] (22) drücken, und „Prune“ auswählen.
2. „Prune?“ wird angezeigt. Um dieSender, diemit „?“ gekennzeichnet sind
zu entfernen, „Yes“ auswählen. Zum Abbrechen „No“ auswählen.
3. Zum Bestätigen auf [ ENTER ] (24) drücken.
Deutsch
Einen Sender auswählen
1. Mit [ I◄◄ ] (17)/(5) oder [ ►►I ] (23)/(6) diegewünschte Senderposition
auswählen (1–20).
2. Zum Bestätigen auf [ ENTER ] (24) drücken.
3. Die Informationen für den ausgewählten Sender werden im Display angezeigt.
Manuelles Einstellen eines Senders: Auf [ I◄◄ ]
(17)/(5) oder [ ►►I ] (23)/(6) drücken, um nach dem
gewünschten Sender zu suchen.
Speichern von Radiosendern
Bis zu 20 Sender können gespeichert werden.
A. Einen Sendersuchlauf durchführen (Auto scan).
Die gefundenen Sender werden gespeichert.
B. Radiosender manuell speichern.
62
Page 63

Die Frequenz des zu speichernden Senders einstellen und
wie folgt speichern:
1. [ ►II ] (25) gedrückt halten, bis „Preset Store“
für ca. 5 Sekunden angezeigt wird.
2. Schnell mit [ I◄◄ ] (17)/(5) oder [ ►►I ] (23)/(6) den
Speicherplatz auswählen (1–20).
Gespeicherten Sender anhören
1. Auf [ ►II ] (25) drücken. Auf dem Display wird für
ca. 5 Sekunden „Preset Recall“ angezeigt.
2. Schnell mit [ I◄◄ ] (17)/(5) oder [ ►►I ] (23)/(6)
diegewünschte Senderposition auswählen (1–20).
3. Zum Bestätigen auf [ ENTER ] (24) drücken.
Beim DAB-Radiohören wird zusätzliche Information angezeigt
Es wird dername des Senders und DLS (Dynamic Label
Segment) angezeigt. DLS können verschiedene Informationen vom Sender sein, z. B. Name derSendung oder des
Liedes. Ist dieDLS-Information länger als 18 Zeichen, wird
sie über dasDisplay gescrollt.
Weitere Information anzeigen
Mehrmals auf [ DISPLAY ] (21) drücken, um weitere Informationen anzuzeigen. DLS-Text, DL Plus-Information (wenn
zugänglich), Signal Strength (Empfangsstärke), Genre,
Künstlername, Sendernummer (Frequenz), Empfangsfehler,
Bitrate (Übertragungsgeschwindigkeit), Codec/DAB-Variante, Zeit und Datum.
Deutsch
10. Pflege und Wartung
Vor derReinigung den Stecker aus derSteckdose ziehen. Das Produkt mit einem
weichen, leicht befeuchteten Tuch reinigen. Keine scharfen Chemikalien, Reinigungslösungen oder starke Reinigungsmittel verwenden.
11. Hinweise zur Entsorgung
Bitte dasProdukt entsprechend den lokalen Bestimmungen entsorgen.
Weitere Informationen sind von derGemeinde oder den kommunalen
Entsorgungsbetrieben erhältlich.
63
Page 64

12. Technische Daten
Stromversorgung 220–240 V AC, 50/60 Hz
Leistungsaufnahme 240 W
Leistungsaufnahme
im Standby-Modus ≤1 W
Bluetooth 2.1 + EDR, A2DP
DAB/DAB+ DAB band III
UKW 87,5–108 MHz, 50 kHz/Stufe
Leistungsabgabe L/R CH 30 W + 30 W (RMS@THD = 10 % 8 Ohm)
SW CH 64 W THD = (RMS@THD = 10 % 8 ohm)
Frequenzbereich L/R CH (200 Hz – 20 kHz)
SW CH (40 – 200 Hz)
Empfindlichkeit L/R: 600 mV
SW: 160 mV
S/N ≥ 70 dB
Reichweite derFernbedienung 5 m bei einem Ausstrahlwinkel von max. 30°
Abmessungen 527×285×800 mm
Deutsch
64
Page 65

65
Page 66

Declaration of Conformity
Hereby, Clas Ohlson AB, declares that this Bluetooth wireless speaker.
38-5698
BDX1400
is in compliance with the essential requirements and other
relevant provisions of Directive 1999/5/EC and 2006/95/EC.
Article 3.1a (Health): EMF/SAR 99/519 EC Council
Recommendation
Article 3.1a (Safety) EN 60065
Article 3.1b (EMC): EN 301489-1
EN 301489-17
Article 3.2 (Radio): EN 300328
0979
Insjön, Sweden, July 2013
Klas Balkow,
President.
Clas Ohlson, 793 85 Insjön, Sweden
66
Page 67

67
Page 68

SVERIGE
KUNDTJÄNST tel: 0247/445 00
fax: 0247/445 09
e-post: kundservice@clasohlson.se
INTERNET www.clasohlson.se
BREV Clas Ohlson AB, 793 85 INSJÖN
NORGE
KUNDESENTER tlf.: 23 21 40 00
faks: 23 21 40 80
e-post: kundesenter@clasohlson.no
INTERNETT www.clasohlson.no
POST Clas Ohlson AS, Postboks 485 Sentrum, 0105 OSLO
SUOMI
ASIAKASPALVELU puh.: 020 111 2222
sähköposti: asiakaspalvelu@clasohlson.fi
INTERNET www.clasohlson.fi
OSOITE Clas Ohlson Oy, Maistraatinportti 4 A, 00240 HELSINKI
GREAT BRITAIN
CUSTOMER SERVICE contact number: 08545 300 9799
e-mail: customerservice@clasohlson.co.uk
INTERNET www.clasohlson.com/uk
POSTAL 10 – 13 Market Place
Kingston Upon Thames
Surrey
KT1 1JZ
DEUTSCHLAND
KUNDENSERVICE Unsere Homepage www.clasohlson.de besuchen
und auf Kundenservice klicken.
 Loading...