

Page 1
www.etoncorp.com
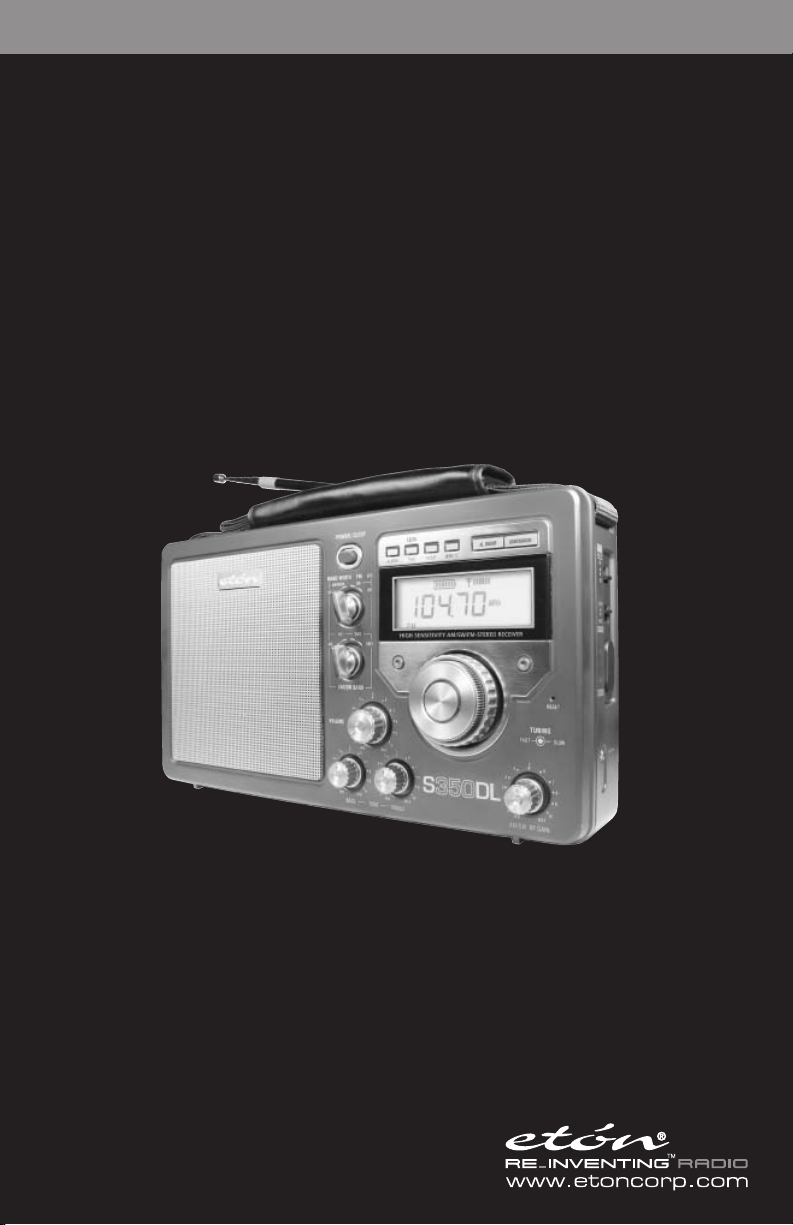
S350DL
OPERATION MANUAL
AM/FM/SHORTWAVE RADIO
Page 2

DO YOU NEED HELP?
We want you to thoroughly enjoy the
use of this product. To take advantage
of its many excellent and unique features, we urge you to carefully read the
owner’s manual. If you need help while
learning its operation, please
contact us, using the methods below.
Monday-Friday, 8:30 a.m. - 4:00 p.m.,
North American Pacific Time.
1-800-872-2228 from the U.S.
1-800-637-1648 from Canada
1-650-903-3866, worldwide
FAX: 650-903-3867
customersvc@etoncorp.com
Web Site: www.etoncorp.com
Mailing Address:
Etón Corporation
1015 Corporation Way
Palo Alto, CA 94303
USA
S350DL OPERATION MANUAL
TABLE OF CONTENTS
page
INTRODUCTION ......................................................................
1
MAJOR FEATURES OF THE MODEL S350DL ..............................
2
CONTROL LOCATIONS ..............................................................
3
CONNECTING TO POWER .......................................................
4
PRELIMINARY CONTROL SETTINGS ........................................
5
TURNING THE RADIO ON AND OFF .......................................
6
SIGNAL STRENGTH INDICATOR ...............................................
7
TUNING IN FM STATIONS .......................................................
8
TUNING IN AM STATIONS .......................................................
9
TUNING IN SHORTWAVE STATIONS .........................................
10
SETTING THE CLOCK .............................................................
11
USING THE SLEEP TIMER .....................................................
12
ALARM CLOCK .....................................................................
13
USING THE BACKLIGHT .......................................................
14
USING THE RESET .................................................................
15
USING THE LINE OUT SOCKETS ...........................................
16
USING THE EARPHONE JACK ................................................
17
USING SUPPLEMENTARY ANTENNAS ..................................
18
INTRODUCTION TO SHORTWAVE ........................................
19
FINDING DESIRED STATIONS ...............................................
20
WHAT ARE BANDS? ..............................................................
21
SHORTWAVE BANDS .............................................................
22
DAY BANDS / NIGHT BANDS .................................................
23
DAYTIME LISTENING ...........................................................
24
EVENING LISTENING ..............................................................
25
WARRANTY REGISTRATION .................................................
26
LIMITED WARRANTY TO THE ORIGINAL CUSTOMER ...........
27
SERVICE INFORMATION ......................................................
28
4
5
6
8
10
11
11
12
12
13
15
15
16
17
17
18
18
19
20
20
21
22
23
24
25
26
26
27
2
3
Page 3

S350DL OPERATION MANUAL
1 INTRODUCTION
This owner's manual is conveniently divided
into two sections, BASIC OPERATION and
INTRODUCTION TO SHORTWAVE. Both
sections are important.
If you are new to shortwave listening, the
INTRODUCTION TO SHORTWAVE section will
give you all the information that you need to
be successful enjoying broadcasts from
around the world.
2 MAJOR FEATURES OF THE MODEL S350DL
• AM 530-1710 KHz
• FM 88-108 MHz
• SHORTWAVE – continuous coverage from 3
to 28 MHz. This includes 13 international
broadcast bands. 11, 13, 15, 16, 19, 22, 25,
31, 41, 49, 60, 75 and 90 meters.
• Highly sensitive and selective analog tuner
circuitry
• Digital frequency readout
• Liquid Crystal Display, (LCD), for frequency
and clock
• Digital clock with selectable 12/24 hour
format
• Wake-up timer (use as radio-play alarm
clock)
• Power failure backup feature
• Sleep timer
• Main tuning knob and independent fine-
tuning control knob
• Variable RF Gain Control
• Rotary volume control
• Variable, independent bass and treble
controls
• Low-pass filter for shortwave and AM
reception
• Left/Right line level outputs (stereo in FM)
• Stereo/Mono switch
• Stereo earphone socket
• Carrying handle/convertible shoulder strap
• Built-in telescopic antenna for FM and
shortwave
• Built-in ferrite bar antenna for AM
• Jacks for supplementary AM, FM and
Shortwave antennas
• Powered by 4 D or 4AA batteries (not
included), AC adaptor (included) or DC car or
boat adaptor (not included)
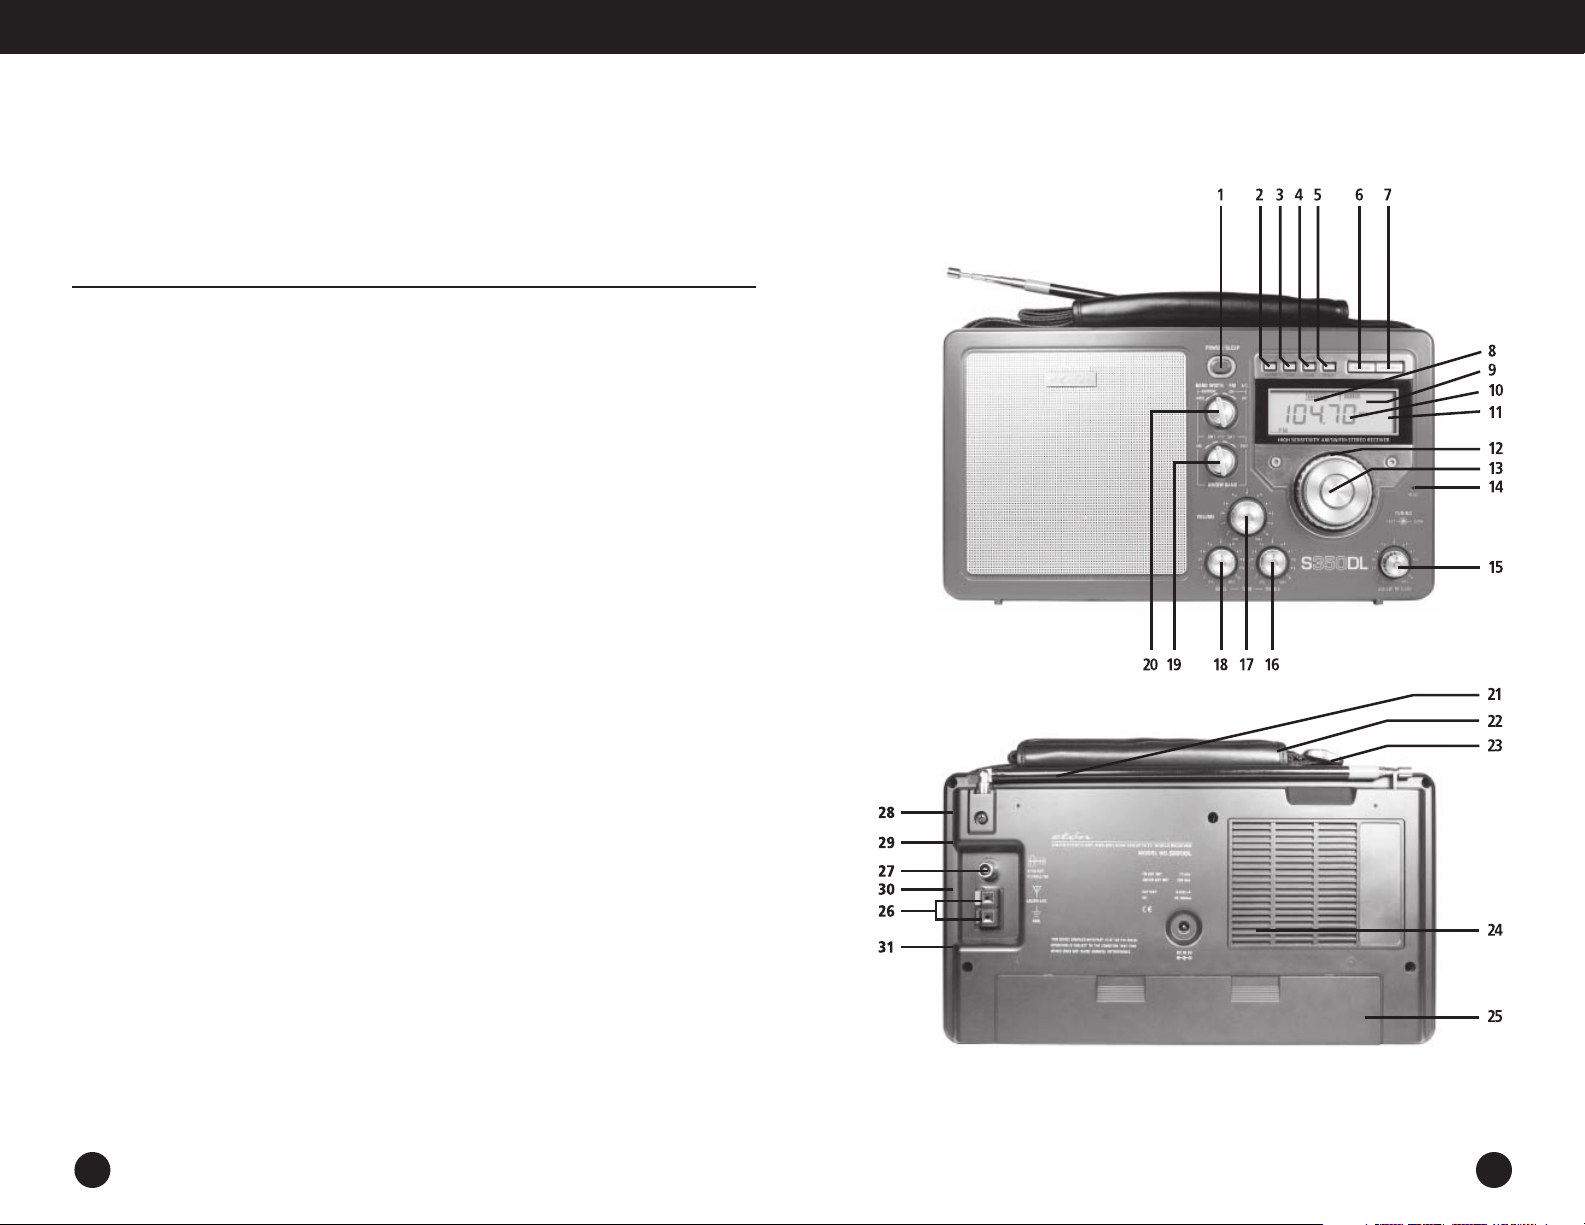
IMPORTANT NOTE: While using the owner’s manual, refer to the diagram titled CONTROL LOCATIONS to
locate controls, switches, sockets, and parts that are referred to in the text.
4
5
Page 4

3 CONTROL LOCATION
Power & Sleep Button
1
Alarm Set Button
2
Time Set Button
3
Hour Set Button
4
Minute Set Button
5
Alarm On/Off Button
6
Backlight/Snooze Button
7
Battery Power Indicator
8
Signal/Strength Indicator
9
Digital Frequency Readout
10
LCD Display
11
Turning Knob (fast)
12
Turning Knob (slow)
13
Reset Button
14
MW/SW RF Gain Knob
15
Treble Knob
16
Volume Knob
17
Bass Knob
18
MW/SW1/SW2/SW3 Band Select
19
Bandwidth/FM Band Select
20
Telescopic Antenna for FM/SW
21
Carrying Handle
22
Shoulder Strap
23
DC Jack
24
Battery Compartment
25
MW/SW Antenna Jack
26
FM Antenna Jack
27
SW LPF On/Off
28
Stereo/Mono switch
29
L & R Line Out
30
Stereo Earphone Jack
31
S350DL OPERATION MANUAL
76
Page 5

4 CONNECTING TO POWER
S350DL OPERATION MANUAL
USING BATTERIES
Open the battery compartment and insert 4 size D
batteries (also called UM-1) according to the
polarity diagram imprinted on the battery compartment floor.
Please note the following regarding
battery operation:
• The S350DL has a battery power indicator in
the LCD. Fresh batteries will show a full power
level of three bars. If the indicator shows only
one bar or the sound becomes week and dis-
torted, replace the batteries.
• The radio will turn off automatically if the
batteries become too weak.
• Check the batteries periodically for leakage.
As a precaution, remove the batteries to
prevent possible leakage if it is to be stored
for long periods without use.
• Turn off the radio while replacing the batteries.
USING AC POWER
The S350DL is supplied with an AC adaptor that
converts AC voltage to the DC voltage used by
the radio. Only use the adaptor that is supplied
with the S350DL or one that meets the generic
specifications required by this product: output of
6 volts, DC, negative polarity; plug-tip outer diameter of 5.5 millimeter, inner diameter of 2.1 millimeter; capable of 300 milliamperes or greater.
Contact Etón for the name and location of a
retailer that sells the proper adaptor.
NEVER USE AN ADAPTOR THAT DOES NOT MEET
THESE SPECIFICATIONS, AS IT MAY CAUSE DAMAGE NOT COVERED BY WARRANTY.
POWERING FROM A CAR OR
BOAT 12 VOLT DC BATTERY
SOURCE
This requires a DC converter that converts the 12
volt DC source to the 6 volts required by the
radio.The output of such an adaptor is 6 volts,
DC, negative polarity. The plug-tip must have an
outer diameter of 5.5 millimeter and an inner
diameter of 2.1 millimeter.
The plug-tip is plugged into the radio’s DC jack.
It must be capable of handling at least 200
milliamperes of current. Contact Etón for the
name and location of a retailer that sells the
proper converter.
8
9
Page 6

S350DL OPERATION MANUAL
5 SETTING THE PRELIMINARY CONTROL SETTINGS
Use these controls as initial guidelines.As you get
to know the radio, you will develop your own
‘favorite’ settings.
• Turn the VOLUME control down to no
greater than 3 so that the radio does not play
loudly when first turned on.
• Turn the AM/SW RF GAIN control to the
10 position.
• Turn the BASS-TONE-TREBLE controls into
the 5 position.
• Turn the SW LPF switch to the OFF position
(right side of the radio).
• Turn the STEREO MONO switch to the
MONO position.
6 TURNING THE RADIO ON AND OFF
There are two ways to turn the radio on, with the
90-minute timer feature or without the 90-minute
timer. To turn it off at any time, press the ‘POWER
& SLEEP’ button for about one second.
NOTE: When SLEEP Times is off, the clock
always shows in the display.
1. WITH TIMER: A quick, short press of the
‘POWER & SLEEP’ button turns the radio on.
‘90’ shows in the display for about three sec-
onds, then the radio’s normal frequency dis-
play shows.Turning it on this way causes it
play for 90 minutes, after which its timer turns
it off automatically (to minimize excess bat-
tery drain). To change this automatic turn-off
time from 90 minutes to a shorter time, see
the section titled USING THE SLEEP TIMER.
2. WITHOUT TIMER: A long press of approxi-
mately 3 seconds of the ‘POWER & SLEEP’
button turns the radio on without engaging
the automatic 90-minute timer feature, caus-
ing the radio to play indefinitely when using
the AC adaptor, and turning off only when the
batteries drain or the radio is turned off.
7 SIGNAL STRENGTH INDICATOR
10
When you are listening to stations, the signal
strength meter, in the upper right area of the display, will show the strength level of reception.
11
Page 7

S350DL OPERATION MANUAL
8 TUNING IN FM STATIONS
Fully extend the telescopic antenna and turn on
the radio. Switch the BAND WIDTH FM AFC selector to the FM AFC ON position. FM appears in the
display, as well as FM frequency numbers in the
range of about 87-108 megahertz, abbreviated
MHz. Use the outer ‘fast’ tuning knob to find stations, fine tuning with the inner ‘slow’ knob when
needed. When Automatic Frequency Control (AFC)
is ON, strong signals will automatically be captured and given precedence over weaker ones.
With AFC turned OFF, the weak stations inbetween stronger ones will be tuned in easier. AFC
ON is generally the preferred position.
• Placing the STEREO MONO switch in the
STEREO position enables FM reception
in stereo.
NOTE: The stereo is heard from earphones or
headphones and it is also heard from the stereo
line-level outputs when feeding their output to
amplified speakers or a stereo system.
• Placing the STEREO MONO switch in the
MONO position will improve the quality of a
poorly received station, but it will not be
heard in stereophonic sound from the line
level outputs.
• When listening through the built-in speaker,
stereophonic sound is not heard. Only monaural sound is heard from the built-in speaker.
• If a station is not being received clearly,
swiveling the telescopic antenna may result in
improved reception.
9 TUNING IN AM STATIONS
TUNING IN AM STATIONS (MW)
Turn on the radio and set the AM/SW BAND
switch to the AM position and the bandwidth
switch to wide or narrow. MW appears in the display. Use the outer ‘fast’ tuning knob to find stations, fine tuning with the inner ‘slow’ knob when
needed.
• If there is interference from adjacent
stations, place the BAND WIDTH control in the
NARROW position. If there is no interference,
leave it in the WIDE position.
• If there is excess background noise, turn on
the SW LPF switch, which may minimize
the noise.
• If a station is so strong that audio distortion
occurs, reduce the gain level with the AM/SW
RF GAIN control knob by turning it counter-
clockwise.
• The telescopic antenna does not have to be
extended for AM reception.The radio has an
internal, directional, ferrite-bar antenna for
AM reception.
• To optimize AM reception, swivel the radio
until maximum signal strength is achieved.
THE FREQUENCY LOCK
FEATURE
The S350DL uses a unique circuit for AM and SW
tuning to optimize frequency stability and minimize signal drifting. While turning either tuning
knob, ‘Khz’ flashes in the display. It stops flashing
about 3 seconds after a station is tuned-in,
engaging frequency-lock.
12
13
Page 8
S350DL OPERATION MANUAL
10 TUNING IN SHORTWAVE STATIONS
IF YOU ARE ALREADY
FAMILIAR WITH SHORTWAVE:
Fully extend the telescopic antenna and turn on
the radio. Set the AM/SW BAND switch to the
SW1, SW2 or SW3 position and the BANDWIDTH
switch to wide or narrow. SHORTWAVE 1, 2
or 3 appears in the display. Use the outer ‘fast’
tuning knob to quickly go to a desired frequency
that you already know or to the band that you
want to tune around in, then fine tune stations
with the inner ‘slow’ knob when needed. If a station is so strong that audio distortion occurs,
reduce the gain level with the AM/SW RF
GAIN control knob by turning it
counter-clockwise.
IF YOU ARE NEW TO SHORTWAVE OR NEED A REFRESHER
(also see the section titled INTRODUCTION TO
SHORTWAVE,later in this manual) Fully extend
the telescopic antenna and turn on the radio.
Get close to a window and fully extend the telescopic antenna. Follow the instructions below,
depending on day or night listening.
If it is daytime, turn the AM/SW BAND switch
to the SW2 position. Use the fast tuning knob
and tune to 15100 KHz. This is the beginning of
the shortwave 19 meter band, one of the three
best daytime bands, extending from 15100-15600
KHz. Using the slow tuning knob, tune through
this band, carefully listening for stations.
Also try the 13 meter band (21450-21850 KHz)
and 16 meter band (17480-17900 KHz),
both in SW3.
If it is night, turn the AM/SW BAND switch to
the SW1 position. Use the fast tuning knob and
tune to 5800 KHz. This is the beginning of the
shortwave 49 meter band, one of the four best
night bands, extending from 5800-6200 KHz.
Using the slow tuning knob, tune through this
band, carefully listening for stations.Also try the
25 meter band in SW2 (11600-12200 KHz), 31
meters in SW2 (9400-9900 KHz) and 41 meters in
SW1 (7150-7600 KHz).
NOTE: If there is interference from adjacent stations, place the BAND WIDTH control in the NARROW position. If there is no interference, leave it
in the WIDE position. If there is excess background noise, turn on the SW LPF switch, which
may minimize the noise. If a station is so strong
that audio distortion occurs, reduce the gain level
with the AM/SW RF GAIN control knob by turning
it counter-clockwise.
The Frequency Lock feature, described on page
13, also works with shortwave.
11 SETTING THE CLOCK
The S350DL's clock is a selectable 12-hour
AM/PM mode or 24-hour mode time system. To
toggle between 12 and 24 hour modes, turn off
the S350DL. Then, press the Hour button for
about 3 seconds until 12 or 24 flashes in the display.Then release the Hour button.When AM or
PM appears in the display, it is set in the 12-hour
AM/PM mode. If they are not in the display, it is
in the 24-hour mode.
The radio can be turned on/off to set the clock.
With the radio turned on/off, hold down the TIME
button for two seconds, then release it.The time
display will flash. While it is flashing press the
HOUR and MINUTE buttons to set the correct
time.After setting the correct time, immediately
press the TIME button to finalize the entry. If the
TIME button is not pressed, the display will auto-
12 USING THE SLEEP TIMER
The S350DL includes a sleep timer, which lets you
set the radio to turn off after an amount of time
of your choice. On the S350DL, the sleep timer is
automatically activated for 90 minutes whenever
the radio is turned on. After pressing the
POWER&SLEEP button to turn on the radio, notice
that ‘90’ appears in the display as well as the
SLEEP symbol. This means that
the radio’s sleep timer is engaged, allowing the
matically finalize the entry after about five seconds.While setting the time, the HOUR and
MINUTE buttons can be held down to advance
the time faster.
NOTE: When the radio is turned off, the display
panel shows the time.When it is turned on, it
shows a radio frequency.While on, pressing the
TIME button causes the display to change from
frequency to time for about three seconds, after
which it shows frequency again.
POWER FAILURE BACKUP
FEATURE
If batteries are in the S350DL and it is powered
via its AC adaptor, it will automatically switch to
battery use if there is an AC power failure.
radio to automatically turn off after 90 minutes.
To change the amount of minutes that the radio
plays before automatically shutting off, press the
POWER&SLEEP button to switch on the radio.
After 90 appears, immediately do quick, short,
repeated presses on the POWER & SLEEP button
until the desired time is reached. Note that the
sleep timer changes from 90 to 75 to 60 to 45
to30 to15 to10 to 01 minutes and finally to off,
with each successive press.
1514
Page 9

S350DL OPERATION MANUAL
13 ALARM CLOCK
SETTING, ACTIVATING AND
DEACTIVATING (ALARM
CLOCK)
The S350DL includes a programmable turn-on
timer, which allows it to turn on at preset times,
like an alarm clock.With the radio powered on or
off, hold down the ALARM button for about three
seconds or until the time digits start flashing,
then release it. While they are still flashing press
the HOUR and MINUTE buttons to set the turn-on
time, then immediately press the AL ARM button.
If the ALARM button is not pressed, the turn-on
time will automatically be set at the time you
selected after 5 seconds.
To activate/deactivate the turn-on timer feature,
with the radio turned on or off, press the AL
ON/OFF button, causing the symbol of a speaker
to appear in the lower right corner of the display.
When the speaker symbol is in the display, the
turn-on timer feature is activated. When it is not
in the display, it is deactivated.
When the alarm radio is on, press power & sleep
button to turn it off.
USING THE SNOOZE FEATURE
When the timer activates and turns the radio on,
the timer activation symbol appears flashing the
display.While it is flashing, press/release
SNOOZE/LIGHT button. The radio will turn off and
then turn on again in 10 minutes.This process
can be repeated 3 times.
To see the turn-on time at any time, with the
radio on or off, press the ALARM button. The turnon time will then appear in the display for about
four seconds.
IMPORTANT NOTES ABOUT
THE TURN-ON TIMER FEATURE
• The radio can be turned on/off for the turn-on
timer feature to function.
• The radio will automatically turn off after
playing for 30 minutes.
USING THE SNOOZE FEATURE
When the timer activates and turns the radio on,
the timer activation symbol appears flashing in
the display.While it is flashing, press/release the
SNOOZE/LIGHT button. The radio will turn off and
then turn on again in 10 minutes.This process
can be repeated 3 times.
14 USING THE BACKLIGHT
The S350DL has a backlight to light the display in
low light situations. It can be activated with the
following two methods.
1. To temporarily light the display, perform a
quick, short press on the BACKLIGHT button.
The backlight automatically turns off after
eight seconds.
2. To permanently light the display, press and
hold BACKLIGHT button for more than one
second. The backlight will be turned on until
the BACKLIGHT button is pressed again.
15 USING THE RESET
S350DL incorporates with a computer microchip
(the component that controls how the radio operates). If the radio has been subjected to abnormal
environmental conditions, the computer microchip
may malfunction and the following symptoms
may appear.
• The display shows nothing and the radio
cannot be turned on by pressing POWER &
SLEEP button.
3. When the radio turn on/off, press the
following keys can turn on the back light for 8
seconds (ALARM SET button, TIME SET but-
ton, HOUR or MINUTE SET button,AL ON/OFF
button and BACKLIGHT button)
4. Moreover, when the radio turns on, rotate
the tuning knob (fast & slow) can also turn on
the backlight for 8 seconds.
CAUTION: leaving the backlight permanently
on will drain the batteries more rapidly.
• The display shows random characters or
does not work properly although the radio
can receive stations normally.
In these cases, you might need to reset the radio.
To reset the S350DL, unplug the external adaptor
(if one is being used) and remove the batteries
from the battery compartment. Insert a pointed
object, such as straightened paper clip, into the
RESET hole on the right, front side of the radio
and gently press and release the button inside the
hole.Then plug in the AC adaptor or reinstall the
batteries.
16
17
Page 10

S350DL OPERATION MANUAL
16 USING THE LINE OUT SOCKETS
The line out sockets (RCA sockets), labeled L, R,
provide industry standard left and right stereo
line level outputs that can be used to feed audio
to a tape recorder, stereo system, or any device
with audio line level inputs.The output is stereo
when the radio is tuned to an FM station broadcasting in stereo.
17 USING THE EARPHONE JACK
The earphone jack can be used with stereo headphones using a 1/8 inch (3.5 millimeter) plug.
Sound is in stereo.
18 USING SUPPLEMENTARY ANTENNAS
SHORTWAVE ANTENNAS. This radio can be
used with basic, long wire antennas and other
high impedance shortwave antennas (optimally
500 ohm). The length of a long-wire antenna
should be anywhere from about 30-100 feet (1030 meters). Best performance is from copper wire.
The antenna should be above ground, preferably
running in a straight line. Non-conductive
insulators should be used on both ends of the
wire to prevent signal loss.The wire is plugged
into the red colored spring socket,AM,SW
ANT., on the back of the radio. Connecting a
ground wire to the black spring socket, GND,
often helps reception, but is not mandatory. The
ground wire should be connected to a cold water
pipe or a ground rod. If no water pipe or ground
rod is available, connect a wire about the same
length as the antenna wire and lay it on the
ground. NEVER CONNECT THE GROUND WIRE TO
A GAS PIPE.
AM ANTENNAS: Any high impedance (optimally 500 ohm) AM antenna can be used, including long-wires and tuned loops.A ground wire, as
discussed under SHORTWAVE ANTENNAS, is even
more helpful during AM reception and often
improves reception considerably, even when no
supplementary AM antenna is used.
FM ANTENNAS: Connect FM antennas to the
FM ANT. CABLE FM socket on the back of the
radio.These antennas should have an impedance
of 75 ohms. Most antennas fed with coaxial cable
are 75 ohm antennas. If your coaxial cable has a
‘F’ plug, like that used on North American TV’s
and VCR’s, use a F to PAL converter plug to fit the
European style PAL socket on the radio. (Radio
Shack part number 278-265).
18
19
Page 11

S350DL OPERATION MANUAL
19 INTRODUCTION TO SHORTWAVE
Shortwave enables you to hear stations from
around the world. Now that you have a shortwave radio, no doubt you’ll want to hear
worldwide stations right away. If you’re new to
shortwave, please take some time to learn the
basics outlined below.To successfully listen to
shortwave stations you must know how to find
them. They are found in the shortwave ‘bands’. If
you’re an experienced shortwave listener, you’ll
already know what bands are and how to use
them, but if you’re new, you’ll need to learn
about bands first. After that, you will have excellent success. Please read on.
20 FINDING DESIRED STATIONS
HOW TO IDENTIFY WHAT
YOU’RE LISTENING TO AND
HOW TO FIND STATIONS THAT
YOU WANT TO HEAR
We recommend the use of a comprehensive
shortwave directory, especially if you want to hear
specific countries or to identify the station you’re
listening to. Such a directory will alphabetically
list the countries broadcasting on shortwave,
showing their language, target area, broadcast
time, and frequency that is used.The best short-
wave directory is PASSPORT TO WORLD BAND
RADIO, available in major bookstores. Published
by International Broadcasting Services, Ltd., Box
300, Penn's Park, Pennsylvania 18943 or available
at www.passband.com.This publication has separate chapters for English and non-English broadcasts, titled World-Wide Broadcasts In English and
Voices From Home.
21 WHAT ARE BANDS?
TO FULLY ENJOY SHORTWAVE
LISTENING, THIS IS THE MOST
IMPORTANT CONCEPT TO
LEARN RIGHT AWAY.
If you have ever listened to AM or FM radio, then
you already know what a band is.The AM band is
a frequency range stretching form 530 to 1600
kilohertz, the FM band is 88-108 megahertz.A
band is simply a frequency range where stations
are located. When you look for stations in these
‘bands’, you simply tune around with the tuning
knob until you find a station you like. Shortwave
is similar and the shortwave bands have names
like 25 meters, 31 meters, 49 meters, etc. These
are abbreviated 25m, 31m and 49m. Just like in
AM and FM radio, one simply gets into the
shortwave band and tunes around, looking
for stations.
For example, the 19 meter shortwave band
encompasses the frequency range of 15100 to
15600 kilohertz. On the next page is a list of
the shortwave bands used for international
shortwave broadcasts and their corresponding
frequency ranges. Since some radios show
frequency in megahertz and some in kilohertz,
both are shown here.The S350DL shows shortwave frequencies in kilohertz, abbreviated KHz.
20
21
Page 12
S350DL OPERATION MANUAL
22 SHORTWAVE BANDS
BAND MEGAHERTZ (MHz) KILOHERTZ (KHz) S350DL
(as on some radios) (as on the model S350DL) switch setting
120 meters 2,300-2,500 MHz 2300- 2500 KHz SW1
90 meters 3,20-3,40 MHz 3200-3400 KHz SW1
75 meters 3,90-4,00 MHz 3900-4000 KHz SW1
60 meters 4,750-5,060 MHz 4750-5060 KHz SW1
49 meters 5,950-6,20 MHz 5950-6200 KHz SW1
41 meters 7,10-7,60 MHz 7100-7600 KHz SW1
31 meters 9,20-9,90 MHz 9500-9900 KHz SW2
25 meters 11,600-12,200 MHz 11600-12100 KHz SW2
22 meters 13,570-13,870 MHz 13570-13870 KHz SW2
19 meters 15,10-15,80 MHz 15100-15800 KHz SW2
16 meters 17,480-17,90 MHz 17480-17900 KHz SW3
13 meters 21,450-21,850 MHz 21450-21850 KHz SW3
11 meters 25,60-26,10 MHz 25600-26100 KHz SW3
10 meters 26,965-27,41 MHz 26965-27410 KHz SW3
also called ’citizens band’ or CB
23 DAY BANDS / NIGHT BANDS
DAY BANDS / NIGHT BANDS –
THE DIFFERENCE IS VERY
IMPORTANT
Because shortwave signals depend on such factors as the sun, the ionosphere and interaction
with the earth itself, signals cannot be heard on
all bands throughout the day. Some bands are
best during the daylight hours, and some are best
at night. Here are some good ‘rules of thumb’.
• In general, the bands with frequencies
below 13000 KHz are better at night and the
bands with frequencies above 13000 KHz are
best during the day.This guideline is not ‘cast
in concrete’ but is a useful general rule of
thumb.
• Around sunrise and sunset, both the day
and night bands might be good, sometimes
exceptionally good.
• In the summer time, the day bands often are
good into the early night.
• While most shortwave stations are found
within the frequency limits of these defined
bands, some are found outside of them. It
pays to take the time to tune in-between
bands too.
• These guidelines can be used worldwide and
are not dependent on location.
Listed on the next page are the characteristics of
the major shortwave bands. Follow these guidelines for best listening results.
22
23
Page 13

S350DL OPERATION MANUAL
24 DAYTIME LISTENING
Shortwave listening is generally at its poorest during the daylight hours of about two hours after sunrise until
about two hours before sunset. The major reason for this is that the broadcasters are not transmitting to North
America at this time, assuming that we are all either at work or at school and are not able to listen during the
day. If you want to try daytime listening, use the guidelines below. Typically, daytime shortwave tends to be better in Eastern North America than in Western North America.
DAY BANDS CHARACTERISTICS
13meters Results vary. Worth trying. Sometimes extremely good around sunrise and sunset.
16meters Similar to 19m.
19meters The best overall daytime band. May also be good at night in the summer months.
Sometimes extremely good around sunrise and sunset. Sometimes good at night in the
summer.
22meters Similar to 19m.
25 EVENING/NIGHT LISTENING
This is the best time to listen, because the broadcasters are deliberately transmitting to North America. These
bands may be extremely good around sunset and sunrise too.
NIGHT BANDS CHARACTERISTICS
25 meters Similar to 31m.
31 meters Good all night, everywhere. Often extremely good at sunrise and sunset. Good results
often start about an hour before sunset.
41 meters Similar to 49m. Good all night in Eastern North America; varies in Western North
America.
49 meters The best overall night band.
IMPORTANT NOTE: Getting close to a window may substantially improve your reception.The construction
materials of some buildings simply do not let signals in very well. Signals penetrate wood frame buildings easiest, while concrete and brick buildings usually block signals. If you are in a building with one or more stories
above you, signals can also be impaired in strength. In such a situation, situate the radio as close to a window
as possible while listening. Holding the radio while close to a window may also improve reception.
24
25
Page 14

S350DL OPERATION MANUAL
26 WARRANTY REGISTRATION
To ensure full warranty coverage or product
updates, registration of your Etón or Grundig product
should be complete as soon as possible after purchase or receipt. To register your radio, please select
one of the following methods:
1. Register by visiting our website at
http://www.etoncorp.com
2. Call our toll-free registration number
anywhere in the United States or Canada at
(888) 889-4391 or world-wide by dialing
(204) 336-6547. French and English speaking
operators available.
3. Mail your registration information to the
following address:
Etón Corporation
1015 Corporation Way
Palo Alto, CA 94303
PRODUCT REGISTRATION
Include your name, full mailing address, phone
number, model purchased, date purchased, retail
vendor name and product serial number (typically
located in or near the battery compartment).
27 LIMITED WARRANTY TO THE ORIGINAL CUSTOMER
This Etón or Grundig brand product, as supplied and
distributed by Etón Corporation (Etón) is warranted
by Etón against manufacturing defects in material
and workmanship for the following limited warranty
period:
ONE (1) YEAR PARTS AND
LABOR
This limited warranty begins on the original date of
purchase, and is valid only on products purchased
through an authorized Etón retailer and does not
include transportation, installation, removal or
reinstallation. Warranty repairs must be performed
by Etón or Etón’s authorized service center. To
receive warranty service, the original dated bill of
sale must be presented upon request as proof of
purchase to Etón or Etón’s authorized service center.
Transportation to Etón or Etón’s authorized service
center is the responsibility of the purchaser.
Etón will repair or replace this product, at our
option and at no charge with new or reconditioned
parts, if found to be defective during the limited
warranty period specified above. The product must
be returned no later than 15 days beyond the
expiration of the warranty period with transportation
charges prepaid to Etón or Etón’s designated service
center for warranty coverage. Prior to returning any
product for warranty service, the purchaser must
contact Etón for problem determination and service
procedure. All replaced parts and products become
the property of Etón. Replacement parts and products assume the remaining original
warranty, or ninety (90) days, whichever is longer.
This limited warranty covers manufacturing defects
LIMITED WARRANTY TO THE ORIGINAL CUSTOMER
in material and workmanship encountered in normal,
noncommercial use of this product and shall not
apply to the following, including, but not limited to:
damage which occurs due to applications and uses
for which the product was not intended;
failures or problems which are caused by products
or equipment not supplied by Etón; accidents,
misuse, abuse, neglect, misapplication, fire, water,
lightning, or other acts of nature; incorrect line volt-
age, fluctuations or surges; damage caused by
improper or faulty installation (including batteries,
which may create an acid leak with irreversible
circuit damage); damage caused by acid leakage;
product alteration or modification; or use of
unauthorized parts, supplies, accessories, or
equipment which damage this product or result in
service problems.
28 LIMITED WARRANTY TO THE ORIGINAL CUSTOMER
SERVICE YOUR ETÓN OR
GRUNDIG PRODUCT
To obtain service for your Etón or Grundig product
we recommend first contacting an Etón service representative at 800-872-2228 US, 800-637-1648
Canada or (650) 903-3866 for problem determination and trouble-shooting. Many of the common
questions can be resolved quickly over the phone.
THERE ARE TWO SERVICE TYPES SHOULD
YOUR ETÓN OR GRUNDIG PRODUCT NEED
REPAIR.
1. WARRANTY – If your product is still in warranty
and the Etón service representative determines
that warranty service is needed, a return
authorization will be issued and instructions for
shipment to an authorized warranty repair facility.
Do Not ship your radio back without obtaining
the return authorization number.
2. NON-WARRANTY – If your product is no
longer under warranty and requires service our
technical staff will refer you to the nearest repair
facility that will be able to best handle the repair.
continued
26
27
Page 15

S350DL MANUEL D'OPÉRATION
SOMMAIRE
VOULEZ-VOUS DE L’AIDE ?
Nous désirons avant tout que vous profitiez
pleinement de cet appareil. Afin d’utiliser
au mieux ses fonctions nombreuses, excellentes et uniques, nous ne pouvons que
vous inciter à lire attentivement ce manuel
d’utilisation. Si au cours de sa lecture, vous
éprouviez quelque difficulté, veuillez nous
contacter par l’un des moyens ci-dessous.
Du lundi au vendredi, de 8 h 30 à 16 h 00,,
Heure nord-américaine, côte ouest.
1-800-872-2228 depuis les U.S.A.
1-800-637-1648 depuis le Canada
1-650-903-3866, depuis le reste du monde
TÉLÉCOPIE : 650-903-3867
customersvc@etoncorp.com
Site Internet : www.etoncorp.com
Adresse postale :
Etón Corporation
1015 Corporation Way
Palo Alto, CA 94303
USA
page
INTRODUCTION .......................................................................................................................................
1
CARACTÉRISTIQUES PRINCIPALES DU MODÈLE S350DL ..........................................................................
2
EMPLACEMENT DES COMMANDES .......................................................................................
3
ALIMENTATION ÉLECTRIQUE ................................................................................................
4
RÉGLAGES PRÉLIMINAIRES DES COMMANDES ...........................................................................
5
ALLUMER ET ÉTEINDRE LA RADIO ........................................................................................
6
INDICATEUR DE PUISSANCE DU SIGNAL ....................................................................................
7
RÉGLAGE DES STATIONS FM ..................................................................................................
8
RÉGLAGE DES STATIONS AM ................................................................................................
9
RÉGLAGE DES STATIONS ONDES COURTES ...........................................................................
10
RÉGLAGE DE L’HEURE ............................................................................................................
11
UTILISATION DE LA FONCTION SOMMEIL .............................................................................
12
FONCTION RÉVEIL ................................................................................................................
13
UTILISATION DU RÉTRO-ÉCLAIRAGE .....................................................................................
14
UTILISATION DE LA FONCTION RESET ...................................................................................
15
UTILISATION DES SORTIES HAUT NIVEAU .............................................................................
16
UTILISATION DE LA PRISE CASQUE .......................................................................................
17
UTILISATION D’ANTENNES ADDITIONNELLES ........................................................................
18
INTRODUCTION AUX ONDES COURTES ....................................................................................
19
RECHERCHE DE STATIONS ....................................................................................................
20
QUE SONT LES BANDES DE FRÉQUENCE ? ............................................................................
21
BANDS DES ONDES COURTES ................................................................................................
22
BANDES DE JOUR / BANDES DE NUIT ....................................................................................
23
ÉCOUTE DE JOUR ........................................................................................................................
24
ÉCOUTE LE SOIR ....................................................................................................................
25
ENREGISTREMENT DE LA GARANTIE ....................................................................................
26
GARANTIE LIMITÉE AU CLIENT D’ORIGINE .................................................................................
27
INFORMATION CONCERNANT LE SAV ...................................................................................
28
30
31
32
34
36
36
37
37
38
39
40
41
42
42
43
43
44
44
45
45
46
47
48
49
50
51
52
53
28
29
Page 16

S350DL MANUEL D'OPÉRATION
1 INTRODUCTION
Le présent manuel d’utilisation est divisé,
pour des raisons de commodité, en deux
parties, UTILISATION DE BASE et INTRODUCTION AUX ONDES COURTES. Ces deux
parties sont importantes.
Si les ondes courtes sont pour vous un
domaine nouveau, l'INTRODUCTION AUX
ONDES COURTES vous donnera toute l’information dont vous aurez besoin pour
profiter pleinement des émissions du
monde entier.
2 CARACTÉRISTIQUES PRINCIPALES DU MODÈLE S350DL
• AM 530 à 1710 kHz
• FM 88 à 108 MHz
• ONDES COURTES – couverture continue de 3 à
28 MHz. Ceci inclut 13 bandes d’émission
internationales. 11, 13, 15, 16, 19, 22, 25, 31,
41, 49, 60, 75 et 90 mètres.
• Circuits de syntonisation analogique très
sensibles et très sélectifs
• Afficheur numérique de fréquence
• Écran à cristaux liquides (LCD), pour l’affichage
des fréquences et de l’heure
• Affichage numérique de l’heure au format 12
ou 24 heures, au choix
• Fonction réveil (possibilité de réveil musical)
• Dispositif de sauvegarde en cas de coupure
de courant
• Fonction sommeil
• Bouton de réglage principal et bouton de
réglage fin indépendants
• Commande de gain RF (radio-fréquence)
variable
• Molette de réglage de volume
• Réglages indépendants des basses et des aigus
• Filtre passe-bas en réception ondes
courtes et AM
• Sorties « line-level » Gauche/Droite
(stéréo en FM)
• Commutateur Stéréo/Mono
• Prise casque stéréo
• Poignée de transport et bandoulière réglable
• Antenne télescopique incorporée pour
réception FM et ondes courtes
• Antenne ferrite interne pour réception AM
• Entrées jack pour antennes additionnelles AM,
FM et ondes courtes
• Fonctionne sur piles 4 D ou 4AA
(non fournies), adaptateur AC/DC (adaptateur
non fourni) ou sur adaptateur DC, courant
continu (adaptateur non fourni) pour
voiture ou bateau.
30
REMARQUE IMPORTANTE: Pendant la lecture du mode d’emploi, consultez le schéma intitulé EMPLACEMENTS DES COMMANDES pour trouver les commandes, les prises et d’autres pièces mentionnées dans le texte.
31
Page 17
3 EMPLACEMENT DES COMMANDES
Bouton Power & Sleep (M/A & Sommeil)
1
Bouton Alarm Set (réglage réveil)
2
Bouton Time Set (réglage de la durée
3
d’endormissement)
Bouton Hour Set (réglage de l’heure)
4
Bouton Minute Set (réglage des minutes)
5
Bouton Alarm On/Off (M/A réveil)
6
Bouton Backlight/Snooze
7
(rétro éclairage et rappel d’alarme)
Indicateur Battery Power (tension des piles)
8
Indicateur Signal/Strength (niveau de signal)
9
Afficheur numérique de fréquence
10
Écran LCD
11
Bouton de recherche (rapide)
12
Bouton de recherche (fine)
13
Bouton Reset (remise à zéro)
14
Bouton MW/SW RF Gain (commande de gain
15
RF MW/SW (ondes moyennes / ondes courtes))
Bouton Treble (aigus)
16
17
18
19
20
21
22
23
24
25
26
27
28
29
30
31
S350DL MANUEL D'OPÉRATION
Bouton de volume
Bouton Bass (basses)
Sélecteur de bande MW/SW1/SW2/SW3 (ondes
moyennes / ondes courtes)
Sélecteur de largeur de bande/bande FM
Antenne télescopique pour FM et OC
Poignée de transport
Bandoulière
Prise Jack DC (courant continu)
Compartiment piles
Prise Jack pour antenne MW/SW
Prise Jack pour antenne FM
SW LPF On/Off (M/A filtre passe-bas)
Commutateur Stéréo/Mono
L & R Line Out (sorties HP gauche et droite)
Prise Jack casque d’écoute
3332
Page 18

4 BRANCHEMENT ÉLECTRIQUE
S350DL MANUEL D'OPÉRATION
SUR PILES
Ouvrez le compartiment des piles et insérez 4
piles de taille D (appelées aussi UM-1) en
respectant le schéma de polarité imprimé au
fond du compartiment des piles.
Veuillez noter les points suivants concernant le
fonctionnement par piles :
• Le S350DL possède un indicateur de charge
des piles dans l’affichage à cristaux liquides.
Des piles neuves seront indiquées par un
niveau de charge maximale avec trois barres.
Si l’indicateur affiche seulement une barre ou
si le son faiblit et se déforme, remplacez les
piles.
• La radio s’éteindra automatiquement si les
piles deviennent trop faibles.
• Vérifiez de temps en temps les piles pour
vérifier qu’elles ne fuient pas, particulièrement si la radio n’a pas été utilisée pendant
une longue période. Par précaution, retirez les
piles pour les empêcher de fuir si la radio
doit être rangée pendant de longues périodes
sans être utilisée.
• Éteignez la radio pendant que vous
remplacez les piles.
BRANCHEMENT SUR LE
RÉSEAU
Le poste S350DL est livré avec un adaptateur AC
(courant alternatif) qui convertit la tension alternative en tension continue (DC), utilisée par le
poste de radio. N’utilisez que l’adaptateur livré
avec le poste S350DL, ou un adaptateur répondant aux caractéristiques génériques du présent
appareil : Tension de sortie de 6 volts, DC
(courant continu), diamètre extérieur d’extrémité
de fiche, 5,5 mm, diamètre intérieur, 2,1 mm,
capable d’un courant de 300 mA ou plus.
Demandez à Etón le nom et l’adresse d’un
revendeur d’adaptateurs appropriés.
NE JAMAIS UTILISER D’ADAPTATEUR NE
RÉPONDANT PAS À CES CARACTÉRISTIQUES,
CAR IL PEUT EN RÉSULTER DES DOMMAGES
NON COUVERTS PAR LA GARANTIE.
ALIMENTATION PAR UNE
BATTERIE 12 VOLTS DC DE
VOITURE OU DE BATEAU
Ceci nécessite un convertisseur DC qui transforme le 12 V de la source en 6 volts, tension
requise par le poste de radio. La tension de sortie
d’un tel adaptateur est de 6 Volts, DC, à polarité
négative. L’extrémité de la fiche doit avoir un
diamètre extérieur de 5,5 millimètres et un
diamètre intérieur de 2,1 millimètres.
La fiche est enfoncée dans la prise Jack DC du
poste de radio. Elle doit être capable d’un
courant d’au moins 200 milliampères. Demandez
à Etón le nom et l’adresse d’un revendeur de
convertisseurs appropriés.
34
35
Page 19
S350DL MANUEL D'OPÉRATION
5 RÉGLAGES PRÉLIMINAIRES DES COMMANDES
Utilisez ces commandes pour effectuer les premiers réglages. Lorsque vous connaîtrez mieux
votre radio, vous effectuerez vos propres
réglages « favoris ».
• Abaissez la commande de VOLUME jusqu’à
une valeur inférieure ou égale à 3 de manière
à ce que la radio ne se mette pas à jouer fort
lorsqu’on l’allume la première fois.
• Tournez la commande de gain RF,AM/SW RF
GAIN, en position 10.
• Tournez les commandes BASS-TONE-TREBLE
(basses, tonalité et aigus) en position 5.
• Tournez le commutateur SW LPF (filtre OC
passe-bas) en position OFF (à droite du poste
de radio).
• Tournez le commutateur STEREO MONO en
position MONO.
6 ALLUMER ET ÉTEINDRE LA RADIO
Il y a deux façons d’allumer le poste de radio,
avec ou sans la fonction minuterie 90 minutes.
Vous pouvez annuler cette fonction à tout
moment en appuyant pendant environ 1 seconde
sur le bouton « POWER & SLEEP »
(M/A et sommeil).
NOTA : Lorsque la fonction SLEEP Time (temps
d’endormissement) est désactivée, l’heure est
constamment affichée à l’écran.
1. AVEC MINUTERIE : Une pression brève
sur le bouton « POWER & SLEEP » allume la
radio. L’écran indique « 90 » pendant à peu près
trois secondes, ensuite l’indication normale de
fréquence s’affiche. En l’allumant de cette façon,
le poste joue pendant 90 minutes, après quoi, la
minuterie l’arrête automatiquement (pour
économiser les piles). Pour diminuer cette durée
de fonctionnement automatique de 90 minutes à
un temps plus court, voir le paragraphe intitulé
UTILISATION DE LA FONCTION SOMMEIL.
2. SANS MINUTERIE : Une pression pro-
longée d’environ 3 secondes sur le bouton «
POWER & SLEEP » (M/A & sommeil), allume la
radio sans activer la fonction minuterie automatique 90 minutes, permettant un fonctionnement
sans limitation avec un adaptateur AC, ou ne
s’arrêtant que lorsque les piles sont déchargées
ou lorsque le poste est volontairement arrêté.
7 INDICATEUR DE PUISSANCE DU SIGNAL
Lorsque vous écoutez une émission, l’indicateur
de puissance du signal, situé en haut à droite de
l’écran, affiche le niveau de puissance
de réception.
8 RÉGLAGE DES STATIONS FM
Tirez au maximum l’antenne télescopique et
allumez le poste de radio. Commutez le sélecteur
BAND WIDTH FM AFC (largeur de bande FM AFC
/ contrôle automatique de fréquence) en position
FM AFC ON (activation du contrôle automatique
de fréquence). L’écran affiche FM ainsi que la
valeur de la fréquence FM, dans une plage
approximative de 87 à 108 mégahertz (ou MHz).
Utilisez le bouton extérieur « fast » (recherche
rapide) pour rechercher les stations, puis réglez
finement à l’aide du bouton intérieur « slow »
(réglage fin) si nécessaire. Lorsque la fonction
AFC (contrôle automatique de fréquence) est sur
ON (activée), les émissions puissantes sont captées automatiquement et ont la priorité sur les
plus faibles. Lorsque AFC est sur OFF (désactivée)
les émissions peu puissantes situées entre les
plus fortes, sont captées plus facilement. AFC
ON est généralement la position préférée.
• En commutant le sélecteur STEREO MONO en
position STEREO il est possible de recevoir les
émissions FM en stéréo.
NOTA : La stéréo peut être écoutée à partir
d’oreillettes ou d’un casque d’écoute, ou
encore via les sorties stéréo "line level"
lorsque ces dernières sont reliées à des
haut-parleurs sur amplificateur ou à une
chaîne stéréo.
• En commutant la sortie STEREO MONO en
position MONO, la qualité de réception d’une
émission faible s’améliore, mais cette dernière
ne pourra plus être écoutée en stéréo à partir
des sorties « line level ».
• L’écoute stéréophonique n’est pas possible à
partir du haut-parleur intégré. Ce dernier ne
permet qu’une écoute monophonique.
• Si une station n’est pas captée clairement, la
réception peut être améliorée en réorientant
l’antenne télescopique.
36
37
Page 20

S350DL MANUEL D'OPÉRATION
9 RÉGLAGE DES STATIONS AM
RÉGLAGE DES STATIONS AM
(MW OU ONDES MOYENNES)
Allumez le poste de radio et commutez le
sélecteur AM/SW BAND (bande AM ou SW /
ondes courtes) en position AM et le sélecteur
BAND WIDTH (largeur de bande) sur « wide »
(large) ou « narrow » (étroit). L’écran affiche MW.
Utilisez le bouton extérieur « fast » (recherche
rapide) pour rechercher les stations, en réglant
finement à l’aide du bouton intérieur « slow »
(réglage fin) si nécessaire.
• S’il y a interférence avec des stations
adjacentes, commutez le sélecteur BAND
WIDTH en position NARROW. S’il n’y a pas
d’interférence, laissez-le en position WIDE.
• S’il y a trop de bruit de fond, tournez le bouton
SW LPF (filtre OC passe-bas) sur ON ; ceci est
susceptible de réduire le bruit.
• Si une station est tellement puissante qu’une
distorsion se produit, réduisez le niveau de
gain à l’aide du bouton AM/SW RF GAIN, en
tournant ce dernier dans le sens antihoraire.
• Il n’est pas nécessaire de tirer l’antenne
télescopique pour capter les émissions en AM.
Le poste dispose d’une antenne ferrite
directionnelle interne pour la réception en AM
• Pour optimiser la réception en AM, orientez le
poste de façon à capter un signal de
puissance maximale.
DISPOSITIF DE VERROUILLAGE
DE FRÉQUENCE
Le modèle S350DL utilise pour la recherche en
AM et SW, un circuit spécifique qui optimise la
stabilité de la fréquence et minimise la variation
du signal. En tournant l’un ou l’autre bouton de
recherche, l’écran affiche un « kHz » clignotant.
L’affichage arrête de clignoter, environ 3 secondes
après qu’une station ait été trouvée, et le verrouillage de fréquence est activé.
10 RÉGLAGE DES STATIONS ONDES COURTES
SI LE DOMAINE DES ONDES
COURTES VOUS EST DÉJÀ
FAMILIER :
Tirez au maximum l’antenne télescopique et allumez le
poste de radio. Commutez le sélecteur AM/SW BAND
(bande AM ou SW / ondes courtes) en position SW1,
SW2 ou SW3 et le sélecteur BANDWIDTH (largeur de
bande) sur « wide » (large) ou « narrow » (étroit).
L’écran affiche SHORTWAVE 1, 2 ou 3 (ondes courtes 1, 2
ou 3). Utilisez le bouton extérieur « fast » (recherche
rapide) pour atteindre rapidement la fréquence désirée,
que vous connaissez déjà, ou la bande de fréquence que
vous voulez explorer,puis réglez finement les stations à
l’aide du bouton intérieur « slow » (réglage fin) si nécessaire. Si une station est tellement puissante qu’une distorsion se produit, réduisez le niveau de gain à l’aide du
bouton AM/SW RF GAIN,en tournant ce dernier dans le
sens antihoraire.
SI LES ONDES COURTES VOUS
SONT ÉTRANGÈRES OU SI VOUS
SOUHAITEZ UN RAPPEL DE
MÉMOIRE
(voir également le paragraphe intitulé INTRODUCTION
AUX ONDES COURTES, dans la suite de ce manuel). Tirez
au maximum l’antenne télescopique et allumez le poste
de radio.Approchez-vous d’une fenêtre et tirez au maximum l’antenne télescopique. Suivez les instructions cidessous, qui distinguent la réception de jour ou de nuit.
Durant la journée, commutez le sélecteur AM/SW BAND
en position SW2. A l’aide du bouton de recherche rapide
« fast », réglez le poste sur 15100 kHz. Ceci est le début
de la bande ondes courtes des 19 mètres, l’une des trois
meilleures bandes de jour,allant de 15100 à 15600 kHz.
A l’aide du bouton de recherche fine « slow », parcourez
cette bande et recherchez attentivement les stations.
Essayez également la bande des 13 mètres (21450 à
21850 kHz) et la bande des 16 mètres (17480 à 17900
kHz), toutes deux en SW3.
La nuit, commutez le sélecteur AM/SW BAND en position
SW1. A l’aide du bouton de recherche rapide « fast »,
réglez le poste sur 5800 kHz. Ceci est le début de la
bande d’ondes courtes des 49 mètres, l’une des quatre
meilleures bandes de jour,allant de 5800 à 6200 kHz. A
l’aide du bouton de recherche fine « slow », parcourez
cette bande et recherchez attentivement les stations.
Essayez également la bande des 25 mètres en SW2
(11600 à 12200 kHz), la bande des 31 mètres en SW2
(9400 à 9900 kHz), et la bande des 41 mètres en SW1
(7150 à 7600 kHz).
NOTA :S’il y a interférence avec des stations adjacentes,
commutez le sélecteur BAND WIDTH en position NARROW. S’il n’y a pas d’interférence, laissez-le en position
WIDE. S’il y a trop de bruit de fond, tournez le bouton
SW LPF (filtre OC passe-bas) sur ON ; ceci est susceptible
de réduire le bruit. Si une station est tellement puissante
qu’une distorsion se produit, réduisez le niveau de gain à
l’aide du bouton AM/SW RF GAIN,en tournant ce dernier
dans le sens antihoraire.
Le dispositif de verrouillage de fréquence décrit en page
13 est également valable en ondes courtes.
38
39
Page 21
S350DL MANUEL D'OPÉRATION
11 RÉGLAGE DE L’HEURE
L’affichage de l’heure du modèle S350DL peut
être fait en mode 12 heures AM/PM (avant et
après midi) ou en mode 24 heures. Pour permuter
entre les modes 12 et 24 heures, éteignez le
poste S350DL. Appuyez ensuite sur le bouton
Hour (heure) pendant environ 3 secondes jusqu’à
ce que l’écran affiche un « 12 » ou « 24 » clignotant. Relâchez alors le bouton Hour. Lorsque
l’écran affiche AM ou PM, le mode 12 heures
AM/PM est alors activé. S’ils n’apparaissent pas,
c’est le mode 24 heures qui est actif
L’heure peut être réglée, radio allumée ou éteinte.
Radio allumée ou éteinte, pressez le bouton TIME
(heure) pendant deux secondes, puis relâchez-le.
L’affichage de l’heure se met alors à clignoter.
Pendant qu’il clignote, appuyez sur les boutons
HOUR (heures) et MINUTE pour régler l’heure
exacte Après avoir réglé l’heure, appuyez immédiatement sur le bouton TIME pour confirmer l’entrée. Si vous n’appuyez pas sur le bouton TIME,
l’affichage enregistrera automatiquement l’entrée
au bout de cinq secondes. Pendant le réglage de
l’heure, les boutons HOUR et MINUTE peuvent
être maintenus enfoncés pour avancer l’heure
plus vite.
Nota : Lorsque la radio est éteinte, l’écran affiche
l’heure. Lorsqu’elle est allumée elle indique une
fréquence radio. En appuyant sur le bouton TIME,
radio allumée, l’affichage bascule de fréquence à
heure pendant environ trois secondes, après quoi
il indique à nouveau la fréquence.
DISPOSITIF DE SAUVEGARDE
EN CAS DE COUPURE DE
COURANT
S’il y a des piles dans le poste S350DL et que ce
dernier est alimenté via un adaptateur AC/DC, le
système basculera automatiquement sur les piles
en cas de coupure de courant.
12 UTILISATION DE LA FONCTION SOMMEIL
Le modèle S350DL comporte une fonction
sommeil qui permet de programmer l’arrêt
automatique de la radio au bout d’un temps à
déterminer. Sur le modèle S350DL, la fonction
sommeil est automatiquement activée pour une
durée de 90 minutes chaque fois que la radio est
allumée.Après avoir appuyé sur le bouton
POWER&SLEEP (M/A & sommeil) pour allumer la
radio, notez que l’écran affiche « 90 » ainsi que
le symbole SLEEP (sommeil) Ceci veut dire que la
minuterie d’endormissement est activée, déclenchant l’arrêt automatique de la radio après
90 minutes.
Pour modifier la durée en minutes de fonctionnement de la radio avant son arrêt automatique,
appuyez sur le bouton POWER & SLEEP pour
allumer la radio.Après que le « 90 » se soit
affiché, appuyez successivement et par pressions
courtes et rapides sur le bouton POWER & SLEEP
jusqu’à ce que la durée souhaitée soit affichée.
Notée que la durée d’endormissement passe de
90 à 75 puis à 60 à 45 à 30 à 15 à 10 et à 01
minute et finalement sur off (arrêt) à
chaque pression.
40
41
Page 22

S350DL MANUEL D'OPÉRATION
13 FONCTION RÉVEIL
RÉGLAGE, ACTIVATION ET
DÉSACTIVATION (RÉVEIL)
Le modèle S350DL comporte une fonction d’activation programmable permettant de l’allumer à des
moments préréglés, comme un réveille-matin. Radio
allumée ou non, pressez le bouton ALARM (réveil)
pendant environ trois secondes ou jusqu’à ce que
l’affichage de l’heure clignote, puis relâchez-le.
Pendant qu’il clignote, appuyez sur les boutons
HOUR (heure) et MINUTE pour régler l’heure de
réveil puis appuyez immédiatement sur le bouton
ALARM. Si vous n’appuyez pas sur le bouton ALARM,
l’heure de réveil que vous avez introduite sera
automatiquement enregistrée au bout de 5 secondes.
Pour activer ou désactiver la fonction réveil, radio
allumée ou non, appuyez sur le bouton AL ON/OFF
(alarme M/A) ; le symbole haut-parleur apparaît en
bas à droite de l’écran. La fonction réveil est activée
lorsque le symbole haut-parleur est affiché. Lorsqu’il
n’apparaît pas à l’écran, la fonction est désactivée.
Lorsque le réveil sonne, appuyez sur le bouton
POWER & SLEEP (M/A & sommeil) pour l’arrêter.
UTILISATION DE LA FONCTION
SNOOZE
Lorsque la minuterie de réveil se déclenche et que la
radio se met en marche, le symbole d’activation
réveil clignote à l’écran. Pendant qu’il clignote,
appuyez puis relâchez le bouton SNOOZE/LIGHT (rappel d’alarme/lumière) La radio s’arrêtera et se remettra en marche au bout de 10 minutes. Ce processus
peut être répété 3 fois.
Pour voir à tout moment l’heure d’activation du
réveil, radio allumée ou non, appuyez sur le bouton
ALARM. L’heure de réveil s’affiche alors à l’écran
pendant environ quatre secondes.
REMARQUES IMPORTANTES CONCERNANT LA FONCTION RÉVEIL
• Le réveil fonctionne, radio allumée ou éteinte.
• La radio s’arrêtera automatiquement au bout
30 minutes.
UTILISATION DE LA FONCTION
SNOOZE
Lorsque la minuterie de réveil se déclenche et que la
radio se met en marche, le symbole d’activation
réveil clignote à l’écran. Pendant qu’il clignote,
appuyez puis relâchez le bouton SNOOZE/LIGHT (rappel d’alarme/lumière). La radio s’arrêtera et se remettra en marche au bout de 10 minutes. Ce processus
peut être répété 3 fois.
14 UTILISATION DU RÉTRO-ÉCLAIRAGE
Le modèle S350DL dispose d’un rétro-éclairage qui
éclaire l’affichage en cas d’obscurité. Il peut être
activé par l’une des deux méthodes suivantes.
1. Pour éclairer momentanément l’écran, appuyez
brièvement sur le bouton BACKLIGHT (rétroéclairage). Le rétro-éclairage s’éteint automatiquement au bout de huit secondes.
2. Pour éclairer l’écran en permanence, maintenez le
bouton BACKLIGHT appuyé pendant plus d’une seconde. Le rétro-éclairage s’allumera jusqu’à ce que
l’on appuie à nouveau sur le bouton BACKLIGHT.
3. Lorsque la radio se met en marche ou s’arrête,
appuyer sur les touches suivantes permet d’allumer
le rétro-éclairage pendant 8 secondes (bouton
ALARM SET, bouton TIME SET, bouton HOUR ou
MINUTE SET, bouton AL ON/OFF et bouton
BACKLIGHT)
4. De plus, lorsque la radio se met en marche, la
rotation de l’un des boutons de recherche (fast &
slow) permet également d’allumer le rétro-éclairage
pendant 8 secondes.
Attention : En laissant le rétro-éclairage
constamment allumé, vous épuiserez plus
rapidement les piles.
15 UTILISATION DE LA FONCTION RESET
Le modèle S350DL comprend un circuit intégré (le
composant qui contrôle le fonctionnement du poste
de radio). Si la radio a été soumise à des conditions
d’environnement anormales, le circuit intégré peut
mal fonctionner et les symptômes suivants peuvent
apparaître.
• L’écran n’affiche rien et la radio ne peut pas être
allumée en appuyant sur le bouton .POWER
& SLEEP.
• L’écran affiche des caractères disparates ou ne
fonctionne pas correctement, bien que la radio c
apte normalement les stations.
Dans ces deux cas, il est possible que vous ayez à
remettre à zéro le poste de radio (fonction RESET).
Pour remettre à zéro le poste S350DL, débranchez
l’adaptateur externe (en cas d’utilisation d’un adaptateur) et enlevez les piles de leur compartiment.
Insérez un objet pointu, par exemple un trombone
redressé, dans l’orifice de RESET situé à droite et à
l’avant du poste et appuyez doucement ; relâchez
ensuite le contact situé au fond de l’orifice. Puis,
rebranchez l’adaptateur AC/DC ou réinstallez
les piles.
16 UTILISATION DES SORTIES HAUT NIVEAU
Les sorties haut niveau (prises RCA) repérées L et R
(gauche et droite), constituent des sorties industrielles stéréo standard, gauche et droite, de type «
line level » qui peuvent donc être utilisées comme
entrée audio d’un magnétophone, d’un système
stéréo, ou de tout appareil disposant d’entrées audio
« line level ». La sortie n’est stéréo que si la radio
est accordée sur une station FM émettant en stéréo.
42
43
Page 23

S350DL MANUEL D'OPÉRATION
17 UTILISATION DE LA PRISE CASQUE
La prise casque peut être utilisée avec un
casque d’écoute stéréo, à fiche 1/8 de pouce
(3.5 millimètres) Le son est stéréo.
18 UTILISATION D’ANTENNES ADDITIONNELLES
ANTENNES ONDES COURTES Ce poste peut
être utilisé avec une antenne classique à fil long
ou une autre antenne ondes courtes à haute
impédance (de façon optimale, 500 ohms) La
longueur d’une antenne à fil long peut aller de 30
à 100 pieds environ (10 à 30 mètres) Les
meilleurs résultats sont obtenus avec du fil de
cuivre. L’antenne doit être installée au-dessus du
sol, de préférence en ligne droite. Les extrémités
du fil doivent être montées sur des isolateurs,
donc non conducteurs, pour éviter des pertes de
signal. Le fil doit être fiché dans la prise à ressort
AM,SW ANT., de couleur rouge (antenne AM,
ondes courtes), située à l’arrière du poste. Le fait
de relier la prise à ressort GND (terre) noire à la
terre, améliore souvent la réception, mais n’est
pas indispensable. Le fil de terre doit être relié à
un conduit d’eau froide ou à un piquet de terre. Si
aucun conduit ni piquet de terre n’est disponible,
reliez un fil de longueur égale à celle de l’antenne
et posez-le par terre. NE RELIEZ JAMAIS LE FIL DE
TERRE À UN TUYAU DE GAZ.
ANTENNES AM : Toute antenne AM à haute
impédance (de façon optimale 500 ohms) peut
être utilisée, y compris les antennes à fil long et
les bobines accordées. Un fil de terre, tel que
décrit au paragraphe ANTENNES ONDES COURTES, est encore plus utile pour la réception en AM
et améliore souvent de façon spectaculaire la
réception, même lorsqu’aucune antenne AM additionnelle n’est utilisée.
ANTENNES FM Reliez les antennes FM à la prise
FM ANT. CABLE FM (antenne et câble FM) située
à l’arrière du poste. Ces antennes doivent avoir
une impédance de 75 ohms. La plupart des
antennes reliées par câble coaxial sont des
antennes 75 ohms. Si votre câble coaxial est
équipé d’une fiche de type « F », comme celles
utilisées sur les postes de télévision et magnétoscopes d’Amérique du Nord, utilisez un adaptateur F / PAL pour pouvoir utiliser la prise de type
PAL européen du poste de radio.(Référence de
pièce Radio Shack 278-265).
19 INTRODUCTION AUX ONDES COURTES
Les ondes courtes vous permettent de capter des
stations émettant de partout dans le monde.
Maintenant que vous disposez d’un poste à
ondes courtes, nul doute que vous voudrez
écouter tout de suite les stations du monde
entier. Si les ondes courtes sont un domaine nouveau pour vous, veuillez consacrer un peu de
temps à la lecture des notions de base ci-dessous.
Pour écouter sans problème les émissions en
ondes courtes, il faut savoir où trouver les stations. Elles se trouvent dans les différentes «
bandes » d’ondes courtes. Si vous êtes un auditeur chevronné d’émissions en ondes courtes,
vous savez déjà ce que sont les bandes et comment les utiliser, mais si c’est nouveau pour
vous, vous aurez à apprendre d’abord ce que
sont les bandes.Après cela, plus de problème.
Veuillez lire la suite.
20 RECHERCHE DE STATIONS
COMMENT IDENTIFIER CE QUE
VOUS ENTENDEZ ET COMMENT
TROUVER LES STATIONS QUE
VOUS VOULEZ ÉCOUTER
Nous vous recommandons d’utiliser un répertoire
détaillé des émissions ondes courtes, spécialement si vous voulez capter les émissions de certains pays en particulier ou si vous désirez identifier une station que vous êtes en train d’écouter.
Un tel répertoire dresse la liste alphabétique des
pays émettant en ondes courtes, en indiquant leur
langue, la zone couverte, les heures d’émission et
la fréquence utilisée. Le meilleur répertoire est
PASSPORT TO WORLD BAND RADIO (passeport
vers les émissions en bande OC du monde entier),
disponible dans les grandes librairies. Il est publié
chez International Broadcasting Services, Ltd., Box
300, Penn's Park, Pennsylvania 18943 ou peut
être commandé sur www.passband.com. Cette
publication traite les émissions en anglais ou non,
dans des chapitres séparés, intitulés World-Wide
Broadcasts In English (Émissions du monde entier
en anglais) et Voices From Home (Les voix de
chez nous).
44
45
Page 24

S350DL MANUEL D'OPÉRATION
21 QUE SONT LES BANDES DE FRÉQUENCE ?
POUR APPRÉCIER PLEINEMENT
LES ÉMISSIONS EN ONDES
COURTES, VOICI LA NOTION LA
PLUS IMPORTANTE À
CONNAÎTRE TOUT DE SUITE.
Si vous avez déjà écouté la radio en AM ou en FM,
vous savez déjà ce que sont les bandes de
fréquence. La bande AM est une plage de
fréquences allant de 530 à 1600 kilohertz ; la
bande FM va de 88 à 108 mégahertz. Une bande
est donc tout simplement une plage de fréquences
dans laquelle se trouvent les stations. Lorsque
vous recherchez des stations dans ces « bandes »,
il vous suffit de tourner le bouton de recherche
jusqu’à ce que vous trouviez une station qui vous
plaise. Pour les ondes courtes c’est pareil et les
bandes d’ondes courtes portent des noms comme
25 mètres, 31 mètres, 49 mètres, etc. Soit en
abrégé 25 m, 31 m et 49 m.Tout comme en AM
ou en FM, il suffit d’entrer dans la bande d’ondes
courtes et de fouiner ici et là pour trouver
les stations.
Par exemple, la bande d’ondes courtes des 19
mètres comprend les fréquences allant de 15100
à 15600 kilohertz. Vous trouverez sur la page
suivante une liste de bandes d’ondes courtes utilisées dans les émissions internationales en ondes
courtes et les plages de fréquences correspondantes. Comme certaines radios indiquent les
fréquences en mégahertz et d’autres en kilohertz,
les deux sont indiqués ici. Le modèle S350DL
indique les fréquences d’ondes courtes en kilohertz, soit en abrégé kHz.
22 BANDS DES ONDES COURTES
BAND MEGAHERTZ (MHz) KILOHERTZ (KHz)
S350DL (suivant certaines radios) (comme sur le modèle S350DL) switch setting
120 mètres 2,300-2,500 MHz 2300 à 2500 kHz SW1
90 mètres 3,20 à 3,40 MHz 3200-3400 kHz SW1
75 mètres 3,90 à 4,00 MHz 3900 à 4000 kHz SW1
60 mètres 4,750 à 5,060 MHz 4750 à 5060 kHz SW1
49 mètres 5,950 à 6,20 MHz 5950 à 6200 kHz SW1
41 mètres 7,10 à 7,60 MHz 7100 à 7600 kHz SW1
31 mètres 9,20 à 9,90 MHz 9500 à 9900 kHz SW2
25 mètres 11,600 à 12,200 MHz 11600 à 12100 kHz SW2
22 mètres 13,570 à 13,870 MHz 13570 à13870 kHz SW2
19 mètres 15,10 à 15,80 MHz 15100 à 15800 kHz SW2
16 mètres 17,480 à 17,90 MHz 17480 à 17900 kHz SW3
13 mètres 21,450 à 21,850 MHz 21450 à 21850 kHz SW3
11 mètres 25,60 à 26,10 MHz 25600 à 26100 KHz SW3
10 mètres 26,965 à 27,41 MHz 26965 à 27410 kHz SW3
Aussi appelée « citizens band » ou CB (bande des citoyens)
46
47
Page 25

S350DL MANUEL D'OPÉRATION
23 BANDES DE JOUR / BANDES DE NUIT
BANDES DE JOUR / BANDES DE
NUIT – LA DIFFÉRENCE EST
TRÈS IMPORTANTE
La transmission des ondes courtes dépendant de
facteurs tels que l’activité solaire, l’ionosphère et
l’interaction avec la Terre elle-même, les signaux
ne peuvent pas être captés dans toutes les bandes toute la journée. Certaines bandes sont
meilleures lorsqu’il fait jour et d’autres lorsqu’il
fait nuit. Voici quelques bons « tuyaux ».
• En général, les bandes dont les fréquences
sont inférieures à 13000 kHz sont meilleures la
nuit et les bandes avec des fréquences
supérieures à 13000 kHz sont meilleures le
jour. Cette indication n’est pas une vérité
absolue mais c’est une astuce à retenir.
• Vers le lever et le coucher du soleil, les deux
types de bandes, de jour et de nuit, peuvent
être bonnes, parfois exceptionnellement
bonnes.
• L’été, les bandes de jour sont souvent bonnes
jusqu’en début de nuit.
• La plupart des stations ondes courtes se
trouvent dans les limites de fréquence définies
pour ces bandes, mais quelques unes peuvent
se trouver en dehors. Cela vaut parfois la peine
d'effectuer aussi une recherche entre
les bandes.
• Ces directives peuvent être utilisées dans le
monde entier et ne dépendent pas de la
localisation.
Vous trouverez à la page suivante les caractéristiques des bandes ondes courtes les plus importantes. Suivez ces directives pour obtenir l’écoute
la meilleure.
24 ÉCOUTE DE JOUR
La réception des ondes courtes est généralement
la plus mauvaise le jour, entre deux heures après
le lever du soleil et deux heures avant le coucher
du soleil. La raison principale est que les émissions ne sont pas dirigées vers l’Amérique du
Nord à ces heures, parce que les responsables
estiment que les gens sont soit au travail, soit à
BANDES DE JOUR CARACTÉRISTIQUES
13 mètres Les résultats varient. Vaut la peine d’essayer.Parfois extrêmement bonne au
lever et au coucher du soleil.
16 mètres Similaire à 19 m.
19 mètres La meilleure bande de jour générale. Peut être bonne aussi la nuit pendant
les mois d’été. Parfois extrêmement bonne au lever et au coucher du soleil.
Parfois bonne la nuit pendant l’été.
22 mètres Similaire à 19 m.
l’école, et n’ont pas le temps d’écouter les émissions durant la journée. Si vous désirez écouter
les ondes courtes durant la journée, suivez les
conseils ci-après. De manière générale, la réception en ondes courtes est meilleure, de jour, à
l’est de l’Amérique du Nord qu’à l’ouest.
48
49
Page 26

S350DL MANUEL D'OPÉRATION
25 ÉCOUTE LE SOIR OU LA NUIT
C’est le meilleur moment pour écouter les ondes courtes, car les émetteurs sont délibérément dirigés vers
l’Amérique du Nord. Ces bandes peuvent être extrêmement bonnes au lever et au coucher du soleil.
BANDES DE NUIT CARACTÉRISTIQUES
25 mètres Similaires à celles des 31 m
31 mètres Bonnes toute la nuit, partout. Souvent extrêmement bonnes au lever et au
coucher du soleil. De bons résultats sont obtenus à partir de une heure
avant le coucher de soleil.
41 mètres Similaires à celles des 49 m Bonnes toute la nuit à l'est de l'Amérique du
Nord, variables à l'ouest.
49 mètres La meilleure de toutes les bandes de nuit.
REMARQUE IMPORTANTE : Le fait de s’approcher d’une fenêtre peut améliorer considérablement la
réception. Les matéraux de construction de certains immeubles ne laissent pas passer facilement les signaux.
Les ondes pénètrent aisément les constructions en bois, tandis que les immeubles en béton et en briques bloquent d’habitude les signaux. Si vous êtes dans un immeuble et que vous avez plusieurs étages au-dessus de
vous, les signaux peuvent également être empêchés de passer. Dans ce cas, installez la radio le plus près possible d’une fenêtre lorsque vous écoutez les émissions OC. En tenant la radio en mains à côté d’une fenêtre peut
également améliorer la réception.
26 ENREGISTREMENT DE LA GARANTIE
Pour assurer l’étendue totale de la garantie ou les
mises à jours de produit, l’enregistrement de votre
produit Etón ou Grundig doit être complété le plus
tôt possible après l’achat ou le reçu. Pour enregistrer votre radio, veuillez sélectionner une des méthodes suivantes :
1. Effectuez l’enregistrement en visitant notre site
Internet au http://www.etoncorp.com
2. Appelez notre numéro gratuit d’enregistrement
n’importe où aux États-Unis ou au Canada au
(888) 889-4391 ou dans le monde entier en
composant le (204) 336-6547. Des opérateurs
parlant le Français et l’Anglais sont disponibles.
3. Postez votre information d’enregistrement à
l’adresse suivante :
Etón Corporation
1015 Corporation Way
Palo Alto, CA 94303
PRODUCT REGISTRATION
Inclure votre nom, adresse postale complète,
numéro de téléphone, modèle acheté, date d’achat,
nom du commerçant et numéro de série du produit
(typiquement situé à l’intérieur ou près du
compartiment à piles).
50
51
Page 27

S350DL MANUEL D'OPÉRATION
27 GARANTIE LIMITÉE AU CLIENT INITIAL
Ce produit de marque Etón ou GRUNDIG, tel que
fourni et distribué par Etón Corporation (Etón) est
garanti par Etón contre tout défaut de fabrication en
matériau et en main-d’œuvre pendant la période de
garantie limitée suivante :
UN (1) ANS PIÈCES ET MAIN
D’ŒUVRE
Cette garantie limitée commence à partir de la date
de l’achat initial, et est valide seulement pour les
produits achetés par l’intermédiaire d’un détaillant
autorisé Etón et n’inclue pas le transport,
l’installation, l’enlèvement ou la réinstallation. Les
réparations sous-garantie doivent être faites par
Etón ou par un centre accrédité de réparation Etón.
Pour recevoir le service de garantie, la facture
originale datée doit être présentée à la demande à
Etón ou au centre accrédité de réparation Etón
comme preuve d’achat. Le transport à Etón ou au
centre accrédité de réparation Etón est à la
responsabilité de l’acheteur.
Etón réparera ou remplacera ce produit, à notre
option et sans frais avec des pièces neuves ou
remises en état, s’il est trouvé défectueux durant la
période de garantie limitée spécifiée ci-dessus. Le
produit doit être renvoyé pas plus tard que 15 jours
au-delà de la date d’expiration de la période de
garantie avec les frais de transport payés à l’avance
à Etón ou au centre de réparation désigné par Etón
pour bénéficier de la garantie. Avant de retourner
tout produit pour le service de garantie, l’acheteur
doit contacter Etón pour la détermination du
problème et la procédure de service. Toutes les
pièces et produits remplacés deviennent la propriété
d’Etón. Les pièces et produits de remplacement
assument la garantie originale restante, ou
quatre-vingt-dix (90) jours, selon laquelle de ces
deux périodes est la plus longue.
Cette garantie limitée couvre les défauts de
fabrication, en matériau et en main d’œuvre
rencontrés avec une utilisation normale, non
commerciale de ce produit et ne s’appliquera pas à
ce qui suit, y compris, mais pas limité à : des dégâts
qui se produisent à la suite d’applications et d’utilisations pour lesquelles le produit n’était pas prévu;
des pannes ou problèmes qui sont causés par des
produits ou équipements non fournis par Etón; des
accidents, l’utilisation incorrecte, abusive, négligente, la mauvaise application, le feu, l’eau, la
foudre, ou d’autres évènements fortuits; une tension
de secteur incorrecte, des variations de tension ou
des surtensions; des dégâts causés par une
installation incorrecte ou erronée (y compris des
piles, qui peuvent créer une fuite d’acide avec des
dégâts de circuit irréversibles); des dégâts causés
par une fuite d’acide; des altérations ou
modifications de produit; ou l’utilisation de pièces,
de fournitures, d’accessoires ou d’équipements nonautorisés qui détériorent ce produit ou
entraînent des problèmes de réparation.
28 RENSEIGNEMENTS SUR LES SERVICES
SERVICE POUR VOTRE PRODUIT
ETÓN OU GRUNDIG
Pour obtenir le service de votre produit Etón ou
Grundig nous recommandons de contacter premièrement un représentant du service des réparations Etón au 800-872-2228 aux États-Unis, 800637-1648 au Canada ou
(650) 903-3866 pour la détermination du problème
et le dépannage. De nombreuses questions communes peuvent être résolues rapidement au téléphone.
IL Y A DEUX TYPES DE SERVICE DANS LE CAS
OÙ VOTRE PRODUIT ETÓN OU GRUNDIG
AURAIT BESOIN D’UNE RÉPARATION.
1. SOUS GARANTIE – Si votre produit est encore
sous garantie et le représentant du service de
réparation Etón détermine que le service sous
garantie est nécessaire, une autorisation de
retour sera émise et les instructions pour
l’expédition vers un centre accrédité de réparation
sous garantie. Ne renvoyez pas votre radio sans
avoir obtenu le numéro d’autorisation de retour.
2. HORS-GARANTIE – Si votre produit n’est plus
sous garantie et nécessite une réparation, notre
personnel technique et de réparation vous
référera au centre de réparation le plus proche
qui sera le mieux adapté pour la réparation.
5352
Page 28

BENÖTIGEN SIE HILFE?
Wir möchten, dass Ihnen die Benutzung
des Produkts wirklich Spaß macht.
Damit Sie die vielen hervorragenden
und einzigartigen Funktionen wirklich
nutzen können, bitten wir Sie dringend,
dieses Benutzerhandbuch zu lesen.
Sollten Sie Fragen zur Funktionsweise
haben, nutzen Sie bitte die Möglichkeit
uns über eine der unten aufgeführten
Alternativen zu kontaktieren.
Montag-Freitag, 8:30 - 16:00
US Pazifische Standardzeit
1-800-872-2228 aus den USA
1-800-637-1648 aus Kanada
1-650-903-3866, weltweit
FAX: 1-650-903-3867
customersvc@etoncorp.com
Webseite: www.etoncorp.com
Postadresse:
Etón Corporation
1015 Corporation Way
Palo Alto, CA 94303
USA
S350DL BENUTZERHANDBUCH
INHALTSVERZEICHNIS
page
EINFÜHRUNG......................................................................................
1
HAUPTFUNKTIONEN DES MODELLS S350DL.........................
2
BEDIENUNGSELEMENTE............................................................
3
STROMANSCHLÜSSE.............................................................
4
VORLÄUFIGE EINSTELLUNGEN...........................................................
5
EIN- UND AUSSCHALTEN DES RADIOS................................................
6
ANZEIGE DER SIGNALSTÄRKE ..............................................
7
EINSTELLEN VON FM-SENDERN................................................
8
EINSTELLEN VON AM-SENDERN............................................
9
EINSTELLEN VON KURZWELLEN-SENDERN...........................
10
EINSTELLEN DER UHR............................................................
11
SLEEP TIMER ........................................................................
12
WECKER.................................................................................
13
HINTERGRUNDBELEUCHTUNG...............................................
14
RESET-FUNKTION...................................................................
15
LINE OUT-BUCHSEN...................................................................
16
OHRHÖRERBUCHSE................................................................
17
EINSATZ ZUSÄTZLICHER ANTENNEN..................................................
18
EINFÜHRUNG IN DIE KURZWELLE.........................................
19
FINDEN BESTIMMTER RADIOSENDER...................................
20
WAS SIND FREQUENZBEREICHE?..........................................
21
KURZWELLENBÄNDER........................................................................
22
TAGES- UND NACHTFREQUENZBEREICHE.............................
23
RADIO HÖREN TAGSÜBER....................................................
24
RADIO HÖREN ABENDS.........................................................
25
GARANTIE-REGISTRIERUNG .................................................
26
BEGRENZTE GARANTIE FÜR DEN URSPRÜNGLICHEN KUNDEN ..
27
WARTUNGSINFORMATIONEN ................................................
28
56
57
58
60
62
63
63
64
65
66
68
69
70
71
71
72
72
73
74
74
75
76
77
78
79
80
80
81
54
55
Page 29

S350DL BENUTZERHANDBUCH
1 EINLEITUNG
Dieses Benutzerhandbuch ist zur
besseren Übersicht in zwei Abschnitte,
GRUNDFUNKTIONEN und EINFÜHRUNG IN
DIE KURZWELLE, unterteilt. Beide Abschnitte
sind wichtig.
Wenn Kurzwellenradio für Sie neu ist, finden
Sie im Teil EINFÜHRUNG IN DIE KURZWELLE
alle nötigen Informationen, um sich an
Radiosendungen aus der ganzen Welt
erfreuen zu können.
2 HAUPTFUNKTIONEN DES MODELLS S350DL
• AM (MW) 530-1710 KHz
• FM (UKW) 88-108 MHz
• KURZWELLE – durchgängiger Sendebereich
von 3 bis 28 MHz. Dieser beinhaltet 13
internationale Rundfunkbereiche. 11, 13, 15,
16, 19, 22, 25, 31, 41, 49, 60, 75 und 90 Meter.
• Äußerst empfindliche und trennscharfe
Analog-Tuner-Schaltkreise
• Digitale Frequenzanzeige
• Flüssigkristallanzeige (LCD) für Frequenz
und Uhr
• Digitale Uhr mit wählbarem 12 bzw. 24
Stundenformat
• Weckfunktion (nutzbar als Radiowecker)
• Absicherung gegen Stromausfall
• Sleep Timer
• Hauptknopf für Sendereinstellung und unab
hängiger Knopf für Feinabstimmung
• Variable HF-Verstärkungsregelung
• Drehknopf für Lautstärkeregelung
• Variable, unabhängige Regler für Bässe
und Höhen
• Tiefpassfilter für den Empfang von
Kurzwelle und AM
• Ausgänge für den linken und rechten Kanal
(Stereo bei FM)
• Stereo/Mono-Schalter
• Stereo-Ohrhöreranschluss
• Verstellbarer Schultergurt als Tragegriff
• Integrierte Teleskopantenne für FM
und Kurzwelle
• Integrierte Ferritantenne für AM
• Anschlüsse für zusätzliche AM-, FM- und
Kurzwellenantennen
• Versorgung über 4 Mono (D) oder 4 Mignon
(AA) Batterien (nicht enthalten), Netzteil
(enthalten) oder Netzteil für Auto oder
Boot (nicht enthalten)
56
WICHTIGER HINWEIS: Beziehen Sie sich beim Gebrauch des Handbuchs auf die Abbildung BEDIENELEMENTE. Hier können Sie die Knöpfe, Schalter, Buchsen und Teile finden, die im Text erwähnt werden.
57
Page 30

3 BEDIENUNGSELEMENTE
Taste Power & Sleep (Ein/Aus und Sleep)
1
Taste Alarm Set (Wecker einstellen)
2
Taste Time Set (Zeit einstellen)
3
Taste Hour Set (Stunden einstellen)
4
Taste Minute Set (Minuten einstellen)
5
Taste Alarm On/Off (Alarm ein/aus)
6
Taste Backlight/Snooze
7
(Hintergrundbeleuchtung/Schlummer)
Anzeige der Batterieladung
8
Signalstärkeanzeige
9
Digitale Frequenzanzeige
10
LCD-Anzeige
11
Drehknopf (schnell)
12
Drehknopf (langsam)
13
Taste Reset (Rücksetzen)
14
Regler für MW/KW HF-Verstärkung
15
Regler Treble (Höhen)
16
Regler Volume (Lautstärke)
17
Regler Bass (Bässe)
18
Frequenzauswahl für MW, KW1,
19
KW2 und KW3
Bandbreite und Frequenzauswahl für FM
20
Teleskopantenne für FM und KW
21
Tragegriff
22
Schultergurt
23
Gleichstrombuchse
24
Batteriefach
25
Antennenbuchse für MW und KW
26
Antennenbuchse für FM
27
KW LPF An/Aus
28
Umschalter für Stereo/Mono
29
L & R Line Out
30
Stereo-Ohrhörerbuchse
31
S350DL BENUTZERHANDBUCH
5958
Page 31

4 ANSCHLIESSEN AN DIE STROMVERSORGUNG
S350DL BENUTZERHANDBUCH
VERWENDEN VON BATTERIEN
Öffnen Sie das Batteriefach, und legen Sie 4
Mono Batterien Größe D (auch UM-1 genannt)
entsprechend den auf dem Boden des
Batteriefachs aufgedruckten Polungen ein.
Bitte beachten Sie beim Betrieb mit Batterien
Folgendes:
• Das S350DL zeigt die Batterieladung in der
LCD-Anzeige an. Neue Batterien werden mit
einem vollen Ladestand von 3 Balken
angezeigt. Wenn in der Anzeige nur noch ein
Balken zu sehen ist und der Ton schwach und
verzerrt wird, wechseln Sie die Batterien aus.
• Das Radio schaltet sich automatisch ab, wenn
die Batterien zu schwach werden.
• Überprüfen Sie regelmäßig, dass die Batterien
nicht auslaufen. Wenn das Radio längere Zeit
nicht genutzt wird, sollten Sie vorsorglich die
Batterien entfernen, um ein mögliches
Auslaufen zu verhindern.
VERWENDEN EINER
WECHSELSPANNUNGSQUELLE
Das S350DL wird mit einem Netzteil ausgeliefert,
das Wechselspannung (AC) in die vom Radio verwendete Gleichspannung (DC) umwandelt.
Verwenden Sie nur das mit dem S350DL ausgelieferte Netzteil oder ein anderes Netzteil, das
den allgemeinen Anforderungen dieses Produkts
entspricht: Ausgabe 6 Volt Gleichspannung, negative Polung; äußerer Durchmesser des
Steckerkopfs 5,5 Millimeter, innerer Durchmesser
2,1 Millimeter; belastbar mit mindestens 300
Milliampere. Setzen Sie sich mit Etón in
Verbindung, um den Namen und Sitz eines
Händlers zu erhalten, der passende Netzteile
verkauft.
VERWENDEN SIE NIEMALS EIN NETZTEIL, DAS
DIESEN SPEZIFIKATIONEN NICHT ENTSPRICHT, DA
DIES ZU SCHÄDEN FÜHREN KANN, DIE NICHT
VON DER GARANTIE GEDECKT SIND.
VERSORGUNG ÜBER EINE
12-VOLT-GLEICHSPANNUNGSBATTERIE EINES AUTOS
ODER BOOTS
Dies erfordert einen Gleichstromwandler, der
die 12-Volt-Gleichspannungsquelle in die vom
Radio benötigten 6 Volt umwandelt. Die Ausgabe
eines solchen Netzteils ist 6 Volt Gleichspannung,
negative Polung. Der Steckerkopf muss einen
äußeren Durchmesser von 5,5 Millimetern sowie
einen inneren Durchmesser von
2,1 Millimeter haben.
Der Steckerkopf wird in die Gleichstrombuchse
des Radios gesteckt. Er muss mit einer
Stromstärke von mindestens 200 Milliampere
belastbar sein. Setzen Sie sich mit Etón in
Verbindung, um den Namen und Sitz eines
Händlers zu erhalten, der passende
Stromwandler verkauft.
• Schalten Sie das Radio aus, wenn Sie die
Batterien entfernen.
60
61
Page 32

S350DL BENUTZERHANDBUCH
5 VORLÄUFIGE EINSTELLUNGEN
Verwenden Sie diese Einstellungen als
anfängliche Richtwerte.Wenn Sie das Radio
besser kennenlernen, werden Sie Ihre eigenen
"bevorzugten" Einstellungen entwickeln.
• Stellen Sie den Lautstärkeregler (VOLUME)
nicht höher als 3 ein, damit das Radio beim
ersten Einschalten nicht zu laut spielt.
• Stellen Sie den Regler AM/SW RF GAIN auf
Position 10.
• Stellen Sie die Regler BASS-TONE-TREBLE
auf Position 5.
• Stellen Sie den Schalter SW LPF auf die
Position OFF (AUS - auf der rechten
Seite des Radios).
• Stellen Sie den Schalter STEREO MONO
auf die Position MONO.
6 EIN-UND AUSSCHALTEN DES RADIOS
Es gibt zwei Möglichkeiten das Radio einzuschalten: mit oder ohne 90-Minuten-Timer. Um diesen
jederzeit abzustellen, drücken Sie die Taste
"POWER & SLEEP" ca. eine Sekunde lang.
HINWEIS: Wenn der SLEEP Timer ausgeschaltet
ist, wird in der Anzeige dauerhaft die Uhr
dargestellt.
1. MIT TIMER: Ein schnelles, kurzes Drücken der
Taste "POWER & SLEEP" schaltet das Radio ein.
Für ca. 3 Sekunden erscheint "90" in der Anzeige,
danach wird die normale Frequenzanzeige des
Radios angezeigt. Wenn Sie das Radio so einschalten, läuft es für 90 Minuten, danach wird es
vom Timer automatisch ausgeschaltet (um übermäßigen Batterieverbrauch zu verhindern). Um
diese automatische Abschaltzeit von 90 Minuten
zu verkürzen, lesen Sie die Informationen im
Kapitel SLEEP TIMER.
2. OHNE TIMER: Durch langes Drücken von ca. 3
Sekunden der Taste "POWER & SLEEP" wird das
Radio ohne der automatische Funktion "90Minuten-Timer" eingeschaltet. Das Radio schaltet
sich dann nur ab, wenn die Batterien leer sind
oder das Radio ausgeschaltet wird.
7 ANZEIGE DER SIGNALSTÄRKE
Wenn Sie einen Radiosender hören, wird im
oberen rechten Bereich der Anzeige die
Signalstärke angezeigt.
62
63
Page 33

S350DL BENUTZERHANDBUCH
8 EINSTELLEN VON FM-RADIOSENDERN
Ziehen Sie die Teleskopantenne ganz aus, und
schalten Sie das Radio ein. Stellen Sie den
Auswahlschalter BAND WIDTH FM AFC
(Bandbreite FM AFC - Automatische
Frequenzkontrolle) auf die Position FM AFC ON
(EIN). In der Anzeige erscheint FM, ebenso die
FM-Frequenznummern im Bereich zwischen 87108 Megahertz, abgekürzt MHz.Verwenden Sie
den äußeren "schnellen" Knopf, um Sender zu
finden, und nehmen Sie bei Bedarf
Feineinstellungen mit dem inneren "langsamen"
Knopf vor. Wenn die Funktion "Automatische
Frequenzkontrolle" (AFC) auf ON gestellt ist,werden starke Signale automatisch empfangen und
erhalten Vorrang gegenüber schwächeren
Signalen. Wenn Sie AFC auf AUS stellen, können
Sie schwache Sender zwischen den starken
Sendern leichter einstellen. Im Allgemeinen wird
empfohlen, AFC auf ON zu stellen.
• Das Einstellen des Schalters STEREO MONO
auf die Position STEREO ermöglicht den
FM-Empfang in Stereo.
HIENWEIS: Der Stereoklang ist hörbar, wenn
Ohr- oder Kopfhörer angeschlossen werden,
ebenso, wenn die Stereoausgänge das Signal
an aktive Lautsprecher oder ein
Stereosystem ausgeben. Das Einstellen des
Schalters STEREO MONO auf die Position
MONO verbessert die Qualität eines schlecht
zu empfangenden Senders, dieser kann aber
nicht in stereophonischem Klang über die
Lautsprecherausgänge gehört werden.
• Über den eingebauten Lautsprecher kann kein
stereophonischer Klang gehört werden. Vom
eingebauten Lautsprecher ist nur monophoner
Klang zu hören.
• Wenn ein Sender nicht klar zu empfangen ist,
kann der Empfang möglicherweise durch
Drehen der Teleskopantenne verbessert
werden.
9 EINSTELLEN VON AM-RADIOSENDERN
EINSTELLEN VON AMRADIOSENDERN (MW)
Das Radio einschalten. Den Schalter AM/SW
BAND in die Stellung MW und den
Bandbreitenschalter in die Stellung weit oder eng
stellen. Auf der Anzeige erscheint MW. Der äußere
Knopf zur ‚schnellen’ Einstellung wir zum Finden
der Sender verwendet, eine Feineinstellung wird
nach Bedarf mit dem inneren ‚langsamen’ Knopf
vorgenommen.
• Wenn Störungen durch benachbarte
Stationen auftreten, den Knopf BANDWEITE
auf die Position ENG stellen.Wenn keine
Störungen vorhanden sind, den Schalter in der
Position WEIT belassen.
• Bei übermäßigen Hintergrundgeräuschen,
den Knopf KW LPF drehen, wodurch die
Geräusche vermindert werden können.
• Wenn ein Sender so stark ist, dass
Klangverzerrungen entstehen, das
Verstärkungsniveau mit dem Knopf MW/KW -
HF-VERSTÄRKER durch Drehen gegen den
Uhrzeigersinn herabsetzen.
• Für MW-Empfang muss die teleskopische
Antenne nicht ausgezogen werden. Das Radio
verfügt über eine interne Ferrit- Richtantenne
für den Empfang von MW.
• Zur Verbesserung des MW-Empfangs das
Radio schwenken, bis das Signal am stärksten
empfangen wird.
FREQUENZSPERRE
Das S350DL verwendet zur Einstellung von MWund KW-Sendern eine einzigartige Schaltung für
Frequenzstabilisierung und minimale
Signalabweichungen. Wenn an einem der beiden
Einstellungsknöpfe gedreht wird, blinkt auf der
Anzeige „Khz“. Die Anzeige hört ungefähr 3
Sekunden nach dem Einstellen des Senders zu
blinken auf, und die Frequenzsperre schaltet
sich ein.
64
65
Page 34

10 EINSTELLEN VON KURZWELLEN-RADIOSENDERN
S350DL BENUTZERHANDBUCH
WENN SIE MIT KURZWELLE
BEREITS VERTRAUT SIND:
Ziehen Sie die Teleskopantenne ganz aus, und
schalten Sie das Radio ein. Stellen Sie den
Schalter AM/SW BAND auf die Position SW1, SW2
oder SW3 und den Schalter BANDWIDTH auf wide
(breit) oder narrow (eng). SHORTWAVE 1, 2 oder
3 erscheint in der Anzeige. Verwenden Sie den
äußeren "schnellen" Knopf, um schnell zu einer
Ihnen bereits bekannten Frequenz bzw. zu der
Frequenz zu gelangen, innerhalb derer Sie einen
Sender suchen möchten. Nehmen Sie bei Bedarf
Feineinstellungen mit dem inneren "langsamen"
Knopf vor. Wenn ein Sender so stark ist, dass es
zu akustischen Verzerrungen kommt, reduzieren
Sie den Verstärkungspegel, indem Sie den Knopf
AM/SW RF GAIN gegen den Uhrzeigersinn drehen.
WENN KURZWELLE FÜR SIE NEU
IST ODER SIE IHR WISSEN
GERNE AUFFRISCHEN MÖCHTEN
(Lesen Sie auch die Informationen im Kapitel
EINFÜHRUNG IN DIE KURZWELLE in diesem
Handbuch.) Ziehen Sie die Teleskopantenne ganz
aus, und schalten Sie das Radio ein. Gehen Sie in
die Nähe eines Fensters, und ziehen Sie die
Teleskopantenne ganz aus. Befolgen Sie die nachfolgenden Anweisungen, je nachdem, ob Sie
tagsüber oder nachts Radio hören.
Tagsüber stellen Sie den Schalter AM/SW BAND auf
die Position SW2.Verwenden Sie den "schnellen"
Knopf zur Sendereinstellung, und stellen Sie 15100
KHz ein. Dies ist der Anfang des 19 Meter
Kurzwellenbereichs, einer der besten drei Bereiche
tagsüber. Dieser erstreckt sich von 15100 bis 15600
KHz. Verwenden Sie den "langsamen" Knopf zur
Sendereinstellung, um diesen Bereich
einzustellen; achten Sie dabei darauf, ob Sie
Sender hören können. Versuchen Sie es außerdem
im 13 Meter Bereich (21450-21850 KH
beide in SW3.
Nachts stellen Sie den Schalter AM/SW BAND auf
die Position SW1.Verwenden Sie den "schnellen"
Knopf zur Sendereinstellung, und stellen Sie 5800
KHz ein. Dies ist der Anfang des 49 Meter
Kurzwellenbereichs, einer der besten vier Bereiche
Nachts. Er erstreckt sich von 5800 bis 6200 KHz.
Verwenden Sie den "langsamen" Knopf zur
Sendereinstellung, um diesen Bereich
einzustellen; achten Sie dabei darauf, ob Sie
Sender hören können. Versuchen Sie auch die
Bereiche 25 Meter in SW2 (11600-12200 KHz), 31
Meter in SW2 (9400-9900 KHz) und 41 Meter in
SW1 (7150-7600 KHz).
HINWEIS: Wenn es zu Interferenzen mit
benachbarten Sendern kommt, stellen Sie den
Regler BAND WID auf die Position NARROW.
Wenn es keine Interferenzen gibt, belassen Sie ihn
in der Position WIDE. Sollten übermäßige
Hintergrundgeräusche vorhanden sein, stellen Sie
den Schalter SW LPF auf ON (EIN); dadurch können diese Geräusche reduziert werden. Wenn ein
Sender so stark ist, dass es zu akustischen
Verzerrungen kommt, reduzieren Sie den
Verstärkungspegel, indem Sie den Knopf AM/SW
RF GAIN gegen den Uhrzeigersinn drehen.
Die auf Seite 13 beschriebene Funktion "Frequenz
einstellen" funktioniert auch bei Kurzwelle.
66
67
Page 35

S350DL BENUTZERHANDBUCH
11 EINSTELLEN DER UHR
Die Uhr des S350DL kann wahlweise im 12
Stundenformat mit AM/PM oder im 24
Stundenformat angezeigt werden. Um zwischen
dem 12 und 24 Stundenformat umzuschalten,
schalten Sie das S350DL aus. Drücken Sie dann
für ca. 3 Sekunden die Taste HOUR, bis 12 oder
24 in der Anzeige blinkt. Lassen Sie die Taste
HOUR los.Wenn AM oder PM in der Anzeige
erscheint, ist das 12 Stundenformat aktiv.
Wenn dies nicht erscheint, ist das 24
Stundenformat aktiv.
Die Uhr kann bei ein- oder ausgeschaltetem
Radio gestellt werden. Drücken Sie die Taste TIME
bei ein- oder ausgeschaltetem Radio für 2
Sekunden, und lassen Sie sie dann los. Die
Zeitanzeige beginnt zu blinken.Während sie
blinkt, drücken Sie die Tasten HOUR und MINUTE,
um die korrekte Zeit einzustellen.Wenn Sie die
korrekte Zeit eingegeben haben, drücken Sie
sofort die Taste TIME, um die Eingabe
abzuschließen. Wenn die Taste TIME nicht
gedrückt wird, wird die Anzeige die Eingabe nach
5 Sekunden automatisch beenden. Während Sie
die Zeit einstellen, können Sie die Tasten HOUR
und MINUTE gedrückt halten, damit diese
schneller voranschreiten.
Hinweis: Wenn das Radio ausgeschaltet ist, wird
in der Anzeige die Zeit angezeigt.Wenn es
eingeschaltet ist, wird eine Radiofrequenz
angezeigt. Wenn am eingeschalteten Gerät die
Taste TIME gedrückt wird, wechselt die Anzeige
für ca. 3 Sekunden von der Frequenz zur Zeit,
danach wieder zur Frequenz.
ABSICHERUNG GEGEN
STROMAUSFALL
Wenn sich Batterien im S350DL befinden und es
während des Betriebs über Netzteil zu einem
Stromausfall kommt, wechselt das Gerät automatisch auf Batterieversorgung.
12 SLEEP TIMER
Das S350DL enthält einen Sleep Timer, den Sie so
einstellen können, dass das Radio nach einem
bestimmten gewünschten Zeitraum ausgeschaltet
wird. Beim S350DL wird der Sleep Timer immer
beim Einschalten des Radios automatisch für
einen Zeitraum von 90 Minuten aktiviert. Wenn
Sie die Taste POWER&SLEEP gedrückt haben, um
das Radio einzuschalten, erscheint "90" in der
Anzeige, zusammen mit dem Symbol SLEEP. Dies
bedeutet, dass der Sleep Timer des Radios
eingeschaltet ist und das Radio nach 90 Minuten
automatisch ausgeschaltet wird.
Um die Anzahl der Minuten zu ändern, bevor das
Radio automatisch ausgeschaltet wird, drücken
Sie die Taste POWER&SLEEP, um das Radio
einzuschalten. Nachdem 90 in der Anzeige
erscheint, drücken Sie mehrfach schnell und kurz
auf die Taste POWER & SLEEP, bis die gewünschte
Zeit erreicht ist. Beachten Sie, dass der Sleep
Timer bei jedem aufeinanderfolgenden Drücken
von 90 zu 75 zu 60 zu 45 zu 30 zu 15 zu 10 zu
01 Minuten und schließlich zu AUS wechselt.
6968
Page 36

S350DL BENUTZERHANDBUCH
13 WECKER
STELLEN, EINSCHALTEN UND
AUSSCHALTEN (WECKER)
Das S350DL enthält einen programmierbaren
Timer zum Einschalten des Gerätes. Dadurch kann
sich das Radio wie ein Wecker zu vorgegeben
Zeiten einschalten. Drücken Sie bei ein- oder ausgeschaltetem Radio die Taste ALARM für ca. 3
Sekunden oder so lange, bis die Zeitziffern zu
blinken beginnen, und lassen Sie sie dann los.
Drücken Sie die Tasten HOUR und MINUTE,
während die Ziffern noch blinken, um die
Einschaltzeit einzustellen, und drücken Sie dann
sofort die Taste ALARM. Wenn die Taste ALARM
nicht gedrückt wird, wird die Einschaltzeit nach 5
Sekunden automatisch auf die von Ihnen
eingegebene Zeit gestellt.
Um die Weckfunktion ein- oder auszuschalten,
drücken Sie bei ein- oder ausgeschaltetem Radio
die Taste AL ON/OFF. Daraufhin erscheint ein
Lautsprechersymbol in der unteren rechten Ecke
der Anzeige. Wenn das Lautsprechersymbol
angezeigt wird, ist die Weckfunktion eingeschaltet. Wenn es nicht in der Anzeige erscheint, ist sie
ausgeschaltet.
Wenn der Radiowecker eingeschaltet ist, drücken
Sie zum Ausschalten die Taste POWER & SLEEP.
SCHLUMMERFUNKTION
Wenn der Timer aktiviert wird und das
Einschalten des Radios bewirkt, blinkt auf der
Anzeige das Timersymbol. Während das Symbol
blinkt, auf die Taste SNOOZE/LIGHT drücken und
diese wieder loslassen. Das Radio schaltet sich ab
und nach 10 Minuten wieder ein. Dieser Vorgang
kann 3 Mal wiederholt werden.
WICHTIGE HINWEISE ZUR
WECKFUNKTION
• Der Wecker funktioniert bei ein- oder aus-
geschaltetem Radio.
• Das Radio schaltet sich nach 30 Minuten
Spielzeit automatisch aus.
SCHLUMMERFUNKTION
Wenn der Timer aktiviert wird und das Radio einschaltet, blinkt auf der Anzeige das Timersymbol
(39). Während das Symbol blinkt, die Taste
SNOOZE/LIGHT (7) drücken und wieder loslassen.
Das Radio schaltet sich ab und nach 10 Minuten
wieder ein. Dieser Vorgang kann 3 Mal wiederholt
werden.
14 HINTERGRUNDBELEUCHTUNG
Das S350DL ist für schlechte Lichtverhältnisse mit
einer Hintergrundbeleuchtung ausgestattet. Sie
kann auf zwei verschiedene Arten eingeschaltet
werden.
1. Um die Anzeige kurzzeitig zu erleuchten,
drücken Sie schnell und kurz auf die Taste BACKLIGHT. Die Hintergrundbeleuchtung schaltet sich
nach acht Sekunden automatisch aus.
2. Um die Anzeige dauerhaft zu beleuchten, halten Sie die Taste BACKLIGHT länger als eine
Sekunde gedrückt. Die Hintergrundbeleuchtung
bleibt eingeschaltet, bis die Taste BACKLIGHT
erneut gedrückt wird.
3. Drücken Sie bei ein- bzw. ausgeschaltetem
Radio eine der folgenden Tasten, um das
Hintergrundlicht für 8 Sekunden einzuschalten:
ALARM SET, TIME SET, HOUR oder MINUTE SET,
AL ON/OFF und BACKLIGHT.
4. Zusätzlich wird bei eingeschaltetem Radio
durch Drehen des Knopfes zur Sendereinstellung
(schnell & langsam) das Hintergrundlicht für 8
Sekunden eingeschaltet.
Warnung: Durch eine dauerhafte
Hintergrundbeleuchtung werden die Batterien
schneller erschöpft.
7170
Page 37

S350DL BENUTZERHANDBUCH
15 RESET-FUNKTION
Das S350DL arbeitet mit einem ProzessorMikrochip (Diese Komponente steuert die
Radiofunktionen). Wenn das Radio ungewöhnlichen Umweltbedingungen ausgesetzt worden ist,
kann der Mikrochip fehlerhaft arbeiten, und die
folgenden Symptome können auftreten.
• Die Anzeige bleibt leer, und das Radio kann
nicht durch Drücken der Taste POWER & SLEEP
eingeschaltet werden.
• In der Anzeige erscheinen zufällige Zeichen,
oder die Anzeige funktioniert nicht
ordnungsgemäß, obwohl das Radio Sender
normal empfangen kann.
16 LINE OUT-BUCHSEN
Die Line Out-Buchsen (RCA-Buchsen) sind mit L
(Links) und R (Rechts) bezeichnet. Diese bieten
rechte und linke Stereopegelausgabe nach
Industriestandard. Über diese können Audiotöne
an Kassettenrecorder, Stereosysteme und jedes
In diesen Fällen kann es sein, dass Sie das Radio
zurücksetzen müssen. Um das S350Dl zurückzusetzen, entfernen Sie das externe Netzteil (falls
verwendet), und entfernen Sie die Batterien aus
dem Batteriefach. Führen Sie ein spitzes Objekt,
beispielsweise eine Büroklammer, in das Loch mit
der Bezeichnung RESET auf der rechten vorderen
Seite des Radios ein. Drücken Sie den Schalter in
dem Loch leicht ein, und lassen Sie ihn wieder los.
Stecken Sie das Netzteil wieder ein oder legen Sie
die Batterien wieder ein.
andere Gerät ausgegeben werden, das über
Audio-Line-Pegeleingänge verfügt. Die Ausgabe
erfolgt in Stereo, wenn das Radio auf einen FMSender eingestellt ist, der in Stereo sendet.
18 EINSATZ ZUSÄTZLICHER ANTENNEN
Kurzwellenantennen. Dieses Radio kann mit
normalen Langdrahtantennen und anderen
Kurzwellenantennen hoher Impedanz (idealerweise 500 Ohm) verwendet werden. Die
Langdrahtantenne sollte zwischen 10 und 30
Meter lang sein. Das beste Ergebnis erzielen Sie
mit Kupferdraht. Die Antenne sollte überirdisch
angebracht werden, am Besten in einer geraden
Linie. Nichtleitende Isolatoren sollten an beiden
Enden des Drahtes verwendet werden, um
Signalverluste zu vermeiden. Der Draht wird in
die rote Buchse AM, SW ANT. auf der Rückseite
des Radios gesteckt. Durch Anschließen einer
Masseleitung an die schwarze Buchse (GND) wird
häufig der Empfang verbessert, dies ist jedoch
nicht zwingend erforderlich. Die Masseleitung
sollte an ein Kaltwasserrohr oder einen
Erdungsstab angeschlossen werden. Wenn kein
Kaltwasserrohr oder Erdungsstab zur Verfügung
steht, schließen Sie einen Draht mit etwa der gleichen Länge wie der Antennendraht an, und legen
Sie diesen auf den Boden. SCHLIEßEN SIE DIE
MASSELEITUNG NIEMALS AN EIN GASROHR AN.
AM-ANTENNEN: Es kann jede AM-Antenne mit
hoher Impedanz (idealerweise 500 Ohm) verwendet werden sowie Langdrähte und
Induktionsschleifen. Eine Masseleitung, wie im
Abschnitt KURZWELLENANTENNEN beschrieben,
ist beim AM-Empfang noch nützlicher und
verbessert den Empfang häufig sehr deutlich,
selbst wenn keine zusätzliche AM-Antenne verwendet wird.
FM-ANTENNEN: Schließen Sie FM-Antennen an
die Buchse FM ANT. CABLE FM auf der Rückseite
des Radios an. Diese Antennen sollten eine
Impedanz von 75 Ohm haben. Die meisten
Antennen mit Koaxialkabel sind 75-OhmAntennen. Wenn Ihr Koaxialkabel einen Stecker
"F" hat, wie er bei den meisten nordamerikanischen Fernsehgeräten und Videorecordern verwendet wird, verwenden Sie einen F-zu-PALUmwandlungsstecker, damit dieses an die
europäische PAL-Buchse des Radios passt. (Radio
Shack Teilenummer 278-265).
17 OHRHÖRERBUCHSE
Die Ohrhörerbuchse kann über Stereo-Kopfhörer
mit einem Stecker der Größe 1/8 inch (3,5
Millimeter) genutzt werden. Die Ausgabe erfolgt
in Stereo.
731972
Page 38

S350DL BENUTZERHANDBUCH
19 EINFÜHRUNG IN DIE KURZWELLE
Über Kurzwelle können Sie Radiosender aus der
ganzen Welt empfangen. Da Sie jetzt ein
Kurzwellenradio besitzen, möchten Sie sicherlich
auch gleich Radiosender aus der ganzen Welt
hören. Wenn Kurzwellenradio für Sie neu ist,
nehmen Sie sich bitte ein wenig Zeit, um die
unten dargestellten Grundlagen kennenzulernen.
Um Kurzwellensender hören zu können, müssen
Sie wissen, wie Sie diese finden können. Sie
befinden sich innerhalb der "Kurzwellenbereiche".
Wenn Sie ein erfahrender Kurzwellenhörer sind,
wissen Sie bereits, was Frequenzbereiche sind und
wie Sie diese nutzen. Wenn dies aber neu für Sie
ist, müssen Sie zunächst ein wenig über
Frequenzbereiche lernen. Danach werden Sie
erfolgreich Kurzwellenradio hören. Bitte lesen Sie
weiter.
20 FINDEN BESTIMMTER RADIOSENDER
IDENTIFIZIEREN DES
GEHÖRTEN SENDERS UND SO
FINDEN VON SENDERN, DIE SIE
HÖREN MÖCHTEN
Wir empfehlen Ihnen, ein umfassendes
Kurzwellenverzeichnis zu verwenden.
Insbesondere dann, wenn Sie Sender aus bestimmten Ländern hören oder die Sender identifizieren möchten, die Sie gerade hören. Solche
Verzeichnisse listen alphabetisch auf, welche
Länder Kurzwelle senden, geben ihre Sprache
sowie das Zielgebiet, die Sendezeit und die
genutzte Frequenz an. Das beste
Kurzwellenverzeichnis ist "PASSPORT TO WORLD
BAND RADIO", zu beziehen in größeren
Buchläden. Es wird herausgegeben von
International Broadcasting Services, Ltd., Box 300,
Penn's Park, Pennsylvania 18943, und ist auch
über www.passband.com verfügbar. Diese
Publikation hat getrennte Kapitel für englische
und nicht-englische Sender, "World-Wide
Broadcasts In English" und "Voices From Home".
21 WAS SIND FREQUENZBEREICHE?
UM SICH AM KURZWELLENRADIO
RICHTIG ZU ERFREUEN,
FOLGEN SIE EINFACH DIESER
ANLEITUNG
Wenn Sie bereits AM- oder FM-Radio gehört
haben, dann wissen Sie bereits, was ein
Frequenzbereich ist. Der AM-Bereich ist ein
Frequenzbereich, der sich von 530 bis 1600
Kilohertz erstreckt, der FM-Bereich liegt zwischen
88 und 108 Megahertz. Innerhalb dieser
Frequenzbereiche befinden sich die Radiosender.
Wenn Sie nach Sendern innerhalb dieser
"Frequenzbereiche" suchen, drehen Sie einfach
den Knopf zur Sendereinstellung, bis Sie einen
Sender finden, der Ihnen zusagt. Bei der
Kurzwelle ist es ähnlich und diese
Kurzwellenbereiche haben Namen wie 25 Meter,
31 Meter, 49 Meter usw. abgekürzt werden diese
mit 25m, 31m und 49m. Genauso wie bei AMund FM-Radio kann man innerhalb des
Kurzwellenbereichs nach Sendern suchen.
Beispielsweise umfasst der Kurzwellenbereich 19
Meter den Frequenzbereich 15100 bis 15600
Kilohertz. Auf der nächsten Seite finden Sie eine
Liste von Kurzwellenbereichen, die für internationale Sendungen verwendet werden sowie die
zugehörigen Frequenzbereiche.Da bei einigen
Radios die Frequenz in Megahertz, bei anderen
aber in Kilohertz angezeigt wird, sind beide
aufgeführt. Das S350DL zeigt
Kurzwellenfrequenzen in Kilohertz an,
abgekürzt KHz.
7574
Page 39

S350DL BENUTZERHANDBUCH
22 KURZWELLENBEREICHE
FREQUENZBEREICH MEGAHERTZ (MHz) KILOHERTZ (kHz) Schalterstellungen
(wie bei manchen Radios) (wie bei Modell S350DL) des S350DL
120 Meter 2,300-2,500 MHz 2300- 2500 kHz SW1
90 Meter 3,20-3,40 MHz 3200-3400 kHz SW1
75 Meter 3,90-4,00 MHz 3900-4000 kHz SW1
60 Meter 4,750-5,060 MHz 4750-5060 kHz SW1
49 Meter 5,950-6,20 MHz 5950-6200 kHz SW1
41 Meter 7,10-7,60 MHz 7100-7600 kHz SW1
31 Meter 9,20-9,90 MHz 9500-9900 kHz SW2
25 Meter 11,600-12,200 MHz 11600-12100 kHz SW2
22 Meter 13,570-13,870 MHz 13570-13870 kHz SW2
19 Meter 15,10-15,80 MHz 15100-15800 kHz SW2
16 Meter 17,480-17,90 MHz 17480-17900 kHz SW3
13 Meter 21,450-21,850 MHz 21450-21850 kHz SW3
11 Meter 25,60-26,10 MHz 25600-26100 kHz SW3
10 Meter 26,965-27,41 MHz 26965-27410 kHz SW3
auch "Citizens Band" oder CB genannt
23 TAGES- UND NACHTFREQUENZBEREICHE
TAGESBÄNDER /
NACHTBÄNDER – EIN SEHR
WICHTIGER UNTERSCHIED
Hierzu ist ein Kurzwellenverzeichnis erforderlich.
Da Kurzwellensignale von solchen Faktoren wie
der Sonne, der Ionosphäre und den
Gegebenheiten der Erde selbst abhängig sind,
können die Signale über den Tag hinweg nicht auf
allen Frequenzbereichen gehört werden. Einige
Frequenzbereiche sind am besten tagsüber,
andere am besten bei Nacht. Nachfolgend finden
Sie einige gute "Faustregeln".
• Im Allgemeinen sind die Bereiche mit den
Frequenzen unterhalb 13000 KHz nachts
besser, und die über 13000 KHz sind tagsüber
besser. Diese Richtlinie ist nicht "in Stein
gemeißelt", aber als Faustregel sinnvoll.
• Während Sonnenuntergang und
Sonnenaufgang können sowohl die Tages- als
auch Nachtfrequenzen gut sein, zeitweise
außerordentlich gut.
• Im Sommer sind die Tagesfrequenzen oft auch
gut bis in die frühe Nacht hinein
zu empfangen.
• Obwohl die meisten Kurzwellensender
innerhalb der Grenzen dieser festgelegten
Frequenzbereiche liegen, finden sich manche
auch außerhalb. Es lohnt sich auch, sich die
Zeit zu nehmen, zwischen den Bereichen
zu suchen.
• Diese Richtlinien können weltweit angewendet
werden, sie sind nicht ortsabhängig.
Auf der nächsten Seite sind die Eigenschaften
der Hauptkurzwellenbereiche aufgelistet.
Befolgen Sie diese Richtlinien, um die besten
Resultate zu erzielen.
7776
Page 40

S350DL BENUTZERHANDBUCH
24 RADIO HÖREN TAGSÜBER
Kurzwellenradio ist normalerweise am schlechtesten tagsüber zu empfangen, in etwa in der Zeit 2 Stunden
nach Sonnenaufgang bis 2 Stunden vor Sonnenuntergang. Der Hauptgrund dafür ist, dass die Sender in dieser
Zeit nicht nach Nordamerika senden, da sie davon ausgehen, dass wir alle entweder in der Arbeit oder in der
Schule sind, und deshalb tagsüber nicht zuhören können.Wenn Sie tagsüber hören möchten, befolgen Sie die
nachfolgenden Richtlinien. Normalerweise ist der Kurzwellenempfang tagsüber eher besser im Norden
Nordamerikas als im Westen.
Wenn sie versuchen möchten, während des Tags zu empfangen, folgen Sie bitte den Richtlinien unten.
TAGESFREQUENZBEREICHE EIGENSCHAFTEN
13 Meter Unterschiedliche Ergebnisse.Es lohnt sich, diesen Bereich auszuprobieren.
Manchmal sehr gut um Sonnenaufgang und Sonnenuntergang.
16 Meter Ähnlich wie 19 m
19 Meter Im Allgemeinen der beste Frequenzbereich tagsüber. Kann in den
Sommermonaten auch nachts gut sein. Manchmal sehr gut um Sonnenaufgang
und Sonnenuntergang. Nachts manchmal im Sommer gut.
22 Meter Ähnlich wie 19 m.
25 RADIO HÖREN ABENDS UND NACHTS
Dies ist die beste Zeit zum Hören, da die Sender bewusst nach Nordamerika senden. Diese Frequenzen können
auch um Sonnenaufgang und Sonnenuntergang sehr gut sein.
NACHTFREQUENZBEREICHE EIGENSCHAFTEN
25 Meter Ähnlich wie 31 m.
31 Meter Überall die ganze Nacht gut. Oft sehr gut bei Sonnenaufgang und
Sonnenuntergang. Gute Ergebnisse, oft beginnend eine Stunde
vor Sonnenuntergang.
41 Meter Ähnlich wie 49m. Die ganze Nacht gut im Osten Nordamerikas; unter
schiedlich im Westen Nordamerikas.
49 Meter Im Allgemeinen der beste Frequenzbereich nachts.
WICHTIGER HINWEIS: Wenn Sie sich in die Nähe eines Fensters begeben, wird der Empfang deutlich
besser. Die Baumaterialien einiger Gebäude lassen die Signale nicht gut ins Innere dringen. Die Signale dringen
am leichtesten in Holzhäuser ein, dagegen blockieren Beton- und Ziegelhäuser die Signale normalerweise.Wenn
Sie sich in einem Gebäude befinden, in dem sich eines oder mehrere Stockwerke über Ihnen befinden, können
die Signale ebenfalls abgeschwächt werden. Bringen Sie das Radio in diesem Fall während des Hörens so nah
wie möglich an ein Fenster. Das Halten des Radios, während Sie sich in der Nähe eines Fensters befinden, kann
den Empfang ebenfalls verbessern.
7978
Page 41

S350DL BENUTZERHANDBUCH
26 GARANTIE-REGISTRIERUNG
Um eine volle Garantieabdeckung und
Produktaktualisierung zu gewährleisten, sollte die
Registrierung Ihres Produkts von Etón oder Grundig
so bald wie möglich nach dem Kauf oder Erhalt
vorgenommen werden. Wählen Sie zur
Registrierung des Radios bitte eine der folgenden
Methoden:
1. Registrierung über unsere Website
http://www.etoncorp.com
2. Rufen Sie unsere gebührenfreie
Registrierungsnummer an. Von den Vereinigten
Staaten und Kanada unter (888) 889-4391 oder
weltweit unter (204) 336-6547. Französisch- und
englischsprechende Mitarbeiter stehen zur
Verfügung.
3. Schicken Sie die Registrierungsinformationen an
die folgende Adresse:
Etón Corporation
1015 Corporation Way
Palo Alto, CA 94303
PRODUKTREGISTRIERUNG
Geben Sie Ihren Namen, die vollständige
Postadresse, Ihre Telefonnummer, das gekaufte
Modell, das Kaufdatum, den Namen der
Verkaufsstelle und die Seriennummer des Produkts
an (diese befindet sich normalerweise im
Batteriefach oder in dessen Nähe).
27 BEGRENZTE GARANTIE FÜR DEN URSPRÜNGLICHEN KUNDE
Für dieses von der Etón Corporation (Etón) vertriebene Markenprodukt von Etón oder GRUNDIG
besteht eine Garantie bezüglich herstellungsbedingter Material- und Verarbeitungsmängel für die
folgende begrenzte Garantiezeit:
EIN (1) JAHR FÜR ERSATZTEILE
UND ARBEIT
Diese begrenzte Garantie beginnt zum Zeitpunkt
des ursprünglichen Kaufs und gilt nur für Produkte,
die von einem autorisierten Etón-Vertreter gekauft
wurden. Sie gilt nicht für Transport, Installation,
Ausbau oder erneute Installation. Durch die
Garantie abgedeckte Reparaturen müssen von Etón
oder einem von Etón autorisierten Kundendienst
durchgeführt werden. Zum Erhalt von
Garantieleistungen muss als Kaufbeweis für Etón
oder den von Etón autorisierten Kundendienst auf
Verlangen der Originalkaufbeleg vorgelegt werden.
Der Käufer ist für den Transport zu Etón oder einen
von Etón autorisierten Kundendienst verantwortlich.
Etón repariert oder ersetzt dieses Produkt nach
eigenem Ermessen. Dies geschieht kostenlos mit
neuen oder aufgearbeiteten Teilen, an denen
während der oben angegebenen Garantieperiode
Schäden festgestellt werden. Das Produkt muss
nicht mehr als 15 Tage vor Ablauf der Garantieperiode
zurückgesendet werden, wobei die Transportkosten
im Voraus an Etón oder einen von Etón bestimmten
Kundendienst für Garantieabdeckung gezahlt werden müssen. Vor der Rückgabe eines Produktes für
Garantieleistungen muss der Käufer Etón zur
Problemfeststellung Informationen über das
Leistungsverfahrens kontaktieren. Alle ersetzten
Teile und Produkte werden Eigentum von Etón. Für
Ersatzteile und -produkte gilt die verbleibende
EINJÄHRIGE EINGESCHRÄNKTE GARANTIE fortgesetzt
Originalgarantie oder neunzig (90) Tage, wobei der
längere Zeitraum zutrifft.
Diese begrenzte Garantie deckt herstellungsbedingte
Material- und Verarbeitungsmängel ab, die bei
normalem nichtgewerblichem Gebrauch dieses
Produkts auftreten und gilt nicht für folgende Fälle
einschließlich u.a.: Schäden, die durch
Anwendungen oder Gebrauch entstehen, für die das
Produkt nicht vorgesehen ist; Mängel oder
Probleme, die durch nicht von Etón gelieferte
Produkte oder Geräte verursacht wurden; Unfälle,
Missbrauch, Vernachlässigung, unsachgemäße
Behandlung, Feuer, Wasser Blitzschlag oder andere
Naturereignisse; falsche Spannung,
Spannungsschwankungen oder Überspannung;
durch falsche oder fehlerhafte Installation
entstandene Schäden (einschließlich Batterien, die
ein Auslaufen von Säure und dadurch irreversible
Stromkreisschäden verursachen können); Schäden
durch Auslaufen von Säure; Änderungen oder
Modifikationen am Produkt oder den Einsatz
unautorisierter Teile, Materialien, Zubehöre oder
Geräte, die das Produkt beschädigen oder zu
Leistungsproblemen führen.
28 GARANTIE-REGISTRIERUNG
DIE WARTUNG IHRES
PRODUKTS VON ETÓN ODER
GRUNDIG
Wenn Sie Ihr Produkt von Etón oder Grundig warten
lassen möchten, empfehlen wir, zunächst einen
Kundendienstvertreter von Etón zur
Problemfeststellung und Fehlerbehebung unter der
Nummer 800-872-2228 in den USA, 800-637-1648
in Kanada oder unter der Nummer (650) 903-3866
zu kontaktieren. Viele der häufigsten Fragen können am Telefon schnell gelöst werden.
SOLLTE IHR PRODUKT VON ETÓN ODER
GRUNDIG EINE REPARATUR BENÖTIGEN,
STEHEN ZWEI DIENSTLEISTUNGSTYPEN
ZUR VERFÜGUNG.
1. VON DER GARANTIE ABGEDECKT – Wenn
für Ihr Produkt noch Garantie besteht und der
Kundendienstvertreter von Etón festgestellt hat,
dass eine Wartung notwendig ist, wird eine
Rückgabegenehmigung ausgestellt und Sie
bekommen Anweisungen zum Einsenden an eine
autorisierte Stelle für durch die Garantie
abgedeckte Reparaturen. Das Radio NICHT
einsenden, ohne eine Autorisationsnummer zur
Rücksendung eingeholt zu haben.
2. NICHT VON DER GARANTIE ABGEDECKT –
Wenn das Produkt nicht länger durch die
Garantie abgedeckt ist und gewartet werden
muss, werden unsere technischen Berater Sie an
die nächste Reparaturstelle verweisen, die eine
Reparatur durchführen kann.
8180
Page 42

¿NECESITA AYUDA?
Queremos que disfrute completamente del uso de este producto. Con el fin de disfrutar de las ventajas de sus excelentes y múltiples funciones, lo invitamos a que lea cuidadosamente el manual del propietario. Si necesita ayuda mientras aprende cómo operar con la radio, contáctenos utilizando
los siguientes métodos.
De lunes a viernes, de 8:30 a.m. a 4:00 p.m.,
Hora estándar del Pacífico (PST, o GMT - 08:00)
1-800-872-2228 desde los EE.UU.
1-800-637-1648 desde Canadá
1-650-903-3866, desde el resto del mundo
FAX: 650-903-3867
customersvc@etoncorp.com
Sitio web: www.etoncorp.com
Dirección postal:
Etón Corporation
1015 Corporation Way
Palo Alto, CA 94303
EE.UU.
S350DL MANUAL DE OPERACIÓN
ÍNDICE
INTRODUCCIÓN ......................................................................
1
CARACTERÍSTICAS PRINCIPALES DEL MODELO S350DL .....................
2
UBICACIÓN DE LOS CONTROLES .......................................................
3
CONEXIÓN DE LA ENERGÍA ELÉCTRICA .............................................
4
AJUSTE PRELIMINAR DE LOS CONTROLES ........................................
5
ENCENDIDO Y APAGADO DE LA RADIO....................................
6
INDICADOR DE INTENSIDAD DE SEÑAL ..............................................
7
SINTONIZACIÓN DE ESTACIONES DE FRECUENCIA
8
MODULADA (FM)..................................................................
SINTONIZACIÓN DE ESTACIONES DE AMPLITUD
9
MODULADA (AM) ...................................................................
SINTONIZACIÓN DE ESTACIONES DE ONDA CORTA ..........................
10
PROGRAMACIÓN DEL RELOJ.................................................
11
USO DEL TEMPORIZADOR PARA DORMIR.............................
12
RELOJ DESPERTADOR.................................................................
13
USO DE LA LUZ DE LA PANTALLA LUMINOSA ..........................
14
REAJUSTE DE LA RADIO CON EL BOTÓN RESET.....................
15
USO DE LOS CONECTORES DE LOS CANALES DE SALIDA DE LÍNEA....
16
USO DEL CONECTOR PARA AUDÍFONOS ..............................
17
USO DE LAS ANTENAS SUPLEMENTARIAS.............................
18
INTRODUCCIÓN A LA ONDA CORTA....................................
19
BÚSQUEDA DE LAS ESTACIONES DESEADAS.......................
20
¿QUÉ SON LAS BANDAS? .....................................................
21
BANDAS DE ONDA CORTA ......................................................
22
BANDAS DIURNAS / BANDAS NOCTURNAS............................
23
USO DE LA RADIO DURANTE EL DÍA...................................
24
USO DEL RADIO DURANTE LA NOCHE .................................
25
PARA REGISTRAR SU GARANTÍA ........................................
26
GARANTÍA LIMITADA PARA EL COMPRADOR ORIGINAL ...
27
INFORMACIÓN DE SERVICIO ..................................................
28
página
84
85
86
88
90
91
91
92
93
94
95
95
96
97
97
98
98
99
100
100
101
102
103
104
105
106
106
107
8382
Page 43

S350DL MANUAL DE OPERACIÓN
1 INTRODUCCIÓN
Este manual de propietario está dividido
convenientemente en dos secciones tituladas
OPERACIÓN BÁSICA e INTRODUCCIÓN A LA
ONDA CORTA. Ambas secciones
son importantes.
Si usted no ha escuchado nunca las bandas
de onda corta, la sección INTRODUCCIÓN A
LA ONDA CORTA le dará toda la información
que necesita para disfrutar de las estaciones
de radio de todo el mundo.
2 CARACTERÍSTICAS PRINCIPALES DEL MODELO S350DL
• AM 530-1710 KHz
• FM 88-108 MHz
• ONDA CORTA: cobertura continua de 3 a 28
MHz. Esto incluye 13 bandas internacionales de
transmisión. 11, 13, 15, 16, 19, 22, 25, 31, 41,
49, 60, 75 y 90 metros.
• Alta sensibilidad y sintonizador de circuito
analógico de alta selectividad
• Lectura digital de frecuencia
• Pantalla de cristal líquido (LCD) para la
frecuencia y el reloj
• Reloj digital con selección de formato de
12 ó 24 horas
• Temporizador de despertador (se puede usar
como reloj despertador para despertar con
música de radio)
• Característica de respaldo en caso de una falla
de la energía eléctrica
• Temporizador para dormir
• Perilla principal de sintonización y perilla
independiente para la sintonización fina
• Control de ganancia variable de RF
• Control rotatorio de volumen
• Controles independientes y variables de
graves y agudos
• Filtros de paso bajo para recepción de
onda corta y AM
• Conectores de salida a nivel de línea para
canales izquierdo y derecho (FM estéreo)
• Selector estéreo o monoaural
• Conector para audífono estéreo
• Manija para transporte y correa convertible
para el hombro
• Antena telescópica incorporada para recepción
de FM y onda corta
• Antena en barra de ferrita incorporada
para AM
• Conectores para antenas suplementarias de
AM, FM y onda corta
• Alimentado por 4 baterías tamaño D o AA
(no incluidas), adaptador para corriente alterna
(CA) (incluido) o adaptador para corriente
continua (CC) para uso en un coche o una
embarcación (no incluido).
NOTA IMPORTANTE: Mientras use el manual del propietario, vea el diagrama titulado UBICACIÓN DE LOS
CONTROLES para localizar los controles, interruptores y partes indicadas en el texto.
8584
Page 44

3 UBICACIÓN DE LOS CONTROLES
Botón “Power & Sleep” para encender la radio o
1
para seguir durmiendo
Botón “Alarm Set” para preparar la alarma
2
Botón “Time Set” para ajustar el tiempo
3
Botón “Hour Set” para ajustar las horas
4
Botón “Minute Set” para ajustar los minutos
5
Botón “Alarm On/Off” para encender o apagar la alarma
6
Botón “Backlight/Snooze” para iluminación de la pantalla o
7
de repetición de la alarma
Indicador de estado de la batería
8
Indicador de intensidad de señal
9
Pantalla con lectura digital de la frecuencia
10
Pantalla de cristal líquido (LCD)
11
Perilla de sintonización rápida
12
Perilla de sintonización lenta
13
Botón “Reset” de reajuste
14
Perilla “MW/SW RF Gain” de ganancia de RF para las bandas MW y SW
15
Perilla “Treble” para tonos altos
16
Perilla “Volume” de control de volumen
17
Perilla “Bass” para tonos bajos
18
Selector de banda MW/SW1/SW2/SW3
19
Selector “Bandwidth/FM Band” de ancho de banda y banda FM
20
Antena telescópica para FM y SW
21
Manija para transporte
22
Correa para el hombro
23
Conector para entrada de corriente continua (CC)
24
Compartimiento de baterías
25
Conector para la antena de MW/SW
26
Conector para la antena de FM
27
Encendido y Apagado de filtro de paso bajo de SW
28
Selector estéreo o monoaural
29
Salida de canales izquierdo y derecho
30
Conector de audífono estéreo
31
S350DL MANUAL DE OPERACIÓN
8786
Page 45

4 CONEXIÓN DE LA ENERGÍA ELÉCTRICA
S350DL MANUAL DE OPERACIÓN
USO DE LAS BATERÍAS
Abra el compartimiento de las baterías e inserte 4
baterías tamaño D (también llamadas UN-1),
según el diagrama de polaridad impreso en la
base del compartimiento.
Tenga en cuenta lo siguiente con respecto a la
operación con baterías:
• El modelo S350DL tiene un indicador de esta
do de carga de las baterías en la pantalla LCD.
Las pilas nuevas mostrarán la carga completa
de tres barras. Si el indicador muestra sólo una
barra o el sonido se torna débil y
distorsionado, reemplace las baterías.
• La radio se apagará automáticamente si las
baterías están muy débiles.
• Inspeccione las baterías periódicamente para
detectar pérdidas. Como precaución, quite las
baterías para evitar posibles pérdidas, si tiene
previsto no utilizar la radio durante un largo
período de tiempo.
• Apague la radio mientras reemplaza las baterías.
USO DE CORRIENTE ALTERNA (CA)
El modelo S350DL está provisto de un adaptador de
CA que convierte el voltaje de CA al voltaje de CC
que utiliza la radio. Utilice únicamente el adaptador
suministrado con el modelo S350DL o alguno que
cumpla con las especificaciones genéricas requeridas por este producto: salida de 6 voltios, CC, polaridad negativa, diámetro externo de la punta del
enchufe de 5,5 milímetros, diámetro interno de 2,1
milímetros; capacidad de 300 miliamperios o mayor.
Comuníquese con Etón para obtener el nombre y la
ubicación de un distribuidor que venda un adaptador correcto.
NUNCA UTILICE UN ADAPTADOR QUE NO
CUMPLA CON ESTAS ESPECIFICACIONES, YA QUE
PUEDE CAUSAR DAÑOS NO CUBIERTOS POR LA
GARANTÍA.
ALIMENTACIÓN DE UNA
BATERÍA DE 12 VOLTIOS DE CC
DE UN COCHE O EMBARCACIÓN
Esto requiere un convertidor de CC que transforme los 12 voltios de CC de la fuente en los 6
voltios que necesita la radio. La salida de ese
adaptador deberá ser de 6 voltios, CC, polaridad
negativa. La punta del enchufe debe tener un
diámetro externo de 5,5 milímetros y un diámetro
interno de 2,1 milímetros.
La punta del enchufe se conecta dentro del
conector de CC de la radio. Debe tener una
capacidad de corriente de por lo menos 200 miliamperios. Comuníquese con Etón para obtener el
nombre y la ubicación de un distribuidor que
venda un convertidor correcto.
8988
Page 46

S350DL MANUAL DE OPERACIÓN
5 AJUSTE PRELIMINAR DE LOS CONTROLES
Use estos ajustes como posiciones iniciales de
los controles.A medida que conozca la radio,
usted decidirá sus puntos de ajuste “favoritos”.
• Gire el control de volumen “VOLUME” hacia
abajo, a un punto no mayor que 3, para que la
radio no tenga un volumen excesivo cuando
se encienda por primera vez.
• Gire el control “AM/SW RF GAIN” (Ganancia
de RF en AM/SW) a la posición 10.
• Gire los controles “BASS-TONE-TREBLE”
(Graves-Tono-Agudos) a la posición 5.
• Coloque el selector “SW LPF” en la posición
“OFF” (Apagado) (en el lado derecho
de la radio).
• Coloque el selector “STEREO MONO” en la
posición MONO.
6 FORMA DE ENCENDER Y APAGAR EL RADIO
Hay dos formas de encender el radio, con el temporizador de 90 minutos o sin el temporizador de
90 minutos. Para apagar el radio en cualquier
momento, oprima el botón ‘POWER & SLEEP’
durante aproximadamente un segundo.
1. CON EL TEMPORIZADOR: Una presión
rápida y corta del botón "POWER & SLEEP"
enciende el radio. La pantalla muestra "90"
durante aproximadamente tres segundos y
entonces muestra la frecuencia normal del
radio. Cuando se enciende de esta manera,
el radio funcionará durante 90 minutos y
después de ese tiempo se apagará automáti-
camente (para ahorrar batería). Para cambiar
el tiempo de operación de 90 minutos a un
tiempo más corto, vea la sección titulada
"USO DEL TEMPORIZADOR PARA DORMIR".
2. SIN EL TEMPORIZADOR: Una presión
más larga, de aproximadamente 3 segundos,
del botón "POWER & SLEEP" enciende el
radio sin activar la característica automática
del temporizador de 90 minutos, causando
que el radio funcione indefinidamente cuando
se usa el adaptador de CA y apagándose
solamente cuando se descarguen las baterías
o cuando se apague el radio.
7 INDICADOR DE INTENSIDAD DE SEÑAL
Cuando escuche estaciones, el indicador de intensidad de señal, en la parte superior derecha de la
pantalla, mostrará el nivel de intensidad de la
señal recibida.
9190
Page 47

S350DL MANUAL DE OPERACIÓN
8 SINTONIZACIÓN DE ESTACIONES
DE FRECUENCIA MODULADA (FM)
Extienda completamente la antena telescópica y
encienda la radio. Coloque el selector “BAND
WIDTH FM AFC” en la posición “FM AFC ON”. En
la pantalla aparecerá FM, así como números de frecuencia de FM en un rango aproximado de 87 a
180 megahercios, abreviados como MHz. Use la
perilla exterior de sintonización “rápida” para
encontrar estaciones, la sintonización fina se consigue con la perilla interior “lenta” cuando sea
necesario. Cuando se enciende el Control automático de frecuencia (AFC), se capturarán automáticamente las señales fuertes, y se les dará prioridad
sobre las más débiles. Con AFC apagado (OFF), las
estaciones débiles que hay entre las más potentes
se sintonizarán con mayor facilidad. La posición
preferida suele ser AFC encendido (ON).
• Al colocar el selector “STEREO/MONO” en la
posición “STEREO” permite la recepción de
señales estereofónicas en FM.
NOTA: El sonido estereofónico se escucha en el
audífono o auriculares y también se escucha en los
canales de salida cuando alimentan altavoces
amplificados o a un sistema estéreo.
• Al colocar el selector STEREO/MONO en la
• Cuando se escucha a través del altavoz
• Si una estación no se recibe con claridad,
posición MONO mejorará la calidad de una
estación con mala recepción, pero no se
escuchará sonido estereofónico en los
canales de salida.
incorporado, no se escucha sonido estereofónico.
En el altavoz incorporado sólo se puede
escuchar sonido monoaural.
orientando la antena telescópica se puede
mejorar la recepción.
9 SINTONIZACIÓN DE ESTACIONES DE AMPLITUD
MODULADA (AM)
SINTONIZACIÓN DE ESTACIONES
DE AM (MW)
Encienda la radio y coloque el selector AM/SW
BAND en la posición AM y el selector de ancho de
banda en ancha o estrecha. Las letras MW aparecerán en la pantalla. Use la perilla de sintonización
exterior “rápida” para encontrar estaciones, la sintonización fina se consigue con la perilla interior
“lenta” cuando sea necesario.
• Si hay interferencia de estaciones adyacentes,
coloque el control “BAND WIDTH” (Anchura de
banda) en la posición “NARROW” (Estrecha).
Si no hay interferencias, déjelo en la posición
WIDE (Ancha).
• Si hay un exceso de ruido de fondo, encienda el
interruptor “SW LPT”, el cual puede reducir
el ruido.
• Si una estación es tan fuerte que se produce
distorsión de audio, reduzca el nivel de ganancia
con la perilla de control “AM/SW RF GAIN”,
moviéndola en sentido contrario al de las
agujas del reloj.
• No es necesario que la antena telescópica esté
extendida para recepción de AM. La radio tiene
una antena interna de barra de ferrita,
direccional para la recepción de AM.
• Para mejorar la recepción de AM, oriente la
radio hasta lograr la máxima intensidad
de señal.
LA FUNCIÓN DE BLOQUEO
DE FRECUENCIA
El modelo S350DL utiliza un circuito único para
sintonizar AM y SW para optimizar la estabilidad
de la frecuencia y reducir la deriva de la señal.
Mientras mueva cualquier perilla de sintonización,
en la pantalla parpadea “KHz”. Deja de parpadear
aproximadamente 3 segundos después de que la
estación está sintonizada, activándose el bloqueo
de frecuencia.
9392
Page 48

S350DL MANUAL DE OPERACIÓN
10 SINTONIZACIÓN DE ESTACIONES DE ONDA CORTA
SI YA ESTÁ FAMILIARIZADO
CON LA ONDA CORTA:
Extienda completamente la antena telescópica y
encienda la radio. Coloque el selector “AM/SW
BAND” en la posición SW1, SW2 ó SW3 y el
selector BANDWIDTH cambiará en ancha ó
estrecha. En la pantalla aparece “SHORTWAVE”
(Onda corta) 1, 2 ó 3. Utiliza la perilla exterior de
sintonización “rápida” para ir a la frecuencia
deseada que ya conoce o a la banda en la cual
desea sintonizar, luego afine la sintonía de las
estaciones con la perilla interior “lenta” cuando
sea necesario. Si una estación es tan fuerte que
se produce distorsión de audio, reduzca el nivel
de ganancia con la perilla de control “AM/SW RF
GAIN”, moviéndola en sentido contrario al de las
agujas del reloj.
SI NO ES FAMILIAR CON LA
ONDA CORTA O NECESITA
RECORDAR COMO USARLA
(vea también la sección titulada INTRODUCCIÓN
A LA ONDA CORTA, más adelante en este manual): Extienda completamente la antena telescópica y encienda la radio.Acérquese a una ventana y
despliegue completamente la antena telescópica.
Siga las instrucciones que se detallan, dependiendo de si es para escuchar de día o de noche.
Si es de día, coloque el selector “AM/SW BAND”
en la posición SW2. Utilice la perilla de sintonización rápida y sintonícela en 15100 KHz.
Este es el principio de la banda de onda corta de
19 metros, una de las tres mejores bandas diurnas, que se extiende de 15100 a 15600 KHz.
Utilizando la perilla de sintonización lenta, sintonice a través de esta banda, escuchando cuidadosamente para localizar estaciones. Pruebe también las bandas de 13 metros (21450-21850 KHz)
y 16 metros (17480-17900 KHz), ambas en SW3.
Si es de noche, coloque el selector “AM/SW
BAND” en la posición SW1. Utilice la perilla de
sintonización rápida y sintonícela en 5800 KHz.
Este es el principio de la banda de onda corta de
49 metros, una de las cuatro mejores bandas nocturnas, que se extiende de 5800 a 6200 KHz.
Utilizando la perilla de sintonización lenta, sintonice a través de esta banda, escuchando cuidadosamente para localizar estaciones. Pruebe también las bandas de 25 metros en SW2 (1160012200 KHz), 31 metros en SW2 (9400-9900 KHz)
y 41 metros en SW1 (7150-7600 KHz).
NOTA: Si hay interferencia de estaciones adyacentes, coloque el control “BAND WIDTH”
(Anchura de banda) en la posición “NARROW”
(Estrecha). Si no hay interferencias, déjelo en la
posición “WIDE” (Ancha). Si hay un exceso de
ruido de fondo, encienda el selector “SW LPT”, el
cual puede reducir el ruido. Si una estación es tan
fuerte que se produce distorsión de audio, reduzca el nivel de ganancia con la perilla de control
“AM/SW RF GAIN”, moviéndola en sentido contrario al de las agujas del reloj.
La función de bloqueo de frecuencia, descrita en
la página 13, también funciona con onda corta.
11 PROGRAMACIÓN DEL RELOJ
El reloj de la radio S350DL se puede seleccionar
entre el modo de 12 horas AM/PM o el modo de 24
horas. Para cambiar entre los modos de 12 y de 24
horas, apague la radio. Luego, pulse el botón
“Hour” durante unos 3 segundos, hasta que 12 o
24 parpadee en la pantalla. Luego suelte el botón
“Hour”. Cuando aparece AM o PM en la pantalla,
se configura en el modo de 12 horas AM/PM. Si no
aparecen en la pantalla, está en el modo de 24
horas.
Para configurar el reloj, la radio puede estar encendida o apagada. Con la radio encendida o apagada,
mantenga pulsado el botón “TIME” durante dos
segundos, y luego suéltelo. La hora parpadeará en
la pantalla. Mientras está parpadeando, pulse los
botones “HOUR” y “MINUTE” para configurar la
hora correcta. Después de configurar la hora correcta, pulse inmediatamente el botón “TIME” para
finalizar la operación. Si no se pulsa el botón
“TIME”, la pantalla finalizará automáticamente el
ajuste después de unos cinco segundos. Mientras
configura la hora, los botones “HOUR” y “MINUTE”
se pueden mantener pulsados para adelantar la
hora más rápidamente.
Nota: Cuando la radio está apagada, la pantalla
muestra la hora. Cuando la radio está encendida,
muestra la frecuencia de radio. Mientras la radio
está encendida, el oprimir el botón “TIME” causa
que la pantalla cambie de la frecuencia a la hora
durante unos tres segundos, después de lo cual
vuelve a mostrar la frecuencia.
CARACTERÍSTICA DE RESPALDO
EN CASO DE UNA FALLA DE LA
ENERGÍA ELÉCTRICA
Si la radio está siendo alimentada por medio de su
adaptador de CA y las baterías están colocadas y la
electricidad falla, la radio pasará automáticamente
a ser alimentada por las baterías.
12 USO DEL TEMPORIZADOR PARA DORMIR
El modelo S350DL incluye un temporizador para
dormir, el cual le permite configurar la radio para que
se apague después de un período de tiempo a su
elección. En el modelo S350DL, el temporizador para
dormir se activa automáticamente durante 90 minutos en cualquier momento en que se encienda la
radio. Después de pulsar el botón “POWER & SLEEP”
para encender la radio, tenga en cuenta que en la
pantalla aparece el número “90” y el símbolo de
“SLEEP”. Esto significa que el temporizador para
dormir de la radio está conectado, permitiéndole
apagarse automáticamente después de 90 minutos.
Para cambiar la cantidad de minutos que la radio
emite antes de apagarse automáticamente, pulse el
botón “POWER & SLEEP” para encender la radio.
Inmediatamente después de que aparezca el número
“90”, pulse repetidamente de forma rápida y corta
en el botón “POWER & SLEEP” hasta que se alcance
la cantidad de minutos deseada. Tenga en cuenta
que con cada pulsación sobre el botón, el temporizador para dormir cambia de 90 a 75, a 60, a 45, a
30, a 15, a 10, a 01minutos y finalmente la radio se
apaga.
9594
Page 49

S350DL MANUAL DE OPERACIÓN
13 RELOJ DESPERTADOR
CONFIGURACIÓN, ACTIVACIÓN
Y DESACTIVACIÓN (RELOJ
DESPERTADOR)
El modelo S350DL incluye un temporizador de
encendido programable, el cual le permite encenderse en horarios predeterminados, como un reloj
despertador. Con la radio encendida o apagada,
mantenga presionado el botón “ALARM” durante
unos tres segundos o hasta que los dígitos indicadores de la hora comiencen a parpadear, y
luego suéltelo. Mientras están parpadeando,
pulse los botones “HOUR” y “MINUTE” para
establecer la hora de encendido, luego presione
de inmediato el botón “ALARM”. Si no se pulsa el
botón “ALARM”, después de 5 segundos y de
forma automática, la hora de encendido quedará
establecida en la hora que seleccionó.
Para activar o desactivar la función de temporizador de encendido, con la radio encendida o
apagada, pulse el botón “AL ON/OFF” (Alarma
conectada / desconectada), lo cual causa que
aparezca el símbolo de un altavoz en el rincón
inferior derecho de la pantalla. Cuando el símbolo
del altavoz está en la pantalla, la función de temporizador de encendido está activada. Cuando no
está en la pantalla, está desactivada.
Cuando la radio alarma está encendida, pulse el
botón “POWER & SLEEP” para apagarla.
USO DE LA FUNCIÓN DE
REPETICIÓN DE ALARMA
Cuando el temporizador se activa y enciende la
radio, el símbolo de activación del temporizador
aparece parpadeando en la pantalla. Mientras
está parpadeando, pulse / suelte el botón
“SNOOZE / LIGHT”. La radio se apagará y luego se
encenderá nuevamente en 10 minutos. Este proceso
se puede repetir 3 veces.
Para ver la hora de encendido automático en
cualquier momento, con la radio encendida o apagada, pulse el botón “ALARM”. La hora de encendido aparecerá en la pantalla durante unos cuatro
segundos.
NOTAS IMPORTANTES ACERCA
DE LA FUNCIÓN DEL TEMPORIZADOR DE ENCENDIDO
• El temporizador de encendido funciona con la
radio encendida o apagada.
• La radio se apagará automáticamente después
de emitir durante 30 minutos.
USO DE LA FUNCIÓN DE
REPETICIÓN DE ALARMA
Cuando el temporizador se activa y enciende la
radio, el símbolo de activación del temporizador
aparece parpadeando en la pantalla. Mientras está
parpadeando, pulse / suelte el botón “SNOOZE /
LIGHT”. La radio se apagará y luego se encenderá
nuevamente en 10 minutos. Este proceso se puede
repetir 3 veces.
14 USO DE LA LUZ DE LA PANTALLA LUMINOSA
El modelo S350DL tiene una luz interior para iluminar la pantalla en situaciones en las que hay
poca luz. Se puede activar con cualquiera de los
dos métodos siguientes.
1. Para iluminar temporalmente la pantalla, pulse
y suelte rápidamente el botón “BACKLIGHT”. La
luz se apaga automáticamente después de ocho
segundos.
2. Para iluminar la pantalla de forma permanente, pulse y mantenga apretado el botón
“BACKLIGHT” durante más de un segundo. La luz
se encenderá hasta que el botón “BACKLIGHT” se
vuelva a pulsar.
3. Cuando la radio se enciende o apaga, el pulsar
las teclas siguientes puede hacer que la luz se
encienda durante 8 segundos (botones “ALARM
SET”; “TIME SET”,“HOUR SET”, “MINUTE SET”,
“AL ON/OFF” y “BACKLIGHT”:
4. Además, cuando la radio se enciende, el giro
de las perillas de sintonización (rápida y lenta)
puede encender la luz de la pantalla durante 8
segundos.
precaución: dejando la luz de la pantalla encendida permanentemente provocará que las baterías
se agoten rápidamente.
15 REAJUSTE DE LA RADIO CON EL BOTÓN RESET
El modelo S350DL cuenta con un microchip de
ordenador (el componente que controla la
operación de la radio). Si la radio ha estado
sometida a condiciones ambientales anormales, el
microchip del ordenador puede funcionar de forma
incorrecta, y pueden aparecer los siguientes síntomas.
• La pantalla no muestra nada y la radio no se
puede sintonizar presionando el botón
“POWER & SLEEP”.
• La pantalla muestra caracteres aleatorios o no
funciona adecuadamente a pesar de que la
radio puede recibir estaciones normalmente.
En estos casos, puede necesitar reajustar la radio.
Para restaurar la radio, desenchufe el adaptador
externo (si se está usando) y quite las baterías de
su compartimiento. Inserte un objeto con punta,
como un clip, en el agujero de RESET (Reajustar)
de la derecha, en la parte frontal de la radio, presione y suelte suavemente el botón que hay dentro del agujero. Luego enchufe el adaptador de
AC o vuelva a colocar las baterías.
9796
Page 50

S350DL MANUAL DE OPERACIÓN
16 USO DE LOS CONECTORES DE LOS CANALES DE SALIDA DE LÍNEA
Los conectores de los canales de salida (enchufes
RCA), etiquetados L, R, proporcionan líneas estándar de canales de salida estéreo izquierda y
derecha, que pueden ser usadas para alimentar
audio a un grabador de cintas, a un sistema
estéreo, o a cualquier dispositivo con entrada de
canales de audio. La salida es estéreo cuando la
radio está sintonizada en una estación de FM que
transmite en estéreo.
17 USO DEL CONECTOR PARA AUDÍFONOS
El conector del audífono se puede usar con auriculares estéreo que utilizan un enchufe de 1/8 de
pulgada (3,5 milímetros). El sonido es en estéreo.
18 USO DE ANTENAS SUPLEMENTARIAS
ANTENAS DE ONDA CORTA: Esta radio se
puede usar con antenas básicas, de cable largo y
con otras antenas de onda corta de alta impedancia (lo óptimo es 500 ohmios). La longitud de una
antena de cable largo debería ser de entre 10 y
30 metros (de 30 a 100 pies). El mejor rendimiento se obtiene con cables de cobre. La antena
debería estar por encima de la tierra, preferentemente siguiendo una línea recta. No conductor
para evitar pérdida de señal, se deberían usar aislantes en ambos extremos del cable. El cable se
conecta en el enchufe de color rojo,AM,SW ANT
(Antena AM, SW), en la parte posterior de la
radio. Conectar un cable a tierra al enchufe negro,
GND (Tierra), a menudo ayuda en la recepción,
pero no es obligatorio. El cable a tierra debería
estar conectado a una tubería de agua fría o a
una varilla de conexión a tierra. Si no hay
disponibles tuberías de agua ni varillas de conexión a tierra, conecte un cable de una longitud
similar a la de la antena y déjelo sobre el suelo.
NUNCA CONECTE EL CABLE A TIERRA A UNA
TUBERÍA DE GAS
ANTENAS DE AM: Se puede usar cualquier antena de alta impedancia (lo óptimo es 500 ohmios),
incluyendo cables largos y enroscados. Un cable a
tierra, tal y como se discutió en ANTENAS DE
ONDA CORTA, es aún más útil durante la recepción de AM y a menudo mejora considerablemente la recepción, aún cuando no se use una
antena adicional de AM.
ANTENAS DE FM: Conecte las antenas de FM al
enchufe FM ANT (Antena FM). CABLE FM en la
parte posterior de la radio. Estas antenas
deberían tener una impedancia de 75 ohmios. La
mayoría de las antenas que se alimentan con
cable coaxial son de 75 ohmios. Si su cable coaxial tiene un conector “F”, como los que se usan en
televisores y vídeo reproductores en Norte
América, use en la radio un convertidor de F a
PAL para ajustarse al estilo europeo de enchufes
PAL. (número de pieza 278-265 de Radio Shack).
9998
Page 51

S350DL MANUAL DE OPERACIÓN
19 INTRODUCCIÓN A LA ONDA CORTA
La onda corta le permite escuchar estaciones de
todo el mundo.Ahora que tiene una radio de
onda corta, no hay duda de que querrá escuchar
estaciones de todo el mundo de inmediato. Si
nunca ha escuchado las bandas de onda corta,
tómese algo de tiempo para aprender los conceptos básicos que se esbozan a continuación. Para
escuchar correctamente estaciones de onda corta,
debe saber encontrarlas. Se las encuentra en las
“bandas” de onda corta. Si es un oyente experimentado de onda corta, ya conocerá las bandas
que hay y cómo utilizarlas, pero si es nuevo,
primero necesitará aprender acerca de las bandas. Después de eso, obtendrá excelentes resultados. Continúe leyendo.
20 BÚSQUEDA DE LAS ESTACIONES DESEADAS
CÓMO IDENTIFICAR LO QUE
ESTÁ ESCUCHANDO Y CÓMO
BUSCAR LAS ESTACIONES QUE
DESEA ESCUCHAR
Le recomendamos el uso de una guía completa
de onda corta, especialmente si desea escuchar
países en concreto o si desea identificar la
estación que está escuchando. Esa guía lista
alfabéticamente los países que transmiten en
onda corta, mostrando el idioma, la zona objetivo, los horarios de transmisión, y la frecuencia
que utilizan. La mejor guía de onda corta es
PASSPORT TO WORLD BAND RADIO, disponible en
las principales librerías. Está publicada por
International Broadcasting Services, Ltd., Box 300,
Penn's Park, Pennsylvania 18943 y está disponible
en www.passband.com. Esta publicación tiene
capítulos separados para transmisiones en inglés
y en otros idiomas, y se llama “World-Wide
Broadcasts In English and Voices From Home”
(Transmisiones mundiales en inglés y voces
desde casa).
21 ¿QUÉ SON LAS BANDAS?
PARA DISFRUTAR COMPLETAMENTE ESCUCHANDO ONDA
CORTA, ÉSTE ES EL CONCEPTO
MÁS IMPORTATNTE Y EL
PRIMERO QUE DEBE
APRENDER.
Si alguna vez ha escuchado radio AM o FM, ya
sabe lo que es una banda. La banda AM es un
rango de frecuencias que abarca de 530 a 1600
KHz, la banda FM es de 88 a 108 MHz. Una
banda es simplemente un rango de frecuencias
donde se encuentran las estaciones. Cuando
busca estaciones en estas “bandas”, simplemente
busca sintonías con la perilla de sintonización
hasta que encuentra la estación que le gusta. La
onda corta es similar, las bandas de onda corta
tienen nombre como 25 metros, 31 metros, 49
metros, etcétera. Se las abrevia como 25m, 31m,
49m. De igual forma que una radio AM o FM,
simplemente se conecta a la banda de onda corta
y sintoniza buscando estaciones.
Por ejemplo, la banda de onda corta de 19 metros
comprende el rango de frecuencias de 15100 a
15600 KHz. En la próxima página hay una lista de
bandas de onda corta utilizadas para transmisiones internacionales de onda corta y sus rangos
de frecuencia respectivos. Dado que algunas
radios muestran las frecuencias en megahercios y
otras en kilohercios, se muestran ambas
unidades. El modelo S350DL muestra las
frecuencias de onda corta en kilohercios,
abreviado como KHz.
101100
Page 52

S350DL MANUAL DE OPERACIÓN
22 BANDAS DE ONDA CORTA
BANDA MEGAHERTZIOS (MHz) KILOHERTZIOS (KHz) S350DL
(como en algunos radios) (como en el modelo S350DL) (Posición del selector)
120 metros 2,300-2,500 MHz 2300- 2500 KHz SW1
90 metros 3,20-3,40 MHz 3200-3400 KHz SW1
75 metros 3,90-4,00 MHz 3900-4000 KHz SW1
60 metros 4,750-5,060 MHz 4750-5060 KHz SW1
49 metros 5,950-6,20 MHz 5950-6200 KHz SW1
41 metros 7,10-7,60 MHz 7100-7600 KHz SW1
31 metros 9,20-9,90 MHz 9500-9900 KHz SW2
25 metros 11,600-12,200 MHz 11600-12100 KHz SW2
22 metros 13,570-13,870 MHz 13570-13870 KHz SW2
19 metros 15,10-15,80 MHz 15100-15800 KHz SW2
16 metros 17,480-17,90 MHz 17480-17900 KHz SW3
13 metros 21,450-21,850 MHz 21450-21850 KHz SW3
11 metros 25,60-26,10 MHz 25600-26100 KHz SW3
10 metros 26,965-27,41 MHz 26965-27410 KHz SW3
también llamada “banda de los ciudadanos” o CB
23 BANDAS DIURNAS / BANDAS NOCTURNAS
BANDAS DIURNAS / BANDAS
NOCTURNAS: LA DIFERENCIA
ES MUY IMPORTANTE
Dado que las señales de onda corta dependen de
factores tales como el sol, la ionosfera y la interacción con la misma tierra, no se pueden
escuchar señales en todas las bandas a lo largo
del día. Algunas bandas son mejores durante las
horas del día, mientras que otras son mejores por
la noche.Aquí hay algunas reglas generales.
• En general, las bandas con frecuencias por
debajo de 13000 KHz son mejores por la
noche y las bandas con frecuencias por encima
de 13000 KHz son mejores durante el día. Esta
guía no es “a prueba de balas” pero es útil
como regla empírica general.
• Cerca de la salida y de la puesta del sol, tanto
las bandas diurnas como las nocturnas pueden
ser buenas, a veces excepcionalmente buenas.
• En verano, las bandas diurnas suelen ser
buenas durante las primeras horas
de la noche.
• Aunque la mayoría de las estaciones de onda
corta están dentro de los límites de las bandas
que se definieron, algunas se encuentran fuera
de ellos.También vale la pena utilizar tiempo
para sintonizar entre bandas.
• Estas guías se pueden usar en todo el mundo y
no dependen de la ubicación geográfica.
En la próxima página están las características de
las principales bandas de onda corta. Siga estas
guías para escuchar con mejores resultados.
103102
Page 53

S350DL MANUAL DE OPERACIÓN
24 USO DEL RADIO DURANTE EL DÍA 25 USO DEL RADIO DURANTE LA NOCHE
Las peores horas para escuchar onda corta suelen ser las del día, desde unas dos horas después de la salida del
sol hasta unas dos horas antes de la puesta del sol. La principal razón por la que esto es así es que las emisoras no transmiten para Norteamérica durante esas horas, asumiendo que todos están trabajando o en el colegio, y que no podrán escuchar durante el día. Si desea intentar escuchar durante el día, siga las siguientes
reglas. Normalmente, la onda corta diurna tiende a ser mejor en la zona este de Norteamérica que en la zona
oeste de Norteamérica.
BANDAS DIURNAS CARACTERÍSTICAS
13metros Los resultados son variables.Vale la pena intentarlo.A veces es
extremadamente buena cerca de la salida y la puesta del sol.
16metros Similar a la banda de 19 metros.
19metros En conjunto, la mejor banda diurna También puede ser buena por la noche
durante los meses de verano.A veces es extremadamente buena cerca
de la salida y la puesta del sol. A veces es buena por la noche, en el verano.
22metros Similar a la banda de 19 metros..
Es el mejor momento para escuchar, porque quienes transmiten lo hacen deliberadamente hacia Norteamérica.
Estas bandas también pueden ser extremadamente buenas cerca de la salida y la puesta del sol.
BANDAS NOCTURNAS CARACTERÍSTICAS
25 metros Similar a la banda de 31 metros.
31 metros Buena por la noche, en todas partes. A menudo es extremadamente buena
durante la salida y la puesta del sol. A menudo los buenos resultados
comienzan alrededor de una hora antes de la puesta del sol.
41 metros Similar a la de 49 metros. Buena toda la noche en el este de
Norteamérica, varía en el oeste de Norteamérica.
49 metros Generalmente, la mejor banda durante la noche.
NOTA IMPORTANTE: Su recepción puede mejorar notablemente si se coloca cerca de una ventana. Los
materiales con que se construyen algunos edificios no dejan pasar bien las señales. Los edificios con estructura
de madera permiten que las señales los atraviesen con facilidad, mientras que los edificios de hormigón y ladrillos las suelen bloquear. Si está en un edificio con una o más plantas por encima suyo, las señales también se
pueden debilitar. En esa situación, coloque la radio tan cerca de una ventana como pueda mientras escucha.
Manteniendo la radio levantada mientras está cerca de una ventana también puede mejorar la recepción.
105104
Page 54

S350DL MANUAL DE OPERACIÓN
Para asegurar una cobertura completa de la garantía o información acerca de nuevos productos, el
registro de su producto de Etón o Grundig debe ser
completado tan pronto como sea posible, después
de la compra o llegada del producto. Para registrar
su radio, por favor seleccione uno de los métodos
siguientes:
1. Registre el producto visitando nuestro sitio de
Internet en http://www.etoncorp.com
2. Llame a nuestro número de teléfono gratis
de registro de productos desde cualquier parte
de los Estados Unidos o Canadá, usando el
número (888) 889-4391, o desde cualquier parte
del mundo por el teléfono
(204) 336-6547. Hay operadores disponibles que
hablan francés e inglés.
3. Envíe por correo la información necesaria para
registrar su producto a la dirección siguiente:
Etón Corporation
1015 Corporation Way
Palo Alto, CA 94303
PRODUCT REGISTRATION
Incluya su nombre, dirección completa, número de
teléfono, modelo comprado, fecha de la compra,
nombre del comercio donde lo compró y número de
serie del producto (este número está situado normalmente dentro o cerca del compartimiento de la
batería).
27 GARANTÍA LIMITADA PARA EL COMPRADOR ORIGINAL
Este producto de la marca Etón o GRUNDIG, como
es suministrado y distribuido por Etón Corporation
(Etón), está garantizado por Etón contra defectos de
fabricación, incluyendo defectos de material y mano
de obra, durante el siguiente período de garantía
limitada.
UN (1) AÑO DE GARANTÍA
PARA PIEZAS Y MANO DE
OBRA
Esta garantía limitada comienza en la fecha de la
compra original y es válida solamente para los
productos comprados a través de un vendedor
autorizado de Etón. La garantía no cubre el transporte, la instalación, desinstalación o reinstalación
del producto. Las reparaciones bajo garantía deben
ser efectuadas por Etón o por un centro de servicio
autorizado por Etón. Para recibir servicio bajo la
garantía, el recibo de venta original deberá ser
presentado, si lo piden,a Etón o al centro de servicio
autorizado por Etón como prueba de la compra. El
transporte del producto a Etón o al centro de
servicio autorizado por Etón es la responsabilidad
del comprador.
Etón reparará o reemplazará el producto, a nuestra
opción y sin ningún costo, con piezas nuevas o
reacondicionadas, si se determina que dichas piezas
son defectuosas durante el período de garantía limitada especificado anteriormente. El producto debe
ser retornado no más tarde que 15 días después de
la expiración del período de la garantía a Etón o al
centro de servicio designado por Etón, con el costo
de transporte prepagado, para recibir servicio bajo
la garantía. Antes de retornar cualquier producto
para recibir servicio bajo la garantía, el comprador
debe comunicarse con Etón para determinar el
problema y el
GARANTÍA LIMITADA DE UN AÑO
procedimiento de servicio.Todas las piezas y
productos reemplazados se convierten en propiedad
de Etón. Las piezas y los productos usados en la
reparación asumen el resto de la garantía original, o
noventa (90) días, lo que sea más largo.
Esta garantía limitada cubre los defectos de
fabricación, ya sean de material o de mano de obra,
encontrados durante el uso normal y no
comercial de este producto, pero no cubre los
problemas siguientes que incluyen pero no se
limitan a los daños que ocurren debido a
aplicaciones y usos para los cuales el producto no
fue diseñado; fallas o problemas causados por
productos o equipos no suministrados por Etón;
28 INFORMACIÓN DE SERVICIO
SERVICIO DE SU PRODUCTO
ETÓN O GRUNDIG
Para obtener servicio para su producto Etón o
Grundig, recomendamos que se comunique primero
con un representante de servicio de Etón por los
teléfonos 800-872-2226 (EE.UU.), 800-637-1648
(Canadá) o (650) 903-3866 para determinar el
problema y localizar la falla. Muchas de las preguntas más comunes pueden ser contestadas
rápidamente por teléfono.
HAY DOS TIPOS DE SERVICIOS DISPONIBLES
SI SU PRODUCTO DE ETÓN O
GRUNDIG NECESITA REPARACIÓN.
continué26 PARA REGISTRAR SU GARANTÍA
accidentes, mal uso, abuso, negligencia, mala
aplicación del producto, fuego, agua, rayos o descargas eléctricas u otros actos de la naturaleza; voltaje
incorrecto de la línea, fluctuaciones o aumentos
momentáneos de voltaje; daños causados por una
instalación incorrecta o inapropiada (incluyendo
baterías que puedan descargar un ácido capaz de
causar daños irreversibles en los circuitos); daños
causados por el escape de ácido; alteración o modificación del producto; o uso de piezas no autorizadas,
suministros, accesorios o equipos que puedan dañar
este producto o resultar en problemas de servicio.
1. GARANTÍA – Si su producto está todavía bajo
garantía y el representante de servicio de Etón
determina que necesita servicio bajo la garantía,
recibirá una autorización para devolver el
producto con instrucciones para enviarlo a un
centro autorizado de servicio bajo garantía. No
envíe su radio de vuelta sin haber recibido
primero un número de autorización para devolver
el producto.
2. SIN GARANTÍA – Si su producto ya no está
cubierto por la garantía y requiere servicio, nuestro personal técnico lo referirá al centro de
reparaciones más cercano a usted, que sea
capaz de hacer la reparación.
107106
Page 55

AVETE BISOGNO DI AIUTO?
Il nostro desiderio è che possiate apprezzare
questo prodotto in tutte le sue potenzialità. Per
sfruttare al meglio le sue numerose funzionalità
esclusive e di qualità, vi preghiamo di leggere
attentamente il manuale dell’utente. Qualora vi
serva aiuto per capire il funzionamento del prodotto, contattateci attenendovi alle indicazioni fornite
di seguito.
lunedì-venerdì, 8:30 – 16:00,
Fuso orario Nord America e Pacifico.
1-800-872-2228 dagli Stati Uniti
1-800-637-1648 dal Canada
1-650-903-3866, dal resto del mondo
FAX: 650-903-3867
customersvc@etoncorp.com
Sito Web: www.etoncorp.com
Indirizzo:
Etón Corporation
1015 Corporation Way
Palo Alto, CA 94303
USA
S350DL MANUALE OPERATIVO
INDICE
INTRODUZIONE ......................................................................
1
PRINCIPALI CARATTERISTICHE DEL MODELLO S350DL ............
2
POSIZIONE DEI COMANDI ........................................................
3
ALIMENTAZIONE ...................................................................
4
IMPOSTAZIONI PRELIMINARI DEI COMANDI ............................
5
ACCENSIONE/SPEGNIMENTO DELLA RADIO .........................
6
INDICATORE FORZA SEGNALI .............................................
7
SINTONIZZAZIONE STAZIONI FM.........................................
8
SINTONIZZAZIONE STAZIONI AM...........................................
9
SINTONIZZAZIONE STAZIONI A ONDE CORTE..........................
10
IMPOSTAZIONE OROLOGIO ................................................
11
UTILIZZO DELLO SLEEP TIMER ...........................................
12
SVEGLIA ................................................................................
13
UTILIZZO DELLA RETROILLUMINAZIONE.............................
14
UTILIZZO DELLA FUNZIONE DI RESET..................................
15
UTILIZZO DELLE PRESE LINE OUT........................................
16
UTILIZZO DEL JACK AURICOLARI.........................................
17
UTILIZZO DI ANTENNE SUPPLEMENTARI.............................
18
ONDE CORTE: INTRODUZIONE ............................................
19
SINTONIZZAZIONE STAZIONI ..............................................
20
CHE COSA SONO LE BANDE? ...............................................
21
BANDE A ONDE CORTE .......................................................
22
BANDE DIURNE / BANDE NOTTURNE .................................
23
ASCOLTO DIURNO ...............................................................
24
ASCOLTO NOTTURNO .........................................................
25
REGISTRAZIONE GARANZIA ...............................................
26
GARANZIA LIMITATA AL CLIENTE ORIGINARIO .......................
27
INFORMAZIONI SULL’ASSISTENZA ..........................................
28
pagina
110
111
112
114
116
117
117
118
119
120
121
121
122
123
123
124
124
125
126
126
127
128
129
130
131
132
132
133
109108
Page 56

S350DL MANUALE OPERATIVO
1 INTRODUZIONE
Il presente manuale dell'utente è suddiviso
in due sezioni, FUNZIONAMENTO DI BASE e
ONDE CORTE: INTRODUZIONE. Entrambe le
sezioni sono importanti.
Se non conoscete ancora il concetto delle
onde corte, nella sezione ONDE CORTE:
INTRODUZIONE troverete tutte le informazioni necessarie per apprezzare le
trasmissioni di tutto il mondo.
2 PRINCIPALI CARATTERISTICHE DEL MODELLO S350DL
• AM 530-1710 KHz
• FM 88-108 MHz
• ONDE CORTE – copertura continua da 3 a
28 MHz. Sono comprese 13 bande
internazionali di trasmissione. 11, 13, 15,
16, 19, 22, 25, 31, 41, 49, 60, 75 e 90 metri.
• Circuiteria del sintonizzatore analogico
selettivo ad alta sensibilità
• Visualizzazione digitale della frequenza
• Display a cristalli liquidi, (LCD), per
frequenza e orologio
• Orologio digitale con formato
selezionabile tra 12/24 ore
• Timer di sveglia (da usare come
radio-sveglia)
• Funzionalità di backup in caso di
interruzione dell’alimentazione
• Sleep timer
• Manopola di sintonizzazione principale e
manopola indipendente di sintonizzazione
di precisione
• Comando RF Gain (guadagno RF) variabile
• Comando Volume con manopola
• Comandi bass (bassi)/ treble (alti)
variabili e indipendenti
• Filtro passabasso per AM e onde corte
• Uscite linea Left/Right (sinistra/destra)
(stereofoniche in FM)
• Interruttore Stereo/Mono
• Presa Stereo earphone (auricolari stereo)
• Impugnatura/tracolla regolabile
• Antenna telescopica integrata per
FM e onde corte
• Antenna integrata in ferrite per AM
• Jack per antenne supplementari AM,
FM e onde corte
• Alimentazione con 4 batterie D o AA
(non incluse), adattatore AC (incluso) o
adattatore DC per auto o barca (non incluso)
N.B. Durante l'uso del presente manuale, fare riferimento allo schema POSIZIONI DEI COMANDI per individuare
i comandi, gli interruttori, le prese ed i componenti della radio.
111110
Page 57

3 POSIZIONE DEI COMANDI
Pulsante Power & Sleep (attivazione/disattivazione)
1
Pulsante Alarm Set (impostazione sveglia)
2
Pulsante Time Set (impostazione orario)
3
Pulsante Hour Set (impostazione ore)
4
Pulsante Minute Set (impostazione minuti)
5
Pulsante Alarm On/Off (attivazione/disattivazione sveglia)
6
Pulsante Backlight/Snooze (retroilluminazione/ripetizione sveglia)
7
Indicatore alimentazione batteria
8
Indicatore forza/segnale
9
Visualizzazione digitale frequenza
10
Display LCD
11
Manopola di regolazione (fast - rapida)
12
Manopola di regolazione (slow - lenta)
13
Pulsante Reset (riarmo)
14
Manopola MW/SW RF Gain (guadagno RF MW/SW)
15
Manopola Treble (alti)
16
Manopola Volume (volume)
17
Manopola Bass (bassi)
18
Selettore di banda MW/SW1/SW2/SW3
19
Selettore di banda Bandwidth/FM (FM/larghezza di banda)
20
Antenna telescopica per FM/SW
21
Impugnatura
22
Tracolla
23
Jack DC
24
Vano batterie
25
Jack antenna MW/SW
26
Jack antenna FM
27
SW LPF On/Off (filtro passabasso SW On/Off)
28
Interruttore Stereo/Mono
29
Uscita linea L&R (sinistra/destra)
30
Jack Stereo Earphone (auricolari stereo)
31
S350DL MANUALE OPERATIVO
113112
Page 58

4 ALIMENTAZIONE
S350DL MANUALE OPERATIVO
USO DELLE BATTERIE
Aprire il vano batterie e inserire 4 batterie di
tipo D (dette anche UM-1) orientandole secondo
lo schema della polarità riportato sul
fondo del vano.
Ricordare quanto segue in merito al
funzionamento a batteria:
• Il modello S350DL visualizza sul display LCD
un indicatore di carica delle batterie. Nelle
batterie nuove la carica completa è indicata
da tre barre. Se l’indicatore visualizza una
sola barra oppure il suono diventa debole
e distorto, sostituire le batterie.
• La radio si spegne automaticamente quando
le batterie si scaricano.
• Controllare periodicamente le batterie per
rilevare eventuali perdite. Come misura
precauzionale, rimuovere le batterie per evitare
possibili perdite se si intende conservare la radio
a lungo senza utilizzarla.
• Spegnere la radio prima di sostituire le batterie.
USO DELL’ALIMENTAZIONE AC
Il modello S350DL è dotato di un adattatore AC che
converte la tensione AC in tensione DC utilizzata
dalla radio. Utilizzare esclusivamente l'adattatore in
dotazione con S350DL oppure un adattatore che
soddisfi le specifiche generali di questo dispositivo.
uscita da 6 volt, DC, polarità negativa; diametro
esterno della punta della spina pari a 5,5 millimetri
e diametro interno pari a 2,1 millimetri; capacità di
300 milliampere o superiore. Contattare Etón per
informazioni sul rivenditore più vicino in grado di
fornire l’adattatore richiesto.
NON UTILIZZARE MAI UN ADATTATORE NON
CONFORME A QUESTE SPECIFICHE TECNICHE, IN
QUANTO POTREBBE CAUSARE DANNI NON
COPERTI DALLA GARANZIA.
ALIMENTAZIONE DA UNA
BATTERIA DC DA 12 VOLT
DI UN’AUTOMOBILE/BARCA
È necessario un convertitore DC che converta la
sorgente DC da 12 volt nei 6 volt richiesti dalla
radio. L’uscita di questo adattatore è di 6 volt DC,
a polarità negativa. La punta della spina deve
avere un diametro esterno di 5,5 millimetri e quello interno di 2,1 millimetri.
La punta della spina va inserita nel jack DC della
radio. Deve essere in grado di gestire una corrente di almeno 200 milliampere. Contattare Etón
per informazioni sul rivenditore più vicino in
grado di fornire il convertitore richiesto.
115114
Page 59

S350DL MANUALE OPERATIVO
5 IMPOSTAZIONI PRELIMINARI DEI COMANDI
Attenersi a queste linee guida iniziali per l’utilizzo
dei comandi. Man mano che si acquisisce familiarità con la radio, si definiranno delle
impostazioni “personalizzate”.
• Far ruotare il comando VOLUME su un valore
pari o inferiore a 3 in modo che il volume non
sia assordante quando la radio viene accesa.
• Far ruotare il comando AM/SW RF GAIN
(guadagno RF AM/SW) fino alla posizione 10.
• Far ruotare i comandi BASS-TONE-TREBLE
(bassi-toni-alti) in posizione 5.
• Far ruotare l’interruttore SW LPF
(filtro passabasso SW) sulla posizione OFF
(sul lato destro
• Far ruotare l’interruttore STEREO MONO
in posizione MONO.
6 ACCENSIONE/SPEGNIMENTO DELLA RADIO
La radio può essere accesa in due modi, con la funzione di timer da 90 minuti o senza. Per spegnerla in
qualsiasi momento, è sufficiente premere il pulsante
POWER & SLEEP (attivazione/disattivazione) per un
secondo circa.
NOTA: Quando SLEEP Times (tempo di spegnimento) è off, il display visualizza sempre l’orologio.
1. CON TIMER: Una breve pressione del pulsante
POWER & SLEEP (attivazione/disattivazione) accende
la radio. Il display visualizza l'indicazione ‘90’ per
circa tre secondi seguita dalla frequenza normale
della radio. Questa modalità di accensione della
radio ne permette il funzionamento per 90 minuti, al
termine dei quali il timer si disattiva automatica-
mente (per ridurre al minimo la scarica della batteria). Per ridurre questo tempo di disattivazione
automatico a meno di 90 minuti, vedere la
sezione UTILIZZO DELLO SLEEP TIMER.
2. SENZA TIMER: Premendo per circa 3 secondi
il pulsante POWER & SLEEP (attivazione/disattivazione) la radio si accende senza che venga attivata la funzione di spegnimento automatico dopo
90 minuti; in questo modo la radio funzionerà a
tempo indeterminato se si usa un adattatore AC e
si spegnerà solo se le batterie si scaricheranno o
verrà disattivata.
7 INDICATORE FORZA SEGNALE
Quando si ascoltano delle stazioni radio, la forza
di ricezione viene visualizzata dal misuratore
della forza del segnale nella sezione superiore
destra del display.
117116
Page 60

S350DL MANUALE OPERATIVO
9 SINTONIZZAZIONE STAZIONI AM 8 SINTONIZZAZIONE STAZIONI FM
Estrarre completamente l’antenna telescopica e
accendere la radio. Posizionare il selettore BAND
WIDTH FM AFC (controllo di frequenza automatico FM larghezza di banda) in posizione FM AFC
ON (controllo di frequenza automatico FM ON).
Sul display viene visualizzata l’indicazione FM
assieme a valori della frequenza FM nell’intervallo
compreso tra 87 e 108 megahertz, in forma
abbreviata MHz. Utilizzare la manopola esterna di
sintonizzazione ‘fast’ (rapida) per trovare le
stazioni e quella interna ‘slow’ (lenta) per perfezionare la ricezione se necessario. Se AFC
(Automatic Frequency Control—Controllo di frequenza automatico) è ON, i segnali forti vengono
ricevuti automaticamente e hanno la precedenza
su quelli deboli. Se AFC è OFF, sarà più facile sintonizzarsi sulle stazioni deboli tra quelle forti.
Generalmente,AFC ON è l’impostazione preferita.
• Posizionando l’interruttore STEREO MONO in
posizione STEREO, si ricevono le stazioni
FM in stereo.
NOTA: L’effetto stereofonico si può ascoltare da
cuffie e auricolari nonché dalle uscite linea stereo
se collegate ad altoparlanti amplificati o a un
impianto stereofonico.
• Posizionando l’interruttore STEREO MONO in
posizione MONO si migliorerà la qualità della
stazioni con problemi di ricezione, ma non si
potrà avere un effetto stereofonico dalle
uscite linea.
• Se l’ascolto avviene tramite altoparlante
integrato, non si avrà l'effetto stereofonico.
Con altoparlante integrato si avrà solo un
effetto monoauricolare.
• Se la ricezione di una stazione non è pulita,
muovendo l’antenna telescopica si può
migliorare la ricezione.
SINTONIZZAZIONE DELLE
STAZIONI AM (MW)
Accendere la radio e impostare l’interruttore
AM/SW BAND (banda AM/SW) in posizione AM e
l’interruttore bandwith (larghezza di banda) su
wide (ampia) o narrow (stretta). Il display visualizza l'indicazione MW. Utilizzare la manopola
esterna di sintonizzazione ‘fast’ (rapida) per
trovare le stazioni e quella interna ‘slow’ (lenta)
per perfezionare la ricezione se necessario.
• In caso di interferenza delle stazioni adiacenti,
posizionare il comando BAND WIDTH
(larghezza di banda) in posizione NARROW
(stretta). Se non si registrano interferenze,
lasciarlo in posizione WIDE (ampia).
• In caso di eccessivo rumore di fondo, attivare
l’interruttore SW LPF (filtro passabasso SW)
per minimizzarlo.
• Se una stazione è talmente potente da causare
distorsioni acustiche, ridurre il guadagno
girando in senso antiorario la manopola del
comando AM/SW RF GAIN
(guadagno RF AM/SW).
• L’antenna telescopica non deve essere estratta
per la ricezione AM. La radio ha un’antenna
direzionale interna in ferrite per la ricezione AM.
• Per ottimizzare la ricezione AM, far ruotare
l’antenna fino a raggiungere la massima
forza del segnale.
FUNZIONALITA' DI BLOCCO
FREQUENZA
Il modello S350DL utilizza un circuito unico per la
sintonizzazione AM e SW in modo da ottimizzare
la stabilità della frequenza e minimizzare la deviazione dei segnali. Quando si fa ruotare una delle
due manopole di sintonizzazione, sul display lampeggia ‘Khz’. L’indicazione smetterà di lampeggiare 3 secondi dopo che la stazione è stata sintonizzata, attivando la funzione di blocco della frequenza.
119118
Page 61

S350DL MANUALE OPERATIVO
10 SINTONIZZAZIONE STAZIONI A ONDE CORTE
SE AVETE GIÀ FAMILIARITÀ
CON IL CONCETTO DELLE
ONDE CORTE:
Estrarre completamente l’antenna telescopica e accendere la radio. Impostare l'interruttore AM/SW BAND
(banda AM/SW) sulla posizione SW1, SW2 o SW3 e l’interruttore BANDWIDTH (larghezza di banda) su wide
(ampia) o narrow (stretta). Sul display viene visualizzata
l'indicazione SHORTWAVE 1,2 o 3 (onda corta 1, 2 o 3).
Utilizzare la manopola esterna di sintonizzazione ‘fast’
(rapida) per individuare subito una determinata frequenza che già conoscete oppure una banda che desiderate
sintonizzare, e perfezionare poi la sintonizzazione delle
stazioni con la manopola interna ‘slow’ (lenta) se necessario. Se una stazione è talmente potente da causare distorsioni acustiche, ridurre il guadagno girando in senso
antiorario la manopola del comando AM/SW RF GAIN
(guadagno RF AM/SW).
SE NON AVETE FAMILIARITÀ
CON IL CONCETTO DELLE ONDE
CORTE O VI SERVE UN RIPASSO
(vedere anche la sezione ONDE CORTE: INTRODUZIONE,
riportata di seguito nel presente manuale). Estrarre completamente l'antenna telescopica e accendere la radio.
Avvicinarsi ad una finestra ed estrarre completamente
l’antenna telescopica. Attenersi alle istruzioni riportate di
seguito, a seconda che ascoltiate la radio di giorno o di
notte.
Durante il giorno, posizionare l'interruttore AM/SW BAND
(banda AM/SW) su SW2. Utilizzare la manopola di sintonizzazione ‘fast’ (rapida) e regolarla su 15100 KHz.
Questo è il punto di partenza della banda a onde corte
dei 19 metri, una delle tre bande migliori con un’estensione da 15100 a 15600 KHz. Utilizzando la manopola di
sintonizzazione ‘slow’ (lenta), effettuare la sintonizzazione in questa banda, ascoltando attentamente le
stazioni. Provare anche la banda dei 13 metri (2145021850 KHz) e quella dei 16 metri (17480-17900 KHz),
entrambe in SW3.
Durante la notte, posizionare l'interruttore AM/SW BAND
(banda AM/SW) su SW1. Utilizzare la manopola di sintonizzazione ‘fast’(rapida) e regolarla su 5800 KHz.
Questo è il punto di partenza della banda a onde corte
dei 49 metri, una delle quattro bande migliori con
un’estensione da 5800 a 6200 KHz. Utilizzando la
manopola di sintonizzazione ‘slow’ (lenta), effettuare la
sintonizzazione in questa banda, ascoltando attentamente le stazioni. Provare anche la banda dei 25 metri in
SW2 (11600-12200 KHz), quella dei 31 metri in SW2
(9400-9900 KHz) e quella dei 41 metri in SW1 (71507600 KHz).
NOTA: In caso di interferenza delle stazioni adiacenti,
posizionare il comando BAND WIDTH (larghezza di
banda) in posizione NARROW (stretta). Se non si registrano interferenze, lasciarlo nella posizione WIDE
(ampia). In caso di eccessivo rumore di fondo, attivare
l’interruttore SW LPF (filtro passabasso SW) per minimizzarlo. Se una stazione è talmente potente da causare distorsioni acustiche, ridurre il guadagno girando in senso
antiorario la manopola del comando AM/SW RF GAIN
(guadagno RF AM/SW).
La funzione Blocco frequenza descritta a pagina 13 funziona anche con le onde corte.
11 IMPOSTAZIONE DELL'OROLOGIO
L’orologio della radio S350DL è un sistema orario attivabile in
modalità da 24 ore o da 12 ore AM/PM. Per commutare tra le
modalità da 12 e da 24 ore, spegnere la radio S350DL.
Premere poi il pulsante Hour (ore) per circa 3 secondi finché
l’indicazione 12 o 24 lampeggia sul display.Rilasciare poi il
pulsante Hour (ore). Se sul display appare l’indicazione AM o
PM, è stata impostata la modalità AM/PM da 12 ore. Se
questa indicazione non appare sul display,è stata impostata
la modalità da 24 ore.
La radio può essere accesa/spenta per impostare l’orologio.
Con la radio accesa/spenta, tenere premuto il pulsante TIME
(orario) per due secondi prima di rilasciarlo. Sul display lampeggerà l'indicazione dell'ora. Mentre lampeggia, premere i
pulsanti HOUR (ore) e MINUTE (minuti) per impostare l’orario
corretto. Dopo aver impostato l’orario corretto, premere
subito il pulsante TIME (orario) per accettare l’immissione.Se
il pulsante TIME (orario) non viene premuto,il display
accetterà automaticamente l’immissione dopo circa cinque
secondi. Durante l’impostazione dell’orario,si possono tenere
premuti i pulsanti HOUR (ore) e MINUTE (minuti) per scorrere
più velocemente le ore.
Nota: Quando la radio viene spenta, il pannello di visualizzazione visualizza l’orario. Quando è accesa,visualizzerà
invece la frequenza della radio. Se si preme il pulsante
TIME (orario) quando la radio è accesa, sul display verrà
visualizzato per circa tre secondi l’orario anziché la frequenza e successivamente verrà ripristinata la visualizzazione della frequenza.
FUNZIONALITA’ DI BACKUP
IN CASO DI INTERRUZIONE
DELL’ALIMENTAZIONE
Se il dispositivo S350DL dispone di batterie e viene alimentato tramite l’adattatore AC,utilizzerà automaticamente le batterie in caso di interruzione dell'alimentazione AC.
12 UTILIZZO DELLO SLEEP TIMER
Il dispositivo S350DL include uno sleep timer,che consente di impostare lo spegnimento della radio dopo un
periodo di tempo impostato dall'utente. Sulla radio
S350DL, lo sleep timer viene attivato automaticamente
con un tempo di 90 minuti ogni volta che la radio viene
accesa. Dopo aver premuto il pulsante POWER&SLEEP
(attivazione/disattivazione) per accendere la radio, sul
display apparirà l’indicazione ‘90’ e il simbolo SLEEP (disattivazione). Questa visualizzazione indica che lo sleep
timer è attivo e che la radio verrà spenta automaticamente dopo 90 minuti.
Per modificare il tempo di funzionamento della radio
prima del suo spegnimento automatico, premere il pulsante POWER&SLEEP (attivazione/disattivazione) per
accendere la radio. Quando appare l'indicazione 90, premere ripetutamente e brevemente il pulsante POWER &
SLEEP (attivazione/disattivazione) fino al raggiungimento
del tempo desiderato.Ad ogni pressione successiva lo
sleep timer passa da 90 a 75 a 60 a 45 a 30 a 15 a 10 a
01 minuti e infine a off.
121120
Page 62

S350DL MANUALE OPERATIVO
13 SVEGLIA
IMPOSTAZIONE, ATTIVAZIONE
E DISATTIVAZIONE (SVEGLIA)
La radio S350DL include un timer di attivazione
programmabile che ne consente l’accensione ad
orari predefiniti, come una sveglia. Con la radio
accesa o spenta, premere il pulsante ALARM
(sveglia) per circa tre secondi oppure finché le
cifre dell’ora iniziano a lampeggiare, e quindi
rilasciarlo. Mentre lampeggiano ancora, premere
i pulsanti HOUR (ore) e MINUTE (minuti) per
impostare il tempo di attivazione, e poi premere
subito il pulsante ALARM (sveglia). Se non viene
premuto il pulsante ALARM (sveglia), l’orario di
attivazione verrà impostato automaticamente sull’ora selezionata dopo 5 secondi.
Per attivare/disattivare la funzionalità del timer di
attivazione, con la radio accesa o spenta premere
il pulsante AL ON/OFF (sveglia on/off): apparirà il
simbolo di un altoparlante nell’angolo inferiore
destro del display. Quando appare a video il simbolo dell’altoparlante, la funzionalità del timer di
attivazione sarà abilitata. Quando questo simbolo
non appare a video, la funzione è disabilitata.
Quando la radio sveglia è attiva, premere il pulsante POWER&SLEEP (attivazione/disattivazione)
per spegnerla.
UTILIZZO DELLA
FUNZIONALITÀ DI
RIPETIZIONE SVEGLIA
Quando il timer si attiva e accende la radio, sul
display lampeggia il simbolo di attivazione del
timer. Mentre lampeggia, premere/rilasciare il pulsante SNOOZE/LIGHT (ripetizione sveglia/illuminazione). La radio si spegnerà e si accenderà di
nuovo dopo 10 minuti. Questa procedura può
essere ripetuta 3 volte.
Per visualizzare il tempo di attivazione, premere il
pulsante ALARM (sveglia) con la radio accesa o
spenta. Il tempo di attivazione apparirà sul display per circa quattro secondi.
NOTE IMPORTANTI SULLA
FUNZIONALITA’ DEL TIMER
DI ATTIVAZIONE
• Questa funzionalità sarà attiva sia con la radio
accesa sia con la radio spenta.
• La radio si spegnerà automaticamente dopo un
periodo di funzionamento di 30 minuti.
UTILIZZO DELLA
FUNZIONALITÀ DI
RIPETIZIONE SVEGLIA
Quando il timer si attiva e accende la radio, sul
display lampeggia il simbolo di attivazione del
timer. Mentre lampeggia, premere/rilasciare il pulsante SNOOZE/LIGHT (ripetizione sveglia/illuminazione). La radio si spegnerà e si accenderà di
nuovo dopo 10 minuti. Questa procedura può
essere ripetuta 3 volte.
14 UTILIZZO DELLA RETROILLUMINAZIONE
La radio S350DL è dotata di retroilluminazione per l’illuminazione del display in condizioni di scarsa luminosità.
Può essere attivata in due modi:
1. Per illuminare temporaneamente il display, premere
brevemente il pulsante BACKLIGHT (retroilluminazione).
La retroilluminazione si spegne automaticamente dopo
otto secondi.
2. Per illuminare in modo definitivo il display, premere e
tenere premuto il pulsante BACKLIGHT (retroilluminazione) per più di un secondo. La retroilluminazione
resterà accesa finché il pulsante BACKLIGHT (retroilluminazione) non verrà premuto di nuovo.
3. Con la radio accesa/spenta, la retroilluminazione
resterà accesa per 8 secondi se si preme uno dei seguenti tasti: pulsante ALARM SET (impostazione sveglia),pulsante TIME SET (impostazione orario), pulsante HOUR
(impostazione ore) o MINUTE SET (impostazione minuti),
pulsante AL ON/OFF (sveglia ON/OFF) e pulsante BACKLIGHT (retroilluminazione).
4. Inoltre, quando la radio è accesa, anche ruotando la
manopola di sintonizzazione (fast & slow - rapida e
lenta) la retroilluminazione si accenderà per 8 secondi.
Attenzione: se si lascia la retroilluminazione costantemente accesa, le batterie si scaricheranno più in fretta.
15 UTILIZZO DELLA FUNZIONE DI RESET
S350DL integra un microchip (il componente che
controlla il funzionamento della radio). Se la radio
è sottoposta a condizioni ambientali anomale, il
microchip potrebbe funzionare in modo scorretto
e potrebbero comparire i seguenti sintomi.
• Il display è vuoto e non è possibile accendere
la radio premendo il pulsante POWER & SLEEP
(attivazione/disattivazione).
• Il display visualizza dei caratteri casuali oppure
non funziona in modo corretto anche se la
radio riceve le stazioni normalmente.
In questi casi, potrebbe essere necessario
resettare la radio. Per resettare la radio S350DL,
scollegare l’adattatore esterno (se utilizzato) e
togliere le batterie dal vano batterie. Inserire un
oggetto appuntito come una graffetta aperta, nel
foro RESET (riarmo) sulla parte anteriore destra
della radio, premere delicatamente e rilasciare il
pulsante nel foro. Ricollegare poi l’adattatore AC
oppure reinstallare le batterie.
123122
Page 63

S350DL MANUALE OPERATIVO
16 UTILIZZO DELLE PRESE LINE OUT
Le prese line out (prese RCA), indicate con L, R
(sinistra, destra) forniscono le uscite destra e sinistra standard della linea stereo, che possono
essere usate per fornire i segnali audio a registra-
tori, impianti stereo o qualsiasi dispositivo con
ingressi di linea audio. L’uscita è stereo quando la
radio è sintonizzata su una stazione FM che
trasmette in stereofonia.
17 UTILIZZO DEL JACK AURICOLARI
Il jack auricolari può essere usato con cuffie
stereo con una presa da 1/8 di pollice (3,5 millimetri). L’effetto acustico è stereofonico.
18 UTILIZZO DI ANTENNE SUPPLEMENTARI
ANTENNE A ONDA CORTA: Questa radio può
essere usata con antenne base a cavo lungo e altre
antenne a onda corta ed elevata impedenza (valore
ottimale: 500 ohm). La lunghezza di un'antenna a
cavo lungo deve essere compresa tra i 30 e i 100
piedi circa (10-30 metri). Le prestazioni migliori si
ottengono con un cavo in rame. L’antenna deve
essere sopra il suolo, preferibilmente in linea diritta.
Si dovrebbero usare
isolatori non conduttivi su entrambe le estremità
del cavo per impedire la perdita di segnali. Il cavo
viene collegato alla presa a molla rossa, AM, SW
ANT. (ant. AM, SW) sul retro della radio. Collegando
un cavo di terra alla presa a molla GND (terra), si
migliora spesso la ricezione, anche se questa procedura non è obbligatoria. Il cavo di terra dovrebbe
essere collegato ad un tubo di acqua fredda o ad
una barra di terra. Se non è disponibile né un tubo
dell’acqua né una barra di terra, collegare un cavo
della stessa lunghezza di quello dell’antenna e
posarlo a terra. NON COLLEGARE MAI IL CAVO DI
TERRA A UN TUBO DEL GAS
ANTENNE AM: Si può usare un’antenna AM ad
elevata impedenza (valore ottimale: 500 ohm),
con lungo cablaggio e circuiti sintonizzati. Il cavo
di terra, come spiegato nella sezione ANTENNE A
ONDE CORTE, è ancora più utile durante la
ricezione AM che spesso migliora notevolmente,
anche se non si utilizza un'antenna AM supplementare.
ANTENNE FM: Collegare le antenne FM alla
presa FM ANT (ant.FM). Presa CABLE FM (cavo
FM) sul retro della radio. Queste antenne devono
avere un'impedenza di 75 ohm. La maggior parte
delle antenne con cavo coassiale sono antenne
da 75 ohm. Se il cavo coassiale ha una presa ‘F’
come quella usata per VCR e TV in Nord America,
usare una presa con convertitore F – PAL per
adattarlo alla presa PAL europea sulla radio.
(Radio Shack codice 278-265).
125124
Page 64

S350DL MANUALE OPERATIVO
19 ONDE CORTE: INTRODUZIONE
Le onde corte vi consentono di ascoltare le
stazioni di tutto il mondo. Ora, grazie a questa
radio a onde corte potrete ascoltare le stazioni di
tutto il mondo senza problemi. Se non avete
familiarità con il concetto di onda corta, prendetevi il tempo di capirne i fondamenti che verranno
spiegati di seguito. Per ascoltare le stazioni a
onde corte, è necessario sapere come trovarle.
20 SINTONIZZAZIONE STAZIONI
COME IDENTIFICARE LE
STAZIONI CHE STATE
ASCOLTANDO E COME
INDIVIDUARE LE STAZIONI
CHE VOLETE ASCOLTARE
Si consiglia di utilizzare una guida completa alle
onde corte, soprattutto se desiderate ascoltare
stazioni di paesi specifici oppure identificare la
stazione che state ascoltando. Questa guida
elencherà in ordine alfabetico tutti i paesi che
trasmettono in onde corte, indicando lingua, area
e orari di trasmissione, e frequenza usata. La
Queste stazioni si trovano nelle ‘bande’ a onde
corte. Se come ascoltatori avete già esperienza in
materia di onde corte, saprete già cosa sono le
bande e come si utilizzano, ma se l’argomento è
nuovo, dovrete capire innanzitutto cosa sono le
bande. Dopodichè potrete utilizzarle nel migliore
dei modi. Leggete qui.
migliore guida sulle emittenti radiofoniche che
trasmettono in onde corte è PASSPORT TO
WORLD BAND RADIO, disponibile nelle principali
librerie. Pubblicata da International Broadcasting
Services, Ltd., Box 300, Penn's Park, Pennsylvania
18943 o reperibile sul sito www.passband.com,
questa guida ha dei capitoli distinti per le
trasmissioni in inglese e quelle in altre lingue,
intitolati World-Wide Broadcasts In English
(Trasmissioni di tutto il mondo in inglese) e Voices
From Home (Voci di casa).
21 CHE COSA SONO LE BANDE?
PER POTER APPREZZARE LE
ONDE CORTE, QUESTO È IL
CONCETTO FONDAMENTALE
DA CAPIRE SUBITO.
Se avete esperienza di radioascolto in AM o FM,
conoscerete già il significato di banda. La banda
AM è un intervallo di frequenza compreso tra 530
e 1600 kilohertz, mentre la banda FM è un intervallo compreso tra 88 e108 megahertz. La banda
è semplicemente l’intervallo delle frequenze nel
quale si trovano le stazioni radiofoniche. Quando
si cercano delle stazioni in queste ‘bande’, è sufficiente regolare la manopola di sintonizzazione
fino a quando si trova la stazione desiderata. Le
onde corte sono simili e le bande a onde corte
vengono definite come bande dei 25, 31, 49 metri
e così via. In forma abbreviata sono indicate
come 25m, 31m e 49m. Come per la radio AM e
FM, è sufficiente accedere alla banda a onde
corte e sintonizzarsi sulla stazione desiderata.
Ad esempio, la banda a onde corte dei 19 metri
copre un intervallo di frequenza compreso tra
15100 e 15600 kilohertz. Alla pagina successiva è
riportato un elenco delle bande a onde corte utilizzate per le trasmissioni internazionali a onde
corte con i relativi intervalli di frequenza. Poiché
alcune radio visualizzano
le frequenze in megahertz e altre in kilohertz, in
questa sede vengono riportate entrambe. La radio
S350DL visualizza le frequenze in kilohertz, KHz
in forma abbreviata.
127126
Page 65

S350DL MANUALE OPERATIVO
22 BANDE A ONDE CORTE
BANDA MEGAHERTZ (MHz) KILOHERTZ (kHz) Impostazione di
(come riportato su alcune radio) (come sulla radio modello S350DL) interruttore della S350DL
120 metri 2,300-2,500 MHz 2300- 2500 KHz SW1
90 metri 3,20-3,40 MHz 3200-3400 KHz SW1
75 metri 3,90-4,00 MHz 3900-4000 KHz SW1
60 metri 4,750-5,060 MHz 4750-5060 KHz SW1
49 metri 5,950-6,20 MHz 5950-6200 KHz SW1
41 metri 7,10-7,60 MHz 7100-7600 KHz SW1
31 metri 9,20-9,90 MHz 9500-9900 KHz SW2
25 metri 11,600-12,200 MHz 11600-12100 KHz SW2
22 metri 13,570-13,870 MHz 13570-13870 KHz SW2
19 metri 15,10-15,80 MHz 15100-15800 KHz SW2
16 metri 17,480-17,90 MHz 17480-17900 KHz SW3
13 metri 21,450-21,850 MHz 21450-21850 KHz SW3
11 metri 25,60-26,10 MHz 25600-26100 KHz SW3
10 metri 26,965-27,41 MHz 26965-27410 KHz SW3
detta anche ‘citizens band’ (banda cittadina) o CB
23 BANDE DIURNE/BANDE NOTTURNE
BANDE DIURNE / BANDE
NOTTURNE – LA DIFFERENZA
È MOLTO IMPORTANTE
Dato che i segnali a onde corte dipendono da fattori come il sole, la ionosfera e l’interazione con
la terra stessa, i segnali non possono essere
ascoltati su tutte le bande in qualsiasi ora del
giorno.Alcune bande sono preferibili durante le
ore diurne e altre durante quelle notturne. Ecco
alcuni suggerimenti
• In generale, le bande con frequenze inferiori a
13000 KHz sono migliori durante la notte
mentre le bande con frequenze superiori a
13000 KHz sono migliori durante il giorno.
Questa indicazione non è una verità assoluta,
ma è utile come suggerimento generale.
• All’alba e al tramonto, funzionano bene,
talvolta molto bene, sia le bande diurne
che quelle notturne.
• D'estate le bande diurne spesso funzionano
bene nella prima parte della notte.
• Mentre la maggior parte delle stazioni a onde
corte si trovano nell’intervallo di frequenza di
queste bande definite, altre si trovano
all'esterno.Vale la pena perdere un po’ di
tempo per la sintonizzazione, anche tra
le bande.
• Queste indicazioni hanno validità a livello
mondiale, a prescindere dalla sede geografica.
Alla pagina successiva è riportato un elenco delle
caratteristiche delle principali bande a onde corte.
Attenersi a queste linee guida per ottimizzare i
risultati dell’ascolto.
129128
Page 66

24 ASCOLTO DIURNO 25 ASCOLTO SERALE/NOTTURNO
S350DL MANUALE OPERATIVO
La qualità dell'ascolto delle onde corte è generalmente peggiore durante il giorno, da circa due ore dopo l’alba
fino a due ore prima del tramonto. Il principale motivo di questa situazione è il fatto che le emittenti non
trasmettono in Nord America in questa fascia oraria, presupponendo che tutti siano al lavoro o a scuola e non
possano ascoltare la radio durante il giorno. Per ascoltare la radio durante il giorno, attenersi alle linee guida
riportate di seguito. Generalmente, le onde corte diurne sono migliori nella parte orientale rispetto alla parte
occidentale del Nord America.
BANDE DIURNE CARATTERISTICHE
13metri Risultati variabili. Da provare. Talvolta ottime verso l’alba e il tramonto.
16metri Simile ai 19m.
19metri In assoluto la migliore banda diurna. Può dare buoni risultati anche la notte nei
mesi estivi. Talvolta ottime verso l’alba e il tramonto.Talvolta buoni risultati
durante la notte in estate.
22metri Simile ai 19m.
È il periodo migliore per l'ascolto della radio perchè le emittenti trasmettono volutamente in Nord America.
Queste bande possono garantire ottimi risultati anche verso il tramonto e l’alba.
BANDE NOTTURNE CARATTERISTICHE
25 metri Simile ai 31m
31 metri Ottima per tutta la notte, ovunque. Spesso ottima all’alba e al tramonto.
Spesso l’ascolto è buono un'ora prima del tramonto.
41 metri Simile ai 49m. Buona durante la notte nella parte orientale del Nord America;
variabile nella parte occidentale del Nord America.
49 metri In assoluto la migliore banda notturna.
NOTA IMPORTANTE: In prossimità di una finestra la ricezione potrebbe migliorare notevolmente. I materiali da costruzione di alcuni edifici ostacolano il passaggio dei segnali. I segnali oltrepassano con estrema facilità gli edifici in legno, mentre quelli in calcestruzzo e mattoni bloccano solitamente i segnali. Se vi trovate in un
edificio con uno o più piani sopra di voi, i segnali potrebbero arrivare con minore forza. In questa situazione,
avvicinare il più possibile la radio ad una finestra durante l'ascolto. Se si tiene la radio in mano in prossimità di
una finestra la ricezione potrebbe migliorare ulteriormente.
130
131
Page 67

S350DL MANUALE OPERATIVO
Per assicurare la completa copertura in garanzia o
gli aggiornamenti del prodotto Etón o Grundig, la
registrazione della relativa garanzia va effettuata
quanto prima possibile dopo l'acquisto o la
ricezione. Per registrare la radio, selezionare uno dei
seguenti metodi:
1. Registrazione presso il sito Web
www.etoncorp.com
2. Telefonata di registrazione, componendo il
numero verde +888 889-4391 da qualunque
località degli Stati Uniti o del Canada o il
+204 336-6547 da qualsiasi altro luogo del
mondo. Sono disponibili operatori sia di lingua
inglese che francese.
3. Invio della registrazione per posta al seguente
indirizzo:
Etón Corporation
1015 Corporation Way
Palo Alto, CA 94303
PRODUCT REGISTRATION
Indicare il proprio nome, recapito postale e numero
telefonico, il modello acquistato, la data d'acquisto,
il nome del rivenditore ed il numero di serie del
prodotto (di solito apposto sullo scompartimento
delle batterie o nelle sue immediate vicinanze).
27 GARANZIA LIMITATA ESTESA ALL'ACQUIRENTE ORIGINARIO
Questo prodotto di marchio Etón o GRUNDIG, fornito e distribuito dalla Etón Corporation (Etón), è
garantito dalla Etón privo di difetti di materiali e di
lavorazione per il seguente periodo limitato di
garanzia:
UN (1) ANNO SUI PEZZI E LA
MANODOPERA.
Questa garanzia limitata decorre dalla data originale
di acquisto, è valida solo nel caso di prodotti
acquistati presso un rivenditore Etón autorizzato e
non comprende il trasporto, l'installazione, la
rimozione né la reinstallazione. Le riparazioni in
garanzia devono essere eseguite dalla Etón o da un
centro di servizio autorizzato Etón. Per richiedere un
intervento in garanzia, è necessario presentare alla
Etón o al centro di servizio autorizzato Etón la ricevuta originale e datata di vendita, che funge da
prova d'acquisto. L'acquirente si assume la responsabilità della spedizione del prodotto alla Etón o al
centro di servizio autorizzato Etón.
Durante il periodo di validità della garanzia limitata
suindicato, se questo prodotto viene riscontrato
difettoso, la Etón lo riparerà o sostituirà a proprio
pare insindacabile con parti nuove o ricondizionate.
Per essere considerato in garanzia, il prodotto deve
essere reso alla Etón o al centro di servizio
autorizzato Etón entro non più di 15 giorni dopo la
data di scadenza della garanzia, a carico del
mittente. Prima di inviare un qualsiasi prodotto per
sottoporlo ad un intervento in garanzia, l'acquirente
deve mettersi in contatto con la Etón per
determinare il problema e chiarire la procedura di
servizio.Tutti i pezzi ed i prodotti sostituiti diventano
proprietà della Etón. I prezzi ed i prodotti di
ricambio sono sotto garanzia per il periodo rimasto
GARANZIA LIMITATA DI UN ANNO
della garanzia originale o per novanta (90) giorni, a
seconda della scadenza più lunga.
Questa garanzia limitata copre difetti di materiali e di
lavorazione emersi nel corso dell'uso normale, non
commerciale di questo prodotto e non è applicabile in
modo non esclusivo a quanto segue: danni incorsi
durante usi ed applicazioni per i quali il prodotto non
era destinato; guasti o problemi causati da prodotti o
attrezzature non forniti dalla Etón; incidenti, uso erroneo, abuso, incuria, applicazione erronea, incendio,
28 INFORMAZIONI SUL SERVIZIO
SERVIZIO DI ASSISTENZA AI
PRODOTTI ETÓN O GRUNDIG
Per sottoporre ad un intervento di servizio il proprio
prodotto Etón o Grundig, si suggerisce anzitutto di
rivolgersi ad un tecnico Etón, telefonando all'+800
872-2228 negli U.S.A., all'+800 637-1648 in
Canada o all’ +650 903-3866, in modo da determinare il problema e la relativa soluzione. La maggior parte delle richieste di chiarimenti possono
essere risolte rapidamente per telefono.
SE UN PRODOTTO ETÓN O GRUNDIG
RICHIEDE RIPARAZIONI, SONO DISPONIBILI
DUE TIPI DI SERVIZIO:
segue26 REGISTRAZIONE DELLA GARANZIA
allagamento, fulmini o altri disastri naturali; tensione errata di linea, fluttuazioni o sovratensioni
istantanee; danni causati da un'installazione errata
o difettosa (compresa quella delle batterie, creando
una perdita d'acido e danni irreversibili ai circuiti
elettronici); danni causati dalle perdite d'acido;
alterazioni o modifiche del prodotto; oppure uso di
parti,forniture, accessori o attrezzature non autorizzate, capaci di danneggiare il prodotto o di rendere
problematici gli interventi di servizio.
1. IN GARANZIA – Se il prodotto è sotto garanzia
ed il tecnico del servizio Etón determina la necessità di un intervento, quest'ultimo fornirà una
autorizzazione alla resa ed informazioni sulla
spedizione ad un centro autorizzato di
riparazione in garanzia. Non inviare la radio in
resa senza aver prima ottenuto l'apposito numero
di autorizzazione.
2. FUORI GARANZIA – Dopo la scadenza della
garanzia, se un prodotto richiede un intervento
di servizio, il tecnico Etón sarà lieto di indicare il
centro di riparazioni più vicino in grado di
provvedere alle eventuali riparazioni.
133132
Page 68

www.etoncorp.com
1-800-872-2228 from the U.S.
1-800-637-1648 from Canada
1-650-903-3866, worldwide
FAX: 650-903-3867
customersvc@etoncorp.com
www.etoncorp.com
Etón Corporation
1015 Corporation Way
Palo Alto, California 94303
USA
 Loading...