

Page 1

Portable Bluetooth Sound System
with Solar Panel
OWNER’S MANUAL
Page 2

RUKUS SOLAR OWNER’S MANUAL
Thank you for purchasing the Etón Rukus Solar, a portable Bluetooth high-quality
sound system featuring solar charging. The Rukus Solar is powered from the
rechargeable Li-ion battery charged by the solar panel or the AC adapter (included).
Please read this user manual to get a good understanding of how the Rukus Solar
works and how to fully rock out with it!
2
Page 3
NEED HELP? CONTACT US. ENVIRONMENT
Etón Corporation, 1015 Corporation Way, Palo Alto, CA 94303,
USA. 1-800-872-2228 ( U.S.); 1-800-637-1648 (Canada);
650-903-3866 (worldwide); M-F, 8:00AM-4:30PM,
Pacic Standard Time; www.etoncorp.com.
DISPOSAL
According to the European Direc tive 2002/96/EC all electrical
and electronic products must be collec ted separately by a local
collec tion system.
RUKUS SOLAR OWNER’S MANUAL
WARNING
Do not expose this appliance to rain or moisture. •
Do not submerge or expose for extended period to water.•
Protect from high humidity and rain.•
Only operate within specied temperature range •
(0 °C to 40 °C).
Unplug immediately if liquid has been spilled or any •
objec t has fallen into the apparatus.
Clean only with a dry cloth. Do not use detergents or •
chemical solvents as this might damage the nish.
Unplug and disconnect external antennas during •
lightning storms.
Do not remove cover [or back].•
Refer ser vicing to qualied service personnel.•
Please act according to your local rules and do not dispose of
your old products with your normal household waste.
Please dispose of all types of batteries per your Government,
State or Local rules and/or regulations. If you are unsure, please
call the appropriate local authority to nd out how to dispose of
them safely and help protect the environment.
3
Page 4
RUKUS SOLAR FEATURES
RUKUS SOLAR OWNER’S MANUAL
1 2 3 4 5 6 7 8 9 10
14
15
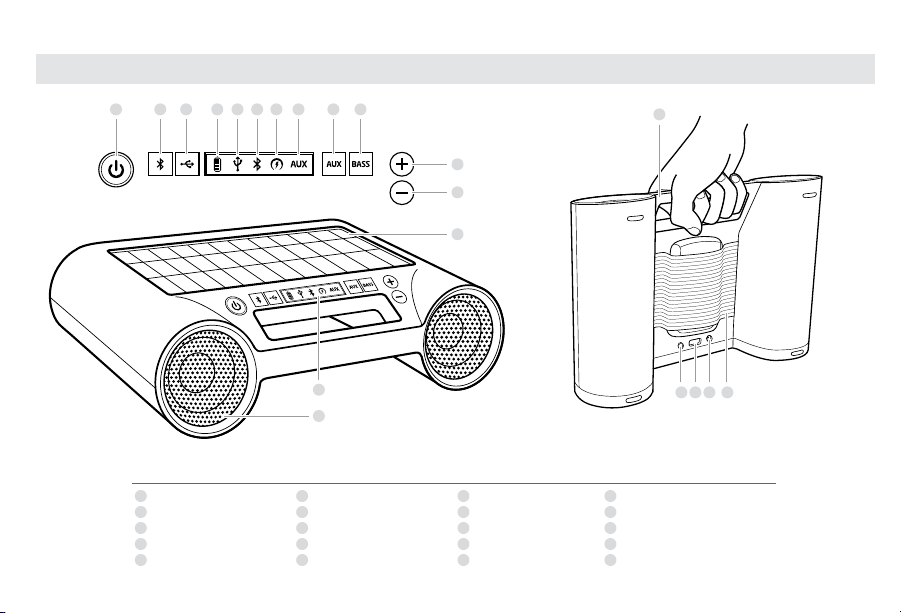
FUNCTIONS
1
Power O N/OFF bu tton
2
Bluetooth button
3
USB por t
4
Batte ry indic ator icon
5
USB por t icon
6
Blueto oth icon
7
Solar c harging i con
8
AUX-in ic on
9
AUX-in bu tton
10
Bass b utton
11
12
13
11
Volume u p button
12
Volume d own butto n
13
Mono crysta l solar pan el
14
E Ink dis play
15
Speake rs
16
17 18 19 20
16
Integr ated carr ying han dle
17
DC-in jack
18
USB jac k
19
AUX-in po rt
20
Adjus table mob ile devic e storage
4
Page 5
RUKUS SOLAR OWNER’S MANUAL
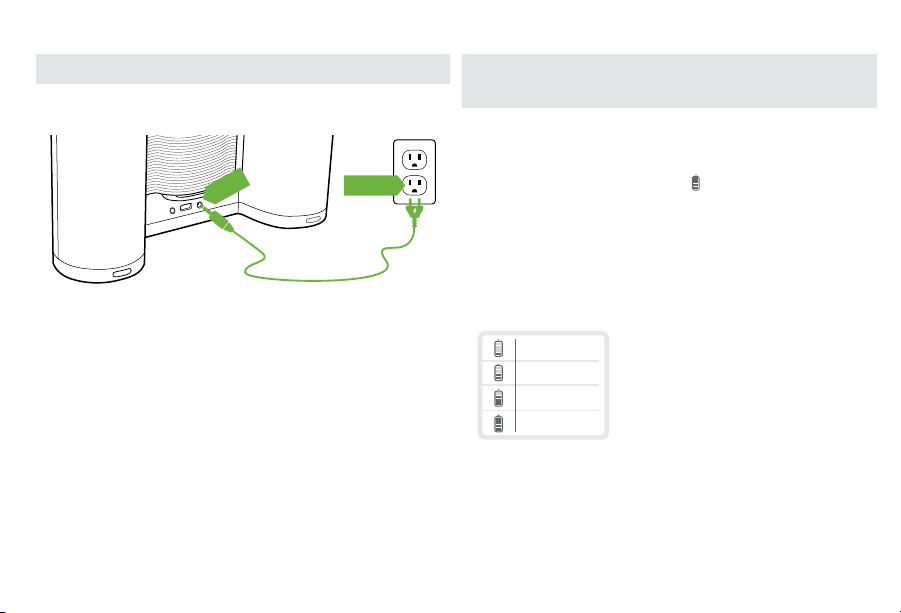
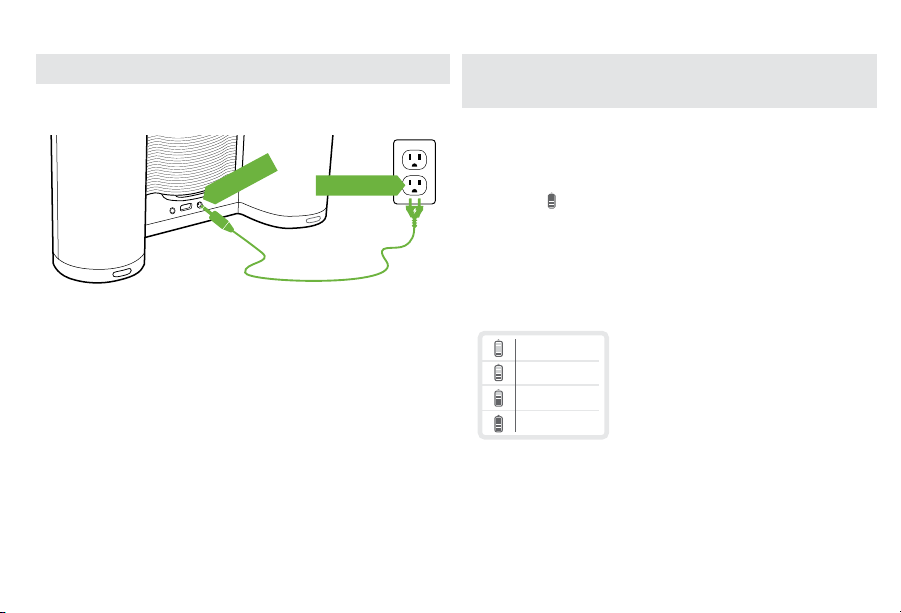
ELECTRICAL
OUTLET
DC JACK
26 - 50 %
51 - 75%
76 - 100%
0 - 25 %
PLUGGING IN THE AC ADAPTER
Connect one end of the AC adapter to the DC jack of the unit and
the other end to an electrical outlet.
CHARGING THE BUILT-IN BATTERY BY
THE AC POWER/SOLAR ENERGY
The unit has a built-in Lithium ion battery for portable power
when not using the AC adapter. When the adapter is plugged
in or the unit is exposed under the sunshine, the unit will
start charging. During charging, the
display starts blinking.
To fully charge an empt y battery:
AC/DC: 3 hours
Solar : 6 hours
BATTERY LIFE (BUILT IN LITHIUM ION BATTERY)
*Charge times may var y depending on solar conditions.
NOTE: To maximize battery life, charge th e unit through
the AC adapter for 12 hours prior to rst use.
indicator on the
5
Page 6
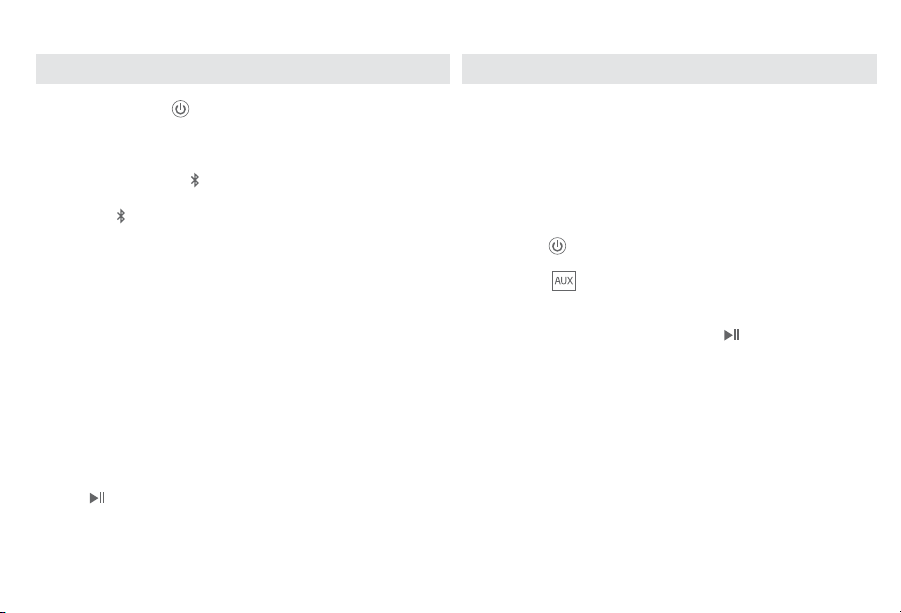
1. Press the ON/OFF button to turn on the unit.
The power indicator lights up.
2. Press the Bluetooth button to switch the sound source to
Bluetooth mode. The
3. Hold the
button for 3 seconds to place the unit in pairing
indicator appears on the display.
mode. T he indicator start s blinking rapidly. Unit will give off
two short beeps.
NOTE: The indicator turns solid af ter the unit is successfully
connected. If the indicator starts to blink slowly after
3 minutes, the pair was unsuccessful.
4. Open the Bluetooth set tings menu on your Bluetooth-enabled
mobile device or computer. Once it is recognized, “rukus solar”
will appear on the display of the Bluetooth-enabled device.
Selec t “rukus solar ” to pair and connect with your device.
NOTE: On an iPhone or iPad, tap “rukus solar ” to select.
If prompted for a password, enter “1234”.
5. Once Bluetooth is connected, seclect the music and press
button on your device. The unit will playback music
the
automatically.
NOTE: Playback time on built-in battery is ~8 hours, depending
on music level and other factors.
RUKUS SOLAR OWNER’S MANUAL
PLAYING BACK VIA AUXPLAYING BACK VIA BLUETOOTH
You can enjoy the sound from an external device such as a
portable digital music player. Be sure to turn off the power of the
external device before making any connections. F or details, refer
to the ins truction manual of the device to be connected.
1. Connect any device with headphone or line out jack with a
3.5mm line in cable to AUX IN jack on the bottom of the unit.
2. Press the
3. Press the
AUX mode, if the unit is not in AUX mode.
4. Turn on your external device and press
5. The unit will play back the music from the external device
automatically.
button to turn on the unit.
button to switch the sound source to
button.
6
Page 7
RUKUS SOLAR OWNER’S MANUAL
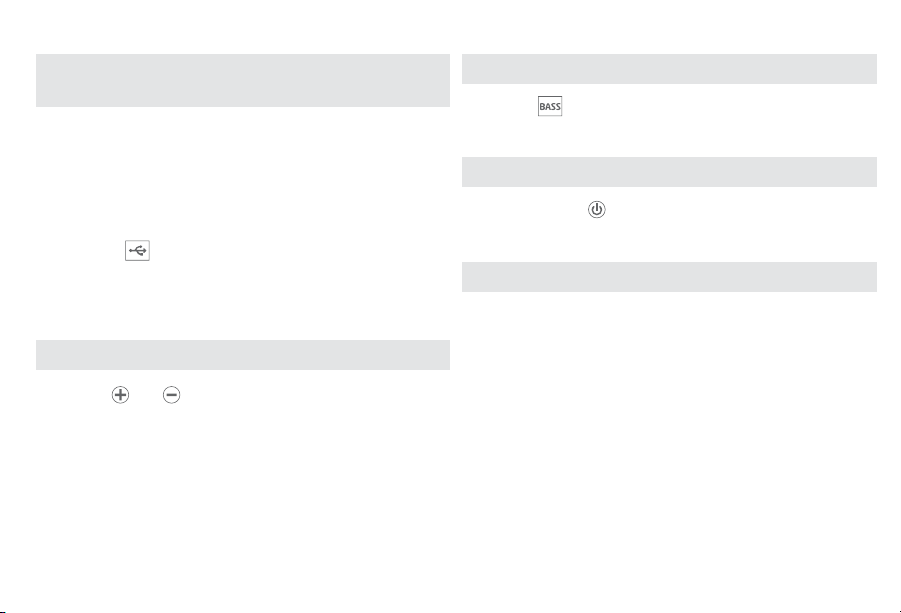
USB PORT FOR MOBILE DEVICE CHARGING
(5V, 500MAH)
The USB jack can be used to charge most devices that allow for
USB charging (including many mobile phones, smart phones and
wireless headsets).
1. Connect one end of the USB cord to your device and the other
end to the USB jack of the unit.
2. Press the button to start charging for your device.
Press the button again to stop charging.
NOTE: Use the USB power cord that came with your device
to connect to the unit.
ADJUSTING THE VOLUME LEVEL
Press the
NOTE: During volume adjustments, if the LED indicator
and buttons to adjust the volume levels.
starts to blink, minimum or maximum volume level
has been reached.
BASS BOOST
Press the
Press the button again to turn off.
button to turn on bass boost.
SWITCHING E INK DISPLAY BACKGROUND COLORS
Press and hold the
white backgrounds on the E Ink display.
for 5 seconds to toggle between black and
AUTOMATIC ENERGY SAVING
If unit is idle for 10 minutes (no sound output or operation),
the unit will turn off automatically.
7
Page 8

RUKUS SOLAR OWNER’S MANUAL
WARRANTY REGISTRATION
To ensure full warranty coverage or product updates, registration
of your product should be completed as soon as possible after
purchase or receipt. You may use one of the following options to
register your product:
1. By visiting our website at www.etoncorp.com.
2. Mail in enclosed warranty card.
3. Mail your registration card or information to the following
address; Include your name, full mailing address, phone number,
model purchased, date purchased, retail vendor name and
product serial number (typically located in or near the batter y
compartment):
Etón Corporation
1015 Corporation Way
Palo Alto, CA 94303
LIMITED WARRANTY
Retain the warranty information from your warrant y card with
your proof of purchase or the Limited Warranty information can
also be viewed at www.etoncorp.com.
SERVICE FOR YOUR PRODUCT
To obtain service for your product , we recommend
rst contacting an Etón service representative at
800- 872-2228 US, 800-637-1648 Canada or (650) 903-3866
for problem determination and trouble-shooting. If further
service is required, the tech nical staff will instruct how to
proceed based on whether the radio is still under warranty
or needs non-warranty ser vice.
WARRANTY
If your produc t is still in warranty and the Etón service
representative determines that warranty service is needed, a
return authorization will be issued and instructions for shipment
to an authorized warranty repair facility.
Do not ship your radio back without obtaining the return
authorization number.
NON-WARRANTY
If your produc t is no longer under warranty and requires service
our technical staff will refer you to the nearest repair facility that
will be able to best handle the repair.
For service outside of Nor th America, please refer to the
distributor information included at time of purchase/receipt .
8
Page 9
Système audio portable Bluetooth
avec panneau solaire
MANUEL DU PROPRIÉTAIRE
RUKUS SOLAR MANUEL DU PROPRIÉTAIRE
9
Page 10

RUKUS SOLAR MANUEL DU PROPRIÉTAIRE
Merci d’avoir acheté le Etón Rukus Solar, un système audio portable Bluetooth de
haute qualité présentant un chargement solaire. Le Rukus Solar est alimenté par
la batterie rechargeable Li-ion, chargée par le panneau solaire ou l’adaptateur c.a
(inclut). Veuillez lire le manuel du propriétaire pour avoir une bonne compréhension
du fonctionnement du Rukus Solar pour savoir tirer pleinement de votre musique!
10
Page 11

BESOIN D’AIDE? CONTACTEZ-NOUS. ENVIRONNEMENT
Etón Corporation, 1015 Corporation Way, Palo Alto, CA 94303,
USA. 1-800-872-2228 ( U.S.); 1-800-637-1648 (Canada);
650-903-3866 (worldwide); M-F, 8:00-4:30,
Pacic Standard Time; www.etoncorp.com.
AVERTISSEMENT
Ne pas exposer cet appareil à la pluie ou à l’humidité. •
Ne pas immerger ou exposer à l’eau pendant •
une longue période.
Protéger d’une grande humidité et de la pluie.•
Débrancher immédiatement si un liquide a été renversé sur •
l’appareil ou si un objet quelconque est tombé à l’intérieur.
Nettoyer seulement avec un chiffon sec. Ne pas utiliser •
de détergents ni de solvants chimiques qui pourraient
endommager le ni.
Débrancher et déconnecter l’antenne extérieure •
en cas d’orages.
Ne pas enlever le couvercle [ou l’arrière].•
S’adresser à du personnel qualié pour la maintenance.•
MISE AU REBUT
Conformément à la Directive Européenne 2002/96/EC tous
les produits électriques et électroniques doivent être récupérés
séparément par un système local de collecte. Veuillez agir
suivant les règles locales et ne pas mettre au rebut vos vieux
appareils avec vos déchets ménagers ordinaires.
Veuillez mettre au rebut tout type de piles selon vos lois/
règlements locaux, d’état, ou de gouvernement. Si vous n’êtes
pas sûr de vous, veuillez appeler l’autorité locale appropriée
pour savoir comment les mettre au rebut en sécurité et aider
à protéger l’environnement.
RUKUS SOLAR MANUEL DU PROPRIÉTAIRE
11
Page 12

CARACTÉRISTIQUES DU RUKUS SOLAR
RUKUS SOLAR MANUEL DU PROPRIÉTAIRE
1 2 3 4 5 6 7 8 9 10
14
15
FONCTIONS
1
Bouto n Marche /Arrêt
2
Bouto n Bluetoot h
3
Câble U SB
4
Icône d ’indic ateur de bat terie
5
Icône d u câble USB
6
Icône B luetooth
7
Icône d e charge so laire
8
Icône AU X-entrée
9
Bouto n AUX-entré e
10
Bouto n de basse
11
12
13
11
Bouto n volume +
12
Bouto n volume —
13
Panneau solaire monocristal
14
Afch eur E Ink
15
Haut-parleurs
16
17 18 19 20
16
Poign ée de tran sport in tégrée
17
Conne cteur CC ent rée
18
Conne cteur USB
19
Câble A UX-entrée
20
Stockage de dispositif mobile ajustable
12
Page 13
RUKUS SOLAR MANUEL DU PROPRIÉTAIRE
PRISE DE COURANT
CONNECTEUR CC
26 - 50 %
51 - 75%
76 - 100%
0 - 25 %
SE BRANCHER À L’ADAPTATEUR CC
Connectez une extrémité de l’adaptateur CC au connec teur c.a
de l’unité et l’autre extrémité à une prise de courant.
CHARGER LA BATTERIE INTÉGRÉE PAR
ALIMENTATION AC/ÉNERGIE SOLAIRE
L’unité a une batterie intégrée Lithium ion pour alimentation
portable lorsque l’adaptateur CC n’est pas utilisé.
Lorsque l’adaptateur est branché ou lorsque l’unité est exposé
au soleil, l’unité débutera sa charge. Pendant le chargement,
l’indicateur
Pour charger complètement une batterie vide :
CC/C.A : 3 heures
Solaire : 6 heures
AUTONOMIE DE L A BATTERIE (INTÉGRÉE AU LITHIUM-ION)
* Les durées de chargement peuvent varier tout dépendant
des conditions solaires.
NOTE : Pour maximiser la durée de vie de la batterie, chargez
sur l’af cheur commence à clignoter.
l’unité avec le C A durant 12 heures avant la première
utilis ation.
13
Page 14

1. Appuyez sur le bouton ON/OFF pour allumer l’unité.
L’indicateur d ’alimentation s’allume.
2. Appuyez sur le bouton Bluetooth changer la source de son
au mode Bluetooth. L’indicateur
3. Maintenez le bouton
pendant 3 secondes pour placer l’unité
apparait sur l’afcheur.
dans le mode d’appairage. L’indicateur commence à clignoter
rapidement. L’unité émettra 2 courts bips.
NOTE : L’indicateur devient xe lorsque l’unité est chargée
avec succès. Si l’indicateur clignote lentement après
3 minutes, l’appairage a éch oué.
4. Ouvrez le menu de réglages Bluetooth sur votre ordinateur
ou sur votre dispositif mobile Bluetooth. Une fois reconnu,
« rukus solar » apparaitra sur l’afcheur du dispositif
Bluetooth. Sélectionne z « rukus solar » pour appairer et
brancher avec votre dispositif.
NOTE : Sur un iPhone ou iPad, tapez « rukus solar » pour
sélectionner. Si un mot de passe est demandé,
entrer « 1234 ».
RUKUS SOLAR MANUEL DU PROPRIÉTAIRE
REPASSER VIA AUXREPASSER VIA BLUETOOTH
Vous pouvez proter du son à partir d’un dispositif externe tel
un baladeur numérique. Assurez-vous de fermer l’alimentation
du dispositif extérieur avant de faire toutes connexions.
Pour les détails, vous référer au manuel d’instructions du
dispositif à être branché.
1. Branchez tout dispositif ayant un casque ou un connec teur
avec un câble de ligne avec un câble LINE IN de 3,5mm au
connecteur AU X IN au bas de l’unité.
2. Appuyez sur le bouton
3. Appuyez sur le bouton
mode AUX, si l’unité n’est pas au mode AUX.
4. Allumez votre dispositif ex terne et appuyez sur le bouton
5. Automatiquement, l’unité lira la musique du dispositif externe.
pour mettre l’unité en marche.
pour changer la source de son au
.
5. Une fois que Bluetooth est branché, sélectionnez la musique
et appuyer sur le bouton
sur votre dispositif. L’unité lira la
musique automatiqu ement.
NOTE : Le temps de lecture avec une batter ie intégrée est de
~8 heures, dépendant du niveau sonore de la musique
et autres facteurs.
14
Page 15

RUKUS SOLAR MANUEL DU PROPRIÉTAIRE
PORT USB POUR UN CHARGEMENT DE DISPOSITIF
PORTABLE (5V, 500MAH)
Le connecteur USB peut être utilisé pour charger la plupart
des dispositifs qui permet tent un chargement USB (incluant
plusieurs téléphones por tables, téléphones intelligents et
écouteurs sans l).
1. Branchez une ex trémité du câble USB à votre dispositif et
l’autre extrémité au connecteur USB de l’unité.
2. Appuyez sur le bouton
votre dispositif. Appuyez le bouton de nouveau pour arrêter
le chargement .
NOTE : Veuillez utiliser le câble d’alimentation USB qui
accompagnait votre dispositif pour brancher à l’unité.
pour débuter le chargement de
AJUSTER LE NIVEAU DU VOLUME
Appuyez sur les boutons
du volume.
NOTE : Lors des ajustements de volume, si l’indicateur LED
commence à clignoter, le niveau minimum ou maximum
du volume a été atteint.
et pour ajuster les niveaux
AMPLIFICATIONS DES BASSES
Appuyez sur le bouton
basses. Appuyez de nouveau le bouton encore pour l’éteindre.
pour allumer l ’amplicateur de
CHANGER LES COULEURS D’ARRIÈRE-PLAN DE
L’AFFICHEUR E INK
Appuyez et maintenez le bouton
revenir entre les arrière-plans noir et blanc de l’afcheur E Ink.
pendant 5 secondes pour
ÉCONOMIE D’ÉNERGIE AUTOMATIQUE
Si l’unité est inactif pendant 10 minutes (aucune sortie de son
ou d’opération), l’unité s’éteindra automatiquement.
15
Page 16

RUKUS SOLAR MANUEL DU PROPRIÉTAIRE
ENREGISTREMENT DE LA GARANTIE
An d’assurer une couver ture complète de la garantie et les
mises à jour du produit , l’enregistrement de votre produit
doit être effectué le plus tôt possible après l’achat ou la
réception. Vous pouvez utiliser une des options suivantes
pour enregistrer votre produit:
1. En consultant notre site web www.etoncorp.com.
2. Par courrier avec la carte de garantie ci-jointe.
3. Envoyer votre car te d’enregistrement ou vos coordonnées
à l’adresse suivante; Il faut indiquer votre nom, adresse
postale complète, n° de téléphone,le nom du modèle
acheté la date d’achat, le nom du vendeur et le numéro
de série du produit (habituellement situé dans ou près du
compartiment du block-pile):
Etón Corporation
1015 Corporation Way
Palo Alto, CA 94303
GARANTIE LIMITÉE
Conservez l’information de garantie de votre car te de
garantie avec votre preuve d’achat ou bien l’information de
garantielimitée peut être consultée sur www.etoncor p.com.
MAINTENANCE DE VOTRE PRODUIT
Pour obtenir la maintenance de votre produit, nous
recommandons de contacter d’abord le service clientèle Etón au
800- 872-2228 US, 800-637-1648 Canada or (650) 903- 3866
pour déterminer le problème et le dépannage. Si une intervention
complémentaire est nécessaire, l’équipe technique vous
indiquera la façon de procéder suivant que la radio est toujours
sous garantie ou si elle nécessite une intervention hors garantie.
GARANTIE
Si votre produit est toujours sous garantie et si le représentant
du service clientele de Etón juge nécessaire une réparation
garantie, une autorisation de retour sera délivrée ainsi que
les instruc tions pour l’expédition à un atelier agréé pour la
réparation sous garantie. NE RENVOYEZ PAS votre radio sans
avoir obtenu le numéro d’autorisation de retour.
HORS GARANTIE
Si votre produit n’est plus sous garantie et nécessite
une reparation, notre équipe technique vous adressera à
l’atelier de réparation le plus proche qui sera apte à réaliser
au mieux la réparation.
Pour une réparation hors de l’Amérique du Nord, veuillez
vous reporter à l ’information sur les distributeurs qui vous
a été fournie lors de l’achat/réception.
16
Page 17

Sistema de sonido portátil con
Bluetooth y panel solar
MANUAL DE USUARIO
Page 18

RUKUS SOLAR MANUAL DE USUARIO
Gracias por comprar el Etón Rukus Solar, un sistema de sonido de alta calidad portátil
con Bluetooth que incluye un cargador solar. El Rukus Solar funciona con una batería
de ion de litio recargable que se carga mediante el panel solar o con el adaptador de
corriente alterna (incluido). Lea este manual de usuario para entender mejor cómo
funciona el Rukus Solar y ¡pasarlo en grande con él!
18
Page 19

RUKUS SOLAR MANUAL DE USUARIO
¿NECESITA AYUDA? PÓNGASE EN CONTACTO CON
NOSOTROS.
Etón Corporation, 1015 Corporation Way, Palo Alto, CA 94303,
USA. 1-800-872-2228 ( U.S.); 1-800-637-1648 (Canada);
650-903-3866 (worldwide); M-F, 8:00-4:30,
Pacic Standard Time; www.etoncorp.com.
ATENCIÓN
No exponer este aparato a la lluvia ni a la humedad.•
No sumergir ni exponer al agua durante un período prolongado.•
Proteger contra la humedad alta y la lluvia.•
Desenchufar inmediatamente en caso de derrame de líquidos •
o de caída de cualquier objeto sobre el aparato.
Limpiar únicamente con un trapo seco. No usar detergentes •
ni solventes químicos, ya que es tos podrían dañar el
acabado del producto.
Desenchufar y desconectar antenas externas •
durante tormentas eléctricas.
No retirar la tapa [ni la parte de atrás].•
Referir cualquier revisión del aparato a personal de •
servicio cualicado.
MEDIO AMBIENTE
DESECHO
Según la Directiva Europea 2002/96/EC, todos los productos
eléctricos y electrónicos deben ser recogidos de forma
separada por parte un sistema local de recogida. Por favor,
actúe de acuerdo a sus leyes locales y no deseche sus productos
viejos en la basura normal de su casa.
Para desechar cualquier tipo de baterías siga las normas o leyes
de su gobierno, estado o ciudad. Si no está seguro, póngase en
contacto con las autoridades locales apropiadas para saber cómo
desecharlas de manera segura y así proteger el medio ambiente.
19
Page 20

CARACTERÍSTICAS DEL RUKUS SOLAR
RUKUS SOLAR MANUAL DE USUARIO
1 2 3 4 5 6 7 8 9 10
14
15
FUNCIONES
1
Botón O N/OFF
2
Botón d e Bluetoot h
3
Puer to USB
4
Icono i ndicado r de baterí a
5
Icono d e puerto US B
6
Icono d e Bluetoot h
7
Icono d e carga sol ar
8
Icono d e entrada AU X
9
Botón d e entrada AU X
10
Botón d e graves
11
12
13
11
Botón d e subida de v olumen
12
Botón d e bajada de v olumen
13
Panel s olar mon ocrista l
14
Vi sualiza dor de tint a electró nica
15
Altavoces
16
17 18 19 20
16
Asa de t ranspo rte integr ada
17
En trada jac k de corrie nte continu a (CC)
18
Entra da USB
19
Puer to de entra da AUX
20
Ad justabl e mobile de vice stor age
20
Page 21

RUKUS SOLAR MANUAL DE USUARIO
TOMA DE CORRIENTE
ELÉCTRICA
DC JACK
26 - 50 %
51 - 75%
76 - 100%
0 - 25 %
CONEXIÓN DEL ADAPTADOR DE CORRIENTE
ALTERNA (CA)
Conecte uno de los extremos del adaptador de CA a la entrada
jack de CC de la unidad y el otro extremo a una toma de corriente
eléctrica.
CARGA DE LA BATERÍA INTEGRADA MEDIANTE
ELECTRICIDAD CA/ENERGÍA SOLAR
La unidad cuenta con una batería de ion de litio integrada para
disponer de electricidad portátil cuando no se usa el adaptador
de corriente alterna. Cuando el adaptador esté enchufado
o la unidad esté expuesta a la luz solar, la unidad empezará
a cargar se. Durante la carga el indicador
empezará a parpadear.
Para cargar completamente un batería vacía:
CA/CC: 3 horas
Solar : 6 horas
DURACIÓN DE L A BATERÍA
(CONSTRUIDO EN EL AÑO DE IONES DE LITIO)
*El tiempo de carga puede variar dependiendo de las condiciones
solares.
NOTA: Para maximizar la vida de la batería cargue la unidad con el
adaptador CA durante 12 horas antes de su primer uso.
del visualizador
21
Page 22

1. Pulse el botón ON/OFF para encender la unidad . El indicador
de electricidad se encenderá.
2. Pulse el botón de Bluetooth para encender la fuente de sonido
en modo Bluetooth. El indicador
3. Presione el botón
durante 3 segundos para poner la unidad
aparecerá en el visualizador.
en modo enlace. El indicador empezará a parpadear rápidamente
y la unidad emitirá dos pitidos cortos.
NOTA: El indicador se estabilizará en cuanto la unidad se haya
conectado correctamente. Si el indicador empieza a
parpadear lentamente después de tres minutos, el enlace
no se ha producido correctamente.
4. Abra el menú de ajustes de Bluetooth en su dispositivo móvil
habilitado con Bluetooth u ordenador. Una vez reconocido
aparecerá “rukus solar” en el visualizador del dispositivo
habilitado con Bluetooth. Seleccione “rukus solar” para
enlazarlo y conectarlo a su dispositivo.
NOTA: En un iPhone o iPad presione “rukus solar” para seleccionarlo.
Si le solicitan una contraseña introduzca “1234”.
RUKUS SOLAR MANUAL DE USUARIO
REPRODUCCIÓN MEDIANTE AUXILIARESREPRODUCCIÓN MEDIANTE BLUETOOTH
Puede disfrutar del sonido desde dispositivos externos como
reproductores de música digitales portátiles. Asegúrese de
que el dispositivo externo está apagado antes de realizar
ninguna conexión. Para más información consulte el manual
de instrucciones del dispositivo que va a conectar.
1. Conecte cualquier dispositivo con auriculares o conector jack
de línea externa con un cable de 3,5mm al conector jack de
entrada AUX de la parte de abajo de la unidad.
2. Pulse el botón
3. Si la unidad no está en modo AUX pulse el botón
para encender la fuente de sonido en ese modo.
4. Encienda el dispositivo externo y pulse el botón
5. La unidad reproducirá la música del dispositivo externo
automáticamente.
para encender la unidad.
.
5. Una vez que el Bluetooth esté conectado seleccione la música
y presione el botón
de su dispositivo. La unidad reproducirá
la música automáticamente.
NOTA: El tiempo de reproducción con la batería integrada es de
~8 horas, dependiendo del volumen de la música y otros
factores.
22
Page 23

RUKUS SOLAR MANUAL DE USUARIO
PUERTO USB PARA CARGA DE DISPOSITIVOS
MÓVILES (5V, 500MAH)
La entrada USB puede us arse para cargar la mayoría de los
dispositivos que aceptan la carga mediante USB (como muchos
teléfonos móviles, smartphones y auriculares inalámbricos).
1. Conecte uno de los extremos del cable USB a su dispositivo
y el otro extremo a la entrada USB de la unidad.
2. Pulse el botón para empe zar la carga del dispositivo.
Pulse el botón otra vez para detener la carga.
NOTA: Use el cable de alimentación USB propio del dispositivo
para conectarlo a la unidad .
AJUSTE DEL NIVEL DE VOLUMEN
Pulse los botones
NOTA: Si el indicador LED empieza a parpadear durante el ajuste
de volumen signica que se ha alcanzado el nivel mínimo
o máximo de volumen.
y para ajustar los niveles de volumen.
POTENCIADOR DE BAJOS
Pulse el botón
Pulse el botón otra vez para desactivarlo.
para activar el potenciador de bajos.
CAMBIO DE COLOR DEL FONDO DEL VISUALIZADOR
DE TINTA ELECTRÓNICA
Pulse y mantenga presionado el
intercambiar el fondo del visualizador de tinta electrónica a
blanco o negro.
durante 5 segundos para
SISTEMA DE AHORRO DE ENERGÍA AUTOMÁTICO
Si la unidad está inactiva durante 10 minutos (sin salida de sonido
u operación) la unidad se apagará automáticamente.
23
Page 24

RUKUS SOLAR MANUAL DE USUARIO
REGISTRO DE LA GARANTÍA
Para asegurar una plena cobertura por parte de la garantía o de
actualizaciones del producto, usted deberá completar el registro
de su producto lo antes posible después de su compra o recibo.
Sírvase de cualquiera de las opciones siguientes para registrar
su producto:
1. Visita a nuestro sitio web www.etoncorp.com.
2. Envío por correo de la tarjeta de garantía incluida.
3. Envío de su tarjeta de registro o sus datos a la dirección
siguiente; incluyendo su nombre, su dirección completa de
envío, su número de teléfono, el modelo comprado, la fecha de
compra, el nombre del establecimiento de venta, y el número
de serie del producto ( localizado generalmente en cerca del
compartimiento de las baterías):
Etón Corporation
1015 Corporation Way
Palo Alto, CA 94303
GARANTÍA LIMITADA
Conserve la información de la garantía presente en su
tarjeta de garantía junto a su prueba de compra; o bien
puede obtener información acerca de la Garantía Limitada
en www.etoncorp.com.
SERVICIO DE REPARACIÓN DE SU PRODUCTO
Para obtener un servicio de reparación de su producto,
recomendamos, lo primero, que usted se ponga en contacto con
un representante del ser vicio de reparación de Eton, llamando al
800- 872-2228 EE.UU., 800-637-1648 Canadá ó (650) 903-3866
para determinar el problema y su solución. Si se requiriera un
servicio adicional, el personal técnico le instruirá acerca de cómo
proceder, dependiendo de si la radio está todavía bajo garantía
o de si necesita un servicio de no garantía.
GARANTÍA
Si su producto aún se encuentra en garantía y el representante
de servicio de reparación de Eton determina que es necesario
un servicio de garantía, se emitirá una autorización de envío
de vuelta acompañada de instrucciones de envío a una tienda
autorizada de servicio de reparación de garantía. No envíe
su radio de vuelta sin previa obtención de un número de
autorización de devolución.
NO GARANTÍA
Si su producto ya no se encuentra en garantía y requiere de
servicio de reparación, nuestro personal técnico le referirá a la
instalación de reparación más cercana y que mejor sea capaz de
hacerse cargo de la reparación.
Para el servicio de reparación fuera de Norteamérica, por favor
reérase a la información del distribuidor incluida en el momento
de compra/recibo del producto.
24
Page 25

Transportierbare Bluetooth
Tonanlage mit Solarzellplatte
BEDIENUNGSANLEITUNG
RUKUS SOLAR BEDIENUNGSANLEITUNG
25
Page 26

RUKUS SOLAR BEDIENUNGSANLEITUNG
Vielen Dank für den Kauf des Etón Rukus Solar, eine erstklassige, transportierbare
Bluetooth Tonanlage, ausgezeichnet mit Solarladung. Der Rukus Solar ist
durch einen wieder auadbaren Lithium-Ionen-Akku angetrieben, und von der
Solarzellplatte oder den Netzadapter (enthalten)aufgeladen. Bitte lesen Sie diese
Bedienungsanleitung sorgfältig durch, um besser zu verstehen, wie der Solar-Rukus
funktioniert und wie man damit total abrocken kann!
26
Page 27

BRAUCHEN SIE HILFE? ENVIRONMENT
Wenn Sie Hilfe benötigen, bitte wenden Sie sich von Montag-
Freitag, von 8:30 Uhr.-16:00 Uhr Nordamerikanische Pazik
Ortszeit an: 1-800-872-2228 aus den U.S A.;
1-800-637-1648 aus Kanada; 650-903-3866, Weltweit;
FAX: 650-903-3867; Webseite, www.etoncorp.com;
Etón Corporation, 1015 Corporation Way, Palo Alto, CA
94303, USA.
WARNUNG
Das Gerät nicht Regen oder Feuchtigkeit aussetzen.•
Dem Wasser nicht längere Zeit aussetzen .•
Vor großer Luftfeuchtigkeit und Regen schüt zen.•
Sofort gerät ausstecken wenn Flüssigkeiten darüber •
verschüttet wurden o der Gegenstände hineingefallen sind.
Nur mit einem sauberen Tuch reinigen . Keine Reinigungsmittel •
oder Lösungsmittel benut zen, da diese die Lackierung
beschädigen könnten.
Exter ne Antennen während Gewittern ausstecken und vom •
Gerät trennen.
Abdeckung [oder die Rückabdeckung] nicht entfernen .•
Reparaturen einem qualizierten Kundendienst überlassen.•
ENTSORGUNG
Gemäß der EG-Verordnung 2002/9 67EC ist vorgeschrieben, dass
alle elektrischen Geräte und Elektropro dukte separat von einem
örtlichen Abfallbetrieb entsorgt werden müssen. Bitte halten
Sie sich an die ör tlichen Vorschrif ten und entsorgen Sie ihre
Altgeräte nicht in den Hausmüll.
Bitte entsorgen Sie alle Batterietypen gemäß der
örtlich geltenden Regierungsbestimmungen oder
Entsorgungsgesetzen. Wenn Sie unsicher sind, setzen Sie sich
mit ihrer dafür zuständigen B ehörde in Verbindung , um Batterien
umweltgerecht und sicher zu entsorgen.
RUKUS SOLAR BEDIENUNGSANLEITUNG
27
Page 28

RUKUS SOLAR AUSGEZEICHNETE
RUKUS SOLAR BEDIENUNGSANLEITUNG
1 2 3 4 5 6 7 8 9 10
14
15
FUNKTIONEN
1
AN / AUS Sc halter
2
Blueto oth Scha lter
3
USB-Port
4
Akku A nzeige Sym bol
5
USB-A nschlu ss Symbol
6
Bluetooth Symbol
7
Solar ladung Sy mbol
8
AUX-In-Symbol
9
AUX-In Sc halter
10
Bass S chalter
11
12
13
11
Laut stärkent aste + (ho ch)
12
Laut stärkent aste — (he rab)
13
Einkristall Solarzellplatte
14
E-Ink D isplay
15
Lautsprecher
16
17 18 19 20
16
Einge bauter Trage griff
17
Eingangsbuchse
18
USB Buc hse
19
AUX-In An schlus s
20
Verstel lbares, m obiles S peicher gerät
28
Page 29

RUKUS SOLAR BEDIENUNGSANLEITUNG
STECKDOSE
NETZADAPTER
26 - 50 %
51 - 75%
76 - 100%
0 - 25 %
ANSCHLUSS DES NETZADAPTER
Schließen Sie das eine Ende des Netzadapter mit der
Eingangsbuchse des Gerät s, und das andere Ende an eine
Steckdose, an.
AUFLADEN DES EINGEBAUTEN AKKU DURCH DIE
AC ENERGIE / SOLAR ENERGIE
Das Gerät hat einen eingebauten Lithium-Ionen-Akku für
transportierbare Energie, wenn der Netzadapter nicht benutzt
wird. Falls der Adapter eingesteckt ist o der das Gerät ist bei
Sonnenschein ausgesetzt, wird das Gerät den Ladevorgang
anfangen. Während der Ladung, beginnt die
dem Display zu blinken.
Einen leeren Akku vollständig auaden:
AC / DC: 3 Stunden
Solar : 6 Stunden
BATTERIELEBENSDAUER (FEST EINGEBAUTE
LITHIUM-IONEN-AKKU)
* Die Ladezeit kann je nach Solar-Verhältnissen unterschiedlich sein.
ANMERKUNG: Um die Lebensdauer des Akkus zu maximieren, laden
Sie das Gerät durch den Net zadapter für 12 Stunden,
vor der ersten Benutzung.
-Anzeige auf
29
Page 30

1. Drücken Sie den AN / AU S S chalter, um das Gerät einzusch alten.
Die Strom anzeige leuc htet auf.
2. Drü cken Sie den Blu etooth Schalter, um die Sc hallquelle z u
Blueto oth-Empfan g umzuschalten. Die
dem Dis play.
3. Halte n Sie den
Paarungsm odus zu versetzen. Die Anzeige fä ngt schnell a n zu
blinken. Das Ge rät gibt zwei ku rze Pieptöne a b.
ANMER KUNG: Die An zeige wird zu ein er Volltonfarb e, nachdem das
4. Öff nen Sie das Blu etooth Einstel lungsmenü a uf Ihrem Blueto othaktivier ten mobilen Gerät oder Compu ter. Sobald es er kannt wird,
zeigt das Display des Bluetooth- ak tivierten Gerätes , “rukus sola r” an.
Wählen S ie “rukus solar”, um da s Gerät zu paare n und zu verbin den.
ANMER KUNG: Mit ein em iPhone od er iPad, tipp en Sie auf “rukus
5. Sob ald Bluetooth v erbunden is t, Musik wähl en, und den Schalter
auf Ihrem Gerät d rücken. Das G erät erzeug t eine automatische
Musikwiedergabe.
ANMER KUNG: Die Wiedergabezeit, von einen ei ngebauten Akku, ist ca.
Schal ter für 3 Sekun den, um das Ger ät in den
Gerät gelungen ange schlossen i st. Falls die Anzeige
nach 3 Mi nuten, langs am zu blinken anfäng t, war die
Paarung nic ht erfolgreic h.
solar ”, um auszusuc hen. Wenn Sie zur Eingabe ein es
Passwortes aufgeforder t werden, geb en Sie “1234” ein .
8 Stunden, je nac h Schallpegel und a nderen Faktore n.
Anzeige ersc heint auf
RUKUS SOLAR BEDIENUNGSANLEITUNG
WIEDERGABE PER AUXWIEDERGABE PER BLUETOOTH
Sie können den Sound von einem externen Gerät genießen,
eventuell, wie ein transportierbarer digitaler Musik-Player.
Machen Sie sicher, das Sie das externe Gerät ausschalten, bevor
Sie irgendwelche Anschlüsse machen. Details nden Sie in der
Bedienungsanleitung des anzuschließenden Gerät.
1. Auf der Unterseite des Geräts, schließen Können Sie jedes
Gerät mit Kopfhörer-oder Ausgang an, mit einem 3,5 mm Line
In-Kabel, an die AUX-IN-Buchse.
2. Drücken Sie den Schalter
3. Drücken Sie den Schalter
den AUX-Modus zu versetzen, wenn sich das Gerät nicht
im AUX-Modus bendet.
4. Schalten Sie Ihr externes Gerät an, und drücken Sie den
Schalter
.
5. Das Gerät spielt die Musik von dem exter nen Gerät
automatisch ab.
, um das Gerät einzuschalten.
, um die Schallquelle an
30
Page 31

RUKUS SOLAR BEDIENUNGSANLEITUNG
USB-PORT FÜR HANDY AUFLADUNG
(5V, 500MAH)
Die USB-Buchse kann genutzt werden, um die meisten Geräte
aufzuladen, die für die USB Ladefunktion geeignet sind;
(darunter viele Handys, Smar t Phones und drahtlose Headsets/
Kopfhörer).
1. Schließen Sie ein Ende des USB-Kabels an das Gerät und das
andere Ende an die USB-Buchse des Geräts.
2. Drücken Sie den Schalter
Drücken Sie den Schalter erneut, um den Ladevorgang
abzubrechen.
ANMERKUNG: Verwenden Sie das USB-Stromkabel, das mit
Ihrem Gerät geliefert wurde, um das Gerät
anzuschließen.
, um Ihr Gerät aufzuladen.
EINSTELLUNG DER LAUTSTÄRKE
Drücken Sie die
einzustellen.
ANMERKUNG: Falls die LED-Anzeige, während der Laut stärke
und -Schalter, um die Lautstärke
Einstellung zu blinken anfäng t, dann ist eine
minimale oder maximale Lautstärke erreicht.
BASSVERSTÄRKUNG
Drücken Sie den Schalter
einzuschalten. Drücken Sie den Schalter erneut, um das Gerät
auszuschalten.
, um die Bassverstärkung
UMSCHALTUNG VON E INK-DISPLAY
HINTERGRUNDFARBEN
Drücken, und halten Sie den
um zwischen einen schwarzen und einen weißen Hintergrund,
auf dem E-Ink-Display umzuschalten.
Schalter für 5 Sekunden,
AUTOMATISCHE ENERGIEEINSPARUNG
Wenn das Gerät für 10 Minuten im Leerlauf ist (keine Tonausgabe
oder Betrieb), dann schaltet sich das Gerät automatisch aus.
31
Page 32

RUKUS SOLAR BEDIENUNGSANLEITUNG
GARANTIE REGISTRIERUNG
Um eine vollständige Garantieabdeckung oder P roduktupdates
zu gewährleisten, sollte Ihr Produk t möglichst bald nach
dem Kauf oder der Empfangsbestätigung registriert
werden. Sie können eine der aufgeführ ten Möglichkeiten zur
Produktregistrierung nutzen:
1. Besuchen Sie unsere Website www.etoncorp.com.
2. Schicken Sie Ihre mitgelieferte Garantiekarte ein.
3. Schicken Sie Ihre Registrier ungskarte oder Information an
folgende Adresse; Nennen Sie Ihren Namen, vollständige
Postadresse, Telefonnummer, gekauftes Modell, kaufdatum,
Vertriebshändler und Produkt seriennummer (meistens bei oder
nahe des Batteriefaches):
Etón Corporation
1015 Corporation Way
Palo Alto, CA 94303
BESCHRÄNKTE GARANTIE
Bewahren Sie die Garantieinformation auf Ihrer Garantiekarte
zusammen mit dem Kaufbeleg zusammen auf oder die
Information für die beschränkte Garantie bendet sich unter:
www.etoncorp.com.
PRODUKTSERVICE
Um für ihr Produkt einen Kundendienst zu erhalten, empfehlen
wir, zuers t den Kundendienstvertreter von Etón unter der
Nummer 1-800-872-2228 US, 1-800-637-16 48 Kanada,
(650) 903-3866 US, customersvc@etoncorp.com oder ihren
jeweiligen Inlandshändler in Europa (siehe beigefügte Liste)
bezüglich Fehlersuche und Fehlerbehebung anzurufen. Wenn
weitergehender Kundendienst gewünscht wird, wird Sie der
technische Kundendienst darüber in Kenntnis setzen, wie weiter
verfahren werden soll. Dies ist abhängig davon, ob das Radio noch
Garantie besitzt oder ein Kundendienst ohne Garantie erfolgen soll.
GARANTIE
Wenn Ihr Produkt noch eine Garantie besitzt und der Etón
Kundendienstmitarbeiter auf Garantiereparatur entscheidet
bekommen Sie eine Genehmigung zum Wiedererhalt und
Anweisungen für das Einschicken an eine autorisierte
Garantiereparaturwerkstät te. Sie sollten Ih r Radio niemals ohne
diese Wiedererhalt autorisierungsnummer einschicken.
KEINE GARANTIE
Wenn Ihr Produkt keine Garantie mehr besitzt nennt Ihnen unser
Kundendienst die nächstliegende Reparatur werkstätte, die die
Reparatur durchführen kann.
Außerhalb Nordamerikas sollten Sie sich an den auf dem
Kaufbeleg genannten Vertriebshändler wenden.
32
Page 33

Sistema audio portatile Bluetooth
con pannello solare
MANUALE DEL
PROPRIETARIO
RUKUS SOLAR MANUALE DEL PROPRIETARIO
33
Page 34

RUKUS SOLAR MANUALE DEL PROPRIETARIO
Grazie per aver acquistato Etón Rukus Solar, un sistema audio portatile Bluetooth di
alta qualità, dotato di carica solare. Rukus Solar è alimentato da una batteria Li-ion
ricaricabile dal pannello solare o dall’adattatore CA (incluso). Si prega di leggere il
presente manuale per avere tutte le informazioni sul funzionamento di Rukus Solar
ed ottenere il massimo da questo dispositivo.
34
Page 35

RUKUS SOLAR MANUALE DEL PROPRIETARIO
HAI BISOGNO DI AIUTO? SMALTIMENTO AMBIENTALE
Se hai bisogno di assistenza, contattaci dal Luned ì al
Venerdì dalle 8:00 della mattina alle 4:30 del pomeriggio.,
North American Pacic Time. 1-800-872-2228 dagli
Stati Uniti U.S; 1-800-637-16 48 dal Canada; 650-903-3866,
dal resto del Mondo; FAX: 650-903-3867; web site,
www.etoncorp.com; Etón Corporation, 1015 Corporation Way,
Palo Alto, CA 94303, USA.
DISPOSIZIONI
In base alla diret tiva Europea 2002/96/EC, tut te le
apparecchiature elettriche ed elettroniche devono essere
dismesse separatamente e utilizzando contenitori appositi.
Contattare le autorità locali che si occupano di questo tipo
di soluzioni per saperne di più e non dismettere il dispositivo
nella stessa maniera in cui si dismettono altri tipi di riuti.
AVVERTENZE
Non esporre questo dispositivo a pioggia o umidità.•
Non immergere il dispositivo in acqua.•
Proteggere il dispositivo da umidità e pioggia.•
Se un liquido entra per sbaglio nel dispositivo, asciugarlo •
immediatamente per evitare problemi.
Pulire il dispositivo con un panno umido. Non utiliz zare •
detergenti o solventi chimici altrimenti il dispositivo
potrebbe rompersi del tutto.
Durante i temporali staccare la spina e scollegare l’antenna•
Non rimuovere la scocca del dispositivo.•
Far riferimento ad un centro autorizzato o personale •
qualicato per riparare il dispositivo.
Si prega di smaltire le bat terie in base alle leggi vigentinel
proprio Stato o Governo, facendo at tenzione anche
allalegislazione regionale. Se non si è certi, si prega di
contattare l’autorità apposita in modo da avere chiarimenti
in materia di protezione ambientale e smaltimento.
35
Page 36

CARATTERISTICHE DI RUKUS SOLAR
RUKUS SOLAR MANUALE DEL PROPRIETARIO
1 2 3 4 5 6 7 8 9 10
14
15
FUNZIONALITÀ
1
Pulsante accensione e
spegn imento ON / O FF
2
Pulsante Bluetoot h
3
Port a USB
4
Icona i ndicatore d ella bat teria
5
Icona p orta USB
6
Icona B luetooth
7
Icona r icarica s olare
8
Icona i ngresso AU X-in
9
Puls ante ingres so AUX-in
10
Puls ante bass
11
12
13
11
Puls ante aument o volume
12
Pulsante diminuzione volume
13
Pannello solare monocristallo
14
Displ ay E Ink
15
Altoparla nti
16
17 18 19 20
16
Manig lia di tras porto inte grata
17
Attacco J ack DC-in
18
Attacco U SB
19
Ingre sso AUX-in
20
Allog giamento d el dispos itivo mob ile
36
Page 37

RUKUS SOLAR MANUALE DEL PROPRIETARIO
PRESA
ELETTRICA
ATTACCO JACK
ALIMENTAZIONE
26 - 50 %
51 - 75%
76 - 100%
0 - 25 %
COLLEGAMENTO DELL’ADATTATORE CA
Collegare un’estremità dell’adattatore CA alla presa di
alimentazione dell’unità e l’altra estremità ad una presa elettrica.
RICARICA DELLA BATTERIA INCORPORATA TRAMITE
CORRENTE ELETTRICA O ENERGIA SOLARE
Il dispositivo ha una batteria integrata agli ioni di litio per
l’alimentazione portatile quando non si utilizza l’adattatore
CA. Quando l’adat tatore è collegato ad una presa elettrica
o l’apparecchio viene esposto alla lu ce del sole, l’unità inizia
a ricaricarsi. Durante la ricarica, l’indicatore
inizia a lampeggiare.
Per ricaricare completamente una bat teria scarica:
Corrente CA/CC: 3 ore
Energia solare: 6 ore
DURATA DELLA BATTERIA
(AGLI IONI DI LITIO INCORPORATA IN BATTERIA)
* I tempi di carica possono variare a seconda delle condizioni
di luce solare.
NOTA :
Per massimizzare la durata della bat teria, caricare
l’apparecchio attraverso l’adattatore CA per 12 ore
prima del primo utilizzo.
sul display
37
Page 38

1. Premere il pulsante ON / OFF per accendere l’apparecchio.
Si illum inerà l’ind icatore di accensione.
2. Premere il pulsante Bluetooth per cambiare sorgente s onora e
passare in modalità B luetooth. L’indicatore
3. Tenere premu to il pulsante
l’apparecch io in modalità p airing. L’indicatore inizierà a
lampeggiare velocemente. Il dispositivo emetter à quindi
due brevi segnali acustici .
NOTA: L’indicatore diventerà sso qua ndo l’unità s arà
corret tamente connessa. S e l’indicatore inizia a
lampeggiare lentamente dop o 3 minuti, sign ica
che il collegam ento non ha avuto successo.
4. Apri re il menu delle impostazioni Blueto oth del vostro cellulare,
lettore o computer abilitato. Una volta riconosciuto, “ruk us solar”
apparirà sul display del vos tro dispositivo Bluetooth. Selez ionare
“rukus solar ” per associare e connettere l ’apparecchio al dispositivo.
NOTA: Su iPhone o iPad, toccare sulla scritta”rukus sola r” per
selezionare. Se vie ne richiesta una password , immettere
“1234”.
5. Una vol ta stabilita la connessione Blueto oth , selezion are la musica
e premere il tasto
automaticam ente la riproduzione m usicale.
NOTA: in modalità di ri produzione musicale, la durata della car ica della
batteria integ rata è di circa 8 ore, a secon da del livello della
musica e di altri fattori.
per 3 secondi per mettere
sul vostro disp ositivo. L’apparecc hio avvierà
apparirà sul display.
RUKUS SOLAR MANUALE DEL PROPRIETARIO
RIPRODUZIONE TRAMITE AUXRIPRODUZIONE TRAMITE BLUETOOTH
Con Rukus Solar è possibile riprodurre musica da un qualsiasi
dispositivo esterno, come un lettore portatile. Assicurarsi
di spegnere l’alimentazione del dispositivo esterno prima di
effettuare qualsiasi collegamento. Per ulteriori informazioni, fare
riferimento al manuale di istruzioni del dispositivo da collegare.
1. Collegare qualsiasi dispositivo provvisto di at tacco jack da
3,5 mm alla porta AUX IN presente sulla parte inferiore
dell’apparecchio.
2. Premere il pulsante
3. Premere il pulsante
passare in modalità AUX, se l’unità non è già in modalità AUX.
4. Accendere il dispositivo esterno e premere il pulsante
5. L’apparecchio inizierà a riprodurre la musica dal dispositivo
esterno automaticamente.
per accendere l’apparecchio.
per cambiare la sorgente audio e
.
38
Page 39

RUKUS SOLAR MANUALE DEL PROPRIETARIO
CARICAMENTO DI UN DISPOSITIVO TRAMITE
PORTA USB (5V, 500MAH)
La presa USB può essere utilizzata per ricaricare la batteria dei
dispositivi che consentono la carica tramite USB (molti telefoni
cellulari, smartphone, cufe wireless, let tori musicali, ecc).
1. Collegare un’estremità del cavo USB al vostro dispositivo
e l’altra estremità alla presa USB dell ’apparecchio.
2. Premere il pulsante per avviare la carica del dispositivo.
Premere nuovamente il tasto per interrompere la ricarica.
NOTA: utilizzare il cavo di alimentazione USB fornito con il vostro
dispositivo per collegarlo a Rukus Solar.
REGOLAZIONE DEL VOLUME
Premere i tasti
NOTA: Durante la regolazione del volume, se l’indicatore LED
inizia a lampeggiare, il livello di volume minimo o massimo
è stato raggiunto.
e per regolare il livello del volume.
BASS BOOST
Premere il pulsante
Premere nuovamente il tasto per disattivare questa f unzione.
per esaltare i toni bassi della musica.
IMPOSTAZIONE DEI COLORI DI SFONDO DEL
DISPLAY E INK
Premere e tenere premuto il pulsante
passare da uno sfondo in bianco e nero ad uno colorato su
display E Ink.
per 5 secondi per
RISPARMIO ENERGETICO AUTOMATICO
Se resta inattivo per 10 minuti (assenza di suono o di
funzionamento), l’apparecchio si spegne automaticamente.
39
Page 40

RUKUS SOLAR MANUALE DEL PROPRIETARIO
REGISTRAZIONE APPARECCHIO PER LA GARANZIA
Per assicurare protezione al prodotto e fare in modo che questo
sia coperto da garanzia contro rischi e problemi, sarebbe bene
registrare l’apparecchio subito dopo l’acquisto. E’ possibile
registrare il prodotto utilizzando una di queste opzioni:
1. Visitando il nostro sito Internet all’indiriz zo
www.etoncorp.com.
2. Inviare la garanzia via posta tramite l’apposita busta
che si trova nel prodotto.
3. Inviare la garanzia via posta al seguente indirizzo.
Includere nome, indirizzo completo, numero di telefono,
modello acquistato, data di acquisto, nome del venditore
da cui si è acquistato il prodotto e numero seriale dello
stesso (di solito collocato vicino al vano b atterie)):
Etón Corporation
1015 Corporation Way
Palo Alto, CA 94303
GARANZIA LIMITATA
Informazioni sulla garanzia e sui limiti di quest’ultima
possono essere anche consultate su Internet all’indirizzo
www.etoncorp.com.
SERVIZI PER IL PRODOTT O
Per fruire dei servizi associati a questo prodotto, si prega
di contat tare prima di tutto un rappresentante di
Etón Corporation al numero 800-872-2228 per gli Stati Uniti,
al 800-637-1648 per il Canada o al numero (650) 903-3866,
customersvc@etoncorp.com, per segnalare problemi e difetti.
Se si richiederà un maggiore intervento, i tecnici daranno tutte
le informazioni del caso comprese quelle che riguardano
la garanzia dell’apparecchio e se il danno scoperto è passabile
o meno di garanzia.
PRODOTT O IN GARANZIA
Se il prodotto è ancora in garanzia e il personale Etón Cor poration
ha stabilito che il guasto può essere risolto fr uendo della
garanzia, allora invierà l ’autorizzazione per la riparazione
direttamente al cliente comprensiva di tutte le istruzioni per
l’invio del prodotto e la sua riparazione. Si raccomanda di non
spedire il prodotto no a quando non si sia ricevuta la richiesta
di autor izzazione comprensiva di numero identicativo.
PRODOTT O NON IN GARANZIA
Se il prodotto non è più in garanzia e richiede l’inter vento di
un tecnico, il cliente sarà indirizzato al centro riparazioni più
vicino e comodo.
Per usufruire del ser vizio al di fuori del Nord Amer ica, si prega di
fare riferimento alle informazioni ricevute al momento dell’acquisto
del prodotto o una volta contattato il produttore dello stesso.
40
Page 41

Etón Corporation
Corporate Headquarters
1015 Corporation Way
Palo Alto, California 94303 USA
tel +1 650-903-3866
Etón Canada
1 Yonge Street, Suite 1801
Toronto, Ontario M5E 1W7
Canada
tel +1 416-214-6885
tel +1 800-872-2228
fax +1 650-903-3867
Designed by Etón Corporation and assembled in China. © Copyright 2012 Etón Corporation. All rights reserved. v0 33 0 12
www.etoncorp.com
 Loading...