


UltimateRadar/LaserDetection
Easy3DNavigation
Register@www.EscortInc.com
U L T I M A T E D R I V I N G C O M P A N I O N
User’s Manual
CONGRATULATIONS
You’ve just purchased the most intelligent personal navigation and radar/laser detection device in the world—the PASSPORT iQ.
In addition to offering the latest in personal navigation technology, PASSPORT iQ delivers extreme long range warning on all radar bands, including X, K, Superwide Ka, Ku, and instant on Pop modes. Multiple front and rear laser sensors provide 360 degree laser protection, including the widest field of view.
For the ultimate in laser protection, PASSPORT iQ can also be used in conjunction with our Laser Shifter product. Visit our website, www.EscortRadar.com, or call us toll free at 800 433 3487 for more details.
The PASSPORT iQ’s GPS powered intelligence provides permanent relief from false alarms, including automatic door openers, motion sensors, and other radar based sensors. And, it comes pre loaded with thousands of red light and fixed position speed camera locations throughout North America.
In addition, PASSPORT iQ boasts the following state of the art performance and features:
•Personal navigation system comes complete with Navteq mapping, branded points of interest, speed limit data, and lane assist.
•AutoLearnTM feature automatically learns and rejects false radar sources based on exact location and frequency.
•New proprietary threat signal ranking (TSR) software intelligently sorts, ranks, and rejects traffic flow monitoring false alarms automatically.
•Cruise Alert feature offers modified radar alerts within specified speeds.
•Defender Database stores thousands of red light and fixed position speed cameras throughout North America.
•Revolutionary AutoSensitivityTM mode provides real time radar performance based on vehicle speed, plus Highway and Auto No X settings.
•Mark Location feature allows you to instantly “mark” known speed traps, cameras and other places of interest.
•Exclusive SpecDisplayTM provides actual numeric frequency for any radar signal.
•Selectable radar and laser bands allow you to customize which bands are monitored.
•Selectable markers allow you to customize which markers (speed traps, cameras) are monitored.
•Exclusive SmartCord for easy access to Mute and TrueLockTM features.
If you’ve used GPS navigation and radar detection devices before, a review of the accompanying Quick Reference Guide will help you get started. If you are new to GPS or radar detection, please read this Owner’s Manual in detail to get the most out of your PASSPORT iQ’s revolutionary performance and innovative features.
Please drive safely.
2
CONTENTS
SECTION 1: SETTING UP PASSPORT iQ |
|
What’s Included |
7 |
Controls and Features |
7 |
Smart Cord |
8 |
Connecting the Power |
8 |
Charging the Battery |
9 |
Mounting in Your Vehicle |
10 |
Important Safety and Product Information |
11 |
SECTION 2: USING PASSPORT iQ |
|
Power Options |
13 |
Initial Setup |
13 |
Warning Screen |
14 |
Main Menu Screen |
15 |
Volume |
16 |
Routes |
16 |
Battery Charge Status |
16 |
GPS Status |
16 |
Viewing latitude and longitude |
16 |
Go To Screen/GPS Navigation Menu |
17 |
Creating a Route to an Address |
18 |
To an intersection |
20 |
To an address in another state |
21 |
Stopping a Route in Progress |
22 |
Resuming a Route after Stopping |
22 |
Avoiding a Route Segment |
22 |
Setting Your Home Address |
24 |
Searching for a Point of Interest |
25 |
Browsing Points of Interest |
26 |
Using Your Favorites List |
28 |
3
Adding favorites |
28 |
Sorting favorites |
29 |
Deleting favorites |
29 |
Navigating to favorites |
29 |
Using Your Recent Locations List |
30 |
Navigating to a recent location |
30 |
Managing Your Routes |
30 |
Map View |
32 |
Changing the Map View |
33 |
Zooming In and Out |
34 |
Panning the Map |
34 |
Viewing Turn by Turn Maneuvers |
34 |
Playing Back Directional Voice Prompts |
34 |
Muting Directional Voice Prompts |
34 |
Using the Lane Assist Feature |
34 |
Using the On Screen Radar/Laser Alert Area |
35 |
Adjusting detector sensitivity |
36 |
Viewing actual speed |
36 |
Muting alerts |
36 |
Locking out false alerts (TrueLock) |
37 |
Viewing Speed Limit Data |
38 |
Marking Locations |
39 |
Viewing Estimated Arrival Time |
40 |
Detector View |
41 |
Choosing Your Detector Screen |
42 |
Selecting Your Color Palette |
42 |
Using the On Screen Radar/Laser Alert Area |
42 |
Adjusting detector sensitivity |
43 |
Muting alerts |
43 |
Locking out false alerts (TrueLock) |
44 |
Playing Back Directional Voice Prompts |
44 |
Muting Directional Voice Prompts |
44 |
4
Viewing Actual Speed |
44 |
Marking Locations |
44 |
Switching to Map View |
44 |
Settings and Preferences |
45 |
GPS Navigation Settings |
46 |
Map view |
46 |
Day/night color palette |
47 |
My Car icon |
47 |
Points of interest (POIs) |
48 |
Clearing lists |
48 |
Managing routes |
48 |
Detector Settings |
49 |
Detection sensitivity |
49 |
AutoLearn |
50 |
Signal strength meter |
50 |
Cruise Alert |
51 |
Band monitoring |
51 |
Detector voice |
52 |
Cameras and speed traps |
52 |
TrueLock GPS Radar/Laser Detector Filter |
52 |
Clearing marked locations |
52 |
Illegal state alert |
52 |
Detector AutoMute |
52 |
Alert tones |
52 |
Laser shifters (optional feature) |
53 |
Restoring detector settings |
53 |
General Settings |
54 |
Screen brightness |
54 |
Language and units |
54 |
Time options |
55 |
Wallpaper (background image) |
55 |
Over speed limit alert |
56 |
5
Restoring all factory settings |
56 |
About PASSPORT iQ |
57 |
Legal information |
57 |
GPS and memory status |
57 |
Demo (route simulation) |
57 |
Calibration |
57 |
SECTION 3: UNDERSTANDING PASSPORT iQ |
|
Understanding Your Detector |
58 |
How radar works |
58 |
How Pop works |
59 |
How laser works |
59 |
How threat signal ranking works |
59 |
How red light cameras work |
59 |
How speed cameras work |
60 |
Interpreting alerts |
60 |
Understanding GPS |
61 |
Specifications |
62 |
SECTION 4: TROUBLESHOOTING, MAINTENANCE & SERVICE |
|
Troubleshooting |
64 |
Software Updates |
65 |
Accessories |
65 |
Service Procedure |
66 |
ESCORT Extended Service Plan |
66 |
SECTION 5: LEGAL INFORMATION |
67 |
6
SECTION 1: SETTING UP PASSPORT iQ
What’s Included
5” GPS/radar detection device SmartCord
USB cable Mounting bracket
Owner’s Manual on CD Quick Reference Guide
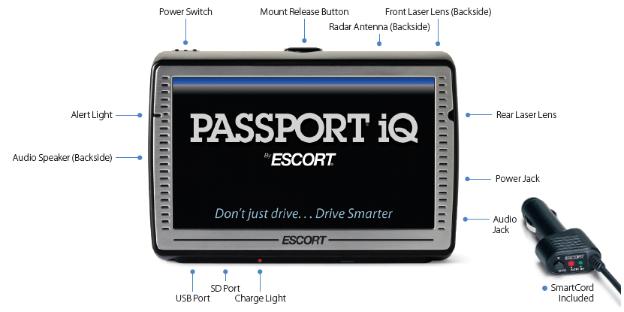
Device Controls and Features
Component |
Description |
|
|
|
|
Power Switch |
Switches PASSPORT iQ on or off, or locks the screen |
|
|
|
|
Charge Light |
Red: Unit is plugged in, and battery is not fully charged |
|
|
Alternating red and green: Battery is almost completely charged |
|
|
Green: Battery is completely charged |
|
LCD Screen |
5” touch sensitive screen |
|
|
|
|
USB Port |
Used only for connecting PASSPORT iQ to your PC or laptop to |
|
download software updates or charge the battery |
||
|
||
Reset Button |
Press to reset the device if unit stops responding |
|
|
|
|
Power Jack |
For connecting your SmartCord to power PASSPORT iQ with your |
|
(telephone type jack) |
vehicle’s battery |
|
Earphone Jack |
For connecting 3.5 mm mono earphone |
|
|
|
|
Micro SD Card Slot |
For adding future optional features |
|
|
|
7
Alert Light |
For indicating radar or laser alerts |
|
|
Rear Laser Lens |
For receiving laser alerts |
|
|
Audio Speaker |
For audible alerts and voice prompts |
|
|
External GPS Port |
Accepts external GPS device for improved reception |
|
|
Mount Release Button |
For conveniently releasing PASSPORT iQ from the windshield mount |
|
|
Front Laser Lens |
For receiving laser alerts (ensure clear view of road ahead) |
|
|
Radar Antenna |
For receiving radar alerts (ensure clear view of road ahead) |
|
|
SmartCord
The SmartCord is a special power cord with a power on indicator (which only lights up when PASSPORT iQ is turned on), a bright LED alert light that warns of radar or laser, and a mute button right on the plug for convenient access to PASSPORT iQ’s Mute and TrueLock features. It’s perfect for any car where reaching the device’s mute button on the windshield is a stretch. For details on connecting PASSPORT iQ to the Smart Cord, see “Connecting the Power.”
Optional power cords
An optional Direct Wire SmartCord is also available. This version includes a small display module that can be wired directly into your electrical system, with a 10 ft. straight cord to route to your PASSPORT iQ. For more information or to order, visit our website, www.EscortRadar.com, or call us toll free at 800 433 3487.
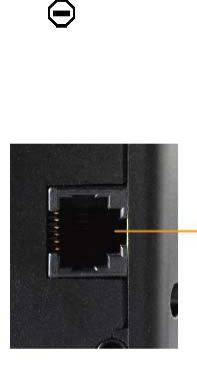
Connecting the Power
PASSPORT iQ is supplied with a SmartCord for power while in a vehicle.
Caution: Disconnect PASSPORT iQ from the SmartCord when starting the vehicle.
To power PASSPORT iQ, plug the small end of the SmartCord (telephone type connector) into the modular jack on the device’s right side and plug the lighter plug adapter into your vehicle’s lighter socket or accessory socket, as shown in the illustration below.
8

PASSPORT iQ operates on 12 volt DC negative ground only. The lighter plug provided is a standard size and will work in most vehicles.
Note: Depending on your vehicle, the lighter socket power may be continuously on or it may be switched on and off with your ignition switch.
Charging the Battery
PASSPORT iQ comes with a built in rechargeable battery. Charge the battery fully before using it for the first time. To charge the battery, connect PASSPORT iQ to a desktop or laptop computer via the USB cable or to an AC/DC 12 volt wall adapter via the SmartCord. Charging time is normally about eight hours (or overnight) via USB computer connection or two hours via wall adapter. A fully charged battery delivers about two hours of use.
Note: Radar/laser detection features cannot run on the PASSPORT iQ battery alone. These functions will only work when your device is connected to your vehicle via the SmartCord.
 Battery warnings
If these guidelines are not followed, the internal lithium ion battery may experience a shortened lifespan or may present a risk of damage to PASSPORT iQ, fire, chemical burn, electrolyte leak, and/or injury.
•Do not remove or attempt to remove the non user replaceable battery.
•Do not leave PASSPORT iQ exposed to a heat source or in a high temperature location, such as in the sun in an unattended vehicle. To prevent damage, remove from the vehicle or store it out of direct sunlight, such as in a glove box.
•Do not puncture or incinerate.
•When storing PASSPORT iQ for an extended time, store within the following temperature range: 32°F to 77°F (0°C to 25°C).
•Do not operate PASSPORT iQ outside of the following temperature range: 4°F to 131°F ( 20°C to 55°C).
•When disposing of PASSPORT iQ, take it to a professional, such as a waste electronics treatment facility, to have the battery removed and recycled.
Warning: PASSPORT iQ, its packaging, and its components contain chemicals known to the state of California to cause cancer, birth defects, or reproductive harm. This notice is provided in accordance with California’s Proposition 65.
9
Mounting in Your Vehicle
Warning: Do not mount PASSPORT iQ where it impairs the driver’s view of the road. Make sure that airbags are not obstructed by the device.
Mounting location
Be sure to mount PASSPORT iQ level and high enough on your front windshield to provide a clear view of the road ahead. In order for the GPS features to work properly, the top case must have a clear view of the sky. For optimum radar and laser sensitivity, center PASSPORT iQ between the driver and passenger and ensure the back of the device faces forward.
Mount PASSPORT iQ away from windshield wipers, other solid objects, and heavily tinted areas that might obstruct the radar antenna or laser lens.
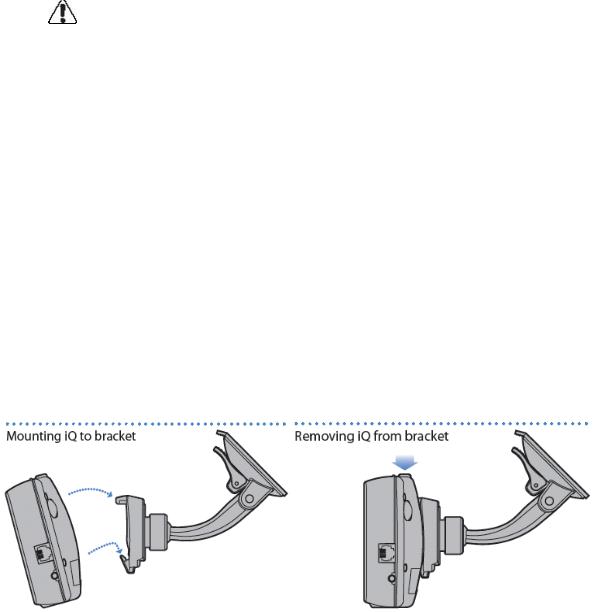
Mounting instructions
PASSPORT iQ’s EasyMount windshield bracket is designed for unobtrusive and hassle free mounting.
To attach the EasyMount bracket to your windshield, press the suction cup firmly onto the glass, then flip the locking clamp to ensure the suction cup is adhered to the windshield securely. Be sure to keep both your windshield and the suction cup clean.
To attach PASSPORT iQ to the EasyMount bracket, slide PASSPORT iQ downward so the EasyMount bracket locks into the slot on the back of the device.
To adjust PASSPORT iQ on your windshield, move the adjustable EasyMount bracket arm to your preferred view.
You can leave the EasyMount bracket in place on your windshield and easily remove PASSPORT iQ by pressing the EasyMount release button and sliding PASSPORT iQ off the mount. Again, be sure to position the bracket where it won’t present a hazard in the event of an accident.
10
Important Safety and Product Information
1.Read these instructions.
2.Keep these instructions.
3.Heed all warnings.
4.Follow all instructions.
5.Do not use this device near water.
6.Clean only with a damp cloth.
7.Maintain well ventilated conditions around PASSPORT iQ to avoid overheating. Install this device according to the instructions in this manual.
8.Do not install near any heat sources, such as radiators, heat registers, stoves, or other devices (including amplifiers) that produce heat.
9.Only use attachments and accessories specified by the manufacturer.
10.Disconnect this device during lightning storms or when it will not be used for a long period of time.
11.Refer all servicing to qualified service personnel. Servicing is required when PASSPORT iQ has been damaged in any way, such as damage to a power supply cord or plug, exposure to rain or moisture, operational failure, or if dropped.
12.Keep PASSPORT iQ away from liquids that might drip or splash on it. Do not place liquid filled containers on it.
13.Failure to avoid the following potentially hazardous situations could result in an accident or collision resulting in death or serious injury:
•When installing PASSPORT iQ in a vehicle, place the unit securely, so it does not obstruct the driver’s view of the road or interfere with vehicle operating controls, such as the steering wheel, foot pedals, or transmission levers. Do not place in front of or above any airbag.
•When navigating, carefully compare information displayed on PASSPORT iQ to all available navigation sources, including information from street signs, visual sightings, and maps. For safety, always resolve any discrepancies or questions before continuing navigation and defer to posted road signs.
•Always operate the vehicle in a safe manner. Do not become distracted by PASSPORT iQ while driving and always be fully aware of all driving conditions Minimize the amount of time spent viewing PASSPORT iQ’s screen while driving and use voice prompts when possible. Do not input destinations, change settings, or access any functions requiring prolonged use of PASSPORT iQ’s controls while driving. Pull over in a safe and legal manner before attempting such operations.
•PASSPORT iQ is designed to provide route suggestions. It is not designed to replace the need for driver attentiveness regarding road closures or road conditions, traffic congestion, weather conditions, or other factors that may affect safety while driving.
Important: Always be sure that PASSPORT iQ and any external device connected to it are switched off and unplugged from the power supply before you attempt to connect it to another external device.
11
Map data information
One of the goals of ESCORT is to provide customers with the most complete and accurate cartography that is available to us at a reasonable cost. We use a combination of governmental and private data sources, which we identify in product literature and copyright messages displayed to the consumer. Virtually all data sources contain some inaccurate or incomplete data. In some countries, complete and accurate map information is either not available or is prohibitively expensive.
Notice regarding windshield mounting legal restrictions
State law in Minnesota and California prohibits or restricts drivers from using suction mounts on their windshields while operating motor vehicles (see California Vehicle Code 26708(a); Minnesota Statutes Section 169.71). Other ESCORT mount options should be used when driving in those states. Many other states have enacted restrictions against placing “non transparent material” upon the windshield or placing objects upon the windshield that obstruct the driver’s vision (e.g., New Jersey law currently prohibits windshield objects that “unduly interfere” with the driver’s vision to the front or sides). Check your state and local laws and ordinances where you drive before using the suction cup mount on your windshield. IT IS THE USER’S RESPONSIBILITIY TO USE THE PASSPORT iQ AND ESCORT MOUNTING OPTIONS IN SUCH A MANNER THAT THE USER IS IN COMPLIANCE WITH ALL APPLICABLE LAWS AND ORDINANCES. Remember to always mount your PASSPORT iQ in a location that does not obstruct the driver’s view of the road. ESCORT does not assume any responsibility for any fines, penalties, or damages that may be incurred as a result of disregarding this notice or as a result of any state or local law or ordinance relating to the use of your PASSPORT iQ.
12

SECTION 2: USING PASSPORT iQ
Note: The screens shown in this guide may be different than the ones you see on PASSPORT iQ, depending on the firmware version.
Power Options
•To turn on PASSPORT iQ, slide the power switch on top of the device to the right.
•To turn off PASSPORT iQ, slide the power switch on top of the device to the right and hold for four seconds. PASSPORT iQ will shut down completely. (Note: Touching Cancel will switch PASSPORT iQ into Battery Only mode.)
•When connected to 12 volt switched power (lighter plug turns on/off with the ignition), PASSPORT iQ will automatically go into Suspend mode (for approximately two hours) when you turn off the ignition. A message will appear acknowledging this change. Suspend mode provides a quick start once 12 volt power is applied again.
•When connected to unswitched 12 volt power (lighter plug has a constant 12 volts), use the power switch to shut off completely. Unplugging the cord will put PASSPORT iQ into Suspend mode (see above).
•To lock PASSPORT iQ’s screen, slide the power switch to the left. Putting PASSPORT iQ in lock mode when not in use or while traveling will keep the device from using its internal battery.
Initial Setup
Upon powering on PASSPORT iQ for the first time, you will be asked to select your preferred language, voice (for directional prompts and radar/laser alerts), and time zone. Simply touch the options you’d like to select and save the settings. The Safety Warning screen appears.
Note: For details on how to edit these preferences, see “General Settings” in the Settings and Preferences section.
13
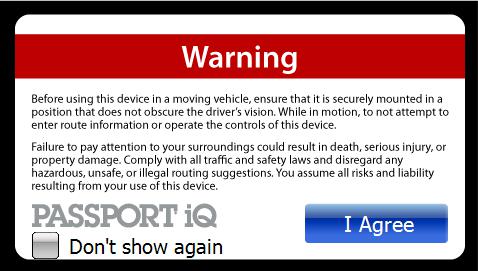
Warning Screen
When you turn on PASSPORT iQ, a splash screen appears for a few seconds, then the safety warning appears.
Be sure you understand these warnings. To continue on to PASSPORT iQ features, touch I Agree at the bottom right of the screen. The Main Menu screen appears.
14
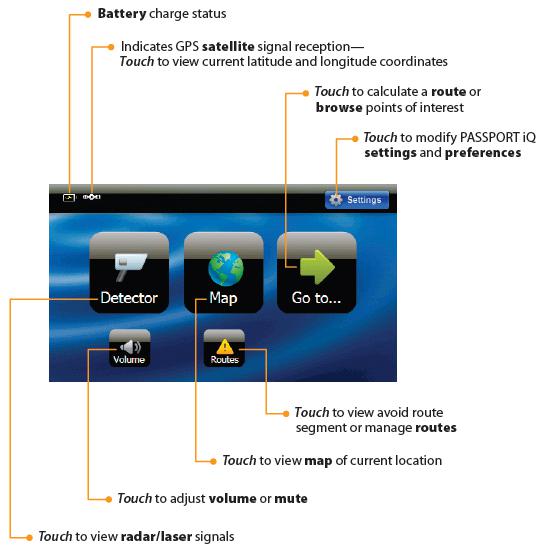
Main Menu Screen
From the Main Menu screen, you can view your current location, set a route to a destination, view radar/laser alert screens, adjust volume, and set PASSPORT iQ preferences.
To view radar signals, touch Detector.
To see where you are, touch Map.
To enter a destination address on the keypad, touch Go to... PASSPORT iQ automatically calculates the best route choice to direct you to that address. See “Creating a Route to an Address” for step by step instructions.
To set PASSPORT iQ preferences, including Detector Settings, touch Settings. To learn more about these settings, see “Settings and Preferences.”
15

Volume
To adjust the volume, touch Volume at the bottom of the Main Menu screen. The volume scale appears.
Touch the scale to adjust the volume. To mute the PASSPORT iQ voice, touch Mute Audio. (Note: Radar/laser alerts will continue to sound.)
Routes
Here you can create and save routes your regularly travel, as well as calculate alternate routes to avoid upcoming traffic slow downs or incidents along your current route. For step by step instructions, see “Managing Your Routes” and “Avoiding a Route Segment” in the GPS Navigation section.
Battery Charge Status
The battery charge status is represented by the battery icon at the upper left of the Main Menu screen. When the icon shows three bars, the battery is fully charged.
GPS Status
The satellite icon at the upper left of the screen indicates whether or not you are receiving a satellite signal. If a red line appears on this icon, PASSPORT iQ is not acquiring a satellite signal.
Viewing latitude and longitude coordinates
From the Main Menu screen, touch the satellite icon to view the latitude and longitude coordinates of your current location.
16
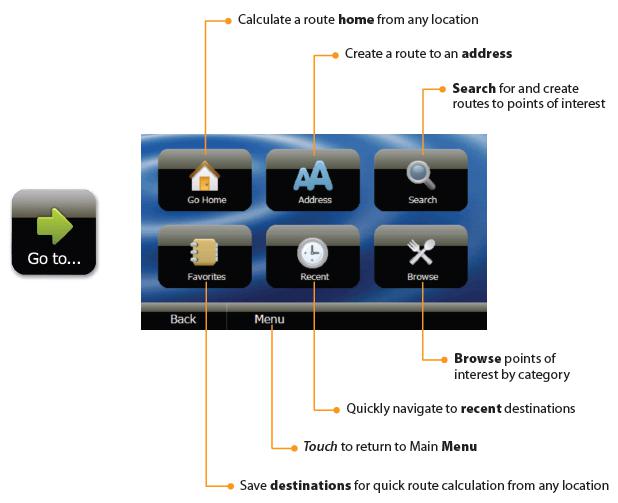
Go To Screen/GPS Navigation Menu
This screen lets you set up a route to an address in your city, in another city, in another state, or to a restaurant, gas station, park, hospital, or other common public locale. Once you set your home address, you can calculate a route to go home from wherever you travel. You can also search for a particular point of interest by name in Search or browse them by category in Browse. Favorites allows you to get directions from your location to places you have saved in your favorites list. Recent allows you to navigate to your most recent destinations without having to enter them again.
17
Creating a Route to an Address
The route to your destination address is based on your current GPS location. Be sure PASSPORT iQ is in clear view of the sky.
To create a route to an address from your current GPS location to a destination in the same city:
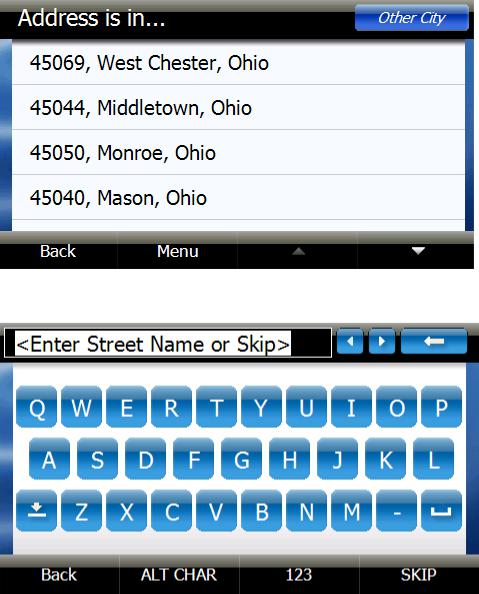
1.Touch Go To... on the Main Menu screen, then touch Address on the Go To… screen. The city in which you are located displays, along with cities to which you have recently navigated. If this is the first time you are using the device, only the name of the city of your current GPS location displays.
2. Once you select the city, the Enter Street Name keypad opens. Enter the name of the street.
3. After entering a few characters, PASSPORT iQ displays a list of street names that include those
18
characters. If a list is not automatically displayed, simply touch NEXT to have PASSPORT iQ search for the street name.
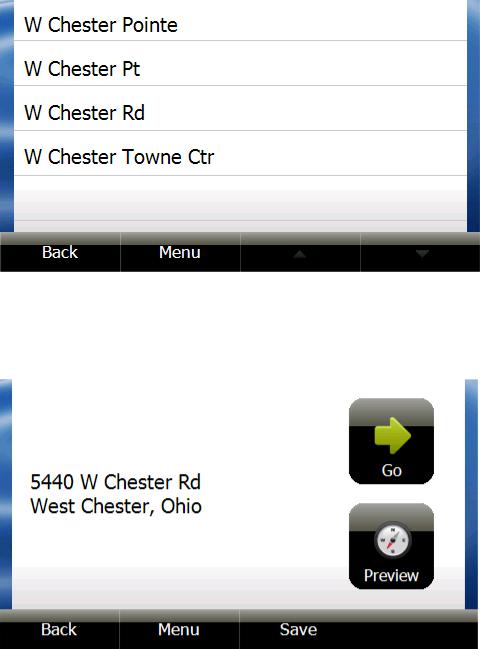
4.Touch the street name you want. If the street name is not on the list, touch Back and re enter the street name. The Enter House Number keypad opens.
5.Enter the house number, then touch NEXT. The address card for your destination displays.
6.Touch Go. The device calculates your route. When the calculation is complete, the route is highlighted on the Map View; the My Car marker shows your starting location, and the voice prompts begin. For details on how to use the various features in this view, see “Map View.”
19
Creating a route to an intersection
You might know the intersecting street names but not the exact address of your destination. You can enter an intersection to get routing instructions.
1.Touch Go To... on the main Menu screen, then touch Address on the Go To… screen. The Address is in... list opens.
2.Touch the city name. Or touch Other city to enter it on the Enter City Name keypad.
3.When the Enter Street Name keypad displays, type the street name. After entering a few characters, PASSPORT iQ displays a list of street names that include those characters.
4.Touch the street name you want. When the Enter House Number keypad displays, touch SKIP.
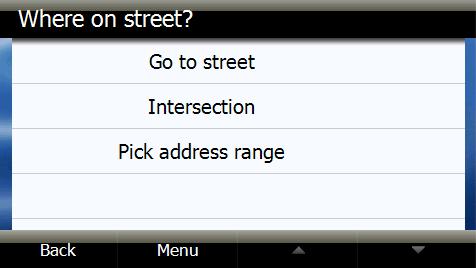
5.The Where on Street? screen displays. Touch Go to street to display an address card for that street.
OR, Touch Intersection to display the Enter Next Street keypad and enter the name.
OR, Touch Pick address range to display a list of address ranges on that street, then touch the address range you want to display on the address card.
6.Touch Go to calculate the route and start voice prompts.
20
Creating a route to an address in another state
1.Start as you would to create a route to an address by touching Go To... on the Main Menu screen, then touching Address on the Go To… screen.
2.When the list of cities to which you have created routes opens, touch Other City in the top right corner of the screen. The City Is In... screen opens showing the list of states to which you have navigated.
3.Touch Other State. The Enter State/Prov or Code keypad displays.
4.Enter the state, the province, or number code. A list of states with the same beginning characters displays.
5.Touch the name of the state you want or touch Back to return to the keypad and continue to enter the state name.
6.Type the name of the city on the Enter City/Postal Code keypad that displays. A list of cities with the same beginning letter displays.
OR, Enter the ZIP code and touch NEXT. A list of cities with that ZIP code displays.
7.Touch the name of the city you want or touch Back to return to the keypad and continue to enter the name or code.
8.Continue as you would to create a route to an address as described in “Creating a route to an address” or follow the steps for “Creating a route to an intersection.”
21
 Loading...