

Epson WorkForce WF-2540 Quick Guide and Warranty

WF-2540
Quick Guide
Your WF-2540. . . . . . . . . . . . . . . . . . . . . . . . . . . . . . . . . . . . . . . . . . . . . . . . . . 2
Using Special Papers . . . . . . . . . . . . . . . . . . . . . . . . . . . . . . . . . . . . . . . . . . . . 4
Placing Originals for Copying, Scanning, or Faxing. . . . . . . . . . . . . . . . . . . . . . 6
Copying a Photo or Document . . . . . . . . . . . . . . . . . . . . . . . . . . . . . . . . . . . . . 8
Printing From Your Computer. . . . . . . . . . . . . . . . . . . . . . . . . . . . . . . . . . . . . . 9
Scanning a Document or Photo . . . . . . . . . . . . . . . . . . . . . . . . . . . . . . . . . . . 13
Faxing a Document. . . . . . . . . . . . . . . . . . . . . . . . . . . . . . . . . . . . . . . . . . . . . 17
Maintaining Your Product . . . . . . . . . . . . . . . . . . . . . . . . . . . . . . . . . . . . . . . . 23
Solving Problems . . . . . . . . . . . . . . . . . . . . . . . . . . . . . . . . . . . . . . . . . . . . . . 28
Notices . . . . . . . . . . . . . . . . . . . . . . . . . . . . . . . . . . . . . . . . . . . . . . . . . . . . . . 35
1

Your WF-2540
After you set up your WF-2540 (see the Start Here sheet), turn to this Quick Guide and
your online User’s Guide for instructions on using your product.
Features Where to find information
Copy, scan, and fax from the easy-to-use
control panel
Wireless printing and scanning from mobile
devices with EPSON Connect
Easy Wi-Fi networking See the online User’s Guide.
High-capacity ink cartridges See this Quick Guide for installation
Advanced paper handling with Automatic
Document Feeder
Copy files between a USB storage device and
your computer
™
See this Quick Guide for the basics.
See the online User’s Guide for details.
See www.epson.com/connect.
instructions.
See this Quick Guide or the online
User’s Guide for paper loading instructions.
See the online User’s Guide for details.
2 Your WF-2540

Using the Control Panel
The control panel makes it easy to use all the features of your product. To save energy, the
screen goes dark after several minutes of inactivity. Press any button to wake it up.
8
12 3 4
5 6
7
10
9
11 12 13
14
Note: To turn off the “beep” heard when you press a button, press the r Copy button
to select copy mode, press x Menu, press u or d to select Printer Setup, then press
OK. Select Sound, then select Off and press OK. If you turn off the sound, the dialing
sound made when you transmit a fax is also turned off.
Number Description
1 Turn the product on or off
2 Access your product’s Fax mode
3 Access your product’s Copy mode
4 View menus and status on the LCD Screen
5 Use the arrow keys and
6 Enter numbers, letters, and symbols
7 Select fax dialing settings
8 Stop printing/copying/scanning/faxing or reset settings
9 View wireless network status
10 Access your product’s Scan mode
11 Display detailed settings for each mode
12 Cancel/return to the previous menu
13 Select Wi-Fi settings
14 Start printing/copying/scanning/faxing
OK button to navigate menus
Using the Control Panel 3

Using Special Papers
Epson offers a wide array of high quality papers, making it easy to maximize the impact of
your photos, presentations, and creative projects.
You can purchase genuine EPSON ink and paper at EPSON
www.epson.com/ink3 (U.S. sales) or www.epson.ca (Canadian sales). You can also
purchase supplies from an EPSON authorized reseller. To find the nearest one, call
800-GO-EPSON (800-463-7766).
Paper name Size
EPSON Bright White Paper Letter (8.5 × 11 inches
[216 × 279 mm])
EPSON Brochure & Flyer Paper Matte
Double-sided
EPSON Ultra Premium Presentation
Paper Matte
EPSON Premium Presentation Paper
Matte
EPSON Premium Presentation Paper
Matte Double-sided
EPSON Presentation Paper Matte Letter (8.5 × 11 inches
EPSON Ultra Premium Photo Paper
Glossy
EPSON Premium Photo Paper
Semi-gloss
EPSON Premium Photo Paper Glossy 4 × 6 inches (102 × 152 mm) S041808
Letter (8.5 × 11 inches
[216 × 279 mm])
Letter (8.5 × 11 inches
[216 × 279 mm])
8 × 10 inches (203 × 254 mm) S041467 50
Letter (8.5 × 11 inches
[216 × 279 mm])
Letter (8.5 × 11 inches
[216 × 279 mm])
[216 × 279 mm])
Legal (8.5 × 14 inches
[216 × 356 mm])
4 × 6 inches (102 × 152 mm) S042181
5 × 7 inches (127 × 178 mm) S041945 20
8 × 10 inches (203 × 254 mm) S041946 20
Letter (8.5 × 11 inches
[216 × 279 mm])
4 × 6 inches (102 × 152 mm) S041982 40
Letter (8.5 × 11 inches
[216 × 279 mm])
5 × 7 inches (127 × 178 mm) S041464 20
8 × 10 inches (203 × 254 mm) S041465 20
Letter (8.5 × 11 inches
[216 × 279 mm])
®
Supplies Central® at
Part
number
S041586 500
S042384 150
S041341 50
S041257
S04218050100
S041568 50
S041062 100
S041067 100
S04217460100
S042182
S0421752550
S041331 20
S04172740100
S042183
S0416672550
Sheet
count
4 Using Special Papers

Part
Paper name Size
EPSON Photo Paper Glossy 4 × 6 inches (102 × 152 mm) S041809
Letter (8.5 × 11 inches
[216 × 279 mm])
EPSON Photo Quality Self-adhesive
Sheets
EPSON Iron-on Cool Peel Transfer
paper
A4 (8.3 × 11.7 inches
[210 × 297 mm])
Letter (8.5 × 11 inches
[216 × 279 mm])
number
S04203850100
S041141
S041649
S041271
S041106 10
S041153 10
Sheet
count
20
50
100
Note: Media availability varies by country.
For detailed paper loading instructions, see the Start Here sheet or online User’s Guide.
For best results:
■ Fan and align the edges of the paper before loading.
■ Load paper against the right edge guide with the printable side faceup; it is usually
whiter or brighter. (Load letterhead or pre-printed paper top edge first.)
■ Always load paper short edge first and make sure the left edge guide is against the
paper as shown.
■ If you use paper with binder holes, only use letter-, A4-, or legal-size and load only
one sheet at a time.
Using Special Papers 5

Placing Originals for Copying, Scanning, or Faxing
Before you copy, scan, or fax, place your documents on the scanner glass or in the
Automatic Document Feeder (ADF). Place photos on the scanner glass only and not in the
ADF.
Using the Scanner Glass
You can place a photo or a document up to letter-size (or A4-size) on the scanner glass.
1. Raise the document cover.
2. Place your original facedown on the front right corner of the scanner glass, with the
top of your original against the right side.
3. Close the cover gently so you don’t move your original.
6 Placing Originals for Copying, Scanning, or Faxing

Using the Automatic Document Feeder
You can place up to 30 sheets of letter- or A4-size paper or 10 sheets of legal-size paper at a
time. Load only plain paper in the ADF.
1. Move the edge guide outward.
2. Fan the originals, then tap them on a flat surface to even the edges.
3. Insert the originals faceup, top edge first. The
on.
ADF light on the control panel turns
4. Slide the edge guide against the originals, but not too tightly.
Using the Automatic Document Feeder 7

Copying a Photo or Document
Follow the steps in this section to copy black-and-white or color documents.
If you use the Automatic Document Feeder (ADF), you can copy up to 30 sheets of letteror A4-size paper or 10 sheets of legal-size paper at a time. Load only plain paper in the
ADF.
1. Load paper in the sheet feeder.
2. Place your original document on the scanner glass, or load your documents in the
ADF (see page 6).
3. Press the r
4. Press u or d or use the numeric keypad to select the number of copies you want (up
to 99).
5. Press l or r to change the copy density (lightness or darkness).
6. To change the layout, press x
Settings
7. Press u or d to select
Borderless (when copying photos onto photo paper) to expand the image all the way
to the edge of the paper (slight cropping may occur). Then press
8. To change paper type, paper size, or any other print settings, press u or d to select the
setting, then press
copying legal-size documents on to letter-size paper, select
select
Note: Not all Paper Type, Paper Size, Layout, and Quality settings may be available
depending on the options you choose. See the online User’s Guide for details.
To clear copy settings, press
9. After you finish selecting settings, press x Menu to exit the settings menu.
10. Press the
y
Stop/Reset.
8 Copying a Photo or Document
Copy button.
Menu, press u or d to select Paper and Copy
, press OK, press u or d to select Layout, then press OK again.
With Border to leave a small margin around the image or
OK.
OK. Press u or d to select an option, then press OK. If you are
Reduce/Enlarge, then
Legal->Letter.
y Stop/Reset.
B&W or Color x Start button to begin copying. To cancel copying, press

Printing From Your Computer
This section describes the basic steps for printing from a Windows® or Mac computer. For
detailed instructions on printing, see the online User’s Guide.
Printing in Windows
1. Select the print command in your application.
Select your EPSON
product
Click here to open
your printer software
2. Make sure your EPSON product is selected, then click the
Properties button.
(If you see a
Properties on the next screen.)
Setup, Printer, or Options button, click it. Then click Preferences or
Printing From Your Computer 9
Preferences or

3. On the Main tab, select the basic print settings. Make sure you choose the correct
Paper Type setting for the paper you are using (see page 12 for details).
Select your
Document Size
Click here
for quick
access to
preselected
settings
Select your
Paper Type
Click here for
2-Sided Printing
Tip: For quick access to the most common settings, select one of the Printing
Presets on the left side of the screen. You can delete these presets or create your
own by clicking the
Add/Remove Presets button.
4. For more printing options, click the More Options tab.
Note: For more information about print settings, click Help or see your online
User’s Guide.
5. Click OK to save your settings.
6. Click
OK or Print to start printing.
10 Printing in Windows

Printing With a Mac
Follow the steps below to print from Mac OS X.
1. Open the
2. Select your EPSON product as the
3. Click the arrow or
4. Select basic copy and page settings. For borderless printing, choose a
setting with a
File menu and select Print.
Printer setting.
Select your EPSON product
Show Details to expand the print window, if necessary.
Paper Size
Borderless option. You can also select a custom setting to create a
custom paper size.
Note: If the setting you want isn’t shown (for example, Scale), check for it in your
application before printing. Or select your application from the pop-up menu in this
window and check if the setting is available.
Copy and page
settings
Application
settings
Pop-up menu
Printing With a Mac 11
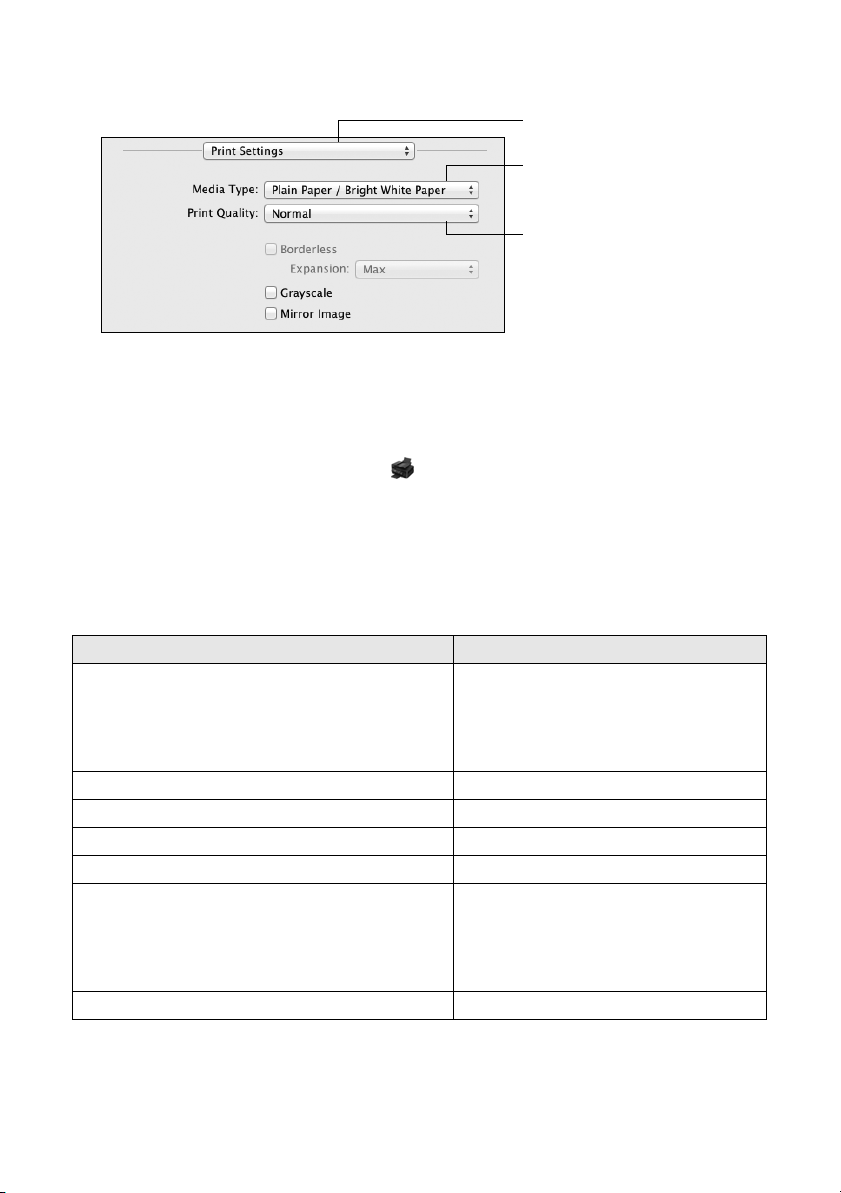
5. Choose Print Settings from the pop-up menu, and select the following print settings:
Choose Print Settings
Select your Media Type
(see below)
Select higher quality or faster
printing (if available)
6. Choose any other printing options you may need from the pop-up menu. See the
online User’s Guide for details.
7. Click
Print.
8. To monitor your print job, click the printer icon in the Dock.
Selecting the Correct Paper Type
Select the correct Paper Type (Windows) or Media Type (Mac OS X) setting in your
printer software so the ink coverage can be adjusted accordingly.
For this paper/media Select this setting
Plain paper
EPSON Bright White Paper
EPSON Presentation Paper Matte
EPSON Photo Quality Self-adhesive Sheets
EPSON Iron-on Cool Peel Transfer paper
EPSON Ultra Premium Photo Paper Glossy Ultra Premium Photo Paper Glossy
EPSON Premium Photo Paper Glossy Premium Photo Paper Glossy
EPSON Photo Paper Glossy Photo Paper Glossy
EPSON Premium Photo Paper Semi-gloss Premium Photo Paper Semi-Gloss
EPSON Premium Presentation Paper Matte
EPSON Premium Presentation Paper Matte
Double-sided
EPSON Ultra Premium Presentation Paper Matte
EPSON Brochure & Flyer Paper Matte Double-sided
Envelopes Envelope
Plain Paper/Bright White Paper
Premium Presentation Paper Matte
12 Selecting the Correct Paper Type

Scanning a Document or Photo
You can use your product to scan original documents and photos and save them on your
computer.
Note: For detailed scanning instructions, see the online User’s Guide.
Quick Scanning With the Scan Button
Use the u Scan button to quickly scan a document or photo and save it on your
computer. You can even scan a photo and have it automatically included in an email
message.
1. Place your original document or photo as shown on page 6.
2. Press the u
3. Press u or d to select one of the following options, then press
■ Scan to USB Device automatically scans a document or photo and saves it to an
■ Scan to Cloud lets you send your scanned files to a destination that you have
■ Scan to PC automatically creates a JPG image and saves it to your computer;
■ Scan to PC (PDF) automatically creates a PDF file and saves it to your computer;
■ Scan to PC (Email) automatically scans a photo, resizes it, launches your email
■ Scan to PC (WSD) lets you manage network scanning in Windows 7 or
Scan button.
OK.
inserted USB storage device.
registered with EPSON Connect.
ideal for scanning photos.
ideal for scanning documents.
application, and attaches a JPG image to a new outgoing message. This works
with MAPI-type email such as Microsoft
not web-based email such as Gmail.
Windows Vista
(Web Services for Devices) on the computer you want to scan to.
®
(English only). To use this feature, you must first set up WSD
®
Outlook or Windows Live Mail, but
Scanning a Document or Photo 13

4. Do one of the following:
■ If you’re scanning to a USB storage device, select your scan settings, then press
the
B&W or Color x Start button to begin scanning.
■ If you’re scanning to the cloud, select your destination, then press the B&W or
Color x Start button to begin scanning.
■ If you’re scanning to your computer, select USB Connection if your product is
connected by a USB cable, or select the name of your computer if your product is
connected over a network. Then press the
Color x Start button to begin
scanning.
Scanning With EPSON Scan Software
You can scan original documents and photos and save them as files on your computer
using the EPSON Scan software. You can also launch EPSON Scan from any TWAINcompliant application.
Note: For Mac OS X 10.6/10.7, see “Scanning With Mac OS X 10.6/10.7” on page 15.
1. Place your original document or photo as shown on page 6.
2. Do one of the following to start EPSON Scan:
■ Windows: Double-click the EPSON Scan icon on your desktop.
■ Mac OS X 10.5: Double-click EPSON Scan in Applications > Epson
Software.
■ To scan from an application, start your application. Then open the File menu,
choose
Import or Acquire, and select your product.
14 Scanning With EPSON Scan Software
 Loading...