

Page 1

WF-8090 User's Guide
Page 2

Page 3

Contents
WF-8090 User's Guide............................................................................................................................... 11
Product Basics .......................................................................................................................................... 12
Using the Control Panel ..................................................................................................................... 12
Control Panel Buttons and Lights.................................................................................................. 12
Status Icons.............................................................................................................................. 13
Setting a Password and Locking the Control Panel....................................................................... 14
Entering Characters on the LCD Screen................................................................................... 15
Changing LCD Screen Language.................................................................................................. 15
Adjusting the Screen Contrast....................................................................................................... 16
Product Parts Locations..................................................................................................................... 17
Product Parts - Front ..................................................................................................................... 18
Product Parts - Inside.................................................................................................................... 20
Product Parts - Back...................................................................................................................... 21
Using Eco Mode................................................................................................................................. 22
Changing the Eco Settings............................................................................................................ 22
Changing the Sleep Timer Settings............................................................................................... 23
Changing the Power Off Timer Settings ........................................................................................ 24
Epson Connect Solutions for Smartphones, Tablets, and More......................................................... 25
Using Epson Email Print ............................................................................................................... 25
Using the Epson iPrint Mobile App ................................................................................................ 25
Using Epson Remote Print ........................................................................................................... 26
Using AirPrint .................................................................................................................................... 26
Using Google Cloud Print................................................................................................................... 27
Setting Up Google Cloud Print on a Chromebook ......................................................................... 28
Wi-Fi or Wired Networking........................................................................................................................ 30
Wi-Fi Infrastructure Mode Setup......................................................................................................... 30
Selecting Wireless Network Settings From the Control Panel ....................................................... 31
Wi-Fi Direct Mode Setup .................................................................................................................... 33
Enabling Wi-Fi Direct Mode........................................................................................................... 34
Wi-Fi Protected Setup (WPS)............................................................................................................. 36
3
Page 4

Using WPS to Connect to a Network............................................................................................. 36
Printing a Network Status Sheet......................................................................................................... 37
Changing or Updating Network Connections ..................................................................................... 38
Accessing the Web Config Utility................................................................................................... 38
Changing a USB Connection to a Wi-Fi Connection...................................................................... 39
Changing a Wi-Fi Connection to a Wired Network Connection...................................................... 39
Connecting to a New Wi-Fi Router ................................................................................................ 39
Disabling Wi-Fi Features............................................................................................................... 40
Enabling Epson Universal Print Driver (PCL) or PostScript Printing.................................................... 41
Selecting PDL (Page Description Language) Settings....................................................................... 41
PDL Print Configuration Options.................................................................................................... 42
Selecting Printer Language and Interface Settings ............................................................................ 45
Printer Language and Interface Options........................................................................................ 46
Printing a PS3 (PostScript) Status Sheet ........................................................................................... 46
Loading Paper ........................................................................................................................................... 48
Loading Paper in the Cassette........................................................................................................... 48
Loading Paper and Envelopes in the Rear Paper Feed Slot .............................................................. 51
Loading Paper in the Front Paper Feed Slot ...................................................................................... 55
Paper Loading Capacity..................................................................................................................... 57
Available Epson Papers..................................................................................................................... 59
Paper or Media Type Settings - Printing Software.............................................................................. 61
Selecting the Paper Settings for Each Source - Control Panel........................................................... 62
Paper Type Settings - Control Panel ............................................................................................. 63
Selecting Default Paper Settings - Administrator................................................................................ 63
Selecting the Paper Source Settings - Administrator..................................................................... 64
Paper Source Settings Options................................................................................................. 65
Selecting Universal Print Settings.................................................................................................. 65
Universal Print Settings Options ............................................................................................... 66
Installing the Optional Cabinet and Paper Cassettes......................................................................... 67
Installing the Optional Cabinet....................................................................................................... 67
Installing the Optional Paper Cassette Units ................................................................................. 75
Enabling the Optional Paper Cassettes - Windows................................................................... 82
Enabling the Optional Paper Cassettes - OS X ........................................................................ 83
4
Page 5

Printing from a Computer......................................................................................................................... 85
Printing with Windows........................................................................................................................ 85
Selecting Basic Print Settings - Windows...................................................................................... 85
Paper Source Options - Windows............................................................................................. 88
Print Quality Options - Windows ............................................................................................... 88
Multi-Page Printing Options - Windows..................................................................................... 89
Selecting Double-sided Printing Settings - Windows..................................................................... 89
Double-sided Printing Options - Windows................................................................................. 92
Print Density Adjustments - Windows....................................................................................... 92
Selecting Additional Layout and Print Options - Windows............................................................. 93
Custom Color Correction Options - Windows............................................................................ 95
Image Options and Additional Settings - Windows.................................................................... 96
Header/Footer Settings - Windows........................................................................................... 97
Selecting a Printing Preset - Windows........................................................................................... 98
Selecting Extended Settings - Windows........................................................................................ 99
Extended Settings - Windows................................................................................................. 100
Printing Your Document or Photo - Windows............................................................................... 101
Locking Printer Settings - Windows............................................................................................. 102
Administrator Lock Settings.................................................................................................... 104
Selecting Default Print Settings - Windows.................................................................................. 105
Changing the Language of the Printer Software Screens....................................................... 106
Changing Automatic Update Options .......................................................................................... 107
Printing with OS X ............................................................................................................................ 108
Selecting Basic Print Settings - OS X ......................................................................................... 109
Paper Source Options - OS X................................................................................................. 113
Print Quality Options - OS X.................................................................................................... 113
Print Options - OS X................................................................................................................ 113
Selecting Page Setup Settings - OS X......................................................................................... 114
Selecting Print Layout Options - OS X......................................................................................... 115
Selecting Double-sided Printing Settings - OS X......................................................................... 116
Double-sided Printing Options and Adjustments - OS X......................................................... 117
Managing Color - OS X................................................................................................................ 118
Color Matching and Color Options - OS X............................................................................... 119
5
Page 6

Selecting Printing Preferences - OS X......................................................................................... 120
Printing Preferences - OS X.................................................................................................... 121
Printing Your Document or Photo - OS X..................................................................................... 122
Checking Print Status - OS X.................................................................................................. 122
Printing with the Epson Universal Print Driver - Windows................................................................. 124
Installing the Epson Universal Print Driver - Windows ................................................................ 124
Synchronizing Printer Settings - Epson Universal Print Driver - Windows................................... 128
Selecting Basic Print Settings - Epson Universal Print Driver - Windows .................................... 130
Selecting Additional Layout and Print Options - Epson Universal Print Driver - Windows ........... 132
Selecting Maintenance Options - Epson Universal Print Driver - Windows.................................. 134
Extended Settings - Epson Universal Print Driver - Windows ................................................. 135
Selecting Default Print Settings - Epson Universal Print Driver - Windows.................................. 136
Locking Printer Settings - Epson Universal Print Driver - Windows ............................................. 138
Epson Universal Print Driver Lock Settings............................................................................. 140
Adding Network Printers - Epson Universal Print Driver - Windows............................................. 141
Printing with the PostScript (PS3) Printer Software - Windows ........................................................ 144
Installing the PostScript (PS3) Printer Software - Windows ........................................................ 144
Enabling the Optional Paper Cassettes - PostScript Printer Software - Windows ....................... 144
Selecting Basic Print Settings - PostScript Printer Software - Windows ...................................... 146
Selecting Additional Layout and Print Options - PostScript Printer Software - Windows ............. 149
Selecting Default Print Settings - PostScript Printer Software - Windows.................................... 150
Printing with the PostScript (PS3) Printer Software - OS X .............................................................. 151
Installing the PostScript (PS3) Printer Software - OS X............................................................... 152
Enabling the Optional Paper Cassettes - PostScript Printer Software - OS X.............................. 152
Selecting Basic Print Settings - PostScript Printer Software - OS X ............................................ 153
Selecting Page Setup Settings - PostScript Printer Software - OS X........................................... 158
Selecting Print Layout Options - PostScript Printer Software - OS X........................................... 159
Sizing Printed Images - PostScript Printer Software - OS X ....................................................... 160
Managing Color - PostScript Printer Software - OS X ................................................................. 160
Printing Your Document or Photo - PostScript Printer Software - OS X....................................... 161
Checking Print Status - PostScript Printer Software - OS X ................................................... 161
Cancelling Printing Using a Product Button...................................................................................... 162
6
Page 7

Replacing Ink Cartridges and Maintenance Boxes............................................................................... 163
Check Cartridge and Maintenance Box Status................................................................................. 163
Checking Cartridge Status on the LCD Screen............................................................................ 163
Checking Cartridge and Maintenance Box Status with Windows ................................................ 164
Checking Cartridge and Maintenance Box Status with OS X....................................................... 167
Purchase Epson Ink Cartridges and Maintenance Box.................................................................... 169
Ink Cartridge and Maintenance Box Part Numbers...................................................................... 169
Removing and Installing Ink Cartridges............................................................................................ 170
Printing with Black Ink and Expended Color Cartridges ................................................................... 173
Printing with Expended Color Cartridges - Windows ................................................................... 173
Printing with Expended Color Cartridges - OS X ......................................................................... 174
Conserving Low Black Ink with Windows ......................................................................................... 176
Replacing the Maintenance Box....................................................................................................... 176
Adjusting Print Quality............................................................................................................................ 179
Print Head Maintenance................................................................................................................... 179
Print Head Nozzle Check............................................................................................................. 179
Checking the Nozzles Using the Product Control Panel ......................................................... 180
Checking the Nozzles Using a Computer Utility...................................................................... 182
Print Head Cleaning .................................................................................................................... 183
Cleaning the Print Head Using the Product Control Panel...................................................... 184
Cleaning the Print Head Using a Computer Utility................................................................... 185
Print Head Alignment ....................................................................................................................... 187
Aligning the Print Head Using the Product Control Panel............................................................ 187
Aligning the Print Head Using a Computer Utility......................................................................... 189
Cleaning the Paper Guide................................................................................................................ 191
Cleaning and Transporting the Product................................................................................................ 193
Cleaning the Product........................................................................................................................ 193
Transporting Your Product............................................................................................................... 193
Solving Problems.................................................................................................................................... 196
Checking for Software Updates........................................................................................................ 196
Product Status Messages ................................................................................................................ 197
Running a Product Check ................................................................................................................ 198
Resetting Control Panel Defaults ..................................................................................................... 199
7
Page 8

Solving Setup Problems................................................................................................................... 200
Product Does Not Turn On or Off................................................................................................. 201
Noise After Ink Installation........................................................................................................... 201
Software Installation Problems.................................................................................................... 201
Solving Network Problems............................................................................................................... 202
Product Cannot Connect to a Wireless Router or Access Point .................................................. 202
Network Software Cannot Find Product on a Network................................................................. 203
Product Does Not Appear in OS X Printer Window...................................................................... 204
Cannot Print Over a Network....................................................................................................... 205
Solving Paper Problems................................................................................................................... 206
Paper Feeding Problems............................................................................................................. 206
Paper Jam Problems in the Front Cover (A)................................................................................ 208
Paper Jam Problems in the Rear Paper Feed Slot (B1) .............................................................. 209
Paper Jam Problems in the Front Paper Feed Slot (B2).............................................................. 209
Paper Jam Problems in the Cassette (C1/C2/C3/C4).................................................................. 212
Paper Jam Problems in the Rear Cover 1 (D1)............................................................................ 213
Paper Jam Problems in the Rear Cover (E) of the Optional Paper Cassette Unit ....................... 216
Paper Ejection Problems............................................................................................................. 217
Solving PostScript Printing Problems............................................................................................... 218
Nothing Prints Using the Postscript Printing Software................................................................. 218
Documents Print Incorrectly Using the Postscript Printing Software............................................ 219
Accessing Printer Properties - Postscript - Windows................................................................... 219
Solving Problems Printing from a Computer..................................................................................... 220
Nothing Prints.............................................................................................................................. 220
Product Icon Does Not Appear in Windows Taskbar................................................................... 221
Printing is Slow............................................................................................................................ 222
Solving Page Layout and Content Problems.................................................................................... 223
Inverted Image............................................................................................................................. 223
Too Many Copies Print................................................................................................................ 224
Blank Pages Print........................................................................................................................ 224
Incorrect Margins on Printout....................................................................................................... 224
Incorrect Characters Print............................................................................................................ 225
Incorrect Image Size or Position.................................................................................................. 225
8
Page 9

Slanted Printout........................................................................................................................... 226
Solving Print Quality Problems......................................................................................................... 226
White or Dark Lines in Printout.................................................................................................... 227
Blurry or Smeared Printout.......................................................................................................... 227
Faint Printout or Printout Has Gaps............................................................................................. 229
Grainy Printout............................................................................................................................. 230
Incorrect Colors........................................................................................................................... 231
When to Uninstall Your Product Software ........................................................................................ 231
Uninstalling Printing Software - Standard Epson Printer Software - Windows............................. 232
Uninstalling Product Software - OS X.......................................................................................... 232
Where to Get Help............................................................................................................................ 233
Technical Specifications ........................................................................................................................ 235
Windows System Requirements ...................................................................................................... 235
OS X System Requirements............................................................................................................. 236
Paper Specifications ........................................................................................................................ 236
Printable Area Specifications ........................................................................................................... 237
Ink Cartridge Specifications.............................................................................................................. 239
Dimension Specifications................................................................................................................. 239
Electrical Specifications ................................................................................................................... 240
Environmental Specifications........................................................................................................... 241
Interface Specifications.................................................................................................................... 241
Network Interface Specifications...................................................................................................... 241
Safety and Approvals Specifications................................................................................................ 243
PS3 Mode Fonts............................................................................................................................... 243
PCL5 Mode Fonts ............................................................................................................................ 245
PCL6 Mode Fonts ............................................................................................................................ 248
Symbol Sets..................................................................................................................................... 250
Notices ..................................................................................................................................................... 258
General Printer Safety Instructions................................................................................................... 258
Ink Cartridge Safety Instructions.................................................................................................. 260
LCD Screen Safety Instructions................................................................................................... 260
Wireless Connection Safety Instructions..................................................................................... 261
Cabinet Safety Instructions.......................................................................................................... 261
9
Page 10

FCC Compliance Statement............................................................................................................. 261
Software Notice................................................................................................................................ 262
Trademarks...................................................................................................................................... 310
Copyright Notice............................................................................................................................... 311
libTIFF Software Acknowledgment.............................................................................................. 311
A Note Concerning Responsible Use of Copyrighted Materials................................................... 312
Default Delay Times for Power Management for Epson Products............................................... 312
Copyright Attribution.................................................................................................................... 312
10
Page 11

WF-8090 User's Guide
Welcome to the WF-8090 User's Guide.
For a printable PDF copy of this guide, click here.
11
Page 12
Product Basics
See these sections to learn about the basic features of your product.
Using the Control Panel
Product Parts Locations
Using Eco Mode
Epson Connect Solutions for Smartphones, Tablets, and More
Using AirPrint
Using Google Cloud Print
Using the Control Panel
See these sections to learn about the control panel and select control panel settings.
Control Panel Buttons and Lights
Setting a Password and Locking the Control Panel
Changing LCD Screen Language
Adjusting the Screen Contrast
Parent topic: Product Basics
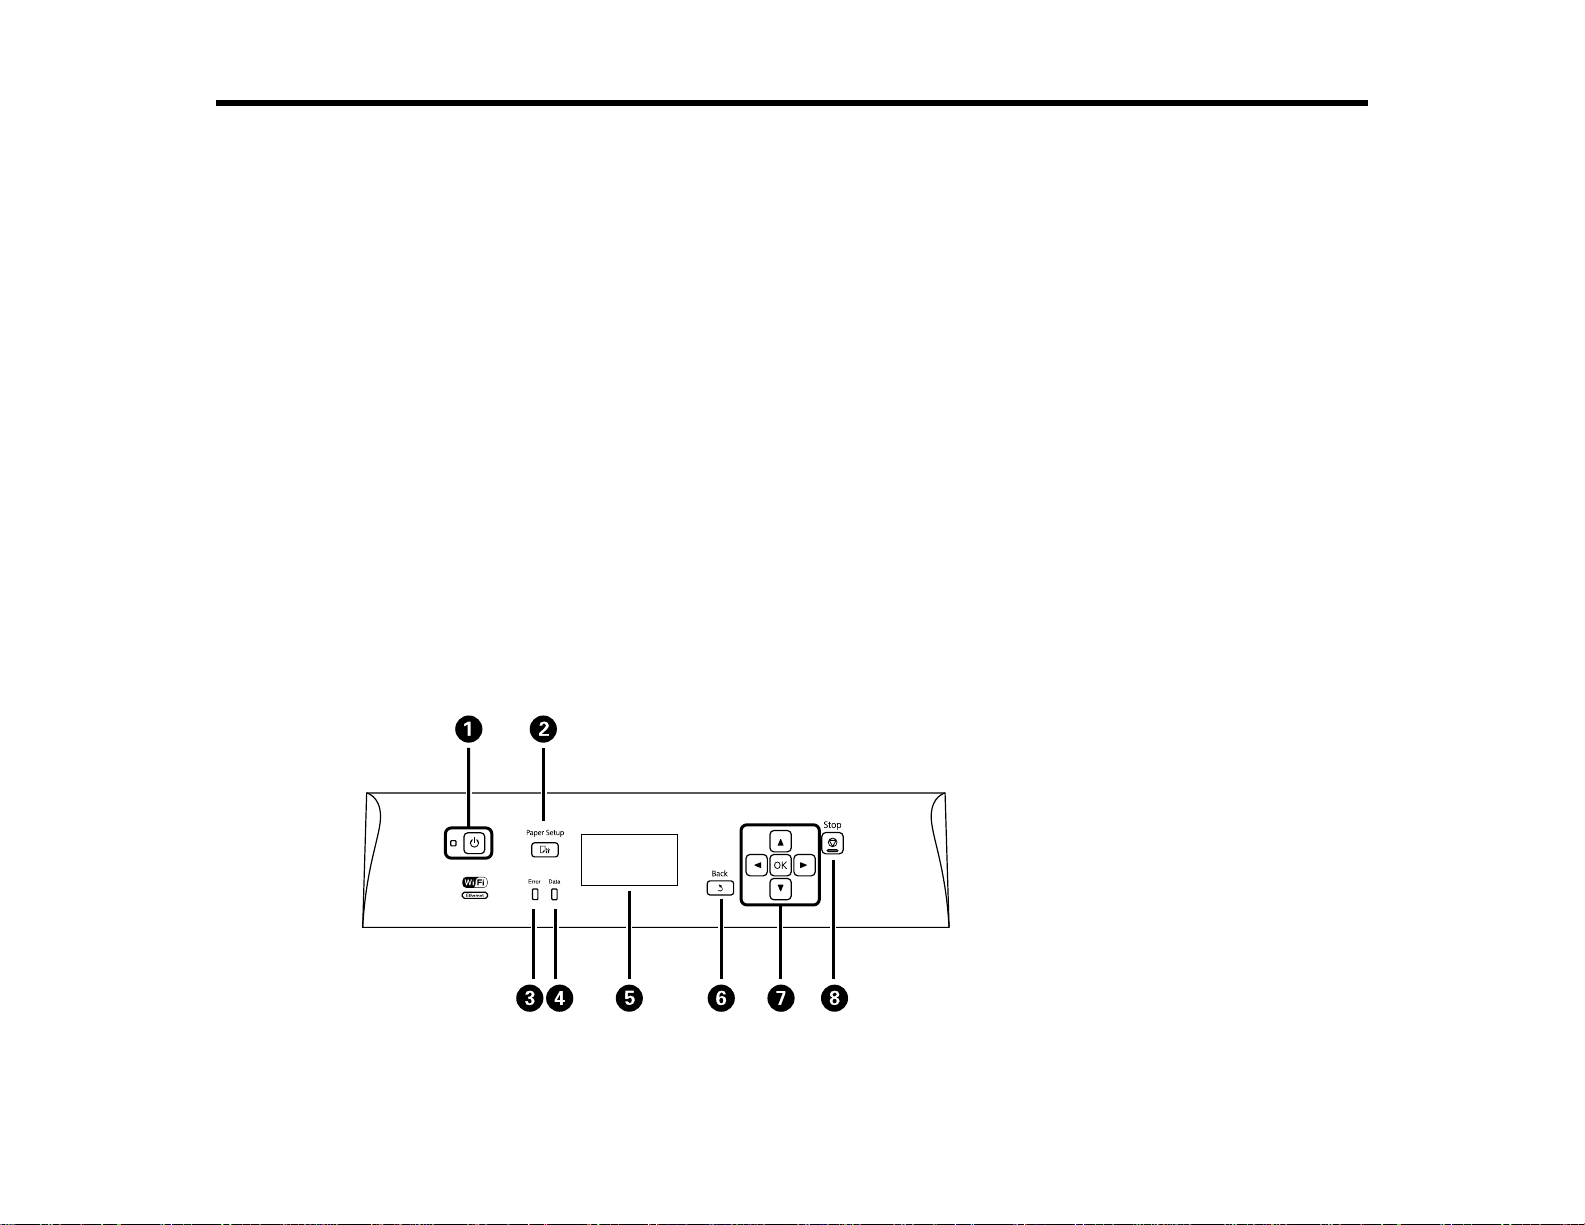
Control Panel Buttons and Lights
12
Page 13
Status Icons
1
The power button and light
2 The Paper Setup button
3 The Error light
4 The Data light
5 The LCD screen
6
The Back button
7 The arrow buttons and the OK button
8
The Stop button
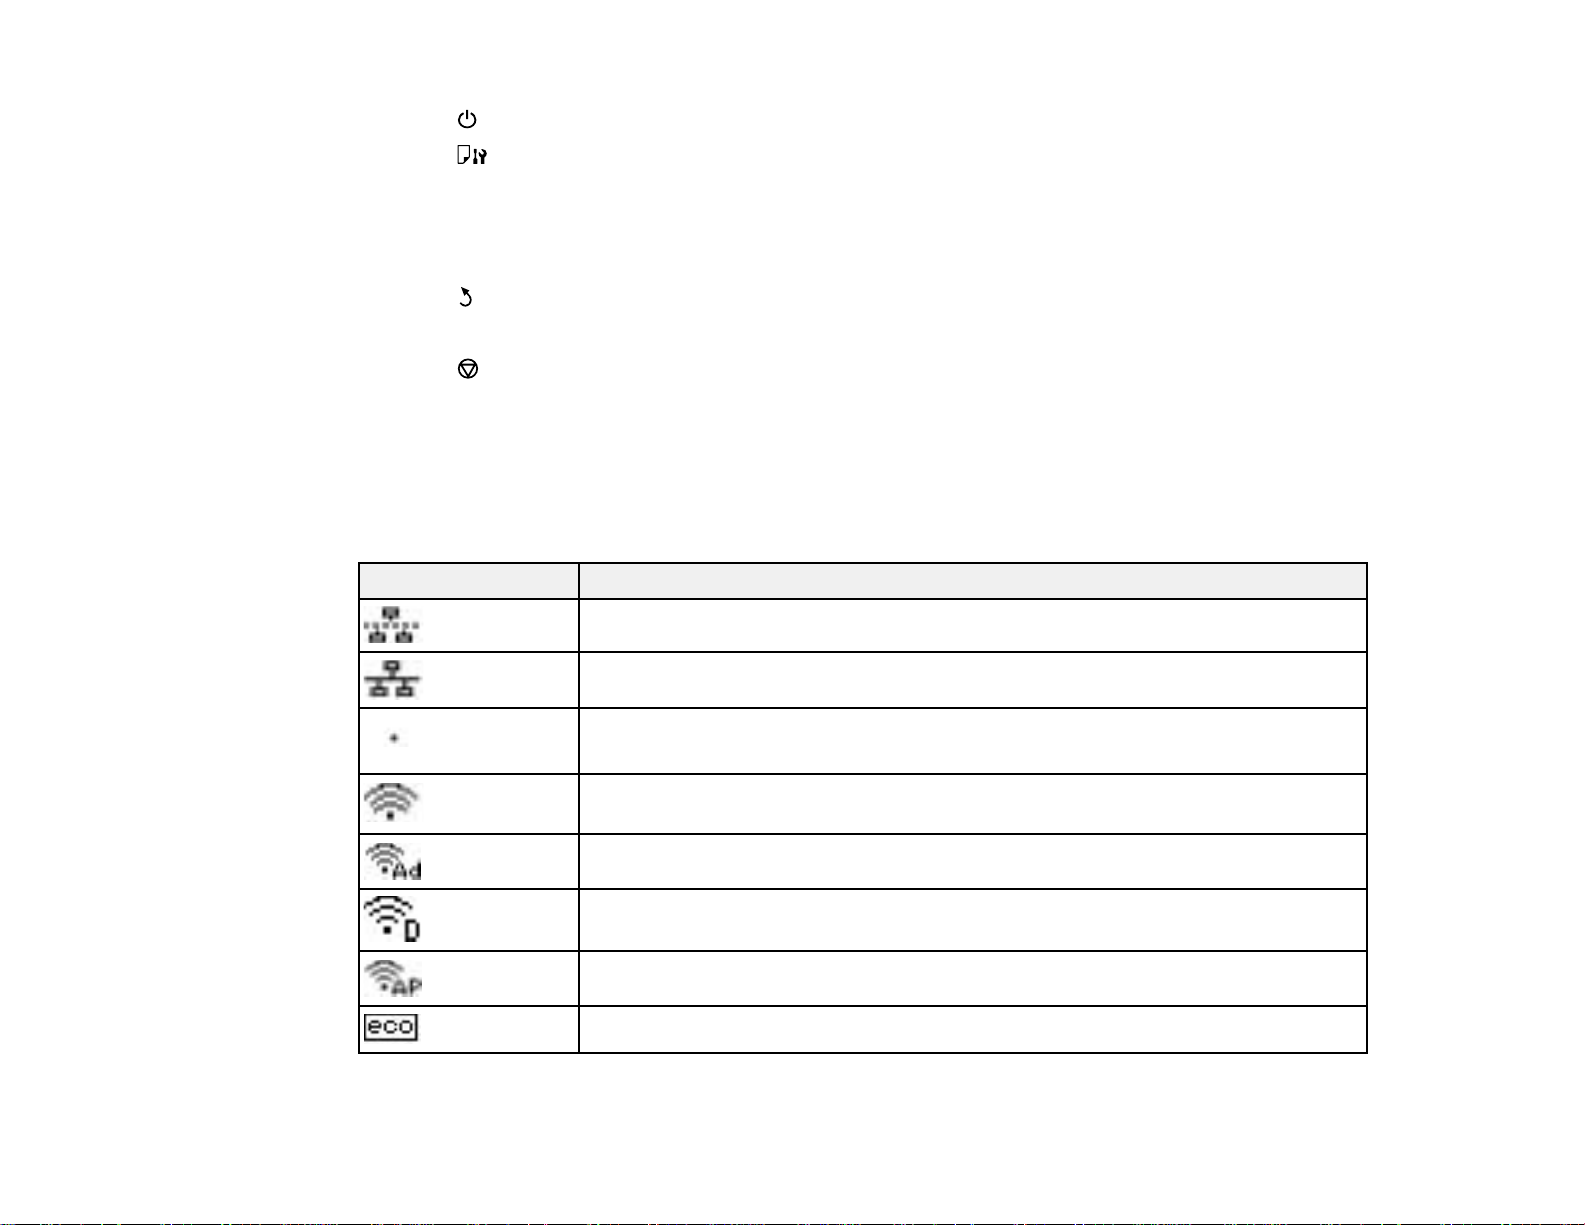
Status Icons
Parent topic: Using the Control Panel
Status icons may be displayed on the LCD screen depending on the product's status.
Icons Description
There is no Ethernet connection.
An Ethernet connection has been established.
A Wi-Fi network error has occurred or the product is searching for a connection.
A Wi-Fi connection has been established. The number of bars indicates the
connection's signal strength.
An Ad hoc connection has been established.
A Wi-Fi Direct mode connection has been established.
A Simple AP mode connection has been established.
One of the Eco Mode settings is enabled.
13
Page 14
Parent topic: Control Panel Buttons and Lights
Setting a Password and Locking the Control Panel
You can set an administrator password to lock the following control panel settings:
• System Administration Setup settings
• Eco mode settings
When the control panel is locked, you must enter the password to access any of the locked settings.
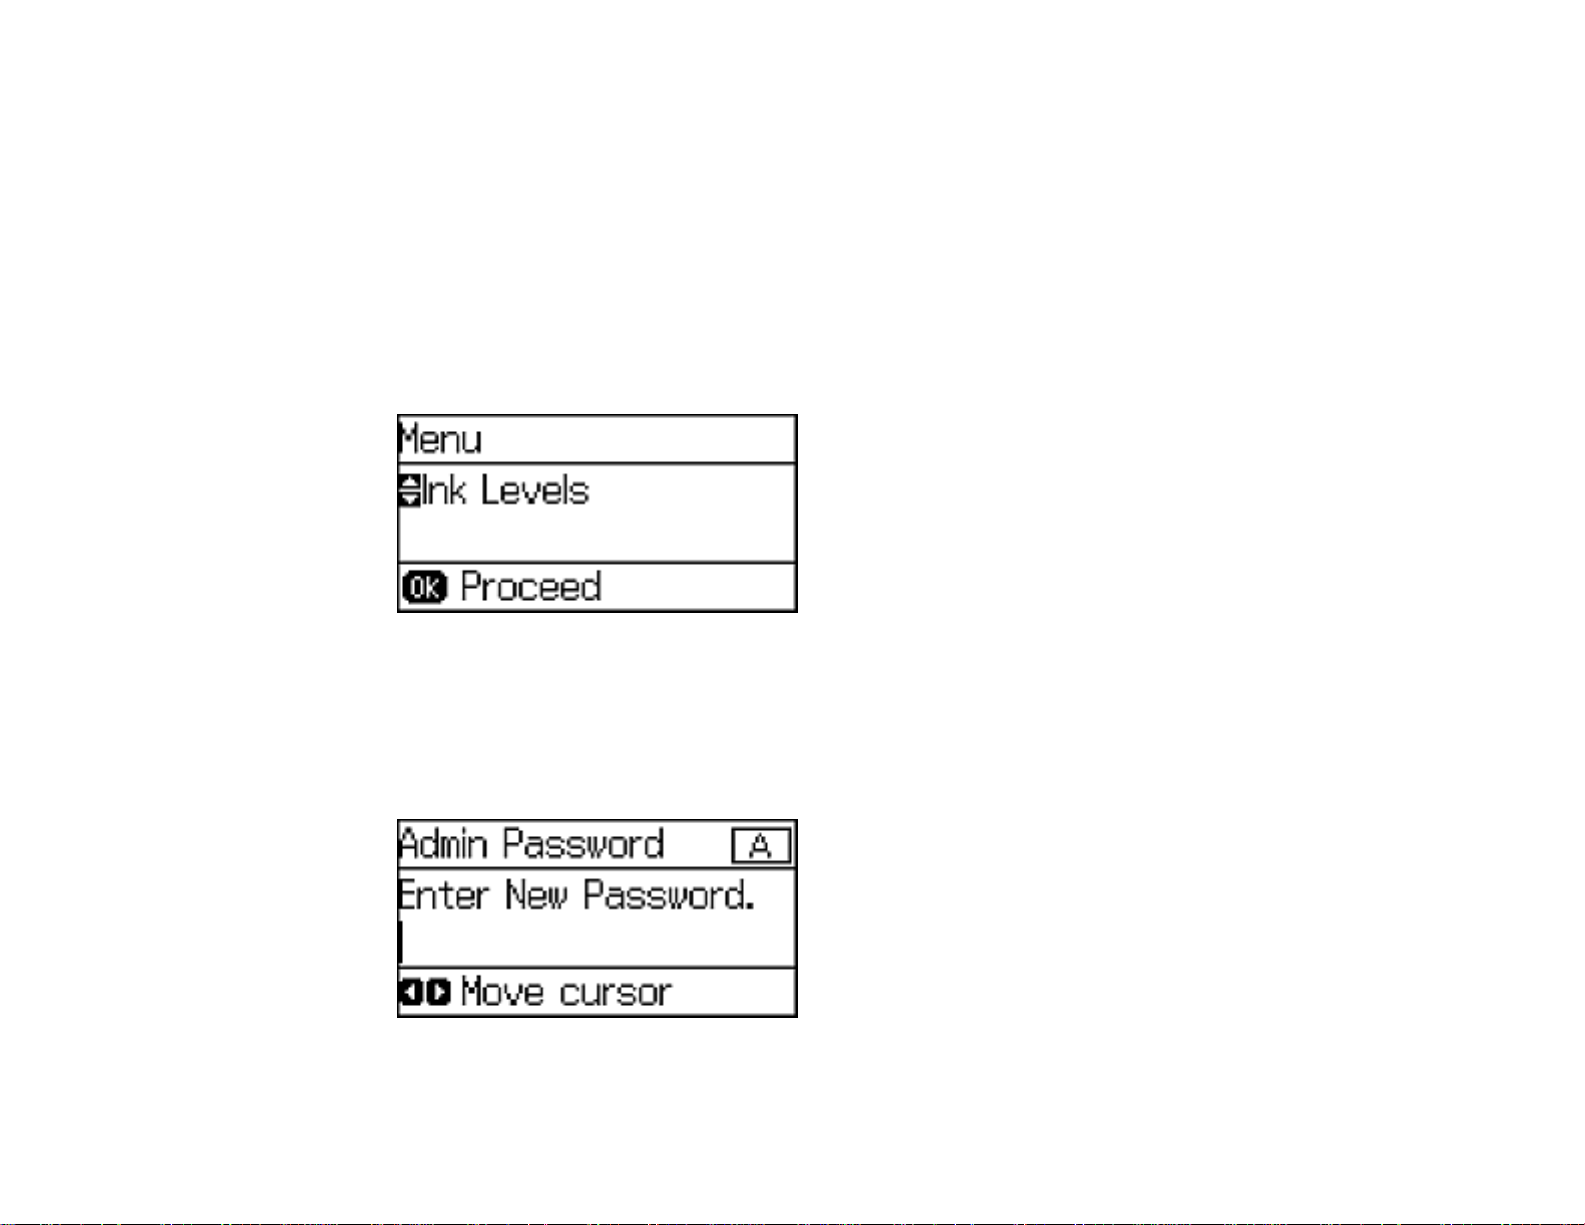
1. Press the arrow buttons to select Menu and press the OK button.
You see a screen like this:
2. Select Admin Settings and press the OK button.
3. Select Admin Password and press the OK button.
4. Select Register and press the OK button.
You see a screen like this:
5. Use the control panel buttons to enter a password and press the OK button.
14
Page 15
6. Enter your password again to confirm.
7. Press the OK button.
8. Select Lock Setting and press the OK button.
9. Select On and press the OK button.
Note: If you forget your password, contact Epson support for assistance.
Entering Characters on the LCD Screen
Parent topic: Using the Control Panel
Entering Characters on the LCD Screen
Follow these guidelines to enter characters for passwords and other settings.
• To enter letters or symbols, press the up or down arrow buttons to scroll through characters, and press
the right arrow button to select one.
• To enter numbers or change the case of letters, press the Stop button.
• To delete the previous character, press the left arrow button.
• To enter a space, press the right arrow button.
Parent topic: Setting a Password and Locking the Control Panel
Changing LCD Screen Language
You can change the language used on the LCD screen.
Note: This setting can be locked by an administrator. If you cannot access or change this setting,
contact your administrator for assistance.
15
Page 16
1. Press the arrow buttons to select Menu and press the OK button.
2. Select System Administration and press the OK button. Enter the administrator password, if
necessary.
You see a screen like this:
3. Select Common Settings and press the OK button.
4. Select Language and press the OK button.
5. Select a language and press the OK button.
Parent topic: Using the Control Panel
Adjusting the Screen Contrast
You can adjust the contrast of the LCD screen.
1. Press the arrow buttons to select Menu and press the OK button.
2. Select System Administration and press the OK button. Enter the administrator password, if
necessary.
You see a screen like this:
16
Page 17

3. Select Common Settings and press the OK button.
4. Select LCD Contrast and press the OK button.
5. Press the up or down arrow buttons to adjust the screen contrast.
6. Press the OK button to exit.
Parent topic: Using the Control Panel
Product Parts Locations
See these sections to identify the parts on your product.
Product Parts - Front
Product Parts - Inside
Product Parts - Back
Parent topic: Product Basics
17
Page 18
Product Parts - Front
1 Edge guides
2 Front paper feed slot (B2)
3 Paper cassette 1 (C1)
4 Optional paper cassettes 2 to 4 (C2 to C4)
5 Optional cabinet
18
Page 19
1 Edge guides
2 Paper support
3 Rear paper feed slot (B1)
4 Feeder guard
19
Page 20
5 Output tray
6 Edge guides
7 Paper cassette
Parent topic: Product Parts Locations
Product Parts - Inside
1 Control panel
2 Print head
20
Page 21
3 Front cover (A)
Parent topic: Product Parts Locations
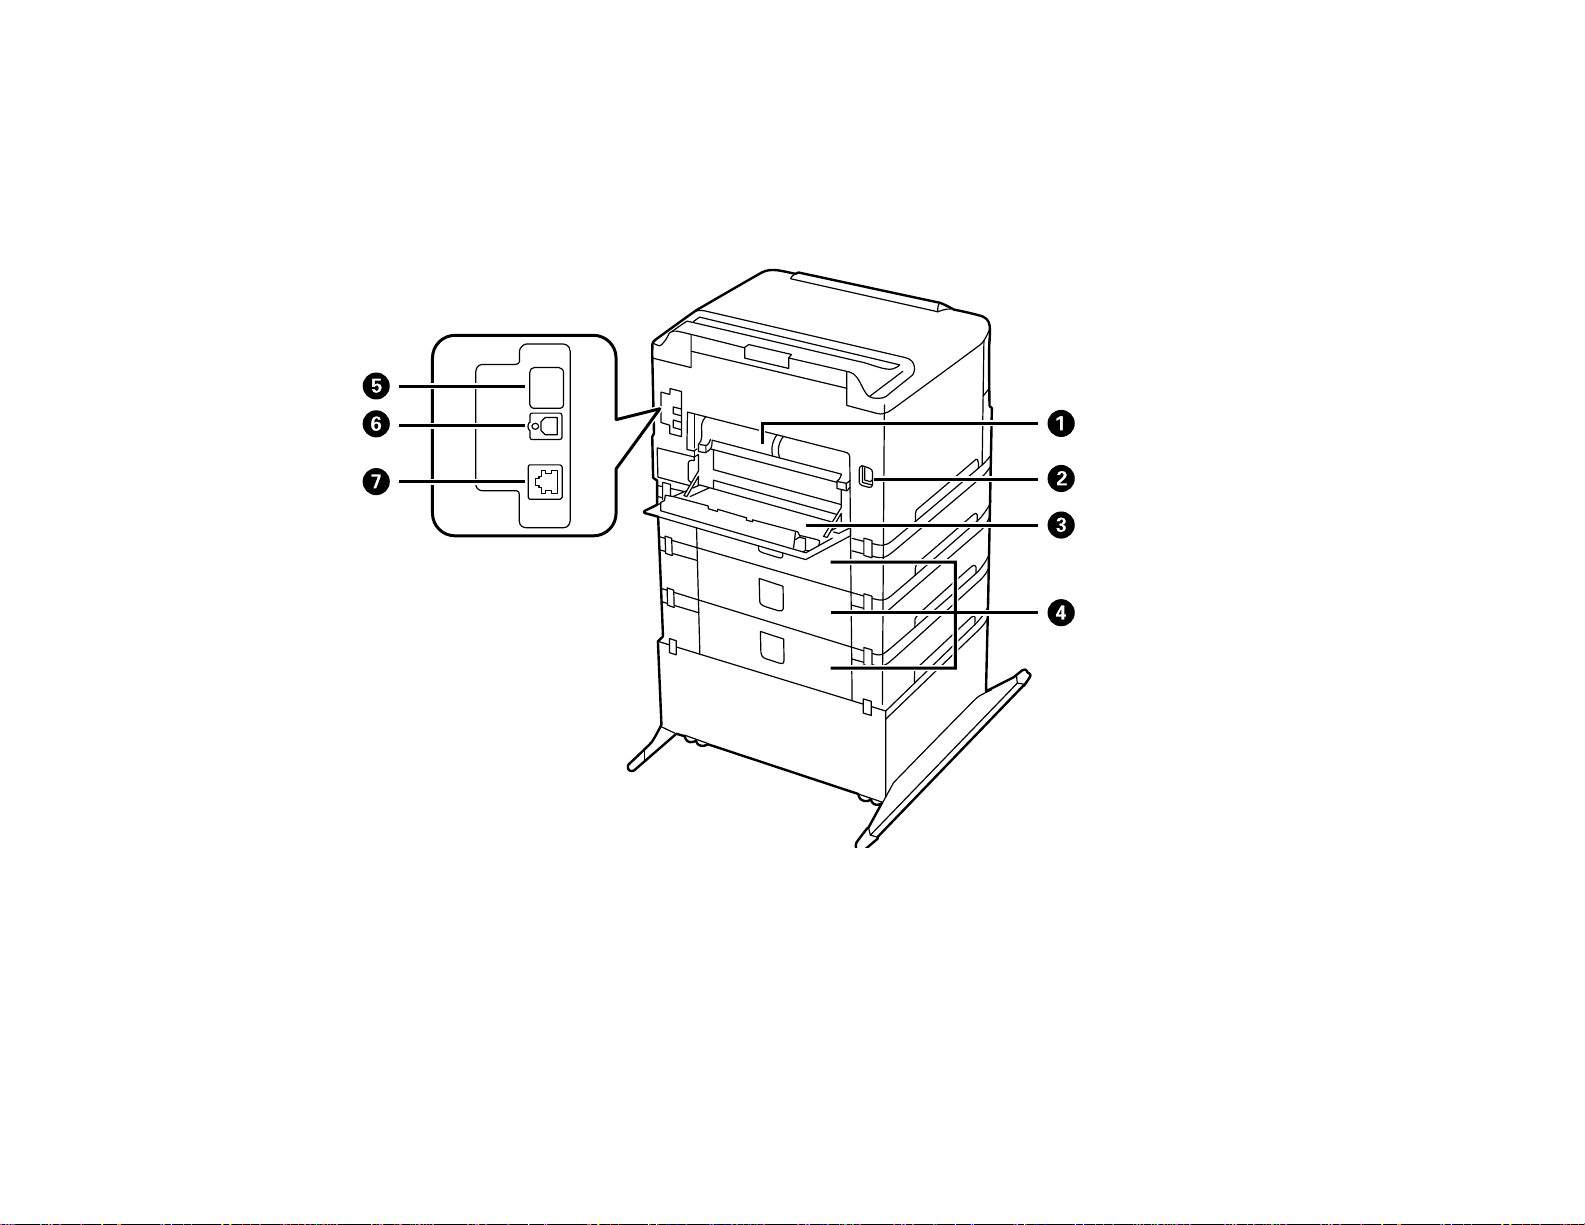
Product Parts - Back
1 Rear cover 2 (D2)
2 AC inlet
3 Rear cover 1 (D1)
4 Rear cover (E)
5 Service USB port (do not remove sticker)
21
Page 22

6 USB port
7 LAN port
Parent topic: Product Parts Locations
Using Eco Mode
Your product enters sleep mode automatically and turns off the LCD screen if it is not used for a period
of time. You can make the time period shorter and select other options to save energy and resources.
Changing the Eco Settings
Changing the Sleep Timer Settings
Changing the Power Off Timer Settings
Parent topic: Product Basics
Changing the Eco Settings
You can use the product control panel to change the Eco settings.
Note: The Sleep Timer setting in Eco Mode overrides the Sleep Timer setting in Common Settings. This
setting can be locked by an administrator. If you cannot access or change this setting, contact your
administrator for assistance.
1. Press the arrow buttons to select Menu and press the OK button.
2. Select System Administration and press the OK button. Enter the administrator password, if
necessary.
3. Select Eco Mode and press the OK button.
You see a screen like this:
22
Page 23
4. Select On and press the OK button.
5. Press the up arrow button.
6. Change settings as necessary.
7. Press the OK button to exit.
You see the icon on the LCD screen to indicate that Eco settings are enabled.
Parent topic: Using Eco Mode
Related tasks
Changing the Sleep Timer Settings
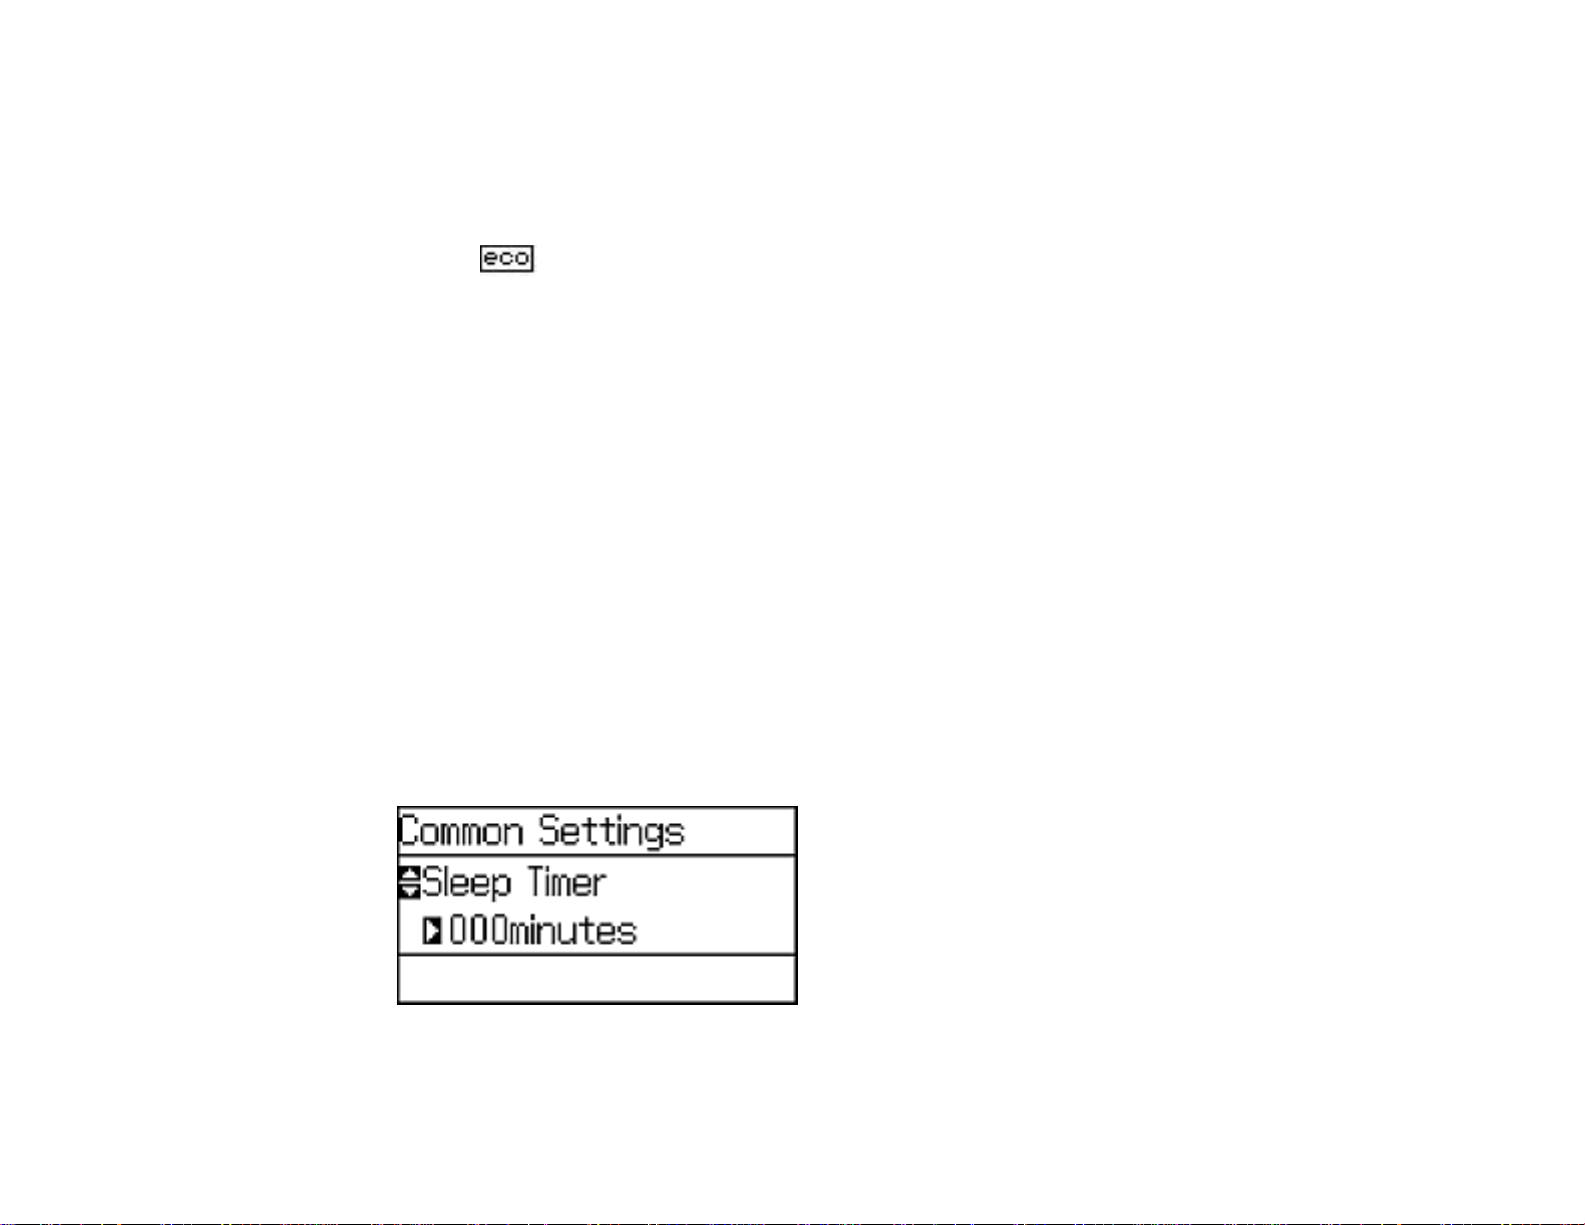
Changing the Sleep Timer Settings
You can adjust the time period before your product enters sleep mode and turns off the LCD screen.
Note: The Sleep Timer setting in Eco Mode overrides the Sleep Timer setting in Common Settings. This
setting can be locked by an administrator. If you cannot access or change this setting, contact your
administrator for assistance.
1. Press the arrow buttons to select Menu and press the OK button.
2. Select System Administration and press the OK button. Enter the administrator password, if
necessary.
3. Select Common Settings and press the OK button.
4. Select Sleep Timer and press the OK button.
You see a screen like this:
5. Press the up or down arrow buttons to increase or reduce the number of minutes.
23
Page 24
6. Press the left or right arrow buttons to move the cursor.
7. Press the OK button to exit.
Parent topic: Using Eco Mode
Related tasks
Changing the Eco Settings
Changing the Power Off Timer Settings
You can have the product turn off automatically if it is not used for a specified period of time.
Note: This setting can be locked by an administrator. If you cannot access or change this setting,
contact your administrator for assistance.
1. Press the arrow buttons to select Menu and press the OK button.
2. Select System Administration and press the OK button. Enter the administrator password, if
necessary.
You see a screen like this:
3. Select Common Settings and press the OK button.
4. Select Power Off Timer and press the OK button.
5. Select a time period between 30minutes and 12h (12 hours), and press the OK button.
Parent topic: Using Eco Mode
24
Page 25

Epson Connect Solutions for Smartphones, Tablets, and More
You can print documents, photos, emails, and web pages from your home, office, or even across the
globe. You can use your smartphone, tablet, or computer. Epson offers these solutions to print from
anywhere: Epson Email Print, Epson iPrint Mobile App, and Epson Remote Print.
Using Epson Email Print
Using the Epson iPrint Mobile App
Using Epson Remote Print
Parent topic: Product Basics
Using Epson Email Print
With Epson Email Print, you can print from any device that can send email, such as your smartphone,
tablet, or laptop. Just activate your product's unique email address. When you want to print, attach a
PDF, Microsoft Office document, or photo to an email and send it to your product.
1. Set up your product for network printing as described in this manual. See the link below.
2. If you did not already set up Email Print when you installed your product software, visit
epson.com/connect to learn more about Email Print, check compatibility, and get detailed setup
instructions.
3. Send an email with attachments to your product's Email Print address.
Note: Both the email and any attachments print by default. You can change these printing options by
logging into your Epson Connect account.
Parent topic: Epson Connect Solutions for Smartphones, Tablets, and More
Related topics
Wi-Fi or Wired Networking
Using the Epson iPrint Mobile App
Use this free Apple and Android app to print to nearby Epson networked products. The Epson iPrint
Mobile App lets you print PDFs, Microsoft Office documents, photos, and web pages over a wireless
network.
1. Set up your product on a network as described in this manual. See the link below.
2. Visit epson.com/connect to learn more about Epson iPrint and check the compatibility of your mobile
device.
25
Page 26

3. Download Epson iPrint from the Apple App Store or Google Play.
4. Connect your mobile device to the same wireless network that your product is using.
5. Print from your mobile device to your Epson product.
Parent topic: Epson Connect Solutions for Smartphones, Tablets, and More
Related topics
Wi-Fi or Wired Networking
Using Epson Remote Print
With Epson Remote Print software on your Windows computer or laptop, you can print to an Epson
Email-enabled product anywhere in the world.
1. Set up your product for network printing as described in this manual. See the link below.
2. Visit epson.com/connect to learn more about Remote Print and how to download the software.
3. Download and install the Remote Print software.
4. Obtain the email address and optional access key of the Epson product you want to use for printing,
and enter this address during Remote Print setup.
5. Select the print command in your application and choose the Remote Print driver for your Epson
product.
Parent topic: Epson Connect Solutions for Smartphones, Tablets, and More
Related topics
Wi-Fi or Wired Networking
Using AirPrint
AirPrint allows you to wirelessly print to your AirPrint-enabled product from your iOS device running the
latest version of iOS, and from your Mac running OS X 10.7 or later.
1. Set up your product for wireless printing as described in this manual. See the link below.
2. Connect your Apple device to the same wireless network that your product is using.
26
Page 27

3. Print from your device to your product.
Note: For details, see the AirPrint page on the Apple website.
Parent topic: Product Basics
Related topics
Wi-Fi or Wired Networking
Using Google Cloud Print
With a Google Account, you can print from your Apple or Android device to your Epson product. You can
also print from Chromebooks and the Google Chrome browser without drivers or cables.
Set up your Epson product for network printing as described in this manual. See the link below.
Note: Make sure your Epson printer and computer are connected to the same network before starting
the Google Cloud Print setup.
1. Connect your device to the same network that your Epson product is using.
2. Print a network status sheet.
3. Locate your product's IP address on the network status sheet.
4. Enter the IP address into the address bar of a web browser.
5. Select the Google Cloud Print Services option.
Note: If you don't see the Google Cloud Print Services option, turn your product off and back on. If
the option still doesn't appear, select the Firmware Update option and follow the on-screen
instructions to update your product.
6. Click Register.
7. Select the checkbox to agree to the Usage Advisory and click Next.
8. Click OK to launch the sign-in page.
A separate browser window opens.
9. Enter your Google Account username and password and click Sign in, or, if you don't have an
account, click Sign up for a new Google Account and follow the on-screen instructions.
10. Click Finish printer registration to complete setup and print a test page.
27
Page 28

Your product is now linked to your Google Account and can be accessed from any Chromebook,
computer, Apple or Android device with Internet access. Visit Epson Support for more information on
using Google Cloud Print, or the Google Cloud Print website for a list of supported apps.
Setting Up Google Cloud Print on a Chromebook
Parent topic: Product Basics
Related topics
Wi-Fi or Wired Networking
Setting Up Google Cloud Print on a Chromebook
With a Google Account, you can print from a Chromebook without drivers or cables.
Set up your Epson product for network printing as described in this manual. See the link below.
Note: Make sure your Epson product is connected to your wireless network before starting the Google
Cloud Print setup.
1. Turn on your Chromebook and connect it to the same wireless network as your product.
Note: See your Chromebook's documentation for details on connecting to a network.
2. Do one of the following:
• Click Add to Cloud Print in the notification that appears in the corner of your Chromebook
screen.
Note: If you do not see a notification, check to see if a number appears in the status area at the
lower-right corner of the screen. Click this number to open the notifications menu, then click Add
to Cloud Print.
• Open a web browser and enter chrome://devices in the address bar. Skip to step 4.
3. Click Add Device.
4. Click the Register button that appears next to your product.
5. Click Register on the confirmation screen. Your product's LCD screen displays a confirmation
message.
6. Select OK or press the OK button on your product to confirm the Google Cloud Print connection and
print a test page.
28
Page 29

Your product is now linked to your Google Account and can be accessed from any Chromebook,
iPhone, or Android phone with Internet access. For more information on using Google Cloud Print,
visit Epson Support.
Parent topic: Using Google Cloud Print
Related topics
Wi-Fi or Wired Networking
29
Page 30
Wi-Fi or Wired Networking
See these sections to use your product on a Wi-Fi or wired network.
Wi-Fi Infrastructure Mode Setup
Wi-Fi Direct Mode Setup
Wi-Fi Protected Setup (WPS)
Printing a Network Status Sheet
Changing or Updating Network Connections
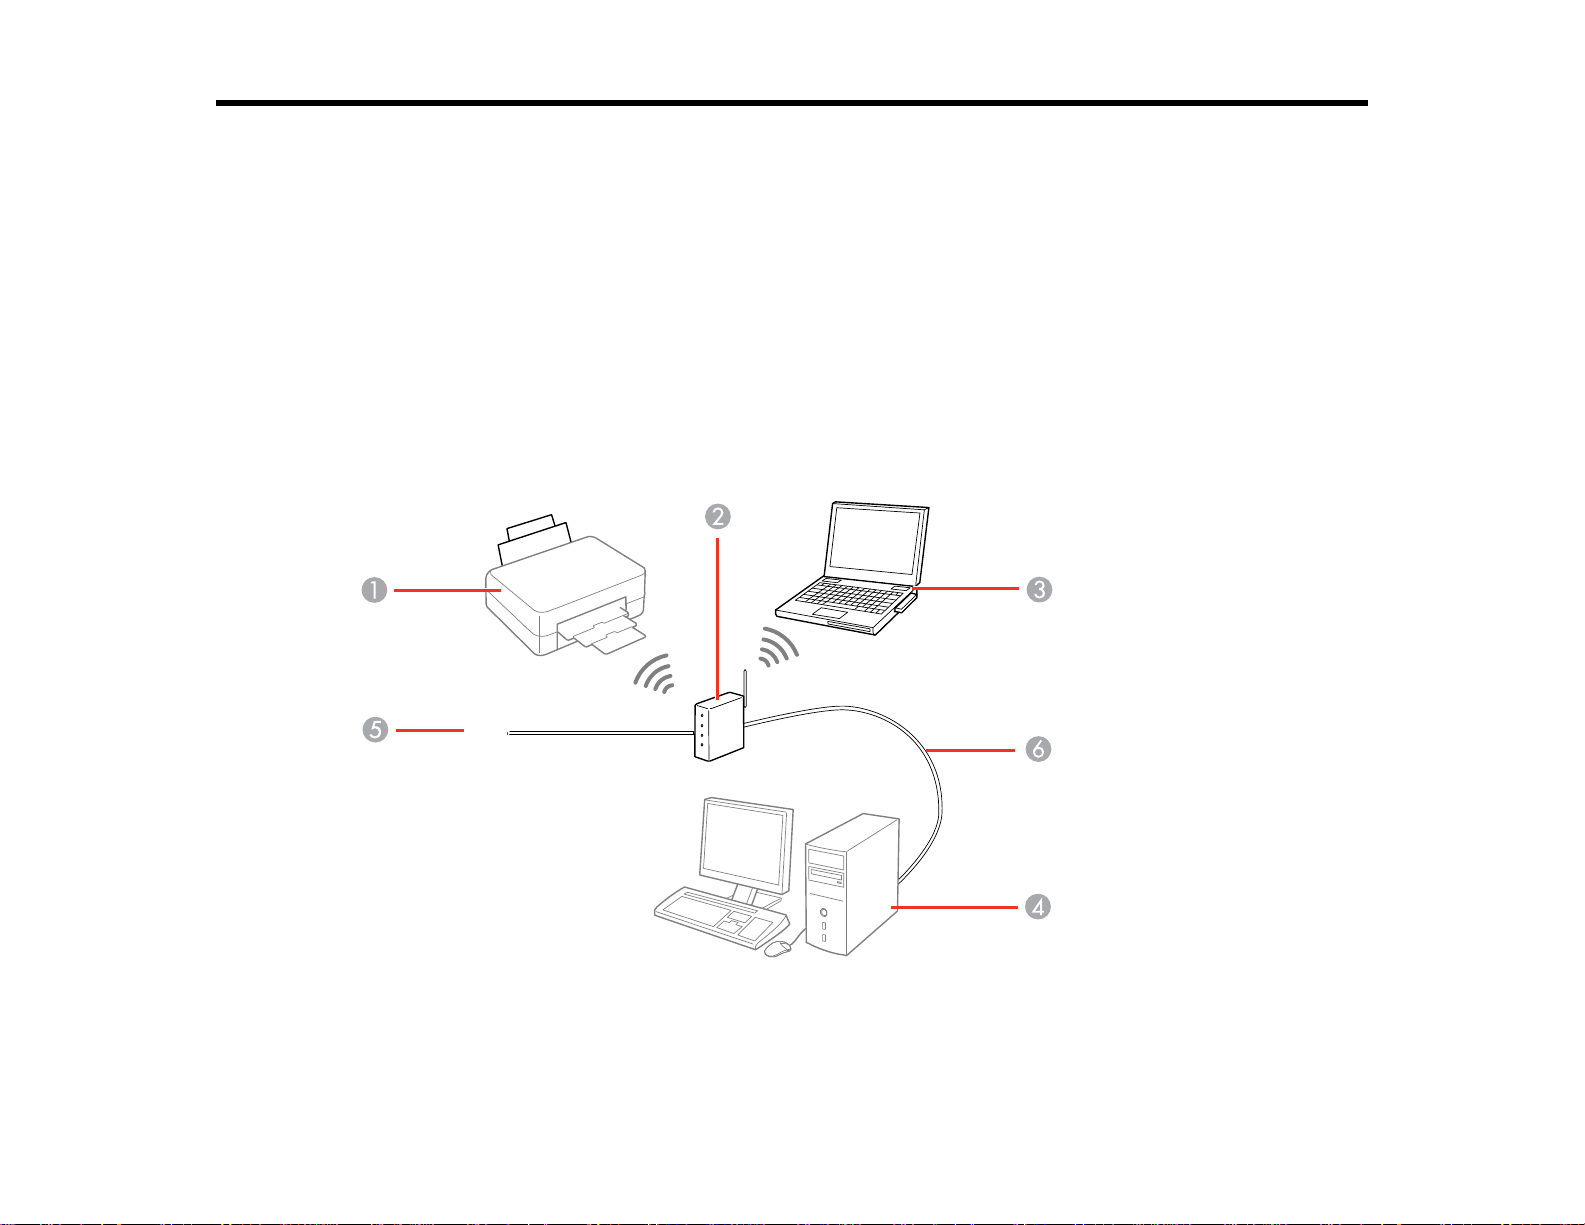
Wi-Fi Infrastructure Mode Setup
You can set up your product to communicate with your computer using a wireless router or access point.
The wireless router or access point can be connected to your computer over a wireless or wired network.
1 Epson product
2 Wireless router or access point
30
Page 31

3 Computer with a wireless interface
4 Computer
5 Internet
6 Ethernet cable (used only for wired connection to the wireless router or access point)
Selecting Wireless Network Settings From the Control Panel
Parent topic: Wi-Fi or Wired Networking
Selecting Wireless Network Settings From the Control Panel
You can select or change wireless network settings using your product control panel.
To install your product on a wireless network, follow the instructions on the Start Here sheet and install
the necessary software. The installer program guides you through network setup.
Note: Breakdown or repair of this product may cause loss of network data and settings. Epson is not
responsible for backing up or recovering data and settings during or after the warranty period. We
recommend that you make your own backup or print out your network data and settings.
1. Press the arrow buttons to select Wi-Fi Setup and press the OK button.
You see this screen:
2. Select Wi-Fi Setup Wizard and press the OK button.
Note: If you need to disable the wireless network to set up your product on an Ethernet network,
press the down arrow button, select Disable Wi-Fi, and press the OK button. Then follow the
instructions on changing to a wired network connection in this guide.
31
Page 32

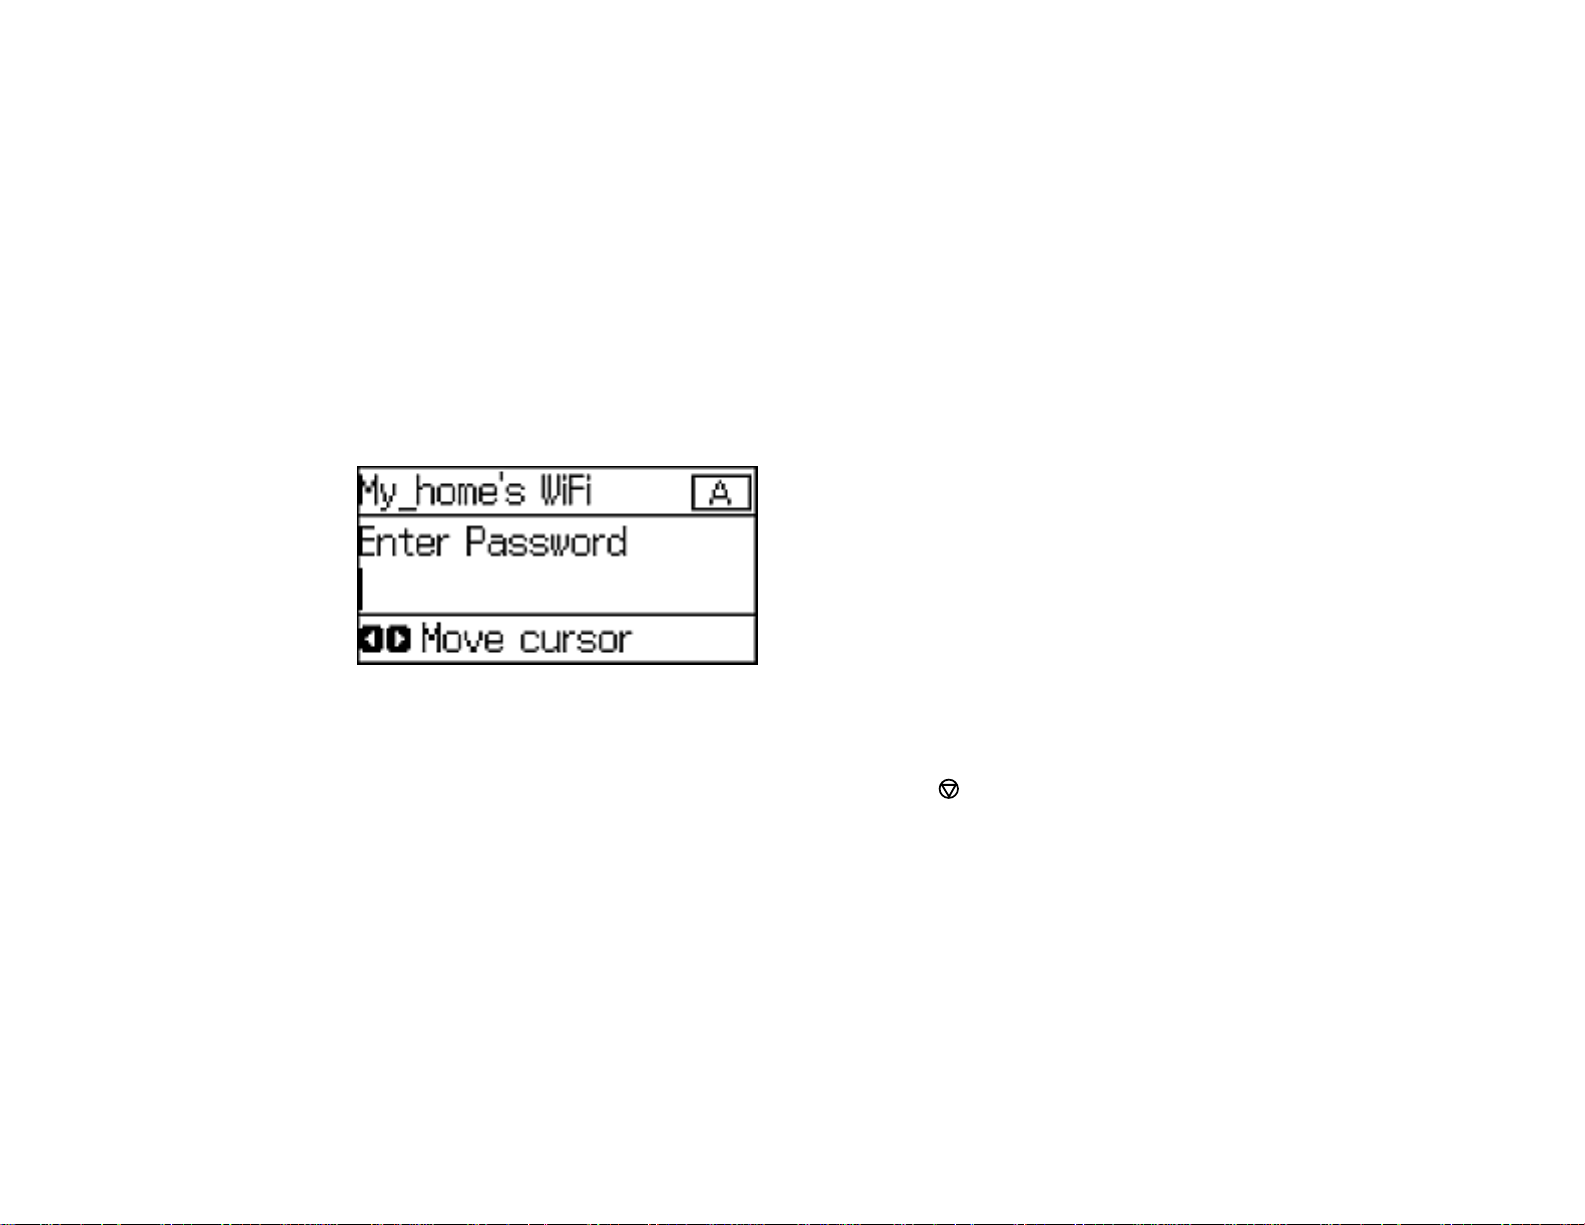
3. Select the name of your wireless network and press the OK button.
Note: To enter the wireless network name manually, select Other Networks and press the OK
button. Use the printer's buttons to enter your network name.
4. Enter your wireless password using the control panel buttons.
Note: The network name and password are case sensitive. Be sure to correctly enter uppercase and
lowercase letters, and numeric or special characters.
• To enter letters or symbols, press the up or down arrow buttons to scroll through characters, and
press the right arrow button to select one.
• To enter numbers or change the case of letters, press the Stop button.
• To delete the previous character, press the left arrow button.
• To enter a space, press the right arrow button.
5. Press the OK button when you’re finished entering your password.
6. Confirm the displayed network settings and press the OK button to save them.
Note: If you need to change a setting, press the Back button.
7. If you want to print a network setup report, press the down arrow button, select Print connection
report, and press the OK button. (Otherwise, press the OK button.)
If the Wi-Fi connection symbol isn't lit or does not appear on the LCD screen, you may have selected
the wrong network name or entered the password incorrectly. Repeat these steps to try again.
Parent topic: Wi-Fi Infrastructure Mode Setup
32
Page 33

Related references
Status Icons
Wi-Fi Direct Mode Setup
You can set up your product to communicate directly with your computer or another device without
requiring a wireless router or access point.
1 Epson product
2 Computer with a wireless interface
3 Other wireless device
Your product automatically selects one of these modes to communicate with your computer or device:
Access point mode
If your product is not already connected to a wireless network, it enters access point mode and the
product itself acts as the network access point for up to 4 devices. When operating in this mode, your
product displays an AP connection symbol on the LCD screen.
Peer-to-peer mode
If your product is already connected to a wireless network, it enters peer-to-peer mode and
disconnects from any other networks. This also disables any other product features requiring access
to the Internet. When operating in this mode, your product displays a Direct or D connection symbol
on the LCD screen.
Note: To disconnect a peer-to-peer mode connection, release the connection to your product from
your computer or other device. Your product will reconnect to the previously used network.
33
Page 34

Enabling Wi-Fi Direct Mode
Parent topic: Wi-Fi or Wired Networking
Related references
Status Icons
Enabling Wi-Fi Direct Mode
You can enable Wi-Fi Direct mode to allow direct communication between your product and a computer
or other devices without a wireless router or access point.
Note: You may need to enable the Wi-Fi Direct setting in the Advanced Settings menu before you can
enable Wi-Fi Direct mode.
1. Press the arrow buttons to select Wi-Fi Setup and press the OK button.
You see this screen:
2. Select Wi-Fi Direct Setup and press the OK button.
3. Select Connection Setup and press the OK button.
4. Select Change Password and press the OK button.
5. Press the OK button.
Note: If you have already connected devices or computers to your product via Wi-Fi Direct, they will
be disconnected when you change the password.
34
Page 35

6. Enter a new Wi-Fi Direct password using the control panel buttons.
Note: Your password must be at least 8 and no more than 22 characters long.
• To enter letters or symbols, press the up or down arrow buttons to scroll through characters, and
press the right arrow button to select one.
• To enter numbers or change the case of letters, press the Stop button.
• To delete the previous character, press the left arrow button.
• To enter a space, press the right arrow button.
7. Press the OK button when you’re finished entering your password.
8. Press the up arrow button.
You see this screen:
9. Press the OK button to view the SSID (Wi-Fi network name) and password.
10. Use your computer or wireless device to select the Wi-Fi network name (SSID) displayed on the
LCD screen, and enter the password shown.
35
Page 36

11. Press the Back button to exit.
You see either the AP or D connection symbol on the LCD screen and should be able to print directly
to your product from your computer or device.
Note: If the AP or D connection symbol is not displayed on the LCD screen, Wi-Fi Direct mode is not
enabled. Repeat these steps to try again.
Parent topic: Wi-Fi Direct Mode Setup
Related references
Status Icons
Wi-Fi Protected Setup (WPS)
If your network uses a WPS-enabled wireless router or access point, you can quickly connect your
product to the network using Wi-Fi Protected Setup (WPS).
Note: To check if your router is WPS-enabled, look for a button labeled WPS on your router or access
point. If there is no hardware button, there may be a virtual WPS button in the software for the device.
Check your network product documentation for details.
Using WPS to Connect to a Network
Parent topic: Wi-Fi or Wired Networking
Using WPS to Connect to a Network
If you have a WPS-enabled wireless router or access point, you can use Wi-Fi Protected Setup (WPS) to
connect your product to the network.
1. Press the arrow buttons to select Wi-Fi Setup and press the OK button.
You see this screen:
36
Page 37

2. Select Push Button Setup (WPS) and press the OK button.
3. Follow the instructions on the LCD screen to complete WPS setup.
4. Press the Back button to exit.
Your product should now be connected to the network.
Parent topic: Wi-Fi Protected Setup (WPS)
Printing a Network Status Sheet
You can print a network status sheet to help you determine the causes of any problems you may have
using your product on a network.
1. Press the arrow buttons to select Menu and press the OK button.
You see this screen:
2. Select Network Status and press the OK button.
3. Select Wi-Fi/Network Status and press the OK button.
You see a screen like this:
37
Page 38

4. Press the OK button to print the network status sheet.
5. Press the up arrow button to begin printing the network status sheet.
Examine the settings shown on the network status sheet to diagnose any problems you have.
Parent topic: Wi-Fi or Wired Networking
Changing or Updating Network Connections
See these sections to change or update how your product connects to a network.
Accessing the Web Config Utility
Changing a USB Connection to a Wi-Fi Connection
Changing a Wi-Fi Connection to a Wired Network Connection
Connecting to a New Wi-Fi Router
Disabling Wi-Fi Features
Parent topic: Wi-Fi or Wired Networking
Accessing the Web Config Utility
You can select your product's network settings and confirm its operating status using a web browser.
You do this by accessing your product's built-in Web Config utility from a computer or other device that is
connected to the same network as your product.
Note: For more information on the Web Config utility see the Administrator's Guide.
1. Print a network status sheet.
2. Locate the IP Address for your product that is listed on the network status sheet.
3. On a computer or other device connected to the same network as your product, open a web
browser.
4. Enter your product's IP address into the address bar.
You see the available Web Config utility options.
Parent topic: Changing or Updating Network Connections
Related tasks
Printing a Network Status Sheet
38
Page 39

Changing a USB Connection to a Wi-Fi Connection
If you have already connected your product to your computer using a USB connection, you can change
to a Wi-Fi connection or add a Wi-Fi connection to print wirelessly.
1. Do one of the following:
• If you want to use only a Wi-Fi connection, disconnect the USB cable from your product. With
Windows, also uninstall your product software.
• If you want to add a Wi-Fi connection in addition to a USB connection, leave the USB cable
connected to your product.
2. Download and install your product software from the Epson website using the instructions on the
Start Here sheet.
Parent topic: Changing or Updating Network Connections
Changing a Wi-Fi Connection to a Wired Network Connection
If you have already connected your product to your computer wirelessly, you can change to a wired
network connection if necessary.
1. Disable your product's Wi-Fi features.
2. Connect one end of an Ethernet network cable to the product's LAN port.
3. Connect the other end to any available LAN port on your router or access point.
4. Uninstall your product software.
5. Download and install your product software from the Epson website.
6. Follow the on-screen instructions to install the software.
7. When you see the Select Your Connection screen, select Wired network connection.
8. If you see a Select Setup Option screen, select Setup printer for the first time.
9. Continue following the rest of the on-screen instructions.
Parent topic: Changing or Updating Network Connections
Related tasks
Disabling Wi-Fi Features
Connecting to a New Wi-Fi Router
If you change the wireless router you have been using on your network, you need to update your
product's Wi-Fi connection to the new router.
39
Page 40

Note: If you switch to a 5 GHz wireless router, set the router to operate in dual band (2.4 GHz and 5
GHz) mode. See your router documentation for instructions.
1. Do one of the following:
• Windows: Uninstall your product software.
• OS X: Go to the next step.
2. Download and install your product software from the Epson website using the instructions on the
Start Here sheet.
Parent topic: Changing or Updating Network Connections
Related tasks
Uninstalling Printing Software - Standard Epson Printer Software - Windows
Disabling Wi-Fi Features
You may need to disable your product's Wi-Fi features if you change your network connection type or
need to solve a problem with your network connection.
Note: Before disabling Wi-Fi features, make a note of your product's SSID (network name) and
password, and any network settings selected for the Epson Connect services you may use.
1. Press the arrow buttons to select Wi-Fi Setup and press the OK button.
You see this screen:
2. Select Disable Wi-Fi and press the OK button.
3. Press the up arrow button to disable Wi-Fi.
Parent topic: Changing or Updating Network Connections
40
Page 41

Enabling Epson Universal Print Driver (PCL) or PostScript Printing
Before enabling Epson Universal Print Driver (PCL) or PostScript printing on your product, make sure
you have installed the software as described on the Start Here sheet.
To download the Epson Universal Print Driver or PostScript drivers, go to epson.com/support/wf8090.
Selecting PDL (Page Description Language) Settings
Selecting Printer Language and Interface Settings
Printing a PS3 (PostScript) Status Sheet
Selecting PDL (Page Description Language) Settings
You can select settings for PCL and PostScript printing using the control panel on the product.
Note: These settings can be locked by an administrator. If you cannot access these settings, contact
your administrator for assistance.
1. Press the arrow buttons to select Menu and press the OK button.
You see a screen like this:
2. Select System Administration and press the OK button. Enter the administrator password, if
necessary.
3. Select Universal Print Settings and press the OK button.
4. Select PDL Print Configuration and press the OK button.
41
Page 42

You see a screen like this:
5. Select an option, then select the settings you want to use.
PDL Print Configuration Options
Parent topic: Enabling Epson Universal Print Driver (PCL) or PostScript Printing
PDL Print Configuration Options
Select the PDL Print Configuration options you want to use for PCL or PostScript printing.
PDL Print Configuration Available Description
option settings
Common Settings
Paper Size Various sizes Sets the default paper size for PCL or PostScript
printing.
Paper Type Various paper Sets the default paper type for PCL or PostScript
types printing.
Orientation Portrait Sets the default orientation for PCL or PostScript
Landscape
Quality Draft Sets the quality for PCL or PostScript printing.
Standard
Best
Ink Save Mode On/Off Saves ink by reducing print density.
printing.
42
Page 43

PDL Print Configuration Available Description
option settings
Print Order Last Page on Starts printing from the first page of a file.
Top
First Page on Starts printing from the last page of a file.
Top
Number of Copies 1 to 999 Selects the number of copies to print.
Binding Margin Left Edge Specifies the binding edge for double-sided documents.
Top Edge
Auto Paper Ejection On/Off Ejects paper automatically when printing is stopped
during a print job.
2-Sided Printing On/Off Selects duplex printing.
PCL Menu
Font Source Resident Uses a font preinstalled on the printer.
Download Uses a font you have downloaded.
Font Number 1 to 111 Selects the default font number for the default font
source.
Pitch 0.44 to 99.99 cpi Selects the default font pitch if the font is scalable and
fixed-pitch (availability depends on font source and
number settings).
Height 4.00to 999.75 pt Selects the default font height if the font is scalable and
proportional (availability depends on font source and
number settings).
Symbol Set Various Selects the default symbol set. If the selected font is not
available for the selected symbol set, the font source
and number are replaced with IBM-US (the default
setting).
Form 5to 128 lines Sets the number of lines for the selected paper size and
orientation. Changes the line spacing (VMI) stored in
the printer. Later changes in page size or orientation
cause changes in the Form value based on the stored
VMI.
43
Page 44

PDL Print Configuration Available Description
option settings
CR Function CR Selects the line feed command when printing with a
CR+LF
driver from a specific operating system.
LF Function LF
CR+LF
Paper Source Assign 4 Makes the paper source select command compatible
with HP LaserJet 4
4K Makesthe paper source select command compatible
with HP LaserJet 4000, 5000, and 8000
5S Makes the paper source select command compatible
with HP LaserJet 5S
PS3 Menu
Error Sheet On/Off Printsa sheet showing the status when errors occur
during PostScript or PDF printing.
Coloration Color Selects the color mode for PostScript printing.
Mono
Image Protect On/Off Disable to lower the print quality automatically if the
printer's memory becomes full.
Binary On/Off Enablewhen printing files that contain binary images
(available when the product is connected to the
network). Allows you to print binary images even if the
driver is set to ASCII.
Text Detection On/Off Converts a text file to a PostScript file when printing
(available when Printing Language is set to PS3).
PDF Page Size Various sizes Selects the paper size when printing a PDF file. If Auto
is selected, the paper size is determined based on the
size of the first page.
Parent topic: Selecting PDL (Page Description Language) Settings
44
Page 45

Selecting Printer Language and Interface Settings
You can select printer language and interface settings using the control panel on the product.
Note: These settings can be locked by an administrator. If you cannot access these settings, contact
your administrator for assistance.
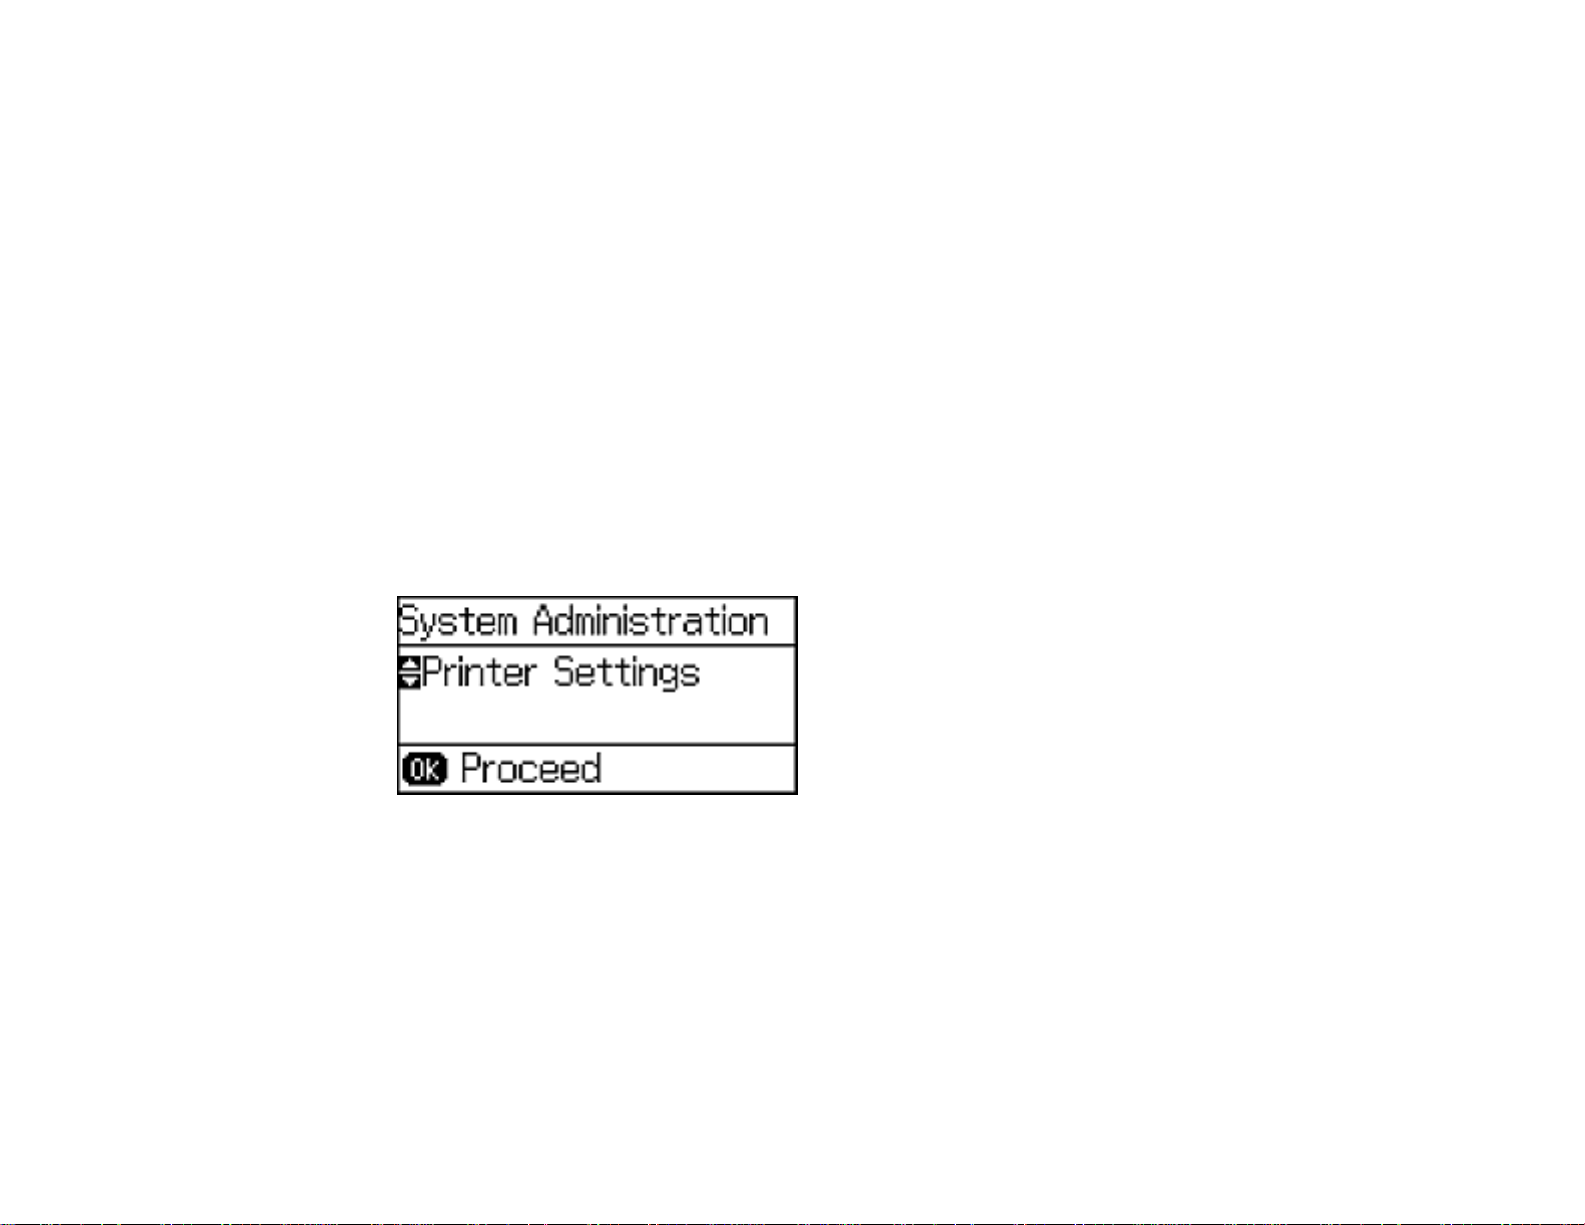
1. Press the arrow buttons to select Menu and press the OK button.
You see a screen like this:
2. Select System Administration and press the OK button. Enter the administrator password, if
necessary.
3. Select Printer Settings.
You see a screen like this:
4. Select the Printing Language and other settings you want to use.
Printer Language and Interface Options
45
Page 46

Parent topic: Enabling Epson Universal Print Driver (PCL) or PostScript Printing
Printer Language and Interface Options
Select the settings you want to use.
Printer Settings option Available Description
settings
USB I/F Timeout Setting 0.5 to 300 Specify the length of time before ending USB
seconds communicationfrom a computer using the PCL or
Printing Language Auto Select the language for the USB or network interface.
PCL
PS3
PDF
PC Connection via USB Enable Select whether to allow USB communication with the
Disable
Parent topic: Selecting Printer Language and Interface Settings
PostScript driver. This setting is necessary to avoid
endless USB communication.
product.
Printing a PS3 (PostScript) Status Sheet
You can print a PS3 (PostScript) status sheet to confirm the current font information and PostScript
printing software version.
1. Press the arrow buttons to select Menu and press the OK.
You see this screen:
46
Page 47

2. Select Print Status Sheet and press the OK button.
3. Select PS3 Status Sheet and press the OK button.
4. Press the up arrow button to begin printing the network status sheet.
Parent topic: Enabling Epson Universal Print Driver (PCL) or PostScript Printing
47
Page 48

Loading Paper
Before you print, load paper for the type of printing you will do.
Note: Load only plain paper when printing with the PostScript (PS3) printer software.
Loading Paper in the Cassette
Loading Paper and Envelopes in the Rear Paper Feed Slot
Loading Paper in the Front Paper Feed Slot
Paper Loading Capacity
Available Epson Papers
Paper or Media Type Settings - Printing Software
Selecting the Paper Settings for Each Source - Control Panel
Selecting Default Paper Settings - Administrator
Installing the Optional Cabinet and Paper Cassettes
Loading Paper in the Cassette
You can load paper up to this size in the paper cassette: A3 (11.7 × 16.5 inches [297 × 420 mm])
Note: If the optional paper cassette units are installed, do not remove more than one cassette at a time.
48
Page 49

1. Make sure the product is not operating and pull out the paper cassette.
2. Slide the front edge guide outward all the way, then slide the side edge guides to the paper size you
are using.
49
Page 50

3. Load paper with the printable side facedown and slide the front edge guide against the paper.
Note: Make sure the paper fits beneath the arrow mark inside the edge guides.
4. Make sure the paper size label matches the size of the paper loaded in the paper cassette. If
necessary, remove the label holder and change the paper size indicated on the label.
5. Insert the paper cassette all the way into the product.
50
Page 51

6. Extend the output tray.
7. Select the size and type of paper you loaded on the product LCD screen.
Always follow these paper loading guidelines:
• Load only the recommended number of sheets.
• Load paper short edge first, no matter which way your document faces.
• Load the printable side facedown.
• Load letterhead or pre-printed paper top edge first.
• Do not load paper above the arrow mark inside the edge guides.
• Check the paper package for any additional loading instructions.
Parent topic: Loading Paper
Related references
Paper Loading Capacity
Related tasks
Loading Paper and Envelopes in the Rear Paper Feed Slot
Loading Paper in the Front Paper Feed Slot
Loading Paper and Envelopes in the Rear Paper Feed Slot
You can print envelopes or documents in a variety of paper types and sizes in the rear paper feed slot.
51
Page 52

1. Open the feeder guard and pull up the paper support.
2. Slide the edge guides outward.
52
Page 53

3. If you are inserting a stack of paper, fan the sheets and tap the stack on a flat surface to even the
edges.
Note: You can load one sheet of binder paper with holes on one of the long edges as shown. Do not
select automatic 2-sided printing for this type of paper.
4. Do one of the following:
• Insert paper, glossy or printable side up and short edge first, in the center of the slot.
Caution: To prevent paper feeding problems, make sure you do not load paper above the arrow
marks inside the edge guides.
53
Page 54

• Load envelopes short edge first, with the flap facing down and the flap edge to the left, in the
center of the slot.
5. Slide the edge guides against the paper, but not too tightly.
6. Extend the output tray.
7. Select the size and type of paper you loaded in the Paper Setup menu.
54
Page 55

Always follow these paper loading guidelines:
• Load only the recommended number of sheets.
• Load paper short edge first, no matter which way your document faces.
• Load the printable side faceup.
• Load letterhead or pre-printed paper top edge first.
• Do not load paper above the arrow mark inside the edge guides.
• If you have trouble loading a stack of envelopes, press each envelope flat before loading it or load one
envelope at a time.
• If print quality declines when printing multiple envelopes, try loading one envelope at a time.
• Do not load envelopes that are curled, folded, or too thin.
• Check the paper package for any additional loading instructions.
Parent topic: Loading Paper
Related references
Paper Loading Capacity
Related tasks
Loading Paper in the Cassette
Loading Paper in the Front Paper Feed Slot
Loading Paper in the Front Paper Feed Slot
You can load one sheet of paper in the front paper feed slot.
Note: You cannot load paper while printing from the front paper feed slot. Paper that is too stiff may not
load correctly even if it is within the product's paper thickness specifications.
55
Page 56

1. Extend the output tray.
2. Slide the edge guides to the paper size you are using.
3. Insert the paper with the printable side facedown until the product pulls it in partially.
Note: Keep the paper straight to prevent it from loading at an angle.
56
Page 57

Always follow these paper loading guidelines:
• Load only one sheet at a time.
• Load paper short edge first, no matter which way your document faces.
• Load the printable side facedown.
• Load letterhead or pre-printed paper top edge first.
• Check the paper package for any additional loading instructions.
Parent topic: Loading Paper
Related references
Paper Specifications
Paper Loading Capacity
Related tasks
Loading Paper in the Cassette
Loading Paper and Envelopes in the Rear Paper Feed Slot
Paper Loading Capacity
Paper type Loading capacity
Plain paper
1
Paper cassettes Rear paper feed slot Front paper
feed slot
A3 (11.7 × 16.5 inches 50 sheets 1
[297 × 420 mm])
Epson Bright White Paper
Up to the arrow mark
Letter (8.5 × 11 inches 80 sheets 1
[216 × 279 mm]), A4
(8.3 × 11.7 inches
[210 × 297 mm]) , and
Legal (8.5 × 14 inches
[216 × 356 mm])
Up to the arrow mark
1
200 sheets (cassette 1) 50 sheets 1
400 sheets (cassettes 2
to 4)
57
Page 58

Paper type Loading capacity
Paper cassettes Rear paper feed slot Front paper
feed slot
Epson Presentation Paper Matte — A3 (11.7 × 16.5 inches —
[297 × 420 mm]) and
larger
50 sheets
Letter (8.5 × 11 inches
[216 × 279 mm]) and
smaller
70 sheets
Epson Photo Paper Glossy — 20
Epson Premium Photo Paper
Glossy
Epson Premium Photo Paper
Semi-gloss
Epson Ultra Premium Photo
Paper Glossy
Epson Premium Presentation
Paper Matte
Epson Premium Presentation
Paper Matte Double-sided
— A3(11.7 × 16.5 inches —
[297 × 420 mm]) and
larger
10 sheets
Letter (8.5 × 11 inches
[216 × 279 mm]) and
smaller
20 sheets
Epson Brochure & Flyer Paper
Matte Double-sided
Thick paper (cardstock up to 68 lb — A3(11.7 × 16.5 inches —
[256 g/m2])
2
[297 × 420 mm]), Letter
(8.5 × 11 inches
[216 × 279 mm]) and A4
(8.3 × 11.7 inches
[210 × 297 mm])
10 sheets
Envelopes — 10 envelopes —
58
Page 59

1
You can print 2-sided print jobs automatically or manually. You can only print 2-sided print jobs
manually in the rear paper feed slot. Load up to 30 sheets for manual 2-sided print jobs.
2
You can load up to 5 sheets for manual 2-sided print jobs.
Parent topic: Loading Paper
Available Epson Papers
You can purchase genuine Epson ink and paper at Epson Supplies Central at epson.com/ink3 (U.S.
sales) or epson.ca (Canadian sales). You can also purchase supplies from an Epson authorized reseller.
To find the nearest one, call 800-GO-EPSON (800-463-7766).
Paper Type Size Part number Sheet count
Epson Bright White Paper Letter (8.5 × 11 inches S041586 500
Epson Brochure & Flyer Paper Letter (8.5 × 11 inches S042384 150
Matte Double-sided [216× 279 mm])
Epson Presentation Paper Matte Letter (8.5 × 11 inches S041062 100
[216 × 279 mm])
[216 × 279 mm])
Legal (8.5 × 14 inches S041067 100
[216 × 356 mm])
11 × 17 inches S041069 100
(279 × 432 mm)
13 × 19 inches S041070 100
(330 × 483 mm)
Epson Premium Presentation 8 × 10 inches (203 × 254 mm) S041467 50
Paper Matte
Letter (8.5 × 11 inches S041257 50
[216 × 279 mm])
S042180 100
11 × 14 inches S041468 50
(279 × 356 mm)
A3 (11.7 × 16.5 inches S041260 50
[297 × 420 mm])
13 × 19 inches S041263 50
(330 × 483 mm)
59
Page 60

Paper Type Size Part number Sheet count
Epson Premium Presentation Letter (8.5 × 11 inches S041568 50
Paper Matte Double-sided [216 × 279 mm])
Epson Photo Paper Glossy 4× 6 inches (102 × 152 mm) S041809 50
S042038 100
Letter (8.5 × 11 inches S041141 20
[216 × 279 mm])
S041649 50
S041271 100
11 × 17 inches S041156 20
(279 × 432 mm)
13 × 19 inches S041143 20
(330 × 483 mm)
Epson Premium Photo Paper 4 × 6 inches (102 × 152 mm) S041808 40
Glossy
S041727 100
16:9 wide (4 × 7.1 inches S042109 20
[102 × 181 mm])
5 × 7 inches (127 × 178 mm) S041464 20
8 × 10 inches (203 × 254 mm) S041465 20
Letter (8.5 × 11 inches S042183 25
[216 × 279 mm])
S041667 50
11 × 14 inches S041466 20
(279 × 356 mm)
11 × 17 inches S041290 20
(279 × 432 mm)
A3 (11.7 × 16.5 inches S041288 20
[297 × 420 mm])
13 × 19 inches S041289 20
(330 × 483 mm)
60
Page 61

Paper Type Size Part number Sheet count
Epson Ultra Premium Photo Paper 4 × 6 inches (102 × 152 mm) S042181 60
Glossy
5 × 7 inches (127 × 178 mm) S041945 20
8 × 10 inches (203 × 254 mm) S041946 20
Letter (8.5 × 11 inches S042182 25
[216 × 279 mm])
Epson Premium Photo Paper 4 × 6 inches (102 × 152 mm) S041982 40
Semi-gloss
Parent topic: Loading Paper
Letter (8.5 × 11 inches S041331 20
[216 × 279 mm])
13 × 19 inches S041327 20
(330 × 483 mm)
Paper or Media Type Settings - Printing Software
For this paper Select this paper Type or Media Type setting
Plain paper Plain Paper / Bright White Paper
S042174 100
S042175 50
Epson Bright White Paper
Letterhead paper Letterhead
Recycled paper Recycled
Color paper Color
Preprinted paper Preprinted
Envelopes Envelope
Epson Ultra Premium Photo Paper Glossy UltraPremium Photo Paper Glossy
Epson Premium Photo Paper Glossy Premium Photo Paper Glossy
Epson Photo Paper Glossy Photo Paper Glossy
Epson Premium Photo Paper Semi-gloss Premium Photo Paper Semi-Gloss
61
Page 62

For this paper Select this paper Type or Media Type setting
Epson Presentation Paper Matte Premium Presentation Paper Matte
Epson Premium Presentation Paper Matte
Epson Premium Presentation Paper Matte Double-
sided
Epson Brochure & Flyer Paper Matte Double-sided
Cardstock up to 68 lb (256 g/m2) Card Stock
Parent topic: Loading Paper
Selecting the Paper Settings for Each Source - Control Panel
You can change the default paper size and paper type for each paper source using the control panel on
the product.
1. Press the Paper Setup button.
2. Select the paper source you want to change and press the OK button.
You see a screen like this:
3. Select the paper size you loaded and press the OK button.
4. Select the paper type you loaded and press the OK button.
5. Select another paper source to change or press the Back button to exit.
Paper Type Settings - Control Panel
Parent topic: Loading Paper
62
Page 63

Paper Type Settings - Control Panel
Select a Paper Type setting that matches the paper you loaded.
Paper type loaded Paper Type setting
Plain paper Plain Paper
Epson Bright White Paper
Letterhead paper Letterhead
Recycled paper Recycled
Color paper Color
Preprinted paper Preprinted
Envelopes Envelope
Epson Ultra Premium Photo Paper Glossy UltraGlossy
Epson Premium Photo Paper Glossy Prem. Glossy
Epson Photo Paper Glossy Glossy
Epson Premium Photo Paper Semi-gloss Prem. Semi-Gloss
Epson Presentation Paper Matte Prem. Matte
Epson Premium Presentation Paper Matte
Epson Premium Presentation Paper Matte Double-
sided
Epson Brochure & Flyer Paper Matte Double-sided
Cardstock up to 68 lb (256 g/m2) Card Stock
Parent topic: Selecting the Paper Settings for Each Source - Control Panel
Selecting Default Paper Settings - Administrator
As an administrator, you can adjust default paper settings that apply to all print jobs sent to the product.
Note: These settings can be locked by an administrator. If you cannot access these settings, contact
your administrator for assistance.
Selecting the Paper Source Settings - Administrator
63
Page 64

Selecting Universal Print Settings
Parent topic: Loading Paper
Selecting the Paper Source Settings - Administrator
You can change default paper source settings using the control panel on the product.
Note: These settings can be locked by an administrator. If you cannot access these settings, contact
your administrator for assistance.
1. Press the arrow buttons to select Menu and press the OK button.
2. Select System Administration and press the OK button. Enter the administrator password, if
necessary.
You see this screen:
3. Select Printer Settings and press the OK button.
4. Select Paper Source Settings and press the OK button.
You see a screen like this:
64
Page 65

5. Select the paper source options you want to use.
6. When you are finished, press the Back button to exit.
Paper Source Settings Options
Parent topic: Selecting Default Paper Settings - Administrator
Paper Source Settings Options
Select the Paper Source Settings options you want to use for your printed jobs.
Paper Source Available settings Description
Settings option
Rear Paper Feed Normal Select Normal to give printing priority to paper loaded in the
Priority rearpaper feed slot.
A4/Letter Auto On Select On to switch the selected paper size to match the
Switching loaded paper (Letter or A4) if the wrong size is selected.
Error Notice Paper Size Notice Select On for either of these settings to display an error
Parent topic: Selecting the Paper Source Settings - Administrator
Last
Off
Paper Type Notice
message when the selected paper type or size does not
match the loaded paper.
Selecting Universal Print Settings
You can change the default universal print settings using the product control panel.
Note: These settings can be locked by an administrator. If you cannot access these settings, contact
your administrator for assistance.
1. Press the arrow buttons to select Menu and press the OK button.
2. Select System Administration and press the OK button. Enter the administrator password, if
necessary.
65
Page 66

You see this screen:
3. Select Universal Print Settings and press the OK button.
You see this screen:
4. Adjust the settings as necessary.
5. When you are finished, press the Back button to exit.
Universal Print Settings Options
Parent topic: Selecting Default Paper Settings - Administrator
Universal Print Settings Options
Select the universal print settings you want to use.
Universal Print Available Description
Settings option settings
Top Offset — Adjust the top or left margin.
Left Offset
66
Page 67

Universal Print Available Description
Settings option settings
Top Offset in Back — Adjust the top or left margin of the back page when performing
Left Offset in Back
Check Paper Width On SelectOn to check the paper width before printing. This
Off
Dry Time Standard Select the drying time when printing double-sided.
Long
Longer
Skip Blank Page On SelectOn to skip blank pages automatically.
Off
PDL Configuration Common Selects the settings for printing with PCL and PostScript Page
Settings Description Language drivers.
PCL Menu
PS3 Menu
Parent topic: Selecting Universal Print Settings
double-sided printing.
prevents printing beyond the edges of the paper when the
paper size settings are wrong, but may reduce the printing
speed.
Installing the Optional Cabinet and Paper Cassettes
Follow these instructions to add the optional cabinet and paper cassette to your product. If you are
installing the optional cabinet, install the cabinet under the bottom of the optional cassette unit first.
Installing the Optional Cabinet
Installing the Optional Paper Cassette Units
Parent topic: Loading Paper
Installing the Optional Cabinet
You can install the optional cabinet to provide mobility and extra storage space.
1. Turn off the product, and unplug the power cord and any connected cables.
Warning: To avoid electric shock, make sure you unplug the power cord.
67
Page 68

2. Remove the cabinet from its packaging and remove any protective materials.
3. Make sure you have all the items shown here:
4. Place the cabinet on a flat surface and lock the front casters.
68
Page 69

5. Attach and secure the stands to the cabinet with the included screws.
Caution: Make sure the stands are securely attached or the product may fall over.
6. Remove the output tray and paper cassette from the product.
69
Page 70

Note: If you installed the optional paper cassette unit, remove the paper cassette from the optional
cassette unit instead.
70
Page 71

7. Lift up your product and gently lower it onto the cabinet with the corners aligned. Secure the product
to the cabinet with the included screws.
71
Page 72

Warning: To lift the product, have two or more people hold it as shown here. Lifting from other areas
may cause the product to fall or cause you to pinch your fingers when placing the product down.
72
Page 73

Note: Secure the optional cassette to the cabinet as shown here.
73
Page 74

8. Secure the back of the product or paper cassette unit to the cabinet using the included brackets and
screws.
9. Insert the paper cassette you removed and attach the output tray.
10. Connect the power cord and other connection cables, then plug in the product.
74
Page 75

Parent topic: Installing the Optional Cabinet and Paper Cassettes
Installing the Optional Paper Cassette Units
You can install up to three optional paper cassette units to provide more paper capacity. If you are using
the optional cabinet, install the cabinet under the bottom of the cassette unit first.
1. Turn off the product, and unplug the power cord and any connected cables.
Warning: To avoid electric shock, make sure you unplug the power cord.
2. Uninstall any optional cassette units already installed on the product.
Note: To uninstall any optional cassette units, turn off the product, unplug the power cord,
disconnect any cables, and follow the rest of these instructions in reverse.
3. Remove the paper cassette unit from its packaging and remove any protective materials.
4. Make sure you have all the items shown here:
75
Page 76

5. Remove the output tray and paper cassette from the product.
6. Remove the paper cassette from the optional paper cassette unit.
76
Page 77

7. Stack all optional paper cassette units on top of each other and secure them to each other with the
included screws.
77
Page 78

8. Lift up your product and gently lower it onto the paper cassette unit with the corners aligned. Secure
the product to the paper cassette unit with the included screws using a screw driver.
78
Page 79

Warning: To lift the product, have two people hold it as shown here. Lifting from other areas may
cause the product to fall or cause you to pinch your fingers when placing the product down.
79
Page 80

9. Secure the back of the paper cassette units to each other and to the product using the included
brackets and screws.
10. Insert a label into the holder indicating the paper size to be loaded in the paper cassette.
80
Page 81

11. Place the correct sticker on the cassette unit to indicate the cassette number.
12. Connect the power cord and other connection cables, then plug in the product.
13. Turn on the product.
14. Pull out and reinsert the paper cassette in the optional paper cassette unit to confirm the cassette
unit is displayed on the Paper Setup screen.
15. Enable the optional paper cassette units in the printer software.
Enabling the Optional Paper Cassettes - Windows
Enabling the Optional Paper Cassettes - OS X
Parent topic: Installing the Optional Cabinet and Paper Cassettes
Related tasks
Enabling the Optional Paper Cassettes - Windows
Synchronizing Printer Settings - Epson Universal Print Driver - Windows
Enabling the Optional Paper Cassettes - PostScript Printer Software - Windows
81
Page 82

Enabling the Optional Paper Cassettes - OS X
Enabling the Optional Paper Cassettes - PostScript Printer Software - OS X
Enabling the Optional Paper Cassettes - Windows
You need to enable the optional paper cassette units before you can use them with the printer software.
Note: If you are using the Epson Universal Print Driver or PostScript (PS3) printer software, see the
sections covering that software in this manual to enable the optional cassette units.
1. Do one of the following:
• Windows 8.x: Navigate to the Apps screen and select Control Panel > Hardware and Sound >
Devices and Printers. Right-click your product name and select Printer properties.
• Windows 7: Click and select Devices and Printers. Right-click your printer name and select
Printer properties.
• Windows Vista: Click and select Control Panel. Click Printer under Hardware and Sound,
then right-click your printer name and select Properties.
• Windows XP: Click Start and select Printers and Faxes. Right-click your product name and
select Properties.
2. Click the Optional Settings tab.
82
Page 83

You see a window like this:
3. Make sure Acquire from Printer is selected, then click Get.
The optional paper sources are listed in the Current Printer Information section.
4. Click OK.
The optional paper cassettes are now enabled.
Parent topic: Installing the Optional Paper Cassette Units
Related tasks
Synchronizing Printer Settings - Epson Universal Print Driver - Windows
Enabling the Optional Paper Cassettes - PostScript Printer Software - Windows
Enabling the Optional Paper Cassettes - OS X
You need to enable the optional paper cassette units before you can use them with the printer software.
83
Page 84

Note: If you are using the PostScript (PS3) printer software, see the section covering that software in
this manual to enable the optional cassette units.
1. In the Apple menu or the Dock, select System Preferences.
2. Select Print & Fax, Print & Scan, or Printers & Scanners, select your product, and select Options
& Supplies.
3. Select Driver or Options.
You see a screen like this:
4. Select the number of optional cassette units installed for the Lower Cassette setting.
5. Click OK.
The optional paper cassettes are now enabled.
Parent topic: Installing the Optional Paper Cassette Units
Related tasks
Enabling the Optional Paper Cassettes - PostScript Printer Software - OS X
84
Page 85

Printing from a Computer
Before printing from your computer, make sure you have set up your product and installed its software
as described on the Start Here sheet.
Note: If you have an Internet connection, it is a good idea to check for updates to your product software
on Epson's support website. If you see a Software Update screen, select Enable automatic checking
and click OK. The update scans your system to see if you have the latest product software. Follow the
on-screen instructions.
Printing with Windows
Printing with OS X
Printing with the Epson Universal Print Driver - Windows
Printing with the PostScript (PS3) Printer Software - Windows
Printing with the PostScript (PS3) Printer Software - OS X
Cancelling Printing Using a Product Button
Printing with Windows
You can print with your product using any Windows printing program, as described in these sections.
Selecting Basic Print Settings - Windows
Selecting Double-sided Printing Settings - Windows
Selecting Additional Layout and Print Options - Windows
Selecting a Printing Preset - Windows
Selecting Extended Settings - Windows
Printing Your Document or Photo - Windows
Locking Printer Settings - Windows
Selecting Default Print Settings - Windows
Changing Automatic Update Options
Parent topic: Printing from a Computer
Selecting Basic Print Settings - Windows
Select the basic settings for the document or photo you want to print.
1. Open a photo or document for printing.
85
Page 86

2. Select the print command in your application.
Note: You may need to select a print icon on your screen, the Print option in the File menu, or
another command. See your application's help utility for details.
3. If necessary, select your product name as the printer you want to use.
Note: You may also need to select Properties or Preferences to view your print settings.
You see the Main tab of your printer settings window:
4. For the Paper Source setting, select where you loaded the paper you want to print on.
5. Select the size of the paper you loaded as the Document Size setting.
86
Page 87

6. Select the orientation of your document.
Note: If you are printing an envelope, select Landscape.
7. Select the type of paper you loaded as the Paper Type setting.
Note: The setting may not exactly match the name of your paper. Check the paper type settings list
for details.
8. Select the Quality setting that matches the print quality you want to use.
9. Select a Color option:
• To print a color document or photo, select the Color setting.
• To print text and graphics in black or shades of gray, select the Black/Grayscale setting.
10. To print on both sides of the paper, select the 2-Sided Printing checkbox and select the options you
want.
11. To print multiple pages on one sheet of paper, or print one image on multiple sheets of paper, select
one of the settings in the Multi-Page menu and select the printing options you want.
12. To print multiple copies and arrange their print order, select the Copies options.
13. To preview your job before printing, select Print Preview.
14. To save your print job as a project that can be modified and combined with other print jobs, select
Job Arranger Lite.
15. To reduce noise during printing when you select Plain Paper/Bright White Paper, select On in the
Quiet Mode menu.
Paper Source Options - Windows
Print Quality Options - Windows
Multi-Page Printing Options - Windows
Parent topic: Printing with Windows
Related references
Paper or Media Type Settings - Printing Software
Related tasks
Selecting Double-sided Printing Settings - Windows
Printing Your Document or Photo - Windows
87
Page 88

Paper Source Options - Windows
You can select any of the available options in the Paper Source menu to print on the paper loaded in that
source.
Note: Paper Cassette 2 through Paper Cassette 4 are available only if you have installed the optional
cassettes.
Auto Select
Automatically selects the paper source based on the selected paper size.
Paper Cassette 1
Selects the paper in cassette 1 as the paper source.
Paper Cassette 2
Selects the paper in cassette 2 as the paper source.
Paper Cassette 3
Selects the paper in cassette 3 as the paper source.
Paper Cassette 4
Selects the paper in cassette 4 as the paper source.
Rear Paper Feed Slot
Selects the paper in the rear feed slot as the paper source.
Front Paper Feed Slot
Selects the paper in the front feed slot as the paper source.
Parent topic: Selecting Basic Print Settings - Windows
Print Quality Options - Windows
You can select any of the available Quality options to fine-tune the quality of your print. Some settings
may be unavailable, depending on the paper type and border setting you have chosen.
Draft
For draft printing on plain paper.
Standard
For everyday text and image printing.
Standard - Vivid
For text and graphics with good quality and print speed.
High
For photos and graphics with high print quality.
88
Page 89

More Settings
Opens a window that lets you choose among levels of speed and quality.
Parent topic: Selecting Basic Print Settings - Windows
Multi-Page Printing Options - Windows
You can select any of the available options in the Multi-Page menu to set up your multi-page print job.
2-Up and 4-Up
Prints 2 or 4 pages on one sheet of paper. Click the Page Order button to select page layout and
border options.
2×1 Poster, 2×2 Poster, 3×3 Poster, 4×4 Poster
Prints one image on multiple sheets of paper to create a larger poster. Click the Settings button to
select image layout and guideline options.
Parent topic: Selecting Basic Print Settings - Windows
Selecting Double-sided Printing Settings - Windows
You can print on both sides of the paper by selecting one of the 2-Sided Printing options on the Main
tab.
Note: Some options may be pre-selected or unavailable, depending on other settings you have chosen
or if you are accessing the product over a network.
1. Select one of the following options for 2-Sided Printing:
• Auto (Long-edge binding) to print your double-sided print job by automatically flipping the paper
on the long edge.
• Auto (Short-edge binding) to print your double-sided print job by automatically flipping the paper
on the short edge.
• Manual (Long-edge binding) to print your double-sided print job by printing one side and
prompting you to flip the paper over on the long edge to print the other side (recommended for
paper types that do not support automatic duplexing).
89
Page 90

• Manual (Short-edge binding) to print your double-sided print job by printing one side and
prompting you to flip the paper over on the short edge to print the other side (recommended for
paper types that do not support automatic duplexing).
2. Click the Settings button.
You see this window:
90
Page 91

3. Select the double-sided printing options you want to use.
4. Click OK to return to the Main tab.
5. Click the Print Density button.
You see this window:
6. Select the type of document you are printing as the Document Type setting. The software
automatically sets the Adjustments options for that document type.
7. If necessary, select the Adjustments options you want to use.
8. Click OK to return to the Main tab.
9. Print a test copy of your double-sided document to test the selected settings.
10. Follow any instructions displayed on the screen during printing.
Double-sided Printing Options - Windows
Print Density Adjustments - Windows
Parent topic: Printing with Windows
Related tasks
Selecting Basic Print Settings - Windows
91
Page 92

Double-sided Printing Options - Windows
You can select any of the available options on the 2-Sided Printing Settings window to set up your
double-sided print job.
Binding Edge Options
Select a setting that orients double-sided print binding in the desired direction.
Binding Margin Options
Select options that define a wider margin to allow for binding.
Start Page
Selects whether printing starts on the front or back page.
Create Folded Booklet Options
Select the Booklet checkbox and a binding option to print double-sided pages as a booklet.
Parent topic: Selecting Double-sided Printing Settings - Windows
Print Density Adjustments - Windows
You can select any of the available options on the Print Density Adjustment window to adjust the print
quality of your double-sided print job.
Print Density
Sets the level of ink coverage for double-sided printing.
Increase Ink Drying Time
Sets the amount of time required for drying ink after printing on one side of the paper before printing
the other side in double-sided printing to prevent ink smearing.
Parent topic: Selecting Double-sided Printing Settings - Windows
92
Page 93

Selecting Additional Layout and Print Options - Windows
You can select a variety of additional layout and printing options for your document or photo on the More
Options tab.
1. To change the size of your printed document or photo, select the Reduce/Enlarge Document
checkbox and select one of these sizing options:
• Select the Fit to Page option to size your image to fit the paper you loaded. Select the size of the
your document or photo as the Document Size setting, and the size of your paper as the Output
Paper setting. If you want to center your image on the paper, select the Center option.
• Select the Zoom to option to reduce or enlarge your document or photo by a specific percentage.
Select the percentage in the % menu.
2. Select one of the following Color Correction options:
• Select Automatic to automatically adjust the sharpness, brightness, contrast, and color saturation
for your image.
93
Page 94

• Select Custom and click the Advanced button to manually adjust thecolor correction settings or
turn off color management in your printer software.
• Select Image Options to access additional settings for improving printed images.
3. To add the following features, click the Watermark Features button:
• Anti-Copy Pattern: adds a watermark that only appears when your printout is copied.
• Watermark: adds a visible watermark to your printout.
Note: Click the Add/Delete button to create your own watermark, and click the Settings button to
customize the watermark.
• Header/Footer: adds information such as the date and time to the top or bottom of your printout.
Note: Click the Settings button to customize the text and location of the header or footer.
4. To add a password to your print job, select the Confidential Job checkbox, then enter a password.
Confidential jobs are stored in the product's memory without being printed. To print the job, enter the
password for the confidential job on the product's control panel.
Note: Confidential print jobs are cleared from the product's memory after printing.
5. Select any of the Additional Settings options to customize your print.
Custom Color Correction Options - Windows
Image Options and Additional Settings - Windows
Header/Footer Settings - Windows
Parent topic: Printing with Windows
Related tasks
Printing Your Document or Photo - Windows
94
Page 95

Custom Color Correction Options - Windows
You can select any of the available options in the Color Correction window to customize the image colors
for your print job.
Color Controls
Lets you select a Color Mode setting, individual settings for Brightness, Contrast, Saturation, and
Density, and individual color tones. Depending on the selected color mode, you can also adjust the
midtone density using the Gamma setting.
Fix Photo
Improves the color, contrast, and sharpness of flawed photos.
Note: Fix Photo uses a sophisticated face recognition technology to optimize photos that include
faces. For this to work, both eyes and the nose must be visible in the subject's face. If your photo
includes a face with an intentional color cast, such as a statue, you may want to turn off Fix Photo to
retain the special color effects.
95
Page 96

ICM
Lets you manage color using installed color printing profiles.
No Color Adjustment
Turns off color management in your printer software so you can manage color using only your
application software.
Parent topic: Selecting Additional Layout and Print Options - Windows
Image Options and Additional Settings - Windows
You can select any of the Image Options and Additional Settings to customize your print. Some options
may be pre-selected or unavailable, depending on other settings you have chosen.
Image Options
Emphasize Text
Adjusts the weight of printed text to increase readability.
Emphasize Thin Lines
Adjusts the weight of printed lines to increase visibility.
Edge Smoothing
Smooths jagged edges in low-resolution images such as screen captures or images from the Web.
Fix Red-Eye
Reduces or removes red-eye in photos.
Print Text in Black
Prints colored text in black.
For Color Text
Prints colored text on a background pattern or underlined.
For Color Graphs and Images
Prints colored graphics and images with overlay patterns.
For Color Text, Graphs, and Images
Prints colored text, graphics, and images with overlay patterns.
Enhancement Options
Specifies Color Universal Print enhancement settings for text, graphics, and images.
Additional Settings Options
Rotate 180º
Prints the image rotated 180º from its original orientation.
96
Page 97

High Speed
Speeds up printing but may reduce print quality.
Mirror Image
Flips the printed image left to right.
Parent topic: Selecting Additional Layout and Print Options - Windows
Header/Footer Settings - Windows
You can select any of the Header/Footer Settings options to add headers or footers when you print. The
items are available to print at the top or bottom of your pages, in either the left, right, or center of the
page.
Note: These settings are not saved with your document.
You can select to print the following information:
• User Name
• Computer Name
• Date
• Date/Time
• Collate Number (copy number)
Note: The user name, computer name, date, and time come from the Windows Control Panel on your
computer.
Parent topic: Selecting Additional Layout and Print Options - Windows
97
Page 98

Selecting a Printing Preset - Windows
For quick access to common groups of print settings, you can select a printing preset on the Main or
More Options tab.
Note: You can create your own preset by clicking the Add/Remove Presets button.
1. Click the Main or More Options tab.
You see the available Printing Presets on the left:
98
Page 99

2. Place your cursor over one of the Printing Presets to view its list of settings.
3. Click on a preset to change its settings, or use any of the available options on the screen to control
your printing presets.
4. To choose a preset for printing, select it.
5. Click OK.
Parent topic: Printing with Windows
Selecting Extended Settings - Windows
You can select additional settings that apply to all the print jobs you send to your product.
1. Access the Windows Desktop and right-click the product icon in the Windows taskbar.
2. Select Printer Settings.
3. Click the Maintenance tab.
You see the maintenance options:
99
Page 100

4. Click the Extended Settings button.
You see this window:
5. Select any of the extended settings to customize your print.
6. Click OK to close the Extended Settings window.
7. Click OK to close the printer software window.
Extended Settings - Windows
Parent topic: Printing with Windows
Extended Settings - Windows
You can select from these settings on the Extended Settings window.
Enable EPSON Status Monitor 3
Enables product monitoring for ink and paper supplies and other issues.
Check Paper Width Before Printing
Prevents printing beyond the edges of the paper if the paper size setting is incorrect; may reduce print
speed.
Thick Paper and Envelopes
Prevents ink from smearing when you print on envelopes or other thick paper.
100
 Loading...