

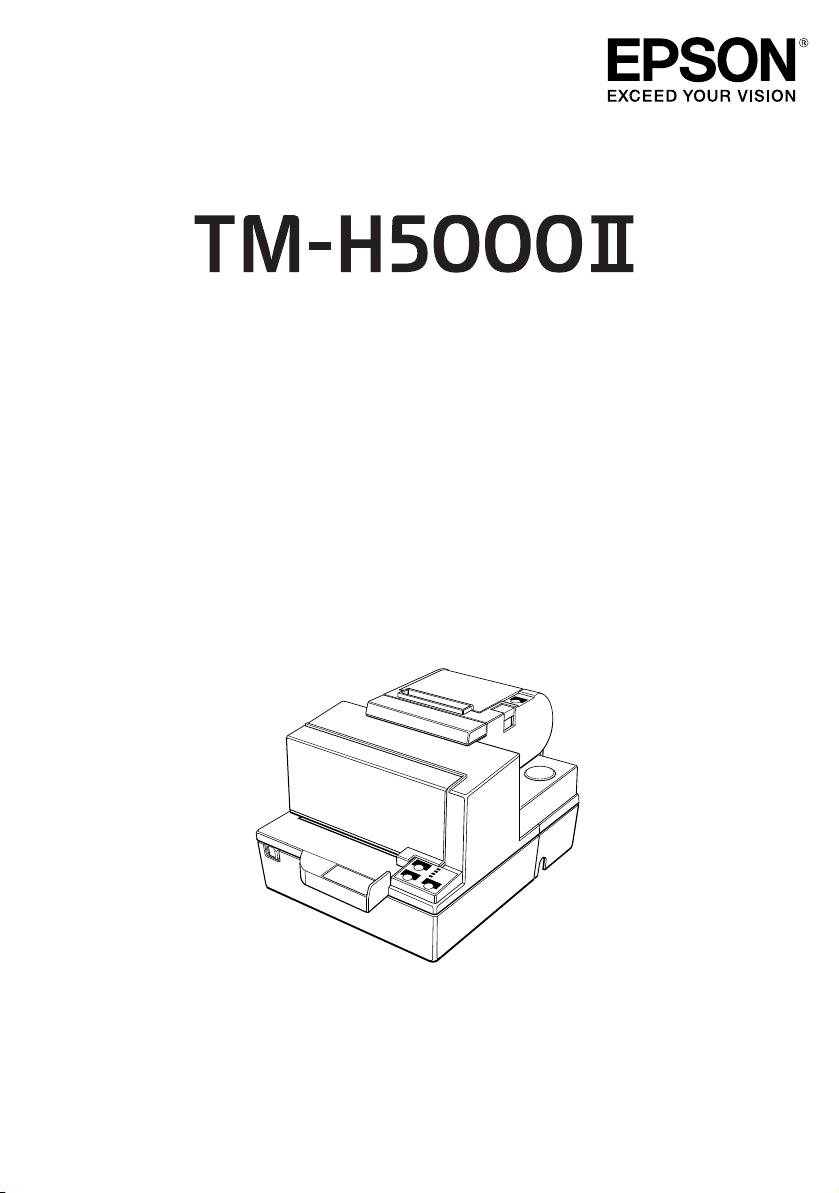
User’s Manual / Petunjuk Penggunaan
Di Impor oleh:
PT. Epson Indonesia
Wisma Kyoei Prince Lt.16
Jalan Jenderal Sudirman Kav.3
Jakarta Pusat 10220, Indonesia
M00031400

English
User’s Manual
English
All rights reserved. No part of this publication may be reproduced, stored in a retrieval system, or
transmitted in any form or by any means, electronic, mechanical, photocopying, recording, or
otherwise, without the prior written permission of Seiko Epson Corporation. No patent liability is
assumed with respect to the use of the information contained herein. While every precaution has been
taken in the preparation of this book, Seiko Epson Corporation assumes no responsibility for errors or
omissions. Neither is any liability assumed for damages resulting from the use of the information
contained herein.
Neither Seiko Epson Corporation nor its affiliates shall be liable to the purchaser of this product or
third parties for damages, losses, costs, or expenses incurred by purchaser or third parties as a result
of: accident, misuse, or abuse of this product or unauthorized modifications, repairs, or alterations to
this product, or (excluding the U.S.) failure to strictly comply with Seiko Epson Corporation’s
operating and maintenance instructions.
Seiko Epson Corporation shall not be liable against any damages or problems arising from the use of
any options or any consumable products other than those designated as Original Epson Products or
Epson Approved Products by Seiko Epson Corporation.
EPSON is a registered trademark of Seiko Epson Corporation in Japan and other countries/regions.
NOTICE: The contents of this manual are subject to change without notice.
Copyright © 2010 by Seiko Epson Corporation, Nagano, Japan.
TM-H5000II User’s Manual 3
l
EnglishEnglish
Safety Precautions
This section presents important information intended to ensure
safe and effective use of this product. Please read this section
carefully and store it in an accessible location.
WARNING:
Shut down your equipment immediately if it produces smoke, a strange
odor, or unusual noise. Continued use may lead to fire. Immediately
unplug the equipment and contact your dealer or a Seiko Epson service
center for advice.
Never attempt to repair this product yourself. Improper repair work can
be dangerous.
Never disassemble or modify this product. Tampering with this product
may result in injury or fire.
Be sure to use the specified power source. Connection to an improper
power source may cause fire.
Do not allow foreign matter to fall into the equipment. Penetration by
foreign objects may lead to fire.
If water or other liquid spills into this equipment, unplug the power cord
immediately, and then contact your dealer or a Seiko Epson service
center for advice. Continued usage may lead to fire.
Do not use aerosol sprayers containing flammable gas inside or around
this product. Doing so may cause fire.
CAUTION:
Do not connect cables in ways other than those mentioned in this
manual. Different connections may cause equipment damage and
burning.
Be sure to set this equipment on a firm, stable, horizontal surface. The
product may break or cause injury if it falls.
Do not use in locations subject to high humidity or dust levels. Excessive
humidity and dust may cause equipment damage or fire.
Do not place heavy objects on top of this product. Never stand or lean
on this product. Equipment may fall or collapse, causing breakage and
possible injury.
Take care not to injure your fingers on the manual cutter
• When you remove printed paper
• When you perform other operations such as loading/replacing roll
paper
To ensure safety, unplug this product before leaving it unused for an
extended.
4 TM-H5000II User’s Manual
Caution Labels
The caution labels on the product indicate the following
precautions.
WARNING:
Do not connect a telephone line to the drawer kick-out connector or
the display module connector; otherwise, the printer and the telephone
line may be damaged.
CAUTION:
The thermal head and print head are hot.
Restriction of Use
When this product is used for applications requiring high
reliability/safety, such as transportation devices related to
aviation, rail, marine, automotive, etc.; disaster prevention devices;
various safety devices, etc.; or functional/precision devices, etc.;
you should use this product only after giving consideration to
including fail-safes and redundancies into your design to maintain
safety and total system reliability. Because this product was not
intended for use in applications requiring extremely high
reliability/safety, such as aerospace equipment, main
communication equipment, nuclear power control equipment, or
medical equipment related to direct medical care, etc., please make
your own judgment on this product’s suitability after a full
evaluation.
English
Unpacking
The following items are included with the standard specification
printer. If any item is damaged, contact your dealer.
❏ Printer ❏ Ribbon cassette
❏ Power switch cover ❏ Paper roll
Downloading Drivers, Utilities, and Manuals
Drivers, utilities, and manuals can be downloaded from the
following URL.
http://www.epson-pos.com/
TM-H5000II User’s Manual 5
l
FEED
FORWARD
REVERSE RELEASE
EnglishEnglish
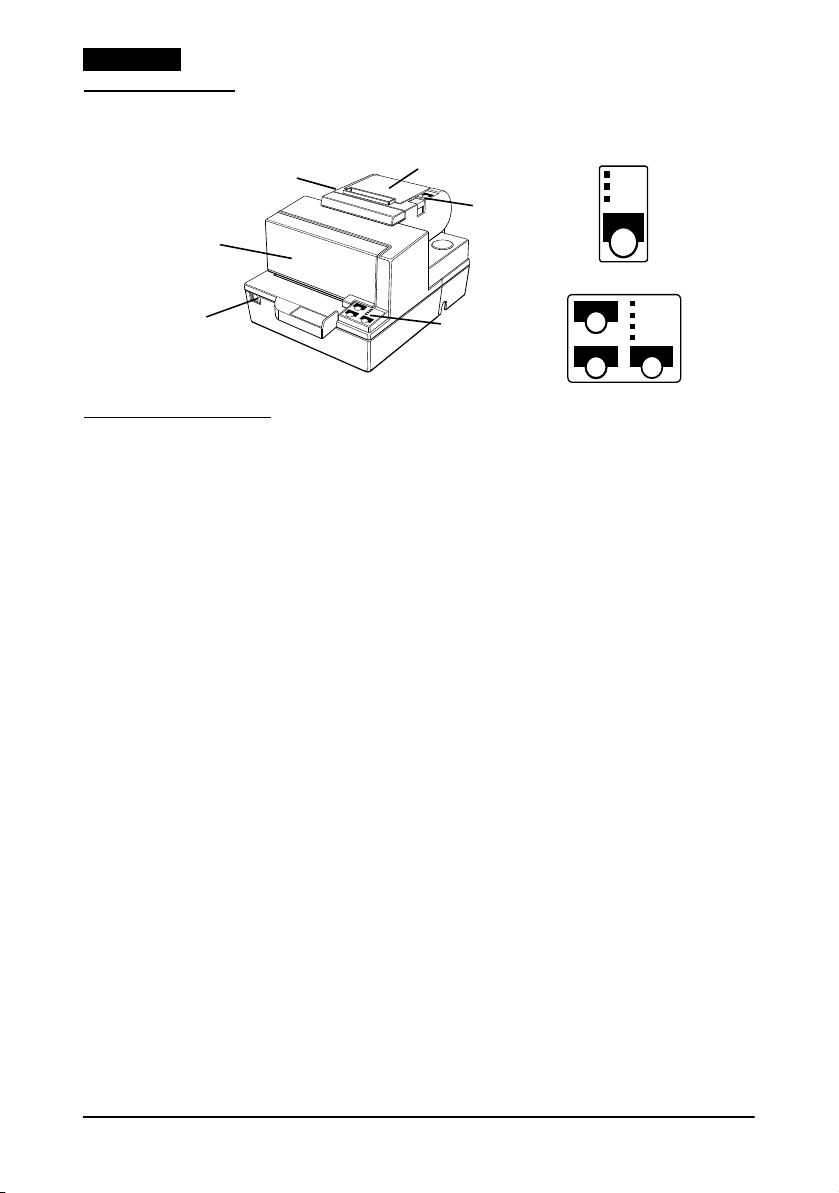
Printer Parts
autocutter cover
front cover
on/off switch
paper roll cover
paper roll
control panel
slip paper
control panel
Control Panels
Paper Roll Control Panel
FEED button
Press to feed paper one line; hold down to feed continuously.
POWER LED
Lights when the printer is on.
ERROR LED
Lights to indicate an error.
PAPER OUT LED
Lights when the paper roll is at the end or near the end.
POWER
ERROR
PAPER
OUT
POWER
ERROR
RELEASE
SLIP
Slip Control Panel
FORWARD button
REVERSE button
RELEASE button
POWER LED
6 TM-H5000II User’s Manual
Press to feed the slip forward one line; hold down to feed it
continuously.
Press to feed the slip backward one line; hold down to reverse feed
continuously.
Press to release slip paper.
Lights when power is on.
ERROR LED
Lights to indicate an error.
RELEASE LED
Lights to indicate that you can insert slip paper.
SLIP LED
Lights to indicate that the printer is in slip mode.
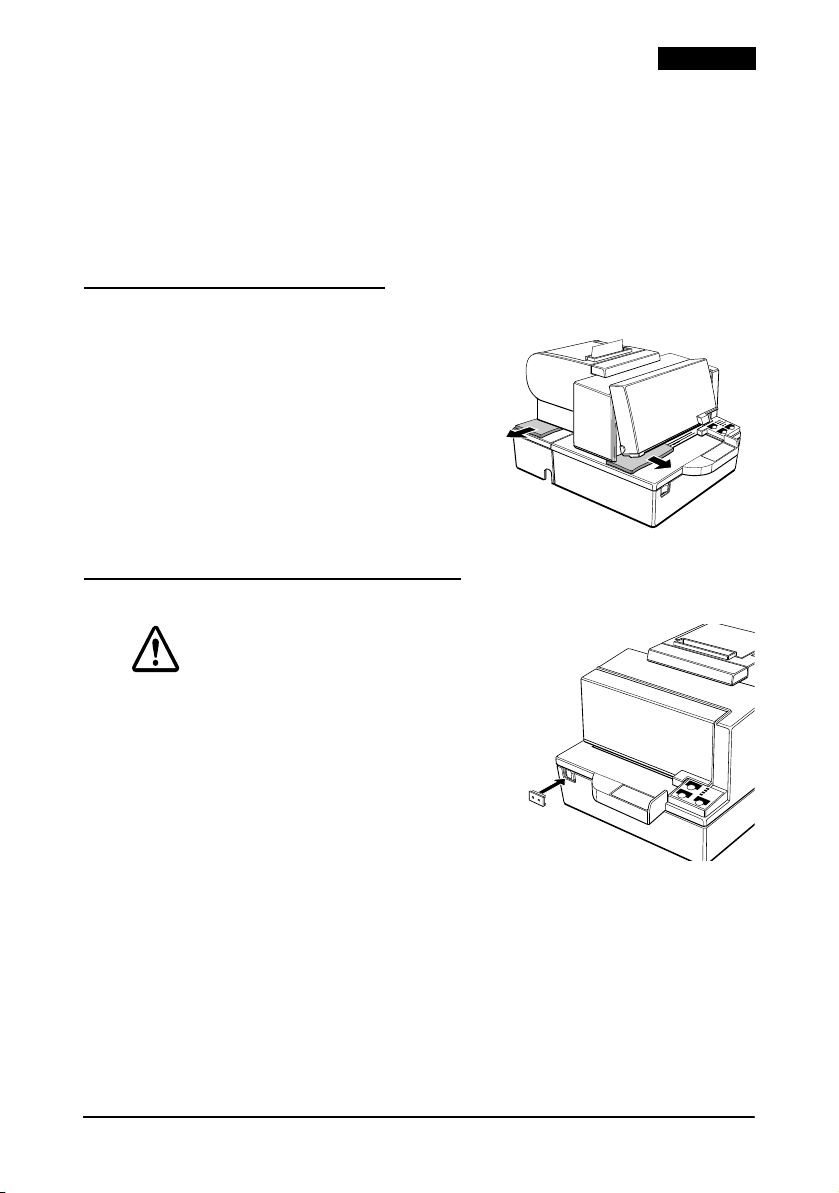
Removing the Dampers
The printer is protected for shipping by
two transportation
dampers that you
must remove before you turn on the
printer.
Open the printer by pulling the tab on
the front cover, and remove the two
dampers shown in illustration
1.
Note:
Reinstall the dampers before shipping.
Using the Power Switch Cover
English
1
WARNING:
If an accident occurs with the power switch
cover attached, unplug the power cord
immediately. Continued use may cause
fire.
The enclosed power switch cover keeps
the power switch from being pressed
accidentally. To use the cover, install it
as shown in illustration
2.
TM-H5000II User’s Manual 7
2
l
EnglishEnglish
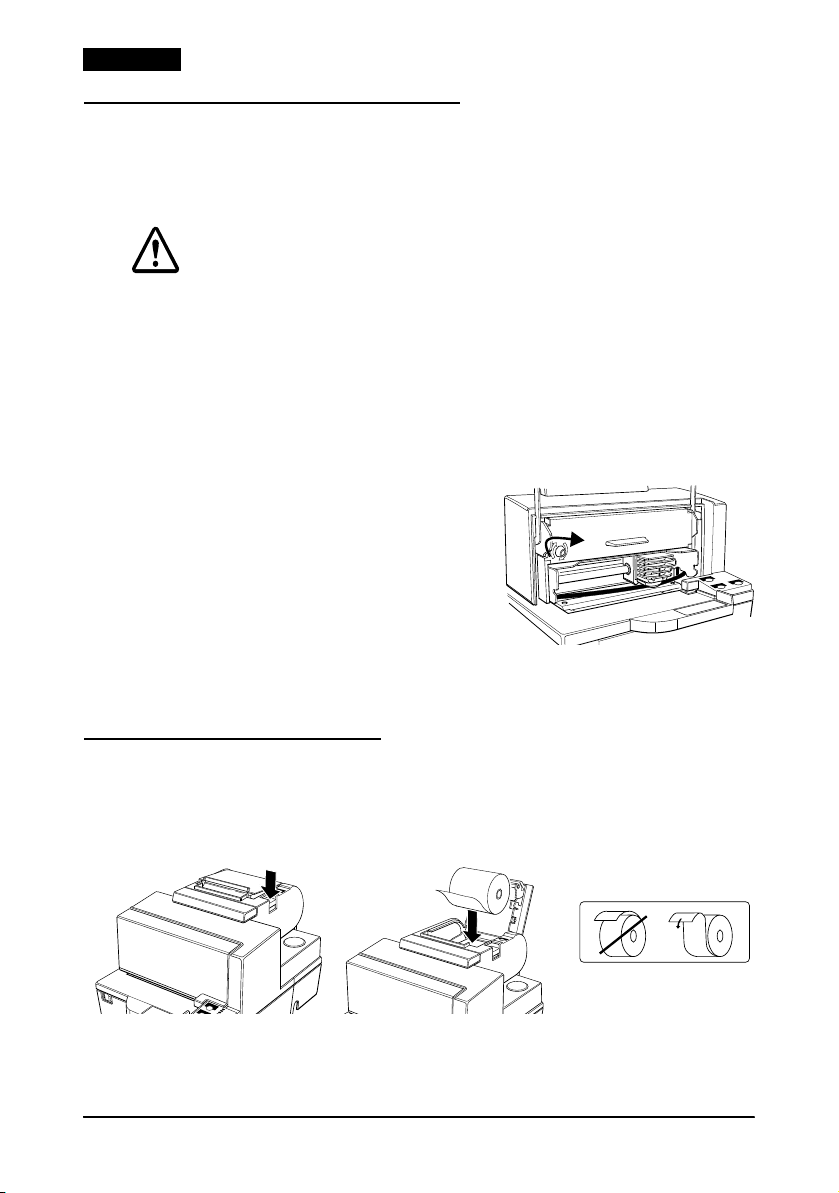
Installing the Ribbon Cassette
Use the EPSON ERC-31 ribbon cassette. The use of any ribbon
cassettes other than those approved by Epson may damage the
printer and will void the warranty.
CAUTION:
Never turn the ribbon cassette’s feed knob in the opposite direction of
the arrow marked on the cassette; otherwise the ribbon cassette may
be damaged.
1. Turn the printer on, and open the front cover by pulling up the
tab on the left side.
2. Be sure the print head is on the right side.
3. If a ribbon is already installed, remove it by grasping the end of
the tab and removing it from the printer.
4. Turn the cassette knob on the
cartridge in the direction of the
arrow 2 or 3 times to remove
any slack.
5. Insert the ribbon, and rotate the
cassette knob 2 or 3 more times,
as shown in illustration
3.
6. Make sure the ribbon has no
wrinkles or creases and is installed below the print head as
shown on the label inside the printer.
3
Installing the Paper Roll
1. Press the button, as shown in illustration 4, to open the cover.
2. Insert the paper roll as shown in illustration 5. Make sure that it
is inserted correctly as shown in illustration
456
3. Pull out a small amount of paper, close the cover, and tear off
the paper.
8 TM-H5000II User’s Manual
6.
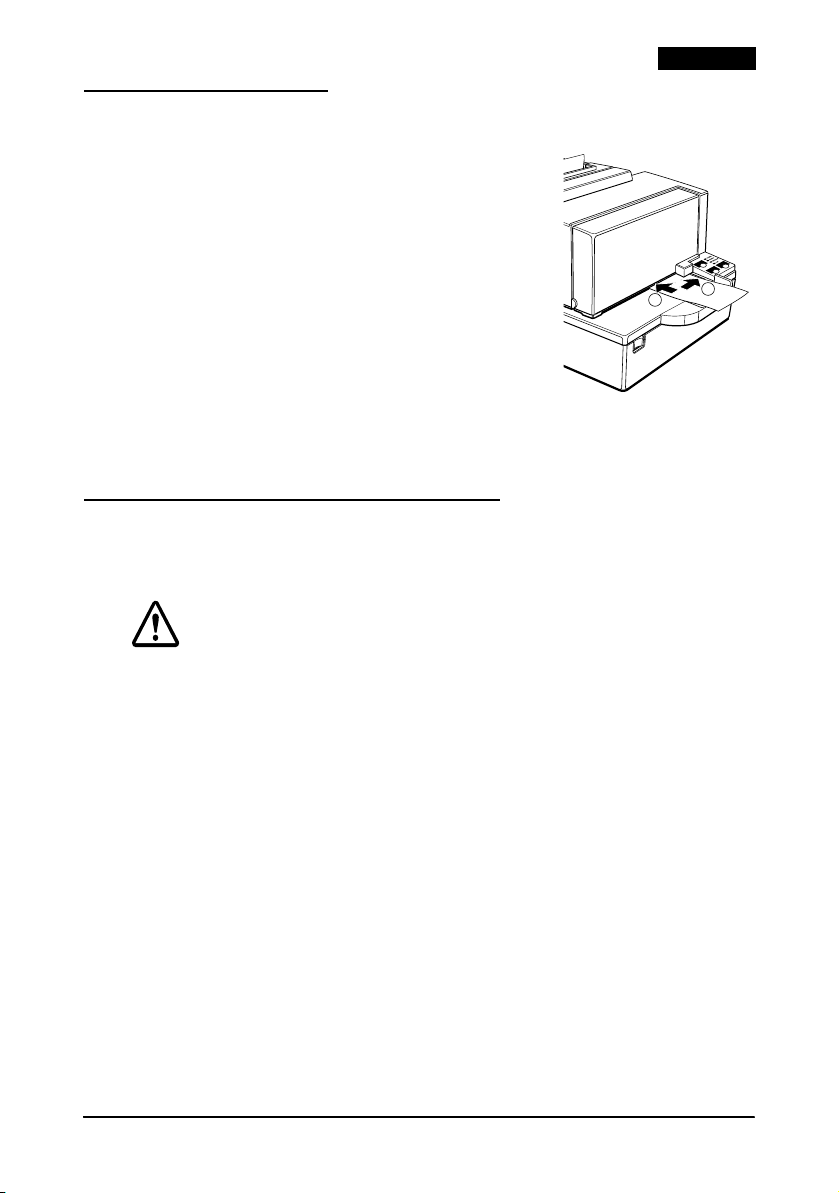
Inserting Slip Paper
Note:
Do not use wrinkled or curled paper.
An optional front extension table (WT-5000) is
available for users who need it to enable
handwriting on paper or other uses.
1. When the SLIP LED flashes, insert slip
paper, using the right edge of the slip
paper inlet as a guide (see illustration
7 ).
2. When you insert the slip into the inlet as
far as it will go, the sensor detects the
slip, the SLIP LED changes from flashing
to on, and the printer draws the paper in
and prints it.
3. After printing is complete, the SLIP LED goes off, and you can
remove the slip.
Using the Optional MICR Reader
The optional, factory-installed magnetic ink character recognition
(MICR) reader lets the printer read MICR ink on personal checks.
2
English
7
1
CAUTION:
Do not insert checks with staples in them. Do not insert wrinkled checks.
1. When the SLIP light flashs, insert the check face down, with the
MICR characters on the right-hand side.
2. Insert the check straight into the inlet using the right edge of
the inlet as a guide, as far as the check will go. See illustration
3. The printer starts drawing the check in. Let go of the check
immediately. The SLIP LED goes from flashing to on.
4. When MICR reading is complete, the printer ejects the check
and the SLIP LED starts flashing again.
5. Remove the check by pulling it straight out (not at an angle).
The SLIP LED goes off.
TM-H5000II User’s Manual 9
7.

l
EnglishEnglish
Cleaning the Paper Roll Print Head
CAUTION:
After printing, the print head can be very hot. Be careful not to touch it
and to let it cool before you clean it. Do not damage the print head by
touching it with your fingers or any hard object.
Turn off the printer, open the paper roll cover, and clean the
thermal elements of the print head with a cotton swab moistened
with an alcohol solvent (ethanol or IPA).
Epson recommends cleaning the thermal head periodically
(generally every 3 months) to maintain receipt print quality.
Cleaning the Optional MICR Mechanism
Clean the MICR head and MICR roller every 6000 passes or once a
month.
Note:
If you encounter frequent MICR reading errors, use one of the following
methods.
For the MICR head
Use a moistened cleaning sheet, such as PRESAT brand (KIC)
“Check Reader Cleaning Card” or an equivalent commercially
available cleaning sheet.
For the MICR feed roller
Use an adhesive cleaning sheet available from Epson. Contact your
dealer.
Cleaning procedure
Use this procedure for both cleaning sheets.
1. Load a paper roll into the printer; then turn off the power.
2. Open the front cover and turn the power back on while holding
down the RELEASE button.
3. Press the RELEASE button 7 times.
4. Close the front cover (the SLIP LED flashes).
5. Follow the instructions on the cleaning sheet. You will insert
the cleaning sheet the same way you insert a normal check.
6. When the sheet is ejected, remove it from the printer; then turn
off the power.
10 TM-H5000II User’s Manual

Troubleshooting
No lights on the control panel
Check that power supply cables are plugged into the printer
correctly, the power unit, and power outlet.
The ERROR light is on, and nothing is printing
If the PAPER OUT LED is on, paper is not inserted or is not inserted
correctly.
If the PAPER OUT LED is off, check that the paper roll cover is
closed correctly.
The ERROR light is flashing, and nothing is printing
Check for a paper jam.
If the printer has been printing for awhile, the print head may be
too hot. This corrects itself when the print head cools down.
Turn the printer off, and after 10 seconds, turn it back on.
The autocutter is jammed
1. Pull the cutter cover toward you so that you can rotate the
cutter motor knob.
2. Follow the instructions on the label, and rotate the knob until ▼
appears in the window.
3. Close the cutter cover.
English
TM-H5000II User’s Manual 11

l
EnglishEnglish
Removing Jammed Paper
CAUTION:
Do not touch the print head because it can be very hot after printing.
Do not move the slip section print head carriage.
1. Turn the printer off and open the appropriate printer cover
(either front or paper roll).
2. If the paper is jammed in the paper roll section, press the cover
open button to open the cover. Then remove the jammed paper
and put the roll back in the printer and close the cover. If the
paper is jammed in the slip section, open the front cover and
remove the jammed paper.
3. If paper is caught in the automatic cutter in the receipt section
and the paper roll cover cannot be opened, open the cutter
cover toward you, as shown in illustration 8.
4. Rotate the knob until ▼ appears in the window, as shown in
illustration 9. This returns the cutter blade to the normal
position. There is a label near the cutter to assist you.
5. Close the cutter cover.
6. Open the paper roll cover and remove the jammed paper.
89
12 TM-H5000II User’s Manual

DIP Switch Tables
Serial
SW Function ON OFF
1-1 Data receive error Ignored Prints “?”
1-2 Receive buffer 45 bytes 4 KB
1-3 Handshaking XON/XOFF DTR/DSR
1-4 Data word length 7 bits 8 bits
1-5 Parity check Enabled
1-6 Parity selection Even
1-7 See “Transmission speed” table.
1-8
SW Function ON OFF
2-1 Handshaking Buffer full Offline or buffer full
2-2 Customer
display
2-3, 2-4 Print density See “Print density” table.
2-5, 2-6 Reserved. Do not change. Fixed to OFF.
2-7 Pin 6 reset Enabled Disabled
2-8 Pin 25 reset Enabled Disabled
Serial transmission speed
1-7 1-8 Speed
ON ON 2400 bps
OFF ON 4800 bps
ON OFF 9600 bps
OFF OFF 19200 bps
Connected Not connected
English
Parallel
SW Function ON OFF
1-1 Auto line feed Enabled Disabled
1-2 Receive buffer 45 bytes 4 KB
1-3 ~ 1-8 Undefined — —
SW Function ON OFF
2-1 Handshaking Buffer full Offline or
2-2 Reserved
Do not change.
2-3, 2-4 Print density See “Print density” table.
2-5 ~ 2-7 Reserved. Fixed to OFF. Do not change.
2-8 Pin 31 reset Fixed to ON.
Fixed to OFF.
buffer full
Print density
2-3 2-4 Density
ON ON Low power mode
OFF OFF 1 (normal)
ON OFF 2
OFF ON 3 (dark)
TM-H5000II User’s Manual 13

l
EnglishEnglish
TM-H5000II specifications
Printing method Slip — Serial impact dot matrix, 9-pin vertical line
Printing direction Slip — Bidirectional, minimum distance printing
Characters per line
(default)
Character structure Slip — 9 × 9, 3-dot spacing (half dots); 7 × 9, 2-dot spacing (half dots)
Character size Slip — 9 × 9 font: 1.6 × 3.1 mm , 7 × 9 font: 1.3 × 3.1 mm
Number of characters Slip — Alphanumeric characters: 95; International characters: 32
Print speed Slip — 9 × 9 = 233 characters/second; 7 × 9 = 311 characters/second
Paper feed speed Receipt — Approx. 120 mm/sec. continuous feeding
Line spacing (default) 4.23 mm {1/6"}
Paper specifications Slip — Normal, carbon-copy, and pressure-sensitive
Thermal paper type Specified: Nakagawa Seisakujo. NTP080-80
MICR Magnetic bias. Recognition rate = 98% at 25°C {77°F}
Number of copies Original + 4 copies at 20 to 45°C {68 to 113°F}
Ribbon cassette ERC-31
Interface (compatible) RS-232 serial or IEEE 1284 parallel, RS-485 (dealer option)
Receive buffer 45 bytes or 4KB
DKD function 2 drives
Power supply
Current consumption
(at 24V)
Reliability Slip MTBF: 180,000 hours
Temperature Operating: 5 to 45°C {41 to 113°F}
Humidity Operating: 10 to 90% RH
Overall dimensions 201 × 252 × 331 mm (H × W × D)
Weight (mass) Approximately 6.5 kg
*1: Be sure to use a safety-standards-applied power source that meets the following specifications.
Rated output: 24 V/2.0 A or more, Maximum output: 240 VA or less
*1
Receipt — Thermal line printing
Receipt — Unidirectional with friction feed
Slip — 9 × 9 font: 66; 7 × 9 font: 88
Receipt — Font A: 42; Font B: 56
Receipt — Font A = 12 × 24, 2-dot spacing; Font B = 9 × 17, 2-dot spacing
Receipt — 12 × 24 font: 1.41 × 3.39 mm, 9 × 17 font: 0.99 × 2.40 mm
Extended graphics: 128 × 10 (with one space page)
Receipt — Alphanumeric characters: 95; International characters: 37
Extended graphics: 128 × 8 (with one space page)
Receipt — High-speed = 120 mm/second max.
Low-power = 70 mm/second
Ladder bar code = 42 mm/second
70 × 70 mm to 210 × 297 mm
Receipt — 79.5 ± 0.5 mm
(Original: Nippon Paper Industries Co., Ltd., TF50KS-E)
Original + 1 to 3 copies at 5 to 45°C {41 to 113°F}
+ 24 VDC ± 10%
Slip operating: Mean: Approx. 1.9 A Peak: Approx. 8 A
Receipt operating: Mean: Approx. 1.7 A Peak: Approx. 7.7 A
Low-power mode: Mean: Approx. 1.2 A Peak: Approx. 6.6 A
Standby: Approx. 0.3 A
Receipt MTBF 360,000 hours
Slip MCBF: 29,000,000 lines
Receipt MCBF: 52,000,000 lines
Storage: –10 to 50°C {14 to 122°F}, except paper
Storage: 10 to 90% RH, except paper
38 lines/second at 3.18 mm feed
28.4 lines/second at 4.23 feed
16.5 lines/second at 4.23 feed
14 TM-H5000II User’s Manual

Bahasa Indonesia
Petunjuk Penggunaan
English
Semua hak dilindungi. Bagian publikasi ini tidak boleh diproduksi ulang, disimpan di sistem
pengambilan, atau dikirimkan dalam bentuk atau cara apa pun, elektronik, mekanis, memfotokopi,
merekam, atau lainnya, tanpa izin tertulis Seiko Epson Corporation sebelumnya. Tidak ada
pertanggung jawaban paten yang diasumsikan berkenaan dengan penggunaan informasi yang
terdapat di dalamnya. Karena setiap perhatian telah diambil dalam persiapan buku ini, Seiko Epson
Corporation mengasumsikan tidak ada tanggung jawab untuk kesalahan atau penghilangan. Tidak
ada pertanggung jawaban apa pun yang diasumsikan untuk kerusakan yang dihasilkan penggunaan
informasi yang terdapat di dalamnya.
Baik Seiko Epson Corporation maupun afiliasinya tidak akan bertanggung jawab pada pembeli
produk ini atau pihak ketiga atas kerusakan, kehilangan, biaya, atau pengeluaran yang dikenakan
oleh pembeli atau pihak ketiga sebagai akibat: kecelakaan, penyalahgunaan, atau penyalahgunaan
produk ini atau modifikasi tidak resmi, perbaikan, perubahan pada produk ini, atau (tidak termasuk
A.S.) gagal mematuhi instruksi pengoperasian dan perawatan Seiko Epson Corporation.
Seiko Epson Corporation tidak akan bertanggung jawab terhadap kerusakan atau masalah yang
timbul dari penggunaan opsi apa pun atau produk habis pakai apa pun selain yang ditunjuk sebagai
Produk Epson Asli atau Produk yang Disetujui Epson oleh Seiko Epson Corporation.
EPSON adalah merek dagang terdaftar dari Seiko Epson Corporation di Jepang dan negara/wilayah
lainnya.
PEMBERITAHUAN: Isi manual ini tunduk pada perubahan tanpa pemberitahuan.
Hak cipta © 2010 oleh Seiko Epson Corporation, Nagano, Jepang.
TM-H5000II Petunjuk Penggunaan 15

l
English
Bahasa Indonesia
Perhatian Keselamatan
Bagian ini menyajikan informasi penting yang dimaksudkan untuk
memastikan penggunaan produk ini dengan aman dan efektif.
Baca bagian ini dengan teliti dan simpan di lokasi yang mudah
diakses.
PERINGATAN:
Matikan peralatan Anda segera jika mengeluarkan asap, bau aneh,
atau kebisingan tidak biasa. Penggunaan yang berkelanjutan bisa
mengakibatkan kebakaran. Cabut peralatan dengan segera dan
hubungi dealer Anda atau pusat layanan Seiko Epson untuk
mendapatkan nasihat.
Jangan pernah berusaha untuk memperbaiki produk ini sendiri.
Pekerjaan perbaikan yang tidak tepat bisa berbahaya.
Jangan pernah membongkar atau memodifikasi produk ini.
Merusakkan produk ini bisa mengakibatkan luka atau terbakar.
Pastikan menggunakan sumber daya khusus. Koneksi ke sumber daya
yang tidak tepat bisa mengakibatkan kebakaran.
Jangan biarkan bahan asing masuk ke dalam peralatan. Penetrasi oleh
benda asing bisa mengakibatkan kebakaran.
Jika air atau cairan lainnya tumpah ke dalam peralatan ini, segera
cabut kabel daya, lalu hubungi dealer Anda atau pusat layanan Seiko
Epson untuk mendapatkan nasihat. Penggunaan yang berkelanjutan
bisa mengakibatkan kebakaran.
Jangan gunakan penyemprot aerosol yang berisi gas yang mudah
terbakar di dalam atau di sekitar produk ini. Jika dilakukan bisa
berakibat kebakaran.
PERHATIAN:
Jangan menyambung kabel dengan cara selain yang disebutkan dalam
manual ini. Sambungan yang berbeda bisa mengakibatkan kerusakan
atau kebakaran peralatan.
Pastikan untuk menyetel peralatan ini pada permukaan datar yang
kokoh dan stabil. Produk tersebut bisa pecah atau mengakibatkan luka
jika jatuh.
Jangan gunakan produk ini di lokasi dengan tingkat kelembaban dan
debu tinggi. Kelembaban dan debu yang berlebihan bisa
mengakibatkan peralatan rusak atau terbakar.
Jangan letakkan benda berat di atas produk ini. Jangan pernah berdiri
atau bersandar pada produk ini. Peralatan bisa jatuh atau roboh, yang
mengakibatkan pecah atau kemungkinan luka.
Berhati-hatilah agar jari Anda tidak terluka di pemotong manual
• Saat Anda membuang kertas yang sudah dicetak
• Saat Anda melakukan operasi lainnya seperti memasang/
mengganti kertas gulung
16 TM-H5000II Petunjuk Penggunaan

Bahasa Indonesia
Untuk memastikan keselamatan, cabut produk ini sebelum
meninggalkan dalam keadaan tidak terpakai untuk periode yang
lama.
Label Perhatian
Label perhatian pada produk mengindikasikan perhatian
berikutnya.
PERINGATAN:
Jangan sambungkan kabel telepon ke laci konektor keluar atau
konektor modul tampilan; jika tidak, printer dan kabel telepon bisa
rusak.
PERHATIAN:
Head termal dan head printer panas.
Batasan Penggunaan
Saat produk ini digunakan untuk aplikasi yang memerlukan
keandalan/keselamatan tinggi seperti alat transportasi yang terkait
dengan penerbangan, kereta api, laut, atau otomotif dll.; alat
penanggulangan bencana; beragam alat keselamatan dll.; atau alat
fungsional/presisi dll., Anda harus menggunakan produk ini
hanya setelah mempertimbangkan penyertaan keselamatankegagalan dan cadangan ke dalam rancangan Anda untuk menjaga
keselamatan dan keandalan sistem keseluruhan. Karena produk ini
tidak dimaksudkan untuk penggunaan pada aplikasi yang
memerlukan keandalan/keselamatan yang sangat tingi seperti
peralatan ruang angkasa, peralatan komunikasi utama, peralatan
pengontrol tenaga nuklir, atau peralatan medis terkait dengan
perawatan medis dll., buat pertimbangan sendiri atas kesesuaian
produk ini setelah evaluasi penuh.
Membuka kemasan
Item berikut disertakan dengan printer spesifikasi standar. Jika ada
item yang rusak, hubungi dealer Anda.
❏ Printer ❏ Kaset pita
❏ Tutup sakelar daya ❏ Kertas gulung
Mendownload Driver, Utilitas, dan Manual
Driver, utilitas, dan manual dapat didownload dari URL berikut.
http://www.epson-pos.com/
TM-H5000II Petunjuk Penggunaan 17

l
FEED
FORWARD
REVERSE RELEASE
English
Bahasa Indonesia
Komponen Printer
tutup pemotong otomatis
tutup pemotong
tutup depan
sakelar nyala/mati
tutup kertas gulung
kertas gulung
panel kontrol
kertas slip
panel kontrol
Panel Kontrol
Panel Kontrol Kertas Gulung
Tombol FEED (Umpan)
Tekan untuk mengumpan kertas satu baris; tahan untuk
mengumpan terus-menerus
LED POWER (Daya)
Menyala saat printer nyala.
LED ERROR (Kesalahan)
Menyala untuk mengindikasikan kesalahan.
LED PAPER OUT (Kertas keluar)
Menyala saat kertas gulung di ujung atau hampir habis.
POWER
ERROR
PAPER
OUT
POWER
ERROR
RELEASE
SLIP
Panel Kontrol Slip
Tombol FORWARD (Maju)
Tombol REVERSE (Balik)
Tombol RELEASE (Lepaskan)
LED POWER (Daya)
18 TM-H5000II Petunjuk Penggunaan
Tekan untuk mengumpan kertas slip ke depan satu baris; tahan
untuk mengumpan terus-menerus.
Tekan untuk mengumpan kertas slip ke belakang satu baris; tahan
untuk mengumpan terus-menerus.
Tekan untuk mengeluarkan kertas slip.
Menyala saat daya nyala.

Bahasa Indonesia
LED ERROR (Kesalahan)
Menyala untuk mengindikasikan kesalahan.
LED RELEASE (Lepaskan)
Menyala untuk mengindikasikan bahwa Anda dapat memasukkan
kertas slip.
LED SLIP (Struk)
Menyala untuk mengindikasikan bahwa printer dalam mode slip.
Membuka Peredam
Printer dilindungi selama pengiriman
dengan dua peredam transportasi yang
harus Anda lepas sebelum menyalakan
printer.
Buka printer dengan menarik tab pada
tutup depan, dan buka peredam
seperti terlihat dalam ilustrasi
1.
Catatan:
Pasang ulang peredam sebelum
pengiriman.
1
Menggunakan Tutup Sakelar Daya
PERINGATAN:
Jika kecelakaan terjadi dengan tutup daya
terpasang, cabut kabel daya segera.
Penggunaan yang terus-menerus bisa
menyebabkan kebakaran.
Tutup sakelar daya yang disertakan
memastikan agar sakelar daya tidak
ditekan dengan tidak sengaja. Untuk
menggunakan tutup ini, pasang seperti
dalam ilustrasi
2.
TM-H5000II Petunjuk Penggunaan 19
2

l
English
Bahasa Indonesia
Memasang Kaset Pita
Gunakan kaset pita EPSON ERC-31. Penggunaan kaset pita selain
yang disetujui oleh Epson bisa merusak printer dan akan
membatalkan garansi.
PERINGATAN:
Jangan pernah memutar kenop umpan kaset pada arah panah
berlawanan yang ditandai pada kaset; jika tidak kaset pitas bisa rusak.
1. Nyalakan printer, dan buka tutup depan dengan menarik tab
di sisi kiri.
2. Pastikan agar head printer pada posisi yang benar.
3. Jika pita sudah dipasang, cabut dengan menarik ujung tab dan
pindahkan dari printer.
4. Putar kenop kaset pada kartrid
sesuai arah panah 2 atau 3 kali
agar tidak kendur.
5. Masukkan pita, dan putar
kenop kaset 2 atau 3 kali, seperti
tampak dalam ilustrasi
3.
6. Pastikan agar pita tidak ada
kerutan atau lipatan dan
terpasang di bawah head printer seperti tampak dalam label di
dalam printer.
3
Memasang Kertas Gulung
1. Tekan tombol, seperti tampak pada ilustrasi 4, untuk membuka
tutup.
2. Masukkan kertas gulung, seperti tampak pada ilustrasi 5.
Pastikan agar kertas masuk dengan benar seperti tampak pada
ilustrasi
456
3. Tarik sedikit kertas, tutup penutupnya, dan sobek kertas.
20 TM-H5000II Petunjuk Penggunaan
6.

Bahasa Indonesia
Memasukkan Kertas Slip
Catatan:
Jangan gunakan kertas yang berkerut atau
keriting.
Tabel tambahan depan pilihan (WT-5000)
tersedia untuk pengguna yang membutuhkannya
agar memungkinkan melakukan tulisan tangan
atau penggunaan lainnya.
1. Saat LED SLIP (Struk) berkedip,
masukkan kertas slip, dengan pinggir
kanan jalur masuk kertas slip sebagai
panduan (lihat ilustrasi
7 ).
2. Saat Anda memasukkan slip ke dalam
jalur masuk, sensor akan mendeteksi
slip, LED SLIP (Struk) berubah dari berkedip menjadi nyala,
dan printer menarik masuk dan mencetak.
3. Setelah pencetakan selesai, LED SLIP (Struk) akan mati, dan
Anda dapat melepas slip.
Menggunakan Pembaca MICR Pilihan
Pembaca pengenalan karakter tinta magnetik (MICR) pilihan yang
dipasang pabrik memungkinkan printer membaca tinta MICR
pada cek pribadi.
7
1
2
PERHATIAN:
Jangan memasukkan cek yang ada staplesnya Jangan memasukkan
cek yang berkerut.
1. Saat lampu SLIP (Struk) berkedip, masukkan cek menghadap ke
bawah, dengan karakter MICR pada sisi kanan.
2. Masukkan cek langsung ke dalam jalur masuk dengan pinggir
kanan jalur masuk sebagai panduan, sejauh cek masuk. Lihat
ilustrasi
3. Printer mulai menarik cek ke dalam. Segera lepas cek. LED SLIP
(Struk) berubah dari berkedip ke nyala.
4. Saat pembacaan MICR selesai, printer akan mengeluarkan cek
dan LED SLIP (Struk) mulai berkedip lagi.
5. Ambil cek dengan menariknya langsung keluar (jangan pada
sudutnya). LED SLIP (Struk) mati.
7.
TM-H5000II Petunjuk Penggunaan 21

l
English
Bahasa Indonesia
Membersihkan Head Printer Kertas Gulung
PERHATIAN:
Setelah mencetak, head printer bisa menjadi sangat panas. Berhatihatilah untuk tidak menyentuhnya dan biarkan dingin sebelum Anda
membersihkannya. Jangan merusak head printer dengan
menyentuhnya dengan jari Anda atau benda keras lainnya.
Matikan printer, buka tutup kertas gulung, dan bersihkan elemen
termal pada head printer dengan kapas pengelap yang dibasahi
dengan cairan alkohol (etanol atau IPA).
Epson merekomendasikan untuk membersihkan head termal
secara berkala (biasanya setiap 3 bulan) untuk menjaga kualitas
cetakan.
Membersihkan Mekanisme MICR Pilihan
Bersihkan head MICR dan penggulung MICR setiap melewati 6000
atau sekali sebulan sekali.
Catatan:
Jika Anda sering mengalami kesalahan pembacaan MICR, gunakan salah
satu metode berikut.
Untuk head MICR
Gunakan kertas pembersih basah, seperti merk PRESAT (KIC)
“Check Reader Cleaning Card” atau kertas pembersih yang
diperjualbelikan lainnya yang sepadan .
Untuk penggulung umpan MICR
Gunakan kertas pembersih berperekat yang tersedia dari Epson.
Hubungi dealer Anda.
Prosedur pembersihan
Gunakan prosedur ini untuk kedua kertas pembersih.
1. Masukkan kertas gulung ke dalam printer; lalu matikan daya.
2. Buka tutup depan dan nyalakan daya lagi sambil menahan
tombol RELEASE (Lepaskan).
3. Tekan tombol RELEASE (Lepaskan) 7 kali.
4. Tutup penutup depan (LED SLIP (Struk) berkedip).
5. Ikuti instruksi pada kertas pembersih. Anda harus
memasukkan kertas pembersih dengan cara yang sama ketika
Anda memasukkan cek biasa.
6. Saat kertas tersebut dikeluarkan, ambil dari printer; lalu
matikan daya.
22 TM-H5000II Petunjuk Penggunaan

Bahasa Indonesia
Pemecahan masalah
Kontrol panel tidak menyala
Periksa agar kabel pemasok daya tertancap ke dalam printer
dengan benar, unit daya, dan keluaran daya.
Lampu ERROR (Kesalahan) menyala, dan tidak ada pencetakan
Jika LED PAPER OUT (Kertas keluar) menyala, kertas tidak masuk
atau masuk dengan benar.
Jika LED PAPER OUT (Kertas keluar) mati, periksa apakah tutup
kertas gulung tertutup dengan benar.
Lampu ERROR (Kesalahan) berkedip, dan tidak ada pencetakan
Periksa apakah ada kertas macet.
Jika printer mencetak hanya sebentar, head printer mungkin
terlalu panas. Kondisi ini memperbaiki sendiri saat head printer
dingin.
Matikan printer, dan setelah 10 detik, nyalakan lagi.
Pemotong otomatis macet
1. Tarik tutup pemotong ke arah Anda sehingga Anda dapat
memutar kenop motor pemotong.
2. Ikuti instruksi pada label, dan putar kenop hingga ▼ muncul
di jendela.
3. Tutup penutup pemotong.
TM-H5000II Petunjuk Penggunaan 23

l
English
Bahasa Indonesia
Mengeluarkan Kertas Macet
PERHATIAN:
Jangan sentuh head printer karena bisa sangat panas setelah
pencetakan. Jangan memindahkan kotak head printer bagian slip.
1. Matikan printer dan buka tutup printer yang sesuai (baik
depan atau kertas gulung).
2. Jika kertas macet pada bagian kertas gulung, tekan tombol
pembuka tutup untuk membuka tutup. Lalu keluarkan kertas
macet dan letakkan kertas gulung lagi di printer dan tutup
penutup. Jika kertas macet pada bagian slip, buka tutup depan
dan keluarkan kertas macet.
3. Jika kertas terjebak di pemotong otomatis pada bagian tanda
terima dan tutup kertas gulung tidak dapat dibuka, buka tutup
pemotong ke arah Anda, seperti tampak pada ilustrasi 8.
4. Putar kenop hingga ▼ muncul di jendela, seperti tampak pada
ilustrasi 9. Langkah ini mengembalikan pisau pemotong
otomatis ke posisi normal. Terdapat label di dekat pemotong
untuk membantu Anda.
5. Tutup penutup pemotong.
6. Buka tutup kertas gulung dan keluarkan kertas yang macet.
89
24 TM-H5000II Petunjuk Penggunaan

Tabel Sakelar DIP
Seri
SW Fungsi NYALA MATI
1-1 Kesalahan
penerimaan data
1-2 Penyangga
penerimaan
1-3 Jabat tangan XNYALA/
1-4 Panjang kata data 7 bit 8 bit
1-5 Pemeriksaan paritas Aktif
1-6 Pemilihan paritas Datar
1-7 Lihat tabel “Kecepatan transmisi”.
1-8
SW Fungsi NYALA MATI
2-1 Jabat
tangan
2-2 Tampilan
pelanggan
2-3, 2-4 Kepadatan
cetak
2-5, 2-6 Ditetapkan. Jangan diubah. Ditetapkan ke
MATI.
2-7 Mengatur
ulang Pin 6
2-8 Mengatur
ulang Pin 25
Kecepatan transmisi seri
1-7 1-8 Kecepatan
NYALA NYALA 2400 bps
MATI NYALA 4800 bps
NYALA MATI 9600 bps
MATI MATI 19200 bps
Diabaikan Cetak “?”
45 bit 4 KB
XMATI
Penyangga
penuh
Tersambung Terputus
Lihat tabel “Kepadatan cetak”.
Aktif Nonaktif
Aktif Nonaktif
DTR/DSR
Offline atau
penyangga
penuh
Bahasa Indonesia
Paralel
SW Fungsi NYALA MATI
1-1 Umpan baris
otomatis
1-2 Penyangga
penerimaan
1-3 ~ 1-8 Tidak ditetapkan — —
SW Fungsi NYALA MATI
2-1 Jabat tangan Penyangga
2-2 Ditetapkan
Jangan diubah.
2-3, 2-4 Kepadatan cetak Lihat tabel “Kepadatan
2-5 ~ 2-7 Ditetapkan. Ditetapkan ke MATI. Jangan
diubah.
2-8 Mengatur ulang
Pin 31
Aktif Nonaktif
45 bit 4 KB
penuh
Ditetapkan ke MATI.
cetak”.
Ditetapkan ke NYALA.
Putus
jaringan
atau
penyangga
penuh
Kepadatan cetak
2-3 2-4 Kepadatan
NYALA NYALA Mode daya rendah
MATI MATI 1 (normal)
NYALA MATI 2
MATI NYALA 3 (gelap)
TM-H5000II spesifikasi
Metode
pencetakan
Arah pencetakan Slip — Dua arah, jarak minimal pencetakan
Karakter per baris
(awal)
Struktur karakter Slip — 9 × 9, dengan jarak 3 titik (titik setengah); 7 × 9,
Ukuran karakter Slip — 9 × 9 huruf: 1.6 × 3,1 mm , 7 × 9 huruf: 1.3 × 3,1 mm
Slip — Matriks titik dampak seri, baris vertikal 9-pin
Tanda terima — Pencetakan baris termal
Tanda terima — Searah dengan umpan geser
Slip — 9 × 9 huruf: 66; 7 × 9 huruf: 88
Tanda terima — Huruf A: 42; Huruf B: 56
dengan jarak 2 titik (titik setengah)
Tanda terima — Huruf A = 12 × 24, dengan jarak titik 2; Huruf B = 9 × 17,
dengan jarak titik 2
Tanda terima — 12 × 24 huruf: 1.41 × 3,39 mm , 9 × 17 huruf: 0.99 × 2,40 mm
TM-H5000II Petunjuk Penggunaan 25

l
English
Bahasa Indonesia
Jumlah karakter Slip — Karakter Alfanumerik: 95; Karakter internasional: 32
Kecepatan
pencetakan
Kecepatan umpan
kertas
Jarak baris (awal) 4,23 mm {1/6"}
Spesifikasi kertas Slip — Normal, salinan-karbon, dan peka-tekanan
Jenis kertas termal Ditentukan: Nakagawa Seisakujo. NTP080-80
MICR Bias magnetis. Nilai pengenalan = 98% pada 25°C {77°F}
Jumlah salinan Asli + 4 salinan pada 20 hingga 45°C {68 hingga 113°F}
Kaset pita ERC-31
Antarmuka
(kompatibel)
Penyangga
penerimaan
Fungsi DKD 2 drive
Pemasok daya
Konsumsi arus
(pada 24V)
Keandalan: Slip MTBF: 180.000 jam
Temperatur Pengoperasian: 5 hingga 45°C {41 hingga 113°F}
Kelembaban Pengoperasian: 10 hingga 90% RH
Dimensi
keseluruhan
Berat (masa) Kira-kira 6,5 kg
*1: Pastikan untuk menggunakan sumber daya yang menerapkan standar keselamatan yang
memenuhi spesifikasi berikut.
Nilai output: 24 V/2,0 A atau lebih, Keluaran maksimum: 240 VA atau kurang
Grafis diperluas: 128 × 10 (dengan satu halaman jarak)
Tanda terima — Karakter Alfanumerik: 95; Karakter internasional: 37
Grafis diperluas: 128 × 8 (dengan satu halaman jarak)
Slip — 9 × 9 = 233 karakter/detik; 7 × 9 = 311 karakter/detik
Tanda terima — Kecepatan tinggi = maksimal 120 mm/detik
Daya-rendah = 70 mm/detik
Kode batang tangga = 42 mm/detik
Tanda terima — Kira-kira 120 mm/dtk umpan terus-menerus
70 × 70 mm hingga 210 × 297 mm
Tanda terima — 79,5 ± 0,5 mm
(Asli: Nippon Paper Industries Co., Ltd., TF50KS-E)
Asli + 1 hingga 3 salinan pada 5 hingga 45°C {41 hingga 113°F}
RS-232 seri atau IEEE 1284 paralel, RS-485 (opsi dealer)
45 bit atau 4KB
*1
+ 24 VDC ± 10%
Slip operasional: Rata-rata: Kira-kira 1,9 A Puncak: Kira-kira 8 A
Tanda terima operasional:Rata-rata: Kira-kira 1,7 A Puncak: Kira-kira 7,7 A
Mode rendah-daya: Rata-rata: Kira-kira 1,2 A Puncak: Kira-kira 6,6 A
Siaga: Kira-kira 0,3 A
Tanda terima MTBF 360.000 jam
Slip MCBF: 29.000.000 baris
Tanda terima MCBF: 52.000.000 baris
Penyimpanan: -10 hingga 50°C {14 hingga 122°F}, kecuali kertas
Penyimpanan: 10 hingga 90% RH, kecuali kertas
201 × 252 × 331 mm (T × L × D)
38 baris/detik pada umpan 3,18 mm
28,4 baris/detik pada umpan 4,23
16,5 baris/detik pada umpan 4,23
26 TM-H5000II Petunjuk Penggunaan

Bahasa Indonesia
Menghubungi Customer Support
Apabila printer tidak beroperasi dengan benar dan Anda tidak dapat
menyelesaikan permasalahan dengan menggunakan petunjuk perbaikan ini,
sebaiknya Anda menghubungi Layanan “Customer Support” kami.
PT. EPSON INDONESIA
Wisma Kyoei Prince Lt. 16
Jl. Jend Sudirman Kav 3, Jakarta 10220
Help Desk : (021) 5724151, Fax : (021) 5724357
EPSON SUPPORT CENTER :
Jakarta : (021) 62301104, 62301103
Bandung : (022) 4207033
Surabaya : (031) 5355035
Yogyakarta : (0274) 581022, 7461560
Medan : (061) 4516173, 4516174
Makassar : (0411) 328212
Pontianak : (0561) 735507
Pekan Baru : (0761) 44270
Untuk informasi lebin lengkap, Anda dapat menghubungi website kami:
www.epson.co.id
TM-H5000II Petunjuk Penggunaan 27

Printed in Indonesia
 Loading...