

Page 1

TITLE
SHEET
C
NO.
NEXT
SHEET
1
ESC/Label
Application Development Guide
for TM-C7500 series
ESC/Label
Application Development Guide
for TM-C7500 series
REVISION
Page 2

TITLE
SHEET
C
NO.
NEXT
SHEET
2
TABLE OF CONTENTS
Introduction ................................................................................................................................... 4
1
1.1 Outline ............................................................................................................................................................................... 4
1.2 Applicable Scope ............................................................................................................................................................... 4
1.3 Reference Documents ....................................................................................................................................................... 4
2 Basic Printing Method .................................................................................................................. 5
2.1 Points for structure Print Commands ................................................................................................................................. 5
2.2 Basic Structure of Printing Commands .............................................................................................................................. 5
2.3 Example Printing Command .............................................................................................................................................. 6
3 Functions to be implemented ..................................................................................................... 10
3.1 List of Functions .............................................................................................................................................................. 10
3.2 Media Coating Type Setting ............................................................................................................................................ 11
3.3 Media Layout Setting ....................................................................................................................................................... 12
3.4 Completion Autocut Setting ............................................................................................................................................. 17
3.5 Completion Beeper Setting.............................................................................................................................................. 18
3.6 Completion Pause Setting ............................................................................................................................................... 19
3.7 Printing Color Correction Mode Setting ........................................................................................................................... 20
3.8 Ink Profile and Brightness Adjustment Setting ................................................................................................................ 21
3.9 Ratio of Black to Composite Setting ................................................................................................................................ 22
3.10 Bar Width Adjustment Setting .......................................................................................................................................... 24
3.11 Banding Reduction Setting .............................................................................................................................................. 25
3.12 Printing Speed Setting ..................................................................................................................................................... 26
3.13 Head maintenance Setting .............................................................................................................................................. 27
3.14 Label Edge Detector Setting ............................................................................................................................................ 28
3.15 Media Source Setting ...................................................................................................................................................... 29
3.16 Nozzle Verification Technology Settings ......................................................................................................................... 30
3.17 Printing Start Position Adjustment Setting ....................................................................................................................... 31
3.18 Re-print Setting ............................................................................................................................................................... 31
3.19 LED Notification Setting (Ink Cartridge Low) ................................................................................................................... 32
3.20 Paper Feed Adjustment Setting ....................................................................................................................................... 32
3.21 TrueType Font Download ................................................................................................................................................ 33
3.22 Display Consumables Information ................................................................................................................................... 34
3.23 Head Cleaning ................................................................................................................................................................. 37
3.24 Print Nozzle Clogging Check Pattern .............................................................................................................................. 37
4 Notes on Communication ........................................................................................................... 38
4.1 DeviceID .......................................................................................................................................................................... 38
4.2 String Descriptor .............................................................................................................................................................. 38
4.3 Receiving Buffer Full Control ........................................................................................................................................... 38
4.4 Notes If Using Printer Information request Command ..................................................................................................... 39
4.5 Notes if Using Commands that Request Resonse from the Printer ................................................................................. 39
4.6 Notes If Using USB and Network Interface Together ...................................................................................................... 40
4.7 Printing Cancel ................................................................................................................................................................ 40
5 How to print labels efficiently ...................................................................................................... 41
5.1 Outline ............................................................................................................................................................................. 41
5.2 Procedure ........................................................................................................................................................................ 42
6 Paper Feed Adjustment .............................................................................................................. 55
6.1 Type of the Paper Feed Adjustment ................................................................................................................................ 55
6.2 Method of Paper Feed Adjustment for EPSON Standard Label(Default Setting) ............................................................ 56
6.3 Method of Paper Feed Adjustment for EPSON Recommended Label ............................................................................ 56
6.4 Method of Paper Feed Adjustment for Other Label ......................................................................................................... 56
6.5 Detail Procedure of Each Step ........................................................................................................................................ 57
7 Control of Beeper Sounding, Cuts, and Pauses ........................................................................ 60
7.1 Outline ............................................................................................................................................................................. 60
7.2 Beeper Sounding ............................................................................................................................................................. 61
7.3 Pause .............................................................................................................................................................................. 62
7.4 Cut ................................................................................................................................................................................... 64
7.5 Example of Combining Cutting and Pausing ................................................................................................................... 65
ESC/Label
Application Development Guide
for TM-C7500 series
REVISION
Page 3

TITLE
SHEET
C
NO.
NEXT
SHEET
3
Cautions
1. This document shall apply to the product(s) to which this document relates.
2. The examples, such as the sample codes or control methods for products described in this document are for
the purpose of designing a model only, and Seiko Epson Corporation shall not provide any sort of warranty
that the contents of the document do not infringe on any intellectual property right of a third party.
3. No part of this document may be reproduced, stored in a retrieval system, or transmitted in any form or by any
means, electronic, mechanical, photocopying, recording, or otherwise, without the prior written permission of
Seiko Epson Corporation.
4. The contents of this document are subject to change without notice. Please contact us for the latest
information.
5. While every precaution has been taken in the preparation of this document, Seiko Epson Corporation
assumes no responsibility for errors or omissions.
6. Neither is any liability assumed for damages resulting from the use of the information cont ained herein.
7. Neither Seiko Epson Corporation nor its affiliates shall be liable to the purchaser of this product or third
parties for damages, losses, costs, or expenses incurred by the purchaser or third parties as a result of:
accident, misuse, or abuse of the product(s) to which this document relates or unauthorized modifications,
repairs, or alterations to the product(s) to which this document relates, or (excluding the U.S. ) failure t o str ictly
comply with Seiko Epson Corporation's operating and maintenance instructions.
8. When the product(s) to which this document relates are used for applications requiring high reliability / safety,
such as transportation devices related to aviati on, rail, marine, automotive, etc.; disaster prevention devices;
various safety devices, etc.; or functional / precision devices, etc., you should use the product(s) t o which this
document relates only after giving consideration to including f ail-safes and redundancies into your design to
maintain safety and total system reliability. B ecause the product(s) to which this document relates were not
intended for use in applications requiring extremely high reliability / safety, such as aerospace equipment,
main communication equipment, nuclear power control equipment, or medical equipment related to direct
medical care, etc., please make your own judgment on the products' suitabil ity after a full evaluation.
9.Seiko Epson Corporation shall not be liable against any damages or problems arising from the use of any
options or any consumable products other than those designated as Original EPSON Products or E PSON
Approved Products by Seiko Epson Corporation.
Trademarks
EPSON is a registered trademark of Seiko Epson Corporation.
Exceed Your Vision and ESC/Label are registered trademarks or t r ademarks of Seiko Epson Corporation.
Zebra Technologies Corporation and ZPL II are the registered tr ademarks or trademar ks of Zebra T echnologies
Corporation.
General Notice: Other product and company names used herein are for identific ation purposes only and may be
trademarks of their respective companies.
©Seiko Epson Corporation 2014-2015. All rights reserved.
ESC/Label
Application Development Guide
for TM-C7500 series
REVISION
Page 4

TITLE
SHEET
C
NO.
NEXT
SHEET
4
1 Introduction
1.1 Outline
This document explains the necessary technical information for developing printer control
software (drivers, utilities and application) for the TM-C7500 series using the ESC/Label
command. For detailed specifications of the ESC/Label command, please refer to the
ESC/Label Command Reference Guide. They will not be described in this document.
1.2 Applicable Scope
This document applies to the development of control software for the TM-C7500 series that use
the ESC/Label command.
1.3 Reference Documents
Ø ESC/Label Command Reference Guide
Ø ESC/Label Command List
ESC/Label
Application Development Guide
for TM-C7500 series
REVISION
Page 5
TITLE
SHEET
C
NO.
NEXT
SHEET
5
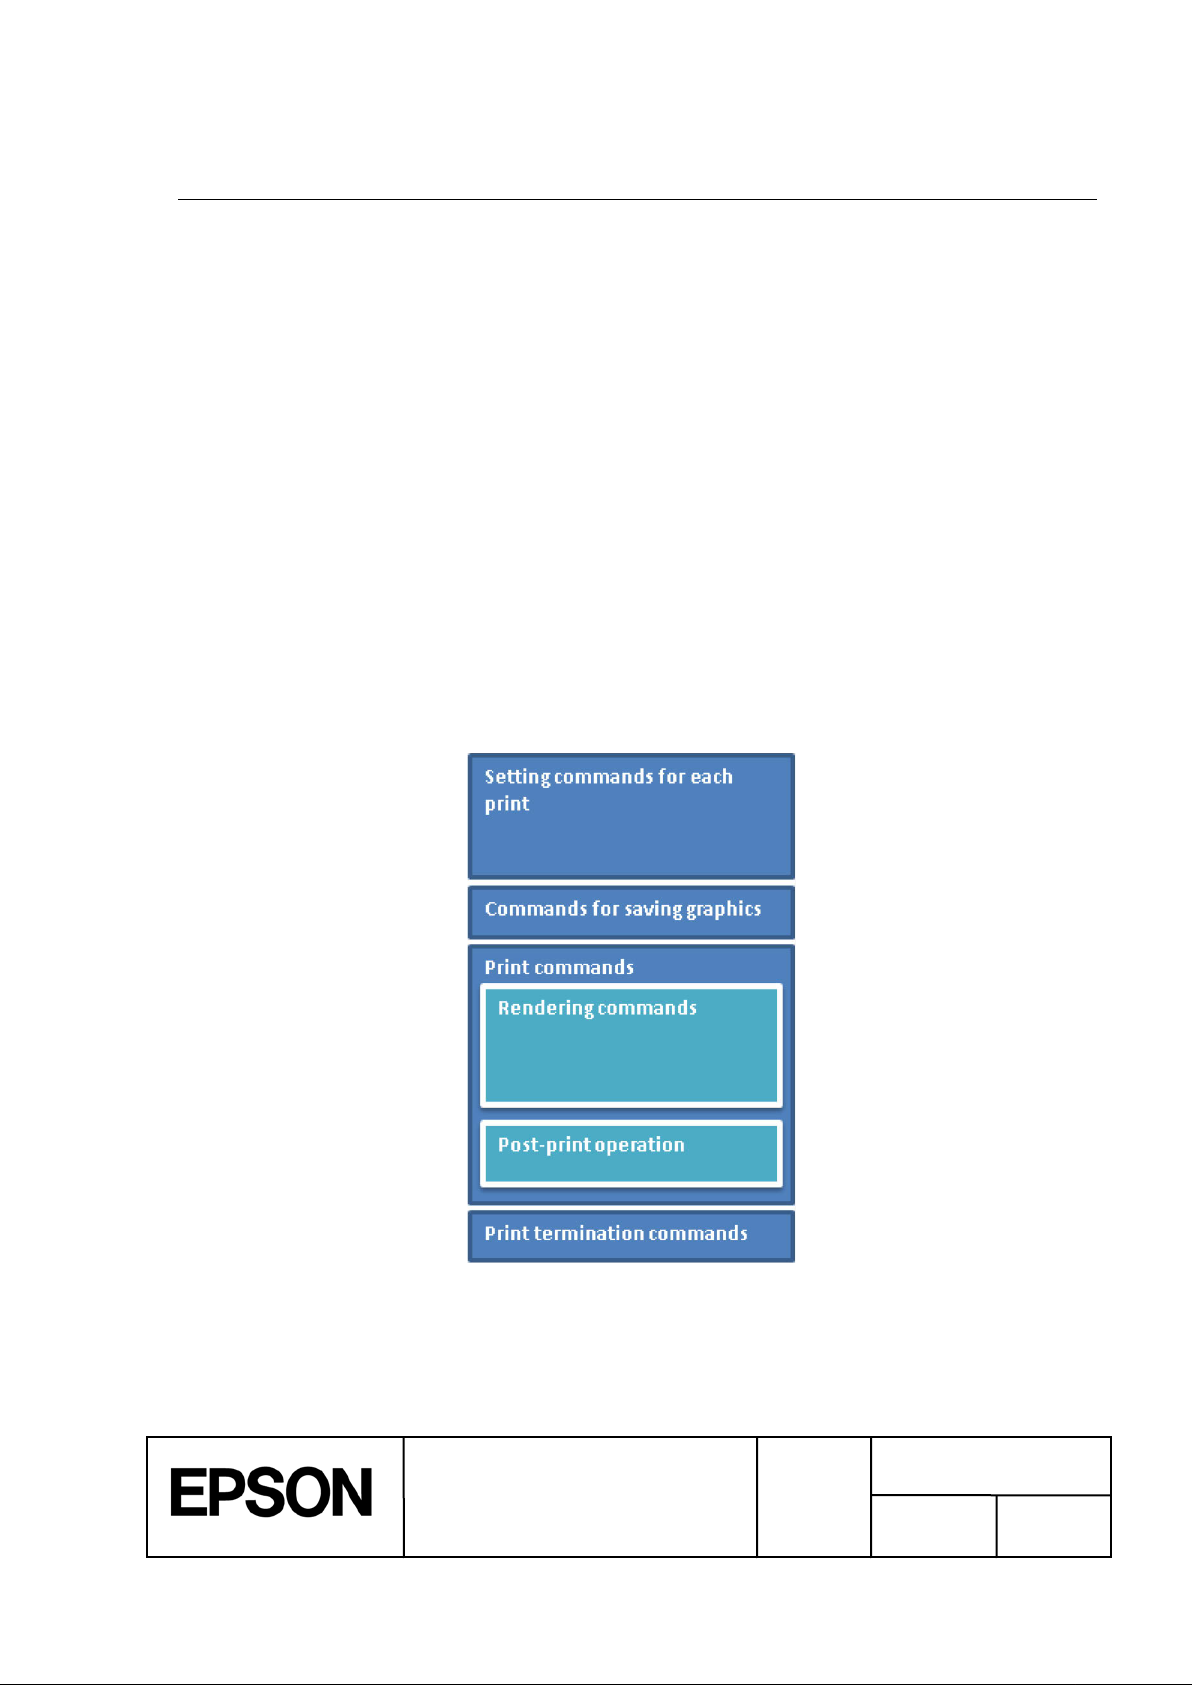
Figure 2-1 Basic Structure of Print Com m ands
2 Basic Printing Method
This section describes how commands are structured, using printing a basic label as an
example.
2.1 Points for structure Print Commands
ž If you want to change printing settings for each print, send t he set ting command for each print.
Ø The print settings can also be saved to the printer. However, we recommend that you
send the setting command for each print for settings that are likely to change for each
print. The settings for setting commands sent for each print are given priority over
settings saved to the printer.
ž To set settings for the label edge detector or paper media source, we recommend checking
that the printer is idle then sending the setting command while replacing paper.
Ø These settings are printer settings that are applied in print operations after the settings are
changed. When changing settings, if there is still unprinted print data in the printer, the
settings after the change may unintentionally be applied.
2.2 Basic Structur e of Printing Commands
The following indicates the basic structure of commands sent for printing.
ESC/Label
Application Development Guide
for TM-C7500 series
REVISION
Page 6
TITLE
SHEET
C
NO.
NEXT
SHEET
6
Table 2-1 Description of Basic St ructure of Print Commands
Item
Description
Setting commands for each print
Allocates commands that perform print settings for each print.
However, if there are other applications or drivers
Therefore, we recommend sending the
.8.1 of ESC/Label
Command Reference Guide).
Commands for saving graphics
Allocates commands for saving the graphics to be printed in the
printer.
Print commands
Allocates commands related to printing and instructions for
operation to the printer.
Rendering commands
Allocates commands for rendering print data such as text,
barcodes, and graphics.
Post-print operation commands
Allocates commands for post-print printer operations such as the
autocut, sounding the buzzer, and pause the printer.
Print termination commands
Allocates commands for cleaning up after the print.
ESC/Label Command Reference Guide) , etc..
Settings are unnecessary if printing using the setting values set in
the printer.
that use the printer, there is a possibility of the printer settings will
be overwritten.
commands for each print.
And, delete the files that remain in the printer, and might become a
potential cause of shortage of the drive space for command
executions that follow (refer to the section 2
Delete the files registered for the print (refer to the section 2.8.1 of
2.3 Example Print i ng Com m and
2.3.1 Description
In this example, imagine you are printing the label in Figure 2-2. The following indicates the
main structures of the label.
ž Use the TrueType font registered in the printer to print “Kotobuki-Koaka Tea Inc.” in green.
ž Print an EAN-13 barcode.
ž Print “IMG001.PNG”, an image of tree.
Application Development Guide
ESC/Label
for TM-C7500 series
REVISION
Page 7
TITLE
SHEET
C
NO.
NEXT
SHEET
7
Figure 2-2 Sample Label
Table 2-2 List of Sample Printing Sett i ngs
Item
Setting
Media coating type
Matte
Media form
Die-cut label
Label edge detection
method
Black mark detection
Media width
2645 [dot] (112.0 [mm])¹
Label width
2551 [dot] (108.0 [mm])¹
Label length
3600 [dot] (152.4 [mm])¹
Left gap
47 [dot] (2.0 [mm])¹
Top margin
35 [dot] (1.5 [mm])¹
Bottom margin
35 [dot] (1.5 [mm])¹
Left margin
35 [dot] (1.5 [mm])¹
Right margin
35 [dot] (1.5 [mm])¹
Feather edges
Disable
Color correction
EPSON Standard
Ink profile and
brightness adjustment
0
Ratio of black to
composite setting
0
Bar width adjustment
0
Head maintenance
Continuous
Printing speed
12 [inch/sec] (300 [mm/sec])
Post-print operations
Autocut after printing is completed
Printer pauses after printing is completed
Also, for this example, imagine you are print ing using the settings in Table 2-2.
¹The unit of the setting value can be selected from dot/mm/inch by ^S(CMP,U or ^MU command.
Buzzer does not sound after printing is completed
ESC/Label
Application Development Guide
for TM-C7500 series
REVISION
Page 8
TITLE
SHEET
C
NO.
NEXT
SHEET
8
[Setting commands for each print]
[Commands for saving graphics]
[Print commands]
< Rendering commands >
2.3.2 Commands
^XA Begins label format.
^IDR:*.*^FS Delete the files that remain in the pri nter.
^S(CLR,R,600 Sets the format base in dots per inch to 600 [dpi].
^S(CLR,P,600 Sets the print resolution to 600 [dpi].
^S(CLM,T,M1 Sets the media coating type to Matte1.
^S(CLM,F,DL Sets the media form to Die-cut Label.
^S(CLM,P,IR Sets the media source to internal roll.
^S(CLM,S,RP Sets the media shape to roll paper.
^S(CLM,D,M Sets the detection method to Black mark detection.
^S(CLS,P,2551 Sets the label width to 2551 [dot].
^S(CLS,L,3600 Sets the label length to 3600 [dot].
^S(CLS,G,47 Sets the left gap to 47 [dot].
^S(CLW,T,35 Sets the top margin to 1.5[mm].
^S(CLW,B,35 Sets the bottom margin to 1.5[mm].
^S(CLW,L,35 Sets the left margin to 1.5[mm].
^S(CLW,R,35 Sets the right margin to 1.5[mm].
^S(CPC,E,D Sets the feather edges function to be not performed.
^S(CPC,C,N Sets the color correction mode to EPSON Preferred
Color.
^S(CPC,D,0 Sets the ink profile and brightne adjustment to 0.
^S(CPC,P,0 Sets the ratio of black to composite setting to 0.
^S(CPC,B,0 Sets the banding reduction to 0.
^S(CBW,C,0 Sets the bar width adjustment to 0.
^S(CMP,F,2 Sets the flush onto paper mode to 2.
^S(CMP,S,12 Sets the printing speed to 12 [inch/sec].
^S(CMP,M,C Sets the printer operation mode to cutter.
^S(CLE,M,10 Adjusts the label left edge position to left 10[dot].
^S(CLE,T,12 Adjusts the label leading edge position
to upper 12[dot].
^S(CLP,M,5 Sets the paper feed adjustment to 5[pixel]
^S(CMV,I,100 Sets the auto nozzle check interval to 100 labels.
^S(CMV,O,N Sets the operation at clogged nozzle detection
to notifying.
^XZ Ends label format.
~DYR:IMG001,B,P,39628,, Saves the PNG file “IMG001.PNG” in the R drive.
^XA Begins label format.
^FO216,216 Field origin: (216, 216)
^A@N,90,90,R:TT001.FNT Calls up the TrueType font registered in the printer.
ESC/Label
Application Development Guide
for TM-C7500 series
REVISION
Page 9

TITLE
SHEET
C
NO.
NEXT
SHEET
9
< Post-print operation commands >
[ Print termination commands ]
^F(C0,128,0,255,0,0,0,0,0,0 Sets the font color to green.
^FDKotobuki-Koaka Tea Inc.^FS Prints “Kotobuki-Koaka Tea Inc.”.
^FO300,348 Field origin: (300, 348)
^A0,N,32,25 Sets the font to Font0.
^FD2070 Kotobuki-Koaka^FS Prints “2070 Kotobuki-Koaka”.
^FO300,438 Field origin: (300, 438)
^A0,N,32,25 Sets the font to Font0.
^FDMatsumoto^FS Prints “Matsumoto”.
^FO300,540 Field ori gin: (300, 540)
^BY9^BEN,360,Y,N^FD123456789012^FS
Prints the EAN-13 barcode.
^PON Sets the printing direction to standard.
^FO1320,240 Field origin: (1320, 240)
^IMR:IMG001.PNG^FS Loads the image saved in the R drive,
“IMG001.PNG”.
^S(CUB,S,N Sets for the buzzer not to sound after printing is
completed.
^PQ1,1 Sets to pause printer after printing is completed.
^XZ Ends label format.
^XA Begins label format.
^IDR:*.*^FS Delete the files registered for the print.
^XZ Ends label format.
ESC/Label
Application Development Guide
for TM-C7500 series
REVISION
Page 10
TITLE
SHEET
C
NO.
NEXT
SHEET
10
Table 3-1 List of Functions to be implemented
Category
Function name
Print setting
Media Coating Type Setting
Media Layout Setting
Completion Autocut Setting
Completion Beeper Setting
Completion Pause Setting
Printing Color Correction Mode Setting
Ink Profile and Brightness Adjustment Setting
Ratio of Black to Composite Setting
Bar Width Adjustment Setting
Banding Reduction Setting
Printing Speed Setting
Head maintenance Setting
Printer setting
Label Edge Detector Setting
Media Source Setting
Nozzle Verification Technology Settings
Printing Start Position Adjustment Setting
Re-print Setting
LED Notification Setting (Ink Cartridge Low)
Paper feed Adjustment Setting
Download
TrueType Font Download
Display status
Display Consumables Information
Utility functions
Head Cleaning
Print Nozzle Clogging Check Pattern
3 Functions to be implemented
3.1 List of Funct ions
Table 3-1 indicates a list of functions that mounted with the control software usually.
ESC/Label
Application Development Guide
for TM-C7500 series
REVISION
Page 11
TITLE
SHEET
C
NO.
NEXT
SHEET
11
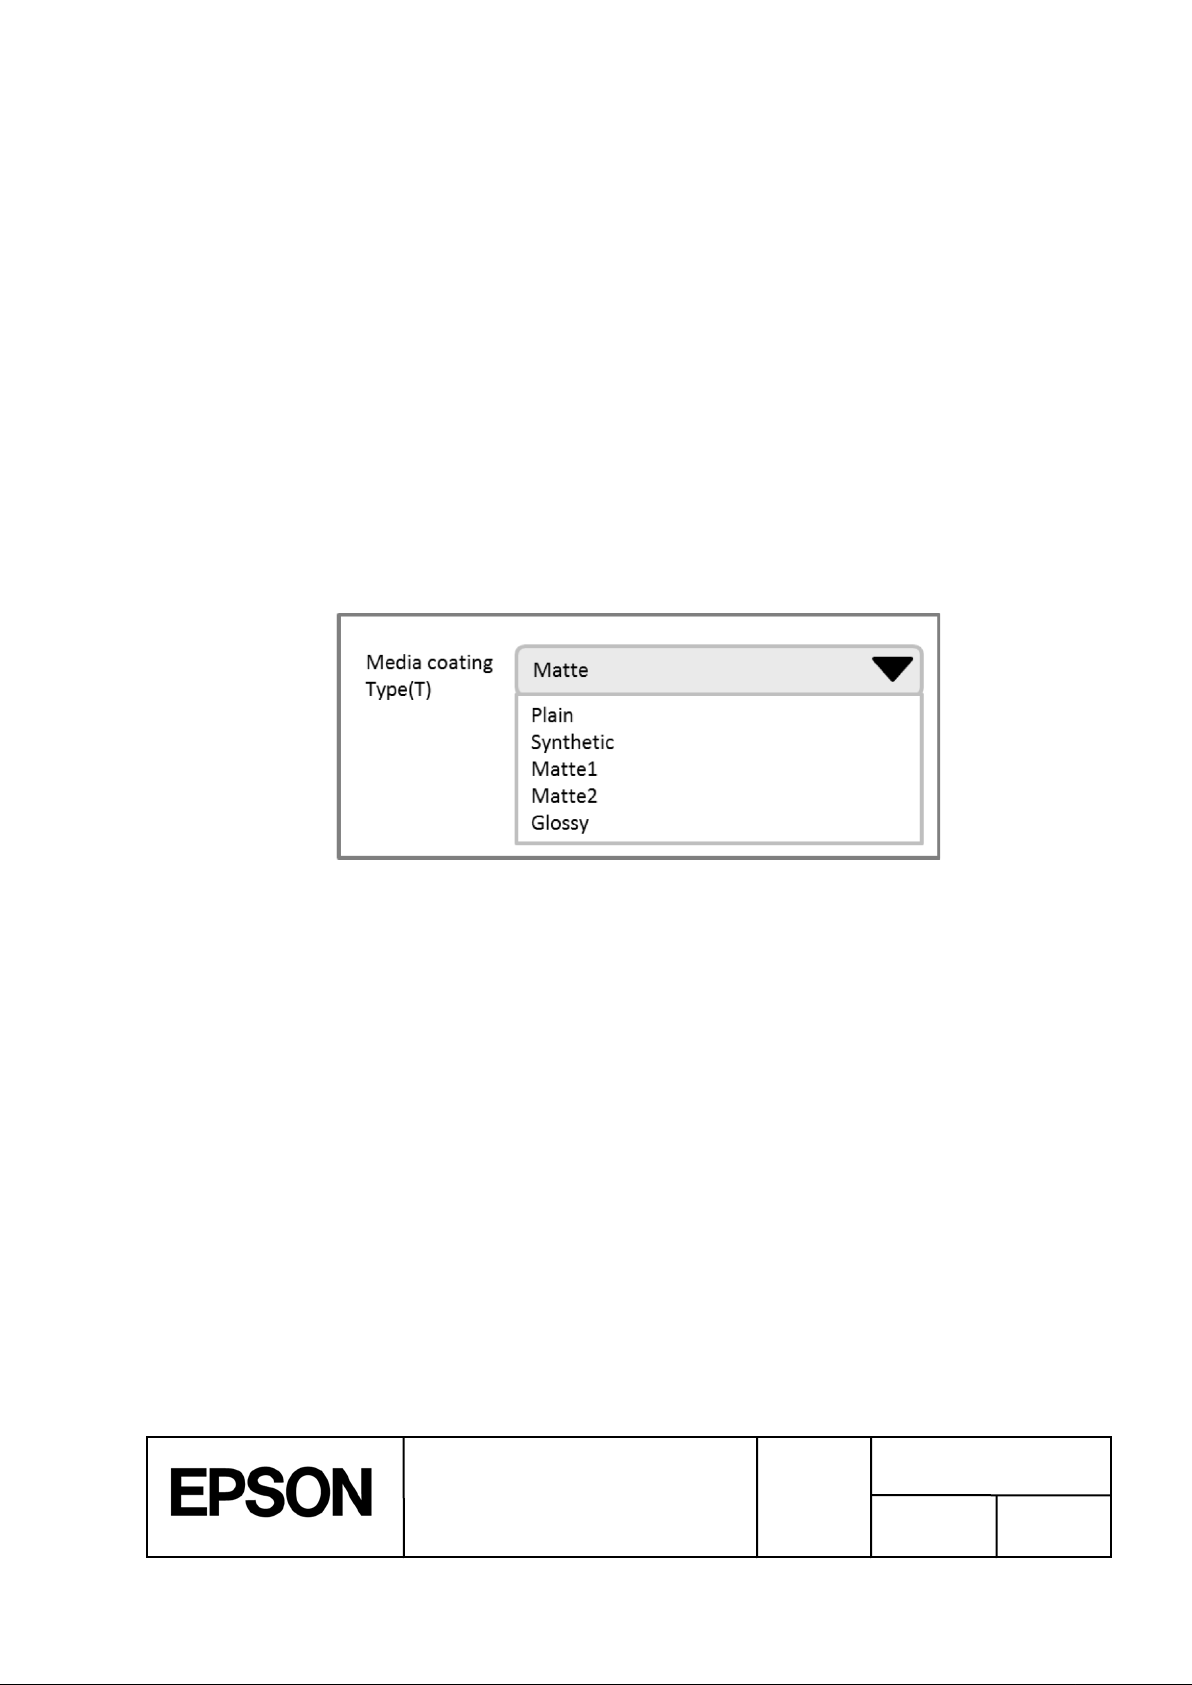
Figure 3-1 UI Sample for the Media CoatingType Setting
3.2 Media Coating Type Setting
n Function description:
Ø This function sets the media coating type to be used.
Ø The printer performs printing that is optimal for the media coating type set in this
function.
Ø If the correct media coating type is not set, the picture quality may decrease.
Ø You can select the media coating type from the following:
Plain / Synthetic / Matte1 / Matte2 / Glossy
Default setting : Matte2
n Use case:
Ø Set when using for the first time or when you changed the paper.
n Recommendation in achievement:
Ø Please allow the user to simply change settings f or each print.
n Command to be used
Ø ^S(CLM,T
n UI sample:
ESC/Label
Application Development Guide
for TM-C7500 series
REVISION
Page 12
TITLE
SHEET
C
NO.
NEXT
SHEET
12
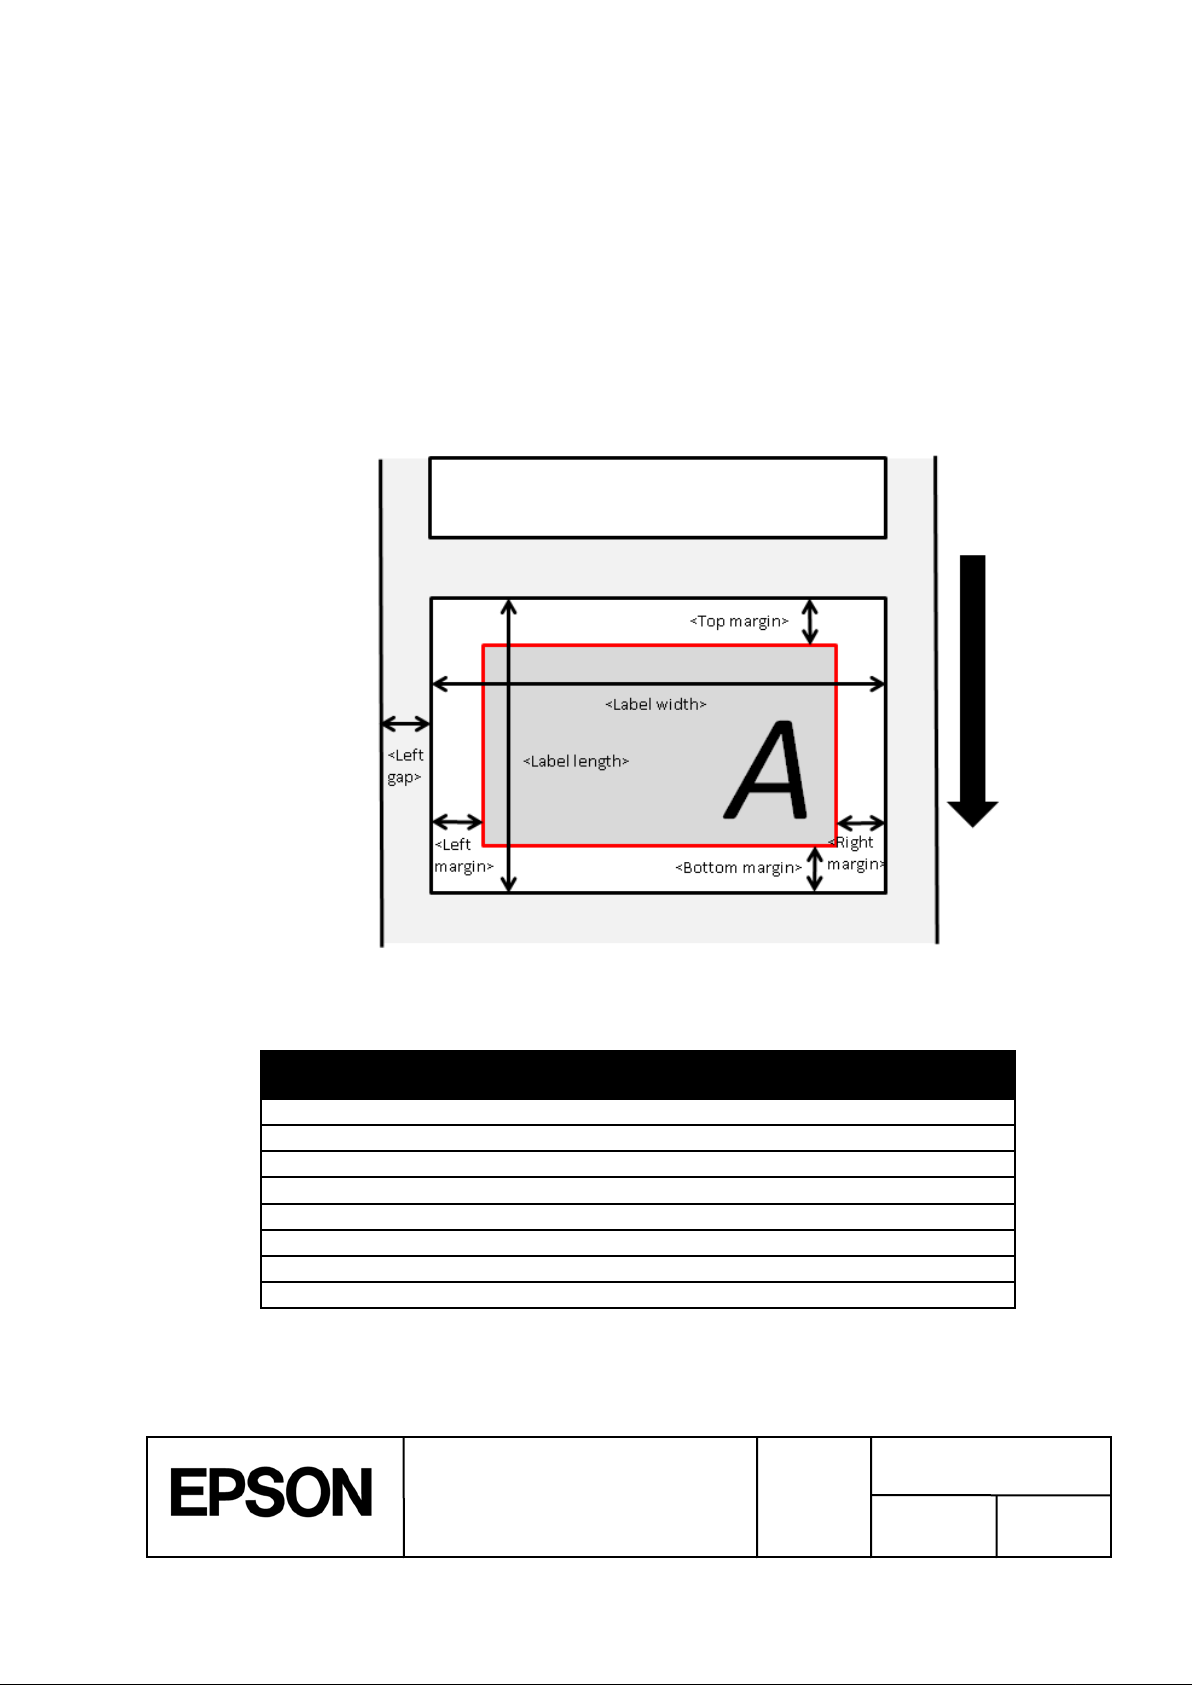
Table 3-2 Die-cut Label (Gap) Settings List
Item
Setting scope
Recommended
initial value
Command
Label width [mm]
46.0 to 108.0
108.0
^S(CLS,P
Label length [mm]
25.4 to 600.0
152.75
^S(CLS,L
Left gap [mm]
1.5 to 2.5
2.0
^S(CLS,G
Top margin [mm]*
0 / 1.5
1.5
^S(CLW,T
Bottom margin [mm]*
0 / 1.5
1.5
^S(CLW,B
Left margin [mm]*
0 / 1.5
1.5
^S(CLW,L
Right margin [mm]*
0 / 1.5
1.5
^S(CLW,R
Feather edges function*
E / D
D
^S(CPC,E
Figure 3-2 Die-cut Label (Gap) Layout
3.3 Media Layout Setting
n Function description:
Ø This function sets the layout information for the media to be used.
Ø The printer performs print processing using the media layout information set in this
function.
Ø If the correct media layout information is not set, a media size error occurs.
Ø For the media layout, set the following information for each media form and label edge
detection method.
² Die-cut label (Gap)
* The feather edges function can be set to “E”(enable), only when all of mar gins(top/bot tom/lef t/right ) are set
to 0.
ESC/Label
Application Development Guide
for TM-C7500 series
REVISION
Page 13
TITLE
SHEET
C
NO.
NEXT
SHEET
13
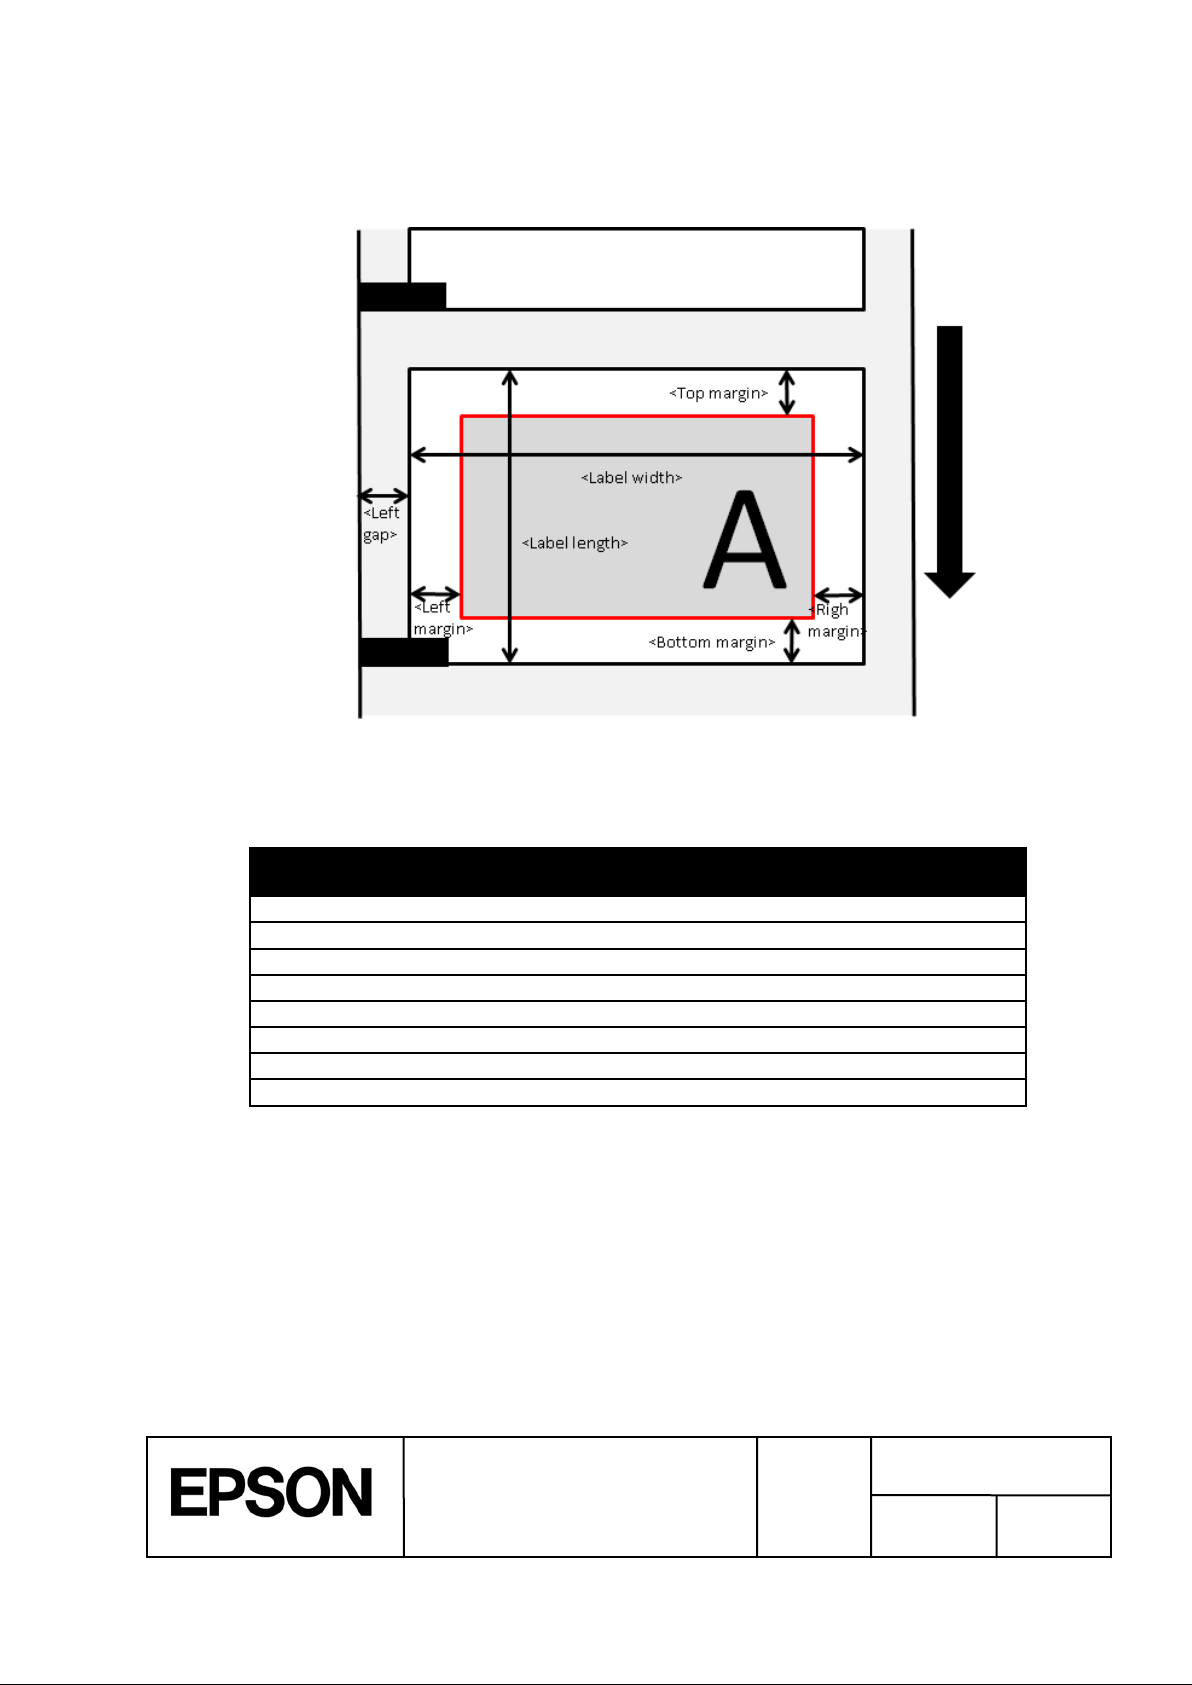
Table 3-3 Die-cut Label (BM) Setting Lis t
Item
Setting scope
Recommended
initial value
Command
Label width [mm]
46.0 to 108.0
108.0
^S(CLS,P
Label length [mm]
25.4 to 600.0
152.75
^S(CLS,L
Left gap [mm]
1.5 to 2.5
2.0
^S(CLS,G
Top margin [mm]*
0 / 1.5
1.5
^S(CLW,T
Bottom margin [mm] *
0 / 1.5
1.5
^S(CLW,B
Left margin [mm] *
0 / 1.5
1.5
^S(CLW,L
Right margin [mm] *
0 / 1.5
1.5
^S(CLW,R
Feather edges function*
E / D
D
^S(CPC,E
Figure 3-3 Die-cut Label (BM) Layout
² Die-cut label (BM)
* BM: Abbreviation for black mark.
*The feather edges function can be set to “E”(enable), only when all of margins(t op/bottom/left/ right) are set
to 0.
ESC/Label
Application Development Guide
for TM-C7500 series
REVISION
Page 14
TITLE
SHEET
C
NO.
NEXT
SHEET
14
Table 3-4 Continuous label (No detection) Setting list
Item
Setting scope
Recommended initial value
Command
Label width [mm]
46.0 to 108.0
108.0
^S(CLS,P
Label length [mm]
28.4 to 600.0
152.75
^S(CLS,L
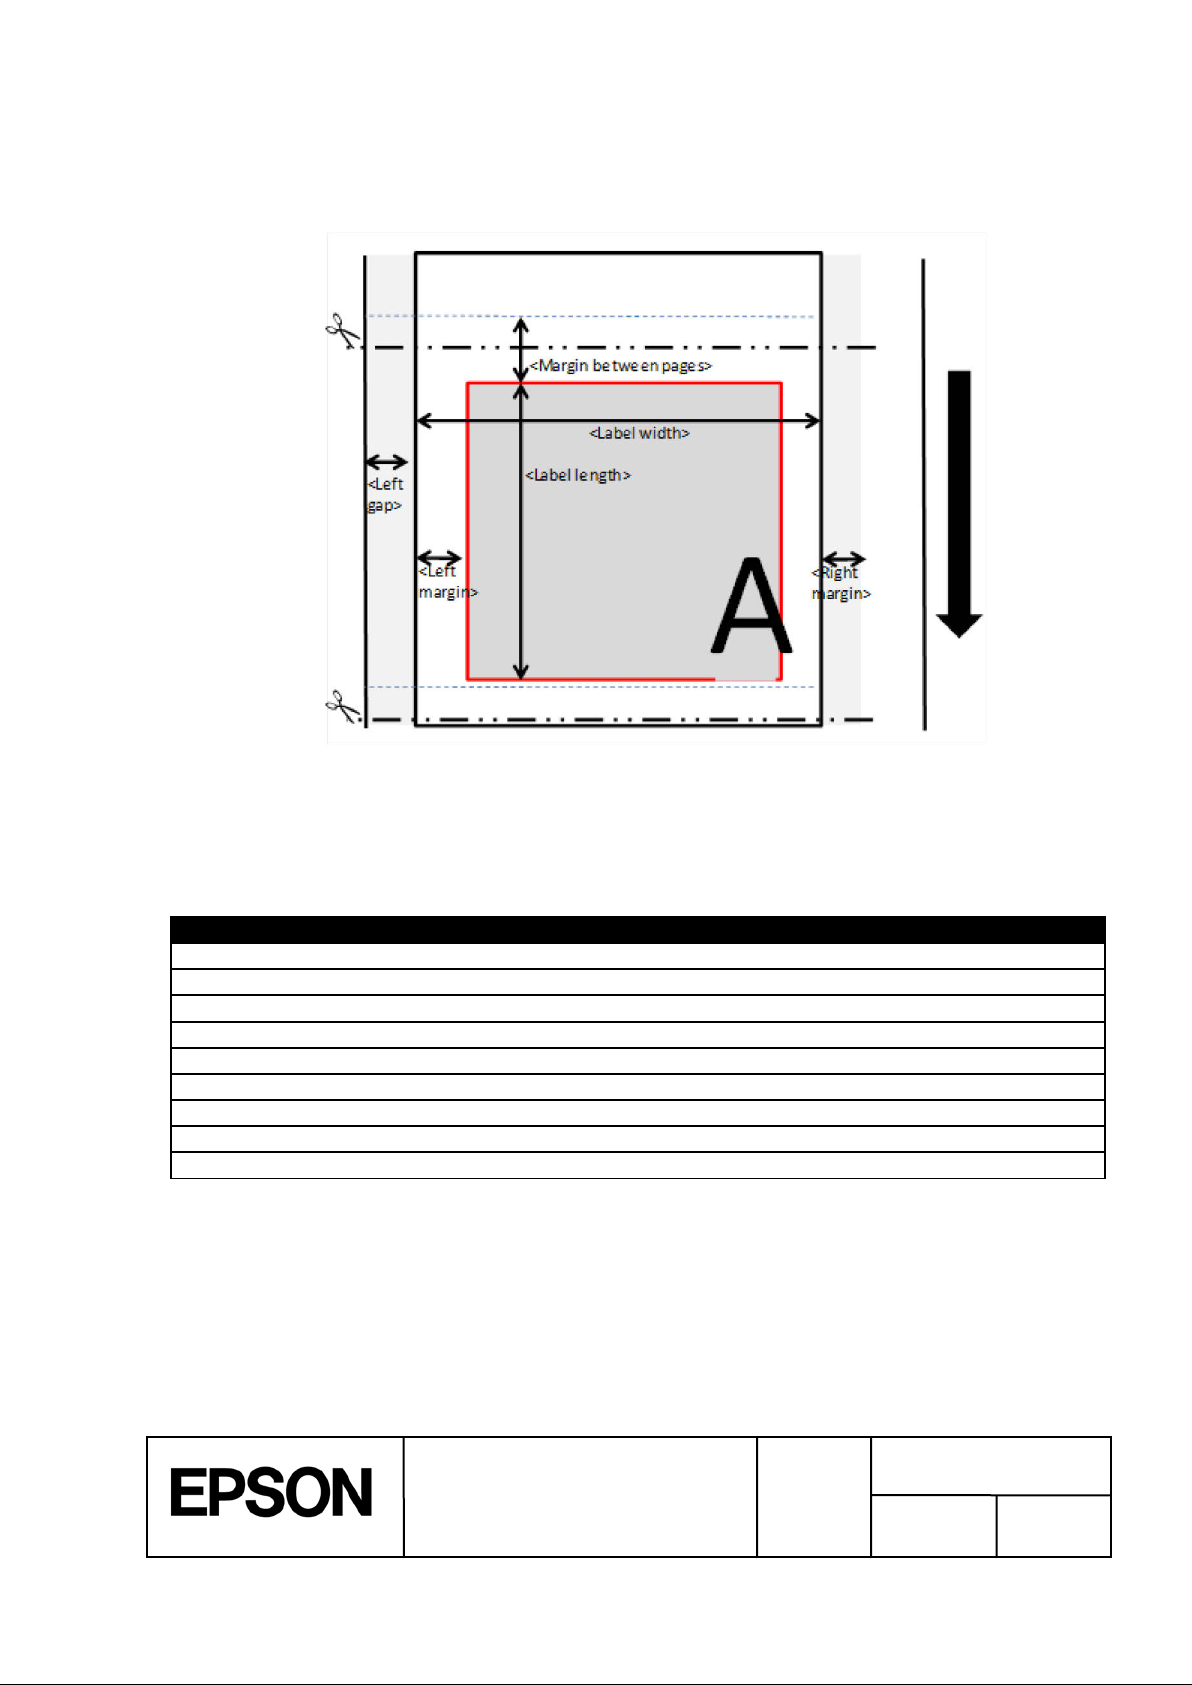
Margin between pages [mm]
3.0 [mm] (Fixed)
- - Left gap [mm]
1.5 to 2.5
2.0
^S(CLS,G
Top margin [mm]*
0 (Fixed)
0.0
^S(CLW,T
Bottom margin [mm]*
0 (Fixed)
0.0
^S(CLW,B
Left margin [mm]*
0 / 1.5
1.5
^S(CLW,L
Right margin [mm]*
0 / 1.5
1.5
^S(CLW,R
Feather edges function*
E / D
D
^S(CPC,E
Figure 3-4 Continuous label (No detection) Layout
² Continuous label (No detection)
*The feather edges function can be set to “E”(enable), only when all of mar gins(top/bottom/ left/right) are set
to 0.
ESC/Label
Application Development Guide
for TM-C7500 series
REVISION
Page 15
TITLE
SHEET
C
NO.
NEXT
SHEET
15
Table 3-5 Continuous Label (BM) Settings Lis t
Item
Setting scope
Recommended
initial value
Command
Label width [mm]
50.0 to 108.0
108.0
^S(CLS,P
Black mark distance [mm]
28.4 to 603.0
155.75
-
Print length
25.4 to Maximum printing length
152.75
^S(CLS,L
Maximum printing length
[mm]
Black mark distance
– 3,0 [mm] (Fixed)
152.75
Left gap
1.5 to 2.5
2.0
^S(CLS,G
Top margin [mm]*
0(Fixed)
0.0
^S(CLW,T
Bottom margin [mm]*
0(Fixed)
0.0
^S(CLW,B
Left margin [mm]*
0 / 1.5
1.5
^S(CLW,L
Right margin [mm]*
0 / 1.5
1.5
^S(CLW,R
Feather edges function*
E / D
D
^S(CPC,E
Figure 3-5 Continuous Label (BM) Layout
² Continuous label (BM)
*The feather edges function can be set to “E”(enable), only when all of margins(top/ bottom/left/r ight) are set
to 0.
ESC/Label
Application Development Guide
for TM-C7500 series
REVISION
Page 16

TITLE
SHEET
C
NO.
NEXT
SHEET
16
n Use case:
Ø Set when using for the first time or when you changed the paper.
n Recommendation in achievement:
Ø Please allow the user to simply change settings f or each print.
² We recommend that the user register the media layout in advance, and select from
among the registered media layouts when printing.
Ø If the margin is set to 0 [mm], the ink may run over the edge of the label. Please
indicate to the user that when setting margin to 0 [mm], there is a risk of ink running
over.
² Example message:
“The printing may run over the edge of the label. Please ensure margins of 1.5
[mm] or larger in the print data so that the printing does not run over the edge of
the label.”
n Commands to be used:
Ø ^S(CLS,G, ^S(CLS,L ^S(CLS,P
Ø ^S(CLW,B, ^S(CLW,L, ^S(CLW,R, ^S(CLW,T
ESC/Label
Application Development Guide
for TM-C7500 series
REVISION
Page 17
TITLE
SHEET
C
NO.
NEXT
SHEET
17
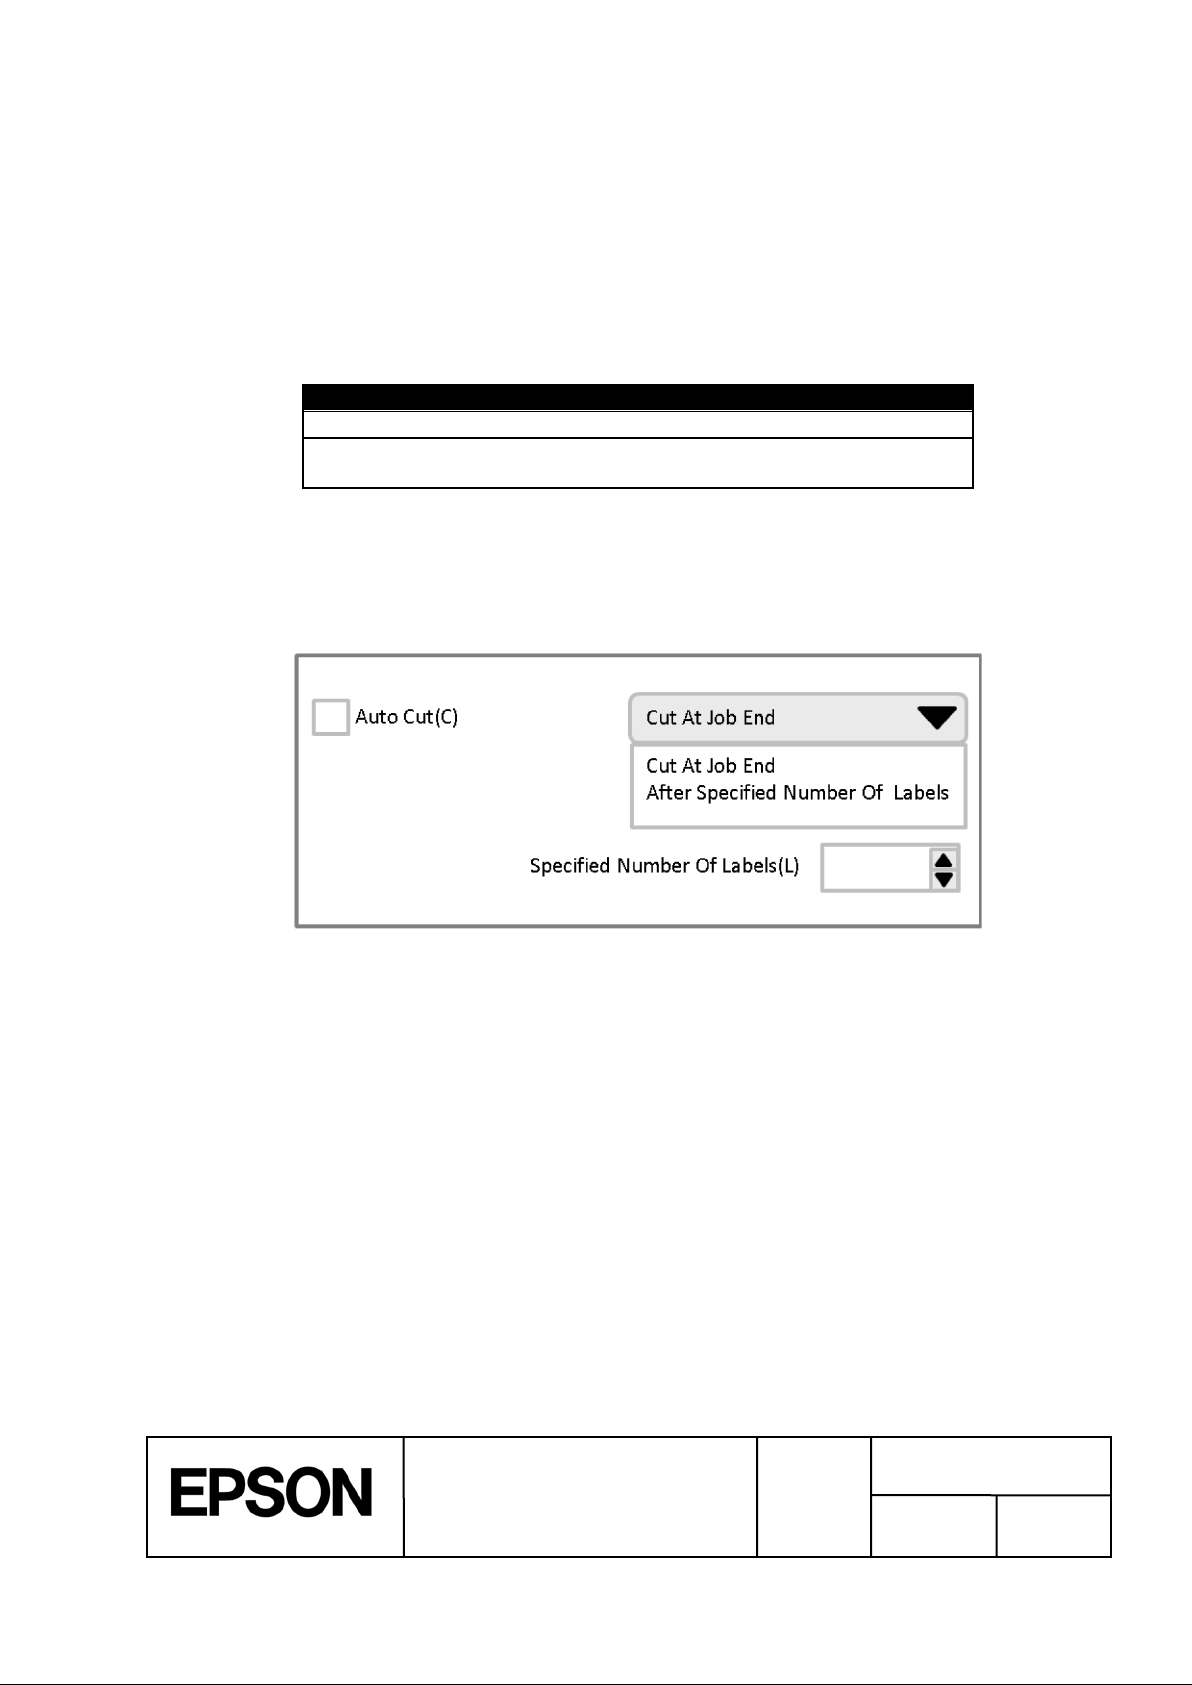
Table 3-6 Autocut Timing List
Timing
Description
Cut at job end
Cuts after printing the last printing label.
After specified
number of labels
Cuts after every number of labels specified by the
user.
Figure 3-6 UI Sample for the Completion Aut ocut Setting
3.4 Completion Aut ocut Setting
n Function description:
Ø This function designates the timing for the autocut.
Ø We recommend the following for the autocut ti m ing.
n Use case:
Ø Use when you want to separate each print.
Ø Use when you want to separate the print in units of multiple sheets.
n Command to be used:
Ø ^PQ
n UI sample:
ESC/Label
Application Development Guide
for TM-C7500 series
REVISION
Page 18
TITLE
SHEET
C
NO.
NEXT
SHEET
18
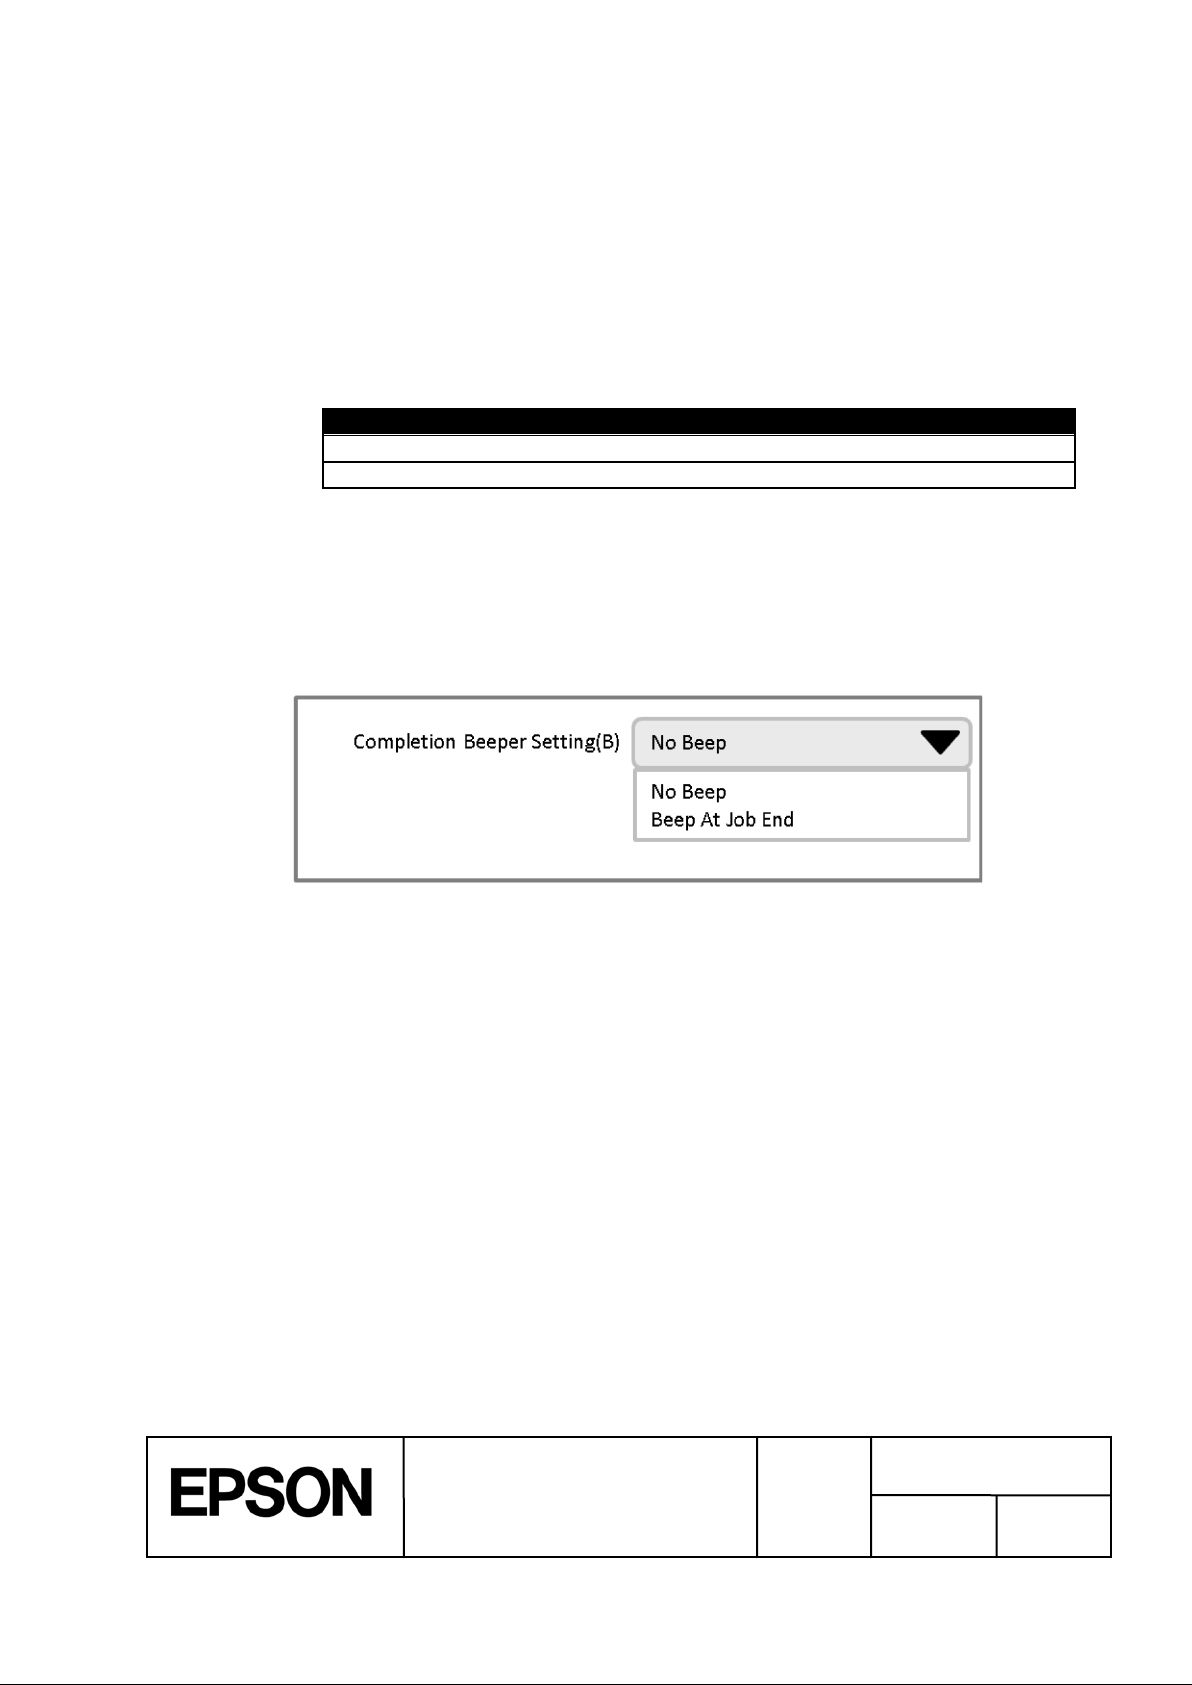
Table 3-7 Buzzer Sounding Timing List
Timing
Description
No beep
Not sounds the buzzer after printing.
Beep at job end
Sounds the buzzer after printing the last label.
Figure 3-7 UI Sample for the Completion Beeper Sett i ng
3.5 Completion Beeper Setting
n Function description:
Ø The function sounds the buzzer equipped in the printer at the print competion timing
designated by the user.
Ø We recommend the following timing to sound the buzzer.
n Use case:
Ø Use to notify by sound that printing has been completed in units specified by the user.
n Recommendation in achievement:
Ø Please allow the user to simply change settings f or each print.
n Command to be used:
Ø ^S(CUB,S
n UI sample:
ESC/Label
Application Development Guide
for TM-C7500 series
REVISION
Page 19
TITLE
SHEET
C
NO.
NEXT
SHEET
19
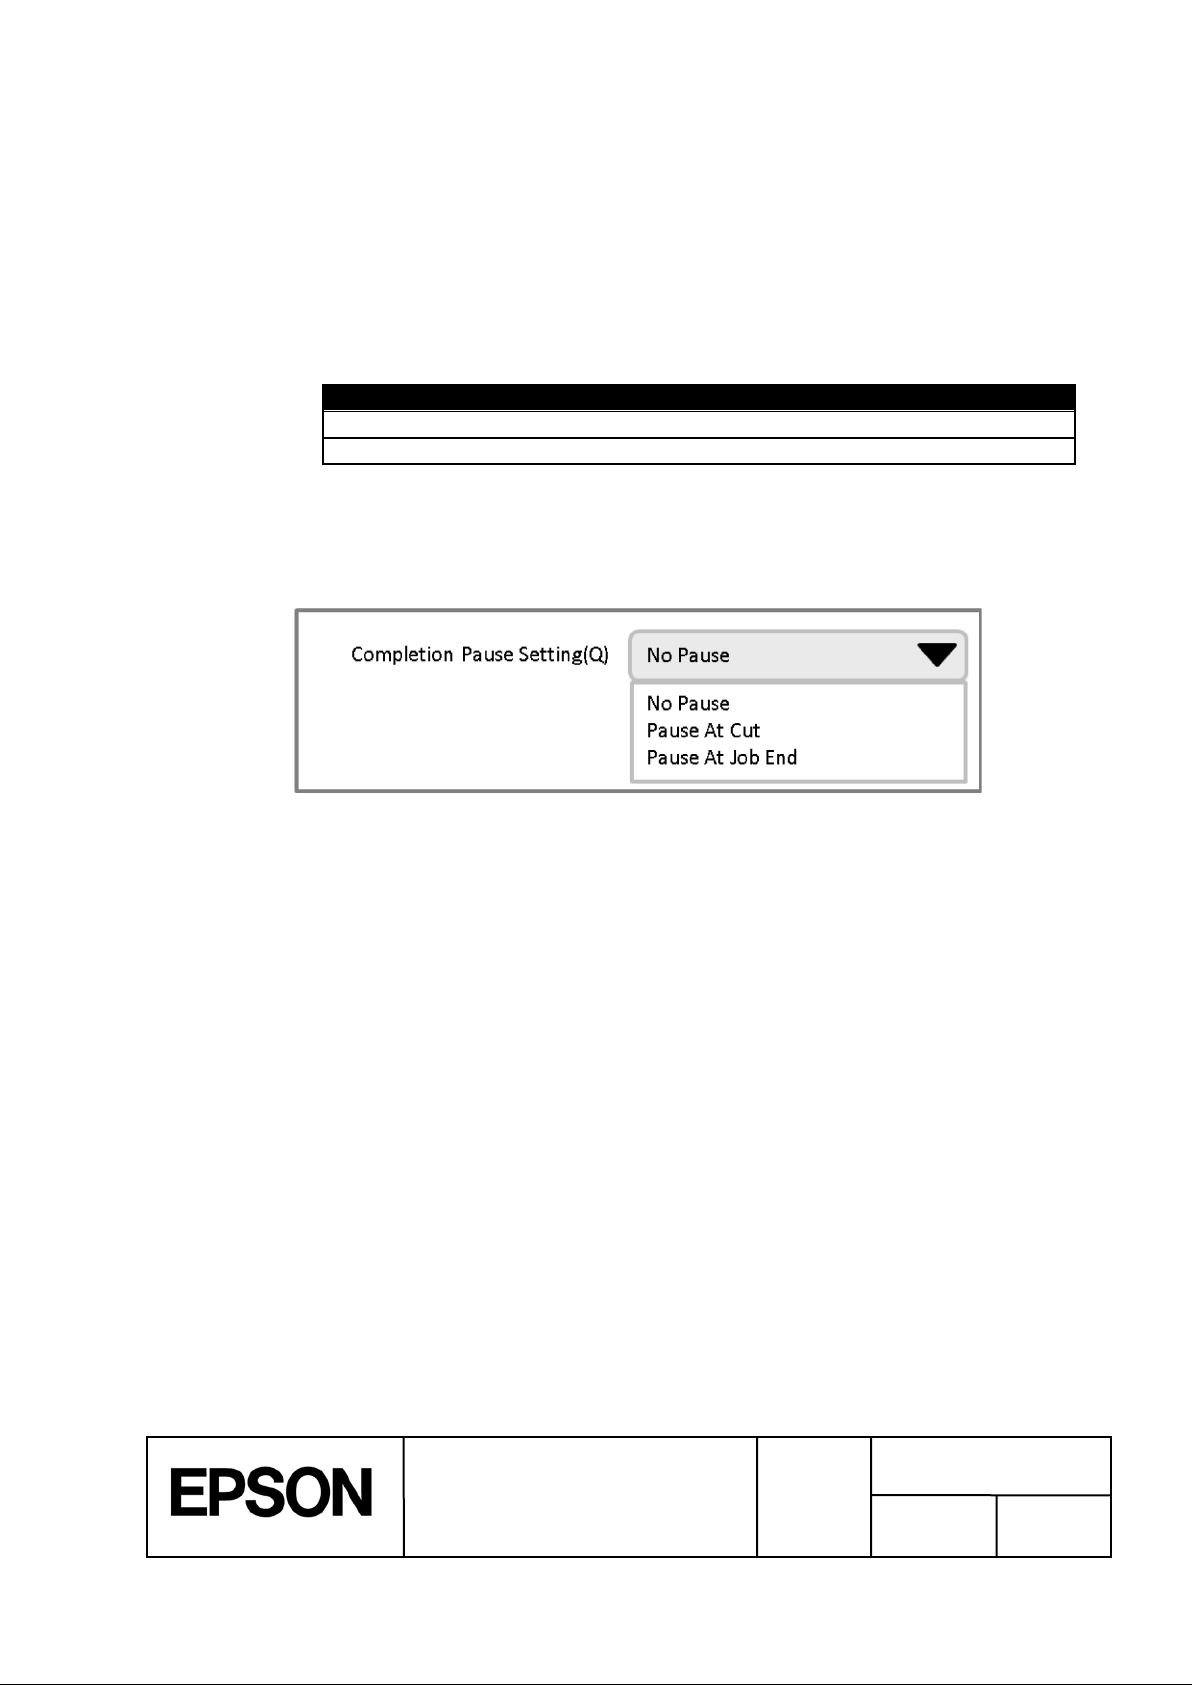
Table 3-8 Pause Printer Timing List
Timing
Description
Pause at cut
Pause the printer after performing an autocut.
Pause at job end
Pause the printer after printing the last label.
Figure 3-8 UI Sample for the Completion Pause Setting
3.6 Completion Pause Set t ing
n Function description:
Ø This function pauses the printer at the print completion timing specified by the user.
Ø We recommend the following timing to pause the printer.
n Use case:
Ø Use when the user performs procedures such as removing the paper after printing.
n Command to be used:
Ø ^PQ
n UI sample:
ESC/Label
Application Development Guide
for TM-C7500 series
REVISION
Page 20
TITLE
SHEET
C
NO.
NEXT
SHEET
20
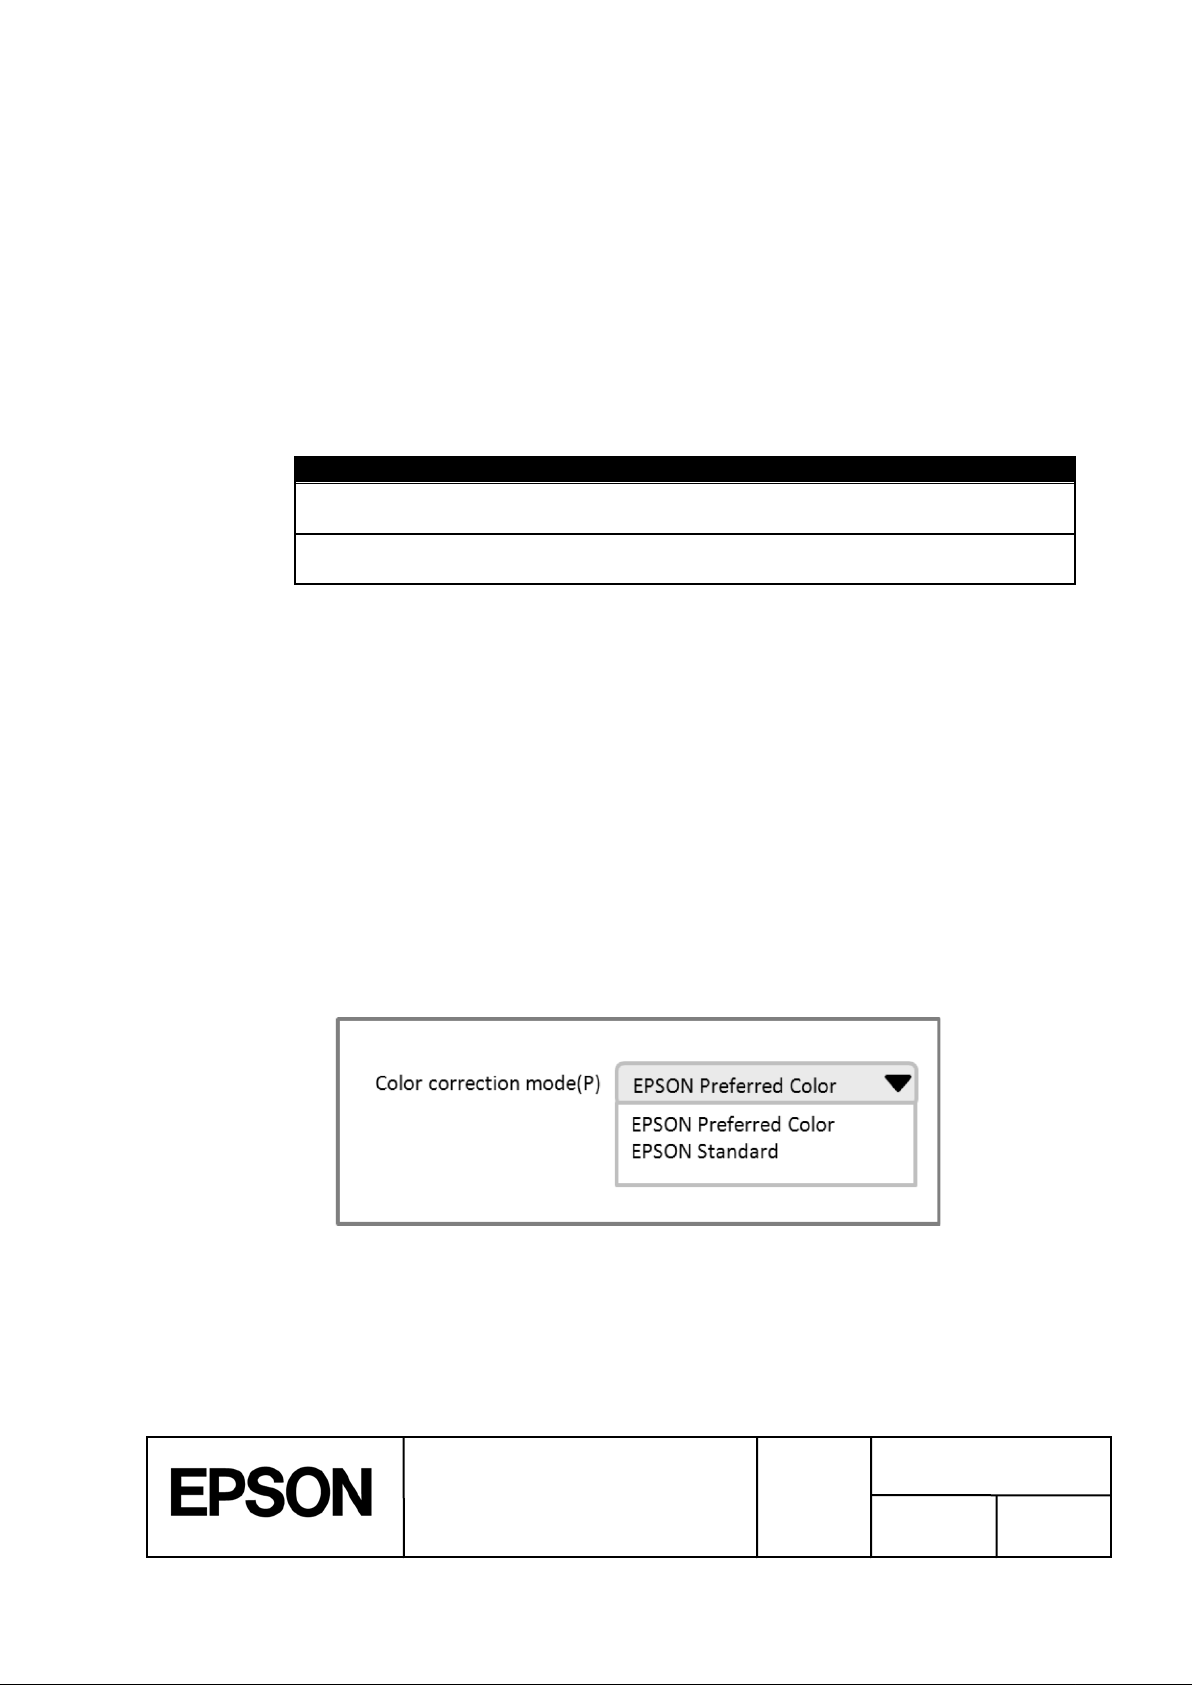
Table 3-9 Color Correction Mode List
Item
Description
EPSON Preferred Color
Prints using optimal color correction to selected media
coating type.
EPSON Standard
Prints with matching to sRGB color space, does not use
color correction to the image.
Figure 3-9 UI Sample for the Color Correction Mode Setting
3.7 Printing Color Correction Mode Setting
n Function description:
Ø This function sets the correction mode for the printing color to match the printed
contents.
Ø The printer uses the color correction mode set in this function to correct the color so
that the printing result is optimal .
Ø Select the correction mode from the following.
n Use case:
Ø Set the optimal color correction mode for the printed contents.
n Recommendation in achievement:
Ø Please allow the user to simply change settings for each print.
² With this setting, the user needs to select a color adjustment setting to match the
printed contents. Therefore, please guide users so that they can select a choice
based on the printing contents.
² Example: Include a message below in the Help menu.
l “EPSON Preferred Color” is suitable for usual case.
l When you want to arrange color, please select “EPSON Standard”.
l Even if which item is selected, the print result does not match necessarily to
the color displayed.
n Command to be used:
Ø ^S(CPC,C
n UI sample:
Application Development Guide
for TM-C7500 series
ESC/Label
REVISION
Page 21

TITLE
SHEET
C
NO.
NEXT
SHEET
21
Figure 3-10 Image of Ink Profile Amounts
Figure 3-11 UI Sample of the Ink Profile and Bright ness Adjustment Setting
3.8 Ink Profile and Brightness Adjustment Setting
n Function description:
Ø This function sets the adjustment values from the standard values of the ink profile and
brightness.
Ø If you change the settings, the ink profile (amount of ink used) duri ng printing changes.
Ø Default is the standard. You can set 6 stages for “light” and 4 stages for “dark” (for a
total of 11 stages). If Matte2 is specified as media coating type, you can set only 6
stages for “light”.
n Use case:
Ø Use to make the printed result lighter or darker depending on the media coating type
and the printed contents.
n Recommendation in achievement:
Ø Please allow the user to simply change settings for each print.
Ø If you set the ink profile and brightness towards light, it may decrease the scan quality
of barcodes. Please indicate to users that if they change the ink profile and
brightness, there is a risk the scan quality will decrease for barcodes.
n Command to be used:
Ø ^S(CPC,D
n UI sample:
ESC/Label
Application Development Guide
for TM-C7500 series
REVISION
Page 22

TITLE
SHEET
C
NO.
NEXT
SHEET
22
Figure 3-12 Image for the Ratio of Black Ink
3.9 Ratio of Black to Composite Setting
n Function description:
Ø This function sets the adjustment value for t he ratio of ink constituting black.
Ø Change this setting to change the ratio of ink used when pri nting black.
Ø Default is the standard. When the media coating type is Matte1/Matte2/ Glossy, you
can set 6 stages to “CMY” and 4 stages to “K” (for a total of 11 stages).
Ø When the media coating type is Plain/ Synthet ic, you can set 6 stages to “CMY”.
Ø Setting the adjustment towards “CMY” reduces the ratio of black ink. Setting the
adjustment towards“K” increases the ratio of black ink. If the ratio of black ink is
high, the ink becomes more likely to be scraped off.
n Use case:
Ø Check the printed material. If the ink is scraped off easily, set towards “CMY”.
² Depending on the quality of the paper, if you print using the default ratio of black to
composite setting, the black ink may be scraped off easily. If this phenomenon
occurs, set towards “CMY”.
n Recommendation in achievement:
Ø Please allow the user to simply change settings f or each print.
Ø If you change the ratio of black to composite setting, it may decrease the scanning
quality of barcodes. Please indicate to users that if they change the ratio of black
to composite setting, there is a risk the scan qualit y will decrease for barcodes.
n Command to be used:
Ø ^S(CPC,P
ESC/Label
Application Development Guide
for TM-C7500 series
REVISION
Page 23

TITLE
SHEET
C
NO.
NEXT
SHEET
23
Figure 3-13 UI Sample for the Ratio of Black t o Composite Setting
n UI sample:
ESC/Label
Application Development Guide
for TM-C7500 series
REVISION
Page 24

TITLE
SHEET
C
NO.
NEXT
SHEET
24
Figure 3-14 UI Sample for the Bar Width Adjustment S etting
3.10 Bar Width Adjustment Setting
n Function description:
Ø This function sets the adjustment value for t he bar width.
Ø If you change this setting, the bar width adjustment value for printing barcodes is
changed.
Ø What is bar width adjustment?
² Bar width adjustment is a function to prevent a decrease in barcode scanning
quality from ink running by adjusting the bar widt h of the barcode.
² Applicable barcodes:
UPC-A, UPC-E, JAN13(EAN), JAN8(EAN), Code39, ITF, Codabar, Code93,
Code128, GS1-128, GS1 DataBar Truncated, GS1 DataBar Expanded, GS1
DataBar Limited
² The bar width changes by 1 dot, when the bar width adjustment value is changed
by 1 step.
² When the bar width adjustment value is default(0), the bar width is narrowed by 2
dots more than the width calculated by the standard of each symbol.
Ø Note:
² Bar width adjustment is performed even in default settings to increase barcode
scanning quality.
n Use case:
Ø Set when you scan a barcode printed on the paper actually used, and the scan quality
was insufficient.
n Recommendation in achievement:
Ø Please allow the user to simply change settings f or each print.
Ø If you change the bar width adjustment value, the barcode scan quality may decrease.
Please indicate to users that if they change the bar width adjustment value, there is
a risk that the barcode scan quality may decrease.
n Command to be used:
Ø ^S(CBW,C
n UI sample:
ESC/Label
Application Development Guide
for TM-C7500 series
REVISION
Page 25

TITLE
SHEET
C
NO.
NEXT
SHEET
25
Figure 3-15 UI Sample for the Bading Reduction Sett i ng
Banding Reduction
Light
Dark
3.11 Banding Reduction Setting
n Function description:
Ø This function sets the adjustment values to reduce vertical banding in the print result.
Ø Default is the standard. You can set 2 stages for “light” and 2 stages for “dark” (for a
total of 5 stages).
Ø Set the adjustment for “light” when the band darker than surroundings is printed, set
the adjustment for “dark” when the band lighter than surroundings is printed.
n Use case:
Ø Set when vertical banding (Light color band or dark color band) occur in the print result
depending on the media coating type.
n Recommendation in achievement:
Ø Please allow the user to simply change settings f or each print.
n Command to be used:
Ø ^S(PC,B
n UI sample:
ESC/Label
Application Development Guide
for TM-C7500 series
REVISION
Page 26

TITLE
SHEET
C
NO.
NEXT
SHEET
26
Figure 3-16 UI Sample for Printing Speed Setting
Printing Speed (S)
3.12 Printing Speed Setting
n Function description:
Ø This function sets the printing speed.
n Use case:
Ø Make the printing speed slower if printing is stopped midway and the paper is fed in
reverse to continue printing.
² This happens when the data transfer speed may not be fast enough depend on the
printed contents.
² This happens when the take-up speeds of re-winder made by 3
than printing speed.
n Recommendation in achievement:
Ø Please allow the user to simply change settings for each print.
n Command to be used:
Ø ^S(CMP,S
n UI sample:
rd
party are slower
ESC/Label
Application Development Guide
for TM-C7500 series
REVISION
Page 27

TITLE
SHEET
C
NO.
NEXT
SHEET
27
Table 3-10 Head Maintenance Setting
Head maintenance
Print settings
Continuous printing(fast)
Flush onto paper mode: Level 2
Pause for maintenance(fine)
Flush onto paper mode: Level 1
Figure 3-17 UI Sample for Head maintenance Setting
3.13 Head maintenance Setting
n Function description:
Ø This function sets whether to prioritize through-put or printing quality when printing.
Ø You can switch between the following print sett ings using this setting.
Ø When “Continuous printing” is set, print quality is decreased, so the through-put is
increased when printing multiple labels.
Ø When “Continuous printing” is set, extra ink is discharged on the printed surface, and
may stand out.
Ø What is flush onto paper mode?
² For the higher level of the flush onto paper mode, the printing quality will decrease
because more ink is discharged. On the other hand, the improvement of
throughput when printing multiple labels is expected, because the period between
regular flushing that discharges ink with the head moving away is increased.
n Use case:
Ø Set when you want to prioritize print quality over through-put.
n Recommendation in achievement:
Ø Please allow the user to simply change settings f or each print.
n Command to be used:
Ø ^S(CMP,F
n UI sample:
ESC/Label
Application Development Guide
for TM-C7500 series
REVISION
Page 28

TITLE
SHEET
C
NO.
NEXT
SHEET
28
Table 3-11 List of Detector Settings for each Media
Media
Detector setting
Die-cut label with Gap
Gap detection
Die-cut label with black
mark, continuous paper
Black mark detection
Continuous label without
black marks
No detection
3.14 Label Edge Detector Setting
n Function description:
Ø This function sets the label edge detection method (black mark detection, gap
detection or no detection).
Ø The detection method needs to be set based on the media set in the printer.
Ø This is a printer setting, and we recommend being able to change this setting
separately from print settings.
Ø Check that the printer is idle before notifying the printer of the setting change.
Ø If it is not set properly, the printer will not detect the label edge.
Ø If the printer does not detect the label edge, an error will occur once a certain amount
of paper is fed.
Ø You can select the label edge detector from the following:
Gap detection / Black mark detection / No detection
Default setting : Gap detection
Ø The following is a list of settings for the detector for each media.
n Use case:
Ø Set the label edge detector after changing to a media with a different detection method.
n Command to be used:
Ø ^S(CLM,D
ESC/Label
Application Development Guide
for TM-C7500 series
REVISION
Page 29

TITLE
SHEET
C
NO.
NEXT
SHEET
29
Table 3-12 List of Media Sources
Item
Description
Internal roll
Select when using roll paper set inside the printer.
Roll paper is supported as media shape.
External feed
Select when using paper set from the rear of the printer.
Fanfold paper is supported as media shape.
Table 3-13 List of combination
Media source
Media shape
Media form
Support
Internal roll
Roll paper
Die-cut label
ü
Contiuous label
ü
External feed
Fanfold paper
Die-cut label
ü
3.15 Media Source Setting
n Function description:
Ø This function sets the media source for the paper used in printing.
This is a printer setting, and we recommend being able to change this setting
Ø
separately from print settings.
Check that the printer is idle before notifying the printer of the setting change.
Ø
Select the media source from below.
Ø
n Use case:
Ø Set when you changed the media source.
² Example: Changed from the internal roll to the external feed.
n Command to be used:
Ø ^S(CLM,P ^S(CLM,S ^S(CLM,F
n Supported combination of media shape and media form:
Ø Depending on media source, the supported combination of media shape and media
form is listed in Table 3-13 List of combination.
Application Development Guide
for TM-C7500 series
ESC/Label
REVISION
Page 30

TITLE
SHEET
C
NO.
NEXT
SHEET
30
Figure 3-18 UI Sample for the Nozzle Verifi c ation Technology
3.16 Nozzle Verification Technology Settings
n Function description:
Ø This function sets the timing of nozzle verification and the operation at clogged nozzle
detection.
Ø What is the nozzle verification technology?
² If the clogged nozzle is detected in nozzle verification, auto cleaning is executed.
l If the nozzle clogging is not recovered from by the cleaning, it reduces
deterioration of printing result by dot subsit uation.
² The nozzle verification can be set while printing multiple labels.
l The printer automatically detects the print beginning point.
sheets of the print from the print beginning point to the nozzle verification can
be specified.
l The user can correspond (confirm print result / continue print / cancel , etc) by
notification when the clogged nozzle is detected.
² Note:
l The nozzle verification is executed before start printing in “None” setting.
n Use case:
Ø Set when you want to minimize the possibility of printing defective labels by clogged
nozzle.
n Command to be used:
Ø ^S(CMV,I ^S(CMV,O
n UI sample:
The number of
ESC/Label
Application Development Guide
for TM-C7500 series
REVISION
Page 31

TITLE
SHEET
C
NO.
NEXT
SHEET
31
Re-print at an error(R)
Printing Start Position Adjustment(P)
Figure 3-20 UI Sample for the Reprint Setting
Figure 3-19 UI Sample for the Printing Start Pos i t i on A djustment Setting
3.17 Printing Start Position Adjustment Setting
n Function description:
Ø This function adjusts the printing start position for the printer.
Ø If the printing start position is changed, printing is started in a position shifted the
adjustment amount from the position set for the pri nt data.
n Use case:
Ø Use when you want to adjust the printing position without changing the application
settings.
n Commands to be used:
Ø ^S(CLE,M, ^S(CLE,T or ^LT
n UI sample:
3.18 Re-print Setting
n Function description:
Ø This function sets whether to perform re-printing when an error, such as paper out,
occurs during printing.
n Use case:
Ø Use when you want to change the re-print settings.
n Command to be used:
Ø ^S(CWR,P, ^JZ
n UI sample:
ESC/Label
Application Development Guide
for TM-C7500 series
REVISION
Page 32

TITLE
SHEET
C
NO.
NEXT
SHEET
32
Figure 3-22 UI Sample for the Paper Feed Adjustment S etting
LED notification setting
at Ink cartridge low(N)
Figure 3-21 UI Sample for the LED Notificati on S et t i ng (I nk Cartridge Low)
3.19 LED Notification Setting (Ink Cartridge Low)
n Function description:
Ø This function sets whether to notify the user through the LED that the printer’s ink
cartridge is low.
n Use case:
Ø Use when you want to change the LED notification method when the ink cartridge is
low.
n Command to be used:
Ø ^S(CSL,N
n UI sample:
3.20 Paper Feed Adjustment Setting
n Function description:
Ø This function adjust CMYK ink position alignment shot onto label.
n Use case:
Ø Use when you want to change label type.
n Recommendation in achievement:
Ø A set result of the paper feed adjustment is confirmed by printing the paper feed
adjustment pattern. Not only the paper feed adjustment but also it is necessary to set
media coating type, media shape, media form and media setting(label width and left
gap) to print the paper feed adjustment pattern. When these settings are changed, it
is preferable to execute each set command.
Ø Please refer to the section 6 for detail procedure of the paper feed adjustment.
n Command to be used:
Ø ^S(CLP,M
n UI sample:
ESC/Label
Application Development Guide
for TM-C7500 series
REVISION
Page 33

TITLE
SHEET
C
NO.
NEXT
SHEET
33
Table 3-14 The List of Combinations of a Character Code Set and a Charac t er Code
Convesion table
Character code set
^CI command
Character code conversion table
d:o.x for ^SE command
KS X 1001(KS C 5601-1987)
^CI14
Z:EUCKR2K6.CNV
Shift-JIS
^CI15
Z:SJIS2K3.CNV
EUC-JP
^CI16
Z:EUCJPK7.CNV
EUC-CN
^CI16
Z:EUCCN199.CNV
BIG5
^CI26
Z:BIG52K7.CNV
GB18030
^CI26
Z:GB18030.CNV
UTF-8
^CI28
unnecessary
(deprecated) UTF-8
^CI17^F8
unnecessary
(deprecated, restricted) UTF-16
^CI17
unnecessary
(unusable) UTF-16
^CI29 or ^CI30
-
3.21 TrueType Font Download
n Function description:
Ø This function downloads TrueType fonts (TTF files) to the printer.
Ø You can download a TrueType font to the printer and can print in the same way as the
fonts loaded in the device using the TrueType font printing function.
n This function is necessary because:
Ø By downloading a TrueType font to the printer, you can print using the same amount of
data as the fonts loaded in the device.
n Use case:
Ø Use when you want to print using a TrueType font.
n Recommendation in achievement:
Ø Please indicate to users that they must obtain the permission of the copyright owner of
the font before they download the font to the printer.
n Command to be used:
Ø ~DY (We recommend it than ~DU.)
n Supplementation:
Ø You should take care of the combination of a download command and a extension of a
file stored as a destination of a download. The reasons are described in the
following.
A extension of a font file which is stored in a printer is decided by a download
command you use.
If you w ill use ~DY command, a extension wil be TTF(when x=T) or TTE(when
x=E),
If you will use ~DU command, a extension wil be FNT.
Even if you designate a extension by a parameter of a download command, the
extension will be set to the mentioned extension in the previous.
When you will access to a font file stored in a printer, you should designate a actual
extension of a font file of a printer.
The corresponding commans: ^A@, ^CW, ^ID, ^H(Y, ^HW, ^WD
Ø When you use a downloaded font,you should set a character code set as needed. In
addition, some of character code sets will need a character code conversion table.
The Table 3-14 shows combinations of a character code set and a character code
conversion table.
Our request : Your driver doesn’t support UTF-16.
ESC/Label
Application Development Guide
for TM-C7500 series
REVISION
Page 34

TITLE
SHEET
C
NO.
NEXT
SHEET
34
Maintenance Box level
Figure 3-23 UI Sample for the Display Consumables I nformation
3.22 Display Consumables Information
n Function description:
Ø This function displays information for t he consumables equipped in the printer.
² Consumables: Ink cartridges, maintenance box
Ø Displays the latest information for t he consumables.
n Use case:
Ø The user checks if there are enough consumables before starting printing.
n Recommendation in achievement:
Ø Display the remaining amount of the ink catridges. (Refer to the UI sample.)
Ø Display the available space of the maint enance box. (Refer to the UI sample.)
n Commands to be used:
Ø ~H(QIQ, ~H(QMN
n UI sample:
ESC/Label
Application Development Guide
for TM-C7500 series
REVISION
Page 35

TITLE
SHEET
C
NO.
NEXT
SHEET
35
Table 3-15 Ink Cartridge Display List
Ink status
Example display
Note
Enough ink in cartridge.:RH
Moderate ink in cartridge.:RM
Small ink in cartridge.:RL
- It must display the image
Ink cartridge low.:RN
Replace ink cartridge.:RR
- It must display the image
Ink cartridge not installed.:NA
Ink cartridge installed.:CI
-It means not to be able to
Ø The amount of remaining ink is shown for the cartridges of each color. Depending on
the situation, they may be displayed in the following ways.
that remain a detected
amount of ink.
that remain a small amount
of ink.
detect the remaining ink
though the ink cartridge
installing has been detected.
ESC/Label
Application Development Guide
for TM-C7500 series
REVISION
Page 36

TITLE
SHEET
C
NO.
NEXT
SHEET
36
Table 3-16 Maintenance Box Display List
Ink status
Example display
Note
Enough space in maintenance
box.:RH
Moderate space in
maintenance box.:RM
Small space in maintenance
box.:RL
- It must display the image
Maintenance box near full.:RN
Replace maintenance box.:RR
- It must display the image
No maintenance box.:NA
Maintenance box installed.:CI
-It means not to be able to
Ø The available space in the maintenance box is displayed in black. The black area
decreases as the available space decreases. Depending on the situation, it may be
displayed in the following ways.
that remain a detected
amount of space in the
maintenance box.
that remain a small amount
of space in the maintenance
box.
n Note:
Ø What is the maintenance box?
² The maintenance box collect s waste ink.
detect the space in the
maintenance box though the
maintenance box installing
has been detected.
ESC/Label
Application Development Guide
for TM-C7500 series
REVISION
Page 37

TITLE
SHEET
C
NO.
NEXT
SHEET
37
3.23 Head Cleaning
n Function description:
Ø This function cleans the head.
Ø This automatically checks nozzle clogs and performs head cleaning.
Confirm the cleaning result by printing the nozzl e check patt ern.
Ø
n This function is necessary because:
Ø Nozzle clogs will occur.
n Use case:
Ø Use when there are missing dots in the printing result.
n Command to be used:
Ø ~J(C
3.24 Print Nozzle Clogging Check Pattern
n Function description:
Ø The function prints the pattern for checking nozzle clogs
n This function is necessary because:
Ø To check if there is no nozle clogs by printing the patt ern for checking nozzle clogs.
n Use case:
Ø Check that nozzle clogs are not occuring before printing labels.
n Command to be used:
Ø ~W(PNC
ESC/Label
Application Development Guide
for TM-C7500 series
REVISION
Page 38

TITLE
SHEET
C
NO.
NEXT
SHEET
38
4 Notes on Communication
4.1 DeviceID
n Description:
Ø The DeviceID is as follows.
MFG:EPSON;
MDL:TM-C7500
CLS:PRINTER;
4.2 String Descri pt or
n Description:
Ø The String Descriptor is as follows.
idVendor = 04B8H
idProduct = 0E19H
iManufacturer ="EPSON“
iProduct ="TM-C7500"
1
2
4.3 Receiving Buffer Full Control
n Description:
Ø Due to color printing, the amount of data that the printer receives increases, and the
receiving buffer is likely to become full.
Ø When the receiving buffer is full, the printer cannot receive data.
Ø Because the printer cannot receive data when the receiving buffer is full, the status
cannot be got with the status command.
Ø The printer receives data even during an error.
Ø The receiving buffer may become full if the printer continues to receive data during an
error.
n Recommended control:
Ø When registering a graphic in the printer, get the available space on the drive using
the printer information request command (get available space information on the
drive).
Ø If there is enough available space for the size of the graphic you want to register, send
the data.
Ø Get the receiving buffer full status using the printer information request command (get
buffer full status information).
Ø If the buffer full status is not receiving buffer full, send dat a that is 4096 bytes or less.
n Commands to be used:
Ø ~H(SDS,R, ~H(SPB,F
1
The characters since "TM-C75" is different depending on the model of the TM-C7500 series.
2
The characters since "TM-C75" is different depending on the model of the TM-C7500 series.
ESC/Label
Application Development Guide
for TM-C7500 series
REVISION
Page 39

TITLE
SHEET
C
NO.
NEXT
SHEET
39
4.4 Notes If Using Pr i nter Information request Command
n Description:
Ø When getting two or more printer information, you can send the printer information
request commands together as one command group.
n Recommended control:
Ø When sending commands together as one command group, after all the received
printer information is confirmed, then send the next command group.
Ø If the time out is necessary, set 10 sec or more per one command.
n Command to be used:
Ø ~H(C,~H(I,~H(Q,~H(S
4.5 Notes if Using Com m ands t hat Request Resonse from the Printer
n Description:
Ø If you continue to send “Commands that request status” or “Commands that request
printer information” after you sent “Command that request response from the
printer”, the response might not be able to be received.
n Recommended control:
Ø After the response to “Command that request response from the printer” is confirmed ,
then send the next “Command that requests status” or “Commands that request
printer information”.
n Commands that request response from the printer:
Ø ^HF,^HG ^HH,^HW,^HY
n Commands that request status:
Ø ~HI,~HM,~HS
n Commands that request printer iformation:
Ø ~H(C,~H(I,~H(Q,~H(S
ESC/Label
Application Development Guide
for TM-C7500 series
REVISION
Page 40

TITLE
SHEET
C
NO.
NEXT
SHEET
40
Figure 4-1 Selection of interface
4.6 Notes If Usi ng USB and Network Interface Together
n Description:
Ø The printer processes data from the interface that received the data fi rst .
Ø When the printer is processing data received via USB, it will only receive data from the
USB. (USB is selected.)
Ø When the printer is processing data received via the network, it will only receive data
from the network. (Network is selected.)
Ø When USB is selected, once the printer completes processing the data received via
the USB, after 10 seconds have passed, the printer becomes able to receive data
from the network.
Ø When network is selected, once the printer completes processing the data received via
the network, the printer immediately becomes able t o receive dat a from the USB.
4.7 Printing Cancel
n Description:
Ø If a spooler cancel is performed or the network cable was pulled to cancel printing,
unnecessary data is left in the printer, and the user may not be able to send any
further data.
Ø To delete unnecessary data, the user must perform a full format cancel using the
printer’s cancel button.
n Recommended control:
Ø Please suggest users performing a full format cancel using the printer’s cancel button if
they want to cancel printing.
ESC/Label
Application Development Guide
for TM-C7500 series
REVISION
Page 41

TITLE
SHEET
C
NO.
NEXT
SHEET
41
Label format
Field
Fixed-Field, Variable-Ffield
Drawing canvas
5 How to print labels efficiently
5.1 Outline
This section describes how to print labels efficient ly.
The print performance can be improved by applying the method that mentioned here.
5.1.1 Definition of Term
Label format means a unit of commands for label printing and a image drawn by the unit of
commands. The unit of commands is began by ^XA,and completed by ^XZ.
At least one field is included i n a label format involving printing.
Field means a command unit which places a object( such as text, graphic, bar code(symbol),
and drawing-diagram) and a image of each object drawn by the command unit.
When plural labels are printed by batch, fields which a label format include can be divided
into fields which become different print result in the labels and fields which become same print
result in the labels.
The former is called a fixed-field and the latter is called a variable-field.
At least of a field is included in a label format involving printing.The including fields are either
fixed-field or variable-field, or both of them.
Drawing canvas means memory that image of label format for print is drawn to. This
memory is gotten inside the printer.
This memory is gotten at each label format. Fields of each label format is drawn to it.
5.1.2 Points for Efficient Label Printing
The points of efficient label printing is the following.
Ø Using the method of saving and loading a image of the drawing canvas
Command to be used ^C(D, ^C(L, ^C(S (Refer to ESC/Label Command Reference
Guide.)
Ø Drawing a label format in order of a fixed-field, a variable-field.
At first, you should save a image of the drawing canvas that only fixed-fields have been
drawn to.
When drawing a image of each format, you should load the saved image, and then draw
variable-fields to a format.
Ø Drawing to the drawing canvas the largest graphic first.
The printer processes transparent color of image by its own drawing process. However,
in case of first graphic of a format, the printer can reduce a process of transparent color.
ESC/Label
Application Development Guide
for TM-C7500 series
REVISION
Page 42

TITLE
SHEET
C
NO.
NEXT
SHEET
42
Step1.
Step2.
Step3.
Step4.
Step5.
5.2 Procedure
This section explains the procedure of implementation of the point with practical example.
The outline of the procedure is shown here.
The following sections explain detail s of each step.
Divide the Fields of the Label Format into Fixed-Fields and Variable-Fields.
Delete the Image of the Drawing Canvas in the Setting Comm ands f or Each Print
Save Graphics of Fixed Grapic Fields in the Commands for Savi ng G raphics
Print commands
Save the image of the drawing-canvas which Includes only fixed-field.
Draw and print first label format.
Draw and print label formats since the second.
Commands
ESC/Label
Application Development Guide
for TM-C7500 series
REVISION
Page 43

TITLE
SHEET
C
NO.
NEXT
SHEET
43
Figure 5-1 Sample Label
5.2.1 Example of Label to Print
The Figure 5-1 shows the label printing by this practical example.
The label has fixed-fields and variable-fields.
ESC/Label
Application Development Guide
for TM-C7500 series
REVISION
Page 44

TITLE
SHEET
C
NO.
NEXT
SHEET
44
Figure 5-2 Divided Result of the Sample Label into Fixed-Fields and Variable-Fields
5.2.2 Divide the Fields of the Label Format into Fixed-Fields and Variable-Fields.
Divide the fields of the label format into fixed-fields and variable-fields.
The Figure 5-2 and Table 5-1show devided result of the practical example.
ESC/Label
Application Development Guide
for TM-C7500 series
REVISION
Page 45

TITLE
SHEET
C
NO.
NEXT
SHEET
45
Table 5-1 Divided Result of the Sample Label into Fixed-Fields and Variable-Fields
Name of Field
Category of
Field
Type of Field
Number of Figure 5-2
FXGR**
Fixed
Fixed-Graphic
01 to 04
FXTX**
Fixed
Fixed-Text(printer font)
01 to 11
FXBC**
Fixed
Fixed-Barcode(Symbol)
none
FXDR**
Fixed
Fixed-Drawing -Diagram
none
VRGR**
Variable
Variable-Graphic
01
VRTX**
Variable
Variable-Text(printer font)
01 to 02
VRBC**
Variable
Variable-Barcode(Symbol)
01
VRDR**
Variable
Variable-Drawing-Diagram
none
In this practical example, you can use drawing-diagram instead of graphic to FXGR03 and
FXGR04.
Text field means that printer font (include downloaded font) is used. If text is sent to printer
by graphic commands, it is a graphic field.
ESC/Label
Application Development Guide
for TM-C7500 series
REVISION
Page 46

TITLE
SHEET
C
NO.
NEXT
SHEET
46
^C(D
[Setting commands for each print]
^C(D Dletes the image of the drawing canvas.
5.2.3 Delete the Image of the Drawing Canvas in the Setting Commands for Each
Print
Add the command (deleting the saved image of the drawing canvas) to the setting
commands for each print mentioned at the section 2.3.2.
Coomand to be used
Delete the image of the drawing canvas saved temporarily
-Example comands
^XA Begins label format.
^IDR:*.*^FS Delete the files that remain in the printer.
^S(CLR,R,600 Sets the format base in dots per inch to 600 [dpi].
^S(CLR,P,600 Sets the print resolution to 600 [dpi].
^S(CLM,T,M1 Sets the media coating type to Matte1.
^S(CLM,F,DL Sets the media form to Die-cut Label.
^S(CLM,P,IR Sets the media source to internal roll.
^S(CLM,S,RP Sets the media shape to roll paper.
^S(CLM,D,M Sets the detection method to Black mark detection.
^S(CLS,P,2551 Sets the label width to 2551 [dot].
^S(CLS,L,3600 Sets the label length to 3600 [dot].
^S(CLS,G,47 Sets the left gap to 47 [dot].
^S(CLW,T,35 Sets the top margin to 1.5[mm].
^S(CLW,B,35 Sets the bottom margin to 1.5[mm].
^S(CLW,L,35 Sets the left margin to 1.5[mm].
^S(CLW,R,35 Sets the right margin to 1.5[mm].
^S(CPC,E,D Sets the feather edges function to be not performed.
^S(CPC,C,N Sets the color correction mode to EPSON Preferred
Color.
^S(CPC,D,0 Sets the ink profile and brightne adjustment to 0.
^S(CPC,P,0 Sets the ratio of black to composite setting to 0.
^S(CPC,B,0 Sets the banding reduction to 0.
^S(CBW,C,0 Sets the bar width adjustment to 0.
^S(CMP,F,2 Sets the flush onto paper mode to 2.
^S(CMP,S,12 Sets the printing speed to 12 [inch/sec].
^S(CMP,M,C Sets the printer operation mode to cutter.
^S(CLE,M,10 Adjusts the label left edge position to left 10[dot].
^S(CLE,T,12 Adjusts the label leading edge position
to upper 12[dot].
^XZ Ends label format.
ESC/Label
Application Development Guide
for TM-C7500 series
REVISION
Page 47

TITLE
SHEET
C
NO.
NEXT
SHEET
47
[Commands for saving graphics]
5.2.4 Save Graphics of Fixed Grapic Fields in the Commands for Saving Graphics
Save graphics as shown by the section 2.3.2.
At here, you should download graphics data of fixed graphic fields.
And at here or between the print commands of each label, you can download graphic data of
variable-graphic fields. In this example, graphic data of variable-graphic-field is downloaded
between the print commands of each label.
-Example comands
~DYR:FXGR01,B,P,...... Saves FXGR01.PNG in the R drive.
~DYR:FXGR02,B,P,...... Saves FXGR02.PNG in the R drive.
~DYR:FXGR03,B,P,...... Saves FXGR03.PNG in the R drive.
~DYR:FXGR04,B,P,...... Saves FXGR04.PNG in the R drive.
Note:The notation of the above-mentioned commands has omitted to specify the number of
graphic data and the data.
ESC/Label
Application Development Guide
for TM-C7500 series
REVISION
Page 48

TITLE
SHEET
C
NO.
NEXT
SHEET
48
5.2.5.1 Save the Image of the Drawing-Canvas which Includes Only Fixed-Field
^C(Sp Save image of drawing canvas temporarily
Figure 5-3 Label Format which Include Only Fix ed-Field
5.2.5 Print commands
You should make a label format which include only fixed-fields, and should temporarily
save a image of the drawing-canvas.
The image temporarily saved is used as the fixed image at t he following.
-Procedure
At beginning of the label format, draw FXGR02 which is the largest fixed-graphic-field,
and after that, draw other fixed-field.
Draw all fixed-fields , and save temporarily the image of the drawing-canvas using ^C(S
command.
Specify the parameter "p"(print image after saving) of ^C(S command to "N"(No).
-Command to be used
ESC/Label
Application Development Guide
for TM-C7500 series
REVISION
Page 49

TITLE
SHEET
C
NO.
NEXT
SHEET
49
[Print commands]
< Rendering commands >
<Fixed-field>
^C(SN Save the image of the drawing canvas.
(without pirnting)
-Example comands
^XA Begins label format.
^FT107,1842
^IMR:FXGR02.PNG^FS Draw FXGR02.PNG.
^FT1174,280 (the largest graphic of fixed-graphic-field)
^IMR:FXGR01.PNG^FS Draw FXGR01.PNG.
^FT376,2324
^IMR:FXGR03.PNG^FS Draw FXGR03.PNG.
^FT2062,3437
^IMR:FXGR04.PNG^FS Draw FXGR04.PNG.
^FT1410,237^A0N,183,187 Draw FXTX01.
^F(C0,0,255,255,D,255,255,255,0,D^FH¥
^FDKotobuki^FS
^FT1430,470^A0N,183,187
^F(C0,0,255,255,D,255,255,255,0,D^FH¥
^FDFood^FS
^FT1181,932^A0N,150,153 Draw FXTX02.
^F(C0,0,0,255,D,255,255,255,0,D^FH¥
^FDABCDEFGHIJK^FS
Drawing FXTX03 to FXTX08 is omitted.
^FT1630,1982^A0N,100,101 Draw FXTX09.
^F(C0,0,0,255,D,255,255,255,0,D^FH¥
^FDFlavor : Tomato^FS
^FT285,3257^A0N,92,94 Draw FXTX10.
^F(C0,0,0,255,D,255,255,255,0,D^FH¥
^FD2070 Kotobuki-Koaka, Matsumoto,^FS
^FT285,3374^A0N,92,94
^F(C0,0,0,255,D,255,255,255,0,D^FH¥
^FDNagano, 399-8702, JAPAN^FS
^XZ Ends label format.
ESC/Label
Application Development Guide
for TM-C7500 series
REVISION
Page 50

TITLE
SHEET
C
NO.
NEXT
SHEET
50
Figure 5-4 The Fixed Image Saved Temporarily
The image of Figure 5-4 is temporarily saved by the above-mentioned commands.
ESC/Label
Application Development Guide
for TM-C7500 series
REVISION
Page 51

TITLE
SHEET
C
NO.
NEXT
SHEET
51
5.2.5.2 Draw and Print first label format
^C(L
[Commands for saving graphics]
[Print commands(continued)]
<Fixed-field>
^C(L
<Variabl-field>
< Post-print operation commands >
Draw and print first label format by the following procedure.
-Procedure
Download variable-graphic-field.
At beginning of the label format, l oad(draw) the fixed image saved temporarily.
And then, draw variable-fields.
-Command to be used
Load temporary saved image of drawing canvas
-Example comands
~DYR:VRGR01,B,P,...... Saves VRGR01.PNG(for 1st label) in the R drive.
^XA Begins label format.
Loads fixed image
^FT81,545
^IMR:VRGR01.PNG^FS Draws VRGR01.PNG(for 1st label)
^FT741,1784^A0N,100,101
^F(C0,0,0,255,D,255,255,255,0,D^FH¥
^FDABC-0001-DEF^FS Draws VRTX01(for 1st label)
^FT441,2406^A0N,233,236
^F(C0,0,0,255,D,255,255,255,0,D^FH¥
^FDABC-0001-DEF^FS Draws VRTX02(for 1st label)
^FT651,3073^BY9,3,403^BCN,,Y,N
^F(C0,0,0,255,D,255,255,255,0,D
^FD>:ABC>50001>6DEF^FS Draws VRBC01(for 1st label)
^S(CUB,S,N Sets for the buzzer not to sound after printing is
completed.
^PQ1,1 Sets to pause printer after printing is completed.
^XZ Ends label format.
The image of Figure 5-5 is printed by the above-mentioned commands.
ESC/Label
Application Development Guide
for TM-C7500 series
REVISION
Page 52

TITLE
SHEET
C
NO.
NEXT
SHEET
52
Figure 5-5 Drawing Image of Label Format
ESC/Label
Application Development Guide
for TM-C7500 series
REVISION
Page 53

TITLE
SHEET
C
NO.
NEXT
SHEET
53
5.2.5.1 Draw and Print Label Formats Since the Second
^C(L
[Commands for saving graphics]
[Print commands(continued)]
<Fixed-field>
^C(L
<Variabl-field>
< Post-print operation commands >
Draw and print label formats since the second.
Repeat this procedure for necessary number of labels.
-Procedure
Download variable-graphic-field.
At beginning of the label format, l oad(draw) the fixed image saved temporarily.
And then, draw variable-fields.
-Command to be used
Load temporary saved image of drawing canvas
-Example comands
~DYR:VRGR01,B,P,...... Saves VRGR01.PNG(for 2nd label) in the R drive.
VRGR01.PNG is overwritten to graphic of 2nd label.
^XA Begins label format.
Loads fixed image
^FT81,545
^IMR:VRGR01.PNG^FS Draws VRGR01.PNG(for 2nd label)
^FT741,1784^A0N,100,101
^F(C0,0,0,255,D,255,255,255,0,D^FH¥
^FDABC-0002-DEF^FS Draws VRTX01(for 2nd label)
^FT441,2406^A0N,233,236
^F(C0,0,0,255,D,255,255,255,0,D^FH¥
^FDABC-0002-DEF^FS Draws VRTX02(for 2nd label)
^FT651,3073^BY9,3,403^BCN,,Y,N
^F(C0,0,0,255,D,255,255,255,0,D
^FD>:ABC>50002>6DEF^FS Draws VRBC01(for 2nd label)
^S(CUB,S,N Sets for the buzzer not to sound after printing is
completed.
^PQ1,1 Sets to pause printer after printing is complet ed.
^XZ Ends label format.
ESC/Label
Application Development Guide
for TM-C7500 series
REVISION
Page 54

TITLE
SHEET
C
NO.
NEXT
SHEET
54
[ Print termination commands ]
In the practical example, each label format includes loading a fixed image and drawing
variable-fields.
You can change this procedure to procedure that load a format file which includes
loading a fixed image and drawing variable-fields at beginning of a label format.
Moreover, in the practical example, one label format can print only one sheet of label,
because this label format has variable-graphic-field.
If a label format doesn't have variable-graphic-filed,you can print plural labels in one
label format by using sequential number commands(^SN, ^SF).
5.2.6 Print Termination Commands
The print termination commands is as showing by the section 2.3.2.
-Example comands
^XA Begins label format.
^IDR:*.*^FS Delete the files registered for the print.
^XZ Ends label format.
ESC/Label
Application Development Guide
for TM-C7500 series
REVISION
Page 55

TITLE
SHEET
C
NO.
NEXT
SHEET
55
Table 6-1 Label Type and Medhod of Paper Feed Adjustment
Label Type
Media
Coating
Type
Method of Paper Feed
Adjustment(Refer to)
Description
EPSON
genuine
Plain1
Method of Paper Feed Adjustment
Standard of the paper feed
Matte1
Matte2
Synthetic1
Glossy1
EPSON recommended
Method of Paper Feed Adjustment
for EPSON Recommended
Label(6.3)
The label recommended by
genuine label.
others
Method of Paper Feed Adjustment
for Other ( 6.4)
Label that no either the
above-mentioned.
6 Paper Feed Adjustment
The paper feed adjustment is the method to adjust posit ion of CMYK ink shot onto label.
When the label printer feeds paper, paper slips slightly. Th e slipping is factor that ink position of
each color of CMYK shot onto label by print head is out of alignment, and is a one of the items that
need to adjust. When the adjustment is inapposite, print quality will decrease.
The slipping has two factors. The factors are aging of printer, and variation of specification of
label. The former is adjusted using a application tool providing by EPSON, and the latter is
adjusted by the paper feed adjusted value that is input by panel operation or printer driver.
This document explains the method of the paper feed adjustment to adjust the slipping that a
variation of specification of label to use is the factor of.
You should develop the printer driver that can enforce the method explained in this section.
6.1 Type of the Paper Feed Adjustment
EPSON's label printer is adjusted based on EPSON standard label at the factory shipment,and at
operation, should be adjusted on a label of using.
The label type and the method of the paper feed adjustment of TM-C7500 series are shown in
Table 6-1.
for EPSON Standard Label(Default
Setting)(6.2)
adjustment.
The default value is set.
EPSON other than the EPSON
Each procedure of method of the paper feed adjustment are explained in the following.
In the explanation of each procedure, the explanation of user interface of printer driver is omitted.
Please refer to the section 3 for detail of user int erf ace of printer driver.
ESC/Label
Application Development Guide
for TM-C7500 series
REVISION
Page 56

TITLE
SHEET
C
NO.
NEXT
SHEET
56
Step1.
Step2.
Step1.
Step2.
Step1.
Step2.
Step3.
Step4.
Step5.
6.2 Method of Paper Feed Adjustment for EPSON Standard Label(Default Setting)
In case of the EPSON genuine label,set the paper feed adjustment value to default value.
Set appropriate settings for using label, and set label to printer(Refer to 6.5.1)
Set paper feed adjustment value to printer(6.5.2)
Paper feed adjustment value : 0
6.3 Method of Paper Feed Adj ustment for EPSON Recommended Label
In case of the EPSON recommended label,set the paper feed adjustment value to the value
designated as a part of label specification.
Set appropriate settings for using label, and set label to printer(Refer to 6.5.1)
Set paper feed adjustment value to printer(6.5.2)
Paper feed adjustment value : the value designated as part of label specification
6.4 Method of Paper Feed Adj ustment for Other Label
In case of other label, the method of the paper feed adjustment is a particular method because
the paper feed adjustment value is uncertain.
value
Set appropriate settings for using label, and set label to printer(Refer to 6.5.1)
Print the paper feed adjustment pattern, and confirm the slipping(6.5.3)
Measure the paper feed adjustment pattern, and calculate the paper feed adjustment
(6.5.4)
Set paper feed adjustment value to printer(6.5.2)
Paper feed adjustment value : the value calculated at st eop 3.
Confirm the result of setting
Print the paper feed adjustment pattern, and confirm t he slipping in a same way as Step2.
If adjustment is necessary, Step3 and 4 are repeated.
ESC/Label
Application Development Guide
for TM-C7500 series
REVISION
Page 57

TITLE
SHEET
C
NO.
NEXT
SHEET
57
Table 6-2 Minimum Settings For Label Type Changing
Setting Item
Commad
label edge detection
^S(CLM,D
media coating type
^S(CLM,T
media shape
^S(CLM,S
media form
^S(CLM,F
media setting
label width
^S(CLS,P
left gap
^S(CLS,G
label length
^S(CLS,L
Table 6-3 Panel Operation for Setting Paper Feed Adjus tment Value
Panel Operation
LCD displaying after operation
- (before operation)
READY
“Menu”, ”▼” 2 times
“OK”, ”▼” 17 times
“OK”
(+99 to -99 in TM-C7500 series)
“▲” or ”▼”
“OK”
CHANGE SUCCEED
6.5 Detail Procedur e of Each St ep
This section explains detail procedure of each step.
6.5.1 Set appropriate settings for using label, and set label to printer
You should set settings according to a label appropriately to printer.
You can set label setting using panel operation or user interface of printer driver.
A minimum settings that should be done whenever the label type is changed is shown in
Table 6-2.
.
6.5.2 Set paper feed adjustment value to printer
The method of setting the paper feed adjustment value to printer has panel operation of
printer or user interface of printer driver.
The operation in case of setting by the panel operation is shown in Table 6-3.
PRINTER SETUP 1
PAPER FEED ADJUSTMENT
+**[pixel] or -**[pixel]
▲:increasing value, ▼:decreasing value
Please refer to the section 3.20 when setting it by the user interface of the printer driver.
6.5.3 Print the paper feed adjustment pattern, and confirm the slipping
Confirm the situation of the slipping by a current paper feed adjustment value.
The slipping is confirmed by printing, and wat ching the paper feed adjustment pattern.
ESC/Label
Application Development Guide
for TM-C7500 series
REVISION
Page 58

TITLE
SHEET
C
NO.
NEXT
SHEET
58
Table 6-4 Panel Operation for Printing the Paper Feed Adjus tment Pattern
Panel Operation
LCD displaying after operation
- (before operation)
READY
“Menu”, “▼” 2 times
PRINTER SETUP 1
“OK”, “▼” 18 times
PAPER FEED ADJUSTMENT PATTERN
“OK”
>PRINT? YES
“OK”
PRINTING
Figure 6-1 Print Result of Paper Feed Adjust m ent P at tern
In TM-C7500 series, the paper feed adjustment pattern is printed by the panel operation
shown in Table 6-4.
Confirm print result of printed paper feed adjustment pattern, and complete adjustment if
printed paper feed adjustment pattern is appropriate state shown in Figure 6-1.
Appropriate state
State requiring adjustment
6.5.4 Measure the paper feed adjustment pattern, and calculate the paper feed
adjustment value
Calculate the paper feed adjustment value by the following procedure.
Place the paper feed adjustment pattern in direction of Figure 6-1('+' is placed upper, '-' is
placed lower).
Measure the distance A between black line and magenta line.
Distance A becomes a plus value when the magenta line is placed lower than the black line,
and becomes a minus value when the magenta line is placed upper than the black line.( Figure
6-2)
ESC/Label
Application Development Guide
for TM-C7500 series
REVISION
Page 59

TITLE
SHEET
C
NO.
NEXT
SHEET
59
Figure 6-2 Measuring a Distance Between Blak Line and M agent a Li ne
Calculate the paper feed adjustment value from the distance A by the following expression.
Calculation by millimeter uni t
Papaer feed adjustment value = Current adjustment value + A[mm]/25.4×1200
Calculation by inch unit
Papaer feed adjustment value = Current adjustment value + A[inch]×1200
ESC/Label
Application Development Guide
for TM-C7500 series
REVISION
Page 60

TITLE
SHEET
C
NO.
NEXT
SHEET
60
Table 7-1 Command Parameter Examples for Each Function
Function
Command example
Description
Beeper setting
^S(CUB,S,N
Printer does not sound beeper
^S(CUB,S,L
Printer sounds beeper after printing final label
Cut
^S(CMP,M,T
Printer does not cut labels
^S(CMP,M,C
Printer cuts labels
Pause
^PQ1
Printer prints 1 label and does not pause
label
label
labels
label
labels
7 Control of Beeper Sounding, Cuts, and Pauses
7.1 Outline
This section describes how to control beeper sounding, cuts, and pauses.
Applying the methods shown here allows you to instruct the printer to sound the beeper, perform
a cut, or pause after any label print.
7.1.1 Beeper Sounding and Cuts
The beeper sounding and cut functions use the ^S(C command to issue setting commands
to the printer. The user can change these settings freely by operating the panel. If you do
not want to use the values set in the printer, we recommend overwriting the settings at the start
of each print job.
7.1.2 Pause
The pause function uses the ^PQ or ^PP command to give commands for each label print
(^XA-^XZ).
^PQ: Pauses the printer each time it prints a certai n num ber of labels
^PP: Pauses the printer after it prints the final label
7.1.3 Command Parameter Examples
^PQ1,1
^PQ3,1
^PQ3,3
^PP
^PQ3^PP
Printer prints 1 label and pauses after printing 1
Printer prints 3 labels and pauses after printing 1
Printer prints 3 labels and pauses after printing 3
Printer prints 1 label and pauses after printing 1
Printer prints 3 labels and pauses after printing 3
ESC/Label
Application Development Guide
for TM-C7500 series
REVISION
Page 61

TITLE
SHEET
C
NO.
NEXT
SHEET
61
7.2 Beeper Sounding
n Function
Sets the buzzer timing setting
n Command code
^S(CUB,S,c
n Parameters
c = N : Printer does not sound the beeper
L : Printer sounds beeper after printing final label
This command sets the printer's beeper sounding operation.
To change the beeper volume, operate the printer panel or use the ^S(CUB,Z command.
Example 1: Printer prints 3 labels then sounds the beeper after printing final label
^XA
^S(CUB,S,L Sets printer to sound beeper after printing final label
^FO0,0^FDprint 3 pages^FS
^PQ3
^XZ
Example 2: Printer prints 3 labels and does not sound the beeper
^XA
^S(CUB,S,N Sets printer to not sound beeper
^FO0,0^FDprint 3 pages^FS
^PQ3
^XZ
Example 3: Printer prints 2 labels then sounds the beeper after printing final label
If setting whether to sound the beeper for each ^XA-^XZ instance, send commands as follows.
^XA
^S(CUB,S,N
^FO0,0^FDprint 1 page(1 of 2)^FS
^XZ
^XA
^S(CUB,S,L
^FO0,0^FDprint 1 page(2 of 2)^FS
^XZ
ESC/Label
Application Development Guide
for TM-C7500 series
REVISION
Page 62

TITLE
SHEET
C
NO.
NEXT
SHEET
62
7.3 Pause
7.3.1 ^PP Command
n Function
Paused
n Command code
^PP
This command pauses the printer after it prints the final label.
Example 1: Printer prints 3 labels then pauses, repeats this 3 times
^XA^S(CMP,M,T^XZ Sets printer to not cut labels
^XA^FO100,100^FD 1 of 3 ^FS ^PQ3 ^PP ^XZ Prints 3 labels then pauses
^XA^FO100,100^FD 2 of 3 ^FS ^PQ3 ^PP ^XZ Prints 3 labels then pauses
^XA^FO100,100^FD 3 of 3 ^FS ^PQ3 ^PP ^XZ Prints 3 labels then pauses
ESC/Label
Application Development Guide
for TM-C7500 series
REVISION
Page 63

TITLE
SHEET
C
NO.
NEXT
SHEET
63
7.3.2 ^PQ Command
n Function
Set print quantity
n Command code
^PQ t, i, c, p
n Parameters
t = 1 or more Total print quantity
i = 0 or more Printer interval for pauses and cuts
c = 0 or more Serialized label print quantity
p = Y or N Set/cancel pause control
Example 1: Printer pauses each time it prints 3 labels using the ^PQ command parameter
i
^XA^S(CMP,M,T^XZ Sets printer to not cut labels
^XA^FO100,100^FD 1 of 9 ^FS ^PQ1,0 ^XZ
^XA^FO100,100^FD 2 of 9 ^FS ^PQ1,0 ^XZ
^XA^FO100,100^FD 3 of 9 ^FS ^PQ1,1 ^XZ Prints label then pauses
^XA^FO100,100^FD 4 of 9 ^FS ^PQ1,0 ^XZ
^XA^FO100,100^FD 5 of 9 ^FS ^PQ1,0 ^XZ
^XA^FO100,100^FD 6 of 9 ^FS ^PQ1,1 ^XZ Prints label then pauses
^XA^FO100,100^FD 7 of 9 ^FS ^PQ1,0 ^XZ
^XA^FO100,100^FD 8 of 9 ^FS ^PQ1,0 ^XZ
^XA^FO100,100^FD 9 of 9 ^FS ^PQ1,1 ^XZ Prints label then pauses
Example 2: Printer prints 3 labels then pauses, repeats this 3 times
^XA^S(CMP,M,T^XZ Sets printer to not cut labels
^XA^FO100,100^FD 1 of 3 ^FS ^PQ3,3 ^XZ Prints 3 labels then pauses
^XA^FO100,100^FD 2 of 3 ^FS ^PQ3,3 ^XZ Prints 3 labels then pauses
^XA^FO100,100^FD 3 of 3 ^FS ^PQ3,3 ^XZ Prints 3 labels then pauses
Example 3: Printer prints 9 labels and pauses each time it pri nts 3 labels
^XA^S(CMP,M,T^XZ Sets printer to not cut labels
^XA^FO100,100^FD 9 pages ^FS ^PQ9,3 ^XZ Prints 3 labels then pauses
ESC/Label
Application Development Guide
for TM-C7500 series
REVISION
Page 64

TITLE
SHEET
C
NO.
NEXT
SHEET
64
7.4 Cut
7.4.1 ^S(CMP,M Command
n Function
Print operation mode settings
n Command code
S(CMP,M,c
n Parameters
c = T Teer-off mode
C Cutter mode
This command sets the print operation mode.
If the printer is set to cutter mode, it cuts the labels at the following timing.
- Timing specified by parameter i of the ^PQ command
- Timing when the final label is printed
Example 1: Printer prints 1 label then cuts
^XA
^S(CMP,M,C Sets printer to cut
^FO100,100^FD 1 of 1^FS Prints label
^XZ
Example 2: Printer prints 3 labels and cuts and pauses for each label
^XA
^S(CMP,M,C Sets printer to cut
^FO100,100^FD 3 pages^FS
^PQ3,1 Sets printer to print 3 labels, and
cut and pause for each label
^XZ
Example 3: Printer prints 3 labels and cuts for each label but does not pause
^XA
^S(CMP,M,C Sets printer to cut
^FO100,100^FD 3 pages^FS
^PQ3,1,,Y Sets printer to print 3 labels, and
cut for each label but not to pause
^XZ
ESC/Label
Application Development Guide
for TM-C7500 series
REVISION
Page 65

TITLE
SHEET
C
NO.
NEXT
SHEET
65
Table 7-2 Cut and Pause Operation for the Sample Code
Operation timing
Cut
Pause
After printing 3rd label
Performed
Performed
After printing 6th label
Not performed
Performed
After printing 9th label
Performed
Not performed
After printing other labels
Not performed
Not performed
7.5 Example of Combi ni ng Cut ting and Pausing
This section describes sample code for cutting labels then pausing, operating as shown below.
Example 1: Printer prints 1 label then performs a cut and pause for each ^XA-^XZ
instance
^XA^S(CMP,M,T^FO100,100^FD 1 of 9 ^FS ^PQ1,0 ^XZ
^XA^S(CMP,M,T^FO100,100^FD 2 of 9 ^FS ^PQ1,0 ^XZ
^XA^S(CMP,M,C^FO100,100^FD 3 of 9 ^FS ^PQ1,1 ^XZ Cuts and pauses
^XA^S(CMP,M,T^FO100,100^FD 4 of 9 ^FS ^PQ1,0 ^XZ
^XA^S(CMP,M,T^FO100,100^FD 5 of 9 ^FS ^PQ1,0 ^XZ
^XA^S(CMP,M,T^FO100,100^FD 6 of 9 ^FS ^PQ1,1 ^XZ Pauses
^XA^S(CMP,M,T^FO100,100^FD 7 of 9 ^FS ^PQ1,0 ^XZ
^XA^S(CMP,M,T^FO100,100^FD 8 of 9 ^FS ^PQ1,0 ^XZ
^XA^S(CMP,M,C^FO100,100^FD 9 of 9 ^FS ^PQ1,0 ^XZ Cuts
Example 2: Printer prints 3 labels then performs a cut and pause for each ^XA-^XZ
instance
^XA^S(CMP,M,C^FO100,100^FD1 of 9^SFd^FS ^PQ3^PP^XZ Prints 3 labels then
cuts and pauses
^XA^S(CMP,M,T^FO100,100^FD4 of 9^SFd^FS ^PQ3^PP^XZ Prints 3 labels then pauses
^XA^S(CMP,M,C^FO100,100^FD7 of 9^SFd^FS ^PQ3^XZ Prints 3 labels then cuts
ESC/Label
Application Development Guide
for TM-C7500 series
REVISION
 Loading...