

User’s Manual
M00066100

All rights reserved. No part of this publication may be reproduced, stored in a retrieval system, or
transmitted in any form or by any means, electronic, mechanical, photocopying, recording, or otherwise,
without the prior written permission of Seiko Epson Corporation. No patent liability is assumed with respect
to the use of the information contained herein. While every precaution has been taken in the preparation of
this book, Seiko Epson Corporation assumes no responsibility for errors or omissions. Neither is any liability
assumed for damages resulting from the use of the information contained herein.
Neither Seiko Epson Corporation nor its affiliates shall be liable to the purchaser of this product or third
parties for damages, losses, costs, or expenses incurred by purchaser or third parties as a result of: accident,
misuse, or abuse of this product or unauthorized modifications, repairs, or alterations to this product, or
(excluding the U.S.) failure to strictly comply with Seiko Epson Corporation’s operating and maintenance
instructions.
Seiko Epson Corporation shall not be liable against any damages or problems arising from the use of any
options or any consumable products other than those designated as Original Epson Products or Epson
Approved Products by Seiko Epson Corporation.
Depending on the area, the interface cable may be included with the product. If so, use that cable.
Seiko Epson Corporation shall not be held liable for any damage resulting from electromagnetic interference
that occurs from the use of any interface cables other than those designated as Epson approved products.
EPSON is a registered trademark of Seiko Epson Corporation in Japan and other countries/regions.
Microsoft, Windows, and Windows Vista are registered trademarks of Microsoft Corporation.
The Ethernet interface model of this product includes software developed by the University of California,
Berkeley, and its contributors.
NOTICE: The contents of this manual are subject to change without notice.
Copyright © 2013 by Seiko Epson Corporation, Nagano, Japan.
2 TM-C3400Z User’s Manual

E
Standards and Approvals
The following standards are applied only to the products that are so labeled.
North America: FCC/CAN ICES-3 (A)/NMB-3 (A)
WARNING
This is a Class A product. In a domestic environment this product may cause radio interference in which case
the user may be required to take adequate measures.
The connection of a non-shielded interface cable to this product will invalidate the EMC standards of this
device. You are cautioned that changes or modifications not expressly approved by Seiko Epson Corporation
could void your authority to operate the equipment.
FCC Compliance Statement For American Users
This equipment has been tested and found to comply with the limits for a Class A digital device,
pursuant to Part 15 of the FCC Rules. These limits are designed to provide reasonable protection
against harmful interference when the equipment is operated in a commercial environment.
This equipment generates, uses, and can radiate radio frequency energy and, if not installed and used
in accordance with the instruction manual, may cause harmful interference to radio communications.
Operation of this equipment in a residential area is likely to cause harmful interference, in which case
the user will be required to correct the interference at his own expense.
TM-C3400Z User’s Manual 3

Safety Precautions
This section presents important information intended to ensure safe
and effective use of this product. Please read this section carefully and
store it in an accessible location.
WARNING:
Shut down your equipment immediately if it produces smoke, a strange
odor, or unusual noise. Continued use may lead to fire. Immediately
unplug the equipment and contact your dealer or a Seiko Epson service
center for advice.
Never attempt to repair this product yourself. Improper repair work can
be dangerous.
Never disassemble or modify this product. Tampering with this product
may result in injury or fire.
Be sure your power cable meets the relevant safety standards and
includes a power-system ground terminal (PE terminal). Otherwise shock
may result. If you acquire a system with different safety standards, use
an AC cable that meets the acquired safety standards.
Do not allow foreign matter to fall into the equipment. Penetration by
foreign objects may lead to fire.
If water or other liquid spills into this equipment, unplug the power cord
immediately, and then contact your dealer or a Seiko Epson service
center for advice. Continued usage may lead to fire.
Do not use aerosol sprayers containing flammable gas inside or around
this product. Doing so may cause fire.
CAUTION:
Do not connect cables in ways other than those mentioned in this manual.
Different connections may cause equipment damage and burning.
Be sure to set this equipment on a firm, stable, horizontal surface. The
product may break or cause injury if it falls.
Do not use in locations subject to high humidity or dust levels. Excessive
humidity and dust may cause equipment damage or fire.
Do not place heavy objects on top of this product. Never stand or lean
on this product. Equipment may fall or collapse, causing breakage and
possible injury.
To ensure safety, unplug this product before leaving it unused for an
extended period.
Do not remove the ink cartridge from the product when you ship it.
4 TM-C3400Z User’s Manual

Do not connect the unit to power outlets that are close to devices that
generate voltage fluctuations or electrical noise. In particular, stay clear
of devices that use large electric motors. Otherwise, this product may
malfunction.
Always unplug the power cable from the power outlet before
unplugging it from the AC inlet of this product.
Make sure that the total power requirements of all devices receiving
power from this product do not exceed the power limitation. Otherwise,
the product may become damaged. See the Specifications (page 32)
for detailed information on the power capacity of the product.
Be sure to use this product with the rear cover attached. If it is not
attached, foreign objects may enter this product, causing fire or
equipment damage.
Caution Label
The caution label on the product indicates the following precaution.
CAUTION:
Take care not to injure your fingers on the fixed blade of the autocutter.
Restriction of Use
When this product is used for applications requiring high reliability/
safety, such as transportation devices related to aviation, rail, marine,
automotive, etc.; disaster prevention devices; various safety devices,
etc.; or functional/precision devices, etc.; you should use this product
only after giving consideration to including fail-safes and
redundancies into your design to maintain safety and total system
reliability.
E
Downloading Drivers, Utilities, and Manuals
Drivers, utilities, and manuals can be downloaded from one of the
following URLs.
For customers in North America, go to the following web site:
http://www.epsonexpert.com/ and follow the on-screen instructions.
For customers in other countries, go to the following web site:
http://download.epson-biz.com/?service=pos
TM-C3400Z User’s Manual 5
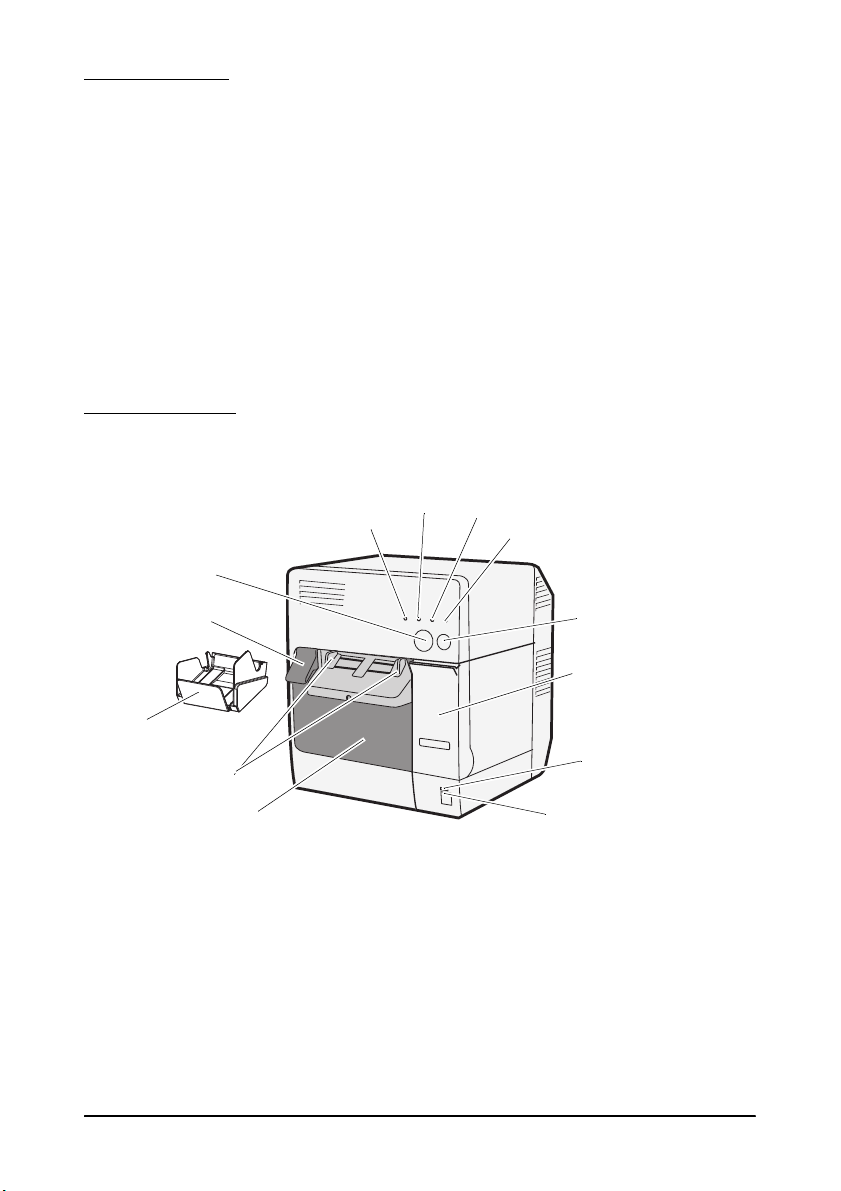
Unpacking
Release lever
Power b utto n
Ink cartridge cover
Feed button
Cut button
Roll paper cover
Paper ejection
guide
Paper ejection tray
Power L ED
Status LED
Error LED
Ink LED
Paper LED
The following items should be included with the printer. If any items
are damaged, contact your dealer.
❏ This product (TM-C3400Z)
❏ Label roll paper
❏ Ink cartridge (Model: SJIC15P)
❏ Paper ejection tray
❏ AC cable
❏ TM-C3400Z Documents Disk
❏ Setup Guide
❏ Warranty card
Part Names
6 TM-C3400Z User’s Manual
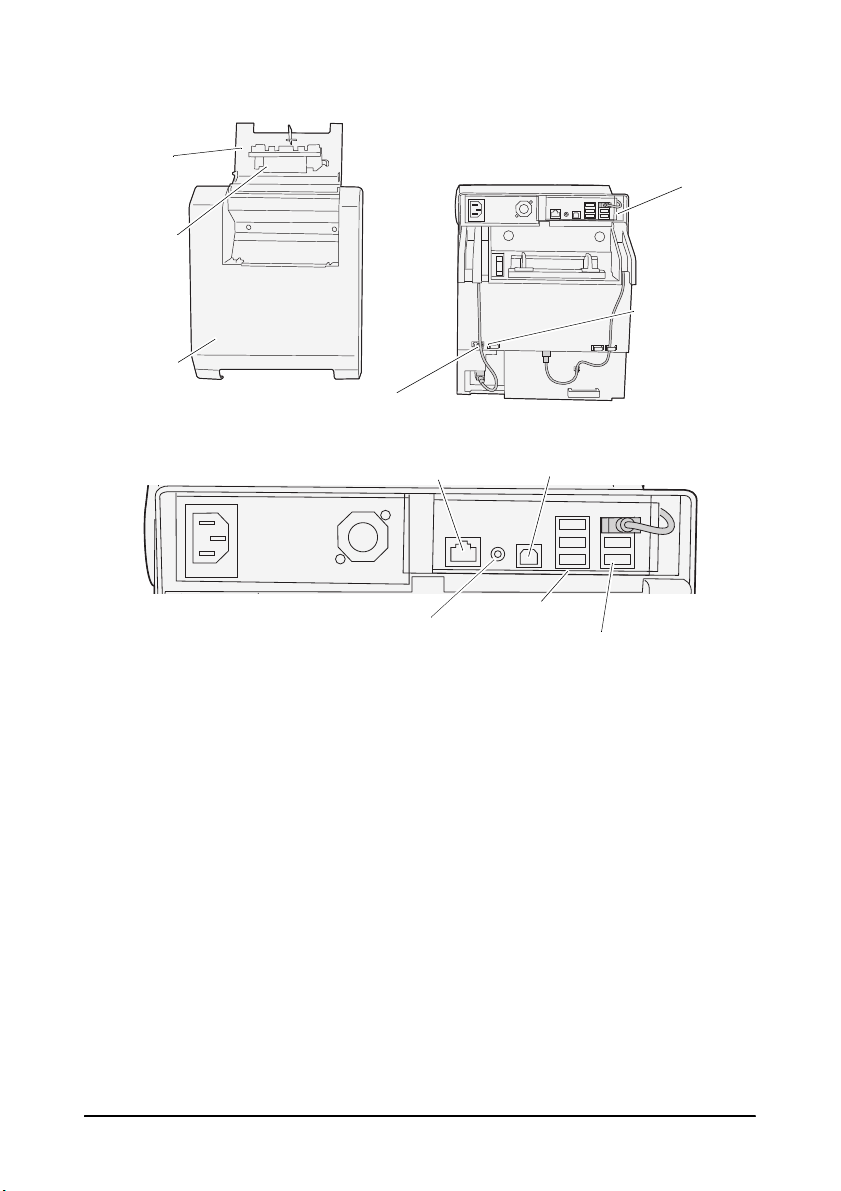
E
Fanfold
paper
cover
Connectors
Cable holders
Paper feed
guide
Power c ord hook
Rear cover
Available
Never disconnect.
USB connectors
Not available
LAN connector
Power LED
Lights when the power is on, and is off when the power is off.
Status LED
Lights when there is no error.
Flashes when the printer is operating (initializing, head cleaning, or
printing) or in an error state.
Error LED
Lights or flashes when the printer is offline, and is off when the printer
is online.
Ink LED
Flashes when ink is low or waste ink in the ink cartridge is nearly full.
Lights when it is time to replace the ink cartridge, when the ink
cartridge is not installed or is not correctly installed, and when waste
ink in the ink cartridge is full.
Off when ink in the ink cartridge is adequate.
TM-C3400Z User’s Manual 7

Paper LED
Lights when the paper is not installed or is not correctly installed.
Off when the paper is correctly installed.
Cut button
Push this button to cut the roll paper.
Feed button
Push this button to feed the roll paper.
USB cover
Use the cover when the USB connectors are not used.
Power button
Push this button to turn on/off the power of the product.
CAUTION:
Be sure to turn off the power of the product using the power button.
When unplugging the AC plug from its socket, push the power button
and then wait for the Power LED to go off.
Paper feed guide
Install the guide when you use the fanfold paper.
Power cord hook
Prevents the power cord from piling on other cables. Be sure to pass it
through the hook.
Cable holders
Prevents the cables from piling on each other. When connecting the LAN
cable, USB cable, or audio cables, be sure to pass them through the holder.
8 TM-C3400Z User’s Manual
Setup
This manual describes how to use the roll paper included with this
product. To use other types of paper, please refer to the TM-C3400Z
Technical Reference Guide.
1.
Installation (See page 9.)
2. Connecting Cables (See
3. Setting the DIP Switches(See
4. Installing the Paper (See page 15.)
5. Installing the Ink Cartridge (See page 24.)
6. Attaching and Adjusting Paper Ejection Tray (See page 28.)
7. Printer Settings (See page 30.)
page 10
page 14
.)
.)
Installation
WARNING:
Do not block the air vents on this product. Blocking the air vents may
result in internal heat build-up and fire.
CAUTION:
Install the product horizontally on a flat, stable, and vibration-free
surface. Otherwise, the roll paper cover may not operate correctly, and
your fingers may be caught.
Do not tilt the product with the roll paper cover open. The roll paper
cover may close unexpectedly, and your fingers may be caught.
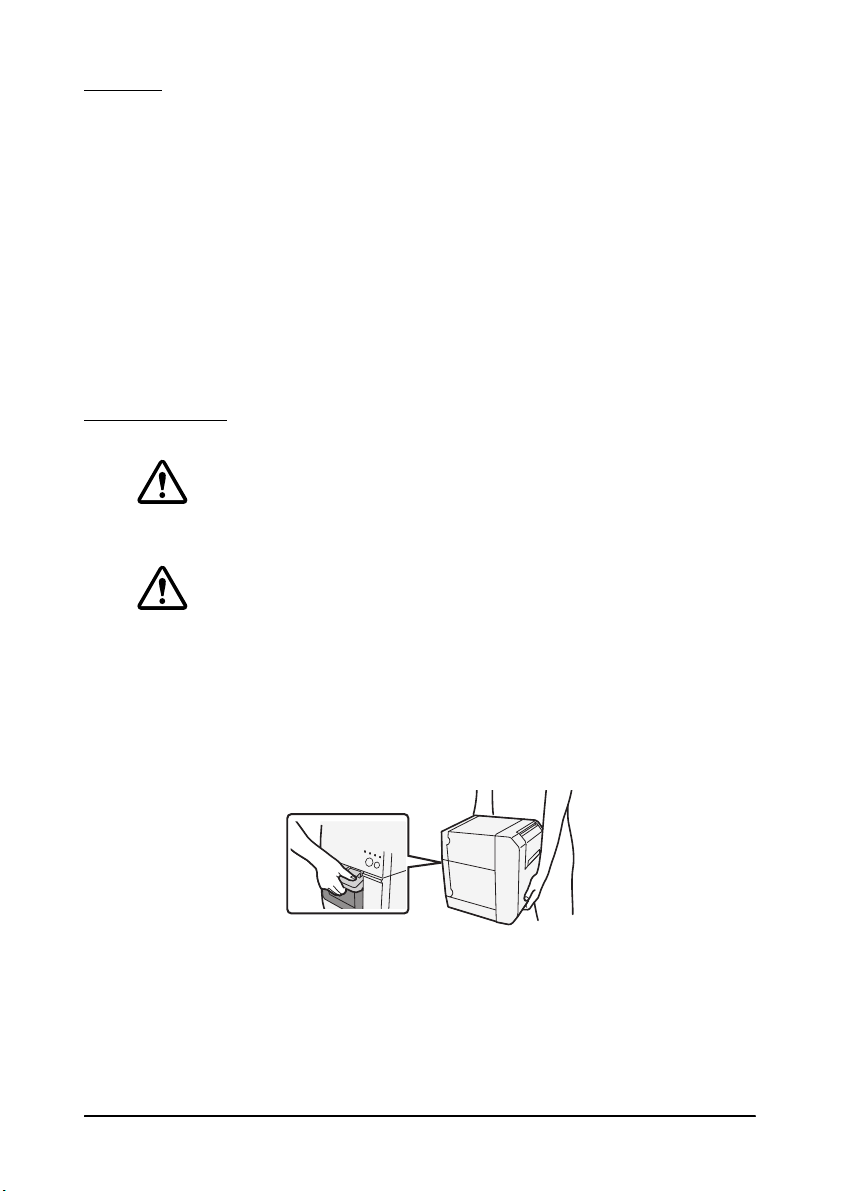
When carrying the product, be sure to hold the parts as shown in the
picture below.
E
TM-C3400Z User’s Manual 9
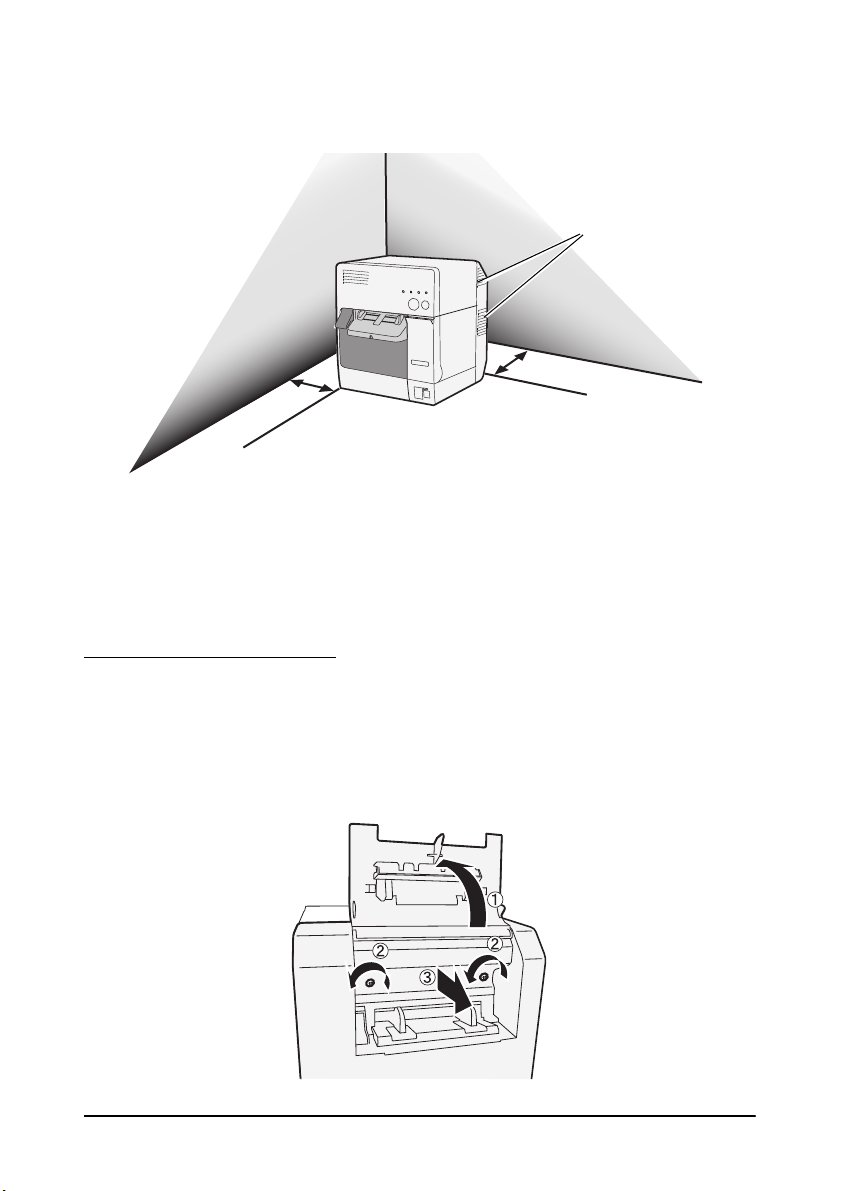
If you install the product against a wall, keep the product more than 10
FP
FP
LQ
LQ
Air vents
Located on the left,
right, and back.
cm from the wall.
❏ Leave enough space for the roll paper cover, ink cartridge cover,
and fanfold paper cover to be fully opened.
❏ Protect the product from heavy impacts. They may cause defective
print.
❏ Do not allow cables to catch or foreign matter to accumulate under
the product.
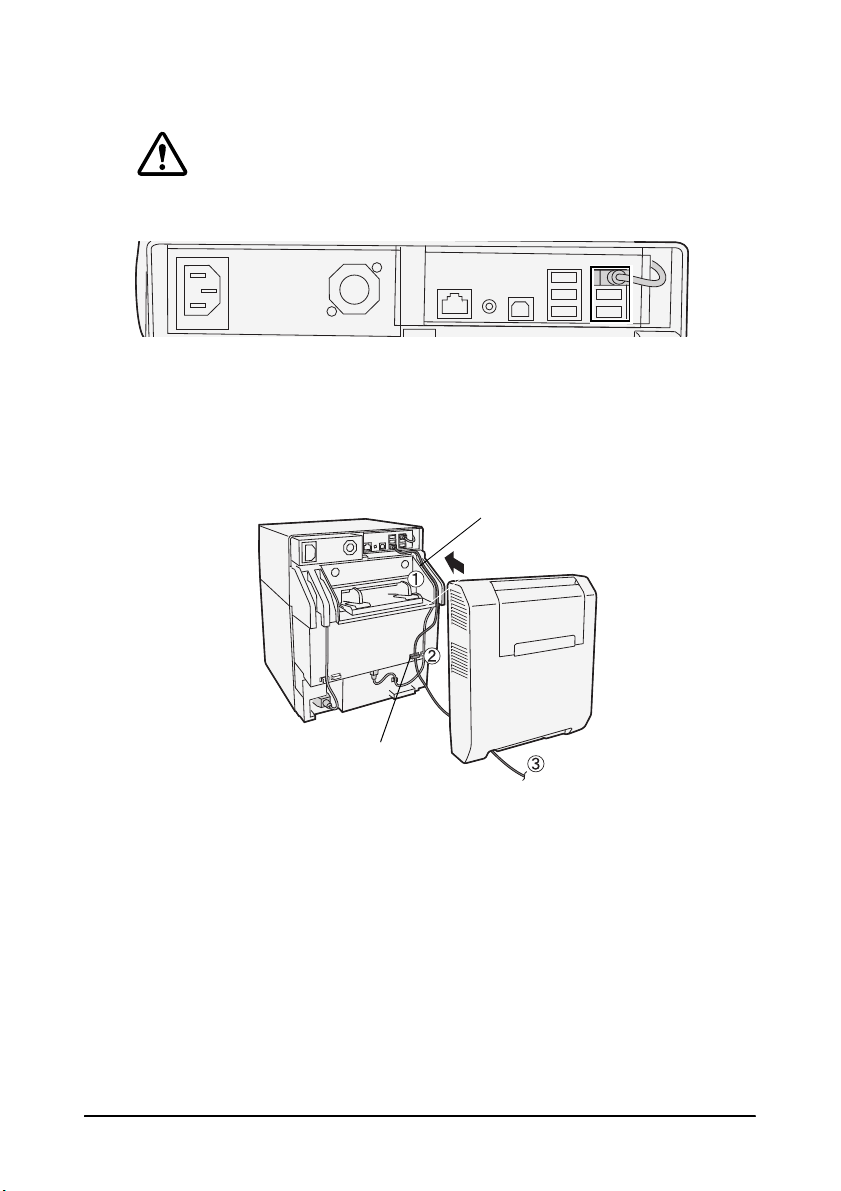
Connecting Cables
To access to the rear connectors, you need to remove the rear cover.
Open the fanfold paper cover (➀), loosen the two screws (➁), and
then remove the rear cover (➂). After connecting the cable, be sure
to re-install the rear cover.
10 TM-C3400Z User’s Manual
Connecting USB cable
Groove
Cable holder
CAUTION:
Never disconnect the cables initially connected to the USB connectors
on the right.
When connecting USB devices to the USB connector, be sure to pass
the cable through the groove (➀), hook the cable holder (➁), pull it out
from the bottom of the rear cover (➂), and then reattach the rear
cover. The cable holder prevents the cables from piling on each other.
If the power cord or other cables are piled on each other, the rear
cover cannot be attached.
E
TM-C3400Z User’s Manual 11

Connecting LAN cable
Groove
Cable holder
To connect this product to a network, connect the LAN cable to the
LAN connector.
When you use the product as a standalone device, connecting the
LAN cable is not required.
CAUTION:
Be sure to pass the LAN cable through the groove (➀), hook the cable
holder (➁), pull it out from the bottom of the rear cover (➂), and then
reattach the rear cover. The cable holder prevents the cables from
piling on each other. If the power cord or other cables are piled on
each other, the rear cover cannot be attached.
12 TM-C3400Z User’s Manual

Connecting power cord
Groove
Power cord hook
Follow the steps below to connect the product to the power supply.
WARNING:
Be sure to use the power cord that is included with the product, and ground it.
Be sure to use the specified power supply.
1. Connect the power cord to the power supply connector.
CAUTION:
Be sure to pass the power cord through the groove (➀), hook the power
cord hook (➁), pull it out from the bottom of the rear cover (➂), and
then reattach the rear cover. The power cord hook prevents the cables
from piling on each other. If the power cord or other cables are piled on
each other, the rear cover cannot be attached.
E
TM-C3400Z User’s Manual 13

2. Connect the power plug to the wall outlet.
Note:
Do not turn on the power before installing the roll paper. For details on how
to install the roll paper, see “Installing the Paper” on page 15.
If setting the printer, connect the LAN cable.
If printing, connect the LAN cable or the USB cable.
Setting DIP Switches
When you open the ink cartridge cover and remove the DIP switch
cover, you will find the DIP switches. Set the DIP switches, using the
tip of a tool, such as a small screwdriver. Change settings when the
printer is off.
For detailed information on function of the DIP switches, see the TMC3400Z Technical Reference Guide.
14 TM-C3400Z User’s Manual

Installing the Paper
When installing roll paper
*When installing fanfold paper
➀
Removing paper (page 16)
➁
Removing the paper feed guide
(page 18)
➁
Attaching the paper feed guide
(page 21)
➃
Installing the roll paper
(page 20)
➂
Adjusting the guides (page 18)
➂
Adjusting the guides (page 22)
➃
Installing the fanfold paper
(page 23)
CAUTION:
Do not tilt the product with the roll paper cover open. The roll paper
cover may close unexpectedly, and your fingers may be caught.
Make sure paper is ejected straight from the paper ejection guides, as
shown in the illustration. If paper is not ejected straight due to such
causes as an obstruction, the print result may be distorted.
Follow the steps below to install the roll paper.
E
*
When you use fanfold paper, first set up the printer using the included roll paper. After you have
completed ink charging, replace it with fanfold paper.
TM-C3400Z User’s Manual 15

➀
Removing paper
Removing roll paper
1. Pull the release lever to open the roll paper cover, and remove the
roll paper or used roll paper core.
2. Close the roll paper cover.
Removing fanfold paper
1. Remove the paper left on the paper ejection table.
16 TM-C3400Z User’s Manual

E
2. When you change the paper type, open the roll paper cover and
the fanfold paper cover to remove the paper.
3. Close the roll paper cover and the fanfold paper cover.
TM-C3400Z User’s Manual 17

When Installing Roll Paper
➁
Removing the paper feed guide
CAUTION:
The paper feed guide should be attached to the printer only when you
use fanfold paper. Be sure to remove the paper feed guide when you
use roll paper.
1. Pull the release lever to open the roll paper cover.
2. If the paper feed guide is attached into the grooves inside of the
roll paper cover, slide it in the direction of the arrow to remove it.
3. Close the roll paper cover.
➂
Adjusting the guides
When the paper width does not need to be changed, skip this step.
1. Pull the release lever to open the roll paper cover.
2. Unlock the roll paper guide.
18 TM-C3400Z User’s Manual

E
Paper ejection guide
3. Push the roll paper guide on the left in the direction of the arrow,
and install the roll paper with the printable side up completely
inside the printer.
4. Lock the roll paper guide.
5. Unlock the paper ejection guide, using the tip of a tool, such as a
pen.
6. Slide the paper ejection guide to align it with the roll paper width.
7. Lock the paper ejection guide, and then close the roll paper cover.
TM-C3400Z User’s Manual 19

➃
Paper ejection guide
Installing the roll paper
1. Pull the release lever to open the roll paper cover.
2. Insert the roll paper all the way to the back with the printable side
up. Unroll the paper slightly by pulling it forward.
3. While aligning the roll paper with the paper ejection guide, close
the roll paper cover.
20 TM-C3400Z User’s Manual

When Installing Fanfold Paper
➁
Attaching the paper feed guide
CAUTION:
Be sure to attach the paper feed guide when you use fanfold paper.
1. Open the fanfold paper cover and take out the paper feed guide.
2. Pull the release lever to open the roll paper cover.
3. Insert the paper feed guide into the grooves inside of the roll paper
cover to attach it.
E
4. Close the roll paper cover.
TM-C3400Z User’s Manual 21

➂
Adjusting the guides
1. Unlock the paper ejection guide, using the tip of a tool, such as a
pen.
2. Slide the paper ejection guide as wide as possible, and lock it.
When you install fanfold paper for the first time, or
paper width needs to be changed, continue to steps 3 and 4.
3. Open the fanfold paper cover and unlock the fanfold paper guide.
22 TM-C3400Z User’s Manual
when the

4. Slide the fanfold paper guide to align it with the fanfold paper
40mm
width, and lock it.
➃
Installing the fanfold paper
1. Turn on the printer.
2. When the Status LED stays on after flashing, insert the paper with
the printable side up until it is automatically drawn in
(approximately 100 mm), and then the paper is fed automatically.
E
3. Place the paper straight at least 40 mm from the printer.
4. Close the fanfold paper cover.
TM-C3400Z User’s Manual 23

Installing the Ink Cartridge
1. Turn on the printer. Press the power button to turn the power on,
and the Status LED will illuminate.
When the printer normally starts, and then the paper is fed
automatically.
2. Pull the ink cartridge cover to open it.
3. Shake the ink cartridge package 4 or 5 times before opening it.
4. Push the ink cartridge gently into the cartridge holder as shown below.
5. Close the ink cartridge cover.
24 TM-C3400Z User’s Manual

Charging ink for the first time
Initial ink charging starts automatically after installing the roll paper,
turning on the printer, and installing the ink cartridge. Initial charging
will require approximately 8 minutes.
Note:
Do not turn the power off or open the roll paper cover or ink cartridge
cover while the cartridges are being charged with ink.
Precautions on Handling
When the ink cartridge is installed for the first time, the product uses ink
to prepare for printing (ink charging). Ink charging takes approximately
eight minutes.
The ink cartridge contains 3 colors of ink. Even when one particular color
is specified, all 3 colors of ink are used for printing and for keeping the
print head in good condition. When the ink level of even one color
comes to the lowest limit, the product stops printing.
Do not touch the IC chip on the cartridge. Doing so may cause
operating/printing malfunction.
This product uses ink cartridges equipped with an IC chip that monitors
the amount of ink used by each cartridge. Cartridges are usable even if
they are removed and reinstalled. However, if an ink cartridge in which
little amount of ink remains is removed and reinstalled, it may not be
usable. Some ink is consumed each time cartridges are installed
because the product automatically checks their reliability.
Since ink cartridges are designed to stop the operation before ink runs
out completely to maintain the quality of the print head, some ink
remains in the used ink cartridge.
All the ink colors are consumed also for the maintenance operations
when an ink cartridge is replaced and for print head cleaning.
Do not turn off the product or open the ink cartridge cover while
charging ink (Power light is flashing). Opening the cover may cause the
ink to be recharged, resulting in more ink being consumed. Also, it may
cause printing malfunction.
Even for monochrome printing, all the ink colors are used in an
operation designed to maintain the printing and print head quality.
Do not disassemble the ink cartridge. Doing so may cause ink to adhere
eyes and skin.
Do not disassemble and remodel the ink cartridge. Doing so may cause
printing malfunction.
Use of an old ink cartridge may result in reduced print quality. Use it up
within six months after opening the package. The usage period for ink
cartridges is printed on the packaging of individual ink cartridges.
E
TM-C3400Z User’s Manual 25

If ink contacts your skin, eyes, or mouth, take the following actions. When it gets onto your skin, immediately wash the area with soap and
water.
-When ink gets into your eyes, immediately flush them with water.
Leaving the ink as is may result in bloodshot eyes or mild
inflammation. If something is wrong, immediately consult with a
doctor.
-When ink gets into your mouth, immediately spit it and consult
with a doctor.
There may be some ink around the ink supply port on the removed ink
cartridge. Take care so that it does not stain the desk or other surface.
Do not remove the ink cartridge, except when you replace it.
Do not open the ink cartridge package until you are ready to install it in
the product.
Open the ink cartridge cover, and wait at least 4 seconds until internal
operations stop. If you take out the ink cartridge in less than 4 seconds,
there is a risk that the ink may spurt out.
Do not shake the ink cartridge too hard. The ink cartridge may leak if
you shake it around too much or push the sides strongly.
Do not allow foreign objects to fall into the cartridge installation section.
Doing so may cause printing malfunction.
When ink is charged for the first time (right after purchase), ink is
consumed for filling the print head nozzle (ink discharge holes) to get
ready for printing. That is why the number of the printable sheets may
be fewer than for the cartridges to be installed later.
Dispose the ink cartridges properly following the law or regulations of
your country and area.
If you turn the power off the product using the power button, the print
head is automatically capped, which prevents the ink from drying. After
installing the ink cartridges, be sure to turn the power off using the
power button when you are not using the product. Do not pull out the
power plug or trip the breaker while the power is on.
Printing on water-repellent paper such as art paper, which is slowdrying, may cause print stains. Also, printing on glossy paper may cause
fingerprints on the paper or ink may adhere to your fingers when you
touch it. Select paper not to case print stains before use.
Epson recommends the use of genuine Epson ink cartridges. For the
best performance of the printer, it is recommended to use genuine
Epson ink cartridges. Use of non-genuine Epson ink cartridges can
adversely affect the printing quality and prevent the printer from
realizing its maximum performance. Epson cannot guarantee the
quality and reliability of non-genuine Epson products. Repairs for any
26 TM-C3400Z User’s Manual

E
damage or breakdown of this product due to the use of non-genuine
Epson products will not be free of charge even if the warranty period is
still valid.
Color adjustment of the product is based on the use of genuine Epson
ink cartridges. Use of non-genuine ink cartridges may result in reduced
print quality. Use of genuine Epson ink cartridges is recommended.
Keep ink cartridges out of the reach of children.
A cool and dark place is recommended to store ink cartridges.
If the ink cartridge is stored in a cold place for a long period of time, let
it warm up at least 3 hours before using it.
If moving or transporting the product after the ink cartridges are
installed, leave them installed during the moving or transporting
process.
TM-C3400Z User’s Manual 27

Attaching and Adjusting Paper Ejection Tray
Paper ejection table
When you attach the paper ejection tray, you can temporarily store the
printed paper in the tray.
Follow the steps below to attach the paper ejection tray if you use it.
Note:
Paper may not stay in the paper ejection tray, depending on the paper
curl and length.
1. Attach the paper ejection tray to the hooks under the paper ejection
table.
2. Pull the lever at the bottom-right of the paper ejection tray to
unlock it.
28 TM-C3400Z User’s Manual

3. Slide the bottom tray to align it with the paper length, and lock it.
Fixed blade
Cleaning the Autocutter
Adhesive from labels may stick to the fixed blade of the autocutter,
which may prevent the autocutter from cutting paper cleanly. If this
happens, follow the steps below to clean the autocutter.
1. Turn off the product and disconnect the power plug from the wall
outlet.
2. Open the roll paper cover to remove the paper.
3. Remove the adhesive on the autocutter blade with an implement
such as a cotton swab. If necessary, moisten the cotton swab with
alcohol.
E
CAUTION:
Do not touch the fixed blade of the autocutter with bare hands. Doing
so may cause injury.
TM-C3400Z User’s Manual 29

Printer Settings
The user can set/check the network information of the printer by the
EPSON Net Config (Function of the printer).
For detailed information on the EPSON Net Config, see the TMC3400Z Technical Reference Guide.
1. Turn on the host computer.
2. Enter the IP address of the printer in the address bar of the Web
browser.
Default setting
IP address: 192.168.192.168
Note:
Epson recommends the Mozilla Firefox web browser. If using the Windows
Internet Explorer web browser, apply the latest security patch and Service
Pack.
3. Enter ID and password to the login screen, login to the EPSON Net
Config.
Default setting
ID : epson
Password : epson
4. Set/Check the network information of the printer by the Printer
Utility.
30 TM-C3400Z User’s Manual

Colorization on TM-C3400Z
TM-C3400Z can colorize monochrome print images described with
ZPL commands.
The Printer Utility is available to support colorization.
For detailed information on colorization, see the TM-C3400Z
Technical Reference Guide.
E
TM-C3400Z User’s Manual 31

Troubleshooting
The power does not turn off.
Unplug the power cord from the outlet. Then, be sure to turn on the
power again, and use the power button to turn off the power.
Leaving as it is can cause drying and clogging of the print head.
Paper jam
Turn off the product and open the roll paper cover or the fanfold paper
cover to remove the jammed paper. Install the paper correctly
referring to “Installing the Paper” on page 15.
Specifications
Item Description
Printer unit Printing method Serial ink jet, dot matrix, three-color printing
Interface Ethernet 10BASE-T/100BASE-TX/1000Base-TX compliant
RTC backup battery Lithium secondary battery backs up RTC.
Power supply AC100V - AC240 V / 50Hz to 60 Hz
Current consumption Operating: 38.8 W
External dimensions (when the LCD
unit is positioned horizontally)
Mass 14.0 kg {30.86 Ib} (excluding ink cartridge, roll paper, AC
*1 Only EPSON-specified options and products whose operation capabilities have been checked
are supported.
*2 If the USB device is not recognized, try disconnecting the cable and then connecting it again.
Printing direction Bi-directional
Paper feed
method
Paper width Receipt roll paper:
Printable area 104 mm Max./1474 positions (360 dpi)
Host USB (rear) (*1) USB2.0 Type A x 6 (High/Full/Low speed available)
Client USB Specifications: USB2.0 Type B x 1 (*This port is used for the
Forward and reverse friction feed
Receipt 30 mm {1.18"} to 108 mm {4.25"}
Full-page label paper (backing paper): 30 mm {1.18"} to
112 mm {4.41"}
Die-cut label (backing paper) : 30 mm {1.18"} to 112 mm
{4.41"}
Fanfold paper:
Receipt 50 mm {1.97"} to 108 mm {4.25"}
Die-cut label (backing paper) 50 mm {1.97"} to 112 mm
{4.41"}
Power capacity: +5VDC 500mA (peak 1A/100ms) *2
(*3 ports are used for internal printer unit and host USB
(front).)
internal printer unit.)
Storage:18.1 W
255 mm (W) x 312 mm (D) x 309 mm (H)
{10.03" (W) x 12.28" (D) x 12.16" (H)}
(excluding projections, including rear cover)
cable)
32 TM-C3400Z User’s Manual

OPEN SOURCE SOFTWARE LICENSE
1. 1) This printer product includes open source software programs
listed in Section 6) according to the license terms of each open
source software program.
2. We provide the source code of the GPL Programs and LGPL
Programs until five (5) years after the discontinuation of same
model of this printer product. If you desire to receive the source
code above, please contact the customer support for your region.
You shall comply with the license terms of each open source
software program.
3. The open source software programs are WITHOUT ANY
WARRANTY; without even the implied warranty of
MERCHANTABILITY AND FITNESS FOR A PARTICULAR
PURPOSE. See the license agreements of each open source
software program for more details, which are described on
\Manual\OSS\OSS.pdf in the CD-ROM.
4. OpenSSL toolkit
This printer product includes software developed by the OpenSSL
project for use in the OpenSSL Toolkit (http://www.openssl.org/
).
This product includes cryptographic software written by Eric
Young (eay@cryptsoft.com).
5. The license terms of each open source software program are
described on ¥Manual¥OSS¥OSS.pdf in the CD-ROM.
6. The list of open source software programs which this printer
product includes are as follows.
E
Module Name Version Licence
Busybox 1.20.2 GNU General Public License version 2
Linux Kernel 3.6.4 GNU General Public License (GPLv2)
grub 0.9.7 GNU General Public License Version3
acpid 2.0.11 GNU Free Documentation License1.1 or Later
binutils 2.21.1 GNU General Public License Version3 and LGPL
bzip2 1.0.6 bzip2 License
freetype 2.4.10 GNU General Public License (GPLv2) or
ICU 4.8.1.1 IBM Public License
Imagemagick 6.7.8-8 Imagemagick License
Version3
Freetype license
TM-C3400Z User’s Manual 33

libffi 3.0.11 BSD License
libpng 1.4.12 ZLIB/libpng License
libtool 2.2.10 GNU General Public License Version2
libxml2 2.8.0 MIT License
libxslt 1.1.26 Libxslt MIT License
libyaml 0.1.4 MIT License
lighttpd 1.4.31 BSD License
lzo 2.0.6 GNU General Public License
m4 1.4.16 GNU Lesser General Public License
microperl 5.1.2.4 Artistic License or GNU
mpc 0.9 LGPL2 or later
mpfr 3.1.1 GNU Lesser General Public License , version 3 or
ncurses 5.3.15 ncurses License
netsnmp 5.7.1 Net-SNMP
openssl 1.0.0 OpenSSL License
pcre 8.30 pcre licence
php 5.3.15 PHP Licence
pkg-config 0.25 GPL version 2 or any later version
python 2.7.2 python Licence
readline 6.2 GNU General Public License Version3
ruby 1.9.2 BSD licence
sqlite 3071300 Sources are uncopyrighted. Use for any purpose.
uclibc 0.9.33.2 LGPL
yaml 0.1.4 Creative Commons Attribution 2.0 License
zint 2.4.3 GNU General Public License Version3 and LGPL
zlib 1.2.7 ZLIB/libpng License
later
Version3
34 TM-C3400Z User’s Manual
 Loading...