

Page 1
Technical Reference Guide
Describes the features and basic operations of the product.
Describes setup and installation of the product and peripherals.
Describes the product's utilities.
Describes how to handle the product.
Overview and Basic Operations
Setup
Utility
Maintenance
Appendix
M00066203
Rev.D
Page 2

Trademarks
• EPSON is a registered trademark of Seiko Epson Corporation.
• Exceed Your Vision is registered trademarks or trademarks of Seiko Epson Corporation.
•Windows
in the United States and other countries.
•ZPL
• Mozilla
All other trademarks are the property of their respective owners and used for identification purpose only.
®
and Internet Explorer® are either registered trademarks or trademarks of Microsoft Corporation
®
and ZPLII® are registered trademarks of ZIH Corp. All rights reserved worldwide.
®
and Firefox® are registered trademark of the Mozilla Foundation.
Ancillary Damage Caused by the Product
In the event that the desired results cannot be obtained from the product (including built-in software, etc.),
any resulting ancillary damage (including fees required for using the product and loss of profits that would
have been obtained from using the product) will not be compensated.
Restriction of Use
When this product is used for applications requiring high reliability/safety such as transportation devices
related to aviation, rail, marine, automotive etc.; disaster prevention devices; various safety devices etc.; or
functional/precision devices etc., you should use this product only after giving consideration to including
fail-safes and redundancies into your design to maintain safety and total system reliability.
Because this product was not intended for use in applications requiring extremely high reliability/safety such
as aerospace equipment, main communication equipment, nuclear power control equipment, or medical
equipment related to direct medical care etc, please make your own judgment on this product’s suitability
after a full evaluation.
© Seiko Epson Corporation 2013-2016. All rights reserved.
2
Page 3
For Safety
Key to Symbols
The symbols in this manual are identified by their level of importance, as defined below. Read the following
carefully before handling the product.
You must follow warnings carefully to avoid serious bodily injury.
WARNING
Provides information that must be observed to prevent damage to the equipment or loss of
data.
CAUTION
Possibility of sustaining physical injuries.
Possibility of causing physical damage.
Possibility of causing information loss.
Provides information that must be observed to avoid damage to your equipment or a
malfunction.
Provides important information and useful tips.
3
Page 4

Cautions for Regarding Installation
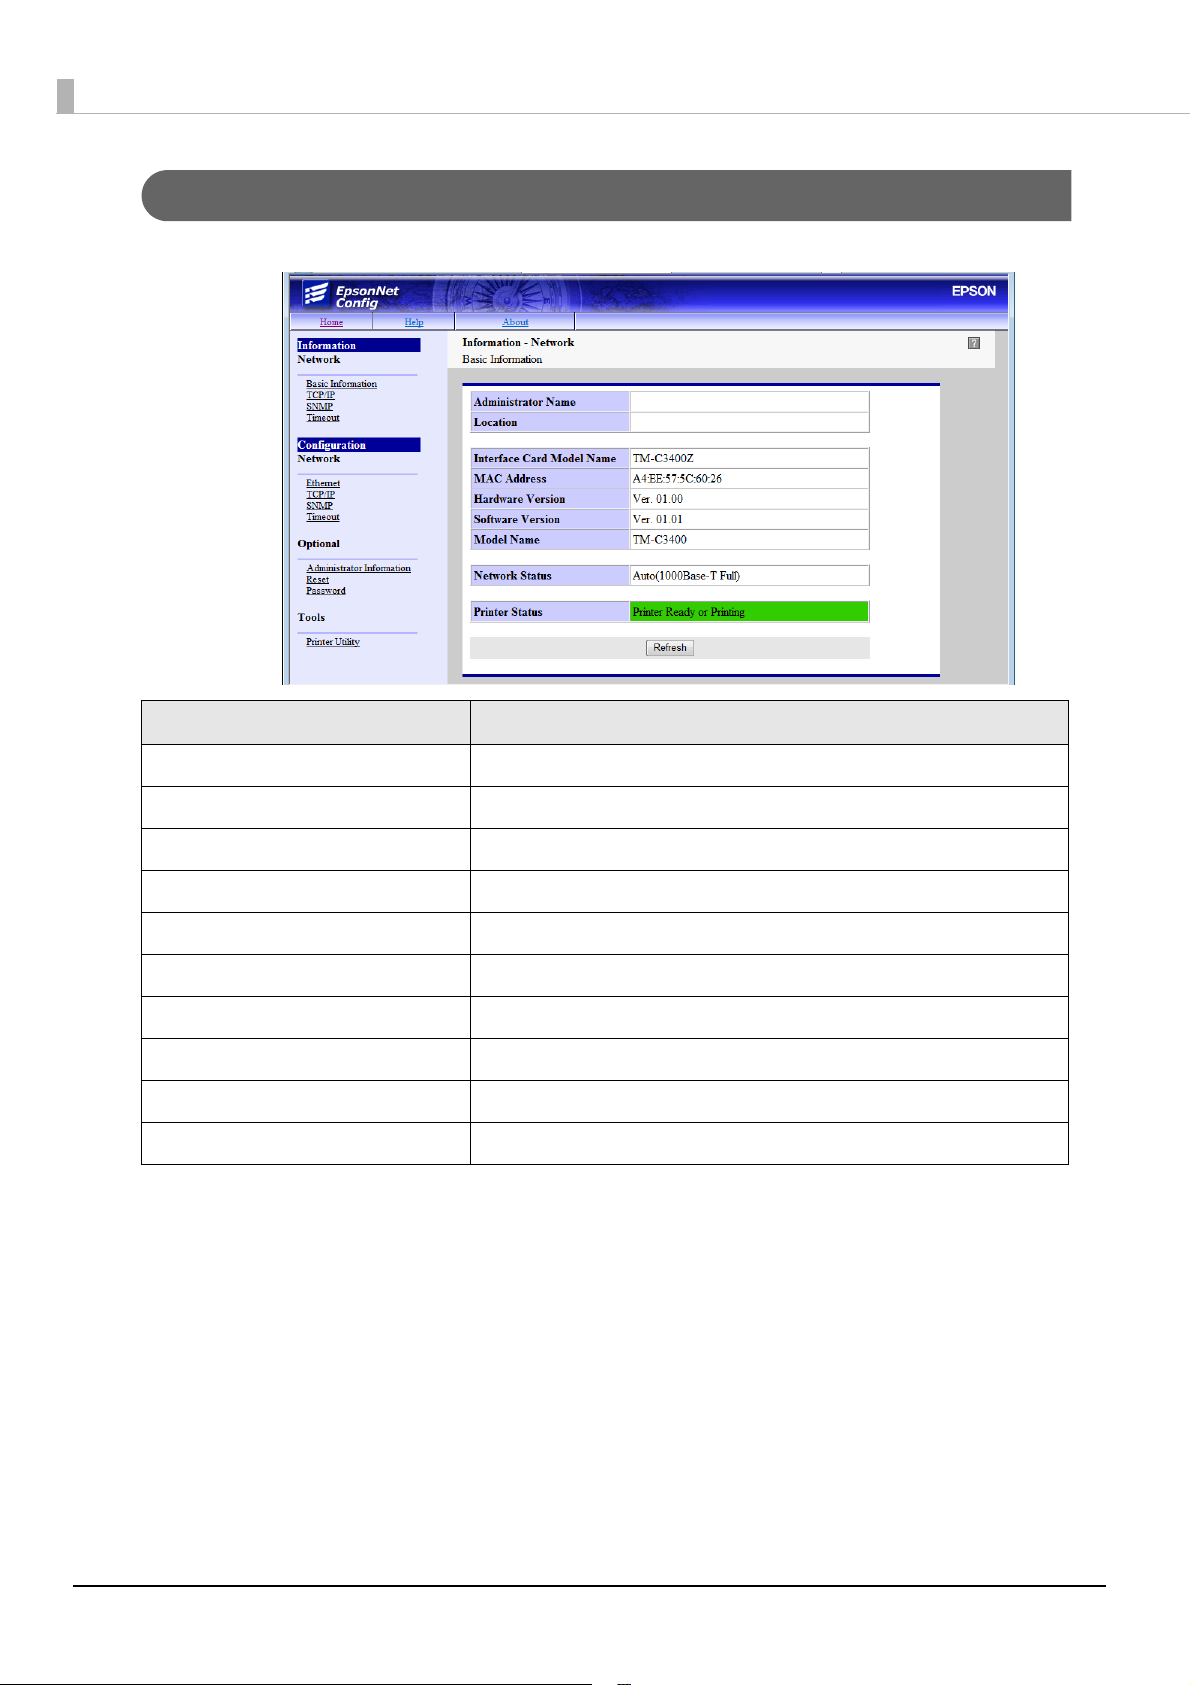
Do not block the air vents on this product.
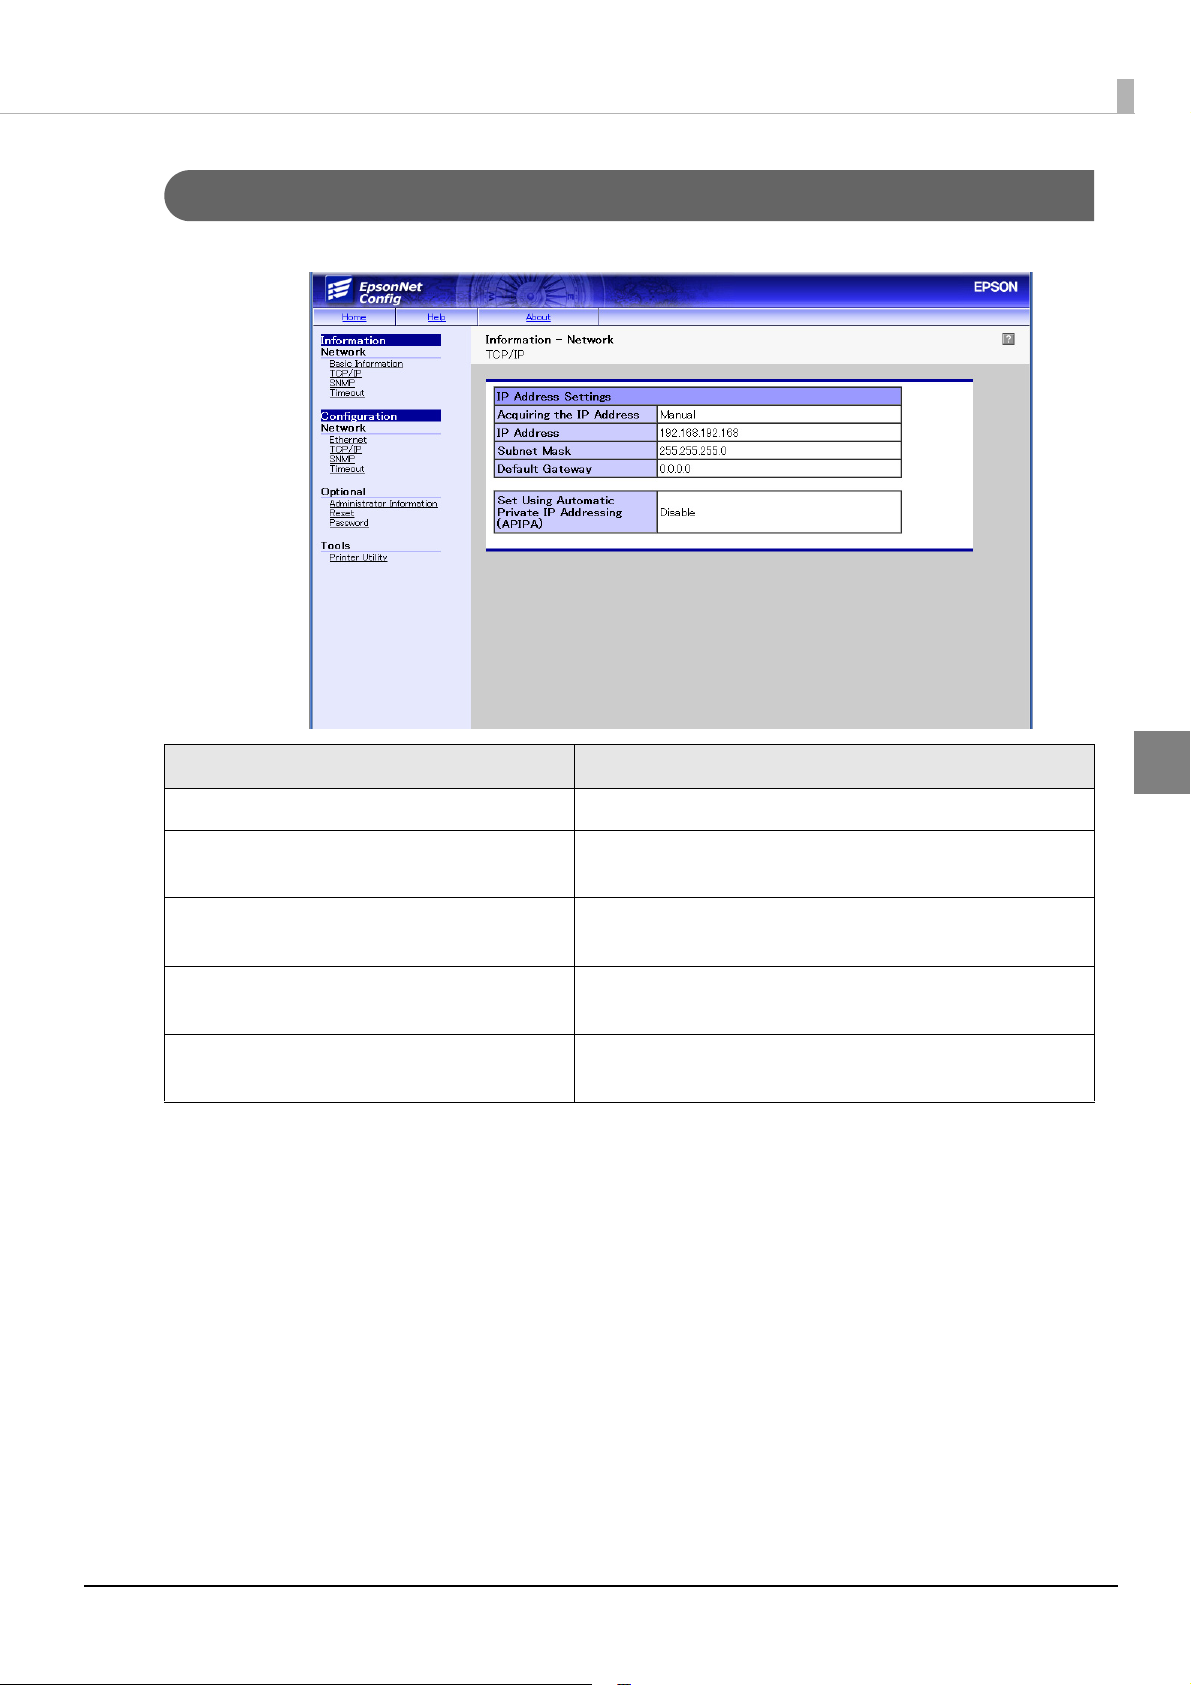
Blocking the air vents may result in internal heat build-up and fire.
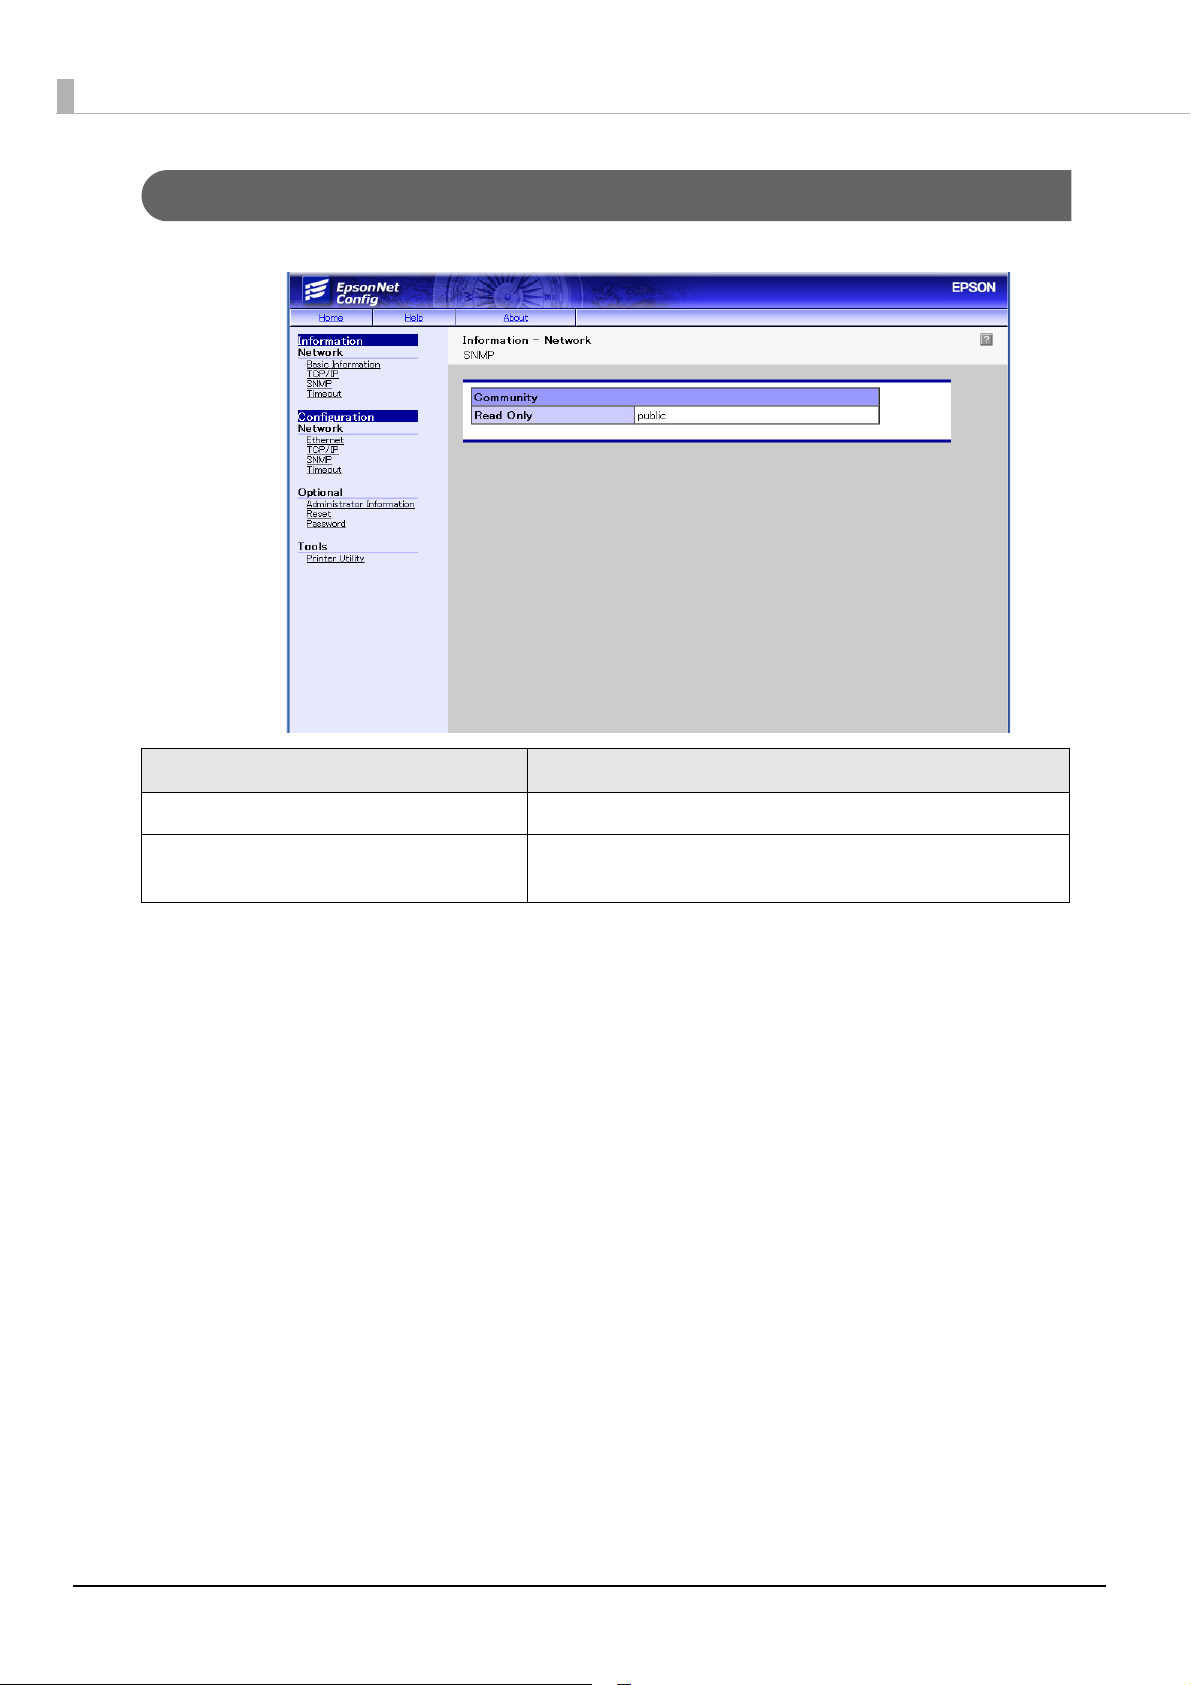
WARNING
CAUTION
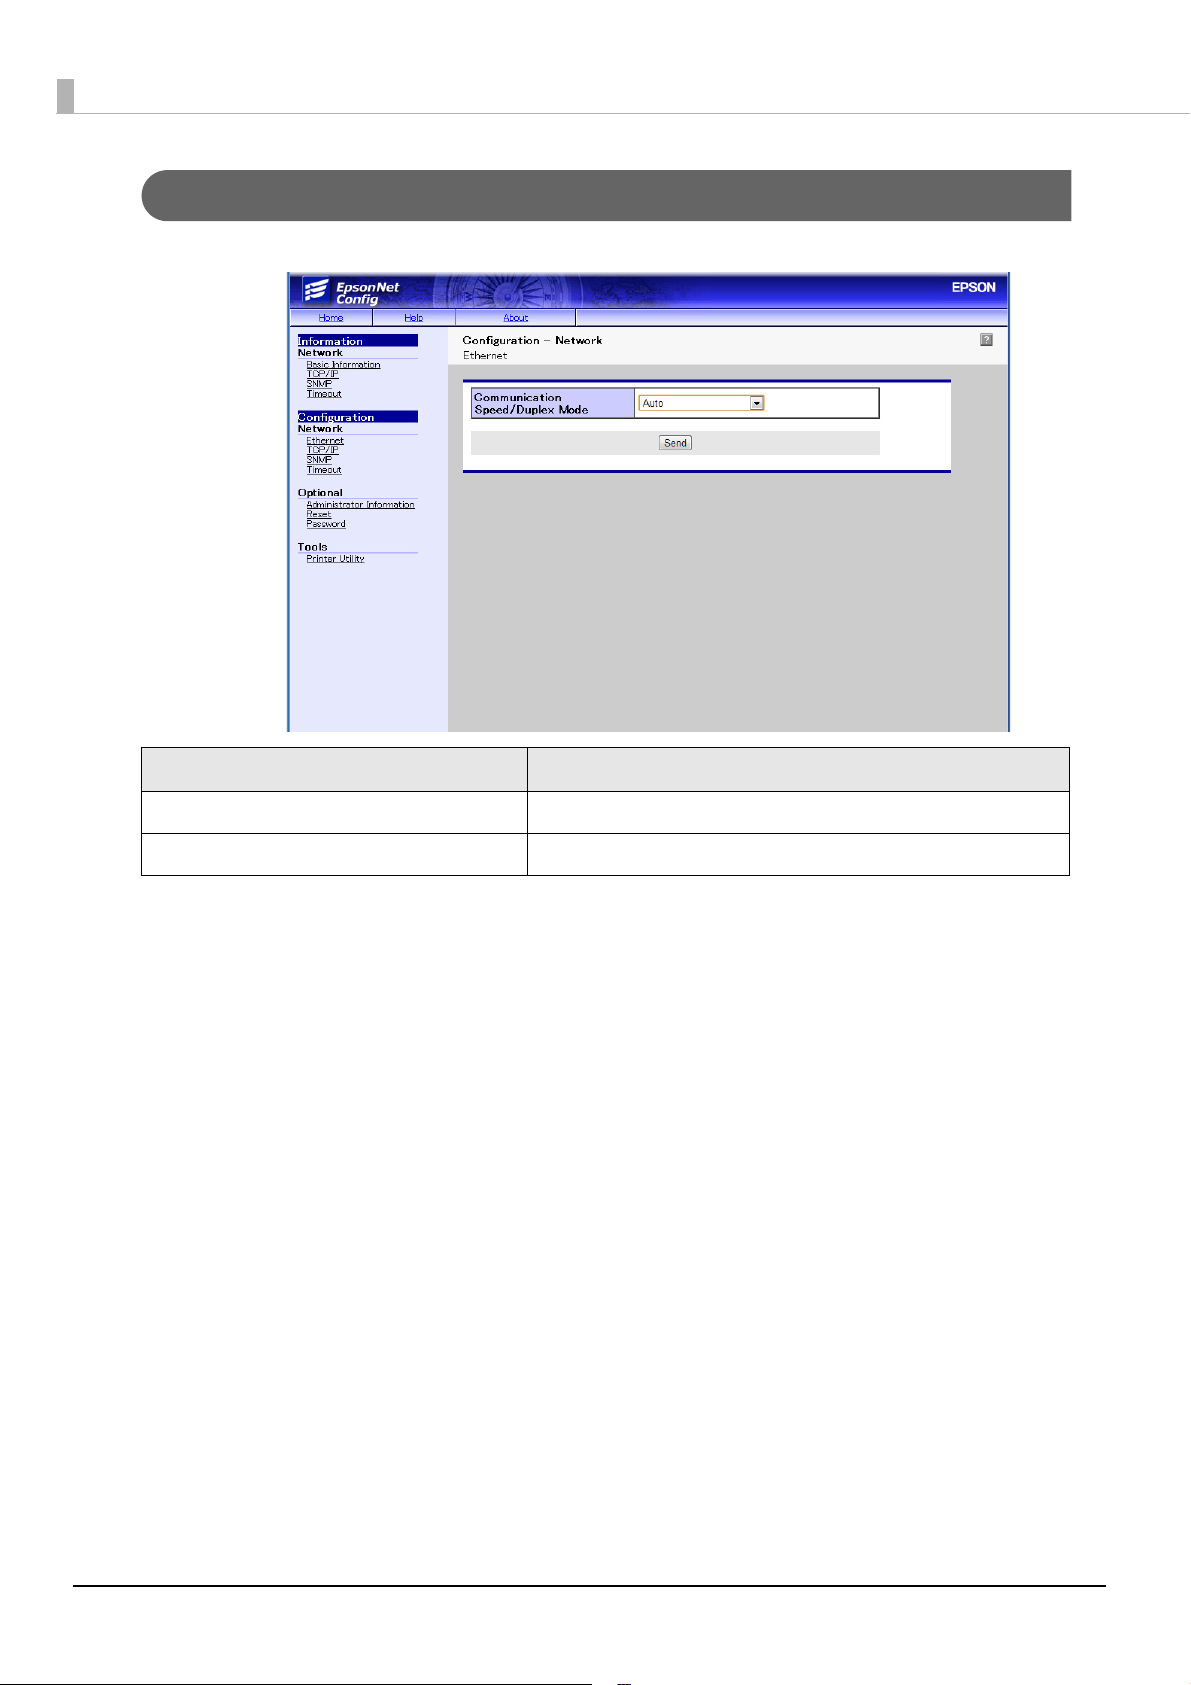
Do not install in the following types of places.
Tight spaces where ventilation is poor, such as in a closet or on a bookshelf
On a rug or bed
Do not install or store in an unstable place (such as on a wobbly or tilted surface),
in reach of children, or in a place subject to vibration from other machines.
There is a risk that it could drop or fall over, resulting in injury.
Do not install in places where there is excessive moisture or dust, risk of getting
wet, direct sunlight, severe changes in temperature and humidity, or close to
heating and cooling devices.
There is a risk of electric shock, fire, and malfunction or failure of this product.
When lifting the product, maintain a comfortable posture.
Lifting the product in the improper posture may result in injury.
When lifting the product, be sure to hold the parts specified in the manual.
If you hold other parts of the product and lift the product, the product may fall or your
fingers may get caught when lowering the product, resulting in injury.
4
Page 5
Cautions for the Power Source
Use only the type of power source indicated on the product's label.
Use of the wrong type of power source may result in electric shock or fire.
WARNING
Be careful when handling the power plug.
Mishandling may result in fire.
Do not leave plugged into a power source with foreign matter such as dust on it
Firmly insert the prongs of the power plug all the way
For safety reasons, be sure to ground the AC cable.
The AC cable supplied with the product has a 3-pin cable with a power system
grounding (PE) terminal, so connect it to an outlet that is grounded securely.
Do not use a damaged AC cable.
This may result in electric shock or fire.
If the AC cable is damaged, consult your dealer for repairs.
Observe the following when handling the AC cable.
Do not modify the AC cable
Do not place heavy objects on the AC cable
Do not bend, twist or pull the AC cable by force
Do not wire the cord near heating appliances
Do not connect or disconnect the power plug with wet hands.
This may result in electric shock.
Do not plug the AC cable into an outlet with many other cords connected to it.
This may result in heat build-up and fire.
Do not affix the AC cable to a connector or power outlet using an adhesive, etc.
There may be a risk of fire.
Regularly disconnect the power plug from the outlet and clean the base of the
prongs and between the prongs.
If you leave the power plug connected to an outlet for a long time, the base of the power
plug prongs may become dusty, which may result in short circuit and fire.
When you disconnect the power plug from the outlet, be sure to turn off the power
and hold the plug as you pull.
If you stretch the AC cable, it may become damaged, which could result in electric shock
or fire.
CAUTION
Be sure to plug the AC cable directly into a power outlet.
Be sure to place the product near a power outlet so that the power plug can be
disconnected immediately in the case of a malfunction.
For safety, be sure to disconnect the power plug from the outlet when you will not
be using the product for a long time.
5
Page 6
Cautions for Using
Do not install in a place where volatile substances, such as alcohol or paint
thinner, are present or in a place where there is fire.
WARNING
This may result in electric shock or fire.
Do not continue to use under abnormal conditions such as smoke, unusual odors
or sounds.
This may result in electric shock or fire.
Immediately turn off the power, disconnect the power plug from the outlet, and contact
your dealer or the Epson Repair Center about repairs. Servicing the product yourself is
dangerous, so never attempt it.
If a foreign object, water or other liquid enters the product, do not continue to use
it.
This may result in electric shock or fire.
Immediately turn off the power, disconnect the power plug from the outlet, and contact
your dealer or the Epson Repair Center about repairs.
Do not perform any disassembly other than those mentioned in this manual.
Do not attempt to service the product yourself
This may result in injury, electric shock, fire or malfunction.
Do not use flammable gas sprays inside or around this product.
There is a risk that gas will build up and a spark may cause a fire.
Do not insert or drop metal or flammable objects into the air vents or other
openings.
This may result in electric shock or fire.
CAUTION
Do not step or place heavy objects on top of the product.
Be especially careful in households with small children. There is a risk that it could fall
over or break, resulting in injury.
When attaching various cables and options, be sure to attach them in the correct
direction and using the correct procedure.
There may be a risk of fire or injury. Follow the instructions in the manual to correctly
attach them.
For safety reasons, if you move this product, first check that the power is off, the
power plug is disconnected from the outlet, and all of the wires are disconnected.
When storing or transporting this product, do not tilt it, stand it on end, or turn it
upside down.
There may be a risk of ink leakage.
6
Page 7

CAUTION
When the battery inside the product needs to be replaced, contact your dealer or
Epson's repair services.
There may be a risk of explosion if it is replaced with an incorrect battery type.
Do not touch the fixed blade of the autocutter with bare hands.
Doing so may cause injury.
When replacing the ink cartridges, be careful that the ink does not contact your
eyes or skin.
If ink gets into your eyes, immediately flush them with water, and if it gets onto your skin,
immediately wash the area with soap and water. Otherwise you may have bloodshot
eyes or a mild inflammation. In the rare event that there is a problem, immediately
consult a physician.
Do not disassemble the ink cartridges to replenish or refill the ink.
Do not shake the ink cartridge too hard.
The ink cartridge may leak if you shake it too much.
Store ink cartridges out of the reach of children. Also, do not ingest the ink.
Do not brush your hands against the edges of printing paper.
Since the edges of paper are thin and sharp, there may be a risk of injury.
7
Page 8

About this Manual
Aim of the Manual
This manual was created to provide information on development, design, and installation of print systems
and development and design of printer applications for developers.
Manual Content
The manual is made up of the following sections:
Chapter 1 Overview and Basic Operations
Chapter 2 Setup
Chapter 3 Utility
Chapter 4 Maintenance
Appendix Problems and Solutions
Product Specifications
Supplies
8
Page 9

Contents
■ For Safety .............................................................................................................................. 3
Key to Symbols........................................................................................................................................3
Cautions for Regarding Installation ......................................................................................................4
Cautions for the Power Source..............................................................................................................5
Cautions for Using...................................................................................................................................6
■ About this Manual................................................................................................................ 8
Aim of the Manual .................................................................................................................................8
Manual Content.....................................................................................................................................8
■ Contents................................................................................................................................ 9
Overview and Basic Operations ................................................13
■ Features............................................................................................................................... 13
Accessories ...........................................................................................................................................14
■ Parts Name and Function.................................................................................................. 15
Front .......................................................................................................................................................15
Back .......................................................................................................................................................16
Power Button .........................................................................................................................................18
■ Status/Error Indications...................................................................................................... 19
■ Utility Operating Environment ........................................................................................... 21
Setting Internet Explorer 8....................................................................................................................21
Setup.............................................................................................23
■ When You Use This Product for the First Time ................................................................... 23
■ Flow of Setup....................................................................................................................... 24
■ Installing the Printer............................................................................................................ 25
Installation .............................................................................................................................................25
■ Connecting the Cable....................................................................................................... 26
Connecting LAN cable........................................................................................................................27
Connecting AC cable .........................................................................................................................28
■ Loading the Ink Cartridge ................................................................................................. 30
■ Setting the DIP Switches..................................................................................................... 33
Setting Procedure.................................................................................................................................33
Function of the DIP Switches ............................................................................................................... 34
■ Setting the Printer IP Address ............................................................................................ 35
■ Loading/Replacing the Paper .......................................................................................... 37
Preparing the Computer ..................................................................................................................... 37
Loading/Replacing the Roll Paper .....................................................................................................38
Loading/Replacing Fanfold Paper.....................................................................................................49
Ejection Angle of Printed Paper .........................................................................................................58
■ Attaching/Adjusting the Paper Ejection Tray .................................................................. 59
9
Page 10

Utility.............................................................................................. 61
■ EpsonNet Config.................................................................................................................61
Starting EpsonNet Config.................................................................................................................... 61
Information-Basic Information (Network) .......................................................................................... 62
Information-TCP/IP (Network) ............................................................................................................. 63
Information-SMNP (Network) .............................................................................................................. 64
Information-Timeout (Network) .......................................................................................................... 65
Configuration-Ethernet (Network)...................................................................................................... 66
Configuration-TCP/IP (Network)......................................................................................................... 67
Configuration-SNMP (Network) .......................................................................................................... 68
Configuration-Timeout (Network) ...................................................................................................... 69
Configuration-Administrator(Optional) ............................................................................................. 70
Configuration-Reset(Optional)........................................................................................................... 71
Configuration-Password(Optional) .................................................................................................... 72
■ Printer Utility ........................................................................................................................ 73
Starting Printer Utility ............................................................................................................................ 73
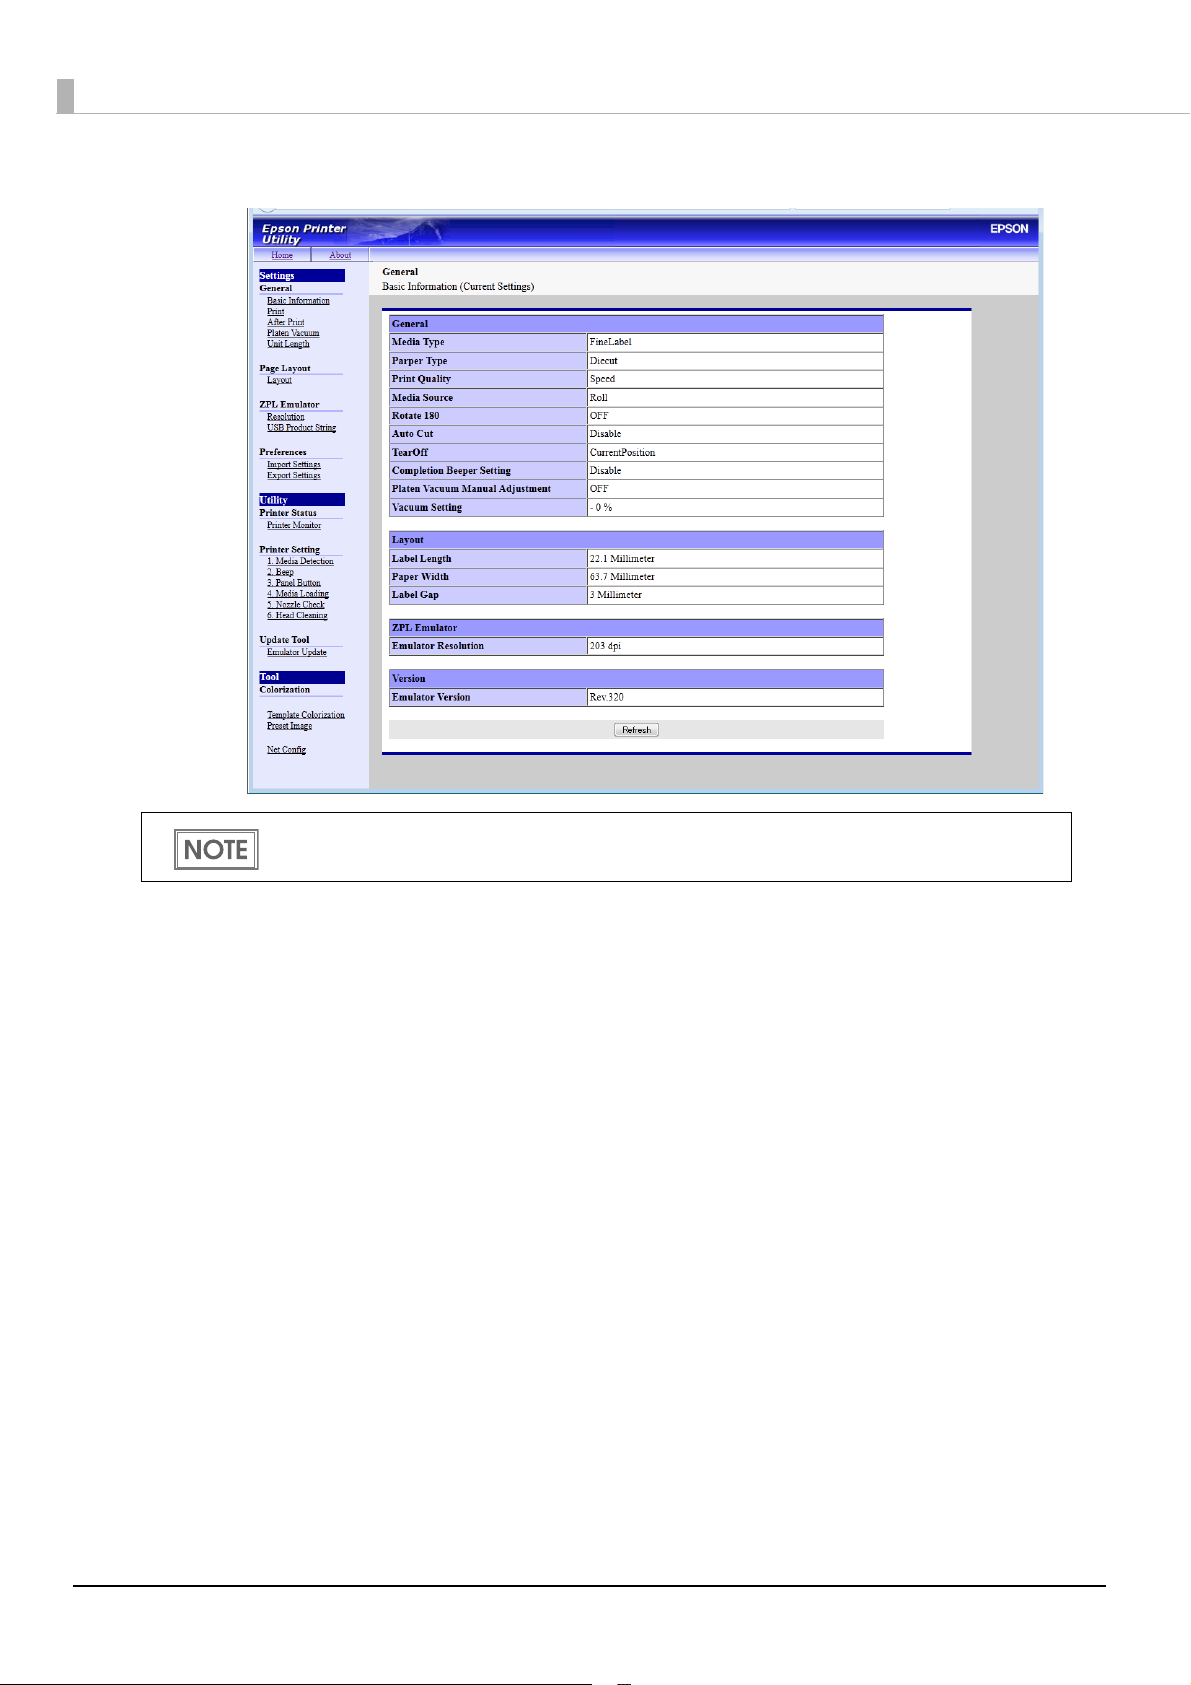
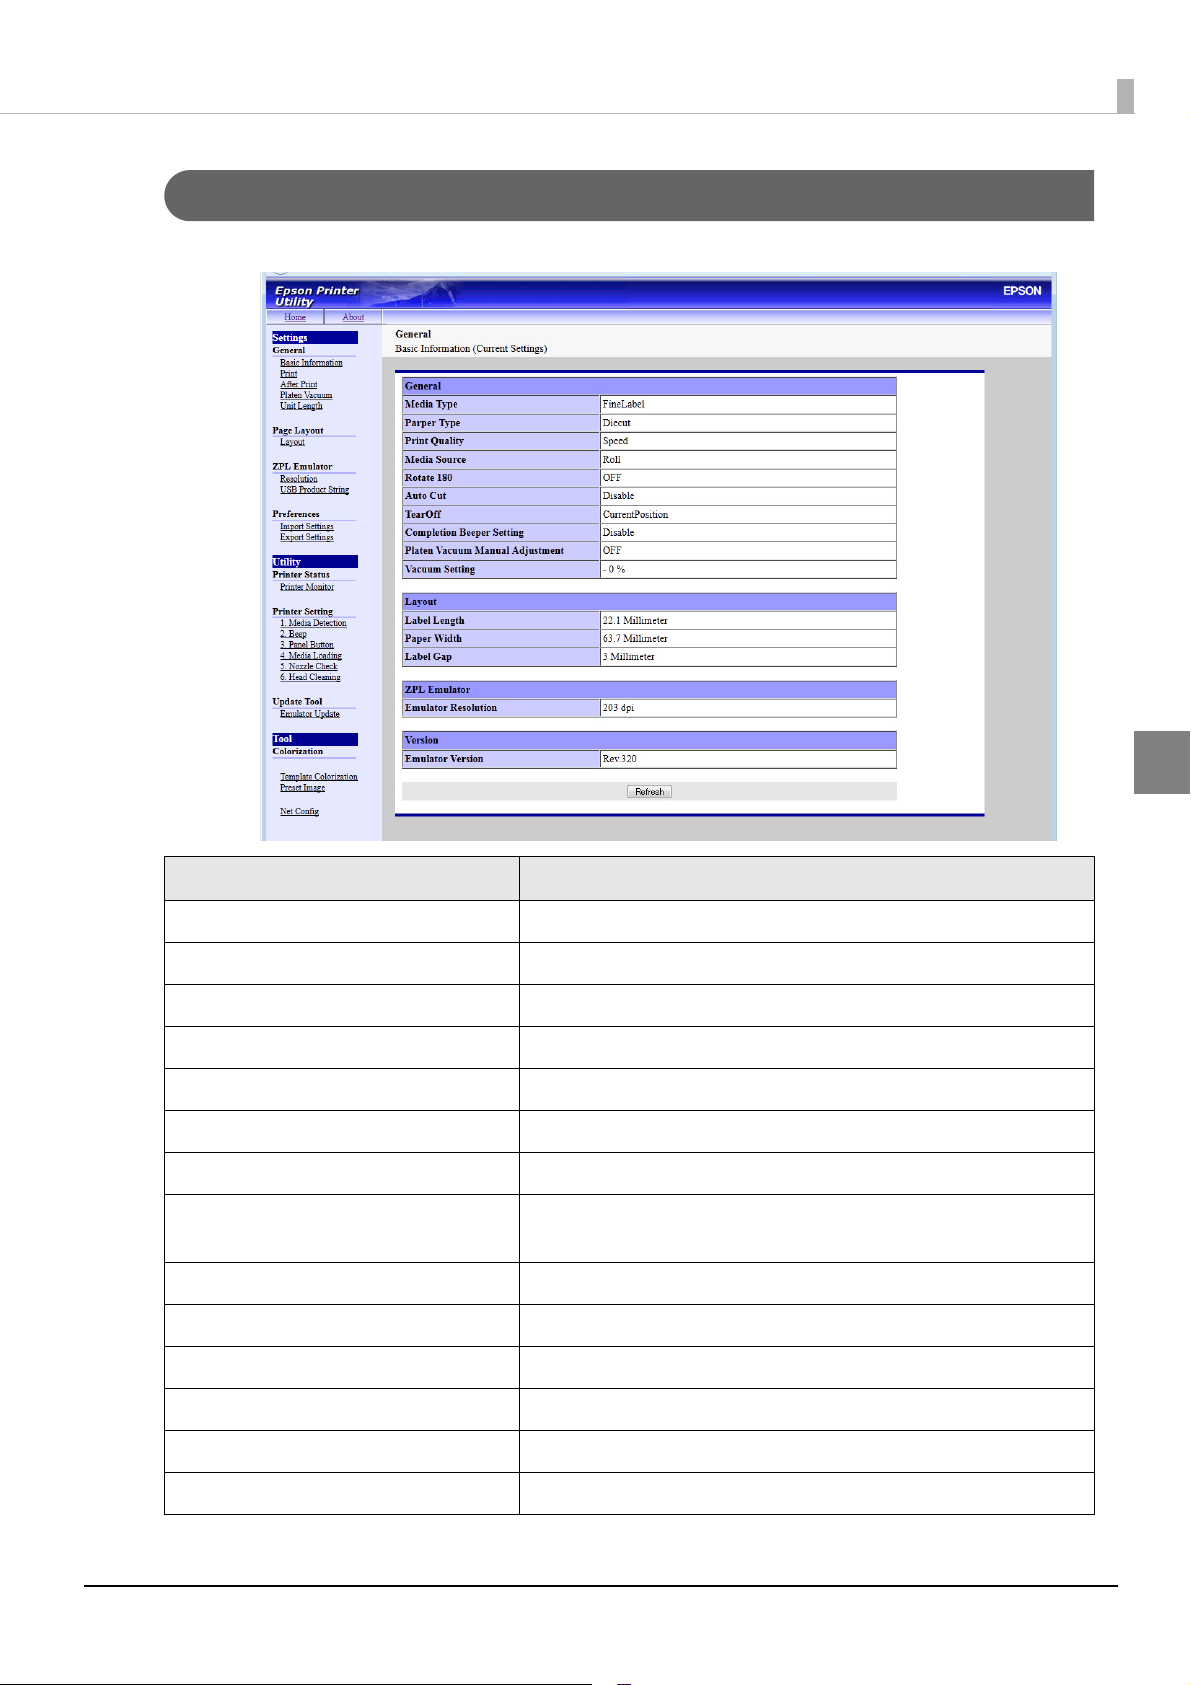
Settings-Basic Information (General) ................................................................................................. 75
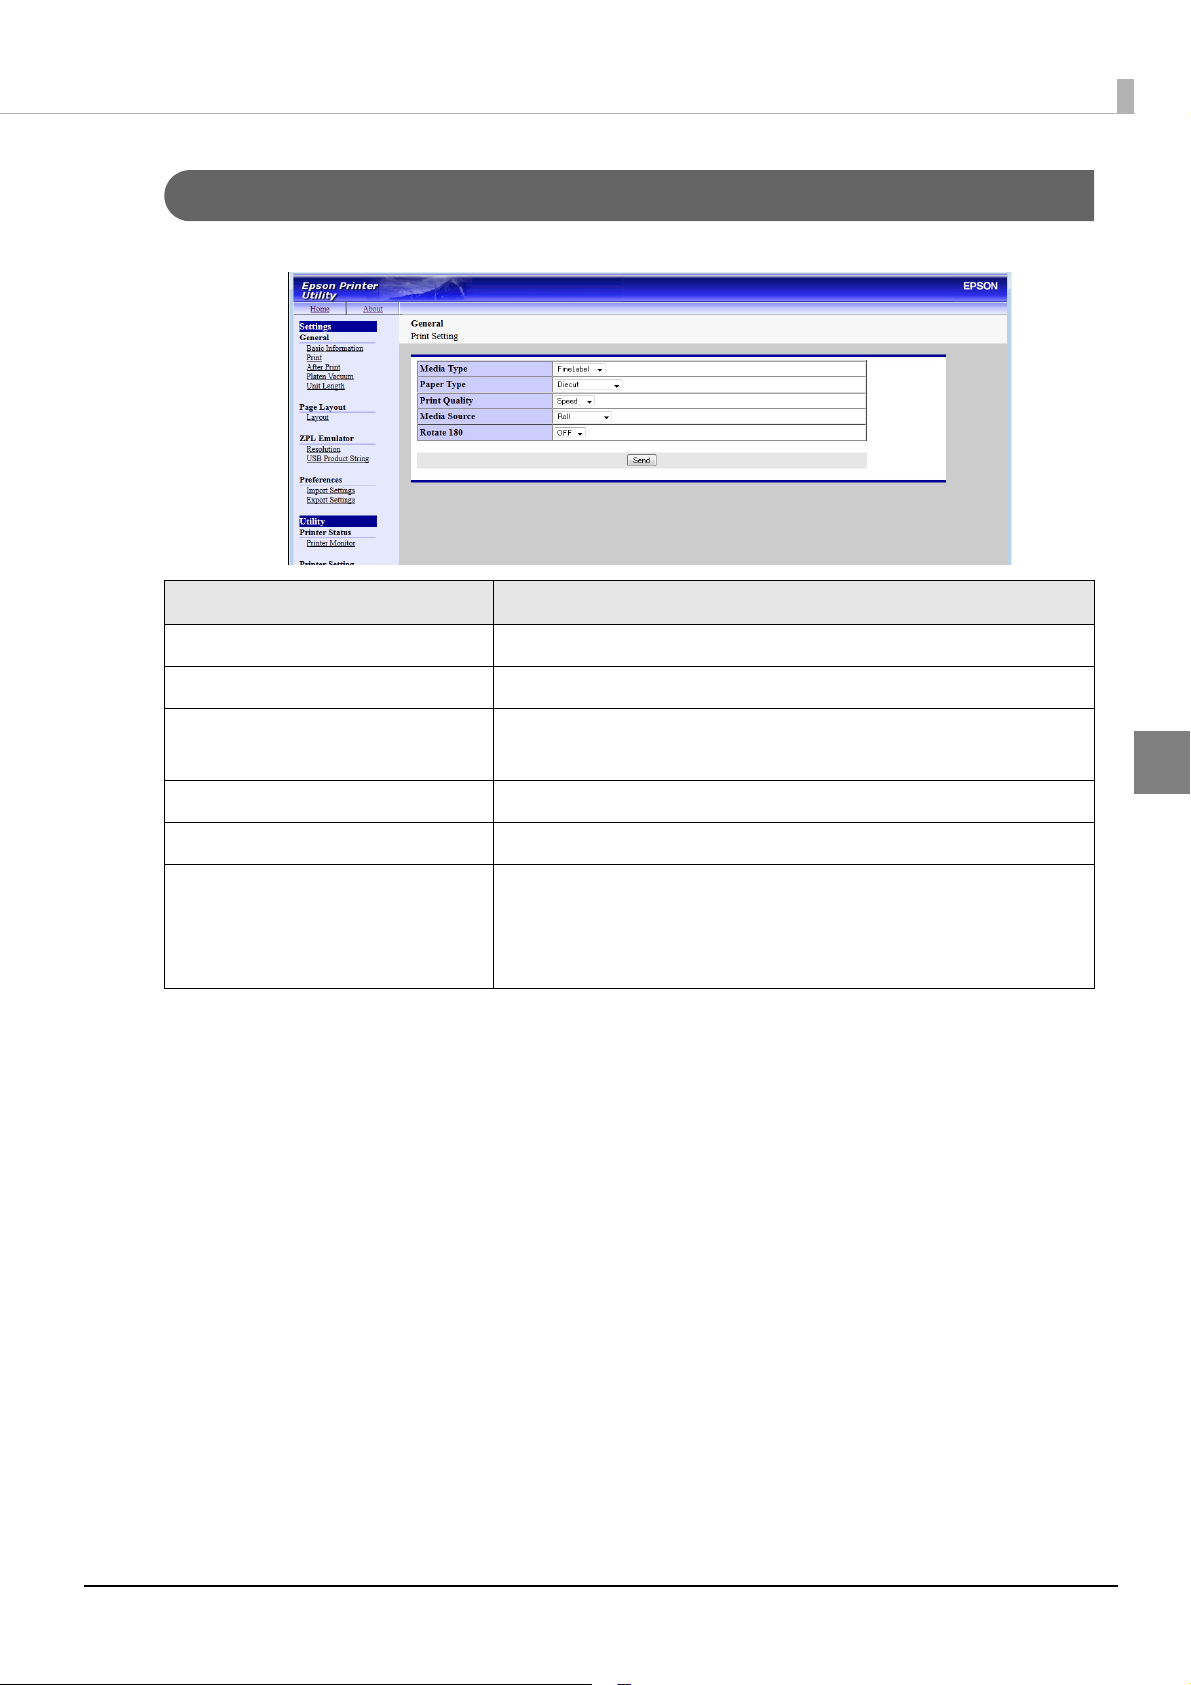
Settings-Print (General) ....................................................................................................................... 77
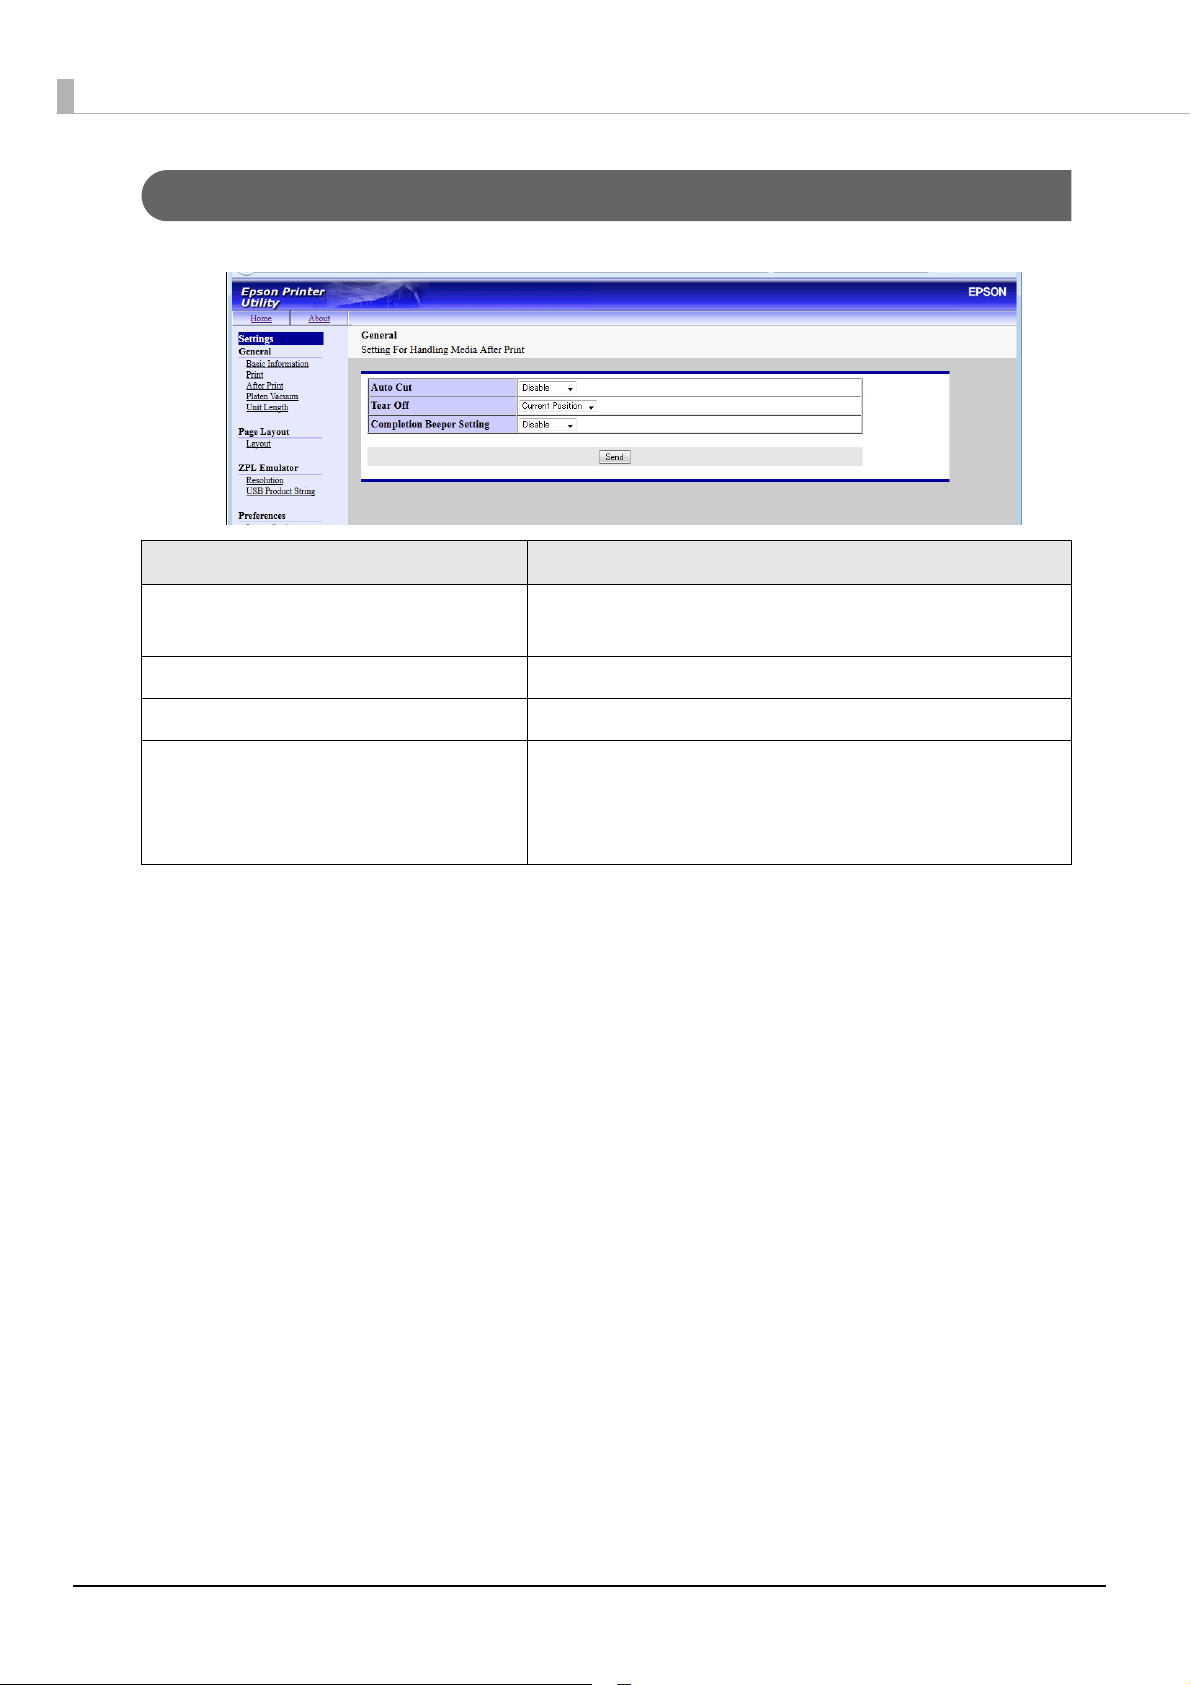
Settings-After Print (General) .............................................................................................................. 78
Settings-Platen Vacuum (General) .................................................................................................... 79
Settings-Unit Length (General) ........................................................................................................... 80
Settings-Layout (Page Layout) ........................................................................................................... 81
Settings-Resolution (ZPL Emulator)...................................................................................................... 82
Settings-USB Product String (ZPL Emulator)........................................................................................ 83
Settings-Import Settings (Preferences)............................................................................................... 84
Settings-Export Settings (Preferences) ............................................................................................... 85
Utility-Printer Monitor (Printer Status) .................................................................................................. 86
Utility-Media Detection (Printer Setting) ............................................................................................ 88
Utility-Beep (Printer Setting)................................................................................................................. 90
Utility-Panel Button (Printer Setting).................................................................................................... 91
Utility-Paper Set Operation Setting (Printer Setting)......................................................................... 92
Utility-Nozzle Check (Printer Setting) .................................................................................................. 93
Utility-Head Cleaning (Printer Setting) ............................................................................................... 93
Utility-Emulator Update (Update Tool) ............................................................................................... 94
■ Preset Image ...................................................................................................................... 95
■ Template Colorization........................................................................................................ 99
Setting Method .................................................................................................................................... 99
Making print data into a template .................................................................................................. 105
■ Printing with the Zebra Printer Driver .............................................................................. 106
Confirming Zebra Printer Information .............................................................................................. 106
Registering data to the Printer Utility ............................................................................................... 108
Maintenance..............................................................................109
■ Replacing the Paper........................................................................................................ 109
Replacing Roll Paper with Roll Paper .............................................................................................. 110
Replacing Fanfold Paper with Fanfold Paper................................................................................. 114
Changing From Roll Paper to Fanfold Paper.................................................................................. 117
Changing From Fanfold Paper To Roll Paper.................................................................................. 121
■ Cleaning the Autocutter.................................................................................................. 125
10
Page 11

■ Exterior Surface Cleaning................................................................................................ 126
■ Preparing for Transport..................................................................................................... 127
■ Restrictions........................................................................................................................ 128
Appendix.................................................................................... 129
■ Problems and Solutions ................................................................................................... 129
Power On / Off Problems ...................................................................................................................129
Printout is Not Satisfactory .................................................................................................................130
Paper is Not Cut Cleanly ...................................................................................................................130
■ Product Specifications..................................................................................................... 131
Reliability..............................................................................................................................................133
Environmental Conditions..................................................................................................................134
External Dimensions............................................................................................................................135
Paper Specifications ..........................................................................................................................136
Print Area and Cutting Position.........................................................................................................149
Paper Ejection Tray.............................................................................................................................156
Ink Cartridge .......................................................................................................................................156
■ Supplies............................................................................................................................. 157
Media...................................................................................................................................................157
Ink Cartridge .......................................................................................................................................157
■ ZPL Commands................................................................................................................. 158
■ Supported Barcodes........................................................................................................ 168
Limitations............................................................................................................................................169
11
Page 12

12
Page 13
Chapter 1 Overview and Basic Operations
Overview and Basic Operations
Features
This product is a 3-color inkjet label printer.
High Productivity
❏ High-speed printing up to 92 mm/s (Printing width 56 mm, 360 x 180 dpi)
❏ Support for high-capacity fanfold paper to save time required for paper replacement
❏ Roll paper and ink cartridge can be replaced simply by performing operations at front of printer
❏ Easy drop-in paper loading
❏ High reliability system to prevent missing dots with auto nozzle check system installed.
❏ Reprint function allows printing to the page that was not printed after solving paper jam error or an error
of paper out.
❏ Labels can be cut one by one using autocutter
❏ Multiple printed sheets can be stored in the paper ejection tray. The paper ejection tray cannot store
multiple sheets of roll paper
1
Printing
❏ High-speed printing
• 92 mm/s (printing width 56 mm, 360 dpi × 180 dpi, bi-directional printing)
• 47 mm/s (printing width 56 mm, 360 dpi × 360 dpi, bi-directional printing)
The print speed is different depending on the resolution and the printing width.
❏ Color printing
• CMY 3-color printing
• Print resolution: Plain Media, Plain Media Label 360 dpi × 180 dpi, 360 dpi × 360 dpi
: Others 360 dpi × 360 dpi, 720 dpi × 360 dpi
(dpi: dots per 25.4 mm (dots per inch))
• Each color has 4 gradations
❏ Supports printing on various types of paper
• Roll paper, Fan-fold paper
• Receipt, Black Mark Receipt, Full-page Label, Die-cut Label, Black Mark Die-cut Label
(Detects positions of black marks and gaps between labels)
• Plain Media, Plain Media Label, Fine Media, Fine Media Label, PET Film, Synthetic Media Label
To configure the paper settings, connect the this product to the computer via a network and
access Printer Setting of this product from the Web browser. USB connection is not available for
paper setting.
❏ System to prevent ink from smearing out of the printable area such as on the backing paper of Die-cut
Label.
❏ System to prevent missing read or missing color caused by missing dots.
13
Page 14

Accessories
Unpacking
• This product (TM-C3400Z)
• Label paper roll (for checking initial movement)
• Ink cartridge (Model number: SJIC15P)
• Paper ejection tray
• Paper feed guide (for fanfold paper: attached on the rear of the fanfold paper cover)
• AC cable (by supplier)
• USB cable (USB interface only)
• TM-C3400Z Documents CD (including User’s Manual and Technical Reference Guide(this manual).)
•Warranty card
• Setup Guide
14
Page 15
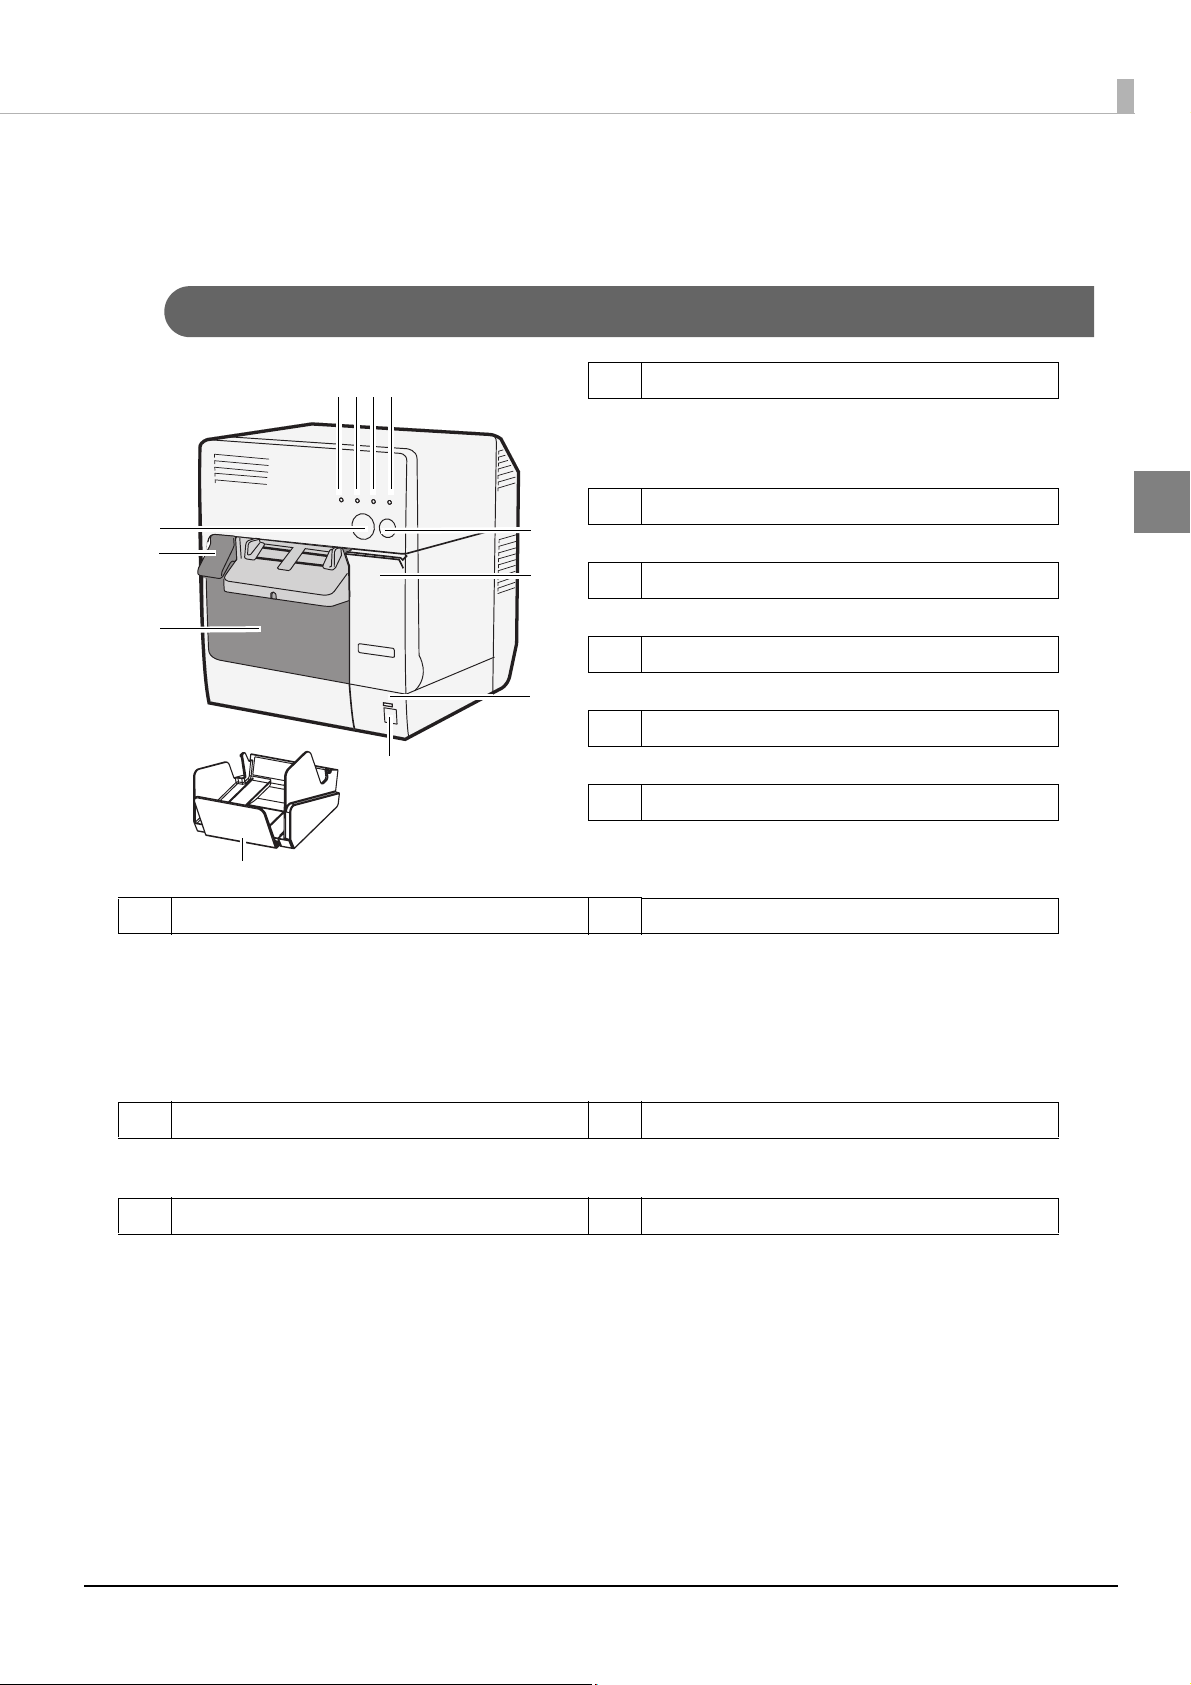
Parts Name and Function
5
6
7
8
9
10
11
12
4321
This section describes the name and function of each part in the product.
Front
4PAPER LED (Red)
Lights when the paper is not installed or is not
correctly installed.
Off when the paper is correctly installed.
Chapter 1 Overview and Basic Operations
5 CUT button
Push this button to cut the roll paper.
6 FEED button
Push this button to feed the roll paper.
7Release lever
Pull to open the roll paper cover.
8 Ink cartridge cover
Open to set/replace the ink cartridge.
9 Roll paper cover
Open to set/replace the paper.
1 Status LED 10 Power button
Lights when there is no error.
Flashes when the printer is operating
(initializing, head cleaning, or printing) or in
an error state.
It takes 40 seconds until the status LED flashes
after the power button is pressed.
Push this button to turn on/off the power of
the product.
It takes 1 or 2 minutes after the power button
is pressed for the printer to be on. Wait until
the status LED quits flashing.
1
2 ERROR LED (Red) 11 Power LED (Green)
Lights or flashes when the printer is offline,
and is off when the printer is online.
3 Ink LED (Red) 12 Paper ejection tray
Flashes when ink is low or waste ink in the ink
cartridge is nearly full.
Lights when it is time to replace the ink
cartridge, when the ink cartridge is not
installed or is not correctly installed, and
when waste ink in the ink cartridge is full.
Off when ink in the ink cartridge is adequate.
Lights when the power is on, and is off when
the power is off.
Installing the paper ejection tray enables you
to accumulate printed paper temporarily in
it.
15
Page 16
Back
2
1
4
3
6
5
1 Rear cover
Remove when connecting connectors.
2 Fanfold paper cover
Open to insert fanfold paper.
3Paper feed guide
Install the guide when you use fanfold paper.
4 Connector part
Connect each cable. For details, see "<Rear Connector Part>" on page 17.
5 AC cable hook
Prevents the AC cable from being tangled with other cables. Be sure to pass it through the hook.
6Cable holders
Prevents the cables from being tangled with each other. When connecting the LAN cable, or USB
cable be sure to pass them through the holder.
16
Page 17
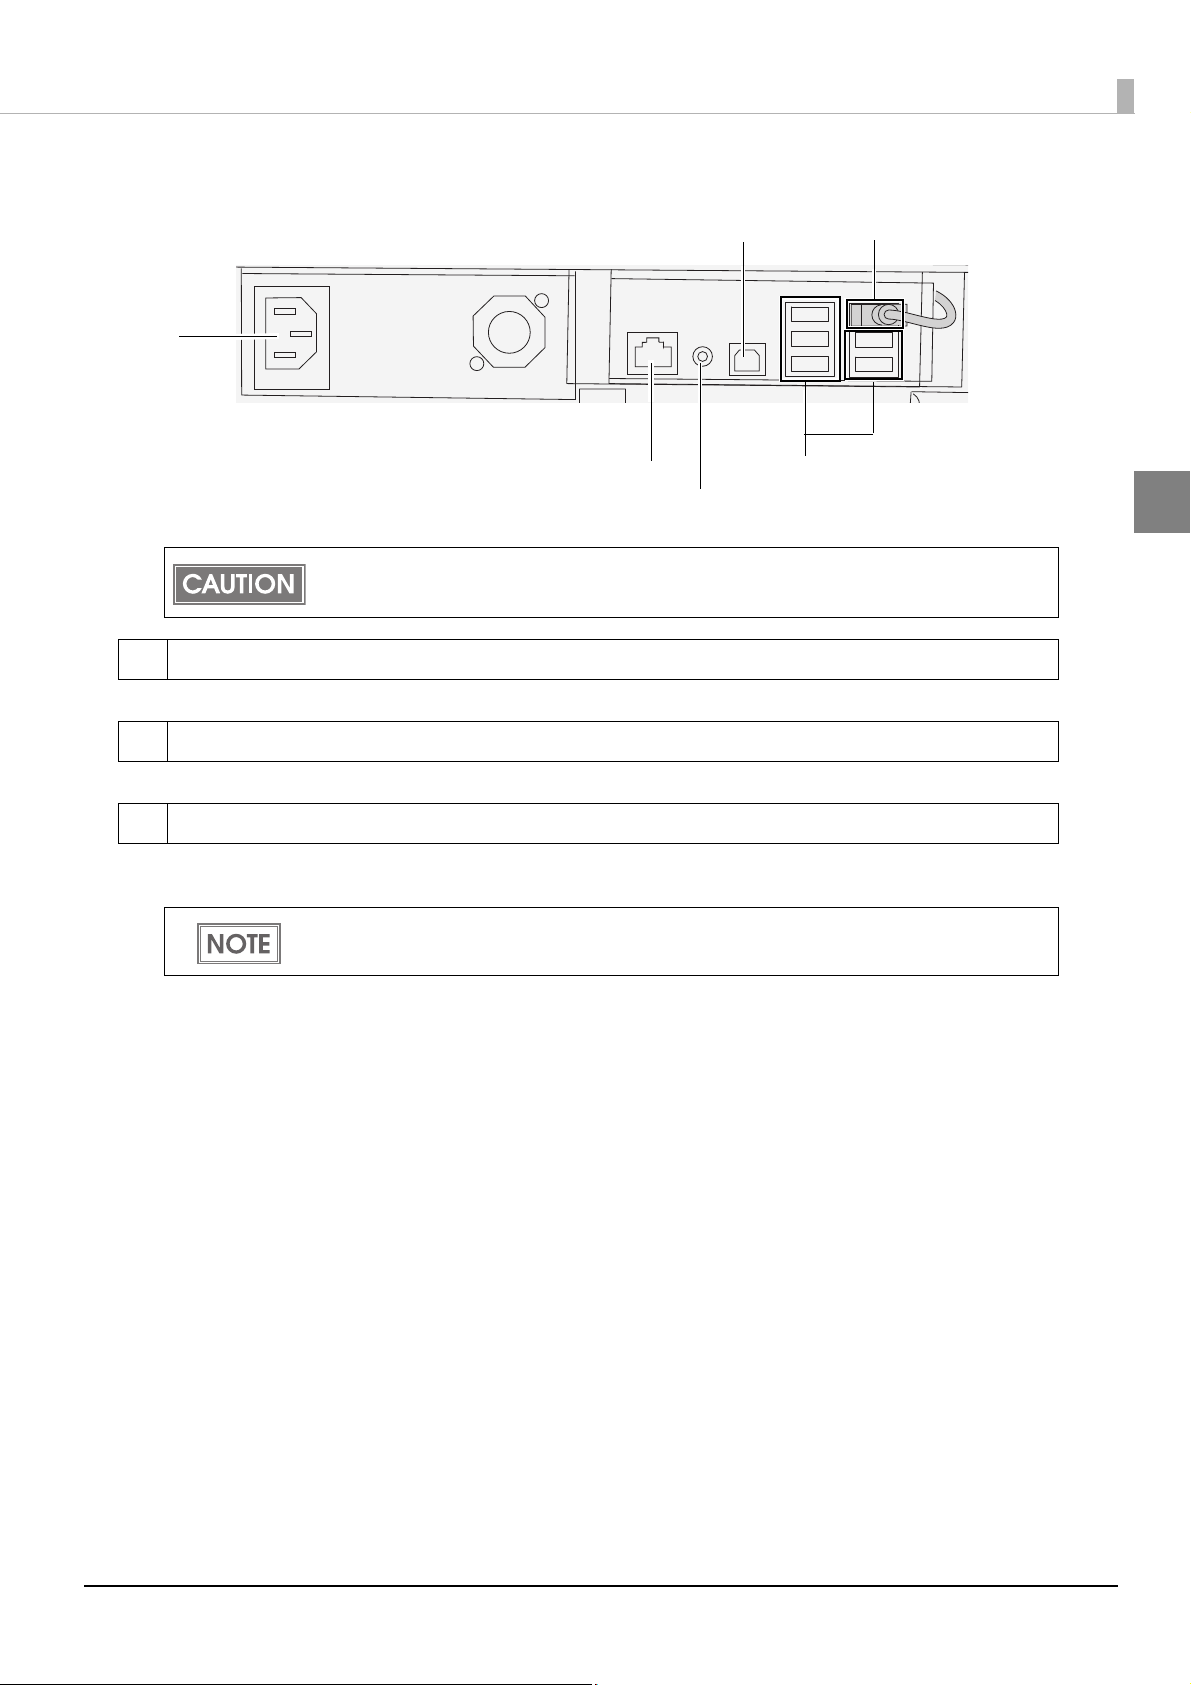
1 Power connector
<Rear Connector Part>
1
2
*Not available
*Never disconnect.
3
*Not available
Chapter 1 Overview and Basic Operations
1
Never disconnect the 3 USB connectors on the right side that are initially connected on the
product.
Connect the AC cable.
2 LAN connector
Connect a LAN cable when using a wired LAN connection.
3 USB B connector
Connect the computer.
To connect the rear connectors, you need to remove the rear cover. For details on how to
remove the cover, see
"Connecting the Cable" on page 26.
17
Page 18
Power Button
Before turning on the printer, be sure to check that the AC cable is connected to the
power supply.
CAUTION
• When DIP switch 1 is OFF, the power is turned on after the POWER button has been pressed for 3 seconds.
• When DIP switch 1 is ON, the printer settings are reset after POWER button has been pressed for 3 seconds.
See "Setting the DIP Switches" on page 33 for DIP switch setting.
18
Page 19

Chapter 1 Overview and Basic Operations
/ : Lights / : Flashes : Off —: No change
Status/Error Indications
The printer status is displayed with combination of lighting and flashing of LEDs.
When an error occurs, you can find out the cause and the remedy from the LED indication for the error.
LED
Power Error Ink Paper
———
———
Status Remedy
Power on
Power ing off
Charging ink
Closing roll paper cover
Saving or printing data
The ambient temperature may be
too low or too high.
Turn OFF the printer power, and
Temperature error
Maintenance requirement The printer needs repair.
Unrecoverable nozzle
clogging error
(Missing Dot Acceptable
Print Mode)
Fatal error
Cutter error
turn the printer ON in a location
with an ambient temperature of
10 to 35 C.
"Environmental Conditions"
(See
on page 134.
This condition occurs when
turning on the printer after a fatal
error resulting from unrecoverable
nozzle clogging. In this mode,
printing is performed even with a
missing dot. The printer needs
repair.
1. Turn the power off.
2. Open the roll paper cover and
remove the jammed paper if any.
3. Turn the power on.
If the same error persists, the
printer needs repair.
—
—
—
)
1
19
Page 20
LED
/ : Lights / : Flashes : Off —: No change
Power Error Ink Paper
—
—
——
——
——
——
Status Remedy
Set specified papers. (See
"Loading/Replacing the Paper"
on page 37
Paper size error
Paper path error
Paper jam error Remove the jammed paper.
Paper type error
Ink end
Waste ink cartridge is full
Ink cartridge is not loaded
Ink cartridge is not loaded
correctly
Ink cartridge cover is open Close the ink cartridge cover.
Ink cartridge is low
Waste ink cartridge is nearly
full
Paper empty
Paper out error
Roll paper cover is open Close the roll paper cover.
Paper removal error
When the specified paper is not
available, cancel the print job
from the spooler. If no print job is in
the spooler, turn off and on the
printer to recover from the error.
Set DIP switch 3 setting to paper
feeding method in the printer
utility. (See
Switches" on page 33
Set specified papers. (See
"Loading/Replacing the Paper"
on page 37
Replace the ink cartridge with a
new one. (See
Cartridge" on page 30.
Load the ink cartridge correctly.
(See
on page 30
The time to replace the ink
cartridge is close. Prepare a new
ink cartridge.
Set the papers. (See
Replacing the Paper" on page
.)
37
Remove the fanfold paper
remaining. (See "Loading/
Replacing the Paper" on page 37
.)
"Setting the DIP
)
.)
"Loading the Ink
)
"Loading the Ink Cartridge"
.)
"Loading/
)
20
Page 21
Chapter 1 Overview and Basic Operations
Utility Operating Environment
For setting, access this product from the Web browser of the terminal or computer.
• Interface of this product: Ethernet
• Web browser of the terminal: Not specified
To use Template Colorization of Printer Utility, use a Web browser supporting HTML5.
Setting Internet Explorer 8
If Template Colorization of Printer Utility does not work on Internet Explorer 8, set Internet Explorer 8 as
follows:
On the Web browser, select [Tool]-[Internet Option] and then the [Security]
1
tab.
Click the [Trusted site] icon and click [Site].
2
The "Trusted site" window appears. Set as shown below and click [Close].
3
Deselect the [Require server verification (https:) for all sites in this zone] checkbox.
he following in [Add this website to the zone] and click [Add].
http://[IP address of the this product]/
The screen returns to the Internet Option window. Click [OK].
4
If the function does not still work with the abovementioned settings, set as follows:
Disable the popup function of Internet Explorer 8.
Disable the popup block function of the installed Tool bar.
1
21
Page 22

22
Page 23

Chapter 2 Setup
Setup
When You Use This Product for the First Time
Ink charging and media position detection setting are necessary before you use this product for the first
time.
Follow the steps below.
Load the label paper roll supplied with this product.
1
For details, see "Loading/Replacing the Roll Paper" on page 38.
Turn on the printer.
2
Load a new ink cartridge.
3
For details, see "Loading the Ink Cartridge" on page 30.
Ink charging starts after the ink cartridge cover is closed.
When the ink cartridge is installed for the first time, the printer takes
approximately 8 minutes for ink charging.
The POWER LED flashes during ink charging. Do not turn
off the printer or open the roll paper cover or the ink cartridge cover.
If the power is turned off, the roll paper cover is opened,
or the ink cartridge cover is opened during ink charging,
ink charging will restart from the beginning and an
extremely large amount of ink will be consumed.
When ink charging finishes, the POWER LED stops flashing and stays on.
2
Set the media source and media detection of the printer for the paper type
4
you will be using.
Connect the printer to the computer via a network. Then access Printer Setting of this product from
the Web browser and configure the settings. This setting is not required when the Label Roll Paper
supplied with this product is loaded.
For details, see
"2. Setting for media detection" on page 41.
The colors of printouts may become abnormal if you tilt this product or subject the printer to
any shocks. When you move this product after ink charging, check the colors by performing a
test print.
If the colors of printouts are not normal, perform head cleaning. See
(Printer Setting)" on page 93
If you turn the printer off without using the power button, the print head may not return to its
home position. In this case, the next time the printer is turned on, the auto head cleaning is
performed, which wastes ink.
for how to perform head cleaning.
"Utility-Head Cleaning
23
Page 24
Flow of Setup
5. Setting the Printer IP Address (page 35)
7. Attaching/Adjusting the Paper Ejection Tray (page 59)
3. Loading the Ink Cartridge (page 30)
6. Loading/Replacing the Paper (page 37)
2. Connecting the Cable (page 26)
1. Installing the Printer (page 25)
4. Setting the DIP Switches (page 33)
This chapter consists of the following sections along with the setup flow of the product and peripherals.
24
Page 25
Chapter 2 Setup
Air vents
Located on the left,
right, and back.
Installing the Printer
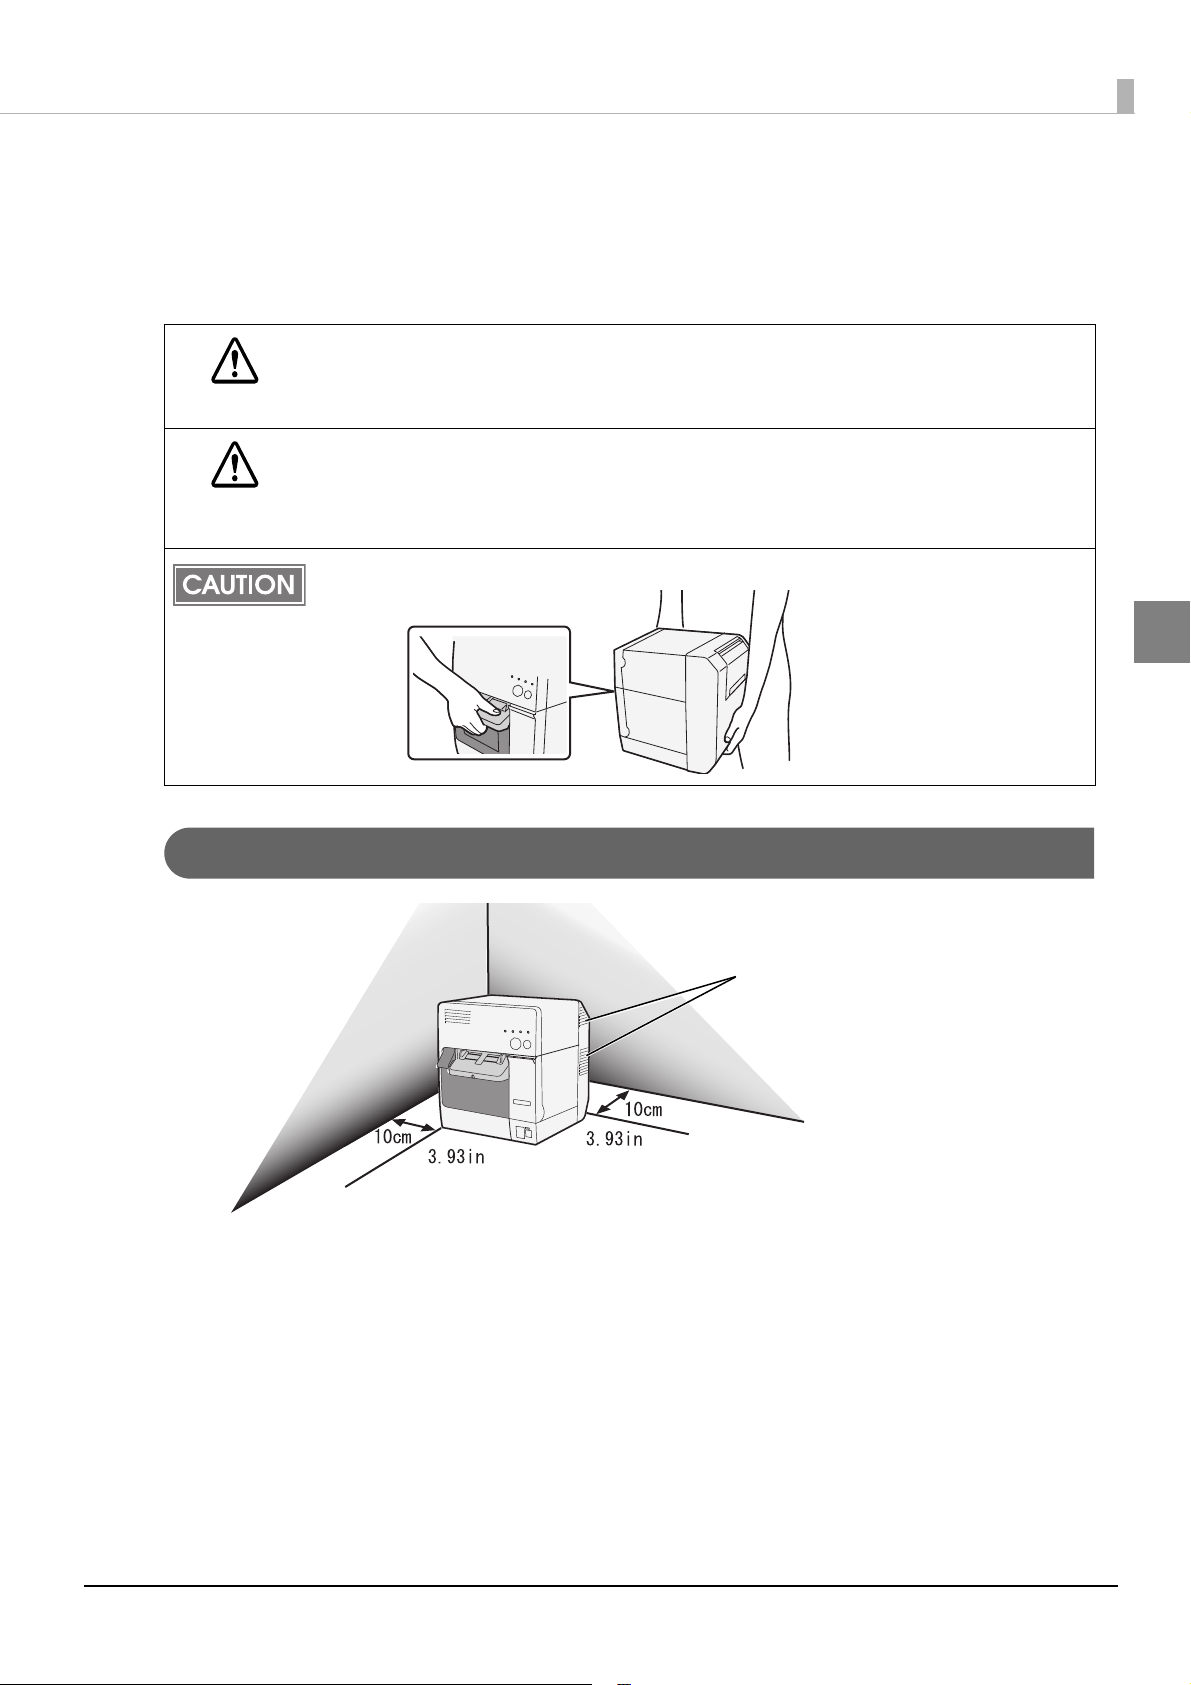
Install the product at an appropriate place, leaving enough space around the product.
If you install the product against a wall, keep the rear and sides of the product more than 10 cm from the
wall.
Do not block the air vents on this product.
Blocking the air vents may result in internal heat build-up and fire.
WARNING
Install the product horizontally on a flat, stable, and vibration-free surface.
Otherwise, the roll paper cover may not operate correctly, and your fingers may be caught.
CAUTION
Do not tilt the product with the roll paper cover open.
The roll paper cover may close unexpectedly, and your fingers may be caught.
When carrying the product, be sure to hold the parts as shown in the picture below.
2
Installation
• Leave enough space for the roll paper cover, ink cartridge cover, and fanfold paper cover to be fully
opened.
• Protect the product from heavy impacts. They may cause defective print.
• Do not allow cables to catch or foreign matter to accumulate under the product.
25
Page 26
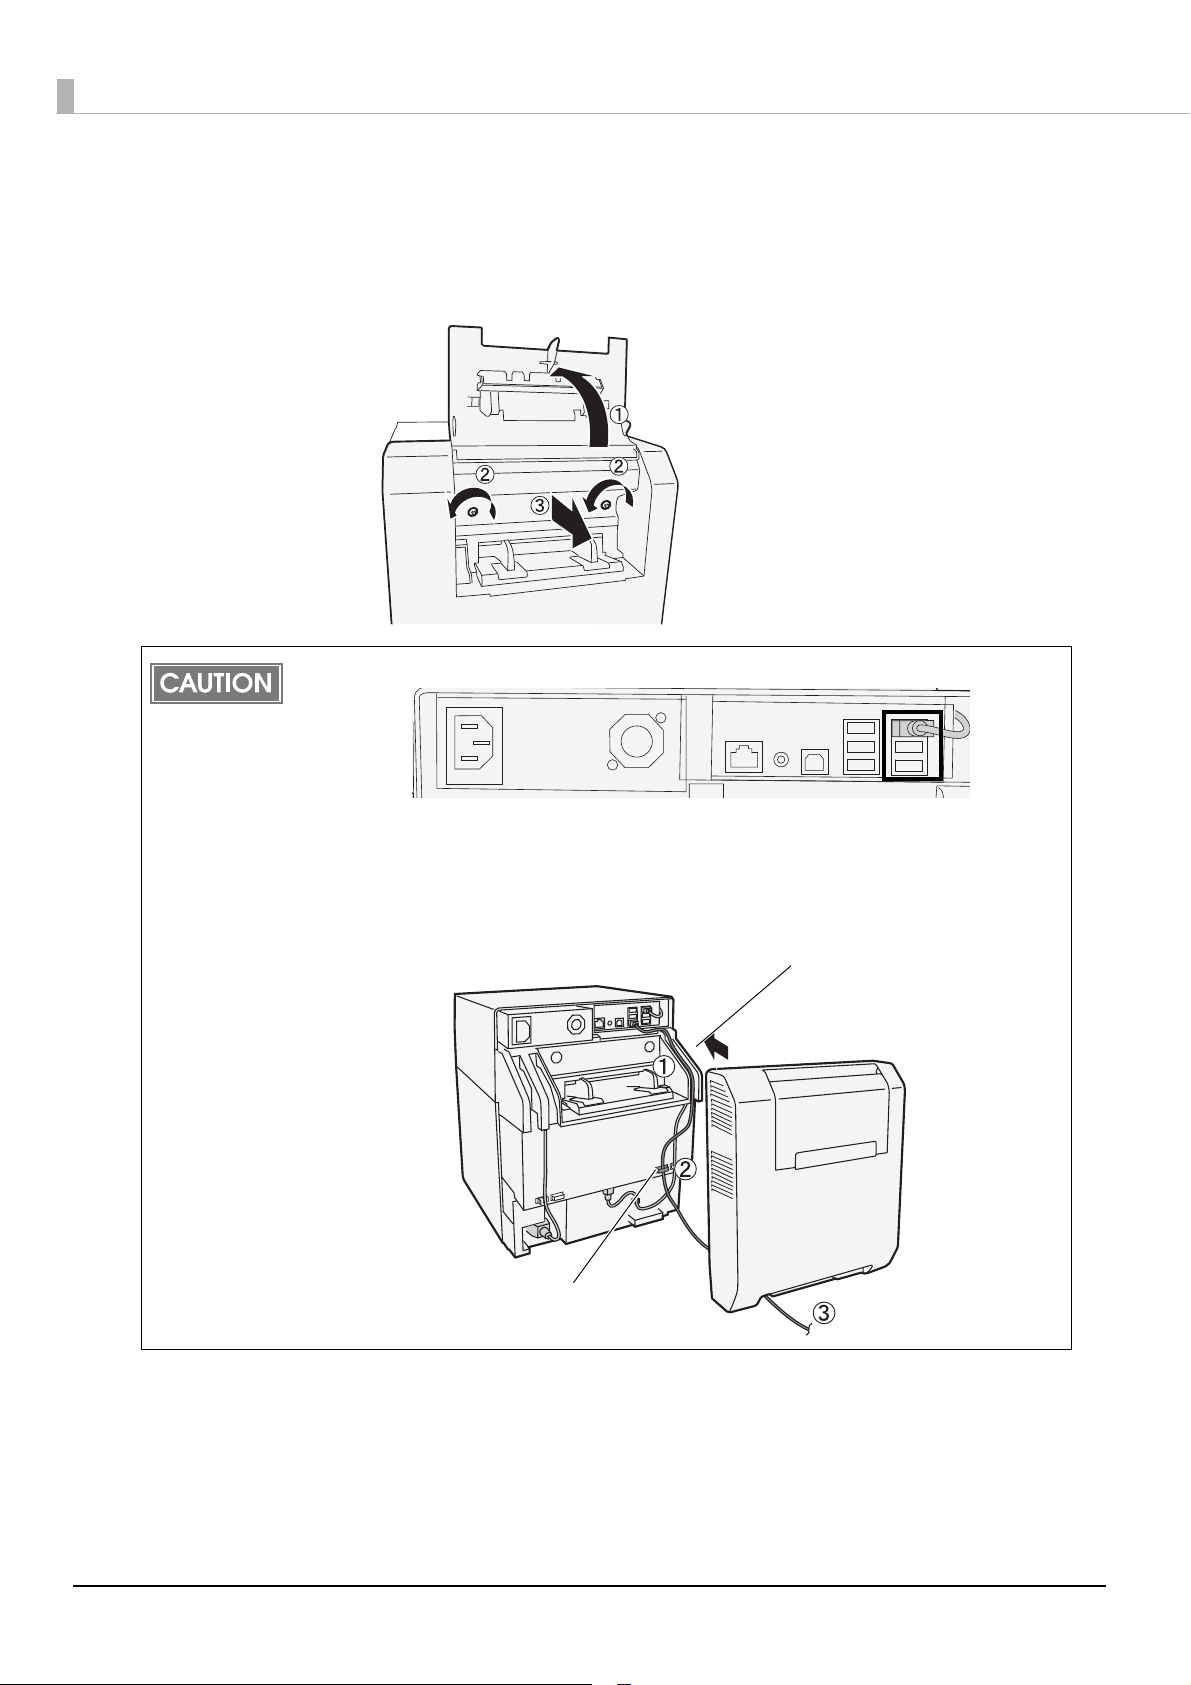
Connecting the Cable
Cable holder
Groove
To access to the rear connectors, you need to remove the rear cover.
Open the fanfold paper cover (1), loosen the two screws (2), and then remove the rear cover (3). After
connecting the cable, be sure to re-install the rear cover.
Never disconnect the cables initially connected to the USB connectors on the right.
When connecting USB devices to the USB connector, be sure to pass the cable through the
groove (1), hook the cable holder (2), pull it out from the bottom of the rear cover (3), and
then reattach the rear cover.
The cable holder prevents the cables from piling on each other. If the AC cable or other
cables are piled on each other, the rear cover cannot be attached.
26
Page 27
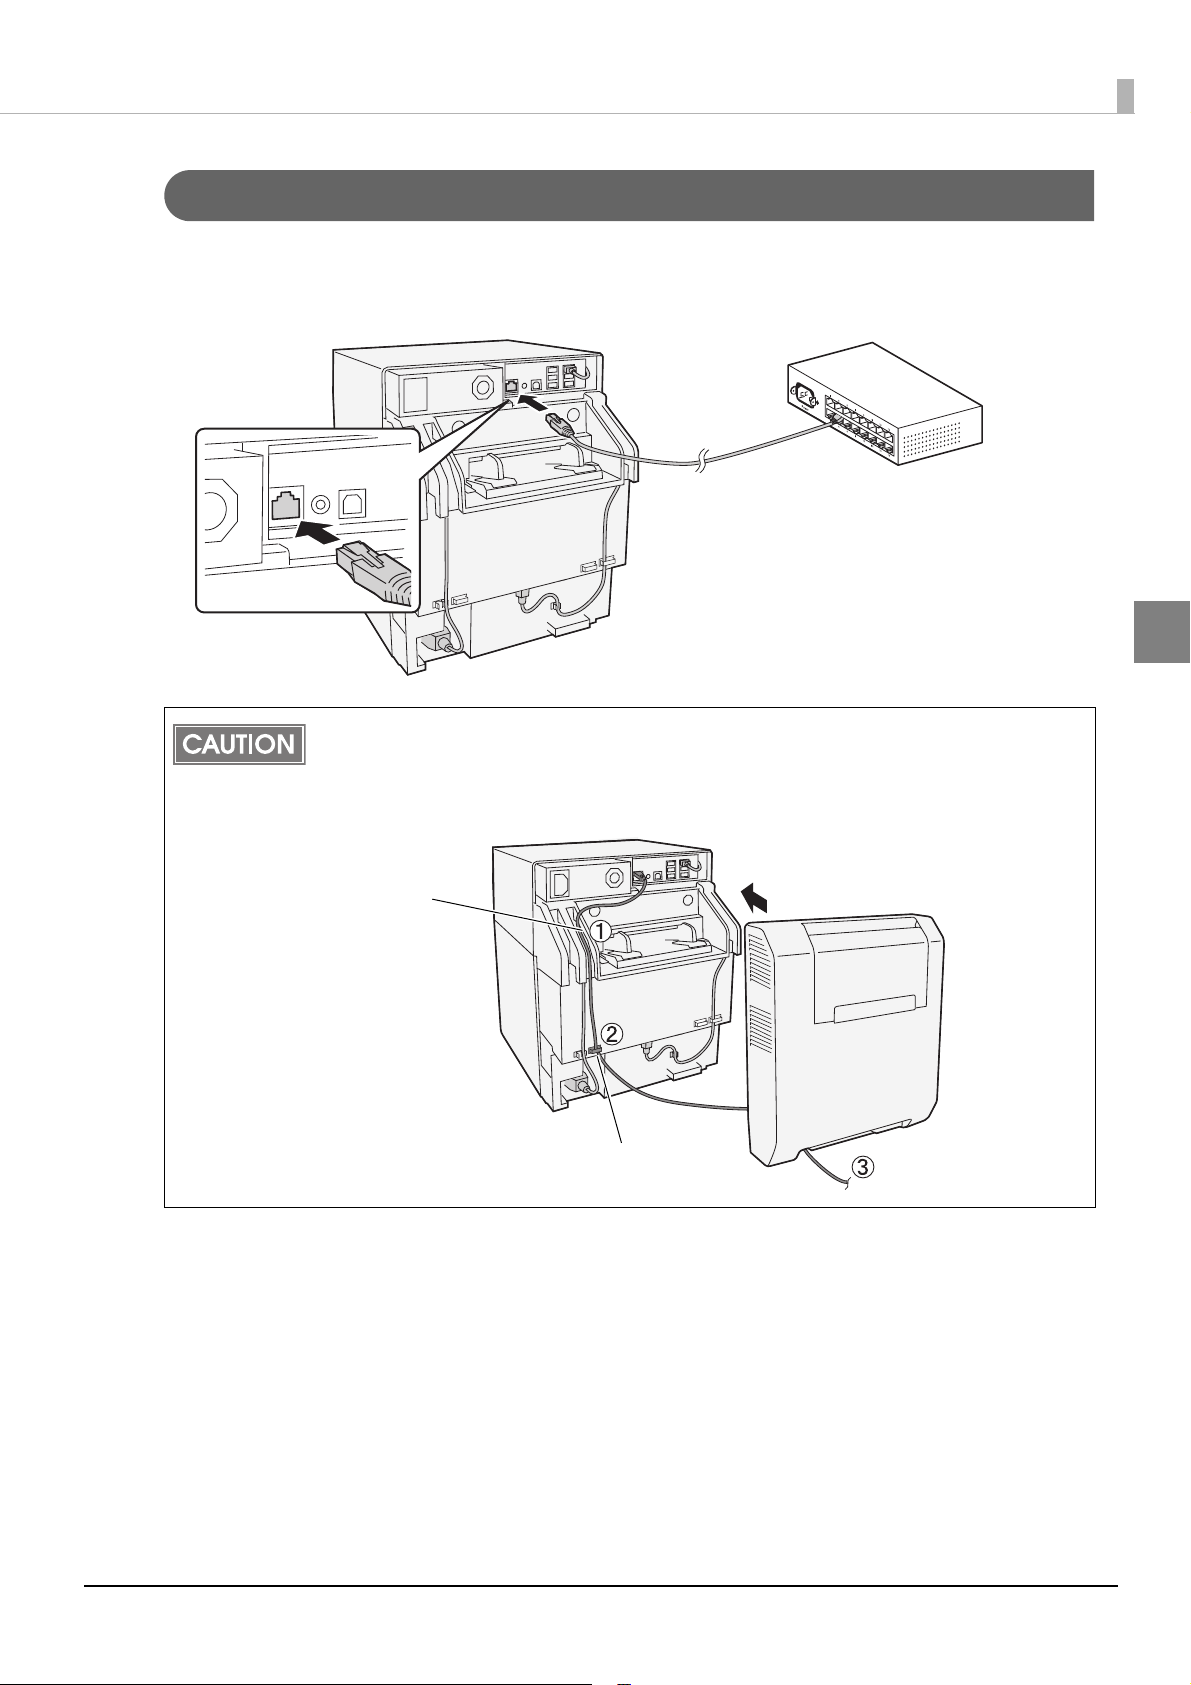
Chapter 2 Setup
Cable holder
Groove
Connecting LAN cable
To connect this product to a network, connect the LAN cable to the LAN connector.
When you use the product as a standalone device, connecting the LAN cable is not required.
2
Be sure to pass the LAN cable through the groove (1), hook the cable holder (2), pull it out from
the bottom of the rear cover (3), and then reattach the rear cover.
The cable holder prevents the cables from piling on each other. If the AC cable or other cables
are piled on each other, the rear cover cannot be attached.
27
Page 28
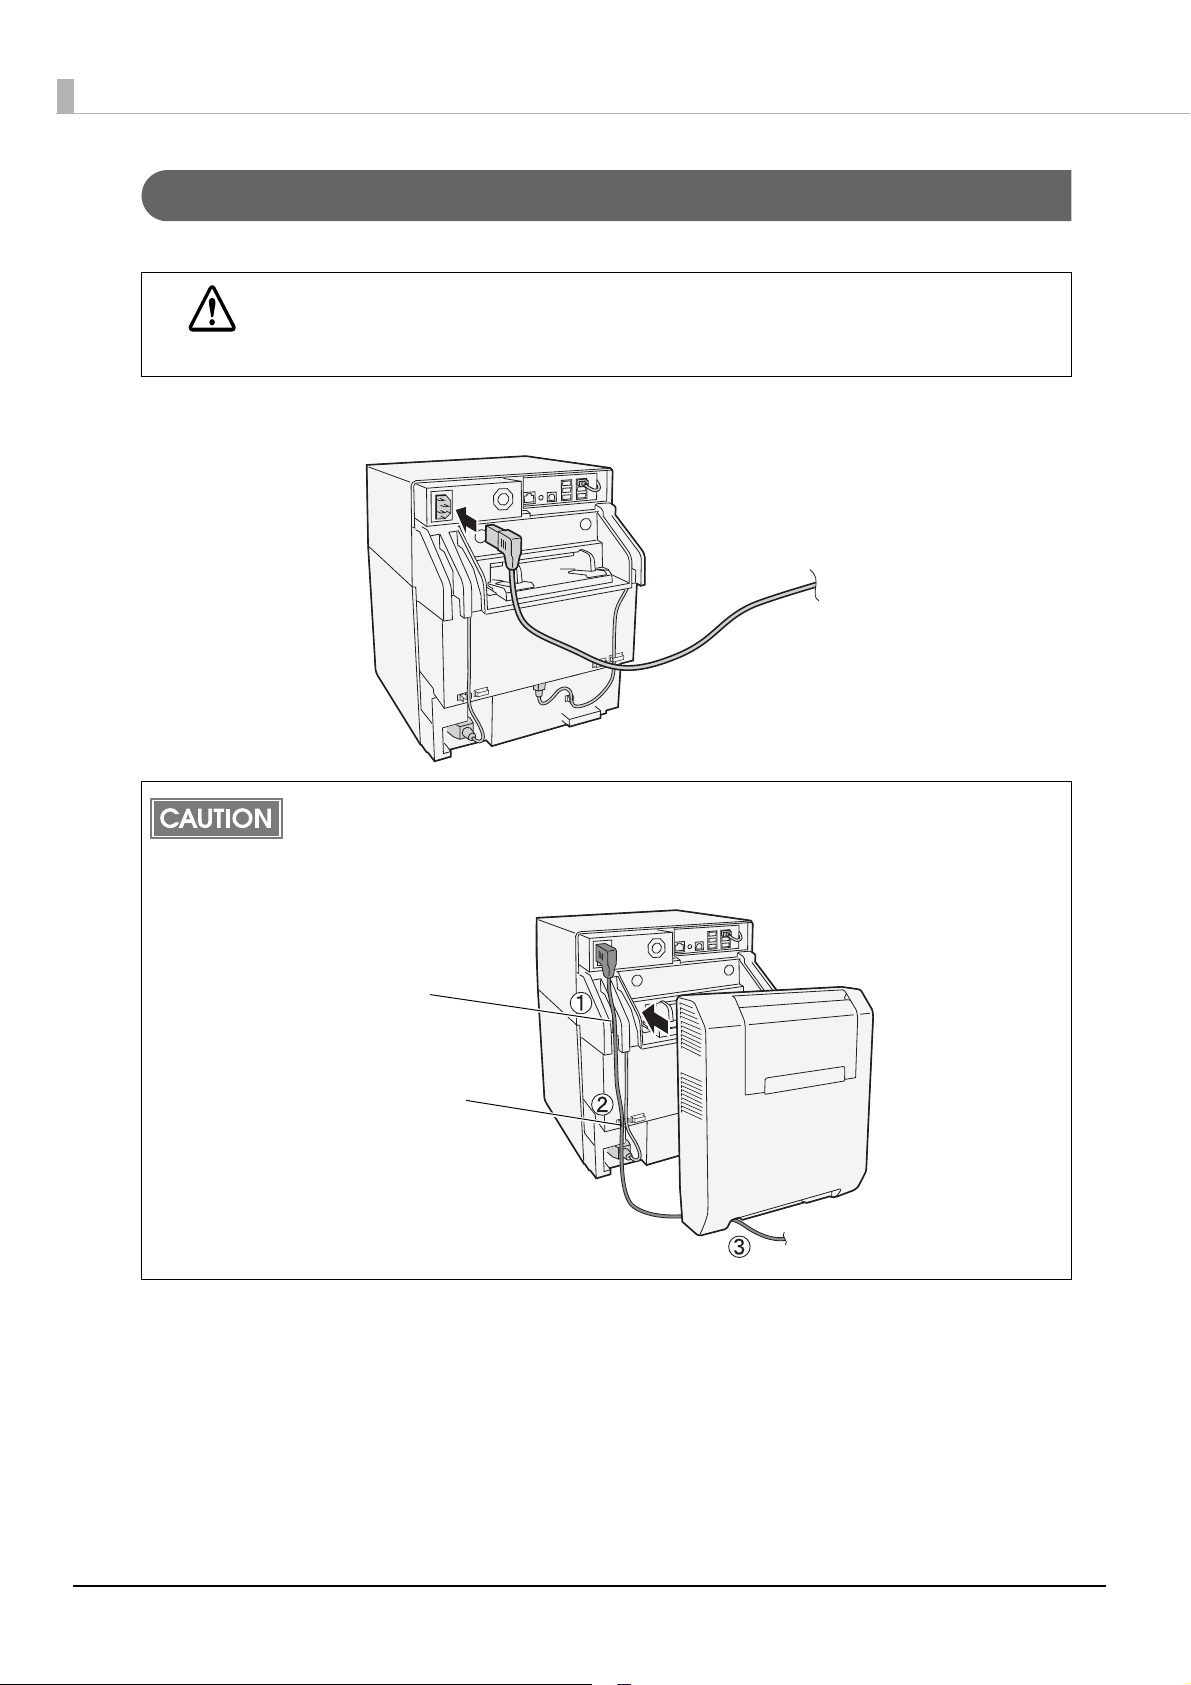
Connecting AC cable
AC cable hook
Groove
Follow the steps below to connect the product to the power supply.
Be sure to use the AC cable that is included with the product, and ground it.
WARNING
Connect the AC cable to the power supply connector.
1
Be sure to pass the AC cable through the groove (1), hook the AC cable hook (2), pull it out
from the bottom of the rear cover (3), and then reattach the rear cover.
The AC cable hook prevents the cables from piling on each other. If the AC cable or other
cables are piled on each other, the rear cover cannot be attached.
28
Page 29
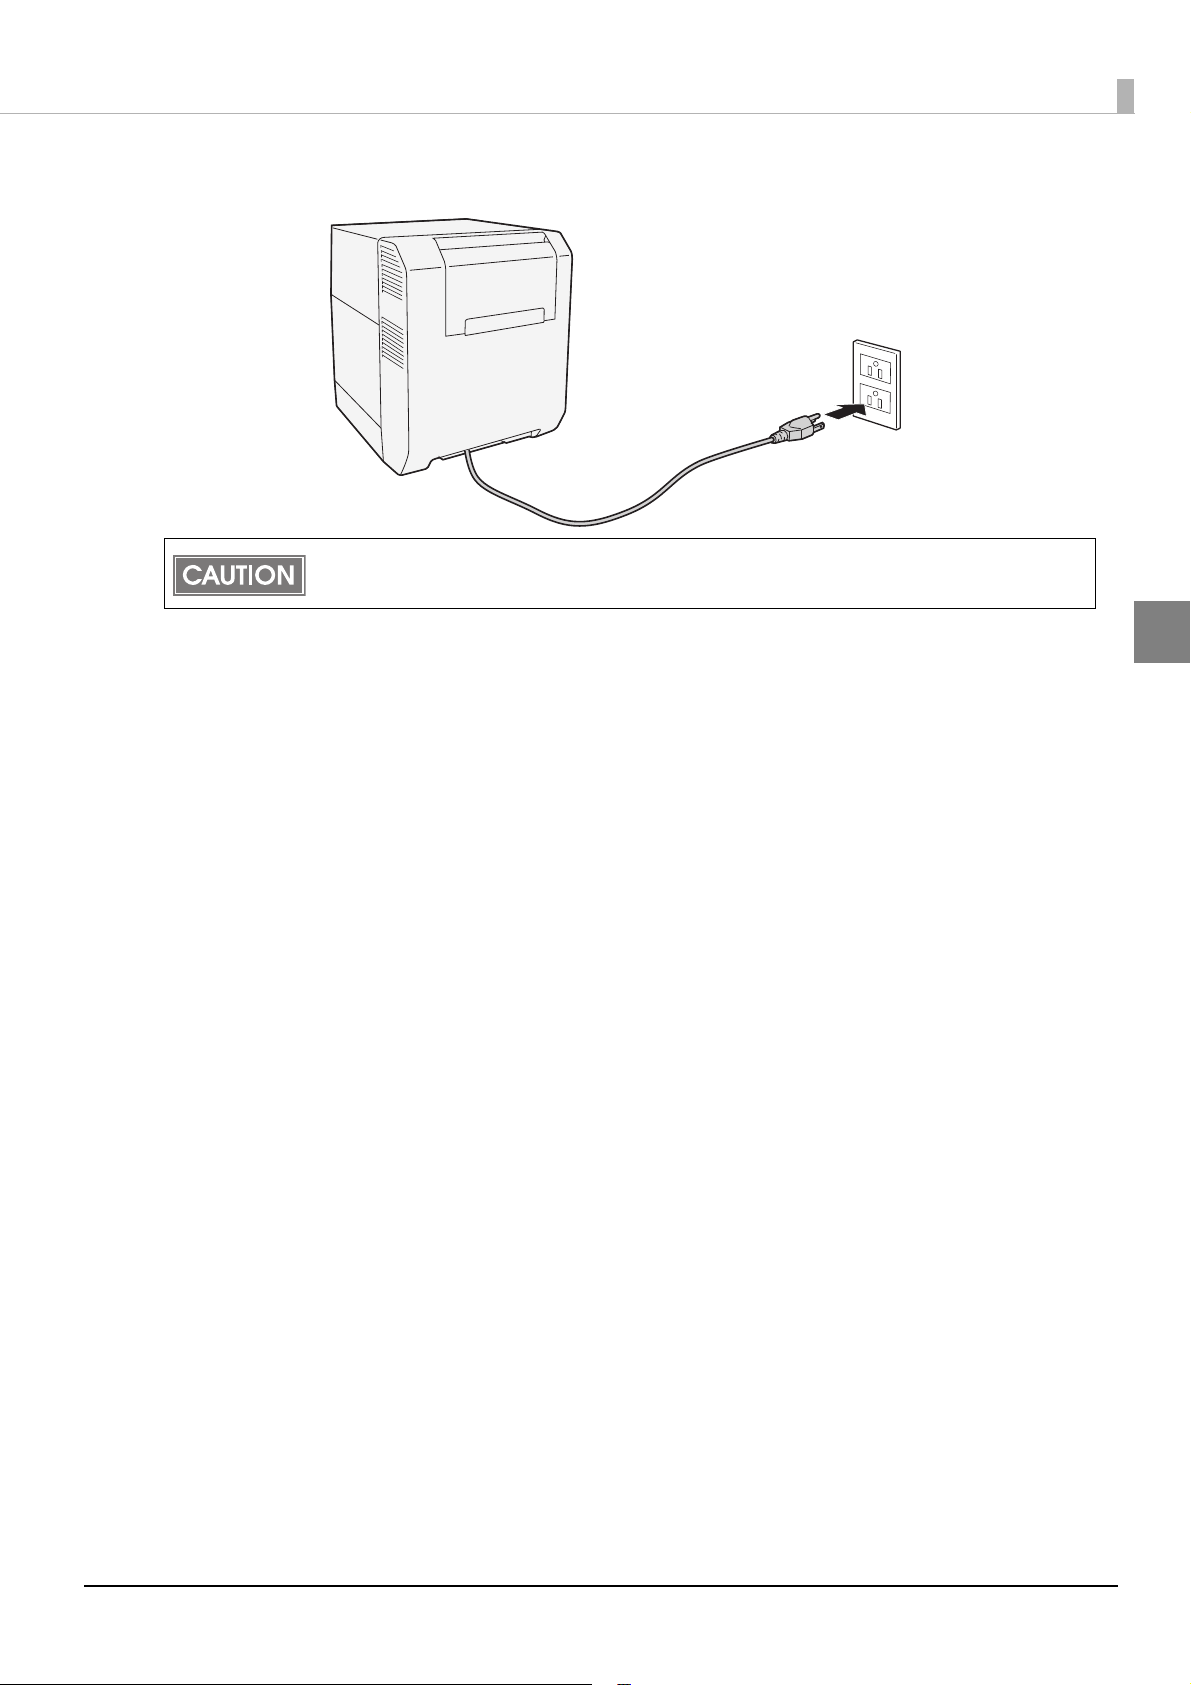
Connect the power plug to the wall outlet.
2
Do not turn on the power before loading the roll paper. For details on how to load the roll paper,
"Loading/Replacing the Paper" on page 37.
see
Chapter 2 Setup
2
29
Page 30
Loading the Ink Cartridge
This section describes the procedure for loading the ink cartridge for the first time and performing ink
charging.
When loading the ink cartridge for the first time, be sure to load the label roll paper shipped
with the product before loading the ink cartridge. (See "Loading/Replacing the Paper" on
page 37
Store the ink cartridge in a cool and dark space and use it before the expiration date printed
on the individual package. Use up the ink within 6 months after opening the package.
Do not open the ink cartridge package until you are ready to load it in the product. The ink
cartridge is vacuum packed to preserve its quality.
After storing the ink cartridge in a cold place for a long period of time, leave the ink cartridge
at room temperature for 3 hours or more before using it.
Do not touch the green board on the ink cartridge. You may not be able to print correctly.
Do not disassemble or alter the ink cartridge. You may not be able to print correctly.
To enable maximum printer performance, we recommend that you use a genuine Epson ink
cartridge (model: SJIC15P). If you use an ink cartridge other than a genuine Epson cartridge,
it may adversely affect the printer hardware and print quality, and you may not be able to
obtain maximum printer performance. We do not insure the quality and reliability of ink cartridges other than genuine Epson cartridges. A fee will be charged for repairing a damaged
or failed product caused by using a non-genuine ink cartridge even if it is during the warranty
period.
Do not remove the ink cartridge from the product when you ship it.
.)
Verify that the power is on (the power lamp is lit) and that the label roll
1
paper shipped with the product is loaded.
Pull down the ink cartridge cover to the front to open it.
2
Shake new ink cartridge package 4 or 5 times before opening it and take
3
out the ink cartridge from the package.
Push the ink cartridge gently into the cartridge holder as shown below.
4
30
Close the ink cartridge cover.
5
Page 31

Chapter 2 Setup
Precautions on Handling
When the ink cartridge is installed for the first time, the product uses ink to prepare for printing (ink charging).
Ink charging takes approximately eight minutes.
The ink cartridge contains 3 colors of ink. Even when one particular color is specified, all 3 colors of ink are
used for printing and for keeping the print head in good condition. When the ink level of even one color
comes to the lowest limit, the product stops printing.
Do not touch the IC chip on the cartridge. Doing so may cause operating/printing malfunction.
This product uses ink cartridges equipped with an IC chip that monitors the amount of ink used by each
cartridge. Cartridges are usable even if they are removed and reinstalled. However, if an ink cartridge in
which little amount of ink remains is removed and reinstalled, it may not be usable. Some ink is consumed
each time cartridges are installed because the product automatically checks their reliability.
Since ink cartridges are designed to stop the operation before ink runs out completely to maintain the
quality of the print head, some ink remains in the used ink cartridge.
All the ink colors are consumed also for the maintenance operations when an ink cartridge is replaced and
for print head cleaning.
Do not turn off the product or open the ink cartridge cover while charging ink (Power light is flashing).
Opening the cover may cause the ink to be recharged, resulting in more ink being consumed. Also, it may
cause printing malfunction.
Even for monochrome printing, all the ink colors are used in an operation designed to maintain the printing
and print head quality.
Do not disassemble the ink cartridge. Doing so may cause ink to adhere eyes and skin.
Do not disassemble and remodel the ink cartridge. Doing so may cause printing malfunction.
Use of an old ink cartridge may result in reduced print quality. Use it up within six months after opening the
package. The usage period for ink cartridges is printed on the packaging of individual ink cartridges.
If ink contacts your skin, eyes, or mouth, take the following actions. -When it gets onto your skin, immediately
wash the area with soap and water.
• When ink gets into your eyes, immediately flush them with water. Leaving the ink as is may result in
bloodshot eyes or mild inflammation. If something is wrong, immediately consult with a doctor.
• When ink gets into your mouth, immediately spit it and consult with a doctor.
There may be some ink around the ink supply port on the removed ink cartridge. Take care so that it does
not stain the desk or other surface.
Do not remove the ink cartridge, except when you replace it.
Do not open the ink cartridge package until you are ready to install it in the product.
Open the ink cartridge cover, and wait at least 4 seconds until internal operations stop. If you take out the
ink cartridge in less than 4 seconds, there is a risk that the ink may spurt out.
Do not shake the ink cartridge too hard. The ink cartridge may leak if you shake it around too much or push
the sides strongly.
Do not allow foreign objects to fall into the cartridge installation section. Doing so may cause printing
malfunction.
When ink is charged for the first time (right after purchase), ink is consumed for filling the print head nozzle
(ink discharge holes) to get ready for printing. That is why the number of the printable sheets may be fewer
than for the cartridges to be installed later.
Dispose the ink cartridges properly following the law or regulations of your country and area.
If you turn the power off the product using the power button, the print head is automatically capped, which
prevents the ink from drying. After installing the ink cartridges, be sure to turn the power off using the power
button when you are not using the product. Do not pull out the power plug or trip the breaker while the
power is on.
Printing on water-repellent paper such as art paper, which is slow-drying, may cause print stains. Also,
printing on glossy paper may cause finger prints on the paper or ink may adhere to your fingers when you
touch it. Select paper not to case print stains before use.
2
31
Page 32

Epson recommends the use of genuine Epson ink cartridges. For the best performance of the printer, it is
recommended to use genuine Epson ink cartridges. Use of non-genuine Epson ink cartridges can adversely
affect the printing quality and prevent the printer from realizing its maximum performance. Epson cannot
guarantee the quality and reliability of non-genuine Epson products. Repairs for any damage or
breakdown of this product due to the use of non-genuine Epson products will not be free of charge even if
the warranty period is still valid.
Color adjustment of the product is based on the use of genuine Epson ink cartridges. Use of non-genuine
ink cartridges may result in reduced print quality. Use of genuine Epson ink cartridges is recommended.
Keep ink cartridges out of the reach of children.
A cool and dark place is recommended to store ink cartridges.
If the ink cartridge is stored in a cold place for a long period of time, let it warm up at least 3 hours before
using it.
If moving or transporting the product after the ink cartridges are installed, leave them installed during the
moving or transporting process.
The ink charging will start. When an ink cartridge is loaded in the product for the first time, the ink charging
will take approximately eight minutes.
32
Page 33

Chapter 2 Setup
Setting the DIP Switches
Change the DIP switch settings in the following cases.
• When changing the power button operation
• When switching the paper type between roll paper and fanfold paper (The default setting is roll paper)
• When changing the volume of the buzzer
Setting Procedure
Follow the steps below to change the DIP switch settings.
Turn the power off before removing the DIP switch cover.
Otherwise, a short-circuit may cause the printer to malfunction.
CAUTION
DIP switch setting becomes enabled after turning the power on or completing reset by the
interface.
Make sure the power supply for the printer is turned off.
1
Open the ink cartridge cover and remove the DIP switch cover.
2
Set the DIP switches, using the tip of a tool, such as a small screwdriver.
3
2
Attach the DIP switch cover, and close the ink cartridge cover.
4
33
Page 34

Function of the DIP Switches
SW Function ON OFF Factory settings
1 Operation of the power button Reset Power ON/OFF OFF
2 Internal use Fixed to OFF (Do not change) OFF
3 Paper selection Fanfold paper Roll paper OFF
7 Internal use Fixed to OFF (Do not change) OFF
8Buzzer volume High Low OFF
34
Page 35

Setting the Printer IP Address
When using TM-C3400Z with Ethernet connection, set the IP address of TM-C3400Z.
Follow the steps below to set the IP address.
Turn on the host computer.
1
Turn on the TM-C3400Z.
2
Enter IP address of the printer to the address bar to the Web browser.
3
Default setting: 192.168.192.168
Recommend the Mozilla Firefox web browser, If using the Windows Internet Explorer
web browser, apply the latest security patch or Service Pack.
Enter ID and password to the login screen, login to the EpsonNet Config.
4
ID: epson
Password: epson
Chapter 2 Setup
2
EpsonNet Config screen appears. Select [Configuration]-[TCP/IP].
5
35
Page 36

"TCP/IP" screen appears. Set IP Address/Subnet Mask/Default Gateway.
6
Then, click the [Send] button.
36
Page 37

Chapter 2 Setup
Loading/Replacing the Paper
Follow the steps below to load the paper for the first time, change classification or type of the paper (roll
paper or fanfold paper) or replace the paper.
Loading the paper is different depending of the type of the paper to use roll paper or fanfold paper.
• For roll paper, see
• For fanfold paper, see
Preparing the Computer
"Loading/Replacing the Roll Paper" on page 38.
"Loading/Replacing Fanfold Paper" on page 49.
Use paper that meets the printer specification. For details about paper specification, see
"Product Specifications" on page 131.
When exchanging paper without changing paper type, media position detection, or paper
width, see
"Replacing the Paper" on page 109.
When using TM-C3400Z with Ethernet connection, the procedure described in this section is
not required.
To configure the paper settings for TM-C3400Z, network connection is required. USB connection is not
available for paper setting. Therefore, when using TM-C3400Z with USB connection, TM-C3400Z and the
computer must be connected with a crossover cable in order to configure the paper settings.
Prepare the following items:
• Computer (with an IP address that can be changed)
• Crossover cable
Set the IP address of the computer so that it can be connected to TM-
1
C3400Z.
Example of computer IP address setting: 192.168.192.10
The default IP address of TM-C3400Z is "192.168.192.168".
Connect the computer and the printer with a crossover cable.
2
For details on how to connect the cable, see "Connecting LAN cable" on page 27.
Turn on the printer.
3
2
Enter IP address of the printer to the address bar to the Web browser.
4
Default setting: 192.168.192.168
Recommend the Mozilla Firefox web browser, If using the Windows Internet Explorer
web browser, apply the latest security patch or Service Pack.
37
Page 38

Enter ID and password to the login screen, login to the EpsonNet Config.
3. Removing the paper feed guide (page 43)
4. Adjusting roll paper guide/paper ejection guide (page 44)
5. Loading the paper and turning on the printer (page 47)
2. Setting for media detection (page 41)
1. Removing the paper (page 39)
5
ID: epson
Password: epson
When EpsonNet Config screen appears, the preparation is complete.
6
Loading/Replacing the Roll Paper
Follow the steps below to load the roll paper.
• Loading the paper for the first time: 2 to 5
• Using up the paper completely (loads same type of paper): 1, 5
• Changing paper type or classification: 1 to 5
Before loading or replacing the roll paper, make sure that the DIP switch 3 (paper selection)
setting is OFF (roll paper). See
"Setting the DIP Switches" on page 33
38
for DIP switches settings.
Page 39
1. Removing the paper
This procedure is not required when the paper is initially loaded to the printer.
For roll paper
Press down the release lever, and pull it to the front to open the roll paper
1
cover.
Remove the roll paper or the roll paper core if any.
Chapter 2 Setup
2
Close the roll paper cover.
2
39
Page 40

For fanfold paper
Open the fanfold paper cover.
1
Remove the remaining paper.
2
40
Page 41
2. Setting for media detection
This procedure is not required when media position detection is not changed.
When paper remains in the printer, media position detection cannot be set.
Be sure to remove the paper before turning on the printer.
Turn the power on.
1
Remove the paper in the printer.
2
Enter IP address of the printer to the address bar to the Web browser.
3
Default setting: 192.168.192.168
Recommend the Mozilla Firefox web browser, If using the Windows Internet Explorer
web browser, apply the latest security patch or Service Pack.
Chapter 2 Setup
Enter ID and password to the login screen, login to the EpsonNet Config.
4
ID: epson
Password: epson
EpsonNet Config screen appears. Click [Printer Utility].
5
Epson Printer Utility screen appears. Click [Printer Setting] - [1.Media detec-
6
tion].
“Media position detection” screen appears. Change Media position
7
detection of the printer utility depending on the paper to use.
Then, click [Send].
2
41
Page 42
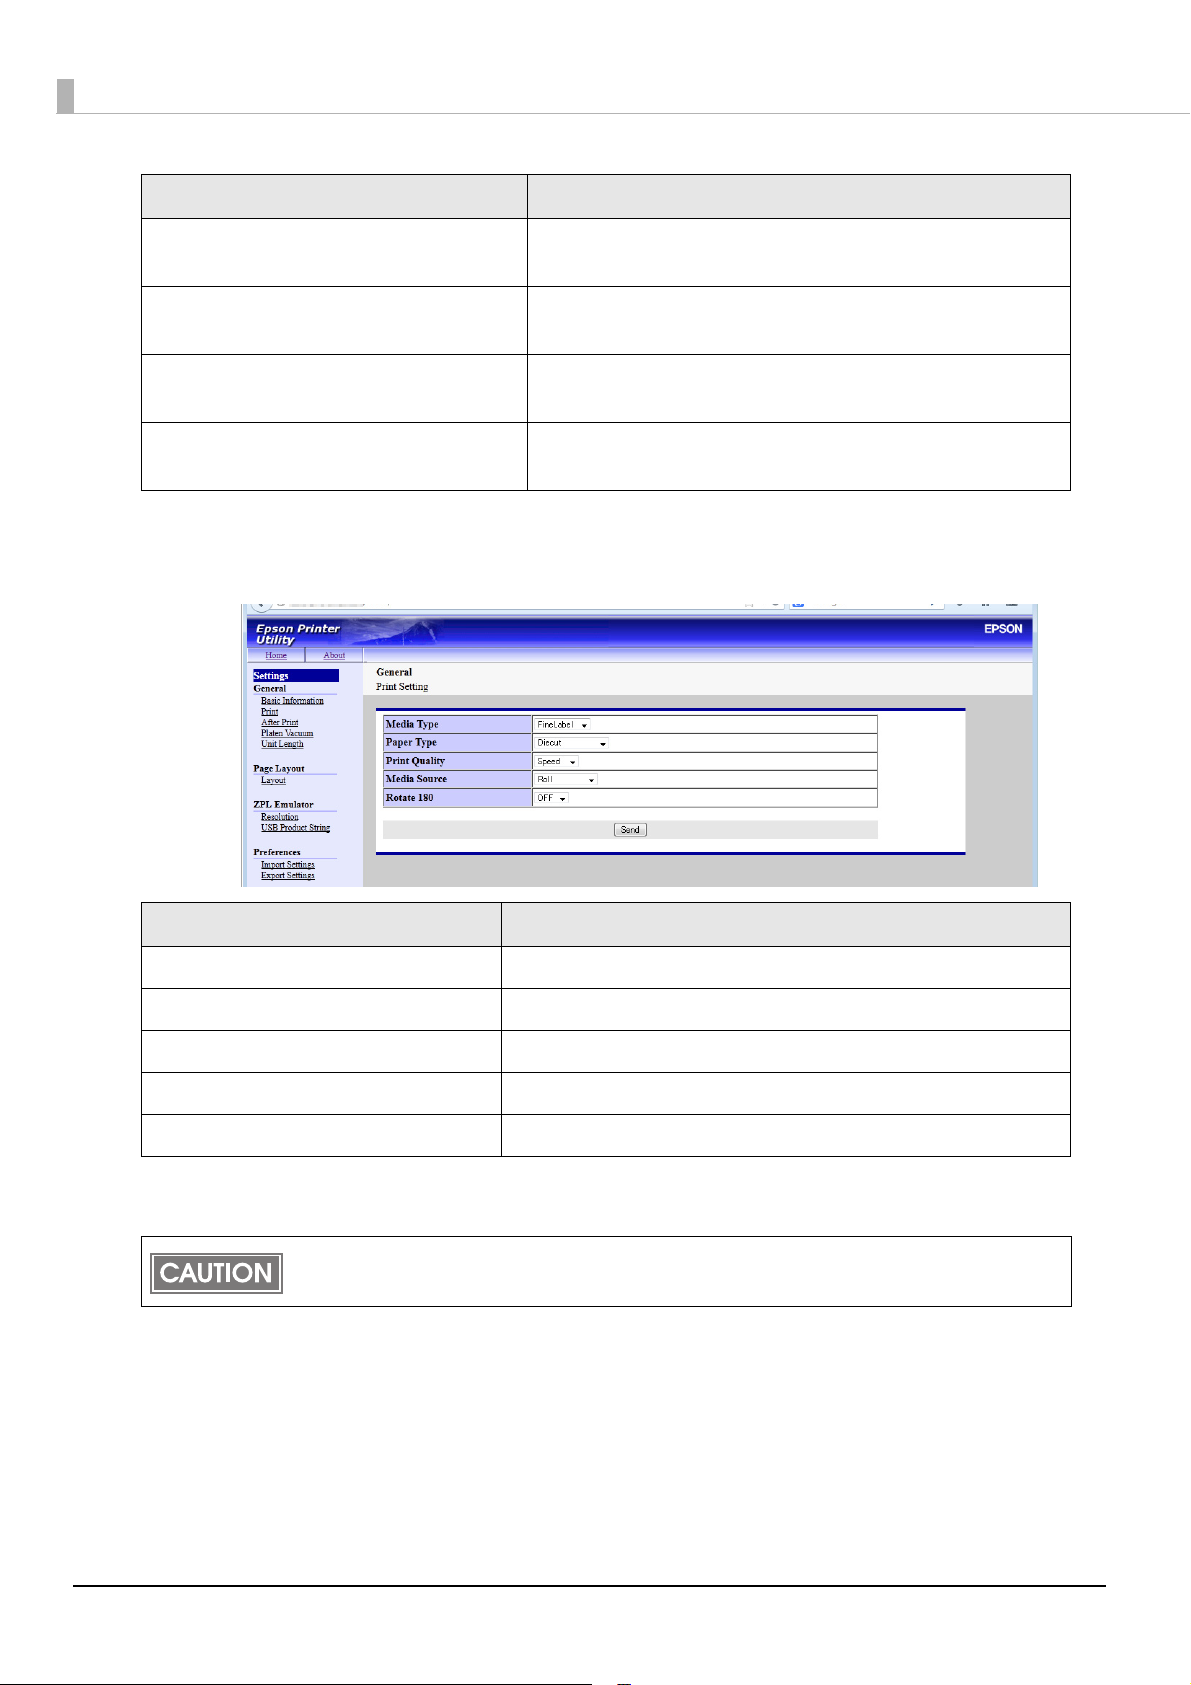
Item Description
No Detection Detects paper presence only, and does not adjust the
paper position.
Detect Blackmarks on Die-cut Labels When using Black Mark Die-cut Label, adjusts printing posi-
tion and autocutting position to the top of the black mark.
Detect Blackmarks on Continuous Paper When using Black Mark Receipt, adjusts printing position
and autocutting position to the top of the black mark.
Detect Margins Between Labels When using Die-cut Label, adjusts printing position and
autocutting position to the top of the labels.
Click [Settings] - [Print]. “Print Setting” screen appears. Set Media Type and
8
Paper Type. Then, click [Send].
Item Description
Media Type Sets the [Roll].
Paper Type Sets the paper type.
Print Quality Sets the print quality.
Media Source Sets the media source.
Rotate 180 Sets the rotation print.
Turn the power off.
9
The changed setting of the media position detection is saved in the NV memory of the printer
when the printer is turned off. Be sure to turn off the printer to enable the setting.
42
Page 43
Chapter 2 Setup
3. Removing the paper feed guide
This procedure is not required when the paper is initially loaded to the printer or the paper type is not
changed (roll paper/fanfold paper).
Attach the paper feed guide to the printer only when using the fanfold paper. Be sure to remove
the paper feed guide when using the roll paper.
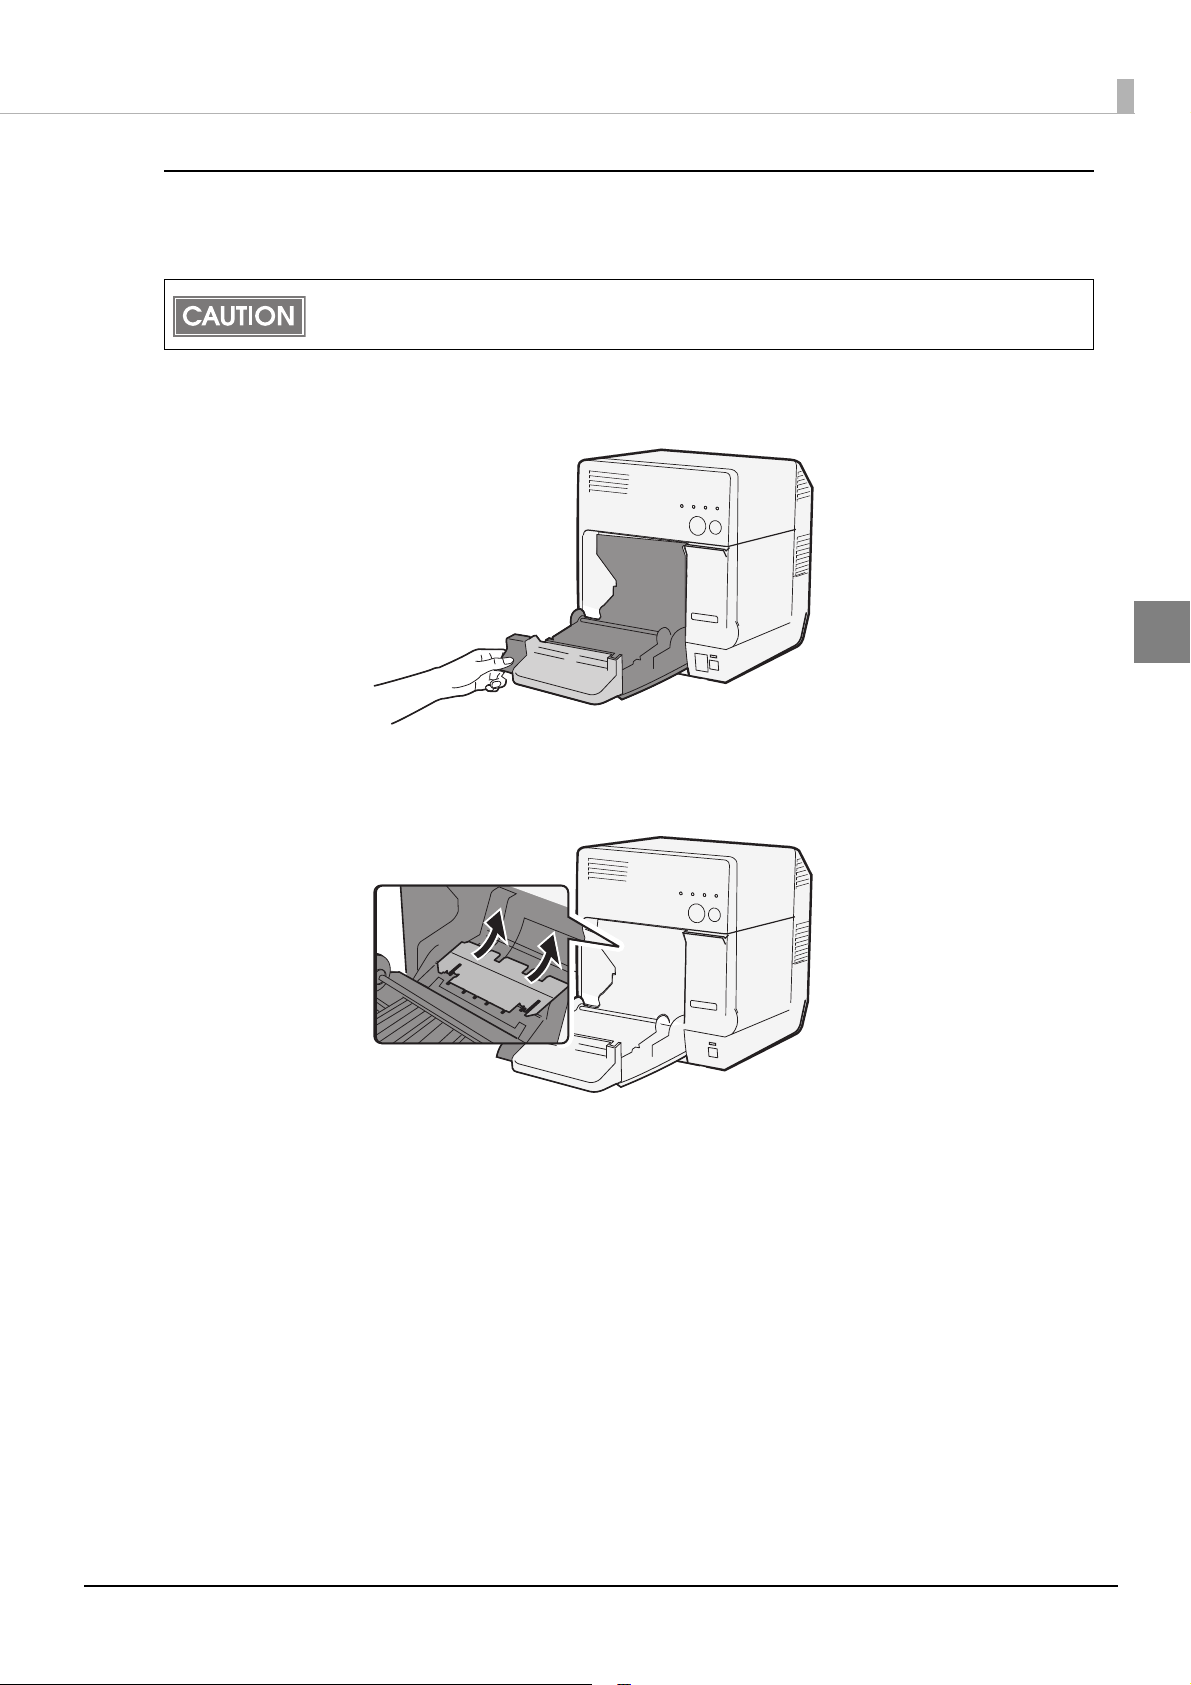
Press down the release lever, and pull it to the front to open the roll paper
1
cover.
2
If the paper feed guide is attached into the grooves inside of the roll paper
2
cover, remove it.
Close the roll paper cover.
3
43
Page 44

4. Adjusting roll paper guide/paper ejection guide
Roll paper guide
This procedure is not required when paper width is not changed.
Press down the release lever, and pull it to the front to open the roll paper
1
cover.
Unlock the roll paper guide.
2
Push the paper guide on the left in the direction of the arrow, and load the
3
roll paper with the printing side up.
44
Page 45

Lock the roll paper guide.
Paper ejection guide
4
Release the lock of the paper ejection guide with a fine-tipped object.
5
Chapter 2 Setup
2
Release the lock of the paper ejection guide.
6
Align the paper ejection guide with the roll paper width.
7
45
Page 46

Lock the paper ejection guide.
Paper ejection guide
8
Close the roll paper cover while aligning the roll paper with the paper ejec-
9
tion guide.
46
Page 47

Chapter 2 Setup
5. Loading the paper and turning on the printer
Steps 1 to 3 below are not necessary after performing Step "4. Adjusting roll paper guide/paper ejection
guide" on page 44
Press down the release lever, and pull it to the front to open the roll paper
1
cover.
.
2
Load the roll paper with the printing side up.
2
47
Page 48
Close the roll paper cover while aligning the roll paper with the paper ejec-
Paper ejection guide
3
tion guide.
Turn the power on.
4
The roll paper is automatically fed.
This is the end of loading of the roll paper.
48
Page 49

Loading/Replacing Fanfold Paper
3. Attaching the paper feed guide (page 54)
4. Adjusting paper ejection guide/fanfold paper guide (page 55)
5. Loading the fanfold paper and turning on the printer (page 56)
2. Setting for media position detection (page 52)
1. Removing the paper (page 50)
Follow the steps below to load the fanfold paper.
• Loading the paper for the first time: 2 to 5
• Using the paper completely (loads same type of paper): 1, 5
• Changing paper type or classification: 1 to 5
Chapter 2 Setup
2
Make sure that the DIP switch 3 (paper selection) setting is ON (fanfold paper) before loading or
replacing the fanfold paper. See
settings.
"Setting the DIP Switches" on page 33 for DIP switches
49
Page 50

1. Removing the paper
This procedure is not required when the paper is initially loaded to the printer.
For roll paper
Press down the release lever, and pull it to the front to open the roll paper
1
cover.
Remove the roll paper or the roll paper core if any.
Close the roll paper cover.
2
50
Page 51

For fanfold paper
Open the fanfold paper cover.
1
Remove the paper left.
2
Chapter 2 Setup
2
51
Page 52

2. Setting for media position detection
This procedure is not required when media position detection is not changed.
When paper remains in the printer, media position detection cannot be set.
Be sure to remove the paper before turning on the printer.
The changed setting of the media position detection is saved in the NV memory of the printer
when the printer is turned off. Be sure to turn off the printer to enable the setting.
Turn the power on.
1
Remove the paper in the printer.
2
Enter IP address of the printer to the address bar to the Web browser.
3
Default setting: 192.168.192.168
Recommend the Mozilla Firefox web browser, If using the Windows Internet Explorer
web browser, apply the latest security patch or Service Pack.
Enter ID and password to the login screen, login to the EpsonNet Config.
4
ID: epson
Password: epson
EpsonNet Config screen appears. Click [Printer Utility].
5
Epson Printer Utility screen appears. Click [Printer Setting] - [1.Media detec-
6
tion].
“Media position detection” screen appears. Change Media position
7
detection of the printer utility depending on the paper to use.
Then, click [Send].
52
Page 53

Chapter 2 Setup
Item Description
No Detection Detects paper presence only, and does not adjust the
paper position.
Detect Blackmarks on Die-cut Labels When using Black Mark Die-cut Label, adjusts printing posi-
tion and autocutting position to the top of the black mark.
Detect Blackmarks on Continuous Paper When using Black Mark Receipt, adjusts printing position and
autocutting position to the top of the black mark.
Detect Margins Between Labels When using Die-cut Label, adjusts printing position and
autocutting position to the top of the labels.
Click [Settings] - [Print]. "Print Setting" screen appears. Set Media Type and
8
Paper Type. Then, click [Send].
2
Item Description
Media Type Sets the [FineLabel].
Paper Type Sets the paper type.
Print Quality Sets the print quality.
Media Source Sets the media source.
Rotate 180 Sets the rotation print.
Turn the power off.
9
The changed setting of the media position detection is saved in the NV memory of the printer
when the printer is turned off. Be sure to turn off the printer to enable the setting.
53
Page 54

3. Attaching the paper feed guide
This procedure is not required when paper type (roll paper/fanfold paper) is not changed.
Make sure to attach the paper feed guide when using fanfold paper.
Open the fanfold paper cover and take out the paper feed guide.
1
Press down the release lever, and pull it to the front to open the roll paper
2
cover.
54
Insert the paper feed guide into the grooves inside of the roll paper cover to
3
attach it.
Close the roll paper cover.
4
Page 55

4. Adjusting paper ejection guide/fanfold paper guide
This procedure is not required when paper type (roll paper/fanfold paper) is not changed.
Release the lock of the paper ejection guide with a fine-tipped object.
1
Chapter 2 Setup
Slide the paper ejection guide as wide as possible. Lock the paper ejection
2
guide.
Open the fanfold paper cover and release the lock of the fanfold paper
3
guide.
2
55
Page 56

Align the fanfold paper guide with the fanfold paper width. Lock the fanfold
4
paper guide.
5. Loading the fanfold paper and turning on the printer
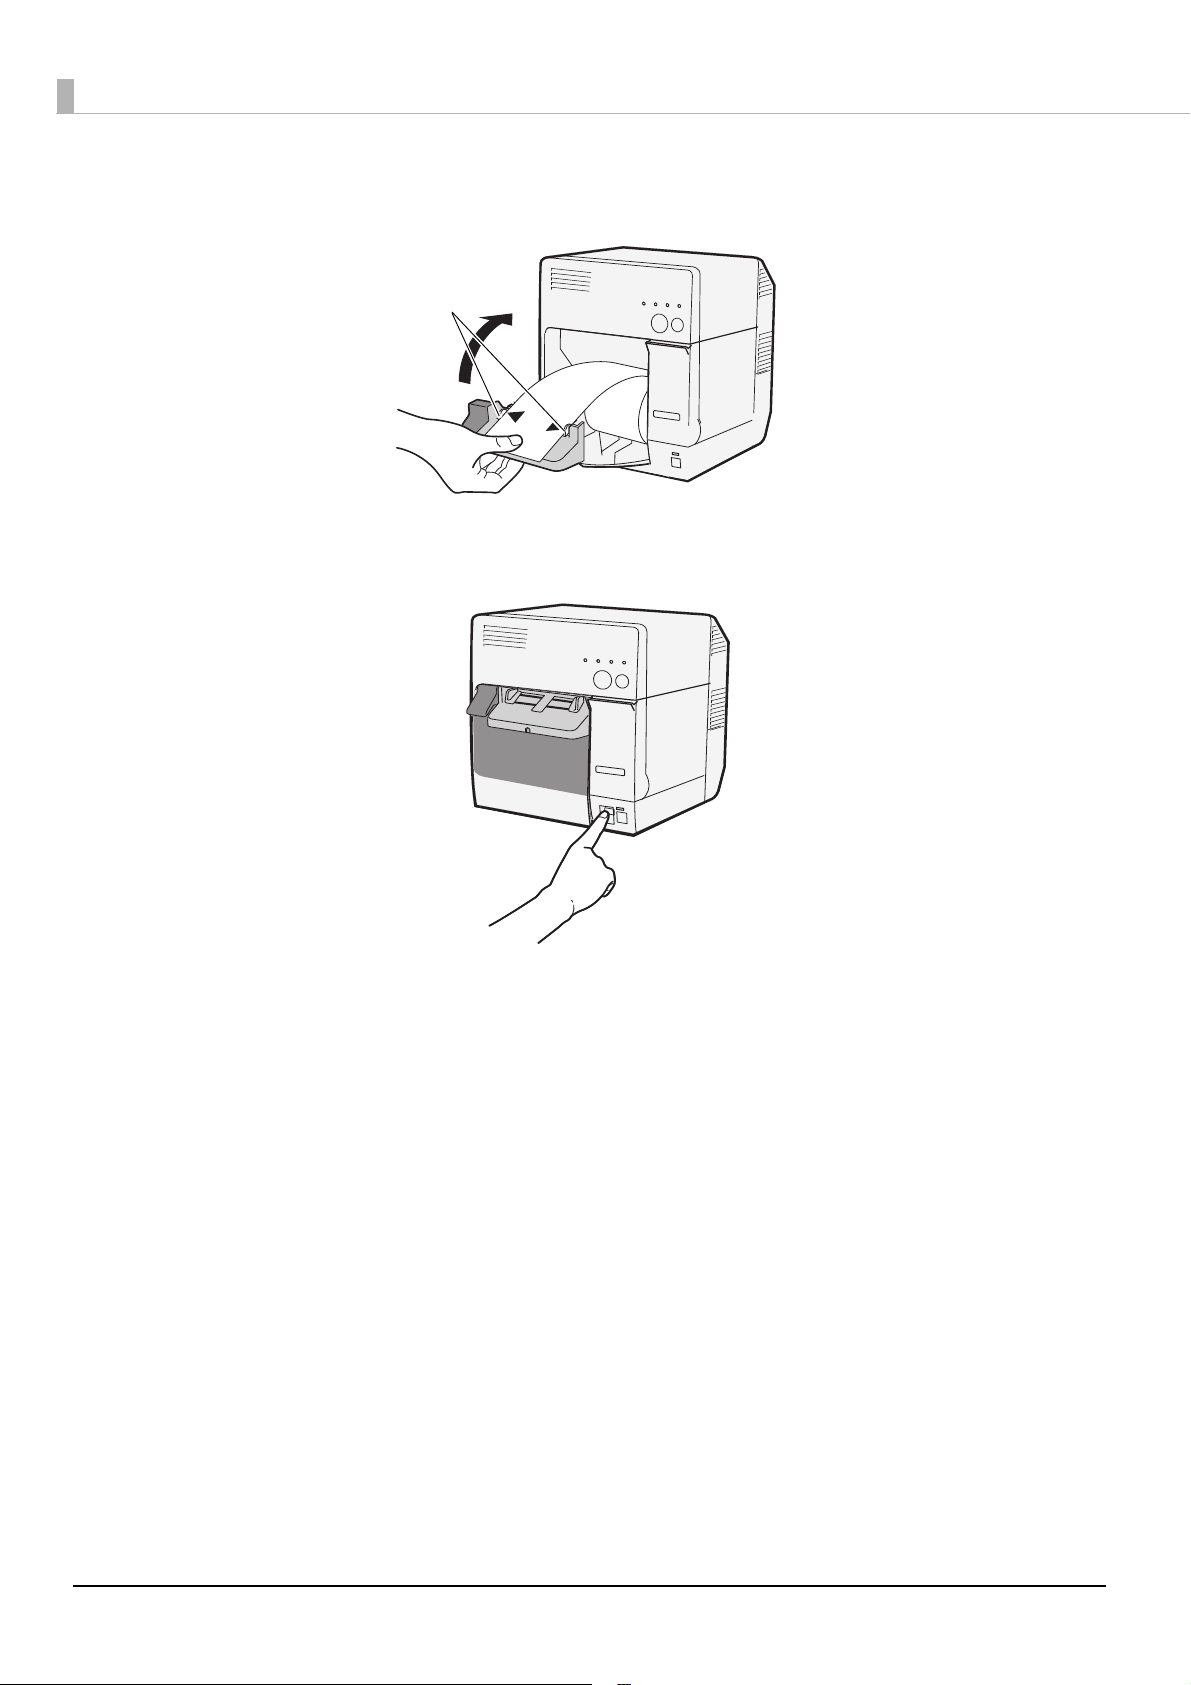
Turn the power on.
1
After the Power LED stops flashing and lights, insert the paper into the paper
2
slot with the print surface facing upward until it is pulled into inside the
printer (approximately 100 mm). The paper is automatically fed.
56
When paper set operation at the paper cover close is set as “Madia Loading Method (with
Cutting)” of [Utility]-[Printer Setting]-[Paper Set Operation Setting] on the printer utility, paper is
automatically cut after the paper is fed.
Page 57

Place the paper straight at least 40 mm from the printer.
3
Close the fanfold paper cover.
4
This is the end of loading of the fanfold paper.
Chapter 2 Setup
2
57
Page 58
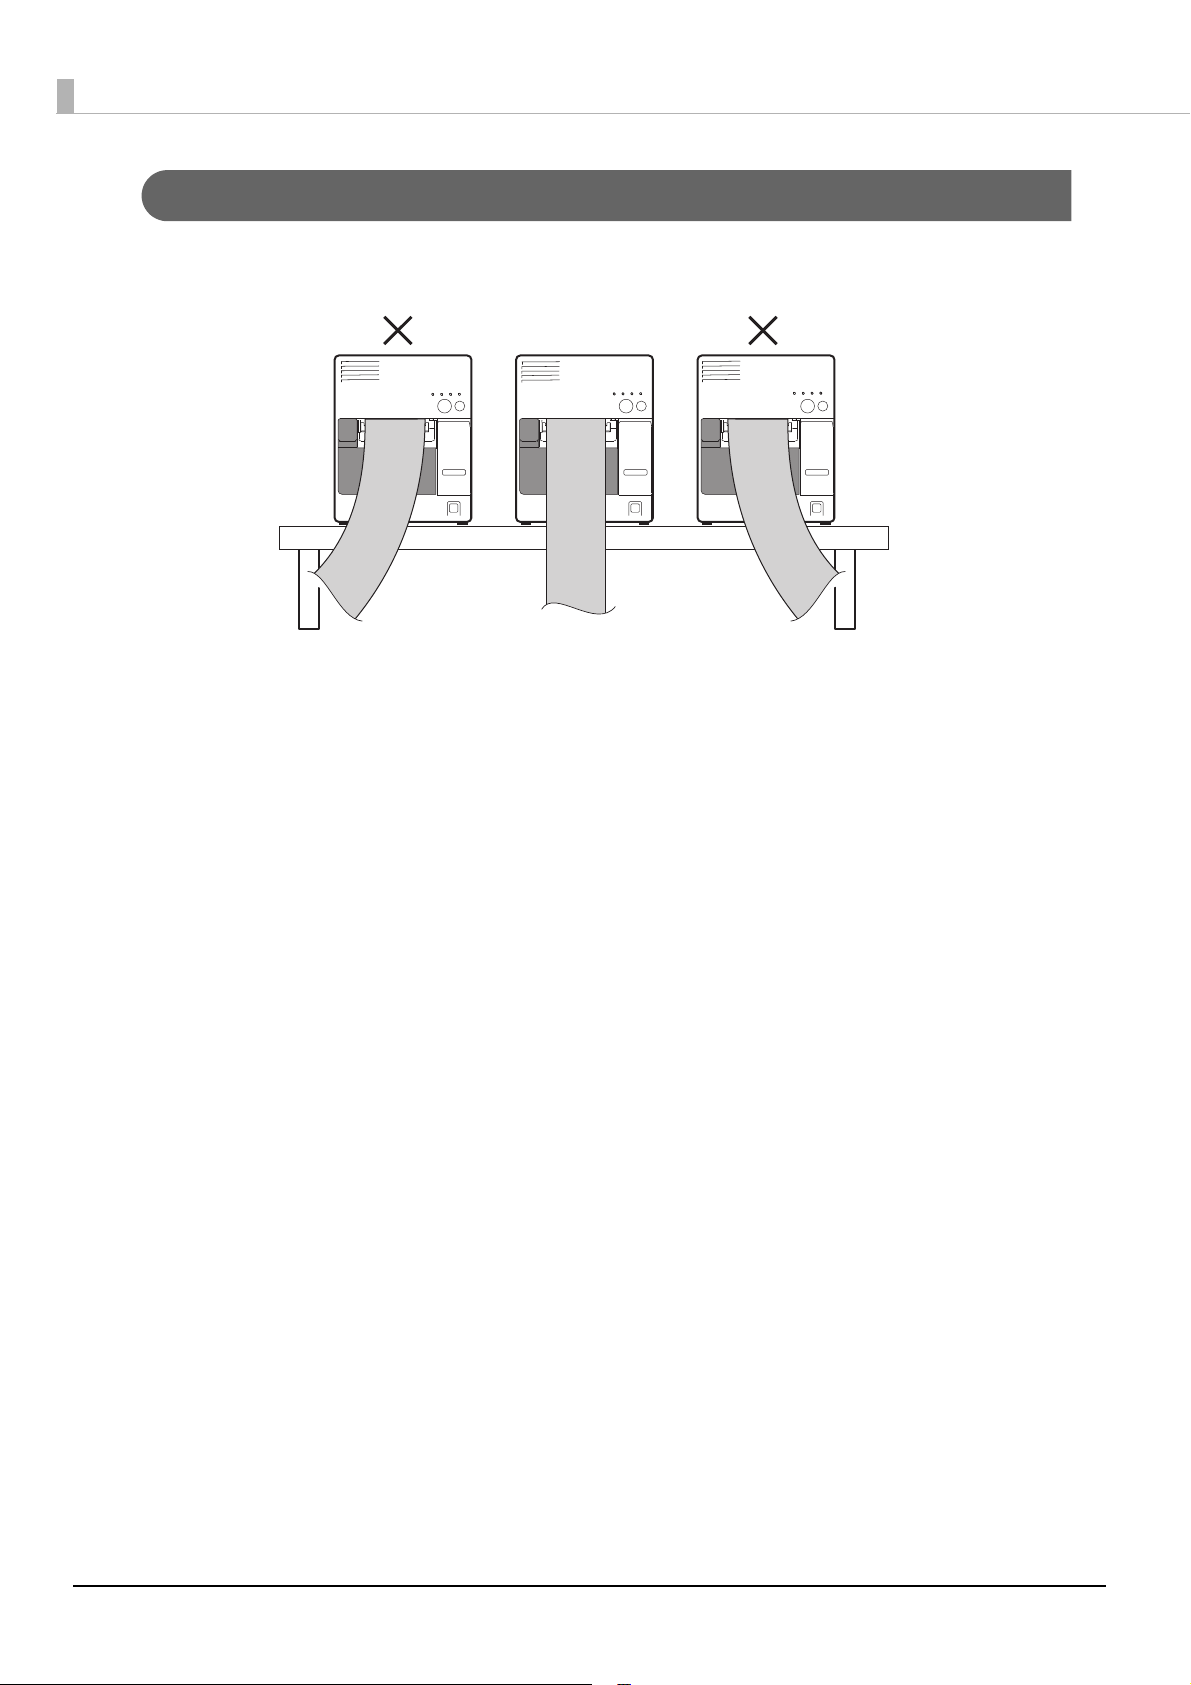
Ejection Angle of Printed Paper
Make sure paper is ejected straight from the paper ejection guides, as shown in the illustration.
If paper is not ejected straight due to such causes as an obstruction, the print result may be distorted.
58
Page 59

Attaching/Adjusting the Paper Ejection Tray
Paper ejection table
If you attach the paper ejection tray, you can temporarily store the printed paper in the tray.
Paper may not stay in the paper ejection tray depending on the paper curl and length.
When using the product with the paper ejection tray, attach and adjust the tray using the following
procedure.
Attach the paper ejection tray to the hooks under the paper ejection
1
table.
Chapter 2 Setup
2
Pull the lever at the bottom-right of the paper ejection tray to unlock it.
2
Slide the bottom tray to align it with the paper length, and lock it.
3
59
Page 60

60
Page 61

Chapter 3 Utility
Utility
EpsonNet Config
EpsonNet Config is a Utility to set the printer on a web browser. This section describes EpsonNet Config using
Internet Explorer as a browser.
Starting EpsonNet Config
Follow the steps below to start up EpsonNet Config.
Connect TM-C3400Z to the computer via a network.
1
You cannot use EpsonNet Config using a USB cable.
Start up the web browser and input the printer’s IP address (http://printer’s
2
IP address) in the address bar as shown below.
http://xxx.xxx.xxx.xxx/PrinterConfigurationPage/
Its address is http://192.168.192.168/ by default.
Input the User Name and Password.
3
ID: epson
Password: epson
EpsonNet Config starts.
3
61
Page 62
Information-Basic Information (Network)
You can check the basic information of the TM-C3400Z.
Item Description
Administrator Name Shows the administrator name.
Location Shows the location
Interface Card Model Name TM-C3400Z
MAC Address Shows the MAC address of the TM-C3400Z
Hardware Version Shows the hardware version of the TM-C3400Z
Software Version Shows the software version of the TM-C3400Z
Model Name Shows the model name of the TM-C3400Z
Network Status Shows the network status
Printer Status Shows the printer status of the TM-C3400Z
Refresh Updates the basic information.
62
Page 63
Information-TCP/IP (Network)
You can check the TCP/IP setting of the TM-C3400Z.
Chapter 3 Utility
Item Description
Acquiring the IP Address Shows the method of acquiring the IP Address
IP Address Shows the IP address when [Acquiring IP Address] is set to
[Manual].
Subnet Mask Shows the subnet mask when [Acquiring IP Address] is set
to [Manual].
Default Gateway Shows the default gateway when [Acquiring IP Address]
is set to [Manual].
Set using Automatic Private IP Addressing
(APIPA)
Shows the APIPA setting.
3
63
Page 64
Information-SMNP (Network)
You can confirm the setting of the access permissions.
Item Description
Read Only "public" appears as a fixed value.
Read/Write SNMP community string for Read/Write appears. No value
appears if no setting is made.
64
Page 65

Information-Timeout (Network)
You can check the timeout setting of the TM-C3400Z.
Chapter 3 Utility
Item Description
RAW(Port9100) A timeout value for the RAW port (Port9100) appears.
(Unit: in seconds)
3
65
Page 66
Configuration-Ethernet (Network)
You can make settings for an Ethernet.
Item Description
Communication Speed/Duplex Mode Sets the speed of data link layer.
Send Sends settings to the TM-C3400Z.
66
Page 67

Configuration-TCP/IP (Network)
You can set TCP/IP.
Chapter 3 Utility
Item Description
Acquiring the IP Address Selects [Auto] or [Manual] for the method for acquiring the
IP address.
IP Address Specifies the IP address.
Only enabled when the method for acquiring the IP address
is [Manual].
Subnet Mask Specifies the subnet mask.
Only enabled when the method for acquiring the IP address
is [Manual].
Default Gateway Specifies the default gateway.
Only enabled when the method for acquiring the IP address
is [Manual].
Set using Automatic Private IP Addressing
(APIPA)
Send Sends settings to the TM-C3400Z.
Designates whether to [Enable] / [Disable] the APIPA.
3
67
Page 68

Configuration-SNMP (Network)
You can set access permissions for SNMP.
Item Description
Read Only Fix value: "public".
Read/Write Sets SNMP community string for Read/Write.
Send Sends settings to the TM-C3400Z.
68
Page 69

Configuration-Timeout (Network)
You can make settings for a timeout.
Chapter 3 Utility
Item Description
RAW(Port9100) Sets a timeout value for the RAW port (Port9100) in seconds.
Send Sends settings to the TM-C3400Z.
3
69
Page 70

Configuration-Administrator(Optional)
You can set the information for the administrator of the TM-C3400Z.
Item Description
Administrator Name Sets the name of the administrator of the TM-C3400Z.
Location Sets the location where the TM-C3400Z is installed.
Send Sends settings to the TM-C3400Z.
70
Page 71

Configuration-Reset(Optional)
You can reset a network settings.
Chapter 3 Utility
Item Description
Reset Resets the network interface, and reboots wired LAN and
wireless LAN functions after applying the changes made in
the settings window.
Reset Default Settings Returns settings of the TM-C3400Z to default ones.
All settings are initialized, except for the internal clock.
3
71
Page 72

Configuration-Password(Optional)
You can change a password.
Item Description
Old Password Enter the current password.
New Password Enter the new password.
Re-input Password Enter the new password for confirmation.
Send Sends settings to the TM-C3400Z.
A user name and a password will be required on the authentication screen when you start up
this utility and when you change settings. Enter “epson” for the user name and the password
you set for the password.
72
Page 73

Printer Utility
Starting Printer Utility
Follow the steps below to start up the printer utility.
Connect TM-C3400Z to the computer via a network.
1
This operation is only available on a web browser.
Access EpsonNet Config using a Web browser.
2
Its address is http://192.168.192.168/ by default.
Chapter 3 Utility
Click [Printer Utility] from [Configuration] - [Tool].
3
3
73
Page 74
Printer Utility starts.
4
Click [Net Config] at the lower left of the window to go back to EpsonNet Config.
74
Page 75
Settings-Basic Information (General)
You can confirm the current printer setting information.
Chapter 3 Utility
Item Description
Media Type Shows the media type.
Paper Type Shows the paper type.
Print Quality Shows the print quality.
Media Source Shows the media source.
Rotate 180 Shows the rotation print setting.
Auto Cut Shows the auto cut setting.
TearOff Shows the tear off setting.
Completion Beeper Setting Shows the setting of the beeper at the time of the print comple-
tion.
Platen Vacuum Manual Adjustment Shows a setting of the platen vacuum manual adjustment.
Vacuum Setting Shows a value of the platen vacuum manual adjustment.
3
Label Length Shows the label length.
Paper Width Shows the paper width.
Label Gap Shows the label gap.
Emulator Resolution Shows the emulator resolution.
75
Page 76

Item Description
Emulator Version Shows the emulator version.
Refresh Updates the basic information.
76
Page 77
Settings-Print (General)
You can set values of media type, print quality, media source, and rotation print.
Item Description
Media Type Sets the media type.
Chapter 3 Utility
Paper Type Sets the paper type.
Print Quality Sets the print quality.
When the paper type is set to "Plain", you cannot select "Fast".
Media Source Sets the media source.
Rotate 180 Sets the rotation print.
Send Sends settings to the TM-C3400Z.
The setting completion message appears on the web page when
the setting has been successfully completed. The web page automatically returns to the setting window.
3
77
Page 78
Settings-After Print (General)
You can make settings after printing.
Item Description
Auto Cut Makes the setting of paper cut.
When "ZplCmd" is selected, ZPL command will be used.
Tear Off Sets the print stop position.
Completion Beeper Setting Sets the beeper at the time of the print completion.
Send Sends settings to the TM-C3400Z.
The setting completion message appears on the web page
when the setting has been successfully completed. The web
page automatically returns to the setting window.
78
Page 79
Chapter 3 Utility
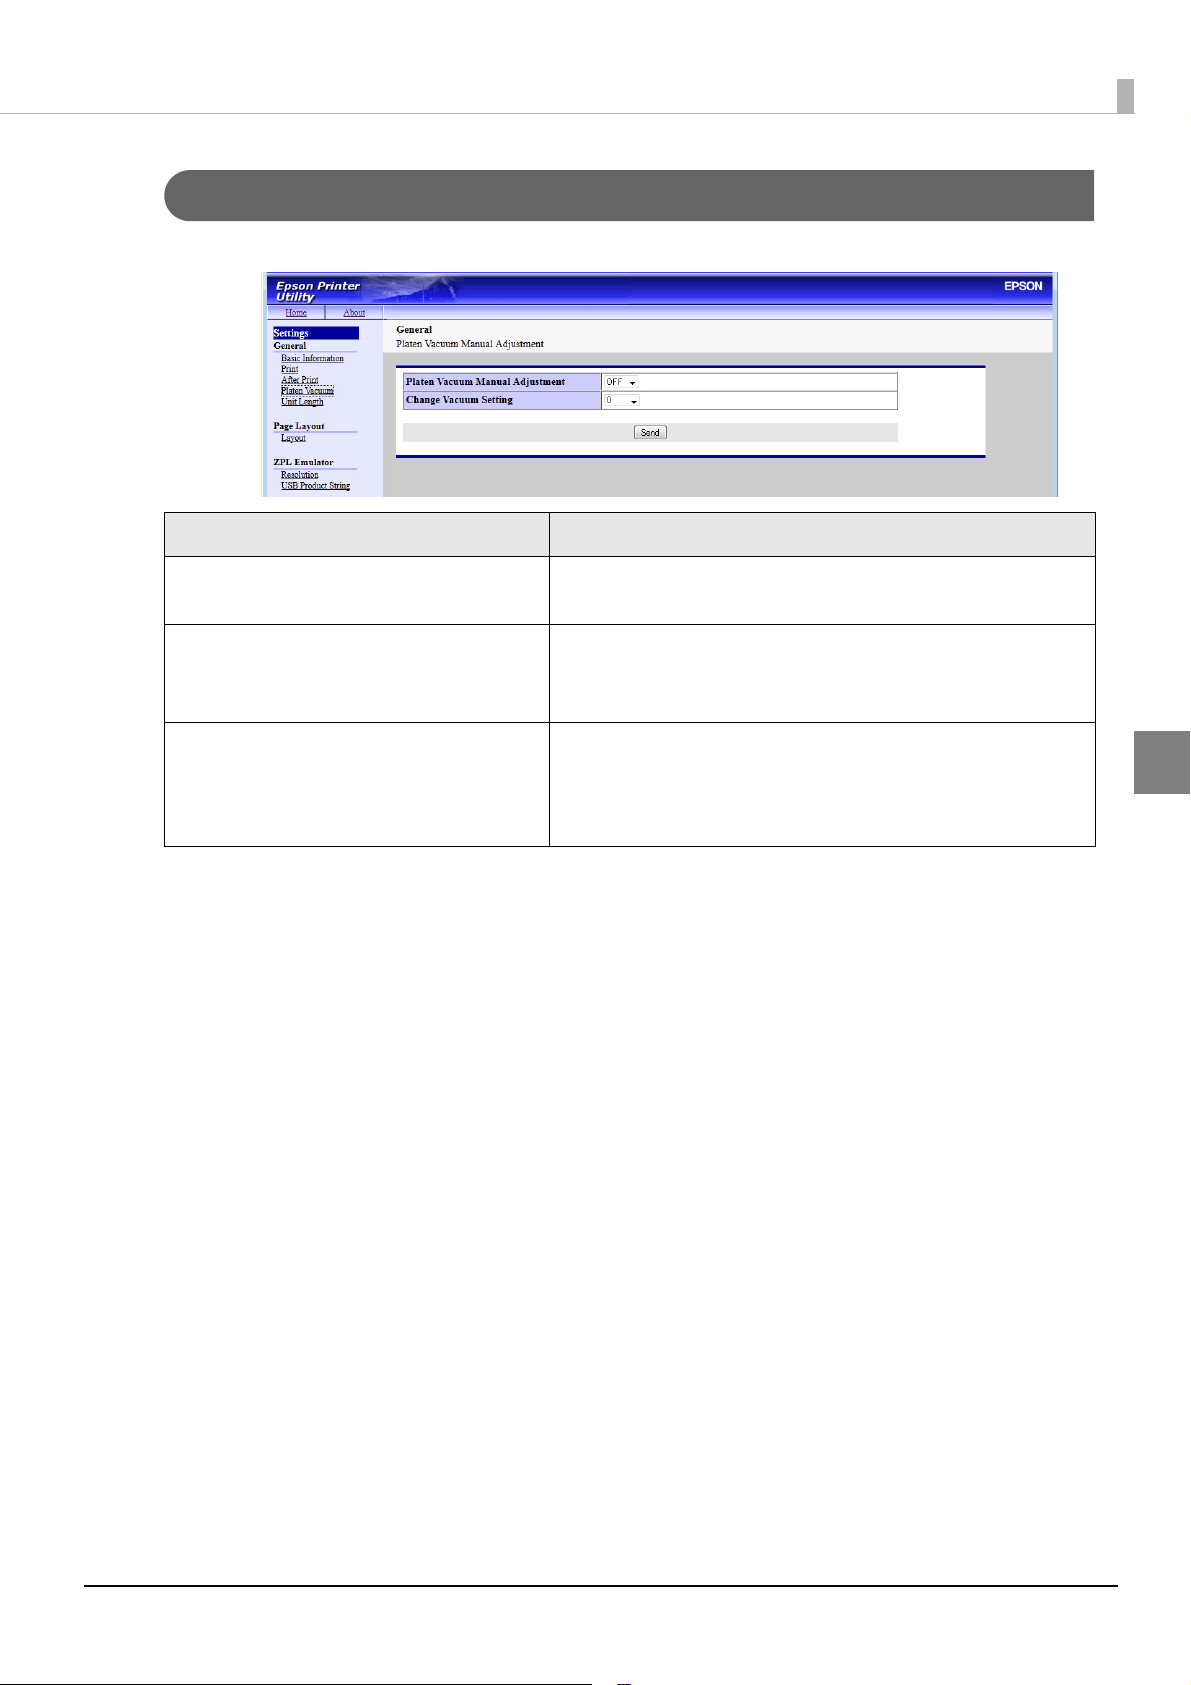
Settings-Platen Vacuum (General)
You can make the settings of the platen vacuum manual adjustment.
Item Description
Platen Vacuum Manual Adjustment Sets w h e t h e r to m a n u a ll y ma k e t h e pl at en va c u u m
adjustment.
Vacuum Setting Sets a value of the platen vacuum manual adjustment.
Available when [Platen Vacuum Manual Adjustment] is
"ON".
Send Sends settings to the TM-C3400Z.
The setting completion message appears on the web page
when the setting has been successfully completed. The web
page automatically returns to the setting window.
3
79
Page 80

Settings-Unit Length (General)
You can set the units of the Printer Utility settings.
Item Description
Unit Length Sets the units of the Printer Utility settings to either "Millimeter"
or "Inch".
Send Sends settings to the TM-C3400Z.
The setting completion message appears on the web page
when the setting has been successfully completed. The web
page automatically returns to the setting window.
80
Page 81
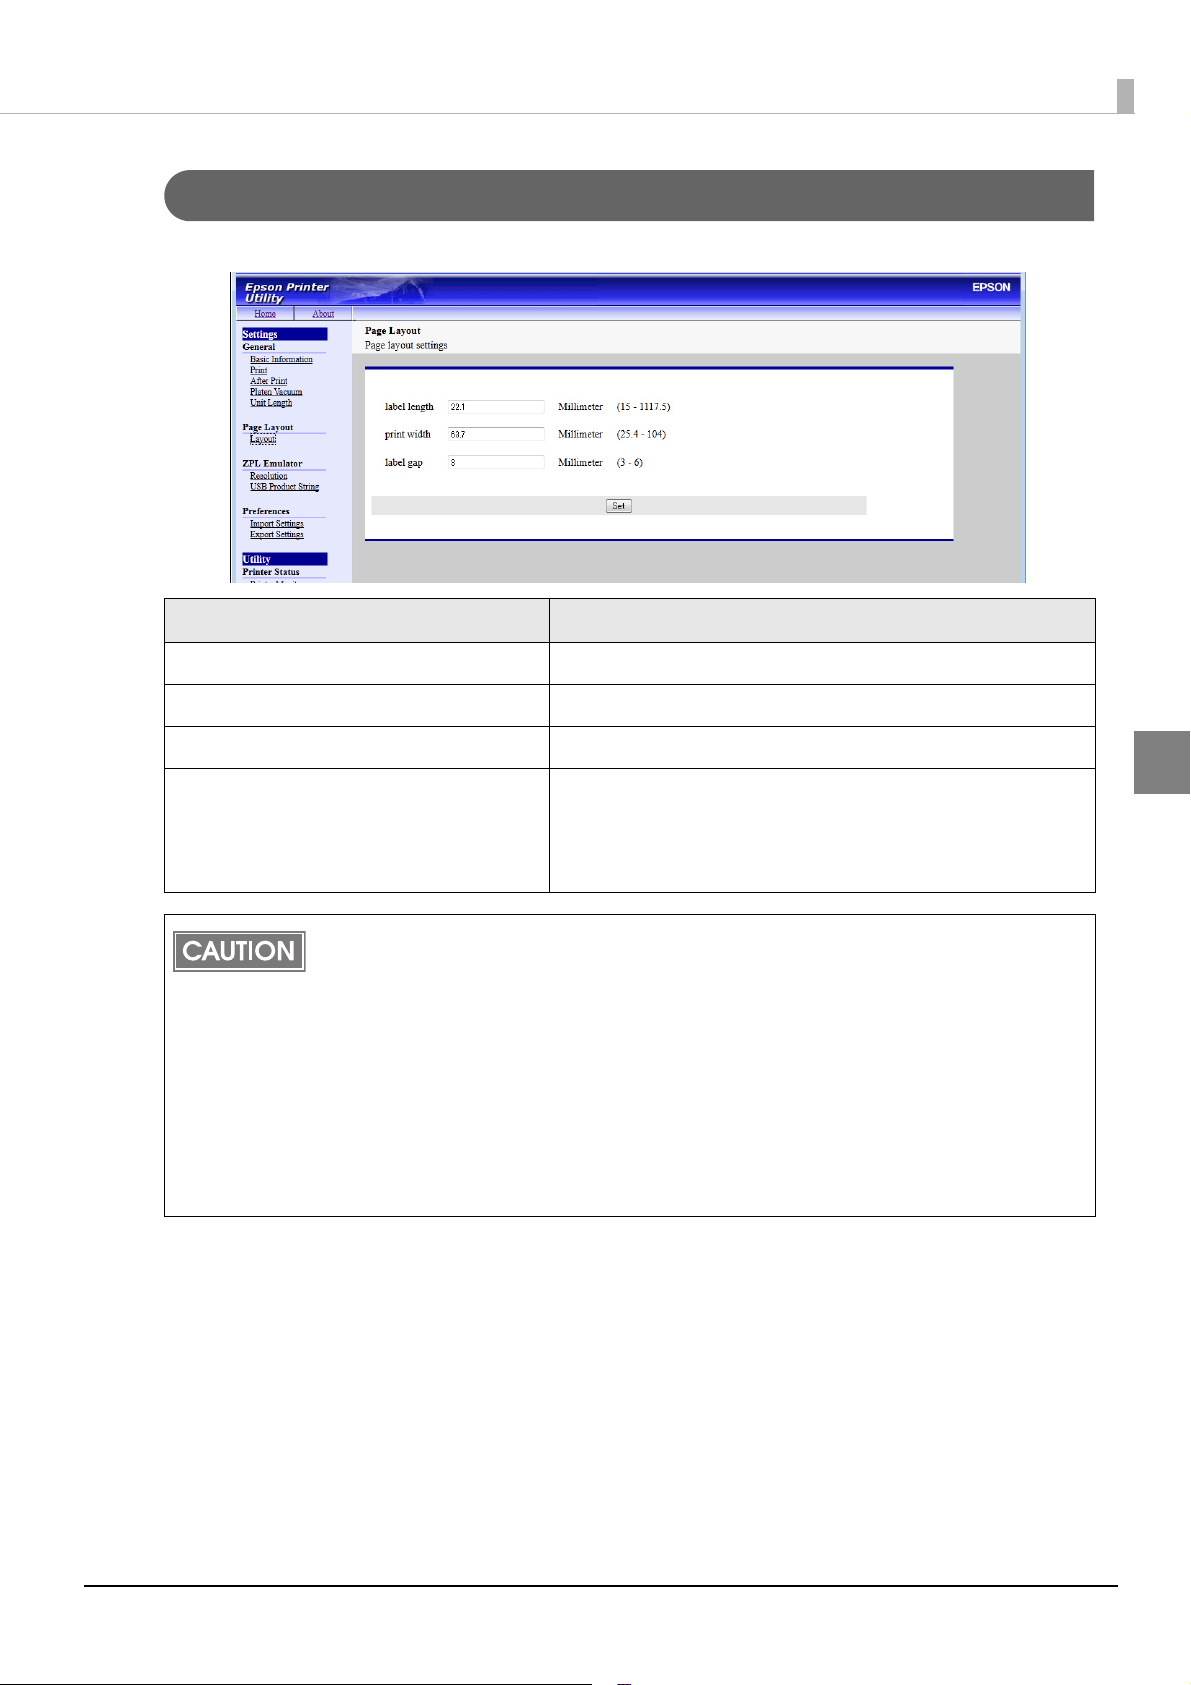
Settings-Layout (Page Layout)
You can set the page layout.
Item Description
Label Length Sets the label length.
Chapter 3 Utility
Paper Width Sets the paper width.
Label Gap Sets the label gap.
Set Sends settings to the TM-C3400Z.
The "Page layout has been saved." window appears when
the setting has been successfully completed. The display
automatically returns to the setting window.
ZPL language has the LL (Label Length) and PW (Paper Width) commands. When these
commands are sent, the settings are retained in the printer until it is turned off. The settings
retained inside are maintained until the next page layout command is sent and used for printing. Therefore, there is no need to send the page layout command each time.
When the JU (Configuration Update) command is sent, the settings in the printer are saved
and maintained even after the printer is turned off. The values saved and retained inside can
be viewed in this screen.
If the settings are configured from this screen, the values set inside are maintained even after
the printer is turned off, as is the case when the JU command is sent. If the printer is turned
on after that and printing is started in the default status without any page layout command
sent, the values specified in this screen are used for printing.
3
81
Page 82

Settings-Resolution (ZPL Emulator)
You can set a resolution for ZPL Emulator.
Item Description
Emulator Resolution Sets the resolution of the ZPL emulator.
Send Sends settings to the TM-C3400Z.
The setting completion message appears on the web page
when the setting has been successfully completed. The web
page automatically returns to the setting window.
82
Page 83

Settings-USB Product String (ZPL Emulator)
You can set USB Product String for ZPL Emulator.
For setting values, refer to
Manufacture Sets the manufacture of the ZPL emulator.
Model Name Sets the model name of the ZPL emulator.
"Printing with the Zebra Printer Driver" on page 106.
Item Description
Chapter 3 Utility
Send Sends settings to the TM-C3400Z.
The setting completion message appears on the web page
when the setting has been successfully completed. The web
page automatically returns to the setting window.
3
83
Page 84

Settings-Import Settings (Preferences)
You can import the Printer Utility setting information to set it to TM-C3400Z.
Item Description
Import File Specifies a Printer Utility setting file to be imported.
Import Sets the information of the Printer Utility setting file to TM-C3400Z.
84
Page 85

Chapter 3 Utility
Settings-Export Settings (Preferences)
You can export the TM-C3400Z setting information to a setting file.
Item Description
Export To export the Printer Utility setting information, specifies a location
to be exported and saves the information to a file.
3
85
Page 86

Utility-Printer Monitor (Printer Status)
You can confirm the printer status.
Item Description
Printer Status
Status Shows the printer status.
Refresh Updates the printer status.
ZPL Status Updates the ZPL status.
PaperOut When 1, is paper out.
RibbonOut When 1, is ink end (replace ink cartridge).
HeadOpen When 1, the paper cover, maintenance box cover, or Mainte-
nance cover is open.
RewindFull When 1, is maintenance box full.
PrinterPaused When 1, printer is paused.
CleanPrintHead When 1, is dead nozzle.
86
Page 87

Chapter 3 Utility
Item Description
ReplaceHead When 1, is fatal error.
MediaOut When 1, is paper near end.
CommunicationSettings Serial communication settings. Fixed to "0".
FunctionSettings Media Type settings.
PrintMode Paper cut and paper feed settings.
PrintWidthMode -
NumberOfFormatsInReceiveBuffer Number of formats (*.ZPL) in receive buffer (in storage area).
ConfigurationDataLost When 1, is configuration data lost.
PartialFormatInProgress When 1, the print command has not been completed.
DiagnosticModeActive When 1, is diagnostic mode active.
ReceiveFullBufferFlag When 1, receive buffer full.
LabelWaitingInPeelOffMode When 1, is label waiting in Peel-off mode.
LabelsRemainingInBatch Number of labels remaining in Print queue.
NumberOfGraphicImagesStoredInMemory
Password Fixed to "0".
HardwareAddressofPrintServer MAC address of the printer.
PrinterSerialNumber Serial number of the printer.
CutterFault When 1, cutter maintenance warning is occurred.
PaperJamDuringRetract When 1, is paper jam.
BlackMarkNotFound When 1, is paper size error.
BlackMarkCalibrateError When 1, is Paper size error.
PaperNearEndSensor When 1, is paper near end.
EarlyWarningMaintenanceStatus When 1, is maintenance near.
Refresh Updates the ZPL status.
Number of graphic images stored in memory.
3
87
Page 88

Utility-Media Detection (Printer Setting)
You can set the media position detection settings.
Item Description
No Detection Detects paper presence only, and does not adjust the
paper position.
Detect Blackmarks on Die-cut Labels When using Black Mark Die-cut Label, adjusts printing posi-
tion and autocutting position to the top of the black mark.
Detect Blackmarks on Continuous Paper When using Black Mark Receipt, adjusts printing position
and autocutting position to the top of the black mark.
Detect Margins Between Labels When using Die-cut Label, adjusts printing position and
autocutting position to the top of the labels.
Send Sends settings to the TM-C3400Z.
The setting completion message appears on the web page
when the setting has been successfully completed. The web
page automatically returns to the setting window.
88
Page 89

Chapter 3 Utility
Relation between Media Position Detection and Paper Type
The printing is not performed and an error occurs when the printer setting is not matched to the paper type
to use. Make sure to set the setting as following.
Paper type to use
Roll Media
Fan-fold
Media
Receipt
Full-page Label
Die-cut Label
Black Mark
Receipt
Black Mark Die-cut
Label
Black Mark
Receipt
(Wrist Band)
Black Mark
Receipt
Black Mark Die-cut
Label
Detect Black-
No Detection
———
——
—
——
—
—
marks on Die-
cut Labels
———
———
-
Detect Black-
marks on
Continuous
Paper
—
—
Detect Mar-
gins Between
Labels
-
—
—
—
3
: Used, —: Not Used
89
Page 90
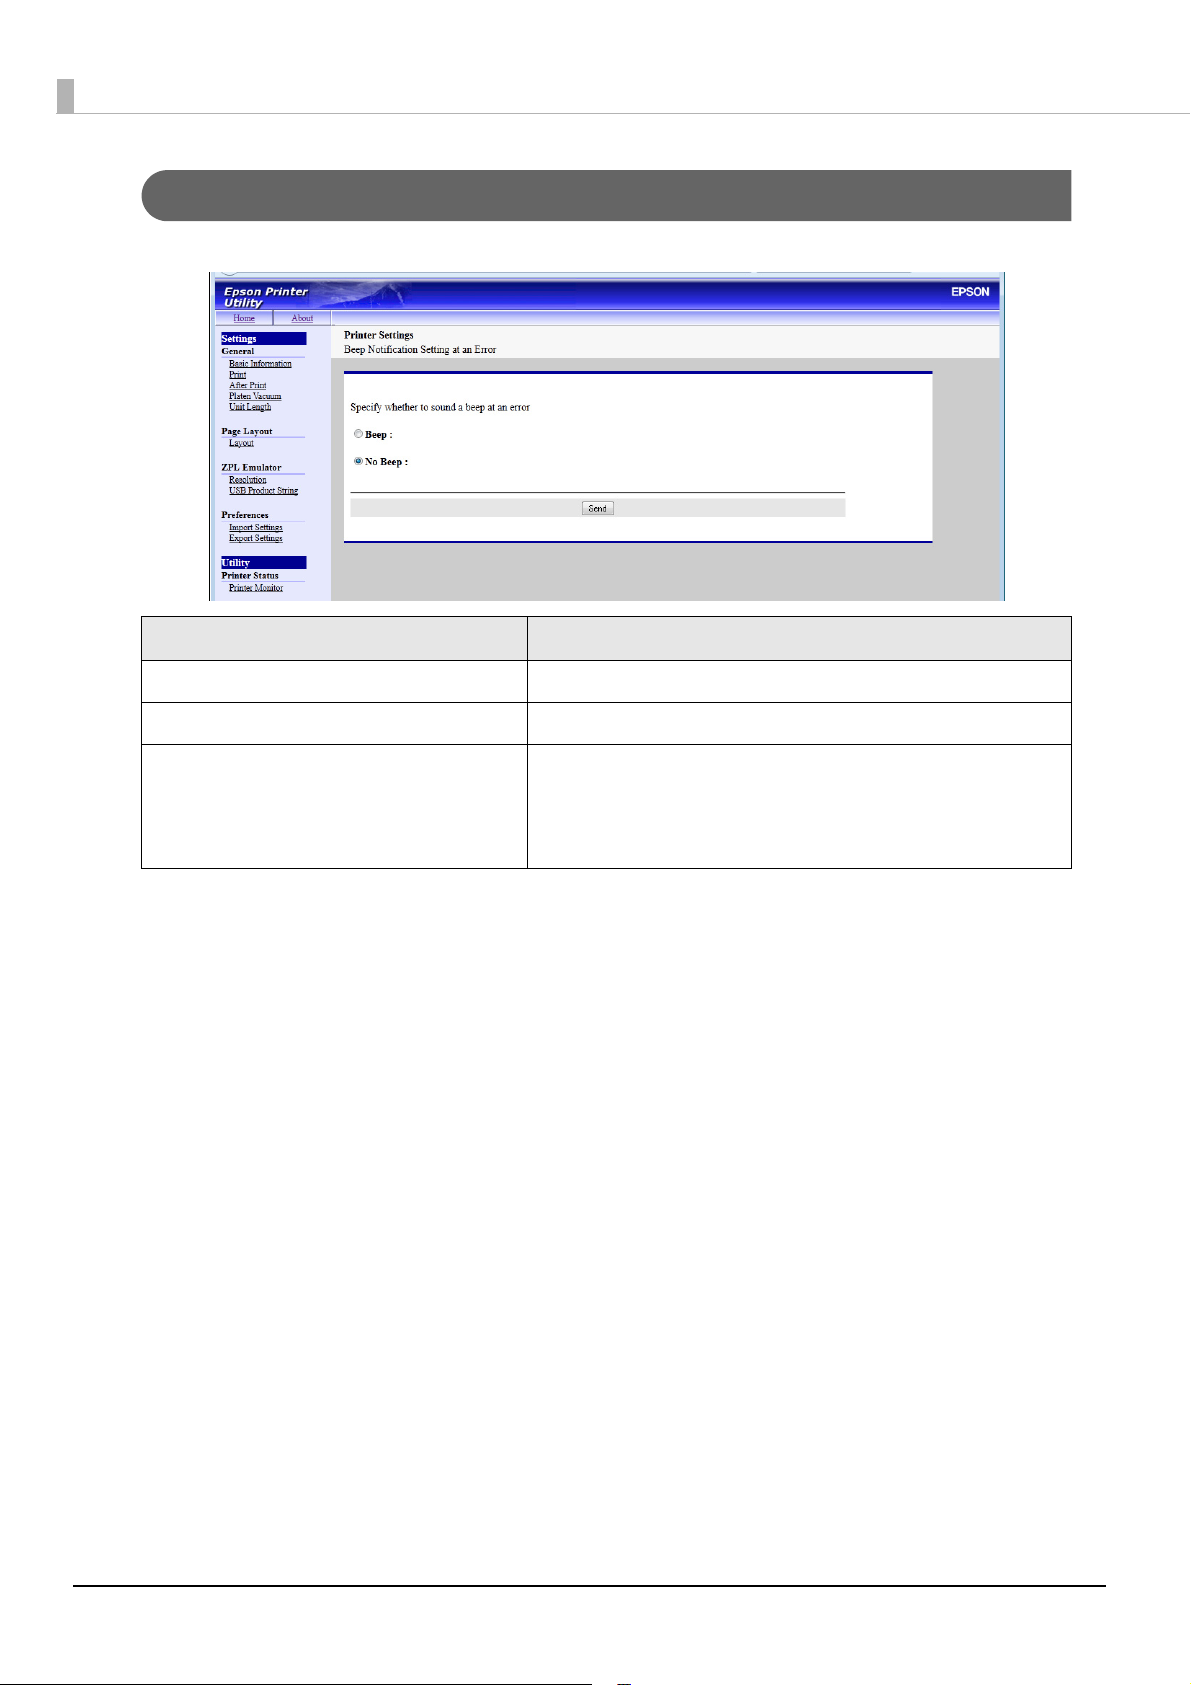
Utility-Beep (Printer Setting)
You can specify whether to sound a beep when an error occurs.
Item Description
Beep Generates a beep when an error occurs.
No Beep Generates no beeps when an error occurs.
Send Sends settings to the TM-C3400Z.
The setting completion message appears on the web page
when the setting has been successfully completed. The web
page automatically returns to the setting window.
90
Page 91
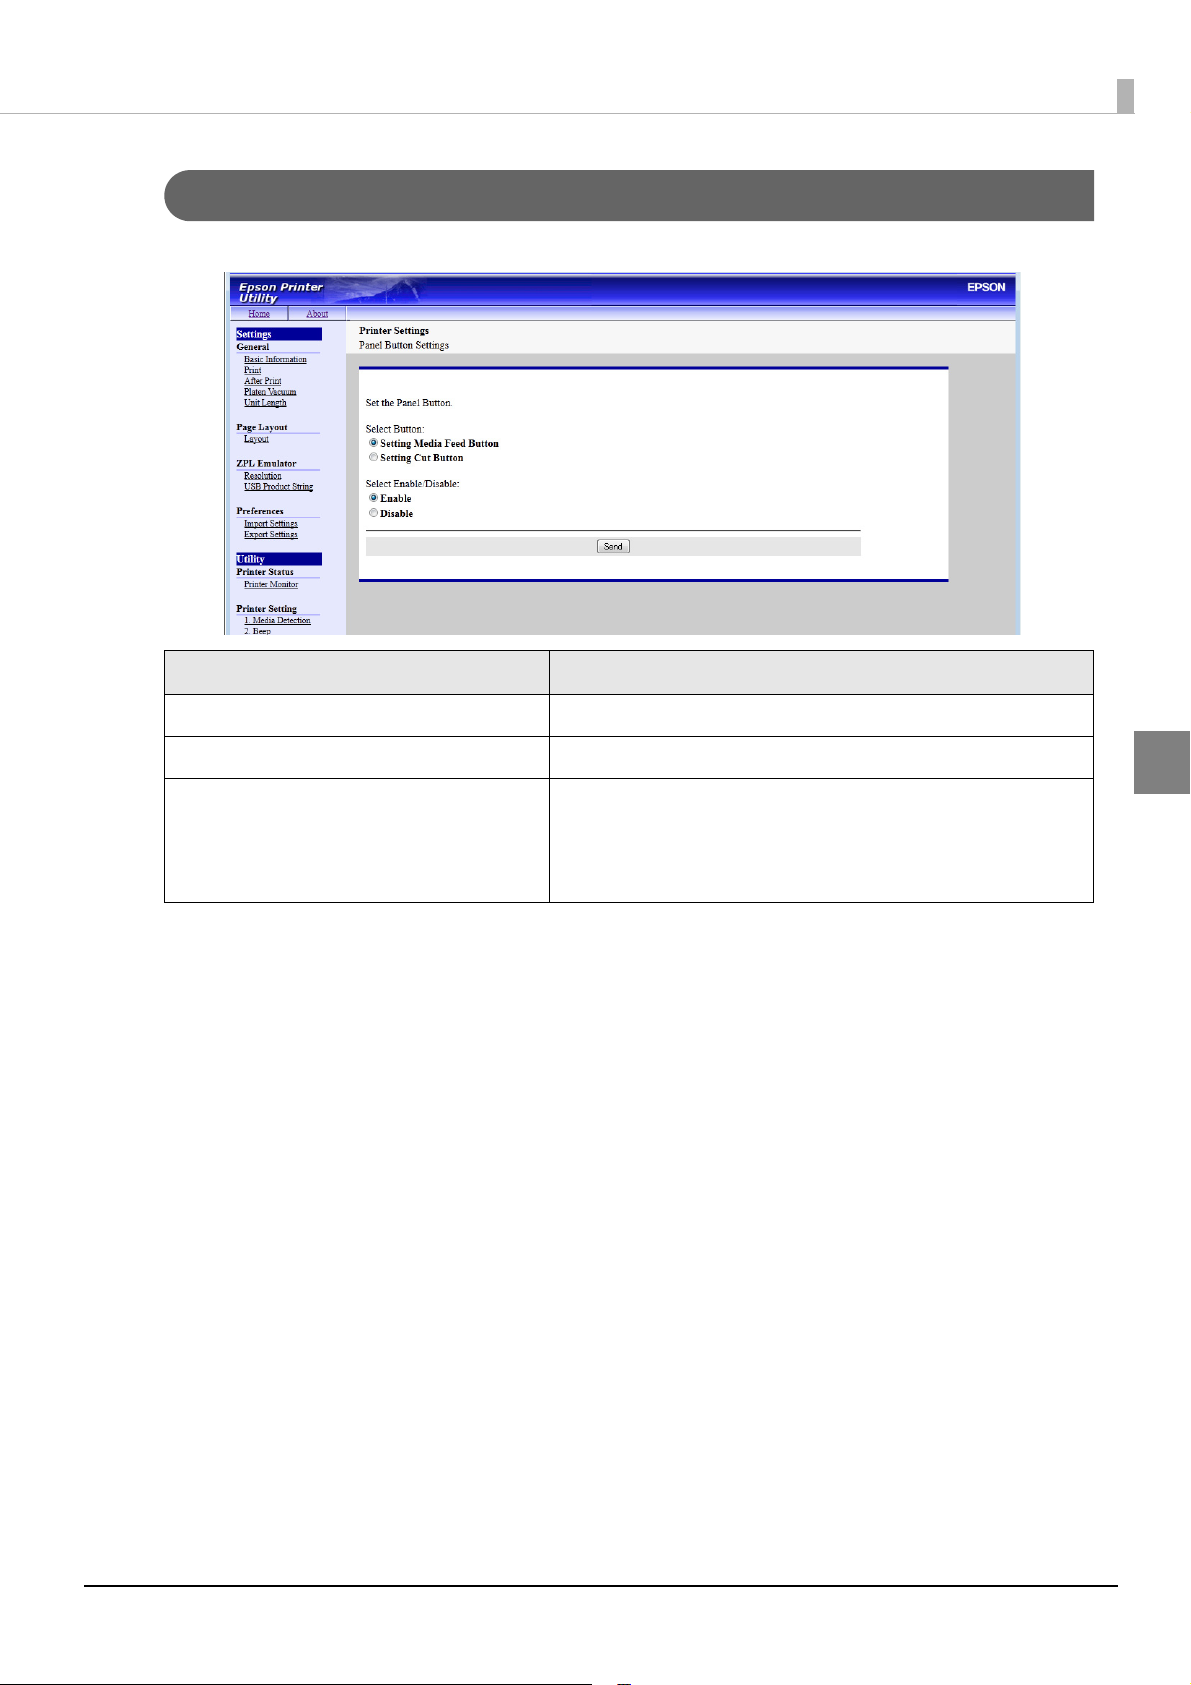
Utility-Panel Button (Printer Setting)
You can specify the panel button operations.
Item Description
Chapter 3 Utility
Select Button Select the panel button to be set.
Select Enable/Disable Select whether to enable/disable the panel button.
Send Sends settings to the TM-C3400Z.
The setting completion message appears on the web page
when the setting has been successfully completed. The web
page automatically returns to the setting window.
3
91
Page 92

Utility-Paper Set Operation Setting (Printer Setting)
You can specify the paper set operation at the printer startup and when the paper cover is closed.
Item Description
Paper Set Operation at the Start up Specifies the operation at the startup of the printer.
Madia Loading Method (with Cutting) Paper is loaded and cut.
Madia Loading Method (without Cutting) Paper is loaded and not cut.
No Madia Loading Method No paper is loaded
Paper Set Operation at the Paper cover close Specifies the operation when the paper cover is
closed.
Madia Loading Method (with Cutting) Paper is loaded and cut.
Madia Loading Method (without Cutting) Paper is loaded and not cut.
Send Sends settings to the TM-C3400Z.
The setting completion message appears on the web
page when the setting has been successfully completed. The web page automatically returns to the setting window.
92
Page 93
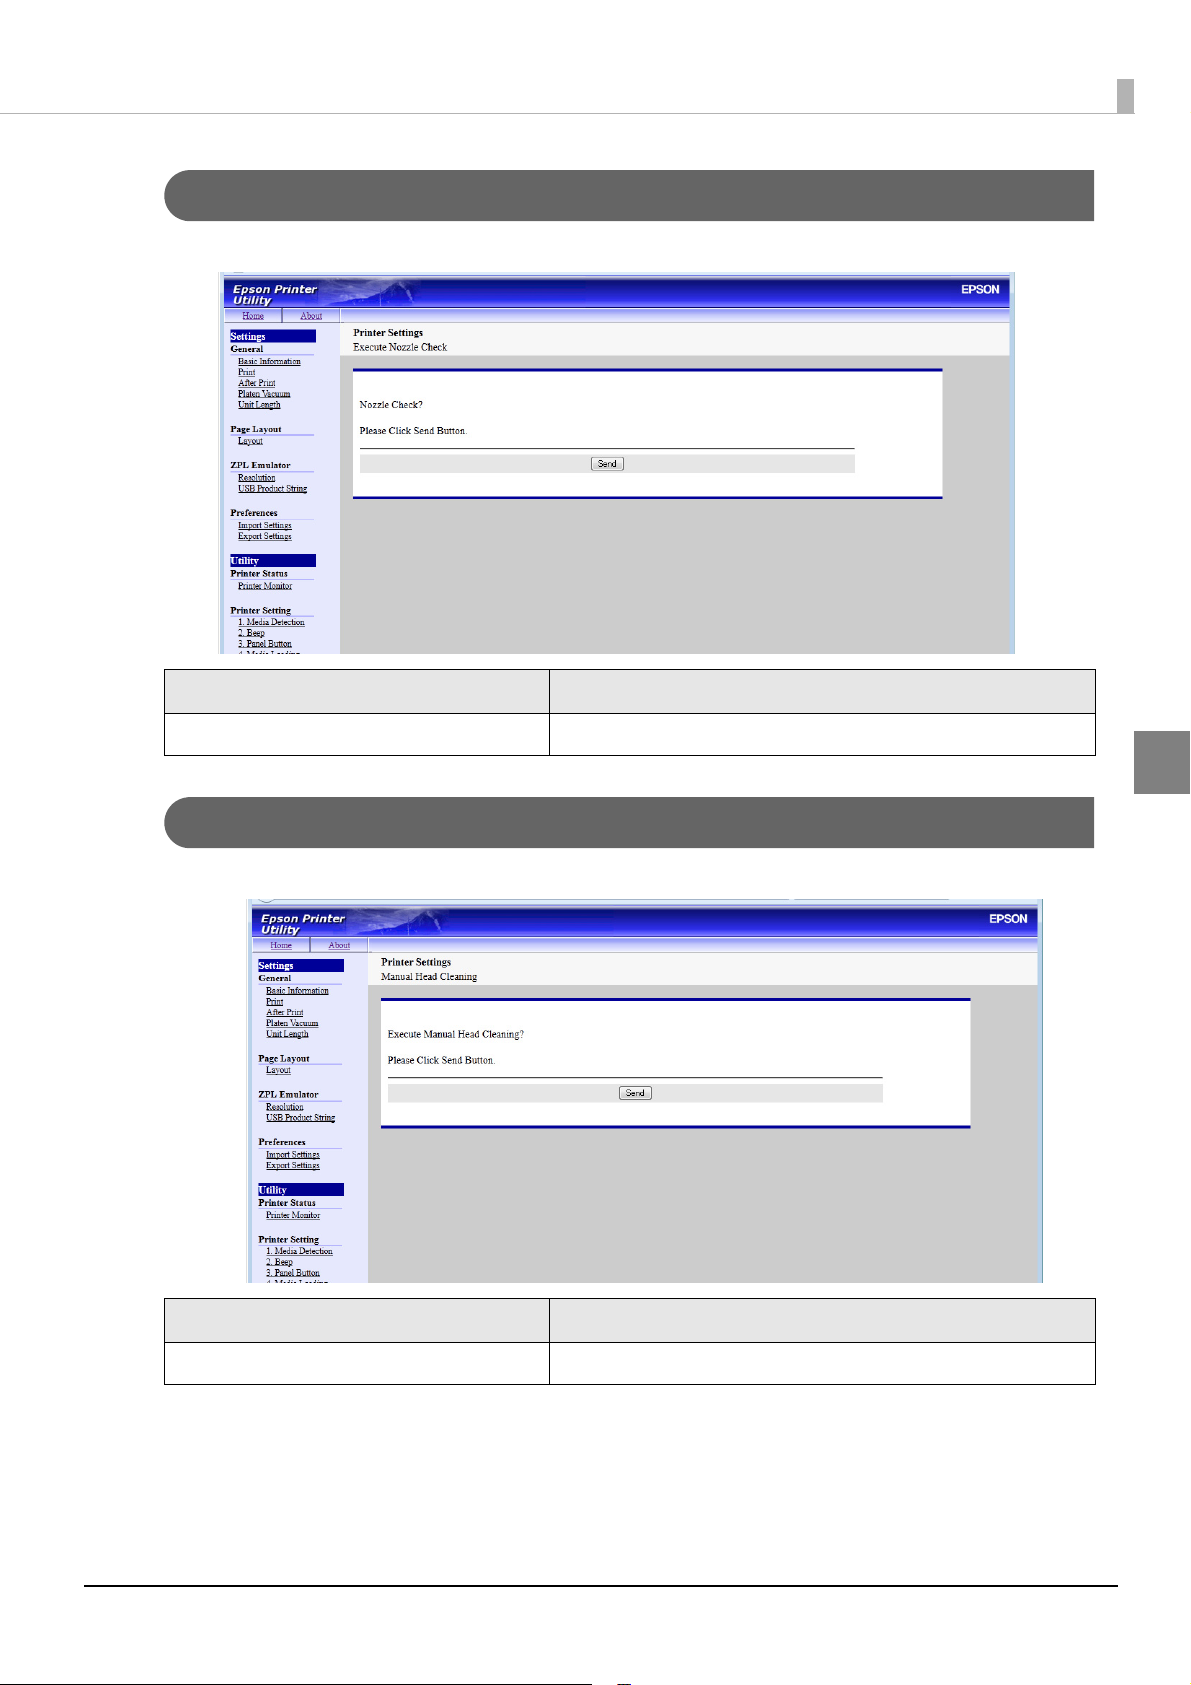
Utility-Nozzle Check (Printer Setting)
You can execute nozzle check.
Chapter 3 Utility
Item Description
Send Starts nozzle check.
Utility-Head Cleaning (Printer Setting)
You can execute head cleaning.
3
Item Description
Send Starts head cleaning.
93
Page 94
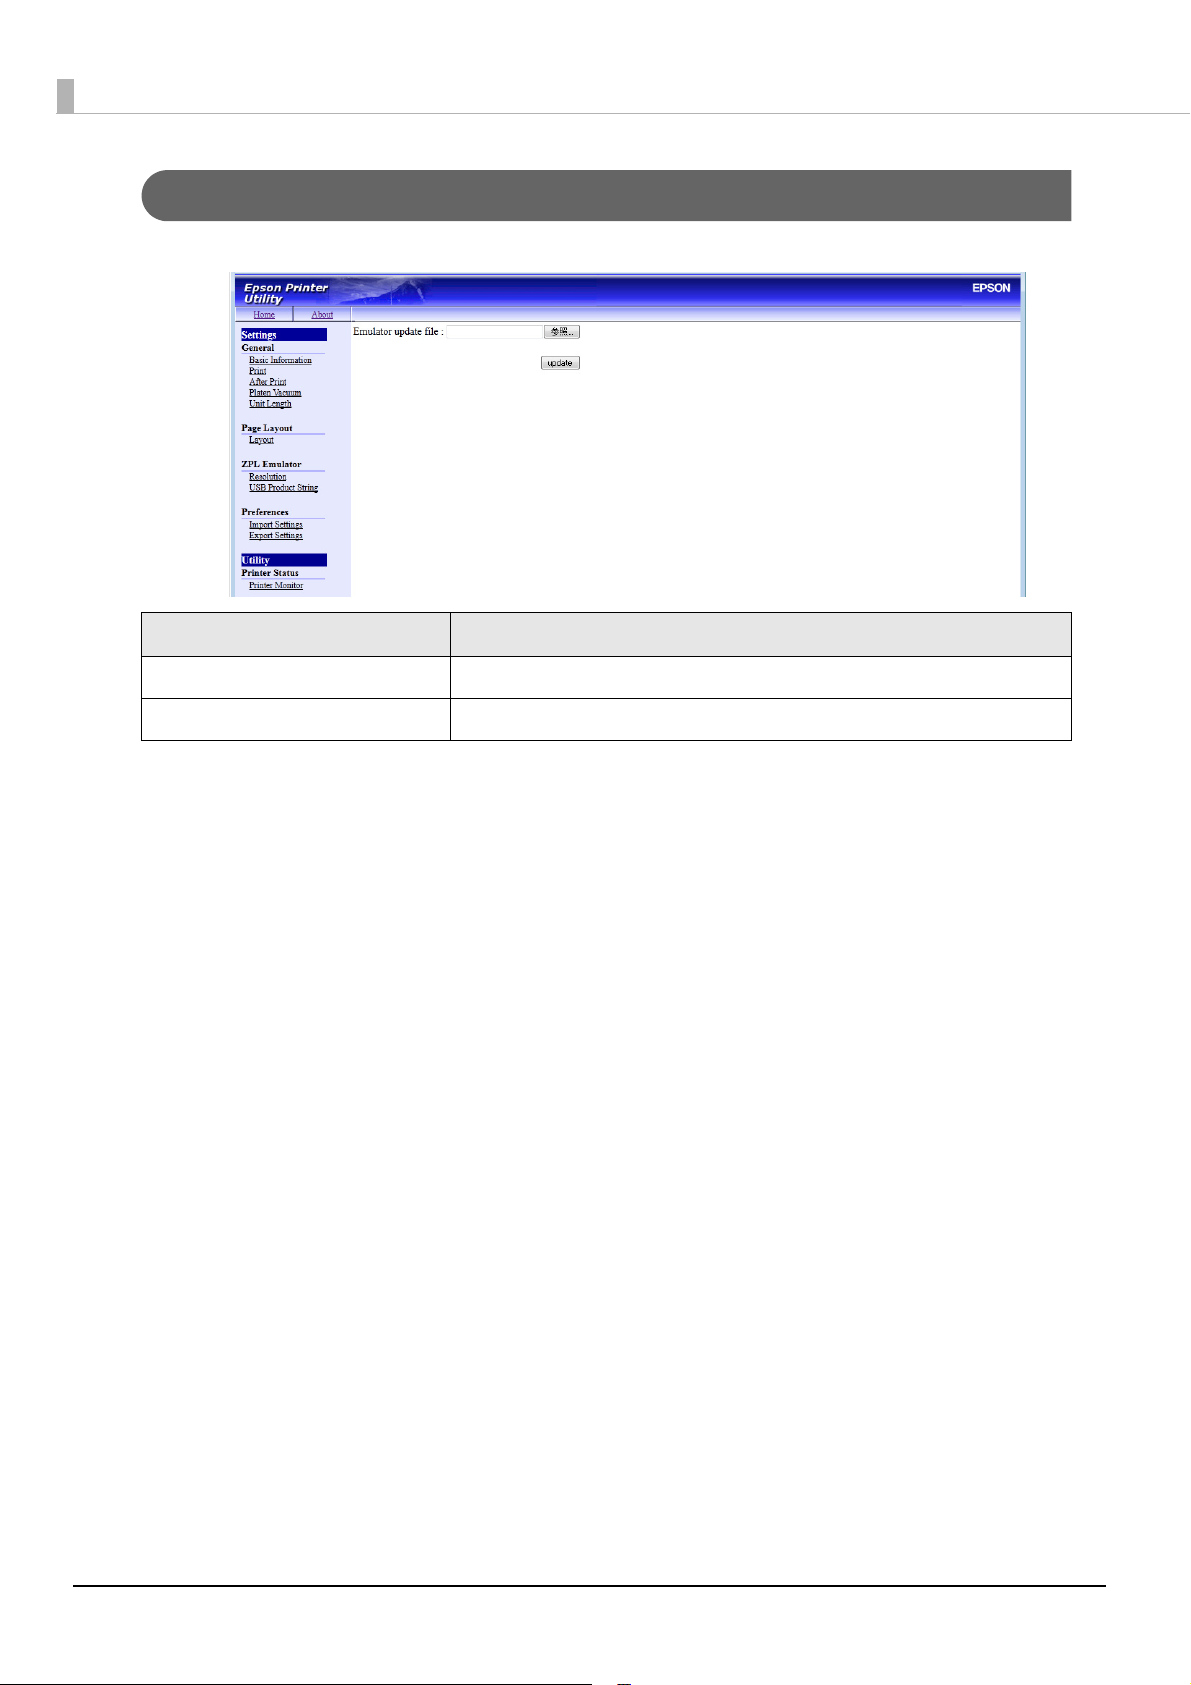
Utility-Emulator Update (Update Tool)
You can update ZPL Emulator.
Item Description
Emulator update file Specify an Emulator update file.
Update Updates ZPL Emulator to the file specified in [Emulator update file].
94
Page 95
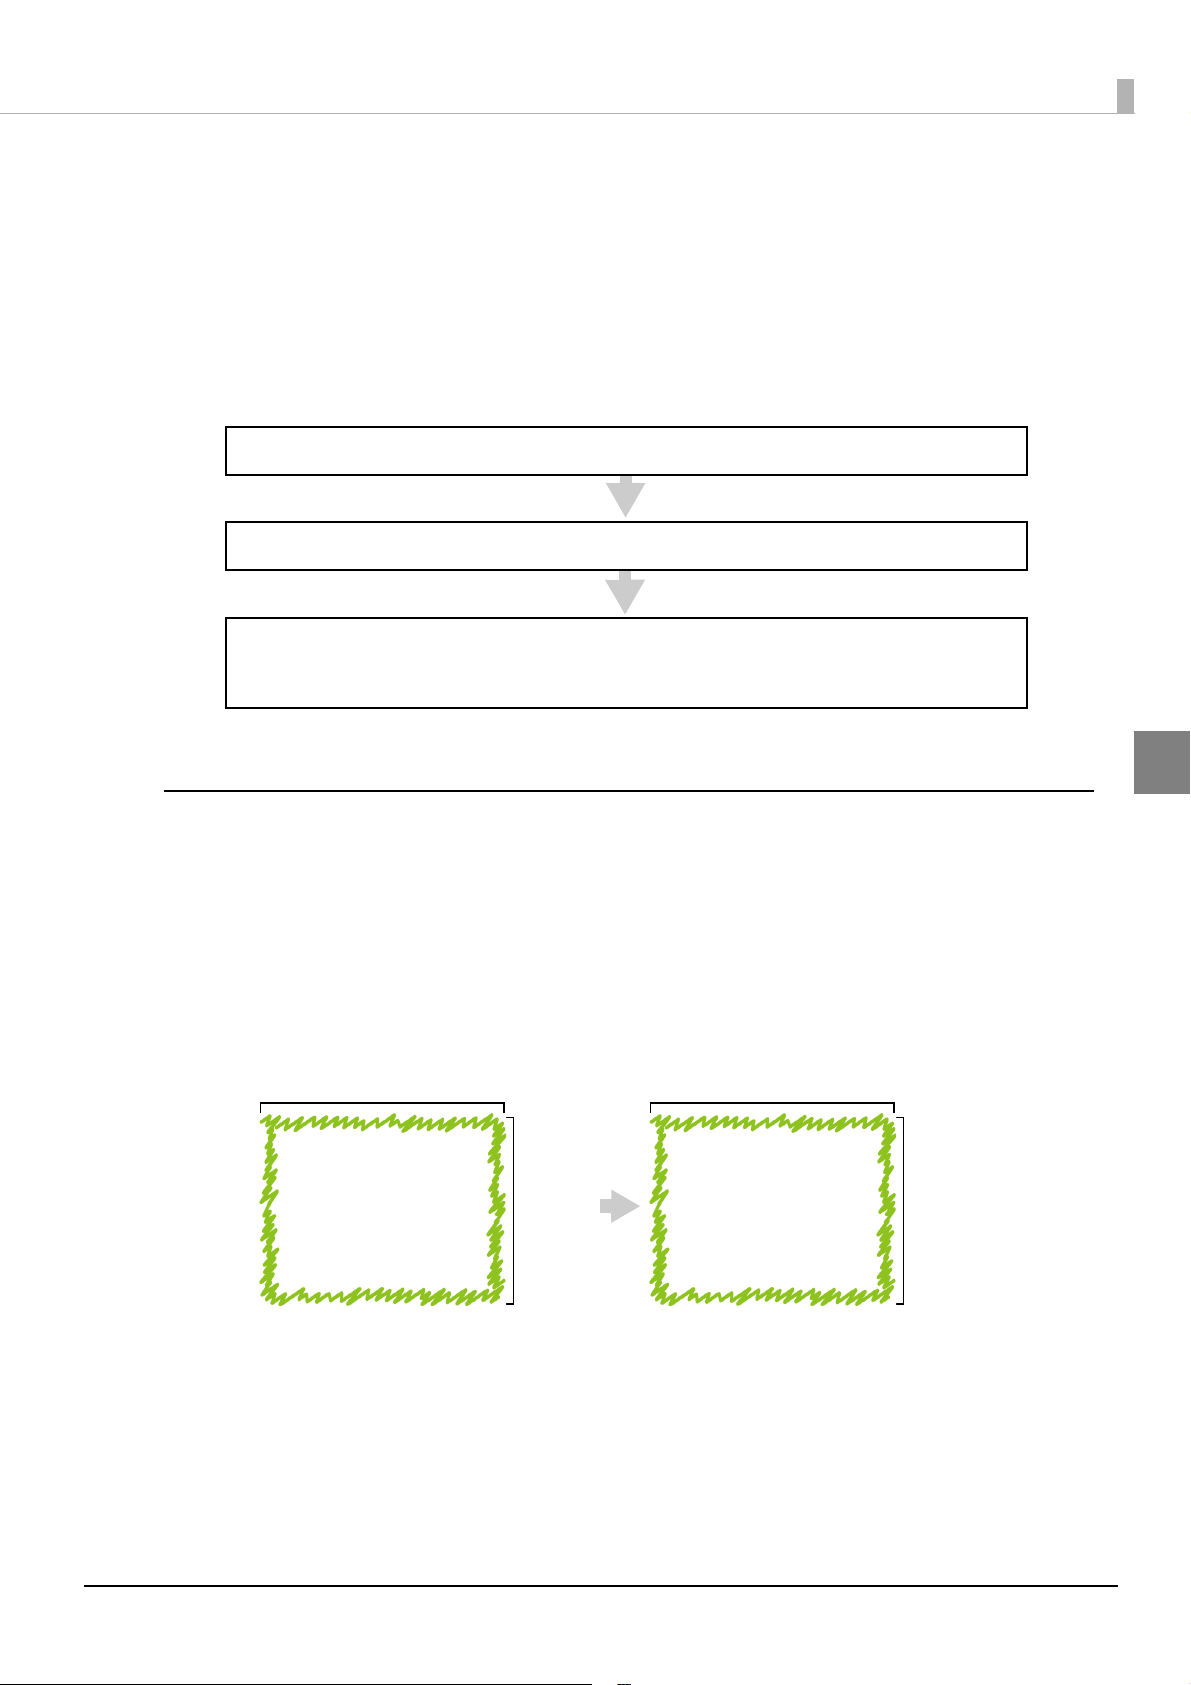
Chapter 3 Utility
2. Send and set the image as a preset image (page 97)
1. Prepare background image data (page 95)
3. Print
Printing from the application prints a registered image on the background.
2 inch
3.5 inch
406 pixel @ 203dpi
710 pixel @ 203dpi
Preset Image
TM-C3400Z presets a background image as if you use previously printed paper media.
You can print data over the image.
The image registered here is not affected by the print data and can be printed as the background of the
print data any time. To disable printing of the image, select "none" in the settings for this item.
Workflow
Prepare background image data
Prepare image data with a size corresponding to the printer resolution and the size to be printed.
TM-C3400Z preprint accepts PNG file. Image's resolution corresponds to TM-C3400Z zebra emulation
resolution (perhaps 203dpi or 300dpi).
Let's assume you print 3.5 inch x 2 inch on 203dpi settings.
The preprint image width should be then 3.5 * 203 = 710.5. In this case, 710 will be enough. And the height
should be 2 * 203 = 406. Of course the ZPL 's Label Length and Paper Width should be 710x406.
Set the paper size through Epson Printer Utility or send the command like "^XA ^LL710 ^PW406 ^XZ".
3
95
Page 96

For the printed size and the number of pixels of image, see the table below.
<Translation Table>
inch 300dpi 203dpi
0 inch 0 pixel 0 pixel
0.25 inch 75 pixel 50 pixel
0.5 inch 150 pixel 101 pixel
0.75 inch 225 pixel 152 pixel
1 inch 300 pixel 203 pixel
1.25 inch 375 pixel 253 pixel
1.5 inch 450 pixel 304 pixel
1.75 inch 525 pixel 355 pixel
2 inch 600 pixel 406 pixel
2.25 inch 675 pixel 456 pixel
2.5 inch 750 pixel 507 pixel
2.75 inch 825 pixel 558 pixel
3 inch 900 pixel 609 pixel
3.25 inch 975 pixel 659 pixel
3.5 inch 1050 pixel 710 pixel
3.75 inch 1125 pixel 761 pixel
4 inch 1200 pixel 812 pixel
96
Page 97

Send and set the image as a preset image
Perform registration using the following steps.
Connect TM-C3400Z to the computer via a network.
1
This operation is only available on a web browser.
Access EpsonNet Config using a Web browser.
2
Its address is http://192.168.192.168/ by default.
Click [Printer Utility].
3
Click [Preset Image].
4
Chapter 3 Utility
The above screenshot shows the window for selecting a preset image before the image is
registered.
3
97
Page 98

Click [Browse] to select an image to add to the list.
5
Click [Add Image] to upload the image file.
6
Select an image from the list and click [Apply] to set it as preset image.
7
The print data received after the above setting will be printed on this background image.
98
Page 99

Chapter 3 Utility
Template Colorization
TM-C3400Z provides color printing by embedding color information into a template file.
Color and other attributes can be added for each item in the template. TM-C3400Z can colorize graphic
items and replace graphic images.
<Function>
• Text item: Colorize foreground and background
• Circle item: Colorize fill and stroke
• Ellipse item: Colorize fill and stroke
• Rectangle item: Colorize fill and stroke
• Line item: Colorize stroke
• Graphic image: Replace image file
Items with a color specified to white cannot be colorized.
<Example>
^GB 100,100,1,W
To configure the settings using Internet Explorer 8, see
21.
"Setting Internet Explorer 8" on page
Setting Method
Perform the settings using the following steps.
Connect TM-C3400Z to the computer via a network.
1
This operation is only available on a web browser.
Access EpsonNet Config using a Web browser.
2
Its address is http://192.168.192.168/ by default.
Click [Printer Utility].
3
3
99
Page 100
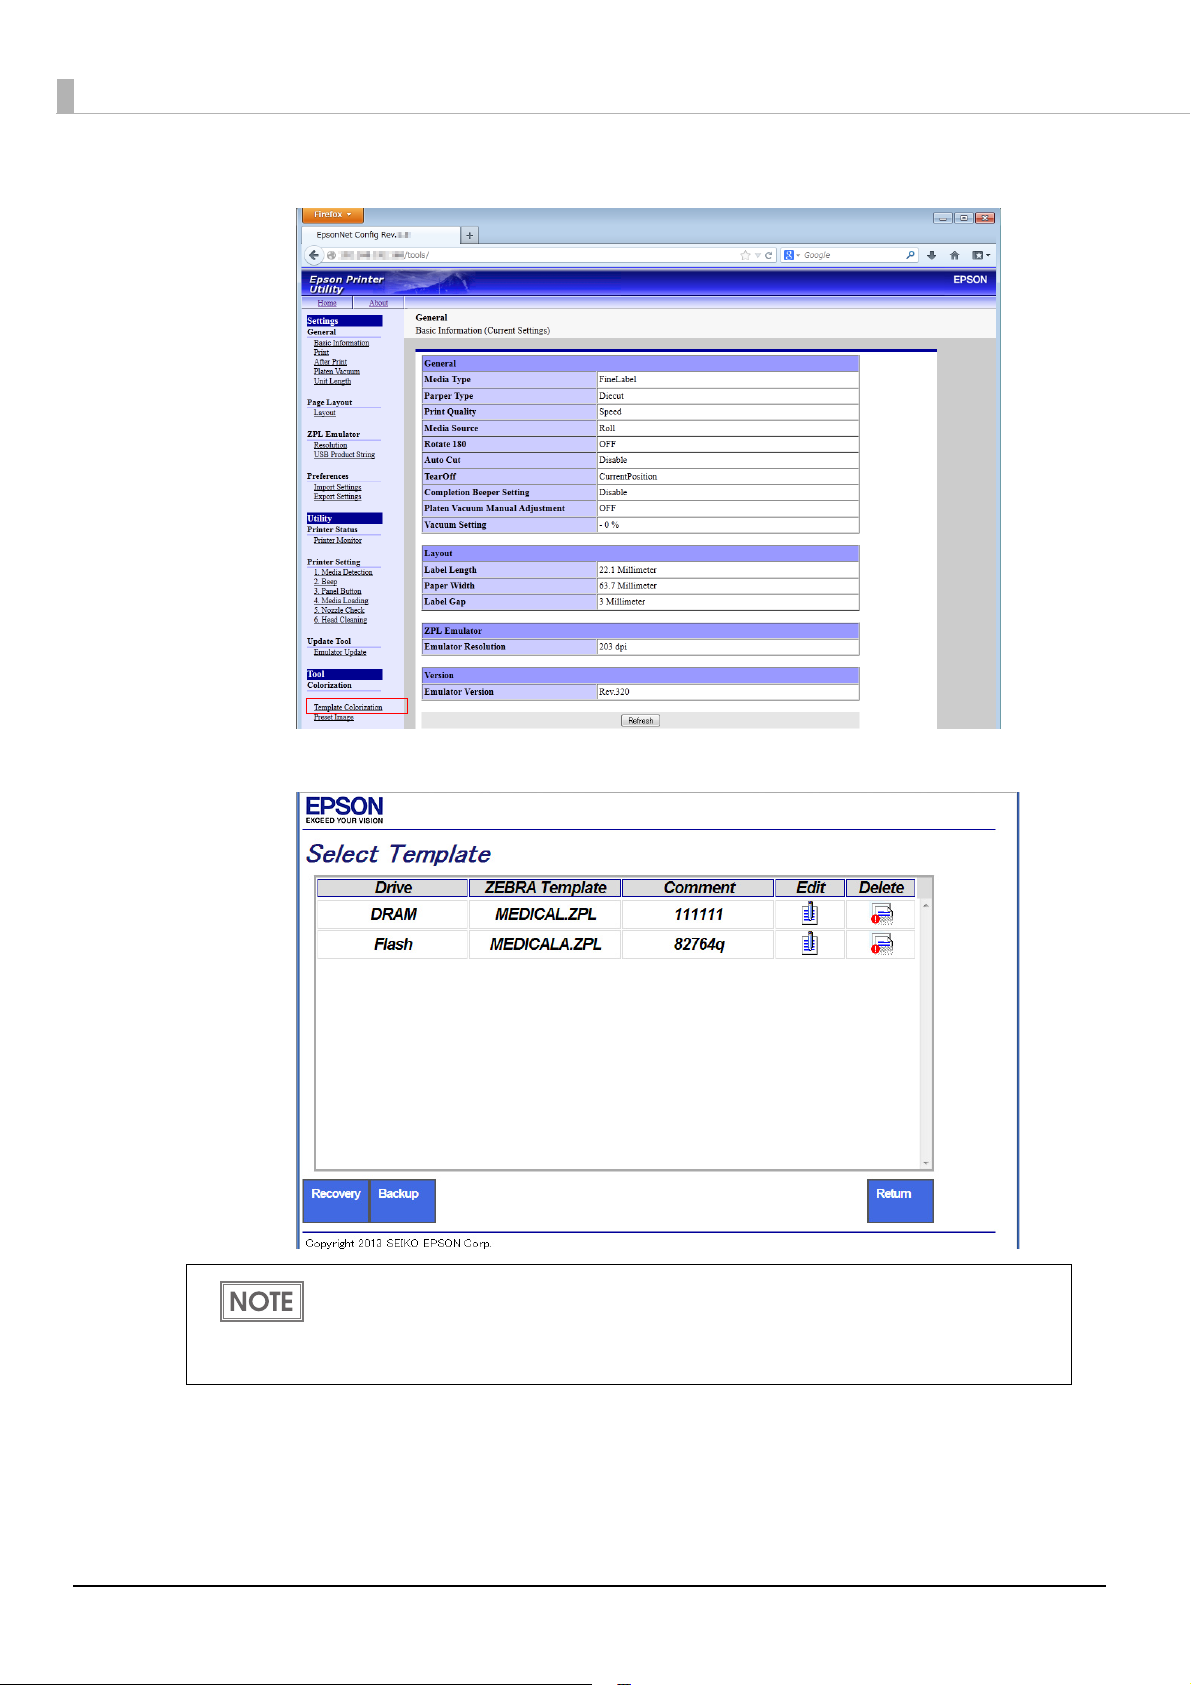
Click [Template Colorization].
4
Click edit icon.
5
The size and position of each item displayed in the template are different from those in the
actual print results. Adjust the size and position by checking the actual print result. Items
may not be displayed or not be aligned in position depending on the command description.
100
 Loading...