


User’s Manual / Petunjuk Penggunaan
Di Impor oleh:
PT. Epson Indonesia
Wisma Kyoei Prince Lt.16
Jalan Jenderal Sudirman Kav.3
Jakarta Pusat 10220, Indonesia
M00041900

2

English
User’s Manual
All rights reserved. No part of this publication may be reproduced, stored in a retrieval system, or
transmitted in any form or by any means, electronic, mechanical, photocopying, recording, or otherwise,
without the prior written permission of Seiko Epson Corporation. No patent liability is assumed with respect
to the use of the information contained herein. While every precaution has been taken in the preparation of
this book, Seiko Epson Corporation assumes no responsibility for errors or omissions. Neither is any liability
assumed for damages resulting from the use of the information contained herein.
Neither Seiko Epson Corporation nor its affiliates shall be liable to the purchaser of this product or third
parties for damages, losses, costs, or expenses incurred by purchaser or third parties as a result of: accident,
misuse, or abuse of this product or unauthorized modifications, repairs, or alterations to this product, or
(excluding the U.S.) failure to strictly comply with Seiko Epson Corporation’s operating and maintenance
instructions.
Seiko Epson Corporation shall not be liable against any damages or problems arising from the use of any
options or any consumable products other than those designated as Original Epson Products or Epson
Approved Products by Seiko Epson Corporation.
EPSON is a registered trademark of Seiko Epson Corporation in Japan and other countries/regions.
Microsoft, Windows, and Windows Vista are registered trademarks of Microsoft Corporation.
The Ethernet interface model of this product includes software developed by the University of California,
Berkeley, and its contributors.
NOTICE: The contents of this manual are subject to change without notice.
Copyright © 2011 Seiko Epson Corporation

English
Precautions When Using This Printer for the First Time
CAUTION:
When using this printer for the first time, ink charging into the printer
automatically starts.
Never take the following actions during ink charging.
Opening the roll paper cover
Opening the ink cartridge cover
Turning off the power
Doing so will cause a significant amount of ink to be consumed, and the
ink cartridge may need to be replaced before ink charging is
completed.
1. Ink charging starts automatically after ➀ installing the roll paper,
➁ turning on the printer, and ➂ installing the ink cartridge.
2. It takes approximately 8 minutes for ink charging. (During ink
charging, the Power LED flashes and the fan sounds.)
3. When ink charging is complete, the Power LED stays on, and the
fan sound stops.
4. After confirming that ink charging is complete, make the printer
settings according to your usage.
Notes:
After ink charging is complete, ink is not wasted by opening the covers or
turning off the power.
The printable amount is less than normal for the ink cartridge that is used
for ink charging.
Precautions on use
If you turn off the printer without using the power switch while using the
printer, the print head may not return to its home position. In this case,
the next time the printer is turned on, auto head cleaning is performed,
which wastes ink.
The colors of printouts may become uneven if you subject the printer to
shock or vibration. When you move this printer after ink charging, check
the colors by performing a test print before use.
If the colors of printouts are not normal, perform head cleaning.
4 TM-C3400 User’s Manual

Safety Precautions
This section presents important information intended to ensure safe
and effective use of this product. Please read this section carefully and
store it in an accessible location.
WARNING:
Shut down your equipment immediately if it produces smoke, a strange
odor, or unusual noise. Continued use may lead to fire. Immediately
unplug the equipment and contact your dealer or a Seiko Epson service
center for advice.
Never attempt to repair this product yourself. Improper repair work can
be dangerous.
Never disassemble or modify this product. Tampering with this product
may result in injury or fire.
Use the specified AC Adapter (Epson Model M159A/M159B [PS-180])
only. Connection to an improper power source may cause fire.
Be sure your power cable meets the relevant safety standards and
includes a power-system ground terminal (PE terminal). Otherwise shock
may result.
Do not allow foreign matter to fall into the equipment. Penetration by
foreign objects may lead to fire.
If water or other liquid spills into this equipment, unplug the power cord
immediately, and then contact your dealer or a Seiko Epson service
center for advice. Continued usage may lead to fire.
Do not use aerosol sprayers containing flammable gas inside or around
this product. Doing so may cause fire.
CAUTION:
Do not connect cables in ways other than those mentioned in this
manual. Different connections may cause equipment damage and
burning.
Be sure to set this equipment on a firm, stable, horizontal surface. The
product may break or cause injury if it falls.
Do not use in locations subject to high humidity or dust levels. Excessive
humidity and dust may cause equipment damage or fire.
Do not place heavy objects on top of this product. Never stand or lean
on this product. Equipment may fall or collapse, causing breakage and
possible injury.
To ensure safety, unplug this product before leaving it unused for an
extended period.
Do not remove the ink cartridge from the product when you ship it.
TM-C3400 User’s Manual 5
English
Caution Label
The caution label on the product indicates the following precaution.
CAUTION:
Take care not to injure your fingers on the fixed blade of the autocutter.
Restriction of Use
When this product is used for applications requiring high reliability/
safety, such as transportation devices related to aviation, rail, marine,
automotive, etc.; disaster prevention devices; various safety devices,
etc.; or functional/precision devices, etc.; you should use this product
only after giving consideration to including fail-safes and
redundancies into your design to maintain safety and total system
reliability.
Downloading Drivers, Utilities, and Manuals
Drivers, utilities, and manuals can be downloaded from the following
URL.
http://www.epson-pos.com/
Unpacking
The following items should be included with the printer. If any items
are damaged, contact your dealer.
❏ Label paper roll
❏ Ink cartridge (Model: SJIC15P)
❏ Paper ejection tray
❏ Power switch cover
❏ AC adapter (Model: M159A/M159B [PS-180])
❏ AC cable
❏ USB cable (USB interface model only)
❏ Instruction sheet
❏ User’s Manuals (for printer and AC adapter)
* The AC adapter is embedded in the printer.
* The AC cable may not be included with the printer.
6 TM-C3400 User’s Manual
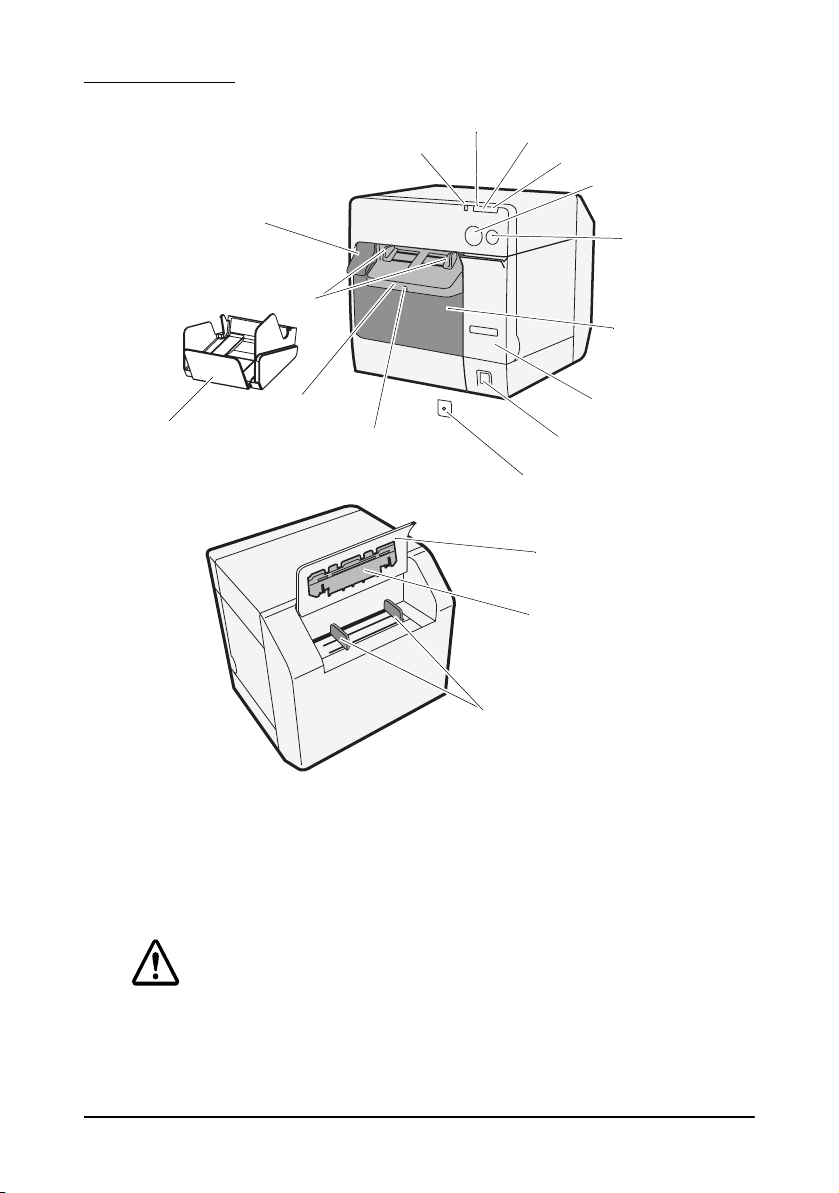
Part Names
Release lever
Paper ejection guide
Paper ejection guide lock
Roll paper cover
Power switch
Ink cartridge cover
Paper ejection tray
Power LED
Error LED
Ink LED
Paper LED
Cut button
Feed button
Paper ejection table
Power switch cover
Fanfold paper cover
Paper feed guide
Fanfold paper guide
Power switch
Turns on/off the printer.
Power switch cover
Installing the power switch cover onto the power switch prevents
inadvertent changing of the power switch.
If an accident occurs with the power switch cover attached, unplug
the AC cable immediately. Continued used may cause fire.
WARNING:
TM-C3400 User’s Manual 7

English
Power LED
Lights when the power is on, and is off when the power is off.
Flashes when the printer is operating (initializing, head cleaning, or
printing) or in an error state.
Error LED
Lights or flashes when the printer is offline, and is off when the printer
is online.
Ink LED
Flashes when ink is low or waste ink in the ink cartridge is nearly full.
Lights when it is time to replace the ink cartridge, when the ink
cartridge is not installed or is not correctly installed, and when waste
ink in the ink cartridge is full.
Off when ink in the ink cartridge is adequate.
Paper LED
Lights when the paper is not installed or is not correctly installed.
Off when the paper is correctly installed.
Cut button
Cuts the paper.
FEED button
Feeds the paper.
Setup
Follow in order the steps below to set up the printer.
1. Installing the printer (See page 9.)
2. Connecting the AC cable (See page 9.)
3. Installing the ink cartridge (See page 10.)
4. Installing the printer driver and connecting the printer to the
computer (See
5. Setting the DIP switches (See page 12.)
6. Installing the paper (See page 13.)
7. Attaching/adjusting the paper ejection tray (See page 21.)
8 TM-C3400 User’s Manual
page 11.)
Installing the Printer
CAUTION:
Install the printer horizontally on a flat, stable, and vibration-free surface.
Otherwise, the roll paper cover may not operate correctly, and your
fingers may be caught.
Do not tilt the printer with the roll paper cover open. The roll paper
cover may close unexpectedly, and your fingers may be caught.
cover may be closed unexpectedly, and your fingers may be caught.
❏ Be sure to open the roll paper cover and remove the cushion
materials in the printer.
❏ Leave enough space in front of the printer for the ink cartridge
cover and the roll paper cover to be fully opened.
❏ Do not place the printer in dusty locations.
❏ Protect the printer from heavy impacts. They may cause defective
print.
❏ Do not allow cables to catch or foreign matter to accumulate under
the printer.
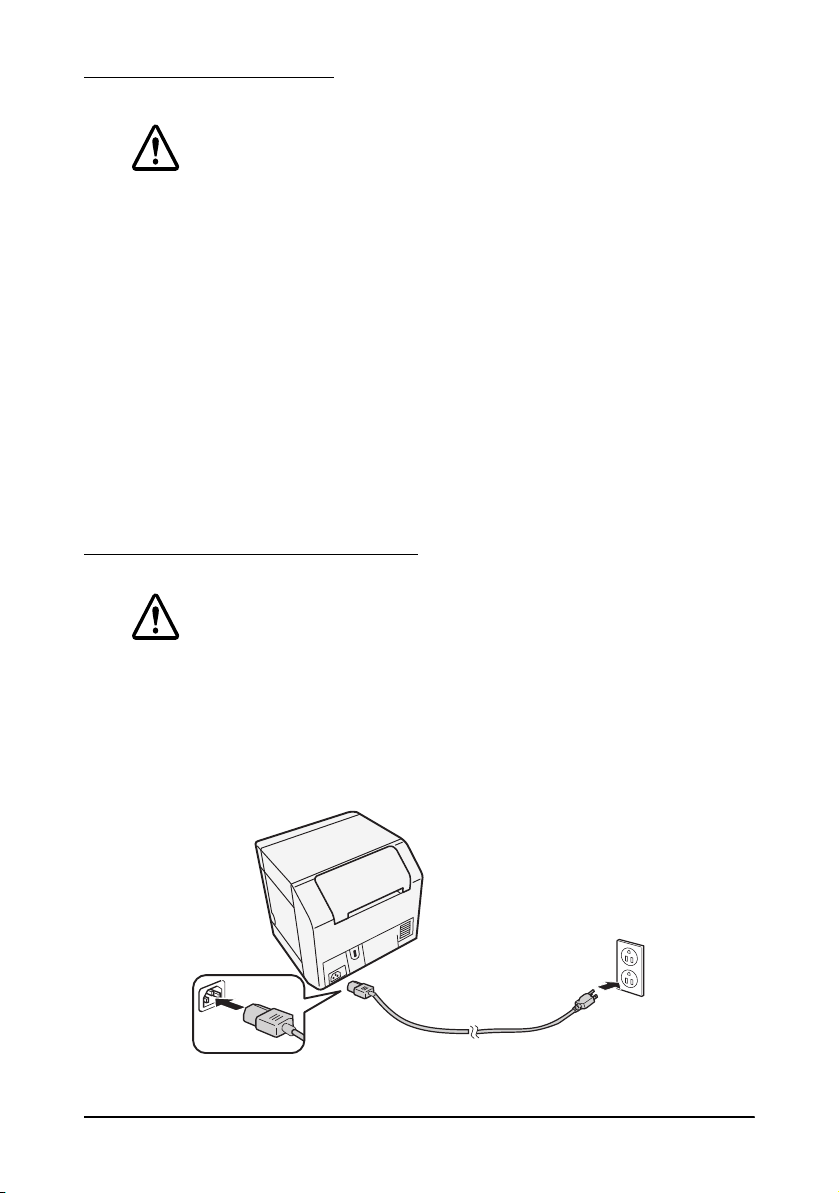
Connecting the AC Cable
WARNING:
Always use the Epson Model M159A/M159B (PS-180) as the AC adapter.
Using the other AC adapter can result in electric shock and fire.
Should a fault ever occur in the AC adapter, immediately turn off the
power to the printer and remove the AC cable from the wall socket.
Insert the connector of the AC cable to into the AC inlet, and then
insert the power plug of the AC cable into the wall socket.
TM-C3400 User’s Manual 9
English
Installing/Replacing the Ink Cartridge
CAUTION:
When the ink cartridge is installed for the first time, be sure to install the
roll paper before installing the ink cartridge. For details on how to install
the label paper roll, see
Always use the EPSON SJIC15P as the ink cartridge.
Do not open the ink cartridge package until you are ready to install it in
the printer.
Do not remove the ink cartridge from the printer when you ship it.
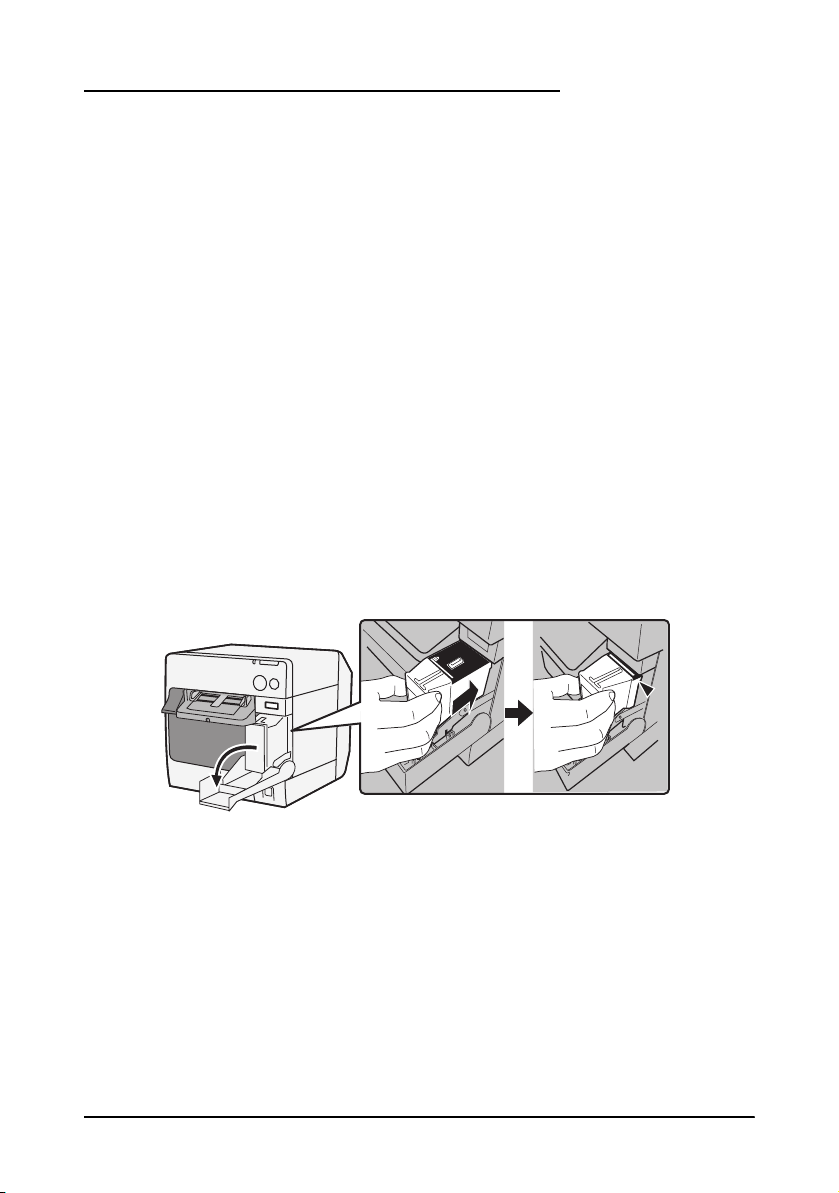
1. Turn on the printer and make sure that the Ink LED lights.
2. Pull the ink cartridge cover to open it.
3. Remove the used cartridge, if any.
4. Shake the ink cartridge package 4 or 5 times before opening it.
5. Push the ink cartridge gently into the cartridge holder as shown below.
6. Close the ink cartridge cover.
When the ink cartridge is installed for the first time, the printer
takes approximately 8 minutes for ink charging. The Power LED
flashes during ink charging. Do not turn off the printer or open the
roll paper cover or the ink cartridge cover. When ink charging
finishes, the Power LED stays on after flashing.
“Installing Paper” on page 13.
Note:
When the ink cartridge is installed for the first time, the printer uses ink to
prepare for printing (ink charging).
Cartridge yields vary based on such factors as type of item printed, print
settings, paper type, frequency of use, and temperature.
To insure print quality, some ink remains in the cartridge after the Ink LED
comes on.
The ink cartridge contains 3 colors of ink. Even when one particular color is
specified, all 3 colors of ink are used for printing and for keeping the print
head in good condition. When the ink level of even one color comes to the
lowest limit, the printer stops printing.
10 TM-C3400 User’s Manual
Installing the Driver and Connecting to the Computer
Cable hook: prevents the cable from falling off.
CAUTION:
Be sure to confirm the operating environment (page 24) before
installing.
You are required to login as a user with administrative rights.
Turn off the printer before connecting it to the computer.
For USB Interface Model
1. Double-click on the icon for Easy Setup (EPSetup.exe).
2. On the screen displayed, click [Local].
3. Complete the installation by following the instructions displayed.
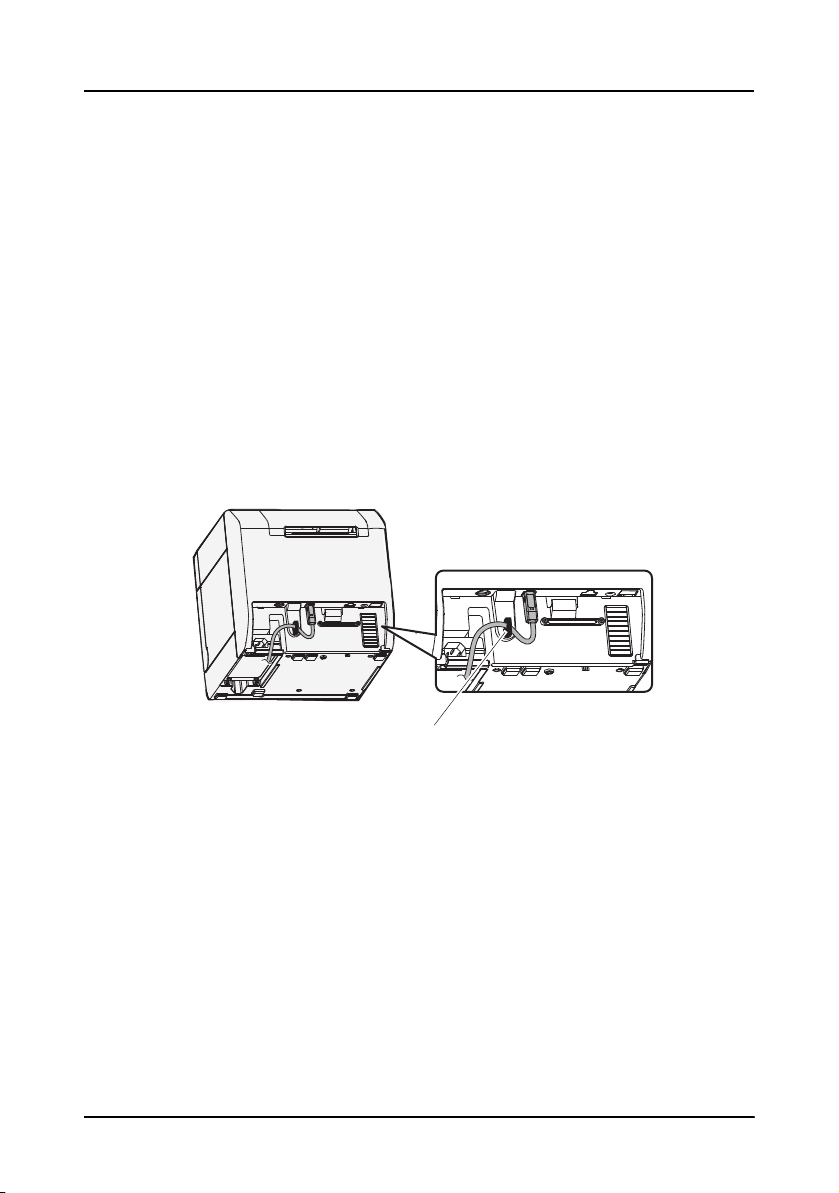
If the screen confirming the connection to the computer is
displayed during the installation, connect the printer to the
computer via the USB cable as shown below, and then turn on the
printer.
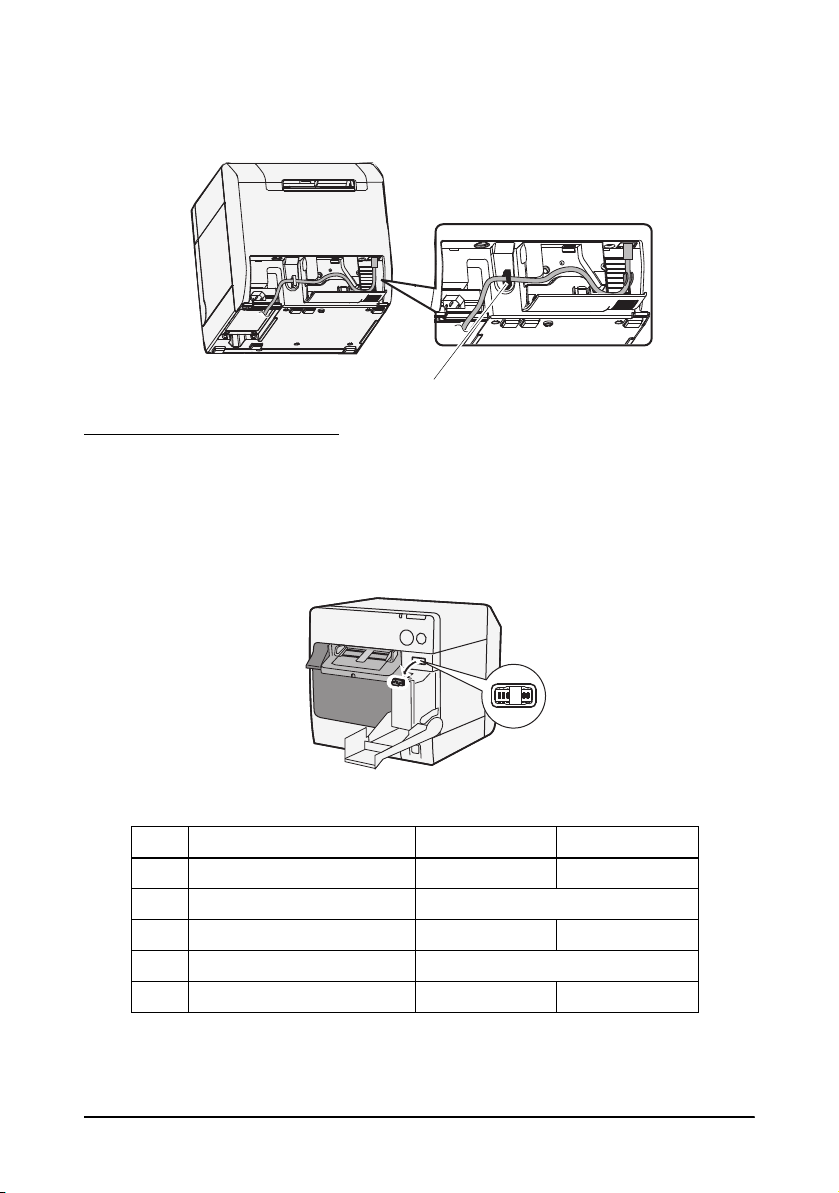
For Ethernet Interface Model
1. Open the connector cover and connect the printer to the computer
via the Ethernet cable as shown below.
2. Turn on the printer.
3. Double-click on the icon for Easy Setup (EPSetup.exe).
4. On the screen displayed, click [Network].
TM-C3400 User’s Manual 11
English
Cable hook: prevents the cable from falling off.
5. Complete the installation by following the instructions displayed.
Network settings are also processed during the installation.
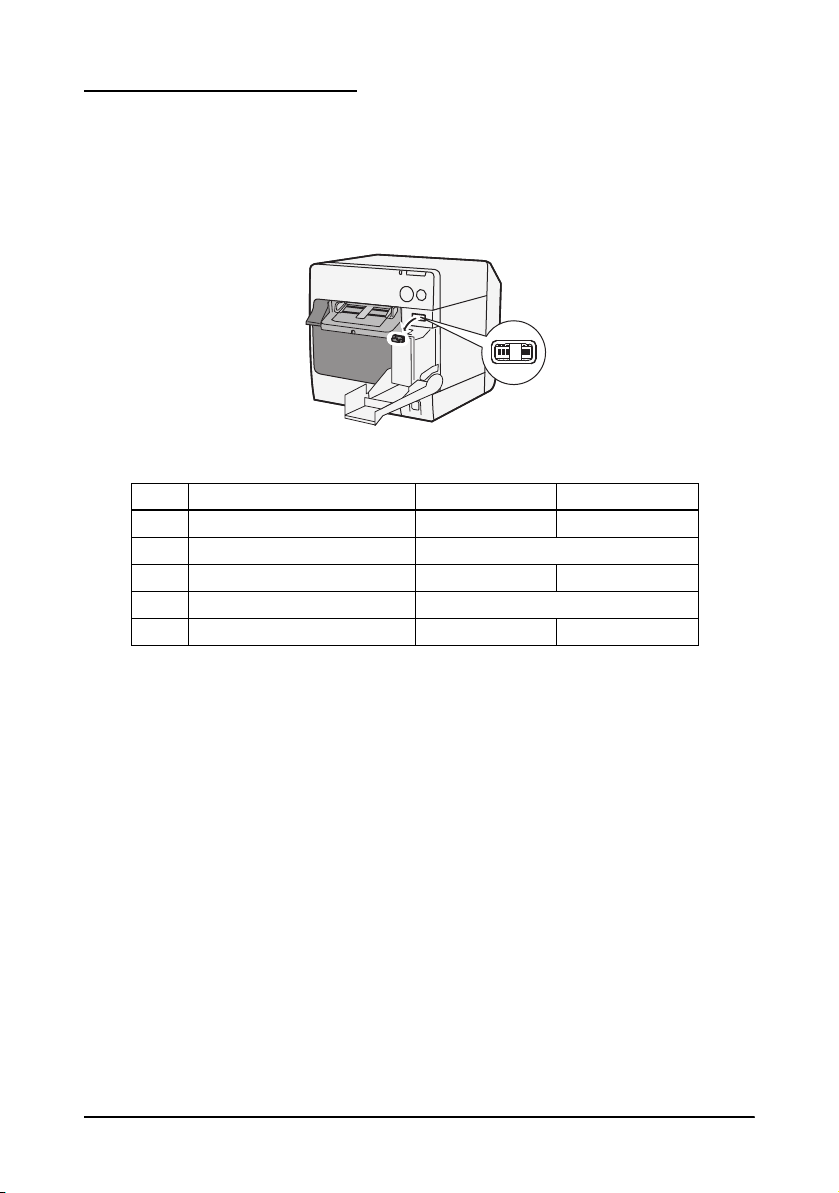
Setting DIP Switches
When you open the ink cartridge cover and remove the DIP switch
cover, you will find the DIP switches. Set the DIP switches, using the
tip of a tool, such as a small screwdriver. Change settings when the
printer is off.
SW Function ON OFF
1 Operation of the power switch Reset Power on/off
2 Internal use Fixed to OFF (Do not change.)
3 Paper selection Fanfold paper Roll paper
7 Internal use Fixed to OFF (Do not change.)
8 Buzzer volume High Low
12 TM-C3400 User’s Manual
Installing Paper
CAUTION:
Do not tilt the printer with the roll paper cover open. The roll paper
cover may close unexpectedly, and your fingers may be caught.
Be sure to confirm that DIP switch 3 (Paper selection) is set correctly
before installing the paper.
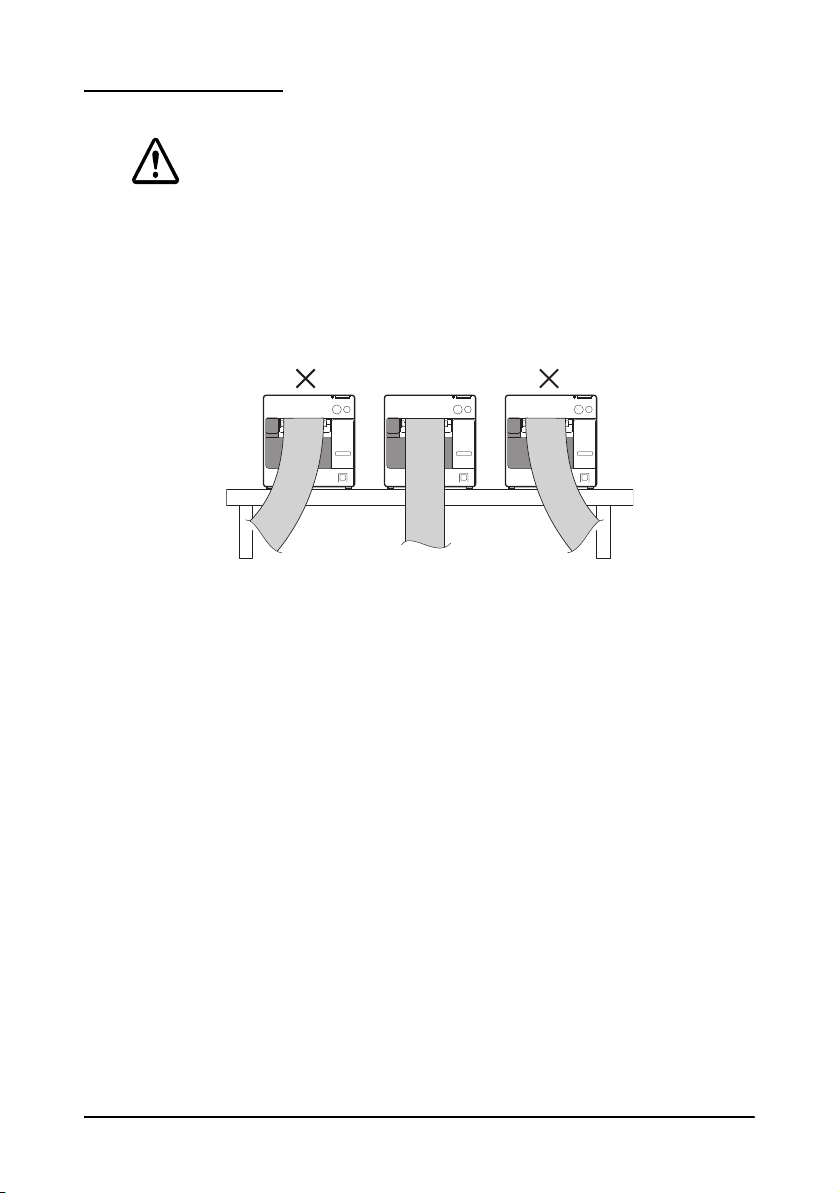
Make sure paper is ejected straight from the paper ejection guides, as
shown in the illustration. If paper is not ejected straight due to such
causes as an obstruction, the print result may be distorted.
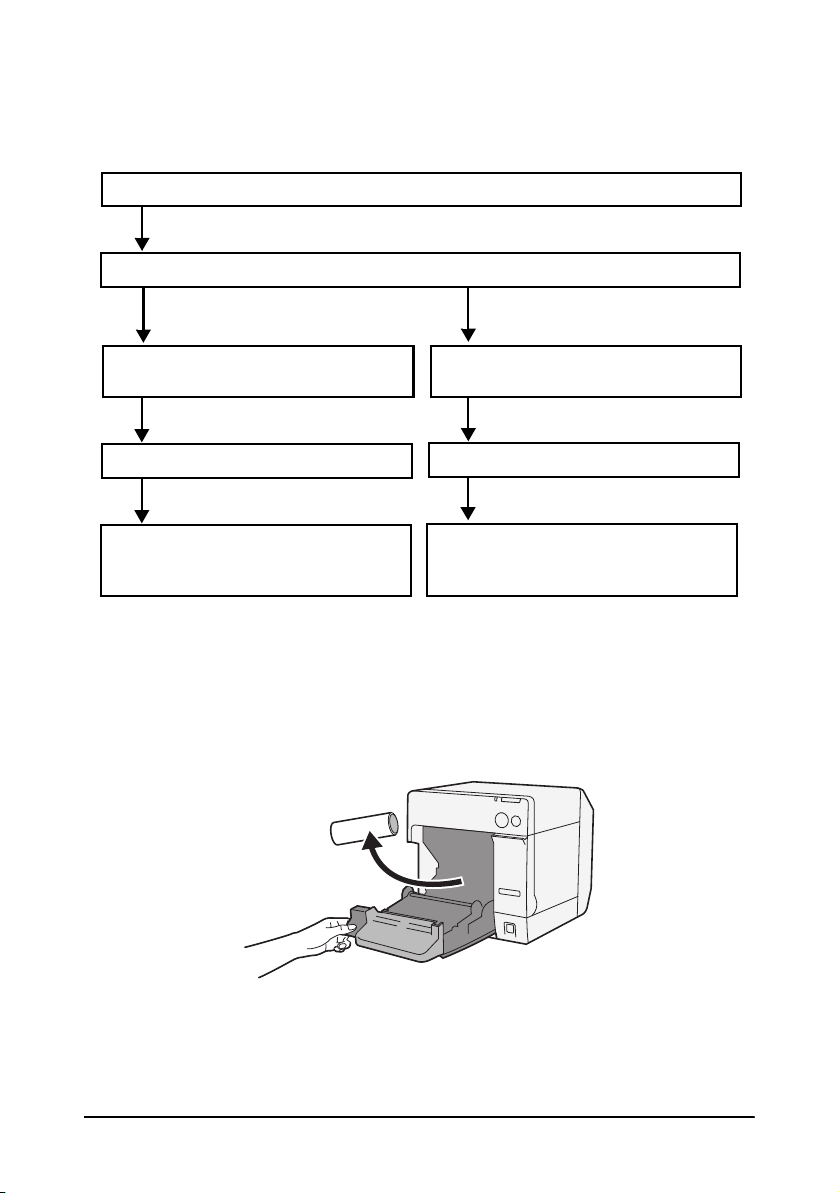
Follow the steps below to install the paper.
❏ When you install the roll paper for the first time (when you install
the ink cartridge for the first time): “When installing roll paper”
∼
➄, and after ink charging, go to ➁.
❏ When you have used up the paper (when you install same type of
paper):
❏ When you change the paper type: ➀ ∼ ➄
➀ and ➄
➃
TM-C3400 User’s Manual 13
English
When installing roll paper
When installing fanfold paper
➀ Removing paper (page 14)
➁ Setting paper position detection (page 15)
➂ Removing the paper feed guide
(page 16)
➂ Attaching the paper feed guide
(page 18)
➄ Loading the paper and
turning on the printer
(page 18)
➃ Adjusting the guides (page 16)
➃ Adjusting the guides (page 19)
➄ Turning on the printer and
loading the paper
(page 20)
For ➂ and after, the procedures differ depending on the paper form,
roll paper or fanfold paper.
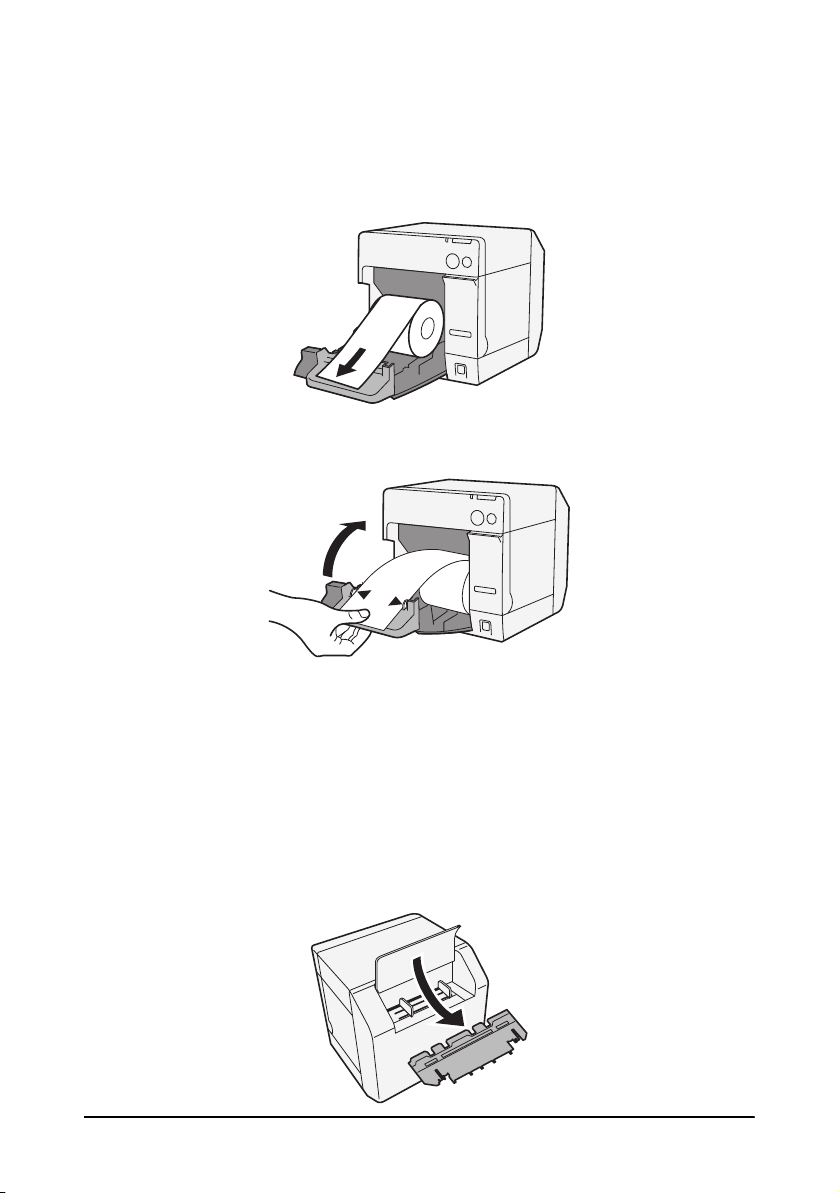
➀ Removing paper
Removing roll paper
1. Pull the release lever to open the roll paper cover, and remove the
roll paper or used roll paper core.
2. Close the roll paper cover.
14 TM-C3400 User’s Manual
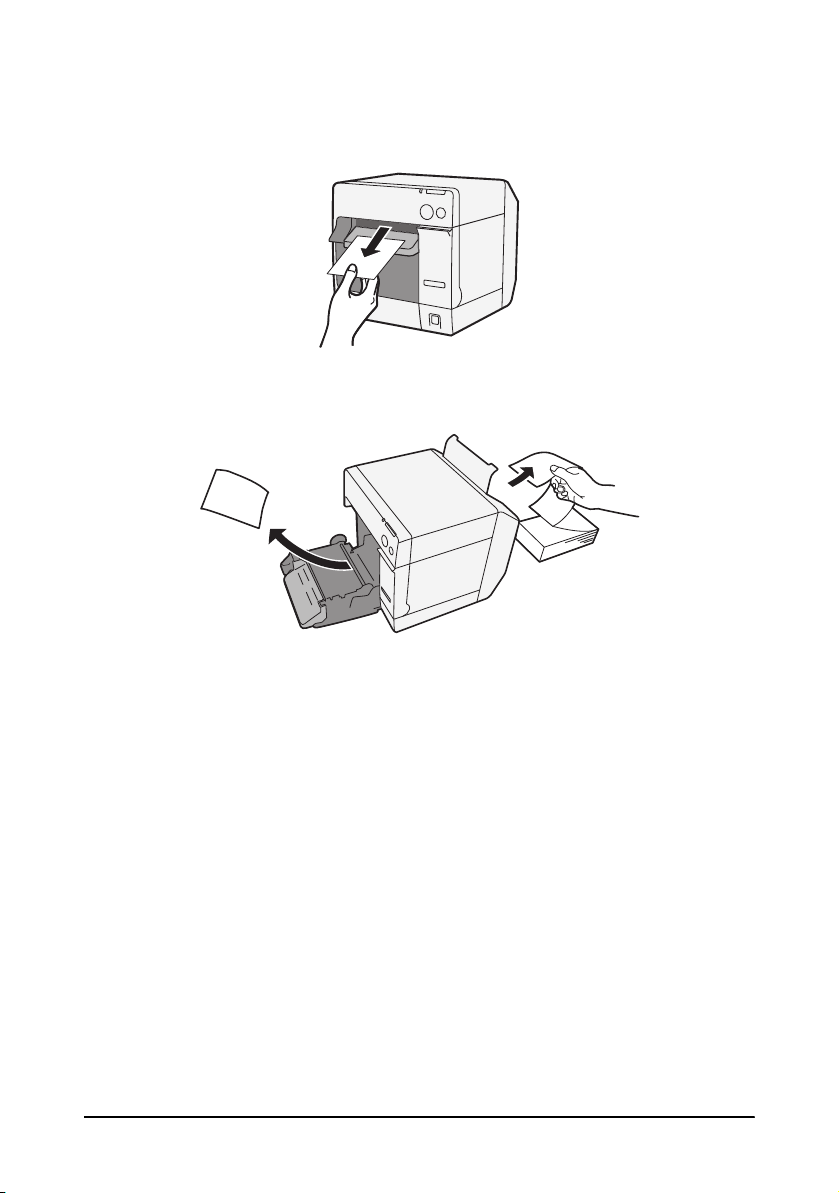
Removing fanfold paper
1. Remove the paper left on the paper ejection table.
2. When you change the paper type, open the roll paper cover and
the fanfold paper cover to remove the paper.
3. Close the roll paper cover and the fanfold paper cover.
➁ Setting paper position detection
When paper position detection setting does not need to be changed,
skip this step. Use the printer driver for this setting.
1. Turn on the printer.
2. Change [Paper Position Detection] on the [Maintenance And
Utilities
Note:
For information on how to display the printer driver, see page 22.
3. Turn off the printer.
CAUTION:
The changed setting of the paper position detection is stored in the
printer when the printer is turned off. Be sure to turn off the printer to
enable the setting.
] tab of the printer driver depending on the paper to use.
TM-C3400 User’s Manual 15
English
When Installing Roll Paper
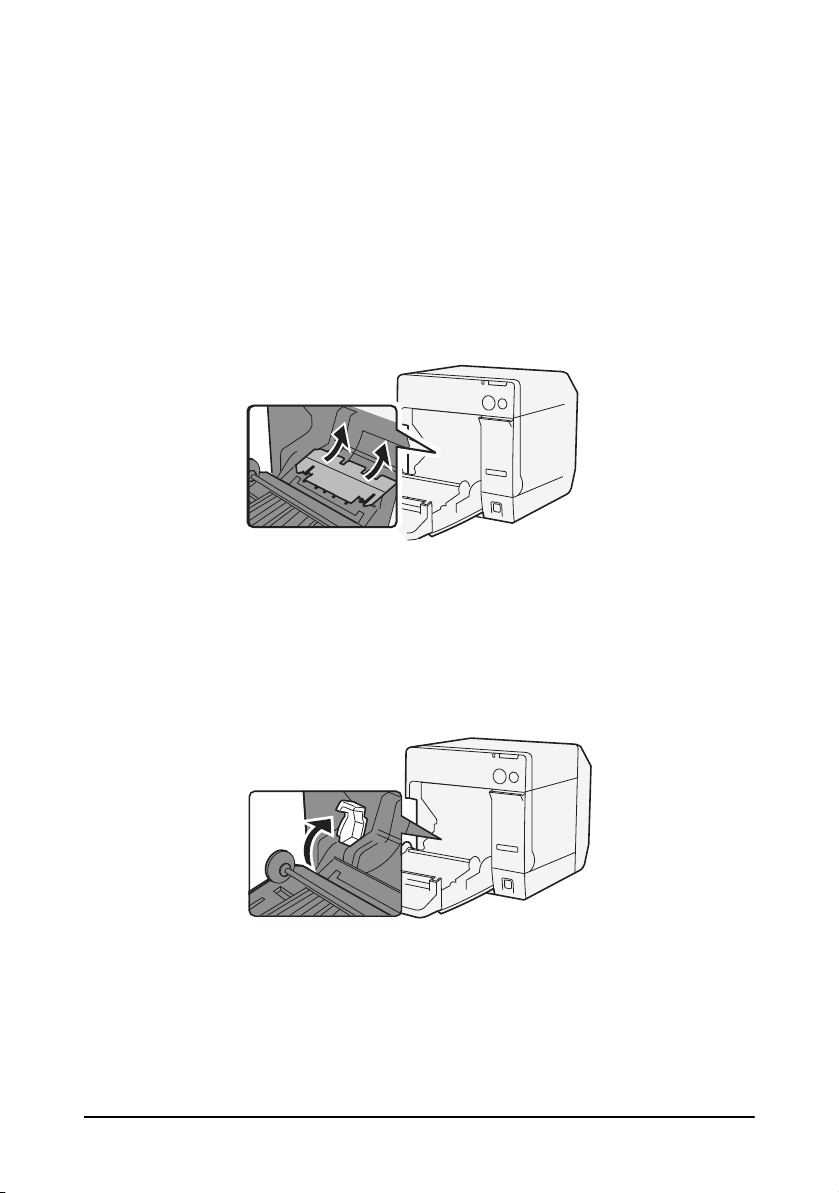
➂ Removing the paper feed guide
CAUTION:
The paper feed guide should be attached to the printer only when you
use fanfold paper. Be sure to remove the paper feed guide when you
use roll paper.
1. Pull the release lever to open the roll paper cover.
2. If the paper feed guide is attached into the grooves inside of the
roll paper cover, slide it in the direction of the arrow to remove it.
3. Close the roll paper cover.
➃ Adjusting the guides
When the paper width does not need to be changed, skip this step.
1. Pull the release lever to open the roll paper cover.
2. Unlock the roll paper guide.
16 TM-C3400 User’s Manual

3. Push the roll paper guide on the left in the direction of the arrow,
and load the roll paper with the printable side up completely
inside the printer.
4. Lock the roll paper guide.
5. Unlock the paper ejection guide, using the tip of a tool, such as a
pen.
6. Slide the paper ejection guide to align it with the roll paper width.
7. Lock the paper ejection guide, and then close the roll paper cover.
TM-C3400 User’s Manual 17

English
➄ Loading the paper and turning on the printer
1. Pull the release lever to open the roll paper cover.
2. Load the roll paper with the printable side up completely inside
the printer.
3. While aligning the roll paper with the paper ejection guide, close
the roll paper cover.
4. Turn on the printer, and then the paper is fed automatically.
When Installing Fanfold Paper
➂ Attaching the paper feed guide
CAUTION:
Be sure to attach the paper feed guide when you use fanfold paper.
1. Open the fanfold paper cover and take out the paper feed guide.
18 TM-C3400 User’s Manual

2. Pull the release lever to open the roll paper cover.
3. Insert the paper feed guide into the grooves inside of the roll paper
cover to attach it.
4. Close the roll paper cover.
➃ Adjusting the guides
1. Unlock the paper ejection guide, using the tip of a tool, such as a
pen.
2. Slide the paper ejection guide as wide as possible, and lock it.
When you install fanfold paper for the first time, or when the
paper width needs to be changed, continue to steps 3 and 4.
TM-C3400 User’s Manual 19

English
3. Open the fanfold paper cover and unlock the fanfold paper guide.
4. Slide the fanfold paper guide to align it with the fanfold paper
width, and lock it.
➄ Turning on the printer and loading the paper
1. Turn on the printer.
2. When the Power LED stays on after flashing, insert the paper with
the printable side up until it is automatically drawn in
(approximately 100 mm), and then the paper is fed automatically.
20 TM-C3400 User’s Manual

3. Place the paper straight at least 40 mm from the printer.
40mm
4. Close the fanfold paper cover.
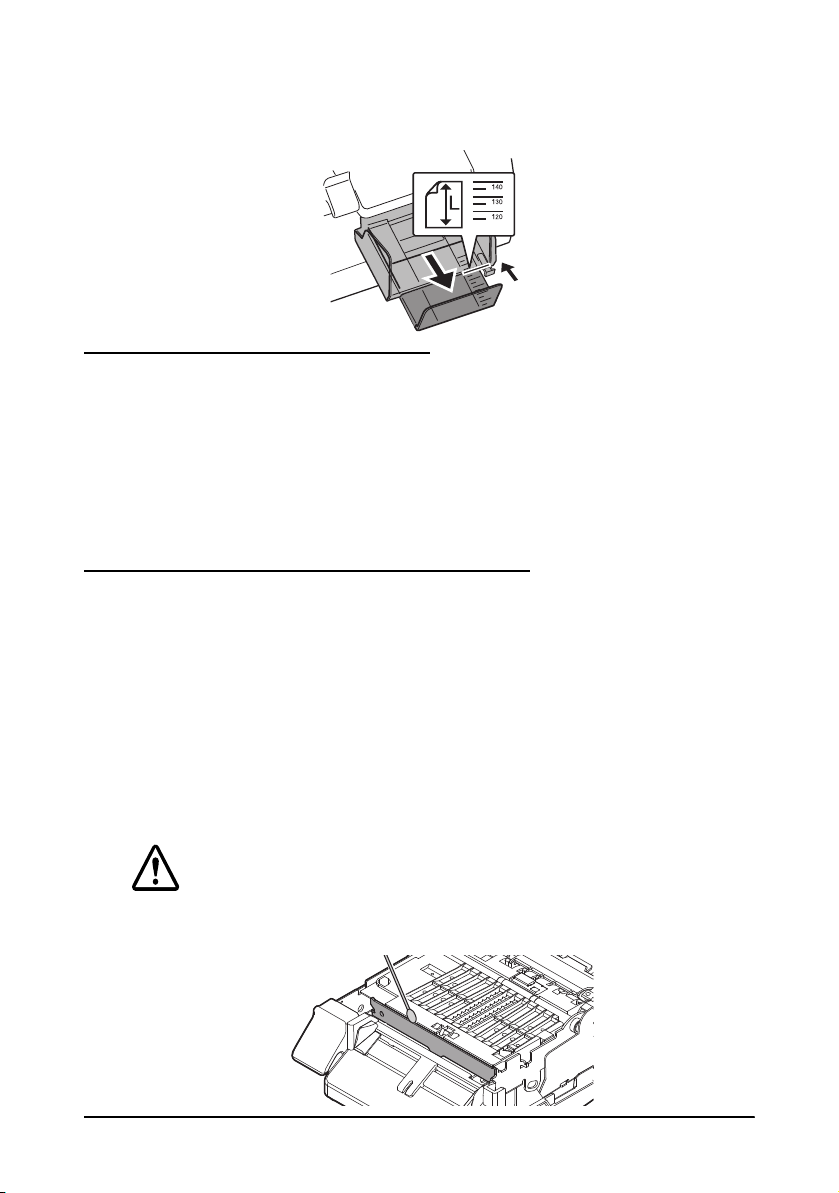
Attaching/Adjusting the Paper Ejection Tray
When you attach the paper ejection tray, you can temporarily store the
printed paper in the tray.
CAUTION:
Paper may not stay in the paper ejection tray, depending on the paper
curl and length.
1. Attach the paper ejection tray to the hooks under the paper
ejection table.
2. Pull the lever at the bottom-right of the paper ejection tray to
unlock it.
TM-C3400 User’s Manual 21

English
3. Slide the bottom tray to align it with the paper length, and lock it.
Displaying the Printer Driver
Follow the steps below to display the printer driver. For details on
how to use the printer driver, see the printer driver help.
1. Open [Printers and Faxes] (or [Printers]).
2. Right-click on [EPSON TM-C3400] and click [Printing
Preferences
] to display the printer driver.
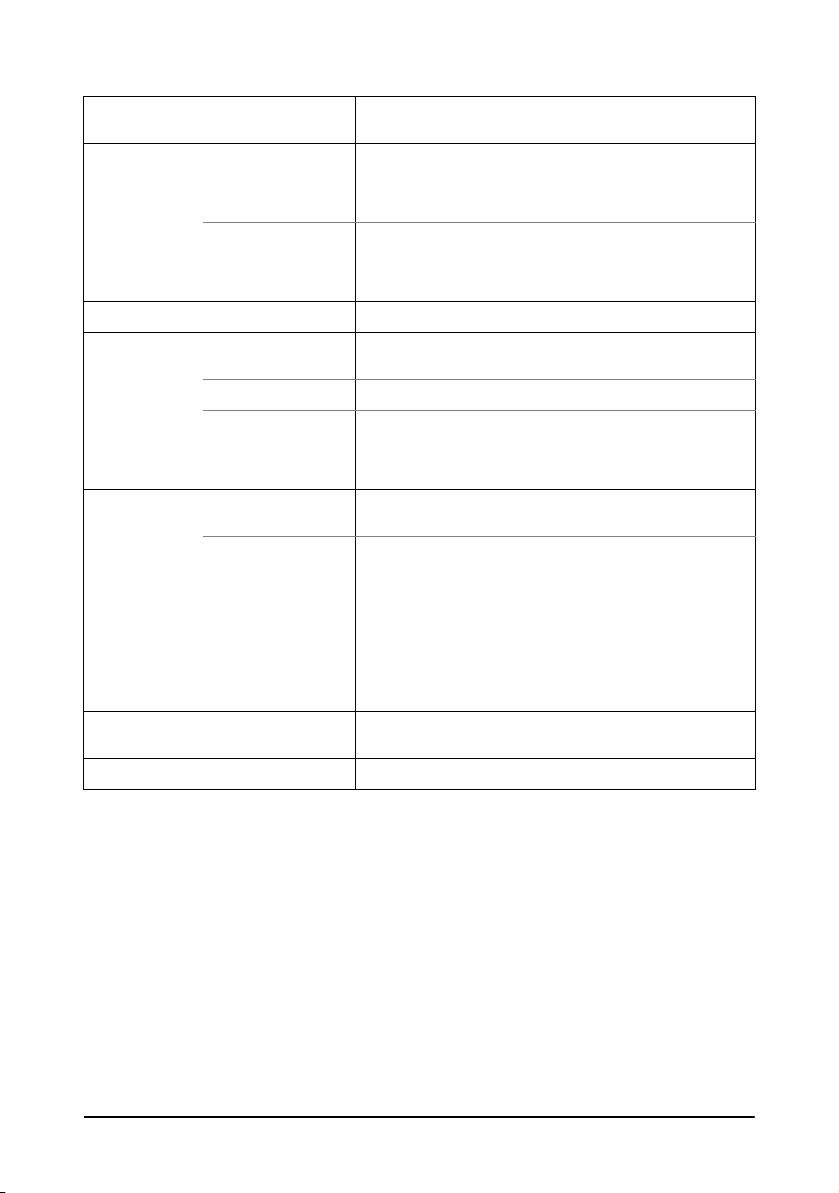
Cleaning the Autocutter
Adhesive from labels may stick to the fixed blade of the autocutter,
which may prevent the autocutter from cutting paper cleanly. If this
happens, follow the steps below to clean the autocutter.
1. Turn off the printer, and unplug the AC cable from the inlet.
2. Open the roll paper cover and remove the paper.
3. Remove the adhesive on the autocutter blade on the side of the roll
paper cover with an implement such as a cotton swab. If
necessary, moisten the cotton swab with alcohol.
CAUTION:
Do not touch the fixed blade of the autocutter directly. Doing so may
cause injury.
22 TM-C3400 User’s Manual

Head Cleaning
This printer has an automatic nozzle check function, and automatically
performs head cleaning under normal conditions. However,
depending on the printer settings, the printout may be faint or
incorrect colors may be printed, due to a clogged print head. If this
happens, perform head cleaning by using the printer driver.
1. Turn on the printer.
2. Display the [Printing Preferences] screen of the printer driver.
3. Click [Manual Head Cleaning] on the [Maintenance And
Utilities
The printer checks for nozzle clogs. If any found, cleaning is
performed automatically. Cleaning will be repeated 5 times at
most.
4. Perform the nozzle check to confirm the cleaning result.
] tab.
Troubleshooting
Error LED on or flashing
❏ Check to see that the roll paper cover and the ink cartridge cover
are closed. If they are open, close them.
❏ Check the Paper LED. If it lights, check for a paper jam, and install
the paper correctly referring to
❏ Turn off the printer and then turn it back on. If the Error LED is still
flashing, call your supervisor or a service person.
“Installing Paper” on page 13.
Paper jam
Turn off the printer and open the roll paper cover or the fanfold paper
cover to remove the jammed paper. Install the paper correctly
referring to
“Installing Paper” on page 13.
TM-C3400 User’s Manual 23

English
Operating Environment
OS Microsoft Windows 2000 SP4
Computers The printer supports the following computers that run the
CPU Computers with a processor of 1 GHz or better are
RAM Windows 2000 256 MB or larger is recommended.
Windows XP/2003 Server/Vista 512 MB or larger is recommended.
HDD 250 MB
Microsoft Windows XP SP3
Microsoft Windows 2003 R2 SP2
Microsoft Windows Vista SP1
Only 32 bit models are supported.
above operating system.
•PC/AT-compatible
recommended.
Intel/Pentium/Celeron series, AMD Athlon/Duron family,
or processors that are compatible with these are
recommended.
Specification
Printing method Serial ink jet, dot matrix
Paper feed Forward and reverse friction feed
Autocutter Cutting method By separated-blade scissors
Cutting type Full cut (cuts paper completely)
Minimum cut length 15 mm {0.59”}
Print density 360 dpi × 180 dpi, 360 dpi × 360 dpi, 720 dpi × 360 dpi
Print speed 92 mm/s (printing width: 56 mm, 360 dpi × 180 dpi,
Paper Category Normal paper, Fine paper, PET film, Artificial paper, List
Type Receipt (with/without black marks)
Form Roll paper, fanfold paper
Ink cartridge 3-color integrated dedicated ink cartridge
Interface USB interface (USB 2.0 High-speed)
Three-color printing
bi-directional printing)
82 mm/s (printing width: 72 mm, 360 dpi × 180 dpi,
bi-directional printing)
band
Label roll paper
Die-cut label paper (with/without black marks)
List band
(Model: SJIC15P)
Ethernet interface (100 Base-TX/10 Base-T)
24 TM-C3400 User’s Manual

Barcode/
2-dimensional
symbol printing
Power supply Dedicated AC adapter (Model: M159A/M159B [PS-180])
Life Carriage
Temperature
and humidity
Overall dimensions (H × W × D) 255 × 270 × 255 {10.04 × 10.63 × 10.04”}
Mass Approximately 10.0 kg (Ethernet interface model)
Barcodes UPC-A, UPC-E, JAN 8 (EAN 8), JAN 13 (EAN 13), Code 39,
2-dimensional
symbols
mechanism
Print head 6,000 million shots/nozzle
Autocutter
mechanism
Printing 10 to 35°C {50 to 95°F}
Storage When packed:
ITF, Codabar, Code 93, Code 128, GS1-128,
GS1 DataBar Omnidirectional, GS1 DataBar Truncated,
GS1 DataBar Limited, GS1 DataBar Expanded
PDF417, QR Code, Maxi Code, GS1 DataBar Stacked,
GS1 DataBar Stacked Omnidirectional,
GS1 DataBar Expanded Stacked, Composite Symbology,
DataMatrix, Aztec
6 million passes (3 million passes of carriage back and
forth)
Normal paper: 1,500,000 cuts
Fine paper: 750,000 cuts
Normal label roll paper: 750,000 cuts
Fine label roll paper: 500,000 cuts
20 to 80% RH (No condensation)
-20 to 60°C {-4 to 140°F},
5 to 85%RH (No condensation, ink not loaded)
(At -20°C or 60°C {-4 or 140°F}: up to 120 hours)
When ink loaded:
-20 to 40°C {-4 to 104°F}
(At -20°C {-4°F}: up to 120 hours)
(At 0 to 30°C {32 to 86°F}: up to 6 months)
(At 40°C {104°F}: up to 1 month)
(The protrusion excluded)
dpi: dots per 25.4 mm (dots per inch)
TM-C3400 User’s Manual 25

Bahasa Indonesia
Petunjuk Penggunaan
Semua hak dilindungi. Bagian publikasi ini tidak boleh diproduksi ulang, disimpan di sistem pengambilan,
atau dikirimkan dalam bentuk atau cara apa pun, elektronik, mekanis, memfotokopi, merekam, atau lainnya,
tanpa izin tertulis Seiko Epson Corporation sebelumnya. Tidak ada pertanggung jawaban paten yang
diasumsikan berkenaan dengan penggunaan informasi yang terdapat di dalamnya. Karena setiap perhatian
telah diambil dalam persiapan buku ini, Seiko Epson Corporation mengasumsikan tidak ada tanggung
jawab untuk kesalahan atau penghilangan. Tidak ada pertanggung jawaban apa pun yang diasumsikan
untuk kerusakan yang dihasilkan penggunaan informasi yang terdapat di dalamnya.
Baik Seiko Epson Corporation maupun afiliasinya tidak akan bertanggung jawab pada pembeli produk ini
atau pihak ketiga atas kerusakan, kerugian, biaya, atau pengeluaran yang dikenakan oleh pembeli atau
pihak ketiga sebagai akibat dari: kecelakaan, kesalahan penggunaan atau penyalahgunaan produk ini atau
modifikasi, perbaikan, perubahan yang tidak resmi pada produk ini, atau (tidak termasuk A.S.) kegagalan
dalam mematuhi instruksi pengoperasian dan perawatan Seiko Epson Corporation.
Seiko Epson Corporation tidak akan bertanggung jawab terhadap kerusakan atau masalah yang timbul dari
penggunaan opsi apa pun atau produk habis pakai apa pun selain yang ditunjuk sebagai Produk Epson Asli
atau Produk yang Disetujui Epson oleh Seiko Epson Corporation.
EPSON adalah merek dagang terdaftar dari Seiko Epson Corporation di Jepang dan negara/wilayah lainnya.
Microsoft, Windows, and Windows Vista adalah merek dagang terdaftar Microsoft Corporation.
Model antarmuka Ethernet pada produk ini mencakup perangkat lunak yang dikembangkan oleh University
of California, Berkeley, dan para kontributornya.
PEMBERITAHUAN: Isi manual ini dapat berubah tanpa pemberitahuan.
Hak cipta © 2011 Seiko Epson Corporation

Tindakan Pencegahan Ketika Menggunakan Printer
ini untuk Pertama Kali
PERHATIAN:
Ketika menggunakan printer ini untuk pertama kali, pengisian tinta ke
printer otomatis akan dimulai.
Jangan pernah melakukan tindakan berikut ini selama pengisian tinta.
Membuka penutup kertas kasir
Membuka penutup kartrid tinta
Mematikan daya
Melakukan hal yang demikian akan menyebabkan banyak tinta yang
terpakai, dan kartrid tinta mungkin perlu diganti sebelum pengisian
tinta selesai.
1. Pengisian tinta mulai secara otomatis setelah (1) memasang kertas
kasir, (2) menyalakan printer, dan (3) memasang kartrid tinta.
2. Kira-kira dibutuhkan waktu 8 menit untuk pengisian tinta. (Selama
pengisian tinta, LED Power (Daya) akan berkedip dan kipas akan
berbunyi.)
3. Ketika pengisian tinta selesai, LED Power (Daya) akan tetap menyala,
dan suara kipas berhenti.
4. Setelah mengonfirmasi bahwa pengisian tinta selesai, lakukan
pengaturan printer sesuai dengan penggunaan Anda.
Catatan:
Setelah pengisian tinta selesai, tinta tidak akan terbuang dengan
membuka penutup atau mematikan daya.
Jumlah yang dapat dicetak adalah kurang dari normal untuk kartrid tinta
yang digunakan untuk pengisian tinta.
TIndakan pencegahan pada saat penggunaan
Jika Anda mematikan printer tanpa menggunakan saklar daya ketika
menggunakan pritner, kepala cetak mungkin tidak kembali ke posisi
awalnya. Dalam hal ini, lain kali printer dinyalakan, pembersihan kepala
otomatis akan dilakukan, dimana akan membuang tinta.
Warna cetakan mungkin tidak merata jika Anda mengenakan
goncangan atau getaran pada printer. Ketika anda memindahkan
printer setelah pengisian tinta, periksa warna dengan melakukan tes
pencetakan sebelum menggunakan.
Jika warna cetakan tidak normal, lakukan pembersihan kepala.
TM-C3400 Petunjuk Penggunaan 27

Inggris
Perhatian Keselamatan
Bagian ini menyajikan informasi penting yang dimaksudkan untuk
memastikan penggunaan produk ini dengan aman dan efektif. Baca
bagian ini dengan teliti dan simpan di lokasi yang mudah diakses.
PERINGATAN:
Matikan peralatan Anda segera jika mengeluarkan asap, bau aneh,
atau kebisingan tidak biasa. Penggunaan yang berkelanjutan bisa
mengakibatkan kebakaran. Cabut peralatan dengan segera dan
hubungi dealer Anda atau pusat layanan Seiko Epson untuk
mendapatkan nasihat.
Jangan pernah berusaha untuk memperbaiki produk ini sendiri.
Pekerjaan perbaikan yang tidak tepat bisa berbahaya.
Jangan pernah membongkar atau memodifikasi produk ini.
Merusakkan produk ini bisa mengakibatkan luka atau terbakar.
Hanya gunakan Adaptor AC yang telah ditetapkan (Epson Model
M159A/M159B [PS-180]). Koneksi ke sumber daya yang tidak tepat bisa
mengakibatkan kebakaran.
Pastikan kabel daya Anda memenuhi strandar keselamatan yang
relevan dan sudah termasuk terminal arde sistem daya (terminal PE)
Jika tidak maka dapat menyebabkan sengatan listrik.
Jangan biarkan bahan asing masuk ke dalam peralatan. Penetrasi oleh
benda asing bisa mengakibatkan kebakaran.
Jika air atau cairan lainnya tumpah ke dalam peralatan ini, segera
cabut kabel daya, lalu hubungi dealer Anda atau pusat layanan Seiko
Epson untuk mendapatkan nasihat. Penggunaan yang berkelanjutan
bisa mengakibatkan kebakaran.
Jangan gunakan penyemprot aerosol yang berisi gas yang mudah
terbakar di dalam atau di sekitar produk ini. Jika dilakukan bisa
menyebabkan kebakaran.
PERHATIAN:
Jangan menyambung kabel dengan cara selain yang disebutkan
dalam manual ini. Sambungan yang berbeda bisa mengakibatkan
kerusakan atau kebakaran peralatan.
Pastikan untuk menyetel peralatan ini pada permukaan datar yang
kokoh dan stabil. Produk tersebut bisa pecah atau mengakibatkan luka
jika jatuh.
Jangan gunakan produk ini di lokasi dengan tingkat kelembaban dan
debu tinggi. Kelembaban dan debu yang berlebihan bisa
mengakibatkan peralatan rusak atau terbakar.
28 TM-C3400 Petunjuk Penggunaan
Jangan letakkan benda berat di atas produk ini. Jangan pernah berdiri
atau bersandar pada produk ini. Peralatan bisa jatuh atau roboh, yang
mengakibatkan pecah atau kemungkinan luka.
Untuk memastikan keselamatan, cabut produk ini sebelum
meninggalkannya dalam keadaan tidak terpakai untuk periode yang
lama.
Jangan melepas kartrid tinta dari produk ketika anda mengirimnya.
Label Perhatian
Label perhatian pada produk mengindikasikan perhatian berikutnya.
PERHATIAN:
Berhati-hatilah agar jari Anda tidak terluka pada bilah tetap di
pemotong otomatis.
Batasan Penggunaan
Saat produk ini digunakan untuk aplikasi yang memerlukan
keandalan/keselamatan tinggi seperti alat transportasi yang terkait
dengan penerbangan, kereta api, laut, atau otomotif dll.; alat
penanggulangan bencana; beragam alat keselamatan dll.; atau alat
fungsional/presisi dll., Anda harus menggunakan produk ini hanya
setelah mempertimbangkan penyertaan keselamatan-kegagalan dan
cadangan ke dalam rancangan Anda untuk menjaga keselamatan dan
keandalan sistem keseluruhan.
Mendownload Driver, Utilitas, dan Manual
Driver, utilitas, dan manual dapat didownload dari URL berikut.
http://www.epson-pos.com/
Membuka kemasan
Item-item berikut ini mungkin tidak disertakan dengan printer. Jika
ada item yang rusak, hubungi dealer Anda.
❏ Kertas gulung label ❑ Kartrid tinta (Model: SJIC15P)
❏ Baki pelontar kertas ❑ Penutup sakelar daya
❏ Adaptor AC (Model: M159A/M159B [PS-180]) ❑ Kabel AC
❏ Kabel USB (hanya model dengan antarmuka USB) ❑ Lembar instruksi
❏ Petunjuk Penggunaan (untuk printer dan adaptor AC)
* Adaptor AC sudah terdapat di dalam printer.
* Kabel AC mungkin tidak disertakan dengan printer.
TM-C3400 Petunjuk Penggunaan 29

Inggris
Tuas pelepas
Alur pelontar kertas
Pengunci alur
pelontar kertas
Penutup kertas
kasir
Sakelar daya
Penutup kartrid
tinta
Baki pelontar kertas
LED Power (Daya)
LED Error (Kesalahan)
LED Ink (Tinta)
LED Paper (Kertas)
Tombol Cut
(Potong)
Tombol Feed
(Umpan)
Meja pelontar kertas
Penutup sakelar daya
Penutup kertas lipat
Alur umpan kertas
Alur kertas lipat
Nama Komponen
Sakelar daya
Menyalakan/Mematikan printer.
Penutup sakelar daya
Memasang penutup saklar daya ke saklar daya mencegah
pengubahan saklar daya secara tidak sengaja.
Jika kecelakaan terjadi dengan tutup daya yang terpasang, cabut
kabel AC segera. Penggunaan yang terus-menerus bisa menyebabkan
kebakaran.
PERINGATAN:
30 TM-C3400 Petunjuk Penggunaan

LED Power (Daya)
Menyala apabila daya hidup, dan mati apabila daya mati.
Berkedip ketika printer sedang operasional (inisialisasi, pembersihan
kepala, atau mencetak) atau pada kondisi kesalahan.
LED Error (Kesalahan)
Menyala atau berkedip ketika printer sedang offline, dan mati ketika
printer sedang online.
LED Ink (Tinta)
Berkedip ketika tinta hampir habis atau tempat buangan tinta pada
kartrid tinta hampir penuh.
Menyala ketika sudah waktunya mengganti kartrid tinta, ketika
kartrid tinta belum dipasang atau dipasang secara salah, dan ketika
buangan tinta pada kartrid tinta sudah penuh.
Mati ketika kartrid tinta mencukupi.
LED Paper (Kertas)
Menyala ketika kertas tidak dimasukkan atau tidak dimasukkan
dengan benar.
Mati ketika kertas telah dimasukkan dengan benar.
Tombol Cut (Potong)
Memotong kertas.
Tombol FEED (Umpan)
Mengumpan kertas.
Pengaturan
Ikutilah langkah-langkah berikut ini untuk mengatur printer.
1. Memasang Printer (Lilhat halaman 32.)
2. Menyambung kabel AC (Lihat halaman 32.)
3. Memasang kartrid tinta (Lilhat halaman 33.)
4. Memasang driver printer dan menyambung printer ke komputer
(Lihat
halaman 34.)
5. Menyetel Sakelar DIP (Lihat halaman 36.)
6. Memasang kertas (Lilhat halaman 37.)
7. Memasang/menyesuaikan baki pelontar kertas
(Lihat halaman 45.)
TM-C3400 Petunjuk Penggunaan 31

Inggris
Memasang Printer
PERHATIAN:
Memasang printer secara horisontal pada permukaan yang datar,
stabil, dan bebas getaran. Jika tidak, penutup kertas kasir tidak akan
berfungsi dengan benar, dan jari-jari anda bisa terjepit.
Jangan memiringkan printer ketika penutup kertas kasir dalam kondisi
terbuka. Penutup kertas kasir mungkin menutup secara tidak sengaja,
dan jari-jari Anda bisa terjepit.
penutup mungkin menutup secara tidak sengaja, dan jari-jari Anda
bisa terjepit.
❏ Pastikan untuk membuka penutup kertas kasir dan melepas
bahan bantalan pada printer.
❏ Sisakan cukup ruang di depan printer untuk penutup kartrid tinta
dan penutup kertas kasir agar bisa terbuka secara penuh.
❏ Jangan meletakkan printer di tempat yang berdebu.
❏ Lindungi printer dari benturan yang keras. Benturan dapat
menyebabkan cetakan yang tidak sempurna.
❏ Jangan biarkan kabel membelit atau benda asing terkumpul di
bawah printer.
Menyambung kabel AC
PERINGATAN:
Selalu gunakan Adaptor AC Epson Model M159A/M159B (PS-180).
Menggunakan adaptor AC lainnya dapat menyebabkan sengatan
listrik dan kebakaran.
Jika terjadi kesalahan pada adaptor AC, segera matikan daya printer
dan lepas kabel AC dari soket tembok.
32 TM-C3400 Petunjuk Penggunaan

Matikan konektor kabel AC ke jalur masuk AC, dan kemudian
masukkan colokan daya kabel AC ke soket tembok.
Memasang/mengganti Kartrid Tinta
PERHATIAN:
Bila kartrid tinta dipasang untuk pertama kalinya, pastikan untuk
memasang kertas kasir sebelum menginstal kartrid tinta. Untuk rincian
tentang bagaimana memasang kertas gulung label, lihat
Kertas” pada halaman 37.
Selalu gunakan EPSON SJIC15P sebagai kartrid tinta.
Jangan membuka kemasan kartrid tinta sampai anda siap
memasangnya ke printer.
Jangan melepas kartrid tinta dari printer ketika anda mengirimnya.
1. Nyalakan printer dan pastikan bahwa LED Ink (Tinta) menyala.
2. Tarik penutup kartrid tinta untuk membukanya.
3. Lepas kartrid bekas jika ada.
4. Goyang kemasan kartrid tinta 4 atau 5 kali sebelum membukanya.
5. Tekan kartrid tinta dengan lembut ke penahan kertas seperti
ditunjukkan di bawah ini.
6. Tutup penutup kartrid tinta.
Ketika kartrid tinta telah dipasang untuk pertama kali, printer
membutuhkan waktu kira-kira 8 menit untuk pengisian tinta. LED
Power (Daya) berkedip selama pengisian tinta. Jangan matikan
“Memasang
TM-C3400 Petunjuk Penggunaan 33

Inggris
printer atau membuka penutup kertas kasir atau penutup kartrid
tinta. Ketika pengisian tinta selesai, LED Power (Daya) tetap
menyala setelah berkedip.
Catatan:
Ketika kartrid tinta telah dipasang untuk pertama kali, printer menggunakan
tinta untuk mempersiapkan pencetakan (pengisian tinta).
Hasil kartrid bervariasi berdasarkan faktor-faktor seperti item yang dicetak,
pengaturan printer, jenis kertas, frekuensi penggunaan, dan suhu.
Untuk memastikan kualtias cetakan, beberapa tinta masih tetap berada di
kartrid setelah LED Ink (Tinta) menyala.
Kartrid tinta berisi 3 warna tinta. Bahkan ketika hanya menggunakan satu
warna tertentu, ketiga warna tinta digunakan untuk pencetakan dan untuk
menjaga kepala cetak tetap dalam kondisi yang baik. Ketika level tinta bahkan
satu warna saja telah mencapai batas terendah, printer akan berhenti
mencetak.
Memasang Driver dan Menyambung ke Komputer
PERHATIAN:
Pastikan untuk mengonfirmasi lingkungan operasional (halaman 48)
sebelum memasang.
Anda perlu login sebagai pengguna dengan hak-hak administratif.
Matikan printer sebelum menyambung ke komputer.
Untuk Model Antarmuka USB
1. Klik ganda pada ikon Easy Setup (EPSetup.exe).
2. Pada layar yang tampil, klik [Local].
34 TM-C3400 Petunjuk Penggunaan

3. Selesaikan instalasi dengan instruksi yang ditampilkan berikut ini.
Kait kabel: mencegah kabel agar tidak jatuh.
Kait kabel: mencegah kabel agar tidak jatuh.
Jika layar yang mengonfirmasi sambungan ke komputer telah
ditampilkan selama instalasi, sambungkan printer ke komputer
lewat kabel USB seperti ditunjukkan berikut ini, dan kemudian
nyalakan printer.
Untuk Model Antarmuka Ethernet
1. Buka penutup konektor dan sambungkan pritner ke komputer
lewat kabel Ethernet seperti ditunjukkan di bawah ini.
2. Hidupkan printer.
3. Klik ganda pada ikon Easy Setup (EPSetup.exe).
4. Pada layar yang tampil, klik [Network].
5. Selesaikan instalasi dengan instruksi yang ditampilkan berikut ini.
Pengaturan jaringan juga diproses selama instalasi.
TM-C3400 Petunjuk Penggunaan 35
Inggris
Menyetel Sakelar DIP
Ketika Anda membuka penutup kartrid dan melepas penutup saklar
DIP, Anda akan menemukan saklar DIP. Atur saklar DIP, dengan
menggunakan ujung alat, seperti obeng kecil. Ubah pengaturan ketika
printer dalam keadaan mati.
SW Fungsi NYALA MATI
1 Pengoperasian saklar daya Reset Nyala/mati
2 Penggunaan internal Diatur ke OFF (Jangan diubah)
3 Pemilihan kertas Kertas lipat Kertas kasir
7 Penggunaan internal Diatur ke OFF (Jangan diubah)
8 Volume buzzer Tinggi Rendah
36 TM-C3400 Petunjuk Penggunaan

Memasang Kertas
PERHATIAN:
Jangan memiringkan printer ketika penutup kertas kasir dalam kondisi
terbuka. Penutup kertas kasir mungkin menutup secara tidak sengaja,
dan jari-jari Anda bisa terjepit.
Pastikan untuk mengonfirmasi bahwa saklar DIP 3 (Pemilihan kertas)
telah diatur dengan benar sebelum memasang kertas.
Pastikan kertas telah dikeluarkan langsung dari alur pelontar kertas,
seperti ditunjukkan pada ilustrasi. Jika kertas tidak dikeluarkan karena
penyebab seperti halangan, hasil cetakan mungkin akan terdistorsi.
Ikuti langkah-langkah di bawah untuk memasang kertas.
❏ Ketika memasang kertas kasir untuk pertama kali (ketika Anda
memasang kartrid tinta untuk pertama kali): "Ketika memasang
kertas kasir" (4) ~ (5), dan setelah pengisian tinta, lanjutkan ke (2).
❏ Ketika Anda telah kehabisan kertas (ketika anda memasang jenis
kertas yang sama): (1) dan (5).
❏ Ketika Anda mengganti jenis kertas: (1) ~ (5)
TM-C3400 Petunjuk Penggunaan 37

Inggris
Ketika memasang kertas kasir
Ketika memasang kertas lipat
(1) Melepas kertas (halaman 38)
(2) Pengaturan deteksi posisi kertas (halaman 39)
(3) Melepas alur umpan kertas
(halaman 40)
(3) Melepas alur umpan kertas
(halaman 42)
(5) Memuat kertas dan
menyalakan printer
(halaman 42)
(4) Menyetel alur (halaman 40) (4) Menyetel alur (halaman 43)
(5) Menyalakan printer dan
memuat kertas
(halaman 44)
Untuk (3) dan selanjutnya, prosedurnya akan berbeda tergantung
pada bentuk kertas, kertas kasir atau kertas lipat.
(1) Melepas kertas
Melepaskan kertas kasir
1. Tarik tuas pelepas untuk membuka penutup kertas kasir, dan
lepas kertas kasir atau inti kertas kasir bekas.
2. Tutuplah penutup kertas kasir.
38 TM-C3400 Petunjuk Penggunaan

Melepaskan kertas lipat
1. Lepas kertas yang tertinggal di meja pelontar kertas.
2. Ketika anda mengganti jenis kertas, buka penutup kertas kasir dan
penutup kertas lipat untuk melepas kertas.
3. Tutup penutup kertas kasir dan penutup kertas lipat.
(2) Pengaturan deteksi posisi kertas
Ketika pengaturan deteksi posisi kertas tidak perlu diubah, lewati
langkah ini. Gunakan driver printer untuk pengaturan ini.
1. Hidupkan printer.
2. Ganti [Paper Position Detection] pada tab [Maintenance And
Utilities
digunakan.
Catatan:
Untuk informasi tentang bagaimana menampilkan driver printer, lihat
halaman 46.
3. Matikan printer.
] pada driver printer tergantung pada kertas yang
PERHATIAN:
Pengaturan deteksi posisi kertas yang telah diubah akan disimpan
pada printer ketika printer dimatikan. Pastikan untuk mematikan
printer untuk mengaktifkan pengaturan ini.
TM-C3400 Petunjuk Penggunaan 39

Inggris
Ketika Memasang Kertas Kasir
(3) Melepas alur umpan kertas
PERHATIAN:
Alur umpan kertas harus dipasang pada printer hanya ketika anda
menggunakan kertas lipat. Pastikan untuk melepas alur umpan kertas
ketika anda menggunakan kertas kasir.
1. Tarik tuas pelepas untuk membuka penutup kertas kasir.
2. Jika alur umpan kertas dipasang ke galur di dalam penutup kertas
kasir, geser ke arah anak panah untuk melepasnya.
3. Tutuplah penutup kertas kasir.
(4) Menyetel alur
Ketika lebar kertas tidak perlu diubah, lewati langkah ini.
1. Tarik tuas pelepas untuk membuka penutup kertas kasir.
2. Buka kunci alur kertas kasir.
40 TM-C3400 Petunjuk Penggunaan

3. Tekan alur kertas kalkir di sebelah kiri searah anak panah, dan
muat kertas kasir dengan sisi cetak menghadap ke atas
sepenuhnya ke dalam printer.
4. Kunci alur kertas kasir.
5. Buka kunci alur pelontar kertas, dengan menggunakan ujung alat,
seperti pena.
6. Geser alur pelontar kertas untuk menyejajarkannya dengan lebar
kertas kasir.
7. Kunci alur pelontar kertas, lalu tutup penutup kertas kasir.
TM-C3400 Petunjuk Penggunaan 41
Inggris
(5) Memuat kertas dan menyalakan printer
1. Tarik tuas pelepas untuk membuka penutup kertas kasir.
2. Muat kertas kasir dengan sisi cetak menghadap ke atas
sepenuhnya ke dalam printer.
3. Ketika menyejajarkan kertas kasir dengan alur pelontar kertas.
4. Nyalakan printer, lalu printer akan diumpan secara otomatis.
Ketika memasang Kertas Lipat
(3) Melepas alur umpan kertas
PERHATIAN:
Pastikan untuk memasang alur umpan kertas ketika anda
menggunakan kertas lipat.
1. Buka penutup kertas lipat dan keluarkan alur umpan kertas.
42 TM-C3400 Petunjuk Penggunaan

2. Tarik tuas pelepas untuk membuka penutup kertas kasir.
3. Masukkan alur umpan kertas ke dalam galur di dalam penutup
kertas kasir untuk memasangnya.
4. Tutuplah penutup kertas kasir.
(4) Menyetel alur
1. Buka kunci alur pelontar kertas, dengan menggunakan ujung alat,
seperti pena.
2. Geser alur pelontar kertas selebar mungkin, dan kunci.
Ketika Anda memasang kertas lipat untuk pertama kali, atau
ketika lebar kertas perlu diubah, lanjutkan ke langkah 3 dan 4.
TM-C3400 Petunjuk Penggunaan 43

Inggris
3. Buka penutup kertas lipat dan buka kunci alur umpan kertas lipat.
4. Geser alur kertas lipat untuk menyejajarkannya dengan lebar
kertas lipat, dan kunci.
(5) Menyalakan printer dan memuat kertas
1. Hidupkan printer.
2. Ketika LED Power (Daya) tetap menyala setelah berkedip,
masukkan kertas dengan sisi cetak menghadap ke atas sampai
otomatis ditarik ke dalam (kira-kira 100mm), lalu kertas diumpan
secara otomatis.
44 TM-C3400 Petunjuk Penggunaan

3. Letakkan kertas langsung sekurang-kurangnya 40 mm dari
40mm
printer.
4. Tutup penutup kertas lipat.
Memasang/menyesuaikan Baki Pelontar Kertas
Ketika Anda memasang baki pelontar kertas, anda dapat menyimpan
untuk sementara kertas yang tercetak di dalam baki.
PERHATIAN:
Kertas mungkin tidak berada di baki pelontar kertas, tergantung pada
lekukan dan panjang kertas.
1. Pasang baki pelontar kertas ke kait di bawah meja pelontar kertas.
2. Tarik tuas pada bagian kanan bawah baki pelontar kertas untuk
membuka kuncinya.
TM-C3400 Petunjuk Penggunaan 45
Inggris
3. Geser baki di bagian bawah untuk menyejajarkannya dengan
lebar kertas, dan kunci.
Menampilkan Driver Printer
Ikuti langkah-langkah di bawah untuk menampilkan driver printer.
Untuk informasi tentang bagaimana menggunakan driver printer,
lihat bantuan driver printer.
1. Buka [Printers and Faxes] (atau [Printers]).
2. Klik kanan pada [EPSON TM-C3400] dan klik [Printing
Preferences
] untuk menampilkan driver printer.
Membersihkan Pemotong otomatis
Perekat dari label mungkin menempel pada bilah tetap pada
pemotong otomatis, yang menyebabkan pemotong otomatis tidak
dapat memotong kertas dengan bersih. jika ini terjadi, ikuti langkahlangkah berikut ini untuk membersihkan pemotong otomatis.
1. Matikan printer, dan lepaskan kabel AC dari colokan.
2. Buka penutup kertas kasir dan lepas kertas.
3. Bersihkan perekat pada bilah pemotong otomatis pada sisi
penutup kertas kasir dengan menggunakan kain katun. Jika perlu,
bahasi kain katun dengan alkohol.
PERHATIAN:
Jangan menyentuh bilah tetap secara langsung pada pemotong
otomatis. Jika dilakukan bisa menyebabkan cedera.
46 TM-C3400 Petunjuk Penggunaan

Pemberishan Kepala
Printer ini mempunyai fungsi pemeriksa nozzle otomatis, dan secara
otomatis melakukan pembersihan kepala di bawah kondisi normal.
Namun, tergantung pada pengaturan printer, cetakannya mungkin
akan kusam atau warna cetakannya tidak benar, dikarenakan kepala
cetak tersumbat. Jika ini terjadi, lakukan pembersihan kepala dengan
menggunakan driver printer.
1. Hidupkan printer.
2. Tampilkan layar [Printing Preferences] pada driver printer.
3. Klik [Manual Head Cleaning] pada tab [Maintenance And
Utilities
Printer memeriksa adanya sumbatan pada nozzle. Jika ada,
pembersihan akan dilakukan secara otomatis. Pembersihan akan
diulangi palign banyak 5 kali.
4. Lakukan pemeriksaan nozzle untuk mengonfirmasi hasil
pembersihan.
].
Pemecahan masalah
LED Error (Kesalahan) menyala atau berkedip
❏ Periksa untuk mengetahui apakah penutup kertas kasir dan
penutup kartrid tinta dalam kondisi tertutup. Jika terbuka,
tutuplah.
❏ Periksa LED Paper (Kertas) Jika menyala, periksa kertas yang
macet, dan pasang kertas secara benar dengan melihat pada
“Memasang Kertas” pada halaman 37.
❏ Matikan printer lalu hidupkan lagi. Jika LED Error (Kesalahan)
masih berkedip, hubungi supervisor Anda atau petugas servis.
Kertas macet
Matikan printer dan buka penutup kertas kasir atau penutup kertas
lipat untuk melepas kertas yang macet. Pasang kertas secara benar
dengan melihat pada
“Memasang Kertas” pada halaman 37.
TM-C3400 Petunjuk Penggunaan 47

Inggris
Lingkungan Operasional
Sistem Operasi Microsoft Windows 2000 SP4
Komputer Printer ini mendukung komputer berikut ini yang
CPU Dianjurkan untuk komputer dengan proses 1Ghz atau
RAM Windows 2000 Dianjurkan 256 MB atau lebih besar.
Windows XP/2003 Server/Vista Dianjurkan 512 MB atau lebih besar.
HDD 250 MB
Microsoft Windows XP SP3
Microsoft Windows 2003 R2 SP2
Microsoft Windows Vista SP1
Hanya model 32 bit yang didukung.
menjalankan sistem operasi di atas.
•PC/AT-compatible
lebih.
Seri Intel/Pentium/Celeron, keluarga AMD Athlon/Duron,
atau dianjurkan untuk prosesor yang kompatibel
dengan ini.
Spesifikasi
Metode pencetakan Serial ink jet, dot matrix
Umpan kertas Umpan gesek maju dan mundur
Pemotong
otomatis
Kepadatan cetak 360 dpi × 180 dpi, 360 dpi × 360 dpi, 720 dpi × 360 dpi
Kecepatan pencetakan 92 mm/s (lebar pencetakan: 56 mm, 360 dpi × 180 dpi,
Kertas Kategori Kertas normal, Kertas halus, film PET, Kertas buatan, Pita
Kartrid tinta kartrit tinta dengan 3 warna terintegrasi
Metode
pemotongan
Jenis pemotongan Potongan penuh (memotong kertas sepenuhnya).
Panjang potongan
minimal
Jenis Kwitansi (dengan/tanpa tanda htiam)
Formulir Kertas kasir, kertas lipat
Pencetakan tiga warna
Dengan gunting bilah terpisah
15 mm {0,59"}
pencetakan bi-direksional)
82 mm/s (lebar pencetakan: 72 mm, 360 dpi × 180 dpi,
pencetakan bi-direksional)
daftar
kertas kasir label
Kertas label tebal (dengan/tanpa tanda htiam)
Pita daftar
(Model: SJIC15P)
48 TM-C3400 Petunjuk Penggunaan
Antarmuka Antarmuka USB (USB 2.0 Kecepatan tinggi)
Kode bar/
pencetakan
simbol
2-dimensi
Sumber daya Adaptor AC khusus (Model: M159A/M159B [PS-180])
Usia Mekanisme mesin
Suhu dan
kelembaban
Dimensi keseluruhan (T × L × K) 255 × 270 × 255 {10,04 × 10,63 × 10,04"}
Masa Kira-kira 10,0 kg (model antarmuka ethernet)
Kode bar UPC-A, UPC-E, JAN 8 (EAN 8), JAN 13 (EAN 13), Code 39,
Simbol 2-dimensi PDF417, QR Code, Maxi Code, GS1 DataBar Stacked,
rol
Kepala cetak 6.000 juta tembakan/nozzle
Mekanisme
pemotong otomatis
Pencetakan 10 hingga 35°C {50 hingga 95°F}
Penyimpanan Dalam kemasan:
Antarmuka ethernet (100 Base-TX/10 Base-T)
ITF, Codabar, Code 93, Code 128, GS1-128,
GS1 DataBar Omnidirectional, GS1 DataBar Truncated,
GS1 DataBar Limited, GS1 DataBar Expanded
GS1 DataBar Stacked Omnidirectional,
GS1 DataBar Expanded Stacked, Composite Symbology,
DataMatrix, Aztec
6 juta pass (3 juta pass mesin rol mundur dan maju)
Kertas normal: 1.500.000 potongan
Kertas halus: 750.000 potongan
Kertas kasir label: 750.000 potongan
Kertas kasir label halus: 500.000 potongan
20 hingga 80% Kelembaban Relatif (Tanpa kondensasi)
-20 hingga 60°C {-4 hingga 140°F},
5 sampai 85%Kelembaban Relatif (Tanpa kondensasi,
tinta tidak termuat)
(Pada -20°C or 60°C {-4 atau 140°F}: sampai 120 jam)
Ketika tinta termuat:
-20 hingga 40°C {-4 hingga 104°F}
(Pada -20°C {-4°F}: sampai 120 jam)
(Pada 0 hingga 30°C {32 hingga 86°F}: sampai 6 bulan)
(Pada 40°C {104°F}: sampai 1 bulan)
(tidak termasuk tonjolan)
dpi: titik per 25,4 mm (titik per inci)
TM-C3400 Petunjuk Penggunaan 49

Inggris
Menghubungi Customer Support
Apabila printer tidak beroperasi dengan benar dan Anda tidak dapat
menyelesaikan permasalahan dengan menggunakan petunjuk
perbaikan ini, sebaiknya Anda menghubungi Layanan “Customer
Support“ kami.
PT. EPSON INDONESIA
Wisma Kyoei Prince Lt. 16
Jl. Jend Sudirman Kav 3, Jakarta 10220
Help Desk : (021) 5724151, Fax : (021) 5724357
EPSON SUPPORT CENTER :
Jakarta : (021) 62301104, 62301103
Bandung : (022) 4207033
Surabaya : (031) 5355035
Yogyakarta : (0274) 581022, 7461560
Medan : (061) 4516173, 4516174
Makassar : (0411) 328212
Pontianak : (0561) 735507
Pekan Baru : (0761) 44270
Untuk informasi lebin lengkap, Anda dapat menghubungi website
kami:
www.epson.co.id
50 TM-C3400 Petunjuk Penggunaan


Printed in Singapore
 Loading...