

Page 1
User’s Manual
M00053900
Page 2

All rights reserved. No part of this publication may be reproduced, stored in a retrieval system, or
transmitted in any form or by any means, electronic, mechanical, photocopying, recording, or otherwise,
without the prior written permission of Seiko Epson Corporation. No patent liability is assumed with respect
to the use of the information contained herein. While every precaution has been taken in the preparation of
this book, Seiko Epson Corporation assumes no responsibility for errors or omissions. Neither is any liability
assumed for damages resulting from the use of the information contained herein.
Neither Seiko Epson Corporation nor its affiliates shall be liable to the purchaser of this product or third
parties for damages, losses, costs, or expenses incurred by purchaser or third parties as a result of: accident,
misuse, or abuse of this product or unauthorized modifications, repairs, or alterations to this product, or
(excluding the U.S.) failure to strictly comply with Seiko Epson Corporation’s operating and maintenance
instructions.
Seiko Epson Corporation shall not be liable against any damages or problems arising from the use of any
options or any consumable products other than those designated as Original Epson Products or Epson
Approved Products by Seiko Epson Corporation.
EPSON is a registered trademark of Seiko Epson Corporation in Japan and other countries/regions.
Microsoft, Windows, and Windows Vista are registered trademarks of Microsoft Corporation.
The Ethernet interface model of this product includes software developed by the University of California,
Berkeley, and its contributors.
NOTICE: The contents of this manual are subject to change without notice.
Copyright © 2012 Seiko Epson Corporation.
Page 3

Standards and Approvals
The following standards are applied only to the printers that are so labeled. (EMC is tested using the Epson
power supplies.)
North America: FCC/ICES-003 Class B
FCC Compliance Statement For American Users
This equipment has been tested and found to comply with the limits for a Class B digital device, pursuant to
Part 15 of the FCC Rules. These limits are designed to provide reasonable protection against harmful
interference in a residential installation.
This equipment generates, uses, and can radiate radio frequency energy and, if not installed and used in
accordance with the instruction manual, may cause harmful interference to radio communications. However,
there is no guarantee that interference will not occur in a particular installation. If this equipment does cause
harmful interference to radio or television reception, which can be determined by turning the equipment off
and on, the user is encouraged to try to correct the interference by one or more of the following measures:
-Reorient or relocate the receiving antenna.
-Increase the separation between the equipment and receiver.
-Connect the equipment into an outlet on a circuit different from that to which the receiver is connected.
-Consult the dealer or an experienced radio/TV technician for help.
For Canadian Users
This Class B digital apparatus complies with Canadian ICES-003.
À l’intention des utilisateurs canadiens
Cet appareil numérique de la classe B est conforme à la norme NMB-003 du Canada.
FCC
According to 47CFR, Part 2 and 15 for Class B Personal Computers and Peripherals; and/or CPU Boards and
Power Supplies used with Class B Personal Computers:
We: EPSON AMERICA, INC.
Located at: MS 3-13
Declare under sole responsibility that the product identified herein, complies with 47CFR Part 2 and 15 of the
FCC rules as a Class B digital device. Each product marketed, is identical to the representative unit tested and
found to be compliant with the standards. Records maintained continue to reflect the equipment being
produced can be expected to be within the variation accepted, due to quantity production and testing on a
statistical basis as required by 47CFR §2.909 Operation is subject to the following two conditions: (1) this
device may not cause harmful interference, and (2) this device must accept any interference received,
including interference that may cause undesired operation.
Trade Name: EPSON
Type of Product: Printer
Model: M242A
3840 Kilroy Airport Way
Long Beach, CA 90806
Telephone: 562-290-5254
DECLARATION of CONFORMITY
TM-C3400 User’s Manual 1
Page 4
Safety Precautions
This section presents important information intended to ensure safe
and effective use of this product. Please read this section carefully and
store it in an accessible location.
WARNING:
Shut down your equipment immediately if it produces smoke, a strange
odor, or unusual noise. Continued use may lead to fire. Immediately
unplug the equipment and contact your dealer or a Seiko Epson service
center for advice.
Never attempt to repair this product yourself. Improper repair work can
be dangerous.
Never disassemble or modify this product. Tampering with this product
may result in injury or fire.
Use the specified AC Adapter (Epson Model M159B) only. Connection
to an improper power source may cause fire.
Be sure your power cable meets the relevant safety standards and
includes a power-system ground terminal (PE terminal). Otherwise shock
may result. If you acquire a system with different safety standards, use
an AC cable that meets the acquired safety standards.
Do not allow foreign matter to fall into the equipment. Penetration by
foreign objects may lead to fire.
If water or other liquid spills into this equipment, unplug the power cord
immediately, and then contact your dealer or a Seiko Epson service
center for advice. Continued usage may lead to fire.
Do not use aerosol sprayers containing flammable gas inside or around
this product. Doing so may cause fire.
CAUTION:
Do not connect cables in ways other than those mentioned in this manual.
Different connections may cause equipment damage and burning.
Be sure to set this equipment on a firm, stable, horizontal surface. The
product may break or cause injury if it falls.
Do not use in locations subject to high humidity or dust levels. Excessive
humidity and dust may cause equipment damage or fire.
Do not place heavy objects on top of this product. Never stand or lean
on this product. Equipment may fall or collapse, causing breakage and
possible injury.
To ensure safety, unplug this product before leaving it unused for an
extended period.
Do not remove the ink cartridge from the product when you ship it.
2 TM-C3400 User’s Manual
Page 5

Caution Label
The caution label on the product indicates the following precaution.
CAUTION:
Take care not to injure your fingers on the fixed blade of the autocutter.
Restriction of Use
When this product is used for applications requiring high reliability/
safety, such as transportation devices related to aviation, rail, marine,
automotive, etc.; disaster prevention devices; various safety devices,
etc.; or functional/precision devices, etc.; you should use this product
only after giving consideration to including fail-safes and
redundancies into your design to maintain safety and total system
reliability.
Unpacking
The following items should be included with the printer. If any items
are damaged, contact your dealer.
❏ Label paper roll
❏ Ink cartridge (Model: SJIC15P)
❏ Paper ejection tray
❏ Power switch cover
❏ AC adapter (Model: M159B)*
❏ AC cable
❏ USB cable (USB interface model only)
❏ TM-C3400 Setup and Utilities CD
❏ Instruction sheet
❏ User’s Manuals (for AC adapter)
* The AC adapter is embedded in the printer.
TM-C3400 User’s Manual 3
Page 6
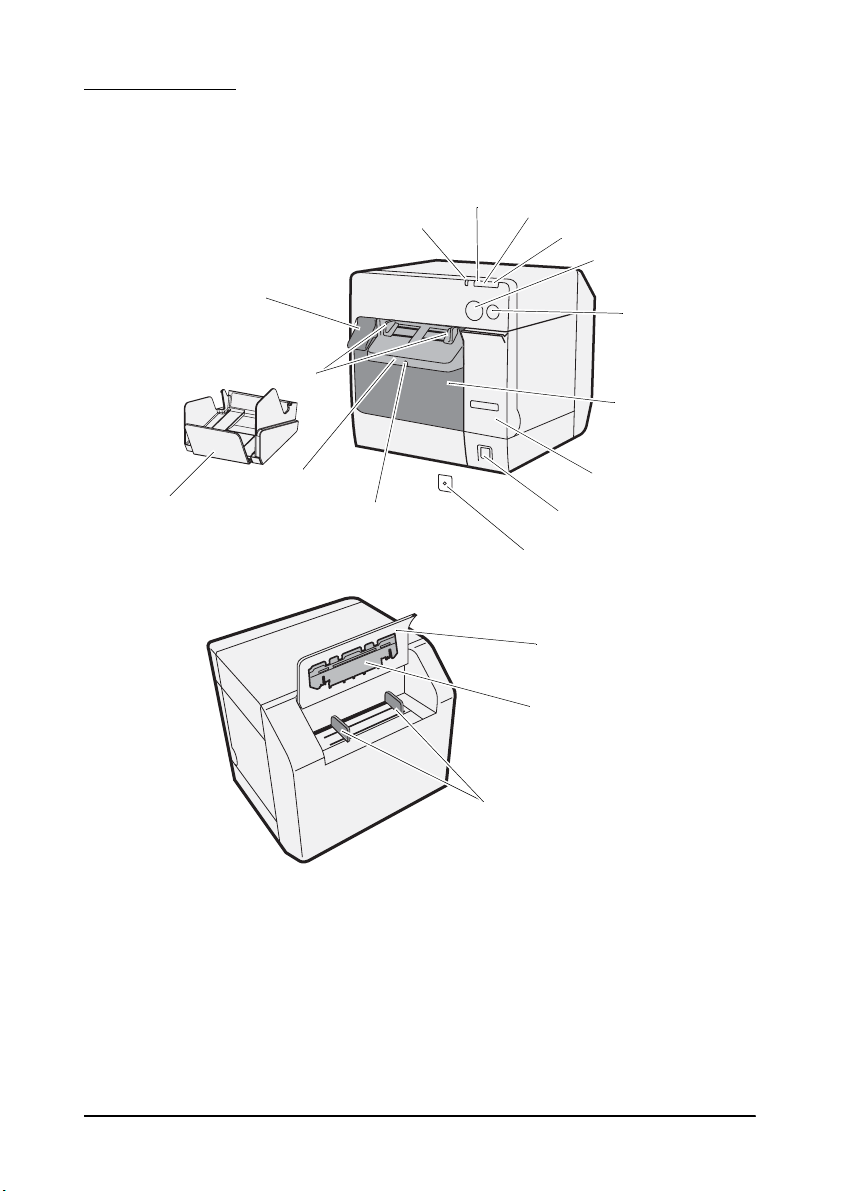
Part Names
Release lever
Paper ejection guide
Paper ejection guide lock
Roll paper cover
Power switch
Ink cartridge cover
Paper ejection tray
Power LED
Error LED
Ink LED
Paper LED
Cut button
Feed button
Paper ejection table
Power switch cover
Fanfold paper cover
Paper feed guide
Fanfold paper guide
4 TM-C3400 User’s Manual
Page 7

Power switch
Turns on/off the printer.
Power switch cover
Installing the power switch cover onto the power switch prevents
inadvertent changing of the power switch.
WARNING:
If an accident occurs with the power switch cover attached, unplug
the AC cable immediately. Continued used may cause fire.
Power LED
Lights when the power is on, and is off when the power is off.
Flashes when the printer is operating (initializing, head cleaning, or
printing) or in an error state.
Error LED
Lights or flashes when the printer is offline, and is off when the printer
is online.
Ink LED
Flashes when ink is low or waste ink in the ink cartridge is nearly full.
Lights when it is time to replace the ink cartridge, when the ink
cartridge is not installed or is not correctly installed, and when waste
ink in the ink cartridge is full.
Off when ink in the ink cartridge is adequate.
Paper LED
Lights when the paper is not installed or is not correctly installed.
Off when the paper is correctly installed.
Cut button
Cuts the paper.
FEED button
Feeds the paper.
TM-C3400 User’s Manual 5
Page 8
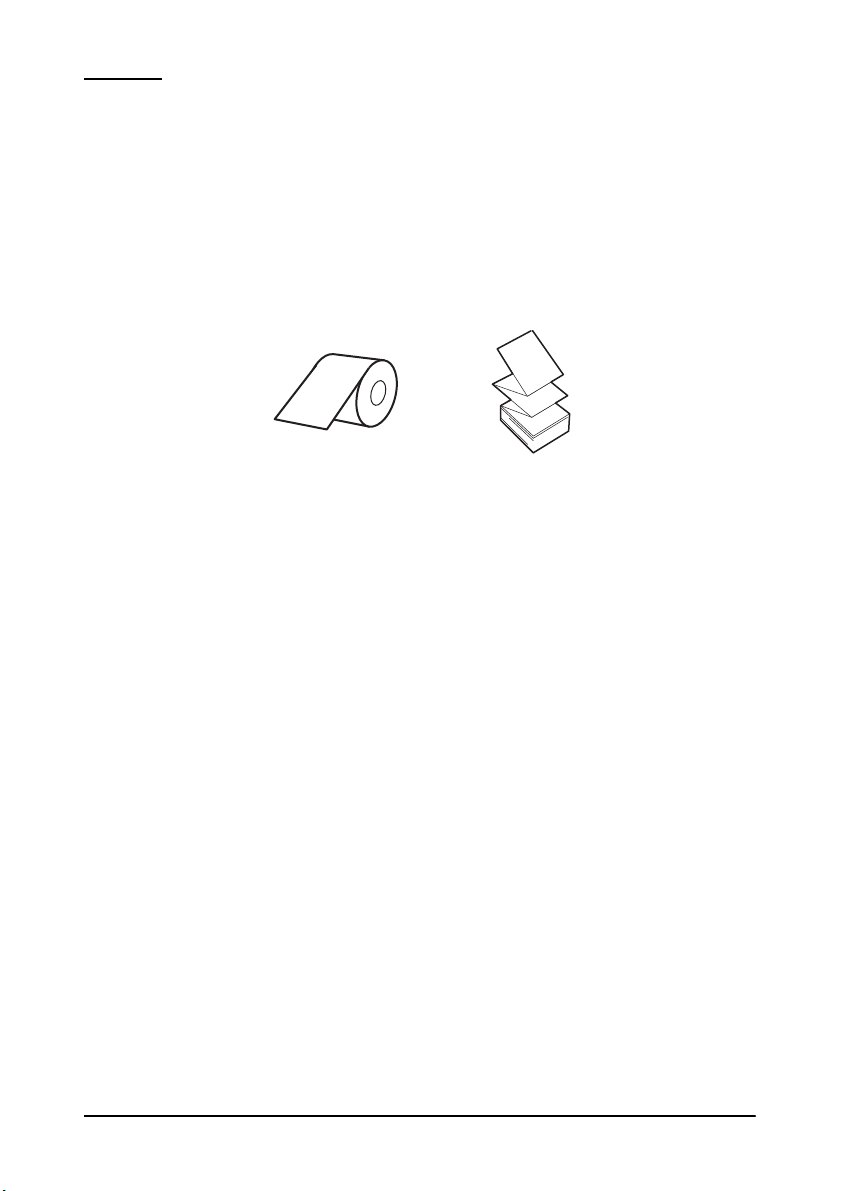
Setup
Roll paper Fanfold paper
Follow in order the steps below to set up the printer.
CAUTION:
When you use fanfold paper (for rear feed printing), first set up the
printer using the INCLUDED roll paper. After you have completed ink
charging (
it with fanfold paper.
1. Installing the printer (See page 7.)
2. Connecting the AC cable (See page 7.)
3. Connecting the printer to the computer (See page 8.)
4. Installing Easy Setup Utility and printer driver (See page 9.)
5. Printer settings (See page 11.)
6. Installing the paper (See page 13.)
7. Installing the ink cartridge (See page 22.)
8. Attaching/adjusting the paper ejection tray (See page 24.)
“Installing/Replacing the Ink Cartridge” on page 22), replace
• Setting with the DIP switches
• Setting with Setup Wizard
6 TM-C3400 User’s Manual
Page 9
Installing the Printer
CAUTION:
Install the printer horizontally on a flat, stable, and vibration-free surface.
Otherwise, the roll paper cover may not operate correctly, and your
fingers may be caught.
Do not tilt the printer with the roll paper cover open. The roll paper
cover may close unexpectedly, and your fingers may be caught.
❏ Be sure to open the roll paper cover and remove the cushion
materials in the printer.
❏ Leave enough space in front of the printer for the ink cartridge
cover and the roll paper cover to be fully opened.
❏ Do not place the printer in dusty locations.
❏ Protect the printer from heavy impacts. They may cause defective
print.
❏ Do not allow cables to catch or foreign matter to accumulate under
the printer.
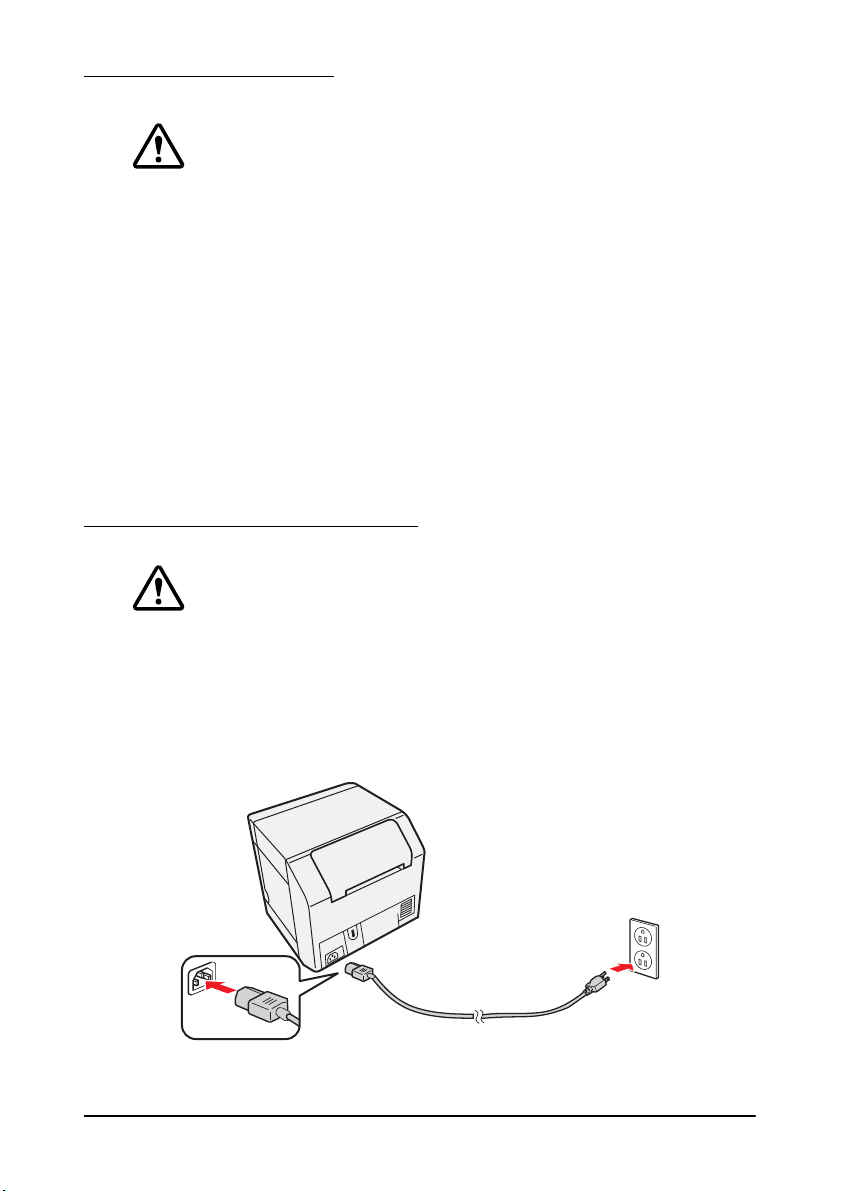
Connecting the AC Cable
WARNING:
Always use the Epson Model M159B as the AC adapter. Using any other
AC adapter can result in electric shock and fire.
Should a fault ever occur in the AC adapter, immediately turn off the
power to the printer and remove the AC cable from the wall socket.
Insert the connector of the AC cable to into the AC inlet, and then
insert the power plug of the AC cable into the wall socket.
TM-C3400 User’s Manual 7
Page 10

Connecting to the Computer
Cable hook: prevents the cable from falling off.
Cable hook: prevents the cable from falling off.
For USB Interface Model
CAUTION:
Do not turn on the printer before installing the printer driver.
Connect the printer to the computer via the USB cable as shown below.
For Ethernet Interface Model
Connect the printer to the computer via the Ethernet cable
(CAT5e-compliant shielded cable) as shown below.
8 TM-C3400 User’s Manual
Page 11

Installing Easy Setup Utility and Printer Driver
Follow the steps below to install Easy Setup Utility and the printer
driver.
CAUTION:
Be sure to confirm the operating environment (page 28) before
installing.
You are required to login as a user with administrative rights.
Installing Easy Setup Utility
1. Load the TM-C3400 Setup and Utilities CD on your computer.
2. Click TM-C3400EasySetup.
Follow the instructions displayed to install Easy Setup Utility.
Installing the Printer Driver
For USB Interface Model
1. Make sure that the printer is turned off.
2. Click the TM-C3400 Easy Setup icon on your desktop.
Easy Setup Utility starts.
TM-C3400 User’s Manual 9
Page 12

3. Click [Install Driver], and then click [Local].
4. Complete the installation by following the instructions displayed.
If the screen confirming the connection to the computer is
displayed during the installation, turn on the printer.
For Ethernet Interface Model
1. Turn on the printer.
2. Click the TM-C3400 Easy Setup icon on your desktop.
Easy Setup Utility starts.
3. Click [Install Driver], and then click [Network].
Complete the installation by following the instructions
displayed. Network settings are also processed during the
installation.
10 TM-C3400 User’s Manual
Page 13

Printer Settings
Perform printer settings with DIP switches, and then with Setup
Wizard in TM-C3400 Easy Setup Utility.
Settings with DIP Switches
CAUTION:
DIP switch settings are enabled only when the power is turned on or the
printer is reset via the interface. If the settings are changed after that,
the functions will not change.
1. Turn off the printer.
2. Open the ink cartridge cover and remove the DIP switch cover.
3. Set the DIP switches, using the tip of a tool, such as a small
screwdriver.
.
SW Function ON OFF Initial Setting
1 Operation of the power switch
2 -
3 Paper selection
7 - Fixed to OFF (Do not change.)
8 Buzzer volume
Reset Power on/off
Fixed to OFF (Do not change.)
Fanfold paper Roll paper OFF
High Low
OFF
OFF
TM-C3400 User’s Manual 11
Page 14
Settings with Setup Wizard
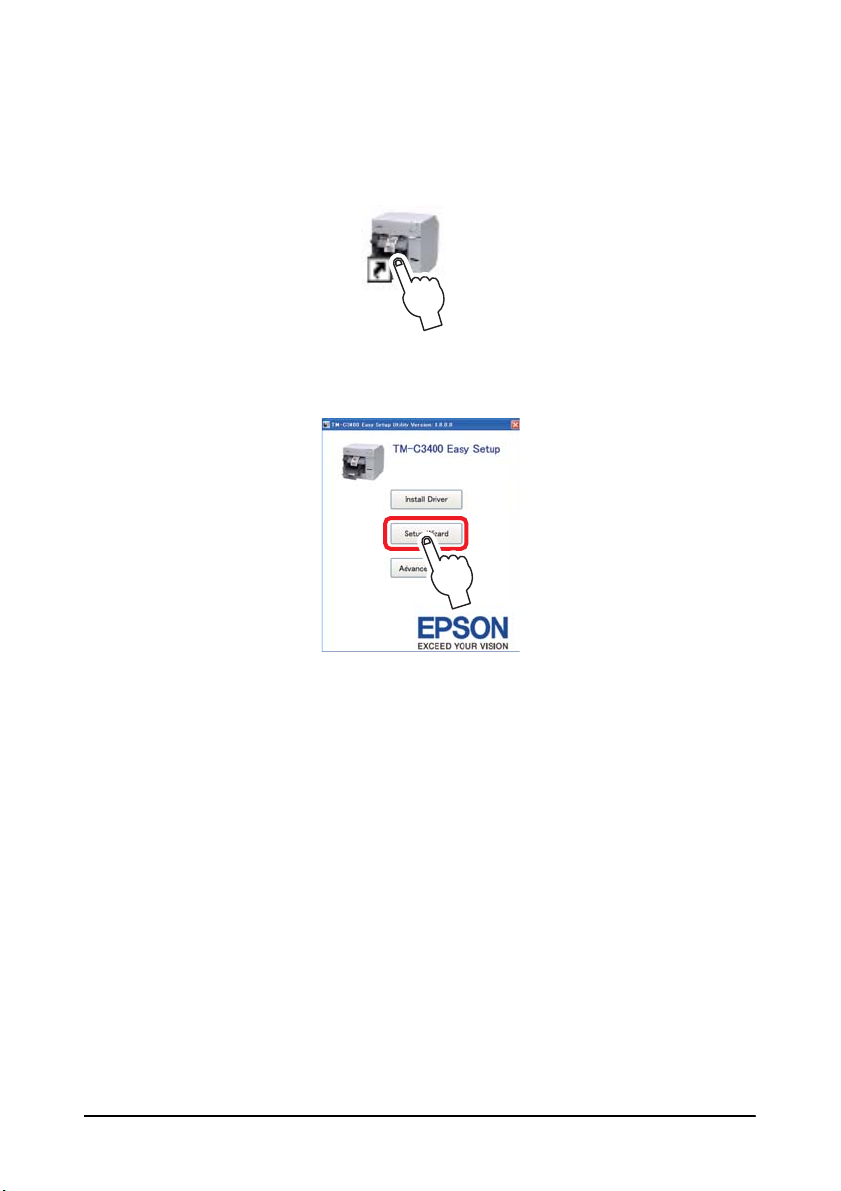
1. Turn on the printer.
2. Click the TM-C3400 Easy Setup icon on your desktop.
Easy Setup Utility starts.
3. Click [Setup Wizard].
Complete the printer settings by following the instructions displayed.
12 TM-C3400 User’s Manual
Page 15

Installing/Replacing Paper
CAUTION:
Do not tilt the printer with the roll paper cover open. The roll paper
cover may close unexpectedly, and your fingers may be caught.
CAUTION:
When you use fanfold paper (for rear feed printing), first set up the
printer using the INCLUDED roll paper. After you have completed ink
charging (See “Installing/Replacing the Ink Cartridge” on page 22),
replace it with fanfold paper.
Confirm that printer settings (See page 11.) are correctly performed
before installing/replacing the paper.
Make sure paper is ejected straight from the paper ejection guides, as
shown in the illustration. If paper is not ejected straight due to such
causes as an obstruction, the print result may be distorted.
TM-C3400 User’s Manual 13
Page 16

When Installing Roll Paper
➀ Removing roll paper (page 14)
➁ Removing the paper feed guide (page 15)
➃ Loading the paper and turning on the printer (page 17)
➂ Adjusting the guides (page 15)
❏ When you install the roll paper for the first time (when you
install the ink cartridge for the first time):
Perform ➂ and ➃.
❏ When you have used up the roll paper (when you install same
type of roll paper):
Perform ➀ and ➃.
❏ When you change the paper type:
Perform ➀ ➃.
➀ Removing roll paper
1. Pull the release lever to open the roll paper cover, and remove the
roll paper or used roll paper core.
2. Close the roll paper cover.
14 TM-C3400 User’s Manual
Page 17
➁ Removing the paper feed guide
CAUTION:
The paper feed guide should be attached to the printer only when you
use fanfold paper. Be sure to remove the paper feed guide when you
use roll paper.
1. Pull the release lever to open the roll paper cover.
2. If the paper feed guide is attached into the grooves inside of the
roll paper cover, slide it in the direction of the arrow to remove it.
3. Close the roll paper cover.
➂ Adjusting the guides
When the paper width does not need to be changed, skip this step.
1. Pull the release lever to open the roll paper cover.
2. Unlock the roll paper guide.
TM-C3400 User’s Manual 15
Page 18

3. Push the roll paper guide on the left in the direction of the arrow,
and load the roll paper with the printable side up completely
inside the printer.
4. Lock the roll paper guide.
5. Unlock the paper ejection guide, using the tip of a tool, such as a
pen.
6. Slide the paper ejection guide to align it with the roll paper width.
7. Lock the paper ejection guide, and then close the roll paper cover.
16 TM-C3400 User’s Manual
Page 19

➃ Loading the paper and turning on the printer
1. Pull the release lever to open the roll paper cover.
2. Load the roll paper with the printable side up completely inside
the printer.
3. While aligning the roll paper with the paper ejection guide, close
the roll paper cover.
4. Turn on the printer, and then the paper is fed automatically.
TM-C3400 User’s Manual 17
Page 20

When Installing Fanfold Paper
➀ Removing fanfold paper (page 18)
➁ Attaching the paper feed guide (page 19)
➃ Turning on the printer and loading the paper (page 21)
➂ Adjusting the guides (page 19)
❏ When you have used up the fanfold paper (when you install
same type of fanfold paper):
Perform ➀ and ➃.
❏ When you change the paper type:
Perform ➀ ➃.
➀ Removing fanfold paper
1. Remove the paper left on the paper ejection table.
2. When you change the paper type, open the roll paper cover and
the fanfold paper cover to remove the paper.
3. Close the roll paper cover and the fanfold paper cover.
18 TM-C3400 User’s Manual
Page 21

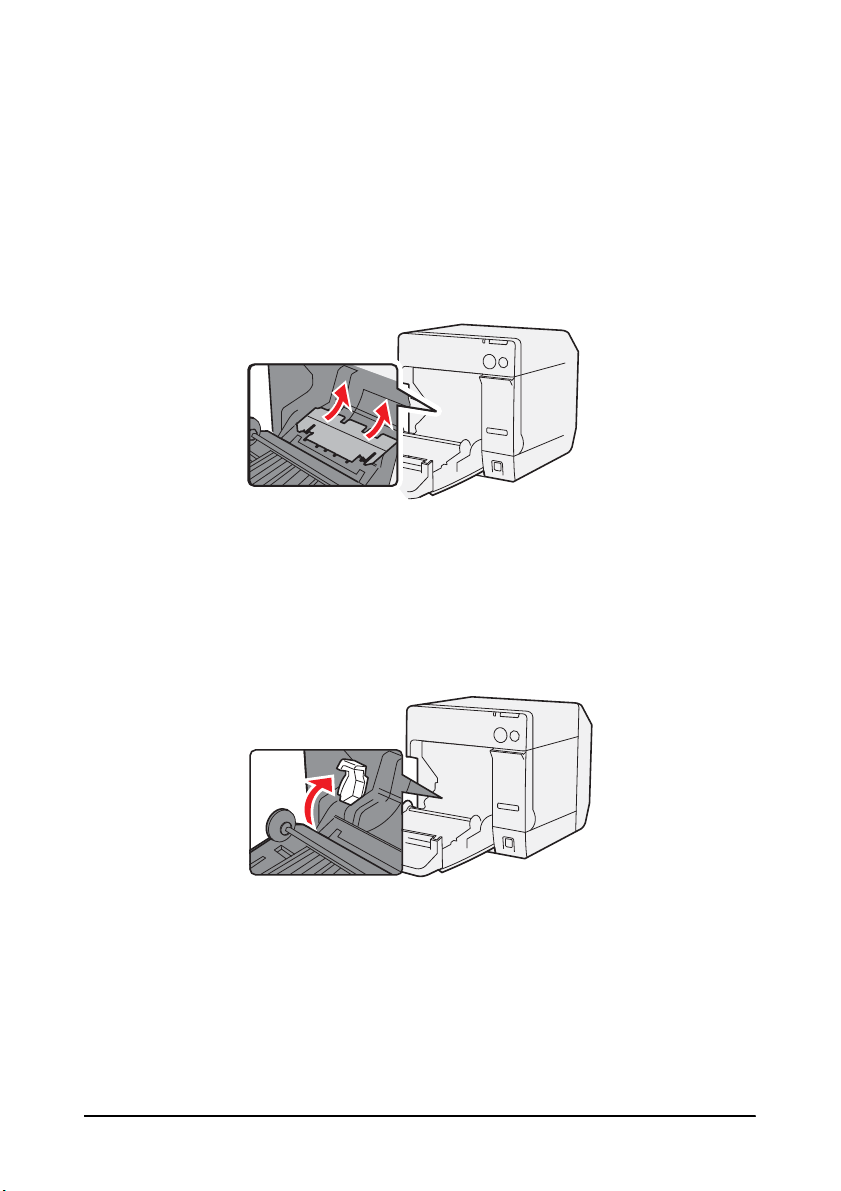
➁ Attaching the paper feed guide
CAUTION:
Be sure to attach the paper feed guide when you use fanfold paper.
1. Open the fanfold paper cover and take out the paper feed guide.
2. Pull the release lever to open the roll paper cover.
3. Insert the paper feed guide into the grooves inside of the roll paper
cover to attach it.
4. Close the roll paper cover.
➂ Adjusting the guides
1. Unlock the paper ejection guide, using the tip of a tool, such as a
pen.
TM-C3400 User’s Manual 19
Page 22

2. Slide the paper ejection guide as wide as possible, and lock it.
When you install fanfold paper for the first time, or when the
paper width needs to be changed, continue to steps 3 and 4.
3. Open the fanfold paper cover and unlock the fanfold paper guide.
4. Slide the fanfold paper guide to align it with the fanfold paper
width, and lock it.
20 TM-C3400 User’s Manual
Page 23

➃ Turning on the printer and loading the paper
40mm
1. Turn on the printer.
2. When the Power LED stays on after flashing, insert the paper with
the printable side up until it is automatically drawn in
(approximately 100 mm), and then the paper is fed automatically.
3. Place the paper straight at least 40 mm from the printer.
4. Close the fanfold paper cover.
TM-C3400 User’s Manual 21
Page 24

Installing/Replacing the Ink Cartridge
CAUTION:
When the ink cartridge is installed for the first time:
❏
Be sure to install the roll paper before installing the ink cartridge. For
details on how to install the roll paper, see
Paper” on page 13.
❏
When you install continuous paper, about 40 inches of paper is fed
and the printer enters the error state right after the printer is turned
on. In that case, turn off the printer, and then turn it back on.
Always use the EPSON SJIC15P as the ink cartridge.
Do not open the ink cartridge package until you are ready to install it in
the printer.
Do not remove the ink cartridge from the printer when you ship it.
1. Turn on the printer and make sure that the Ink LED lights.
2. Pull the ink cartridge cover to open it.
3. Remove the used cartridge, if any.
4. Shake the ink cartridge package 4 or 5 times before opening it.
5. Push the ink cartridge gently into the cartridge holder as shown
below.
“Installing/Replacing
6. Close the ink cartridge cover.
When the ink cartridge is installed for the first time, the printer
takes approximately 8 minutes for ink charging. The
flashes during ink charging.
CAUTION:
Do not turn off the printer or open the roll paper cover or the ink
cartridge cover during ink charging.
When ink charging finishes, the Power LED stays on after flashing.
22 TM-C3400 User’s Manual
Power LED
Page 25

Note:
When the ink cartridge is installed for the first time, the printer uses ink to
prepare for printing (ink charging).
Cartridge yields vary based on such factors as type of item printed, print
settings, paper type, frequency of use, and temperature.
To insure print quality, some ink remains in the cartridge after the Ink LED
comes on.
The ink cartridge contains 3 colors of ink. Even when one particular color is
specified, all 3 colors of ink are used for printing and for keeping the print
head in good condition. When the ink level of even one color comes to the
lowest limit, the printer stops printing.
TM-C3400 User’s Manual 23
Page 26

Attaching/Adjusting the Paper Ejection Tray
When you attach the paper ejection tray, you can temporarily store the
printed paper in the tray.
CAUTION:
Paper may not stay in the paper ejection tray, depending on the paper
curl and length.
1. Attach the paper ejection tray to the hooks under the paper
ejection table.
2. Pull the lever at the bottom-right of the paper ejection tray to
unlock it.
3. Slide the bottom tray to align it with the paper length, and lock it.
24 TM-C3400 User’s Manual
Page 27

Displaying the Printer Driver
Follow the steps below to display the printer driver. For details on
how to use the printer driver, see the printer driver help.
1. Open [Printers and Faxes] (or [Printers]).
2. Right-click on [EPSON TM-C3400] and click [Printing
Preferences
] to display the printer driver.
Cleaning the Autocutter
Adhesive from labels may stick to the fixed blade of the autocutter,
which may prevent the autocutter from cutting paper cleanly. If this
happens, follow the steps below to clean the autocutter.
1. Turn off the printer, and unplug the AC cable from the inlet.
2. Open the roll paper cover and remove the paper.
3. Remove the adhesive on the autocutter blade on the side of the roll
paper cover with an implement such as a cotton swab.
If necessary, moisten the cotton swab with alcohol.
CAUTION:
Do not touch the fixed blade of the autocutter directly. Doing so may
cause injury.
TM-C3400 User’s Manual 25
Page 28

Head Cleaning
This printer has an automatic nozzle check function, and automatically
performs head cleaning under normal conditions. However,
depending on the printer settings, the printout may be faint or
incorrect colors may be printed, due to a clogged print head. If this
happens, perform head cleaning by using the printer driver.
1. Turn on the printer.
2. Display the [Printing Preferences] screen of the printer driver.
3. Click [Manual Head Cleaning] on the [Maintenance And
Utilities
The printer checks for nozzle clogs. If any found, cleaning is
performed automatically. Cleaning will be repeated 5 times at
most.
4. Perform the nozzle check to confirm the cleaning result.
] tab.
Troubleshooting
Error LED on or flashing
❏ Check to see that the roll paper cover and the ink cartridge cover
are closed. If they are open, close them.
❏ Check the Paper LED. If it lights, check for a paper jam, and install
the paper correctly referring to
page 13.
❏ Turn off the printer and then turn it back on. If the Error LED is still
flashing, call your supervisor or a service person.
“Installing/Replacing Paper” on
Paper jam
Turn off the printer and open the roll paper cover or the fanfold paper
cover to remove the jammed paper. Install the paper correctly
referring to
“Installing/Replacing Paper” on page 13.
26 TM-C3400 User’s Manual
Page 29

Specification
Printing method Serial ink jet, dot matrix
Paper feed Forward and reverse friction feed
Autocutter Cutting
Print density 360 dpi 180 dpi, 360 dpi 360 dpi, 720 dpi 360 dpi
Print speed 92 mm/s (printing width: 56 mm, 360 dpi 180 dpi,
Paper Category Normal paper, Fine paper, PET film, Artificial paper, List band
Ink cartridge 3-color integrated dedicated ink cartridge (Model: SJIC15P)
Interface USB interface (USB 2.0 High-speed)
Barcode/
2-dimensional
symbol printing
Power supply Dedicated AC adapter (Model: M159B)
Life Carriage
method
Cutting type Full cut (cuts paper completely)
Minimum cut
length
Type Receipt (with/without black marks)
Form Roll paper, fanfold paper
Barcodes UPC-A, UPC-E, JAN 8 (EAN 8), JAN 13 (EAN 13), Code 39, ITF,
2-dimensional
symbols
mechanism
Print head 6,000 million shots/nozzle
Autocutter
mechanism
Three-color printing
By separated-blade scissors
15 mm {0.59”}
bi-directional printing)
82 mm/s (printing width: 72 mm, 360 dpi 180 dpi,
bi-directional printing)
Label roll paper
Die-cut label paper (with/without black marks)
Wrist band
Ethernet interface (100 Base-TX/10 Base-T)
Codabar, Code 93, Code 128, GS1-128,
GS1 DataBar Omnidirectional, GS1 DataBar Truncated, GS1
DataBar Limited, GS1 DataBar Expanded
PDF417, QR Code, Maxi Code, GS1 DataBar Stacked,
GS1 DataBar Stacked Omnidirectional,
GS1 DataBar Expanded Stacked, Composite Symbology,
DataMatrix, Aztec
6 million passes (3 million passes of carriage back and forth)
Normal paper: 1,500,000 cuts
Fine paper: 750,000 cuts
Normal label roll paper: 750,000 cuts
Fine label roll paper: 500,000 cuts
TM-C3400 User’s Manual 27
Page 30

Temperature
and humidity
Overall dimensions (H W D) 261 255 275 {10.28 10.04 10.83”}
Mass Approximately 10.0 kg (Ethernet interface model)
dpi: dots per 25.4 mm (dots per inch)
Printing 10 to 35°C {50 to 95°F}
Storage When packed:
20 to 80% RH (No condensation)
-20 to 60°C {-4 to 140°F},
5 to 85%RH (No condensation, ink not loaded)
(At -20°C or 60°C {-4 or 140°F}: up to 120 hours)
When ink loaded:
-20 to 40°C {-4 to 104°F}
(At -20°C {-4°F}: up to 120 hours)
(At 0 to 30°C {32 to 86°F}: up to 6 months)
(At 40°C {104°F}: up to 1 month)
(The protrusion excluded)
Operating Environment
OS Microsoft Windows 7 SP1 (32/64 bit)
Computers PC/AT-compatible computers that run the above operating system.
CPU 1 GHz or better is recommended.
RAM 512 MB or larger is recommended.
HDD 250 MB or larger
Note: Microsoft .NET Framework 3.5 SP1 is required to use Easy Setup Utility.
Microsoft Windows Vista SP2 (32/64 bit)
Microsoft Windows XP SP2 (64 bit)
Microsoft Windows XP SP3 (32 bit)
Microsoft Windows Server 2008 R2 SP1
Microsoft Windows Server 2008 SP2 (32/64 bit)
Microsoft Windows Server 2003 R2 SP2 (32/64 bit)
Intel/Pentium/Celeron series, AMD Athlon/Duron family, or processors that are
compatible with these are recommended.
28 TM-C3400 User’s Manual
 Loading...